If you love making little things that are both pretty and actually useful, cute clay trays are the sweetest project to keep on your table. I’m sharing my favorite tray ideas that feel playful and doable, whether you’re using polymer clay or air-dry clay for a tiny ring dish or trinket tray.
Scalloped Flower-Petal Ring Dish
This delicate little catch-all mimics the gentle curves of a blooming flower, offering a soft spot for your favorite jewelry. With its pastel pink hue and speckled texture, it brings a touch of organic elegance to your bedside table.
Step-by-Step
Materials
- Polymer clay (light pink or peach)
- Faux granite or speckle polymer clay (white or translucent base)
- Rolling pin or pasta machine
- Circle cutter (approx. 3-4 inches diameter)
- Smooth, rounded sculpting tool or ball stylus
- Small bowl or curved baking form (oven-safe)
- Craft knife
- Gloss glaze or varnish
- Soft paintbrush
- Sandpaper (fine grit)
Step 1: Preparing the Clay Body
-
Condition the hues:
Begin by warming up your light pink clay in your hands until it becomes pliable and soft. Separately, condition a small amount of the speckled or faux granite clay. -
Create the marble blend:
Mix the pink clay with a pinch of the speckled clay. Fold and knead them together thoroughly until the speckles are evenly distributed throughout the pink base, giving it a stone-like pottery effect. -
Roll it out:
Flatten the conditioned clay into a smooth sheet about 1/4 inch thick. I like to use a pasta machine on a medium setting for consistent thickness, but a rolling pin works perfectly fine too. -
Cut the base shape:
Press your circle cutter firmly into the clay sheet to create a perfect round disc. If you don’t have a cutter, trace around a glass and cut carefully with a craft knife.
Step 2: Sculpting the Petals
-
Mark the segments:
Lightly visualize the circle as a clock face. Using the back of a craft knife or a needle tool, make very faint indentations to divide the circle into roughly 12-16 equal sections radiating from the center. -
Form the scallops:
Use your rounded sculpting tool or the handle of a paintbrush to press down gently along those radial lines. This pressure will cause the clay in between the lines to puff up slightly, creating the petal ridges. -
Refine the edge:
At the outer rim of the circle, where your radial lines end, use your finger to gently push the clay inward slightly. This accentuates the scalloped shape of each petal tip. -
Deepen the grooves:
Go back over the radial lines with a slightly smaller tool to deepen the separation between petals, ensuring they extend from the outer edge almost to the center. -
Smooth the surface:
Dip your finger in a tiny bit of water (or baby oil if the clay is sticky) and gently run it over the petals to soften any harsh tool marks and round off the ridges.
Clean Cuts Pro Tip
Before cutting your initial circle, place a piece of plastic wrap over the clay. Press the cutter through the plastic for a softly rounded, professional-looking edge that requires less sanding.
Step 3: Shaping and Curing
-
Curve the form:
Carefully lift your clay flower and place it inside a small oven-safe bowl or draped over an overturned muffin tin. This gravity will help it hold a concave, dish-like shape while baking. -
Final adjustments:
While in the form, gently press the center down to ensure the bottom is relatively flat so it won’t wobble later. -
Bake the piece:
Bake according to your polymer clay manufacturer’s instructions (usually around 275°F or 135°C for 15-30 minutes). Let it cool completely inside the oven or form to prevent cracking. -
Sand edges:
Once fully cooled and hardened, use fine-grit sandpaper to gently smooth the outer rim of the scallops if they feel sharp or rough. -
Add the shine:
Apply a thin, even coat of high-gloss glaze to the inside and rim of the dish using a soft brush. This mimics the glazed ceramic look seen in the photo. -
Dry and display:
Allow the glaze to dry completely in a dust-free area before placing your rings inside.
Gilded Edge Upgrade
After baking but before glazing, use a small detail brush to paint the very rim of the scallops with liquid gold leaf. This adds a luxurious, high-end finish to the pastel pink.
Your new trinket dish is now ready to hold your most precious little treasures


Strawberry-Shaped Trinket Tray
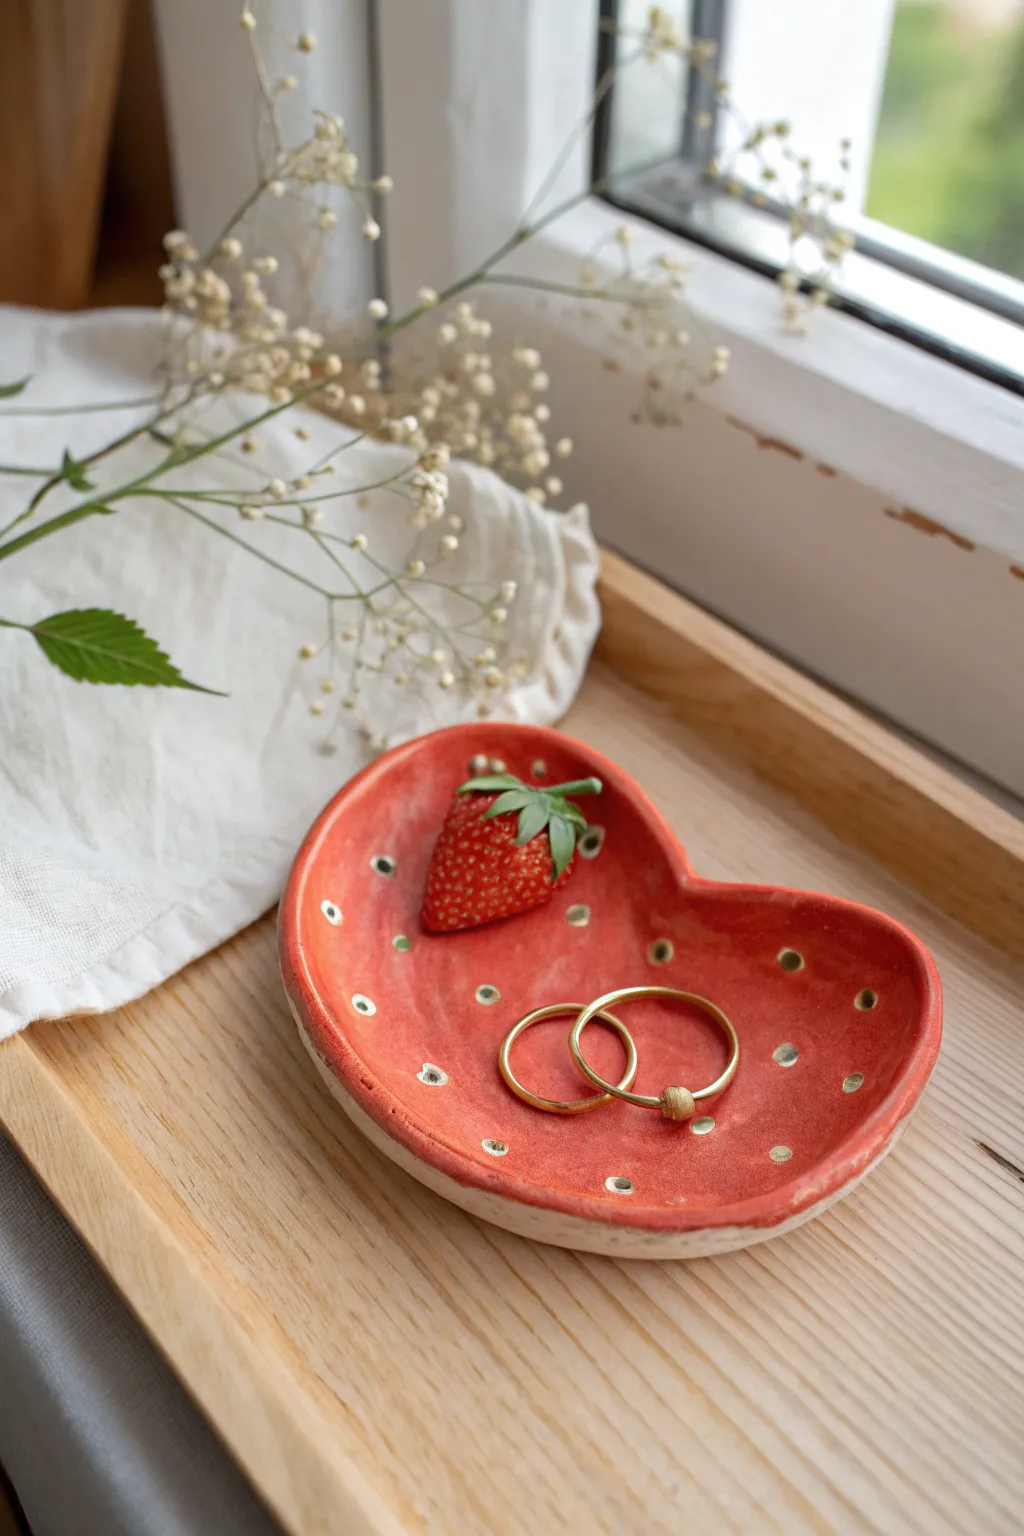
Capture the essence of summer with this charming, handmade ceramic piece that’s perfect for holding your favorite rings. Its playful, organic strawberry shape and vibrant red glaze with recessed ‘seeds’ create a delightful pop of color on any vanity or bedside table.
Step-by-Step Tutorial
Materials
- Air-dry clay or polymer clay (white)
- Rolling pin
- Heart-shaped cookie cutter (large) or X-Acto knife
- Sponge and water
- Modelling tool with a small ball tip
- Needle tool
- Acrylic paints (bright red, soft yellow-green/beige for seeds)
- Fine-grit sandpaper
- High-gloss varnish or sealant
- Small paintbrush
Step 1: Shaping the Berry
-
Condition the Clay:
Start by taking a handful of white clay and kneading it thoroughly in your hands until it is smooth, pliable, and free of cracks. Warm clay is much easier to work with. -
Roll out the Slab:
Using your rolling pin, flatten the clay on a clean surface to an even thickness of about 1/4 inch. Avoid rolling it too thin, as you want the tray to feel substantial. -
Cut the Basic Shape:
Press a large heart-shaped cookie cutter into the clay to create your base. If you don’t have a cutter, I usually sketch a rounded, soft heart shape on paper first, cut it out, and trace it onto the clay with a needle tool. -
Refine the Outline:
Strawberries aren’t perfect hearts, so gently manipulate the clay. Round out the pointed bottom slightly and soften the dip at the top to make it look more organic and berry-like. -
Lift and Pinch the Edges:
Gently lift the clay shap off your work surface. Use your fingertips to pinch and raise the outer rim all the way around, creating a shallow dish profile. -
Smooth the Rim:
Dip your finger or a small piece of sponge into water and run it along the lifted rim to smooth out any fingerprints or rough cracks. -
Create the Seed Indentations:
Take your ball-tipped modelling tool and press firmly into the surface of the clay to create small, evenly spaced divots. Don’t puncture all the way through; just make a nice little nest for the ‘seeds’ later. -
Final Smooth and Dry:
Give the entire piece one last check for rough spots, smoothing with a damp sponge if needed. Set the tray aside in a safe place to dry completely, which usually takes 24-48 hours depending on humidity.
Rim Cracking?
If the clay starts cracking while you lift the walls, wet your finger slightly and smooth the crack immediately into a paste to seal it back up.
Step 2: Painting and Finishing
-
Sand for Perfection:
Once the clay is bone dry, lightly rub the edges and surface with fine-grit sandpaper to remove any remaining bumps or sharp textures. -
Apply the Base Coat:
Load a soft brush with bright red acrylic paint. Apply a smooth layer over the entire top interior of the dish, getting into the seed divots but leaving the rim and exterior unpainted for that artisanal look. -
Layer the Color:
Let the first coat dry, then apply a second coat of red to ensure opaque, vibrant coverage. I find two coats usually give that rich, ripe strawberry look. -
Paint the Seeds:
Mix a tiny bit of yellow-green or beige paint. Using a very fine detail brush, carefully paint a small dot inside each recessed divot you created earlier. -
Clean Up the Rim:
If any red paint strayed onto the rim, gently sand it away or paint over it with a bit of white to keep that crisp, unglazed ceramic aesthetic on the edge. -
Glaze the Interior:
Once all paint is totally dry, apply a generous coat of high-gloss varnish to the painted red interior. This mimics the juicy sheen of a real strawberry and protects the paint. -
Seal the Exterior:
For durability, apply a matte sealant to the unpainted white exterior and bottom. This keeps the clay from absorbing moisture without changing its natural look.
Add a Stem
Create a tiny green clay stem and leaves separately, then glue them to the top dip of the heart after painting for extra 3D detail.
Place your favorite rings inside and enjoy this little slice of summer on your dresser


Lemon Slice Catchall Tray
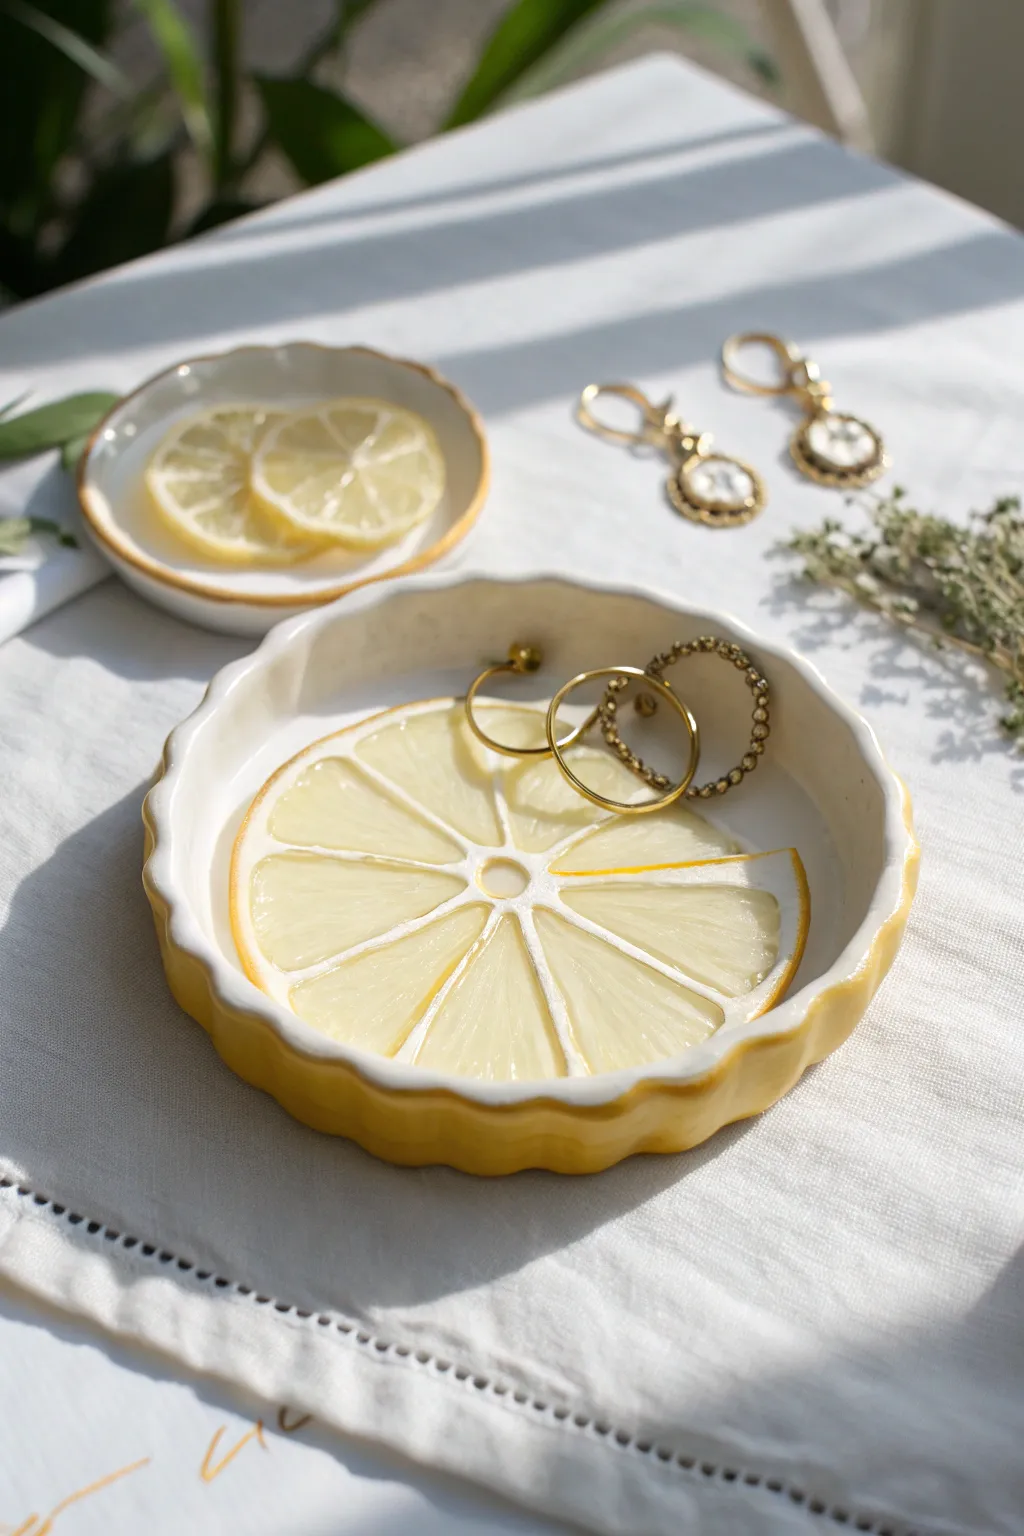
Bring a fresh squeeze of citrus to your vanity with this charming lemon-inspired tray. Featuring sculpted pulp segments and a fluted crust edge, this glossy ceramic-style dish is perfect for corralling your favorite rings and earrings.
How-To Guide
Materials
- White air-dry clay or polymer clay
- Rolling pin
- Clay knife or X-Acto blade
- Small round cookie cutter or bottle cap
- Needle tool or toothpick
- Yellow acrylic paint (buttery yellow and bright yellow)
- White acrylic paint
- Small flat paintbrush
- Fine detail paintbrush
- High-gloss varnish or UV resin
- Small bowl (for shaping)
- Sandpaper (fine grit)
Step 1: Shaping the Base
-
Roll the foundation:
Begin by conditioning your clay until it is soft and pliable. Roll it out on a smooth surface to an even thickness of about 1/4 inch. You want it sturdy enough to hold its shape but not too chunky. -
Cut the primary circles:
Use a large circle cutter or trace around a bowl (approx. 4-5 inches diameter) to cut out your main circle. If you want the ‘crust’ rim to be separate, cut a long strip of clay about 1/2 inch wide to wrap around later, or plan to pinch the edges up from a single slab. -
Create the fluted edge:
Gently pinch the outer rim of your circle upwards to create a raised wall. To get that tart pan look, use your thumb and forefinger to crimp the clay at regular intervals, pushing in slightly with your finger from the outside while supporting the inside.
Uneven Segments?
If freehanding segments is tough, lightly press a real lemon slice (wrapped in plastic wrap) into the clay to leave an imprint you can trace over.
Step 2: Sculpting the Citrus Details
-
Mark the center:
Find the exact center of your tray and press a small circle cutter or bottle cap lightly into the clay surface. Do not cut all the way through; you just want an indented guideline for the central pith. -
Score the segments:
Using a needle tool, lightly score straight lines radiating from the center circle to the inner edge of the crust, dividing the lemon into equal pie slices. Aim for about 8 to 10 segments. -
Define the pith lines:
Roll very thin, worm-like coils of clay. Place these over your scored radiating lines and around the center circle. Gently press them down and smooth the edges so they merge with the base but stay raised enough to act as dividers. -
Texture the pulp:
Inside each triangular segment, use a needle tool or a stiff brush to stipple and prick the clay repeatedly. This creates the juicy, fibrous texture of lemon pulp. Leave the raised dividers smooth. -
Dry and refine:
Place your clay inside a shallow bowl to dry so it maintains a slightly curved, concave shape. Once fully hardened, lightly sand any rough edges on the rim or the dividers for a professional finish.
Step 3: Painting and Glazing
-
Base coat the pulp:
Mix a pale, buttery yellow paint. Apply this to the textured segments first. I find watering down the paint slightly helps it settle into the texture, emphasizing the depth. -
Highlight the segments:
Once the base yellow is dry, dry-brush a brighter, more saturated lemon yellow over the tops of the texture. This emphasizes the ‘juiciness’ without covering the shadows in the crevices. -
Paint the pith:
Using a fine detail brush and pure white paint, carefully paint the raised dividers, the center circle, and the inner wall of the rim. Keep your hand steady to create clean, crisp separation between the fruit segments. -
Color the crust:
Paint the outer fluted rim a solid, warm yellow-orange tone, mimicking the lemon peel. Ensure you cover the top edge of the rim completely. -
Seal for shine:
The secret to the ceramic look is a thick, glossy topcoat. Apply two coats of high-gloss varnish or a layer of UV resin to the entire piece. This makes the ‘fruit’ look wet and freshly sliced.
Add a Seed Accent
Sculpt tiny teardrop shapes from clay scraps and attach 1-2 to the pulp sections before baking for adorable lemon seeds.
Place this sunny dish on your nightstand for a pop of color to start your day


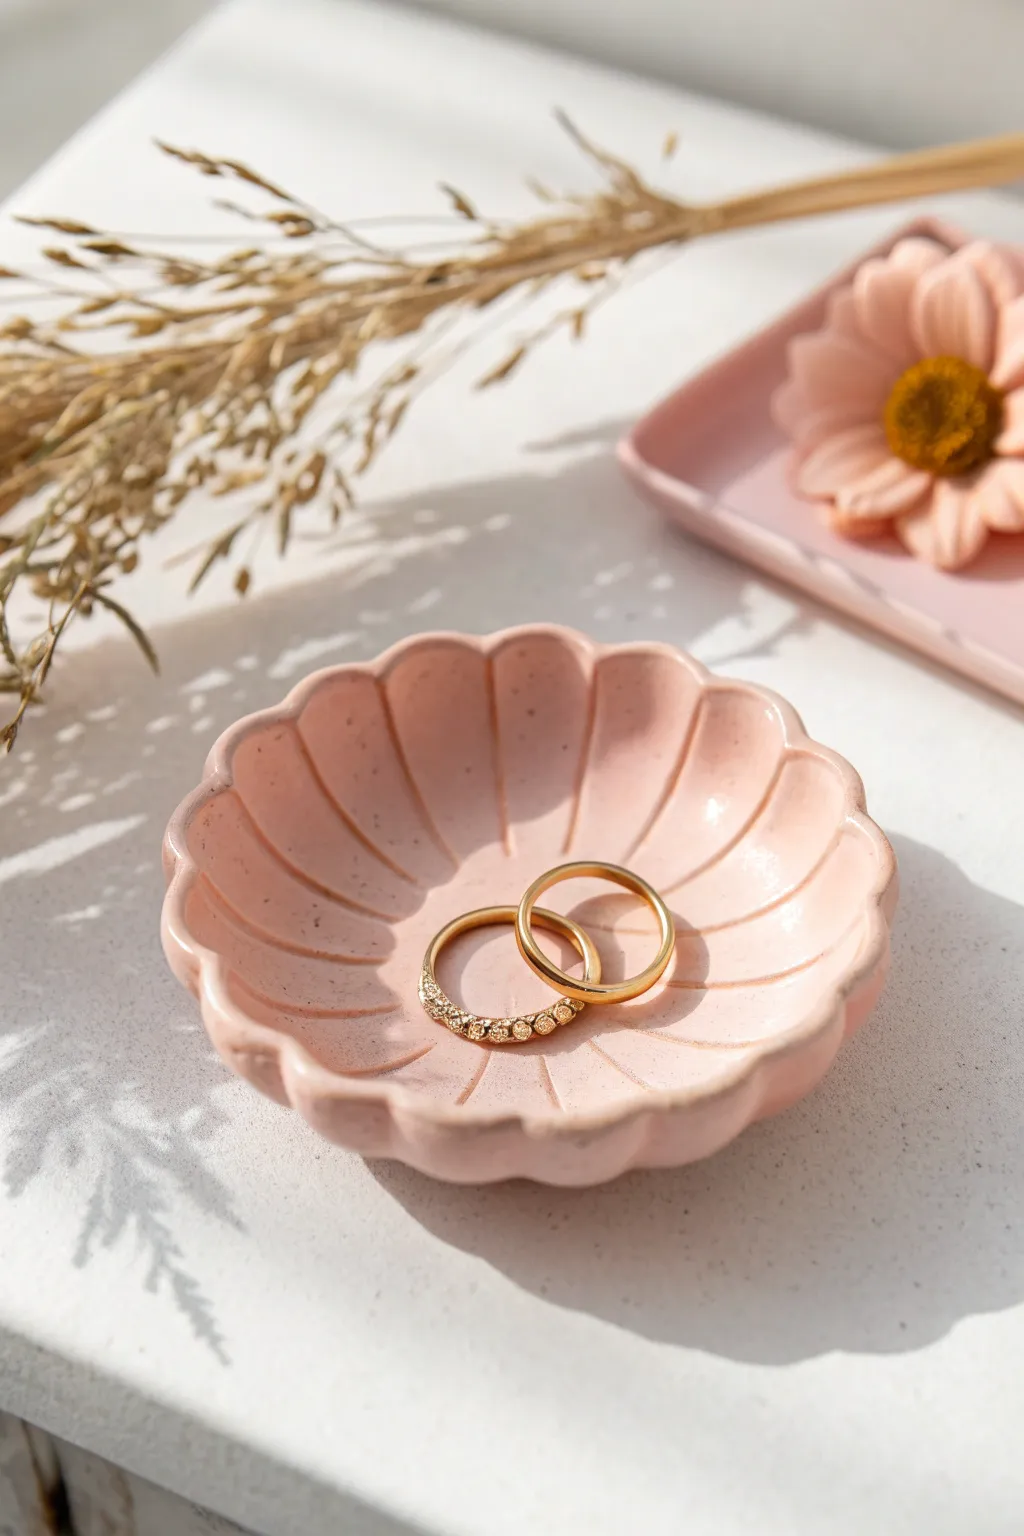
Pastel Checkerboard Jewelry Tray
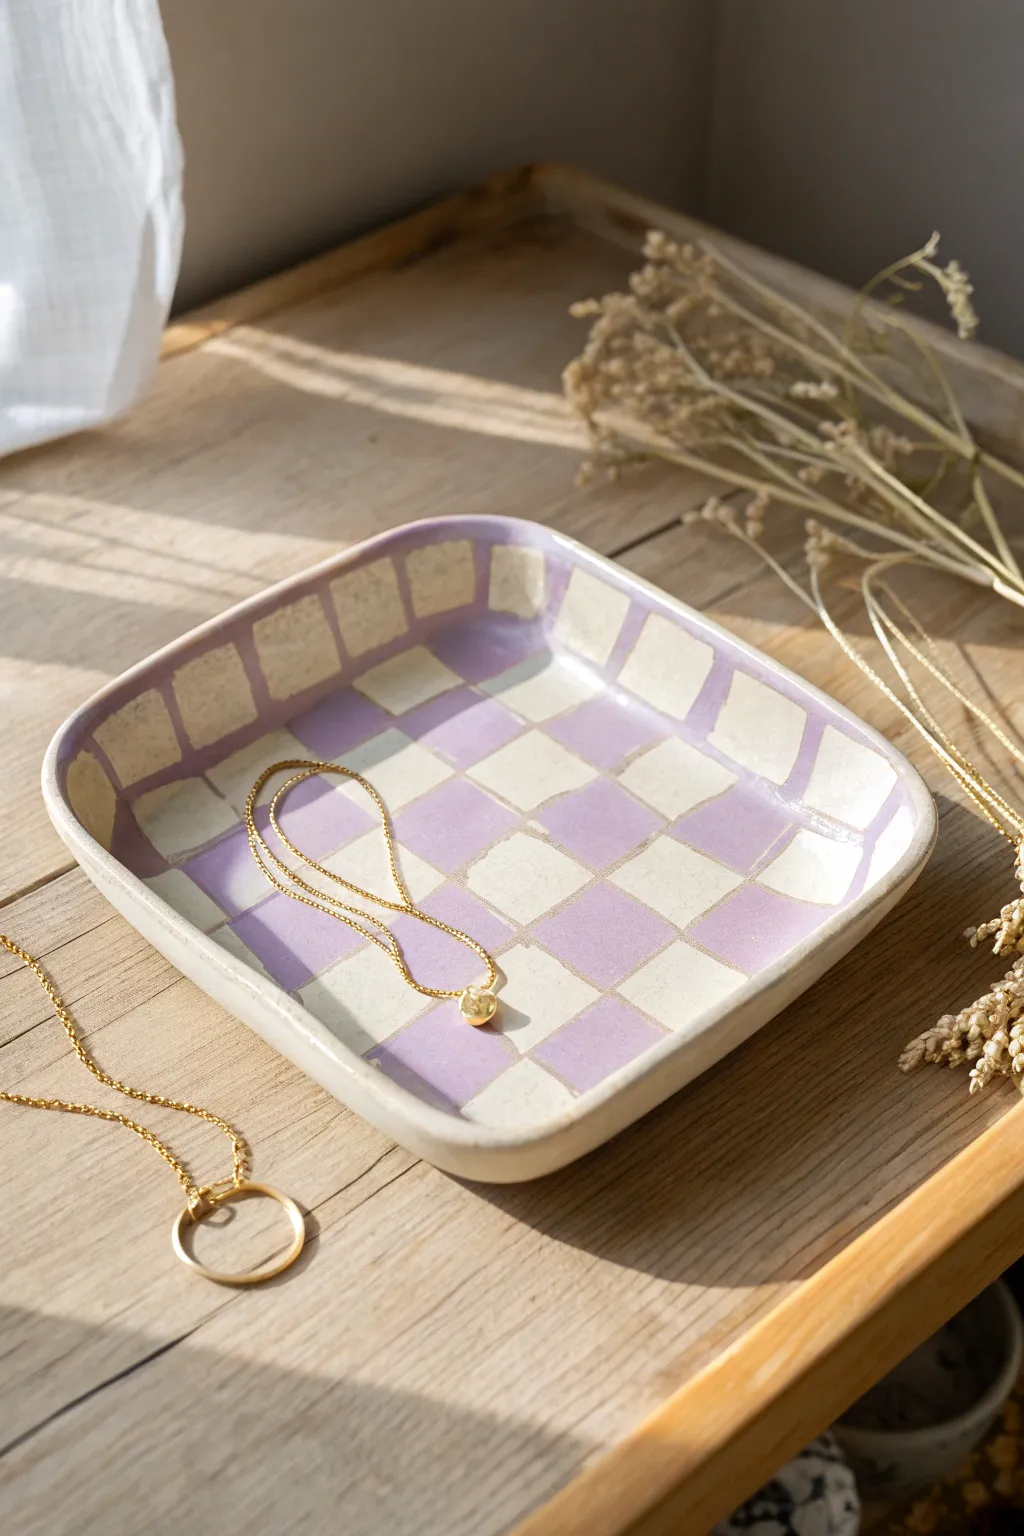
This sweet, square trinket dish brings a soft pop of colour to your dresser with its hand-painted lavender and cream checkerboard pattern. It’s the perfect size for catching delicate gold chains and rings at the end of the day.
Detailed Instructions
Materials
- Air-dry clay (white)
- Rolling pin
- Square carving tool or precision knife
- Sponge and small bowl of water
- Acrylic paints (pastel lavender, creamy white)
- Flat shader brush (size 6 or 8)
- Fine liner brush
- Gloss varnish or sealant
- Parchment paper or canvas mat
- Ruler
Step 1: Shaping the Clay
-
Roll the slab:
Begin by conditioning your air-dry clay until it’s pliable, then roll it out on a piece of parchment paper to an even thickness of about 1/4 inch. -
Cut the square:
Use a ruler and your precision knife to cut a perfect square from the slab. A size of roughly 5×5 inches works beautifully for a jewelry dish. -
Lift the edges:
Gently lift the edges of the square upwards to create a rim. I find it helpful to pinch the corners slightly to encourage the wall to stand up. -
Smooth the form:
Dip your finger or a small sponge into water and run it along the rim and the inside corners to smooth out any cracks or harsh lines. You want the edges to look soft and rounded. -
Refine the shape:
Check that the bottom remains flat. If the center has puffed up, gently press it back down so your jewelry will sit flat later. -
Dry completely:
Set the tray aside to dry for 24-48 hours. Flip it over halfway through the drying process to ensure the bottom dries evenly.
Step 2: Painting the Grid
-
Base coat:
Once fully dry, sand any rough spots lightly. Then, paint the entire interior of the tray with your creamy white acrylic paint. You may need two coats for full opacity. -
Mark the grid:
Using a pencil and a ruler, very lightly mark out a grid on the inside of the tray. Aim for squares that are about 1 inch wide. -
Map the rim:
Extend your grid lines up the sides of the rim so the pattern looks continuous. This gives it that cohesive, professional pottery look. -
Paint the first color:
Load your flat brush with the creamy white paint and fill in alternating squares. Don’t worry if you go slightly over the lines; we can fix that later. -
Paint the lavender:
Switch to your pastel purple paint. Carefully fill in the remaining empty squares to create the checkerboard effect. -
Edge details:
Carry the purple squares up the rim as well. Paint the very top edge of the rim purple to frame the design. -
Refine lines:
Use a fine liner brush to touch up the boundaries between the squares. Hand-painted lines have a lovely charm, so they don’t need to be mechanically perfect. -
Leave gaps for style:
Notice in the inspiration image how there is a sliver of unpainted clay or white space between some squares? Feel free to leave tiny gaps for an artistic touch.
Grid Master Tip
For sharper lines without relying on a steady hand, use thin washi tape to mask off your grid before painting the contrasting squares.
Step 3: Finishing Touches
-
Dry the paint:
Allow the acrylic paint to dry completely. This usually takes about an hour, depending on how thick your layers were. -
Seal the piece:
Apply a coat of gloss varnish over the entire painted surface. This protects the clay from scratches and gives it a ceramic-like shine. -
Final cure:
Let the varnish cure according to the bottle instructions (usually overnight) before placing any jewelry inside.
Level Up: Texture
Before the clay dries, gently press a piece of linen fabric into the surface to give your tray a subtle, woven texture underneath the paint.
Now your vanity has a trendy new spot to keep your favorite little treasures safe

The Complete Guide to Pottery Troubleshooting
Uncover the most common ceramic mistakes—from cracking clay to failed glazes—and learn how to fix them fast.
Celestial Moon-and-Stars Tray
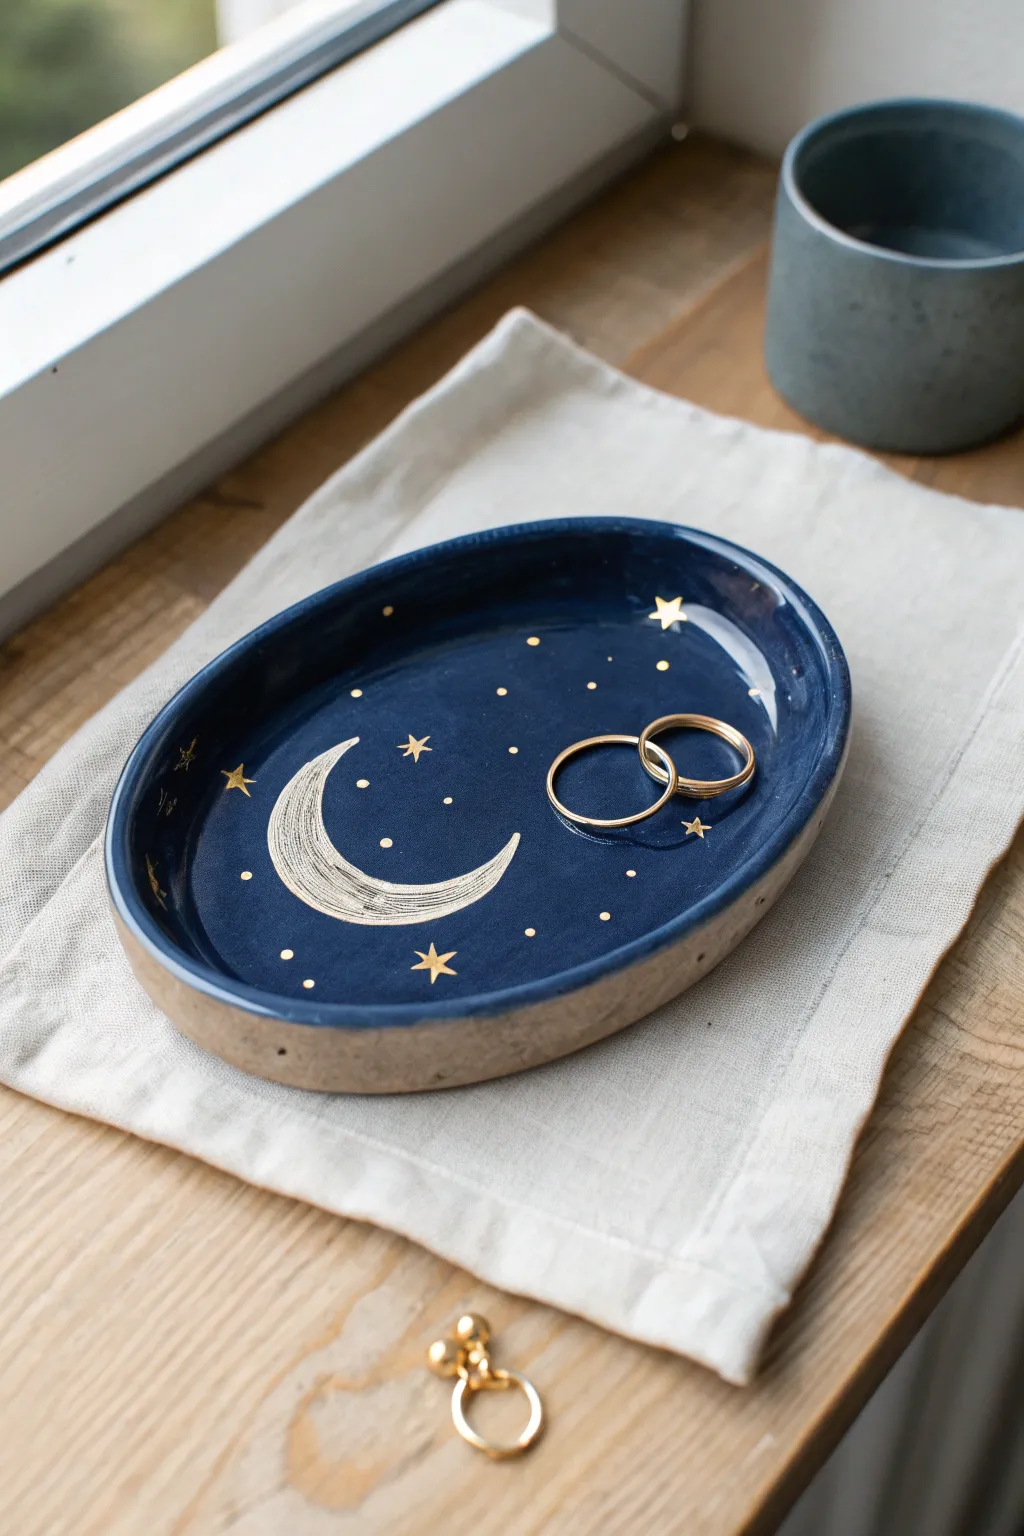
Capture the magic of a clear night sky with this enchanting oval trinket dish. Featuring a deep indigo glaze contrasting against raw stoneware, this piece uses delicate gold detailing to bring a celestial moon and stars motif to life.
Step-by-Step
Materials
- Stoneware clay (buff or speckled)
- Rolling pin
- Canvas mat or cloth
- Oval template (paper or cardstock)
- Needle tool or fettling knife
- Small sponge
- Carving tool (smecca or fine loop)
- Underglaze (Deep Navy Blue)
- Clear Glaze (food safe)
- Gold Luster (overglaze)
- Small detailing brush
- Kiln access
Step 1: Forming the Tray
-
Roll the Slab:
Begin by rolling out your stoneware clay on a canvas mat until it is an even slab, approximately 1/4 inch thick. Flip the slab occasionally while rolling to prevent it from sticking to the texture of the canvas. -
Cut the Shape:
Place your oval paper template onto the smooth slab. Trace around the edge with a needle tool or fettling knife to cut out your base shape. -
Build the Walls:
For this design, you can either pinch up the edges of the slab gently to create a rim or use a coil method. For the coil method shown here, roll a defined coil of clay and score and slip it onto the outer edge of your oval base. -
Blend the Coil:
Using a modeling tool or your thumb, blend the inside seam of the coil down into the base until it is completely invisible. Smooth the outside seam as well, creating a seamless, organic oval wall. -
Refine the surface:
Take a slightly damp sponge and run it along the rim and the interior to smooth out any fingerprints or rough tooling marks. The surface needs to be pristine for the dark glaze application later.
Clean Lines
When painting the gold luster stars, keep a Q-tip dipped in luster thinner nearby. If you make a blob instead of a point, quickly wipe it away before it dries.
Step 2: Painting and Carving
-
Dry to Leather Hard:
Allow the tray to dry slowly until it reaches a leather-hard state. It should be firm enough to hold its shape perfectly but still have enough moisture to be carved without chipping. -
Apply Underglaze:
Apply three even coats of Deep Navy Blue underglaze to the interior of the tray only. Let each coat dry to the touch before applying the next one to ensure solid, opaque coverage. -
Trace the Moon:
Once the underglaze is dry, lightly sketch the outline of a crescent moon in the center using a dull pencil or a scratch tool. Don’t press too hard; you just want a guide. -
Sgraffito the Design:
Using a fine carving tool, gently scrape away the blue underglaze inside your moon outline to reveal the raw clay body beneath. This technique is called sgraffito. I find short, textural strokes work best to mimic the moon’s surface. -
Fire to Bisque:
Let the piece bone dry completely, which may takes several days depending on humidity. Once dry, load it into the kiln for a bisque fire (usually Cone 04).
Rim Variation
Instead of leaving the rim simple, press real dried lavender or tiny flower stamps into the outside wall clay before it dries for a hidden botanical detail.
Step 3: Glazing and Gold
-
Apply Clear Glaze:
After the bisque firing, wipe the piece with a damp sponge to remove dust. Apply a dipping or brush-on clear glaze over the entire interior, covering your blue sky and the carved moon. Leave the exterior raw for that lovely textural contrast. -
Glaze Fire:
Fire the piece again to your clay body’s maturity temperature (e.g., Cone 5 or 6). This will turn the interior into a glossy, dark glass surface. -
Add Gold Accents:
Once the piece is cool and finished, use a very fine liner brush to paint pure gold luster over your carved moon area. Use the same luster to paint small, scattered stars and tiny dots across the blue sky. -
Third Firing:
Place the tray back into the kiln for a third, lower-temperature firing (usually Cone 018 or 019) to set the metallic gold.
Now you have a stunning piece of the night sky ready to hold your favorite rings and treasures
Marble Swirl Tray With Painted Rim
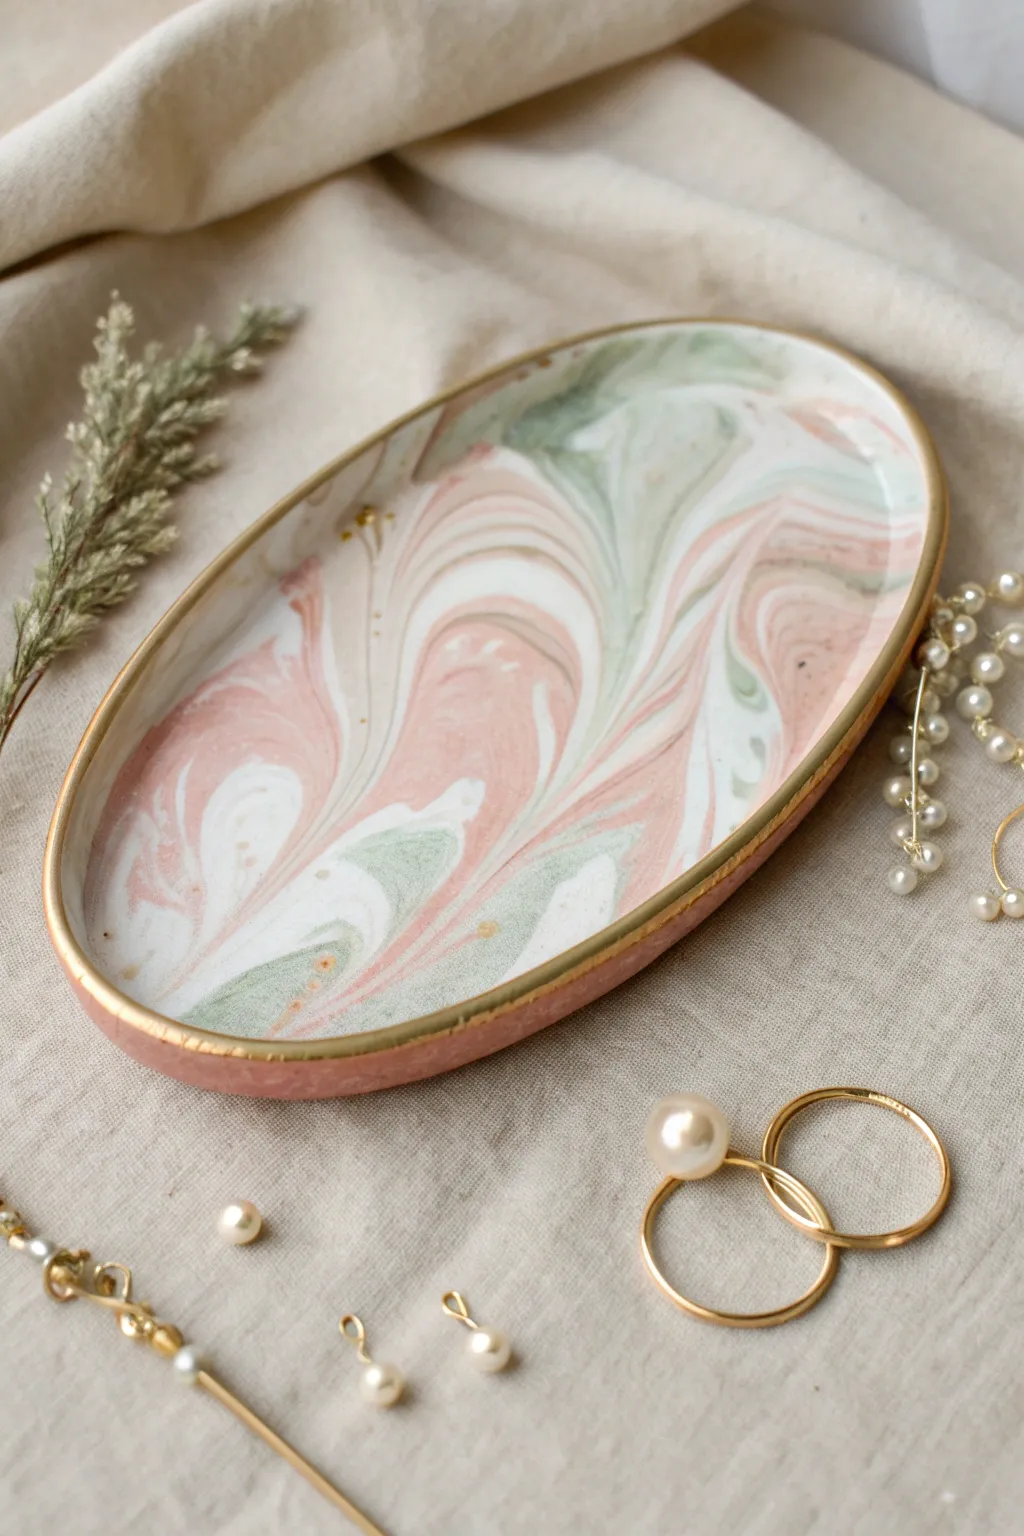
Soft pinks, creamy whites, and sage greens swirl together in this dreamy oval trinket tray. The elegant marbled effect is surprisingly easy to achieve, and a touch of gold paint on the rim gives it a polished, high-end ceramic look.
Step-by-Step Tutorial
Materials
- Polymer clay (White, Pastel Pink, Sage Green)
- Acrylic rolling pin or pasta machine
- Oval clay cutter or paper template with craft knife
- Small bowl or curved baking dish (oven-safe)
- Liquid gold leaf or gold acrylic paint
- Fine detail paintbrush
- Gloss glaze or polyurethane varnish (optional)
- Sandpaper (fine grit, 400-800)
- Parchment paper
Step 1: Prepping The Clay
-
Condition the clay:
Begin by thoroughly kneading your white, pink, and green polymer clay separately until each color is soft, pliable, and warm to the touch. -
Create distinct ropes:
Roll each color into long, thin snakes or ropes. You’ll want roughly 50% white clay, 30% pink, and 20% green to match the balance seen in the example. -
Bundle the colors:
Gather the snakes together into a single thick log, twisting them gently around each other to start the blending process. -
Twist and fold:
Twist the combined log tighter like a candy cane. Fold it in half, then twist it again. Repeat this motion 3-4 times, but be careful not to over-mix, or the colors will turn muddy. -
Ball it up:
Once you see distinct swirls you like, roll the clay into a tight ball, smoothing out any seams or air pockets with your palms.
Step 2: Shaping The Tray
-
Roll out the slab:
Place the ball on a sheet of parchment paper. Using your acrylic roller, flatten the ball into an oval sheet about 1/4 inch thick. Roll in different directions to stretch the marble pattern organically. -
Check the pattern:
Inspect both sides of your clay sheet. Sometimes the underside has a more pleasing swirl pattern than the top, so choose your favorite side to be the face. -
Cut the shape:
Place your oval cutter or paper template over the most attractive section of the marble. Press down firmly with the cutter or trace around your template with a craft knife to cut out the oval shape. -
Smooth the edges:
Dip your finger in a tiny bit of baby oil or cornstarch and run it along the cut edge to soften any sharp corners left by the blade. -
Form the curve:
Gently lift the clay oval and place it inside your curved oven-safe bowl or baking dish. Press it lightly so it takes on the dish’s concave shape, creating the raised rim.
Twist It Up
Don’t just fold; roll the clay into a snake again between folds. This elongates the color streaks, creating those elegant, long ribbon-like swirls rather than choppy blobs.
Step 3: Baking & Finishing
-
Bake the piece:
Bake the clay directly in the forming dish according to the manufacturer’s temperature instructions (usually around 275°F/135°C) for 15-30 minutes. -
Cool down completely:
Let the tray cool completely inside the baking dish before trying to remove it. Removing it while hot can cause warping. -
Sand for smoothness:
Once cool, use fine-grit sandpaper to buff the edges and surface under running water. This removes fingerprints and creates a professional, stone-like finish. -
Clean surface:
Wash the tray with mild soap and water to remove any sanding dust, then dry it thoroughly with a lint-free cloth. -
Paint the rim:
Shake your liquid gold leaf well. Using a fine detail brush, carefully paint the very top edge of the rim. I find steadying my hand against the table helps get a straight line. -
Add stray details:
For that authentic look shown in the photo, dab tiny, almost invisible speckles of gold onto a few random spots on the marble face itself. -
seal the deal:
Apply a coat of gloss glaze over the entire piece if you want a shiny ceramic look, or leave the main clay matte and just seal the gold rim to prevent tarnishing.
Muddy Colors?
If your colors are blending into a single brownish hue, you have over-mixed. Stop twisting sooner next time. The colors should distinct separate lines, not a blended gradient.
Now you have a chic catch-all dish perfect for holding rings or just looking pretty on your vanity


What Really Happens Inside the Kiln
Learn how time and temperature work together inside the kiln to transform clay into durable ceramic.
Pressed Leaf Mini Tray
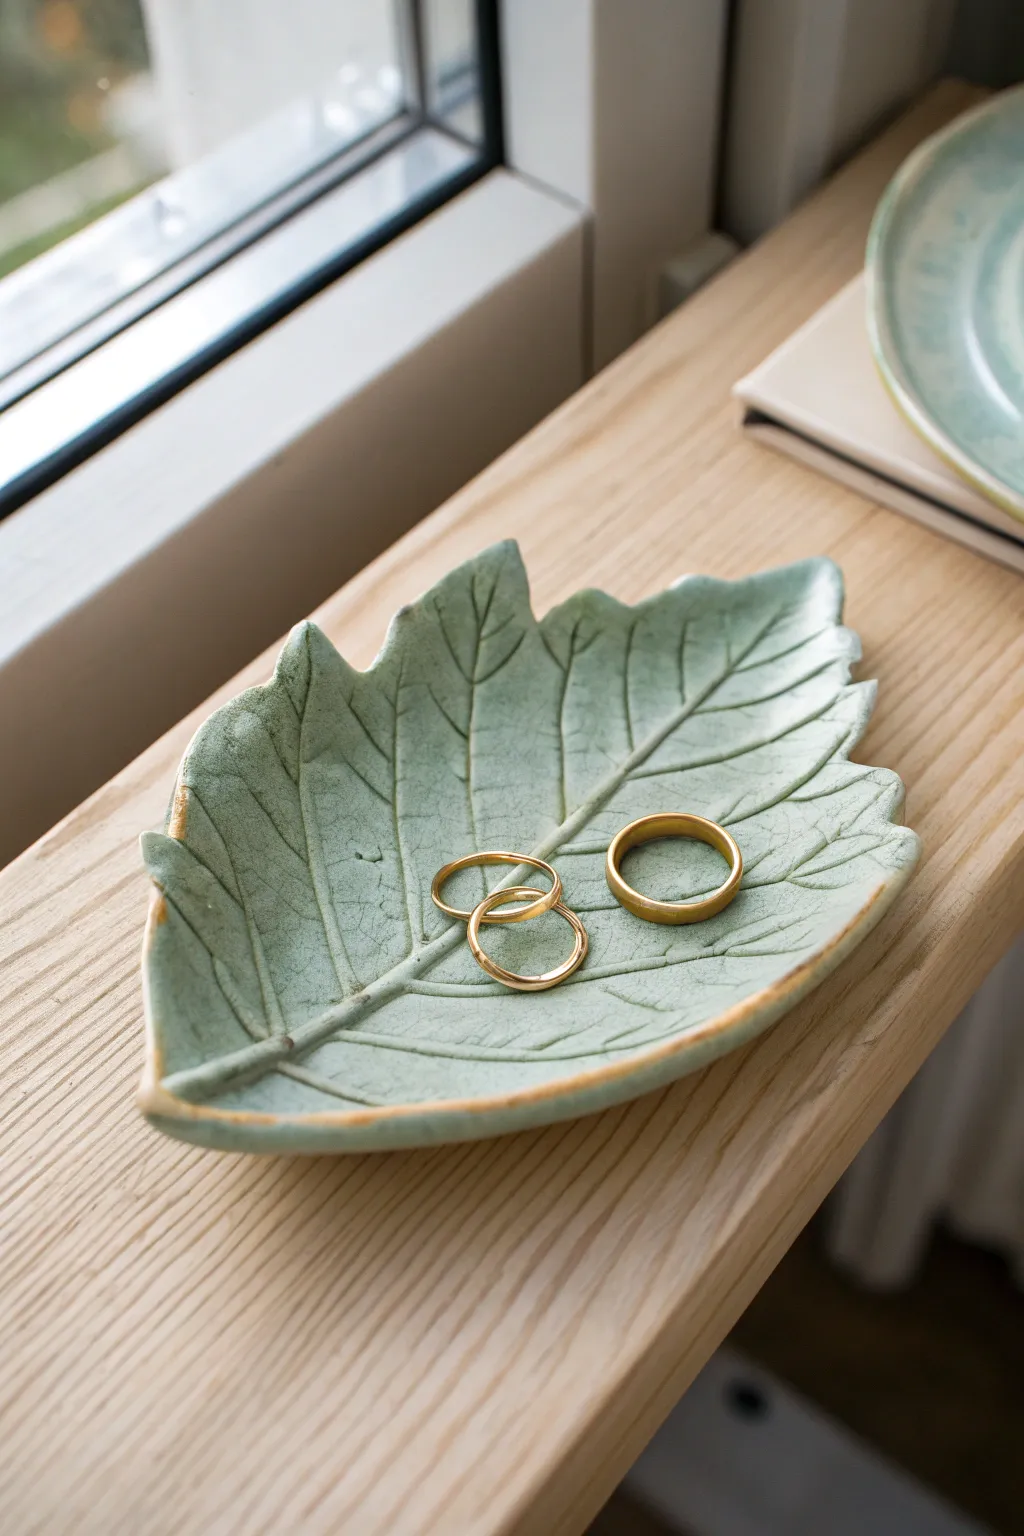
Capture the delicate beauty of nature with this elegant jewelry dish, formed by pressing a real leaf directly into clay. The resulting tray features intricate vein textures highlighted by a soft celadon glaze and a touch of metallic gold on the rim.
How-To Guide
Materials
- Air-dry clay or polymer clay (white)
- A fresh, deeply veined leaf (like hydrangea or maple)
- Rolling pin
- sharp craft knife or scalpel
- Small bowl or curved surface (for drying form)
- Fine grit sandpaper
- Celadon or sage green acrylic paint (or glaze if firing)
- Glossy varnish or sealant
- Gold leaf paint or liquid gilding
- Small detail brush
- Large soft brush
Step 1: Preparing the Impression
-
Select your leaf:
Go on a scavenger hunt for a fresh leaf. Look for one that is sturdy with very prominent, deep veins on the backside, as this creates the best texture. -
Roll out the slab:
Take a ball of white clay and roll it out on a smooth, clean surface until it is about 1/4 inch thick. Aim for an even thickness throughout. -
Position the leaf:
Place your chosen leaf vein-side down onto the clay slab. The vein side is usually the back of the leaf and provides the crispest impression. -
Press perfectly:
Gently roll over the leaf with your rolling pin. Use firm, even pressure to embed the veins into the clay without making the slab too thin.
Clay sticking?
If the clay sticks to your work surface or rolling pin, lightly dust your surface (and the leaf!) with cornstarch or baby powder before rolling.
Step 2: Shaping and Refining
-
Cut the shape:
Using a sharp craft knife, carefully trace around the edge of the leaf to cut out the clay shape. Keep your knife vertical for clean edges. -
Remove the botanical:
Locate the stem and gently peel the leaf away from the clay to reveal the intricate impression underneath. -
Smooth the edges:
Dip your finger in a little water and run it along the cut edges to smooth out any roughness or sharp bits left by the knife. -
Form the curve:
To give it a dish shape, gently lift the clay leaf and place it inside a shallow bowl or drape it over a curved object. I like to let this dry briefly for an hour to set the shape before leaving it completely. -
Full dry time:
Allow the clay to dry completely according to the package instructions. This usually takes 24-48 hours depending on humidity. -
Sand for perfection:
Once bone dry, lightly sand the edges with fine-grit sandpaper to ensure a professional, smooth finish.
Step 3: Glazing and Gilding
-
Base coat:
Dilute your sage green paint slightly with water to create a semi-transparent wash. This helps the paint settle into the deep veins, accentuating the texture. -
Paint application:
Apply the wash over the entire top surface. Quickly wipe the high points with a paper towel if you want the veins to appear darker than the leaf surface. -
Seal the surface:
Once the paint is fully dry, apply two coats of glossy varnish. This mimics the look of a ceramic glaze and protects the clay. -
Prep the gold:
Shake your liquid gilding or gold leaf paint well. You want the metallic pigments to be rich and opaque. -
Gild the rim:
Using a small detail brush, carefully paint a thin line of gold along the very edge of the leaf. You can let it drift slightly onto the top surface for an organic look. -
Final cure:
Let the gold rim dry completely before using the tray for rings or jewelry.
Glaze Hack
To fake a ‘crackled’ look like ceramic, use a crackle medium between your paint and varnish layers, or gently scratch the dry paint before sealing.
Place your new nature-inspired tray on a nightstand to add a serene, organic touch to your room
Shell-Inspired Coastal Tray
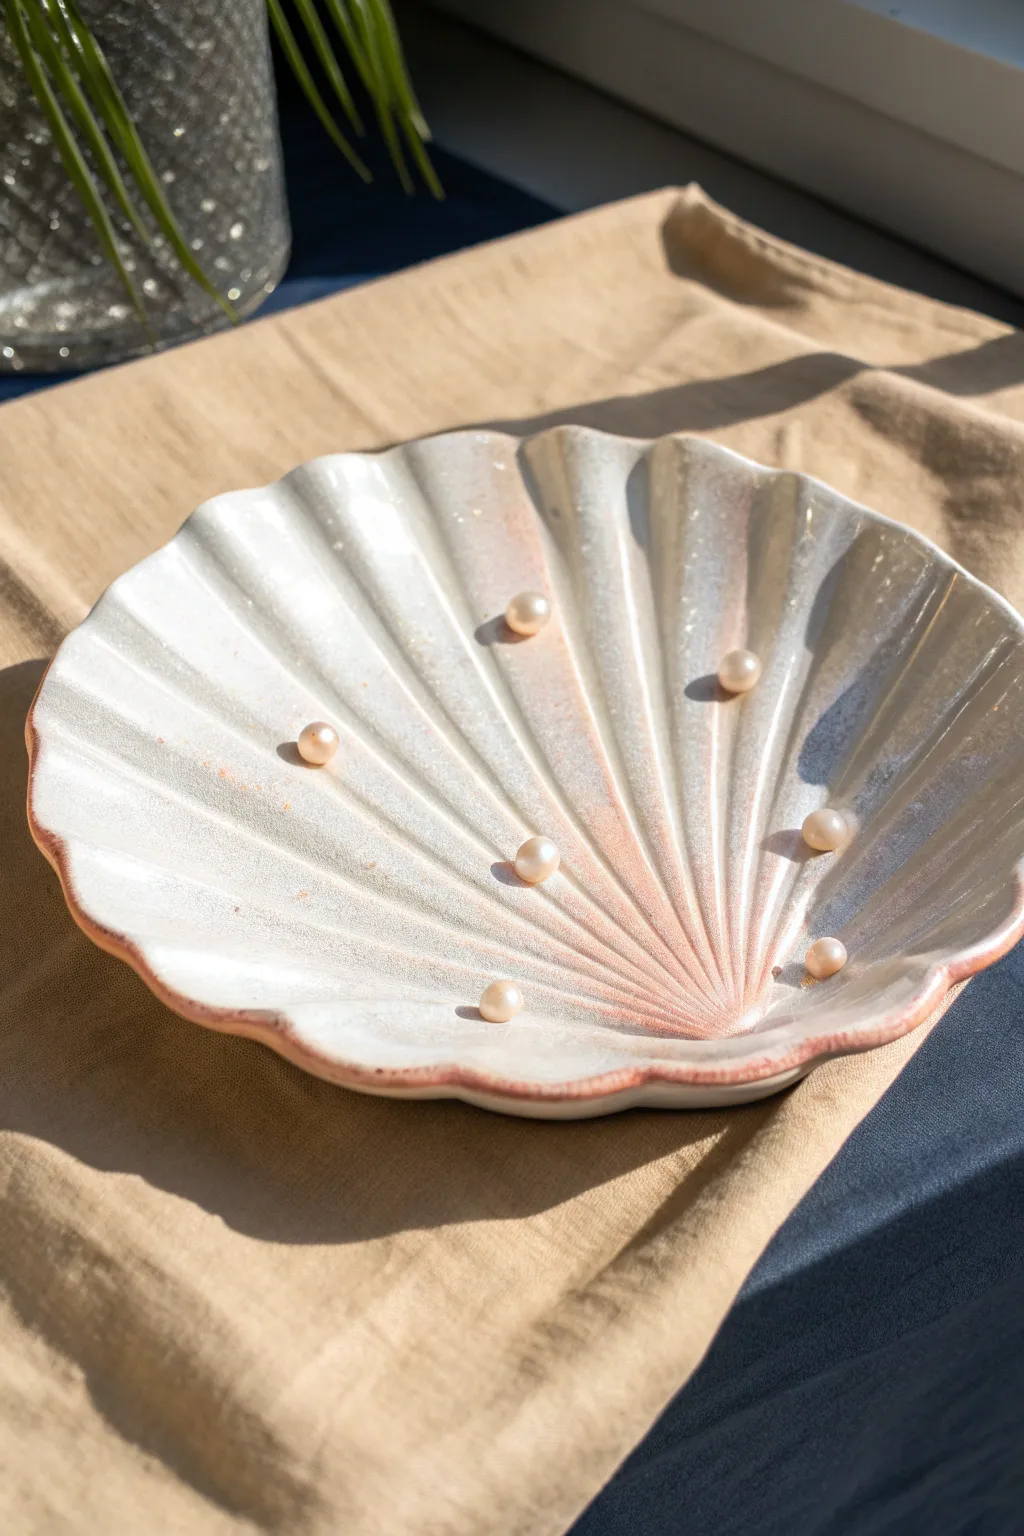
Bring a touch of the seaside to your vanity with this ethereal shell-shaped tray. The soft ridges and shimmering glaze mimic the delicate beauty of a real scallop shell, making it the perfect resting place for your favorite pearls or earrings.
Step-by-Step
Materials
- Air-dry clay (white) or polymer clay
- Rolling pin
- Rolling guides (approx 1/4 inch thick)
- Scallop shell template (paper printout or hand-drawn)
- Craft knife or scalpel
- Modeling tools (specifically a rib tool and a ball tool)
- Small bowl or rounded object (for drying shape)
- Sandpaper (fine grit)
- White acrylic paint
- Iridescent medium or pearlescent top coat
- Soft pink glossy acrylic glaze or diluted paint
- Gloss varnish
- Paintbrushes (flat and fine round)
Step 1: Shaping the Clay
-
Condition the Clay:
Begin by wedging your white clay thoroughly to remove any air bubbles. If using polymer clay, warm it in your hands until it is pliable and smooth. -
Roll the Slab:
Place your rolling guides on either side of the clay ball and roll it out into a consistent slab about 1/4 inch thick. -
Trace and Cut:
Lay your scallop shell template gently on top of the slab. Using your craft knife, carefully trace around the edge to cut out the basic fan shape. -
Smooth the Edges:
Dip your finger in a little water (for air-dry clay) or baby oil (for polymer) and run it along the cut edges to soften any sharp corners. -
Mark the Rays:
Find the central point at the bottom of the shell. Using a dull tool or the back of a knife, lightly impress radial lines fanning out from this center point to the scalloped edges to guide your sculpting. -
Sculpt the Ridges:
Use a modeling tool or your fingers to gently press down between the radial lines, creating concave valleys. This pushes the marked lines upward, forming the distinct ribbed structure of a scallop shell. -
Refine the Fan Shape:
Go back over the raised ridges and smooth them so they look organic rather than sharp. I like to gently pinch the very end of each ridge at the rim to emphasize the scalloped silhouette. -
Create the Curve:
Carefully lift your clay shell and drape it inside a shallow bowl or over a rounded mold. Gravity will help it take on a natural, cupped shape.
Smoother Transitions
Use a damp sponge to wipe the clay while shaping. This smooths out tool marks instantly, saving you tedious sanding time later.
Step 2: Finishing and Glazing
-
Dry Completely:
Allow the clay to dry fully according to the package instructions. For air-dry clay, this usually takes 24-48 hours; for polymer, bake as directed. -
Sand for Smoothness:
Once hardened, grab your fine-grit sandpaper and gently buff the surface, paying special attention to the rim to ensure it feels polished to the touch. -
Base Coat Application:
Apply a solid coat of white acrylic paint to the entire piece to create a clean, bright canvas for the effects. -
Add Subtle Blush:
Mix a tiny drop of pink paint with a lot of clear glaze or water to create a transparent wash. Brush this primarily into the deep crevices, wiping away excess from the high points. -
Rim Detail:
Using a fine brush and slightly more concentrated pink-terracotta paint, carefully trace the very edge of the rim to define the shape. -
Apply Iridescence:
Brush on a layer of iridescent medium or pearlescent top coat. This is the secret ingredient that gives the tray that magical, shimmery mother-of-pearl look. -
Final Seal:
Finish with a high-gloss varnish to protect the paint and give it a wet, ceramic-like shine.
Gilded Edge
For a luxe upgrade, paint the rim with liquid gold leaf instead of pink. The metallic contrast against the pearl finish looks incredibly high-end.
Now you have a shimmering coastal accent piece ready to hold your treasures

TRACK YOUR CERAMIC JOURNEY
Capture glaze tests, firing details, and creative progress—all in one simple printable. Make your projects easier to repeat and improve.
Kitty Face Tray With Pointy Ears
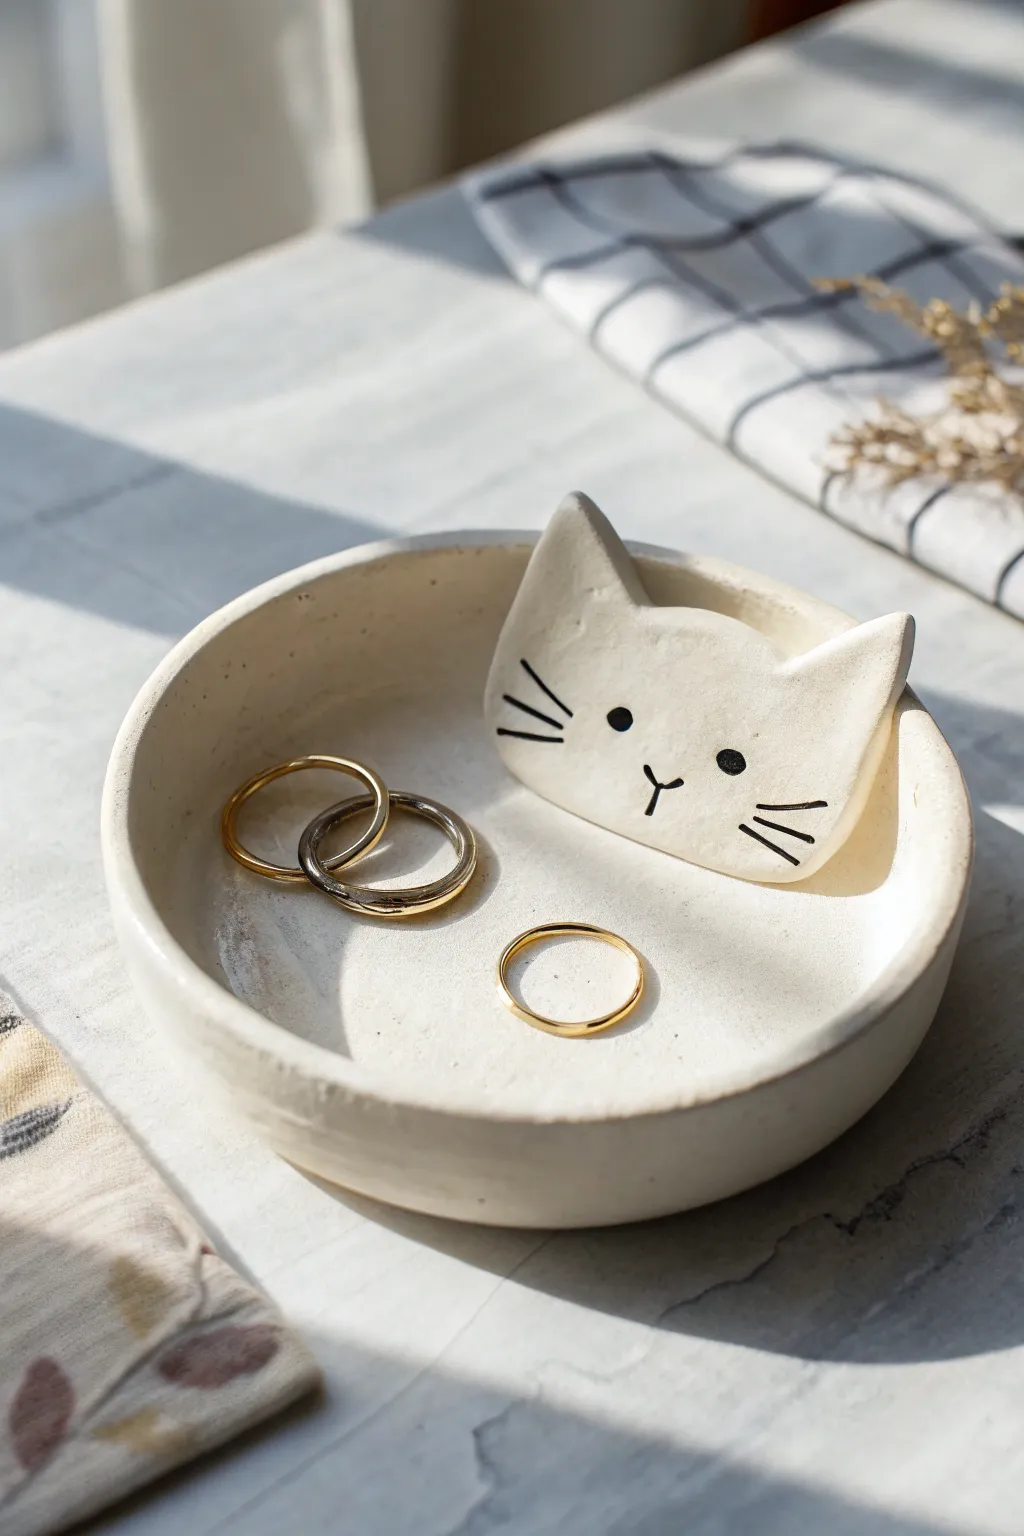
This charming, minimalist trinket dish features a subtle feline friend peeking up from the edge, perfect for guarding your favorite rings. The creamy white finish and simple black line work give it a modern, clean aesthetic that looks lovely on any bedside table.
Detailed Instructions
Materials
- White air-dry clay or polymer clay (oven-bake)
- Rolling pin or smooth glass jar
- Small bowl (approx. 4-5 inches diameter) to use as a mold
- Craft knife or clay cutting tool
- Small cup of water (for smoothing)
- Fine grit sandpaper
- Black acrylic paint or black paint pen
- Fine detail paintbrush
- Matte or satin varnish/sealant
- Clay sculpting tool (optional)
Step 1: Shaping the Base
-
Prepare the clay:
Start by conditioning your clay. Knead a ball of white clay in your hands until it is soft, pliable, and free of cracks. Warm clay is much easier to work with. -
Roll it out:
On a clean, flat surface, roll the clay out into an even slab. Aim for a thickness of about 1/4 inch (approx. 5-6mm) to ensure your dish is sturdy but not clunky. -
Cut the circle:
Place your small bowl upside down on the clay slab to use as a template. Use your craft knife to trace around the rim, cutting out a perfect circle. -
Form the shallow bowl:
Gently press this clay circle into the *inside* of your bowl mold to give it a curved shape, or simply curl up the edges by hand if you prefer a more organic, handmade look like the photo. -
Smooth the edges:
Dip your finger in a little water and run it along the rim of the dish to smooth out any rough cutting marks or cracks. A smooth rim makes the final piece look much more professional.
Cracks while drying?
If you see hairline cracks appearing as air-dry clay dries, mix a tiny bit of fresh clay with water to make a paste (slip) and fill the crack immediately.
Step 2: Sculpting the Kitty
-
Cut the head shape:
Roll out a smaller piece of clay to the same thickness. Freehand cut a simple cat head shape—an oval bottom with two distinct, triangular pointed ears on top. -
Refine the ears:
Use your fingers to softly pinch and round the tips of the ears slightly so they aren’t razor-sharp, matching the soft aesthetic of the main dish. -
Attach the head:
Score the back of the cat head and the spot on the inner rim of the bowl where you want it to sit. Scoring means making little cross-hatch scratches to create grip. -
Blend the seam:
Press the head firmly onto the inner curved wall. Use a sculpting tool or your finger to smooth the clay where the head meets the bowl, blending the back seam so it becomes one solid unit. -
Check the profile:
Looking from the side, ensure the cat head follows the curve of the bowl but sticks up slightly above the rim, just like a cat peeking over a fence.
Step 3: Refining and Drying
-
Final smoothing:
Do one last pass over the entire piece with a damp finger or sponge. I always take a moment here to double-check that no fingerprints are left behind. -
Let it dry:
If using air-dry clay, let it sit in a cool, dry place for at least 24-48 hours. If using polymer clay, bake it according to the package instructions. -
Sand imperfections:
Once fully dry (or baked and cooled), gently sand any rough spots, especially around the rim and the ears, until the surface feels milky smooth. -
Wipe clean:
Remove all sanding dust with a slightly damp cloth or paper towel. The surface needs to be dust-free for the painting step.
Speckled Stone Effect
For a trendy finish, flick a stiff toothbrush dipped in diluted brown paint over the dried white clay to create a faux speckled ceramic pottery look.
Step 4: Adding Personality
-
Paint the face:
Using a very fine paintbrush or a black paint pen, draw two wide-set dots for eyes. Keep them simple and small. -
Add nose and mouth:
Draw a small ‘Y’ shape between the eyes for the nose and mouth. The center vertical line connects the nose to the mouth area purely minimally. -
Draw whiskers:
Add three short, straight lines on each cheek for whiskers. Ensure they float freely and don’t touch the nose or mouth lines. -
Seal the piece:
Once the paint is totally dry, apply a coat of matte or satin varnish. This protects the clay from moisture and gives the dish a finished, ceramic-like sheen.
Now you have a sweet little guardian for your daily treasure collection
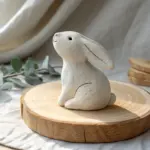
Bunny-Ear Oval Tray

This adorable dusty pink trinket dish combines a simple oval base with a playful bunny ear accent, perfect for holding your favorite rings and studs. The soft matte finish and whimsical silhouette make it a charming addition to any bedside table or vanity.
How-To Guide
Materials
- Air-dry clay (white or light grey)
- Acrylic rolling pin
- Oval cookie cutter (or a paper template and craft knife)
- Small bowl of water
- Modeling tools (or a toothpick and butter knife)
- Fine-grit sandpaper (220-400 grit)
- Acrylic paint (dusty pink/blush)
- Matte varnish or sealant
- Soft paintbrushes
Step 1: Shaping the Base
-
Condition the Clay:
Begin by taking a handful of air-dry clay and kneading it in your hands until it feels warm, pliable, and free of cracks. -
Roll it Out:
Place the clay on a clean, flat surface and use your acrylic rolling pin to flatten it into an even slab, approximately 1/4 inch thick throughout. -
Cut the Shape:
Press your oval cookie cutter firmly into the clay slab. If you are using a paper template, lay it on the clay and carefully trace around it with a craft knife to get your oval shape. -
Build the Rim:
Roll a separate long, thin snake or coil of clay. Place this coil along the outer top edge of your oval base to create the raised rim. -
Blend the Seams:
Using your thumb or a modeling tool, drag the clay from the coil down onto the base, blending the two pieces together seamlessly on both the inside and outside. I find slightly wetting my finger helps smooth out the join marks perfectly.
Step 2: Creating the Ears
-
Form the Head:
Roll a small ball of clay, roughly the size of a marble, which will serve as the connection point for the ears. -
Shape the Ears:
Roll two smaller, equal-sized logs of clay. Flatten them gently and taper the ends to create the elongated teardrop shape of rabbit ears. -
Attach Ears to Head:
Score the bottom of the ears and the top of the small clay ball with a needle tool or toothpick. Add a dab of water (slip) and press the ears firmly onto the ball. -
Smooth the Connection:
Use a small tool to blend the clay at the base of the ears into the ball so they stand upright and secure. -
Attach to Tray:
Score the back rim of your oval tray and the bottom of the bunny head. Apply slip and press the head component onto the rim. -
Secure the Bond:
Blend the clay from the head piece down into the rim of the tray, ensuring a strong connection that won’t snap off later. -
Final Smooth:
Dip a finger in water and run it over the entire piece to remove fingerprints and refine the curves of the ears.
Slip & Score Tip
For the strongest bond when attaching the ears, scratch cross-hatch patterns (scoring) on both surfaces before adding water. This acts like Velcro for clay.
Step 3: Finishing Touches
-
Dry Completely:
Set the tray aside in a cool, dry place. Let it dry for at least 24-48 hours, flipping it occasionally if possible to ensure the bottom dries evenly. -
Sand Imperfections:
Once fully hard and white, use fine-grit sandpaper to gently buff away any rough edges or bumps, paying special attention to the rim and ear tips. -
Mix Your Color:
Mix white acrylic paint with a tiny drop of red and a touch of brown to achieve that soft, dusty pink shade shown in the image. -
Apply Base Coat:
Paint the entire tray with a thin, even layer of your pink mixture. Let it dry to the touch. -
Apply Second Coat:
Add a second coat for full opacity, ensuring you get into the crevices around the bunny ears. -
Seal the Tray:
Finish by applying a matte varnish or sealant to protect the paint and give the tray a finished, professional look.
Make it Luxe
Use a gold leaf pen or fine metallic paint to verify the very rim of the tray and the tips of the bunny ears for an elegant, high-end finish.
Place your new ring holder on your dresser and enjoy a tidy, stylish space
Frog Pond Lily Pad Tray
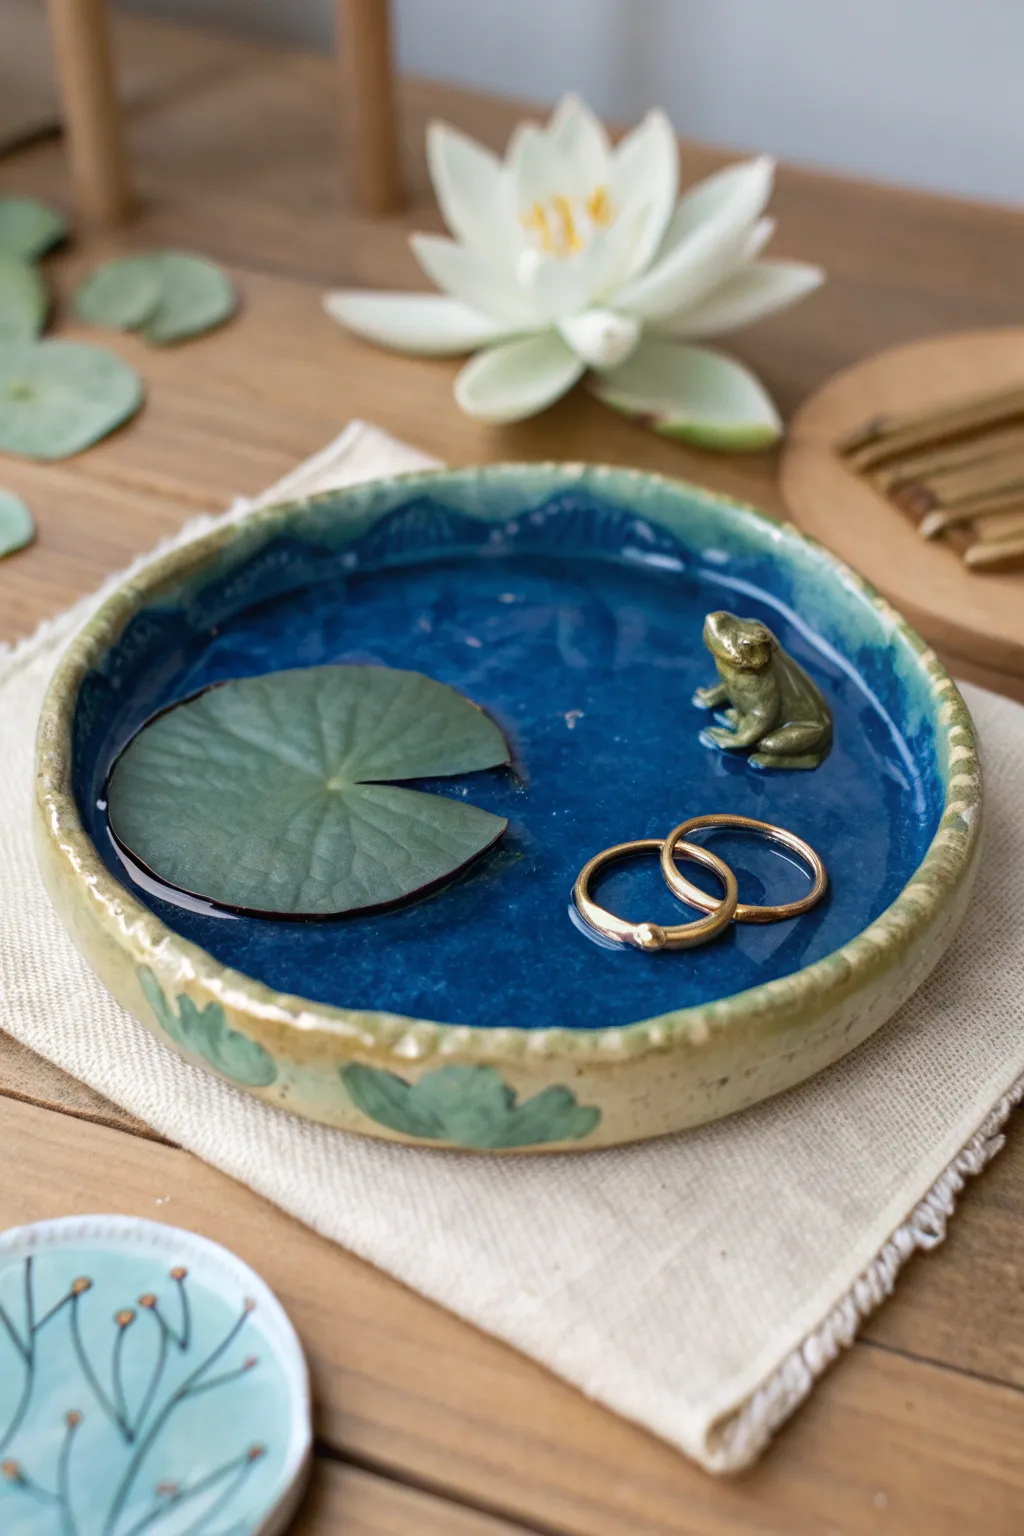
Bring the tranquility of a garden pond to your dresser with this adorable ceramic-style trinket dish. Featuring a glossy deep blue interior, a sculpted lily pad, and a tiny frog friend, it’s the perfect spot to rest your favorite rings.
Step-by-Step Guide
Materials
- Air-dry clay (white) or polymer clay
- Rolling pin
- Circular bowl or template (approx. 5-6 inches)
- Clay sculpting tools (needle tool, smoothing tool)
- Acrylic paints (deep blue, moss green, pale green, light brown, gold/bronze)
- High-gloss varnish or UV resin
- Fine grit sandpaper
- Paintbrushes (small detail brush and medium flat brush)
- Small cup of water (for smoothing clay)
Step 1: Shaping the Pond Base
-
Roll out the slab:
Begin by conditioning your clay until it’s soft and pliable. Roll it out into an even slab, roughly 1/4 inch thick, to ensure a sturdy base for your pond. -
Cut the circle:
Place your circular template or bowl onto the clay slab. Use a needle tool or craft knife to cut out a perfect circle, peeling away the excess clay. -
Create the rim:
Roll a long, thin snake of clay, enough to go around the circumference of your circle twice. Gently flatten it slightly so it isn’t perfectly round. -
Attach and build up sides:
Score the edges of your base circle and moisten with a little water or slip. Place the flattened coil on top of the edge to build the vertical wall of the tray, blending the clay downwards into the base so no seam is visible on the inside. -
Sculpt the exterior leaves:
On the outside of the rim, use a curved tool or your finger to push the clay slightly outward at intervals, mimicking the shape of leaf tips wrapping around the bowl.
Fixing Cracks
If small cracks appear as your air-dry clay cures, don’t panic. Mix a tiny bit of fresh clay with water to make a paste and fill the cracks, then sand smooth once dry.
Step 2: Adding the Details
-
Form the lily pad:
Roll a small ball of clay and flatten it into a thin disc. Cut a small pie-slice shape out of one side to created the classic lily pad notch. -
Texture the leaf:
Use a needle tool to gently etch veins radiating from the center of the lily pad. Place this securely into the bottom of the dish, off-center, using water to bond it. -
Sculpt the frog body:
Roll a tiny grape-sized ball for the body and a smaller one for the head. Blend them together. Attach two tiny logs for back legs, folded against the body, and two smaller ones for front legs. -
Detail the frog:
Add tiny clay specks for eyes. Position the frog so it looks like it’s sitting on the water or just perched on the edge of the lily pad. -
Dry and sand:
Allow the entire piece to dry completely (24-48 hours for air-dry clay). Once dry, gently sand any rough fingerprints or sharp edges on the rim.
Resin Magic
For the most realistic water, mix a tiny drop of blue ink into clear resin before pouring. This adds depth that paint alone can’t achieve.
Step 3: Painting and Glazing
-
Base coat the water:
Paint the entire interior surface (avoiding the frog and lily pad) with a deep, rich Prussian blue. Use two coats to get a solid, opaque color. -
Paint the lily pad:
Use a muted moss green for the lily pad. If you want depth, mix a tiny bit of brown into the center and drag it outward along the vein lines. -
Decorate the rim:
Paint the exterior leaf shapes with a pale sage green. I like to dry-brush a lighter cream color on the raised edges to highlight the texture. -
Bring the frog to life:
Paint the frog an olive green with a bronze or light brown underside. Use a fine tip brush to add a metallic gold tint to its eyes or back spots for a magical touch. -
The glossy finish:
The secret to the ‘water’ look is the finish. Pour a generous layer of high-gloss varnish or UV resin into the blue section of the tray. Be careful not to flood the frog. -
Final seal:
Apply a regular satin varnish to the rim and the frog to seal the paint without making them look wet like the pond water.
Now you have a charming little sanctuary to keep your jewelry safe and organized
Mushroom Garden Tray
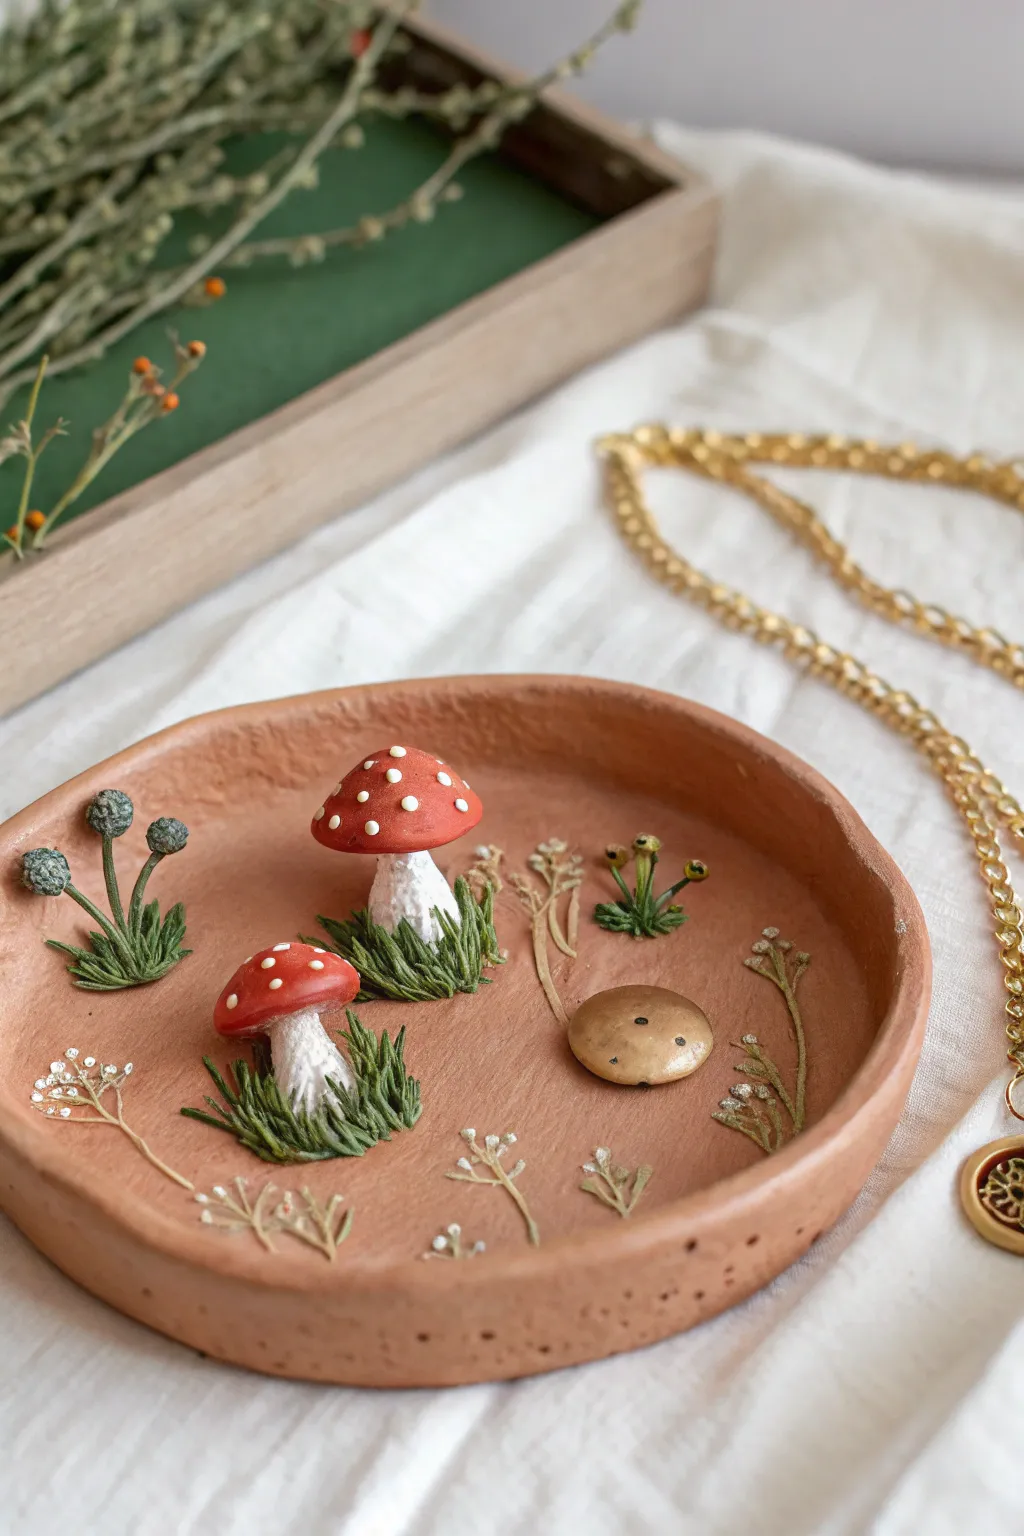
Bring a touch of the forest floor into your home with this charming terracotta-style tray featuring sculpted mushrooms and delicate floral details. It is perfect for holding rings, earrings, or simply resting as a sweet piece of cottagecore décor.
Detailed Instructions
Materials
- Air-dry clay (terra cotta color recommended)
- Acrylic paints (red, white, deep green, metallic gold, slate blue)
- Fine detail paintbrushes (00 and 0 sizes)
- Clay sculpting tools (needle tool, ball stylus)
- Small rolling pin
- Bowl for water
- Sandpaper (fine grit)
- Matte or satin varnish
Step 1: Shaping the Base
-
Prepare the clay:
Start by conditioning a large ball of terra cotta air-dry clay in your hands until it is warm and pliable, eliminating any cracks. -
Form the slab:
Roll the clay out into a circle about 1/4 inch thick. You can use a circular cutter or trace a bowl to get a perfect round shape. -
Create the rim:
Gently pinch up the edges of the circle to create a raised wall. Smooth the rim with water on your finger to ensure it connects seamlessly to the base. -
Refine the surface:
Use a slightly damp sponge or finger to smooth out the interior floor of the tray, removing fingerprints.
Use Slip for Strength
Always scratch (score) both clay surfaces and add water (slip) before joining pieces. This acts like glue and prevents elements from popping off.
Step 2: Sculpting the Forest Elements
-
Form mushroom stems:
Roll two small cones of clay for the mushroom stems. Score the bottom of the cones and the tray floor, add a dab of water (slip), and press them firmly into place near the center-left. -
Add mushroom caps:
Shape two rounded caps. Attach them to the top of the stems using the score-and-slip method. One should be slightly larger than the other. -
Create grass clumps:
Apply small bits of clay around the base of the stems. Use a needle tool to drag upwards repeatedly, creating a textured, grass-like appearance. -
Sculpt the flower buds:
On the left side, attach three thin snakes of clay for stems. Top them with tiny textured balls to resemble seed pods or flower buds. -
Add 3D accents:
On the right side, add a small, flattened button shape to look like a gold pebble or fallen cap. Add another small clump of textured greenery behind it. -
Impress floral details:
Use your needle tool to lightly scratch or impress delicate branching stem patterns directly into the flat surface of the tray floor. Let the entire piece dry for 24-48 hours.
Add Real Moss Texture
For ultra-realistic texture on the grass, press a piece of rough sandpaper or a clean toothbrush into the wet clay before dragging the needle tool.
Step 3: Painting and Finishing
-
Base coat the stems:
Paint the mushroom stems white. Don’t worry about being perfectly opaque; a little translucency adds texture. -
Paint the caps:
Carefully paint the mushroom caps a vibrant red. Let this dry completely before moving to the next step to avoid smudging. -
Add the spots:
Using the tip of a small brush or a dotting tool, apply tiny white dots to the red caps. -
Greenery details:
Paint the sculpted grass clumps with a deep, mossy green. Dry brush a slightly lighter green on the tips to highlight the texture. -
Paint secondary elements:
Paint the tall flower buds on the left a muted slate blue-green. Paint the small pebble shape a metallic gold. -
Highlight impressed stems:
Using a very fine brush, paint the impressed floral lines on the tray floor with a creamy white or pale grey to make them stand out against the terra cotta. -
Seal the piece:
Once all paint is fully dry, cover the entire tray with a coat of matte or satin varnish to protect your work and seal the clay.
Place your finished tray on a sunny windowsill or vanity to enjoy a tiny piece of magical woodland scenery every day
Heart Hands “Hug” Tray
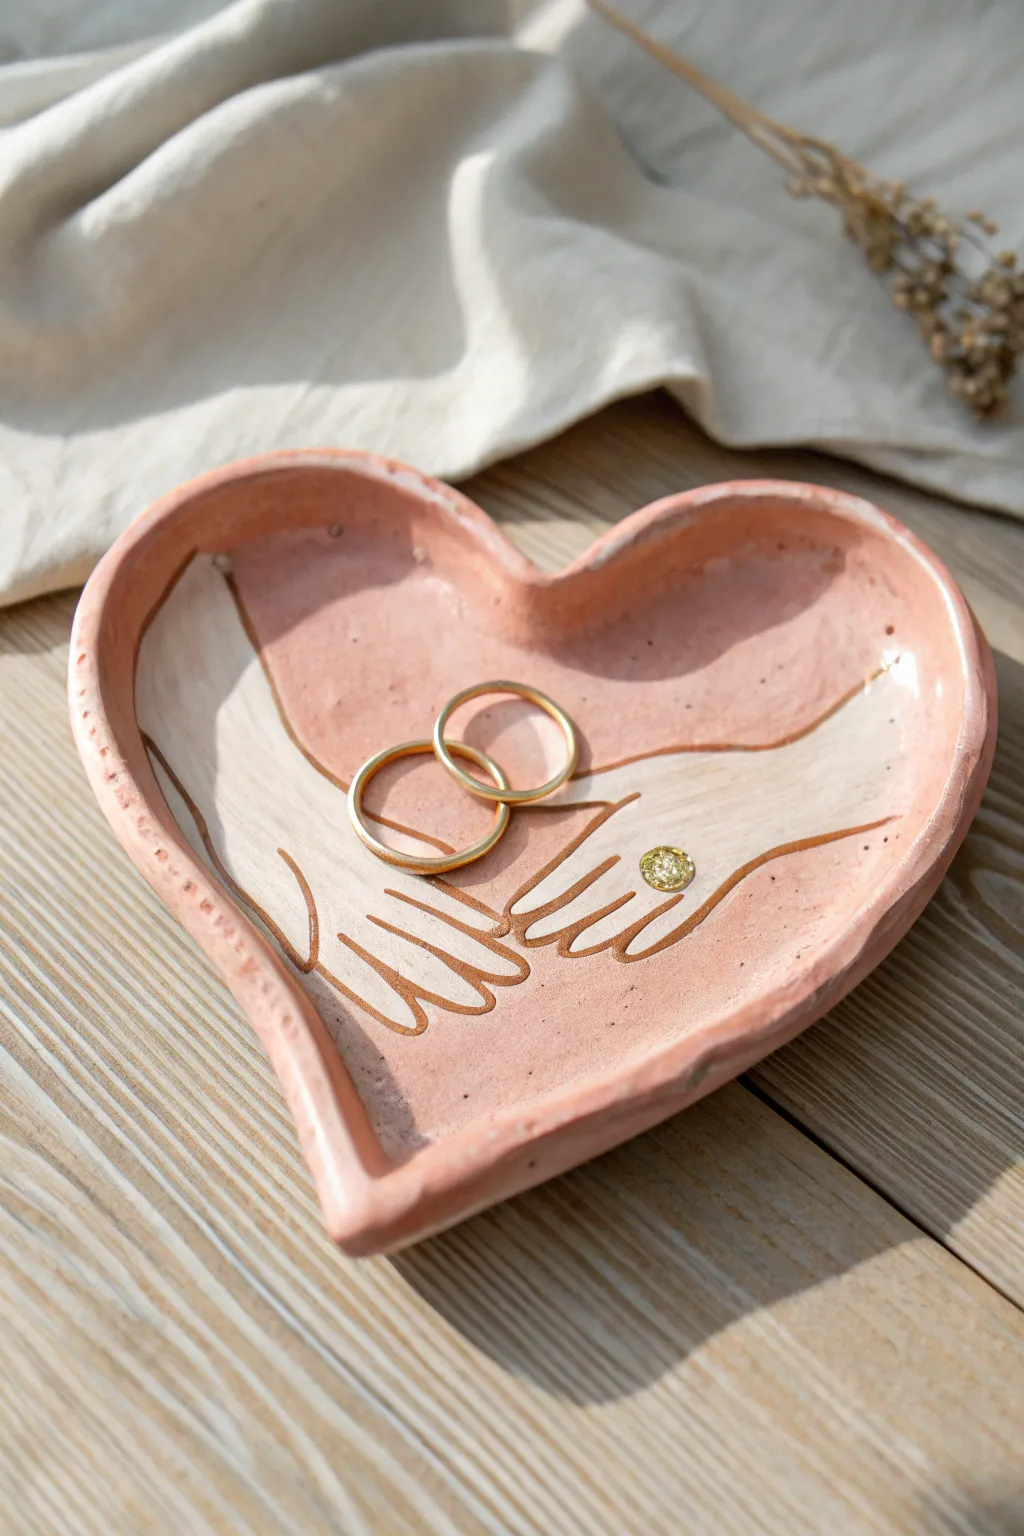
This rustic, heartwarming trinket dish features two hands coming together to form a gentle heart shape on a textured, clay pink surface. The finished piece makes a perfect resting place for wedding rings or small mementos, combining organic clay textures with delicate line art.
Step-by-Step Guide
Materials
- Air-dry clay (terracotta or white colored)
- Heart-shaped cookie cutter (large) or paper template
- Rolling pin
- Parchment paper or canvas mat
- Small bowl of water
- Sponge
- Sculpting tools (needle tool and smoothing tool)
- Fine grit sandpaper
- Acrylic paints: Terra-cotta pink, Cream/Off-white, Burnt Sienna/Bronze
- Fine detail paintbrush (size 0 or 00)
- Golden yellow glass gem or rhinestone (optional ring detail)
- Gloss or matte varnish sealant
- Strong craft glue (E6000) for the gem
Step 1: Shaping the Base
-
Prepare the Clay:
Begin by kneading a fist-sized ball of air-dry clay until it is warm and pliable. This conditioning step is crucial to prevent cracks later on. -
Roll the Slab:
On a piece of parchment paper, roll out the clay to an even thickness of about 1/4 inch. If you want that rustic, handmade charm visible in the reference, don’t worry about making it perfectly smooth yet. -
Cut the Shape:
Place your large heart cutter or paper template onto the slab. Cut around it cleanly with a needle tool or knife, removing the excess clay. -
Form the Rim:
Gently pinch the edges of the heart upwards to create a raised rim. You want the sides to slope gently inward to hold items safely inside. -
Smooth the Edges:
Dip your finger or a small sponge into water and run it along the rim to soften any sharp cutting marks. The goal is a soft, organic edge rather than a sharp, commercial look.
Step 2: Refining & Drying
-
Add Texture (Optional):
If your clay is too smooth, you can lightly dab it with a crumpled paper towel or sponge to mimic the stone-like texture seen in the photo. -
Dry the Piece:
Place the tray in a safe, dry spot away from direct sunlight. Let it air dry for 24-48 hours until it turns a lighter color and feels hard to the touch. -
Sanding:
Once fully dry, take fine-grit sandpaper and gently gently buff any rough spots on the rim or underside. Wipe away the dust with a slightly damp cloth.
Fixing Wobbly Lines
If your painted outlines aren’t crisp, wait for them to dry fully. Then, use the cream or pink base color to carefully “cut in” and correct the mistake from the outside.
Step 3: Painting the Design
-
Base Color:
Paint the entire interior and rim of the heart with a terracotta-pink shade. You may need two thin coats for opaque coverage, letting the first dry before applying the second. -
Sketch the Hands:
Using a very light pencil touch, sketch the outline of two forearms coming from the sides, with fingers interlacing in the center to mimic the reference image. -
Paint the Arms:
Fill in the arm shapes with a cream or off-white acrylic paint. This creates a bold contrast against the pink base. I like to use a flat brush here to get clean edges. -
Drying Time:
Allow the cream paint to dry completely. If the base pink shows through, add a second layer of cream. -
The Outline Work:
Using a size 00 detail brush and Burnt Sienna or Bronze paint, carefully trace the outline of the arms and draw the individual fingers. Keep your hand steady and use fluid strokes for the knuckles. -
Adding Detail:
Don’t forget to paint the small fingernail details on the cream hands using your outline color.
Pro Shape Tip
To get the perfect rim curve, let the clay dry inside a larger bowl lined with plastic wrap. Gravity will help curb the edges upward.
Step 4: Finishing Touches
-
Sealing:
Protect your artwork by applying a coat of varnish. A glossy finish mimics the ceramic look of the original image, while matte looks more earthy. -
The Ring Detail:
Once the varnish is dry, apply a small dot of strong craft glue to the ‘ring finger’ of the painted hand. -
Place the Gem:
Using tweezers, carefully place the small yellow gem onto the glue dot to simulate a ring, adding a touch of sparkle to the finished tray.
Place your favorite jewelry in the palm of these hands and enjoy your handmade decor piece
Tiny Rainbow Arch Tray
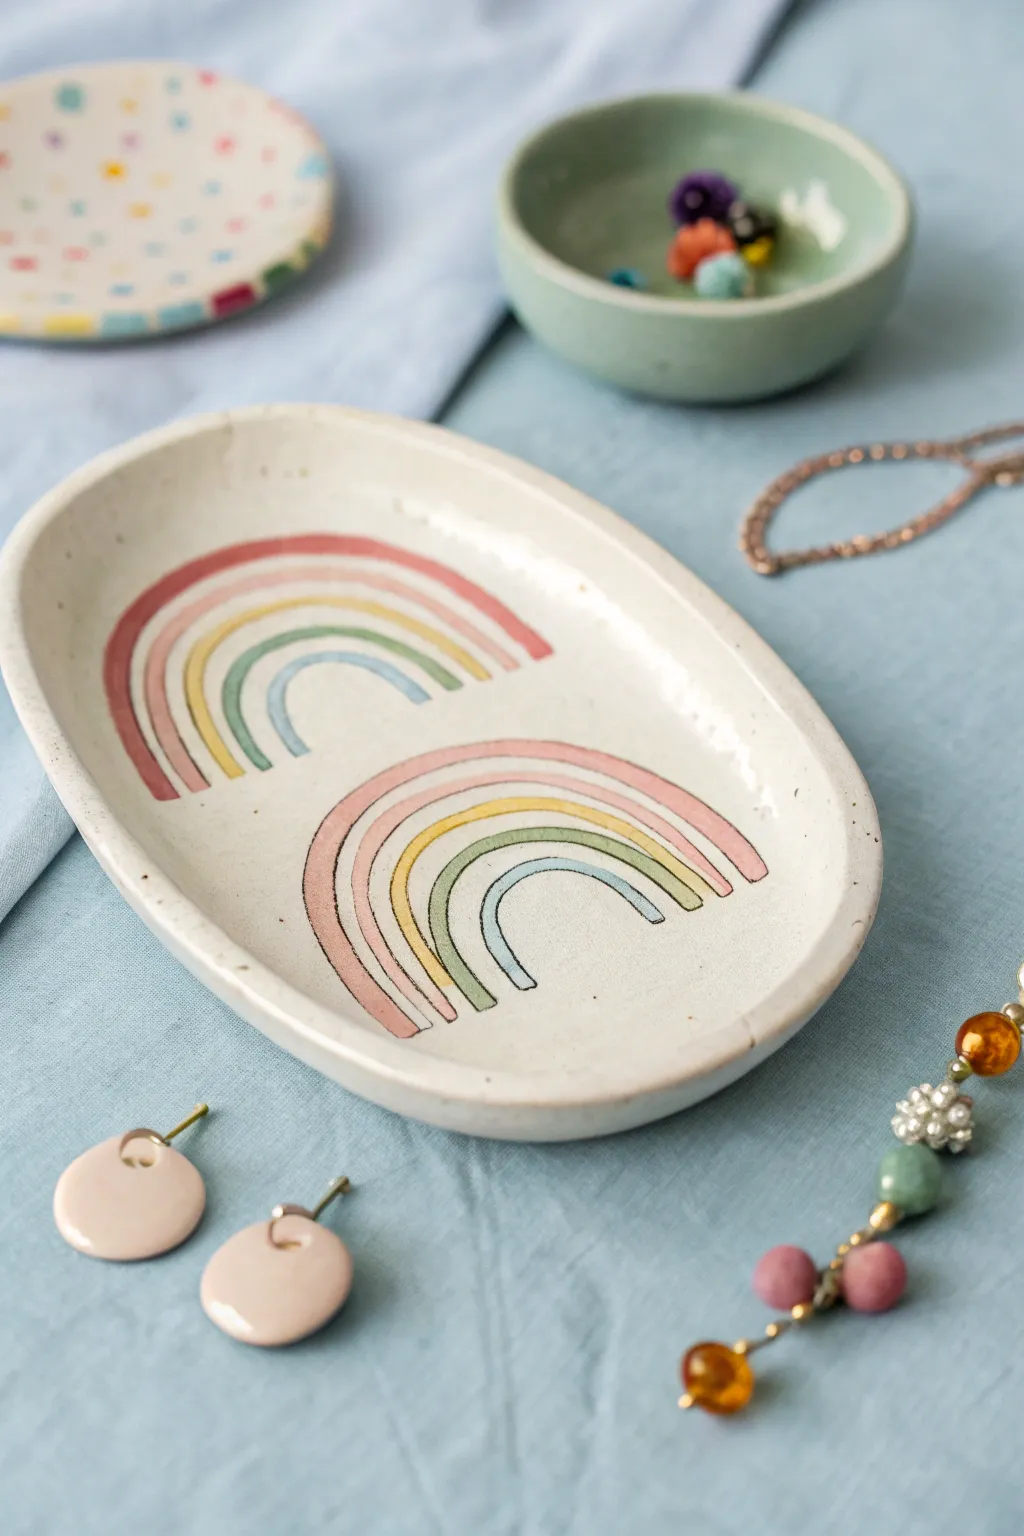
Brighten up your dresser with this serene, hand-built oval tray featuring dual rainbow motifs in soft, muted pastels. With its organic shape and charming hand-painted details, it is the perfect spot to catch rings, necklaces, or delicate studs at the end of the day.
Step-by-Step Tutorial
Materials
- White air-dry clay or polymer clay
- Rolling pin
- Oval paper template (approx. 6 inches long)
- Craft knife or clay needle tool
- Small bowl with water
- Sponge
- Fine grit sandpaper
- Acrylic paints (dusty pink, mustard yellow, sage green, light blue)
- Fine detail paintbrush (size 0 or 00)
- Black ultra-fine tip marker or black acrylic paint
- Gloss or matte varnish/sealant
Step 1: Shaping the Base
-
Roll the slab:
Start by taking a manageable ball of white clay and kneading it until soft and pliable. Use your rolling pin to flatten it into an even slab, aiming for a consistent thickness of about 1/4 inch. -
Cut the oval:
Place your paper oval template onto the clay slab. Using a craft knife or needle tool, carefully trace around the template to cut out your base shape. -
Smooth the edges:
Dip your finger or a small sponge into a little water and run it along the cut edges to smooth out any roughness or loose clay crumbs. -
Create the rim:
To create the raised edge, gently curve the outer rim of the oval upwards with your thumbs. I like to work slowly around the circumference several times, pinching slightly to build a wall about 1/2 inch high. -
Refine the shape:
Once the rim is raised, use a damp sponge to smooth the transition between the floor of the tray and the inner wall, ensuring there are no cracks. -
Dry completely:
Set the tray aside in a dry, cool area. Let it dry completely for 24-48 hours, flipping it over halfway through to ensure the bottom dries evenly. -
Sand for perfection:
Once fully cured and hard, gently sand the entire surface, paying special attention to the rim, to create a smooth canvas for your painting.
Smooth Moves
If you notice small cracks forming while bending up the rim, dip your finger in water (or clay slip) and rub the crack in a circular motion to ‘heal’ it immediately.
Step 2: Painting the Rainbows
-
Sketch the design:
Lightly sketch two rainbow arches in the center of the tray using a pencil. Orient them so they curve towards the short ends of the oval. -
Paint the outer arch:
Using your fine detail brush, paint the largest, outermost arch with the dusty pink paint. Keep your hand steady to create clear lines. -
Paint the middle strips:
Move inward to the next stripe using the mustard yellow paint. Leave a very tiny gap of white space between the pink and yellow to keep the colors distinct. -
Add the green layer:
Paint the third stripe using the sage green. Try to keep the width of this stripe consistent with the previous two. -
Finish the inner arch:
Complete the rainbow with the smallest, innermost arch in light blue. Repeat this entire painting process for the second rainbow on the other side of the tray. -
Let paint dry:
Allow the acrylic paint to dry fully to the touch before moving on to the outlining step. -
Outline the design:
Using an ultra-fine black marker or a very steady hand with black paint, carefully outline each colored stripe. The black lines define the arches and give it that illustration-style look. -
Seal the tray:
Apply a coat of varnish over the entire tray to protect the clay and the paint. Let it cure according to the sealant’s instructions before use.
Personal Touch
Instead of mirroring the rainbows, try flipping one upside down or painting tiny clouds, stars, or dots in the negative space around the arches for a celestial theme.
Now your jewelry has a beautiful new home that looks like a piece of modern art
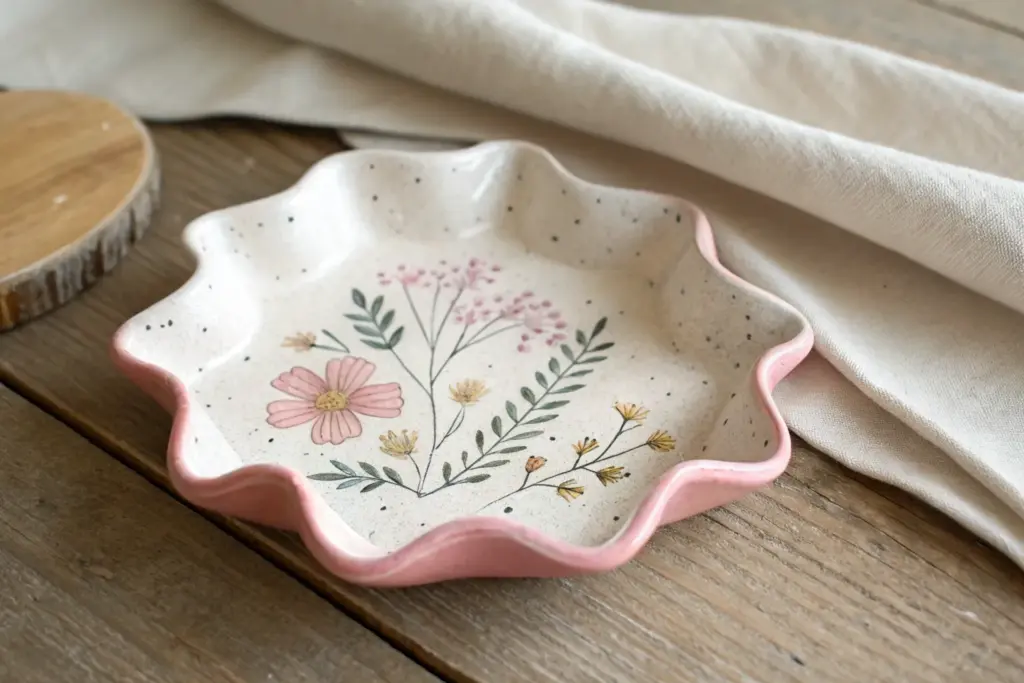
Mini Dessert Sprinkle Tray
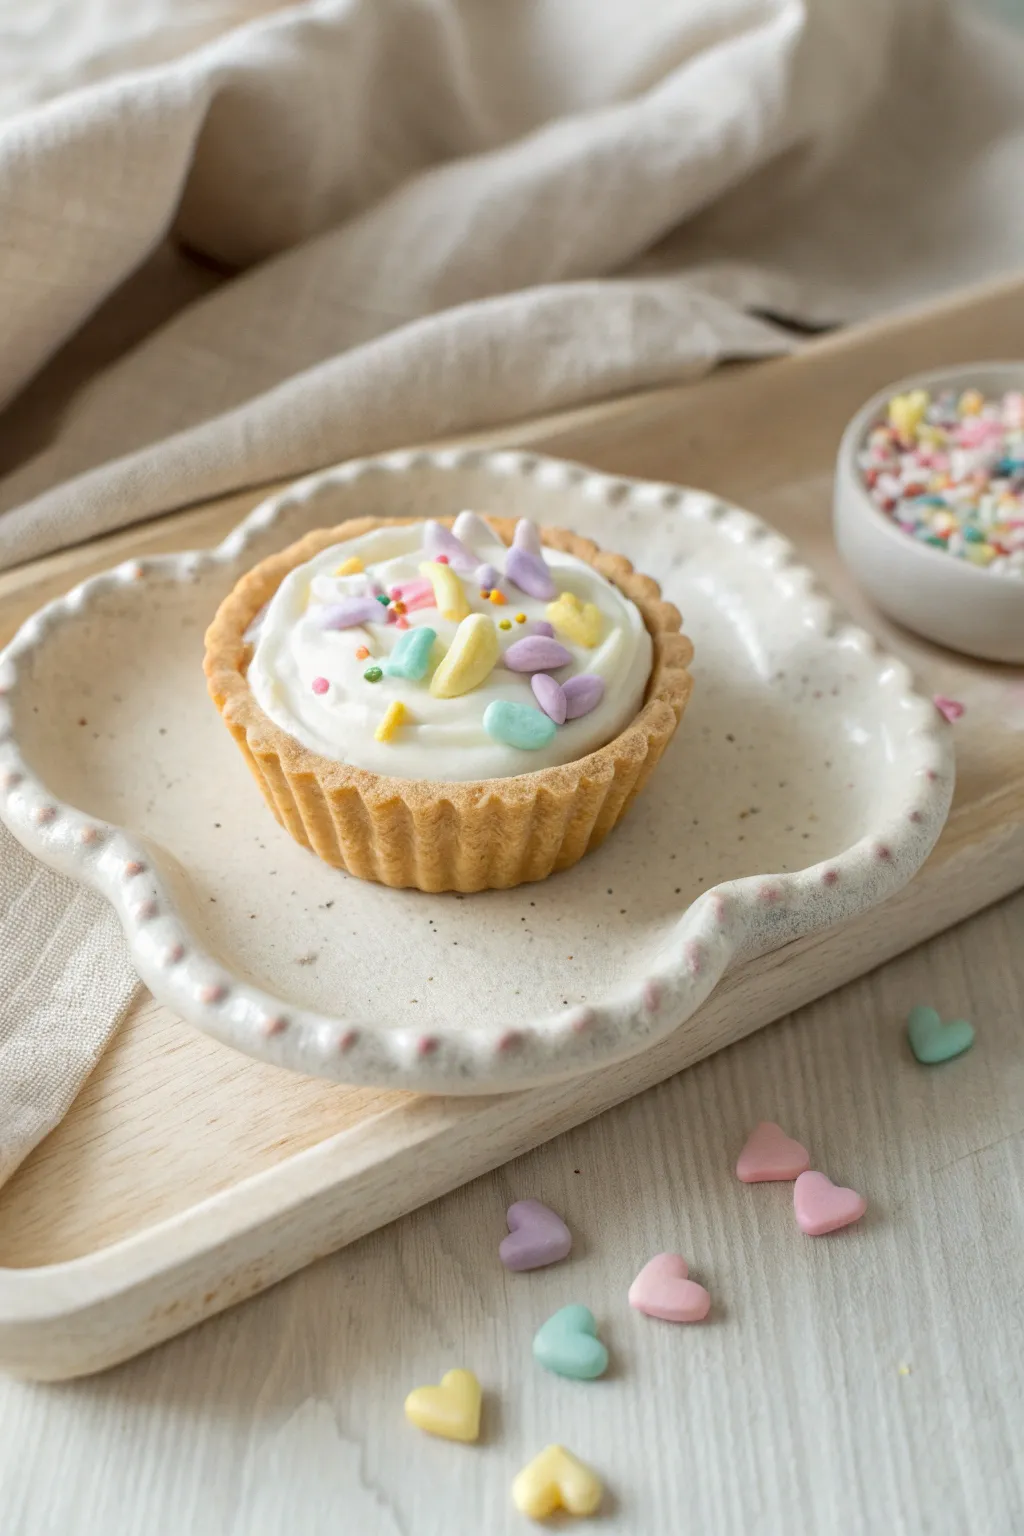
This whimsical little catch-all tray features a soft, cloud-like shape with delicate pink dotted details that make it perfect for serving a single sweet treat. Its speckled stoneware look adds a cozy, handmade charm that elevates even the simplest afternoon snack.
Detailed Instructions
Materials
- White air-dry clay or polymer clay
- Rolling pin
- Cloud or flower-shaped cookie cutter (approx. 4 inches)
- Small bowl of water
- Needle tool or toothpick
- Sandpaper (fine grit)
- Acrylic paints (creamy white, light pink, and brown)
- Old toothbrush or stiff bristle brush
- Small round paintbrush (size 0 or 1)
- Gloss or satin varnish (food-safe sealant if using for food)
Step 1: Shaping the Base
-
Preparation:
Begin by conditioning your clay. Knead a ball of white clay in your hands until it becomes soft, pliable, and free of any cracks. -
Rolling out:
On a clean, flat surface, roll out the clay to a uniform thickness of about 1/4 inch. If the clay is sticking, you can lightly dust your surface with cornstarch. -
Cutting the shape:
Press your cloud or flower-shaped cookie cutter firmly into the clay. Lift away the excess clay around the edges before carefully removing the cutter to preserve the shape. -
Smoothing edges:
Dip your finger in a little water and run it gently along the cut edge of the clay shape to smooth out any roughness or sharp corners left by the cutter.
Clay Cracking?
If you see tiny cracks forming while the clay dries, mix a small amount of fresh clay with water to make a paste (slip) and fill them in, then sand smooth once dry.
Step 2: Forming the Rim
-
Creating the curved edge:
With the shape still flat on your work surface, gently use your thumb to press the center down while lifting the scalloped edges slightly upward to create a shallow dish form. -
Refining the lip:
Work your way around the perimeter, pinching the rim slightly to define it. You want a subtle, raised lip that will keep crumbs or small items contained. -
Final smoothing:
Do one last pass with a damp finger or a slightly wet sponge to ensure the surface is perfectly smooth and free of fingerprints. -
Drying:
Allow the clay to dry completely according to the package instructions. Flip it over halfway through the drying process to prevent curling.
Step 3: Adding the Speckled Finish
-
Sanding:
Once fully dry, lightly sand any rough spots on the rim or base to ensure a professional finish. Wipe away the dust with a barely damp cloth. -
Base coat:
Paint the entire tray with a creamy off-white acrylic paint. You might need two coats for full opacity, making sure to let the first coat dry before applying the second. -
Mixing part one:
Dilute a small amount of brown acrylic paint with water. It should be fluid but not completely transparent—think ink consistency. -
Splattering:
Dip an old toothbrush into the watered-down brown paint. Hold it over the tray and run your thumb across the bristles to flick tiny speckles onto the surface. I suggest testing this on a piece of paper first to gauge the spray. -
Adding texture detail:
While the speckles dry, mix a tiny amount of grey-brown paint. Use a very fine brush to add a few larger, deliberate faux-stone dots to enhance the ceramic look.
Pastel Variation
Instead of speckles, try painting the base a solid pastel blue or lavender before adding the dots. It gives a ‘frosted cookie’ vibe perfect for dessert tables.
Step 4: Pink Polka Dotted Rim
-
Prepping the pink:
Mix a soft, pastel pink acrylic paint. You want a shade that looks like strawberry milk. -
Dotting the edge:
Using the back end of a paintbrush or a specialized dotting tool, carefully place small pink dots along the highest ridge of the scalloped rim. -
Spacing:
Try to space the dots evenly. Following the natural curves of the ‘cloud’ bumps helps guide your placement. -
Drying details:
Let the paint dry completely for at least an hour to ensure the dots don’t smear during the sealing process. -
Sealing:
Apply a coat of gloss or satin varnish to the entire piece. If you plan to put food directly on the tray, ensure you are using a certified food-safe resin or sealant.
Now your sweet little tray is ready to hold trinkets or treats with style
Cloud-Shaped Bedside Tray
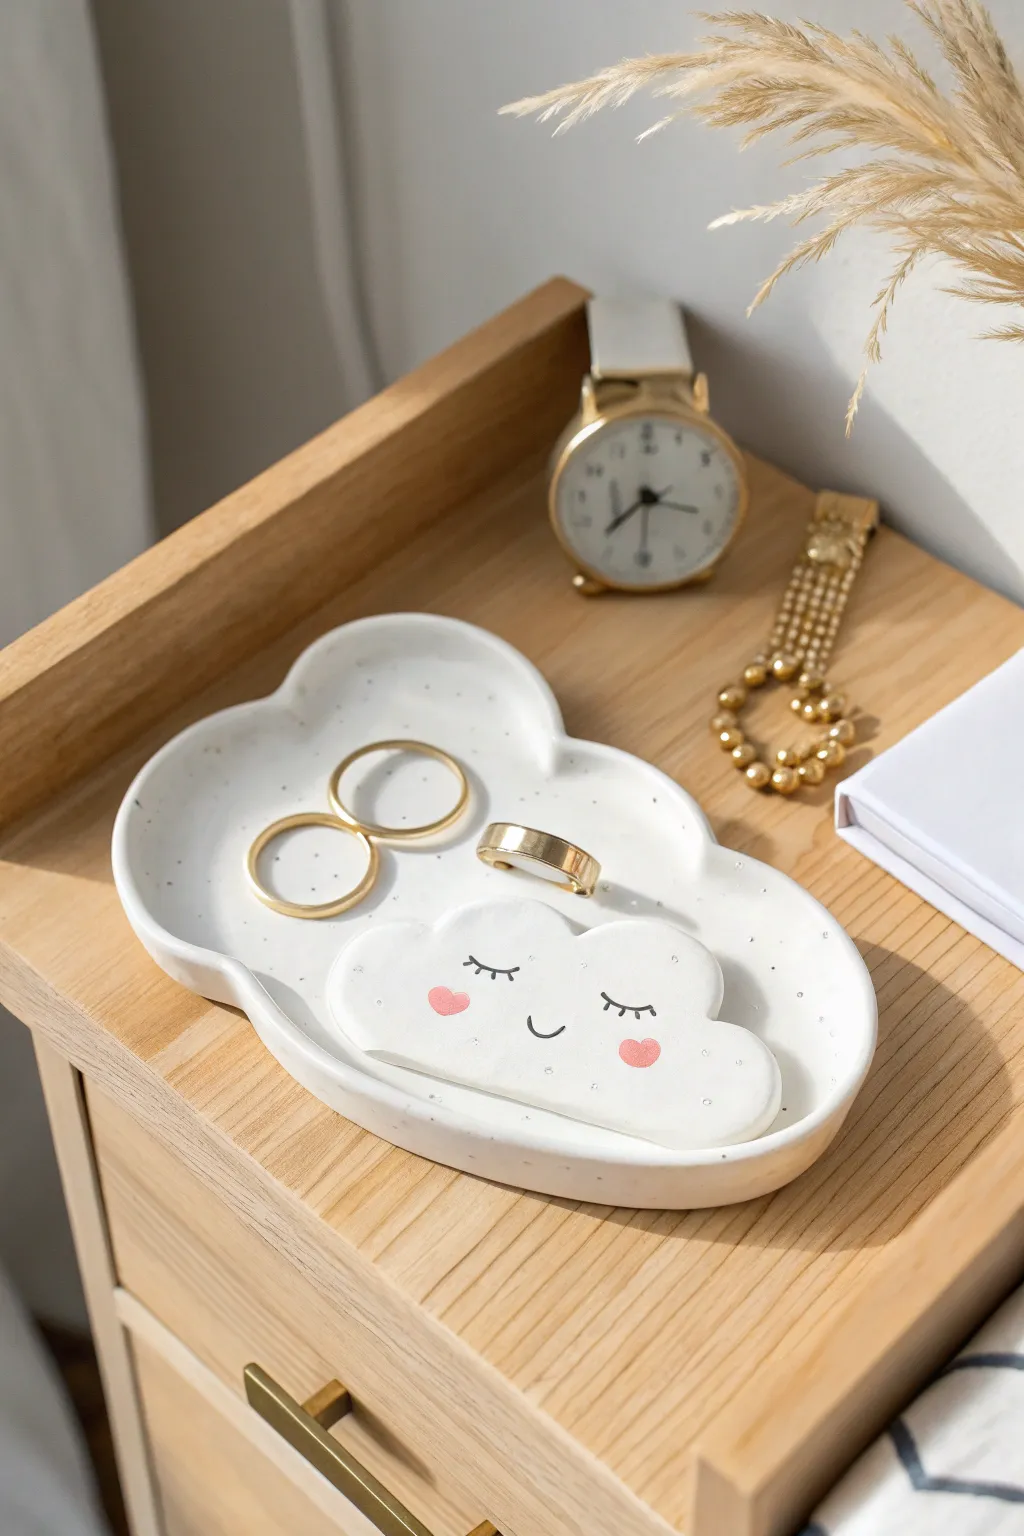
This whimsical little tray adds a soothing touch to any bedside table with its soft curves and sleepy, smiling face. Featuring a larger cloud basin and a smaller, raised cloud character inside, it’s the perfect spot to keep your dainty rings safe while you drift off to sleep.
Step-by-Step
Materials
- Air-dry clay (white)
- Acrylic rolling pin
- Cloud-shaped cookie cutters (large and small)
- Craft knife or scalpel
- Small bowl of water
- Fine-grit sandpaper
- Acrylic paints (black, soft pink)
- Very fine detail paintbrush
- Glossy varnish or sealant
- Old toothbrush (optional, for speckling)
- Light grey acrylic paint (optional, for speckling)
Step 1: Shaping the Clouds
-
Prepare the Clay:
Begin by kneading a fist-sized ball of white air-dry clay until it is warm, pliable, and free of any air bubbles. -
Roll the Base:
Roll out the clay on a flat, non-stick surface until it is about 1/4 inch thick. Aim for an even thickness throughout to ensure sturdy edges. -
Cut the Main Shape:
Use your larger cloud cookie cutter to press firmly into the clay. If you don’t have a cutter, you can sketch a cloud shape lightly with a needle tool and cut it out freehand with a craft knife. -
Create the Lip:
To transform the flat shape into a tray, gently pinch and lift the edges of the cloud upward all the way around. Use your thumb to smooth the curve so it creates a shallow basin. -
Cut the Mini Cloud:
Roll out a small amount of leftover clay, slightly thicker this time (about 1/3 inch). Use a smaller cloud cutter or freehand cut a chubby, smaller cloud shape. -
Smooth the Edges:
Dip your finger in a little water and run it along the cut edges of both clay pieces to smooth out any ragged bits or sharp corners.
Smooth Surface Secret
Use a tiny amount of baby oil on your fingertip to smooth the clay before drying. It eliminates fingerprints much better than water.
Step 2: Assembly and Refining
-
Score and Slip:
Identify where you want the small cloud to sit inside the larger tray. Use a needle tool to scratch cross-hatch marks on the bottom of the small cloud and the corresponding spot on the tray. -
Attach the Cloud:
Dab a drop of water onto the scored areas and press the small cloud firmly into place inside the tray. -
Seamless Bonding:
Use a modeling tool or your finger to smooth the seam where the small cloud meets the tray floor, ensuring they are securely bonded as one solid piece. -
Drying Time:
Place your tray in a safe, dry spot away from direct sunlight. I usually prefer to let this dry for at least 24-48 hours, flipping it occasionally so the bottom dries evenly.
Night Sky Vibe
Paint the main tray a deep midnight blue and leave the inner cloud white. Add gold star speckles instead of grey for a celestial theme.
Step 3: Painting and Finishing
-
Sanding:
Once fully dry and bone-white, gently sand any rough spots or fingerprints with fine-grit sandpaper until the surface feels satin-smooth. -
Speckling (Optional):
To get that trendy speckled pottery look, dip an old toothbrush into watered-down grey paint. Use your thumb to flick the bristles, spraying tiny droplets over the entire tray. -
Paint the Sleepy Eyes:
Using your finest detail brush and black acrylic paint, carefully draw two curved lines for closed eyes on the small cloud. Add three tiny lashes to each eye. -
Add the Smile:
Paint a small, simple ‘u’ shape between the eyes for a sweet, contented smile. -
Rosy Cheeks:
Dip the back end of a paintbrush into soft pink paint and dot it onto the cheeks to create perfect circular blushes. -
Golden Rim (Optional):
For a touch of elegance, you can sketch a very thin line of gold paint along the top rim of the larger tray, though the original project looks lovely left plain. -
Seal the Tray:
Finish by applying two coats of glossy varnish. This protects the paint and gives the tray a ceramic-like shine.
Now you have a charming little spot to rest your favorite jewelry at the end of the day
Candy-Colored Terrazzo Confetti Tray
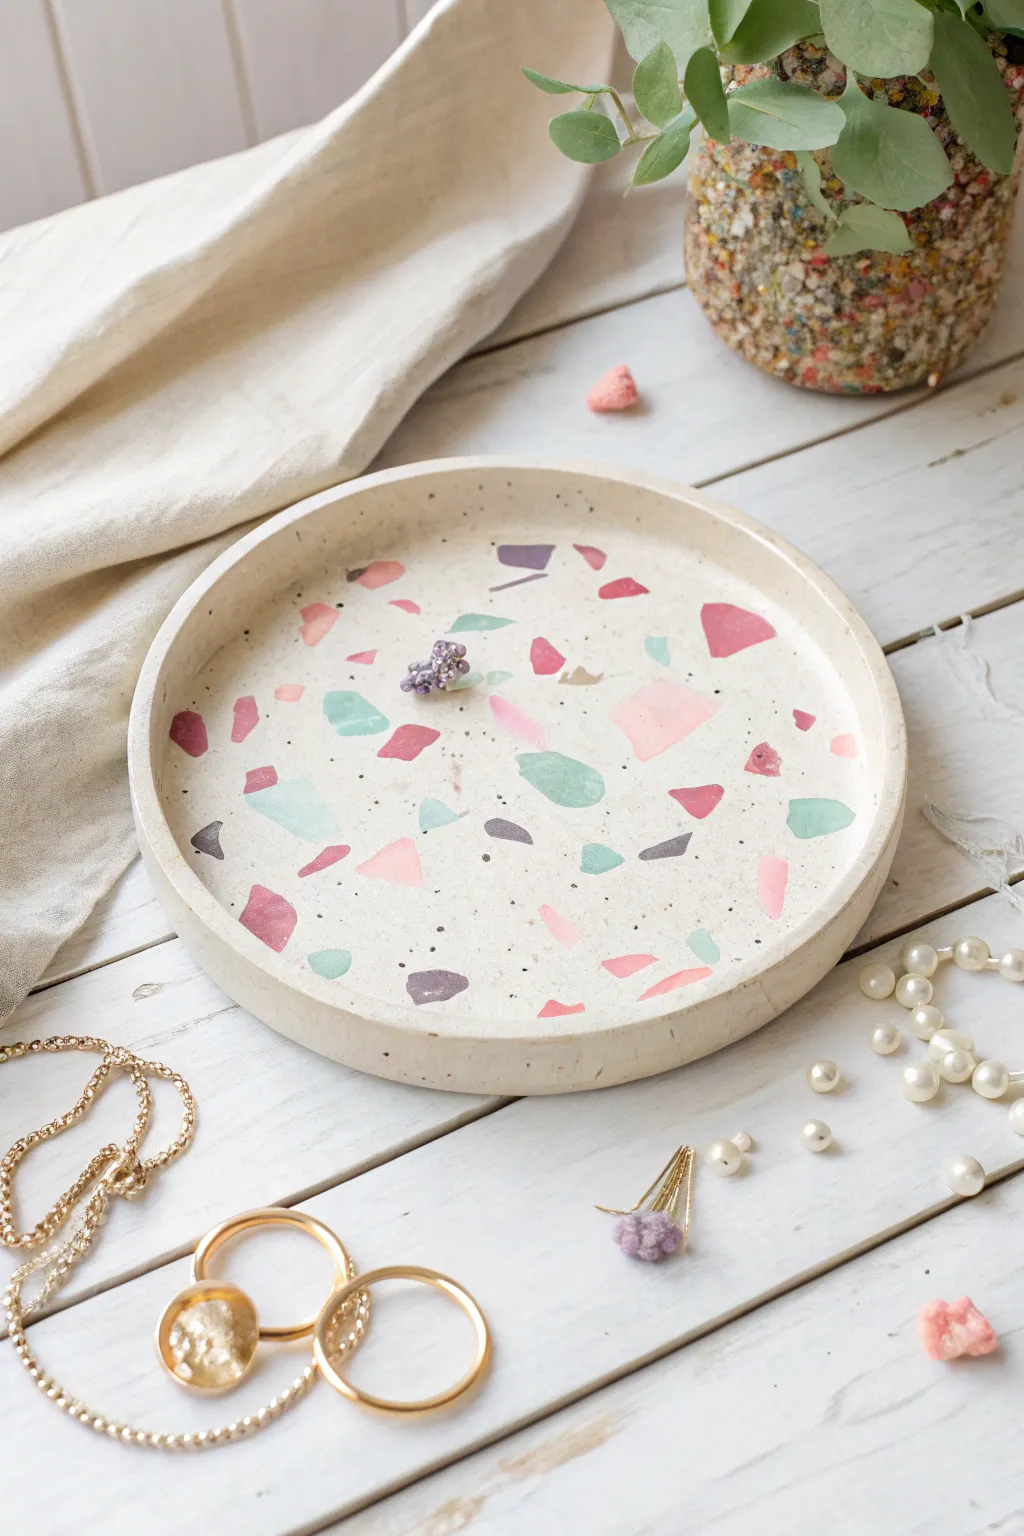
This delightful jewelry tray brings a playful pop of color to your vanity with its sweet pastel terrazzo effect. The creamy base is speckled with custom-made chips in shades of mint, bubblegum pink, and lavender for a truly unique finish.
Detailed Instructions
Materials
- Polymer clay (white, pink, mint green, lavender, dark grey)
- Acrylic rolling pin
- Circle cutter or bowl (approx. 5-6 inches diameter)
- Craft knife or tissue blade
- Parchment paper or baking mat
- Oven-safe bowl (for forming the rim)
- Fine-grit sandpaper (400 to 1000 grit)
- Gloss or satin varnish (optional for sealing)
Step 1: Making the Terrazzo Chips
-
Condition the colored clay:
Start by taking small amounts of your pink, mint green, lavender, and dark grey polymer clay. Knead each color separately in your hands until they are soft and pliable. -
Roll out thin sheets:
Roll each colored piece into a very thin sheet using your acrylic roller. Aim for a thickness of about 1-2mm—these will become your embedded chips, so thin is better. -
Bake the color sheets:
Place these flat, colored sheets onto a baking tray lined with parchment paper. Bake them according to the package instructions for a short duration (usually 10-15 minutes is sufficient for thin pieces) to harden them. -
Example time to chop:
Once the baked sheets have cooled completely, it’s time to create the confetti. Use your craft knife or simply your fingers to chop and crumble the colored sheets into irregular shapes and sizes. I keep the grey pieces much smaller, almost like ground pepper, while leaving the pastels a bit chunkier.
Step 2: Creating the Tray Base
-
Prepare the white base:
Take a large block of white polymer clay. Condition it thoroughly by kneading until it’s warm and soft. This prevents cracking later. -
Incorporate the chips:
Flatten the white clay slightly and sprinkle a generous amount of your pre-baked colored chips onto it. Fold the clay over the chips and knead gently to distribute them throughout the block. -
Repeat and refine:
Continue folding and rolling to maximize the distribution. If you want more density, add more chips now. You want the colors visible from the inside out. -
Roll out the slab:
Roll the chip-filled white clay into a large, even slab, approximately 1/4 inch thick. Move the roller in different directions to keep the shape relatively circular. -
Smooth the surface:
Run your roller lightly over the surface one last time to ensure the embedded chips are flush with the white clay. If there are gaps, press tiny chips into the holes and roll flat.
Smudged Colors?
If your colored chips smear into the white base while rolling, the white clay was likely too soft or the chips weren’t baked long enough initially. Cool the white clay in the fridge before rolling.
Step 3: Shaping and Finishing
-
Cut the circle:
Place your circle cutter or an upside-down bowl onto the slab. Use your craft knife to trace around it, cutting out a perfect circle. -
Form the rim:
To create the raised lip shown in the photo, take the long strip of excess clay you just trimmed off. Roll it into a long, even snake or a flat strip, depending on your preference for the edge style. -
Attach the rim:
Place the strip along the outer edge of your clay circle. Blend the seam on the inside and outside using your thumb or a clay tool so it looks like one seamless piece. -
Smooth the edges:
Take a moment to smooth the top rim with your finger. Dip your finger in a little bit of water or baby oil if the clay feels too sticky. -
Final Bake:
Place your finished tray form onto your baking sheet. Bake for the full duration recommended by the clay manufacturer (often 30 minutes per 1/4 inch of thickness at 275°F/130°C). -
Cool down:
Let the tray cool completely in the oven with the door cracked open to avoid thermal shock. -
Sand for the reveal:
This is the magic step. To make the terrazzo chips pop, sand the surface under running water using wet/dry sandpaper. Start with 400 grit and move to 1000 grit until the surface is buttery smooth and the chips are clearly defined. -
Seal:
Wipe the tray clean and dry. If you want a glossy finish like ceramic, apply a thin coat of polymer clay varnish.
Luxe Gold Rim
After baking and sanding, paint the very top edge of the rim with liquid gold leaf or metallic acrylic paint to add an elegant, high-end finish to your jewelry tray.
Place your favorite rings and pearls inside your new tray and enjoy the handmade charm on your dresser
Little Desert Sunburst Tray
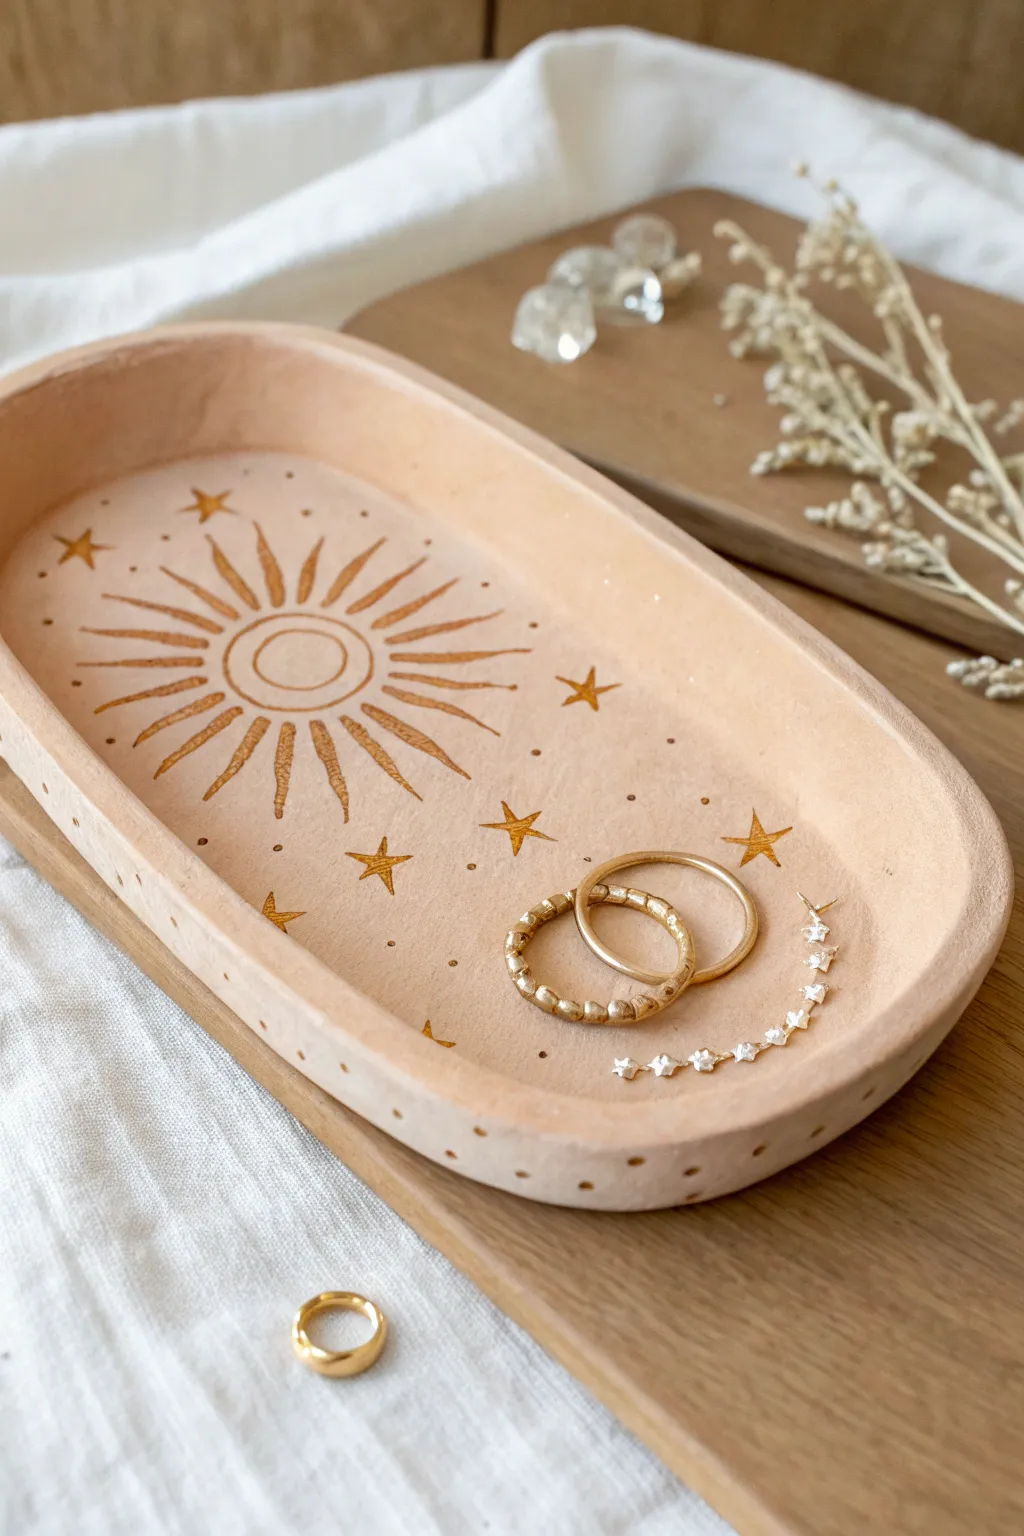
Bring a touch of desert warmth to your vanity with this charming clay tray featuring a hand-painted golden sunburst. Its organic oval shape and celestial details make it the perfect resting spot for your favorite rings and delicate chains.
Step-by-Step Tutorial
Materials
- Air-dry clay (white or terracotta)
- Acrylic rolling pin
- Oval template or cookie cutter (approx. 6 inches)
- Craft knife
- Small bowl of water
- Fine-grit sandpaper
- Acrylic paint (warm blush/terracotta shade)
- Gold metallic paint or gold leaf pen
- Fine detail paintbrush
- Matte varnish or sealant
Step 1: Shaping the Clay Base
-
Roll out the slab:
Begin by conditioning a handful of air-dry clay until it is soft and pliable. Roll it out on a smooth surface to an even thickness of about 1/4 inch. -
Cut the oval shape:
Place your oval template or cookie cutter onto the clay slab. Use your craft knife to trace around the template, cutting cleanly through the clay to create the base. -
Prepare the rim:
Roll a long, snake-like coil of clay, keeping it roughly the same thickness as your base (about 1/4 inch thick). Aim for a length that matches the circumference of your oval base. -
Attach the rim:
Score the edges of the oval base and one side of the coil using a needle tool or knife. Apply a small amount of water to the scored areas to act as glue. -
Blend the seams:
Press the coil gently onto the edge of the base. Using your thumb or a sculpting tool, drag the clay from the coil down onto the base on the inside, and up from the base onto the coil on the outside. -
Smooth the surface:
Dip your finger in water and run it over the seams and the entire surface to smooth out any bumps or fingerprints. The goal is a seamless transition between the floor and the wall of the tray. -
Let it dry:
Set the tray aside in a cool, dry place. Allow it to dry completely for 24-48 hours, turning it occasionally to ensure even drying and prevent warping.
Cracks Appearing?
Mix a tiny amount of fresh clay with water to create a paste (slip). Fill the cracks, smooth over, and let dry again before painting.
Step 2: Decorating and Finishing
-
Sand for perfection:
Once the clay is bone dry, use fine-grit sandpaper to gently smooth down any rough edges or uneven spots, particularly around the rim. -
Base coat application:
Mix a warm, dusty pink or light terracotta acrylic paint. Apply a solid coat over the entire tray, inside and out. I like to let this dry briefly before adding a second coat for full opacity. -
Outline the sun:
Using a very fine detail brush and gold metallic paint, paint a small circle slightly off-center on the left side of the tray interior. Paint a larger circle around it to form the sun’s center. -
Add sun rays:
Paint long, thin triangular rays extending outward from the center circle. Vary the lengths slightly natural look, ensuring they point towards the tray’s edges. -
Draw celestial stars:
Scatter small five-pointed stars around the remaining empty space in the tray. Keep them simple and delicate. -
Add detail dots:
Dip the non-brush end of your paintbrush into the gold paint. Dot tiny specks of gold loosely around the sunburst and stars to fill the negative space. -
Decorate the rim:
Continue the dot pattern along the top edge and outer side of the rim, spacing the dots evenly for a cohesive border. -
Seal the tray:
Once all paint is completely dry, apply a layer of matte varnish or sealant to protect your design and give the tray a finished, professional look.
Add Texture
Before the clay dries, gently press a piece of linen fabric into the surface to give the tray a subtle, woven texture beneath the paint.
Now your beautiful, sun-kissed tray is ready to keep your treasures safe and stylish
Mini Book Page Quote Tray
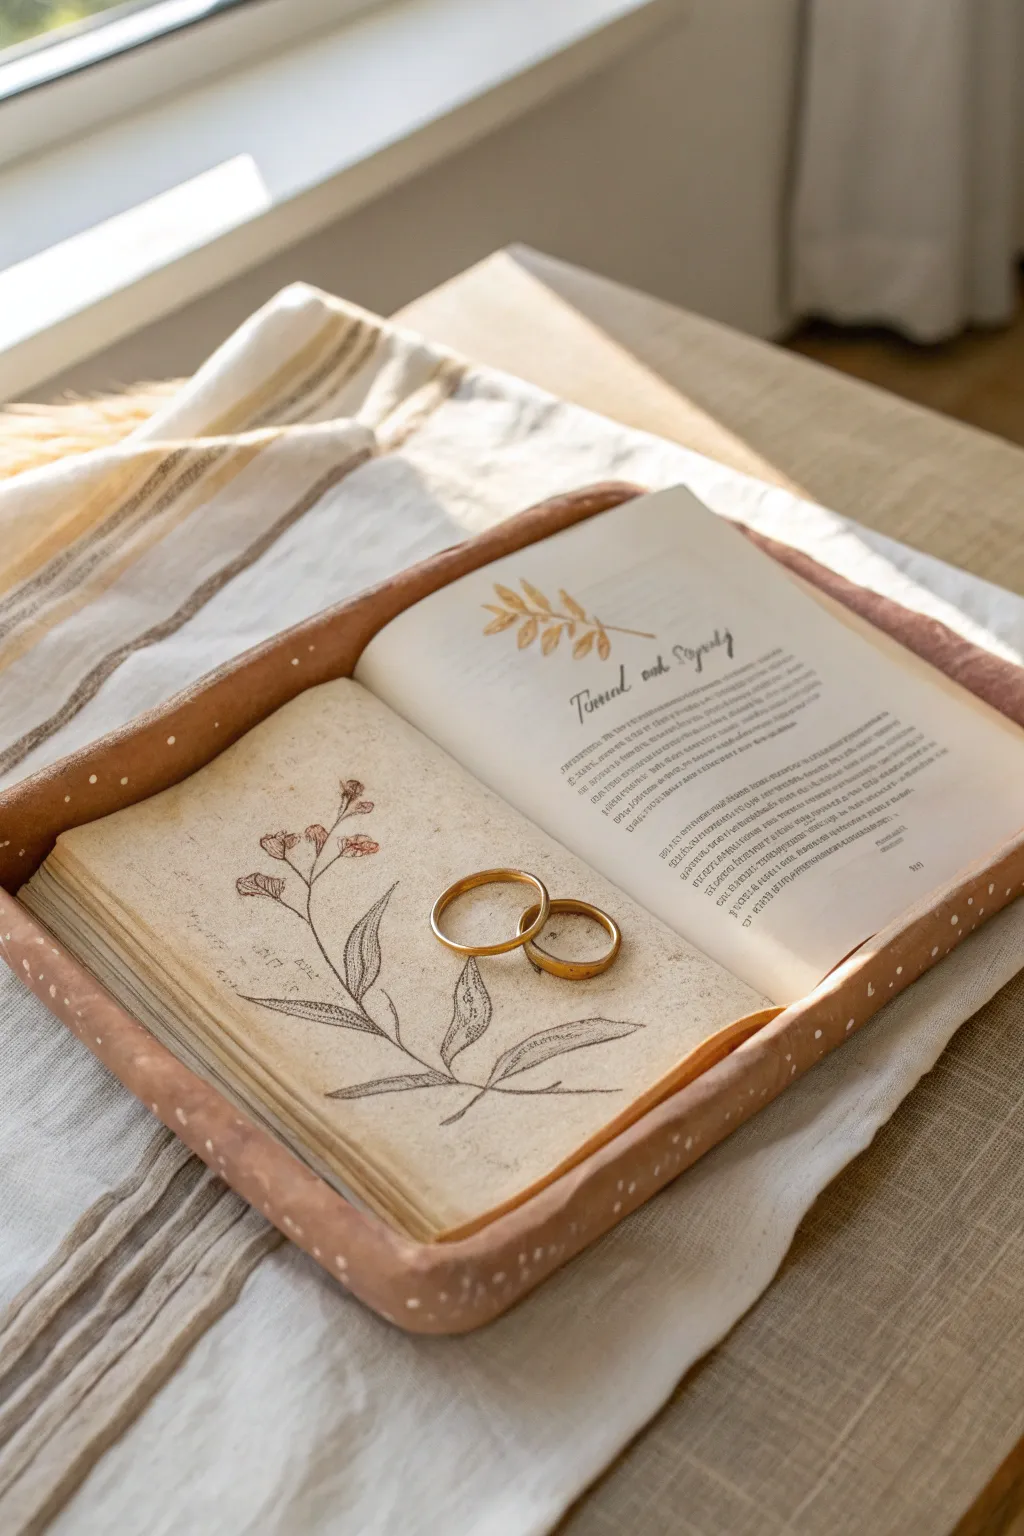
For the literature lover in your life, this charming clay tray mimics the look of an open book resting gently on a table. With delicate botanical illustrations and script text, it serves as a unique jewelry dish or a decorative accent for a bookshelf.
Detailed Instructions
Materials
- Air-dry clay (white or terracotta)
- Rolling pin
- sharp craft knife or scalpel
- Smoothing sponge and water
- Acrylic paints (cream/off-white, burnt umber, black, sage green)
- Fine-tipped paintbrush (liner brush)
- Fine-point permanent marker or archival ink pen
- Matte varnish or sealant
- Sandpaper (fine grit)
- Small bowl of water
- Towel or textured fabric (optional for texture)
Step 1: Shaping the Book Base
-
Roll the Slab:
Begin by conditioning your air-dry clay until it is pliable. Roll it out into a rectangular slab about 1/4 inch thick. Aim for a size roughly 6 inches by 8 inches, though you can adjust this based on the size of the book you want to mimic. -
Cut the Shape:
Using a craft knife, trim the edges of your clay slab to create a neat, clean rectangle. Save the excess clay for the rim. -
Form the Open Pages:
Gently lift the two shorter sides of the rectangle and curve them slightly upward to create a subtle U-shape in the middle, mimicking the spine of an open book. You want the center to dip down and the sides to curve up like fluttering pages. -
Create the Rim:
Roll a long snake of clay, roughly the thickness of a pencil. Attach this snake to the outer perimeter of your rectangle using the score and slip method (scratching both surfaces and adding a bit of water) to create a raised edge that will hold jewelry. -
Blend the Seams:
Use a modeling tool or your finger to smooth the clay snake into the base slab, ensuring there act no visible seams. The transition from the flat ‘page’ area to the raised rim should be smooth but distinct. -
Simulate Page Layers:
Take a needle tool or the back of your knife and gently score horizontal lines along the outside edges of the raised rim. This simple detail creates the illusion of stacked paper pages.
Step 2: Adding the Details
-
Create the Spine Definition:
Press a ruler or straight edge gently into the very center of the tray, creating a vertical indentation that separates the left page from the right page. -
Add Texture (Optional):
If you want a rustic cover look, lightly press a piece of textured fabric onto the outer rim before the clay starts to dry too much. -
Dry Completely:
Allow the tray to dry fully. This usually takes 24-48 hours depending on humidity. Flip it halfway through to ensure the bottom dries evenly. -
Sand for Smoothness:
Once bone dry, use fine-grit sandpaper to smooth out any rough fingerprints or sharp edges, particularly on the ‘page’ surface where you will be painting.
Pro Tip: Instant Age
Mix a tiny drop of burnt umber paint with water to create a wash. Brush it over the cream ‘pages’ and wipe it back immediately for a vintage, antique paper look.
Step 3: Painting and Finishing
-
Base Coat:
Paint the inner ‘pages’ with a cream or off-white acrylic paint to mimic aged paper. Paint the outer rim (the ‘cover’) a contrasting color like a warm terracotta or leather brown. -
Add Speckles:
To enhance the stoneware look, dip an old toothbrush into watered-down white paint and flick it gently over the dried rim to create tiny speckles. -
Draw the Botanicals:
Using a very fine liner brush or a fine-point archival ink pen, sketch a delicate botanical stem on the left page. Keep the lines thin and fluid. -
Add the Script:
On the right page, write a short quote or a few lines of faux-script using your pen or brush. I find it helps to practice the spacing on a piece of scrap paper first. -
Protect the Piece:
Seal the entire tray with a matte varnish. This is crucial to protect your painted details and prevent the clay from absorbing moisture.
Level Up: Gold Edging
Use liquid gold leaf or metallic gold paint along the very top edge of the rim to mimic the gilded pages found on classic hardcover books.
Now your literary treasure dish is ready to hold your favorite rings or simply look lovely on your nightstand