Some of my favorite date nights are the ones where you both end up laughing over tiny, ridiculously cute clay creations. These ideas are made for side-by-side crafting, so you each get a little keepsake (or a matching pair) that screams clay date energy.
Matching Blob Animals Duos
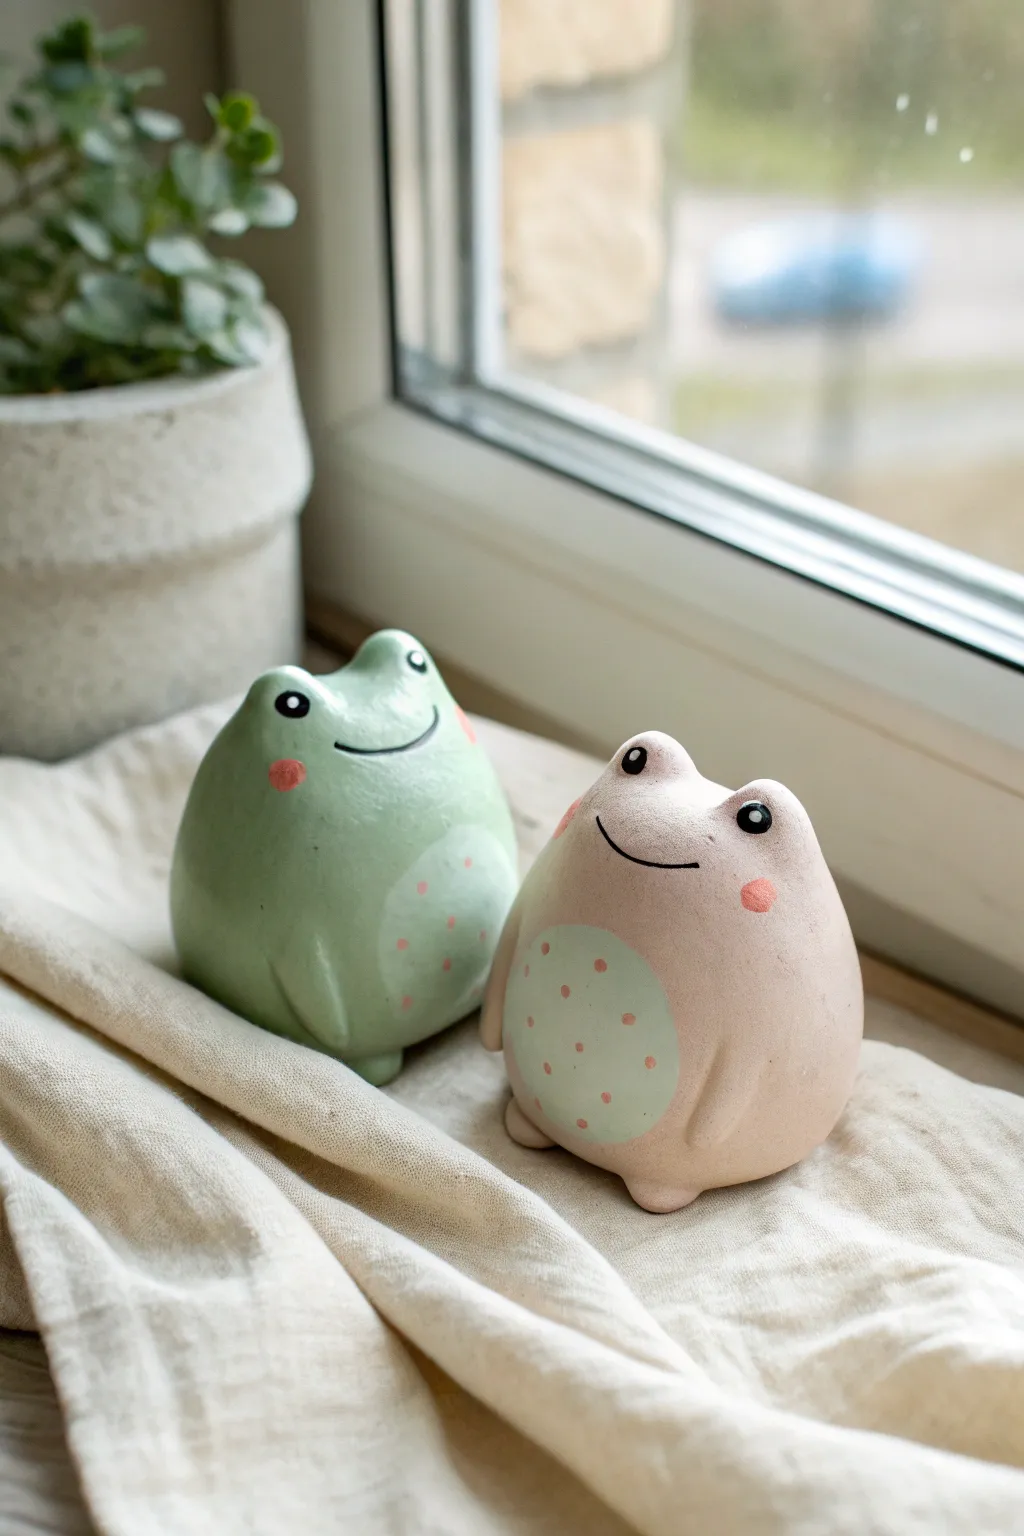
Create an adorable duo of round, cheerful frogs with this simple hand-building clay project. These pastel-colored blob animals are perfect for a beginner-friendly clay date, sitting sweetly side-by-side with minimal sculpting required.
Step-by-Step
Materials
- White or light gray air-dry clay (or polymer clay)
- Acrylic paints (Mint Green, Pastel Pink, Black, White, Coral)
- Clay sculpting tools (or a toothpick)
- Small cup of water
- Fine grit sandpaper
- Paintbrushes (medium flat, small detail)
- Matte or satin varnish/sealant
- Aluminum foil (optional, for armature)
Step 1: Sculpting the Base Forms
-
Prepare the Clay:
Start by kneading a tennis-ball-sized amount of clay until it is warm and pliable. Divide this amount in two to ensure your frogs will be roughly the same size. -
Shape the Bodies:
Roll each piece of clay into a smooth ball. Gently tap the bottom on your work surface to flatten it slightly, creating a stable base so the frogs won’t roll over. I like to gently taper the top just a little to create an egg-like silhouette. -
Form the Eye Mounds:
Pinch two small mounds of clay at the top of the head for the eyes. You want these to be integrated bumps rather than separate balls attached later, so push the clay up from the body and smooth it out. -
Add Arms:
Roll two very small, thin tapered snakes of clay for the arms. Score the side of the body and the back of the arm with a needle tool, add a dab of water, and press the arms vertically against the sides. Blend the seams completely until invisible. -
Add Tiny Feet:
Create two tiny flattened oval shapes for feet. Attach them to the bottom front of the body using the same score-and-slip method, positioning them so they just barely peek out from under the tummy. -
Refine the Surface:
Dip your finger in a little water and smooth out any fingerprints or cracks. The goal is a super smooth, rounded pebble-like finish. -
Dry Completely:
Let your frogs dry completely. For air-dry clay, this usually takes 24-48 hours depending on thickness. Rotate them occasionally to ensure the bottom dries evenly.
Smooth Surface Secret
Use a slightly damp sponge to wipe the raw clay before it dries. It acts like an eraser for fingerprints and saves you sanding time later.
Step 2: Painting & Details
-
Sand Imperfections:
Once bone dry, gently rub the surface with fine-grit sandpaper to remove any rough texture or bumps. -
Base Coat:
Paint one frog entirely with a pastel mint green and the other with a soft pastel pink. You will likely need 2-3 coats for solid, opaque coverage. -
Paint the Bellys:
Mix a lighter version of your green (add white) or pick a contrasting pastel color. Paint a large, soft oval shape on the stomach area. -
Add Belly Dots:
Using the back end of a small paintbrush or a dotting tool, dab small coral or pink dots onto the lighter belly patches for a speckled look. -
Draw the Face:
Using a very fine detail brush and black paint, carefully draw a wide, shallow U-shape for the smile. Paint two solid black circles on the eye mounds. -
Eye Highlights:
Dip a toothpick into white paint and add a single tiny white dot to the upper right corner of each black eye. This reflection brings the character to life. -
Cheeky Blush:
Add small, round coral-colored cheeks just below the eyes on the outside edges of the face. -
Seal the Project:
Allow the paint to fully cure, then apply a coat of matte or satin varnish to protect your new friends.
Make Them Functional
Before drying, use a knife to cut a slot in the back or top to turn these cute frogs into matching photo holders or business card displays.
Set your finished frog duo on a windowsill where they can enjoy the view together


Tiny Food Besties Set
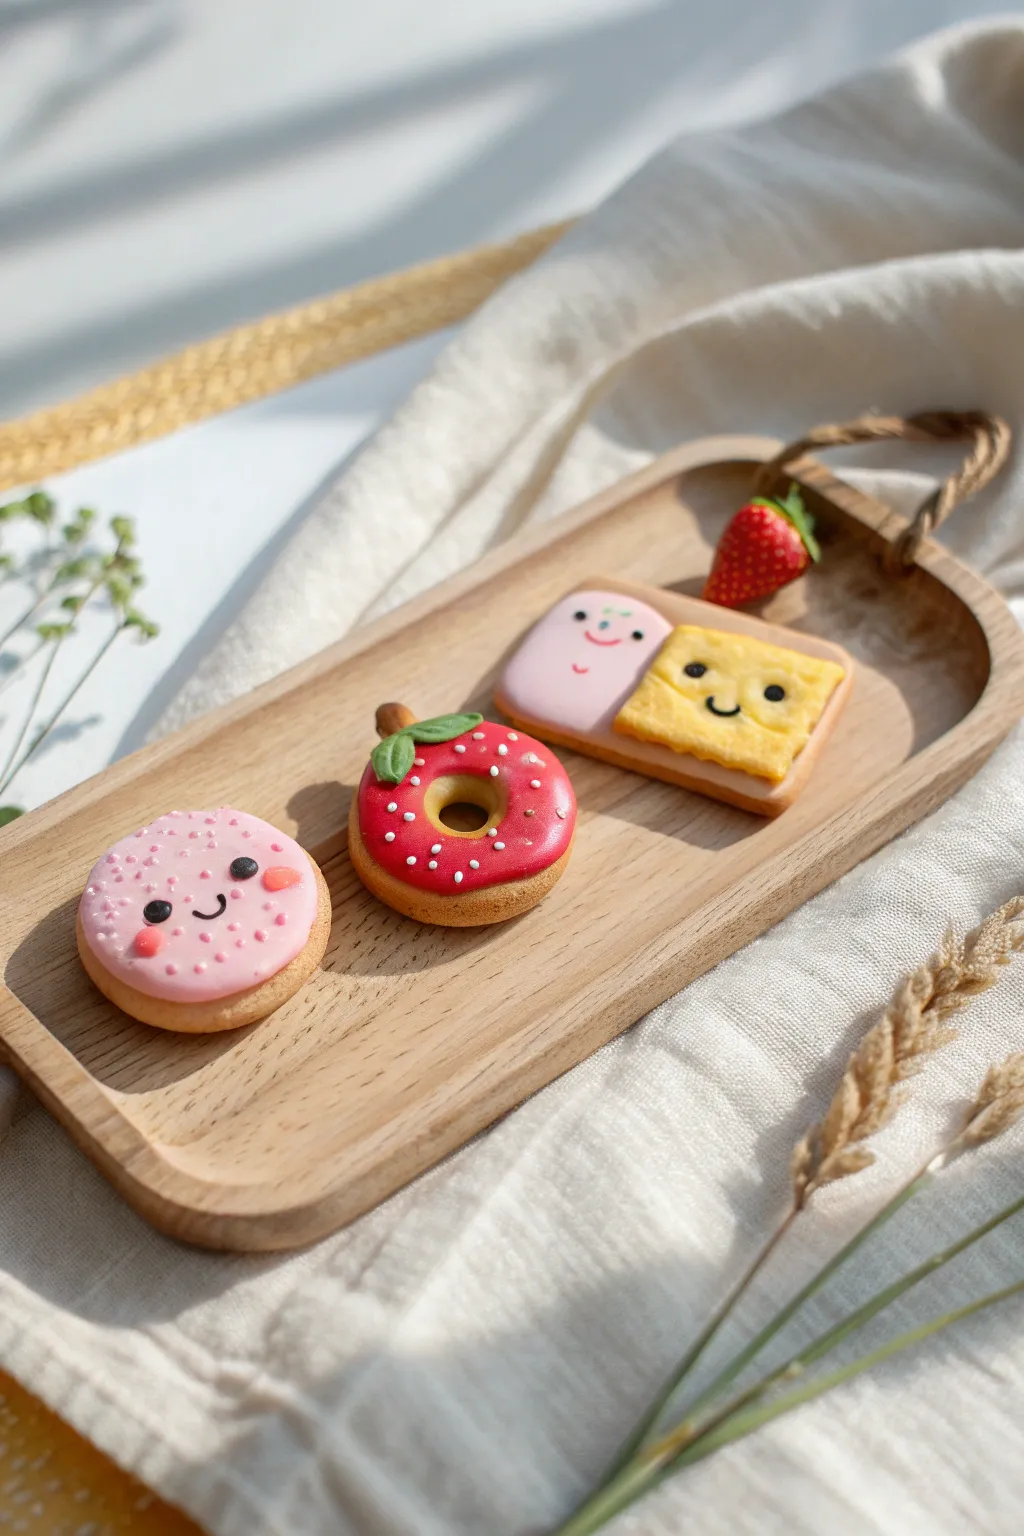
Create the perfect little trio of snacking besties with these delightful clay food miniatures. Featuring a smiley cookie, a tiny strawberry donut, and a cheerful dual-toned pastry, this set is bursting with personality.
How-To Guide
Materials
- Polymer clay (beige, pastel pink, bright pink, yellow, red, green, black)
- Liquid polymer clay or TLS (Translucent Liquid Sculpey)
- Fine-grit sandpaper or a texturing toothbrush
- Detailing needle tool
- Small dotting tool or ball stylus
- Soft artist pastels (red, deep orange) for shading
- Small soft paintbrush
- Gloss glaze (optional)
Step 1: The Round Pink Cookie
-
Base shape:
Start by conditioning a small ball of beige clay, roughly 2cm in diameter. Flatten it gently into a thick disc to form the cookie base. -
Texture:
Use an old toothbrush or a ball of aluminum foil to gently tap the sides of the disc, creating a realistic baked cookie texture. -
Icing layer:
Roll out a thin sheet of pastel pink clay. Use a small circular cutter (slightly smaller than your cookie base) to cut a circle, then place it on top of the beige disc. -
Adding the face:
Roll two impossibly tiny balls of black clay for eyes and press them into the pink icing. Roll a hairline-thin snake of black clay and curve it into a small smile between eyes. -
Cheeky details:
Mix a tiny amount of red pastel dust with liquid clay to create a ‘jam’ consistency, or use tiny flattened discs of pink clay, to add rosy cheeks. -
Sprinkles:
Roll extremely thin snakes of white or light pink clay and chop them into tiny bits. Press these ‘sprinkles’ gently around the face.
Step 2: The Strawberry Donut
-
Forming the donut:
Roll a ball of beige clay and flatten it slightly. Use the back of a paintbrush or a large dotting tool to push a hole through the center, smoothing the edges to create a ring. -
Shading for realism:
Brush some orange/brown artist pastel dust around the outer edges and bottom of the donut to give it a ‘golden baked’ look. -
Glazing:
Mix bright red clay with liquid Sculpey until you have a thick icing consistency. Carefully drip this over the top of the donut, letting it curve naturally. -
Seeds and stem:
While the icing is wet, add tiny white clay dots for seeds. Form two small teardrops from green clay, flatten them for leaves, and add a small brown stem to the top.
Pro Tip: Clean Clay
Keep baby wipes or hand sanitizer nearby. Clean your hands thoroughly between colors, especially before handling the beige or white clay, to avoid stains.
Step 3: The Cheerful Pastry
-
Rectangle base:
Cut a rectangle of beige clay (approx 3cm x 2cm). Soften the corners with your finger so it looks more like a baked biscuit. -
Dual toppings:
Create two small squares of clay—one pale pink, one yellow. Place them side-by-side on the beige base, leaving a small crust border visible. -
Cheese texture:
For the yellow side (resembling cheese or custard), use a needle tool to gently poke small indentations across the surface. -
Dual faces:
I usually like to give these two distinct expressions. Add tiny black clay eyes and smiles to both the pink and yellow sections. -
Final baking:
Place all three friends on a baking tile. Bake according to your clay package instructions (usually 275°F/135°C for 15-30 minutes). Let cool completely.
Level Up: Magnet Magic
After baking, use strong E6000 glue to attach small round neodymium magnets to the backs. Now your tiny food besties can live on your fridge
Arrange your trio on a tiny tray or shelf to show off their sweet smiles


Mini Panda and Bunny Figurines
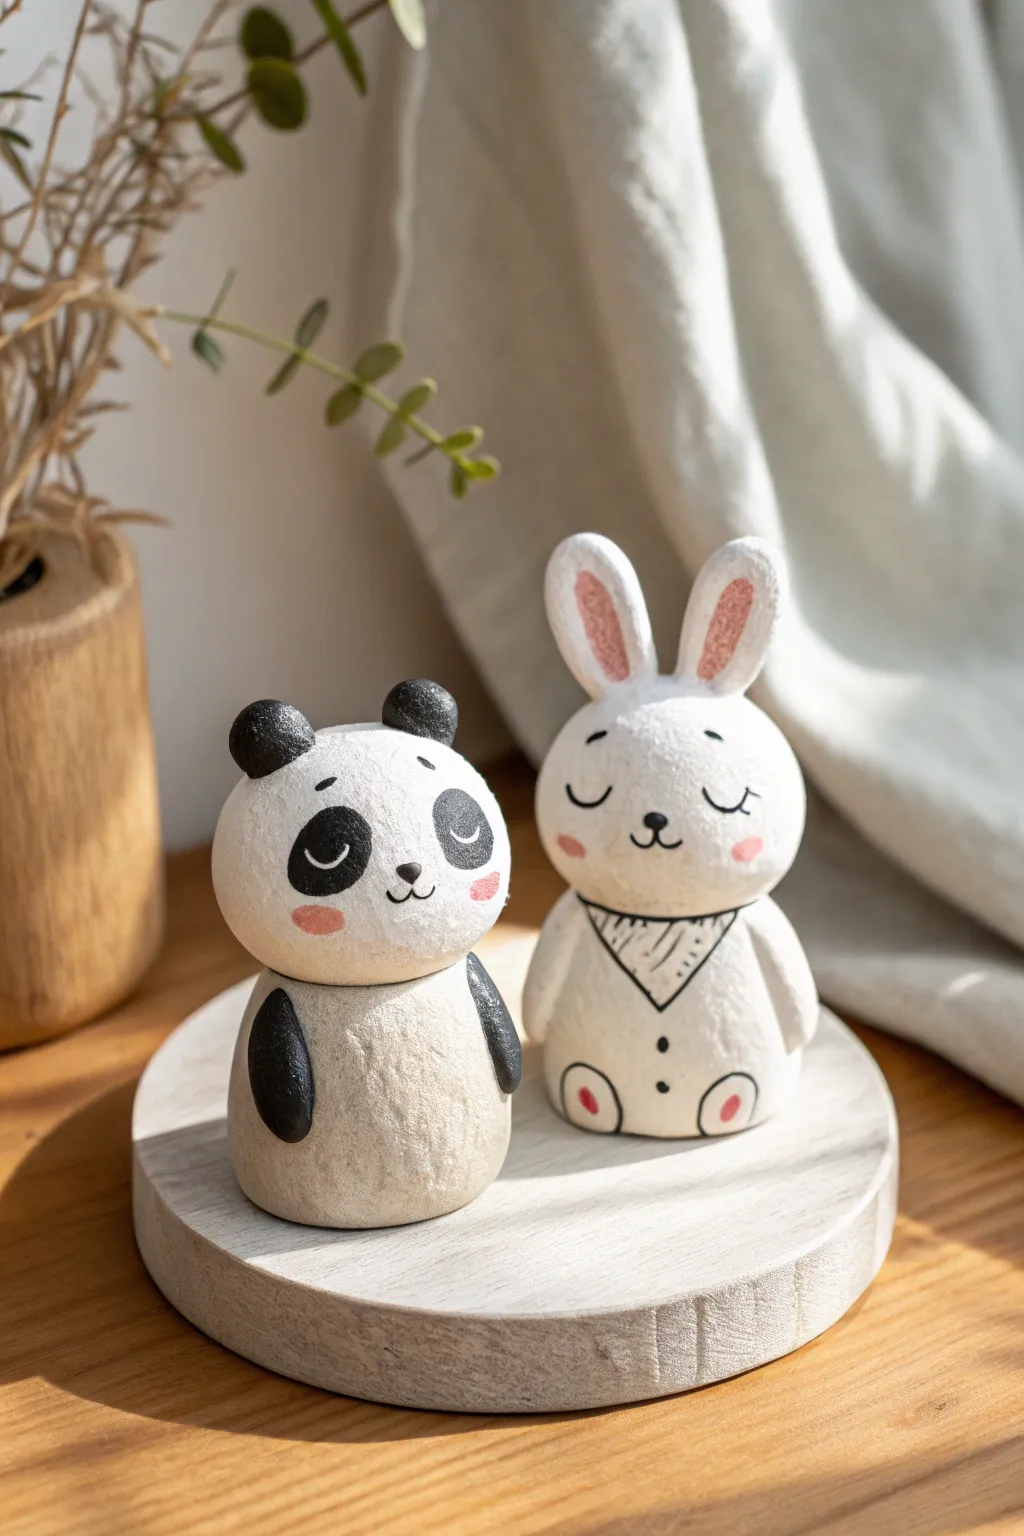
Create this adorable pair of minimalist figurines using simple shapes and gentle expressions for a charming shelf display. The sweet panda and bunny characters feature a smooth, matte finish that gives them a modern, handcrafted feel perfect for gifting or keeping.
How-To Guide
Materials
- White creative paper clay or air-dry clay
- Small bowl of water
- Acrylic paints (black, white, soft pink)
- Fine detail paintbrush (size 0 or 00)
- Small flat paintbrush
- Clay sculpting tools (optional, fingers work well)
- Matte varnish or sealant spray
- Fine grit sandpaper (400 grit)
Step 1: Shaping the Bodies
-
Divide the clay:
Start by kneading your clay until it’s pliable and smooth. Divide the clay into four main portions: two slightly larger balls for the heads and two slightly smaller, drum-shaped cylinders for the bodies of the panda and bunny. -
Form the base shapes:
Roll the body pieces into smooth, stout cylinders that slightly taper inward at the top. Flatten the bottoms by tapping them gently against your table so they stand securely. -
Shape the heads:
Roll the head pieces into spheres. For the bunny, keep it fairly round. For the panda, you can flatten the face area ever so slightly to create a wide canvas for its features. -
Attach heads to bodies:
Score (scratch) the top of the body and the bottom of the head with a sculpting tool or toothpick. Dab a little water or ‘slip’ (watery clay) onto the scored areas, then press the head firmly onto the body. Smooth the seam at the neck lightly with your finger, but leave a defined separation.
Step 2: Adding Ears and Limbs
-
Create panda ears:
Roll two tiny balls of clay for the panda’s ears. Press them onto the top corners of the head, flattening them slightly against the curve. Use a little water to blend the back seam so they stay put. -
Create panda arms:
Roll two small teardrop shapes for the panda’s arms. Attach these to the sides of the body, pressing them flat so they look like they are resting by its side. -
Form bunny ears:
Roll two longer, sausage-like shapes for the bunny ears. Flatten them gently and round off the tips. Attach them to the top of the bunny’s head, pressing them upright and close together. -
Form bunny arms and feet:
Like the panda, add two flattened teardrop arms to the bunny’s sides. Then, add two small flattened ovals near the bottom front of the bunny’s body to represent its feet. -
Dry and sand:
Let your figurines dry completely according to package directions (usually 24-48 hours). Once fully dry, satisfy any rough spots or fingerprints with fine sandpaper for that smooth, professional stone-like finish.
Smoother Seams
Use a damp paintbrush (water for air-dry clay, baby oil for polymer) to smooth out seams and fingerprints before the clay cures.
Step 3: Painting and Details
-
Base coat:
If your clay isn’t naturally bright white, give both figurines a solid coat of white acrylic paint. This provides a clean canvas. I prefer to do two thin coats rather than one thick one. -
Paint panda extremities:
Using black paint and a small brush, carefully paint the panda’s ears, nose area, and arm patches. The paint should cover the relief clay shapes you made earlier. -
Add panda facial features:
Paint two oval patches for the panda’s eyes. Once the black is dry, paint small downwards-curved lines for sleepy eyelids in white or light grey over the black patches. Add a tiny nose and mouth. -
Paint bunny details:
Mix a very soft pink. Paint the inner part of the bunny ears and the pads on the feet. Paint a tiny pink nose. -
Draw fine lines:
Using your finest brush and black paint (or a fine-tip Posca marker if you struggle with brush control), draw the sleepy eye curves, eyelashes, and the little mouth on the bunny. -
Add the scarf:
Paint a simple triangle shape on the bunny’s chest to mimic a bandana or scarf. Add decorative lines or dots inside the triangle for texture. -
Rosy cheeks:
Dilute a tiny dot of pink paint with water to make a wash. Gently dab this onto the cheeks of both animals to give them a blushing look. -
Seal:
Once all paint is bone dry, finish with a coat of matte spray varnish to protect your new friends without making them too glossy.
Cracks while Drying?
Mix a small amount of fresh clay with water to create a paste (slip). Fill the crack, smooth it over, and let it dry again.
Set your finished duo on a little wooden coaster or shelf to enjoy your handiwork


Kawaii Fruit Pair Keychains

Sculpt a pair of impossibly cute fruit friends perfect for sharing with your favorite person. These polymer clay peach and strawberry keychains feature soft blushing cheeks and shiny gold hardware for a polished finish.
Step-by-Step
Materials
- Polymer clay (peach, white, red, green, brown)
- Soft pastels (pink, red)
- Black acrylic paint
- Fine detail paintbrush or dotting tool
- Sculpting tools (needle tool, ball stylus)
- Gloss glaze or UV resin (optional)
- Eye pins (gold)
- Gold keychain hardware (chain and split ring)
- Jewelry pliers
- Oven
Step 1: Shaping the Peach
-
Mix the color:
Blend a small amount of white clay into a light orange or peach color to create a soft, varied skin tone. Don’t worry if it’s not perfectly uniform; natural variation looks great. -
Form the base:
Roll a sphere of the peach-colored clay, about the size of a ping pong ball or slightly smaller. Gently shape it slightly more oval. -
Create the signature cleft:
Using the side of a needle tool or a dull knife tool, press a deep, rounded indentation vertically down one side of the sphere to create the peach’s classic ‘bottom’ shape. -
Add shading:
Shave a bit of pink soft pastel into a powder. Use a soft brush to dust this powder onto the ‘cheeks’ of the peach and towards the bottom for a ripe, blushing effect. -
Stem and leaf:
Roll a tiny snake of brown clay for the stem and attach it to the top. Add a small teardrop of green clay for a leaf, using a needle tool to press in a central vein.
Step 2: Sculpting the Strawberry
-
Form the strawberry body:
Roll red clay into a sphere, then gently pinch and roll the bottom half to create a rounded cone or teardrop shape. Flatten the top slightly. -
Texture the surface:
Using a needle tool or small ball stylus, gently press tiny indentations into the clay all over the surface to mimic seed pockets. -
Create the leafy cap:
Flatten a small disk of green clay. Use a blade to cut a star shape or small triangles out of the edge to form sepals. -
Attach the greenery:
Place the green star on the flat top of the strawberry. Gently curve the tips of the leaves downward so they hug the fruit. -
Add the stem:
Add a tiny stalk of reddish-brown clay to the very center of the green leaves.
Clean Clay Tip
Keep wet wipes handy! Polymer clay picks up everything. Wipe your hands and tools thoroughly when switching from the dark red strawberry clay to the light peach clay.
Step 3: Faces and Finishing
-
Insert hardware:
Trim your gold eye pins if they are too long. Insert one straight down into the center top of both the peach and the strawberry. Secure with a tiny bit of liquid clay if desired. -
Bake:
Bake the pieces according to your clay manufacturer’s instructions (usually 275°F/135°C for 15-30 minutes). Let them cool completely. -
Paint the eyes:
Using a dotting tool dipped in black acrylic paint, place two small dots for eyes on the peach. For the strawberry, paint slightly larger, oval eyes. -
Add the mouths:
Use your finest detail brush to paint a tiny ‘u’ shape mouth between the eyes. I like to make the grin slightly crooked for extra personality. -
Rosy cheeks:
For the peach, dip a distinct bright pink paint or pastel powder and dab tiny dots specifically under the eyes (on top of the pastel shading you did earlier). Do the same for the strawberry. -
Glaze (Optional):
If you want a shiny finish, coat the fruits in a layer of gloss glaze or UV resin. This also protects the painted faces. -
Assemble keychains:
Using jewelry pliers, open the jump ring at the bottom of the keychain mechanism and attach it through the loop of the eye pin.
Textured Touch
For a ‘fuzzy’ peach texture, gently roll a clean toothbrush or piece of sandpaper over the unbaked peach clay before adding the pastel shading.
Now clip your adorable fruit duo onto your keys and notify your backpacks that they just got a major style upgrade

The Complete Guide to Pottery Troubleshooting
Uncover the most common ceramic mistakes—from cracking clay to failed glazes—and learn how to fix them fast.
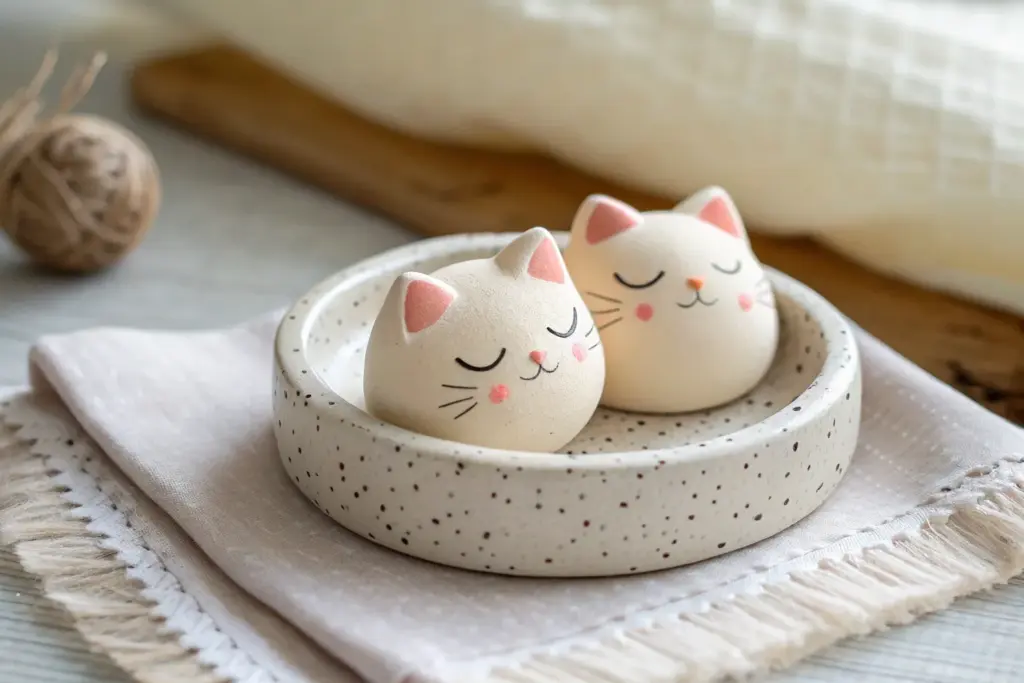
Sweet Little Pet Portrait Coins
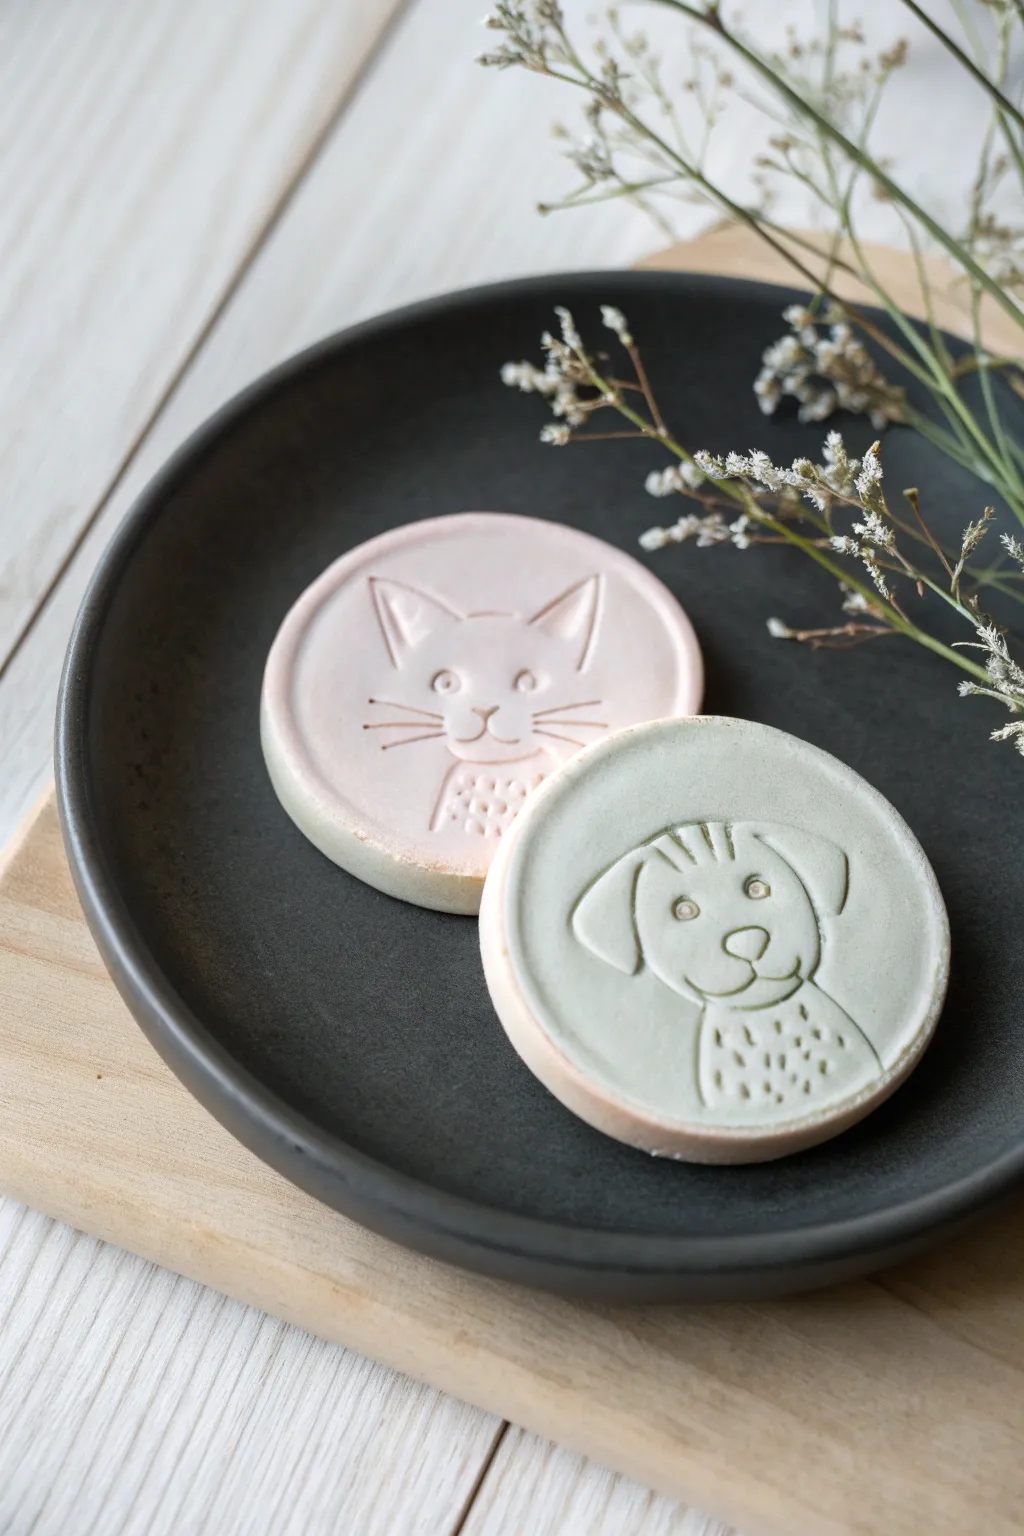
Immortalize your furry, feathered, or scaled friends with these adorable, simplified ceramic coins. Their minimalist line-art style and soft pastel wash give them a modern, handmade charm perfect for a small keepsake.
How-To Guide
Materials
- White specialized air-dry clay or low-fire earthenware clay
- Rolling pin
- Circle cookie cutter (approx. 3 inches)
- Needle tool or toothpick
- Small carving tool or stylus
- Fine-grit sandpaper
- Acrylic paints (pale pink and sage green)
- Water and small brush
- Clear matte varnish (optional)
Step 1: Shaping the Base
-
Prepare the Clay:
Cut a chunk of your white clay and kneed it briefly to ensure it is warm and pliable. If you’re using air-dry clay, keeping your hands slightly damp can help prevent cracking. -
Roll the Slab:
Roll out the clay on a flat, clean surface to an even thickness of about 1/4 inch. You want it sturdy enough to handle carving but not too chunky. -
Cut the Circles:
Press your circle cutter firmly into the clay slab to create clean discs. If you’re making a set, try to cut them close together to minimize waste. -
Smooth the Edges:
Dip your finger in a tiny bit of water and run it gently around the cut edges of the circles to round them off and remove any sharp rough bits left by the cutter.
Step 2: Carving the Characters
-
Draft the Design:
Before carving, lightly scratch your design onto the surface using a needle tool. Keep the shapes simple—think geometric ears and basic muzzles rather than hyper-realistic fur. -
Define the Outline:
Using a stylus or slightly blunter carving tool, press into your scratched lines to deepen them. Go for a consistent depth to make the line art pop. -
Add Texture Details:
For areas like the chest ruff or whiskers, use firmer, shorter strokes. I like to use tiny dots or dashes to suggest fur patterns without cluttering the face. -
Clean Up Burrs:
Carving often pushes up tiny crumbs of clay along the lines. wait for the clay to stiffen slightly (about 20 minutes) and then brush these away with a soft, dry paintbrush.
Clean Lines Secret
If your carving tool is dragging, lay a piece of plastic wrap over the clay before pressing your design in. This softens the edges instantly.
Step 3: Refining and Coloring
-
Dry Completely:
Allow your coins to dry fully. For air-dry clay, this usually takes 24-48 hours. Flip them occasionally so they dry evenly and don’t warp. -
Sand for Smoothness:
Once bone dry, take fine-grit sandpaper and gently sand the surface and edges. This is crucial for that polished, ceramic-like finish visible in the photo. -
Create a Wash:
Dilute your acrylic paint with water until it has a milky consistency. You want a stain, not an opaque coat, so the white clay still shows through. -
Apply the Base Color:
Brush the pale pink wash over the cat coin and the sage green wash over the dog coin. Let the watery paint pool slightly in the carved crevices. -
Wipe Back:
Immediately use a damp paper towel or sponge to wipe the surface gently. This removes most of the color from the high points but leaves pigment in the carved lines, highlighting your drawing. -
Second Pass (Optional):
If the lines aren’t dark enough, you can take a tiny brush with undiluted paint and carefully re-trace just the deepest grooves for extra contrast. -
Seal the Work:
To protect the finish, especially if these will be handled, apply a thin coat of clear matte varnish once the paint is totally dry.
Functional Twist
Before the clay dries, poke a small hole near the top edge. Now your portrait can be a holiday ornament or a cute gift tag.
Now you have a sweet, permanent tribute to your favorite pet
Lovebirds Desk Buddy Sculptures
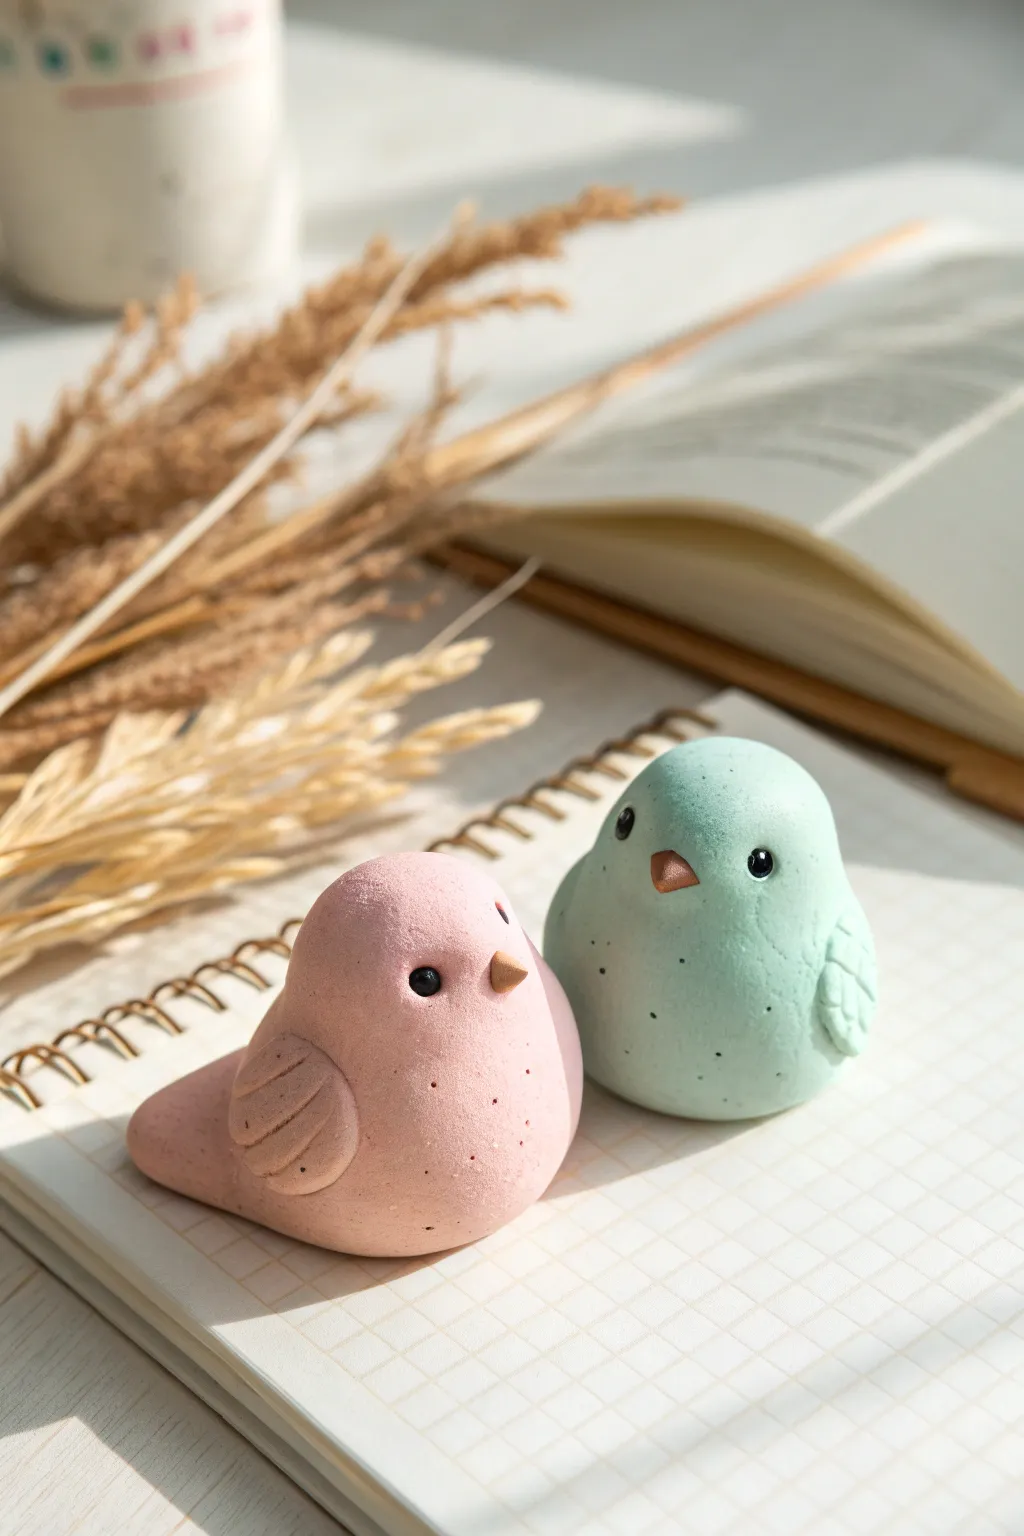
Create a pair of utterly charming desk companions with this beginner-friendly sculpting project. These chubby, smooth lovebirds feature a minimalist design with soft pastel hues and sweet, simple details that make them perfect for gifting or keeping.
Step-by-Step Tutorial
Materials
- Polymer clay (Pastel Pink, Mint Green, and a tiny amount of Orange/Gold)
- Small black glistening beads or black clay for eyes
- Sculpting tool set (specifically a needle tool and a small rounded blending tool)
- Clean ceramic tile or glass work surface
- Oven (for baking polymer clay)
- Optional: Fine-grit sandpaper
- Acryllic roller or pasta machine
Step 1: Shaping the Bodies
-
Condition the clay:
Start by warming up your pastel pink and mint green clay in your hands. Knead and roll each color until it is soft, pliable, and free of cracks. -
Form the base balls:
Roll each color into a smooth sphere about the size of a golf ball or slightly smaller. Ensure there are no seam lines visible. -
Create the teardrop shape:
Gently roll one side of the sphere against your work surface to elongate it slightly into a fat teardrop shape. This taper will become the tail. -
Flatten the base:
Tap the bottom of your teardrop shapes onto your work surface so the birds sit flat and stable without rolling over. -
Smooth the contours:
Use your thumb to gently smooth out the transition from the round head area to the tapered tail, ensuring a chubby, continuous silhouette.
Step 2: Adding Details
-
Indent eye sockets:
Using a small ball tool or the smooth end of a paintbrush, make two small, shallow indentations on the face where the eyes will go. -
Insert the eyes:
Press a small black bead into each indentation. Alternatively, roll tiny balls of black clay and press them in securely. -
Sculpt the beaks:
Take a tiny amount of orange or gold clay and roll it into a very small cone. Press this onto the center of the face, just below the eyes. -
Refine the beak shape:
I like to use a flat tool to gently press the sides of the beak to ensure it adheres well to the face without losing its triangular look. -
Make the wings:
Roll two small spheres of the matching body color clay (pink for the pink bird, green for the green bird) and flatten them slightly into oval discs. -
Attach the wings:
Press these discs onto the sides of the bird’s body. Use a blending tool to smooth the clay where the wing meets the body so it looks seamless. -
Texture the feathers:
Using a needle tool or a dull knife tool, gently impress three or four curved lines into each wing to suggest flight feathers. -
Add subtle texture (Optional):
For a natural, stony look like in the photo, you can gently tap the surface with a clean toothbrush or piece of sandpaper to remove the shiny fingerprint texture.
Keeping It Clean
Pastel clay picks up dust easily! Keep a pack of wet wipes nearby to clean your hands and tools often, especially between switching colors.
Step 3: Baking and Finishing
-
Check for lint:
Before baking, give your birds a final inspection. Use a bit of baby oil on your finger to smooth away any stray lint or fingerprints. -
Bake the birds:
Place your creations on a ceramic tile or baking sheet lined with parchment paper. Bake according to your clay manufacturer’s specific temperature instructions (usually around 275°F/135°C). -
Cool down completely:
Turn off the oven and let the birds cool inside slowly to prevent cracking. Do not touch them until they are fully cold and hard. -
Final polish:
If there are any rough spots, you can lightly sand them with fine-grit sandpaper for a professional matte finish.
Head Too Heavy?
If the birds tip forward, gently tap the tail area on the table again to flatten the base more, shifting the center of gravity backward.
Now you have an adorable pair of lovebirds to brighten up your workspace or bookshelf


What Really Happens Inside the Kiln
Learn how time and temperature work together inside the kiln to transform clay into durable ceramic.
Cute Axolotl Twins
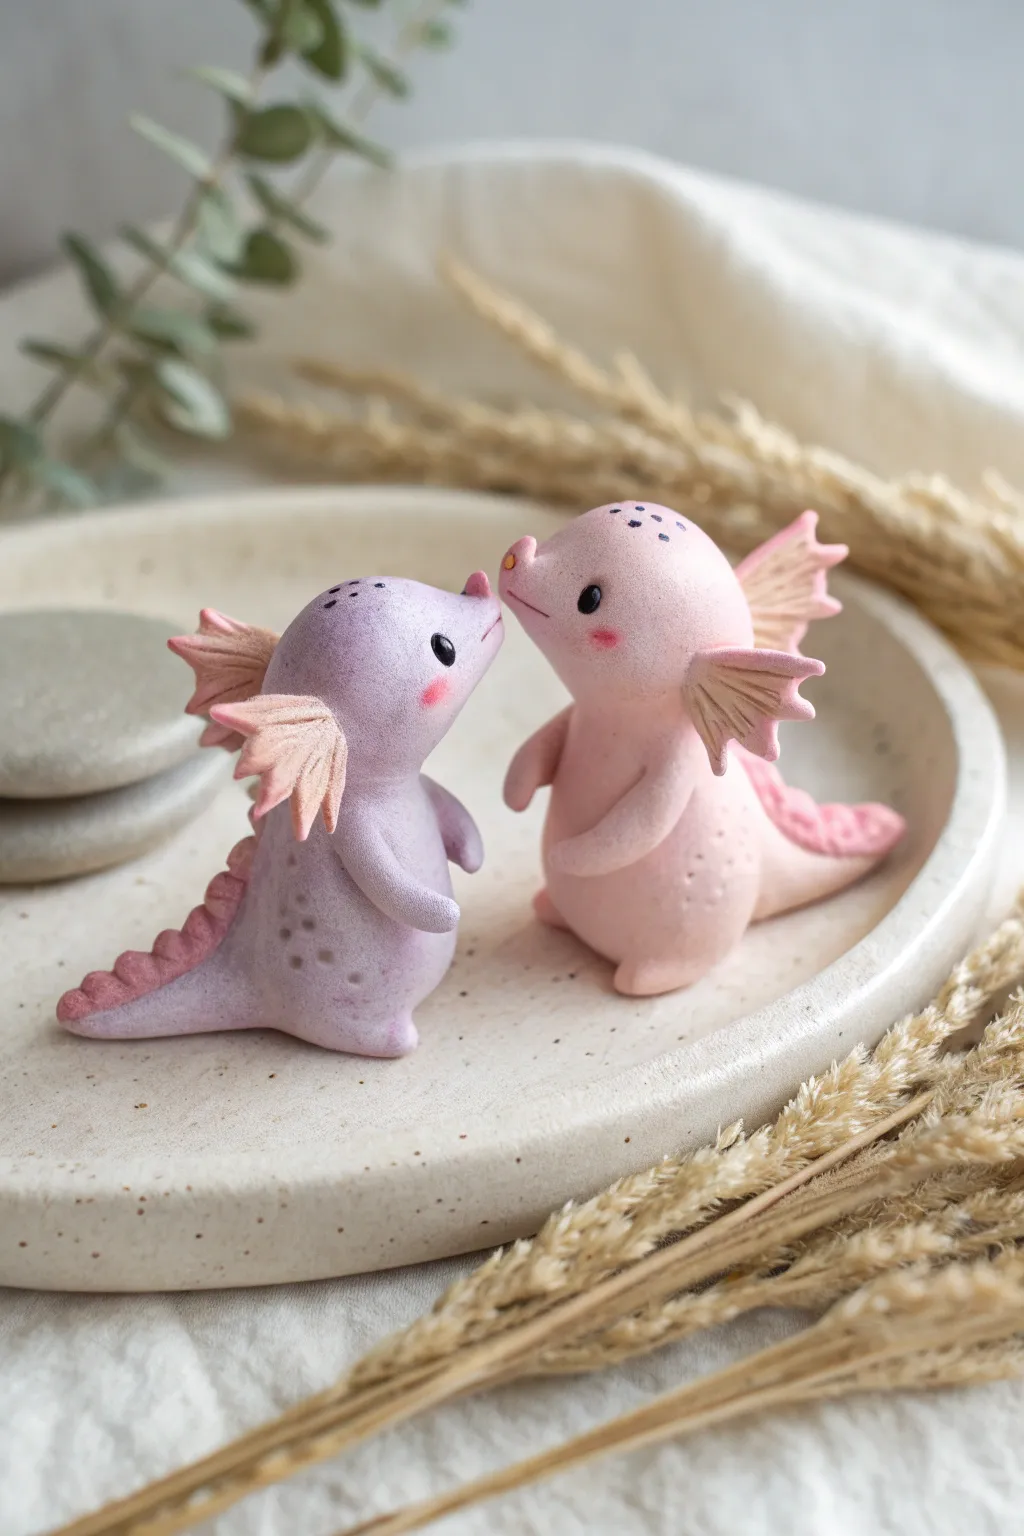
These utterly adorable twin dragons are sculpted from polymer clay in soft pastel shades of lavender and pink. With their tiny wings, rosy cheeks, and sweet poses, they make for a charming keepsake or a delightful cake topper for a special celebration.
Step-by-Step
Materials
- Polymer clay (Lavender, Pastel Pink, Darker Pink/Rose, Black)
- Needle tools and ball stylus tools
- Small blade or craft knife
- Soft pastel chalks (Pink, Purple)
- Soft paintbrush for shading
- Acrylic rolling pin (optional)
- Baking sheet and parchment paper
- Oven (for curing)
- Clear matte varnish (optional)
Step 1: Shaping the Bodies
-
Prepare the Clay:
Start by conditioning your lavender and pastel pink clay until it is soft and pliable. Roll two equal-sized balls, roughly the size of a walnut, to serve as the main body mass for each dragon. -
Form the Pear Shape:
Gently roll one side of the ball to elongate it, creating a pear or teardrop shape. The wider bottom will be the belly and legs, while the narrower top will become the head and neck area. -
Define the Head:
Using your fingers, gently pinch and smooth the neck area to distinguish the head from the body. You want a seamless transition, so keep the neck thick and sturdy to support the head without needing wire. -
Pull the Tail:
At the bottom back of the figure, gently pinch and pull the clay outward to form a thick, short tail. Smooth it upwards so it curves slightly, giving the dragon a seated posture. -
Scrub the Surface:
Before adding details, use a baby wipe or a bit of rubbing alcohol to gently smooth away any fingerprints on the main bodies.
Sticky Fingerprints?
If your clay gets too warm and sticky, showing prints, pop it in the fridge for 10 minutes. Use a brush with baby oil or alcohol to smooth prints before baking.
Step 2: Adding Sweet Features
-
Create the Arms:
Roll two tiny snakes of clay for each dragon. Attach them to the upper belly area, blending the shoulder seam smoothly into the body using a sculpting tool. Curve the little arms forward so they look like they are reaching out. -
Add the Legs:
Form two small, flattened ovals for feet. Attach these to the bottom of the body, just peeking out from under the belly, to stabilize the sitting pose. -
Sculpt the Face:
Use a small ball tool to make indentations for the eye sockets. Roll tiny bits of black clay and press them into the sockets. For the snout, gently pinch the front of the face to create a slight point. -
Rosy Cheeks:
Scrape a little pink soft pastel chalk into a powder. Using a soft dry brush, gently dust the cheek area and the tip of the tail to create a soft, blushing gradient. I find this looks much more natural than painting it on later. -
Speckled Texture:
Use a needle tool or a very fine dotting tool to add subtle texture. Poke shallow, decorative dots on the belly and the top of the head for that magical creature look.
Eye Sparkle Tip
After baking, add a tiny dot of white acrylic paint to the black eyes for life, then coat just the eyes with high-gloss varnish for a wet look.
Step 3: Wings and Finishes
-
Making the Wings/Gills:
Using a slightly darker shade of pink (or mixing pink with a tiny bit of red), flatten small pieces of clay into fan shapes. You’ll need two for the head (like axolotl gills) and potentially small ones for the back. -
Texturing the Wings:
Use a knife tool or needle to score lines radiating from the base of the fan to the edges, creating a ribbed, webbed look. Cut small notches into the outer edges for a feathered appearance. -
attaching the Variations:
Press the fan shapes onto the sides of the head. Use a blending tool to smooth the clay connection point so they don’t fall off during baking. -
Spiny Ridge:
Roll a very thin snake of the darker pink clay. Place it running down the center of the tail. Use a needle tool to press down at intervals, creating a spiky, dragon-like ridge. -
Positioning the Pair:
Before baking, place your two finished dragons on the baking sheet facing each other. Adjust their snouts so they are just barely touching or sniffing, ensuring the angle is perfect. -
Bake and Cool:
Bake according to your polymer clay package instructions (usually around 275°F/130°C for 15-30 minutes). Let them cool completely before handling.
Place these sweet little dragons on a shelf or gift them to a loved one to share a bit of magic
Mini Mushroom Couple Scene
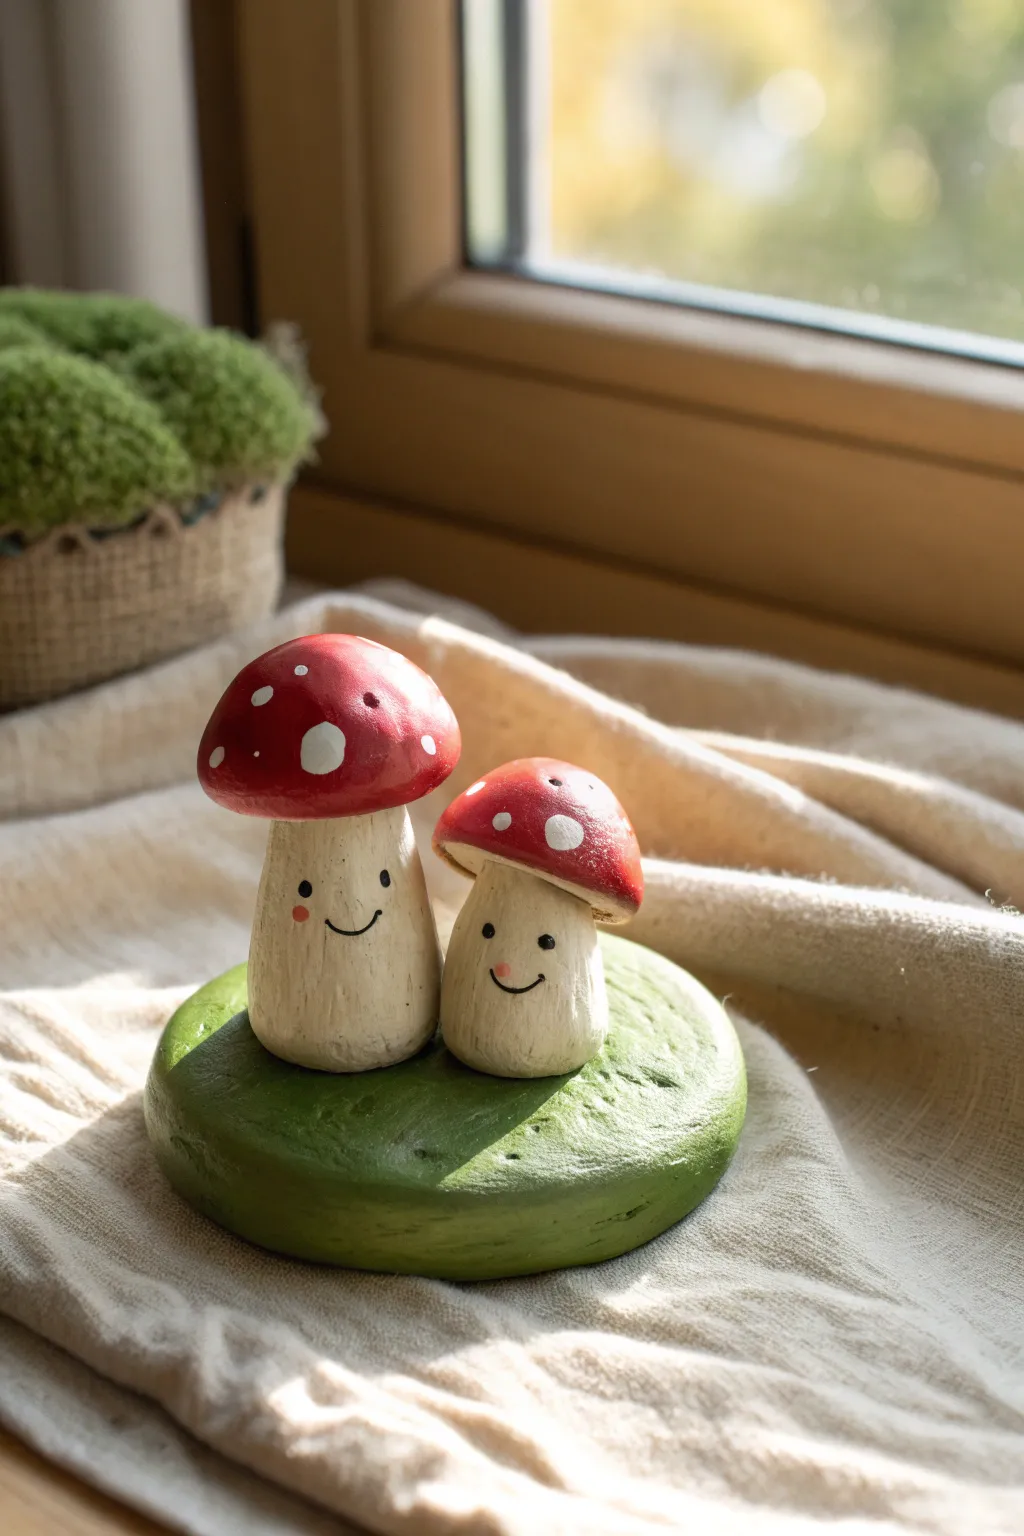
Capture the charm of the forest floor with this adorable duo of smiling toadstools resting on a mossy green base. These hand-sculpted friends feature sweet, blushing faces and classic red-and-white caps that add a touch of woodland magic to any windowsill.
How-To Guide
Materials
- Air-dry clay or polymer clay (white)
- Acrylic paints (Red, White, Moss Green, Black, Pink)
- Set of small paintbrushes (flat and fine detail)
- Aluminum foil for armature (optional)
- Sculpting tools (needle tool, smoothing tool)
- Water cup (for smoothing)
- Gloss varnish or sealant
Step 1: Shaping the Base
-
Preparing the clay:
Start by conditioning a generous amount of clay until it is pliable and warm in your hands. -
Forming the disc:
Roll the clay into a ball, then gently flatten it into a thick, rustic disc shape. This will be the grassy knoll for your mushrooms. -
Texturing the ground:
Before the clay sets, use a crumpled ball of aluminum foil or a stiff bristle brush to tap texture onto the top surface of the disc, mimicking uneven mossy ground.
Natural Texture
For the moss base, dab the wet green paint with a dry sponge or paper towel. This creates a realistic, uneven grassy effect compared to flat brushstrokes.
Step 2: Sculpting the Mushrooms
-
Creating the stems:
Roll two cylinders of clay. Make one slightly taller and thicker than the other to create the ‘parent’ or big sibling mushroom. -
Shaping the stalks:
Gently taper the top of each cylinder so it’s narrower than the base. The bottoms should be somewhat bulbous and grounded. -
Adding the stems to the base:
Score the bottom of the stems and the spot on the base where they will sit. Apply a tiny bit of water or liquid clay (if using polymer) and press them firmly onto the green disc. -
Blending the seams:
Use a silicone tool or your finger to smooth the clay where the stems meet the base so they look like they are growing out of the ground. -
Forming the caps:
Roll two balls of clay and flatten them into hemispheres. Gently pinch the edges to create a slight overhang. -
Curving the caps:
Press your thumb into the center of the flat side to create a small indentation where the stem will fit. -
Attaching the caps:
Score and slip the tops of the stems and press the red caps onto them. I like to tilt the smaller one slightly toward the larger one for a cute, interacting look. -
Final smoothing:
Check over the entire sculpture for fingerprints. Dip your finger in a little water and gently buff them away before letting the piece dry completely.
Step 3: Painting and Details
-
Base coating the grass:
Once fully dry, paint the bottom disc with a lush moss green. Don’t worry about perfect coverage; a bit of unevenness adds natural texture. -
Painting the stems:
Paint the mushroom stalks with an off-white or cream color. You can mix a tiny drop of brown into your white paint to make it look creamy and not stark white. -
Adding the red:
carefully paint the caps a bright, cheerful red. Apply two thin coats rather than one thick one for the smoothest finish. -
Vertical texturing:
Using a very dry brush with a tiny amount of grey or light brown paint, lightly streak the stems vertically to mimic the fibrous texture of a real mushroom stalk. -
Painting the faces:
Use your finest detail brush or a toothpick dipped in black paint to create two small dots for eyes and a simple U-shape for the smile on each stem. -
Adding blush:
Dilute a tiny dot of pink paint with water and dabb it gently onto the cheeks for a soft, rosy flush. -
The white spots:
Dip the back end of a paintbrush into white paint and dot it onto the red caps. Vary the sizes of the dots for a playful, organic pattern. -
Sealing the work:
Finish by applying a coat of gloss varnish, focusing especially on the red caps to make them shine like they’ve been caught in the rain.
Forest Friends
Make tiny clay snails or ladybugs and glue them onto the base or the mushroom caps after baking for extra woodland detail.
Place your finished mushroom couple near a sunny window to brighten up your plant collection

TRACK YOUR CERAMIC JOURNEY
Capture glaze tests, firing details, and creative progress—all in one simple printable. Make your projects easier to repeat and improve.
Pocket-Size Dino Best Friends
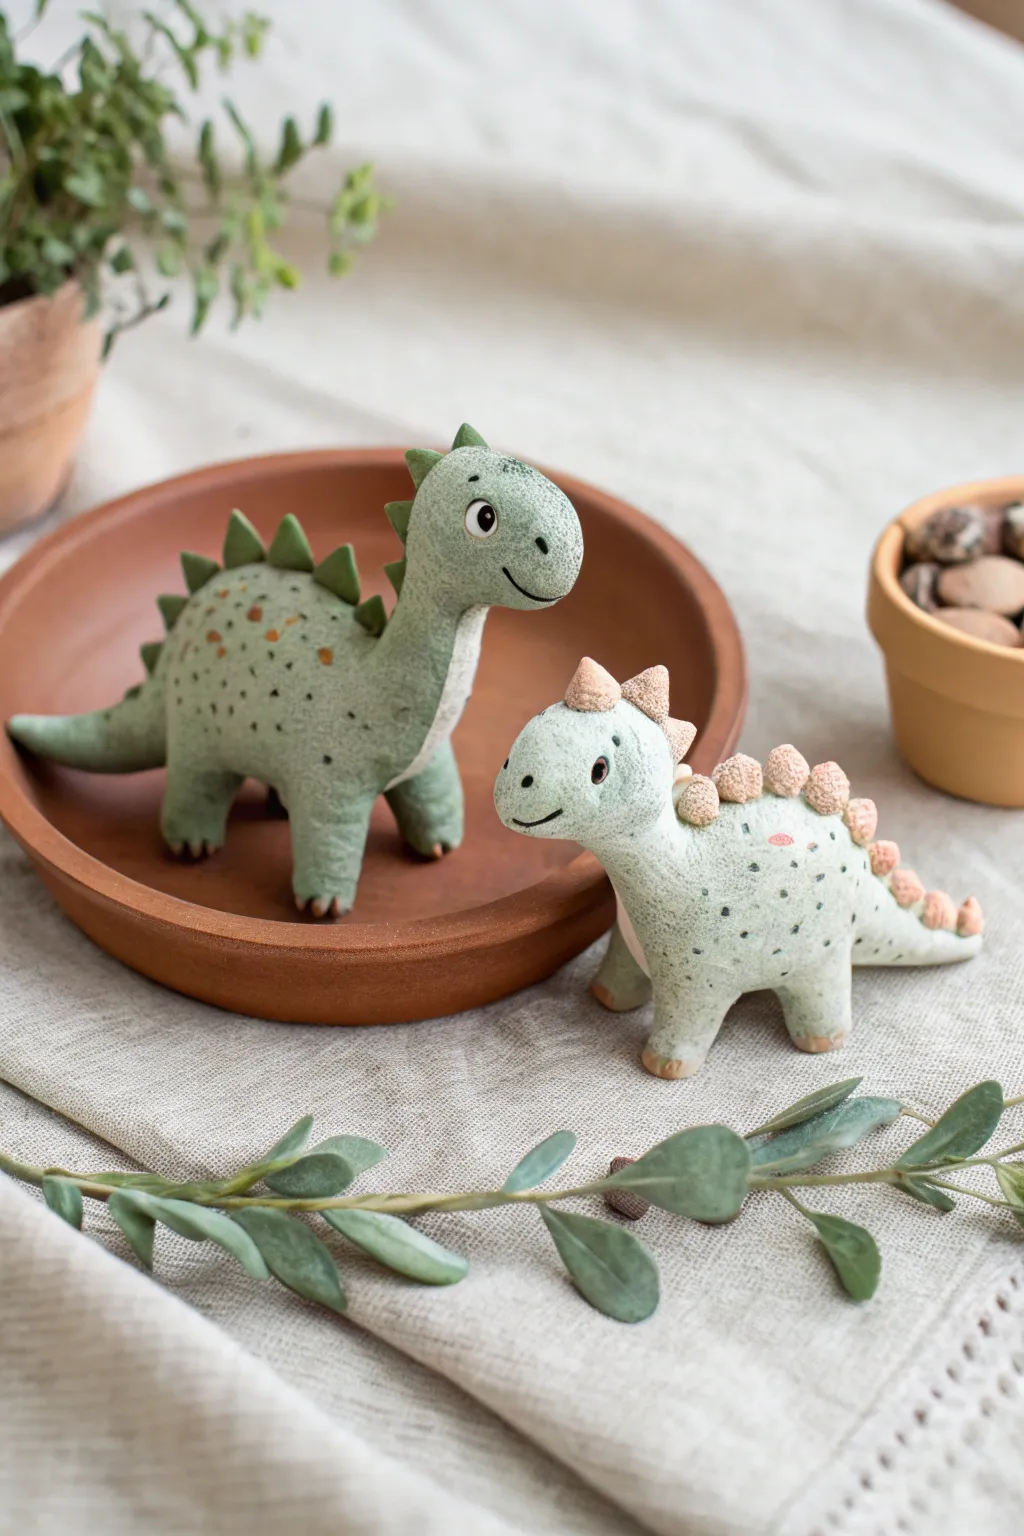
Sculpt an adorable pair of dinosaur companions that fit perfectly in the palm of your hand. With their textured green skin and playful spikes, these charming figurines make the sweetest desk buddies or handmade gifts.
Step-by-Step Guide
Materials
- Polymer clay (Sage Green, Mint Green, Dark Green, Peach/Tan, White, Black)
- Small ball stylist tool
- Needle tool or toothpick
- Texture sponge or coarse sandpaper
- Acrylic paint (burnt orange or rust)
- Fine detail paintbrush
- Baking sheet and parchment paper
- Clay roller or pasta machine
Step 1: Body Sculpting
-
Mix your greens:
Start by conditioning your clay. You’ll need two main shades of green: a deeper sage for the larger dino and a pale mint for the smaller one. Mix a little white into your greens if you want that soft, pastel look shown in the photo. -
Form the torsos:
Roll a smooth ball of the sage clay for the big dino’s body, then elongate it into a thick pear shape. Repeat this process with the mint clay for the smaller companion, making it about 2/3 the size. -
Shape the necks:
Gently pinch and pull the thinner top part of your pear shapes to extend the necks. Keep the transition smooth so the neck flows naturally into the body rather than looking like a separate sausage attached on top. -
Create the legs:
Roll four small cylinders for each dinosaur. Press them onto the bottom of the bodies, blending the seams upward with your thumb so they are securely attached. Make the front legs slightly shorter than the back legs for a cute stance. -
Add the tails:
Roll a cone of clay for each tail. Attach it to the back of the body, smoothing the clay so there is no visible seam. Curve the tail slightly to the side to add movement and character. -
Refine the surface:
Once the basic forms are complete, gently gently roll a texture sponge or coarse sandpaper over the entire surface of the clay. This gives the skin that realistic, stone-like texture rather than being perfectly smooth.
Droopy Dinos?
If the necks sag while sculpting, insert a cut piece of toothpick or armature wire internally through the body and into the neck for hidden structural support.
Step 2: Facial Features
-
Create eye sockets:
Use a small ball stylus to make shallow indentations where the eyes will go. Place them on the sides of the head to give that classic dino look. -
Make the eyes:
Roll tiny balls of white clay and press them into the sockets. Add microscopic dots of black clay for the pupils. For the larger dino, place the pupil in the center; for the smaller one, I like to place it slightly to the side for a shy expression. -
Sculpt the smiles:
Use a needle tool or the edge of a credit card to press a curved line for the mouth. Adding a tiny vertical tick mark at the end of the smile makes them look extra friendly. -
Add nostrils:
Prick two tiny holes at the very front of the snout for nostrils. Keep them small and close together.
Step 3: Spikes and Details
-
Make triangular plates:
For the larger sage dino, flatten a small strip of dark green clay. Cut out small triangles. Press these firmly in a row starting from the top of the head all the way down the spine to the tail. -
Create bumpy spikes:
For the smaller mint dino, switch to the peach or tan clay. Instead of triangles, roll tiny, irregular balls. Press them onto the spine to create a knobby, organic ridge. -
Texture the spikes:
Take your needle tool and prick the peach bumps gently to give them a porous, bony texture, distinct from the body skin. -
Paint speckles:
Before baking (if using bakeable paint) or after, use a very fine brush to add tiny freckles. Use rust or dark orange dots scattered across the back and sides of both dinos for pattern depth. -
Bake the batch:
Place both figures on a parchment-lined baking sheet. Bake according to your customized clay package instructions—usually around 275°F (135°C) for 15-30 minutes depending on thickness. -
Final touches:
Once cooled, you can add a small dot of white paint to the eyes as a highlight if the clay wasn’t bright enough. A swipe of matte varnish will protect your handiwork without making them look like plastic.
Keeping It Clean
Light clay, like mint, picks up dust easily. Keep a pack of baby wipes nearby to clean your hands and tools before switching to lighter colors.
Set your prehistoric pair on a shelf or gift them to your favorite person for a little everyday joy
Cute Little Planet and Star Pair
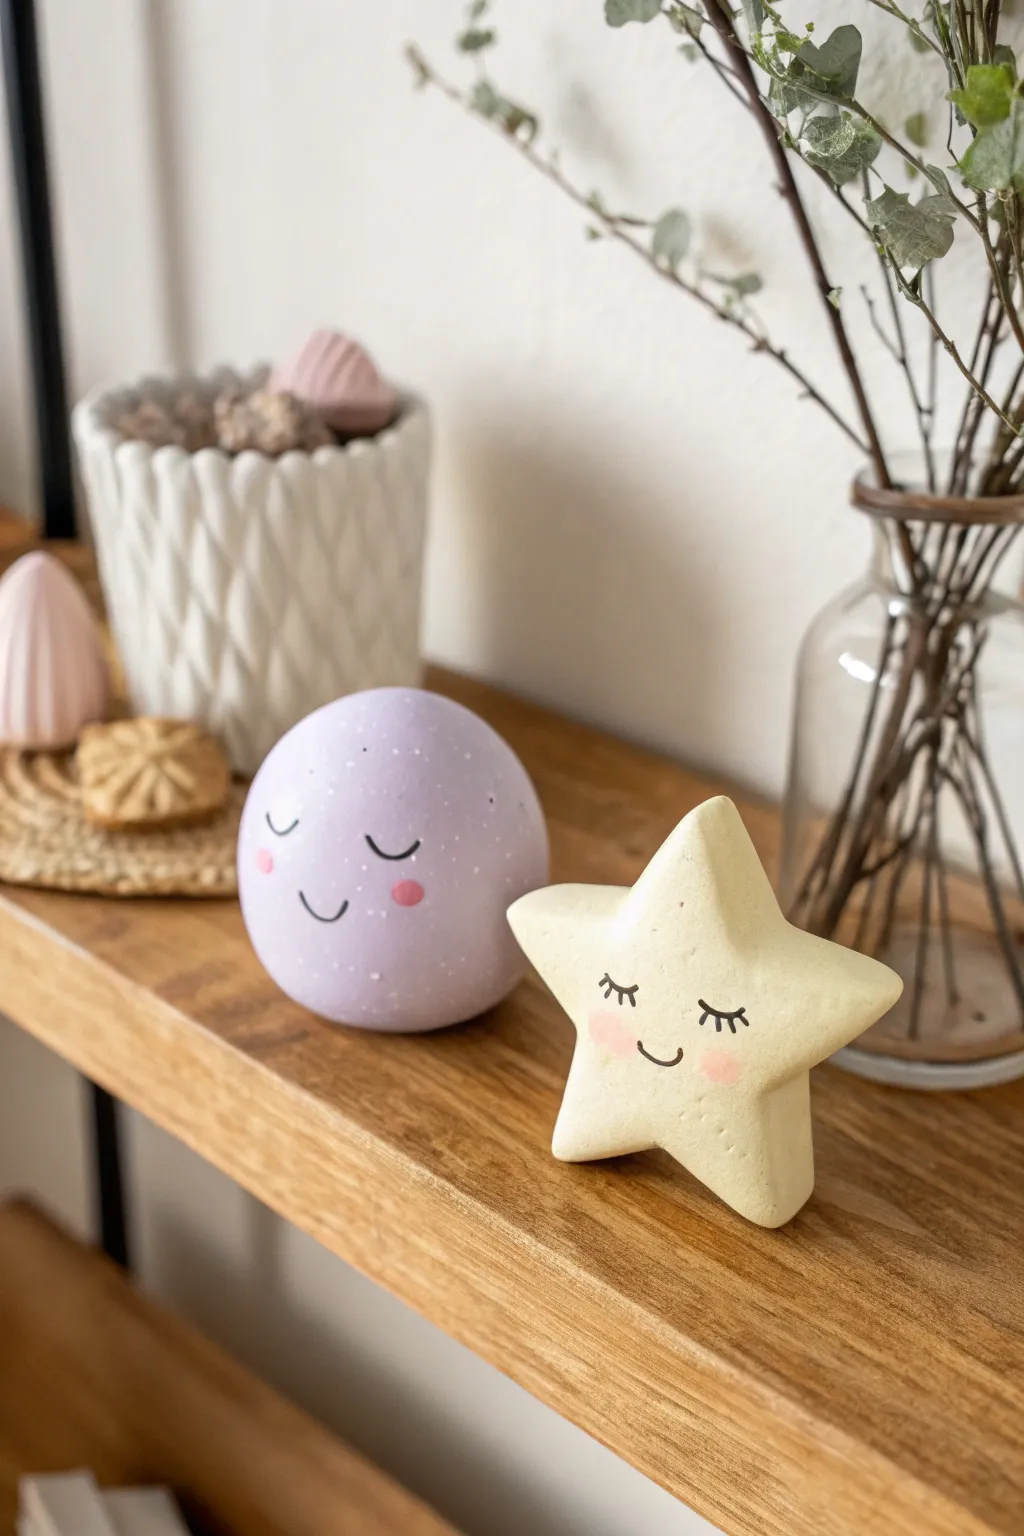
Bring a little bit of the night sky into your home with this adorable duo. These smiling moon and star figures are simple to sculpt with air-dry clay and make for a perfect beginner-friendly date night project.
Step-by-Step
Materials
- White air-dry clay (or polymer clay)
- Acrylic paints: Lavender/Lilac, Pastel Yellow, Black, Pink, White
- Rolling pin
- Modeling tools (or a toothpick)
- Fine grit sandpaper
- Fine tip paintbrush
- Clear matte varnish or sealant
- Bowl of water (for smoothing)
Step 1: Sculpting the Shapes
-
Prep your clay:
Start by taking two equal portions of air-dry clay. Knead them warm in your hands to make the material pliable and remove any air pockets. -
Form the moon sphere:
Take the first lump of clay and roll it between your palms to create a smooth, perfect sphere. Gently tap the bottom on your work surface to create a small flat spot so it won’t roll away. -
Create the star base:
Roll your second lump of clay into a ball, then flatten it slightly with your palm or a rolling pin until it is about 3/4 inch thick. -
Shape the star points:
Using your fingers, gently pinch and pull out five points from the flattened disc. Don’t worry about sharpness; keep the tips rounded and soft for that cute, cartoonish aesthetic. -
Refine the star:
Press the flat sides of the star gently to ensure the thickness is even. Smooth the valleys between the star points with a modeling tool or your finger to get gentle curves. -
Final smoothing:
Dip your finger in a little water and run it over both figures to erase any fingerprints or cracks. Let them dry completely, which usually takes 24-48 hours depending on humidity.
Step 2: Painting and Details
-
Sand for perfection:
Once fully dry, lightly sand any rough spots on your shapes to get a silky-smooth finish perfect for painting. -
Base coat the moon:
Paint the entire sphere with a soft lavender or lilac acrylic paint. You may need two thin coats for full coverage. -
Star texture technique:
Paint the star with a pastel yellow. I like to dab the paint on with a stifling motion rather than sweeping strokes to create a slightly textured, stone-like surface. -
Add moon speckles:
Mix a tiny bit of white into your lavender paint. Dip a toothbrush or stiff brush into it and flick tiny speckles onto the moon to give it a celestial texture. -
Paint the closed eyes:
Using your finest detail brush and black paint, draw two small arched ‘U’ shapes for sleeping eyes. Add small lashes—three simple lines on the outer edges. -
Add the smiles:
Paint a small, simple upward curve between the eyes on both figures. Keep the lines thin and delicate. -
Rosy cheeks:
Dip a round tool or the back of a paintbrush into pink paint. Dot it gently onto the cheeks of both figures for that blushing look. -
Seal your work:
Finish by applying a clear matte varnish to protect the paint and give your cosmic friends a professional, finished look.
Smooth Operator
Use a barely damp sponge during the drying phase to wipe away cracks before they set fully.
Make it Sparkle
Mix fine glitter or mica powder into your varnish for a subtle, magical shimmer on the star.
Set your new celestial friends on a shelf near some greenery to admire your handiwork
Mini Couple Name Initial Charms
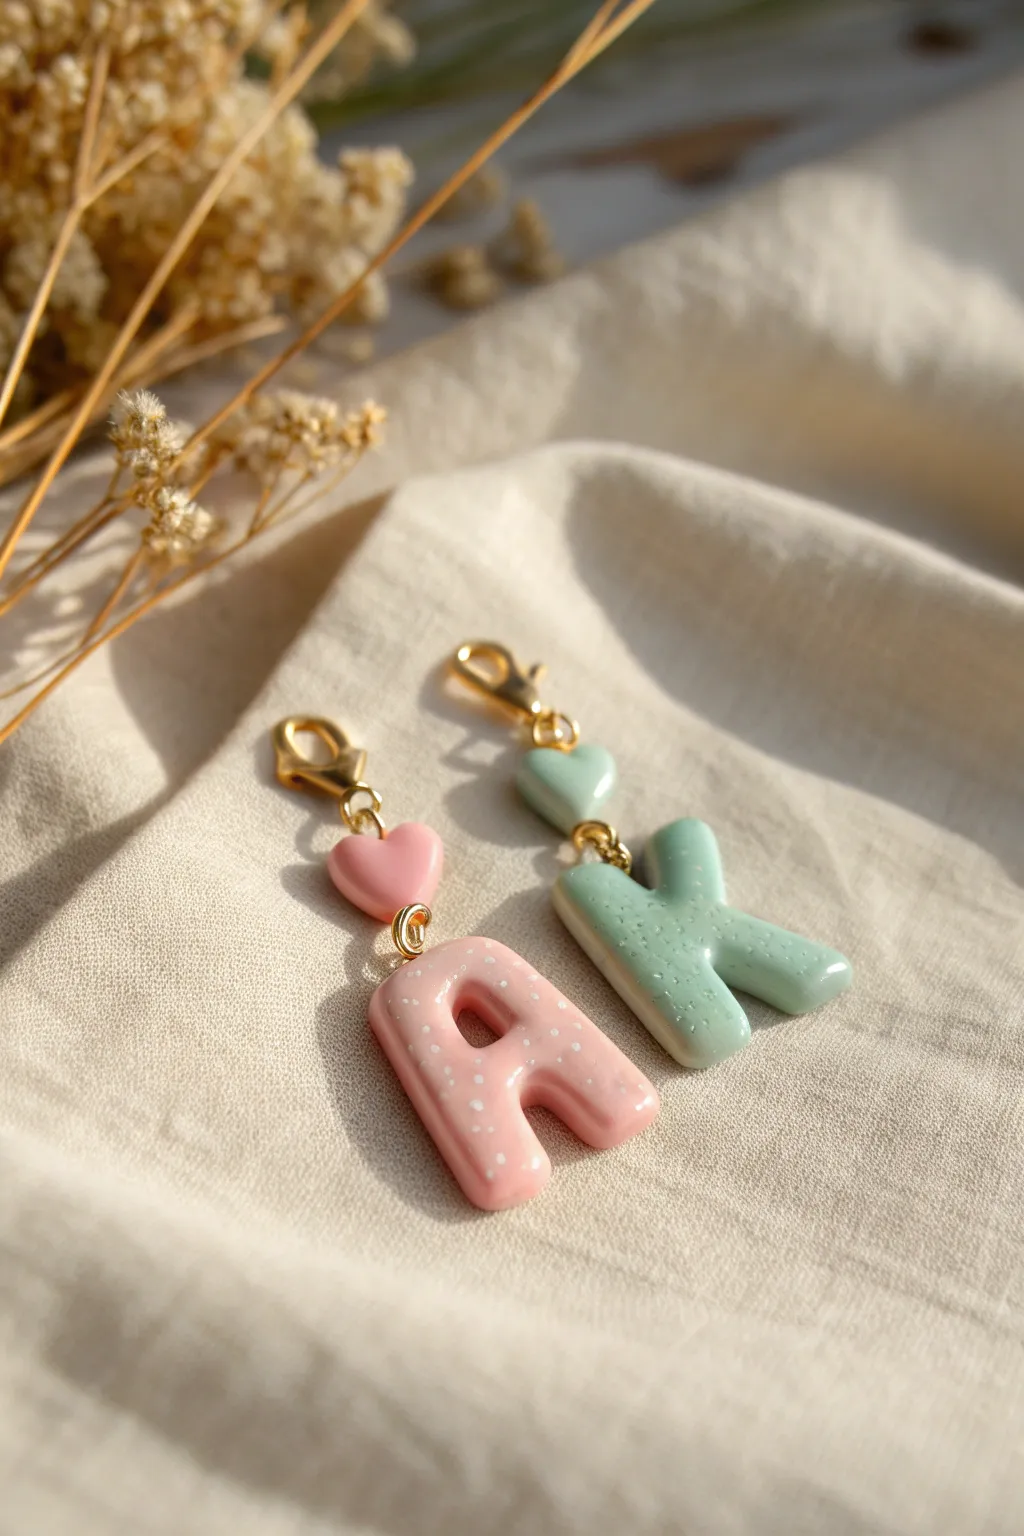
These adorable custom charms feature chunky letter initials topped with sweet matching hearts, perfect for swapping with your partner. The soft pastel pink and mint green colors are enhanced with a subtle white speckled pattern and a high-gloss finish that makes them look professionally made.
Step-by-Step Tutorial
Materials
- Polymer clay (pastel pink, mint green, and white)
- Acrylic rolling pin or pasta machine
- Alphabet cookie cutters (approx. 1 inch)
- Small heart cutter (approx. 0.5 inch)
- Ceramic tile or baking sheet
- Parchment paper
- Liquid polymer clay or Bake & Bond
- Gold screw eye pins
- Gold jump rings
- Gold lobster clasps
- UV resin or gloss glaze
- UV lamp (if using resin)
- Needle tool or toothpick
- Jewelry pliers
- Sandpaper (optional)
Step 1: Creating the Speckled Clay
-
Condition the base colors:
Start by warming up your pastel pink and mint green clay in your hands until they are soft and pliable. Roll them into two separate balls to prepare them for mixing. -
Prepare the speckles:
Tak a very small amount of white polymer clay and chop it into tiny, irregular crumbs using a craft blade. You want these bits to be very fine, almost like coarse sand. -
Incorporate the speckles:
Gently press the white crumbs onto your pink and green clay balls. Fold the clay over once or twice to trap the white bits inside, but be careful not to over-knead, or the white will blend into the color instead of remaining distinct specks. -
Roll out the slab:
Using an acrylic rolling pin or pasta machine, flatten your clay into a slab. Aim for a thickness of about 4mm to 5mm; you want these charms to be chunky and durable.
Clean Cuts Only
To avoid fingerprints, place a piece of plastic wrap over the clay before using your cutters. This creates a lovely domed edge.
Step 2: Cutting and Assembling
-
Cut the letters:
Place your alphabet cutters onto the clay slab. Press down firmly to cut out your desired initials. If the clay sticks to the cutter, you can dip the cutter in cornstarch first. -
Cut the hearts:
Using the same clay colors, cut out two small hearts. You can match the heart color to the letter (pink on pink) or mix and match for a playful look. -
Smooth the edges:
Once cut, gentle run your finger along the edges of the raw clay to smooth out any harsh lines or jagged bits left by the cutter. -
Insert eye pins:
Carefully screw a gold screw eye pin into the top center of each letter and the top center of each heart. I find using a twisting motion helps the pin grip the raw clay without deforming the shape. -
Add bottom pins to hearts:
For the hearts, you will need a second eye pin inserted into the *bottom* point. This will allow the letter to hang from the heart. Trim the pin slightly if it’s too long for the small heart shape.
Step 3: Baking and Finishing
-
Bake the pieces:
Place your clay pieces on a ceramic tile or baking sheet lined with parchment paper. Bake according to your brand of clay’s instructions (usually 275°F/135°C for 15-30 minutes). -
Cool down:
Let the pieces cool completely before handling. Polymer clay is slightly soft when hot and hardens as it cools. -
Apply the gloss:
Place the cooled pieces on a silicone mat. Apply a thin, even layer of UV resin (or gloss glaze) over the front and sides of the letters and hearts to get that shiny, ceramic-like look. -
Cure the resin:
Place the coated pieces under a UV lamp for 2-3 minutes until the surface is hard and non-tacky. If using regular glaze, allow it to air dry for the listed time. -
Connect the components:
Using jewelry pliers, open a jump ring and connect the bottom eye pin of the heart to the top eye pin of the letter. -
Attach the clasp:
Open another jump ring to attach the top loop of the heart to the gold lobster clasp. Close the jump ring securely so there are no gaps.
Make it Sparkle
Mix a pinch of gold leaf flakes or iridescent glitter into the clay along with the white speckles for a subtle shimmer effect.
Clip these onto your keys or bags as a daily reminder of your creative date night
Chubby Sea Creature Duo
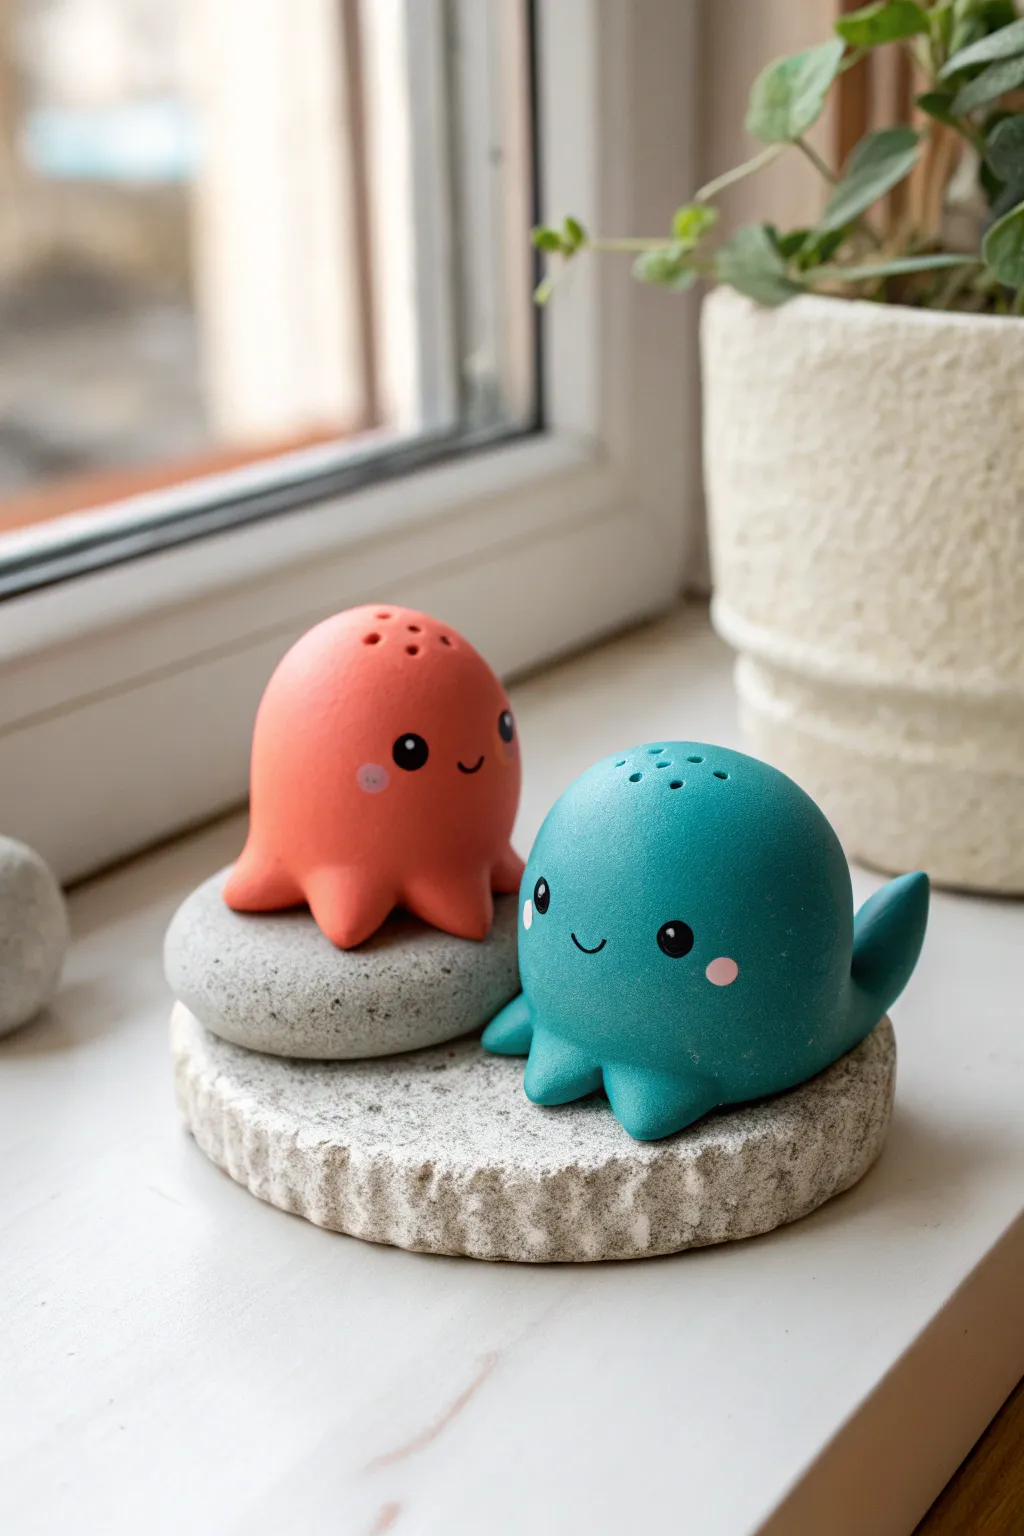
Create an adorable duo of sea creatures that double as charming salt and pepper shakers. These rounded, palm-sized figurines feature a sweet octopus in coral pink and a cheerful whale in deep teal, perfect for brightening up any windowsill.
Step-by-Step
Materials
- Polymer clay (coral pink, teal/blue, black, pale pink)
- Clay sculpting tools (ball tool, needle tool)
- Rolling pin or pasta machine
- Aluminum foil (for creating a core)
- Oven for baking polymer clay
- Fine grit sandpaper
- Matte varnish or sealant
- Toothpick or pin
Step 1: Sculpting the Shapes
-
Prepare the foil cores:
To save clay and reduce weight, crumple two small balls of aluminum foil, roughly 1 inch in diameter. Pack them tightly into rounded dome shapes to serve as the inner structure for your creatures. -
Condition the clay:
Take your coral pink clay and knead it thoroughly until it is warm and pliable. Do the same with the teal clay. Proper conditioning prevents cracks later on. -
Cover the first core:
Flatten a portion of the coral clay into a pancake. Wrap it completely around one of the foil balls, smoothing out any seams or fingerprints until you have a perfect, smooth dome. -
Form the octopus base:
For the octopus, gently pinch the bottom edge of the dome to create a slightly flared skirt. Use your fingers to pull out six to eight small, stubby tentacle points around the circumference. -
Form the whale body:
Repeat the covering process with the teal clay on the second foil ball. Smooth it into a round dome, but keep the bottom flatter than the octopus. -
Add the whale tail:
Fashion a small, curved triangle of teal clay for the tail. Look at where you want the back of the whale to be and blend this piece seamlessly onto the lower side of the body, curving it upwards. -
Create side fins:
For the teal whale, make two tiny triangular fins. Attach them low on the sides of the body, blending the clay into the main shape so they look like little flippers resting on the ground.
Step 2: Adding Faces and Details
-
Indent the eye sockets:
Using a small ball tool, gently press two indentations into the front of each creature where you want the eyes to sit. This helps the black clay sit flush with the colorful body. -
Place the eyes:
Roll tiny balls of black clay. Insert them into the sockets you just made and flatten them slightly. Add extremely tiny specks of white clay or paint later for the ‘catch light’ in the eyes. -
Give them rosy cheeks:
I particularly enjoy this step—take a tiny amount of pale pink clay, flatten it into thin ovals, and press them onto the cheeks just below the eyes for a blushing effect. -
Carve the smiles:
Use a needle tool or a small curved blade to carefully press a simple ‘u’ shape mouth between the eyes. Keep the stroke shallow and clean. -
Create the shaker holes:
If you want these to be functional shakers (or just mimic the look), use a toothpick or large needle tool to poke a pattern of holes on the very top of each head. A simple 5-hole flower pattern works well.
Smooth Surface Secret
Use a tiny amount of baby oil or clay softener on your fingertip to buff away fingerprints before baking for a flawless finish.
Step 3: Finishing Touches
-
Check for imperfections:
Before baking, give both figures a final once-over. Smooth out any accidental fingernail marks or fingerprints. Isopropyl alcohol on a brush can help smooth the clay surface. -
Bake the clay:
Place your creatures on a baking sheet or tile. Bake according to the manufacturer’s instructions for your specific brand of polymer clay (usually around 275°F/130°C for 15-30 minutes). -
Cool down:
Let the figures cool completely in the oven. Taking them out too early while they are still hot can make them brittle. -
Sand the bottoms:
Once cool, use a piece of fine-grit sandpaper to briefly sand the bottom of each figure to ensure they sit perfectly flat on your surface. -
Seal the surface:
Apply a thin coat of matte varnish to protect the clay and give it a finished, ceramic-like texture. Avoid glossy finishes to maintain that soft, natural look seen in the photo.
Display Idea
Sculpt small flat ‘rocks’ from grey granite-effect clay to serve as custom display stands for your new ocean friends.
Place your new clay companions on a sunny shelf and enjoy their cheerful presence every day
Mini Cozy House Keepsakes
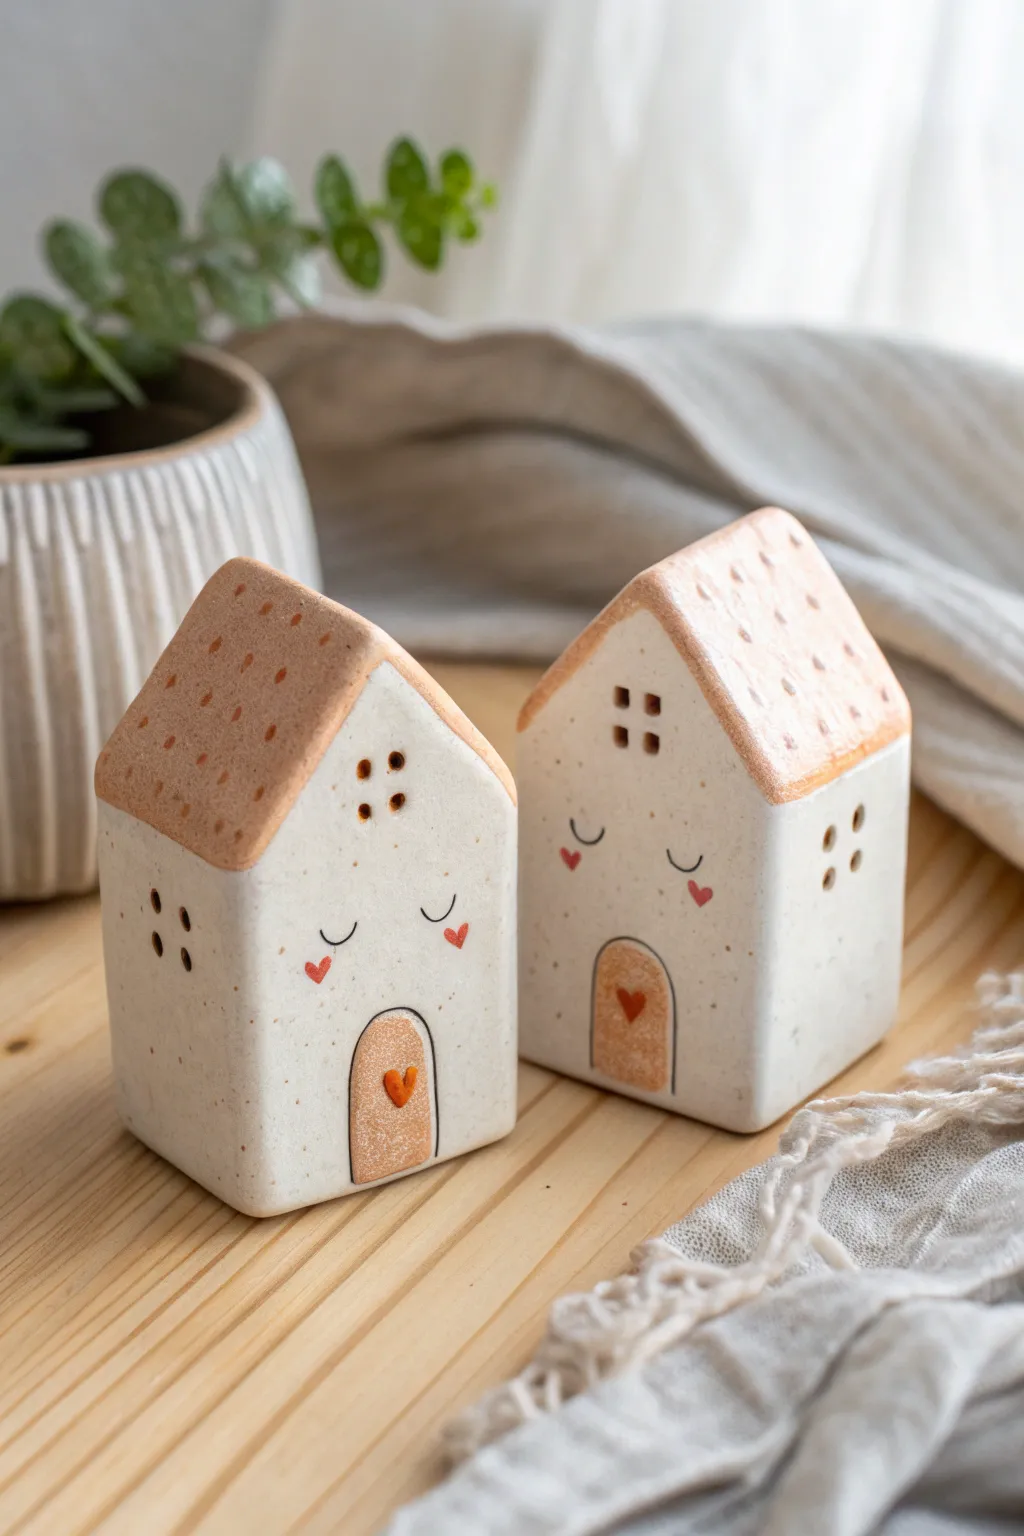
Create a pair of adorable matching clay houses that act as sweet mementos of your creative time together. These tiny dwellings feature textured roofs, sleeping faces, and charming little hearts, making them perfect shelf decor.
Step-by-Step Tutorial
Materials
- White air-dry clay or polymer clay (oven-bake)
- Acrylic paints (Terra cotta orange, red, black)
- Fine grit sandpaper
- Rolling pin
- Sharp crafting knife or X-Acto knife
- Ruler
- Needle tool or toothpick
- Small flat brush
- Fine liner brush (size 0 or 00)
- Matte varnish (optional)
Step 1: Shaping the Structure
-
Prepare the Clay:
Start by conditioning your white clay until it is soft and pliable. Roll it into a smooth square block roughly 2 inches wide and 2.5 inches tall. -
Define the Shape:
Gently tap the block on your work surface to flatten the bottom so it stands upright. Use your flat palm to smooth the sides, ensuring they are square and even. -
Create the Roofline:
Using your knife, cut the top of your block into a triangle shape to form the peak of the house. I find it helpful to mark the center point lightly first to ensure the roof slopes are symmetrical. -
Add Texture Details:
With a needle tool or toothpick, gently poke small holes into the sides of the house to mimic windows. Create clusters of four holes for a window pane look or vertical lines of three. -
Forming the Roof:
Roll out a separate thin slab of clay to about 1/8 inch thickness. Cut a rectangle that is slightly wider than your house and long enough to drape over the peak, creating an overhang. -
Attach the Roof:
Score the surface of the house peak and the underside of the roof slab. Apply a tiny bit of water (for air-dry) or liquid clay (for polymer) and press the roof firmly onto the peak. -
Roof Texture:
Take your needle tool and poke random, evenly spaced indentations all over the roof surface. This creates a cute, stippled texture that adds character. -
The Front Door:
Roll a small, thin oval of clay and flatten the bottom edge to create an arch shape. Attach this to the bottom center of the front face to serves as the door. -
Drying or Baking:
If using air-dry clay, let the houses sit in a cool, dry place for 24-48 hours. For polymer clay, bake according to the package instructions, usually around 275°F for 15-20 minutes.
Cracking Up?
If air-dry clay develops mesmerizing hairline cracks while drying, mix a tiny bit of fresh wet clay with water to make a paste and smooth it into the cracks.
Step 2: Decorating and Painting
-
Smooth the Surface:
Once fully cured and cooled, lightly sand any rough edges or fingerprints with fine grit sandpaper to achieve a professional matte finish. -
Speckled Effect:
Mix a tiny drop of brown paint with water and flick it lightly over the white walls using an old toothbrush or stiff brush to create a faux-ceramic speckled look. -
Paint the Roof:
Paint the textured roof with a terra cotta or soft orange acrylic paint. Use a fairly dry brush to ensure the paint gets into the indentations but keeps a matte, earthy texture. -
Painting the Door:
Use the same terra cotta shade to fill in the arched door shape. You can outline it slightly with a darker shade if you want more definition. -
Drawing the Faces:
Using your finest liner brush and black paint, carefully draw two ‘U’ shapes for sleeping eyes. Add tiny eyelashes if you like a sweeter expression. -
Adding Cheeks:
Dip the tip of a toothpick or the back of a brush into red or pink paint. Dot two small hearts or circles under the eyes to create rosy cheeks. -
Heart Details:
Paint a tiny heart in the center of the door using the red paint. This small detail ties the whole cute aesthetic together. -
Sealing:
Protect your work with a coat of matte varnish. This will seal the paint and give the clay a unified finish without making it too glossy.
Make it Functional
Before the clay dries, carve out the entire inside to make it hollow, then cut out the windows. Place a battery-powered tea light inside for a glowing luminaria.
Place your little village on a windowsill where the sunlight can catch those sweet painted details
Two-Part Puzzle Heart Tokens
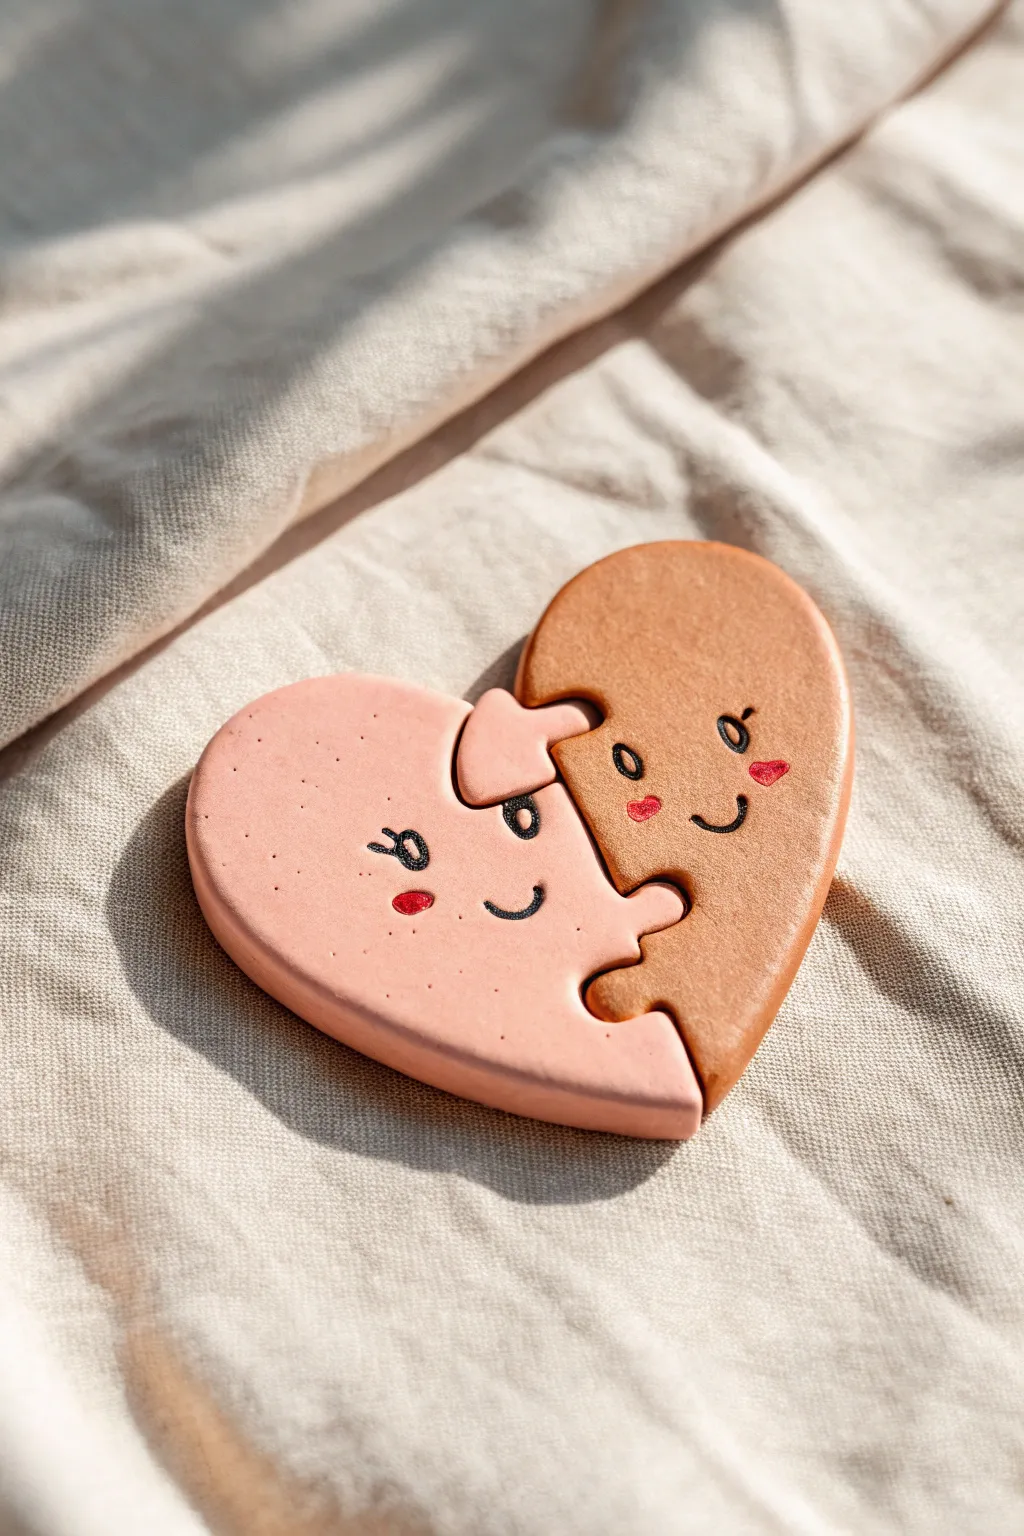
These adorable two-tone heart tokens fit together perfectly like a simple puzzle, symbolizing how you and your date complete each other. The smooth, matte finish and sweet hand-painted faces make them a charming keepsake from your creative time together.
How-To Guide
Materials
- Polymer clay (light pink and tan/caramel)
- Small rolling pin
- Heart-shaped cookie cutter (medium size)
- X-Acto knife or clay craft blade
- Fine-point black permanent marker or acrylic paint pen
- Small detail paintbrush
- Red or pink acrylic paint
- Baking sheet with parchment paper
- Sandpaper (fine grit, optional)
- Matte finish sealant (optional)
Step 1: Shaping the Base
-
Condition the clay:
Start by warming up your clay. Take a chunk of the pink clay and a chunk of the tan clay, kneading them separately in your hands until they are soft, pliable, and free of cracks. -
Roll it out:
Using your rolling pin, flatten the pink clay into a slab about 1/4 inch thick. Repeat this process with the tan clay, trying to keep both slabs the exact same thickness so they fit flush later. -
Cut the hearts:
Press your heart-shaped cookie cutter firmly into the pink slab to create your first heart. Clean the cutter, then do the same with the tan slab. You now have two solid hearts. -
Create the puzzle line:
This is the tricky part. Use your craft blade to draw a wavy line down the center of the pink heart. Don’t cut straight through yet; just sketch the line lightly to plan where your interlocking ‘tabs’ will go. -
Cut the puzzle pieces:
Follow your sketched line on the pink heart, cutting all the way through with the blade. Create a distinct ‘out’ tab and an ‘in’ slot. Separate the two halves carefully. -
Trace and match:
Take the left side of your cut pink heart and lay it gently on top of the solid tan heart. Use it as a stencil to carefully trace the puzzle line onto the tan clay with your blade. -
Cut the second heart:
Remove the pink piece and cut along the traced line on the tan heart. You want to discard the left side of the tan heart and keep the right side that fits your pink piece. -
Test the fit:
Gently slide the left pink piece and the right tan piece together. If the fit is too tight, shave off tiny slivers of clay from the edge until they lock together comfortably.
Step 2: Refining and Baking
-
Smooth the edges:
Using your fingertip, very gently rub the cut edges of the puzzle connection. You want to round them off slightly so they aren’t sharp, which helps the pieces slide together better after baking. -
Texture check:
Inspect the surface for any fingerprints. I find that lightly buffing the surface with a tiny bit of cornstarch on my finger helps smooth out imperfections before the oven. -
Bake:
Place your separated heart halves on a parchment-lined baking sheet. Bake according to your polymer clay package instructions (usually around 275°F for 15-20 minutes). -
Cool down:
Let the pieces cool completely on the tray before handling. They are fragile while warm.
Piece Doesn’t Fit?
If pieces don’t lock after baking, use fine-grit sandpaper to gently file down the inner tabs. Sand a little at a time and re-check constantly.
Step 3: Adding Personality
-
Draw the eyes:
Once cool, use your fine-point black marker or paint pen to draw the eyes. Place them fairly low for that cute ‘kawaii’ look. On the pink side, draw curved lines for happy, closed eyes. -
Add the lashes:
Give the eyes on the pink side little eyelashes for extra character. On the tan side, draw simple oval shapes for open eyes. -
Draw the mouths:
Draw a tiny, simple ‘U’ shape for the mouth between the eyes on both pieces. -
Paint the cheeks:
Dip the very tip of your detail brush (or even a toothpick) into the red or pink paint. Dab two tiny ovals onto the cheeks of each face, just outside the mouth area. -
Heart detail:
Keep the cheek shapes slightly oval or heart-shaped if you can manage the detail, consistent with the image’s sweet style. -
Seal (optional):
To protect the paint from scratching off, apply a thin coat of matte sealant over the front of the pieces. Let it dry completely.
Pro Tip: Clean Cuts
Before cutting your puzzle line, rub a tiny bit of lotion or cooking oil on your craft blade. This helps it glide through the clay without dragging or warping the shape.
Slide your finished halves together and display them as a sweet reminder of your connection
Tiny “Inside Joke” Character Mashups
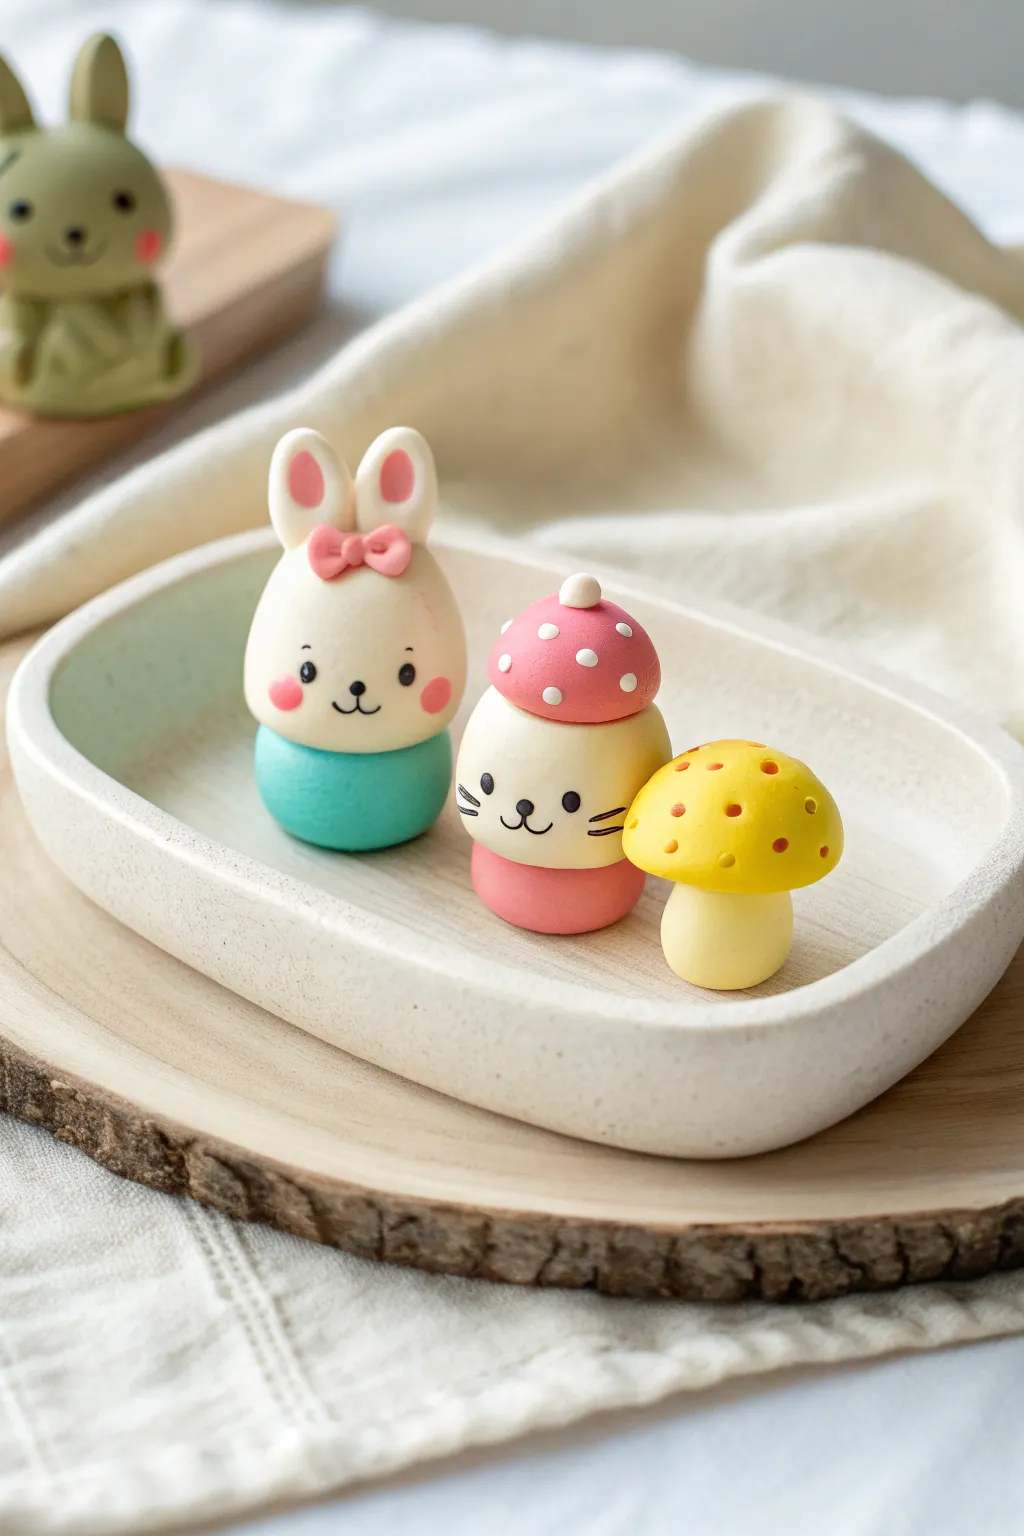
These adorable polymer clay miniatures combine charming animal features with soft, pastel aesthetics for a perfect tiny display. You’ll create a sweet bunny in teal trousers, a hybrid cat-mushroom character, and a classic spotted toadstool companion to round out the set.
Detailed Instructions
Materials
- Polymer clay (White, Teal/Turquoise, Pastel Pink, Dark Pink, Soft Yellow, Beige/Cream)
- Set of small ball stylus tools
- Flexible clay blade or craft knife
- Black acrylic paint or fine-point POSCA pen
- Pink chalk pastel (for blushing)
- Small soft paintbrush
- Matte varnish (optional)
- Clean ceramic tile or baking sheet
Step 1: Sculpting the Bunny
-
Form the base body:
Start by conditioning a small ball of teal clay into a rounded, squat cylinder shape for the bottom half. Lightly flatten the base so it stands securely. -
Add the head:
Roll a slightly larger ball of white clay for the head. Press it gently onto the teal body, ensuring a smooth connection without squishing the shapes too much. -
Create the ears:
Roll two small white ovals and flatten them slightly. Use a small ball tool to indent the center of each ear, then fill that indentation with a tiny snake of pink clay. Pinch the bottoms and attach them to the top of the head. -
The bow and details:
Fashion a microscopic bow from dark pink clay and place it right between the ears. For the cheeks, press two tiny flat circles of pink clay onto the face.
Clean Clay Pro-Tip
White clay attracts dust like a magnet. Keep a pack of baby wipes nearby and clean your hands thoroughly before switching to the white clay steps to keep it pristine.
Step 2: Sculpting the Cat-Mushroom Hybrid
-
Build the mushroom stalk body:
Roll a medium ball of dark pink clay and flatten it slightly into a disc. This forms the base. On top of this, add a cream or beige cylinder for the main body/face area. -
Shape the mushroom cap:
Take a ball of dark pink clay and flatten the bottom while doming the top to create a cap shape. It should be slightly wider than the body. -
Decorate the cap:
Roll tiny, almost microscopic balls of white clay. Press them gently onto the pink cap to create polka dots. Add a single white ball on the very peak. -
Assemble the hybrid:
Place the decorated cap onto the cream body. Gently smooth the seam underneath if needed so it looks like a hat sitting snugly.
Level Up: Glossy Caps
Use a high-gloss UV resin or glaze *only* on the colored mushroom caps (pink and yellow) while keeping the bodies matte. This contrast makes them look extra premium.
Step 3: Sculpting the Yellow Toadstool
-
Form the stem:
Roll a thick, short cylinder of soft yellow or cream clay. Taper slightly at the top where it will connect to the cap. -
Make the yellow cap:
Create a smooth dome from bright yellow clay. Use a medium-sized ball tool to gently press indentations all over the surface, creating divots rather than adding clay dots. -
Add texture:
Pinpoint the center of each divot with the tip of a smaller tool or needle to give it an organic, porous texture found in nature. -
Assembly:
Attach the yellow cap to the stem, pressing firmly enough to adhere but gently enough to maintain the rounded shape.
Step 4: Baking and Finishing
-
Pre-bake check:
Give everything a once-over for dust or fingerprints. I like to use a bit of baby oil on my finger to smooth out any last imperfections before they harden. -
Bake the figures:
Bake according to your specific clay brand’s instructions (usually around 230°F/110°C for 30 minutes). Let them cool completely before handling. -
Paint the faces:
Using a tiny detail brush or a fine tip pen, carefully draw the eyes, nose, and mouth on the bunny. For the cat-mushroom, weave in the whiskers specifically on the cream body section. -
Add blushing blush:
For a softer look than clay cheeks (optional for the cat), use a dry brush to dust a tiny amount of pink pastel powder onto the cheeks. -
Satin finish:
If desired, coat the figures in a matte or satin varnish to protect the paint and give the clay a professional, uniform sheen.
Arrange your trio on a small tray or shelf and enjoy the adorable corner of cheer they bring to your space