When I’m craving a low-stress studio day, I always reach for cute cute clay ideas—the kind with round shapes, dot eyes, and tiny smiles. These are my go-to projects for polymer clay or air-dry clay when you want something fast, beginner-friendly, and ridiculously charming.
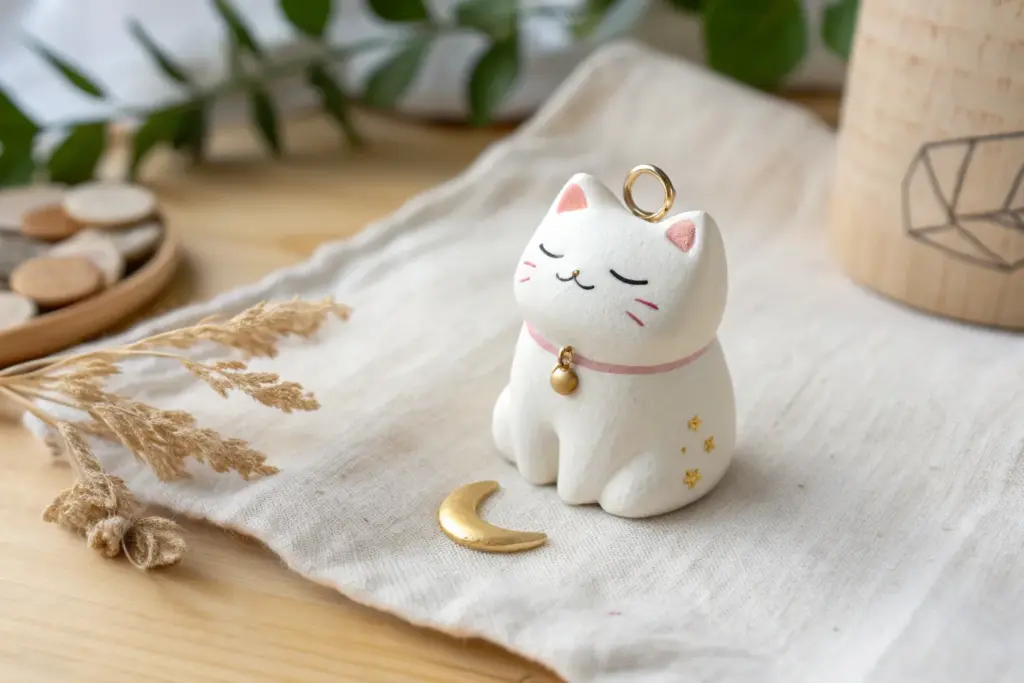
Chubby Cat Mini Charms
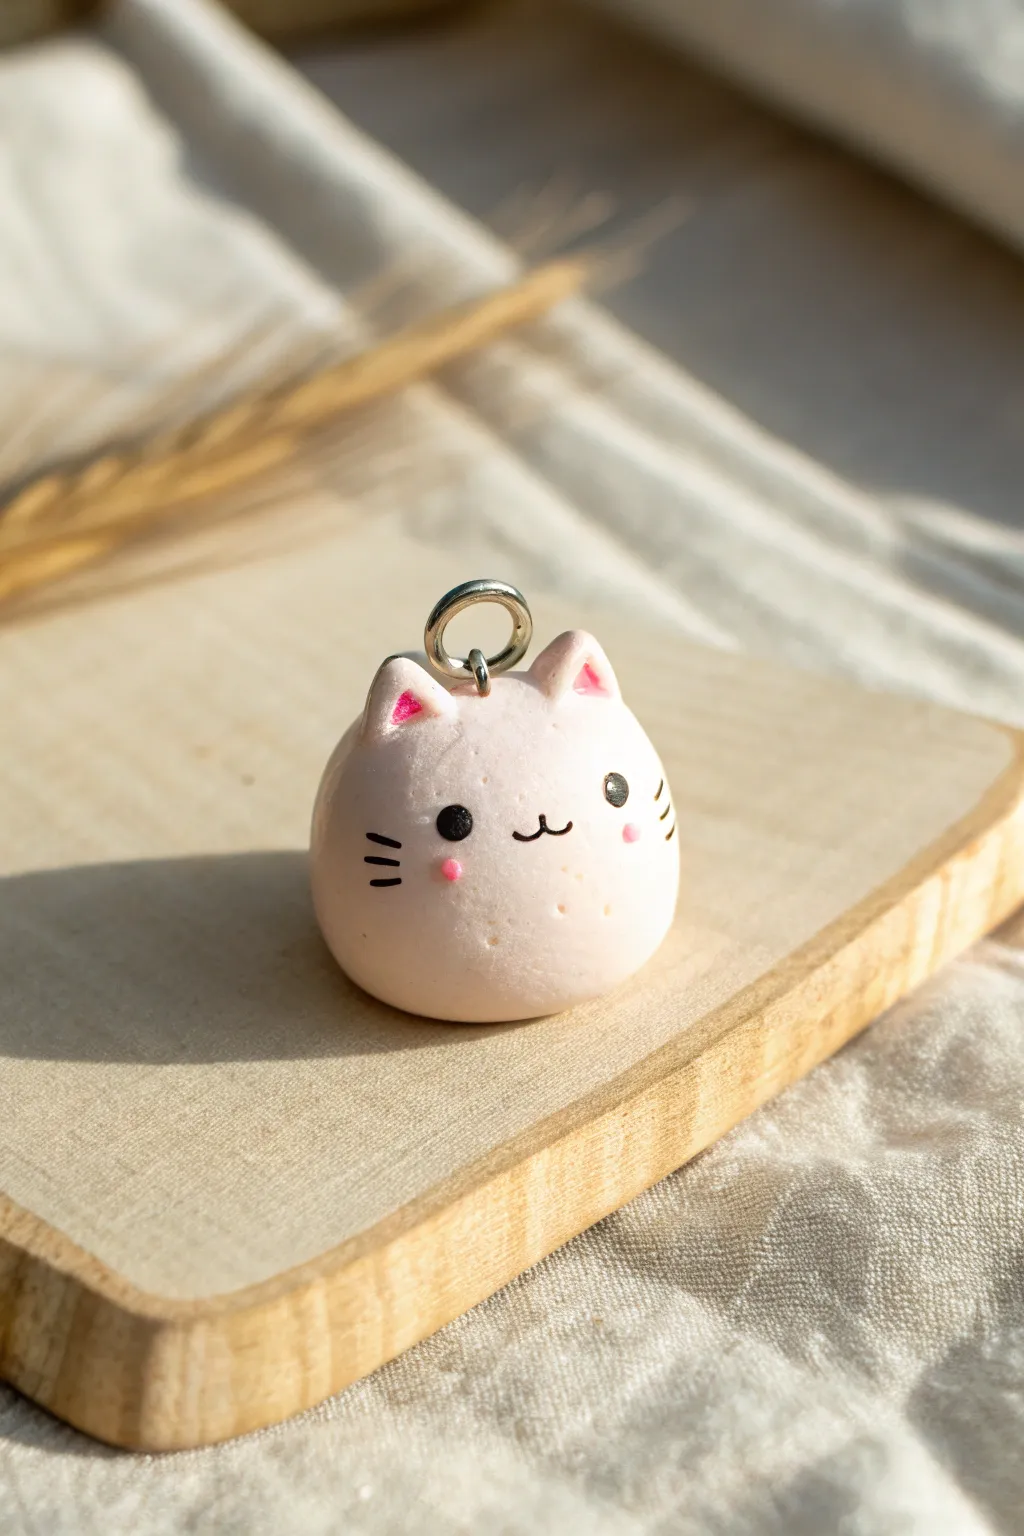
This adorable round kitty charm captures the essence of kawaii with its simple spherical shape and dainty painted details. It’s perfectly bite-sized and makes for a sweet addition to a bracelet, keychain, or zipper pull.
Detailed Instructions
Materials
- Pale pink polymer clay
- Dark pink loose pigment or chalk pastel (for ears/cheeks)
- Black acrylic paint
- Fine detail paintbrush or needle tool
- Metal eyepin hook
- Metal jump ring
- Small blending tool or silicone shapers
- Gloss glaze (optional)
Step 1: Shaping the Base
-
Condition the clay:
Start by taking a small amount of pale pink polymer clay. Knead it thoroughly in your hands until it becomes soft, pliable, and free of any cracks. -
Form the sphere:
Roll the conditioned clay between your palms to create a smooth, perfect ball. This should be about the size of a large marble or a grape. -
Flatten the base:
Gently press the ball onto your work surface just enough to create a flat bottom around the base. This gives the cat its seated, chubby look. -
Smooth the surface:
Check the sphere for any fingerprints. Lightly brush over them with your finger or a silicone tool to ensure the surface is uniform.
Step 2: Adding Features
-
Shape the ears:
Take two very tiny pieces of the same pink clay. Roll them into small balls, then pinch one side of each to form small triangles. -
Attach the ears:
Place the triangular ears on top of the head, spacing them evenly apart. Blend the bottom seam of the ears into the head using a silicone tool so they look like one solid piece. -
Indent the ears:
Use a small ball tool or the end of a paintbrush to gently press an indentation into the front center of each ear triangle. -
Add inner ear color:
Take a tiny bit of dark pink chalk pastel dust on a small brush. Gently dust the inside of the ear indentations to give them a rosy glow. -
Insert hardware:
Trim a metal eyepin to a short length (about 1cm). Push it straight down into the center top of the head, between the ears, until the loop rests just above the clay.
Uneven Surface?
If you see fingerprints before baking, brush the raw clay lightly with a drop of baby oil or cornstarch to smooth them out perfectly.
Step 3: Baking and Painting
-
Bake the charm:
Place your cat on a baking sheet or ceramic tile. Bake according to your specific polymer clay manufacturer’s instructions (usually around 275°F/135°C for 15-30 minutes). -
Cool completely:
Allow the clay to cool fully before painting. Painting on hot clay can make the acrylic drag or dry too quickly. -
Paint the eyes:
Using a very fine detail brush or a dotting tool dipped in black acrylic paint, place two small dots for the eyes. Position them fairly wide apart for a cuter look. -
Draw the mouth:
With the finest brush tip or even a toothpick, carefully paint a tiny ‘w’ shape between the eyes for the mouth. -
Add whiskers:
Paint three very short, horizontal lines on each cheek area for the whiskers. Keep your hand steady and light. -
Apply blush:
Dip a Q-tip or small dry brush into your pink pastel dust or a tiny dot of pink paint. Dab it gently under the eyes to create sweet rosy cheeks. -
Add highlight dots:
I like to add a microscopic white dot to the upper corner of each black eye to bring the expression to life. -
Attach the jump ring:
Once all paint is dry, use pliers to open your jump ring, loop it through the eyepin on top of the head, and close it securely.
Texture Twist
Before baking, gently dab the surface with a stiff toothbrush or crumpled foil to give the cat a flocked, fuzzy texture.
Enjoy your new little companion as it hangs cheerfully from your favorite bag or keychain


Tiny Frog Desk Buddy Figures
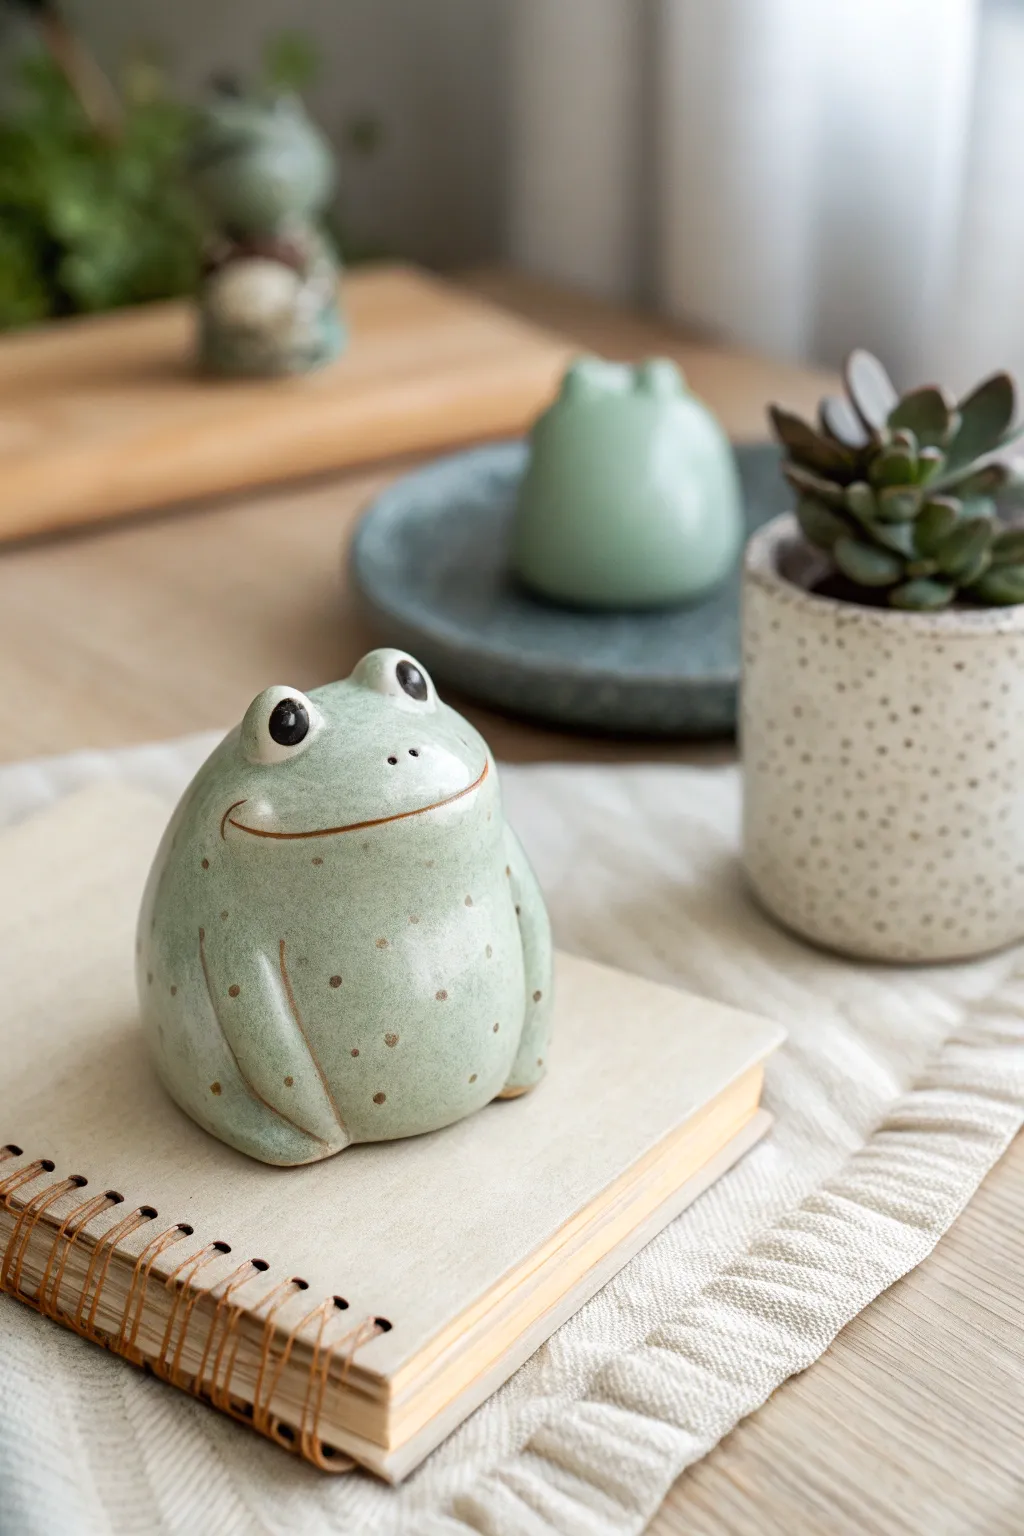
Create your own meditative desk companion with this adorable, minimalistic frog figure. Featuring a soothing sage green glaze, tiny speckled details, and a welcoming smile, this simple hand-building project is perfect for beginners.
Step-by-Step
Materials
- White or light-colored polymer clay (or air-dry clay)
- Acrylic paints (Sage green, darker green/brown, white, black)
- Glossy varnish or glaze
- Aluminum foil (for armature)
- Clay sculpting tools (needle tool, smooth modeling tool)
- Soft paintbrush
- Fine-grit sandpaper
Step 1: Forming the Body
-
Prepare the core:
Crumple a piece of aluminum foil into a tight sphere roughly the size of a golf ball or slightly larger to save on clay and keep the figure lightweight. -
Condition the clay:
Knead your white polymer clay until it is soft and pliable. Flatten it into a large pancake that is thick enough to cover the toil without tearing. -
Cover the armature:
Wrap the clay sheet around the foil ball. Smooth the seams completely until you have a seamless, round lump. -
Shape the silhouette:
Gently roll and press the ball on your work surface to create a teardrop shape that is wider at the bottom (for the belly) and slightly tapered at the top (for the head). -
Flatten the base:
Tap the bottom of the figure firmly against the table so the frog sits flat and stable without tipping over.
Step 2: Adding Details
-
Create eye sockets:
Use your thumbs or a large ball tool to press two shallow indentations near the top of the head where the eyes will sit. -
Form the eyes:
Roll two small, equal-sized balls of clay. Place them onto the top of the head, blending the clay downwards at the back and sides so they look integrated, not just stuck on. -
Define the arms:
Roll two thin sausages of clay for the arms. Attach them vertically along the sides of the belly, curving slightly to follow the round shape. -
Blend the limbs:
Using a modeling tool, blend the top and back edges of the arms into the body, leaving the front edge distinct to create a relief effect. I find blending with a silicone tool works best here. -
Carve the mouth:
Use a needle tool or a thin clay blade to slice a wide, shallow curve across the face for the smile. Curve the ends slightly upward for a happy expression. -
Add nose holes:
Prick two tiny holes right above the smile line for the nostrils. -
Smooth everything:
Dip your finger in a little clay softener (or water for air-dry clay) and run it over the entire figure to remove fingerprints. -
Bake or dry:
Bake according to your polymer clay package instructions, or let air-dry clay sit for 24-48 hours.
Sticky fingerprints?
If fingerprints are stubborn, lightly brush the raw clay with baby powder or cornstarch before smoothing. It acts as a buffer and washes off later.
Step 3: Painting & Finishing
-
Base coat:
Mix a soft sage green acrylic paint. Apply two even coats to the entire frog, letting the first coat dry completely before adding the second. -
Face details:
Paint the eye bumps solid white. Once dry, add large black circles for pupils, leaving a tiny white highlight dot in each for life. -
Refine the smile:
Take a very fine brush with diluted brown paint and carefully trace the carved smile line to make it pop. -
Speckling:
Dip an old toothbrush or stiff brush into watered-down brown or dark green paint. Run your thumb over the bristles to flick tiny speckles across the frog’s body. -
Glazing:
Once all paint is perfectly dry, apply a high-gloss varnish or UV resin. This mimics the shiny ceramic look of the original inspiration.
Ceramic Look Hack
Apply three thick coats of high-gloss polyurethane varnish. The thickness mimics the depth of kiln-fired glaze.
Place your shiny new friend on your notebook or desk for a little boost of happiness while you work


Pastel Dino Pocket Pets
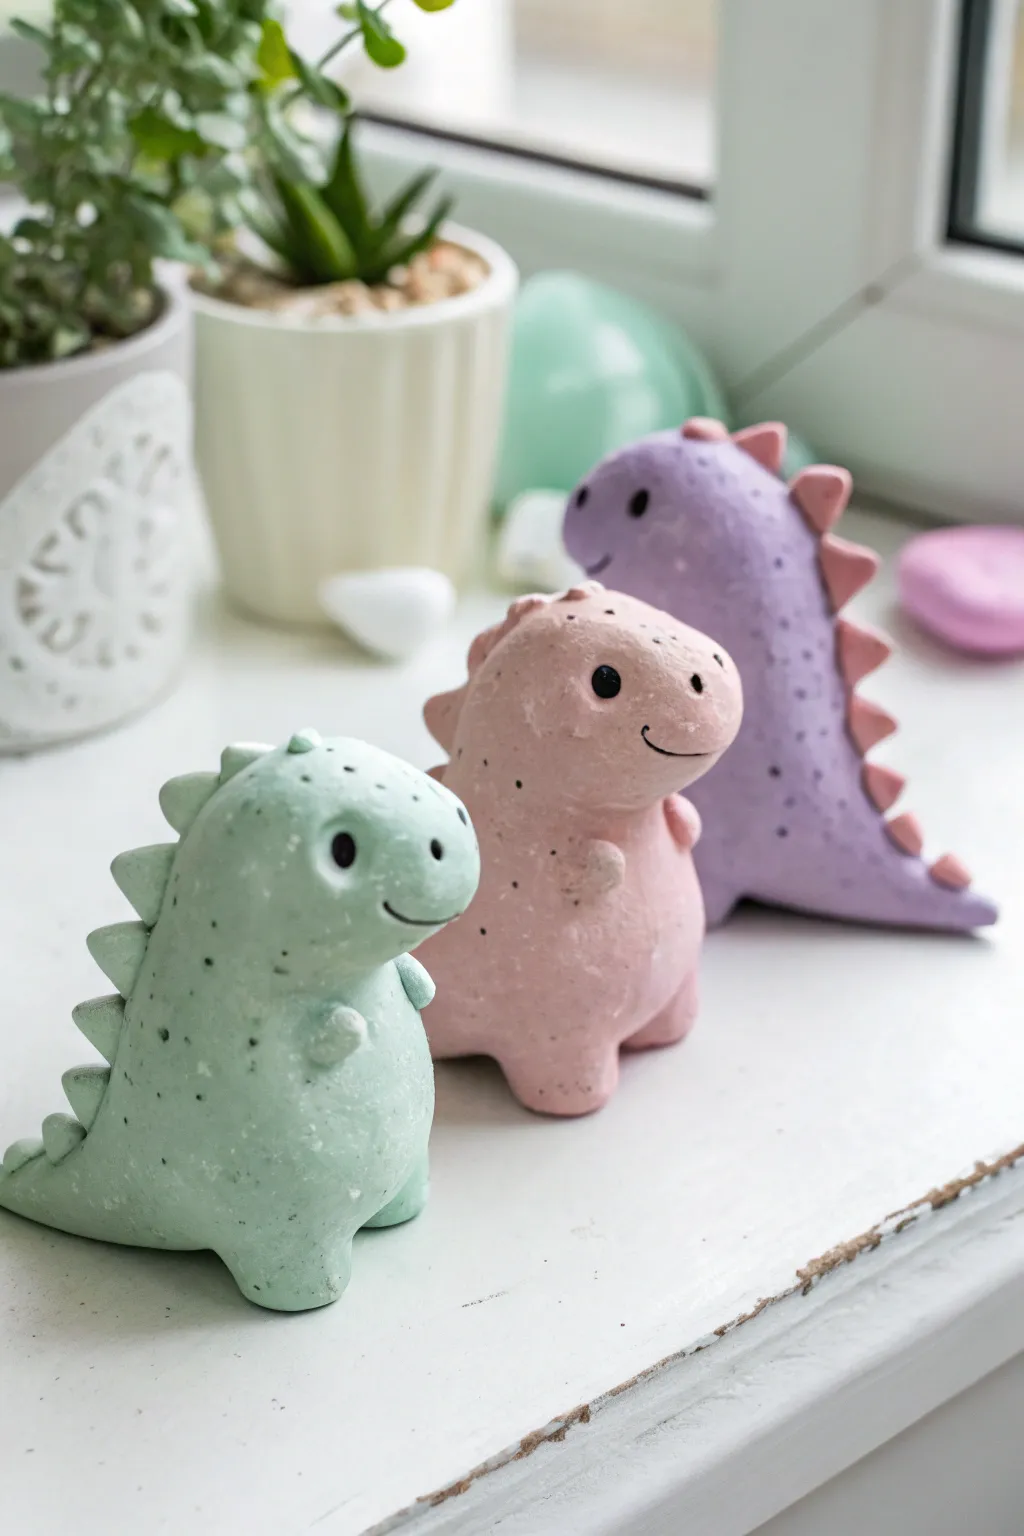
Create a trio of prehistoric pals that fit right in your hand using soft pastel colors and a charming speckled finish. These chunky little dinosaurs have a smooth, matte texture that pairs perfectly with modern home decor or a child’s shelf.
Step-by-Step Tutorial
Materials
- Polymer clay (mint green, blush pink, lilac purple)
- Black pepper or dried tea leaves (finely ground)
- Black acrylic paint
- Small dotting tool or toothpick
- Needle tool
- X-Acto knife or clay blade
- Rolling pin (acrylic or glass)
- Oven and baking sheet
- Balling tool (for eye sockets)
- Matte varnish (optional)
Step 1: Prepping the Textured Clay
-
Condition the clay:
Start by warming up your mint green clay in your hands until it is soft and pliable. This prevents cracking later on. -
Add the speckles:
Flatten the clay slightly and sprinkle a tiny pinch of ground black pepper or finely crushed dried tea leaves onto it. I find that pepper gives a more natural stone-like look. -
Mix thoroughly:
Fold the clay over and knead it repeatedly until the speckles are evenly distributed throughout the entire ball. -
Repeat for all colors:
Follow the same conditioning and speckling process for your blush pink and lilac purple clay portions.
Clean Hands, Clean Clay
Keep baby wipes nearby! When switching from darker colors or pepper-mixed clay to lighter pastels, clean your hands and tools to avoid unwanted smudges.
Step 2: Shaping the Bodies
-
Form the base:
For the green dino, roll a smooth ball of clay about the size of a golf ball, then gently elongate it into a teardrop shape. -
Stand it up:
Flatten the wider bottom of the teardrop against your work surface so the figure stands upright on its own. -
Create the head:
Gently press and pull the narrower top part of the teardrop forward to distinguish the head from the body, keeping the neck thick and sturdy. -
Add legs:
Roll two small, pea-sized balls of green clay. Attach them to the bottom front of the body and smooth the seams completely with your thumb or a modeling tool so they look like part of the main shape. -
Make the arms:
Roll two tiny sausages of clay for the arms. Press them onto the chest area, blending the shoulder joint seamlessly while leaving the little hands rounded. -
Start the tail:
Form a thick cone of clay and blend it onto the back of the figure, curving it down to touch the surface for extra stability.
Step 3: Adding Details
-
Make the spine plates:
Roll a very thin snake of clay and slice it into small triangles. Alternatively, pinch tiny balls into triangular shapes. -
Attach the spines:
Starring from the top of the head, press the triangular plates in a row down the back and onto the tail. Ensure they bond well to the body. -
Create eye sockets:
Use a balling tool to press two indentations on either side of the head where the eyes will go. -
Refine the face:
Use a needle tool or knife to gently carve a curved smile line. Use a small dotting tool to poke two nostril holes on the snout. -
Repeat for friends:
Construct the pink and purple dinosaurs using the same method, perhaps varying the tail curve or arm position slightly for personality.
Air Dry Alternative
Don’t have an oven? Use air-dry clay and mix acrylic paint directly into the white clay to get these custom pastel shades before shaping.
Step 4: Finishing Touches
-
Bake carefully:
Bake the figures according to your clay package instructions (usually 275°F/135°C for 15-30 minutes). Let them cool completely. -
Paint the eyes:
Dip a toothpick or small dotting tool into black acrylic paint and carefully fill the eye sockets you created earlier. -
Add highlights:
Once the black paint is dry, add a minuscule dot of white paint to the eyes to bring them to life. -
Seal (Optional):
If you want extra protection, brush on a coat of matte varnish, avoiding the natural stone look of a glossy finish.
Arrange your adorable trio on a sunny windowsill near some succulents for the perfect display


Smiling Toast Charms
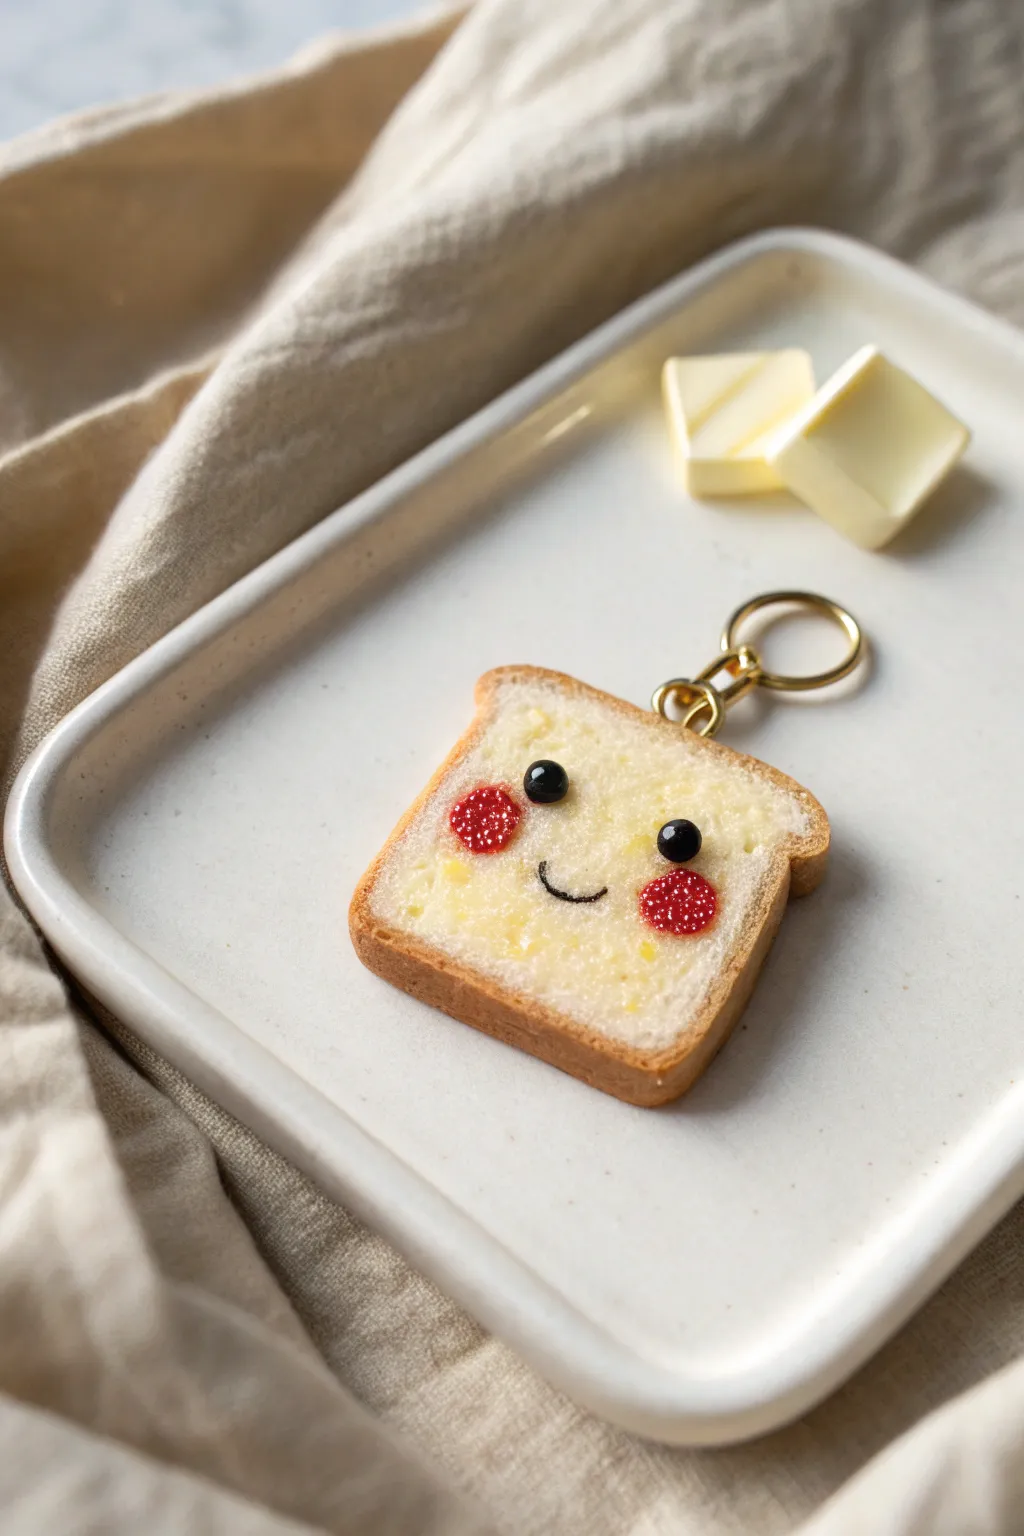
This adorable polymer clay charm captures the cozy feeling of breakfast with a kawaii twist. Featuring realistic bread texture, a melting buttery sheen, and a sweet smiling face, it makes for a perfect bag accessory or keychain gift.
How-To Guide
Materials
- Polymer clay (white, beige/tan, translucent yellow, black, bright red)
- Liquid polymer clay (translucent or white mixed with yellow soft pastels)
- Soft pastels (ochre, burnt orange, brown)
- Toothbrush or texturing tool
- Small ball tool or dotting tool
- Needle tool
- Craft knife or tissue blade
- Fine paintbrush
- Gold screw eye pin
- Gold jump ring and keychain ring
- Gloss glaze or UV resin (optional for wet look)
Step 1: Shaping the Bread Base
-
Mix the Dough Color:
Start by conditioning white polymer clay with a very small amount of beige or tan. You want an off-white, light cream color that resembles white sandwich bread. -
Form the Slice:
Roll the clay into a ball and then flatten it into a thick square shape, approximately 1/4 inch thick. Round off the top two corners slightly more to mimic the classic loaf shape. -
Add the Crust:
Roll out a thin strip of tan or light brown clay. Carefully wrap this strip around the edges of your white square. Gently blend the seam where the ends meet, smoothing it with your finger or a rubber tool so it looks seamless. -
Texture the Crumb:
Take an old toothbrush or a stiff stipple sponge and firmly press it all over the front and back white surfaces. This creates the porous, airy texture of bread. Don’t be afraid to be a little rough here; real bread isn’t perfectly smooth.
Fixing “Dirty” Clay
White clay picks up lint easily! Keep a piece of scrape clay nearby and roll it in your palms before starting to pull up dust, or use baby wipes to clean hands and tools frequently.
Step 2: Toasting and Buttering
-
Shade the Crust:
Scrape some ochre and burnt orange soft pastels into fine dust. Using a dry, soft brush, gently specific dusting the tan edges (crust) to give them a baked, golden appearance. Focus on the corners for a realistic gradient. -
Create the Butter:
Mix a tiny amount of translucent yellow clay with white liquid clay (or use liquid clay mixed with yellow pastel dust) to create a spreadable ‘butter’ mixture. It should be slightly runny but hold its shape. -
Spread the Butter:
Dab the butter mixture onto the center of the toast face. Use a needle tool to swirl it around slightly, leaving the texture uneven so it looks like it’s melting into the bread pores. -
Add Texture to Butter:
While the liquid clay is wet, take your toothbrush again and lightly tap over the buttered area. This integrates the topping with the bread texture underneath.
Realistic Texturing
For ultra-realism, tear a small piece of cosmetic sponge and use the ragged edge to texture the clay. It creates more irregular, natural-looking bread pockets than a standard toothbrush.
Step 3: Adding the Kawaii Face
-
Position the Eyes:
Determine where the face will go—usually centered or slightly lower allows for maximum cuteness. Gently create two small indentations with a ball tool where the eyes will sit. -
Place the Eyes:
Roll two tiny balls of black clay. Press them securely into the indentations you executed. Make sure they are embedded slightly so they don’t pop off later. -
Add Highlights:
It’s optional, but adding a micro-dot of white paint or clay to the black eyes creates a lively sparkle. -
Sculpt the Mouth:
Roll an incredibly thin snake of black clay. Cut a tiny ‘U’ shape and gently press it into the clay between the eyes using a needle tool. -
Create Rosy Cheeks:
Roll two small spheres of bright red clay. Flatten them into discs and press them onto the cheeks, just below and outside the eyes. -
Texture the Cheeks:
To make the cheeks look like jam or just sugary toppings, tap them lightly with your toothbrush or needle tool to roughen the surface slightly.
Step 4: Assembly and Baking
-
Insert Hardware:
Insert a gold screw eye pin into the top center of the crust. If the clay is soft, you can push it straight in; if firm, twist it gently. Ensure it goes deep enough to be secure. -
Bake:
Bake the charm according to your clay manufacturer’s instructions (usually 275°F/135°C for 15-30 minutes). I often tent foil over white clay to prevent scorching. -
Finish and Attach:
Once cool, inspect the charm. If desired, brush a coat of gloss glaze or UV resin over the ‘buttered’ area and the red cheeks for a permanent wet look. Finally, use pliers to attach the jump ring and keychain.
Clip this smiling breakfast buddy to your keys and enjoy a little boost of happiness every time you leave the house

The Complete Guide to Pottery Troubleshooting
Uncover the most common ceramic mistakes—from cracking clay to failed glazes—and learn how to fix them fast.
Happy Fruit With Tiny Faces
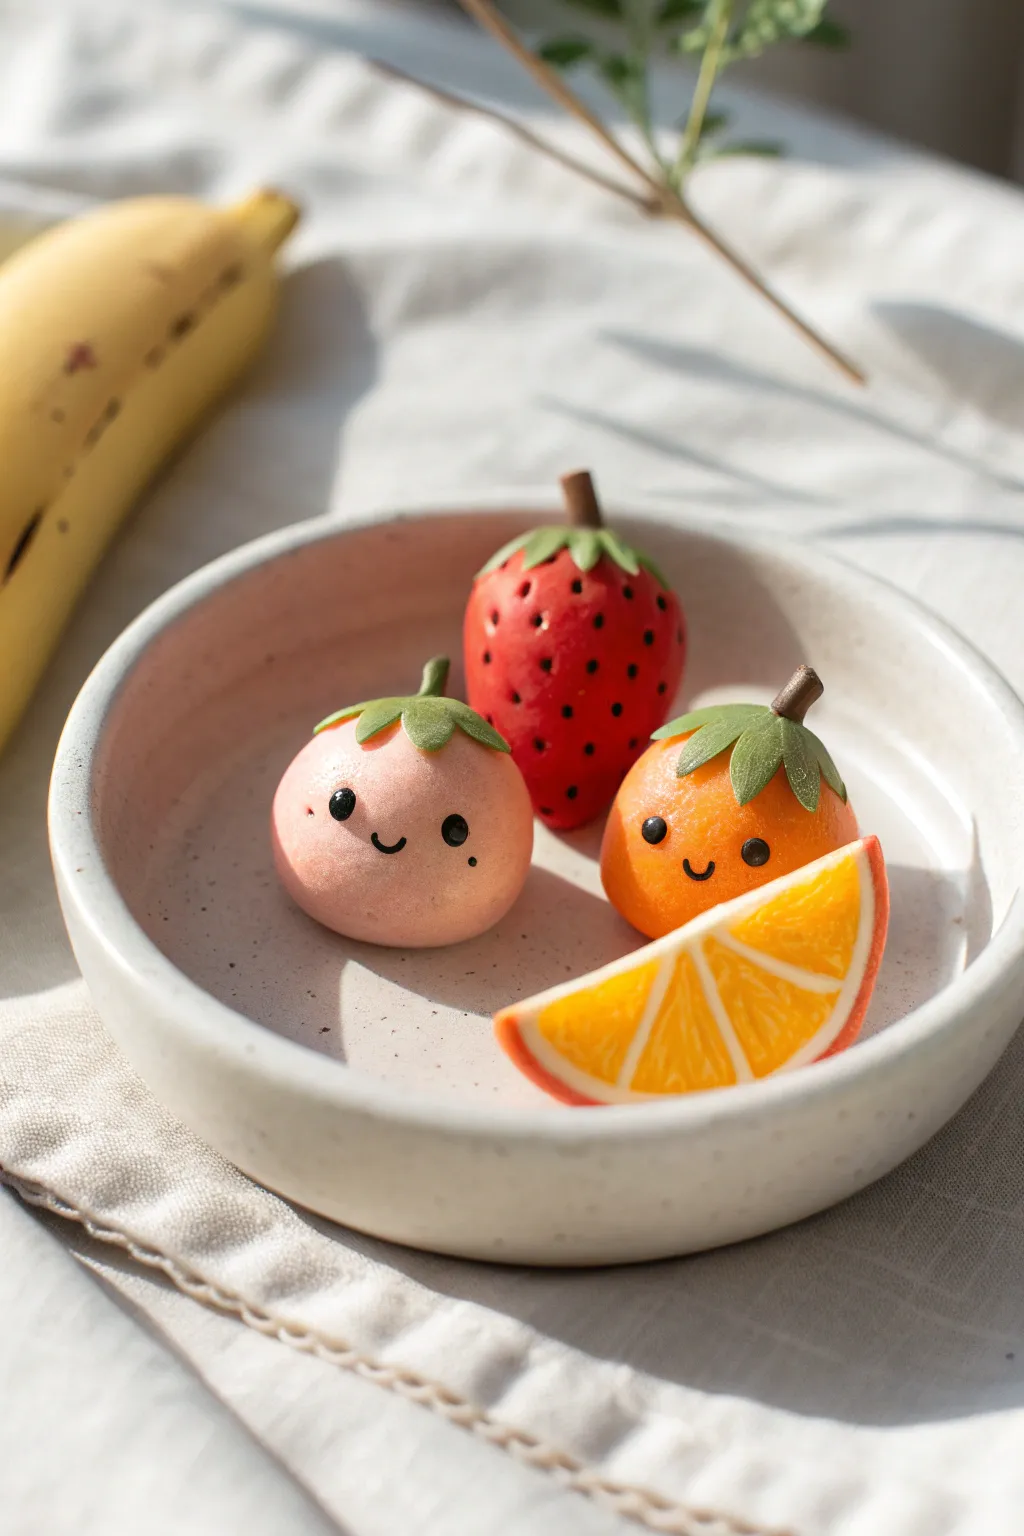
These adorable miniature clay fruits bring a burst of sweetness to any desk or shelf with their tiny, sculpted smiles. You’ll create a trio of happy characters—a blushing peach, a joyful tangerine, and a classic strawberry—along with a realistic citrus slice for extra charm.
Step-by-Step Guide
Materials
- Polymer clay (pink, orange, red, green, white, translucent, brown, black)
- Blade or craft knife
- Modeling tools (ball tool, needle tool)
- Small star-shaped cutter (optional for leaves)
- Soft pastel chalks (red, orange) for shading
- Soft brush
- Mod Podge or gloss glaze
- Oven for baking
Step 1: Sculpting the Base Fruits
-
Mix and Condition:
Start by conditioning your pink, orange, and red polymer clay until soft and pliable. For the pink peach, I like to mix a tiny bit of white into standard pink to get that soft, pastel hue. -
Shape the Bodies:
Roll three balls of clay: one pink (about 1 inch), one orange (same size), and one red that is slightly tapered at the bottom to form a strawberry shape. -
Refine the Peach and Tangerine:
Gently press the pink and orange spheres onto your work surface to flatten the bottoms slightly so they sit upright. Use your thumb to smooth any fingerprints. -
Texture the Strawberry:
Take your red tapered cone and use a needle tool to gently poke small indentations all over the surface to mimic seed pockets.
Step 2: Adding Leafy Crowns
-
Create the Sepals:
Roll out a thin sheet of green clay. Use a small star cutter or cut freehand star shapes with your craft knife to make the leafy tops for all three fruits. -
Attach the Caps:
Gently press a green star shape onto the top of each fruit. Use a ball tool to smooth the center of the green cap down onto the fruit body, creating a small depression in the middle. -
Shape the Stems:
Roll tiny logs of brown clay for the stems. Insert them into the depression you made in the center of the green leaves. You can curve them slightly for a whimsical look. -
Refine the Leaves:
Use a needle tool or knife to gently score lines on the green leaves for texture, or curl the tips upward slightly to make them look organic.
Use Liquid Clay
Apply a tiny dot of liquid polymer clay (like Bake & Bond) under the eyes and stems before attaching. This acts as a glue and ensures tiny parts don’t fall off after baking.
Step 3: Creating the Orange Slice
-
Construct the Cane:
To make the realistic slice, form a cylinder of translucent orange clay. Wrap this cylinder in a thin sheet of white clay. -
Section the Segments:
Cut this wrapped cylinder into 8 pie-shaped wedges. Place a thin sheet of white clay between the wedges as you reassemble them into a circle, creating the pith lines. -
Wrap the Rind:
Wrap the reassembled cylinder in a final thick sheet of orange clay to form the rind. Reduce the cane by rolling it gently until it’s the desired diameter. -
Cut the Slice:
Slice a thin disk from your cane, then cut that disk in half to create the semi-circle wedge shown in the photo. Texture the inner orange segments lightly with a needle tool.
Make it Functional
Instead of leaving them as figurines, insert a magnetic disc into the back before baking to create adorable fridge magnets, or add an eye pin to the top to make charms.
Step 4: Adding Faces and Details
-
Mark the Features:
On the pink and orange fruits, use a needle tool to lightly mark where the eyes and mouth will go. Keep the features low on the ‘face’ for maximum cuteness. -
Sculpt the Eyes:
Roll extremely tiny balls of black clay. Press them gently into the marked eye spots. -
Create the Smiles:
Roll a microscopic snake of black clay. Cut tiny segments and curve them into a ‘U’ shape using a needle tool, then press onto the face. -
Strawberry Seeds:
For the strawberry, roll tiny specks of black or dark brown clay and place one into each indentation you made earlier. -
Adding Blush:
Scrape some pink or red soft pastel into a powder. Use a soft brush to gently apply ‘blush’ onto the cheeks of the peach and tangerine, and add some depth to the strawberry’s surface.
Step 5: Finishing Up
-
Bake:
Bake your pieces according to your clay package instructions (usually 275°F / 135°C for 15-30 minutes). Let them cool completely. -
Add Shine:
Apply a coat of gloss glaze or polyurethane varnish to the strawberry and the orange slice to give them a juicy, wet look. Keep the peach and tangerine matte for a velvety skin effect.
Now you have a trio of sweet, smiling fruit companions to brighten up your day
Mini Popsicle Keychain Cuties
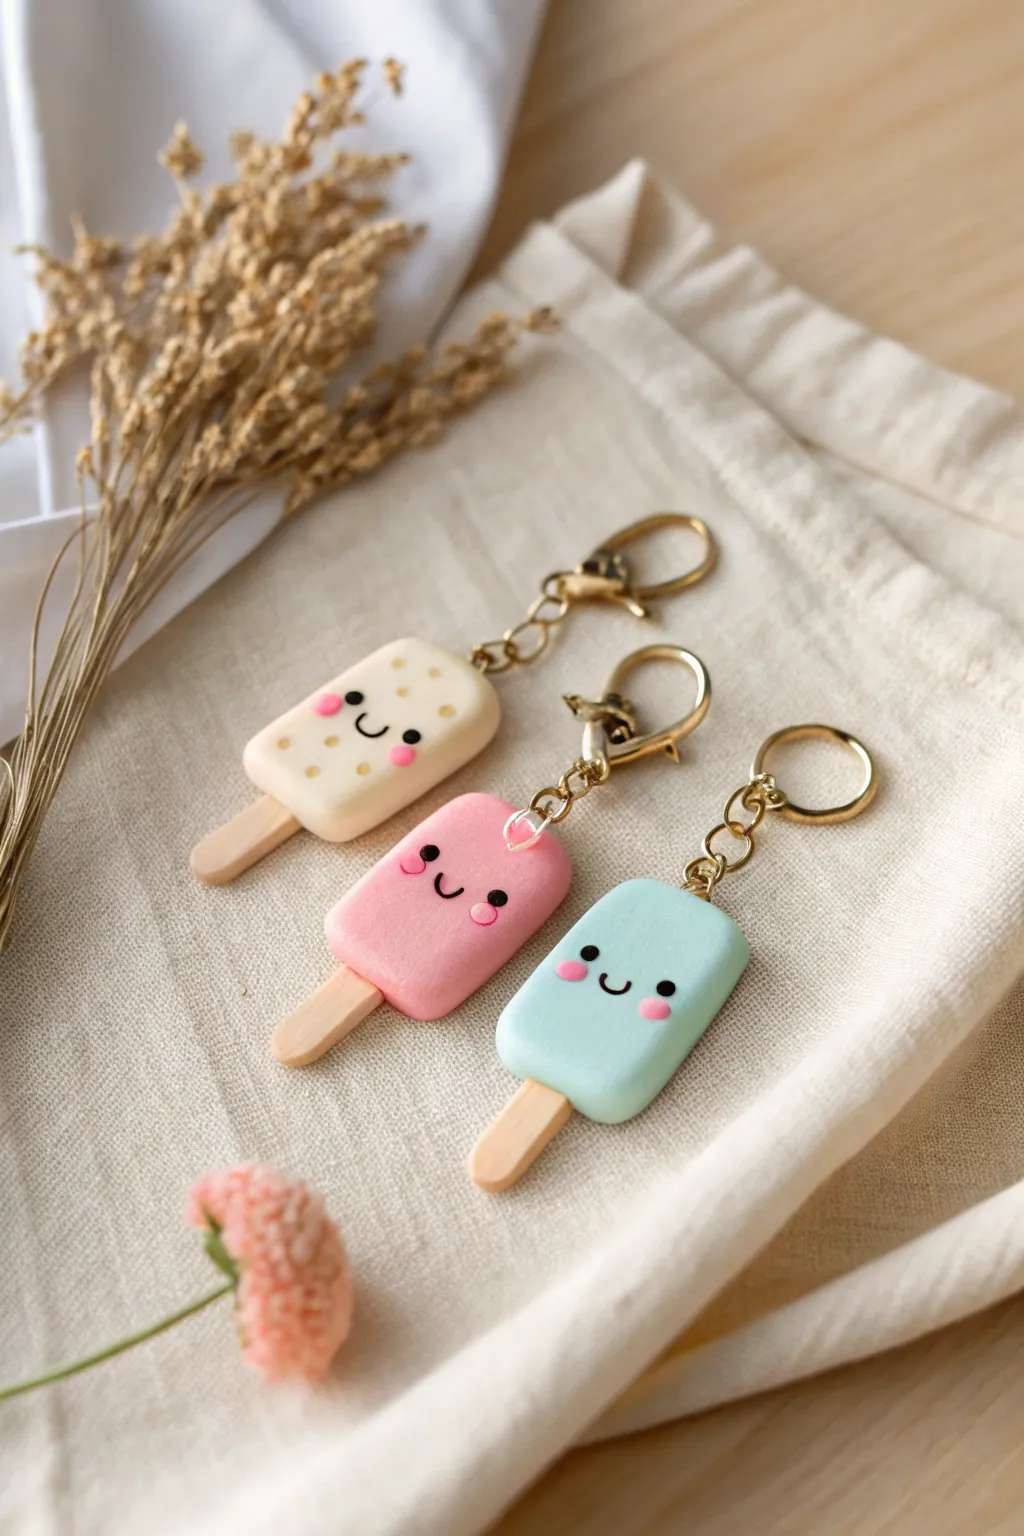
These adorable polymer clay popsicles are the perfect accessory to sweeten up your keychain or backpack. With their pastel colors and cheerful little faces, they capture the essence of summer fun in a durable, handmade charm.
Step-by-Step
Materials
- Polymer clay (beige/ecru, pastel pink, pastel blue/mint, tan for sticks, black for eyes)
- Acrylic rolling pin
- Popsicle-shaped clay cutter (small) or X-acto knife
- Dotting tool or ball stylus
- Liquid polymer clay (Translucent)
- Modeling tool or toothpick
- Eye pins (gold)
- Jump rings and keychain clasps (gold)
- Gloss glaze or UV resin (optional for shine)
- Oven and baking sheet
Step 1: Shaping the Base
-
Condition the Clay:
Begin by thoroughly conditioning your beige, pink, and mint blue clays separately. You want the clay to be soft and pliable without any cracks, warmth from your hands helps with this process. -
Roll the Slabs:
Roll each color out into a thick slab, approximately 1/4 inch (6mm) thick. You want them chunky enough to look like real ice cream bars and to securely hold an eye pin later. -
Cut the Shapes:
Use a small popsicle-shaped cutter to punch out your forms. If you don’t have a cutter, print a small paper template, lay it on the clay, and carefully trace around it with an X-acto knife for a clean edge. -
Soften the Edges:
Gently tap the sharp edges of your clay cutouts with your fingertip. We want a soft, rounded look like a melting treat, rather than sharp, harsh angles. -
Create the Sticks:
Take the tan clay and roll it into a thin sheet. Cut small rectangles with rounded bottoms to serve as the wooden stick. Alternatively, form a small log and flatten it slightly. -
Attach the Sticks:
Insert the tan clay stick into the bottom center of each popsicle body. To ensure a permanent bond, I like to add a tiny drop of liquid polymer clay or ‘Bake and Bond’ to the connection point before pressing them together.
Clean Clay Pro Tip
Keep baby wipes or rubbing alcohol nearby. Clean your hands and tools between colors (especially before touching the beige clay) to prevent lint or dye transfer.
Step 2: Adding Personality
-
Indent for Eyes:
Decide where you want the face to be—usually slightly lower than center looks cutest. Use a small ball stylus to make two tiny, shallow indentations where the eyes will sit. -
Insert the Eyes:
Roll incredibly tiny balls of black clay. Place them into the indentations you just made and gently press them flat so they don’t protrude too much. -
Draw the Mouth:
Roll a microscopic snake of black clay and curve it into a ‘U’ shape for the smile. Carefully place it between the eyes using a needle tool or toothpick. Press gently to adhere. -
Add Rosy Cheeks:
For the pink and blue popsicles, take a darker shade of pink clay (or use pink chalk pastel dust) and create small oval cheeks under the eyes. For the beige popsicle, add pink cheeks just like the others. -
Texture the Beige Pop:
The beige popsicle in the image has a cookie-dough texture. Use a small dotting tool to gently press random indentations all over the front surface, mimicking crumbs or texture. -
Insert Hardware:
Carefully push a gold eye pin into the top center of each popsicle. If the pin is too long, trim it first. Similar to the stick, adding a dab of liquid clay on the pin helps it stay put after baking.
Fixing Fingerprints
Before baking, lightly brush the surface with a tiny amount of baby oil or cornstarch. This smoothes out fingerprints without changing the shape.
Step 3: Baking and Assembly
-
Bake:
Place your creations on a baking sheet lined with parchment paper or a ceramic tile. Bake according to your brand of clay’s instructions—usually around 275°F (130°C) for 30 minutes for this thickness. -
Cool Down:
Let the pieces cool completely inside the oven or on a wire rack. Polymer clay is slightly soft when hot and hardens fully as it cools, so don’t touch them yet. -
Secure the Pin:
Once fully cooled, gently tug the eye pin. If it feels loose, pull it out, add a drop of super glue or E6000, and slide it back in for maximum durability. -
Seal (Optional):
For a glossy ‘melting ice cream’ finish, apply a thin coat of UV resin or polymer clay gloss glaze. Cure the resin under a UV lamp or let the glaze air dry completely. -
Attach Keychain:
Using two pairs of pliers, twist open a jump ring. Loop it through the eye pin on the popsicle and the bottom loop of your gold keychain clasp, then twist it closed securely.
Now clip your sweet new charms onto your bag and show off your summer style


What Really Happens Inside the Kiln
Learn how time and temperature work together inside the kiln to transform clay into durable ceramic.
Kawaii Animal Ring Dishes
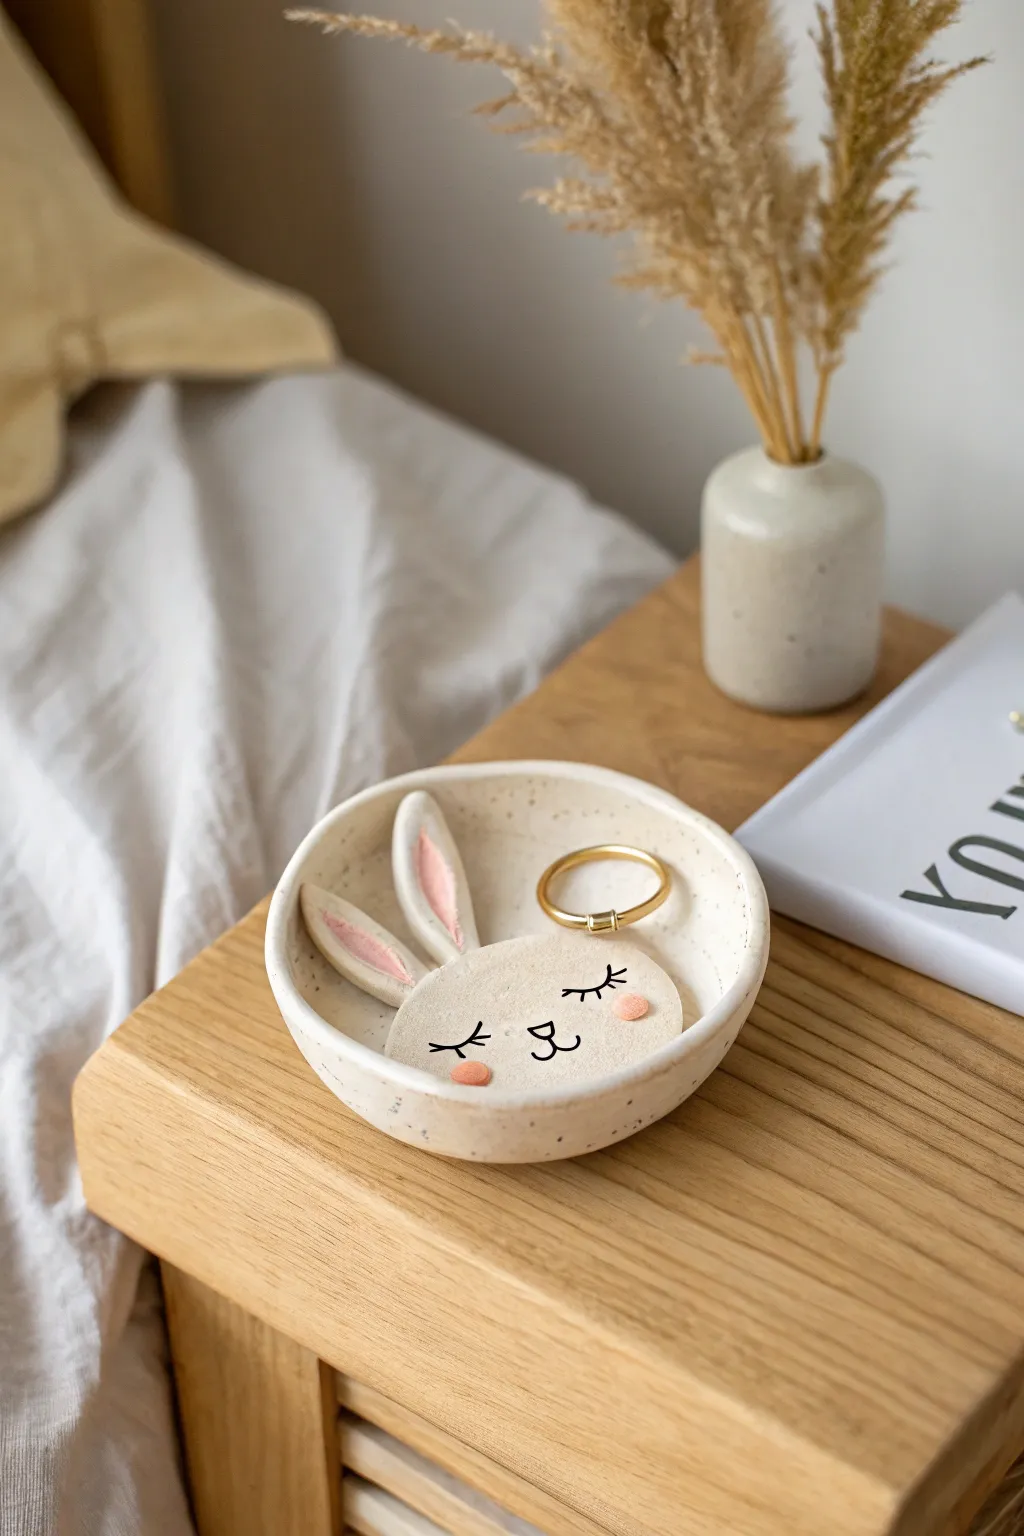
This adorable ring dish features a sleepy bunny face resting peacefully inside a shallow bowl, perfect for holding your favorite jewelry. With its speckled finish and sweet 3D ears, it adds a touch of gentle charm to any bedside table.
How-To Guide
Materials
- White or speckled polymer clay (or air-dry clay)
- Acrylic rolling pin
- Round cookie cutter (approx. 4-5 inches)
- Small clay sculpting tools (needle tool, smoothing tool)
- Acrylic paints (black and soft pink)
- Fine detail paintbrush
- Gloss varnish or glaze
- Oven (for polymer) or drying space (for air-dry)
- Sandpaper (fine grit)
- Small bowl (oven-safe if using polymer) to use as a form
Step 1: Creating the Dish Base
-
Condition the Clay:
Begin by kneading your chosen clay until it is soft and pliable. If you want that speckled pottery look shown in the photo, mix in a small amount of black pepper or use pre-speckled granite-effect clay. -
Roll It Out:
Use your acrylic rolling pin to roll the clay into a smooth, even slab. Aim for a thickness of about 1/4 inch so the dish feels substantial but not chunky. -
Cut the Circle:
Press your large round cookie cutter firmly into the clay to create a perfect circle. Peel away the excess clay. -
Form the Curve:
Gently drape your clay circle inside a slightly larger, shallow bowl to give it a curved shape. If baking polymer clay, ensure this forming bowl is oven-safe.
Cracked Clay?
If you see tiny cracks after drying, mix a loose paste of clay and water (slip) or liquid clay to fill them in, then sand smooth once dry.
Step 2: Sculpting the Bunny Features
-
Shape the Head:
Roll a separate ball of clay and flatten it into a wide oval shape. This will be the bunny’s face. Place it securely in the bottom center of your dish, pressing gently to adhere it. -
Make the Ears:
Shape two teardrop pieces of clay for the ears. Elongate them slightly and flatten them. I find it helpful to curve one ear slightly for a more organic look. -
Create Inner Ears:
Using a sculpting tool or your thumb, make a shallow indentation down the center of each ear. This creates space for the pink detail later. -
Attach the Ears:
Attach the ears to the top of the bunny’s head inside the bowl. Blend the seams at the base of the ears into the head using a smoothing tool so they don’t break off later. -
Smooth Everything Out:
Dip your finger in a little water (for air-dry) or clay softener (for polymer) and gently run it over all edges to remove fingerprints and harsh lines.
Make it Luxe
Use gold leaf paint on the rim of the bowl or the tips of the bunny ears for an elegant, high-end ceramic look.
Step 3: Finishing Touches
-
Cure or Dry:
Bake your piece according to the clay package directions, or let it air dry for 24-48 hours until completely hard. -
Sand Edges:
Once fully cured and cooled, lightly sand the rim of the bowl with fine-grit sandpaper to ensure it’s perfectly smooth to the touch. -
Paint the Details:
Using a very fine brush and black acrylic paint, carefully draw two curved lines with lashes for sleepy eyes, and a small anchor shape for the nose and mouth. -
Add Pink Accents:
Paint the inner indentations of the ears with soft pink paint. Dab two small circles of pink on the cheeks for a blushing effect. -
Seal the Piece:
Apply a coat of glossy varnish or glaze over the entire dish. This gives it that ceramic-like shine and protects your paint work. -
Final Dry:
Let the varnish dry completely in a dust-free area before placing any jewelry inside.
Now you have a sweet little guardian for your precious rings and earrings
Bunny Toothbrush Holder Buddy
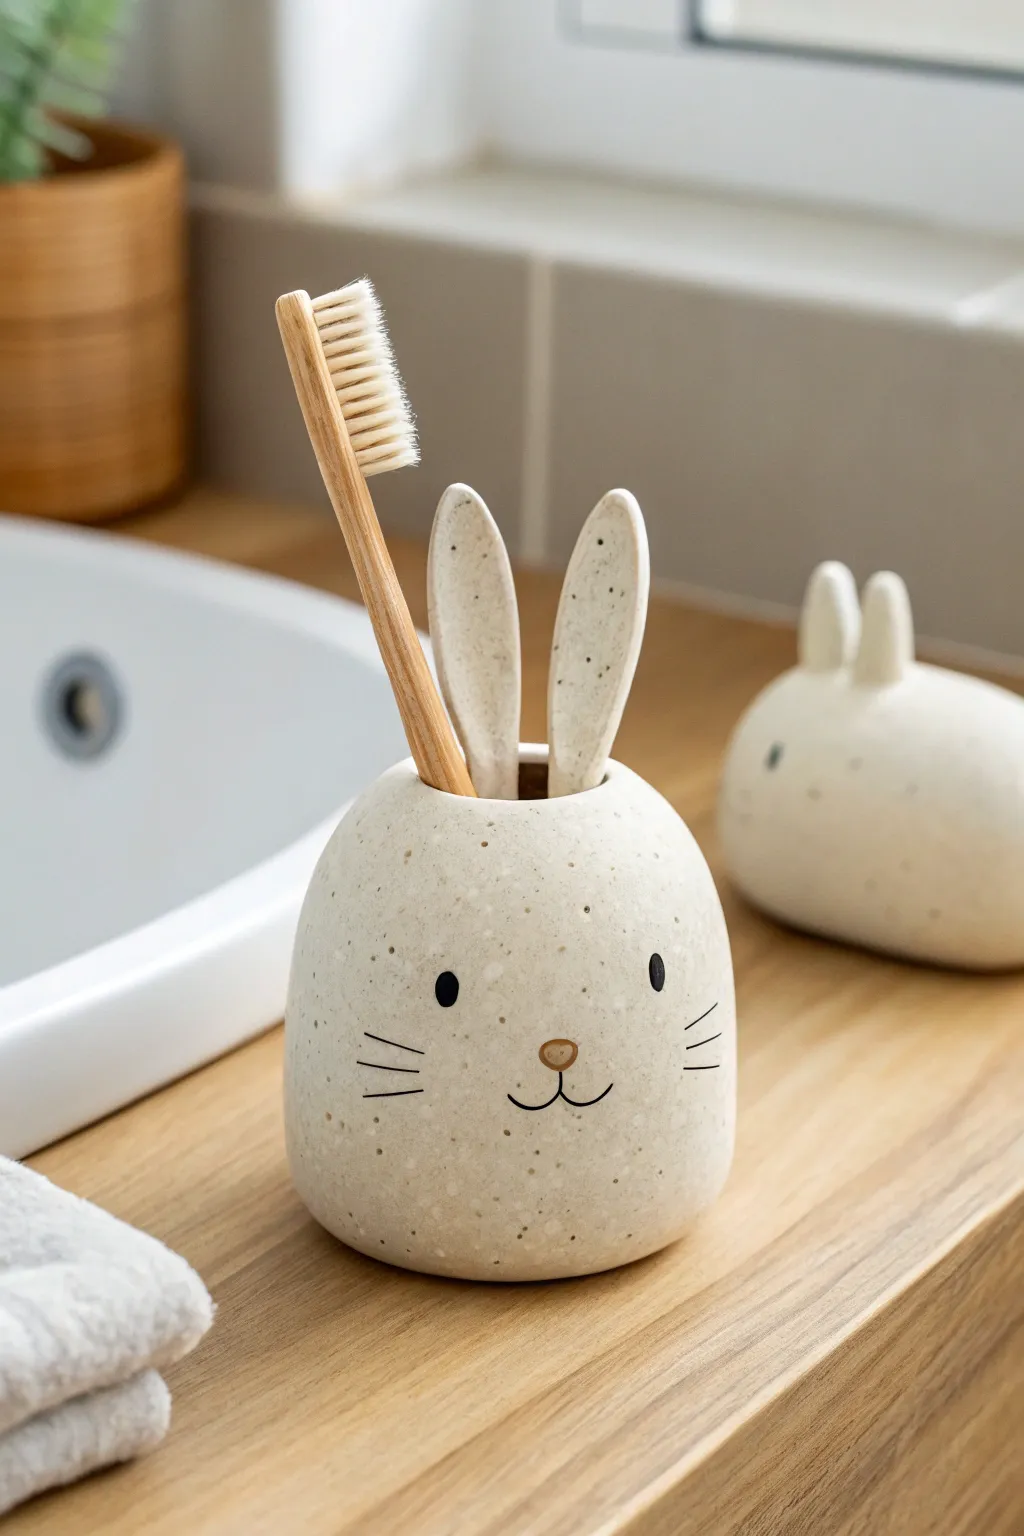
Bring a little whimsy to your morning routine with this adorable speckled bunny toothbrush holder. Modeled to look like ceramic stoneware, this project uses polymer or air-dry clay to create a functional and sweet bathroom accessory.
Step-by-Step
Materials
- Beige polymer clay (approx. 2-3 blocks) or air-dry clay
- Coarse black pepper or dried tea leaves (for speckled effect)
- Acrylic rolling pin
- Blade or craft knife
- Small circle cutter (approx. 1 inch diameter)
- Modeling tools (smoothing tool, needle tool)
- Black and brown acrylic paint
- Fine detail paintbrush
- Satin or matte varnish (water-resistant)
- Aluminum foil
- Toothbrush (for sizing)
Step 1: Prepping and Shaping
-
Create the Speckled Clay:
Begin by conditioning the beige clay until it is soft and pliable. To achieve that trendy stoneware look, sprinkle in a pinch of coarse black pepper or dried tea leaves and knead it thoroughly until the speckles are evenly distributed throughout the batch. -
Form the Base Body:
Roll the main portion of your clay into a large, smooth ball. Gently flatten the bottom against your work surface so it sits stability without rolling away. -
Shape the Dome:
Using your palms, gently taper the top of the ball slightly to create a soft, rounded dome shape, resembling a fat gumdrop. This will be the bunny’s head and body combined. -
Create the Opening:
Press the end of a toothbrush handle or a similarly sized dowel into the top center/back of the shape. Wiggle it slightly to widen the hole, ensuring it is deep enough to hold a brush securely but not so deep that it pierces the bottom. -
Refine the Holder:
Smooth out the rim of the hole you just made. I like to use a ball-tipped tool or a wet finger here to make sure the opening is neat and rounded.
Step 2: Adding the Ears
-
Shape the Ear Slabs:
Take two smaller equal portions of clay and roll them into thick logs, then flatten them gently to create elongated oval shapes. -
Refine Ear Shape:
Pinch the bottom of each oval slightly to create a narrower attachment point, keeping the tops rounded and spoon-like. -
Attach the ears:
Position the ears behind the toothbrush opening. Provide firm pressure to blend the clay at the base of the ears into the main body so there are no visible seams. -
Secure the Structure:
If the ears are drooping, prop them up with crumpled bits of paper towel or aluminum foil to hold them straight while the clay cures or dries.
Ears Falling Off?
If the ears feel too heavy, insert a small piece of toothpick or wire into the ear and body to act as an internal armature before blending the clay seams.
Step 3: Finishing Details
-
Surface Smoothing:
Check the entire piece for fingerprints or lumpy areas. Dip your finger in a little rubbing alcohol (for polymer) or water (for air-dry) and smooth the surface perfectly. -
Bake or Dry:
Follow your clay manufacturer’s instructions for baking or drying. If baking, tent with foil to prevent scorching the beige color. -
Cool Down:
Allow the piece to cool completely before attempting any painting. The clay needs to be room temperature for paint to adhere properly.
Stone Texture Trick
To enhance the stoneware look, gently pat the raw clay surface with a stiff toothbrush or crumpled foil before baking to create a subtle pitted texture.
Step 4: Painting the Face
-
Paint the Nose:
Using a fine detail brush and light brown paint, create a small, soft inverted triangle in the center of the face for the nose. You can leave a tiny unpainted dot for a highlight. -
Draw the Mouth:
With black paint and your finest brush (or a fine-tip permanent marker), draw a simple ‘w’ shape extending down from the nose to form the mouth. -
Add the Eyes:
Paint two small, solid black ovals on either side of the nose. Keep them wide-set to enhance the cute, chubby aesthetic. -
Whiskers Details:
With a very light touch, flick three short lines on each cheek area for whiskers. -
Seal for Bathroom Use:
Since this will live near a sink, apply two to three coats of a water-resistant polyurethane or resin varnish to protect the paint and clay from moisture.
Place your finished bunny by the sink and enjoy the extra cheer during your daily brushing routine

TRACK YOUR CERAMIC JOURNEY
Capture glaze tests, firing details, and creative progress—all in one simple printable. Make your projects easier to repeat and improve.
Cute Pen Cup With Little Ears
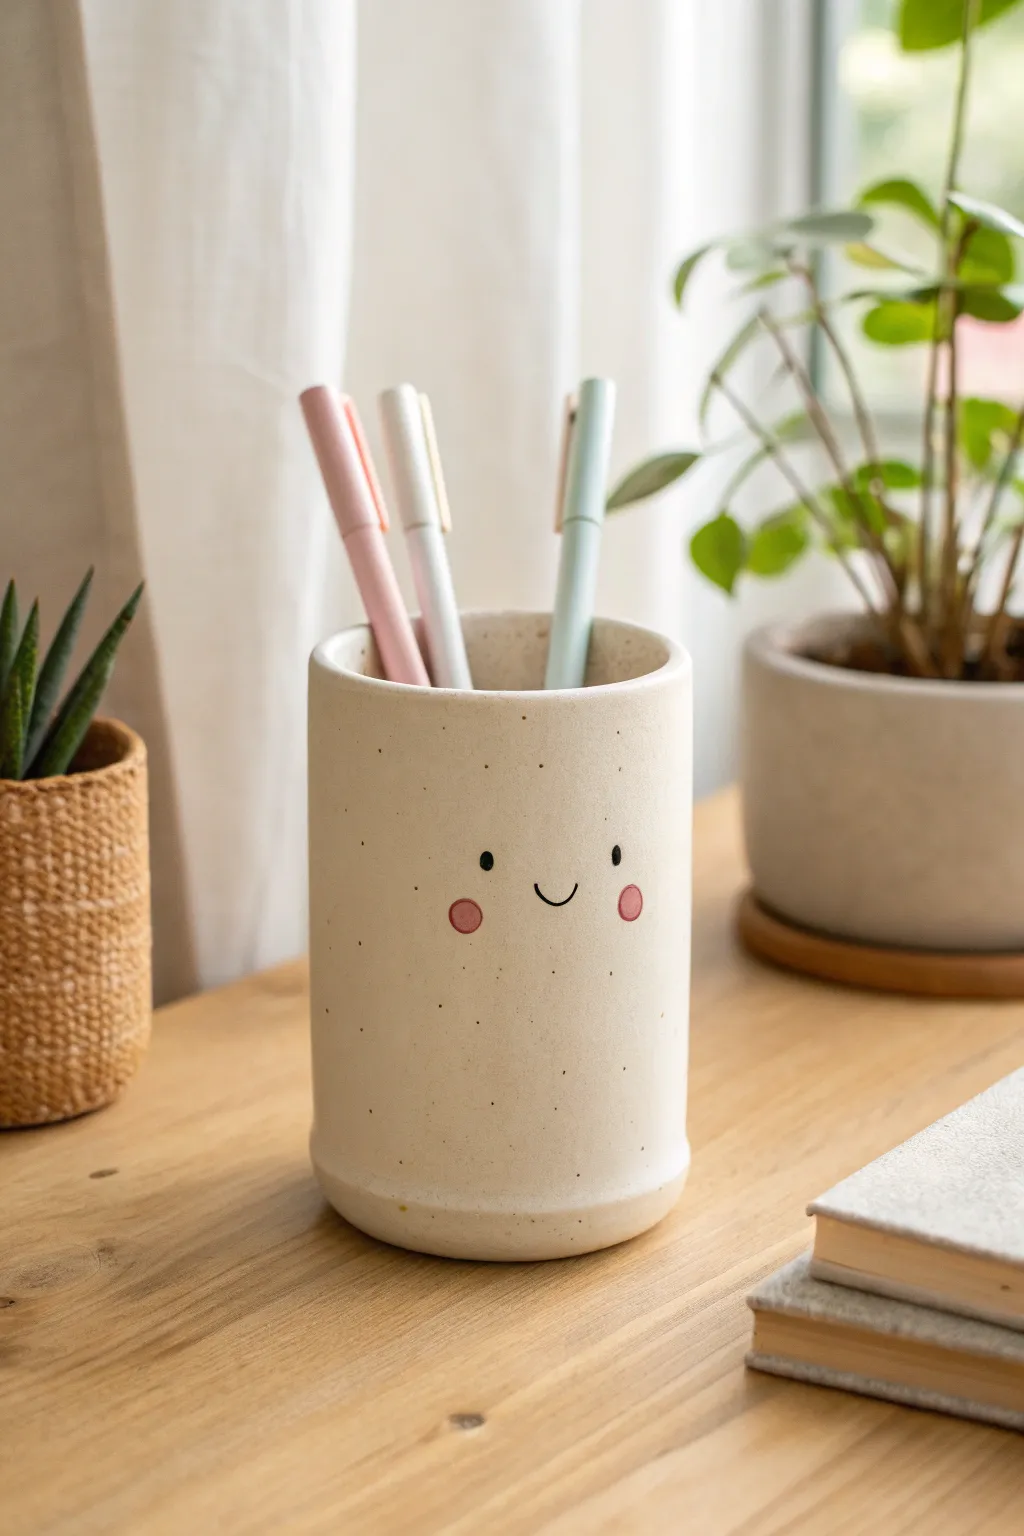
Brighten up your desk with this incredibly charming pen cup featuring a sweet, minimalist face. The natural speckled clay look combines perfectly with the simple hand-painted details for a piece that feels both modern and handmade.
Detailed Instructions
Materials
- Air-dry clay (white or cream)
- Speckled clay additive or black pepper/sand
- Rolling pin
- Craft knife or clay tool
- Small cup or jar (to use as a mold)
- Parchment paper
- Small bowl of water
- Sanding sponge (fine grit)
- Acrylic paint (black and pink)
- Fine detail paintbrush or dotting tool
- Matte sealant or varnish
Step 1: Preparing the Clay Base
-
Create the speckled effect:
If you aren’t using pre-speckled clay, knead a pinch of coarse black pepper, dried coffee grounds, or craft sand into your white clay. Fold and knead until the specks are evenly distributed throughout the ball. -
Roll out the slab:
Place your clay on parchment paper and roll it out to an even thickness of about 1/4 inch. Try to keep the thickness consistent so the cup walls are sturdy. -
Cut the base:
Use your chosen cylinder mold (like a jar) to trace a circle onto the clay slab, then cut it out with your craft knife. This circular disc will be the bottom of your cup. -
Measure the walls:
Measure the circumference of your base circle. Cut a long rectangular strip from the remaining clay slab that matches this length plus a little extra for overlap, with your desired height (around 4-5 inches).
Step 2: Assembling the Cylinder
-
Form the cylinder:
Wrap the parchment paper around your mold first to prevent sticking. Then, wrap the clay rectangle around the mold, bringing the two short ends together. -
Join the seam:
Roughen the edges where they meet (scoring) and add a drop of water (slip). Press the edges firmly together and smooth the seam with your finger or a tool until it disappears. -
Attach the base:
Score the bottom edge of your cylinder walls and the outer edge of your circular base. Press the cylinder onto the base. -
Smooth the connection:
Use a modeling tool to drag a little clay from the wall down to the base to lock them together. Then, smooth the outside connection with a wet finger to create a seamless transition. -
Create the flared bottom:
To mimic the image, gently press and pinch the very bottom edge of the cup outwards slightly. This creates that subtle, weighted look at the foot of the holder. -
Refine the rim:
Smooth the top rim of the cup with a damp sponge or finger. I like to round the edges to get that soft ceramic look rather than a sharp cut edge. -
Remove the mold:
Once the clay has stiffened slightly but is not fully dry, carefully slide the inner mold out. If you leave it in too long, the clay might shrink and crack around it.
Uneven Seams?
If the vertical seam keeps cracking open as it dries, dampen the area slightly and fill the crack with a thick paste made of clay scraps and water, then resmooth.
Step 3: Finishing Details
-
Let it dry:
Allow the clay to dry completely for 24-48 hours. Keep it away from direct heat sources to prevent uneven drying and warping. -
Sand for smoothness:
Once bone dry, take your sanding sponge and gently buff the entire surface. Focus on the rim and the bottom edge to ensure they feel pleasant to the touch. -
Paint the eyes:
Using a dotting tool or the back end of a paintbrush dipped in black acrylic paint, place two small, wide-set dots for the eyes about halfway down the cup. -
Add the smile:
With your finest brush and black paint, draw a tiny, shallow ‘U’ shape right between the eyes. Keep the line thin and delicate. -
Paint the cheeks:
Mix a soft dusty pink color. Using a slightly larger dotting tool or a round brush, add two rosy circles just below and outside the eyes. -
Seal the piece:
Finish by applying two coats of matte sealant. This protects the clay and gives the surface a professional, finished texture without being too shiny.
Add Texture
Before the clay dries, gently press a clean toothbrush against the surface to give it a subtle, stone-like texture that enhances the speckled look.
Now you have a cheerful companion to keep your favorite pens organized and ready for work
Blob-Animal Fridge Magnets
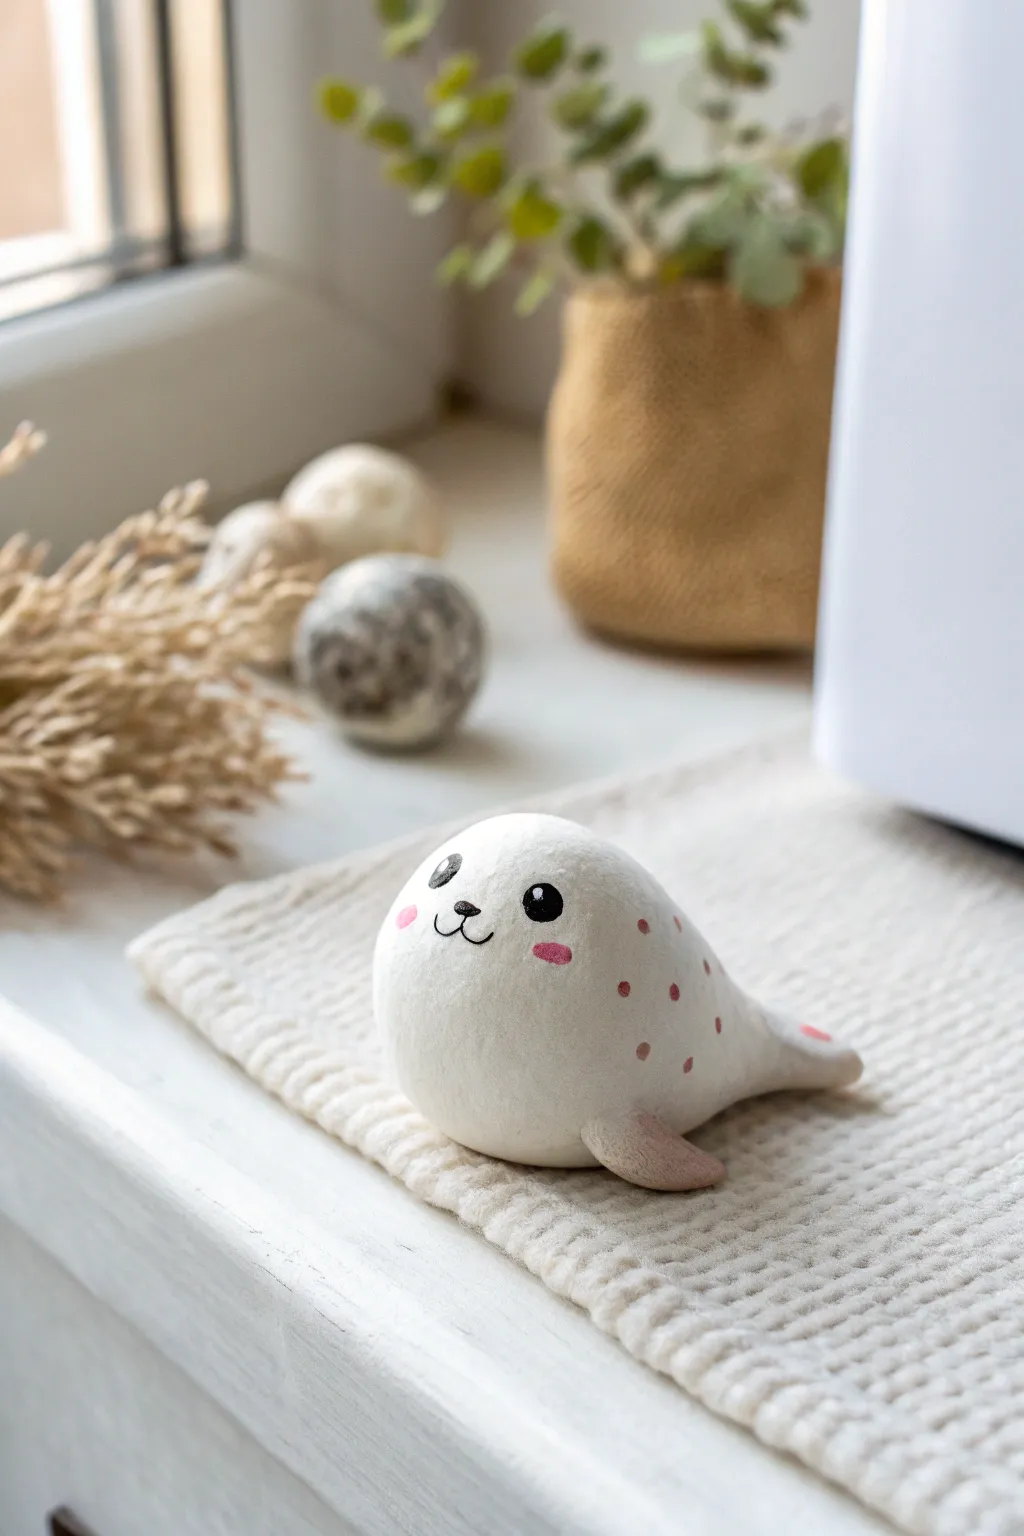
This adorable little seal brings a cheery brightness to your kitchen with its round, blob-like shape and sweet expression. Modeled from air-dry clay and painted with delicate pink spots, it’s a simple yet heartwarming project perfect for beginners.
Step-by-Step
Materials
- White stone clay or fine-grain air-dry clay
- Water (for smoothing)
- Sandpaper (fine grit, 400-600)
- Acrylic paints: Black, White, Soft Pink, Dusty Rose
- Fine detail paintbrush (size 0 or 00)
- Round neogydium magnet (strong)
- Superglue or E6000 adhesive
- Matte spray varnish
Step 1: Sculpting the Base
-
Condition the Clay:
Start by taking a walnut-sized amount of white air-dry clay. Knead it thoroughly in your hands until it is warm, pliable, and free of any cracks. -
Form the Body:
Roll the clay into a smooth ball between your palms. Gently tap it onto your work surface to flatten the bottom slightly, creating a stable base. -
Shape the Head:
Using your thumb and forefinger, gently pinch one side of the ball to elongate it slightly upwards and forwards. This softer slope will become the seal’s face area, giving it that classic eager look. -
Create the Tail:
At the back of the blob, pinch a small amount of clay and pull it outward to form a short, stubby tail. Flatten it horizontally and use a modeling tool or a credit card edge to make a small indentation in the center for the flipper shape. -
Add Side Flippers:
Roll two tiny, pea-sized balls of clay. Flatten them into teardrop shapes. Attach these to the lower sides of the body using a small amount of water to bond the clay. -
Smooth the Seams:
Dip your finger in water and gently rub the areas where the flippers attach to the body. Blend the clay until the seams disappear completely and the seal looks like one solid piece. -
Final Surface Check:
Inspect the seal for any accidental fingernail marks or uneven spots. Smooth everything out with a damp finger one last time before setting it aside to dry. -
Drying Time:
Let the clay dry completely. Depending on your humidity and clay type, this usually takes 24-48 hours. Rotate the piece occasionally so the bottom dries evenly.
Smooth Surface Trick
For a porcelain-like finish without sanding, brush a tiny amount of water over the raw clay with a soft makeup brush right before drying.
Step 2: Refining and Painting
-
Sand for Smoothness:
Once fully dry, take your fine-grit sandpaper and gently buff the entire surface. Focus on removing any fingerprints or bumps to get that ceramic-smooth finish shown in the photo. -
Wipe Clean:
Use a slightly damp cloth or a dry soft rush to remove all the clay dust from sanding. A clean surface is crucial for the paint to adhere properly. -
Paint the Base Coat:
Even if your clay is white, apply a thin coat of white acrylic paint. This seals the clay and provides a uniform canvas. Let this dry for about 20 minutes. -
Draft the Face:
Lightly sketch the position of the eyes and nose with a pencil. Place them somewhat high on the front curve to enhance the cute factor. -
Paint the Eyes:
Using your smallest detail brush and black paint, carefully fill in two round circles for the eyes. Add a tiny white dot in the upper corner of each eye for a reflective glint. -
Add Nose and Mouth:
Paint a small, inverted triangle for the nose between the eyes. Draw two curved lines coming down from the nose to form a ‘w’ shape for the mouth. -
Apply Blush:
Dilute a bit of soft pink paint with water to make a glaze. Dab two small ovals under the eyes for rosy cheeks. -
Create the Spots:
Using a dusty rose or brownish-pink color, paint small, irregular dots along the seal’s back and sides. Vary the spacing to keep it looking organic. -
Color the Tail:
I like to gently dry-brush a little of the dusty rose paint onto the tips of the back flippers to add a subtle gradient effect. -
Seal the Work:
Once all paint is totally dry, take the project outside or to a ventilated area and apply a matte spray varnish to protect the paint.
Step 3: Final Assembly
-
Attach the Magnet:
Apply a dab of strong superglue or E6000 to the flat bottom of the seal. Press the magnet firmly into the glue. -
Cure:
Allow the glue to cure fully according to the package instructions before sticking your new friend to the fridge.
Customize Your Pod
Make a whole family by changing the spot colors to intricate greys or blues, or add a tiny clay fish in the seal’s mouth.
Now your charming little seal is ready to guard your grocery list with a smile
Mini Planter With a Smiley Face
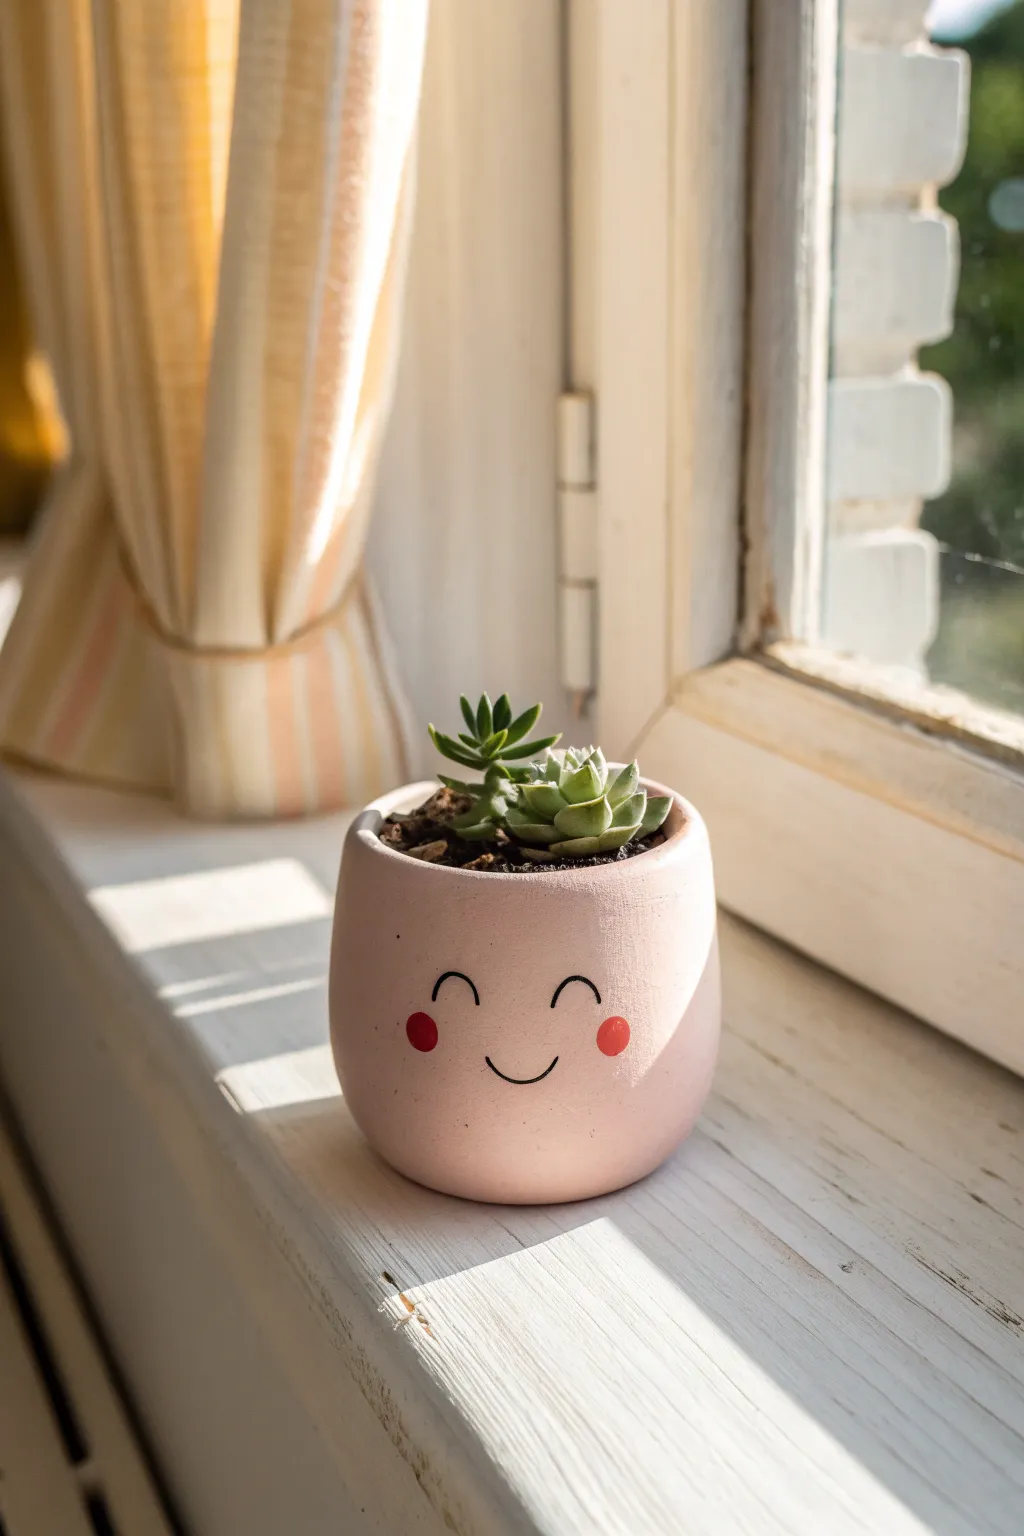
Bring a little joy to your windowsill with this adorable miniature planter that’s always happy to see you. Crafted from smooth clay and finished with a soft pink glaze, its simple hand-painted expression adds instant whimsy to any succulent collection.
Detailed Instructions
Materials
- Air-dry clay or polymer clay (white)
- Acrylic rolling pin
- Small circular cookie cutter or jar lid (approx. 3 inches)
- Craft knife or clay tool
- Water bowl and sponge (for smoothing)
- Pale pink acrylic paint (matte)
- Black acrylic paint or fine-tip paint pen
- Red or coral acrylic paint
- Small paintbrush
- Dotting tool or cotton swab
- Clear varnish or sealant (waterproof)
- Sandpaper (fine grit)
Step 1: Shaping the Pot
-
Condition the Clay:
Start by taking a handful of clay, about the size of a tennis ball. Knead it in your hands until it is warm, pliable, and free of any air bubbles. -
Roll the Base:
Pinch off a small portion of the clay and roll it into a ball. Flatten this ball onto your work surface to create a disc about 1/4 inch thick. You can use your circular cutter here to ensure a perfect circle for the base. -
Create the Walls:
Take the remaining clay and roll it into a long, even snake or coil. The coil should be roughly the thickness of your pinky finger. -
Build Upwards:
Place the coil on top of the outer edge of your base disc. Begin spiraling the coil upward, stacking the clay to form the walls of the pot. Aim for a slightly rounded, cup-like shape rather than a straight cylinder. -
Blend the Seams:
Using your thumb or a clay modeling tool, drag the clay from the upper coil down into the coil below it to bond them together. Do this on both the inside and outside of the pot. -
Smooth the Surface:
Once the general shape is built, dip your finger or a small sponge into water. Gently rub the outside of the pot to completely erase the coil lines and create a smooth, unified surface. I like to spend extra time here to get that really flawless look. -
Refine the Rim:
gently tap the top rim of the pot with a flat tool or your finger to flatten it slightly, ensuring it looks tidy and finished. -
Add Drainage (Optional):
If you plan to plant directly into the pot, use a straw to poke a hole in the center of the bottom for drainage. If using it as a cachepot for a plastic nursery pot, you can skip this. -
Dry Time:
Allow the clay to dry completely according to the package instructions. This usually takes 24-48 hours for air-dry clay. It will turn chalky white when fully dry.
Waterproofing Wisdom
Air-dry clay dissolves in water! Only plant directly if you use a heavy-duty resin sealant. Otherwise, keep the plant in a plastic nursery pot inside.
Step 2: Decorating
-
Sand for Perfection:
Once fully dry, lightly sand any bumps or rough fingerprints using fine-grit sandpaper. Wipe away the dust with a slightly damp cloth. -
Base Coat:
Paint the entire exterior and the inner rim of the pot with the pale pink acrylic paint. You may need two to three coats to get an opaque, solid color, letting each coat dry in between. -
Sketch the Face:
Very lightly sketch the face placement using a pencil. Draw two small arches for the eyes and a wider U-shape for the smile centered below them. -
Paint the Expression:
Using a very fine liner brush and black paint, or a black paint pen, trace over your pencil lines. Keep the lines thin and crisp for that minimalist aesthetic. -
Add Cheeks:
Dip a dotting tool, the back end of a paintbrush, or even a cotton swab into the red or coral paint. -
Stamp the Blush:
Press the tool gently onto the cheeks, just outside and slightly below the eyes to create perfect red circles. -
Seal the Deal:
Once the paint is completely dry, apply a coat of waterproof varnish or sealant. This is crucial to protect the clay from moisture when watering your plants.
Glazed Donut Effect
For a super shiny, ceramic look without a kiln, use a high-gloss Triple Thick glaze or UV resin as your final topcoat instead of standard matte varnish.
Now pop in a tiny succulent and enjoy your new desk companion
Sweet Flower Coasters With Faces
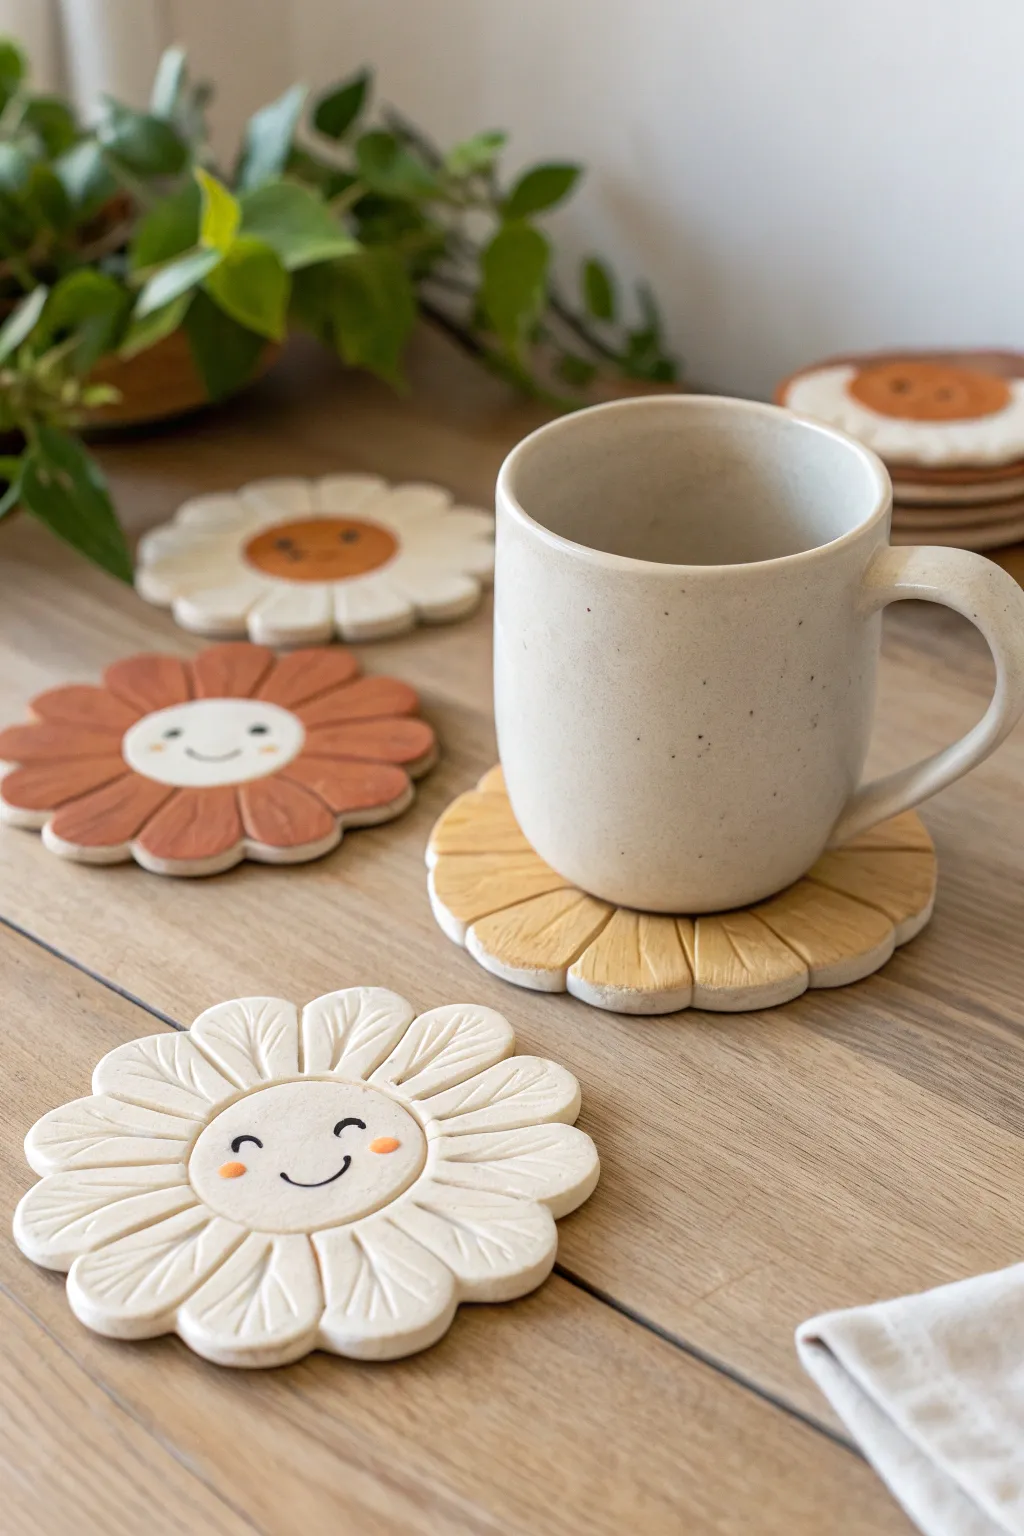
Bring a dose of sunshine to your coffee table with these delightful daisy-shaped coasters. Featuring sweet, hand-painted faces and grooved petal details, each piece adds warmth and charm to your daily ritual.
How-To Guide
Materials
- White air-dry clay or polymer clay
- Rolling pin
- Circle cookie cutters (one large approx. 4″, one small approx. 1.5″)
- Modelling tool or blunt knife
- Sponge and water
- Acrylic paints (terracotta, mustard yellow, white, black, rosy pink)
- Fine detail paintbrush
- Clear matte varnish or sealant
- Sandpaper (fine grit)
Step 1: Shaping the Flower Base
-
Prepare the Clay:
Start by conditioning your clay. Knead it until it’s soft, pliable, and free of cracks. If you are using air-dry clay, keep your hands slightly damp to prevent sticking. -
Roll Out the Slab:
Roll the clay out onto a smooth work surface to a consistent thickness of about 1/4 inch. You want it sturdy enough to hold a mug but not too chunky. -
Cut the Center Circle:
Use your smaller circle cutter to gently mark the center of the coaster, but don’t cut all the way through—this just guides where the face will go. -
Cut the Outer Shape:
Using the large circle cutter or a freehand template, cut out the main disc. If freehanding, aim for a roughly 4-inch diameter. -
Form the Petals:
Use your modeling tool or blunt knife to cut slight notches around the perimeter of the circle. Create curved indentations to define individual petals. -
Sculpt Petal Details:
With the blade of your tool, gently press radial lines extending from the center circle out to the edge of each petal. This creates that lovely organic texture. -
Smooth the Edges:
Dip your finger or a sponge in a little water and gently smooth all cut edges. This removes any harsh lines and gives the clay a soft, finished pottery look. -
Dry or Bake:
Follow the instructions for your specific clay. For air-dry, let them sit flat for 24-48 hours, flipping halfway through. For polymer, bake according to package directions.
Smooth Operator
Use a damp sponge to wipe the clay before drying. This ‘burnishes’ the surface and saves you hours of sanding later.
Step 2: Painting and Finishing
-
Sanding:
Once fully cured or dry, lightly sand any rough edges with fine-grit sandpaper to ensure a perfectly smooth surface for your mug. -
Base Colors:
Decide on your color scheme. For the terracotta flower, paint the petals a warm rust orange and leave the center white. For the white flower, leave the petals pale and paint the center circle in rust or mustard. -
Layering Paint:
Apply a second coat if needed to get an opaque, matte finish. I find that thin layers dry smoother and look more professional. -
Drafting the Face:
Lightly sketch the facial features with a pencil first. Place the eyes wide apart and the smile low for that signature ‘kawaii’ look. -
Painting the Eyes and Mouth:
Using your finest detail brush and black acrylic paint, carefully paint two small curved arches for smiling eyes and a simple U-shape for the mouth. -
Adding Cheeks:
Dip the end of a paintbrush handle or a dotting tool into rosy pink or orange paint. Dab two small dots on the cheeks for a blushing effect. -
Sealing:
Protect your work from moisture and heat by applying a coat of matte varnish or sealant over the entire coaster. -
Final Cure:
Allow the sealant to cure completely for at least 24 hours before placing any hot mugs on your new creation.
Mix ‘n Match
Try reversing the colors on a set of four—two with painted petals and white centers, and two with white petals and painted centers.
Enjoy your morning coffee with these perpetually cheerful companions
Matching Best-Friend Split Charms
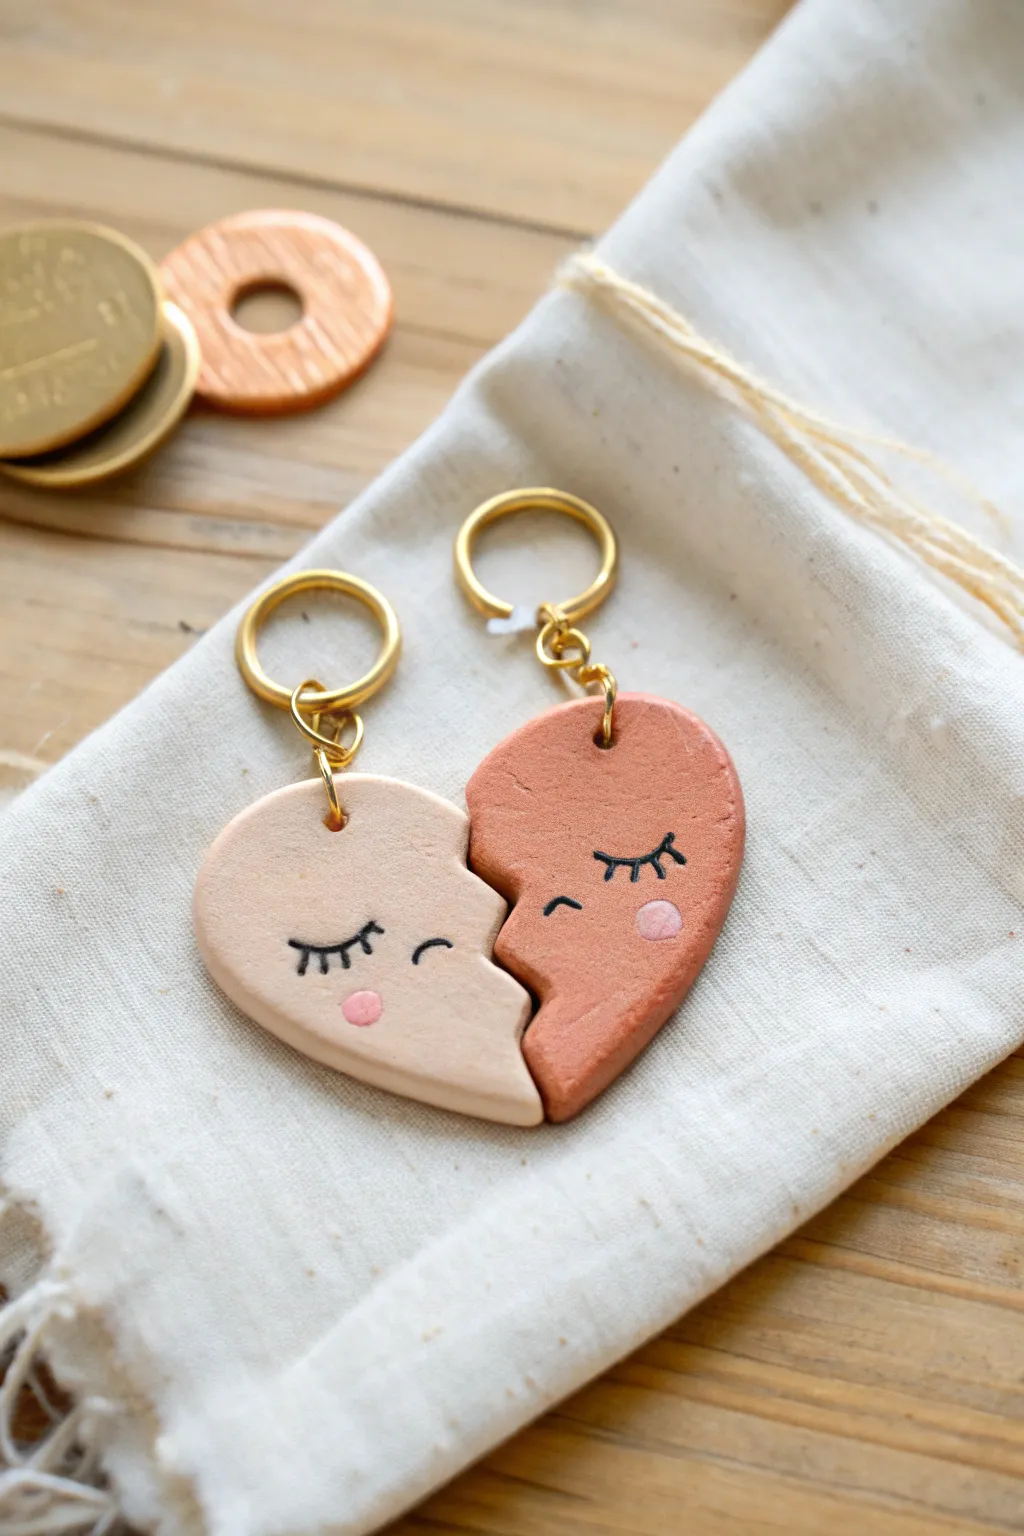
Celebrate friendship with these adorable split-heart keychains that fit perfectly together just like you and your best friend. Made from polymer clay in complementary earthy tones, they feature sweet sleepy faces and gold hardware for a chic, handmade finish.
Step-by-Step
Materials
- Polymer clay in light beige/cream
- Polymer clay in terracotta/burnt orange
- Acrylic paint (black and soft pink)
- Fine detail paintbrush or dotting tool
- Heart-shaped clay cutter (medium size)
- X-acto knife or clay blade
- Rolling pin or pasta machine
- Small jump rings (gold)
- Keyring findings (gold)
- Needle tool or toothpick
- Small pliers
- Gloss or matte varnish (optional)
- Parchment paper or ceramic tile
Step 1: Shaping the Base
-
Condition the clay:
Start by warming up your beige and terracotta clays in your hands separately. Knead them until they are soft, pliable, and free of cracks. -
Roll it out:
Roll each color into a slab approximately 1/4 inch thick. You want them to be uniform so the two halves match up perfectly later. -
Cut the hearts:
Using your heart-shaped cutter, punch out one heart from the beige slab and one from the terracotta slab. If you don’t have a cutter, you can trace a paper template with your craft knife. -
Create the split:
This is the most crucial part. Take your blade and cut a jagged, puzzle-piece line down the center of each heart. Try to make the cuts distinct so they look like they interlock. -
Swap and match:
You will end up with four pieces total. Use the left beige side and the right terracotta side (or vice versa) to form your mixed pair. You can save the other halves for a second set of keychains. -
Smooth the edges:
Gently tap the cut edges with your finger to remove any sharp corners or clay burrs, but be careful not to distort the puzzle shape too much. -
Add holes:
Use a needle tool or toothpick to pierce a hole near the top of each heart half. Make sure the hole is big enough for your jump ring but not too close to the edge to prevent tearing.
Step 2: Baking and Decorating
-
Bake the pieces:
Place your clay pieces on parchment paper or a ceramic tile. Bake according to your specific brand of polymer clay’s instructions—usually around 275°F (135°C) for 15-30 minutes. -
Cool down completely:
Let the pieces cool fully before handling. Polymer clay hardens as it cools, so don’t be alarmed if they feel slightly flexible right out of the oven. -
Map out the faces:
Using a very light pencil mark, sketch where you want the eyes and cheeks to go to ensure symmetry. -
Paint the lashes:
Dip a fine detail brush into black acrylic paint. Carefully paint a curved U-shape for the closed eye, adding three small ticks for eyelashes. -
Add the nose:
Paint a tiny, subtle curved line for a nose or a small smile near the split edge of the heart. -
Add rosy cheeks:
Using the back of your brush or a dotting tool, dip into the soft pink paint. Place a gentle dot below the eye for a cute, blushing effect. -
Seal the work:
Once the paint is totally dry, I recommend applying a thin coat of matte or gloss varnish to protect the paint from scratching off inside a pocket or purse.
Clean Edges Pro Tip
Before baking, lightly brush the clay with a tiny bit of baby oil or cornstarch. This smoothes out fingerprints and removes lint instantly.
Step 3: Assembly
-
Open the jump rings:
Using two pairs of pliers, twist your gold jump rings open sideways (never pull them apart outward) to maintain their round shape. -
Attach to clay:
Slide the open jump ring through the hole you created in the clay heart half. -
Connect the keyring:
Loop the keyring hardware onto the jump ring as well. For extra security, you might want to use a sequence of two small rings. -
Close securely:
Twist the jump ring back using your pliers until the ends meet flush with no gap.
Level Up: Texture
Before baking, gently press a piece of sandpaper or a toothbrush onto the clay surface to give it a realistic, stone-like texture.
Give one half to your favorite person and keep the other as a sweet reminder of your bond.
Mix-and-Match Bag Charm Set
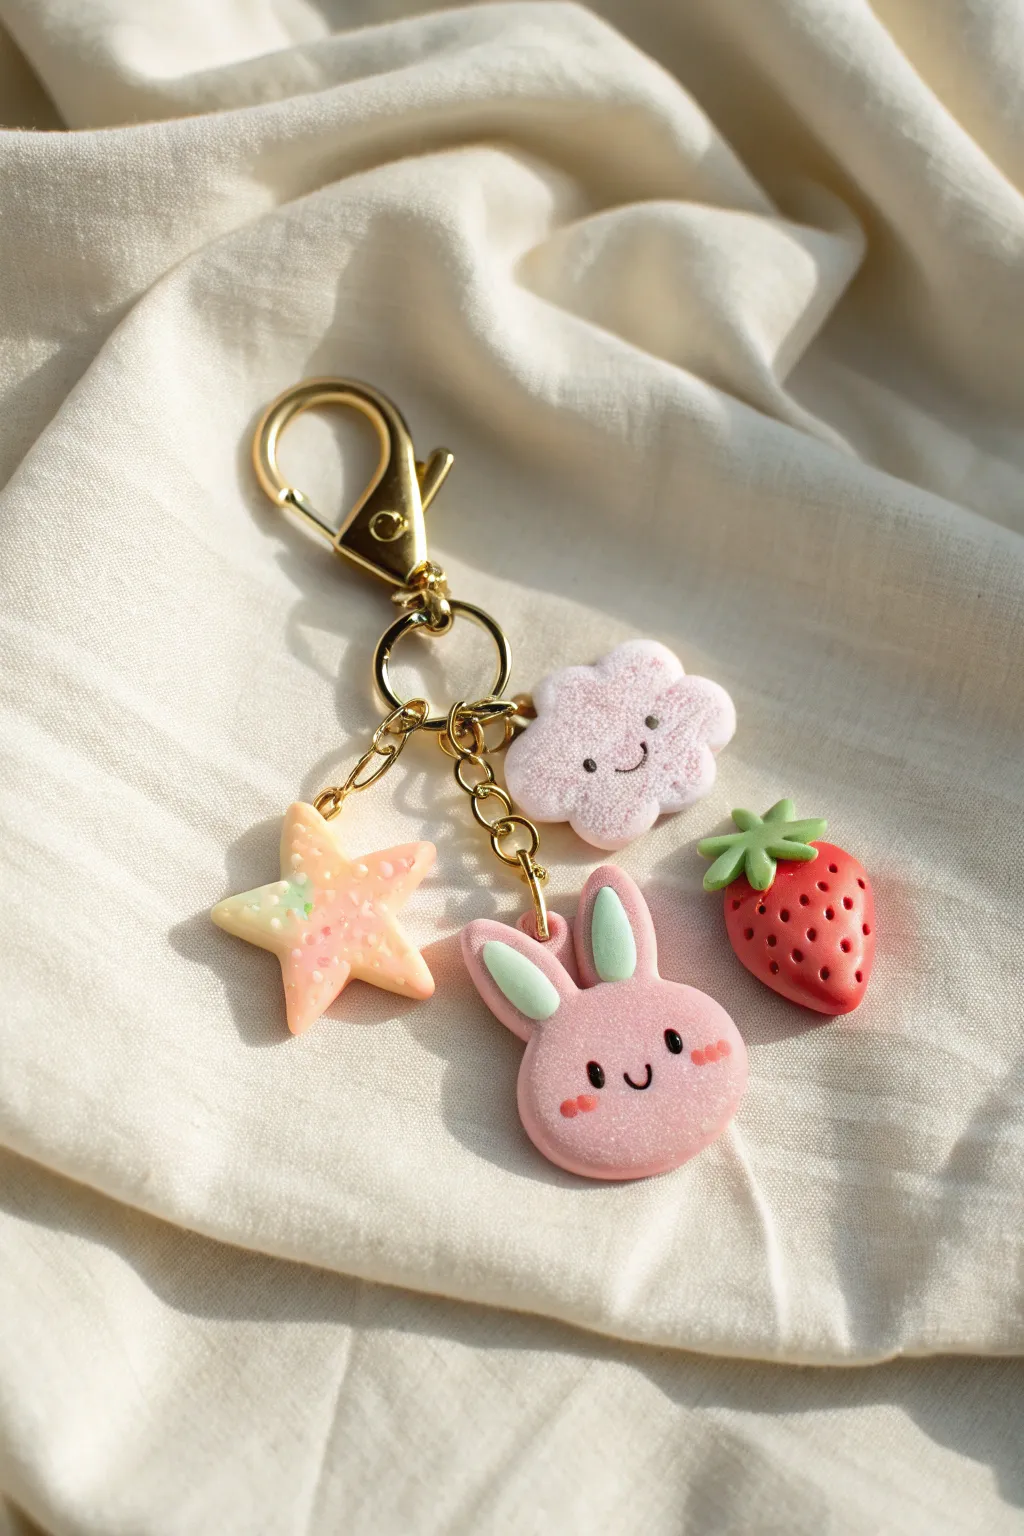
These adorable polymer clay charms come together to create a delightful bag accessory full of personality and sweetness. With glossy finishes and tiny smiling faces, this mix-and-match set features a cloud, a bunny, a star, and a strawberry for the ultimate cute aesthetic.
How-To Guide
Materials
- Polymer clay (baby pink, pastel yellow, red, white, leaf green, mint green)
- Glossy polyurethane glaze or UV resin
- Gold keychain clasp with chain and jump rings
- Needle tool or toothpick
- Ball stylus tool
- Black acrylic paint or black clay for details
- Soft paintbrushes (fine tip for painting, flat for glazing)
- Eye pins (gold)
- Clay rollers or a pasta machine
- Craft blade
- Jewelry pliers (round nose and flat nose)
- Parchment paper and baking tray
Step 1: Sculpting the Cloud and Star
-
Shape the Cloud:
Mix white clay with a tiny dot of pink to get a very pale, glittery pink if you have it. Roll a small ball, flatten it slightly into an oval, and use your needle tool to scallop the edges, pushing inwards to create fluffy cloud bumps. -
Texture the Surfce:
To mimic the soft look in the photo, gently tap the surface of the cloud with an old toothbrush or a stiff brush to give it a subtle, airy texture. -
Add the Cloud Face:
Use a ball stylus to indent small eye sockets. Roll two microscopic ropes of black clay for the eyes and a tiny ‘U’ shape for the smile, pressing them gently into place. -
Create the Star:
Marble pastel yellow and baby pink clay together but stop before they blend completely. Flatten the clay and use a small star cutter, or cut a star shape freehand with your craft blade. -
Decorate the Star:
Sprinkle the star with tiny bits of leftover white clay to look like sugar sprinkles, pressing them lightly so they adhere.
Clean Clay Tip
Keep a pack of baby wipes or rubbing alcohol nearby. Clean your hands and tools between colors, especially before touching white or light pink clay, to avoid lint transfer.
Step 2: Crafting the Bunny
-
Form the Head:
Roll a smooth ball of baby pink clay and flatten it gently into a rounded disk for the bunny’s face. -
Add Ears:
Shape two smaller pink teardrops and attach them to the top of the head. Indent the centers with a tool and fill them with mint green clay inserts. -
Bunny Facial Features:
Just like the cloud, add tiny black clay eyes and a smile. I usually add two tiny pink ovals under the eyes for blushing cheeks.
Loose Eye Pins?
If an eye pin pulls out after baking, don’t panic. Put a drop of super glue on the pin’s shaft and slide it back into the hole. It will hold perfectly once dry.
Step 3: Modeling the Strawberry
-
Shape the Berry:
Roll a ball of red clay and taper one end to create a strawberry shape. Flatten the back slightly if you want it to lay flat against a bag, or leave it 3D. -
Seed Details:
Use your needle tool to poke small, evenly spaced holes all over the surface of the strawberry to represent seeds. -
Add the Calyx:
Cut a small star shape from leaf green clay or mold individual teardrops. Press this onto the top of the berry, curling the leaves slightly upward. Add a tiny green stem in the center.
Step 4: Baking and Assembly
-
Insert Hardware:
Before baking, carefully trim gold eye pins to length and insert one into the top of each charm. Adding a dab of liquid clay or ‘Bake and Bond’ on the pin helps secure it permanentely. -
Bake:
Bake all pieces on parchment paper according to your clay package instructions (usually 275°F for 15-30 minutes). Let them cool completely. -
Glaze:
Apply a coat of glossy polyurethane glaze or UV resin to the bunny and strawberry for a ‘wet’ look. The cloud and star can remain matte or get a light coat depending on your preference. -
Assembly:
Use your pliers to open jump rings. Attach each charm’s eye pin loop to the chain links on the main gold clasp. -
Final Adjustments:
Hold the keychain up to check how the charms dangle. Adjust the chain lengths if necessary so the charms overlap slightly without bunching up too much.
Now clip your new handmade charm set onto your favorite backpack or purse for an instant dose of kawaii style
Pillow-Shape Character Mini “Army”
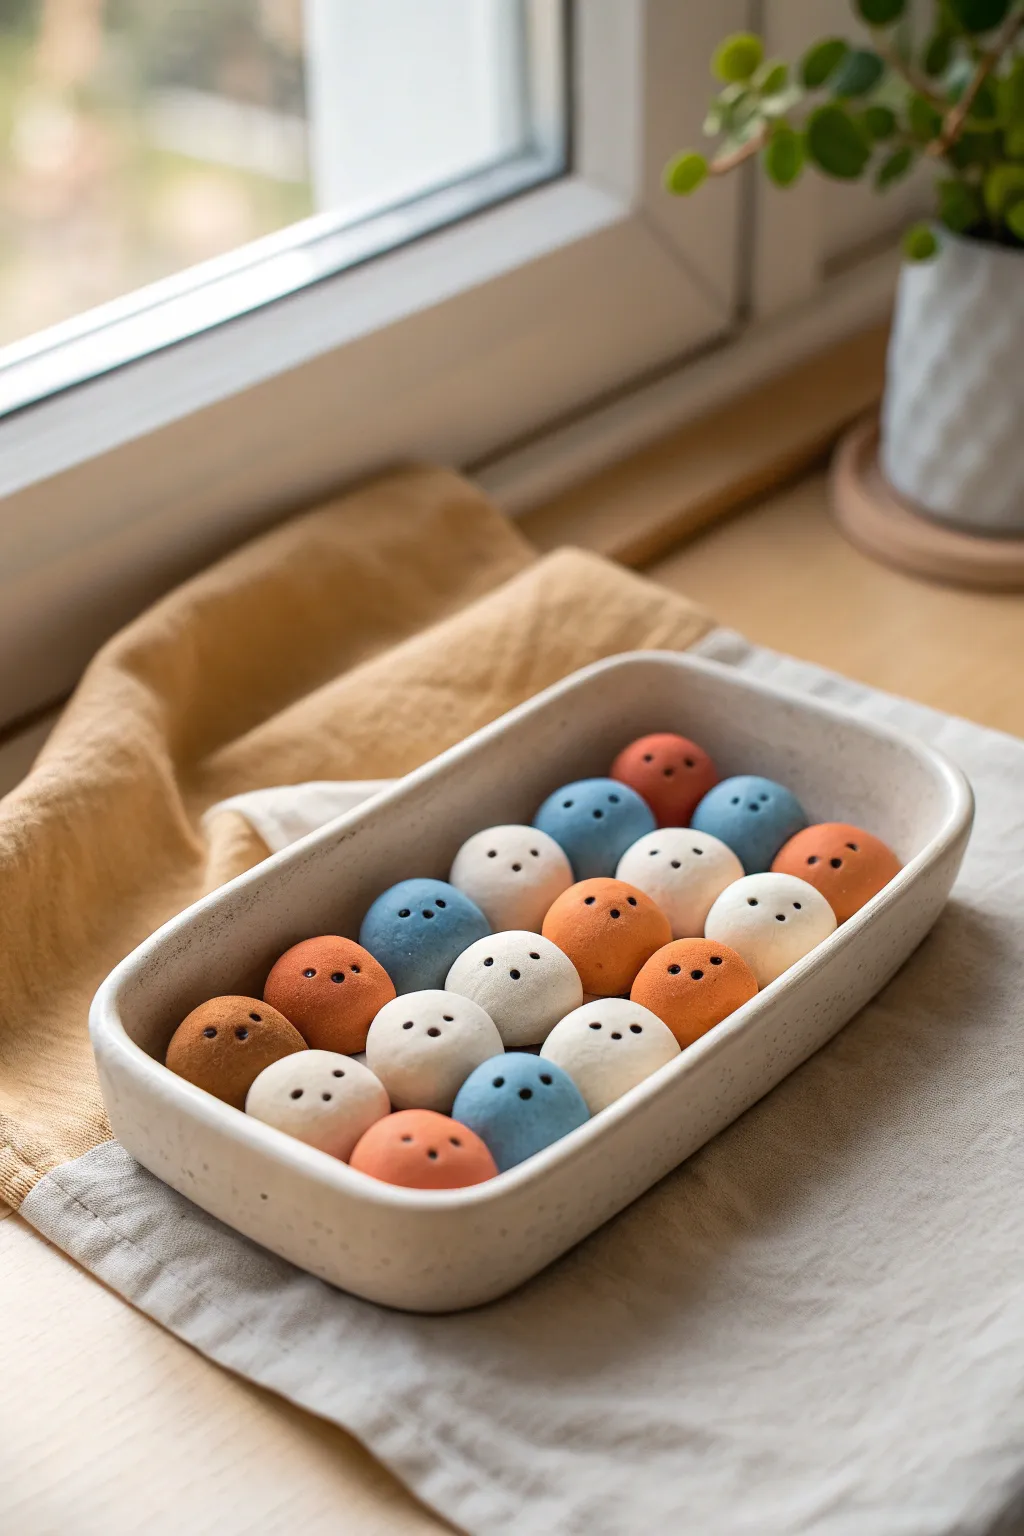
These adorable, minimalist little characters look just like a tray of fresh sweet mochi or dumpling treats sitting by the window. Their soft, matte finish and tiny, simple faces give them a charming personality that creates a delightful little “army” when displayed together in a ceramic dish.
Step-by-Step Tutorial
Materials
- Polymer clay or air-dry clay (white base)
- Acrylic paints (pastel blue, burnt orange, terracotta, cream)
- Black acrylic paint or fine-tip permanent marker
- Rolling pin or clay roller
- Fine-grit sandpaper
- Matte varnish or sealant
- Small dotting tool or toothpick
- Rectangular ceramic dish (for display)
Step 1: Mixing and Shaping
-
Prepare your colors:
If using white clay as a base, separate it into four or five distinct lumps. Knead small amounts of acrylic paint into each lump to create your custom shades: a soft sky blue, a creamy white, a dusty orange, and a darker terracotta brown. Keep the colors muted and earthy. -
Portion the clay:
Pinch off small pieces of clay from your different colored lumps. Aim for pieces that are roughly the size of a large gum ball or a small walnut. -
Roll the spheres:
Roll each piece between your palms to create a smooth, round ball. Apply gentle pressure to ensure there are no cracks or seams. -
Form the base:
Once round, gently tap the bottom of the sphere against your work surface. This creates a slightly flattened bottom so the character will sit upright without rolling away. -
Refine the shape:
Inspect each ball. You want them to look soft and slightly organic, not perfectly machine-made spheres. Use your thumb to smooth out any fingerprints. -
Create the entire set:
Repeat this process until you have about 18-20 whimsical little spheres in varying colors. I like to make a few extra just in case I mess up a face later. -
Let them cure:
Follow the instructions for your specific clay type. If baking polymer clay, arrange them on a baking sheet. If using air-dry clay, leave them in a dry spot for 24-48 hours.
Step 2: Detailing and Finishing
-
Sand for texture:
Once fully cured or dry, lightly sand the surface of each ball with very fine-grit sandpaper. This knocks back any shine and gives that soft, powdery “mochi” texture. -
Wipe clean:
Use a barely damp cloth or a soft brush to remove any sanding dust before you start adding details. -
Prepare the face tool:
Dip a small dotting tool or the blunt end of a toothpick into black acrylic paint. You want just enough paint to make a clean dot, but not a blob. -
Map the features:
Visualize a small triangle in the center of the sphere. The eyes should be somewhat wide set, with the mouth dot placed slightly lower in the middle. -
Dot the eyes:
Gently press two dots for the eyes. Try to keep them high up on the sphere to make the character look cute and innocent. -
Add the mouth:
Place a third, slightly smaller dot centered below the eyes to complete the face. -
Vary the expressions:
For variety, make some eyes slightly closer together or further apart on different characters. It gives each one a unique personality. -
Seal the deal:
Apply a coat of matte varnish spray. It is crucial to use matte, not gloss, to maintain the soft, ceramic-like appearance of the original inspiration. -
Final arrangement:
Once the varnish is dry, pile your new friends into a rectangular ceramic dish. Mixing the colors randomly creates the best visual effect.
Uneven Faces?
If you struggle with painting dots, pre-mark the eye positions with a needle tool first. This creates a tiny divot that guides the paint and keeps your spacing perfect.
Add Texture
Before the clay dries, gently roll the balls over a piece of canvas fabric. This imparts a subtle texture that makes them look even more like handmade fabric or stone items.
Now you have a serene little collection of clay friends to brighten up your desk or windowsill
Tiny Bakery Counter Diorama
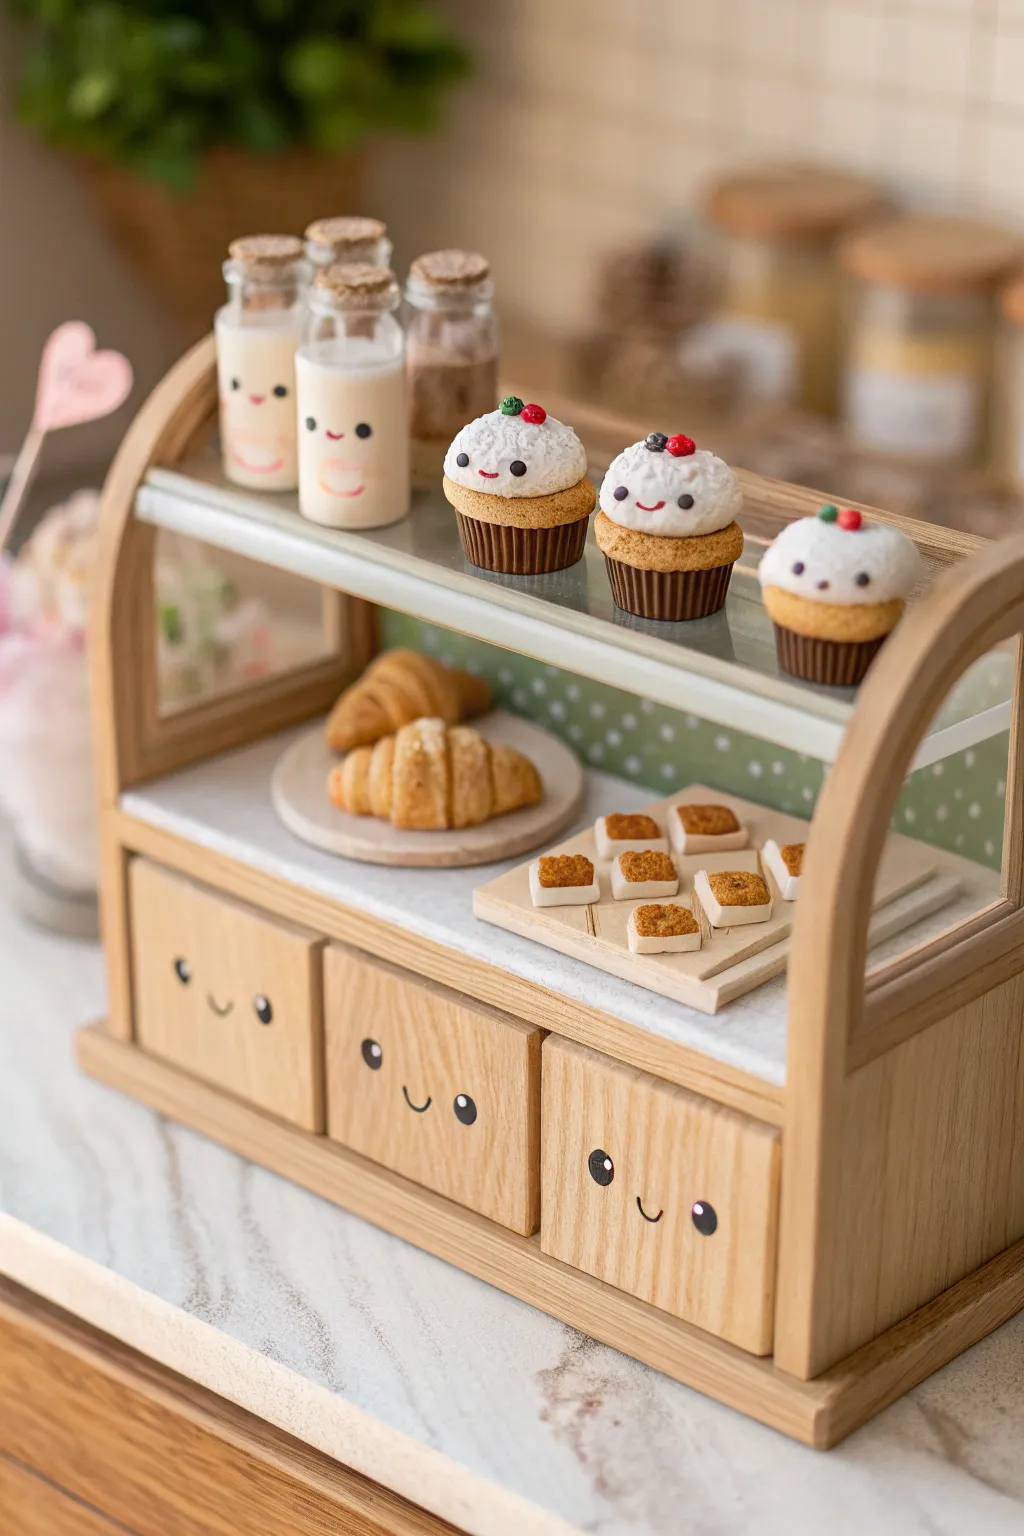
This adorable miniature diorama captures the sweet essence of a tiny bakery, complete with smiling wooden drawers and bite-sized polymer clay treats. It’s a delightful project that combines simple woodworking with intricate clay modeling for a heartwarming display.
Step-by-Step
Materials
- Balsa wood sheets (various thicknesses)
- Small craft wood blocks (for drawers)
- Polymer clay (white, tan, dark brown, red, green, black)
- Clear rigid plastic sheet (for glass shelf)
- Miniature glass bottles with corks
- Resin or white glue
- Acrylic paints (black, pink, wood stain)
- Sculpting tools (needle tool, ball tool)
- Sandpaper
- Superglue or wood glue
- Texture brush or toothbrush
Step 1: Building the Counter
-
Cut the frame pieces:
Cut two arched side panels from balsa wood. They should be roughly 4 inches tall with a gentle curve at the top. Cut a rectangular base piece and a top strip to connect them. -
Assemble the structure:
Glue the side panels to the base and add the top reinforcement strip. Ensure the structure stands flat. -
Create the shelf:
Cut a piece of clear rigid plastic to fit between the two side panels. Secure it halfway up the unit using small wood support strips or strong clear glue. -
Make the drawers:
Select three wooden blocks that fit snugly into the bottom of your cabinet frame. Sand the fronts until they are perfectly smooth. -
Add drawer faces:
Using a fine-tip paintbrush or a black paint pen, draw wide-set eyes and a tiny smile on each drawer front. Add rosy cheeks with watered-down pink paint.
Pro Texture Tip
For realistic cake texture, scrub the surface of unbaked clay with a stiff toothbrush or a ball of aluminum foil. This breaks up the smoothness and mimics crumbs perfectly.
Step 2: Sculpting the Pastries
-
Base for cupcakes:
Mix tan clay with a speck of brown to create a dough color. Roll small balls and press them into a miniature cupcake mold or use the ribbed end of a tool to create the liner texture. -
Frosting installation:
Take white clay and texture it roughly with a toothbrush to look like fluffy cream. Mound this on top of your cupcake bases. -
Decorate the cupcakes:
Add tiny faces to the frosting using microscopic bits of black clay for eyes and red or pink for smiles. Top with a tiny red berry. -
Shape the croissants:
Roll tan clay into a long teardrop shape. Flatten it slightly, then roll it up starting from the wide end. Curve the edges inward to form the crescent. -
Texture and shade:
Use a needle tool to add flaky layers to the croissants. Brush with soft pastels or diluted brown paint to mimic a baked golden crust. -
Square cookies:
Cut small squares of white clay. Place a smaller square of ‘jam’ colored clay (brown or orange) in the center. -
Bake the clay:
Arrange all clay items on a tile and bake according to your polymer clay package instructions.
Step 3: Finishing Touches
-
Prepare the milk bottles:
Fill miniature glass jars with white resin or white glue mixed with paint to simulate milk. Let this cure completely. -
Paint bottle faces:
Once dry, paint tiny smiling faces on the glass using a toothpick dipped in black and pink acrylic paint. -
Final assembly:
Slide the wooden drawers into the bottom slots. I prefer to glue a small wooden bead to the back of the drawers so they don’t push in too far. -
Stock the shelves:
Place the croissants on a small clay plate. Arrange the cupcakes on the glass shelf and the milk bottles on top. Use a dab of wax or repositionable glue to keep them secure.
Level Up: Lighting
Install a tiny battery-operated LED chip underneath the top wooden strip to illuminate the glass shelf and make your pastries glow.
Now your tiny bakery is open for business, ready to bring a smile to anyone who peeks inside
Mini Fishbowl With Micro Sea Cuties
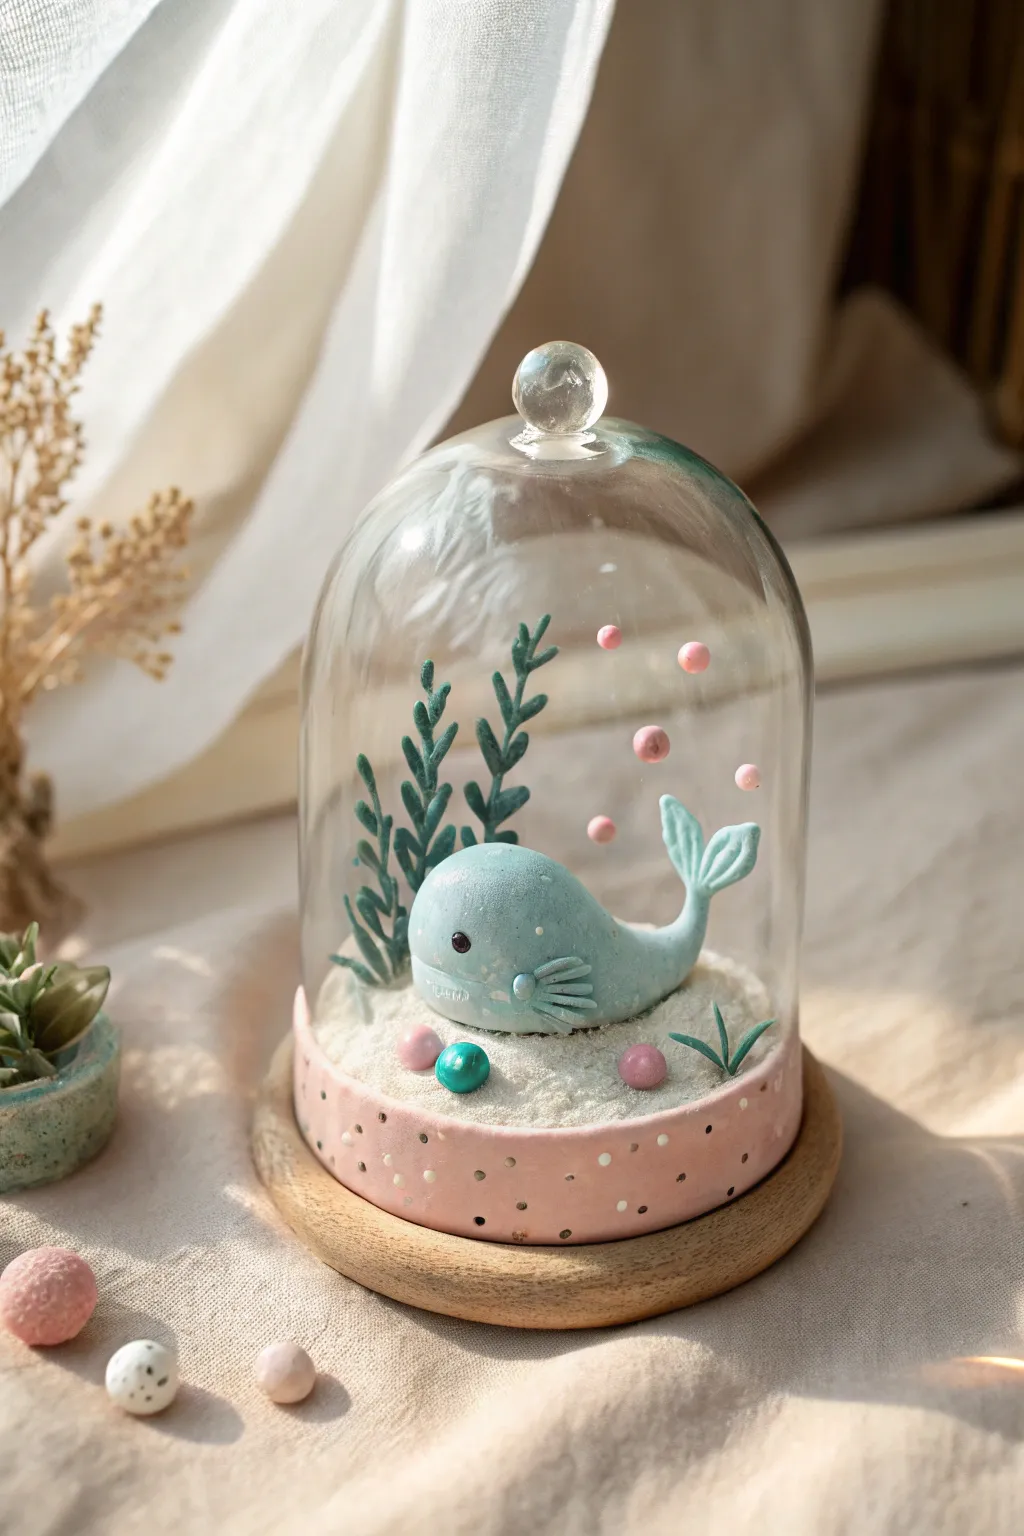
Capture the serenity of the ocean floor in this adorable miniature display featuring a clay whale and floating bubbles. Enclosed in a glass bell jar, this scene makes a perfect whimsical desk ornament or a sweet handmade gift.
Step-by-Step Guide
Materials
- Polymer clay (light blue, dark green, pale pink, white)
- Small glass cloche with wooden base
- Acrylic paint (pink, white, gold)
- Fine white sand
- Craft glue or strong adhesive
- Thin fishing line or clear monofilament thread
- Sculpting tools (needle tool/toothpick, small ball tool)
- Black bead or black clay for the eye
- Paintbrush
Step 1: Preparing the Base
-
Paint the Rim:
Begin by painting the vertical side edge of your wooden base with a soft pink acrylic paint. You may need two coats for opaque coverage. -
Add Polka Dots:
Once the pink paint is completely dry, use a small dotting tool or the back of a paintbrush to apply alternating white and gold dots around the rim. -
Create the Sand Bed:
Brush a thick layer of craft glue over the top surface of the wooden base. Sprinkle fine white sand generously over the glue, pressing it down gently. Shake off the excess after a few minutes.
Step 2: Sculpting the Whale
-
Form the Body:
Roll a piece of light blue clay into a smooth ball, then gently taper one side into a teardrop shape to form the tail. -
Shape the Tail Flukes:
Split the tapered end slightly and flatten both sides to create the tail flukes. Use a sculpting tool or toothpick to press lines into the tail for texture. -
Add Side Fins:
Create two small teardrop shapes from the same blue clay. Press them onto the sides of the whale’s body and score them with three lines each to mimic fin rays. -
Give Him a Face:
Press a small indentation where the eye should go and insert a tiny black bead or a small ball of black clay. Use a sculpting tool to carve a sweet, curved smile. -
Curve the Pose:
Gently bend the tail section upward so it looks like the whale is swimming or resting comfortably on the sand.
Sticky Situation?
If the fishing line won’t stick to the glass immediately, use a tiny dot of UV resin and a UV light for an instant, invisible bond.
Step 3: Creating the Flora & Bubbles
-
Roll Snake Scales:
Take dark green clay and roll it into very thin, long snakes. These will be the stems of your underwater plants. -
Build the Seaweed:
Pinch off tiny bits of green clay and flatten them into teardrops. Attach these alternately along the stems to create leafy fronds. Make 3-4 distinct stalks. -
Form Floating Bubbles:
Roll tiny spheres of varying sizes using pale pink clay. These will be suspended in the ‘water’ later. -
Make Floor Pebbles:
Create a few slightly larger spheres in pink and teal (or iridescent white) to serve as decorative seabed pearls. -
Bake the Clay:
Arrange all your clay pieces on a baking sheet or tile. Bake according to your polymer clay manufacturer’s instructions (usually 275°F/135°C for 15-30 minutes). Let them cool completely.
Make it Glow
Add glow-in-the-dark powder to the clay used for the bubbles or the pearls for a magical night-light effect.
Step 4: Assembly
-
Attach the Seaweed:
Using a dab of strong glue, secure the green seaweed stalks into the sand at the back left of the base. It helps to clear a tiny bit of sand away to glue directly to the wood for stability. -
Place the Whale:
Glue the finished whale into the center of the scene, nesting it slightly into the sand texture. -
Scatter the Pearls:
Glue the larger floor pebbles around the whale and near the base of the seaweed to add visual interest to the ground level. -
Suspend the Bubbles:
Cut varied lengths of clear fishing line or monofilament. Glue one pink bubble to the end of each line. -
Hang the Lines:
Carefully glue the top ends of the fishing lines to the inside ceiling of the glass dome. This is tricky—I find using tweezers helps create the illusion that the bubbles are rising from the whale. -
Final Seal:
Once the glue inside the dome is dry, place the glass dome over the base. You can glue the glass to the wood if you want it permanently sealed.
Enjoy your peaceful little slice of the ocean on your shelf