
If you’re just starting with clay, the fastest way to build confidence is sticking to simple shapes that still come out ridiculously cute. These beginner ideas are all about tiny wins—smooth ovals, little dot eyes, and projects you can finish in an afternoon with air-dry clay or polymer clay.
Smiley Pinch-Pot Trinket Dish
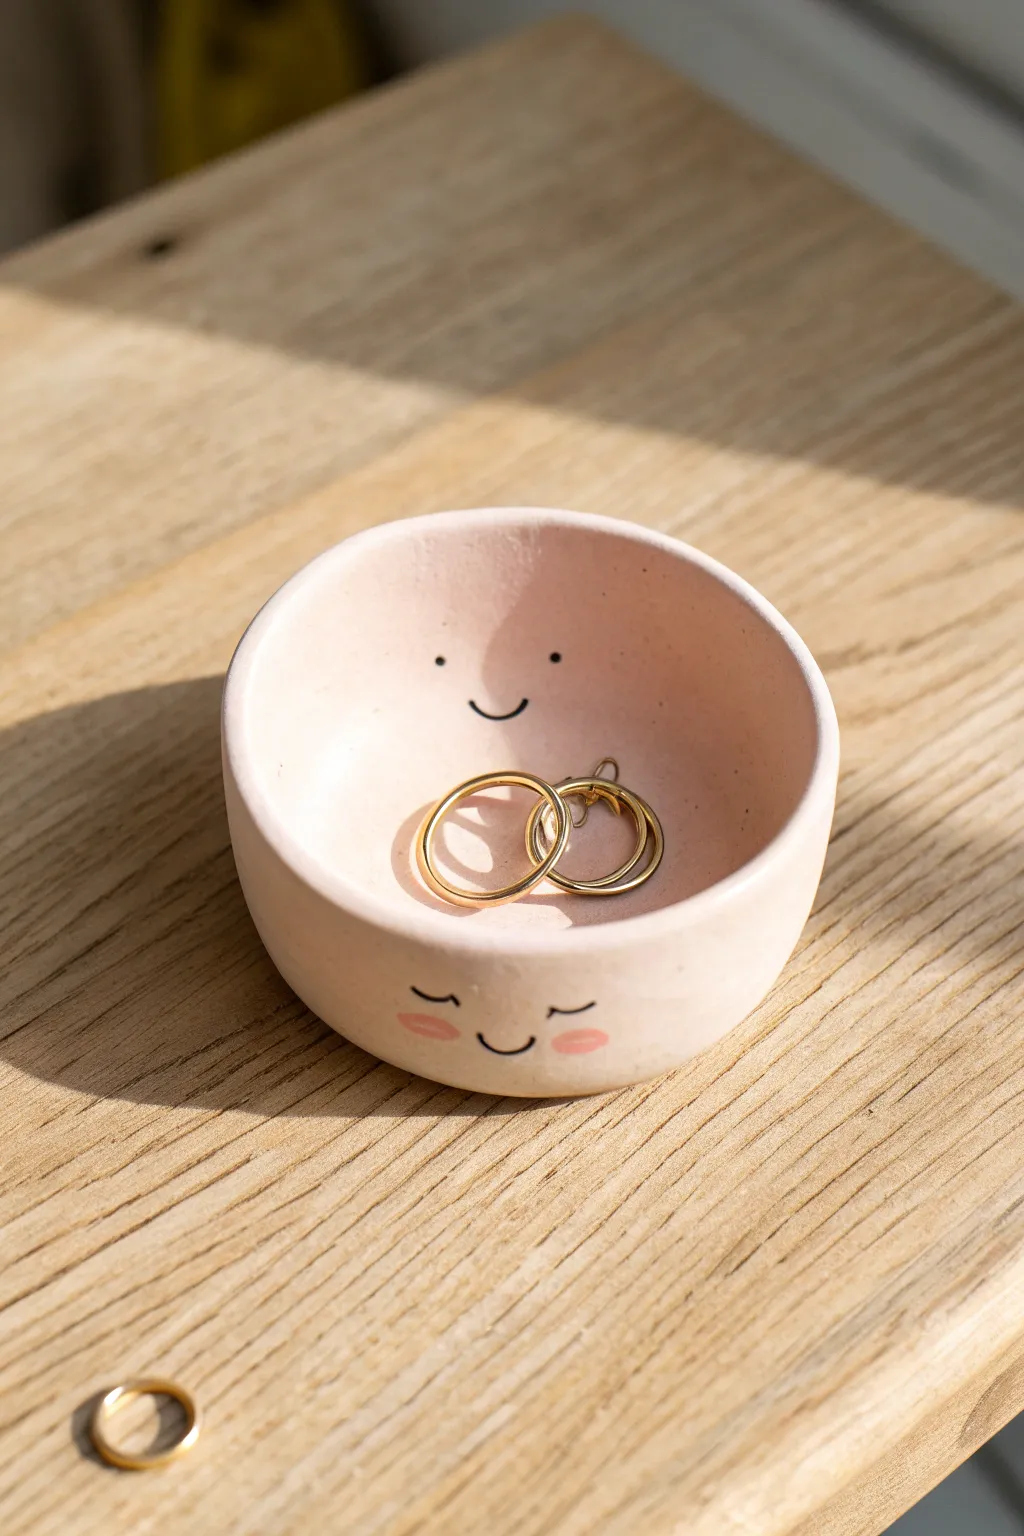
This adorable little pinch pot features a double dose of cuteness with a happy face on the inside and a sleeping, blushing face on the outside. It’s the perfect beginner clay project that ends up being a functional home for your favorite rings.
Step-by-Step
Materials
- Air-dry clay (white)
- Acrylic paint (pale pink, black, rose pink)
- Fine-grit sandpaper
- Small bowl of water
- Paintbrushes (fine detail brush and medium flat brush)
- Glossy varnish or sealant (optional but recommended)
- Rolling pin (optional)
Step 1: Shaping the Pot
-
Prepare the ball:
Start by taking a chunk of air-dry clay roughly the size of a lemon. Roll it between your palms until you have a smooth, crack-free sphere. -
Open the center:
Hold the ball in one hand and gently press your thumb into the center, stopping about a half-inch from the bottom. This forms the base of your pinch pot. -
Pinch the walls:
Rotate the ball slowly while pinching the clay between your thumb (inside) and fingers (outside). Work your way up the walls, aiming for an even thickness of about 1/4 inch all around. -
Flatten the rim:
Gently tap the rim of the bowl upside down on your table to create a uniform, flat edge. You can also smooth the rim with a slightly damp finger to remove any jagged bits. -
Smooth the surfaces:
Dip your finger in a tiny bit of water and run it over the entire surface to smooth out fingerprints and minor cracks. I like to spend extra time here to get that porcelain-smooth look. -
Dry completely:
Let the dish air dry for 24-48 hours. It should turn a chalky white color and feel room temperature (not cold) when it is fully dry.
Fixing Cracks
If small cracks appear while drying, mix a tiny bit of fresh clay with water to make a paste (slip) and fill them in before painting.
Step 2: Painting & Details
-
Sand for perfection:
Once fully dry, lightly sand the rim and sides with fine-grit sandpaper to remove any remaining bumps or rough textures. Wipe away the dust with a dry cloth. -
Mix the base color:
Mix a small amount of red or pink acrylic paint with plenty of white to create a very pale, soft baby pink. You want it to look almost pastel. -
Apply the base coat:
Paint the entire dish—inside and out—with your pale pink mixture. Let this layer dry completely, then add a second coat for opaque, streak-free coverage. -
Paint the inside face:
Using a very fine detail brush and black paint, create the interior face. Make two small dots for eyes and a simple, thin ‘U’ shape for a smile. -
Start the outside face:
On the exterior wall, paint two small, downward-curving arcs for ‘sleeping’ eyes using the thin black paint. Add a tiny smile centered below them. -
Add the blush:
Using a slightly darker rose pink paint, dab two small ovals on the exterior cheeks, right next to the smile. You can use the back end of a paintbrush handle to stamp these for a perfect shape. -
Seal the piece:
Once all paint is 100% dry, apply a coat of glossy varnish. This protects the paint from scratches and gives it a finished ceramic look.
Pro Tip
Don’t rush the drying process! Placing it in direct sunlight can dry the outside faster than the inside, causing warping or cracks.
Place your jewelry inside your new smiling friend and enjoy the tidy cuteness on your nightstand


Tiny Animal Pebble Figures

Transform simple lumps of clay into charmingly round animal friends that mimic the smooth, soothing shape of river stones. These adorable bunnies and cats feature a soft matte finish and minimalist faces, perfect for perching on a sunny windowsill.
Step-by-Step Guide
Materials
- Air-dry clay (white or terracotta)
- Acrylic paints (Cream, soft pink, peach, black)
- Fine grit sandpaper
- Small bowl of water
- Sculpting tools (or a toothpick)
- Fine detail paintbrush or dotting tool
- Matte varnish or sealant
Step 1: Shaping the Base
-
Condition the clay:
Start by taking a handful of air-dry clay and kneading it thoroughly until it is warm, pliable, and free of cracks. This conditioning step is crucial for a smooth finish later. -
Form the pebble shape:
Roll the clay into a smooth ball between your palms. Gently press it down onto your work surface to flatten the bottom so it stands securely, then refine the rest into an egg-like or rounded pebble shape. -
Smooth the surface:
Dip your finger into a little water and gently rub it over the clay surface to erase any fingerprints or small seams. You want the clay to look as smooth as a polished stone.
Cracks while drying?
Mix a tiny amount of fresh clay with water to create a paste (slip). Fill the cracks with this paste, let it dry again, then sand smooth before painting.
Step 2: Adding Animal Features
-
Form the ears:
For the bunny, roll two small, equal-sized logs of clay. Flatten them slightly and taper the tops. For the cats or bears, form two small triangles or semi-circles. -
Attach the ears:
Score the top of the head and the bottom of the ears with a needle tool or toothpick. Apply a tiny dab of water or slip to the scored areas and press the ears firmly in place. -
Blend the seams:
Use a sculpting tool or your wet finger to drag the clay from the base of the ears down onto the head, smoothing the join until it’s completely seamless. The ears should look like they grew naturally from the stone shape. -
Check symmetry:
Turn your figure around and view it from all angles to ensure the ears are even and the pebble shape hasn’t been distorted during handling. Gentle adjustments now save time later. -
Create texture (Optional):
If you want that speckled, stone-like look directly in the clay, you can gently press sand or crushed dried herbs into the surface before drying, or save this for the painting phase. -
Allow to dry:
Set your figures aside in a dry, room-temperature spot. Let them harden completely, which usually takes 24 to 48 hours depending on the thickness.
Step 3: Painting and Finishing
-
Sand for smoothness:
Once fully dry, take a piece of fine-grit sandpaper and gently buff out any remaining bumps or rough spots. Wipe away the dust with a slightly damp cloth. -
Apply base coat:
Paint each figure with a matte acrylic paint. Use cream for the bunny, apricot or terracotta for the center figure, and a soft pink for the cat. Apply two thin coats rather than one thick one for even coverage. -
Add speckles:
To mimic a natural stone texture, dip an old toothbrush or stiff brush into slightly watered-down brown or grey paint. Run your thumb over the bristles to flick tiny speckles onto the figures. -
Draft the face:
Lightly sketch the position of the eyes, nose, and mouth with a pencil. Keep the features small and centered low on the face for maximum cuteness. -
Paint the eyes:
Using a dotting tool or the back of a paintbrush dipped in black paint, create two small, perfectly round dots for the eyes. -
Details the nose:
With your finest brush, paint a tiny triangular or oval nose between the eyes. For the cat or bear, add a small vertical line downwards from the nose. -
Add mouth and whiskers:
Carefully paint thin curves for the mouth. If making the cat or bear, add two or three short, floating whiskers on each cheek area using a very light touch. -
Blush the cheeks:
Mix a soft pink or peach color. Using a dry brush technique or a finger, dab a gentle circle of blush onto the cheeks, or paint solid pastel circles for a more graphic look. -
Seal the work:
Finish by applying a coat of matte varnish. This protects the paint and maintains the natural, stone-like appearance without making it unnaturally shiny.
Weight it down
For a satisfying heft, press a real smooth river rock into the center of your clay ball before sealing it up. It makes the figure double as a paperweight.
Arrange your trio on a shelf or desk for a peaceful, adorable display.


Chubby Frog Toothbrush Buddy
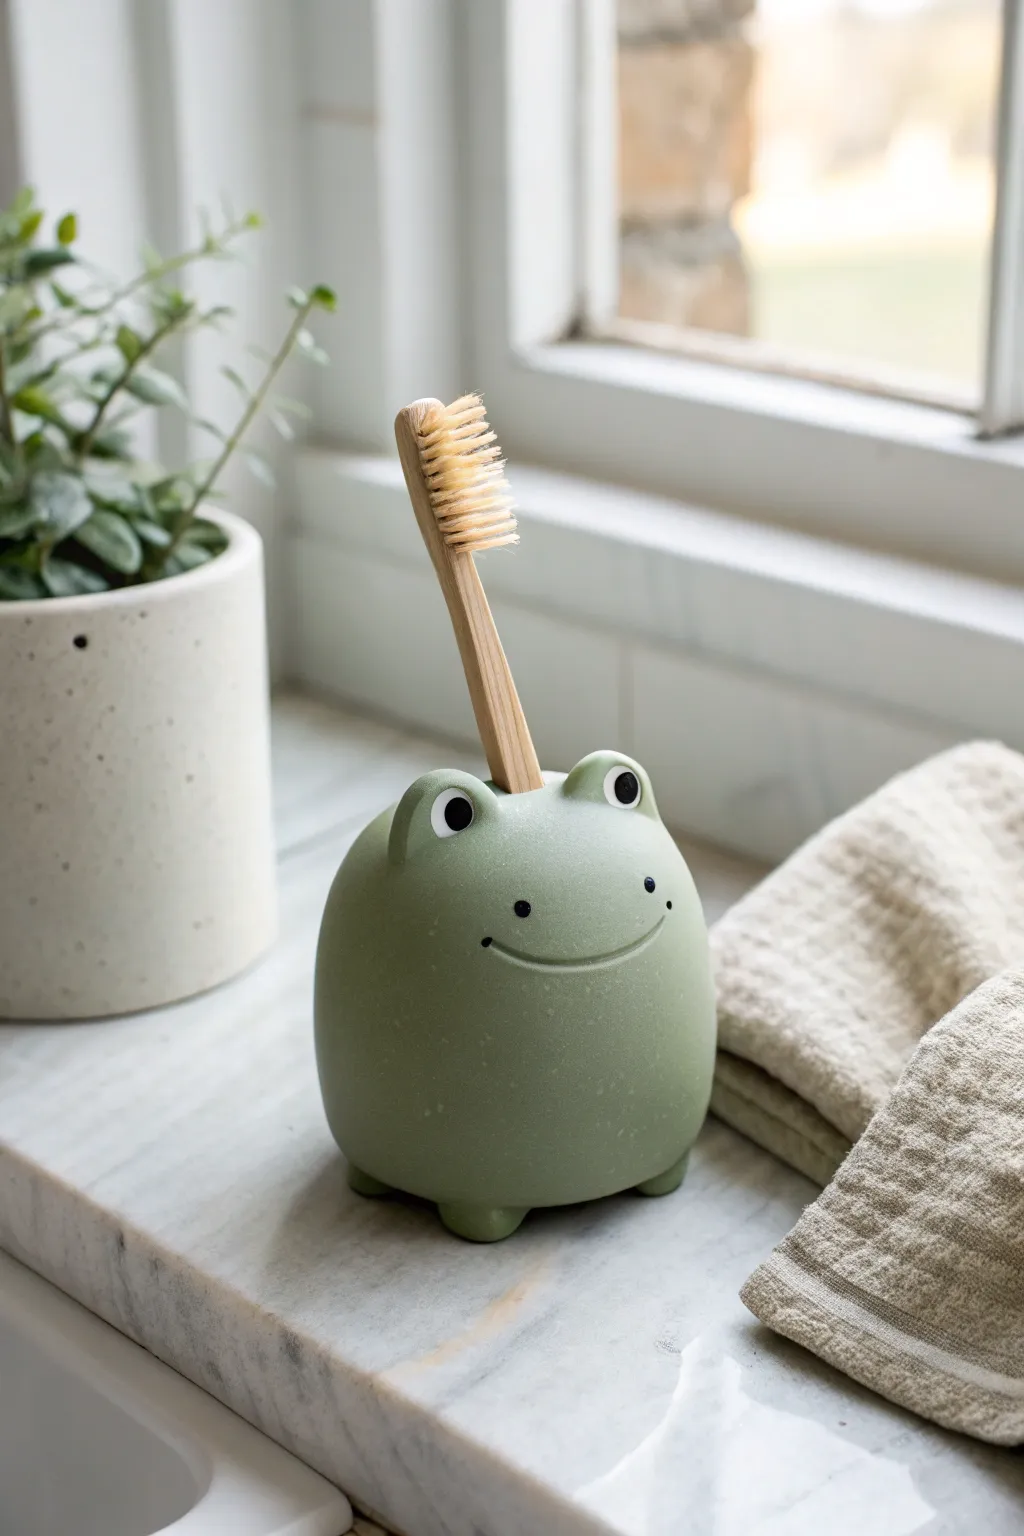
Bring a touch of whimsical greenery to your bathroom with this adorable, stout frog toothbrush holder. With its friendly smile and sturdy, pebble-smooth body, this little buddy is the perfect motivation for your morning routine.
How-To Guide
Materials
- Polymer clay (sage green or moss green)
- Polymer clay (white and black for details)
- Acrylic roller or rolling pin
- Aluminum foil
- Toothbrush (for sizing)
- Needle tool or toothpick
- Ball stylus tool
- Clay smoothing tool (rubber tip) or water
- Matte sealant or water-based polyurethane varnish
Step 1: Forming the Base
-
Prepare the core:
Crumple a piece of aluminum foil into a tight ball, slightly flattened on the bottom so it sits stable. This foil core saves clay and keeps the piece lightweight. -
Condition the clay:
Take a large portion of your green clay and knead it well until it’s soft and pliable. I find this warmth helps prevent cracks later on. -
Cover the core:
Flatten the green clay into a thick sheet and dismantle the foil ball completely. Smooth the seams together with your thumb until you have a seamless, round, slightly bottom-heavy shape. -
Shape the body:
Roll the clay gently on your work surface to create a smooth, rounded pebble shape. Tap the bottom firmly against the table to create a flat base so the frog won’t tip over. -
Create the holder:
Take your actual toothbrush (handle end) and press it vertically into the center top of the sphere to create the hole. Make sure it goes deep enough to hold the brush stable, but stop before hitting the foil core. -
Refine the opening:
Remove the toothbrush and slightly widen the opening with your finger or a large ball tool to account for minor shrinkage and ensure an easy fit.
Step 2: Adding Features
-
Make the eyes:
Roll two medium-sized balls of green clay for the eye sockets. Place them on top of the head, on either side of the toothbrush hole. -
Blend the eyes:
Using a rubber-tipped tool or your finger, blend the bottom seam of the eye balls into the main body so they look integrated rather than just stuck on. -
Add the whites:
Roll two smaller balls of white clay. Flatten them slightly and press them onto the front of the green eye mounds. -
Add the pupils:
Take two tiny specs of black clay, roll them into balls, flattening them onto the center of the white circles to complete the eyes. -
Create the feet:
Form four small balls of green clay. Lift the body gently and place these underneath near the corners to act as little nubby feet. -
Secure the feet:
Press the body down gently to secure the feet and ensure the holder still sits perfectly level on the table.
Waterproof Warrior
Since this lives near a sink, seal the inside of the toothbrush hole extra thoroughly with resin or polyurethane to prevent mold growth inside the clay.
Step 3: Refining and Baking
-
Carve the smile:
Use a needle tool or an exacto knife to carefully carve a wide, U-shaped smile across the face. Curve the ends slightly upward for a happy expression. -
Add dimples:
For extra cuteness, use a small dotting tool to press a tiny indentation at each corner of the mouth. -
Add freckles:
Use the needle tool to gently poke two small dots wide on the cheeks for blush or freckles. -
Smooth everything:
Dip your finger in a little bit of water (or baby oil if using polymer clay) and gently run it over the entire surface to remove any fingerprints or tool marks. -
Bake:
Bake the piece according to your clay manufacturer’s instructions (usually 275°F/135°C for 15-30 minutes depending on thickness). Use an oven thermometer for accuracy. -
Seal:
Once fully cooled, apply two coats of matte waterproof varnish. This is crucial since the item will live in a humid bathroom environment.
Make it texture-rich
Before baking, gently roll a piece of sandpaper or a clean toothbrush over the frog’s green skin to give it a realistic, stone-like matte texture.
Place your new green friend on the sink and enjoy a smile every time you brush your teeth


Mini Dino Nugget Desk Pal
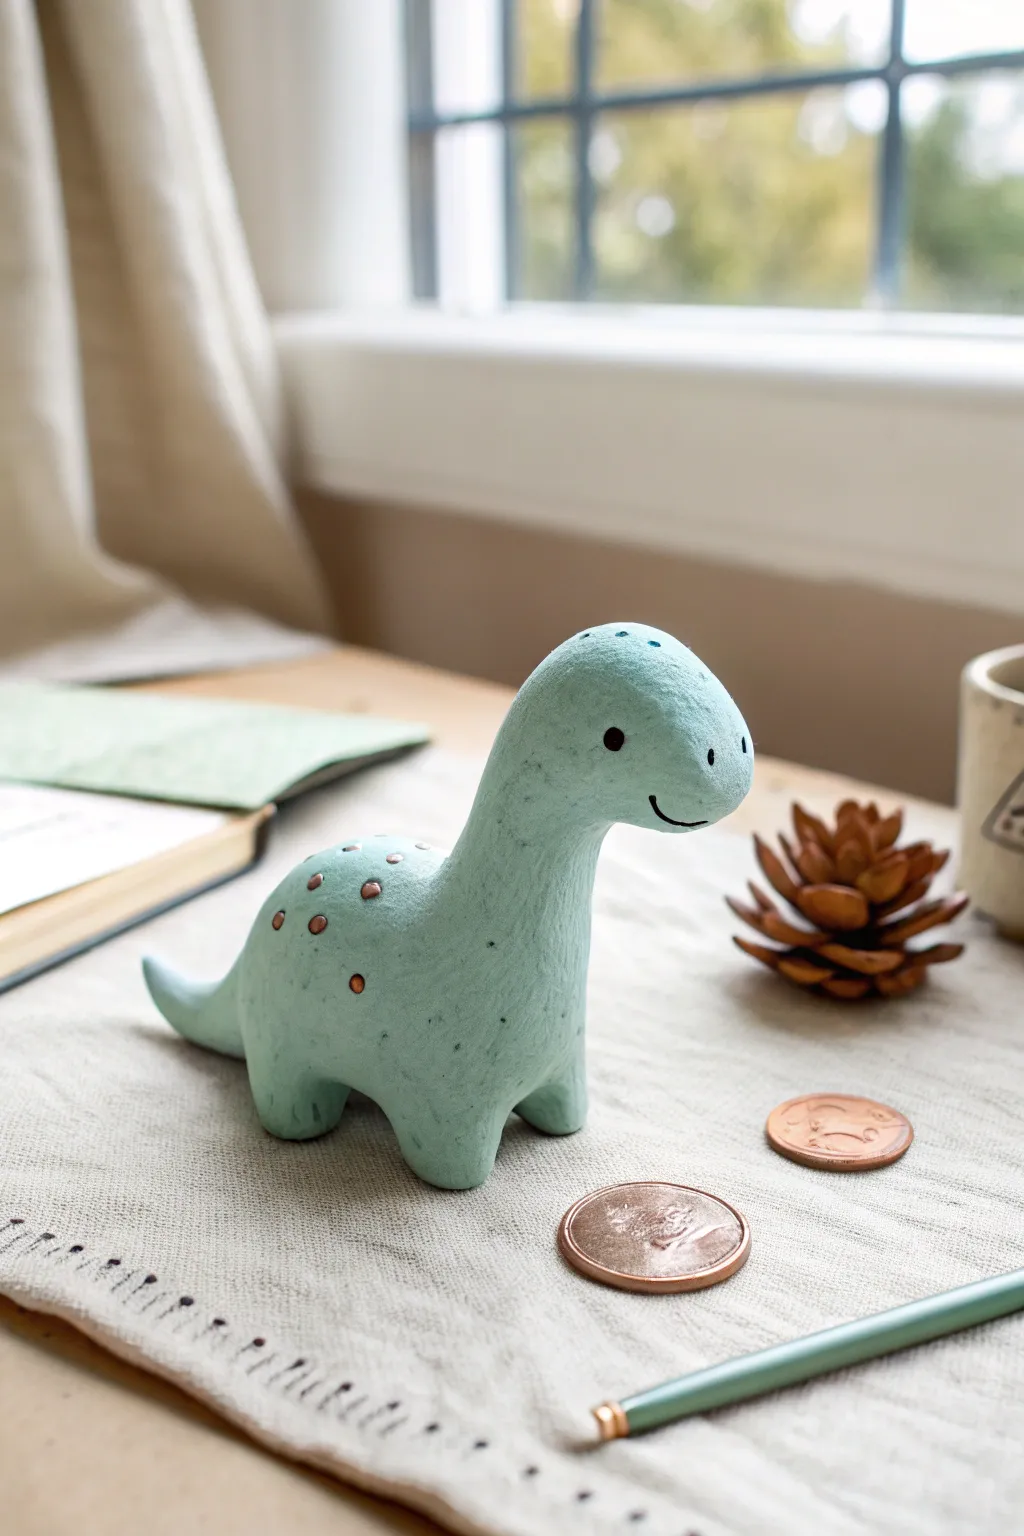
This charming little sauropod brings a prehistoric pop of cheer to any workspace with its soft mint green finish and delightful copper spots. Perfect for beginners, this project turns a simple ball of clay into a smiling desk companion that feels both modern and playfully handmade.
Detailed Instructions
Materials
- Polymer clay (mint green and copper/bronze colors)
- Aluminum foil (for the core)
- Clay sculpting tools (needle tool, ball stylus)
- Black acrylic paint
- Small paintbrush
- Oven for baking (if using polymer clay)
- Gloss glaze (optional)
Step 1: Shaping the Base
-
Create a foil core:
Crumple a small piece of aluminum foil into an oval shape, roughly the size of a large grape. This saves on clay and makes the figure lighter. -
Condition the clay:
Take your mint green clay and knead it thoroughly in your hands until it becomes soft, pliable, and free of cracks. -
Form the body:
Roll the conditioned clay into a smooth ball, then gently flatten it slightly to form a thick oval. Press your foil core into the center and work the clay around it until the foil is completely hidden. -
Pull the neck:
Choose one end of the oval to be the front. Gently pinch and pull the clay upward and slightly forward to create a thick, sturdy neck. Smooth the transition area with your thumb so there are no seams. -
Shape the head:
At the top of the neck, mold the clay into a rounded, slightly bulbous head shape. It should look organic and soft, rather than perfectly spherical. -
Form the tail:
On the opposite end, pull a smaller amount of clay outwards to form a short, tapered tail that curves slightly upward.
Smooth Moves
Before baking, wipe your figure gently with a brush dipped in baby oil or rubbing alcohol. This removes fingerprints and lint for a pro finish.
Step 2: Adding Legs & Stability
-
Make the legs:
Roll four small, equal-sized balls of mint clay. These will become the stubby legs. -
Attach the legs:
Press the four balls onto the underside of the body. Use a sculpting tool or your finger to blend the seams of the clay upward into the body so they are securely attached. -
Check the balance:
Set the dinosaur down on your work surface. Press down gently to flatten the bottoms of the feet ensuring the figure stands stable and doesn’t wobble. -
Refine the silhouette:
Look at your dino from all angles. Smooth out any fingerprints or bumps. I usually dip my finger in a tiny bit of water (for air-dry clay) or baby oil (for polymer) to get a flawless finish.
Step 3: Detailing & Finishing
-
Create the spots:
Take tiny pinches of the copper or bronze colored clay and roll them into extremely small balls. -
Apply the spots:
Press these copper balls gently onto the dinosaur’s back. Flatten them slightly so they look like integrated markings rather than raised bumps. -
Add facial divots:
Use a small ball stylus or the rounded end of a paintbrush to make two small indentations for the eyes on the sides of the head. -
Carve the mouth:
Using a needle tool or a sharp craft knife, carefully carve a small, curved smile line on one side of the face. -
Add nostrils:
create two tiny pin-pricks near the front of the snout to serve as nostrils. -
Bake or dry:
Follow the instructions on your specific clay package to bake (polymer) or dry (air-dry) your creation. Ensure it is fully cured before painting. -
Paint the eyes:
Dip a fine-point brush or a toothpick into black acrylic paint. Carefully fill the eye indentations you made earlier to bring the face to life. -
Highlight the smile:
Run a very thin line of black paint into the carved smile groove to make the expression pop.
Dino Decor
Try using metallic gold or silver paint for the spots after baking instead of clay for an extra shiny, glamorous look.
Place your new prehistoric friend on your desk to guard your pencils and bring a smile to your workday

The Complete Guide to Pottery Troubleshooting
Uncover the most common ceramic mistakes—from cracking clay to failed glazes—and learn how to fix them fast.
Sleepy Cat Loaf Magnet
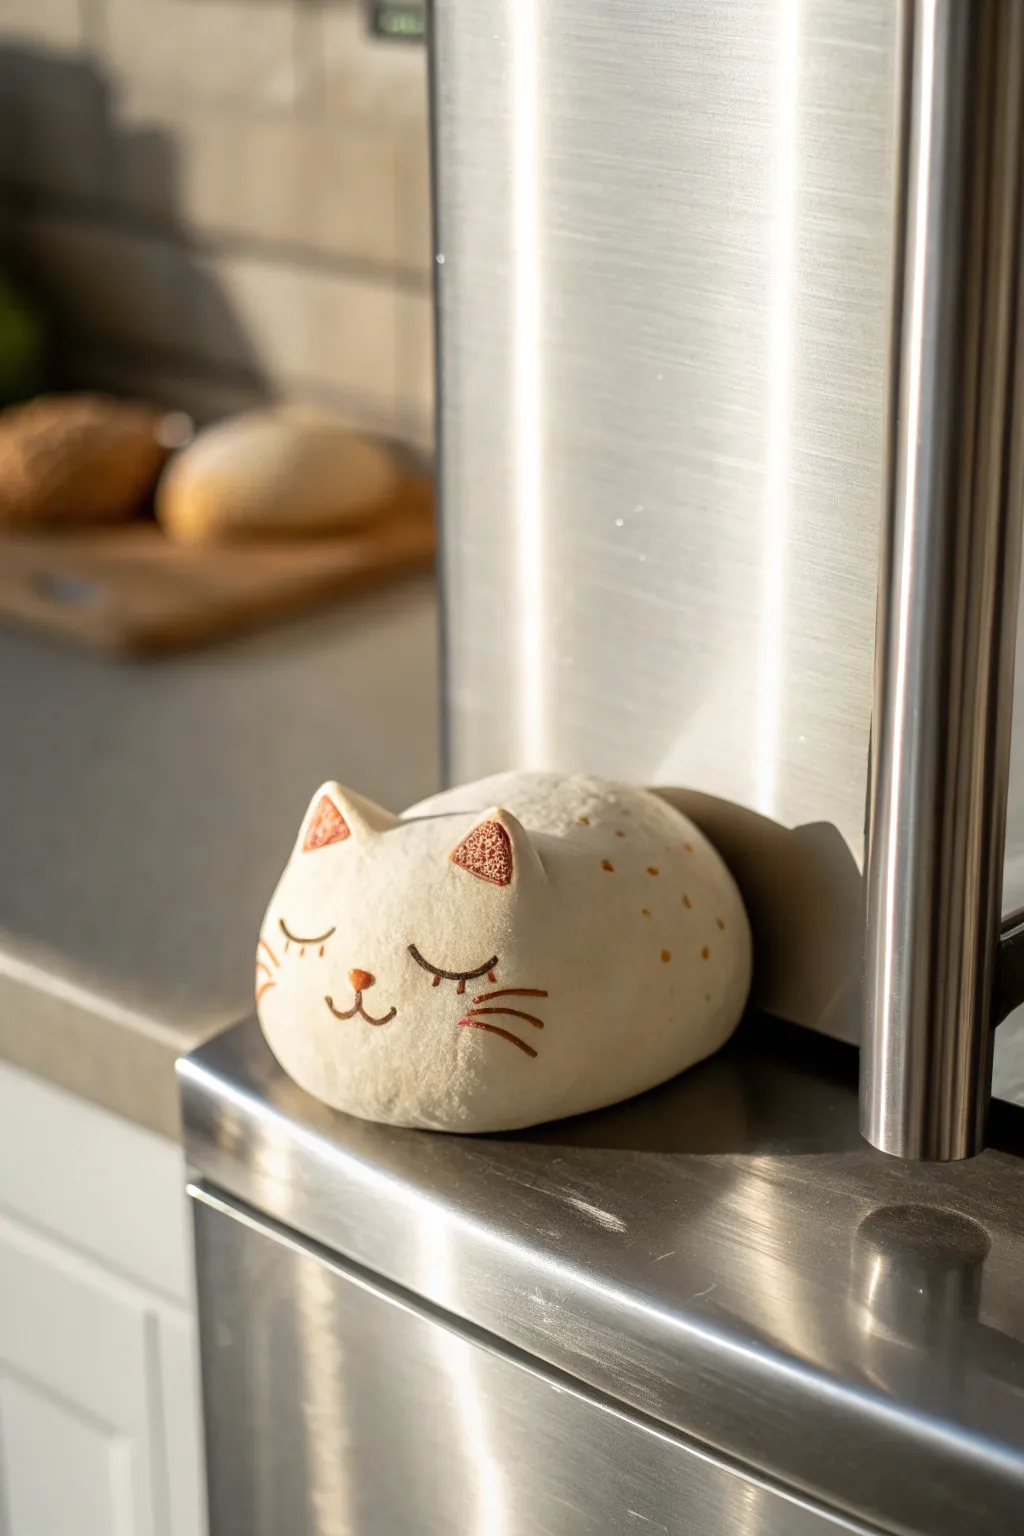
Bring a touch of whimsy to your kitchen with this adorable, sleepy cat magnet. Modeled after a perfectly resting ‘cat loaf’, this project features smooth curves, simple painted details, and a sturdy magnetic backing.
How-To Guide
Materials
- White or cream-colored polymer clay (approx. 2 oz)
- Acrylic paints (brown, pink/terracotta)
- Fine detail paintbrush (0 or 00 size)
- Heavy-duty neodymium magnets (1-2 strong round ones)
- Strong craft glue (E6000 or strong super glue)
- Doting tool or toothpick
- Aluminum foil (optional for core)
- Matte varnish or sealant
- Texture tool or stiff bristle brush (for ear detail)
Step 1: Shaping the Base
-
Prepare the Clay:
Begin by conditioning your white polymer clay until it is soft and pliable. Use the warmth of your hands to work out any air bubbles, ensuring a smooth finish later. -
Form the Body:
Roll the clay into a smooth ball, then gently flatten and elongate it into an oblong, oval shape. This will be the main body of the cat. -
Create the Loaf Shape:
Press the bottom against your work surface so it sits flat. Use your palms to smooth the sides, creating a dome shape that mimics a cat tucking its paws underneath. -
Smooth the Surface:
Take a moment to gently rub your finger over the surface of the clay to remove any fingerprints or imperfections. A drop of baby oil can help achieve a perfectly glass-smooth finish here.
Step 2: Adding Details
-
Make the Ears:
Pinch off two small, equal amounts of clay. Roll them into tiny balls and then pinch one side to form a triangle shape. -
Attach the Ears:
Place the triangles on the front-top of the ‘loaf’, spacing them appropriately. Gently blend the base of the ears into the head using a silicone tool or your finger so there are no visible seams. -
Texture the Inner Ears:
Using a small texturing tool, a needle, or even a scrunched-up ball of foil, gently press into the front face of each ear triangle to create a rough, stippled texture inside the ear. -
Embed the Magnet:
Flip the cat over. Press your magnet slightly into the flat bottom to create an indentation, then remove it. This ensures the magnet sits flush later, though I prefer to glue it after baking to avoid heat damage to the magnet.
Smooth Operator
Before baking, wipe the unbaked clay with a little rubbing alcohol or baby oil on a brush. This melts away dust and fingerprints instantly.
Step 3: Baking and Painting
-
Bake the Clay:
Bake the piece according to your clay manufacturer’s instructions (usually 275°F/135°C for 15-30 minutes depending on thickness). Let it cool completely before moving on. -
Paint the Inner Ears:
Dip your fine brush into terracotta or pink paint. Carefully dab this color only onto the textured area inside the ears. -
Draft the Face:
If you’re nervous about painting directly, lightly sketch the eyes and mouth with a pencil first to get the spacing right. -
Paint the Eyes:
Using brown acrylic paint and your finest brush, paint two downward-curving arcs for the sleepy closed eyes. Add three small lashes to the outer corner of each eye. -
Add the Nose and Mouth:
Paint a tiny terracotta triangle or oval between the eyes for the nose. Below that, paint a small brown ‘w’ shape for the mouth. -
Whiskers and Freckles:
Paint three simple horizontal lines on each cheek for whiskers. If desired, add tiny brown dots along the back or sides for subtle markings. -
Seal the Piece:
Once the paint is fully dry, apply a coat of matte varnish over the entire cat to protect the paint and give the clay a finished ceramic look. -
Attach the Magnet:
Place a dab of strong glue into the indentation you made earlier on the bottom. Press the magnet firmly into place and let it cure fully before sticking it to your fridge.
Calico Customization
Before baking, mix small patches of orange and black clay into your white base clay for a tricolor calico effect instead of painting spots later.
Your peaceful kitty is now ready to guard your grocery list
Round Chick or Duckling Charm
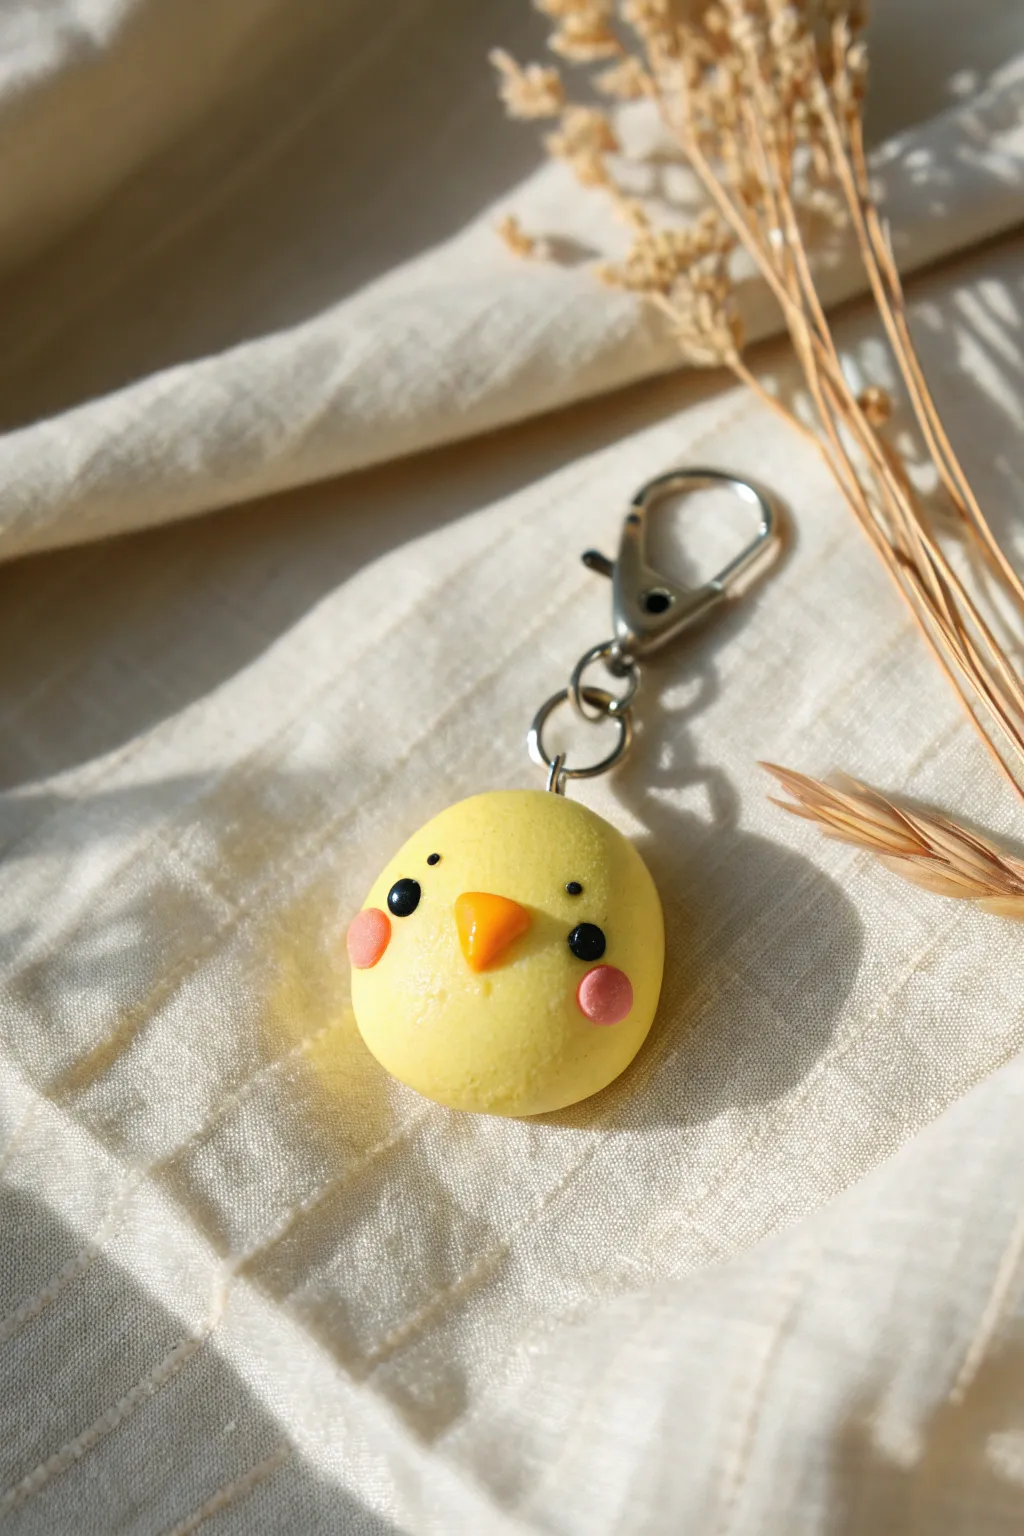
This cheerful little charm is proof that simple shapes create the cutest results. With just a few bits of clay, you can craft a permanently happy companion perfect for keychains or zipper pulls.
Detailed Instructions
Materials
- Yellow polymer clay
- Orange polymer clay
- Pink polymer clay
- Black polymer clay
- Silver eye pin
- Silver lobster clasp keychain finding
- Needle tool or toothpick
- Ball tool (small)
- Gloss glaze (optional)
- Small paintbrush
- Jewelry pliers
Step 1: Shaping the Base
-
Prepare the yellow clay:
Begin by conditioning a chunk of yellow clay in your hands until it becomes soft, pliable, and warm. -
Roll the body:
Roll the yellow clay between your palms to create a smooth, perfect sphere. It should be about the size of a large grape or small walnut. -
Flatten slightly:
Gently press the sphere onto your work surface just enough to create a flat bottom, so the chick doesn’t roll away while you work on it. -
Smooth imperfections:
Inspect the surface for fingerprints. If you find any, lightly buff them away using the pad of your finger or a drop of baby oil.
Step 2: Adding the Hardware
-
Identify the top:
Find the very center of the top of your yellow sphere. -
Prepare the eye pin:
Check the length of your eye pin stem. If it’s longer than the height of your chick, trim it down using your wire cutters. -
Insert the pin:
Push the straight end of the eye pin directly into the top center of the clay. Stop when the loop rests gently against the yellow surface.
Clean Hands are Key
Yellow clay picks up dirt easily. Wipe your hands with a baby wipe or wash them thoroughly before handling the yellow clay to keep the color bright and pure.
Step 3: Creating the Face
-
Make the eyes:
Roll two tiny specks of black clay into balls. They should be very small to maintain the cute factor. -
Place the eyes:
Press the black balls onto the face, spacing them somewhat widely apart. I like to place them slightly lower than the halfway line of the sphere. -
Create the beak:
Take a very small piece of orange clay and roll it into a tiny cone or teardrop shape. -
Attach the beak:
Place the orange cone directly in the center between the eyes, pointing downward. Press it gently so it adheres. -
Shape the rosy cheeks:
Roll two small balls of pink clay, slightly larger than the eyes but smaller than the beak. -
Apply the blush:
Press these pink circles onto the cheeks, placing them just below and slightly to the outside of each eye. -
Add highlights:
For extra sparkle, add minuscule dots of white clay (or white paint after baking) to the upper right corner of each black eye.
Texture Time
Before baking, gently tap the yellow surface with a clean toothbrush or a ball of aluminum foil to give the chick a fuzzy, fluffy texture instead of a smooth one.
Step 4: Finishing Up
-
Add detail dots:
Using a needle tool or toothpick, create two very faint, tiny indentations above the eyes for eyebrows, or poke two tiny holes near the beak for nostrils if desired. -
Final inspection:
Give your chick a once-over to ensure no lint or dust is stuck to the yellow clay before baking. -
Bake:
Bake the charm according to your specific clay manufacturer’s instructions (usually around 275°F or 135°C for 15-30 minutes). -
Cool:
Allow the piece to cool completely before handling it, as hot clay is fragile. -
Seal (Optional):
Apply a thin layer of gloss glaze with a soft brush to protect the charm and give it a shiny, ceramic-like finish. -
Assemble:
Once dry, use your pliers to open the jump ring (or the ring on the lobster clasp) and attach it securely to the eye pin loop on top of the chick.
Now your adorable round chick is ready to brighten up your keychain or backpack


What Really Happens Inside the Kiln
Learn how time and temperature work together inside the kiln to transform clay into durable ceramic.
Cute Cloud Ring Holder
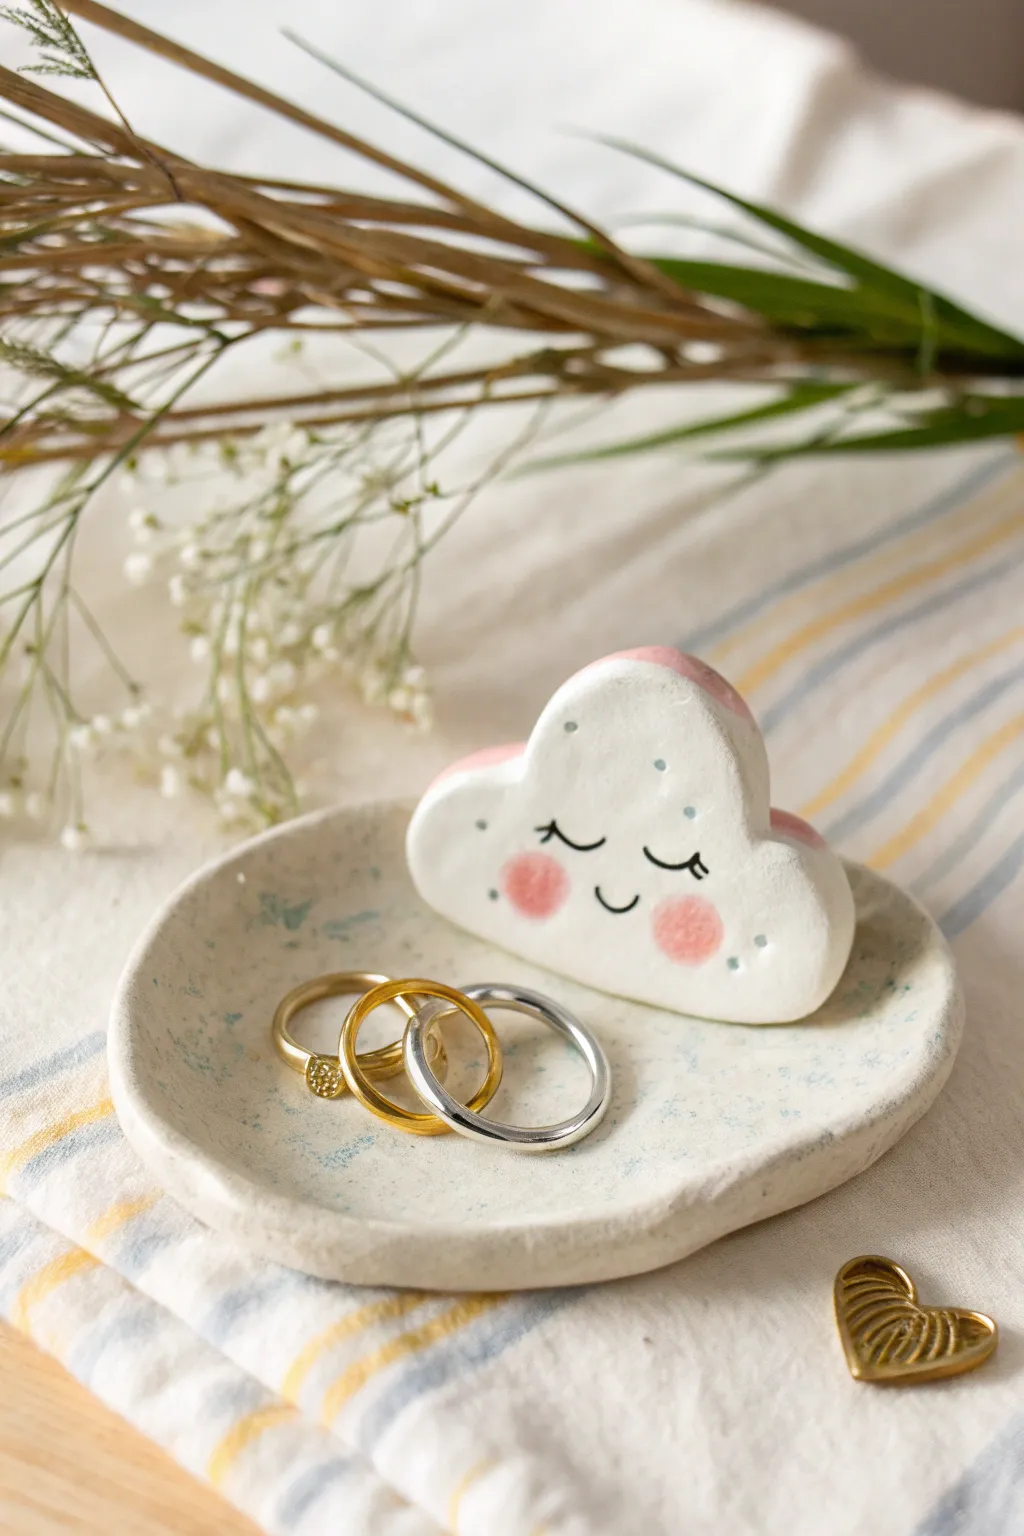
Keep your favorite rings safe with this adorable, sleepy cloud holder that watches over your jewelry. Perfect for a nightstand or vanity, this sweet ceramic dish features a speckled finish and a charming blush-cheeked face that brings a touch of whimsy to any space.
How-To Guide
Materials
- White air-dry clay or polymer clay
- Rolling pin
- Clay knife or craft knife
- Small bowl (for shaping)
- Small cloud cookie cutter (optional)
- Sponge
- Water (for smoothing)
- Acrylic paints (pastel pink, black, white, light blue)
- Fine detail paintbrush
- Glossy varnish or sealant
- Toothbrush (for speckled effect)
Step 1: Shaping the Base
-
Prepare the Clay:
Start by taking a medium-sized ball of white clay and kneading it in your hands until it’s soft, warm, and pliable to prevent cracks later on. -
Roll the Slab:
Using a rolling pin, roll the clay out into an even slab, aiming for a thickness of about 1/4 inch so the dish feels sturdy. -
Cut the Circle:
Use a round cookie cutter or trace around a small bowl (about 3-4 inches in diameter) to cut a perfect circle from your rolled clay. -
Form the Dish:
Gently lift the edges of your clay circle, curving them upward to create a shallow bowl shape. -
Smooth the Edges:
Dip your finger in a little bit of water and run it along the rim of the dish to smooth out any rough cuts or fingerprints. -
Let it Rest:
Set the formed dish aside on a flat surface or nestle it inside a small bowl to help it maintain its curved shape while you work on the cloud.
Cracks while drying?
If small hairline cracks appear as the clay dries, mix a tiny bit of fresh clay with water to make a paste and fill them in before painting.
Step 2: Creating the Cloud
-
Cut the Cloud Shape:
Roll out a smaller piece of thick clay (about 1/2 inch thick) and cut out a cloud shape freehand with your knife or use a cloud cutter. -
Soften the Edges:
Use a damp sponge or your finger to firmly round off all the sharp corners of the cloud, giving it that puffy, soft marshmallow look. -
Attach the Cloud:
Score the bottom of the cloud and the spot on the dish where it will sit with a needle tool or toothpick to create a rough texture. -
Secure the Bond:
Apply a dab of water or liquid clay (slip) to the scored areas and press the cloud firmly onto the dish, slightly off-center looks nice. -
Smooth the Seam:
I prefer to use a slightly wet sculpting tool to blend the clay at the base of the cloud into the dish so they become one seamless piece. -
Allow to Dry:
Let the entire piece dry completely according to your clay’s package instructions, which usually takes 24-48 hours depending on humidity.
Step 3: Painting and Finishing
-
Paint the Cheeks:
Using a dry brush technique and pastel pink paint, gently dab two soft, round circles onto the cloud for rosy cheeks. -
Add the Face:
With your finest detail brush and black paint, carefully paint two closed U-shaped eyes with eyelashes and a tiny smile between the cheeks. -
Highlight and Detail:
Add tiny white dots to the pink cheeks for highlights, and use a light blue paint to add small decorative dots or freckles around the face. -
Pink Accents:
Paint the back bumps of the cloud with the same pastel pink to add some dimension that can be seen from behind. -
Create Speckles:
Dilute a tiny bit of light blue or grey paint, dip an old toothbrush in it, and flick the bristles to spray fine speckles across the dish surface. -
Seal the Project:
Once all paint is totally dry, apply a coat of glossy varnish to protect your jewelry holder and give it a finished, ceramic-like shine.
Make it Sparkle
Mix a small amount of fine iridescent glitter into your final glossy varnish coat to give the cloud a subtle, magical shimmer.
Place this on your dresser and enjoy having the sweetest spot to store your treasures
Tiny Mushroom Buddy Pair
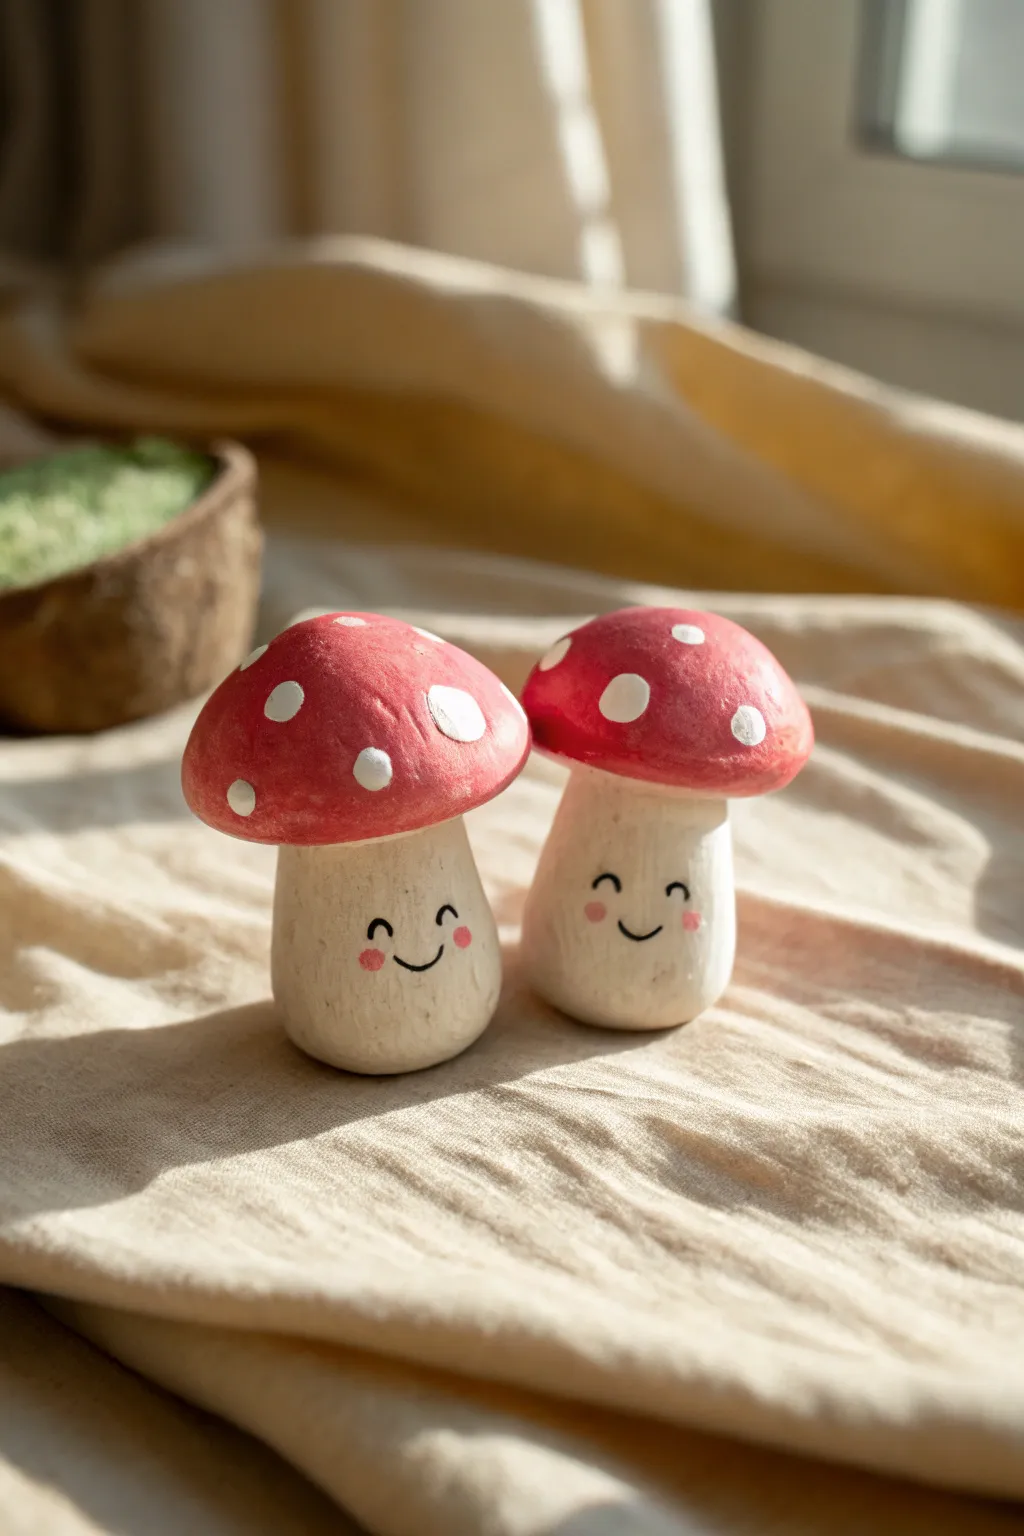
These charming little fungi feature cheery red caps speckled with white dots and sweet, smiling faces that bring them to life on your shelf. With their chunky, sturdy stems and vibrant tops, this pair makes for a delightful and beginner-friendly sculpting project.
Step-by-Step
Materials
- White air-dry clay or white polymer clay
- Acrylic paints: Bright red, white, black, and soft pink
- Sculpting tools or a craft knife
- Fine-grit sandpaper
- Small round paintbrush
- Fine detail brush or toothpick
- Gloss or matte varnish (optional)
Step 1: Forming the Shapes
-
Prep the clay:
Start by conditioning your clay. If you’re using air-dry clay, knead it slightly to make it pliable but not sticky; for polymer clay, warm it in your hands until soft. -
Create the stems:
Roll two equal balls of white clay, roughly the size of a large walnut. Gently roll each ball into a thick cylinder shape, tapering slightly towards the top to mimic a natural mushroom stem. -
Flatten the base:
Press the bottom of each cylinder firmly onto your work surface so the mushrooms will stand upright without wobbling. -
Shape the caps:
Take two slightly smaller portions of clay and roll them into balls. Flatten the bottom of each ball and gently dome the top with your fingers to create the classic mushroom cap shape. -
Attach cap to stem:
Score the top of the stem and the underside of the cap with a craft knife (scratching a cross-hatch pattern). Apply a tiny bit of water (for air-dry) or liquid clay (for polymer) and press the parts together firmly. -
Blend the seams:
Using a smoothing tool or your finger, gently blend the clay where the cap meets the stem on the underside to ensure a secure bond, though keeping a distinct separation looks cute too.
Don’t rush the bond
If your cap keeps sliding off the stem while working, insert half a toothpick into the stem and push the cap onto the other half for an internal skeleton.
Step 2: Refining and Drying
-
Texture:
For a rustic look, you can leave slight finger impressions or use a stiff brush to dab texture onto the stem, mimicking organic growth. -
Dry or bake:
If using air-dry clay, let the mushrooms sit undisturbed for 24-48 hours until completely hard. For polymer clay, bake according to the package instructions. -
Smooth the surface:
Once fully cured, use fine-grit sandpaper to gently buff away any harsh fingerprints or rough bumps on the cap to ensure a smooth painting surface.
Step 3: Painting and Details
-
Paint the cap base:
Paint the entire mushroom cap with opaque red acrylic paint. You may need two coats to get a solid, vibrant color without streaks. -
Add the stem color:
Start applying an off-white or cream paint to the stem. I like to use a slightly dry brush here to let some of the clay’s natural texture show through. -
Create the polka dots:
Dip the handle end of a paintbrush into white paint. Dot it onto the red cap to create perfect, varying-sized circles. Place these randomly for a natural feel. -
Paint the face – Step 1:
Using your finest detail brush and black paint, draw two small upward-curving arcs for the eyes. Position them fairly low on the stem for maximum cuteness. -
Paint the face – Step 2:
Paint a small ‘U’ shape between the eyes for a smiling mouth. -
Add rosy cheeks:
Dip a cotton swab or a dry brush into pink paint and dab off the excess. Gently tap two little circles onto the cheeks just below the eyes. -
Seal the work:
Once all paint is completely dry, apply a coat of varnish. A matte finish is great for the stem, while a gloss varnish makes the red cap look freshly rained on.
Help, my paint looks streaky!
Red pigment is notoriously transparent. Let the first coat dry completely, then apply a second (or third) thin coat rather than one thick, goopy layer.
Now you have a pair of woodland buddies ready to brighten up your desk or windowsill

TRACK YOUR CERAMIC JOURNEY
Capture glaze tests, firing details, and creative progress—all in one simple printable. Make your projects easier to repeat and improve.
Easy Heart Pocket Tokens
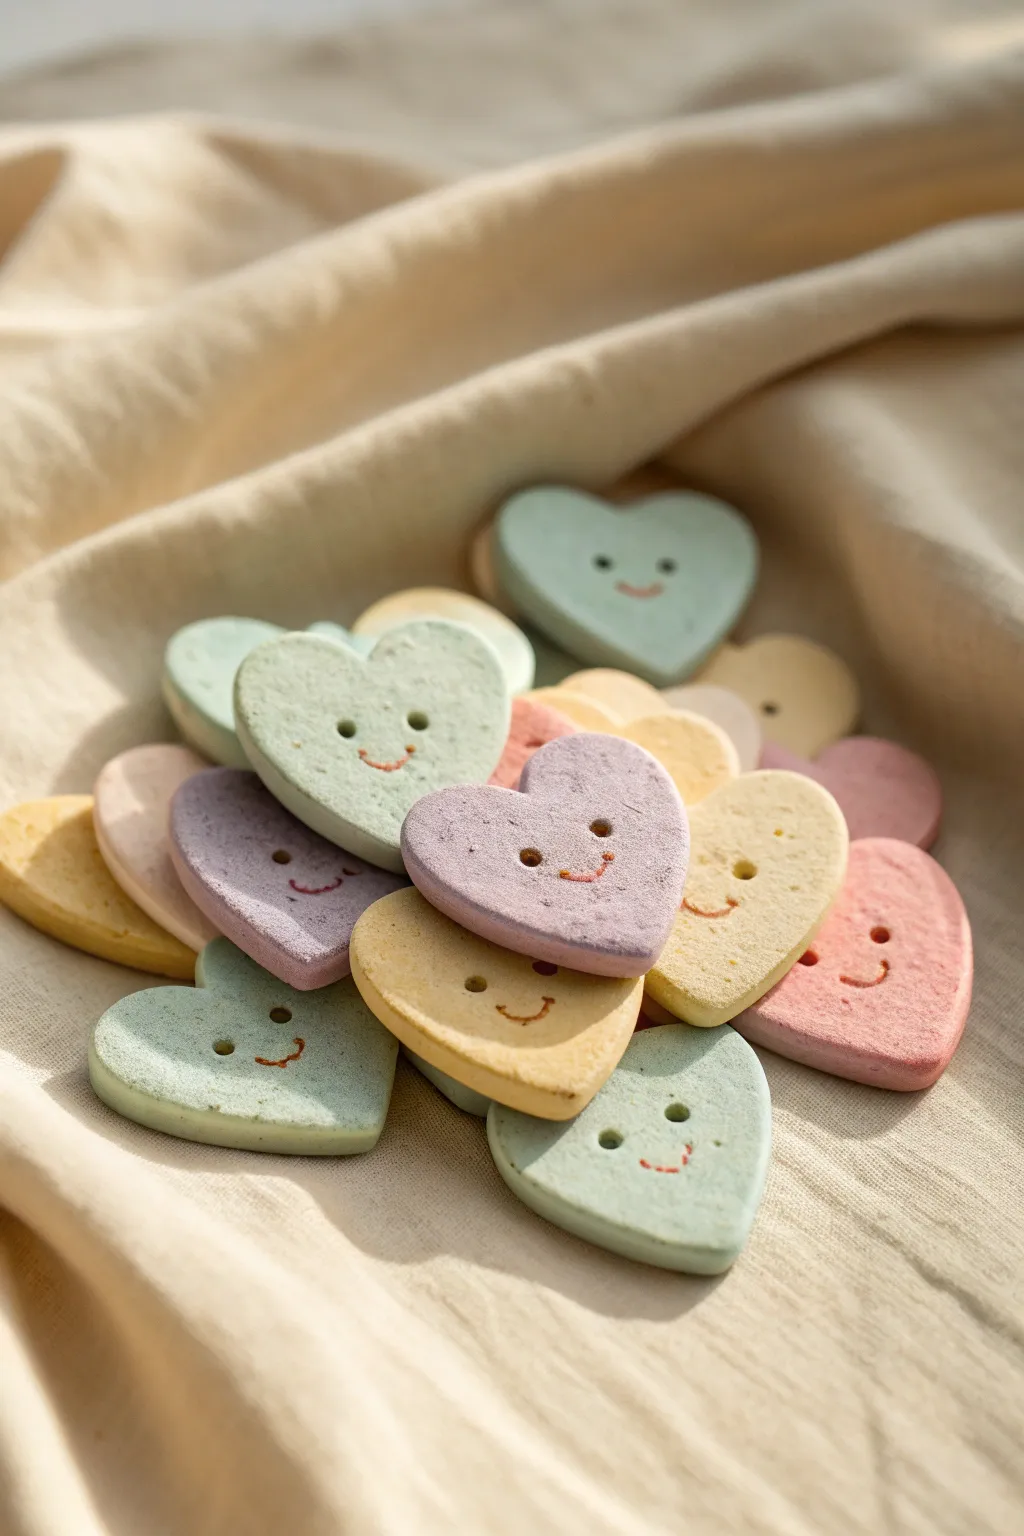
These adorable heart-shaped tokens are like little smiles you can hold in your palm. With their soft, matte finish and simple cheerful expressions, they make perfect handmade gifts to remind someone they are loved.
Step-by-Step Tutorial
Materials
- Air-dry clay (white)
- Acrylic paints (pastel mint, yellow, pink, lavender, peach)
- Rolling pin
- Heart-shaped cookie cutter (small)
- Toothpick or needle tool
- Fine-grit sandpaper (optional)
- Matte sealant or varnish
- Parchment paper
Step 1: Shaping the Hearts
-
Condition the Clay:
Start by taking a chunk of air-dry clay and kneading it in your hands until it is warm, pliable, and free of cracks. -
Add Color (Method A):
For integral color like the photo, mix a small pea-sized amount of acrylic paint directly into the white clay. Knead thoroughly until the color is uniform and pastel. Repeat with different colors for variety. -
Roll it Out:
Place your colored clay on parchment paper. Use a rolling pin to flatten it to an even thickness of about 1/4 inch (6mm). You want them substantial, not wafer-thin. -
Cut Shapes:
Press your small heart-shaped cutter firmly into the clay. wiggle it slightly to ensure a clean cut, then lift away the excess clay. -
Soften Edges:
Once cut, gently tap the edges of the heart with your finger to round them off slightly. This gives that smooth, stone-like appearance rather than sharp, cookie-cutter edges.
Cracking Issues?
If your clay is cracking while drying, try covering the hearts loosely with a plastic sheet to slow down the evaporation process. This helps them dry evenly.
Step 2: Creating Expressions
-
Poke the Eyes:
Take a toothpick or a small dotting tool. Press straight down into the upper half of the heart to create two small, round indentations for the eyes. Don’t go all the way through. -
Carve the Smile:
Using the tip of your needle tool or a sharp toothpick, gently drag a curved line below the eyes to form a smile. I usually go over the line twice to make sure it’s deep enough to hold paint later. -
Initial Drying:
Let the hearts sit on the parchment paper for about 30 minutes. This allows the surface to firm up slightly before you do any final smoothing. -
Refine the Surface:
Check for any burrs or rough spots around the face features. Gently smooth them down with a damp fingertip. -
Full Cure:
Allow the hearts to dry completely for 24-48 hours. Flip them over halfway through the drying process to ensure the bottoms dry evenly and don’t warp.
Step 3: Finishing Touches
-
Sand Imperfections:
Once fully dry, if there are any rough edges, very lightly buff them with fine-grit sandpaper. -
Accentuate the Face:
Mix a tiny amount of reddish-brown or dark pink acrylic paint. Using a very fine brush (or even a toothpick tip), carefully fill in the carved smile line and eye holes. -
Wipe Excess:
If you get paint outside the grooves, quickly wipe the surface with a slightly damp paper towel, leaving the paint only inside the recessed features. -
Seal (Optional):
To protect your tokens while keeping that natural look, apply a thin coat of matte varnish. Avoid glossy finishes if you want to replicate the soft texture in the image.
Make them fragrant
Add a drop of essential oil to the clay while kneading. Once dry, the porous clay acts as a passive diffuser, releasing a gentle scent when held.
Now you have a handful of sweet, smiling hearts ready to brighten someone’s day
Happy Face Blob Magnets
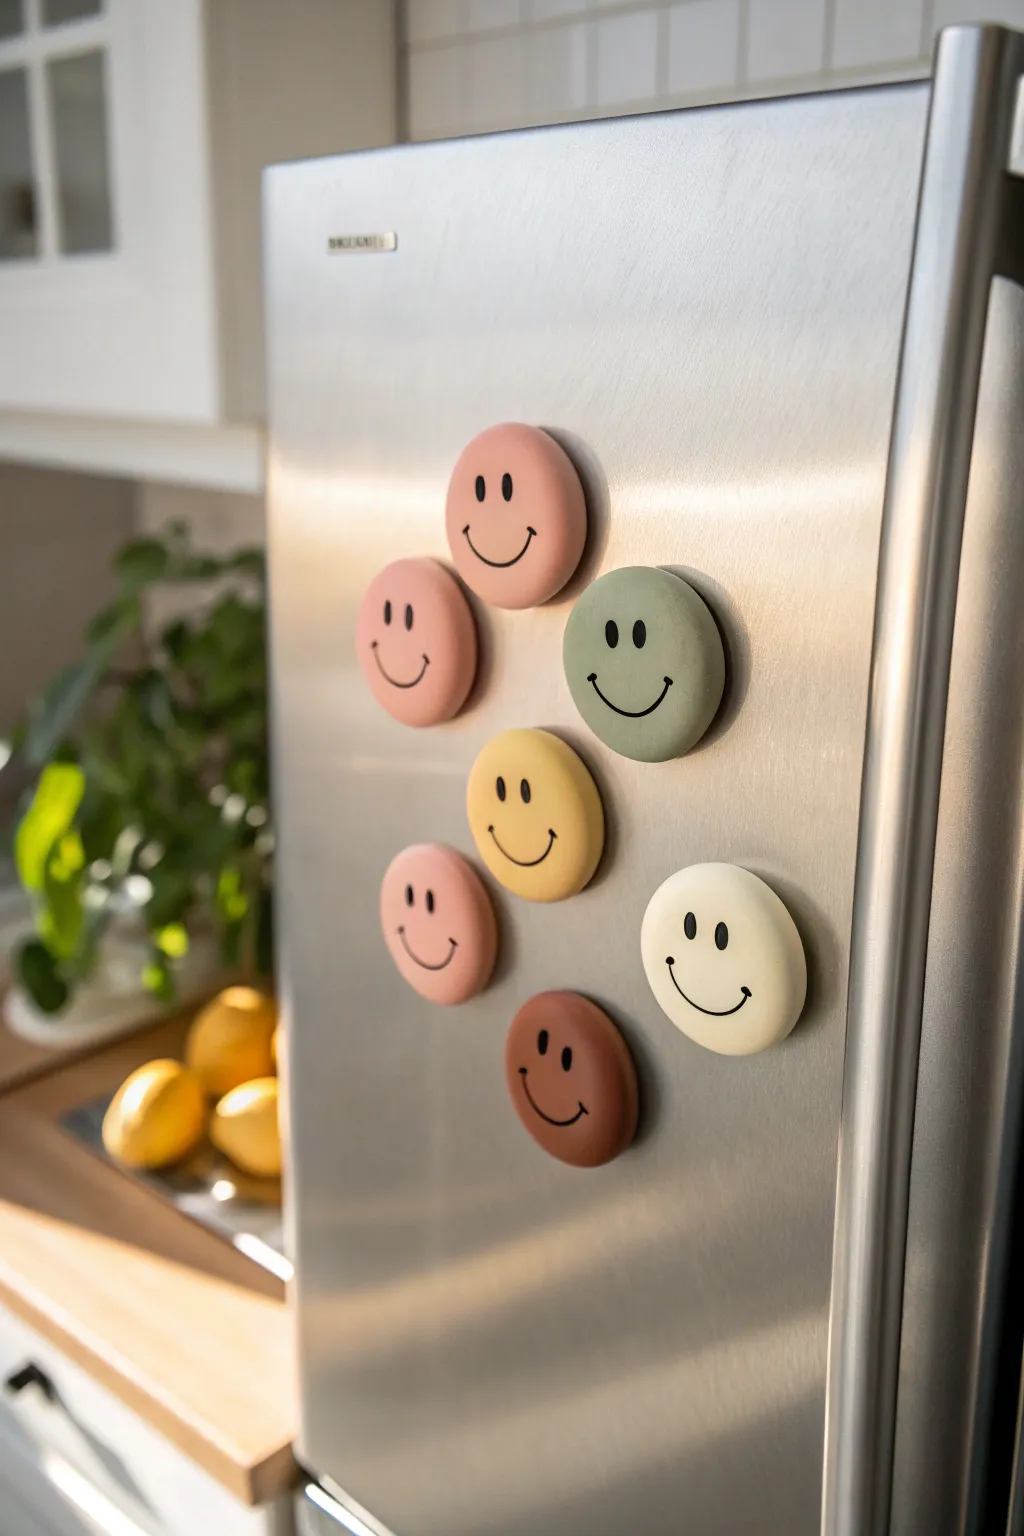
Brighten up your kitchen with these impossibly cute, matte-finish smiley face magnets. Their soft, rounded edges and muted pastel tones give them a modern, cozy vibe that looks great on any appliance.
How-To Guide
Materials
- Polymer clay (muted pink, peach, yellow, sage green, cream, brown)
- Black acrylic paint
- Fine-point detail brush or paint pen
- Rolling pin or smooth glass jar
- Round cookie cutter (approx. 2 inches)
- Strong round magnets
- Super glue or E6000
- Gloss glaze (optional, for eyes only)
- Smooth work surface (ceramic tile or glass)
- Oven for baking
Step 1: Shaping the Bases
-
Condition the clay:
Start by warming up your first color of polymer clay in your hands. Knead it thoroughly until it’s soft, pliable, and free of any cracks. -
Create a smooth ball:
Roll the conditioned clay into a tight ball between your palms to ensure there are no air bubbles trapped inside. -
Flatten gently:
Place the ball on your work surface and press it down with your palm. Use a rolling pin to flatten it into a thick slab, aiming for about 1/4 inch thickness. We want these to look puffy, not like thin cookies. -
Cut the circle:
Use your round cutter to punch out a clean circle. If the clay sticks to the cutter, you can dip the cutter in a little cornstarch first. -
Soften the edges:
The cutter leaves a sharp edge, which we want to avoid for this project. Use your finger to gently rub and round over the top edges of the circle until it looks like a smooth, domed button. -
Repeat for all colors:
Repeat this process with your other pastel clay colors until you have a nice collection of round, puffy discs. -
Bake the clay:
Place your clay circles on a baking sheet lined with parchment paper. Bake according to your specific clay package’s instructions—usually around 275°F (135°C) for 15-30 minutes. -
Cool down:
Let the clay pieces cool completely on the baking tray before handling them. They harden fully as they cool.
Clean Clay Pro-Tip
Baby wipes are your best friend here. Clean your hands and rolling pin thoroughly between colors to prevent darker clays from tinting your lighter pastel shades.
Step 2: Adding Personality
-
Sketch the face:
Before painting, I sometimes lightly mark the eye positions with a pencil to make sure they are centered. Aim for wide-set eyes for that extra cute factor. -
Paint the eyes:
Dip the handle end of a paintbrush into black acrylic paint. Press it straight down onto the clay to create perfect round dots for eyes. Lift straight up to avoid smearing. -
Draw the smile:
Using a very fine liner brush or a black paint pen, draw a simple, wide U-shape curve between the eyes. -
Add the smile creases:
At the very ends of your smile curve, add tiny little perpendicular ticks or curves upward. This small detail gives the face a genuine, happy expression. -
Let paint dry:
Allow the paint to dry completely. If you used thick acrylic for the eyes, this might take an hour or so.
Step 3: Assembly
-
Prepare the backs:
Flip your smiley faces over. If the backs are very smooth, scuff the center slightly with sandpaper to help the glue adhere better. -
Apply adhesive:
Place a small dollop of strong super glue or E6000 adhesive in the center of the back. -
Attach magnets:
Press a round ceramic or neodymium magnet firmly into the glue. -
Final cure:
Let the glue cure undisturbed for at least 24 hours to ensure the magnets won’t pop off when you stick them to the fridge.
Level Up Your Blobs
Before baking, press a textured sponge gently onto the distinct clay surfaces to give them a matte, stone-like texture instead of a smooth plastic finish.
Now you have a cheerful set of magnets ready to hold up your grocery lists and favorite photos
Daisy Flower Coasters
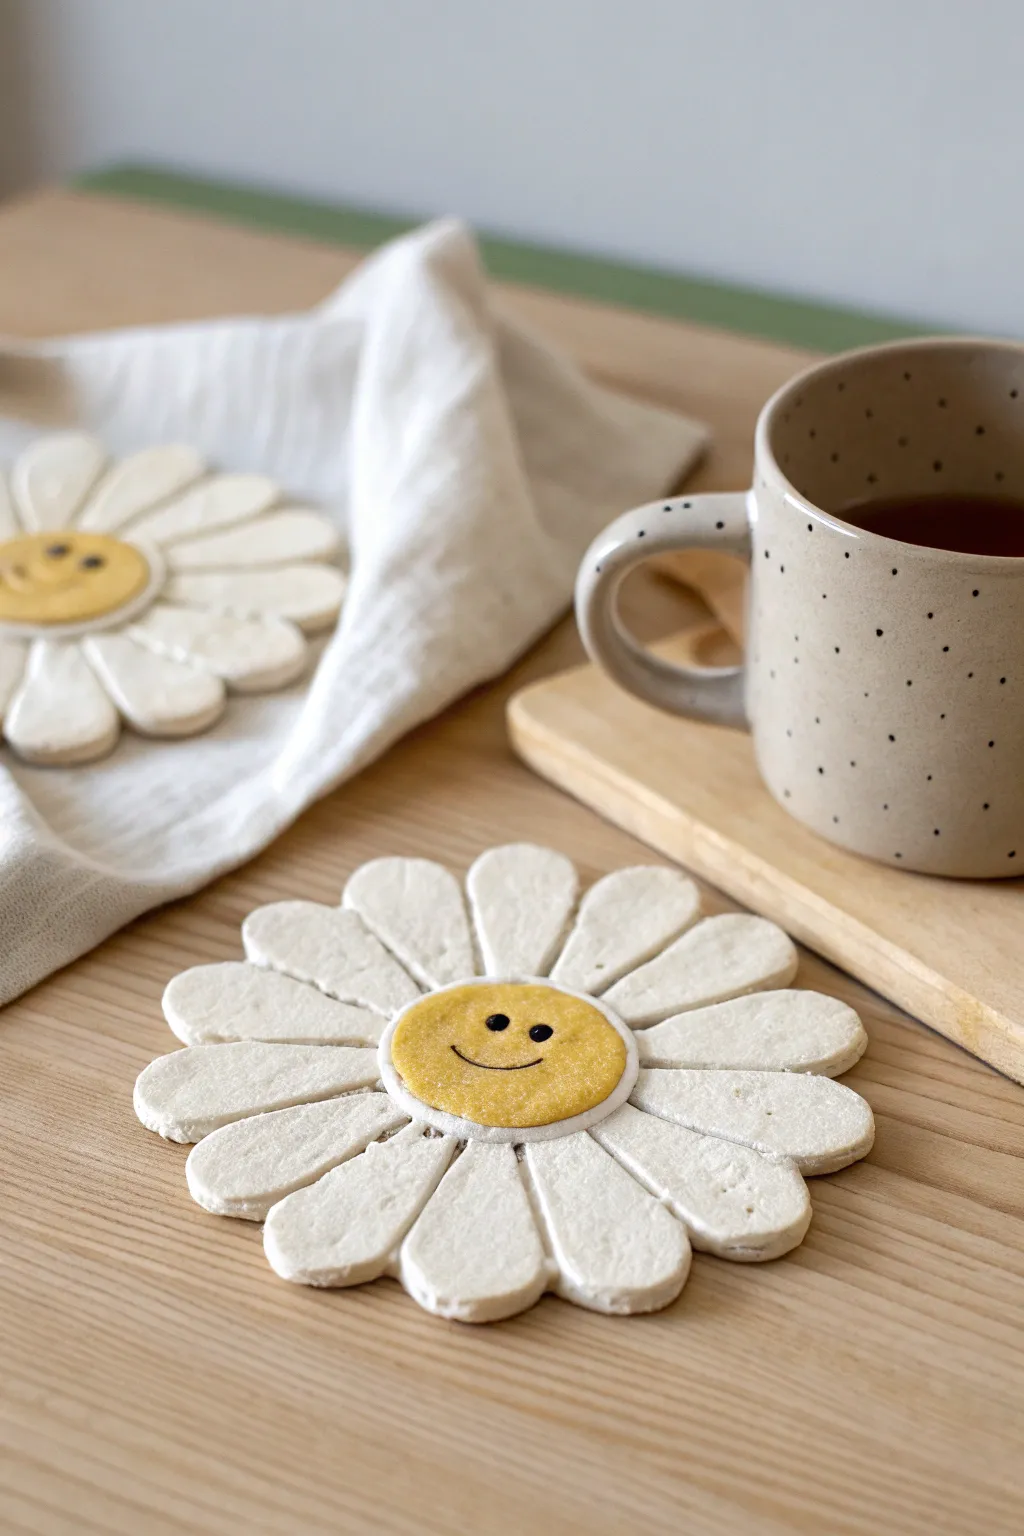
Brighten up your coffee table with these cheerful, flower-shaped coasters that literally smile back at you. The simple daisy design features chunky white petals and a textured yellow center, perfect for resting your favorite mug.
Detailed Instructions
Materials
- White polymer clay or air-dry clay
- Yellow polymer clay or air-dry clay
- Rolling pin
- Parchment paper or craft mat
- Exacto knife or clay blade
- Round cookie cutter (approx. 2 inches)
- Small round cutter (approx. 1.5 inches)
- Modeling tool or toothpick
- Black acrylic paint
- Fine tip paintbrush
- Sealant (glaze or varnish)
Step 1: Creating the Base
-
Prepare the workspace:
Lay down a sheet of parchment paper or use a dedicated craft mat to prevent the clay from sticking to your table. -
Roll the white clay:
Take a generous ball of white clay and knead it until soft. Roll it out to an even thickness of about 1/4 inch (6mm). You want it thick enough to be sturdy as a coaster. -
Cut the center:
Use your larger round cookie cutter to punch out a circle in the middle of your rolled white clay. This acts as the anchor for your petals. -
Form the petals:
Roll more white clay into a long snake, then cut it into roughly equal segments. Roll each segment into a ball, then flatten and elongate them into teardrop shapes to form the petals. -
Arrange the flower:
Place the petals around the white center circle you cut earlier. Press the narrow end of each teardrop gently against the center circle so they bond together. -
Texture the petals:
I like to use a modeling tool to gently press a central line down the middle of each petal, giving it that distinct daisy look shown in the photo. -
Smooth the seams:
On the backside of the coaster, use your finger or a smoothing tool to blend the seams where the petals meet the center to ensure the structure holds together.
Cracking Clay?
If you see tiny cracks forming while air-drying, dip your finger in a little water and smooth them out immediately. For polymer, ensure you knead well before rolling.
Step 2: Adding the Face
-
Create the center:
Roll out a small amount of yellow clay. Use your smaller round cutter to create a perfect yellow circle for the flower’s face. -
Attach the center:
Place the yellow circle directly in the middle of your white flower base. Press it down gently to adhere it. -
Add texture:
To mimic the pollen texture seen in the image, take an old toothbrush or a stiff brush and tap it gently over the surface of the yellow clay to stipple it. -
Bake or Dry:
If using polymer clay, bake according to package instructions (typically 275°F/135°C for 15-30 mins). If using air-dry clay, let it sit undisturbed for 24-48 hours until fully hardened.
Step 3: Finishing Touches
-
Paint the face:
Once the coaster is cool or fully dry, dip a fine-tip brush into black acrylic paint. Carefully paint two small dots for eyes. -
Add the smile:
Paint a thin, curved line beneath the eyes for the smile. Keep the line simple and slightly imperfect for a sweeter look. -
Let the paint dry:
Allow the black paint to dry completely to avoid smudging during the sealing process. -
Seal the coaster:
Since this used for drinks, apply a waterproof varnish or sealant over the entire piece. This protects the paint and clay from moisture rings.
Make it a Set
Mix up the expressions! Create a whole set where one daisy is winking, one is sleeping (closed eyelids), and one has a surprised ‘O’ mouth.
Enjoy your delightful new table accessory that brings a bit of spring indoors year-round
Shy Ghost Shelf Buddy
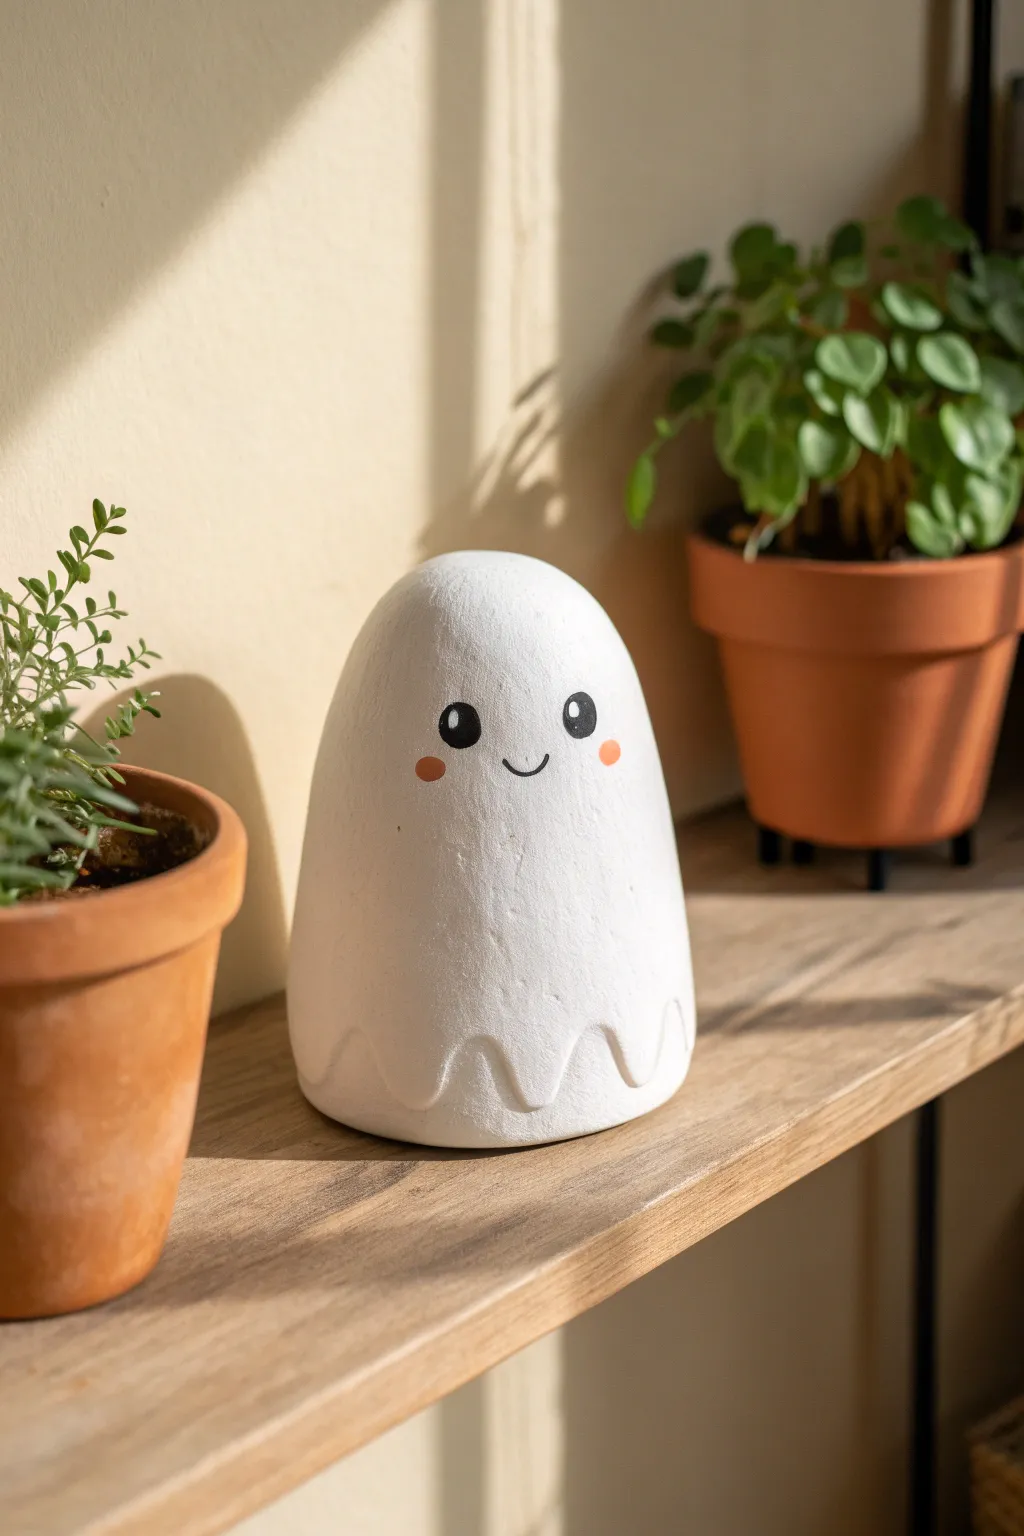
This adorable little ghost brings a friendly, non-spooky vibe to your shelves with its gentle smile and blushing cheeks. It’s a perfect beginner sculpting project that uses simple shapes to create a heartwarming piece of decor.
Step-by-Step Tutorial
Materials
- White sculpting clay (air-dry clay or polymer clay)
- Small cup of water (for smoothing)
- Black acrylic paint
- Soft pink or coral acrylic paint
- Fine-point paintbrush
- Detail tool or toothpick
- Rolling pin (optional)
- Matte sealant (optional)
Step 1: Shaping the Ghost Body
-
Condition the clay:
Start by taking a handful of white clay about the size of a large lemon. Knead it in your hands until it is warm, pliable, and free of cracks. -
Form the base cylinder:
Roll the clay into a smooth ball first, then gently roll it back and forth on your work surface to create a thick, short cylinder shape. -
Create the rounded head:
Using your palms, gently effectively dome the top of the cylinder to create a smooth, rounded head. The entire shape should resemble a sturdy gumdrop or a very rounded cone. -
Flatten the base:
Press the bottom of the ghost firmly onto your table to ensure it sits completely flat and won’t wobble on your shelf. -
Smooth the surface:
Dip your finger in a tiny bit of water and run it over the clay to smooth out any fingerprints or uneven textures. Air-dry clay loves a little moisture for a seamless finish.
Cracking Clay?
If you see tiny cracks forming as air-dry clay dries, mix a small amount of fresh clay with water to make a paste (slip) and fill them in
Step 2: Adding the Wavy Detail
-
Roll a thin snake:
Take a smaller piece of fresh clay and roll it into a long, thin snake, roughly the same circumference as the base of your ghost. -
Form the wave pattern:
Attach this thin snake near the bottom edge of the ghost. Instead of a straight line, manipulate the snake into smooth peaks and valleys to create a scalloped, wavy hem. -
Blend the waves:
Use a blending tool or your finger to smooth the top edge of the wavy snake into the main body, making it look like one cohesive piece of ‘fabric’ rather than an added strip. -
Refine the bottom edge:
Gently press the bottom of the waves so they are flush with the base, ensuring the scalloped detail looks integrated.
Step 3: Finishing and Painting
-
Allow to dry:
Let your ghost sit undisturbed. If using air-dry clay, this usually takes 24-48 hours depending on thickness. Polymer clay will need baking according to package instructions. -
Sand imperfections:
Once fully dry or baked and cooled, inspect your ghost. If there are rough spots, very lightly sand them down with fine-grit sandpaper. -
Paint the eyes:
Using a fine-point brush and black acrylic paint, create two oval-shaped eyes. Place them slightly wide apart to enhance the cute factor. -
Add eye highlights:
For that sparking look, dip the very tip of a toothpick into white paint (or leave tiny unpainted spots if you have steady hands) and add a tiny dot to the upper corner of each black eye. -
Paint the smile:
With the finest brush you have or a black paint pen, draw a tiny, shallow ‘U’ shape right between the eyes for a shy little smile. -
Add blushing cheeks:
Dip your finger or a cotton swab into pink paint, dab most of it off onto a paper towel, and gently press two soft circles onto the cheeks just outside the smile. -
Seal the piece:
To protect your paint job, apply a thin coat of matte sealant over the entire figure once the paint is completely dry.
Glow Up
Mix glow-in-the-dark powder into your white paint or apply a glow glaze over the body so your ghost softly illuminates at night
Place your new friendly ghost among your plants or books for a subtle touch of whimsy