When I want a quick win at the clay table, I always reach for cute, easy clay ideas that start with simple little blobs and end in something that makes you grin. These projects are perfect for air-dry clay or polymer clay, and they’re all about tiny shapes, sweet faces, and low-stress details.
Tiny Chubby Bunny Figures
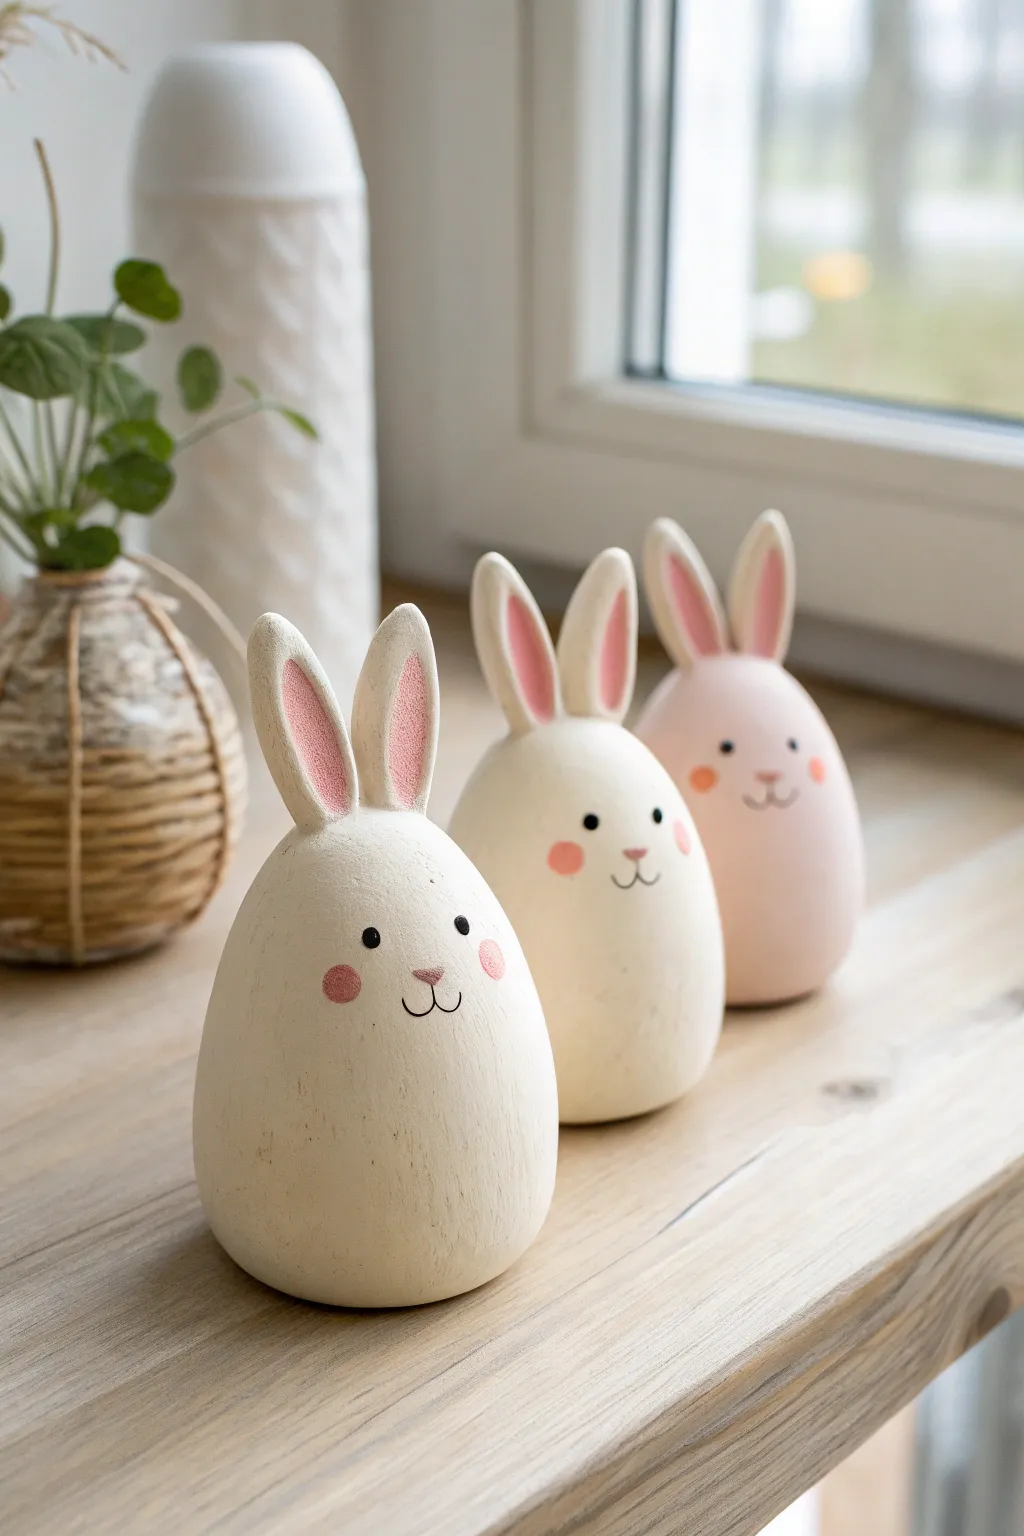
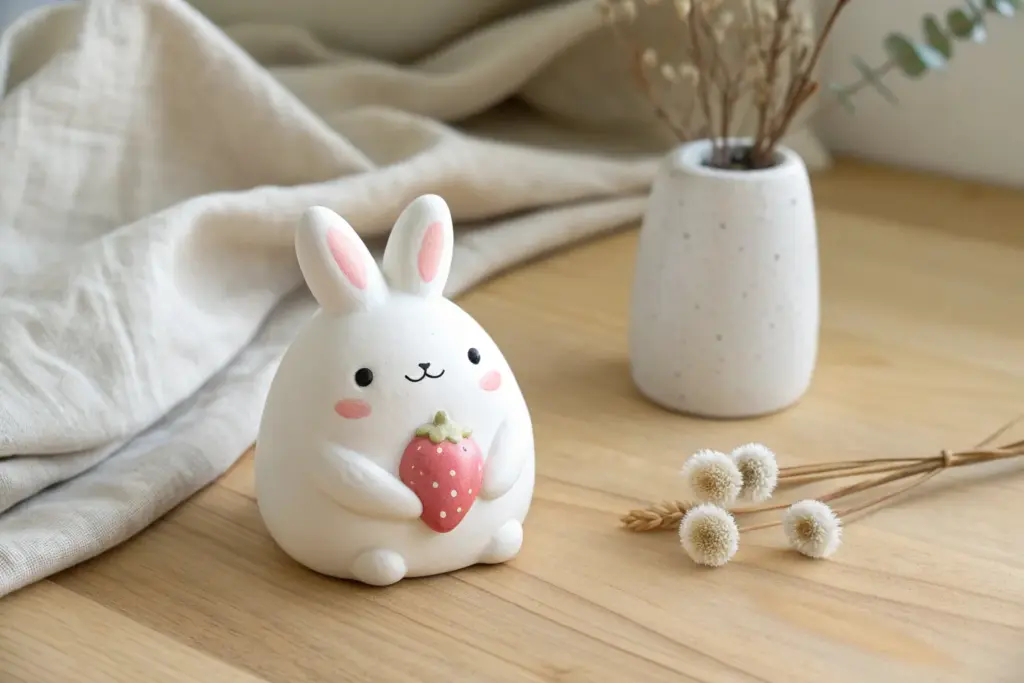
These charming, chubby bunny figures are the definition of sweet simplicity, featuring smooth, egg-like bodies and perky ears. Their minimalist faces and pastel accents make them perfect for a subtle spring display or a nursery shelf.
Step-by-Step Tutorial
Materials
- White air-dry clay or polymer clay
- Rolling pin
- Small bowl of water (for smoothing)
- Craft knife or clay tool
- Fine-grit sandpaper
- Acrylic paints: Cream/Off-white, Pastel Pink, Black
- Small flat paintbrush
- Fine detail paintbrush or dotting tool
- Matte varnish or sealant
Step 1: Shaping the Bodies
-
Prepare the clay:
Begin by conditioning your clay. If using air-dry clay, knead it briefly to ensure it is pliable and free of air bubbles. For polymer clay, warm it in your hands until soft. -
Form the base:
Take a handful of clay—about the size of a tennis ball—and roll it into a smooth sphere between your palms. -
Create the egg shape:
Gently taper the top of the sphere while flattening the bottom against your work surface. You want a stable, standing egg shape that is slightly wider at the base than at the top. -
Smooth the surface:
Dip your finger in a tiny bit of water and rub it over the clay to remove any fingerprints or cracks. Aim for a very smooth, matte finish. -
Repeat for the set:
Create two more egg shapes. Make them vary slightly in height or width to give your trio of bunnies a natural, organic look.
Step 2: Adding Ears & Details
-
Shape the ears:
Roll out two small sausages of clay for each bunny. Flatten them gently to create elongated, rounded ear shapes, keeping the bottom edge slightly thicker for attachment. -
Indent the ears:
Using a clay tool or the back of a paintbrush, press a shallow groove down the center of each ear. This creates the ‘inner ear’ area we will paint later. -
Attach the ears:
Score the top of the bunny’s head and the bottom of the ears with a craft knife. Add a drop of water (or liquid clay for polymer) and press the ears firmly onto the head. -
Blend the seams:
Use a modeling tool to smooth the clay where the ears meet the head so they look like one seamless piece. I find using a silicone-tipped tool works best here to avoid drag marks. -
Dry or bake:
If using air-dry clay, let the figures dry for 24-48 hours until fully hard and white. If using polymer clay, bake according to the package instructions. -
Sand for perfection:
Once fully cured, gently sand any rough spots or fingerprints with fine-grit sandpaper to achieve a porcelain-like finish.
Cracking Up?
If small cracks appear in air-dry clay while drying, mix a tiny bit of fresh clay with water to make a paste and fill the cracks, then sand smooth once dry.
Step 3: Painting the Faces
-
Base coat:
Paint two of the bunnies with a creamy off-white acrylic paint. Paint the third bunny a very soft pastel pink. You may need two thin coats for opaque coverage. -
Paint inner ears:
Mix a warm pink shade. Carefully paint the indented groove inside the ears. For the pink bunny, use a slightly darker rose shade so it stands out against the body. -
Add rosy cheeks:
Using the same pink, paint two small, soft circles on the cheeks. Keep the paint slightly jagged or textured at the edges to mimic a hand-drawn look. -
Dot the eyes:
Dip the handle end of a paintbrush or a dotting tool into black paint. press two wide-set dots onto the face for the eyes. -
Draw the nose and mouth:
With your finest detail brush, paint a tiny pink ‘Y’ shape or a small triangle for the nose. Then, use black or dark grey to draw the thin, curving anchor shape for the mouth. -
Final seal:
Protect your work with a layer of matte varnish to preserve the soft, natural look of the clay.
Texture Play
Before the clay dries, gently press a piece of linen fabric against the body to give the bunnies a subtle, woven texture instead of a smooth finish.
Arranging your trio near a window brings a lovely touch of handcrafted whimsy to your room


Mini Cat Head Charms
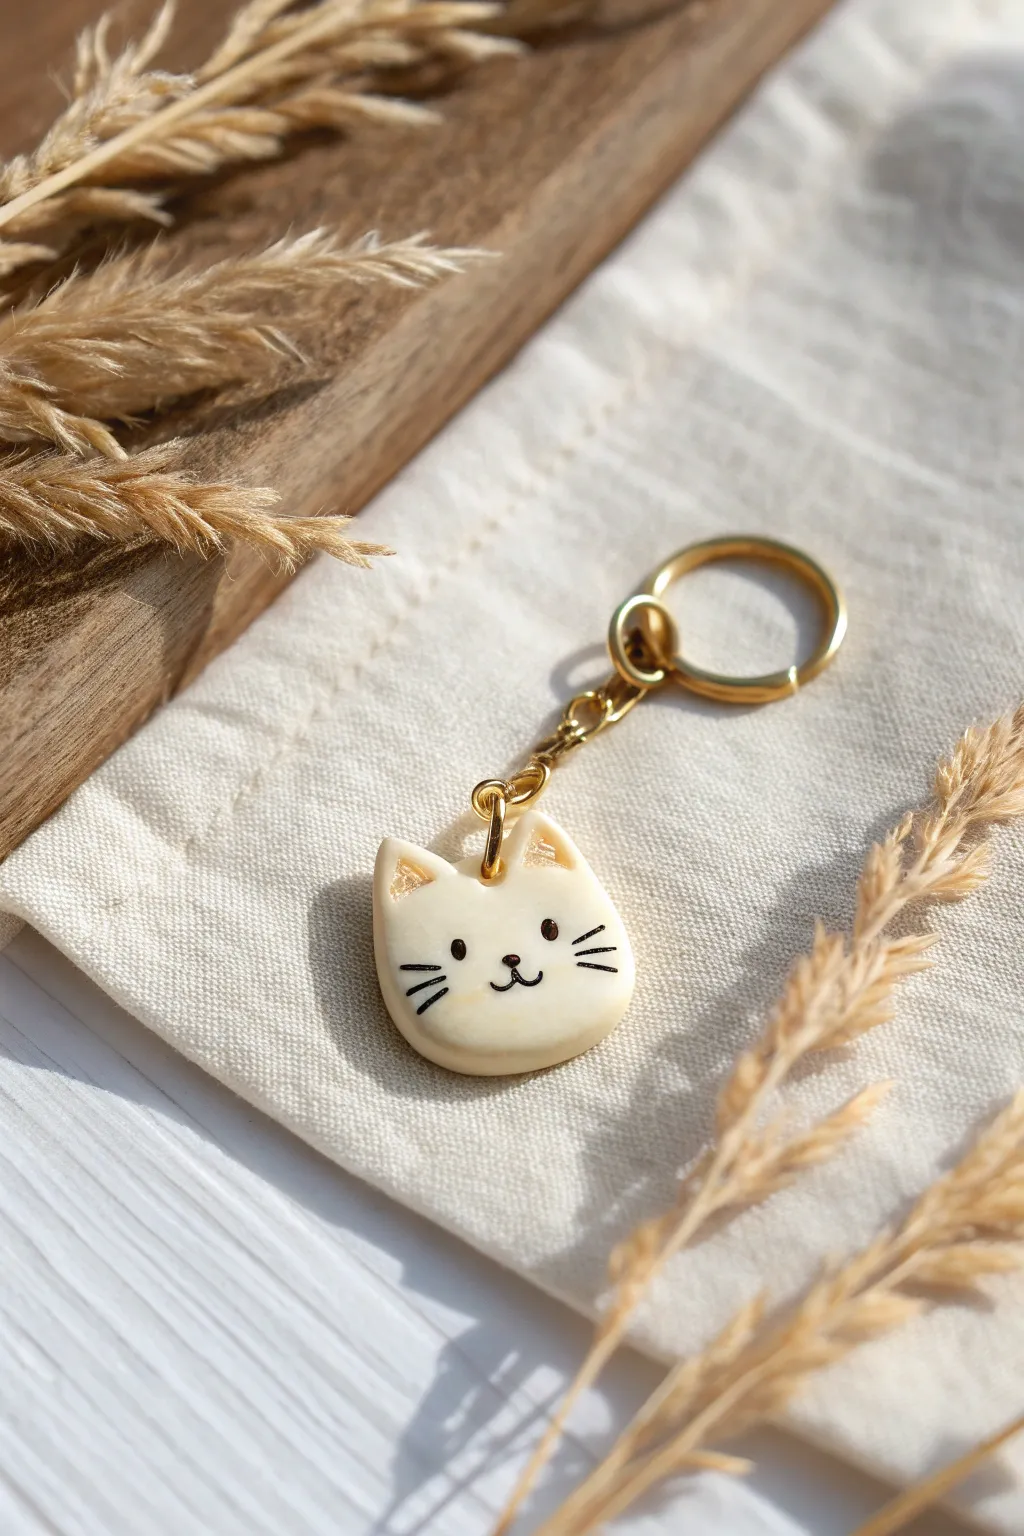
This adorable mini cat charm captures a sweet, minimalist aesthetic perfect for keychains or zipper pulls. With its milky white finish and delicate painted details, it’s a simple yet charming polymer clay project for beginners.
Detailed Instructions
Materials
- Polymer clay (white or translucent white)
- Small rolling pin
- Modeling tool (ball stylus or dotting tool)
- X-acto knife or craft blade
- Soft pastels (pink or peach)
- Small paintbrush
- Black acrylic paint
- Fine-point paintbrush or toothpick
- UV resin or high-gloss varnish
- Gold screw eye pin
- Gold jump rings and keychain hardware
- Super glue (optional)
Step 1: Shaping the Base
-
Condition the Clay:
Begin by kneading your white or translucent white polymer clay until it is soft and pliable. If it’s too sticky, you can leach it on a piece of paper for a few minutes. -
Create a Smooth Ball:
Roll a small amount of clay into a seamless ball about the size of a large grape. -
Flatten Slightly:
Gently press the ball down onto your work surface using your palm or a rolling pin until it’s about 1/4 inch thick. Aim for a rounded oval shape rather than a perfect circle. -
Form the Ears:
Using your fingertips, gently pinch the top two corners of the oval to pull out triangle shapes for the ears. Soften the points slightly so they aren’t too sharp. -
Refine the Silhouette:
Smooth around the edges with your finger to ensure there are no fingerprints or cracks. The bottom of the face should stay nice and round.
Clean Lines Trick
If you struggle painting thin whiskers with a brush, try using a super-fine permanent micron pen (005 size) after the clay is baked but before varnishing.
Step 2: Adding Details & Baking
-
Indenting the Ears:
Use a small ball tool or the rounded end of a paintbrush handle to press a shallow triangular indentation into the center of each ear. -
Adding Blush (Optional):
I like to scrape a tiny bit of pink soft pastel into a powder. Use a soft brush to gently dust the inside of the ear indentations for a soft, fleshy look. -
Insert Hardware:
Trim a gold screw eye pin if it’s too long. Screw or push it gently into the top center of the head, right between the ears. To ensure a tight hold later, remove it, add a dab of super glue (optional, can be done after baking), and reinsert. -
Bake:
Bake the clay pieces according to the manufacturer’s instructions on your clay package. Let the piece cool completely before handling.
Dust Magnets?
White clay attracts lint instantly. Keep baby wipes nearby to clean your hands and tools often, and lightly sand the baked piece before varnishing to remove stray fibers.
Step 3: Painting & Finishing
-
Mix Your Black Paint:
Squeeze out a tiny dot of black acrylic paint. You want a creamy consistency—if it’s too thick, add a microscopic drop of water. -
Paint the Eyes:
Using your finest brush or a toothpick, dab two small dots for the eyes. Space them fairly wide apart for that ‘kawaii’ look. -
Draw the Nose and Mouth:
Paint a tiny, inverted triangle for the nose centered below the eyes. Draw two small ‘u’ curves coming from the bottom tip of the nose to form the mouth. -
Add Whiskers:
Carefully paint three thin, short lines on each cheek. Keep your hand steady and lift the brush at the end of the stroke for a tapered look. -
Dry Completely:
Allow the paint to dry fully. Acrylics dry fast, but give it 15 minutes to be safe so you don’t smear your work. -
Glaze:
Apply a thin layer of UV resin or glossy varnish over the entire front face (or the whole charm). Cure under a UV light or let dry according to your varnish instructions. -
Attach Hardware:
Using pliers, open a jump ring and thread it through the eye pin on the cat’s head. Connect the keychain hardware and close the jump ring securely.
Now you have a sweet little feline friend to keep your keys company


Smiling Strawberry Characters

These adorable pastel pink strawberries are the sweetest little desk companions you’ll ever make. With their tiny smiles and realistic textures, they strike the perfect balance between minimal modern decor and charming kawaii character design.
Step-by-Step Guide
Materials
- Light pink polymer clay (soft finish)
- Leaf green polymer clay
- Black acrylic paint or clay for eyes
- Pink acrylic paint or chalk pastel for cheeks
- Pointed sculpting tool or toothpick
- Small ball tool
- Precision knife or scalpel
- Soft paintbrush
- Matte varnish (optional)
Step 1: Shaping the Base
-
Condition the clay:
Start by taking a piece of light pink clay about the size of a walnut and knead it thoroughly until it is soft and pliable. This prevents cracks during baking. -
Form a ball:
Roll the conditioned clay between your palms to create a smooth, seamless sphere. -
Create the taper:
Gently roll one side of the ball while applying slightly more pressure to form a soft teardrop or gumdrop shape. The bottom should remain somewhat rounded rather than coming to a sharp point. -
Flatten the top:
Press the wider top end of your shape gently against your work surface. Creates a flat area for the leaves to sit later.
Fixing Fingerprints
If you notice fingerprints on your smooth strawberry, lightly brush the raw clay with a little baby oil or cornstarch before baking to smooth them out completely.
Step 2: Adding Texture & Face
-
Mark the seeds:
Using a pointed tool or toothpick, gently press small indentations all over the strawberry’s surface. I like to stagger these in loose rows to mimic real fruit patterns. -
Add eye sockets:
Use a small ball tool to press two slightly larger indentations where you want the eyes to go. Place them somewhat low on the strawberry for maximum cuteness. -
Insert the eyes:
Roll two minuscule balls of black clay and press them into the eye sockets. Alternatively, you can bake the piece first and paint these on later. -
Draw the smile:
Take a very thin snake of black clay and curve it into a ‘U’ shape, placing it between the eyes. Press it gently to adhere.
Step 3: Crafting the Leaves
-
Prepare the green clay:
Condition your green clay and roll it out into a thin sheet, about 1-2mm thick. -
Cut the shapes:
Using your precision knife, cut out 5-6 small, teardrop-shaped leaves. They don’t need to be identical; variation adds realism. -
Texture the leaves:
Lightly press your finger or a sponge onto the surface of the green leaves to give them a matte, velvety texture rather than a smooth plastic look. -
Attach the calyx:
Arrange the leaves in a star pattern on top of the strawberry, gently curving the tips downward to hug the pink fruit shape. -
Add the stem:
Roll a small, thicker cylinder of green clay for the stem. Press it into the center where all the leaves meet.
Make it a Charm
Before baking, insert a metal eye pin deeply into the top stem. Once baked, you can attach these cute berries to keychains, earrings, or necklace chains.
Step 4: Finishing Touches
-
Add blush:
Before baking, use a soft brush to dust a tiny amount of pink chalk pastel powder underneath the eyes for rosy cheeks. -
Bake:
Bake your strawberries according to the instructions on your specific brand of polymer clay. Usually, this is around 275°F (130°C) for 15-30 minutes. -
Cool down:
Let the figures cool completely before handling them to ensure the clay hardens properly. -
Optional glaze:
If you want a protective finish, apply a thin coat of matte varnish. Avoid glossy finishes if you want to maintain the soft, velvety look seen in the photo. -
Highlight eyes:
Once cool, use a toothpick to add a tiny dot of white paint to the black eyes for a ‘sparkle’ effect.
Group your little trio together on a shelf or gift them to a friend to brighten their day


Easy Frog Blob Buddies
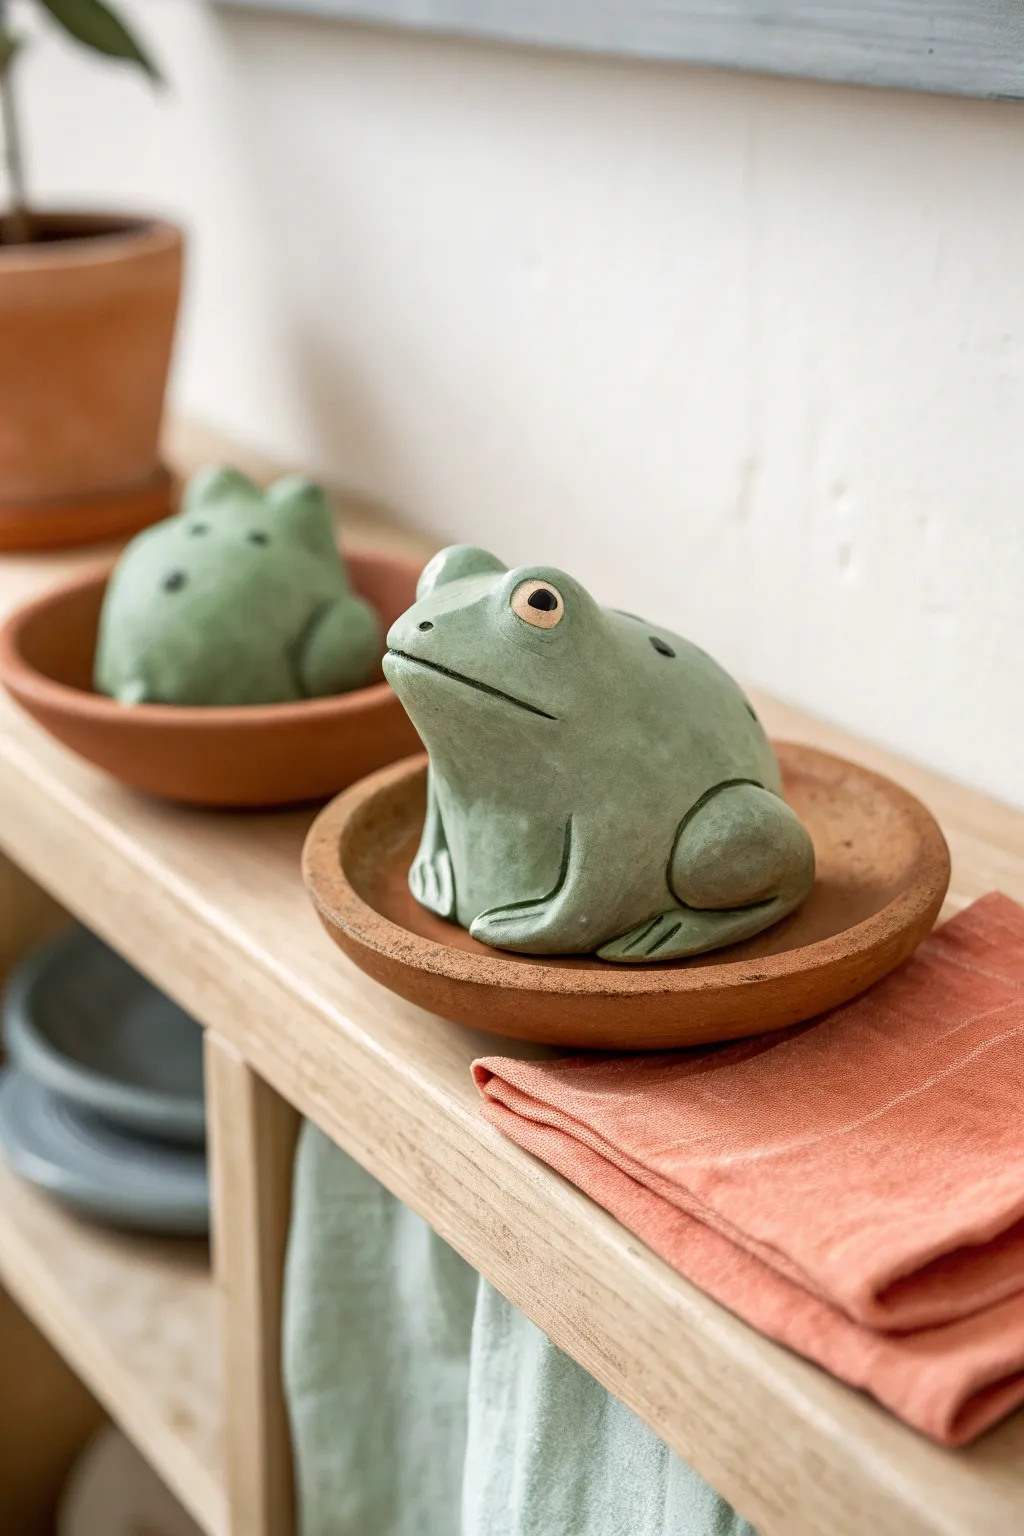
These charming, rounded frog friends are the perfect introduction to sculpting with air-dry or polymer clay. Their smooth, matte finish and simple, stylized features give them a modern yet handmade feel that looks adorable perched on a shelf or tucked into a planter.
Step-by-Step
Materials
- Air-dry clay or polymer clay (white or grey)
- Acrylic paints (sage green, black, white/cream)
- Matte sealant or varnish
- Sculpting tools (needle tool, smooth modeling tool)
- Small bowl of water (for smoothing)
- Fine grit sandpaper
- Paintbrushes (medium flat brush, fine detail brush)
Step 1: Shaping the Base Body
-
Create the main blob:
Start by conditioning a fist-sized ball of clay until it is soft and pliable. Roll it into a smooth sphere, then gently flatten the bottom against your work surface so it sits stably without wobbling. -
Form the slope:
Using your palms, gently press the front half of the sphere downwards to create a slope. You want the back of the frog to be higher and rounder, tapering down towards where the face will be. -
Refine the silhouette:
Smooth out the transition between the high back and the sloping front. The overall shape should look like a soft, asymmetrical rounded mound rather than a perfect geometric shape.
Step 2: Adding Facial Features
-
Position the eyes:
Roll two small, equal-sized balls of clay for the eyes. Place them high on the head, near the top of the slope you created, spacing them slightly apart. -
Blend the eyes:
Use a modeling tool or your finger to smooth the bottom edges of the eye balls into the main body. Do not smooth the top connection; you want them to protrude distinctly like little domes. -
Carve the mouth:
Take a needle tool or the edge of a credit card and press a long, horizontal line across the front of the face. Curve the ends slightly downward for a thoughtful expression or upward for a smile. -
Add nostril details:
Use the very tip of your needle tool to poke two tiny, shallow holes just above the mouth line for nostrils.
Weighted Base
To give your frog a satisfying heft and prevent tipping, press a small, flat skipping stone or a heavy washer into the bottom of the clay blob before you start shaping the body.
Step 3: Sculpting the Legs
-
Outline the back legs:
Instead of adding separate clay, we’ll carve the legs in relief. Use a modeling tool to gently press an outline of a folded leg onto the side of the body. It should look like a large oval shape near the back. -
Define the thigh:
Deepen the groove around the top curve of the leg to make the thigh look muscular and folded against the body. Smooth the clay inside the line so it looks puffy. -
Create front feet:
Roll two small sausages of clay and attach them to the front chest area. Flatten the ends slightly to create feet. -
Detail the toes:
Use a knife tool to press vertical lines into the flattened ends of the front, creating the suggestion of three or four toes. Blend the top of the arm seamlessly into the body. -
Final smoothing:
Dip your finger in a little water and run it over the entire sculpture to remove fingerprints and harsh tool marks. I find this step crucial for getting that stone-like finish.
Terracotta Texture
Mix baking soda into your acrylic paint before applying. This creates a gritty, stone-like texture that mimics real terracotta or concrete pottery.
Step 4: Finishing and Painting
-
Dry thoroughly:
If using air-dry clay, let the frog sit for 24-48 hours until completely dry and white. If using polymer clay, bake according to the package instructions. -
Sand for texture:
Once dry (or baked and cooled), gently sand any rough spots with fine-grit sandpaper. Wipe away all dust with a slightly damp cloth. -
Apply base color:
Mix a muted sage green acrylic paint. Apply two coats over the entire frog, letting the first coat dry completely before adding the second for solid coverage. -
Paint the eyes:
Using a smaller brush, paint the protruding eye domes a creamy beige or soft yellow. Let this dry fully. -
Add pupils:
With a fine detail brush or the back of a paintbrush handle, dot a solid black circle onto the center of each cream eye. -
Seal the piece:
Finish by applying a matte varnish over the entire frog. This protects the paint and gives it that smooth, finished ceramic look without being overly shiny.
Place your new green buddy in a small terracotta saucer to complete the charming garden look.

The Complete Guide to Pottery Troubleshooting
Uncover the most common ceramic mistakes—from cracking clay to failed glazes—and learn how to fix them fast.
Cloud Face Fridge Magnets
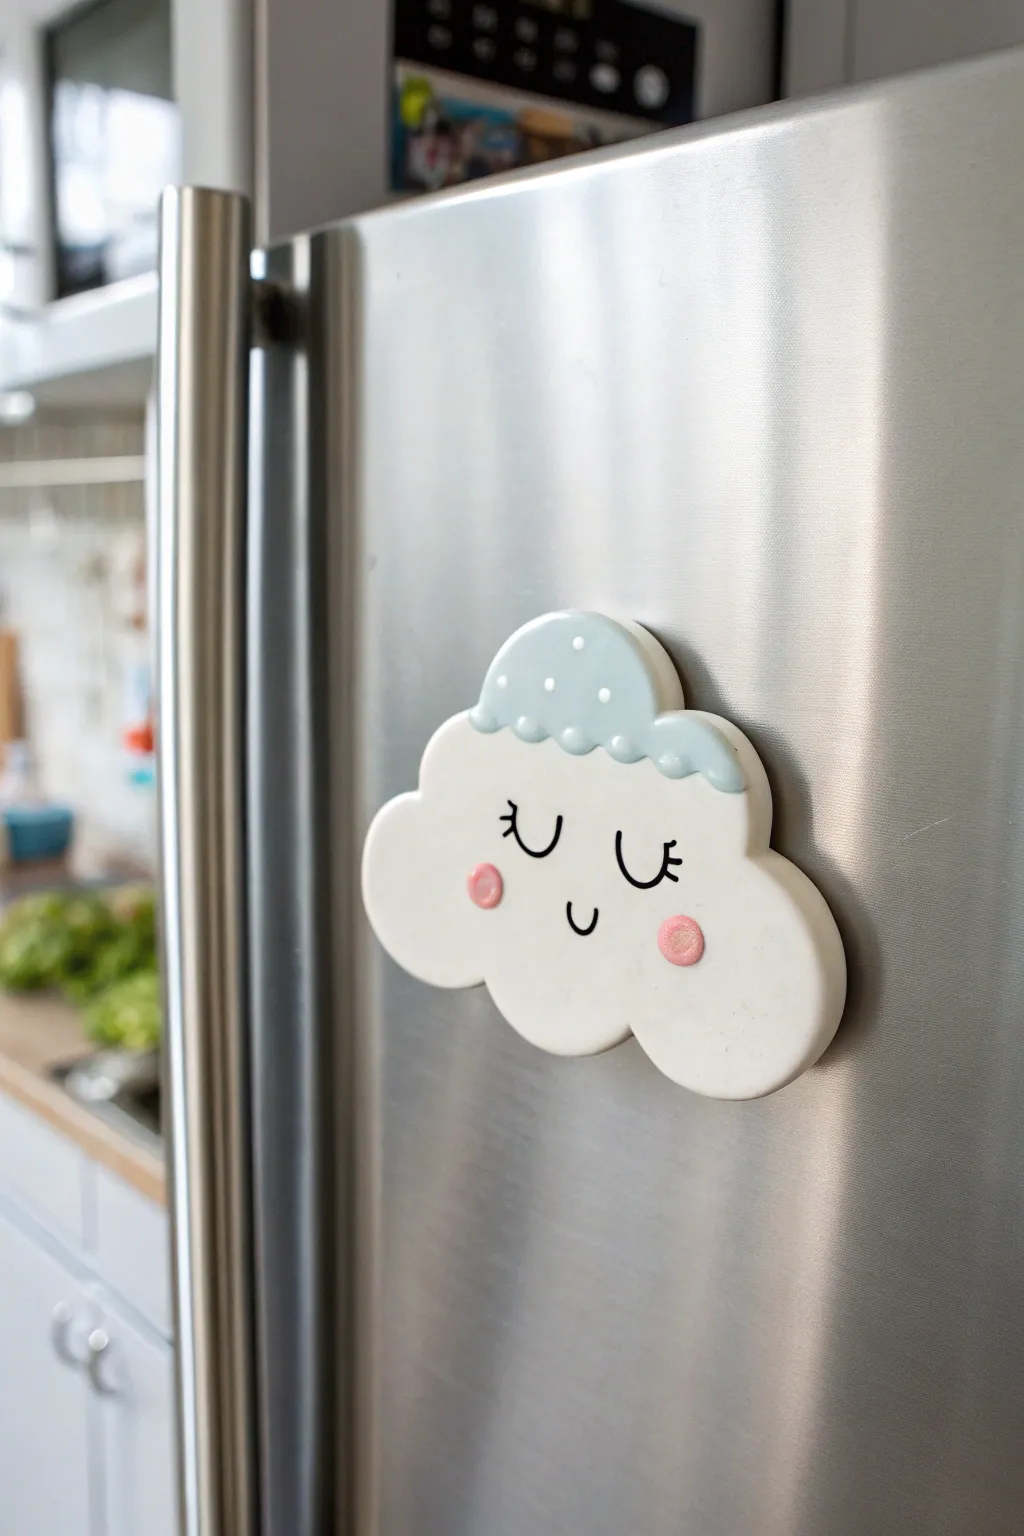
Bring a little sky-high cheer to your kitchen with this adorable sleepy cloud magnet. This smooth, cartoon-style project features sweet closed eyes, rosy cheeks, and a textured sleeping cap for a perfectly cozy look.
Step-by-Step Guide
Materials
- White polymer clay (or air-dry clay)
- Baby blue polymer clay
- Pink polymer clay (small amount)
- Rolling pin
- Cloud-shaped cookie cutter (optional, or a craft knife)
- Black acrylic paint or extra fine permanent marker
- Fine detail paintbrush
- Dotting tool or toothpick
- Strong neodymium magnet
- Strong adhesive (like E6000)
- Gloss glaze (optional)
Step 1: Shaping the Cloud Base
-
Prepare the Clay:
Start by conditioning your white clay until it is soft and pliable. Use your hands to warm it up, ensuring there are no cracks or air bubbles. -
Roll it Out:
Use your rolling pin to flatten the white clay into a sheet about 1/4 inch thick. You want it substantial enough to be sturdy but not too heavy for the magnet. -
Cut the Cloud Shape:
If you have a cloud-shaped cookie cutter, press it firmly into the clay. If not, lightly sketch a fluffy cloud shape with a toothpick and carefully cut it out using a craft knife. -
Smooth the Edges:
Gently rub your finger along the cut edges of the cloud to soften them. This gives the finished piece a polished, professional look rather than a sharp, cookie-cutter finish.
Smooth Operator
Before baking, wipe your raw clay gently with a little baby oil or rubbing alcohol on your finger. This removes fingerprints and dust for a flawless finish.
Step 2: Adding Details
-
Create the Nightcap:
Takes a small piece of baby blue clay and flattened it into a rounded, semi-circle shape. This will sit on top of the cloud’s ‘head’ like a beanie. -
Attach the Cap:
Press the blue piece onto the top center bump of your white cloud. Smooth the seams gently where they meet so they bond together. -
Add the Brim:
Roll a very thin snake of blue clay. Place this along the bottom edge of the blue cap to create a brim. Use a tool to gently indent the brim at intervals, giving it a scalloped, fluffy texture. -
Polka Dot Texture:
Using a very small dotting tool or the blunt end of a needle, gently press tiny indentations into the blue hat area to mimic polka dots. Alternatively, you can add tiny balls of white clay here, but indentations are easier for beginners. -
Make the Cheeks:
Roll two tiny spheres of pink clay. Flatten them slightly into discs and press them onto the cloud face area, spacing them widely apart for that cute ‘kawaii’ proportion.
Step 3: Finishing Touches
-
Bake or Dry:
Follow the manufacturer’s instructions for your specific clay type. If using polymer clay, place it on a dedicated baking sheet and bake at the recommended temperature. -
Cool Down:
Allow the clay to cool completely before moving on to painting. Painting on warm clay can cause the paint to dry too quickly and clump. -
Paint the Face:
Using black acrylic paint and a fine liner brush (or a fine permanent marker), carefully draw two ‘U’ shapes for the closed sleeping eyes. Add three small lashes to the outer corner of each eye. -
The Smile:
Draw a tiny, simple ‘U’ shape right between the eyes, slightly lower down, for the smiling mouth. -
Highlight the Cap:
Dip a toothpick into white paint and carefully fill the little indentations you made on the blue cap earlier to make the polka dots pop. -
Attach the Magnet:
Flip the cloud over. Apply a dab of strong adhesive to the back and press your neodymium magnet firmly into place. -
Seal (Optional):
I like to add a coat of gloss glaze over the eyes and cheeks to make them shine, but you can leave it matte if you prefer a natural ceramic look.
Switch It Up
Try making a ‘stormy’ version using light grey clay for the cloud and a yellow lightning bolt accessory instead of the sleeping cap.
Now you have a serene little cloud to watch over your grocery list
Lil’ Mushroom Pals
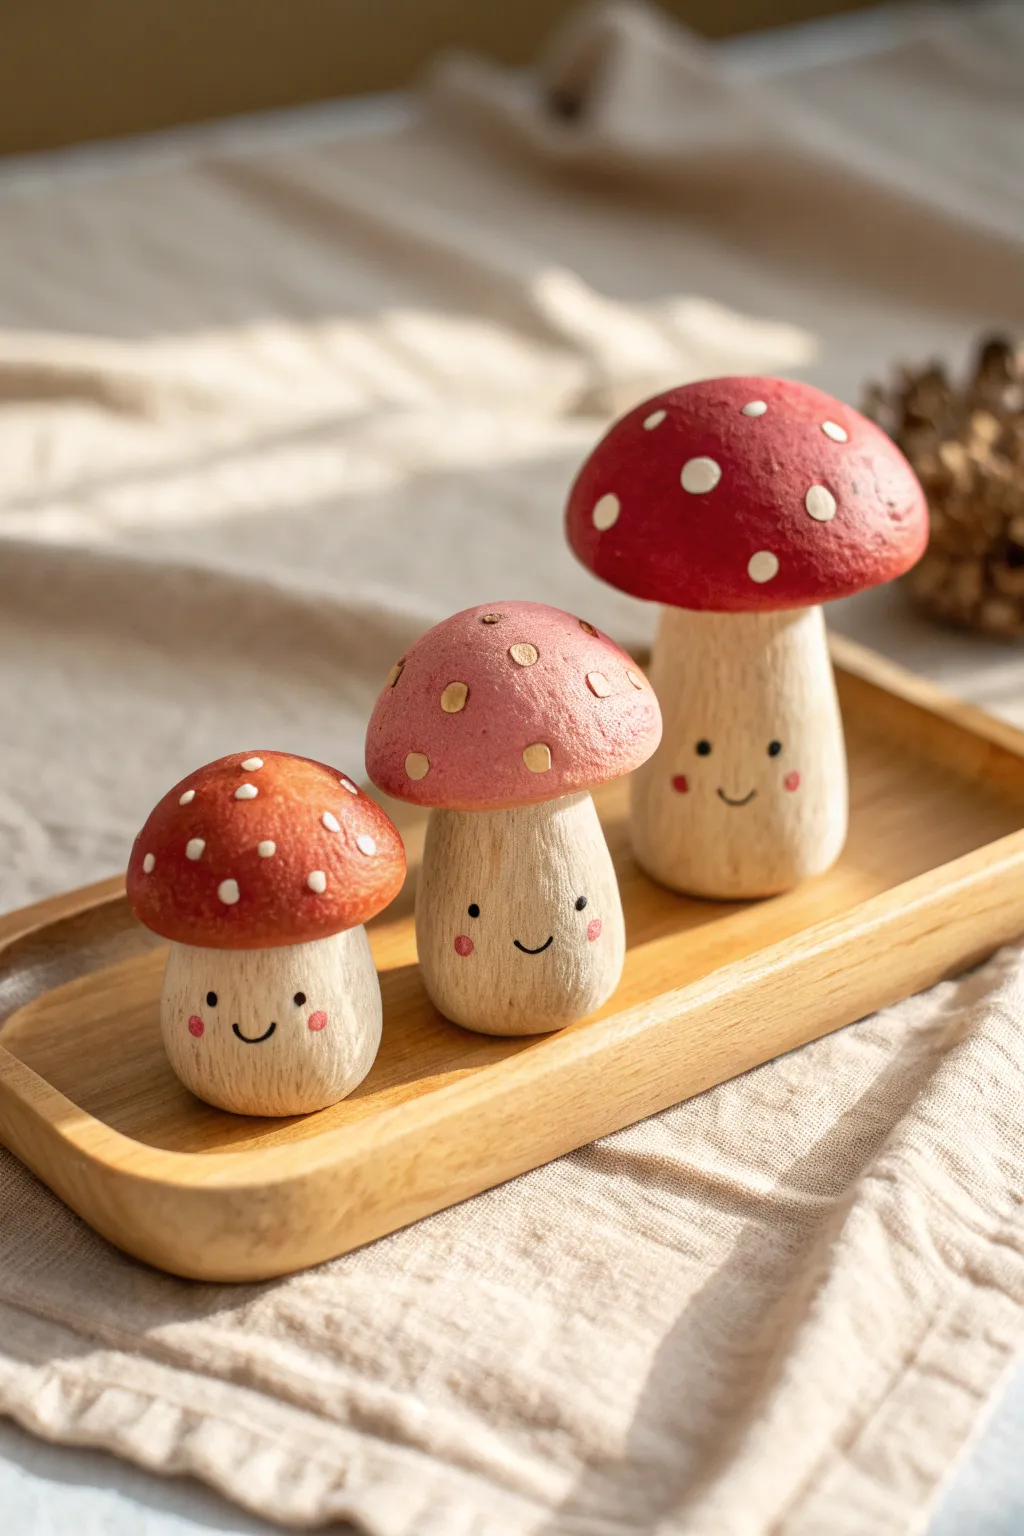
Create a trio of adorable forest friends with a charming wood-carved aesthetic using just polymer clay and paint. These delightful mushrooms feature textured stems and vibrant caps that bring a touch of woodland magic to any shelf.
Step-by-Step Tutorial
Materials
- Polymer clay (white or beige widely preferred, plus scrap clay for bulk)
- Acrylic paints (red, pink, white, black, light tan/beige)
- Fine grit sandpaper
- Modeling tools or a toothpick
- Coarse bristle paintbrush
- Fine detail paintbrush
- Aluminum foil
- Matte varnish or sealant
Step 1: Shaping the base forms
-
Prepare the core:
Crumple three small balls of aluminum foil into varying sizes to act as the core for your mushroom caps. This keeps the sculpture light and saves clay. -
Cover the caps:
Roll out sheets of your beige or white polymer clay to about 1/4 inch thickness. Wrap these sheets carefully around your foil cores, smoothing out any seams until you have three smooth, dome-like shapes. -
Form the stems:
Roll three sturdy cylinders of clay for the stems. Make them thick and slightly tapered at the top, ensuring they are wide enough to support the caps. Press the bottom flat so they stand stably. -
Create the texture:
Before attaching the caps, use a needle tool or toothpick to score vertical lines up and down the stems. vary the depth and length of these lines to mimic organic wood grain. -
Assembly:
Press the caps firmly onto the stems. I like to blend a little bit of the clay from the underside of the cap down onto the stem to ensure a secure bond, but you can also use liquid clay as an adhesive. -
Double check balance:
Stand your mushrooms up on a flat surface to check their balance. Adjust the base if any are leaning too precariously before baking. -
Bake:
Bake the clay pieces according to the manufacturer’s instructions for the specific brand you are using. Let them cool completely before moving to the painting phase.
Uneven Texture?
If your wood grain looks too messy, lightly sand the stem surface after baking. This smooths the high points while keeping the texture in the grooves.
Step 2: Painting and detailing
-
Base coat the stems:
Mix a diluted wash of light tan acrylic paint. Apply this liberally over the textured stems, letting the paint settle into the grooves. -
Wipe back:
While the paint is still wet, use a paper towel to gently wipe the surface of the stems. This leaves the darker paint in the cracks and highlights the ‘wood’ texture on the raised areas. -
Paint the caps:
Paint the largest cap a deep red, the medium one a softer red-pink, and the smallest one a bright coral or dark orange. You may need two coats for full opacity. -
Faces:
Using your finest detail brush and black paint, add two small dots for eyes low on the stem. Paint a simple, thin ‘U’ shape between them for a smile. -
Blush:
Dip a dry brush into a tiny amount of pink paint and dab off the excess. Gently stipple little rosy cheeks right next to the smile lines. -
Seal:
Once all paint is fully dry, coat each mushroom with a matte varnish to protect the finish and unify the sheen.
Forest Floor Base
Glue your finished mushrooms onto a slice of natural wood or a coaster covered in faux moss to create a permanent mini diorama display.
Now you have a trio of friendly fungi ready to brighten up your desk or nature table


What Really Happens Inside the Kiln
Learn how time and temperature work together inside the kiln to transform clay into durable ceramic.
Round Bear Pocket Figures
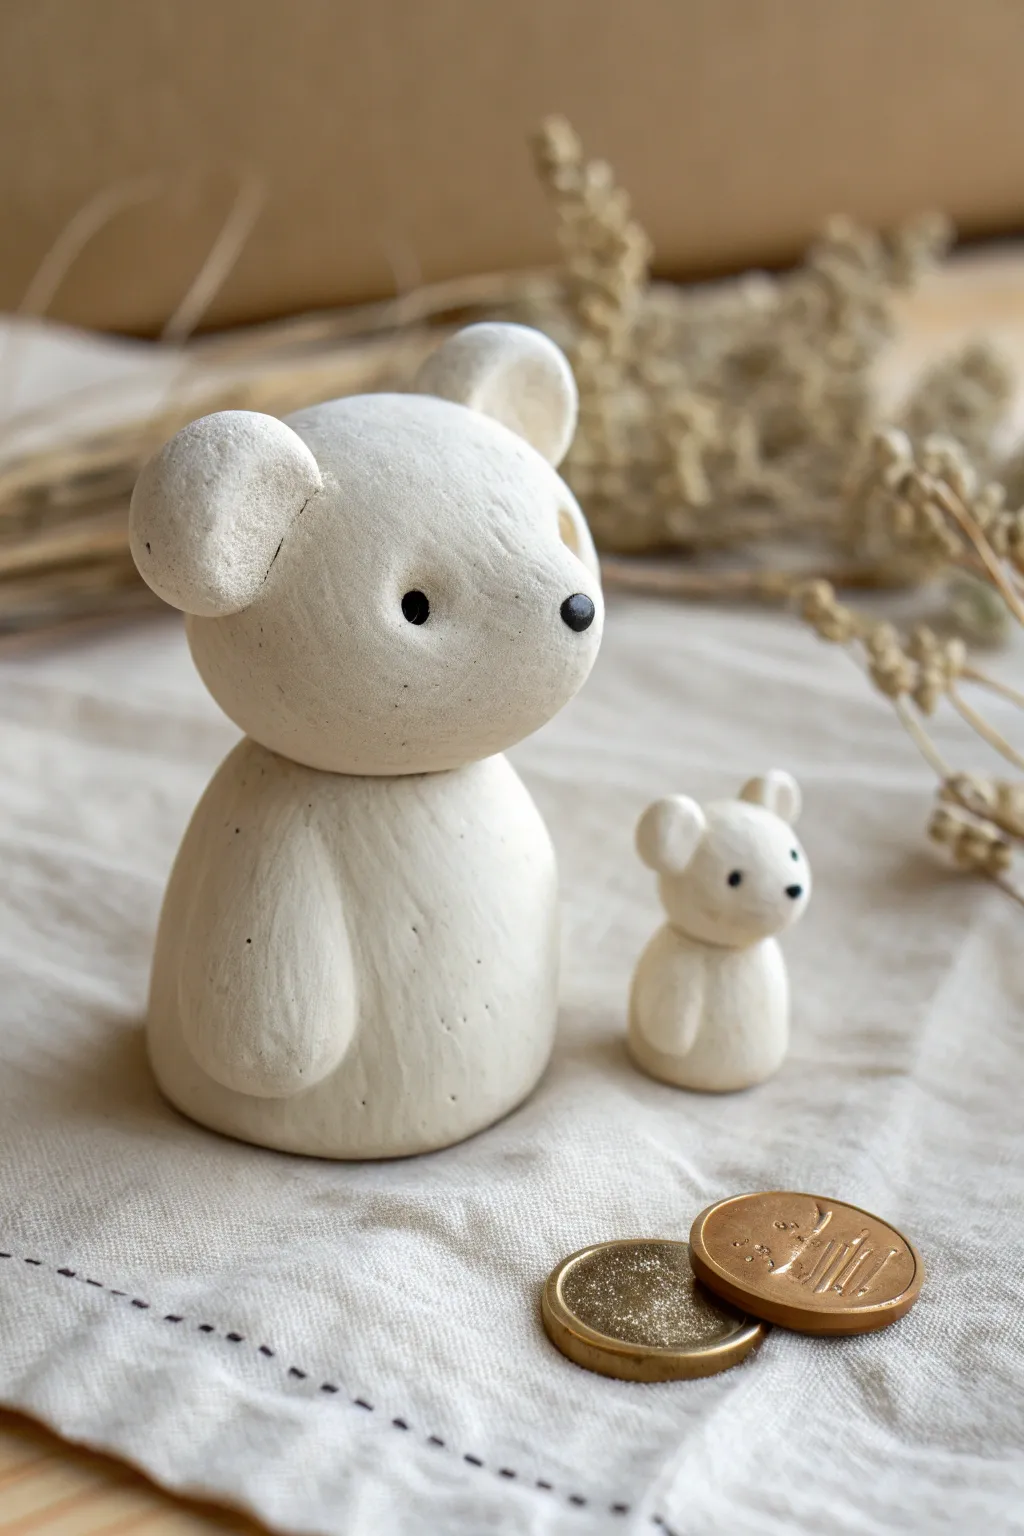
These charming, rounded bear figures have a wonderfully tactile, minimalist design that fits perfectly in a pocket or on a shelf. Their soft, off-white finish mimics the look of smooth river stones, creating a calm and earthy aesthetic.
Detailed Instructions
Materials
- White or stone-colored air-dry clay (or polymer clay)
- Small amount of black acrylic paint
- Fine-grit sandpaper
- Water in a small cup
- Toothpick or sculpting needle tool
- Fine detail paintbrush
- Smooth work surface
Step 1: Shaping the Bodies
-
Prepare the Clay:
Start by kneading a chunk of your clay until it is soft and pliable. For the larger bear, you’ll need a ball roughly the size of a golf ball; for the smaller one, aim for a marble-sized amount. -
Form the Base:
Roll the larger piece of clay into a smooth sphere. Gently tap the bottom on your work surface to create a flat base so the bear stands upright without wobbling. -
Create the Torso Shape:
While keeping the bottom flat, gently roll the upper part of the sphere between your palms to taper it slightly, creating a very subtle pear shape for the body. -
Shape the Head:
Take a second piece of clay, slightly smaller than the body piece. Roll this into a perfect sphere. Flatten the bottom just enough to create a contact point for the neck. -
Attach Head to Body:
Score the top of the body and the bottom of the head with your needle tool (make scratch marks). Dab a little water (for air-dry clay) on the scratched areas and press the head firmly onto the body. Gently smooth the seam with your finger or a tool if you want a seamless look, or leave it distinct as shown in the photo.
Step 2: Adding Details
-
Make the Ears:
Roll two small pea-sized balls for the ears. Flatten them slightly into thick discs. -
Attach the Ears:
Press the ears onto the top sides of the head. Use your sculpting tool to blend the clay at the back of the ear into the head for a strong bond. -
Sculpt the Snout:
The snout is barely there—just a subtle protrusion. Gently pinch the front of the face to pull out a tiny rounded muzzle area, keeping it very smooth. -
Add Arms:
Roll two small, elongated sausage shapes for the arms. Flatten them slightly and press them vertically onto the sides of the body. I like to curve them slightly forward to hug the belly. -
smooth Everything Out:
Dip your finger in water and run it over the entire figure to remove fingerprints and cracks. The goal is a super-smooth, stone-like finish. -
Repeat for Baby Bear:
Repeat the entire process with much smaller amounts of clay to create the tiny companion bear. -
Let Dry:
Allow the figures to dry completely. For air-dry clay, this usually takes 24-48 hours depending on thickness. Flip them occasionally to ensure the bottom dries too.
Cracks Appearing?
If you see tiny cracks forming while the clay dries, mix a tiny bit of fresh clay with water to make a paste (slip) and fill the cracks, then smooth over with a finger.
Step 3: Finishing Touches
-
Sand for Texture:
Once fully dry, use fine-grit sandpaper to gently buff the surface. This removes any final bumps and enhances that matte, stone-like quality. -
Paint the Eyes:
Dip the very tip of a toothpick or a fine detail brush into black acrylic paint. Dot two small, wide-set eyes onto the face. -
Paint the Nose:
Add a slightly larger dot of black paint to the tip of the muzzle for the nose. -
Seal (Optional):
If you want to protect the figures, apply a matte varnish. Avoid glossy finishes as they will ruin the natural stone look.
Speckled Stone Effect
For a true faux-stone look, knead some black pepper or dried tea leaves into your white clay before sculpting to create natural-looking speckles.
Place your finished bears together on a desk or shelf for a quiet, heartwarming display
Mini Dino With Simple Spikes
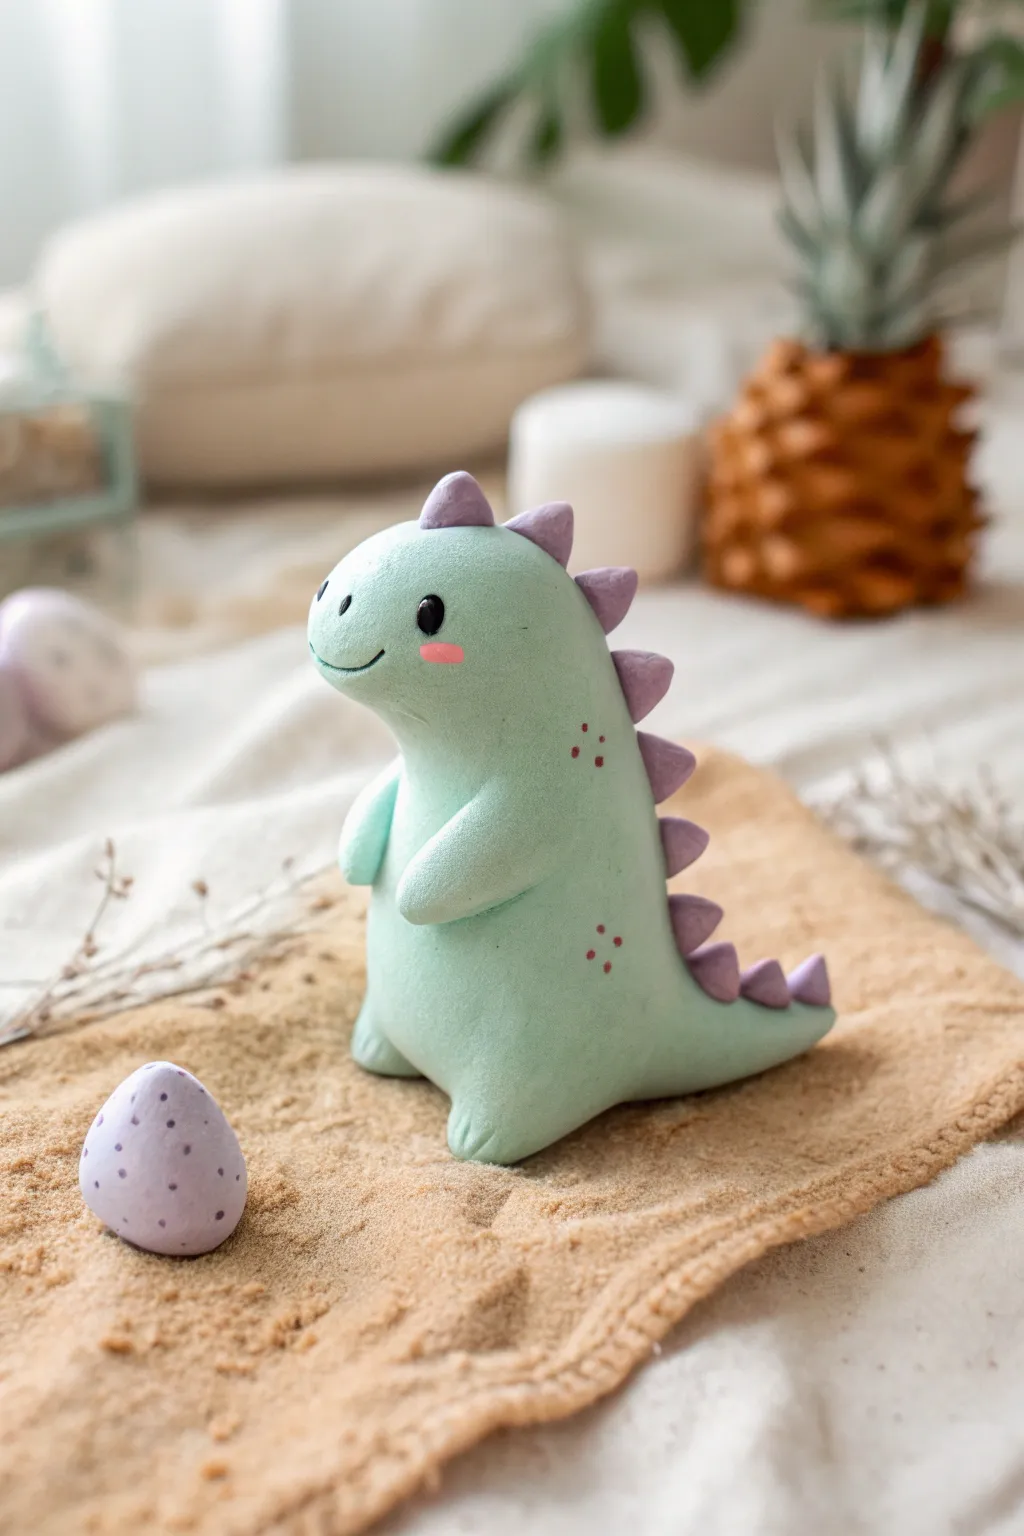
Sculpt your very own miniature Jurassic buddy with this adorable dinosaur project. Featuring soft pastel green clay and charming purple spikes, this little dino makes a perfect desk companion or a sweet handmade gift.
Step-by-Step Tutorial
Materials
- Light green air-dry clay or polymer clay
- Light purple air-dry clay or polymer clay
- Black acrylic paint
- Pink acrylic paint
- Reddish-brown acrylic paint
- Fine-point paintbrush or dotting tool
- Clay sculpting tools (knife tool, smoothing tool)
- Small cup of water (if using air-dry clay)
- Matte varnish (optional)
Step 1: Shaping the Body
-
Create the base form:
Start by rolling a large ball of light green clay into a smooth sphere to remove any cracks. -
Form the torso:
Gently roll the sphere into a thick teardrop or pear shape. The wider bottom will be the belly and legs, while the tapered top will become the head. -
Define the head:
Use your thumb and forefinger to gently pinch and pull the thinner top section slightly forward to create a distinct snout and head shape, blending the neck smoothly into the body. -
Sculpt the legs:
At the base of the body, use a sculpting tool or your finger to push up gently into the clay, creating two small stumps for feet. Flatten the bottom so the dino stands independently. -
Form the tail:
Pinch the back lower section of the body and pull the clay outward to form a short, pointed tail. Smooth any seams so it looks like one continuous piece. -
Make the arms:
Roll two very small sausage shapes from the green clay. Attach them to the front of the chest, curving them slightly inward as if the dino is holding its belly. Blend the shoulder connection points.
Step 2: Adding Spikes and Details
-
Prepare the spikes:
Switch to your light purple clay. Roll about 8-10 tiny balls, graduating them in size from very small to medium. -
Shape the triangles:
Pinch each purple ball into a small triangle or cone shape. -
Attach the spine:
Starting from the top of the head and working down to the tip of the tail, press the purple triangles onto the dino’s back. Place the largest spikes in the middle of the back and the smallest at the head and tail tip. -
Create the egg:
With leftover purple clay, roll a separate egg shape about the size of a marble. Smooth the surface completely. -
Let it cure:
Allow your clay to dry (if using air-dry) or bake it according to the package instructions (if using polymer clay). I find letting air-dry clay sit for at least 24 hours ensures the best surface for painting.
Seamless Spikes
To ensure spikes don’t fall off later, score the back of the dino slightly with a needle tool and add a dab of water (for air-dry) or liquid clay (for polymer) before attaching them.
Step 3: Painting the Face
-
Paint the eyes:
Using a fine-point brush or a dotting tool dipped in black acrylic paint, place two solid black dots on the face for eyes. -
Add eye highlights:
Once the black paint is dry, add a tiny white speck to the top corner of each black eye to bring them to life. -
Draw the smile:
Paint a very fine, curved black line between the eyes for a gentle smile. -
Apply blush:
Dip a brush lightly in pink paint and dab two small oval cheeks just below the eyes. -
Add speckles:
Using a reddish-brown paint, add three small dots in a triangle pattern on the dino’s back flank, and repeat this pattern on the matching egg. -
Seal the piece:
Finish by applying a coat of matte varnish to protect the paint and give the clay a professional, finished look.
Cracking Clay?
If you see small cracks forming while smoothing air-dry clay, dip your finger in water and gently massage the area. Don’t use too much water, or the clay will become mushy.
Now you have a charming little dinosaur friend ready to guard your desk

TRACK YOUR CERAMIC JOURNEY
Capture glaze tests, firing details, and creative progress—all in one simple printable. Make your projects easier to repeat and improve.
Cute Donut Trinket Charms
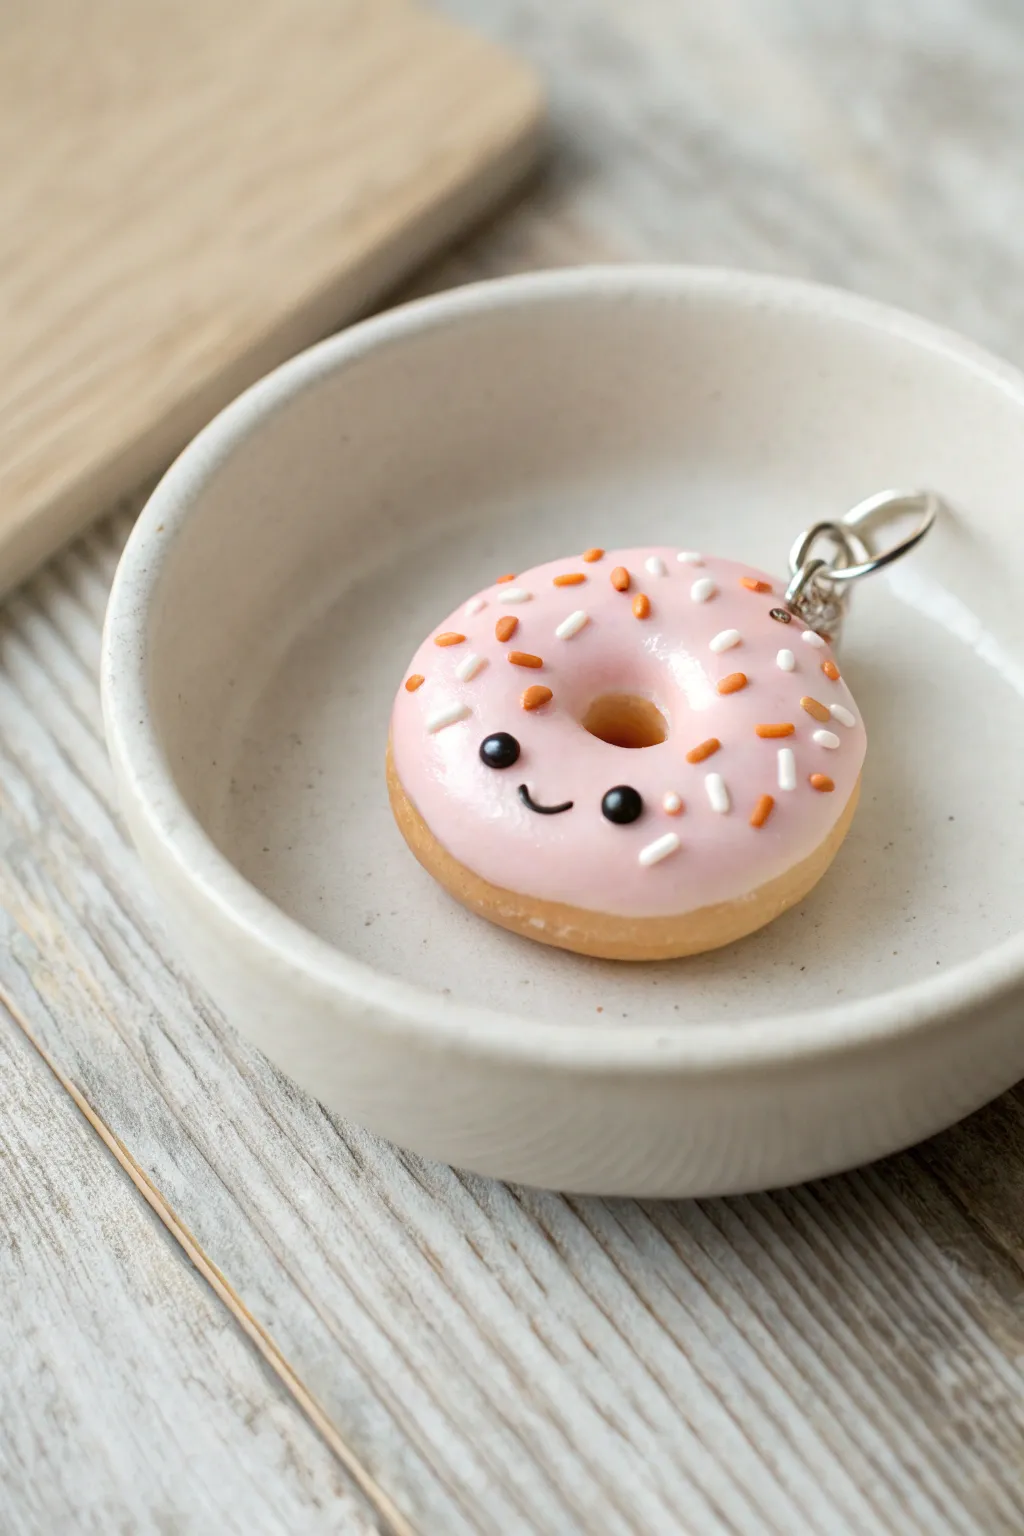
This adorable miniature donut charm captures everyone’s heart with its sweet smiley face and glossy pink frosting. It’s a perfect beginner project that results in a tiny, wearable piece of art that looks almost good enough to eat.
Step-by-Step
Materials
- Polymer clay (dough color, pastel pink, chocolate brown, black)
- White liquid polymer clay (optional, for sprinkles)
- Soft pastels (ochre, light brown)
- Small paintbrush
- Dotting tool or ball stylus
- Eye pin
- Needle tool
- Glossy glaze or UV resin
- UV lamp (if using resin)
- Clay roller or pasta machine
- Round cutters (two sizes)
Step 1: Shaping the Base
-
Mix the dough color:
Start by conditioning your beige or tan clay until it is soft and pliable. If the color is too dark, mix in a little translucent or white clay to get that perfect unbaked dough shade. -
Form the initial shape:
Roll a small amount of clay into a smooth ball, roughly 2cm in diameter. Gently flatten it between your palms into a thick disk, keeping the edges beautifully rounded like a real donut. -
create the donut hole:
Using a small round tool or the back of a paintbrush, press directly into the center of the disk to create the hole. Widen it slightly by gently rotating the tool, smoothing the inner edges so they look organic. -
Texture the dough:
For realistic texture, lightly tap the surface of the dough with a toothbrush or crumbled aluminum foil. This breaks up the shiny surface and mimics a fried texture. -
Add baked shading:
Shave a little ochre and light brown soft pastel onto a piece of paper. Use a dry paintbrush to dust the edges and bottom of the donut, focusing on where it would naturally brown in the oven.
Sticky Situation?
If fingerprints are ruining your smooth frosting, lightly dust your finger with cornstarch or use a bit of baby oil to smooth them away before baking.
Step 2: Frosting and Face
-
Prepare the pink frosting:
Condition your pastel pink clay. Roll it out into a thin sheet, slightly thinner than the dough base, or use a pasta machine on a thin setting. -
Cut the frosting shape:
Use a round cutter slightly smaller than your donut base to cut a circle of pink clay. Alternatively, use a wavy cutter for a more irregular frosting look. -
Apply the frosting:
Place the pink circle on top of your dough base. Use a large ball tool or your finger to gently stretch the edges down the sides, making it look like the icing has melted slightly. -
Pierce the frosting hole:
Locate the hole in the dough underneath and pierce through the pink layer. Smooth the pink clay down into the hole so no gap shows between the frosting and the dough. -
Insert the hardware:
Take a metal eye pin. If the stem is too long, trim it with wire cutters. Insert it firmly into the top edge of the donut, securing it with a tiny dab of liquid clay if needed. -
Make the eyes:
Roll two minuscule balls of black clay. Position them on the lower half of the donut face, distinctively wide-set for that ‘kawaii’ look, and flatten them gently. -
Add the smile:
Roll an incredibly thin snake of black clay. Cut a tiny segment and curve it into a ‘U’ shape using a needle tool, then press it onto the face between the eyes.
Pro Tip: Eye Sparkle
Add a tiny dot of white paint to the black eyes after baking to bring the character to life and add extra cuteness.
Step 3: Sprinkles and Finish
-
Create clay sprinkles:
Roll very thin snakes of white and orange clay. Bake these snakes partially or just let them sit for a moment to firm up, then chop them into tiny bits with a blade. -
Apply sprinkles:
Scatter the tiny clay bits onto the pink frosting area. Avoid the face area so the expression remains clear. Press them down gently so they adhere well. -
Bake the charm:
Place the donut on a tile or baking sheet. Bake according to your brand of polymer clay instructions (usually around 275°F/130°C for 15-20 minutes). -
Cool down:
Allow the charm to cool completely before handling. It will be slightly soft when hot but hardens as it reaches room temperature. -
Glaze for shine:
Apply a coat of UV resin or glossy polyurethane glaze over the frosting area only. I find using a small brush helps keep the ‘dough’ matte while making the icing look sticky and sweet. -
Cure or dry:
If using UV resin, cure under a UV lamp for 2-3 minutes until hard and tack-free. If using glaze, let it air dry completely.
Now you have a charming little donut ready to become a necklace, keychain, or zipper pull
Watermelon Slice Smile Clips
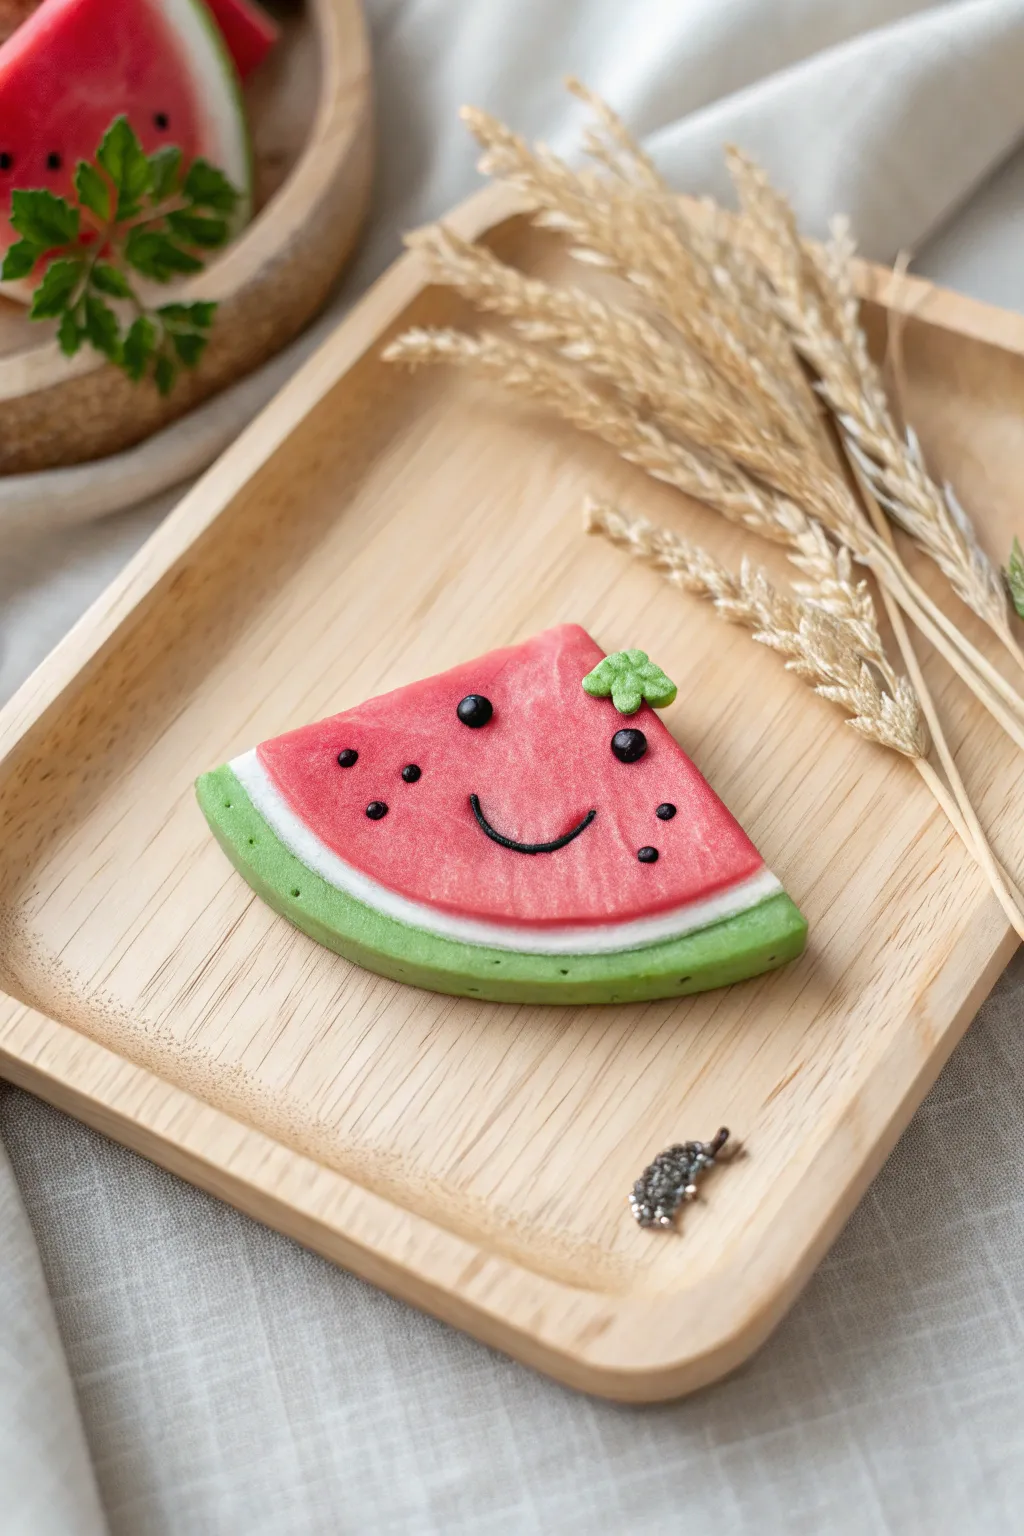
Brighten up your desk or accessories with this adorably happy watermelon slice made from polymer clay. With its textured surface, sweet little clover accent, and cheerful grin, it captures the perfect essence of summer fun.
Detailed Instructions
Materials
- Polymer clay (watermelon pink/red, white, green, black)
- Clay rolling pin or pasta machine
- Circle cutter (approx. 3-4 inches diameter)
- Sharp clay blade or craft knife
- Texture sponge or toothbrush
- Needle tool or toothpick
- Small clover cutter or mold (optional)
- Black liquid clay or black acrylic paint (for smile)
- Oven for baking
- Glaze or varnish (optional)
Step 1: Creating the Base Layers
-
Condition the pink clay:
Start by thoroughly conditioning your pink or watermelon-red clay until it is soft and pliable. Roll it into a ball and flatten it slightly. -
Form the main body:
Roll the pink clay into a thick sheet, roughly 1/4 inch thick. This will be the juicy center of your watermelon. -
Prepare the rind layers:
Clean your hands or tools to avoid color transfer, then condition the white and green clays separately. Roll the white clay into a long, thin strip, and do the same with the green clay. -
Wrap the pink core:
Take the white strip and wrap it snugly around the curved edge of your pink shape. Trim any excess so the ends meet flush with the flat top edge. -
Add the green skin:
Repeat the process with the green strip, layering it directly over the white strip. Gently press the layers together to ensure they adhere without trapping air bubbles.
Smudged Colors?
Red clay stains easily! Always handle lighter colors (white rind) before the red and green to keep your whites looking crisp and clean.
Step 2: Shaping and Texturing
-
Cut the slice:
Using your circle cutter or a blade, cut the layered assembly into a classic wedge shape. Ensure clean, straight cuts for the sides of the slice. -
Refine the shape:
Use your fingers to gently smooth the cut edges, softening the sharpness just a bit so it looks organic and friendly. -
Texture the fruit:
Lightly press a texture sponge, a stiff brush, or an old clean toothbrush onto the pink area. This gives it that realistic, fibrous watermelon look.
Glossy Finish
Apply a coat of UV resin or high-gloss varnish only to the seeds and eyes after baking. This makes them pop against the matte fruit texture.
Step 3: Adding the Face and Details
-
Create the eyes:
Roll two tiny balls of black clay. Position them centrally on the pink area, spaced slightly apart, and press them down gently to flatten them into oval eyes. -
Form the seeds:
Roll very small, teardrop-shaped bits of black clay. Scatter three or four on each side of the face to represent seeds. -
Indent the seeds:
Use a needle tool to press a tiny indentation into the pink clay right next to or under each seed, embedding them slightly for a natural appearance. -
Add a blush of highlight:
I like to add tiny white specs to the black eyes using a speck of white clay or paint after baking, but you can skip this for a simpler look. -
Design the smile:
Roll an incredibly thin snake of black clay. Curve it into a ‘U’ shape and place it between the eyes to create a wide, happy grin. -
Craft the lucky clover:
Using a tiny bit of green clay, shape three small hearts and join their points to make a clover, or use a mini cutter. Place this little accessory on the upper corner of the slice ‘hair’.
Step 4: Finishing Up
-
Deepen the texture:
Go back over the pink area with your texturing tool one last time, being careful not to disturb the face features. -
Bake carefully:
Place your watermelon slice on a baking sheet or tile. Bake according to your clay manufacturer’s instructions (usually 275°F/135°C for 15-30 minutes). -
Cool down:
Let the piece cool completely in the oven or on a wire rack before handling to prevent fingerprints or warping. -
Attach hardware (Optional):
Once cool, use strong glue (like E6000) to attach a hair clip, magnet, or brooch pin to the back of the slice.
Enjoy your cheerful new watermelon friend as a cute accessory or fridge magnet
Heart Cheek Character Tokens
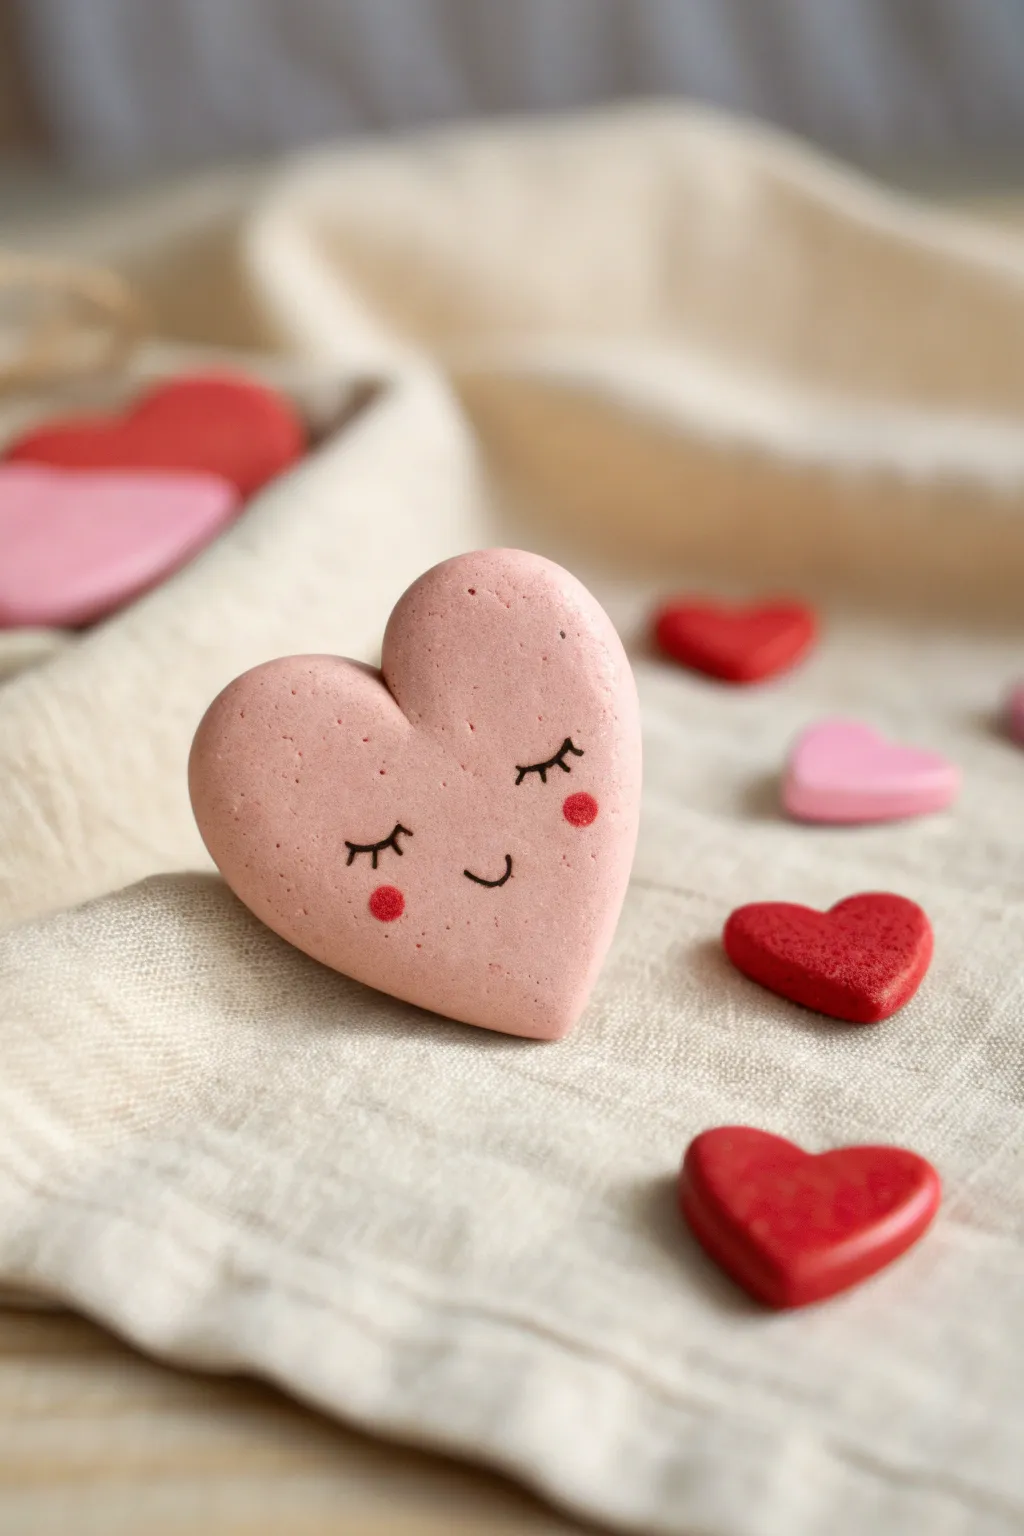
Create adorable heart-shaped tokens with peaceful, sleeping expressions that add a touch of whimsy to any gift or display. These smooth, pastel pink hearts feature delicate hand-drawn details and a soft matte finish that feels wonderful to hold.
Step-by-Step Tutorial
Materials
- Pale pink polymer clay (e.g., Fimo or Sculpey)
- Red polymer clay (small amount)
- Dark pink polymer clay (small amount)
- Small heart-shaped cutter (approx. 1 inch)
- Medium heart-shaped cutter which is slightly puffed (approx. 2 inches)
- Acrylic rolling pin
- Fine-grit sandpaper (400 and 800 grit)
- Fine-point black permanent marker or ultra-fine paintbrush with black acrylic paint
- Small dotting tool or toothpick
- Pink craft chalk or pastel shavings
- Soft blush brush or cotton swab
- Oven and baking sheet (if using polymer clay)
Step 1: Shaping the Hearts
-
Condition the rose clay:
Begin by taking a block of pale pink clay and kneading it thoroughly in your hands until it becomes warm, soft, and pliable. This conditioning step prevents cracks during baking. -
Roll perfect thickness:
Using your acrylic rolling pin, roll the clay out on a smooth surface. You want these tokens to be substantial, so aim for a thickness of about 1/4 inch (6mm). -
Cut the main character:
Press your medium-sized heart cutter firmly into the rolled clay. If you don’t have a puffy cutter, you can use a standard cutter and gently press the edges inward with your finger to round them off. -
Smooth the edges:
Dip your finger in a tiny bit of water (or baby oil for polymer clay) and gently run it along the cut edges of the heart to remove any sharpness or burrs. -
Create companion hearts:
Roll out small amounts of red and dark pink clay to a thinner gauge, perhaps 1/8 inch. Use your smallest heart cutter to create the little scatter tokens shown in the scene. -
Texture check:
Inspect the surface of your main pink heart. It should be very smooth. If you see fingerprints, lightly roll the pin over it one last time with very little pressure.
Smudged Ink Help
If your marker smudges on the clay, dip a Q-tip in rubbing alcohol and gently wipe the error away. Wait for the alcohol to evaporate completely before re-drawing the line.
Step 2: Baking and Refining
-
Bake firmly:
Place all your clay pieces on a parchment-lined baking sheet. Bake according to your specific clay manufacturer’s instructions. Usually, this is around 230°F to 275°F for 15-30 minutes. -
Cool down completely:
Once baked, remove the tray from the oven and let the hearts cool completely. Do not attempt to draw on them while they are warm, or the ink will bleed. -
Sand for smoothness:
I find that a quick sanding makes a huge difference here. Lightly sand the edges and surface with 400 grit, then 800 grit sandpaper to achieve that velvety, stone-like texture. -
Wipe clean:
Use a slightly damp cloth to wipe away any white sanding dust. Let the surface dry completely before moving to the decoration phase.
Step 3: Adding the Personality
-
Draft the face:
If you are nervous about freehanding, lightly sketch the location of the eyes and mouth with a pencil first. Position the eyes slightly wide apart for maximum cuteness. -
Draw the lashes:
Using your fine-point black marker, draw two small downward curves for the closed eyes. Add three tiny, precise ticks to the outer corner of each curve for the eyelashes. -
Add the smile:
Draw a tiny, simple ‘U’ shape right between the eyes, positioned slightly lower than the eye line. Keep it small and centered. -
Prepare the blush:
Take a small scrape of pink chalk pastel or use a dab of real powder blush. Pick up a tiny amount of pigment with a cotton swab or soft brush. -
Apply rosy cheeks:
Gently dab the pink pigment onto the clay just below the outer corners of the eyes. This creates that soft, airbrushed glow shown in the photo. -
Paint the cheek dots:
To mimic the specific style in the image, dip a dotting tool or the flat end of a toothpick into red acrylic paint. Place a solid red dot right in the center of your soft pink blush area. -
Seal the deal:
Once the paint and ink are fully dry, apply a thin coat of matte varnish to protect the face features from rubbing off over time.
Make it a Magnet
Turn these into functional decor by gluing a strong neodymium magnet to the back using E6000 glue. They look incredibly sweet holding notes on a refrigerator.
Give your little heart character a name and display it somewhere special to bring a smile to your day
Mini Star “Worry Stone” Faces
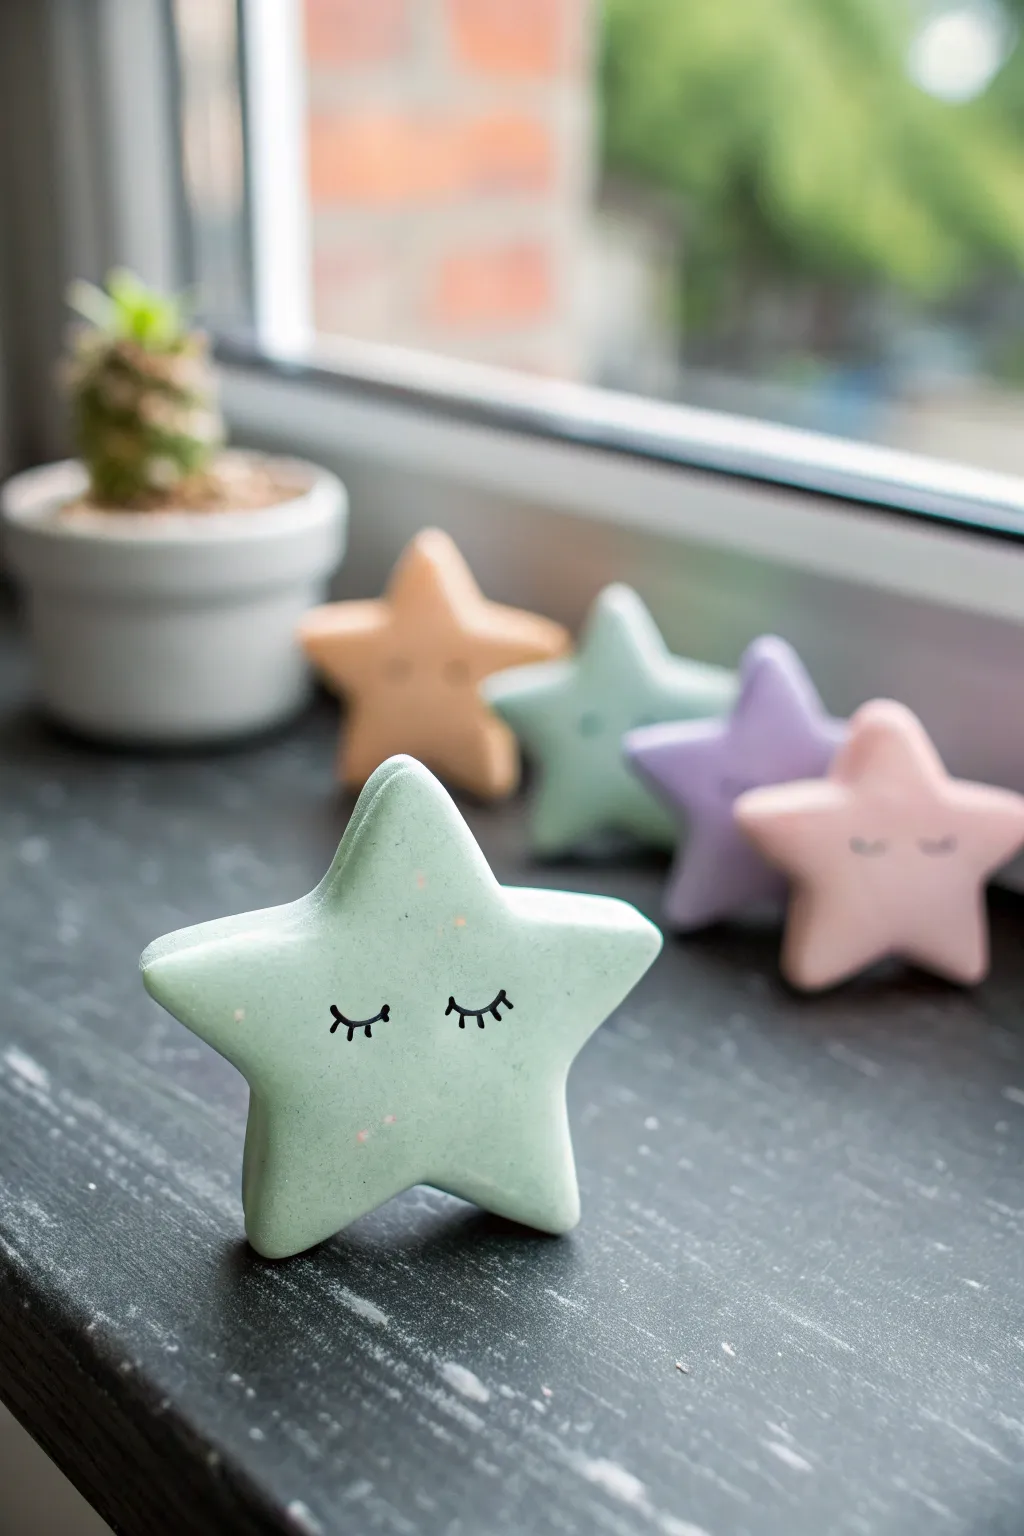
These soothing, chunky stars are perfect little handheld companions with a gentle pastel finish and sweet sleepy faces. Their smooth, rounded edges make them ideal worry stones to keep in your pocket or display on a windowsill.
Step-by-Step
Materials
- Polymer clay (pastel colors: mint, peach, lavender, pink)
- Star-shaped cookie cutter (approx. 2-3 inches)
- Fine-grit sandpaper (400 and 800 grit)
- Black acrylic paint or extra-fine permanent marker
- Fine detail paintbrush (size 00 or 000)
- Clear matte varnish or sealant
- Rolling pin or acrylic roller
- Parchment paper or ceramic tile
Step 1: Shaping the Stars
-
Condition the clay:
Begin by warming your polymer clay in your hands. Knead it thoroughly until it is soft, pliable, and free of cracks. If you want a speckled effect like the mint star, mix in a tiny pinch of colored sand or glitter. -
Roll the slab:
Place the clay on parchment paper or a smooth work surface. Use your rolling pin to roll it into a thick, even slab. Aim for a thickness of about 1/2 to 3/4 inch—these need to be chunky to stand upright. -
Cut the shape:
Press your star-shaped cookie cutter firmly into the clay slab. Wiggle it slightly to ensure it cuts all the way through, then lift the cutter. Gently push the clay shape out. -
Soften the edges:
Using your fingertips, gently tap and smooth the sharp edges left by the cutter. You want a rounded, stone-like feel, so take your time softening every point and curve. -
Check stability:
Stand the star up on its bottom two points. If it wobbles or tips over, gently flatter the very tips of the bottom points just enough to create a stable base. -
Bake the clay:
Preheat your oven according to the clay manufacturer’s instructions. Place your stars on a ceramic tile or baking sheet lined with parchment paper. Bake for the recommended time, usually 15-30 minutes per 1/4 inch of thickness. -
Cool down:
Remove the stars from the oven and let them cool completely. Do not handle them while hot, as the clay is still fragile.
Step 2: Finishing Touches
-
Sand for smoothness:
Once cool, dip the star in a little water and use wet/dry sandpaper to buff the surface. Start with 400 grit to remove fingerprints, then switch to 800 grit for a silky smooth finish. -
Wash and dry:
Rinse off any sanding dust and dry the stars thoroughly with a soft cloth. -
Draft the face:
Use a pencil to very lightly sketch the placement of the sleepy eyes. Aim for the middle or lower-middle of the star to give it a cute, chibi-style proportion. -
Paint the eyes:
Dip your fine detail brush into black acrylic paint. Carefully paint two downward curves for closed eyelids. Add three tiny lashes to each eye for extra sweetness. -
Optional blush:
For a subtle touch, you can dust a tiny bit of pink crafting chalk or blush powder on the cheeks using a soft brush. -
Seal the star:
To protect the face paint and give the star a uniform texture, apply a thin coat of matte varnish. I find that a spray fixative works best to avoid brush strokes. -
Final cure:
and dry appropriately. Let the varnish dry completely in a dust-free area for at least 24 hours before handling.
Fingerprint Fix
Before baking, lightly brush your raw clay with a tiny bit of baby oil or cornstarch. This helps smooth out fingerprints without altering the clay’s shape.
Scented Stars
Add a drop of essential oil to the back of the baked, unsealed clay. The porous clay will absorb the oil and act as a passive diffuser for your desk.
Enjoy your collection of calming little stars sitting peacefully on your shelf
Tiny Fruit Slice Friends
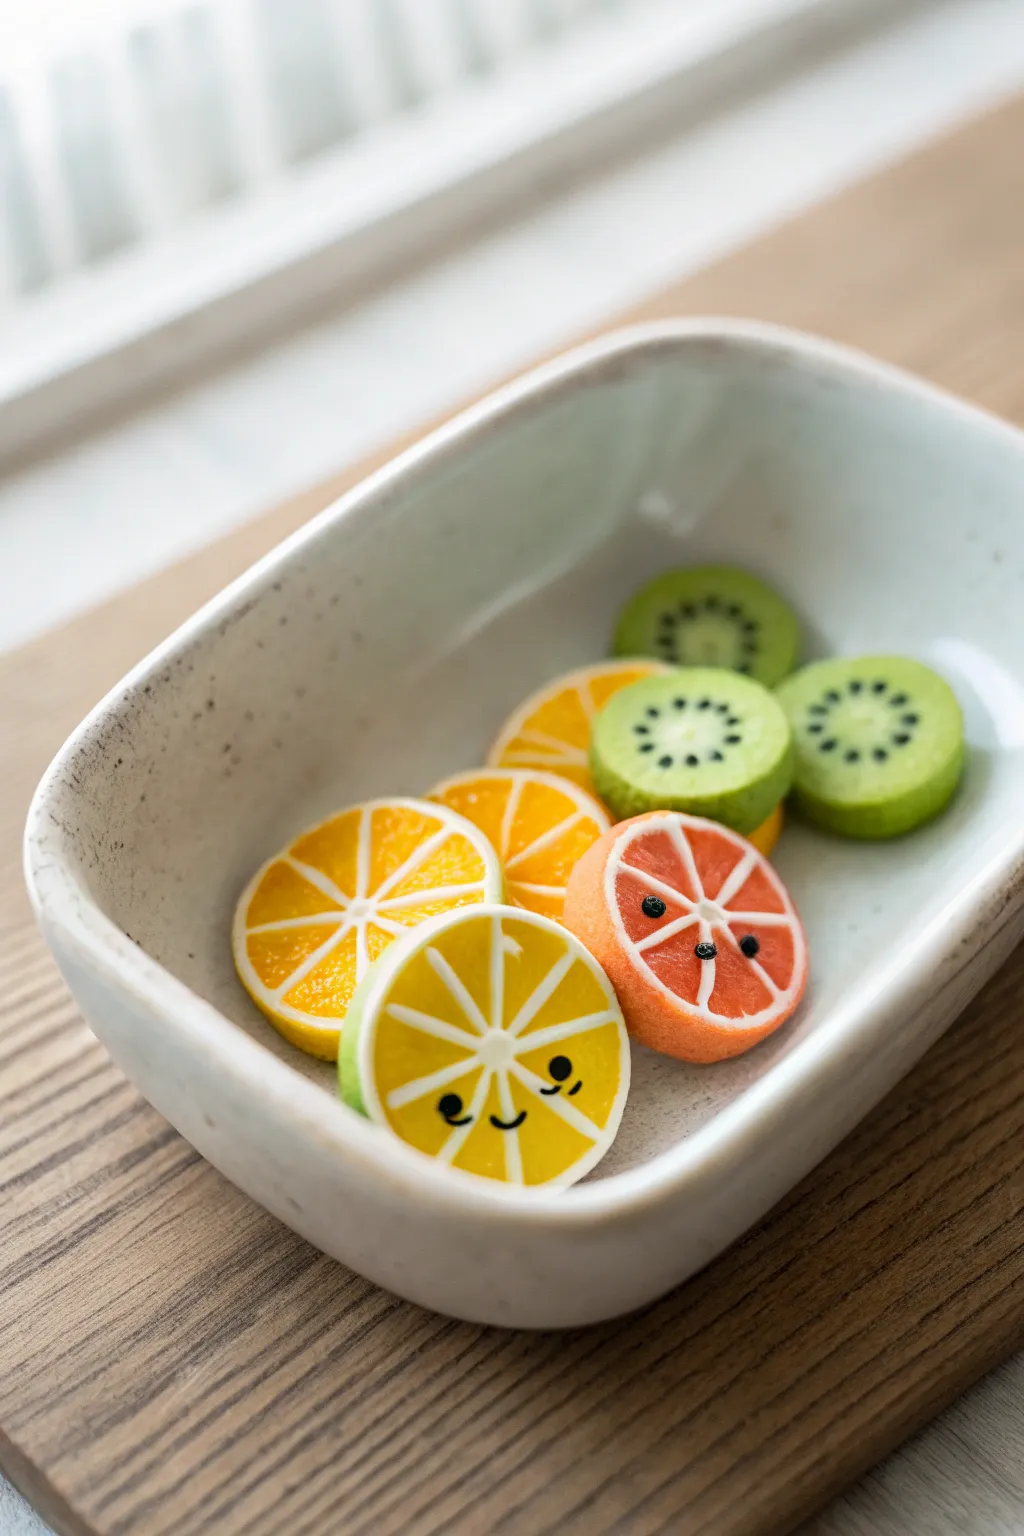
Brighten up your day with these impossibly cute miniature fruit slices made from polymer clay. These tiny lemon, orange, and kiwi friends feature simple smiling faces that add a touch of whimsy to any craft collection.
Step-by-Step Tutorial
Materials
- Polymer clay in yellow, orange, green, white, and translucent
- Rolling pin or clay machine
- Sharp tissue blade or X-Acto knife
- Small round cutters (various sizes)
- Black acrylic paint or fine tip marker
- Very fine paintbrush or dotting tool
- Gloss glaze or varnish (optional)
Step 1: Creating the Citrus Canes
-
Prepare the segments:
Start by rolling a log of yellow or orange clay for the fruit pulp. Use a pinch of translucent clay mixed in to give it that realistic juicy look. -
Wrap the pulp:
Roll out a very thin sheet of white clay. Wrap this sheet around your colored log completely to create the pith (the white part between segments). -
Form the wedge shape:
Gently pinch one side of your wrapped log to form a teardrop or wedge shape. Stretch and pull this log until it’s long and thin, then cut it into 8 equal lengths. -
Assemble the center:
Take a very thin snake of white clay to act as the center. Attach the pointed ends of your 8 wedges to this center snake, forming a circle that looks like a pre-sliced orange. -
Wrap the whole fruit:
Wrap the entire assembled circle in another thin sheet of white clay, followed by a slightly thicker sheet of the original rind color (yellow or orange) to finish the skin. -
Reduce the cane:
Gently squeeze and roll the large cylinder to reduce its diameter. Start from the center and work outward to prevent distortion until it’s the size you want your slices to be.
Step 2: Making the Kiwi Cane
-
Create the core:
Roll a small cylinder of white clay for the kiwi center. -
Prepare the seeds:
Mix a tiny amount of black clay (or use black paint later) into small specks and press them around the white core. -
Add the green flesh:
Wrap a thick layer of light green clay around the seeded center. I like to shape this green layer slightly oval rather than perfectly round for realism. -
Add the skin:
Wrap the green cylinder in a thin layer of brownish-green clay for the fuzzy skin. -
Reduce:
Just like the citrus, gently roll and stretch this cane to reduce it to the desired diameter.
Smudged Slices?
If your design smears while slicing, the clay is too warm. Pop the cane in the freezer for 5-10 minutes. Also, rotate the cane after every cut to keep it round.
Step 3: Slicing and Decorating
-
Chill the canes:
Place your clay canes in the refrigerator for about 15-20 minutes. Firm clay slices much more cleanly and prevents squishing the design. -
Slice the fruit:
Use a very sharp tissue blade to cut thin, even slices from your canes. Aim for about 2-3mm thickness so they are sturdy but delicate. -
Texture (Optional):
For extra realism on the grapefruit or orange, gently stipple the surface of the fruit segments with a toothbrush or needle tool before baking. -
Bake:
Arrange the slices on a baking sheet lined with parchment paper. Bake according to your clay manufacturer’s instructions (usually around 275°F/135°C for 15-30 minutes). -
Cool down:
Let the slices cool completely before handling them again to ensure they harden fully. -
Painting faces:
Using a tiny dotting tool or the tip of a toothpick dipped in black paint, add two small dots for eyes on selected slices. -
Adding expressions:
With a fine liner brush, paint a tiny curved smile between the eyes. You can vary the expressions—try a wink or a small ‘o’ mouth. -
Adding kiwi seeds:
If you didn’t add clay seeds earlier, use your fine brush to paint tiny black teardrops around the white center of your kiwi slices. -
Seal:
Once the paint is dry, coat the slices with a thin layer of gloss varnish to make them look wet and fresh.
Make them Magnets!
Glue small neodymium magnets to the backs of your finished slices. They make adorable fridge magnets or cute locker decorations.
Arrange your little fruit family in a tiny bowl or scatter them on a shelf for a burst of permanent summer cheer
Baby Toast With Happy Butter
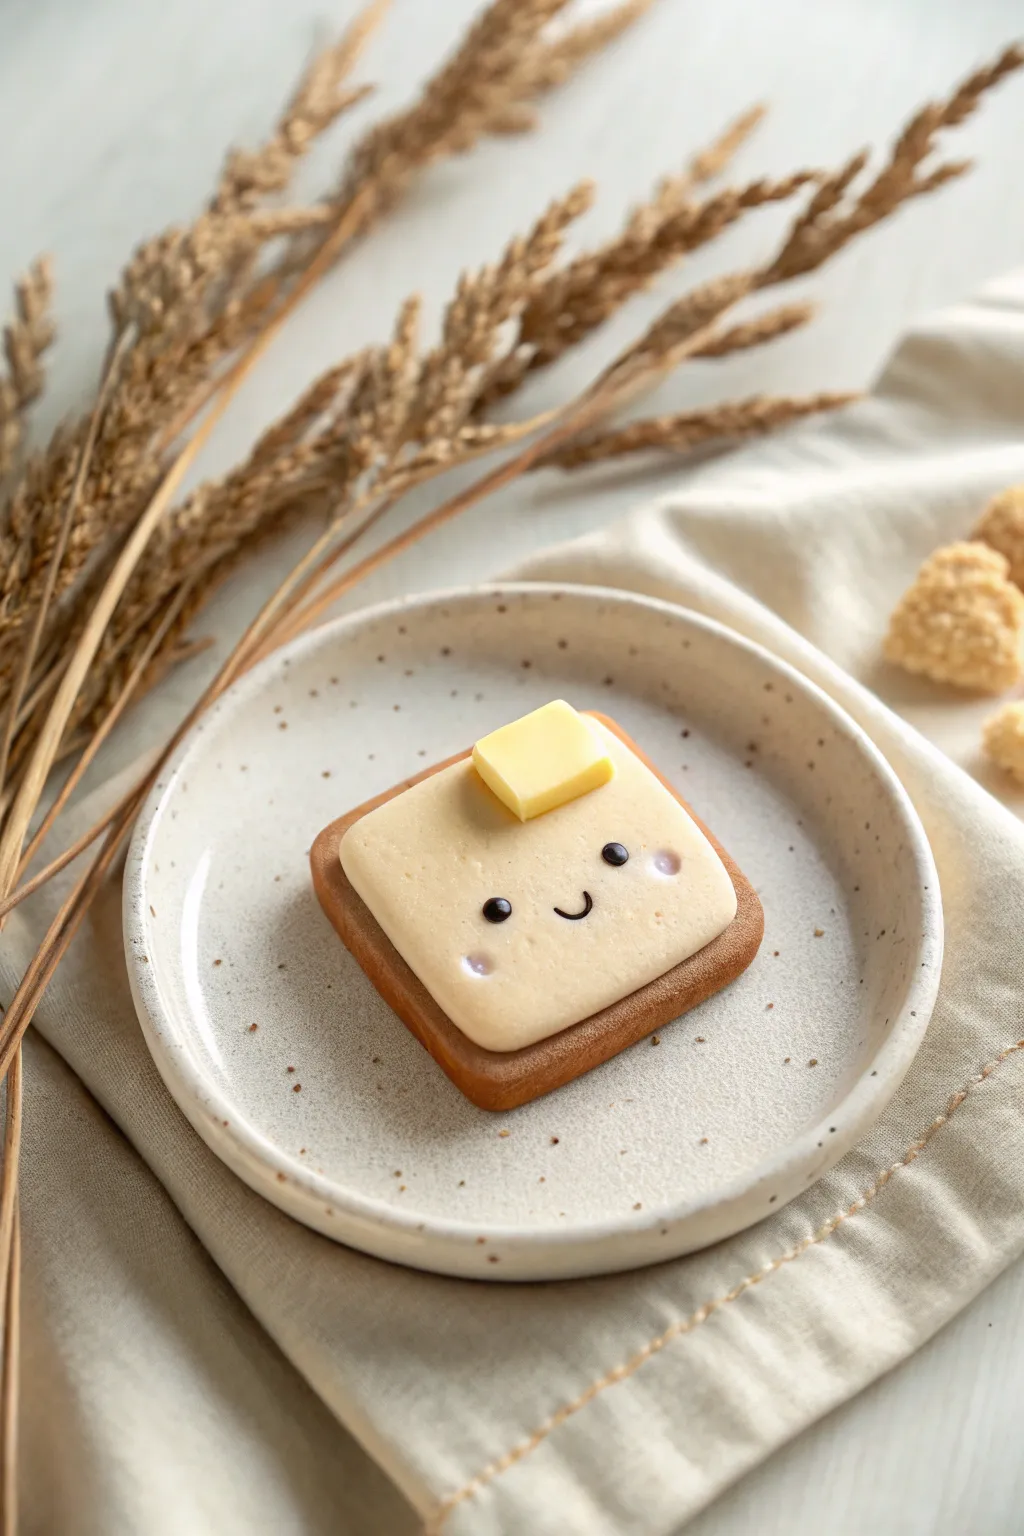
This adorable miniature toast charm features a golden-brown crust and a creamy pat of butter with a sweet, smiling face. It’s perfect for turning into a magnet, a brooch, or just a cute desk companion to brighten your day.
How-To Guide
Materials
- Polymer clay (tan/beige, light yellow, white, brown, black)
- Set of soft pastels (orange, brown, yellow ochre)
- Small paintbrush (for shading)
- Clay roller or pasta machine
- Square cookie cutter (approx. 1.5 inch) or a sharp blade
- Needle tool or dotting tool
- Liquid polymer clay (optional, for adhesive)
- Gloss glaze (optional)
Step 1: Shaping the Toast Base
-
Mix the bread color:
Start by mixing a small amount of translucent clay into your tan or beige clay. This gives the finished piece a more realistic, slightly airy bread texture rather than looking like flat plastic. -
Create the main slab:
Roll out your mixed tan clay to a thickness of about 1/4 inch (6mm). You want it thick enough to look like a hearty slice of Texas toast. -
Cut the square:
Use your square cutter or a sharp blade to cut out a clean square shape. If using a blade, just trim the edges to ensure they are straight and even. -
Soften the edges:
Gently tap the corners and edges with your fingertip to round them off slightly. Real bread rarely has razor-sharp corners. -
Prepare the crust:
Roll out a thin snake of brown clay. Flatten it gently with your roller so it becomes a long, thin ribbon, slightly wider than the thickness of your toast slab. -
Wrap the crust:
Wrap this brown ribbon around the perimeter of your tan square. Smooth the join where the ends meet so the seam is invisible. -
Texture the bread:
Before adding the face, use an old toothbrush or a ball of aluminum foil to gently tap the surface of the tan clay. This adds a realistic crumb texture.
Clean Clay Tip
Keep separate baby wipes nearby for light and dark clays. Clean your hands thoroughly before touching the cream face layer to avoid transferring brown ‘crust’ residue to the white clay.
Step 2: Adding the Happy Face
-
Shade the toast:
Scrape some orange and yellow ochre soft pastels into a powder. Use a dry brush to gently dust the center of the toast, giving it a ‘toasted’ golden glow. -
Create the creamy face layer:
Mix white clay with a tiny touch of yellow to create a pale cream color. Roll this out very thinly and cut a square slightly smaller than your toast base. -
Round the cream edges:
Use your finger to smooth the edges of this cream square so it looks soft, like slightly melted butter or cream cheese. -
Attach the face layer:
Place the cream square onto the toast base. I like to press it down gently in the center to ensure good contact without squishing the texture beneath. -
Add the eyes:
Roll two impossibly tiny balls of black clay. Press them into the cream layer, spacing them widely apart for that ‘kawaii’ look. -
Make the smile:
Roll a very thin thread of black clay. Cut a tiny U-shape and gently press it into the clay between the eyes using a needle tool. -
Add rosy cheeks:
Use a small dotting tool to pick up a tiny bit of pink pastel powder (or tiny discs of pink clay) and apply them just below and outside the eyes.
Make it a Magnet
Before baking, press a strong neodymium magnet into the back of the toast. Remove it, bake the clay, then glue the magnet into the indentation afterwards for a strong hold.
Step 3: The Butter Pat & Finishing
-
Form the butter pat:
Take a brighter yellow clay and form a small cube. Soften the edges just slightly so it doesn’t look too rigid. -
Position the butter:
Place the butter cube jauntily on top of the head (the upper corner of the cream layer). You can use a dab of liquid clay here to help it stick securely. -
Final inspection:
Check for any lint or fingerprints. Use a bit of rubbing alcohol on a brush to smooth out any unwanted imperfections before baking. -
Bake:
Bake the piece according to your clay manufacturer’s instructions (usually 275°F/135°C for 15-30 minutes). -
Glaze (Optional):
Once cool, create a wet look by applying a thin layer of gloss glaze strictly to the yellow butter pat, suggesting it is starting to melt.
Now you have a charming little breakfast buddy that will stay fresh forever
Candy-Colored Bow Earrings
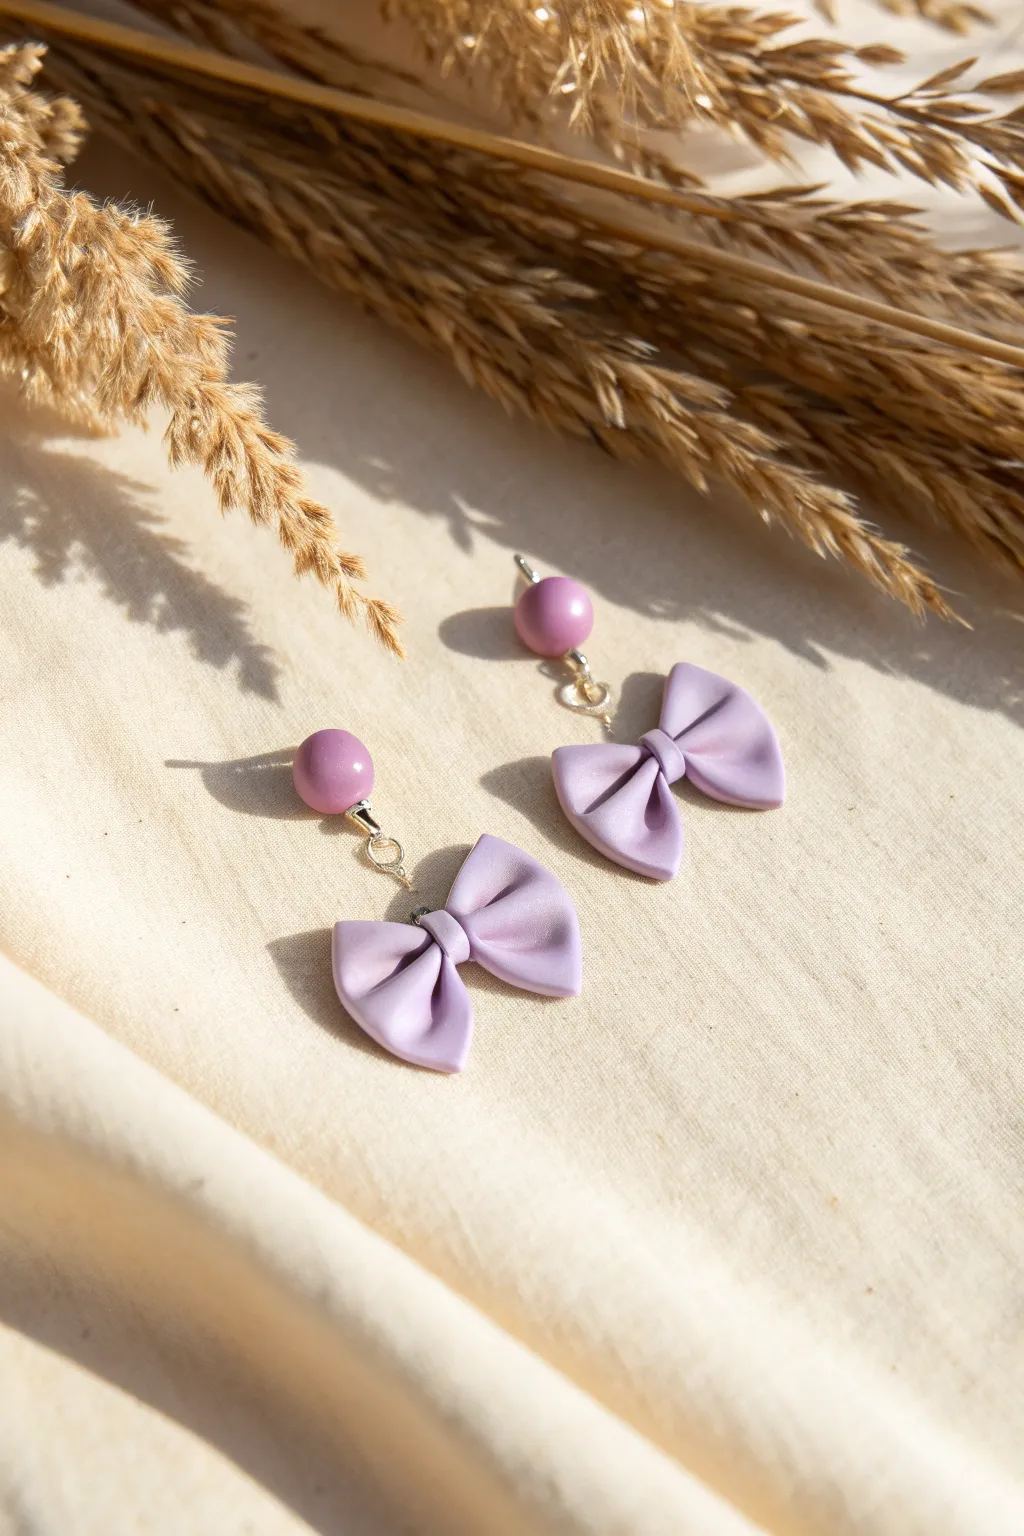
These dainty lavender earrings combine sculptural bows with classic bead elements for a design that feels both playful and elegant. The soft matte finish and monochromatic palette make them a versatile accessory perfect for spring styling.
Step-by-Step Tutorial
Materials
- Lavender purple polymer clay
- Silver eye pins (4 pieces)
- Silver jump rings (2 small)
- Earring posts or fishhook wires
- Rolling pin or pasta machine
- Clay blade or craft knife
- Needle tool or toothpick
- Round nose pliers
- Wire cutters
- Liquid polymer clay (optional)
- Oven for baking
Step 1: Creating the Bead Components
-
Condition the clay:
Start by warming a small portion of lavender polymer clay in your hands. Knead it thoroughly until it is soft, pliable, and free of any air bubbles or cracks. -
Roll spheres:
Pinch off two equal-sized pieces of clay, roughly the size of a pea. Roll these between your palms to create perfectly smooth spheres for the top bead component. -
Insert eye pins:
Gently insert a silver eye pin through the center of each sphere. If the bead deforms slightly, softly reshape it while the pin is inside. -
Secure pins:
Ensure the loop of the eye pin sits flush against the bottom of the bead, which will eventually connect to the bow. I usually trim the excess wire sticking out the top to about 1cm. -
Create top loops:
Using round nose pliers, curl the trimmed wire at the top into a loop, securing the bead onto the wire link. Set these bead links aside.
Fixing Fingerprints?
If you see fingerprints on your raw clay, lightly brush the surface with a tiny amount of baby oil or cornstarch before baking to smooth them out completely.
Step 2: Sculpting the Bows
-
Prepare a clay sheet:
Roll out the remaining lavender clay into a thin, even sheet, approximately 2mm thick. A pasta machine works best for consistency, but a hand roller works too. -
Cut strips:
Use your clay blade to cut two long, rectangular strips. Each strip should be about 1cm wide and 4cm long. Also, cut two very small, thin strips for the center knots. -
Form the loops:
Take one long rectangle and fold both ends toward the center so they meet in the middle, creating a basic tube or loop shape. -
Pinch the center:
Gently pinch the middle where the ends meet to create the ‘waist’ of the bow. This naturally flares out the two loops on either side. -
Detail the folds:
Use your needle tool or fingertips to press an indentation into the loops on either side of the pinch, enhancing the draped fabric look. -
Add the center knot:
Wrap one of the small, thin strips around the pinched center to hide the seam. Press it gently at the back to secure it. -
Insert hardware:
Insert an eye pin vertically through the center knot of the bow. Ensure the loop sticks out of the top, ready to connect to the bead component. -
Repeat steps:
Repeat the folding and wrapping process to create the second matching bow.
Add Pearl Shimmer
For a glossy ‘candy’ finish, coat the baked pieces with a layer of UV resin or polyurethane gloss varnish. Dust with mica powder before baking for extra sparkle.
Step 3: Assembly and Finishing
-
Bake carefully:
Place the bead links and the bow charms on a baking sheet lined with parchment paper or cardstock. Bake according to your clay manufacturer’s specific temperature instructions, usually for 15-30 minutes. -
Cool down:
Allow the pieces to cool completely inside the oven or on a wire rack before handling, as warm clay is fragile. -
Connect components:
Open a small jump ring using two pairs of pliers. Thread it through the top loop of the bow and the bottom loop of the bead unit. Close the ring securely. -
Attach earring finding:
Open the loop at the very top of your bead component (or use another jump ring if needed) and attach your earring post or hook. -
Final check:
Inspect all connections to ensure loops are closed tight so pieces don’t slip apart.
Enjoy styling these sweet pastel accessories with your favorite outfit