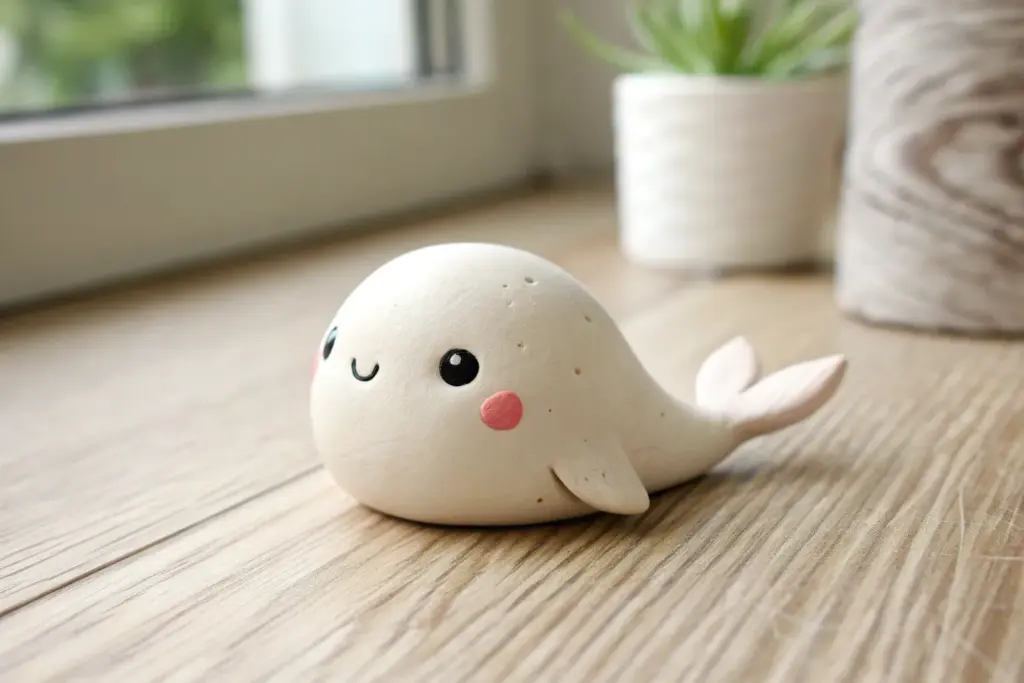
If you’ve got a little lump of modeling clay and a craving to make something adorable, you’re in the right headspace. These ideas are intentionally cute, super beginner-friendly, and all about simple shapes you can finish in one relaxed crafting session.
Chubby Cat Blob Figurines
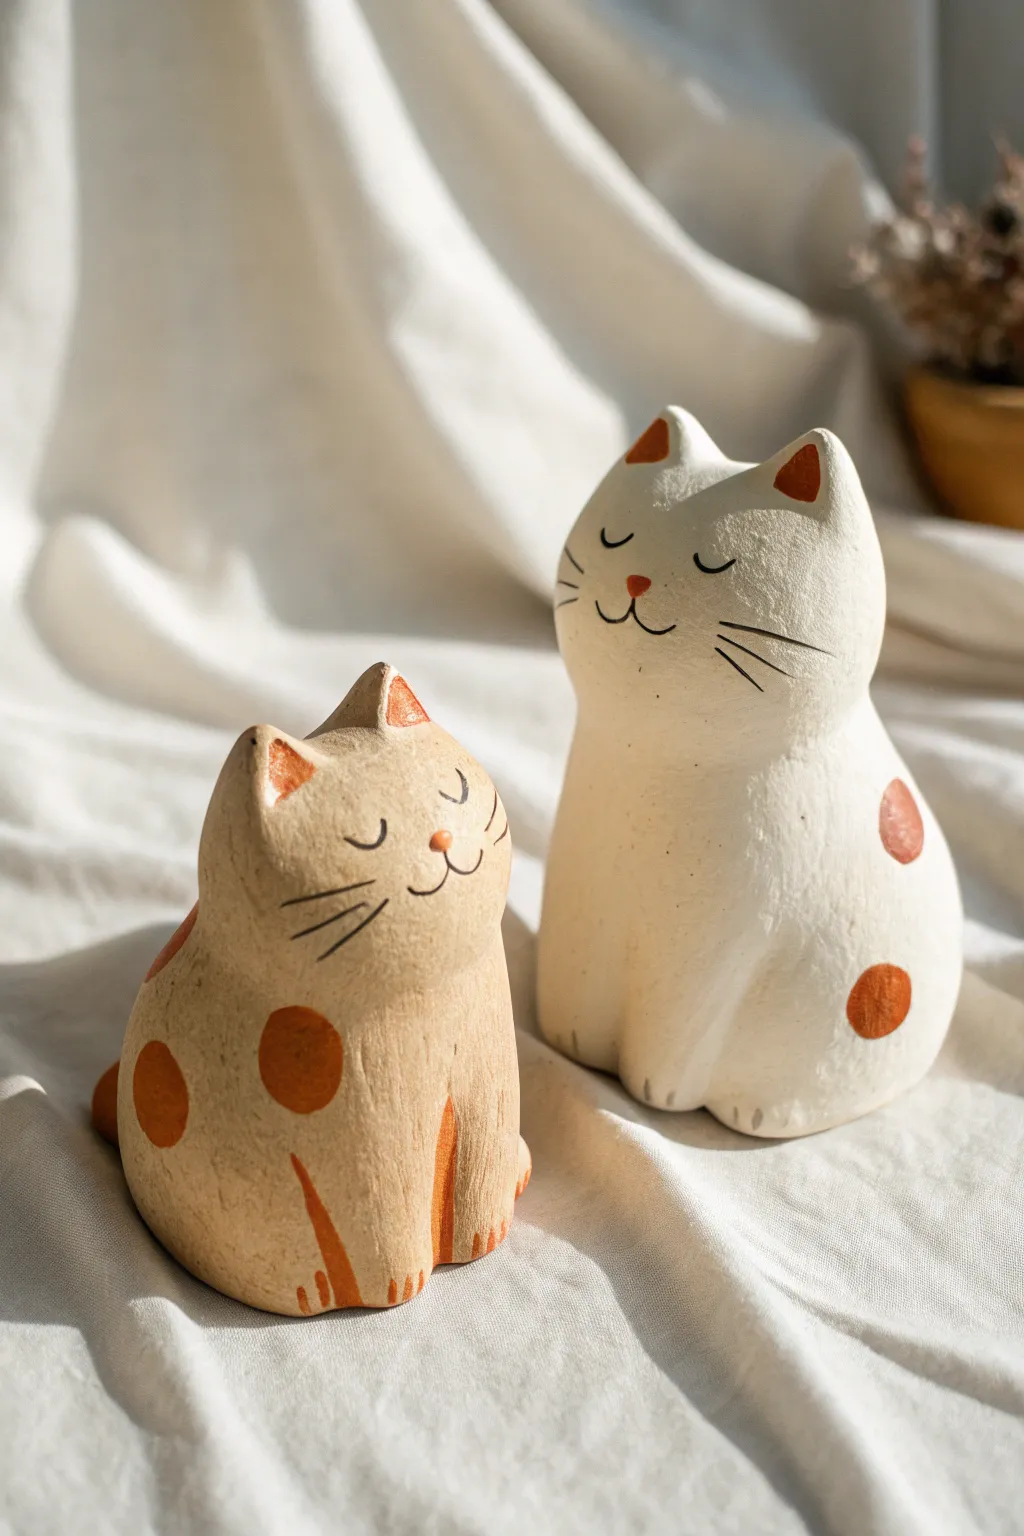
Create a pair of charming, chubby cat figurines with this simple modeling project that celebrates soft shapes and minimalist details. These delightful clay blobs feature incised whiskers and warm earthy spots, making them perfect little sentinels for a bookshelf or desk.
Detailed Instructions
Materials
- Air-dry clay (white and terracotta/beige)
- Acrylic paint (burnt orange/terracotta color)
- Small detail paintbrush
- Needle tool or toothpick
- Small cup of water
- Fine-grit sandpaper (optional)
- Matte varnish or sealant
Step 1: Shaping the Bodies
-
Prepare the clay:
Start by conditioning your clay. Knead a fist-sized ball of white clay for the taller cat and a slightly smaller ball of beige clay for the shorter cat until they are soft and crack-free. -
Form the base shape:
Roll the white clay into a smooth cylinder. Gently tap the bottom on your work surface to create a flat base so it stands upright securely. -
Refine the silhouette:
Using your palms, narrow the top third of the cylinder slightly to suggest a neck area, but keep the transition very subtle; we want a continuous ‘blob’ shape rather than a distinct head and body. -
Create the ears:
Pinch two small triangles at the very top of the head. Smooth the clay from the ears down into the head so they look integrated, not just stuck on. -
Repeat for the smaller cat:
Repeat the previous steps with the beige clay, but make this form shorter and slightly rounder, like a squat gumdrop shape.
Step 2: Adding Details
-
Smooth the surface:
Dip your finger in a tiny bit of water and rub it over the entire surface of both cats to remove fingerprints and minor imperfections. -
Sketch the face:
Before carving, you might want to lightly mark where the eyes and nose will go with your fingernail to ensure symmetry. -
Carve the features:
Using a needle tool or toothpick, carefully incise two small ‘U’ shapes for sleeping eyes. Press a small indentation for the nose. -
Add whiskers:
Carve three long, sweeping lines on each cheek for whiskers. Press a bit harder near the nose and lift up as you move outward to create a tapered line. -
Define the paws:
At the bottom front of the figurine, use your tool to carve two vertical lines on each side to suggest front paws tucked under the body. -
Shape the tail:
Roll a small snake of clay and attach it to the back or wrap it around the side of the body. Score and slip the connection point (blending the clay together) so it doesn’t fall off. -
Dry thoroughly:
Set your cats aside in a safe place. Allow them to dry completely for 24-48 hours, or until they feel room temperature rather than cool to the touch.
Cracks Appearing?
If small cracks appear while drying, mix a tiny bit of fresh clay with water to make a paste (slip) and fill them in. Smooth with a damp finger and let dry again.
Step 3: Painting and Finishing
-
Sand imperfections:
Once fully dry, you can lightly sand any rough bumps with fine-grit sandpaper for a smoother finish. -
Paint the ears:
Load your small brush with burnt orange paint. Carefully fill in the triangular recess of the ears. -
Paint the nose:
Dab a tiny triangle or oval of orange paint onto the nose indentation. -
Add the spots:
Paint large, organic circular spots on the body. I like to place one on the flank and one on the lower back for balance. -
Highlight the paws:
Add thin strokes of orange paint inside the carved lines of the paws to emphasize the separation of the toes. -
Seal the work:
Finish by applying a coat of matte varnish to protect the paint and seal the clay without making it look glossy or plastic.
Pro Tip: Weighted Base
For better stability, poke a hole in the bottom of the wet clay and insert a crumpled ball of aluminum foil or a small stone before sealing it back up.
Display your new feline friends together for an adorable handmade vignette


Smiling Strawberry Mini Charms
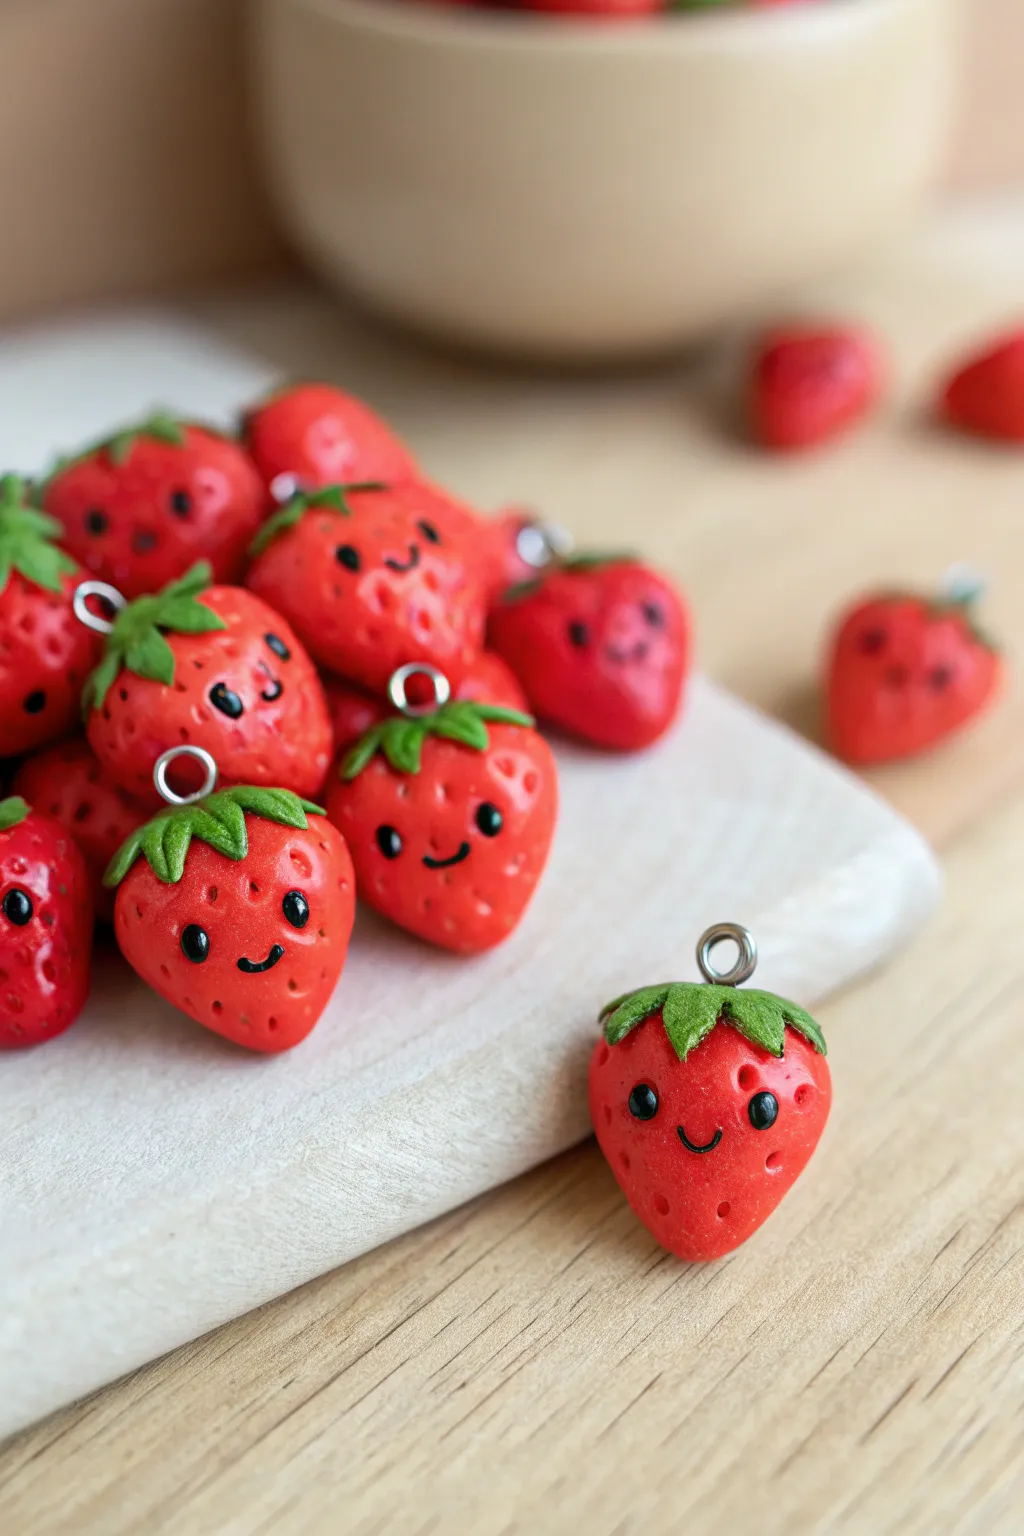
Brighten up your accessories with these irresistibly cheerful miniature fruits that are perfect for beginners. These polymer clay strawberry charms feature adorable textured details and sweet little faces that make them ideal for earrings, keychains, or zipper pulls.
Step-by-Step Tutorial
Materials
- Red polymer clay (opaque)
- Green polymer clay (leaf shade)
- Black liquid clay or black acrylic paint
- Clear gloss glaze or polyurethane varnish
- Needle sculpting tool or toothpick
- Small dotting tool
- Metal eye pins (approx. 20mm)
- X-acto knife or clay blade
- Baking sheet with parchment paper
- Tiny black seed beads (optional for eyes)
- Wire cutters
Step 1: Shaping the Berry Body
-
Condition the red clay:
Start by warming a small chunk of red polymer clay in your hands until it becomes soft and pliable. -
Form the base sphere:
Roll the clay into a smooth ball about the size of a large marble, roughly 1.5 cm in diameter. -
Create the taper:
Gently roll one side of the sphere between your fingers to create a slight cone shape that mimics a real strawberry. -
Flatten the top:
Press the wider end of your cone lightly against your work surface so it sits flat; this is where the leaves will go.
Seed Depth Tip
Don’t poke straight in! Angle your needle tool slightly upward as you make the seed holes. This creates a teardrop shadow that looks much more like real fruit texture.
Step 2: Adding Texture and Leaves
-
Create seed indentations:
Using a needle tool, poke tiny, shallow holes all over the red surface to mimic strawberry seeds, leaving a smooth open space in the lower center for the face. -
Prepare the greenery:
Take a very small pea-sized amount of green clay and flatten it into a thin disk. -
Cut the calyx shape:
Use your X-acto knife to cut a five-pointed star or simple flower shape from the green disk to act as the leaves. -
Attach the leaves:
Place the green star on the flat top of the strawberry and gently drape the points down over the red shoulders. -
Texture the leaves:
I prefer to use the needle tool to drag a gentle center vein down each leaf point for extra realism.
Dip It in Chocolate!
Dip the bottom third of your baked berry into brown liquid clay or thick brown acrylic paint to create a ‘chocolate-dipped’ version, then add microbeads as sprinkles.
Step 3: Bringing It to Life
-
Make the eye sockets:
Use a small ball tool to press two indentations in the smooth area you reserved for the face earlier. -
Insert the eyes:
Place a tiny dab of black liquid clay into the sockets, or press small black seed beads securely into the clay. -
Draw the smile:
With a very fine needle tool or a thin brush dipped in black paint, carefully draw a small ‘U’ shape between the eyes. -
Insert the hardware:
Trim a metal eye pin to about 1cm long and push it straight down through the center of the green leaves into the body of the strawberry. -
Secure the pin:
Gently pinch the clay around the base of the pin to ensure it holds tight during baking.
Step 4: Finishing Up
-
Bake the batch:
Arrange your strawberries on a parchment-lined tray and bake according to your clay package instructions (usually 275°F/135°C for 15-20 minutes). -
Cool completely:
Let the charms cool fully before handling them, as hot clay is fragile. -
Add shine:
Brush a thin coat of gloss glaze over the berry to make it look juicy and protect the painted face details.
Once the glaze is dry, add a jump ring and your new cheerful friend is ready to dangle from a backpack or bracelet


Tiny Avocado Best-Friends Set
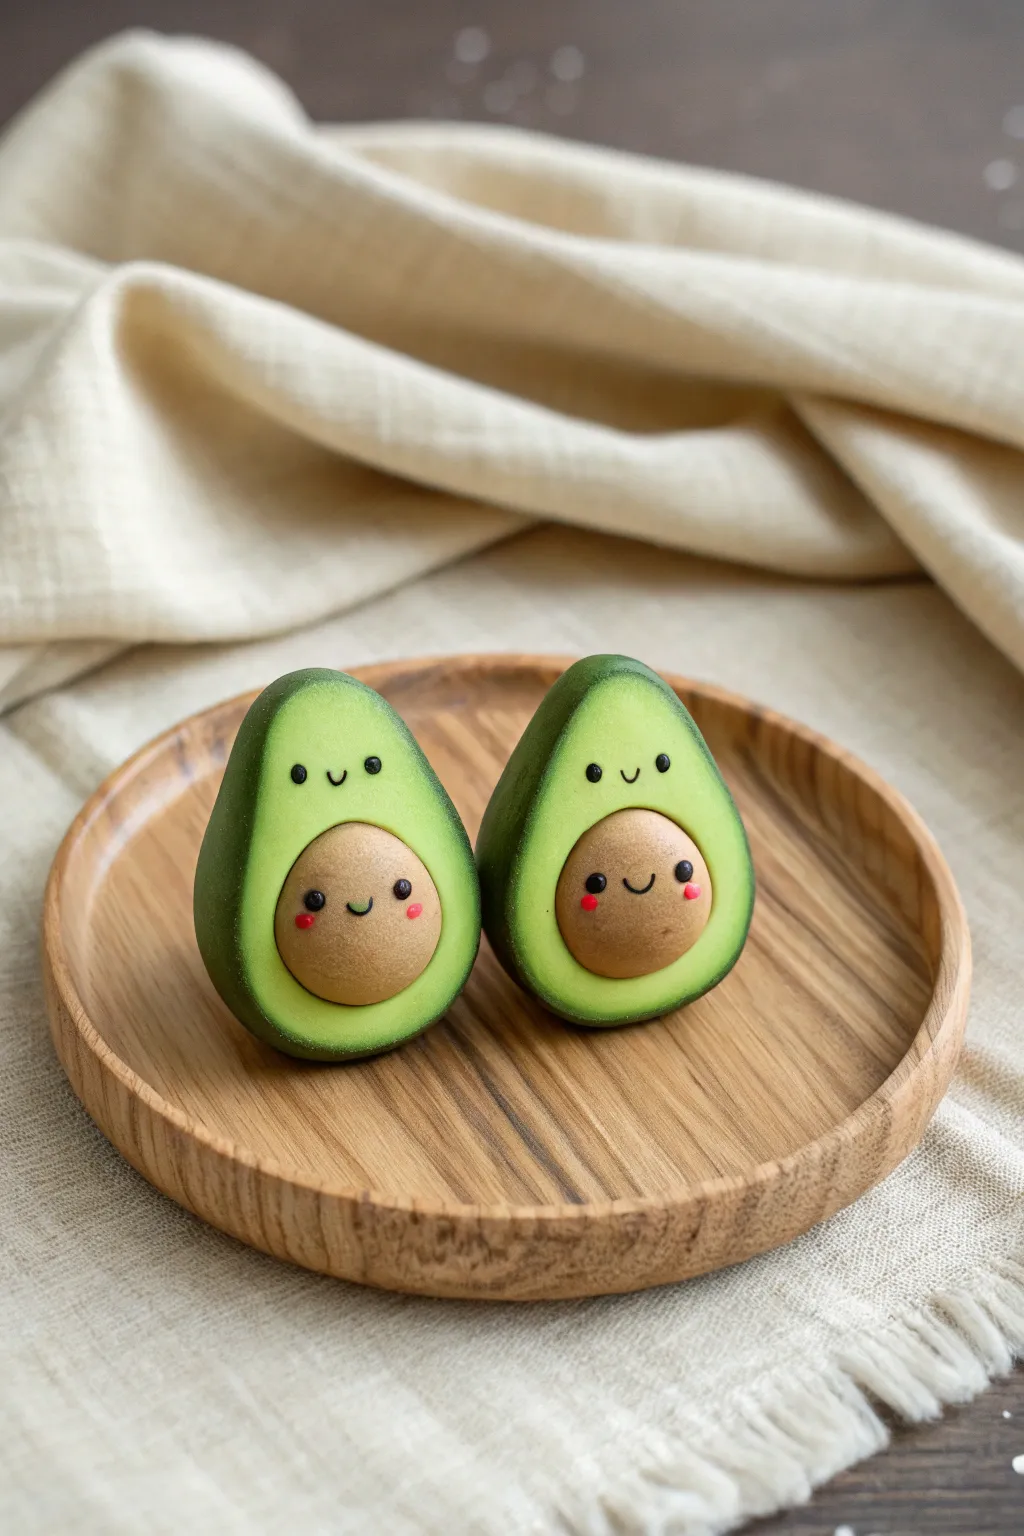
Create the perfect pair of palm-sized pals with this ridiculously cute avocado set. These charming figures feature two happy layers of green and a removable-style pit that has a life of its own.
Step-by-Step Guide
Materials
- Polymer clay (dark green, light lime green, tan/light brown, black, pink)
- Clay sculpting tools (needle tool, small ball tool)
- Rolling pin or pasta machine for clay
- Blade or X-Acto knife
- Oven for baking (if using polymer clay)
- Matte varnish (optional)
Step 1: Shaping the Bodies
-
Mix the colors:
Condition your dark green and light lime green clay until soft and pliable. If the lime green is too bright, mix in a tiny pinch of yellow or white to soften it. -
Form the dark base:
Take a walnut-sized ball of dark green clay and roll it into a teardrop shape. Flatten the bottom slightly so it can stand upright on its own. -
Create the light interior:
Roll a slightly smaller amount of lime green clay into a similar teardrop shape. flatten it gently with your palm or a roller until it’s about 3-4mm thick. -
Layer the greens:
Place the flattened lime green piece onto the front of the dark green teardrop. Gently smooth the edges of the light green clay so it adheres to the dark base without blending the colors fully. -
Indent the bellies:
Use your thumb or a large ball tool to press a deep, circular indentation into the lower center of the light green section. This is where the pit will sit, so make sure it’s roomy.
Clay Too Stick?
If your clay is getting too soft and sticky from the warmth of your hands, pop it in the fridge for 10 minutes to firm it up before detailing.
Step 2: Crafting the Pits
-
Roll the pits:
Take your tan or light brown clay and roll two perfect spheres. Test the fit by placing them into the indentations you made; they should protrude slightly, like a real avocado pit. -
texture the surface (optional):
For a bit of realism, I like to gently tap the surface of the brown spheres with an old toothbrush or sandpaper to give them a matte, organic texture before adding faces. -
Attach the pits:
Once satisfied with the fit, press the brown spheres firmly into the indentations. If they don’t stick well, a tiny drop of liquid clay or translucent sculpey can act as glue.
Make it a Keychain
Insert a metal eye screw into the top of the avocado before baking to turn your cute creation into a durable charm or keychain.
Step 3: Bringing Them to Life
-
Make the eyes:
Roll tiny strands of black clay. Cut two very small bits for eyes on the light green flesh (upper part) and two slightly larger bits for the pit’s eyes. -
Add the smiles:
Roll an incredibly thin snake of black clay. Cut small curved sections to form smiles. Place a small smile between the eyes on the upper green section, and another on the brown pit. -
Apply the blush:
Take minuscule amounts of pink clay and flatten them into tiny ovals. Place these ‘cheeks’ just below the eyes on the brown pits for that extra cute factor. -
Final smoothing:
Check for any fingerprints. You can lightly brush the clay with a bit of baby oil on your finger to smooth out imperfections before baking. -
Bake carefully:
Bake according to your clay manufacturer’s instructions, usually around 275°F (130°C) for 15-20 minutes depending on thickness. Let them cool completely before handling.
Set your new little friends on a desk or shelf to bring a smile to your day


Easy Mushroom Buddies
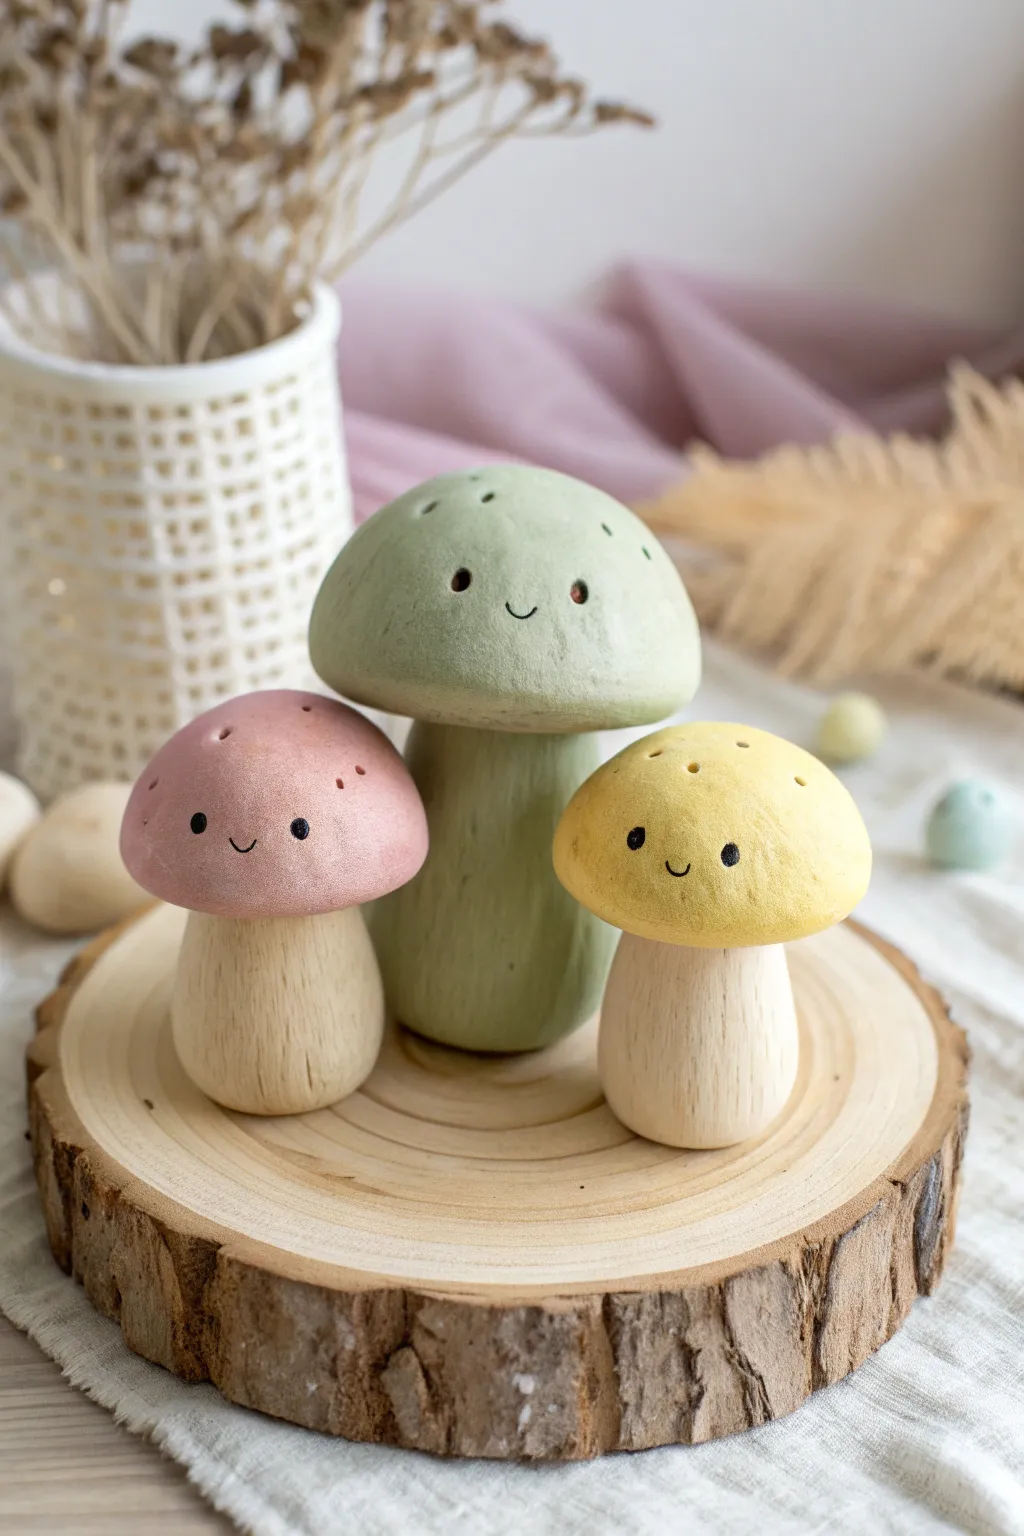
Mix natural textures with smooth clay to create a trio of adorable forest friends. These charming mushroom buddies pair hand-shaped pastel caps with rustic wooden stems for a sweet, scandi-style decoration.
How-To Guide
Materials
- Air-dry modeling clay (white)
- Small wooden craft pegs or unfinished wooden doll bodies (peg doll shapes)
- Acrylic paints (pale pink, sage green, buttery yellow, black)
- Fine grit sandpaper
- Water in a small cup
- Detail paintbrush
- Toothpick or needle tool
- Matte varnish or sealant (optional)
- Modeling tools (or a spoon back for smoothing)
Step 1: Shaping the Caps
-
Prepare the Clay:
Start by conditioning your air-dry clay. Knead a small handful until it becomes warm, pliable, and free of cracks. -
Form the Base Shape:
Roll three separate balls of clay in varying sizes—make one large for the green mushroom and two smaller ones for the pink and yellow mushrooms. -
Sculpt the Domes:
Gently press each ball against your work surface to flatten the bottom. Use your palms to round the tops into smooth, domed mushroom cap shapes. -
Create the Hollowing:
Flip the caps over. Use your thumb or a rounded modeling tool to create an indentation in the center where the wooden stem will eventually sit. Test fit your wooden pegs to ensure the hole is wide enough, but don’t glue them yet. -
Add Texture Details:
While the clay is still soft, use a toothpick to poke tiny, random holes scattered across the top of the caps for that classic toadstool texture. -
Drying Time:
Set the clay caps aside to dry completely. Depending on your brand of clay and the thickness, this may take 24 to 48 hours. Start them on their flat sides, then flip them halfway through.
Smoother Surfaces
Use a tiny bit of water on your fingertip to smooth out cracks while the clay is wet. This saves huge amounts of sanding time later.
Step 2: Painting & Assembly
-
Sand for Smoothness:
Once bone dry, take a moment to gently sand the clay caps with fine-grit sandpaper. This removes any fingerprints or rough edges that happened during sculpting. -
Base Coat Painting:
Paint the large cap with a muted sage green. I find that mixing a tiny dot of brown into green paint helps achieve this earthy tone. -
Paint the Smaller Caps:
Paint one small cap a soft, dusty pink and the other a cheerful, pale yellow. You may need two thin coats for opaque coverage. -
Paint the Stems (Optional):
The large green mushroom in the example has a painted stem. Paint one of your larger wooden pegs exactly the same shade of green as the cap. Leave the other two pegs as natural wood. -
Add the Faces:
Using your finest detail brush and black paint, carefully add the faces. Paint two small dots for eyes wide apart, and a tiny, thin ‘U’ shape in between for a smiling mouth. -
Assemble the Mushroom:
Apply a strong craft glue or superglue to the top of the wooden pegs. Firmly press the dried clay caps onto their corresponding stems. -
Add Painted Details (Large Mushroom):
For the green mushroom, add slight vertical streak textures using a darker green paint on the stem if you want to mimic the reference perfectly. -
Final Seal:
Whatever finish you prefer, apply a coat of matte varnish to protect the paint and give the clay a unified, professional look.
Forage & Find
Instead of craft store pegs, go outside and find thick, straight sticks. Create a flat top with a hobby knife for a true cottagecore look.
Now you have a trio of friendly fungi to brighten up your shelf or desk

The Complete Guide to Pottery Troubleshooting
Uncover the most common ceramic mistakes—from cracking clay to failed glazes—and learn how to fix them fast.
Pastel Dinosaur Nuggets

These adorable stegosaurus figures bring a soft, prehistoric charm to your desk or shelf with their matte, candy-like finish. The simple, rounded shapes make them perfect for beginners looking to create a complete set of pastel dino friends.
Detailed Instructions
Materials
- Air-dry clay or polymer clay (white base)
- Acrylic paints or clay pigments (pastel pink, yellow, mint green, lavender)
- Black acrylic paint (for eyes)
- Small ball tool or toothpick
- Rolling pin (optional)
- Plastic knife or clay sculpting tool
- Smooth work surface
Step 1: Mixing and Prep
-
Create pastel shades:
Start by dividing your white clay into four equal portions. Mix a tiny amount of pigment or paint into each ball to create soft pastel shades: pink, yellow, mint green, and lavender. Keep the color subtle for that sugary look. -
Condition the clay:
Knead each colored ball thoroughly until it is warm, pliable, and the color is completely streak-free. Cover the colors you aren’t currently using with plastic wrap to prevent them from drying out.
Step 2: Shaping the Body
-
Form the main shape:
Take the pink clay first. Roll it into a smooth ball, then gently elongate it into a thick, rounded egg shape. This will be the dinosaur’s combined body and head. -
Define the head:
Using your thumb, gently press down on the narrower end of the shape to slightly distinct the head area, keeping the snout rounded and blunt. -
Pull the tail:
At the opposite end, pinch and gently pull the clay to form a short, pointed tail that curves slightly upward. Blend the transition so it looks seamless. -
Create the legs:
Roll four small, equal-sized balls of pink clay for the legs. Gently press them onto the bottom of the body—two in front, two in back—and smooth the seams with your finger or a tool so they attach firmly without squishing the body shape.
Clean Hands, Clean Clay
Pastel clay picks up dust easily. Keep a pack of wet wipes or a scrap piece of white ‘cleaning clay’ nearby to roll in your hands between color changes to prevent staining.
Step 3: Adding Details
-
Make the spikes:
Roll a small snake of pink clay and cut it into 5-7 tiny triangular segments. Flatten slightly to create the distinct stegosaurus plates. -
Attach the spine:
Starting from the top of the head down to the tail, press the triangular plates onto the center line of the back. I find using a tiny dab of water helps them stick better if the clay has started to dry. -
Texture the skin:
Using a toothpick or a small dotting tool, gently press tiny indentations on the side of the body to mimic skin texture or scales. Keep these subtle and random. -
Repeat for all colors:
Repeat the shaping process for the yellow, green, and purple dinosaurs, ensuring they are all roughly the same size for a cohesive set.
Textured Effect
For a hyper-realistic ‘sugar cookie’ look, use a scrap toothbrush to gently tap the surface of the clay before it dries. This creates a porous, stone-like texture.
Step 4: Finishing Touches
-
Add the eyes:
Once the main forms are set, use a very fine tool or toothpick dipped in black paint to create two tiny, wide-set eyes on each face. -
Refine the surface:
If you notice any fingerprints, lightly brush the surface with a soft, dry brush or a tiny bit of water to smooth them out before the final cure. -
Dry or bake:
Follow the instructions for your specific clay type. If using air-dry clay, let them sit undisturbed for 24 hours. If baking polymer, use low heat as per the package to preserve the pastel color. -
Optional matte finish:
To achieve the powdery, sugar-nugget look seen in the photo, avoid glossy varnishes. Leave the clay raw or finish with a matte spray sealant.
Arranging your little herd in a row creates a delightful display that looks almost good enough to eat
Round Octopus Couple
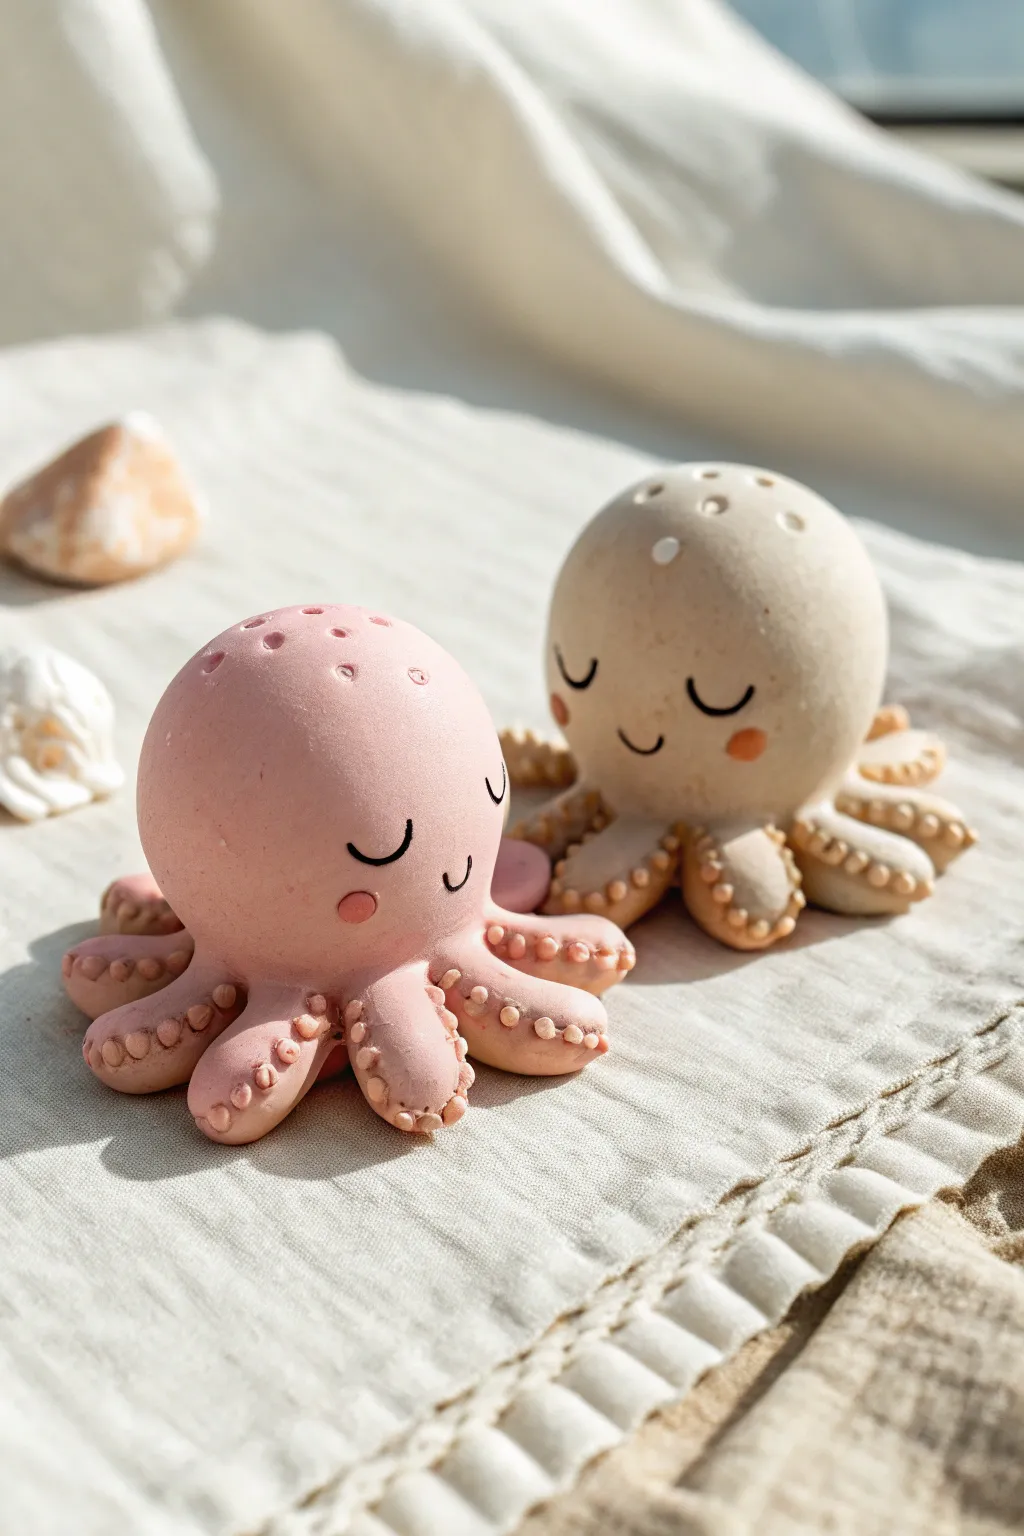
Create this adorable duo of sleeping octopuses using soft, desaturated shades of polymer clay. With their peaceful expressions and textured tentacles, they make perfect desk companions or sweet handmade gifts.
Step-by-Step Guide
Materials
- Polymer clay (matte pink and beige/sand)
- Black acrylic paint or fine-tip permanent marker
- Small dotting tool or toothpick
- Orange or dark pink chalk pastel (for blushing cheeks)
- Soft paintbrush
- Clay sculpting tools
- Clean work surface
Step 1: Shaping the Bodies
-
Prepare the clay:
Start by conditioning your pink and beige clay separately until they are soft and pliable. If the colors are too bright, mix in a tiny amount of white or grey to achieve that muted, matte aesthetic. -
Form the main shapes:
Roll two large balls of clay, one in each color. These should be smooth and spherical to form the main head and body of the octopuses. Aim for a size that fits comfortably in your palm, roughly like a tangerine. -
Create the tentacles:
For each octopus, roll out eight smaller sausage shapes. These should be slightly thicker at one end and taper down to a rounded point at the other. -
Assemble the base:
Arrange the eight tentacles in a starburst circle on your work surface. Gently press the thicker ends together in the center to create a base where the head will sit. -
Attach the head:
Place the large ball firmly onto the center of the tentacle ring. Blend the clay at the seam underneath carefully with a modelling tool so the head and legs become one solid unit. -
Curl the tips:
Gently lift the tip of each tentacle and curl it slightly upwards. This movement adds life to the sculpture and makes them look like they are resting comfortably.
Uneven Seams?
If the joint between the head and tentacles looks rough, roll a thin snake of clay, wrap it around the neck like a scarf, and blend it smooth with a tool.
Step 2: Adding Texture & Details
-
Make the suckers:
Roll many tiny, uniform balls of clay in the same color as the body. You will need about roughly 5-6 for each tentacle. -
Apply the suckers:
Press these tiny balls onto the underside and visible curled edges of the tentacles. Gently flatten them slightly so they adhere well. -
Indent the suckers:
Using a small ball tool or the tip of a toothpick, press a small indentation into the center of each tiny ball to create the suction cup look. -
Create the vent holes:
Use a medium-sized dotting tool to press a random pattern of gentle indentations on the very top of each head. This mimics the porous texture of coral or sea sponge.
Make it a Trio
Make a tiny baby octopus in a third color like mint green or lavender to sit on top of one of the larger heads.
Step 3: Face & Finish
-
Paint the eyes:
Using a very fine brush and black acrylic paint (or a marker), draw two simple ‘U’ shapes for sleeping eyes. Keep them low on the face for a cute proportion. -
Add the smile:
Draw tiny, subtle smiles right between the eyes. A smaller mouth often looks sweeter on kawaii characters. -
Apply blush:
Scrape a little powder from an orange or dark pink chalk pastel. Use a dry, soft brush to gently dust rosy cheeks onto the clay below the eyes. -
Baking (if using polymer):
Bake your creations according to the manufacturer’s instructions for your specific brand of clay. I recommend using an oven thermometer to ensure you don’t scorch the light colors. -
Add highlights:
Once cooled (or dried), you can add tiny white dots to the top of the head for extra texture, or leave them natural matte for a modern look.
Place your finished octopus couple on a shelf where they can nap peacefully together


What Really Happens Inside the Kiln
Learn how time and temperature work together inside the kiln to transform clay into durable ceramic.
Cute Bear Face Fridge Magnets
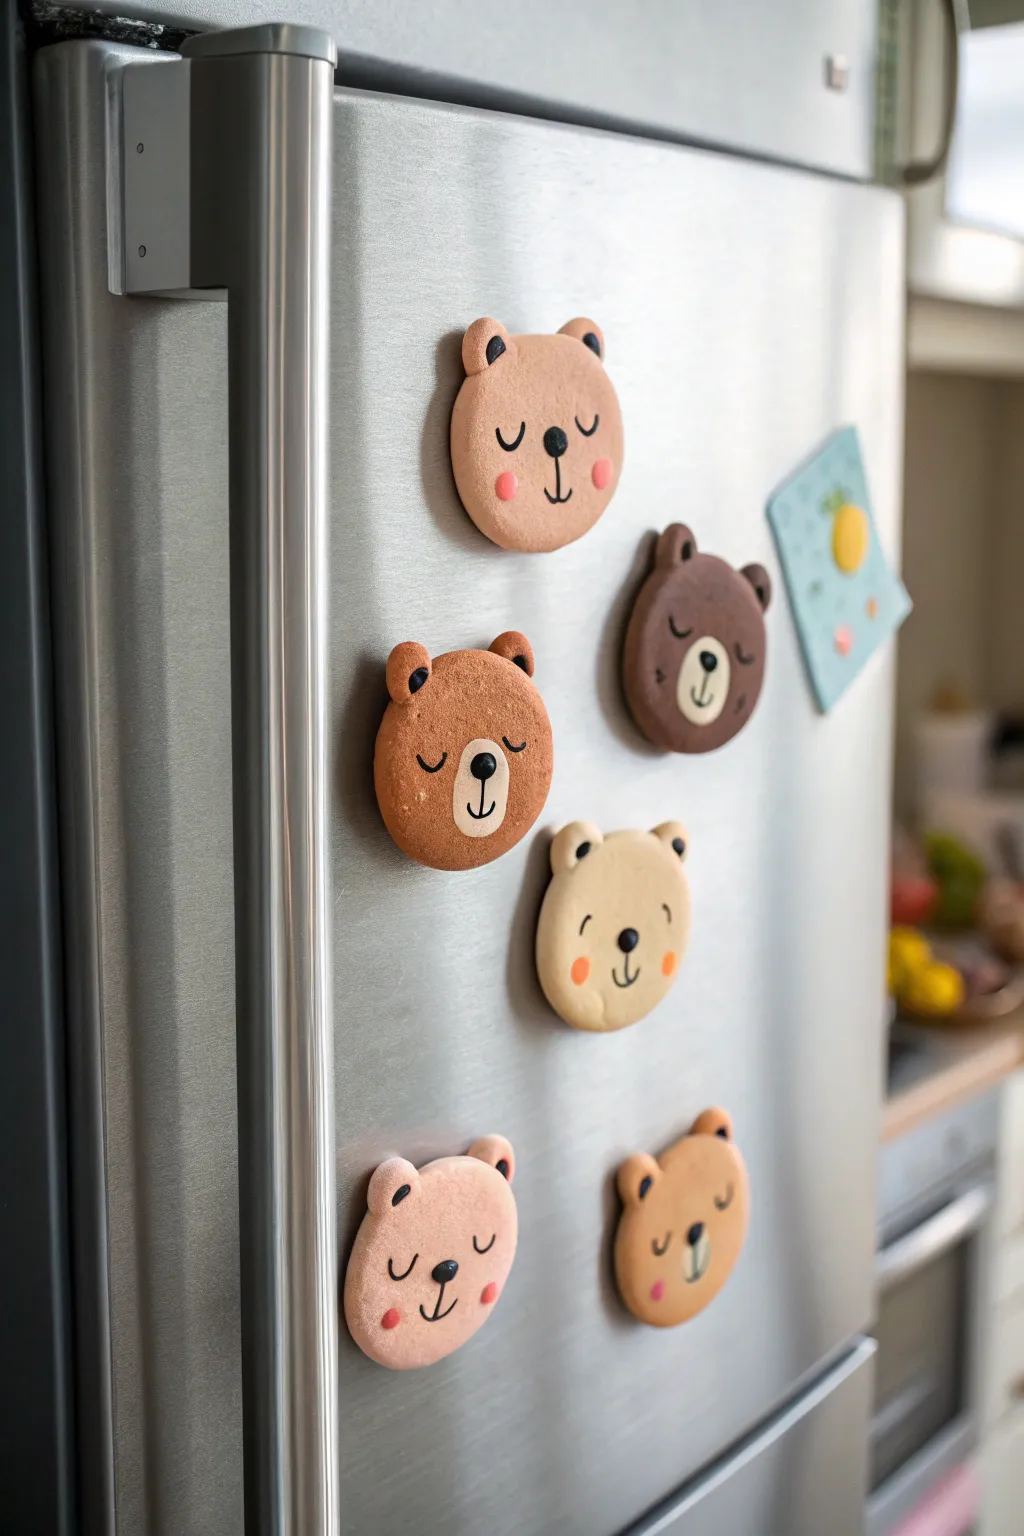
Transform your refrigerator into a gallery of smiles with these adorable bear face magnets. Using simple modeling clay techniques, you’ll sculpt a variety of sweet, sleepy, and cheerful expressions in soft, earthy tones.
Step-by-Step
Materials
- Polymer clay in assorted colors: beige, tan, dark chocolat brown, cream, black, and pink
- Rolling pin or acrylic roller
- Round cookie cutter (approx. 2 inches)
- Small dotting tool or a toothpick
- Strong craft glue (E6000 or similar)
- Round ceramic magnets (strong enough to hold clay)
- Parchment paper or baking mat
- Oven (for baking polymer clay)
Step 1: Shaping the Base
-
Condition the clay:
Start by kneading your chosen base color (beige, tan, or brown) until it is soft and pliable. This prevents cracks during baking. -
Roll it out:
Roll the clay into a smooth sheet about 1/4 inch thick. You want it substantial enough to be durable but not too heavy for the magnet. -
Cut the circle:
Use your round cookie cutter to punch out a perfect circle. Gently smooth the edges with your finger to remove any sharp cut marks. -
Make the ears:
Take two small balls of the same base color clay, slightly smaller than a dime. Flatten them gently and press them firmly against the top left and right edges of the circle to form ears. Blending the seam slightly on the back helps them stick better.
Step 2: Creating the Muzzles
-
Choose a muzzle style:
Decide on your design. For the lighter bears, you might skip a separate muzzle piece. For the darker brown bears, create a contrast by taking a small ball of cream or lighter tan clay. -
Attach the muzzle:
Flatten the light clay ball into an oval and press it onto the lower center of the face. Press gently so it bonds without losing its shape. -
Add the nose:
Roll a tiny ball of black clay. Position it centrally on the muzzle (or directly on the face guidelines for bears without muzzles) and press down to create a cute button nose.
Smooth Finish Tip
Before baking, wipe the raw clay gently with a brush dipped in rubbing alcohol or baby oil. This removes dust, lint, and fingerprints for a professional look.
Step 3: Adding Details & Expressions
-
Form the eyes:
Roll extremely thin snakes of black clay for sleepy eyes or curved smiling eyes. Carefully place them on the face using a toothpick to guide the tiny pieces. -
Make open eyes:
For awake bears, simply flatten tiny black balls into ovals. You can add a speck of white clay as a highlight for extra cuteness. -
Stitch the mouth:
Roll another very thin black snake for the mouth line. Attach it vertically from the nose down, curving at the bottom to form the classic bear smile. -
Rosy cheeks:
Roll two tiny balls of pink clay, flatten them, and press them onto the cheeks for a blushing effect. I like to place these slightly wider than the eyes. -
Refine the texture:
Check your work for fingerprints. If you see any, lightly buff them out with a drop of baby oil on your finger before baking.
Make it a Set
Don’t stop at bears! Use the same circle base to make pandas, koalas, or tigers by simply changing the ear shapes and clay colors.
Step 4: Baking and Assembly
-
Bake the bears:
Place your bear faces on a parchment-lined baking sheet. Bake according to your brand of polymer clay instructions (usually around 275°F or 135°C for 15-30 minutes). -
Cool down:
Let the clay cool completely in the oven with the door cracked slightly; this gradual cooling helps prevent cracking. -
Attach the magnet:
Apply a dab of strong craft glue to the back of the cooled clay bear. -
Final set:
Press the magnet firmly into the glue and let it cure fully (usually 24 hours) before sticking it to your fridge.
Now your kitchen has a touch of handmade woodland charm to hold up all your important notes and photos
Bunny Dumpling Kawaii Figures
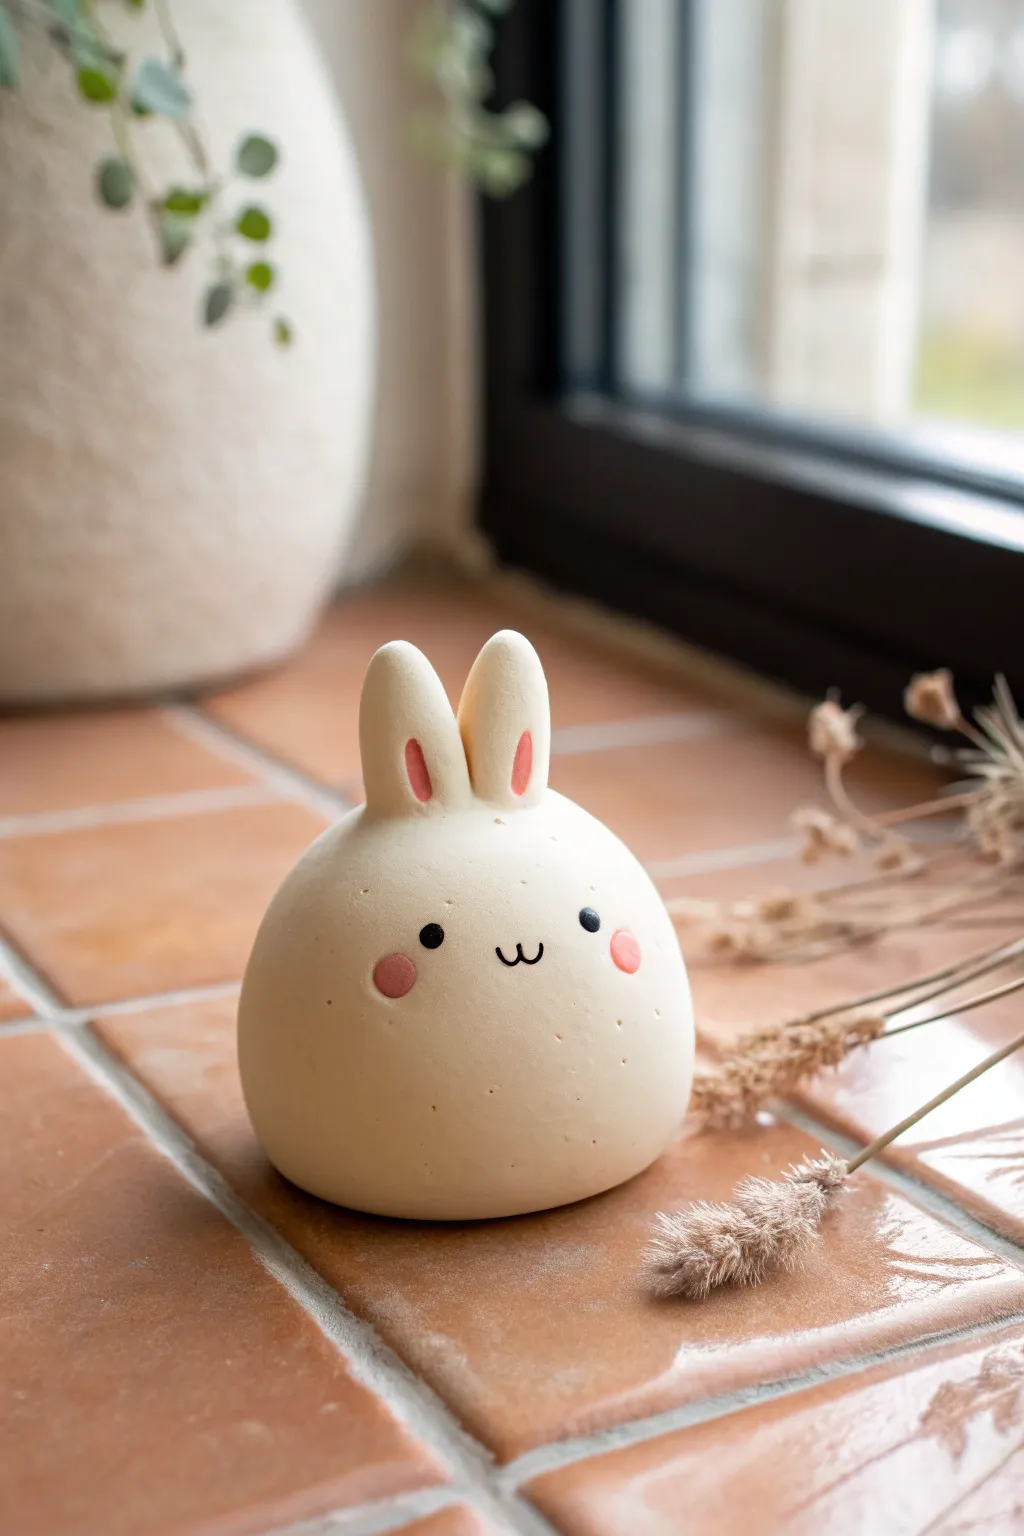
This adorable clay figure captures the essence of kawaii simplicity with its round, dumpling-like shape and minimal features. The smooth, matte finish and soft cream color make it a perfect little guardian for your windowsill or desk.
Step-by-Step Tutorial
Materials
- Air-dry clay or polymer clay (beige/cream colored)
- Acrylic paint (black, soft pink)
- Fine detail paintbrush (size 0 or 00)
- Ball stylus or dotting tool (optional)
- Water bonding slip (if using air-dry clay)
- Matte sealant or varnish
- Rolling pin (optional, for flattening base)
Step 1: Shaping the Body
-
Portion the clay:
Start by taking a lump of cream-colored clay about the size of a tangerine. Warm it up in your hands by kneading it until it’s pliable and smooth, removing any potential cracks. -
Roll a sphere:
Roll the clay between your palms to create a perfect sphere. Take your time here; the smoother the ball now, the better the final finish will be. -
Create the dumpling shape:
Gently tap the bottom of the sphere against your work surface to flatten it slightly. This creates a stable base so your bunny won’t roll away. Reshape the sides gently to maintain that chubby, rounded look. -
Smooth the surface:
Dip your finger in a tiny bit of water (or baby oil for polymer clay) and run it over the dome to erase any fingerprints or small imperfections.
Step 2: Creating the Ears
-
Form the ears:
Pinch off two smaller pieces of the same cream clay, roughly the size of large jellybeans. Roll each into a small ball, then elongate them into tapered teardrop shapes. -
Flatten and shape:
Gently press down on the wider end of each teardrop to flatten them slightly, but keep them fairly thick and pillowy. -
Attach the ears:
Position the ears on the very top of the head, close together but slightly angled outward. To ensure a good bond, score the connection points with a needle tool or toothpick first. -
Blend the seams:
Using a clay tool or your finger, carefully smooth the clay where the ears meet the head so no seam is visible. It should look like one continuous piece.
Smoother Seams
For invisible ear seams, roll a tiny ‘snake’ of clay, wrap it around the join, and smooth it upwards and downwards until it completely blends in.
Step 3: Adding the Details
-
Dry the base:
If using air-dry clay, let the figure dry completely for 24-48 hours. If using polymer clay, bake according to the package instructions and let it cool. -
Paint the inner ears:
Using your fine brush and soft pink paint, add a long oval shape inside each ear. I like to keep the paint fairly recessed, leaving a nice beige border around the edge. -
Dot the eyes:
Dip the handle end of a paintbrush or a dotting tool into black acrylic paint. Press two small, symmetrical dots onto the face, spaced somewhat wide apart for maximum cuteness. -
Paint the cheeks:
Clean your dotting tool or use a new one. Dip it into the pink paint and place two larger pink circles directly under and slightly outside the eyes. -
Draw the mouth:
With your finest detail brush and black paint, carefully draw a tiny, shallow ‘w’ shape between the eyes. Keep the lines very thin and delicate. -
Create texture (optional):
For that speckled, organic ceramic look seen in the photo, you can flick a tiny amount of diluted brown paint onto the surface using a toothbrush, or gently poke tiny, random pinholes for texture. -
Apply sealant:
Once all paint is totally dry, coat the entire figure with a matte varnish. This protects the paint and gives the clay that smooth, finished porcelain appearance.
Seasonal Switch
Make a whole family by varying the sizes, or add a tiny clay flower or bow near one ear to customize your bunny for spring decor.
Place your finished bunny near a window where the natural light can highlight its gentle curves

TRACK YOUR CERAMIC JOURNEY
Capture glaze tests, firing details, and creative progress—all in one simple printable. Make your projects easier to repeat and improve.
Rainbow Cloud Charm Trio
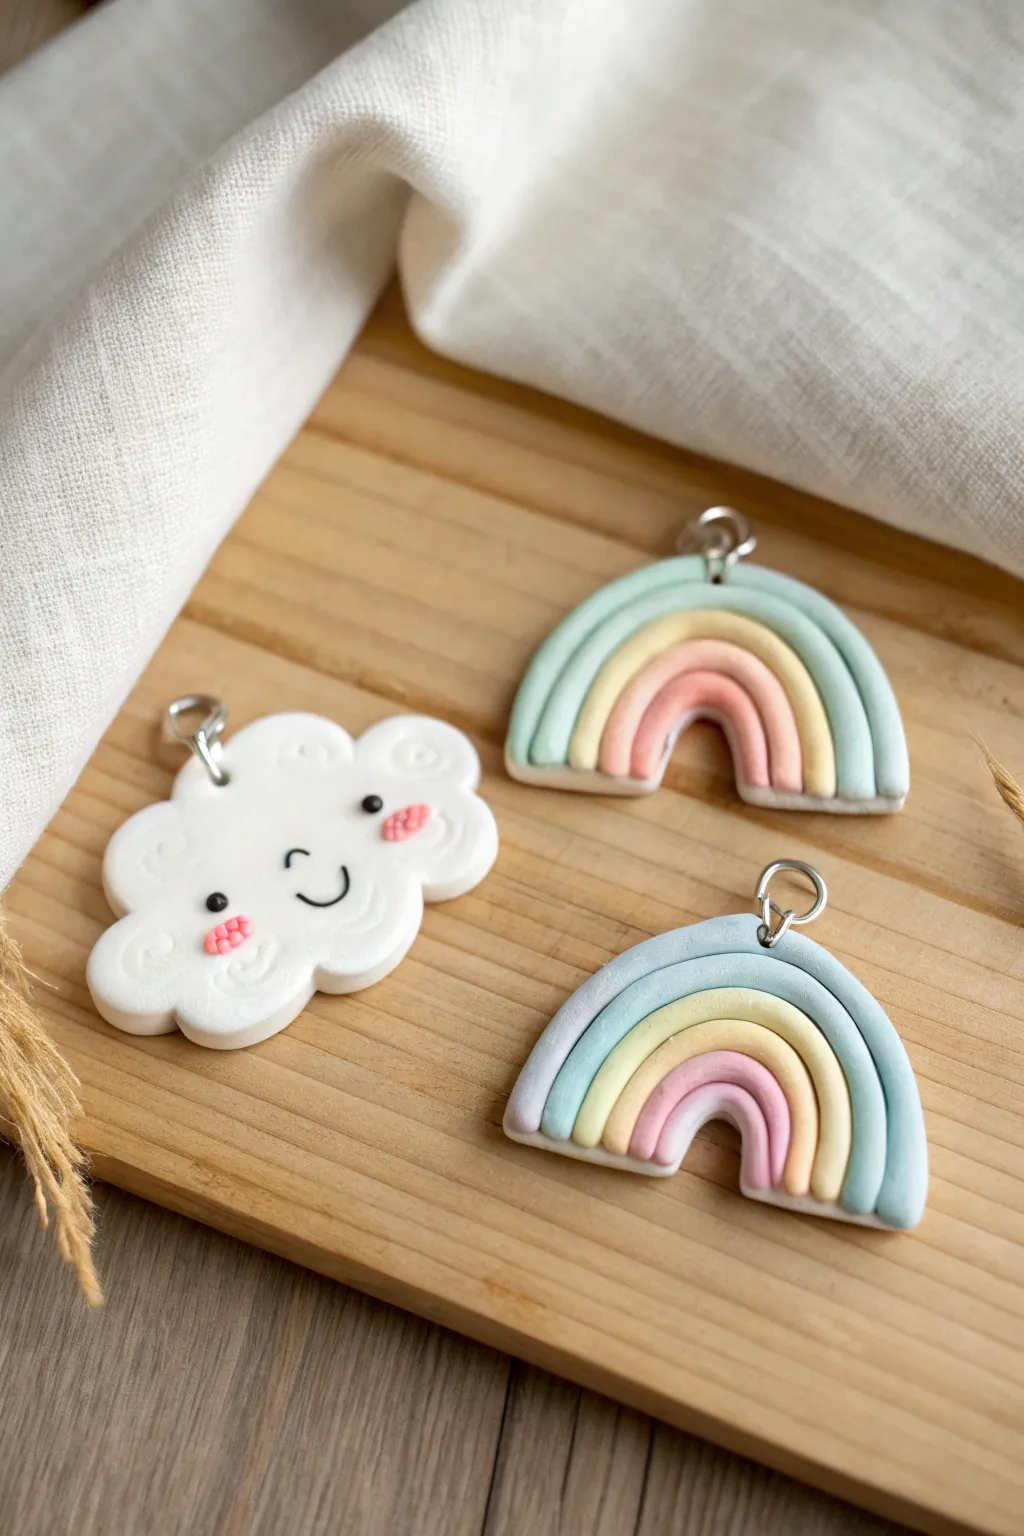
Bring a little sunshine to your day with these adorable polymer clay charms featuring soft pastel rainbows and a sweetly smiling cloud. They make perfect keychains, necklace pendants, or cheerful zipper pulls for a backpack.
Step-by-Step
Materials
- White polymer clay
- Pastel polymer clay colors (mint, baby blue, pale yellow, peach/pink)
- Black polymer clay (tiny amount)
- Rolling pin or acrylic roller
- Clay knife or craft blade
- Needle tool or toothpick
- Small round cutter or bubble tea straw (optional)
- Eye pins (silver tone)
- Liquid polymer clay (optional, for bonding)
- Gloss glaze (optional)
Step 1: Sculpting the Happy Cloud
-
Condition the white clay:
Start by warming up a medium-sized ball of white polymer clay in your hands until it is soft and pliable, then flatten it into a thick pancake, about 5mm thick. -
Cut the cloud shape:
Use a small cloud-shaped cutter if you have one, or freehand the shape with your craft knife. Alternatively, press balls of clay together into a cluster and smooth the back to create a bumpy cloud silhouette. -
Create the swirl texture:
Take your needle tool or a toothpick and gently press small swirl patterns into the surface of the cloud, focusing near the edges for a fluffy texture. -
Add the face details:
Roll two miniscule balls of black clay for the eyes and press them onto the cloud. Roll a very thin snake of black clay and curve it into a ‘U’ shape for the smile, pressing it gently between the eyes. -
Add rosy cheeks:
Take tiny bits of pink clay and flatten them into small ovals. Place them under the eyes. Use your needle tool to create a hatched, waffle-like grid texture on these pink cheeks for a cute detail. -
Insert the hardware:
Carefully push an eye pin into the top center of the cloud. If the clay distorts, gently reshape it around the pin.
Clean Clay Tip
Baby wipes are essential! Wipe your hands and tools between colors, especially before handling white clay, to avoid transferring lint or dark pigments.
Step 2: Building the Rainbows
-
Prepare your pastel colors:
Condition your pastel clays—mint, blue, yellow, and peach. If you don’t have pastels, mix white clay with standard colors until you achieve soft, creamy shades. -
Roll the arches:
Roll each color into an even snake or ‘coil’ of the same thickness. I find using an acrylic block to roll them creates the smoothest finish. -
Form the rainbow stack:
Curve the inner-most color (peach/pink) into a tight arch. Take the next color (yellow) and curve it tightly around the first. Repeat with the remaining colors, stacking them snugly so there are no gaps. -
Create the backing:
Roll out a thin sheet of white clay. Place your stacked rainbow arches on top of this sheet and press down gently to bond them. This adds structural support. -
Trim the edges:
Use your sharp craft blade to cut straight across the bottom of the rainbow legs so they are all flush and even. Then, carefully trim the excess white backing clay from around the entire shape. -
Insert eye pins:
Just like with the cloud, insert a silver eye pin into the top center of the outer arch. You can add a drop of liquid clay on the pin shaft for extra security.
Baking Trouble?
If your white clay turns yellow or brown, your oven is too hot. Use an oven thermometer to verify the temp and tent foil over the charms while baking.
Step 3: Baking and Finishing
-
Preheat the oven:
Set your oven to the temperature recommended on your specific brand of clay packaging (usually around 275°F or 130°C). -
Bake the charms:
Place your pieces on a ceramic tile or baking sheet lined with parchment paper. Bake for approximately 15-20 minutes depending on thickness. -
Cool down:
Allow the charms to cool completely inside the oven or on a cooling rack before handling them, as warm clay is fragile. -
Secure the pins (optional):
If any eye pins feel loose after baking, pull them out, add a dab of superglue, and slide them back in. -
Glaze (optional):
For a shiny finish, apply a thin coat of polymer clay gloss glaze or UV resin to the front of the charms.
Attachment jump rings to your new charms and they are ready to brighten up your accessories collection.
Mini Donut Stack With Faces
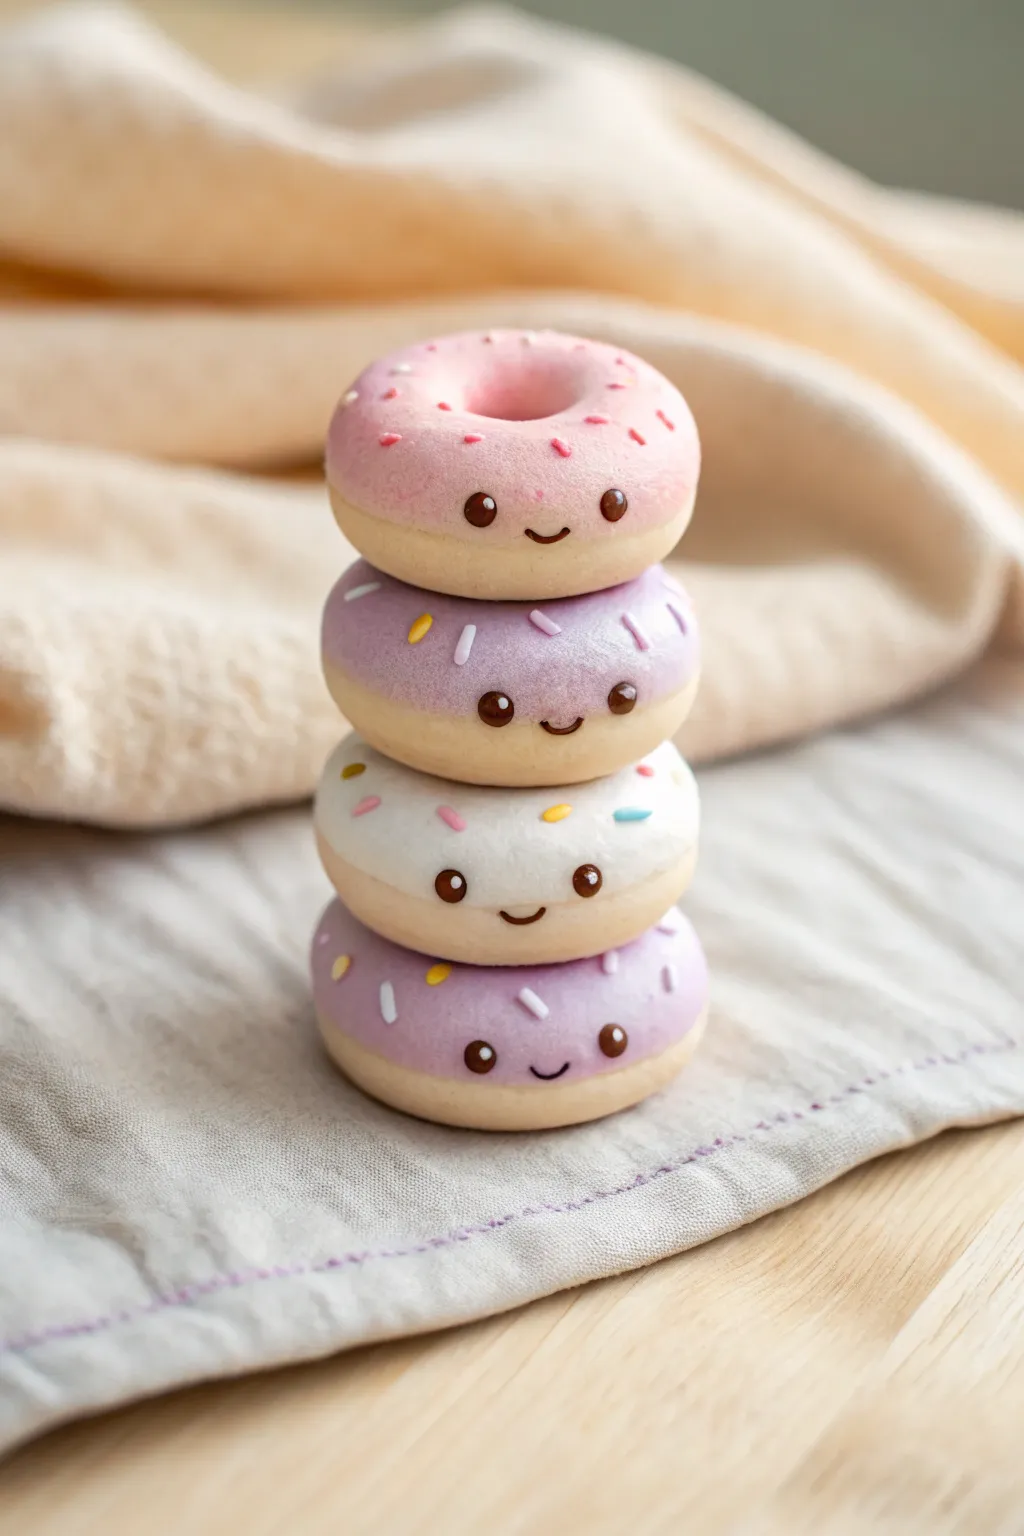
Create a sweet stack of four miniature donuts that are too cute to eat. These pastel-colored treats feature happy little faces and delicate sprinkles, making for an adorable desk companion or keychain charm.
How-To Guide
Materials
- Polymer clay (beige/tan for dough)
- Polymer clay (pink, light purple, white)
- Dark brown acrylic paint or liquid clay
- Ball stylus tool or toothpick
- Tiny clay sprinkles (pre-made or cut from thin clay snakes)
- Gloss glaze (optional)
- Baking sheet and oven (if using polymer clay)
Step 1: Shaping the Dough Base
-
Portion the clay:
Start by conditioning your beige or tan clay until it’s soft and pliable. Divide it into four equal-sized balls, each about the size of a large marble. -
Form the donut shape:
Gently flatten each ball into a thick disc shape. Use your thumb and forefinger to smooth the edges so they look round and fluffy, like a baked donut. -
Create the center hole:
Take a ball stylus or the back of a paintbrush handle and press it through the center of each disc. Don’t make the hole too wide; we want them to look plump. -
Refine the shape:
After piercing, the clay might deform slightly. Gently pat the sides back into a perfect circle, softening the edges of the hole so it looks natural.
Fingerprint Fix
If you see fingerprints on your smooth dough, lightly brush the raw clay with a little baby oil or cornstarch before baking to smooth them away instantly.
Step 2: Adding the Glaze
-
Mix frosting colors:
Prepare your frosting colors: a soft pink, a lavender purple, and a creamy white. You’ll need two distinct shades of purple if you want to match the image exactly. -
Create the icing layer:
Flatten a small ball of colored clay into a very thin, irregular pancake. It should be slightly smaller than the donut base. -
Apply the frosting:
Drape the thin colored clay over the top of a donut base. Gently press it down, smoothing the edges onto the beige clay to mimic melted icing dripping down. -
Open the center:
Locate the hole in the beige base underneath and pierce through the colored icing layer, smoothing the icing inside the hole for a seamless look. -
Texture the surface:
I like to take an old toothbrush or a crumpled piece of aluminum foil and very lightly tap the frosting surface to give it a realistic, sugary texture
Step 3: Faces and Details
-
Indent eye sockets:
Use a small ball tool to press two tiny, shallow divots into the front of the donut where the eyes will go. This helps the paint sit better later. -
Add the sprinkles:
Apply pre-baked clay sprinkles or roll incredibly thin snakes of colored clay, cut them into tiny segments, and press them gently into the “icing” on top of the head. -
Stack and secure:
Carefully stack the donuts in the order shown: pink on top, purple, white, and a darker purple at the bottom. Press them gently so they adhere to one another without squashing the shapes. -
Bake the clay:
Bake your tower according to the package instructions for your specific brand of polymer clay. Let it cool completely before painting.
Pro Tip: Liquid Clay
For ultra-realistic icing, mix your colored clay with a few drops of liquid clay softener until it’s a spreadable paste, then drizzle it on.
Step 4: Final Touches
-
Paint the eyes:
Using a fine-tip brush or a needle tool dipped in dark brown acrylic paint, carefully fill in the eye divots you made earlier. -
Draw the smiles:
Paint a tiny, shallow U-shape between the eyes for the mouth. Keep the line very thin for the cutest expression. -
Add eye highlights:
Dip a toothpick in white paint and add a microscopic dot to the top corner of each brown eye. This brings the character to life. -
Seal the piece:
Once the paint is fully dry, you can brush a coat of gloss glaze over just the “icing” parts to make them look wet and sugary, leaving the dough matte.
Now you have a charming little stack of sweetness to brighten up your shelf
Sweet Watermelon Slice Cuties
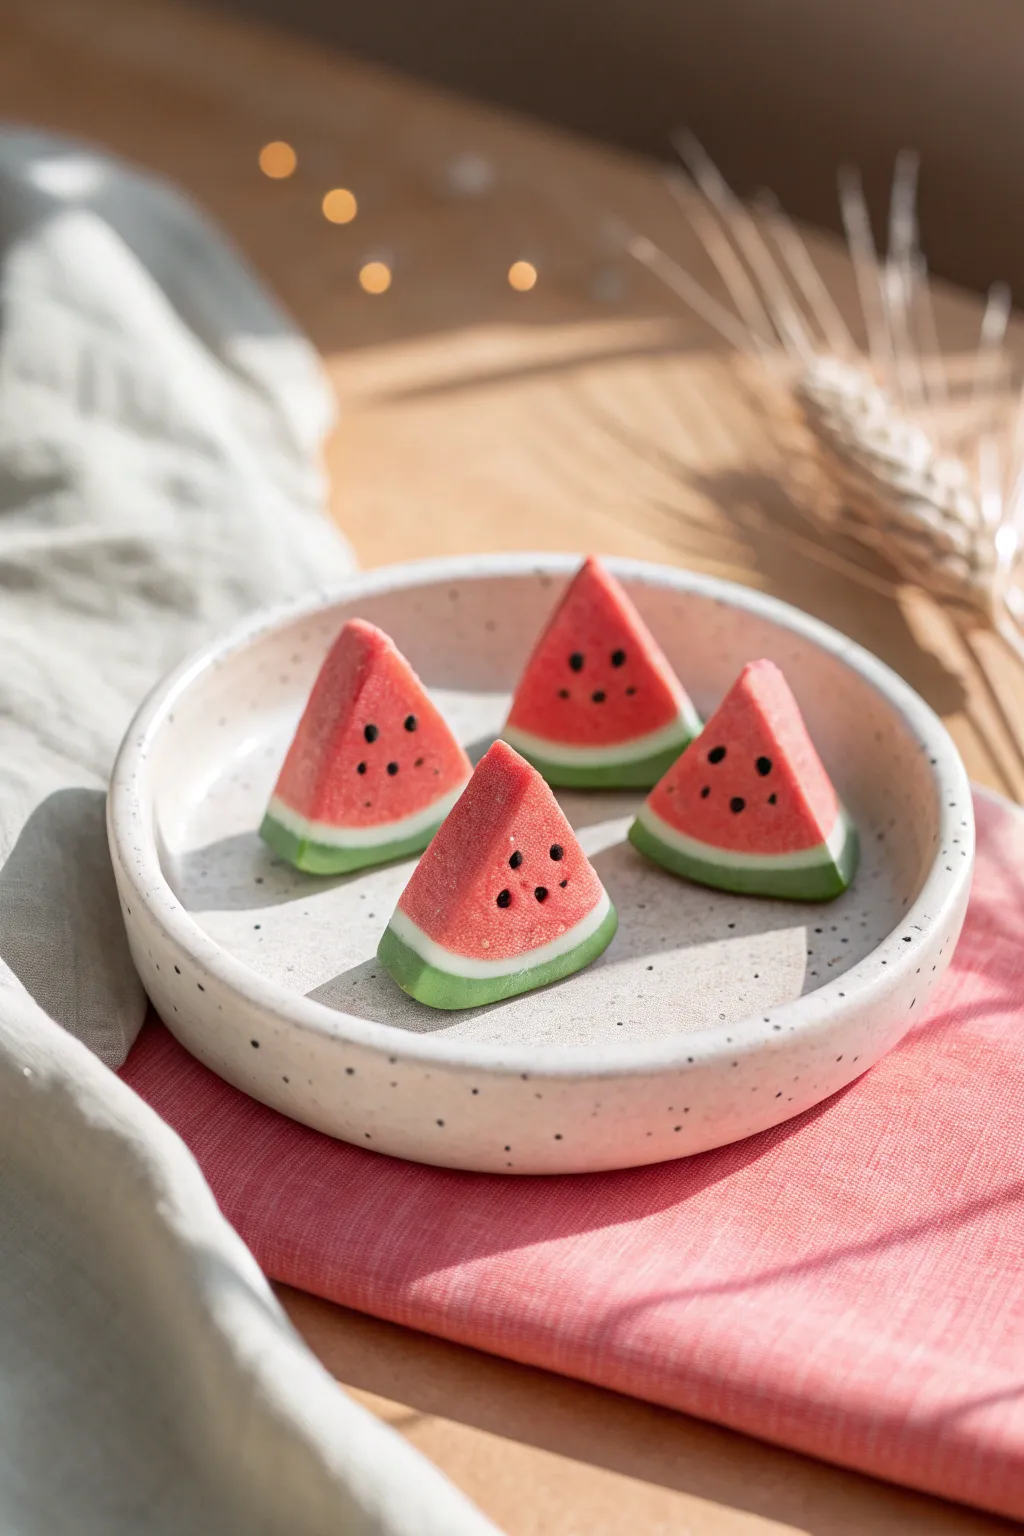
These adorable watermelon wedges look good enough to eat with their vibrant pink centers and crisp rinds. The secret to that realistic texture is a simple toothbrush trick that transforms smooth clay into juicy fruit flesh.
Step-by-Step Tutorial
Materials
- Polymer clay (translucent red/pink, white, leaf green)
- Black acrylic paint
- Fine-grit sandpaper (optional)
- Old toothbrush or texturing tool
- Liquid clay or bake-and-bond (optional)
- Dotting tool or toothpick
- Sharp tissue blade or craft knife
- Gloss glaze (optional)
Step 1: Creating the Cane
-
Condition the centers:
Start by thoroughly conditioning your translucent red or pink clay until it’s soft and pliable. Roll it into a smooth, thick log about 1 inch in diameter. -
Form the teardrop:
Pinch the top of your red log along its entire length to create a teardrop cross-section. This shape mimics the wedge of the watermelon slice. -
Prepare the rind layers:
Roll out a sheet of white clay and a sheet of green clay using a rolling pin or pasta machine. Aim for a medium thickness—roughly 2mm for each. -
Apply the pith:
Wrap the curved bottom part of your red teardrop log with the white sheet. Trim the excess so the white layer perfectly cups the red fruit without overlapping onto the sharp top edge. -
Add the skin:
Repeat the previous process with the green clay sheet, wrapping it directly over the white layer. Smooth the seams gently with your finger to ensure the layers adhere well.
Step 2: Slicing and Texturing
-
Chill the cane:
Place your clay log in the refrigerator for about 15–20 minutes. Firming up the clay prevents it from squishing when you cut it. -
The first slice:
Use a very sharp tissue blade to slice the log into individual wedges. Aim for slices that are about 1/4 inch thick so they can stand up on their own. -
Refining the shape:
If slicing distorted the shape slightly, gently pat the sides of each wedge to restore that sharp, triangular profile. -
Adding texture:
Take a clean, old toothbrush and gently tap the bristles onto the red surface of each slice. This stippling motion creates a realistic, porous fruit texture. -
Smooth the rind:
Be careful not to texture the white or green rind parts. If you accidentally roughen them, smooth them back down with your fingertip.
Smudged Colors?
If red clay smears onto the white rind while cutting, use a cotton swab dipped in rubbing alcohol or acetone to gently wipe the white section clean before baking.
Step 3: Finishing Details
-
Baking:
Preheat your oven according to the clay manufacturer’s instructions (usually around 230°F – 275°F). Place your slices on a ceramic tile or baking sheet. -
The bake:
Bake the pieces for the recommended time, usually 15–30 minutes per 1/4 inch of thickness. Let them cool completely before handling. -
Painting seeds:
Dip a fine dotting tool or the tip of a toothpick into black acrylic paint. Carefully place 3-5 small dots on each face of the watermelon slices. -
Seed shape:
To make them look like real seeds rather than polka dots, slightly drag the paint upwards as you lift the tool to create a tiny teardrop shape. -
Let paint dry:
Allow the black paint to dry completely. Since the dots are small, this should only take a few minutes. -
Optional glaze:
For a ‘freshly cut’ wet look, apply a thin coat of gloss glaze only to the red fruit part, leaving the rind matte.
Make it a Magnets
Before baking, press a small, strong neodymium magnet into the back of the green rind. Bake as normal to create adorable summer fridge magnets.
Arranged together on a tiny plate, these sweet slices bring a permanent touch of summer to your desk or shelf
Frog Toothbrush Holder Buddy
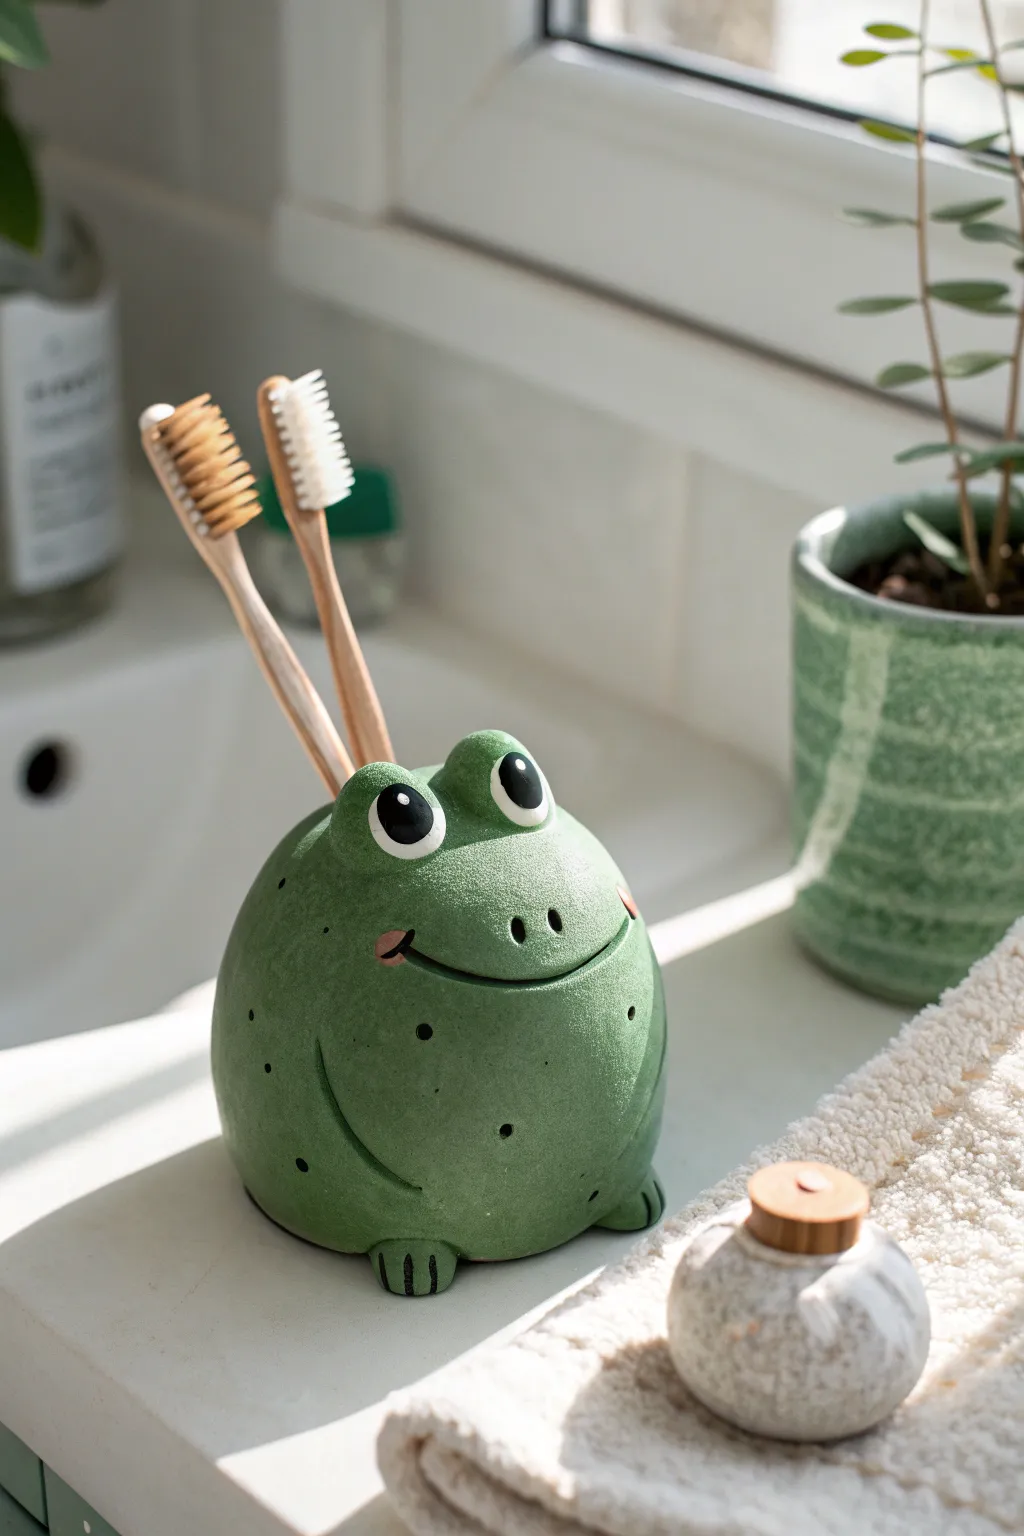
Brighten up your bathroom vanity with this adorable, bubbly frog that happily holds your dental essentials. Its sturdy, rounded shape and wide smile make it both functional and cheerful, perfect for adding a splash of whimsy to your morning routine.
Detailed Instructions
Materials
- Air-dry clay or polymer clay (white or green)
- Acrylic paints (sage green, black, white, pink)
- Clear sealant or waterproof varnish (Mod Podge Outdoor or polyurethane)
- Clay sculpting tools (needle tool, ball stylus)
- Small paintbrush
- Aluminum foil (for core structure)
- Water and sponge (for smoothing)
- Two toothbrushes (for sizing holes)
Step 1: Shaping the Base
-
Prepare the core:
Crumple a ball of aluminum foil into a slightly flattened sphere shape, roughly the size of a large orange. This saves clay and keeps the holder lightweight. -
Cover with clay:
Roll out a thick sheet of clay and wrap it fully around your foil core. Smooth the seams together with a bit of water until you have a seamless, round blob. -
Create the base:
Gently tap the bottom of the sphere against your table to flatten it. This ensures your frog sits sturdily without rolling away. -
Form the feet:
Roll two small balls of clay and flatten them into thick ovals. Attach them to the front base of the body for feet, blending the back edges into the main body. -
Detail the toes:
Use a knife tool or needle tool to press vertical lines into the front of the feet to create little toe separations. -
Add the arm details:
Roll a thin snake of clay and attach it in a curved line on the side of the body to suggest a folded leg or arm. Blend the clay well so it looks like a raised relief line.
Uneven Footing?
If your frog wobbles after drying, glue a circle of felt or cork to the bottom. This stabilizes the base and also protects your countertop from scratches.
Step 2: Adding Features & Function
-
Sculpt the eyes:
Roll two medium-sized balls of clay for the eyes. Attach them firmly to the top of the head, spacing them slightly apart. -
Create the brush holes:
While the clay is still soft, press the handle of a toothbrush (or a similarly sized dowel) into the top of the head, behind the eyes. I like to wiggle it slightly to ensure the holes are wide enough for easy use. -
Carve the smile:
Use a needle tool or a clay knife to carve a wide, curved line for the mouth across the front of the face. -
Refine the surface:
Dip a sponge or your finger in water and gently rub the entire surface to remove fingerprints and smooth out any bumps before drying. -
Let it dry:
Allow the clay to dry completely according to package instructions. For thick air-dry clay pieces, this might take 24-48 hours.
Step 3: Painting & Sealing
-
Base coat:
Paint the entire frog with a sage green acrylic paint. You may need two coats for opaque coverage. -
Paint the eyes:
Paint the raised eye balls white. Once dry, add large black circles for pupils, leaving a tiny white dot in each for a sparkle highlight. -
Add facial details:
Paint the carved mouth line black. Dab two small pink circles at the corners of the mouth for rosy cheeks and add two small black dots for nostrils. -
Texture with speckles:
Dilute a chaotic mix of dark green or black paint and lightly flick it perfectly onto the body using an old toothbrush or stiff brush to create natural-looking speckles. -
Seal for waterproofing:
This is crucial: Apply 2-3 coats of a waterproof varnish or sealant. Since this lives in a bathroom, it must be protected from moisture to prevent the clay from softening.
Make it a Set
Make a tiny matching lily pad out of clay to serve as a soap dish, or create a smaller frog friend to hold cotton swabs.
Pop your toothbrushes in and enjoy your new green bathroom buddy
Animal Ring Cone Friends
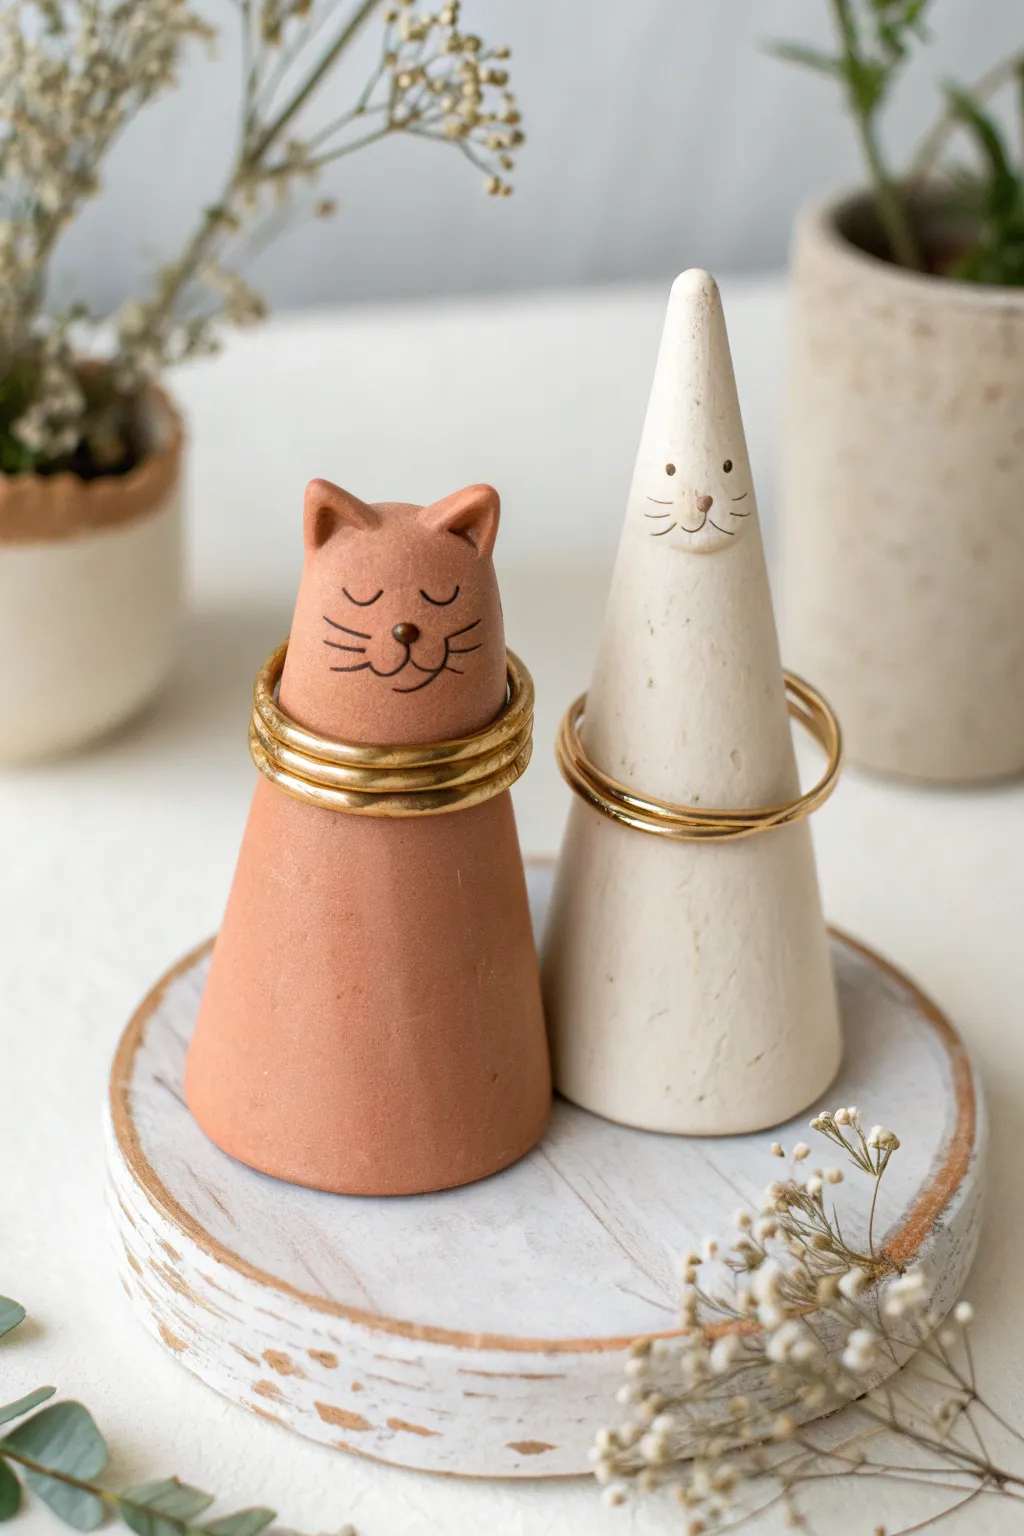
Keep your jewelry organized with these adorable charming guardians for your favorite rings. These tapered cones featuring sweet sleeping cat and happy rabbit faces are functional sculptures that bring a touch of whimsy to any dresser or vanity.
Step-by-Step
Materials
- Air-dry clay or polymer clay (terracotta and white)
- Rolling pin
- Clay knife or wire cutter
- Needle tool or toothpick
- Small bowl of water
- Fine-grit sandpaper
- Fine-point black marker or acrylic paint
- Clear matte sealant or varnish
Step 1: Shaping the Cones
-
Prepare the Clay:
Start by conditioning your clay. Knead a ball of terracotta clay and a ball of white clay separately until they are soft, pliable, and free of cracks. -
Form the Base Cone:
Take the terracotta ball and roll it into a thick sausage shape. Gently roll one end against your work surface with more pressure to begin tapering it. -
Refine the Shape:
Stand the clay up on its flat end. Use your fingers to smooth and elongate the shape into a tall, sturdy cone. The cat cone should be slightly wider at the top than a pure geometric cone to accommodate the head shape. -
Flatten the Bottom:
Firmly tap the base of the cone against the table to ensure it stands perfectly straight and stable. It shouldn’t wobble. -
Create the Rabbit Cone:
Repeat the rolling process with the white clay. For this one, aim for a sharper, taller point at the top to mimic the rabbit’s long, upright body style.
Smooth Seams
When attaching ears, use a rubber-tipped clay tool to drag clay from the ear down onto the head. This strengthens the bond so they don’t snap off.
Step 2: Adding Animal Features
-
Form Cat Ears:
Pinch off two very small, equal-sized pieces of terracotta clay. Shape them into small triangles. -
Attach the Cat Ears:
Score the top of the terracotta cone and the bottom of the ears with your needle tool. Add a tiny dab of water (or liquid clay if using polymer) and press the ears firmly onto the top edge. -
Blend the Seams:
Use a modeling tool or your finger to smooth the clay where the ears meet the head so they look like one continuous piece rather than tacked-on additions. -
Add the Cat Nose:
Roll a tiny speck of darker clay (or just the same terracotta) into a ball and press it into the center of the face area for a nose. -
Create Rabbit Ears:
The rabbit shown is stylized with ears integrated into the continuous cone shape. However, you can pinch the very top of the white cone slightly to suggest ears, or model small nubby ears similar to the cat but position them closer together. -
Add the Rabbit Nose:
Roll a tiny ball of terracotta clay and press it onto the white cone, slightly lower than midway down the top point, to create a contrasting nose.
Step 3: Finishing Touches
-
Smooth the Surface:
Dip your finger in a little water and gently run it over both sculptures to remove any fingerprints or minor imperfections. Smooth surfaces make for a much cleaner final look. -
Let it Dry or Bake:
Follow the instructions for your specific clay. If using air-dry clay, I usually let them sit for 24-48 hours to ensure the core is fully dry. If using polymer, bake according to the package directions. -
Sand Imperfections:
Once fully cured and cooled, use fine-grit sandpaper to buff away any rough spots, especially around the base. -
Draw the Faces:
Using a fine-point black marker or a very thin brush with black acrylic paint, carefully draw the sleeping eyes (two semi-circles curving down) and whiskers on the cat. -
Detail the Rabbit:
Draw small dot eyes and long, straight whiskers on the white rabbit cone. Add a little vertical line under the nose for the mouth. -
Seal the Project:
Apply a coat of clear matte sealant to protect the clay and the painted details from wear and tear.
Add a Tail
Make a long, thin snake of clay and wrap it around the bottom base of the cone to create a curled tail that also adds extra stability.
Now you have a sweet, handmade display for your rings that looks lovely even when empty
Mini Succulent Pot With a Face
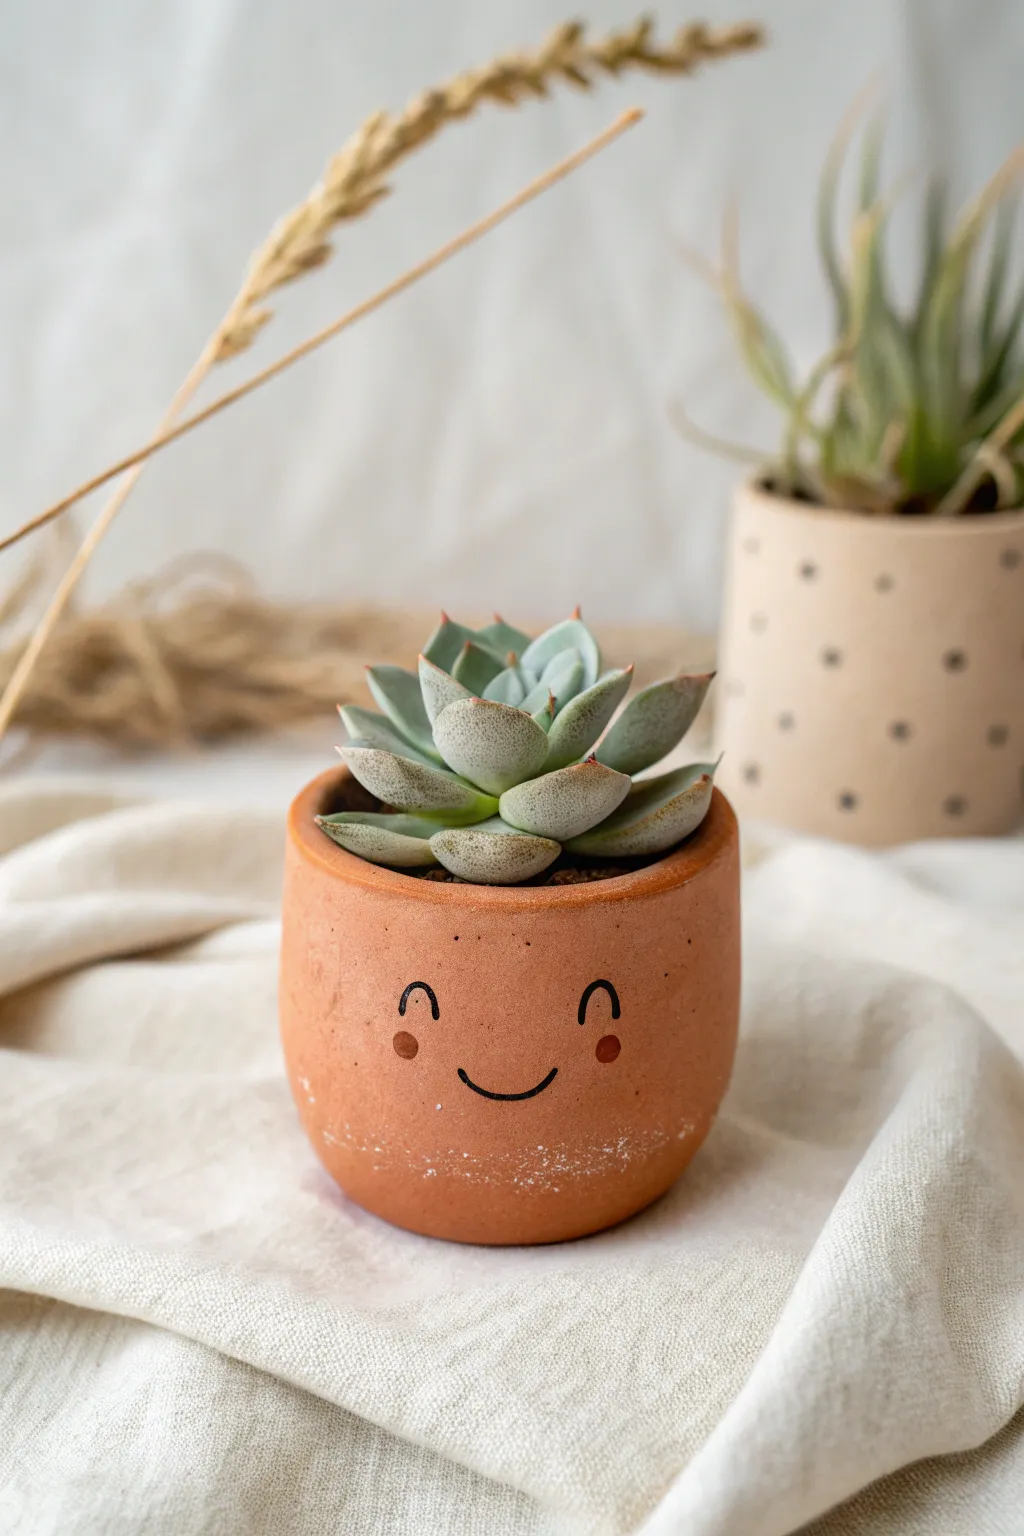
Bring a little personality to your windowsill with this adorable miniature succulent planter made from modeling clay. Its warm terracotta tone and simple, cheerful face make it a perfect home for your favorite tiny succulent.
Detailed Instructions
Materials
- Terracotta-colored polymer clay (or air-dry clay)
- Small rolling pin or acrylic roller
- Clean work surface or clay mat
- Circle cookie cutter (approx. 3-4 inches)
- Ruler
- Craft knife or clay blade
- Small bowl or cup (to use as a mold)
- Black acrylic paint or black permanent marker
- Fine-tip paintbrush (if using paint)
- Pink or reddish-brown pastel chalk (for cheeks)
- Oven (for baking polymer clay) or drying rack
- Clear matte varnish (optional)
- Small succulent plant and soil
Step 1: Shaping the Base
-
Condition the clay:
Start by kneading your terracotta-colored clay in your hands until it becomes soft, pliable, and easy to work with. -
Roll it out:
Use your rolling pin to flatten the clay into a smooth sheet, aiming for an even thickness of about 1/4 inch. -
Cut the base:
Press your circle cutter into the rolled clay to create a perfect round disc. This will serve as the bottom of your pot. -
Prepare the wall:
Roll out another section of clay into a long, rectangular strip. The width of the strip will determine the height of your pot, so aim for around 2.5 to 3 inches. -
Measure the length:
Wrap this strip loosely around your circular base to estimate the length needed, then cut the strip to size with your craft knife, leaving a tiny bit of overlap.
Smart Drainage
Before baking, use a straw to punch a small hole in the center of the base. Good drainage keeps succulents happy and prevents root rot.
Step 2: Assembling the Pot
-
Attach the wall:
Carefully wrap the rectangular strip around the circular base, placing it on top of the circle’s edge rather than around the outside. -
Seal the seam:
Where the two ends of the wall meet, gently press them together. I like to smudge the clay up and down across the seam with my thumb to blend it until the line disappears. -
Secure the bottom:
Use a modeling tool or your finger to smooth the clay on the inside where the wall meets the circular base, ensuring a watertight seal. -
Create a mold (optional):
If your clay is very soft, you can place a small, glass-safe jar or cup inside the clay pot to help it hold a perfect cylindrical shape while you work. -
Refine the rim:
Gently tap the top rim of the pot with your finger to round off any sharp edges keeping the look soft. -
Add texture:
To mimic the natural, slightly grainy texture of real terracotta seen in the photo, lightly tap the exterior surface with a stiff toothbrush or a ball of crinkled foil.
Step 3: Finishing Touches
-
Bake or dry:
Follow the manufacturer’s instructions for your specific clay. If using polymer clay, bake it in the oven; for air-dry clay, let it sit for 24-48 hours. -
Cool down:
Allow the pot to cool completely before you start decorating. Painting on hot clay can cause the paint to crack. -
Draw the eyes:
Using a fine-tip black marker or paint, draw two small, upside-down ‘U’ shapes for the squinting happy eyes. Space them widely for extra cuteness. -
Add the smile:
Paint a simple, curved line centered below the eyes to create a gentle smile. -
Rosy cheeks:
Scrape a little dust from a pink pastel chalk. Use your pinky finger or a Q-tip to dab two soft, round spots of blush onto the cheeks, just outside the smile lines. -
Seal the face:
Apply a coat of clear matte varnish over the painted face area to protect your artwork from water damage when you water your plant. -
Plant and enjoy:
Fill your new pot with cactus soil and nestle your succulent inside.
Wonky Walls?
If the clay feels too floppy while building, pop the pieces in the fridge for 10 minutes. Chilled clay is firmer and holds vertical shapes much better.
Now you have a charming little buddy to keep your desk company
Desk Buddy Animal Mini Calendar Block
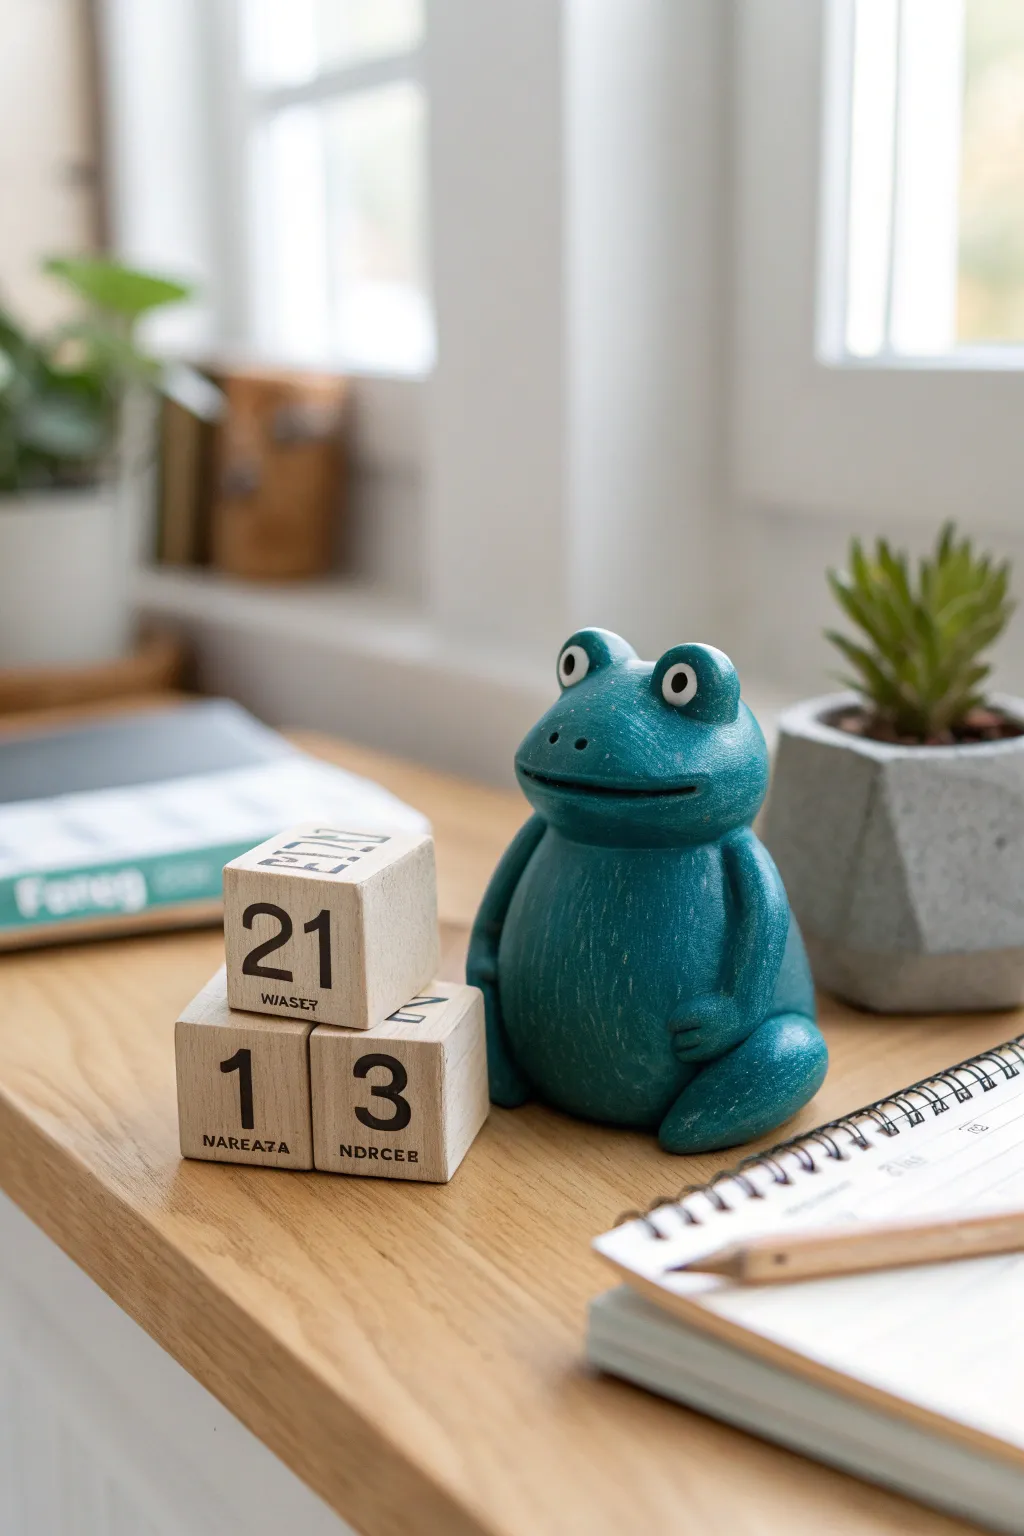
Brighten up your workspace with this charming teal frog sculpture that doubles as a functional perpetual calendar. The sturdy little amphibian sits patiently beside versatile wooden blocks, ready to help you keep track of the date in style.
How-To Guide
Materials
- Teal or greenish-blue polymer clay (approx. 4oz)
- Small amount of white and black polymer clay
- Three 1-inch wooden cubes (unfinished)
- Acrylic paint (black)
- Small detail paintbrush
- Clay sculpting tools (needle tool, ball stylus)
- Aluminum foil
- Clay varnish or glaze (matte or satin)
- Sandpaper (fine grit)
- Oven (for baking clay)
Step 1: Sculpting the Frog Base
-
Create the armature:
Start by crumpling a small ball of aluminum foil into a pear shape. This saves clay and keeps the figure lightweight while baking. -
Cover with clay:
Condition your teal clay until it’s soft and pliable. Flatten a large portion into a sheet and wrap it completely around your foil pear, smoothing out any seams with your thumb. -
Shape the body:
Roll the clay-covered form on your work surface to smooth it. Gently press the bottom onto the table to create a flat base so the frog sits securely without wobbling. -
Form the head:
Using your fingers, gently pinch and mold the narrower top part of the pear shape to define a wide, rounded frog head seamlessly connected to the body.
Sticky Fingerprints?
If your clay builds up fingerprints, lightly brush the raw sculpture with a drop of baby oil or cornstarch before baking to smooth it out.
Step 2: Adding Features & Limbs
-
Make the mouth:
Use a needle tool or a clay knife to cut a long, wide horizontal slit for the mouth. Curve the ends slightly upward for a subtle, friendly expression. -
Create the eyes:
Roll two small balls of teal clay for the eye sockets and press them onto the top of the head. Indent the centers with a ball tool. -
Add pupils:
Place tiny balls of white clay into the sockets, then add even tinier dots of black clay for the pupils. Position them looking slightly sideways for character. -
Sculpt the arms:
Roll two thick logs of teal clay. Attach them vertically to the sides of the body, blending the top shoulder area into the main torso. -
Shape the hands:
Flatten the bottom of the arm logs slightly and use a knife tool to cut grooves, creating three simple fingers that rest on the frog’s belly. -
Add the legs:
Form two large teardrop shapes from teal clay. Press these against the lower sides of the body, with the rounded part sticking out to resemble folded frog legs. -
Refine the feet:
Flatten the tips of the teardrops against the table and use your tool to mark toes, grounding the figure. -
Add texture:
Before baking, I like to gently tap the surface with a stiff toothbrush or a textured sponge to give the skin a realistic, slightly bumpy look. -
Bake:
Bake the frog according to your clay package instructions (usually 275°F/135°C for 15-30 minutes). Let it cool completely.
Step 3: Creating the Calendar Blocks
-
Prep the wood:
Lightly sand the edges of your wooden cubes to ensure they are smooth and comfortable to handle. -
Plan the numbers:
You need specific numbers on the two date cubes to make all dates 01-31. Cube 1: 0, 1, 2, 3, 4, 5. Cube 2: 0, 1, 2, 6, 7, 8 (the 6 doubles as a 9). -
Plan the months:
The third cube will hold month names. Since a cube has 6 sides and there are 12 months, you can fit two abbreviated months per side (e.g., Jan/Feb) or use a larger rectangular block for months. -
Paint the digits:
Using a fine brush and black paint, carefully paint the numbers onto the faces of the first two cubes. A stencil can help keep the font crisp and uniform. -
Paint the text:
On the third cube or block, paint the month abbreviations in a smaller, neat font. Let the paint dry completely between sides. -
Seal the project:
Finish both the frog and the wooden blocks with a thin coat of matte varnish to protect the paint and clay from daily handling.
Make it Magnetic
Embed small magnets inside the frog’s hands and the wooden blocks before baking/painting so the frog can ‘hold’ the calendar date.
Set your new green friend on your desk and enjoy flipping the blocks each morning.