If you’re craving something adorable you can finish in a sitting, cute easy small clay ideas are my favorite kind of studio therapy. I’m sharing tiny projects that stay beginner-friendly, use simple shapes, and still give you that “I made this!” glow.
Tiny Toast With a Smile
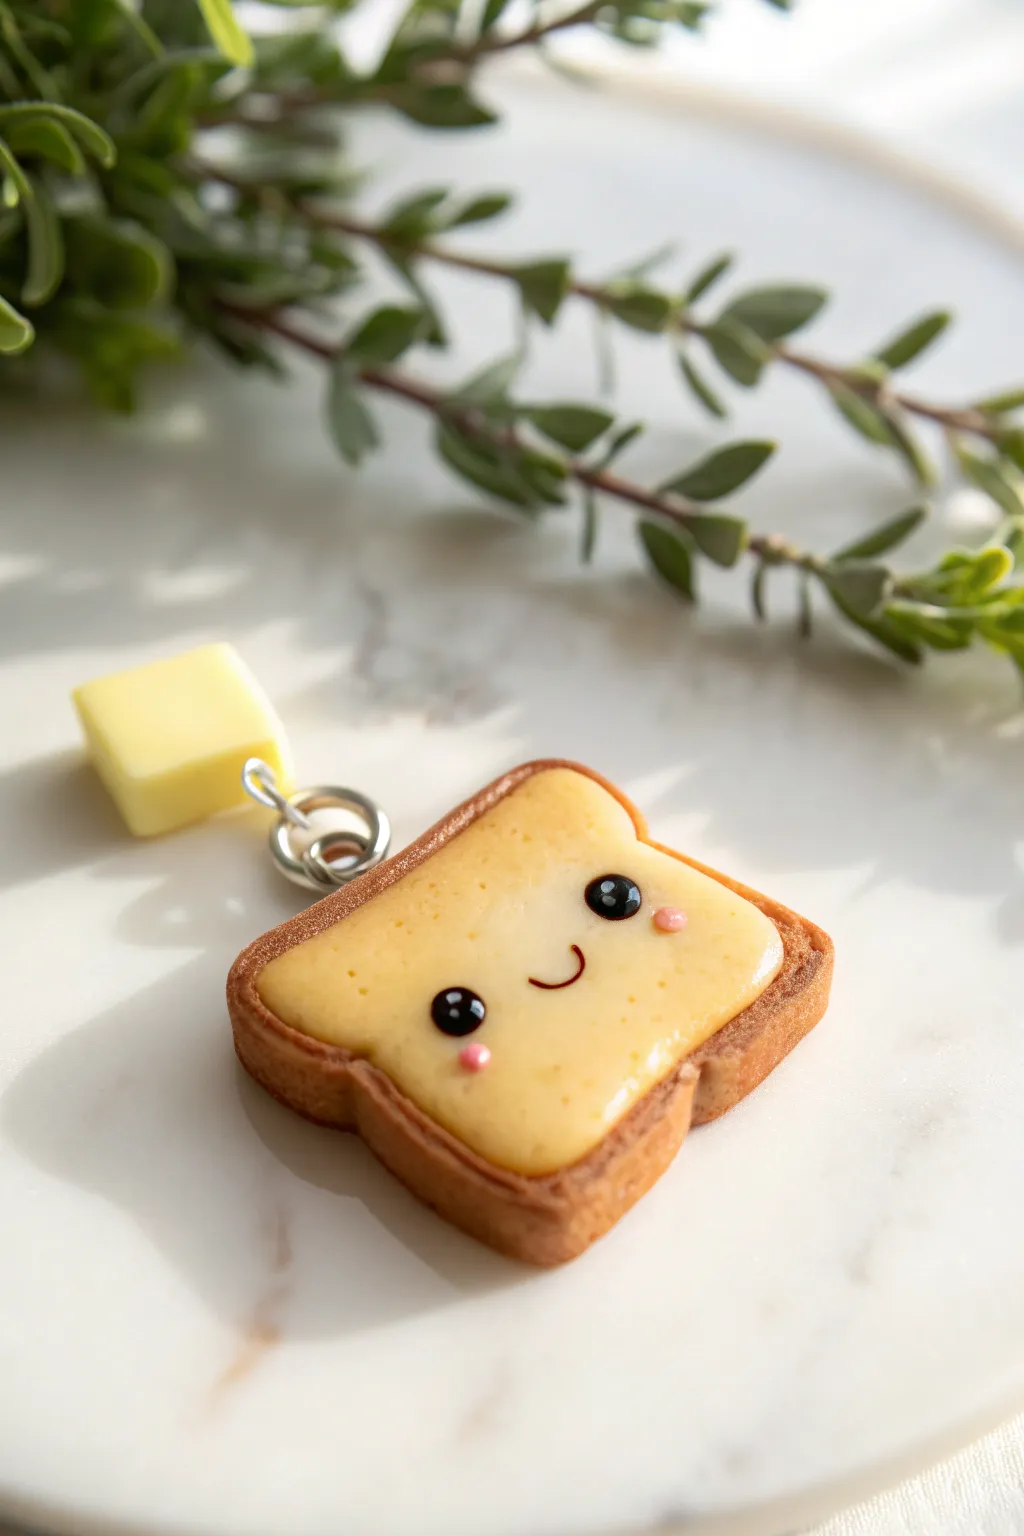
This adorable little slice of happiness adds a cheerful touch to any keychain or necklace. With its golden-brown crust, melted buttery topping, and sweet smiling face, this tiny toast is almost good enough to eat—but much cuter to wear.
Step-by-Step Guide
Materials
- Polymer clay: Tranlucent white, white, yellow, pale orange, and brown
- Liquid polymer clay (Translucent Liquid Sculpey or Fimo Liquid)
- Soft artist pastels (yellow ochre, burnt sienna, dark brown)
- Small paintbrush for shading
- Blade or X-Acto knife
- Needle tool or dotting tool
- Black acrylic paint
- Pink acrylic paint or pink chalk pastel
- Eye pin or screw eye
- Jump rings
- Jewelry pliers
- Gloss glaze or UV resin (optional)
Step 1: Baking the Bread Base
-
Mix the dough color:
Start by mixing translucent white clay with a small amount of regular white and a tiny speck of yellow. You want a creamy, off-white color that mimics raw dough but has a slight translucency for realism. -
Shape the slice:
Roll the clay into a ball, then flatten it into a thick square sheet about 1/4 inch thick. Gently press the top edge inwards with your finger to create the dip found in a traditional loaf slice. -
Texture the surface:
Use a toothbrush or a balled-up piece of aluminum foil to gently tap the surface of the clay. This creates a realistic bread texture, but keep the area where the butter will go slightly smoother. -
Add the crust:
Roll a thin snake of medium-brown clay. Wrap this strip around the edges of your toast shape. Blend the seam where the strip meets the bread using a rubber shaper or your finger, smoothing it so it looks like a natural crust. -
Shade the bread:
Using a dry brush, apply shaved yellow ochre pastel dust to the center of the bread. Then, adding burnt sienna to the edges creates that perfectly toasted, golden-brown gradient.
Step 2: Butter and Baking
-
Mix the butter topping:
In a small container or on a tile, mix liquid polymer clay with a bit of yellow clay (or yellow chalk pastel shavings) and a tiny touch of white. You want a creamy, semi-opaque yellow mixture. -
Spread the butter:
I like to use a needle tool to carefully spread this liquid mixture over the center of the toast. Let it pool slightly unevenly to look like melting butter, but leave a rim of ‘crust’ visible. -
Create the butter pat charm:
Take a small cube of pale yellow solid clay. Smooth the edges slightly so they aren’t razor-sharp, mimicking a soft pat of butter. Insert a small eye pin into the top corner. -
Add hardware:
Insert an eye pin into the top corner of your toast slice. Ensure it goes deep enough into the solid clay to be secure. -
Bake the pieces:
Bake both the toast and the butter pat according to your clay manufacturer’s instructions (usually 275°F/135°C for 15-30 minutes). Let them cool completely before handling.
Texturing Tip
Before shading with pastels, texture the crust strip with a toothbrush too. The powder settles into the tiny pits, making the ‘baked’ effect look incredibly realistic.
Step 3: Kawaii Details and Assembly
-
Paint the eyes:
Using a dotting tool dipped in black acrylic paint, place two medium-sized dots on the ‘buttery’ area for eyes. Space them widely apart for maximum cuteness. -
Add eye highlights:
Once the black paint is barely dry, use a toothpick to add a tiny white dot in the upper corner of each eye. This ‘sparkle’ brings the character to life. -
Draw the mouth:
Use a very fine detail brush or a waterproof black fine-liner pen to draw a small, simple ‘U’ shape between the eyes. -
Apply blush:
Dip a toothpick or small dotting tool into pink paint and dab small cheeks just below and to the outside of the eyes. -
Glaze the butter:
For a wet, shiny look, apply a coat of gloss glaze or UV resin specifically over the yellow butter area and the separate butter pat square. Avoid glazing the brown crust to keep its matte texture. -
Assemble the keychain:
Open a jump ring with your pliers. Slide on the loop from the toast charm and the loop from the butter pat charm. -
Final connection:
Attach the jump ring to your keychain fixture or necklace chain and close it securely.
Make it a Set
Create a ‘Breakfast Bestie’ by making a second charm shaped like a fried egg or a bacon strip to give to a friend as a split friendship necklace set!
Now you have a charmingly toasty friend ready to brighten up your accessories collection


Pastel Dino Pair
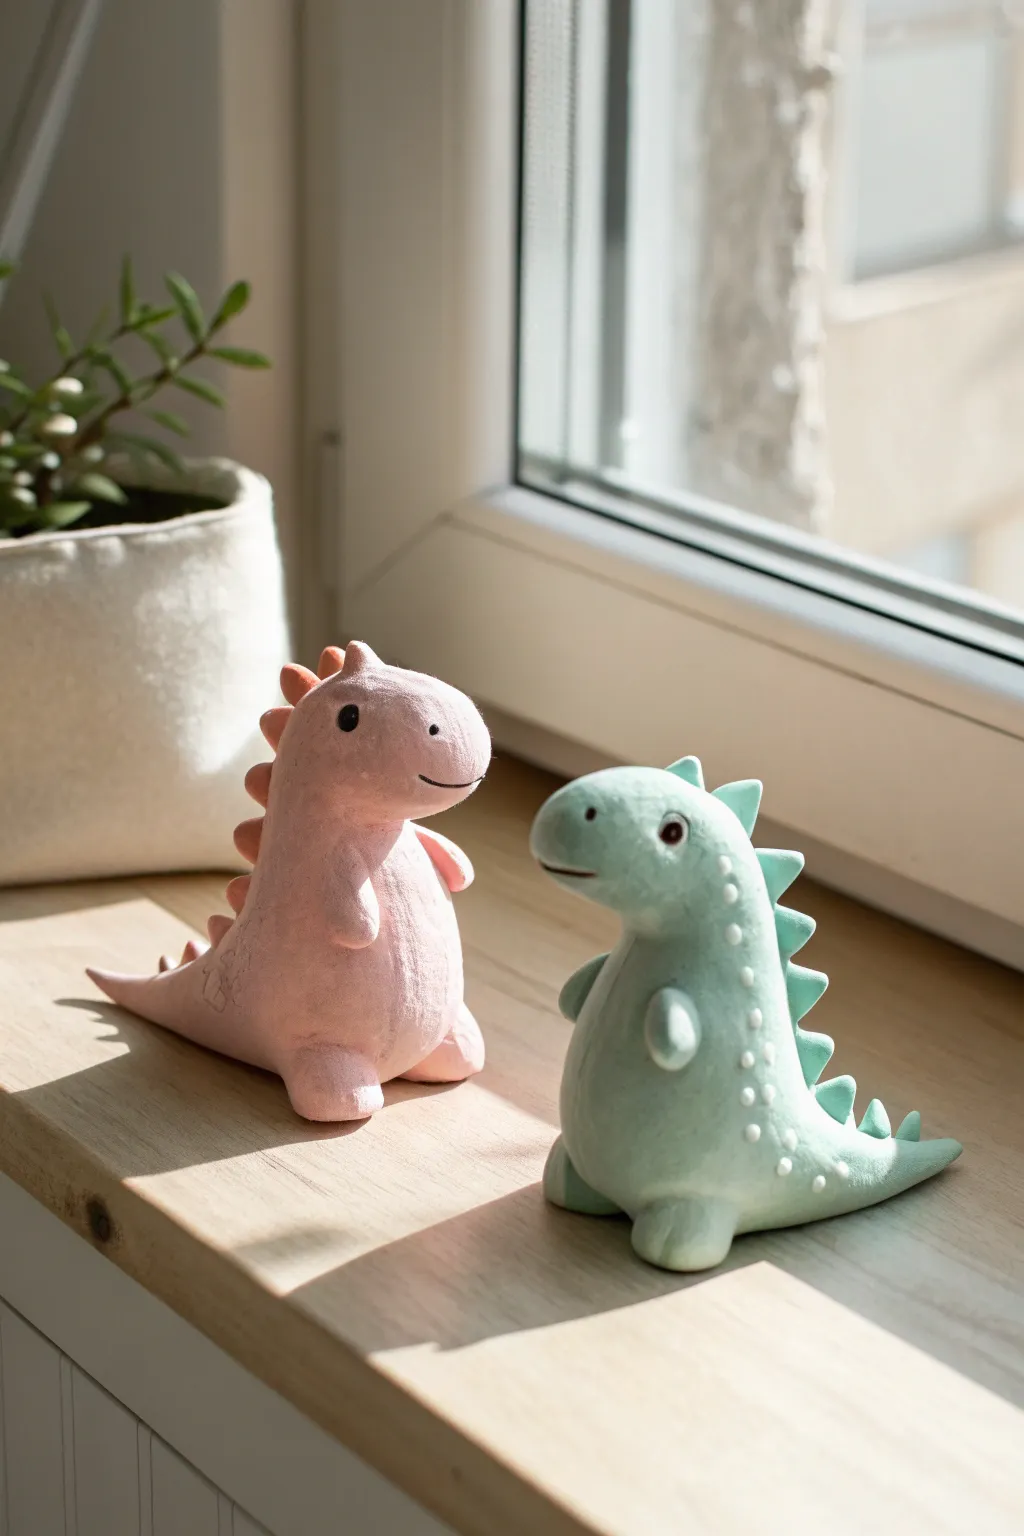
Create a charming duo of prehistoric friends with this simple yet adorable clay project. These smooth, matte-finished dinosaurs feature soft pastel colors and chubby proportions that fit perfectly on any windowsill or desk.
How-To Guide
Materials
- Air-dry clay or polymer clay (white)
- Acrylic paints (pastel pink, mint green, white, black)
- Small paintbrush
- Modeling tools (ball tool, needle tool)
- Sandpaper (fine grit)
- Water cup (for smoothing)
- Matte varnish (optional)
Step 1: Shaping the Bodies
-
Prepare the clay:
Start by conditioning two balls of white clay until they are pliable and smooth. One ball should be slightly larger than a golf ball for each dinosaur. -
Form the base shape:
Roll the clay into a smooth pear shape. This will serve as the combined body and head. The wider bottom is the tummy, and the narrower top will become the head. -
Define the head:
Gently pinch and press the narrower top section to define a rounded snout area, pulling it slightly forward so the dinosaur looks like it’s gazing ahead. -
Shape the tail:
Pull the clay at the bottom back side of your pear shape to extend into a thick, pointed tail. Smooth the transition so there are no seams between the body and tail. -
Create the legs:
Roll two small marble-sized balls for the feet. Flatten the bottoms slightly and attach them to the front base of the body. Blend the clay upwards into the belly using water or a modeling tool. -
Add the arms:
Form two tiny teardrop shapes for the arms. Press them onto the sides of the chest area, blending the shoulder joint seamlessly while leaving the little rounded hands free.
Step 2: Adding Details
-
Make the spine ridges:
For the pink dino, make several small triangles of clay. Attach them running down the back from the head to the tail. -
Create the spikes:
For the green dino, create sharper, distinct triangular spikes. Press them firmly along the spine, blending the base of each spike into the back. -
Smooth the surface:
Dip your finger in a little water and gently rub over the entire sculpture to remove fingerprints and tiny cracks. This step is crucial for that soft, matte look. -
Dry or bake:
Allow your figures to dry completely (24-48 hours for air-dry clay) or bake according to your polymer clay package instructions.
Seamless Blending
If using air-dry clay, keep a small dish of water nearby. Frequently dipping your finger and rubbing clay joints creates invisible seams.
Step 3: Painting and Finishing
-
Sand imperfections:
Once fully cured, gently sand any rough spots or bumps with fine-grit sandpaper to achieve a porcelain-like finish. -
Paint the base coats:
Paint one dinosaur entirely in pastel pink and the other in mint green. I prefer to apply two thin coats rather than one thick one for even coverage. -
Add spine details:
For the pink dino, paint the triangular ridges a slightly darker coral or terracotta shade. For the green dino, keep the spikes the same color as the body. -
Create the texture:
On the green dinosaur, use a very fine brush or dotting tool to add tiny white dots along the side of the spine for extra texture. -
Paint the eyes:
Use a small dotting tool dipped in black paint to create simple round eyes. Add a tiny white reflection spec to bring them to life. -
Add facial features:
Paint a very thin, curved black line for the mouth. On the green dino, you can add small dash-like nostrils near the tip of the snout. -
Seal the work:
Finish by applying a matte varnish to protect the paint while maintaining the soft, non-glossy aesthetic shown in the photo.
Textured Skin
Before the clay dries, gently press a piece of rough fabric or a dry sponge against patches of the skin to give the dinos a realistic, bumpy texture.
Set your new prehistoric pals on a sunny ledge to brighten up your room


Pocket-Size Octopus Couple
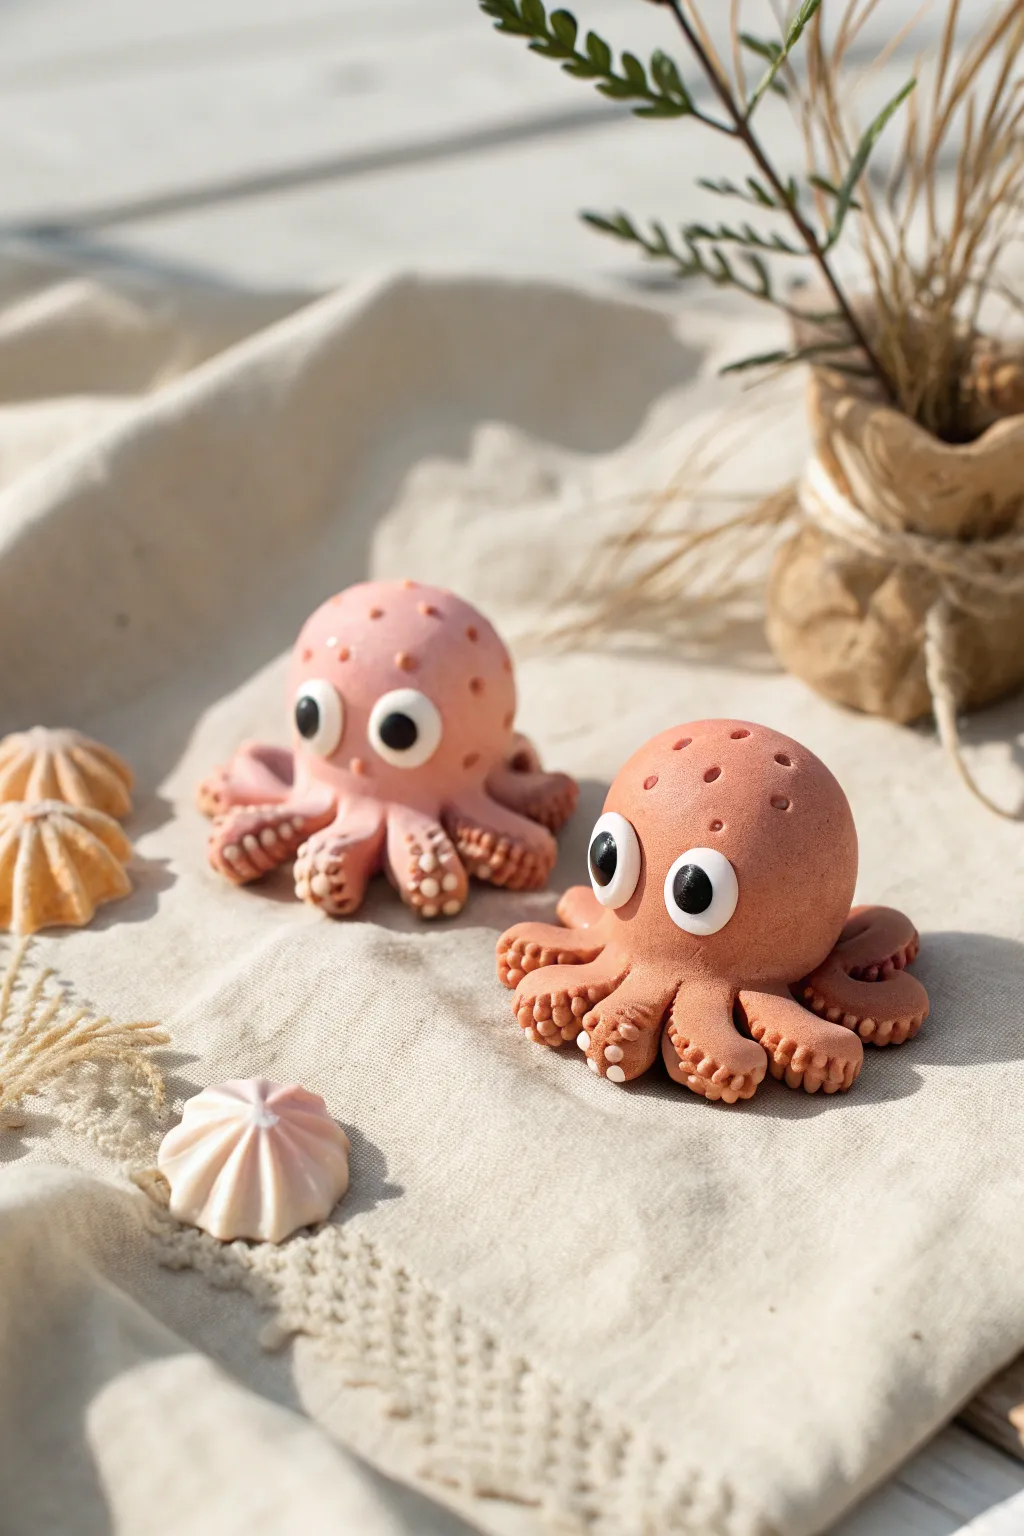
These adorable cephalopods are the perfect afternoon project, featuring textured tentacles and wide, expressive eyes. With their soft matte finish and playful poses, they make charming desk companions or sweet handmade gifts.
Detailed Instructions
Materials
- Polymer clay (light pink and terracotta/peach)
- White polymer clay
- Black polymer clay
- Ball stylus tool (small and medium)
- Needle tool or toothpick
- Blade or craft knife
- Work surface (ceramic tile or glass mat)
- Oven for baking (if using polymer clay)
Step 1: Shaping the Bodies
-
Prepare the clay:
Start by conditioning your pink and terracotta clay separately until they are soft and pliable. Roll each color into a smooth ball about the size of a ping-pong ball for the main heads. -
Form the head shape:
Gently gently flatten the bottom of each ball against your work surface to create a dome shape. The dome should be tall and rounded, not too flat. -
Create tentacle segments:
For the first octopus, roll eight small logs of matching clay, each about an inch long. Taper one end of each log slightly so it looks like a long teardrop. -
Attach the tentacles:
Flip the head dome over. Arrange the eight tentacles in a starburst pattern on the underside, pressing the thicker ends into the center of the base. Smooth the seams where they join so they won’t fall off. -
Pose the legs:
Turn the octopus back over. Gently curl the ends of the tentacles upward or outward to give them movement. I like to make a few curl quite tightly to look more dynamic.
Droopy Tentacles?
If the legs sag while you work, prop them up with crumpled aluminum foil or cornstarch until the clay is baked and hardened.
Step 2: Adding Details
-
Texture the suckers:
Using a small ball tool or a blunt toothpick, press two rows of tiny indentations along the underside of any curled-up tentacles. This mimics the suction cups. -
Refine the skin:
Take a needle tool and gently poke random, shallow holes over the top of the head dome. These shouldn’t be deep; they are just for surface texture. -
Make the eye whites:
Roll two small balls of white clay for each octopus. Flatten them into thick discs and press them onto the front of the face, spacing them somewhat wide apart for a cute look. -
Add the pupils:
Roll even smaller balls of black clay. Press these onto the white discs. Placement is key here—placing them slightly cross-eyed or looking in different directions adds huge personality. -
Highlight the eyes:
For extra life, add a tiny speck of white clay to the black pupils as a reflection, though the matte black works well on its own too.
Step 3: Finishing Touches
-
Smooth fingerprints:
Check your work for any accidental fingerprints. You can brush a little baby oil or clay softener over the surface to smooth them out before baking. -
Bake the clay:
Bake the figures according to your clay manufacturer’s instructions. Usually, this is around 275°F (135°C) for 15-30 minutes, depending on thickness. -
Cool down:
Let the octopuses cool completely in the oven with the door slightly ajar to prevent cracking from sudden temperature changes. -
Optional matte finish:
If your clay is too shiny after baking, you can lightly sand it with very fine grit sandpaper or apply a matte varnish to achieve the soft look in the image.
Make it a Keychain
Before baking, screw a threaded eye pin into the top of the head. Once baked, you can attach a jump ring and chain to take your octopus on the go.
Now you have a charming pair of sea creatures ready to brighten up any shelf


Chubby Blob Creatures
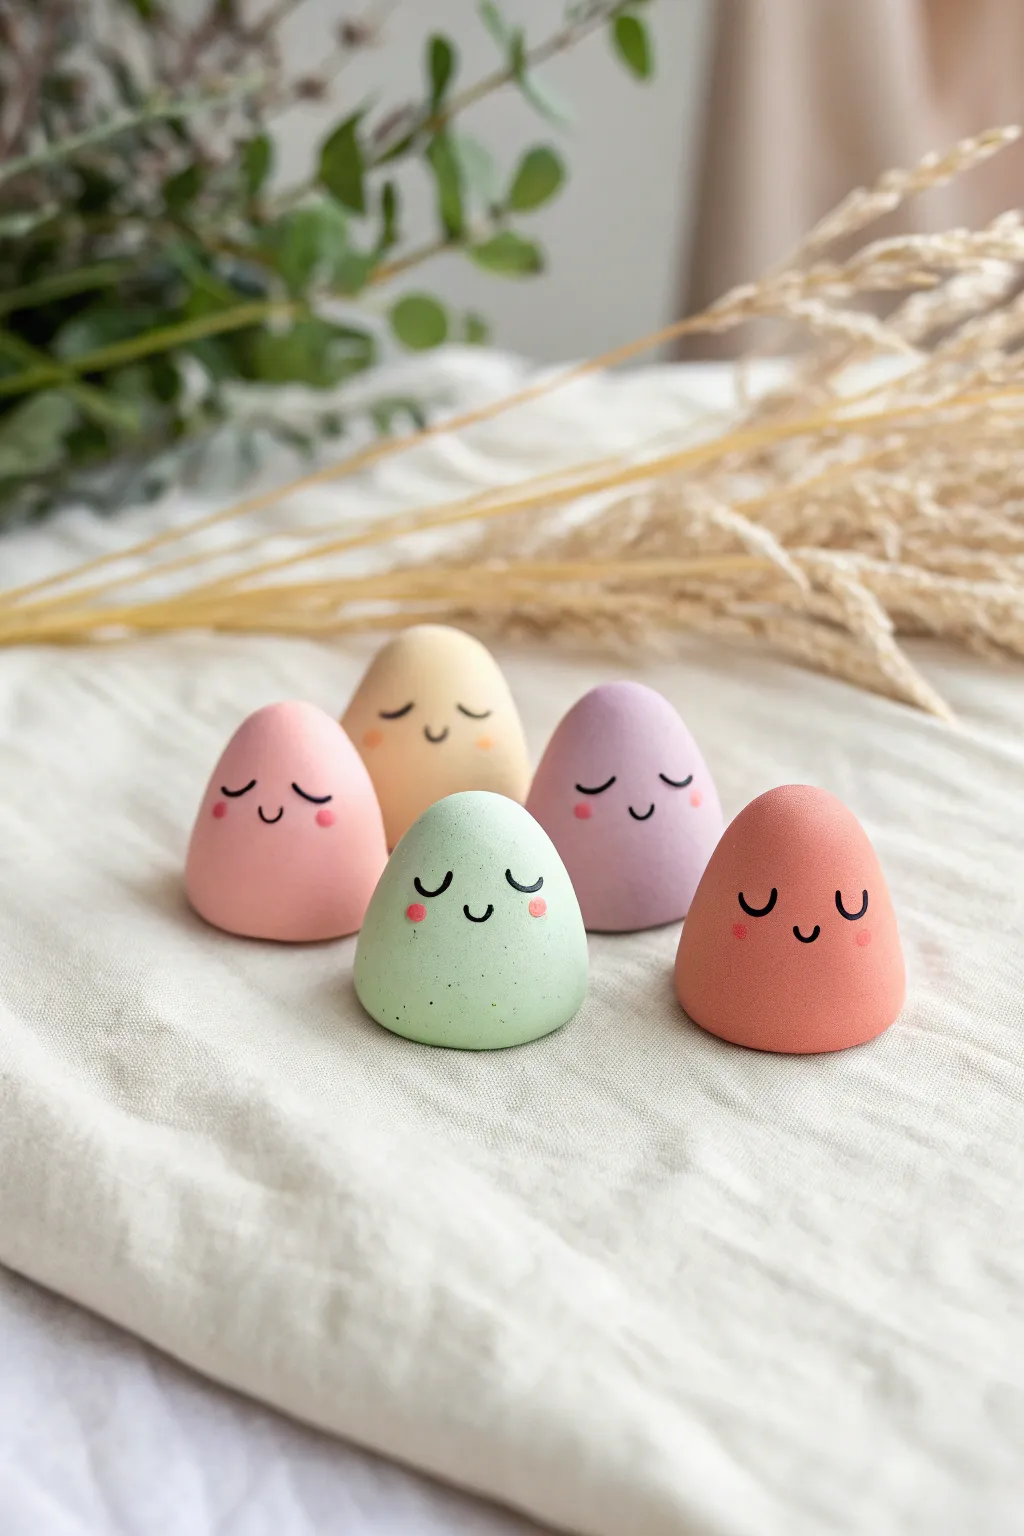
These delightfully simple pastel creatures are the perfect introduction to working with polymer or air-dry clay. Their smooth, rounded bodies and sleepy triangular faces radiate a calm sweetness that looks adorable on any shelf.
Step-by-Step Tutorial
Materials
- Polymer clay or air-dry clay (pastel pink, peach, yellow, lavender, and mint green)
- Black fine-point acrylic marker or permanent pen
- Small dotting tool or toothpick
- Pink acrylic paint or blush powder
- Smooth work surface (ceramic tile or silicone mat)
- Parchment paper (if baking polymer clay)
- Matte spray varnish (optional)
Step 1: Shaping the Bodies
-
Prepare your clay:
Start by conditioning your clay. If you are using polymer clay, knead each color in your hands until it becomes warm, soft, and pliable. This prevents cracks later on. -
Portion the pieces:
Pinch off small amounts of clay, aiming for pieces about the size of a large grape or small walnut. You want five distinct colors to match the group. -
Roll spheres:
Take one portion of clay and roll it between your palms to create a perfectly smooth ball. Check for any seam lines or fingerprints and gently buff them out with your thumb. -
Form the cone:
Place the ball on your work surface. Cup your hands slightly and create a gentle rolling motion on just the top half of the ball to taper it. -
Refine the shape:
You are aiming for a soft, rounded triangle shape—like a candy corn or a very chubby mountain. The base should remain wide and round, not sharp. -
Flatten the base:
Pick up the creature and gently tap the bottom against your table. This gives it a flat surface to sit on so it won’t roll away. -
Smoothing:
Run your finger lightly over the surface to ensure it is completely smooth. I like to use a tiny drop of baby oil or water (depending on clay type) to remove any lingering fingerprints. -
Repeat for all colors:
Create the remaining four blobs in different pastel shades, trying to keep them roughly the same height for a cohesive family look, though slight variations add character.
Smudged Ink?
If your pen line goes astray or smudges, dip a Q-tip in rubbing alcohol (for polymer clay) or water (for air-dry clay) and gently wipe the error away before trying again.
Step 2: Finishing and Details
-
Hardening the clay:
If using polymer clay, bake according to the package instructions (usually 275°F/135°C for 15-30 minutes). If using air-dry clay, let them sit undisturbed for 24-48 hours until fully dry. -
Cool down:
Ensure the figures are completely cool (or fully dry) before attempting to draw on them, otherwise the ink might bleed or smudge. -
Draw the eyes:
Using your fine-point black marker, draw two small ‘U’ shapes for sleeping eyes. Place them low on the body—about one-third of the way up from the bottom—to maximize cuteness. -
Add the mouth:
Draw a tiny ‘U’ shape right between the eyes for a smiling mouth. Keep the spacing tight; the closer the features are, the cuter the face looks. -
Prepare the blush:
Dip a rounded dotting tool or the blunt end of a toothpick into a tiny amount of pink paint. You can also use real makeup blush applied with a Q-tip for a softer look. -
Apply cheeks:
Gently dot the pink color just outside and slightly below each eye. The cheeks should be subtle spots of color that frame the face. -
Adding texture (optional):
If you want the speckled egg look seen on the green blob, dip an old toothbrush in watered-down darker green paint and flick it very lightly over the surface before drawing the face. -
Seal the work:
To protect the face paint from scratching off, apply a thin coat of matte varnish. This unifies the surface sheen and keeps them looking fresh.
Level Up: Accessories
Before baking/drying, sculpt tiny clay leaves or flowers and press them onto the top of the ‘heads’ to turn your blobs into little forest spirits or sprouts.
Now you have a serene little family of blobs ready to bring a smile to your workspace or windowsill

The Complete Guide to Pottery Troubleshooting
Uncover the most common ceramic mistakes—from cracking clay to failed glazes—and learn how to fix them fast.
Mini Mushroom Buddies

These adorable mini mushroom buddies add a touch of forest magic to any windowsill or shelf with their sweet smiles and faux-wood finish. Using polymer clay and careful painting techniques, you’ll create a charming pair that looks hand-carved but is surprisingly simple to sculpt.
Detailed Instructions
Materials
- Polymer clay (white or beige)
- Acrylic paints (burnt sienna, terra cotta, black, white, pink)
- Fine-grit sandpaper
- Detail paintbrushes (fine tip)
- Mod Podge or satin varnish
- Sculpting tools (needle tool/blade)
- Aluminum foil (optional for core)
Step 1: Sculpting the Shapes
-
Form the mushroom stems:
Condition a ball of beige or white polymer clay until it’s soft and pliable. Divide it into two slightly unequal portions, rolling each into a thick, stout cylinder. Tap the bottoms on your work surface to flatten them so they stand independently. -
Shape the large cap:
Take a new piece of clay and roll it into a ball, then flatten the underside while leaving the top rounded to create a dome shape. This cap should be slightly wider than your taller stem. -
Shape the small cap:
Create a second, smaller dome for the shorter mushroom companion. For this one, gently press the edges downward a bit more to create a slightly distinct rim. -
Texture the stem surface:
To mimic raw wood, lightly drag a sculpting tool or a stiff-bristled brush vertically up and down the stems. Don’t overdo it; you just want subtle vertical striations. -
Add gill details:
Flip the mushroom caps upside down. Using a needle tool or craft knife, gently score lines radiating from the center to the edge to simulate the mushroom gills underneath. -
Attach caps to stems:
Place the caps onto their respective stems. Gently press down to secure the bond, or use a drop of liquid clay/Sculpey Bake & Bond if you have it. -
Bake the clay:
Bake the figures according to your specific clay package’s temperature and time instructions. I usually let them cool completely in the oven to prevent cracking.
Natural Wood Texture
Use a toothbrush to tap texture onto the unbaked clay caps for a more organic feel. It breaks up the smoothness and grips the paint better.
Step 2: Painting & Personality
-
Base coat the stems:
Mix a very watery wash of burnt sienna paint. Brush this over the stems and immediately wipe most of it off with a paper towel. This settles into the texture lines, creating an aged wood effect. -
Paint the tall cap:
Paint the cap of the taller mushroom with a solid coat of medium brown or dark tan acrylic paint. You may need two thin coats for full opacity. -
Paint the small cap:
For the shorter mushroom, use a terra cotta or reddish-brown shade for the cap. Paint carefully along the rim, leaving the textured gill area underneath unpainted or lightly washed with beige. -
Add large spots:
Once dry, use a small round brush to dab large, irregular white spots onto the taller brown mushroom cap. -
Add small polka dots:
For the reddish mushroom, use the handle end of a paintbrush dipped in white paint to create uniform, small polka dots scattered across the cap. -
Paint the gill rim:
On the shorter mushroom, paint a thin, cream-colored line around the very edge of the cap to define the separation between the red top and the gills. -
Draft the faces:
Lightly sketch the position of the eyes and mouth with a pencil first to ensure the expressions look sweet and symmetrical. -
Paint the eyes:
Using your finest brush and black paint, fill in two oval shapes for the eyes on each stem. Leave enough space between them for a cute, wide-set look. -
Add the smiles:
Paint a very fine, shallow ‘U’ shape between the eyes for the smile. I suggest thinning the black paint slightly with water to make the lines flow smoother. -
Add eye highlights:
Dip the tip of a toothpick into white paint and add a tiny dot to the upper corner of each black eye. This ‘catchlight’ brings them to life instantly. -
Apply blush:
Dilute a tiny drop of pink paint until it is transparent. Dab two soft, round cheeks onto the taller mushroom. For the small one, you can use tiny solid red dots for a different style. -
Seal the project:
Finish with a coat of satin varnish or Mod Podge, focusing mainly on the caps to give them a slight sheen while keeping the stems more matte.
Fairy Garden Display
Glue a small magnet to the bottom to stick them on the fridge, or attach a wire stake into the base before baking to plant them in soil.
Place your new cheerful fungi friends in a sunny spot to brighten up your day
Tiny Cactus Pal

Bring a little desert charm to your desk without the prickly thorns using this adorable clay project. With its sweet blushing cheeks and speckled pot, this tiny cactus pal is the perfect beginner-friendly sculpture to brighten up any small corner.
Step-by-Step
Materials
- Polymer clay (sage green, light terracotta/pink, black, pink)
- Acrylic rolling pin
- Modeling tools (needle tool or toothpick, blade)
- Brown textured clay or brown paint (for ‘soil’)
- Soft paintbrush
- Small dotting tool or ball stylus
- Dark grey or black acrylic paint (optional, for pot speckles)
- Oven for baking (if using polymer clay)
Step 1: Sculpting the Pot
-
Form the base:
Start by conditioning a ball of light terracotta or earthy pink clay until it is soft and pliable. Roll it into a smooth sphere about the size of a golf ball. -
Shape the cylinder:
Gently flatten the bottom of your sphere against your work surface so it stands upright. Using your thumb and fingers, pinch and pull the clay upwards to form a thick cylinder shape, slightly wider at the top than the bottom. -
Create the rim:
Roll a separate snake of the same pink clay. Flatten it slightly with your rolling pin to create a long, consistent strip about 1/4 inch wide. -
Attach the rim:
Wrap this strip around the top edge of your cylinder to create the distinct rim of a flower pot. Smooth the seam carefully with your finger or a clay tool so it looks like one solid piece. -
Add texture:
For that realistic ceramic look, you can gently tap the surface with an old toothbrush or stiff brush to remove fingerprints and add a subtle stone texture.
Step 2: Creating the Cactus
-
Shape the body:
Take a generous amount of sage green clay and roll it into a smooth, oblong shape with a rounded top, resembling a pill_capsule. -
Check the fit:
Test the size by placing it into your pot. It should be wide enough to fill most of the opening but tall enough to peek out cheerfully. -
Adding ribs:
Using a needle tool or the back of a dull craft knife, press vertical lines straight down the length of the green body. Space them evenly around the entire cactus to create the ribbed effect. -
Soften the lines:
If the indented lines are too sharp, gently run a finger over them to smooth the edges while keeping the defined grooves. -
Make the soil:
Fill the space inside the rim of the pot with dark brown clay. You can texture this clay by poking it repeatedly with a needle tool to simulate loose dirt. -
Assemble the parts:
Press the green cactus body firmly onto the brown soil base inside the pot. Ensure it stands straight and is well-adhered.
Clean Clay Tip
Keep wet wipes handy! Switching between black clay for the eyes and the pastel pink pot can transfer dark smudges. Clean hands ensure bright colors.
Step 3: Bringing it to Life
-
Add the eyes:
Roll two intensely tiny balls of black clay. Press them gently onto the upper third of the cactus, spacing them wide apart for a cute expression. -
Create the smile:
Roll an extremely thin thread of black clay. Cut a tiny u-shape segment and press it carefully between the eyes to form the smile. -
Blush those cheeks:
Take two small bits of soft pink clay, flatten them into little discs, and press them just below and to the outside of the eyes. -
Add speckles:
To mimic the spines without the sharp poke, use a needle tool to make tiny pricks or dots all over the green ribs, avoiding the face area. -
Finish the pot:
Using a toothpick dipped in grey or black paint (or tiny bits of dark clay), add random speckles to the pink pot for a stone-effect finish. -
Bake:
Bake your creation according to your clay manufacturer’s instructions—usually around 275°F (130°C) for 15-30 minutes.
Level Up: Blooming
Make a tiny flower by flattening five small circles of yellow or orange clay and pressing them onto the top of the cactus head for a blooming effect.
Once cooled, this sweet little companion is ready to sit on your shelf and smile back at you all day long


What Really Happens Inside the Kiln
Learn how time and temperature work together inside the kiln to transform clay into durable ceramic.
Little Heart Trinket Dish
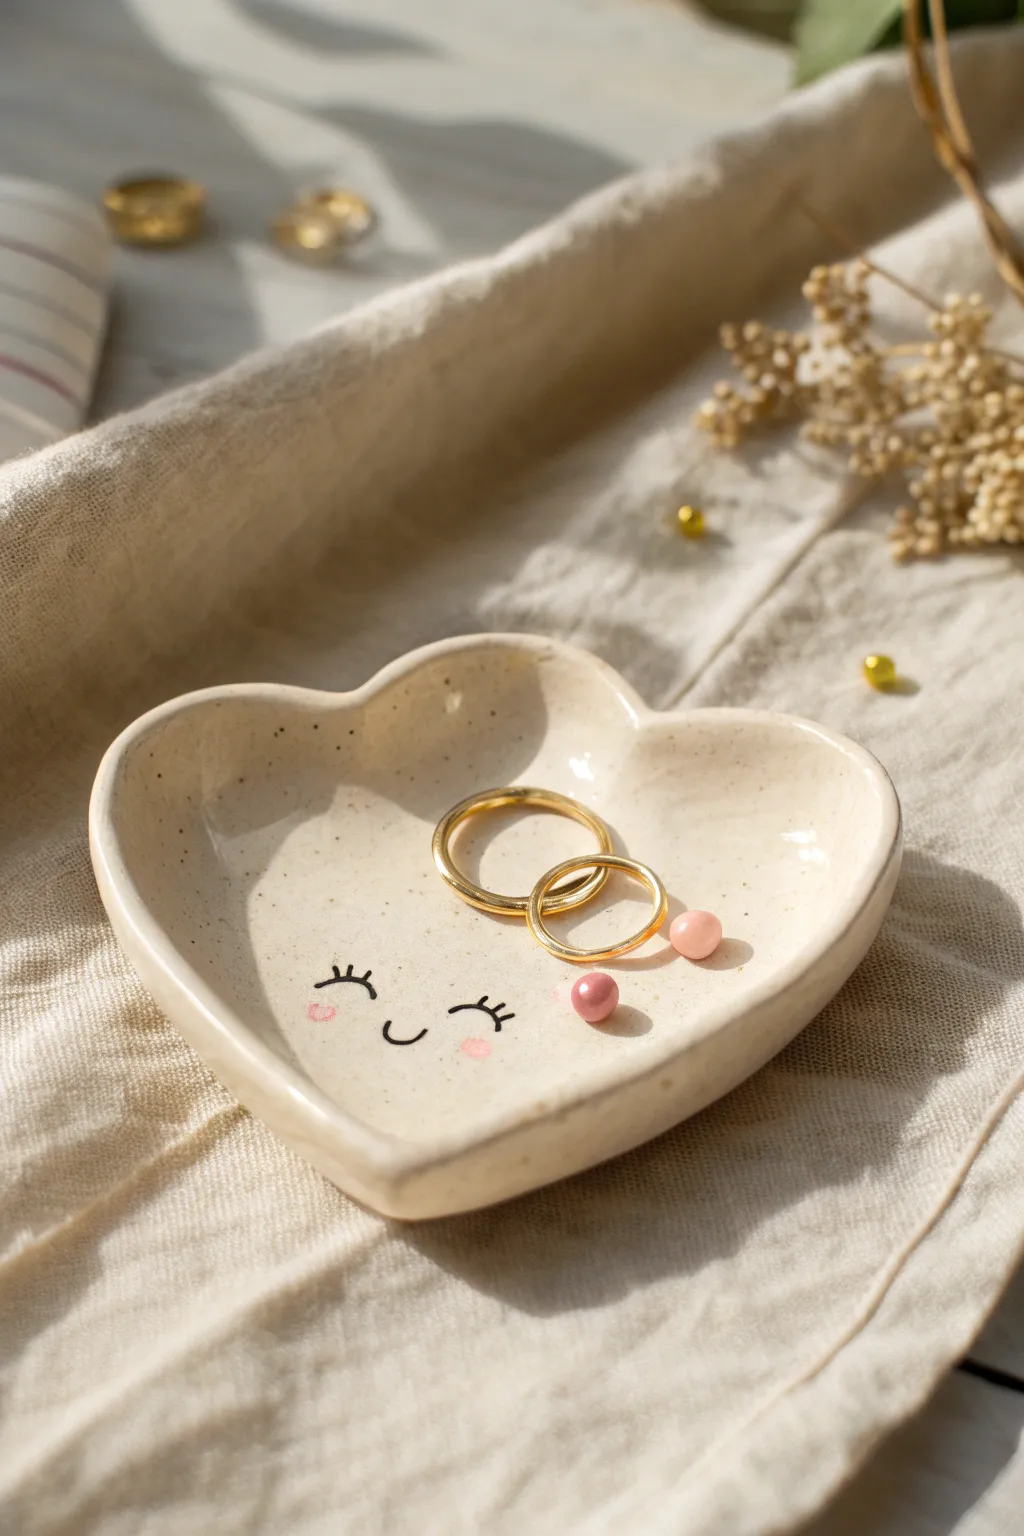
This adorable speckled heart dish is the perfect resting spot for your favorite rings and small treasures. With its gently curved edges and charming hand-painted face, it adds a touch of whimsical warmth to any bedside table.
How-To Guide
Materials
- White polymer clay or air-dry clay (speckled variety preferred)
- Black acrylic paint or fine-point permanent marker
- Pink acrylic paint
- Fine detail paintbrush
- Rolling pin
- Heart-shaped cookie cutter (medium size)
- Small bowl or sponge (for drying shape)
- Fine grit sandpaper (400-600 grit)
- Gloss varnish or glaze
Step 1: Shaping the Clay
-
Prepare your clay:
Start by conditioning your clay. Knead it in your hands until it becomes soft, pliable, and warm to the touch. If you are using plain white clay and want the speckled look shown, mix in a tiny pinch of black pepper or craft sand now. -
Roll it out:
Place the clay on a smooth, non-stick surface. Use your rolling pin to flatten the clay evenly until it is about 1/4 inch thick. Try to keep the thickness consistent so the dish is sturdy. -
Cut the heart:
Press your heart-shaped cookie cutter firmly into the rolled clay. Wiggle it slightly to ensure a clean cut, then lift the cutter away. Peel away the excess clay from around the heart. -
Smooth the edges:
Dip your finger in a little bit of water (if using air-dry clay) or baby oil (if using polymer) and gently run it along the cut edges of the heart to smooth out any roughness or sharp debris. -
Create the curve:
Carefully lift your clay heart. Place it inside a gently curved bowl or on top of a rounded sponge. Gently press the center down so the edges rise up slightly. This creates the dish shape that will hold your jewelry. -
Refine the rim:
While it’s in the drying form, use your fingertips to gently pinch and round off the upper rim of the heart. You want it to look soft and organic, not sharp and mechanical. -
Initial drying or baking:
If using polymer clay, bake according to the package instructions while it sits on an oven-safe curved form. If using air-dry clay, let it sit in the bowl for 24-48 hours until completely hard.
Step 2: Painting and Finishing
-
Sand for smoothness:
Once the dish is fully cured or dry, inspect the edges. If there are any rough spots, use fine-grit sandpaper to buff them away gently until the surface feels satin-smooth. -
Plan the face:
I like to use a pencil to very lightly sketch where the eyes and mouth will go. Aim for the lower half of the heart to leave room for jewelry. Draw two small curves for closed eyes and a small ‘u’ for the smile. -
Paint the lashes:
Using a very fine detail brush and black acrylic paint (or a marker), trace your sketched eye curves. Add three tiny, delicate lashes flicking outward from each eye curve. -
Add the smile:
Paint the small smile right in the center, between and slightly below the eyes. Keep the line thin and delicate. -
Blush the cheeks:
Dip the end of a paintbrush handle or a dotting tool into pink acrylic paint. Dab a small dot just below and to the outside of each eye to create the rosy cheeks. -
Let the paint set:
Allow the painted details to dry completely. This usually takes about 15-20 minutes, depending on how thick the paint was applied. -
Apply varnish:
Using a clean customized brush, apply a coat of gloss varnish over the entire top surface of the dish. This seals the paint and gives the ceramic-like shine seen in the photo. -
Final cure:
Let the varnish dry fully according to the bottle’s instructions. Once dry, your little heart dish is ready to hold your treasures.
Wobbly Edges?
If your clay edges look uneven after cutting, use a damp Q-tip to smooth the rim before you create the curve. It acts like an eraser for imperfections.
Make Your Own Speckles
Can’t find speckled clay? Mix semi-dried used coffee grounds or cracked black pepper into white clay to get that trendy pottery aesthetic.
Place this charming dish on your dresser and enjoy the smile it brings to your daily routine
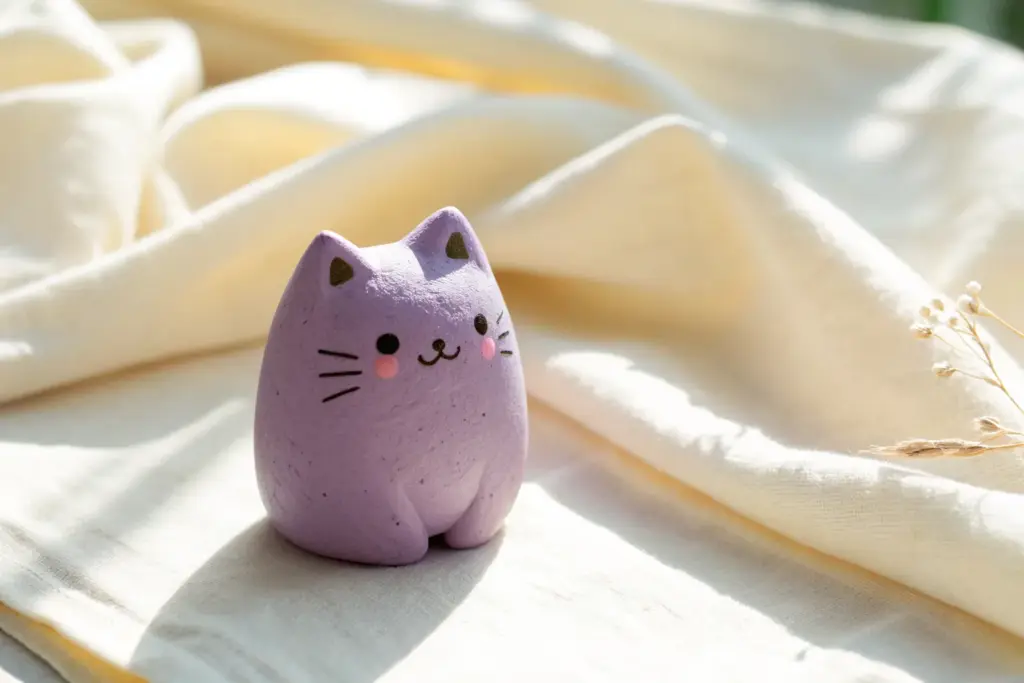
Sleepy Cat Ring Holder
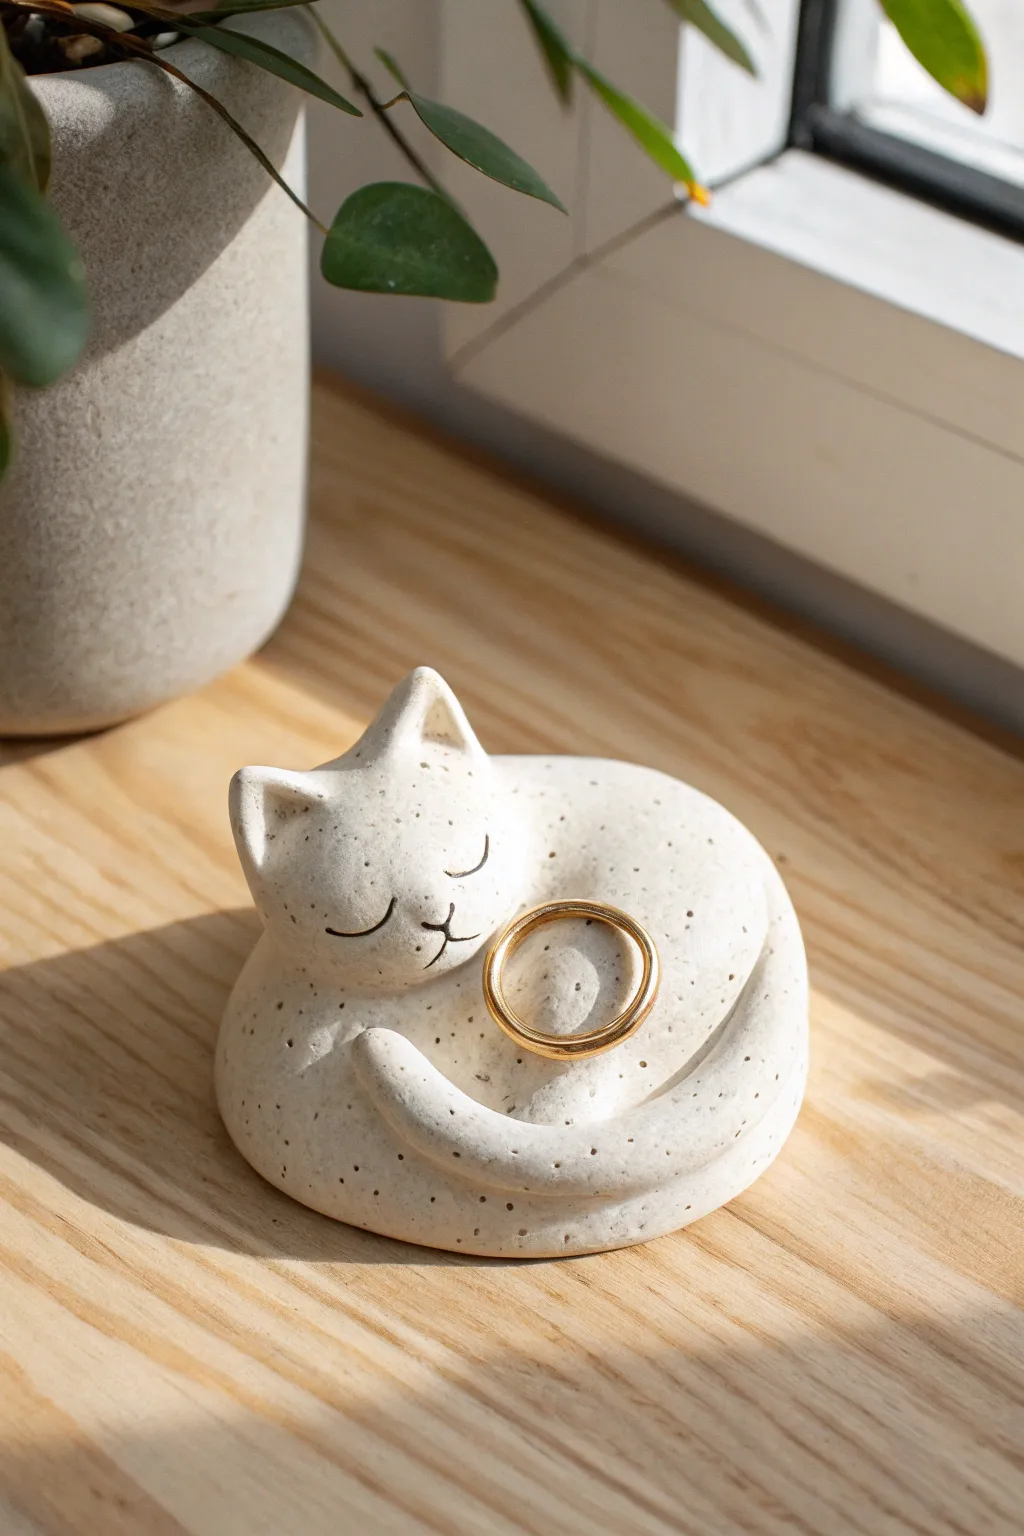
Keep your favorite rings safe and sound with this adorable sleeping cat dish crafted from speckled clay. Its curled-up shape creates a natural, secure hollow for jewelry while looking charming on any nightstand.
Step-by-Step
Materials
- White or cream polymer clay with speckles (granite effect)
- Black acrylic paint or a fine permanent ink pen
- Clay sculpting tools (specifically a needle tool and a blending tool)
- Smooth work surface (ceramic tile or glass)
- Oven for baking
- Fine grit sandpaper (optional)
- Matte or satin varnish
Step 1: Forming the Body
-
Condition the clay:
Start by warming a palm-sized amount of speckled clay in your hands. Knead and roll it until it becomes soft, pliable, and free of any internal air bubbles. -
Shape the base ball:
Roll the clay into a smooth, tight sphere. Then, gently press it down onto your work surface to create a flattened bun shape, roughly half an inch thick. -
Create the tail coil:
Take a smaller piece of clay and roll it into a long, tapered snake. One end should be thicker for attaching to the body, tapering down to a rounded point for the tail tip. -
Attach the tail:
Wrap the tail coil around the perimeter of the flattened body. Blend the thick end seamlessly into the body using a blending tool so no seam is visible where it starts. -
Curve the tail inward:
Instead of completing a full circle, curve the tip of the tail inward to rest on top of the ‘back’ area. This creates the cozy, curled-up posture and a little nook for the ring.
Step 2: Sculpting the Head
-
Form the head shape:
Roll a smaller ball of clay for the head. Shape it slightly into a rounded triangle or gumdrop shape to suggest the cat’s face. -
Add the ears:
Pinch two small, triangular pieces of clay. Attach them firmly to the top of the head, blending the clay downward at the back and front so they don’t pop off later. -
Refine the ears:
Use a small ball stylus or the back of a paintbrush to gently indent the front of each ear, giving them realistic depth. -
Position the head:
Place the head on the body, nestled into the curve where the tail wraps around. I find tilting the head slightly downward makes it look more deeply asleep. -
Blend the neck:
Use your sculpting tool to drag clay from the underside of the head onto the body, smoothing the connection completely. The cat should look like one cohesive piece, not a snowman of stacked balls.
Head Won’t Stay?
If the head feels wobbly or heavy before baking, cut a short piece of toothpic or wire and insert it halfway into the body and halfway into the head to act as an internal armature.
Step 3: Details & Finishing
-
Smooth the surface:
Dip your finger in a tiny bit of baby oil or water (depending on your clay type) and gently rub out any fingerprints or tool marks to get that smooth, stone-like finish. -
Bake the project:
Bake the clay according to the manufacturer’s specific instructions for time and temperature. Let it cool completely in the oven to prevent cracking. -
Sand imperfections:
Once cool, check for any rough spots. You can lightly sand the bottom or any sharp edges with fine-grit sandpaper if needed. -
Paint facial features:
Using a very fine brush with black acrylic paint or a permanent ink pen, draw two small U-shapes for sleeping eyes. -
Add nose and mouth:
Draw a tiny upside-down triangle for the nose and a small anchor shape beneath it for the mouth. Keep the lines delicate for a sweet expression. -
Seal the piece:
Apply a coat of matte or satin varnish to protect the paint and give the clay a professional, finished sheen.
Texture Tip
If you can’t find pre-speckled ‘granite’ clay, simply mix ground black pepper or dried used coffee grounds into regular white clay before you start shaping.
Place your favorite ring on the tail and enjoy your new handmade clay companion

TRACK YOUR CERAMIC JOURNEY
Capture glaze tests, firing details, and creative progress—all in one simple printable. Make your projects easier to repeat and improve.
Cloud and Star Charms
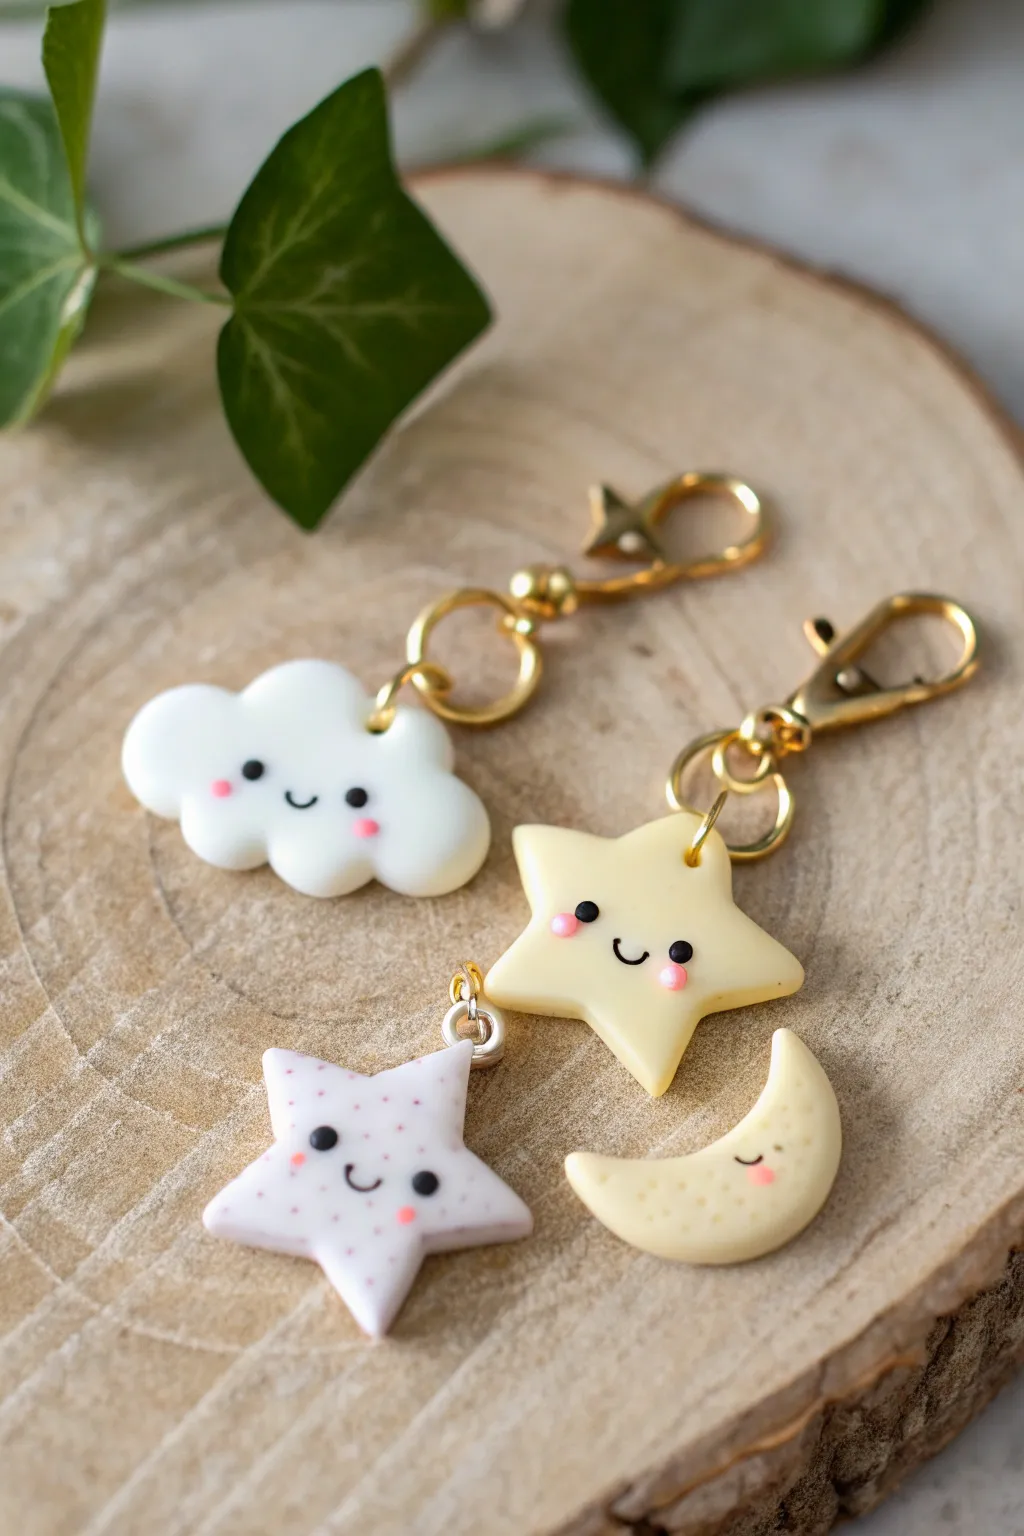
Create a whimsical collection of sky-themed charms featuring happy little clouds and smiling stars. These kawaii-style accessories are perfect for zippers, bags, or as sweet handmade gifts for friends.
Step-by-Step Tutorial
Materials
- White polymer clay
- Yellow polymer clay (pastel shade)
- Light pink polymer clay
- Black polymer clay (tiny amount)
- Pink polymer clay (tiny amount for cheeks)
- Eye pins (gold or silver)
- Gold jump rings
- Lobster clasp keychains
- Dotting tools or ball stylus
- Needle tool
- Flexible blade or craft knife
- Gloss glaze or UV resin (optional)
- Small round cutter (optional)
- Star cutter (optional but helpful)
Step 1: Shaping the Cloud
-
Condition the clay:
Start by kneading a small amount of white polymer clay until it is soft and pliable. This prevents cracks later on. -
Create the base bubbles:
Roll five or six small balls of white clay in varying sizes. You want a mix of slightly larger and smaller spheres to create a fluffy look. -
Assemble the cloud:
Press the balls together in a cluster, creating a rough cloud shape with a flat bottom edge or a rounded organic shape. Gently smoosh the seams together on the back so they adhere well. -
Smooth the surface:
Use your finger or a smoothing tool to gently blend the balls where they touch on the front, keeping the bumpy ‘cloud’ outline distinct but making the surface cohesive. -
Insert hardware:
Ideally, trim an eye pin to size and carefully insert it into the top center of your cloud shape before baking.
Clean Clay Tip
Keep baby wipes nearby! Clean your hands thoroughly between colors, especially before handling the white cloud, to avoid transferring lint or dye.
Step 2: Crafting the Stars and Moon
-
Make the yellow star:
Roll out a slab of pastel yellow clay (about 4-5mm thick). Use a small star cutter or cut a star shape freehand with a craft knife. -
Soften the edges:
Gently tap the points of the star with your fingertip to round them off slightly. This gives it that soft, cute aesthetic rather than sharp geometric points. -
Create the speckled star:
Take a piece of light pink clay. To get the speckled effect, grate a tiny amount of darker pink or purple clay into dust and knead it in partially, or mix in glitter. -
Cut the second star:
Cut your second star shape from this speckled pink mixture, following the same softening technique as the yellow one. -
Form the mini moon:
Roll a small ball of pale yellow clay, flatten it slightly, and use a small round cutter (or a straw) to cut a crescent shape out of it. -
Add eye pins:
Insert eye pins into the top point of both stars and the top tip of the crescent moon.
Step 3: Adding Kawaii Expressions
-
Make eye sockets:
Use a small ball stylus to make two tiny indentations on the cloud and yellow star faces where the eyes will go. -
Insert eyes:
Roll incredibly tiny balls of black clay and press them into the indentations. For the pink star and moon, you might choose to roll thin snakes of black clay for winking or sleeping eyes. -
Create the mouth:
Roll a microscopic ‘snake’ of black clay. Curve it into a ‘U’ shape and gently press it between the eyes using a needle tool. -
Add rosy cheeks:
Roll two tiny dots of bright pink clay, flatten them, and press them onto the cheeks just below the eyes. -
Add texture:
For the moon charm, use a needle tool to add tiny dots or ‘craters’ over the surface for extra detail.
Make it Sparkle
Mix pearlescent mica powder into your yellow clay before shaping to give the stars and moon a subtle, magical shimmer.
Step 4: Baking and Assembly
-
Bake the pieces:
Bake your charms according to the clay package instructions (usually 230°F – 275°F for 15-30 minutes). I recommend tenting them with foil to prevent white and yellow clay from browning. -
Cool and finish:
Let the pieces cool completely before handling. If desired, coat with a layer of UV resin or gloss glaze for a shiny, durable finish. -
Attach the hardware:
Open a gold jump ring using pliers. Thread it through the eye pin of your charm. -
Connect to clasp:
Before closing the jump ring, slide on the lobster clasp mechanism. Close the ring securely.
Now you have an adorable set of sky friends ready to brighten up your keychain or planner
Mini Flower Stud Shapes
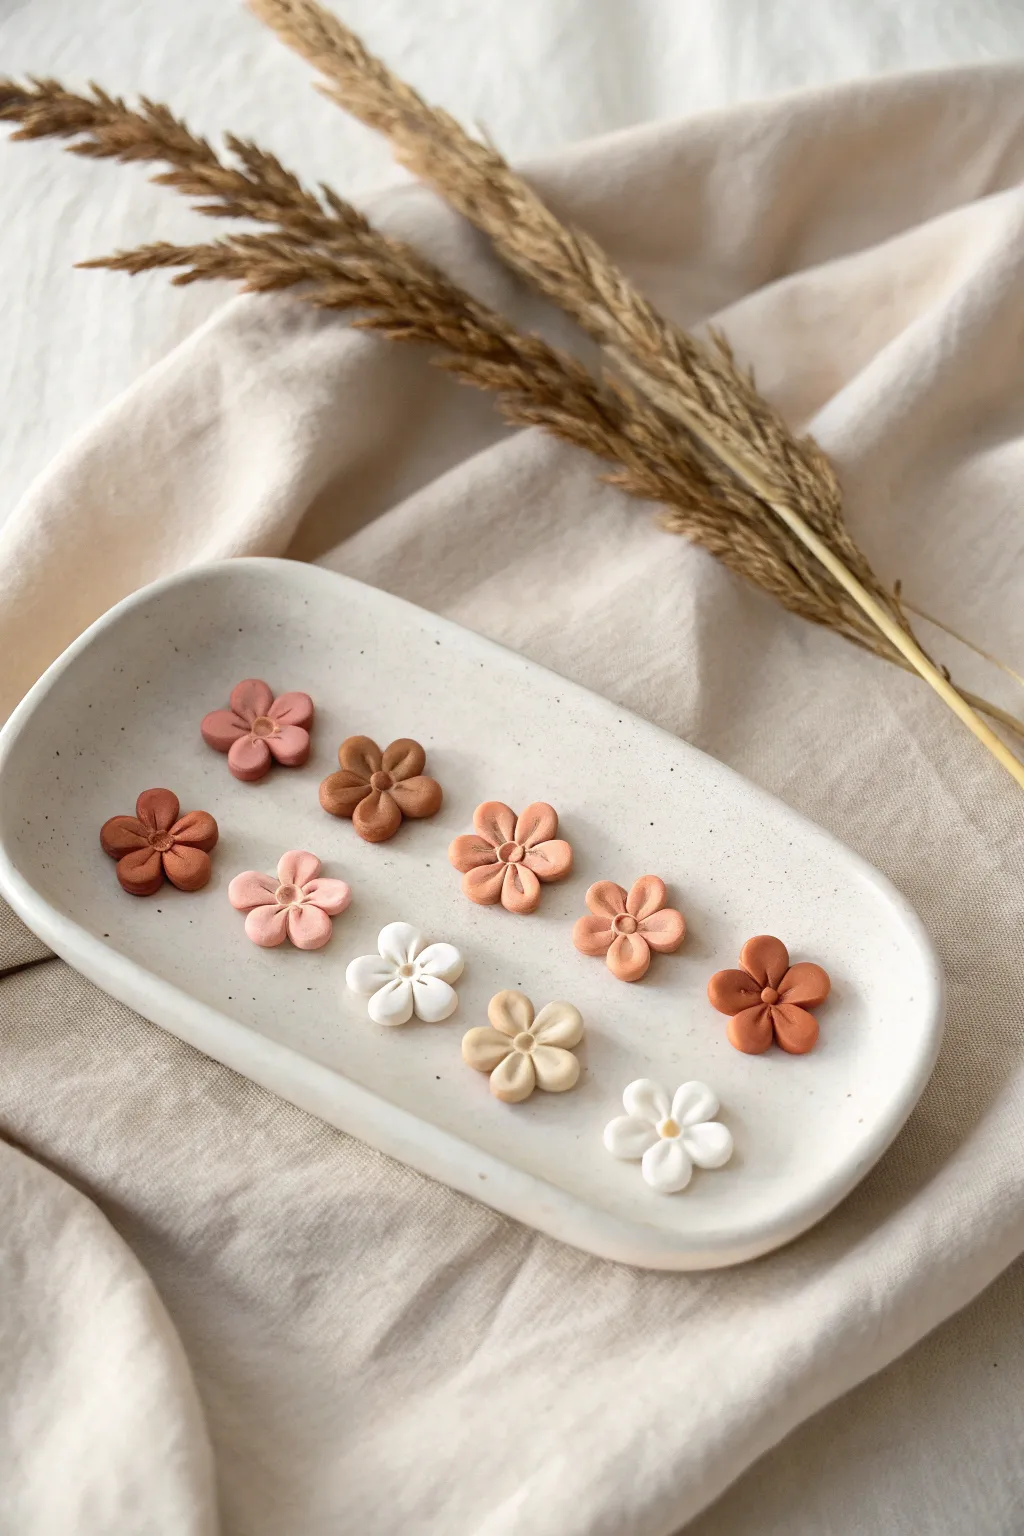
These miniature floral shapes are perfect for creating dainty earring studs or adding tiny embellishments to larger clay pieces. With their soft, earthy color palette and simple five-petal design, they offer a charmingly rustic yet modern aesthetic.
Step-by-Step
Materials
- Polymer clay in various earthy tones (white, beige, terracotta, dusty rose, muted orange)
- Small dotting tool or ball stylus
- Pointed detailing tool or needle tool
- Ceramic tile or glass work surface
- Clay roller or pasta machine (optional)
- Blade or craft knife
- Wet wipes for cleaning hands between colors
Step 1: Prepping and Mixing Colors
-
Condition the Clay:
Begin by taking small amounts of your chosen clay colors. Knead each piece thoroughly in your hands until it becomes soft, pliable, and warm to the touch. -
Create Custom Shades:
To achieve the muted, boho palette seen in the photo, try mixing a tiny bit of brown or translucent clay into bright oranges or pinks to tone them down. -
Roll Out Coils:
Take a small portion of your first color choice and roll it into a very thin snake or coil on your work surface. Aim for a thickness of about 2-3mm.
Consistent Size Hack
Use a small circular cutter on a rolled sheet of clay to punch out rounds first. Roll those rounds into balls to guarantee every single petal is the exact same volume.
Step 2: Forming the Petals
-
Cut Equal Segments:
Using your blade, slice the thin coil into five tiny, equal-sized segments. Uniformity here helps your flower look balanced later. -
Roll Petal Spheres:
Roll each of the five tiny segments between your fingertips to create smooth, perfect little balls. -
Arrange the Circle:
Place the five balls onto your work tile in a tight circle shape, ensuring they are touching each other at the center. -
Flatten Slightly:
Gently press down on the cluster with your finger or a flat tool just enough to flatten the tops and help the clay adhere together.
Step 3: Detailing the Flowers
-
Indent the Center:
Take your small dotting tool and press it firmly into the direct center where all five petals meet. This bonds the petals and creates space for the flower center. -
Create Petal Lines:
Using the needle tool or a pointed detail tool, press a single line down the center of each petal, starting near the center indentation and stopping just before the outer edge. -
Add Texture:
For a softer look, you can gently rock the needle tool slightly as you effect the impression, creating a natural petal vein. -
Make the Center:
Roll a very tiny ball of clay in the same color (or a contrasting one like white or yellow, as seen in some variations) and place it into the center indentation. -
Secure the Center:
Use the smallest end of your dotting tool to gently tap the center ball into place so it doesn’t fall out after baking.
Petals Not Sticking?
If your clay is too dry and the petals won’t fuse, add a tiny drop of liquid clay or bake-and-bond to the center point before pressing them together.
Step 4: Finishing Up
-
Repeat the Process:
Continue creating flowers in different colorways. I find it relaxing to make all the petals for one color first before moving to the next shade to keep the clay clean. -
Final Shaping:
Check the edges of your petals; if they became distorted while detailing, gently nudge them back into a rounded shape with a tool. -
Bake:
Bake the pieces according to your specific brand of polymer clay’s instructions (usually 275°F/135°C for 15-30 minutes). -
Cool Down:
Let the flowers cool completely on the tile before attempting to move them, as warm clay is brittle.
Once baked, these tiny blooms are ready to be glued onto earring posts or used as sweet decorations for your craft projects
Tiny House Desk Decor
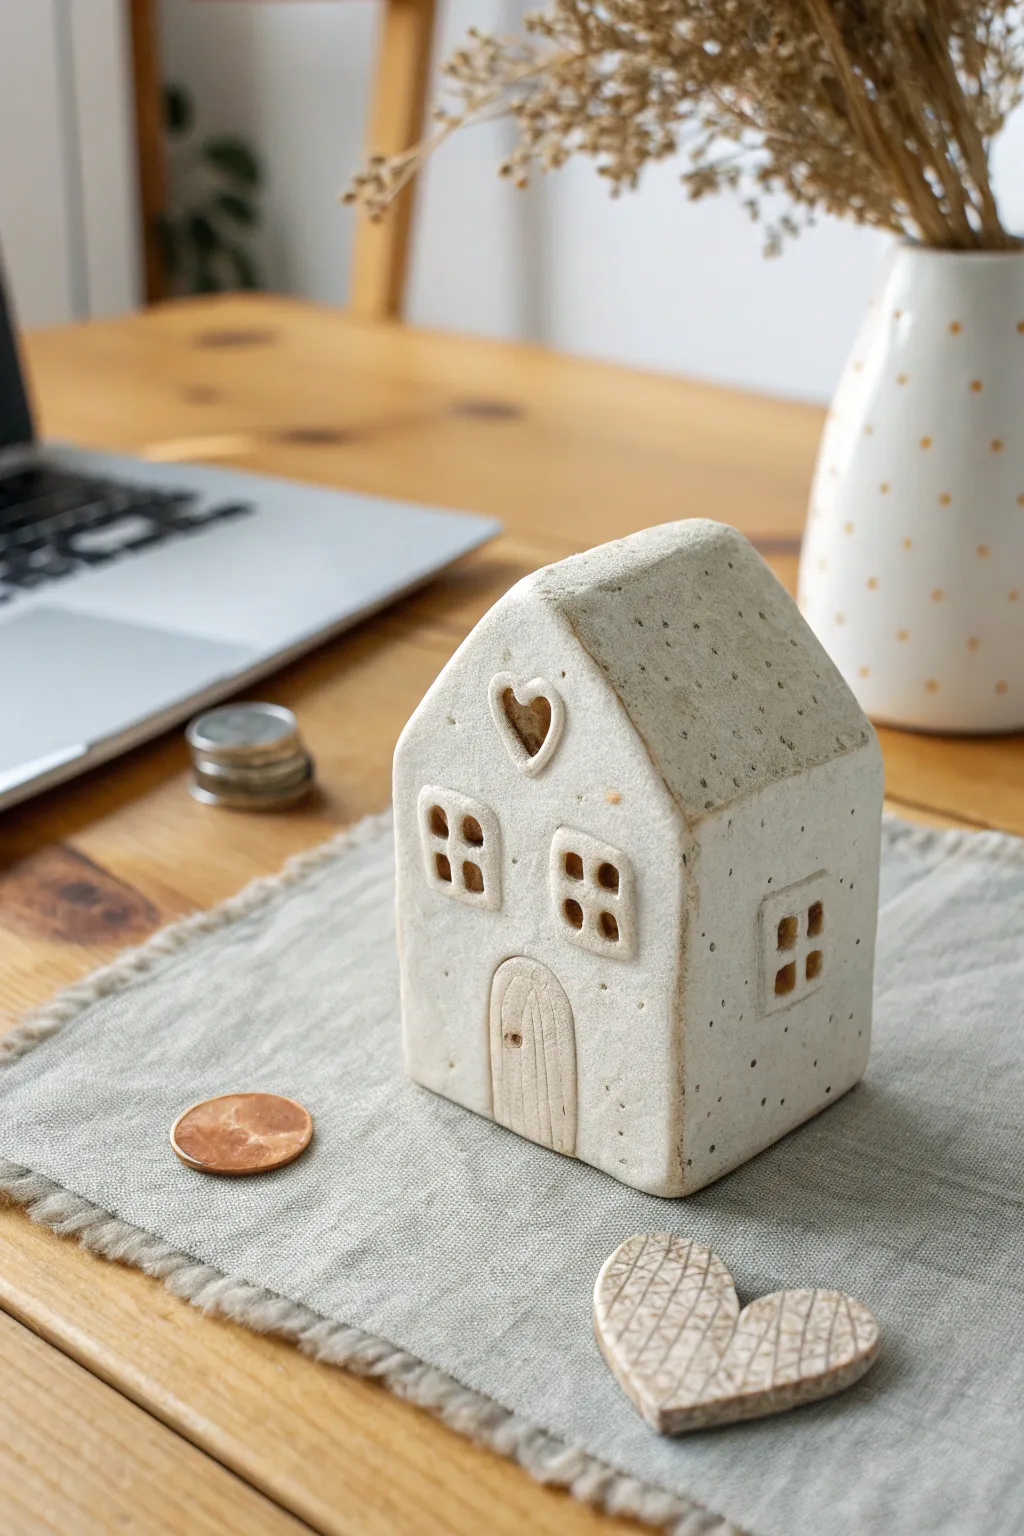
Bring a touch of cozy charm to your workspace with this miniature ceramic-style house. Its minimalist white finish with subtle speckles and heart motif makes for a sweet, scandi-inspired desk companion.
Step-by-Step Guide
Materials
- Air-dry clay (white or light grey)
- Speckle additive (sand, crushed dried herbs, or pre-mixed speckled clay)
- Rolling pin
- Craft knife or scalpel tool
- Ruler
- Small square cutter (optional, for windows)
- Texturing tool or toothpick
- Cardboard (for template)
- Fine-grit sandpaper
- Matte sealant spray
Step 1: Preparation & Cutting
-
Prepare your clay:
Start by conditioning your white air-dry clay. If you don’t have pre-speckled clay, knead in a tiny pinch of clean sand or crushed dried tea leaves to achieve that lovely stone-like texture. Roll it into a ball. -
Draft the template:
Cut a simple template from cardboard. You’ll need a pentagon shape for the front and back (a square base with a triangle roof) and two rectangles for the side walls. Make the roof flaps separately as two rectangles. -
Roll the slab:
Roll your clay out to a consistent thickness of about 1/4 inch (6mm). Using depth guides or two wooden rulers on either side can help you get an even surface. -
Cut the shapes:
Place your cardboard templates onto the clay slab. Use your craft knife to trace around them carefully, cutting out two house facades, two side walls, and two roof panels. -
Cut the details:
On the front facade piece, use a small cutter or freehand cut a heart shape near the peak of the roof. Then, carefully cut out four small squares for the windows. I find using a small square piping tip works great here if you have one.
Cracks appearing?
If small cracks form while drying, mix a tiny bit of fresh clay with water to make a paste. Fill the cracks, smooth it over, and let it dry again.
Step 2: Assembly
-
Score and slip:
Take your front facade and one side wall. Use a toothpick to scratch up the edges where they will join (scoring). Dab a little water or liquid clay (slip) onto the rough areas. -
Build the walls:
Press the side wall against the back of the front facade’s edge. Smooth the seam on the inside with your finger or a modeling tool to ensure a strong bond. -
Complete the box:
Repeat the scoring and slipping process for the remaining side wall and the back panel. Assemble them to form the main box structure of the house. -
Attach the roof:
Score the top edges of your walls. Place your two roof panels on top so they meet at a peak. Press the seams gently together, smoothing the clay where the roof pieces touch the walls.
Make it glow
Leave the bottom of the house open (no floor panel) so you can place an LED tea light underneath. The light will shine sweetly through the windows.
Step 3: Detailing & Finishing
-
Sculpt the door:
Roll a small, thin oval of clay for the door. Press it onto the bottom center of the front facade. Use a needle tool to scratch vertical wood-grain lines into it. -
Add window frames:
Roll tiny snakes of clay and outline the small square windows you cut earlier to give them raised frames. Gently press them onto the main body so they adhere. -
Refine the edges:
Dip your finger in a little water and smooth out any sharp corners or rough seams on the house exterior. The goal is a soft, hand-built look rather than perfect geometric angles. -
Create texture:
If your clay looks too smooth, lightly tap the surface with a stiff-bristled toothbrush or a crumpled ball of aluminum foil to give it a porous, stone-like feel. -
Slow drying:
Place the house in a cool, dry spot away from direct sunlight. Let it dry slowly for 24-48 hours. Turning it occasionally helps it dry evenly without warping. -
Sanding:
Once fully cured and hard, use fine-grit sandpaper to gently buff away any unwanted bumps or fingerprints, paying attention to the window corners. -
Sealing:
Finish the piece with a light coat of matte sealant spray. This protects the clay from moisture and dust while keeping that natural, unglazed pottery aesthetic.
Place your tiny cottage on your desk to enjoy a peaceful, creative vibe while you work
Mini Magnet Bud Vases
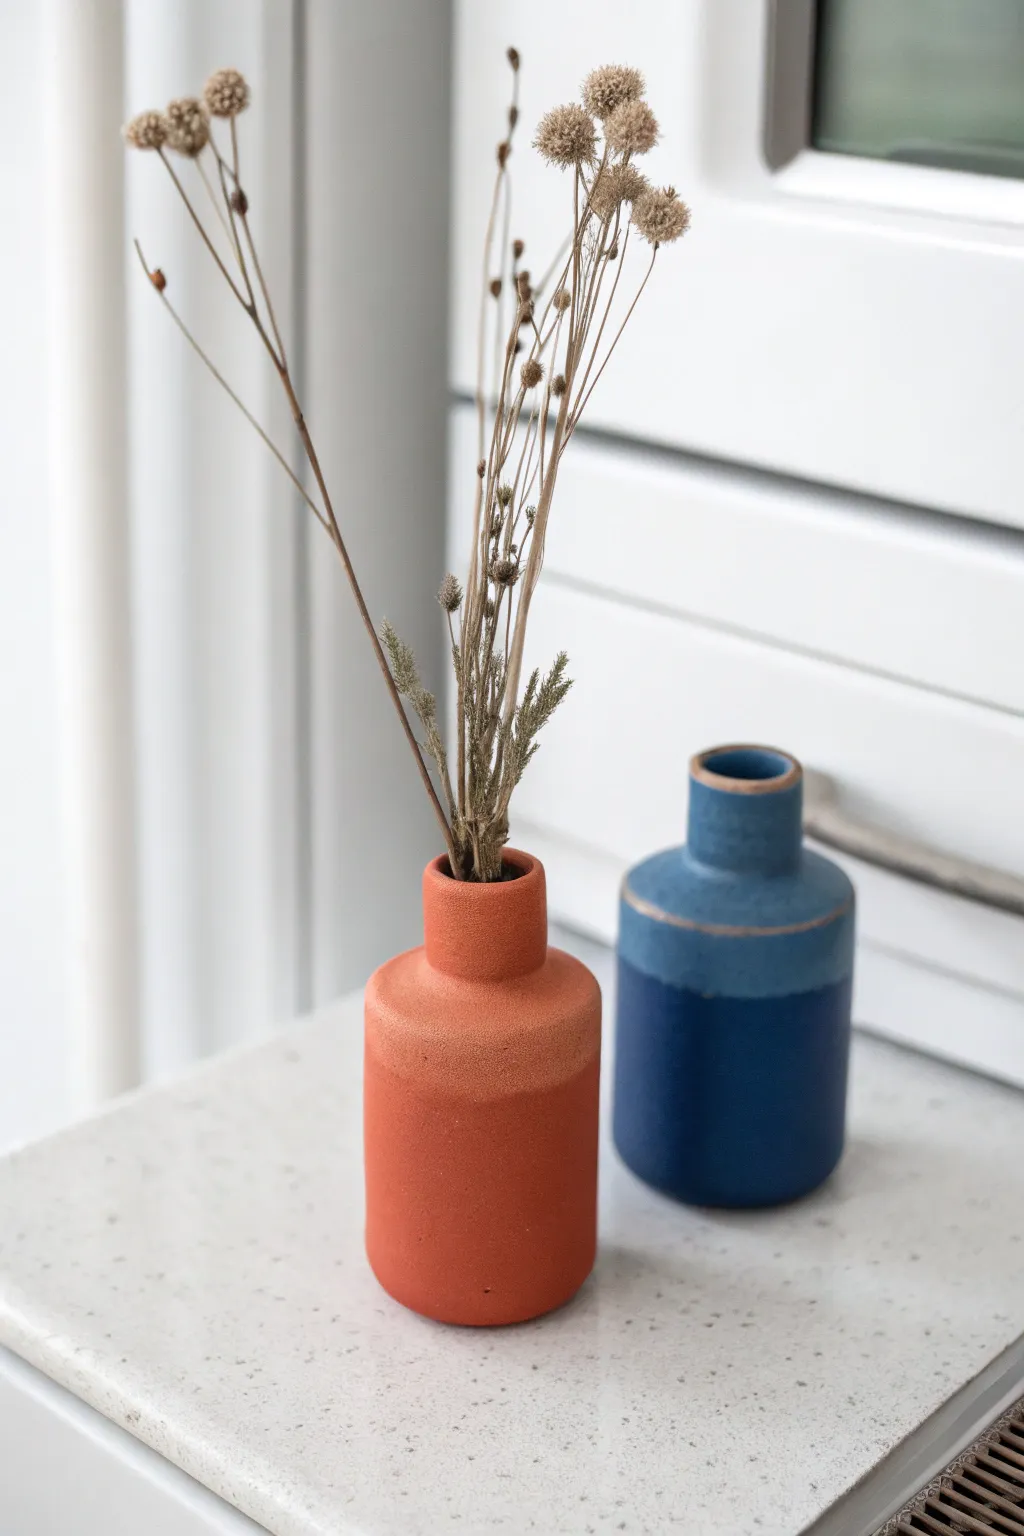
These charming, two-tone bud vases bring a pop of modern style to your fridge or magnetic board. Using polymer or air-dry clay, you’ll sculpt sleek, bottle-shaped vessels perfect for holding lightweight dried blooms.
Step-by-Step
Materials
- Polymer clay (terracotta, vibrant blue, and navy blue)
- Small magnets (neodymium recommended)
- Super glue or E6000
- Rolling pin or pasta machine
- Exacto knife or clay blade
- Small cylindrical tool (like a pen casing or straw) for the neck
- Sandpaper (fine grit)
- Optional: Matte varnish
Step 1: Sculpting the Base Form
-
Conditioning the Clay:
Start by warming up your terracotta clay in your hands until it is soft and pliable. If you want the two-tone blue vase, verify you have your two shades ready. -
Rolling a Cylinder:
Take a walnut-sized ball of clay and roll it on your work surface to form a thick, smooth cylinder. This will be the main body of the vase. Aim for about 1.5 inches in height and 1 inch in diameter. -
Creating the Interior:
Using the back of a paintbrush or a small dowel, gently press into the center of the cylinder to create the opening. Don’t go all the way through; stop about a quarter inch from the bottom to ensure it holds stems securely. -
Flattening the Back:
Since these are magnets, gently press the cylinder against your work surface to flatten one side slightly. This creates a surface for the magnet to adhere to later. -
Forming the Neck Component:
Roll a significantly smaller ball of clay into a thinner cylinder for the vase neck. Use your tool to create a hollow center in this piece as well, matching the width of the hole in your main body.
Magnet Sinking
If the magnet protrudes too much, carve a shallow recess into the flat back of the raw clay before baking. This lets the magnet sit flush against the fridge surface.
Step 2: Assembling and Refining
-
Joining the Pieces:
Place the smaller cylinder on top of the main body. Use a sculpting tool or your finger to blend the clay seams where the neck meets the body on the inside, ensuring a strong bond. -
Smoothing the Exterior:
Rub your finger gently over the exterior seam if you want a seamless look, or leave a slight definition line for a handmade pottery aesthetic. I prefer to smooth it completely for a modern silhouette. -
Creating the Two-Tone Effect:
For the blue vase, sculpt the bottom half in navy and the top shoulder/neck in a lighter blue. Join them by scoring the touching surfaces and pressing them firmly together, then smoothing the join. -
Refining the Rim:
Check the very top opening. If it’s uneven, slice a tiny amount off the top with your blade to create a crisp, flat rim. -
Texture Check:
Inspect the surface for fingerprints. You can gently roll the vase over a piece of textured paper or simply buff it lightly with cornstarch on your finger to remove prints.
Step 3: Finishing Touches
-
Baking or Drying:
If using polymer clay, bake according to the package directions (usually 275°F for 15-30 mins). If using air-dry clay, let it sit undisturbed for 24-48 hours. -
Sanding:
Once fully cured and cooled, use fine-grit sandpaper to smooth out any bumps or sharp edges on the rim or base. -
Adding the Magnet:
Apply a dab of strong glue (like E6000) to the flat spot on the back of the vase. Press your magnet firmly into the glue. -
Setting the Glue:
Let the glue cure completely, usually overnight, to ensure the magnet doesn’t pop off when you attach it to the fridge. -
Waterproofing (Optional):
If using air-dry clay, apply a coat of sealant. Polymer clay is naturally water-resistant, but a matte varnish can protect the surface finish. -
Arranging:
Trim your dried flowers or grasses so they are lightweight and proportional to the vase size, then arrange them inside.
Faux Ceramic Look
For a sandy texture like the orange vase, mix a pinch of baking soda or black pepper into the clay before sculpting to mimic unglazed pottery.
Pop your new miniature vases onto any magnetic surface to enjoy a little burst of nature indoors
Micro Room Scene Tray

Transform a simple oval tray into a peaceful, minimalist living space for the tiniest of inhabitants. This project combines clay sculpting with diorama styling to create a serene micro-world perfect for display on a coffee table or shelf.
Step-by-Step
Materials
- Polymer clay (beige/tan, sage green, terracotta, light pink, dark brown/black)
- Oval speckled resin or concrete tray (approx. 8-10 inches)
- Liquid polymer clay (optional, for adhesive)
- Texture tool (toothbrush or stiff bristle brush)
- Needle tool or toothpick
- Small rolling pin
- Blade or X-Acto knife
- Faux miniature greenery (fern tips, succulent buds)
- Glue (E6000 or superglue)
- Small fine-grit sandpaper
Step 1: Sculpting the Armchairs
-
Base shape:
Start with the beige or tan polymer clay. Condition it well until soft, then roll two equal-sized balls, roughly the size of a walnut. -
Forming the seat:
Flatten each ball slightly into a thick cube shape. Use your thumb to press deeply into the center, creating the seat depression while pushing the clay up to form the back and sides. -
Refining the silhouette:
Gently pinch and smooth the clay to define the armrests and the backrest. The back should curve gently around, hugging the seat area. Keep the lines soft and rounded for a modern look. -
Texturing:
To mimic fabric upholstery, firmly tap surface of the clay with a toothbrush or stiff bristle brush. This removes fingerprints and adds a cozy, woven texture. I like to do this before adding the legs so I don’t crush them. -
Adding legs:
Roll out a thin snake of matching beige clay. Cut eight small, equal lengths (four for each chair). Attach them to the bottom corners. If the clay is fresh, they should stick, but a dab of liquid clay helps secure them.
Uneven Legs?
If your chairs wobble after baking, simply rub the bottom of the legs gently over fine-grit sandpaper on a flat surface until they sit flush and stable.
Step 2: Crafting the Accessories
-
The green tray-table:
Roll out sage green clay into a flat oval shape, about 2-3 inches long. Create a slight rim by gently pinching the edges upward. This acts as the floor rug or low table for the scene. -
Tiny cushions:
Using light pink clay, form two tiny rectangular pillows or ‘soaps’. Soften the corners and place them onto the green tray table. -
Miniature potted cactus:
Make a tiny pot using tan clay (a small cylinder with a hole in top). Place a small ball of dark brown clay inside as ‘dirt’. Add a tiny round green clay ball on top and poke it repeatedly with a needle tool to create a spiky cactus texture.
Step 3: Pottery and Plants
-
Terracotta planter:
Roll a larger ball of terracotta-colored clay. Press your thumb into the center to create a wide, low bowl shape. Keep the walls relatively thick for a rustic pottery feel. -
White textured planter:
Create a second, smaller pot using white or light grey clay. You can texture the outside with your brush or leave it smooth. Fill the bottom half with scrap clay to save material. -
Baking:
Arrange all your clay pieces (chairs, green tray, pots) on a baking sheet lined with parchment paper. Bake according to your clay package instructions (usually 275°F for 15-30 minutes per 1/4 inch thickness).
Pro Tip
To get the speckled look on the planter pots without painting, mix small shavings of black clay or ground black pepper into your white clay before sculpting.
Step 4: Assembly and Styling
-
Adding greenery:
Once baked and cooled, glue faux succulent pieces into the terracotta pot. Use small bits of gravel or coarse sand glue on top of the ‘soil’ area to conceal any plastic stems. -
Fern placement:
Glue the faux fern sprigs into the smaller white pot. Pack them tightly so it looks lush and full. -
Final arrangement:
Place your chairs, the green tray table, and the two potted plants inside the large speckled oval tray. You can leave them loose to rearrange later, or secure them with a tiny dot of museum wax for stability.
Now you have a stylish, miniature interior scene that brings a calm vibe to your desk or shelf