If you’re craving something festive but still totally sweet, Halloween clay bead bracelets are my go-to studio project this time of year. Here are my favorite cute Halloween designs using heishi clay beads, fun color palettes, and a few playful focal details.
Classic Orange, Black, and White Color Blocks
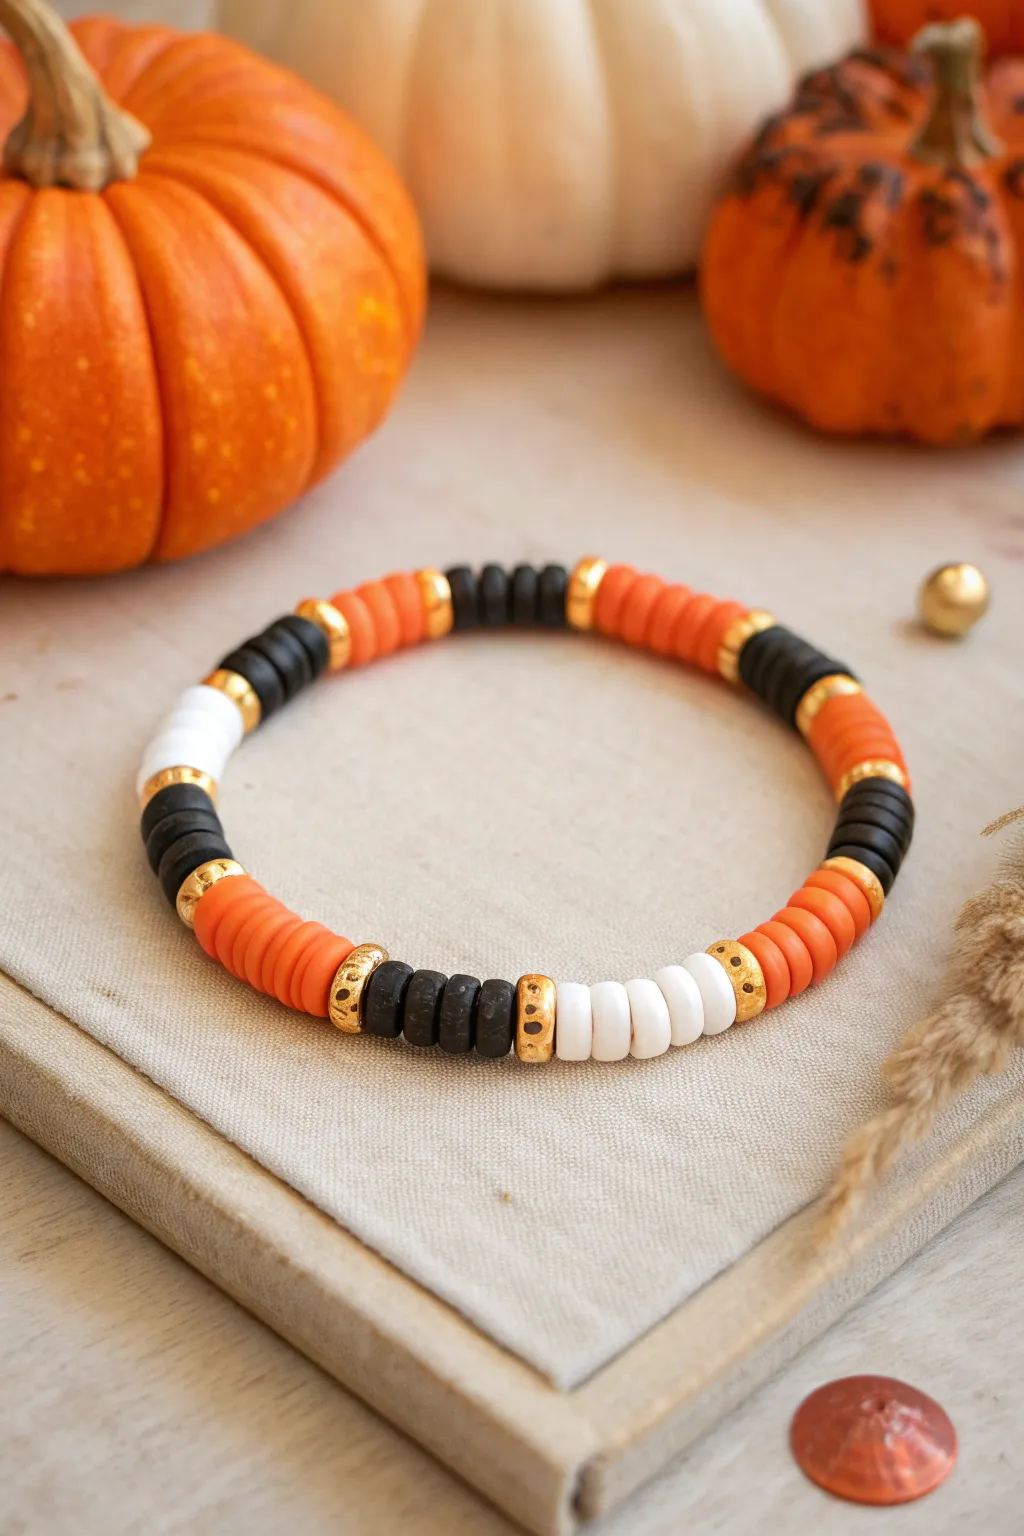
Embrace the spirit of the season with this crisp and clean color-blocked bracelet design. Featuring the quintessential trio of Halloween colors separated by gleaming gold accents, this accessory adds a polished touch to any spooky outfit.
Step-by-Step Guide
Materials
- Orange polymer clay disc beads (Heishi beads, approx. 6mm)
- Black polymer clay disc beads (Heishi beads, approx. 6mm)
- White disc beads (Heishi or pony bead style)
- Gold spacer beads (rondelle or disc shape, slightly textured)
- Clear elastic jewelry cord (0.8mm recommended)
- Jewelry glue or clear nail polish
- Scissors
- Tape or a bead stopper
- Beading needle (optional but helpful)
Step 1: Planning Your Pattern
-
Measure your wrist:
Before cutting any string, wrap a measuring tape around your wrist to find your size. Add about half an inch to this measurement for a comfortable fit, then cut a piece of elastic cord about 4 inches longer than that total length to give yourself plenty of tying room. -
Secure the end:
Attach a piece of tape or a bead stopper to one end of your elastic cord. This small step saves you the frustration of beads slipping off while you work. -
Establish the pattern math:
Look closely at the design. The pattern relies on symmetry. Each main color block consists of roughly 6-8 clay disc beads, punctuated by a single gold spacer on each side.
Knot Hiding Trick
Try to arrange your pattern so the final knot lands inside a gold bead or a black bead. The knot becomes nearly invisible against darker colors compared to white sections.
Step 2: Stringing the Beads
-
Start with gold:
Thread on one gold spacer bead to begin the sequence. This will act as the anchor for your first color section. -
Create the first orange block:
String approximately 7 to 8 orange clay disc beads. You want a block roughly 1 to 1.5 cm long. -
Add a gold divider:
Slide on another gold spacer bead to close off the orange section. -
Build the black block:
Thread on your black clay beads. Aim for the same count (around 7-8 beads) to keep the sections uniform with the orange block you just made. -
Insert the next separator:
Add a gold spacer bead after the black section is complete. -
Form the white accent:
Now for the high-contrast section. Add your white beads. In this specific design, the white section looks slightly shorter, using about 5-6 thicker white beads, so adjust accordingly if your white beads are thicker than the clay ones. -
Cap with gold:
Finish the color trio by adding one final gold spacer bead. -
Repeat the sequence:
Continue this pattern—Orange Block, Gold, Black Block, Gold, White Block, Gold—until you reach your desired length. I usually check the length against my wrist periodically to ensure a perfect fit.
Step 3: Finishing Touches
-
Pre-stretch the cord:
Once all beads are strung, gently pull on both ends of the elastic. This ‘pre-stretching’ helps prevent the bracelet from sagging later on after you’ve started wearing it. -
Remove the stopper:
Carefully take off the tape or bead stopper while firmly holding both ends of the elastic. -
Tie the knot:
Tie a secure surgeon’s knot (right over left, left over right) or a strong square knot. Pull it tight so the beads sit flush against each other with no gaps. -
Secure with glue:
Dab a tiny drop of jewelry glue or clear nail polish onto the knot. Let it dry completely before cutting anything. -
Trim the excess:
Use sharp scissors to trim the excess elastic tails close to the knot. If possible, gently tuck the knot inside one of the adjacent beads to hide it.
Jack-o’-Lantern Upgrade
Swap one of the solid orange sections for a custom bead mix! Use a black permanent marker to draw tiny jack-o’-lantern faces on a few orange beads for a playful detail.
Slide on your new bracelet and enjoy the perfectly balanced autumn vibes it brings to your wrist


Candy Corn Gradient Stripes

Capture the nostalgic essence of Halloween’s most controversial treat with this subtle yet festive bracelet. By blending white, soft yellow, and muted orange clay disc beads, you create a sophisticated gradient that nods to candy corn without being overly loud.
Detailed Instructions
Materials
- Polymer clay heishi beads (6mm or similar) in off-white/cream
- Polymer clay heishi beads in soft yellow
- Polymer clay heishi beads in muted orange or terracotta
- Elastic stretch cord (0.8mm or 1mm transparent)
- Super glue or jewelry glue
- Scissors
- Bead stopper or masking tape
- Ruler or measuring tape
Step 1: Preparation & Planning
-
Measure your wrist:
Wrap a measuring tape loosely around your wrist to determine the desired length. A standard adult bracelet is usually around 7 inches. -
Cut the cord:
Cut a piece of elastic cord about 10-12 inches long. This extra length is crucial for tying the knot comfortably later on. -
Secure the end:
Attach a bead stopper clip or a piece of masking tape to one end of the cord to prevent your beads from sliding off while you work. -
Plan the palette:
Lay out your three bead colors—cream, yellow, and orange—on a flat surface or bead mat. Notice how the image uses slightly muted, earthy tones rather than neon brights for a more modern look.
Irregularity is Key
For that organic, handmade look, vary the number of beads in each solid color block. Do 5 white, then 4 yellow, then 6 orange to keep it playful.
Step 2: Creating the Gradient Pattern
-
Start with white:
Begin stringing your beads with the cream/white color. Thread about 4 to 6 discs onto the cord to establish a solid block of color. -
Transition to yellow:
Instead of switching abruptly, add one yellow bead, then one cream, then two yellows. This staggering creates the soft gradient effect seen in the photo. -
Solidify the yellow block:
String 4 to 6 yellow beads consecutively. This forms the center of your ‘candy corn’ stripe. -
Transition to orange:
Repeat the gradient technique: add one orange bead, one yellow bead, one orange, then move into the solid orange block. -
Solid orange section:
Thread on 4 to 6 orange beads. The exact number creates the organic feel, so don’t worry about being perfectly precise with every block count. -
Reverse the gradient:
Now work backwards through the colors. Transition from orange back to cream. You can either go directly to cream (orange-cream-orange-cream) or cycle back through yellow depending on the specific striping you want. -
Continue the pattern:
Repeat these color blocks (Cream -> Yellow -> Orange -> Repeat) until you have filled the length of the cord minus about two inches of slack. -
Check the fit:
Wrap the unfinished strand around your wrist. The ends should touch comfortably without stretching the elastic too much.
Step 3: Finishing Touches
-
Pre-stretch the cord:
Before tying, give the ends of the cord a gentle tug. This pre-stretching helps prevent the bracelet from loosening up after you wear it for the first time. -
Tie the surgeon’s knot:
Cross the ends, loop one side through twice, and pull tight. Repeat this process to secure the knot firmly. -
Secure with glue:
I always place a tiny drop of super glue or jewelry cement right on the knot. Let it dry completely for a minute or two. -
Trim the excess:
Using sharp scissors, trim the tails of the elastic cord close to the knot, leaving just about 1-2mm. -
Hide the knot:
Gently pull the beads adjacent to the knot so that the knot slides inside the hole of one of the beads, hiding it from view.
Gold Accent Level Up
Insert a tiny gold saucer bead or a flat gold spacer between every full repetition of the candy corn pattern for a touch of elegance.
Slip on your new accessory and enjoy the spooky season with a subtle pop of color


“BOO” Letter Bead Centerpiece
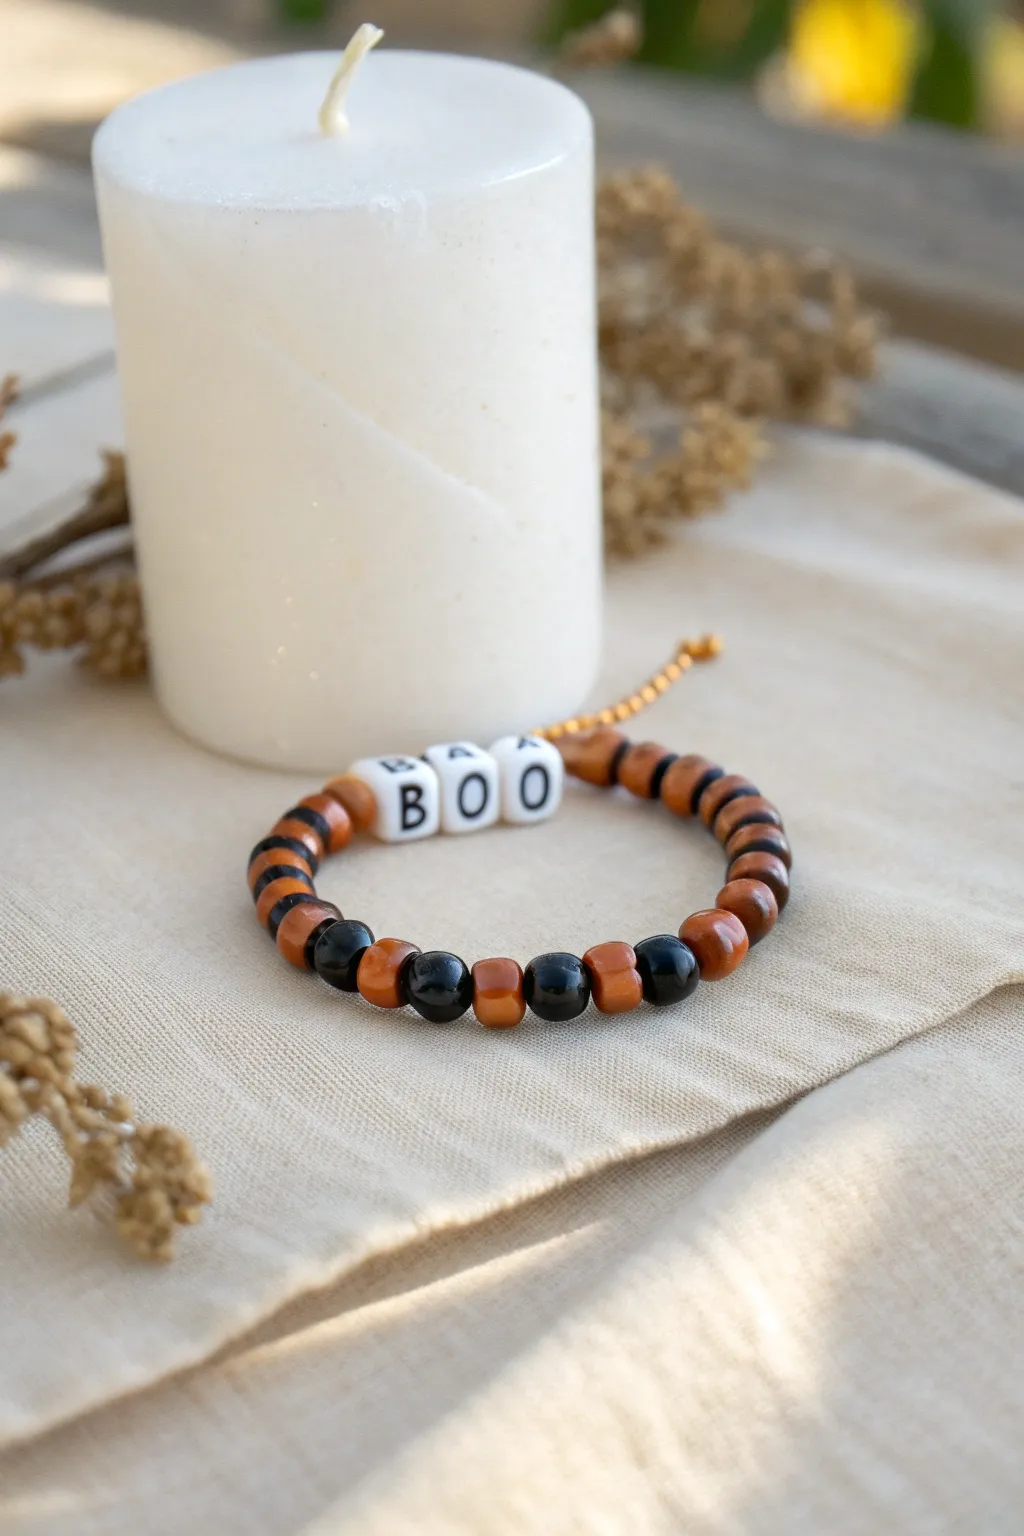
Embrace the Halloween spirit with this charmingly simple beaded bracelet. Featuring a classic pattern of pumpkin orange and varying black beads, the centerpiece spells out a festive “BOO” to add a playful touch to your autumn wardrobe.
Step-by-Step Guide
Materials
- Elastic stretch beading cord (0.7mm or 0.8mm)
- Square white alphabet beads (letters B, O, O)
- Small round wooden or clay beads in burnt orange
- Small round wooden or clay beads in black
- Larger striped or patterned beads (black and orange stripes)
- Black round beads (medium size)
- Gold crimp bead covers (optional)
- Jewelry glue or clear nail polish
- Scissors
- Beading needle (optional but helpful)
- Small gold extension chain and jump ring (optional for adjustable fit)
Step 1: Planning the Pattern
-
Measure your wrist:
Before you start stringing, wrap a piece of string around your wrist to find your comfortable size. Add about an inch to this measurement to allow for tying the knot later. -
Cut the cord:
Cut a length of elastic cord roughly 10-12 inches long. Having extra length makes the final knot-tying process significantly easier than struggling with short ends. -
Pre-stretch the elastic:
Give your cut piece of elastic a few gentle tugs. This pre-stretching helps prevent the bracelet from loosening up immediately after you wear it for the first time. -
Lay out your beads:
Arrange your beads on a layout board or a soft towel. Place the ‘B’, ‘O’, and ‘O’ beads in the center. Decide on the pattern for the sides; the image uses a mix of solid rounds and larger striped beads.
Sticky Situation
Use a piece of tape to secure one end of your elastic cord to your table while stringing. This prevents beads from sliding off the other end if you accidentally let go.
Step 2: Stringing the Design
-
Start from the center:
Thread the letter beads onto the cord first. String them in reverse order if you are working from one specific side, or just string ‘B-O-O’ and slide them to the absolute middle of your cord. -
Build the right side:
On the right side of the letters, add a small orange spacer bead. Follow this with a pattern: one black bead, one orange bead, one striped bead, then repeat or vary slightly as shown in the photo. -
Build the left side:
Repeat a symmetrical pattern on the left side of the ‘B’. Start with a small orange spacer, then mirror the bead sequence you created on the right side to maintain balance. -
Incorporate the striped beads:
Make sure to distribute the larger black-and-orange striped beads evenly. In the reference image, they act as accents between sections of solid colored rounds. -
Check the length:
Periodically wrap the beaded cord around your wrist. You want the ends to touch comfortably without gaps between the beads, but not be too tight against your skin. -
Add gold accents:
If you wish to attach the gold extension chain seen in the background, thread a jump ring onto one end of the cord now, before tying. This is optional but adds a professional finish.
Glow Up
Swap the white alphabet beads for glow-in-the-dark letter beads. It makes the ‘BOO’ message pop during trick-or-treating or dimly lit Halloween parties.
Step 3: Finishing Touches
-
Tie the first knot:
Bring the two ends of the elastic together carefully. Tie a simple overhand knot, pulling it tight against the beads so there is no slack in the loop. -
Secure with a surgeon’s knot:
For extra security, tie a surgeon’s knot. This is just like a standard square knot, but you loop the elastic through twice before pulling tight. This prevents slipping. -
Apply adhesive:
Dab a tiny drop of jewelry glue or clear nail polish directly onto the knot. This chemically bonds the elastic strands together so they won’t unravel. -
Hide the knot:
While the glue is still slightly tacky but not wet, pull the knot gently inside the hole of the nearest large bead. This conceals the mechanics of the bracelet. -
Trim the excess:
Once the glue is fully dry (I usually give it at least 15 minutes), trim the excess cord ends close to the bead hole. Be careful not to nick the main cord.
Your spooky wrist candy is now ready to wear for the entire Halloween season


Smiley Pumpkin Focal Bead Bracelet
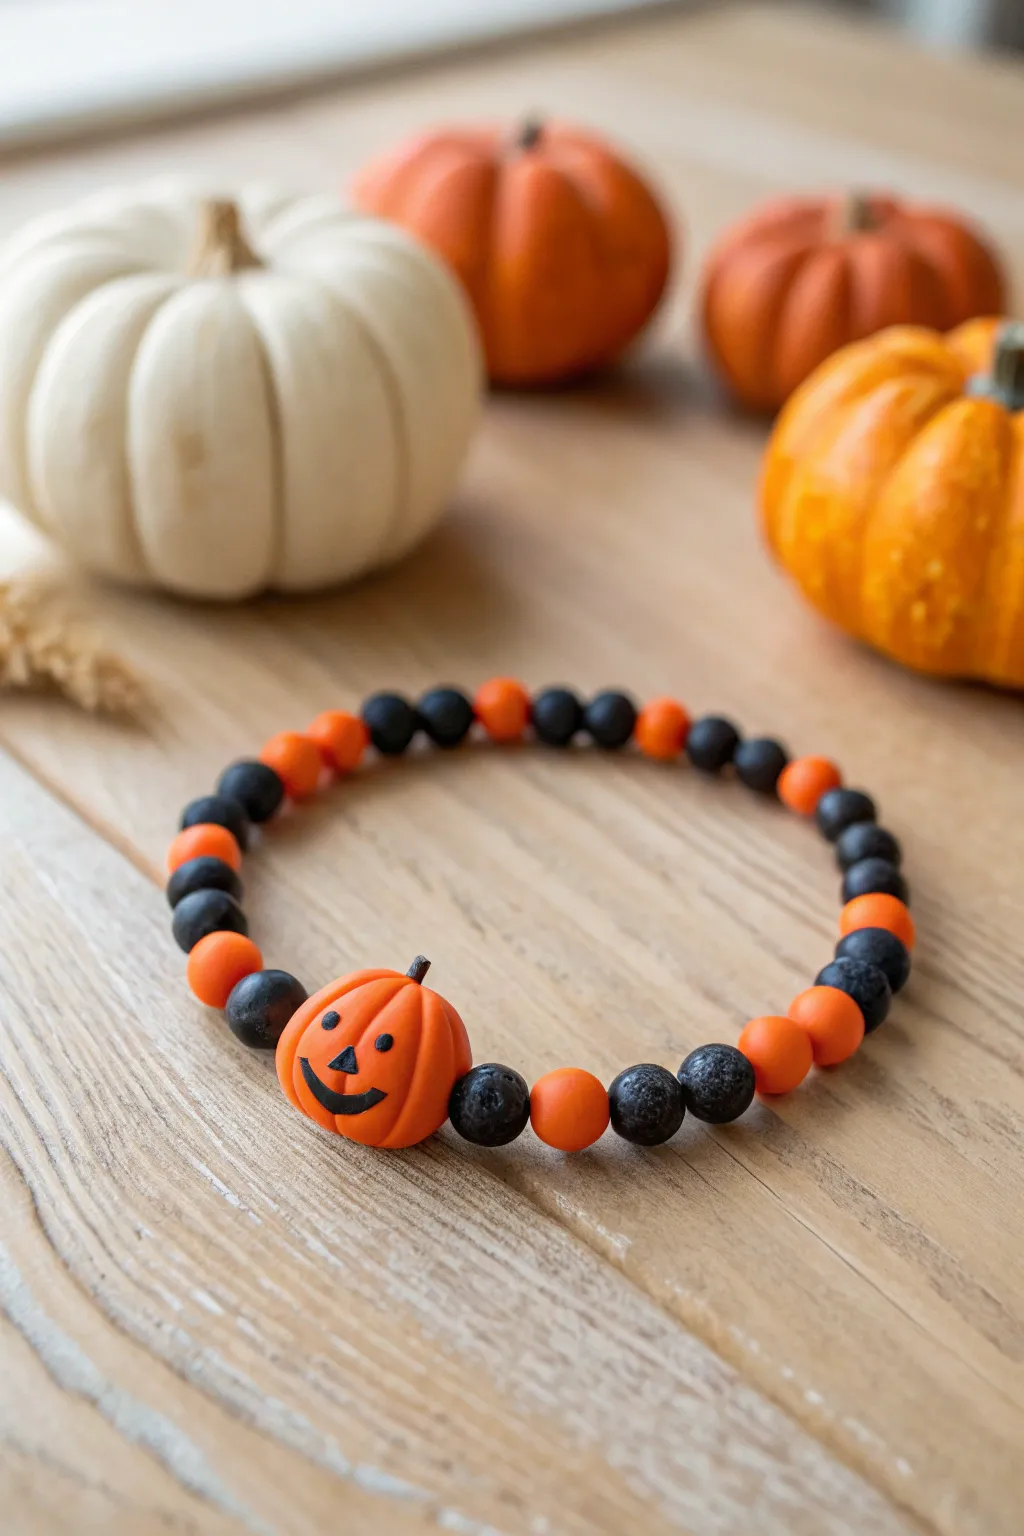
This charming bracelet balances spooky and sweet with a classic alternating black and orange pattern centered around an adorable handmade polymer clay pumpkin. The mix of matte and textured beads adds a lovely tactile element that elevates this simple Halloween accessory.
How-To Guide
Materials
- Polymer clay (Orange, Black)
- Black lava stone beads (8mm or 10mm)
- Matte orange acrylic or clay beads (8mm or 10mm)
- Elastic beading cord (0.8mm recommended)
- Needle tool or toothpick
- Clay sculpting tools (small ball tool)
- Beading needle (optional but helpful)
- Super glue or jewelry cement
- Scissors
- Oven for baking clay
Step 1: Sculpting the Pumpkin Charm
-
Form the Base:
Start by conditioning a chunk of orange polymer clay until it is soft and pliable. Roll it into a smooth sphere approximately 12-14mm in diameter, slightly larger than your surrounding beads. -
Create the Ribs:
Using a needle tool or the dull side of a craft knife, gently press vertical lines around the sphere. Start from the top center and curve down to the bottom center to mimic the natural ribs of a pumpkin. -
Pierce the Bead:
Carefully insert a needle tool or toothpick horizontally through the center of the pumpkin. Rotate the tool gently as you push it through to avoid squashing your sphere shape. Ensure the hole is wide enough for your elastic cord. -
Add the Stem:
Take a tiny pinch of black clay and roll it into a thin, short log. Attach this to the top of your pumpkin, pressing it down gently so it bonds with the orange clay. -
Make the Face:
Roll extremely tiny specks of black clay for the eyes and mouth. Flatten two small triangles for the eyes and a thin crescent shape for the smile. -
Attach Components:
Gently press the facial features onto the front of the pumpkin. You can use a needle tool to nudge them into the perfect position. -
Bake:
Place your focal bead on a baking sheet. Bake according to your brand of polymer clay instructions (usually 275°F/135°C for 15-30 minutes). Let it cool completely before handling.
Make It Shine
For a glossy finish on your pumpkin face, apply a thin coat of water-based polyurethane varnish or UV resin just on the eyes and mouth after baking.
Step 2: Assembling the Bracelet
-
Prepare the Cord:
Cut a piece of elastic cord about 10-12 inches long. This generous length makes it much easier to tie the finishing knot without struggling. -
Pre-stretch the Elastic:
Give your cord a few firm tugs. This is a crucial step I always do to prevent the bracelet from stretching out and becoming loose after the first wear. -
Start the Pattern:
Thread your beads onto the cord. Begin an alternating pattern: one textured black lava bead followed by one smooth matte orange bead. -
Check Length:
Continue the pattern until the strand is long enough to go almost all the way around your wrist, leaving a gap of about 1/2 inch for the focal bead. -
Add the Focal Bead:
Thread your cooled handmade pumpkin bead onto the cord. Position it so it sits between two black lava beads for maximum contrast. -
Verify Fit:
Wrap the loose strand around your wrist to double-check the sizing. Add or remove the pattern beads if necessary to get a comfortable fit. -
Tie the Knot:
Bring the two ends of the elastic together. Tie a surgeon’s knot (loop the cord through twice on the first pass, then tie a standard overhand knot on top) and pull it tight. -
Secure the Knot:
Apply a tiny drop of super glue or jewelry cement directly onto the knot. Let it dry for a minute or two. -
Hide the Knot:
Trim the excess cord ends close to the knot. Gently pull the elastic so the knot slips inside the hole of the large pumpkin bead or one of the adjacent lava beads to hide it.
Scented Surprise
Use the porous nature of the black lava beads by adding a drop of pumpkin spice or cinnamon essential oil to them for a scratch-and-sniff accessory.
Now you have a festive, custom accessory perfect for wearing throughout the entire autumn season

The Complete Guide to Pottery Troubleshooting
Uncover the most common ceramic mistakes—from cracking clay to failed glazes—and learn how to fix them fast.
Friendly Ghost Charm Drop
This minimalist Halloween bracelet combines sleek black and cream heishi beads with an adorable hand-painted ghost charm for a subtle spooky touch. It’s the perfect understated accessory that nods to the season without screaming costume jewelry.
Step-by-Step Tutorial
Materials
- Black polymer clay heishi beads (6mm)
- Cream or off-white polymer clay heishi beads (6mm)
- Small white flat bead or charm blank (oval or round)
- Black acrylic paint or permanent marker
- Fine detail paintbrush
- Gold jump ring (4mm or 5mm)
- Jewelry beading wire
- 2 Crimp beads
- 2 Wire guardians (optional but recommended)
- Jewelry chain extender and lobster clasp
- Flat nose pliers
- Wire cutters
Step 1: Creating the Ghost Charm
-
Prepare the charm base:
Select a flat, white bead or charm blank. If you are using polymer clay, roll a small ball of white clay, flatten it into an organic oval shape, poke a hole at the top with a needle tool, and bake according to package instructions. -
Paint the eyes:
Using a very fine detail brush or a fine-point permanent marker, draw two oval shapes for eyes near the upper middle of the charm. Leave a tiny bit of space between them for that classic ghostly expression. -
Add the mouth:
Below the eyes, create the mouth by painting four or five small dots in a slight upward curve, resembling a stitched smile. This gives the ghost a friendly, almost Jack Skellington-inspired vibe. -
Seal the design:
Once the paint is fully dry, I like to brush a thin layer of gloss varnish or clear nail polish over the face to protect the design from wear.
Step 2: Stringing the Beads
-
Cut the wire:
Measure your wrist and cut a piece of beading wire about 3 inches longer than your measurement to allow ample room for finishing the ends. -
Secure the first end:
Thread a crimp bead onto one end of the wire, followed by a wire guardian and one half of your clasp set (or a jump ring). Loop the wire back through the crimp bead. -
Crimp firmly:
Use your flat nose pliers to squash the crimp bead flat, securing the wire. Trim the short tail of excess wire close to the bead. -
Start the pattern:
Begin stringing your beads. Start with a section of black heishi beads. For the look in the photo, use approximately 10 to 12 black beads. -
Add contrast:
String on a smaller section of cream beads. Use about 3 to 4 beads to create a crisp, striped pause in the black pattern. -
Repeat the sequence:
Continue alternating between these long black sections and short cream sections until you reach the halfway point of your bracelet length.
Keep it Straight
When stringing flat heishi beads, occasionally roll the strand between your fingers to ensure the discs nest together flatly rather than bunching up crookedly.
Step 3: Attaching the Charm and Finishing
-
Center position:
Once you hit the middle of your bracelet, ensure you end on a cream section. Thread roughly 5 to 6 cream beads. -
Mount the charm:
Open a gold jump ring using two pliers to twist it sideways. Slide your ghost charm onto the ring. -
Place the charm:
Slide the jump ring (with the ghost) onto the beading wire right in the middle of that central cream section so it hangs freely. -
Finish the pattern:
Continue the pattern in reverse order to mirror the first half, alternating long black sections and short cream sections until the bracelet reaches your desired length. -
Secure the end:
Thread on a crimp bead, a wire guardian, and the other part of your clasp or extender chain. -
Final crimp:
Loop the wire back through the crimp bead and into the first few heishi beads. Pull tight to remove slack, flatten the crimp bead with pliers, and trim the excess wire.
Glow Up
Swap the white clay for glow-in-the-dark polymer clay when making the charm. Your friendly ghost will visibly shine when the lights go out for trick-or-treating.
Now you have a stylishly spooky accessory ready to wear all October long
Black Cat Accent With Pinky Blush

This charming bracelet balances the spookiness of Halloween with soft, earthy tones, featuring textured lava beads and gentle blush accents. It’s a sophisticated take on holiday jewelry that transitions effortlessly from October nights to everyday wear.
How-To Guide
Materials
- 6mm or 8mm black lava stone beads
- 6mm matte pink round beads (stone or clay)
- 6mm matte white round beads
- Cream or off-white heishi disc spacer beads (coconut shell or clay)
- Small gold accent spacer beads
- Gold tone jump ring (open)
- Small gold round charm blank
- Elastic stretch cord (0.8mm recommended)
- Jewelry finish glue (e.g., G-S Hypo Cement)
- Scissors
- Flat nose pliers (for the jump ring)
Step 1: Planning and Stringing
-
Measure your wrist:
Cut a length of elastic cord about 10-12 inches long. This gives you plenty of extra room for tying knots later without struggling. -
Pre-stretch the cord:
Give your elastic a few gentle tugs. This helps prevent the bracelet from stretching out and becoming loose after you wear it for the first time. -
Secure the end:
Place a piece of tape or a bead stopper clip on one end of the cord so your beads don’t slide off while you work. -
Start the pattern:
Begin your pattern near the center. Thread on two cream heishi disc beads followed by a black lava bead. -
Add the blush accent:
Next, slide on another two cream heishi discs, followed by a matte pink bead to introduce that soft blush tone. -
Build the sequence:
Continue this pattern: two heishi discs, one round bead. Rotate the round bead colors between black lava, matte pink, and matte white. -
Vary texture:
Notice in the reference image that some black beads are porous lava stone while others appear smoother; feel free to mix these textures for visual interest. -
Check length:
Wrap the strand around your wrist occasionally to check the fit. You want it snug but not tight, usually around 6.5 to 7 inches of beads for an average wrist. -
Prepare for the focal point:
When you near the end of your strand, thread on three small gold spacer beads. These will hide the knot and hold the charm.
Essential Oil Hack
Apply a drop of fall-scented essential oil (like pumpkin spice or cinnamon) to the black lava beads. They are porous and will diffuse the scent all day.
Step 2: Finishing Touches
-
Tie the knot:
Remove the tape or stopper. Bring the two ends of the cord together and tie a surgeon’s knot (loop the cord through twice before pulling tight). -
Tighten securely:
Pull the cords firmly to secure the knot. I like to see the elastic stretch slightly to know it’s tight enough. -
Glue the knot:
Apply a tiny dab of jewelry glue specifically on the knot. Let it dry for a moment to ensure it won’t slip. -
Hide the mechanism:
Gently slide the knot inside the hole of one of the adjacent beads or tuck it near the gold spacers so it remains invisible. -
Trim excess:
Use your scissors to trim the excess elastic tail, being careful not to cut the main cord or the knot itself. -
Prep the charm:
Take your gold blank charm and an open jump ring. Using flat nose pliers, twist the jump ring open sideways (never pull it apart). -
Attach the charm:
Loop the open jump ring around the gold spacer beads section of the bracelet and slide the charm onto the ring. -
Close the ring:
Use the pliers to twist the jump ring closed again, ensuring the ends meet perfectly flush so the ring doesn’t snag. -
Final inspection:
Give the bracelet a final gentle stretch test to make sure everything holds together and the pattern looks even.
Gap Prevention
If you see gaps between beads when wearing it, add 1-2 extra heishi spacers. Beads sit differently on a curved wrist than they do on a flat table.
Enjoy wearing your sophisticated Halloween accessory that adds just the right amount of subtle spookiness to your outfit


What Really Happens Inside the Kiln
Learn how time and temperature work together inside the kiln to transform clay into durable ceramic.
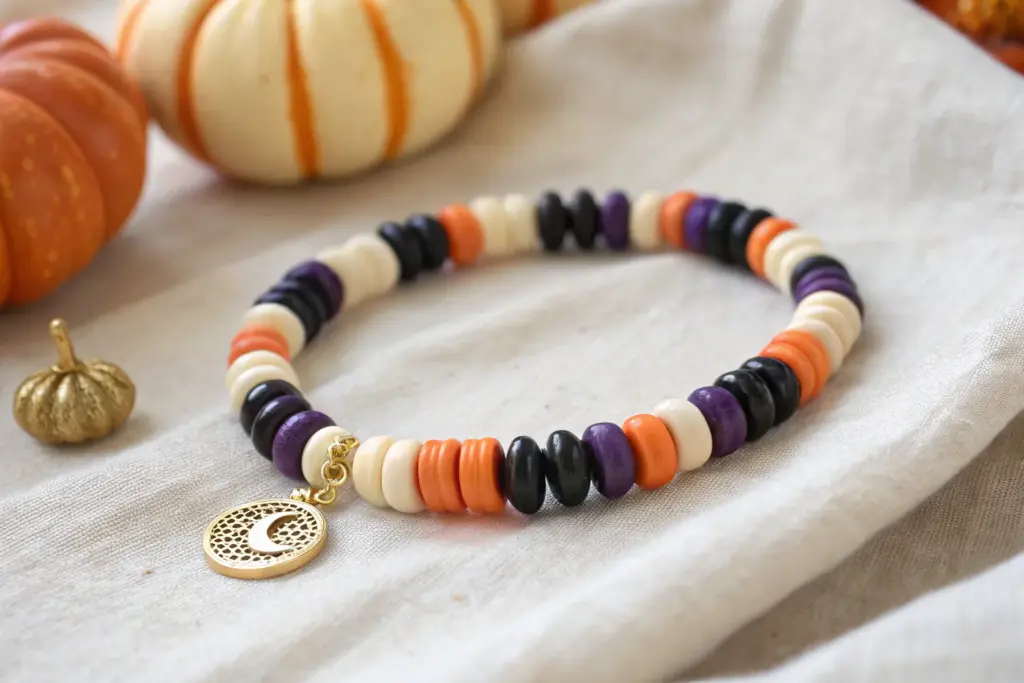
Bat and Moon Night-Sky Pattern
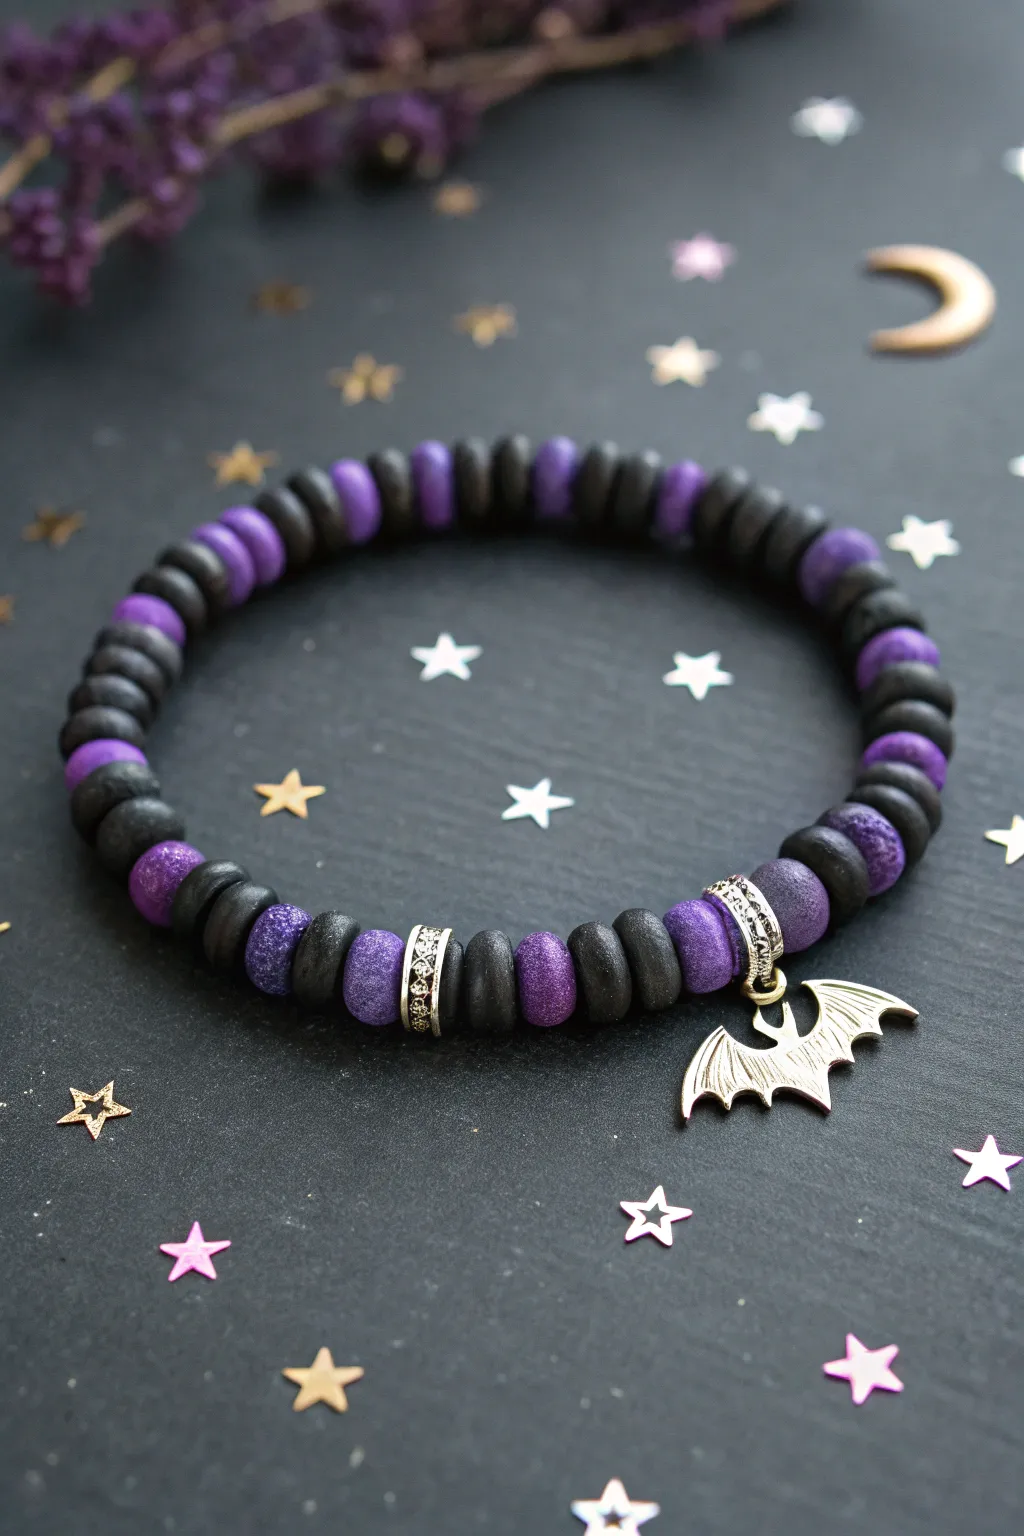
Capture the magic of a starry Halloween sky with this stylish clay bead bracelet. Featuring a classic alternating pattern of matte black and textured purple discs, it’s centered by a striking silver bat charm for just the right amount of spooky flair.
Step-by-Step Tutorial
Materials
- Polymer clay heishi beads (disc beads) in matte black
- Polymer clay heishi beads (disc beads) in textured/glittery purple
- Elastic stretch cord (0.7mm or 0.8mm clear)
- Silver-tone metal spacer beads with intricate detailing (cylindrical shape)
- Silver-tone bat charm
- Jump ring (silver-tone, 4mm or 5mm)
- Jewelry glue or clear nail polish
- Scissors or jewelry wire cutters
- Flat-nose pliers
- Bead stopper or binder clip
Step 1: Preparation & Charm Assembly
-
Measure the Cord:
Cut a piece of elastic cord about 10-12 inches long. This generous length gives you plenty of room to tie knots later without struggling with tight ends. -
Secure the End:
Attach a bead stopper or a binder clip to one end of your cord to prevent your intricate pattern from sliding off while you work. -
Prep the Charm:
Locate the small loop on top of your silver bat charm. Using two pairs of pliers (or your fingers and one pair), gently twist your open jump ring sideways to create a gap. -
Attach the Charm:
Slide the bat charm onto the jump ring. Then, loop the jump ring onto what will become the center of your bracelet—often, I like to hang it directly onto the elastic cord itself, or attach it to a specific bail bead if you have one. For this design, we will slide the jump ring directly onto the cord later. -
Close the Jump Ring:
Twist the jump ring back into a closed circle, ensuring the ends meet perfectly flush so the charm doesn’t slip off.
Knot Too Slippery?
If the elastic knot keeps slipping undone before the glue dries, try tying the knot while the cord is under slight tension, or ask a friend to hold the first loop down.
Step 2: Beading the Pattern
-
Start the Sequence:
Begin threading your beads. The core pattern shown here is: two black beads, followed by one purple bead. Repeat this ‘2 Black, 1 Purple’ sequence about 10-15 times for the first half of the bracelet. -
Check the Length:
Pause and wrap the beaded section around your wrist to estimate how close you are to the center point. You want the charm to sit right in the middle. -
Add Decorative Spacers:
Once you near the center, add one silver decorative spacer bead. This frames the focal point elegantly. -
Create the Centerpiece:
Thread a few more pattern beads (e.g., 2 black, 1 purple, 2 black) to create a small buffer. -
Insert the Charm:
Slide your closed jump ring (with the bat charm attached) onto the elastic cord now. Let it rest against the beads you just placed. -
Mirror the Center:
Add the matching buffer beads on the other side of the charm (e.g., 2 black, 1 purple, 2 black). -
Finish the Center Frame:
Slide on the second decorative silver spacer bead. Your bat charm is now perfectly framed by silver accents. -
Complete the Pattern:
Continue the main pattern (2 Black, 1 Purple) on the second half of the cord until the bracelet reaches your desired total length.
Step 3: Finishing Touches
-
Pre-Stretch the Cord:
Before tying, give the ends of the elastic a gentle tug. This pre-stretching helps prevent the bracelet from sagging or loosening immediately after you wear it. -
Make the First Knot:
Remove the bead stopper and bring the two ends together. Tie a simple overhand knot, pulling it tight against the beads without causing them to buckle. -
The Surgeon’s Knot:
Tie a surgeon’s knot for extra security. Loop the ends over each other as if tying a standard knot, but pass the top tail through the loop twice instead of once before pulling tight. -
Secure with Glue:
Dab a tiny drop of jewelry glue or clear nail polish onto the knot. Let it dry completely—don’t rush this step. -
Conceal the Knot:
Trim the excess cord ends close to the knot (leave about 1-2mm). Gently pull the cord so the knot slides inside the hole of the nearest black disc bead to hide it.
Texture Tip
Mix up your heishi beads! Using standard matte black beads alongside glittery or ‘sandstone’ texture purple beads creates depth and makes the colors pop.
Now your wrist is ready for a moonlit flight with this perfectly spooky accessory
Witchy Purple, Black, and Green Pops
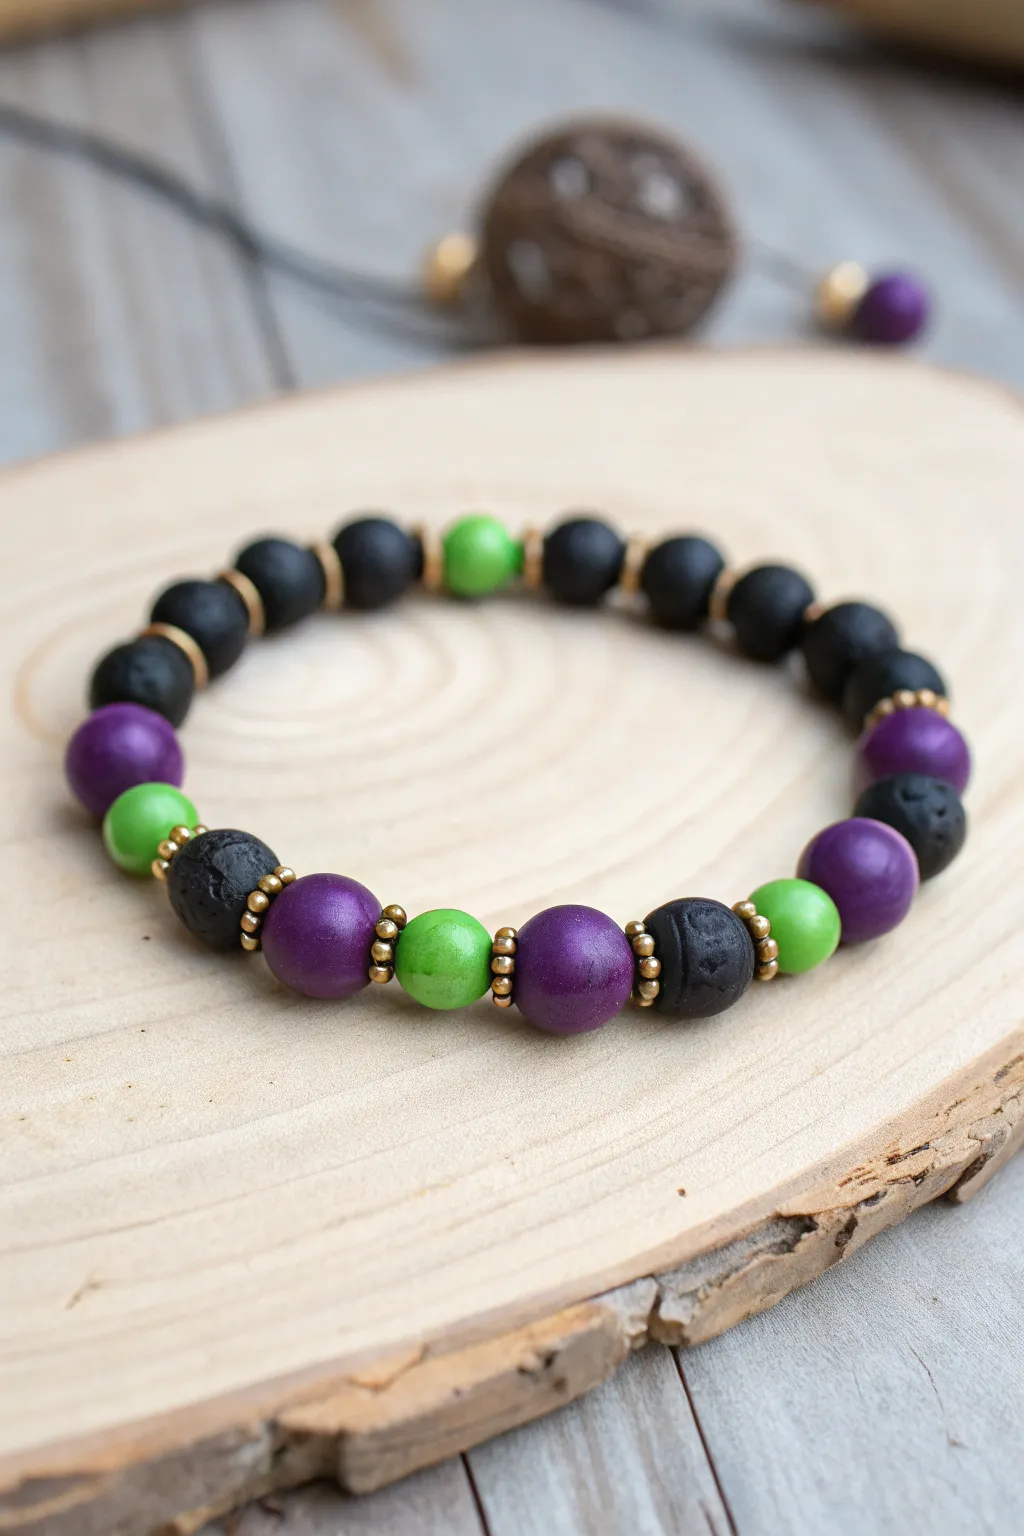
Channel the classic colors of a witch’s brew with this striking beaded bracelet that balances spooky and chic. Combining textured lava stones with smooth, vibrant clay beads creates a delightful tactile contrast perfect for the Halloween season.
Detailed Instructions
Materials
- Black lava stone beads (8mm)
- Purple polymer clay or acrylic round beads (8mm)
- Lime green polymer clay or acrylic round beads (8mm)
- Gold tone spacer beads (daisy or tiny rondelle style)
- Stretch cord (0.8mm or 1mm thickness)
- Jewelry glue or clear nail polish
- Scissors
Step 1: Preparation
-
Measure your wrist:
Wrap a piece of string around your wrist to find a comfortable fit. Add about half an inch to this measurement to account for the bulk of the 8mm beads. -
Cut the cord:
Cut a length of stretch cord about 10-12 inches long. Is usually cut slightly longer than needed to make tying the knot easier at the end. -
Pre-stretch the cord:
Hold both ends of the cord and give it a few firm tugs. This pre-stretching step helps prevent the bracelet from sagging or loosening up after you wear it a few times. -
Secure the end:
Place a piece of tape on one end of the cord or attach a bead stopper clip so your beads don’t slide off while you are working.
Knot Slipping?
If your stretch cord feels too slick and the knot won’t hold, try sanding the very ends of the cord lightly with an emery board before tying to create friction.
Step 2: Creating the Pattern
-
Start with the main focal section:
Begin stringing with an alternating pattern of color. Slide on a purple bead, followed by a gold spacer, then a textured black lava bead. -
Continue the focal sequence:
Add another gold spacer, followed by a bright lime green bead, and another gold spacer. -
Build the center motif:
Repeat the sequence: purple bead, spacer, black lava bead, spacer, lime green bead. Continue this colorful alternating pattern for about the front half of the bracelet (roughly 3-4 inches). -
Transition to the back:
Once you have your vibrant ‘witchy’ section done, switch to a darker aesthetic for the back of the wrist. Thread on a single gold spacer after your last colored bead. -
String the back section:
Thread on a series of black lava stone beads. Between every one or two black beads, add a single gold spacer to keep the metallic accent consistent. -
Incorporate the lone accent:
About halfway through the black section, add a single lime green bead flanked by gold spacers. This adds a nice pop of color to the back so the bracelet looks good from all angles. -
Finish the perimeter:
Continue adding black lava beads until the strand reaches your desired length.
Aromatic Touch
Add a drop of essential oil to the porous lava stones. They absorb the oil and will act as a personal diffuser throughout the day.
Step 3: Finishing Touches
-
Check the size:
Carefully bring the two ends of the cord together and wrap the bracelet around your wrist to verify the fit. Add or remove black beads if necessary. -
Tie the knot:
Remove the tape or clip. Tie the ends together using a surgeon’s knot (right over left, left over right, and loop through an extra time) for extra security. -
Secure with glue:
Apply a tiny drop of jewelry glue or clear nail polish directly onto the knot. Wait a moment for it to become tacky before pulling it tight one last time. -
Hide the knot:
Once the glue is dry, trim the excess cord ends close to the knot. Gently pull the cord so the knot slides inside the hole of the nearest black lava bead to hide it.
Now you have a wickedly cute accessory ready to complement any Halloween outfit

TRACK YOUR CERAMIC JOURNEY
Capture glaze tests, firing details, and creative progress—all in one simple printable. Make your projects easier to repeat and improve.
Spiderweb-Inspired Alternating Lines
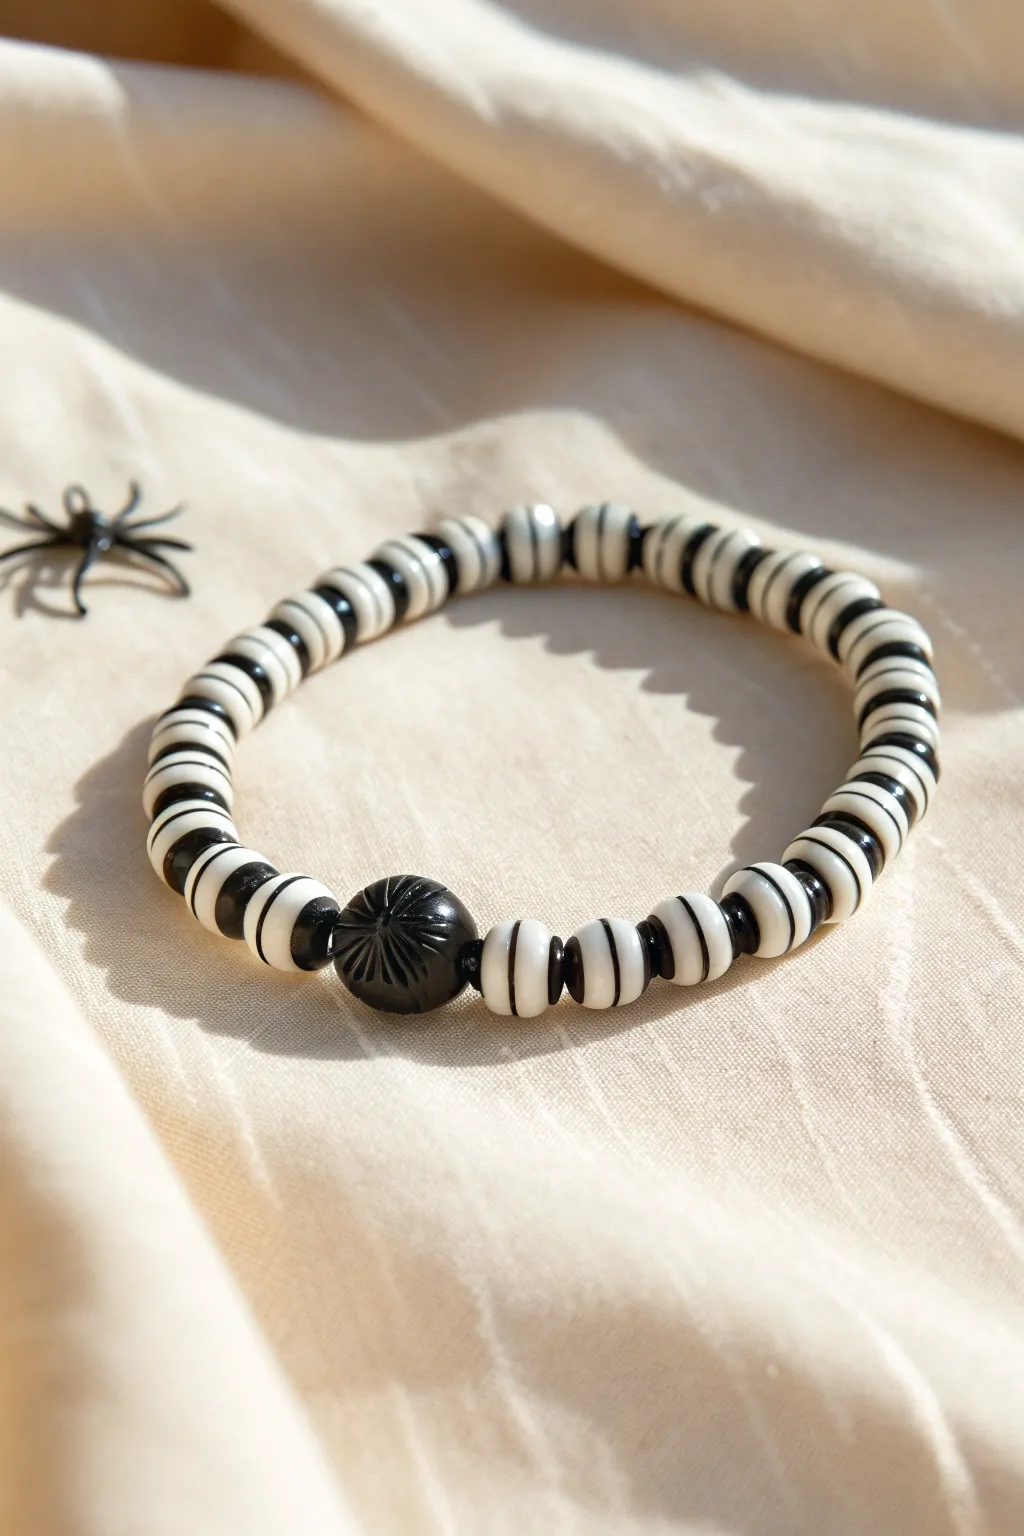
Capture the spooky spirit with this striking black and white striped bracelet that echoes classic Halloween aesthetics and spiderweb vibes. The design relies on high-contrast clay disc beads and a unique focal bead to create a bold, graphic accessory perfect for the season.
How-To Guide
Materials
- White polymer clay heishi beads (6mm or 8mm)
- Black polymer clay heishi beads (6mm or 8mm)
- Black round focal bead with carved or textured details (approx. 10-12mm)
- Stretch cord (0.8mm clear elastic)
- Jewelry glue or clear nail polish
- Scissors
Step 1: Pattern Planning
-
Measure your wrist:
Wrap a piece of string around your wrist to find a comfortable fit, then add about an inch to account for tying the knot later. Cut your stretch cord to this length plus a few extra inches for easier handling. -
Pre-stretch the cord:
Give your length of elastic cord a few gentle tugs before you begin stringing. I always do this because it prevents the bracelet from loosening up significantly after the first wear. -
Determine the sequence:
This design uses a repeating pattern of white and black discs. To replicate the ‘spiderweb’ look, you will group several white beads together, separated by single black beads. -
Lay out the beads:
Before stringing, lay out your beads on a bead board or a piece of felt. Arrange a set of 3 white heishi beads followed by one black heishi bead to test the visual rhythm.
Tuck & Hide
If the knot won’t fit inside the focal bead, widen the hole of an adjacent clay bead slightly using a bead reamer or a thick needle to accommodate it.
Step 2: Stringing the Design
-
Secure the end:
Place a piece of tape or a bead stopper on one end of your cord so your hard work doesn’t slide off while you string. -
Start the pattern:
Thread on three white heishi beads. Follow this immediately with one black heishi bead. -
Build the first half:
Continue this 3-white, 1-black pattern until you have filled approximately half the length needed for your wrist size. -
Add the focal point:
Slide on the large black textured focal bead. This bead acts as the ‘spider’ or center knot of the web design. -
Check for symmetry:
Look at the pattern leading up to the focal bead. If you ended with a black spacer bead before the focal, start the other side with a black spacer bead for perfect symmetry. -
Finish the strand:
Resume the pattern of three white beads and one black bead until you reach your desired total length.
Step 3: Closing the Loop
-
Check the fit:
Carefully wrap the unfinished strand around your wrist. Ideally, the two ends should meet comfortably without stretching the cord tight, leaving no large gaps between beads. -
Tie the first knot:
Remove the tape or stopper. Bring the two ends together and tie a simple overhand knot, pulling it gently down close to the beads. -
Secure with a surgeon’s knot:
For the main security knot, tie a surgeon’s knot. This is like a standard square knot, but you loop the cord through twice before pulling tight. -
Apply adhesive:
Place a tiny drop of jewelry glue (or clear nail polish in a pinch) directly onto the knot. This prevents the elastic from slipping over time. -
Hide the knot:
Once the glue is tacky but not fully dry, try to slide the knot inside the hole of the large focal bead or one of the adjacent heishi beads if the hole is large enough. -
Trim the excess:
Once the glue is completely dry, trim the excess cord ends close to the beads with your scissors.
Glow Up
Swap the standard white heishi beads for glow-in-the-dark polymer clay beads. The design looks classic by day but reveals a glowing skeleton ribcage look at night.
Enjoy wearing your spooky-chic accessory all October long
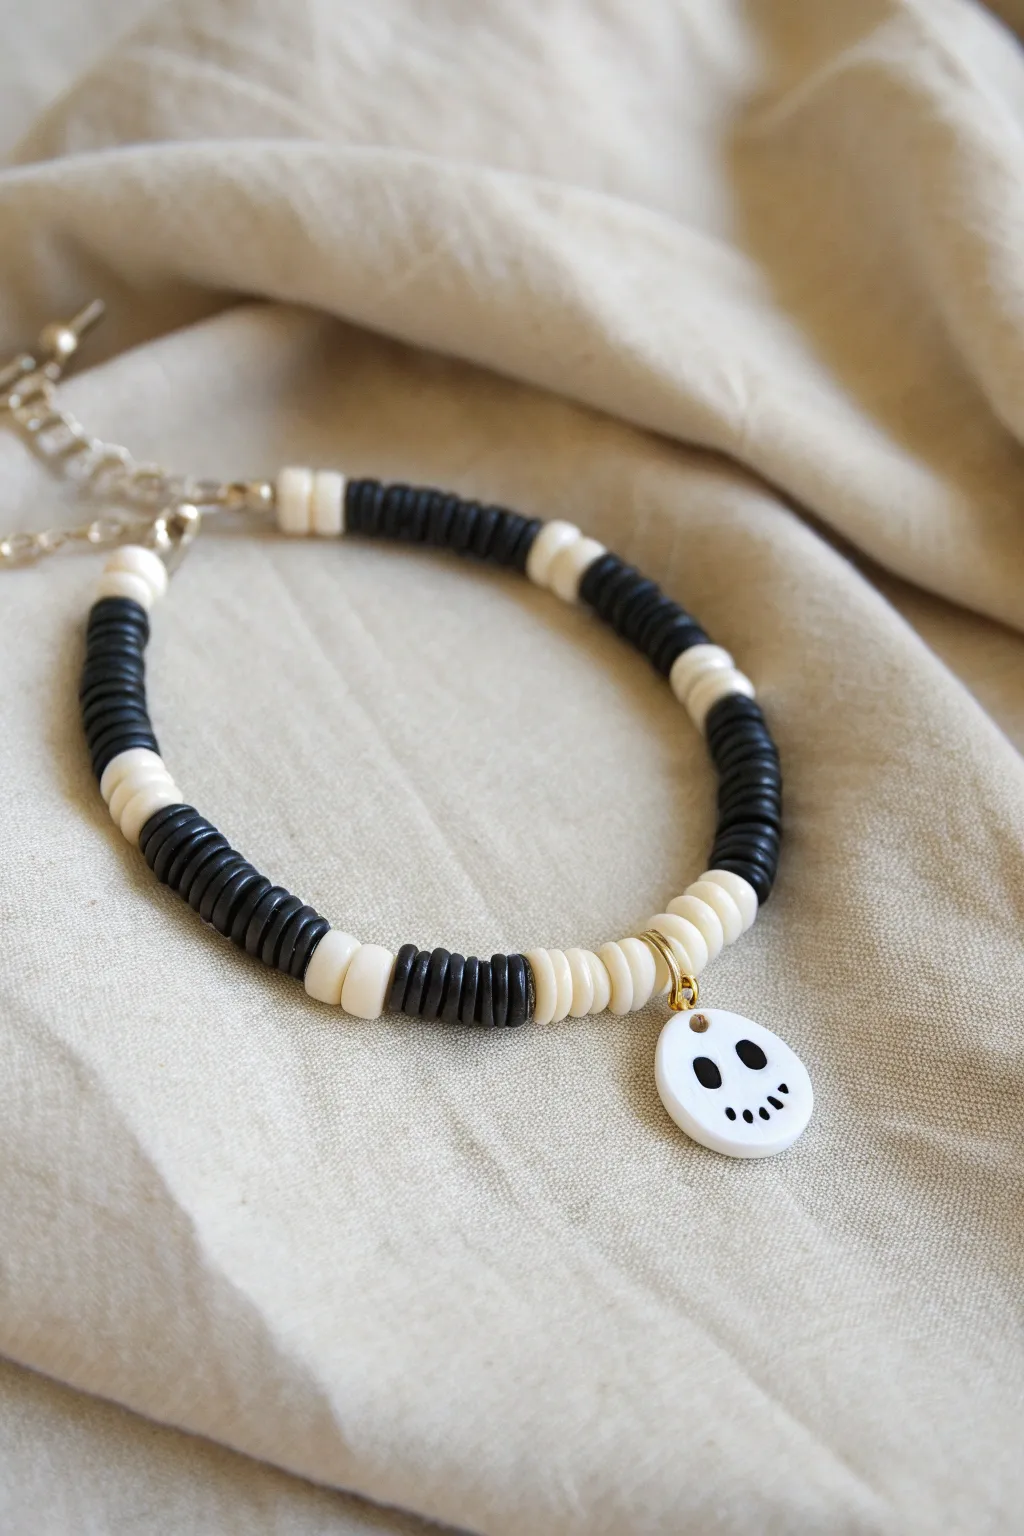
Cute Skull With Soft Neutrals
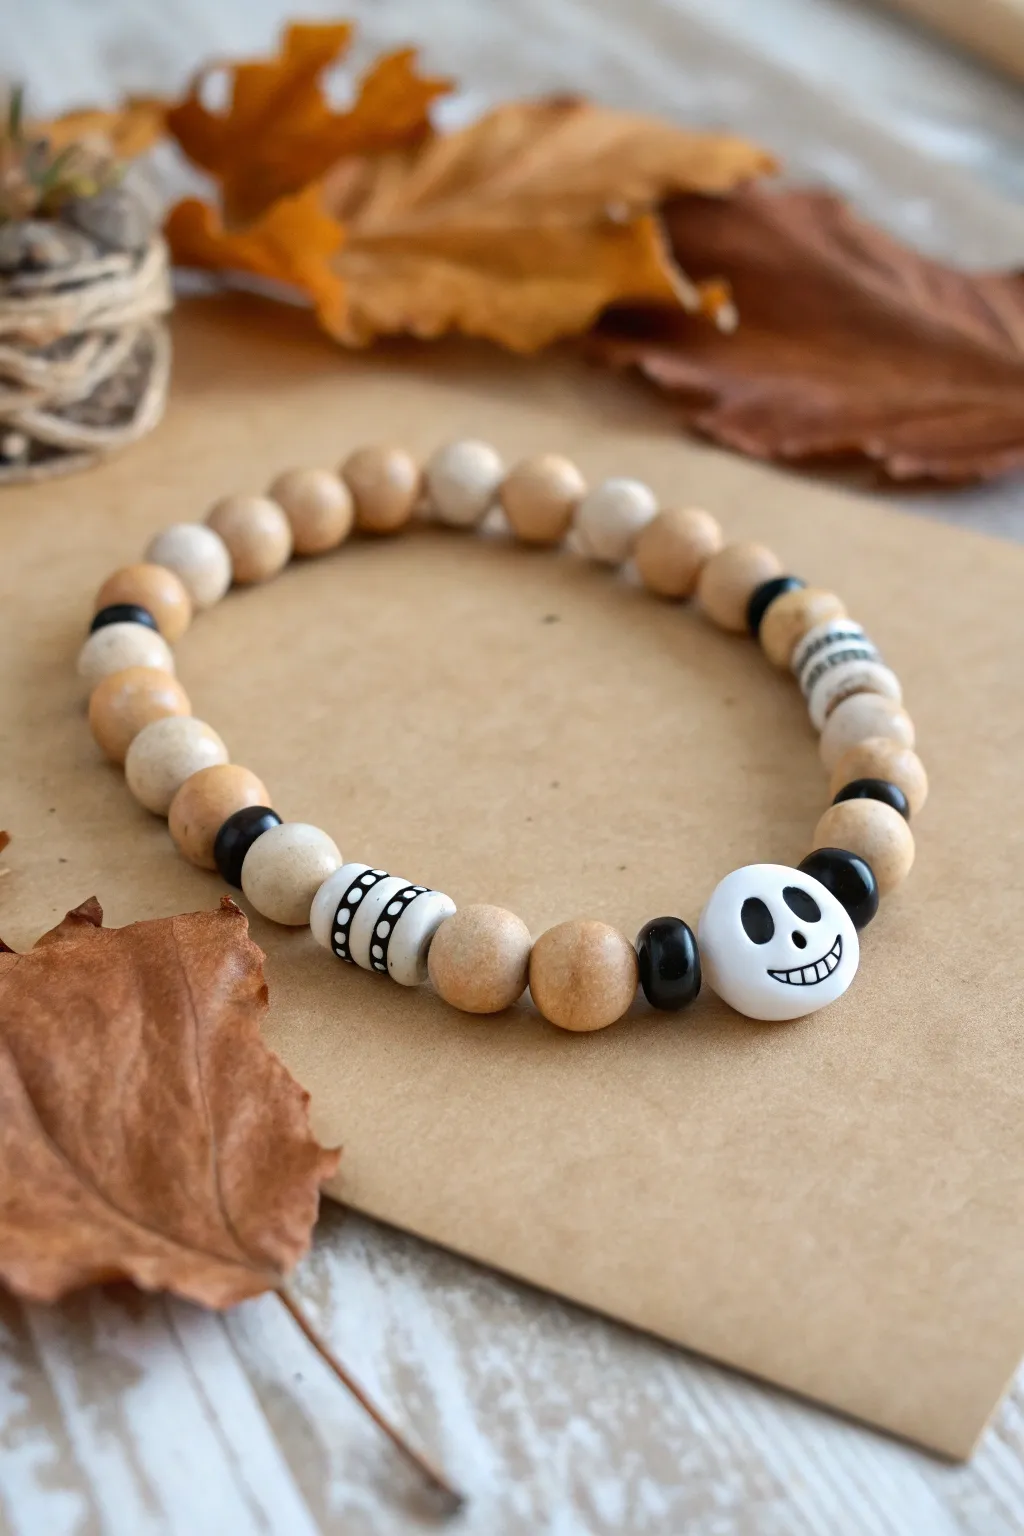
This charming Halloween accessory combines the rustic warmth of natural wood with a playful spooky touch. By mixing neutral tones with stark black accents and a hand-drawn clay bead, you create a piece that feels both festive and sophisticated enough for everyday wear.
Step-by-Step Guide
Materials
- Large white polymer clay round bead (10-12mm)
- Black permanent marker or fine-tip acrylic paint pen
- Natural light-wood round beads (8mm and 10mm mixed)
- Small black spacer beads or seed beads
- White tube/barrel bead with black patterns (or plain white barrel bead)
- Elastic beading cord (0.8mm recommended)
- Super glue or jewelry adhesive
- Scissors
- Tape or bead stopper
Step 1: Creating the Focal Bead
-
Prepare the face bead:
Start with your large white round clay bead. Ensure the surface is clean and dry so the ink adheres properly. -
Draw the eyes:
Using a fine-tip black permanent marker or acrylic paint pen, draw two large, slightly oval-shaped eyes near the top center of the bead. -
Add the nose:
Just below and between the eyes, draw two small teardrop shapes or slits for the nostrils. -
detail the smile:
Draw a wide, curved line underneath the nose for the mouth. Add short vertical tally marks along the curve to create the classic stitched skeleton grin. -
Let it set:
Allow the ink or paint to dry completely. I usually give this at least 10 minutes to prevent smudging during assembly.
Seal the Deal
To keep the marker face from rubbing off over time, coat the painted white bead with a thin layer of matte Mod Podge or clear nail polish.
Step 2: Arranging the Pattern
-
Secure the cord:
Cut a piece of elastic cord about 10 inches long. Place a piece of tape or a bead stopper on one end to keep beads from sliding off. -
Start with the focal point:
Thread the skull face bead onto the cord first so it ends up in the center of your design. -
Frame the face:
On the immediate left side of the skull, add one black spacer bead. Repeat this on the immediate right side. -
Add wood accents:
Next to the black spacers on both sides, thread on a medium-sized (10mm) natural wood bead. -
Add the next wood beads:
Add a slightly smaller (8mm) wood bead next to the 10mm ones on both sides. This subtle gradation adds nice texture. -
Insert the patterned bead:
On the left side of the string only, add the white barrel bead with black patterns after your first two wood beads. If yours is plain, draw stripes or dots on it first. -
Balance the right side:
On the right side, mimic the placement by adding another patterned barrel bead after the second wood bead to keep symmetry, or skip it for an asymmetrical look like the photo. -
Continue the neutral pattern:
Fill the rest of the string with the remaining wood beads. Alternating between the 8mm and 10mm sizes creates a more organic, natural feel. -
Add black accents:
Intermittently place a black spacer bead or two between the wood beads as you work your way around, particularly near the back, to tie in the color scheme.
Step 3: Finishing Touches
-
Check the fit:
Wrap the unfinished strand around your wrist to ensure it’s comfortable. Add or remove wood beads from the ends as needed. -
Pre-stretch the cord:
Gently pull on both ends of the elastic cord a few times. This pre-stretching prevents the bracelet from becoming loose after you wear it. -
Tie the knot:
Remove the tape or stopper and tie a strong surgeon’s knot (right over left, left over right) to secure the circle. -
Secure the join:
Dab a tiny drop of super glue or jewelry adhesive onto the knot. Let it dry for a few seconds. -
Hide the details:
Trim the excess cord close to the knot. If possible, gently tug the cord so the knot slides inside the hole of the nearest wood bead to hide it.
Level Up: Pumpkin Spice
Replace the black spacer beads with burnt orange seed beads to give the neutral palette a warmer, pumpkin-inspired autumn vibe.
Now you have a delightfully subtle Halloween accessory that pairs perfectly with cozy fall sweaters
Mini Potion Colors With “MAGIC” Letters
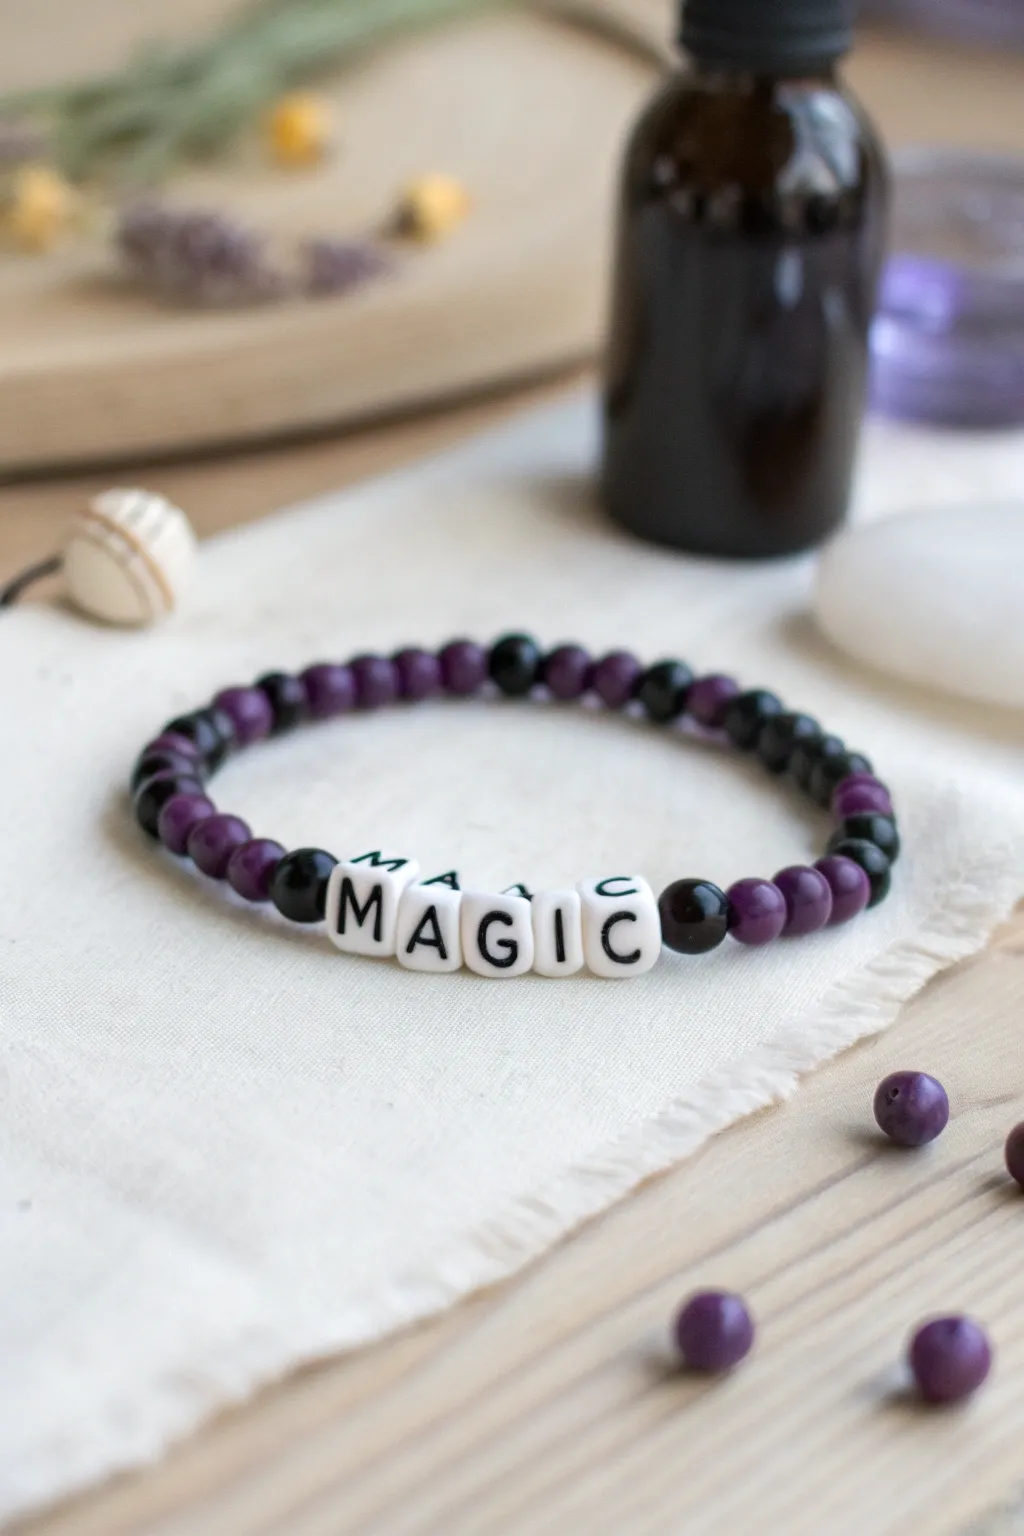
Channel the enchanting vibes of a bubbling potion with this simple yet striking beaded bracelet design. The deep purples and blacks contrast beautifully with crisp white letter beads, creating a wearable spell that is perfect for spooky season or everyday whimsy.
Step-by-Step Tutorial
Materials
- Elastic cord (0.8mm clear)
- 6mm round matte purple beads (acrylic or wood)
- 6mm round glossy black beads (onyx or acrylic)
- White square letter beads spelling ‘MAGIC’
- Scissors
- Bead stopper or binder clip
- Jewelry glue or clear nail polish
Step 1: Preparation and Setup
-
Measure the cord:
Cut a length of elastic cord approximately 10-12 inches long. This generous length gives you plenty of room to knot it securely later without frustration. -
Stretch the elastic:
Gently pull on the cord a few times to pre-stretch it. This crucial step prevents the finished bracelet from sagging or loosening after you start wearing it. -
Secure the end:
Attach a bead stopper or a simple binder clip to one end of the cord. This acts as an anchor so your beads don’t slide right off while you’re working.
Step 2: Creating the Centerpiece
-
Plan the word:
Locate your white square letter beads: M, A, G, I, and C. Arrange them in order on your work surface to ensure you thread them correctly. -
Add flanking beads:
Before adding the letters, thread one glossy black bead onto the cord. This will sit immediately to the left of the ‘M’. -
Thread the word:
Slide the letter beads onto the cord in order, starting with ‘M’ and ending with ‘C’. Double-check that they are all facing the correct direction. -
Finish the focal point:
Add one glossy black bead immediately after the ‘C’. Your central ‘MAGIC’ section is now framed by two black beads.
Knot Slipping?
If your elastic knot feels loose, try tying it while the cord is under slight tension. A surgeon’s knot holds much better on stretchy cord than a standard square knot.
Step 3: Building the Pattern
-
Start the left side:
Working outward from the left black bead, add two matte purple beads. -
Establish the rhythm:
Add one black bead, followed by two purple beads. This is your primary pattern unit: 1 black, 2 purple. -
Continue the left:
Repeat this pattern (1 black, 2 purple) until you have covered about half of the remaining length needed for your wrist size. -
Start the right side:
Switch to the other side of the ‘MAGIC’ centerpiece. Add two matte purple beads next to the right-hand framing black bead. -
Mirror the pattern:
Continue adding beads in the same rhythm: 1 black, 2 purple. I find it helpful to hold the bracelet up to my wrist occasionally to check the fit. -
Check symmetry:
Ensure both sides have an equal number of pattern repeats so the word ‘MAGIC’ stays centered on your wrist. -
Final sizing:
Add or remove pattern units as needed until the bracelet wraps comfortably around your wrist with no gaps.
Add Sparkle
Swap the matte purple beads for iridescent or glitter-filled purple beads to give the bracelet a shimmering, magical potion effect under the light.
Step 4: Finishing Touches
-
Tie the knot:
Remove the bead stopper and bring the two ends together. Tie a surgeon’s knot (loop the cord through twice before tightening) for extra security. -
Secure with glue:
Apply a tiny dab of jewelry glue or clear nail polish directly onto the knot. This prevents it from slipping over time. -
Hide the knot:
If one of your black beads has a larger hole, gently tug the knot inside it to conceal the join. -
Trim excess:
Once the glue is dry, use your sharp scissors to trim the excess cord tails close to the knot.
Now your wrist carries a little touch of magic wherever you go
Trick-or-Treat Stack of Three
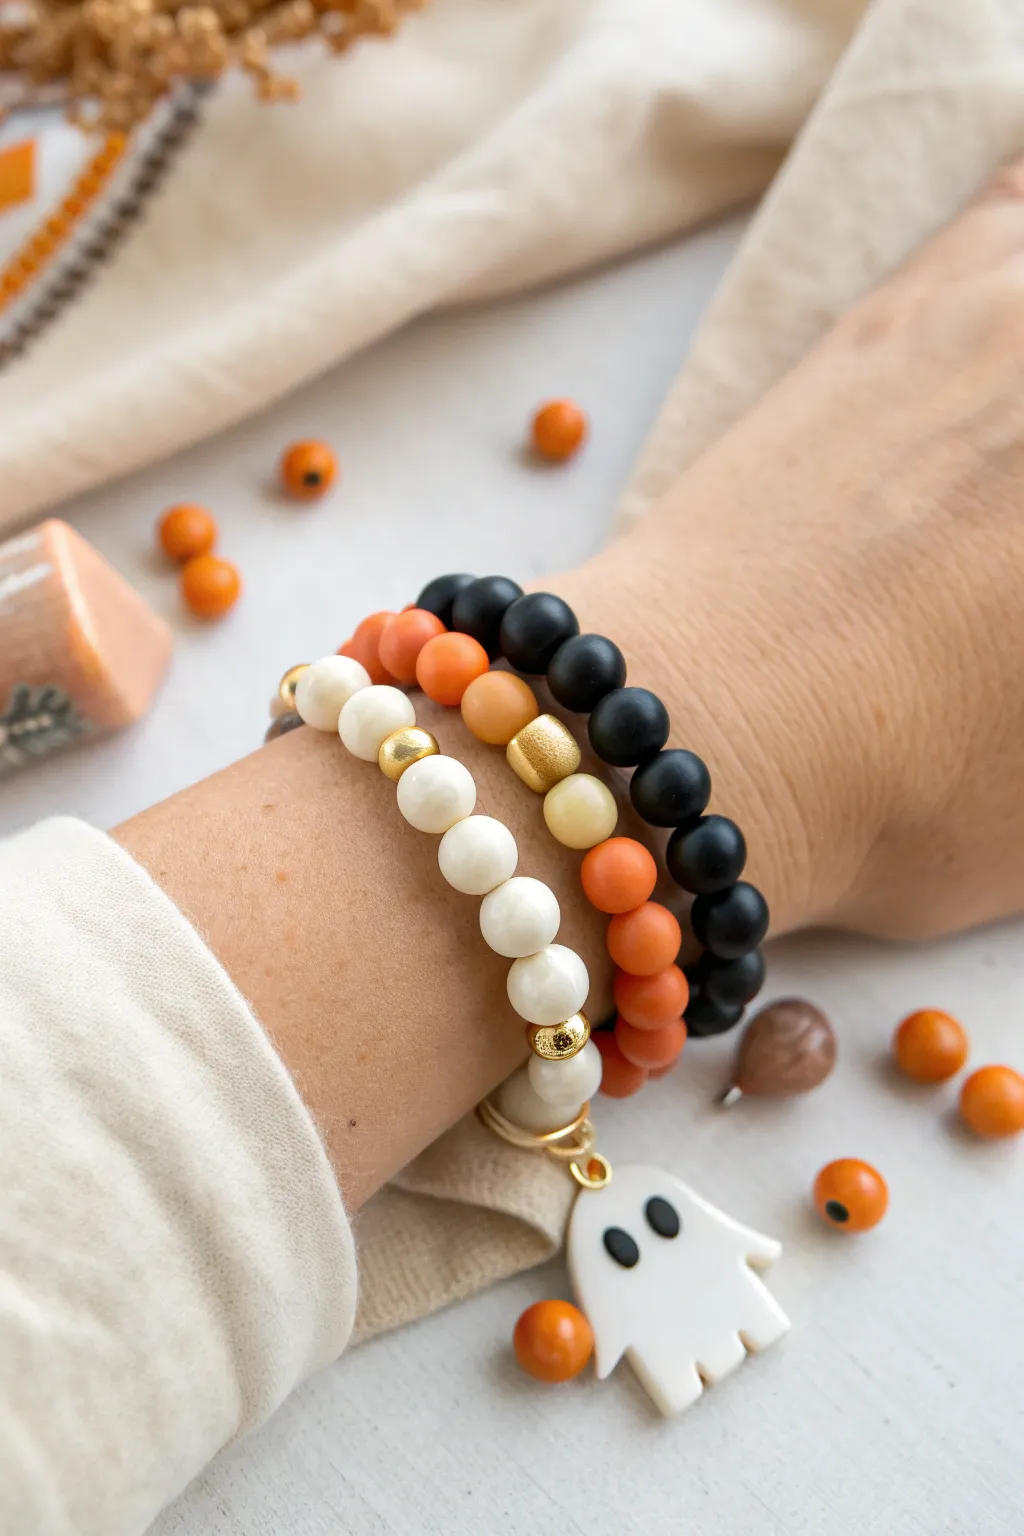
Embrace the Halloween spirit with this charming trio of stretch bracelets featuring classic black, pumpkin orange, and creamy white beads. The stack is perfectly finished with a playful ghost charm that adds just the right amount of boo to your wrist.
Step-by-Step Guide
Materials
- Matte black round beads (8mm or 10mm)
- Matte orange round beads (8mm or 10mm)
- White or cream round beads (8mm or 10mm)
- Small gold spacer beads (round or heishi style)
- Large gold nugget or textured accent bead
- White ghost charm with gold jump ring
- Strong elastic decorative cord (0.8mm or 1mm)
- Jewelry glue or clear nail polish
- Scissors
- Tape or bead stopper
Step 1: The Midnight Black Strand
-
Measure and cut:
Begin by measuring your wrist with a piece of string or tape measure to determine the correct length. Cut a piece of elastic cord about 3-4 inches longer than your measurement to give yourself plenty of room for tying knots. -
Secure the end:
Place a piece of tape or a bead stopper on one end of your elastic cord. This simple step prevents your beads from sliding right off while you work. -
String the black beads:
Thread your matte black beads onto the cord one by one. Continue adding beads until the strand wraps comfortably around your wrist without being too tight, typically about 7 inches for an average adult wrist. -
Tie the knot:
Remove the stopper and bring the two ends of the elastic together. Tie a standard surgeon’s knot: cross right over left, then left over right and loop it through twice before pulling tight. -
Secure and trim:
Apply a tiny dab of jewelry glue to the knot to ensure it holds. Let it dry for a moment, then trim the excess cord carefully, leaving just a tiny tail that can be hidden inside a bead.
Knot Slipping?
If your elastic knot feels loose, try a drop of GS Hypo Cement. It has a precision tip perfect for jewelry and stays flexible when dry.
Step 2: The Pumpkin Patch Strand
-
Prepare the cord:
Cut a second length of elastic cord, keeping the same extra length allowance as before, and secure one end. -
Start the pattern:
Begin stringing your matte orange beads. For this bracelet, we’ll interrupt the pattern slightly for visual interest. -
Add the gold accent:
After stringing about one-third of your beads, slide on a large gold textured bead or nugget. Just next to it, I like to place a lighter shade of bead (like a pale yellow or cream) to create a focal point. -
Finish the strand:
Continue adding the rest of your orange beads until the length matches your first black bracelet. -
Knot and glue:
Tie off this strand with a strong surgeon’s knot, apply your adhesive, let it set, and trim the ends cleanly.
Level Up: Glow Time
Swap out a few white beads for glow-in-the-dark acrylic beads. By day they look standard, but at night your ghost stack will eerily light up.
Step 3: The Ghostly Charm Strand
-
Prep the final cord:
Cut your third and final piece of elastic cord and secure the end with your stopper. -
String the white beads:
Thread on your creamy white beads. To add elegance, intersperse one or two small gold spacer beads randomly or near where you plan to hang the charm. -
Attach the ghost:
Open a gold jump ring using pliers (or use the one already attached) and loop it onto the shaft of the ghost charm. Thread the elastic cord directly through this jump ring so the ghost dangles freely. -
Check placement:
Position the ghost so it sits opposite your knot, or flanked by gold spacers for extra shine. Ensure the strand length matches the other two bracelets. -
Final knotting:
Tie your secure surgeon’s knot one last time. Pull it tight to ensure the elastic is pre-stretched slightly so it won’t sag later. -
Hide the knot:
After gluing and trimming, gently tug the elastic so the knot slides inside the hole of a neighboring bead, making the finish completely invisible.
Slip on your new stack and enjoy the festive jingle of your spooky handmade accessories
Mismatched Micro-Charms Around the Bracelet
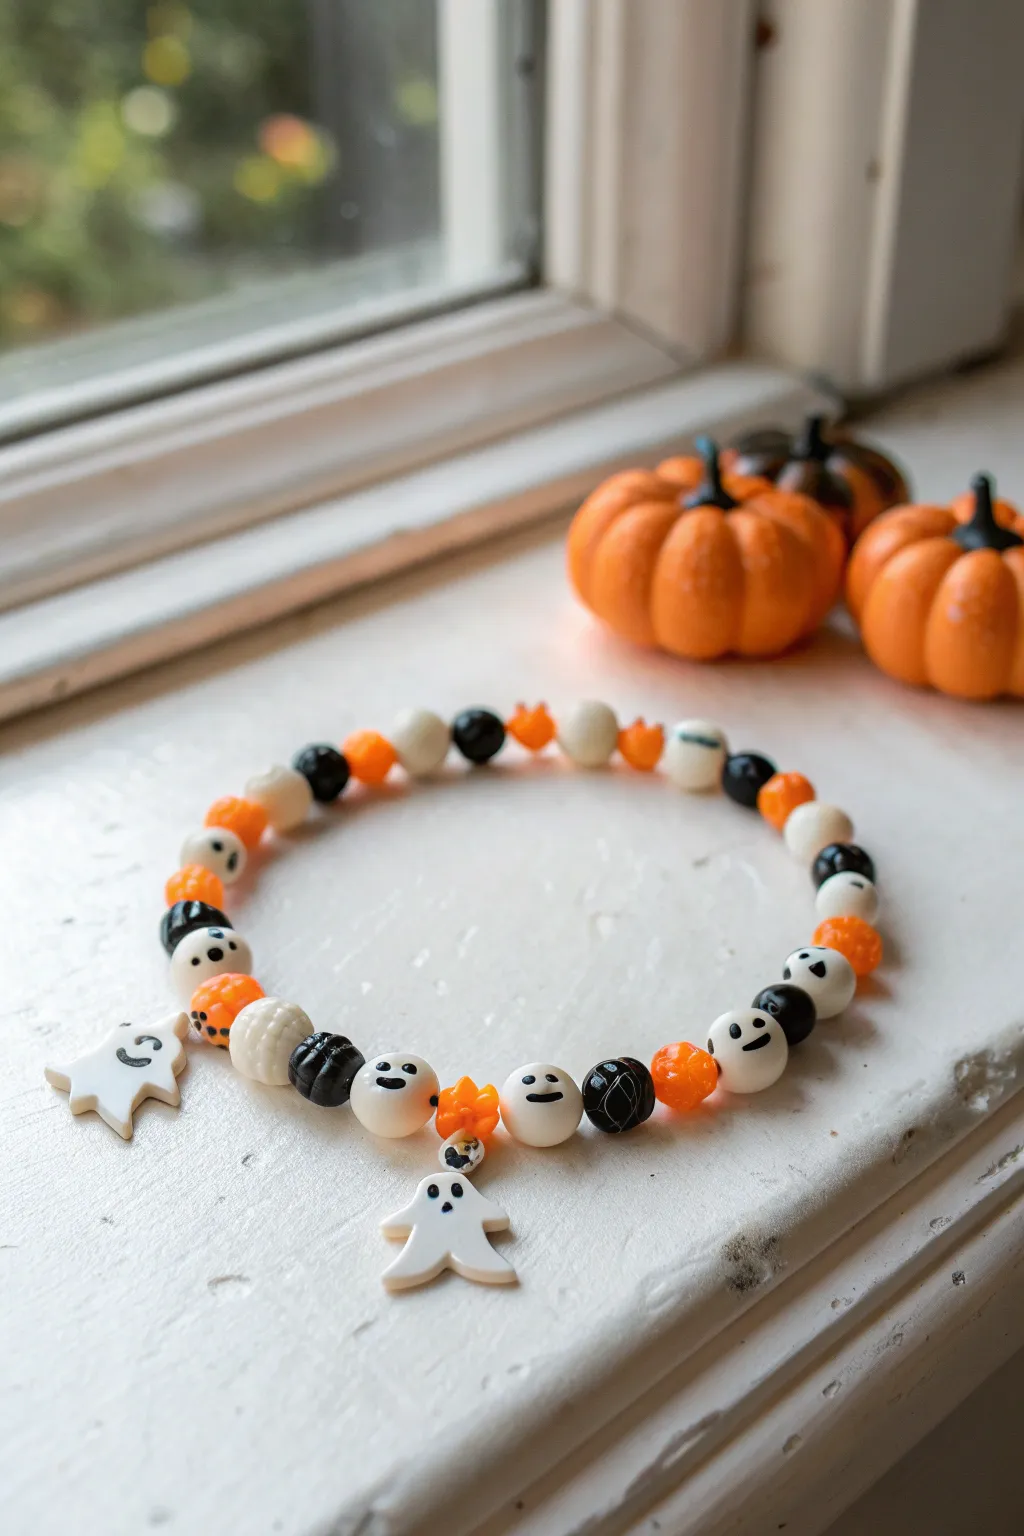
This playful bracelet combines classic Halloween motifs into a wearable piece of art, featuring hand-sculpted clay beads in orange, black, and white. The standout feature is a pair of adorable, dangling ghost charms that add movement and whimsy to the design.
Step-by-Step Tutorial
Materials
- Polymer clay in white, orange, and black
- Elastic beading cord (0.8mm or 1mm)
- Headpins or eye pins (silver or gold tone)
- Jump rings (4mm or 6mm)
- Beading needle (optional but helpful)
- Clay sculpting tools (needle tool, small ball tool)
- Clay roller or pasta machine
- Superglue or jewelry glue
- Round nose pliers
- Wire cutters
- baking sheet and parchment paper
Step 1: Sculpting the Feature Beads
-
Form the base beads:
Condition your white clay until it’s soft and pliable. Roll small balls of clay approximately 8-10mm in diameter to serve as the round spacer beads and the ghost faces. -
Create the pumpkin textures:
Roll balls of orange clay and black clay for the pumpkins. Using a needle tool or the back of a knife, gently press vertical indentations around the sides of each ball to mimic pumpkin ridges. -
Add pumpkin details:
For a textured look, you can lightly stipple the surface of the orange pumpkins with a toothbrush or crumbled foil before baking. -
Detail the ghost faces:
Take your white round beads. Using a tiny dotting tool or a toothpick, carefully paint on simple eyes and mouths using a tiny amount of black liquid clay or acrylic paint (after baking). Alternatively, press tiny bits of black clay into the white beads for eyes. -
Pierce the beads:
Before baking, carefully pierce a hole through the center of every bead using a needle tool or toothpick. Ensure the hole is wide enough for your elastic cord.
Smooth Operator
To avoid fingerprints on your white clay, wipe your hands with a baby wipe before rolling. You can also lightly dust the clay with cornflour for a matte, fingerprint-free finish.
Step 2: Creating the Ghost Charms
-
Shape the ghost bodies:
Flatten a small piece of white clay into a sheet about 3mm thick. Use a small ghost-shaped cutter or cut a freehand ghost shape with a craft knife. -
Add facial features:
Just like the beads, give your flat ghosts personality with tiny black clay eyes and mouths. I like to make the expressions slightly different for variety. -
Insert the hardware:
Carefully insert an eye pin into the top of each ghost charm. If the clay is soft, you may need to reshape the head slightly after insertion. -
Bake the clay:
Arrange all your beads and charms on a parchment-lined baking sheet. Bake according to your polymer clay package instructions (usually 275°F/130°C for 15-30 minutes). Let them cool completely.
Step 3: Assembly
-
Secure the charm hardware:
Once cool, gently pull on the eye pins in the ghosts. If they are loose, remove them, add a dab of superglue, and reinsert them for a permanent hold. -
Attach jump rings:
Open a jump ring using your pliers. Slide it through the loop of the eye pin on the ghost charm, then close it securely. You can also attach it directly to the elastic in the next step or add a secondary ring for more dangle. -
Plan your pattern:
Lay out your beads on a bead board or cloth. Create a pattern alternating between the white ghost faces, textured pumpkins, and plain rounds. Decide where you want your ghost charms to hang—spacing them out creates balance. -
String the beads:
Thread your elastic cord through the beads following your pattern. When you reach the spot for a charm, simply thread the cord through the jump ring attached to the ghost. -
Check the fit:
Wrap the strung beads around your wrist to check the size. Add or remove beads as necessary to ensure a comfortable fit. -
Tie the knot:
Tie a secure surgeon’s knot (right over left, left over right, loop through twice). Pull the elastic tight to secure the knot. -
Finish the bracelet:
Add a tiny drop of superglue to the knot to prevent slipping. Once dry, snip the excess elastic cord close to the knot and gently tuck the knot inside a neighboring bead hole if possible.
Glow Up
Use glow-in-the-dark polymer clay for the white ghost beads and charms. The bracelet will look cute during the day and spookily illuminated at night.
Now you have a charmingly spooky accessory ready to wear for the entire Halloween season
Pastel Halloween Palette With Tiny Hearts
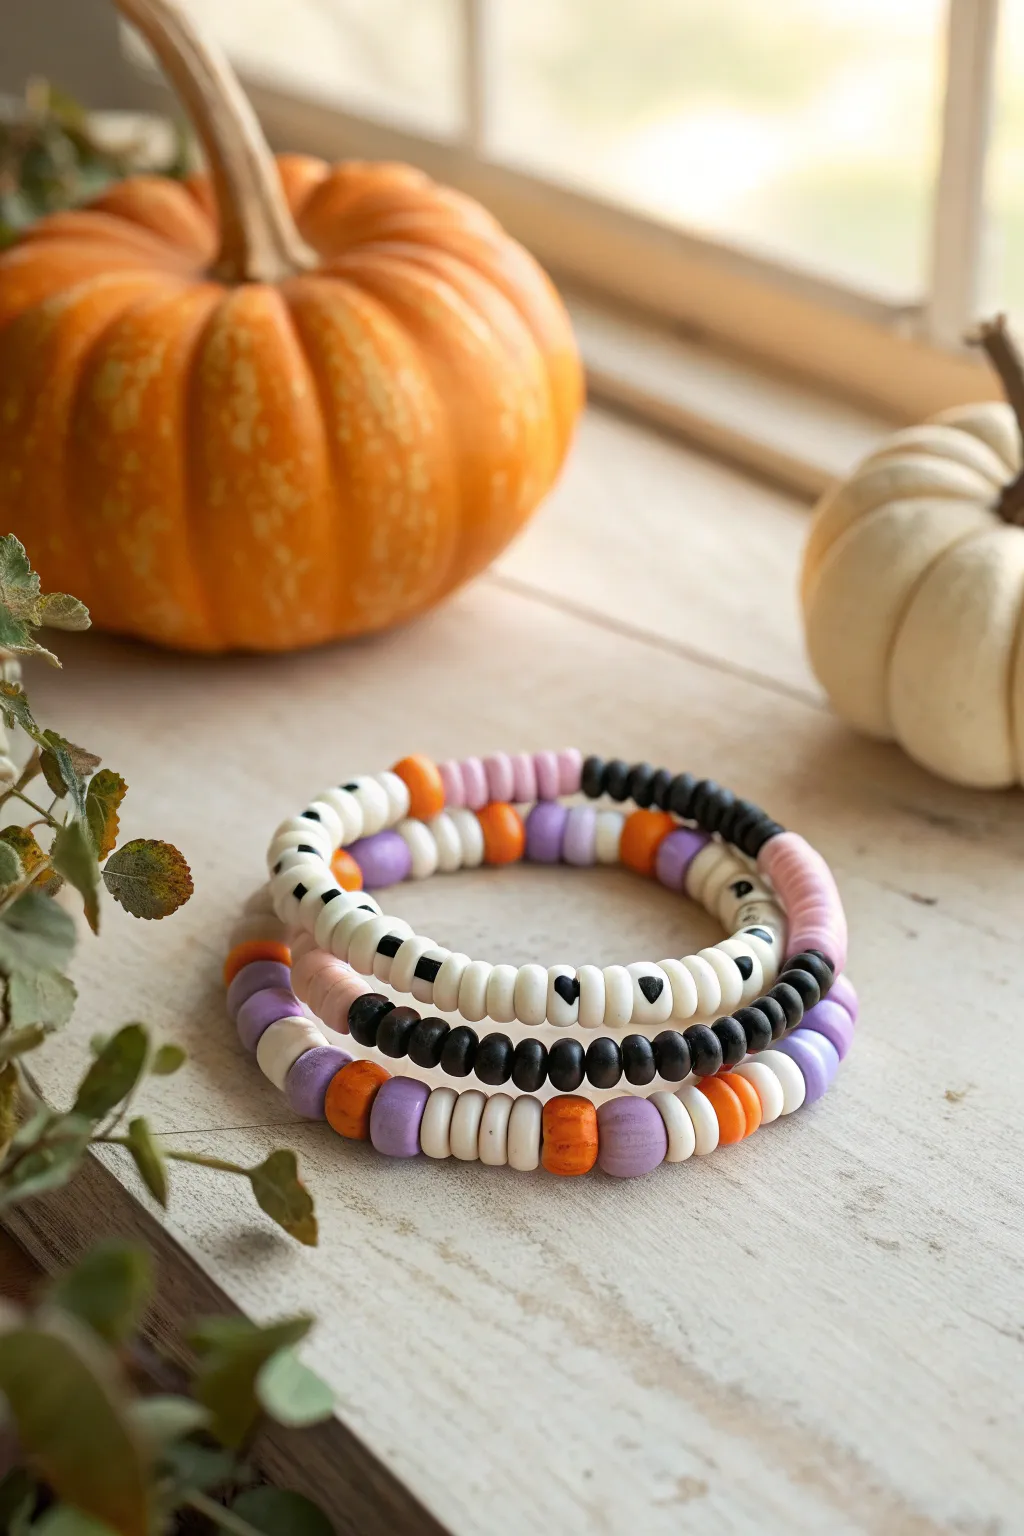
Embrace a softer side of spooky season with this trio of clay bead bracelets featuring muted oranges, purples, and lovely little heart details. This stack combines pattern play and texture for a sophisticated yet festive autumn accessory.
Detailed Instructions
Materials
- Polymer clay heishi beads (white, pastel pink, lavender, black, muted orange)
- Small heart-printed white clay beads (black hearts)
- Stretch cord (0.8mm or 1mm thickness)
- Scissors
- Hypo-cement or jewelry glue
- Tape or bead stopper
- Bead design board (optional)
Step 1: Setting Up
-
Measure the Cord:
Cut three strands of stretch cord, each about 10-12 inches long. This generous length gives you plenty of room to tie secure knots later without struggling. -
Secure the Ends:
Place a piece of tape or a bead stopper on one end of each cord to prevent your hard work from sliding off while you design.
Step 2: Bracelet 1: The Heart Pattern
-
Start the Base:
Begin threading white heishi beads onto your first cord. Add about 1-2 inches of plain white beads to create a clean foundation. -
Introduce the Hearts:
Thread on a heart-printed bead, ensuring the heart is facing the correct direction. Follow this with two plain white heishi beads as spacers. -
Create the Motif:
Repeat the pattern: one heart bead, then two plain white beads. Continue this sequence for the central 2-3 inches of the bracelet so the hearts sit prominently on top of the wrist. -
Add Contrast Sections:
Transition into blocks of color on the sides. Thread about 10 black beads, followed by a small section of pastel pink (about 5 beads), then back to white to finish the loop.
Knot Slipping?
If your elastic knot feels slick or keeps undoing itself before you can glue it, try rubbing the cord ends with a little beeswax or chalk to add friction/grip.
Step 3: Bracelet 2: The Color Block Mix
-
Start with Lavender:
On your second cord, begin with a section of lavender beads, approximately 1 inch long. -
Add Orange Accents:
Thread three muted orange beads. These provide that essential pumpkin-spice pop without overwhelming the pastel palette. -
Build White Spacers:
Add a slightly longer section of white beads (about 8-10 beads) to separate the colors and keep the look airy. -
Repeat the Sequence:
Continue this pattern—Lavender, Orange Trio, White Section—until the strand reaches your desired wrist size, usually around 6.5 to 7 inches total.
Make It Sparkle
Add 2-3 gold or brass spacer discs between the color changes. The metallic shine creates a more polished, expensive look against the matte clay.
Step 4: Bracelet 3: The Dark Accent
-
Begin with Black:
For the final bracelet, start with a bold section of black heishi beads. Thread about 1.5 inches to anchor the stack’s darker tones. -
Create a Striped Pattern:
Switch to a pattern of alternating colors: 3 white beads, 3 lavender beads, 3 white beads, then 3 orange beads. -
Insert a Focal Bead:
In the middle of this sequence, you can add a single heart bead or a uniquely patterned bead if you have extras, though a simple color rotation works beautifully too. -
Finish the Loop:
Complete the strand by mirroring the pattern on the other side or filling the remaining length with alternating black and pastel pink sections.
Step 5: Finishing Touches
-
Check the Fit:
Wrap each unfinished strand around your wrist to verify the size. Add or remove a few beads if it feels too tight or too loose. -
Pre-stretch the Cord:
Gently pull on the ends of the cord before tying. This crucial step prevents the elastic from stretching out and sagging the first time you wear it. -
Tie the Knots:
Tie a secure surgeon’s knot (right over left, left over right, looping through twice) for each bracelet. Pull tight to close any gaps between beads. -
Secure with Glue:
Dab a tiny drop of jewelry glue or hypo-cement onto the knots. Let it dry completely for at least 15 minutes. -
Hide the Knot:
Trim the excess cord close to the knot, then gently slide a nearby bead over the knot to conceal it inside the bead’s hole.
Stack these together for a full look or share them with friends for a subtle nod to the Halloween season