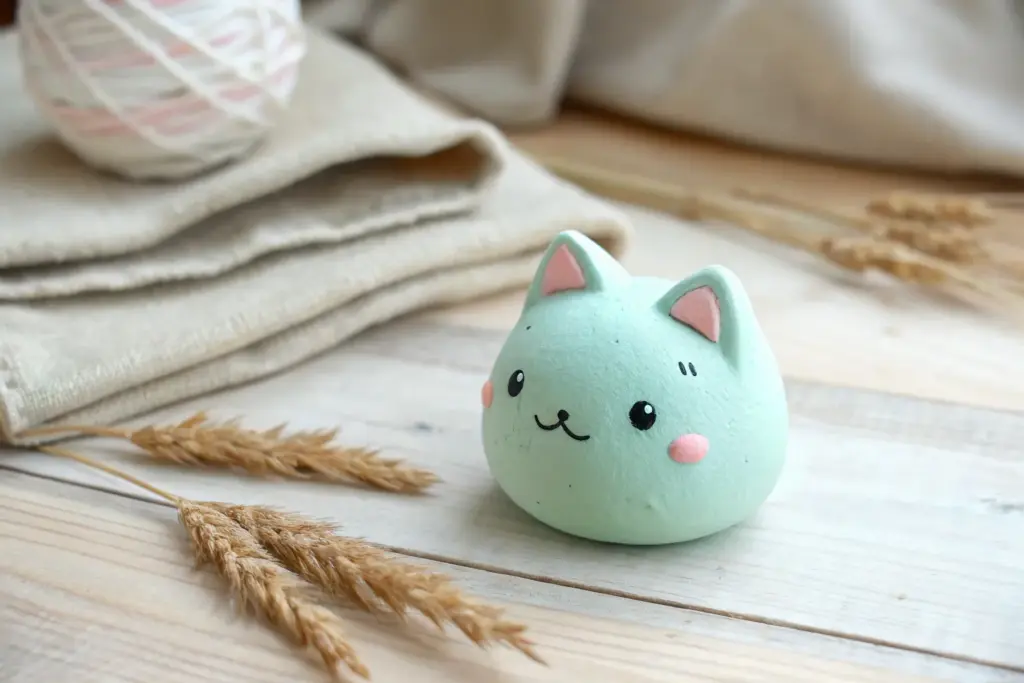
When I’m craving a quick, feel-good project, I reach for air dry clay and make something in that sweet, rounded kawaii style. These ideas are all about simple shapes, tiny faces, and charming little details you can finish, display, and totally get attached to.
Chibi Bunny Mini Figurines With Big Ears
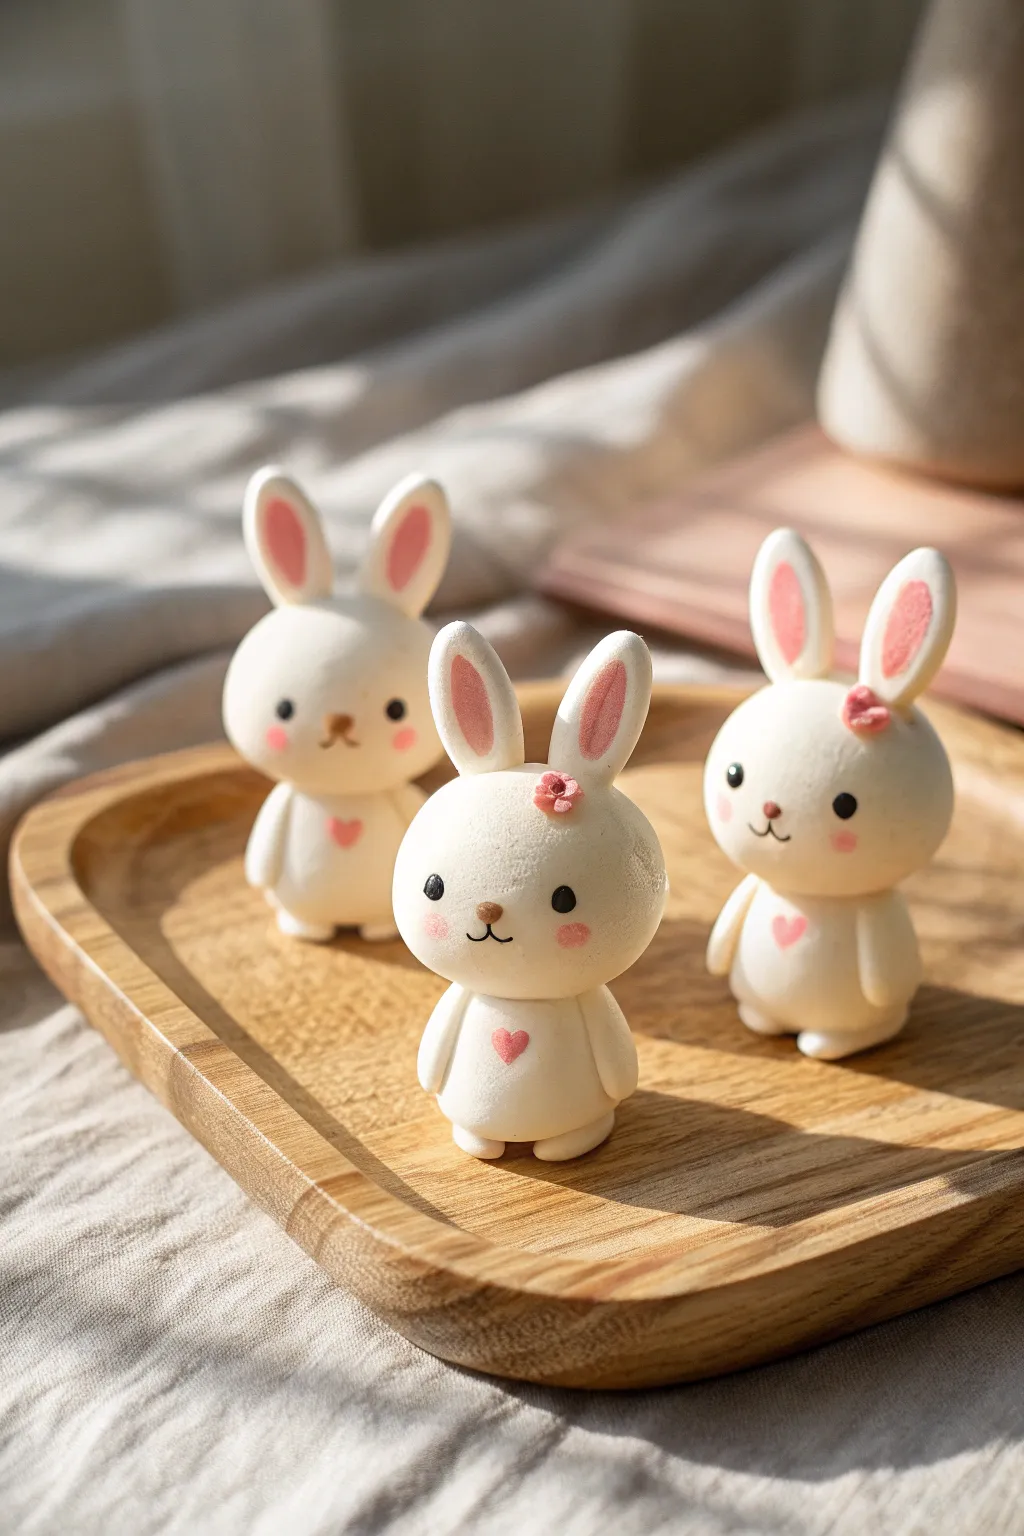
These utterly adorable bunny figurines capture the essence of kawaii culture with their sweet expressions and soft pastel accents. The smooth, marshmallow-like finish of the white clay pairs perfectly with the blush-pink details for a heartwarming addition to any desk or shelf.
How-To Guide
Materials
- White lightweight air dry clay (like Hearty or clay for slime)
- Pink air dry clay (or red acrylic paint to mix)
- Black acrylic paint
- Ball stylus tool (small)
- Needle tool or toothpick
- Small fine-point paintbrush or dotting tool
- Soft pastel chalk (pink or peach)
- Small fluffy brush (for blush)
- Clear matte varnish (optional)
Step 1: Shaping the Chibi Body
-
Mix your colors:
Before sculpting, ensure you have a soft baby pink color ready. If you don’t have pink clay, knead a very tiny dot of red acrylic paint into a small ball of white clay until the color is uniform. -
Form the head base:
Take a walnut-sized amount of white clay and roll it into a smooth, seamless ball. Gently flatten the bottom slightly so it can sit on the neck later. -
Create the body:
Roll a slightly smaller ball of white clay for the body. Shape it into a soft teardrop or gumdrop shape, flattening the bottom so the bunny stands securely on its own. -
Connect head and body:
Place the head on top of the narrowed part of the body. Since the clay is fresh, it should stick, but you can add a tiny dab of water or white glue if needed. Gently press them together without deforming the spheres. -
Add little arms:
Roll two small, rice-grain-sized pieces of white clay. Attach these to the sides of the body, curving them slightly inward to look like the bunny is standing politely. -
Make the feet:
Create two small flattened ovals of white clay and attach them to the bottom front of the body. They should peek out just slightly to give the bunny a seated or standing posture.
Smooth Operator
To get that seamless marshmallow look, dip your finger in water and gently run it over the clay to erase fingerprints before the clay starts to dry.
Step 2: The Signature Big Ears
-
Shape the ear forms:
Roll two equal-sized logs of white clay, slightly tapered at both ends. Flatten them gently with your finger to create the long, signature bunny ear shape. -
Add the inner ear detail:
Take your pink clay and roll two smaller, thinner logs. Flatten these and press them into the center of the white ear shapes. Smooth the edges so the pink sits flush with the white. -
Attach the ears:
Press the ears onto the top of the head. You can pose them straight up for an alert look, or slightly tilted for a playful expression. Use a sculpting tool to blend the clay at the attachment point if desired.
Make it a Trio
Give each bunny a unique personality by changing the ear positions: one folded down, one quirky and tilted, and one straight up and alert.
Step 3: Kawaii Details
-
Sculpt the snout:
For the muzzle, roll a tiny, flattened oval of white clay and place it in the lower center of the face. This adds dimension to the profile. -
Add the nose:
Roll a microscopic ball of brown or pink clay (or paint it later) and press it into the top center of the muzzle area. -
Paint the eyes:
Using a dotting tool or the back of a paintbrush dipped in black acrylic paint, stamp two wide-set eyes. They should be placed just above the line of the nose. -
Draw the mouth:
With a very fine liner brush or a needle tool dipped in black paint, carefully draw the ‘W’ shape mouth connecting to the nose. Keep the lines very thin for that delicate look. -
Apply the blush:
Scrape a little pink pastel chalk into a powder. Use a soft dry brush to gently dust rosy cheeks onto the bunny’s face, right under the eyes. -
Heart details:
Using pink clay or pink paint, add a small heart to the center of the chest. For the bunnies with hair accessories, form a tiny pink flower or bow and attach it near the base of one ear. -
Final drying:
Allow your bunnies to dry completely for at least 24 hours. I like to keep them away from direct sunlight to prevent cracking.
Once dry, these sweet little creatures are ready to bring a touch of softness to your space


Smiling Strawberry and Peach Kawaii Minis
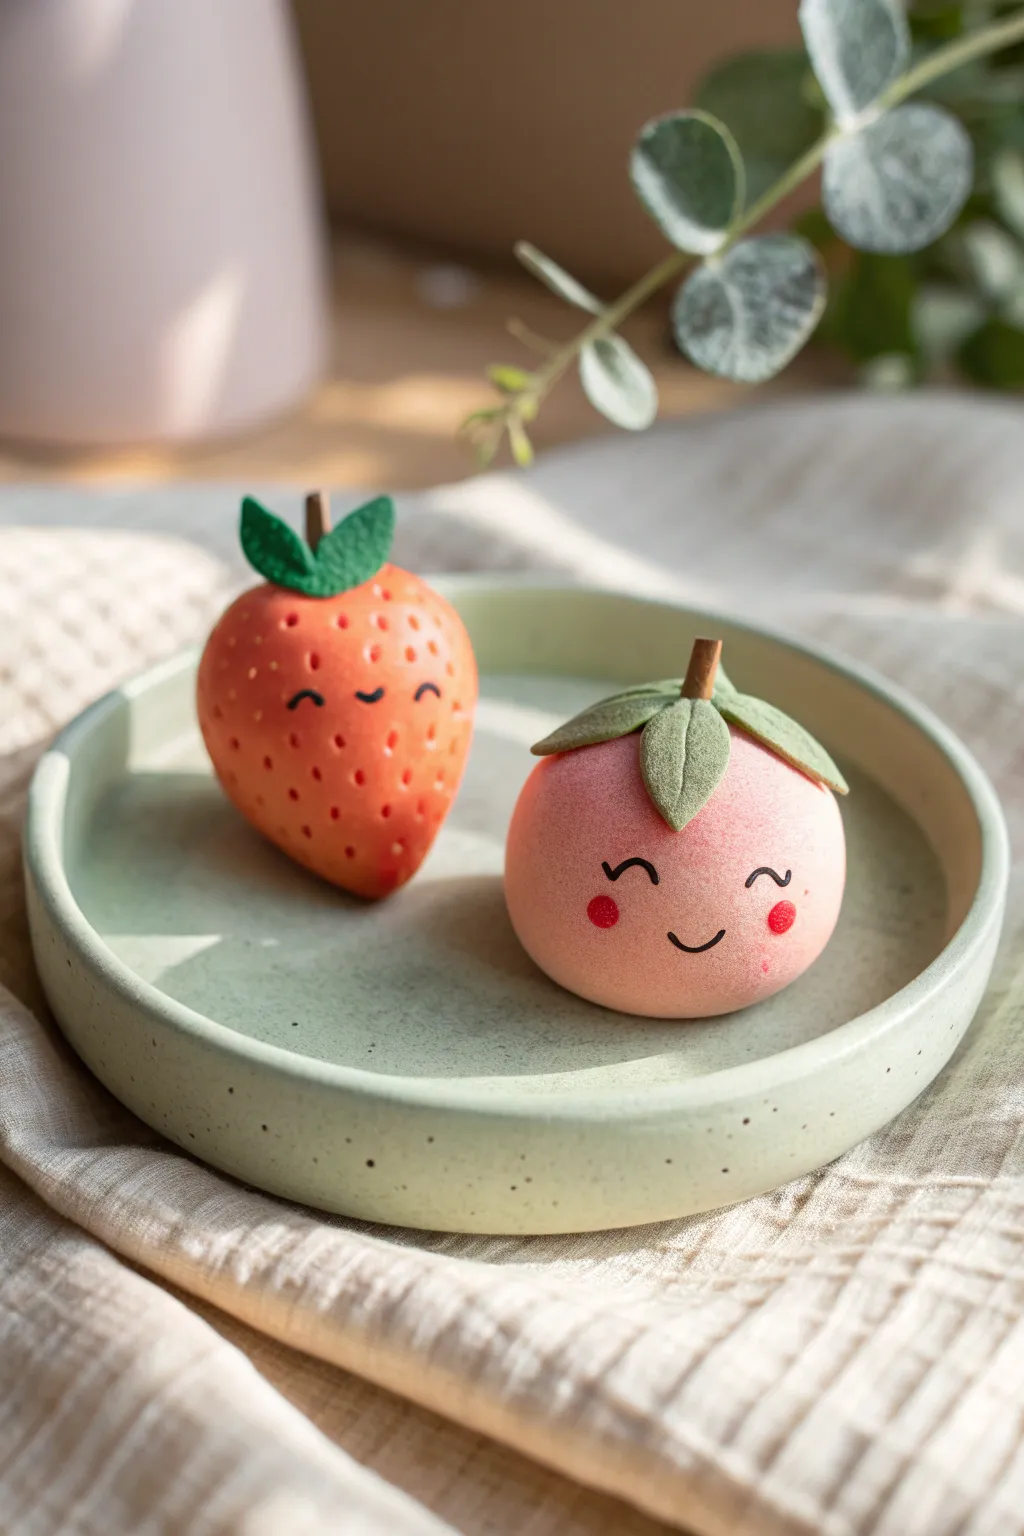
Brighten up your desk with this adorable pair of fruit minis, sculpted with soft, rounded forms and charming faces. The textured strawberry and blushing peach are simple to shape but packed with personality thanks to their felt leaves and tiny painted smiles.
Detailed Instructions
Materials
- Air dry clay (white or pre-colored red and peach)
- Acrylic paints (red, orange, pinkish-peach, black, white)
- Green felt fabric (soft sage or olive tones)
- Small craft scissors
- Fine-point needle tool or toothpick
- Small ball stylus tool
- Detail paintbrush (size 0 or 00)
- Craft glue or tacky glue
- Matte varnish (optional)
- Brown twig or brown clay for stems
Step 1: Shaping the Fruit Bases
-
Mix your base colors:
If using white clay, mix a small amount of red and orange acrylic paint into one ball of clay for the strawberry, aiming for a warm reddish-orange. For the peach, mix a very pale pinkish-orange tone. -
Form the strawberry body:
Roll the strawberry clay into a smooth sphere, then gently taper the bottom half to create a rounded teardrop or heart-like shape. Keep the top slightly flattened where the leaves will sit. -
Create the strawberry texture:
Using a needle tool or toothpick, gently press small, shallow holes all over the strawberry’s surface to mimic seeds. I find it best to avoid the very center of the ‘face’ area so the smile is easy to paint later. -
Form the peach body:
Roll your peach-colored clay into a perfect sphere. To get that distinct peach shape, gently press a vertical indentation down one side using the side of a toothpick or a modeling tool, smoothing the edges with your finger. -
Flatten the bottoms:
Lightly tap both fruit figures on your work surface to create a small flat spot on the bottom. This ensures they will sit securely without rolling away.
Step 2: Adding Charming Details
-
Prepare the stems:
You can use tiny real twigs for a natural look, or roll small snakes of brown clay. Insert a small piece into the top center of each fruit. If using clay stems, secure with a dab of glue. -
Cut the felt leaves:
From your green felt, cut out small leaf shapes. For the strawberry, cut two or three small, rounded teardrop leaves. For the peach, cut slightly longer, pointed oval leaves. -
Attach the greenery:
Apply a small dot of craft glue near the stem of each fruit. Arrange the felt leaves around the stem, pressing them gently so they conform to the curved top of the fruit. -
Paint the blush:
For the peach, dip a dry brush into a tiny amount of darker pink paint. Dab most of it off on a paper towel, then gently stipple ‘cheeks’ onto the sides of the peach for a soft gradient effect. -
Let the clay dry:
Allow your figures to air dry completely. This usually takes 24-48 hours depending on the humidity and thickness of your clay.
Seed Spacing Secret
When making seed holes on the strawberry, stagger the rows rather than placing them in a grid. This offset pattern looks much more natural and organic.
Step 3: Bringing Them to Life
-
Draft the faces:
Once dry, lightly mark where the eyes and mouth will go using a pencil. Keep the features low on the face for extra cuteness. -
Paint the eyes:
Using your finest detail brush and black acrylic paint, carefully paint two small curved arches for ‘happy’ squinting eyes. Keep the lines thin and crisp. -
Add the smiles:
Paint a tiny ‘U’ shape between the eyes for the mouth. On the peach, you can make the smile slightly wider or deeper to differentiate their personalities. -
Add rosy cheeks:
Dip the back end of your paintbrush or a ball stylus into pink or red paint. Dot two small circles beneath the eyes on the peach figure for distinct rosy cheeks. -
Highlight the texture:
If I want the strawberry seeds to pop, I sometimes mix a slightly darker red wash and brush it over the body, wiping away the excess so the darker color stays only in the seed indentations. -
Seal the project:
Finish by applying a coat of matte varnish over the clay parts (avoid the felt leaves) to protect the paint and give the clay a smooth, finished look.
Make Them Magnets
Before the clay dries, press a strong neodymium magnet into the back of each fruit. Secure firmly with superglue after drying for cute fridge decor.
Place your new fruity friends on a shelf or windowsill to add a touch of sweetness to your day


Kawaii Boba Cup Desk Buddy
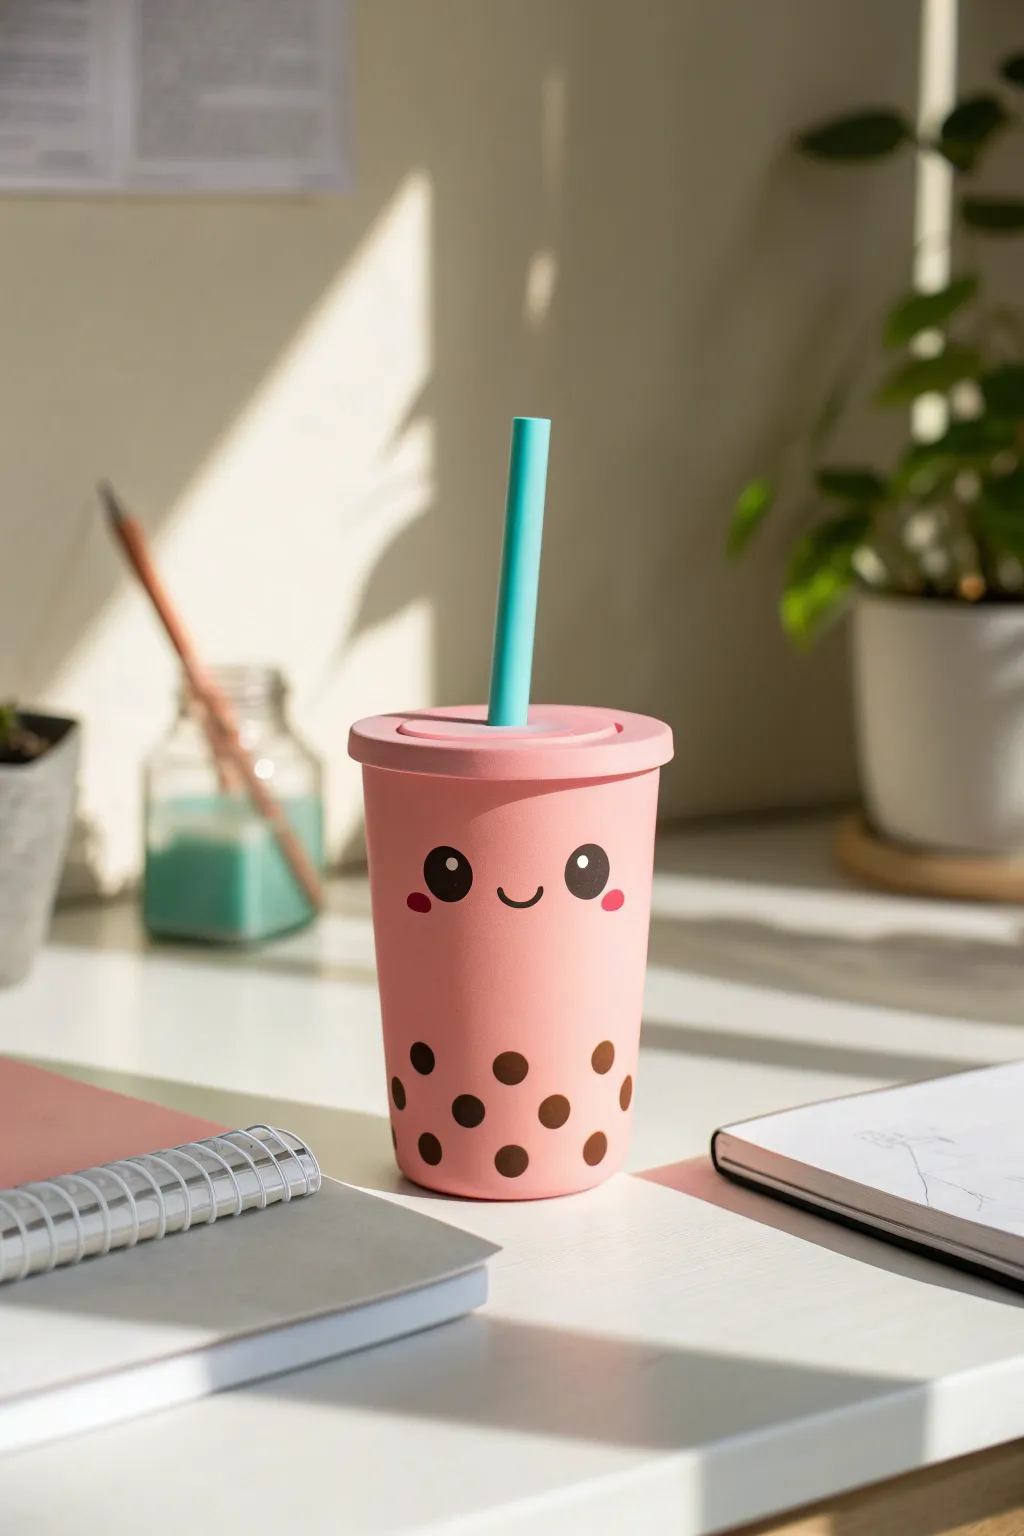
Brighten up your workspace with this adorable boba tea cup that doubles as a delightful desk companion. With its soft pink hue, sweet smiling face, and whimsical tapioca pearls, this air dry clay project is as functional as it is charming.
Step-by-Step
Materials
- Air dry clay (white)
- Acrylic paints (pastel pink, teal/turquoise, dark brown, black, white)
- Clay rolling pin
- Empty clean jar or sturdy cardboard tube (for the core structure)
- Clay sculpting tools (knife, smoothing tool)
- Sandpaper (fine grit)
- Paintbrushes (flat shader, fine detail liner)
- Water cup
- Varnish or sealant (matte or satin finish)
- Strong craft glue
Step 1: Sculpting the Cup Body
-
Prepare the core:
Select a clean, empty jar or a sturdy cardboard tube to serve as the structural base of your cup. This ensures the walls are perfectly straight and sturdy. -
Roll the clay slab:
Condition a large portion of air dry clay and roll it out into a smooth, even slab about 1/4 inch thick. Make sure the slab is long enough to wrap completely around your chosen core. -
Wrap the core:
Carefully lift your clay slab and wrap it around the jar or tube. Trim the excess clay where the ends meet, creating a straight seam. -
Join the seam:
Blend the seam together using a little water and a sculpting tool until the join is invisible. I usually spend extra time here to ensure the surface is perfectly smooth. -
Create the rim:
Roll a thick snake of clay and slightly flatten it. Attach this to the top edge of the cup to create a distinct, wider rim, smoothing the transition onto the cup body. -
Form the lid insert:
Roll out a flat circle of clay that fits just inside the rim you created. This will be the ‘lid’ surface. Poke a hole in the center large enough for your straw.
Crack Control
If small cracks appear as the clay dries, mix a tiny bit of fresh clay with water to make a paste (slip) and fill them in before painting.
Step 2: Adding Details & The Straw
-
Sculpt the straw:
Roll a smooth cylinder of clay to act as the straw. You can insert a real thick straw or dowel inside the clay to keep it straight while it dries. Ensure it fits into the hole you made in the lid. -
Dry completely:
Allow the main cup body, lid insert, and straw to dry completely. This usually takes 24-48 hours depending on humidity. Rotate the pieces occasionally for even drying. -
Sand for smoothness:
Once fully dry, use fine-grit sandpaper to gently buff out any fingerprints or bumps on the surface. Wipe away the dust with a slightly damp cloth.
Weight It Down
For a sturdier feel, place a few heavy coins or clean pebbles in the bottom of your jar/core before wrapping it in clay to prevent tipping.
Step 3: Painting & Decoration
-
Base coat:
Paint the entire cup body and lid insert with a soft pastel pink acrylic paint. You will likely need 2-3 coats for opaque coverage, letting each layer dry in between. -
Paint the straw:
Paint the clay straw a vibrant teal or turquoise color. This provides a lovely contrast to the pink cup. -
Paint the tapioca pearls:
Using a dark brown paint and a small round brush, paint circular dots around the lower third of the cup to represent the boba pearls. Keep them randomly spaced but balanced. -
Add the face:
With a fine detail brush and black paint, draw two large circles for eyes and a small ‘U’ shape for the mouth in the visual center of the cup. -
Eye highlights:
Add tiny white dots inside the black eye circles to bring the character to life with a ‘sparkle’ effect. -
Cheek details:
Dip a small brush into darker pink paint (or mix a little red into your base pink) and add small oval blush marks under the eyes. -
Assembly & Finishing:
Glue the lid insert into the rim of the cup, and glue the straw into the center hole. Finish by applying a coat of matte or satin varnish to protect your new desk buddy.
Now you have a sweet boba friend to keep your desk company while you study or work


Tiny Kawaii Dumplings With Blushing Cheeks
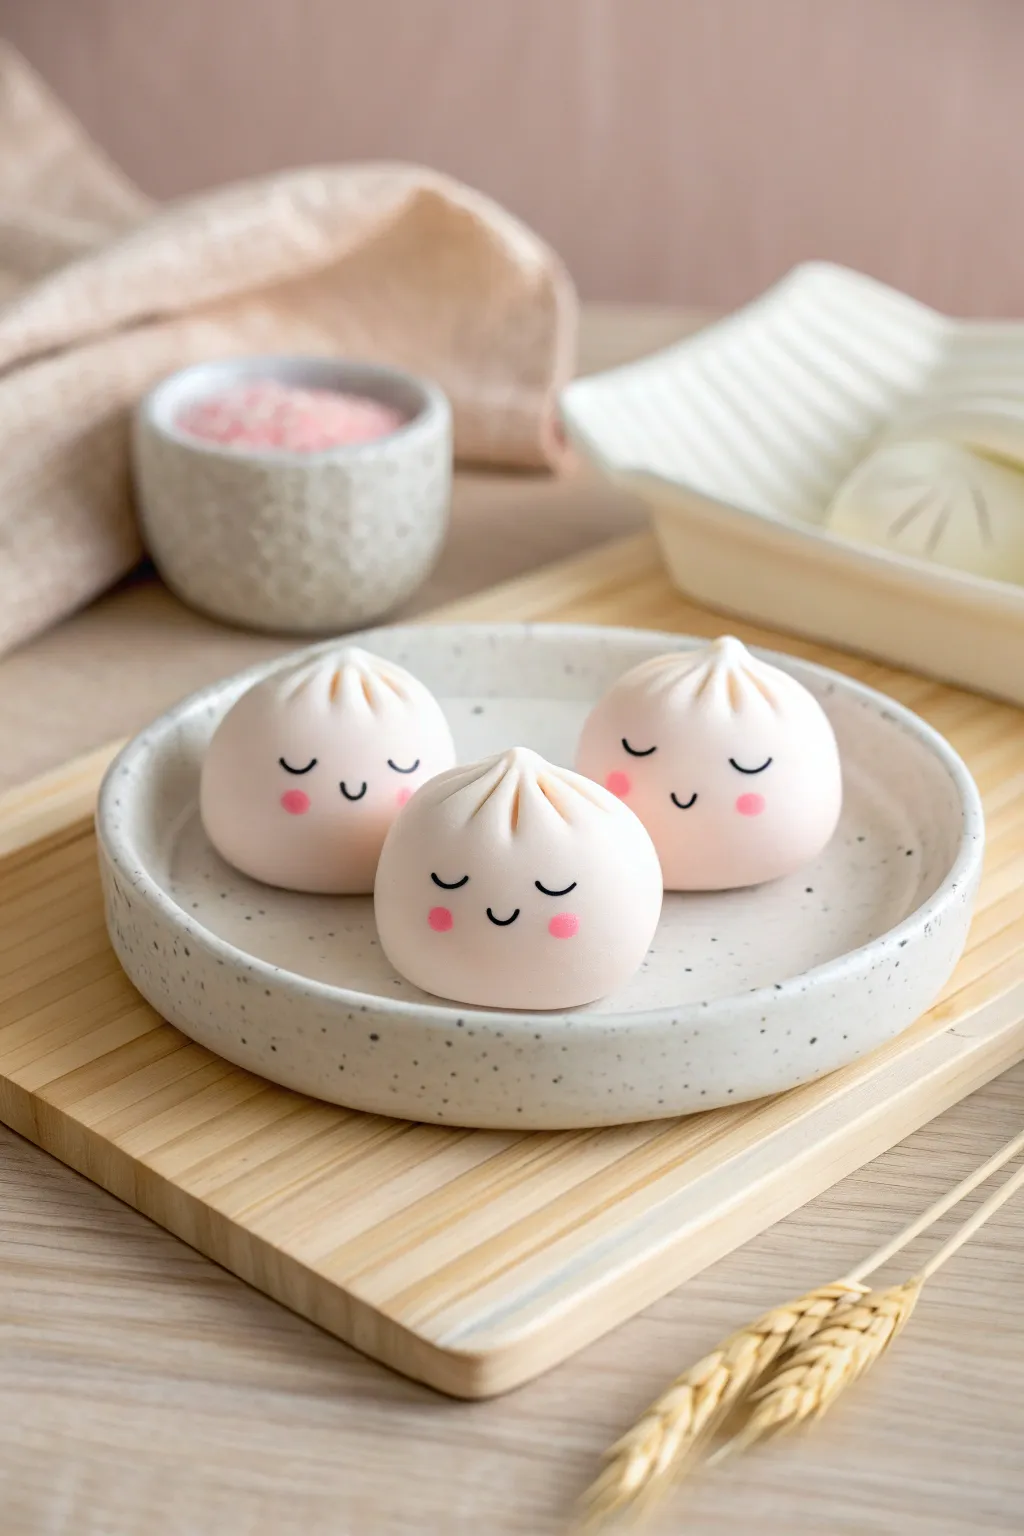
These sweetly sleeping dumplings bring a touch of dim sum delight to your desk without the steam. With their soft pastel shading and iconic pleated tops, they are a perfect beginner project for mastering simple three-dimensional shapes.
How-To Guide
Materials
- White air dry clay
- Soft pastel chalks (light pink)
- Small soft brush (for shading)
- Black fine-liner pen or acrylic paint
- Detail brush (if using paint)
- Clay sculpting tool (knife or needle tool)
- Water
- Matte varnish or sealant
Step 1: Shaping the Base
-
Condition the clay:
Start by taking a medium-sized chunk of white air dry clay. Knead it thoroughly in your hands until it feels warm, pliable, and free of any internal air bubbles. -
Tint the clay (optional):
If you want the entire dumpling to have that very subtle, raw-dough pinkish hue shown in the photo, mix a tiny speck of pink paint or pastel dust into your white clay now. Otherwise, keep it stark white. -
Form the spheres:
Divide your clay into three equal portions. Roll each portion between your palms to create a smooth, seamless ball. They should be roughly the size of a golf ball or slightly smaller. -
Create the base:
Gently press each ball down onto your work surface just enough to flatten the bottom so they sit stability without rolling away. Keep the dome shape nice and round.
Clean Lines
Keep a baby wipe or damp towel nearby. Using clean hands prevents dust or lint from getting trapped in the white clay, which shows every speck.
Step 2: Sculpting the Pleats
-
Pinch the peak:
At the very top center of your dome, gently pinch the clay upwards to create a small, raised peak. This will be the gathering point for your dumpling folds. -
Mark the fold lines:
Using a plastic knife tool or a needle tool, press light indentations radiating from the center peak down the sides of the dumpling. You don’t need to cut deep; just mark where the folds will go. -
Define the pleats:
Using the side of your tool or your fingernail, gently press into the clay between your marked lines to create the illusion of folded fabric. Smooth the edges slightly with a damp finger so they look soft, not sharp. -
Twist the top:
Give the very tip of the peak a tiny, gentle twist. This mimics the way real dough is sealed and adds a realistic touch to the silhouette.
Cracked Clay?
If you see tiny fissures forming as you shape the pleats, dip your finger in water and create a ‘slip’ (clay mud) to fill and smooth the cracks immediately.
Step 3: Adding Kawaii Details
-
Smooth the surface:
Before the clay dries, do a final check for fingerprints. Dip your finger in a little water and buff out any imperfections on the ‘face’ area of the dumpling. -
Let it dry completely:
Place your dumplings in a safe, dry spot. Depending on your humidity and clay brand, this usually takes 24 to 48 hours. I find flipping them over halfway through helps the bottom dry evenly. -
Draw the face sketch:
Once fully hard, use a very light pencil to mark where the eyes and mouth will go. aim for the lower half of the sphere to maximize the cute factor. -
Paint the expression:
Using a black fine-liner pen or black acrylic paint on a fine brush, carefully draw two ‘U’ shapes for sleeping eyes and a tiny ‘u’ for the smiling mouth. -
Prepare the blush:
Scrape a little bit of pink pastel chalk into a powder on a piece of scrap paper. -
Apply the rosy cheeks:
Dip a dry, soft brush into the pastel powder. Gently dab it onto the cheek area, circular motions, building up the color slowly until you have a soft, airbrushed look. -
Add general shading:
With the leftover powder on your brush, very lightly dust the very bottom edge of the dumpling to give it a warm, shadowed glow. -
Seal the piece:
To protect the pastel from smudging, apply a coat of matte varnish. Avoid glossy finishes, as you want to maintain the soft texture of steamed dough.
Arranging these little friends together on a small plate creates an adorable display piece

What Really Happens Inside the Kiln
Learn how time and temperature work together inside the kiln to transform clay into durable ceramic.
Kawaii Panda and Bear “Marshmallow” Blobs

Create an adorable tower of soft, marshmallow-like bear blobs using lightweight air dry clay. This project features a stack of four distinct characters with a smooth, velvety finish that looks good enough to eat.
Step-by-Step Tutorial
Materials
- Lightweight white air dry clay (e.g., Hearty Soft or Cloud Clay)
- Acrylic paints (brown, yellow ochre, pink, black)
- Set of small clay sculpting tools (ball tool essential)
- Smooth work surface or silicone mat
- Toothpicks or a thin dowel for internal structure
- Water for smoothing
- Glue (PVA or tacky glue)
- Matte varnish (optional)
Step 1: Shaping the Base Blobs
-
Prepare the clay colors:
Start by dividing your white clay into four equal portions. Leave two plain white. Mix a tiny drop of yellow ochre into one portion for a cream color, and brown paint into the last portion for the chocolate bear. -
Roll spheres:
Take each colored portion and roll it aggressively between your palms to remove all cracks, forming a perfect sphere. -
Form the bun shape:
Gently press each sphere down onto your work surface to flatten the bottom. Use your palms to cup and smooth the sides, creating a slightly squat, bun-like shape rather than a perfect ball. -
Refine the surface:
Dip your finger in a tiny bit of water and rub away any fingerprints or fine lines on the clay surface until it looks completely smooth like a marshmallow. -
Create the stack test:
Stack the four buns (White, Brown, Cream, White) to check if they balance well. If they wobble, flatten the connection points slightly before separating them again.
Cracks Appearing?
If fine cracks appear while smoothing the ‘buns’, mix a tiny bit of water into fresh clay to make a slip paste. Rub this paste into the cracks to seal them seamlessly.
Step 2: Adding Facial Features
-
Make the snouts:
Mix a very small amount of clay: pink for the top white bear, cream for the second bear, tan for the brown bear, and white for the bottom bear. Roll tiny ovals and press them gently onto the center of each face. -
Attach the ears:
Roll pairs of tiny balls for ears. Use contrasting colors like pink for the top bear and the matching body color for the others. Attach them to the top corners of the heads with a dab of water. -
Indent details:
Use a small ball tool or a rounded toothpick end to press small indentations where the eyes will go. I find this helps the painted eyes sit better later. -
Structural support:
Insert a toothpick vertically through the center of the bottom bear, leaving half exposed. Add a dot of glue, then slide the brown bear on top. Repeat this pinning process up the stack to keep the tower stable. -
Dry the structural stack:
Let the entire stacked tower dry for at least 24 hours. The internal toothpicks will prevent the heavy clay from sliding while wet.
Make it a Photo Holder
Before the top bear dries, insert a coiled wire photo clip into the center of its head. Now your cute sculpture doubles as a functional memo or photo holder.
Step 3: Final Details
-
Paint the eyes:
Using a fine detail brush or a dotting tool dipped in black acrylic paint, carefully dot eyes into the indentations you made earlier. -
Paint the noses:
Add a tiny black oval or rounded triangle to the center of each snout. For the bottom bear, you can paint a small heart shape for extra cuteness. -
Add blush (optional):
Use a dry brush with a tiny amount of pink chalk pastel or watered-down pink paint to dust cheeks onto the cream and white bears. -
Seal the project:
Once all paint is completely dry, coat the stack with a matte varnish to protect the clay while preserving that soft, non-shiny marshmallow look. -
Display setup:
Place your finished stack on a small wooden coaster or tray to mimic the reference image.
You now have a charming stack of bear buddies to brighten up your desk or shelf
Kawaii Frog Beans With Tiny Crowns
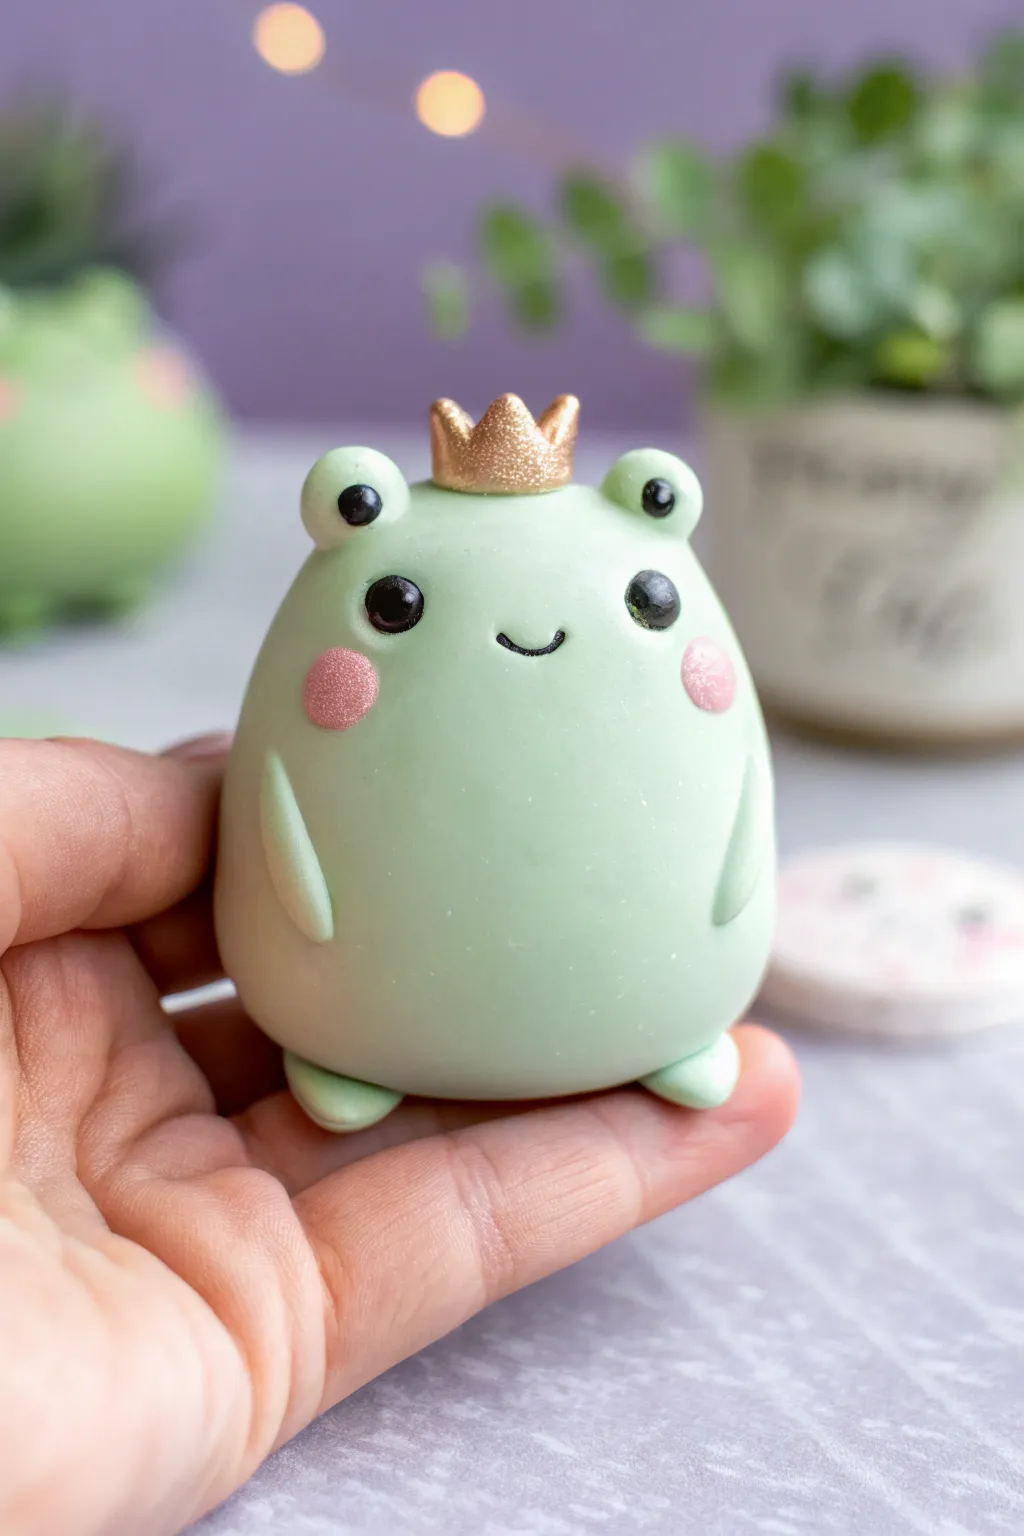
Create your own pocket-sized royalty with this adorable, bean-shaped frog prince or princess. This smooth, pastel green friend features a sparkling gold crown and blushing cheeks that make it an irresistible desk companion.
Step-by-Step Guide
Materials
- White air-dry clay (or polymer clay)
- Light green acrylic paint (or green clay)
- Gold acrylic paint or gold fine glitter
- Black acrylic paint
- Soft pink acrylic paint
- Dotting tools (or toothpicks/paintbrush ends)
- Fine detail paintbrush
- Gloss varnish or UV resin
- Clay blending tool
- Sandpaper (optional)
Step 1: Shaping the Base
-
Tint the clay:
Begin by taking a chunk of white air-dry clay about the size of a golf ball. Mix a small drop of light green acrylic paint into the clay, kneading it thoroughly until the color is a consistent, pastel mint green. If using polymer clay, condition your green clay until soft. -
Form the body:
Roll the green clay into a smooth ball between your palms to remove any cracks. Gently tap the bottom against your work surface to flatten it slightly so it sits upright, and gently taper the top to create a soft, egg-like ‘bean’ shape. -
Add the eyes:
Take two very small, pea-sized balls of the same green clay. Attach these to the top of the head, spacing them slightly apart to form the raised frog eye sockets. Blend the seam where the eyes meet the head using a silicone tool or your finger with a tiny bit of water. -
Create tiny feet:
Roll two small flattened ovals of green clay. Attach these to the bottom front of the body to serve as feet. They should peek out just slightly, giving the frog a seated appearance. -
Attach the arms:
Roll two thin, tapered logs of green clay for the arms. Press them vertically onto the sides of the body, curving them slightly inward as if the frog is holding its belly. Blend the top connection point smoothly into the body.
Step 2: Crafting the Crown
-
Shape the crown base:
Take a tiny amount of clay (white or yellow) and roll it into a small, thick disc. This will be the base of your crown. -
Add points:
Pinch the top edge of the disc or cut tiny triangles out of the top to create three or four crown points. Smooth the edges so they aren’t sharp. -
Mount the crown:
Place the crown securely in the center of the frog’s head, right between the eyes. Press down gently to adhere it—use a dab of water or clay glue if needed. -
Initial Drying:
Allow the entire sculpture to dry completely. For air-dry clay, this usually takes 24-48 hours depending on humidity. Rotate it occasionally so the bottom dries evenly.
Smooth Operator
To get that flawless, smooth finish on air-dry clay, rub a tiny drop of water over the surface with your finger before drying to erase fingerprints.
Step 3: Painting and Details
-
Gild the crown:
Once dry, paint the crown carefully with metallic gold acrylic paint. I find that two thin coats give a much richer shine than one thick coat. -
Add glitter (optional):
While the gold paint is still slightly tacky, you can gently tap some fine gold glitter onto the crown for extra texture and sparkle. -
Paint the eyes:
Using a dotting tool or the back of a paintbrush, stamp two large circles of black paint onto the front of the raised eye bumps. Let this dry fully. -
Add the highlights:
Dip a smaller dotting tool or a toothpick into white paint. Add a small white reflection dot to the upper right corner of each black eye to bring the frog to life. -
Rosy cheeks:
Mix a soft pink paint (or use a shimmery pink). Dab circular cheeks just below the eyes using a round sponge dabber or your finger for a soft, airbrushed look. -
Draw the smile:
Using your finest detail brush or a waterproof fineliner pen, draw a tiny, shallow U-shape between the eyes for a sweet, simple smile. -
Seal the project:
Finish by coating the eyes and crown with a high-gloss varnish or UV resin to make them shine like glass. You can leave the body matte for contrast or glaze the whole piece.
Royal Accessories
Instead of a crown, try sculpting a tiny mushroom cap, a flower, or a party hat to create a whole village of different frog personalities.
Enjoy displaying your regal little amphibian on your desk or planting it in a pot perfectly.


The Complete Guide to Pottery Troubleshooting
Uncover the most common ceramic mistakes—from cracking clay to failed glazes—and learn how to fix them fast.
Kawaii Mushroom Pair With Sweet Faces
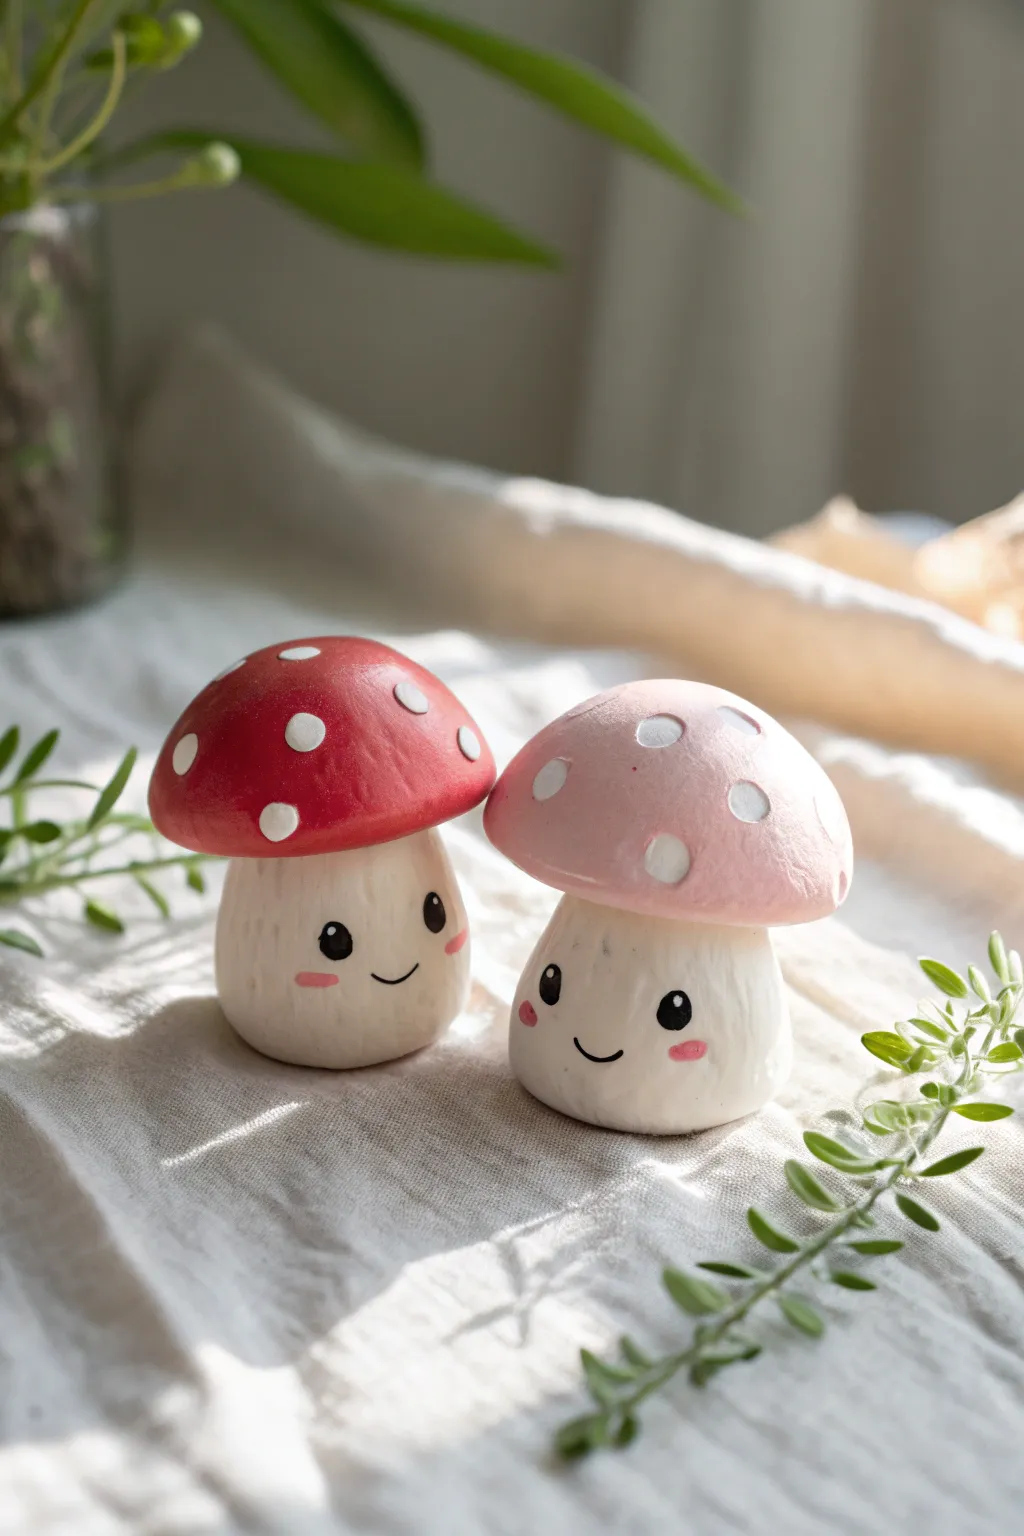
Bring a touch of forest magic to your desk with this adorable pair of blushing mushrooms. With their smooth, rounded caps and sweet expressions, these air-dry clay figures are the perfect introduction to creating kawaii characters.
Step-by-Step Tutorial
Materials
- White air-dry clay
- Acrylic paints (red, pastel pink, white, black)
- Small paintbrush (fine tip)
- Medium flat paintbrush
- Ball stylus tool or toothpick
- Water cup
- Sandpaper (fine grit)
- Matte varnish or sealant
Step 1: Shaping the Stems
-
Condition the clay:
Start by taking a chunk of white air-dry clay and kneading it thoroughly in your hands until it becomes warm, pliable, and free of cracks. -
Form the bases:
Divide the clay into two equal portions. Roll each portion into a smooth ball first, then gently roll it back and forth on your work surface to create a thick cylinder shape. -
Create the taper:
Gently pinch and roll the top third of each cylinder so it becomes slightly narrower than the bottom. This tapered neck will hold the mushroom cap securely. -
Flatten the bottoms:
Press the bottom of each stem firmly onto your table so they stand upright independently. Smooth the sides with a bit of water on your finger if any cracks appear.
Cracks Appearing?
If you see small cracks while drying, mix a tiny bit of fresh clay with water to make a paste. Fill the cracks, smooth with a finger, and let dry again.
Step 2: Creating the Caps
-
Roll the cap spheres:
Take two new pieces of clay, slightly larger than the stem pieces. Roll them into perfect spheres. -
Shape the domes:
Press each sphere gently onto a flat surface to flatten the bottom. Use your thumb to create a slight indentation in the center of the flat side where the stem will connect. -
Round the edges:
Smooth the edges of the caps with your fingertips to create a nice, rounded dome shape. I like to keep the curve quite high for that classic cartoon mushroom look. -
Checking the fit:
Place the caps onto the stems without gluing them yet. Ensure the proportions look right—the caps should be slightly oversized for maximum cuteness. -
Attach the pieces:
Score the top of the stem and the indented part of the cap with a toothpick. Add a dab of water or clay slip, then press the pieces together firmly to bond them. -
Dry time:
Set your mushrooms aside to dry completely. This usually takes 24-48 hours depending on humidity; flip them occasionally so the bottoms dry evenly.
Step 3: Painting & Details
-
Sand for smoothness:
Once fully dry, lightly sand the surface with fine-grit sandpaper to remove any fingerprints or bumps. Wipe away the dust with a damp cloth. -
Base coat the stems:
Paint the stems with an off-white or creamy white acrylic paint. You might need two layers to get a solid, opaque finish. -
Paint the red cap:
Paint one mushroom cap with a vibrant red acrylic paint. Be careful near the rim where it meets the white stem. -
Paint the pink cap:
Paint the second mushroom cap with a soft pastel pink. Let both caps dry completely before moving to the next step. -
Add the dots:
Dip the back end of a paintbrush or a ball stylus tool into white paint. Dot spots randomly over the colored caps to create the classic toadstool pattern. -
Draw the faces:
Using your finest brush and black paint, carefully paint two small oval eyes low on the stem. Add a tiny U-shaped smile between them. -
Add highlights and cheeks:
Place a minuscule white dot near the top of each black eye for a sparkle. Finally, paint small pink ovals under the eyes for blushing cheeks. -
Seal the work:
Finish by applying a coat of matte varnish to protect your paint job and give the clay a professional looking finish.
Make it a Charm
Before the clay dries, insert a metal eye pin into the center of the cap. Once painted and glued, you can attach jump rings to turn them into keychains.
Now you have a charming little duo to keep you company on your shelf
Kawaii Cloud and Rainbow Shelf Decor
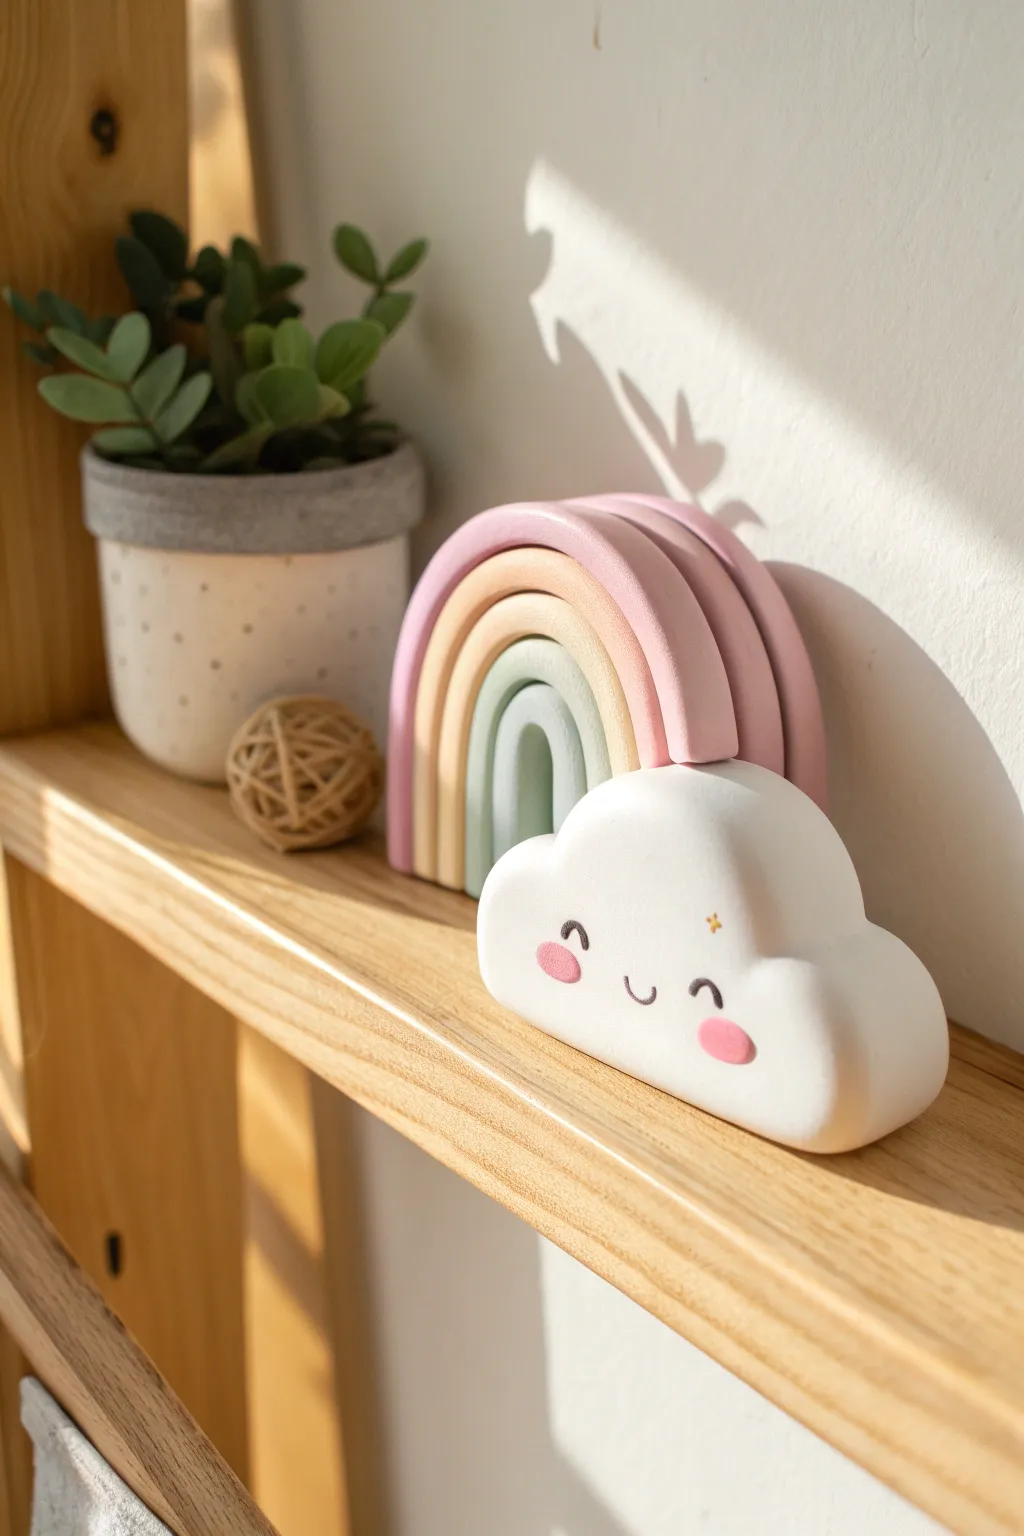
Bring a little piece of the sky into your home with this adorable duo featuring a stacked pastel rainbow and a cheerful cloud buddy. The soft matte finish and gentle color palette make this the perfect whimsical addition to a nursery or floating shelf.
Detailed Instructions
Materials
- White air dry clay (approx. 500g)
- Acrylic paints (pastel pinks, peach, sage green, yellow, black)
- Rolling pin
- Clay knife or craft blade
- Fine grit sandpaper
- Small paintbrush
- Dotting tool or toothpick
- Water and sponge (for smoothing)
- Matte varnish (optional)
Step 1: Forming the Rainbow Arches
-
Prepare the clay:
Begin by conditioning your air dry clay until it is soft and pliable, ensuring there are no cracks or dry spots before you start rolling. -
Roll the coils:
Roll out five separate ropes of clay. Make them relatively thick—about 3/4 inch in diameter—to ensure the rainbow stands upright easily. Try to keep the thickness consistent along the entire length. -
Form the smallest arch:
Take your shortest rope and curve it into a tight U-shape to form the center arch. Create a flat bottom by gently pressing the ends onto your work surface. -
Layer the arches:
Take the next rope and curve it snugly over the first arch. Repeat this process with the remaining ropes, stacking them directly on top of one another to build the full rainbow shape. -
Trim the base:
Once all arches are stacked, use a long craft blade or knife to slice straight across the bottom of the entire stack. This ensures all legs are perfectly even and the rainbow will sit flat. -
Separate for drying:
Carefully separate the arches slightly so they don’t fuse together while drying. I prefer to let them dry individually to make painting easier later. -
Smooth imperfections:
Dip your finger or a small sponge in water and gently smooth out any fingerprints or cracks on the surface of the clay coils.
Smooth Operator
To get perfectly smooth snakes for the rainbow, use an acrylic block or a flat piece of plastic to roll the clay back and forth instead of your hands.
Step 2: Sculpting the Cloud
-
Shape the body:
Take a large ball of white clay and flatten it slightly into an oblong oval shape, keeping it quite thick (about 1 inch) so it can stand on its own. -
Add fluffy curves:
Use your fingers to mold lumps and bumps along the top edge to mimic a fluffy cumulus cloud. Keep the bottom edge perfectly flat. -
Refine the surface:
Smoothen the entire surface with a little water. For a truly professional look, ensure the transition between the curves is soft and rounded, not sharp. -
Dry completely:
Allow both the rainbow arches and the cloud to dry for at least 24-48 hours. Turn them occasionally to ensure even airflow.
Make it Sparkle
Wait until the sealant is dry, then apply a tiny dot of glitter glue or gold leaf to the star on the cloud’s cheek for a texture that catches the light.
Step 3: Painting and Finishing
-
The sanding step:
Once bone dry, lightly sand any rough edges with fine-grit sandpaper to achieve that buttery smooth texture seen in the photo. -
Paint the rainbow:
Paint each arch a different shade. Start with a muted sage green for the center, moving outward to peach, apricot, and finally a dusty rose pink for the largest arch. Apply two coats for opacity. -
Paint the cloud base:
Although the clay is white, give the cloud a coat of white acrylic paint. This seals the clay and provides a uniform, bright finish. -
Add the face:
Using a very fine brush or a black paint pen, draw two small arched eyes and a tiny ‘U’ smile in the center of the cloud. -
Rosy cheeks:
Mix a soft pink paint and use your fingertip or a round sponge dabber to gently stamp circular blush marks on either side of the smile. -
The golden star:
Using a toothpick or fine brush, add a tiny yellow or gold star accent near the right eye. -
Assembly and seal:
You can glue the rainbow arches together now, or simply stack them freely on the shelf. Finish everything with a spray of matte varnish/sealant to protect your work without making it glossy.
Now you have a charming, handmade set ready to brighten up any corner of your room

TRACK YOUR CERAMIC JOURNEY
Capture glaze tests, firing details, and creative progress—all in one simple printable. Make your projects easier to repeat and improve.
Kawaii Star and Moon Keychain Set
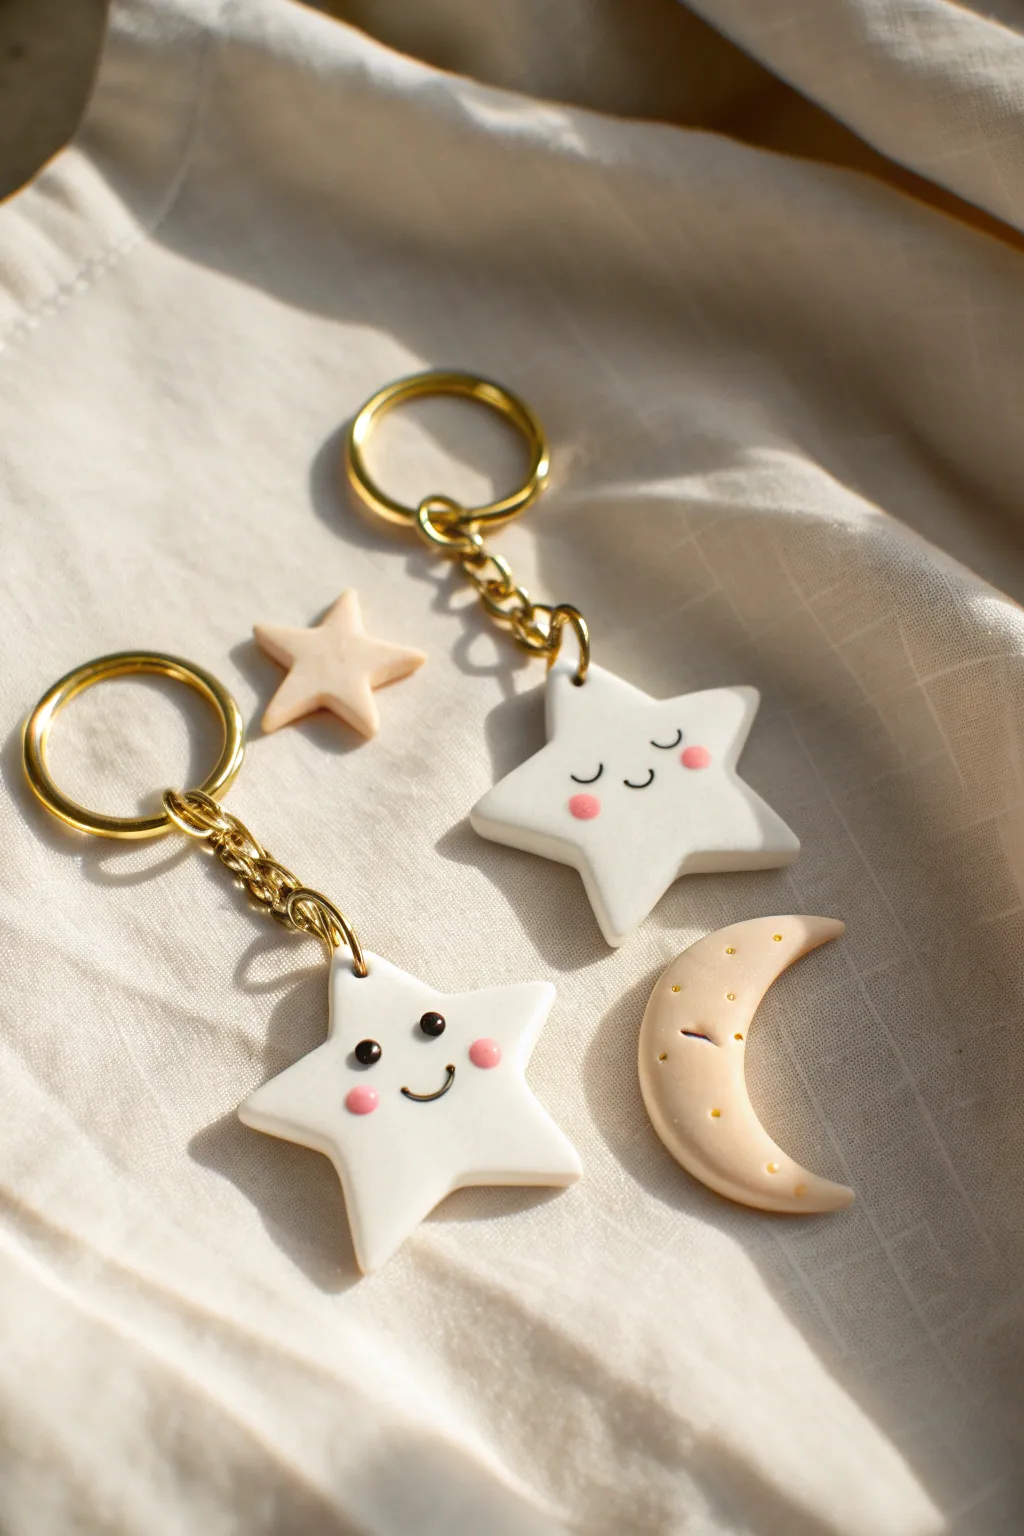
Create a celestial pair of keychains featuring an awake and a sleeping star, perfect for sharing with a best friend or partner. These glossy white stars are accented with sweet blushing cheeks and come together with a simple moon and mini star charm.
Step-by-Step Guide
Materials
- White polymer clay or air dry clay (air dry works, but polymer is more durable for keychains)
- Beige or pale yellow clay (for the moon)
- Small star cookie cutter (approx. 1.5 inches)
- Moon cookie cutter (optional, or cut by hand)
- Black acrylic paint or a fine-tip permanent marker
- Pink acrylic paint or soft pastels
- Gold eyeshadow or gold mica powder (optional for moon craters)
- Doting tool or toothpick
- Gold keychain hardware with jump rings
- Eye screws (gold)
- Glossy varnish or UV resin
- Clay roller
- Pliers
Step 1: Shaping the Celestial Bodies
-
Roll the clay:
Start by conditioning your white clay until it’s soft and pliable. Roll it out on a smooth surface to an even thickness of about 1/4 inch (6mm). You want it thick enough to hold the eye screw securely. -
Cut the star shapes:
Using your star cutter, punch out two identical star shapes. Smooth the edges with your finger to remove any jagged bits from the cutter. -
Form the moon:
Take a small amount of beige or pale yellow clay. Roll it into a thick log and taper the ends, then curve it into a crescent shape. Alternatively, flatten it and use a cutter. Smooth the surface so it looks soft and rounded. -
Create the mini star:
With the leftover beige clay, cut or mold a tiny, thumbnail-sized star as an extra charm. -
Attach the hardware:
Carefully screw a gold eye screw into the top point of both white stars. If you are using air dry clay, dip the screw in a bit of white glue first for extra hold.
Step 2: Adding Details & Expressions
-
Texture the moon:
Use a small dotting tool or the tip of a paintbrush handle to press gentle indentations into the moon’s surface to create craters. -
Add moon shimmer:
Dip a toothpick into gold paint or mica powder and gently dab it into the center of each crater for a subtle sparkle. -
Cure or dry the base:
If using polymer clay, bake according to the package instructions (usually 275°F for 15-30 mins). If using air dry clay, let the pieces sit in a dry spot for 24-48 hours until fully hardened.
Hardware Loose?
If the eye pin wiggles after the clay dries, unscrew it, add a drop of superglue to the threads, and screw it back in. Let it set for 10 minutes.
Step 3: Painting the Faces
-
Paint the cheeks:
Once the stars are hard, dip a dotting tool into pink paint. Place two soft dots on the star’s face area for blushing cheeks. Do this for both stars. -
Draw the sleeping face:
On one star, use a fine brush with black paint (or a fine-liner pen) to draw two ‘U’ shapes for closed, sleeping eyes. Add a tiny curved line for a smiling mouth between the cheeks. -
Draw the awake face:
On the second star, paint two solid black circles for open eyes. Add a tiny white highlight dot in each black eye to make it look alive. Draw a similar smile between the cheeks. -
Dry the details:
Allow the paint to dry completely. I prefer to wait at least an hour to ensure I don’t smudge the faces during the glazing step.
Galaxy Glitter
Mix a pinch of holographic glitter into your gloss varnish before applying. This adds a subtle, magical twinkle to the white clay without overpowering the face.
Step 4: Finishing Touches
-
Apply varnish:
Coat the front and sides of the stars and moon with a glossy varnish or UV resin. This gives them that ceramic-like shine shown in the photo and protects the paint. -
Assemble the chains:
Open the jump ring on your gold keychain hardware using two pairs of pliers. Slide the eye screw of the star onto the ring. -
Close the ring:
Twist the jump ring closed securely. The moon and mini star can be kept as loose pocket charms or attached to a separate chain if desired.
Now you have an adorable set of celestial companions to brighten up your keys or backpack
Kawaii Heart Pocket Tokens With Expressions
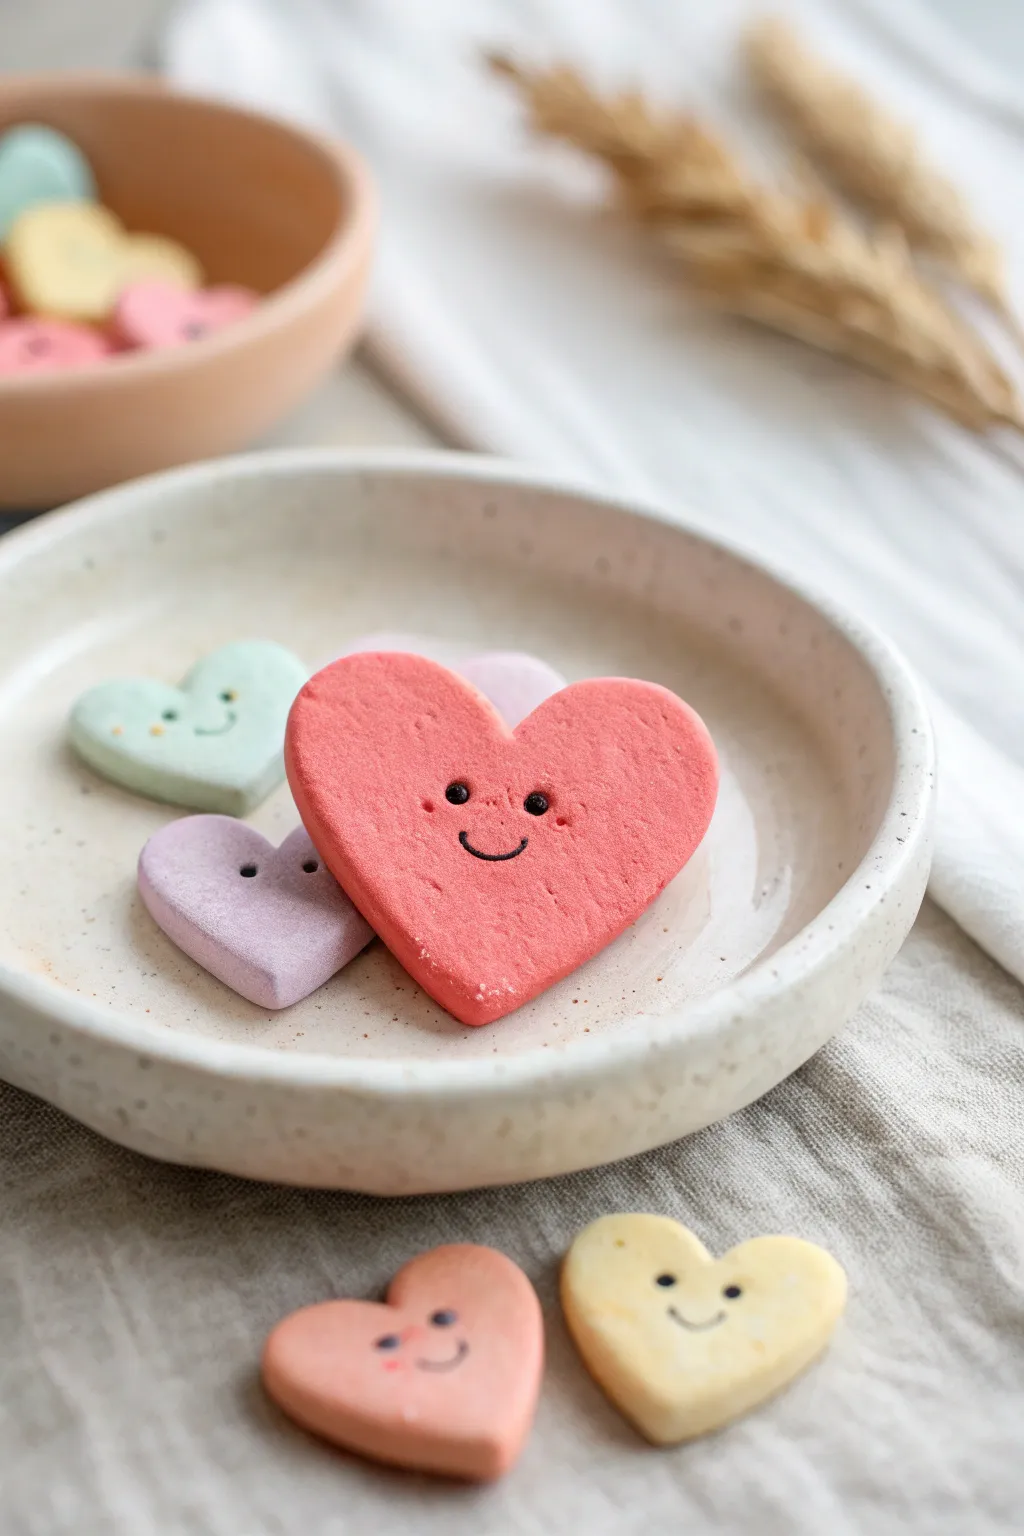
These charming little heart-shaped pocket tokens are the perfect blend of simple crafting and sweet sentiment. With their soft matte finish and tiny, friendly expressions, they make adorable gifts or comforting keepsakes to carry with you.
Step-by-Step Tutorial
Materials
- White air dry clay (smooth specialty clay preferred)
- Acrylic paints (pastel pink, bright coral, mint green, lavender, soft yellow)
- Rolling pin
- Small heart-shaped cookie cutter (approx. 1-1.5 inches)
- Fine-grit sandpaper (400-600 grit)
- Fine detail paintbrush (size 00 or 000)
- Black fine-tip acrylic paint marker or black acrylic paint
- Ball stylus tool or a toothpick
- Matte varnish or sealant (spray or brush-on)
- Parchment paper or non-stick craft mat
Step 1: Shaping the Hearts
-
Condition the Clay:
Begin by taking a chunk of white air dry clay and kneading it thoroughly in your hands until it feels warm, pliable, and free of cracks. -
Add Base Color:
Flatten the clay slightly and add a small drop of acrylic paint into the center (start with the coral red for the main heart). Fold the clay over the paint and knead until the color is completely uniform. -
Create a Clean Surface:
Lay down a piece of parchment paper or a non-stick mat to prevent sticking and ensure a smooth back side. -
Roll Smoothly:
Roll the colored clay out to an even thickness of about 1/4 inch (6mm). Try to keep the roller pressure consistent so the token isn’t lopsided. -
Cut the Shapes:
Press your heart-shaped cutter firmly into the clay. Give it a tiny wiggle to separate the edges before lifting it up. -
Soften the Edges:
Once cut, run your finger gently around the sharp perimeter of the heart to soften and round off the cut edge slightly for a more organic, ‘cookie-like’ look. -
Repeat for Variety:
Repeat the coloring and cutting process with your other pastel paint colors—mint, lavender, and yellow—so you have a nice assortment. -
Dry Completely:
Place the hearts on a flat surface to dry for 24-48 hours. Flip them over halfway through the drying process to prevent curling.
Step 2: Adding the Kawaii Faces
-
Sand Imperfections:
Once fully hard, gently sand any rough spots on the edges or surface using fine-grit sandpaper until the heart is buttery smooth. -
Dust Clean:
Wipe the hearts with a barely damp cloth or a dry soft brush to remove all sanding dust before painting. -
Paint the Eyes:
Dip the tip of a ball stylus or the back end of a paintbrush into black acrylic paint. Dot two small, widely spaced eyes onto the center of the heart. -
Draw the Smile:
Using a super fine detail brush or a fine-tip paint pen, carefully connect the area between the eyes with a small, U-shaped curved line. -
Create Rosy Cheeks:
Mix a tiny bit of darker pink paint with water to make a thin wash. Using a Q-tip or a small brush, dab gentle circles underneath the eyes to create a blushing effect. -
Add Highlights:
I find that adding a microscopic dot of white paint to the upper corner of the black eyes really brings the character to life. -
Freckles and Details:
For the mint or yellow hearts, you can add tiny extra details like three small dots for freckles using a contrasting color. -
Seal the Work:
Apply a thin coat of matte varnish over the entire piece. This protects the paint from scratching and gives the clay a finished, professional texture.
Smooth Surface Secret
Use a tiny amount of water on your fingertip to smooth out the clay surface before it dries to minimize sanding later.
Fixing Cracks
If small cracks appear while drying, make a paste of clay and water (slip) and fill them in, then sand smooth once dry.
Now you have a handful of cheerful tokens ready to brighten someone’s day
Kawaii Mini Trinket Dish With a Character Rim
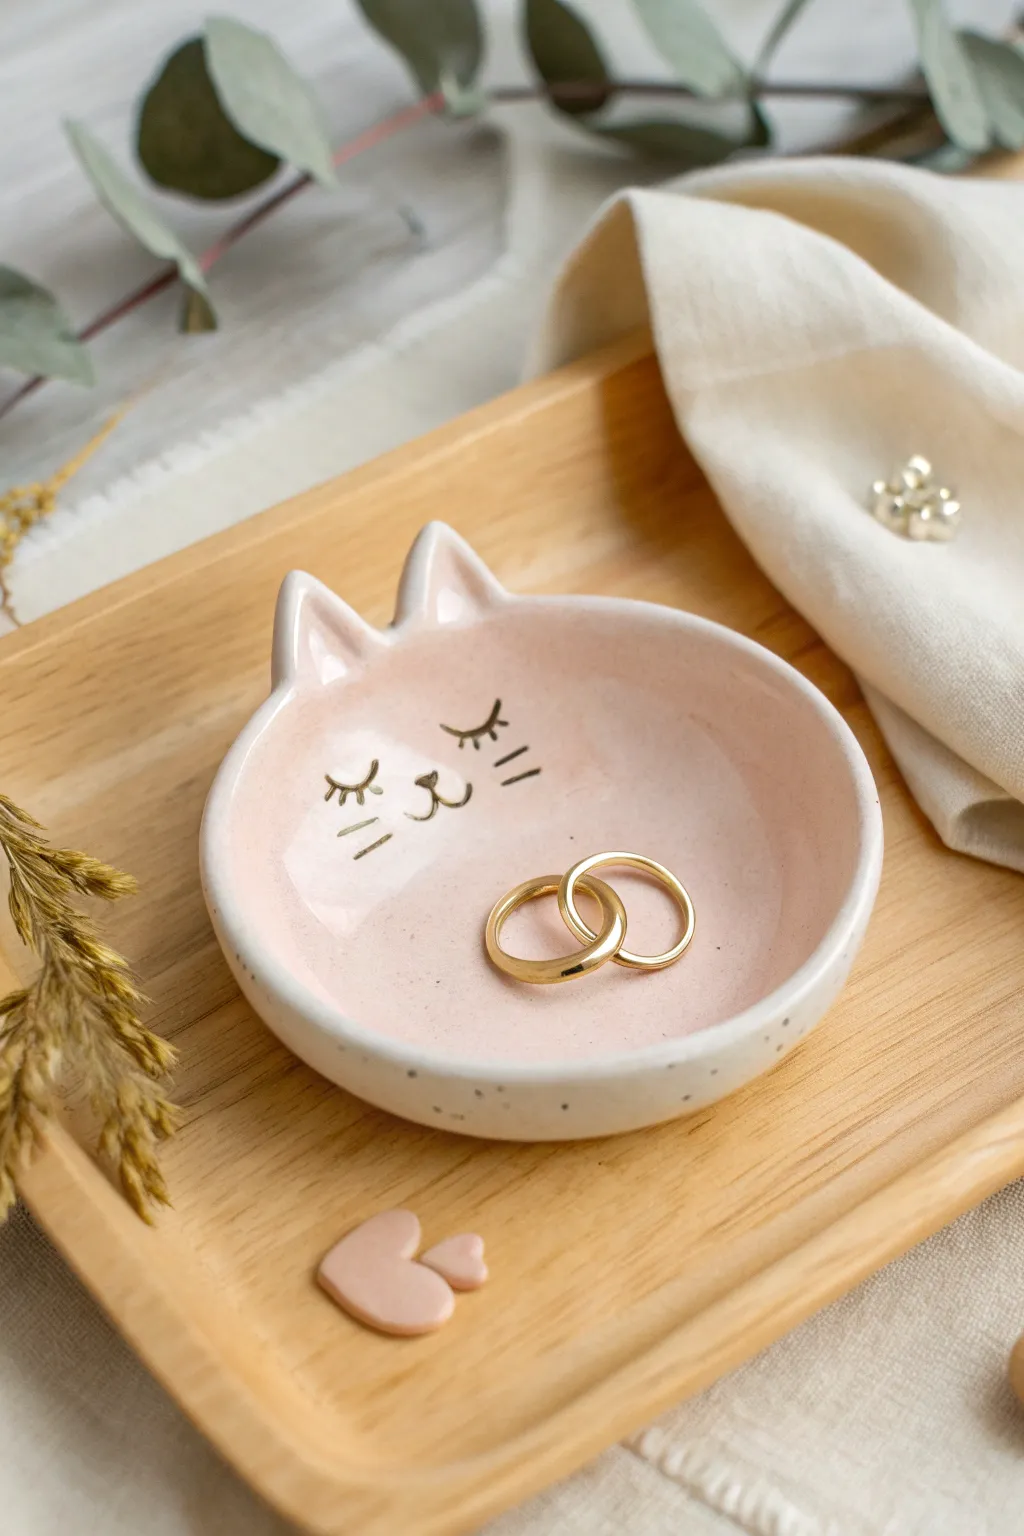
This adorable ring holder brings a touch of kawaii charm to your nightstand with its sweet, sleeping kitty face. Sculpted from air dry clay and finished with a soft pink blush, it’s the perfect size for keeping your most precious jewelry safe.
Step-by-Step
Materials
- White air dry clay
- Rolling pin
- Round cookie cutter (approx. 3-4 inches) or a glass
- Clay sculpting tools (or a toothpick)
- Small bowl or sandpaper (for smoothing)
- Acrylic paints: Blush Pink, Black, Gold
- Fine detail paintbrush
- Glossy varnish or sealant
- Small bowl of water
- Sponge or paper towel
Step 1: Shaping the Base
-
Prepare the Clay:
Start by conditioning a ball of white air dry clay in your hands until it is smooth and pliable. You want to remove any air bubbles and ensure the texture is consistent. -
Roll it Out:
Roll the clay flat to a thickness of about 1/4 inch (approx. 5-6mm). Try to keep the thickness even across the entire surface to prevent cracking later. -
Cut the Circle:
Use your round cookie cutter or the rim of a glass to punch out a perfect circle. Remove the excess clay from around the edges. -
Form the Ears:
Take two small scraps of the excess clay and shape them into small triangles. These should be slightly rounded at the tips for a softer, cartoon-like look. -
Attach the Ears:
Score the bottom of the ears and the top edge of your circle with a needle tool or toothpick. Apply a tiny dab of water as ‘glue’ and press the ears firmly onto the rim. -
Seamless Blending:
Use your finger or a clay tool to smooth the seam where the ears meet the circle. The transition should be invisible, making the clay look like one continuous piece. -
Create the Curve:
Gently lift the edges of the circle to create a shallow bowl shape. I like to delicately pinch and smooth the rim upward so it holds its cupped shape.
Pro Tip: Smooth Edges
Keep a small sponge damp with water nearby. Lightly wiping the rim as you work prevents the clay from cracking and saves you sanding time later.
Step 2: Surface Detailing & Drying
-
Smooth Everything:
Dip your finger in a little water and run it over the entire surface to erase any fingerprints or cracks. Pay special attention to the rim and the back of the ears. -
Add Speckles (Optional):
If you want the speckled ceramic look shown in the photo, you can gently prick the clay surface randomly with a toothbrush or leave it smooth for a cleaner finish. -
Dry Completely:
Set the dish aside to dry for 24-48 hours. Turning it over halfway through the drying process helps the bottom dry evenly. -
Sanding:
Once bone dry, use fine-grit sandpaper to buff away any rough edges on the rim or the ears for a professional-looking finish.
Level Up: Gold Accents
Instead of black paint for the face, use metallic gold leaf or liquid gold gilding paint for the whiskers and eyes to make the dish look high-end.
Step 3: Painting & Glazing
-
Base Coat:
Mix a very pale, milky pink acrylic paint. Apply a wash of this color to the inside of the dish, leaving the outside white or speckling it later. -
Inner Ears:
Paint the inside of the triangle ears with a slightly more opaque white or lighter pink to define the shape. -
Draw the Face:
Using your finest detail brush and black acrylic paint (or a waterproof fine-liner pen), draw two curved lines for sleeping eyes with eyelashes. Add a small nose and mouth in the center. -
Whiskers:
Paint three short, straight lines on either side of the face for whiskers. Keep your hand steady and light for thin lines. -
Speckled Finish:
Dip an old toothbrush into diluted black or grey paint. Run your thumb over the bristles to flick tiny speckles over the dish, mimicking pottery clay. -
Seal it Up:
Once the paint is fully dry, cover the entire dish with a glossy varnish. This gives it that shiny, ceramic-like quality and protects your artwork.
Now you have a charming little spot to rest your rings at the end of the day