Whenever I need a quick win at the clay table, I reach for cute mini clay projects because they’re small, low-pressure, and ridiculously satisfying. These ideas lean into kawaii-style faces, tiny shapes, and that “I can’t believe I made this” kind of charm.
Tiny Kawaii Food Charms With Smiley Faces
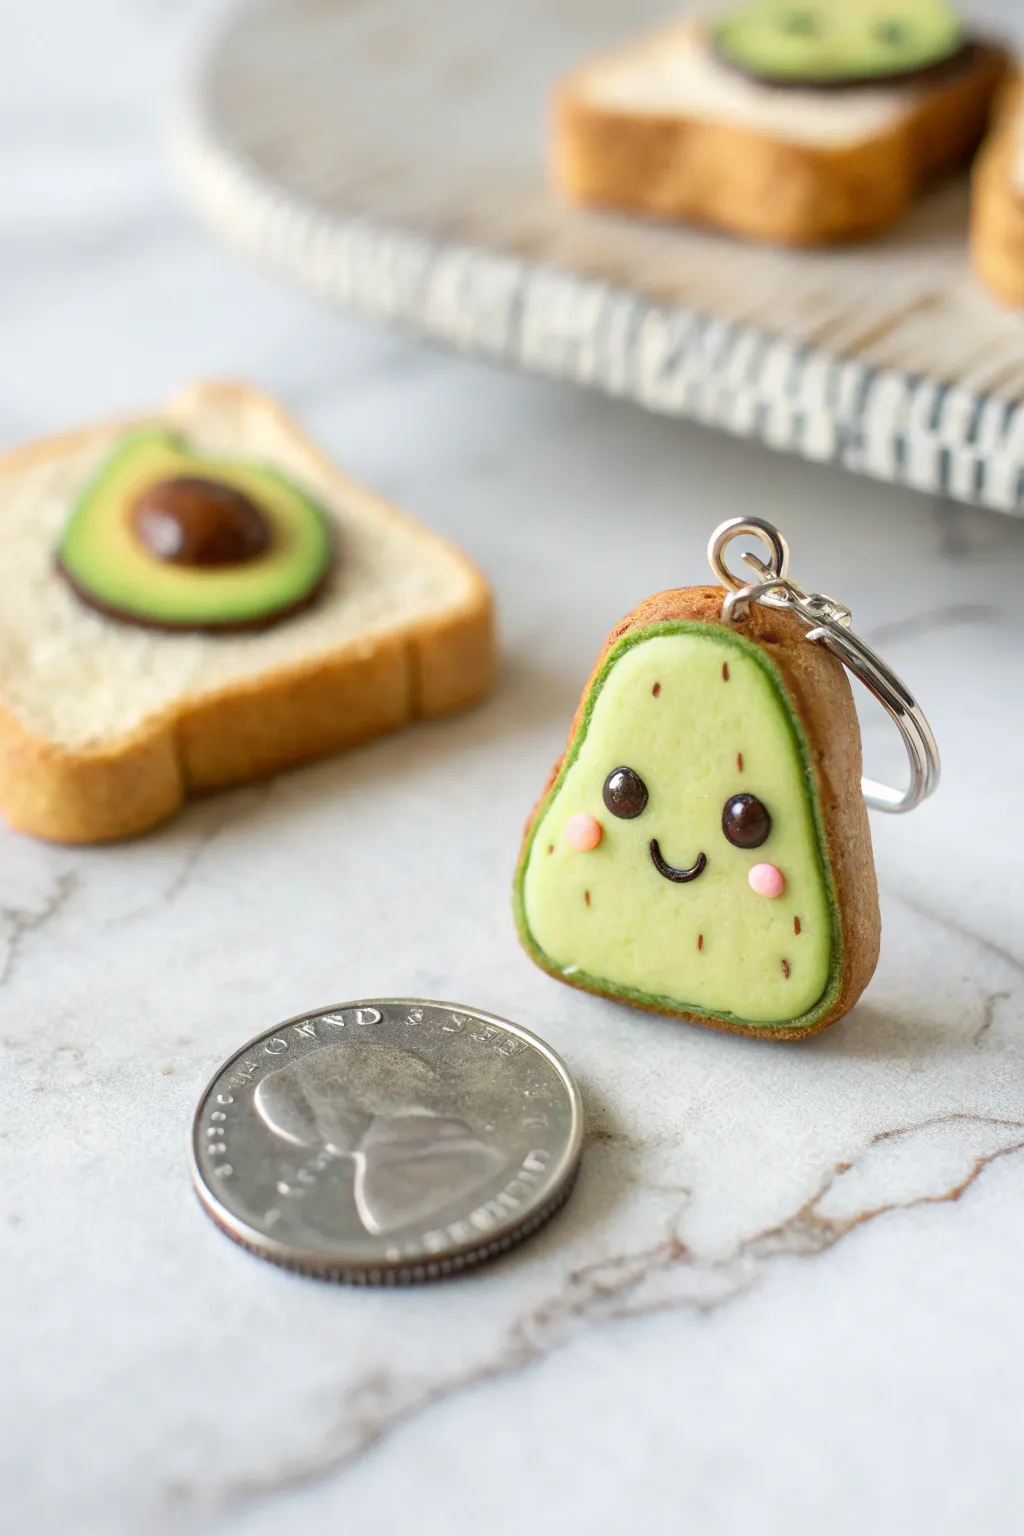
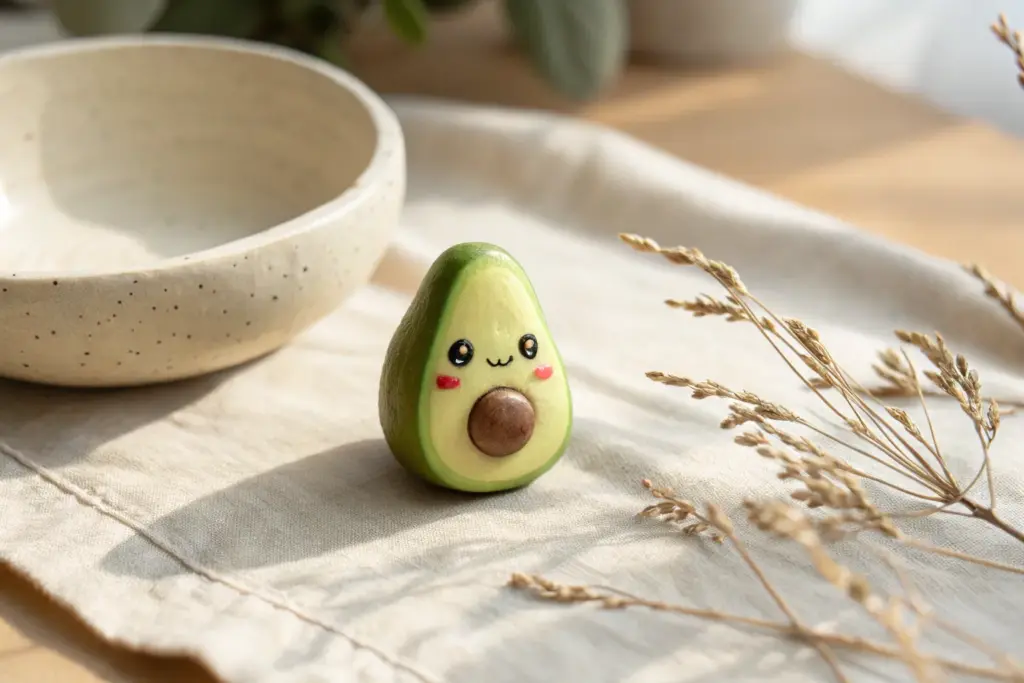
This adorable avocado charm is a tiny burst of happiness, complete with rosy cheeks and a warm, textured crust. Perfect for keychains or stitch markers, this kawaii project captures the cozy vibe of avocado toast in miniature form.
Step-by-Step Tutorial
Materials
- Polymer clay (tan/light brown, pale green, dark green, black, pink)
- Liquid polymer clay (optional)
- Texture tool (toothbrush or stiff bristle brush)
- Needle tool or toothpick
- Rolling pin or clay machine
- Blade or craft knife
- Eye pin
- Jump rings and keychain finding
- Gloss glaze (optional)
Step 1: Shaping the Base
-
Mix the bread color:
Start by conditioning your tan or light brown clay until it is soft and pliable. If it’s too dark, mix in a little white or translucent clay to get a realistic baked bread tone. -
Form the slice shape:
Roll the tan clay into a thick sheet, about 1/4 inch thick. Use your blade to cut out an avocado shape—essentially a pear shape with a flattened bottom. -
Texturize the crust:
Take a toothbrush or a stiff-bristled brush and gently tap it all over the rounded edge of the clay shape. This creates a realistic, baked bread texture along the crust. -
Create the avocado well:
Use your thumb or a ball tool to gently press a shallow indentation into the center of the bread shape, leaving a raised rim for the crust.
Pastel Shading Tip
For realistic toast, brush orange pastel powder first, then brown on the high points. It creates depth that single-color paint can’t match.
Step 2: Adding the Avocado
-
Prepare the greens:
Condition your pale green clay. Roll it out thinly. You can also mix a tiny bit of yellow into green to get that fresh, creamy avocado flesh color. -
Cut the avocado insert:
Cut a shape from the green clay that matches the indentation you made in the bread, but slightly smaller so the crust remains visible. -
Add the dark rim:
Roll a very thin snake of dark green clay. Wrap this around the edge of your pale green slice to mimic the avocado skin layer. -
Assemble the layers:
Place the green avocado piece (with its dark green rim) into the indentation on the bread base. Gently press it down to secure it without squashing the texture. -
Blend the surface:
Smooth the surface of the pale green clay with your finger to remove fingerprints, ensuring it looks creamy and flat.
Turn it into Jewelry
Make a second matching charm but omit the keychain clasp. Attach earring hooks instead for an adorable set of best-friend avocado earrings.
Step 3: Kawaii Details
-
Make the eyes:
Roll two tiny balls of black clay for the eyes. Place them on the upper half of the avocado face, spacing them apart slightly. -
Flatten the eyes:
Gently press the black balls flat against the green surface. If they won’t stick, a tiny dab of liquid clay helps secure them. -
Create the smile:
Roll an incredibly thin thread of black clay. Cut a tiny u-shaped segment and carefully place it between and slightly below the eyes. -
Add rosy cheeks:
Roll two tiny balls of pink clay. Press them onto the face just below and to the outside of the eyes to give it that sweet, blushing look. -
Add speckles:
Using a needle tool, gently poke or scratch tiny little flecks into the green clay to mimic the natural texture of an avocado, or add tiny bits of brown clay.
Step 4: Finishing Up
-
Insert the hardware:
Trim an eye pin to the correct length and dip the end in liquid clay or super glue gel. Insert it into the top center of the bread crust. -
Shade the crust:
I like to use soft pastels here; shave a little brown pastel into powder and brush it lightly onto the textured crust edge to make it look perfectly toasted. -
Bake the charm:
Bake your charm according to the manufacturer’s instructions for your specific brand of polymer clay. Let it cool completely before handling. -
Glaze and assemble:
Once cool, create highlights on the eyes with white paint or glaze the eyes for shine. Finally, use pliers to attach your jump ring and keychain finding to the eye pin.
You now have a delightful little charm to brighten up your keys or zipper pull


Cute Mini Fruit Slice Charms

Brighten up your accessories with this adorable miniature orange slice charm, complete with a tiny, friendly face. The translucent pith and realistic rind texture give it a professional finish, while the simple expression makes it impossibly sweet.
How-To Guide
Materials
- Orange polymer clay
- Translucent white polymer clay
- Solid white polymer clay
- Black polymer clay
- Liquid polymer clay (translucent)
- Gloss glaze or UV resin
- Basic clay sculpting tools (needle tool, dotting tool)
- Small circle cutter
- Eye pin or screw eye
- Blade or craft knife
- Sandpaper or texture sponge
Step 1: Creating the Orange Cane
-
Form the segments:
Start by rolling a log of orange clay. Wrap this log in a thin sheet of solid white clay. This will form the individual juice segments of your fruit. -
Shape the wedge:
Pinch one side of the wrapped log to create a teardrop or wedge shape. I like to make sure the white outline is even on all sides. -
Elongate the cane:
Gently stretch and roll this wedge-shaped log until it is long and thin. Cut it into eight equal-length pieces. -
Assemble the center:
Roll a very thin snake of translucent white clay for the center core. Arrange the eight orange wedges around this core, with the pointy ends facing inward. -
Wrap the core:
Wrap the entire assembled circle in a thin layer of translucent white clay. This creates the inner pith layer. -
Add the rind:
Finally, wrap the whole cylinder in a slightly thicker sheet of orange clay to create the outer skin. Roll the cane gently to bind the layers together.
Fresh Tip
Chill your raw cane in the fridge for 20 minutes before slicing. Firm clay slices cleanly without distorting the internal pattern.
Step 2: Slicing and Shaping
-
Slice the charm:
Use a sharp blade to cut a slice from your cane, about 4-5mm thick. Make sure the clay has rested and is cool so the pattern doesn’t smudge. -
Soften the edges:
Gently tap the cut edges of the slice with your finger to round them off slightly, giving it a plump, natural look. -
Texture the rind:
Roll the outer edge of the slice against a piece of sandpaper or a toothbrush to create a realistic dimpled citrus skin texture. -
Add segment detail:
Using a needle tool, gently press into the center of each orange segment to create a slight indentation or texture, mimicking juice sacs.
Step 3: Adding Personality & Finishing
-
Create the eyes:
Roll two minuscule balls of black clay. Position them on the lower half of the slice, spacing them apart for a cute ‘kawaii’ look. -
Form the smile:
Roll an incredibly thin thread of black clay. Cut a tiny u-shape and press it gently between the eyes with a needle tool. -
Add highlights:
Using a needle tip and white paint or a tiny speck of white clay, add a microscopic dot to the top right of each black eye for sparkle. -
Insert hardware:
Insert an eye pin or screw eye into the top of the rind (the ’12 o’clock’ position). Add a dab of liquid clay to the shaft before inserting for extra security. -
Bake the charm:
Bake according to your clay manufacturer’s instructions, usually around 275°F (130°C) for 15-20 minutes. -
Cool and glaze:
Once fully cooled, coat the entire front face of the slice with gloss glaze or UV resin to make it shine like fresh fruit.
Citrus Twist
Change the palette to create other fruits! Try ruby red for blood oranges, bright yellow for lemons, or green for tart limes.
Now you have a refreshing little charm ready to hang on a necklace or keychain


Round Mini Cat Pocket Friends
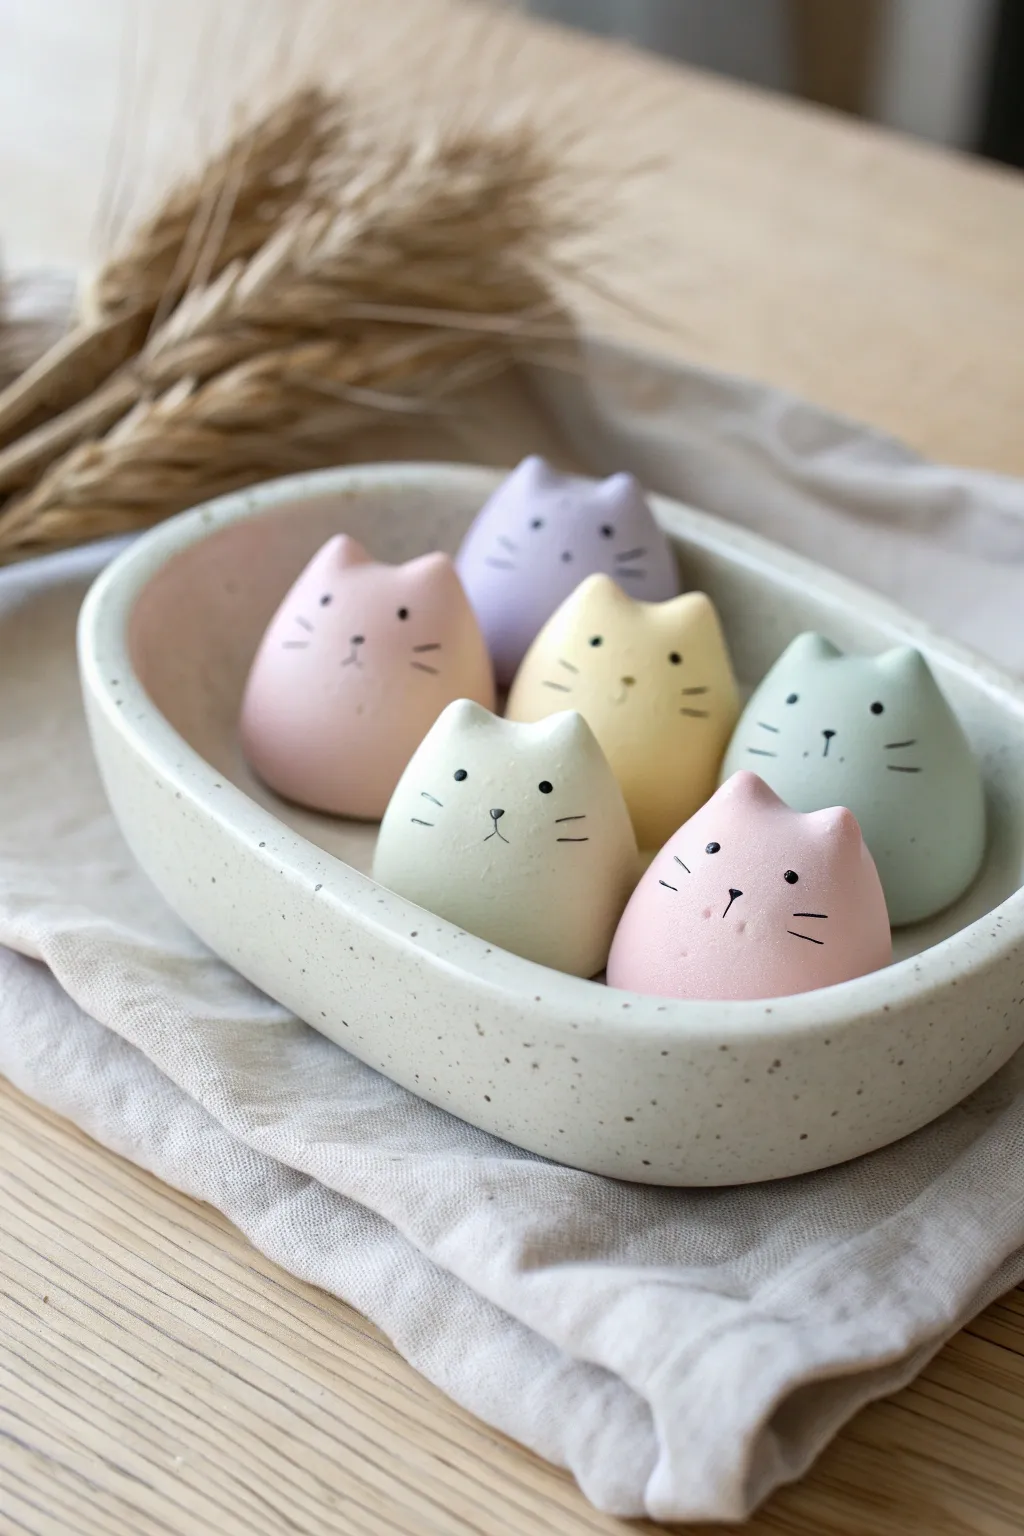
These delightfully chubby clay cats are the perfect soothing desk companions or sweet handmade gifts. With their smooth, rounded forms and soft pastel hues, they bring a gentle charm that feels wonderful to hold in your hand.
Detailed Instructions
Materials
- Polymer clay (whites and pastel colors: pink, lavender, mint, yellow)
- Acrylic rolling pin
- Small ball stylus or toothpick
- Black acrylic paint
- Fine-point detail brush (size 000)
- Gloss or matte varnish (optional)
- Baking sheet
- Parchment paper
- Wet wipes (for cleaning hands)
Step 1: Shaping the Base
-
Condition the Clay:
Begin by thoroughly kneading your chosen pastel clay color until it is soft, warm, and pliable. This prevents cracking later on. -
Form the Body:
Roll a piece of clay about the size of a large walnut into a smooth, crack-free sphere between your palms. -
Create the Drop Shape:
Place the ball on your work surface and gently roll it back and forth just on the top half to create a subtle teardrop or egg shape. The bottom should remain wide and rounded. -
Establish the Base:
Gently tap the bottom of your clay egg onto the table to flatten it slightly so the cat sits upright securely without wobbling. -
Refine the Surface:
Look closely for any fingerprints. I like to gently buff the surface with the pad of my finger to ensure a matte, smooth finish.
Smudge Patrol
Pastel clay picks up dust instantly. Keep wet wipes nearby and clean your hands thoroughly when switching colors to keep your light pinks and creams pristine.
Step 2: Sculpting Ears
-
Pinch the Ears:
Using your thumb and forefinger, gently pinch the top of the tapered clay upwards at two points to form the initial ear shapes. -
Refine Ear Shape:
Use a modeling tool or your fingers to smooth the clay between the ears, creating a soft dip in the center of the head. -
Soften the Tips:
These cats are meant to be round and friendly, so gently tap the pointed tips of the ears to round them off slightly; they shouldn’t be too sharp. -
Shape Check:
Turn the figure around and ensure the ears transition smoothly into the back of the head without leaving a harsh ridge. -
Repeat:
Create the remaining five cats in various pastel shades using the same techniques, ensuring they are roughly the same size for a cohesive set.
Make it a Sound Toy
Before sealing the bottom, hollow out the center slightly and insert a small ceramic bead or rattle insert to turn these into cute, soothing shakers.
Step 3: Painting & Finishing
-
Bake the Clay:
Arrange your cats on a baking sheet lined with parchment paper. Bake according to your polymer clay package instructions (usually around 275°F/135°C for 15-30 minutes). -
Cool Down:
Allow the figures to cool completely before attempting to paint. Painting on warm clay can make the acrylic uneven. -
Paint the Eyes:
Dip a small ball stylus or the back of a paintbrush into black acrylic paint. Dot two small, wide-set eyes onto the face, about halfway down the body. -
Add the Nose:
Using your finest detail brush, paint a tiny inverted triangle or a small ‘Y’ shape right between and slightly below the eyes. -
Draw Whiskers:
With a very steady hand and minimal paint on your brush, flick three thin whiskers outwards on each cheek area. -
Seal (Optional):
If these will be handled often, apply a thin coat of matte varnish to protect the paint, though bare clay has a wonderful texture on its own.
Now you have a whole litter of peaceful pastel kittens to decorate your space


Cute Mini Frog Blob Figurines
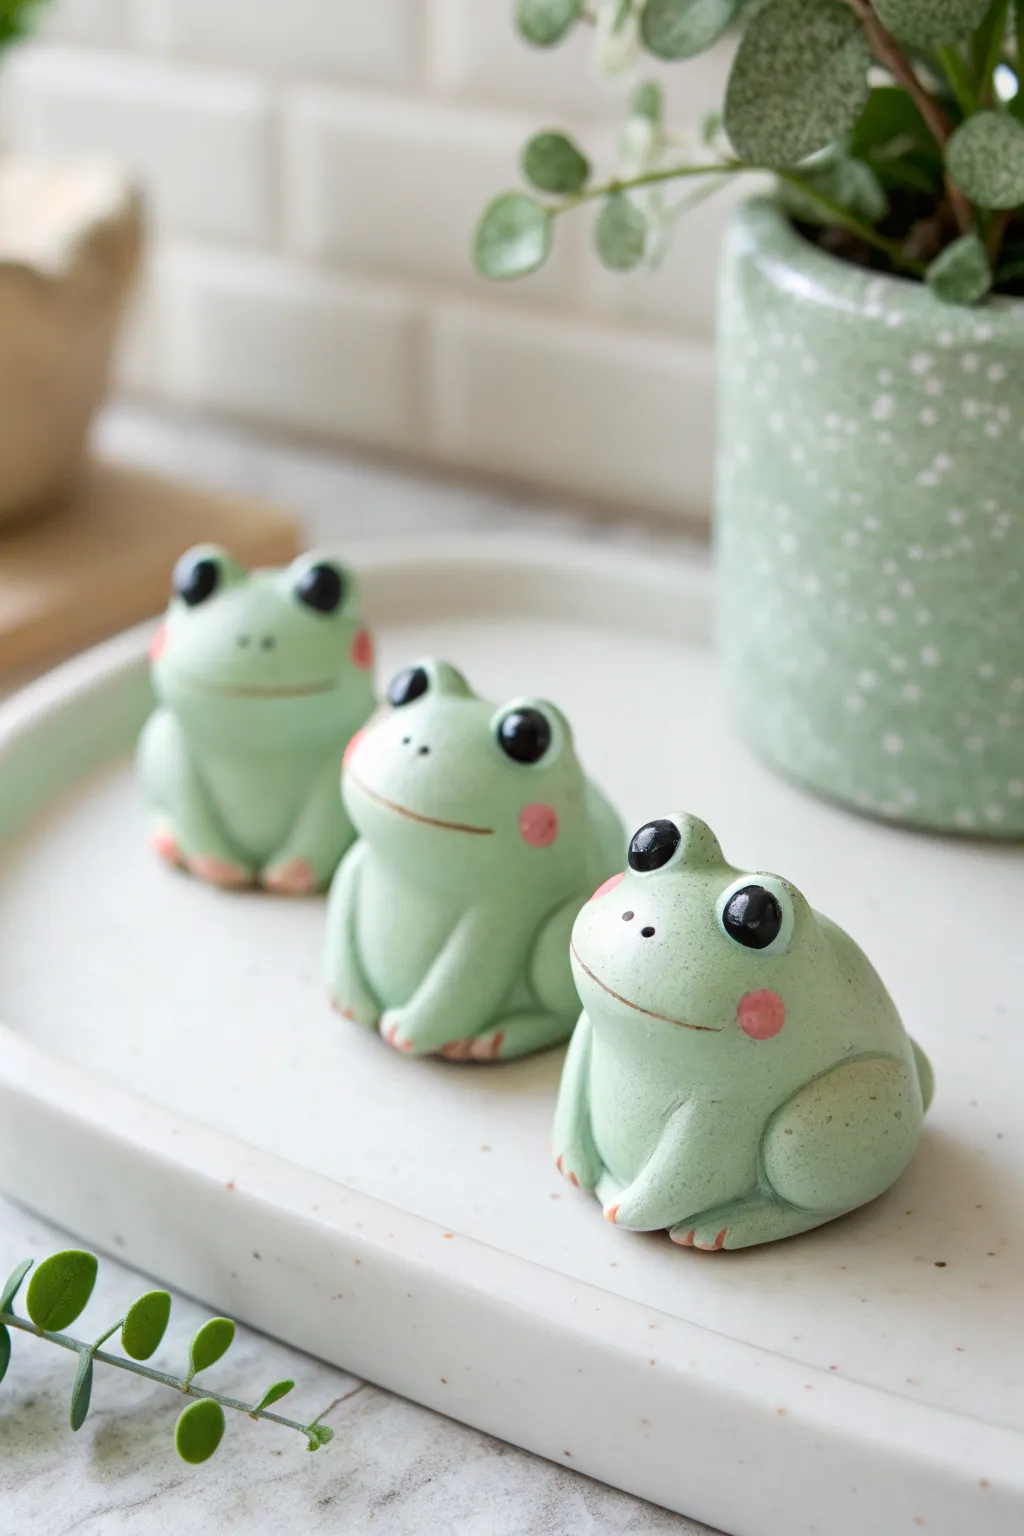
These delightfully chubby frog figurines capture the essence of cuteness with their soft mint-green hue, wide-set eyes, and tiny pink cheeks. Their smooth, sculpted forms and neatly tucked limbs make them perfect little companions for your desk or plant shelf.
Step-by-Step Guide
Materials
- Polymer clay (Mint Green or White mixed with Green)
- Polymer clay (Black)
- Polymer clay (Soft Pink)
- Clay sculpting tools (needle tool, small ball tool)
- Acrylic rolling pin (optional)
- Rubbing alcohol and Q-tips (for smoothing)
- Oven for baking polymer clay
- Aluminum foil (for baking support)
- Gloss glaze or polyurethane (optional)
Step 1: Basic Shape
-
Mix the perfect green:
If you don’t have pre-mixed mint green clay, blend white clay with a very small amount of bright green. Knead thoroughly until the color is uniform and pale, like mint ice cream. -
Form the body:
Roll a medium-sized ball of green clay, about the size of a walnut or large gumball. This will be the main body. -
Shape the blob:
Gently press the ball onto your work surface to flatten the bottom so it sits stable. Allow the top to remain rounded and domed; we want a chubby, blob-like silhouette rather than a realistic frog anatomy. -
Smooth the surface:
Check for fingerprints. If you see any, lightly brush them away with a finger dipped in a tiny bit of rubbing alcohol or cornstarch.
Uneven Eyes?
If the black eyes look wonky or different sizes, roll the black clay into a single snake effectively, cut it exactly in the middle, and roll those halves into balls for perfect symmetry.
Step 2: Adding Features
-
Sculpt the eye sockets:
Use a medium-sized ball tool to press two indentations near the top of the head. Space them widely apart to achieve that cute, derpy look. -
Create the eyes:
Roll two small balls of black clay. They should fit snugly into the indentations you just made but protrude slightly, creating a bug-eyed effect. -
Place the eyes:
Press the black balls gently onto the head. Ensure they are symmetrical. If you want a sparkle, add a microscopic dot of white clay or white paint later. -
Add rosy cheeks:
Take extremely tiny amounts of pink clay and roll them into flat discs. Press these onto the face, just below and slightly outside the eyes. -
Carve the mouth:
Using a needle tool or a curved blade, gently press a wide, shallow smile into the clay between the cheeks. It should be a simple line that curves up slightly at the ends.
Lily Pad Bases
Roll out a thin sheet of dark green clay and cut a circle with a small wedge removed. Place your baked frog on top for a complete pond scene!
Step 3: Limbs & Details
-
Form the back legs:
Roll two small teardrop shapes from the green clay. Flatten them slightly. -
Attach the thighs:
Press the wider part of the teardrops against the sides of the body near the back bottom edge. Blend the seams into the body using a silicone tool so they look like folded legs. -
Make the front arms:
Roll two smaller, thinner logs of green clay for the front arms. They should be simple tube shapes. -
Position the arms:
Attach these vertically to the front of the belly. I find placing them close together makes the frog look polite and attentive. -
Detail the toes:
Use a needle tool or knife to make two tiny indents on the bottom of each arm and leg to suggest toes or webbing. -
Add nostrils:
Poke two very tiny holes between the eyes with a needle tool for the nostrils.
Step 4: Finishing
-
Final smooth:
Do a last check for dust or lint. A Q-tip with alcohol works wonders here to clean up the white or light green clay. -
Bake:
Place your frogs on a piece of cardstock or foil on a baking sheet. Bake according to your customized clay package instructions (usually 275°F/135°C for 15-30 minutes per 1/4 inch thickness). -
Cool down:
Let the figurines cool completely in the oven with the door cracked open to prevent cracking from thermal shock. -
Optional glaze:
If you want the eyes or body to shine, apply a thin coat of polymer clay gloss glaze after cooling.
Now you have a trio of adorable amphibians ready to brighten up any corner of your home

The Complete Guide to Pottery Troubleshooting
Uncover the most common ceramic mistakes—from cracking clay to failed glazes—and learn how to fix them fast.
Mini Bear Heads for Keychains
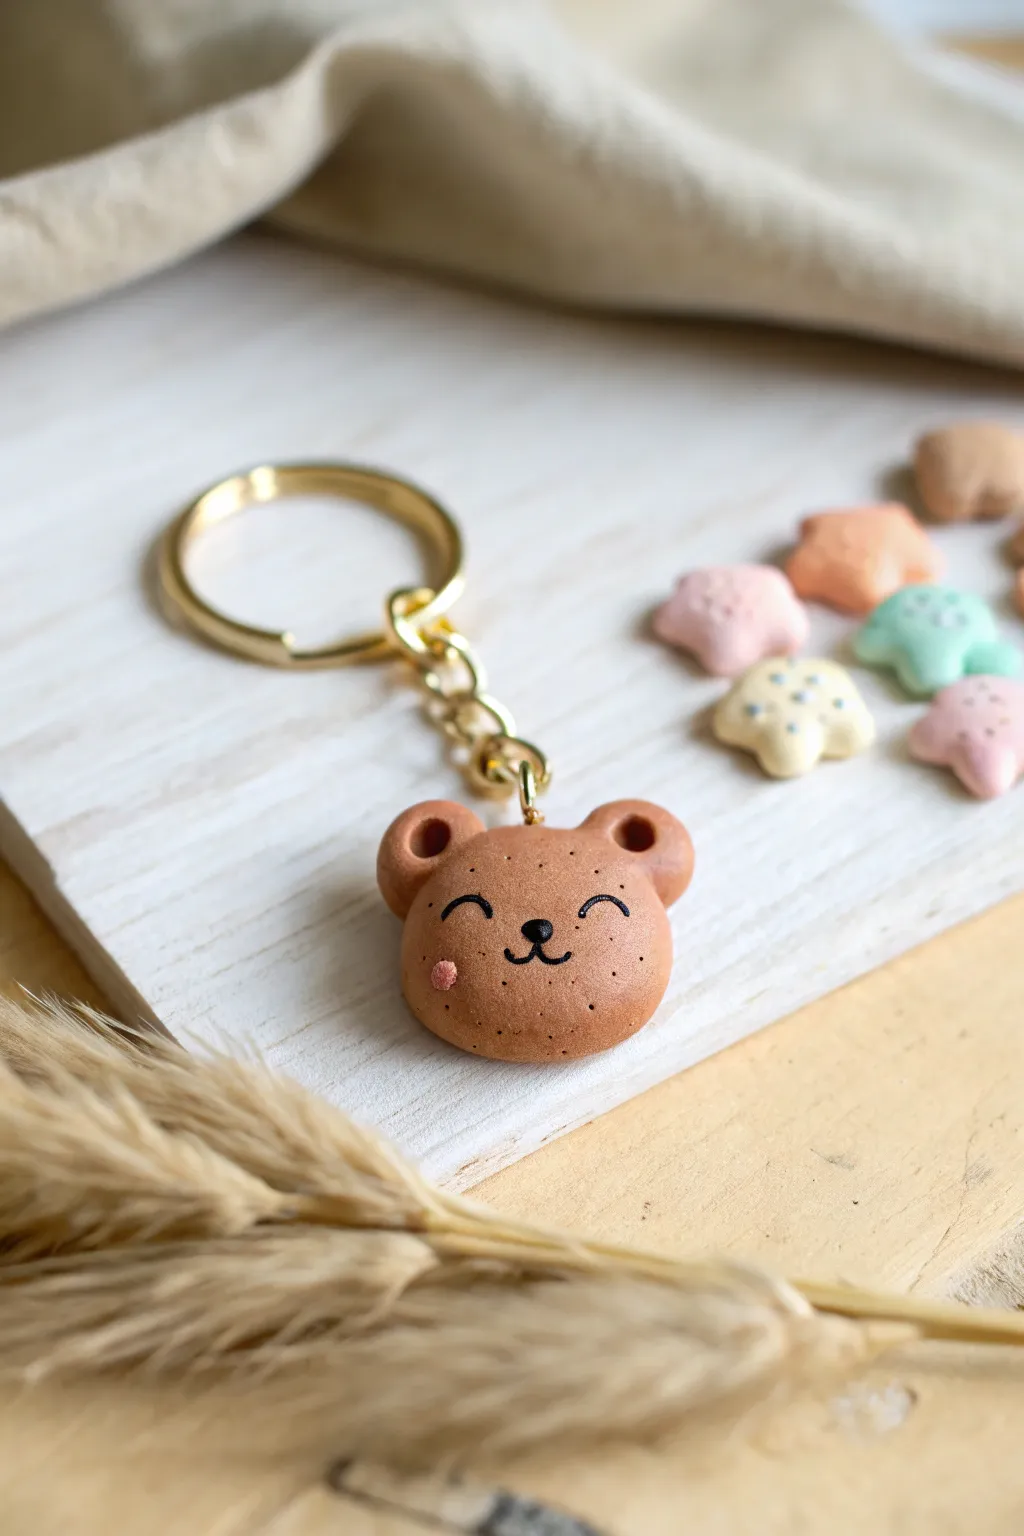
Create the sweetest little companion for your keys with this biscuit-textured bear head charm. The simple facial features and warm, toasted color give it an irresistible freshly-baked cookie appearance.
Detailed Instructions
Materials
- Light brown polymer clay (tan or biscuit color)
- Black polymer clay (tiny amount)
- Pink soft pastel chalk or pink clay
- Gold screw eye pin
- Gold keyring with chain
- Pliers (needle nose and round nose)
- Toothbrush or texturing tool
- Needle tool or toothpick
- Doting tool (ball stylus)
- Liquid polymer clay (optional)
- Matte varnish
- Oven for baking
Step 1: Shaping the Base
-
Condition the clay:
Start by warming up your light brown clay in your hands until it is soft and pliable. Make sure there are no cracks. -
Form the head:
Roll a ball of clay approximately 1 inch in diameter. Slightly flatten it into a thick disc shape, keeping the edges rounded like a soft cookie. -
Make the ears:
Roll two much smaller balls of the same brown clay for the ears. They should be proportional to the head, about the size of small peas. -
Attach the ears:
Press the small ear balls onto the top sides of the head. Use your finger or a silicone tool to blend the seam at the back so they are securely attached. -
Indent the ears:
Use a medium-sized ball tool to press a gentle indentation into the center of each ear to give them depth and a cupped shape.
Clean Texture
Work on a piece of bright white paper. It prevents dust from getting into your light clay, and if you accidentally texture too hard, the paper won’t leave a weird pattern on the back.
Step 2: Adding Texture and Details
-
Create the cookie texture:
Take a clean toothbrush and gently tap it all over the surface of the bear’s head and ears. This stippling effect mimics the look of a baked biscuit. -
Secure the hardware:
Twist a gold screw eye pin into the top center of the head. I like to dip the tip in a tiny bit of liquid polymer clay before inserting it for extra hold. -
Pre-bake shading:
For a realistic baked look, scrape a little brown pastel chalk into dust and brush it lightly on the edges and ears to simulate toasting.
Double Sided?
Why not make the back cute too? Before baking, add a tiny rolled ‘tail’ ball of clay to the back of the head so your bear looks adorable from every angle.
Step 3: The Face
-
Roll the nose:
Take a microscopic amount of black clay and roll it into a tiny oval for the nose. -
Place the nose:
Press the black nose gently into the center of the face. The clay should stick naturally if fresh, or use a dot of liquid clay. -
Draw the mouth:
Roll an incredibly thin snake of black clay. Cut two tiny curved pieces and place them under the nose to form the ‘w’ mouth shape, or paint this on after baking if you prefer. -
Create the eyes:
Roll two more thin threads of black clay. Curve them into rainbow arches and press them onto the face for happy, closed eyes. -
Add blush:
Make a tiny dot of pink clay (or use pink pastel dust on your finger) and apply it to one cheek for a cute asymmetric detail. -
Simulate freckles:
Using a needle tool, poke very shallow, tiny holes scattered across the face to look like cookie porosity or freckles.
Step 4: Finishing
-
Bake:
Bake the piece according to your clay package instructions (usually 275°F for 15-30 minutes). Let it cool completely. -
Varnish:
Apply a coat of matte varnish to protect the surface without making it look glossy or plastic. -
Attach keychain:
Open the jump ring on your gold keychain using pliers, loop it through the screw eye on the bear, and close it securely.
Now your adorable biscuit bear is ready to guard your keys with a smile
Cute Mini Mushroom Sprouts With Faces
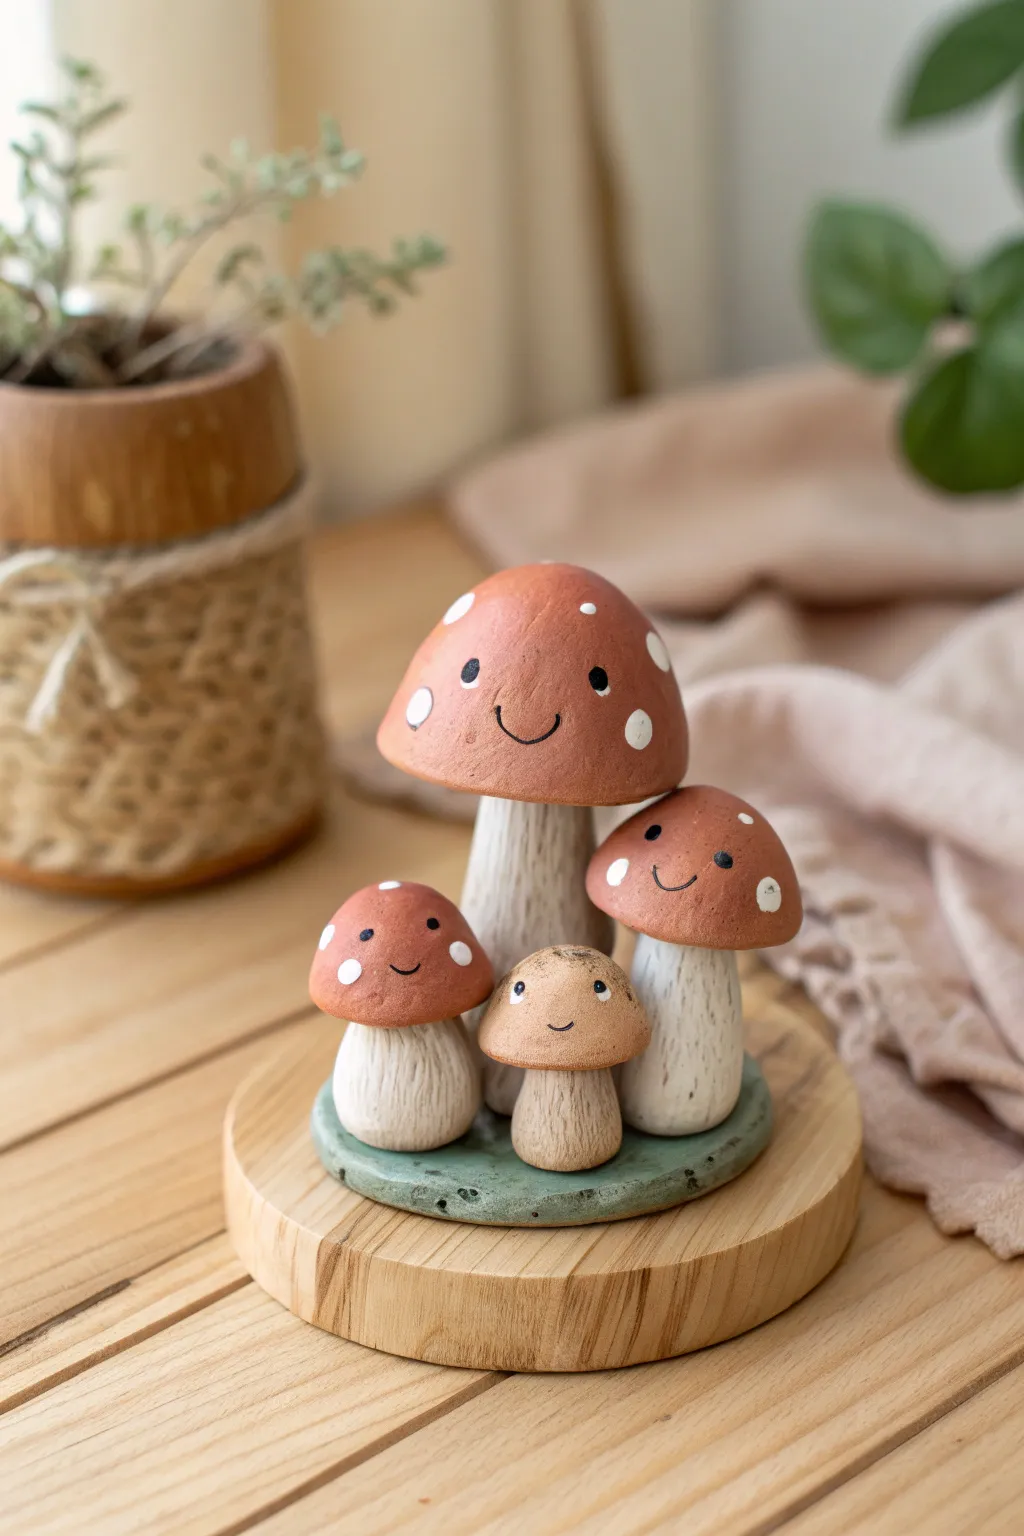
Bring a touch of woodland whimsy into your home with this adorable family of smiling mushrooms. Sculpted from clay and painted with warm, earthy tones, these cheerful sprouts make a perfect desk companion or shelf decoration.
Step-by-Step Guide
Materials
- Air-dry clay or polymer clay (white or terracotta)
- Acrylic paints (terracotta/rust red, cream/off-white, black, moss green)
- Fine grit sandpaper
- Small paintbrush (detail and flat)
- Dotting tool or toothpick
- Texturing tool (needle tool or old toothbrush)
- Strong craft glue or clay adhesive
- Clear matte sealant spray
- Wooden circular display base
Step 1: Sculpting the Shapes
-
Form the large stem:
Start with a walnut-sized ball of clay. Roll it into a cylinder that is slightly wider at the bottom than the top to create the stem for the largest mushroom. -
Add stem texture:
Using a needle tool or the bristles of an old toothbrush, gently scratch vertical lines up and down the stem to mimic organic, fibrous texture. -
Create the large cap:
Roll a larger ball of clay and flatten the bottom while keeping the top rounded and domed. Smooth the edges so it looks like a soft bun. -
Test the fit:
Place the cap onto the stem to ensure the proportions look right. If the cap is too heavy, slightly hollow out the underside to reduce weight. -
Make the smaller mushrooms:
Repeat the previous steps to create three smaller mushrooms of varying sizes: one medium and two small sprouts. Vary their heights to create visual interest. -
Create the base:
Roll out a flat, irregular circle of clay about 1/4 inch thick. This will serve as the mossy ground for your mushroom family. -
Initial assembly:
Position your mushroom stems onto the clay base. Press them down firmly to adhere them, or score and slip the connection points if the clay is getting dry. -
Drying time:
Let all your separate pieces (caps and the stem-base unit) dry completely. I prefer to dry caps separately from stems so I can paint the undersides easily.
Uneven Standing?
If your mushroom stems wobble or won’t stand straight on the base, sand the bottom of the stem flat before gluing. A tiny ball of wet clay can also act as mortar.
Step 2: Painting and Details
-
Apply base coats:
Once dry, sand any rough fingerprints. Paint the stems with a cream or off-white acrylic paint. Give them two coats for solid coverage. -
Enhance the texture:
Mix a tiny amount of brown into your cream paint and dry-brush it lightly over the textured lines of the stems to make the details pop. -
Paint the caps:
Coat the mushroom caps in a warm terracotta or rust-red color. For the smallest mushroom, you might choose a lighter tan color as shown in the reference. -
Paint the base:
Color the clay base with a muted moss green. You can dab darker green in spots to simulate the uneven color of real moss or stone. -
Add the spots:
Using a dotting tool or the back end of a paintbrush, dip into white paint and stamp random dots all over the red caps. Keep them irregular for a natural look. -
Draw the faces:
With your finest detail brush or a black fine-tip paint pen, carefully draw small, wide-set eyes and a simple U-shaped smile on each cap. -
Add eye highlights:
To bring them to life, add a tiny speck of white paint inside the black part of the eyes using a toothpick. -
Final assembly:
Glue the caps securely onto their corresponding stems using strong craft glue. -
Mounting:
Glue the entire painted clay piece onto your wooden display round to give it a polished, professional finish. -
Seal the project:
Spray the entire sculpture with a clear matte sealant to protect the paint and give the clay a smooth, finished texture.
Add Realism
Glue tiny bits of dried moss or artificial turf around the base of the stems to hide the seams and add a fuzzy, forest-floor texture.
Now you have a charming little fungi family ready to brighten up your favorite corner


What Really Happens Inside the Kiln
Learn how time and temperature work together inside the kiln to transform clay into durable ceramic.
Mini Succulent Pot Buddies

Give your tiny green friends a home with personality using this adorable sleeping face planter. The soft pink clay body paired with simple black line work creates a charming, drowsy character that brings warmth to any windowsill.
How-To Guide
Materials
- Air-dry clay (white or terracotta)
- Pink acrylic paint (soft pastel shade)
- Black acrylic paint or fine-tip permanent marker
- Deep Navy Blue acrylic paint
- High-gloss varnish or sealant (waterproof)
- Rolling pin
- Clay sculpting tools (or a butter knife)
- Small bowl or cylinder (for a mold)
- Fine grit sandpaper
- Paintbrushes (medium flat and fine liner)
- Succulent potting soil
- Small pea gravel or decorative stones
- Small succulent plant (like an Echeveria)
Step 1: Sculpting the Pot Buddy
-
Prepare the clay base:
Start by conditioning a baseball-sized amount of air-dry clay until it is soft and pliable. Roll it out into a smooth slab about 1/4 inch thick on a clean, flat surface. -
Cut the base and walls:
Cut a circle for the base using a cookie cutter or a small glass as a template. Measure the circumference of your base and cut a rectangular strip of clay long enough to wrap around it, keeping the height around 3 inches. -
Construct the cylinder:
Wrap the rectangular strip around the circular base. Join the ends of the strip together, smoothing the seam with your fingers and a little water until it disappears. -
Blend the seams:
Use a sculpting tool or your finger to firmly blend the clay from the walls down onto the base circle on both the inside and outside to ensure a water-tight seal. -
Shape the rounded form:
Gently cup the pot in your hands and smooth the sides, pressing slightly outward from the inside to create a subtle, rounded belly shape rather than a straight cylinder. -
Create the saucer:
Roll out a smaller amount of clay and cut a circle slightly larger than your pot’s base. Gently curve the edges upward to create a shallow rim for catching water. -
Smooth and dry:
Dip your finger in water and run it over the rim of the pot and saucer to soften any sharp edges. Set both pieces aside in a dry, safe place for 24-48 hours until completely hardened.
Cracking Up?
If you see hairline cracks as the clay dries, patch them with a ‘slip’ mixture (clay mixed with water into a paste). Apply it into the cracks and smooth over before painting.
Step 2: Painting and Finishing
-
Sand imperfections:
Once fully dry, lightly sand any rough bumps or uneven spots on the exterior of the pot and the saucer with fine-grit sandpaper. Wipe away the dust with a slightly damp cloth. -
Apply base color:
Paint the entire exterior and the inner rim of the pot with the soft pink acrylic paint. I usually apply two or three thin coats for an opaque, even finish, letting each coat dry in between. -
Paint the saucer:
Paint the saucer a creamy white or leave it natural clay color if using white clay. Let this base coat dry completely. -
Add the speckled texture:
Dilute a tiny drop of dark grey or black paint with water. Load an old toothbrush or stiff brush, and flick the bristles with your thumb to mist tiny speckles over the pink pot for a stone-like effect. -
Draw the sleeping face:
Using a very fine brush with black paint, or a permanent marker, draw two downward-curving crescents for closed eyes in the center of the pot. Add tiny vertical lashes to the outer edges. -
Add the smile:
Paint a small, sweet ‘U’ shape exactly centered between and slightly below the eyes to complete the sleepy expression. -
Decorate the saucer rim:
Use the navy blue paint and a small round brush to make evenly spaced dots along the rim of the white saucer. -
Seal the pottery:
Apply a waterproof varnish to the inside and outside of the pot and saucer. This is crucial for air-dry clay to prevent it from dissolving when you water your plant.
Hair Stylist
Change the plant to change the hairstyle. A Spiky Aloe gives a punk rock look, while a trailing String of Pearls creates long, elegant locks for your pot buddy.
Step 3: Planting
-
Add drainage layer:
Place a shallow layer of larger pebbles at the very bottom of the pot to help keep roots from sitting in standing water. -
Position the succulent:
Fill the pot halfway with succulent soil. Gently nestle your plant into the soil, filling in around the sides until secure. -
Top dressing:
Cover the exposed soil surface with small decorative gravel or sand for a finished look that matches the clean aesthetic of your new pot pal.
Place your sleepy friend on a sunny desk to keep you company while you work
Cute Mini Rainbow Cloud Clips
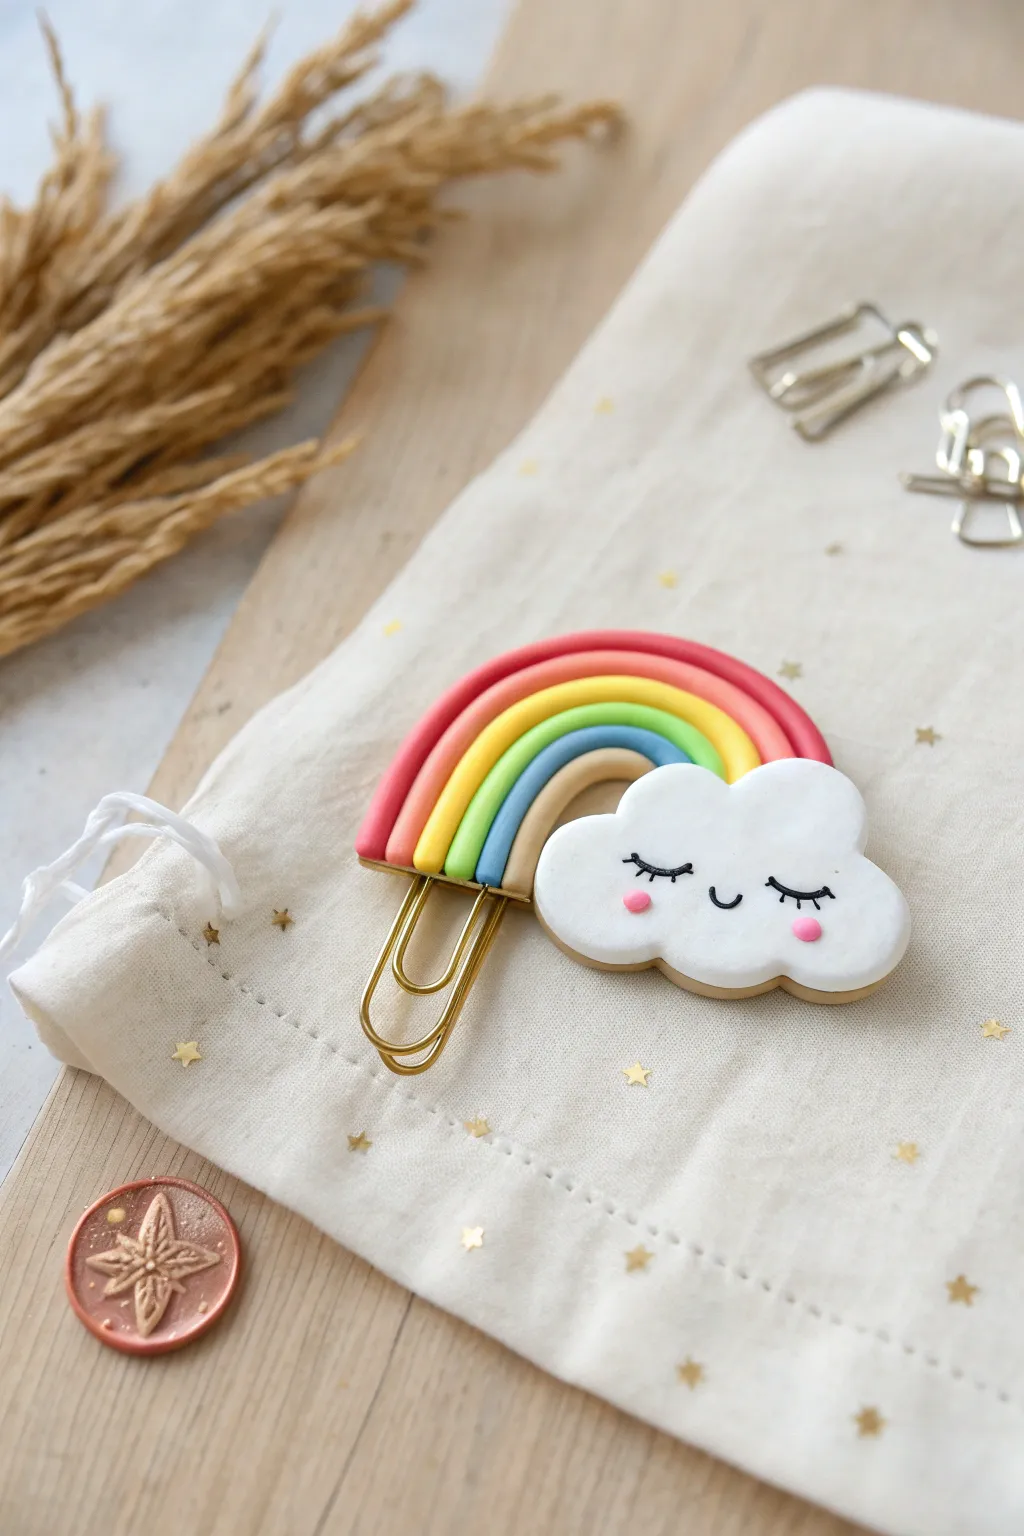
Add a touch of whimsy to your planner or reading nook with this adorable polymer clay bookmark. Combining a sweet, sleeping cloud face with a vibrant five-color rainbow, this functional clip is as practical as it is charming.
Step-by-Step Guide
Materials
- Polymer clay (Red/Pink, Orange, Yellow, Green, Pale Blue, White, Black)
- Large gold paperclip (approx. 2-3 inches)
- Small rolling pin or acrylic roller
- Precision craft knife or clay blade
- Ball tool or dotting tool
- Liquid polymer clay or bake-and-bond
- Ceramic tile or baking sheet
- Oven
- Needle tool
- Super glue (optional, for extra hold)
Step 1: Forming the Rainbow Arches
-
Prepare your colors:
Condition your clay by kneading it until it is soft and pliable. You will need small amounts of pinkish-red, orange, yellow, bright green, and pale blue clay. -
Roll the snakes:
Roll each color into a long, thin snake. Aim for a consistent thickness of about 3-4mm for each strand. -
Start the arc:
Begin with the smallest arch, the pale blue snake. Bend it into a tight U-shape on your work surface. -
Build the rainbow:
Apply a tiny amount of liquid clay or bake-and-bond along the outer edge of the blue arch. Gently press the green snake against it, following the curve. Repeat this process with yellow, orange, and finally the pinkish-red snake. -
Trim the ends:
Using your clay blade, make a clean horizontal cut across the bottom of the rainbow legs so they are all perfectly flush and even.
Fixing Breaks
If an arch cracks during bending, the clay is too dry. Mix in a drop of clay softener or baby oil and knead thoroughly before re-rolling.
Step 2: Creating the Cloud
-
Shape the cloud base:
Roll a ball of white clay and flatten it significantly to about 4mm thickness. Use a cutter or freehand cut a fluffy cloud shape that is slightly wider than your rainbow. -
Soften the edges:
Use your finger to gently tap and round off the cut edges of the cloud so it looks pillowy rather than sharp. -
Attach the paperclip:
Flip the cloud over to the back side. Press the top loop of your gold paperclip firmly into the clay. To secure it, place a small rectangle of white clay over the wire and smooth the seams down until the clip is embedded. -
Connect to rainbow:
Flip the cloud back over. Apply a line of liquid clay to the bottom cut edge of your rainbow section. Press the rainbow firmly onto the top edge of the cloud, ensuring a strong bond.
Step 3: Adding the Face Details
-
Make the eyes:
Roll two incredibly thin, tiny threads of black clay. Shape them into small downward curves for sleeping eyes and place them carefully on the cloud face. -
Add lashes:
Using your needle tool or tiny bits of black clay, add three small eyelashes to the outer corner of each eye. -
Create the smile:
Roll a tiny black U-shape for the mouth and place it centered between the eyes. -
Rosy cheeks:
Roll two tiny balls of pink clay. Press them flat onto the cheeks, just below the outer corners of the eyes. -
Secure details:
Gently press all facial features down with a flat tool or your finger to ensure they don’t fall off during baking.
Cleaner Cuts
Pop the rainbow assembly in the fridge for 10 minutes before trimming the bottom. Cold clay cuts cleaner and won’t smush the arches together.
Step 4: Baking and Finishing
-
Final check:
Inspect your piece for any fingerprints. You can lightly brush intricate areas with a bit of cornstarch or baby oil to smooth them out before baking. -
Bake carefully:
Bake according to your clay manufacturer’s instructions (usually around 230°F – 275°F for 15-30 minutes). I recommend tenting foil over the piece to prevent the white cloud from scorching. -
Cool down:
Allow the clip to cool completely before handling. The clay is fragile while hot. -
Reinforce:
If the bond between the clip and clay feels loose after baking, add a drop of super glue to the back where the metal meets the clay.
Clip this onto your favorite notebook and enjoy the cheerful vibes every time you turn the page

TRACK YOUR CERAMIC JOURNEY
Capture glaze tests, firing details, and creative progress—all in one simple printable. Make your projects easier to repeat and improve.
Tiny Star and Moon Friend Charms
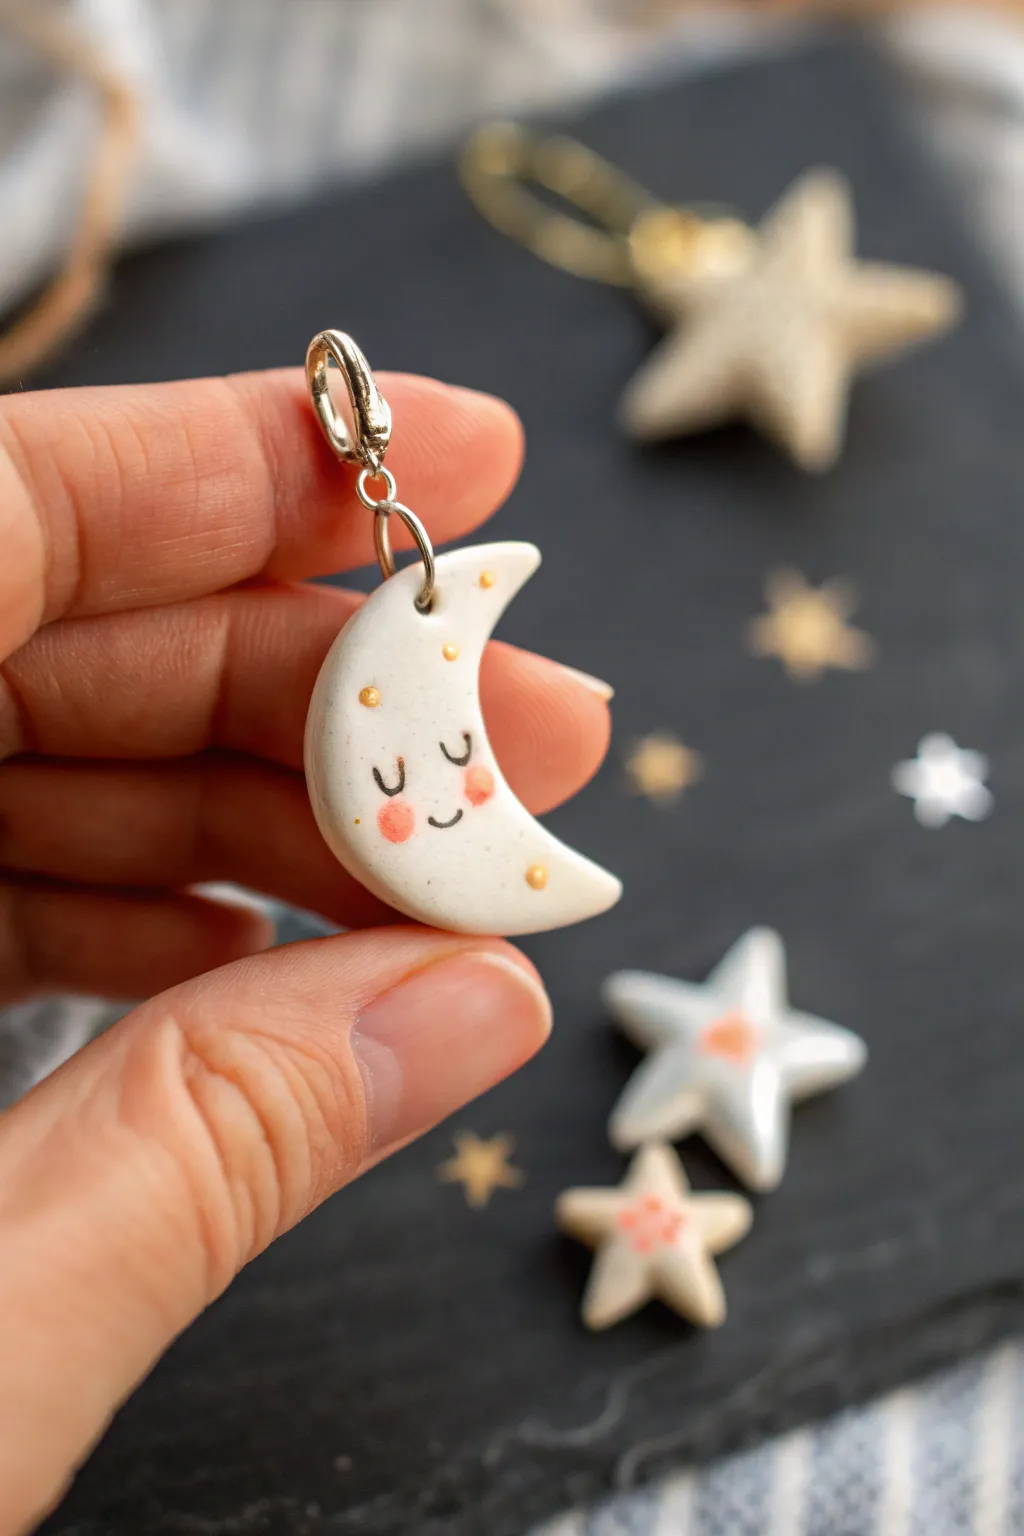
Create a dreamy little celestial friend with this charming crescent moon tutorial. Featuring delicate gold accents and a sweet sleeping face, this glossy charm makes for an adorable keychain or necklace pendant.
How-To Guide
Materials
- White polymer clay
- Rolling pin or acrylic roller
- Crescent moon clay cutter (approx. 1.5 inch) or craft knife
- Dotting tool or toothpick
- Black acrylic paint (or fine tip marker)
- Pink soft pastel chalks (or pink eyeshadow)
- Gold acrylic paint
- Small paintbrush
- Glossy clay varnish/glaze
- Eye pin or screw eye pin
- Make-up brush or cotton swab
- Jump ring and lobster clasp
- Oven (for baking)
Step 1: Shaping the Base
-
Condition the Clay:
Begin by warming up a small block of white polymer clay in your hands. Knead and roll it until it becomes soft, pliable, and free of any cracks. -
Roll It Smooth:
Use your acrylic roller to flatten the clay into a slab. You want it to be reasonably thick, about 5mm to 6mm, to ensure the finished charm is sturdy. -
Cut the Shape:
Press your crescent moon cutter firmly into the clay slab. If you don’t have a cutter, I like to use a circular cutter first, then offset a second cut to create the crescent shape, or simply trace a template with a craft knife. -
Smooth the Edges:
Gently run your finger dipped in a tiny bit of water (or baby oil) around the cut edges to soften any sharp corners left by the cutter, giving it a puffy, friendly look. -
Insert the Hardware:
Carefully insert a screw eye pin into the top point of the crescent moon. Ensure it goes in straight and doesn’t poke out through the sides.
Clean Clay Tip
White clay picks up dust instantly. Before rolling, wipe your work surface, hands, and tools with a baby wipe or alcohol to keep the clay pristine.
Step 2: Painting the Details
-
Bake the Clay:
Place your moon on a baking tray lined with parchment paper. Bake according to your specific brand of clay’s instructions (usually around 275°F/135°C for 15-30 minutes). Let it cool completely before painting. -
Draw the Eyes and Mouth:
Using a very fine paintbrush and black acrylic paint, carefully paint two small semi-circles for the closed eyes and a tiny ‘u’ shape for the smile. A fine-tip permanent marker can also work if you have a steady hand. -
Add Rosy Cheeks:
Scrape a little bit of pink soft pastel chalk into a powder. Pick up the powder with a dry brush or cotton swab and gently buff two soft pink circles onto the cheeks. -
Add Golden Freckles:
Dip a fine dotting tool or the tip of a toothpick into metallic gold acrylic paint. Add three or four tiny dots scattered around the face for a magical, celestial touch. -
Let the Paint Dry:
Allow the paint to dry fully. This is crucial so you don’t smear the face when applying the finish.
Galaxy Glitter
Mix a tiny pinch of fine iridescent glitter into the white clay before rolling it out to give your moon a subtle, built-in sparkle.
Step 3: Finishing Up
-
Glaze the Front:
Apply a thin, even coat of glossy clay varnish over the front of the charm. This seals the paint and gives it that ceramic-like shine. -
Glaze the Back:
Once the front is dry to the touch, flip it over and glaze the back so the finish is consistent on both sides. -
Attach Hardware:
Using needle-nose pliers, open a jump ring and thread it through the eye pin loop on your moon. -
Finish Assembly:
Add a lobster clasp onto the open jump ring, then close the ring securely. Your sleepy moon is now ready to hang.
Enjoy wearing your peaceful new celestial charm or gift it to a friend who loves the night sky
Mini Bubble Tea Cup Charms
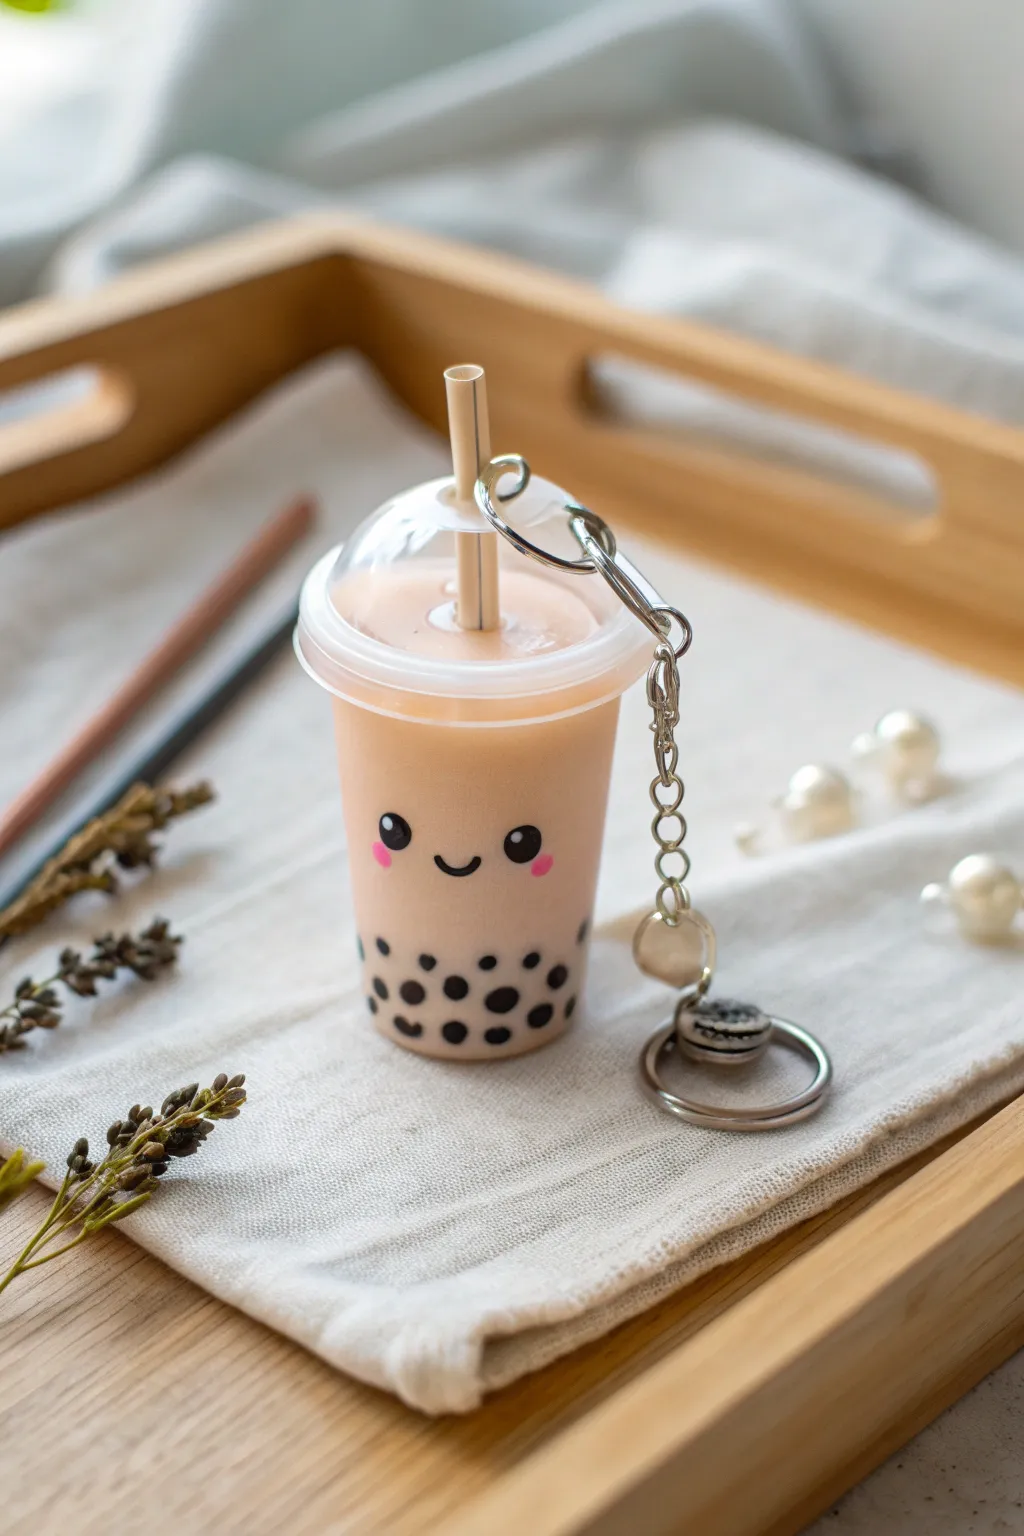
Capture the sweetness of your favorite drink with this adorable miniature bubble tea charm. Featuring a realistic milky tea color, tiny floating tapioca pearls, and a happy little face, this project combines resin and clay for a durable, glassy finish.
Step-by-Step Tutorial
Materials
- UV resin (clear)
- Small plastic miniature cup with dome lid (specifically for crafts)
- Polymer clay (black and beige/cream)
- Acrylic paint (pastel pink, black)
- Toothpicks or dotting tools
- UV lamp
- Small jump rings and keychain hardware
- Sandpaper or nail file
- Super glue (cyanoacrylate)
- Pastel chalks or mica powder (orange/brown for tea color)
Step 1: Prepping the Pearls
-
Roll the Boba:
Start by taking a tiny amount of black polymer clay. Roll it into a very thin snake, then cut tiny sections off. Roll each section into a small sphere to create your tapioca pearls. You’ll need about 15-20 depending on your cup size. -
Bake the Beads:
Place your tiny clay pearls on a baking sheet or tile. Bake them according to your clay package instructions (usually around 275°F/130°C for 10-15 minutes). Since they are so small, watch them closely to ensure they don’t burn. -
Create the Straw:
While the pearls bake, take your beige or cream clay and roll a thin cylinder for the straw. Insert a thin wire or needle through the center if you want it hollow, or leave it solid. Cut it to a length that will poke out of the cup’s lid. Bake this along with the pearls.
Sticky Situation?
If your resin feels tacky after curing, wipe the surface with rubbing alcohol or place the cup in direct sunlight for 30 minutes to finish the hardening process naturally.
Step 2: Mixing the Tea
-
prepare the Resin:
Pour clear UV resin into a small mixing cup. To get that classic milk tea color, scrape a bit of orange and light brown pastel chalk into the resin. Mix thoroughly until the powder is dissolved. -
Make it Milky:
To make the resin opaque like milk tea, add a tiny drop of white acrylic paint or white resin pigment. Mix gently to avoid creating too many air bubbles. The goal is a creamy, semi-opaque tan color. -
First Pour:
Pour a very small layer of the colored resin into the bottom of your plastic miniature cup. This base layer will hold the first few pearls in place. -
Adding Pearls:
Drop your baked black clay pearls into the resin. Use a toothpick to push them down and arrange them against the sides of the cup so they remain visible. Cure this layer under your UV lamp for 60 seconds.
Step 3: Filling and Assembly
-
Fill the Cup:
Pour the remaining colored resin into the cup, stopping about 2mm from the rim. If you see any large bubbles, pop them with a lighter or a toothpick. -
Insert the Straw:
Place your plastic dome lid onto the cup. Take your baked clay straw and insert it through the hole in the lid, pushing it down into the uncured resin. Adjust the angle so it looks cute. -
Final Cure:
Place the entire assembly under the UV lamp. Cure for 2-3 minutes, rotating the cup to ensure the light hits the resin from all sides, locking the straw and liquid in place. -
Seal the Lid:
If the lid feels loose, add a tiny rim of clear UV resin around the seam where the lid meets the cup and cure again to seal it permanently.
Shake it Up!
Instead of curing the resin solid, use baby oil or water mixed with glue. Seal the pearls inside for a ‘shaker’ charm where the liquid and boba actually move around.
Step 4: Adding Personality
-
Paint the Blush:
Dip a rounded dotting tool or the end of a toothpick into pastel pink acrylic paint. Dab two small oval shapes onto the ‘cheeks’ of the cup. -
Draw the Eyes:
Using black acrylic paint and a fine detail brush (or a toothpick), add two solid black circles for eyes just above the blush marks. I like to keep them wide-set for a ‘kawaii’ look. -
Add the Sparkle:
Once the black paint is dry, add a tiny white dot inside each eye to bring the character to life. -
The Smile:
carefully paint a small ‘U’ shape between the eyes for the smile. Let all paint dry completely. -
Keyring Hardware:
Attach a large jump ring to the loop on the plastic lid (drilling a small hole if your lid doesn’t have one). Connect your keychain chain and lobster clasp to the jump ring securely using pliers.
This charming little accessory is now ready to hang on your bag or bundle with your keys
Mini Veggie Characters With Texture
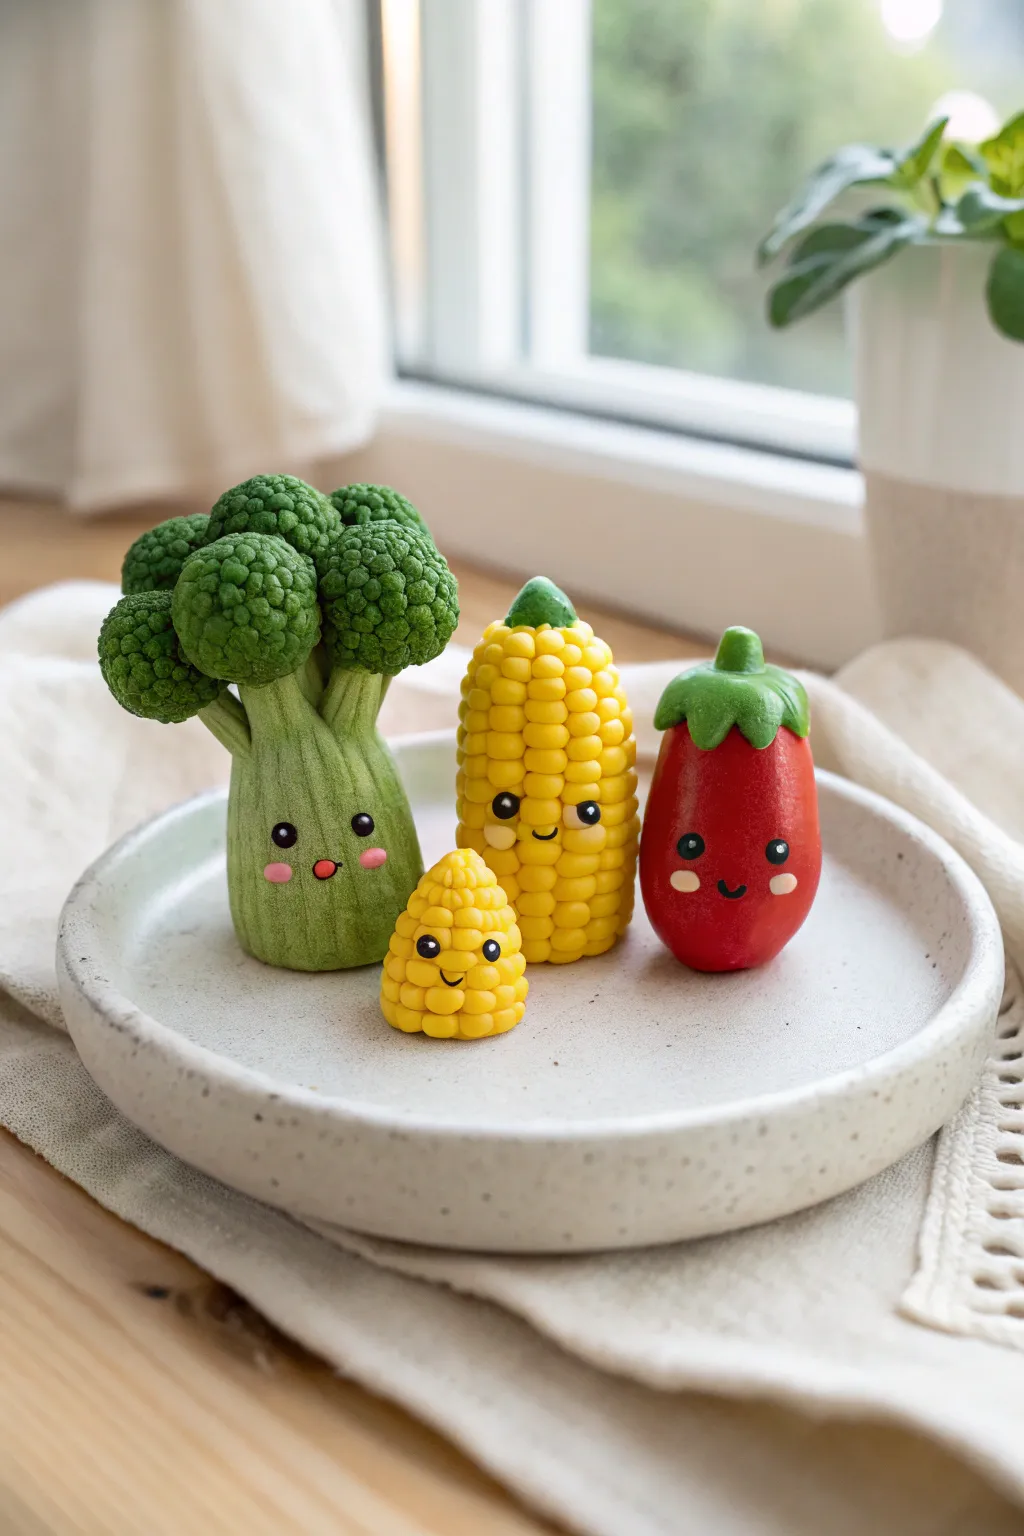
Bring your miniature garden to life with these adorable, textured vegetable characters modeled from polymer clay. This project focuses on achieving realistic surface textures—from bumpy corn kernels to fluffy broccoli florets—paired with irresistibly cute kawaii faces.
Step-by-Step Tutorial
Materials
- Polymer clay (green, dark green, yellow, red, white, black, pink)
- Ball stylus tools (various sizes)
- Needle tool or toothpick
- Toothbrush or crumpled foil (for texturing)
- X-acto knife or clay blade
- Liquid polymer clay or bake and bond (optional)
- Acrylic rolling pin
- Gloss glaze (optional for eyes)
Step 1: The Big Broccoli
-
Shape the Stalk:
Start with a medium ball of light green clay. Roll it into a thick cylinder that widens slightly at the bottom for stability, creating the main stalk body. -
Texture the Stalk:
Use a needle tool or a dull knife blade to gently score vertical lines up and down the stalk, mimicking the fibrous texture of a broccoli stem. -
Create the Branches:
At the top of the stalk, use your fingers to pinch and pull the clay slightly upwards to create 3-4 thick, short branches where the florets will sit. -
Form the Florets:
Roll many small balls of dark green clay. Cluster them together into tight, rounded bunches and press them firmly onto the top branches of your stalk. -
Stipple the Texture:
This is the crucial part: take a stiff toothbrush, a ball of crumpled foil, or a coarse stippling sponge and press it repeatedly all over the dark green balls. This creates that nubbly, flowery broccoli texture.
Step 2: The Corn Couple
-
Base Shapes:
For the papa corn, roll a cylinders of yellow clay with a rounded top and flat bottom. For the baby corn, make a much smaller, squat cone shape. -
Create Kernels:
Roll a massive amount of tiny, equal-sized yellow balls. Starting from the bottom of each corn shape, press the balls onto the body in organized horizontal rows. -
Refine the Rows:
As you stack the rows upward, try to stagger the kernels slightly like a brick wall pattern for a natural look, covering the entire yellow cylinder until you reach the top. -
Add the Husk:
For the larger corn, take a tiny bit of green clay, flatten it into a small cone, and place it on the very top of the cob as a little stem cap.
Quick Kernel Trick
Instead of rolling individual balls for corn, roll a long snake while holding a comb against it to make cuts, then wrap the textured snake around the core.
Step 3: The Sweet Pepper
-
Mold the Body:
Roll a smooth ball of bright red clay. Gently elongate it into a teardrop shape with a flat bottom so it can stand upright. -
Make the Cap:
Flatten a small piece of green clay into a star shape. Soften the edges and drape it over the pointed top of the red pepper. -
Add the Stem:
Roll a tiny cylinder of green clay and attach it to the center of the green cap, smoothing the seam where they connect.
Sticky Fingerprints?
If you are leaving fingerprints on the smooth pepper, lightly brush it with a tiny amount of baby oil or cornstarch before baking to smooth it out.
Step 4: Bringing Them to Life
-
indent Eye Sockets:
Use a medium ball stylus to gently press two indentations into the ‘face’ area of each vegetable. This helps the eyes sit flush rather than bulging out. -
Add the Eyes:
Roll tiny balls of black clay and press them into the sockets. Add microscopic specs of white clay in the upper corners of the black balls for that sparkling ‘kawaii’ look. -
Create Mouths:
Roll extremely thin snakes of black clay for smiles. For the broccoli, use a tiny pink oval for an open mouth. Use a needle tool to gently curve the clay snakes into happy expressions. -
Rosy Cheeks:
For a final touch of cuteness, I like to add tiny flattened ovals of pale pink clay just below the eyes on the broccoli and pepper. -
Bake and Seal:
Bake your veggies according to your specific clay package instructions (usually 275°F/135°C for 15-30 minutes). Once cool, you can add a dot of gloss glaze to the eyes for extra shine.
Arrange your little edible-looking family on a shelf or attach magnets to the back for fridge decor
Cute Mini Sea Creature Figurines
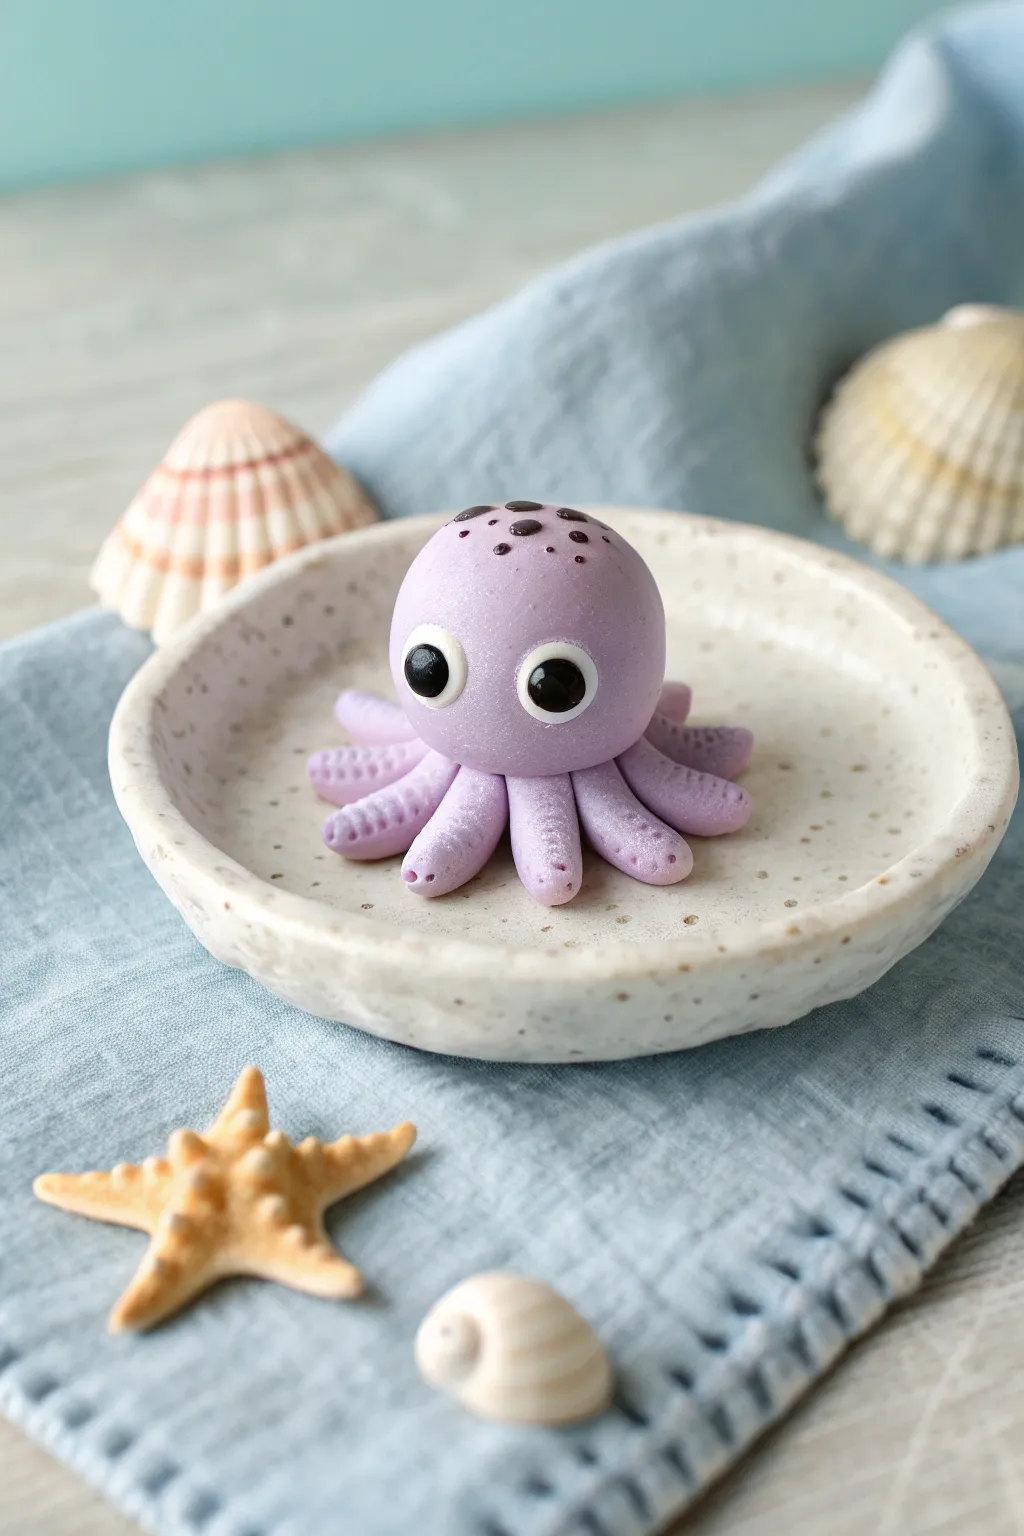
This adorable miniature octopus brings a splash of charm with its smooth lavender skin, tiny textured tentacles, and wide, innocent eyes. It’s a quick and rewarding project that captures the whimsical side of ocean life in a palm-sized figurine.
Step-by-Step
Materials
- Polymer clay (Lavender/Light Purple)
- Polymer clay (White)
- Polymer clay (Black)
- Deep purple acrylic paint or clay slip
- Ball stylus tool (small)
- Needle tool or toothpick
- Smooth work surface of ceramic tile
- Oven (for baking polymer clay)
- Dotting tool or fine paintbrush
- Gloss glaze (optional)
Step 1: Creating the Base
-
Prepare the main color:
Condition a chunk of lavender polymer clay until it is soft and pliable. If you don’t have the perfect shade, mix a little white into a darker purple to get a pastel hue. -
Form the head:
Roll a large portion of the clay into a smooth, seamless ball about the size of a large grape. Gently flatten the bottom just slightly so it can sit without rolling away. -
Divide the tentacles:
Take the remaining lavender clay and divide it into eight small, equal portions. Roll each of these into a small ball first to ensure they are consistent in size. -
Shape the tentacles:
Roll each small ball into a tapered log or cone shape, keeping one end slightly thicker than the other. These will become the legs.
Sticky Situation?
If your clay gets too soft and sticky from the heat of your hands, pop it in the fridge for 10 minutes. This firms it up, making it easier to roll smooth, fingerprint-free shapes.
Step 2: Assembly and Detailing
-
Attach the legs:
Position the eight tentacles in a circle underneath the head. Press the thicker ends gently against the bottom of the head piece, blending the seams with your finger or a modelling tool so they look like one solid unit. -
Curl the tips:
Gently curl the tips of the tentacles upward or outward to give the octopus a bit of movement and personality. I find that curving them in alternating directions makes it look more alive. -
Add suction cups:
Using a small needle tool or the tip of a toothpick, press tiny rows of indentations along the tops and sides of each tentacle to mimic suction cups. -
Make the eye sockets:
Use a medium-sized ball tool to press two indentations into the front of the face where the eyes will go. This helps the eyes sit securely. -
Create the whites of the eyes:
Roll two small balls of white clay. Press them flat into the indentations you just made. -
Add the pupils:
Roll two much smaller balls of black clay. Flatten them onto the white circles. Placement is key here—placing them slightly far apart gives that cute, vacant expression. -
Add the sparkle:
Roll two teeny-tiny specs of white clay and place them on the black pupils to create a ‘catchlight’ reflection.
Step 3: Finishing Touches
-
Paint the spots:
Using a dotting tool and deep purple acrylic paint (or tiny flattened bits of dark purple clay), add a cluster of spots to the very top of the head. -
Enhance the texture:
If desired, dry-brush a tiny amount of darker purple powder or chalk pastel into the suction cup holes to deepen the shadows before baking. -
Bake the figurine:
Place your octopus on a ceramic tile or baking sheet. Bake according to your clay manufacturer’s instructions (usually around 275°F/135°C for 15-30 minutes). -
Cool down:
Let the figurine cool completely inside the oven or on the counter before handling it to prevent fingerprints on the soft hot clay. -
Glaze the eyes:
Once cool, apply a small drop of gloss glaze or UV resin specifically to the eyes to make them look wet and shiny.
Creative Twist
Make a tiny accessory! Fashion a minuscule top hat, a flower, or a tiny shell for it to hold. You can also mix glitter into the lavender clay for a magical, shimmering sea creature.
Now you have a charming little desk companion to remind you of the sea
Mini Happy Face Magnet Minis
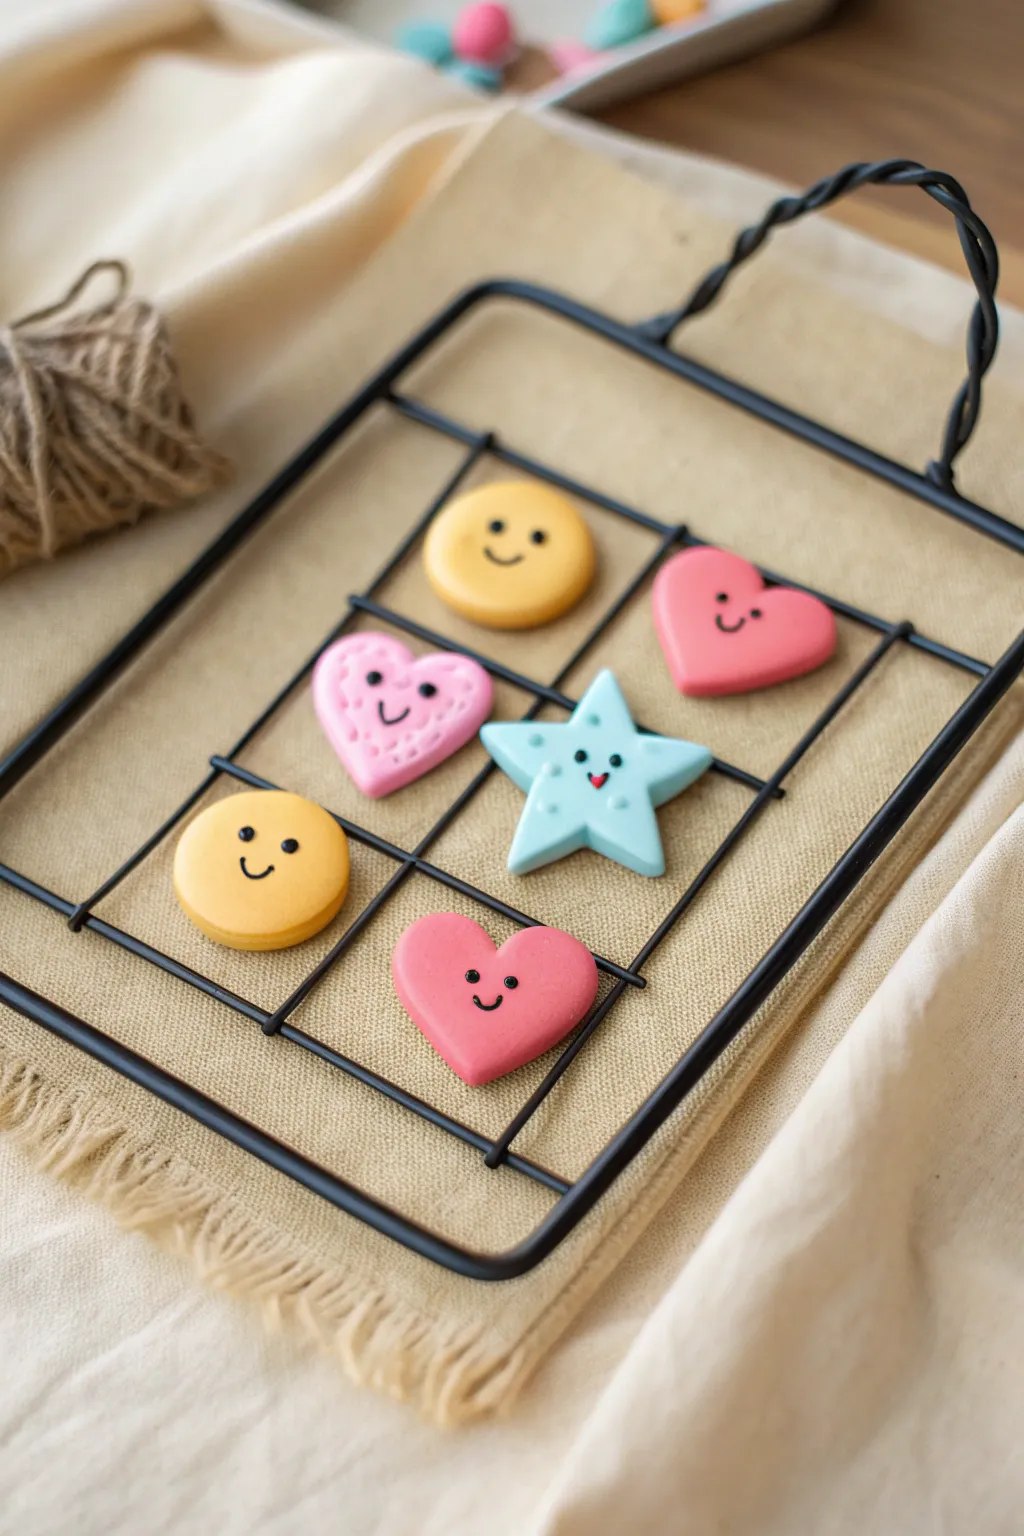
These adorable little smiley face magnets are perfect for brightening up your fridge or workspace. Using basic shapes and simple expressions, you’ll create a cheerful set featuring classic emojis, sweet hearts, and a friendly star.
How-To Guide
Materials
- Polymer clay (Yellow, Pink, Light Blue, Black)
- Small circle cutter
- Small heart cutter
- Small star cutter
- Acrylic rolling pin
- Clay sculpting tools (needle tool, small ball tool)
- Baking sheet and parchment paper
- Strong craft glue (E6000)
- Small round magnets
- Gloss glaze (optional)
Step 1: Shape Preparation
-
Condition the Clay:
Begin by kneading your yellow, pink, and light blue clay separately until they are soft and pliable. This conditioning step helps prevent cracking later on. -
Roll Out Sheets:
Use your acrylic rolling pin to roll each color into a slab about 1/4 inch thick. You want them chunky enough to hold the magnet but not too heavy. -
Cut the Base Shapes:
Cut out two yellow circles, two pink hearts, one darker pink heart, and one blue star using your cutters. If you are working freehand, shape balls of clay and gently flatten them into these forms. -
Smooth the Edges:
Gently tap the edges of your cut shapes with your finger to round them off. This removes the sharp ‘cookie cutter’ look and gives them a soft, pillowy appearance.
Step 2: Adding Expressions
-
Mark Eye Placement:
Using a needle tool or a very small ball tool, lightly mark where you want the eyes to go on each shape to ensure symmetry before committing. -
Create Black Clay Strings:
Roll a very small amount of black clay into an extremely thin snake or thread. This requires patience; roll it against your work surface until it’s barely thicker than a thread. -
Form the Eyes:
Cut tiny snippets from your black thread and roll them into minuscule balls for the eyes. Press them gently onto your marked spots. Use the ball tool to slightly embed them so they don’t fall off. -
Make the Mouths:
Cut small segments of the black thread and curve them into ‘U’ shapes on your fingertip. Carefully transfer these to the faces to create the smiles. -
Detail the Pink Heart:
For the light pink heart, use a needle tool to add texture. Poke small indents all over the surface, avoiding the eye and mouth area, to create a ‘stitched’ or textured look. -
Detail the Star:
On the blue star, create a tiny red triangle from scrap clay for an open mouth instead of a black line, giving it a surprised or singing expression. -
Add Cheeks (Optional):
If you like, I sometimes add tiny flattened dots of pink clay under the eyes for blushing cheeks, though the simple look works great too.
Clean Clay Pro-Tip
Make sure to clean your hands and tools with baby wipes when switching between colors, especially before touching the light yellow or blue clay, to avoid smudging.
Step 3: Baking and Assembly
-
Prepare for Baking:
Arrange your finished faces on a baking sheet lined with parchment paper. Leave a little space between each one. -
Bake:
Bake the pieces according to your polymer clay manufacturer’s instructions (usually around 275°F or 135°C for 15-30 minutes). Do not overbake. -
Cool Completely:
Let the clay pieces cool down fully on the baking sheet. They will harden as they cool. -
Attach Magnets:
Flip the cooled excited shapes over. Apply a dab of strong craft glue to the back of each piece and press a magnet firmly into the glue. -
Dry Time:
Allow the glue to cure for at least 24 hours before sticking them to your fridge to ensure the bond is secure. -
Glaze (Optional):
For a shiny finish like the photo, brush a thin coat of gloss glaze over the front of the magnets and let it dry.
Level Up: Tic-Tac-Toe
Create 5 ‘O’ shapes (circles) and 5 ‘X’ shapes (stars or hearts) to make a functional travel tic-tac-toe game set.
Now you have a cheerful little squad ready to hold up your notes and photos