Whenever I need a quick creative win, I reach for modeling clay and make something tiny with a sweet little face. These cute clay ideas are all about simple shapes, soft colors, and that instant happy vibe you get from a finished mini.
Smiling Avocado Besties With a Heart Pit
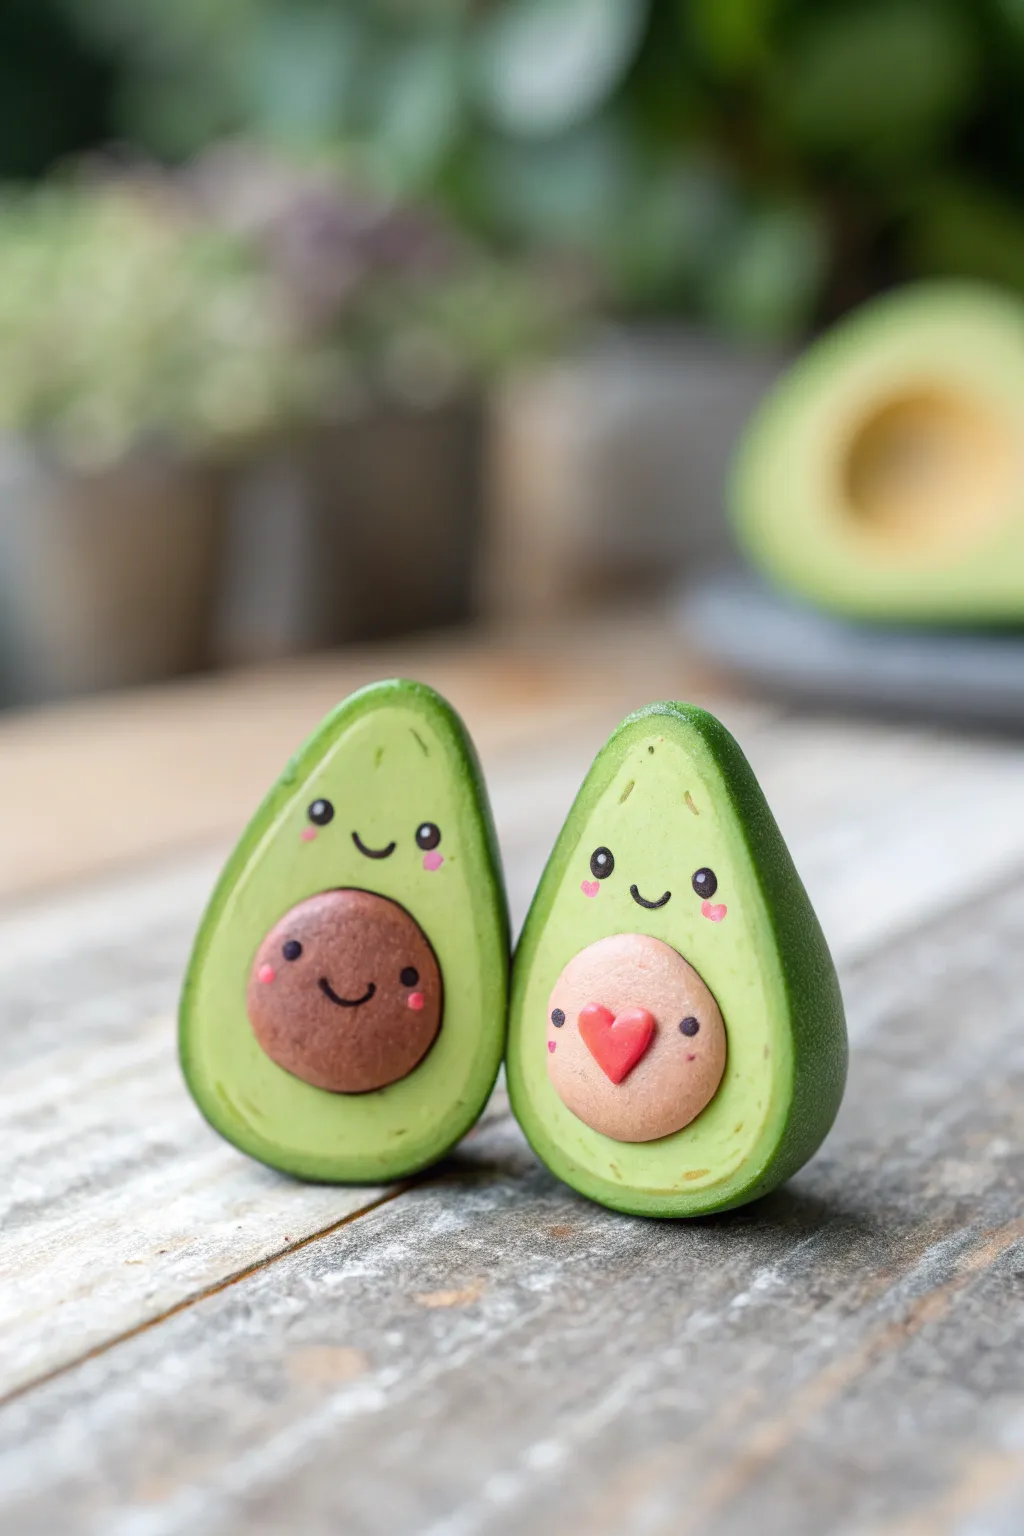
These adorable avocado halves make perfect matching charms for best friends or a sweet desk decoration. Crafted from polymer clay, one friend features a classic brown pit while the other sports a blushing pink center with a tiny heart.
Step-by-Step Guide
Materials
- Polymer clay (dark green, lime green, dark brown, pale pink/beige, red, black, brighter pink)
- Blade or craft knife
- Dotting tools or ball stylus (various sizes)
- Clean work surface or ceramic tile
- Wet wipes (for cleaning hands between colors)
- Oven for baking
- Gloss glaze (optional)
Step 1: Shaping the Avocado Bodies
-
Mix the green tone:
Start by conditioning your lime green clay until it is soft and pliable. If you want a more natural look, you can mix a tiny bit of yellow or white into the lime green to get that creamy avocado flesh color. -
Form the pear shapes:
Roll two equal-sized balls of the lime green clay, about the size of a large grape. Gently pinch the top of each ball and roll it slightly to create a tapered pear shape, slightly flattening the bottom so they can stand up. -
Flatten the fronts:
Press the pear shapes gently onto your work surface to flatten the back, then smooth the front face so it is flat but retains rounded edges, mimicking a sliced avocado half. -
Create the skin layer:
Roll out a thin sheet of dark green clay. It needs to be thin enough to look like skin but thick enough not to tear. -
Wrap the avocados:
carefully wrap the dark green sheet around the curved back and sides of your light green pear shapes. Trim the excess flush with the flat front face using your blade for a clean edge. -
Smooth the seams:
Use your finger to gently smooth the dark green rim so it adheres perfectly to the light green flesh without distorting the shape.
Step 2: Creating the Character Pits
-
Make the indents:
Use a large ball tool or the pad of your thumb to press a shallow, round indentation into the lower center of each avocado body where the pits will sit. -
Form the brown pit:
Roll a ball of dark brown clay that fits snugly into the indentation of the first avocado. Flatten it slightly into a dome shape and press it into place. -
Form the pink pit:
Repeat the process for the second avocado, but use pale pink or beige clay for this pit. This creates a softer, contrasting look for the second character. -
Add the tiny heart:
Take a tiny speck of red clay and form a microscopic teardrop. Press it onto the center of the pink pit, shaping it into a heart with a needle tool or small blade.
Fingerprint Troubles?
If you see fingerprints on your clay, lightly brush the surface with a little baby oil or cornstarch before baking to smooth them out completely.
Step 3: Adding Faces and Details
-
Carve the eyes:
Using a small nail art dotting tool or a needle, mark the positions for the eyes on the upper green part of the avocados and on the pits themselves. -
Insert the black eyes:
Roll teeny-tiny balls of black clay. carefully place them into the marked eye spots on the green avocado flesh. Gently press them flat. -
Add pit faces:
Similarly, add tiny black eyes to the brown pit and the pink pit. I prefer using a needle tool to help pick up these microscopic pieces. -
Draw the smiles:
Roll extremely thin snakes of black clay for the mouths. Curve them into U-shapes and press them onto the avocado faces and the pit faces. -
Apply rosy cheeks:
Use a bright pink clay to make tiny, flat ovals. Place these under the eyes of the main avocado faces. For the brown pit, use the same pink; for the pink pit, you might need a slightly darker mauve shade to show up. -
Texture detail:
If you like, take a needle tool and gently scratch tiny radiating lines or specks on the light green flesh near the skin to simulate avocado texture.
Make Them Charms
Insert a metal eye screw into the top of each avocado before baking. Once baked and cooled, secure it with a drop of super glue to attach to keychains.
Step 4: Baking and Finishing
-
Pre-bake check:
Before baking, give your avocados a once-over. Remove any dust specks with a bit of rubbing alcohol on a brush or a baby wipe. -
Bake:
Bake the figures according to your polymer clay manufacturer’s instructions, usually around 275°F (130°C) for 15-30 minutes. -
Cool down:
Let the pieces cool completely in the oven before handling them to prevent cracking. -
Glaze (Optional):
For a polished look, apply a thin coat of water-based polyurethane gloss varnish to the eyes and the red heart to make them shine.
Now you have a pair of everlasting avocados ready to brighten up your space


Chubby Ice Cream Cone With a Tiny “U” Mouth
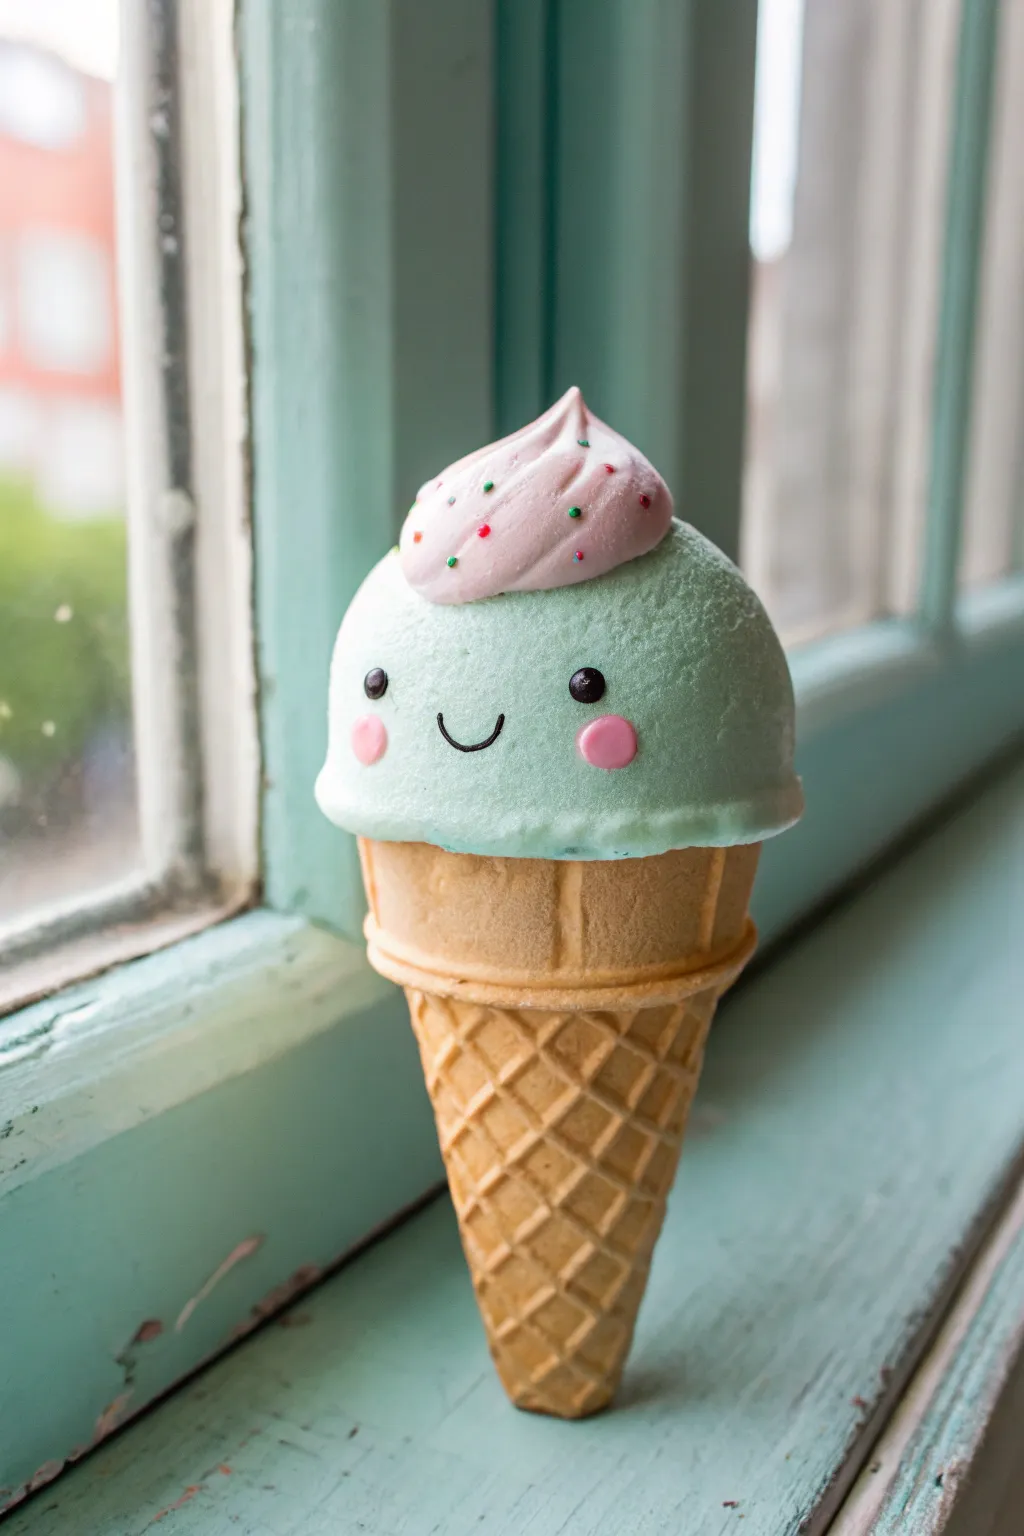
This adorable anthropomorphic treat combines a realistic waffle texture with kawaii character design. With its minty green scoop and playful pink swirl, this little sculpture makes for a perfect desk buddy or sweet gift.
Step-by-Step Tutorial
Materials
- Light tan or beige modeling clay (polymer or air-dry)
- Mint green modeling clay
- Light pink modeling clay
- Black modeling clay (for eyes and mouth)
- A small brush or toothbrush (for texturing)
- A dull knife or ruler edge
- Pointed sculpting tool or toothpick
- Liquid clay (optional, for adhesion)
- Gloss varnish (optional)
Step 1: Sculpting the Waffle Cone
-
Form the base cone:
Start with your tan clay and roll it into a smooth ball to remove air bubbles. Gently shape this into a tapered cone, wide at the top and coming to a blunt point at the bottom. -
Flatten the top:
Press the wide end against your work surface to create a flat top where the ice cream scoop will eventually sit. -
Create the waffle grid:
Using a dull knife or ruler, gently press diagonal lines into the clay surface, starting from the top and angling down to the right. Repeat this all around the cone. -
Cross-hatch the pattern:
Make a second set of diagonal lines going in the opposite direction to create the classic diamond waffle pattern. Be careful not to squash the cone shape while doing this. -
Add surface texture:
To make the cone look baked, lightly tap a toothbrush or texturing brush over the waffle pattern. -
Form the cone rim:
Take a separate piece of tan clay and roll it into a thick, flat disc. Place this on top of your cone base. -
Define the rim:
Use a sculpting tool to press vertical indentations around this upper disc, mimicking the reinforced rim of a real sugar cone.
Fixing Smashed Details
If you accidentally squash your waffle texture while holding the cone, reshape it gently and re-trace the lines before baking. Light handling is key
Step 2: Adding the Mint Scoop
-
Shape the ice cream:
Roll a large ball of mint green clay. This should be slightly wider than the rim of your cone so it overhangs adorably. -
Create the rounded dome:
Press the green ball onto the cone rim. Shape the top into a perfect hemisphere while flattening the bottom slightly to bond with the cone. -
Add the ‘skirt’:
Using your thumb or a rounded tool, gently push the bottom edge of the green clay downward to create an uneven, naturally melting ruffle effect where it meets the cone. -
Texture the scoop:
Use your toothbrush again to stipple the entire surface of the green clay. This removes fingerprints and creates that cold, frosty ice cream texture.
Step 3: Face and Toppings
-
Place the eyes:
Roll two tiny spheres of black clay. Position them wide apart on the mint scoop, pressing them in gently so they sit flush with the surface. -
Add highlights:
For that spark of life, add a microscopic dot of white clay or paint to the top corner of each black eye. -
Sculpt the smile:
Roll an incredibly thin snake of black clay. Cut a small segment and curve it into a ‘U’ shape, placing it perfectly centered between the eyes. -
Apply blushing cheeks:
Flatten two small circles of pink clay and press them onto the cheeks, just outside the eyes. -
Create the dollop:
Take your light pink clay and form a teardrop shape. Twist the tip slightly to look like soft-serve or whipped cream. -
Attach the swirl:
Place the pink dollop on top of the green scoop, curving it slightly to one side for a dynamic look. -
Sprinkle time:
Roll tiny specks of green and red clay into minuscule cylinders. Press these randomly into the pink swirl. -
Final finish:
I like to bake the piece according to package instructions now. Once cooled, you can apply a gloss varnish just to the eyes and the pink swirl to make them look wet and shiny.
Keeping White Clay Clean
Dust or lint ruins the look of light pink clay quickly. Wipe your hands and tools with a baby wipe or alcohol before handling the lighter colors.
Now you have a sweet little frozen friend that will never melt


Chibi Cat Figurine With Oversized Head
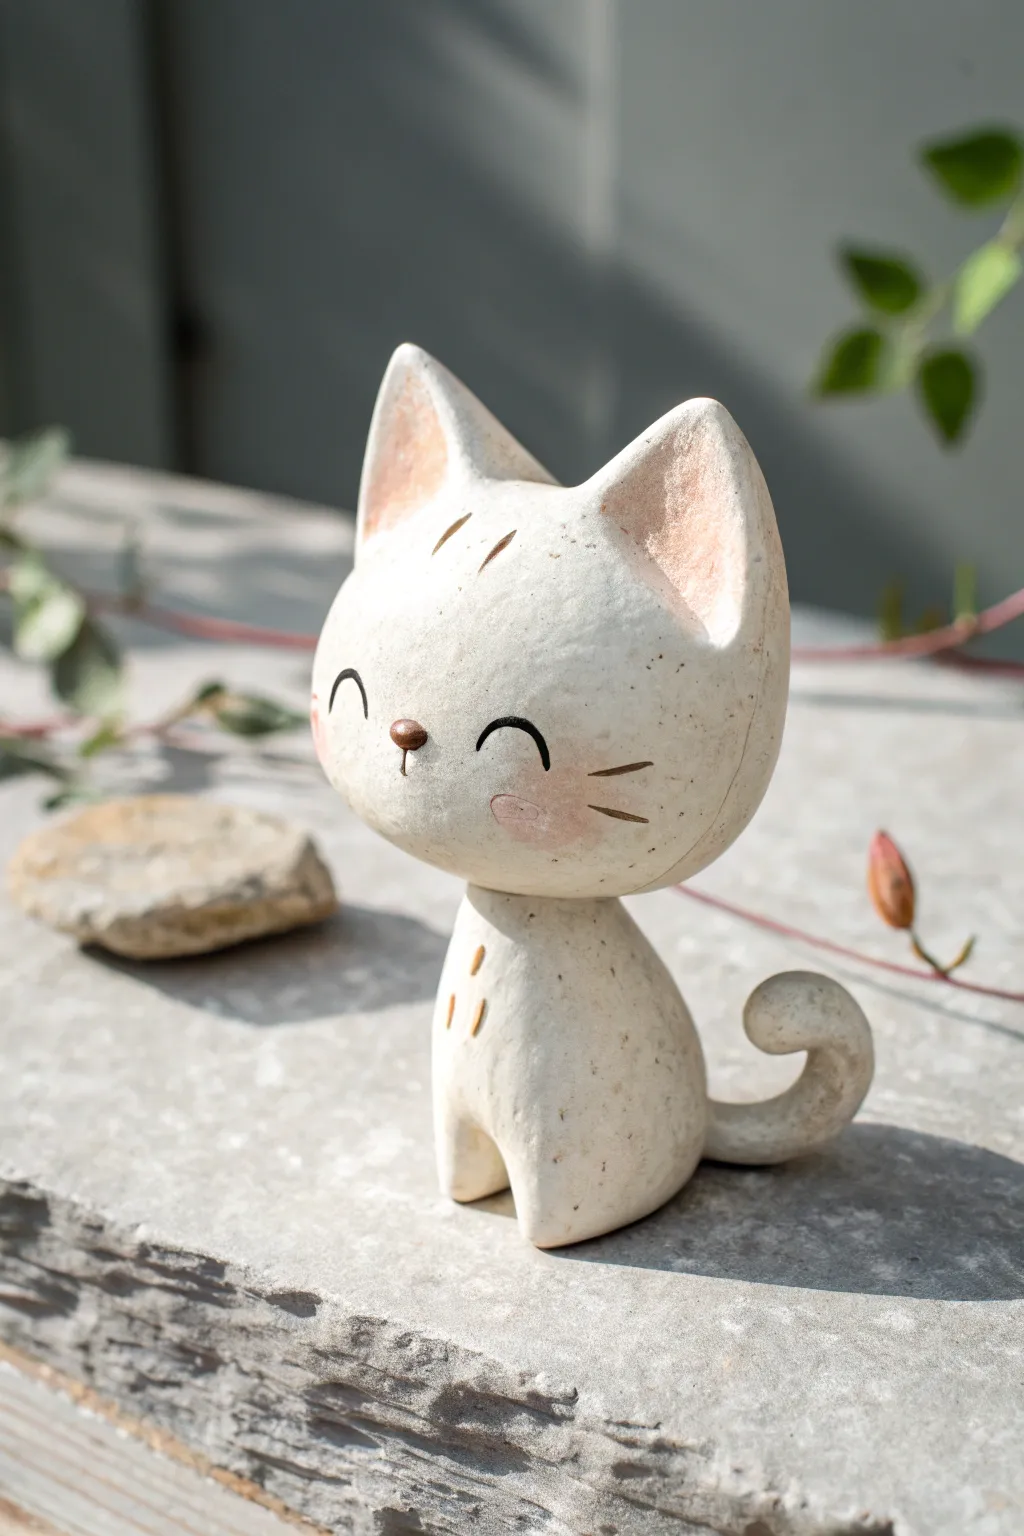
This adorable figurine captures the charm of a chubby-cheeked kitten with a modern, speckled stone finish. Its oversized head and tiny body give it classic chibi proportions that are irresistible and surprisingly sturdy to sculpt.
Step-by-Step Guide
Materials
- White air-dry clay or polymer clay (white granite/stone effect prepared)
- Aluminum foil
- Set of clay sculpting tools (needle tool, small ball stylus)
- Fine grit sandpaper
- Soft pastel chalks (pink, light brown)
- Small fluffy brush (for applying pastel)
- Acrylic paint (dark brown/black)
- Fine detail paintbrush
- Matte varnish or sealant
Step 1: Sculpting the Base Forms
-
Prepare the foil core:
Start by crumpling a piece of aluminum foil into a tight, slightly flattened sphere about the size of a golf ball. This will be the core of the oversized head to reduce weight and save clay. -
Cover with clay:
Roll your white clay flat (about 1/4 inch thick) and wrap it completely around the foil ball. Smooth the seams with your thumbs until you have a perfect, seamless sphere. -
Shape the head:
Gently press the sides of the sphere to flatten it slightly, creating a wide, oval face shape rather than a perfect circle. Keep the bottom slightly flatter where it will attach to the neck. -
Create the body:
Roll a smaller solid piece of clay into a teardrop shape. This should be about one-third the size of the head. Flatten the bottom of the teardrop so it sits stably on your work surface. -
Attach head to body:
Insert a short piece of wire or a toothpick into the top of the body and push the head down onto it. Blend the clay at the neck seam slightly with a tool, though a distinct separation is part of the style.
Head Too Heavy?
If the head keeps tipping over before drying, prop it up with small objects (like erasers or crumpled foil) under the chin until the neck joint is fully hardened.
Step 2: Adding Ears and Tail
-
Form the ears:
Roll two small triangles of clay. Use your thumb or a ball tool to press an indentation into the front of each triangle to create the inner ear curve. -
Attach the ears:
Score the top of the head and the bottom of the ears for better adhesion. Press them firmly onto the head, smoothing the back seam so they look integrated, not just stuck on. -
Sculpt the tail:
Roll a tapered snake of clay. Curve the tip into a tight swirl like a cinnamon roll. Attach the thicker end to the lower back of the body, curling it upward against the side. -
Refine the feet:
Use a modeling tool to press a small notch at the bottom front of the body, suggesting a separation between two tiny front paws.
Step 3: Carving and Detailing
-
Carve facial features:
While the clay is still workable but slightly firm, use a needle tool to drag curved lines for the closed, smiling eyes. Carve three distinct whisker lines on each cheek. -
Add forehead markings:
Carve two or three small, dashed lines on the forehead and the chest to mimic fur markings. I find pressing the tool in deeper at the start of the line creates a nice tapered effect. -
Create the nose:
Roll a tiny speck of clay into a triangle and press it right between the eyes. It should protrude slightly for a cute 3D effect. -
Add texture:
If your clay isn’t pre-speckled, use an old toothbrush to gently flick tiny specks of watered-down grey or brown paint onto the raw clay, or mix sand into the clay beforehand. -
Dry or bake:
Follow your specific clay’s instructions to harden the piece. If using air-dry clay, let it sit for at least 24-48 hours until fully cured.
Stone Texture Trick
Mix black pepper or used dry coffee grounds directly into white clay before sculpting. This creates an authentic, organic speckled granite look without painting.
Step 4: Painting and Finishing
-
Apply shading:
Scrape some pink soft pastel into powder. Use a soft, fluffy brush to dust this powder inside the ears and generously onto the cheeks for a blushing effect. -
Paint the recesses:
Dilute dark brown acrylic paint with a little water. Carefully paint into the carved eye lines, whiskers, and fur markings. Wipe away excess surface paint quickly with a damp cloth/tissue, leaving the dark color only in the grooves. -
Paint the nose:
Paint the tiny 3D nose solid brown to match the carved details. -
Seal the piece:
Finish with a coat of matte varnish. This protects the pastel shading from rubbing off and enhances the stone-like appearance.
Place your little feline on a sunny windowsill or desk for a daily dose of serenity


Round Frog Pal With Rosy Cheeks
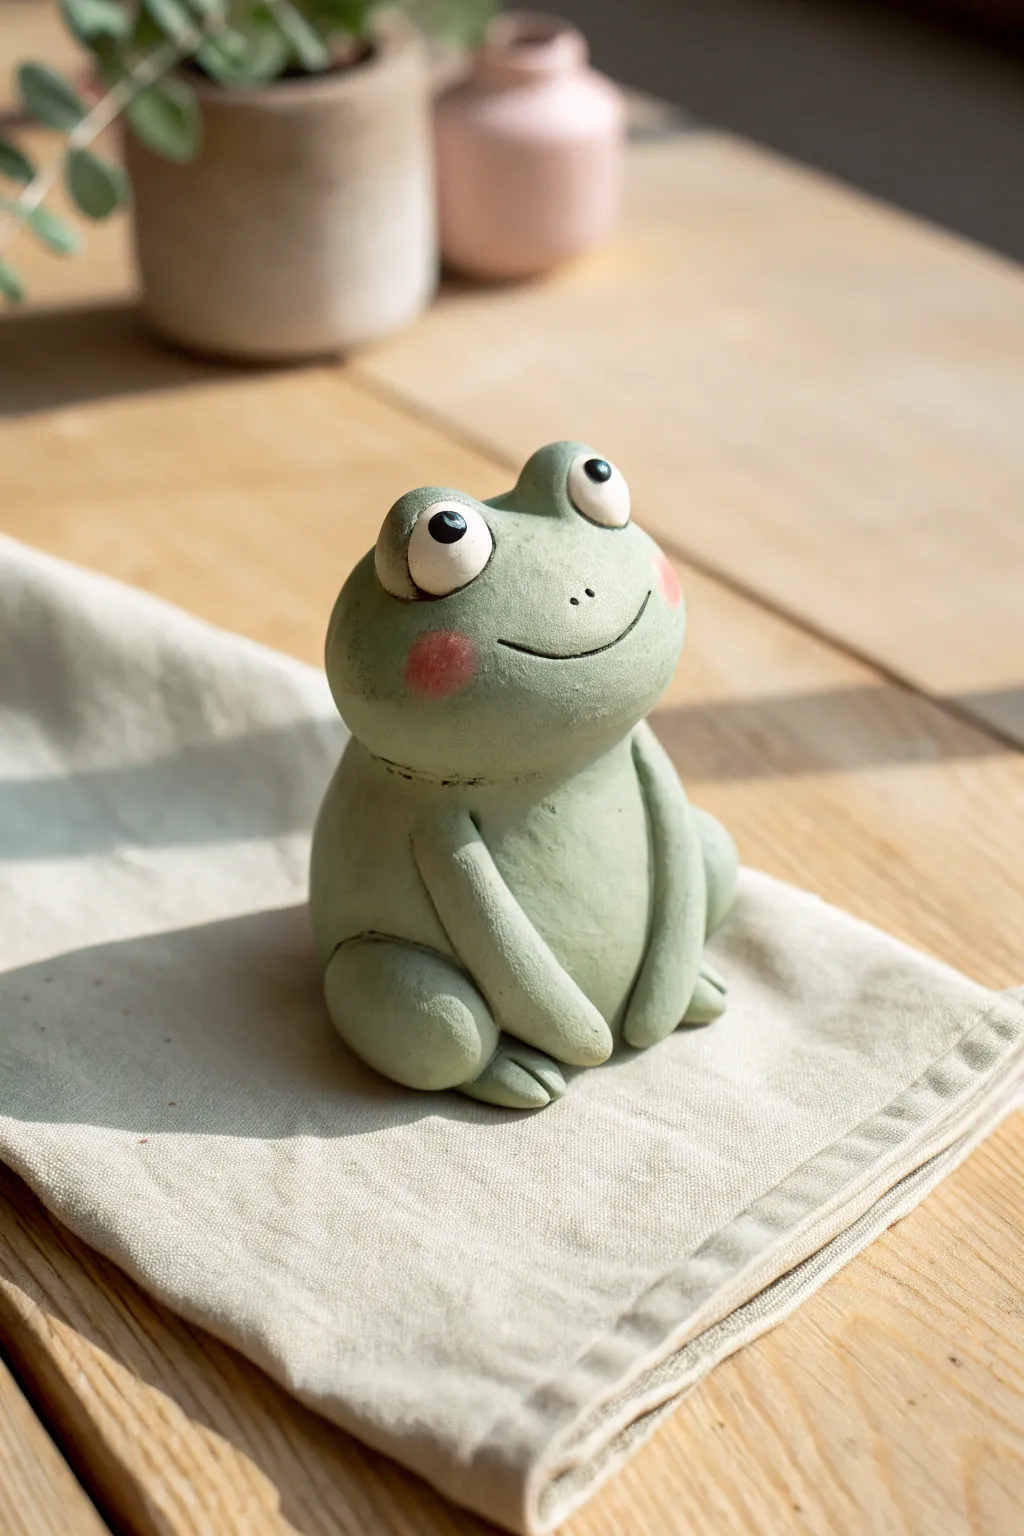
Sculpt a delightfully chubby amphibian friend looking hopeful and sweet with this simple modeling project. This matte-finish frog features large, expressive eyes and rosy cheeks that add a touch of whimsy to any desk or shelf.
Detailed Instructions
Materials
- Light sage green polymer clay (or air-dry clay)
- White clay for the eyes
- Black clay for pupils
- Rose/pink soft pastel or blush powder
- Pointed sculpting tool or toothpick
- Soft brush for applying blush
- Smooth work surface
Step 1: Body Formation
-
Prepare the Clay:
Begin by conditioning your sage green clay thoroughly until it’s soft, pliable, and free of cracks. -
Shape the Main Mass:
Roll a large ball of green clay to form the body. Gently taper the top slightly so it looks a bit like a very rounded pear, but keep the bottom wide and stable. -
Smooth the Surface:
Use your thumbs to smooth out any fingerprints. The charm of this frog is its super-smooth, matte texture, so take your time here. -
Define the Neck:
Using a blunt tool or your finger, create a very subtle indentation around the upper third of the shape to distinguish the head from the body without separating them.
Step 2: Adding the Limbs
-
Make the Arms:
Roll two thick logs of green clay for the arms. They should be slightly tapered at one end. -
Attach the Arms:
Press the thicker end of the arms onto the sides of the body, blending the seam at the shoulder so it looks seamless. -
Position the Hands:
Curve the arms forward so they rest on the belly or just in front of the frog’s feet. I like to have them pointing inward slightly for a shy look. -
Form the Thighs:
Create two flattened semi-circles of green clay for the rear legs. -
Attach the Thighs:
Press these onto the lower sides of the body, towards the back, blending the edges smoothly into the main shape. -
Create Feet:
Shape small, flattened ovals for the feet and attach them at the base of the thighs and arms. -
Detail the Toes:
Use your pointed tool or a toothpick to press two indentations into each foot, creating three simple toes.
Fixing Cracks
If you see tiny cracks forming while smoothing the clay, dip your finger in a little bit of water (for air-dry) or baby oil (for polymer) and gently rub the area to fuse it back together.
Step 3: Face and Expressions
-
Eye Sockets:
Using a ball tool or your thumb, press two small, shallow divots on top of the head where the eyes will sit. -
Create Eye Bulges:
Roll two balls of green clay and place them into the divots you just made, blending the bottom edges into the head to form the eyelids/sockets. -
Make the Eyeballs:
Roll two slightly smaller balls of white clay. Press them gently into the green eye mounds so they bulge out slightly. -
Add Pupils:
Take tiny specs of black clay and place them on the white eyeballs. Positioning them looking upward gives the frog a hopeful expression. -
Carve the Smile:
Use a needle tool or clay knife to carve a wide, shallow smile. Curve the ends upward toward the eyes. -
Nostrils:
Prick two tiny holes above the mouth for the nose.
Make it a Planter
Instead of closing the top of the head, leave it open and hollow out the body to create a miniature pot for a tiny succulent or air plant.
Step 4: Finishing Touches
-
Apply Rosy Cheeks:
Before baking (or drying), shave a little pink pastel into a powder. Use a soft dry brush to gently dab this powder onto the cheeks for a soft blush effect. -
One Last Polish:
Check the whole figure for lint or fingerprints. You can use a tiny bit of baby oil on your finger to smooth out final imperfections. -
Final Cure:
Bake the frog according to your clay package instructions (or let it air dry completely for 24-48 hours).
Now you have a calm little companion ready to keep you company on your desk

The Complete Guide to Pottery Troubleshooting
Uncover the most common ceramic mistakes—from cracking clay to failed glazes—and learn how to fix them fast.
Tiny Hedgehog With a Cozy Texture Coat
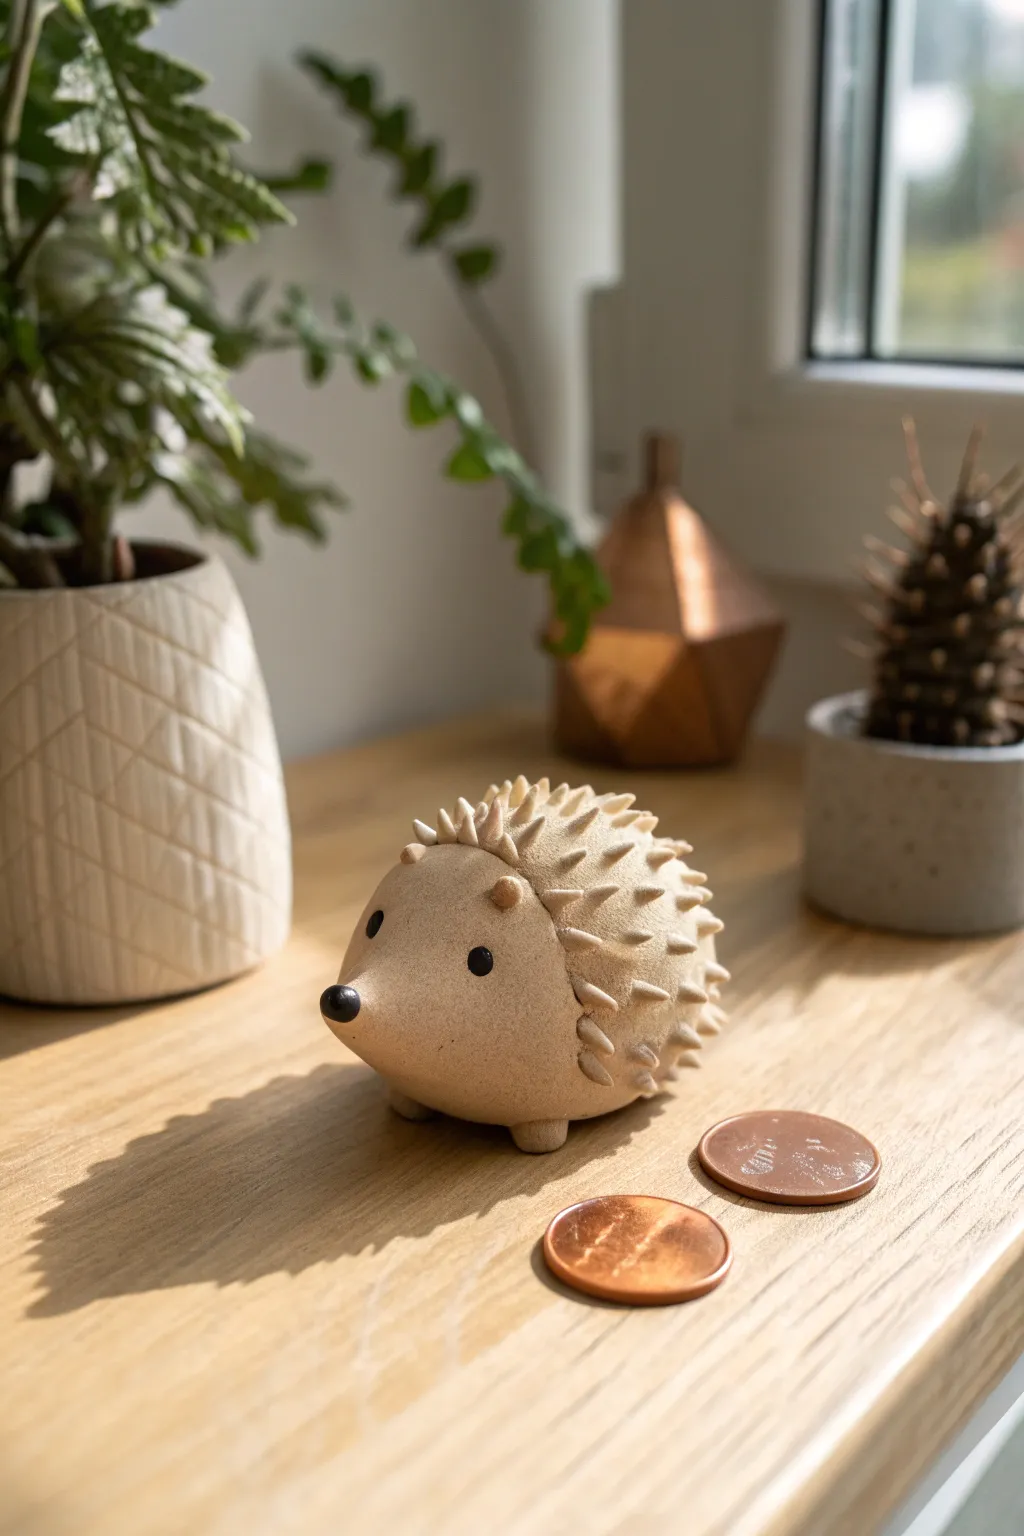
Sculpt a charming woodland creature that brings a touch of nature to your shelf. This tiny hedgehog features a smooth, speckled beige face contrasted by a wonderfully tactile coat of individually placed spikes.
Step-by-Step Tutorial
Materials
- Beige polymer clay (preferably with a speckled or ‘granite’ effect)
- Black polymer clay
- Pointed modeling tool or toothpick
- Ball stylus tool
- Smooth work surface
- Baking sheet and parchment paper
- Oven (for baking according to clay package)
- Small craft knife
Step 1: Shaping the Base
-
Prepare the main body:
Start by conditioning a golf-ball-sized amount of the beige speckled clay until it is soft and pliable. Roll it into a smooth, crack-free sphere between your palms. -
Form the teardrop shape:
Gently apply pressure to one side of the sphere to elongate it slightly, creating a fat teardrop shape. The wider end will be the body and the tapered end will become the face. -
Flatten the base:
Tap the bottom of your teardrop on your work surface to create a flat stable base so your hedgehog won’t roll away. -
Lift the snout:
Using your thumb and forefinger, gently stroke the tapered end upward just a tiny bit to give the snout a cute, inquisitive lift.
Step 2: Adding Facial Features
-
Create the nose:
Take a tiny pinch of black clay and roll it into a very small ball. Press this gently onto the very tip of the lifted snout. -
Indent eye sockets:
Use a small ball stylus to make two shallow indentations on either side of the face where the eyes will go. Placing them slightly wide apart increases the cuteness factor. -
Place the eyes:
Roll two minuscule balls of black clay, slightly smaller than the nose. Place them into the sockets you just made and press gently to secure them. -
Form the ears:
Make two small balls of beige clay about the size of a peppercorn. Flatten them slightly, creating tiny thick discs. -
Attach the ears:
Press the ears onto the head, positioned just behind and slightly above the eyes. Use a modeling tool to blend the back edge of the ears into the head for strength. -
Add tiny feet:
Create four small, equal-sized balls of beige clay. Flatten them into little stubs and attach them to the underside of the body so they just peek out.
Loose Spikes?
If spikes won’t stick, use a dab of liquid polymer clay or PVA glue (if air drying) as an adhesive for each quill. Blending the base of the spike is key.
Step 3: Creating the Spiky Coat
-
Prepare the spikes:
This step requires patience. Roll out many small, uniform teardrop shapes from the beige clay. You will need roughly 40-50 of these depending on the size of your hedgehog. -
Start the back row:
Begin attaching the spikes at the very rear of the hedgehog, just above the base. Press the wider end of the spike onto the body, leaving the pointed end sticking out. -
Work upwards:
Add a second row above the first, offsetting them like bricks so they sit in the gaps of the previous row. Use a modeling tool to blend the attached ends smoothly into the body. -
Continue layering:
Work your way up the back and over the sides, maintaining that staggered, scale-like pattern. Ensure the spikes point slightly backward and outward. -
Frame the face:
As you reach the top of the head, carefully place the final spikes to create a rounded hairline above the eyes and ears. These spikes should be slightly smaller for a neat transition. -
Refine the texture:
Inspect your work. If any spikes were squashed during handling, gently reshape their tips with a toothpick or your fingers.
Make it Shine
Once baked and cooled, apply a tiny dot of gloss varnish specifically to the black eyes and nose. This gives them a wet, lifelike sparkle.
Step 4: Finishing Up
-
Final smooth:
Check the face area for any fingerprints. I like to lightly buff the smooth clay with a drop of baby oil on my finger to remove prints before baking. -
Bake:
Place your hedgehog on a parchment-lined baking sheet. Bake according to your specific clay brand’s temperature and time instructions. -
Cool down:
Let the figurine cool completely in the oven with the door open to prevent cracking from sudden temperature changes.
Place your new prickly companion on your desk or windowsill for a daily dose of cuteness
Sleepy Sloth Hugging a Little Leaf
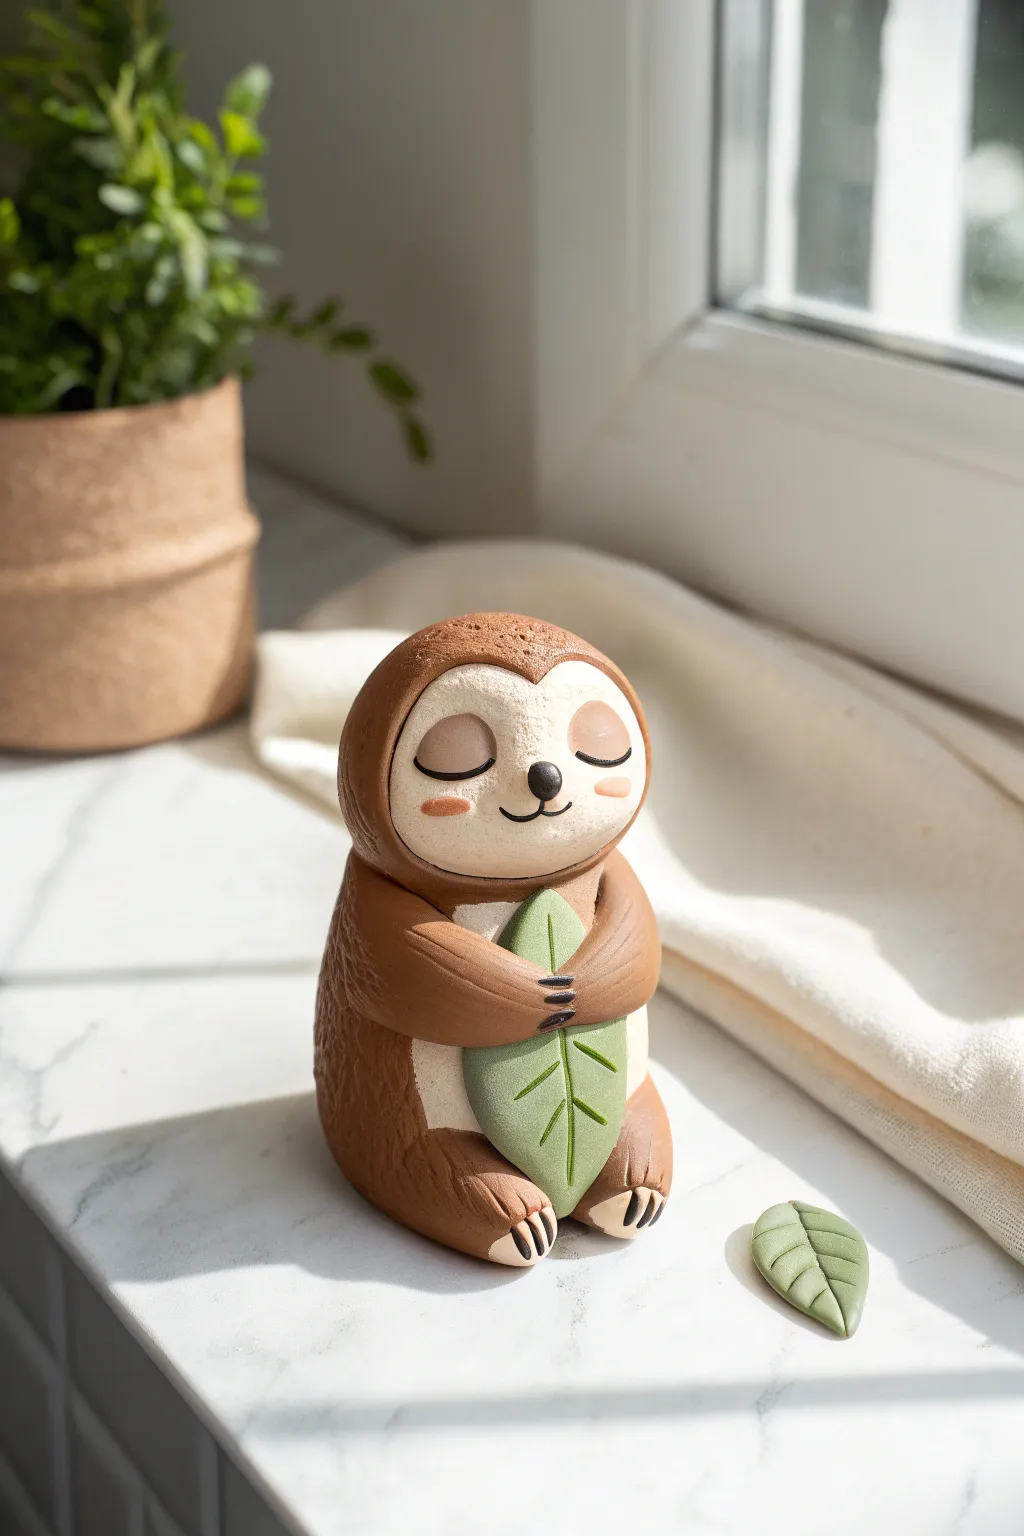
This adorable project captures a sloth in its favorite state: fast asleep and hugging something cozy. The smooth curves and warm brown tones create a peaceful figurine, perfect for sitting on a sunny windowsill or guarding your desk plants.
Detailed Instructions
Materials
- Polymer clay (medium brown, light cream/beige, sage green)
- Black clay or acrylic paint for details
- Pink chalk pastel or blush (for cheeks)
- Clay sculpting tools (needle tool, ball stylus)
- Smooth work surface (ceramic tile or glass mat)
- Craft knife
- Oven (if using polymer clay)
Step 1: Shaping the Cozy Body
-
Form the base:
Start with a generous amount of medium brown clay. Roll it into a smooth, slightly squat pear shape to form the sloth’s main body. The base should be wide enough to be stable. -
Create the face area:
Flatten a small ball of light cream or beige clay into a heart-shaped disc. The bottom of the heart should be rounded, not pointy. -
Attach the face:
Press this cream heart onto the upper front of the brown body. Use your thumbs to smooth the edges so it blends seamlessly into the brown clay, creating a recessed look for the face mask. -
Define the head:
On the top of the brown section, gently redefine the hood shape so it looks like it’s wrapping around the cream face. You can use a silicone tool to smooth the transition line.
Step 2: Adding Facial Features
-
Indent eye sockets:
Using a large ball stylus or the back of a paintbrush, gently press two shallow indentations into the cream face on either side of the center. -
Sculpt the eyelids:
Roll two small, flattened discs of brown clay that match the body color. Place these into the indentations to create closed, sleeping eyelids. Smooth them down gently. -
Add the lashes:
Roll extremely thin threads of black clay (or plan to paint this later). Curve them into upward ‘U’ shapes and place one on each closed eyelid for a peaceful sleeping expression. -
Nose and mouth:
Place a tiny oval of black clay in the center for the nose. Use a needle tool or knife to gently press a curved smile line extending from the nose to the left and right. -
Blush those cheeks:
Scrape a little pink chalk pastel into powder. Use a soft brush or your finger to dab rosy spots onto the cheeks and gently on the nose for extra cuteness.
Sticky Fingerprints?
If you’re leaving fingerprints, lightly dust your fingers with cornstarch or baby powder before handling the clay. You can also wipe the raw clay with baby oil before baking to smooth it out.
Step 3: Leaves and Limbs
-
Shape the leaf:
Take your sage green clay and flatten it into a large teardrop shape. Use a needle tool to score a central vein line and smaller angled veins branching off it. -
Position the leaf:
Place the leaf vertically against the sloth’s belly, with the pointed tip facing up towards the chin. Press it gently so it adheres. -
Create the arms:
Roll two thick logs of brown clay for the arms. They should be tapered slightly at the wrist end. -
Attach the arms:
Attach the thicker end of the arms to the shoulders. Curve the arms around the front of the body so they look like they are hugging the green leaf tightly. -
Add the feet:
Roll two smaller balls of brown clay into ovals for the feet. Attach them at the very bottom of the body, pointing forward. -
Detail the claws:
Take tiny snippets of black clay and roll them into sharp points. Attach three small claws to each hand (resting on the leaf) and three to each foot. -
Texturize the fur:
For a realistic finish, take a needle tool and scratch short, directional lines into the brown clay on the back and sides of the arms to mimic furry texture. I find this really brings the character to life. -
Bake and finish:
Bake the figurine according to your clay package’s specific instructions. Once cooled, you can add a matte varnish to protect your new friend.
Pro Tip: Eye Depth
When making the eyelids, use a slightly darker shade of brown than the body clay. This subtle contrast makes the eyes pop and adds dimension to the face without needing paint.
Now you have a serene little companion to bring a sense of calm to any busy space


What Really Happens Inside the Kiln
Learn how time and temperature work together inside the kiln to transform clay into durable ceramic.
Mushroom Sprout Creatures With Stubby Legs
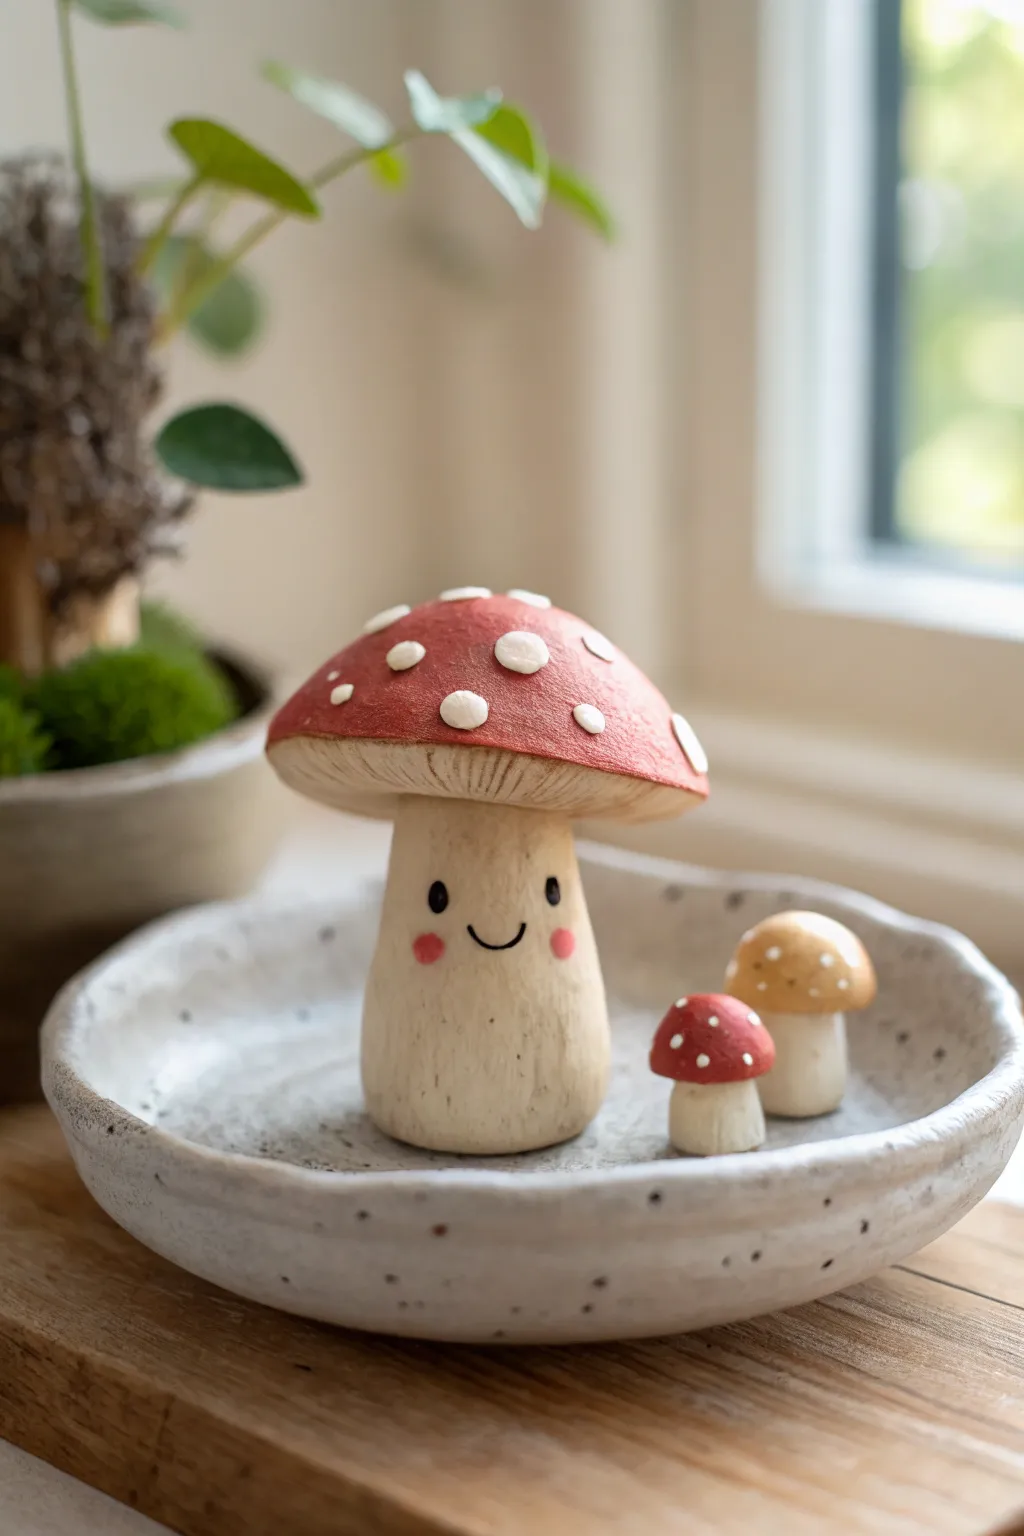
Create a charming trio of woodland fungi friends to brighten up any shelf or windowsill. These adorable clay mushrooms feature textured caps, sweet painted faces, and a rustic matte finish that looks right at home among your houseplants.
Step-by-Step Tutorial
Materials
- White air-dry clay or polymer clay
- Acrylic paints (red, burnt siena, ochre, cream/beige, black, pink, white)
- Sculpting tools (needle tool, small ball stylus)
- Fine grit sandpaper
- Small paintbrushes (flat and fine liner)
- Matte varnish or sealant
- Aluminum foil (optional for armature)
- Water cup
Step 1: Sculpting the Base Forms
-
Form the main stalk:
Start with a generous lump of clay for the largest mushroom. Roll it into a thick cylinder that widens slightly at the bottom for stability. Smooth the sides with a bit of water if using air-dry clay, ensuring there are no cracks. -
Shape the large cap:
Roll a separate ball of clay and flatten it into a dome shape. Gently pinch and pull the edges outwards to create a wide mushroom cap. The underside should be flat or slightly concave to fit onto the stalk. -
Add gill texture:
Before attaching the cap, flip it over. Using a needle tool or a craft knife, carefully score fine lines radiating from the center to the outer edge to mimic mushroom gills. This hidden detail adds lovely realism. -
Assemble the big mushroom:
Score the top of the stalk and the center of the cap’s underside. Add a dab of water (or slip) and press them firmly together. Smooth the seam slightly under the cap so it looks like one organic piece. -
Create the mini mushrooms:
Repeat the process for the two smaller companions. Make one medium-sized with a rounder cap and one tiny sprout. Varying their heights and cap shapes gives the group more character. -
Refine the surface:
Check all three mushrooms for fingerprints or uneven spots. Dip your finger in water and gently run it over the clay to get a silky smooth finish before drying. Let them dry completely according to your clay’s instructions—usually 24-48 hours.
Step 2: Painting and Details
-
Sand for perfection:
Once fully dry, lightly sand the stems and tops of the caps with fine-grit sandpaper. This removes any rough grain and prepares the surface for a smooth paint application. -
Base coat the stems:
Mix a warm cream or beige color. Paint the entire stalk of the large mushroom and the smaller ones. You might need two coats for opaque coverage. I usually let the first coat dry for about 10 minutes. -
Paint the caps:
For the big mushroom, mix red with a touch of brown for a earthy, muted tone. Paint the top of the cap carefully. Paint the medium mushroom a golden ochre and the smallest one a bright red. -
Add the spots:
Instead of just painting flat circles, mix thick white paint or use a tiny bit of fresh clay flattened into discs and glued on for 3D texture. If painting, dab thick, irregular white dots onto the caps. -
Draw the face:
Using your finest liner brush and black paint, add two small oval eyes and a simple U-shaped smile to the large mushroom’s stem. Keep the features small and centered for maximum cuteness. -
Apply rosy cheeks:
Dip the back end of your paintbrush or a ball stylus into pink paint. Gently stamp a round cheek on either side of the smile. This perfect circle technique is foolproof. -
Dry styling:
Use a nearly dry brush with a tiny amount of brown paint to add very subtle vertical streaks on the stems, mimicking wood grain or natural staining. Keep this extremely faint. -
Final seal:
Coat the finished pieces with a matte varnish. Avoid glossy finishes, as the matte look contributes to the organic, stone-like aesthetic shown in the photo.
Cracking Up?
If small cracks appear as the clay dries, mix a tiny amount of fresh clay with water to make a paste. Fill the cracks, smooth it over, and let it dry again before painting.
Weighted Base
To prevent your mushroom from toppling over, press a small flat stone or metal washer into the bottom of the stalk while the clay is still wet to lower the center of gravity.
Set your finished mushroom family in a shallow dish or beside a leafy plant to enjoy their cheerful company
Friendly Little Ghost With Pastel Tint
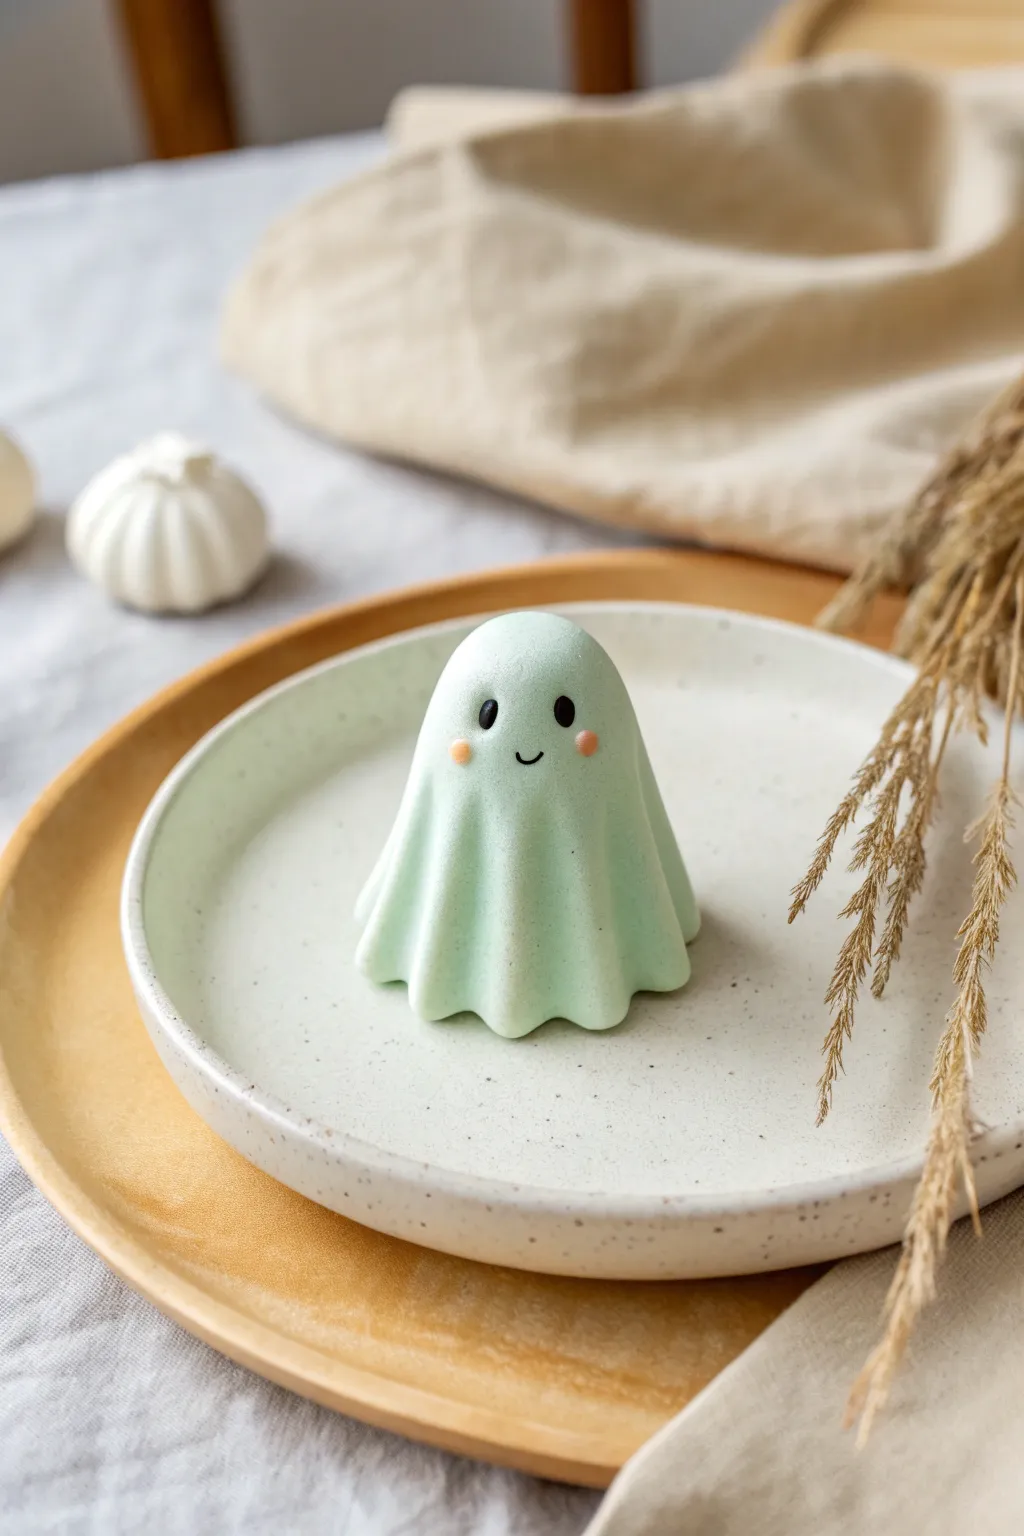
This adorable little ghost brings a gentle spooky vibe to any shelf with its soft mint-green hue and sweet, simple expression. It’s a quick, beginner-friendly project that focuses on smooth draping shapes and tiny details.
How-To Guide
Materials
- White air-dry clay or polymer clay
- Light green acrylic paint (or pre-colored mint clay)
- Black acrylic paint
- Light pink acrylic paint or soft pastel chalk
- Small rolling pin
- Ball tool or toothpick
- Fine detail paintbrush
- Clay sculpting tool or butter knife
- Aluminum foil (for the core armature)
Step 1: Creating the Core and Base
-
Tinting the Clay:
If you are using white clay, mix in a very small amount of light green paint. Knead it thoroughly until the color is a uniform, soft mint shade. To keep it pastel, add the color gradually—you can always add more, but you can’t take it out. -
Forming the Core:
Grab a piece of aluminum foil and crumple it into a smooth, upright bullet shape. This will act as the armature to support the ghost’s body and save you some clay. -
Smoothing the Core:
Roll a small piece of your mint clay into a thin sheet and wrap it around the foil armature to hide the texture. Smooth out any seams so you have a solid, clean base shape.
Fixing Cracks
If you see hairline cracks forming while draping the clay, wet your finger slightly with water (for air-dry) or baby oil (for polymer) and gently rub the area smooth.
Step 2: Sculpting the Sheet
-
Rolling the Dough:
Take a larger ball of mint clay and flatten it with your rolling pin. You want a circle about 1/4 inch thick—not too thin, or the folds will collapse. -
Draping the Shape:
Gently lift the clay circle and center it over the top of your base armature. Let the sides fall naturally, just like a real sheet would. -
Forming the Folds:
Using your fingers, gently pinch and guide the clay at the bottom edge to create wavy folds. I find it helpful to press the clay inward toward the base in alternating sections to create those deep shadow folds. -
Smoothing the Dome:
Use the palm of your hand to very lightly smooth the top of the head so it is perfectly round and free of fingerprints. -
Refining the Edges:
Check the bottom hem of your ghost. If the clay is too long, trim it with a sculpting tool. Soften the cut edge with your finger so it looks rounded, not sharp. -
Checking Balance:
Set the ghost down on a flat surface to ensure it stands straight. Adjust the bottom folds if it leans too much to one side.
Step 3: Adding the Face
-
Marking Eye Placement:
Use a toothpick to lightly mark two small dots where the eyes will go. Place them slightly wide apart to achieve that ‘kawaii’ look. -
Painting the Eyes:
Dip the handle end of a paintbrush into black paint. Dot it onto your marked spots to create perfectly round eyes. Alternatively, roll tiny balls of black clay and press them flat onto the face. -
Designing the Smile:
With an ultra-fine detail brush and black paint, draw a tiny ‘u’ shape between the eyes. Keep the line thin and delicate. -
Adding Blush:
For the rosy cheeks, dip a distinct small tool or toothpick into light pink paint and dab small dots just below the outer corners of the eyes. You can also brush on a little powdered pastel chalk for a softer, fuzzier look. -
Final Polish:
Do a final check for any lint or dust stuck to the clay. If you used polymer clay, bake it according to the package instructions. If using air-dry clay, set it aside in a draft-free spot.
Make it Sparkle
Before the clay dries or bakes, brush a tiny amount of pearl mica powder over the ghost’s ‘sheet’ to give it an ethereal, shimmering glow.
Place your new friendly spirit among some dried flowers or autumn leaves for a charming seasonal display

TRACK YOUR CERAMIC JOURNEY
Capture glaze tests, firing details, and creative progress—all in one simple printable. Make your projects easier to repeat and improve.
Baby Turtle Trinket Dish With a Sweet Face

This adorable turtle trinket dish combines functionality with a sweet, calming aesthetic, perfect for holding rings or small treasures. With its gentle green glaze and etched shell pattern, it brings a little touch of nature to any bedside table.
Step-by-Step Guide
Materials
- Air-dry clay or polymer clay (white or light beige)
- Acrylic paints (sage green, tan/light brown, black, pink)
- Glossy varnish or glaze (mod podge or resin works too)
- Rolling pin
- Small bowl (for shaping the curve)
- Needle tool or toothpick
- Small sponge
- Fine detail paintbrush
- Water cup (for smoothing)
Step 1: Shaping the Base
-
Roll out the clay:
Begin by taking a large ball of clay and rolling it out into a smooth, even slab about 1/4 inch thick. Aim for a consistent thickness so it dries evenly. -
Cut the circle:
Use a round cookie cutter or trace around a small bowl (about 4-5 inches in diameter) to cut a perfect circle from your clay slab. This will be the turtle’s shell. -
Create the curve:
Gently lift your clay circle and drape it into a slightly larger bowl lined with plastic wrap. Press it down gently so it takes on a shallow dish shape. -
Smooth the rim:
Dip your finger in a little water and run it along the rim of the clay circle to smooth out any sharp edges or cracks.
Cracks while drying?
If you spot hairline cracks emerging as the clay shrinks, mix a tiny bit of fresh clay with water to make a paste and fill them in immediately before painting.
Step 2: Adding the Turtle Features
-
Form the head:
Roll a smaller ball of clay into a smooth, slightly flattened teardrop shape for the head. -
Attach the head:
Score (scratch) the back of the head and a spot on the rim of your dish. Add a dab of water or liquid clay, then press the head firmly onto the rim. Smooth the seam underneath so it’s seamless. -
Make the feet:
Create four small, flattened oval shapes for the feet. They should be chunky and stable. -
Attach the feet:
Flip the slightly firming dish over (carefully!) or reach underneath to attach the feet to the bottom of the bowl. Position them so the turtle sits level when placed on a table. -
Etch the design:
Using a needle tool or toothpick, gently carve the shell pattern into the inside of the bowl. Draw a hexagon in the center, then draw lines radiating out to the rim to create the classic turtle shell look. -
Dry completely:
Let the piece dry fully according to your clay’s instructions. For air-dry clay, this usually takes 24-48 hours. Rotate it occasionally for even airflow.
Step 3: Painting and Glazing
-
Base coat the shell:
Paint the entire top surface of the shell and the head with a soft sage green acrylic paint. You might need two coats for opaque coverage. -
Paint the underbelly:
Paint the bottom of the dish, the feet, and the underside of the rim in a sandy tan or light brown color to create a natural two-tone look. -
Highlight the grooves:
Mix a tiny bit of brown into your green or use thinned brown paint. carefully paint inside the etched shell lines to make the pattern pop. Wipe away excess surface paint with a damp sponge if it gets messy. -
Speckle effect:
I like to flick a toothbrush loaded with slightly watered-down brown paint over the green areas to create realistic ceramic-style speckles. -
Draw the face:
Using your finest detail brush and black paint, add two small U-shapes for closed sleepy eyes and a tiny smile on the head. -
Rosy cheeks:
Add two soft pink ovals under the eyes for cheeks. Blending the edges slightly makes it look softer. -
Seal the piece:
Once all paint is bone dry, apply a high-gloss varnish or distinct glaze layer. This gives it that shiny, ceramic-fired appearance and protects the paint.
Smooth Seams
Use a wet paintbrush instead of your finger to smooth the tight corners where the head meets the shell. It reaches crevices better for a professional finish.
Now you have a charming little companion ready to keep your jewelry safe and sound
Tiny Rain Cloud With Dangly Raindrop Charms
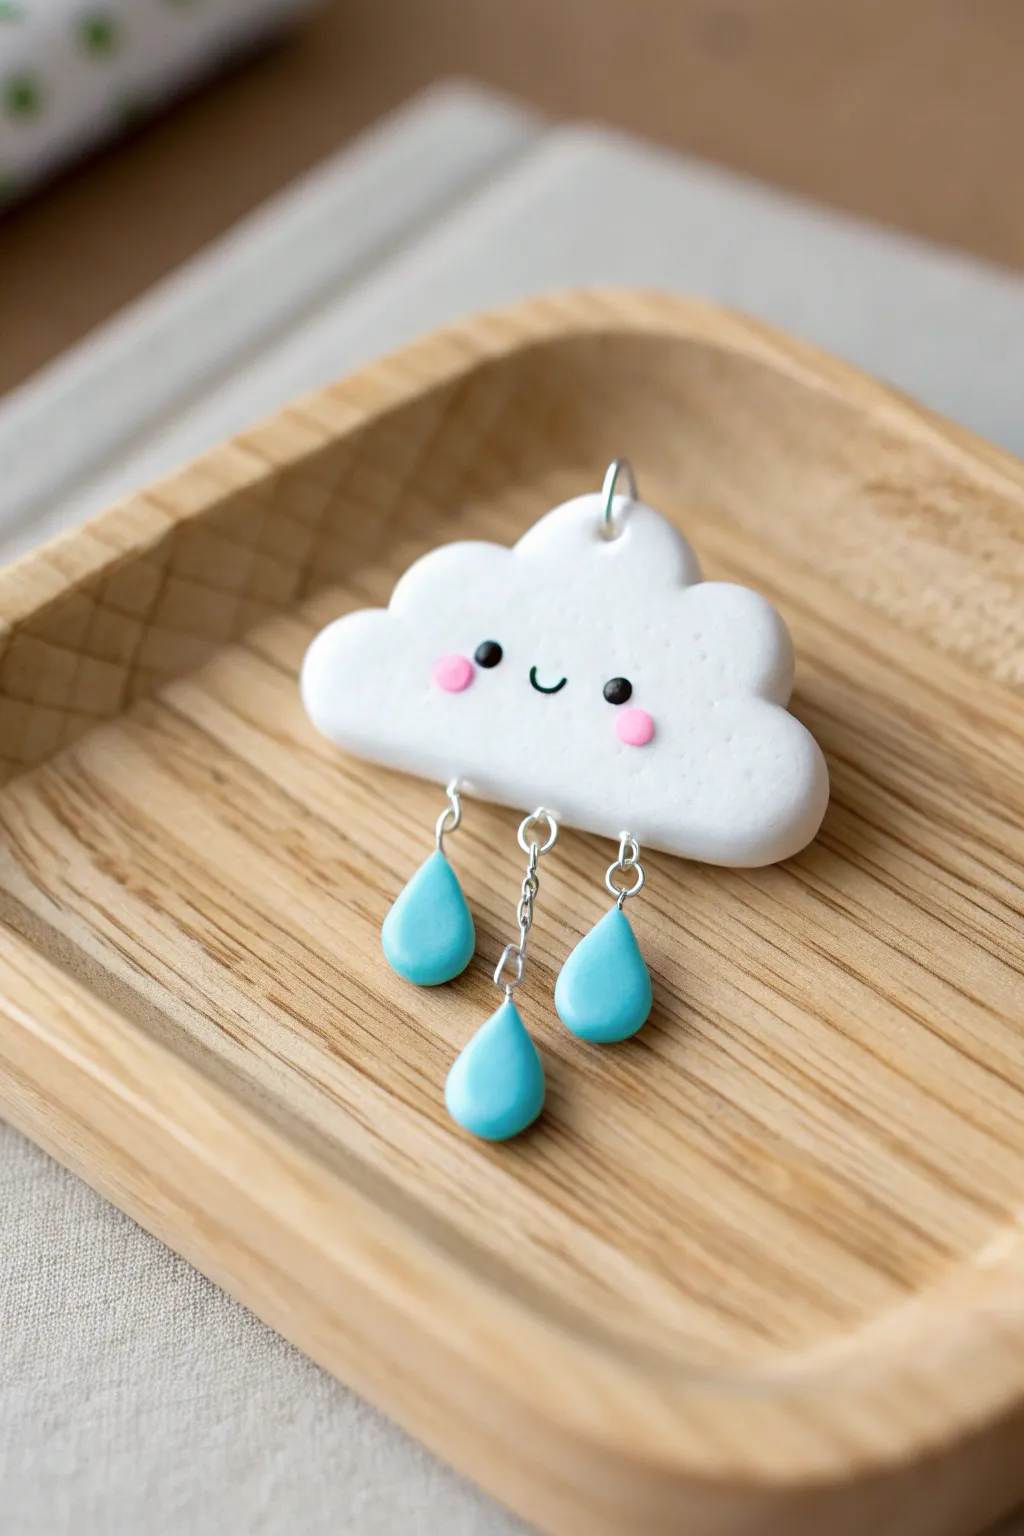
Brighten up even the gloomiest days with this adorable kawaii cloud charm featuring dangling raindrops. It combines simple sculpting techniques with basic jewelry assembly for a mobile-like accessory that moves delightfully when worn.
Step-by-Step
Materials
- White polymer clay
- Light blue polymer clay
- Black polymer clay (tiny amount)
- Pink polymer clay (tiny amount)
- Eye pins (silver tone, small)
- Jump rings (silver tone)
- Small chain segments (silver tone)
- Needle tool or toothpick
- Round nose pliers
- Wire cutters
- Gloss varnish or resin (optional)
- Rolling pin or acrylic roller
Step 1: Sculpting the Cloud
-
Condition the Clay:
Begin by taking a chunk of white polymer clay and kneading it thoroughly in your hands until it becomes soft, pliable, and easy to shape. -
Form the Base Shape:
Roll the white clay into a smooth ball, then gently flatten it into an oval disk about 1/4 inch thick. This will be the body of your cloud. -
Create the Fluff:
Roll several smaller balls of white clay in varying sizes. Press these around the upper edge and sides of your oval base to create the bumpy, fluffy cloud silhouette. Blend the seams on the back for smoothness, but you can leave the front seams visible for texture. -
Adding Hardware:
Insert a silver eye pin into the top center of the cloud for hanging later. Then, insert three eye pins into the bottom edge—one in the center and one on either side—trimming the wire stems if they are too long for the cloud’s body.
Clean Clay Tip
Polymer clay picks up dust easily. Keep baby wipes or rubbing alcohol nearby to clean your hands and tools before touching the pristine white clay to ensure your cloud stays bright.
Step 2: Adding the Kawaii Face
-
Make the Eyes:
Take the tiniest pinch of black clay and roll two microscopic balls. Press these gently onto the center of the cloud, spacing them slightly apart. -
Create the Smile:
Roll a very thin snake of black clay. Cut a tiny U-shaped segment and carefully place it between the eyes to form a happy smile. -
Add Cheeks:
Roll two small balls of pink clay, flatten them into discs, and press them onto the cloud’s face just below and to the outside of the eyes for that classic blushing look.
Step 3: Making the Raindrops
-
Shape the Drops:
Take your light blue clay and divide it into three equal blueberry-sized portions. -
Refine the Form:
Roll each blue portion into a smooth ball, then pinch and pull one end to create a tapered teardrop shape. I find it helpful to gently tap the rounded bottom on my work surface to flatten it slightly. -
Insert Eye Pins:
Carefully insert a trimmed eye pin into the pointed top of each raindrop carefully so you don’t distort the shape. -
Bake the Clay:
Place the cloud and the three raindrops on a baking sheet or ceramic tile. Bake according to your brand of polymer clay instructions (usually around 275°F/135°C for 15-30 minutes). Let them cool completely.
Level Up: Glitter Storm
Mix fine iridescent glitter or mica powder into the blue clay before shaping the raindrops. This adds a magical shimmer that catches the light as the charms dangle.
Step 4: Assembly & Finishing
-
Prepare the Chains:
Cut three small lengths of silver chain. For a varied look, make the center chain slightly longer than the two outer chains. -
Connect the Drops:
Using your pliers, open a jump ring and attach one end of a chain segment to a blue raindrop’s loop. Repeat for all three drops. -
Attach to Cloud:
Attach the other end of each chain to the corresponding eye pins on the bottom of your white cloud using jump rings. Close the rings securely. -
Seal (Optional):
If you want extra durability or shine, apply a thin coat of gloss varnish or UV resin to the eyes, mouth, and raindrops.
Now you have a charming weather accessory ready to be turned into a necklace or brooch
Cute Star and Moon Pair With Matching Faces
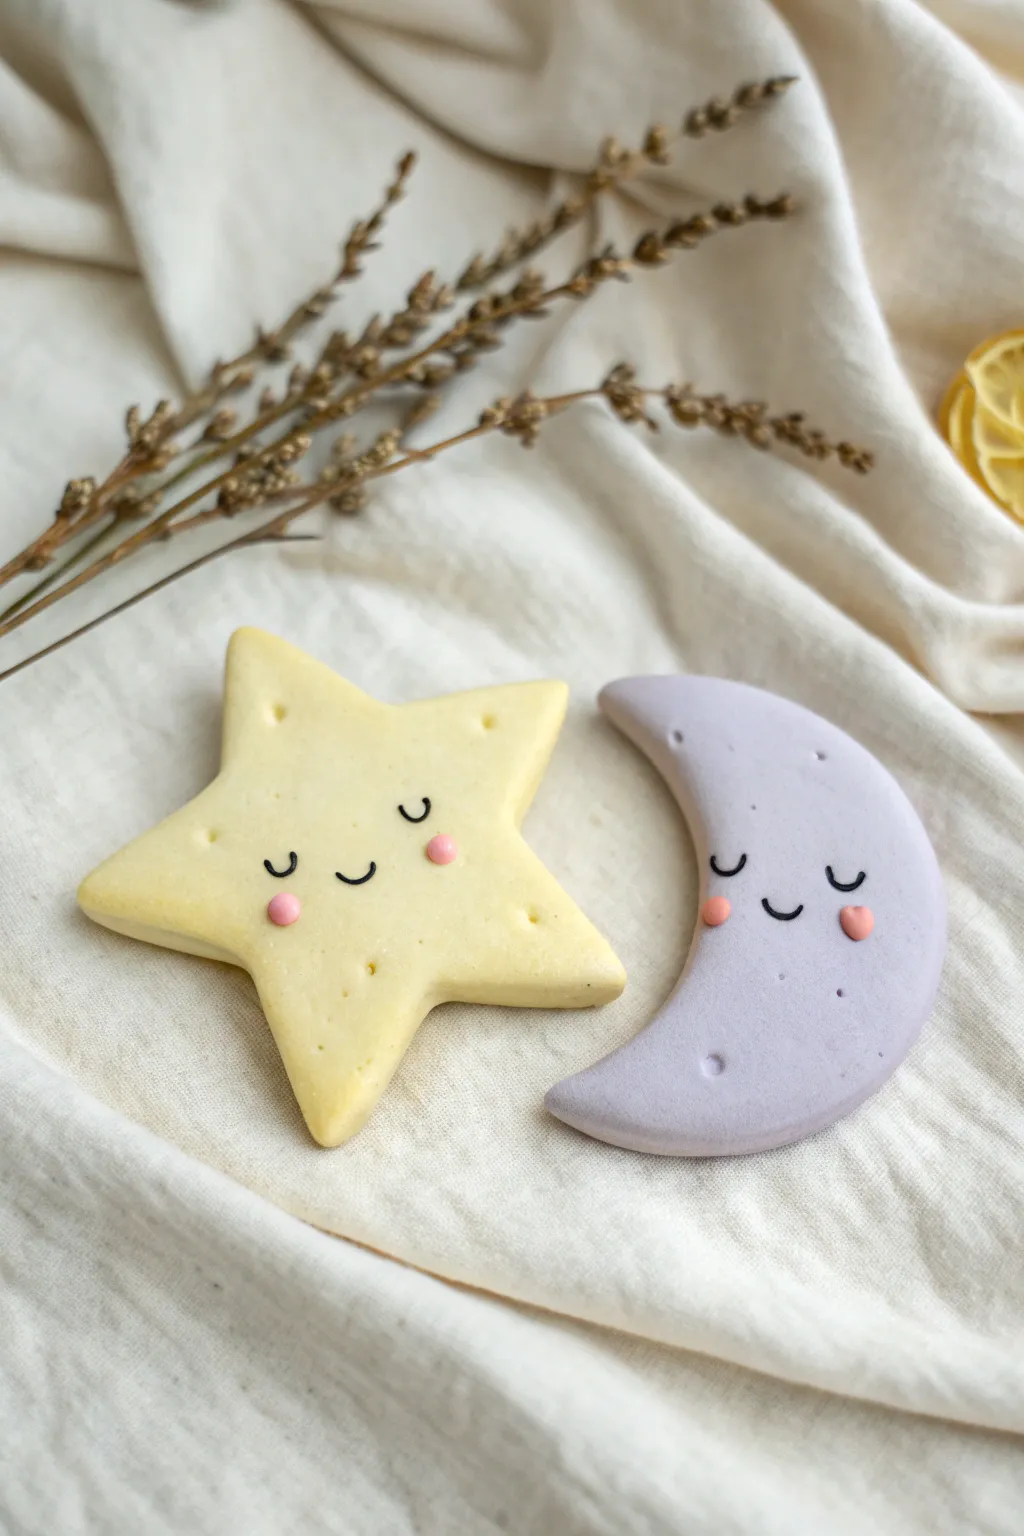
Create a soothing bit of sky magic with this adorable duo of a yellow star and a lavender moon. Featuring matching sleepy expressions and soft pastel tones, these clay creations are perfect for nursery decor or sweet handmade gifts.
Detailed Instructions
Materials
- Polymer clay or air-dry clay (pastel yellow and pastel lavender)
- Black acrylic paint or a fine-tip black marker
- Pink clay or pink acrylic paint
- Rolling pin or smooth round bottle
- Star cookie cutter (medium size)
- Circle cookie cutter (medium size)
- Small dotting tool or a toothpick
- Fine detail paintbrush
- Ball stylus tool
- Parchment paper or non-stick working mat
Step 1: Shaping the Star
-
Prepare the yellow clay:
Begin by conditioning your pastel yellow clay until it is soft and pliable. Roll it into a smooth ball to remove any air bubbles. -
Roll out the slab:
On your non-stick surface, flatten the ball with a rolling pin until it is about 1/4 inch thick. Try to keep the thickness even across the entire surface. -
Cut the star shape:
Press your star-shaped cookie cutter firmly into the yellow clay. Wiggle it slightly to ensure a clean cut, then remove the excess clay from around the shape. -
Soften the edges:
Gently tap the edges of the star with your fingertip to round them off slightly. This gives the finished piece a softer, friendlier look rather than sharp, rigid angles.
Clean Edges Trick
Use a bit of cornstarch on your cookie cutters before pressing into the clay. This prevents sticking and helps the clay release cleanly without deforming the shape.
Step 2: Crafting the Moon
-
Prepare the lavender clay:
Condition and roll out a ball of pastel lavender clay, just as you did with the yellow. Aim for the same 1/4 inch thickness so the pair matches in weight and style. -
Cut the crescent shape:
Use a circle cutter to cut a round disc. Then, position the same cutter overlapping one side of the circle to slice away a portion, leaving behind a crescent moon shape. -
Refine the points:
Use your fingers to gently shape the tips of the crescent moon. You want them slightly rounded rather than dangerously sharp, ensuring they don’t break off easily later. -
Smooth the surface:
Check the surface of your moon for any fingerprints or lint. You can gently buff them away with a tiny bit of baby oil or water on your fingertip.
Make Them Magnets
Before the clay dries or hardens, press a small, strong round magnet into the back. Secure it with a dab of superglue after the piece is finished for cute fridge decor.
Step 3: Adding Faces and Texture
-
Create indentations:
Using a small dotting tool or the blunt end of a toothpick, press tiny random dots onto the surface of both the star and the moon. This adds a subtle, playful texture. -
Dry or Bake:
If using polymer clay, bake according to the manufacturer’s instructions. If using air-dry clay, allow the pieces to dry completely on a flat surface for 24-48 hours. -
Paint the eyes:
Once the clay is fully hardened, use a very fine detail brush and black acrylic paint to draw two small, U-shaped curves for the closed, sleepy eyes. I find it easiest to practice on paper first to get the curve right. -
Add the smile:
Paint a tiny, simple curve centered between the eyes for a gentle smile. Keep the line thin and delicate. -
Apply the cheeks:
You can either paint small pink circles for cheeks or, if you used polymer clay, you might have added tiny flattened discs of pink clay before baking. If painting, dab a small dot of pink paint just below the outer corner of each eye. -
Final touches:
Verify the paint is completely dry. If you want extra durability, apply a thin coat of matte varnish to seal the faces and protect the clay.
Now you have a charming celestial set ready to brighten up any quiet corner
Tiny Book Buddy Desk Charm (With a Bookmark Tassel Look)
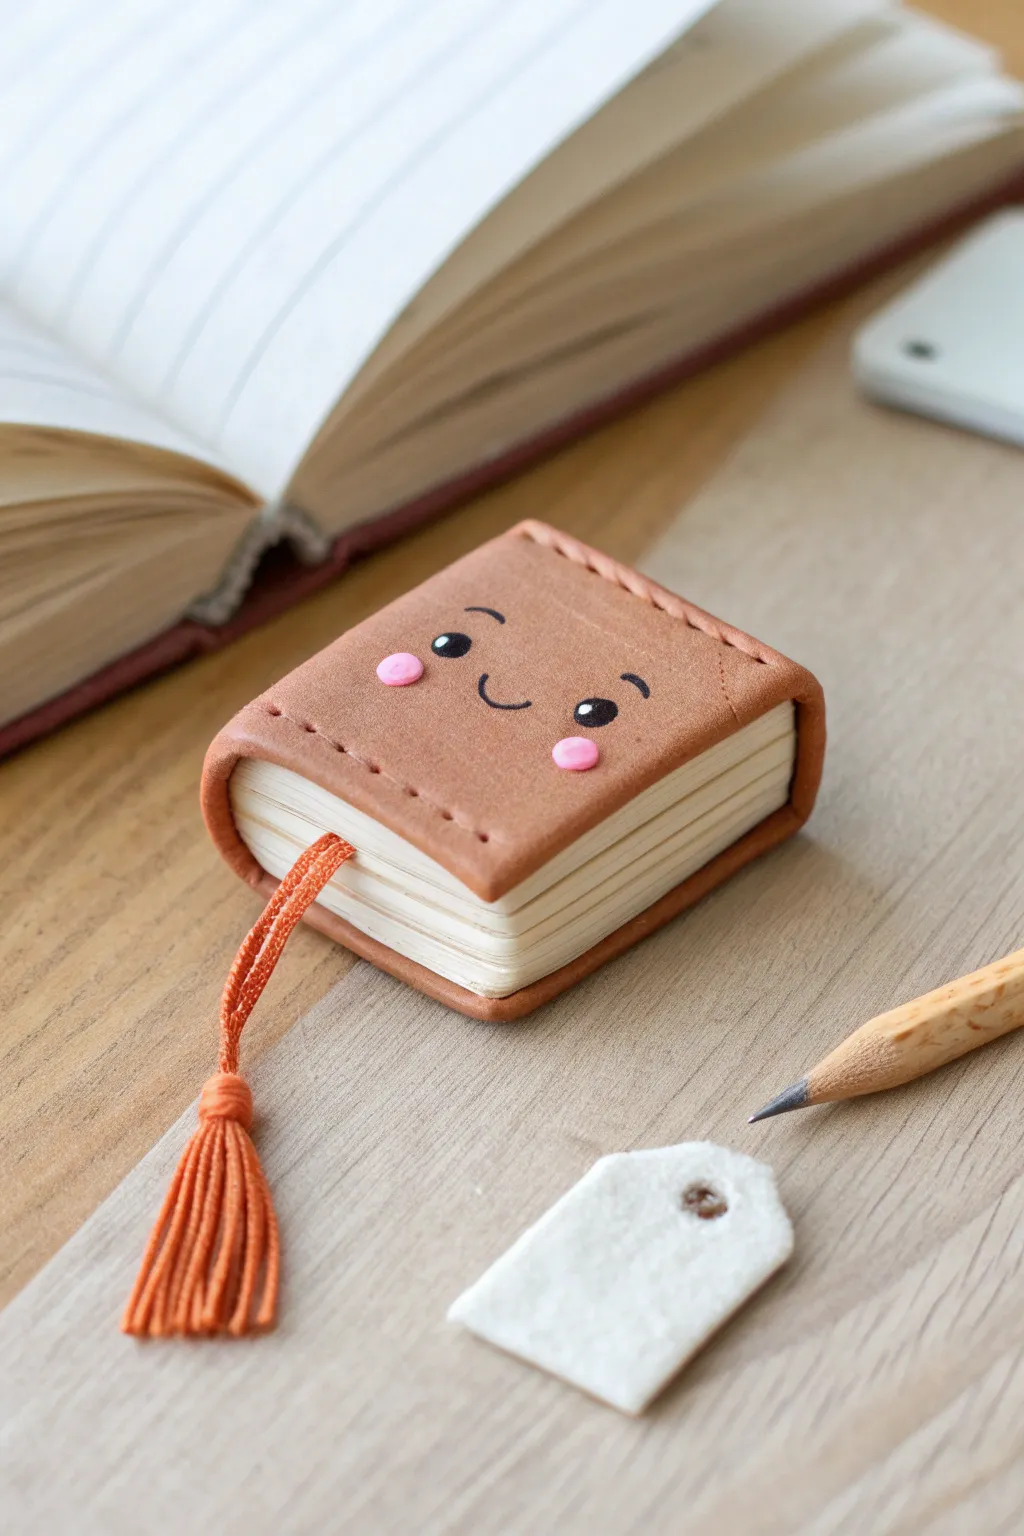
Bring a little joy to your workspace with this adorable miniature book figurine, crafted to look like a well-loved leather volume. With its tiny stitched details, happy expression, and real tassel accent, it’s the perfect companion for your actual reading time.
Step-by-Step Guide
Materials
- Polymer clay (caramel brown/tan, white/cream, pink)
- Small rolling pin
- Clay knife or blade
- Needle tool or toothpick
- Black acrylic paint
- Fine detail paintbrush or dotting tool
- Orange embroidery floss or thin string
- Scissors
- Oven (for baking polymer clay)
Step 1: Creating the Pages
-
Form the block:
Start by conditioning your white or cream clay until it is soft and pliable. Form it into a thick rectangular block, approximately 1 inch by 1.5 inches, with a thickness of about half an inch. -
Texture the pages:
Use your knife or blade to gently score distinct, parallel horizontal lines along three sides of the white block (the top, bottom, and right side). These lines mimic the stacked pages of a book. -
Detail the spine side:
Leave the fourth side (the left side) smooth or slightly curved inward, as this is where the pages connect to the spine.
Step 2: Crafting the Cover
-
Roll the cover:
Roll out a sheet of the caramel brown clay to about 2-3mm thickness. You want it substantial enough to hold texture but thin enough to fold around the pages. -
Cut to size:
Cut a long rectangle from the brown sheet that is slightly wider than your page block and long enough to wrap around the front, spine, and back. -
Assemble the book:
Gently wrap the brown cover around the white page block. Press lightly onto the top and bottom surfaces, and ensure the spine area fits snugly against the curved side of the pages. -
Curl the edges:
Allow the brown cover to slightly overhang the white block. Gently curl these overhanging edges inward just a tiny bit to give it a soft, realistic leather-bound look. -
Add stitching details:
Using a needle tool, press small, evenly spaced indentations along the top and bottom edges of the cover to simulate stitching thread marks.
Stitch Perfect
For ultra-realistic stitching, drag your needle tool slightly between the holes to create a ‘thread’ impression connecting the dots.
Step 3: Adding the Face & Tassel
-
Add cheeks:
Roll two tiny dots of pink clay. Flatten them slightly and press them onto the front cover for the cheeks, spacing them apart to leave room for the mouth. -
Indent the eyes:
Use a ball tool or the end of a paintbrush handle to make shallow indentations where the eyes will eventually be painted, just above the cheeks. -
Create the tassel anchor:
Before baking, carefully poke a hole or create a small gap at the bottom of the spine area where you will later glue the tassel string. -
Bake the project:
Place your book on a baking sheet and bake according to your polymer clay package instructions. Let is cool completely before handling. -
Make the tassel:
While the clay bakes, cut several short lengths of orange embroidery floss. Fold a longer piece in half and tie the short lengths around the loop to create a mini tassel. Trim the bottom evenly.
Make it a Keychain
Insert a screw eye pin into the top of the spine before baking instead of creating a desk charm, so you can attach it to a bag or zipper pull.
Step 4: Finishing Touches
-
Paint the face:
Once the book is cool, use black acrylic paint and a fine brush to paint two small curved eyes in the indentations you made earlier. Add a small ‘u’ shape for the smiling mouth between the cheeks. -
Highlight the eyes:
dip a toothpick in white paint and add a tiny white dot to each black eye to bring the expression to life. -
Attach the bookmark:
Twist the top tail of your embroidery floss tassel. Apply a tiny dot of strong glue to the twisted end and insert it into the gap you created at the bottom of the spine. -
Final seal:
If desired, you can brush a matte varnish over the clay parts to protect the paint and give the ‘leather’ a nice finish, though bare clay has a natural matte look that works well here.
Now you have a charming little reading buddy to keep you company while you study or journal
Animal Macaron Trinket Box With a Hidden Surprise
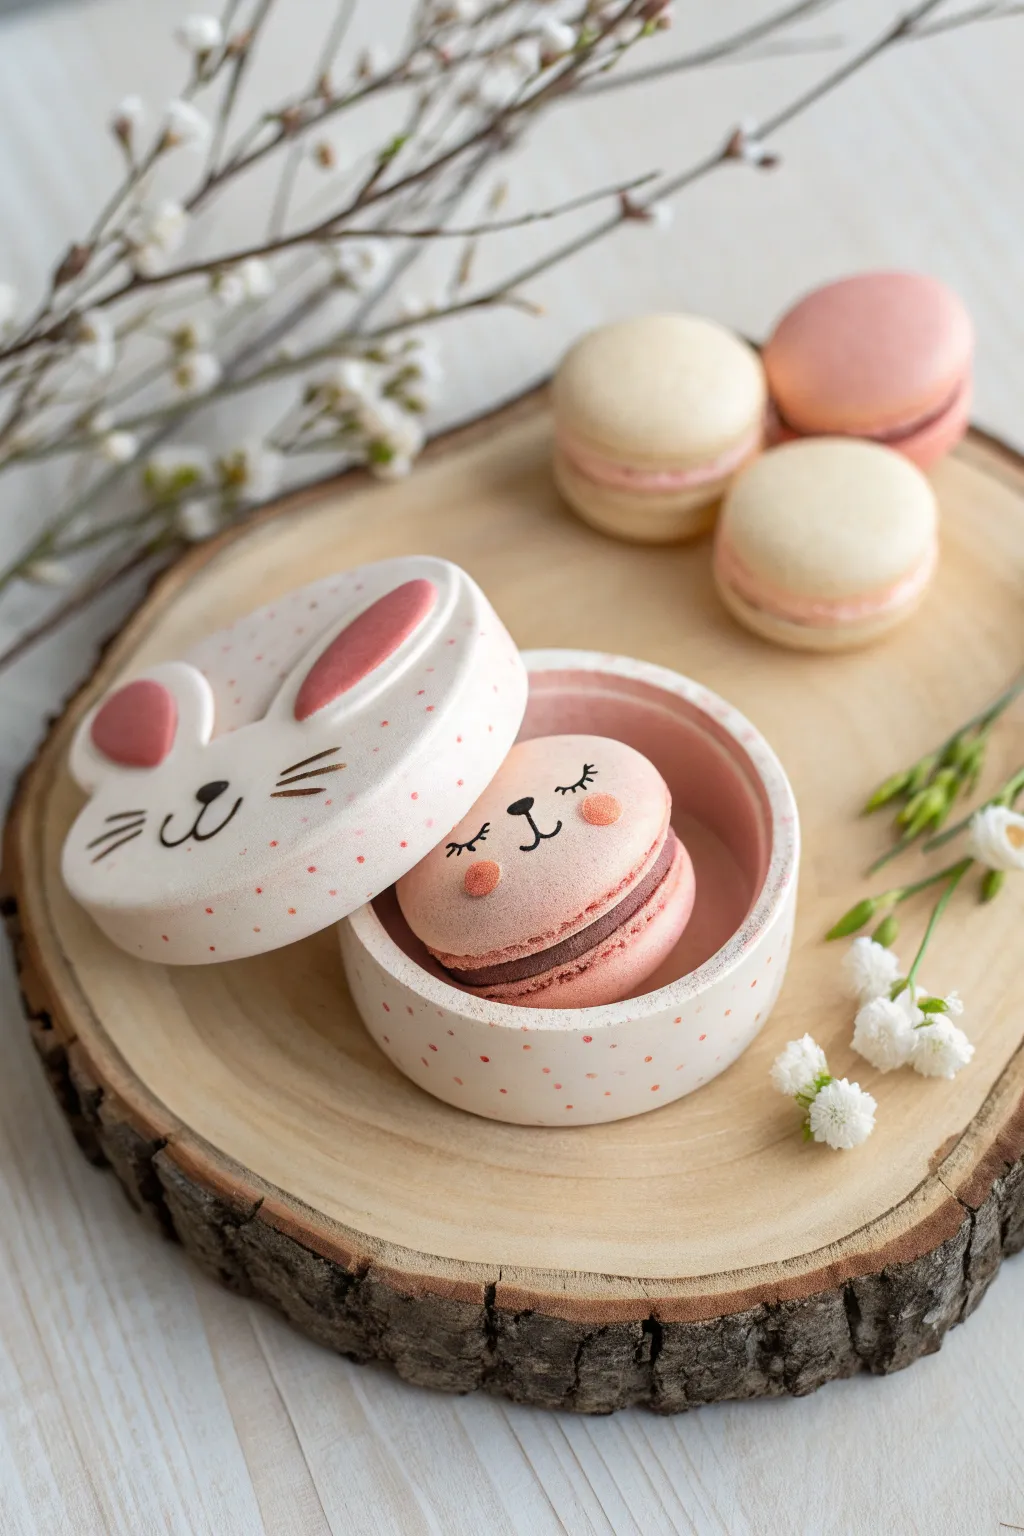
Craft an adorable hiding spot for your tiniest treasures with this speckled bunny macaron trinket box. This sweet project features a removable lid with charming bunny ears and reveals a matching mini-macaron character nestled inside.
Detailed Instructions
Materials
- White polymer clay
- Pink polymer clay (pastel shade)
- Brown polymer clay (chocolate shade)
- Black acrylic paint or fine-tip marker
- Pink soft pastel chalks (for cheeks)
- Round cookie cutters (approx. 2-3 inches)
- Clay roller
- Needle tool or toothpick
- Ball tool
- Small paintbrush
- Sandpaper or toothbrush (for speckle effect)
- Liquid clay (TLS) or strong craft glue
Step 1: Shaping the Box Base
-
Prepare the speckled clay:
Condition your white clay until soft. To achieve that delicate speckled look, grate a tiny amount of pink chalk or dried pink clay into the white and knead until distributed, or paint speckles later. Roll it out to about 1/4 inch thickness. -
Cut the base circles:
Using your medium round cutter, punch out two identical circles. One will be the floor of your box, and the other will help form the lid later. Set one aside for the lid. -
Form the box walls:
Roll a long snake of white clay and flatten it into a strip. The width of the strip determines the depth of your box—about 1 inch is good. Wrap this strip around the edge of your base circle. -
Blend the seams:
Where the strip ends meet, cut the excess and smooth the join with your finger or a clay tool. Flip the box over and firmly blend the walls into the base circle on the outside so it’s one solid piece. Smooth out any fingerprints.
Step 2: Creating the Bunny Lid
-
Prepare the lid base:
Take the second circle you cut earlier. This needs to fit snugly on top of your box walls. I like to gently press it onto the refined box walls to ensure the circumference matches perfectly. -
Sculpt the ears:
Shape two teardrops of white clay. Flatten them slightly. Take smaller amounts of pink clay, shape into smaller teardrops, and press them into the center of the white ears. -
Attach the ears:
Press the base of the ears onto the top of the lid. Use a blending tool to smooth the clay from the back of the ears onto the lid surface so they are secure. -
Add facial details:
Using a needle tool, lightly sketch where the eyes and nose will go. For the nose, roll a tiny triangle of black or dark brown clay and press it into the center. -
Paint features:
With a fine brush and black paint (or a marker after baking), draw the sleeping shutter eyes, whiskers, and mouth. Brush a little pink pastel dust on the cheeks for a blush effect. -
Add final speckles:
If you didn’t mix speckles into the clay, dip an old toothbrush into watered-down pink paint and flick it gently over the lid and box base for that textured eggshell look.
Clean Lines Pro Tip
Wipe your clay tools with a baby wipe or alcohol swab between colors. White clay picks up dust easily, so clean hands ensure your bunny stays bright.
Step 3: Making the Mini Macaron Surprise
-
Form the macaron shells:
Roll two balls of pink clay and flatten them into domes. These should be small enough to fit easily inside your finished box. -
Create the signature “feet”:
Use a needle tool or toothpick to tease and fluff the clay right at the bottom edge of each dome. This creates the crumbly texture characteristic of real macarons. -
Add the filling:
Roll a ball of chocolate brown clay, flatten it into a disc, and sandwich it between the two pink shells. Press gently so they stick. -
Decorate the hidden bunny:
Just like the lid, give this mini macaron a face. Paint on tiny sleeping eyes, a nose, and blushy cheeks. -
Bake and finish:
Bake all pieces according to your polymer clay package instructions (usually 275°F/135°C for 15-30 minutes). Once cool, the mini macaron can rest inside as a permanent resident or a removable charm.
Lid Fit Troubleshooting
If the lid slides off too easily after baking, glue a slightly smaller circle of felt or craft foam to the underside of the lid to create a snug stopper.
Now you have a precious keepsake box perfect for gifting small jewelry or keeping as a desk companion
Pastel Snail Ring Holder With a Spiral Shell

This charming little desk companion combines whimsy with utility, offering a safe spot for your favorite rings on its sturdy eyestalks. With its soft beige body and gentle pink shell, this snail brings a touch of playful cottagecore aesthetic to your vanity or bedside table.
Step-by-Step Guide
Materials
- Air-dry clay (white or cream)
- Acrylic paints (white, beige, pastel pink, black)
- Small paintbrush (detail brush)
- Modeling tools (needle tool or toothpick)
- Water in a small cup
- Rolling pin
- Clear matte or satin varnish
Step 1: Shaping the Snail Body
-
Condition the clay:
Begin by taking a generous ball of air-dry clay and kneading it in your warm hands until it feels soft, pliable, and free of cracks. -
Form the base shape:
Roll the clay into a thick, elongated log shape that is slightly fatter at one end for the head and tapers gently toward the tail. -
Lift the head:
Gently bend the thicker front end upward to create the snail’s neck and head. Press the bottom flat against your work surface so the snail sits stably without tipping. -
Smooth the transition:
Use a tiny bit of water on your fingertip to smooth out the crease created by bending the neck, ensuring the transition from body to neck is seamless.
Balance Check
Before drying, test the balance by gently placing a ring on the eyestalks. If it tips, flatten and widen the base of the snail’s body for better stability.
Step 2: Creating the Shell
-
Prepare the shell clay:
Take a second ball of clay, slightly smaller than the body. You can either mix a drop of pink paint directly into the wet clay now for uniform color, or sculpt it white to paint later. I prefer mixing it in now for a softer look. -
Roll a coil:
Roll this second ball into a long, even snake shape. It should be thick enough to have some substance, roughly the thickness of your finger. -
Coil the spiral:
Starting from one end, tightly roll the snake inward on itself to form a flat, cinnamon-roll style spiral. Keep the coils close together. -
Attach the shell:
Score (scratch) the back of the snail body and the flat underside of your spiral shell. Add a dab of water or slip to the scratched areas and press the shell firmly onto the snail’s back. -
Texture the shell:
Using a needle tool or toothpick, gently press curved lines radiating from the center of the spiral outward to emphasize the shell’s segments. -
Add body texture:
Use your sculpting tool to carve two horizontal, curved lines along the side of the snail’s body, just below the shell, to suggest the ‘foot’ of the snail.
Step 3: Detailing the Face
-
Make the eyestalks:
Roll two small, thin cylinders of clay for the eyestalks. These need to be vertical and sturdy enough to hold a ring, so don’t make them too wispy. -
Add the eyes:
Roll two tiny spheres and attach them to the tops of the stalks. Gently flatten the front of each sphere slightly. -
Attach stalks to head:
Score the top of the head and the bottom of the stalks. Press them firmly into place, smoothing the clay at the join point so they look like they grew naturally from the head. -
Refine the surface:
Do a final check for fingerprints or rough spots. Dip your finger in water and give the entire sculpture a final gentle polish. -
Allow to dry:
Let your snail dry completely in a safe spot for 24-48 hours. Turn it occasionally to ensure the bottom dries evenly.
Custom Shell Pattern
Instead of scoring lines, try embedding tiny seed beads into the soft clay shell spiral before drying for a unique, textured mosaic effect.
Step 4: Painting and Finishing
-
Base coat:
If you didn’t pre-color your clay, paint the body a creamy beige and the shell a dusty rose pink. Avoid harsh, bright colors to maintain the pastel vibe. -
Paint the face:
Using your finest detail brush and black paint, add two small dots on the eye spheres and a simple, curved smile line lower on the face. -
Add rosy cheeks:
Dip a rounded tool or the back of a paintbrush into pink paint and stamp a small blush circle right next to the smile. -
Seal the project:
Once the paint is fully dry, apply a coat of matte or satin varnish. This protects the clay from moisture and gives it a finished ceramic look.
Now your gentle snail friend is ready to keep your jewelry safe and add a sweet touch to your decor
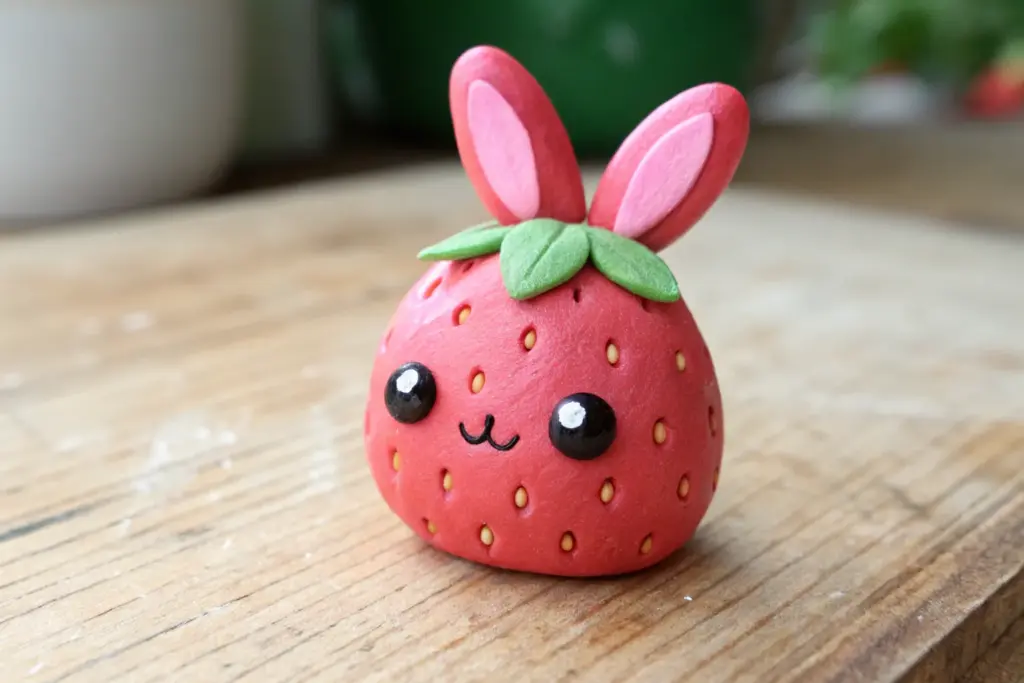
Kawaii Face Mix-and-Match Set for Instant Cute Minis
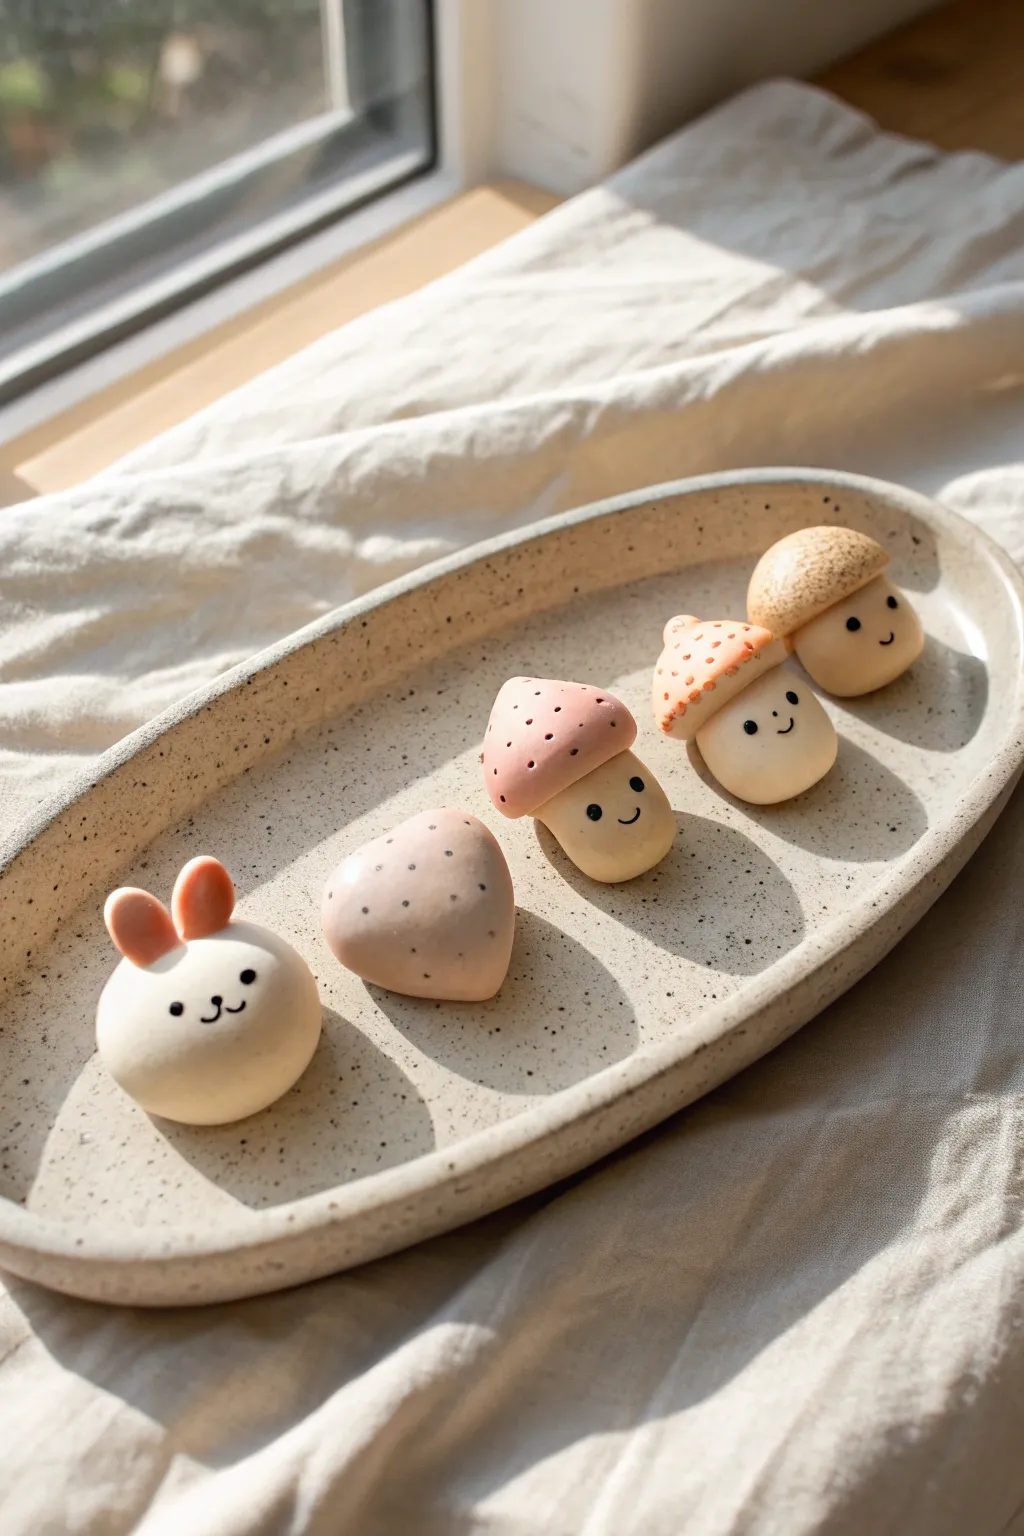
Create a charming lineup of simple kawaii characters that act as a perfect introduction to miniature sculpting. This set features a sweet bunny, a strawberry accent, and a trio of smiling mushrooms, all crafted with smooth curves and minimalist facial details.
Step-by-Step Tutorial
Materials
- Polymer clay (White, Pastel Pink, light Terracotta/Tan, Beige)
- Black acrylic paint or fine-tip permanent marker
- Dotting tools or ball stylus (various sizes)
- Needle tool or toothpick
- Soft pastel chalks in pink (for blushing cheeks)
- Small paintbrush
- Gloss glaze (optional)
- Baking sheet and parchment paper
- Oven
Step 1: The Little Bunny
-
Base Body:
Start with a small ball of white clay, rolling it until it is perfectly smooth and free of lint. Gently press it onto your work surface to flatten the bottom slightly so it sits stable without rolling. -
Ears:
Create two tiny teardrop shapes from white clay. Press a smaller, flattened teardrop of pastel pink clay into the center of each white ear. Attach these to the top of the head, blending the seam at the base carefully with a small tool. -
Face Details:
Using a very small dotting tool dipped in black paint (or a marker after baking), add two wide-set eyes. Paint a small ‘w’ shape between them for the mouth.
Lint Magnet Warning
White and light clay picks up dust instantly. Keep a scrap piece of ‘waste clay’ nearby to roll in your hands periodically—it pulls dust off your fingers before you touch your project.
Step 2: The Strawberry Accent
-
Shaping:
Roll a ball of pale pink clay and pinch the bottom to form a rounded, soft heart or strawberry shape. Keep the edges very soft and rounded rather than sharp. -
Seed Texture:
Take a needle tool and gently poke small indentations scattered across the surface to mimic seeds. If you prefer color, you can use a fine-tip brown marker to add tiny dots inside these indents after baking.
Make them Magnets
Before baking, adhere a small neodymium magnet to the back of each figure. Embed it slightly into the clay so it sits flush, turning your cute lineup into a functional fridge set.
Step 3: Toadstool Trio
-
Stems:
Create three stems using beige or light cream clay. Roll them into thick, short cylinders that flare slightly at the base like a squat teardrop. Flatten the bottoms for stability. -
Cap Bases:
Prepare three balls of clay for the caps: one pastel pink, one light terracotta, and one tan. Flatten the bottom of each ball and use your thumb to create a slight indentation where it will sit on the stem. -
Cap Shaping:
Shape the pink cap into a tall, rounded cone. Make the terracotta cap slightly rounder and wider. The tan cap can be a simple hemisphere. Gently press them onto their respective stems. -
Poked Details:
For the pink mushroom, use a needle tool to poke distinct holes scattered over the cap. For the terracotta one, create a denser pattern of smaller pokes near the rim using a toothbrush or needle tool to simulate texture. -
Speckled Texture:
For the tan mushroom cap, I like to use an old toothbrush to gently tap the surface, giving it a porous, bread-like texture rather than smooth holes. -
Mushroom Faces:
Just like the bunny, add tiny black eyes and smiling mouths to the stems of the pink and terracotta mushrooms. Leave the tan mushroom plain or add a face if desired.
Step 4: Finishing Touches
-
Blushing:
Before baking, scrape a little pink chalk pastel into powder. Use a soft brush to gently dust rosy cheeks onto the bunny and the smiling mushrooms. -
Baking:
Arrange all five pieces on a parchment-lined baking sheet. Bake according to your specific clay brand’s instructions (usually 275°F/135°C for 15-30 minutes). -
Sealing:
Once cool, you can leave them matte for a natural look or apply a thin coat of matte varnish to protect the painted faces.
Enjoy arranging your tiny clay family on a windowsill or desk for a daily dose of cuteness