Whenever I need a quick mood-boost in the studio, I reach for oven bake clay and make something tiny, sweet, and a little bit silly. Here are my favorite cute miniatures you can bake at home—perfect for charms, jewelry, and small shelf buddies.
Mini Donut Charm Trio
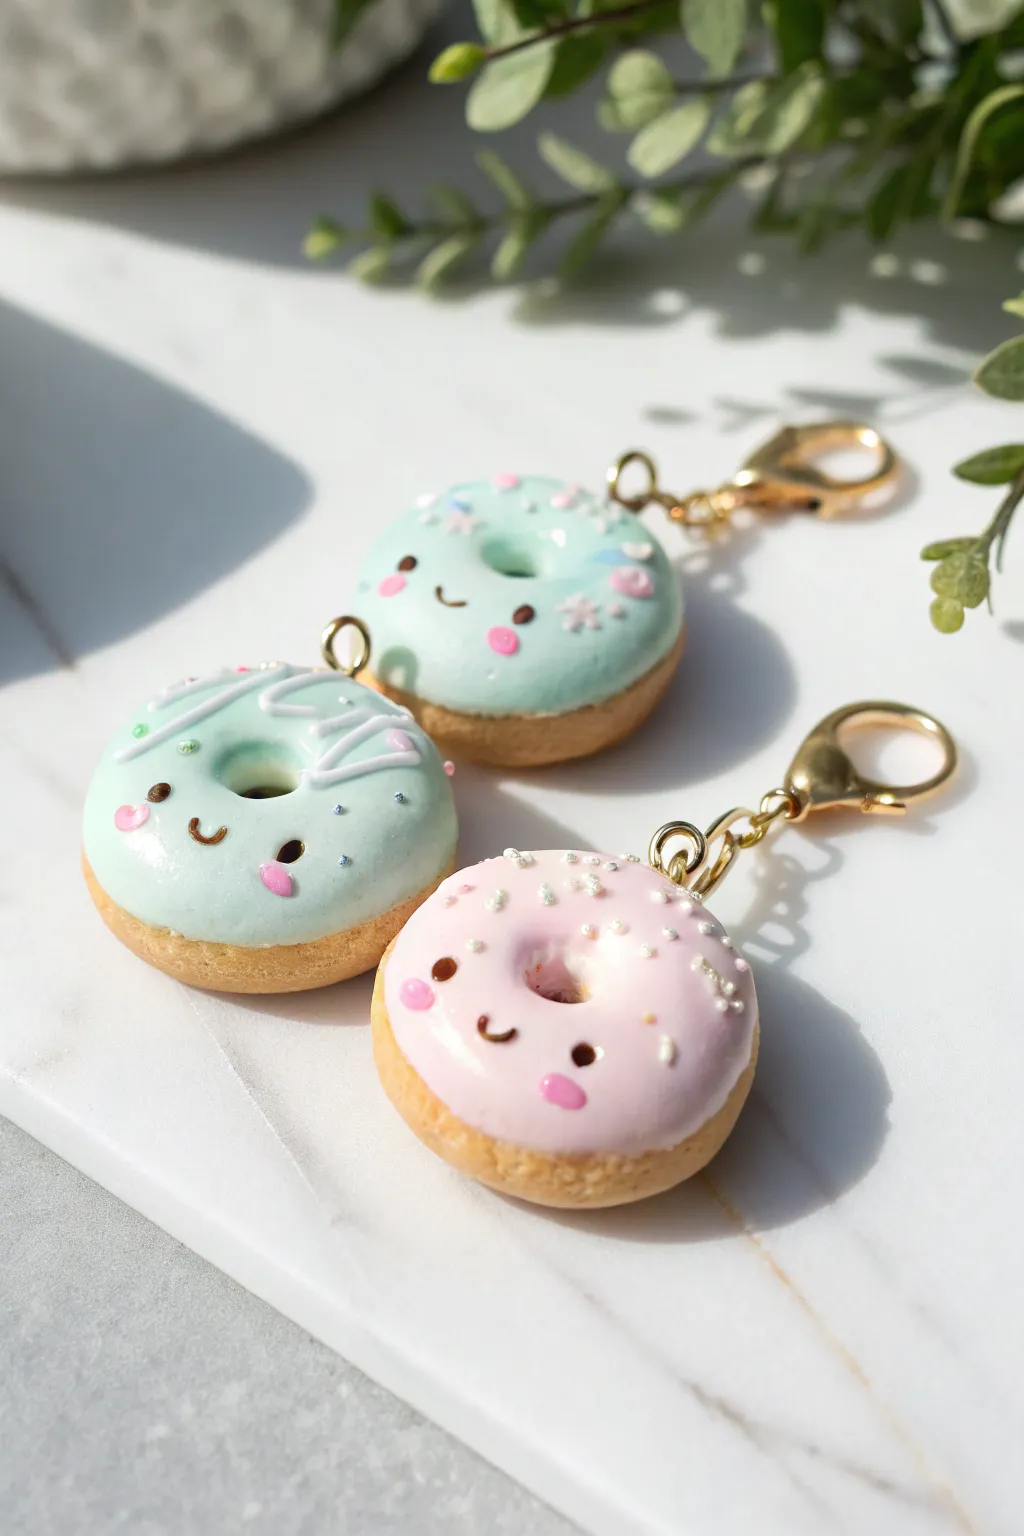
These adorable oven-bake clay donuts feature sweet smiling faces and pastel icing that looks good enough to eat. With dainty sprinkles and rosy cheeks, they make the perfect trio for keychains or friendship necklaces.
Step-by-Step Guide
Materials
- Polymer clay (beige/tan for dough)
- Polymer clay (mint green and light pink for icing)
- Liquid clay or Bake & Bond
- Acrylic paints (dark brown, bright pink, white)
- Fine detail paintbrush or dotting tool
- Needle tool or toothpick
- Ball tool (small and medium)
- Eye pins (gold)
- Gold lobster clasps and jump rings
- Gloss glaze or UV resin
- Glitter or fake clay sprinkles (optional)
- Oven and baking tray
Step 1: Shaping the Dough Base
-
Condition the clay:
Start by thoroughly conditioning your beige or tan clay until it is soft and pliable. Roll it into a smooth ball about 1 inch in diameter for each donut. -
Form the donuts:
Gently flattened the ball with your palm to create a thick disc shape. Smooth the edges so they are rounded, resembling a classic yeast donut. -
Create the center hole:
Using a medium-sized balled tool or the handle of a paintbrush, press down into the exact center of the disc. Flip the donut over and press from the other side until the hole goes all the way through. -
Texture the dough:
To give the dough a realistic baked texture, take a toothbrush or a ball of crinkled aluminum foil and gently tap it all over the beige surface on the top, bottom, and sides.
Step 2: Adding the Icing
-
Prepare the icing colors:
Condition your mint green and light pink clay. Roll each color into a ball slightly smaller than your donut base. -
Flatten the icing:
Press the colored clay flat or use a rolling pin to get a thin sheet. For a natural drippy look, use your fingers to gently pull and stretch the edges into an irregular, wavy shape. -
Attach the icing:
Apply a tiny dab of liquid clay to the top of your beige donut for adhesion. Place the flattened icing shape on top. -
Shape the hole and drips:
Use your tool to poke the center hole through the icing layer to match the dough underneath. Gently press the wavy edges down the sides of the donut to simulate gravity pulling the glaze down.
Clean Lines
Keep separate baby wipes handy for each color of clay. This prevents pastel yellow or pink clay from getting smudged with lint or darker pigments from your hands.
Step 3: Adding Faces & Hardware
-
Secure the eye pin:
Trim an eye pin to an appropriate length. Dip the end in liquid clay and insert it firmly into the top of the donut. -
Bake the charms:
Arrange your donuts on a baking sheet or ceramic tile. Bake according to your specific clay manufacturer’s instructions (usually 275°F for 15-30 minutes). -
Let cool completely:
Allow the charms to cool fully before painting. Painting on warm clay can cause the acrylics to dry too fast or crack. -
Paint the eyes:
Using a dotting tool or the very tip of a toothpick dipped in dark brown paint, create two small oval eyes widely spaced on the front of the donut. -
Add a smile:
With an ultra-fine detail brush and the same dark brown paint, carefully draw a tiny ‘U’ shape between the eyes for a smile. -
Create rosy cheeks:
Dip a larger dotting tool into bright pink paint. Carefully place, an oval blush mark underneath each eye.
Scented Charms
Before baking, mix a tiny drop of vanilla or strawberry fragrance oil into the clay. Your charms will smell as sweet as a real bakery when finished
Step 4: Decorating & Finishing
-
Add sprinkles:
For the painted sprinkles shown in the teal donut, use white acrylic paint and a fine brush to draw thin lines or squiggles. You can also mix glitter into glaze for a sparkly effect. -
Paint light reflections:
To make the eyes look lively, add a minuscule dot of white paint to the upper corner of each brown eye oval. -
Glaze the icing:
Apply a coat of gloss glaze or UV resin ONLY to the icing part of the donut. This makes the icing look wet and sugary while keeping the dough matte and realistic. -
Assemble keychain:
Once the glaze is cured or dry, use pliers to open a jump ring. Attach your gold lobster clasp to the eye pin loop and close the ring securely.
Clip these sweet treats onto your zipper or bag to bring a smile to your day


Smiling Strawberry and Cherry Charms
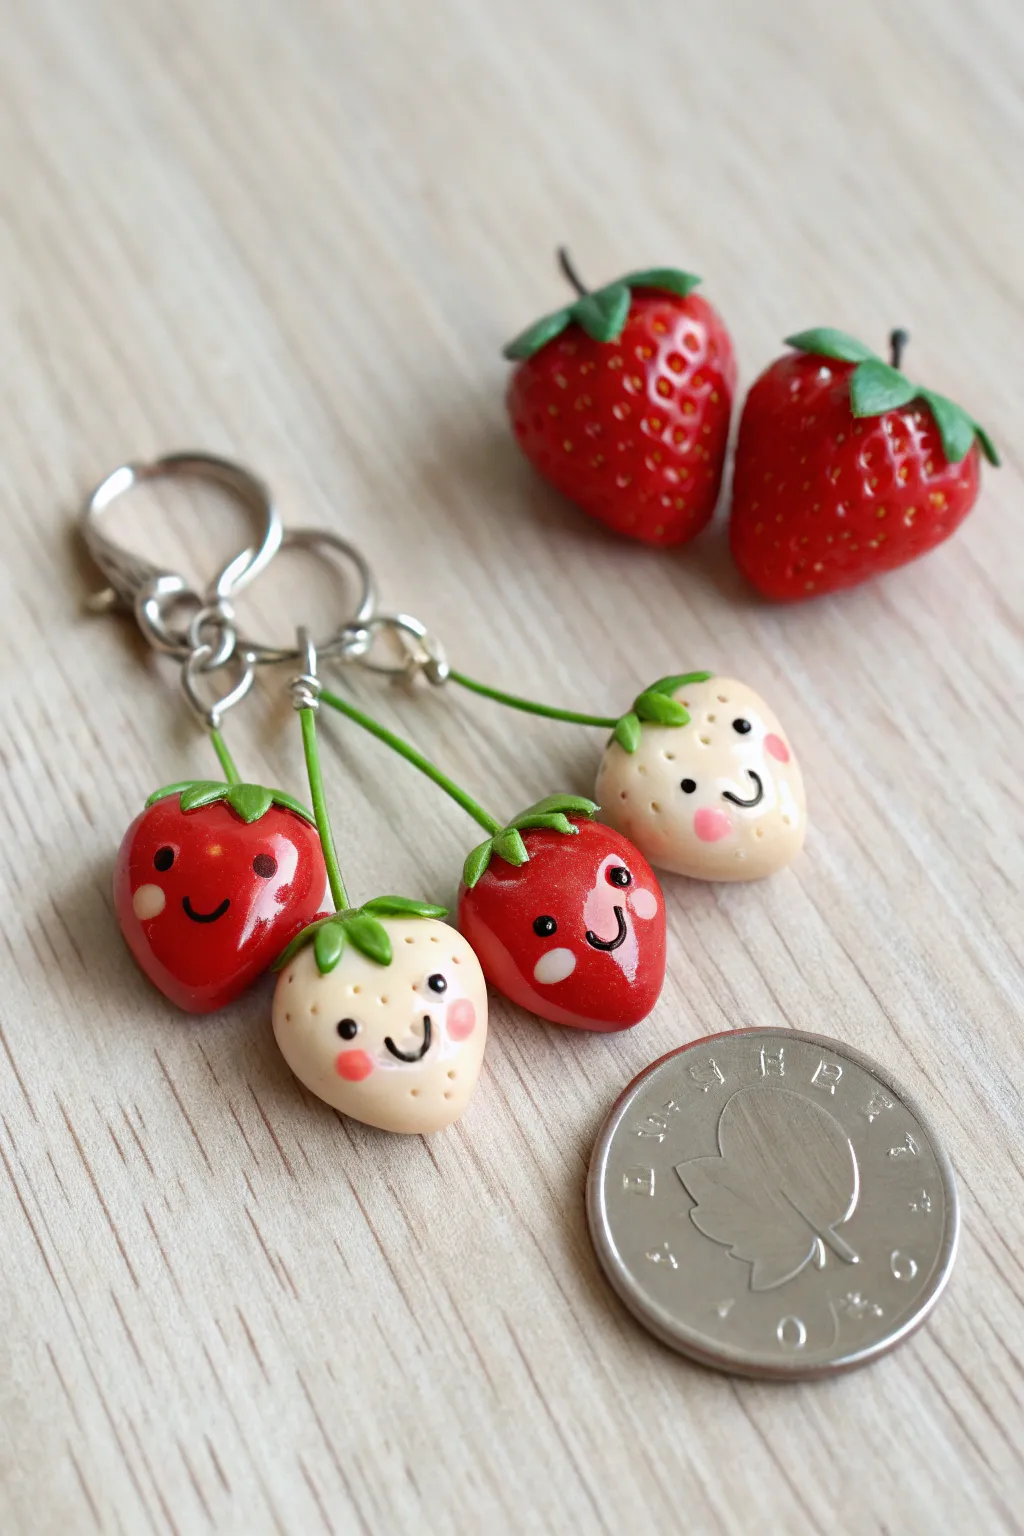
These adorable blushing strawberry charms add a playful touch to any keychain or zipper pull, featuring both classic red and sweet cream varieties. With their tiny, hand-painted faces and leafy tops, they perfectly balance realism with irresistible cuteness.
Detailed Instructions
Materials
- Polymer clay (Bright Red, Cream/White, Leaf Green)
- Gloss glaze (e.g., polyurethane or specialized clay glaze)
- Headpins or eye pins (silver tone)
- Acrylic paint (Black, Pink, White)
- Fine detail paintbrush or dotting tool
- Needle tool or toothpick
- Wire cutters and round-nose pliers
- Jump rings and keychain hardware
- Oven for baking
Step 1: Shaping the Strawberries
-
Condition the Clay:
Begin by thoroughly kneading your red and cream polymer clay separately until soft and pliable. This prevents cracking later. -
Form the Base:
Roll small balls of clay about the size of a marble (roughly 1.5 cm diameter). Gently pinch the bottom of each ball and flatten the top slightly to create a signature rounded strawberry cone shape. -
Create Texture:
Using a needle tool or toothpick, gently press small indentations all over the surface of the fruit to mimic seeds. Be careful not to press too deeply; you just want surface texture. -
Prepare the Leaves:
Roll out a very thin sheet of green clay. Use a small star cutter or cut freehand triangles with a craft knife to create the leafy calyx. You’ll need one set of leaves for each berry. -
Attach the Stem:
Gently press the green leaves onto the flat top of your strawberry. Smooth the edges down slightly so they hug the fruit’s curve. -
Add the Hardware:
Insert a headpin or eye pin through the center of the green leaves and down into the body of the strawberry. If you are using a headpin inside out to create a stem look, ensure the wire is firmly embedded.
Seed Detail Trick
For extra realism, bake the seed texture first, then rub a tiny bit of darker acrylic paint into the holes and wipe the surface clean before glazing.
Step 2: Adding Personality
-
Baking:
Bake your clay pieces according to the manufacturer’s instructions (usually around 275°F/130°C for 15-30 minutes). Let them cool completely before painting. -
Paint the Face:
Using a very fine detail brush or a dotting tool, dab two small dots of black paint for the eyes. Position them low on the ‘face’ for maximum cuteness. -
Draw the Smile:
Paint a tiny, curved ‘U’ shape between the eyes using black paint. A fine liner brush works best here to keep the line weight delicate. -
Add Cheeks:
Dip a dotting tool into pink paint and add rosy cheeks just below and to the outside of the eyes. -
Highlight the Eyes:
Once the black paint is dry, add a minuscule dot of white paint to the upper corner of each eye to give them a sparkling, lively look. -
Seal the Charm:
Apply a coat of gloss glaze over the entire fruit. This protects the paint and gives the strawberry a juicy, realistic shine.
Mixed Fruit Salad
Don’t stop at strawberries. Use this same technique to make a variety of dangling fruit charms like teardrop-shaped avocados or round oranges.
Step 3: Assembly
-
Create loops:
Using your round-nose pliers, bend the excess wire coming from the top of the strawberry into a neat loop. -
Trim Excess:
Snip off any extra wire with your wire cutters, ensuring the loop is closed securely. -
Connect to Chain:
Open a jump ring with two pairs of pliers (twist sideways, don’t pull apart) and attach your strawberry charm to the keychain hardware. -
Final Adjustments:
Close the jump ring tightly. Make sure all connections are secure so your strawberries don’t fall off during use.
Enjoy carrying these sweet little companions on your bag or keys


Tiny Avocado Keychain Buddy
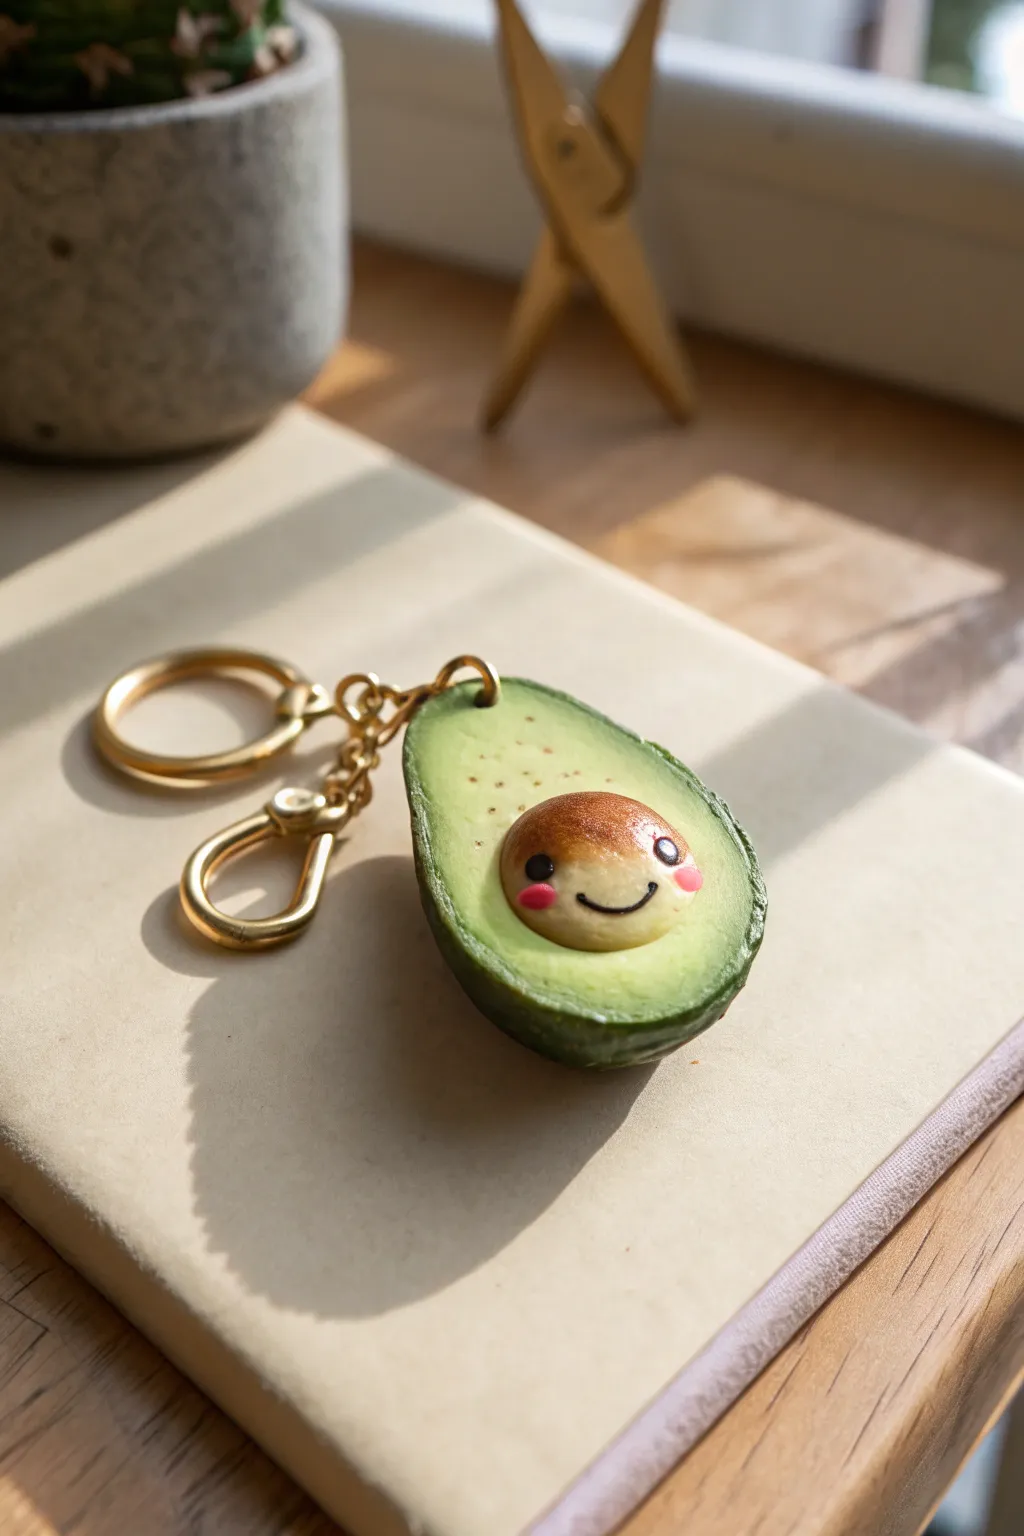
Carry a little dose of healthy happiness with you everywhere with this adorable polymer clay avocado keychain. This project combines realistic texturing with kawaii charm, resulting in a durable and delightful accessory that looks good enough to eat—but please don’t.
Step-by-Step
Materials
- Polymer clay (Dark Green, Light Green, Translucent White/Beige, Brown, Pink)
- Clay blade or craft knife
- Medium ball tool or dotting tool
- Needle tool or stiff toothbrush for texturing
- Soft artist pastels (Dark Green, Brown)
- Black acrylic paint
- Fine detail paintbrush
- Eye pin or screw eye
- Keychain hardware (gold finish recommended)
- Gloss varnish or UV resin
- Oven for baking
Step 1: Forming the Avocado Base
-
Mix the flesh color:
Start by mixing a small amount of light green clay with translucent white or beige. You want a creamy, pale green shade that mimics the inner flesh of a ripe avocado. -
Shape the teardrop:
Roll your mixed clay into a smooth ball about the size of a large grape, then gently pinch and roll one end to create a teardrop preparation shape. -
Flatten the form:
Press the teardrop down against your work surface to flatten the back, keeping the top domed and rounded. Smooth out any fingerprints with a light touch. -
Create the pit hollow:
Use a medium-sized ball tool to gently press an indentation into the lower, wider part of the avocado. This is where the seed will sit later. -
Prepare the skin layer:
Roll out a thin sheet of dark green clay. You can use a pasta machine or an acrylic roller, aiming for about 1-2mm thickness. -
Wrap the avocado:
Place your light green shape onto the dark green sheet. Carefully trim the excess dark green clay around the edges, then smooth the seam upwards so the dark skin wraps slightly around the curve of the flesh.
Realistic Rind Tip
Mix a tiny amount of translucent clay into your dark green skin color. This gives the ‘rind’ a waxy, natural depth rather than looking like flat plastic.
Step 2: Adding Texture and the Pit
-
Texture the skin:
Take a stiff toothbrush or a crumpled ball of aluminum foil and firmly tap it all over the dark green skin. Real avocados have a bumpy, pebbled texture, so don’t be too gentle here. -
Shave the pastels:
Use a craft knife to scrape a little powder from a dark green soft pastel chalk. -
Shade the gradient:
With a soft brush, dust the green pastel powder around the very outer edge of the light green flesh, right where it meets the skin. This creates that realistic ripe gradient. -
Form the pit:
Roll a ball of brown clay that fits snugly into the indentation you made earlier. Press it in gently so it looks embedded but still protrudes slightly. -
Contour the pit:
I like to brush a tiny bit of brown pastel powder on the top of the pit to give it a ‘roasted’ or dimensional look, focusing on the upper curve.
Dirty Clay Fix
Light clay picks up dust easily. If your light green flesh gets dirty before baking, dip a Q-tip in rubbing alcohol or acetone and gently wipe the surface clean.
Step 3: Bringing it to Life
-
Add the cheeks:
Take two impossibly tiny specks of pink clay. Press them onto the brown pit to serve as the blushing cheeks. -
Paint the face:
Using a very fine detail brush or a toothpick dipped in black acrylic paint, carefully draw two small eyes and a simple U-shaped smile between the pink cheeks. -
Add the hardware:
Insert an eye pin or screw eye into the top center of the avocado. For extra security, you can bend the bottom of the pin slightly before inserting it so it anchors into the clay. -
Add speckles:
For a final realistic touch, use a needle tool to add tiny, shallow dots randomly across the light green flesh, avoiding the face area. -
Bake the piece:
Bake the charm according to your specific clay brand’s instructions (usually around 275°F/130°C for 15-30 minutes). Let it cool completely. -
Seal and finish:
Brush a coat of gloss varnish or UV resin over the brown pit/face area to make it shine like a real seed. Keep the green flesh matte for contrast. -
Attach keychain:
Once the varnish is dry, use pliers to open the jump ring of your gold keychain and attach it securely to the eye pin.
Now your keys have a cheerful companion that will stay fresh forever


Chubby Dino Pocket Figurines
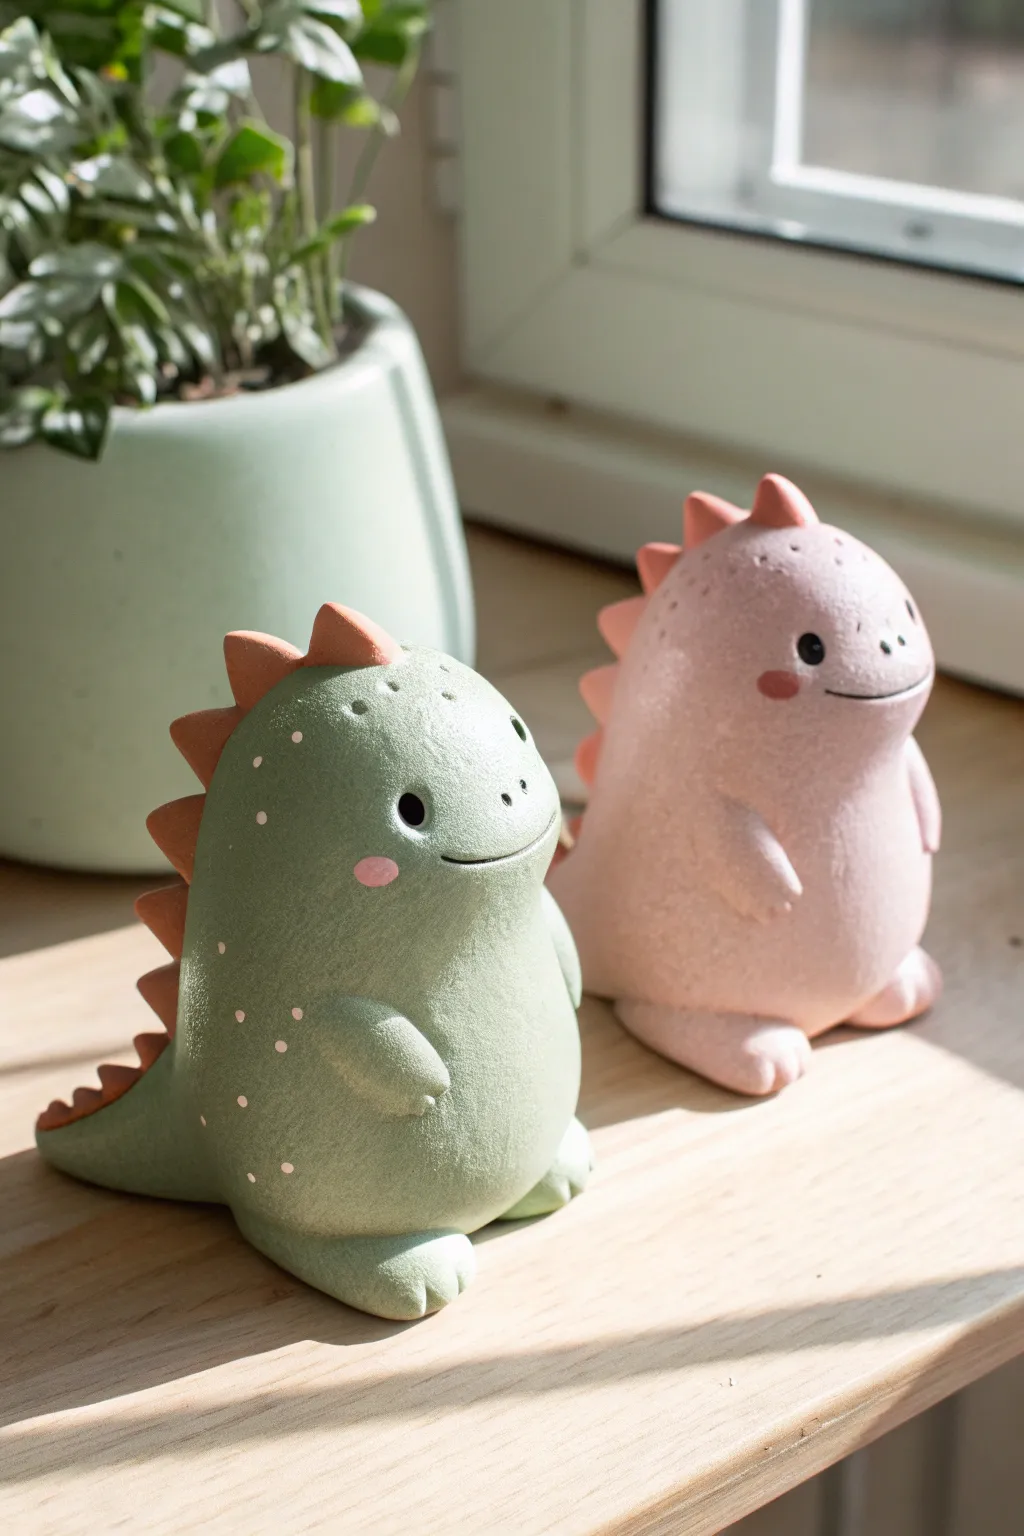
These adorable, stout dinosaurs feature a unique stone-like texture and sweet, simple faces that make them perfect desktop companions. Their rounded bellies and tiny arms give them an irresistibly huggable look, even though they fit right in your pocket.
Step-by-Step Guide
Materials
- Polymer clay (Sage Green and Pastel Pink)
- Polymer clay (Terracotta or light pink) for spikes
- Coarse sandpaper or a stiff toothbrush for texturing
- FolkArt acrylic paint (Black and Pink)
- Small dotting tool or toothpick
- Clay carving tools or a craft knife
- Oven and baking sheet
- Wet wipes (for cleanup)
Step 1: Shaping the Bodies
-
Condition the clay:
Start by warming up your green or pink polymer clay in your hands until it becomes soft and pliable, which prevents cracking later. -
Form the base:
Roll a large ball of clay about the size of a golf ball, then gently taper the top third to create a seamless head-and-body shape that looks like a stout teardrop. -
Give it a stable seat:
Tap the bottom of your teardrop on your work surface to flatten it slightly so the dinosaur sits upright without tipping. -
Add a tail:
Pinch the clay at the bottom rear of the figure and gently pull it outward to form a short, thick tail that curves slightly for balance. -
Create the feet:
Make two small balls of the main color, flatten them into discs, and press them firmly onto the front bottom of the body; use a clay tool to indent three tiny toes on each. -
Attach the arms:
Roll two small sausage shapes for arms, attach them to the sides of the belly, and blend the upper seams into the body so they look naturally connected.
Tip: Stone Texture
For an even more realistic stone look, mix a tiny amount of black pepper or craft sand into your clay before sculpting.
Step 2: Texturing and Details
-
Create the rough texture:
This is crucial for the stone effect: take a piece of coarse sandpaper or a stiff toothbrush and press it repeatedly all over the surface of the clay until it looks pitted and matte. -
Refine the texture:
Make sure you get into the crevices around the arms and tail, but be careful not to squash the overall rounded shape you built. -
Prepare the spikes:
Switch to your accent color clay (terracotta or light pink) and roll out a thin snake, then cut it into 5-7 graduated small triangles. -
Attach the spine:
Press the triangles down the center of the dinosaur’s back, starting from the top of the head down to the tail, largest to smallest. -
Texture the spikes:
Lightly tap the spikes with your texturing tool so they match the finish of the body rather than looking smooth and shiny.
Level Up: Incense Holder
Before baking, use a needle tool to poke a deep hole in the dinosaur’s hand or mouth to hold a standard incense stick.
Step 3: Baking and Finishing
-
Add facial features:
I prefer using a small ball tool to make indentations where the eyes will go before baking, ensuring precise placement. -
Bake the figures:
Place your dinosaurs on a baking sheet and bake according to your clay package’s specific instructions (usually around 275°F or 135°C for 15-30 minutes). -
Cool completely:
Let the figures cool down inside the turned-off oven or on a wire rack until they are hard and room temperature. -
Paint the eyes:
Dip a dotting tool or the end of a paintbrush into black acrylic paint and fill the eye indentations carefully. -
Add the mouth:
Use a very fine liner brush or a toothpick to paint a thin, curved black line for a smile connecting squarely between the eyes. -
Apply blush:
Dab a tiny amount of pink paint onto the cheeks using a dry brush technique or your finger to give them a rosy glow. -
Add final speckles:
For that earthy look, use a toothpick to add tiny dots of light pink or cream paint randomly across the back and sides.
Enjoy displaying your prehistoric pals on a sunny windowsill where their textures can really shine

The Complete Guide to Pottery Troubleshooting
Uncover the most common ceramic mistakes—from cracking clay to failed glazes—and learn how to fix them fast.
Mini Cat Paw Earrings
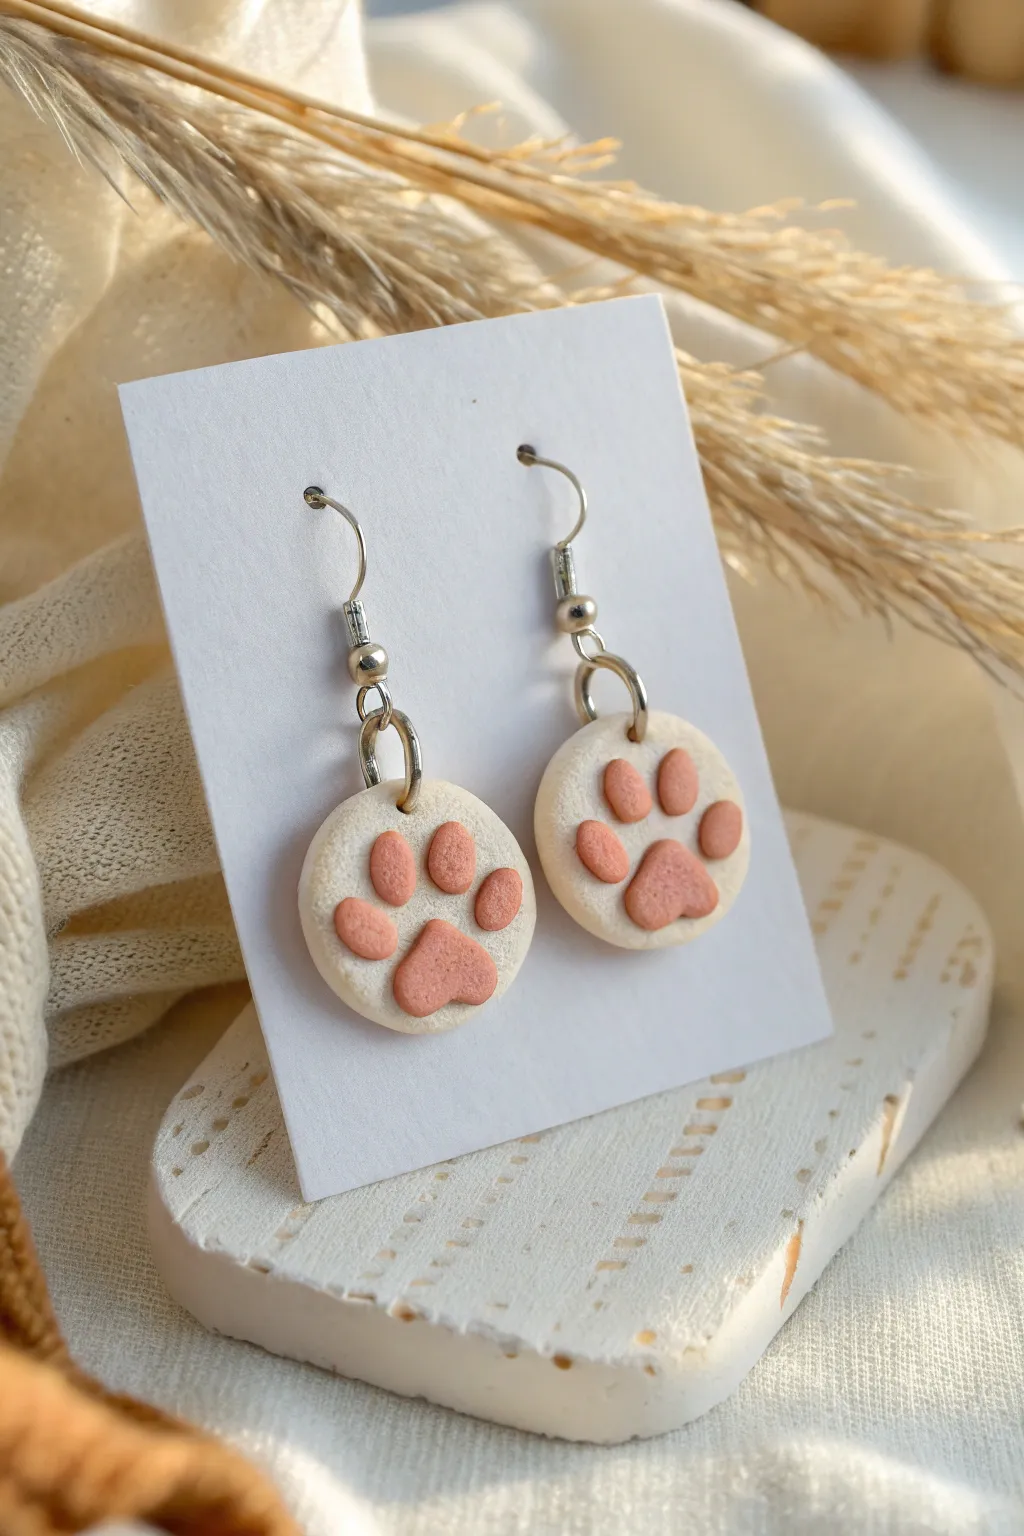
These adorable earrings feature a soft, raised paw print design on a simple round charm, perfect for any animal lover. The subtle texturing and pastel colors give them a sweet, modern look that pairs well with casual outfits.
How-To Guide
Materials
- Oven-bake polymer clay (white or cream)
- Oven-bake polymer clay (pastel pink or terra cotta)
- Small circle cutter (approx. 1.5 cm diameter)
- Rolling pin or pasta machine
- Detailing needle tool or toothpick
- Jump rings (4mm or 5mm)
- Earring hooks (French hooks)
- Jewelry pliers (flat nose and round nose)
- Parchment paper or ceramic tile for baking
- Optional: Sandpaper or buffing tool
- Hand drill or small drill bit
Step 1: Creating the Base
-
Condition the base clay:
Start by warming up your white or cream clay in your hands until it is soft and pliable. If you want the speckled effect shown in the photo, you can mix in tiny specks of black pepper or use a ‘granite’ effect clay. -
Roll out the slab:
Roll the clay flat to a medium thickness, about 3mm thick. You want it sturdy enough to hold the jump ring but light enough for ears. -
Cut the circles:
Use your small circle cutter to punch out two identical circles. Smooth the edges with your fingertip to remove any harsh cut lines.
Step 2: Sculpting the Paw Details
-
Prepare the pink clay:
Condition a very small amount of the pink or terra cotta clay. Roll it into a thin snake or log. -
Form the main pad:
Cut two small, equal-sized pieces from the pink log. Roll them into balls, then flatten them slightly into rounded triangles or heart shapes to form the main paw pad. Gently press one onto the center-bottom of each white circle. -
Create the toe beans:
Cut eight tiny, equal-sized pieces of pink clay. Roll each into a small ball. -
Attach the toes:
Place four of the tiny balls in an arch above the main pad on each earring. Gently press them down so they adhere to the white base without losing their rounded, raised shape. -
Add texture:
For a matte, stone-like finish, take a toothbrush or a crumpled piece of aluminum foil and very lightly tap the surface of the white clay around the paw pads. Avoid texturing the pink pads themselves to keep them smooth. -
Make the hole:
Use a needle tool or toothpick to pierce a hole near the top edge of each circle. Make sure the hole is large enough for your jump rings to fit through later.
Uneven Toe Beans?
If your toe pads look different sizes, roll the clay into a long snake of even thickness first. Slice equal lengths using a sharp blade before rolling them into balls.
Step 3: Baking and Assembly
-
Bake the clay:
Place your pieces on a ceramic tile or parchment-lined baking sheet. Bake according to the manufacturer’s instructions on your pack of clay (usually around 275°F/135°C for 15-30 minutes). -
Cool down:
Let the pieces cool completely inside the oven or on a cooling rack. Do not handle them while hot as they are fragile. -
Sand edges (optional):
If there are any rough spots on the edges of your white circles, gently sand them with fine-grit sandpaper for a professional finish. -
Open the jump ring:
Using two pairs of pliers, twist a jump ring open sideways (never pull it apart outwards). -
Attach the hook:
Slide the open jump ring through the hole in the clay charm, then loop the earring hook onto the jump ring. -
Close the ring:
Twist the jump ring back closed, ensuring the ends meet perfectly so the charm doesn’t slip off. Repeat for the second earring.
Add Some sparkle
After baking, brush a thin layer of gloss varnish or UV resin over just the pink paw pads. This makes them look like wet, shiny noses or finished ceramic glaze.
Now you have a charming set of handmade accessories to wear or gift to a fellow pet lover
Happy Toast and Butter Magnet Set
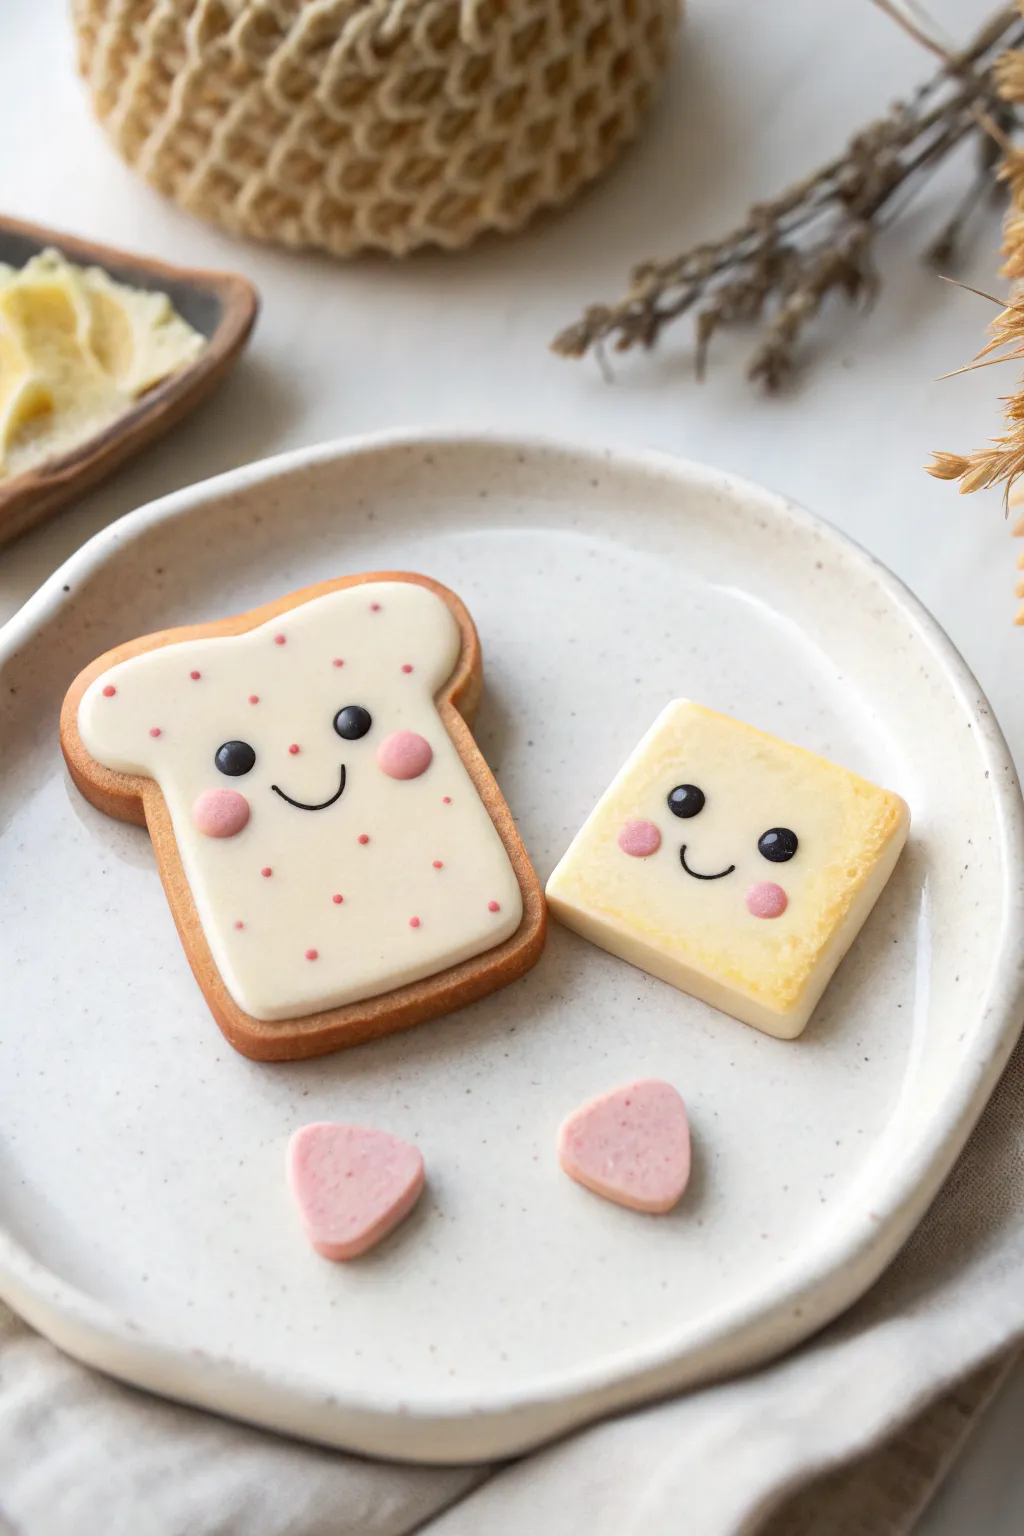
These adorable polymer clay magnets feature a happy slice of toast and a cheerful pat of butter, complete with rosy cheeks and sweet smiles. The smooth, shiny finish gives them a polished ceramic look, perfect for brightening up any fridge or magnetic board.
Step-by-Step Guide
Materials
- White polymer clay
- Translucent polymer clay
- Ochre/Light Brown soft pastel chalk (for shading)
- Black polymer clay (tiny amount)
- Pink polymer clay (small amount)
- Yellow polymer clay
- Liquid polymer clay (Fimo liquid or similar)
- Glossy polyurethane varnish/glaze
- Rolling pin or pasta machine
- X-acto knife or clay blade
- Toast-shaped cutter (optional, can freehand)
- Small square cutter
- Dotting tools or ball stylus
- Strong craft magnets
- Super glue (E6000 or similar)
- Small soft brush for pastels
Step 1: Shaping the Base
-
Mix the bread color:
Start by mixing white polymer clay with a tiny pinch of translucent clay and the smallest speck of ochre. You want a very pale, off-white milky color for the bread’s interior. -
Roll the dough:
Roll your clay out to a thickness of about 4-5mm. It needs to be sturdy enough to hold a magnet later. -
Cut the toast shape:
Use a toast-shaped cutter if you have one. If not, cut a rounded rectangle and use your finger to gently push the top center down to create the ‘dip’ of the crust. -
Create the crust:
Shave some ochre or light brown pastel chalk into a powder. Using a soft, dry brush, gently dust the outer edges of your toast shape. Build up the color slowly to mimic a golden-brown crust. -
Create the butter square:
Mix white clay with a small amount of yellow to get a soft, creamy butter color. Roll this out slightly thinner than the toast, about 3-4mm. -
Cut the butter shape:
Use a small square cutter or your knife to cut a clean square. Soften the sharp edges just slightly with your fingertip so it looks organic. -
Shade the butter:
Lightly dust the edges of the butter square with a mix of yellow and a tiny bit of orange pastel powder to give it a rich, fatty butter look.
Sticky Situation?
If your white liquid clay is too runny and dripping off the toast, let it sit on a piece of paper for 10 minutes to leach out some plasticizer before applying.
Step 2: Adding the Faces & Details
-
Make the icing/spread:
For the toast, mix liquid clay with white solid clay until you have a thick paste consistency. Spread this carefully on top of the toast shape, leaving the brown ‘crust’ edges exposed. -
Adding texture spots:
While the liquid clay layer is wet, take tiny bits of pink clay, roll them into microscopic balls, and drop them randomly onto the white spread to create sprinkles or jam spots. -
Place the eyes:
Roll tiny balls of black clay. Press two onto the toast (into the liquid layer) and two onto the butter square. Use a dotting tool to slightly flatten them. -
Create the smiles:
Roll an incredibly thin snake of black clay. Cut two small U-shapes. Gently press one onto the toast and one onto the butter using your needle tool or knife tip. -
Add rosy cheeks:
Flatten four small balls of pink clay into discs. Place two under the eyes of the toast and two on the butter square for that classic kawaii blush. -
Make the heart accessories:
Roll out pink clay and cut two small triangles with rounded corners. These will serve as loose ‘jam drops’ or decorative extras.
Step 3: Baking and Finishing
-
Bake:
Place all pieces on a ceramic tile or baking sheet. Bake according to your clay manufacturer’s instructions (usually 230°F – 275°F for 15-30 minutes). -
Cool down:
Let the pieces cool completely. Moving them while hot can cause warping or cracking since the clay is still slightly soft. -
Glazing:
Coat the front and sides of the toast, butter, and pink triangles with a glossy polyurethane varnish. This protects the pastel shading and gives that shiny ‘ceramic’ finish. -
Attach magnets:
Once the glaze is fully dry, flip the pieces over. Use a dab of strong super glue to attach a round magnet to the back of each main piece. -
Final cure:
Allow the glue to cure for at least 24 hours before sticking them to your fridge to ensure the best hold.
Make it Sparkle
Mix a tiny amount of extra-fine iridescent glitter into your glossy glaze before applying it. This gives the ‘sugar’ or ‘jam’ elements a subtle, magical shimmer.
Now you have a charming breakfast set that will greet you every morning from the refrigerator door


What Really Happens Inside the Kiln
Learn how time and temperature work together inside the kiln to transform clay into durable ceramic.
Bubble Tea Cup Pendant
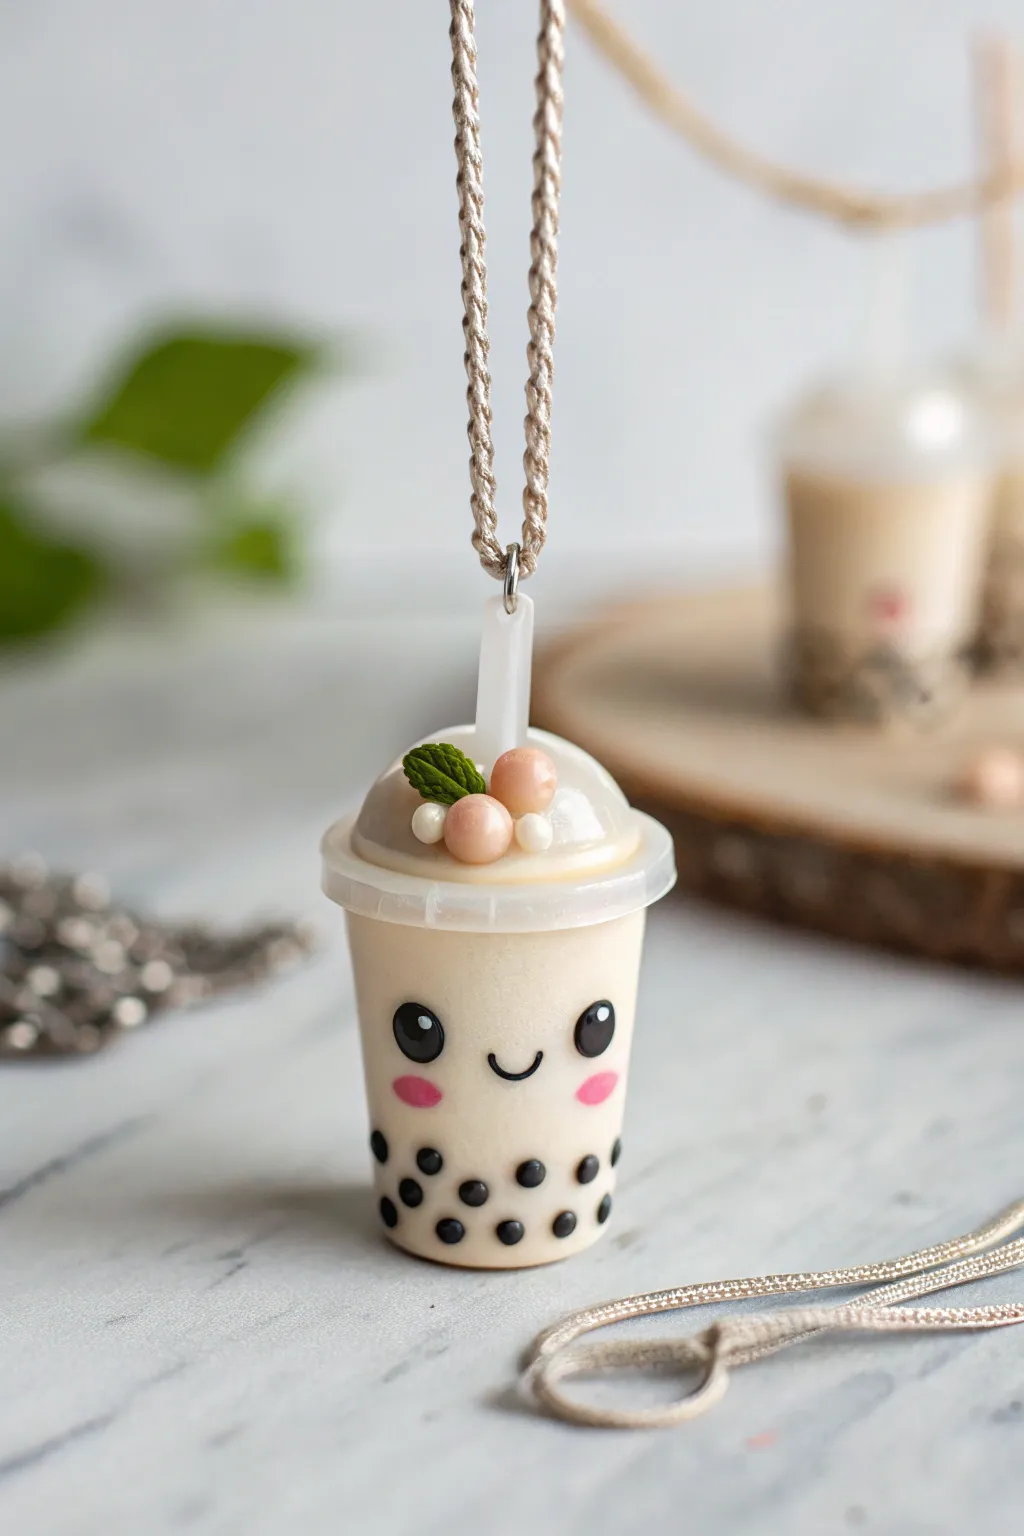
Carry your love for bubble tea everywhere with this adorable polymer clay charm featuring a sweet smiling face and tiny tapioca pearls. The mixture of opaque clay and translucent effects gives it a delightful, semi-realistic finish perfect for a necklace or keychain.
Step-by-Step Tutorial
Materials
- Polymer clay: Beige/Cream, Black, White, Translucent White, Pink, Green
- Liquid polymer clay (Translucent or White)
- Gloss glaze or UV resin (optional for wet look)
- Eye pin or screw eye
- Pointed sculpting tool or toothpick
- Dotting tool or ball stylus
- Small circle cutter (optional)
- Craft knife or blade
- Cord for hanging
- Acrylic rolling pin
Step 1: Forming the Cup Base
-
Create the main shape:
Condition a ball of beige or cream-colored clay until it is soft and pliable. Roll it into a smooth cylinder shape, slightly tapered at the bottom to mimic a standard plastic cup. -
Flatten the surfaces:
Gently press the cylinder against your work surface to flatten the bottom so it stands straight. Use your finger or a flat tool to smooth the top surface, ensuring it is level. -
Make the tapioca pearls:
Roll tiny spheres of black clay. These need to be quite small to fit the scale of the cup. You will need about 10-15 depending on the size of your pendant. -
Attach the boba:
Press the tiny black spheres onto the lower third of the cup. Gently flatten them slightly so they look like they constitute the bottom layer inside the cup rather than just sitting on the surface.
Fingerprint Fixer
Before baking, lightly brush the smooth parts of the clay with a tiny amount of baby oil or cornstarch to smooth away any accidental fingerprints.
Step 2: Adding the Kawaii Face
-
Make the eyes:
Roll two slightly larger balls of black clay for the eyes. Press them onto the middle of the cup, spacing them apart to leave room for the mouth. -
Add eye highlights:
Using a very fine dotting tool or the tip of a toothpick, place a tiny spec of white clay onto the upper right corner of each black eye to bring the character to life. -
Create the smile:
Roll a very thin snake of black clay. Cut a tiny u-shape segment and carefully place it between the eyes to form a smiling mouth. -
Blush the cheeks:
Take two small bits of pink clay, flatten them into ovals, and press them below the eyes to create rosy cheeks.
Translucent Tip
To shock the translucent clay into being clearer after baking, plunge the hot piece (carefully!) into ice water immediately after taking it out of the oven.
Step 3: Lid, Toppings, and Assembly
-
Form the rim:
Roll a thin snake of translucent white clay. Wrap it around the very top edge of the cup to create the plastic rim found on boba cups. -
Create the dome lid:
Shape a piece of translucent clay into a flattened hemisphere that matches the diameter of your cup. Place this securely on top of the rim. -
Insert the straw:
Cut a short length of white clay (or a real piece of cut plastic straw if oven-safe) and insert it into the center of the dome lid. If using clay, make it a thick cylinder. -
Add whipped topping:
Adding a dollop of liquid clay or soft white clay mixed with a little translucent clay around the base of the straw creates a creamy foam effect. -
Garnish with fruit pearls:
Roll three small balls of pale pink clay (slightly pearlescent looks great here) and cluster them near the straw. -
Add the mint leaf:
Shape a tiny teardrop of green clay. Flatten it and use a needle tool to impress a central vein and small side veins to resemble a mint leaf. Place it next to the pink pearls. -
Secure the hardware:
Insert an eye pin deeply through the top of the straw or directly into the dome lid. I like to twist the pin slightly as I push it in to help it grip the clay better. -
Bake carefully:
Bake the piece according to your clay manufacturer’s instructions, usually around 275°F (130°C) for 15-20 minutes. Keep an eye on the translucent clay to ensure it doesn’t darken. -
Optional glazing:
Once cool, brush a coat of gloss glaze or clear UV resin over the dome lid and the boba pearls to make them look wet and shiny. -
String it up:
Thread a cord through the eye pin loop to finish your pendant.
Enjoy wearing your sweet little beverage everywhere you go
Pastel Rainbow Cloud Necklace
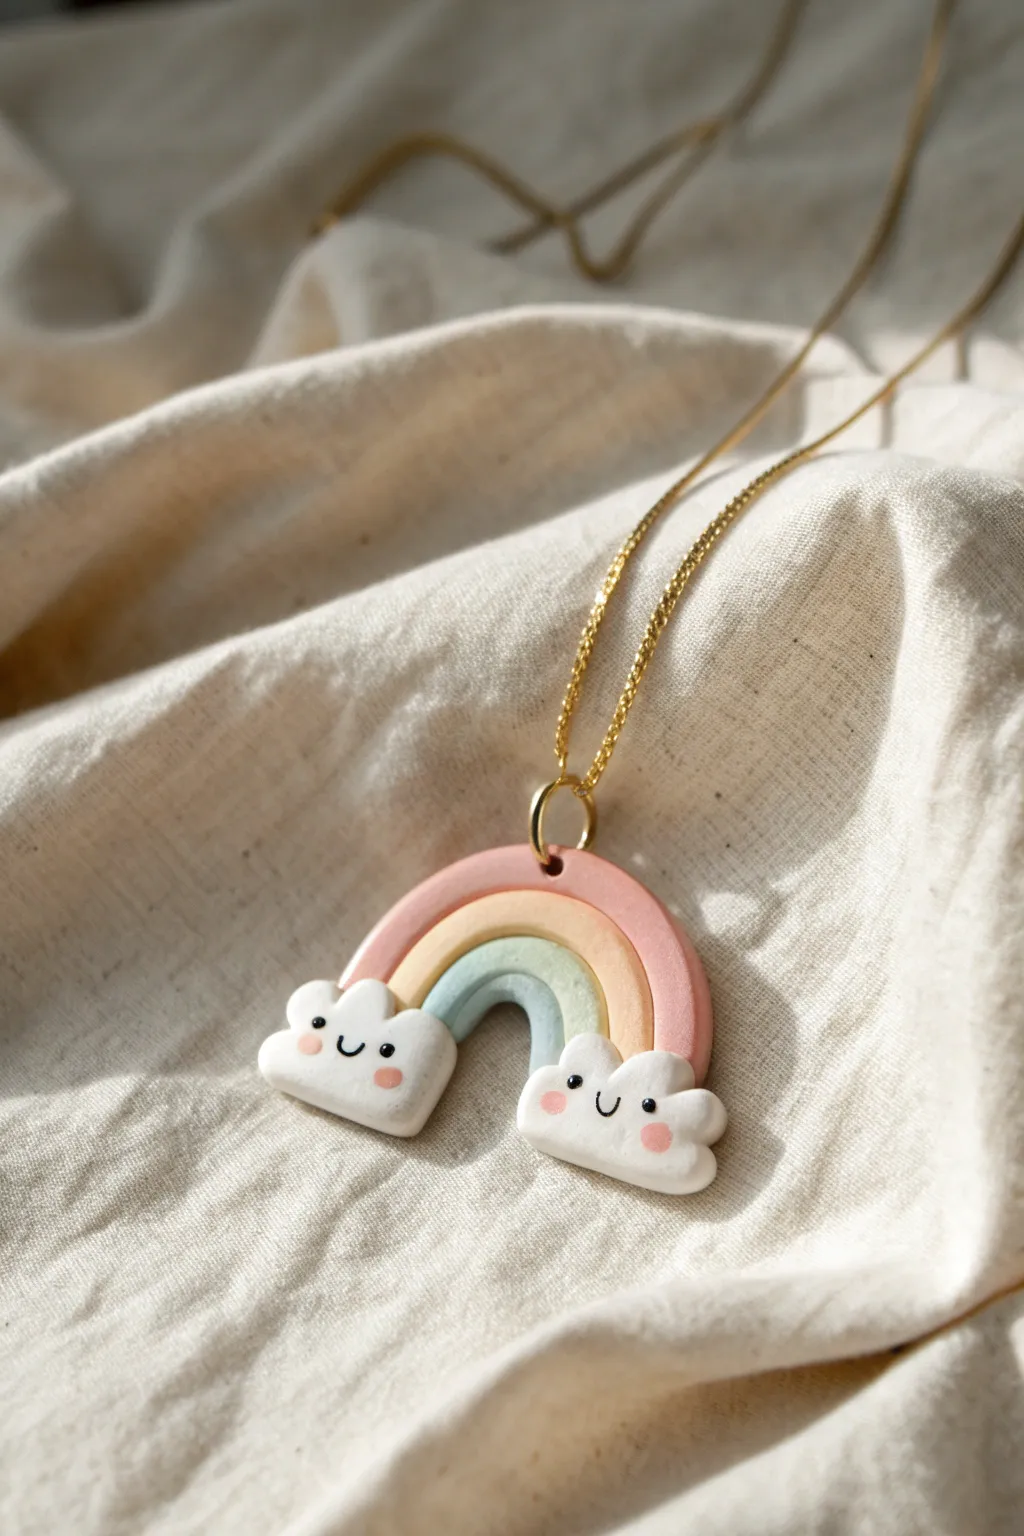
Carry a little bit of sunshine with you everywhere you go with this adorable polymer clay charm. Featuring soft pastel arches and two smiling cloud friends, this necklace is the perfect cheerful addition to your jewelry collection.
Step-by-Step Tutorial
Materials
- Polymer clay (pastels: pink, peach, mint/light blue; white)
- Black acrylic paint
- Pink acrylic paint or pink chalk pastel
- Small dotting tool or toothpick
- Fine detail paintbrush
- Clay roller or pasta machine
- Craft blade or X-Acto knife
- Small circle cutter (optional)
- Gold jump ring (approx 6-8mm)
- Gold necklace chain with clasp
- Gloss glaze (optional)
- Needle tool or small drill bit
Step 1: Shaping the Rainbow
-
Prepare your colors:
Begin by conditioning your polymer clay until it is soft and pliable. You will need three pastel colors for the rainbow arches—a soft pink, a warm peach, and a minty blue—plus white for the clouds. -
Roll the coils:
Roll each of your three pastel colors into long, even snakes. Aim for a thickness of about 4-5mm for each coil to ensure the rainbow looks sturdy but refined. -
Form the arches:
Start with the innermost color (mint blue). Bend it into a U-shape. Take the next color (peach) and wrap it snugly around the outside of the first arch. Finally, wrap the outer pink coil around the peach one. -
Secure the layers:
Gently press the coils together so they bond without flattening the rounded profile of the snakes. I like to gently stroke the back of the rainbow to help the seams merge slightly for structural integrity. -
Trim the ends:
Once your arch shape is pleasing, use your sharp craft blade to slice straight across the bottom of the rainbow legs, creating a flat surface for the clouds to attach to.
Step 2: Adding the Clouds
-
Create cloud shapes:
Roll two balls of white clay, roughly the size of large peas. Flatten them slightly into thick oval shapes. -
Mold the fluffy edges:
Use a small dotting tool or your fingers to indent the tops and sides of the white ovals, sculpting them into bumpy, fluffy cloud shapes. Keep the bottoms relatively flat. -
Attach to the rainbow:
Place a cloud at the bottom of each rainbow leg. Press them firmly against the flat cut ends of the rainbow coils. You can gently blend the clay on the backside to ensure they don’t pop off after baking. -
Add the hardware hole:
At the very top center of the pink arch, use a needle tool to pierce a hole for your jump ring. Make sure the hole is large enough for your ring to move freely but not so close to the edge that it breaks.
Keep it Clean
White clay picks up everything! Wipe your hands and work surface thoroughly with a baby wipe before handling the white cloud clay to avoid dust specks.
Step 3: Baking and Detailing
-
Bake the piece:
Place your rainbow on a ceramic tile or baking sheet lined with parchment paper. Bake according to your specific brand of clay’s instructions (typically 275°F/135°C for 15-30 minutes). -
Cool down:
Let the piece cool completely before handling. Polymer clay is fragile when warm and hardens fully as it cools. -
Paint the faces:
Using a very fine paintbrush or the tip of a toothpick, dip into black acrylic paint to make two tiny eyes and a small U-shaped smile on each cloud. -
Add rosy cheeks:
Dip a dotting tool into pink paint (or use a bit of dry pink chalk pastel dust) and gently stamp small circles under the eyes for blush marks. -
Seal (optional):
If you want a shiny finish or need to protect the paint, apply a thin coat of gloss glaze over the clouds or the entire charm. -
Assemble the necklace:
Open your gold jump ring using pliers, thread it through the hole in the top arch, and loop your necklace chain through the ring before closing it securely.
Make it Sparkle
Before baking, lightly brush the clouds with pearl mica powder or press in tiny iridescent glitters to give them a magical, shimmering finish.
Wear your new creation with pride and enjoy the smiles it brings to everyone’s face

TRACK YOUR CERAMIC JOURNEY
Capture glaze tests, firing details, and creative progress—all in one simple printable. Make your projects easier to repeat and improve.
Sleepy Star Hair Clips
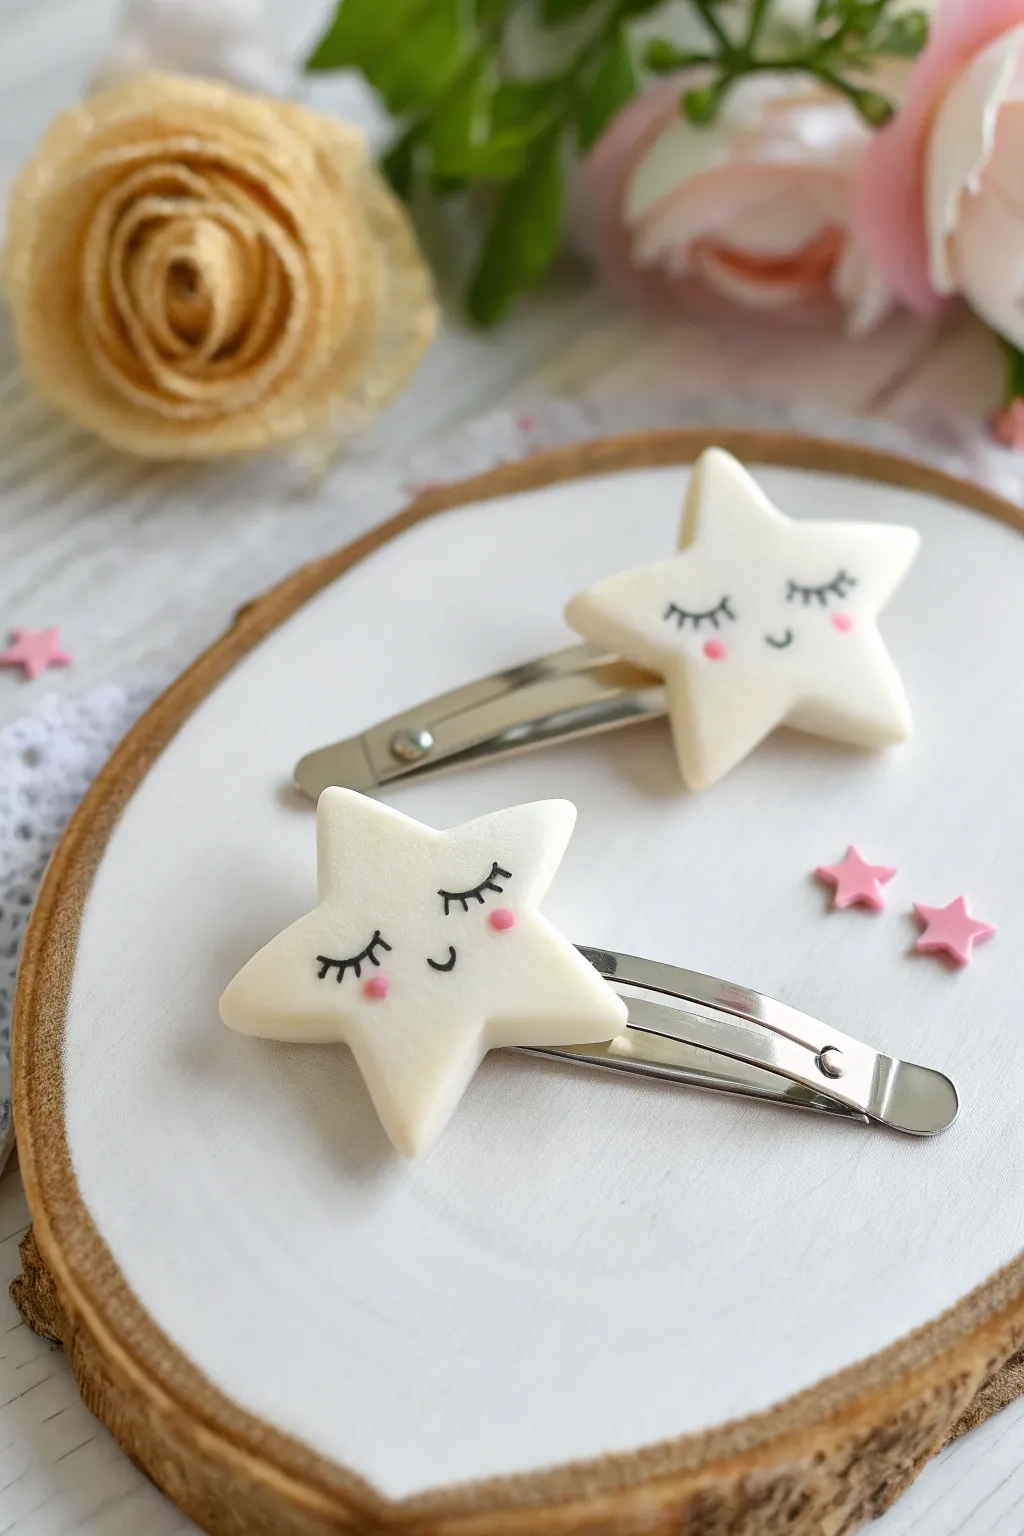
Create a dreamy set of accessories with these adorable star-shaped hair clips made from polymer clay. Featuring sweet, sleepy faces and soft rosy cheeks, they add a touch of whimsy to any hairstyle.
Step-by-Step Guide
Materials
- White or translucent white oven-bake polymer clay
- Rolling pin (acrylic or glass)
- Star-shaped cookie cutter (approx. 1.5 – 2 inches)
- Metal snap hair clips (plain silver)
- Parchement paper or ceramic tile (for baking)
- Black acrylic paint or fine-tip permanent marker
- Pink acrylic paint or soft pink pastel chalk
- Fine detail paintbrush or dotting tool
- Strong craft glue (e.g., E6000) or heavy-duty super glue
- Gloss or matte varnish (optional)
- Sandpaper (fine grit)
Step 1: Shaping the Stars
-
Condition the clay:
Start by kneading your white polymer clay in your hands until it becomes soft, pliable, and warm. This prevents cracking later on. -
Roll it out:
Place the clay on a clean, smooth surface or parchment paper. Use your acrylic roller to flatten the clay into an even sheet, aiming for about 1/4 inch thickness so the clips feel substantial. -
Cut the shapes:
Press your star-shaped cookie cutter firmly into the clay. Give it a tiny wiggle to ensure it cuts all the way through, then lift the cutter. -
Smooth the edges:
Gently push the clay star out of the cutter. Use your fingertip to lightly tap and smooth the sharp edges created by the cutter for a softer, pillowy look. -
Bake the pieces:
Transfer your stars onto a baking sheet lined with parchment paper. Bake according to your specific clay brand’s package instructions—usually around 275°F (135°C) for 15-30 minutes. -
Cool down:
Remove the stars from the oven and let them cool completely on the tray. Do not handle them while hot, as they are still fragile.
Clean Clay Trick
White clay picks up every speck of dust! Wet wipe your hands, tools, and work surface immediately before handling the white clay to keep it pristine.
Step 2: Adding the Details
-
Prep for painting:
Once cool, check for any rough spots. If needed, you can gently sand the edges with fine-grit sandpaper for a flawless finish. -
Draw the lashes:
Using a very fine paintbrush dipped in black acrylic paint (or a fine-tip permanent marker), carefully draw two curved lines for the closed eyes. Add three tiny ticks to each curve for the eyelashes. -
Add the smile:
Just below the center of the eyes, paint a tiny, U-shaped curve for the smiling mouth. -
Create rosy cheeks:
Dip a dotting tool or the back end of a paintbrush into pink paint. Gently dab a small dot at the end of each eye crease to create the blushing cheeks. -
Let it dry:
Allow the paint to dry completely. I prefer to wait at least an hour to ensure nothing smudges during the final assembly. -
Seal the face (Optional):
If you want extra protection, brush a thin layer of matte or gloss varnish over the front of the star.
Step 3: Assembly
-
Prepare the clip:
Take a plain metal snap clip and ensure the flat surface is clean and dry. -
Apply adhesive:
Squeeze a generous dot of strong craft glue onto the wide end of the metal clip. -
Attach the star:
Press the back of your finished clay star firmly onto the glued area of the clip. Hold it in place for about 30 seconds to initiate the bond. -
Cure the glue:
Set the finished clip aside in a safe spot and let the glue cure fully (usually 24 hours) before wearing it.
Avoiding Fingerprints
If you see fingerprints on your raw clay stars, lightly brush them with a little cornstarch or baby oil before baking to smooth the surface perfectly.
Now you have a charming pair of sleepy stars ready to brighten your day
Mini Sushi Pair Studs
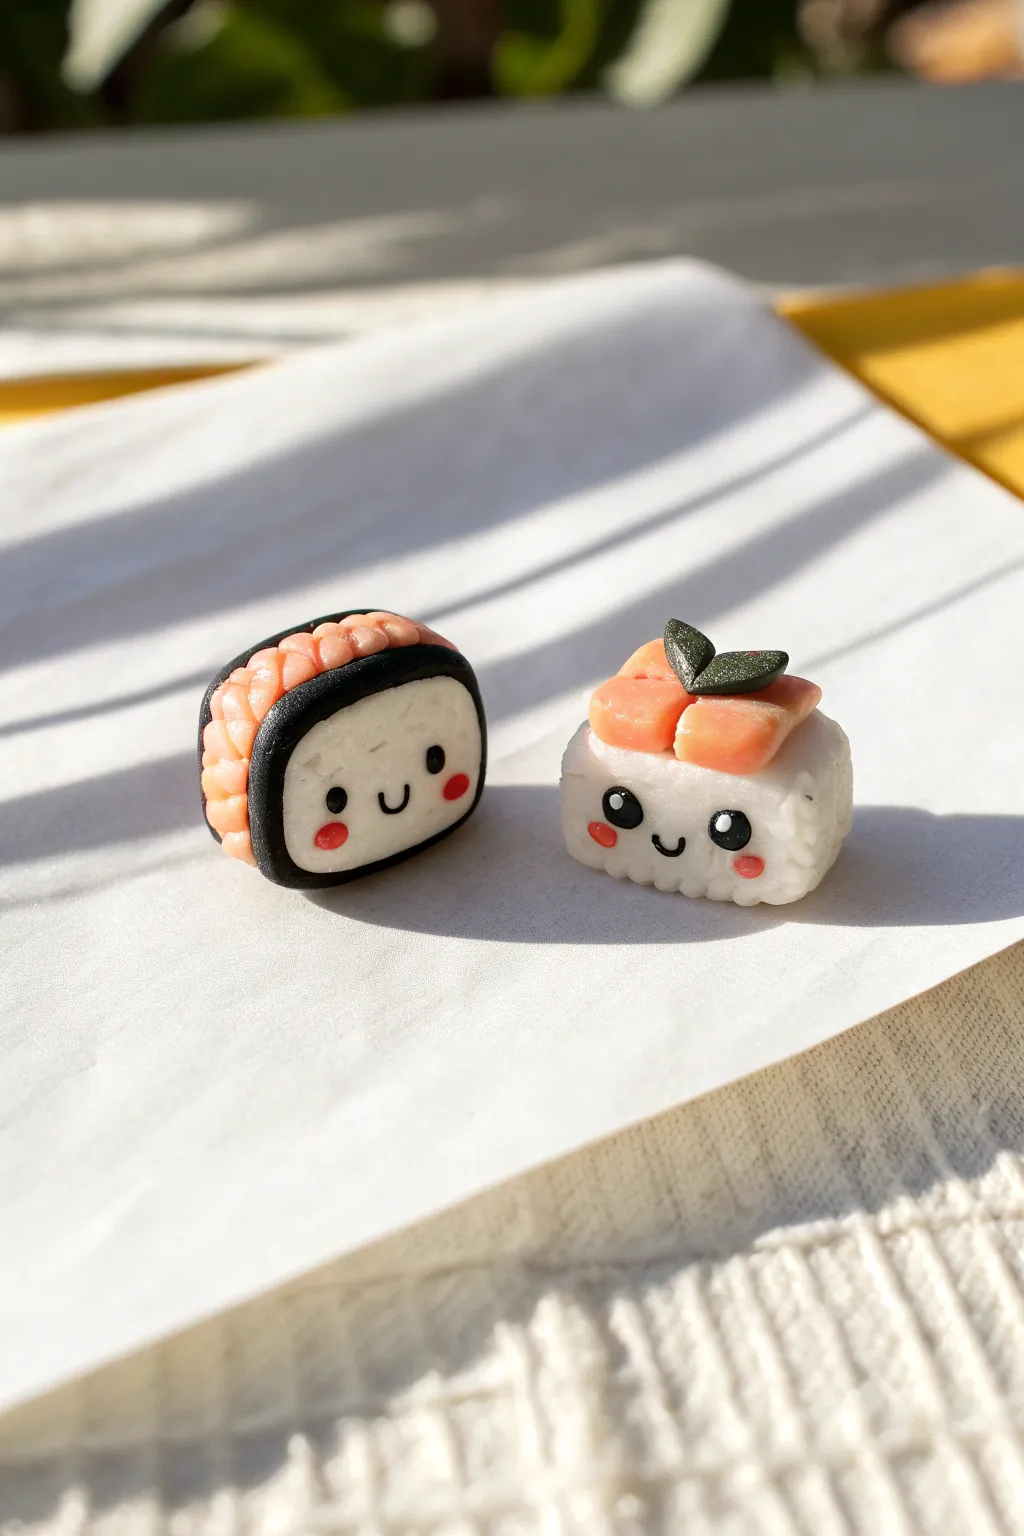
These adorable miniature sushi friends are almost too cute to eat, featuring a happy shrimp nigiri and a smiling salmon roll. With their tiny blushing cheeks and joyful expressions, they make the perfect mismatched pair for earrings or friendship charms.
How-To Guide
Materials
- White polymer clay (for rice)
- Black polymer clay (for nori)
- Peach/Light Pink polymer clay (for shrimp)
- Salmon/Orange polymer clay (for fish topping)
- Green polymer clay (for garnish)
- Black and pink acrylic paint (for faces)
- Needle tool or toothpick
- Ball stylus tool
- Translucent liquid clay (optional)
- Small fine-tipped paintbrush
- Glaze (optional)
Step 1: Prepping the Rice Base
-
Conditioning the Clay:
Start by thoroughly kneading your white clay until it is soft and pliable. This prevents cracks during baking. -
Shaping the Blocks:
Form two small, equal-sized rectangular blocks with rounded corners. These should be roughly 1cm wide to match the scale of studs. -
Texturing the Rice:
Using a needle tool, gently poke and swirl the surface of the white blocks repeatedly. You want to create a bumpy, grainy texture that mimics sticky rice grains.
Texturing Tip
To get realistic rice texture without squishing the shape, use an old toothbrush instead of a needle tool. Gently tap the bristles over the white clay for instant graininess.
Step 2: Crafting the Shrimp Nigiri
-
Forming the Shrimp:
Take a small amount of peach clay and roll it into a short, slightly flattened teardrop shape. -
Adding Segmentation:
Using a dull knife or your needle tool, press shallow distinct horizontal lines across the back of the shrimp body to simulate the segmented shell sections. -
Creating the Seaweed Wrap:
Roll out a very thin snake of black clay. Flatten it gently with your finger to create a ribbon. -
Assembling the Nigiri:
Place the textured shrimp on top of one rice block. Wrap the black ribbon vertically around the center of the shrimp and rice, trimming any excess at the bottom.
Step 3: Building the Salmon Roll
-
Shaping the Fish:
Take two small rectangles of salmon-colored clay. Place them on top of the second rice block, leaving a small gap in the center. -
Adding Garnish:
Shape a tiny bit of dark green clay into two minuscule leaf shapes. Press these into the gap between the salmon slices for a pop of color. -
Wrapping the Roll:
Isolate the face area first; wrap a thin, flat strip of black clay around the sides and back of the rice block, leaving the front face exposed white. -
Detailing the Edges:
If the black wrap looks too smooth, you can texture it slightly with a toothbrush to make it look organic like dried seaweed.
Level Up: Wasabi Kick
Mix translucent clay with a tiny dot of bright green paint. Apply a minuscule dab under the fish topping or on the side for a realistic ‘spicy’ wasabi detail.
Step 4: Finishing Touches
-
Baking:
Bake the pieces according to your clay manufacturer’s instructions, usually at 275°F (130°C) for 15-20 minutes depending on thickness. Let them cool completely. -
Painting the Eyes:
Use a ball stylus dipped in black acrylic paint to stamp two small dots for eyes on the front of each rice block. -
Adding the Sparkle:
Once the black is dry, use a very fine pin or the tip of a toothpick to add a tiny white dot in the upper corner of each eye for a reflective ‘kawaii’ look. -
Drawing the Mouth:
With an ultra-fine brush or a fine-tip permanent marker, carefully draw a small ‘U’ shape for a smiling mouth between the eyes. -
Blushing Cheeks:
Dip the ball stylus into pink paint and dab small circles underneath the eyes to give them a rosy glow. -
Sealing:
Protect your tiny paint details with a coat of polyurethane varnish or glaze if desired.
Now you have a charming set of sushi buddies ready to brighten up your jewelry collection
Kawaii Mushroom Fairy Set
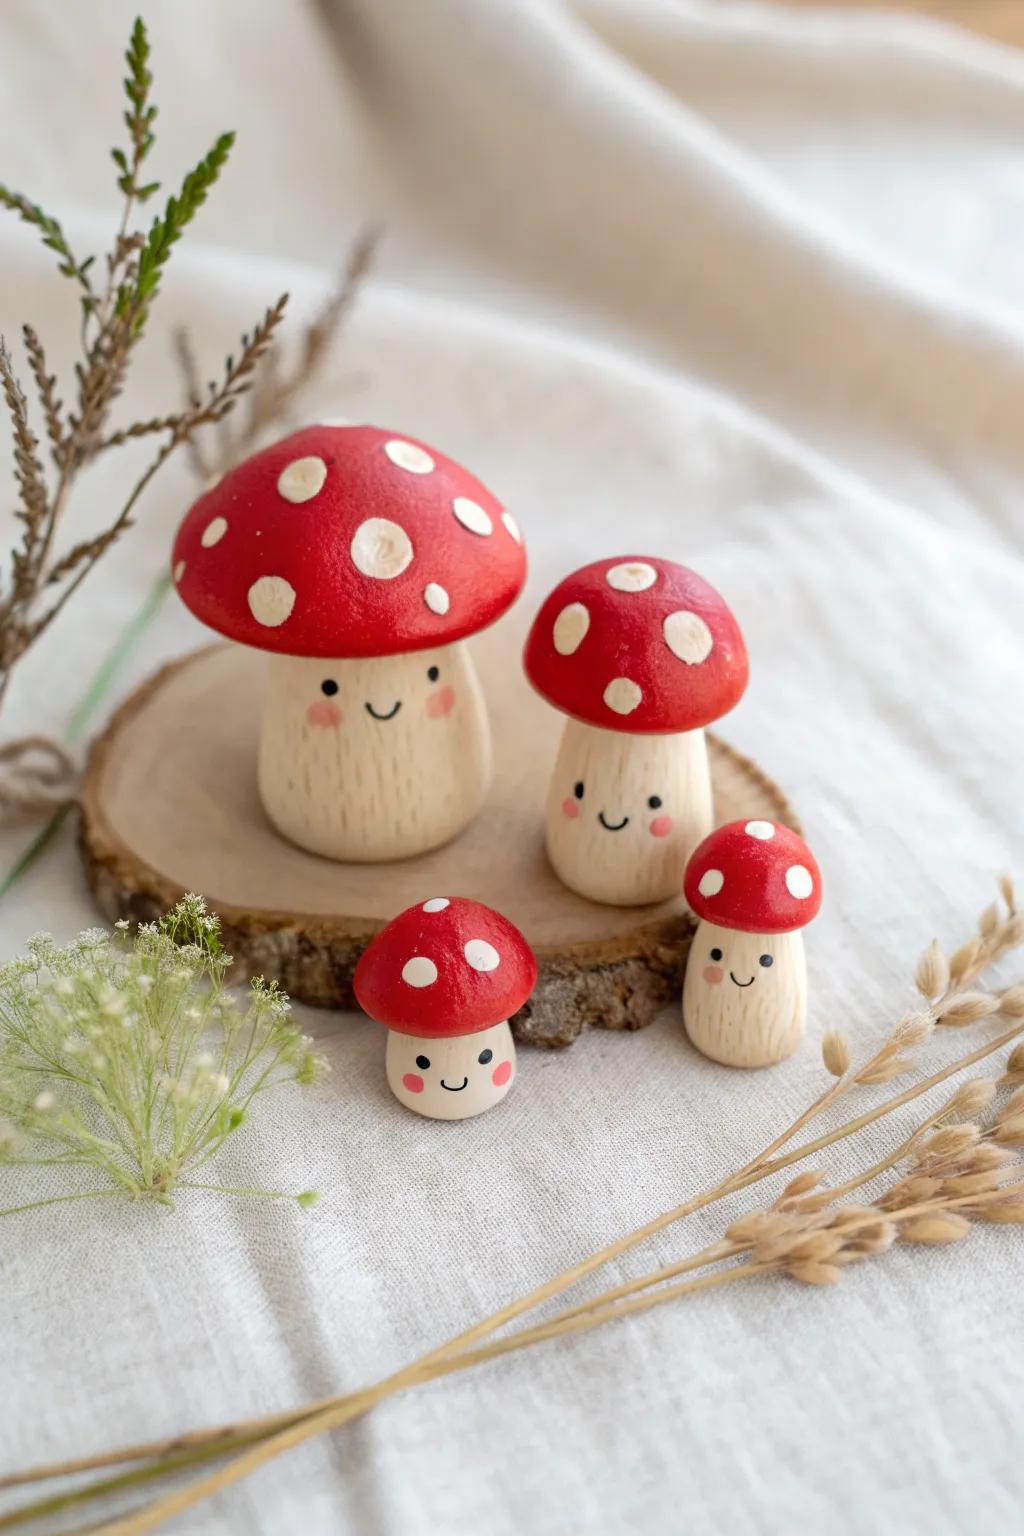
Create a whimsical little family of toadstools that look like they just popped out of a fairy tale forest. These adorable figurines feature hand-painted wooden textures and sweet, smiling faces that bring instant charm to any shelf or desk.
Step-by-Step
Materials
- Polymer clay (white or beige for the stem, red for the cap)
- Acrylic paints (Titanium White, Crimson Red, Black, Pink)
- Sculpting tools (needle tool, ball stylus)
- Fine detail paintbrush (size 0 or 00)
- Aluminum foil (for armature)
- Matte varnish or sealant
- Sandpaper (optional for texture)
Step 1: Shaping the Base
-
Create foil cores:
To save clay and ensure even baking, crumple small pieces of aluminum foil into rough mushroom shapes—a thick cylinder for the stem and a domed disc for the cap. Make four sets in graduating sizes to create a family. -
Cover the stems:
Condition your beige or white clay until soft. Flatten a sheet and wrap it around the foil cylinder, smoothing the seams completely so the join is invisible. -
Shape the stems:
Roll the clay-covered stems gently on your work surface. Taper them slightly so they are wider at the bottom for stability and slightly narrower at the top where the cap will sit. -
Cover the caps:
Take your red clay (or white clay you plan to paint red later) and cover the foil domes. Smooth the clay over the top, curling it slightly underneath to create the mushroom’s gill area. -
Attach cap to stem:
Firmly press the red cap onto the beige stem. I like to use a small hidden piece of wire or a toothpick inserted between the two parts for extra structural strength. -
Blend the connection:
Use a modeling tool to ensure the clay of the cap bonds well with the top of the stem, though you still want a distinct overhang for that classic mushroom look.
Faux Wood Hack
Mix a tiny amount of translucency into your beige clay before sculpting. It adds depth that makes the faux wood texture look surprisingly realistic.
Step 2: Texturing & Baking
-
Add wood grain texture:
To mimic the wooden look in the photo, use a needle tool to gently scratch vertical lines up and down the white stems. Vary the pressure to make some lines deeper than others. -
Smooth the caps:
Before baking, give the red caps a final smoothing with your finger or a little baby oil to remove any fingerprints. -
Bake the figures:
Place your mushroom family on a ceramic tile or baking sheet. Bake according to your polymer clay package instructions (usually 275°F/135°C for 15-30 minutes depending on thickness). -
Cool down:
Let the mushrooms cool completely in the oven before handling them to prevent cracking.
Wobbly Mushrooms?
If your stems aren’t standing straight, sand the bottoms flat gently against a piece of fine-grit sandpaper after they have been baked and cooled.
Step 3: Painting & Details
-
Paint the caps:
If you used white clay for the caps, paint them with two coats of Crimson Red acrylic paint, letting the first coat dry fully before applying the second. -
Add spots:
Using a small round brush or a dotting tool, paint mismatched circular spots on the red caps with Titanium White. Leave the paint slightly thick for a bit of raised texture. -
Highlight the stems:
To enhance the wood/clay texture, you can do a very light wash of watered-down brown paint over the stems, then wipe it off quickly, leaving pigment only in the needle grooves. -
Paint the faces:
With your finest detail brush and black paint, carefully add two small dots for eyes widely spaced apart. Between them, paint a tiny ‘u’ shape for a smile. -
Add rosy cheeks:
Dip a ball stylus or the handle end of a paintbrush into pink paint and dab lightly just below and outside the eyes to give them a blushing look. -
Seal the work:
Once all paint is perfectly dry, apply a coat of matte varnish. This removes the plastic shine of the clay and gives them that soft, wooden toy finish seen in the image.
Arrange your little mushroom family on a windowsill or planter for a daily dose of cuteness
Mini Planet and Moon Desk Buddy
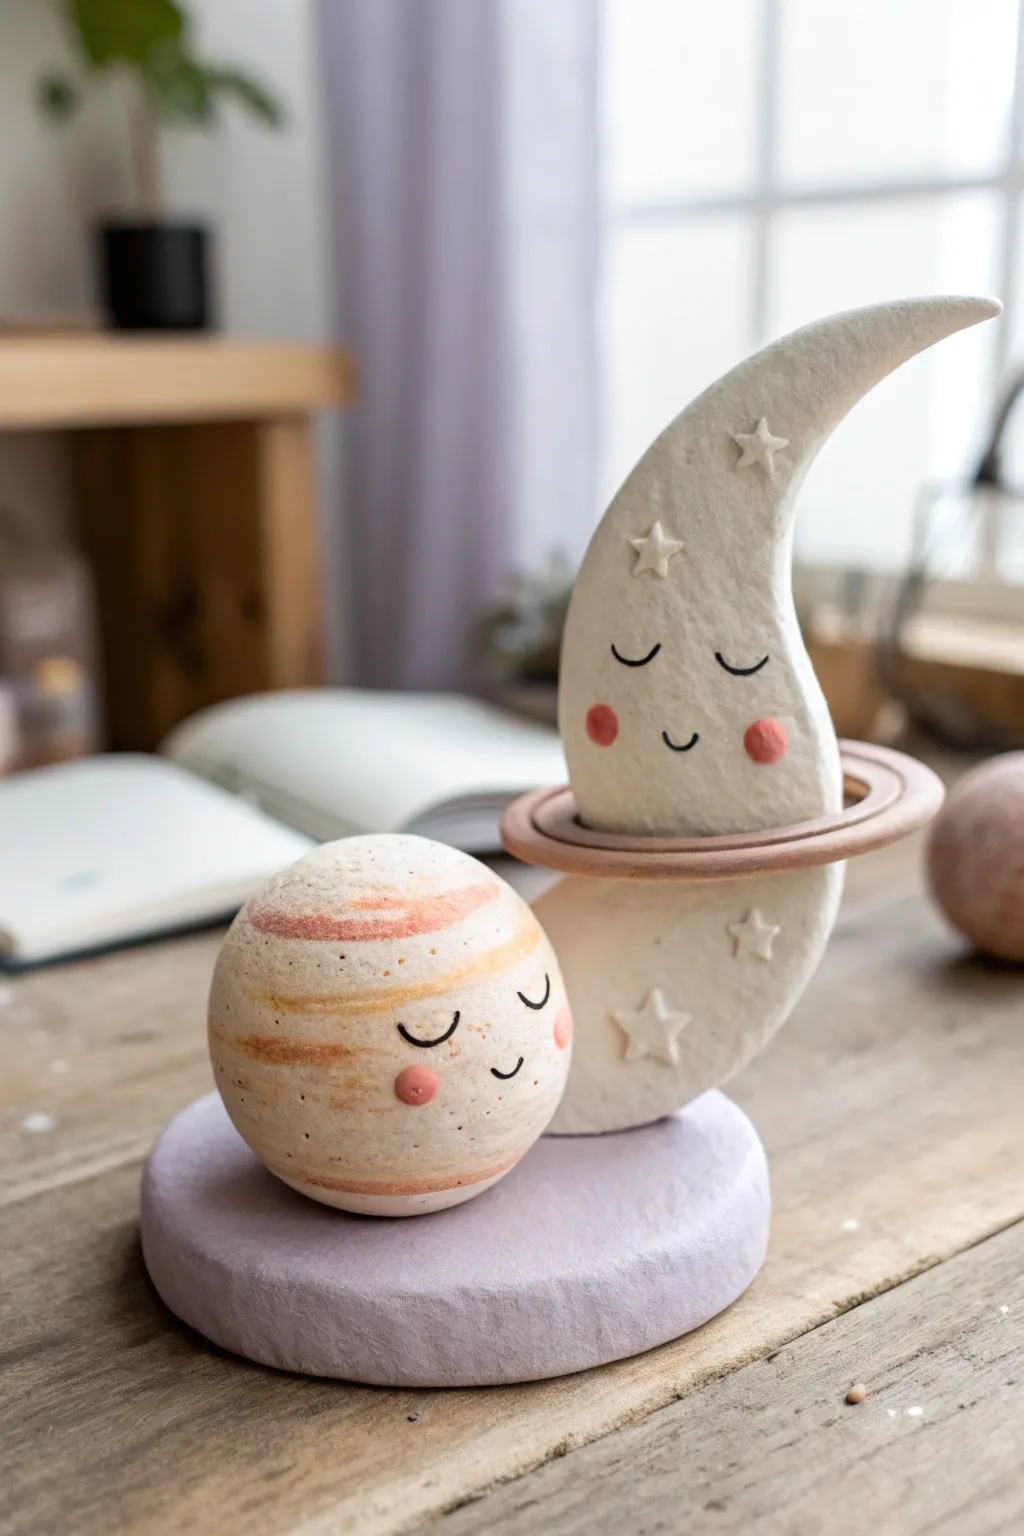
Brighten up your workspace with this adorable duo featuring a smiling Jupiter and a cheerful crescent moon on a shared base. The textured, stone-like finish and sweet facial expressions make this polymer clay project a uniquely charming decorative piece.
Step-by-Step Tutorial
Materials
- Oven-bake polymer clay (white or beige, pale orange, pale purple)
- Acrylic paints (black, pink, white)
- Soft pastel chalks (orange, rust, brown)
- Sculpting tools (needle tool, dotting tool, blade)
- Small star-shaped clay cutter or plunger cutter
- Rolling pin
- Aluminum foil (for armature)
- Heavy-grit sandpaper or a stiff bristle brush (for texturing)
- Oven and baking sheet
- Toothbrush (for texturing)
Step 1: Sculpting the Moon
-
Form the Base Shape:
Start with a large ball of white or beige clay. Roll it into a thick log, tapering the ends slightly, and curve it into a crescent moon shape. Flatten the bottom edge so it can stand upright on its own, ensuring the top point curves elegantly upward. -
Refine the Curve:
Smooth out the surface with your fingers. I like to gently pinch the upper tip to make it sharper, giving the moon a whimsical, fairytale look. -
Add Texture:
Take an old toothbrush or a stiff bristle brush and tap it all over the surface of the moon to create a stone-like, pitted texture. This removes fingerprints and gives it an organic feel. -
Create the Ring:
Mix a small amount of beige clay with a tiny bit of brown or orange to get a darker tan shade. Roll this into a long, thin snake. Flatten the snake slightly. -
Attach the Ring:
Wrap the flattened snake around the middle of the moon shape. It should look like it’s floating, but press it firmly against the moon body to bond the clay. Smooth the seam where the ends meet at the back. -
Add Stars:
Roll out a thin sheet of white clay. Use a tiny star plunger cutter or a craft knife to cut out 4-5 small stars. Press these gently onto the moon’s surface, scattering them near the top and bottom tips.
Clean Texture
To get that sandy, stone-like look without picking up lint, lightly dust your texturing brush with cornstarch before tapping the clay.
Step 2: Sculpting the Planet
-
Create the Core:
Crumple a small tight ball of aluminum foil. This saves clay and makes the planet lighter. Cover this foil core with a layer of beige or off-white clay, rolling it until perfectly spherical and smooth. -
Apply Planet Stripes:
Using soft pastel chalks, scrape some orange, rust, and brown dust onto a palette. Use a soft brush or your finger to apply horizontal bands of color around the sphere to mimic Jupiter’s gas giant stripes. -
Add Blush:
Make two tiny flattened circles of pink clay for cheeks and press them onto the middle of the sphere where you want the face to be. -
Texture the Planet:
Just like with the moon, gently tap the surface with your toothbrush to add texture. Be careful not to smudge your pastel stripes too much.
Glow Up
Use glow-in-the-dark polymer clay for the stars or the moon body. It creates a magical night-light effect on your desk after dark.
Step 3: Assembly and Baking
-
Make the Stand:
Condition a chunk of pale purple clay. Roll it into a thick, flat disc about 3-4 inches in diameter and half an inch thick. Texture the top and sides with your brush or sandpaper. -
Position the Figures:
Place the moon and planet onto the purple base to check spacing. Press them down firmly to create shallow indentations, then remove them. Add a drop of liquid clay or ‘Bake & Bond’ to these indentations. -
Secure the Duo:
Place the figures back onto the adhesive spots. Ensure they are balanced and secure. -
Draw Faces (Pre-Bake):
Use a needle tool to gently etch the curves for the sleeping eyes and the smiling mouths into the raw clay. This creates a guide for painting later. -
Bake:
Bake the entire sculpture according to your clay manufacturer’s instructions (usually 275°F/135°C for 15-30 minutes per 1/4 inch thickness).
Step 4: Finishing Touches
-
Cool Down:
Let the sculpture cool completely in the oven before handling. While it’s warm, polymer clay is brittle. -
Paint Details:
Using a fine detail brush and black acrylic paint, carefully fill in the etched lines for the eyes and mouths. Add two pink circles for the moon’s cheeks if you didn’t add clay cheeks earlier. -
Seal (Optional):
Once the paint is dry, you can apply a matte varnish to protect the surface, though the natural texture looks great unsealed.
Enjoy the quiet company of your new celestial friends as they keep watch over your desk
Tiny Book Stack With Faces
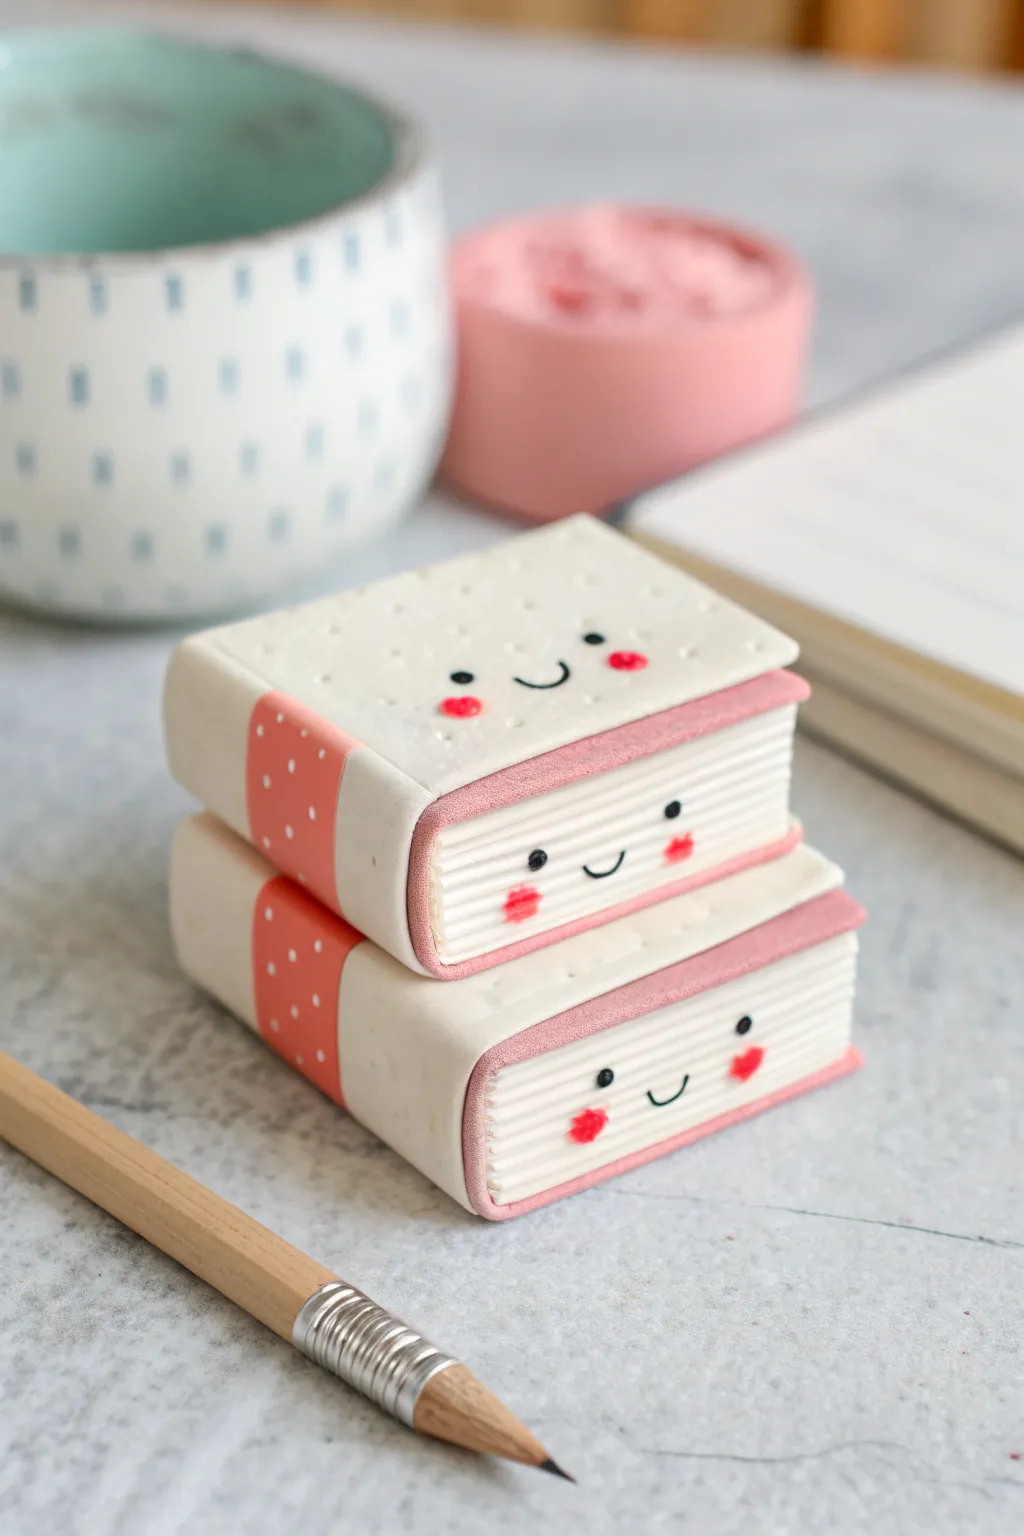
These miniature clay books have so much personality you’ll feel like you’re crafting little friends rather than décor. The stacked design features textured pages, pastel pink accents, and impossibly cute facial expressions that bring the entire piece to life.
Detailed Instructions
Materials
- White oven-bake polymer clay
- Pastel pink or coral oven-bake polymer clay
- Rolling pin or pasta machine
- Craft knife or tissue blade
- Needle tool or toothpick
- Black acrylic paint
- Red or dark pink acrylic paint
- Waitressing dotting tool or small ball stylus
- Eye pin (optional, for making a charm)
- Matte varnish or glaze
Step 1: Forming the Book Blocks
-
Condition the Clay:
Start by warming up your white conditioning clay in your hands until it is soft and pliable, ensuring there are no cracks when you flatten it. -
Create the Pages:
Form the white clay into two rectangular blocks. One should be slightly larger than the other for the bottom book. Flatten the sides to make sharp, boxy edges. -
Texturize the Pages:
Using your needle tool or a craft knife, gently score horizontal lines along three sides of each white block to mimic the look of stacked paper pages.
Clean Clay Tip
Keep separate baby wipes for white and pink clay. Wipe your hands and tools thoroughly when switching colors to keep that bright white clay pristine.
Step 2: Adding the Covers
-
Roll Out Cover Clay:
Take a portion of white clay and roll it out into a thin, even sheet. Do the same with a smaller portion of the pink clay. -
Cut the Top and Bottom Covers:
Cut two rectangles from the white sheet that are slightly larger than your book blocks. Place one on top of each block and smooth the edges down slightly so they overhang just a bit. -
Texture the Top Cover:
For a realistic hardback feel, lightly press a dotting tool or the blunt end of a needle randomly across the top white cover to create a dimpled texture. -
Add the Spines:
Cut a strip of the pink clay sheet. It should be the same height as the book block plus the covers. Wrap this around the ‘spine’ side of each book, gently pressing it onto the white top and bottom covers. -
Add Decorative Spine Dots:
Roll tiny, almost microscopic balls of white clay. Press these in a polka-dot pattern onto the pink spine of each book.
Step 3: Assembly and Features
-
Stack the Books:
Place the slightly smaller book on top of the larger one, offsetting it just a bit or angling it if you prefer a ‘messy desk’ look, though perfectly aligned is cute too. -
Add the Inner Covers:
If you want that peek-a-boo pink effect seen in the image, roll extremely thin snakes of pink clay and press them into the crevice between the white ‘pages’ and the white ‘cover’ before stacking, or paint this detail later. -
Bake the Clay:
Place your creation on a ceramic tile or baking sheet covered with parchment. Bake according to the manufacturer’s instructions for your specific brand of clay (usually around 275°F for 15-30 minutes).
Squashed pages?
If the page lines get mashed while handling, pop the book in the fridge for 10 minutes. The firm clay is much easier to re-score without distortion.
Step 4: Bringing Them to Life
-
Cool Completely:
Let the clay cool down fully before painting. Painting on warm clay can make the acrylics get gummy or change texture. -
Paint the Eyes:
Dip a small dotting tool into black acrylic paint. Create two wide-set eyes on the spine of the bottom book and two on the top cover of the top book. -
Draw the Smiles:
Using a very fine detail brush or even the tip of a toothpick, carefully paint a small ‘U’ shape between the eyes for a happy grin. -
Add Chewy Cheeks:
Dip a clean dotting tool into red or dark pink paint. Stamp little rosy cheeks next to the smile. I find adding a tiny horizontal dash texture makes them look even sweeter. -
Seal the Piece:
Once the paint is totally dry, apply a coat of matte varnish to protect the surface and remove any fingerprints left during sculpting.
Now you have a delightful little literary duo ready to brighten up your desk or bookshelf