If you’re craving cute polymer clay earrings that feel playful but still wearable, you’re in the right spot. I’m sharing my go-to polymer clay earring ideas—starting with the classics and ending with a few delightfully unexpected designs.
Pastel Arch Dangles
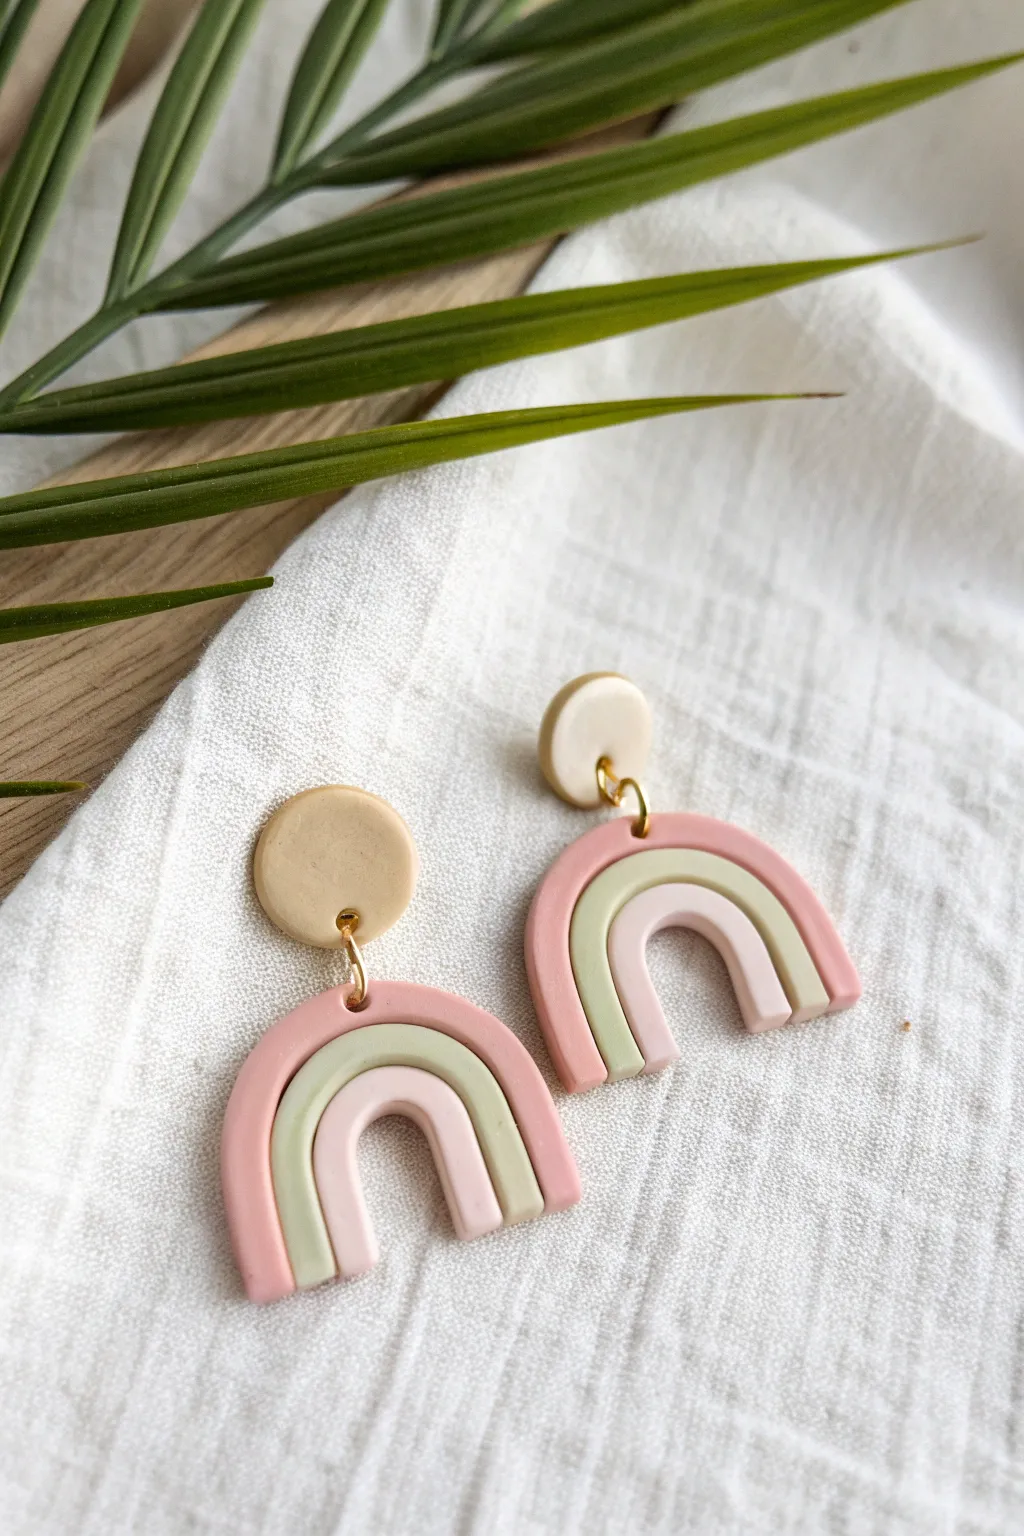
These sweet pastel rainbow earrings feature soft, muted tones of pink, sage green, and light blush that stack perfectly into cheerful arches. Their lightweight design and simple geometric construction make them an ideal project for beginners looking to create trendy, boutique-style jewelry at home.
Step-by-Step Guide
Materials
- Polymer clay in pastel pink, sage green, and beige/sand
- Rolling pin or pasta machine
- Clay extruders (optional) or a flat surface for rolling snakes
- Round cutters (small for the stud)
- Tissue blade or sharp craft knife
- Jump rings (gold finish)
- Earring posts and backs
- Super glue or jewelry resin
- Baking sheet and parchment paper
- Hand drill or pin vise with small bit
- Pliers (flat nose and round nose)
Step 1: Preparing the Clay
-
Condition the Clay:
Begin by kneading each color of polymer clay—pastel pink, sage green, and beige—individually until they are soft, pliable, and free of any air bubbles. Warm hands help speed up this process. -
Color Mixing (Optional):
If your colors feel too vibrant, try mixing in a tiny amount of white or translucent clay to mute them into the soft pastels seen in the photo. -
Roll the Base Studs:
Take the beige clay and roll it out into a flat sheet, roughly 3mm thick. It’s important that this thickness is consistent so the studs sit flat on the ear. -
Cut the Circles:
Use a small round cutter (approx. 10-12mm diameter) to punch out two circles for the top stud pieces. Set these aside on a piece of clean parchment paper.
Uneven Snakes?
If you struggle to roll even clay snakes by hand, use an acrylic block to roll them back and forth. The flat surface applies even pressure, smoothing lumps instantly.
Step 2: Forming the Rainbow Arches
-
Create the Snakes:
Roll out a ‘snake’ or log of clay for each of your three rainbow colors: pink, sage green, and a lighter blush/beige. Aim for an even thickness of about 4-5mm for each strand. -
Shape the Inner Arch:
Take the lightest blush/beige strand and gently curve it into a tight ‘U’ shape. This will be the smallest, innermost layer of your rainbow. -
Layer the Middle Arch:
Take the sage green strand and carefully mold it over the top of your inner arch. Press it gently against the first strand so they adhere without smashing the round profile. -
Add the Outer Arch:
Place the pastel pink strand over the green one to create the final, largest arch. Ensure the strands are snug against each other. -
Trim the Bottoms:
Use your tissue blade to make a clean, straight cut across the bottom of the rainbow legs so all three colors end at the exact same length. -
Repeat for the Second Earring:
Repeat the arch-building process to create a matching second rainbow. Place them side-by-side to ensure they are synonymous in size and shape.
Seamless Finish
Before baking, use a cotton swab dipped in a tiny bit of rubbing alcohol or acetone to gently wipe away fingerprints and dust from your clay surface.
Step 3: Assembly and Baking
-
Create Holes:
Using a needle tool or toothpick, carefully poke a hole near the bottom edge of the beige stud circle and another hole at the top center of the pink rainbow arch. Ensure the holes are large enough for your jump rings. -
Bake the Pieces:
Arrange all four clay pieces on a parchment-lined baking sheet. Bake according to your brand’s package instructions—usually around 275°F (130°C) for 15-30 minutes. -
Cool Down:
Once baked, I like to let the pieces cool completely inside the oven or on a wire rack before handling them to prevent warping. -
Attach the Posts:
Apply a small dab of super glue (or UV resin for a stronger hold) to the back of the beige studs and press the flat pad of the earring post onto it. Let it cure fully. -
Connect the Components:
This is the final touch. Use two pairs of pliers to twist open a jump ring. Thread it through the hole in the stud and the hole in the rainbow arch, then twist it closed securely.
Wear your new pastel arches with pride, knowing you made something beautiful by hand


Tiny Daisy Studs
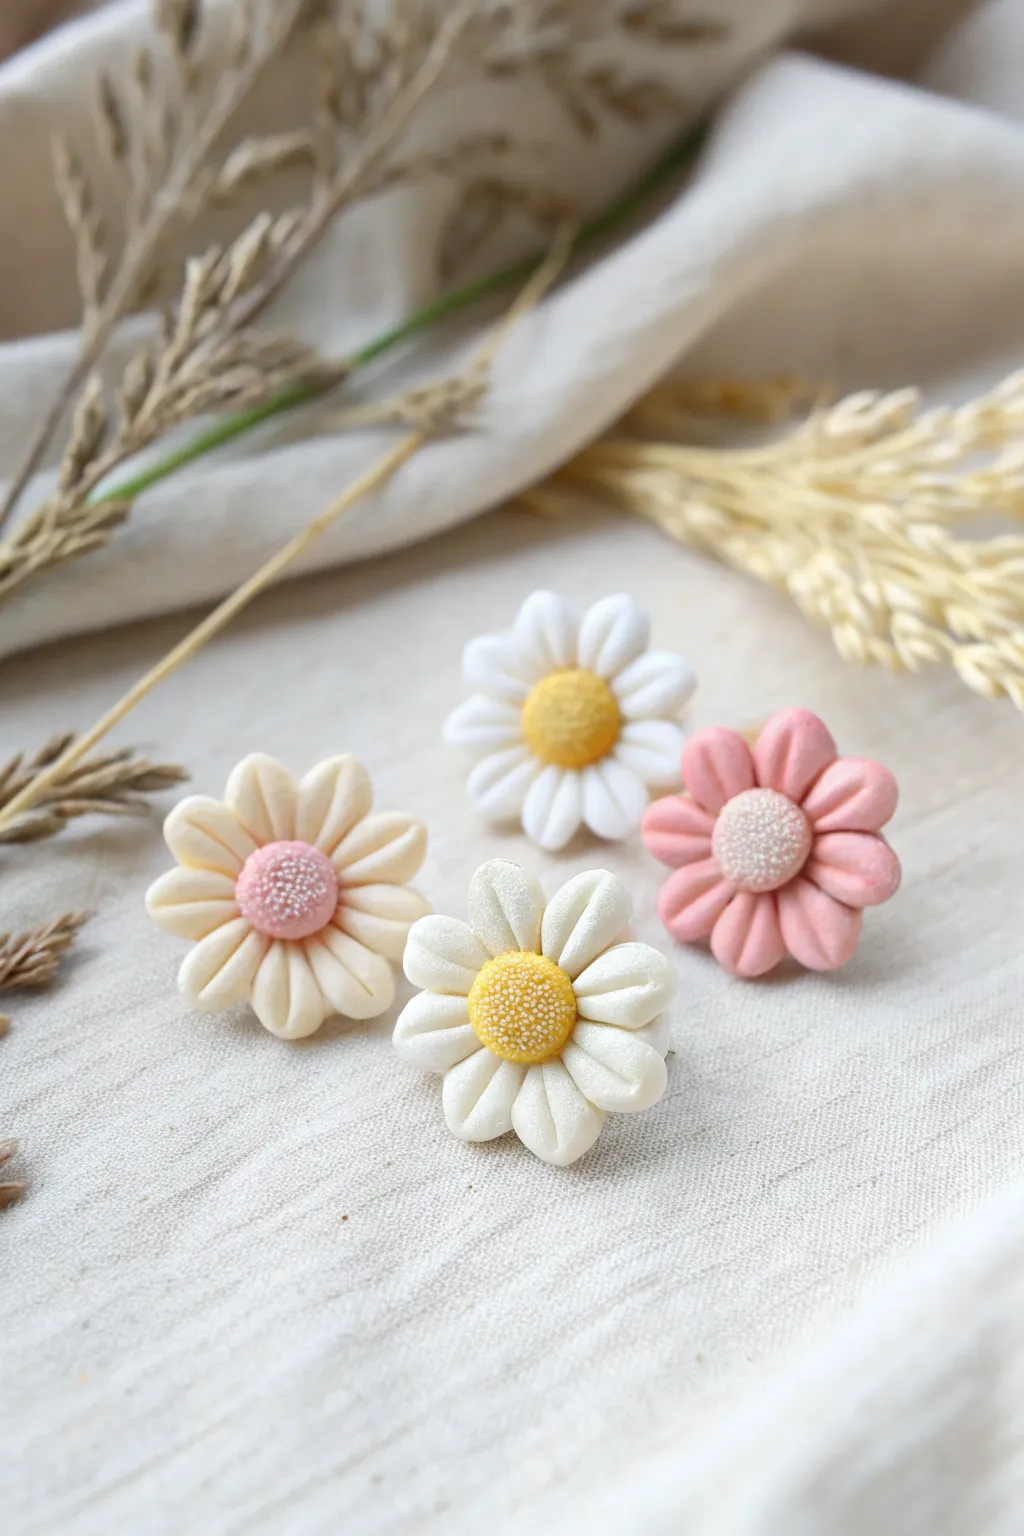
These charming little daisies feature soft, puffy petals and realistically textured centers, creating a perfect balance between playful and delicate. Their matte finish and gentle pastel palette make them ideal studs for everyday wear.
Step-by-Step Tutorial
Materials
- Polymer clay (White, Cream, Soft Pink, Mustard Yellow)
- Small ball tool or detail tool
- Needle tool or toothpick
- Soft pastel chalks/powder (optional, for shading)
- Small soft brush
- Craft knife or tissue blade
- Earring posts and backs
- Strong jewelry glue (e.g., E6000)
- Oven for baking
Step 1: Prepping the Clay
-
Condition the clay:
Begin by thoroughly conditioning your clay colors until they are soft and pliable. You’ll need white or cream for the petals of the classic daisies, and pink for the colorful variant. -
Mix custom shades:
For the centers, mix a mustard yellow for a natural look. Only a tiny amount is needed. For the pink center seen on the cream flower, create a soft dusty rose shade. -
Divide into portions:
Roll your petal color into a thin log or snake. Use your craft knife to slice 8 equal-sized tiny segments for each flower. Uniformity here is key to a symmetrical bloom.
Sticky Petals?
If your clay gets too warm and sticky while shaping petals, pop it in the fridge for 5-10 minutes. This firms it up, making it easier to add those delicate indentations without distortion.
Step 2: Forming the Petals
-
Roll spheres:
Take each of the 8 small segments and roll them into smooth, tiny balls between your fingertips. -
Shape teardrops:
Gently roll one side of each ball to form a short, fat teardrop shape. The rounded end will be the outer edge of the petal. -
Flatten slightly:
Press down gently on the teardrops to flatten them just a bit. You want them to look puffy, not like flat pancakes. -
Indent the petals:
Using a blunt tool or the side of a toothpick, press a gentle central line or indentation down the length of each petal. This gives them that classic daisy dimension.
Texture Pro Tip
For ultra-realistic centers, place a tiny piece of sandpaper over the clay dome and press gently before using your needle tool. The grit adds a subtle, organic micro-texture.
Step 3: Assembling the Flower
-
Arrange the petals:
On your baking tile or parchment paper, arrange the 8 petals in a circle with the pointed ends touching in the middle. -
Secure the base:
Gently press the inner points together to ensure they adhere to one another. You can use a small dab of liquid clay if the clay feels too dry. -
Make the center:
Roll a slightly larger ball of your chosen center color (yellow or pink). Flatten it into a small dome shape. -
Attach the center:
Place the dome directly onto the center of your petal ring, covering the junction points where the petals meet.
Step 4: Texturing and Baking
-
Stipple the center:
Using a needle tool or a very fine ball tool, gently poke the surface of the center repeatedly. I like to do this in a tight circular pattern to mimic pollen texture without squashing the dome. -
Refine the shape:
Check the petals one last time to ensure none were smudged during assembly. Re-press the central indentations if needed. -
Baking:
Bake the pieces according to your polymer clay package instructions (typically 275°F/130°C for 15-30 minutes). Let them cool completely before handling. -
Attach findings:
Apply a small dot of strong jewelry glue to the flat pad of an earring post. -
Secure post:
Press the glued post firmly onto the back of the cooled flower. Allow the glue to cure fully (usually 24 hours) for maximum durability.
Enjoy wearing your blooming bouquet or package them up as a thoughtful handmade gift.


Puffy Heart Drops
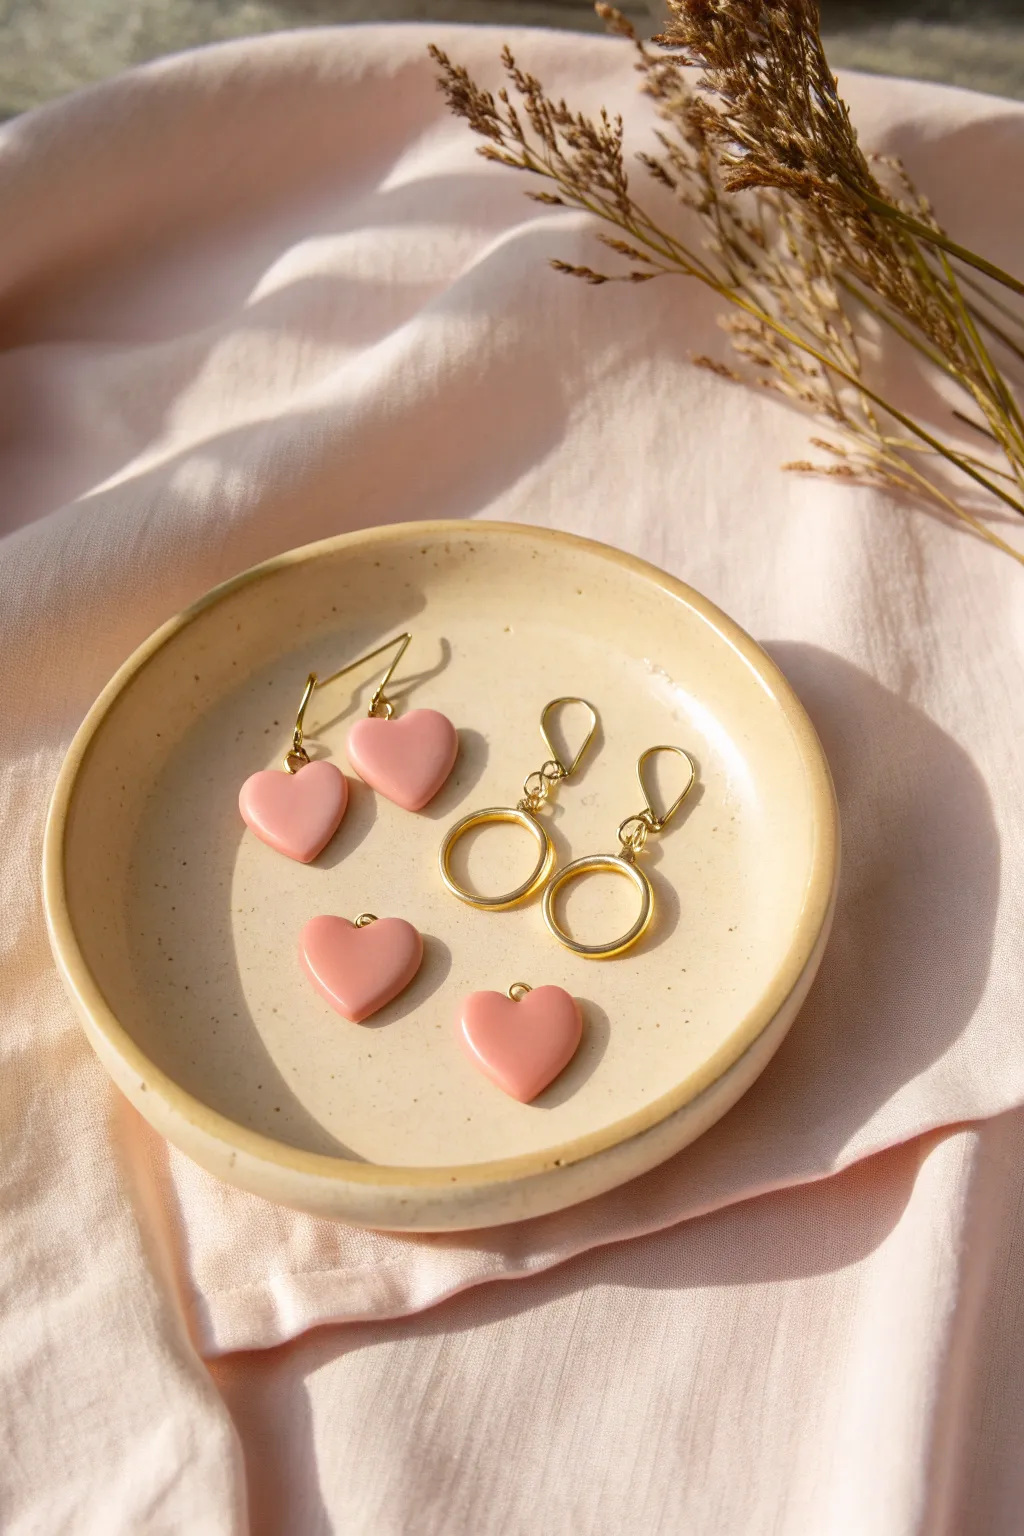
These simple yet elegant earrings feature soft pink, dimensional hearts with a glossy finish that looks almost like ceramic glaze. The versatile design allows you to create classic drop earrings or modular charms that can be swapped out on gold hoops.
How-To Guide
Materials
- Polymer clay in a soft dusty pink shade
- Small heart-shaped cutter
- Ceramic tile or glass work surface
- Cling film (plastic wrap)
- Hand drill or needle tool
- Jump rings (gold, approx. 4mm – 6mm)
- French hook ear wires (gold)
- Optional: Hoop earring findings (gold)
- Gloss glaze or UV resin
- Small paintbrush
- Sandpaper (wet/dry, 400-1000 grit)
- Jewelry pliers (flat nose and round nose)
- Oven for baking
Step 1: Creating the Hearts
-
Condition the Clay:
Begin by warming the dusty pink polymer clay in your hands, kneading it thoroughly until it is soft, pliable, and free of any air bubbles. -
Roll to Thickness:
Roll out a slab of clay. For that ‘puffy’ look seen in the photo, keep the slab quite thick—aim for about 4mm to 5mm thickness. -
The Puffy Trick:
Lay a piece of cling film gently over the surface of your clay slab. Smooth out any major wrinkles with your finger. -
Cut the Shapes:
Press your small heart cutter firmly down through the cling film and into the clay. The film rounds over the sharp edges, creating that instant pillow-like dome. -
Remove and Refine:
Peel back the film and remove the excess clay. If the hearts have slightly ragged bottom edges, gently smooth them with your finger. -
Pierce the Holes:
Before baking, use a needle tool to create a hole at the top center of each heart. Ensure the hole is large enough for your jump rings. -
Bake:
Place your hearts on a ceramic tile and bake according to the manufacturer’s instructions for your specific brand of clay, usually around 275°F (135°C).
Uneven Puffiness?
If the cling film creates weird creases, try pulling it tauter next time. You can also smooth faint creases with a drop of baby oil before baking.
Step 2: Finishing and Assembly
-
Cool and Sand:
Let the hearts cool completely. If there are any fingerprints, lightly wet-sand them away with fine-grit sandpaper. -
Glaze Application:
Apply a thin layer of gloss glaze or UV resin to the top and sides of the hearts. This mimics the ceramic look in the photo. -
Cure or Dry:
Let the glaze air dry or cure the UV resin under a UV lamp until the surface is rock-hard and non-tacky. -
Repeat for Back:
I usually flip them over and glaze the back as well for a truly professional finish, though this is optional. -
Open Jump Rings:
Using two pairs of pliers, twist your gold jump rings open sideways (never pull them apart outward). -
Option A: French Hooks:
For the standard drop style, slide the heart onto the jump ring, then add the French hook ear wire, and close the ring securely. -
Option B: Hoop Dangles:
For the convertible style shown, attach a jump ring to the heart and slide it directly onto the shimmering gold hoop component before closing the clasp.
Make them Sparkle
Mix a tiny amount of translucent liquid clay and gold mica powder, then swirl it lightly into your pink clay for a faux-stone effect.
Enjoy styling these versatile charms on different hoops or hooks for a fresh look every day


Cherry Cluster Dangles
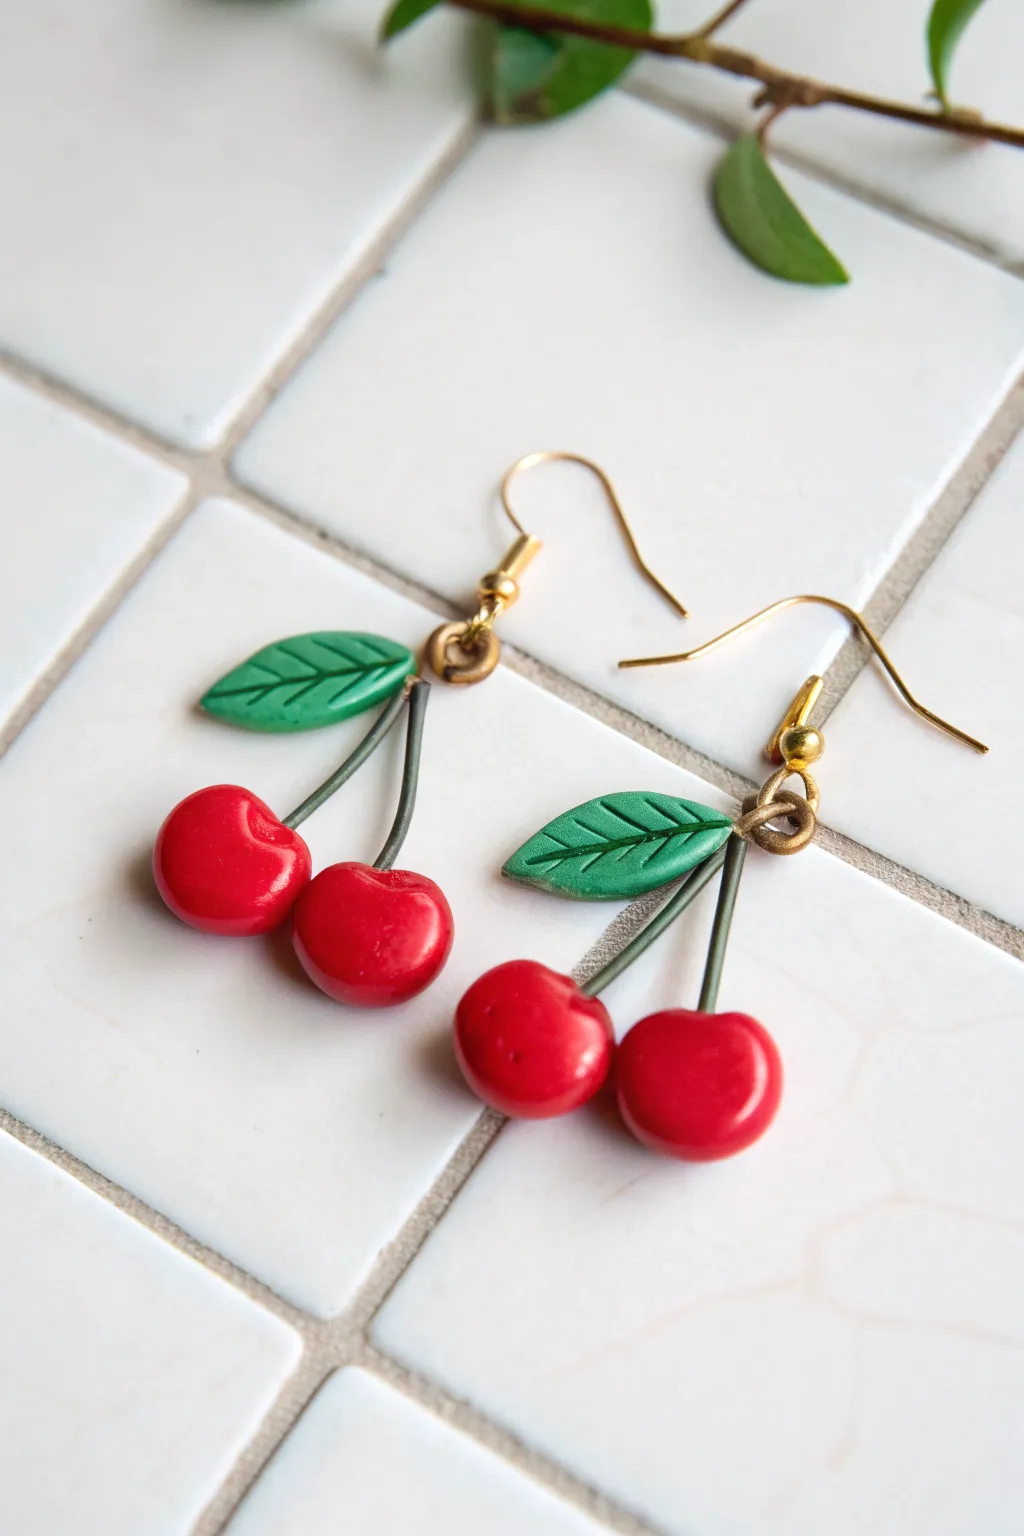
Capture the essence of summer with these delightful cherry cluster earrings made from polymer clay. The glossy red finish and delicate green leaves give them a fresh-picked look that adds a pop of playful color to any outfit.
How-To Guide
Materials
- Red polymer clay
- Green polymer clay
- Dark green artistic wire (20-22 gauge)
- Gold tone jump rings (approx 6-8mm)
- Gold tone ear wires (French hook style)
- Glossy polyurethane varnish or UV resin
- Liquid polymer clay (Translucent or Red)
- Wire cutters
- Round nose pliers
- Needle tool or toothpick
- Craft blade
- Small paintbrush
- Oven for baking
Step 1: Shaping the Cherries
-
Prepare the clay:
Begin by conditioning your red polymer clay until it is soft and pliable. Roll it into a smooth log of even thickness to ensure your cherries will be similar in size. -
Cut equal portions:
Using your craft blade, cut four equal segments from the log. These will become the four cherries needed for one pair of earrings. -
Roll into spheres:
Roll each red segment between your palms to create a perfect sphere. Aim for a diameter between 10mm and 12mm for a realistic yet lightweight size. -
Indent the top:
Take a needle tool or a ball stylus and gently press into the top center of each red sphere to create a small indentation where the stem will eventually attach. -
Refine the shape:
Gently pinch the bottom of the sphere very slightly if you want a more heart-shaped cherry look, though perfectly round works beautifully too.
Stems Pulling Out?
If wires loosen often, bend the inserted tip into a “U” or squiggle shape before embedding. The complex shape locks into the baked clay better than a straight pin.
Step 2: Creating Stems and Assembly
-
Cut the wire stems:
Cut four pieces of dark green artistic wire, each about 1.5 inches long. These will serve as the stems connecting the cherries to the hardware. -
Create a hook:
Using your round nose pliers, make a very small hook or loop at one end of each wire piece. This anchor helps the wire grip the clay securely so it won’t pull out later. -
Insert the stems:
Dip the hooked end of the wire into a tiny bit of liquid polymer clay for extra adhesion. Insert this end into the indentation you made on top of each cherry. -
Seal the connection:
Gently smooth the red clay around the entry point of the wire to ensure a seamless fit. Repeat this for all four cherries. -
Curve the stems:
I like to add a gentle, natural curve to the wires now so they don’t look too rigid. Bend two stems slightly towards each other to form a pair.
Step 3: Adding Leaves and Baking
-
Form the leaves:
Condition a small amount of green clay. Roll two small tear-drop shapes and flatten them to create leaves about 1cm long. -
Texture the leaves:
Use your needle tool or craft knife to gently score a central vein down the middle of each leaf, followed by small angled lines for side veins. -
Prepare the jump rings:
Open two gold jump rings. Take a pair of cherry stems and cross their top ends. Loop the wire ends over the jump ring to secure them, trimming excess wire if necessary. -
Attach the leaf:
Press one green leaf firmly onto the junction where the wire stems meet the jump ring. The clay should cover the wire loops slightly, acting as a decorative cover. -
Secure the leaf:
You can add a tiny dab of liquid clay on the back of the leaf before pressing it onto the wires to ensure a permanent bond during baking. -
Bake:
Arrange the earrings on a baking tile or parchment-lined tray. Bake according to your clay manufacturer’s instructions (usually 275°F/130°C for 15-30 minutes for this thickness).
Shiny Finish Tip
For an ultra-glassy finish without brushstrokes, dip the cherry part directly into the varnish and hang it upside down to drip dry, rather than painting it on.
Step 4: Finishing Touches
-
Cool and inspect:
Let the pieces cool completely before handling. Check that the stems are secure and the leaves are firmly attached. -
Glaze:
Apply a coat of glossy polyurethane varnish or UV resin strictly to the red cherry parts. This mimics the juicy, wet look of real fruit. -
Add hardware:
Once the glaze is fully dry or cured, use pliers to attach the gold ear wires to the main jump ring. -
Final check:
Verify that the jump rings are closed tightly so your cherries don’t escape while you are wearing them.
Now you have a charming pair of fruity earrings ready to wear or gift

The Complete Guide to Pottery Troubleshooting
Uncover the most common ceramic mistakes—from cracking clay to failed glazes—and learn how to fix them fast.
Smiley Face Coin Studs
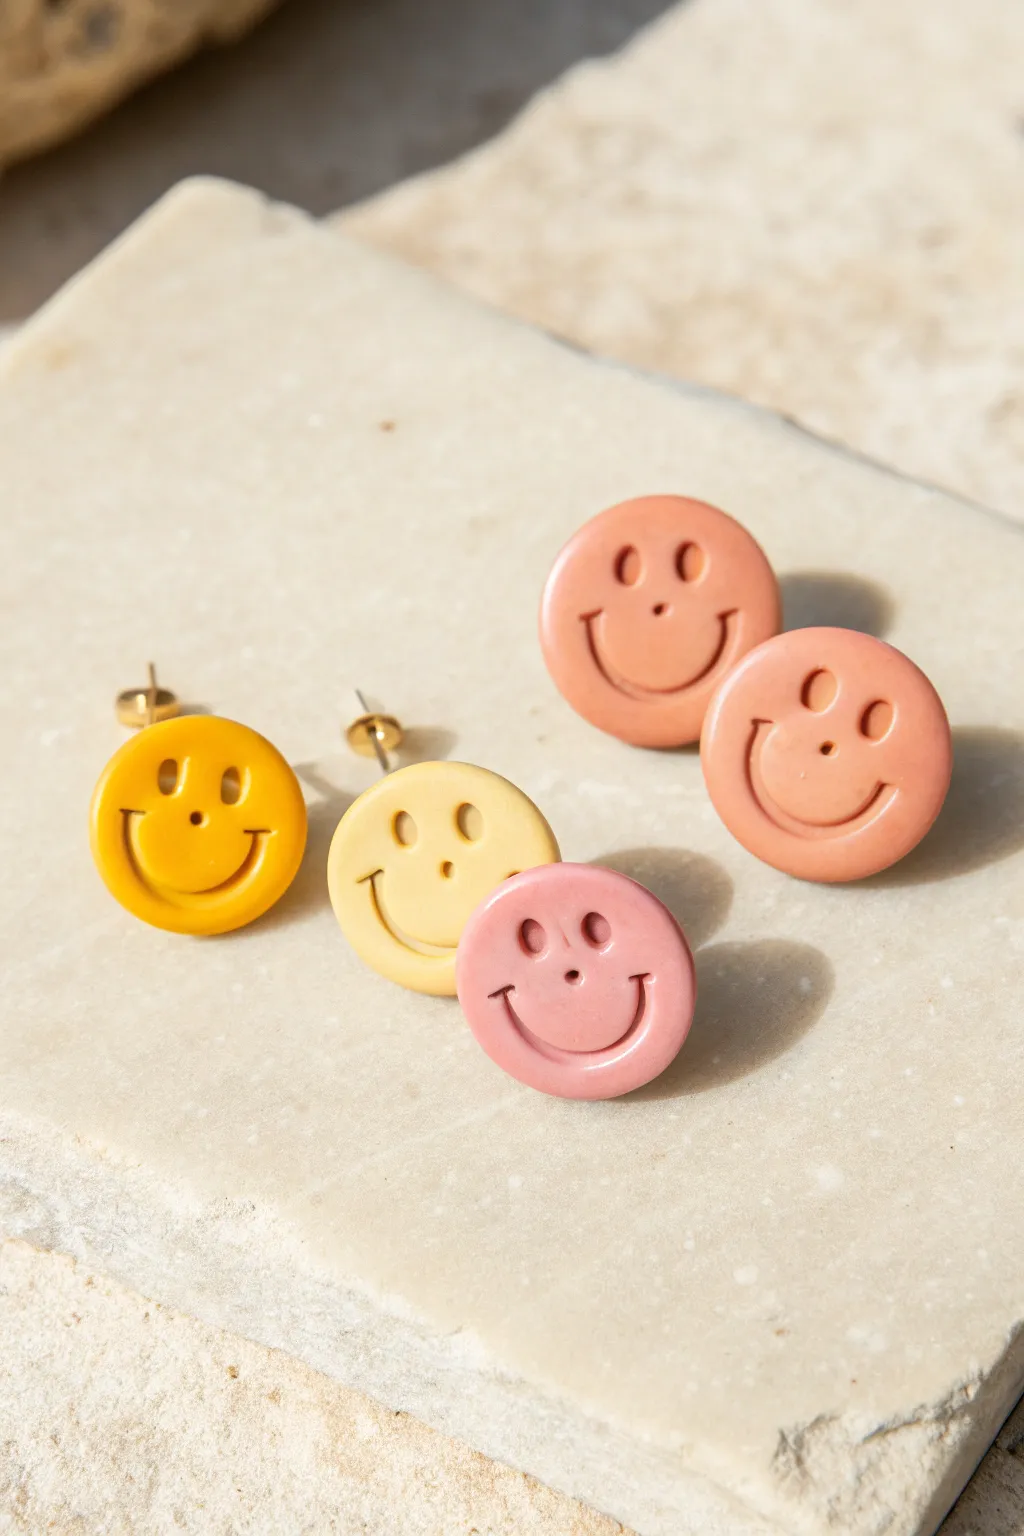
These charming coin studs are guaranteed to bring a smile to your face with their simple, impressed designs and soft pastel palette. They feature a clean, matte finish and a nostalgic smiley face motif that’s perfect for everyday wear.
Detailed Instructions
Materials
- Polymer clay (mustard yellow, pale cream, dusty pink, terracotta)
- Small round circle cutter (approx. 10-12mm)
- Acrylic roller or pasta machine
- Ball tool (small size for eyes)
- Small U-shaped cutter or a trimmed straw (for the smile)
- Needle tool
- Ceramic tile or baking sheet
- Earring posts and backs (gold or surgical steel)
- Super glue or E6000
- Oven thermometer
Step 1: Prepping the Clay
-
Condition the clay:
Start by thoroughly conditioning your polymer clay colors. Knead each color in your hands until it becomes soft, pliable, and warm, which helps prevent cracks later. -
Roll out sheets:
Using your acrylic roller or pasta machine, roll the conditioned clay into sheets. Aim for a thickness of about 3mm—thick enough to hold the impression but sleek enough for a stud. -
Check for bubbles:
Inspect your clay sheets for any trapped air bubbles. If you spot one, gently pierce it with your needle tool and smooth the air out with your finger.
Step 2: Cutting and Stamping
-
Punch circles:
Using your small round cutter, punch out circles from each clay color. For cleaner edges, dip your cutter into cornstarch or water before pressing down. -
Create eyes:
Take your small ball tool and gently press two indentations into the upper half of the circle to form the eyes. Don’t press all the way through; imply depth without perforation. -
Form the nose:
Use a smaller ball tool or the tip of a blunt needle tool to add a tiny, shallow dot right in the center for the nose. -
Stamp the smile:
Use a small U-shaped cutter to press the smile shape. If you don’t have a cutter this small, you can cut a plastic straw in half lengthwise to create a custom curved tool. -
Refine the expression:
Add small cheek lines at the ends of the smile using the needle tool if you want extra character, though the simple curve works beautifully on its own. -
Smooth the edges:
Inspect the edges of your clay circles. Gently run your fingertip along the rim to soften any sharp cutting lines or clay burrs.
Clean Imprints
Cover the clay with a piece of cling wrap before cutting and stamping. This creates beautifully rounded, ‘pillowy’ edges and prevents harsh lines in the clay.
Step 3: Baking and Assembly
-
Transfer to tile:
Carefully move your finished faces onto a ceramic tile or a parchment-lined baking sheet. Touching them too much can distort the circle, so use a blade to lift them if needed. -
Bake:
Bake the pieces according to the manufacturer’s instructions for your specific brand of clay. I always recommend using an oven thermometer to ensure the temperature is accurate. -
Cool down:
Allow the clay pieces to cool completely inside the oven or on a cooling rack before handling them. They harden fully as they cool. -
Prepare the back:
Once cool, lightly sand the back of the clay coin if it isn’t perfectly flat. This ensures a strong bond with the earring post. -
Attach posts:
Apply a small dot of strong adhesive (like super glue gel or E6000) to the flat pad of the earring post. -
Secure the post:
Press the post firmly onto the upper back of the clay circle and hold it for a few seconds. -
Final cure:
Allow the glue to cure fully (check your glue’s package for timing) before testing the bond or wearing the earrings.
Make them Shine
For a glossy finish instead of matte, apply a thin layer of UV resin or jewelry-grade gloss varnish over the front after baking to make the colors pop.
Now you have a cheerful set of accessories ready to mix, match, and brighten up your outfit
Rainbow Coil Hoops
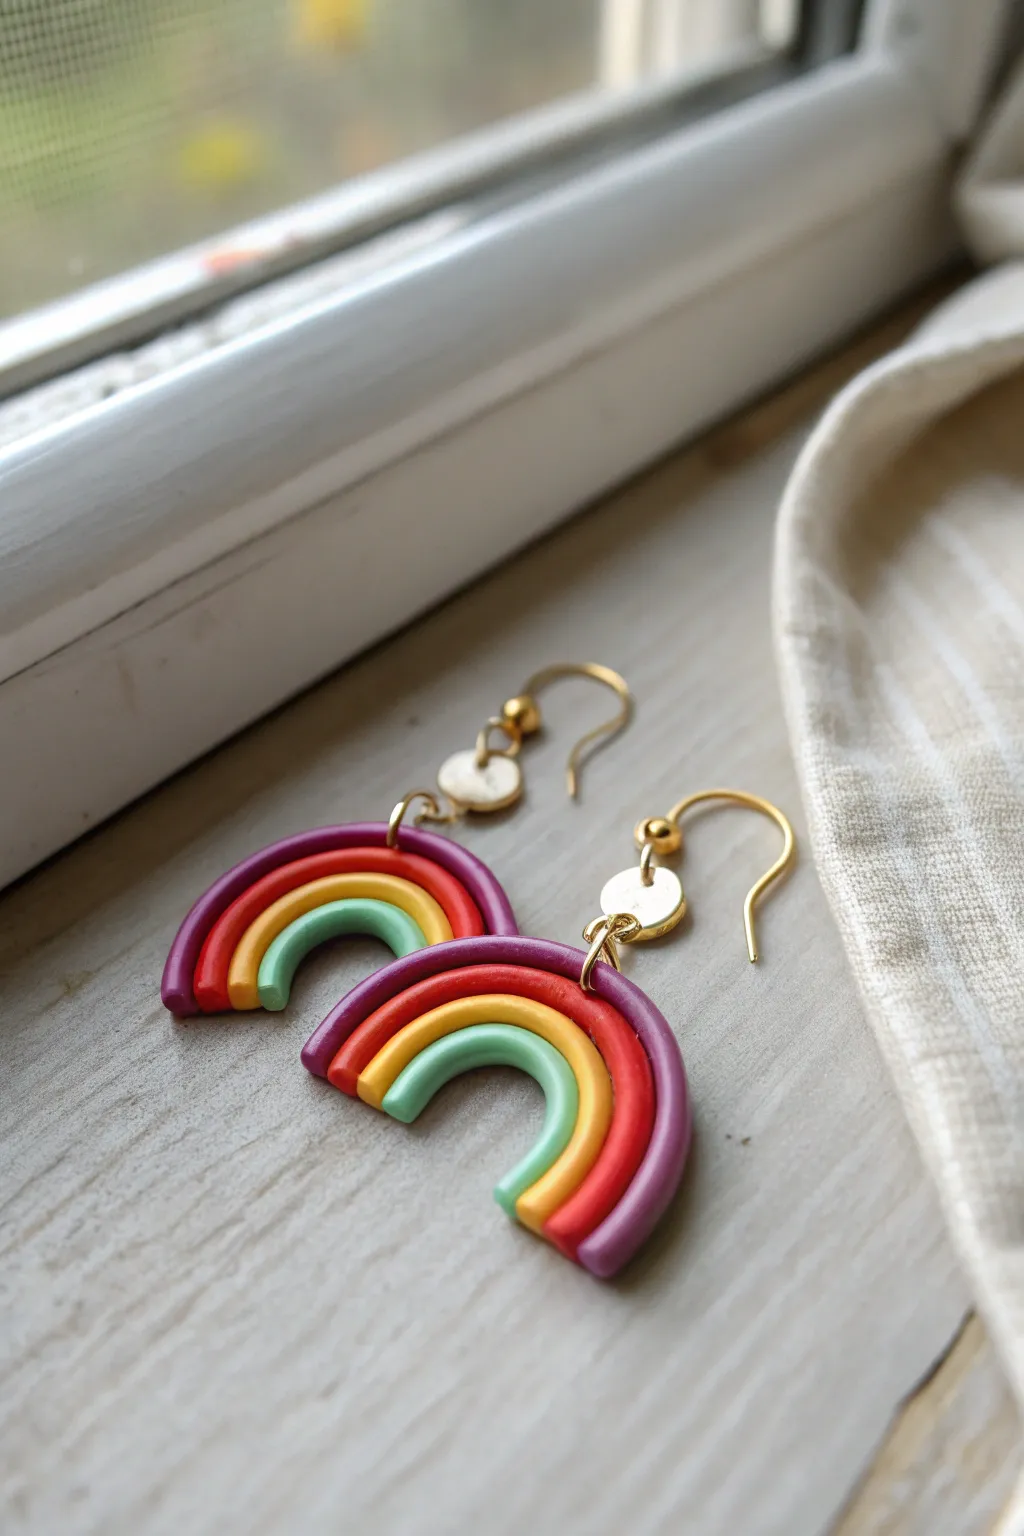
Brighten up any outfit with these delightful, retro-inspired rainbow earrings made from polymer clay. Featuring four distinct arches in a cheerful color palette of mint, mustard, red, and plum, they offer a playful pop of color with a polished finish.
Step-by-Step Tutorial
Materials
- Polymer clay in four colors: Mint green, mustard yellow, coral red, and deep plum
- Acrylic rolling pin or pasta machine
- Clay extruder with a small round disc (optional but recommended)
- Clean ceramic tile or glass work surface
- Flexible tissue blade or craft knife
- Small circle cutter (approx. 5-7mm)
- Liquid polymer clay (Bake & Bond)
- 2 Gold-plated ball post earring hooks (French hooks)
- 4 Gold jump rings (approx. 4-6mm)
- 2 Flat gold connector discs/charms
- Jewelry pliers (round nose and flat nose)
- Hand drill or pin vibe with a small bit
- Oven thermometer
Step 1: Creating the Clay Coils
-
Condition the Clay:
Begin by thoroughly conditioning each color of polymer clay until it is soft, pliable, and free of any air bubbles. I find distinct colors mix best when your hands are clean between handling each shade. -
Form the Ropes:
You need uniform ropes for this project. If using an extruder (which creates the most consistent results), load each color one by one and extrude a long snake using a medium-small round disc. -
Hand-Rolling Method:
If you don’t have an extruder, roll the clay into snakes by hand. Use an acrylic block to gently roll back and forth over the clay on your work surface to ensure an even thickness throughout. -
Cutting to Size:
Cut two segments of each color. Since the arches grow in size from the center out, your mint pieces can be short (about 1.5 inches), while the plum pieces need to be the longest (about 3 inches).
Gaps Between Coils?
If your arch layers separate after baking, use a tiny drop of superglue or Loctite Gel on the backside cracks to secure them invisibly.
Step 2: Assembling the Arches
-
Starting the Curve:
Take your shortest mint green rope and gently curb it into a small ‘U’ shape on your ceramic tile. This forms the innermost arch of the rainbow. -
Applying Adhesive:
Brush a very thin, almost invisible layer of liquid polymer clay along the outer edge of the mint arch. This acts as the glue to hold the suspended coils together. -
Add the Second Layer:
Take the mustard yellow rope and press it gently against the mint arch, following the curve. Ensure there are no gaps between the strands. -
Completing the Rainbow:
Repeat the process with the red rope, and finally the plum rope on the very outside. Press them together gently from the sides to bond them without flattening the round profile of the coils. -
Trimming the Ends:
Once your four-color rainbow is assembled, use your tissue blade to slice straight across the bottom legs of the arch. This gives the earrings a clean, flush bottom edge. -
Drilling Prep:
Before baking, use a needle tool or toothpick to mark a small pilot hole in the center of the top plum arch where the jump ring will eventually go. Don’t poke all the way through yet to avoid distortion.
Smooth Operator
Before baking, lightly brush the clay with a little baby oil or cornstarch to smooth away any fingerprints without ruining the texture.
Step 3: Baking and Assembly
-
Baking:
Place the tile with your rainbows directly into the oven. Bake according to the manufacturer’s instructions for your specific brand of clay—usually 275°F (135°C) for about 30 minutes. -
Cooling:
Allow the pieces to cool completely inside the oven or on a cooling rack before handling them. Warm clay is fragile and can snap easily. -
Drilling the Holes:
Using a hand drill or pin vise, carefully drill through the pilot mark you made earlier on the top arch. Drill straight through from front to back. -
Jump Ring Attachment:
Open a jump ring with your pliers using a twisting motion. Thread it through the hole you just drilled in the clay rainbow. -
Adding the Connector:
Before closing the jump ring, slide on the small gold connector disc. Close the jump ring securely. -
Attaching the Hook:
Open the loop on your earring hook (or use a second jump ring if needed for orientation). Attach it to the top of the gold connector disc. -
Final Check:
Repeat the assembly steps for the second earring, ensuring the hooks face the correct direction so the rainbows hang forward.
Now you have a charming set of handmade rainbows ready to wear or gift.


What Really Happens Inside the Kiln
Learn how time and temperature work together inside the kiln to transform clay into durable ceramic.
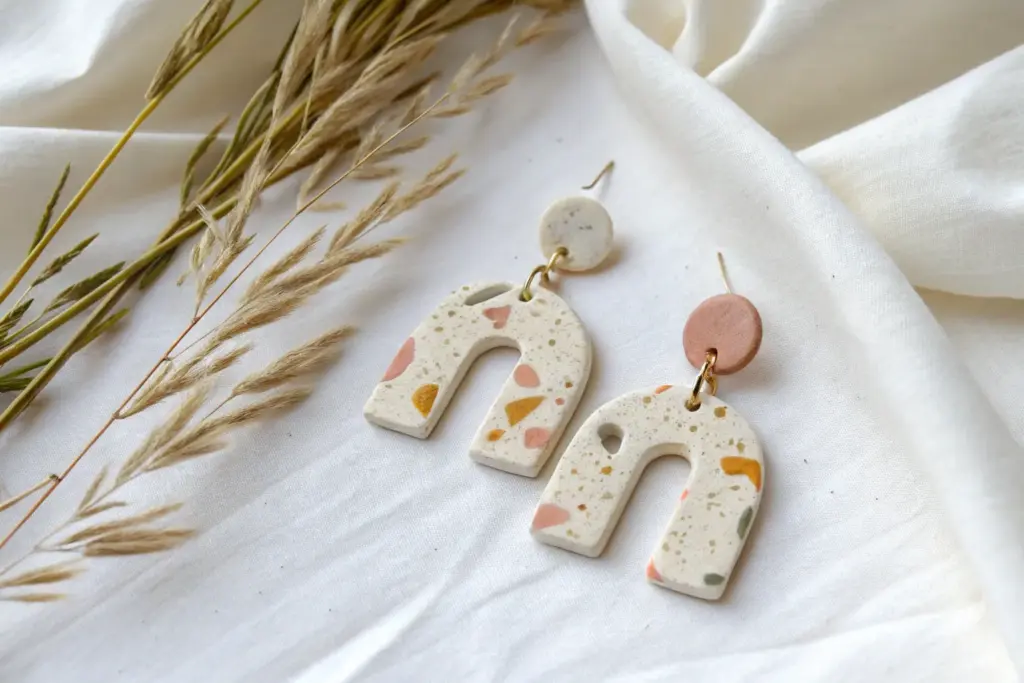
Terrazzo Sprinkle Tiles
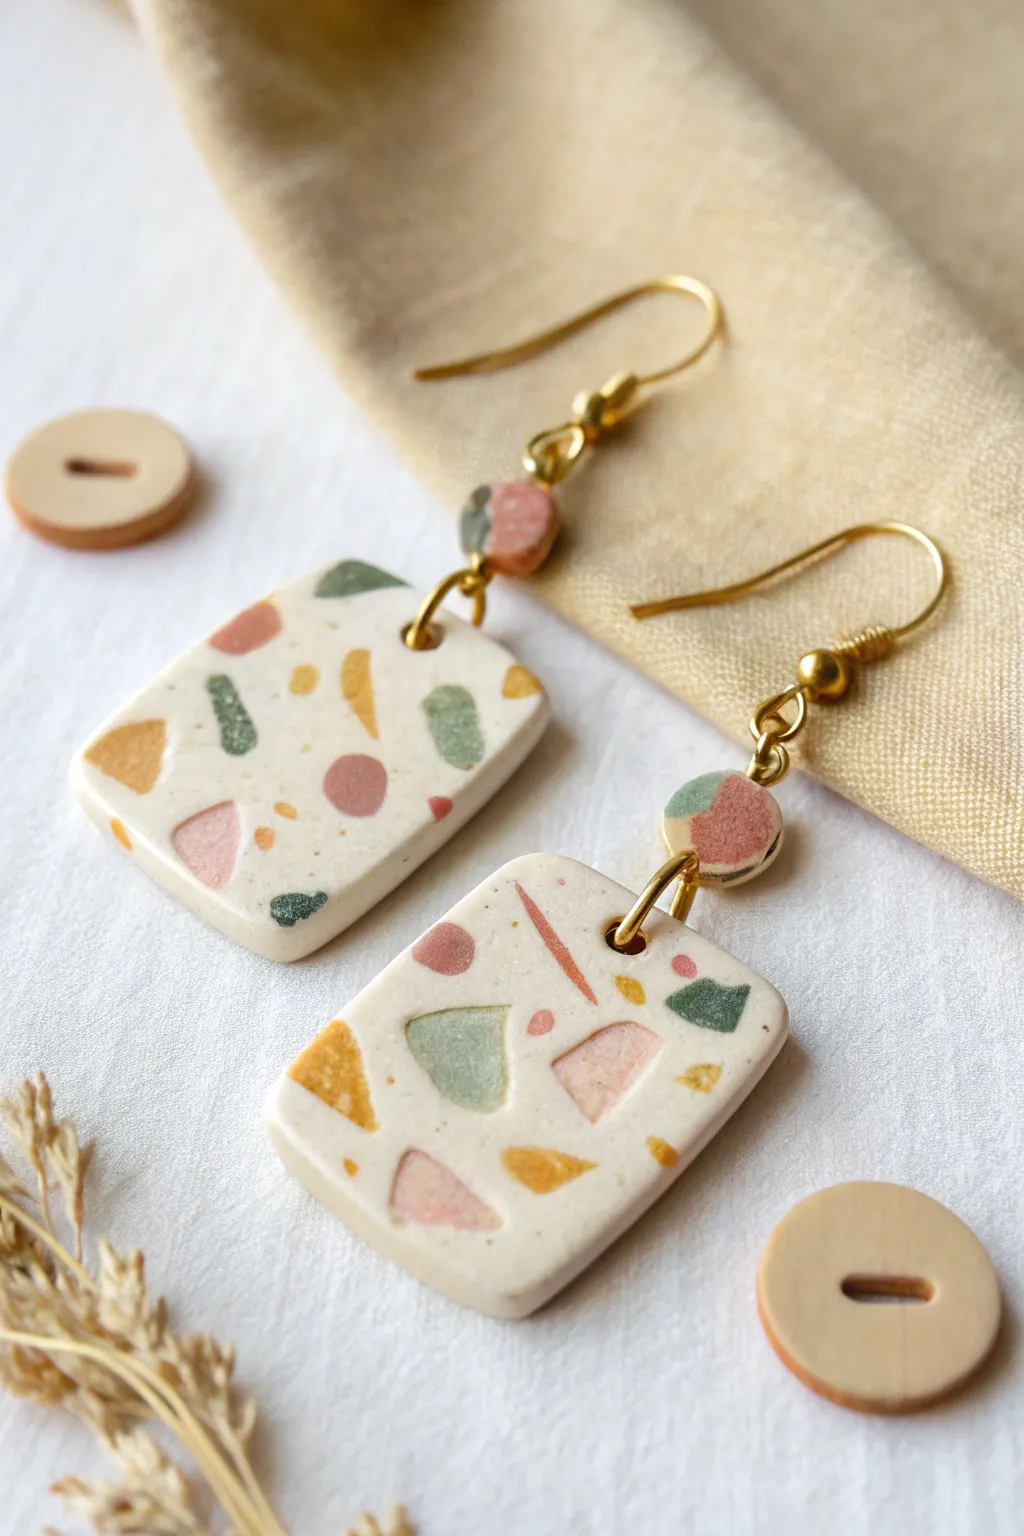
These charming earrings feature a creamy white base speckled with organic, terrazzo-style chips in earthy tones like sage green, dusty rose, and mustard yellow. The rectangular tile shape combined with delicate gold hardware gives them a modern, artistic feel perfect for everyday wear.
Step-by-Step
Materials
- White or cream polymer clay (base)
- Polymer clay in sage green, dusty rose/terracotta, mustard yellow, and forest green
- Rolling pin or pasta machine
- Sharp tissue blade or X-Acto knife
- Small rectangular clay cutter (approx. 1 inch)
- Tiny circular clay cutter (approx. 5mm)
- Parchment paper or ceramic tile for baking
- Oven
- Hand drill or pin vibe with small bit
- Fine-grit sandpaper (400 to 1000 grit) or buffing block
- 4 Gold jump rings (approx. 6mm)
- 2 Gold fishhook ear wires
- Needle nose pliers
- Gloss glaze or matte varnish (optional)
Step 1: Making the Terrazzo Chips
-
Roll Colored Sheets:
Condition small amounts of the colored clays (sage, rose, mustard, forest green) separately. Roll each color into a very thin sheet, approximately 1mm thick or the thinnest setting on your pasta machine. -
Bake the Sheets:
Place these thin colored sheets onto a baking surface. Bake them for about 10–15 minutes at the temperature recommended on your clay package. We want them partially cured so they are brittle enough to chop. -
Cool Down:
Remove the sheets from the oven and let them cool completely. They must be cold to snap properly. -
Create the Chips:
Use your fingers or a sharp blade to chop the baked sheets into irregular, jagged fragments. Aim for a mix of sizes—some tiny specks and some larger, chunky geometric shapes. Keep the colors separated or mix them into a festive pile.
Smudged Colors?
If your colored chips are smearing into the white base when rolling, your chips weren’t baked enough initially. Ensure the colored sheets are fully hardened before chopping them up.
Step 2: Forming the Slabs
-
Condition the Base:
Take a larger block of your white or cream clay and condition it until soft and pliable. Roll it out into a slab about 3-4mm thick. -
Apply the Chips:
Scatter your chopped colorful chips randomly over the raw white slab. Don’t overthink the placement—terrazzo looks best when organic. -
Embed the Pattern:
Cover the slab with parchment paper. Use your rolling pin to firmly roll over the chips, pressing them flat into the white base until the surface is completely smooth and level. -
Refine the Thickness:
If the slab has become too thin from rolling, you can fold it or stack it on a plain sheet of white clay to regain thickness, then roll gently to ensure the surface is flat.
Step 3: Cutting and Baking
-
Cut the Rectangles:
Using your rectangular cutter, punch out two identical shapes from the patterned slab. Try to capture areas with a nice variety of colors. -
Cut the Connector Circles:
Find a scrap area of the patterned slab and punch out two small circles using the tiny cutter. These will sit between the hook and the main tile. -
Drill Guide Holes:
Before baking, you can gently poke a small guide hole at the top center of each rectangle and the top/bottom of the small circles using a needle tool, or wait to drill after baking for cleaner edges. I prefer marking them now. -
Final Bake:
Place your cut shapes on a ceramic tile or baking sheet in the oven. Bake for the full recommended time (usually 30 minutes at 275°F/130°C for standard brands) to ensure durability.
Level Up: Hardware Swap
Instead of a fishhook wire, glue a flat stud post directly onto the back of the small circular piece. This creates a modern ‘dangle stud’ look that sits flush against the earlobe.
Step 4: Finishing Touches
-
Cool and Sand:
Allow the pieces to cool completely. Wet sand the edges and the surface lightly with fine-grit sandpaper to reveal the sharp definition of the chips and remove any lint or fingerprints. -
Buff or Glaze:
If you want a shine, buff the pieces with a denim cloth or apply a thin layer of matte varnish for a stone-like finish. -
Drill Holes:
Use a small hand drill to finalize the holes. You need one hole at the top of the rectangle, and two holes opposite each other on the small circles. -
Assemble the Connectors:
Open a jump ring with your pliers. Thread it through the top of the rectangle and one hole of the small circle. Close the ring securely. -
Attach Ear Wires:
Open the loop on the bottom of the fishhook ear wire (or use another jump ring) and attach it to the top hole of the small circle.
Now you have a stunning pair of custom terrazzo earrings ready to match any outfit.
Soft Marble Swirl Teardrops
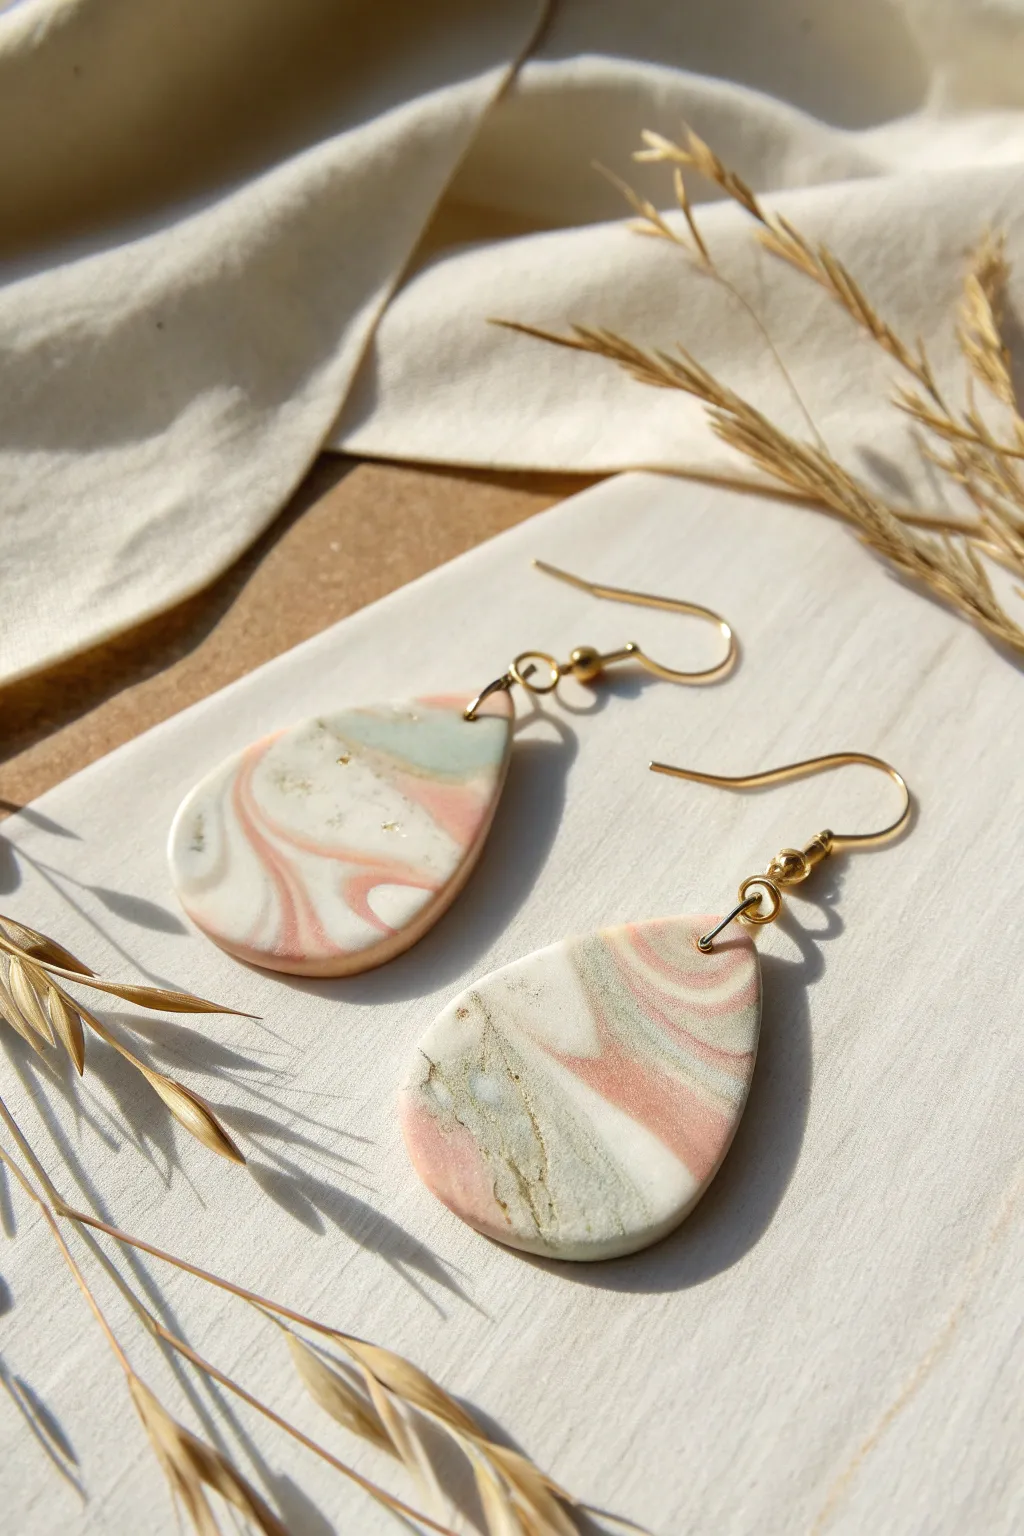
These elegant earrings combine muted pastels with organic swirled patterns to create a sophisticated, faux-stone aesthetic perfect for everyday wear. The soft palette of sage, coral, and cream blends seamlessly with subtle gold leaf accents for a truly timeless look.
How-To Guide
Materials
- Polymer clay (white, pastel pink/coral, muted sage green, beige)
- Gold leaf foil (optional but recommended)
- Black pepper or black paint (for speckling)
- Acrylic rolling pin
- Teardrop-shaped clay cutters (medium size)
- Clay slicing blade
- Pin vise or hand drill
- 2 Gold fishhook ear wires
- 4 Gold jump rings (small)
- Jewelry pliers
- Fine grit sandpaper (400-1000 grit)
- UV resin or gloss varnish (optional for finish)
Step 1: Preparing the Clay
-
Condition the white base:
Start by thoroughly conditioning a block of white polymer clay until it is soft and malleable. This will be your primary color, so prepare a larger amount than the other shades. -
Mix custom pastels:
If you don’t have exact shades, mix a tiny bit of red into white for the coral, and a touch of green and brown into white for the sage. Aim for muted, earthy tones rather than bright primaries. -
Roll small snakes:
Take your white, sage, coral, and beige clays and roll them into long, thin snakes of varying thicknesses. Keep the white snakes thicker to maintain that dominant creamy background. -
Join the colors:
Cluster the snakes together into one large log, twisting them gently around each other. Don’t over-twist yet; just enough to get them sticking together.
Step 2: Creating the Marble Effect
-
Initial twisting:
Hold both ends of your combined log and twist in opposite directions. Fold the twisted log in half, and twist again. Repeat this simple fold-and-twist motion 2-3 times. -
Add gold accents:
Tear small, scattered pieces of gold leaf foil and press them randomly onto your twisted clay log. This adds that luxe shimmer seen in the final piece. -
Adding texture:
For the stone-like speckling, sprinkle a tiny pinch of ground black pepper or dried craft sand onto the clay. I find this creates a much more natural stone look than paint. -
Final consolidation:
Roll the log into a ball to consolidate the gold and speckles, then roll it back out into a thick log one last time.
Clean Cuts Pro-Tip
To prevent the clay from sticking to your cutter or distorting the shape, dip your cutter into a small pile of cornstarch or water before pressing it into the slab.
Step 3: Shaping and cutting
-
Flatten the slab:
Using your acrylic roller, flatten the log into a slab about 3mm thick. Roll in different directions to stretch the marble pattern interestingly. -
Select your pattern:
Look closely at your slab before cutting. Use your teardrop cutter to frame the most pleasing swirls where the sage and coral meet the white. -
Cut the shapes:
Press the cutter firmly into the clay. Give it a tiny wiggle to separate clean edges, then lift carefully. Cut at least two shapes for your pair. -
Smooth the edges:
Before baking, gently run your fingertip along the cut edges of the raw clay to smooth out any harsh lines or fingerprints. -
Pierce holes:
Using a needle tool or toothpick, poke a hole near the top point of each teardrop. Make sure the hole is big enough for your jump rings.
Resin Shine Level-Up
For a high-gloss, ceramic look, apply a thin layer of UV resin to the front of the baked earrings and cure under a UV lamp for 2 minutes. It makes the gold pop.
Step 4: Finishing Up
-
Bake the pieces:
Place your teardrops on a tile or parchment paper. Bake according to your brand of clay’s instructions (usually around 275°F/130°C for 30 minutes). -
Cool and inspect:
Allow the pieces to cool completely. The clay should be hard but have a slight flexibility. -
Sand and buff:
Dip your sandpaper in water and gently sand the edges and surface to a smooth finish. This stage really brings out the translucent depth of the marble. -
Assemble the hardware:
Using two pairs of pliers, twist open a jump ring laterally. Thread it through the clay hole and attach the ear wire loop. -
Close the rings:
Twist the jump ring back into a closed position, ensuring the ends meet perfectly so the charm doesn’t slip off.
Enjoy the sophisticated beauty of your new handmade faux-stone earrings

TRACK YOUR CERAMIC JOURNEY
Capture glaze tests, firing details, and creative progress—all in one simple printable. Make your projects easier to repeat and improve.
Color-Blocked Stacked Shapes
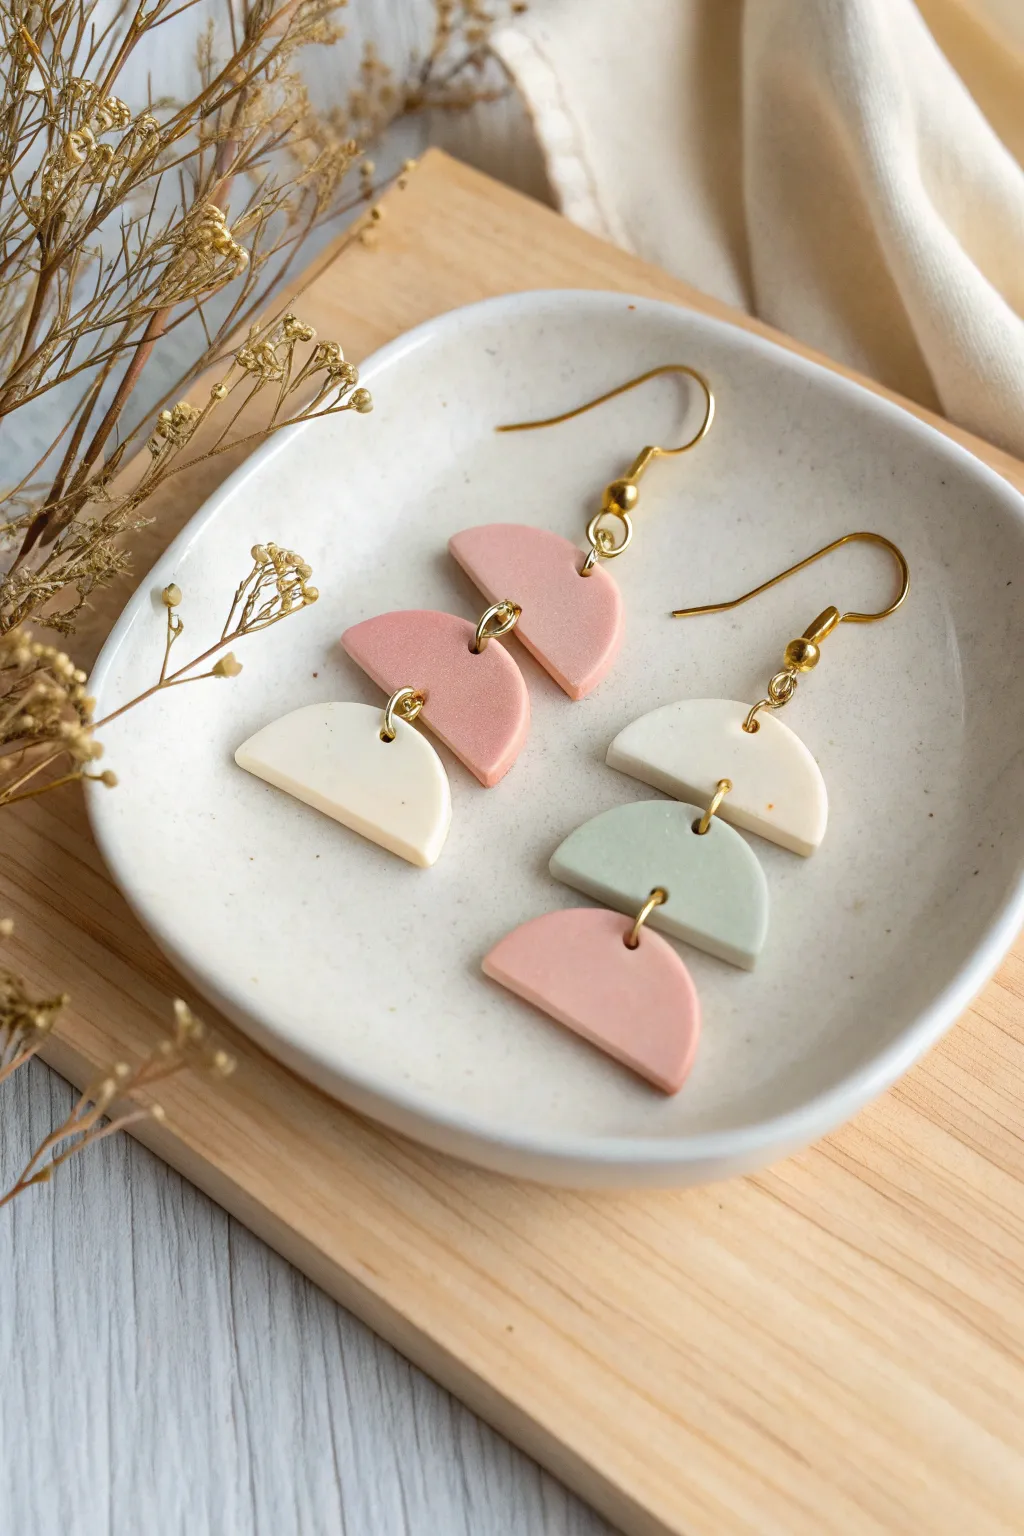
These charming earrings feature a cascade of soft, graduated semi-circles in a lovely muted palette of blush, sage, and cream. The simple geometric shapes are linked together for a delightful swaying movement that elevates any casual outfit.
Detailed Instructions
Materials
- Polymer clay in dusty pink, sage green, and cream/white
- Rolling pin or pasta machine
- Circle cutters in graduated sizes (small, medium, large)
- Rigid tissue blade or craft knife
- Gold jump rings (approx. 6mm or 7mm)
- Gold fishhook ear wires
- Needle tool or small drill bit
- Jewelry pliers (flat nose and round nose)
- Ceramic tile or baking sheet
- Fine grit sandpaper (optional)
Step 1: Clay Preparation
-
Condition the Clayton:
Begin by thoroughly kneading each color of polymer clay—dusty pink, sage green, and cream—until they are soft, pliable, and free of cracks. -
Roll Flat Sheets:
Roll out each color into an even sheet. Aim for a thickness of about 3mm (or setting 1 on most pasta machines) to ensure the earrings are sturdy but not too heavy. -
Check for Air Bubbles:
Scan the clay surface for any trapped air bubbles. If you spot one, gently pierce it with your needle tool and smooth the clay back down with your finger.
Step 2: Cutting the Shapes
-
Cut the Circles:
Using your circle cutters, punch out full circles from each color. You will need pairs of circles if you want varying sizes, but for this specific look, aim for medium-sized circles. -
Create Semi-Circles:
Take your rigid tissue blade and slice each circle exactly in half to create two semi-circles. Try to make the cut as straight and clean as possible. -
Select Your Layout:
Arrange the semi-circles on your work surface to plan your color blocking. For the first earring, you might stack pink, pink, cream. For the second, try white, green, pink. This helps visualize the final balance. -
Smooth the Edges:
Gently embrace the edges of each cut shape with your fingertip to round them slightly, removing any sharp corners or drag marks left by the blade.
Sticky Situation?
If your clay sticks to the table when lifting the shapes, try working on a piece of parchment paper or lightly dust your work surface with cornstarch before rolling.
Step 3: Assembly Prep & Baking
-
Pierce Connection Holes:
Use a needle tool to poke holes in the semi-circles. The top piece needs one hole at the top curve (for the hook) and one at the bottom straight edge. The middle piece needs a top and bottom hole. The bottom piece only needs a top hole. -
Refine Hole Positions:
Ensure the holes are close enough to the edge to accommodate the jump rings, but not so close that the clay will tear. About 2-3mm from the edge is generally safe. -
Bake the Pieces:
Place your clay shapes on a ceramic tile or baking sheet lined with parchment paper. Bake according to the manufacturer’s instructions for your specific brand of clay—usually around 275°F (135°C) for 30 minutes. -
Cool and Sand:
Allow the pieces to cool completely. If there are any rough spots, lightly sand the edges or faces with fine-grit sandpaper, or buff them with a piece of denim for a matte sheen.
Drilling Pro Tip
Instead of poking holes before baking, try baking the solid shapes first and then using a small hand drill or rotary tool. This prevents the shapes from distorting.
Step 4: Final Assembly
-
Open Jump Rings:
Using two pairs of pliers, twist your gold jump rings open sideways (never pull them apart outward) to maintain their round shape. -
Link the Shapes:
Thread an open jump ring through the bottom hole of the top semi-circle and the top hole of the middle semi-circle. Close the ring securely. -
Add the Bottom Piece:
Repeat the previous step to attach the bottom semi-circle to the middle one using another jump ring, completing the stacked tier. -
Attach Ear Wires:
Open the small loop on your fishhook ear wire or use a small jump ring to connect the ear wire to the very top hole of your earring stack. -
Double Check Connections:
Gently wiggle the assembly to ensure all rings are fully closed and the pieces swing freely without getting stuck.
Enjoy wearing your new modern art earrings, or box them up as a lovely handmade gift
Cloud and Raindrop Mismatched Pair
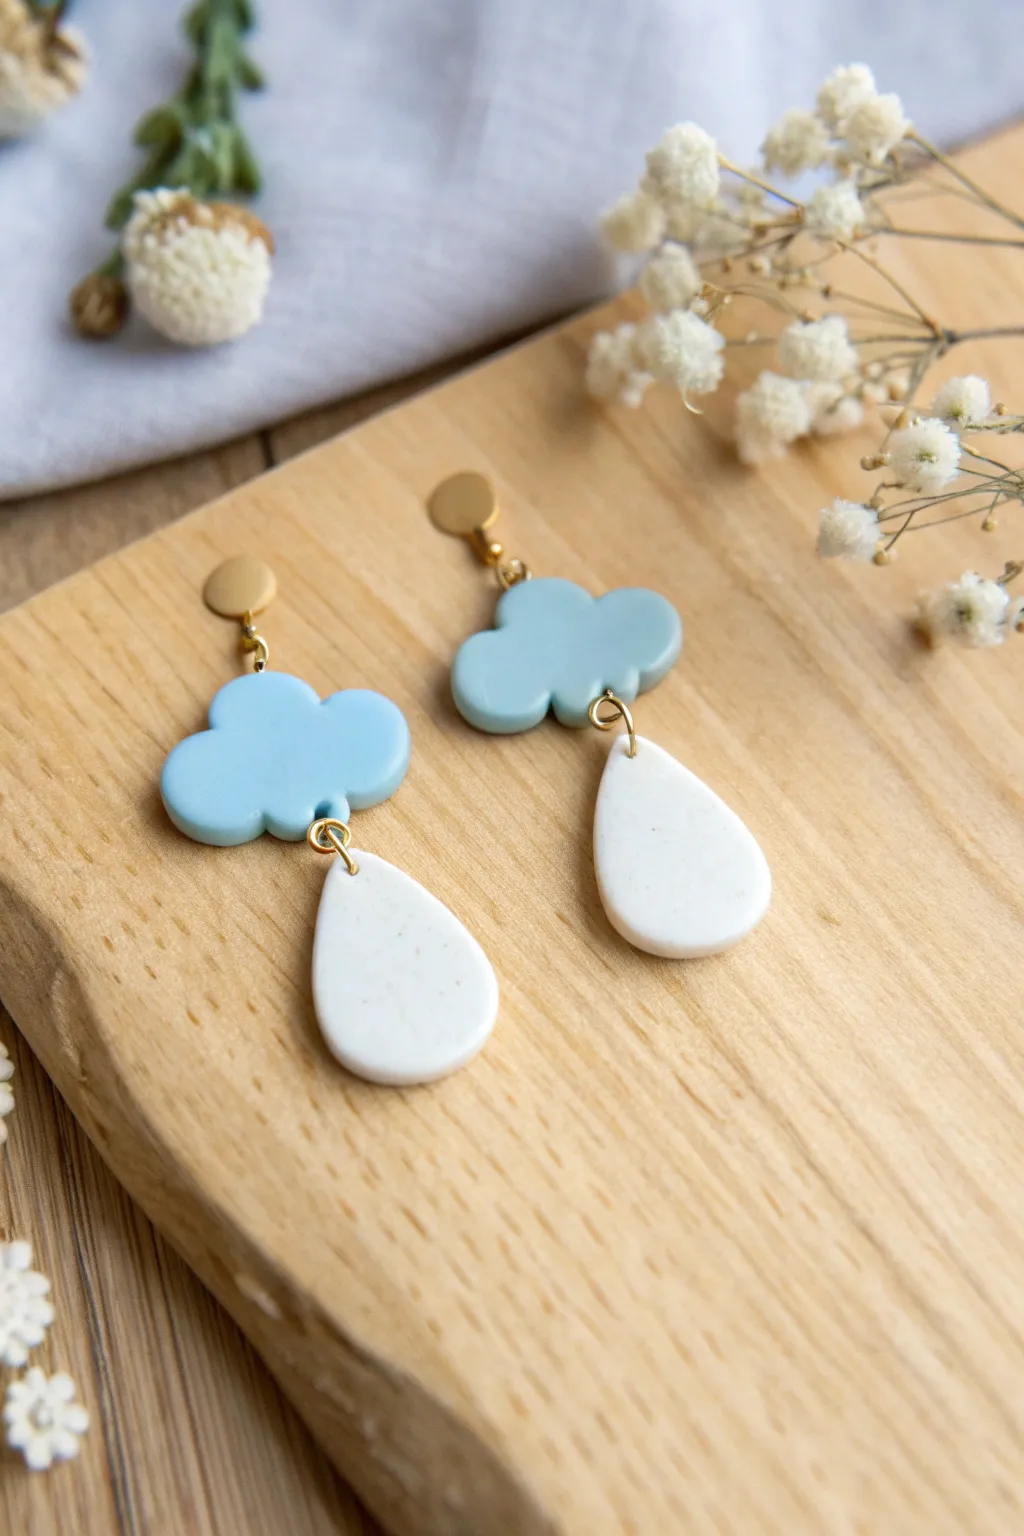
Capture the cozy feeling of a spring shower with these adorable polymer clay dangles. Featuring soft blue clouds and speckled white raindrops, this design adds a touch of whimsy to any rainy day outfit.
Detailed Instructions
Materials
- Polymer clay (baby blue and white)
- Speckled clay (or black pepper to mix in like faux stone)
- Clay rolling pin or pasta machine
- Cloud shaped clay cutter (small)
- Teardrop shaped clay cutter (medium)
- Hand drill or needle tool
- 4 large gold jump rings
- 2 small gold jump rings
- 2 flat-pad gold earring posts
- Super glue or E6000
- Jewelry pliers
- Clay oven and baking sheet
- Parchment paper
Step 1: Shaping the Clouds
-
Prepare the blue clay:
Condition your baby blue clay by kneading it in your hands until it is soft and pliable. Roll it out into a sheet about 3mm thick using your roller or pasta machine. -
Cut the cloud shapes:
Using your small cloud cutter, press firmly into the blue sheet to cut out two identical cloud shapes. If you don’t have a cutter, you can hand-cut the curves with a craft knife using a paper template. -
Smooth the edges:
Gently rub the edges of the cut clouds with your finger or a little cornstarch to remove any sharp ridges left by the cutter, giving them a soft, puffy look. -
Add jump ring holes:
Use a needle tool to pierce a hole near the top center of each cloud (for the earring stud) and another hole at the bottom center (for the raindrop).
Sticky Situation?
If your clay is sticking to the cutter, dip the cutter in cornstarch or water before pressing it into the clay slab. This acts as a release agent.
Step 2: Creating the Raindrops
-
Mix the drop effect:
For that subtle textured look seen in the photo, mix a tiny pinch of speckled clay or even ground black pepper into your white clay. Condition until the specks are evenly distributed. -
Roll and cut:
Roll the white clay to the same thickness as your clouds (3mm). Use the teardrop cutter to punch out two large raindrops. -
Smooth and pierce:
Soften the edges of the raindrops just like you did with the clouds. Pierce a single hole at the very top point of each raindrop, making sure there is enough clay above the hole so it won’t tear later. -
Bake the pieces:
Place all four clay pieces on a parchment-lined baking sheet. Bake according to your clay package instructions (usually 275°F/135°C for 15-30 minutes). -
Cool down:
Let the pieces cool completely on the baking sheet before handling them to ensure they harden properly.
Step 3: Assembly
-
Attach the drops:
Using two pliers, twist open a large gold jump ring. Thread it through the top of a white raindrop and the bottom hole of a blue cloud, then close the ring securely. -
Repeat for the pair:
Repeat the previous step for the second earring so you have two assembled dangles. -
Prepare the studs:
Take your flat-pad earring posts. I like to lightly sand the back of the gold pad to give the glue more grip. -
Glue the assembly:
This style dangles from the stud rather than being glued to it directly. Attach a small jump ring to the *top* hole of the cloud. -
Connect to post:
If your earring post has a loop, connect the jump ring directly. If it is a flat pad post intended for gluing, you might need a small separate clay circle to glue the post onto, and connect that to the cloud via jump ring. Alternatively, use a ball-stud with a loop for the easiest connection. -
Final check:
Ensure all jump rings are closed fully flush so the pieces don’t slip out during wear.
Level Up: Stormy Skies
Marble grey and white clay together for the clouds to create a stormy effect, or add a coat of UV resin for a glossy, wet-rain look.
Now you have a charming set of weather-themed accessories ready to brighten up any grey day
Mini Flower Bouquet Dangles
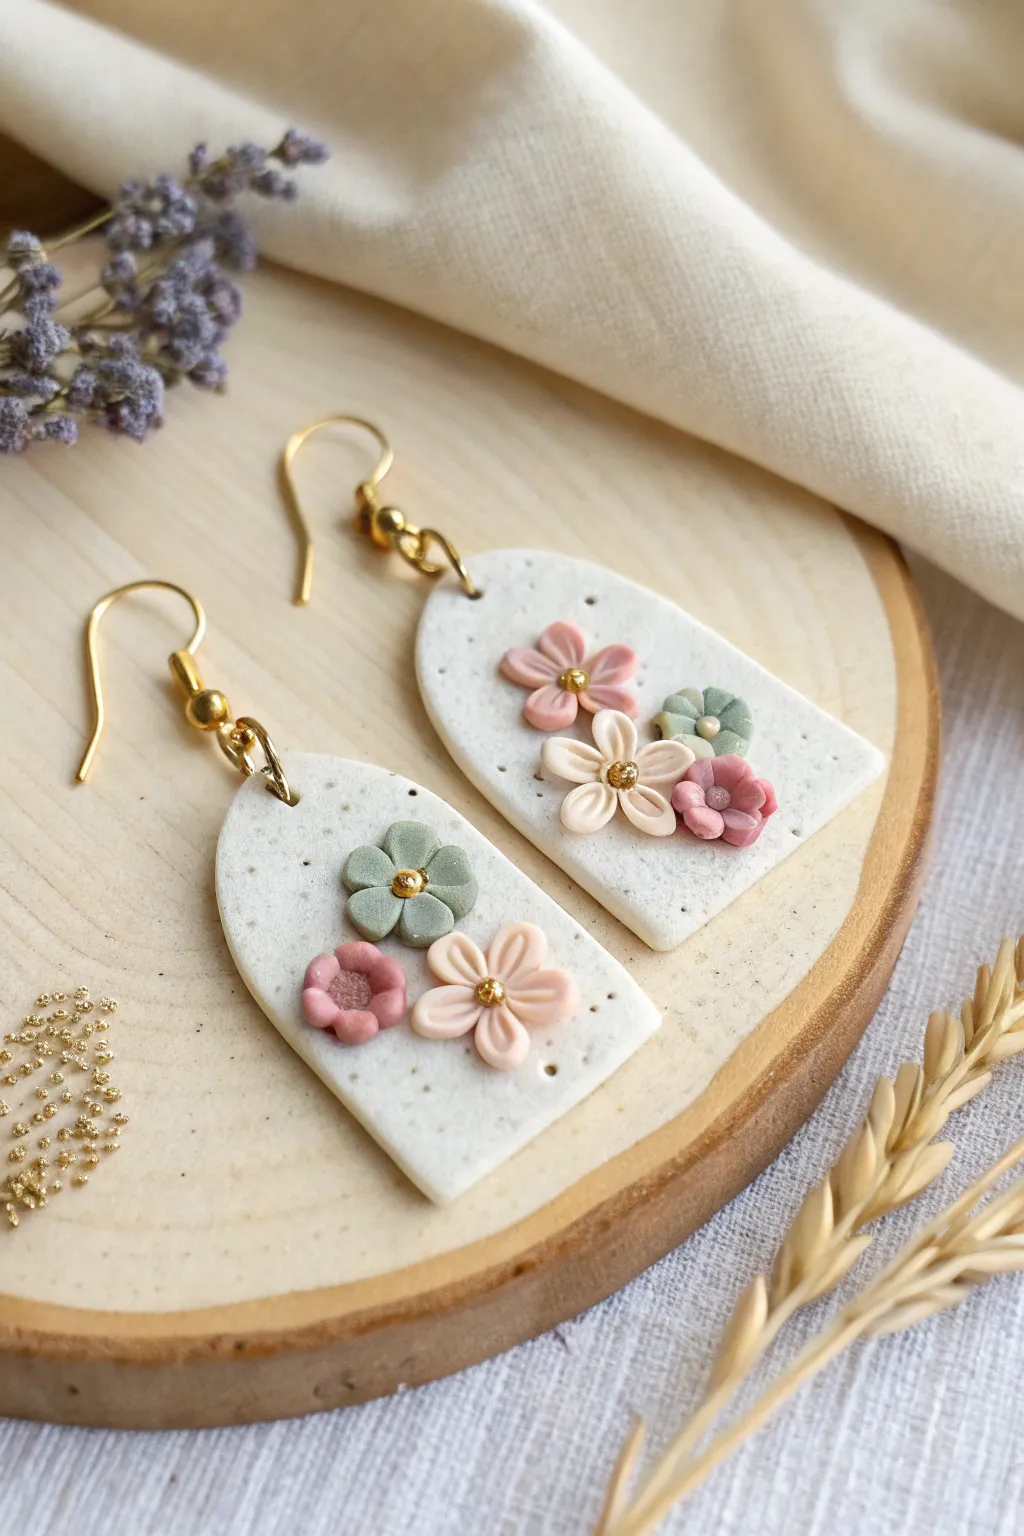
Embrace the softness of spring with these delicate polymer clay earrings featuring a bouquet of tiny, sculpted blooms. The speckled white background provides a ceramic-like texture that makes the pastel flowers truly pop.
Step-by-Step
Materials
- White or translucent white polymer clay
- Speckled clay (or black pepper to mix in)
- Pastel colored polymer clay (dusty pink, blush, sage green)
- Small gold micro-beads or seed beads
- Arch-shaped clay cutter (approx. 1.5 inches)
- Rolling pin or pasta machine
- Ball stylus tool
- Needle tool or toothpick
- Gold jump rings (4-6mm)
- Gold fishhook ear wires
- Jewelry pliers
- Hand drill or pin vise
- Gloss varnish (optional)
Step 1: Creating the Base
-
Prepare the speckled clay:
Start by conditioning your white clay until soft. If your clay isn’t pre-speckled, mix in a tiny pinch of ground black pepper or black embossing powder to create a stone-like effect. -
Roll the slab:
Roll out the clay to an even thickness of about 3-4mm. A pasta machine works best for consistency, but a rolling pin with depth guides is also perfect. -
Cut the shapes:
Using your arch cutter, press firmly into the slab to cut out two identical base shapes. Gently smooth the edges with your fingertip to remove any stray bits of clay.
Step 2: Sculpting the Miniature Flowers
-
Mix your palette:
Condition your colored clays. You’ll need a sage green for the leaves/green flowers, a dusty rose, and a pale blush pink. -
Form petals for the large flower:
For the main blush flower, roll five tiny balls of clay (about 2mm usually works well). Flatten each slightly into a teardrop shape. -
Assemble the blush flower:
Arrange the five teardrops in a circle on your work surface, pressing the pointed ends together in the center. Use a needle tool to gently indent the center of each petal for dimension. -
Create the greenery:
Repeat the process with the sage green clay to make a four-petaled flower shape. I like to make these slightly smaller than the blush ones. -
Sculpt the accent blooms:
Finally, create smaller, three or four-petaled flowers using the dusty rose clay to complete your floral trio. -
Attach flowers to base:
Carefully lift your flowers with a blade and place them onto the raw white arch shapes. Gently press them down so they adhere. -
Add the centers:
Use a ball tool to make a tiny divot in the center of each flower. Press a gold micro-bead firmly into each center divot; the clay will hold it in place during baking. -
Add decorative texture:
Using a needle tool, poke random, shallow dots into the white background around the flowers to enhance the speckled, textural look. -
Backing holes:
Use a straw or small round cutter to pierce a hole at the very top of each arch for the hardware.
Sticky Situation?
If tiny petals stick to your fingers, lightly dust your fingertips with cornstarch before rolling. It helps release the clay without altering the color.
Step 3: Finishing Touches
-
Bake the pieces:
Bake your earrings according to the clay manufacturer’s instructions—usually 275°F (130°C) for about 30 minutes. Let them cool completely. -
Drill (if needed):
If your pre-punched holes closed up during baking, gently re-open them using a hand drill or pin vise. -
Attach hardware:
Open a gold jump ring using two pairs of pliers (twist side-to-side, never pull apart). Thread it through the hole in the arch. -
Secure the hook:
Slide the loop of the fishhook ear wire onto the open jump ring, then twist the ring closed securely.
Placement Pro Tip
Arrange flowers slightly off-center or overflowing the edge just a hair for a more organic, hand-picked bouquet look rather than perfect symmetry.
Wear your mini garden creations with pride or gift them to a flower-loving friend
Shaker-Style Confetti Window Dangles
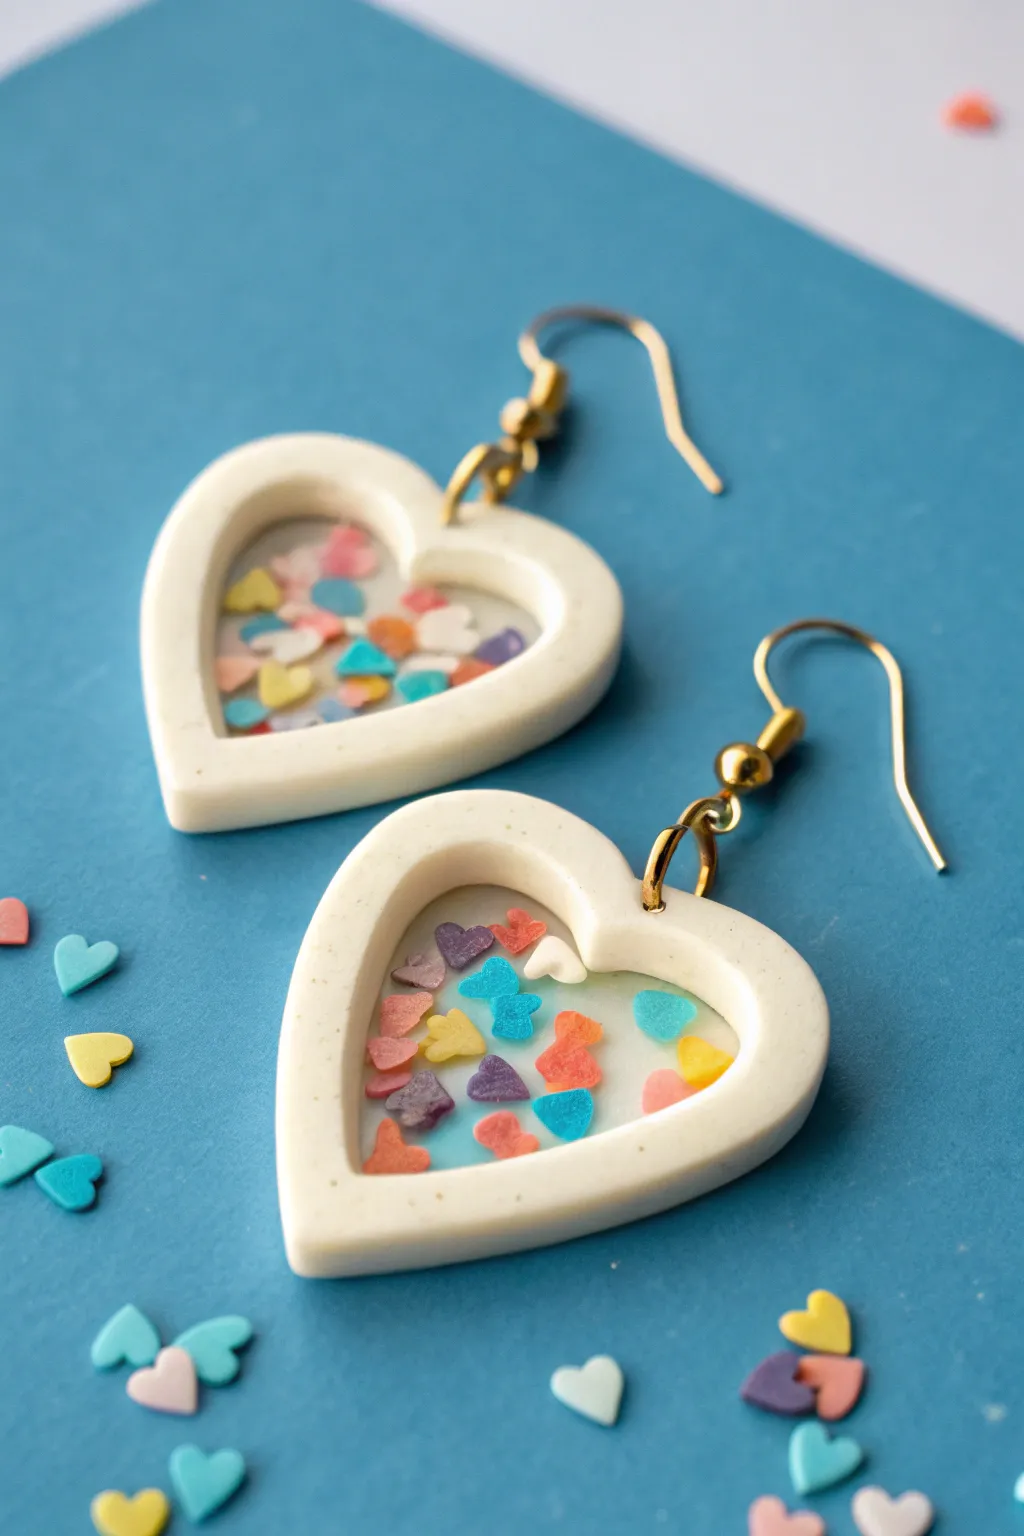
Capture the whimsy of childhood crafts with a polished, modern twist in these adorable heart-shaped shaker earrings. Featuring a speckled clay frame and a clear window filled with tiny, colorful hearts, they add a joyful pop of color to any outfit.
How-To Guide
Materials
- White polymer clay (with granite or speckle effect)
- Small heart-shaped cookie cutter (approx. 1.5 inch)
- Smaller heart-shaped cookie cutter (approx. 1 inch)
- UV resin (hard type)
- UV lamp
- Clear packing tape or specialized resin tape
- Polymer clay heart sprinklets or confetti slices
- Earring hooks (gold)
- Jump rings (gold)
- Jewelry pliers
- Hand drill or pin vibe
- Acrylic roller or pasta machine
- Silicon mat
Step 1: Creating the Clay Frames
-
Condition the Clay:
Begin by thoroughly conditioning your speckled white polymer clay until it is soft and pliable. Roll it out into a sheet approximately 3mm to 4mm thick. You want it thick enough to act as a sturdy frame. -
Cut the Outer Shape:
Place your larger heart cutter onto the clay sheet and press down firmly to cut the main shape. Repeat this to create two hearts. -
Cut the Inner Window:
Center the smaller heart cutter inside the larger clay heart you just cut. Press down to remove the center, leaving you with a hollow heart frame. Do this for both pieces. -
Smooth the Edges:
Gently lift the frames. If there are any rough edges from the cutters, smooth them out carefully with your fingertip or a silicone tool. -
Bake the Frames:
Place the frames on a ceramic tile or baking sheet lined with parchment paper. Bake according to your clay manufacturer’s instructions (usually 275°F/135°C for 30 minutes). Let them cool completely before moving to the next phase.
Step 2: Creating the Resin Window
-
Tape the Back:
Cut a piece of clear packing tape slightly larger than your heart frame. Press the sticky side firmly against the *back* of the baked clay frame. Ensure a tight seal around the inner rim so resin won’t leak. -
First Resin Layer:
Flip the frame over so the sticky tape side is facing up through the window. Pour a very thin layer of clear UV resin onto the tape, spreading it to the edges of the clay with a toothpick. -
Add Confetti:
Sprinkle your polymer clay heart confetti into the wet resin. Arrange them so they aren’t overlapping too much, ensuring distinct pops of color. I like to nudge a few right to the edge for a floating effect. -
Cure the Base:
Place the piece under your UV lamp for about 60-90 seconds to freeze the confetti in place. -
Fill the Window:
Pour another layer of UV resin over the cured confetti layer, filling the window until it is flush with the top of the clay frame. Pop any bubbles with a lighter or toothpick. -
Final Cure:
Cure under the UV lamp for 2-3 minutes until the resin is hard and tack-free. -
Remove Tape:
Peel off the packing tape from the back. If the back feels tacky, cure the back side under the lamp for another 60 seconds. -
Back Seal (Optional):
If the tape left a texture, add a tiny layer of resin to the back window and cure again for crystal-clear transparency.
Sticky Situation?
If your tape leaves a sticky residue on the back of the resin window after peeling, wipe it gently with a cotton swab dipped in rubbing alcohol or Goo Gone before adding a final sealing layer.
Step 3: Assembly
-
Drill Holes:
Using a manual hand drill or pin vibe, carefully drill a small hole at the very top center of each heart frame. -
Attach Jump Rings:
Twist open a gold jump ring using two pairs of jewelry pliers. Thread it through the hole you just drilled. -
Add Earring Hooks:
Before closing the jump ring, slide on the loop of your earring hook. Ensure the hook is facing the correct direction so the front of the heart faces forward. -
Close and Secure:
Twist the jump ring closed securely so there is no gap. Give the earring a little shake to make sure everything holds together nicely.
Make it a True Shaker
To make the confetti move, cure a clear base layer first. Then add dry confetti. Cover with a cut sheet of transparency film, seal edges with resin, and dome the top. Now they rattle!
Now you have a charming pair of sweet, confetti-filled earrings ready to wear or gift