If you’re brand new to polymer clay, the cutest projects are usually the simplest ones—think tiny shapes you can roll in your palms and press together. Here are my favorite beginner-friendly ideas that turn basic balls and logs of clay into cute polymer clay pieces you’ll actually want to make a whole set of.
Kawaii Donut Charms
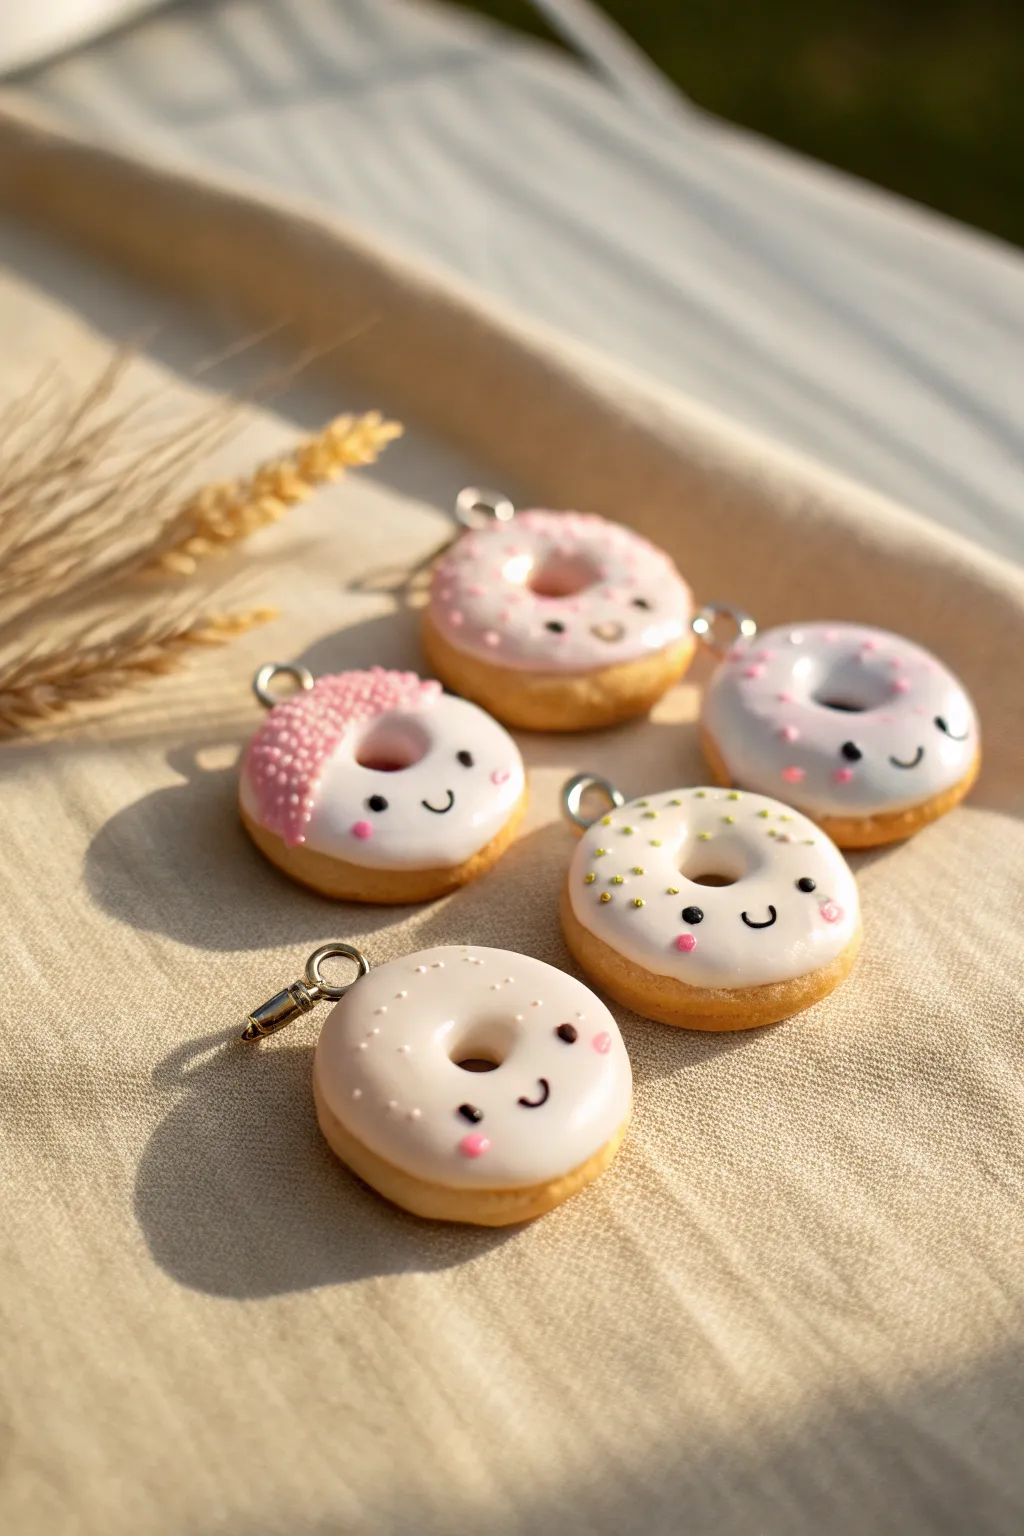
These adorable polymer clay donut charms feature sweet, smiling faces and tiny, realistic details that make them good enough to eat. With their golden-baked bases and glossy icing, they are the perfect beginner project for practicing texture and kawaii facial expressions.
Step-by-Step Guide
Materials
- Polymer clay (dough color/beige, white, translucent)
- Liquid polymer clay (Translucent Liquid Sculpey or Fimo Liquid)
- Chalk pastels (orange, yellow ochre, warm brown)
- Soft paintbrush for shading
- Ball stylus tool or toothpick
- Small eye screw pins
- Black acrylic paint
- Pink acrylic paint or pink chalk pastel
- Very fine detail paintbrush or needle tool
- Micro beads or sprinkles (can use clay bits)
- Gloss glaze (polyurethane or resin)
Step 1: Shaping the Base
-
Mix the dough Color:
Start by mixing beige polymer clay with a tiny amount of translucent clay and white. This creates a realistic, slightly airy dough look rather than a flat plastic color. -
Form the donuts:
Roll the clay into a smooth ball about the size of a large marble, then gently flatten it into a thick disc. Use your finger to round off the harsh edges so it looks puffed up. -
Create the hole:
Take a large ball stylus or the back of a paintbrush and press firmly into the center to create the donut hole. Press from both sides to ensure the opening is clean and the shape stays symmetrical. -
Texture the dough:
Use a toothbrush or a crumpled ball of aluminum foil to gently tap texture all over the beige clay. This mimics the porous surface of a real fried donut. -
Pre-bake shading:
Scrape some orange and brown chalk pastel into fine powder. Using a soft dry brush, gently dust the edges and the area around individual sprinkles to simulate a golden-baked effect. I like to focus on the outer rim for that ‘fresh from the fryer’ look.
Step 2: Icing and Details
-
Prepare the icing:
Mix liquid polymer clay with a small amount of solid white clay. Mash them together until you have a thick, gooey consistency that resembles royal icing. If you want pink icing, add a speck of pink clay. -
Apply the glaze:
Carefully spread the liquid clay mixture onto the top of your donut using a toothpick or small tool. Let it drip slightly over the edges naturally, but control the flow so it doesn’t cover the textured sides completely. -
Add sprinkles:
While the liquid clay is wet, drop on micro beads or tiny hand-rolled logs of pink and yellow clay to act as sprinkles. Gently press them down so they adhere to the liquid. -
Insert hardware:
Screw a small eye pin into the top edge of the donut. Adding a tiny bit of liquid clay to the screw threads before inserting helps it bond permanently during baking. -
Bake the batch:
Bake the donuts according to your clay manufacturer’s instructions (usually 275°F/130°C for 15-30 minutes). Let them cool completely before moving to the next step.
Sticky Situation?
If your liquid clay icing is too runny and dripping off the donut, let the mixture sit open for an hour to thicken up, or mix in more solid white clay to give it body
Step 3: Bringing them to life
-
Paint the eyes:
Using black acrylic paint and a very fine detail brush (or a toothpick tips), paint two small, wide-set upside-down ‘U’ shapes for the eyes, or simple dots. Keep them low on the face for maximum cuteness. -
Add the smile:
Paint a tiny, simple ‘U’ shape between the eyes for the mouth. The line should be thin and delicate. -
Blush those cheeks:
Dip a cotton swab or a dry brush into pink chalk pastel powder (or use very watered-down pink paint) and gently dab rosy cheeks underneath the eyes. -
Sealing the charm:
Once the paint is fully dry, coat the icing area (not the bread part) with a gloss glaze. This makes the icing look wet and meaningful while keeping the dough matte and realistic.
Sprinkle Surprise
Make custom sprinkles by extruding long thin snakes of colored clay, baking them straight, and then chopping them into tiny bits with a sharp blade
Now you have a sweet set of charms ready for a keychain or necklace


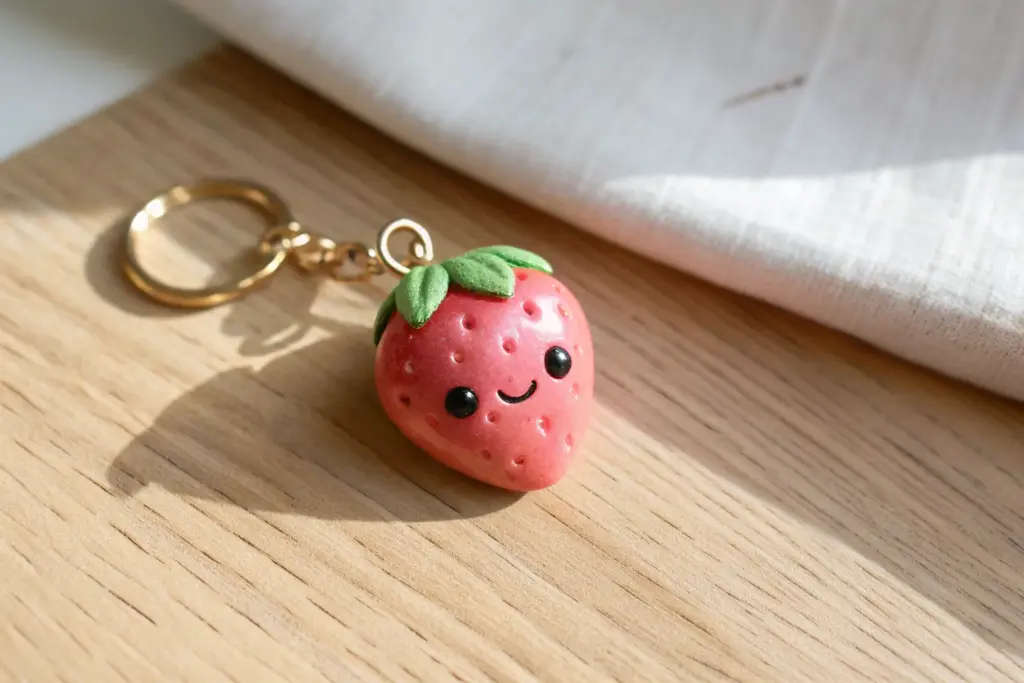
Tiny Strawberry Friends
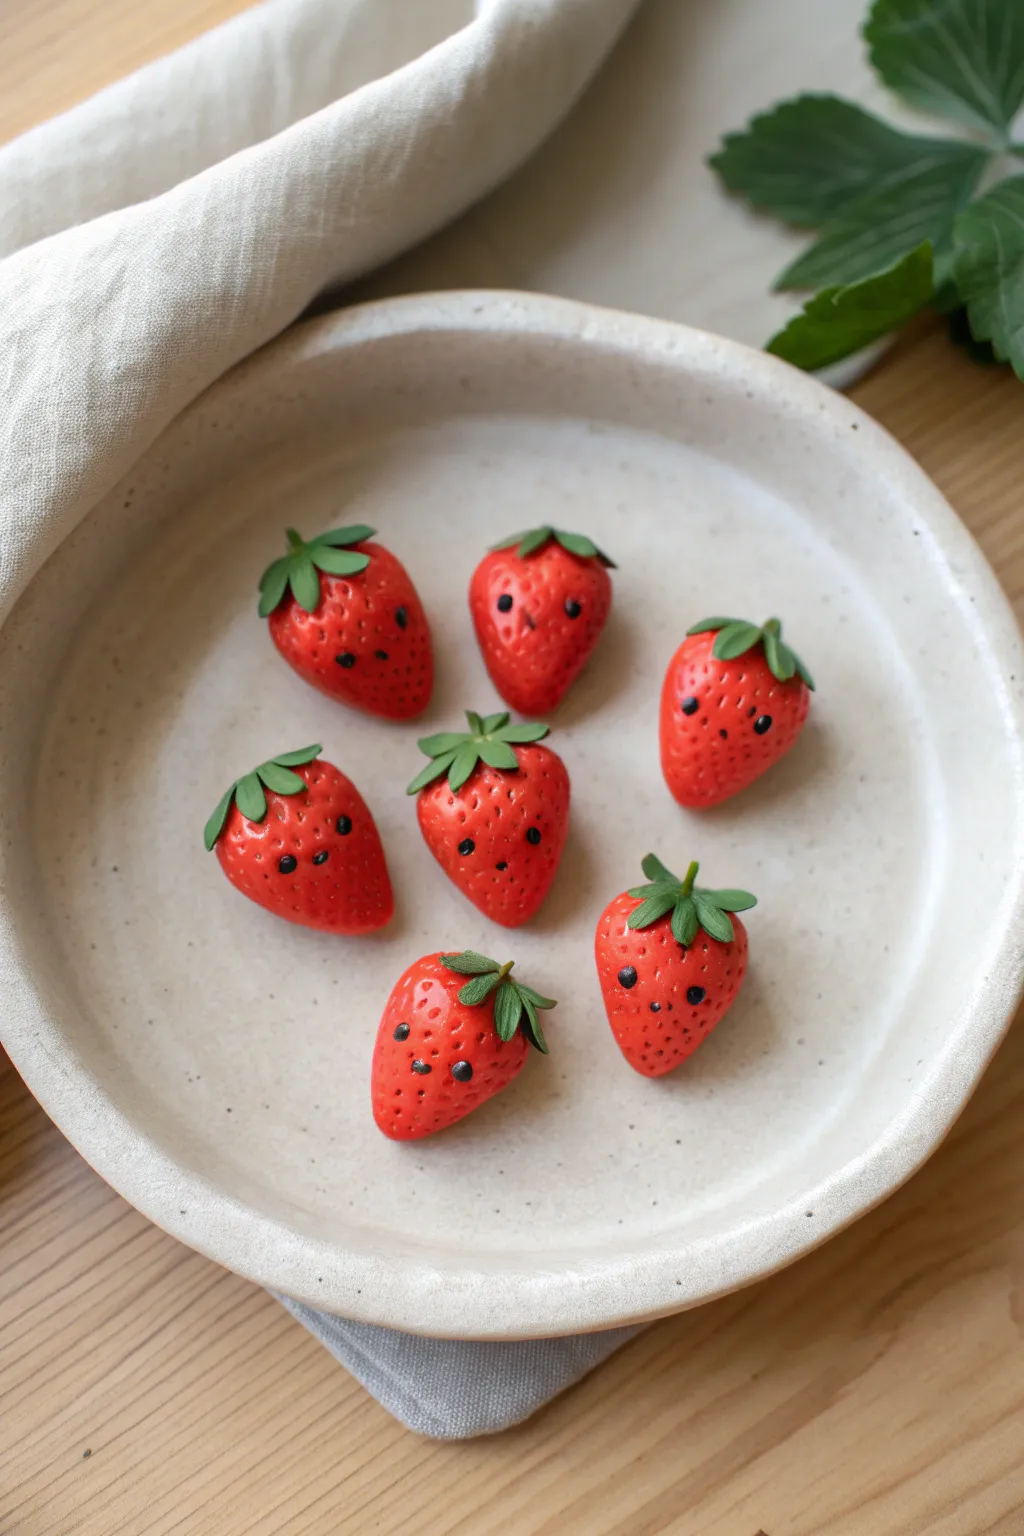
These adorable little berries redefine sweetness with their bright red bodies and tiny, expressive faces. Perfect for absolute beginners, this project teaches basic shaping and texturing techniques to bring a whole bowl of fruit friends to life.
Step-by-Step Guide
Materials
- Red polymer clay (bright scarlet)
- Leaf green polymer clay
- Black polymer clay (or black acrylic paint)
- Needle tool or toothpick
- Small ball tool (2mm)
- Caning blade or craft knife
- Gloss varnish or UV resin (optional)
- Ceramic tile or glass work surface
- Baby wipes (for cleaning hands)
Step 1: Shaping the Berry Bodies
-
Condition the Clay:
Begin by thoroughly kneading your red clay until it is soft, pliable, and free of any cracks. Warm clay is much easier to smooth later. -
Roll Spheres:
Divide the red clay into small, equal-sized portions, each about the size of a large marble. Roll each piece into a perfectly smooth ball between your palms. -
Form the Strawberry Shape:
Gently roll one side of the ball between your fingers to taper it slightly, creating a rounded teardrop or strawberry silhouette. Flat the wider top slightly so the leaves will sit flush. -
Create Seed Texture:
Using a needle tool or toothpick, gently press small indentations all over the red surface. Don’t press too deep; you just want dimples to mimic seeds. Leave a small clear patch on the lower half for the face.
Clean Hands
Red clay pigment loves to travel. Always wipe your hands thoroughly or switch to gloves before handling the green clay and especially the black clay to keep colors crisp.
Step 2: Adding the Leafy Tops
-
Prepare Green Clay:
Clean your hands or use a baby wipe to remove red pigment before handling the green clay. Condition a small amount of green clay until soft. -
Flatten Small Discs:
Pinch off tiny bits of green clay and flatten them into thin little pancakes. You’ll need one for each strawberry. -
Cut Star Shapes:
Use your craft knife to cut a rough 5 or 6-pointed star shape from the green discs. They don’t need to be geometrically perfect; organic shapes look more natural. -
Attach the Calyx:
Gently place a green star on the wide top of a strawberry. Press the center down lightly to adhere it. -
Curve the Leaves:
Use the side of your needle tool to gently curve the tips of the leaves downward against the berry, or flip one or two upward for a jaunty look. -
Add a Stem:
Roll a tiny speck of green into a thin log and press it into the center of the leaves to act as the stem.
Make Them Jewelry
Insert a small metal eye-pin into the top of the strawberry through the leaves *before* baking. Now your berries can become earrings or charm bracelets.
Step 3: Bringing Them to Life
-
Mark Eye Sockets:
Looking at the clear patch you saved on the red body, use a small ball tool to make two tiny indents where the eyes will go. Spacing them slightly far apart adds cuteness. -
Insert Eyes:
Roll incredibly tiny balls of black clay. Pick them up with the tip of your needle tool and gently press them into the eye sockets. -
Add the Mouth:
For the mouth, roll a microscopic ‘snake’ of black clay or create a tiny dot. Press this centrally between and slightly below the eyes. -
Bake:
Arrange your squad on a baking sheet or ceramic tile. Bake according to your specific clay brand’s instructions (usually 275°F/135°C for 15-30 minutes). -
Cool and Finish:
I usually let them cool completely in the oven before removing. Once cool, you can brush a little gloss varnish over the eyes to make them twinkle.
Now you have a whole bowl of charismatic fruit friends ready to brighten up your desk shelf


Cute Panda Head Charms
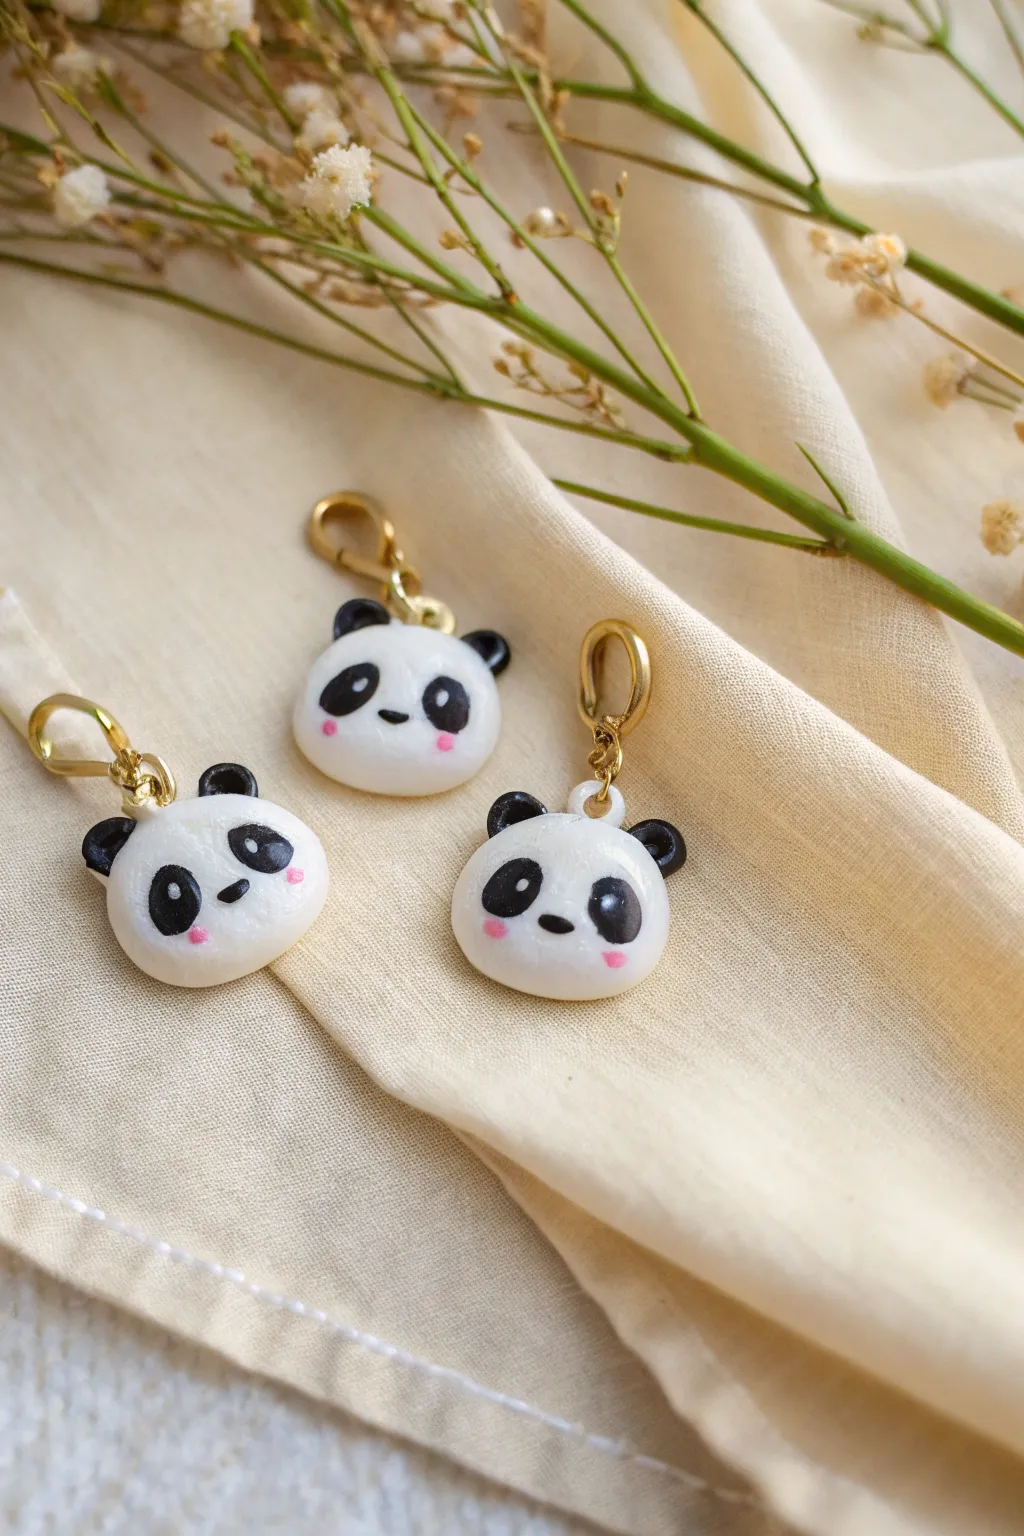
These adorable panda head charms are perfect for adding a touch of sweetness to zipper pulls, planners, or stitch markers. Their simple, round shapes and expressive little faces make them an ideal starting project for polymer clay beginners wanting cute results quickly.
Step-by-Step
Materials
- White polymer clay
- Black polymer clay
- Pink polymer clay (or pink acrylic paint)
- White acrylic paint (for eye highlights)
- Gloss glaze or UV resin
- Gold screw eye pins (small size)
- Gold jump rings
- Gold lobster clasps
- Dotting tools (various sizes)
- Rolling pin or pasta machine
- Circle cutter (approx. 2-3cm)
- Needle tool
- Pliers (round nose and flat nose)
- Oven for baking
Step 1: Shaping the Head
-
Condition the Clay:
Start by thoroughly conditioning your white polymer clay. Knead it in your hands until it is soft, pliable, and free of cracks. -
Form the Base:
Roll the white clay into a smooth ball about the size of a large marble. Gently press it down onto your work surface to flatten it into a thick disc, smoothing the edges to create a soft, rounded cushion shape. -
Refine the Shape:
If you want uniform sizes, roll a sheet of clay to about 5mm thickness and use a small circle cutter. Afterwards, soften the sharp cut edges with your fingertip to get that organic, ‘marshmallow’ look. -
Add Hardware:
Take a small gold screw eye pin. Carefully screw or push it into the top center of the head. I like to add a tiny dab of liquid clay or Bake & Bond on the threads to ensure it stays secure after baking.
Clean Hands Trick
White clay picks up everything! Keep baby wipes or a scrap piece of white ‘cleaning clay’ nearby to roll in your hands before handling the white base to remove dust.
Step 2: Creating the Face
-
Make the Ears:
Roll two tiny balls of black clay equal in size. Press them gently onto the top left and right sides of the white head, slightly flattening them so they bond well. -
Shape the Eye Patches:
Roll two slightly larger balls of black clay for the eye patches. Shape them into teardrops or ovals. -
Place the Eyes:
Press the black teardrops onto the face, tilting them slightly downward towards the outside edges to create that sad, sweet panda expression. Flatten them flush against the white clay. -
Add the Nose:
Roll a minuscule oval of black clay. Place this right in the center, between the bottom edges of the eye patches. -
Add Cheeks:
Using a tiny amount of pink clay, create two small dots and press them onto the cheeks below the eyes. Alternatively, you can paint these on later with acrylics or soft pastels. -
Bake the Pieces:
Arrange your charms on a baking sheet or ceramic tile. Bake according to your specific clay brand’s instructions (usually around 275°F/130°C for 15-30 minutes). Let them cool completely before handling.
Fixing Fingerprints
If you see fingerprints on your white clay before baking, lightly brush the surface with a little baby oil or cornstarch to smooth them out completely.
Step 3: Finishing Touches
-
Paint Highlights:
Once cool, use a fine dotting tool or a toothpick dipped in white acrylic paint to add a small reflection dot to the upper corner of each black eye patch. This brings the panda to life. -
Seal the Charm:
Apply a coat of gloss glaze or UV resin over the entire charm (or just the eyes and nose for targeted shine). This protects the paint and gives it a professional, ceramic-like finish. -
Attach Clasps:
Using two pairs of pliers, twist open a gold jump ring. Thread it through the screw eye on top of the panda. -
Secure the Hardware:
Add a gold lobster clasp onto the open jump ring, then twist the ring closed securely so there is no gap.
Now you have a set of charming panda companions ready to clip onto your accessories


Round Froggy Pebble Buddies
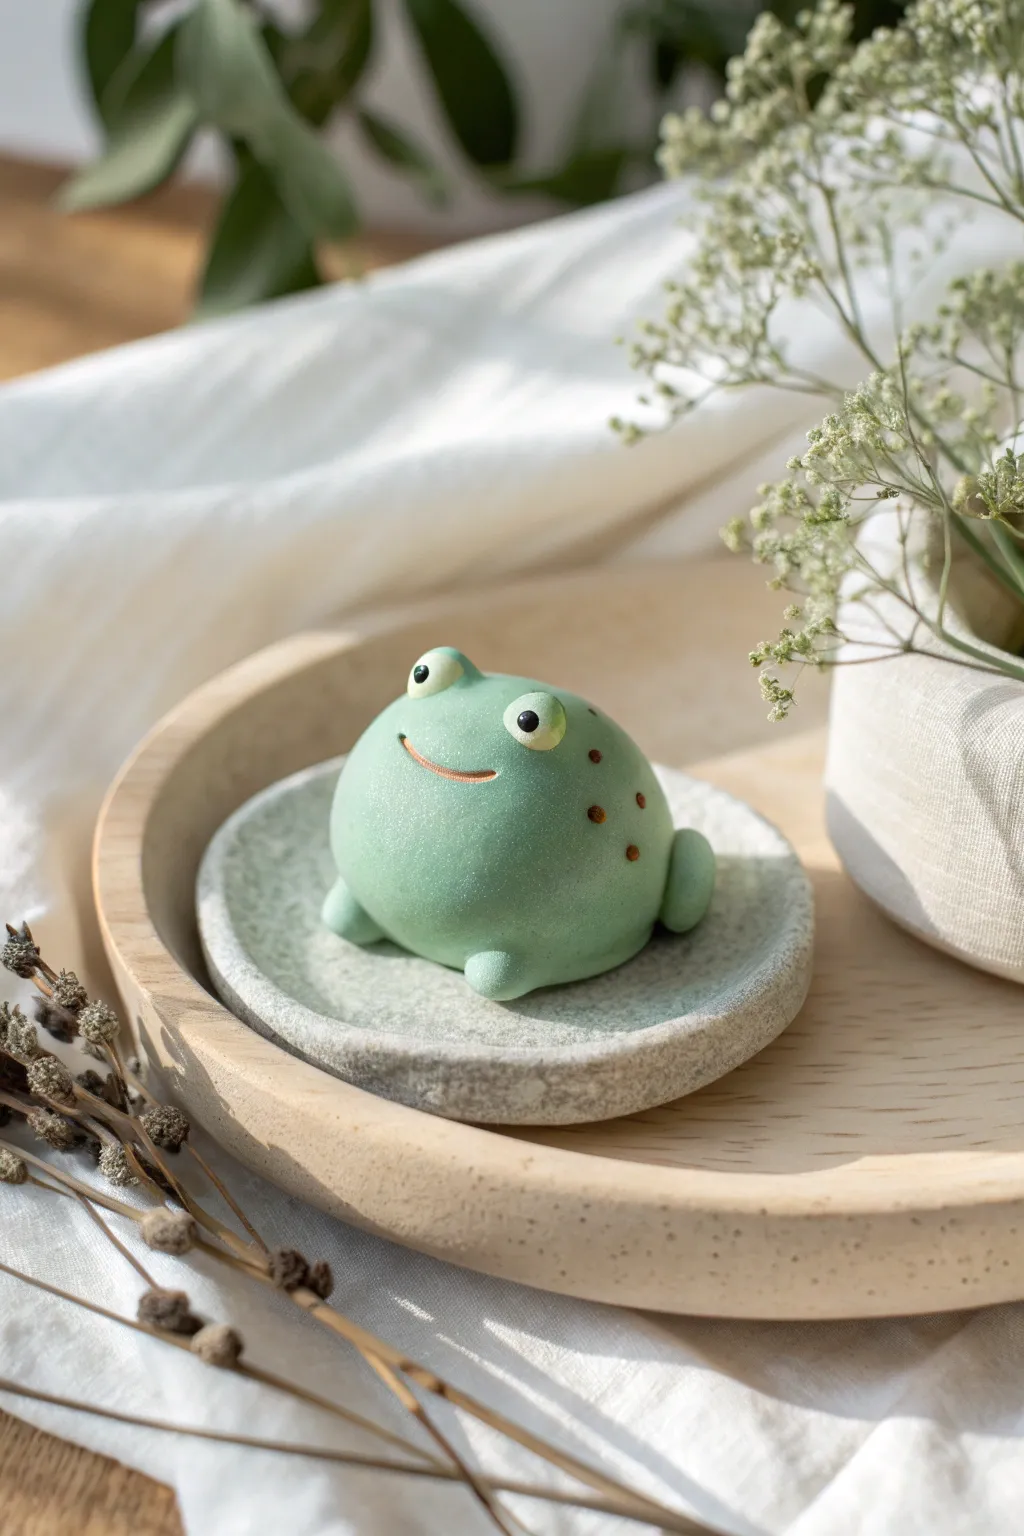
This adorable little amphibian is the perfect desk companion, featuring a smooth, matte finish and a chubby, round shape that fits perfectly in the palm of your hand. Its minimal details and soft green hue make it an ideal project for beginners looking to master smooth clay blending and simple sculpting shapes.
Detailed Instructions
Materials
- Polymer clay (pale sage green, white, black, dark brown)
- Clean work surface (glass or ceramic tile)
- Acrylic roller
- Ball tool (small and medium sizes)
- Needle tool or toothpick
- Soft pastel chalks (pink or peach)
- Small fluffy paintbrush
- Matte varnish (optional)
- Wet wipes (for cleaning hands and tools)
Step 1: Shaping the Base
-
Condition the Clay:
Start by taking a chunk of your sage green clay about the size of a walnut. Knead and roll it in your hands until it is warm, soft, and completely pliable. This conditioning step is crucial to prevent cracking later. -
Form the Body:
Roll the green clay into a tight, smooth ball. Gently press it down onto your work surface just enough to create a flat bottom, while keeping the top very round and domed like a smooth river stone. -
Smooth Imperfections:
Inspect the dome for any fingerprints or lint. Lightly stroke the surface with your finger or a baby wipe to ensure it is perfectly smooth.
Step 2: Adding Features
-
Create Eye Sockets:
Using your fingers, shape two small balls of green clay (about the size of peas). Press them gently onto the top of the head, spaced slightly apart, blending the bottom seams into the main body so they look integrated rather than just stuck on. -
Form the Whites:
Take two tiny balls of white clay and flatten them into discs. Press these onto the front of the green eye mounds you just created. -
Add Pupils:
Roll two even smaller balls of black clay. Position them in the center of the white discs and press gently to flatten them. Add a minuscule speck of white clay to the upper right corner of each pupil for a lively ‘sparkle’ effect. -
Sculpt the Mouth:
Use a needle tool to gently impress a wide, shallow U-shape for the smile. I find it helpful to rock the tool slightly side-to-side to widen the line without dragging the clay. -
Inlay the Smile:
Roll a microscopically thin snake of brown clay. Carefully lay it into the groove you made for the mouth, trimming any excess. Gently press it in so it is flush with the surface.
Lint Magnet?
Polymer clay loves dust. Keep a pack of baby wipes nearby to clean your hands between colors, and use a piece of scotch tape to lift stray fibers off the raw clay before baking.
Step 3: Limbs & Details
-
Make the Back Legs:
Roll two small balls of green clay for the hind legs. Shape them slightly into ovals and press them firmly against the lower back sides of the body. -
Make the Front Feet:
Create two tiny green balls for the front paws. Place them tucked just under the front curve of the belly, so the frog looks like it is resting comfortably. -
Blend Seams:
Use a silicone tool or your finger to smooth the seams where the legs meet the body, ensuring a strong bond. -
Add Spots:
Take tiny pinches of brown clay and roll them into varying sizes of small balls. Press these randomly onto the back and sides of the frog to create natural-looking speckles. -
Apply Blush:
Before baking, scrape a little pink soft pastel into a powder. Use a soft, fluffy brush to gently dust rosy cheeks right under the eyes.
Level Up: Habitat
Don’t stop at the frog! Create a custom textured base like the one in the photo using granite-effect clay pressed into a recycled lid to make a personalized display dish.
Step 4: Finishing
-
Bake:
Bake the frog according to your clay manufacturer’s instructions (usually around 275°F/135°C for 15-30 minutes). Use an oven thermometer to ensure the temperature is accurate to prevent scorching. -
Cool Down:
Let the piece cool completely inside the oven with the door slightly ajar. This gradual cooling helps prevent thermal shock cracks. -
Varnish (Optional):
Once fully cool, you can apply a layer of matte varnish to protect the surface, or use a gloss glaze just on the eyes to make them look wet and shiny.
Enjoy the calm presence of your new little green friend sitting on your desk

The Complete Guide to Pottery Troubleshooting
Uncover the most common ceramic mistakes—from cracking clay to failed glazes—and learn how to fix them fast.
Sleepy Kitty Loaf Charms
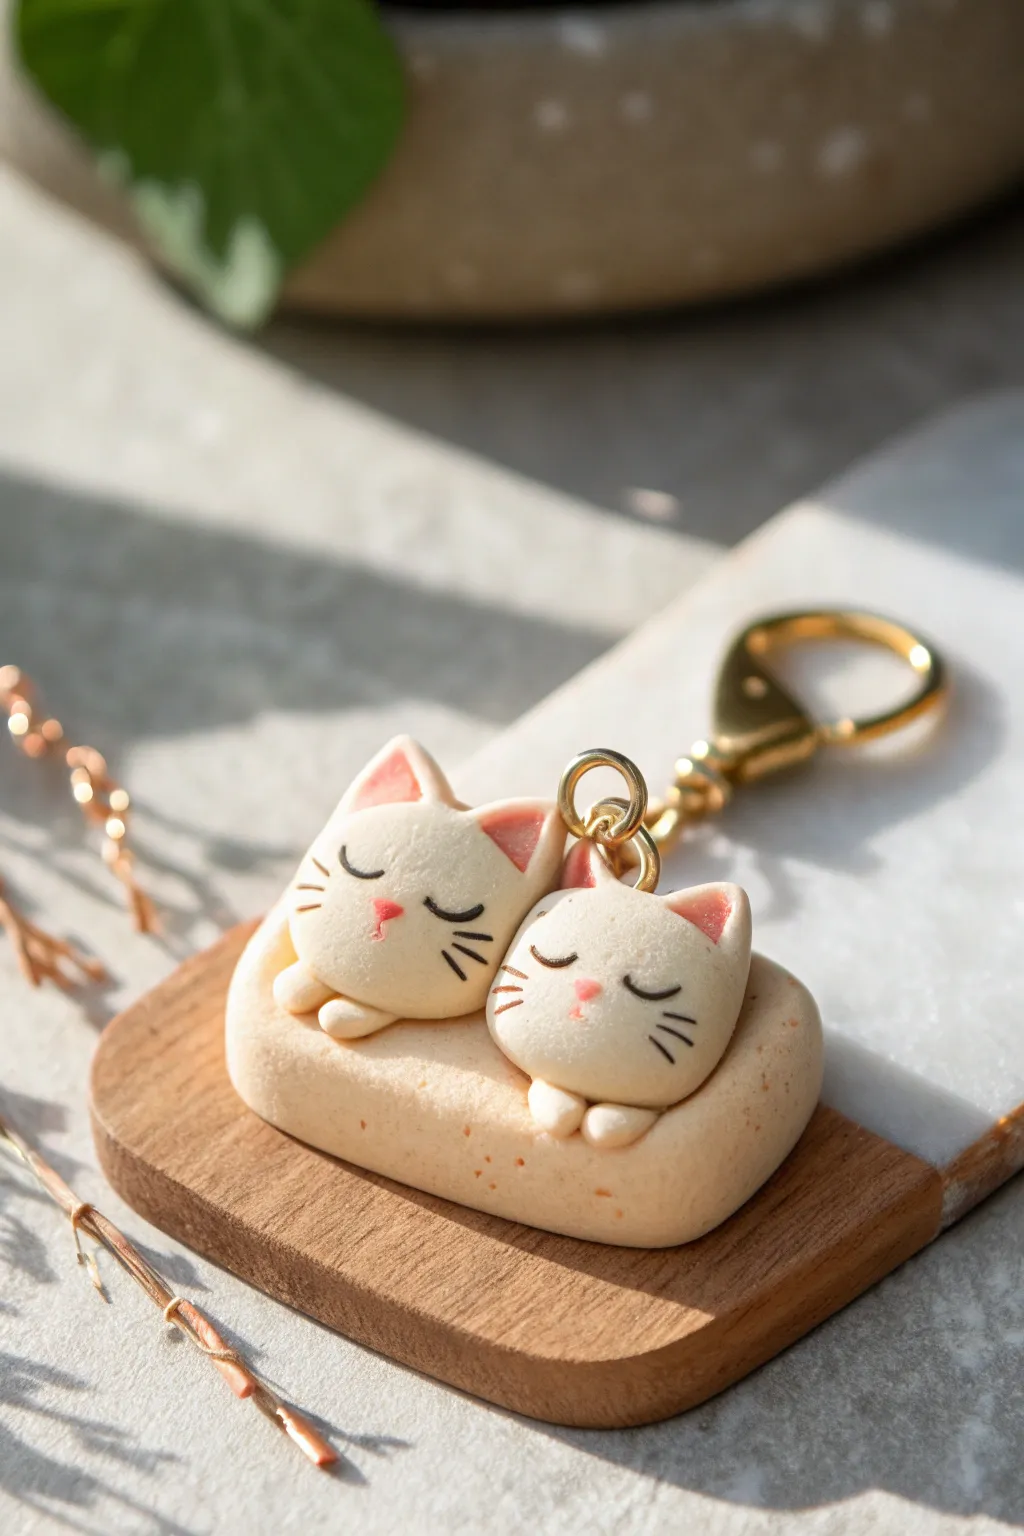
Capture the serenity of a peaceful nap with this adorable polymer clay charm featuring two cats snuggled into a warm, dough-like base. The soft matte finish and simple sleeping expressions make this a perfect beginner-friendly project that radiates comfort.
Step-by-Step
Materials
- Polymer clay (white, beige/tan, translucent, pale pink)
- Black acrylic paint
- Fine detail paintbrush (000 size) or dotting tool
- Gloss glaze (optional, for noses/ears)
- Gold keychain hardware with jump ring
- Needle tool or toothpick
- Eye pin
- Soft pastel chalks (orange/brown) for shading
- Small brush for pastels
- Clay blade or craft knife
- Oven for baking
Step 1: Forming the Loaf Base
-
Mix the dough color:
Start by mixing beige clay with a tiny amount of translucent clay to give it a realistic, slightly airy baked-good appearance. You want a warm, light tan shade. -
Shape the rectangle:
Roll your mixed beige clay into a smooth ball, then gently flatten it into a thick rectangle. Round off the corners with your fingers so it looks soft and pillowy rather than sharp. -
Add texture:
Use a stiff toothbrush or a ball of crumpled aluminum foil to gently tap the surface of the base. This creates a subtle texture that mimics a baked crust or soft fabric. -
Shade the edges:
Scrape some orange and brown soft pastel chalk into a powder. Using a soft brush, lightly dust the bottom edges and corners of your beige rectangle to give it a ‘toasted’ look.
Smudged Clay?
White clay attracts dust easily. Keep baby wipes nearby to clean your hands often, and use a cotton swab dipped in rubbing alcohol to gently wipe away lint from raw clay before baking.
Step 2: Sculpting the Cats
-
Create the heads:
Condition your white clay and roll two equal-sized balls. Flatten them slightly into rounded cushion shapes—these shouldn’t be perfect spheres, but more like rounded triangles. -
Form the ears:
Pinch two small triangles of white clay for each cat. Attach them seamlessly to the top of the heads, blending the clay downward with a silicone tool or your finger so there are no visible seams. -
Add pink details:
Take tiny sterile bits of pale pink clay and press them into the center of the ears. Smooth them flat so they look like the inner ear skin. -
Position the cats:
Place the two heads side-by-side on top of your textured beige base. Make sure they are touching slightly to emphasize that snuggly, cozy feeling. -
Shape the paws:
Roll four tiny white teardrops. Place two under the chin of each cat, resting on the edge of the beige base. Use a needle tool to press tiny indentations for toe separation.
Try This Variation
Customize your kitties! Before baking, add small patches of orange, grey, or black clay to create calico, tabby, or tuxedo cat patterns to match your own pets.
Step 3: Finishing Details
-
Make the noses:
Roll extremely small specks of bright pink clay into triangles. Gently press these into the center of each face. -
Insert hardware:
Insert a metal eye pin into the top center of the taller cat’s head (or between them). I prefer to add a dab of liquid clay or Bake & Bond on the pin before inserting it for extra security. -
Bake the piece:
Bake the charm according to your clay manufacturer’s instructions (usually 275°F/130°C for 15-30 minutes). Let it cool completely before handling. -
Paint the faces:
Using a very fine detail brush and black acrylic paint, carefully draw two curved lines for sleeping eyes and three whiskers on each cheek. Keep your hand steady and light. -
Seal and assemble:
Once the paint is dry, you can add a tiny drop of gloss glaze to the noses for a wet look. Finally, use pliers to attach the jump ring and gold keychain clasp to the eye pin.
Now you have a sweet little companion to keep your keys company wherever you go
Rainbow Candy Heart Tokens
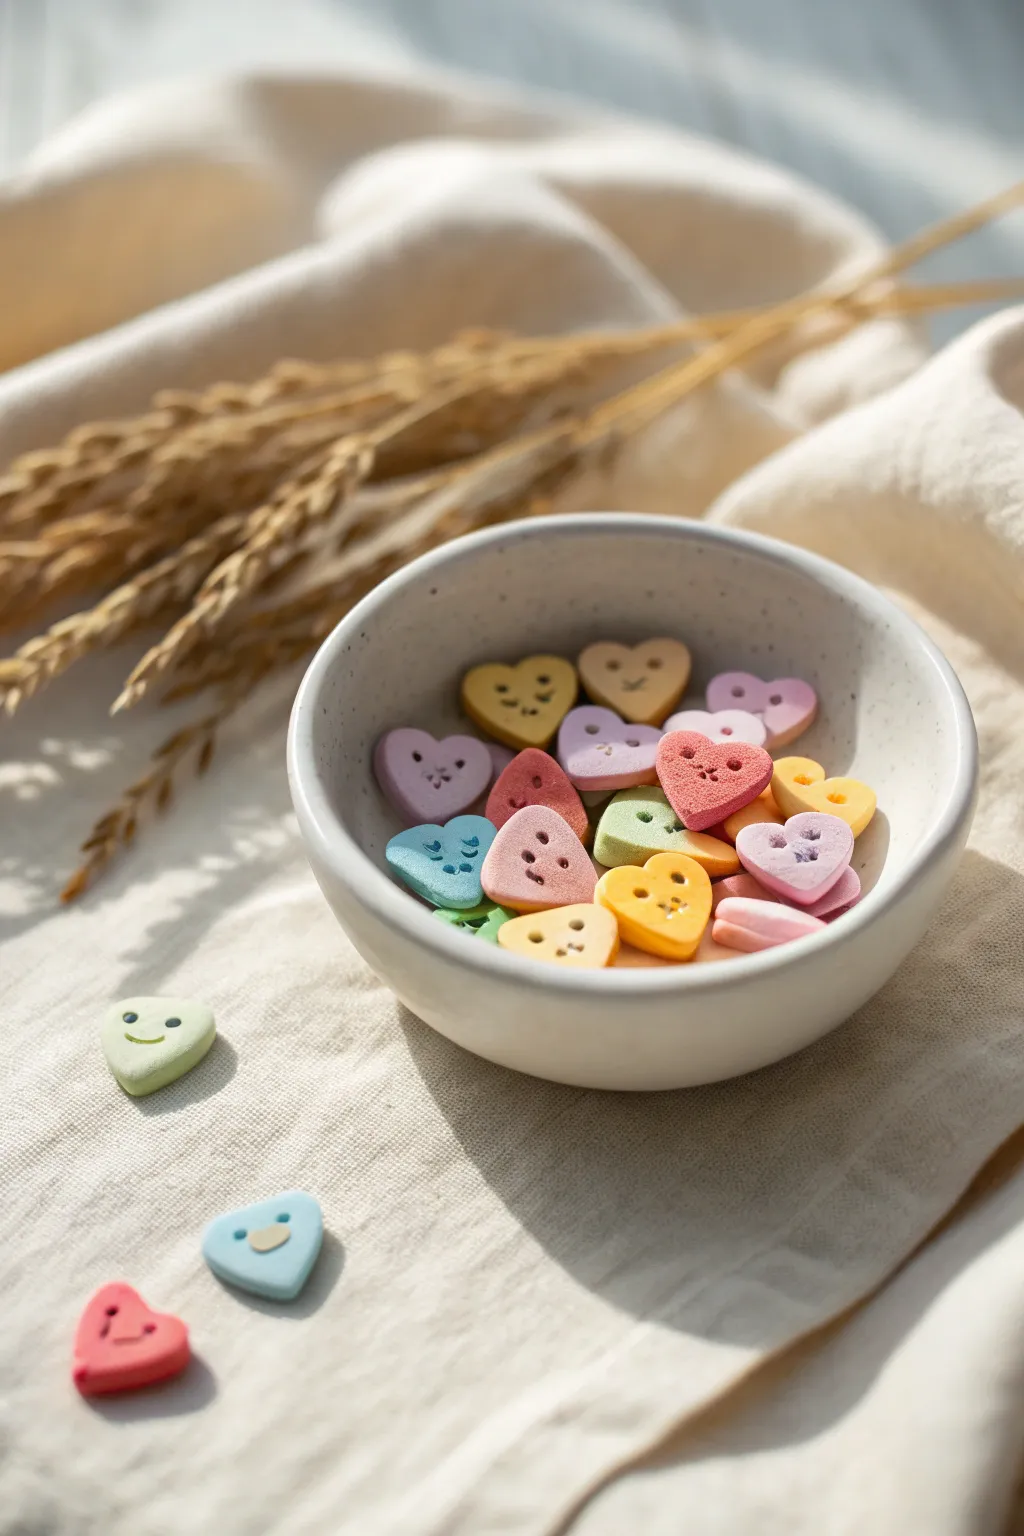
Create a bowlful of sweetness without the sugar rush using these adorable polymer clay heart tokens. With their soft matte finish and tiny, expressive faces, they look just like classic conversation hearts but last forever as cute desk decor or game pieces.
Step-by-Step Tutorial
Materials
- Polymer clay in pastel rainbow colors (pink, peach, yellow, mint, light blue, lavender)
- Small heart-shaped cutter (approx. 1 inch wide)
- Needle tool or toothpick
- Ball stylus tool (small)
- Black acrylic paint (optional for eyes)
- Rolling pin or pasta machine
- Baking sheet and parchment paper
- Cornstarch (for dusting)
- Matte varnish (optional)
Step 1: Prepping the Clay
-
Condition colors:
Begin by conditioning each color of clay thoroughly until it is soft and pliable. If your clay is too firm, mix in a tiny drop of clay softener or baby oil. -
Create custom pastels:
To achieve the soft, candy-like hues shown in the photo, mix white clay into your standard colors. A ratio of 2 parts white to 1 part color usually creates that perfect chalky candy look. -
Roll out sheets:
Roll each color into a sheet about 1/4 inch thick. You want them to be slightly chunky, just like real candy hearts. -
Dust the surface:
Lightly dust your clay sheet and cutter with a bit of cornstarch. This prevents the heart shapes from sticking inside the cutter and distorting when you pop them out.
Keep it Clean
Pastel clay picks up dust easily. Keep a pack of baby wipes nearby to clean your hands and tools extensively between color changes.
Step 2: Shaping the Hearts
-
Cut the shapes:
Press your heart cutter firmly into the clay. Give it a tiny wiggle before lifting to ensure a clean cut. -
Soften the edges:
After cutting, the edges might be sharp. Gently tap the edges with your finger to round them off slightly, mimicking the molded look of pressed sugar candies. -
Position the eyes:
On the upper half of the heart, use a small ball stylus tool to press two small indentations for the eyes. For winking faces, use a needle tool to scratch a tiny curved line instead of a dot. -
Carve the smiles:
Use a needle tool or the edge of a small straw to press a simple curved smile below the eyes. Vary the expressions: make some small and shy, others wide and happy. -
Add blush details:
For extra cuteness, you can indent two tiny cheeks at the corners of the mouth using the smallest ball tool. -
Texture match:
If you want a porous, sugary texture, gently tap the surface with an old toothbrush. However, for the smooth look in the image, keep them clean and fingerprint-free.
Fixing Fingerprints
If you smudge a heart while moving it, lightly brush the surface with a little baby oil before baking to smooth it out instantly.
Step 3: Baking and Finishing
-
Arrange for baking:
Place your heart tokens on a parchment-lined baking sheet, spacing them out so they don’t touch. -
Bake:
Bake according to your clay manufacturer’s instructions. A lower temperature for a longer time generally helps prevent pastel colors from darkening or scorching. -
Cool down:
Let the hearts cool completely on the tray. Polymer clay is fragile when hot, so resist the urge to move them until they are room temperature. -
Enhance features:
If the indented faces aren’t visible enough, dilute a tiny bit of black or brown acrylic paint with water. Brush it into the grooves. -
Wipe excess paint:
Immediately wipe over the surface with a damp paper towel or baby wipe. This leaves paint only deep inside the carved lines, making the faces pop. -
Matte finish:
The hearts in the image have a natural matte finish. If you used paint, seal just the painted area with a tiny dab of matte varnish, or leave them raw for that authentic chalky texture.
Fill a small ceramic bowl with your finished hearts to create a charming coffee table accent


What Really Happens Inside the Kiln
Learn how time and temperature work together inside the kiln to transform clay into durable ceramic.
Little Mushroom Sprout Cuties
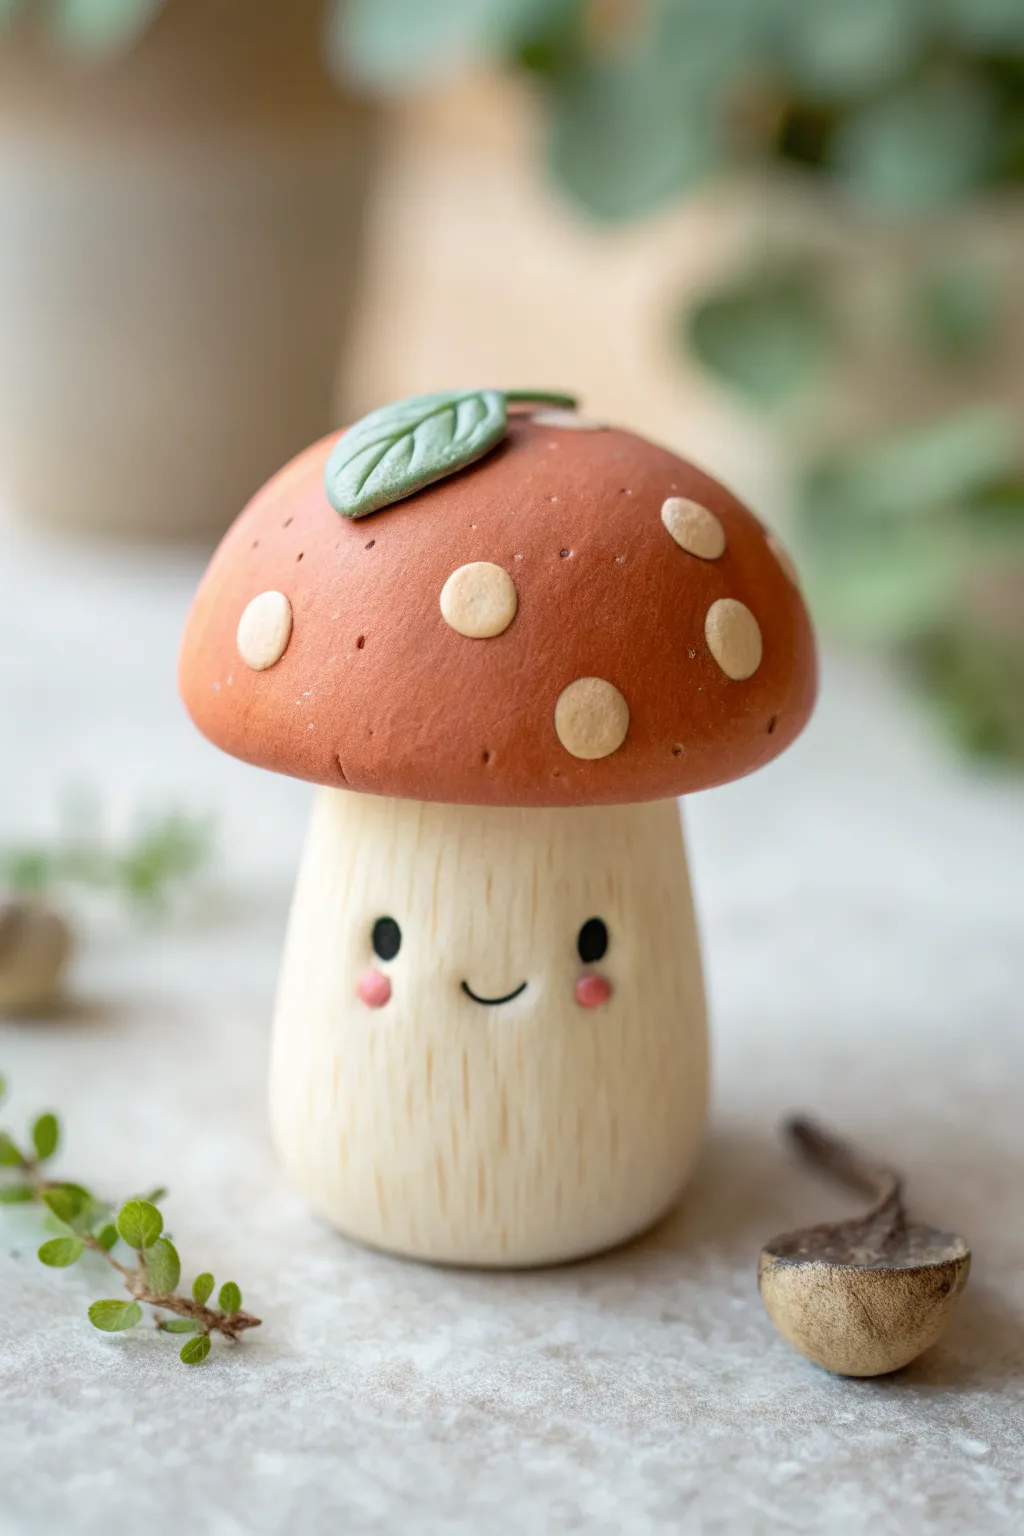
This adorable little fungus friend brings a touch of whimsy to any desk or shelf with its happy smile and earthy textures. You’ll learn how to transform basic polymer clay into a sweet, textural character perfect for beginners.
How-To Guide
Materials
- Polymer clay (terracotta/rust color, white/beige, light green)
- Acrylic paint (black, pink)
- Needle tool or toothpick
- Ball stylus tool
- Small paintbrush or dotting tool
- Texture tool (clean toothbrush or sandpaper)
- Liquid polymer clay (optional)
- Oven for baking
Step 1: Shaping the Stalk
-
Condition the Clay:
Begin by thoroughly conditioning your white or beige clay until it is soft and pliable. If the clay feels too stiff, roll it back and forth in your warm hands for a few minutes. -
Form the Base:
Roll the clay into a smooth ball about the size of a large grape, then gently roll it against your work surface to elongate it into a thick cylinder. -
Create the Taper:
Slightly press down on the bottom of the cylinder to flatten it so it stands on its own. Gently pinch the top section so the stalk becomes slightly narrower at the neck and wider at the base. -
Add Texture:
Using a needle tool, scratch vertical lines all around the stalk. Vary the pressure and length of your strokes to create a realistic, fibrous mushroom stem texture. -
Smooth the Neck:
Leave the very top surface smooth where the cap will attach, ensuring a good flat connection point.
Seamless Spots
To make the spots look inlaid rather than stuck on, gently roll the entire cap against your work surface after applying the dots. This embeds them into the clay for a smooth finish.
Step 2: Creating the Cap
-
Shape the Cap:
Take a portion of terracotta or rust-colored clay—slightly larger than the stalk piece—and roll it into a ball. Flatten the bottom against your table and use your thumb to round the top into a distinct dome shape. -
Hollow the Connection:
Turn the cap over and use your thumb or a ball tool to create a slight indentation in the center of the underside. This helps the cap sit securely on the stalk. -
Texture the Cap:
Before attaching, gently tap a clean toothbrush or piece of sandpaper over the surface of the terracotta dome to remove fingerprints and add a natural, porous look. -
Make the Dots:
Roll tiny bits of beige clay into balls and flatten them into thin discs of varying sizes. -
Apply the Spots:
Press the beige discs randomly onto the mushroom cap. Use your finger to smooth them down so they sit flush with the surface, not raised like bumps. -
Attach Cap to Stalk:
Place the cap onto the prepared stalk. If you have liquid clay, add a tiny drop between the pieces for extra security; otherwise, press firmly to bond the raw clays together.
Step 3: Details & Face
-
Leaf Accents:
Condition a tiny amount of light green clay. Shape it into a small teardrop, flatten it, and use a needle tool to press a central vein down the middle. -
Placing the Greenery:
Pres the little leaf onto the top of the mushroom cap, curving it slightly to look natural. -
Marking the Eyes:
Use a medium-sized ball tool to press two indentations into the stalk where you want the eyes to go. This helps define the face before baking. -
Baking:
Bake your mushroom according to your specific clay manufacturer’s instructions (usually 275°F/135°C for 15-30 minutes). Let it cool completely before handling. -
Painting the Face:
Once cool, use a fine tip brush or dotting tool with black acrylic paint to fill in the eye indentations. -
Adding the Smile:
With an extremely fine brush or a fine-tip marker, draw a tiny, shallow ‘U’ shape between the eyes for the smile. -
Rosy Cheeks:
Apply two tiny dots of pink paint just below the outer corners of the eyes for a sweet, blushing effect.
Forest Floor Base
Create a small disc of green clay textured with a toothbrush to act as moss. Bake your mushroom attached to this base for better stability and an instant mini-diorama feel.
Place your new little companion near a potted plant for the perfect natural habitat
Baby Octopus Blob Charms
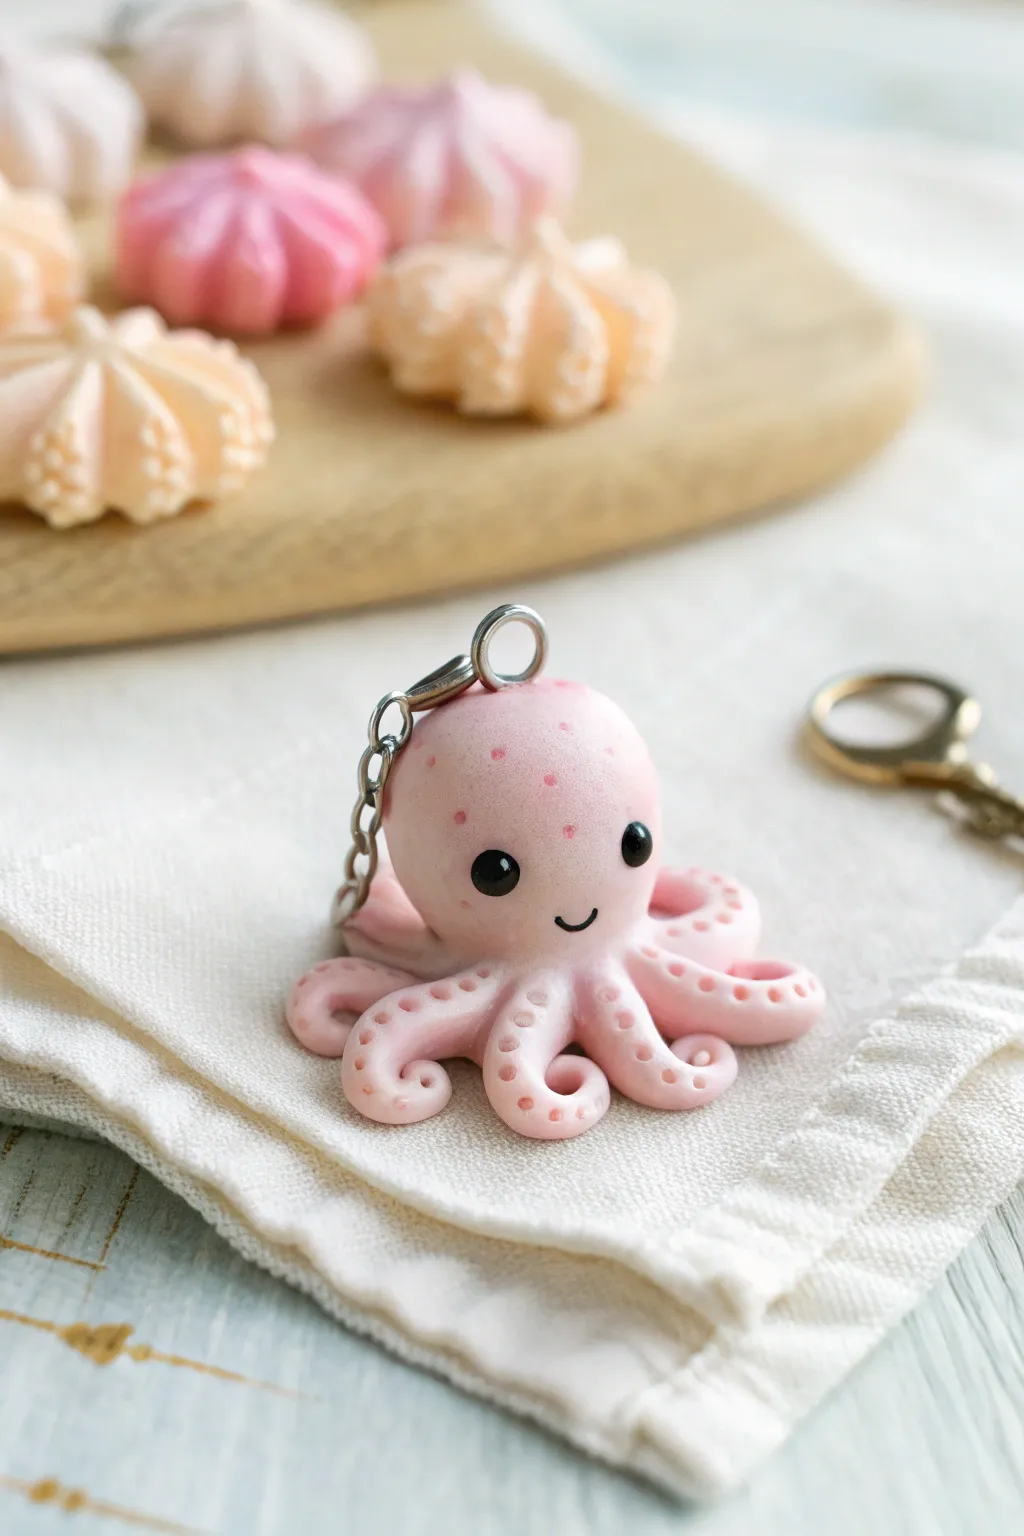
This adorable baby octopus charm is the perfect beginner project, featuring soft pastel pink clay and delicate speckled details. Its rounded, blob-like shape makes it incredibly forgiving to sculpt, while the tiny suction cups add an impressive level of detail.
Detailed Instructions
Materials
- Pastel pink polymer clay
- Darker pink pigment or soft pastel chalk (for freckles)
- Black polymer clay (tiny amount)
- White or translucent liquid clay (optional for bonding)
- Eye pin or screw eye
- Dotting tools (large and small ball ends)
- Needle tool or toothpick
- Fine detail paintbrush
- Gloss glaze or UV resin (optional)
- Clean work surface (ceramic tile or glass)
Step 1: Shaping the Base Body
-
Condition the Clay:
Start by kneading your pastel pink clay until it is soft, pliable, and free of any air bubbles. If it’s too sticky, leach it on paper for a bit; if too hard, add a drop of clay softener. -
Form the Head:
Roll a smooth ball of clay about the size of a large grape or small walnut. Gently elongate it slightly into a very subtle egg shape to form the main head and body blob. -
Create the Tentacles:
Roll eight small, equal-sized balls of the same pink clay. These should be much smaller than the head, roughly pea-sized. -
Attach the Tentacles:
Flatten the bottom of your main head blob slightly. Arrange the eight small balls in a ring underneath the head so they poke out radially. -
Blend the Seams:
Using a silicone blending tool or your fingertip, gently smooth the seams where the small balls meet the underside of the head. Leave the outer rounded parts distinct so they look like chubby legs. -
Curl the Tips:
Gently press and curl the end of each tentacle upwards. I like to vary the curls slightly—some curling up more, some twisting sideways—to give it a lively, organic movement.
Step 2: Adding Details and Hardware
-
Add Suction Cups:
Using a very small dotting tool, gently press indentations into the underside or side of the curled-up tentacles. Create two rows of tiny dimples on the visible parts of the legs. -
Insert the Eye Pin:
Trim an eye pin to the right length. Dip the end in a tiny bit of liquid clay or translucent sculpey (for extra grip) and push it straight down into the center of the head until the loop sits flush. -
Create Eye Sockets:
Use a medium-sized ball tool to press two shallow indentations into the face area where you want the eyes to sit. This helps the eyes stay secure. -
Add the Eyes:
Roll two tiny spheres of black clay. Place them into the sockets and flatten them gently so they look like round buttons. -
Add the Highlight:
For that classic kawaii sparkle, take the tiniest speck of white clay and place it on the upper right side of each black eye. -
Sculpt the Mouth:
Use a needle tool or a small curved blade to impress a tiny ‘U’ shape between the eyes for a smiling mouth.
Dust Bunny Alert
Light clay shows every speck of dust! Clean your hands and tools with baby wipes before starting, and keep some scrap white clay nearby to roll in your hands to pick up hidden lint.
Step 3: Finishing Touches
-
Apply Freckles:
Scrape a little dark pink pastel chalk into a powder. Using a fine detail brush or a needle tool, pick up tiny specks of powder and dab them onto the forehead area to create soft, spotted freckles. -
Check for Fingerprints:
Before baking, look over the model for any accidental fingerprints. Smooth them away with a drop of baby oil on your finger or a soft brush. -
Bake:
Bake the charm according to your clay manufacturer’s instructions (usually around 275°F/130°C for 15-30 minutes). Let it cool completely inside the oven to prevent cracks. -
Glaze (Optional):
If you want a wet, aquatic look, brush a coat of gloss glaze or UV resin over the eyes or the entire octopus once it is fully cooled. -
Attach Hardware:
Open a jump ring with pliers, loop it through the eye pin, and attach your keychain findings.
Level Up: Texture
Before baking, brush a tiny amount of mica powder or pearlescent pigment over the head for a magical, shimmering sea-creature finish that catches the light.
Now your cute little cephalopod is ready to hang on your keys or bag

TRACK YOUR CERAMIC JOURNEY
Capture glaze tests, firing details, and creative progress—all in one simple printable. Make your projects easier to repeat and improve.
Puffy Cloud And Star Pals
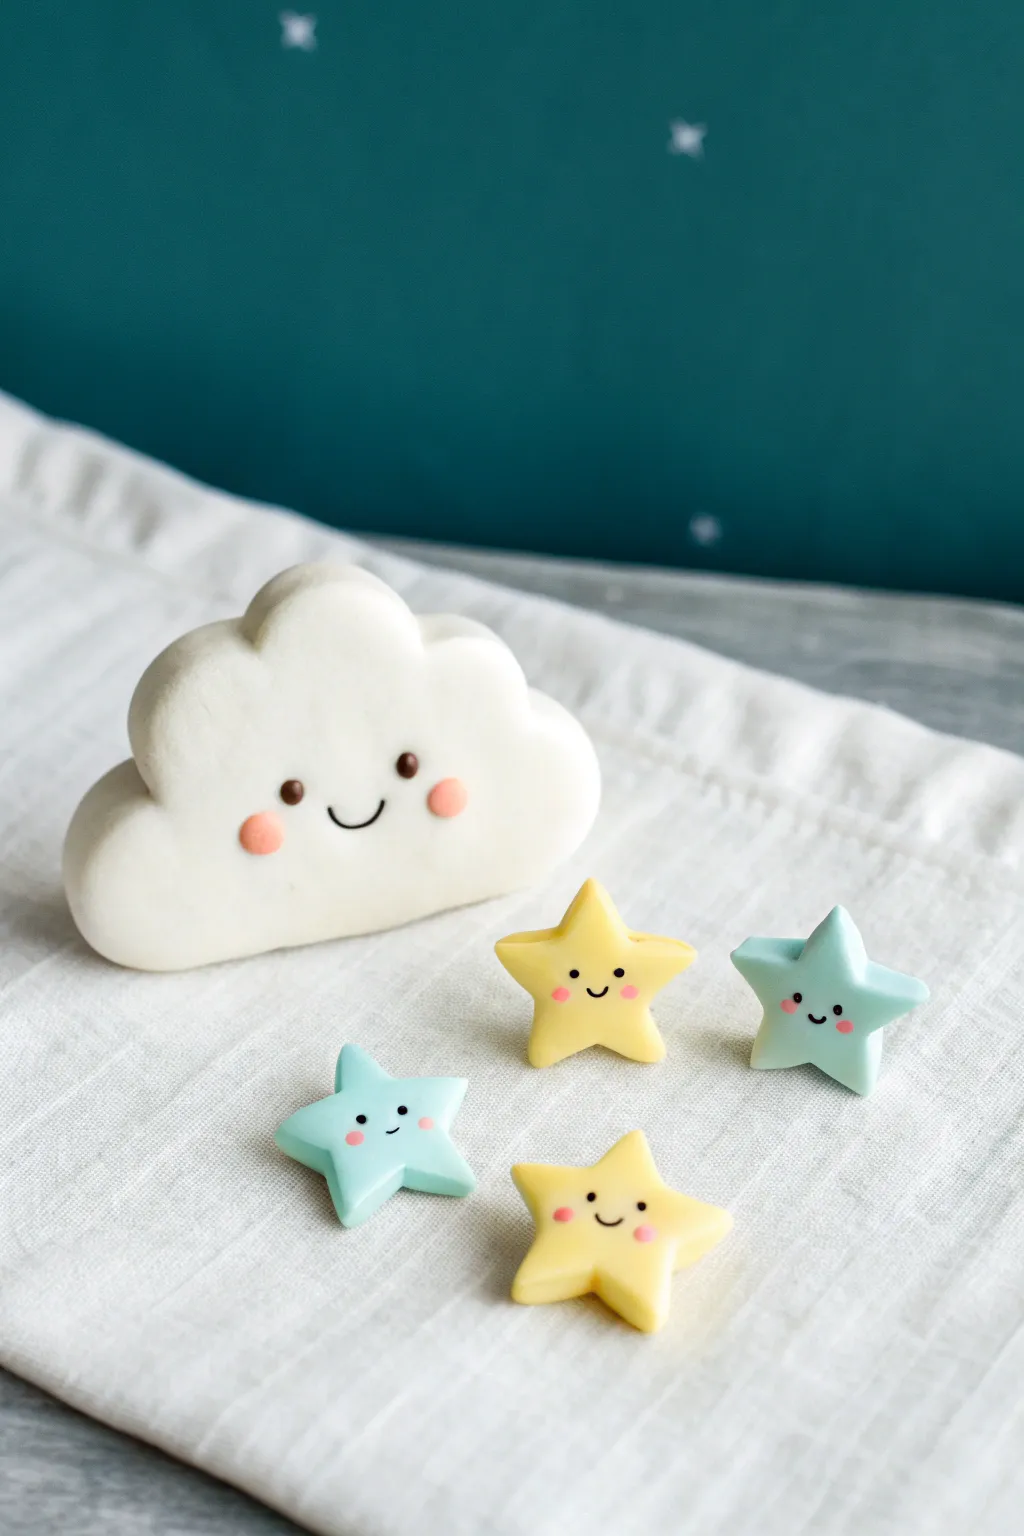
Create a dreamy little scene with this adorably chubby cloud and its colorful star companions. This beginner-friendly project focuses on soft shapes and cute expressions, perfect for adding a touch of whimsy to any desk or shelf.
Step-by-Step Guide
Materials
- White polymer clay
- Pastel yellow polymer clay
- Pastel blue or mint polymer clay
- Can of waste clay or aluminum foil (for cloud core)
- Black acrylic paint or fine-tip black marker
- Pink chalk pastel or pink acrylic paint
- Dotting tools or small paintbrushes
- Clay roller or pasta machine
- Star-shaped cookie cutters (small)
- Cloud-shaped cutter (optional) or blade
- Gloss glaze (optional)
Step 1: Sculpting the Cloud
-
Prepare the core:
To keep the cloud lightweight and save on white clay, scrunch a piece of aluminum foil into a rough oval shape, flattened slightly at the bottom so it stands up. -
Condition the white clay:
Knead your white polymer clay until it is soft and pliable. Use a roller to flatten it into a thick sheet, about 1/4 inch thick. -
Cover the core:
Wrap the sheet of white clay completely around your foil core. Smooth out the seams gently with your fingers until the surface is seamless. -
Shape the fluff:
With the basic oval formed, use your thumbs to press gently into the top edge, creating divots that suggest the ‘puffy’ humps of a cloud. You want rounded, distinct sections along the top. -
Refine the edges:
Smooth the clay with a light touch to remove any fingerprints. If you want a softer look, gently rub the surface with a tiny bit of potential baby oil on your finger. -
Create the face:
Use a medium-sized dotting tool to create two small indentations for the eyes where you want them placed. This helps the paint sit better later.
Step 2: Making the Stars
-
Roll out colors:
Condition your yellow and blue clays separately. Roll them out into slabs that are fairly thick—about 1/4 inch—so the stars can stand up or lean comfortably. -
Cut the shapes:
Use a small star cutter to punch out your shapes. Make two yellow stars and two blue stars. -
Soften the edges:
Freshly cut clay can have sharp, harsh edges. Gently tap the edges of each star with your fingertip to round them slightly for that ‘puffy’ aesthetic. -
Add face indentations:
Just like with the cloud, use a small dotting tool (smaller than the one used for the cloud) to mark where the eyes will go on each star point.
Clean Clay Tips
White clay picks up lint easily. Keep wet wipes nearby to clean your hands and tools often, and roll the clay on a clean piece of paper rather than a dusty mat.
Step 3: Baking and Decorating
-
Bake the pieces:
Place your cloud and stars on a ceramic tile or baking sheet lined with parchment paper. Bake according to your specific clay manufacturer’s instructions (usually around 275°F/130°C for 15-30 minutes). -
Cool down:
Let the pieces cool completely inside the oven or on a wire rack before painting. Painting warm clay can make the paint dry too fast and clumps up. -
Paint the eyes:
Dip a small dotting tool or toothpick into black acrylic paint. Carefully dot paint into the eye indentations you made earlier. -
Add the smiles:
Using a very fine detail brush or a fine-tip black marker, draw a tiny, U-shaped smile between the eyes on all your characters. -
Apply blush:
Scrape a little pink chalk pastel into dust. Use a dry Q-tip or soft brush to gently dab pink cheeks onto the cloud and stars right next to the eyes. -
Add eye highlights:
Once the black paint is fully dry, add a tiny speck of white paint to the upper corner of each eye using a needle or toothpick for a sparkly look. -
Seal:
If executed correctly, these should be durable, but adding a coat of matte or gloss varnish will protect the painted faces from scratching off over time.
Make it a Mobile
Insert small eye screws into the top of the stars and the bottom of the cloud before baking. Use clear fishing line to hang the stars from the cloud after baking.
Enjoy styling your cheerful weather friends on a bookshelf or window sill
Mini Avocado With Tiny Pit Face
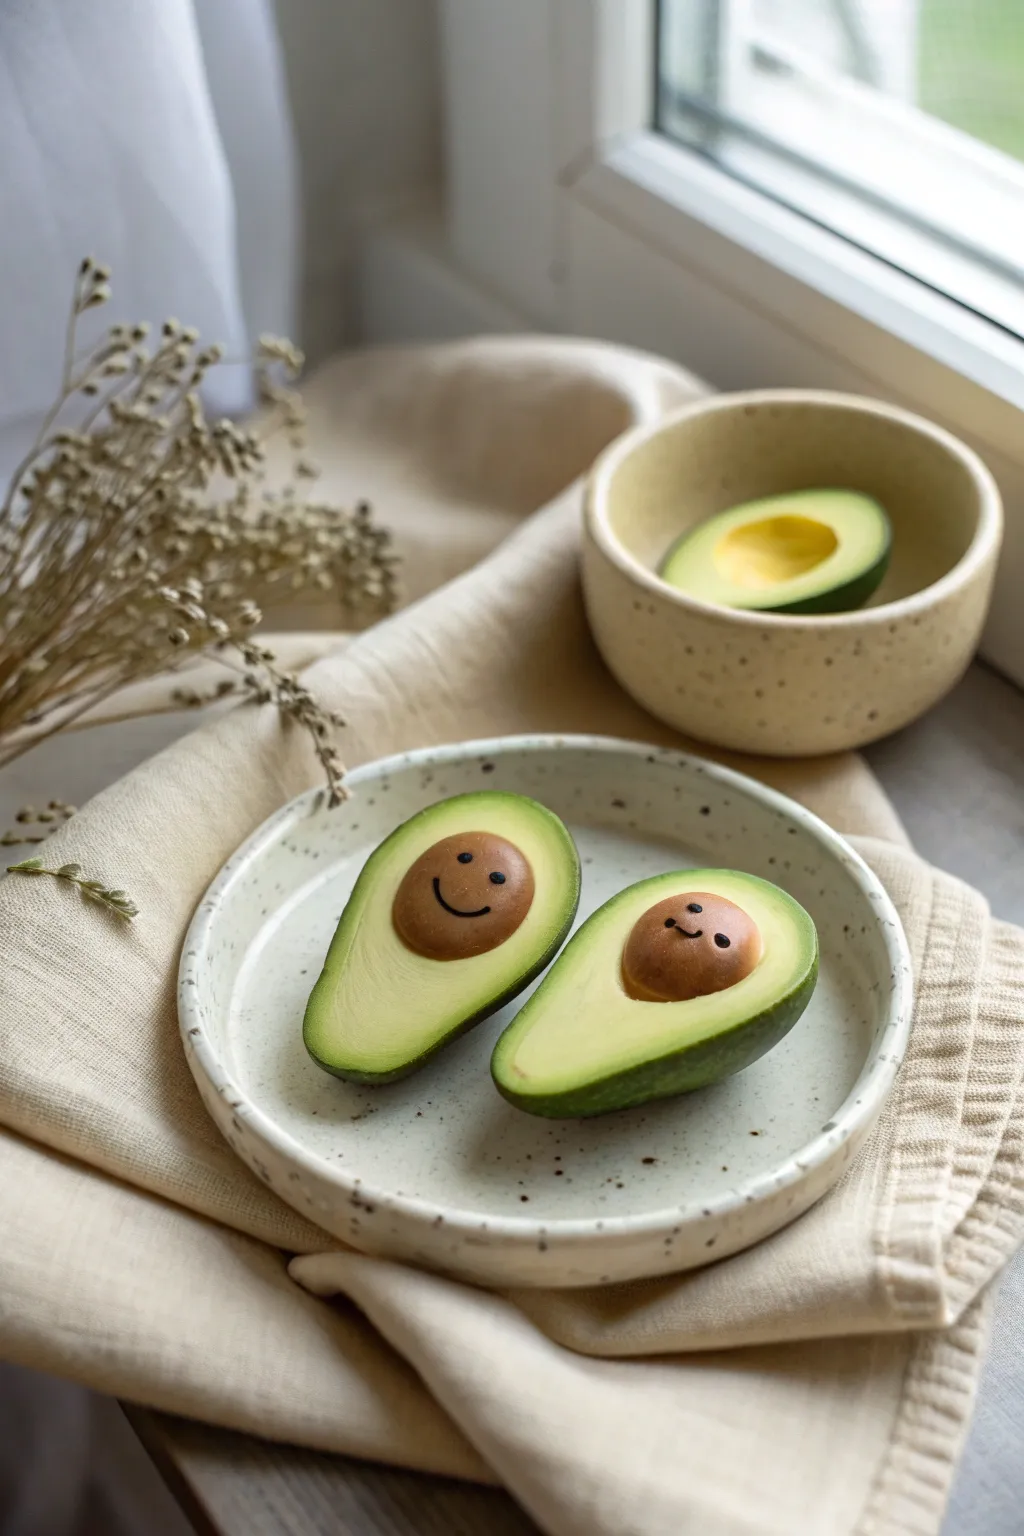
These miniature avocados are irresistibly cute with their tiny, smiling pits nestled inside. They make perfect charms, magnets, or simply sweet desk companions to brighten your day.
Step-by-Step Tutorial
Materials
- Polymer clay (dark green, light yellow-green, and light brown)
- Black acrylic paint or fine-point black marker
- Small dotting tool or toothpick
- Polymer clay blade or craft knife
- Soft pastel chalks or brown acrylic paint (for shading)
- Small paintbrush
- Gloss glaze or polyurethane varnish
- Oven for baking
Step 1: Creating the Avocado Shape
-
Condition the clay:
Start by kneading your light yellow-green clay until it is soft and pliable, which prevents cracking later on. -
Form the base:
Roll the light green clay into a smooth ball about the size of a walnut. -
Shape the pear:
Gently taper the top third of the ball to create the characteristic teardrop or pear shape of an avocado. -
Prepare the skin:
Condition a piece of dark green clay and roll it out into a thin sheet. -
Wrap the filling:
Carefully wrap the yellow-green pear shape in the thin dark green sheet, smoothing the seams so the dark skin covers it entirely. -
Slice it open:
Using your blade, slice the avocado shape vertically down the center to create two identical halves. -
Texture the skin:
I like to gently tap the outside dark green skin with a toothbrush or crumpled foil to give it a realistic bumpy texture.
Fixing Smudges
If the dark green skin smudges onto the light green flesh during slicing, use a cotton swab dipped in rubbing alcohol or acetone to gently wipe the light clay clean.
Step 2: Creating the Pit
-
Form the pit:
Roll a small ball of light brown clay. It should be sized to fit comfortably inside the wider bottom part of your avocado half. -
Create the indent:
Press a rounded tool or your thumb into one of the avocado halves to create a nesting spot for the pit. -
Insert the pit:
Place the brown ball into the indentation, pressing it down slightly so it looks embedded rather than just resting on top. -
Add shading:
Use a dry brush to dust some brown soft pastel chalk around the edges where the pit meets the flesh for a realistic shadow effect.
Make it a Necklace
Before baking, insert a small eyepin into the top of the avocado. Once baked and cooled, add a jump ring and a chain to wear your cheerful avocado as a pendant.
Step 3: Adding the Face and Finishing
-
Bake the pieces:
Bake the avocado halves according to your clay package instructions (usually 275°F/135°C for 15-30 minutes). Let them cool completely. -
Paint the eyes:
Using a very fine dotting tool or toothpick dipped in black paint, place two tiny dots on the upper half of the brown pit. -
Draw the mouth:
With a fine liner brush or ultrafine marker, draw a small, curved ‘U’ shape between and slightly below the eyes. -
Varnish the pit:
Apply a coat of gloss glaze specifically to the brown pit to make it look shiny and moist. -
Matte finish:
Leave the green flesh matte, or apply a matte varnish if you prefer a sealed finish over the whole piece.
Display your smiling avocado in a tiny bowl or turn it into a magnet for your fridge
Tiny Animal Paw Prints
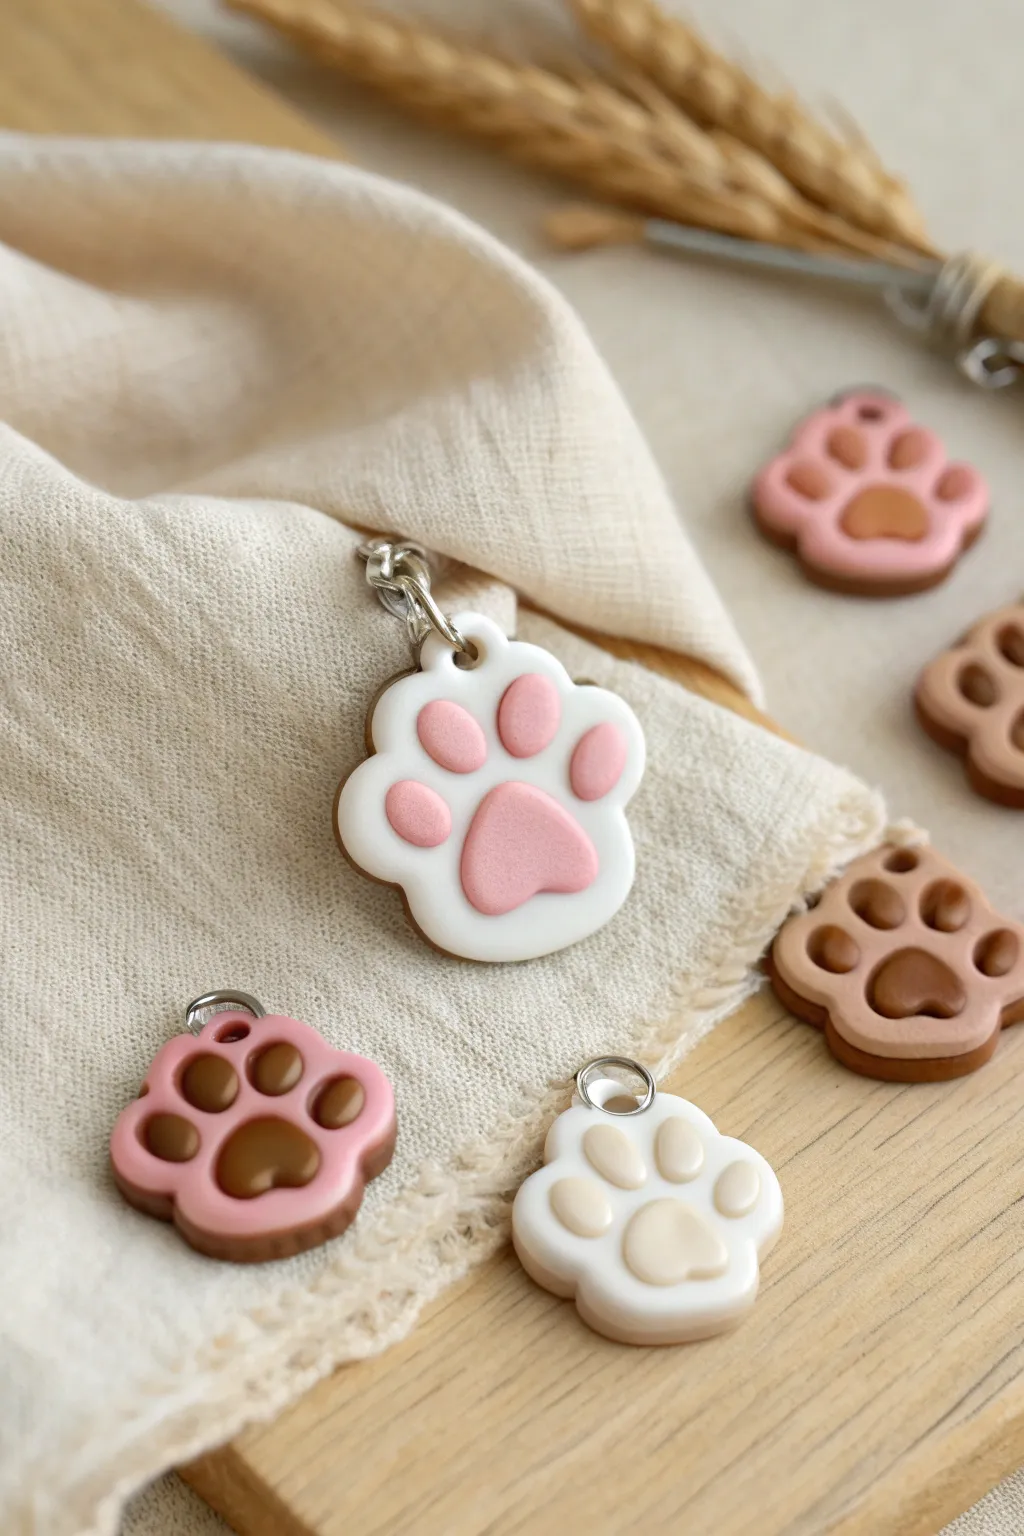
These miniature animal paw print charms feature a delightful 3D effect with raised toe beans nestled into a contrasting base. The soft, rounded edges and pastel color palettes make them perfect for zipper pulls, stitch markers, or sweet friendship gifts.
Step-by-Step Tutorial
Materials
- Polymer clay in various colors (white, baby pink, mocha brown, cream)
- Small heart-shaped cutter (approx. 1cm)
- Small circle cutter (approx. 0.5cm)
- Larger paw-shaped cutter (optional, or freehand modeling tools)
- Acrylic rolling pin
- Ball stylus tool (medium and large)
- Headpins or screw eye pins
- Liquid polymer clay (translucent or matching color)
- Gloss glaze (optional for finish)
- Needle nose pliers (for assembly)
- Small jump rings
Step 1: Prepping the Base Shape
-
Condition the clay:
Begin by thoroughly conditioning your chosen base color clay—let’s start with white for the main charm shown. It needs to be soft and pliable to avoid cracking. -
Roll it out:
Roll the white clay into a sheet approximately 4-5mm thick. You want it relatively chunky so the charm feels substantial. -
Create the paw outline:
If you have a paw-shaped cutter, press it firmly into the clay. If not, cut a rounded triangle shape and use a large ball tool or your finger to gently indent the top edge to simulate the toe separations. -
Smooth the edges:
Gently run your finger around the perimeter of the cut shape to soften the sharp edges created by the cutter. The charm should look pillowy and soft. -
Make the indentations:
Using a large ball stylus, press firmly into the lower center of the paw to create a depression for the main pad. Then, make four smaller circular depressions in an arc above it for the toes.
Fixing “Fingerprints”
If you see fingerprints on your raw clay, brush a tiny amount of baby oil or cornstarch over the surface and smooth it gently before baking.
Step 2: Adding the Toe Beans
-
Prepare the pad color:
Condition a contrasting color of clay, such as baby pink. Roll this out slightly thinner than your base, about 2-3mm. -
Cut the main pad:
Use a small, upside-down heart cutter or hand-form a rounded triangular shape for the main palm pad. -
Form the toes:
Roll four tiny balls of pink clay. These should be sized just right to fit into the toe indentations you made earlier. -
Apply adhesive:
Place a tiny drop of liquid polymer clay (Bake and Bond) into each indentation on the white base. This acts as the glue. -
Place the main pad:
Press the pink heart shape into the large central depression. Use your finger to smooth it down so it looks embedded rather than just sitting on top. -
Insert the toes:
Place the four pink balls into the toe indentations. Flatten them slightly with your fingertip so they maintain a domed, 3D look. -
Refine the shape:
I like to go back with the ball tool and very gently press around the edges of the pink pads to ensure a seamless fit against the white base.
Pro Tip: Texturing
For a softer look, gently dab the colored pads with a toothbrush before baking to give the ‘skin’ a realistic, matte texture.
Step 3: Hardware and Baking
-
Insert the eye pin:
Take a small screw eye pin. Apply a speck of liquid clay to the threads and screw it gently into the top center of the paw charm. -
Check alignment:
Look at the charm from the side to ensure the pin is straight and hasn’t poked through the back or front surfaces. -
Bake:
Bake the charms according to your clay manufacturer’s instructions (usually 275°F/130°C for 15-30 minutes). Place them on a ceramic tile or cardstock to prevent shiny spots. -
Cool down:
Allow the pieces to cool completely inside the oven before removing them to prevent thermal shock. -
Add jump rings:
Using pliers, open a jump ring sideways, thread it through the eye pin, and close it securely.
Now you have a handful of adorable paw prints ready to hang on your keychain or bag
Mini Planet Faces With Rings
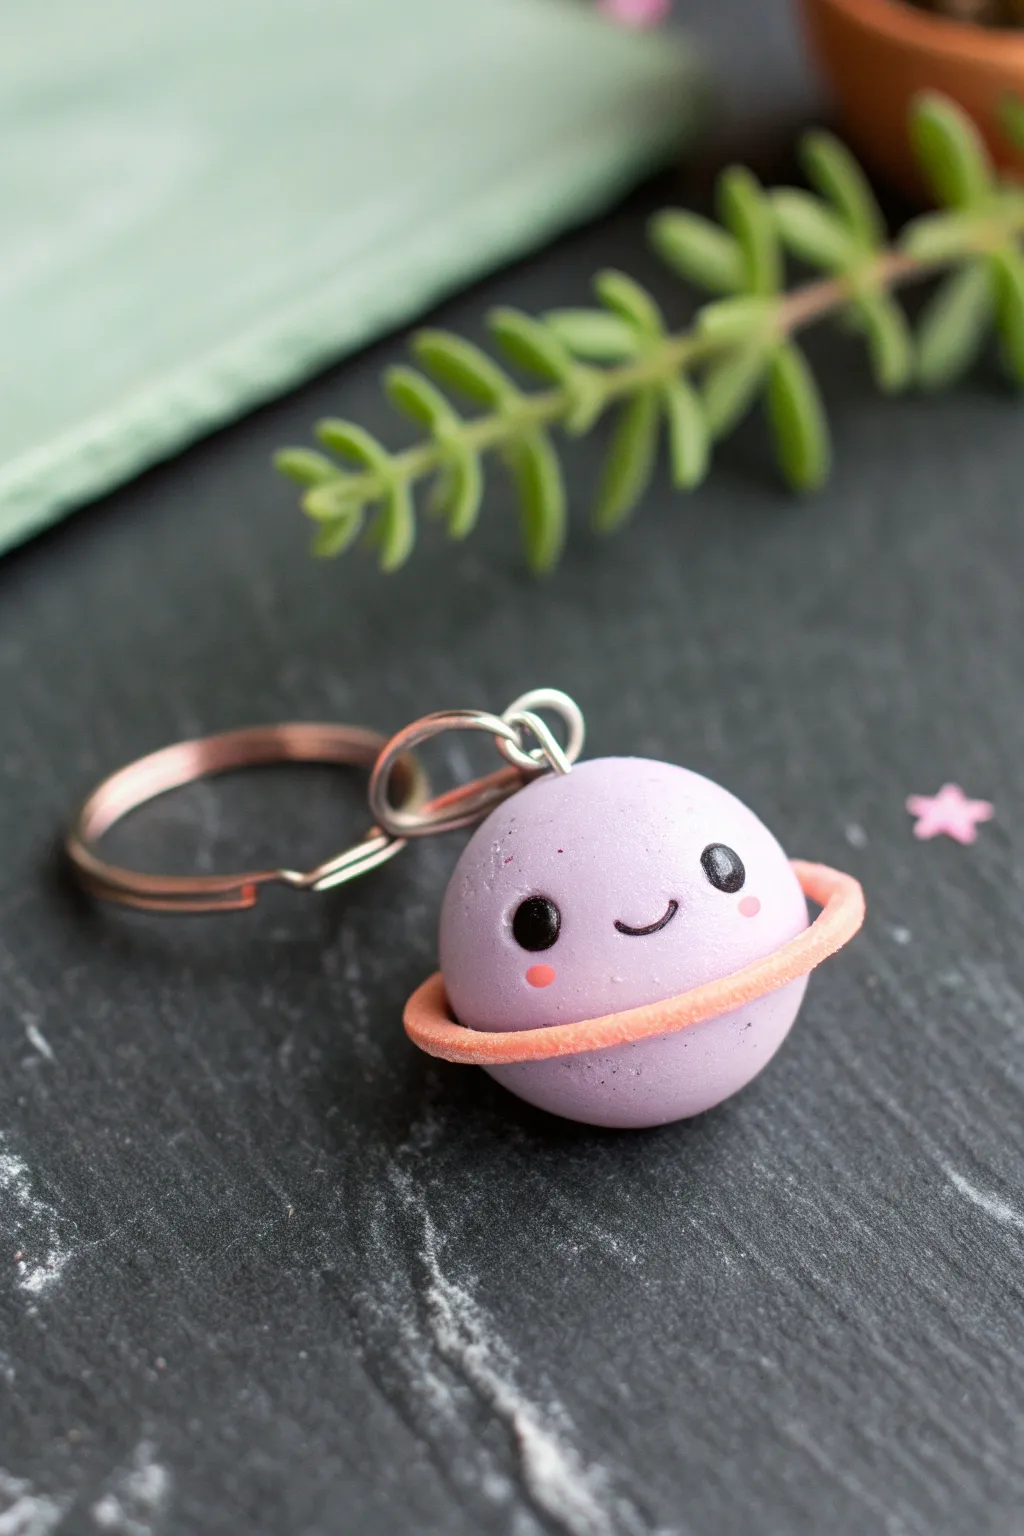
Blast off into crafting fun with this adorable, grinning Saturn-style planet keychain. Its soft lavender body and coral ring make it a sweet celestial companion for your keys or backpack.
How-To Guide
Materials
- Polymer clay (light purple/lavender)
- Polymer clay (coral or light orange)
- Black acrylic paint
- Pink acrylic paint or chalk pastel
- Silver eye screw
- Keyring hardware and jump ring
- Dotting tool or small ball stylus
- Fine detail paintbrush
- Rolling pin or pasta machine
- Circle cutter (small/medium) or just your hands
- Gloss glaze (optional)
Step 1: Forming the Planet
-
Condition the clay:
Begin by taking your lavender polymer clay and kneading it in your hands until it becomes soft, warm, and pliable. This conditioning step is crucial to prevent cracking later. -
Shape the sphere:
Roll the purple clay into a smooth, perfect ball between your palms. Aim for a size roughly 1 to 1.5 inches in diameter, like a large bouncy ball. -
Check for flaws:
Inspect the surface for fingerprints or lint. You can gently buff away prints by lightly rolling your finger over the spot.
Step 2: Creating the Ring
-
Prepare the ring clay:
Condition a smaller amount of coral or light orange clay until it’s ready to work with. -
Roll a snake:
Roll this orange clay into a long, thin, even snake. It should be consistent in thickness, about 2-3mm wide. -
Flatten deeply:
Using a rolling pin or just your finger, gently flatten the snake so it looks like a long, flat ribbon rather than a round tube. -
Attach the ring:
Wrap this ribbon around the center of your purple sphere. Angle it slightly diagonally to give the planet a dynamic look. -
Secure the seam:
Where the ends of the ring meet, trim away any excess clay carefully. Blend the seam together gently with a tool or your finger so it looks like one continuous ring.
Fixing Fingerprints
Can’t get the sphere smooth? Lightly brush the raw clay with a little baby oil or cornstarch before baking to buff out stubborn prints.
Step 3: Adding Hardware & Baking
-
Insert the eye screw:
Twist a small silver eye screw into the very top of the planet. I find adding a tiny dab of liquid clay or bake-and-bond on the screw threads helps it stay put permanently. -
Bake the charm:
Place your planet on a baking sheet or tile. Bake according to your specific clay brand’s instructions (usually around 275°F or 130°C for 15-30 minutes). Let it cool completely before handling.
Galaxy Glitter
Mix translucent clay with ultrafine glitter for the ring, or dust the baked planet with pearl ex powder for a shimmering cosmic effect.
Step 4: Face & Assembly
-
Paint the eyes:
Once cool, use a dotting tool or the back of a paintbrush dipped in black acrylic paint to create two wide-set, round eyes above the ring. -
Add a smile:
With an ultra-fine detail brush and black paint, carefully draw a small, U-shaped smile right between the eyes. -
Garnish with cheeks:
Dip a smaller dotting tool into pink paint and add tiny blush marks just below the outer corners of the eyes. -
Highlight the eyes:
For extra spark, add a tiny white dot (the ‘catchlight’) to the upper right corner of each black eye. -
Seal (optional):
If you want a shiny finish or need to protect the paint, apply a coat of polymer clay glaze. -
Attach the keyring:
Open a jump ring using pliers, loop it through the eye screw and your keyring chain, and close it securely.
Now you have a tiny galaxy guardian ready to travel with you on all your adventures