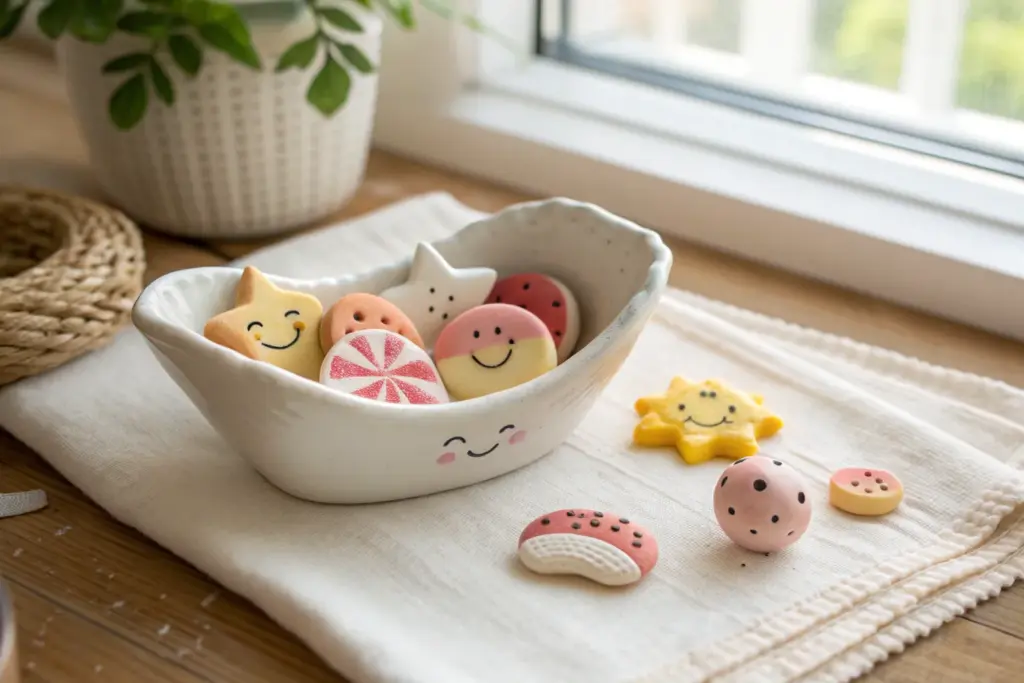
Every summer, I get obsessed with making tiny clay cuties that look like they’re living their best sunny-day life. These cute summer clay ideas are all about small, cheerful pieces with sweet little faces you can turn into charms, gifts, or desk buddies.
Happy Pineapple Mini Figurines
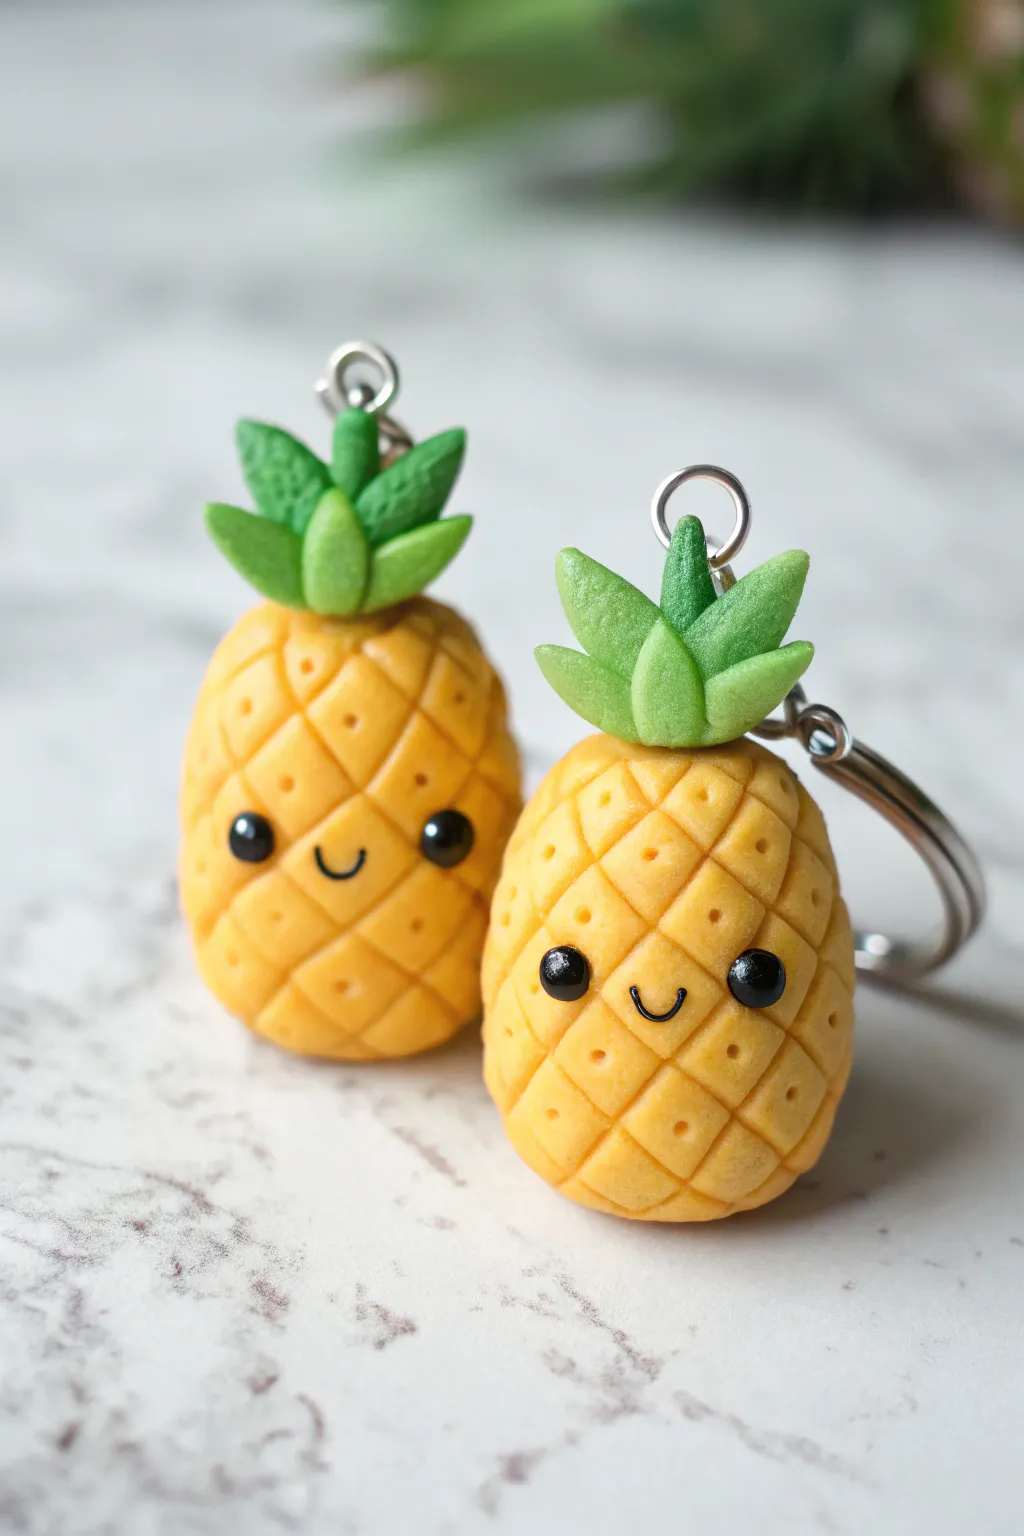
Bring a splash of tropical sunshine to your accessories with these adorable kawaii pineapple charms. These miniature figurines feature a textured, golden-yellow body and a leafy green crown, finished with a sweet, smiling face that’s impossible to resist.
How-To Guide
Materials
- Golden yellow polymer clay
- Leaf green polymer clay
- Black polymer clay (very small amount)
- Eye pin or screw eye hook
- Keychain ring and jump ring
- Needle tool or toothpick
- Ball stylus tool (small)
- X-acto knife or clay blade
- Gloss glaze (optional)
Step 1: Shaping the Fruit Base
-
Condition the Clay:
Start by taking a chunk of golden yellow polymer clay and kneading it in your hands until it becomes soft, pliable, and free of cracks. -
Form the Body:
Roll the yellow clay into a smooth ball about the size of a large marble or a grape. -
Refine the Shape:
Gently roll the ball slightly between your palms to elongate it into a stout oval or egg shape, flattening the bottom just enough so it can stand upright on your work surface. -
Create the Grid Pattern:
Using the back of a knife or a specialized clay blade, gently press diagonal lines across the surface of the yellow oval, spacing them evenly. -
Cross-Hatch the Texture:
Repeat the previous step in the opposite diagonal direction to create a diamond-shaped grid pattern all over the pineapple’s body. -
Add Detail Dots:
Take a needle tool or toothpick and press a single small hole into the center of each diamond. This gives the fruit its realistic, prickly texture without being sharp.
Clean Before Handling
Wipe your hands with a baby wipe before shaping the yellow clay. Dark lint shows up easily on light colors, especially if you touched black clay!
Step 2: Adding the Crown
-
Prepare Green Clay:
Condition a piece of leaf green clay. Pinch off several small pieces, roughly the size of rice grains. -
Shape the Leaves:
Roll each small green piece into a teardrop shape and flatten them slightly with your finger to resemble spiky leaves. -
Texture the Foliage:
Use your needle tool to lightly score a central vein down the middle of each leaf for added detail. -
Assemble the Crown Base:
Attach a ring of these leaves to the top center of the pineapple body, pressing them gently so they adhere to the yellow clay. -
Build Up Height:
Add a second, slightly smaller layer of leaves inside the first ring, standing them up a bit straighter to create a full, spiky crown.
Step 3: Creating the Kawaii Face
-
Mark Eye Sockets:
Use a small ball tool to gently indent two spots on the smooth front area of the pineapple where you want the eyes to sit. -
Insert the Eyes:
Roll two tiny spheres of black clay. Place one into each indentation and press gently to secure them; ensure they are identical in size for that cute look. -
Add the Smile:
Roll an extremely thin snake of black clay. Cut a tiny U-shape segment and press it gently between the eyes using your needle tool to form the smile. -
Highlight the Eyes:
I like to add a microscopic dot of white clay or paint to the black eyes later creates a ‘sparkle,’ though plain black works perfectly too.
Smudged the Smile?
If the tiny black smile smears, use a q-tip dipped in a tiny bit of rubbing alcohol to gently wipe the area clean before trying again.
Step 4: Finishing and Baking
-
Insert Hardware:
If you are making this into a charm, carefully screw an eye pin into the center of the green leaves before baking. -
Bake the Figurine:
Place your pineapple on a baking sheet lined with parchment paper. Bake according to your specific clay package instructions (usually 275°F/135°C for 15-30 minutes). -
Cool Down:
Let the piece cool completely before handling to ensure the clay hardens fully. -
Glaze (Optional):
For a shiny finish, brush a coat of gloss glaze over the pineapple, avoiding the leaves if you want a matte contrast. -
Attach Keychain:
Open a jump ring with pliers, loop it through the eye pin and your keychain ring, and close it securely.
Enjoy your new pocket-sized tropical friend attached to your keys or bag


Popsicle Pals With Bite Marks
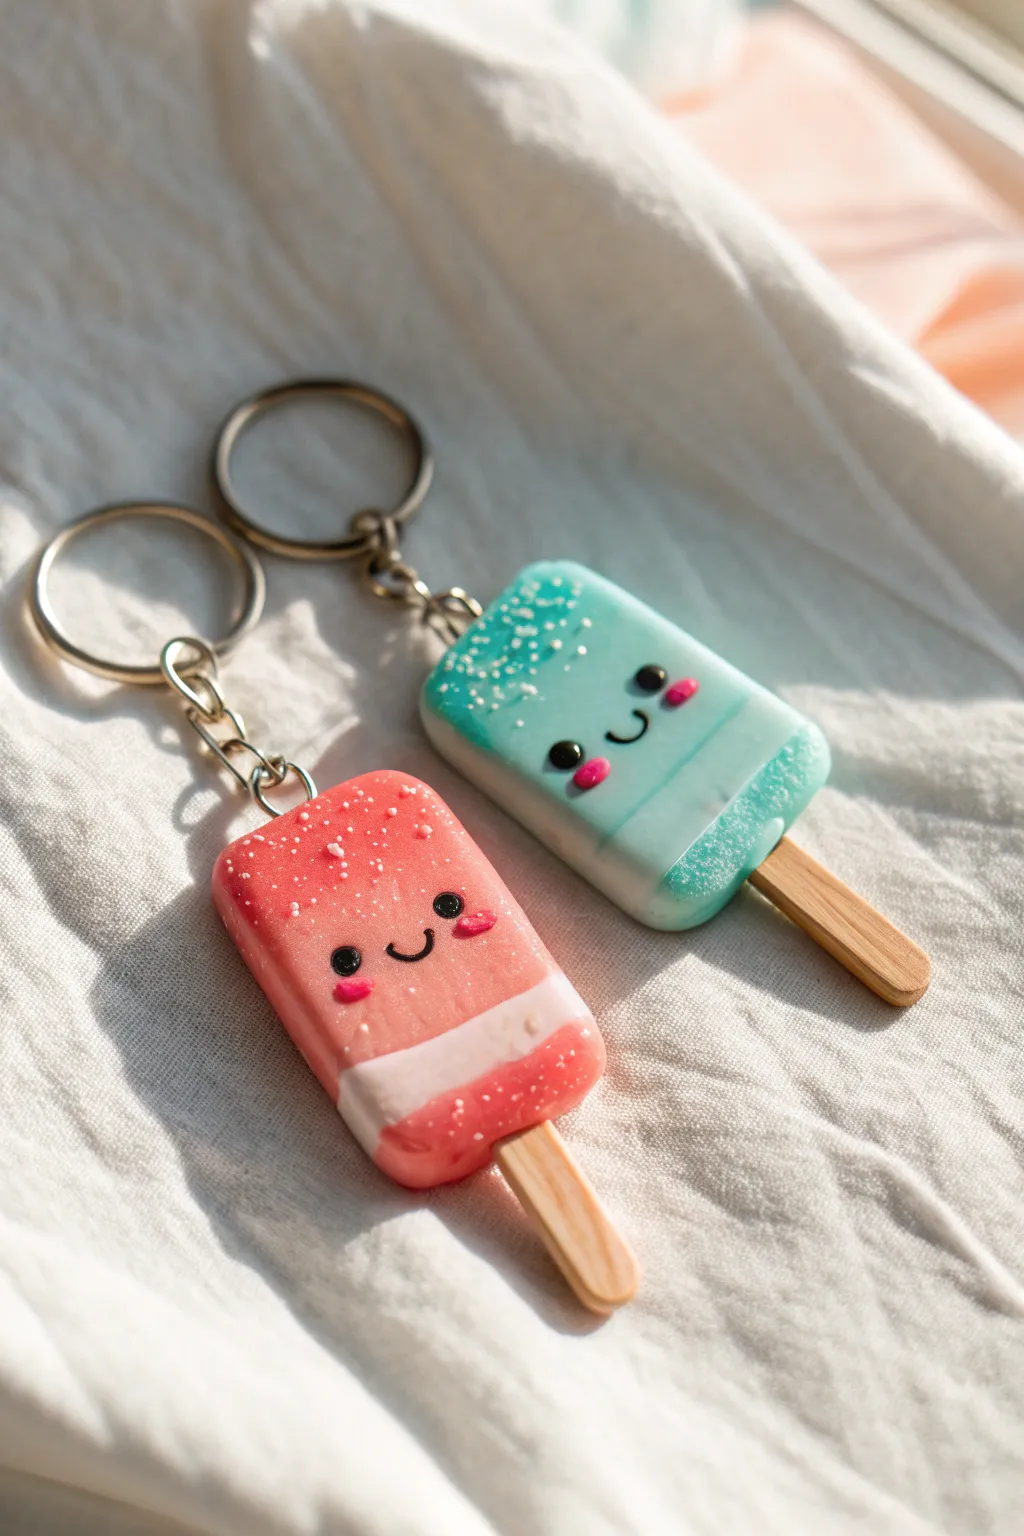
Cool down with these adorable popsicle keychains that look good enough to eat. Featuring a realistic ‘frosty’ texture and charming kawaii faces, these polymer clay creations are the perfect summer accessory for your keys or bag.
Step-by-Step Tutorial
Materials
- Polymer clay (translucent white, red, teal/blue, black, pink)
- Liquid polymer clay (translucent)
- Small wooden popsicle sticks
- Fine white glitter or embossing powder
- Keychain hardware (jump rings and split rings)
- Needle tool or toothpick
- Soft pastel chalks (white)
- Craft knife or blade
- Dotting tools
- Gloss glaze (optional)
- Pliers
- Hand drill or eye screw
Step 1: Mixing and Shaping the Base
-
Creating the Colors:
Start by mixing translucent clay with a very small amount of red clay for the pink popsicle, and translucent with a tiny bit of teal for the blue one. The translucent clay gives that realistic, icy jelly look. -
Forming the Rectangle:
Roll your mixed clay into a smooth ball, then flatten it slightly. Use your fingers and a flat surface to shape it into a thick, rounded rectangle. -
Making the Bite:
Before the clay gets too hard, gently press your clean thumb or a round cutter into the top corner to create a soft indentation, mimicking a bite taken out of the popsicle. -
Inserting the Stick:
Take a small wooden craft stick (you may need to trim a standard one down) and carefully push it into the bottom center of the rectangle. Ensure it goes deep enough to be secure.
Frosty Tip
Don’t over-mix your translucent clay colors. Leaving slight streaks of unmixed translucent white creates a more realistic frozen ice pop texture.
Step 2: Adding the Kawaii Face
-
Placing the Eyes:
Roll two tiny balls of black clay. Position them on the popsicle face, spacing them wide apart for maximum cuteness, and press them flat gently. -
Creating the Smile:
Roll an extremely thin snake of black clay. Cut a tiny U-shape and gently press it into the clay between the eyes using a needle tool. -
Adding Cheeks:
Take two small ovals of pink clay and place them directly under the eyes to create blushing cheeks. -
Securing the Features:
Use a silicone tool or your finger to lightly tap the facial features so they bond well with the base clay without distorting their shape.
Make it Fruity
Before baking, press thin slices of polymer clay fruit canes (like kiwi, orange, or strawberry) into the surface for a gourmet artisanal pop look.
Step 3: Creating the Frosty Texture
-
Applying Liquid Clay:
Brush a thin layer of translucent liquid polymer clay over the top third and the bottom third of the popsicle, skipping the middle band where the face is. -
Adding the Sprinkles:
While the liquid clay is wet, sprinkle fine white glitter or white embossing powder over the wet areas to simulate ice crystals and sugar. -
Dusting for Frost:
Scrape some white soft pastel into a fine dust. Use a dry brush to dab this dust heavily onto the ‘bitten’ area and the bottom edge to make it look extra frozen. -
The Drip Effect:
Mix a tiny bit of white clay with translucent liquid clay to make a milky paste. carefully paint a faint, wavy line across the bottom section to look like melting juice.
Step 4: Finishing Up
-
Pre-baking Holes:
If you are using eye screws, insert them now into the top center of the popsicle. If using jump rings later, pierce a hole through the top with a needle tool. -
Baking:
Bake the pieces according to your clay manufacturer’s instructions, usually around 275°F (135°C) for 15-20 minutes. I usually tent them with foil to prevent scorching. -
Cooling Down:
Let the popsicles cool completely before handling. The translucent clay will look clearer once it is fully cold. -
Sealing the Face:
For extra durability, you can apply a tiny drop of UV resin or gloss glaze just over the black eyes to make them shine. -
Attaching Hardware:
Use pliers to open a jump ring and thread it through the eye pin or hole you created. Connect this to your keychain split ring. -
Final Check:
Give the stick a gentle tug to ensure it is secure; if it feels loose, slide it out, add a drop of superglue, and slide it back in.
Now you have a refreshing set of buddies to keep your keys cool all summer long


Cheery Citrus Slice Magnets
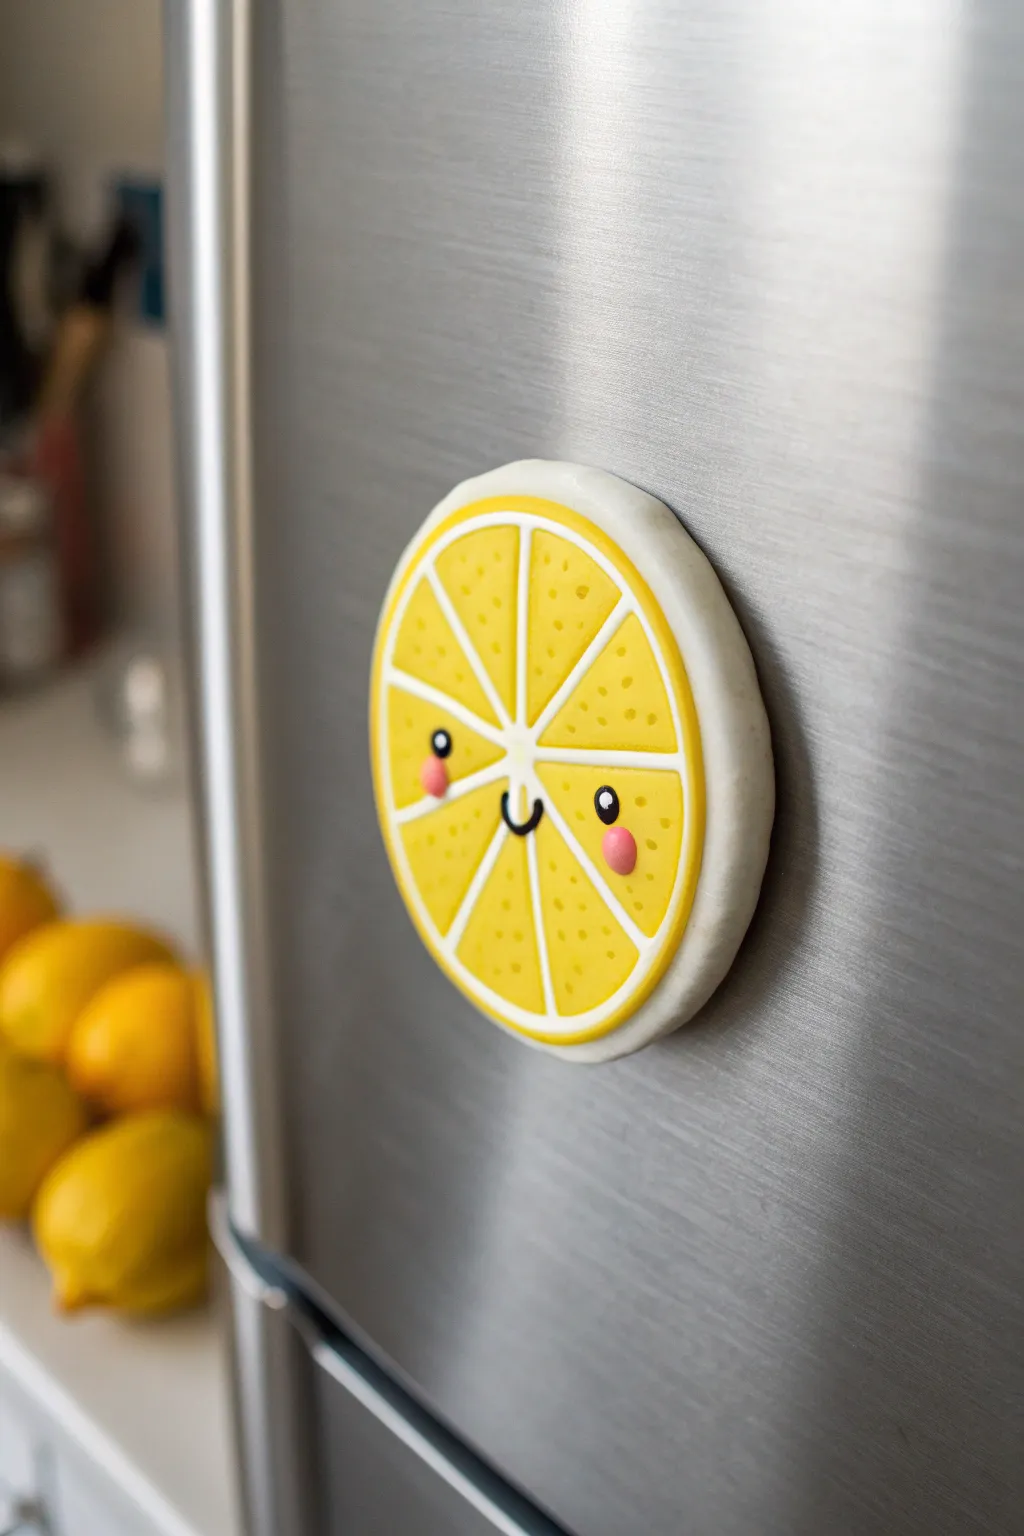
Brighten up your appliance with this sunny, kawaii-inspired lemon slice made from polymer clay. This cheerful magnet features a layered citrus design, an adorable smiling face, and a sturdy white rind that adds a clean, graphic finish.
Step-by-Step Guide
Materials
- White polymer clay
- Yellow polymer clay
- Pink polymer clay
- Black polymer clay
- Circle cutter (approx. 2-3 inches)
- Small circle cutter (approx. 0.5 inch)
- X-Acto knife or clay blade
- Needle tool or dotting tool
- Rolling pin (acrylic roller)
- Strong round craft magnet
- Superglue or E6000
- Oven for baking
Step 1: Creating the Citrus Base
-
Prepare the rind:
Begin by conditioning a chunk of white polymer clay until it is soft and pliable. Roll it out into a thick, even sheet, roughly 1/4 inch thick. This will be the sturdy backing and rind of your lemon. -
Cut the main circle:
Use your large circle cutter to punch out a perfect round shape from the white clay sheet. Smooth the edges with your finger to remove any rough texture. -
Roll the yellow layer:
Clean your work surface or rolling pin to avoid color transfer, then condition the yellow clay. Roll it out slightly thinner than the white layer, about 1/8 inch thick. -
Cut the fruit circle:
Using a cutter that is slightly smaller than your white base (or by hand-trimming), cut a yellow circle. You want this yellow circle to sit on top of the white base leaving a visible white border. -
Divide into segments:
Before attaching the yellow piece, use your clay blade to cut it into eight equal pizza-slice wedges. I find it easiest to cut it in half, then quarters, then eighths for symmetry. -
Arrange the segments:
Place the eight yellow wedges onto the white clay base. Leave a small gap between each slice to let the white ‘pith’ show through, creating the classic citrus look.
Clean Clay Tip
Keep baby wipes handy! Wipe your hands and tools thoroughly when switching from the dark black clay back to white or yellow to prevent smudging.
Step 2: Adding the Face and Details
-
Texture the fruit:
Take a needle tool or a stiff toothbrush and gently tap texture into the yellow segments. This stippling effect mimics the juice sacs of a real lemon. -
Make the eyes:
Roll two very tiny balls of black clay. Flatten them gently onto the two central yellow wedges to form the eyes, placing them slightly wide apart for a cute look. -
Add eye sparkles:
Roll extremely tiny specks of white clay and place one on the upper right side of each black eye. This ‘catchlight’ brings the character to life. -
Create the smile:
Roll a thin snake of black clay. Cut a tiny u-shape segment and position it right in the center of the lemon, directly over the central white pith line between the eyes. -
Apply blush cheeks:
Condition a small amount of pink clay and roll two small balls. Flatten these onto the yellow segments just below and outside the eyes.
Step 3: Finishing Up
-
Final inspection:
Check over your lemon to ensure no lint is stuck to the lighter clay pieces. If you see fingerprints, lightly brush them away with a tiny bit of baby oil on your finger. -
Bake the clay:
Bake the piece according to the temperature and time instructions on your specific brand of polymer clay packaging. Usually, this is around 275°F (135°C) for 15-30 minutes. -
Cool down:
Allow the citrus slice to cool completely on a flat surface. Moving it while hot can warp the shape. -
Attach the magnet:
Flip the cooled lemon over. Apply a drop of strong adhesive like E6000 or superglue to the back center. -
Secure the backing:
Press your round magnet firmly into the glue. Let the adhesive cure fully (usually 24 hours for maximum strength) before placing it on your fridge.
Make a Fruit Salad
Swap colors to make a whole set! Use orange clay for oranges, green for limes, or pink with black seeds for a watermelon variation.
Pop your cheerful new friend onto the fridge and enjoy a burst of summer all year round


Tiny Strawberry Shortcake Friends
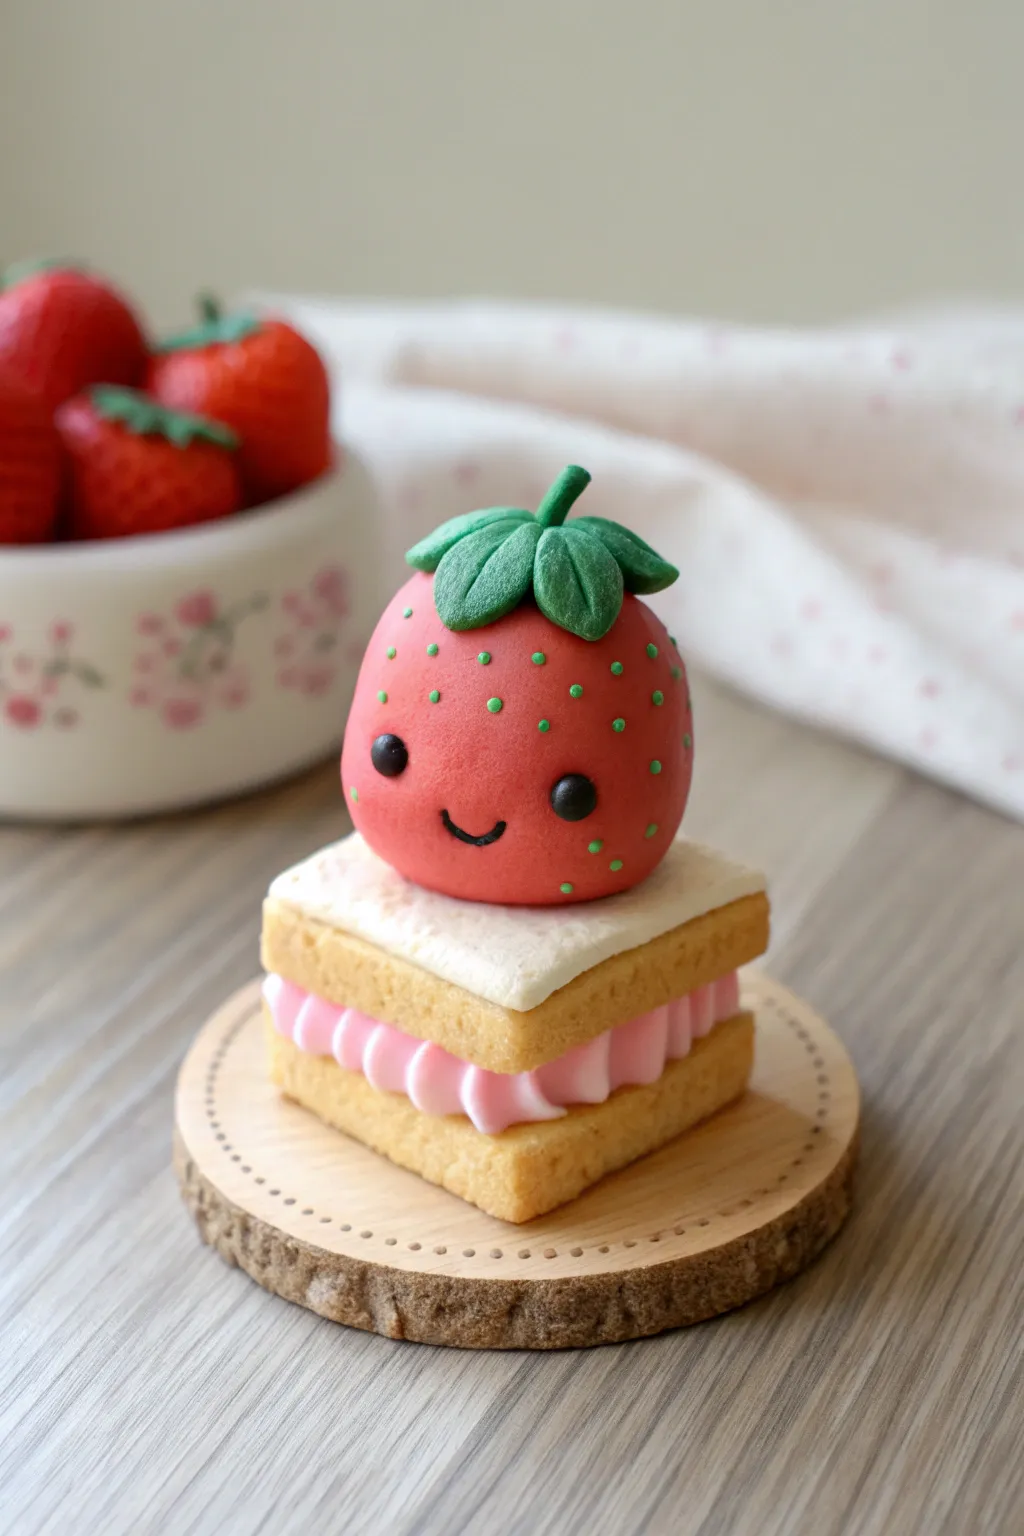
This adorable anthropomorphic strawberry perched atop a tiny dessert sandwich captures all the sweetness of summer in miniature form. With its friendly smile and realistic cookie texture, this polymer clay charm makes a perfect desk companion or distinctive gift.
Detailed Instructions
Materials
- Polymer clay: red, light tan, pale pink, white, green, black
- Liquid polymer clay (optional, for adhesion)
- Blade or craft knife
- Needle tool or toothpick
- Ball tool (small and medium)
- Small square cutter (approx. 1 inch)
- Old toothbrush or sandpaper (for texturing)
- Baking tile or parchment paper
- Oven
Step 1: Baking the Base
-
Mix the cookie color:
Start by conditioning your light tan clay. If it’s too dark, mix in a significant amount of white to achieve that golden-baked shortbread dough color. -
Form the cookie sheets:
Roll the tan clay out to a medium thickness, about 3-4mm. You want it substantial enough to look like a biscuit, not a cracker. -
Texture the dough:
Before cutting, gently press an old toothbrush or a piece of sandpaper onto the surface of the clay. This creates a realistic baked texture. -
Cut the shapes:
Use your small square cutter to punch out two identical squares. If the edges get squished, gently nudge them back into shape with your blade. -
Shade the edges:
Using a soft brush and some soft pastel chalk shavings (in orange or brown), lightly dust the edges of your squares to give them a perfectly baked look.
Step 2: Creamy Filling
-
Prepare the pink cream:
Condition pale pink clay until soft. I like to roll it into a long, thin snake first to ensure it’s pliable. -
Create the swirl:
Fold the pink snake into a zigzag or ribbon candy pattern. Alternatively, you can twist two thin snakes together for a swirled effect, then flatten slightly. -
Assemble the sandwich:
Place the pink cream layer onto the bottom cookie square. Top it with the second cookie square and press down very gently to secure the layers without squashing the texture. -
Add the icing:
Roll out a very thin sheet of white clay. Cut a square slightly smaller than your cookie and place it on top to represent the fondant or icing layer.
Sticky Situation?
If your clay gets too soft and sticky while shaping tiny details like the smile, pop it in the fridge for 5-10 minutes. The chilled clay will hold its shape much better.
Step 3: The Strawberry Character
-
Shape the body:
Roll a smooth ball of bright red clay, then gently taper the top to create a rounded strawberry shape with a wider base. -
Mount the strawberry:
Place the red strawberry shape securely onto the center of the white icing square. Use a dab of liquid clay here if you want extra security. -
Add the seeds:
Using your needle tool, poke tiny, shallow indentations all over the red surface. Roll minuscule specks of light green clay and press one into each hole. -
Create the face:
Use a medium ball tool to press two eye sockets low on the face. Insert small black balls of clay for eyes. Roll an extremely thin black snake for the smile and press it into a U-shape between the eyes. -
Sculpt the leaves:
Form five small teardrops from green clay. Flatten them slightly and use a needle tool or knife to impress a center vein on each leaf. -
Crown the berry:
Arrange the leaves in a star pattern on top of the strawberry’s head, pressing the centers together. Add a tiny green stalk in the middle. -
Final Bake:
Bake the entire piece according to your clay manufacturer’s instructions (usually 275°F/135°C for 15-30 minutes). Let it cool completely before handling.
Make it Sparkle
Before baking, brush a tiny bit of pearl mica powder over the white icing square. It adds a sugary sheen that makes the dessert look even more delicious.
Place your finished strawberry friend on a shelf to keep you smiling all summer long

The Complete Guide to Pottery Troubleshooting
Uncover the most common ceramic mistakes—from cracking clay to failed glazes—and learn how to fix them fast.
Mini Peach And Apricot Blush Buddies
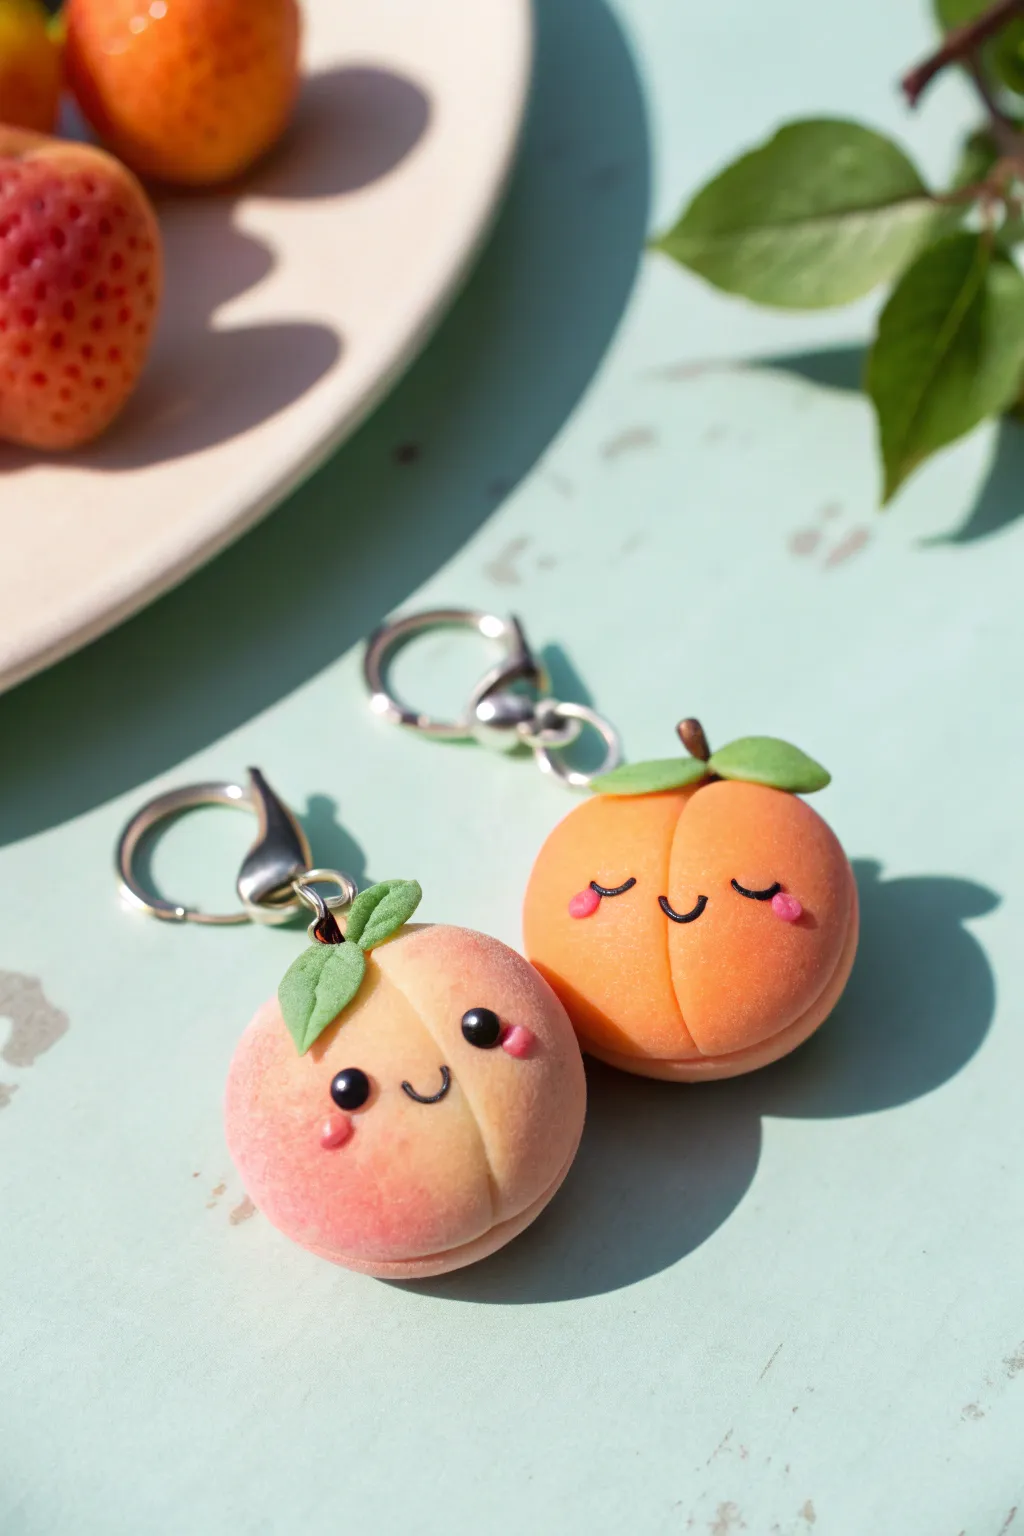
Capture the sweetness of summer with these adorable fruit charms that look nearly good enough to eat. With their soft, blushing gradients and tiny kawaii faces, these mini peach and apricot buddies make the perfect keychain companions.
Step-by-Step Tutorial
Materials
- Polymer clay (white, translucent, crimson, orange, green, dark brown/black)
- Soft pastels or chalk pastels (reds, pinks, oranges)
- Soft paintbrush for shading
- Ball tool or rounded sculpting tool
- Needle tool or toothpick
- Headpins or eye pins
- Jump rings and lobster clasps (or keychain findings)
- Gloss glaze or UV resin (optional for eyes)
- Wire cutters and round nose pliers
- Oven for baking
Step 1: Mixing the Fruit Base
-
Create the apricot shade:
Start by mixing a vibrant orange polymer clay with a small amount of white and a tiny bit of translucent clay. This helps achieve that slightly waxy, realistic fruit skin look rather than a flat plastic color. -
Mix the peach shade:
For the peach, take a portion of white clay and tint it very lightly with pink and a hint of yellow. You want a very pale, creamy base color because the darker peach tones will be added later with pastels. -
Shape the spheres:
Roll your mixed clays into smooth, wrinkle-free balls about the size of a large marble (roughly 1 inch in diameter). I find rolling them between two acrylic blocks or flat surfaces helps get them perfectly round. -
Sculpt the cleft:
Use a needle tool or the side of a toothpick to gently press an indentation down the side of each sphere. This creates the classic butt-chin shape characteristic of stone fruits. Soften the edges of this line with your finger so it looks natural, not sliced.
Pastel Dust Woes?
If pastel powder gets on parts you want to keep clean (like the eyes), use a cotton swab dipped in rubbing alcohol or nail polish remover to wipe the pigment away precisely before baking.
Step 2: Blushing and Texturing
-
Apply the fuzz texture:
Before shading, take an old toothbrush or a stiff stippling brush and gently tap it all over the surface of the clay. This creates a subtle ‘fuzzy’ texture that mimics real peach skin. -
Shade the peach:
Shave a bit of pink and red soft pastel into a powder. Using a soft, fluffy brush, gently dust the bottom and one side of the pale peach sphere to create a gradient blush. Build the color up slowly for a realistic ombre effect. -
Shade the apricot:
For the orange apricot, use a slightly darker orange or reddish-orange pastel. Brush this primarily near the cleft and the top where the stem will go, giving it a ripe, sun-kissed appearance. -
Insert hardware:
Insert an eye pin or a headpin through the top center of each fruit. If you want extra security, bend the end of the wire into a small hook before pushing it into the clay so it can’t be pulled out easily after baking.
Step 3: Adding Kawaii Details
-
Make the stems:
Roll a tiny snake of dark brown clay. Cut two very short segments and attach them right at the top of the cleft where the pin enters, pressing gently to adhere. -
Sculpt the leaves:
Take your green clay and form two small teardrops. Flatten them slightly and use a blade or needle tool to impress a central vein. Attach one or two leaves near the stem of each fruit. -
Create the faces:
Roll incredibly thin threads of black clay for the mouths. For the apricot, shape a ‘U’ for a smile and two upside-down ‘U’ curves for sleeping eyes. For the peach, make a small smile and roll two tiny balls for open eyes. -
Apply the cheeks:
Roll two minuscule balls of pink clay for each fruit. Press them onto the cheeks below the eyes. I like to flatten these quite a bit so they look like painted-on blushes. -
Final pre-bake check:
Give everything a once-over to smooth out any fingerprints. You can use a brush with a tiny bit of baby oil or clay softener to lightly erase accidental marks.
Scented Charms
Mix a drop of peach fragrance oil into the clay before shaping. Don’t add too much or the clay gets sticky, but just enough will make them smell as sweet as they look.
Step 4: Finishing Up
-
Bake:
Bake the pieces according to your polymer clay package instructions. Usually, this is around 275°F (130°C) for 15–30 minutes, but check your specific brand to avoid scorching. -
Highlight the eyes:
Once cooled, add a tiny dot of white acrylic paint to the black eyes of the peach character to bring it to life. For extra shine, apply a drop of UV resin or gloss varnish just to the eyes. -
Assemble the charm:
Use your round nose pliers to create a loop with the headpin sticking out of the top (if you haven’t already). Attach a jump ring and your lobster clasp or keychain finding.
Now you have a set of sweet, sun-ripened friends ready to brighten up your bag or keys
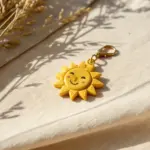
Sunny Little Sun Face Tokens
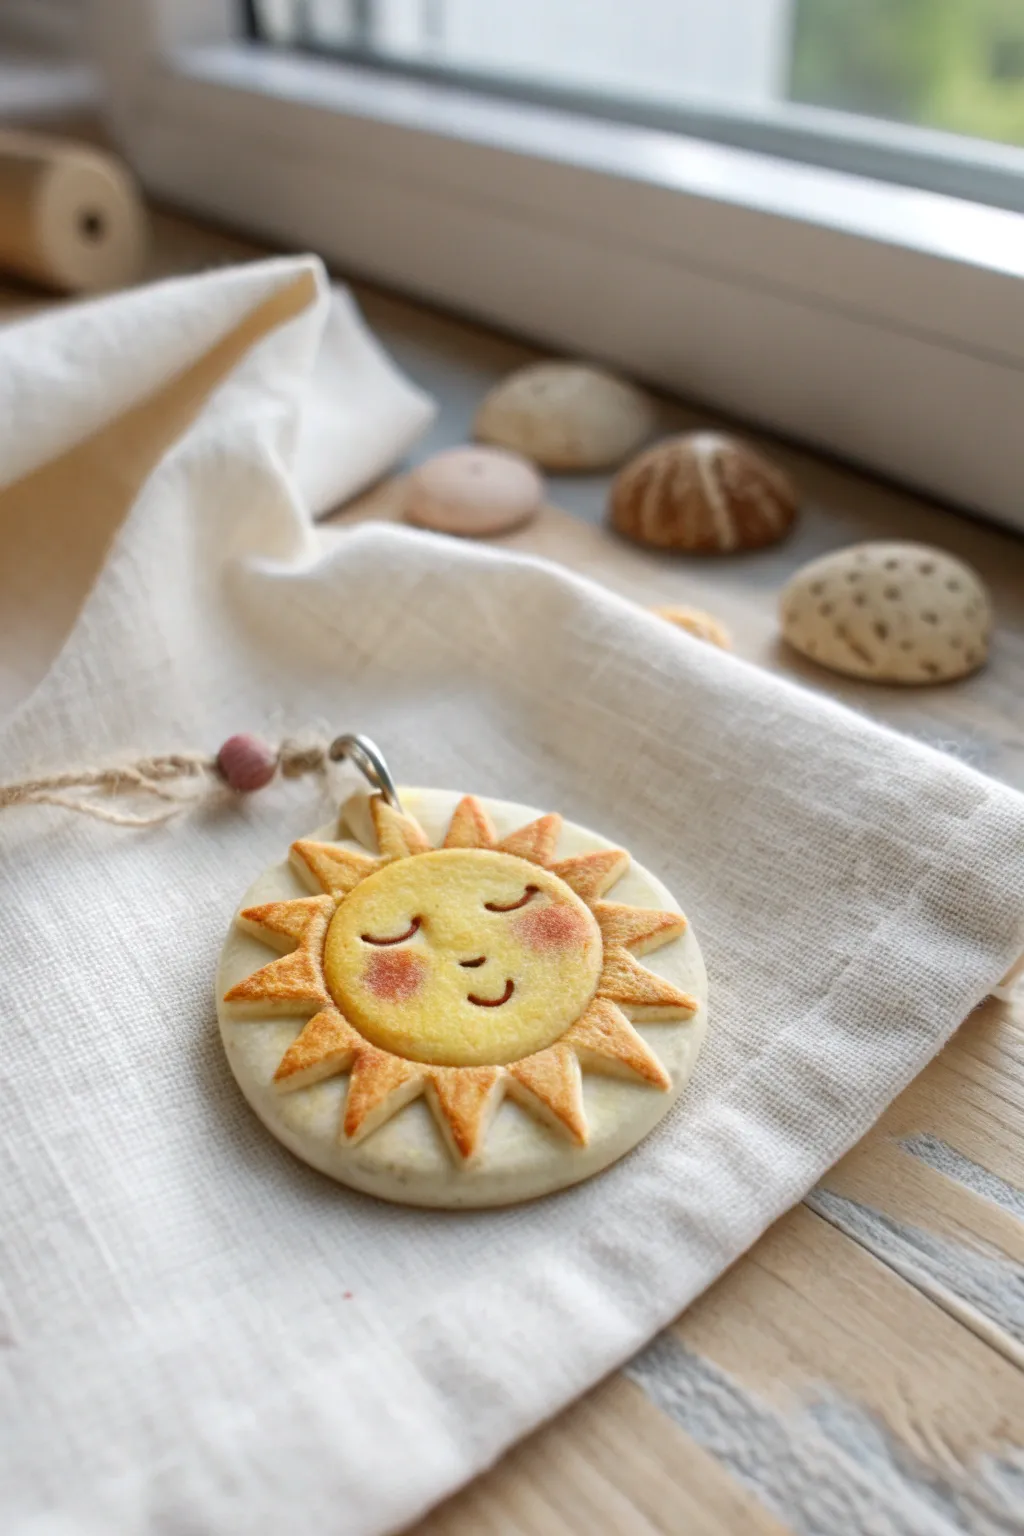
Capture the warmth of a summer afternoon with this delightful clay sun token. Its gentle smile, toasted golden edges, and soft, floury texture give it a charming, freshly-baked appearance perfect for a rustic necklace or keychain.
Step-by-Step Guide
Materials
- White or cream polymer clay (or air-dry clay)
- Yellow polymer clay (soft pastel yellow)
- Circle cutters (two sizes: approx. 2.5 inch and 1.5 inch)
- Craft knife or scalpel
- Soft pure pastel chalks (orange, deep yellow, brown)
- Small fluffy paintbrush
- Needle tool or toothpick
- Ball stylus tool
- Small jump ring
- Jewelry pliers
- Translucent liquid clay or bake and bond (optional)
- Small drill bit or pin drill (if baking first)
Step 1: Forming the Base
-
Condition the clay:
Start by conditioning a chunk of white or cream clay until it is soft and pliable. Roll it out into a smooth sheet about 1/4 inch thick. -
Cut the backing:
Using your larger circle cutter, punch out a clean circle. This will serve as the backing disc for your sun. -
Add texture:
Gently tap the surface of the white circle with a toothbrush or a piece of sandpaper to give it a matte, slightly stony or floury texture rather than a shiny synthetic finish. -
Create the hole:
Use a straw or a small cutter to create a hole at the very top of the disc for the hardware later. Make sure not to get too close to the edge to prevent tearing.
Fixing Smudges
If you smudge the chalk pastel where you don’t want it, use a cotton swab dipped in a tiny bit of rubbing alcohol or baby oil to gently wipe the clay clean before baking.
Step 2: Sculpting the Sun
-
Mix the sun color:
Take your yellow clay and mix in a tiny amount of white if it’s too vibrant; you want a soft, buttery yellow. -
Cut the face:
Roll out the yellow clay just slightly thinner than the base. Use the smaller circle cutter to punch out the sun’s face. -
Center the face:
Place the yellow circle directly in the center of your white backing disc. Press it down gently so it adheres. -
Form the sun rays:
Roll a small snake of yellow clay and flatten it slightly. Cut small triangles using your craft knife to create the rays. -
Attach the rays:
Arrange the triangular rays around the central yellow circle. I find it easiest to place four ‘compass points’ (top, bottom, left, right) first, then fill in the gaps for even spacing. -
Blend the seams:
Use a sculpting tool to gently press the base of each ray into the central face circle so they look like one cohesive unit, not just pieces sitting next to each other.
Pro Tip: Texture
To get that specific ‘floury’ look, lightly dust the raw clay with cornstarch before texturing. It acts as a release agent and leaves a soft, matte residue after baking.
Step 3: Adding Personality
-
Define the nose:
Roll a tiny ball of yellow clay and press it into the center of the face for a nose, or simply use a tool to push up a small mound of clay from the surface. -
Sculpt the features:
Use a needle tool or craft knife to carefully impress two crescent shapes for sleepy, smiling eyes. Add a small curved line for the mouth. -
Add the cheeks:
Scrape a little bit of red or pink pastel chalk into a powder. Use a small brush or your finger to gently dab this ‘blush’ onto the sun’s cheeks. -
Create the toasted effect:
Shave some orange and light brown chalk into a powder. With a dry, fluffy brush, lightly dust the tips of the sun rays and the edges of the face to create that ‘baked cookie’ look. -
Deepen the details:
Use a tiny brush with dark brown chalk powder (or diluted acrylic paint) to very carefully darken the inside of the eye and mouth indentations so they stand out.
Step 4: Finishing Up
-
Bake the project:
Bake your piece according to the directions on your specific package of clay (usually 275°F/135°C for 15-30 minutes for polymer clay). -
Cool down:
Let the clay cool completely before handling it, as it is fragile while hot. -
Add hardware:
Once cool, use your jewelry pliers to open a sturdy jump ring. Thread it through the pre-made hole at the top. -
Secure the ring:
Close the jump ring securely. Add a string of twine or a leather cord to complete the rustic vibe.
Now you have a cheerful little sun companion to brighten even the cloudiest days


What Really Happens Inside the Kiln
Learn how time and temperature work together inside the kiln to transform clay into durable ceramic.
Beach Ball Charms With Tiny Smiles
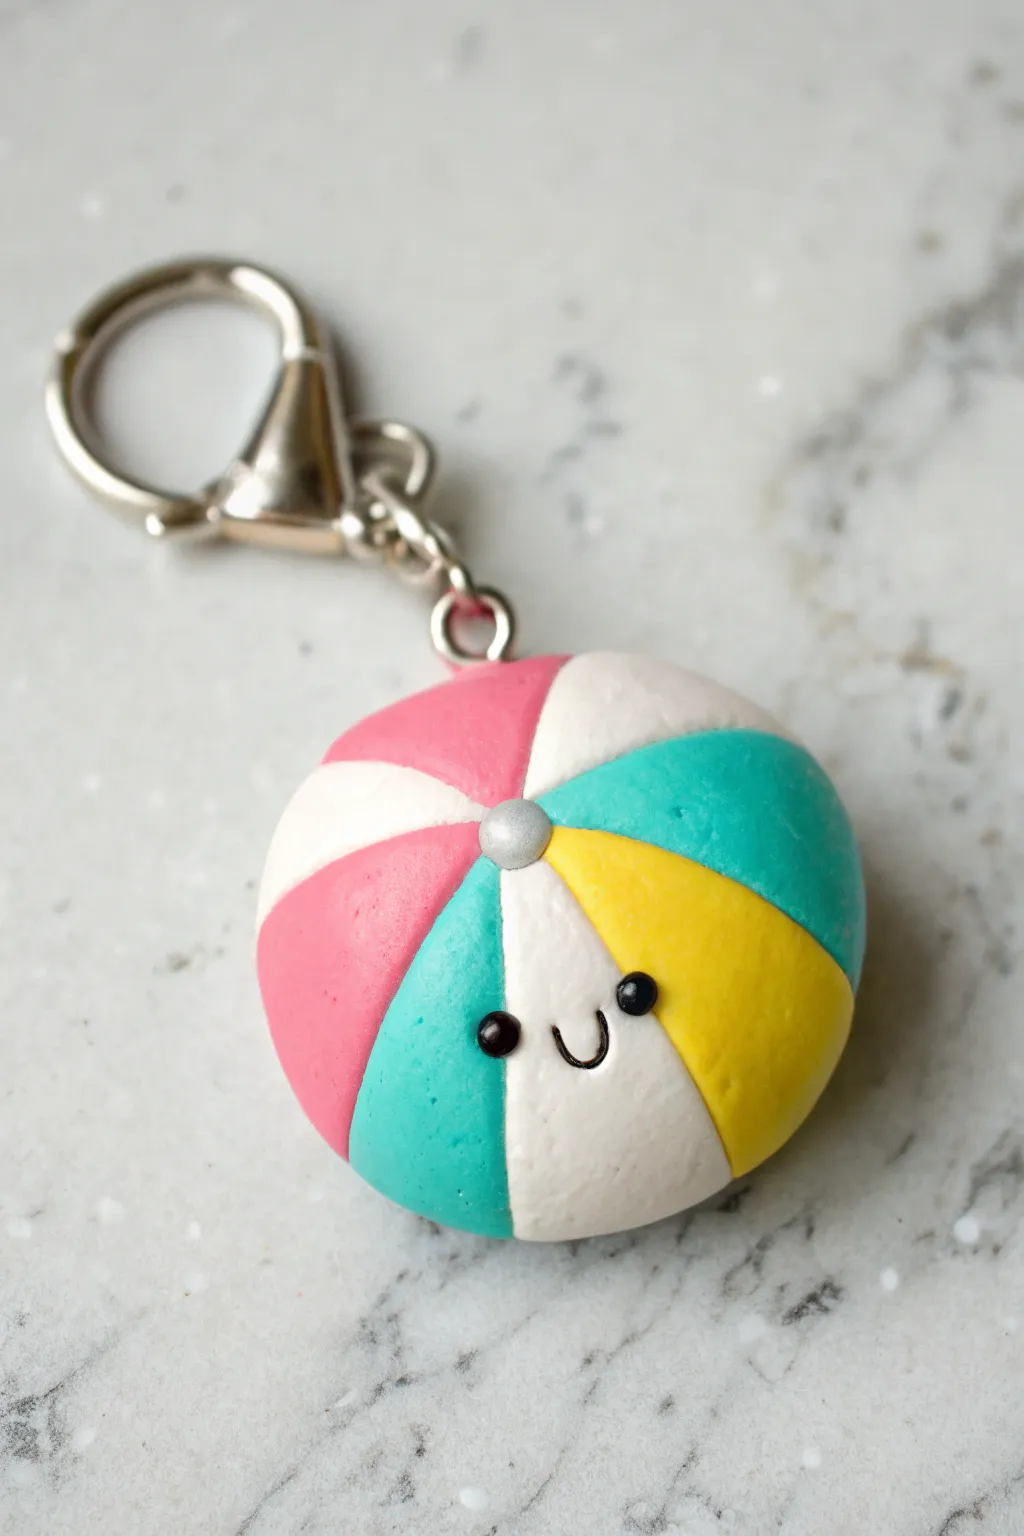
Capture the endless fun of summer with this adorable miniature beach ball charm, complete with a perpetually happy smile. Its vibrant stripes of teal, pink, and yellow bring a pop of color to any keychain or zipper pull, making it a perfect sunny day accessory.
Detailed Instructions
Materials
- Polymer clay (white, pink, teal, yellow, black)
- Silver polymer clay or acrylic paint
- Rolling pin or pasta machine
- Clay blade or craft knife
- Needle tool or dotting tool ball stylus
- Eyepin or screw eye hook
- Silver lobster clasp keychain finding
- Jump ring
- Gloss glaze or polyurethane varnish (optional)
- Small paintbrush
- Oven for baking
Step 1: Prepping the Clay Base
-
Condition the white clay:
Begin by taking a chunk of white polymer clay and kneading it thoroughly until it is soft and pliable. This conditioning step prevents cracks later on. -
Form the core ball:
Roll the white clay into a smooth sphere, roughly the size of a large gum ball or a small walnut. Roll it between your palms to ensure there are no seams. -
Flatten slightly:
Gently press the ball down against your work surface to flatten it just a tiny bit into a thick disc shape, rather than a perfect sphere. This makes it sit nicer as a charm.
Step 2: Creating the Colored Segments
-
Roll out colors:
Roll out small amounts of pink, teal, and yellow clay into thin sheets. You want them to be uniform in thickness, about 1-2mm. -
Cut triangular wedges:
Using your clay blade, cut elongated tear-drop or wedge shapes from the colored sheets. Imagine these as the peel of an orange; they need to be wide in the middle and tapered at the ends to fit the curve of the ball. -
Place the first color:
Pick a spot on your white base and lay down a teal wedge. Gently smooth it down with your finger so it adheres fully. -
Add alternating stripes:
Leave a gap of white space equal to the width of your colored strip, then place a pink wedge. Repeat the process for the yellow wedge. You should end up with a pattern of Color-White-Color-White. -
Refine the seams:
Use your fingers to gently smooth the edges of the colored clay into the white base. The goal is to make them look like a single inlaid surface rather than layers sitting on top.
Uneven Wedges?
If your colored wedges look wonky, make a paper template first! Cut a teardrop shape from paper, hold it against the ball to test the size, and use it as a stencil to cut your clay.
Step 3: Adding the Details
-
Create the top button:
Roll a very tiny ball of silver clay (or grey clay if you plan to paint it silver later). Flatten it slightly into a disc. -
Attach the button:
Place this silver disc at the very top center point where all your colored segments converge. Press it down gently to secure the tips of the wedges. -
Make the eye sockets:
On one of the white segments (this will be the face), use a small ball stylus to make two shallow indentations where the eyes will go. -
Insert the eyes:
Roll two minuscule balls of black clay. Carefully place them into the indentations you just made. I find using a needle tool helps transfer these tiny pieces without squishing them. -
Sculpt the smile:
Roll a microscopic snake of black clay for the mouth. Curve it into a ‘U’ shape and press it onto the clay between the eyes. Alternatively, you can paint this on after baking for precision.
Super smooth finish
To get that seamless vinyl look, lightly roll the entire finished ball in your palms for a few seconds before adding the face. This embeds the colored strips flush with the white clay.
Step 4: Finishing Up
-
Clean up fingerprints:
Before baking, give the piece a once-over with a tiny amount of baby oil or rubbing alcohol on your finger to smooth out any fingerprints or lint. -
Insert the hardware:
Insert your eyepin or screw eye into the top of the ball, ideally right through the center of the silver button. -
Bake the charm:
Bake the charm according to your specific brand of clay’s instructions (usually around 275°F/135°C for 15-30 minutes). -
Cool and glaze:
Let the charm cool completely. Once cool, apply a coat of gloss glaze to make it shiny and wet-looking, just like a real pool toy. -
Attach the keychain:
Open a jump ring with pliers, loop it through the eyepin and the lobster clasp, then close it securely.
Attach this cheery charm to your beach bag and enjoy the summer vibes all year round
Floatie Ring Friends

Bring a little poolside sunshine to your desk with these adorable clay floatie friends. Modeled with simple shapes and finished with sweet, painted expressions, they capture the perfect lazy summer vibe in miniature form.
Step-by-Step
Materials
- Polymer clay (peach, white, mint green, and black)
- Acrylic paint (black and pink)
- Fine detail paintbrush or dotting tool
- Rolling pin or pasta machine
- Circular cutter (small)
- Clay sculpting tools (needle tool)
- Gloss glaze or varnish
Step 1: Shaping the Base
-
Condition the clay:
Start by kneading your main color clay, I’m using a warm peach tone here, until it is soft and pliable. This prevents cracks later on. -
Roll a log:
Roll the conditioned clay into a smooth, even log shape on your work surface. Aim for a thickness of about 1/2 inch. -
Form the ring:
Gently curve the log into a circle, bringing the two ends together. Cut off any excess length so you have a perfect donut shape. -
Seamless join:
Press the cut ends together firmly. Use a sculpting tool or your fingertip to smooth the seam completely so the ring looks continuous. -
Perfect the shape:
Pat down the top slightly to flatten the ring just a bit, making it look more like an inflated tube rather than a perfect sphere.
Seam Struggles
If the seam where you joined the ring keeps cracking open, add a tiny drop of liquid clay or translucent liquid sculpey as a bonding agent before smoothing it over.
Step 2: Adding Details
-
Prepare the stripes:
Roll out a very thin sheet of white clay. Use a craft knife to slice narrow, uniform strips for the lifebuoy markings. -
Box the stripes:
Picking up the delicate white strips, wrap them around the peach ring at equal intervals. usually four stripes look balanced. -
Smooth the bands:
Gently roll the ring on your work surface or use a fingertip to press the white clay into the peach clay so they become one flush surface. -
Mint variety:
For the mint green version shown in the background, skip the stripes and instead press tiny flattened balls of pink clay onto the surface for polka dots.
Step 3: Finishing Touches
-
Bake the clay:
Place your floaties on a baking sheet or tile. Bake according to your brand of polymer clay’s specific temperature and time instructions. -
Cool down:
Allow the pieces to cool completely before painting. Painting on warm clay can make the acrylics gummy. -
Paint the eyes:
Using a dotting tool or the back of a paintbrush dipped in black acrylic paint, add two small eyes on the front section between two white stripes. -
Add a smile:
With your finest detail brush, carefully paint a tiny U-shaped smile between the eyes. -
Highlight the eyes:
Once the black paint is dry, add a minuscule dot of white paint to the upper corner of each eye for a sparkling kawaii look. -
Seal it up:
Coat the entire piece with a layer of gloss glaze. This mimics the shiny plastic texture of a real pool float and protects the paint.
Floatie Accessories
Before baking, create a tiny animal head (like a duck or flamingo) out of clay and attach it to the front of the ring to turn a standard tube into an animal floatie.
Now you have a tiny squad of summer friends ready to brighten your shelf

TRACK YOUR CERAMIC JOURNEY
Capture glaze tests, firing details, and creative progress—all in one simple printable. Make your projects easier to repeat and improve.
Sea Shell Characters With Blushing Cheeks
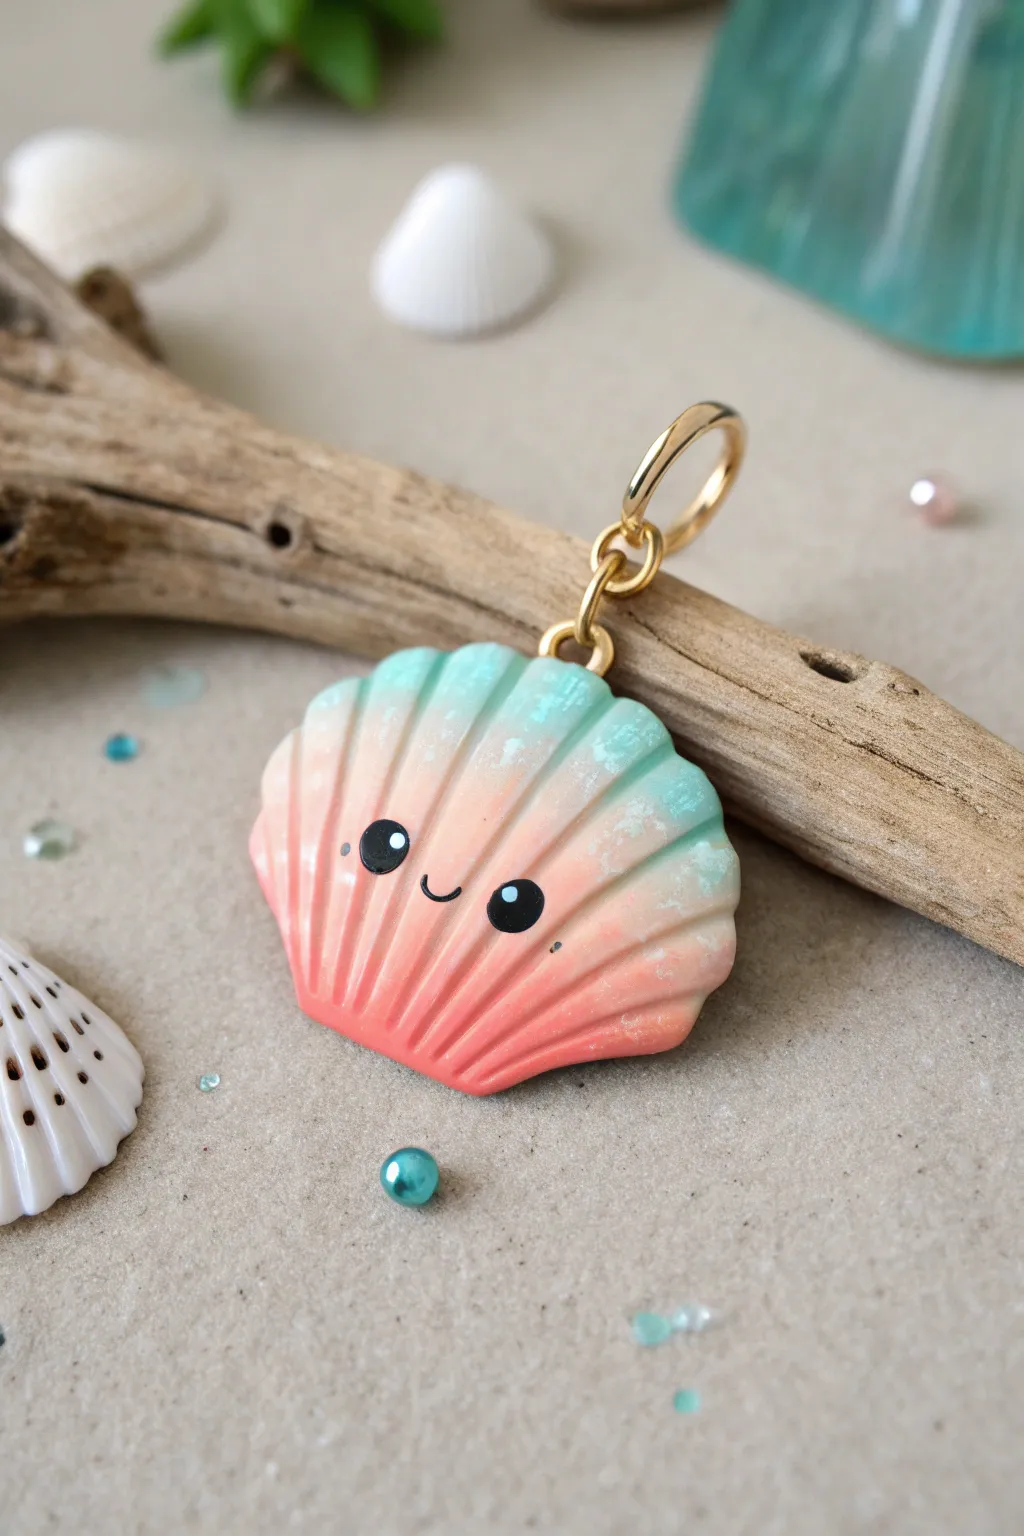
Capture the essence of a beach sunset with this adorable gradient seashell charm featuring a kawaii face. Its soft transition from coral to mint and subtle sparkling finish makes it a perfect summer accessory or keychain.
Step-by-Step Tutorial
Materials
- Polymer clay (Coral Pink, Mint Blue, White)
- Scallop shell cutter or craft knife
- Pointed sculpting tool or toothpick
- Metal eye screw
- Jump ring and lobster clasp
- Black acrylic paint
- Small dotting tool or ball stylus
- Fine detail paintbrush
- Gloss glaze or UV resin
- Soft pastel chalks (optional, for shading)
- Sandpaper (fine grit)
Step 1: Forming the Ombré Base
-
Condition the Clay:
Start by thoroughly kneading your coral pink and mint blue clays separately until they are soft and pliable. If the colors are too dark, mix in a little white clay to achieve pastel tones. -
Created the Gradient:
Create a ‘Skinner blend’ by forming a triangle of pink and a triangle of blue. Press them together to form a rectangle and pass this through a pasta machine or roll it out by hand, folding and rolling repeatedly until you have a smooth transition from pink to blue. -
Shape the Shell:
Once your gradient sheet is ready, roll it to about 1/4 inch thickness. Use a scallop shell cutter to punch out the shape. If you don’t have a cutter, print a small shell template, lay it on the clay, and carefully cut around it with a craft knife. -
Smooth the Edges:
Gently tap the edges of the clay with your finger to round them off, removing any sharp cuts left by the tool. I like to dip my finger in a tiny bit of water or cornstarch to glide over the clay smoothly.
Oops! Harsh Lines?
If your gradient looks stripy instead of smooth, keep folding and rolling! You can also gently rub the seam with your finger to blur the colors together before cutting.
Step 2: Adding Texture and Detail
-
Sculpt the Ribs:
Using a pointed sculpting tool or a toothpick, press vertical lines into the shell fanning out from the bottom center to the scalloped top. Make these indentations deep enough to be visible but not so deep they cut through. -
Refine the Shape:
Between each indented line, gently press the clay to make the sections look puffy and rounded, enhancing the ribbed shell effect. -
Insert Attachment Point:
While the clay is still raw, screw a small metal eye pin into the top center of the shell. You can add a drop of liquid clay or ‘Bake and Bond’ to the threads to ensure it stays secure after baking. -
Add Subtle Texture:
For that slightly weathered, organic look seen in the photo, lightly dab a stiff toothbrush or a textured sponge over the surface, particularly near the top edges.
Make it Sparkle
Mix a pinch of iridescent mica powder or fine glitter into your translucent liquid clay/glaze before applying the final coat for a magical shimmer.
Step 3: Baking and Painting
-
Bake the Piece:
Bake the clay according to the manufacturer’s instructions for your specific brand. Usually, this is around 275°F (130°C) for 15-30 minutes. Let it cool completely before moving to the next step. -
Paint the Eyes:
Dip a medium-sized dotting tool into black acrylic paint. Place two solid black circles on the lower half of the shell for the eyes, spacing them wide apart for maximum cuteness. -
Add the Smile:
Using your finest detail brush and black paint, draw a tiny ‘u’ shape slightly between and below the eyes. Keep the line very thin. -
Highlights:
Once the black paint is dry, use a toothpick or very small dotting tool with white paint to add a tiny reflection dot in the upper corner of each eye. -
Create ‘Sea Foam’ Speckles:
To mimic the texture in the image, mix a tiny bit of white acrylic paint with water. Dip a toothbrush in it and flick very fine speckles over the top teal section of the shell.
Step 4: Finishing Touches
-
Glaze:
Apply a coat of satin or gloss glaze (or UV resin for extra durability) to seal the paint and give the shell a ceramic-like finish. Cure or dry as directed. -
Assemble Hardware:
Open a jump ring using two pairs of pliers. Thread it through the eye pin loop on the shell and then attach your keychain hardware or lobster clasp. Close the jump ring securely.
Now your happy little seashell is ready to hang on your bag or keys for a splash of ocean joy
Flip-Flop Pals With Tiny Faces
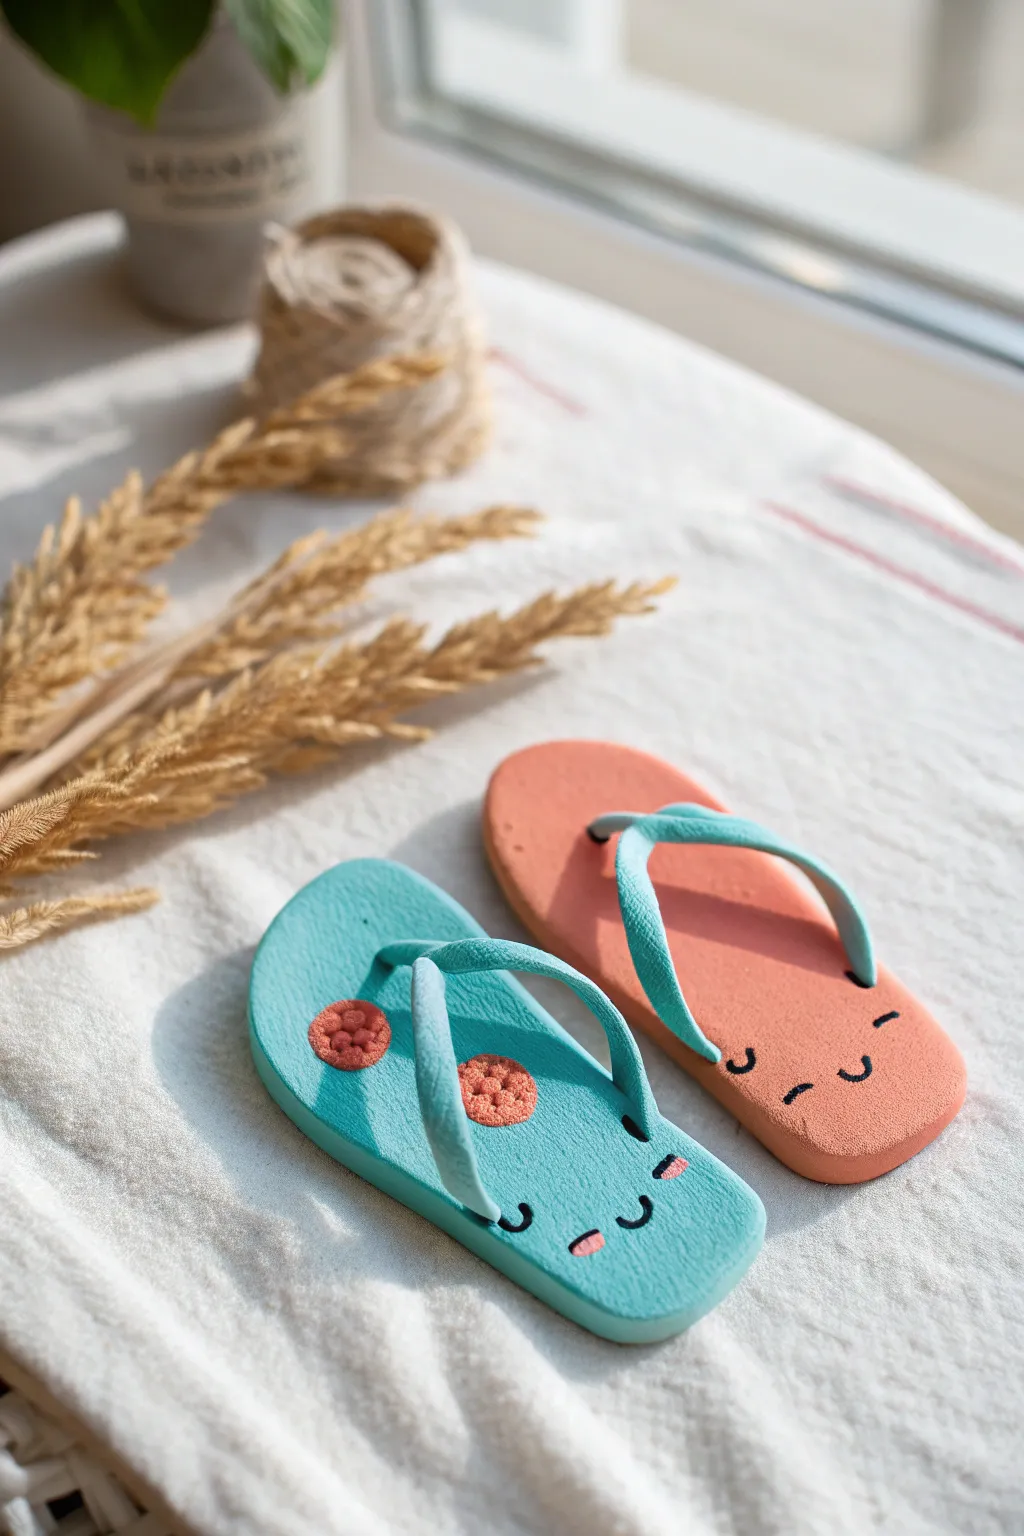
Capture the essence of summer with these adorable miniature flip-flops made from polymer clay. These tiny accessories feature sweet, sleepy faces and vibrant colors, making them perfect for dollhouses, charms, or just a cute desk decoration.
Step-by-Step
Materials
- Polymer clay (Teal, Peach/Salmon, slightly darker Teal for dots)
- Black acrylic paint or fine-tip black marker
- Pink acrylic paint or pastel chalk for cheeks
- Rolling pin or pasta machine
- Craft knife or scalpel
- Small oval cutter (or round cutter stretched)
- Needle tool or toothpick
- Fine detail paintbrush
- Liquid polymer clay (optional)
- Smoothing tool or your finger
Step 1: Shaping the Soles
-
Condition the Clay:
Begin by thoroughly conditioning your teal and peach clay separately until they are soft and pliable. This prevents cracks during baking. -
Roll the Base:
Roll out a slab of clay for each color to a thickness of about 1/4 inch (6mm). You want them thick enough to look chunky and cute. -
Cut the Shape:
Using a small oval cutter (or freehanding with a craft knife), cut out two elongated rounded shapes to form the soles. Gently pinch one end to be slightly wider for the ‘toe’ area and the other slightly narrower for the heel. -
Smooth the Edges:
Run your finger or a silicone tool along the cut edges to soften them. The look we are going for is soft and rounded, not sharp or blocky. -
texture the Surface:
Take an old toothbrush or a stiff bristle brush and gently tap it all over the top surface of the soles to give them a realistic foam texture.
Step 2: Creating the Straps
-
Prepare Strap Clay:
Roll out a very thin sheet of the same teal and peach clay used for the soles. -
Cut Strips:
Use your craft knife to cut two thin, consistent strips for each shoe. These should be about 2-3mm wide. -
Mark Anchor Points:
Use a needle tool or dotting tool to poke three indentations into each sole: one in the center near the toes, and two on the sides near the instep. -
Attach the Toe Post:
Take the two strips and join them at one end. Press this joined end into the front center hole. You can use a tiny drop of liquid clay here for a stronger bond. -
Form the V-Shape:
Loop the strips outwards to form the classic ‘V’ shape of a flip-flop strap. -
Secure Side Straps:
Tuck the loose ends of the strips into the side holes you created earlier. Use your smoothing tool to blend the clay slightly so the straps look seamless entering the sole.
Foam Texture Trick
To get realistic foam pores, gently tap the unbaked clay with coarse sandpaper or a balled-up piece of aluminum foil.
Step 3: Adding Details & Baking
-
Add Polka Dots:
For the teal flip-flop, roll tiny balls of the darker contrasting clay (like a coral or dark pink). Flatten them onto the sole before baking for a flush design. -
Texture Check:
Re-texture any areas that got smoothed out while you were handling the straps. -
Bake:
Bake the clay pieces according to the manufacturer’s instructions on your clay package. Let them cool completely before painting.
Straps Won’t Stick?
If the straps won’t stay in the holes, add a tiny drop of translucent liquid clay (Bake & Bond) into the hole before inserting the strap ends.
Step 4: Painting the Faces
-
Draft the Face:
Since the surface is small, lightly mark where the eyes and mouth will go with a pencil first. -
Paint the Eyes:
Using a very fine brush and black paint, create two small ‘u’ shapes for sleepy closed eyes. I actually find a toothpick works better than a brush for lines this thin if your hand shakes. -
Paint the Mouth:
Paint a tiny matching curved line for the smile right between the eyes. -
Add Cheeks:
Dip a toothpick into pink paint or use a bit of shaved pastel chalk to add tiny blush marks on the cheeks or sides of the mouth. -
Seal:
Once the paint is fully dry, apply a matte varnish to protect the face paint from scratching off.
Now you have a charming pair of summer sandals that mimic the real thing in miniature form
Sunglasses Characters With Sparkly Eyes
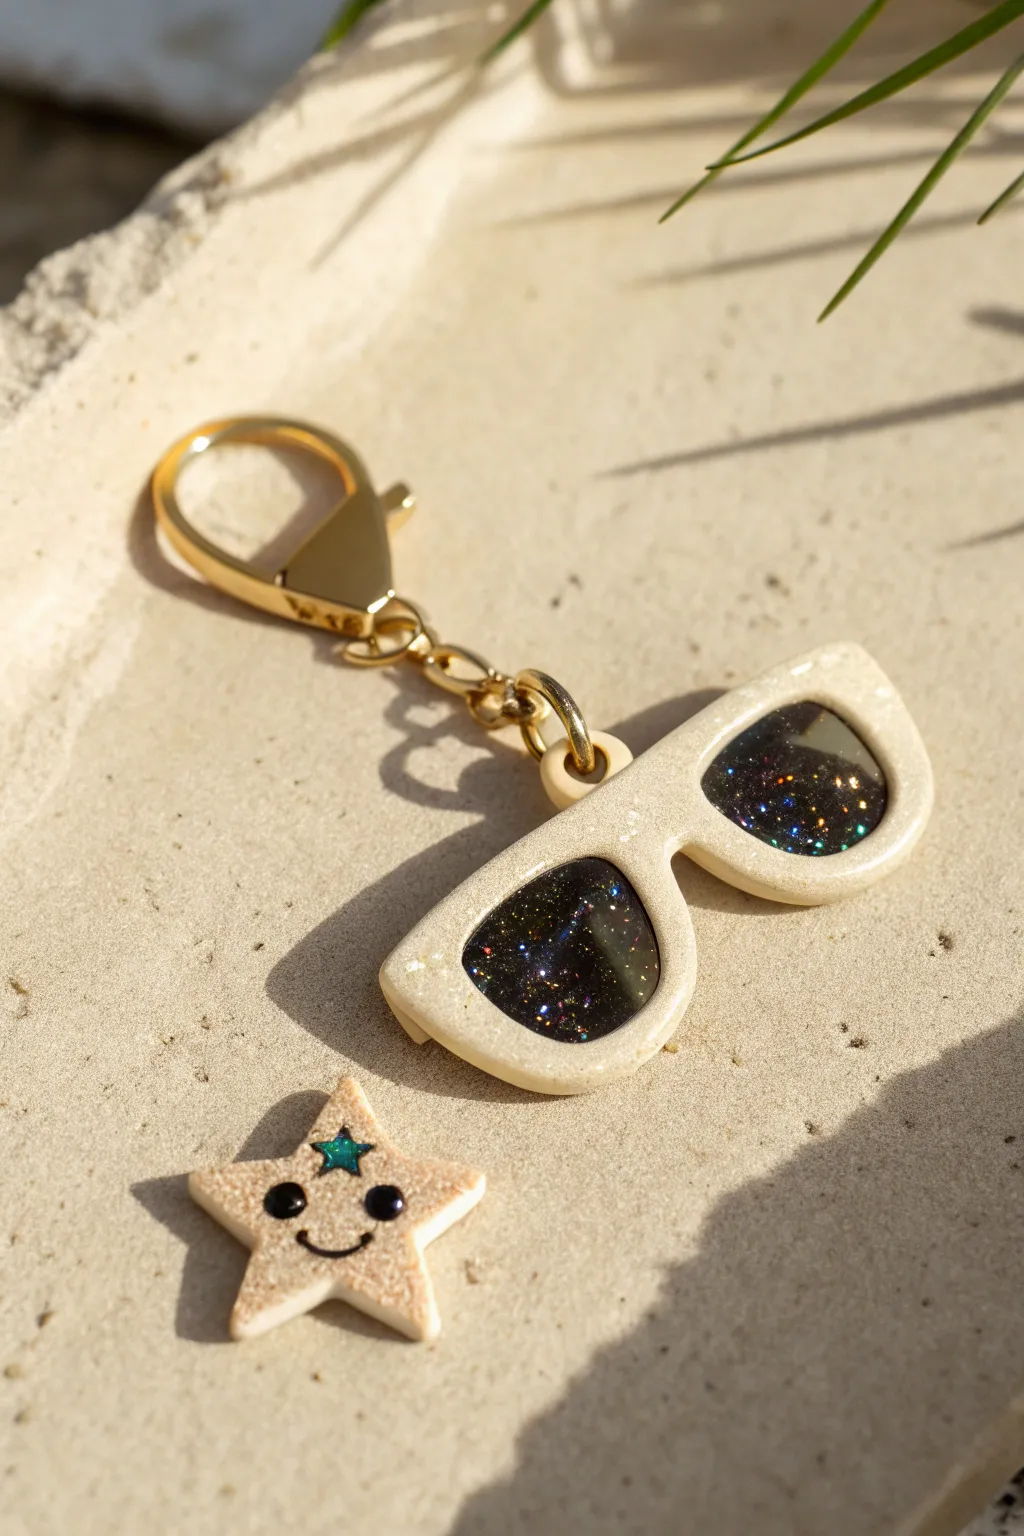
Capture the magic of starry summer nights with these adorable polymer clay sunglasses. This project combines creamy clay frames with dazzling, deep-space lenses to make a chic accessory that sparkles in the sun.
How-To Guide
Materials
- Polymer clay (cream/beige)
- Black UV resin (or black clay + clear resin)
- Holographic fine glitter mix (blue/purple/stars)
- UV lamp
- Gold keychain hardware with chain
- Jump rings x2
- Rolling pin
- Craft knife or scalpel
- Needle tool or small drill
- Small oval cutters (optional but helpful)
- Sandpaper or nail buffer
- Glazing resin or polyurethane gloss varnish
Step 1: Shaping the Frames
-
Condition the clay:
Start by thoroughly kneading your cream-colored polymer clay until it’s soft and pliable. This prevents cracking later on. -
Roll out the slab:
Roll the clay into a smooth slab about 4-5mm thick. You want it sturdy enough to hold the resin pools without warping. -
Cut the lens holes:
Using a small oval cutter or your craft knife, cut out two identical D-shapes for the lenses. Space them slightly apart, mimicking the bridge of a nose. -
Cut the outer frame:
Carefully cut around the lens holes to create the sunglasses shape. Leave a consistent border width of about 3-4mm around the lens openings. -
Smooth the edges:
Gently tap the raw edges with your finger or a silicone tool to soften any sharp cuts. I like to smooth the bridge area specifically to make it look comfortable. -
Add the hardware loop:
At the top corner of one lens frame or the center bridge, twist a small eye pin into the clay or create a hole using a needle tool large enough for a jump ring later. -
Bake the base:
Place the clay frames on a baking tile. Bake according to your packet instructions (usually 275°F/135°C for 15-30 minutes). Let it cool completely.
Step 2: Creating the Galaxy Eyes
-
prepare the backing:
Once cool, place the frames on a piece of packing tape, sticky side up. Press the clay down firmly so the tape creates a seal at the bottom of the lens holes. -
Mix the galaxy resin:
Mix a small amount of UV resin with a tiny drop of black pigment or black alcohol ink. It should be semi-transparent, not solid black. -
Pour the base layer:
Pour a thin layer of the tinted resin into the lens cavities. Use a toothpick to guide it to the edges without overflowing onto the clay frame. -
Add the sparkle:
While the resin is wet, sprinkle in your holographic glitter. Use a mix of fine dust and chunkier glitter to create depth like a starry sky. -
Cure the first layer:
Cure under a UV lamp for 60 seconds until hard. -
Dome the lenses:
Apply a final generous layer of clear resin over the galaxy layer. Let surface tension create a nice rounded dome over the top. -
Final cure:
Cure for 2-3 minutes to ensure the resin is non-tacky and durable. Remove the tape from the back.
Tape Sealing Trick
For a leak-proof seal, burnish the clay firmly onto the packing tape using the back of a spoon before pouring any resin.
Step 3: Assembly
-
Drill the hole:
If you didn’t add an eye pin earlier, use a small hand drill to make a hole in the top corner of the frame now that the clay is hard. -
Attach the jump ring:
Open a gold jump ring using two pairs of pliers (twist, don’t pull). Thread it through the hole in your sunglasses charm. -
Connect the keychain:
Attach the gold keychain clasp to the jump ring and close the ring securely. -
Optional star charm:
If you made a matching star like in the photo, attach it to the same chain or a separate link for extra flair.
Cloudy Resin?
If your resin looks cloudy after curing, wipe it with a little rubbing alcohol or apply a thin coat of gloss varnish to restore the shine.
Clip your new sparkly shades onto a backpack or purse and enjoy the sunshine
Tiny Beach Scene Dome Keepsakes
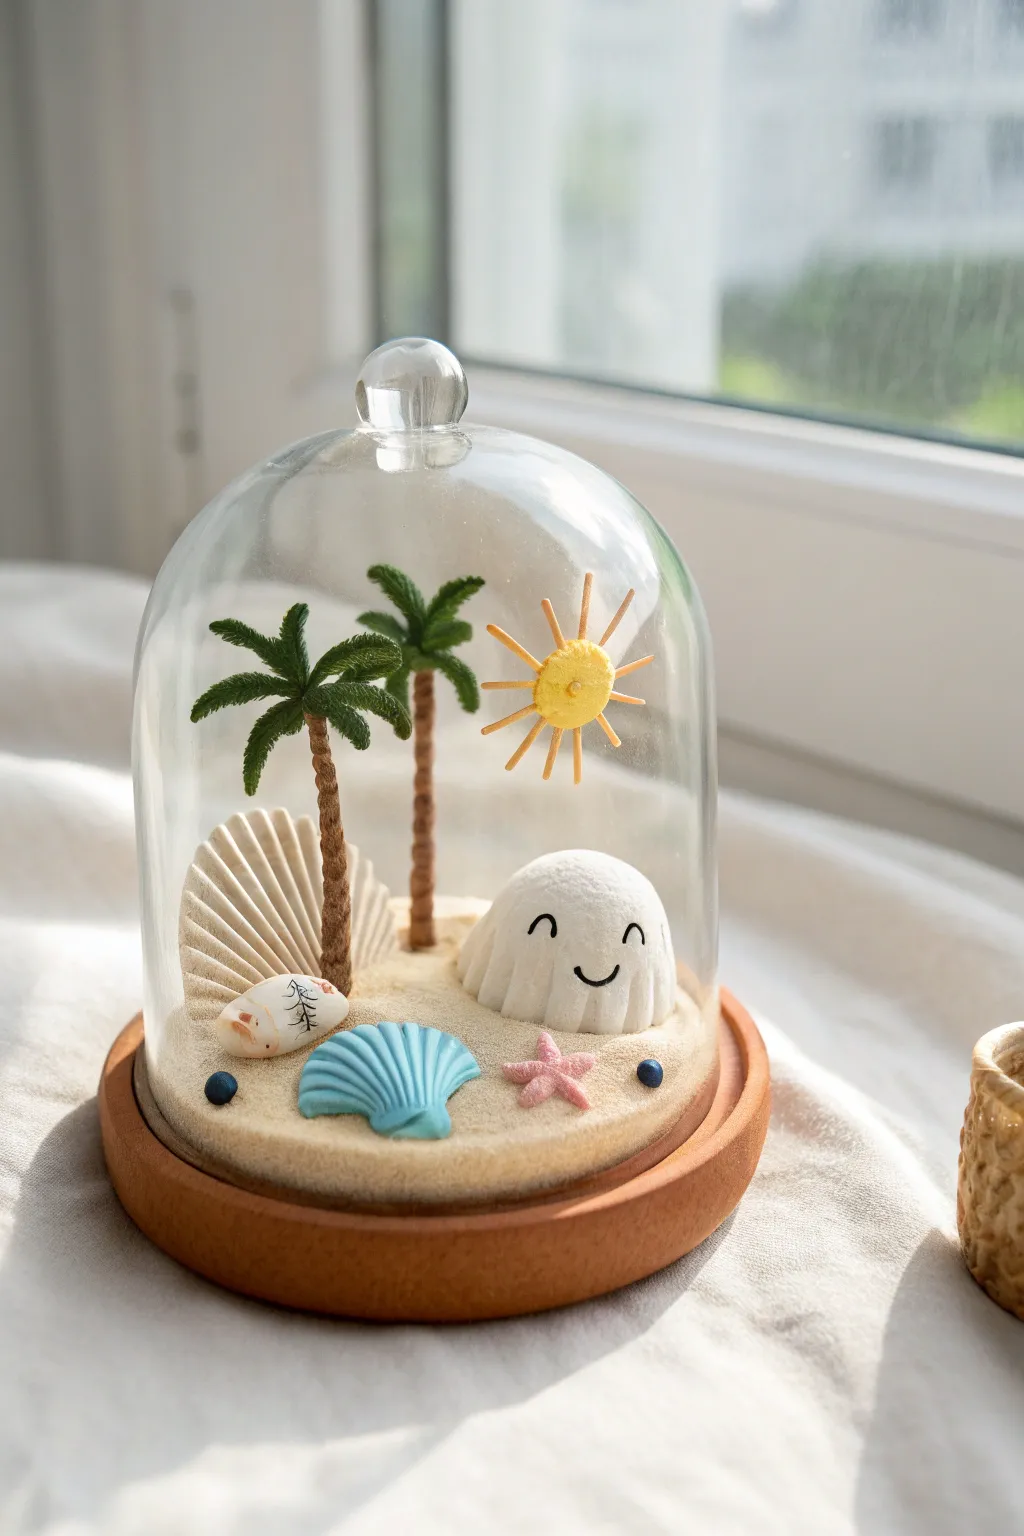
Capture the eternal joy of a summer day with this adorable glass cloche scene. Using air-dry or polymer clay, you’ll sculpt a miniature paradise complete with swaying palms and a cheerful, smiling creature.
Step-by-Step Guide
Materials
- Small glass cloche with wooden base (approx. 4-5 inches)
- Air-dry clay or polymer clay (white, brown, green, yellow, blue, pink)
- Fine decorative sand (light beige)
- Craft glue or strong clear adhesive
- Acrylic paints (black for details, optional for coloring clay)
- Fine detail brush or toothpick
- Sculpting tools (needle tool, small ball tool)
- Texture tool or clean toothbrush
Step 1: Setting the Scene
-
Prepare the base:
Start by applying a generous layer of craft glue to the wooden base of your cloche. Leave a small rim around the edge so the glass dome can fit properly later. -
Clay foundation:
Press a flat disc of beige or white clay onto the glue to create the ground layer. It doesn’t need to be perfectly smooth; a little unevenness looks more natural. -
Sand texture:
While the clay foundation is still tacky (or by adding a thin layer of glue on top), sprinkle your fine beige sand over the entire surface. Press it gently to adhere.
Step 2: Sculpting the Palms
-
Trunks:
Roll two thin snakes of brown clay for the palm trunks. Create texture by gently pressing the side of a toothpick repeatedly up the length of the trunks to mimic bark rings. -
Fronds:
For the leaves, shape small teardrops of green clay. Flatten them slightly and use a knife or needle tool to cut tiny slits along the edges for a feathery look. -
Tree assembly:
Attach 4-5 fronds to the top of each trunk. Curve the trunks slightly so they look like they are swaying in a breeze, then firmly press the bases into the sandy clay ground.
Sun Won’t Stick?
If the clay sun is too heavy to glue to the glass, attach it to a stiff piece of clear acetate or thin wire anchored in the sand behind the white mound.
Step 3: Main Characters
-
The smiling mound:
Roll a smooth ball of white clay and flatten the bottom to create a dome shape. Use a sculpting tool or toothpick to press vertical grooves around the sides, creating a ribbed texture. -
Happy face:
Using a very fine black marker or a tiny brush with black paint, draw two arched eyes and a simple smile on the white mound. Place this character on the right side of the scene. -
Golden sun:
Form a small yellow circle for the sun. For the rays, roll very thin spikes of yellow clay and attach them radially around the disk. You can let this harden slightly before placing it. -
Levitating the sun:
Since the sun floats in the image, you can glue it to the back wall of the glass dome later, or use a tiny hidden piece of wire to prop it up from the ground behind the character.
Night Mode
Hide a tiny battery-operated LED fairy light inside the white smiling mound (making it hollow) to turn your beach scene into a soft nightlight.
Step 4: Beach Treasures
-
Blue shell:
Take a small piece of light blue clay and shape it into a fan. Use a needle tool to press deep ridges radiating from the bottom point to the top edge. -
Pink starfish:
Create a tiny star shape using pink clay. Gently curve the five arms to make it look organic and use a needle to poke tiny texture holes along the limbs. -
Background sheel:
If you have a real scallop shell or want to sculpt a large fan shell from beige clay, place this vertically behind the palm trees to add height and depth. -
Tiny pebble:
Roll a tiny white oval pebble. I like to add a tiny delicate drawing of a plant on it with a micro-pen for extra detail.
Step 5: Final Assembly
-
Placement:
Arrange your blue shell, starfish, and pebble on the sand. Use a dot of glue to secure them so they don’t shift when you move the dome. -
Accents:
Add two or three tiny balls of dark blue or black clay scattered on the sand as small rocks or debris. -
Sealing:
Once all clay elements are fully dry (wait 24 hours for air-dry clay), carefully place the glass dome over the scene and fit it into the wooden groove.
Place your warm little beach scene on a windowsill to enjoy summer vibes all year round