Whenever I need a quick creative win, I reach for tiny clay and make a handful of cute miniatures that fit right in my palm. These little projects are beginner-friendly, totally giftable, and perfect for turning simple shapes into sweet characters with kawaii-style faces.
Mini Smiling Fruit Charms
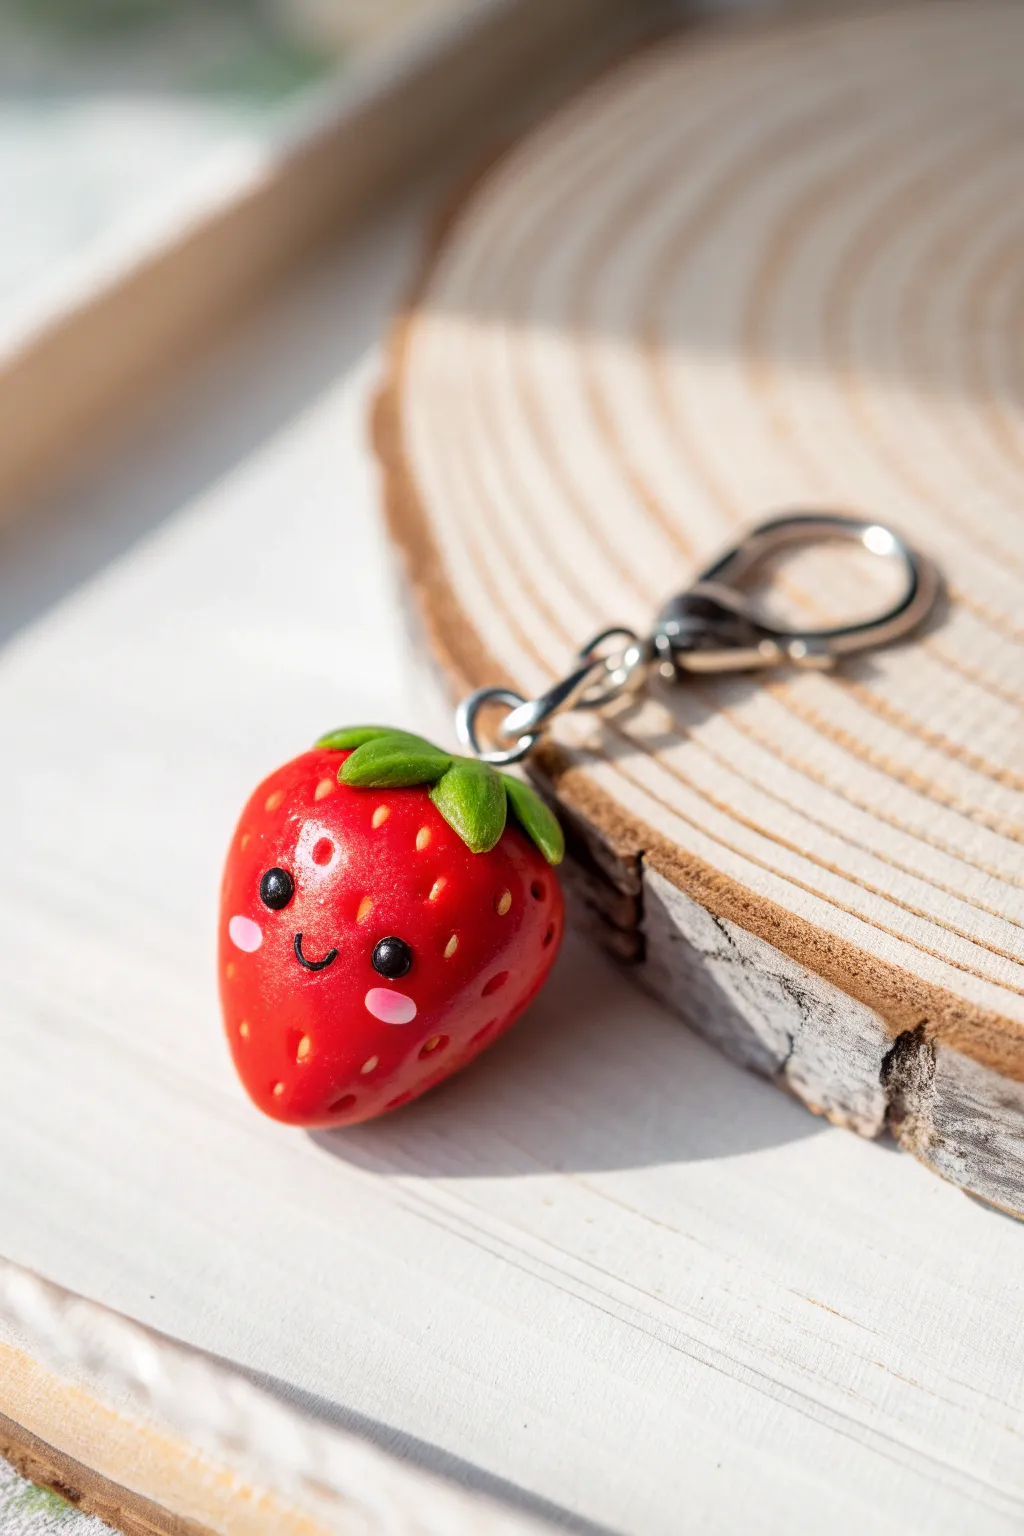
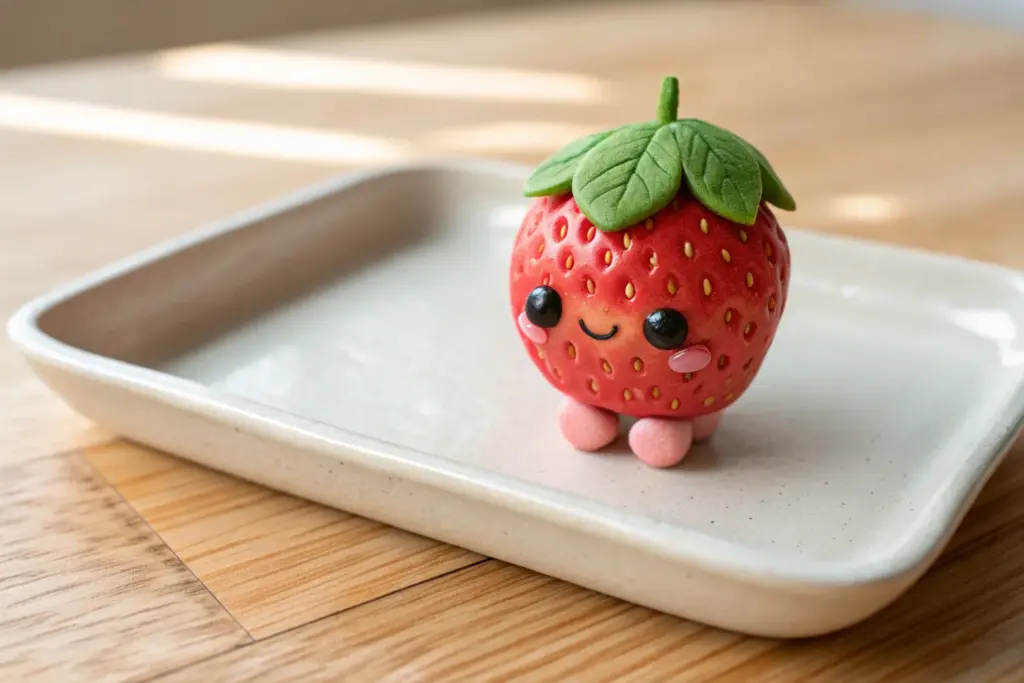
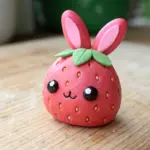
This adorable little strawberry buddy brings a pop of summer sweetness to any backpack or keyring. With its glossy finish, tiny seeds, and kawaii face, it captures the perfect balance of realistic texture and cartoon charm.
Step-by-Step Guide
Materials
- Red polymer clay
- Green polymer clay (leaf green)
- Black polymer clay or black acrylic paint
- Pink acrylic paint
- White acrylic paint
- Gloss glaze or UV resin
- Needle tool or toothpick
- Ball stylus tool
- Eyepin or screw eye hook
- Keyring clasp and jump ring
- Sculpting tools
- Oven for baking
Step 1: Shaping the Berry
-
Condition the red clay:
Start by taking a chunk of red polymer clay roughly the size of a large gum ball. Knead it thoroughly in your hands until it becomes soft, pliable, and free of cracks. -
Form the base shape:
Roll the conditioned clay into a smooth ball between your palms. Once smooth, begin to gently taper one end by rolling it back and forth with slightly more pressure on one side. -
Refine the strawberry silhouette:
Continue refining the shape until you have a plump teardrop or rounded cone. Flatten the wider top slightly where the leaves will sit, while keeping the bottom tip rounded but distinct. -
Create seed indentations:
Using a needle tool or a very fine ball stylus, gently press small, shallow indentations all over the surface of the red berry. Stagger them somewhat randomly but evenly to mimic real seed patterns.
Fingerprint Troubles
To remove pesky fingerprints before baking, lightly brush the raw clay with a tiny amount of baby oil or cornstarch to smooth the surface perfectly.
Step 2: Adding the Greens
-
Prepare the leaves:
Take a small amount of green clay and flatten it into a thin sheet. You can use a tiny star cutter or hand-cut a roughly star-shaped piece with five or six points. -
Texture the leaves:
Before attaching, I like to use a needle tool to drag a gentle center line down each leaf point for a subtle vein texture. This adds a nice bit of realism to the cartoon style. -
Attach the calyx:
Gently press the green star shape onto the flattened top of the strawberry. Drape the leaf points down over the red shoulders of the fruit, curving the tips slightly upwards for a lively look. -
Secure the hardware:
Take your eyepin or screw eye hook. If using an eyepin, trim it to size and bend a small hook at the bottom end for grip. Insert it through the exact center of the green leaves and down into the berry body.
Step 3: The Kawaii Face
-
Mark the features:
Decide which side of the strawberry looks best. Using a needle tool, lightly mark two tiny spots for the eyes and a small curve for the mouth to guide your placement. -
Add the eyes:
Roll two minuscule balls of black clay. Press them gently into the marked eye spots. Alternatively, you can paint these on after baking if you prefer a flatter look. -
Create the smile:
Roll a breathtakingly thin snake of black clay. Cut a tiny segment and carefully curve it into a ‘U’ shape, then press it onto the face area between the eyes. -
Baking time:
Place your strawberry upright on a baking sheet or foil. Bake according to your specific brand of polymer clay instructions (usually around 275°F or 135°C for 15-30 minutes). Let it cool completely.
Level Up: Fruity Scents
Mix a drop of strawberry essential oil or strawberry fragrance into the clay while conditioning it. Your charm will smell just as sweet as it looks.
Step 4: Finishing Touches
-
Seed details:
Once cool, mix a tiny amount of yellow or light brown paint. Using a dry brush technique or a very fine point, dab a speck of color into each seed indentation to make them pop. -
Highlight the eyes:
Dip the tip of a toothpick into white acrylic paint. Add a tiny white dot to the upper corner of each black eye to give it that sparkling, alive expression. -
Rosy cheeks:
Use a small dotting tool or the back of a paintbrush to apply two oval dabs of pink paint right below the eyes for the blush. -
Glazing:
Apply a coat of gloss glaze or UV resin over the entire red portion of the strawberry (avoiding the leaves if you want a matte contrast, or glaze everything for durability). Cure or dry according to product instructions. -
Assembly:
Open a jump ring using pliers, slide it through the loop on top of the strawberry and connect it to your keychain clasp. Close the ring securely.
Now you have a sweet little companion ready to hang on your keys or gift to a friend


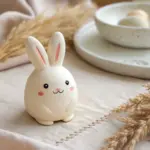
Chubby Tiny Bunny Figurines
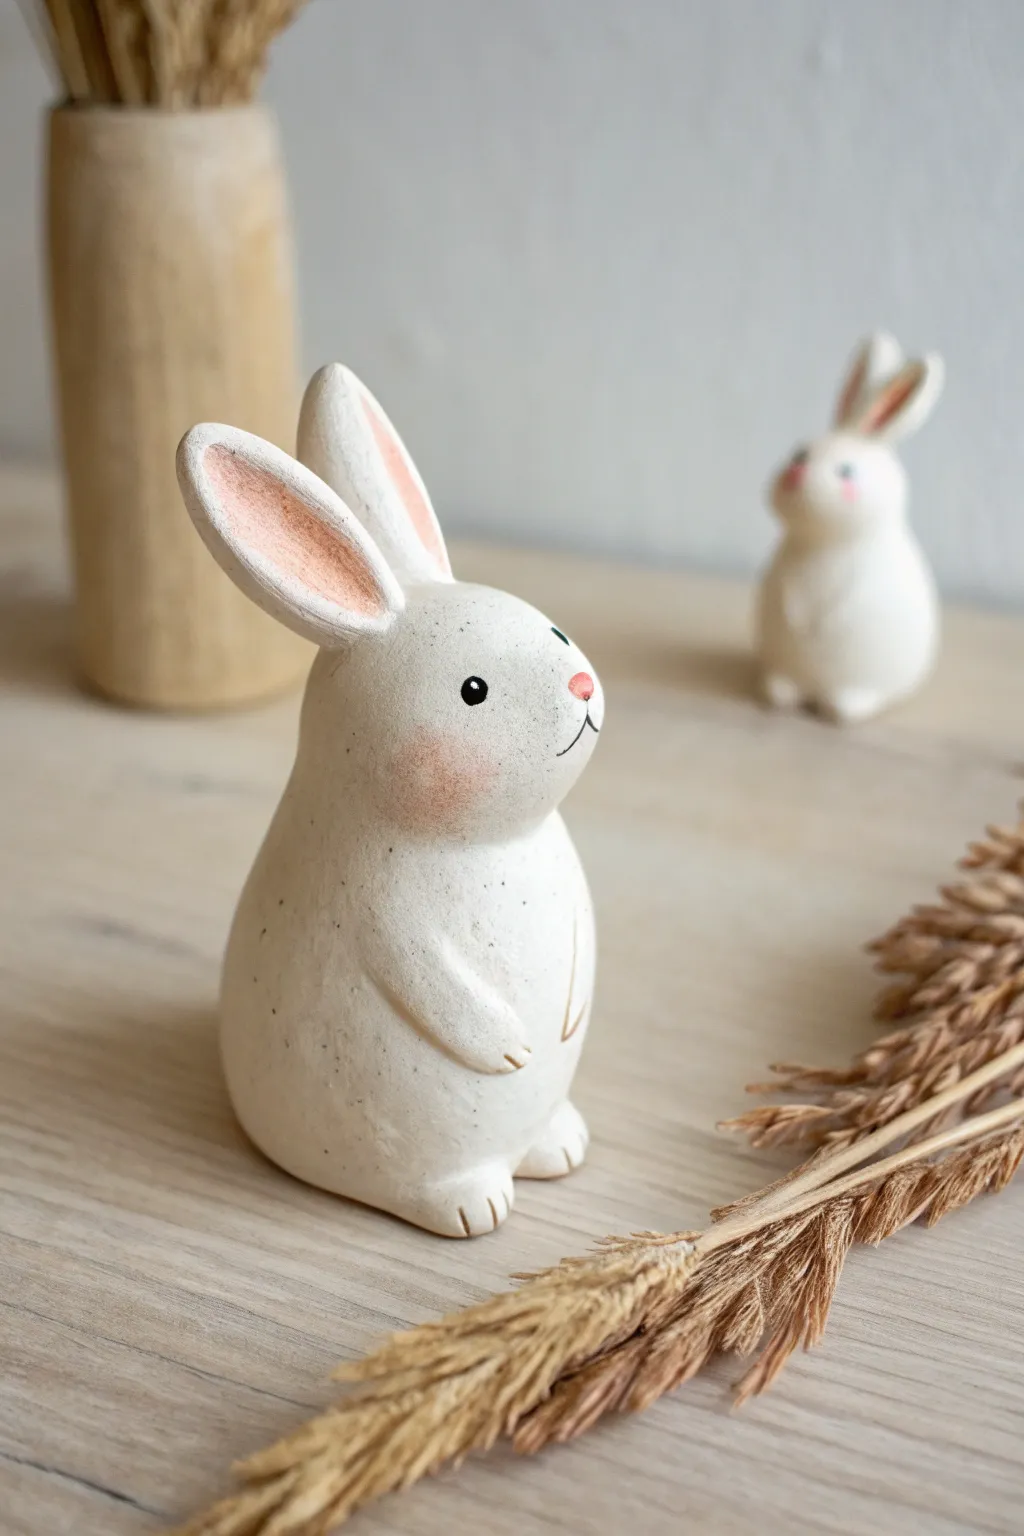
These adorable, stout little bunny figurines are perfect for adding a touch of spring cheer to any shelf or mantelpiece. Their simple, speckled white finish and blushing cheeks give them a rustic, handmade ceramic charm without requiring a kiln.
Detailed Instructions
Materials
- White air-dry clay or polymer clay
- Aluminum foil (for armature)
- Black acrylic paint
- Soft pink acrylic paint or pink pastel chalk
- Fine detail paintbrush
- Small fluffy paintbrush (for blushing)
- Needle tool or toothpick
- Smoothing tool or water (for air-dry clay)
- Matte varnish
- Old toothbrush (optional for speckling)
Step 1: Shaping the Base
-
Create the core:
Start by crumpling a small piece of aluminum foil into a pear shape. This saves clay and makes the figurine lighter. The bottom should be wide and flat so it stands securely. -
Cover the core:
Roll out a sheet of white clay just thick enough to cover the foil without tearing. Wrap it around your foil armature, pressing the seams together and smoothing them out completely so no lines remain. -
Refine the body shape:
Roll the covered form between your palms to smooth it. You want a distinct pear shape: a chubby bottom tapering slightly up towards the head area, though the head and body are one continuous piece here. -
Define the face:
Gently press your thumb into the upper third of the shape to create a very subtle indentation where the eyes will go, distinguishing the snout area slightly.
Step 2: Adding Features
-
Make the ears:
Roll two medium-sized logs of clay. Flatten them gently to form long oval shapes. Pinch one end of each oval to create a tapered point for attaching to the head. -
Shape the inner ear:
Use a modeling tool or the handle of a paintbrush to press a long, shallow groove down the center of each ear. This creates the inner ear area we will paint later. -
Attach the ears:
Score the top of the head and the bottom of the ears (scratching the clay helps it grip). Press the ears firmly onto the head. Blending the clay downwards with a smoothing tool is crucial here so they don’t pop off later. -
Form the arms:
Roll two small sausage shapes for the arms. Flatten one end slightly and attach them to the sides of the body, curving them forward so they rest on the rabbit’s tummy. -
Add the feet:
Create two small flattened ovals for feet. Attach them to the very bottom front of the body. Use a needle tool or toothpick to press three lines into each foot to create little toes. -
Detail the tail:
Roll a small ball of clay and attach it to the lower back of the bunny. You can roughen it up with a toothbrush to give it a fluffy texture. -
Smooth everything:
Before drying, do one final pass over the whole sculpture with a slightly damp finger or sponge to remove any fingerprints or cracks.
Cracks Appearing?
If air-dry clay cracks while drying, mix a tiny bit of fresh clay with water to make a paste (slip). Fill the cracks with this paste and smooth it over.
Step 3: Decoration & Finishing
-
Dry completely:
Let the bunny dry fully. If using air-dry clay, this might take 24-48 hours. If using polymer, bake according to the package instructions. -
Add speckles (optional):
To mimic the stone look in the photo, dilute a tiny drop of black or brown paint with water. Dip an old toothbrush in it and flick the bristles with your thumb to spray tiny speckles over the white body. -
Paint the inner ears:
Mix a soft, uneven pink wash using acrylic paint. Paint this inside the grooved ear sections. It doesn’t need to be perfectly opaque; a rougher application looks more natural. -
Draw the face:
Using your finest detail brush and black paint, add two small round eyes and a tiny ‘Y’ shape for the nose and mouth. I find keeping the features small makes the face look cuter. -
Add the nose color:
Dab a tiny spot of pink right on the nose area, overlapping the top of your black ‘Y’ mouth line. -
Create blushing cheeks:
This is the secret sauce. Take a dry, fluffy brush and barely dip it in pink paint (or use pink pastel dust). Wipe almost all the paint off on a paper towel, then gently buff pink circles onto the cheeks. -
Varnish:
Seal your bunny with a matte varnish to protect the paint and give it a finished, professional ceramic look.
Softer Blus
Instead of paint, scrape pink chalk pastel into a powder. Apply this powder to the cheeks with a dry brush for a softer, airbrushed look that won’t streak.
Set your finished bunny on a windowsill or near a plant for a sweet decorative touch


Pocket-Size Baby Dino Pals
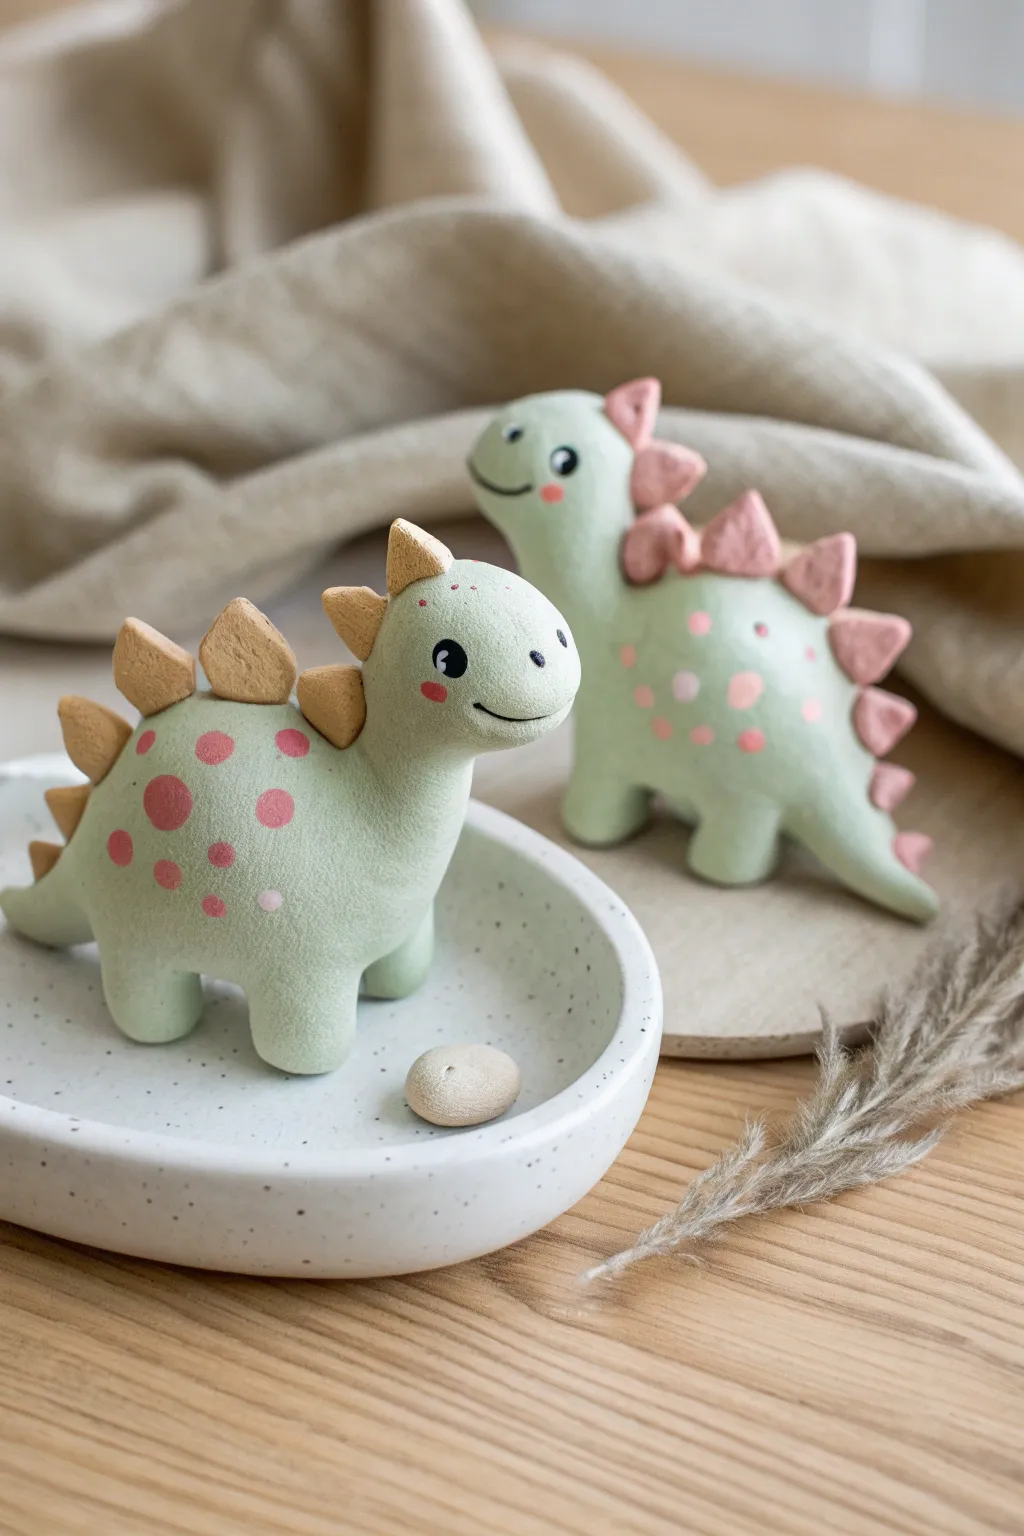
These adorable, miniature stegosauruses are the perfect weekend project to add a touch of prehistoric charm to your desk or shelf. With their soft pastel green bodies, rosy spots, and tiny smiles, they bring a gentle, whimsical vibe that is surprisingly easy to sculpt at home.
Step-by-Step Guide
Materials
- Polymer clay or air-dry clay (Sage Green, Light Pink, Cream/Beige)
- Black acrylic paint
- Fine-point detail brush
- Ball stylus tool
- Needle tool or toothpick
- Matte varnish (optional)
- Small rolling pin
- Clean work surface (ceramic tile or silicone mat)
Step 1: Shaping the Bodies
-
Base Body:
Start with a chunk of sage green clay about the size of a walnut. Roll it into a smooth ball, then gently elongating it into a teardrop shape. -
Forming the Neck:
Pull the narrower end of the teardrop upwards and curve it slightly to creating the neck and head area. The transition should be smooth, not sharp. -
Head Definition:
Gently press and round the top of the neck to define the head. It should be bulbous but proportional to the body, resembling a soft, rounded snout. -
Leg Stumps:
For the legs, roll four small, equal-sized balls of green clay. Flatten the tops slightly so they attach well. -
Attaching Legs:
Press the four small cylinders onto the bottom of the body. Use your finger or a silicone tool to blend the seams upward into the belly so the clay becomes one solid unit. -
Tail Extension:
Pinch and pull the back of the body to extend the tail slightly. Curve it to one side for a more dynamic, playful pose.
Step 2: Spines and Details
-
Creating Spines:
Using the cream or beige clay (or pink for the second dino), roll out a small snake and cut it into tiny, triangle-like segments. -
Shaping Plates:
Flatten each segment slightly between your fingers to create the stegosaurus plates. Make the ones for the middle of the back largest, tapering smaller toward the head and tail. -
Attaching Plates:
Carefully press the plates in a single row along the spine. I like to start at the highest point of the back and work outwards to ensure spacing is even. -
Rosy Cheeks:
Take a microscopic amount of pink clay and press it onto the cheek area. Flatten it completely flush with the skin for a blushing effect. -
Polka Dots:
Roll tiny balls of pink clay and press them randomly onto the dinosaur’s flank. Flatten them gently so they look like painted spots rather than bumps. -
Baking or Drying:
If using polymer clay, bake according to the package instructions (usually 275°F for 15-30 minutes). If using air-dry clay, let it sit undisturbed for 24-48 hours.
Smooth Operator
Before baking, lightly brush the clay with a little baby oil (polymer) or water (air-dry) to remove any fingerprints and smooth out blending lines.
Step 3: Bringing it to Life
-
Painting Eyes:
Once fully cured or dry, use a fine detail brush dipped in black acrylic paint to create a small, solid black circle for the eye. -
Eye Highlights:
Dip the very tip of a toothpick into white paint and add a tiny dot inside the black circle. This ‘catchlight’ instantly gives the figure a lively expression. -
The Smile:
With the finest brush or a needle tool dipped in black paint, draw a very thin, curved line for the mouth just below the snout. -
Freckles:
Add three microscopic dots of red or dark pink paint near the eye or on the snout for extra texture and cuteness. -
Finishing Touch:
Seal your dinosaur with a matte varnish to protect the paint and give the clay a professional, soft finish.
Wobbly Dino?
If your dino tips over, gently tap the feet on a flat surface while the clay is still soft to create a completely flat base before curing.
Place these little companions on a trinket dish and enjoy their serene company


Tiny Octopus Desk Buddy
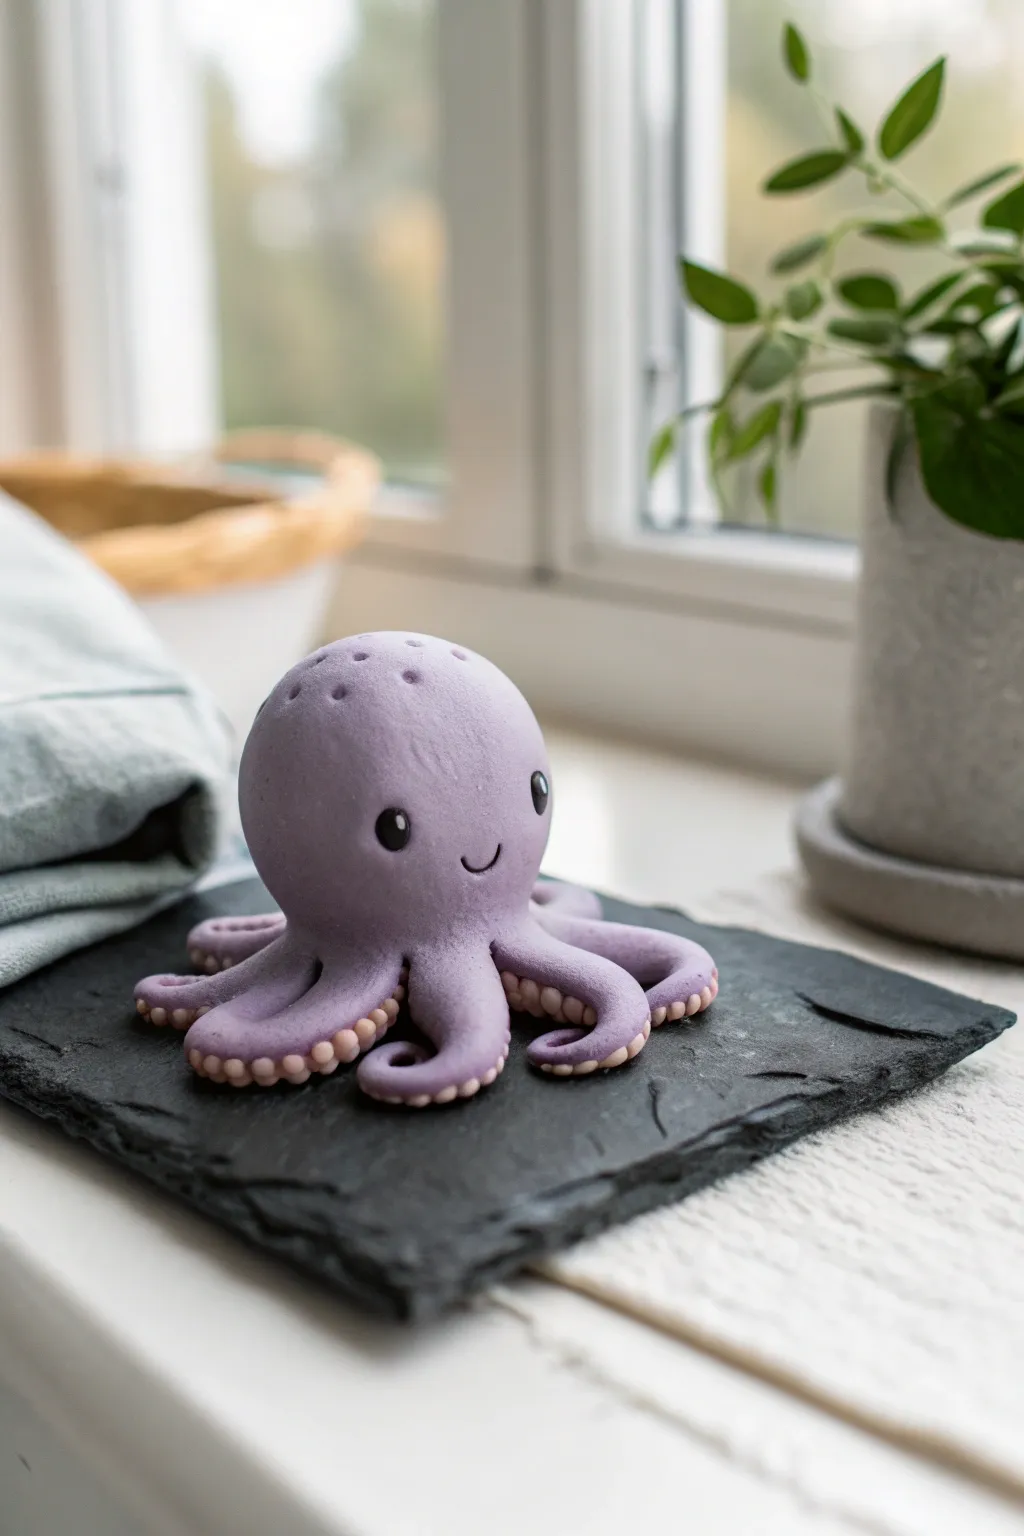
This charming little cephalopod makes for the perfect desk companion with its soothing pastel violet hue and curious, wide-set eyes. Crafted from polymer clay, its textured tentacles and smooth finish give it a professional, high-quality look that belies how simple it is to make.
Step-by-Step
Materials
- Polymer clay (pastel violet/lavender)
- Polymer clay (pale peach or light beige)
- Polymer clay (black)
- White acrylic paint or tiny white clay bits
- Ball stylus tool (small and medium sizes)
- Needle tool or toothpick
- Basic sculpting tools
- Baking sheet and parchment paper
- Wet wipes (for smoothing)
Step 1: Sculpting the Head and Base
-
Prepare the Clay:
Start by conditioning your violet polymer clay until it is soft and pliable. Warm clay prevents cracking later on, so kneed it thoroughly in your hands. -
Form the Head Shape:
Roll a large portion of the violet clay into a smooth ball slightly smaller than a golf ball. Gently flatten the bottom so it can sit securely, but keep the top very round. -
Create the Tentacle Base:
Roll eight small logs of violet clay, tapering them at one end to create a cone shape. These should be roughly proportional to the head size. -
Attach Tentacles:
Arrange the eight tapered legs in a circle underneath the head piece. Blend the top of each leg seamlessly into the bottom of the head using a modeling tool or your finger, ensuring no seams are visible. -
Shape the Movement:
Now for the fun part: gently curl the tips of the tentacles upwards and outwards. I like to twist a few of them slightly to give the octopus a sense of playful movement.
Pro Tip: Tentacle Support
If your tentacles droop before baking, prop them up with crumpled bits of aluminum foil or tissue paper to hold their curl in place while in the oven.
Step 2: Adding Details and Texture
-
Prepare Suction Cups:
Take your pale peach or beige clay and roll it into a very thin snake. Cut tiny, equal-sized slices from this snake. -
Apply Suction Cups:
Roll each tiny beige slice into a ball and press two rows of them along the underside of each curling tentacle. -
Intent the Cups:
Use a small ball stylus tool to gently press into the center of each beige ball. This creates the classic suction cup look and secures the clay pieces together. -
Add Head Texture:
Using a needle tool, poke a pattern of tiny holes on the very top of the head. Keep them random but grouped near the crown for a speckled texture. -
Smooth the Surface:
Before adding the face, go over the main violet body with a baby wipe or a finger dipped in a little baby oil to remove any fingerprints.
Step 3: Bringing the Face to Life
-
Mark Eye Sockets:
Use a medium ball tool to press two indentations into the front of the face. Place them wide apart to achieve that cute, ‘kawaii’ look. -
Insert Eyes:
Roll two small balls of black clay and press them firmly into the sockets you just created. Flatten them slightly so they aren’t bulging too far out. -
Add the Glint:
Place a minuscule dot of white clay (or a dot of white paint after baking) in the upper corner of each black eye to give it a spark of life. -
Carve the Smile:
Use a curved tool or the side of a small straw to imprint a tiny, U-shaped smile right between the eyes. -
Refine the Expression:
Use a needle tool or toothpick to add tiny cheek indentations or accent lines near the corners of the mouth for extra personality.
Troubleshooting: Dust
Light colored clay shows dust easily. Keep a scrap piece of ‘junk’ white clay nearby and roll it in your hands periodically to lift dirt off your skin.
Step 4: Baking and Finishing
-
Final Check:
Look over your creation from all angles. Ensure the tentacles are curled exactly how you want them, as they will harden in this position. -
Preheat Oven:
Preheat your oven according to the specific manufacturer’s instructions on your package of clay (usually around 275°F or 130°C). -
Bake:
Place the octopus on a parchment-lined baking sheet. Bake for the recommended time, usually 15-30 minutes per 1/4 inch of thickness. -
Cool Down:
Let the sculpture cool completely in the oven with the door cracked open. This gradual cooling helps prevent cracks. -
Optional Varnish:
If you want a glossy, wet look like a real sea creature, brush on a coat of water-based polyurethane varnish after the clay has fully cooled.
Place your new purple friend on your desk or a slate coaster to keep you company during work.

The Complete Guide to Pottery Troubleshooting
Uncover the most common ceramic mistakes—from cracking clay to failed glazes—and learn how to fix them fast.
Little Mushroom Sprites
This enchanted forest floor miniature combines soft pastel mushrooms with vibrant moss for a dreamy desk accessory. The composition features a variety of shapes and sizes, from a towering pink toadstool to tiny russet sprouts, all gathered on a rustic clay base.
How-To Guide
Materials
- Polymer clay (white, beige, translucent, pastel pink, pastel green, terracotta/orange)
- Circular clay cutter (approx. 3-4 inches)
- Basic sculpting tools (needle tool, ball tool)
- Soft pastel chalks (browns and greens)
- Liquid polymer clay (Translucent Liquid Sculpey or similar)
- Faux moss or dried preserved moss
- Craft glue or strong adhesive
- A small wood slice for display
- Toothbrush or texturing tool
- Aluminum foil (optional, for armatures)
Step 1: Crafting the Base
-
Condition the clay:
Begin by conditioning a mix of beige and white polymer clay until it is soft and pliable. You want a color that resembles stone or dry earth. -
Form the disc:
Roll the clay into a slab approximately 1/4 inch thick. Use your circular cutter to stamp out a clean, round base. -
Texture the edges:
Before the clay hardens, soften the sharp cut edges with your fingertip. Using an old toothbrush, gently tap the surface to give it a realistic, porous stone texture. -
Pre-bake the base:
Bake the base on a tile or baking sheet according to your clay package instructions (usually 275°F/135°C for 15 minutes) so it provides a solid foundation for the mushrooms.
Clean Spots
Use a needle tool to gently texture the white spots after applying them. This removes fingerprints and makes the spots look like natural fungal growth.
Step 2: Sculpting the Stems
-
Mix stem colors:
Mix white clay with a tiny amount of translucent clay and beige. This creates a realistic, slightly organic stem color rather than a stark, artificial white. -
Shape the large stem:
Roll a thick cylinder for the main pink mushroom. Taper it slightly so it is wider at the bottom and narrower at the neck. -
Create the smaller stems:
Repeat the rolling process for the medium green mushroom and the three smaller orange/brown ones. Vary the heights and thicknesses to make the cluster look natural. -
Add vertical texture:
Take a needle tool or a craft knife and gently score vertical lines up and down the stems. This mimics the fibrous texture of real mushroom stalks.
Step 3: Creating the Caps
-
Roll the cap colors:
Prepare balls of clay in your chosen colors: pastel pink, soft sage green, warm terra cotta, and a lighter orange. -
Shape the domes:
Press your thumb into the center of each ball to create a dome shape. I find rotating the ball while pressing helps keep the wall thickness even. -
Attach stems to caps:
Apply a tiny drop of liquid polymer clay to the top of each stem and press the caps gently onto them. Ensure a secure bond without squashing the stem texture. -
Add signature spots:
Roll extremely tiny balls of white clay. Press them randomly onto the colored caps, flattening them slightly so they look integrated rather than just stuck on top. -
Shade gently:
Use a soft brush to dust a little brown pastel chalk near the bottom of the stems and under the caps for depth. -
Final Bake:
Arrange your mushrooms on the pre-baked base using a touch of liquid clay to hold them in place. Bake the entire assembly again for the full recommended time (usually 30 minutes).
Glow Up
Mix glow-in-the-dark powder into the white clay used for the spots. Your little mushroom grove will magically illuminate when the lights go out.
Step 4: Assembly & Finishing
-
Cool down:
Allow the piece to cool completely. The clay is fragile while hot, so patience is key here. -
Apply the moss:
Spread craft glue generously over the base, working around the mushroom stems. Press small clumps of faux moss into the glue, burying the bottom of the stems slightly to make them look like they grew out of the earth. -
Add detail elements:
If you have tiny dried twigs or bark chips, glue a few piece amongst the moss for extra forest realism. -
Mount display:
Place your finished clay disc onto the rustic wood slice. You can glue it down permanently or leave it loose to switch out displays later.
Place this charming little scene on a bookshelf or windowsill to bring a touch of woodland magic to your daily view
Mini Puffy Heart Keychains
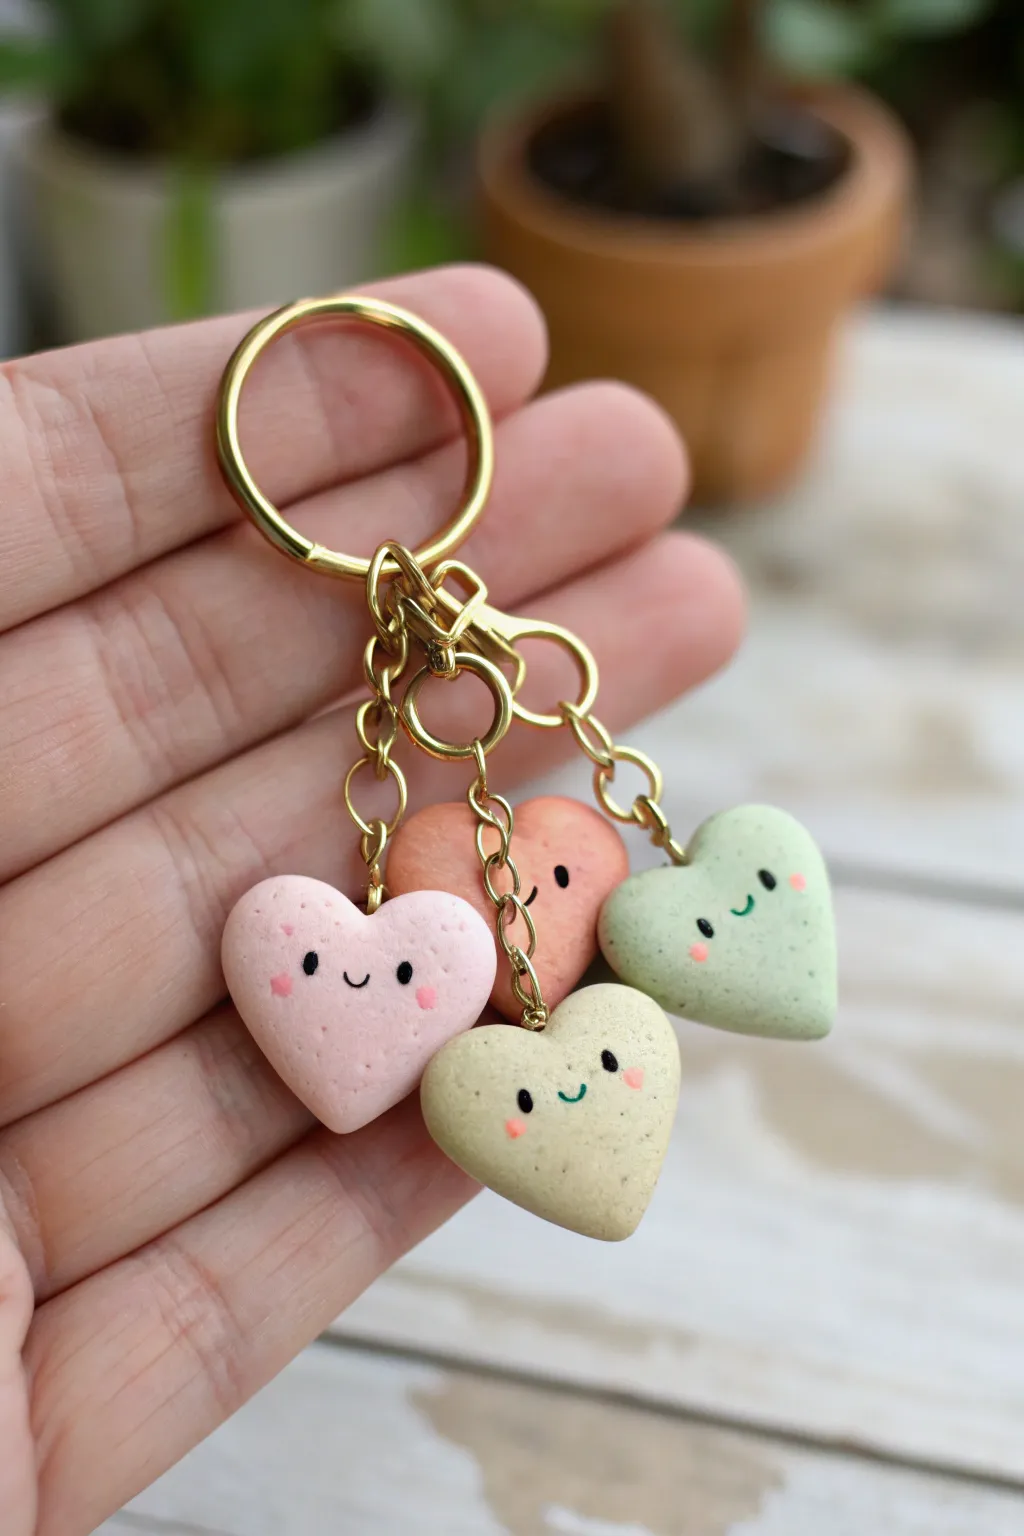
These adorable heart-shaped keychain charms bring a dose of kawaii to your keys or bag with their sweet, simple expressions. Featuring soft pastel tones and a delightful speckled texture, this project is perfect for beginners looking to master cute miniature sculpting.
Step-by-Step
Materials
- Polymer clay in pastel colors (pale pink, cream, sage green, terracotta)
- Fimo effect clay in ‘granite’ or black pepper (for creating speckles)
- Gold tone keychain hardware (large ring, jump rings, chain links)
- Small eye screws (gold)
- Black acrylic paint
- Pink acrylic paint or pink chalk pastel
- Fine detail paintbrush or dotting tool
- Clay roller or pasta machine
- Small heart-shaped cutter (approx. 1 inch)
- Needle tool
- Gloss glaze (optional)
Step 1: Mixing and Shaping
-
Create the speckled mix:
Begin by taking a very small amount of granite-effect clay or mixing tiny flecks of black pepper into your pastel colored clays. Knead thoroughly until the speckles are evenly distributed throughout each color block to give that organic, stone-like look. -
Roll the clay:
Roll out your conditioned clay on a clean surface to a thickness of about 4-5mm. You want these hearts to be distinctively puffy and chubby, not flat like cookies. -
Cut the shapes:
Using your small heart cutter, press firmly into the clay. If you don’t have a cutter, you can hand-mold a ball of clay, slightly flatten it, and indent the top to form the heart lobes. -
Soften the edges:
Gently gently rub your finger along the sharp cut edges of each heart. I find that smoothing these corners rounds them out perfectly and enhances that soft, pillow-like aesthetic. -
Insert hardware:
Take a small gold eye screw and carefully twist it into the top center of each heart, right between the two rounded lobes. Ensure it goes in straight and deep enough to be secure.
Smooth Operator
Before baking, lightly brush the clay with a tiny bit of baby oil or cornstarch to remove any fingerprints left during the smoothing process.
Step 2: Baking and Painting
-
Bake the charms:
Preheat your oven according to the manufacturer’s instructions on your specific brand of clay. Arrange the hearts on a baking tile or parchment paper and bake. Let them cool completely before handling. -
Paint the eyes:
Dip a fine dotting tool or the non-brush end of a paintbrush into black acrylic paint. Carefully place two small dots effectively wide apart on the face of the heart for the eyes. -
Add the smile:
using an extremely fine detail brush and the black paint, draw a tiny, shallow ‘U’ shape exactly between the eyes. Keep the line thin for the daintiest look. -
Blush the cheeks:
Using pink paint or scraped pink chalk pastel dust, apply small, soft oval marks directly under and slightly outside the eyes. This gives them their blushing personality. -
Seal the face:
Once the paint is totally dry, apply a thin coat of glaze just over the face area or the whole heart if you prefer a shiny finish. This protects the painted details from scratching off.
Texture Twist
Instead of speckles, try marbling two similar pastel shades together for a soft, dreamy cloud effect on your puffy hearts.
Step 3: Assembly
-
Prepare the chains:
Cut four small lengths of gold chain, varying the lengths slightly (e.g., 3 links, 5 links, 7 links) so the hearts will cascade rather than clump together. -
Attach hearts to chains:
Open a jump ring with pliers, loop it through the eye screw on a heart, and attach it to one end of a chain segment. Close the jump ring securely. -
Connect to main ring:
Open the jump ring at the top of your chain segment and loop it onto the main large split ring or a lobster clasp assembly. -
Final check:
Repeat for all four hearts, ensuring all jump rings are pinched tight so no charms slip off during use.
Clip this jingle-jangle of happiness onto your keys and enjoy those smiling faces every time you head out the door


What Really Happens Inside the Kiln
Learn how time and temperature work together inside the kiln to transform clay into durable ceramic.
Tiny Star and Moon Charms
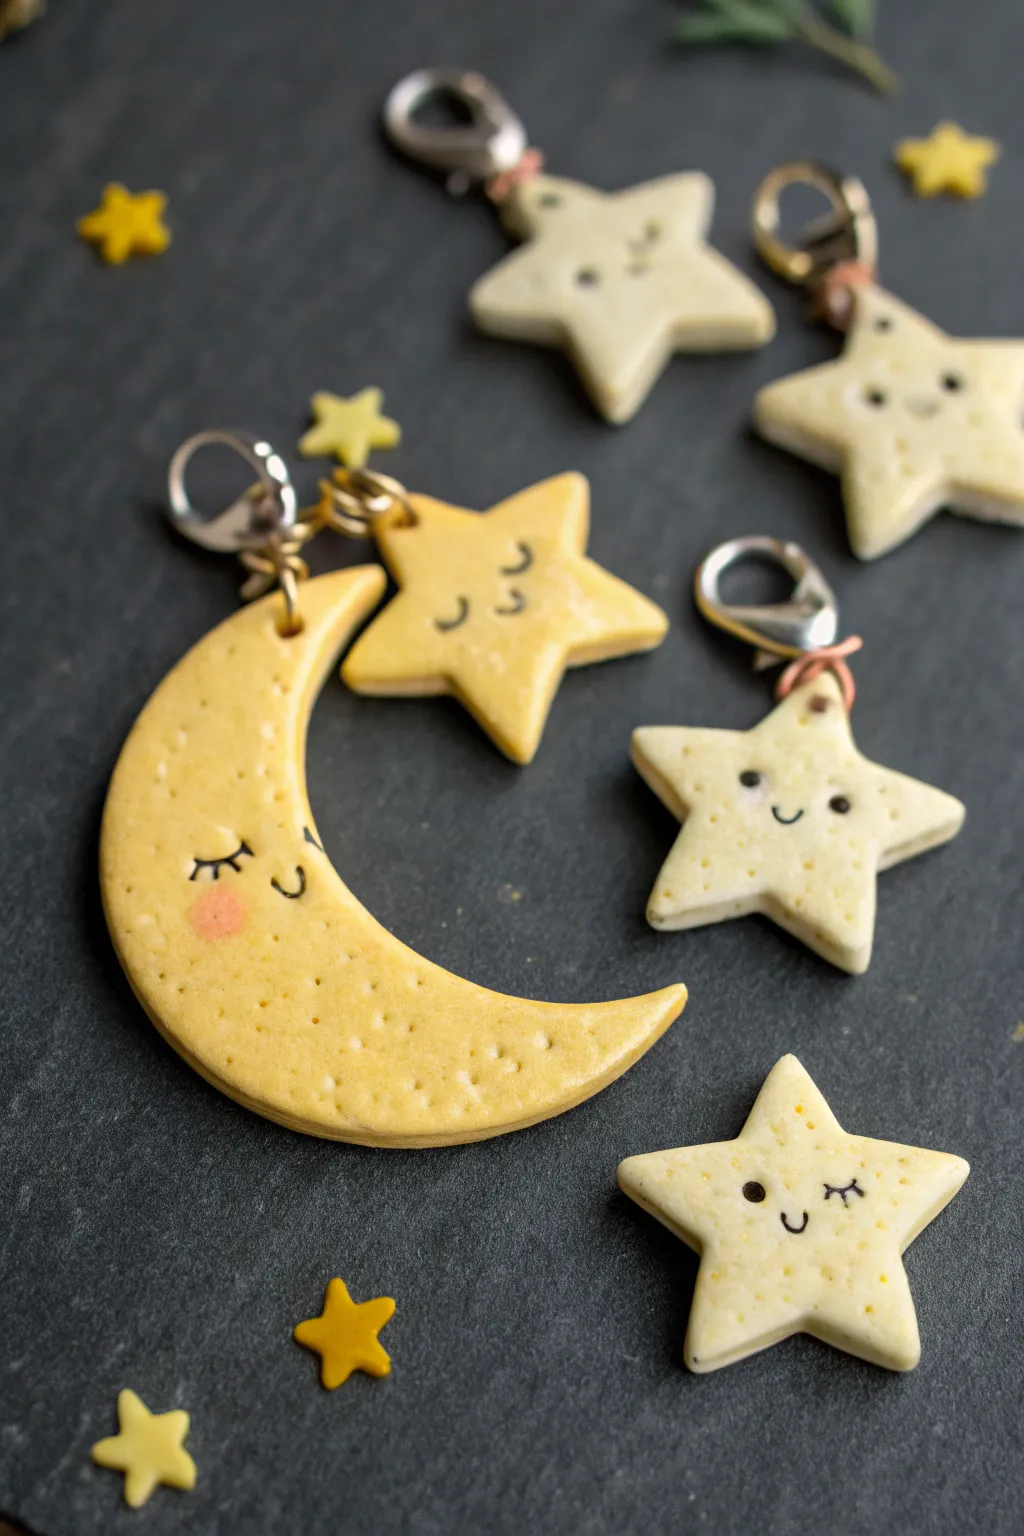
These adorable celestial charms mimic the texture of freshly baked sugar cookies with their soft, pitted surfaces and warm pastel tones. Perfect for keychains or stitch markers, these sleepy moons and winking stars will bring a calming touch of the night sky to your accessories.
Detailed Instructions
Materials
- Polymer clay (pale yellow, cream/white, and a tiny bit of pink)
- Black acrylic paint or a fine-tip permanent marker
- Rolling pin or clay machine
- Cookie cutters (crescent moon and star shapes)
- Toothbrush or stiff bristle brush (for texturing)
- Needle tool or toothpick
- Jump rings (gold or silver)
- Lobster clasps or keychain hardware
- Jewelry pliers
- Oven (for baking clay)
- Detail paintbrush (00 size)
Step 1: Shaping the Dough
-
Prepare the Colors:
Begin by conditioning your polymer clay until it is soft and pliable. For the moon, use a warm pastel yellow. For the stars, mix a bit of white into the yellow to create a paler, creamier shade similar to cookie dough. -
Roll it Out:
Roll your clay out into a slab that is approximately 3mm to 4mm thick. You want them thick enough to be sturdy but thin enough to look like a cookie. -
Cut the Shapes:
Use your crescent moon and star cutters to punch out your shapes. If the edges are a bit rough, gently smooth them with your finger to round them off slightly. -
Add Texture:
To achieve that realistic baked good look, gently press a clean toothbrush or stiff bristle brush over the entire surface of the clay shapes. The goal is to create subtle dimples, not deep holes. -
Create Attachment Holes:
Use a needle tool or toothpick to poke a hole near the top of each shape. Make sure the hole is large enough for your jump rings to fit through later, and wiggle the tool slightly to ensure the opening is clean.
Step 2: Bringing Them to Life
-
Bake the Clay:
Place your textured shapes on a baking sheet or ceramic tile. Bake them in your oven according to the specific temperature and time instructions on your package of clay. Let them cool completely before handling. -
Paint the Eyes:
Using a very fine detail brush and black acrylic paint (or a fine marker), carefully draw the eyes. For sleepy expressions, draw small downward curves with tiny eyelashes. For winking faces, draw one open circle and one curved line. -
Add Small Smiles:
Just below the eyes, paint a tiny, simple ‘u’ shape for the mouth. Keep the lines thin and delicate for the cutest effect. -
Blush the Cheeks:
For the moon charm especially, mix a very diluted wash of pink paint or use soft pastels. Dab a tiny rosy circle onto the cheek area to give it a sweet, flush appearance. -
Seal (Optional):
If you want extra durability, you can apply a matte varnish over the pieces. I usually skip gloss here because the matte finish looks more like a real cookie.
Pro Tip: Realistic texture
Dust the raw clay lightly with cornstarch before texturing with the toothbrush. This prevents the bristles from sticking and dragging the clay.
Step 3: Assembly
-
Open Jump Rings:
Using two pairs of jewelry pliers, twist your jump rings open sideways (never pull them apart outward) to preserve their shape. -
Attach Single Stars:
For the standalone star charms, slide the open jump ring through the hole in the star, add your lobster clasp, and twist the ring closed securely. -
Assemble the Moon Combo:
To make the large moon charm, use a slightly larger jump ring to connect the moon to the main clasp. You can attach a second, smaller star to the same ring so they dangle together playfully. -
Double Check Connections:
Give each charm a gentle tug to ensure the metal rings are fully closed so your celestial friends stay safe and secure.
Level Up: Galaxy sparkle
Before baking, brush a tiny amount of gold mica powder or cosmetic glitter onto the edges of the stars for a magical, shimmering finish.
Now you have a handful of dreamy, pocket-sized companions ready to brighten up any zipper or keyring.
Mini Animal Face Studs
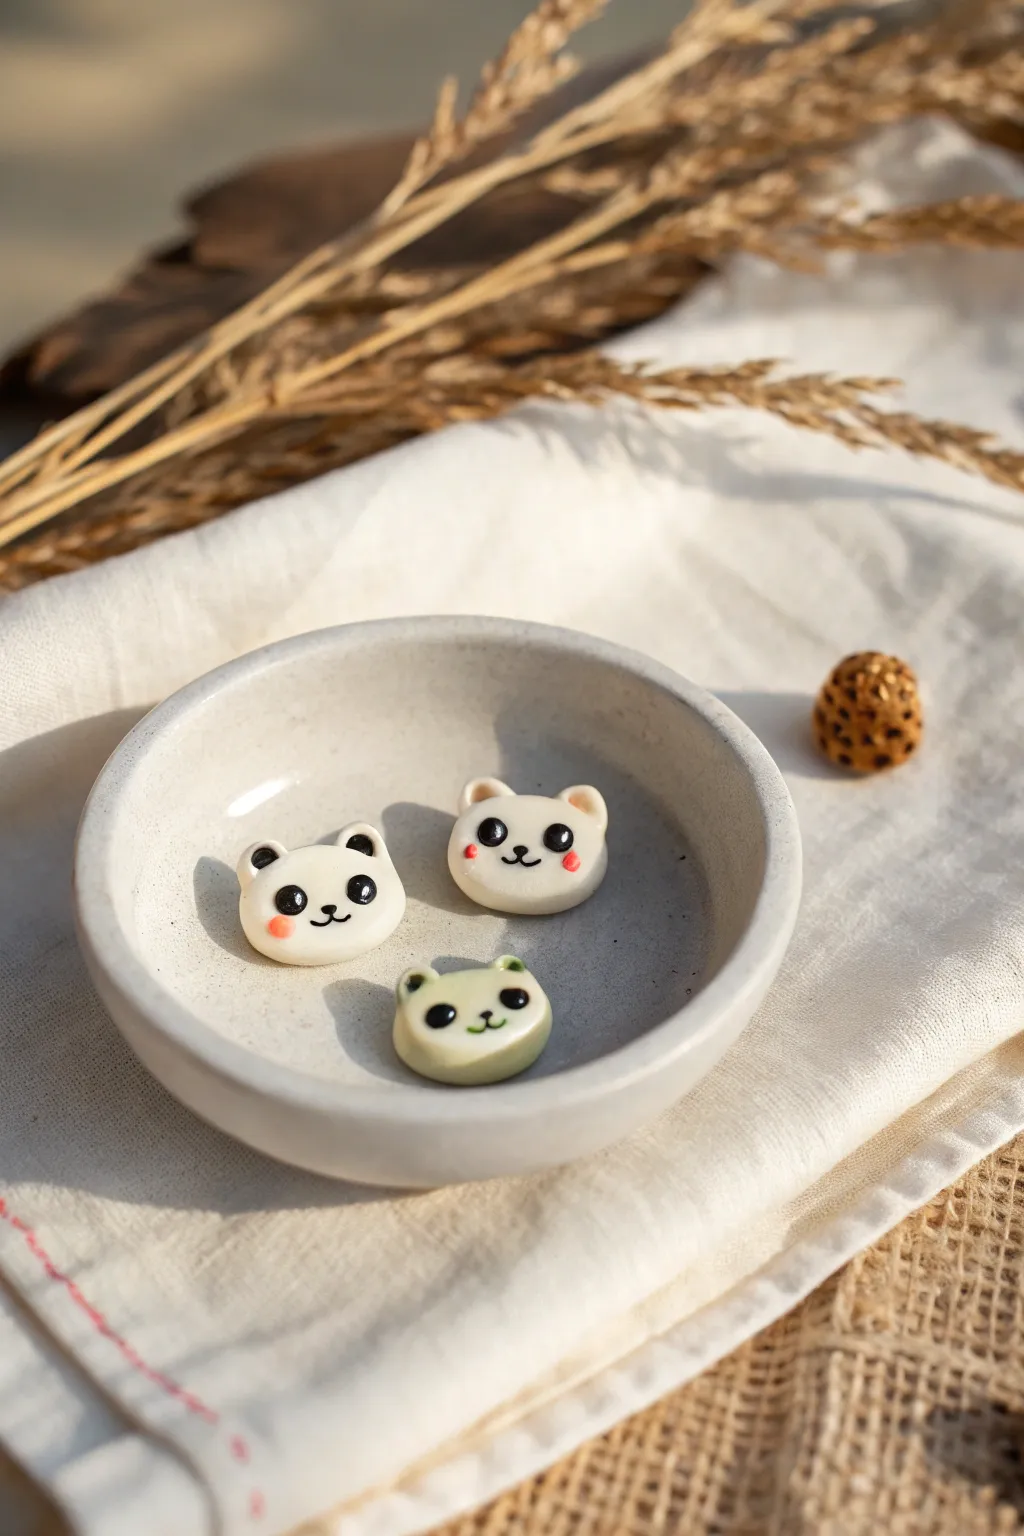
These adorable, glossy animal faces are perfect for adding a touch of sweetness to your day. Using simple shapes and careful detailing, you can craft a trio of tiny studs that look professionally finished and smooth.
Step-by-Step Guide
Materials
- White polymer clay
- Pale green polymer clay (or mix white with a speck of green)
- Black liquid clay or black acrylic paint
- Pink chalk pastel or pink acrylic paint
- High-gloss glaze or UV resin
- Needle tool or toothpick
- Small dotting tool
- Ceramic tile or baking surface
- Oven (for baking clay)
- Earring posts and superglue (optional for final assembly)
Step 1: Shaping the base forms
-
Conditioning the clay:
Start by warming the white polymer clay in your hands until it becomes soft and pliable. This conditioning step is crucial to prevent cracks later on. -
Forming the heads:
Roll small balls of white clay, roughly the size of a pea. Gently press them onto your work surface (like a ceramic tile) to flatten the bottom slightly while keeping a rounded, dome-like top. -
Adding the green variation:
For the green character, take a small amount of white clay and mix in a tiny speck of green until fully blended to achieve that soft mint color. Roll and flatten this just like the white ones. -
Creating the ears:
Roll extremely tiny balls of clay for the ears. Make six balls total—four white and two green. -
Attaching the ears:
Place two small balls on top of each head. Using the rounded end of a tool or your finger, gently blend the seam where the ear meets the head so they become one solid piece rather than just stuck on. -
Refining the shape:
I like to use a silicone smoothing tool here to ensure the transition between ear and head is seamless and the surface is perfectly smooth.
Clean Clay Trick
Keep wet wipes or baby wipes nearby. Clean your hands and tools often, especially when switching from darker colors back to the pristine white clay.
Step 2: Adding the facial details
-
Adding blush:
Before baking, use a small brush to apply scraped pink chalk pastel dust to the cheek areas. This creates a soft, airbrushed look that paint can’t quiet mimic. -
Pre-baking indentation (optional):
If you plan to use paint later rather than liquid clay, you can use a small dotting tool to make slight indentations where the eyes and nose will go to guide your hand later. -
Baking the pieces:
Bake the clay pieces according to the manufacturer’s instructions for your specific brand. Let them cool completely before moving to the next step. -
Painting the eyes:
Using a very fine dotting tool or a toothpick, dip into black acrylic paint (or black liquid clay). Carefully place two round dots for eyes. -
Drawing the nose and mouth:
With the finest point of a needle tool or a 0000 brush, draw a tiny oval nose between the eyes and drag a small line down, splitting into a ‘w’ shape for the mouth. -
Adding ear details:
If making the white bear, use black paint to create rounded accents on the ears. Leave the green one plain or add tiny inner ear details if desired. -
Highlighting:
Once the black paint is fully dry, add a microscopic dot of white paint to the upper corner of each eye to give them life and sparkle.
Step 3: Finishing touches
-
Sealing the work:
Apply a coat of UV resin or a high-gloss water-based varnish over the entire face. This protects the paint and gives that ceramic-like shine shown in the photo. -
Curing or drying:
If using resin, cure under a UV lamp for 2-3 minutes. If using varnish, allow it to air dry in a dust-free environment for several hours. -
Attaching hardware:
Flip the pieces over and use a strong adhesive like E6000 or superglue to attach metal earring posts to the flat backs.
Dust Magnets?
If you see dust specks on your raw white clay, barely dampen a cotton swab with rubbing alcohol or nail polish remover and gently wipe the surface to remove them.
Enjoy wearing your charming new accessories or gift them to a friend who loves miniatures

TRACK YOUR CERAMIC JOURNEY
Capture glaze tests, firing details, and creative progress—all in one simple printable. Make your projects easier to repeat and improve.
Tiny Sleepy Cloud Figurines

Capture the sweetness of a peaceful nap with this adorable polymer clay cloud charm. Its smooth, rounded edges and simple facial features make it a perfect beginner project that results in a professional-looking pendant.
How-To Guide
Materials
- White polymer clay (e.g., Fimo Soft or Sculpey Premo)
- Black acrylic paint or a fine-tip permanent marker
- Pink acrylic paint or soft pastel chalk
- Gold screw eye pin (small)
- Gloss glaze (UV resin or water-based varnish)
- Sculpting tools (needle tool/dotting tool)
- Small paintbrush
- Wet wipes
- Oven (for baking)
- Gold jump ring (optional)
Step 1: Shaping the Cloud
-
Prepare the Clay:
Start by conditioning your white polymer clay. Knead it thoroughly in your hands until it is soft, warm, and pliable. This prevents cracks later on. -
Form the Base:
Roll a piece of clay about the size of a large marble into a smooth ball. Flatten it slightly between your palms to create a thick disc shape, roughly 5-7mm thick. -
Clean Your Hands:
White clay picks up dust easily. Before the final sculpting, give your hands a quick wipe with a wet wipe to ensure the cloud stays pristine. -
Create the Bottom Curve:
Gently press the bottom of the disc against your work surface to create a flat base. This gives the cloud that classic, stable cartoon shape. -
Sculpt the Flells:
Using your fingers, gently pinch and mould the top edge into three rounded bumps. Make the center bump slightly higher than the two side bumps for a symmetrical look. -
Smooth the Edges:
Go around the perimeter of the cloud and tap down any sharp edges. You want the form to look soft and puffy, like a marshmallow. -
Insert the Hardware:
Take your small gold screw eye pin. Carefully twist
Step 2: Adding Details & Baking
-
Pre-Bake Check:
Inspect the clay for any fingerprints. If you find any, lightly brush them away with a tiny drop of baby oil or water on your fingertip. -
Bake the Clay:
Place the charm on a tile or baking sheet lined with parchment paper. Bake according to your specific clay package instructions (usually 230°F-275°F for 15-30 minutes). -
Cool Down:
Allow the cloud to cool completely inside the oven or on a cooling rack. Painting on warm clay can ruin the finish. -
Paint the Cheeks:
Dip a small dotting tool or the end of a toothpick into pink acrylic paint. Gently dab two small circles onto the lower corners of the cloud face. -
Draw the Eyes:
Using a very fine detail brush with black acrylic paint (or a fine-liner pen), draw two downward curves for the sleepy eyes. I find resting my pinky on the table helps steady my hand for this fine work. -
Add Eyelashes:
Add two tiny little flicks to the outer corner of each eye curve to create sleepy eyelashes. -
Seal (Optional):
Once the paint is fully dry, coat the entire piece in a thin layer of gloss glaze or UV resin to protect the paint and give it a shiny, finished look. -
Final Twist:
Double-check that your screw eye pin is secure. If it feels loose after baking, twist it out, add a dab of superglue, and screw it back in.
Dust Bunny Alert
White clay attracts lint like a magnet. Keep a piece of scotch tape handy to dab against the raw clay; it lifts off dust specs instantly without denting.
Soft Blush Hack
Instead of acrylic paint, scrape some pink chalk pastel into powder. Apply it with a soft brush before baking for a natural, diffused blush effect.
Now you have a serene little sky companion ready to be worn as a necklace or attached to a keychain
Micro Surprise Capsule Charms
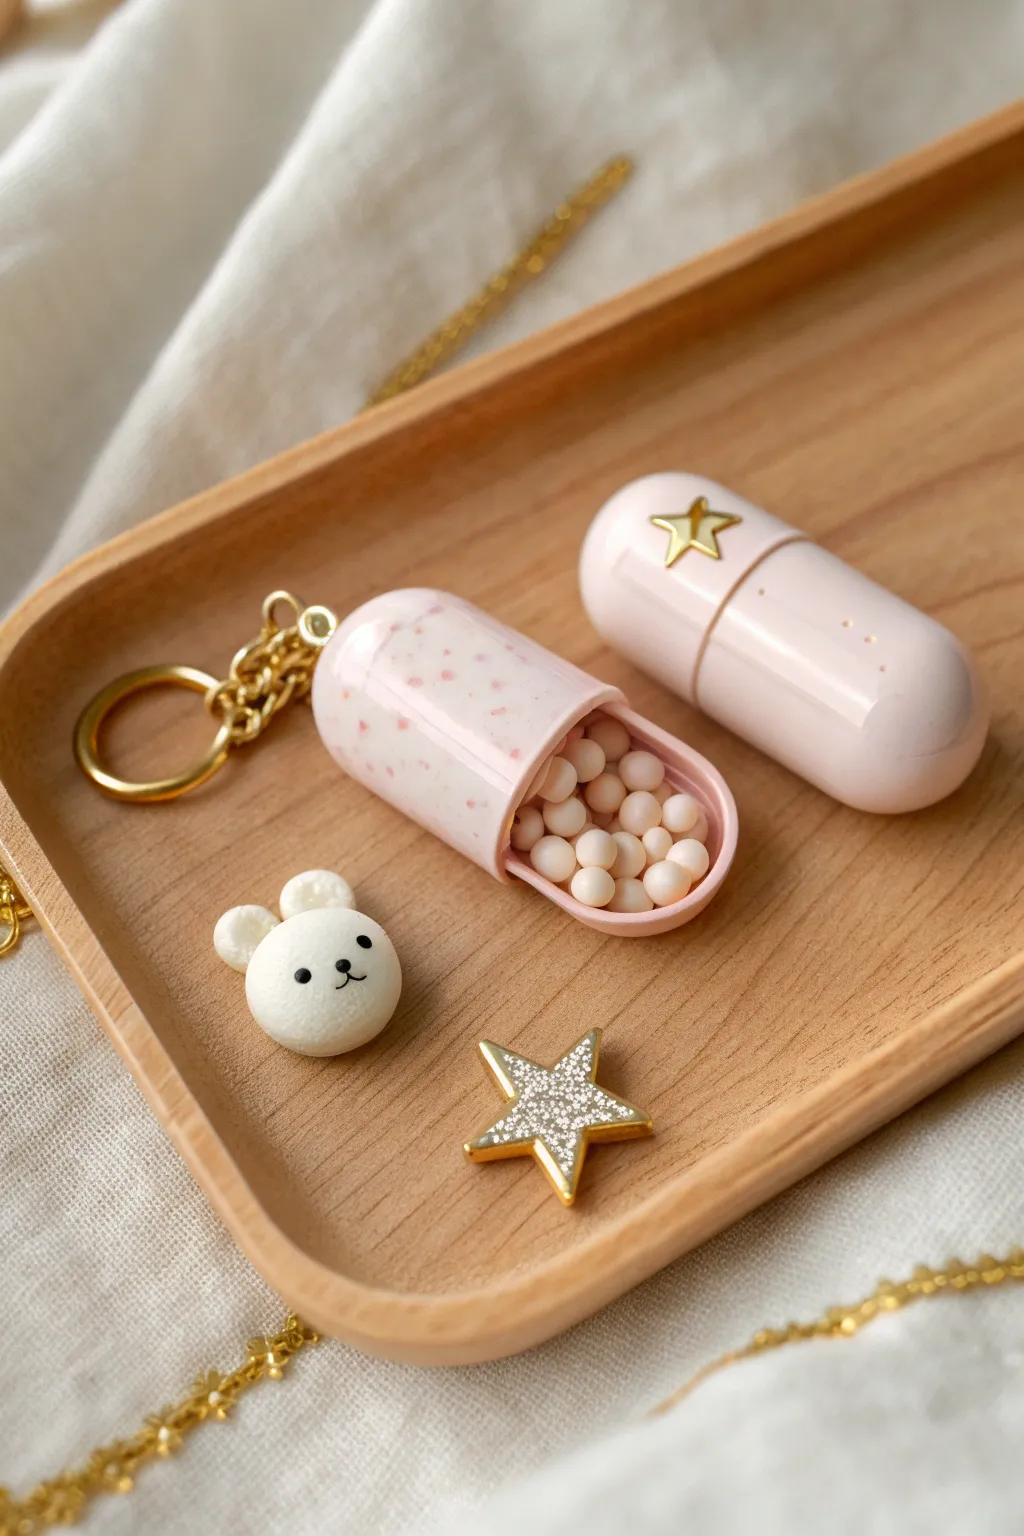
This adorable split-capsule charm reveals a hidden treasure of tiny micro-pearls inside. With its soft speckled pink finish and gold star accent, it makes for a whimsical and surprising keychain addition.
Step-by-Step
Materials
- Light pink polymer clay
- Translucent polymer clay (optional for mixing)
- Red or dark pink pastel chalk (for speckles)
- White or cream polymer clay (for pearls)
- Blade or craft knife
- Needle tool
- Rolling pin
- Small domed cutters or a pill-shaped mold (custom or scavenged)
- Gold star charm or stud
- Gold keychain hardware with jump rings
- Strong craft glue (e.g., E6000)
- Gloss glaze or UV resin (optional)
Step 1: Creating the Capsule Base
-
Prepare the Speckled Clay:
Start by conditioning your light pink clay until soft. Scrape a small amount of red pastel chalk into a fine dust and knead it into the clay to create tiny, realistic speckles throughout the pink base. -
Form the Capsule Halves:
Roll the clay into a smooth cylinder. Cut this cylinder in half to create two equal lengths. Round off one end of each piece to create a classic pill shape. -
Hollow the Bottom Half:
Take the bottom half of your capsule. Carefully press a smaller round tool or the end of a paintbrush handle into the flat end to hollow it out, creating a cup shape akin to an empty pill casing. -
Refine the Rim:
As you hollow it, the walls might splay out. Gently gently push them back in with your fingers to ensure the rim stays uniform and doesn’t get too thin. -
Create the Top Cover:
Repeat the hollowing process for the top half, but make the walls slightly thinner if you want it to slide over the bottom, or keep them equal thickness if you plan to simply hinge or glue them. -
Add Structural Detail:
Roll a very thin strip of pink clay and wrap it around the open rim of the top half to simulate the slightly wider band often found on real gelatin capsules. -
Attach Hardware:
Twist a small screw eye pin into the rounded top of the capsule lid. Remove it, add a dab of liquid clay or glue to the hole, and screw it back in for a secure hold. -
Pre-Bake Preparation:
If you are worried about the hollow shapes collapsing, you can rest them on a small ball of paper towel or baking batting.
Step 2: Making the Filling & Baking
-
Roll Tiny Pearls:
While the capsule rests, take your white or cream clay and roll dozens of extremely tiny spheres. These need to be small enough to pile up inside the capsule like medicine beads. -
Fill the Capsule:
Fill the bottom half of the capsule with the tiny white clay spheres. I like to mound them slightly so they look plentiful. -
Secure the Spheres:
Drip a small amount of liquid polymer clay or bake-and-bond over the spheres to ensure they stick together and stay inside the capsule permanently. -
Add the Star Accent:
Take your metal gold star charm. Press it gently into the side of the top capsule piece so it creates an indentation, then remove it for baking (metal can get hot or disqualify the finish). -
Bake:
Bake all clay pieces (capsules and loose stars if making clay ones) according to the manufacturer’s instructions. Usually, this is 275°F (135°C) for about 15-20 minutes depending on thickness. -
Cool and Assemble:
Once fully cooled, glue the gold star into the indentation you made earlier using strong craft glue. -
Attach Keychain:
Use pliers to open a jump ring and attach the keychain chain to the eye pin on the capsule top. -
Final Polish:
For a glassy look similar to a real pill, coat the outside pink surfaces with a gloss glaze or a thin layer of UV resin and cure.
Use Real Capsules
For perfect spacing, use a real empty gelatin capsule as a mold! Wrap your clay around it to get the curve right, then gently slide it off before baking.
Clay Too Soft?
If the hollow shape slumps while working, put the clay in the fridge for 10 minutes. A firmer consistency holds the thin walls much better.
This charming little capsule makes a perfect gift or a cute accessory for your planner or bag