Whenever I’m stuck on what to make next, I reach for ideas that are both cute and genuinely useful in everyday life. These clay projects are small, satisfying, and perfect for turning clutter-prone spots into tiny moments of joy.
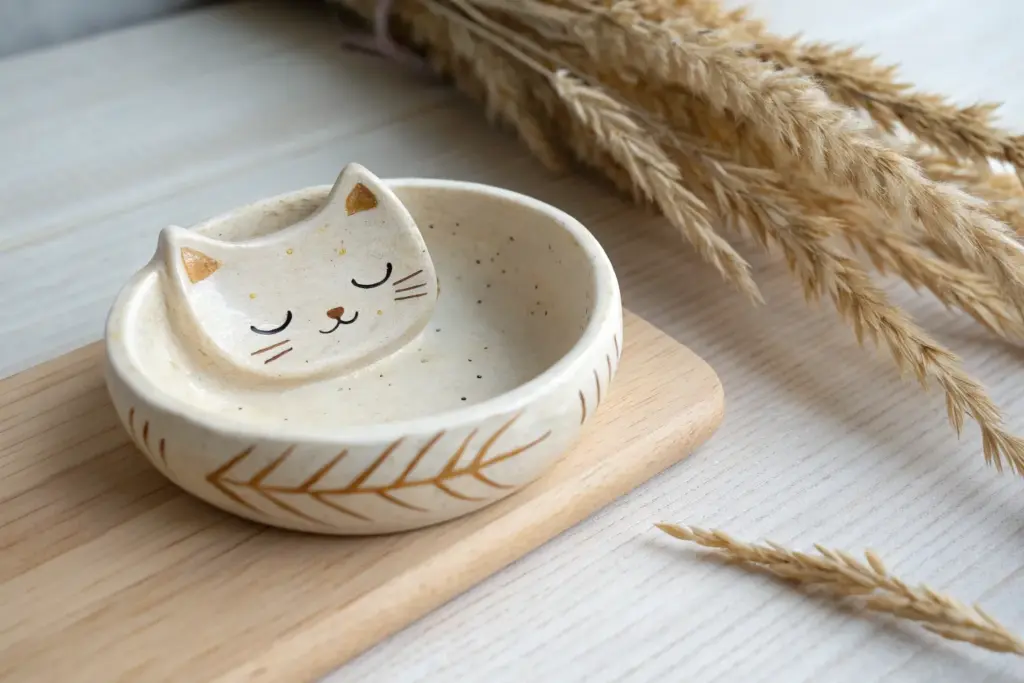
Cat-Shaped Trinket Dish
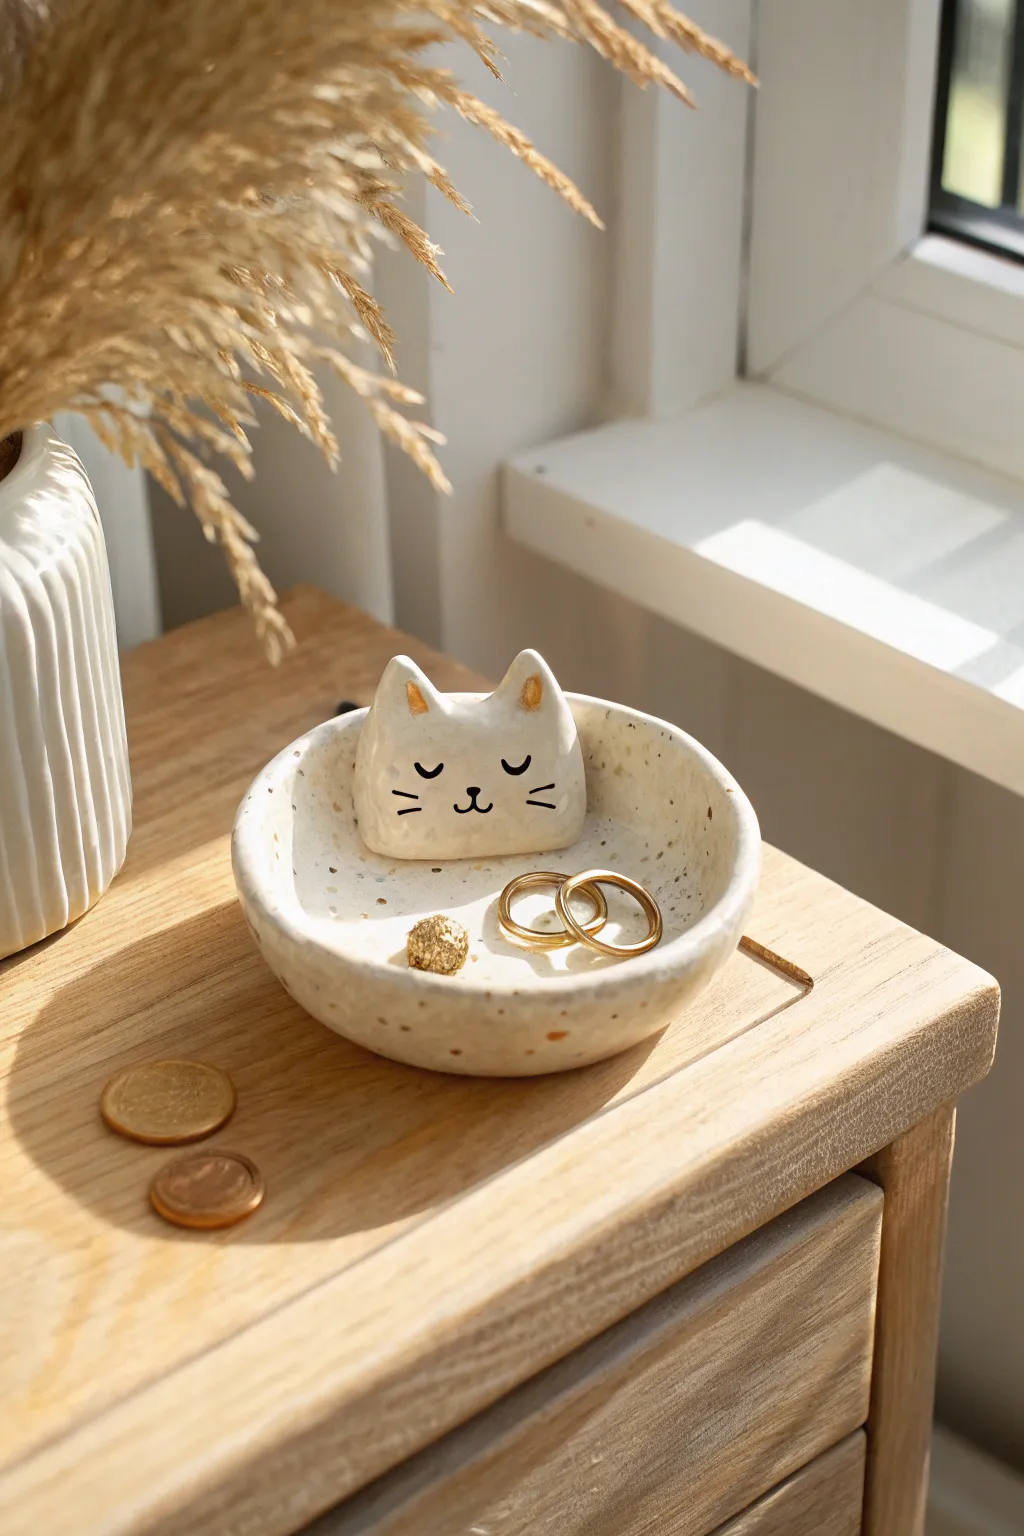
This adorable speckled trinket dish features a serene, sleeping kitty face rising from the bowl’s edge, perfect for guarding your favorite rings. The natural clay tone and minimalist black detailing give it a chic, modern handmade feel that looks great on any bedside table.
Step-by-Step Guide
Materials
- Polymer clay or air-dry clay (white or cream)
- Speckled clay addition (or black pepper/sand for faux speckles)
- Small rolling pin
- Circle cutter (approx. 4-5 inches) or a bowl to trace
- Small sponge
- Water (for smoothing)
- Clay sculpting tools (needle tool, smoothing tool)
- Acrylic paint (black and gold)
- Fine detail paintbrush
- Gloss varnish or glaze
- Small bowl (for forming the curve)
- Sandpaper (fine grit)
Step 1: Base Construction
-
Prepare the clay:
Begin by conditioning your clay until it is soft and malleable. If you are using plain clay and want that speckled look shown in the photo, knead in a small pinch of black pepper or fine craft sand until it’s evenly distributed. -
Roll the slab:
Roll out a slab of clay to an even thickness of about 1/4 inch. Ensure the surface is smooth and free of air bubbles. -
Cut the circle:
Use your circle cutter or place a bowl upside down on the clay to trace and cut out a perfect circle. This will form the main bowl of the dish. -
Soften edges:
Dip your finger or a small sponge in water and gently run it around the cut edge of the circle to round it off and remove any sharp angles. -
Form the curve:
Gently lift the clay circle and place it inside a small bowl to give it a curved, dish-like shape while it waits for the cat addition.
Cracking Up?
If you see tiny hairline cracks appearing as the clay dries, mix a small amount of fresh clay with water to make a paste and fill them in immediately.
Step 2: Sculpting the Cat
-
Shape the head:
Roll a separate ball of clay regarding the size of a walnut. Flatten it slightly into a thick oval shape. -
Form the ears:
Pinch the top two corners of your oval gently upwards to create two pointed triangular ears. -
Refine the face:
Smooth the clay between the ears so there is a gentle dip, giving the top of the head a natural cat silhouette. -
Attach to the bowl:
Score the back of the cat head and the inner rim of your clay bowl where you want the cat to sit. Add a dab of water or liquid clay (slip) to join them. Press the head firmly against the inside edge. -
Blend the seams:
Use a sculpting tool or your finger to smooth the clay where the neck meets the bowl. The transition should be seamless so the cat looks like it is emerging from the dish.
Golden Glamour
For sharper gold ear details, use a gold leaf pen instead of a brush and paint. It gives a brighter, more metallic finish with cleaner edges.
Step 3: Finishing Touches
-
Drying:
Allow the piece to dry completely according to your clay package instructions. If using air-dry clay, this may take 24-48 hours. -
Sanding:
Once fully cured or dry, use fine-grit sandpaper to buff away any fingerprints or rough spots on the rim and the cat’s ears. -
Paint the face:
Using a very fine detail brush and black acrylic paint, carefully draw two small ‘U’ shapes for sleeping eyes, a tiny nose, a mouth, and three whiskers on each cheek. Steady your hand by resting your pinky on the table. -
Add gold details:
Dip your brush in metallic gold paint and fill in the inner triangles of the ears for a touch of elegance. -
Seal the piece:
Apply a coat of gloss varnish or glaze over the entire dish to protect the paint and give it that ceramic-like shine shown in the image.
Place this charming little guardian on your dresser to keep your treasures safe


Ring Cone With a Cute Face
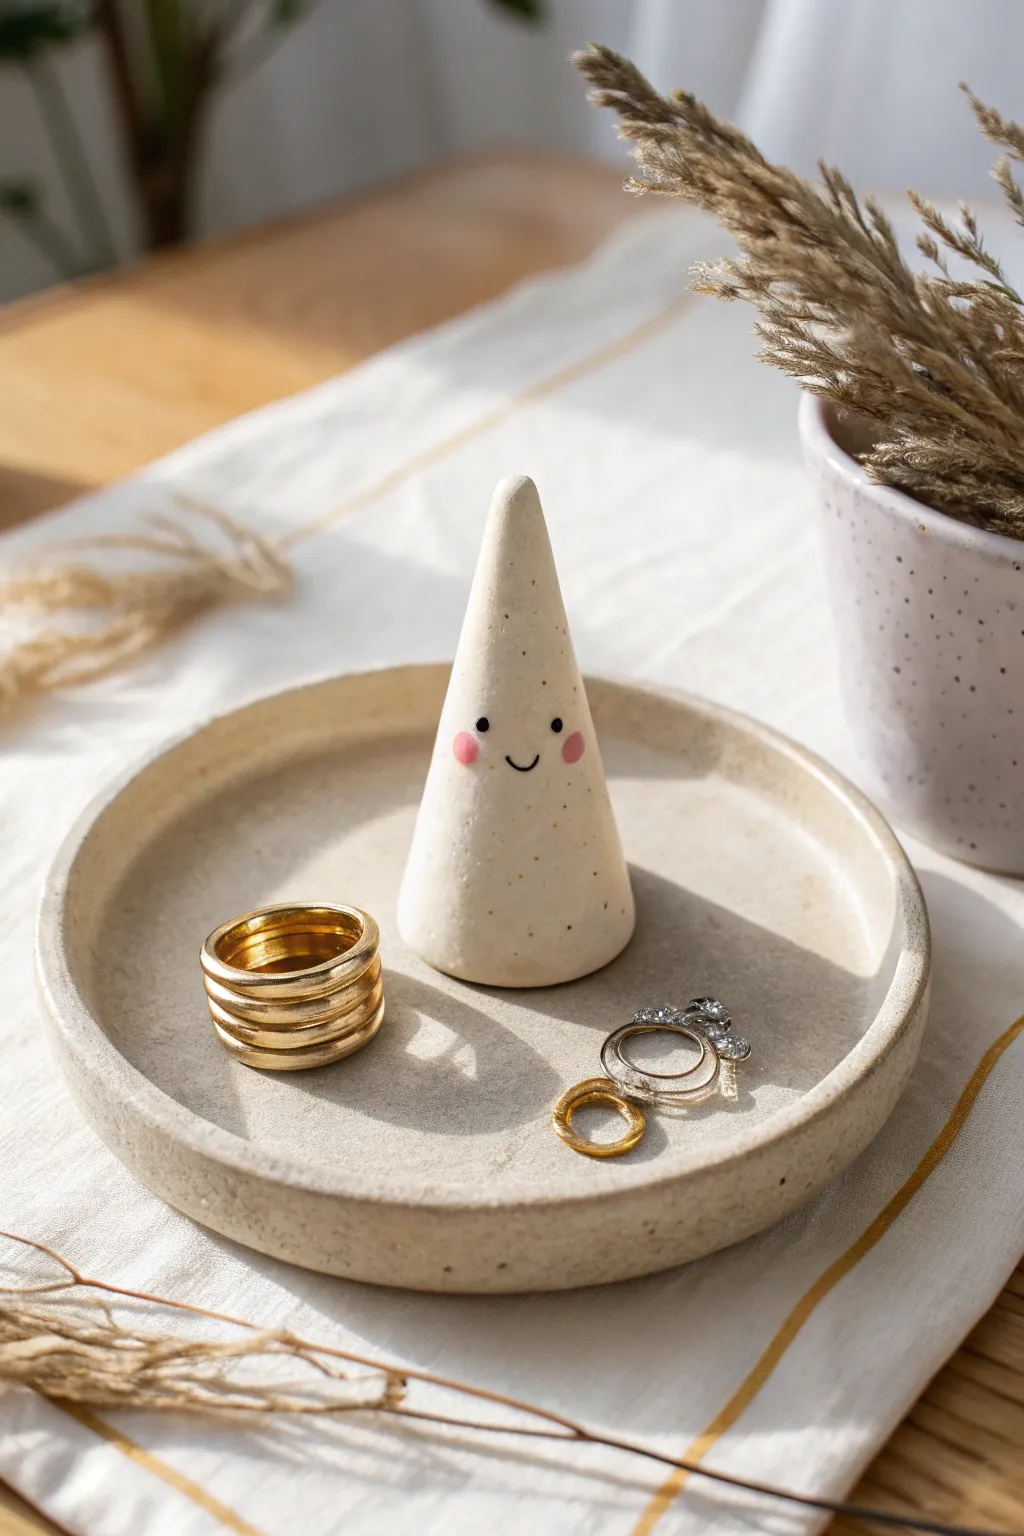
This adorable storage set combines a functional trinket dish with a personality-filled ring cone to keep your jewelry organized. The speckled beige finish gives it a trendy ceramic look, while the minimalist smiley face adds a touch of sweetness to your vanity.
Step-by-Step
Materials
- Speckled beige polymer clay (or plain beige clay + ground black pepper)
- Acrylic rolling pin
- Circle cutters (approx. 4-5 inches diameter)
- Craft blade or X-Acto knife
- Smooth work surface (ceramic tile or glass)
- Sandpaper (fine grit)
- Fine-point paintbrush or dotting tool
- Black acrylic paint
- Pink acrylic paint
- Matte or satin glaze (optional)
- Oven (for baking)
- Parchment paper
Step 1: Shaping the Ring Cone
-
Condition the clay:
Begin by kneading a sphere of speckled beige polymer clay until it is soft and pliable. If you don’t have pre-speckled clay, knead plain beige clay with a pinch of ground black pepper or dried coffee grounds to achieve that faux-ceramic texture. -
Form the basic cone:
Roll the ball into a smooth teardrop shape between your palms. Place the wider end onto your work surface and gently press down to flatten the base. -
Refine the shape:
Using your fingers, gently roll and smooth the cone while it stands on its base. You want a tall, tapered point that is sturdy enough to hold rings but thin enough at the top to look elegant. -
Smooth the surface:
Check for any fingerprints. I lightly stroke the clay upward from the base to the tip to erase marks and ensure the silhouette is perfectly conical.
Step 2: Creating the Trinket Dish
-
Roll out the slab:
Take a larger portion of the same speckled clay and roll it out with an acrylic roller. aim for an even thickness of about 1/4 inch. -
Cut the circle:
Use a large circle cutter or trace around a bowl to cut a perfect circle from your slab. Lift away the excess clay. -
Create the rim:
Roll a long, thin snake of clay. Place this snake directly on top of the circle’s edge, following the perimeter all the way around. -
Blend the seams:
Using a modeling tool or your finger, blend the clay snake downward into the base on the inside of the dish. This connects the pieces seamlessly. -
Smooth the exterior:
Repeat the blending process on the outside seam so the wall looks like one solid piece of clay rising from the base. -
Refine the lip:
Gently pinch and smooth the top edge of the rim to make it uniform. The dish should look like a low, shallow saucer.
Pepper Texture Trick
Mix coarse ground black pepper into translucent or white clay to mimic expensive speckled stoneware without needing specialized glazes.
Step 3: Baking and Decorating
-
Bake the pieces:
Place both the cone and the dish on parchment paper. Bake according to your polymer clay package instructions (usually 275°F for 15-30 minutes depending on thickness). -
Cool down:
Allow the pieces to cool completely inside the oven. This gradual cooling helps prevent cracking. -
Sand for finish:
Once cool, use fine-grit sandpaper to buff away any uneven spots on the rim of the dish or the base of the cone for a professional feel. -
Position the face:
Decide where the ‘front’ of your cone is. Imagine a face placement about halfway down the cone’s height. -
Paint the cheeks:
Dip a small dotting tool or the end of a paintbrush into pink acrylic paint. Dab two small circles onto the cone to create rosy cheeks. -
Add the eyes:
Clean your tool, dip it into black acrylic paint, and place two tiny dots slightly above and between the pink cheeks. -
Draw the smile:
Using an ultra-fine detail brush, paint a very tiny, delicate ‘U’ shape between the eyes for the smile. Keep it small for maximum cuteness. -
Seal the project:
Once the paint is completely dry, apply a thin layer of matte varnish over the painted area or the entire piece to protect it from wear.
Gold Rim Accent
Paint the very top edge of the dish rim with liquid gold leaf after baking. It adds a chic, jewelry-store finish that matches gold rings perfectly.
Now your charming little guardian is ready to keep your favorite rings safe and sound


Smiley Pencil Cup for Your Desk
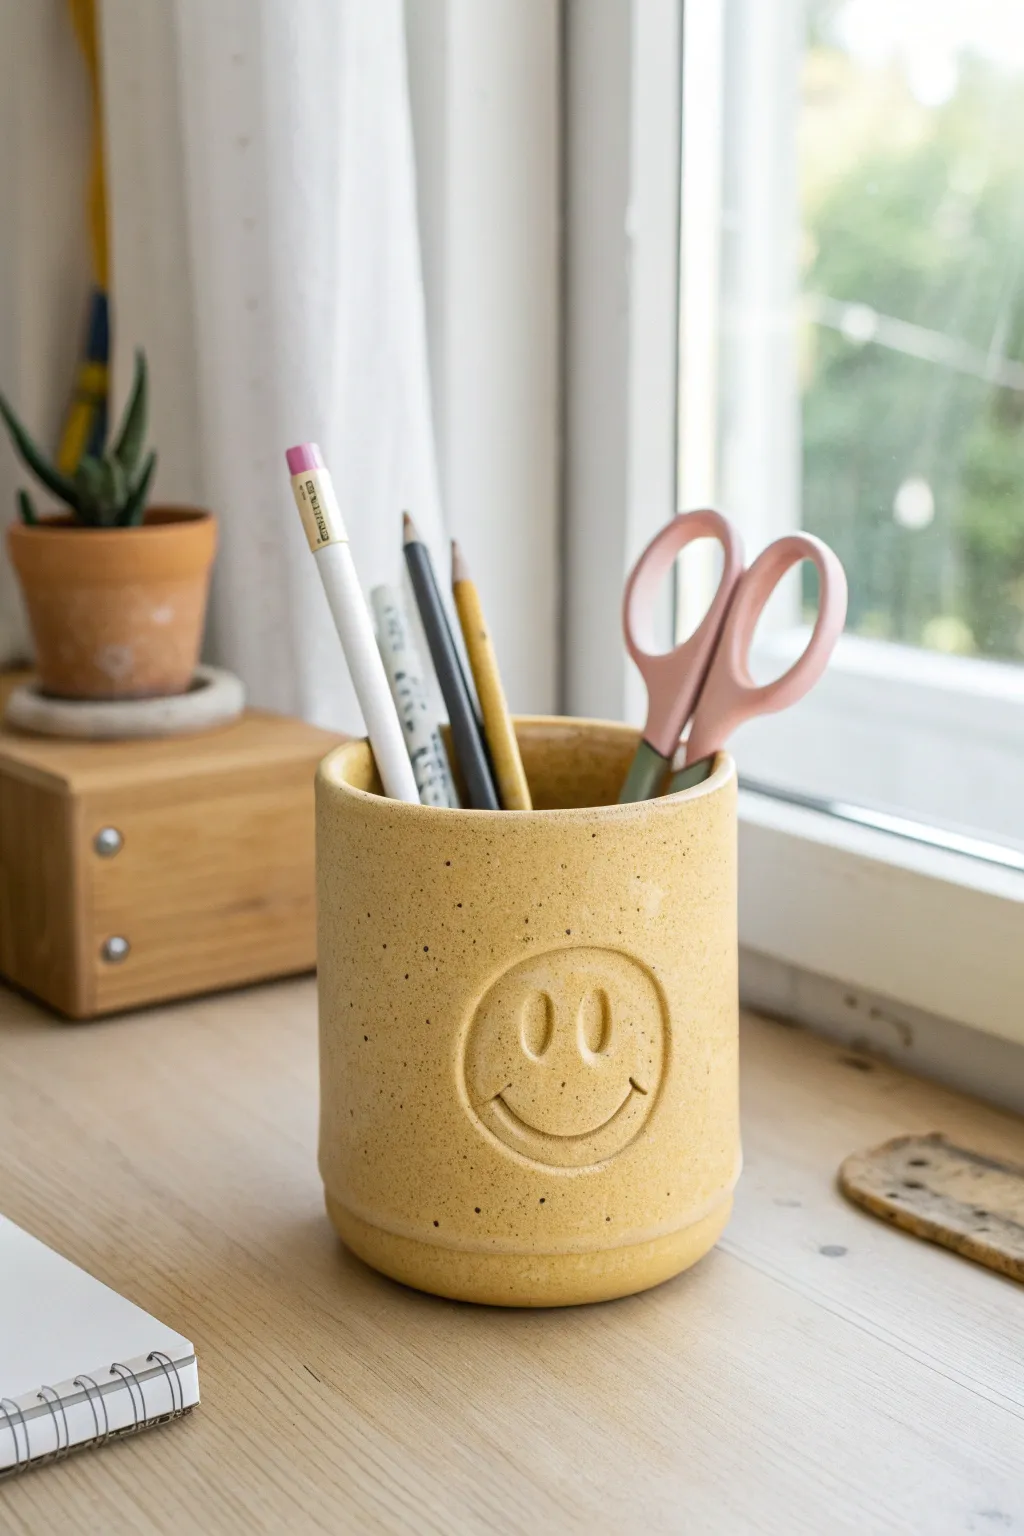
Brighten up your workspace with this charming yellow pencil cup featuring a simple, embossed smiley face. Its sturdy shape and speckled finish give it a modern handmade feel perfect for holding your favorite tools.
Step-by-Step Tutorial
Materials
- Air-dry clay or polymer clay (white or neutral)
- Acrylic rolling pin
- Flat blade or craft knife
- Round cookie cutter (approx. 3-4 inches diameter)
- Slip (clay mixed with water) and scoring tool
- Mustard yellow acrylic paint
- Small paintbrush
- Brown acrylic paint (for speckles)
- Old toothbrush
- Satin varnish or sealant
- Modeling tool with a small ball end
Step 1: Building the Form
-
Prepare the workspace:
Lay down a non-stick mat or parchment paper to work on. Knead a large ball of clay until it is soft, pliable, and free of air bubbles. -
Roll out the base slab:
Using your rolling pin, roll a portion of clay to an even thickness of about 1/4 inch. Use the round cookie cutter to stamp out a perfect circle for the base. -
Cut the wall slab:
Roll out the remaining clay into a long rectangular strip. Ensure it is also 1/4 inch thick. The height should be about 4-5 inches depending on how tall you want your cup. -
Measure the circumference:
Wrap the rectangular strip gently around the circular base to measure the length needed. Trim the excess clay with your craft knife, leaving just a slight overlap for joining. -
Score and slip:
Using your scoring tool or a toothpick, scratch up the edges of the base circle and the bottom edge of the wall strip. Apply a little slip (clay water) to these roughed-up areas. -
Assemble the cylinder:
Carefully wrap the wall piece around the base. Press the scored edges together firmly to create a seal. Join the vertical seam where the wall ends meet using the same score-and-slip method. -
Smooth the seams:
Use your finger or a smoothing tool to blend the clay across the seams on both the inside and outside until they are invisible. Use a little water if the clay feels dry. -
Refine the shape:
Check that the cylinder is perfectly round. I usually run a damp sponge around the top rim to soften any sharp edges created during cutting.
Crack Control
If you see tiny cracks forming as the clay dries, wet your finger slightly and smooth a tiny bit of fresh, soft clay into the fissure to patch it instantly.
Step 2: Adding the Details
-
Mark the face placement:
Decide where you want the face to be. Using a very light touch, lightly sketch a large circle for the face outline directly onto the wet clay cylinder. -
Emboss the outline:
Using a modeling tool, gently press into the clay along your sketched circle line to create a recessed groove. Do not cut all the way through; just create a distinct indentation. -
Create the smile:
Inside the lower half of the circle, use the same tool to press in a wide, U-shaped smile. Add small tick marks at the ends of the smile for extra charm. -
Add the eyes:
Roll two small, equal-sized ovals of clay. Press these flat onto the face area above the smile to create slightly raised eyes with a soft, cartoony look. -
Dry phase:
Let the pencil cup dry completely according to your clay’s instructions. This usually takes 24-48 hours for air-dry clay. Rotate it occasionally for even drying.
Step 3: Painting and Finishing
-
Apply base color:
Paint the entire cup inside and out with mustard yellow acrylic paint. You may need two coats for full opacity, letting the paint dry between layers. -
Create the speckles:
Dilute a small amount of dark brown paint with water. Dip an old toothbrush into the mixture and run your thumb across the bristles to flick tiny speckles over the yellow surface. -
Seal the project:
Once the paint is fully dry, apply a coat of satin varnish. This protects the paint from chipping and gives the cup a finished, professional look.
Texture Twist
Before rolling the slab into a cylinder, press a piece of coarse fabric or sandpaper onto the clay surface to give the whole cup a rough, stone-like texture.
Now your desk has a cheerful new friend ready to help organize your creative space


Cute Toothbrush Stand With Little Feet
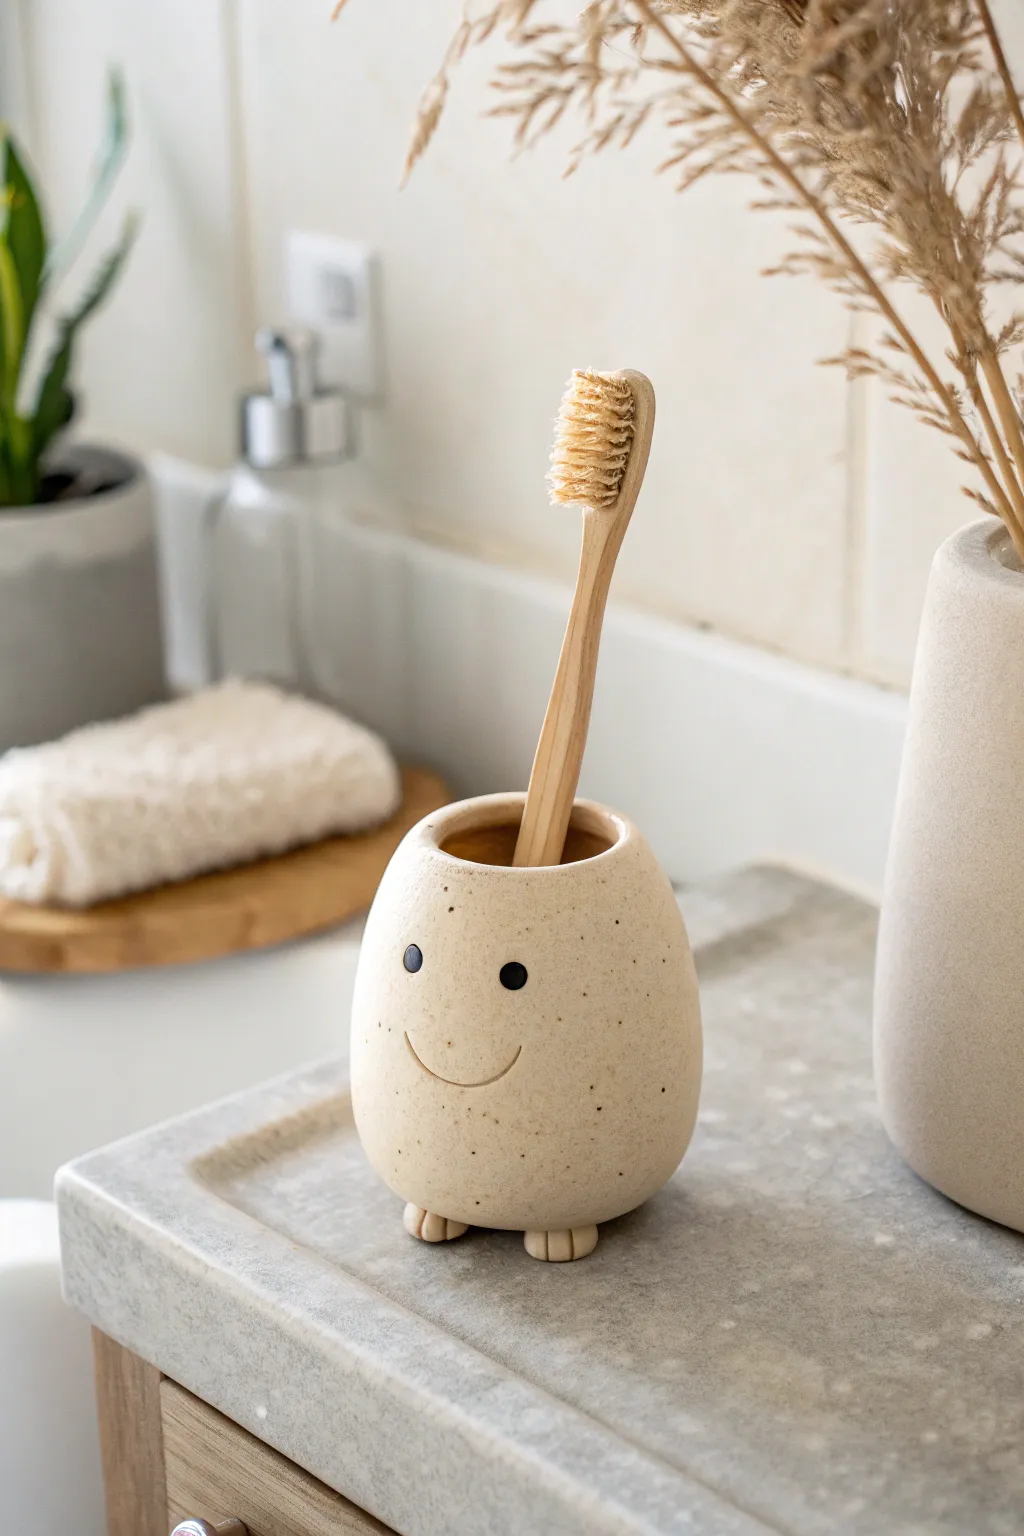
This adorable toothbrush stand adds a touch of whimsy to your bathroom routine with its simple smiley face and tiny, sculpted feet. The natural beige speckled clay gives it a warm, organic feel that perfectly balances the cartoonish charm.
Step-by-Step Tutorial
Materials
- Speckled beige stoneware clay (or polymer clay)
- Small rolling pin
- Potter’s needle tool or toothpick
- Wooden sculpting tool (rounded end)
- Small sponge
- Water (slip)
- Black underglaze or acrylic paint
- Clean paintbrush (small round)
- Clear matte glaze (if using ceramic clay)
Step 1: Shaping the Body
-
Prepare the clay:
Start with a ball of clay roughly the size of a large orange. Wedge it well to remove air bubbles if using ceramic clay, or condition it until pliable if using polymer. -
Form the base shape:
Roll the ball into a smooth, slightly tapered egg shape. The bottom should be wider than the top to ensure stability. -
Create the opening:
Using your thumb, press gently into the center of the top of the egg shape. Slowly widen this hole by pinching the walls between your thumb and fingers while rotating the piece. -
Refine the interior:
Continue hollowing until the hole is deep enough to hold a toothbrush securely (about 2-3 inches). Keep the walls relatively thick, around 1/4 to 1/2 inch, for a sturdy look. -
Smooth the shape:
Use a damp sponge or your finger to smooth out the rim and the exterior. You want a soft, rounded silhouette without any sharp edges.
Step 2: Adding Personality
-
Make the feet:
Roll two small marble-sized balls of clay for the feet. Flatten them slightly into oval shapes. -
Attach the feet:
Score the bottom of the body and the top of the feet with a needle tool. Apply a dab of water or slip, then press the feet firmly onto the front edge of the base so they poke out slightly. -
Detail the toes:
Take a wooden tool or the dull side of a knife and gently press two vertical indentations into the front of each foot to create little toes. -
Sculpt the smile:
Using a needle tool, lightly sketch a wide, U-shaped smile onto the front of the pot. Once you are happy with the placement, carve it slightly deeper using a rounded sculpting tool for a soft expression. -
Create the eye sockets:
Press the rounded end of a paintbrush handle or sculpting tool into the clay above the smile to create two small, shallow circular indentations for the eyes.
Weighted Base Tip
Make the bottom of the holder thicker than the top walls. This extra weight at the base prevents it from tipping over when you drop a heavy toothbrush inside.
Step 3: Finishing Touches
-
Final smoothing:
Give the entire piece one last pass with a barely damp sponge to embrace that organic, stone-like texture and remove fingerprints. -
Drying or Baking:
If using ceramic clay, let the piece dry slowly under loose plastic for a few days before bisque firing. If using polymer clay, bake according to the package instructions now. -
Paint the eyes:
Once dry (or baked and cooled), use a small brush to carefully fill in the eye indentations with black underglaze or acrylic paint. -
Glazing:
If working with ceramics, dip or brush a clear matte glaze over the entire piece (avoiding the bottom of the feet) and fire it again. For polymer clay, a matte varnish is optional but recommended for bathroom use.
Eyes Look Messy?
If you accidentally paint outside the eye indentation, let the black paint dry completely, then gently scrape the excess off with an aesthetic knife or sandpaper.
Place your new little buddy by the sink and enjoy the cheerful company every morning and night

The Complete Guide to Pottery Troubleshooting
Uncover the most common ceramic mistakes—from cracking clay to failed glazes—and learn how to fix them fast.
Frog Pen Rest or Desk Buddy
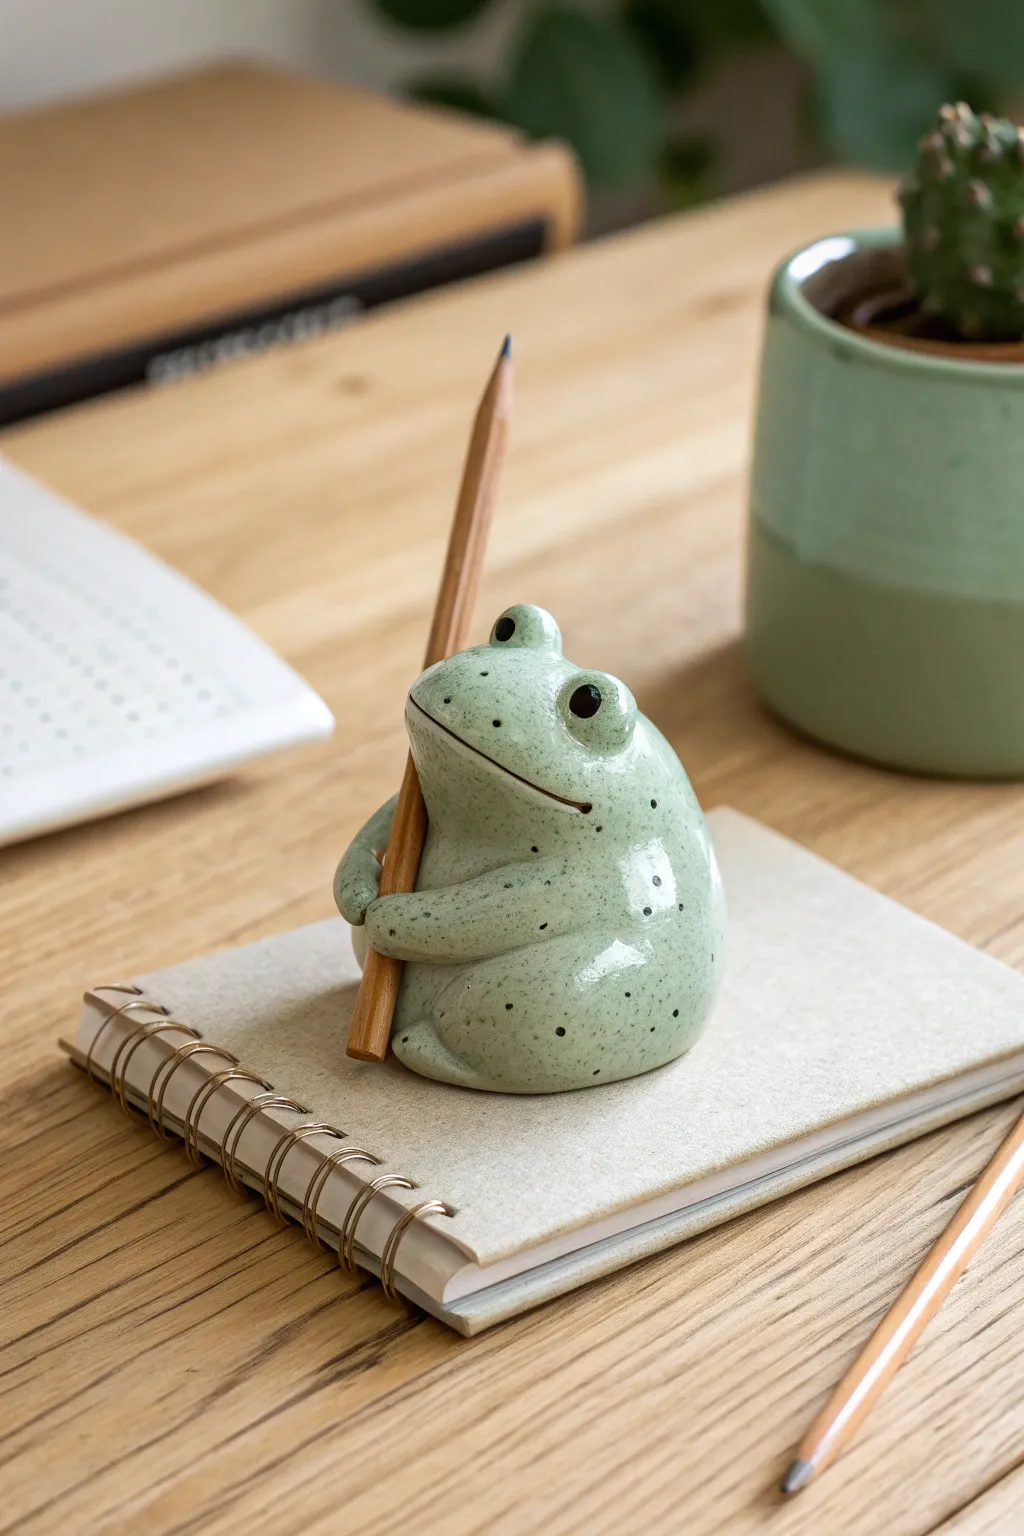
This charming ceramic-style frog isn’t just adorable decor; he’s hard at work holding your favorite pencil upright and ready to write. With a speckled mint-green finish and a sturdy, rounded body, this little amphibian brings a touch of nature to your workspace.
Step-by-Step
Materials
- White air-dry clay or polymer clay (approx. 150g)
- Acrylic paints (mint green, white, black)
- High-gloss varnish or glaze
- Sculpting tool with a needle point
- Smooth work surface/mat
- Small bowl relative for water (if using air-dry clay)
- Pencil (to test fit)
Step 1: Shaping the Base
-
Form the Body:
Start with a ball of clay roughly the size of a tangerine. Roll it between your palms until it is smooth and crack-free, then gently flatten the bottom onto your work surface so it sits stably without tipping. -
Create the Head Tilt:
Using your thumb, gently press into the upper third of the ball to define a subtle neck area, tilting the head section slightly upward as if the frog is looking up at you. -
Add the Eyes:
Roll two small pea-sized balls of clay. Attach them to the very top of the head, spacing them slightly apart. Blend the seams downward into the head using a sculpting tool or your finger so they look integrated, not just stuck on. -
Carve the Mouth:
Use a needle tool or a thin blade to press a long, slightly curved smile line horizontally across the face. Make it deep enough to be visible after painting.
Don’t Rush the Dry
If using air-dry clay, loosely cover the frog with plastic wrap for the first 24 hours. This slows drying and prevents cracks from forming where the arms meet the body.
Step 2: Adding the Arms & Function
-
Make the Arms:
Roll two sausage shapes, roughly 2 inches long each. These should be thicker at the ‘shoulder’ end and slightly tapered toward the ‘hand’ end. -
Attach the Right Arm:
Score and slip (or just press, if using polymer) the right arm onto the side of the body. Curve it forward so the hand rests on the frog’s belly. -
Position the Left Arm:
Attach the left arm similarly, but leave a distinct gap between the two hands. This gap is crucial because it needs to hold the pencil. -
Shape the Grip:
Take a real pencil and place it vertically against the frog’s belly, between the arms. Gently mold the clay hands around the pencil shaft to create a custom-fit groove. -
Refine the Hands:
While the pencil is still in place (carefully remove and re-insert to ensure it doesn’t stick), use a small tool to press minimal indentations for fingers or paws on the hands. -
Smoothing Phase:
Dip your finger in a little water (for air-dry) or baby oil (for polymer) and smooth out all fingerprints, particularly around the arm joints and eye sockets. -
Drying or Baking:
Follow the manufacturer’s instructions to cure your frog. If baking, I recommend propping the arms with a bit of foil so they don’t sag during the heat.
Make it a Trio
Create two more frogs with different poses—one holding a pen horizontally and one with an open mouth to hold a paperclip! Group them for a pond scene.
Step 3: Painting & Glazing
-
Base Coat:
Mix a soft, minty green using white and a touch of green acrylic. Apply two thin coats over the entire frog, letting the first layer dry completely before adding the second. -
Detail the Eyes:
Using a very fine brush or a toothpick, dot the eyes with solid black paint. Make them relatively large to achieve that innocent expression. -
Highlight the Eyes:
Once the black is dry, add a tiny white speck to the upper right corner of each pupil to bring the frog to life. -
Speckling Effect:
Dilute a small amount of dark green or charcoal paint with water. Dip a stiff toothbrush into the mix and run your thumb over the bristles to flick tiny speckles onto the frog’s back and sides. -
The Glossy Finish:
This step is arguably the most important for the ceramic look. Apply a thick coat of high-gloss varnish or resin over the entire piece. -
Double Gloss:
For extra depth, apply a second coat of gloss just to the eyes. This makes them look wet and glass-like.
Now your desk has a reliable little guardian to keep your tools organized and your spirits high
Whale Phone Stand
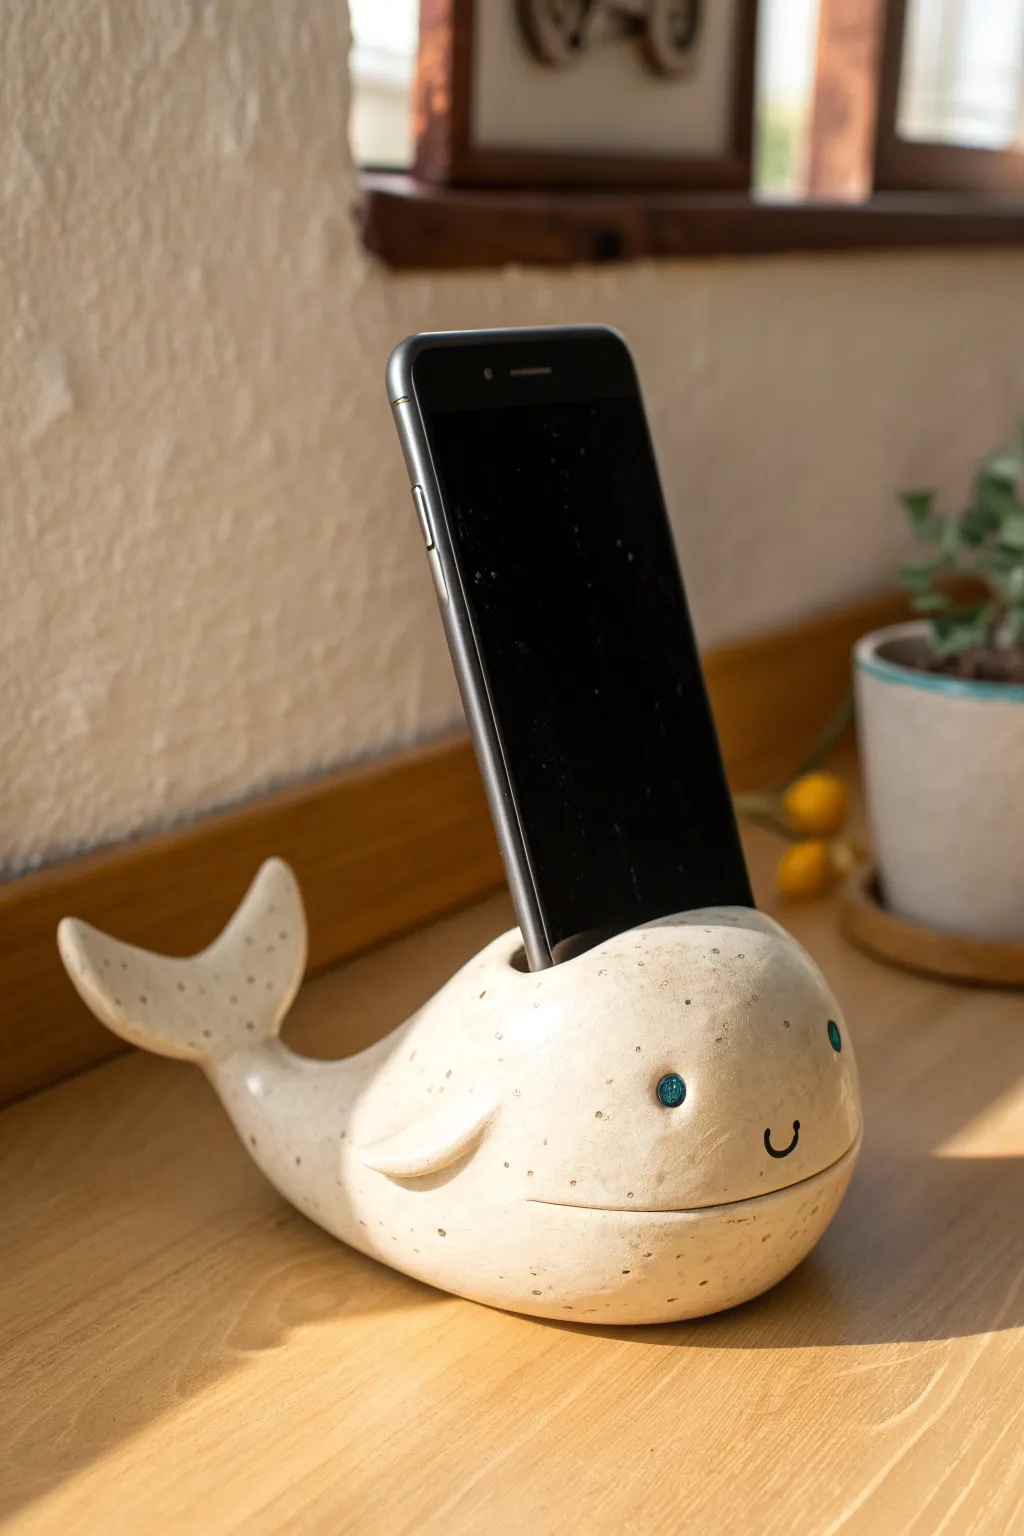
Brighten up your desk with this adorable, speckled clay whale that doubles as a sturdy phone stand. Its gentle curves and sweet smile bring a touch of seaside charm while keeping your device perfectly upright.
Step-by-Step
Materials
- White air-dry clay or polymer clay (about 1 lb)
- Speckled clay pottery glaze or acrylic paint (cream and brown)
- Small round sculpting tool or brush handle
- Rolling pin
- Aluminum foil (for armature)
- Flexible clay rib or old credit card
- Craft knife
- Small beads (blue or black) for eyes
- Clear sealant or varnish (matte or satin)
- Water and sponge for smoothing
Step 1: Shaping the Body
-
Prepare the core:
Crumple a piece of aluminum foil into a dense oval shape, roughly the size of a large lemon. This will act as the core to save clay and keep the sculpture lightweight. -
Cover the armature:
Roll out a slab of clay to about 1/4 inch thickness. Wrap it completely around your foil core, pressing the seams together firmly so no foil is visible. -
Refine the form:
Roll the clay ball gently on your work surface to smooth it out. Gently taper one end slightly to create the nose area, keeping a rounded, bulbous shape overall. -
Extend the tail:
Pull a section of clay from the rear of the body to elongate it into a tail. If you need more length, score and slip a small log of clay onto the back. -
Sculpt the flukes:
Flatten the end of the tail section and use your craft knife to cut a ‘V’ notch in the center. Carefully round off the tips of the two resulting flukes, bending them slightly upward for a playful curve.
Step 2: Functional Details
-
Create the support slot:
Use your actual phone (or a piece of cardboard of similar thickness) to measure the slot. Press a rectangular indentation into the top center of the whale’s back. -
Deepen the hold:
Carve out the clay inside your marked rectangle. You want a slot deep enough to hold the phone securely—usually about an inch deep—but be careful not to hit the foil core. -
Check the angle:
Test the fit immediately. Insert your phone to ensure it leans back slightly for a good viewing angle. Adjust the clay behind the slot to provide a strong backrest. -
Add side fins:
Shape two small teardrops of clay. Flatten them slightly and attach one to each side of the body using the score-and-slip method. Smooth the seams so they look integrated.
Weighted Base Pro-Tip
Before sealing the body, push a few heavy metal washers or coins into the bottom clay layer. This lowers the center of gravity so the whale won’t tip over when holding a large phone.
Step 3: Face and Fishing
-
Make the smile:
Using a small U-shaped carving tool or the end of a straw cut in half, press a tiny, curved smile into the front of the face. -
Embed the eyes:
Press two small blue or black beads into the clay above the smile for the eyes. Push them in deep enough so they sit flush with the surface. -
Smooth everything out:
Dip a sponge or your finger in water and go over the entire piece. Erase any fingerprints and soften the edges around the tail and fins. -
Dry thoroughly:
Let the whale dry completely. If using air-dry clay, this might take 24-48 hours depending on thickness. Rotate it occasionally so bottom dries evenly.
Level Up: Sound Boost
Make the phone slot wider and carve a hollow channel connecting the bottom of the slot to the whale’s mouth. This creates a natural acoustic amplifier for your phone’s speaker.
Step 4: Faux-Ceramic Paint Job
-
Base coat:
Paint the entire whale with a creamy, off-white acrylic paint. You may need two coats for opaque coverage. -
Create the speckles:
To mimic the stonewear look in the photo, dilute a tiny bit of dark brown paint with water. Load a toothbrush with the mixture and flick the bristles with your thumb to spray tiny speckles over the whale. -
Highlight the smile:
Use a very fine brush or a black paint pen to carefully darken the inside of the carved smile line. -
Seal the piece:
Apply a coat of satin or matte varnish. This protects the paint and gives it that smooth, fired-ceramic sheen.
Now you have a charming little desk companion ready to hold your phone in style


What Really Happens Inside the Kiln
Learn how time and temperature work together inside the kiln to transform clay into durable ceramic.
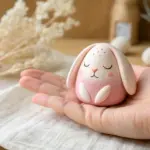
Mini Planter With a Sleepy Face
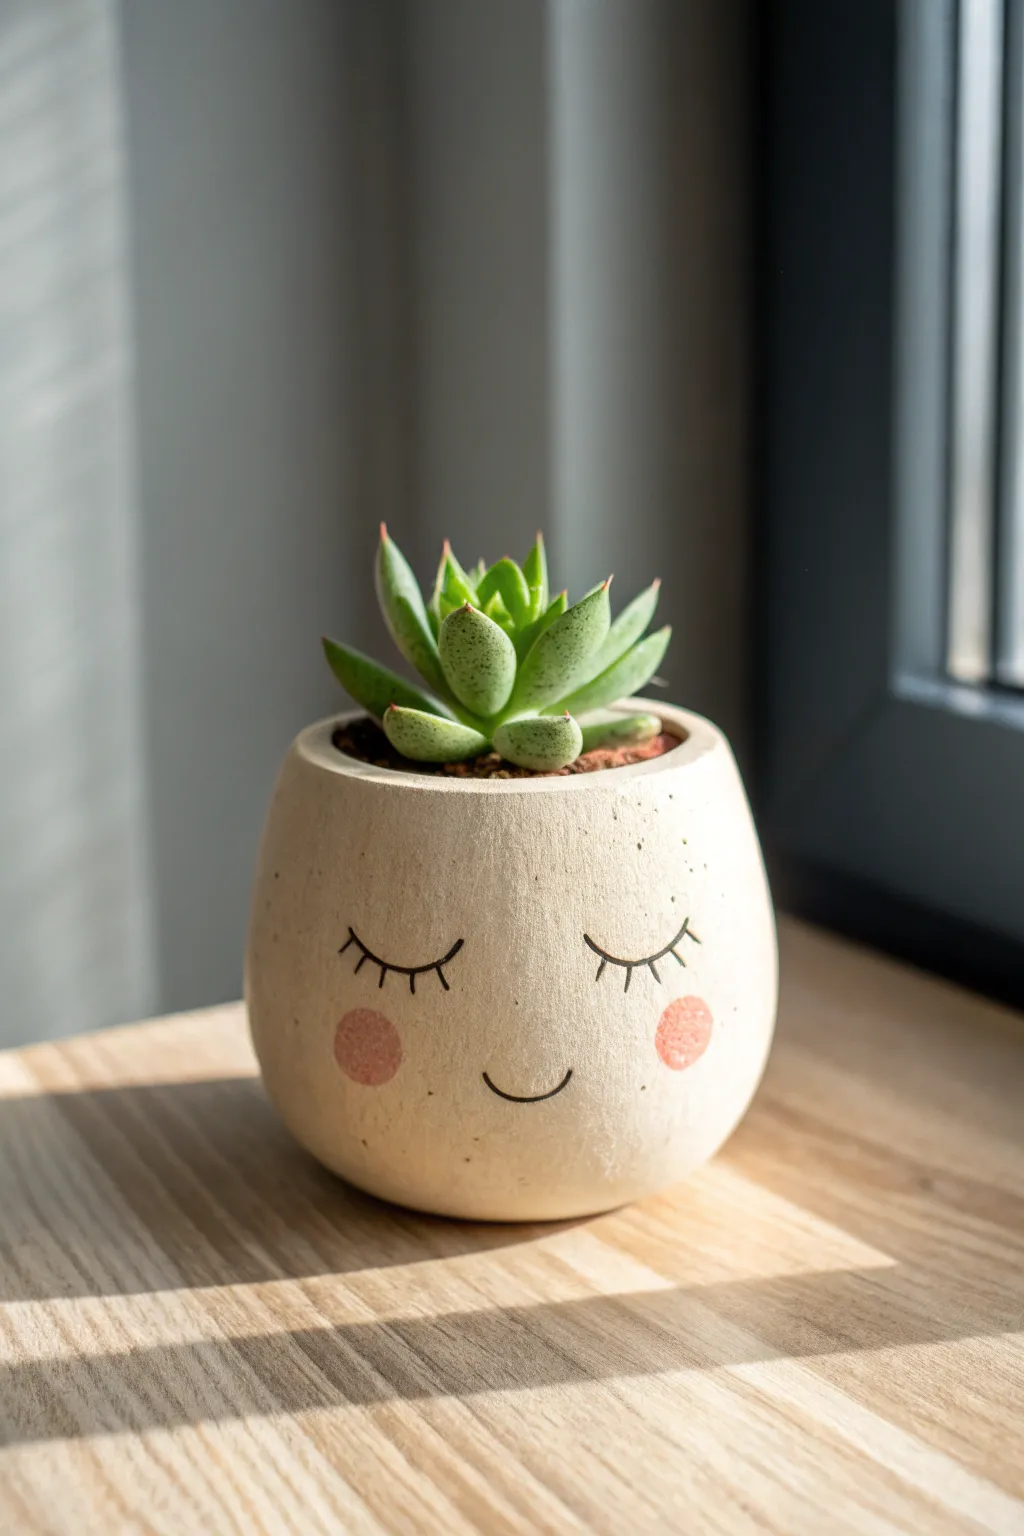
This adorable mini planter brings a sense of calm to any windowsill with its softly rounded shape and peaceful, sleepy expression. The natural beige clay texture combined with delicate painted details makes it the perfect home for your favorite small succulent.
Step-by-Step
Materials
- Air-dry clay (white or light beige)
- Small rolling pin
- Circle cutter or small bowl (approx. 4-5 inches diameter)
- Small balloon (water balloon size is ideal)
- Clay sculpting tools (or a butter knife and toothpick)
- Fine-grit sandpaper
- Sponge
- Black fine-point permanent marker or acrylic paint
- Peach or light pink acrylic paint
- Small round paintbrush or cotton swab
- Matte spray varnish or sealant
- Small succulent and potting soil
Step 1: Shaping the Base
-
Prepare the balloon form:
Inflate a small balloon until it reaches the desired size of your pot, keeping it relatively round rather than pear-shaped. Tie it off securely. -
Roll out the clay:
Take a generous handful of air-dry clay and knead it until soft and pliable. Roll it out on a flat surface to a uniform thickness of about 1/4 inch. -
Create the base circle:
Use your circle cutter or a small bowl as a template to cut a clean circle from the rolled clay. This ensures you start with an even amount of material. -
Drape the clay:
Center your clay circle over the top of the inflated balloon. Gently press and smooth the clay down the sides of the balloon, cupping it with your hands to encourage a rounded shape. -
Flatten the bottom:
Once the clay is molded to your liking, gently press the bottom of the balloon-clay assembly onto a flat table. This creates a stable base so the pot won’t roll away. -
Refine the rim:
Look at the opening of your pot. If the edges are uneven, use a clay knife to trim them level. Dip your finger in a little water and smooth the rim to soften any sharp angles. -
Let it dry:
Allow the clay to dry completely on the balloon. I usually leave it for at least 24 hours in a cool, dry place. Don’t rush this, or the pot might crack. -
Remove the balloon:
Once the clay is bone dry and hard to the touch, pop the balloon carefully and peel away any rubber remnants from the inside of the pot.
Pro Tip: Make-up Hacks
Instead of paint, you can actually use real powder blush for the rosy cheeks! Apply it with a Q-tip before sealing the pot with varnish for a soft, diffused look.
Step 2: Finishing and Painting
-
Sand for smoothness:
Use fine-grit sandpaper to gently buff the exterior of the pot. Focus on removing any fingerprints or bumps to achieve that smooth, stone-like texture shown in the photo. -
Sketch the face:
Lightly pencil in the facial features before committing to ink. Place the eyes about halfway down the pot, spacing them widely apart for that cute, ‘kawaii’ look. -
Draw the eyelashes:
Using a black fine-point permanent marker or a very thin brush with black acrylic paint, draw two downward curves for the closed eyes. Add three small lashes to the outer corner of each eye. -
Add the smile:
Draw a tiny, simple ‘U’ shape exactly centered between the eyes but slightly lower down. -
Paint the blushing cheeks:
Dip a small round brush or a cotton swab into the peach paint. Dab off most of the paint onto a paper towel until the brush is almost dry, then gently stipple two round circles on the cheeks. -
Seal the pot:
Since air-dry clay isn’t waterproof, spray the entire pot (inside and out) with a matte varnish. Apply two to three coats, letting each dry in between. -
Add drainage (optional):
If you plan to plant directly inside, carefully drill a small hole in the bottom. Alternatively, keep the plant in a plastic nursery pot that fits inside. -
Final assembly:
Place your succulent into the pot, packing a little extra soil around the edges if needed to secure it.
Troubleshooting: Cracking Clay
If small cracks appear while drying, mix a tiny bit of fresh clay with water to make a paste (slip) and fill the cracks. Smooth it over and let it dry again.
Now you have a serene little friend to keep your plants company on a sunny desk
Magnet Set of Puffy Character Faces
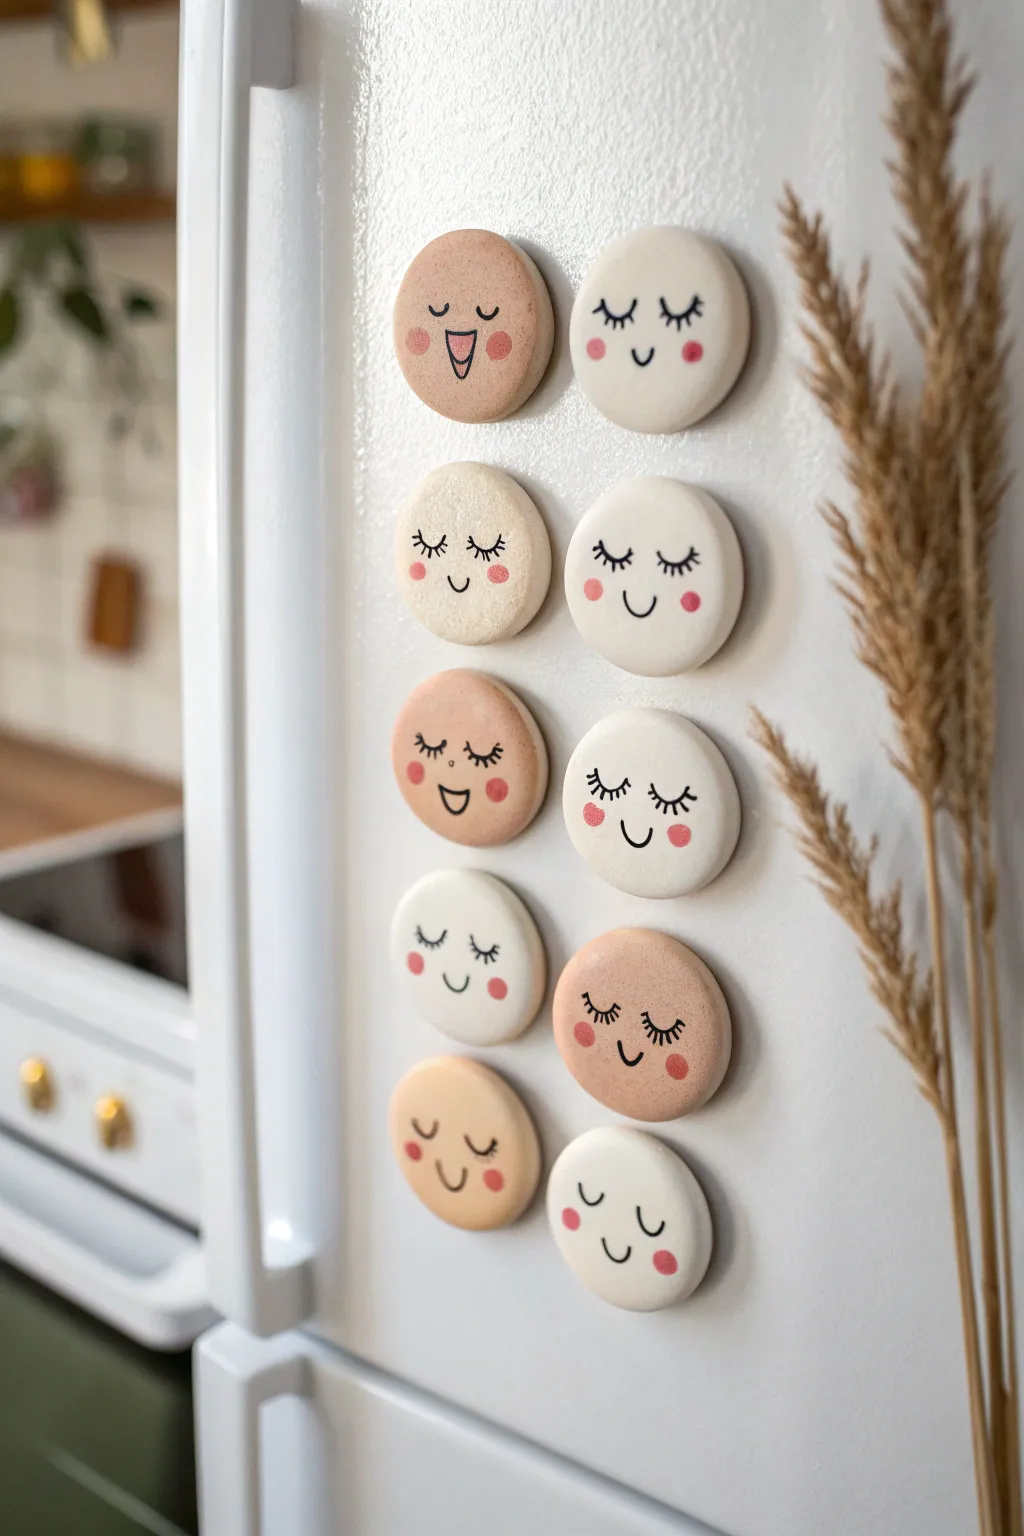
Brighten up your fridge with these adorable, minimalist magnet faces that add a touch of personality to your kitchen decor. Made from air-dry or polymer clay, these smooth, puffy discs feature simple painted expressions ranging from sleepy smiles to cheerful grins.
Step-by-Step Guide
Materials
- White air-dry clay or polymer clay
- Acrylic paint (burnt sienna, white, black, pale pink)
- Circular cookie cutter (approx. 1.5 – 2 inches)
- Rolling pin
- Fine-grit sandpaper (400-600 grit)
- Fine detail paintbrush (size 0 or 00)
- Strong round ceramic magnets
- Super glue or E6000 adhesive
- Water cup and palette
- Matte varnish or sealant (optional)
Step 1: Shaping the Clay Bases
-
Condition the Clay:
Begin by kneading your clay thoroughly. If you are using polymer clay, warm it in your hands until it’s pliable. For air-dry clay, ensure it is smooth and free of cracks. -
Mix Skin Tones:
If using polymer clay, create different skin tones now by mixing small amounts of brown or terracotta into white clay. If using air-dry clay, you will paint the background colors later, so just use the standard white clay for now. -
Roll Out the Slab:
Roll your clay out on a smooth surface to a thickness of about 1/4 inch (6mm). You want them thick enough to hold the ‘puffy’ look but not so heavy they slide down the fridge. -
Cut the Circles:
Use your circular cutter to punch out as many shapes as you need. For the set in the image, aim for 8-10 circles. -
Soften the Edges:
The cutter leaves a sharp edge. Gently tap around the circumference of each circle with your finger to round it off, creating a soft, pillowy cushion shape. -
Drying or Baking:
If using polymer clay, bake according to the package instructions (usually 275°F for 15-30 mins). If using air-dry clay, let the pieces dry on a wire rack for 24-48 hours until fully hardened and white.
Step 2: Preparing the Surface
-
Sand for Smoothness:
Once fully cured or dry, inspect your discs. Use fine-grit sandpaper to buff away any fingerprints or rough spots on the surface. Wipe away dust with a slightly damp cloth. -
Base Color Painting:
If you used white air-dry clay, this is where you customize. Mix white acrylic with a tiny drop of burnt sienna to create varying shades of beige, cream, and warm terracotta. Paint the entire front and sides of each disc. Let dry completely.
Smooth Surface Trick
Before baking or drying, dip your finger in a tiny bit of water (for air-dry) or baby oil (for polymer) and rub the surface gently to remove all fingerprints.
Step 3: Painting the Faces
-
Practice the Expressions:
Before painting on the clay, sketch a few simple face designs on paper. The style here relies on minimal lines—u-shaped smiles and lashes. -
Paint the Cheeks:
Dip a brush (or a q-tip for a softer edge) into pale pink paint. Dab two small circles on the lower half of the face for cheeks. I find doing this first helps center the eyes and mouth later. -
Detail the Eyes:
Using your finest brush and black paint (or a black permanent paint pen), draw the closed eyelids. Add three small lashes to each eye. -
Add the Mouths:
painting simple ‘U’ shapes for smiles between the cheeks. For variety, add an open mouth on one or two faces by drawing a ‘V’ shape with a curved top, coloring the inside pink. -
Seal the Design:
Once the paint is bone dry, add a coat of matte varnish. This protects the paint from chipping and gives the magnets a finished, professional ceramic look.
Add Functionality
Before the clay dries, impress a small hook or hole at the bottom of a few faces. Once finished, you can use them to hold notes or lightweight keys.
Step 4: Final Assembly
-
Attach the Magnet:
Flip the clay discs over. Apply a strong dot of E6000 or super glue to the center of the back. -
Press and Hold:
Press a round ceramic magnet into the glue. Hold it firmly for 30 seconds to ensure a tight bond. -
Final Cure:
Allow the glue to cure fully (usually 24 hours for maximum strength) before placing them on your refrigerator.
Now you have a charming lineup of expressions to greet you every time you reach for a snack

TRACK YOUR CERAMIC JOURNEY
Capture glaze tests, firing details, and creative progress—all in one simple printable. Make your projects easier to repeat and improve.
Incense Holder Shaped Like a Little Ghost
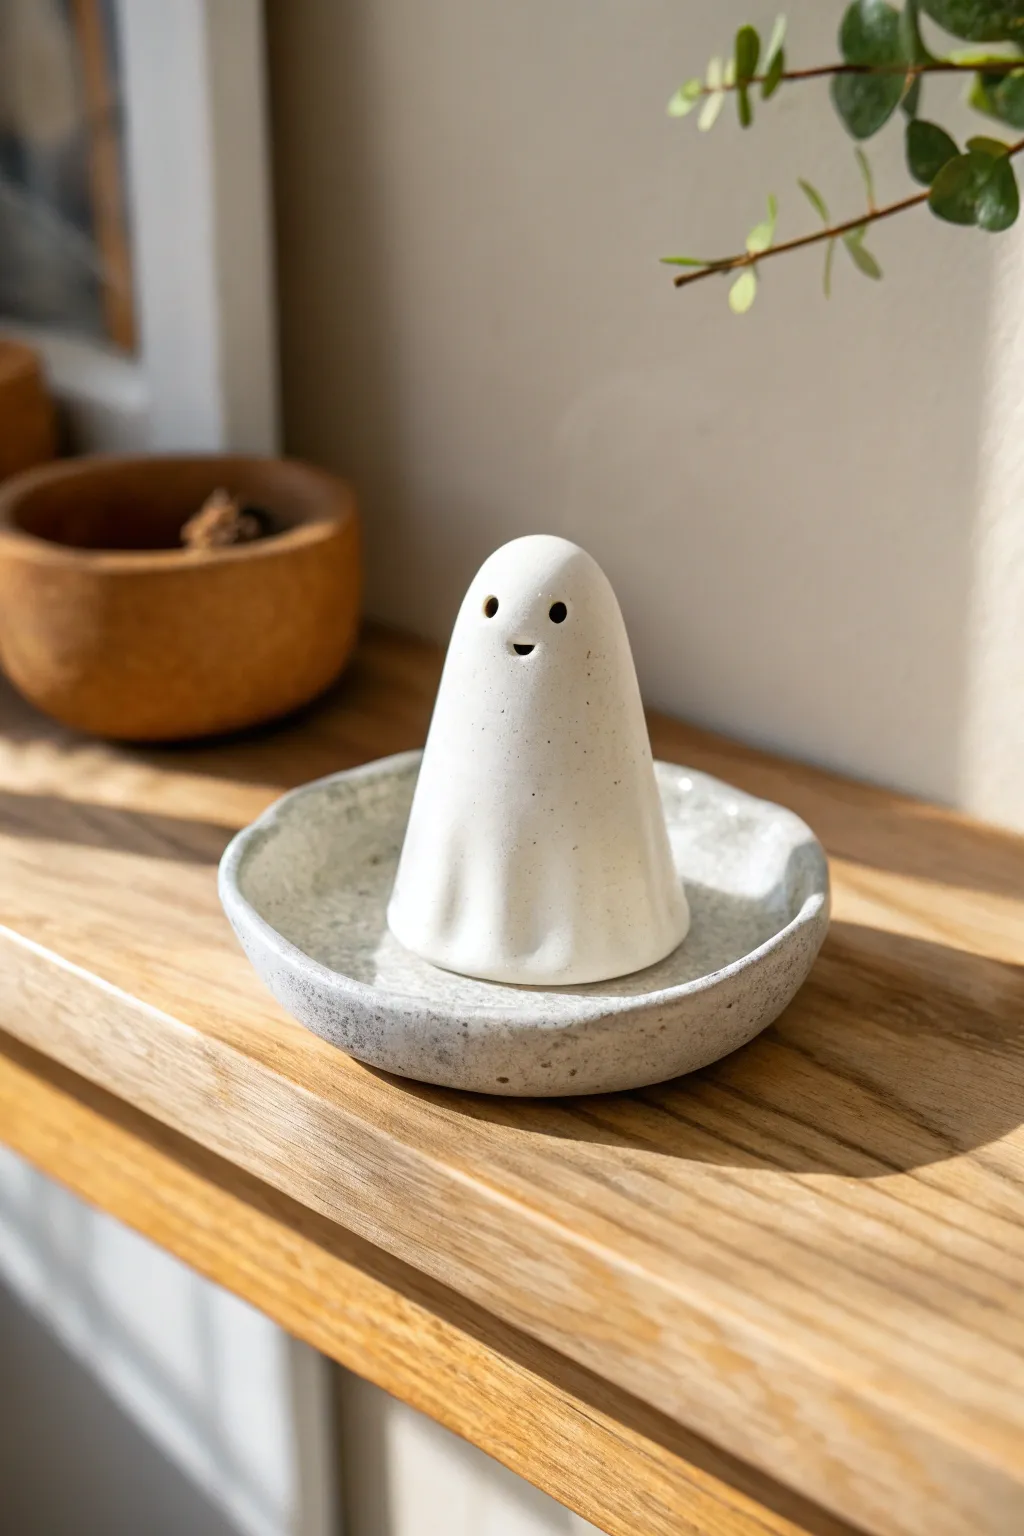
This adorable little ceramic ghost functions as a clever incense burner, hiding the cone inside its hollow body while smoke wafts gently through the eye holes. The set includes a matching speckled dish to protect your surfaces and complete the minimalist, handcrafted aesthetic.
Step-by-Step Tutorial
Materials
- White air-dry clay or polymer clay (oven bake)
- Speckled clay (optional, or mix black pepper/sand into white clay)
- Small rolling pin
- Pointed sculpting tool or toothpick
- Small circular cutter (cookie cutter or glass rim)
- Small sponge and water
- Fine-grit sandpaper
- Matte sealant or glaze (optional)
- Incense cone (for testing size)
Step 1: Forming the Base Dish
-
Prepare the Speckled Clay:
If you are starting with plain white clay, knead in a small amount of black pepper, black sand, or dried coffee grounds to achieve that organic, speckled stoneware look visible in the photo. -
Roll the Slab:
Roll out a ball of your speckled clay until it is about 1/4 inch thick. Aim for an even thickness throughout so it dries without warping. -
Cut the Circle:
Use a round cutter or press the rim of a small glass into the clay to cut a perfect circle, approximately 3-4 inches in diameter. -
Shape the Rim:
Gently pinch the edges of the circle upward to create a shallow lip. Use your thumb to smooth the curve on the inside and your index finger to shape the outside. -
Add Texture:
To mimic the handmade feel in the image, don’t worry about making the rim perfectly symmetrical; slight undulations add character. Use a damp sponge to smooth out any harsh fingerprints.
Airflow is Key
For the incense to burn properly, ensure you add a tiny semi-circle notch at the bottom back rim of the ghost. This allows fresh air to enter as smoke exits the eyes.
Step 2: Sculpting the Ghost
-
Create the Cone Shape:
Take a lump of plain white clay (or speckled, if you prefer continuity) and roll it into a ball, then elongate it into a thick cone shape with a rounded top. -
Hollow the Body:
Carefully push your thumb into the bottom of the cone to start hollowing it out. Pinch the walls while rotating the ghost to thin them out, ensuring the cavity is wide enough to fit over an incense cone. -
Check the Fit:
Place your hollowed clay shape over a real incense cone to ensure the clearance is sufficient; the clay shouldn’t touch the incense. -
Refine the Silhouette:
Smooth the outside of the ghost into a classic domed sheet shape. I find dragging a wet finger from top to bottom helps remove lumps and creates a seamless flow. -
Form the Ruffles:
At the very bottom rim of the ghost, use your finger to gently push the clay outward and upward in 3-4 spots to create soft, fabric-like folds or waves. -
Pierce the Face:
Use a small, round tool or the back of a paintbrush to poke two holes for eyes. These double as ventilation for the incense smoke. -
Add the Mouth:
Use a smaller tool or toothpick to add a tiny hole for the mouth, placed slightly lower than the eyes to create a curious expression. -
Smooth the Openings:
Smooth the rough edges around the eye and mouth holes with a damp brush so they look intentional and clean.
Step 3: Finishing Touches
-
Dry Completely:
Let both the ghost and the dish air dry for at least 24-48 hours. If using polymer clay, bake according to the package instructions. -
Sand for Smoothness:
Once fully dry (and before sealing), use fine-grit sandpaper to gently buff the surface of the ghost to a matte, stone-like finish. -
Seal the Pieces:
Apply a matte sealant or varnish to protect the clay, especially on the inside of the ghost where smoke will gather. This makes cleaning ash easier later.
Make it Glow
Instead of incense, make the ghost slightly larger and use it to cover a battery-operated tea light for a safe, glowing Halloween nightlight.
Place your finished spirit on a shelf and enjoy the spooky ambiance as watching smoke drift from its eyes