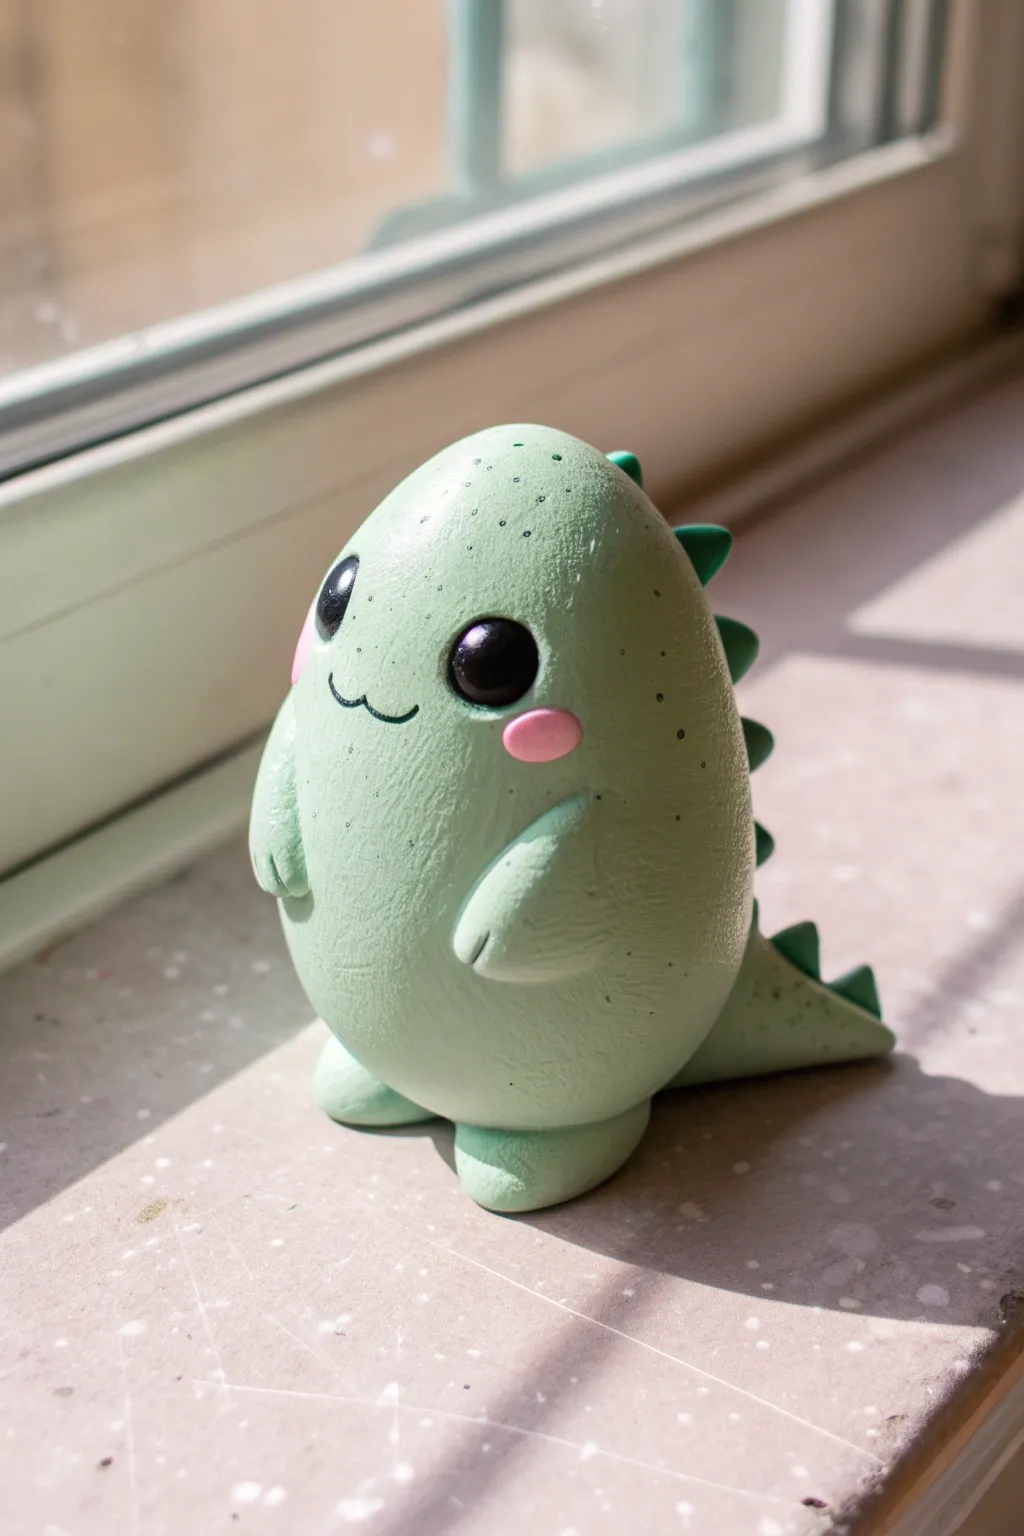
If you love dinosaurs but want them extra sweet, kawaii air dry clay is the perfect combo of nostalgic and adorable. These ideas keep the shapes simple, the faces expressive, and the colors soft so you can make a whole tiny dino world without stressing the details.
Chubby T-Rex Buddy
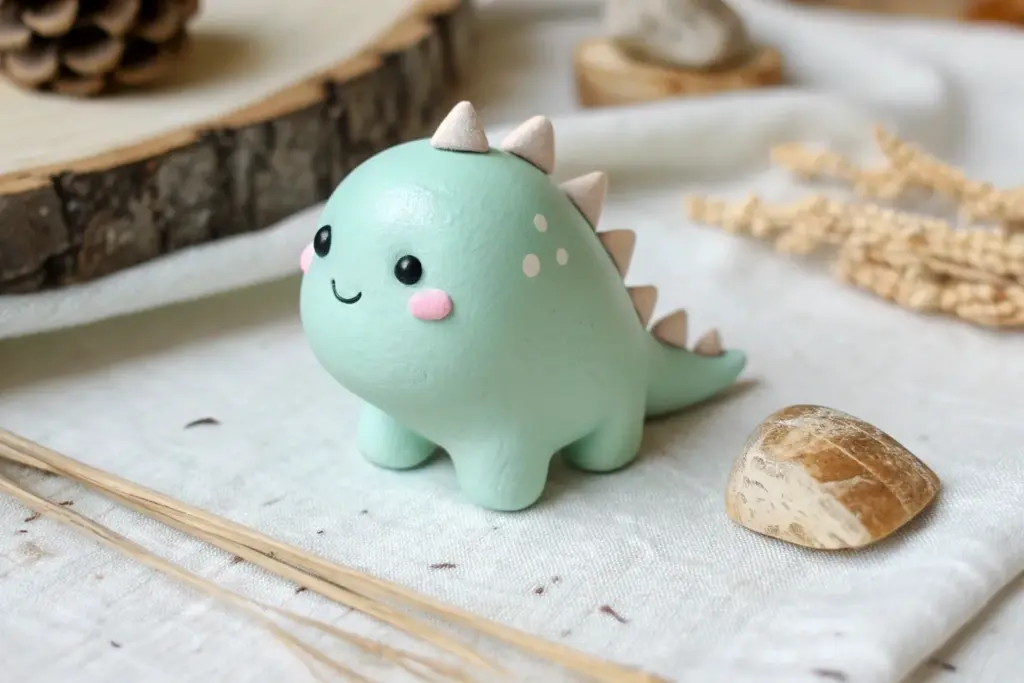
This adorable, egg-shaped dinosaur is the perfect companion for your desk or windowsill. With its smooth, chubby body and tiny features, it captures that classic kawaii aesthetic effortlessly.
Step-by-Step Tutorial
Materials
- Light green air dry clay
- Dark green air dry clay
- Pink air dry clay (or paint)
- Black air dry clay (or black beads)
- Clean rolling surface
- Small ball tool or dotting tool
- Needle tool or toothpick
- Water (for smoothing)
- Clear varnish (optional)
- Black acrylic paint (for details)
- Fine paintbrush
Step 1: Shaping the Base
-
Roll the main body:
Start with a generous ball of light green clay. Roll it between your palms until it is perfectly smooth and free of major cracks. -
Create the egg shape:
Gently gently roll one end of the ball slightly more to taper it, creating a tall egg shape. The bottom should be wider than the top so it sits sturdily. -
Flatten the bottom:
Tap the wider end of your egg shape onto your work surface to create a flat base. Make sure the body stands up straight on its own.
Step 2: Adding the Limbs
-
Form the feet:
Take two small balls of the same light green clay. Flatten them slightly into rounded discs. -
Attach the feet:
Press these discs underneath the front of the body, positioning them so they stick out just a little bit like stubby toes. Blend the seams at the back using a little water. -
Make the tiny arms:
Roll two very small teardrop shapes from light green clay. These should be quite short to maintain the chubby look. -
Attach the arms:
Place the arms on the sides of the body, about midway down. Press the wider end onto the body and blend the seam, letting the pointed end rest against the belly. -
Create the tail:
Roll a slightly larger cone of light green clay for the tail. Curve the tip slightly if you want extra character. -
Secure the tail:
Attach the tail to the lower back of the body. Use a tool to blend the clay smoothly where it joins the main egg shape so it doesn’t fall off later.
Cracking Clay?
If you see small fissures appearing as you work, dip your finger in water and smooth them out immediately. Cracks often happen if the clay gets too dry while handling.
Step 3: Details & Spikes
-
Prepare the spikes:
Roll several tiny balls of dark green clay. Pinch each one into a small triangle or cone shape. -
Attach the spikes:
Starting from the top of the head and working down to the tail, press the dark green spikes in a straight line down the center of the back. -
Add the eyes:
Roll two small balls of black clay. Press them firmly into the face area, spacing them somewhat wide apart for a cute look. You can flatten them slightly against the curve of the head. -
Make the cheeks:
Take extremely small amounts of pink clay, flatten them into thin ovals, and press them just below and to the side of the eyes. -
Draw the mouth:
Using a needle tool or a very fine brush with black paint, create a small ‘w’ shape between the eyes for the mouth. -
Paint highlights:
Dip a toothpick into white paint and add a tiny dot to each black eye to bring the character to life. -
Add freckles:
I love adding texture here, so use a needle tool to gently poke tiny shallow dots on the forehead and body, or paint them on with diluted dark green paint.
Glossy Finish
Apply a coat of UV resin or glossy varnish to the eyes only. This makes them look like wet glass or plastic beads and adds a professional toy-like finish.
Step 4: Finishing Touches
-
Smooth imperfections:
Dip your finger in a tiny bit of water and gently rub away any fingerprints or rough edges on the light green body. -
Let it dry:
Allow the figure to dry completely in a safe spot away from direct heat. This usually takes 24-48 hours depending on the brand of clay.
Place your little dino on a shelf where its cheerful smile can greet you every day


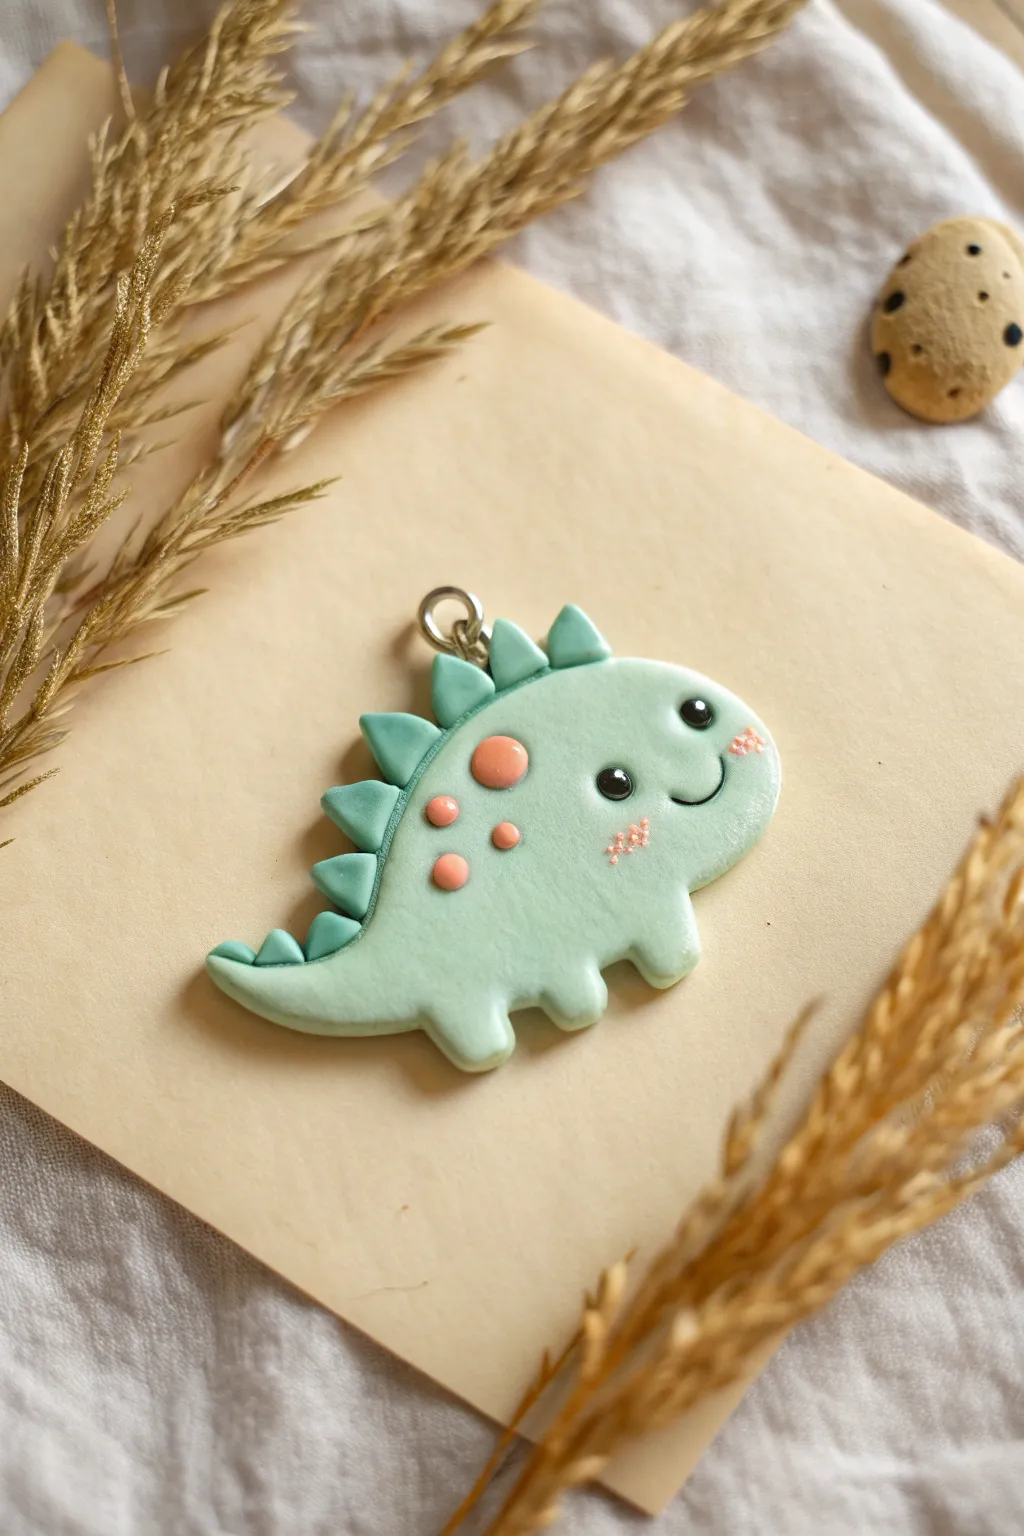
Baby Triceratops With Soft Horns
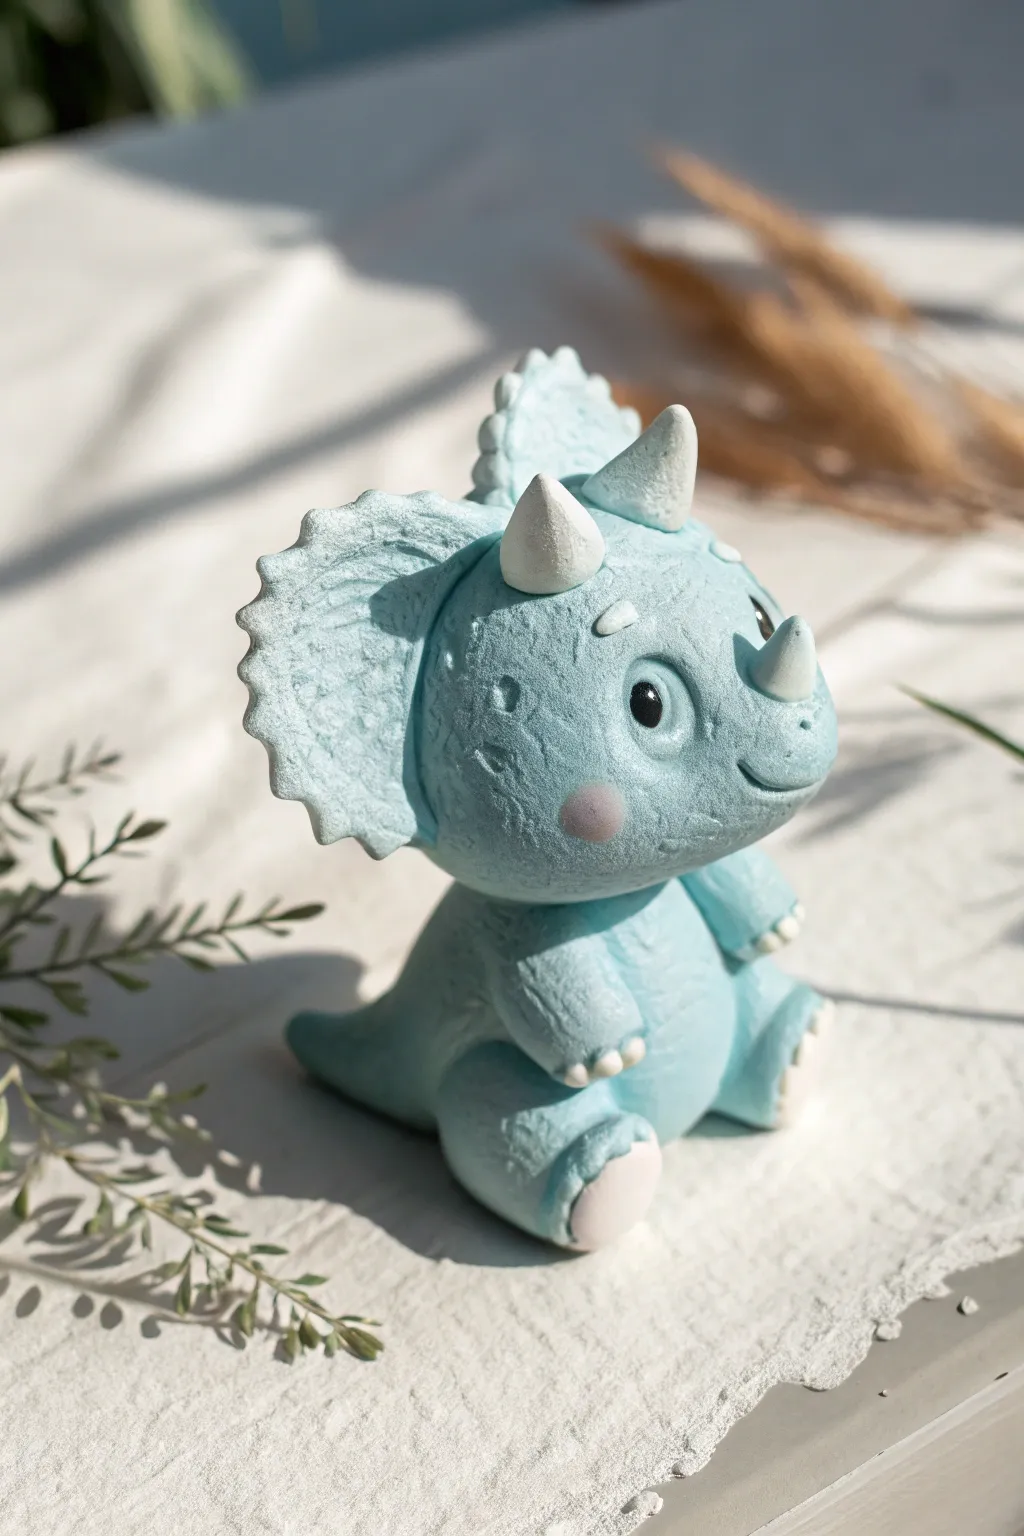
This adorable baby triceratops features a soft, textured finish and gentle pastel hues that make it undeniably kawaii. Its sweet expression and sitting pose give it a playful personality perfect for decorating a nursery or desk.
How-To Guide
Materials
- Light blue air-dry clay (soft modeling type or foam clay)
- White air-dry clay
- Pink air-dry clay (or pink pastel/chalk)
- Black plastic safety eyes (small) or black beads
- Detailing tools (needle tool, ball tool, small knife)
- Toothbrush or rough sponge (for texturing)
- Glue (PVA or clay glue)
- Toothpicks (for structural support)
Step 1: Sculpting the Head and Body
-
Mix the base color:
Start by kneading your light blue clay until it’s pliable. If the blue is too dark, mix in some white clay to achieve that soft, baby-blue pastel shade shown in the photo. -
Form the head shape:
Roll a large sphere for the head. Shape it slightly into a rounded teardrop to define the snout area, keeping the overall form very chubby and round. -
Create the body:
Roll a slightly smaller sphere for the body. Gently press it into a pear shape, making the bottom wider for a stable sitting pose. -
Texture the surface:
Before attaching anything, gently tap a clean toothbrush or a piece of rough sponge all over the head and body. This creates the realistic, stone-like skin texture visible in the image. -
Attach head to body:
Insert half a toothpick into the top of the body and push the head onto the other half. Apply a tiny dot of glue between the pieces to secure them firmly.
Step 2: Facial Features and Frill
-
Indent eye sockets:
Use a medium ball tool to press two indentations on the sides of the snout where the eyes will sit. -
Insert the eyes:
Place your black safety eyes or beads into the sockets. Press them in deeply so they look embedded in the chubby cheeks. -
Sculpt the mouth and nostrils:
Use a small blade tool to carve a curved smile line. Use a small ball tool to make two nostril indents above the mouth. -
Make the frill base:
Flatten a piece of blue clay into a semi-circle or fan shape. Use your fingers to scallop the top edge to create the classic triceratops crest. -
Attach the frill:
Texture the back of the frill with your toothbrush, then glue it to the back of the head. Smooth the seam where the frill meets the head so it looks like one continuous piece. -
Add blush:
Take a tiny amount of pink clay, flatten it into a very thin oval, and press it onto the cheek. Blend the edges seamlessly into the blue skin.
Texturing Like a Pro
For that pitted ‘dino skin’ look, wrap a rough stone or a ball of cral foil in cling wrap and press it gently against the clay. It creates a more organic pattern than a straight tool.
Step 3: Limbs and Details
-
Form the rear legs:
Roll two thick sausages of blue clay. Bend them into a rounded ‘L’ shape and flatten the bottom. Attach these to the sides of the body so the dinosaur looks like it is sitting down. -
Add foot pads:
Flatten small circles of white or very pale pink clay and attach them to the soles of the rear feet. -
Create the front arms:
Roll two smaller sausage shapes for the arms. Attach them to the front of the body, positioning them so they rest on the belly or between the legs. -
Add toes:
Roll tiny balls of white clay. Attach three to each foot and hand to act as little claws or toes. -
Shape the tail:
Roll a cone of blue clay for the tail. Glue it to the lower back of the body, curving it slightly to one side so it peeks out from behind.
Loose Horns?
If the horns keep sliding off the curved head while the glue dries, use small sewing pins or cut paperclips as internal anchors to hold them in place.
Step 4: Horns and Finishing Touches
-
Shape the horns:
Roll three cones of white clay: two larger ones for the brow horns and a smaller, shorter one for the nose horn. -
Attach the horns:
Glue the nose horn above the nostrils. Glue the two brow horns above the eyes. I like to curve the brow horns slightly inward for a cuter look. -
Add final texture:
Go over any areas that lost texture during handling with your toothbrush, being careful around the eyes and painted cheeks. -
Dry completely:
Let the figure sit undisturbed for at least 24 hours to ensure the core is fully dry and the horns are secure.
Once fully dry, your little blue dinosaur is ready to sit guard on your shelf


Potato Brachiosaurus Long-Neck
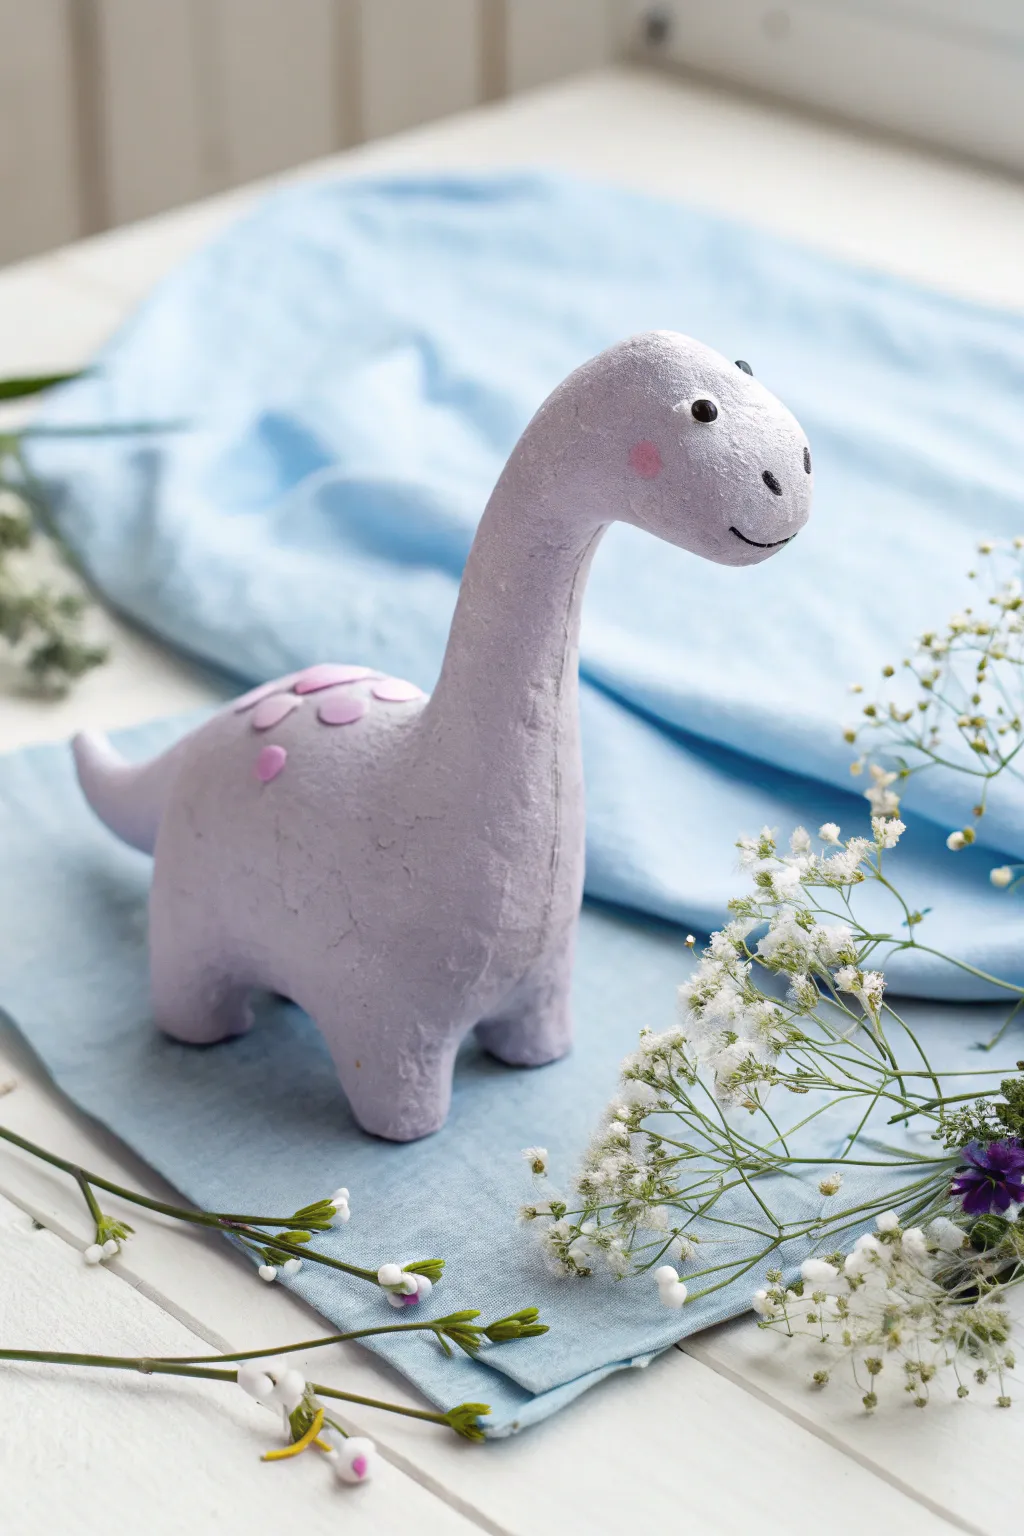
This endearing little long-neck features a soothing, matte lavender texture and a adorably stout, potato-like body. With its sweet expression and delicate pink spots, it makes for a perfect desk companion or a lovely handmade gift for dinosaur enthusiasts.
Step-by-Step
Materials
- Air dry clay (white or light grey base)
- Acrylic paints: Lavender/lilac, soft pink, black, white
- Aluminum foil (for armature)
- Sculpting tools (needle tool, smoothing sponge)
- Fine grit sandpaper
- Soft synthetic paintbrushes (medium flat and fine liner)
- Water cup for smoothing
- Matte spray varnish (optional)
Step 1: Building the Core Structure
-
Form the foil armature:
Crumple a piece of aluminum foil into a stout, oval potato shape for the body. This saves clay and keeps the figurine lightweight. -
Add the neck support:
Create a thinner, curved cylinder of foil for the neck and head. Attach it firmly to the front of your body piece, ensuring the neck curves gracefully upward. -
Roll out the clay slab:
Condition your air dry clay until it’s pliable, then roll it out to about 1/4 inch thickness. I like to drape this sheet over the foil armature rather than packing it on in chunks for a smoother finish. -
Cover the armature:
Wrap the clay sheet around the foil structure. Pinch the seams together and smooth them out with a little water on your fingertip so the joins disappear completely.
Step 2: Sculpting the Dinosaur
-
Refine the neck shape:
Gently massage the clay on the neck to smooth it into the body. Add a little extra clay where the neck meets the torso to create a seamless, sturdy slope. -
Pull the legs:
Instead of attaching separate legs, gently pinch and pull four short, stout stumps directly from the bottom of the body. They should be wide and flat-bottomed for stability. -
Create the tail:
Pinch the back of the body and pull out a short, tapered tail that curves slightly upward. Blend the clay smoothly back into the rear. -
Shape the head:
Mold the top of the neck into a rounded, continuous head shape. It shouldn’t be too distinct from the neck; think of a smooth, sock-puppet contour. -
Smooth the surface:
Use a damp sponge or your fingers to smooth out any fingerprints or bumps. The texture in the photo is slightly organic and matte, so it doesn’t need to be glass-smooth. -
Let it dry completely:
Allow the sculpture to dry for at least 24-48 hours. Turn it occasionally so the bottom of the feet dry evenly.
Cracks happen!
If small cracks appear as the clay dries, don’t panic. Mix a tiny bit of fresh clay with water to make a paste (slip) and fill them in before painting.
Step 3: Painting and Details
-
Sand imperfections:
Once fully bone-dry, lightly sand any rough patches or sharp ridges with fine-grit sandpaper. -
Apply base coat:
Mix a soft, uneven lavender shade. Apply two coats over the entire dinosaur. Using slightly diluted paint can help achieve that textured, almost paper-mache look visible in the reference. -
Paint the spots:
Mix a soft baby pink acrylic. Paint several irregular oval spots on the dinosaur’s back, trailing down slightly onto the tail. -
Add blushing cheeks:
Using a very dry brush with the same pink paint, gently dab a small circle on the cheek area for a blushing effect. -
Detail the eyes:
Use a fine liner brush or a dotting tool with black paint to make two small, wide-set eyes. Add tiny white reflection dots once the black is dry for that ‘kawaii’ spark. -
Draw the smile and nostrils:
With your finest brush and black paint, draw a tiny, thin smile line near the chin and two simple dots for nostrils. -
Seal the work:
Finish with a matte spray varnish to protect the paint without making it shiny, preserving the soft, chalky aesthetic.
Make it a planter
Before drying, hollow out a small section in the dinosaur’s back to hold a tiny air plant or succulent for a functional desk buddy.
Place your purple dinosaur among some dried flowers or on a sunny shelf to enjoy your handiwork


Stegosaurus With Rainbow Plates
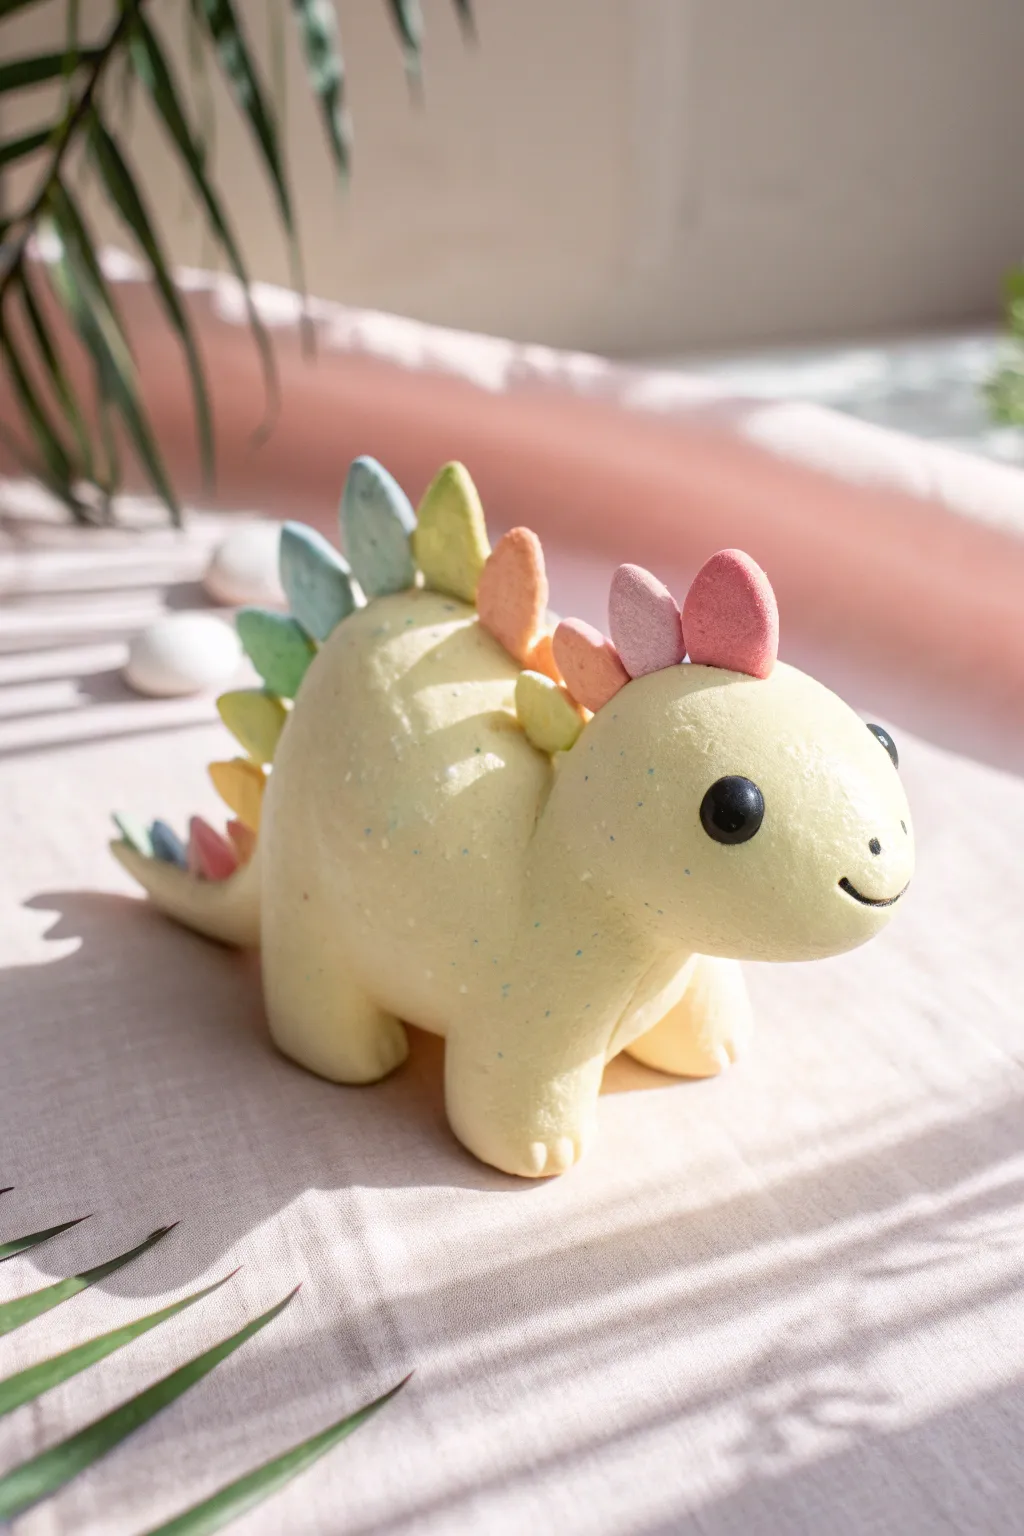
This adorable yellow stegosaurus features a soft, marshmallow-like texture and a playful array of pastel rainbow plates down its back. With its chubby legs and sweet smile, this kawaii dino makes for a perfect desk companion or a charming handmade gift.
Step-by-Step Guide
Materials
- Yellow air dry clay (light, pastel shade)
- Air dry clay in assorted pastel colors (pink, peach, mint, blue, lavender)
- Black air dry clay (tiny amount)
- Clay sculpting tools (or a toothpick)
- Water (for smoothing)
- Acrylic rolling pin (optional)
- Gloss glaze (optional for shininess on eyes)
Step 1: Body & Legs
-
Form the main body:
Start with a large ball of light yellow clay. Gently roll it into a thick, elongated oval shape, slightly tapering one end for the tail and keeping the head end round and bulbous. -
Create the legs:
Roll four equal-sized balls of the same yellow clay. These should be quite chunky to support the dino’s weight. Flatten the tops slightly so they attach easily. -
Attach the legs:
Press the four legs onto the bottom of the body. You can use a tiny dab of water to help them stick. Position them wide enough so the figure stands stably on its own. -
Smooth the seams:
Using your finger or a smoothing tool, blend the clay where the legs meet the body until the seams disappear and the transition is seamless. -
Shape the tail:
Gently pull and curve the tapered end of the body upwards to create a cute, perky tail. -
Define the toes:
Use a small tool or a toothpick to press three tiny indentations into the bottom front of each foot to imply toes.
Step 2: Rainbow Plates
-
Prepare pastel colors:
Take small pinches of your assorted pastel colored clays. You will need roughly 7-9 pieces depending on the size of your dinosaur. -
Shape the plates:
Roll each small pinch into a ball, then flatten it into a teardrop or petal shape. The base should be slightly thicker for attaching. -
Arrange the pattern:
Lay out your plates in a rainbow gradient order (e.g., pink, peach, yellow, mint, blue) on your work surface before attaching them to ensure you like the color flow. -
Attach the center plates:
Start attaching the largest plates at the highest point of the dinosaur’s back. Press them gently into the yellow clay so they stand upright. -
Complete the spine:
Work your way forward toward the head and backward toward the tail, using slightly smaller plates as you reach the ends. -
Add tail spikes:
For the very tip of the tail, use the smallest plates or create two tiny spikes using a contrasting pastel color.
Seamless Spikes
If plates won’t stick, score the bottom of the plate and top of the back with a needle tool, add a drop of water, and wiggle slightly as you press down.
Step 3: Face & Details
-
Make the eye sockets:
Use a ball tool or the rounded end of a paintbrush handle to make two shallow indents on the head where the eyes will go. This helps them sit flush. -
Add the eyes:
Roll two tiny balls of black clay. Press them into the sockets you created. Flatten them slightly, but keep them rounded for a cute look. -
Create the smile:
Roll a very thin, tiny snake of black clay. Use a needle tool or toothpick to curve it into a smile shape and gently press it onto the face below the eyes. -
Add texture (optional):
To mimic the speckled look in the reference image, you can gently tap the surface with an old toothbrush or sprinkle tiny flecks of contrasting clay dust before the piece dries. -
Final drying:
Let the dinosaur dry completely in a safe spot for 24-48 hours. I like to turn it gently after the first day to ensure the bottom dries evenly.
Cracking Clay?
If you see tiny cracks forming as you work, your clay is too dry. Dip your finger in water and smooth over the cracks immediately to heal them.
Enjoy your new prehistoric pal on your desk or shelf

The Complete Guide to Pottery Troubleshooting
Uncover the most common ceramic mistakes—from cracking clay to failed glazes—and learn how to fix them fast.
Tiny Dino Couple Holding Tails
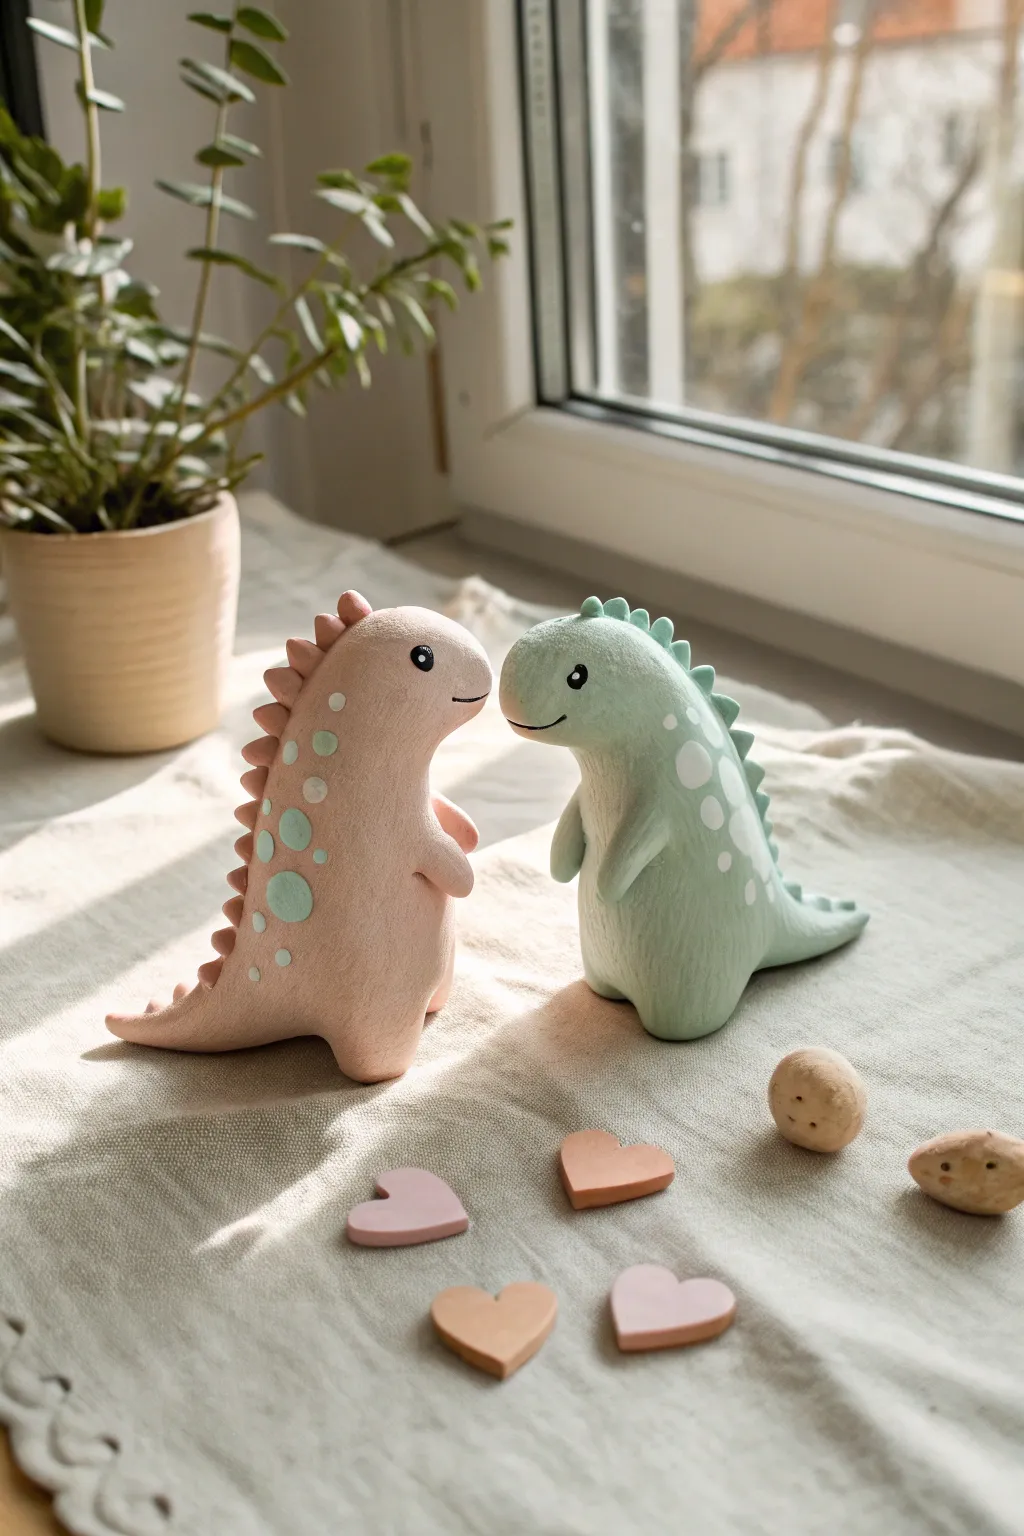
These two adorable dinosaurs are sculpted with smooth curves and soft pastel tones, creating a sweet moment by the window. Their rounded forms and dotted patterns make them a perfect beginner project for mastering clean, simple shapes in air-dry clay.
Detailed Instructions
Materials
- Air-dry clay (white)
- Acrylic paints (pastel pink, pastel green, white, black, light blue)
- Fine grit sandpaper
- Water cup and sponge
- Sculpting tools (needle tool, smoothing tool)
- Small paintbrush
- Clear matte varnish or sealant
Step 1: Shaping the Bodies
-
Portion the clay:
Start by kneading your white air-dry clay until it is soft and pliable. Divide it into two equal large balls for the bodies, and set aside smaller amounts for the tails and arms. -
Form the base shape:
Take one of the large balls and roll it into a smooth pear shape. Flatten the bottom gently against your table so the dinosaur stands upright stably without tipping over. -
Create the head:
Gently pinch and pull the thinner top part of the pear shape forward to create a snout. Smooth the transition so the neck flows naturally into the head. -
Add the tail:
Instead of attaching a separate piece, try to pull the clay from the bottom rear of the body outwards to form a thick, short tail. If adding extra clay, score both surfaces, add a dab of water, and blend the seams completely until invisible. -
Repeat for the partner:
Create the second dinosaur body exactly the same way. Place them facing each other to ensure their heights and snout positions match nicely.
Step 2: Adding Details
-
Attach the arms:
Roll two very small sausage shapes for each dinosaur. Attach them to the front of the belly, blending the upper shoulder edge into the body while leaving the little hands free and rounded. -
Form the spines:
For the pink dino, roll tiny balls of clay and slightly pinch them into triangles. Attach a row of these down the back of the head and spine using a little water. For the green dino, you can use slightly rounder bumps. -
Smooth everything out:
Dip your finger or a sponge in a tiny bit of water and run it over the entire sculpture to remove fingerprints. This step is crucial for that matte, soft toy look. -
Sculpt the hearts:
With leftover clay, roll out a small slab and cut or mold freehand heart shapes. Create a few small pebble shapes as well to complete the scene. -
Let it dry:
Allow the sculptures to dry completely for at least 24-48 hours. I find flipping them upside down halfway through helps the bottom dry evenly.
Smooth Operator
Use a slightly damp baby wipe instead of just water when smoothing the raw clay. It removes fingerprints effortlessly without making the clay too mushy or wet.
Step 3: Painting and Finishing
-
Sand for perfection:
Once fully dry, use fine-grit sandpaper to gently buff away any remaining roughness or bumps, wiping away the dust with a barely damp cloth. -
Base coat:
Paint one dinosaur in a solid coat of pastel pink and the other in pastel green. You may need two thin layers to get full, opaque coverage without brushstrokes. -
Paint the spots:
On the pink dinosaur, use a small round brush or dotting tool to add light blue or minty green spots on the back and tail. For the green dino, use white paint for the spots. -
Add facial features:
Using a very fine brush or a black paint pen, draw a small black circle for the eye. Add a tiny white highlight dot to bring it to life, then draw a simple curved line for the mouth. -
Paint the accessories:
Paint the clay hearts in soft pinks and corals, and give the rocks a natural beige tone with tiny brown speckles. -
Seal the work:
Finish both dinosaurs and the accessories with a coat of clear matte varnish. This protects the paint and gives that smooth, ceramic-like finish seen in the photo.
Texture Twist
Before the clay dries, gently press a coarse fabric or linen cloth against the belly area to give the dinos a subtle ‘plush toy’ texture that catches the paint beautifully.
Set your finished pair on a sunny windowsill or shelf to enjoy their sweet company every day
Dino Family Trio Set

Create this adorable family of three dinosaurs featuring a gentle oversized friend and two pint-sized companions. With their soft matte finish, kawaii expressions, and delicate spotted details, these air-dry clay figures add a touch of whimsy to any nursery or desk decor.
Step-by-Step Guide
Materials
- Air dry clay (white)
- Acrylic paints (Mint Green, Baby Pink, Teal, White, Black)
- Clay sculpting tools (modeling tool, needle tool)
- Small cup of water
- Fine grit sandpaper
- Fine detail paintbrush
- Medium flat paintbrush
- Toothpicks or armature wire (for neck support)
- Matte varnish or sealant
Step 1: Sculpting the Large Dino
-
Form the base body:
Start with a large ball of clay for the body. Roll it into a smooth pear shape, then gently flatten the bottom so it sits stably on your work surface. Pull the narrower top section upwards to begin forming the neck. -
Shape the long neck and head:
Refine the neck by smoothing it upwards, inserting a toothpick or short wire inside for internal structure if the clay feels too soft. Curve the top slightly forward and mold a rounded head shape at the end of the neck. -
Add the legs:
Roll four small, equal-sized sausages of clay. Attach two to the front and two to the back of the body base. Blend the seams seamlessly using a wet finger or modeling tool until the legs look like natural extensions of the body. -
Attach the tail:
Roll a cone shape for the tail. attach the wider end to the dinosaur’s rear and blend the clay smooth. Curve the tip slightly for movement. -
Create the spines:
Pinch off tiny pieces of clay and roll them into small triangles. Attach these in a row running down the back of the neck to the tail. Use a tiny bit of water to adhere them firmly.
Smooth Operator
Keep a damp sponge nearby while sculpting. Regularly wiping your tools and fingertips prevents clay buildup, ensuring your dinosaurs remain smooth and fingerprint-free.
Step 2: Creating the Little Companions
-
Sculpt the medium pink dino:
Repeat the previous body sculpting process but on a much smaller scale. Give this one a shorter, stouter neck and a slightly chunkier body shape. -
Sculpt the small teal dino:
Create the smallest dinosaur, similar to the medium one but with a more upright posture. This little one can have a slightly sharper tail curve. -
Add petite spines:
Add tiny triangular spines to both smaller dinosaurs. I find it easier to use tweezers to place these very small pieces accurately before blending. -
Smooth and dry:
Dip your finger in water and run it over all three figures to remove fingerprints and cracks. Let them dry completely for 24-48 hours until hard.
Step 3: Painting and Details
-
Sand imperfections:
Once fully dry, lightly sand any rough bumps or fingerprints with fine-grit sandpaper to achieve that smooth, porcelain-like finish. -
Base coat colors:
Paint the large dinosaur in a soft mint green. Paint the medium one in a dusty pink, and the smallest one in a muted teal. Apply two thin coats for opaque coverage, letting the first coat dry before adding the second. -
Paint the spines:
Carefully paint the spines of the large green dinosaur in pink. For the other two, paint their spines in contrasting colors—perhaps darker pink for the medium dino and dark teal for the small one. -
Add body speckles:
Using a fine detail brush or the tip of a toothpick, dot white paint across the lower back and sides of the large dinosaur. Add darker colored dots to the smaller dinos for variety. -
Paint the faces:
Using your finest brush, paint simple black circles for eyes. Add a tiny white reflection dot in the upper corner of each eye. Paint a thin, curved line for the mouth. -
Apply finishing touches:
Paint soft pink circles for cheeks on the cheeks of all three dinos. For the large dino, add three tiny white dots over the pink cheek patch. -
Seal the set:
Protect your work with a coat of matte varnish. This unifies the sheen and keeps the paint from chipping over time.
Texture Time
Instead of painted dots, use the head of a pin to gently press indentations into the wet clay before drying. This creates a tactile, textured skin effect for the dinos.
Arranging your finished dinosaur family together creates a heartwarming display that showcases your clay modeling skills


What Really Happens Inside the Kiln
Learn how time and temperature work together inside the kiln to transform clay into durable ceramic.
Blush Cheeks and Shy Smile Faces
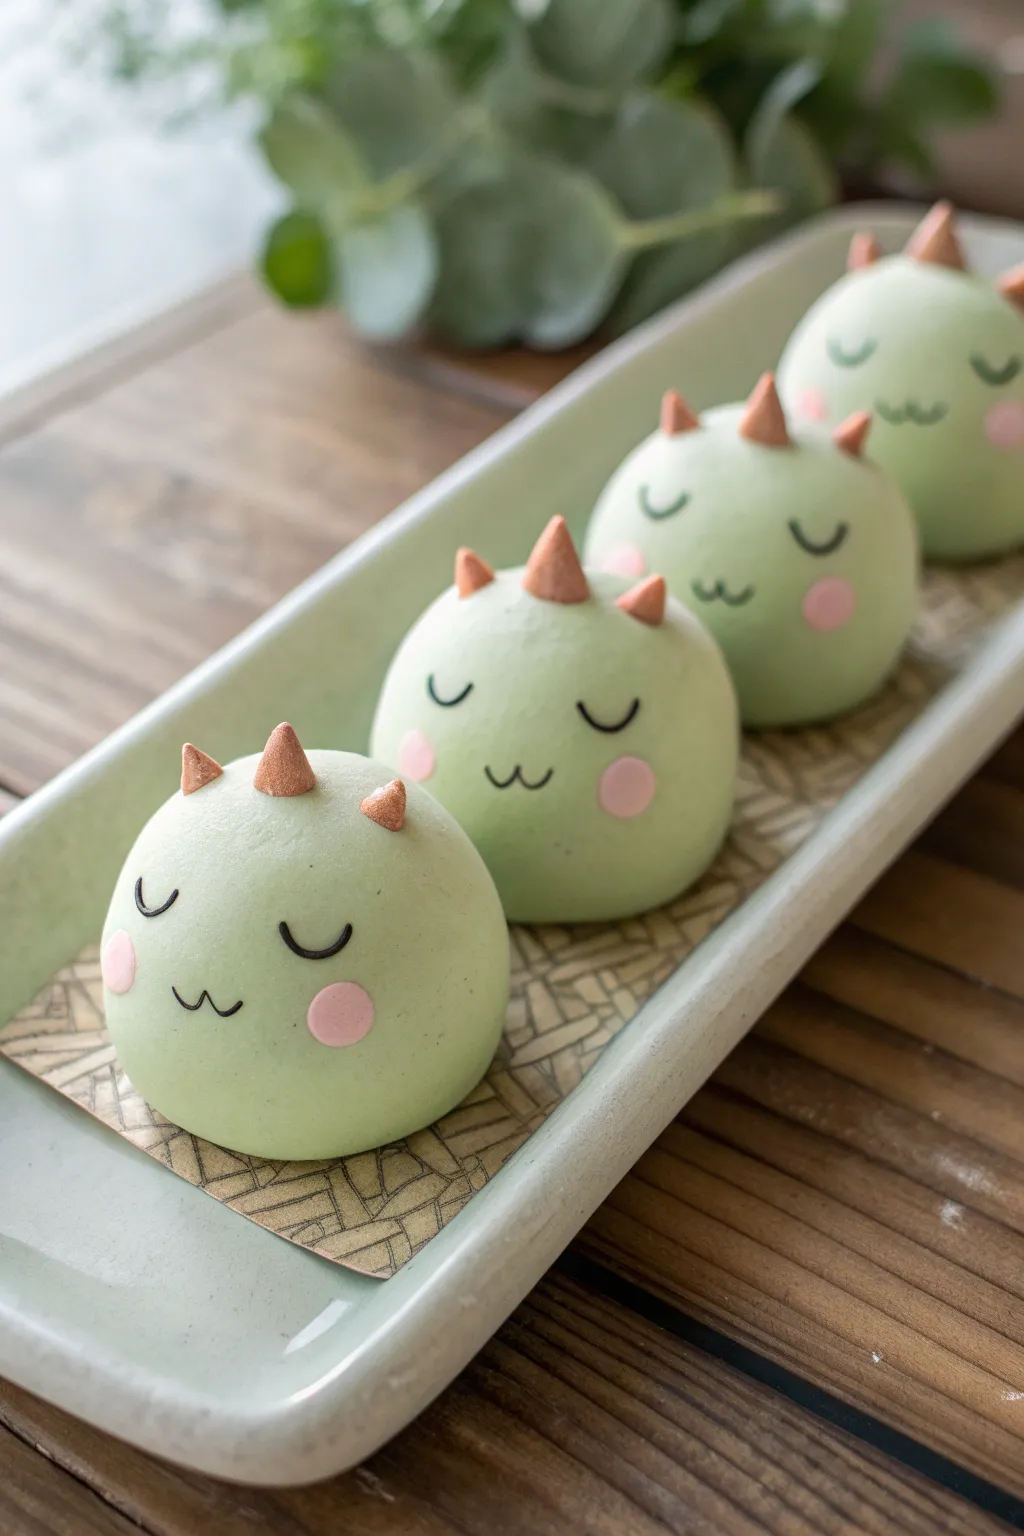
These adorable, round dinosaur figures look just like soft, squishy mochi or dumplings resting on a plate. With their peaceful expressions and pastel green bodies, they capture the essence of a cozy nap time.
Detailed Instructions
Materials
- Light green air dry clay (pale pastel shade)
- Pink air dry clay (or white clay mixed with pink acrylic)
- Brown or dark grey air dry clay (or black fine-tip marker)
- Copper or terracotta colored clay (for spikes)
- Clay sculpting tools (specifically a small ball tool)
- Smooth work surface or silicone mat
- Water (for smoothing)
- Optional: Clear matte varnish
Step 1: Shaping the Base
-
Prepare the Body Clay:
Start by taking a chunk of your light green clay. Knead it thoroughly until it is soft, pliable, and free of any air bubbles. -
Form the Spheres:
Divide the green clay into four equal portions. Roll each piece between your palms to create perfect, seamless spheres. -
Flatten the Base:
Gently press the bottom of each sphere onto your work surface. You want them to have a flat bottom so they sit stable, mimicking the look of a dumpling resting on a plate. The shape should be slightly domed rather than perfectly round. -
Smooth Imperfections:
Dip your finger in a tiny bit of water and gently glide it over the surface of the clay domes to remove any fingerprints or cracks.
Smooth Operator
Keep a small dish of water nearby. Wet fingers are key for blending seams seamlessly, making the clay look like smooth mochi skin.
Step 2: Adding Dino Details
-
Create the Spikes:
Take the copper or terracotta colored clay and roll tiny little cones. You will need three spikes for each dinosaur. -
Attach the Spikes:
Arrange three spikes in a row along the top center of each green dome. Use a dab of water or liquid clay (slip) to glue them down securely. -
Blend the Seams:
I like to use a small silicone tool to gently blend the base of the spikes into the green head, ensuring they look like they belong there rather than just sitting on top. -
Make the Blush Cheeks:
Roll very small balls of pink clay. These should be tiny, flat discs. -
Apply the Blush:
Press one pink disc onto each side of the face area. Make sure they are symmetrical and positioned fairly low on the sphere for maximum cuteness.
Make a Scene
Create a rectangular ‘plate’ from white clay and texture a thin sheet of tan clay to look like a woven bamboo mat for them to sit on.
Step 3: Drawing the Face
-
Create Thin Logs:
For the facial features, roll out incredibly thin ‘worms’ or threads of the dark brown or grey clay. This requires patience to get them consistent. -
Form the Eyes:
Cut four small curved pieces from your thin clay thread. Place them in a ‘U’ shape for sleepy, closed eyes. Position them slightly above the cheek level. -
Shape the Mouth:
Cut a slightly longer piece of the thin thread and shape it into a small ‘w’ or ‘3’ shape on your work surface first. -
Place the Mouth:
carefully transfer the mouth to the center of the face, right between the eyes. Press it gently into the green clay so it adheres. -
Alternative Option:
If working with tiny clay threads is too difficult, wait for the green body to fully dry and draw the eyes and mouth on with a fine-tip black marker instead.
Step 4: Finishing Touches
-
Final Smoothing:
Check over your dinosaurs one last time. If you smudged anything while placing the face, gently tap it back into shape. -
Drying Time:
Allow the figures to air dry completely exactly where they are. Moving them while wet might distort their flat bottoms. Drying usually takes 24-48 hours depending on humidity.
Once dry, arrange your sleepy dinosaur squad in a row for a display that radiates calm and kawaii charm
Dino Head Magnets With Big Eyes

This friendly dinosaur face brings a pop of prehistoric charm to your fridge with its oversized eyes and textured, stone-like green skin. It is an approachable project perfect for beginners who want to practice adding character through simple facial features.
Step-by-Step
Materials
- Green air dry clay (or white clay mixed with green acrylic paint)
- Black air dry clay
- White air dry clay
- Pink air dry clay
- Pointed sculpting tool or toothpick
- Ball tool (small)
- Small round magnet
- Strong craft glue (E6000 or similar)
- Rough texture tool (old toothbrush or stiff bristle brush)
- Water bonding slip (clay mixed with water)
Step 1: Shaping the Head
-
Mix your base color:
Start with a golf-ball-sized amount of green clay. If you are using white clay, knead in green acrylic paint until the color is uniform and streak-free. -
Form the basic shape:
Roll the clay into a smooth ball, then gently press it down onto your work surface to flatten the back. Shape the front into a rounded, slightly elongated tear-drop or egg shape to mimic a snout. -
Define the mouth line:
Use a sculpting tool to slice a horizontal line across the lower third of the face for the mouth. Curve the cut slightly upwards at the corners for a subtle smile. -
Add skin texture:
Take a stiff bristle brush or an old toothbrush and gently tap it all over the green surface. This creates a realistic, scaly skin texture rather than a smooth finish. Don’t worry about being too neat; random patterns look best. -
Emphasize wrinkles:
Using a toothpick or a fine sculpting tool, gently score a few deeper lines across the top of the head and near the eyes to suggest skin folds or wrinkles.
Step 2: Facial Features
-
Create eye sockets:
Press your thumbs or a large ball tool into the upper part of the head to create two shallow indentations where the eyes will sit. -
Form the eye whites:
Roll two small balls of white clay and flatten them into discs. Press these into the indentations you just made. They should look slightly oversized for that cute ‘kawaii’ effect. -
Add the pupils:
Roll two slightly smaller balls of black clay. Flatten them gently and press them onto the white discs, positioning them slightly off-center or looking in one direction to give the dino personality. -
Highlight the eyes:
To make the eyes look shiny and alive, add a tiny speck of white clay or a dot of white paint to the upper corner of each black pupil. -
Sculpt the snout:
At the front of the face, use a medium-sized ball tool to press two distinct nostril indents right above the mouth line. -
Fill the nostrils:
Take tiny pinches of black clay and press them deep into the nostril holes you just created for depth. -
Apply blush spots:
Roll two very small, flat triangles or ovals of pink clay. Press one onto each cheek area, just below the eyes, to give him a rosy, friendly expression.
Cracking Clay?
If you see tiny cracks forming as the clay dries, smooth a small amount of water or a clay slurry (water + clay mix) into the fissures with your finger to seal them.
Step 3: Assembly and Finishing
-
Initial drying:
Let the dinosaur head sit undisturbed for about 24 to 48 hours. I like to flip it over gently halfway through to ensuring the flat back dries evenly. -
Prepare the magnet:
Once the clay is fully hardened, check the back surface. If it puffed up during drying, you can sand it flat with fine-grit sandpaper. -
Attach the magnet:
Apply a dab of strong craft glue to the back of the clay head and press your round magnet firmly into place. -
Final cure:
Allow the glue to cure completely according to the manufacturer’s instructions before sticking your new friend to the fridge.
Make it Shine
For a wet, reptilian look, coat the finished, dry piece with a layer of glossy water-based varnish or clear nail polish, focusing especially on the eyes.
Your adorable prehistoric guardian is now ready to hold up your important notes and photos

TRACK YOUR CERAMIC JOURNEY
Capture glaze tests, firing details, and creative progress—all in one simple printable. Make your projects easier to repeat and improve.
Kawaii Dino Keychain Charms
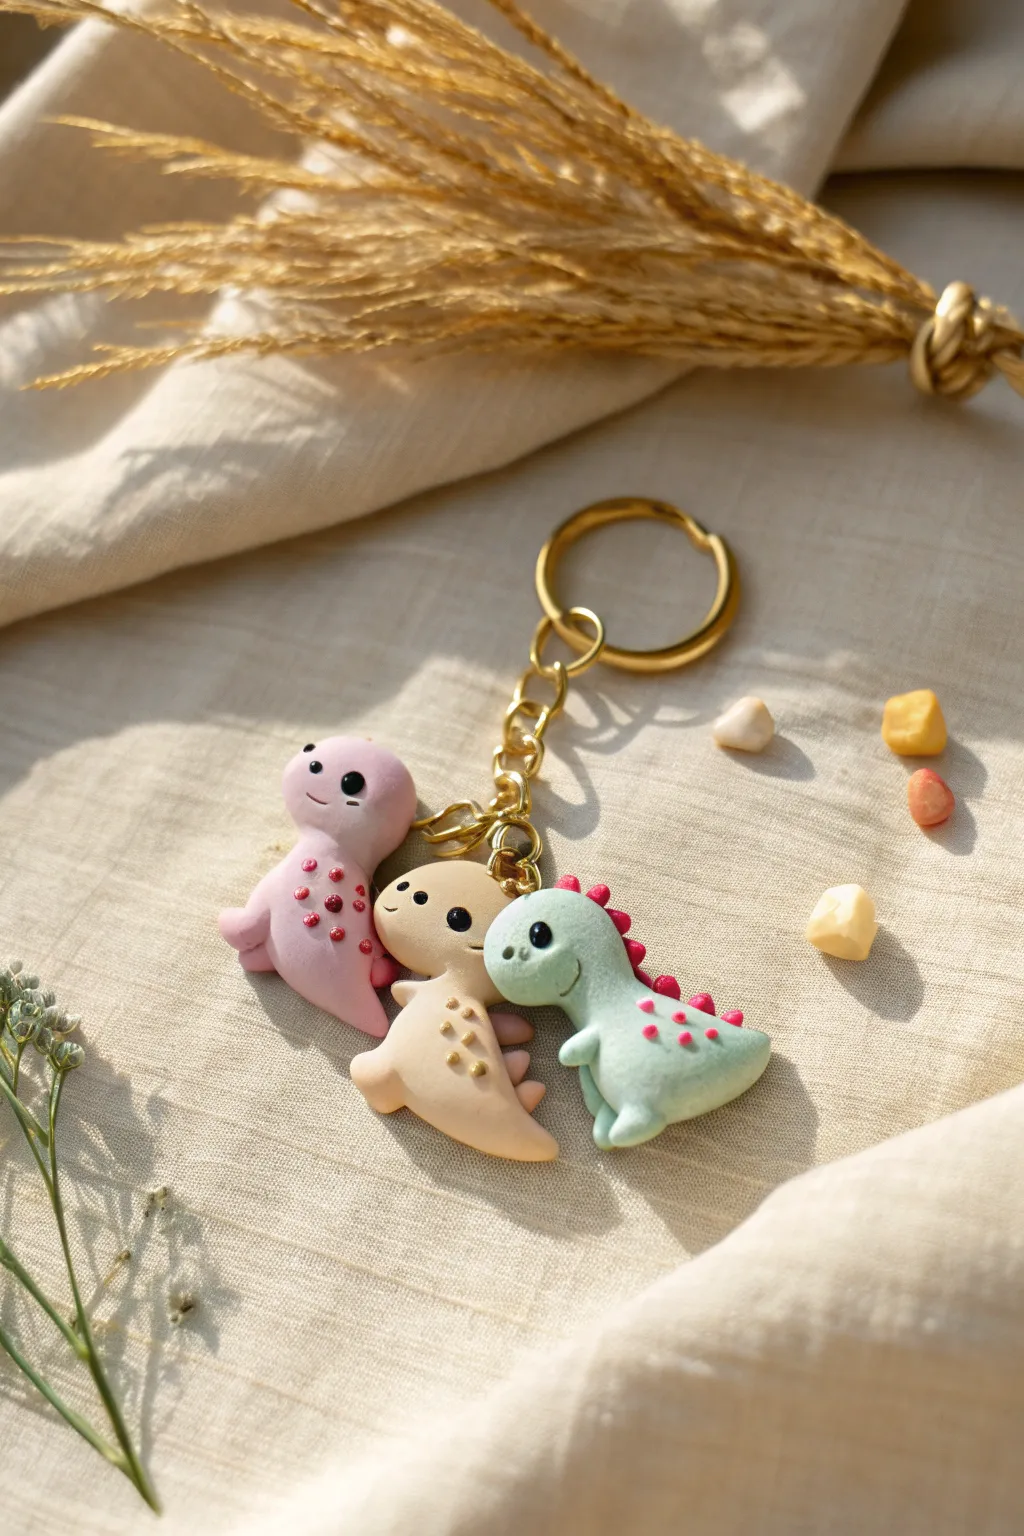
These adorable pastel dinosaur charms are perfect for adding a touch of whimsy to your keys or bag. With their soft, matte finish and tiny speckled details, this trio of pink, beige, and mint dinos is surprisingly simple to sculpt from air dry clay.
How-To Guide
Materials
- Air dry clay (pink, beige/cream, mint green)
- Black acrylic paint or clay for eyes
- Gold/bronze jump rings and keychain hardware
- Sculpting tools (needle tool, ball tool)
- Small eye pins (3)
- Gloss varnish (optional for eyes)
- Dark red/pink acrylic paint for dots
- Fine detail paintbrush or toothpick
- Strong craft glue (e.g., E6000)
Step 1: Shaping the Bodies
-
Prepare the clay:
Start by conditioning your three colors of clay—pink, beige, and mint green—until they are soft and pliable. Roll a small walnut-sized ball of each color to serve as the base for each dinosaur. -
Form the main shape:
Take the pink ball and gently roll it into a teardrop shape. Keep the bottom thicker for the body and slightly elongate the top to form the neck and head area. -
Define the head:
Using your thumb and forefinger, gently pinch and smooth the narrower part of the teardrop to distinguish a round head from the body. You want a smooth, continuous curve like a bowling pin. -
Pull the tail:
At the wider base of the body, gently pull and pinch a small section of clay outwards to create a short, pointed tail. Smooth the transition so it looks seamless. -
Repeat for all three:
Repeat this shaping process with the beige and mint green clay balls, ensuring all three dinosaurs are roughly the same size for a balanced keychain.
Cracking Clay?
If you see tiny cracks forming as the clay dries, smooth a slurry of clay and water (called ‘slip’) over the crack with your finger to seal it seamlessly.
Step 2: Adding Limbs and Features
-
Create tiny legs:
For each dino, roll two tiny spheres of matching clay. Flatten them slightly and press them onto the bottom of the body to form chubby little feet that will help the charm sit upright. -
Attach the arms:
Roll two even smaller teardrop shapes for the arms. Press these onto the sides of the chest area, blending the clay where it connects so they look securely attached. -
Add back spikes:
For the mint green dino, roll tiny balls of contrasting pink clay. Press these in a row down the spine, starting from the back of the head to the tail, to create adorable dorsal plates. -
Make the dots:
For the pink and beige dinos, use a dotting tool or a toothpick dipped in contrasting paint (dark pink for the pink dino, gold/brown for the beige one) to create speckles on their bellies. -
Insert eye pins:
Before the clay begins to dry, take a metal eye pin. Dip the end in a tiny bit of glue and insert it deeply into the top of each dinosaur’s head. Smooth the clay around the entry point.
Step 3: Bringing Faces to Life
-
Indent eye sockets:
Use a small ball tool to gently press two indentations into the face where the eyes will go. This adds dimension and helps the eyes sit flush. -
Add the eyes:
Roll extremely tiny balls of black clay and press them into the sockets. Alternatively, you can paint the eyes on later with black acrylic paint after the clay dries. -
Sculpt the snout:
For the beige and mint dinos, add a tiny extra flattened oval of clay to the face area to build up a snout, then use a needle tool to poke two small nostril holes. -
Carve the smile:
I like to use the edge of a small straw or a curved sculpting tool to impress a quirky, sideways smile onto the pink dino’s face.
Make it Sparkle
Dust the wet clay with pearlescent mica powder or use metallic gold paint for the belly speckles to give your dinos a magical, shimmering finish.
Step 4: Finishing and Assembly
-
Allow to dry:
Let your dinosaurs dry completely. Depending on your brand of clay and humidity, this usually takes 24 to 48 hours. Turn them occasionally so they dry evenly. -
Highlight the eyes:
Once dry, use a toothpick to add a microscopic white dot of paint to the black eyes for a ‘sparkle’ reflection. This makes them look alive. -
Seal the charms:
Coat the dinosaurs with a matte varnish to protect the paint and clay. For extra cuteness, put a dot of gloss varnish just on the eyes. -
Open jump rings:
Using pliers, open your jump rings sideways. Attach one jump ring to the eye pin on each dinosaur head. -
Assemble the keychain:
Hook the jump rings onto the chain links of your main gold keychain hardware. Arrange them at slightly different heights if your chain allows, then close the rings securely.
Now you have a trio of prehistoric pals ready to guard your keys
Mini Dino Planter Buddy
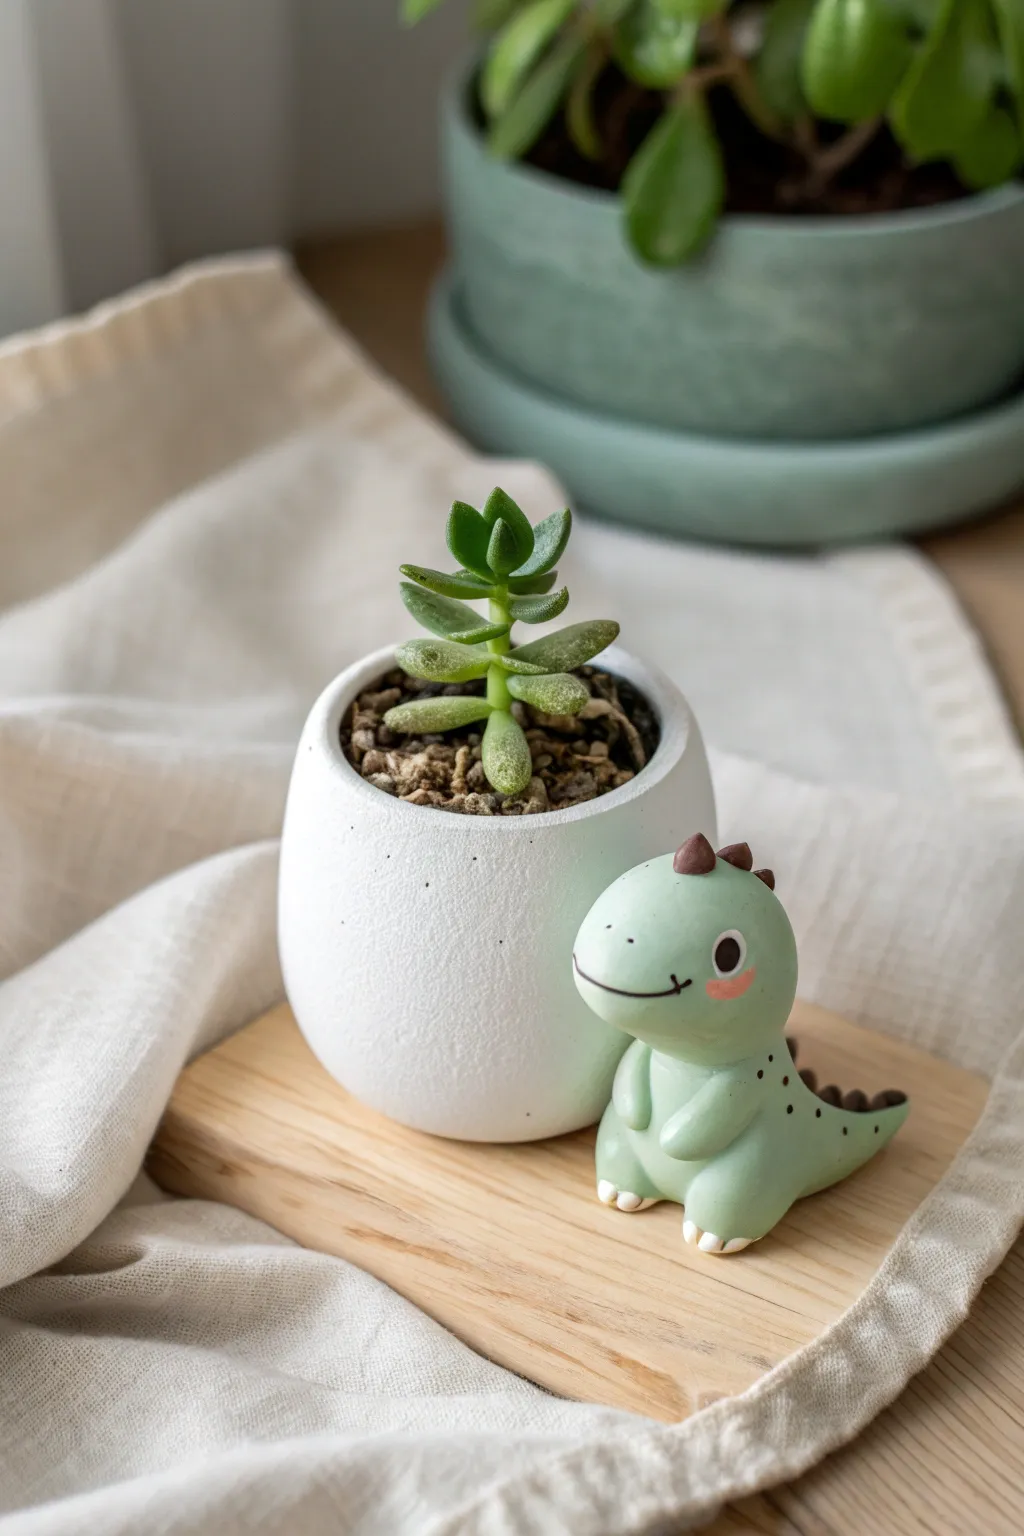
This adorable little dinosaur brings a touch of prehistoric whimsy to your plant collection without taking up much space. With its soft mint green color, rosy cheeks, and friendly smile, it’s the perfect companion for a small succulent pot.
Step-by-Step Guide
Materials
- Air dry clay (white)
- Acrylic paints (mint green, white, brown, pink, black)
- Clay sculpting tools (or a toothpick)
- Water in a small cup
- Small paintbrush
- Gloss varnish (optional)
Step 1: Body & Head Shape
-
Mix the color:
Start by tinting your white air dry clay with a small amount of mint green acrylic paint. Knead it thoroughly until the color is uniform and pale. If it’s too sticky, let it sit for a minute. -
Form the base:
Separate a larger portion of clay for the body. Roll it into a smooth ball, then gently taper the top slightly to create a very subtle pear shape. This will be the dinosaur’s tummy and chest. -
Shape the head:
Take a slightly smaller piece of clay for the head. Roll a ball and then press it gently to flatten the bottom so it sits securely on the body. Round out the snout area just a little. -
Attach head to body:
Score the bottom of the head and the top of the body with a toothpick to create texture. Dab a tiny bit of water on the scored areas and press them firmly together. Smooth the seam at the back of the neck so it looks like one piece.
Smooth Moves
Use a tiny bit of water on your fingertip to smooth out fingerprints before the clay dries. This creates a professional, porcelain-like finish.
Step 2: Limbs & Tail
-
Create the tail:
Roll a small cone of mint clay. Attach the wider end to the lower back of the body, blending the clay seams carefully with a sculpting tool or your finger so it curves naturally to one side. -
Form the legs:
Roll two small balls of clay for the feet. Press them gently onto the bottom front of the body. They should look like little rounded mounds poking out. -
Add the arms:
Create two small teardrop shapes for the arms. Attach them to the sides of the chest area, angling them slightly forward as if the dino is resting its hands on its belly. -
Sculpt the toes:
Using a needle tool or toothpick, gently press vertical lines into the bottom of the feet to suggest toes. You don’t need to cut all the way through, just make an indentation.
Step 3: Spikes & Details
-
Make the spikes:
Mix a small amount of brown paint into a tiny piece of clay. Roll very tiny balls—about 5 or 6 of them—and pitch them into triangles. -
Attach the spikes:
Using a tiny dab of water, place the largest spike on top of the head. Continue sticking them down the back of the head and along the spine, getting progressively smaller as you reach the tail. -
Drying:
Let the figure sit undisturbed for at least 24 hours until fully hardened. It needs to be completely dry before painting the face details.
Make it a Gift
Create a whole family of dinos in pastel pink, lavender, and yellow to give as a set with mini succulents for a housewarming gift.
Step 4: Face & Finish
-
Paint the eyes:
Dip the back end of a paintbrush into black paint to create perfect circles for the eyes. Place them wide apart for that cute ‘kawaii’ look. -
Add the spark:
Once the black paint is barely dry, use a toothpick with white paint to add a tiny reflection dot in each eye. -
Blush and mouth:
Paint small pink ovals under the eyes for cheeks. Use a very fine liner brush or a fine-tip black marker to draw a simple curved smile. -
Toenail details:
Paint the little toe indentations with white paint to make them pop against the mint green body. -
Add spots:
Using the dark brown paint, add tiny freckle-like dots on the dinosaur’s back, near the spikes. Ideally, keep these irregular for a natural pattern. -
Protective coat:
Finish by brushing on a layer of matte or gloss varnish to seal the paint and protect your buddy from moisture near the plants.
Place your new prehistoric friend next to your favorite potted plant to keep it company
Dino Egg With Peekaboo Baby

Create an adorable surprise with this kawaii baby dinosaur just breaking free from its shell. Featuring realistic crackle textures and sweet hand-painted details, this project combines simple sculpting with clever finishing techniques.
Step-by-Step
Materials
- White air-dry clay
- Acrylic paints (pale sage green, teal, white, pink, black, brown, metallic gold)
- Small foam ball or plastic egg (armature)
- Sculpting tools (needle tool, smooth modeling tool)
- Fine detail paintbrush
- Sponge or stiff bristle brush
- Rolling pin
- Craft knife
- Texture tool or crumpled foil
Step 1: Forming the Dinosaur
-
Tint the clay:
Start by mixing a very small amount of pale sage green acrylic paint into a ball of white air-dry clay until the color is uniform. Aim for a soft, pastel hue. -
Shape the head:
Roll the green clay into a smooth sphere. This will form the baby dino’s head inside the egg. -
Add the spike:
Pinch a small amount of white clay (or light tan) into a tiny cone shape. Attach this to the very top center of the head using a little water to blend the seams. -
Create the paws:
Roll two small, pea-sized balls of the green clay. Flatten slightly and use a needle tool or knife to press two indentations into each, creating little toes. -
Speckle the skin:
Before the clay dries, dip a stiff brush or old toothbrush into diluted brown paint and gently flick or stipple tiny speckles onto the green head for texture.
Fixing Cracks
If unwanted cracks appear as the clay dries, mix a tiny bit of fresh clay with water to make a paste (slip) and smooth it over the fissure with your finger.
Step 2: Creating the Eggshell
-
Prepare the shell clay:
Roll out a sheet of white air-dry clay to about 3mm thickness. You want it thin enough to look like a shell but thick enough to hold its shape. -
Texture the surface:
Gently press a texture tool or a ball of crumpled aluminum foil over the white clay sheet to give it a porous, egg-like surface. -
Wrap the base:
Take your armature (foam ball or plastic egg) and wrap the bottom half with the textured clay. Smooth the clay upward, leaving the top open. -
Create the broken edge:
Use a craft knife or needle tool to cut a jagged, zig-zag pattern around the top rim of the shell to mimic a freshly cracked egg. -
Form the cap:
Using remaining white clay, shape a smaller, curved piece that looks like the top of the eggshell. Ensure it also has jagged edges that roughly correspond to the bottom piece. -
Add crack details:
With a very sharp needle tool, gently carve thin, branching crack lines into the surface of the white shell while the clay is still damp.
Glittery Surprise
Hide a small folded paper fortune or message inside the hollow space beneath the dinosaur head before sealing the bottom for a true surprise egg.
Step 3: Assembly and Painting
-
Position the dino:
Place the dried green head inside the bottom eggshell. Secure it with a dab of wet clay or glue if necessary. -
Attach the paws:
Adhere the two little paws to the front rim of the eggshell, making it look like the baby is pushing itself up to peek out. -
Place the hat:
Position the shell ‘cap’ piece slightly askew on top of the dino’s head, leaving the face fully visible. -
Paint the face:
Using a fine detail brush and black paint, draw a wide smile and two curved eyes—one open and one ‘winking.’ Add round pink cheeks with a dry-brush technique for a soft blush. -
Paint the shell base:
Paint the bottom third of the eggshell with teal acrylic paint. I find a slightly uneven, organic line looks best here. -
Add gold accents:
Dip the end of a paintbrush handle into metallic gold paint and dot it over the teal section. Also, paint the little spike on the head gold. -
Enhance the cracks:
Mix a very watery grey-brown wash. Paint it into the carved cracks on the shell, then immediately wipe the surface with a damp paper towel so the dark color stays only in the crevices.
Display your newly hatched friend on your desk or give it as a delightful handmade gift
Sleepy Dino With Star Blanket
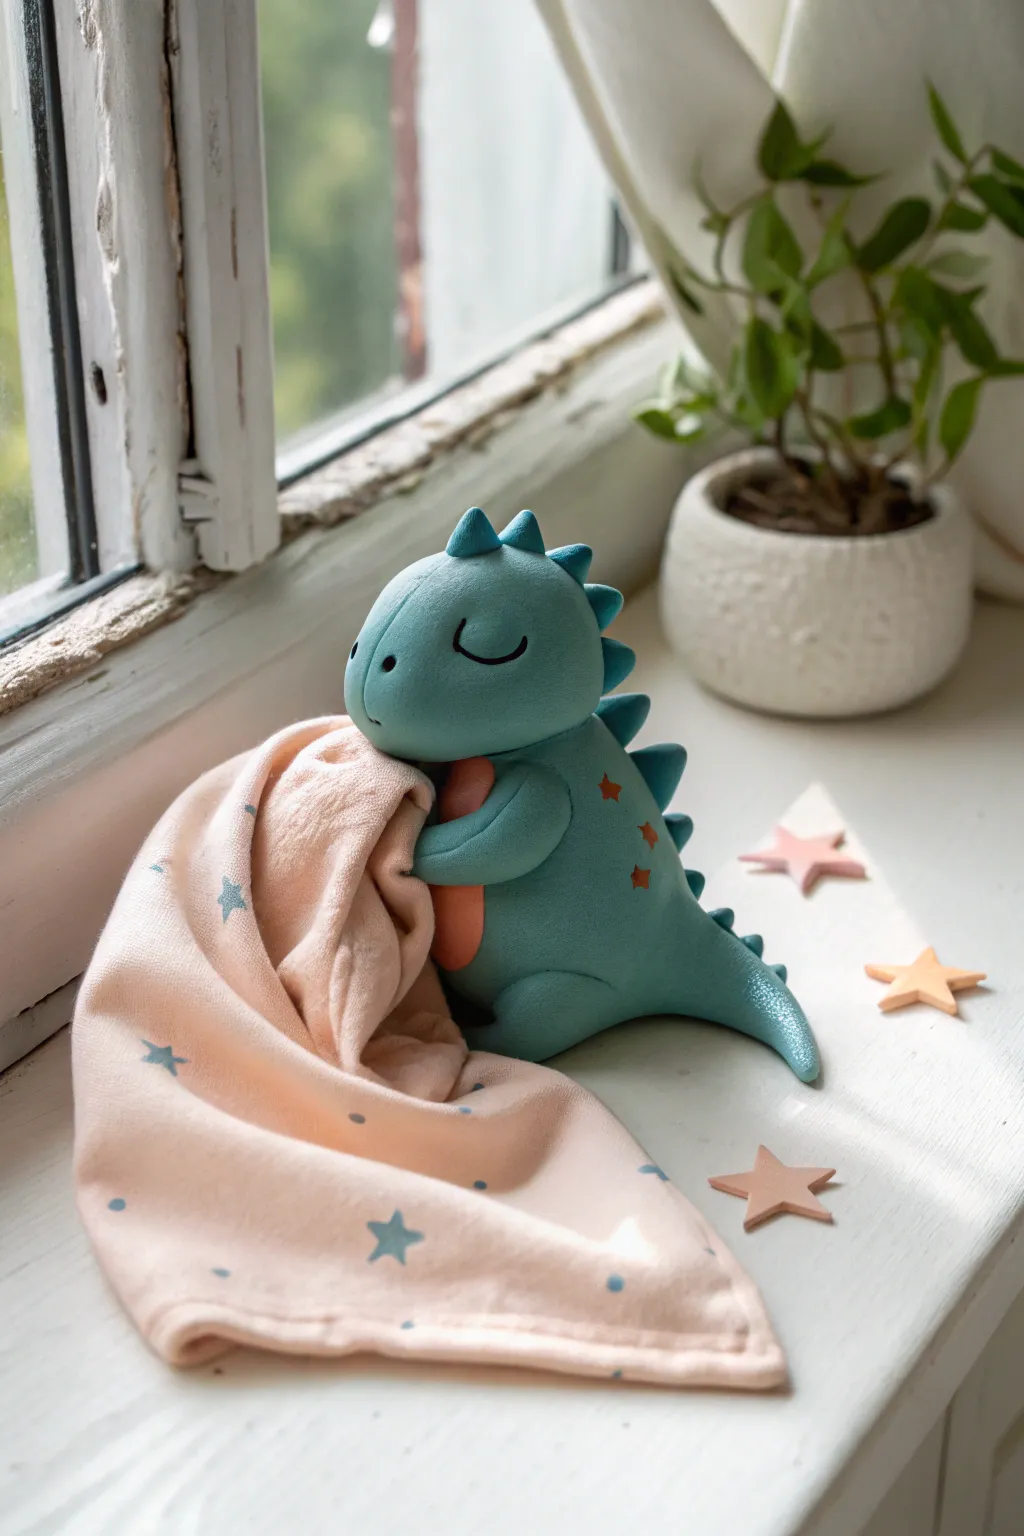
This adorable sleepy dinosaur brings a sense of calm to any space, featuring a smooth teal finish and clutching a real fabric blanket. With its peaceful closed eyes and star-studded back, this mixed-media piece combines clay sculpting with simple fabric play for a truly cozy result.
Detailed Instructions
Materials
- Teal or turquoise air dry clay
- Peach or light pink air dry clay (small amount for tummy)
- Black fine-liner or acrylic paint for eyes
- Small piece of pink fabric with star pattern (or plain fabric + fabric paint)
- Small star-shaped cookie cutters (optional)
- Clay tools (modeling tool, needle tool)
- Water for smoothing
- PVA glue or clay adhesive
Step 1: Sculpting the Base Body
-
Form the main shape:
Start with a large ball of teal clay for the body. Roll it into a smooth pear shape, keeping the bottom wider and heavier so the figure sits stably. The top should taper slightly to form the head area, but keep it chubby and rounded. -
Define the head:
Using your thumb, gently press to create a subtle indentation where the neck would be, separating the head from the body without fully detaching them. The head should look like it’s resting slightly forward. -
Add the tummy patch:
Take a small pinch of peach clay and flatten it into an oval. Gently press this onto the front of the belly area. Use a tiny bit of water to smooth the edges so it merges seamlessly with the teal body.
Step 2: Adding Limbs and Details
-
Create the legs:
Roll two small sausage shapes from teal clay for the hind legs. Press them onto the sides of the body near the base. Blend the clay well at the connection points so they look like part of the main form. -
Sculpt the tail:
Roll a cone of teal clay for the tail. Attach it to the lower back of the body, creating a smooth curve that rests on the ground. I like to curve the very tip slightly for a bit of character. -
Attach the arms:
Make two smaller teardrops for arms. Before attaching, position them so they are reaching forward, as if hugging something close to the chest. Don’t press them flat against the body yet; leave space for the blanket. -
Spine details:
Roll tiny triangles or cones of teal clay for the spines. Attach them in a row running from the top of the head down to the tail tip. Use a small tool to blend the base of each spine into the back.
Cracking Issues?
If small cracks appear while drying, mix a tiny amount of fresh clay with water to make a paste (slip). Fill the cracks with this paste and smooth it over.
Step 3: The Cozy Blanket
-
Prepare the fabric:
Cut a small square or rectangle of your star-patterned fabric. If you don’t have patterned fabric, you can paint tiny blue stars onto a plain pink cloth using fabric paint or diluted acrylics. -
Drape and position:
Fold or bunch the fabric softly. Place it against the dinosaur’s belly, tucking it under the one arm you positioned earlier. Arrange the folds so it looks natural and heavy. -
Secure the hug:
Now, firmly press the clay arms over the fabric to lock it in place. You might need a drop of PVA glue where the clay meets the fabric to ensure it holds permanently once dry.
Night Light Glow
Mix glow-in-the-dark powder into your clay or paint the little scattered stars with glow paint so your dino becomes a comforting night guardian.
Step 4: Finishing Touches
-
Dry the sculpture:
Let the dinosaur air dry completely. This usually takes 24-48 hours depending on the thickness. Keep it away from direct heat to prevent cracking. -
Paint the face:
Once fully dry, use a black fine-liner or a thin brush with black acrylic paint to draw two U-shaped curves for closed, sleepy eyes. Add two tiny dots for nostrils. -
Decorate the body:
Paint small orange or copper stars directly onto the side of the teal body for extra decoration. You can also make separate clay stars to scatter around the scene. -
Final smoothing:
If there are rough spots, you can very gently sand them with fine-grit sandpaper, being careful not to scratch the painted areas.
Place your sleepy dino on a bedside table to watch over your dreams
Dino Donut With Sprinkles
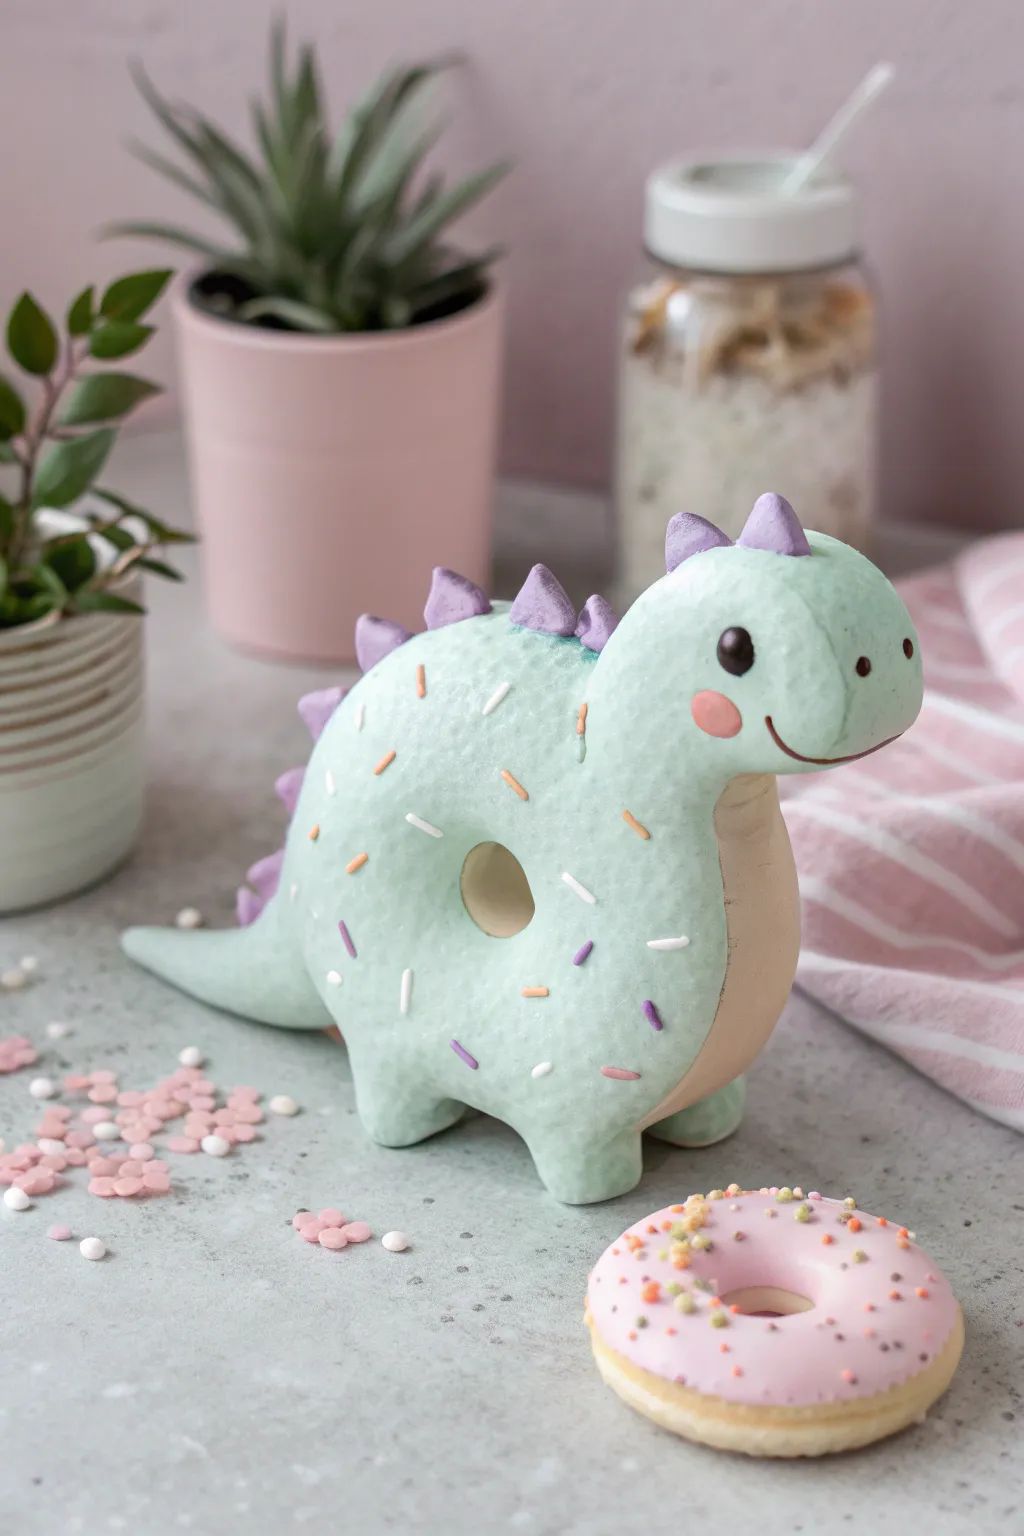
Combine your love for prehistoric creatures and sweet treats with this adorable donut-shaped dinosaur. This kawaii project features a soft mint-green body, purple spikes, and delicate sprinkles for a whimsical finish that looks good enough to eat.
Step-by-Step Tutorial
Materials
- Air dry clay (mint green or white + mixing paint)
- Air dry clay (lavender/purple)
- Air dry clay (cream/tan)
- Acrylic paints (black, pink, white, pastel orange, yellow)
- Circle cutter (small)
- Clay tools (needle tool, smoothing tool)
- Rolling pin
- Water for adhesion
- Gloss varnish (optional)
Step 1: Shaping the Donut Body
-
Mix your mint:
If you don’t have pre-colored mint clay, take a large ball of white clay and mix in a very small amount of green and a tiny dot of blue acrylic paint. Knead thoroughly until the color is uniform and pastel. -
Form the base:
Roll your mint clay into a thick, smooth ball. Gently flatten it between your palms to create a thick disc shape, similar to a hamburger patty but rounder on the edges. -
Cut the center:
Use a small circle cutter (or the cap of a marker) to punch a clean hole directly in the center of your disc. Smooth the inner edges of the hole with a wet finger so it looks like a soft, baked donut. -
Add the legs:
Roll four small, equal-sized balls of mint clay. Attach two to the bottom front and two to the bottom back of the donut shape. Blend the seams upwards into the body using a modeling tool so they look like one seamless piece.
Seamless Smoothing
Use a minuscule amount of baby oil or water on your fingertip to buff away fingerprints before the clay dries. It creates that professional, porcelain-like finish.
Step 2: Head and Tail
-
Create the head:
Roll a medium-sized ball of mint clay for the head. Shape it into a rounded teardrop or egg shape to define the snout area. -
Position the neck:
Attach the head to the upper front side of the donut body. You may need to insert a small piece of toothpick or wire for support. Smooth the clay at the connection point to create a seamless neck. -
Form the tail:
Roll a cone of mint clay for the tail. Attach it to the lower back side of the donut body, blending the seam thoroughly so the tail extends naturally from the donut shape. -
Add the belly patch:
Roll out a thin sheet of cream or tan clay. Cut an oval shape and carefully press it onto the front of the chest and underbelly area. Smooth edges for a seamless transition.
Level Up: Icing Effect
Instead of a solid body color, make the top half a different color with drippy edges to look like glazed icing over a plain cake donut
Step 3: Spikes and Details
-
Make the spikes:
Using lavender or light purple clay, form several small triangles. They don’t need to be identical; a little variation adds character. -
Attach the ridge:
Adhere the purple triangles in a line running from the top of the head, down the back of the donut curve, and ending partway down the tail. Use a tiny dab of water to secure them. -
Sculpt the face:
Use a ball tool to make slight indentations for the eye sockets. Shape the snout gently with your fingers to give it a soft, rounded profile.
Step 4: Sprinkles and Finishing
-
Paint the eyes:
Using a fine detail brush, paint two solid black circles for eyes. Once dry, add a tiny white dot in the upper corner of each eye for a reflective highlight. -
Add mouth and blush:
Paint a thin, curved smile line using dark brown or black paint. Add a soft pink circle on the cheek just below the eye for that classic kawaii blush. -
Create the sprinkles:
Roll extremely thin snakes of clay in white, orange, purple, and green. Cut them into tiny segments to create sprinkles. -
Apply the toppings:
Gently press the clay sprinkles all over the mint-green body of the dinosaur. Scatter them randomly for a realistic donut look. -
Texture the surface:
For an advanced touch, you can gently tap the surface of the clay with a clean toothbrush before the sprinkles dry to mimic the texture of baked cake. -
Final touches:
Allow the entire figure to dry completely (usually 24-48 hours depending on thickness). I find placing it on a piece of parchment paper helps prevent sticking. -
Varnish:
Apply a coat of semi-gloss or matte varnish to protect your creation, or use a high-gloss glaze just on the sprinkles to make them look sugary.
Place your sweet new friend on your desk or shelf where it can bring a smile to your face every day
Heart-Belly Dino Figurines

Create a sweet, pastel green dinosaur that stands tall with a heart full of love. This kawaii air dry clay figurine features a smooth matte finish, rosy pink cheeks, and a signature heart emblem right on its tummy.
Step-by-Step
Materials
- White air dry clay
- Acrylic paints (mint green, pastel pink, black, white)
- Clay sculpting tools (specifically a smoothing tool and a needle tool)
- Small heart-shaped cutter (optional)
- Water in a small cup
- Fine-grit sandpaper
- Paintbrushes (detail brush and a flat shader)
- Matte varnish or sealant
Step 1: Sculpting the Base Form
-
Mix Your Base Color:
Knead a generous amount of mint green acrylic paint into your white air dry clay until the color is uniform and streak-free. This pre-coloring method gives a great base tone without needing heavy painting later. -
Form the Body:
Take a large portion of clay and roll it into a thick, smooth cylinder. Taper the top end significantly to form a long neck, and gently widen the bottom to create a stable, rounded belly. -
Shape the Head:
Bend the tapered neck forward slightly to creaet a natural curve. At the very top, round off the clay to form a distinct, bulbous snout, smoothing the transition from neck to head with a splash of water. -
Pull the Legs:
Instead of attaching separate legs, gently pinch and pull four short, sturdy stumps directly from the base of the body. Flat surfaces work best here—tap the figure firmly on your table to flatten the feet so it stands upright on its own. -
Add the Tail:
Pinch the clay at the rear of the body and elongate it into a short, pointed tail. You want it to rest on the ground just behind the legs to act as a third point of balance. -
Create the Spine Spikes:
Mix a small amount of pink paint into a separate ball of clay. create tiny triangles or flattened teardrop shapes and attach them in a row running down the back of the dinosaur’s neck and spine using a little water as glue.
Cracks happen?
If you see hairline cracks as the clay dries, mix a tiny bit of fresh clay with water to make a paste (slip). Fill the cracks, smooth with a finger, and let dry again.
Step 2: Adding Details & Finishing
-
Place the Heart:
Using the same pink clay, roll out a small slab and cut a heart shape (either by hand or with a cutter). Press this firmly onto the dinosaur’s chest, smoothing the edges slightly so it looks integrated rather than just stuck on. -
Refine the Face:
Use a ball tool or the end of a paintbrush handle to create small indentations for the nostrils. For the mouth, use a sculpting blade or needle tool to press in a gentle, upward-curving smile. -
Dry Completely:
Let your dinosaur figure dry for at least 24-48 hours. Turn it occasionally so the bottom of the feet dry evenly. I like to prop the head up with a bit of foam if it starts to droop while wet. -
Sand for Smoothness:
Once fully cured, use fine-grit sandpaper to gently buff away any fingerprints or rough textures on the green body, being careful around the pink spikes. -
Paint the Cheeks:
Dilute a tiny drop of pink acrylic paint with water. dab two soft circles on the cheeks to give it a rosy, blushing look. -
Paint the Eyes:
Using a fine detail brush and black acrylic paint, add two solid circles for eyes. Once the black is dry, add a tiny white dot in the upper corner of each eye for a reflective sparkle. -
Texture the Heart:
If the pink clay heart faded during drying, give it a fresh coat of pastel pink paint to make it pop against the mint green body. -
Seal the Figure:
Finish the project by applying a coat of matte varnish. This protects the clay from moisture and gives the piece a professional, velvety finish without being too shiny.
Make it texture-rich
Before the clay dries, use a clean toothbrush to gently stipple the dinosaur’s skin. This adds a subtle, stone-like texture that looks amazing under the matte varnish.
Now you have an adorable prehistoric friend ready to guard your desk or bookshelf
Puffy Sticker-Style Dino Flat Charms
Bring the kawaii aesthetic to life with this adorable, puffy sticker-style dinosaur charm. Its smooth, rounded edges and soft pastel green color make it perfect for a keychain or a cute bag accessory.
Step-by-Step Tutorial
Materials
- Light mint green air dry clay
- Sligtly darker turquoise or teal clay
- Soft peach or light coral clay
- Black acrylic paint or clay for the eye
- White gel pen or paint for eye highlights
- Pink or coral chalk pastel (or paint) for blush
- Clay roller or smooth round tool
- Needle tool or toothpick
- Small dotting tool
- Jump ring and eye screw
- Gloss glaze (optional)
Step 1: Shaping the Base
-
Roll out the body:
Start with a ball of light mint green clay about the size of a walnut. Flatten it gently with your palm or a roller until it’s about 1/4 inch thick. You want it to look plush, not paper-thin. -
Carve the silhouette:
Using a needle tool, lightly sketch a rounded kidney bean shape for the body on the clay surface, adding a small bump for the head and a tail. Once happy with the outline, use a blade or scissors to cut it out cleanly. -
Smooth the edges:
This is crucial for the ‘puffy’ look. Dip your finger in a tiny bit of water and rub all the cut edges until they are completely rounded and smooth. It should look like a soft pillow. -
Form the legs:
Instead of attaching separate pieces, use your finger or a modeling tool to gently push in the bottom edge of the clay to form two stubby, rounded legs. Smooth the transition area so it looks like one solid piece.
Step 2: Adding the Spikes
-
Prepare the teal clay:
Take your darker turquoise clay and roll a thin snake, then flatten it slightly. Cut this strip into small triangles. You will need about 7-9 triangles, graduating in size from small to medium and back to small. -
Attach the spine:
Starting near the head, press the triangles onto the curved back of the dinosaur. Ensure the base of each triangle makes good contact with the mint body. -
Blend the seams:
I like to use a small silicone tool to gently smooth the seam where the spike meets the back, but leave the tips sharp and distinct.
Cracking Clay?
If you see tiny cracks forming as you smooth the edges, your clay might be too dry. Dip your finger in water and massage the area immediately to rehydrate and bond the surface.
Step 3: Personality & Details
-
Create the spots:
Roll tiny balls of peach or coral clay. Flatten them into discs of varying sizes. Press these onto the dinosaur’s flank in a random pattern, making sure they sit flush with the green surface. -
Add the eye:
Press a small indentation where the eye should go. Either insert a tiny bead of black clay or wait until the piece is dry to paint a black circle. -
The smile:
Use the curved edge of a straw or a small carving tool to impress a tiny, U-shaped smile just below the eye. -
Rosy cheeks:
To get that soft, airbrushed look, shave a little pink chalk pastel into dust. Use a dry brush or cotton swab to gently dab this powder onto the cheek area and tail tip. -
Hardware preparation:
While the clay is still wet, carefully screw a small eye screw into the top center of the back.
Pro Tip: Clean Cuts
Let your rolled-out clay sit for about 10 minutes before cutting the dinosaur shape. Slightly firmer clay cuts cleaner and deforms less when you lift it.
Step 4: Finishing Touches
-
Highlighting:
Once the clay is fully dry (usually 24 hours), use a white gel pen or a tiny dot of white paint to add a reflection sparkle to the eye. -
Glazing:
For durability and a finished sheen that mimics a puffy sticker, apply a coat of gloss or satin varnish over the entire charm. -
Assembly:
Open a jump ring with pliers, loop it through the eye screw, and attach your keychain or phone strap.
Now you have a charming little dinosaur friend to keep you company wherever you go
Dino Sundae With Cherry Top
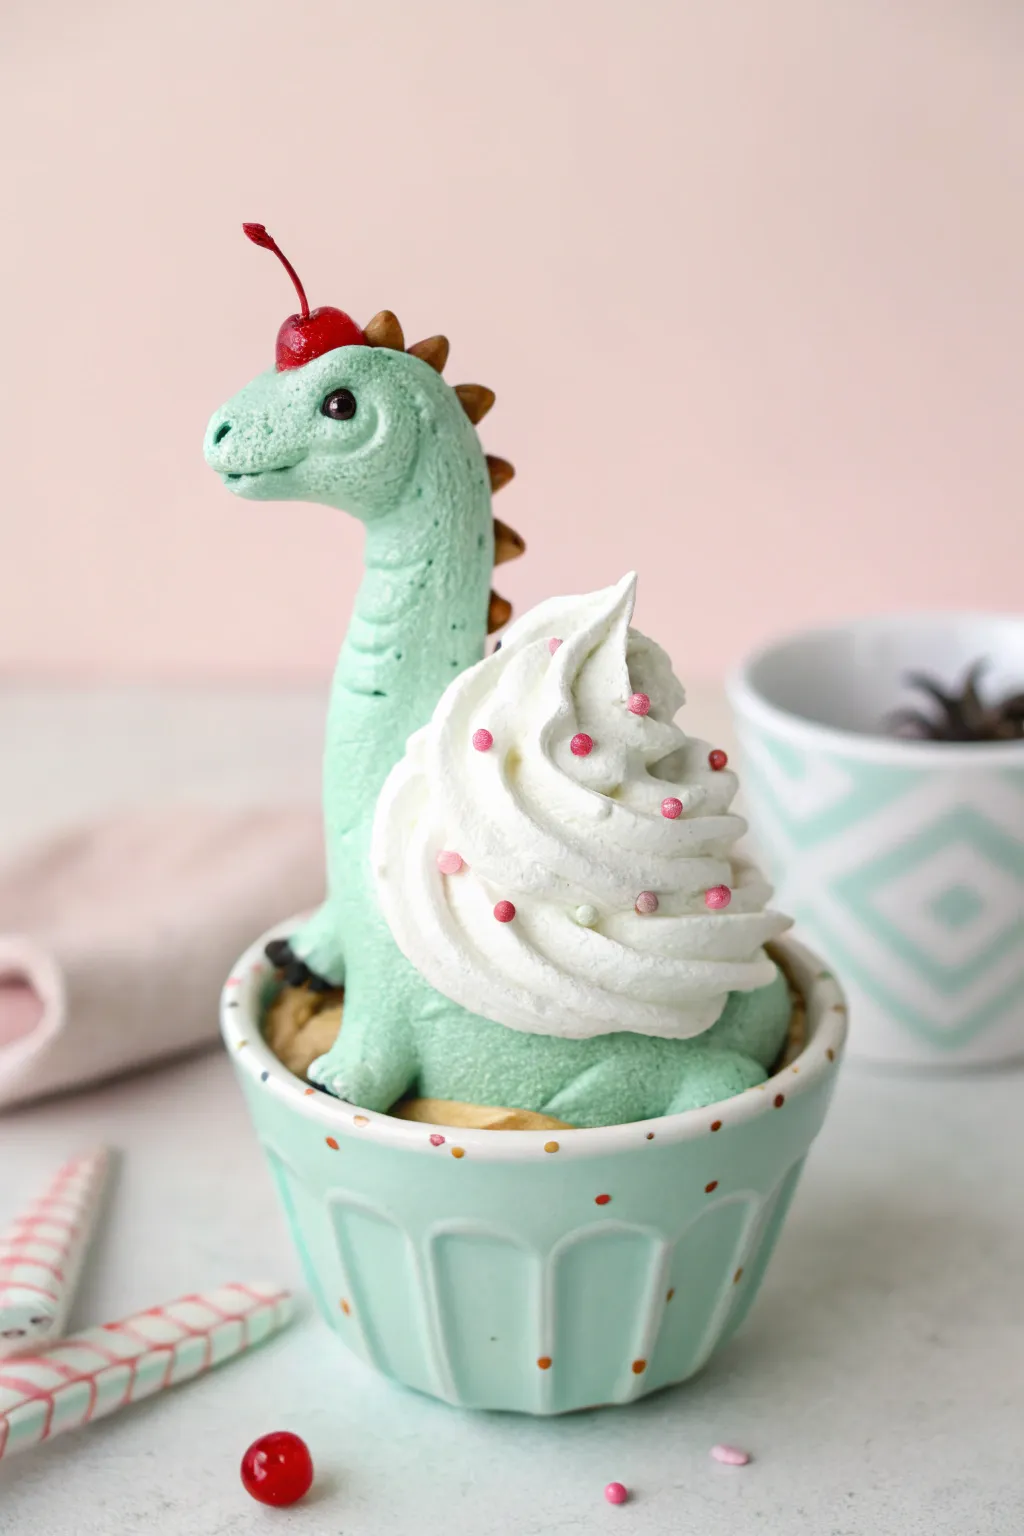
Transform simple air dry clay into an adorable dessert-themed figurine featuring a minty-green dinosaur nestled in a sundae cup. This kawaii project combines smooth sculpting with textured piping techniques to mimic fluffy whipped cream.
Step-by-Step
Materials
- Light turquoise or mint green air dry clay
- White creamy clay (or standard white clay mixed with water/Decoden cream)
- Small ceramic ramekin or dessert cup (mint green)
- Brown clay (for spikes)
- Black beads or clay (for eyes)
- Red bead or clay ball (for cherry)
- Glossy varnish or UV resin
- Small pink sprinkles (clay or real)
- Sculpting tools (needle tool, ball tool)
- Piping bag with star tip (if using creamy clay)
- Toothbrush or texturing tool
Step 1: Sculpting the Dino Body
-
Form the base:
Start with a ball of mint green clay roughly the size of a golf ball. Press it gently into your ceramic cup so it fills the bottom comfortably, creating a mound that sits just below the rim. -
Shape the neck:
Roll a thick log of the same green clay, tapering it slightly at one end. Smoothly attach the wider end to the front of your base mound, blending the seams with a little water until invisible. -
Create the head:
Form a rounded oval shape for the head and attach it to the top of the neck. Use your thumb to gently press an indentation for the snout, giving it a friendly, upturned profile. -
Add facial details:
Use a ball tool to press eye sockets, then insert small black beads or rolled black clay. Use a needle tool to mark a small smile and nostrils. -
Texturize the skin:
To mimic the slightly rough texture seen in the photo, gently tap the surface of the green clay with a clean toothbrush or a balled-up piece of foil. I find this really helps it look less like plastic and more organic. -
Add dorsal spines:
Roll tiny triangles of brown clay. Attach them in a row running down the back of the neck and head. Press them on firmly so they don’t fall off later. -
Form the limbs:
Roll two short, sausage shapes for the front legs. Attach them to the front of the body, blending the upper edge into the torso while letting the ‘paws’ rest on the cup’s rim or the base clay.
Step 2: The Sundae Toppings
-
Prepare the whipped cream:
If using creamy clay (Decoden cream), fit a piping bag with a large open star tip. If using regular air dry clay, soften it with water until it’s a toothpaste consistency. -
Pipe the swirl:
Pipe a generous, tall swirl of the white mixture onto the dinosaur’s back, covering the rear portion of shape. Build it up in a spiral motion just like real soft-serve ice cream. -
Add sprinkles:
While the white clay is still wet, carefully drop small pink clay sprinkles or microbeads onto the swirls. Press them in very lightly so they adhere. -
Create the cherry:
Roll a perfect sphere of red clay. If you have a small red bead, that works too. Place it momentarily on top of the dino’s head to check the size. -
Add the stem:
Take a tiny piece of wire or a thin strip of red clay and attach it to your cherry. Gently curve it for a natural look. -
Place the cherry:
Secure the cherry onto the top of the dinosaur’s head using a dab of liquid clay or glue if the base is already drying.
Creamy Clay Hack
No piping clay? Mix standard white air dry clay with white glue and a little water in a cup until it’s sticky and pipeable.
Step 3: Finishing Touches
-
Clean the cup:
Wipe away any clay smudges from the ceramic cup rim using a damp cotton swab before the clay hardens. -
Initial drying:
Let the project dry in a cool, dry place. Because the body is thick, I recommend letting this sit for at least 48 hours to ensure the core is solid. -
Glossing the cherry:
Once dry, apply a high-gloss varnish or a drop of UV resin specifically to the cherry and the eyes to make them shine like glass. -
Sealing the body:
Paint a matte varnish over the green dinosaur skin to protect it while keeping that soft, clay look. You can leave the white ‘whipped cream’ unvarnished to keep its fluffy texture.
Level Up: Scented Clay
Knead a drop of vanilla or mint essential oil into the clay before sculpting for a figurine that smells as sweet as it looks.
Display your sweet prehistoric friend on a kitchen shelf for a daily dose of cuteness
Dino Tea Party Mini Scene
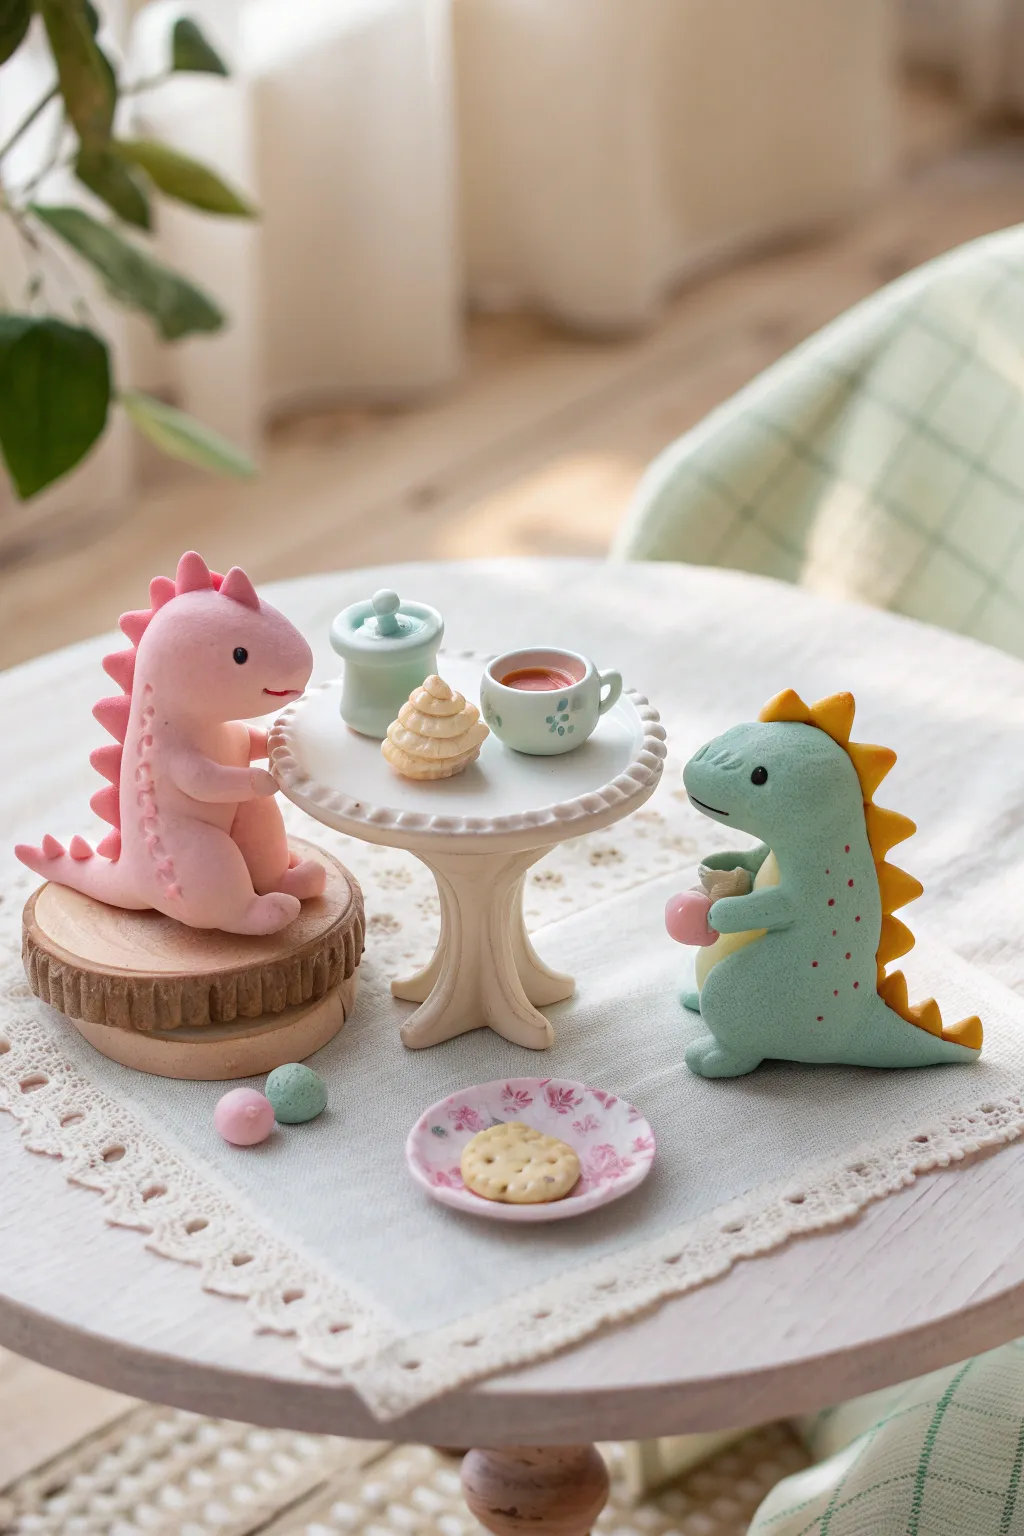
Create a whimsical miniature scene where two adorable clay dinosaurs enjoy an afternoon tea break together. This project involves sculpting simple character shapes, miniature food, and tiny furniture for a complete, heartwarming diorama.
Step-by-Step Guide
Materials
- Air dry clay (Pink, Teal/Green, White, Yellow/Orange, Beige)
- Clean working surface or silicone mat
- Sculpting tools (needle tool, ball stylus, plastic knife)
- Chalk pastels (pink, brown) for shading
- Small soft brush
- Water in a small cup
- Small round wooden slice (approx. 2 inches diameter)
- Gloss varnish (optional)
Step 1: Sculpting the Pink Dino
-
Body Basic Shape:
Start with a ball of pink clay about the size of a walnut. Roll it into a smooth pear shape, then gently flatten the bottom so it sits securely. This will be the seated body. -
Forming the Head:
Roll a smaller pink ball for the head. Shape it slightly oblong to create a snout area. Attach this to the top of the body, blending the clay at the neck seam with a little water until smooth. -
Adding Limbs:
For the legs, roll two small sausages of pink clay. Press them against the sides of the lower body, curving them forward so the feet rest flat. Create two smaller sausages for arms and attach them higher up. -
Spikes and Tail:
Roll a darker pink (or reuse the body color) into a cone for the tail and attach it to the back. For the spikes, pinch tiny triangles of clay and run them in a line from the top of the head down to the tail. I like to use a needle tool to gently texture the seam where the spikes meet the back. -
Facial Features:
Use a ball tool to indent eye sockets and insert tiny beads of black clay. Use a needle tool to poke a small nostril and carve a simple smiling mouth line.
Wobbly Dinos?
If your standing dino keeps falling over, flatten the bottom of the feet and tail more aggressively wet. You can also bake/dry the body first, then add legs.
Step 2: Sculpting the Green Dino
-
Standing Posture:
Form a teal or green pear shape similar to the first dino, but elongated slightly to suggest standing. If the clay is soft, you might need a toothpick armature inside for support. -
Head and Tail:
Attach a rounded head shape. Add a thick, cone-shaped tail at the back to act as a third leg for balance, ensuring the figure stands upright on its own. -
Contrasting Spikes:
Roll small balls of yellow or orange clay and pinch them into sharp triangles. Attach these in a row down the spine, distinct from the body color. -
Holding the Cup:
Form short arms. Before attaching the hands fully, mold a tiny cup shape from pink clay. Position the arms so they appear to be clutching this cup against the dino’s chest. -
Adding Details:
Add the black eyes and create textural dots on the dino’s body using a needle tool or toothpick for extra character.
Texture Time
Press a piece of lace into the raw clay of the tablecloth or the dinosaur’s skin before it dries to add an intricate, realistic pattern instantly.
Step 3: Setting the Scene
-
Table Base:
Roll white clay into a thick cylinder. Pinch the middle to narrow it into an hourglass shape, flaring the bottom out for stability to create a pedestal leg. -
Table Top:
Flatten a disc of white clay. Use a small round cutter or knife to create a scalloped edge pattern. Place this on top of your pedestal leg, ensuring it’s level. -
Miniature Food:
Create a tiny tea set: a green cylinder for a sugar pot and a small cup with a handle. For the treat, stack three tiny flattened discs of beige clay, tapering in size, to make a tiered pastry. -
Cookie Plate:
Make a thin pink plate and sculpt a small beige circle. Texture the circle with a toothbrush to look like a biscuit and place it on the plate. -
Final Assembly:
Once all pieces are dry, I often brush a little pink pastel dust on the dinos’ cheeks for a blush effect. Arrange the pink dino on the wooden slice and position the table and green dino on a piece of fabric or lace to complete the scene.
Now you have a charming prehistoric picnic scene ready to display on your shelf
Dino Costume Onesie Characters
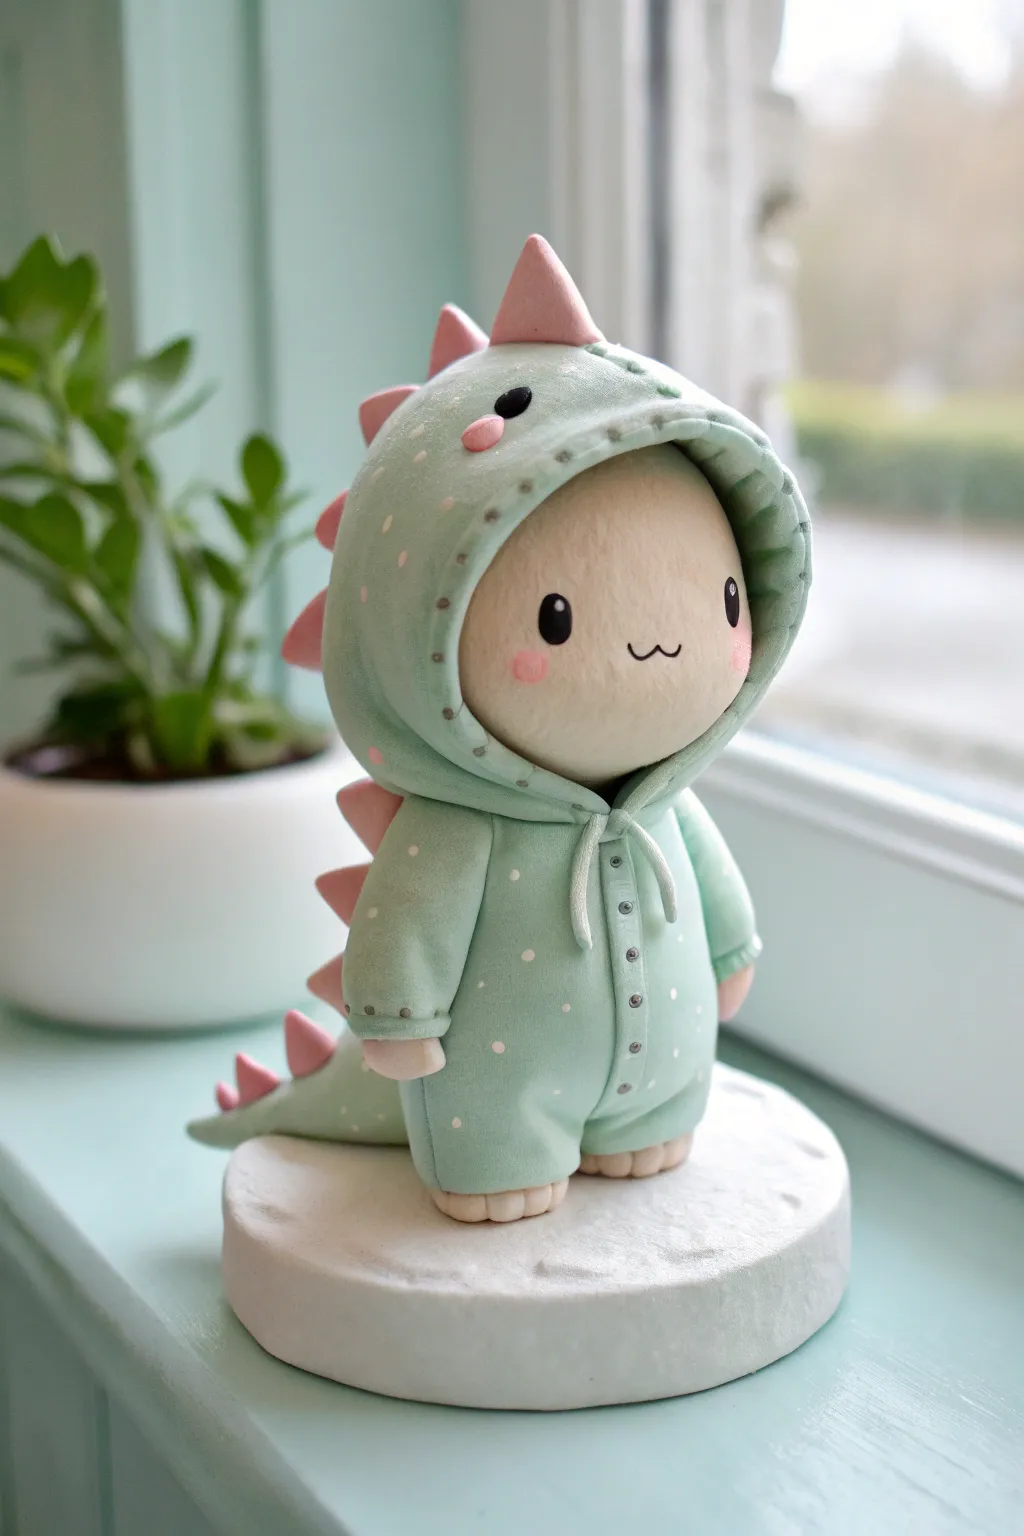
Create an adorable chibi character snug in a minty-green dinosaur costume, complete with soft pink spikes and tiny polka dots. This project focuses on achieving a smooth, matte finish that mimics the look of soft fabric on your clay figure.
Step-by-Step
Materials
- Air dry clay (white)
- Acrylic paints (mint green, soft pink, black, white)
- Clay sculpting tools (ball tool, needle tool, silicone shaper)
- White craft glue or PVA glue
- Rolling pin
- Fine detail paintbrush (00 or 000 size)
- Matte varnish or sealant
- Tootpick or wire for armature support
- Circle cutter or cookie cutter (for the base)
Step 1: Base and Body Construction
-
Prepare the stand:
Start by rolling out a thick slab of white clay and cutting a neat circle for the base. Use a ball tool or a textured roller to create a subtle faux-rock texture on the surface, then let it set slightly. -
Form the body armature:
Roll a smooth egg shape from white clay for the main body. Insert a toothpick or short piece of wire vertically through the center—this will connect the head, body, and base securely. -
Color mixing:
Mix a small amount of mint green paint into a larger ball of white clay until you achieve a consistent pastel shade. Do the same with a tiny bit of pink for the spikes. -
Dress the body:
Flatten a piece of your mint green clay and drape it over the body shape to create the onesie look. Smooth the seams at the back with a little water so it looks like a seamless piece of clothing.
Step 2: Head and Hood Features
-
Sculpt the head:
Roll a clean ball of white clay (uncolored) for the face. It should be slightly flattened on the front. Place this onto the neck wire. -
Create the hood:
Roll out a flat sheet of the mint green clay. Cut a wide strip and wrap it around the white head, pinching it at the back to close it. Leave the face exposed. -
Refine the hood edge:
Use a silicone tool to gently curl the front edge of the hood outward slightly, giving it a thick, fabric-like hem appearance. -
Add the hood drawstrings:
Roll two very thin snakes of mint clay. Attach them at the neckline where the hood meets the body, letting them hang down like tied strings.
Smoothing Seams
If you struggle to smooth clay seams, dip your finger in water (or baby oil for polymer clay) and gently rub the join in circles until invisible.
Step 3: Limbs and Tail
-
Attach the legs:
Form two short, chubby cylinders from mint clay. Attach them to the bottom of the body, blending the clay upwards so they look like part of the suit, not separate pieces. -
Add the arms:
Roll two tapered sausage shapes for arms. Indent the wider end to create a ‘sleeve’ look, then insert tiny white clay nubs for hands before attaching the arms to the sides of the body. -
Form the tail:
Create a thick, tapered cone of mint clay. Attach this to the lower back of the figure, curving it slightly to rest on the base for extra stability.
Texture Play
Before the clay dries, gently press a piece of real fabric or a toothbrush against the green parts to give the ‘onesie’ a realistic cloth texture.
Step 4: Details and Finishing
-
Add the spikes:
Create several small triangles from your pink clay. Glue them in a row running from the top of the hood, down the back, and onto the tail. Use a needle tool to gently texture lines onto the spikes. -
Paint the face:
Once dry, use your finest brush to paint two wide-set black oval eyes. Add a tiny white highlight dot to each eye for a lively look, and paint a small ‘w’ shape for the mouth. -
Apply blush:
Use a dry brush with a tiny amount of diluted pink paint (or pink pastel dust) to softly blush the cheeks. -
Paint the buttons:
Using a dotting tool or toothpick, add a vertical row of tiny grey or silver dots down the center of the belly to represent snap buttons. -
Add the pattern:
With white paint and a toothpick, carefully dot a random polka-dot pattern all over the mint green suit. Keep the dots tiny and delicate. -
Stitching details:
Use a grey fine-liner or very thin grey paint to draw tiny dash marks along the edge of the hood and cuffs to mimic stitching. -
Final seal:
Coat the entire figure with a matte varnish. Avoid glossy finishes, as the matte texture helps sell the soft, fabric-like effect of the costume.
Place your little dino friend on a shelf near a window to enjoy the soft natural light
Glow-In-The-Dark Pastel Dino Stars
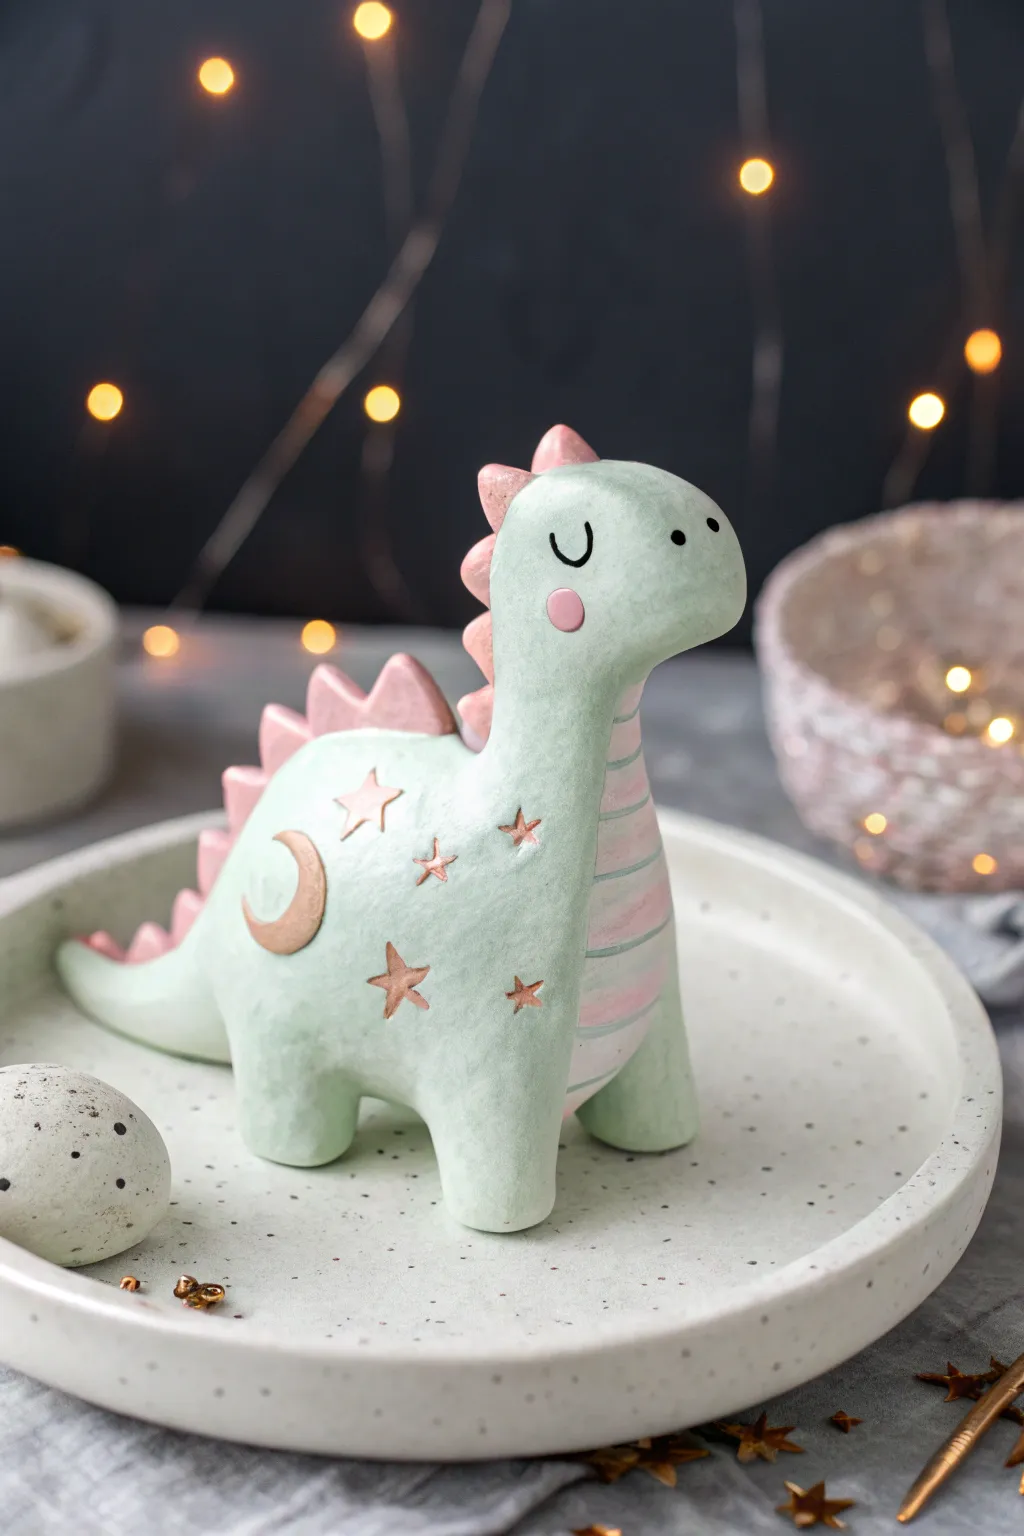
Create a dreamy night-time companion with this adorable pastel dinosaur sculpture made from air-dry clay. Featuring soft pink spikes and metallic celestial details, this gentle creature adds a touch of magic to any shelf.
Detailed Instructions
Materials
- Air-dry clay (white)
- Acrylic paints: Pastel Mint Green, Soft Pink, Black, Metallic Gold or Bronze, White
- Sculpting tools (needle tool, ball tool, rolling pin)
- Wire armature or toothpicks (for neck support)
- Water cup and small sponge
- Small star-shaped clay cutters (optional)
- Fine detail paintbrush
- Varnish or sealant (matte or satin finish)
- Sandpaper (fine grit)
Step 1: Sculpting the Body
-
Prepare the clay:
Start by conditioning your air-dry clay until it is smooth and pliable. If the clay feels dry, knead in a tiny drop of water to prevent cracking. -
Form the torso:
Roll a large ball of clay into a sturdy, slightly elongated egg shape. This will become the main body of your dinosaur. Flatten the bottom gently on your work surface so it stands upright on its own. -
Add the legs:
Create four smaller cylinders of equal size. Attach two to the front and two to the back of the body to form stubby, stable legs. Use a little water or clay slip (a mixture of clay and water) to blend the seams smoothly so the legs look integrated, not just stuck on. -
Shape the tail:
Roll a cone of clay and attach it to the rear of the body, positioning it so it rests on the ground for extra stability. Smooth the join thoroughly with your fingers or a sculpting tool. -
Construct the neck and head:
Roll a thicker cylinder for the neck and a rounded oval for the head. I like to insert a toothpick or wire into the body and neck for internal support before joining them. Attach the head to the neck, blending the clay to create a seamless, curvaceous silhouette.
Cracked Clay Crisis?
If small cracks appear during drying, mix a small amount of fresh clay with water to make a paste. Fill the cracks, smooth over, and let dry again before sanding.
Step 2: Adding Details
-
Create the spikes:
Roll out a small sheet of clay about 3-4mm thick. Cut out a series of small triangles, varying gradually in size. Attach them in a row running from the top of the head down the spine to the tail tip, using slip to secure them. -
Add celestial texture:
Roll very thin coils or use a small ball tool to create slightly raised crescent moon and star shapes on the dinosaur’s flank. Alternatively, cut tiny flat stars and a moon from thinly rolled clay and adhere them to the side of the body. -
Initial drying:
Allow the sculpture to dry completely. This usually takes 24-48 hours depending on the thickness. Turn it occasionally if possible to ensure even drying. -
Sanding:
Once bone dry, use fine-grit sandpaper to gently smooth out any fingerprints, bumps, or rough seams on the surface. Wipe away the dust with a slightly damp cloth.
Step 3: Painting & Decoration
-
Base coat:
Paint the entire body with the pastel mint green acrylic paint. You may need two thin coats for opaque coverage. Let the first coat dry fully before applying the second. -
Pink accents:
Paint the triangular spikes along the back with soft pink. Use the same pink to paint horizontal stripes across the belly and chest area for a cute, patterned effect. -
Face details:
Using your finest brush, paint two small black dots for eyes and a tiny ‘U’ shape for the smiling mouth between them. Add a small circle of pink on the cheek for a blush. -
Gilding the stars:
Carefully paint the raised star and moon shapes on the side with metallic gold or bronze paint. This step really brings the magical theme to life. -
Protective finish:
Seal your finished dinosaur with a matte or satin varnish to protect the paint and give the clay a professional, finished look.
Make It Glow
Mix glow-in-the-dark powder into your pastel green paint or use specific glow paint for the stars and moon to make a real nightlight companion.
Place your finished celestial dino on your desk or bedside table to add a calming, creative presence to your room