If you love that storybook-theme-park kind of magic, clay bead bracelets are such a fun way to wear it on your wrist. I’m sharing my favorite character-coded color palettes, letter-bead layouts, and iconic motif ideas you can mix and match into your own stack.
Mouse-Ear Icon Center Bracelet
Celebrate the leader of the club with this stylish tribute featuring the classic Mickey Mouse color palette. Using simple clay heishi beads and textural lava stones, you’ll create a sophisticated yet playful accessory that centers on a charming mouse-ear charm.
Step-by-Step Guide
Materials
- Black clay heishi beads (flat disc)
- Red clay heishi beads (flat disc)
- Yellow clay heishi beads (flat disc)
- Black lava stone beads (round, porous)
- Mickey Mouse icon charm (silver tone with black enamel)
- Elastic stretch beading cord (0.8mm recommended)
- Jewelry glue or clear nail polish
- Scissors
Step 1: Planning and Centerpiece
-
Measure your fit:
Begin by wrapping the elastic cord loosely around your wrist to determine the comfortable length. Add about 3-4 inches of extra cord to this measurement to ensure you have plenty of room for tying the finishing knot. -
Prepare the workspace:
Lay out a bead board or use a soft towel on your table. This keeps your beads from rolling away while you plan your pattern. -
Start with the charm:
Thread your Mickey Mouse icon charm onto the absolute center of your cut elastic cord. This will anchor your design and ensure the pattern stays symmetrical on both sides. -
Add texture with lava beads:
String three round black lava stone beads on the right side of the charm, and three identical lava beads on the left side of the charm. These larger, textured beads frame the centerpiece beautifully.
Knot Slipping?
If your elastic knot feels loose, try tying it while the cord is under tension. Ask a friend to hold the first loop tight against the beads while you tie the second loop.
Step 2: Creating the Color Pattern
-
Introduce the yellow acccents:
On the right side, add one single yellow heishi bead after the lava stones. Repeat this on the left side. -
Build the red block:
String a group of red heishi beads onto the right side. Looking at the design, you’ll want about 5 to 6 red beads to create a distinct stripe of color. -
Mirror the red:
Repeat that same count of red beads on the left side to maintain symmetry. -
Add the secondary yellow:
Place one yellow heishi bead after the red section on the right, and then do the same on the left. -
Begin the black transition:
Add a small group of black heishi beads—about 3 or 4—following the yellow bead on the right side. -
Mirror the transition:
Add the matching 3 or 4 black heishi beads to the left side.
Aromatherapy Trick
Add a drop of essential oil to the porous black lava beads near the charm. They act as a natural diffuser, carrying your favorite scent throughout the day.
Step 3: Finishing the Loop
-
Repeat the pattern:
Continue this pattern sequence: one yellow, a large block of red, one yellow, and a small block of black. Depending on your wrist size, you might fit one or two more full repeats. -
Fill the back:
Once you have enough color sections to cover the front and sides of your wrist, fill the remaining space at the back of the bracelet primarily with black heishi beads. This creates a comfortable, neutral closure. -
Check the symmetry:
Hold the two ends of the cord together and let the charm hang down. Ensure both sides of beads align perfectly before you commit to tying. -
Pre-stretch the cord:
Gently pull tightly on both ends of the elastic. I find this pre-stretching step crucial because it prevents the bracelet from sagging immediately after you wear it. -
Tie the knot:
Cross the left cord over the right and tie a basic overhand knot. Pull it tight. -
Secure with a surgeon’s knot:
Tie a second knot, but loop the cord through twice before pulling tight. This creates a secure surgeon’s knot that resists slipping. -
Apply adhesive:
Dab a tiny drop of jewelry glue or clear nail polish directly onto the knot. Let it dry completely for a minute. -
Trim the excess:
Use your scissors to trim the excess cord tails close to the knot, leaving just a tiny bit visible to ensure it doesn’t unravel. -
Hide the knot:
Gently gently wiggle the beads near the closure until the knot slips inside the hole of one of the larger beads, hiding it from view.
Slip on your new bracelet and enjoy the subtle nod to classic animation style


Storybook Castle Pastel Stack
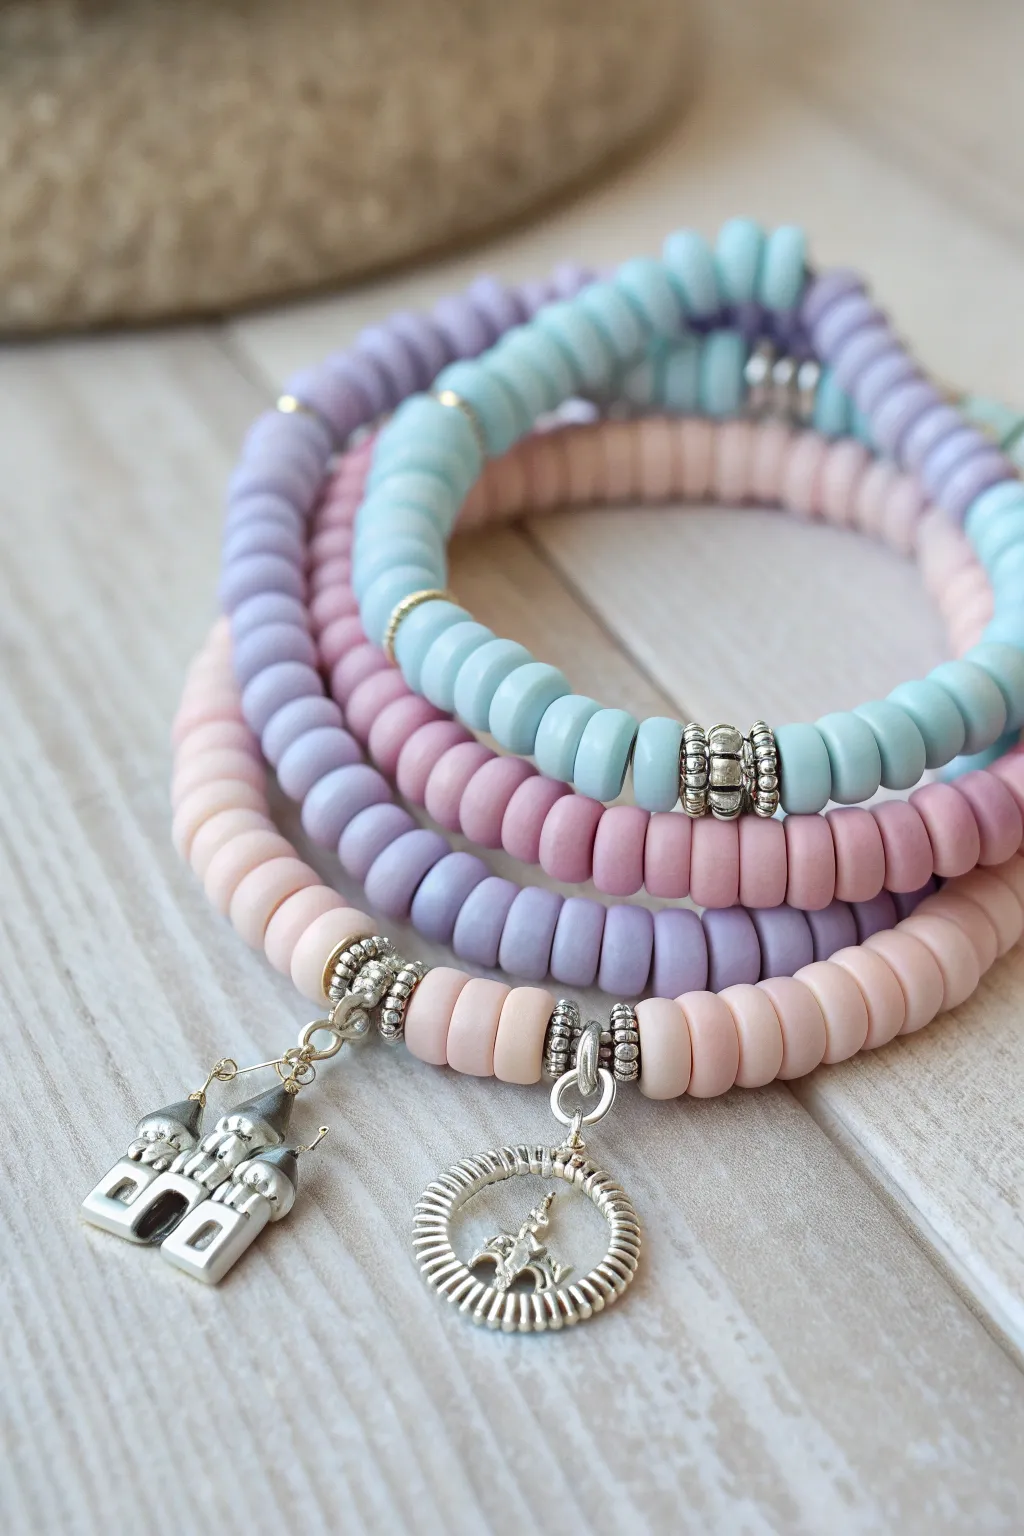
Whisk yourself away to a magical kingdom with this set of four coordinated stretch bracelets. Featuring soft matte pastel heishi beads and enchanting silver charms, this stack captures the dreamy essence of a fairy tale princess.
Detailed Instructions
Materials
- 6mm or 8mm matte polymer clay heishi disc beads in pastel blue, lavender, mauve, and light pink
- Silver-tone twisted ring spacer beads (approx. 6mm diameter)
- Silver-tone small daisy or smooth disc spacers
- Silver-tone decorative barrel spacers (ribbed design)
- Silver castle charm
- Silver carriage or circular icon charm
- Strong elastic bead cord (0.8mm recommended)
- Jump rings (4mm or 5mm)
- Jewelry adhesive or clear nail polish
- Scissors
Step 1: Planning Your Stack
-
Measure your wrist:
Before stringing, wrap a piece of string around your wrist to find your comfortable size. Add about half an inch to this measurement to ensure the bracelets aren’t too tight. -
Sort your palette:
Separate your heishi beads into piles by color: pastel blue, lavender, mauve, and light pink. This project uses a distinct monochromatic theme for each bracelet in the stack.
Step 2: Blue Bracelet Assembly
-
Cut the cord:
Cut a piece of elastic cord about 10-12 inches long. Having extra length makes tying the final knots much easier. -
String the base:
Begin threading the pastel blue heishi beads onto the elastic. I suggest using a bead stopper or piece of tape on the end to prevent beads from slipping off. -
Insert spacers:
Periodically interpolate the heishi beads with silver twisted ring spacers. The photo shows them placed roughly every 1.5 inches to add a touch of sparkle. -
Add the focal point:
For the blue strand, thread on a larger, decorative ribbed silver barrel bead in the center to serve as a focal point without a dangling charm. -
Finish the strand:
Continue adding blue beads until you reach your desired length.
Knot Hiding Trick
Use a bead with a slightly larger hole next to your knot location. It makes pulling the knot inside for a seamless finish much easier and cleaner.
Step 3: Pink & Mauve Bracelets
-
Create the mauve layer:
Repeat the stringing process with the mauve-colored beads. For this layer, keep it simple with just the clay beads and occasional thin silver spacers, skipping the large focal bead. -
Start the charm bracelet:
For the light pink charm bracelet, thread about half the length required with your pink heishi beads. -
Attach the castle:
Thread on two decorative twisted silver spacers. Between them, slide on the jump ring attached to your silver castle charm. This frames the charm beautifully. -
Complete the circle:
Finish stringing the rest of the pink beads to match the other bracelets’ sizes.
Loose Elastic?
Pre-stretch your elastic cord by pulling it firmly a few times before stringing. This prevents the bracelet from drooping or resizing after you wear it.
Step 4: Lavender Charm Bracelet
-
Prepare the lavender strand:
Begin stringing your lavender beads, incorporating small plain silver disc spacers every inch or so for variety. -
Add the circular charm:
Just like the pink bracelet, place your second silver charm (the circular icon or carriage) between two textured silver ring spacers at the center point. -
Final bead check:
Hold all four strands up together to ensure they are roughly the same circumference before tying them off.
Step 5: Securing the Knots
-
Tie the surgeon’s knot:
Remove your tape or bead stopper. Cross the ends of the elastic, bring one end over and under twice, then pull tight. Repeat this knotting process for extra security. -
Apply adhesive:
Place a tiny drop of jewelry glue or clear nail polish directly onto the knot. This prevents the elastic from slipping over time. -
Hide the knot:
Once the glue is tacky but drying, gently pull the knot inside the hole of a neighboring bead to hide it from view. -
Trim excess:
Carefully snip off the excess elastic tail close to the bead, being careful not to cut the main cord.
Slip on your new stack and enjoy the gentle pastel colors reminiscent of a storybook ending


Sea-Princess Teal Shell Mix

Capture the magic of the ocean with this charming bracelet inspired by everyone’s favorite mermaid. Featuring textured teal and smooth purple beads accented with silver spacers, it’s finished with a delightful shell charm that feels right at home on the shore.
Step-by-Step Tutorial
Materials
- Teal polymer clay beads (textured/sugar-effect, approx. 10mm)
- Purple polymer clay beads (smooth matte finish, approx. 10mm)
- Small silver spacer beads (approx. 3-4mm)
- Silver seashell charm
- Silver charm bail or large jump ring
- Silver decorative bead cap or ornate spacer (for the charm attachment)
- Strong elastic display cord (0.8mm or 1mm)
- Jewelry glue (GS Hypo Cement recommended)
- Scissors
- Bead stopper or masking tape
Step 1: Preparation & Charm Assembly
-
Measure your cord:
Cut a piece of elastic cord about 10-12 inches long. This generous length makes tying the final knot much easier. -
Secure the end:
Attach a bead stopper or simply fold a piece of masking tape over one end of the cord so your beads don’t slide off while you work. -
Prepare the charm:
Locate your silver seashell charm. Attach it securely to a charm bail or a sturdy jump ring using pliers if it isn’t already attached. -
Optional charm accent:
In the photo, the charm hangs from a slightly larger, ornate silver bead component. Thread your bail onto the elastic first, then thread this special decorative silver spacer on top of it so the charm hangs directly beneath it.
Step 2: Stringing the Pattern
-
Start the sequence:
Begin stringing from the right side of your charm setup. Add one smooth purple bead. -
Add a spacer:
Slide on a small silver spacer bead. These metallic accents add a nice break between the bold colors. -
Introduce the teal:
Thread on one textured teal bead. Notice the ‘sugar’ or ‘lava’ texture on these beads—it mimics coral reef structures perfectly. -
Complete the first segment:
Add another textured teal bead immediately after the first one. The pattern here uses pairs of the same color often. -
Switch back to purple:
Add a purple bead, followed simply by another purple bead. I find grouping them strictly by color blocks (2 teal, 2 purple) or alternating them with single colors keeps the design dynamic. -
Create the repeating pattern:
Follow the visual pattern from the image: generally alternating between teal and purple sections, separated by those small silver spacers. The pattern isn’t strictly 1-to-1; sometimes two teals are next to each other. -
Check the fit:
Wrap the beaded cord around your wrist. You want the beads to touch comfortably without gaps, but not be too tight. -
Balance the design:
Ensure you end your pattern with a bead that complements the start. If you started with purple on the right of the charm, try to end with purple on the left so the charm is framed symmetrically.
Loose Charm?
If the charm doesn’t hang straight, add tiny silver spacer beads on either immediate side of the charm bail. This acts as a buffer and keeps the larger clay beads from squeezing the charm sideways.
Step 3: Finishing Touches
-
Pre-stretch the cord:
Before tying, give the elastic a gentle tug. This pre-stretching prevents the bracelet from loosening up the first time you wear it. -
Tie the knot:
Remove the bead stopper. Tie a standard square knot (right over left, left over right). Pull the elastic tight so the knot disappears between beads. -
Secure with glue:
Apply a tiny drop of jewelry glue directly onto the knot. Let it tack up for a moment. -
Hide the knot:
If one of your beads has a large enough hole (often the purple ones are softer), gently pull the knot inside that bead to hide it. -
Trim excess:
Once dry, use sharp scissors to trim the excess cord tails as close to the bead as possible without snipping the knot.
Upgrade Your Texture
Instead of pre-bought textured beads, roll smooth teal clay in coarse sea salt before baking. Wash the salt away after baking for authentic ‘coral’ pits.
Slip on your new bracelet and enjoy those beachy vibes wherever you go


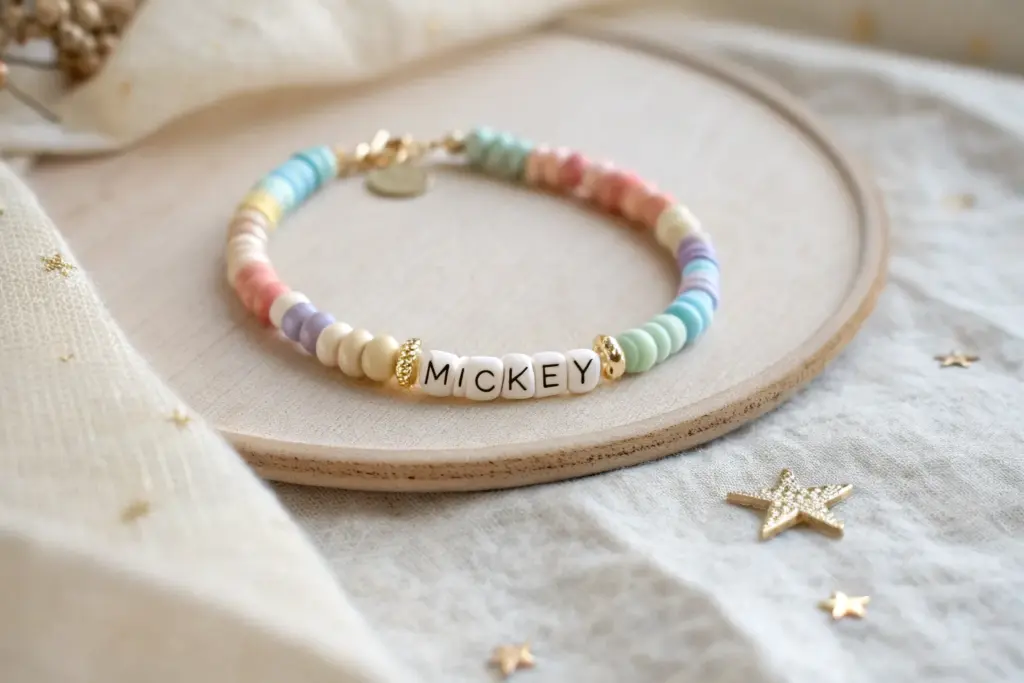
Tower-Hair Lavender and Sunflower Yellow
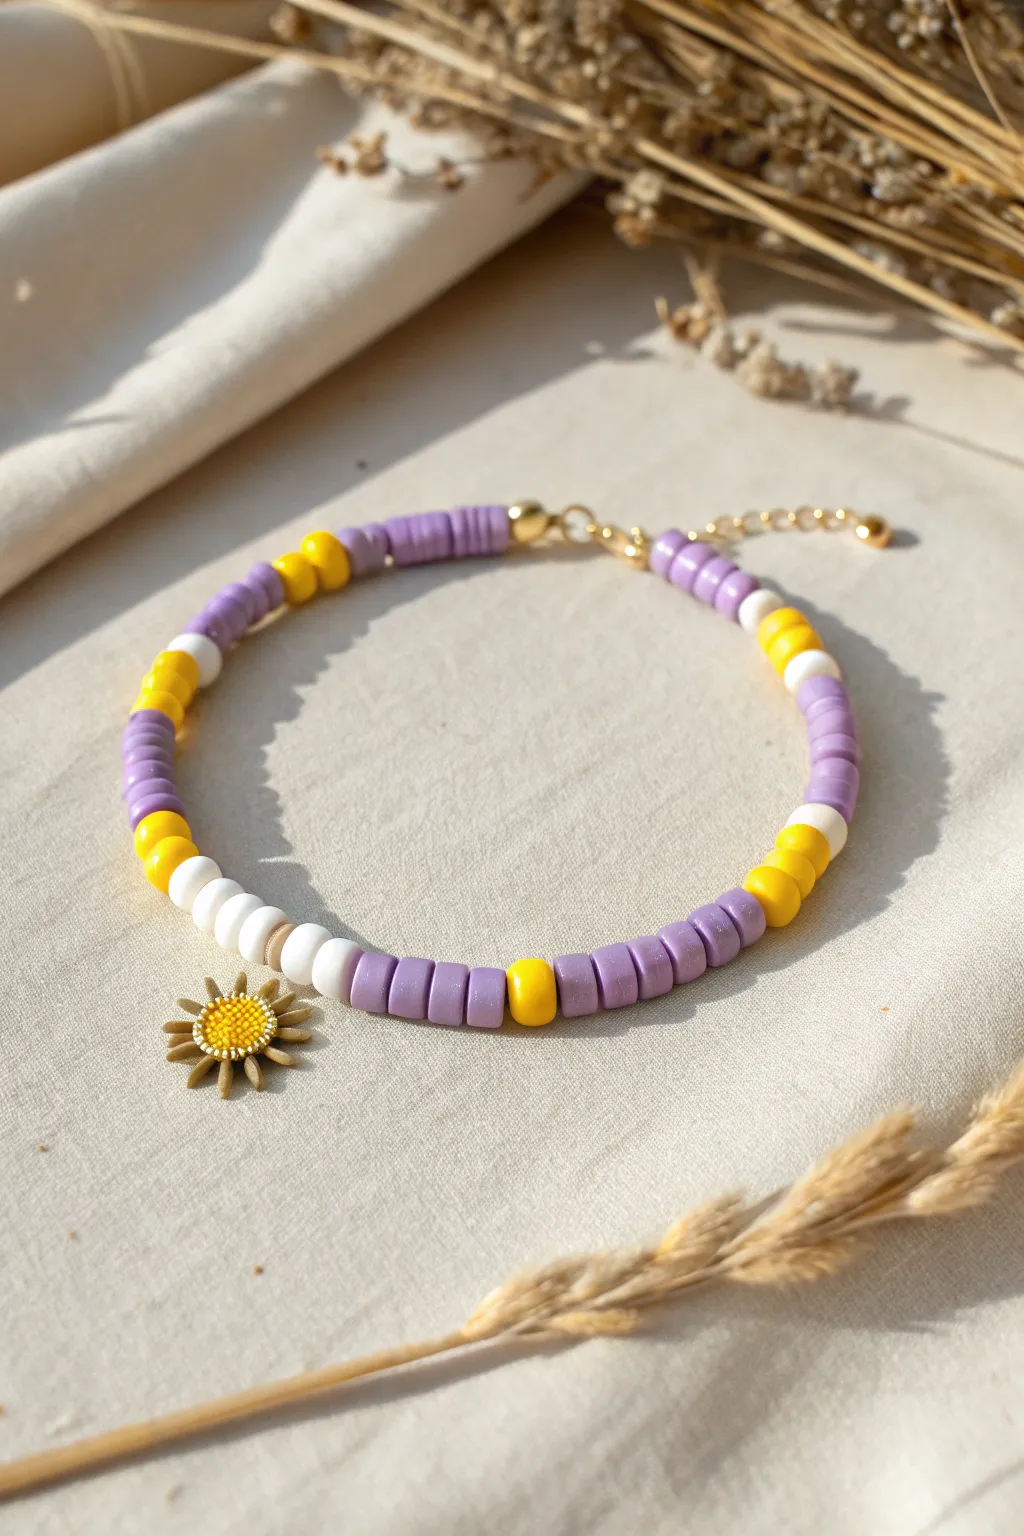
Channel the magic of floating lanterns and long locks with this charming beaded bracelet inspired by the Lost Princess. The mix of matte lavender discs, vibrant yellow accents, and a delicate sunflower charm captures the essence of Rapunzel’s tower adventures perfectly.
Step-by-Step Guide
Materials
- Lavender polymer clay heishi beads (approx. 6mm)
- Bright yellow polymer clay small round spacers (or large seed beads)
- White polymer clay heishi beads
- Gold tone sunflower charm with yellow center
- Gold jump ring (4-6mm)
- Small gold spacer beads (round)
- Elastic beading cord (0.8mm recommended)
- Gold crimp beads or knot covers
- Jewelry clam shell tips (optional, for a cleaner finish)
- Gold lobster clasp and extender chain
- Jewelry pliers (flat nose and round nose)
- Scissors
- Super glue or jewelry adhesive
Step 1: Planning and Prep
-
Measure the cord:
Cut a piece of elastic cord about 8 to 10 inches long. You’ll want plenty of extra slack on both ends to make knotting or attaching the clasp easier without beads slipping off. -
Secure the end:
If you are using a clasp system like the one in the photo, thread the cord through a clam shell tip, tie a secure knot, add a dab of glue, and close the shell over the knot. If just knotting the elastic later, simply tape one end to your table. -
Prepare the charm:
Using your flat nose pliers, carefully open the gold jump ring by twisting it sideways. Slide the loop of the sunflower charm onto the ring and close it back up securely, ensuring there is no gap.
Loose Beads?
If the pattern has gaps showing cord, you need tighter stringing. Push beads firmly together before knotting the end, but allow just enough slack so the bracelet can bend without snapping.
Step 2: Creating the Pattern
-
Start loosely:
Begin threading your beads. The pattern relies on blocks of color rather than a strict 1-1-1 sequence. Start with a section of the lavender heishi beads, using about 5-8 beads to create a solid purple block. -
Add a golden touch:
Slide on one of the bright yellow round spacer beads. This change in shape adds a lovely texture that contrasts with the flat clay discs. -
Add white highlights:
Thread on a small section of white heishi beads. In the photo, these sections are shorter than the purple ones—try using just 2 or 3 white beads. -
Repeat the rhythm:
Continue this alternating pattern: a long block of lavender, a yellow spacer, a short block of white, and another yellow spacer. -
Find the center:
Once you have beaded about halfway through your desired length, pause to add the focal point. This is where your charm will hang. -
The charm section:
Before adding the charm, thread a small section of about 4-5 white heishi beads. This creates a bright, neutral backdrop so the sunflower stands out. -
Attach the sunflower:
Slide the jump ring (with the sunflower attached) directly onto the elastic cord so it rests in the middle of that white bead section. -
Complete the white section:
Add 2-3 more white beads after the charm to balance the center focal point visually.
Royal Upgrade
Swap the plain yellow spacer beads for tiny gold-plated beads or Swarovski crystals. This adds a bit of princess sparkle that catches the sunlight beautifully.
Step 3: Finishing the Circle
-
Resume pattern:
Go back to your main rhythm. Add a yellow spacer, then a large block of lavender heishi beads. I find mirroring the first half looks best, but a random pattern is fun too. -
Check the fit:
Wrap the beaded strand around your wrist to check the size. Add or remove purple beads from the ends until it fits comfortably—remembering the clasp will add about half an inch of length. -
Secure the second end:
Feed the open end of the elastic through the hole of your second clam shell tip. -
Knot and glue:
Tie a double or surgeon’s knot firmly against the inside of the clam shell tip. Apply a tiny drop of super glue to the knot to ensure it never slips. -
Close the hardware:
Cut off the excess elastic. Use your flat nose pliers to gently squeeze the clam shell tip closed, hiding the knot inside. -
Attach the clasp:
Open a small jump ring, loop it through the hook of the clam shell tip, and attach your lobster clasp. Close the jump ring. -
Add the extender:
On the other end of the bracelet, repeat the jump ring process to attach the extender chain. This makes the bracelet adjustable for different wrist sizes.
Now you have a stunning accessory ready for your next adventure to see the floating lights

The Complete Guide to Pottery Troubleshooting
Uncover the most common ceramic mistakes—from cracking clay to failed glazes—and learn how to fix them fast.
Enchanted Rose Burgundy and Gold
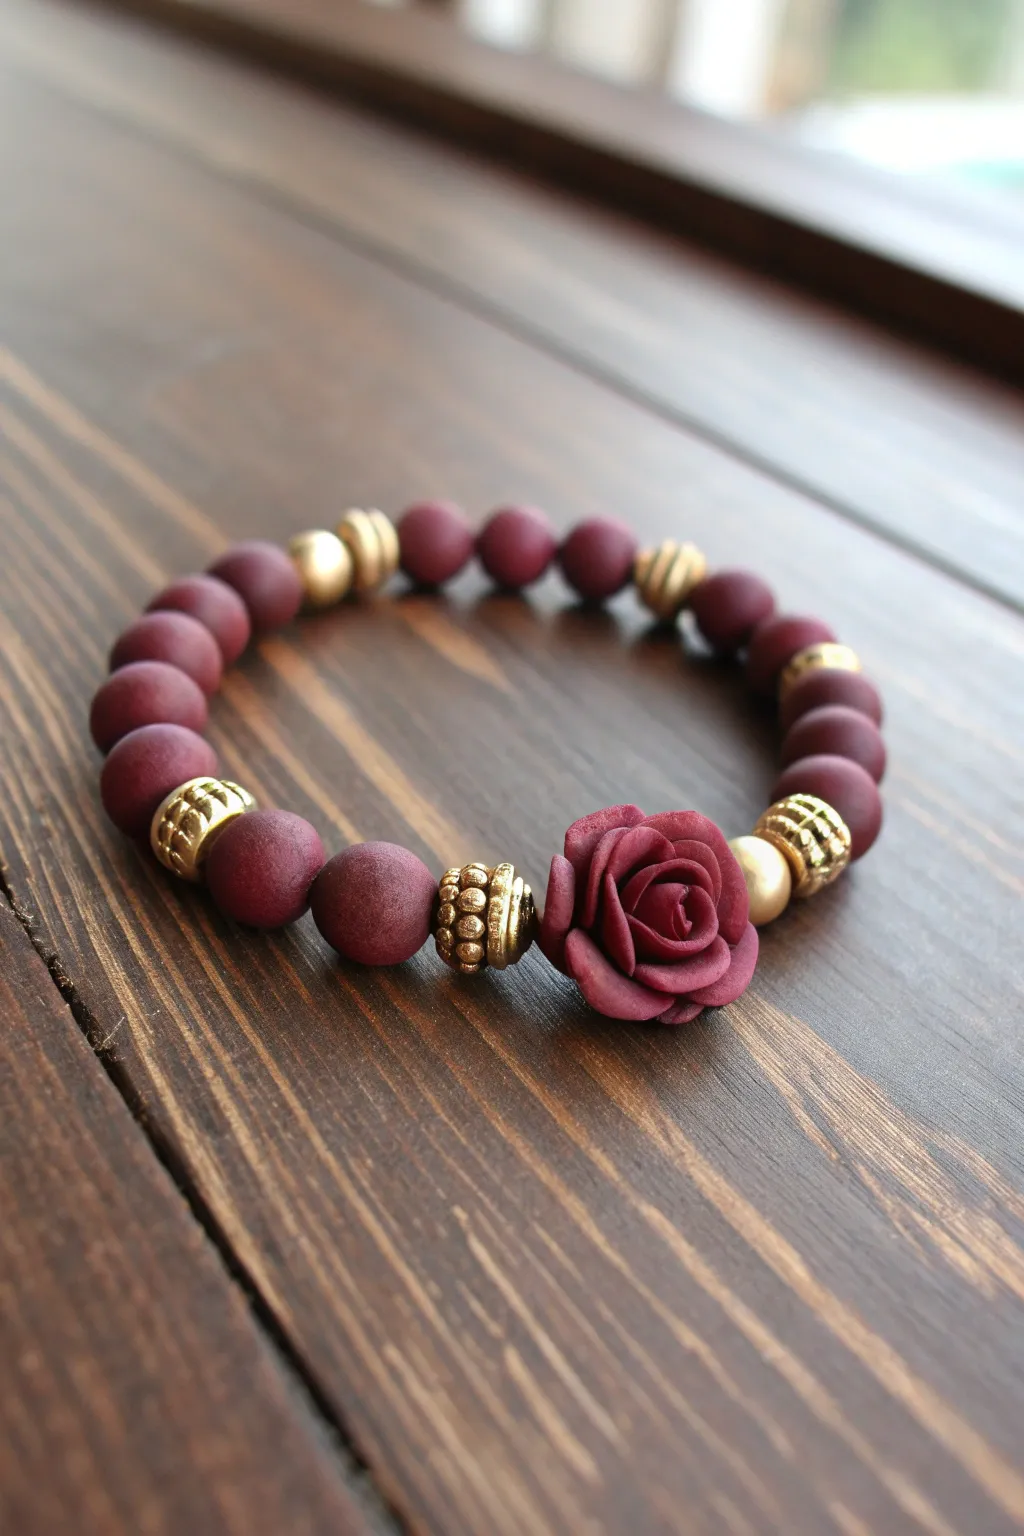
Capture the magic of a timeless tale with this elegant burgundy and gold beaded bracelet. Featuring a stunning handcrafted polmer clay rose as the centerpiece, this accessory perfectly balances rustic charm with regal colors.
How-To Guide
Materials
- Burgundy polymer clay (Fimo, Sculpey, or similar)
- Matte burgundy round beads (8mm or 10mm, likely acrylic or wood)
- Gold tone spacer beads (various patterns: ribbed, dotted, plain)
- One large gold round bead
- Strong elastic beading cord (0.8mm or 1.0mm recommended)
- Super glue or jewelry adhesive
- Beading needle (optional but helpful)
- Scissors
Step 1: Sculpting the Rose
-
Condition the clay:
Start by kneading a small amount of burgundy polymer clay until it is soft and pliable. -
Form the center:
Roll a tiny piece of clay into a teardrop shape to form the tightly curled center of the rose bud. -
Create petals:
Flatten several small balls of clay between your fingers to create thin, circular petal shapes. -
Layering:
Wrap the first petal around the teardrop center so it hugs it tightly. -
Building the bloom:
Continue adding petals, overlapping them slightly and curling the edges outward gently to mimic a blooming flower. -
Create the hole:
Once satisfied with the rose shape, carefully pierce a horizontal hole through the base of the flower using a toothpick or headpin before baking. -
Bake:
Bake the clay rose according to the manufacturer’s instructions (usually 275°F/135°C for 15-30 minutes) and let it cool completely.
Rose Won’t Stay Up?
If the rose spins downward due to weight, use a slightly thicker elastic cord or glue the cord inside the rose channel to keep it fixed in place.
Step 2: Assembling the Bracelet
-
Measure the cord:
Cut a piece of elastic cord about 10-12 inches long to give yourself plenty of room for tying knots. -
Pre-stretch:
Give the elastic a few firm tugs to pre-stretch it; this prevents the bracelet from loosening up after you wear it. -
String the focal point:
Thread your cooled clay rose onto the cord first so it sits in the middle. -
Add gold accents:
Place a ribbed or textured gold spacer bead on the left side of the rose. -
Balance the right side:
On the right side of the rose, add a large smooth gold bead followed immediately by a textured gold spacer. -
Begin the pattern:
Start adding your matte burgundy beads on either side, creating a symmetrical look extending from the rose. -
Insert spacers:
After every 3 to 4 burgundy beads, insert a gold spacer bead to break up the color and add rhythm to the design. -
Check the fit:
Wrap the strand around your wrist to check the size, adding or removing burgundy beads until it fits comfortably. -
Tie the knot:
Tie a secure surgeon’s knot (right over left, left over right) and pull tightly to secure the circle. -
glue and hide:
Dab a tiny drop of super glue on the knot, let it dry, trim the excess cord, and tuck the knot inside a neighboring bead hole.
Make it Sparkle
Brush a light dusting of gold mica powder or gold acrylic paint onto the edges of the rose petals before baking for an extra magical shimmer.
Now you have a piece of wearable enchantment ready for any royal ball or casual day out
Bayou Green and Firefly Glow Accents
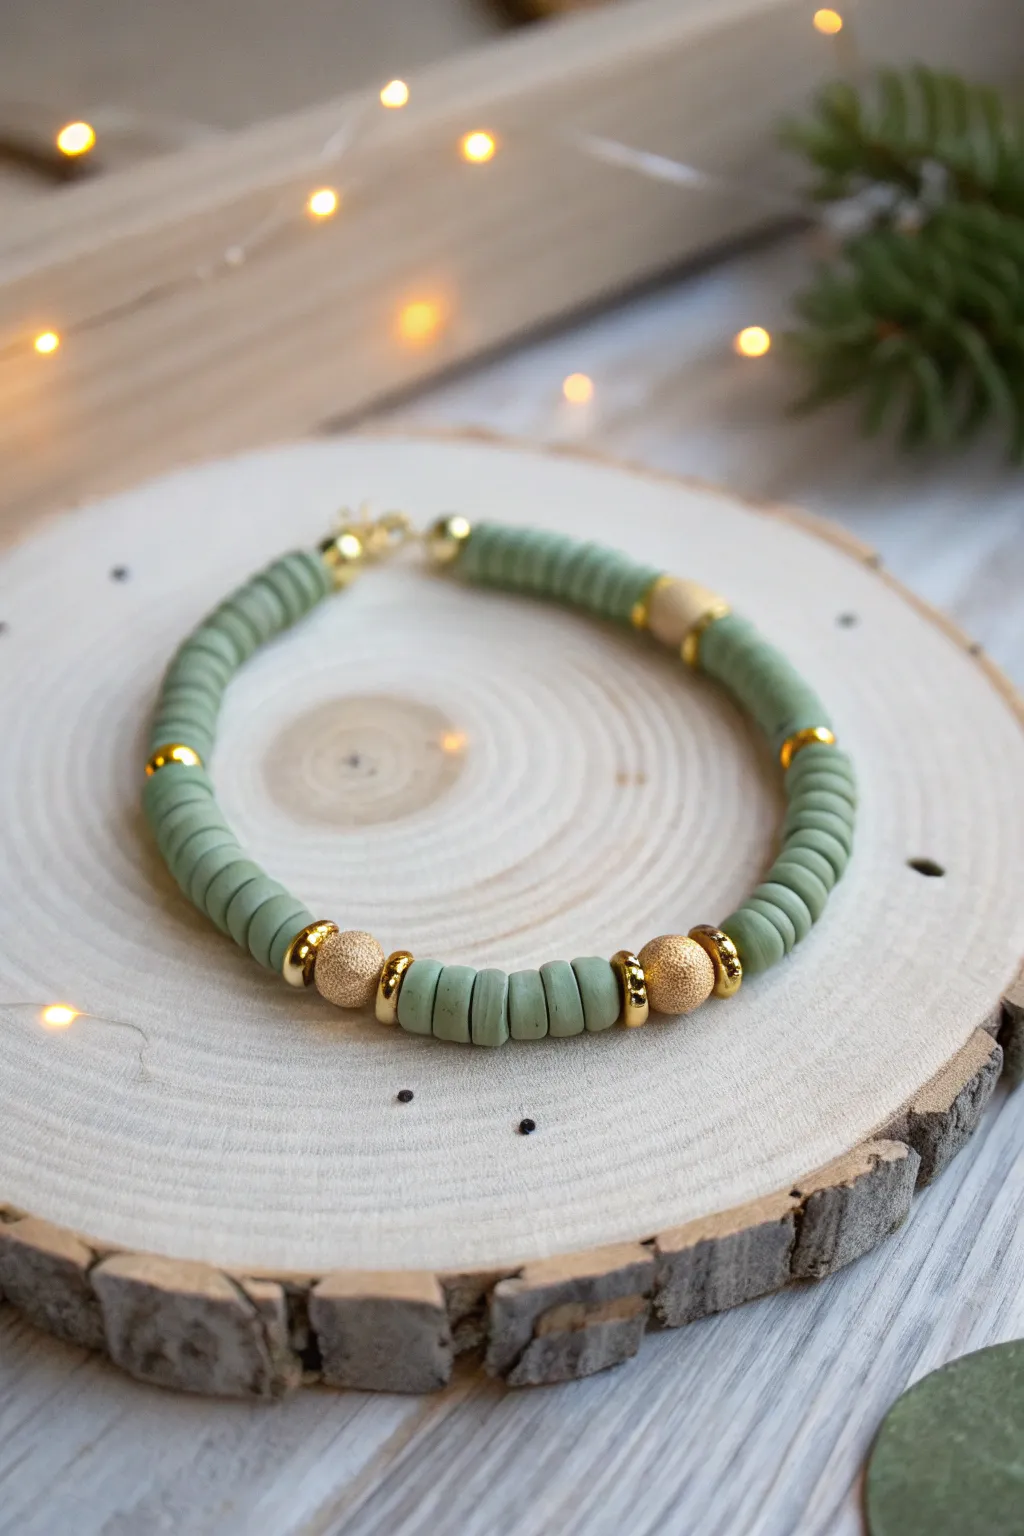
Evoke the magic of the evening bayou with this elegant bracelet featuring earthy sage heishi beads punctuated by warm, glowing gold accents. The combination of matte textures and metallic shimmer captures the enchanting atmosphere of fireflies dancing among the reeds.
Step-by-Step Tutorial
Materials
- Sage green polymer clay heishi beads (6mm)
- Gold plated stardust round beads (6mm or 8mm)
- Thick gold spacer beads or Rondelle beads (shiny finish)
- Elastic stretch cord (0.8mm clear)
- Gold tone crimp beads (optional for finishing)
- Gold tone jump rings and lobster clasp
- Jewelry glue (such as E6000 or G-S Hypo Cement)
- Scissors
Step 1: Planning and Stringing
-
Measure your wrist:
Cut a piece of elastic cord approximately 10-12 inches long. This generous length gives you plenty of room to tie knots without struggling against tension. -
Secure the end:
Place a piece of tape or a bead stopper on one end of your cord to prevent your design from sliding off while you work. -
Start with the base color:
Begin threading the sage green heishi beads onto the cord. String about 1.5 inches of these green discs to create the first solid section of the bracelet. -
Add the first glimmer:
Slide on one shiny gold spacer bead. This acts as a frame for the upcoming feature bead. -
Feature bead placement:
Thread one of the textured gold stardust beads next. The rough texture of this bead beautifully mimics the flickering light of a firefly. -
Close the accent section:
Add another shiny gold spacer bead immediately after the stardust bead to complete this focal point. -
Create separation:
Resume stringing the green heishi beads. Add a shorter section this time, perhaps just 5 to 8 discs, to create a small bridge between accents. -
Repeat the pattern:
Add your second accent cluster: one shiny spacer, one stardust bead, and one shiny spacer. -
Build the main body:
Now, thread a significantly longer section of the green heishi beads. This will form the back or side of the bracelet, balancing out the intricate front design. -
Add side details:
Roughly halfway through the remaining length, insert a single shiny gold spacer bead on its own for a subtle touch of elegance without the full stardust cluster. -
Check the fit:
Wrap the unfinished strand around your wrist to check the size. Add or remove green heishi beads until the ends meet comfortably without stretching the cord.
Uneven Heishi Stack?
Polymer clay heishi beads can vary in thickness. Sort through your strand before starting and discard any that are wedge-shaped or broken to ensure your bracelet lays flat and smooth.
Step 2: Finishing Touches
-
Prepare for closure:
If you are using a clasp, thread a crimp bead onto one end, followed by a jump ring attached to one half of your clasp. -
Loop back:
Thread the cord back through the crimp bead to create a loop holding the clasp component. Pull it snug but not tight. -
Secure the crimp:
Use flat-nose pliers to flatten the crimp bead firmly. I like to add a tiny dot of glue inside the crimp before flattening for extra security. -
Finish the other side:
Repeat the crimping process on the other end of the cord with the other half of your clasp (the lobster claw). -
Alternative knot method:
If you prefer a continuous stretch bracelet without a clasp, simply remove the tape and tie the two ends together using a surgeon’s knot (right over left, left over right twice). -
Secure the knot:
Apply a small dab of jewelry glue to the knot. Let it dry completely before trimming the excess cord close to the knot. -
Hide the mechanism:
If possible, slide one of the larger gold spacer beads over the knot or crimp bead to conceal the closure and give a seamless professional finish.
Pro Tip: Prestretching
Before adding any beads, give your elastic cord a few firm tugs. This ‘pre-stretching’ removes slack and prevents the bracelet from loosening up and sagging after the first few wears.
Wear your new accessory and enjoy the subtle sparkle


What Really Happens Inside the Kiln
Learn how time and temperature work together inside the kiln to transform clay into durable ceramic.
Desert-Princess Teal and Gold Name Strand
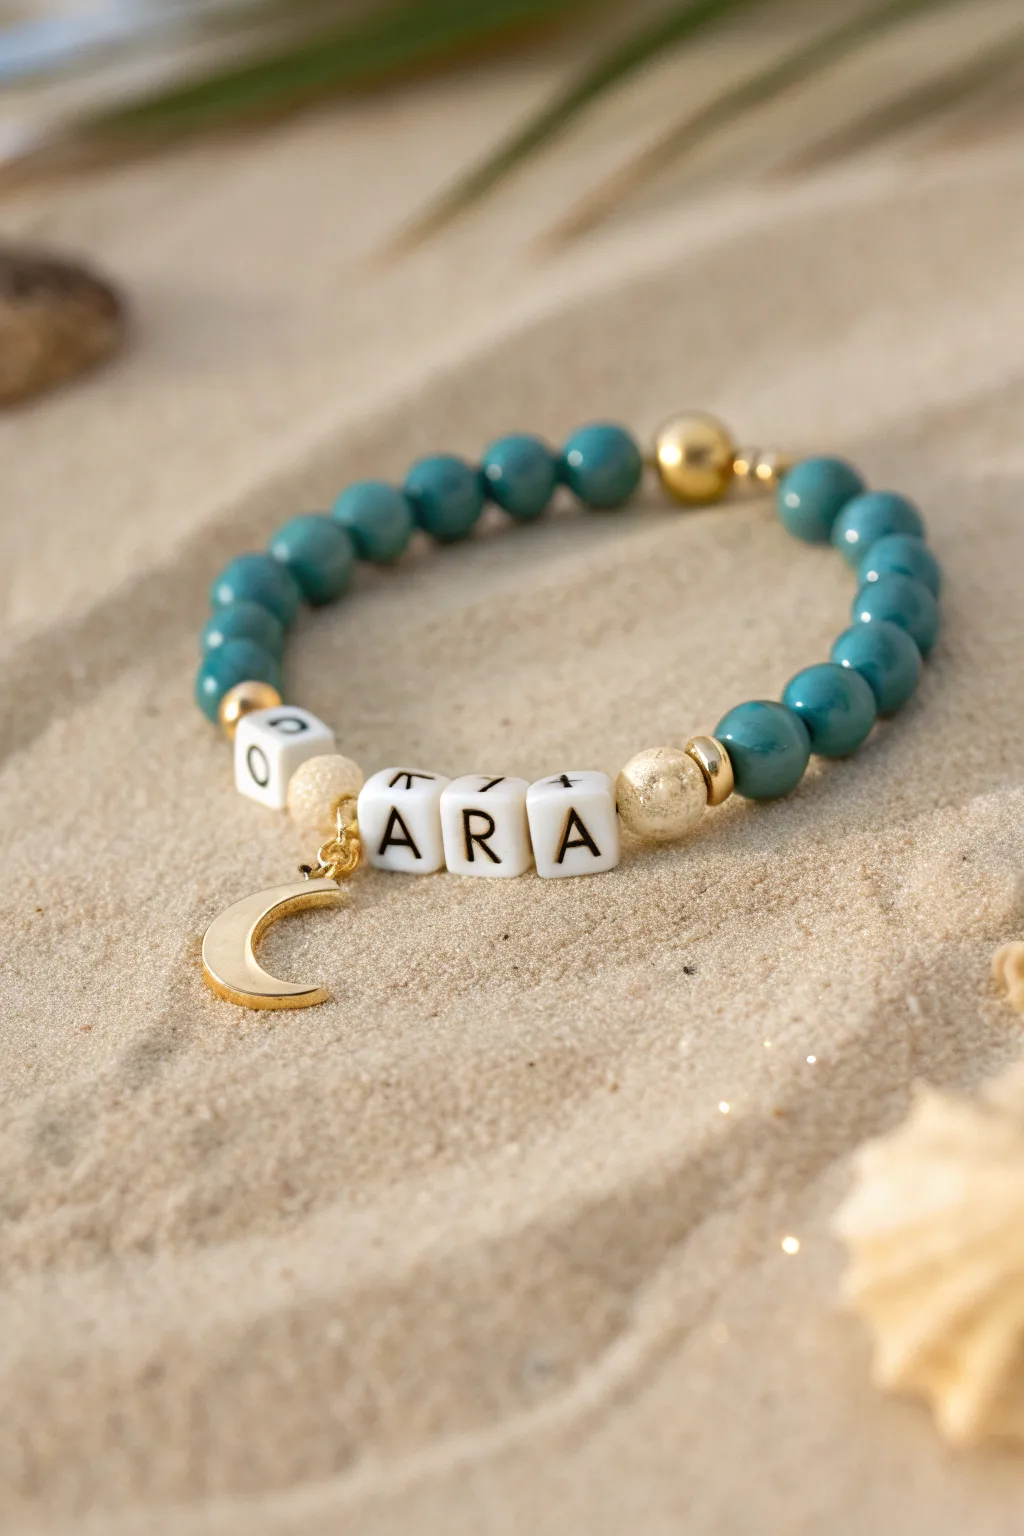
Channel the adventurous spirit of a desert princess with this elegant name bracelet. Featuring deep teal gemstone beads, warm gold accents, and a distinctive crescent moon charm, this piece feels both royal and grounded.
Step-by-Step Guide
Materials
- Teal turquoise or blue jade round beads (8mm or 10mm)
- Square white alphabet letter beads (black text)
- Gold crescent moon charm with a loop
- Gold-tone jump ring (4mm or 5mm)
- Small gold spacer beads or heishi beads
- Two textured gold focal beads (stardust or brushed finish)
- One smooth gold round bead
- Stretch cord (0.8mm clear elastic)
- Jewelry glue (GS Hypo Cement recommended)
- Scissors
Step 1: Planning Your Design
-
Measure your wrist:
Before you begin stringing, wrap a piece of string around your wrist to find your size, then add about half an inch for a comfortable fit. -
Pre-stretch the cord:
Cut a piece of stretch cord about 10-12 inches long. Give it a few firm tugs to pre-stretch it; this prevents the bracelet from sagging later. -
Select your name or phrase:
Pick out the letter beads you want to use. The example uses ‘OARA’, but you can choose ‘JASMINE’ or any name you like. -
Prepare the charm:
Using pliers or your fingers, carefully open the jump ring and slide the crescent moon charm onto it. Close the jump ring securely. This will hang between two beads.
Textured Treasure
Look for ‘Stardust’ beads specifically for the gold accents. Their rough, sparkling surface mimics desert sand much better than plain smooth metal beads.
Step 2: Stringing the Beads
-
Start the center focal point:
String the first letter of your chosen name (e.g., ‘A’) onto the elastic cord. -
Add the charm connection:
If you want the charm to hang mid-name or near the start, string the jump ring (with the moon attached) next. In our design, it sits right next to the letter beads. -
Place the spacer bead:
Add a textured gold ‘stardust’ bead next to your first letter or charm assembly. This adds that magical, glittering texture. -
Continue the name:
Thread on the remaining letter beads (e.g., ‘R’, ‘A’) to complete the name section. -
Add the second gold accent:
Slide on the second textured gold bead to frame the other side of the name, creating a balanced focal section. -
Begin the teal strand:
Start adding your teal round beads on one side of the name section. Count out about 8-10 beads depending on your wrist size. -
Add the back detail:
Once you have filled one side halfway around your wrist, slide on the single smooth gold round bead. This will sit at the back of the wrist opposite the name. -
Finish the teal strand:
Fill the rest of the cord with the remaining teal beads until the strand is long enough to circle your wrist comfortably. -
Check the fit:
Wrap the unfinished strand around your wrist to ensure it isn’t too tight or too loose. Add or remove a teal bead if necessary.
Step 3: Finishing Touches
-
Tie the first knot:
Bring the two ends of the elastic cord together. Tie a simple overhand knot, pulling it tight so there are no gaps between beads. -
Secure with a surgeon’s knot:
Tie a second knot, but this time loop the cord through twice (a surgeon’s knot) before pulling tight. This adds extra security. -
Apply adhesive:
I always put a tiny drop of jewelry glue directly onto the knot. This prevents it from slipping over time. -
Hide the knot:
Ideally, slide the adjacent gold bead over the knot while the glue is wet to hide it inside. If the hole is too small, just let it dry securely between beads. -
Trim the excess:
Once the glue is fully dry (wait about 15 minutes), use your scissors to trim the extra cord tails close to the knot.
Royal Layers
Create a stacked look by making a second bracelet using only the small gold spacer beads and one single large teal bead as a center focus.
Now you have a stunning, personalized accessory ready for your next adventure
Fairest-Princess Primary Color Blocks
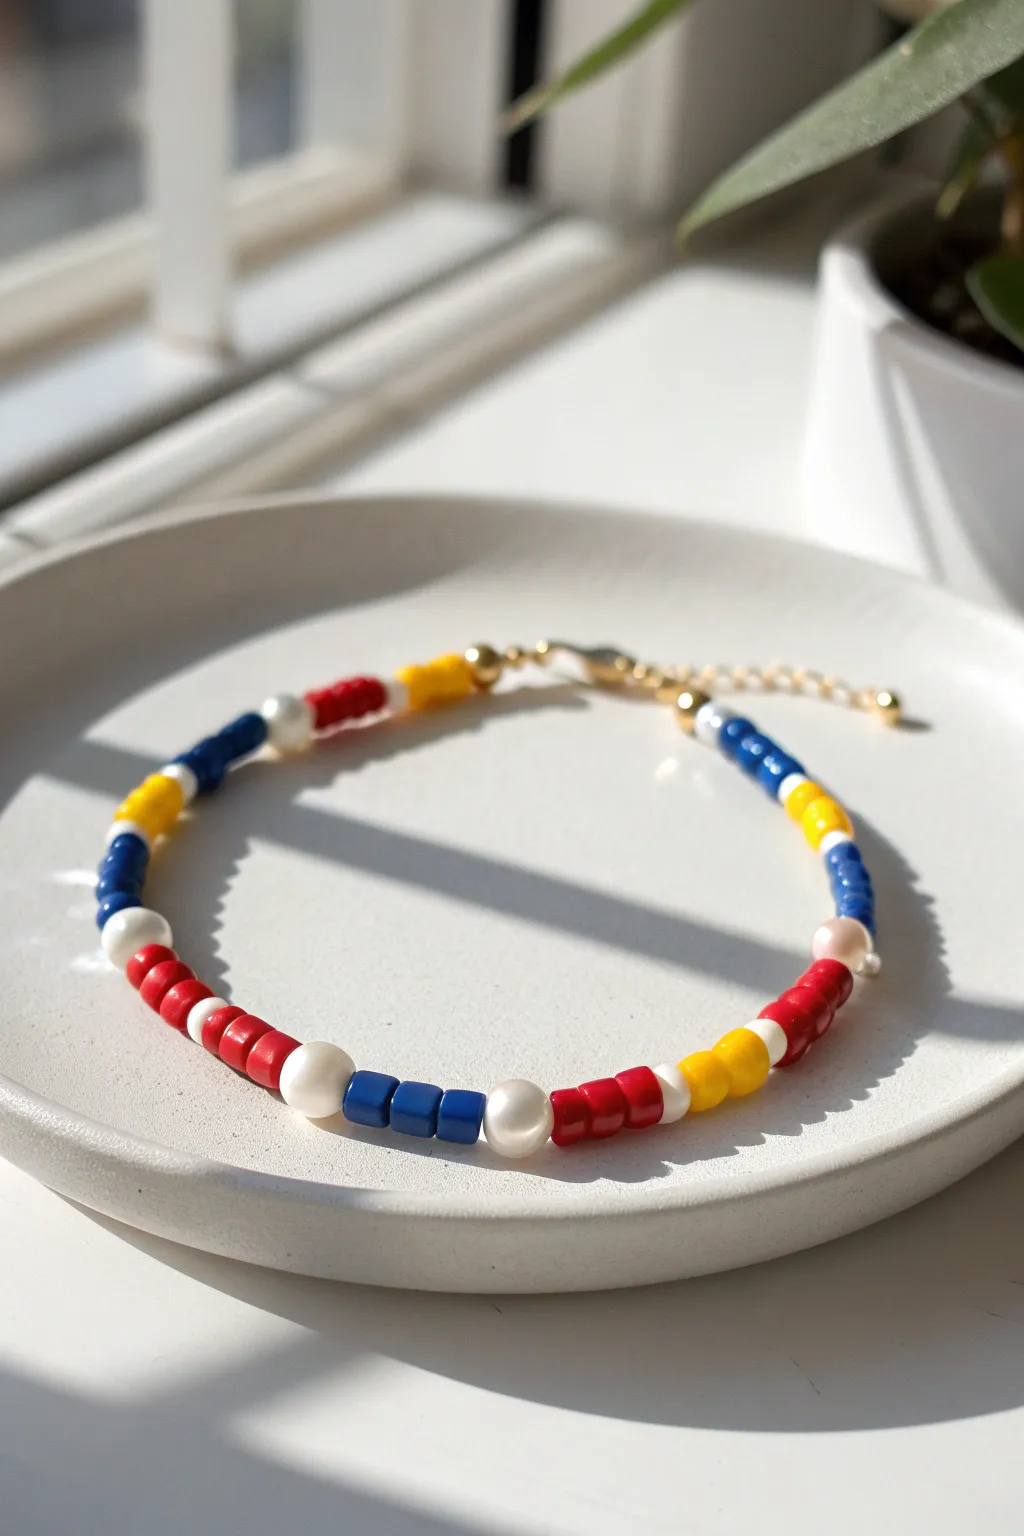
Capture the classic charm of the fairest one of all with this elegant bracelet featuring bold primary color blocks. The mix of matte clay heishi beads and lustrous freshwater pearls creates a timeless look that nods to iconic fairytale dresses without being overly costume-like.
How-To Guide
Materials
- Red polymer clay heishi beads (4-6mm)
- Blue polymer clay heishi beads (4-6mm)
- Yellow polymer clay heishi beads (4-6mm)
- White polymer clay heishi beads (4-6mm)
- Freshwater pearls (approx. 6mm, irregularly shaped)
- Gold spacing beads (round, small 3mm)
- Gold crimp beads
- Gold lobster clasp
- Gold extension chain
- Beading wire (clear or gold-tinted, 0.38mm)
- Crimping tool or flat-nose pliers
- Wire cutters
- Ruler or measuring tape
Step 1: Planning the Pattern
-
Measure your wrist:
Before laying out your beads, wrap a measuring tape around your wrist to find your desired length. Add about half an inch for comfort, remembering that the chunky pearls will take up some interior space. -
Establish the color units:
This design relies on repeating color blocks. Create a ‘unit’ consisting of three beads of the same color. For example, stack three red heishi beads together to see the thickness of a single color block. -
Determine the sequence:
Examining the photo, the pattern follows a specific rhythm: a pearl, a single white spacer bead, a color block (e.g., blue), a single white spacer bead, another color block (e.g., yellow), and usually repeating back to a pearl. Lay your beads out on a bead board or towel to finalize this sequence before stringing.
Pearl Perfection
Look for “potato” or “baroque” pearls rather than perfectly round ones. Their unique, bumpy texture contrasts beautifully with the uniform, coin-like shape of the clay heishi beads.
Step 2: Starting the strand
-
Cut the wire:
Cut a piece of beading wire about 10 inches long. This gives you plenty of extra room on both ends to work with the clasp without frustration. -
Attach the first clasp component:
Thread a crimp bead onto one end of the wire, followed by the extension chain ring (or a jump ring). Loop the wire back through the crimp bead to create a secure loop. -
Secure the start:
Use your crimping tool to flatten the crimp bead firmly. Give the wire a gentle tug to ensure it holds. It helps to thread the short tail of the wire into the first few beads of your design for a cleaner finish. -
Add a gold accent:
Begin the beading with a small gold round spacer bead. This adds a professional touch right next to the hardware.
Apple Red Accent
Swap the standard red block for a single, tiny red apple charm or a red heart bead at the very center. It’s a subtle nod to the poison apple that fits the theme perfectly.
Step 3: Stringing the Design
-
Thread the first color block:
Slide on three blue heishi beads. Ensure they sit flat against each other. -
Add a separator:
Place a single white heishi bead next. This thin slice of white acts as a ‘palette cleanser’ between the colors, making them pop more vividly. -
Thread the second color block:
Slide on three yellow heishi beads. -
Incorporate the pearl:
Select a freshwater pearl. I prefer using ones that are slightly irregular for that organic, romantic look. Slide this onto the wire. -
Continue the pattern:
Following the pearl, string the sequence: 3 red beads, 1 white bead, 3 blue beads, 1 white bead, 3 yellow beads, then another pearl. Note that the red section in the image is slightly longer (about 5-6 beads), creating a focal point often seen in the front center of the bracelet. -
Check the symmetry:
As you work, occasionally lift the wire to see how the beads drape. The heishi beads should stack neatly while the pearls will naturally break up the straight line. -
Adjust length needed:
Continue repeating the color blocks and pearls until you are about 0.5 inches short of your total desired length to account for the clasp.
Step 4: Finishing Touches
-
End with gold:
Finish the bead stringing with one last small gold round spacer bead to mirror the beginning. -
Thread the final crimp:
Slide a crimp bead onto the wire, followed by the lobster clasp. -
Create the final loop:
Pass the wire back down through the crimp bead and through the first gold spacer and one or two clay beads. -
Pull tight and secure:
Pull the wire taut so there are no large gaps between beads, but not so tight that the bracelet becomes stiff. Crimp the bead firmly with your tool. -
Trim excess wire:
Use flush cutters to snip the remaining wire tail as close to the beads as possible without nicking your work.
Slip on your new bracelet and enjoy that subtle touch of storybook magic in your everyday style

TRACK YOUR CERAMIC JOURNEY
Capture glaze tests, firing details, and creative progress—all in one simple printable. Make your projects easier to repeat and improve.
Savanna Sunset Warm Ombre
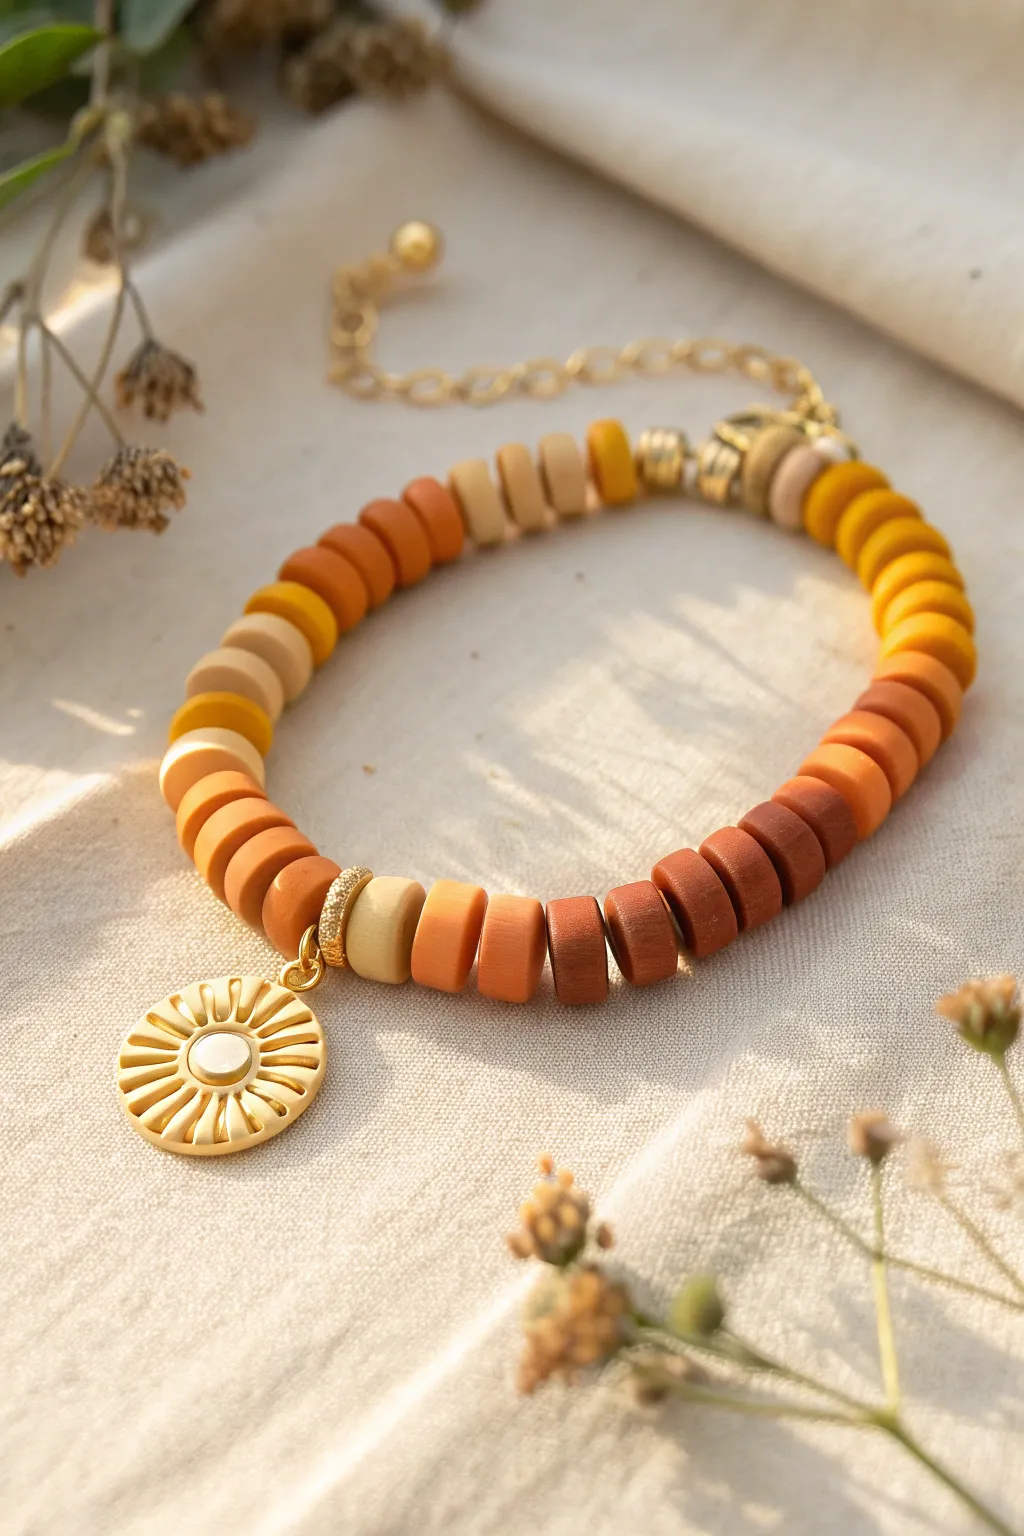
Create a wearable piece of the pride lands with this Lion King-inspired design that captures the warmth of an African sunset. The rich gradient of earthy golds, terracottas, and browns is perfectly accented by a shining sun charm.
Step-by-Step Tutorial
Materials
- Polymer clay heishi beads (6mm or 4mm) in: mustard yellow, honey gold, burnt orange, terracotta, and dark chocolate brown
- Gold-plated sunburst charm with a white center stone
- Gold beading wire (0.38mm or 0.45mm)
- Gold lobster clasp
- Gold extender chain with teardrop end
- 2 Gold crimp beads
- 2 Gold crimp covers
- 2 Gold wire guards (optional but recommended)
- Small gold jump ring (4mm-6mm)
- Gold spacer beads (thin rondelle style)
- Flat nose pliers
- Wire cutters
- Bead design board or ruler
Step 1: Planning the Gradient
-
Lay out the palette:
Begin by sorting your heishi beads by color tone on your bead board. You want to create a visual flow from light to dark. -
Design the ombre:
Experiment with the sequence before stringing. A repeating pattern of 5-7 beads per color block works well to establish the gradient. -
Create the sequence:
Arrange the beads in this order: Mustard Yellow -> Honey Gold -> Burnt Orange -> Terracotta -> Dark Chocolate -> Terracotta -> Burnt Orange -> Honey Gold. Make sure the transition looks smooth.
Stiff Bracelet?
If the finished bracelet feels rigid or kinks up, you crimped too tightly. Leave a tiny gap (about 1mm) of slack wire before the final crimp to allow beads to rotate.
Step 2: Stringing the Beads
-
Prepare the wire:
Cut a piece of beading wire about 10-12 inches long. This gives you plenty of extra room to work with the finishing crimps. -
Secure the start:
Thread a crimp bead and a wire guard onto one end. Loop the wire back through the crimp bead to create a loop for your clasp later. -
Lock the crimp:
Use your flat nose pliers to flatten the crimp bead securely. I like to give it a gentle tug to ensure it holds firm. -
Cover the mechanics:
Place a gold crimp cover over the flattened crimp bead and gently close it with pliers so it looks like a round gold bead. -
Begin beading:
Start threading your pre-planned pattern. You might want to add a single small gold spacer bead between major color transitions for a subtle glimmer. -
Add the focal point:
Locate the exact center of your design. Insert a gold spacer bead, followed by a gold jump ring (which will hold the charm), and another gold spacer bead. -
Finish the pattern:
Continue stringing the second half of your gradient pattern until the beaded section measures about 6 to 6.5 inches (or your desired wrist size).
Step 3: Adding the Charm & Hardware
-
Attach the charm:
Open your gold jump ring using two pairs of pliers (twist side-to-side, never pull apart). Slide the sunburst charm onto the ring and close it securely around the center wire gap you created. -
Crimp the end:
Thread a crimp bead and a wire guard onto the unfinished end. Pass the wire through the last loop of your extender chain, then back through the crimp bead. -
Tighten the wire:
Pull the wire taut so there are no gaps between beads, but leave just enough slack so the bracelet remains flexible and doesn’t stiffen up. -
Final secure:
Flatten the crimp bead with pliers and trim the excess wire tail flush with the bead. -
Hardware finish:
Cover this final crimp with a crimp cover. Attach the lobster clasp to the starting loop using a jump ring if you haven’t already attached it directly.
Seamless Ombre
For a smoother color melt, mix the beads at the transition points. Instead of a hard stop, use a pattern like A-A-B-A-B-B between color blocks.
Now you have a beautifully warm accessory ready to wear on your next adventure
Ice-Queen Icy White Glitter Stack
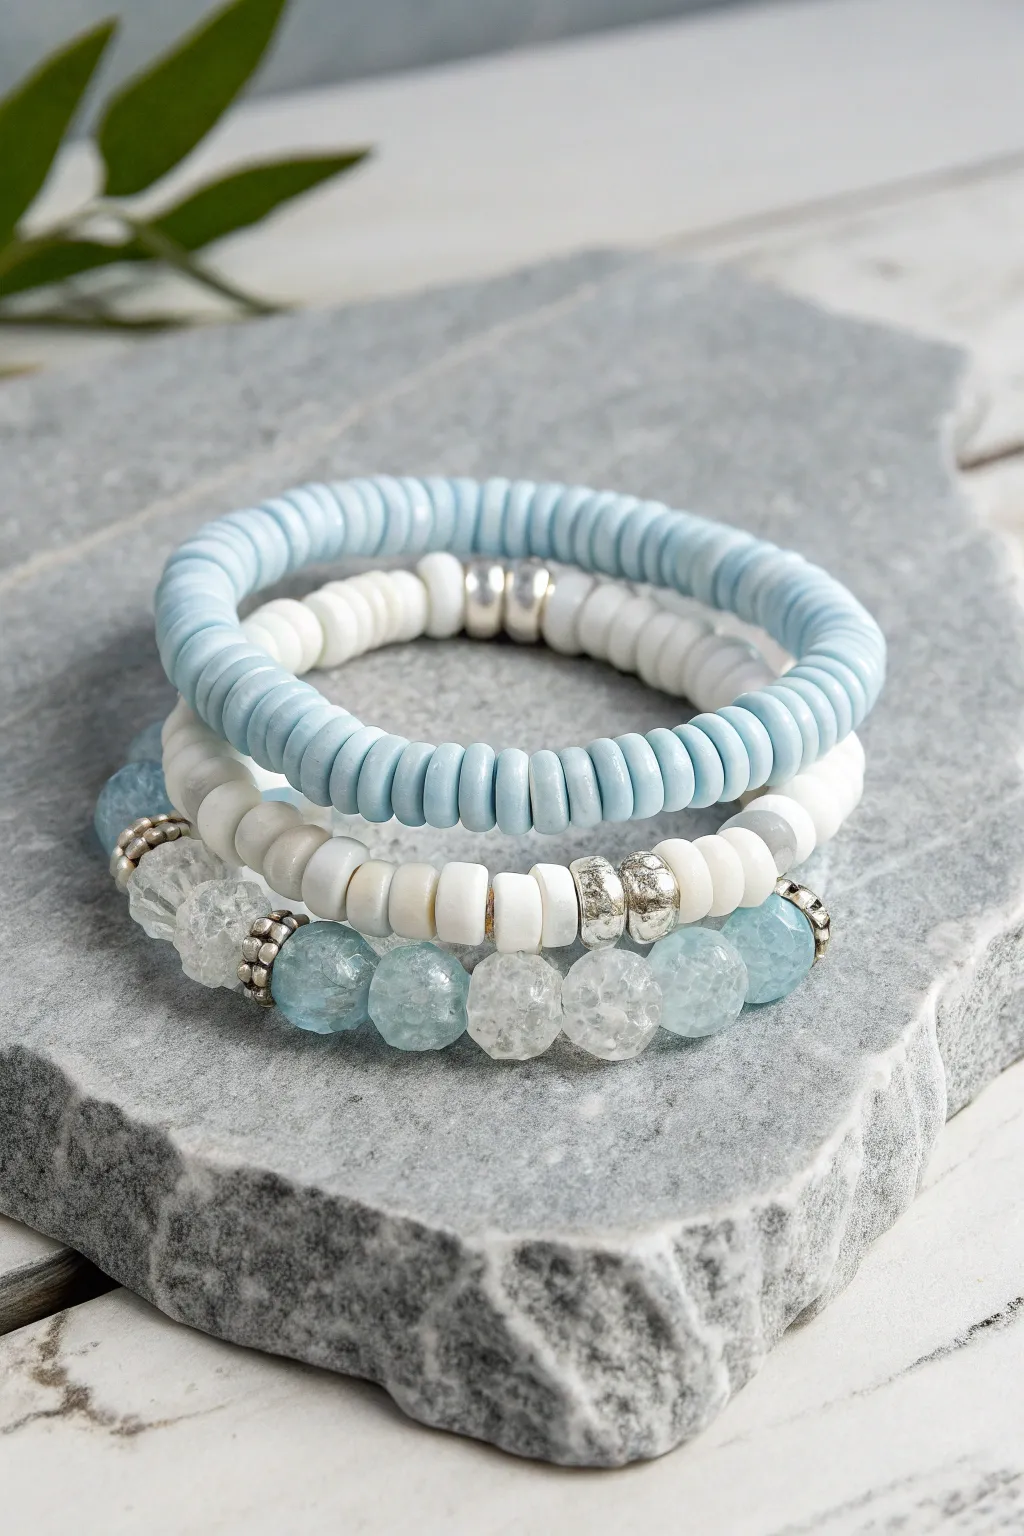
Channel the serene beauty of a winter landscape with this icy stack of three bracelets, blending matte textures with sparkling facets. This project combines soft heishi discs with glittering glass beads for a look fit for an ice queen.
Step-by-Step
Materials
- Light blue polymer clay heishi beads (6mm)
- Cream or off-white polymer clay heishi beads (6mm)
- Faceted glass or quartz beads in clear/white (8mm or 10mm)
- Faceted glass or gemstone beads in light blue (aquamarine or blue quartz style, 8mm or 10mm)
- Silver spacer beads (metal rondelles or smooth round beads)
- Silver focal accent beads (textured or larger round)
- Flexible jewelers elastic cord (0.8mm)
- Jewelry glue or clear nail polish
- Scissors
Step 1: Planning Your Stack
-
Measure your wrist:
Before you begin stringing, measure your wrist and add about half an inch for a comfortable fit. This usually equates to roughly 7 inches for an average adult wrist. -
Lay out the design:
I always suggest laying your beads out on a bead board or a soft towel first. This stops them from rolling away and helps you visualize the pattern before committing to the string.
Knot Security
When tying elastic, pull the cord tight enough that the beads bunch slightly. Over time, elastic relaxes, so a tight initial fit prevents gaps from appearing later.
Step 2: Creating the Blue Heishi Band
-
Cut the cord:
Cut a piece of elastic cord about 10-12 inches long. Having extra length makes tying the final knot much easier than struggling with short ends. -
String the base:
Begin stringing your light blue heishi beads. You want these to form the majority of the bracelet, covering about 90% of the circumference. -
Add silver accents:
Once the blue section is complete, slide on two or three silver spacer beads. These will act as the focal point and hide the knot later. -
Check the fit:
Wrap the strand around your wrist to ensure it sits comfortably without digging in. Add or remove a few heishi discs if necessary. -
Secure the bracelet:
Tie a strong surgeon’s knot (right over left, left over right), pulling the elastic tight to pre-stretch it slightly. -
Finishing touches:
Apply a tiny dab of jewelry glue to the knot, let it dry, trim the excess cord, and gently tuck the knot inside one of the silver beads.
Make It Sparkle
Add a snowflake charm to the crystal bracelet using a generic jump ring. It adds movement and emphasizes the winter theme perfectly.
Step 3: Creating the Cream Heishi Band
-
Start the second strand:
Cut another length of elastic cord. For this layer, we are using the cream or off-white heishi beads to create contrast against the blue. -
Create the pattern:
String the cream beads until you have nearly a full circle. This bracelet mirrors the first one but swaps the primary color. -
Add silver texture:
Instead of smooth spacers, select a slightly more textured silver bead or a larger silver focal bead to place between the cream sections for visual interest. -
Tie and finish:
Repeat the knotting process: tie a surgeon’s knot, glue, trim, and hide the knot within the metal bead.
Step 4: Creating the Crystal Accent Band
-
Prepare the final cord:
Cut your final piece of elastic. Since the glass beads are heavier, you might want to pre-stretch the cord firmly before stringing to prevent sagging later. -
Alternate the crystals:
String your beads in an alternating pattern: two clear faceted beads, followed by two light blue faceted beads. This mimics the look of ice and water. -
Intersperse spacers:
Between every set of four crystal beads (or wherever you prefer texture), add a small silver daisy spacer or rondelle bead. -
Balance the weight:
Ensure the beads are distributed evenly. If you are using a large focal bead, place it in the center and work symmetrically outwards. -
Final knot:
Tie your final surgeon’s knot securely. Because the holes in stone beads can be larger, make sure the knot is large enough not to slip through, or hide it inside a silver spacer. -
Trim and set:
Trim the ends close to the knot after the glue has fully cured. Stack on your wrist with the other two for the complete frozen effect.
Wear your new icy stack together or mix and match them with other silver jewelry for a cool winter look
Pixie-Dust Pastels With Star Spacers
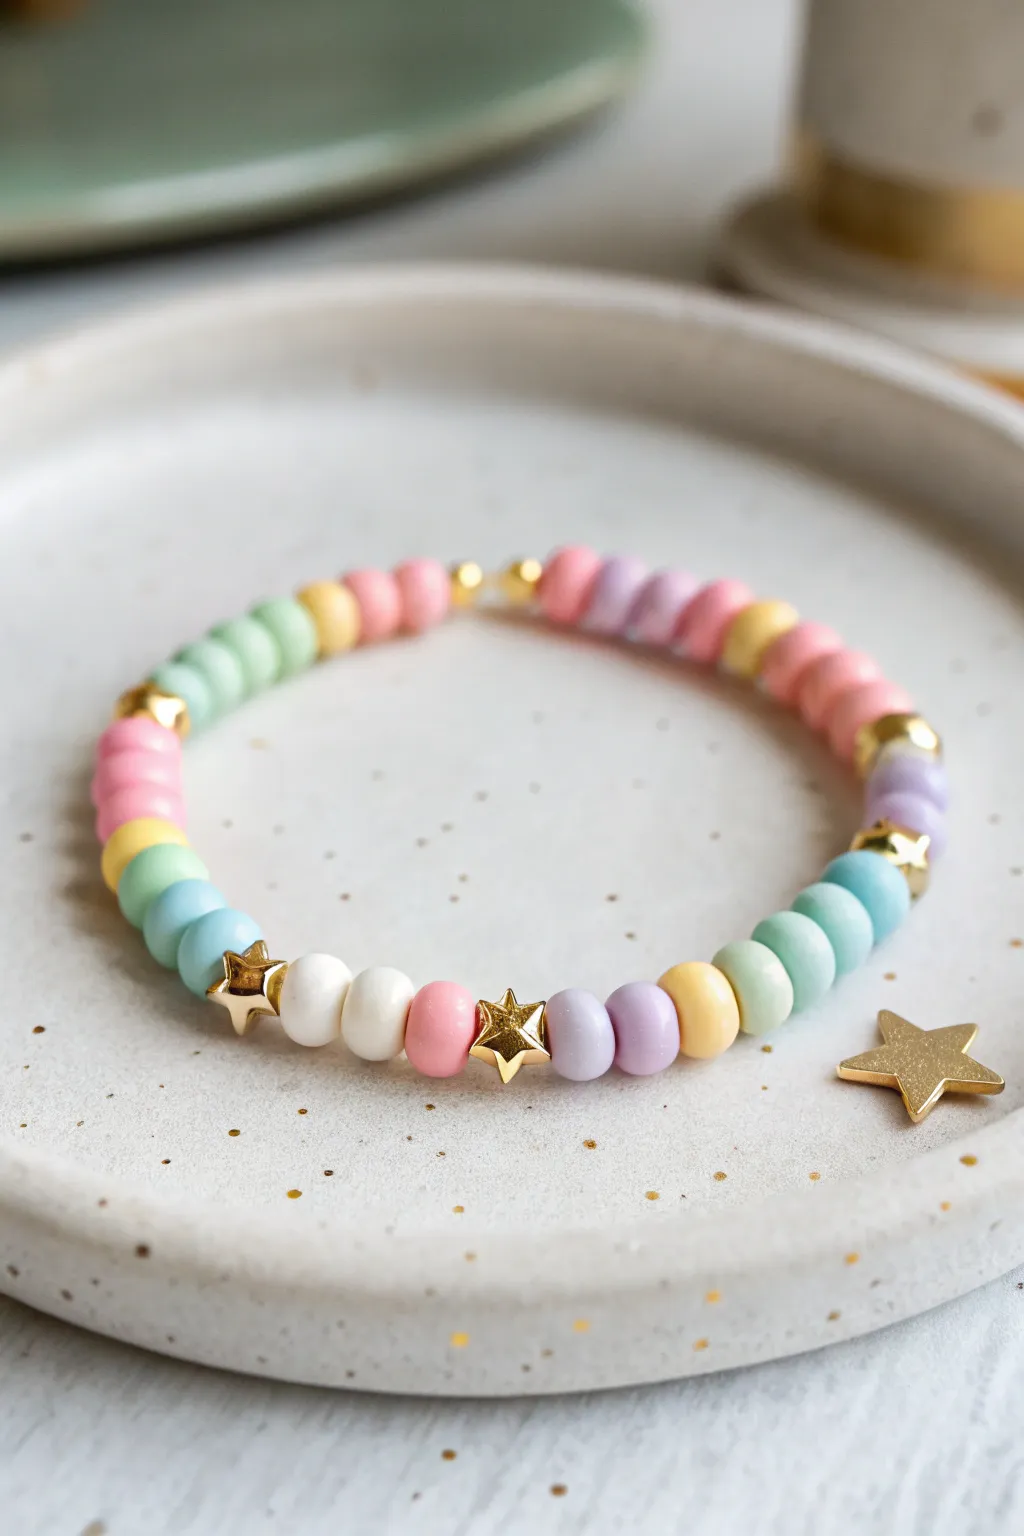
Capture a bit of fairy magic with this delicate bracelet featuring soft pastel hues and shimmering golden stars. The design alternates sweet candy-colored beads with elegant metallic spacers for a look that feels both playful and polished.
Detailed Instructions
Materials
- Polymer clay Heishi beads (assorted pastels: light pink, lavender, lemon yellow, mint green, baby blue)
- White or cream round acrylic beads (approx. 4-6mm)
- Gold star spacer beads (approx. 6mm)
- Small gold round spacer beads (2-3mm)
- Clear elastic beading cord (0.7mm or 0.8mm)
- Super glue or jewelry cement
- Scissors
Step 1: Planning and Sorting
-
Measure your wrist:
Cut a piece of elastic cord about 10-12 inches long. This gives you plenty of extra room to tie the knot later without losing beads. -
Select your palette:
Gather your pastel clay beads. You will need a mix of soft pinks, purples, yellows, greens, and blues to achieve that dreamy ‘pixie dust’ vibe. -
Pre-stretch the cord:
Gently tug on the elastic cord a few times before you start beading. I find this helps prevent the bracelet from sagging or stretching out permanently after the first wear.
Knot Slipping?
If your elastic knot feels insecure, try pre-stretching the knot itself slightly before gluing. Use a Surgeon’s Knot specifically, as standard square knots often slip on slick elastic cord.
Step 2: Stringing the Pattern
-
Secure the end:
Place a piece of tape or a binder clip on one end of your elastic cord to act as a stopper so your beads don’t slide off while you work. -
Start the main sequence:
Begin threading your clay beads. Create small color blocks by stringing 2-3 beads of the same color together before switching hues. -
Create color flow:
Move through your colors in a rough gradient or repeating pattern—for example, pink, yellow, green, blue, purple—keeping those 2-3 bead clusters for visual weight. -
Insert the first gold accents:
After about an inch of pastel clay beads, add a small gold round spacer bead to introduce a touch of glimmer. -
Continue the pattern:
Resume your pastel color blocking. String another inch or so of the colorful clay beads. -
Add a star focal point:
Thread on one of the larger gold star spacers. These act as the ‘pixie dust’ highlights of the piece. -
Introduce variance:
To break up the flat clay beads, thread on two white round acrylic beads. Place a gold star spacer between them or right next to them for an asymmetrical, organic look. -
Resume pastel blocks:
Go back to your 2-3 bead color blocks. Try to ensure the colors used near the white beads contrast nicely, like using a bright pink or purple next to the neutral white. -
Complete the circumference:
Continue this pattern around the bracelet—alternating sections of pastel blocks with sporadic gold stars and round spacers—until the beaded length measures your wrist size.
Step 3: Finishing Touches
-
Check the fit:
Wrap the unfinished strand around your wrist to verify the size. Add or remove a few clay beads if it feels too tight or loose. -
Tie the knot:
Remove the tape or clip. Bring the two ends together and tie a surgeon’s knot (right over left, left over right, looping the top strand through twice on the second pass). -
Secure the bond:
Pull the knot tight. Apply a tiny drop of super glue or jewelry cement directly onto the knot to ensure it never slips. -
Hide the knot:
If possible, gently slide a nearby bead (one with a larger hole is best) over the knot while the glue is still slightly tacky to conceal it. -
Trim the excess:
Once the glue is fully dry, use your scissors to snip the excess elastic tails close to the bead, being careful not to cut the main cord.
Clean Color Changes
When switching pastel colors, separate them with a single thin white clay bead or a tiny gold seed bead. It makes the transition between colors look much sharper and cleaner.
Slip on your new creation and enjoy the subtle sparkle of your handcrafted accessory
Theme-Park Snack Color Combo Bracelet
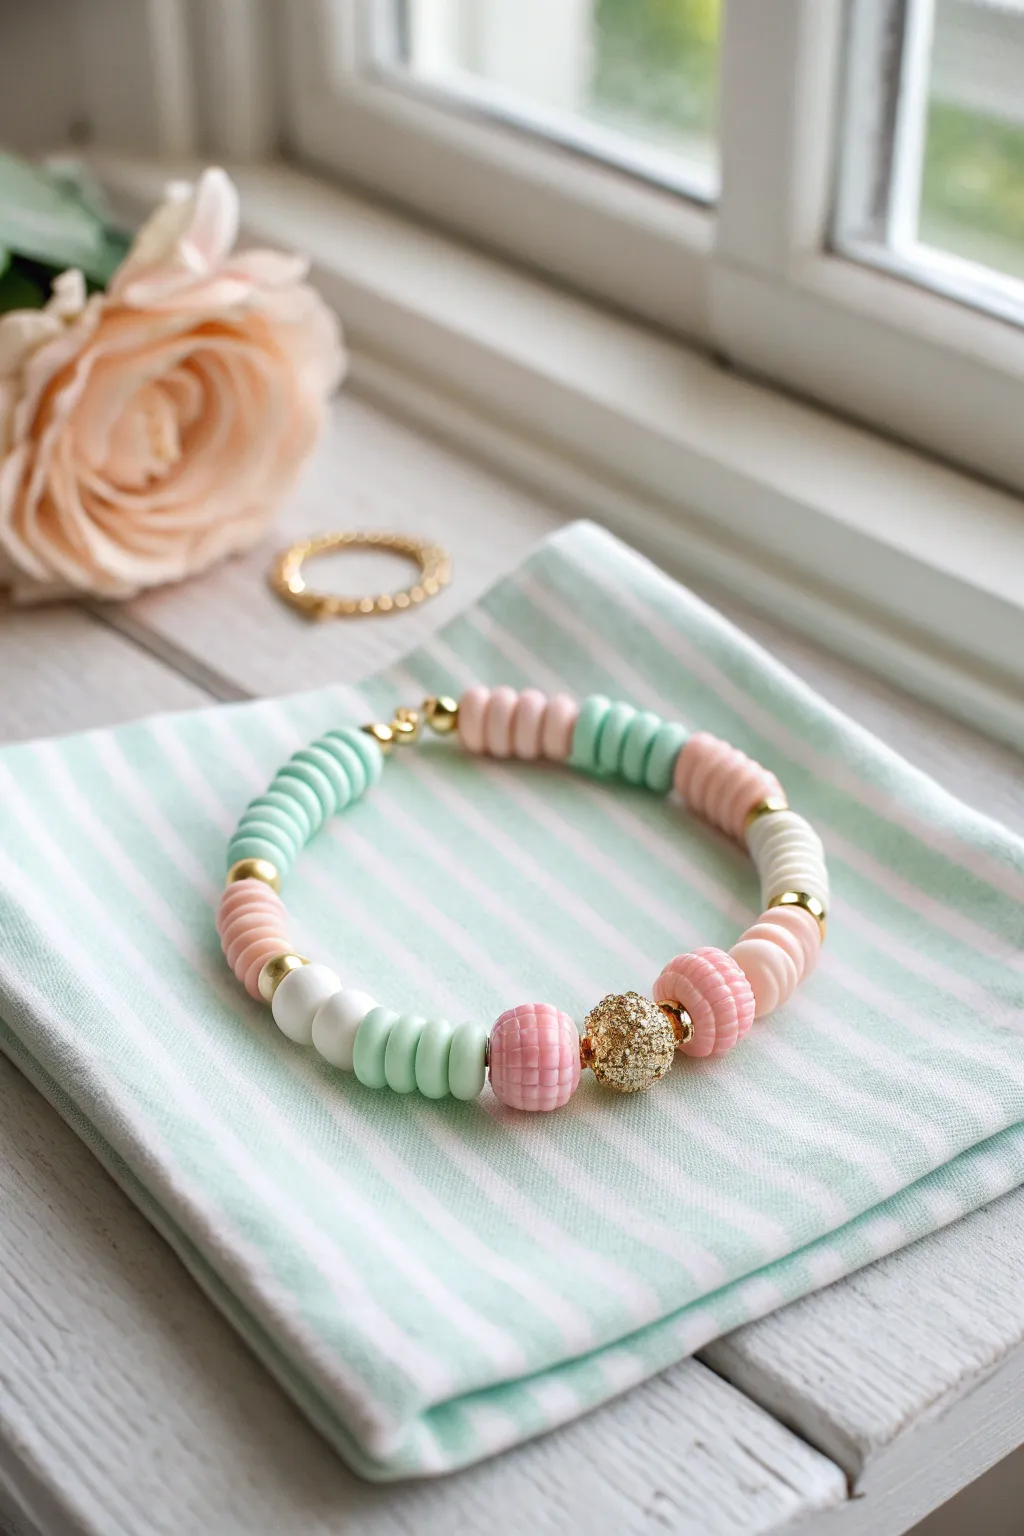
Capture the nostalgic sweetness of classic theme park treats with this delightful clay bead bracelet. Combining soft mint, pastel pink, and crisp white discs with eye-catching gold accents, this accessory is as refreshing as a frozen confection.
How-To Guide
Materials
- Polymer clay heishi beads (mint green, pastel pink, white)
- Gold spacer beads (small round balls)
- One large textured gold statement bead (pave or stardust style)
- Elastic stretch cord (0.5mm to 0.8mm)
- Jewelry glue or clear nail polish
- Scissors
- Bead stopper or tape
- Ruler
Step 1: Preparation and Pattern Planning
-
Measure and Cut:
Cut a piece of elastic cord approximately 10-12 inches long to give yourself plenty of room for knotting later. -
Secure the End:
Attach a bead stopper or a piece of tape to one end of the cord to prevent your colorful beads from sliding off while you work. -
Plan Your Focal Point:
Identify your large textured gold bead; this will be the centerpiece of the bracelet, sitting opposite the closure.
Knot Slipping?
If your elastic knot feels slippery, try roughening the cord ends slightly with sandpaper before tying, or use a surgeon’s knot for extra grip.
Step 2: Creating the Central Feature
-
Start the Center:
Thread your large textured gold bead onto the middle of the cord. -
Add Small Gold Spacers:
Place one small gold ball spacer on immediately on either side of the large central bead to frame it elegantly. -
Begin the Pink Section:
On the right side of the center gold cluster, thread on three to four pastel pink clay disk beads. -
Mirror the Left Side:
Repeat the previous step on the left side, adding the same number of pink beads to maintain symmetry.
Add a Charm
Attach a tiny ice cream cone or pretzel charm on a jump ring next to the large gold bead for extra snack-themed flair.
Step 3: Building the Segments
-
Transition to Mint:
After the pink section on the right, thread on about six to seven mint green clay beads. -
Balance the Other Side:
Do the same on the left side, adding six to seven mint green beads. -
Introduce White Segments:
On the right side, add a small section of white beads; typically, about three or four beads look best here. -
Add Gold Accents:
Slide a single small gold spacer bead after the white section to break up the matte clay texture with a bit of shine. -
Continue the Pattern:
Repeat this pattern of color blocking—pink section, mint section, white section—separated occasionally by gold spacers until you reach your desired length. -
Check Symmetry:
Periodically hold the two ends together to ensure your pattern is mirroring correctly on both sides of the central gold bead. -
Sizing Check:
Wrap the unfinished strand around your wrist. For an adult wrist, you typically want about 6.5 to 7 inches of beaded length.
Step 4: Finishing Touches
-
Pre-Stretch the Cord:
Before tying, gently pull on both ends of the elastic. I find this pre-stretching step crucial to prevent the bracelet from loosening up after the first wear. -
Tie the Knot:
Remove the bead stopper and tie a surgeon’s knot (a standard square knot with an extra loop through) to secure the ends tightly. -
Secure with Glue:
Dab a tiny drop of jewelry glue or clear nail polish onto the knot and let it dry completely. -
Trim Excess:
Cut off the excess cord close to the knot, being careful not to snip the knot itself. -
Hide the Knot:
If one of your beads has a large enough hole, gently slide it over the knot to conceal it for a professional finish.
Slip on your new accessory and enjoy the sweet, pastel vibes all day long
Movie-Quote Vibes Without the Exact Quote
This charming bracelet channels the soft, magical essence of fairytale characters without needing literal charms or text. Featuring a soothing palette of matte mint, coral, lavender, and cream polymer clay beads accented with gold spacers, it captures a dreamy, animated movie aesthetic perfect for stacking.
Step-by-Step Tutorial
Materials
- Polymer clay beads (heishi or round) in pastel mint green
- Polymer clay beads in coral or peach
- Polymer clay beads in soft lavender
- Polymer clay beads in various white/cream tones (some speckled)
- Small gold disc spacer beads or gold accent beads
- Stretchy elastic jewelry cord (0.8mm or similar)
- Jewelry glue or clear nail polish
- Scissors
Step 1: Planning and Preparation
-
Measure your wrist:
Before you begin stringing, wrap a piece of string around your wrist to find your size, then add about half an inch for a comfortable fit. Cut a length of elastic cord about 4-6 inches longer than this measurement to ensure you have plenty of room for tying knots later. -
Sort your palette:
Lay out your clay beads on a bead board or a soft cloth. Group them by color: mint green, coral/peach, lavender, and your mix of whites and creams. Having them separated makes the pattern selection much faster. -
Pre-stretch the cord:
Give your elastic cord a few gentle tugs. This pre-stretching technique helps prevent the bracelet from sagging or loosening up immediately after you finish making it. -
Secure the end:
Place a bead stopper or simply clear tape on one end of your cut cord. This prevents your hard work from sliding off the table if you accidentally let go of the string.
Step 2: Creating the Pattern
-
Start with cool tones:
Begin your pattern by threading on a few mint green beads. The bracelet in the image uses groupings of 2-3 beads of the same color before switching, which creates a chunky, distinct color block effect. -
Add a gold accent:
Slide on a single gold disc spacer. These gold touches act as dividers and add a slightly regal, finished look to the otherwise matte texture of the clay. -
Transition to warm tones:
Follow the gold accent with a coral or peach bead. Notice how the image alternates between single beads and pairs; try adding just one coral bead here for variety. -
Incorporate neutrals:
Add a speckled white or cream bead next. I really love using the textured or speckled clay beads here because they add an organic feel that contrasts nicely with the smooth solid colors. -
Introduce lavender:
Thread on a lavender bead followed by a darker mauve or purple tone if you have it, creating a soft gradient effect within the purple section. -
Repeat the gold:
Add another gold spacer. Try to place these gold accents irregularly rather than perfectly symmetrical—perhaps every 6-8 beads—to keep the design feeling playful and spontaneous. -
Build the pattern:
Continue adding beads, alternating your color groups. You don’t need a strict pattern (like A-B-C). Instead, try a ‘random but balanced’ approach. If you just used two greens, maybe switch to a single white, then two lavenders, then a gold spacer. -
Check the length:
Periodically wrap the strand around your wrist. The clay beads take up space, so you might need a slightly longer strand than you initially thought to accommodate the thickness of the beads.
Knot Slipping?
If your elastic knot feels slick, dip the knot in water before tightening. The moisture adds friction, helping the knot grip itself tighter before you apply glue.
Step 3: Finishing Touches
-
Verify the fit:
Once you have enough beads to circle your wrist comfortably, bring the two ends together to double-check the size. Make sure there are no large gaps showing the elastic. -
Tie the knot:
Remove the tape or stopper. Tie a simple overhand knot, but don’t pull it tight yet. Follow this with a surgeon’s knot (looping the elastic through twice) for extra security. -
Tighten securely:
Pull all four strands (the two tail ends and the loop sides) gently but firmly to tighten the knot down towards the beads. -
Glue the knot:
Dab a tiny drop of jewelry glue or clear nail polish onto the knot. This is crucial for elastic bracelets to prevent them from unraveling over time. Let it dry for a minute or two. -
Hide the knot:
Trim the excess elastic ends close to the knot, leaving about 1mm. If possible, gently tug the knot inside one of the larger-hole beads next to it to conceal it completely.
Add a Hidden Mickie
Use three small round beads of the same color (one larger, two smaller) grouped together in the strand to create a subtle, abstract mouse shape silhouette.
Slip on your new pastel bracelet for a subtle touch of magic that goes with everything in your wardrobe
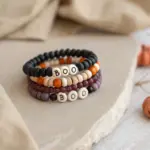
Hidden Symbol “Morse Code” Magic
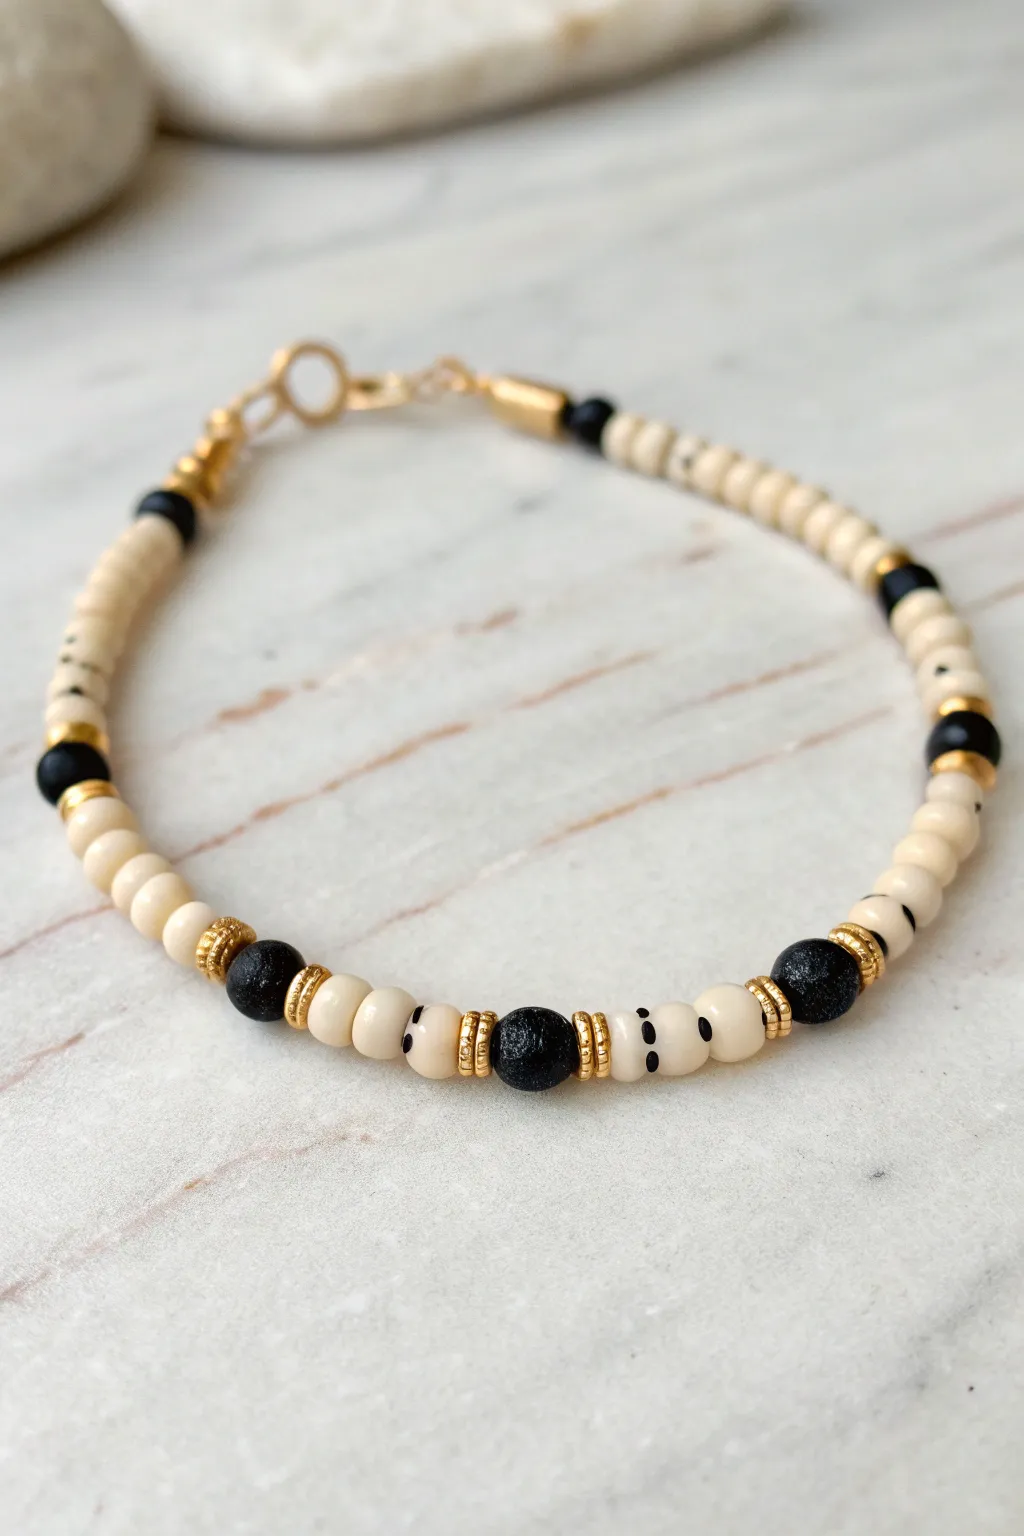
Create a sophisticated piece of jewelry that holds a secret meaning with this Morse code inspired design. By alternating tiny cream and black beads with elegant gold accents, you can spell out a hidden word or phrase in a stylish, minimalist pattern.
Step-by-Step
Materials
- Cream or off-white clay heishi beads (approx. 4mm)
- Black lava or clay round beads (approx. 4-6mm)
- Gold plated disc spacer beads
- Gold crimp beads
- Gold lobster clasp and jump ring
- Strong beading wire or elastic cord (0.5mm – 0.8mm)
- Jewelry pliers (flat nose and wire cutters)
- Beading needle (optional)
Step 1: Planning Your Message
-
Decode your word:
Choose a word or short phrase that holds meaning for you. Use a Morse code chart to translate letters into dots and dashes. -
Map the beads:
Decide on your bead representation. In this design, the larger round black beads act as the ‘dots’ or focal points, while the cream heishi beads act as the spacing or ‘dashes’. The gold spacers add definition between letters. -
Measure your wrist:
Wrap a measuring tape loosely around your wrist to determine the finished length. Subtract about an inch for the clasp hardware so the bracelet fits comfortably.
Pro Tip: Bead Soup
Mix subtle variations of cream and speckled white beads to give the neutral sections more organic texture and depth.
Step 2: Stringing the Pattern
-
Secure the wire:
Cut a length of wire about 10 inches long. Attach one end to a crimp bead and a jump ring (or closed loop of the clasp), looping the wire back through the crimp bead. -
Flatten the crimp:
Use your flat nose pliers to firmly squash the crimp bead flat, locking the wire in place. I like to double-check that it’s tight before adding any decorative beads. -
Start with neutrals:
Begin stringing a section of plain cream heishi beads. This acts as the ‘band’ or filler for the back of the wrist. String about 1-2 inches worth, depending on your wrist size. -
Add first accent:
Slide on a small black heishi bead or spacer, followed by a gold disc spacer. -
Begin the code sequence:
String a few cream beads, then add a gold spacer, a round black lava bead, and another gold spacer. This framed black bead creates a bold ‘dot’ in your visual code. -
Create spacing:
Add a few more cream heishi beads (about 3-4) to create separation between your coded elements. -
Add a dash element:
For a ‘dash’ or longer pause, you can use a sequence of cream beads marked with tiny black dots or specks if you have them, or simply use a slightly longer run of cream beads framed by gold. -
Vary the pattern:
Continue the pattern seen in the reference: a black round bead framed by gold, followed by cream beads, then perhaps a sequence of smaller black spacers. -
Check the symmetry:
Hold the bracelet up to see if your ‘message’ or pattern is centered. The design works best if the main coded section sits on top of the wrist. -
Finish the other side:
Once your central pattern is complete, mirror the starting side by adding another 1-2 inches of plain cream heishi beads until you reach the desired length.
Troubleshooting: Stiff Wire
If the bracelet feels rigid, you pulled the wire too tight. Leave a millimeter of slack before crimping to allow movement.
Step 3: Attaching the Clasp
-
Add final hardware:
String a crimp bead onto the end of the wire, followed by the lobster clasp. -
Loop back:
Thread the tail of the wire back through the crimp bead and through the last few heishi beads you strung. This hides the sharp wire end. -
Tighten the slack:
Pull the wire snug so there are no large gaps between beads, but leave just enough wiggle room so the bracelet stays flexible and doesn’t become stiff. -
Secure the end:
Flatten the final crimp bead with your pliers to lock everything in place. -
Trim excess:
Use wire cutters to snip off the remaining tail of wire as close to the beads as possible for a clean finish.
Now you have a stylish accessory that carries a secret sentiment wherever you go
Villain-Inspired Black and Neon Pop

Channel your inner antagonist with this edgy design that pairs matte textured black beads with striking pops of neon green and purple. The triangular silver charm adds a mysterious, geometric focal point perfect for a subtle nod to classic Disney villains.
Detailed Instructions
Materials
- Matte black lava stone beads (8mm)
- Neon green polymer clay heishi beads (disk beads)
- Purple polymer clay heishi beads (disk beads)
- Black polymer clay heishi beads (disk beads)
- Silver triangular geometric charm
- Silver charm bail or heavy jump ring
- Strong elastic beading cord (0.8mm or 1mm)
- Jewelry glue or clear nail polish
- Scissors
Step 1: Planning the Pattern
-
Assess your wrist size:
Before you start stringing, measure your wrist and lay out your beads on a bead board or a soft towel. This prevents them from rolling away and helps you visualize the final circumference. -
Establish the focal point:
Center your design around the charm. Start by selecting the silver bail that will hold the triangle charm. -
Create the central accent:
The image shows a symmetrical design radiating from the charm. Place one black lava bead on either side of where your charm bail will sit.
Aromatic Additions
Since lava beads are porous, you can add a drop of essential oil to the black beads. It turns your jewelry into a subtle diffuser throughout the day.
Step 2: Stringing the Beads
-
Secure the cord:
Cut a piece of elastic cord about 12 inches long. I usually stretch the cord firmly a few times before starting; this ‘pre-stretching’ prevents the bracelet from drooping later. -
Attach the charm:
Slide the silver bail with the triangle charm onto the center of your cord. -
Add the first lava beads:
Thread one round black lava bead onto the cord on the right side of the charm, and one on the left side. -
Add neon green accents:
On the right side, string two neon green heishi beads next to the lava bead. Repeat this on the left side to maintain symmetry. -
Continue the pattern outward:
Add another black lava bead to each side, following the green disks. -
Insert black texture spacing:
On the left side specifically (looking at the image), add a small stack of three black heishi beads to create visual variety in the texture. -
Build the bracelet body:
Continue adding the round black lava beads to both sides until you are about halfway to your desired length. -
Create the secondary color pop:
Add a stack of purple heishi beads. The image uses about three or four purple disks on each side to balance the green near the center. -
Finish the bead strand:
Fill in the rest of the bracelet length with the remaining black lava beads until the two ends meet comfortably around your wrist.
Villain Variants
Swap the neon green for deep red heishi beads to channel the Queen of Hearts, or use teal and purple for an Ursula-inspired oceanic look.
Step 3: Finishing Touches
-
Check the fit:
Wrap the unfinished strand around your wrist to ensure it isn’t too tight or too loose, adding or removing a black bead if necessary. -
Tie the knot:
Tie a surgeon’s knot (right over left, left over right twice) to secure the ends. Pull the elastic tight so the beads bundle closely together. -
Secure with adhesive:
Apply a tiny dab of jewelry glue or clear nail polish directly onto the knot. This is crucial for longevity. -
Hide the mechanics:
Once the glue is tacky but almost dry, slide the nearest lava bead over the knot to hide it inside the bead hole. -
Trim the excess:
Carefully snip the excess elastic cord close to the bead, being extremely careful not to cut the main knot.
Wear your new villain-inspired accessory with a touch of wicked pride
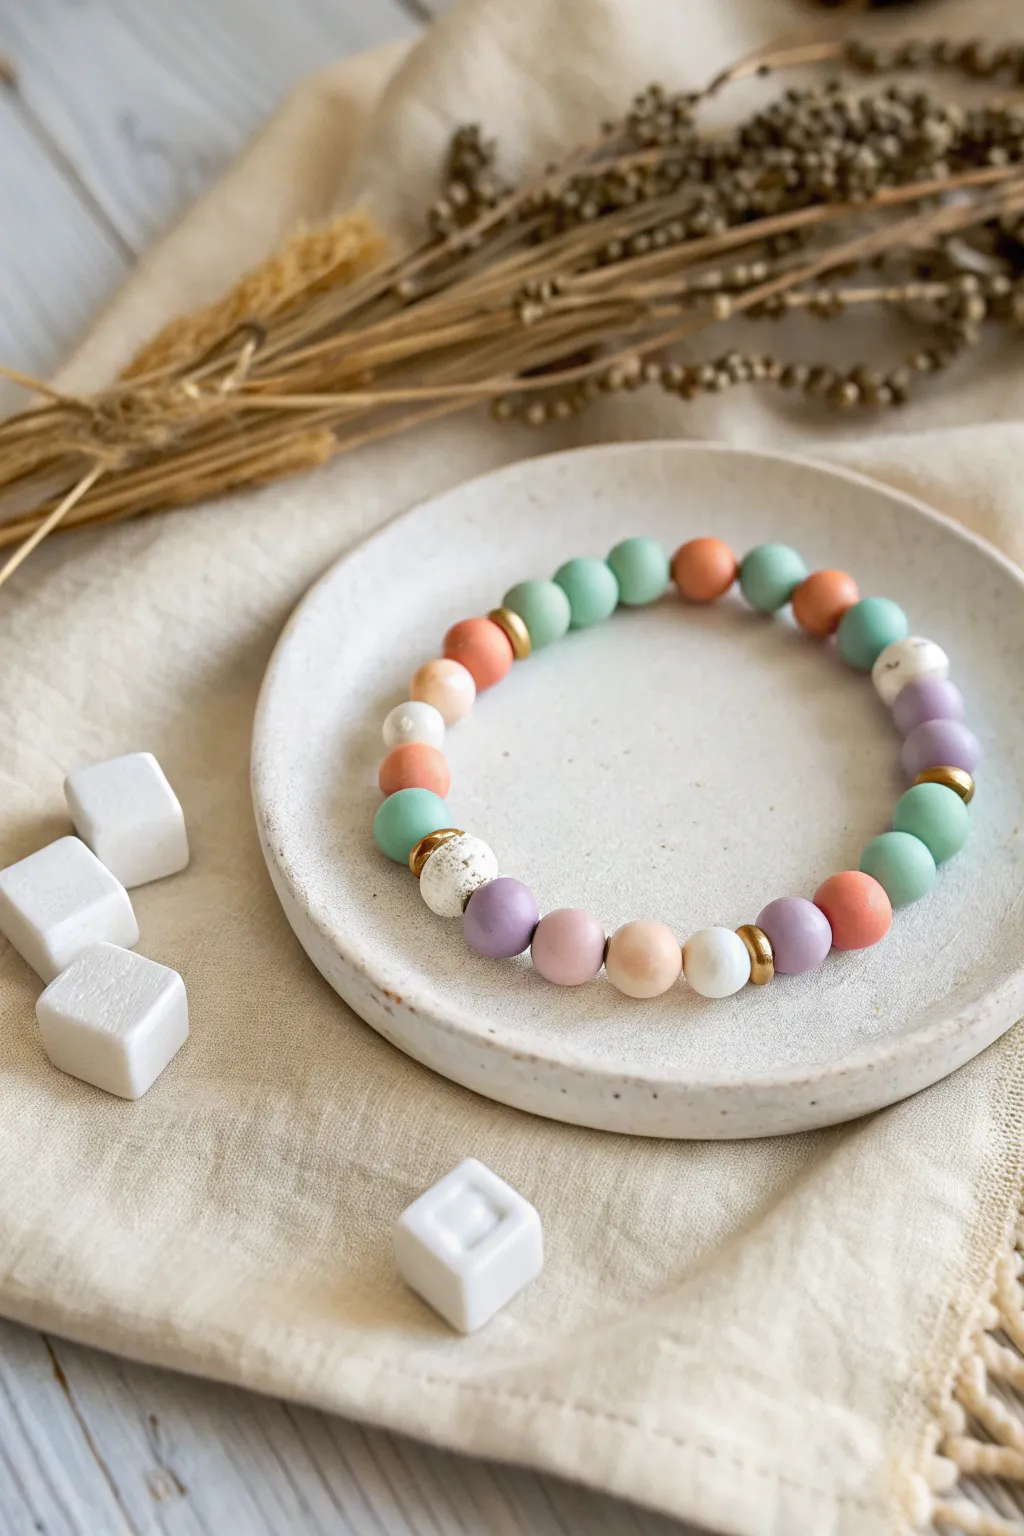
Character-Coded Gradient With Metallic Spacers
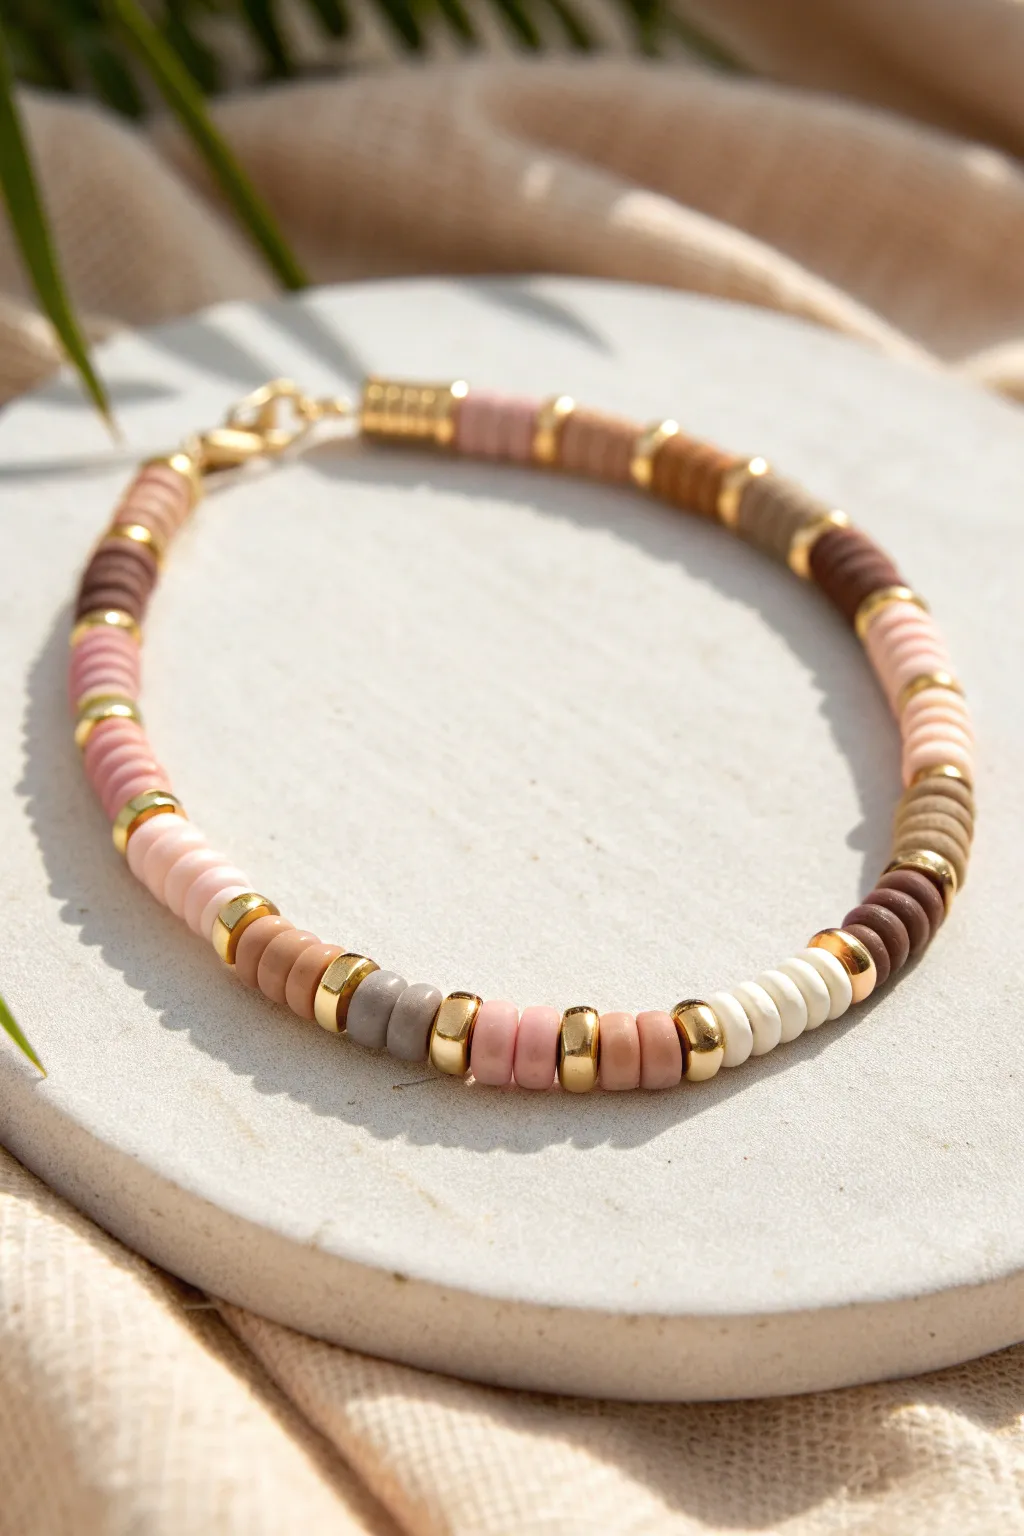
This sophisticated take on the classic Disney princess aesthetic swaps neon brights for a muted, earthy gradient palette accented with rich gold. It captures the essence of characters like Pocahontas or Moana using soft clay heishi beads interrupted by elegant metallic spacers for a versatile piece that feels grown-up but playful.
Step-by-Step
Materials
- Polymer clay heishi beads (approx. 4-6mm) in: muted rose, dusty pink, caramel, dark brown, warm beige, cream, and grey
- Gold rondelle spacer beads (approx. 4mm)
- Strong elastic cord (0.8mm recommended)
- Jewelry glue or clear nail polish
- Scissors
- Bead stopper or decorative tape
- Gold crimp bead cover (optional)
- Gold jump ring and clasp (optional, for a non-elastic version)
Step 1: Preparation
-
Measure your wrist:
Wrap a flexible measuring tape around your wrist to find your size. Add about 0.5 inches to this measurement to ensure the bracelet fits comfortably without pinching. -
Cut the cord:
Cut a piece of elastic cord about 10-12 inches long. Having this extra length makes tying the final knot significantly easier than struggling with short ends. -
Secure the end:
Place a bead stopper or a piece of tape on one end of the cord to prevent your beads from sliding off while you work.
Spacer Squeeze
If your gold spacers are swallowed by the clay beads, try adding two spacers side-by-side or choosing a slightly larger metal bead to ensure it stands out.
Step 2: Designing the Gradient
-
Sort your colors:
Lay out your clay beads on a bead board or soft cloth. Group them by color shade: creams, soft pinks, dusty roses, caramels, and dark browns. -
Plan the pattern logic:
The pattern in this bracelet relies on color blocking. Instead of random mixing, you will string small groups of 3 to 6 beads of the same color before switching shades. -
Insert the gold accents:
Decide on the placement of your gold spacers. In this design, a single gold rondelle bead is placed between every change of color block, acting as a shiny punctuation mark.
Step 3: Stringing the Beads
-
Start with the darkest shade:
Begin by threading 4 dark brown heishi beads onto the cord. Follow this block immediately with one gold spacer bead. -
Add a lighter brown block:
Next, string 5 caramel or tan beads. The slight variation in number (4 vs 5) makes the handmade texture feel more organic. Add another gold spacer. -
Transition to pinks:
Thread on 4 dusty pink beads followed by a gold spacer. Then, add 5 soft, muted rose beads and another gold spacer. -
Incorporate neutrals:
Add a section of 3 grey beads, a gold spacer, and then a section of 5 cream or off-white beads. Don’t forget the gold spacer in between. -
Create the focal point:
For the center of the bracelet, you might choose a slightly longer run of your favorite color, perhaps a nice warm beige, capped on either side by gold spacers. -
Reverse or repeat:
Continue adding color blocks. You can either mirror the gradient back to dark brown or simply repeat the sequence until you reach your desired length. -
Check the fit:
I always wrap the unfinished strand around my wrist periodically to check the fit, making sure the pattern meets nicely without a large gap.
Charm Styling
Add a small gold leaf or feather charm to the center jump ring to emphasize the Pocahontas inspiration without disrupting the sleek bead line.
Step 4: Finishing Touches
-
Pre-stretch the elastic:
Before tying, give the ends of the elastic a gentle tug. This pre-stretches the material so the bracelet won’t loosen up immediately after you wear it. -
Tie the surgeon’s knot:
Remove the tape or stopper. Cross the ends, loop one under twice, and pull tight. Repeat this knotting process to secure the bracelet firmly. -
Secure with glue:
Dab a tiny drop of jewelry glue or clear nail polish onto the knot. Let it dry completely before trimming any excess cord. -
Hide the knot:
Carefully trim the excess string close to the knot. Ideally, gently tug the bracelet so the knot slides inside the hole of a nearby bead, hiding it from view. -
Alternative clasp finish:
If you opted for a clasp instead of elastic, use crimp tubes to attach jump rings and a lobster clasp to the ends of your wire for a more traditional jewelry finish.
Enjoy styling your new bracelet stack with worn denim or a flowy summer dress for that perfect bohemian vibe
Mixed Clay Beads With Tiny Ceramic “Souvenir” Bead
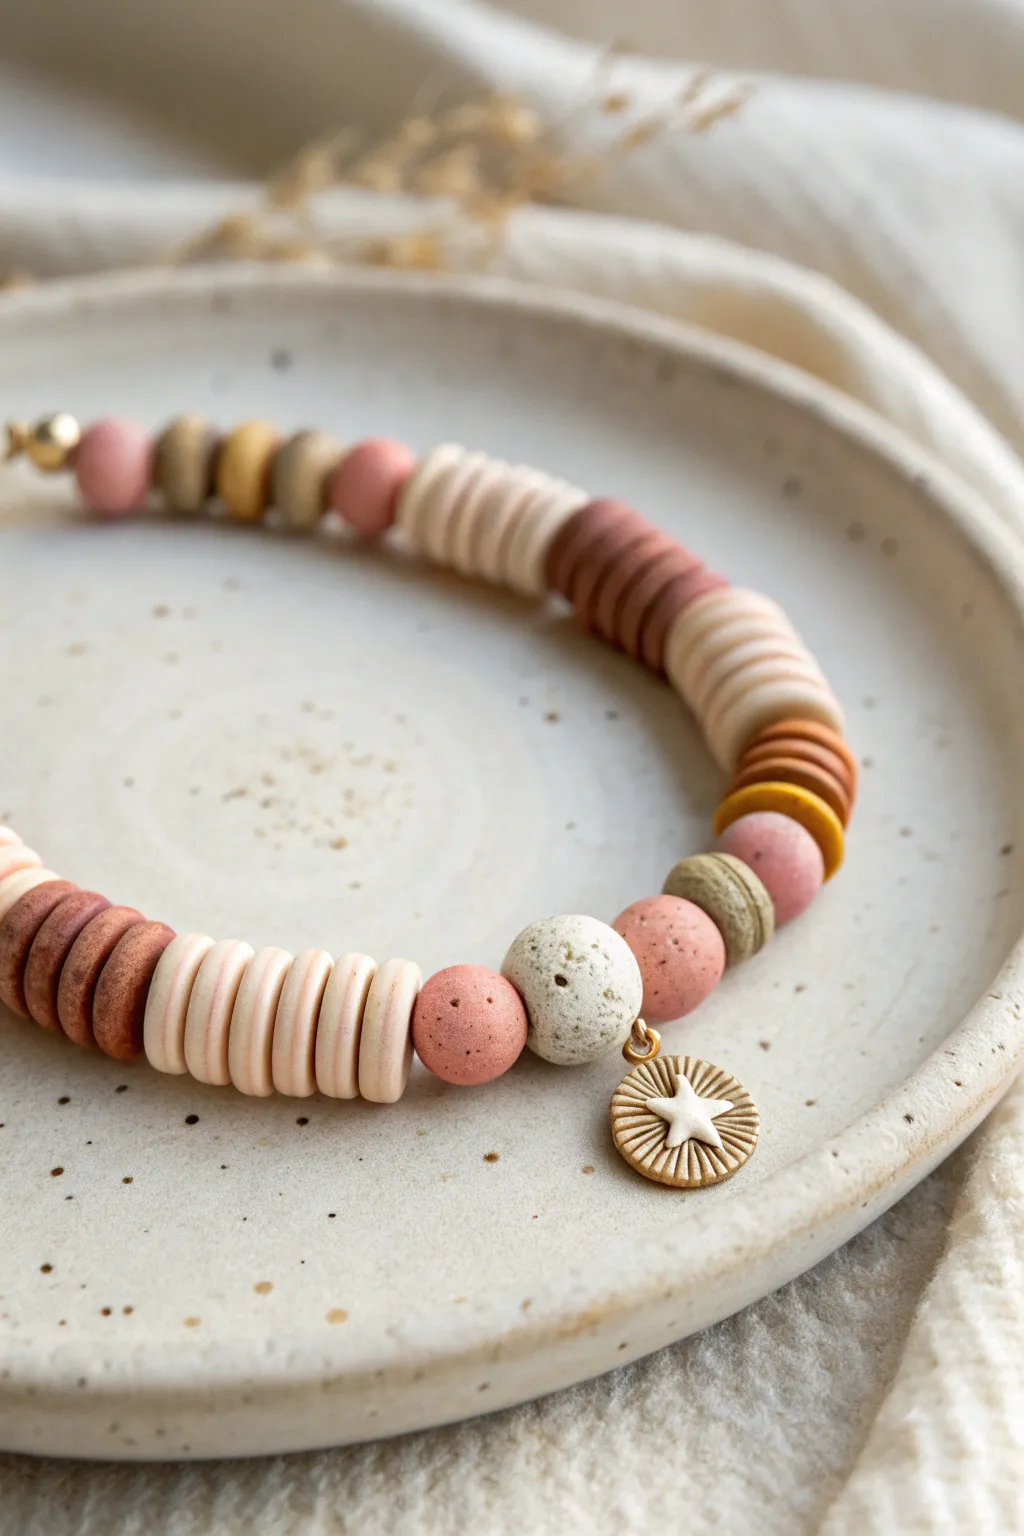
This rustic, nature-inspired design combines the playful texture of heishi clay beads with the organic feel of speckled ceramic. The result is a grounded, bohemian piece centered around a tiny star charm that feels like a hidden treasure found on a sandy beach.
Detailed Instructions
Materials
- Polymer clay heishi beads (cream, terracotta/rust, dusty rose)
- Small round speckled ceramic beads (pink and white/grey)
- One slightly larger round focal bead (white with heavy speckling)
- Gold star charm with a circular textured frame
- Gold jump ring (4mm or 6mm)
- Elastic beading cord (0.7mm or 0.8mm)
- Gold spacer beads (optional)
- Super glue or jewelry adhesive
- Scissors
Step 1: Planning the Pattern
-
Lay out the centerpiece:
Begin by placing your gold star charm in the center of your bead board or felt mat. This will be the anchor for your design. -
Choose the focal beads:
Select the largest speckled white ceramic bead and place it immediately to the left of the charm’s position. This bead acts as a visual break from the repeating pattern. -
Add ceramic accents:
On either side of that central focal area, select 2-3 smaller round speckled ceramic beads in dusty pink or muted earth tones. These transition the texture from the smooth ceramic to the matte heishi beads. -
Establish the heishi rhythm:
Plan the rest of the bracelet using the flat heishi discs. Create stacks of color rather than alternating single beads. I find that grouping 5-8 beads of the same color creates a bold, deliberate ‘stripe’ effect. -
Check the color flow:
Arrange the color stacks to mimic a sunset gradient: move from cream to dusty rose, then to rust or terracotta, and back again.
Step 2: Assembling the Bracelet
-
Prepare the cord:
Cut a piece of elastic cord about 10-12 inches long. Pre-stretching the elastic gently by pulling on it a few times helps prevent the bracelet from stretching out later. -
Secure the end:
Place a bead stopper or a piece of tape on one end of the cord so your beads don’t slide off while you work. -
Attach the charm:
Before stringing, use pliers to carefully open the jump ring, slide on the star charm, and close the ring securely. Thread the cord through the jump ring first so it sits in the middle of your design. -
String the focal section:
Thread the large speckled white bead onto the left side of the charm, followed by a pink ceramic round bead. -
Balance the right side:
On the right side of the charm, thread two pink ceramic round beads and perhaps a darker earth-tone ceramic bead to create subtle asymmetry. -
Start the heishi stacking:
Begin adding your stacks of flat clay beads. Thread a stack of about 6-8 cream beads, followed by a similar sized stack of rust-colored beads. -
Continue the pattern:
Keep adding blocks of color, alternating between light cream, dusty rose, and deep terracotta until you reach the desired length for your wrist. -
Check for gaps:
Push all beads gently toward the center to ensure there are no unintended gaps between the flat discs.
Natural Beauty Tip
Look for “terrazzo” style polymer clay beads if you can’t find real ceramic ones. They mimic that lovely speckled stone look but are lighter to wear.
Step 3: Finishing Touches
-
Measure the fit:
Wrap the unfinished strand around your wrist. The ends should touch comfortably without stretching the elastic too tight. -
Tie the knot:
Remove the stopper and tie a surgeon’s knot (loop the cord through twice before pulling tight) to secure the bracelet. -
Add adhesive:
Apply a tiny dab of jewelry glue or super glue specifically to the knot. Let it dry completely before touching it. -
Trim the excess:
Once dry, use sharp scissors to trim the excess cord ends close to the knot. -
Hide the knot:
Ideally, gently pull the knot inside the hole of one of the larger heishi beads or ceramic beads to conceal it for a professional finish.
Wobbly Charm?
If the charm doesn’t hang right, add a tiny round gold spacer bead on each side of the jump ring. This gives the ring space to pivot freely designated spot.
Now you have a serene, earthy bracelet that captures a bit of natural magic on your wrist.