I never get tired of the moment chia seeds pop and your little creation suddenly has bright green grass hair. Here are my favorite DIY chia pet ideas—starting with the classics and drifting into the delightfully weird stuff I love making in the studio.
Classic Grass-Head Stocking Pet
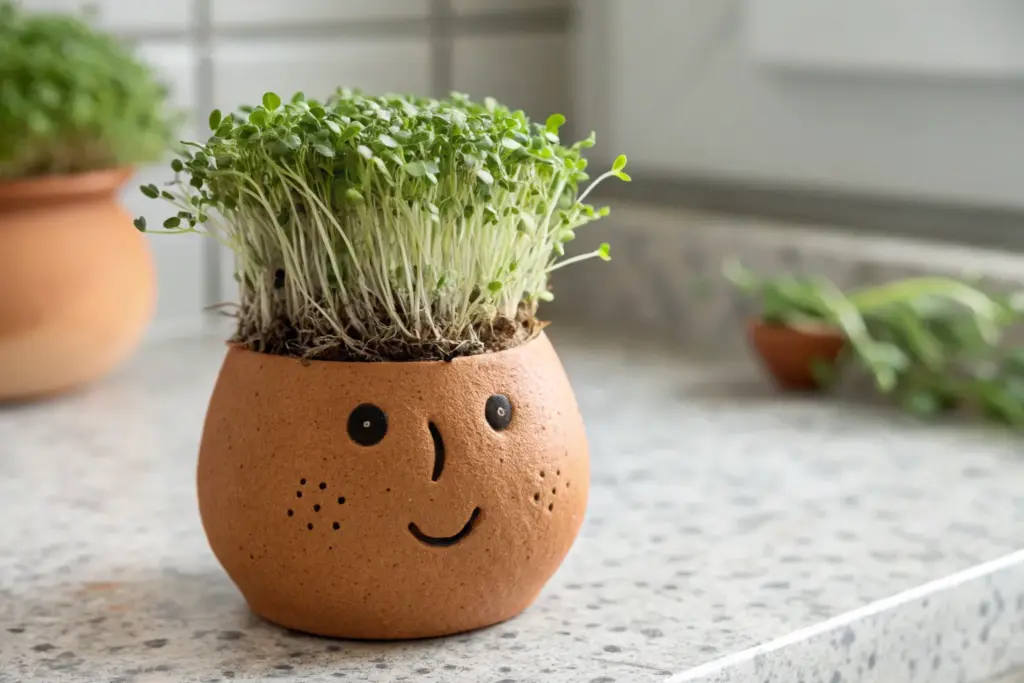
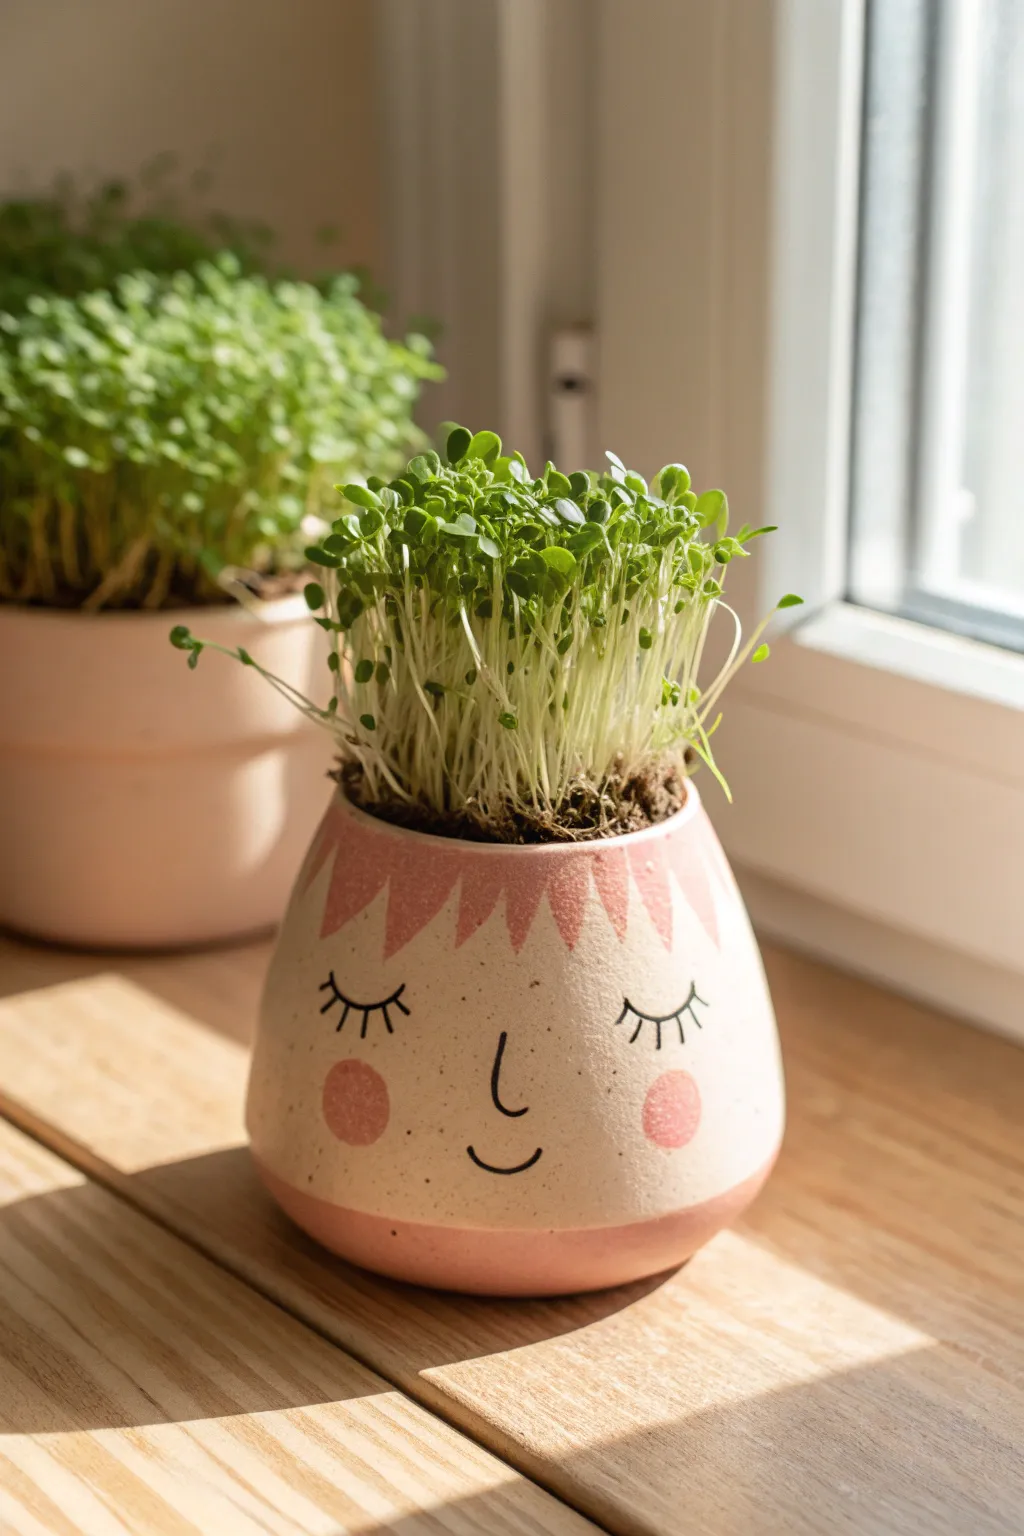
Bring a dash of literal life to your windowsill with this refreshingly simple ceramic planter project. With just a small glazed pot, a bit of marker work, and some quick-growing seeds, you’ll have a cheerful green companion that styles its own hair.
Detailed Instructions
Materials
- Small white ceramic or clay pot (glazed, rounded shape preferred)
- Black permanent marker (oil-based works best) or acrylic paint pen
- Potting soil or coconut coir
- Wheatgrass seeds (cat grass) or rye seeds
- Jute twine or rustic hemp cord
- Scissors
- Water spray bottle
- Clear matte sealant spray (optional but recommended)
Step 1: Preparing the Vessel
-
Clean the surface:
Before you start drawing, ensure your small ceramic pot is completely clean and dry to allow the marker to adhere properly. Wipe it down with a damp cloth and let it air dry for a few minutes. -
Plan the face:
Visualize where you want the face to sit. Position the eyes slightly above the centerline of the pot to leave plenty of room for a widely curving smile. -
Draw the eyes:
Using your black permanent marker or paint pen, draw two vertical ovals for the eyes. These should be spaced comfortably apart. -
Fill in the pupils:
Leave a small white circle uncolored near the top-left of each oval to create a highlight, then fill in the rest of the oval solidly with black ink. -
Add the smile:
Draw a wide, shallow U-shape for the mouth. Start below the left eye and curve gently down and up, ending below the right eye. -
Detail the expression:
Add tiny ‘cheek’ lines at the ends of the smile to emphasize the grin. You can add a few random dots or freckles on the cheeks for personality. -
Seal the design:
If you want your pot to last through many waterings, give the painted face a light coat of clear matte sealant spray and let it dry completely.
Marker Smudging?
If using a glazed pot, permanent marker can sometimes rub off. Lightly sand the area where you’ll draw with fine-grit sandpaper first to give the ink some ‘tooth’ to grab onto.
Step 2: The Rustic Accent
-
Measure the twine:
Cut a length of jute twine approximately 12-14 inches long. This needs to be long enough to wrap around the rim and tie a bow. -
Position the cord:
Wrap the twine around the very top rim of the pot. It should sit right on the edge where the soil meets the container. -
Tie the bow:
Tie a simple shoelace bow right in the center, directly above the space between the eyes. Adjust the loops so they are small and neat. -
Trim the ends:
Snip the excess tails of the twine so they don’t dangle too far down the forehead of your character.
Step 3: Planting the Hair
-
Fill with soil:
Fill the pot with potting soil or coconut coir, stopping about half an inch from the top rim. -
Sow the seeds:
Sprinkle a generous layer of wheatgrass or rye seeds over the soil surface. You want them dense so the ‘hair’ looks thick. -
Cover lightly:
Add a very thin layer of soil on top of the seeds, just enough to barely cover them. -
Initial watering:
Use a spray bottle to thoroughly moisten the top layer of soil without flooding the pot. -
Wait for growth:
Place the pot in a warm, bright spot. Keep the soil moist daily with your spray bottle, and watch the green spikes emerge within a few days.
Dense Hair Trick
Soak your wheatgrass seeds in a bowl of water for 8-12 hours before planting. This speeds up germination and helps ensure almost every seed sprouts.
Once the grass grows tall, give your cheerful pot a haircut with scissors to complete the look.


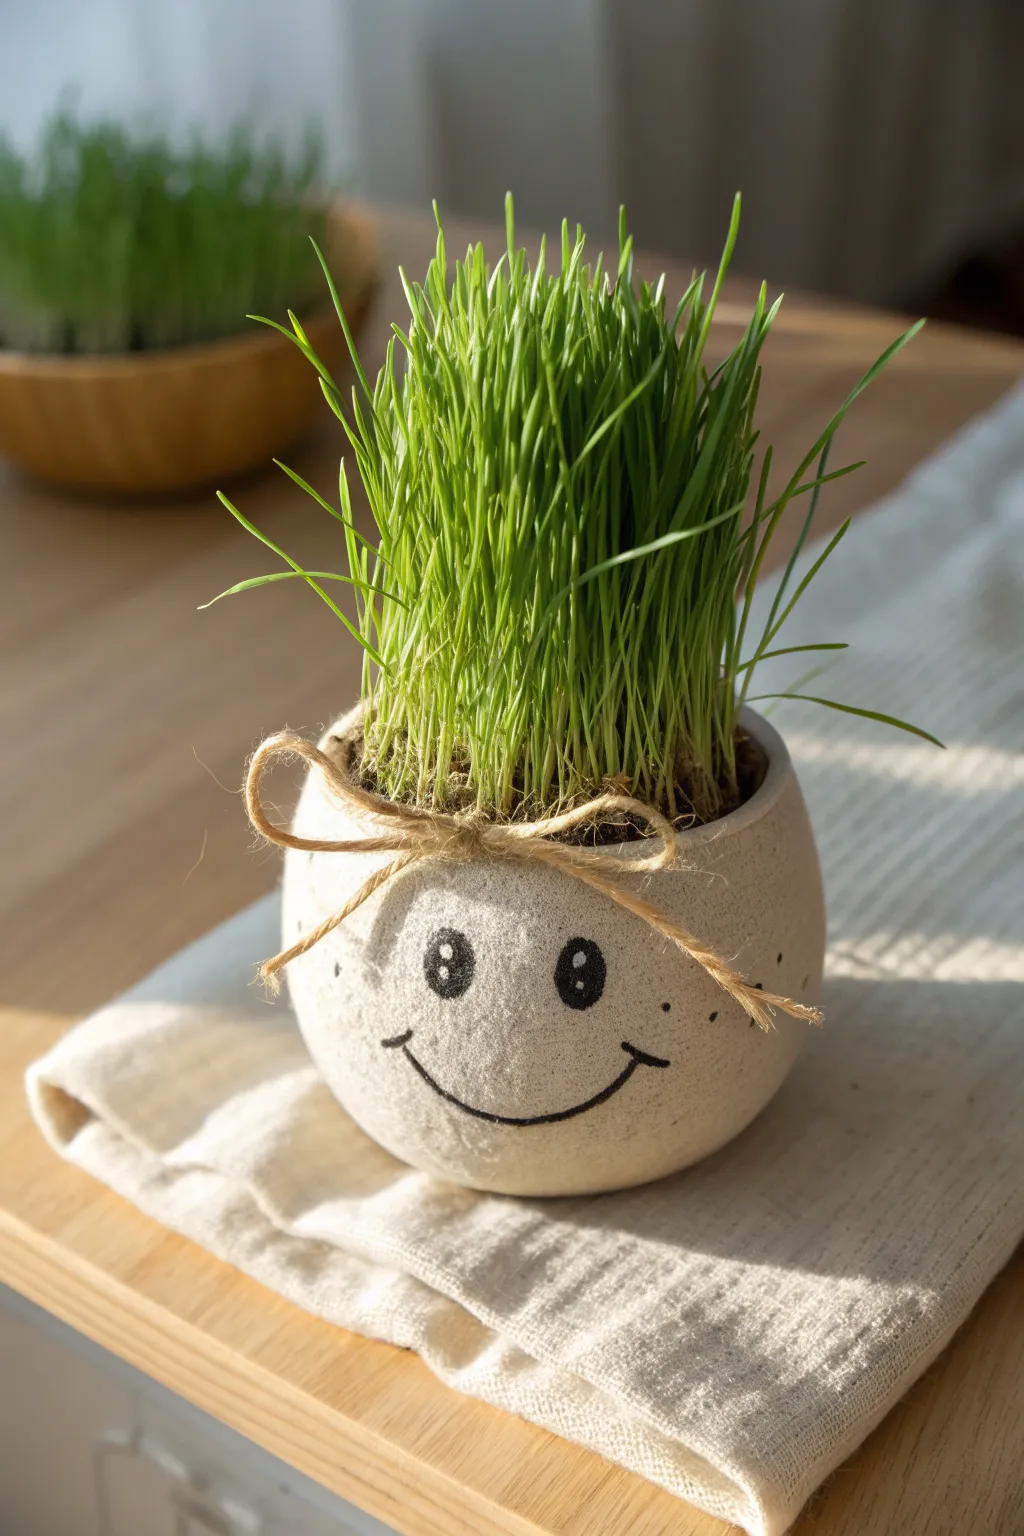
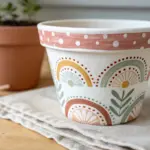
Painted Terra-Cotta Pot Chia Buddy
Transform a simple terra cotta vessel into a charming, sleeping character whose grassy hair grows wild in the sunlight. This gentle face design uses negative space and soft pink accents to create a peaceful addition to your windowsill garden.
Step-by-Step Tutorial
Materials
- Small bulbous terra cotta pot (about 4-5 inches wide)
- White or cream matte spray paint (primer)
- Cream or light beige acrylic paint
- Soft pink acrylic paint
- Black fine-point paint pen or permanent marker
- Small flat paintbrush
- Medium round paintbrush
- Potting soil or chia growing medium
- Chia seeds
- Clear matte sealant spray (optional)
- Spray bottle with water
Step 1: Preparing the Canvas
-
Clean the Pot:
Begin by wiping down your terra cotta pot with a damp cloth to remove any dust or oils. Let it dry completely so the paint adheres properly. -
Base Coat Application:
Take your pot to a well-ventilated area and apply a thin, even coat of white or cream spray primer. This seals the porous clay and ensures your top colors pop. -
Drying Time:
Allow the primer to dry for at least one hour or until it is no longer tacky to the touch. -
Cream Backdrop:
Paint the entire outside of the pot with your cream or light beige acrylic paint. Use a flat brush for smooth strokes, covering the primer completely. -
Second Coat:
Once the first layer is dry, I usually add a second coat of the cream paint to ensure a solid, opaque finish that hides any brushstrokes.
Uneven Paint?
If you make a mistake with the paint pen, don’t panic. Let the black ink dry completely, then dab a little cream paint over the error like correction fluid before trying again.
Step 2: Painting the Character
-
Mapping the Hairline:
Visualize a zigzag pattern around the top rim of the pot—this will be the character’s ‘bangs.’ You can lightly sketch this with a pencil first if you want precision. -
Painting the Hair:
Using the soft pink paint and a medium round brush, fill in the zigzag shapes pointing downward from the rim. Keep the points somewhat irregular for a hand-drawn look. -
Creating the Base:
Paint a matching pink band around the very bottom of the pot. It should be about half an inch thick, anchoring the design visually. -
Adding Rosy Cheeks:
Dip your round brush into the pink paint again. Dab two solid circles onto the middle area of the pot to create blushing cheeks. -
Check Symmetry:
take a step back to ensure the cheeks are leveled with each other before the paint dries. -
Drawing the Eyes:
Once the paint is fully dry, take your black paint pen. Draw two downward-curving arcs above the cheeks to represent closed, sleeping eyelids. -
Adding Lashes:
Carefully draw three to four small vertical ticks on the top of each eyelid arc for the eyelashes. -
Nose and Mouth:
Draw a simple ‘L’ shape or hook for the nose in the center. Directly below that, add a gentle upward-curving line for a small smile. -
Sealing the Art:
For longevity, especially since this pot will get wet, spray a light coat of clear matte sealant over the entire painted exterior.
Chia Density Tip
Pre-soak your chia seeds in water for 10 minutes until they form a gel. This sticky paste is easier to spread evenly and helps seeds cling to the soil surface.
Step 3: Planting the Hair
-
Preparing the Soil:
Fill the pot almost to the brim with potting soil. Pack it down lightly so it is firm but not rock-hard. -
Sowing Seeds:
Sprinkle a generous layer of chia seeds over the top of the soil. You want them close together for a dense ‘hair’ look. -
Watering In:
Gently press the seeds into the soil surface, then mist heavily with your spray bottle until the top layer is soaked. -
Initial Care:
Place the pot in a sunny window and keep the seeds moist by misting daily until they sprout. -
Watching it Grow:
Within a few days, green sprouts will emerge, completing the look with a wild, grassy hairstyle.
Enjoy watching your sleeping friend sprout a luscious head of green hair over the coming week

Upcycled Jar Chia Pet With Root View
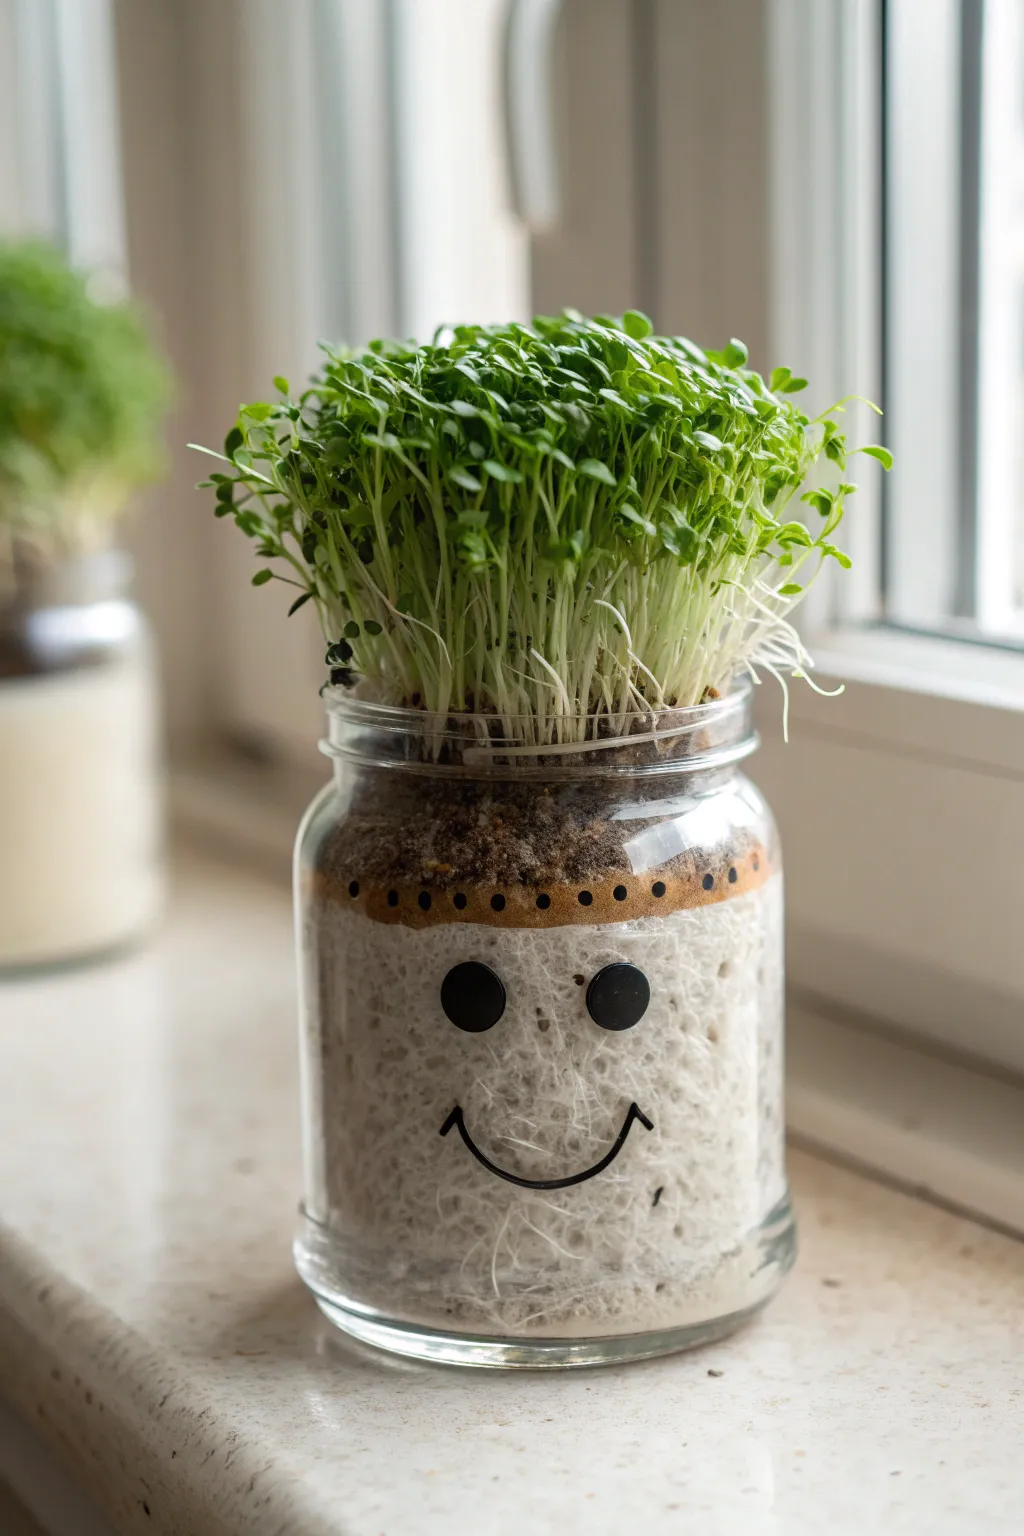
Turn a simple glass jar into a smiling, sprouting friend with this clever upcycling project. This transparent design is particularly fun because it reveals the fascinating root system as it grows, creating a “hair” effect up top and a textured white interior below.
Detailed Instructions
Materials
- Clean, clear glass jar (salsa, jam, or mason jar)
- Black permanent marker or paint pen
- Self-adhesive googly eyes (large)
- Cotton balls or paper towels (roughly 10-15)
- Water spray bottle
- Chia seeds or cress seeds
- Cling film (optional)
Step 1: Preparing the Jar Character
-
Clean the canvas:
Begin by thoroughly washing your glass jar. Remove any sticky label residue using warm soapy water or an adhesive remover, then dry the glass completely to ensure your decorations stick. -
Stick on the eyes:
Select two large black button-style eyes or googly eyes. Peel off the adhesive backing and place them on the front of the jar, positioning them slightly above the midpoint. -
Draw the smile:
Using your black permanent marker, draw a simple, curved line beneath the eyes to create a smile. I usually add small vertical ticks at the ends of the smile for extra charm. -
Add decorative details:
Draw a decorative band near the neck of the jar, just below the threads. A line of small dots or dashes works well to frame the “face” and separate it from where the green “hair” will emerge.
Step 2: Creating the Interior Base
-
Stuff the jar:
Take your cotton balls or crumpled paper towels and pack them into the jar. You want the material to fill the space snugly but not be compressed into a hard brick. -
Check the density:
Ensure the stuffing reaches all the way up to the neck of the jar, about half an inch below the very top rim. This substrate supports the roots visible through the glass. -
Hydrate the base:
Slowly pour water into the jar or use a spray bottle to saturate the cotton or paper towels. The material should be damp all the way through but not swimming in a pool of standing water. -
Drain excess:
If you accidentally over-watered, carefully tip the jar to drain out any unabsorbed liquid. The environment needs to be moist, not swampy.
See It Grow
Use clear water gel beads (hydration crystals) instead of cotton for the interior. The roots will remain perfectly visible as they grow through the clear beads.
Step 3: Planting and Growing
-
Soak the seeds:
Place about a tablespoon of chia seeds in a small bowl with a little water for 5-10 minutes until they form a gel-like paste. This helps them stick to the surface. -
Spread the seeds:
Spoon the seed gel onto the top surface of your wet cotton inside the jar. Spread them in an even layer right up to the glass edges. -
Create a greenhouse:
Loosely cover the top of the jar with a piece of cling film or a clear plastic bag. This locks in humidity to encourage germination. -
Find a sunny spot:
Place your jar buddy on a windowsill that gets indirect sunlight. Direct noon sun might dry it out too quickly or cook the seeds. -
Monitor moisture:
Check daily. If the cotton looks dry, mist specifically the top seeds with your spray bottle to keep them hydrated without drowning them. -
Remove the cover:
Once you see green sprouts emerging (usually within 2-3 days), remove the plastic covering to let air circulate. -
Rotate regularly:
As the sprouts grow tall, rotate the jar every growing day so the “hair” grows straight up rather than leaning toward the light source. -
Watch the roots:
Observe the jar daily; as the green top grows, white roots will navigate down through the cotton, eventually filling the jar with the cool texture seen in the photo.
Hair Stylist
Once the sprouts are tall (about 2 inches), let kids use safety scissors to give the jar character a haircut or trim the sprouts into different shapes.
Enjoy watching your jar friend develop a wild green hairstyle and a fascinating root system over the next week


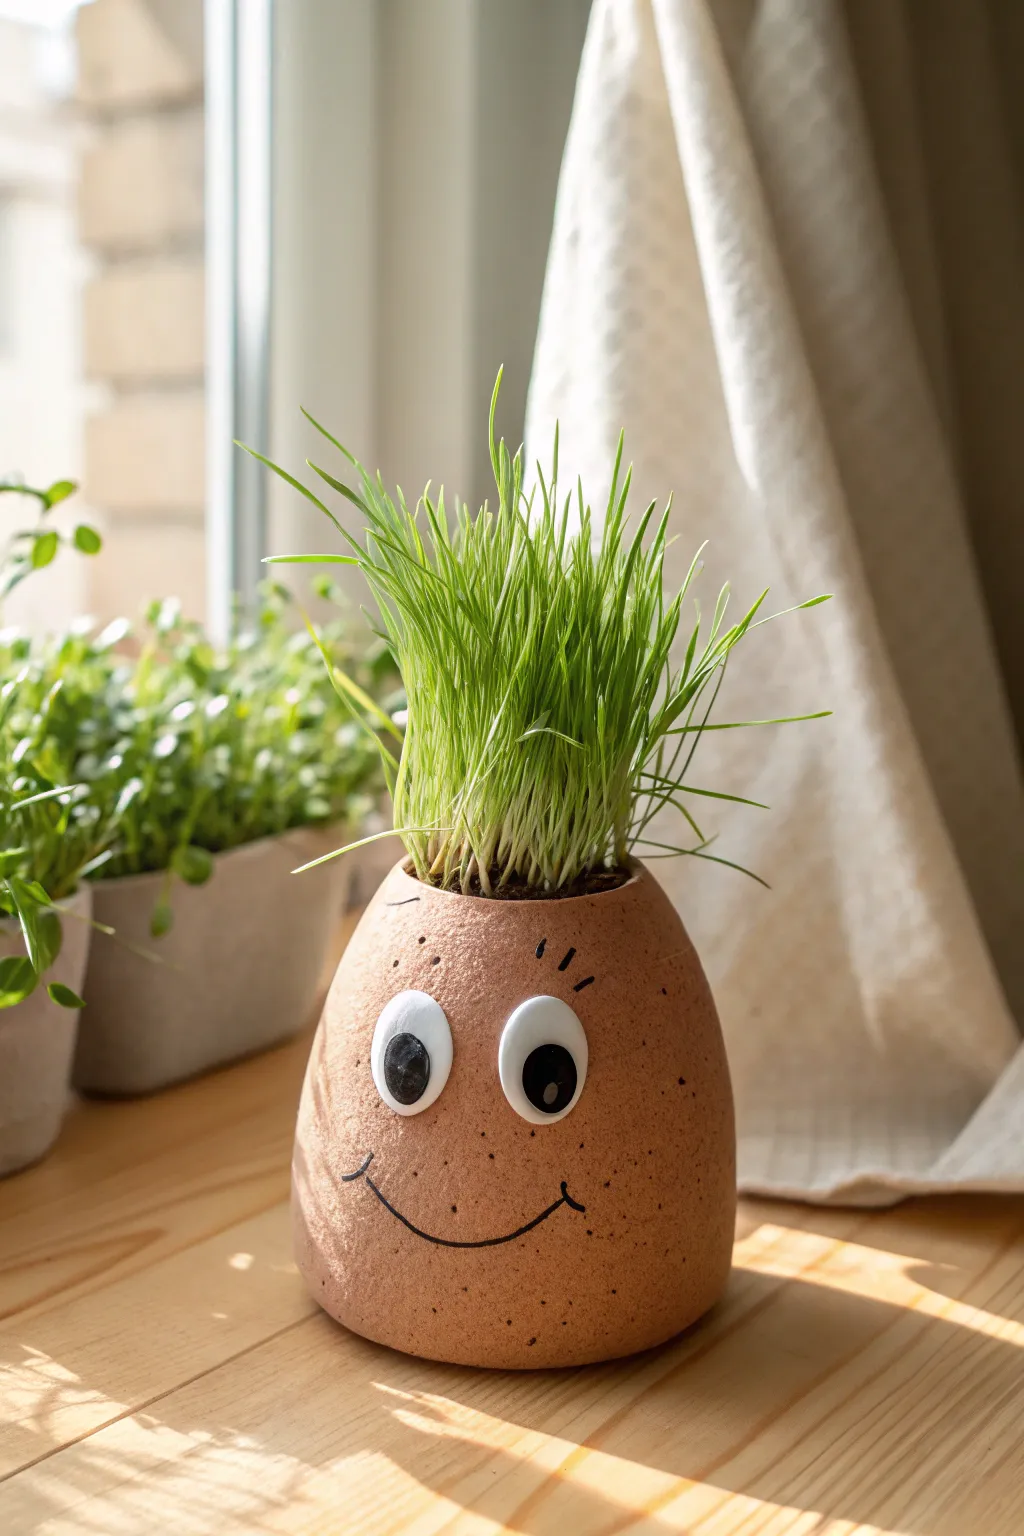
Air-Dry Clay Face Planter With Chia Hair
Capture a serene, meditative vibe with this charming air-dry clay planter that uses towering chia sprouts as a wild, green hairstyle. The simple, line-drawn facial features give it a peaceful expression that complements the minimalist aesthetic perfectly.
Step-by-Step Guide
Materials
- Air-dry clay (white or light beige)
- Small plastic cup or yogurt container (as a mold)
- Small rolling pin
- Clay sculpting tools (needle tool, small spatula)
- Sponge and water
- Acrylic sealer (matte finish)
- Potting soil
- Chia seeds
- Water spray bottle
Step 1: Sculpting the Vessel
-
Prepare your mold:
Select a small plastic cup to serve as the internal structure, which ensures your planter is waterproof and holds its shape. If the cup has a rim, trim it off so the sides are straight. -
Roll out the slab:
Take a large handful of air-dry clay and knead it until soft. Roll it out on a flat surface into a long rectangular slab about 1/4 inch thick. -
Wrap the mold:
Wrap the clay slab around the plastic cup. Trim the excess clay where the ends meet and gently blend the seam together with your fingers until it disappears completely. -
Form the base:
Place the wrapped cup onto a fresh piece of rolled clay to create the bottom. Trace around the cylinder, cut out the circle, and press it firmly to the bottom of the cylinder, smearing the clay upward to seal the joint. -
Shape the rim:
Add a little extra clay to the top rim if needed to cover the plastic edge entirely. Smooth it over with a damp sponge so it looks like a solid ceramic piece. -
Refine the surface:
Use a slightly damp sponge to wipe down the entire exterior, removing any fingerprints or bumps. You want a smooth, stone-like texture before you start detailing.
Step 2: Adding the Face
-
Build the nose structure:
Roll a small, elongated tear-drop shape of clay for the nose. Attach it to the center of the cylinder face using a bit of water or slip (clay mixed with water) as glue. -
Blend the nose:
Use a sculpting tool to smooth the edges of the nose into the main body, leaving the bridge defined but seamless at the sides. It should look like it’s emerging from the pot, not just stuck on. -
Carve the eyes:
With a needle tool or a dull pencil, gently carve two large, downward-curving semi-circles for the closed eyelids. Ensure they are symmetrical on either side of the nose. -
Add dimension to the eyes:
Roll very thin coils of clay (hair-thin) and carefully lay them over your carved lines to create raised eyelids. Gently press them down to adhere. -
Detail the brows:
Carve a second, slightly shorter arch above each eye to suggest the eyebrows or the crease of the eye socket. -
Sculpt the mouth:
Carve a simple lip shape below the nose. I like to outline the lips first, then gently press in the corners to create a subtle smile. -
Add texture (optional):
For that speckled, organic pottery look seen in the photo, you can flick a stiff toothbrush dipped in diluted brown paint over the wet clay, or gently poke tiny random pinholes around the cheeks.
Pro Tip: The Taper
When shaping the pot, slightly squeeze the bottom half inward while smoothing. This gentle taper creates the elegant chin shape rather than a straight cylinder.
Step 3: Finishing and Planting
-
Dry thoroughly:
Let the planter air dry completely. This usually takes 24-48 hours depending on humidity. Don’t rush this, or the clay might crack. -
Seal the piece:
Apply two coats of matte acrylic sealer to the exterior and the inner rim of clay. This protects the clay from water damage when you mist your plants. -
Add soil:
Once the sealer is dry, fill the inner plastic cup with potting soil almost to the top. -
Sow the seeds:
Sprinkle a dense layer of chia seeds over the soil. You don’t need to bury them; just press them gently onto the surface. -
Water and wait:
Mist the seeds heavily with a spray bottle. Keep the soil moist daily, and within a few days, your planter will sprout its magnificent green hair.
Troubleshooting: Cracking
If small cracks appear as the clay dries, mix a tiny amount of clay with water to make a paste and fill the cracks, then smooth over with a damp finger.
Watching the green hair grow tall and wild is the most rewarding part of this peaceful project

The Complete Guide to Pottery Troubleshooting
Uncover the most common ceramic mistakes—from cracking clay to failed glazes—and learn how to fix them fast.
Mini Pinch-Pot Animal Chia Pets
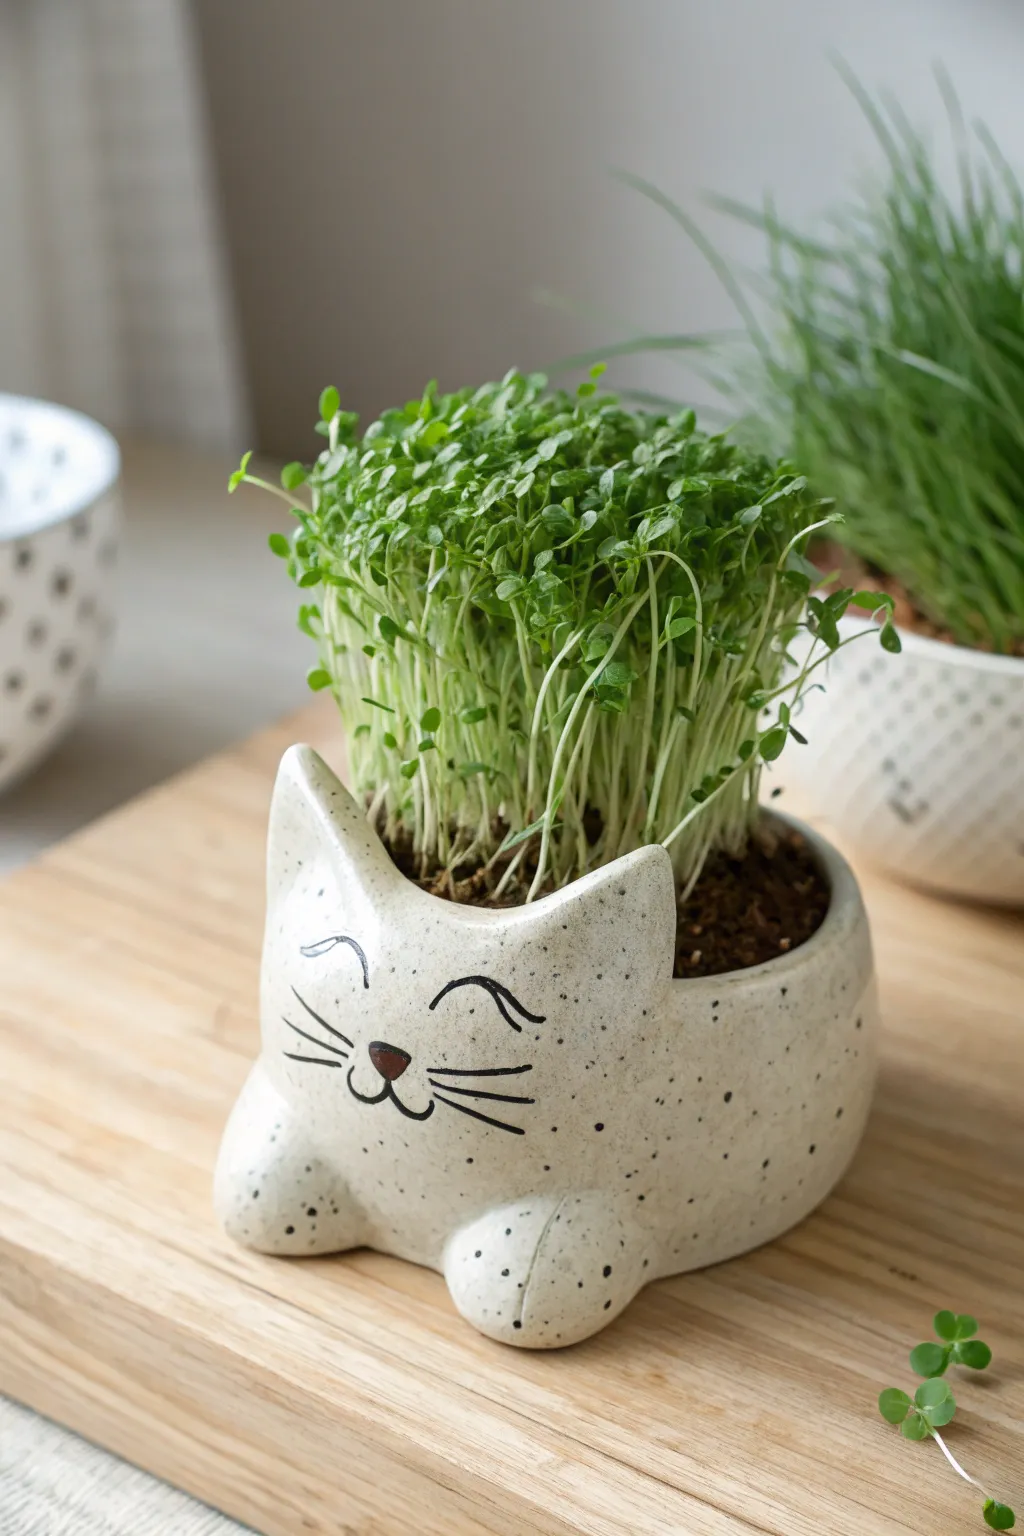
Create your own adorable micro-garden with this speckled cat pinch-pot, designed to cradle a tuft of fresh green sprouts. The finished piece features a charming hand-drawn face and tiny paws, making it the perfect windowsill companion.
Step-by-Step
Materials
- Air-dry clay or polymer clay (white or light beige)
- Black acrylic paint
- Brown acrylic paint
- Fine-point paintbrush or black paint marker
- Clay sculpting tools (or a toothpick and spoon)
- Water (for smoothing)
- Potting soil
- Chia seeds or microgreen seeds (like cress)
- Clear spray sealant (waterproof)
Step 1: Sculpting the Base
-
Form the main ball:
Start with a fist-sized ball of clay. Roll it firmly between your palms to remove cracks and create a smooth, even sphere. -
Create the pinch pot:
Insert your thumb into the center of the ball and gently pinch the clay between your thumb and fingers, rotating as you go. Aim for walls about 1/4 inch thick while keeping a rounded bottom. -
Shape the cat’s head:
At one side of the rim, pinch and pull the clay upward to form a triangular peak for the left ear. Repeat this a short distance away for the right ear. -
Refine the ears:
Smooth the area between the ears to create a gentle curve for the top of the head. Use a wet finger to round off the ear tips slightly so they aren’t sharp. -
Form the paws:
Roll two small marble-sized balls of clay. Slightly flatten them and attach them to the bottom front of the pot using a scratching-and-wetting technique (slip and score) to ensure they stick. -
Blend the seams:
Use a sculpting tool or your finger to smooth the clay where the paws meet the body, ensuring there are no visible gaps. -
Smooth the surface:
Dip your finger in water and run it over the entire outside of the pot to remove fingerprints and bumps. I like to spend extra time here to get that glossy ceramic look.
Uneven Drying?
If using air-dry clay cracks while drying, fill the cracks with a wet clay ‘slurry’ (clay mixed with water to a paste consistency) and smooth over before painting.
Step 2: Painting and Planting
-
Dry the clay:
Allow your clay to dry completely according to the package instructions. This usually takes 24-48 hours for air-dry clay. -
Create the speckled effect:
Dilute a tiny amount of black paint with water. Dip a toothbrush or stiff brush into the mixture and run your thumb across the bristles to flick tiny specks all over the pot. -
Draw the eyes:
Using a fine-point brush or marker, draw two downward-curving arcs for the closed, smiling eyes. Position them centered below the ears. -
Add the nose:
Paint a small, inverted triangle with rounded corners using brown paint for the nose. Place it centrally between and slightly below the eyes. -
Detail the mouth:
Draw two small hooks curving upward from the bottom point of the nose to create the classic cat smile. -
Add whiskers:
Paint three horizontal lines extending outward from each cheek area. Keep the lines thin and tapered at the ends. -
Seal the pot:
Because this pot will hold moist soil, spray the entire inside and outside with a waterproof clear sealant. Apply two coats for extra durability. -
Add soil:
Fill your new planter with potting soil, leaving about half an inch of space at the top. -
Plant the seeds:
Sprinkle a dense layer of chia or cress seeds over the soil surface. Spritz with water immediately.
Tail Extension
Make a long snake of clay and attach it to the back of the pot, curling it around the side toward the paws for a cute 360-degree wrapped tail design.
Place your kitty in a sunny spot and keep the seeds moist to watch the fur grow
Hedgehog Chia Pet With Spiky Green Quills
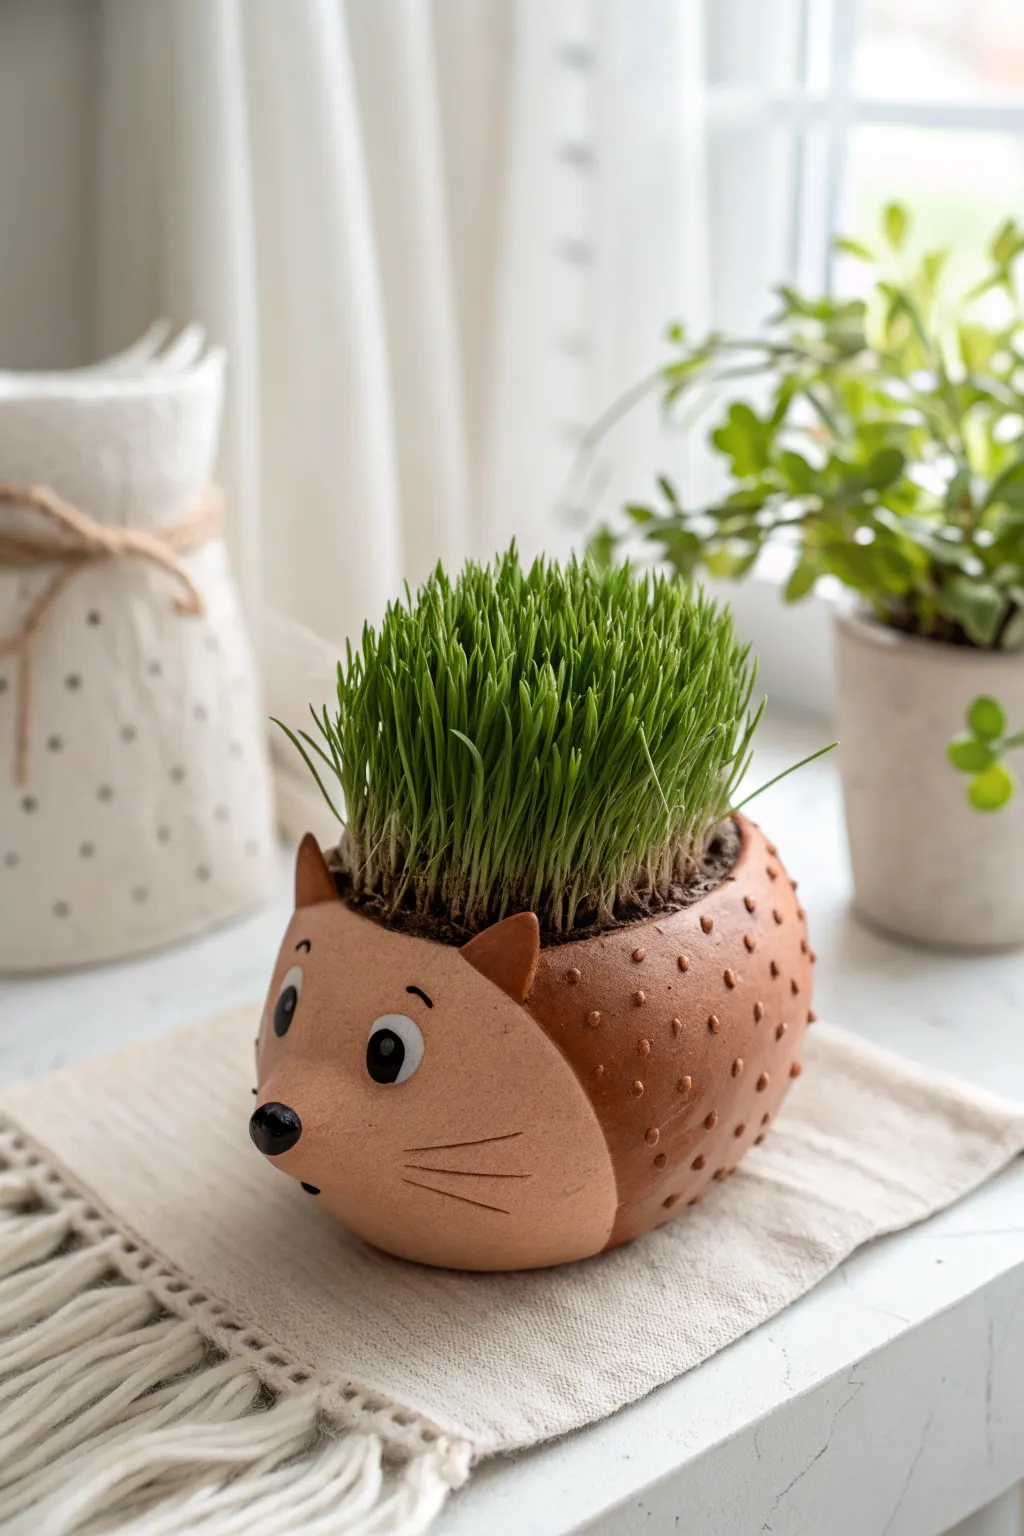
Bring a touch of nature indoors with this adorable handmade hedgehog planter that grows its own spiky green quills. Using simple clay techniques and fast-growing seeds, you’ll create a charming desktop companion that evolves from a cute ceramic figurine into a lush, living sculpture.
How-To Guide
Materials
- Air-dry clay (terracotta color)
- Air-dry clay (buff or light beige color)
- Wheatgrass or cat grass seeds
- Potting soil
- Pottery tools (needle tool, small loop tool)
- Black acrylic paint
- White acrylic paint
- Small detail paintbrush
- Rolling pin
- Small bowl of water
- Plastic wrap
- Sponge
Step 1: Sculpting the Base Form
-
Form the body:
Start by taking a large handful of the terracotta-colored clay. Roll it into a smooth oval ball, slightly larger than a grapefruit. This will be the main body of your hedgehog. -
Create the planting opening:
Using your thumbs, gently press into the top center of the oval to create a hollow cavity. Work the clay outwards to thin the walls to about a quarter-inch thick, leaving a deep well for the soil. Ensure the bottom is flat so it sits stably. -
Add the face:
Roll a smaller ball of the lighter beige clay. Flatten it slightly into a rounded triangle shape. Score the back of this piece and the front of your terracotta body, add a dab of water, and press the beige piece onto the front to form the face area. Smooth the seams with your fingers. -
Shape the snout:
Gently pinch and pull the center of the beige face piece outward to create a slightly pointed snout. This gives the hedgehog its characteristic inquisitive look.
Patchy Quills?
If your grass grows in uneven clumps, sprinkle new seeds into the bare spots and add a tiny bit of soil on top. Keep it moist to encourage the new growth to catch up.
Step 2: Adding Details and Texture
-
Attach the ears:
Take two small pinch of terracotta clay and shape them into tiny triangles. Attach these to the top of the head, right where the beige face meets the darker body, using the score-and-slip method. -
Create the quill texture:
This is a fun part where the hedgehog gets its character. Using the rounded end of a small paintbrush or a dotting tool, press small indentations all over the terracotta body. Stagger the dots to mimic the pattern of spines. -
Sculpt the nose:
Roll a tiny pea-sized ball of black clay (or paint it black later) and attach it to the very tip of the snout. -
Refine the whiskers:
Use a needle tool or the sharp edge of a credit card to gently carve three lines on each cheek for whiskers. Keep the lines light and cheerful. -
Smooth the surfaces:
Dip a sponge in a little water and wipe down the exterior surfaces to remove fingerprints and harsh tool marks. Let the sculpture dry completely according to the clay package instructions—usually 24 to 48 hours.
Give Him a Haircut
Once the grass gets too tall and droopy, use scissors to trim it into different styles—a flat top, a mohawk, or just a neat trim to keep the spiky look fresh.
Step 3: Painting and Planting
-
Paint the eyes:
Once fully dry, dip your detail brush in black acrylic paint. Paint two solid black circles for eyes. I like to place them slightly wide apart for a cuter expression. -
Add eye highlights:
When the black paint is dry, use a toothpick to add a tiny dot of white paint to the upper corner of each eye. This ‘catchlight’ brings the character to life. -
Seal the interior:
To protect the clay from moisture, coat the inside of the planter cavity with a waterproof sealant or varnish. Let this cure fully. -
Prepare the soil:
Fill the cavity with potting soil, packing it lightly until it is just below the rim of the opening. -
Sow the seeds:
Sprinkle a generous layer of wheatgrass or cat grass seeds over the soil surface. You want them dense so the ‘quills’ look full. -
Cover with soil:
Add a very thin layer of soil on top of the seeds, just enough to barely cover them. -
Water and wait:
Mist the soil generously with a spray bottle. Place the hedgehog in a sunny spot and keep the soil moist. In about 3-5 days, you’ll see green sprouts, and within a week, your hedgehog will have a full head of hair.
Enjoy watching your little friend sprouting new green spikes every day


What Really Happens Inside the Kiln
Learn how time and temperature work together inside the kiln to transform clay into durable ceramic.
Silly Monster Chia Pet With Wild Hair
Transform a simple terracotta bulb pot into a whimsical character with wild, grassy hair. This charming planter uses fast-growing wheatgrass to create a fun, customizable hairstyle that sprouts right before your eyes.
Detailed Instructions
Materials
- Small terracotta bulb pot (unglazed, rounded shape)
- Wheatgrass seeds (cat grass)
- Potting soil
- Large plastic googly eyes (adhesive back or plain)
- Hot glue gun and glue sticks
- Black permanent marker (Sharpie)
- Brown acrylic paint (optional)
- Old toothbrush (optional)
- Spray bottle with water
- Paper towel
- Plastic wrap
Step 1: Preparing the Pot Character
-
Clean surface:
Before decorating, ensure your terracotta pot is completely clean and dry. Wipe it down with a slightly damp paper towel to remove any pottery dust that might prevent the glue from sticking. -
Eye placement:
Hold the googly eyes against the pot to find the funniest position. Placing them slightly wider apart can give a more innocent or silly look. -
Attach eyes:
Once you’re happy with the placement, apply a small dot of hot glue to the back of each eye and press firmly onto the pot. If using self-adhesive eyes, I still recommend a dab of glue for longevity. -
Draw the smile:
Using a black permanent marker, draw a wide, U-shaped smile centered below the eyes. Add small, perpendicular ticks at the ends of the smile line for cheerful dimples. -
Add eyebrows:
Draw three short, vertical dashes above the right eye to create an expressive eyebrow. Adding eyebrows to just one side gives the character a quizzical, friendly expression. -
Create freckles:
Using the marker, dot random freckles across the ‘nose’ area between the eyes and the mouth. You can vary the pressure to make some dots larger than others. -
Optional paint speckling:
For a more textured skin look, dip an old toothbrush in watered-down brown acrylic paint. Run your thumb over the bristles to flick tiny specks of paint onto the pot.
Mold Troubles?
If you see white fuzz on the soil, you’re overwatering. Remove the plastic wrap immediately to let air circulate and let the soil surface dry out slightly.
Step 2: Planting the Hair
-
Pre-soak seeds:
To speed up germination, soak your wheatgrass seeds in a bowl of water for about 8 to 12 hours before planting. -
Fill with soil:
Fill the decorated pot with potting soil, stopping about half an inch from the top rim. Press the soil down gently so it isn’t too loose. -
Sow the seeds:
Spread a generous layer of soaked seeds across the top of the soil. Don’t worry about spacing them out; for a thick head of hair, you want the seeds touching each other. -
Cover seeds:
Sprinkle a very thin layer of soil over the seeds—just enough to barely cover them. -
Moisten:
Use your spray bottle to thoroughly mist the top layer of soil until it is moist but not swimming in water. -
Create a greenhouse:
Cover the top of the pot loosely with a piece of plastic wrap. This retains humidity and encourages the seeds to pop. -
Wait for sprouts:
Place the pot in a warm spot away from direct sunlight. Check daily to ensure the soil remains damp. -
Let it grow:
Once you see green sprouts (usually in 2–3 days), remove the plastic wrap and move the pot to a sunny windowsill. -
Styling:
Water daily with the spray bottle. Once the grass reaches 3–4 inches tall, it’s ready for its first haircut.
Seed Density Tip
Don’t be stingy with the seeds! Use about twice as many as you think you need. A crowded seed layer guarantees the classic, dense ‘hair’ look shown in the photo.
Enjoy watching your new green friend develop a wild personality as grows on a sunny windowsill
Unicorn Mane Chia Pet
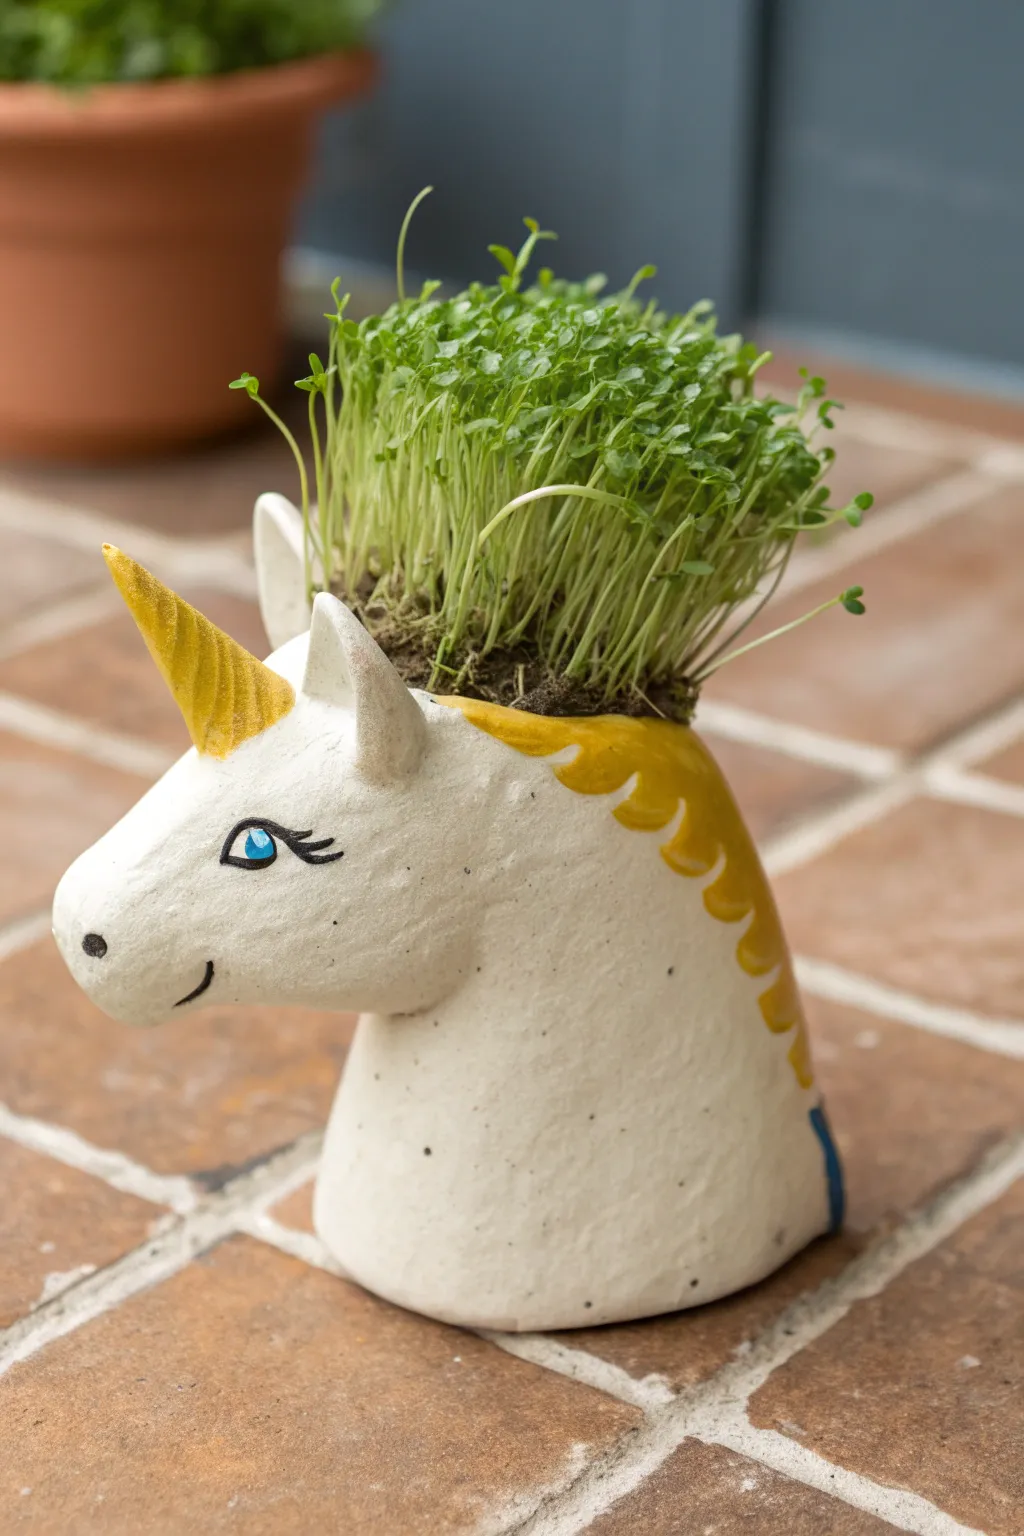
Transform a simple craft store find into a magical growing experiment with this delightful unicorn chia pet. The bright green sprouts act as a wild, grassy mane for the hand-painted unicorn head, creating a charming piece of living decor.
Step-by-Step
Materials
- Unicorn head planter (bisque, terra cotta, or paper maché)
- White acrylic paint (matte finish)
- Yellow or gold acrylic paint
- Black acrylic paint or fine-point marker
- Blue acrylic paint
- Small paintbrush set (flat and detail brushes)
- Potting soil or seed starting mix
- Chia seeds or microgreens seeds (like cress)
- Spray bottle with water
- Clear matte sealant spray (optional)
Step 1: Painting the Base
-
Clean surface:
Begin by wiping down your unicorn planter with a dry cloth to remove any dust or debris. If using a ceramic bisque piece, a slightly damp sponge works well to prep the surface. -
Base coat:
Using a wide flat brush, apply a coat of white acrylic paint over the entire head, avoiding the open planting area at the top if possible. Let this dry completely. -
Second coat:
Apply a second layer of white paint to ensure solid, opaque coverage, so none of the original material shows through. The matte finish gives it a soft, stone-like look. -
Paint the horn:
Dip a medium round brush into your yellow or gold paint. Carefully paint typical spiral ridges onto the horn, or simply paint the entire horn yellow for a bold look. -
Add the mane base:
Use the same yellow paint to create a painted ‘hairline’ just below the planter opening. Paint scalloped or wavy lines flowing down the back of the neck to suggest where the grassy mane will eventually cascade.
Seed Selection Tip
While chia is traditional, try wheatgrass or micro-arugula for a taller, spikier mane that you can actually trim and style.
Step 2: Adding Facial Details
-
Create the eye:
Switch to a fine detail brush and black paint. Outline a large, almond-shaped eye on the side of the face. -
Fill the iris:
Using a tiny dab of bright blue paint, fill in a circle towards the front of the eye shape. -
Pupil details:
Once the blue is dry, add a smaller black circle inside it for the pupil. I like to add a tiny dot of white paint near the top of the pupil for a ‘sparkle’ effect. -
Add lashes:
With a very steady hand or a fine-tip paint marker, draw three long, sweeping eyelashes extending from the outer corner of the eye. -
Draw the nose and mouth:
Paint a small, round nostril near the tip of the snout and a small curved line below it for a gentle smile. -
Seaing (Optional):
If you plan to keep this outdoors or want extra durability, mist the painted areas with a clear matte sealant spray and let it dry for 24 hours.
Why isn’t it growing?
If seeds dry out, they won’t sprout. Mist them twice a day. If using a terra cotta base, soak the pot in water first so it doesn’t steal moisture.
Step 3: Planting the Mane
-
Soak seeds:
If using traditional chia seeds, soak a teaspoon of seeds in a small amount of water for about 15-30 minutes until they form a gel-like consistency. -
Fill with soil:
While the seeds soak, fill the unicorn’s head cavity with potting soil. Pack it down gently but leave it loose enough for roots to penetrate, filling it right to the brim. -
Sow the seeds:
Spread your gelled chia seeds (or dry cress seeds) generously over the top of the soil. You want a dense layer so the ‘mane’ grows in thickly. -
Moisten:
Use a spray bottle to gently mist the top of the seeds, ensuring they make good contact with the soil without washing them away. -
Create humidity:
Place the planter in a sunny spot. For the first two days, you can loosely cover the top with plastic wrap to create a mini greenhouse effect. -
Daily care:
Remove the plastic once sprouts appear. Mist the seeds daily with your spray bottle to keep the soil moist but not waterlogged.
Watch gradually as your unicorn grows a lush green hairstyle that you can trim and shape

TRACK YOUR CERAMIC JOURNEY
Capture glaze tests, firing details, and creative progress—all in one simple printable. Make your projects easier to repeat and improve.
Mermaid Shell Chia Hair
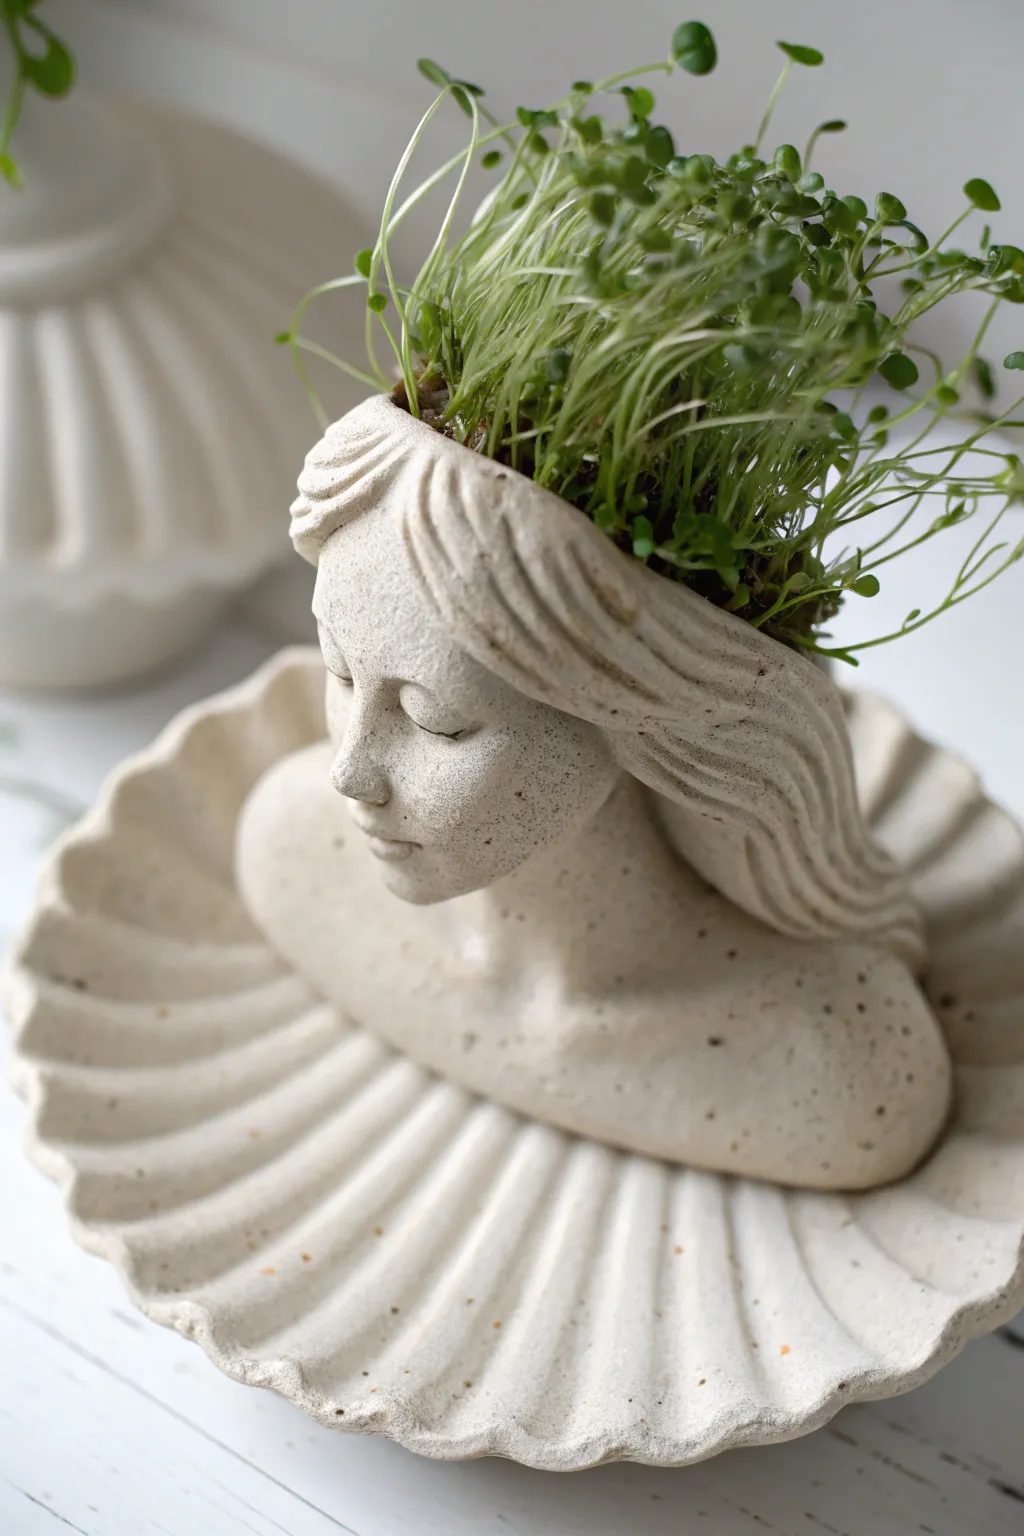
Transform a simple stone planter into a living piece of art with this elegant take on the classic chia pet. By pairing a statue-style bust with fresh microgreens, you create the illusion of wild, flowing green hair atop a serene mermaid figure.
How-To Guide
Materials
- Head-shaped planter (with drainage hole)
- Matching shell-shaped saucer or tray
- Potting soil or coco coir soil medium
- Chia seeds (or flax/cress seeds)
- Spray bottle with water
- Plastic wrap or clear shower cap
- Small spoon
- Container for soaking seeds
Step 1: Planter Preparation
-
Select the vessel:
Begin by finding a concrete or resin planter shaped like a female bust. Look for one where the top of the head is open and serves as the planting cavity. The texture should look like stone or unfinished plaster. -
Clean surface:
Wipe down the inside and outside of the planter with a damp cloth to remove any dust or manufacturing residue. -
Prepare the base:
Center the bust inside the shell-shaped saucer. If the fit is wobbly, you can use a small amount of waterproof putty or museum wax on the bottom of the bust to secure it firmly to the shell.
Chia Gel Consistency
The seed paste should feel like jam. If it’s too runny, add more seeds. If it’s too clumped, add a drop of water. Proper gel helps seeds stick to the edges.
Step 2: Soil and Seed Method
-
Soak the seeds:
In a small bowl, mix 2 teaspoons of chia seeds with a small amount of water. Let them sit for about 10-15 minutes until they form a gel-like paste. This helps them stick to the soil and jumpstarts germination. -
Fill with soil:
While the seeds soak, scoop your potting soil or coco coir into the head cavity. Fill it nearly to the brim, leaving just a few millimeters of space at the top. -
Pack lightly:
Use the back of your spoon to gently press the soil down. You want a firm surface so the seeds don’t sink, but avoid packing it too densely or the roots will struggle. -
Moisten the soil:
Generously mist the soil surface with your spray bottle until it is damp but not swimming in water.
Level Up: Floral Crown
Once the grass is tall, press tiny dried flowers or small seashells into the soil line to give your mermaid a floral crown or oceanic accessories.
Step 3: Planting and Germination
-
Apply the seed paste:
Take your gelled chia seeds and spread them evenly over the soil surface. Use the back of a spoon or your fingers to ensure a single, consistent layer without large clumps. -
Extend to the edges:
Make sure to push the seeds right up to the rim of the planter’s opening. This ensures the ‘hair’ looks full and voluminous right from the scalp line. -
Create a greenhouse:
Cover the top of the planter loosely with plastic wrap or a clear shower cap. This traps humidity, which is crucial for early sprouting. -
Initial resting period:
Place the planter in a dark, warm spot for about 2 days. Check daily to ensure the seeds remain moist, giving them a quick spritz if they look dry.
Step 4: Growth and Maintenance
-
Move to light:
Once you see tiny white tails (roots) and the beginnings of green stems, remove the plastic cover. Move the bust to a bright, indirect light source, like a windowsill. -
Rotate daily:
Plants naturally lean toward the light. I turn the shell tray 180 degrees every morning to ensure the ‘hair’ grows straight up rather than sideways. -
Water carefully:
Continue to mist the sprouts twice a day. As the roots establish, you can begin to slowly water the soil directly, but be careful not to wash away the delicate stems. -
Watch the height:
Within 5 to 7 days, your mermaid should have a full head of green hair. The sprouts will continue to grow taller for another week. -
Styling the hair:
If the growth becomes uneven, use a pair of scissors to trim the top, giving your statue a neat, flat-top look or sculpting it into layers.
Enjoy the serene beauty of your new botanical sculpture as it brings a touch of classical elegance to your space