If you’re making a DIY clay ashtray, you get to blend pure function with your own style in the most satisfying little project. I love how a simple pinch of clay can turn into something that feels personal—whether you’re into clean lines, playful shapes, or tiny sculptural details.
Classic Pinch Pot Ashtray
Embrace the raw beauty of natural clay with this substantial, minimalist ashtray that eschews glaze for a pure, tactile finish. Its thick walls and smooth, unrefined texture make it a timeless piece that feels both modern and ancient.
Detailed Instructions
Materials
- Stone-colored stoneware clay or air-dry clay (approx. 1 lb)
- Small cup of water
- Potter’s sponge or a piece of soft chamois
- Wooden modeling tool (flat edge)
- Fettling knife or a wire clay cutter
- Metal kidney scraper (optional)
- Large round object (like a jar lid) for pressing the base
Step 1: Forming the Base
-
Prepare the clay:
Start by wedging your clay to remove any air bubbles, which is crucial for structural integrity. Form the clay into a smooth, solid ball approximately the size of a large orange. -
Open the pot:
Hold the clay ball in your non-dominant hand. Push your thumb directly into the center, stopping about a half-inch from the bottom. This thickness is key for the chunky aesthetic we are aiming for. -
Widen the base:
Instead of pinching upwards immediately, press your thumb outwards towards your palm to widen the floor of the pot. We want a broad, flat bottom rather than a rounded bowl shape. -
Flatten the interior:
Use the flat bottom of a jar or a small glass to gently press down inside the pot. This creates that perfectly flat, circular interior floor seen in the reference image.
Uneven Walls?
If one side is higher than the other, don’t pinch it down. Instead, use a needle tool to trim the excess height off the top, then smooth the new edge with a damp chamois cloth.
Step 2: Building the Walls
-
Pinch the walls:
Begin pinching the clay between your thumb and fingers, moving in a spiral from the base upwards. Aim for a consistent thickness of about 1/4 to 1/2 inch to maintain that heavy, durable look. -
Straighten the profile:
Use a wooden modeling tool or just a flat slat of wood to paddle the outside of the walls. This helps transform the rounded pinch pot shape into a straighter, more cylindrical form. -
Level the rim:
Place the ashtray upside down on a flat surface and gently press it down. This naturally levels the top rim, ensuring it’s even all the way around. -
Refine the lip:
With the pot right-side up, use a slightly damp sponge to smooth the top rim. You want to soften the sharp edges while keeping the top surface relatively flat.
Step 3: Adding Details & Refining
-
Mark the notches:
Decide on the placement for your cigarette rests. Three or four notches spaced evenly around the rim is standard. You can lightly mark these spots with your fingernail first. -
Carve the rests:
Use the rounded handle of a tool or your pinky finger to press firmly into the marked spots on the rim. Press down and slightly outward to create a smooth U-shaped groove. -
Smooth the grooves:
Dip your finger in water and run it back and forth through the notches to completely smooth out any cracked clay edges created by the pressing action. -
Surface smoothing:
Take a metal kidney scraper or a damp sponge and run it around the exterior and interior walls. I find this step distinctively satisfying as the rough texture transforms into a velvety matte surface. -
Final texture check:
If you want the exact look from the photo, don’t over-polish. Leave a few subtle fingerprints or light dragging marks to emphasize the hand-built nature of the piece. -
Drying:
Let the piece dry slowly away from direct drafts. If using kiln-fire clay, follow your clay interaction’s firing schedule; if using air-dry, wait 24-48 hours until completely bone dry. -
Finishing touch:
Once fully cured or fired, you can lightly sand the bottom with fine-grit sandpaper to ensure it sits perfectly flat on a table without wobbling.
Level Up: Speckled Effect
Knead grog or sand into your clay body before forming the ball. When you sponge the finished piece, the texture will reveal a beautiful, gritty, stone-like surface.
Place your finished piece on a side table to bring a touch of grounded, artisanal warmth to your space


Simple Slab Tray With Corner Rests
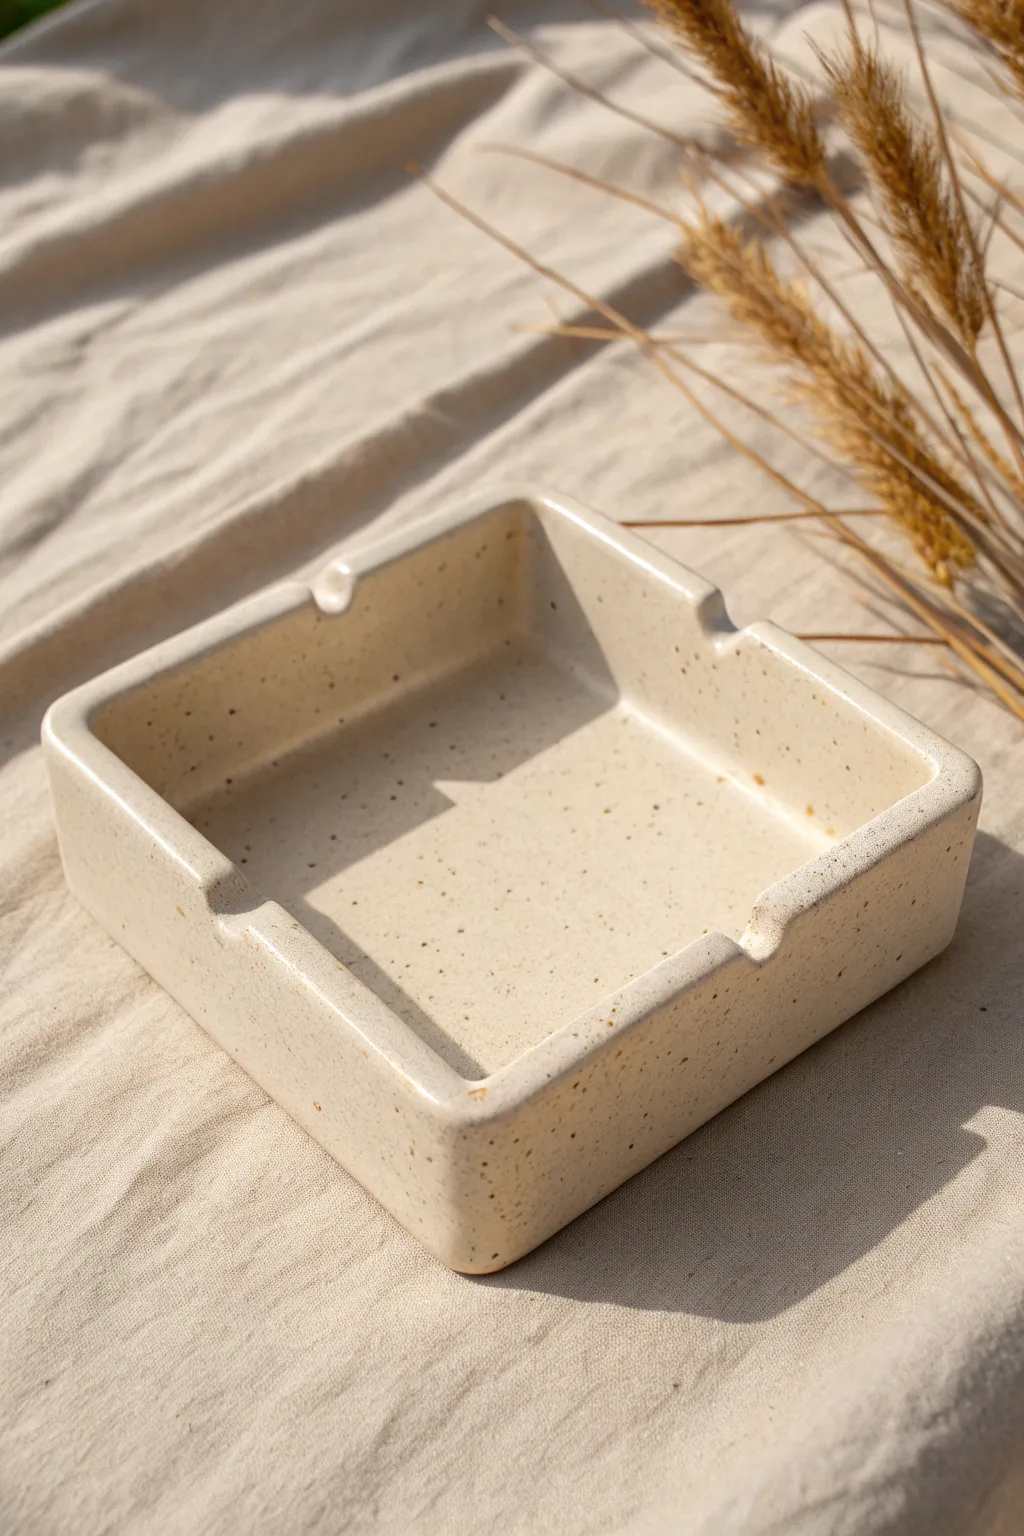
This project features a clean, modern aesthetic with its creamy beige tone and distinctive speckling. The simple square form is elevated by soft, rounded edges and perfectly placed rests, making it a stylish addition to any table.
Step-by-Step
Materials
- Speckled stoneware clay (beige/buff body)
- Rolling pin
- Two guide strips (wood slats, approx. 1/4 inch thick)
- Square template (paper or cardstock, approx. 5×5 inches)
- Needle tool or fettling knife
- Sponge
- Rib tool (flexible metal or rubber)
- Small round tool (dowel or paintbrush handle) for indentations
- Slip (clay mixed with water)
- Scoring tool or old fork
- Clear glaze (cone 5/6 or air-dry sealant depending on clay type)
Step 1: Preparing the Slab
-
Wedge and Roll:
Start by wedging your speckled stoneware clay to remove air bubbles. Place the clay between two guide strips on a canvas surface and use your rolling pin to create a perfectly even slab about 1/4 inch thick. -
Smooth the Surface:
Before cutting, take a damp sponge or a soft rib tool and gently compress the clay surface. This removes the canvas texture and aligns the clay particles, which helps prevent warping later. -
Cut the Components:
Using your square template, cut out the base of the ashtray with a needle tool. For the walls, cut four rectangular strips that match the length of your square’s sides and are about 1.5 inches tall.
Warped Walls?
If walls bow inward while drying, place a crumpled ball of newspaper inside the tray to gently hold the shape until the clay stiffens to leather-hard.
Step 2: Assembling the Form
-
Score the Edges:
Rough up the outer edges of the square base and the bottom long edge of each wall strip using a scoring tool. Be thorough here; good texture is key to a strong bond. -
Apply Slip:
Generously dab slip onto all the scored areas. It acts as the glue, so you want it wet but not sloppy. -
Attach the Walls:
Place the wall strips onto the base, aligning them with the edges. I find it easiest to attach opposite sides first, then the remaining two, ensuring they fit snugly at the corners. -
Reinforce the Seams:
On the inside of the tray, use a wooden modeling tool or your fingertip to coil a tiny snake of clay into the seam where the wall meets the floor, smoothing it out so the transition is seamless.
Step 3: Refining and Detailing
-
Smooth the Outside:
Work on the outside corners where the walls meet. Blend the clay together using a vertical motion, then smooth horizontally until the joint is invisible. -
Round the Rim:
With a slightly damp sponge, run your fingers over the top rim of the tray to soften the sharp edges. The goal is a pillowy, rounded look rather than a sharp geometric angle. -
Create the Corner Rests:
Use a round object, like a thick dowel or the handle of a large paintbrush, to create the cigarette rests. Press the tool gently into the rim near each corner. -
Shape the Indentations:
While pressing down, gently rock the tool slightly to widen the groove. Ensure the indentation is deep enough to be functional but doesn’t crack the wall structure. -
Final Smoothing:
Go over the entire piece one last time with a polishing sponge. Pay special attention to the new indentations to ensure there are no sharp burrs of clay.
Surface Level Up
Enhance the speckled look by flicking iron oxide wash onto the wet clay with a toothbrush before glazing to add larger, distinct spots.
Step 4: Drying and Finishing
-
Slow Drying:
Loosely cover the tray with plastic to let it dry slowly. This is crucial for flat-bottomed pieces to prevent the corners from curling up. -
Bisque Fire:
Once bone dry, fire the piece to the appropriate cone for your clay body (usually Cone 04 for stoneware bisque). -
Glaze Application:
Dip the piece in a clear or translucent white glaze. This will seal the ceramic while allowing the natural speckles of the clay body to shine through. -
Final Fire:
Fire the glazed piece to maturity (often Cone 5 or 6). If you are using air-dry clay instead of kiln clay, apply a high-gloss acrylic sealant instead.
Once fired, you will have a durable, minimalist piece that combines functionality with beautiful texture


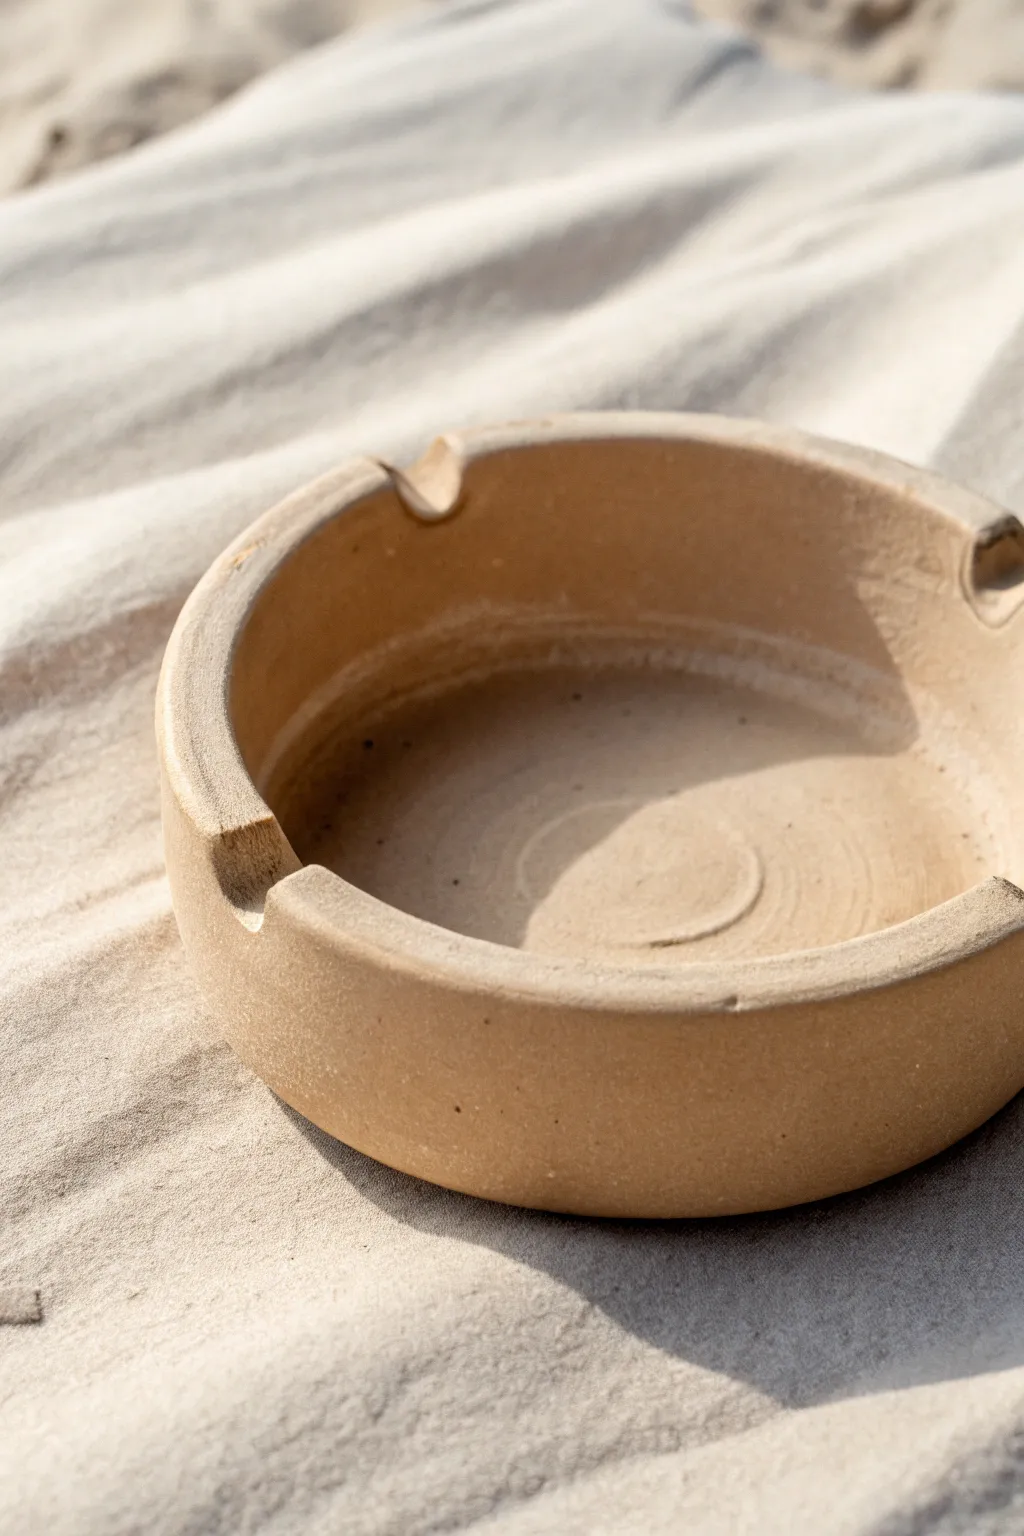
Deep Bowl Ashtray for Windy Spots
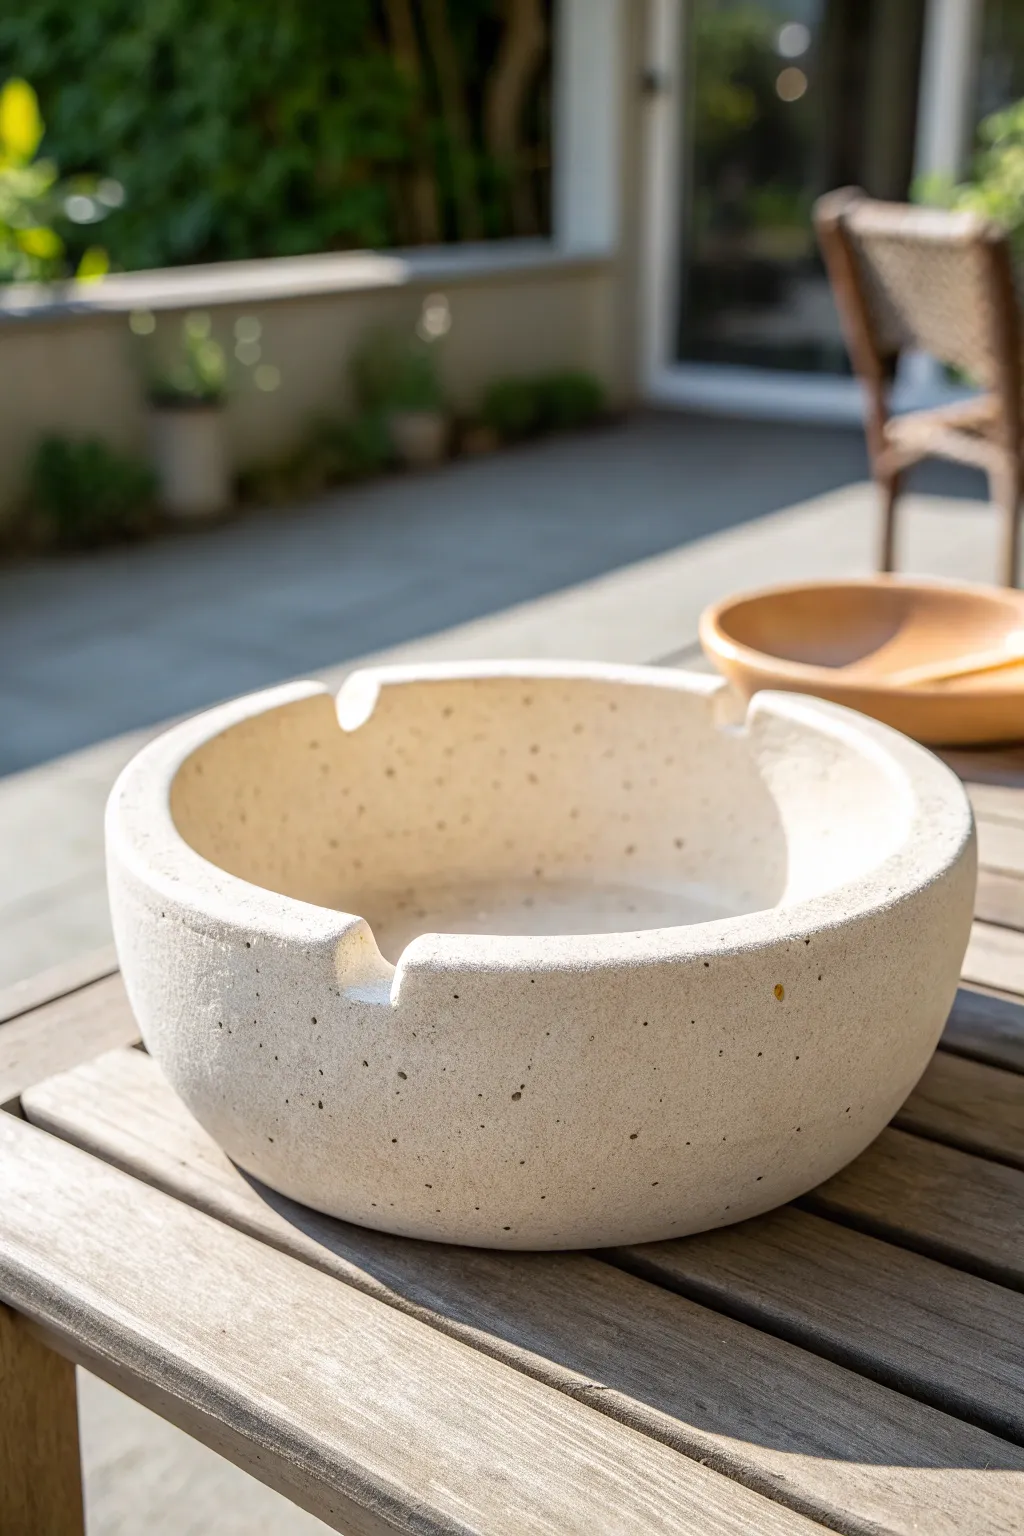
This robust, high-walled ashtray is perfect for outdoor patios where the wind loves to play, featuring a thick, minimalist design with a natural stone texture. The speckled finish mimics raw sandstone or concrete, giving it an elegant, grounding presence on any wooden table.
Step-by-Step Tutorial
Materials
- White or beige air-dry clay (or polymer clay)
- Course black sand or clean potting grit (for speckling)
- Rolling pin
- Large bowl (to use as a slump mold)
- Plastic wrap
- Fettling knife or craft knife
- Sponge
- Bowl of water
- Sandpaper (medium and fine grit)
- Matte sealant (spray or brush-on)
- Circular cookie cutter or small cap (approx. 1/2 inch diameter)
Step 1: Preparing the Clay Body
-
Incorporate Texture:
Begin by taking a large block of your white or beige clay. Before rolling, sprinkle a generous amount of coarse black sand or grit onto the clay surface. -
Knead Thoroughly:
Fold the clay over the grit and knead it well. You want the speckles to be distributed evenly throughout the entire mass, not just on the surface. Add more grit if the texture looks too sparse. -
Rest the Clay:
Let the clay sit for about 10 minutes. This allows the moisture to equalize slightly, making it easier to work with. -
Roll the Slab:
Roll out the clay into a thick slab, aiming for a consistent thickness of about 3/4 inch to 1 inch. This specific design relies on chunky, substantial walls.
Stone Effect
Don’t over-smooth the clay during the wet phase. Leaving slight finger marks or imperfections enhances the organic, carved-stone aesthetic after sanding.
Step 2: Shaping the Bowl
-
Prepare the Mold:
Take a large kitchen bowl that matches your desired diameter. Flip it upside down and cover the exterior tightly with plastic wrap to prevent sticking. -
Drape the Clay:
Gently lift your thick clay slab and drape it over the covered bowl. Gravity will do some of the work, but you’ll need to press it gently against the mold. -
Establish the Depth:
Using a knife, trim the excess clay around the base of your mold to establish a uniform rim height. Aim for a deep profile, at least 3 to 4 inches high. -
Create the Flat Bottom:
Press a flat object (like a cutting board) gently onto the top of the inverted clay (which will become the bottom of the ashtray) to ensure it sits perfectly flat on a table.
Add Weight
For maximum wind resistance, create a double-walled bottom and fill the cavity with clean sand before sealing the base shut with a clay disc.
Step 3: Refining and Detailing
-
Initial Smoothing:
While the clay is still on the mold, use a damp sponge to smooth out any fingerprints or cracks on the exterior surface. -
Remove from Mold:
Once the clay has stiffened slightly (leather hard), carefully remove it from the bowl mold. It should hold its shape but still be carveable. -
Refine the Rim:
Use your fingers and a little water to round off the sharp edges of the top rim. I like to spend extra time here to get that soft, stone-like curve. -
Mark Suggestive Notches:
Choose three or four equidistant points along the rim. Use a small circular cutter or bottle cap to gently press into the rim, marking where the cigarette rests will go. -
Carve the Notches:
Using your fettling knife or a carving tool, hollow out the marked semi-circles. Creating a smooth, U-shaped dip that angles slightly inward toward the bowl’s center. -
Smooth the Notches:
Wet your finger and run it through the carved notches to eliminate any jagged clay bits and ensure a smooth resting surface.
Step 4: Finishing Touches
-
Drying Process:
Allow the piece to dry slowly away from direct sunlight. Rushing this step can cause cracks, especially with such thick walls. Rotate it occasionally. -
Expose the Grit:
Once bone dry, take your medium-grit sandpaper and sand the entire surface. This is crucial—it removes the top layer of clay dust and exposes the beautiful black speckles you added earlier. -
Clean Up:
Wipe away all sanding dust with a slightly damp cloth or a dry brush. -
Seal for Safety:
Apply a coat of matte sealant. If using air-dry clay, ensure the sealant is non-flammable once cured, or apply a coat of resin strictly to the bottom interior where ash will sit.
Now you have a sturdy, stylish piece that looks like it was carved directly from beach stone


Terrazzo Speckled Clay Ashtray
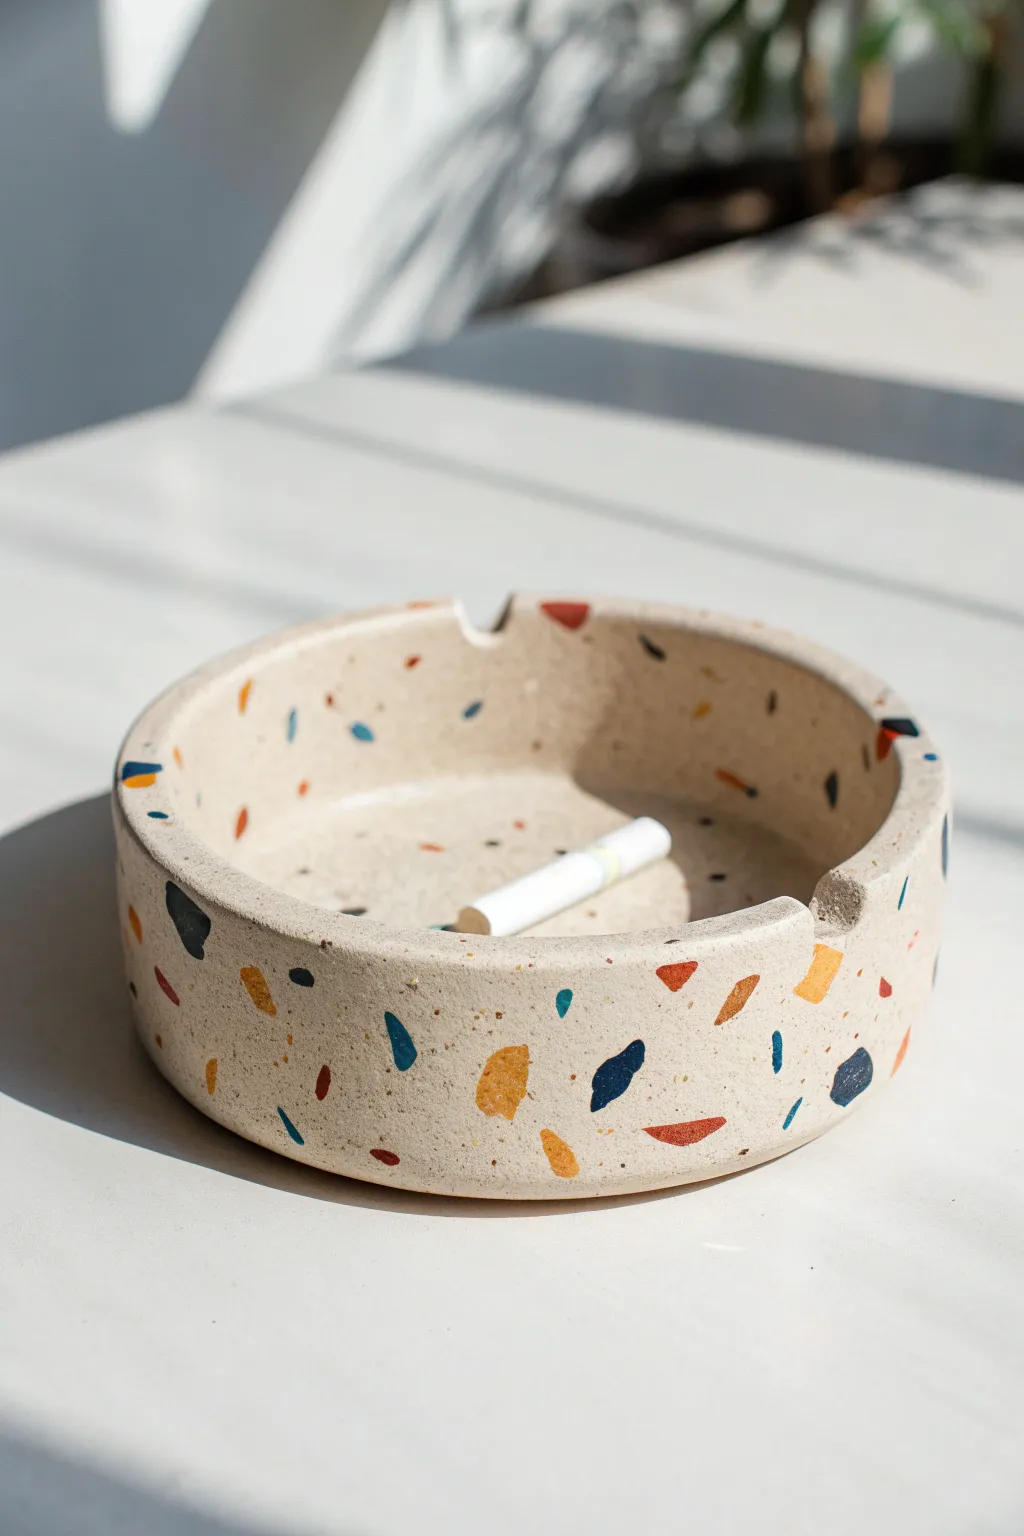
Bring the timeless elegance of Italian flooring to your coffee table with this faux terrazzo clay project. This tutorial guides you through creating a chunky, modern ashtray featuring vibrant, embedded chips of color against a creamy neutral base.
How-To Guide
Materials
- Polymer clay (base color: beige/ecru/granite)
- Polymer clay (chip colors: navy blue, rust orange, mustard yellow, forest green)
- Acrylic rolling pin
- Circle cutter or bowl (approx. 4-5 inches diameter)
- Craft knife or clay blade
- Rolling guides or playing cards (optional)
- Sanding paper (wet/dry, grits 400, 600, 1000)
- UV resin or polyurethane gloss varnish (for sealing)
- Gloss glaze (optional, for extra shine)
- Clay sculpting tool (for making indents)
- Parchment paper
Step 1: Creating the Terrazzo Chips
-
Mix colors:
Begin by conditioning your colored clays (navy, rust, mustard, green). If the colors are too bright, mix in a tiny amount of the beige base clay to mute them slightly for a more cohesive look. -
Flatten the colors:
Roll each colored piece into a very thin sheet, roughly 1mm thick or even less. -
Bake the sheets:
Place these thin colored sheets on parchment paper and bake them for about 10-15 minutes according to the package instructions. We want them hard enough to chop, but they don’t need a full cure yet. -
Chop the chips:
Once cooled, break the thin sheets into varied, irregular shards. Use your fingers for larger chunks and a craft blade to mince some pieces smaller. Aim for variety in size.
Step 2: Preparing the Base
-
Condition the base:
Take a large block of your beige or ecru polymer clay and condition it thoroughly until it is soft and malleable. -
Incorporate chips:
Flatten the base clay slightly and sprinkle a generous amount of your pre-baked colored chips onto it. Fold the clay over, roll it, and fold again to distribute the chips throughout the entire block, not just the surface. -
Roll out the slab:
Roll the mixed clay out into a thick slab, approximately 1/4 inch (6mm) thick. I like to use rolling guides here to ensure the thickness is perfectly even. -
Add surface texture:
If the surface looks too plain, press more colored chips directly into the top of the slab and roll over it gently once more to embed them flush with the surface.
Master the mix
Don’t over-mix the clay once chips are added. Too much rolling can smear the colored chips, ruining the crisp terrazzo look. Fold gently and stop early.
Step 3: Shaping the Ashtray
-
Cut the base:
Use your circle cutter or a bowl as a template to cut out the round base of the ashtray. -
Create the walls:
Roll the remaining clay into a long snake, then flatten it into a long strip that matches the circumference of your base. Trim the height to about 1 inch. -
Attach the wall:
Wrap the strip around the edge of the circular base. Carefully blend the seams on the inside and outside using a sculpting tool or your finger so the transition is seamless. -
Smooth the rim:
Run your finger along the top rim to round off any sharp edges created during cutting. -
Carve cigar rests:
Using the side of a rounded tool or a small dowel, press down into the rim at opposite sides to create the characteristic U-shaped notches for holding cigarettes.
Uneven sanding?
If sanding isn’t revealing chips, your top layer of beige clay might be too thick. Use a coarser grit (like 320) to aggressively remove that top film first.
Step 4: Finishing Touches
-
Final smooth:
Inspect the piece for any fingerprints. Smoothing them out now with a tiny bit of baby oil saves sanding time later. -
Bake:
Bake the assembled ashtray according to the manufacturer’s instructions for the thickness of the clay, usually 30-45 minutes at 275°F (130°C). -
Wet sand:
Once fully cooled, wet sand the piece under running water. Start with 400 grit to reveal the sharp edges of the interior chips, then move to 600 and 1000 for a smooth finish. -
Buff:
Rub the piece vigorously with a denim cloth or a buffing wheel to bring out a natural sheen. -
Seal:
Apply a coat of polyurethane varnish or UV resin to protect the surface and make it easier to clean ash later.
This sophisticated piece is now ready to serve as a functional object or a chic catch-all dish for your keys

What Really Happens Inside the Kiln
Learn how time and temperature work together inside the kiln to transform clay into durable ceramic.
Marbled Swirl Polymer Clay Ashtray
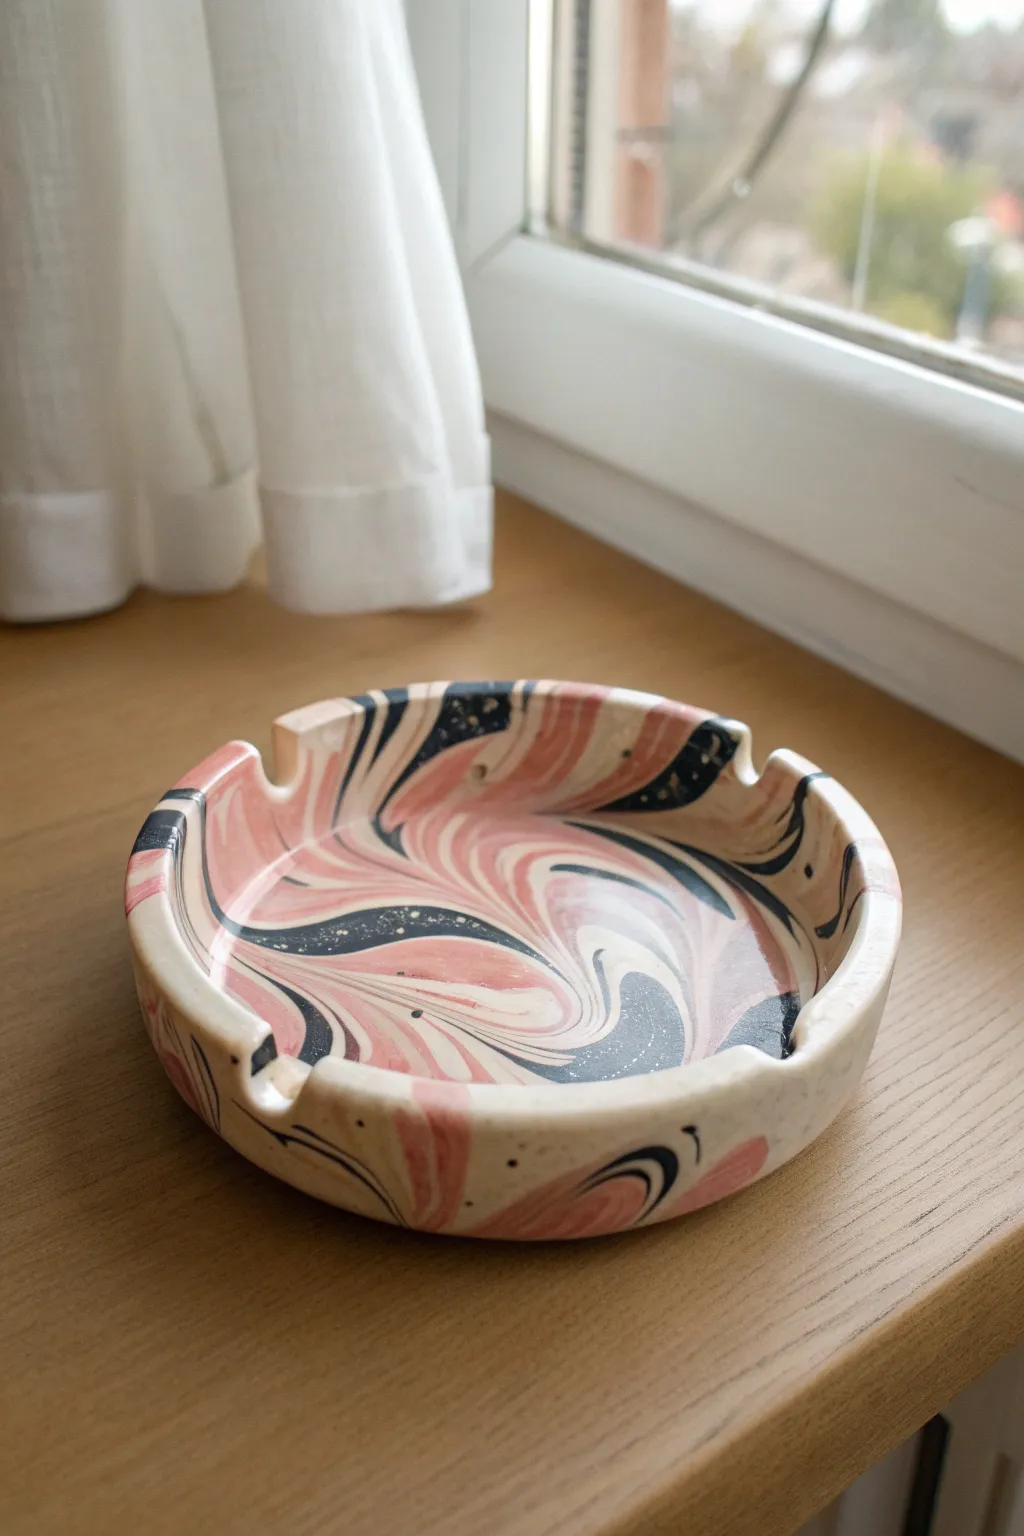
Capture the hypnotic beauty of flowing water with this marbled polymer clay ashtray. The dusty pink, deep navy, and creamy white swirls create a sophisticated, modern ceramic look without needing a kiln.
Detailed Instructions
Materials
- Polymer clay (white or beige, dusty pink, black or navy blue)
- Acrylic rolling pin
- Circle cookie cutter or a round bowl to trace
- Craft knife or scalpel
- Smooth glass or ceramic work surface
- Modeling tool or the back of a paintbrush (for notches)
- Sandpaper (fine grit)
- Gloss glaze or polyurethane varnish
- Soft paintbrush
Step 1: Preparing the Clay
-
Condition the Clay:
Begin by kneading each color of polymer clay separately until they are soft and pliable. You’ll need about 50% white/beige base, 30% dusty pink, and 20% dark navy or black. -
Create Snakes:
Roll each color into several long, thin snakes. Varying the thickness slightly can add interest to the final pattern. -
Bundle and Twist:
Gather your snakes into one large bundle. Twist the bundle tightly like a candy cane to begin merging the colors. -
Roll and Fold:
Roll the twisted bundle into a longer snake, then fold it in half. Twist it again. Repeat this process until you see the marbling effect you desire, but stop before the colors muddy into a single shade.
Clean Cuts Only
Chill your clay in the fridge for 10 minutes before slicing or cutting the final circle. The firmer clay resists dragging and keeps your marble lines crisp.
Step 2: Shaping the Ashtray
-
Form a Ball:
Roll your marbled clay into a smooth ball. You should already see beautiful streaks of color on the surface. -
Flatten the Base:
Using your acrylic rolling pin or the palm of your hand, flatten the ball into a thick disc, about 1/2 inch thick. -
Define the Size:
Use a large circle cutter or trace around a bowl to cut a perfect circle from your flattened disc. Keep the scraps for the rim. -
Create the Rim:
Roll the leftover scraps into a long, even snake that is long enough to circle the perimeter of your base. -
Attach the Wall:
Place the snake on top of the base’s edge. Use your thumb or a modeling tool to blend the clay from the snake down into the base on the inside, ensuring a seamless connection. -
Smooth the Outside:
Repeat the smoothing process on the outside wall. I like to use a little bit of baby oil on my finger to really erase the seams and fingerprints. -
Refine the Lip:
Gently pinch and flatten the top of the wall to create a uniform height and thickness all the way around.
Step 3: Detailing and Finishing
-
Carve the Notches:
Using a thick modeling tool or the handle of a paintbrush, press down firmly into the rim at three equidistant points to create the cigarette rests. -
Clean Up Edges:
Use your fingers to round off the edges of your notches so they look intentional and soft, rather than sharp indentations. -
Bake:
Place the ashtray on a baking sheet lined with parchment paper. Bake according to your clay package instructions (usually around 275°F or 135°C for 15-30 minutes). -
Cool Down:
Allow the piece to cool completely in the oven with the door cracked open. This gradual cooling helps prevent cracking. -
Sand for Smoothness:
Once cool, use fine-grit sandpaper under running water to gently sand any rough spots or fingerprints, paying special attention to the rim. -
Adding Shine:
Apply a thin coat of gloss glaze or varnish to the entire piece. This not only protects the clay but makes the marbled colors pop vividly. -
Final Cure:
Let the varnish dry completely according to the manufacturer’s time, usually 24 hours for a full cure, before use.
Gilded Touch
Before baking, press small bits of gold leaf flakes onto the surface for a luxurious vein effect, then seal them in with your glossy varnish later.
Now you have a chic, custom piece of decor that looks like expensive stone but was made right at your kitchen table
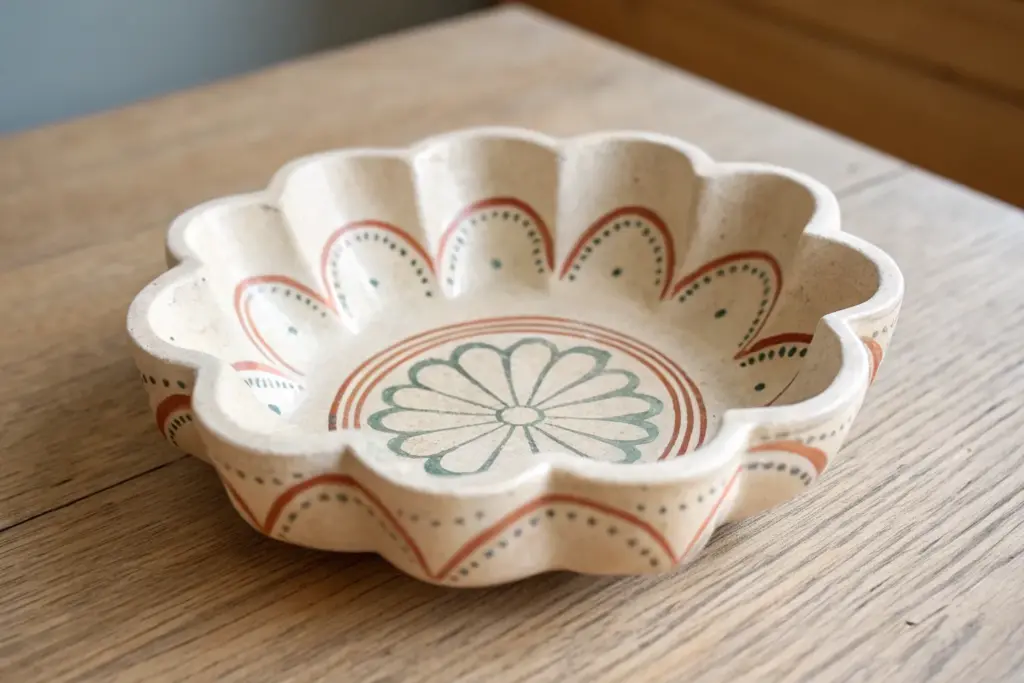
Scalloped Rim Flower Ashtray
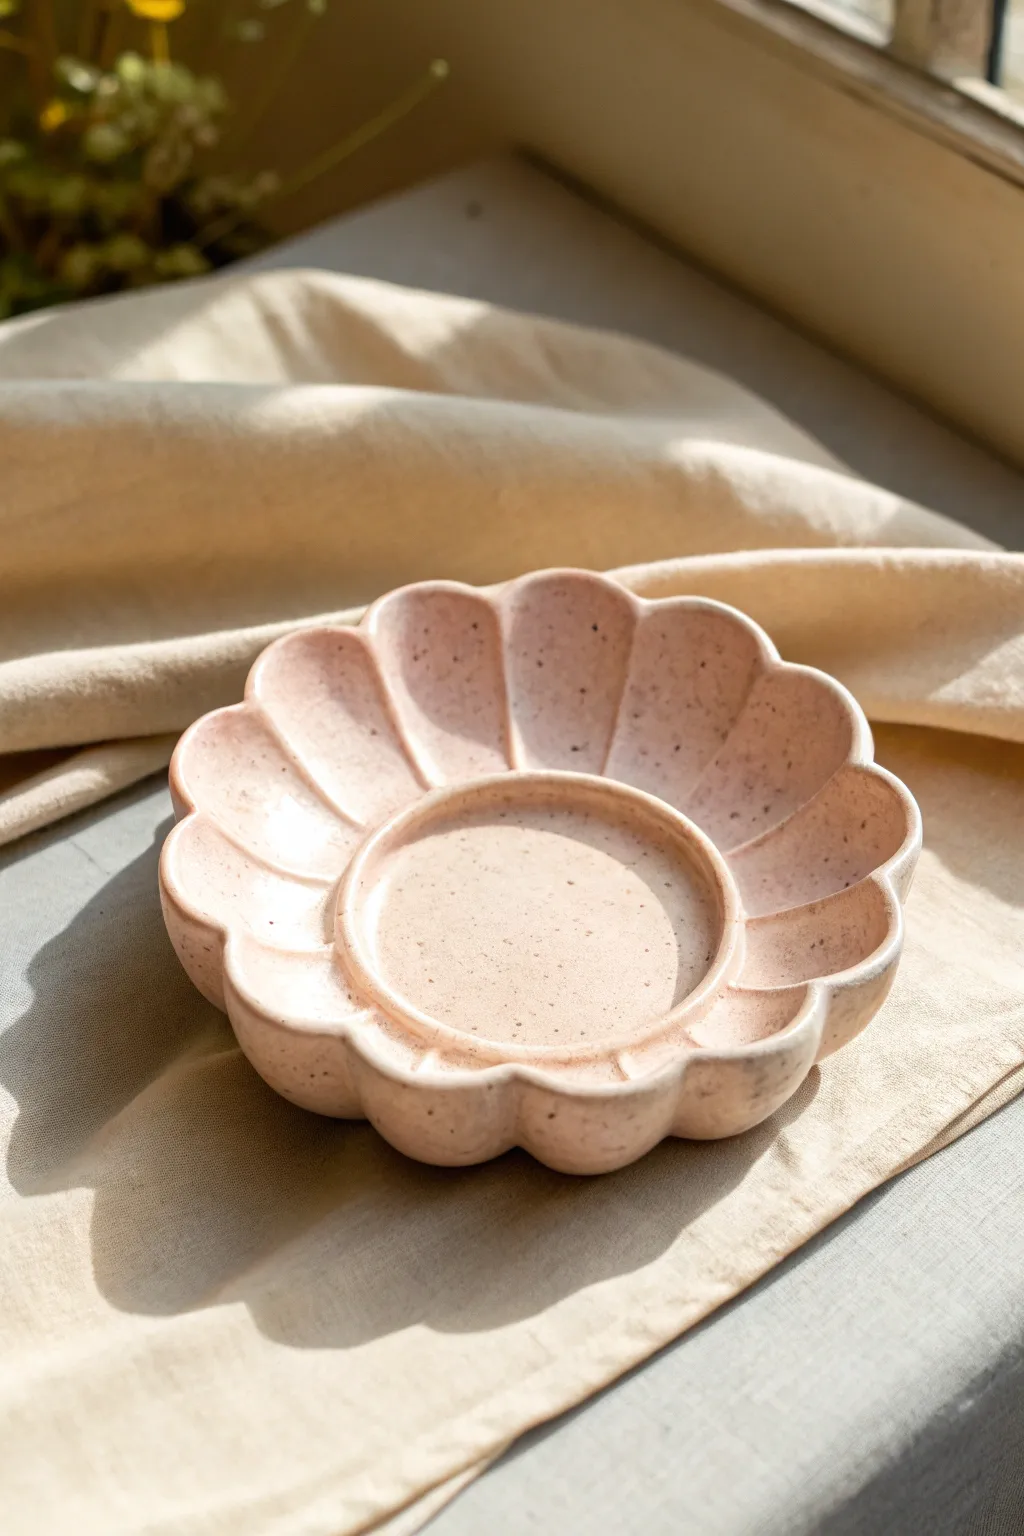
This charming, flower-shaped ashtray features soft, undulating petals and a natural speckled finish that gives it a professional ceramic look. The gentle pink hue combined with the organic shape makes it both functional and a lovely decorative accent.
How-To Guide
Materials
- Air-dry clay (white or terracotta)
- Rolling pin
- Circle template or bowl (approx. 4-5 inches diameter)
- Clay sculpting tool or butter knife
- Small sponge
- Sandpaper (fine grit)
- Acrylic paint (pale blush pink)
- Acrylic paint (dark brown or black for speckling)
- Old toothbrush
- Glossy varnish or sealant (waterproof if using as an ashtray)
- Water cup
Step 1: Shaping the Base
-
Prepare the clay slab:
Begin by wedging your clay to remove any air bubbles. Roll it out on a smooth surface to an even thickness of about 1/4 inch. -
Cut the circle:
Place your circle template or bowl onto the clay slab and trace around it with a knife to cut out a clean, perfect circle. Remove the excess clay. -
Smooth the edges:
Dip your finger in a little water and run it along the cut edge of the circle to smooth out any roughness or sharp debris.
Rim Perfection
To keep the petals lifted while drying, place the clay circle inside a curved bowl lined with plastic wrap. This supports the shape as it sets.
Step 2: Sculpting the Petals
-
Mark the center:
Lightly press a smaller circular object (like a jar lid or cup) into the very center of your clay circle. Don’t cut through; just make an indentation to define the flat central well. -
Divide the rim:
Using your sculpting tool, make light tick marks around the outer edge to divide the circle into roughly 10-12 equal sections. -
Cut the petal notches:
At each tick mark, cut a small V-shape into the rim or simply press your tool down to create separation between the petals. -
Curve the petals:
Gently lift the outer rim of the clay. Using your thumb and forefinger, pinch and mold each section into a rounded petal shape, curving them slightly upward. -
Refine the shape:
Smooth the transitions between petals with a damp sponge so the scalloped edge looks fluid and soft rather than geometric and sharp. -
Final smooth:
Run a barely damp sponge over the entire surface to erase fingerprints. I find this step crucial for getting that professional, store-bought finish. -
Dry completely:
Let the piece dry for 24-48 hours until it is bone dry and hard. Flip it occasionally to ensure even drying.
Incense Holder Hack
Before the clay dries, poke a small hole in the center of the inner well at an angle. This turns your ashtray into a dual-purpose incense holder.
Step 3: Painting and Finishing
-
Sand imperfections:
Once dry, gently sand any rough spots or sharp edges with fine-grit sandpaper. Wipe away the dust with a dry cloth. -
Apply base color:
Paint the entire dish with two coats of pale blush pink acrylic paint, allowing the first coat to dry before applying the second. -
Create the speckles:
Dilute a small drop of dark brown or black paint with water until it’s fluid. Dip an old toothbrush into this mixture. -
Splatter paint:
Hold the toothbrush over the dish and run your thumb across the bristles to flick tiny speckles onto the surface. Practice on paper first to control the spray. -
Seal the piece:
Once the paint is completely dry, apply two coats of glossy varnish. If this will be a functional ashtray, ensure you use a heat-resistant and waterproof sealer.
This lovely speckled dish brings a soft, artistic touch to any table setup


The Complete Guide to Pottery Troubleshooting
Uncover the most common ceramic mistakes—from cracking clay to failed glazes—and learn how to fix them fast.
Heart-Shaped Ashtray With Glossy Finish
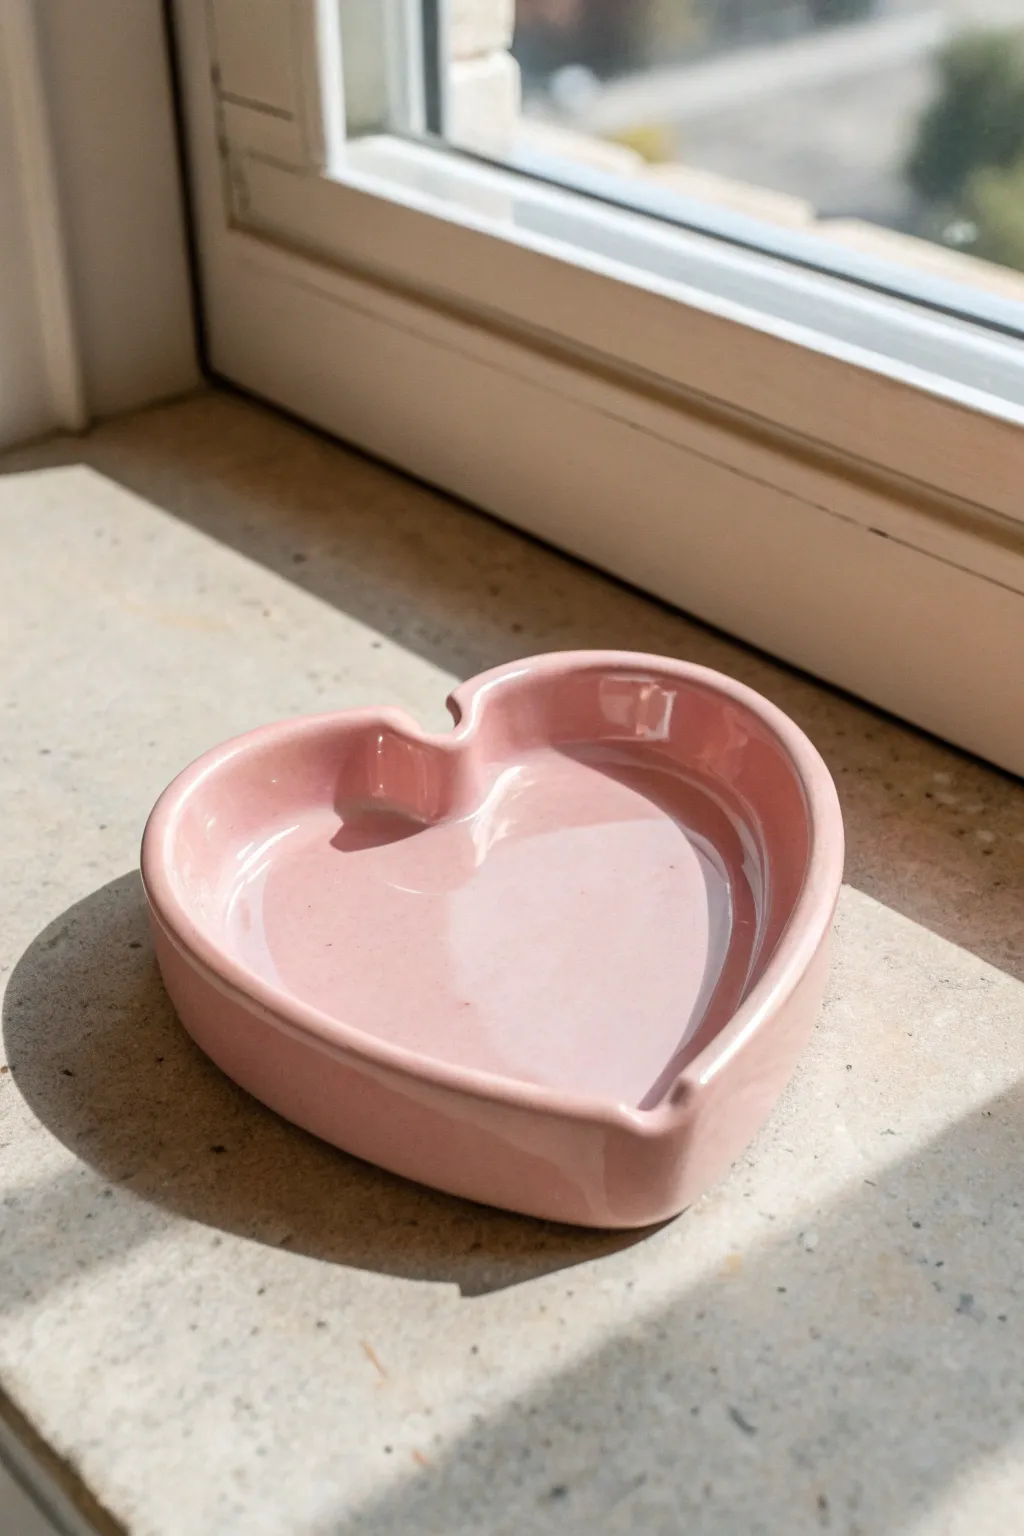
This charming ash tray features a classic heart silhouette and a smooth, candy-like glossy finish that catches the light beautifully. Its minimalist pastel pink color makes it a sweet decorative piece regardless of its practical use.
Step-by-Step
Materials
- Air-dry clay (or polymer clay)
- Acrylic rolling pin
- Heart-shaped cookie cutter (large) or paper template and craft knife
- Small bowl of water
- Sponge or fine-grit sandpaper
- Pastel pink acrylic paint
- High-gloss varnish or UV resin
- Paintbrushes (flat and detail)
- Modeling tools (or a butter knife)
Step 1: Shaping the Clay
-
Knead and Prepare:
Begin by taking a generous handful of air-dry clay. Knead it thoroughly in your hands to warm it up and remove any air bubbles, which helps prevent cracks later. -
Roll out the Base:
Place the clay on a smooth work surface. Use your acrylic rolling pin to roll it out into an even slab, aiming for a thickness of about 1/4 inch (6-7mm). -
Cut the Heart Shape:
If you have a large heart-shaped cutter, press it firmly into the clay. Alternatively, place a paper template on top and carefully trace around it with a craft knife to cut out your heart base. -
Create the Sidewalls:
Roll a separate long snake or coil of clay roughly the thickness of a pencil. This will form the raised rim of your ashtray. -
Attach the Walls:
Score the edges of your heart base and the underside of the coil with a needle tool or old toothbrush. Apply a little water or slip to the scored areas and gently press the coil along the perimeter of the heart base. -
Blend the Seams:
Using a modeling tool or your fingers, blend the clay coil downwards into the base on both the inside and outside. The goal is to make it look like one solid piece rather than two joined pieces. -
Form the Rests:
Decide where you want the cigarette rests to be. Typically, these go at the top curves of the heart. Use a round tool or your finger to gently press indentations into the rim.
Cracks Appearing?
If small cracks appear while drying, mix a tiny bit of fresh clay with water to make a paste and fill them in. Let dry and sand smooth.
Step 2: Refining and Drying
-
Smooth the Surface:
Dip your finger or a small sponge into water and run it over the entire surface. Smooth out any fingerprints, bumps, or seam lines to get that professional finish. -
Initial Drying:
Set the ashtray aside in a cool, dry place. Let it dry completely according to your clay package’s instructions—usually 24 to 48 hours for air-dry clay. -
Sand for Perfection:
Once fully dry, inspect for rough spots. Use fine-grit sandpaper to gently buff away any imperfections, paying special attention to the rim and the indentations. -
Wipe Clean:
Use a slightly damp cloth to wipe away all the sanding dust. The surface needs to be perfectly clean before painting.
Add Some Sparkle
Mix fine iridescent glitter into your final gloss glaze layer for a subtle shimmer that reveals itself when it hits the sunlight.
Step 3: Painting and Glazing
-
Base Coat:
Apply a coat of pastel pink acrylic paint. Cover the inside, outside, and the rim evenly. Let this first layer dry completely. -
Second Coat:
Apply a second or even third coat of pink paint to ensure solid, opaque coverage. I find that multiple thin layers look much smoother than one thick gloopy one. -
Apply Gloss Varnish:
To achieve that glass-like ceramic look shown in the image, apply a thick layer of high-gloss varnish or heavy gloss glaze. -
Optional Resin Finish:
For extreme durability and shine, you can pour a thin layer of resin into the bottom and brush it onto the sides. If using resin, ensure you work in a ventilated area and cure it properly. -
Final Cure:
Allow your varnish or resin to cure fully undisturbed. This final step is crucial for achieving that non-tacky, reflective surface.
Place your finished piece by a sunny window to enjoy that brilliant glossy reflection
Cloud Ashtray With Soft Curves
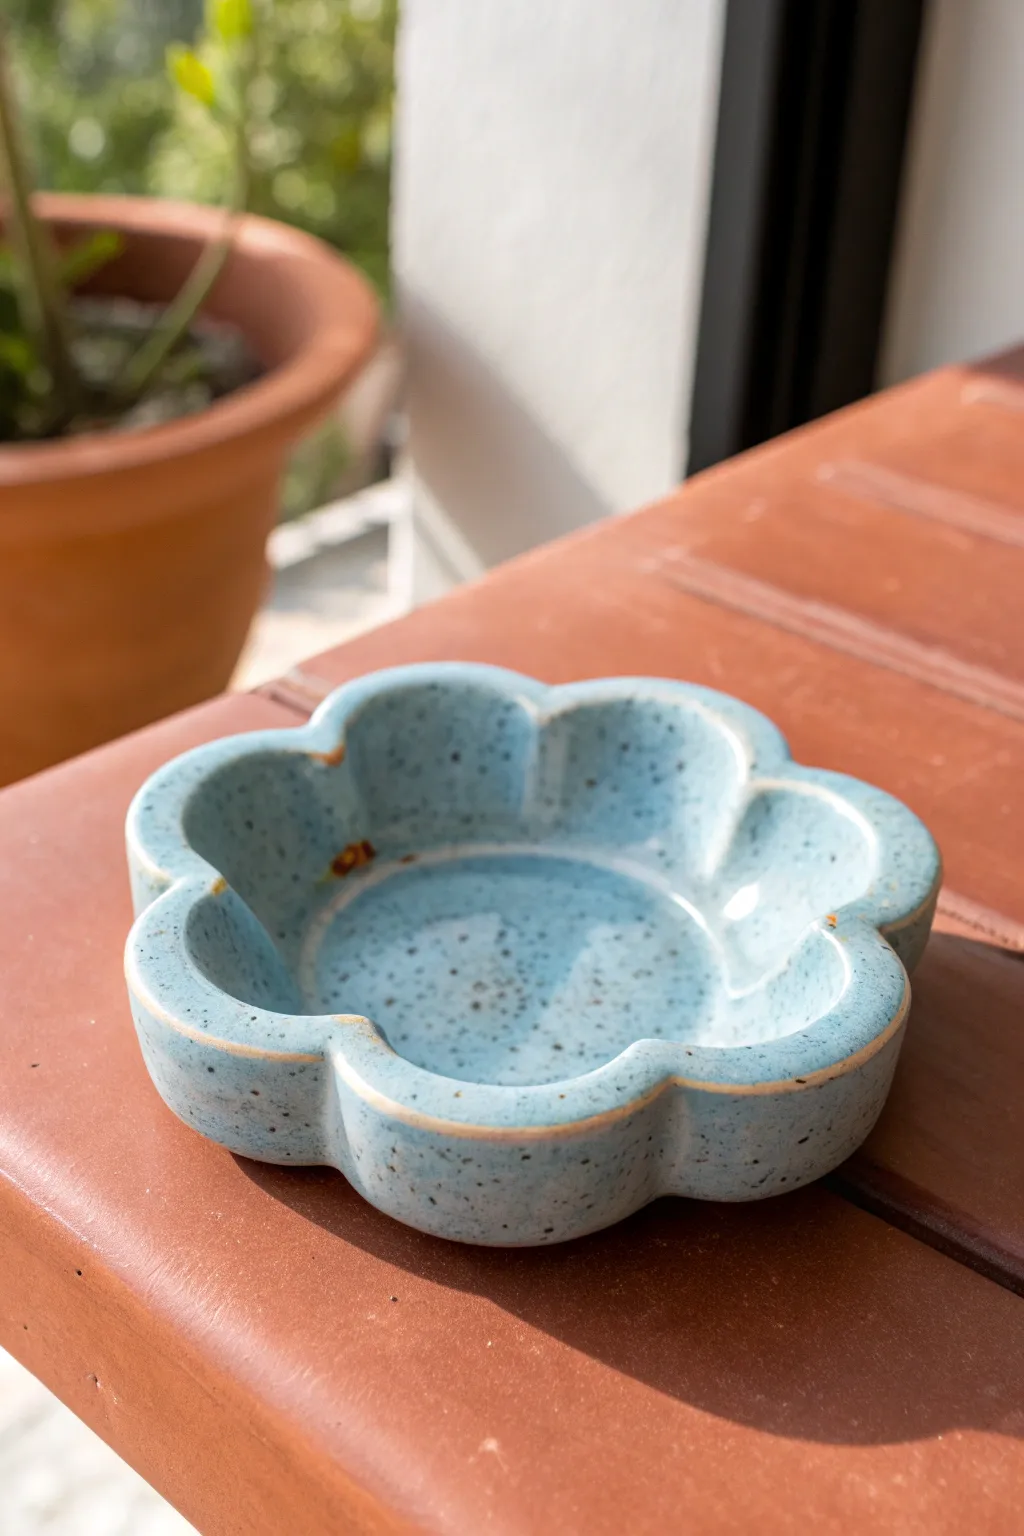
This charming ceramic piece features a soft, undulating cloud shape with a glossy, speckled blue finish. The design uses thick, rounded walls to create a sturdy feel, while the glaze breaks over the edges to reveal a hint of warm clay underneath.
Step-by-Step Guide
Materials
- Air-dry clay or polymer clay (white or light grey)
- Rolling pin
- Flower or cloud-shaped cookie cutter (large)
- Small bowl or sponge for shaping
- Pottery sponge
- Clay sculpting tools (modeling tool, needle tool)
- Acrylic paints (baby blue, black, white)
- High-gloss varnish or resin
- Old toothbrush (for speckling)
- Sandpaper (fine grit)
Step 1: Shaping the Base
-
Prepare the Clay:
Start by conditioning your clay. If using polymer, knead it until soft. If using air-dry clay, ensure it is moist and pliable. Roll it out to a uniform thickness of about 1/4 inch (6mm). -
Cut the Shape:
Press your large flower or cloud-shaped cutter firmly into the slab. If you don’t have a cutter, print a template, place it on the clay, and trace around it carefully with a needle tool. -
Smooth the Edges:
Once the shape is cut, use a damp sponge or your finger to gently round over the sharp cut edges. This project relies on soft, pillowy curves, so eliminate any harsh angles now. -
Form the Bowl:
Gently lift the clay shape. Place it inside a small, shallow bowl lined with plastic wrap, or drape it over a rounded form. Press the center down gently so the ‘petals’ curve upward to form the sides of the ashtray. -
Refine the Walls:
While it sits in the mold, use your thumb to smooth the interior walls. Ensure that the transitions between the curved sections are deep enough to hold a cigarette if needed, but smooth enough to wipe clean. -
Review the Rim:
Check the thickness of the rim. I like to gently pinch the rim slightly to make it look uniform all the way around, mimicking the look of thrown pottery.
Step 2: Drying and Refining
-
Let it Dry:
Allow the clay to dry completely according to the package instructions. For air-dry clay, this might take 24-48 hours. For polymer clay, bake it in the oven as directed. -
Check for Imperfections:
Once hardened, inspect the piece for any cracks or rough spots. Use fine-grit sandpaper to gently smooth out any bumps on the rim or the exterior curves. -
Dust Off:
Wipe the entire piece down with a slightly damp cloth or a dry brush to remove all sanding dust before painting. Clean surfaces are crucial for a smooth finish.
Pro Tip: Liquid Glass
For an ultra-realistic ceramic look, use UV resin instead of varnish for the final coat. It creates a thick, glassy depth that standard varnish can’t replicate.
Step 3: Faux Glazing Technique
-
Base Coat:
Mix a soft baby blue acrylic paint. Apply two even coats to the entire piece, letting the first coat dry completely before adding the second. This creates your opaque ceramic look. -
Create the ‘Breaks’:
To mimic the look of glaze breaking over the rim, use a very small brush and a burnt orange or light brown paint. Carefully paint a thin, slightly irregular line along the very top edge of the rim. -
Feather the Edges:
While the brown rim paint is wet, use a clean, slightly damp brush to feather the bottom edge of the line slightly, so it blends naturally into the blue rather than sitting as a hard stripe. -
Prepare the Speckles:
Mix a small amount of black or dark grey paint with a drop of water to make it fluid. Dip the bristles of an old toothbrush into this mixture. -
Apply Speckles:
Hold the toothbrush over the ashtray and run your thumb across the bristles to flick tiny dots onto the surface. Practice on paper first to control the density of the spray. -
Seal the piece:
Once all paint is bonedry, apply two to three distinct coats of high-gloss varnish. This mimics the glassy shine of fired ceramic glaze and protects the paint from ash. -
Final Cure:
Let the varnish cure for at least 24 hours in a dust-free area to ensure the finish is hard and durable.
Troubleshooting: Warping
If your air-dry clay warps while drying, place a small bag of rice inside the bowl shape. The weight keeps the bottom flat while still allowing airflow.
Your finished cloud tray is now ready to hold trinkets or ash with effortless style

TRACK YOUR CERAMIC JOURNEY
Capture glaze tests, firing details, and creative progress—all in one simple printable. Make your projects easier to repeat and improve.
Yin-Yang Split Color Ashtray
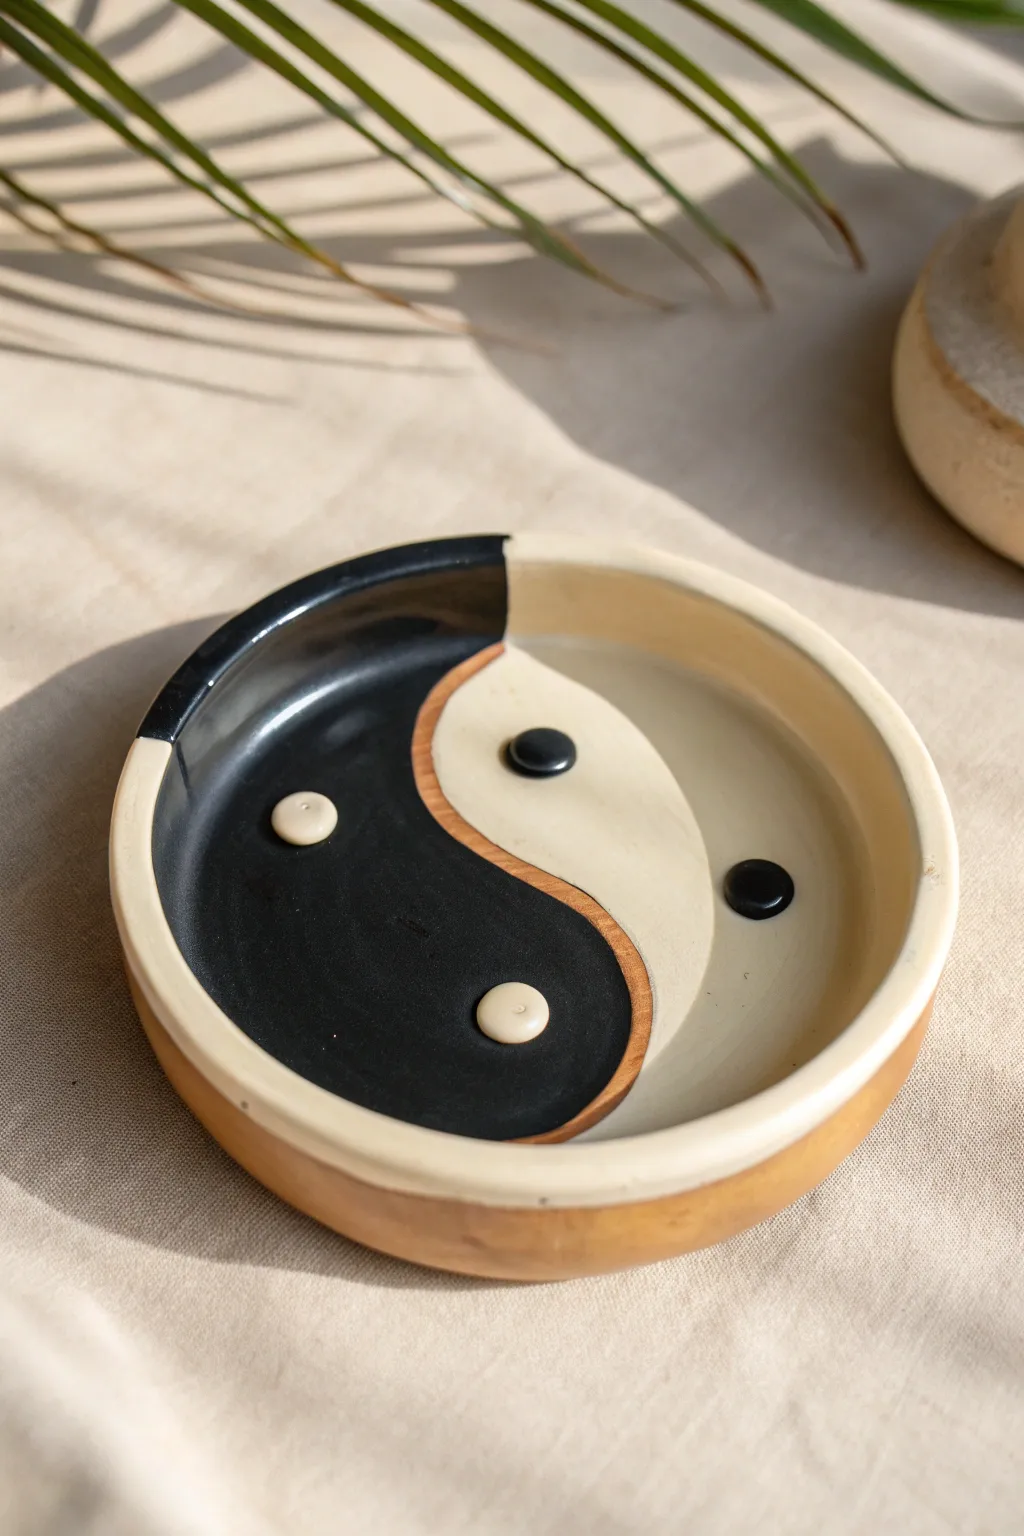
Achieve perfect equilibrium with this sleek wooden-style clay ashtray featuring a classic Yin-Yang motif. The natural wood rim contrasts beautifully with the glossy black and cream interior, creating a functional piece that doubles as modern decor.
Step-by-Step
Materials
- Air-dry clay or polymer clay (white or beige)
- Rolling pin
- Circle template or bowl (approx. 5-6 inches)
- Clay sculpting tools (knife tool, smoothing tool)
- Sandpaper (medium and fine grit)
- Acrylic paints: Black, Cream/Off-White, and warm Caramel/Wood tone
- Glossy varnish or resin (for the interior)
- Matte varnish (for the exterior/rim)
- Fine detail paintbrush
- Flat shader paintbrush
- Small round object (like a bottle cap) for shaping cigarette rests
Step 1: Shaping the Base
-
Roll the Slab:
Begin by conditioning your clay until it is pliable and smooth. Roll it out into a flat, even slab about 1/4 inch thick to ensure durability. -
Cut the Circle:
Place your circle template or an upside-down bowl onto the clay slab. Use your knife tool to trace around it, cutting out a perfect circle for the base. -
Form the Rim:
Roll a long snake of clay for the walls. Flatten it slightly into a strip about 3/4 inch high. Attach this strip to the perimeter of your circle base, scoring and slipping both surfaces (if using air-dry clay) to create a strong bond. -
Blend the Seams:
Use your fingers or a smoothing tool to merge the wall seamlessly with the base on both the inside and outside. I find that taking extra time here prevents cracking later. -
Create Functional Rests:
While the clay is still soft, gently press four small indentations into the base—spaced evenly like the points of a compass—using a small rounded tool or your thumb. These will serve as the rests. -
Dry Completely:
Allow the piece to dry fully according to your clay package instructions. This usually takes 24-48 hours for air-dry clay. Turn it over halfway through to ensure the bottom dries evenly.
Pro Tip: Sharp Lines
If you struggle with steady painting hands, try using thin automotive masking tape or flexible washi tape to mask off the curve before painting the black section.
Step 2: Refining and Sketching
-
Sand Smooth:
Once bone dry, sanding is crucial for that polished look. Start with medium grit to level any bumps, then finish with fine grit for a silky surface. -
Clean the Dust:
Wipe the entire piece down with a slightly damp cloth or sponge to remove all clay dust before painting. -
Outline the Yin-Yang:
Using a pencil, lightly sketch a curved ‘S’ line down the center of the dish to divide it into two teardrop shapes. Be sure the line curves around the center point for that classic swirl.
Level Up: Real Wood Inlay
Instead of painting the wood-tone divider line, try inlaying a thin piece of actual wood veneer or pressing a texture tool into the clay while wet for a tactile border.
Step 3: Painting and Finishing
-
Paint the Wood Rim:
Mix a warm caramel or light brown paint to mimic natural wood. Paint the exterior walls and the top rim edge with this color. You can add faint, darker streaks for a wood grain effect if desired. -
Fill the Yin (Black):
Carefully paint one side of the ‘S’ curve with opaque black acrylic paint. Use a flat shader brush for the larger areas and switch to a detail brush near the center line for a sharp edge. -
Fill the Yang (Cream):
Paint the opposite side with a cream or off-white shade. You may need two coats here to ensure the clay color doesn’t show through. -
Add the Dots:
Paint four small circles directly over the four indentations you made earlier. Paint two of them black (on the cream side or opposing spacing) and two of them cream (on the black side), creating contrast. -
Refine the Divider:
To mimic the wooden inlay look seen in the inspiration photo, paint a very thin line of your wood tone color in between the black and cream sections, separating them cleanly. -
Seal for Gloss:
Apply a thick coat of glossy varnish or a thin layer of resin to the *interior* floor of the tray only. This gives it that wet, ceramic look and protects the paint from ash. -
Seal the Exterior:
Finish the project by applying a matte varnish to the outer wood-colored rim to maintain a grounded, natural texture.
Place your finished dish on a coffee table or shelf to enjoy the calming symmetry of your work
Checkerboard Pattern Statement Ashtray
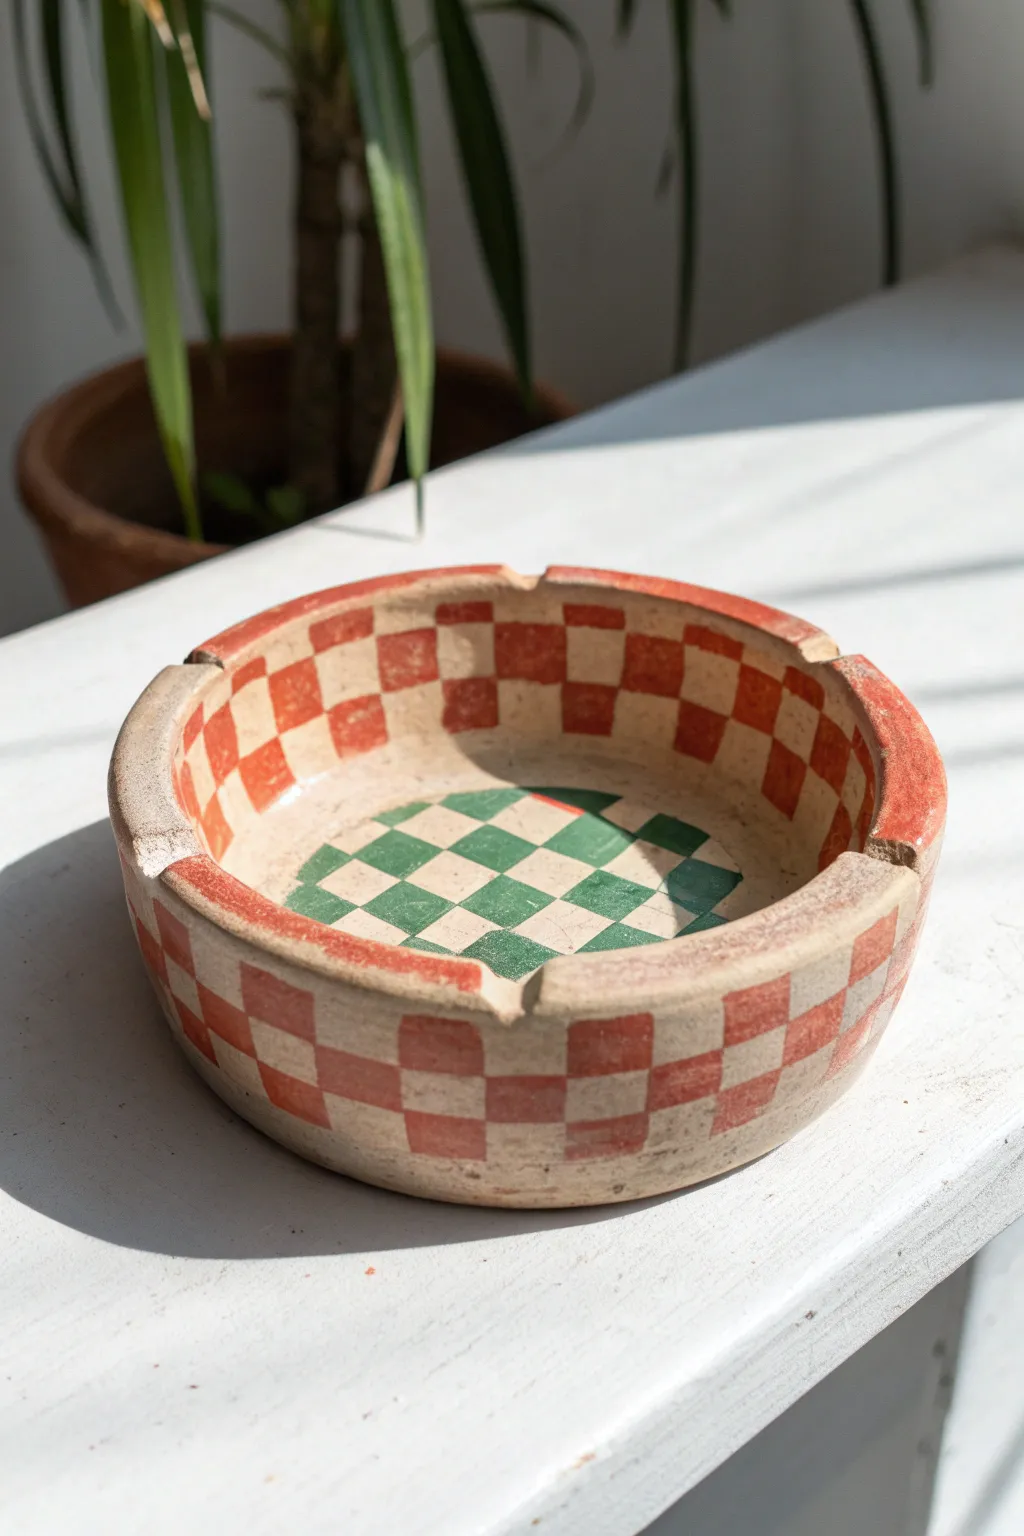
This project combines rustic charm with bold geometric design, featuring a hand-built clay vessel adorned with a classic checkerboard pattern. The contrast between raw beige clay, terracotta red, and deep forest green creates a timeless piece that serves as both a functional ashtray and a striking decor accent.
How-To Guide
Materials
- Air-dry clay or polymer clay (beige/natural finish)
- Rolling pin
- Circular template (bowl or lid approx. 5-6 inches)
- Clay knife or craft blade
- Water and sponge (for smoothing)
- Acrylic paints (Terracotta Orange, Forest Green)
- Fine flat brush (size 2 or 4)
- Pencil and ruler
- Clear matte varnish or sealant
- Sandpaper (fine grit)
Step 1: Shaping the Vessel
-
Prepare the Clay Base:
Begin by conditioning your clay until it’s pliable. Roll out a slab of clay to an even thickness of about 1/4 inch. Using your circular template, cut out a perfect circle for the base of the ashtray. -
Cut the Wall strip:
Roll out a long rectangular strip of clay from the remaining slab. This strip should be about 1.5 inches tall and long enough to wrap around the circumference of your base circle with a slight overlap. -
Attach the Wall:
Score the outer edge of the base and the bottom edge of the strip with cross-hatch marks. Apply a little water or slip (liquid clay) to the scored areas. Wrap the strip around the base, pressing firmly to join them. -
Blend the Seams:
Where the strip ends meet, cut them at an angle for a cleaner join. Use your fingers or a modeling tool to smooth the seam on both the inside and outside until the line disappears completely. -
Create the Lip:
Gently pinch and smooth the top rim of the wall to create a flat, even surface. I find it helpful to turn the ashtray upside down on a flat surface and press gently to level the rim. -
Carve the Notches:
Using your craft knife or a rounded tool, carve out three or four U-shaped notches evenly spaced along the rim. These are the cigarette rests. Smooth the edges of these cuts with a damp finger so they aren’t sharp. -
Dry and Refine:
Let the clay dry completely according to the package instructions (usually 24-48 hours for air-dry clay). Once fully dry, lightly sand any rough spots or fingerprint marks with fine-grit sandpaper.
Wobbly Lines?
If painting freehand is difficult, use thin automotive masking tape (1/4 inch) to mask off your grid before painting. Peel it off while the paint is still slightly tacky for crisp edges.
Step 2: Designing the Grid
-
Map the Base Grid:
Using a ruler and pencil, lightly draw a grid pattern on the interior bottom of the ashtray. Aim for squares approximately 1/2 inch in size. Don’t worry if the outer squares get cut off by the walls. -
Mark the Wall Grid:
Continue your vertical grid lines up the interior walls. Then, draw horizontal rings around the inside wall to create the checkerboard squares. Repeat this process on the exterior wall ensuring the lines align with the interior as best as possible. -
Mark the Rim:
Connect the interior and exterior vertical lines by drawing across the top rim. This creates the small rectangular sections on the lip of the ashtray.
Step 3: Painting the Pattern
-
Paint the Green Center:
Select your Forest Green acrylic paint. Identify the alternating squares on the interior floor of the ashtray. Carefully fill in these squares with your flat brush, leaving every other square the raw clay color. -
Paint the Red Walls:
Switch to your Terracotta red paint. Moving to the interior walls, paint alternating squares just like a chessboard. Continue this pattern up and over the rim. -
Paint the Exterior:
Continue the red checkerboard pattern down the outside walls. Be mindful to keep your edges crisp; a steady hand is key here, or you can use painter’s tape for extra precision. -
Touch Ups:
Once the first coat is dry, check for any uneven coverage. Apply a second coat to the colored squares if needed to make the colors pop against the beige clay. -
Seal the Project:
After the paint has fully cured, apply a generous coat of matte varnish over the entire piece. This protects the paint and makes the ashtray easier to wipe clean.
Make it Glossy
Swap the matte varnish for a high-gloss glaze or resin coating. This gives the piece a ceramic-fired look without needing a kiln and makes it waterproof.
Place your finished ashtray on a sunny windowsill or side table to show off that handcrafted charm
Minimalist Line Art Sgraffito Ashtray
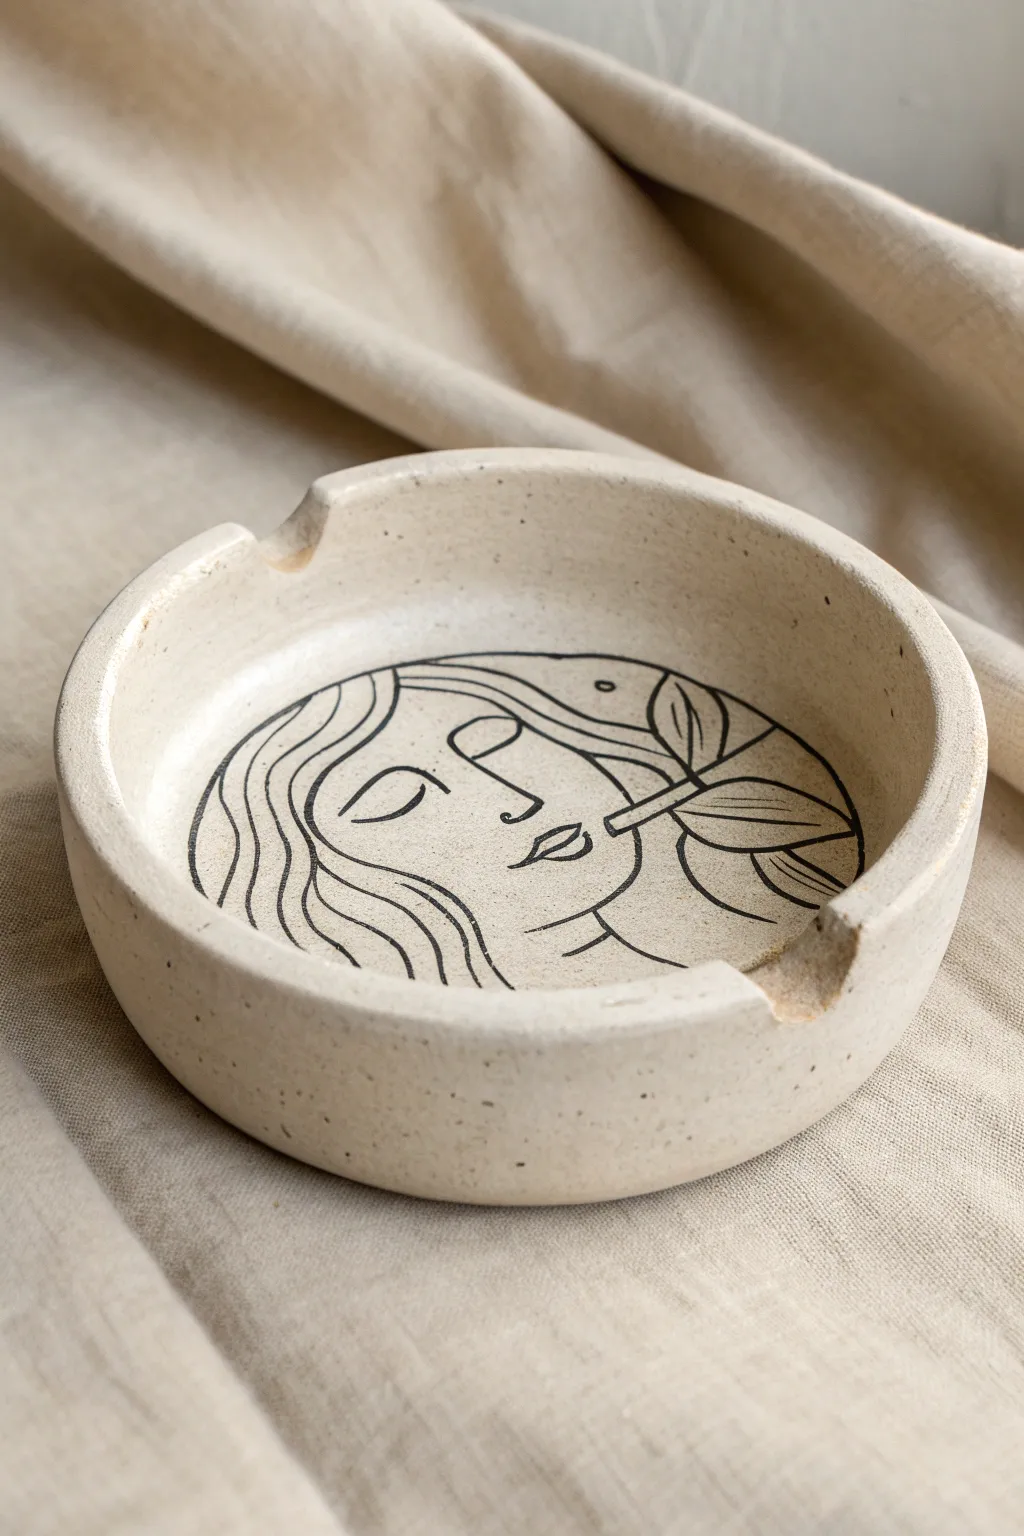
For the lover of understated design, this project combines the raw, earthy texture of speckled clay with clean, modern linework. By using a simple slab-building technique and a black underglaze inlay method, you can achieve a sophisticated illustration that feels permanently etched into the vessel.
Step-by-Step
Materials
- Speckled cream stoneware clay (cone 5/6)
- Black underglaze
- Clear matte glaze
- Rolling pin
- Canvas work surface
- Circle template (bowl or sturdy paper)
- Needle tool or X-Acto knife
- Scoring tool (serrated rib)
- Slip (clay slurry)
- Sponge
- Soft paintbrush
- Carving tool or fine stylus
- Damp clean cloth
Step 1: Forming the Basin
-
Roll the Slab:
Begin by wedging your speckled clay to remove air bubbles. Roll it out on a canvas surface into a smooth, even slab about 1/4 inch thick. I like to rotate the clay occasionally as I roll to ensure it doesn’t stick. -
Cut the Base:
Using your circle template, cut out the round base for your ashtray with a needle tool. Set this disc aside on a small board. -
Cut the Wall Strip:
From the remaining slab, cut a long rectangular strip. This will become the walls. It should be long enough to wrap around the circumference of your base and about 1.5 inches tall. -
Score and Slip:
Take your scoring tool and rough up the outer edge of the circular base and one long edge of your rectangular strip. Apply a generous amount of slip to the scored areas. -
Attach the Wall:
Carefully wrap the strip around the base, pressing the slipped edges together firmly. Trim any excess length from the strip where the ends meet, score and slip the join, and smooth it together so the seam disappears. -
Blend the Seams:
Use a wooden modeling tool or your finger to smooth the inside seam where the wall meets the floor. Reinforce the outside connection as well to ensure it’s watertight. -
Create Cigarette Rests:
While the clay is still soft, use a round tool handle or your finger to gently press down two indentations on opposite sides of the rim. Smooth the edges of these dips with a damp sponge.
Reverse Method
For finer lines, carve the design into plain clay first, fill the grooves with black underglaze, let dry, and scrape the surface clean (Mishima technique).
Step 2: Creating the Illustration
-
Leather Hard Stage:
Allow the piece to dry slowly until it reaches a ‘leather hard’ state. It should be firm enough to hold its shape but soft enough to carve without chipping. -
Apply Underglaze:
Paint a layer of black underglaze over the interior floor of the ashtray where you plan to draw. Don’t worry about being messy; you will be carving through it later. -
Sketch the Design:
Once the underglaze is dry to the touch, use a pencil to lightly sketch the woman’s face and leaf motif directly onto the dark surface. The graphite will shine slightly, making it visible. -
Carve the Lines (Sgraffito):
Using a sgraffito tool or a sharp loop tool, carve along your pencil lines. You are scraping away the black underglaze to reveal the creamy clay body underneath. Keep your lines confident and fluid. -
Clean Up Debris:
As you carve, little crumbs of clay and underglaze will accumulate. Brush these away gently with a soft, dry brush; do not wipe them with a wet sponge or you may smear the black pigment.
Step 3: Finishing and Firing
-
Bisque Fire:
Let the ashtray dry completely (bone dry) before loading it into the kiln for a bisque fire (usually Cone 04). -
Refine the Lines:
If the sgraffito lines need extra contrast, you can wipe a damp sponge over the design now. This cleans up any stray underglaze dust left on the lighter clay. -
Glaze Application:
Apply a clear matte glaze over the entire piece. Pouring the glaze inside and swirling it around ensures an even coat over the illustration without blurring the lines. -
Final Wipe:
Ensure the bottom of the ashtray is completely free of glaze so it doesn’t stick to the kiln shelf. -
Glaze Fire:
Fire the piece again to the maturation temperature of your specific clay and glaze (likely Cone 5 or 6). This final firing will vitrify the clay and seal the design.
Smudged Lines?
If you accidentally smear black underglaze onto the white clay while carving, wait for it to dry completely, then gently scratch the smudge off with a clean knife.
Now you have a stunning, food-safe vessel that serves as both a functional object and a piece of modern art
Gold-Accented Rim Ashtray
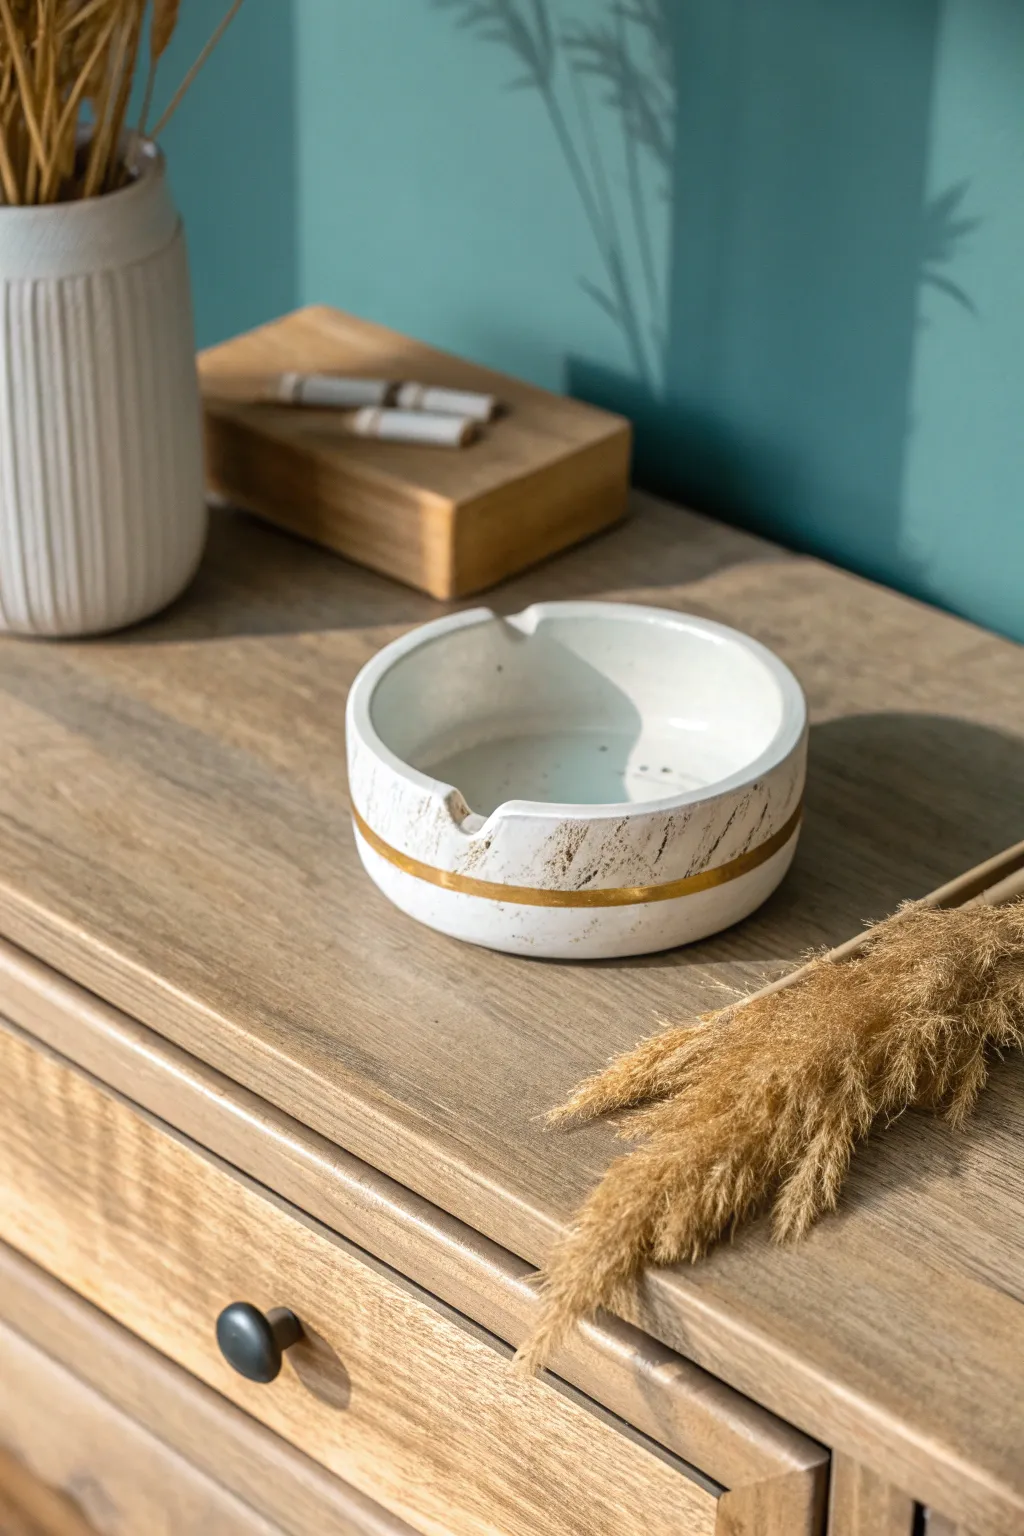
Elevate your coffee table décor with this sophisticated white clay ashtray featuring a faux-marble finish and a striking gold band. This project combines simple hand-building techniques with elegant painting details aimed at mimicking high-end ceramic ware.
Step-by-Step Tutorial
Materials
- Air-dry clay (white)
- Acrylic rolling pin
- Circular cookie cutter or template (approx. 4-5 inches)
- Small bowl or dish (for molding)
- Plastic wrap
- Sandpaper (fine grit)
- White acrylic paint
- Gold metallic paint or gold leaf pen
- Brown or grey acrylic paint (diluted)
- Old toothbrush or sponge
- High-gloss varnish or sealant
- Paintbrushes (flat and detail)
- Water and sponge for smoothing
- Masking tape or painter’s tape
Step 1: Shaping the Base
-
Prepare the Clay:
Start by taking a generous handful of white air-dry clay and kneading it in your hands to warm it up and remove any air bubbles. -
Roll it Out:
Place the clay on a clean, flat surface. Using your acrylic rolling pin, roll the clay out to an even thickness of about 1/4 inch. -
Cut the Circle:
Use your large circular cutter or a paper template to cut a perfect circle from the rolled slab. This forms the base and walls combined. -
Prepare the Mold:
Take a small bowl that has the shape you want. Line the inside of the bowl with plastic wrap to prevent the clay from sticking. -
Shape the Form:
Gently press your clay circle into the lined bowl. Smooth it against the sides to create the raised rim, ensuring the bottom remains flat. -
Create Cigarette Rests:
While the clay is still soft inside the mold, use your pinky finger or the handle of a paintbrush to gently press down two or three indentations on the rim. -
Smooth the Edges:
Dip your finger in a little water and run it along the top rim to smooth out any rough edges or cracks. I find this significantly reduces sanding time later. -
Let it Dry:
Allow the clay to dry in the mold for about 24 hours until it holds its shape, then remove it and let it air dry completely (another 24-48 hours).
Step 2: Finishing and Decorating
-
Sand to Perfection:
Once fully dry, use fine-grit sandpaper to smooth the entire surface, paying special attention to the rim and the indentations. -
Base Coat:
Apply two coats of white acrylic paint to the entire piece to create a uniform, stark white canvas. Let it dry completely between coats. -
Create the Marbling Effect:
Dilute a tiny amount of brown or grey paint with water until it’s very runny. -
Apply Texture:
Using a dry brush technique or a sponge, lightly dab faint streaks onto the sides to mimic a stone texture. Keep it subtle. -
Add Speckles:
Dip an old toothbrush into your diluted paint, aim it at the ashtray, and run your thumb across the bristles to flick tiny speckles onto the surface. -
Tape the Gold Line:
Once the paint is bone dry, careful apply a strip of masking tape around the circumference of the bowl, leaving a exposed gap where you want the gold band to sit. -
Paint the Gold Band:
Fill in the gap between the tape (or freehand it if you have a steady hand) with metallic gold paint. Apply two layers for a rich, opaque metallic shine. -
Remove Tape:
Peel off the tape while the paint is still slightly tacky to ensure a crisp, clean line without chipping. -
Seal the piece:
Finish by applying a coat of high-gloss varnish. This not only protects the paint but gives it that convincing ceramic shine.
Smoother Shaping
Running a slightly damp sponge over your clay before it dries removes fingerprints and creates a professional finish that needs less sanding later.
Faux Stone Look
Mix a small amount of baking soda into your white base paint. This adds a gritty texture that feels and looks just like real stone or ceramic bisque.
Place your sleek new creation on a side table and enjoy the touch of modern elegance it adds to the room
Lily Pad Nature Ashtray
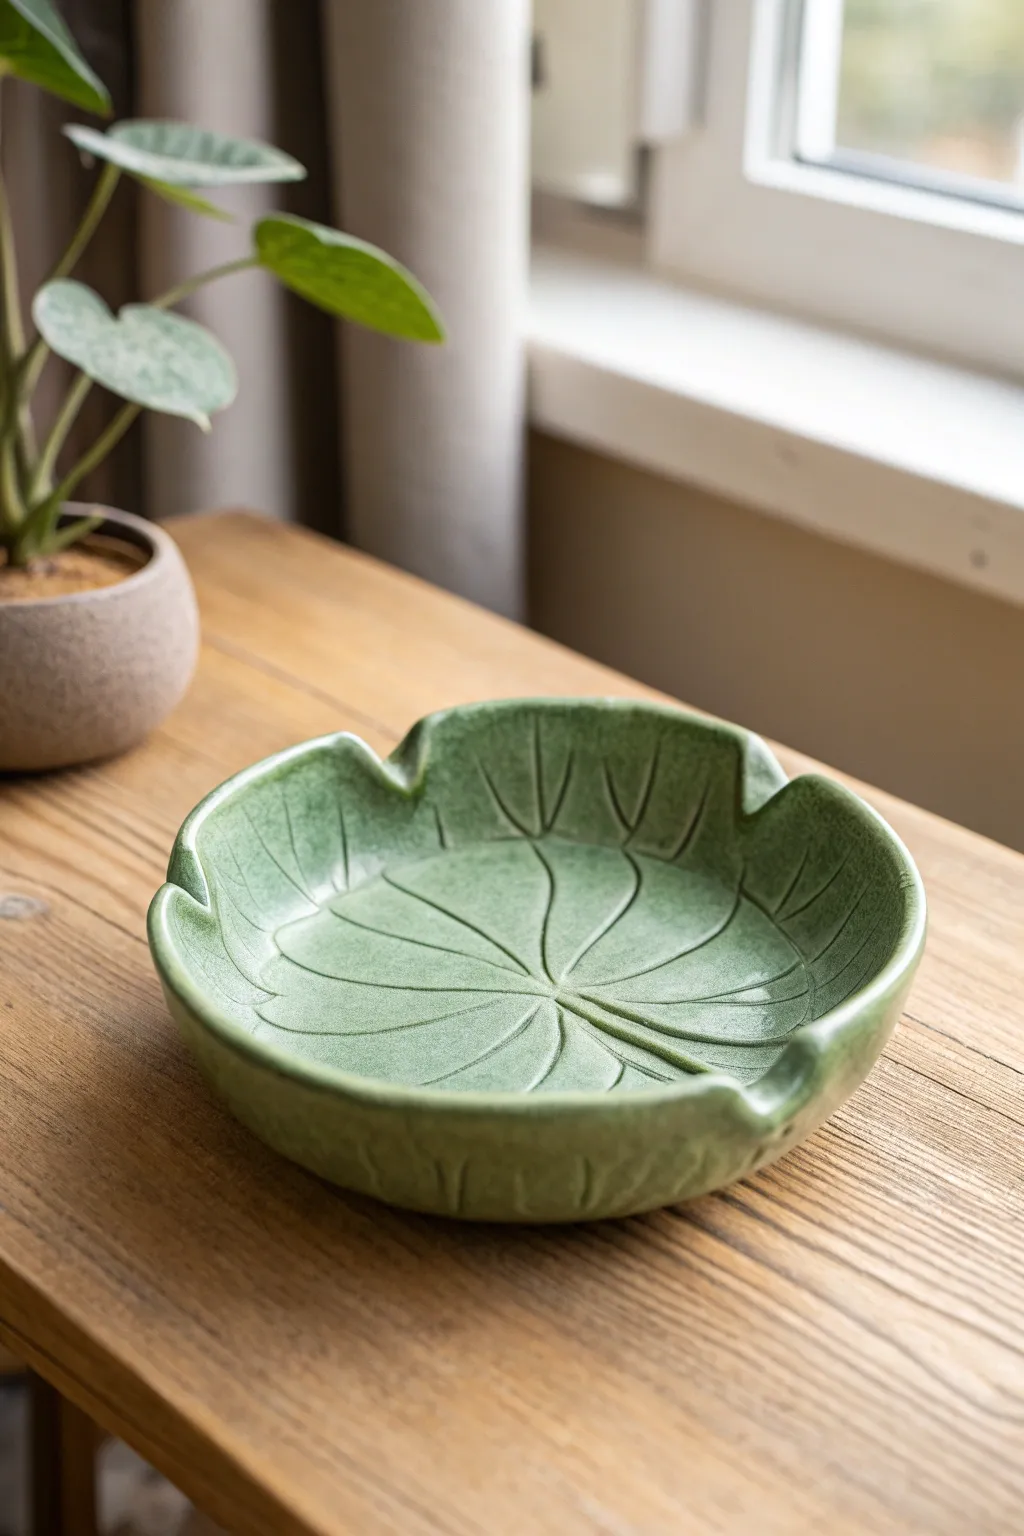
Bring a touch of serene nature indoors with this sculpted lily pad dish, featuring gentle leaf veining and a soft, organic green glaze. Its undulating rim and subtle notches make it both a functional ashtray and a beautiful botanical accent for any table.
How-To Guide
Materials
- Air-dry clay or low-fire earthenware clay
- Rolling pin
- Canvas mat or parchment paper
- Small bowl (for slump mold)
- Needle tool or toothpick
- Loop tool (for carving)
- Sponge
- Green ceramic glaze (celadon or crackle finish recommended)
- Soft fan brush
- Clear sealant (if using air-dry clay)
- Water cup
Step 1: Shaping the Base
-
Prepare the Clay:
Begin with a ball of clay about the size of a large orange. Knead it thoroughly to remove any air bubbles, ensuring the consistency is smooth and pliable. -
Roll the Slab:
On your canvas mat or parchment paper, roll the clay out into an even slab. You are aiming for a thickness of about 1/4 inch—thick enough to be sturdy but thin enough to look delicate. -
Cut the Circle:
Find a bowl or round object slightly larger than your desired finished size to use as a template. Place it lightly on the clay and trace around it with a needle tool, then cut out the perfect circle. -
Create the Wave:
Gently lift the edges of your clay circle. Using your fingers, pinch and pull the rim upwards periodically to create an organic, wavy wall. The wall should rise about 1 to 1.5 inches.
Vein Tip
When carving veins, vary your pressure. Press harder near the center and lighter near the edges to mimic the natural tapering structure of a real leaf.
Step 2: Sculpting the Details
-
Form the Notches:
To distinguish this as a lily pad, create three or four distinct indentations along the rim. Press down gently with your thumb or a modeling tool to create smooth dips in the wavy wall. -
Refine the Resting Points:
If this is intended as a functional ashtray, ensure these dipped sections are shaped to hold a cigarette comfortably. Smooth the edges of these notches with a damp finger so nothing is sharp. -
Mark the Center:
Find the approximate center of the dish’s interior. Press a small, shallow indentation here to act as the convergence point for the leaf veins. -
Carve Primary Veins:
Using a needle tool or a fine loop tool, draw curved lines radiating from the center point out toward the rim. Press firmly enough to create texture but don’t cut all the way through. -
Add Secondary Veins:
For a realistic look, I like to branch smaller veins off the main radiating lines near the outer edges. These should be lighter and more subtle than the primary veins. -
Extend Texture Outside:
Continues the vein lines over the lip and slightly down the exterior wall of the dish. This ensures the piece looks continuous and detailed from all angles. -
Smooth the Surfaces:
Take a slightly damp sponge and run it gently over the surface. This softens the harsh lines of your carving and removes any clay crumbs, giving it a worn, natural appearance.
Enhance the Green
After the base green glaze dries, wipe away the high points with a damp sponge before firing. This leaves more pigment in the grooves for higher contrast.
Step 3: Finishing and Glazing
-
Controlled Drying:
Place your piece in a slump mold (a bowl lined with plastic) or simply let it dry slowly on a flat surface away from direct drafts. Uneven drying can cause warping. -
Bisque Fire (Ceramic Only):
If using proper ceramic clay, fire the piece to bisque temperature (usually cone 04) once it is bone dry. If using air-dry clay, simply wait until it is fully hardened and light in color. -
Applying Glaze:
Select a semi-transparent green glaze. A ‘celadon’ or ‘breaking’ glaze is ideal because it pools in the carved veins, making them darker and highlighting your texture. -
Brush Technique:
Apply 2-3 coats of glaze with a soft fan brush, letting each coat dry to the touch before adding the next. Ensure the glaze gets into all the carved crevices. -
Final Fire or Seal:
Fire the piece again specifically to the temperature required by your glaze. For air-dry clay, paint with acrylics and finish with a high-gloss, waterproof resin or varnish to mimic the ceramic look.
Once fired or sealed, you’ll have a tranquil, organic piece ready to display.
Mushroom Garden Diorama Ashtray
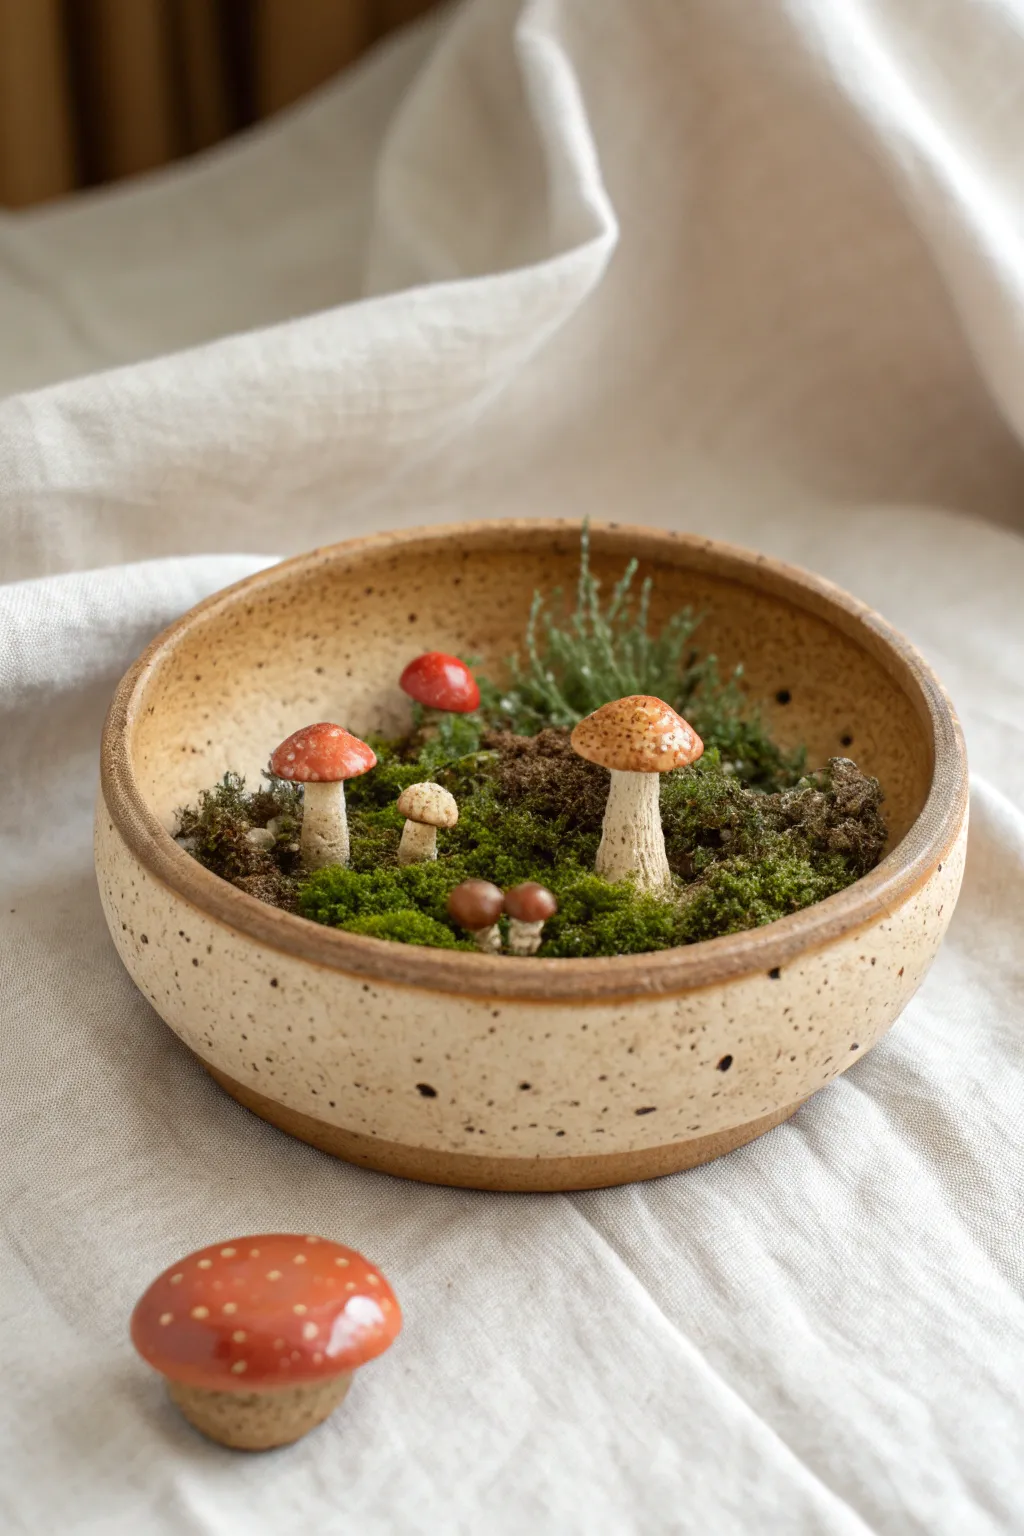
Transform a simple clay vessel into a whimsical forest floor scene that doubles as decor or a functional piece. This project combines hand-built pottery with intricate miniature sculpting to create a tiny, mossy world featuring speckled toadstools and delicate greenery.
Step-by-Step Guide
Materials
- Speckled buff stoneware clay (or similar air-dry clay)
- Pottery wheel or rolling pin and slump mold (for the bowl)
- Sculpting tools (needle tool, small loop tool)
- Underglazes (red, white, brown/tan)
- Clear glaze (glossy for caps, matte for stems/bowl)
- Preserved moss (various textures)
- Dried floral bits or miniature faux shrubbery
- Potting soil or dry floral foam (as filler)
- Kiln (if using stoneware) or acrylic sealant (if using air-dry)
Step 1: Crafting the Base Vessel
-
Form the bowl:
Begin by creating a shallow, wide bowl using speckled buff clay. If you are throwing on a wheel, keep the walls thick enough to support the future filling. Alternatively, roll out a slab and drape it over a mold to create a rustic, organic shape. -
Refine the rim:
While the clay is leather hard, smooth the rim with a damp sponge. You want imperfect perfection here; a slight wobble adds to the earthy aesthetic. -
Create the foot:
Trim a distinct foot ring on the bottom of the bowl. This elevates the piece physically and visually, giving it a more finished pottery look. -
Bisque fire:
Allow the bowl to bone dry completely before firing it to bisque temperature in your kiln. If using air-dry clay, simply let it cure fully according to package instructions.
Step 2: Sculpting the Fungi
-
Shape the stems:
Roll small coils of clay for the mushroom stems. Vary them in thickness—one chunky bolete style, a few slender toadstools, and some tiny pin-sized ones. -
Add texture:
I like to take a stiff brush or a needle tool and gently scratch vertical lines up the stems to mimic the fibrous texture of real mushrooms. -
Form the caps:
Roll small balls of clay and flatten them slightly into domes. Press your thumb gently into the underside to create a space for the stem connection. Vary the openness of the caps from buttons to wide parasols. -
Attach cap to stem:
Score and slip the top of the stem and the underside of the cap, then press them firmly together. Smooth the seam with a modeling tool. -
Fire the miniatures:
Once your mushrooms are bone dry, bisque fire them alongside your bowl. Handling these tiny pieces requires a light touch to avoid snapping the stems.
Natural Texture Hack
Roll your damp clay stems over a piece of coarse canvas or sandpaper before attaching the caps. This instantly adds an organic, earthy texture without tedious sculpting.
Step 3: Glazing and Decoration
-
Glaze the bowl:
Apply a clear matte glaze to the exterior of the bowl to let those beautiful clay speckles shine through without being overly shiny. Glaze the interior with a darker earth tone if desired, though it will mostly be covered. -
Paint the caps:
Apply bright red or reddish-brown underglaze to the tops of the mushroom caps. For variety, paint the chunky mushroom cap a warm tan color. -
Add the spots:
Using a fine-tip applicator or toothpick, dot white glaze or underglaze onto the red caps. Keep the dots irregular for a natural fly agaric look. -
Gloss the tops:
Dip just the caps of the mushrooms into a clear gloss glaze. This makes them look dewy and wet, contrasting nicely with the matte stems. -
Final firing:
Fire all pieces to the final glaze temperature. Ensure the mushrooms are standing upright on kiln stilts or dedicated cookies so the glaze doesn’t drip and stick.
Wobbly Mushrooms?
If your mushrooms won’t stay upright in the moss, glue a small wire or toothpick into the hollow base of the stem (if hollow) or glue a flat washer to the bottom for stability.
Step 4: Assembling the Diorama
-
Prepare the base layer:
Fill the finished ceramic bowl with dry floral foam or tightly packed potting soil (if you want live moss) or sand. This acts as the anchor for your scene. -
Position the mushrooms:
Press the ceramic stems of your fired mushrooms into the filler material. Group them naturally—clusters often look better than evenly spaced placement. -
Layer the moss:
Tuck preserved reindeer moss or sheet moss around the stems, covering every bit of the filler material. Use tweezers to get into the tight spaces between the smaller mushrooms. -
Insert shrubbery:
Place small sprigs of dried greenery or faux shrubs behind the mushrooms to add height and depth to the background of your diorama. -
Final touches:
Sprinkle a tiny bit of dark
Now you have a serene little slice of the forest floor captures in a bowl to enjoy on your table
Frog Buddy Rim-Sitter Ashtray
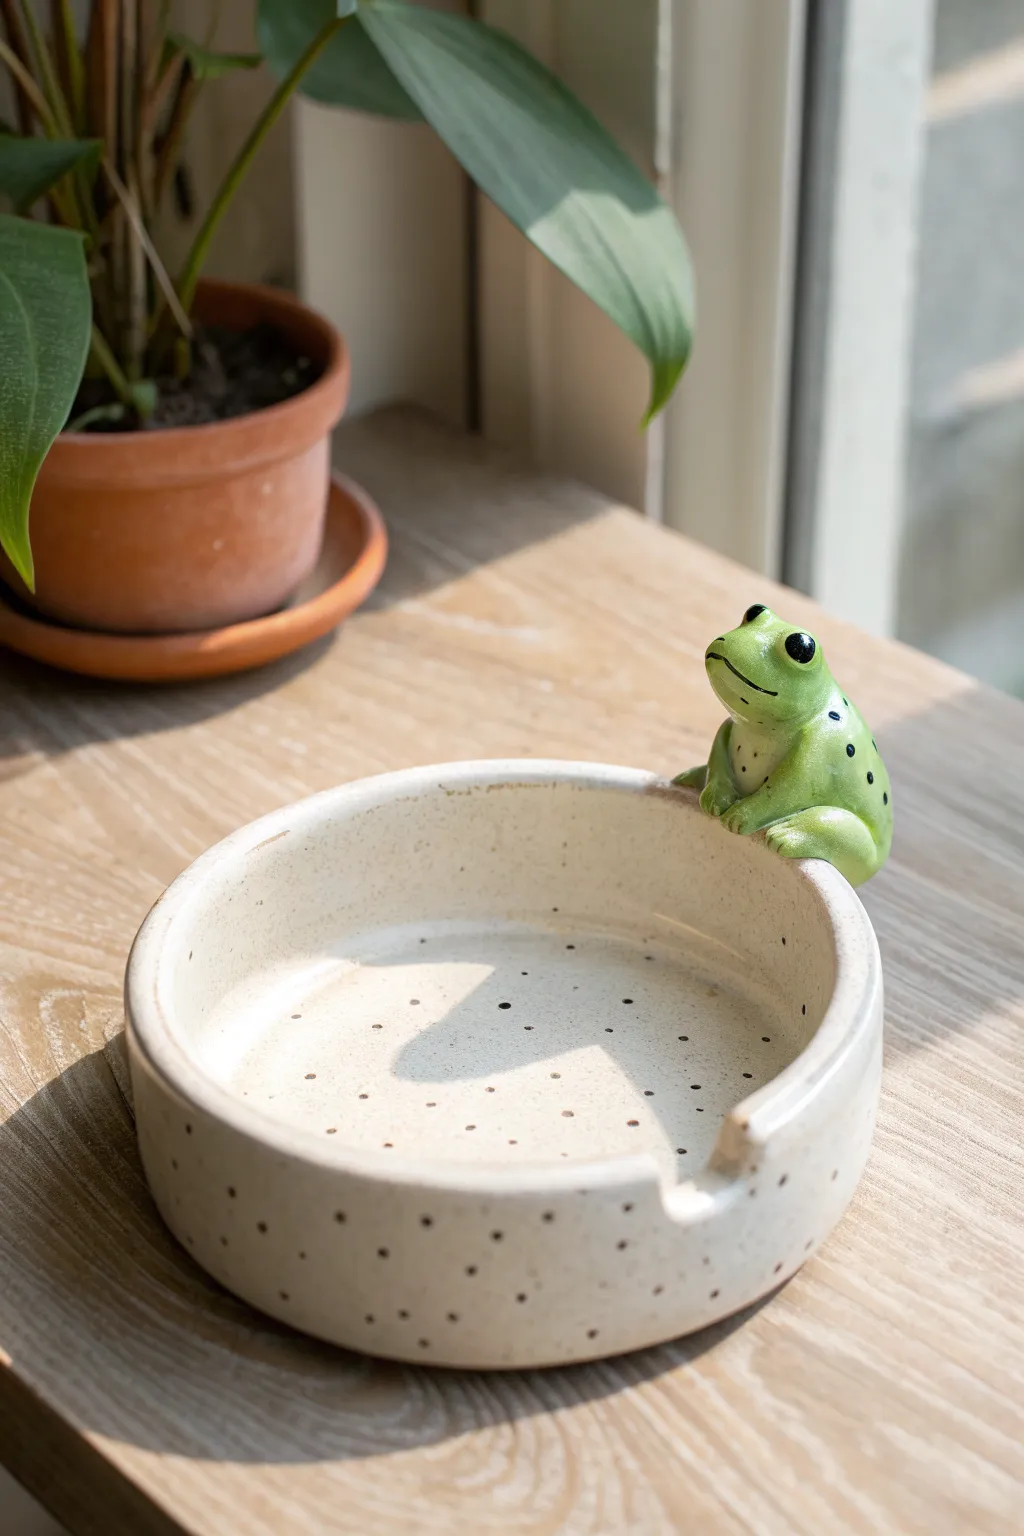
Add a touch of whimsy to your space with this speckled clay ashtray featuring an adorable frog companion perched on the edge. The creamy, spotted finish gives it a natural, earthy feel, while the little green buddy adds charm and personality.
Detailed Instructions
Materials
- White polymer clay or air-dry clay (approx. 500g)
- Acrylic rolling pin
- Circle cutter or bowl (approx. 4-5 inches diameter)
- Needle tool or craft knife
- Slip (clay and water mixture) or liquid sculpey
- Sculpting tools (ball styluses, blending tools)
- FolkArt acrylic paints (Cream/Beige, Leaf Green, Black)
- Small detail brushes
- Old toothbrush (for speckling)
- Gloss varnish or clear sealant
Step 1: Forming the Base Dish
-
Roll the Base:
Begin by conditioning your clay until it is soft and pliable. Roll out a slab of clay to an even thickness of about 1/4 inch. Use a large round cutter or trace around a bowl to cut out a perfect circle for the base. -
Create the Walls:
Roll a long snake or coil of clay, keeping it consistent in thickness (about 1/2 inch thick). Flatten this coil slightly into a long strip that matches the height you want for the ashtray walls. -
Attach the Rim:
Score the outer edge of your base circle and the bottom edge of your clay strip. Apply a little slip or liquid clay, then wrap the strip around the base to form the walls. Smooth the seams on both the inside and outside until they are invisible. -
Refine the Shape:
Use a damp sponge or your finger to smooth the top rim of the ashtray. Ensure the walls are standing straight and the surface is even. -
Carve the Rest Divots:
Decide where you want the cigarette rests to be. Use a modeling tool handle or a crafting knife to gently press or carve out U-shaped indentations into the rim. Smooth the edges of these cutouts with a little water.
Secure Seating
Score the rim heavily before attaching the frog. If the clay is slipping, insert a small piece of toothpick or wire between the frog’s bum and the rim for an internal armature.
Step 2: Sculpting the Frog Buddy
-
Shape the Body:
Take a small ball of clay, roughly the size of a walnut. Shape it into a slightly flattened teardrop. This will be the frog’s main body. Test the fit by placing it on the rim; you want the bottom to curve slightly to hug the edge. -
Add Legs:
Roll two small sausages of clay for the back legs. Fold them in half to create the knee joint and attach them to the sides of the body. Shape little feet at the bottom. Make two smaller arms for the front, positioning them so the hands look like they are gripping the inside of the rim. -
Sculpt the Face:
Add two tiny balls of clay to the top of the head for eye sockets. Use a needle tool to gently carve a wide, happy mouth line. Blend all attachment points smoothly into the body using a small tool, ensuring the frog is securely fused to the rim. -
Final Smoothing:
Give the entire piece, including the frog, a final smooth-over with water or baby oil to remove fingerprints. Let the clay dry or bake according to your specific clay brand’s instructions.
Step 3: Painting and Finishing
-
Base Coat:
Once hardened, paint the entire ashtray (excluding the frog) with a creamy beige acrylic paint. You may need two coats for opaque coverage. -
Speckling the Dish:
Dip an old toothbrush into slightly watered-down black or dark brown paint. Run your thumb over the bristles to flick tiny speckles across the beige surface. This mimics the look of speckled stoneware. -
Paint the Frog:
Paint the frog’s body with a bright leaf green. I find mixing a tiny bit of yellow into the green gives it a more vibrant, amphibian look. Let it dry completely. -
Frog Details:
Using your smallest detail brush, paint the eyes solid black. Add small black spots down the frog’s back to match the speckled theme of the dish. -
Seal the Piece:
Finish by applying a high-gloss varnish over the entire piece. This protects the paint and gives the frog a wet, shiny appearance and makes the ashtray easier to wipe clean.
Lil’ Lily Pad
Sculpt a flat, round lily pad shape and attach it to the bottom inside of the ashtray before baking. Paint it dark green to create a fun surprise at the bottom of the dish.
Place your finished piece near a window where the light can catch the glossy finish and show off your new little friend
Moon and Stars Celestial Ashtray
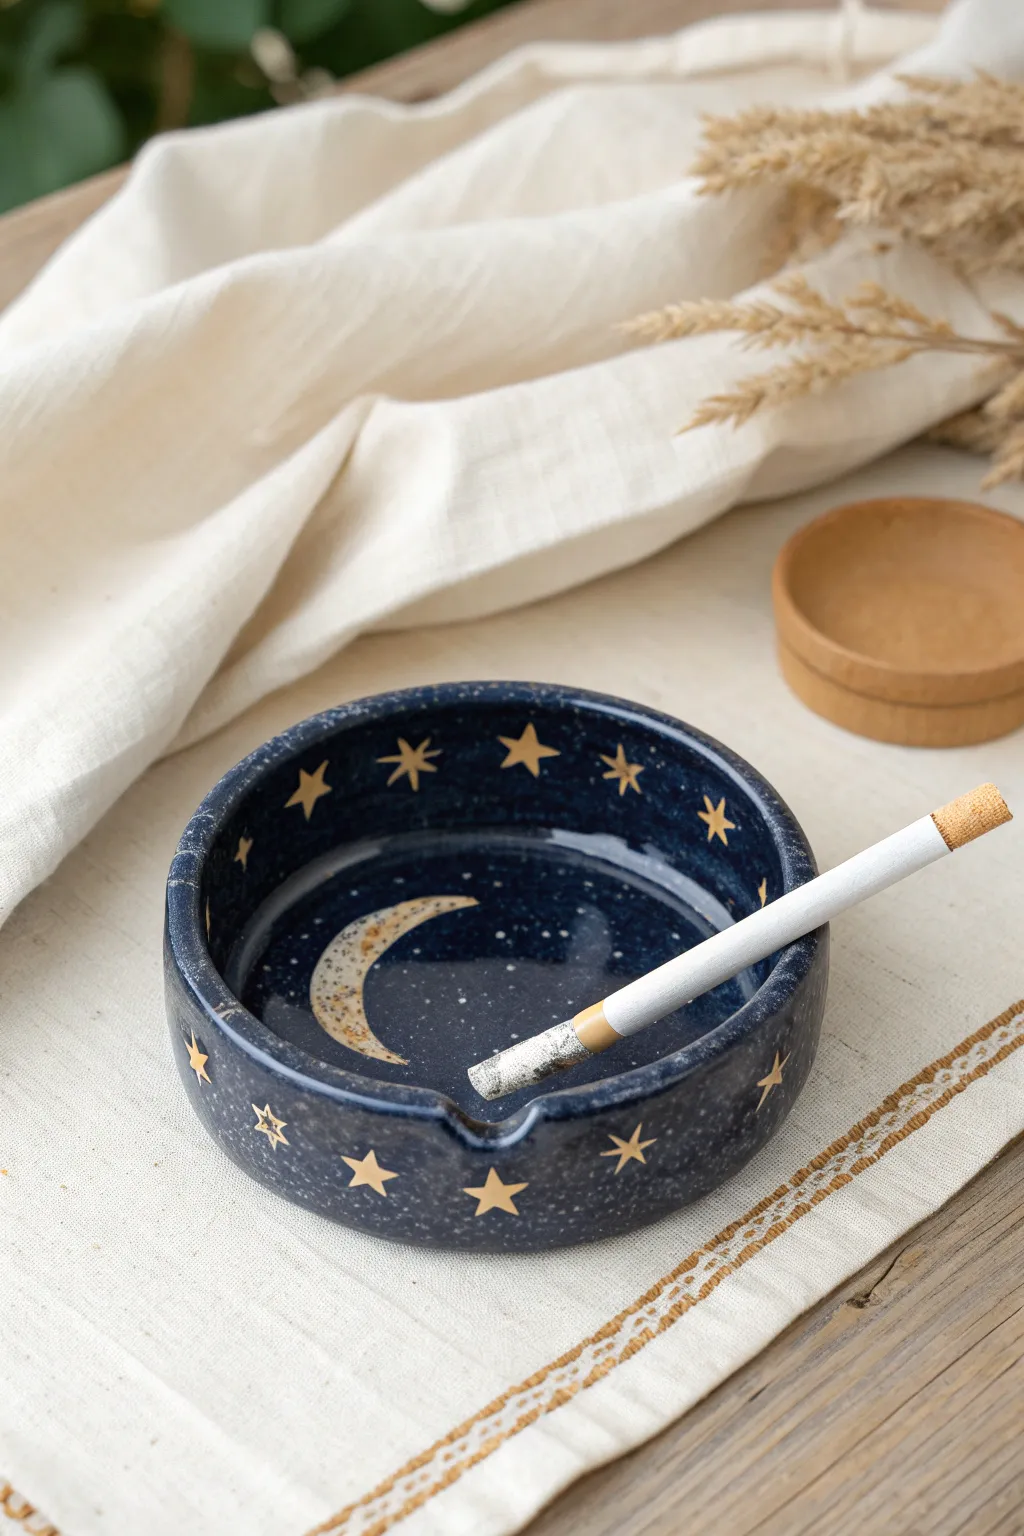
Bring the mystique of the midnight sky to your tabletop with this deep blue ceramic ashtray featuring hand-painted celestial motifs. The glossy finish mimics the twinkling depth of space, while the golden moon and stars add a touch of elegant whimsy.
How-To Guide
Materials
- Air-dry clay or polymer clay (approx. 500g)
- Rolling pin
- Circular cutter or bowl (approx. 4-5 inches diameter)
- Clay sculpting tools (specifically a needle tool and a small loop tool)
- Sponge and water bowl
- Acrylic paints: Deep midnight blue, metallic gold, pale cream or white mixture
- Fine detail paintbrushes
- High-gloss varnish or resin (for that glass-like ceramic look)
- Sandpaper (fine grit)
Step 1: Forming the Basin
-
Roll the base:
Begin by conditioning your clay until it’s pliable. Roll out a slab to about 1/4 inch thickness. Use your circular cutter or trace around a bowl to cut a perfect circle for the base. -
Create the walls:
Roll a long snake or coil of clay, roughly the same thickness as your base. Flatten this coil into a long strip using your rolling pin to create the wall height you desire, aiming for about 1.5 inches tall. -
Attach the walls:
Score (scratch) the outer edge of your base circle and the bottom edge of your clay strip. Apply a little water (slip) to the scored areas and wrap the strip around the base, pressing firmly to join them. -
Blend the seams:
Using your thumb or a modeling tool, smooth the clay where the wall meets the base, both on the inside and outside, until the seam completely disappears. I find it helpful to support the wall from the outside while smoothing the inside. -
Thicken the rim:
Gently tap the rim of the ashtray with a flat tool or piece of wood to level it out. You want the rim to feel substantial and thick, giving it that sturdy ceramic feel. -
Smooth the surface:
Dip a sponge in water and squeeze it out well, then gently wipe the entire surface to remove fingerprints and smooth out any bumps. -
Carve cigarette rests:
While the clay is still soft, use a round tool or your finger to press down two or three indentations into the rim. These U-shaped notches should be deep enough to hold a cigarette securely.
Step 2: Creating the Sky
-
Dry and sand:
Let your piece dry completely according to package instructions (usually 24-48 hours). Once fully dry, lightly sand any rough edges with fine-grit sandpaper. -
Base coat application:
Apply a coat of deep midnight blue acrylic paint to the entire piece, inside and out. You may need two to three coats to get a totally opaque, rich color. -
Stippling texture:
To give the illusion of a starry galaxy texture rather than flat blue, dip a toothbrush or stiff brush into a slightly lighter blue or white paint and flick (splatter) tiny specks across the surface. This creates depth. -
Drafting the moon:
Using a white pencil or a very thin layer of white paint, sketch a crescent moon shape in the center of the inner basin. -
Painting the moon:
Fill in the crescent shape using a cream or pale metallic gold paint. Add subtle texture by dabbing darker tan spots to mimic craters. -
Adding stars:
With your finest detail brush and metallic gold paint, draw five-pointed stars around the inner rim and outer walls. Vary their sizes slightly for visual interest. -
Gold accents:
For extra shine, you can add tiny gold dots amongst the stars to represent distant planets or star dust.
Sticky Situation?
If your clay is sticking to the table while rolling, roll it out on a piece of parchment paper. This allows you to rotate the project easily without distortion.
Step 3: Finishing Touches
-
Sealing the deal:
Once all paint is completely dry, apply a generous coat of high-gloss varnish. This mimics the glazed look of the ceramic artwork in the photo. -
Double glazing:
For a truly glass-like finish, apply a second coat of varnish after the first has dried. Pay special attention to the inside bottom where ash will sit to ensure it’s wipeable.
Starry Precision
Use a specialized gold paint pen instead of a brush for the stars. It offers much better control for sharp points and consistent lines than a traditional brush.
Enjoy your beautifully crafted piece of the night sky, perfect for adding a touch of magic to your space
Built-In Lighter Slot Ashtray
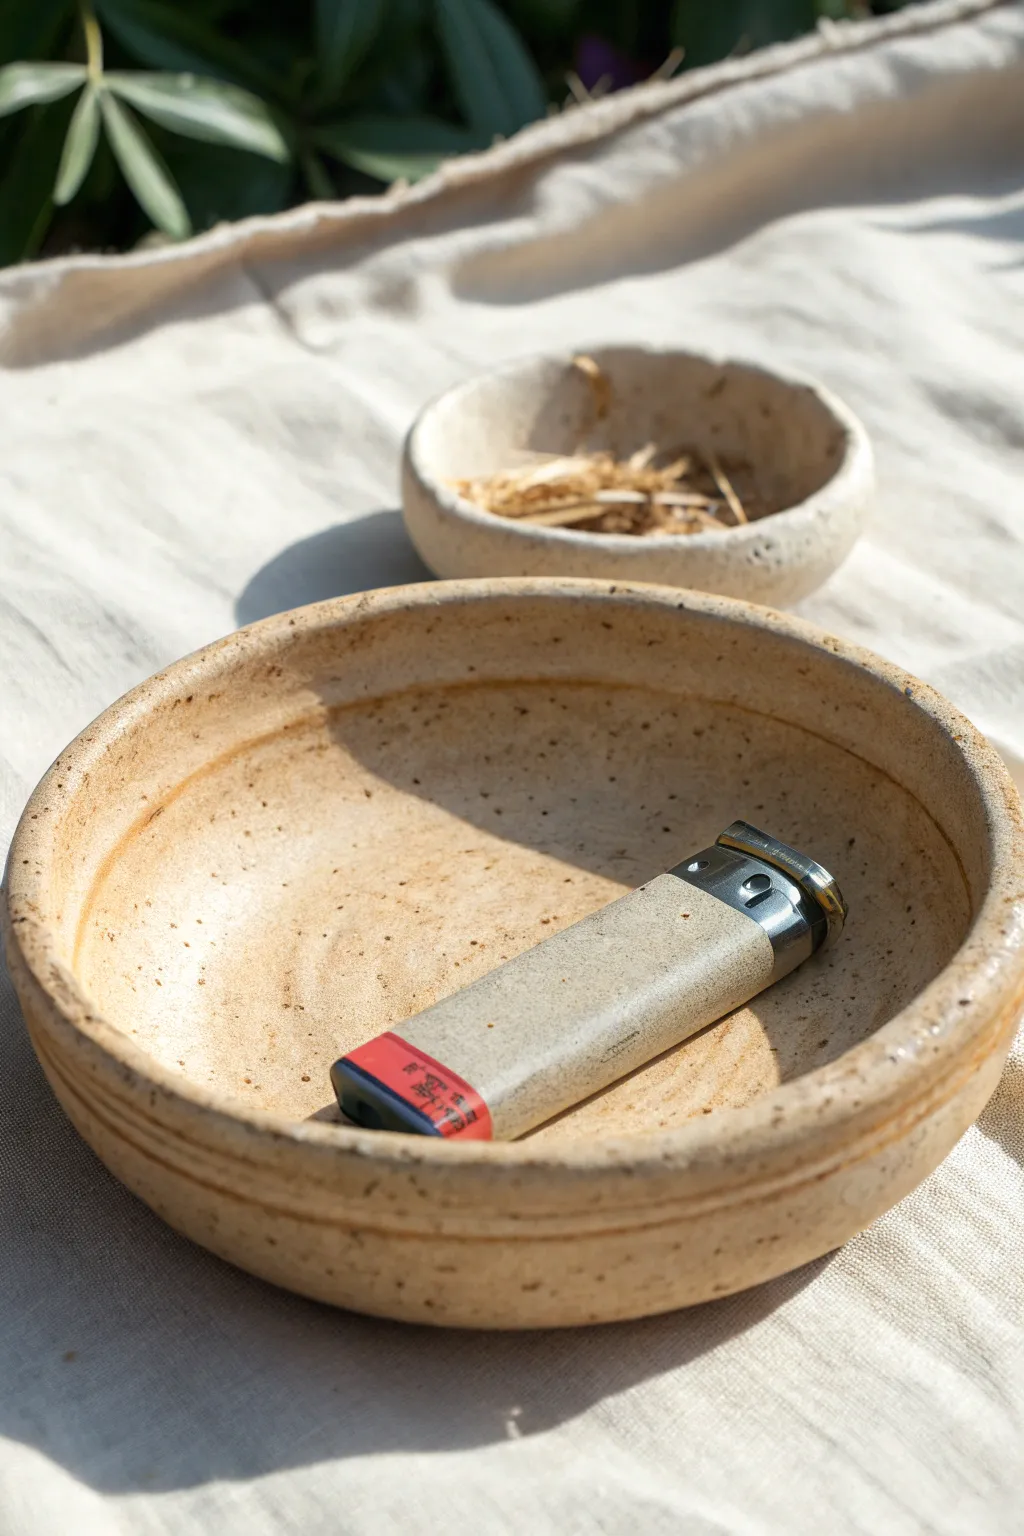
This minimalist, earthy ashtray combines functionality with understated beauty, featuring a perfectly sized groove to nestle your lighter. The speckled beige glaze and subtle ridge details give it a modern handmade aesthetic that fits any natural decor.
Detailed Instructions
Materials
- Speckled buff stoneware clay
- Pottery wheel (or rolling pin for hand-building)
- Wooden throwing ribs / kidney tool
- Needle tool
- Loop tool for trimming
- Sponge
- Lighter (for measuring scale)
- Matte cream or clear glaze
- Wire cutter
- Kiln
Step 1: Throwing the Form
-
Prepare the Clay:
Begin by wedging about 1 to 1.5 pounds of speckled buff clay. Ensure there are no air bubbles, as this clay body shows imperfections beautifully but demands good preparation. -
Center on the Wheel:
Throw your clay onto the wheel head and center it firmly. Since this is a wide, shallow dish, you want a low, wide puck shape to start. -
Open the Floor:
Open the form, but keep the floor somewhat thick—thicker than a standard bowl—to account for the trimming stage later. Pull the floor out until it’s about 5-6 inches in diameter. -
Pull the Walls:
Pull up low walls, keeping them fairly vertical or slightly flared. The height should be roughly 1.5 to 2 inches. Compress the rim with a chamois or sponge for a smooth finish. -
Create the Outer Ridge:
Using a wooden rib or a modeling tool, gently press a horizontal groove quickly into the exterior wall about halfway down. This decorative line adds the visual break seen in the photo.
Iron Speckle Pop
To get those visible dark spots, ensure you don’t use an opaque white glaze. A translucent satin matte enhances the natural iron pyrite in the clay body.
Step 2: Shaping & Drying
-
Refine the Interior:
Use a smooth kidney rib to compress the interior floor, removing throwing lines if you prefer a smooth look, or leaving faint spirals for texture. -
Measure the Resting Spot:
While the clay is still plastic, take your lighter and gently press it into the interior floor to gauge if the curve matches. Currently, we aren’t carving the slot, just ensuring the bowl’s curvature accommodates the object. -
Wire Off:
Run your wire cutter under the base and slide the piece onto a ware board. I like to let this dry to a leather-hard state, usually overnight under loose plastic.
Step 3: Trimming & Glazing
-
Trim the Foot:
Once leather-hard, center the piece upside down on the wheel. Use a loop tool to trim away excess weight from the bottom, carving a neat foot ring that elevates the piece slightly. -
Refining Surfaces:
Flip it right side up. If you want a dedicated slot (optional), you could carve a slight depression now, but the version shown relies on the bowl’s natural curve to hold the lighter. -
Bisque Fire:
Load the bone-dry piece into the kiln for a bisque firing (usually Cone 04). This prepares the clay to accept glaze. -
Glaze Application:
Dip or brush your piece with a semi-transparent matte cream or clear glaze. The goal is to let the iron speckles in the clay body show through the glaze. -
Wipe the Foot:
Use a damp sponge to meticulously wipe any glaze off the foot ring and the bottom of the piece to prevent it from fusing to the kiln shelf. -
Glaze Fire:
Fire the piece a second time to the maturation temperature of your specific clay and glaze (often Cone 5 or 6 for stoneware). -
Final Polish:
Once cool, use fine-grit wet sandpaper to smooth the unglazed foot ring so it won’t scratch your table surfaces.
Add a Notch
Instead of just resting the lighter inside, carve a U-shaped notch into the rim while the clay is leather hard. This turns it into a dedicated cigarette rest.
Now you have a custom, durable ceramic piece that perfectly organizes your tabletop items
Mini Stove-Inspired Novelty Ashtray
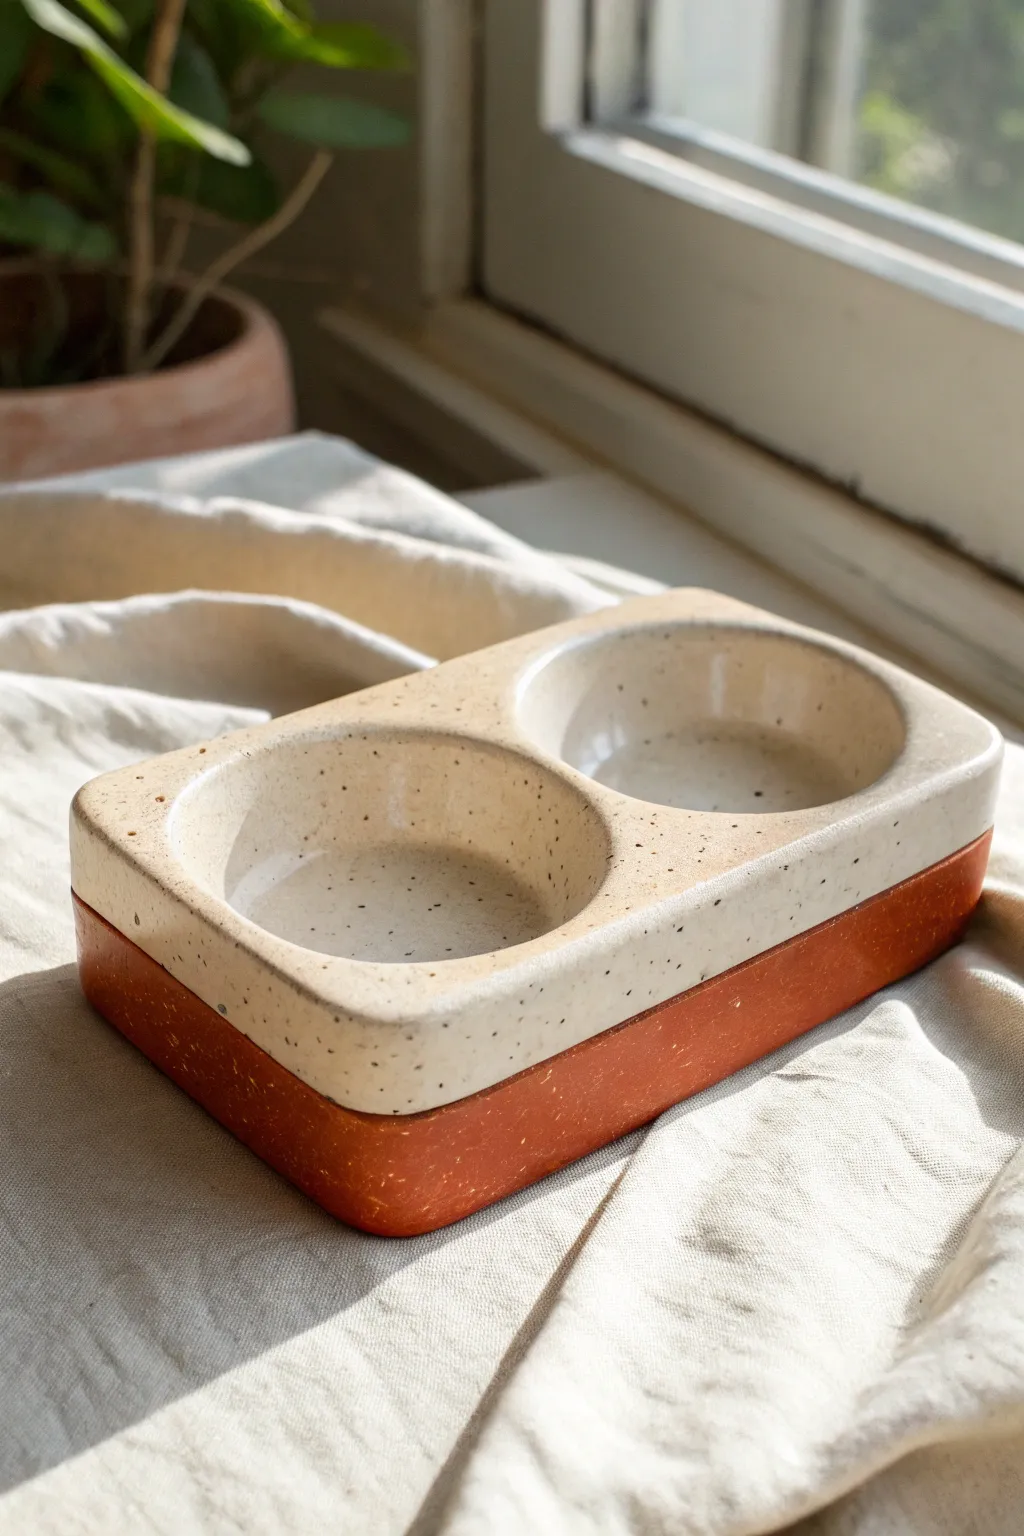
This charming, dual-tone ashtray channels a retro kitchen aesthetic, resembling a tiny camping stove or bento box. The design features a terracotta-colored base supporting a speckled cream top with two custom depressions for ash or trinket storage.
Step-by-Step Tutorial
Materials
- Polymer clay (Terracotta color)
- Polymer clay (Cream or Granite/Speckled White)
- Clay rolling pin or pasta machine
- Rectangle clay cutter (approx. 4 x 2.5 inches) or craft knife
- Measuring ruler
- Two small smooth spheres (like lightbulbs, large marbles, or rounded measuring spoons)
- Black pepper or sand (if creating custom speckles)
- Clay adhesive (Bake & Bond or liquid clay)
- Fine grit sandpaper (400-800 grit)
- Matte or satin varnish
Step 1: Base Construction
-
Condition the Terracotta:
Begin by thoroughly kneading your terracotta-colored polymer clay until it is soft and pliable. Warm clay is essential for preventing cracks during the shaping process. -
Roll the Base Slab:
Roll out the terracotta clay into a thick, even slab. For a substantial base resembling the photo, aim for a thickness of about 1/2 inch to 3/4 inch. -
Cut the Base Shape:
Using your rectangular cutter or a ruler and craft knife, cut a clean rectangle. Place this on your baking surface immediately to avoid distorting it later. -
Smooth the Edges:
Dip your finger in a little bit of water (or cornstarch) and run it along the cut edges of the terracotta rectangle to soften the sharp corners slightly.
Step 2: Top Section and Detail
-
Prepare the Speckled Clay:
If you don’t have pre-speckled granite clay, take your cream clay and mix in a pinch of coarse black pepper or clean sand. Knead well until the speckles are evenly distributed. -
Form the Top Slab:
Roll out the speckled clay. This layer should be slightly thinner than your base, perhaps around 1/2 inch thick, but wide enough to match the terracotta rectangle dimensions. -
Cut to Match:
Place the terracotta base lightly on top of the speckled clay as a template, or measure carefully, then cut the speckled clay into an identical rectangle. -
Create the Depressions:
With the speckled slab flat on your work surface, gently press your two spherical objects (like rounded measuring spoons) into the clay to create two deep, even bowls. I find twisting the tool slightly helps create a smooth finish. -
Refine the Rims:
Pressing the bowls will displace some clay. Use your fingers to gently flatten and reshape the top surface so the rectangle keeps its straight sides while retaining the bowl shapes. -
Join the Layers:
Apply a thin layer of liquid clay or clay adhesive to the top of the terracotta base. Carefully align and place the speckled slab on top. -
Blend the Seam:
Gently press the layers together. You can either leave the seam visible for a distinct two-tone look (as seen in the photo) or lightly smooth it. Ensure there are no air gaps between the slabs.
Fixing Cracks
If hairline cracks appear while pressing the bowls, fill them immediately with a tiny bit of liquid clay or soft clay paste and smooth over before baking.
Step 3: Finishing Touches
-
Initial Smoothing:
Before baking, use baby oil or a clay softener on your fingertip to buff out any fingerprints, focusing on the inside of the bowls. -
Bake the Piece:
Bake according to your clay manufacturer’s instructions. Since this is a very thick piece, you may need to bake it for a longer duration (45-60 minutes) at a lower temperature to prevent scorching. -
Cool Down:
Turn off the oven and let the piece cool down completely inside. This gradual cooling makes the clay stronger and prevents thermal shock. -
Sand for Texture:
Once cool, wet-sand the piece under running water using fine-grit sandpaper. Focus on the corners and the rim of the bowls to give it that polished, stone-like feel. -
Clean Up:
Wash off any sanding residue and let the piece dry thoroughly. -
Seal:
Apply a thin coat of matte or satin varnish to protect the surface from ash staining while maintaining the natural pottery look.
Weight It Down
For a sturdier, heavier feel that mimics real ceramic, create a hollow space in the base layer and fill it with crumpled foil or a flat stone before sealing.
Now you have a stylish, minimalist accessory ready for use on your coffee table or balcony