
If you’ve been itching to make your own DIY clay candle holder, you’re in for the coziest kind of project—quick, satisfying, and instantly useful. I’m sharing my favorite ideas using air-dry clay and polymer clay, from classic shapes you’ll make on repeat to sculptural styles that feel like little pieces of art.
Simple Pinch-Pot Tea Light Cup
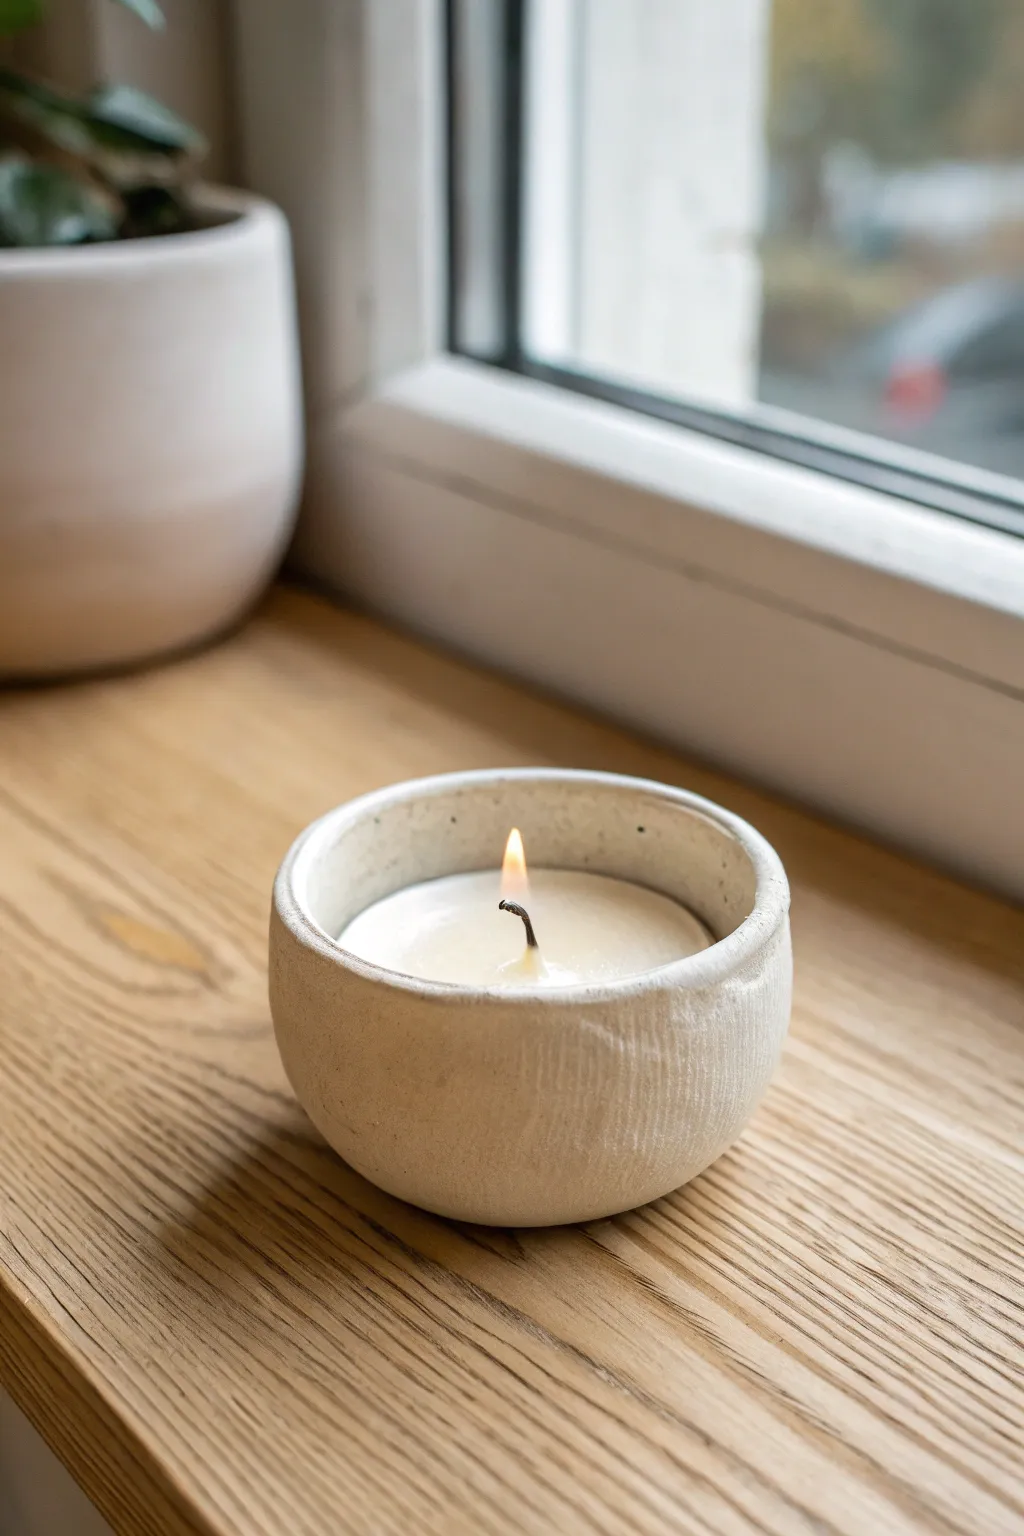
This project embraces the imperfect beauty of hand-formed clay with a textured, organic pinch pot sized perfectly for standard tea lights. The aesthetic is wonderfully rustic yet modern, featuring a raw, matte finish that highlights the natural grain of the clay.
Detailed Instructions
Materials
- Air-dry clay (white or cream stone)
- Small bowl of water
- Standard tea light candle (for sizing)
- Canvas mat or wooden board (work surface)
- Potter’s sponge or piece of soft foam
- Mod Podge or matte acrylic sealer (optional)
- Fine-grit sandpaper (220 grit)
- Wooden sculpting tool or old toothbrush for texturing
Step 1: Forming the Base
-
Prepare the clay:
Start by grabbing a chunk of air-dry clay roughly the size of a tangerine. Squeeze and knead it in your hands for about a minute to warm it up and ensure there are no air bubbles hidden inside. -
Roll a sphere:
Place the clay on your canvas mat or board. Roll it firmly between your palms or against the table until you have a smooth, round ball. -
Begin the pinch pot:
Hold the ball in your non-dominant hand. Take your dominant thumb and push it gently but firmly into the center of the sphere, stopping about a half-inch from the bottom. -
Shape the walls:
With your thumb still inside the hole, begin pinching the clay between your thumb and fingers. Rotate the ball slowly as you pinch, working your way from the bottom up to the rim. -
Check thickness:
Aim for an even thickness of about a quarter-inch throughout the walls. If you feel a thick spot, give it an extra squeeze to distribute the clay.
Shrinkage Check
Clay shrinks 10-15% when drying! Make your opening noticeably wider than your candle now, or the tea light won’t fit later.
Step 2: Refining and Sizing
-
Flatten the bottom:
Once the basic cup shape is formed, gently tap the bottom of the pot against your work surface. This creates a stable, flat base so your candle holder won’t wobble. -
Verify the size:
Take your actual tea light candle and place it inside the pot. There should be a small gap around the edges—remember that clay shrinks slightly as it dries, so you want a little extra breathing room. -
Level the rim:
Look at the pot from the side. If the rim is very uneven, gently pat down the high spots with your finger or slice off excess clay with a wire tool for a cleaner, modern edge. -
Add texture:
Instead of smoothing the outside perfectly, embrace the texture shown in the photo. I like to use a dry, stiff brush or lightly drag a sculpting tool vertically up the sides to create those subtle, rustic striations. -
Smooth the lip:
Dip your finger in a tiny bit of water and run it along the top rim to soften any sharp edges, ensuring the opening looks finished but still handmade.
Step 3: Finishing Up
-
Drying phase:
Place your pot in a cool, dry spot away from direct sunlight. Let it dry slowly for 24 to 48 hours. Turn it over gently after the first day to let the bottom dry evenly. -
Check for dryness:
The clay will turn a lighter shade of white and feel room temperature (not cold) to the touch when it is fully bone dry. -
Sand gently:
Once dry, use fine-grit sandpaper to perform a very light pass over the rim or any sharp bumps inside. Be careful not to sand away the exterior texture you created. -
Dust off:
Wipe the entire piece down with a dry cloth or a soft brush to remove any clay dust from sanding. -
Seal (Optional):
To protect against soot or wax drips, apply a thin coat of matte sealer to the inside of the pot. Leave the outside raw if you prefer the stony look.
Cracks Appearing?
If hairline cracks appear while drying, mix a tiny bit of clay with water to make a paste (slip) and fill them in immediately with a small brush.
Place your tea light inside and enjoy the warm glow of your handmade creation
Minimalist Cylinder Votive Holder
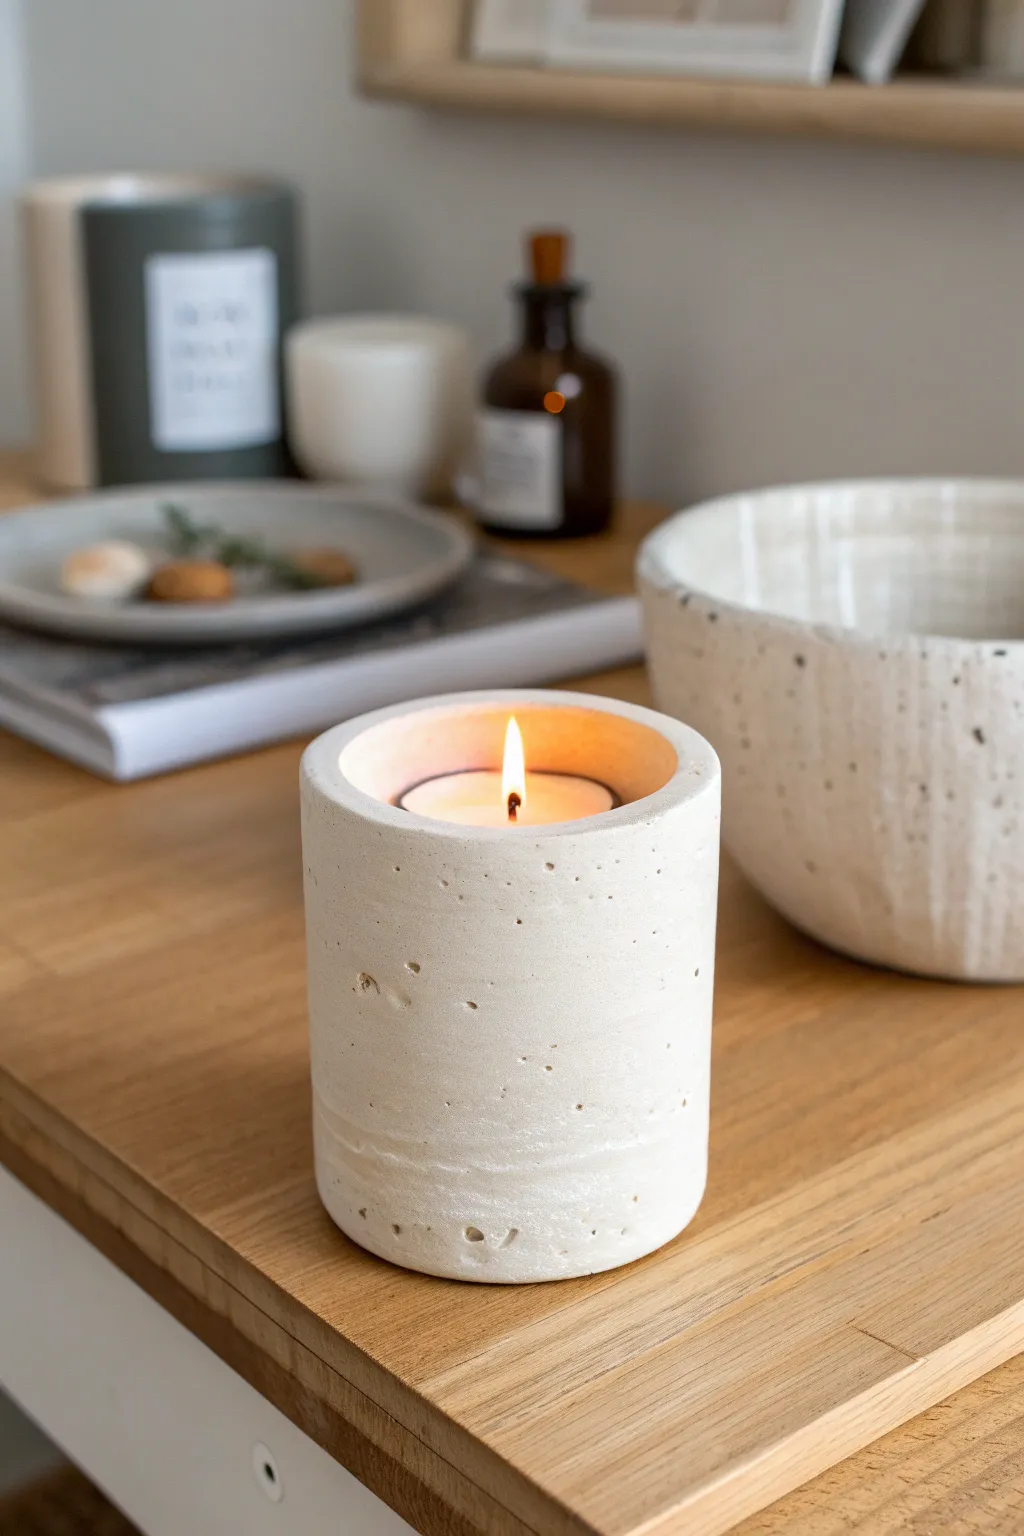
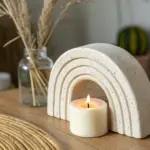
Embrace the beauty of imperfection with this industrial-chic concrete votive holder. Its crisp cylindrical shape is softened by natural air pockets and a warm, creamy finish that glows beautifully when lit.
Step-by-Step
Materials
- Fine-grain white concrete mix or plaster of Paris
- Empty cardboard cylinder (like a sturdy toilet paper roll or mailing tube section)
- Small plastic cup or pill bottle (narrower than the outer mold)
- Cooking spray or petroleum jelly
- Sandpaper bundle (120 and 220 grit)
- Clear matte sealer spray
- Duct tape or sturdy packing tape
- Small cardboard square (for the base)
- Mixing bowl and spoon
- Standard tealight candle
Step 1: Preparing the Mold
-
Select your forms:
Choose a main outer cylinder that fits your desired width. A sturdy mailing tube cut to size works perfectly for that crisp, straight edge shown in the photo. -
Create the base:
Center your cardboard cylinder on a loose square of cardboard. Seal the outer seam thoroughly with duct tape to prevent the wet cement from leaking out the bottom. -
Prep the insert:
Find a smaller internal object—like an old plastic pill bottle or a small disposable cup—that is wider than your tealight but fits inside the main tube with room to spare. -
Apply release agent:
Generously coat the inside of your cardboard tube and the outside of your insert object with cooking spray or petroleum jelly. This step is crucial for easy removal later.
Sticky Situation?
If the inner cup is stuck, don’t force it. Pour hot water into the cup (if plastic) or use a hairdryer to gently heat it; the slight expansion often breaks the seal.
Step 2: Mixing and Pouring
-
Mix the medium:
Combine your white concrete or plaster with water according to package directions. Aim for a consistency similar to pancake batter. -
Add air bubbles:
Normally, you tap molds to remove bubbles, but to replicate the pockmarked texture in the photo, stir the mixture vigorously right before pouring to trap tiny pockets of air. -
Fill the mold:
Pour the mixture into your taped cardboard cylinder until it’s about 3/4 full, leaving room for displacement when you add the center insert. -
Insert the center:
Push your lubricated small cup or bottle into the center of the wet mix. Don’t push all the way to the bottom; leave about a half-inch of concrete at the base. -
Weight it down:
The inner cup will want to float up. Tape it securely across the top of the outer mold or place heavy coins inside the cup to keep it submerged.
Step 3: Finishing Touches
-
Initial cure:
Let the mold sit undisturbed for at least 24 hours. If using plaster, it may cure faster, but concrete needs time to strengthen. -
Demold the object:
Peel away the cardboard base first. Then, gently twist and pull out the center insert. Finally, tear or slice the outer cardboard tube to reveal your raw cylinder. -
Rough sanding:
Use 120-grit sandpaper to smooth the top rim, which might have sharp edges from the pouring process. Keep the sides mostly untouched to preserve the texture. -
Refine the texture:
If I want a smoother feel without losing the look, I lightly sand the exterior with 220-grit paper, just enough to knock off any jagged bits while keeping the craters intact. -
Clean surface:
Wipe the cylinder down with a damp cloth to remove all chalky dust. Allow it to dry completely before the final step. -
Seal:
Spray a light coat of clear matte sealer over the entire holder. This prevents the porous material from staining if wax drips on it later. -
Insert candle:
Place a standard tealight into the recess. The white concrete will amplify the light, creating a warm, cozy focal point.
Pro Tip: Marble Effect
Mix a tiny drop of grey acrylic paint into your wet concrete but don’t stir it completely. This creates subtle veins that look incredible alongside the air pockets.
Light your candle and enjoy the calm atmosphere your handcrafted piece brings to the room

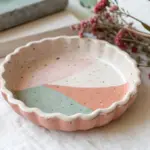

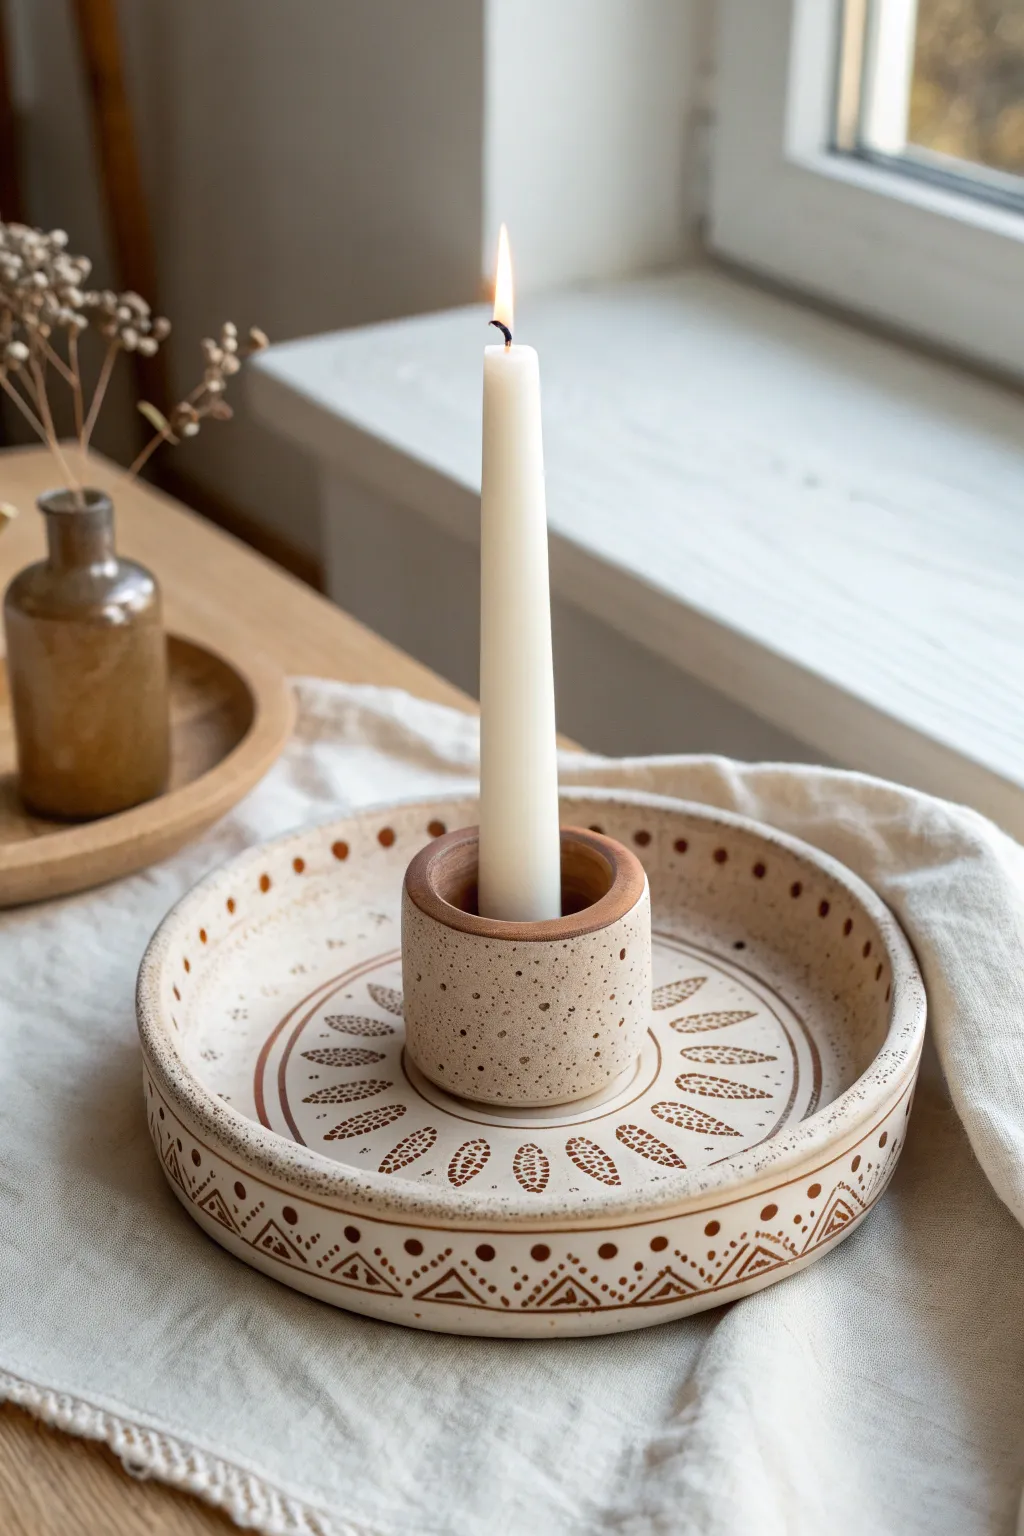
Classic Taper Holder With Round Base
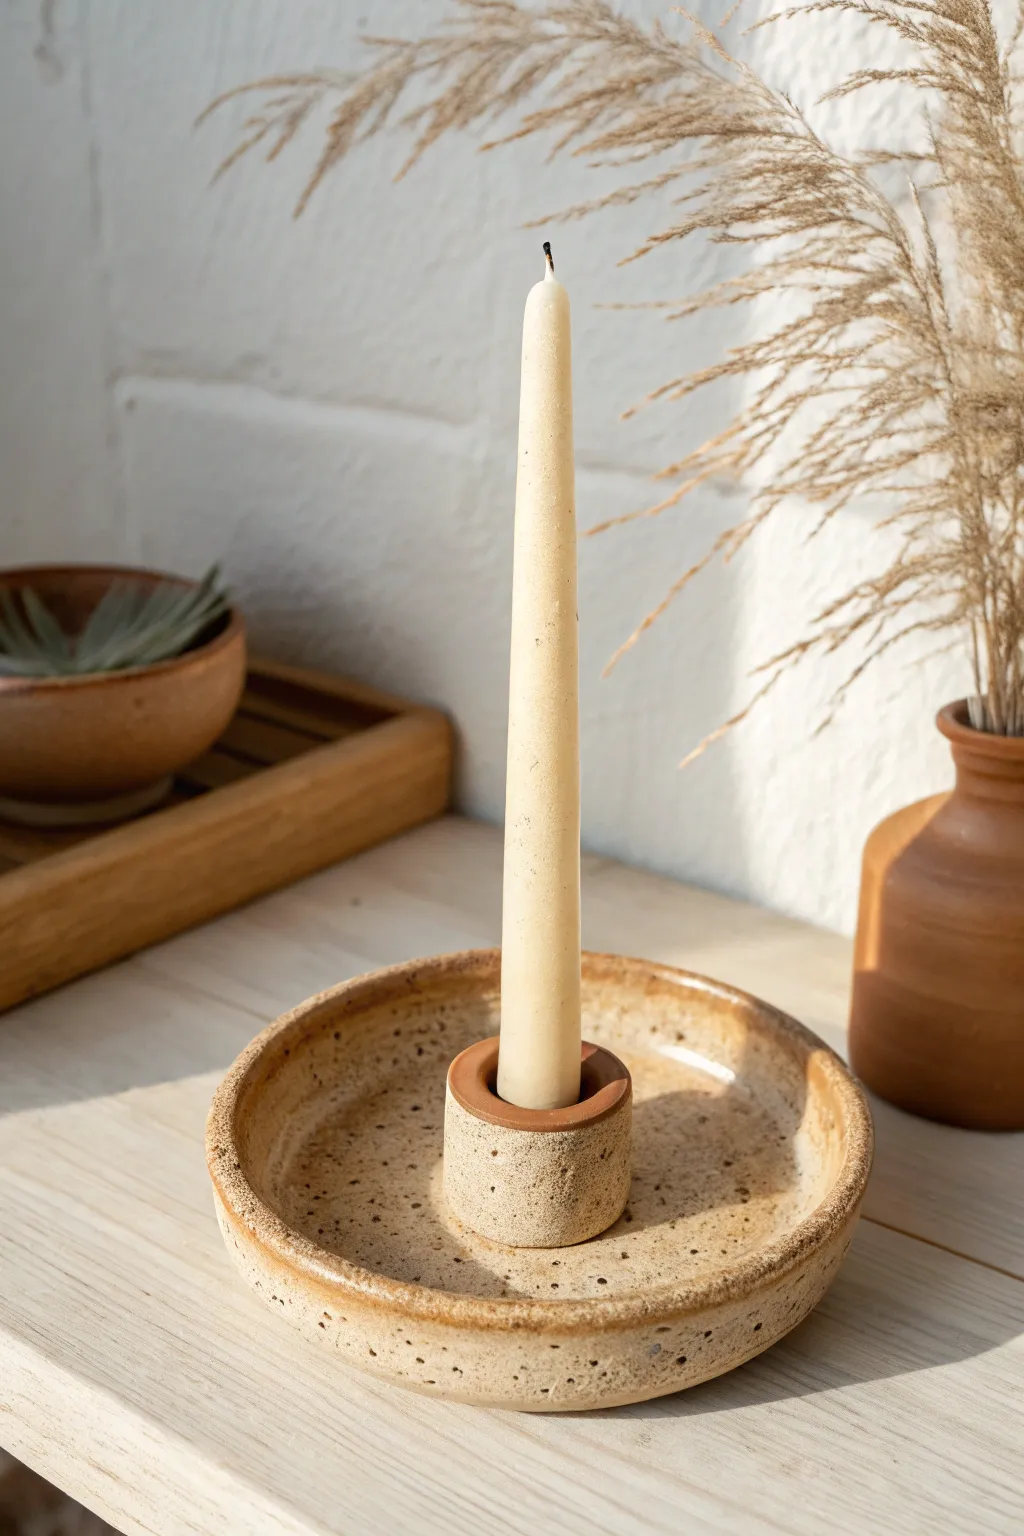
Embrace the beauty of simplicity with this handmade ceramic candle holder featuring a wide, speckled base and a central column for a classic taper candle. The natural clay body and glossy glaze create a warm, earthy aesthetic perfect for cozy evenings.
Step-by-Step Guide
Materials
- Speckled stoneware clay (e.g., Speckled Buff)
- Pottery wheel (or can be hand-built)
- Trimming tools
- Wire cutter
- Sponge
- Needle tool
- Clear transparent glaze
- Kiln
- Calipers or ruler
- Taper candle for sizing
Step 1: Throwing the Base
-
Prepare the clay:
Begin by wedging about 1.5 to 2 pounds of speckled stoneware clay to remove air bubbles. Form it into a uniform ball. -
Center on the wheel:
Slam the clay onto the center of your wheel head. Using wet hands and steady pressure, center the clay until it spins without wobbling. -
Open the form:
Press your thumbs into the center of the mound to open it, leaving about a half-inch of thickness for the floor. widen the base to create a shallow, plate-like shape. -
Raise the rim:
Pull up a short wall at the perimeter, roughly 1 inch high. This creates the dish portion that will catch wax drips. Compress the rim with a sponge for a smooth finish. -
Refine the floor:
Use a wooden rib to smooth and compress the flat floor of the dish, ensuring it is level. I like to run the rib from the center out to the edge to remove any finger marks.
Uneven Drying?
If the cylinder dries faster than the plate, wrap the cylinder loosely in plastic while the base catches up. Even moisture is key to preventing cracks at the seam.
Step 2: Creating the Candle Cup
-
Throw a small cylinder:
You can throw the central holder directly onto the base if you are skilled (throwing off the hump style), but for accuracy, it’s often easier to throw a separate small cylinder or use a ‘donut’ method if throwing all at once. For this tutorial, we will throw a separate small cylinder ring. -
Size the opening:
While throwing the small cylinder, use your calipers to measure the inner diameter. It should be just slightly larger than your standard taper candle (about 7/8 inch) to account for clay shrinkage. -
Refine the cylinder:
Shape the outside of the cylinder so it has straight, vertical walls. It should be roughly 1.5 inches tall. -
Cut and dry:
Wire the dish base and the small cylinder off the wheel. Let both pieces dry to a leather-hard state.
Step 3: Assembly & Finishing
-
Trim the base:
Once leather hard, flip the dish base over and trim the bottom to clean up the shape and create a foot ring if desired. -
Score and slip:
Mark the exact center of your dish base. Score this area and the bottom of your small cylinder thoroughly with a needle tool. Apply clay slip to both scored areas. -
Attaching components:
Firmly press the cylinder onto the center of the dish. Wiggle it slightly to ensure a strong bond. -
Clean the seam:
Use a small modeling tool or your fingertip to smooth the seam where the cylinder meets the floor of the dish. A tiny coil of clay added to the seam can reinforce this joint if needed. -
Smooth the edges:
Wipe down the entire piece with a damp yellow sponge to soften any sharp edges and expose the speckles in the clay.
Perfect Fit Pro-Tip
Make the candle hole slightly deeper than you think necessary. This adds stability so tall taper candles won’t wobble or tip over once the wax melts a bit.
Step 4: Firing & Glazing
-
Bisque fire:
Allow the assembled holder to dry completely (bone dry) before loading it into the kiln for a bisque fire (typically Cone 04). -
Apply glaze:
Once bisqued, dip the entire piece into a clear transparent glaze. Or, if you want the rim of the candle cup to remain unglazed like the photo, carefully wax resist the top rim before dipping. -
Clean the foot:
Wipe away any glaze from the bottom of the piece to prevent it from sticking to the kiln shelf. -
Glaze fire:
Fire the piece again to the maturity temperature of your clay body (likely Cone 5 or 6 for stoneware).
Place a slender beeswax candle inside and enjoy the warm glow of your handcrafted ceramic piece


Wavy Multi-Taper Candelabra
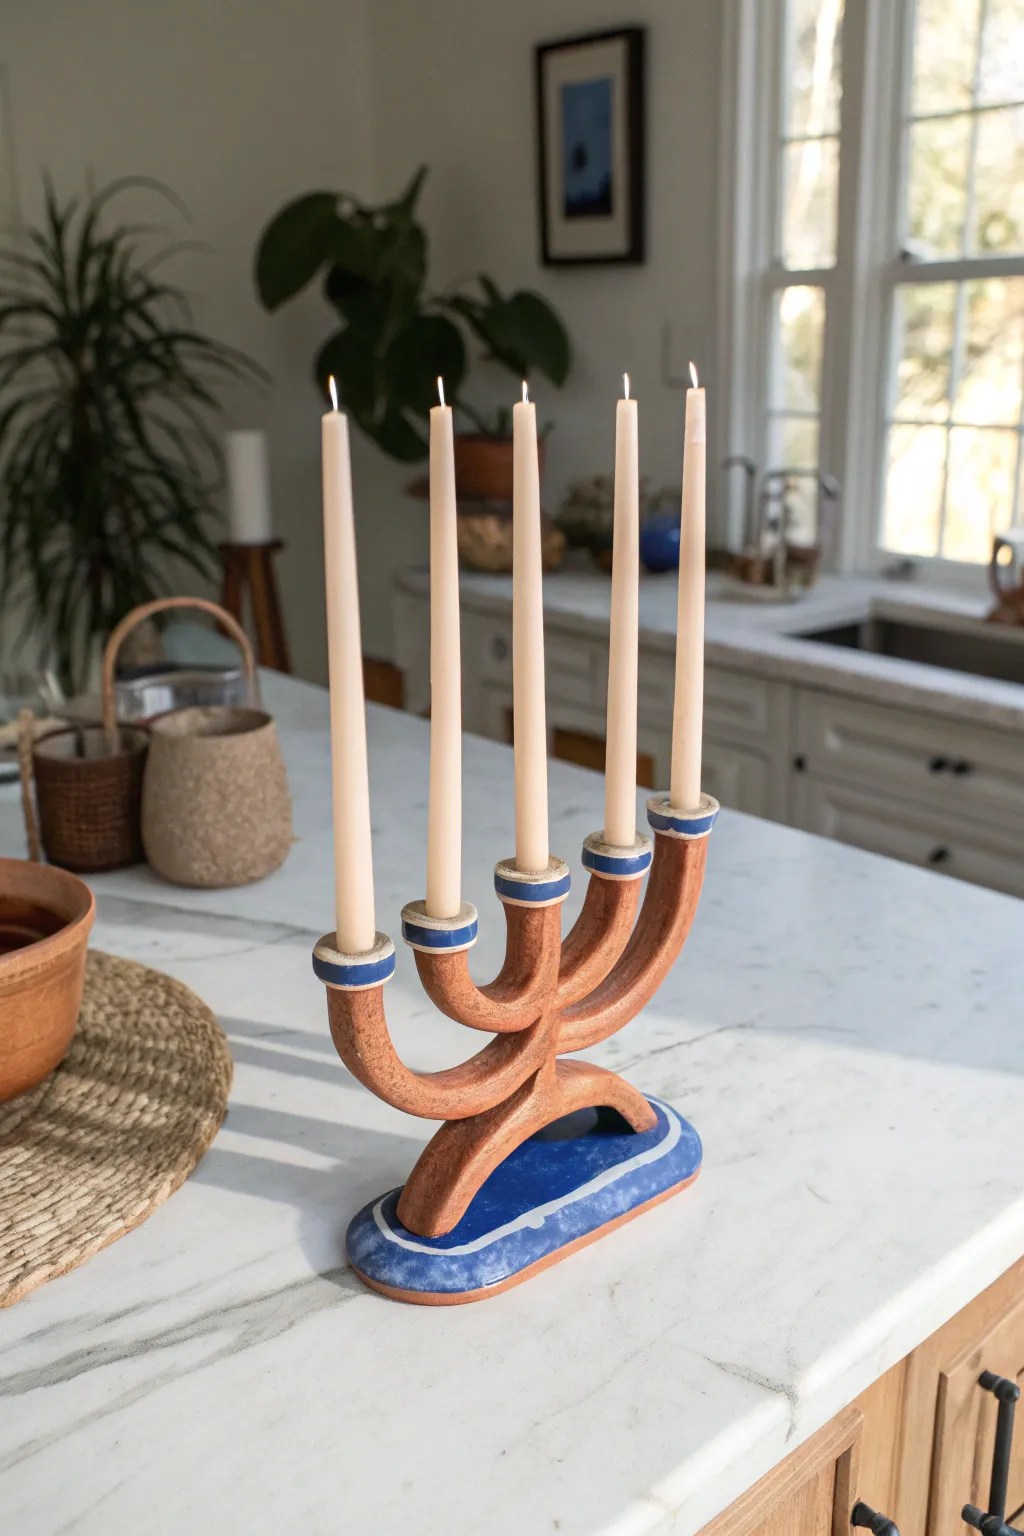
Embrace organic shapes with this striking terracotta-style candelabra featuring a flowing, branched structure and vibrant cobalt blue accents. This statement piece brings a warm, artisanal touch to your dining table while holding five standard taper candles securely.
Detailed Instructions
Materials
- Air-dry clay (terra cotta color) or polymer clay
- Rolling pin
- Clay knife or cutting tool
- Small bowl of water (for smoothing)
- Slip (clay and water mixture)
- Cobalt blue acrylic paint
- White acrylic paint
- Fine detail paintbrush
- Sandpaper (fine grit)
- Clear sealant (matte or satin finish)
- Taper candle (for sizing)
- Cardboard or paper (for templates)
Step 1: Forming the Base
-
Prepare the foundation:
Begin by rolling out a thick slab of clay, approximately 3/4-inch thick. Cut out a long oval shape, roughly 8 inches long by 3 inches wide. This will serve as the sturdy base for your candelabra. -
Create the support arch:
Roll a thick snake of clay, about 1 inch in diameter. Shape it into a low, gentle arch that spans most of the length of your oval base. This arch acts as the bridge connecting the base to the candle arms. -
Attach and secure:
Score the top of the oval base and the bottom of the arch legs. Apply a generous amount of slip to the scored areas and press the arch firmly onto the base. Use your fingers or a modeling tool to blend the clay seams until invisible.
Balance Check
Before the clay dries, insert candles into the holders briefly to check for balance. If the piece leans, gently adjust the base arch while the clay is still pliable.
Step 2: Constructing the Arms
-
Shape the main arms:
Roll a long, uniform snake of clay (slightly thinner than the base arch). Form it into a wide U-shape. This will be the lower tier of arms. -
Add the central tier:
Create a second, smaller U-shaped piece for the inner arms. I find it helpful to lay these out flat first to ensure symmetry before assembling. -
Assemble the structure:
Stack the smaller U-shape inside the larger one, joining them at the bottom center point with slip and scoring. Then, mount this combined structure onto the center top of your base arch, ensuring it stands vertical and balanced. -
Form the candle cups:
Roll five small balls of clay. Flatten them slightly into thick disks that are wider than your taper candles. -
Sizing the holders:
Press the base of a real candle into the center of each disk to create an indentation. Wiggle it slightly to ensure the fit isn’t too tight, as clay shrinks when drying. -
Attach the cups:
Score the tops of your four arm ends and the single center point. Attach a clay cup to each of these five points using slip, blending the clay downwards for a seamless transition. -
Create the rims:
Roll very thin coils of clay and wrap one around the top edge of each cup to create a distinct, raised rim. Smooth the join.
Step 3: Refining and Painting
-
Final smoothing:
Dip your finger in water and run it over all surfaces to smooth out bumps and fingerprints. Pay special attention to the interior curves of the arms. -
Dry thoroughly:
Let the piece dry completely. For air-dry clay of this thickness, this may take 48-72 hours. Turn it occasionally to ensure even drying. -
Sand imperfections:
Once fully cured, use fine-grit sandpaper to gently remove any rough patches or sharp edges. -
Paint the base:
Using cobalt blue paint, cover the top surface of the oval base completely, leaving the edges natural clay color if desired. -
Paint the accents:
Paint the raised rims of each candle cup with the same cobalt blue. Let the blue paint dry completely. -
Add the white details:
Using a fine detail brush and white paint, carefully outline the blue oval on the base and add a thin white ring around the bottom of each blue cup rim. -
Seal the piece:
Finish by applying a coat of matte or satin clear sealant to protect the paint and give the clay a finished look.
Cracking Issues?
If you see hairline cracks appearing as it dries, mix a small amount of clay with water to make a paste and fill them in immediately, then smooth over.
Light your candles and enjoy the warm glow of your handmade centerpiece

The Complete Guide to Pottery Troubleshooting
Uncover the most common ceramic mistakes—from cracking clay to failed glazes—and learn how to fix them fast.
Faceted Geometric Tea Light Block
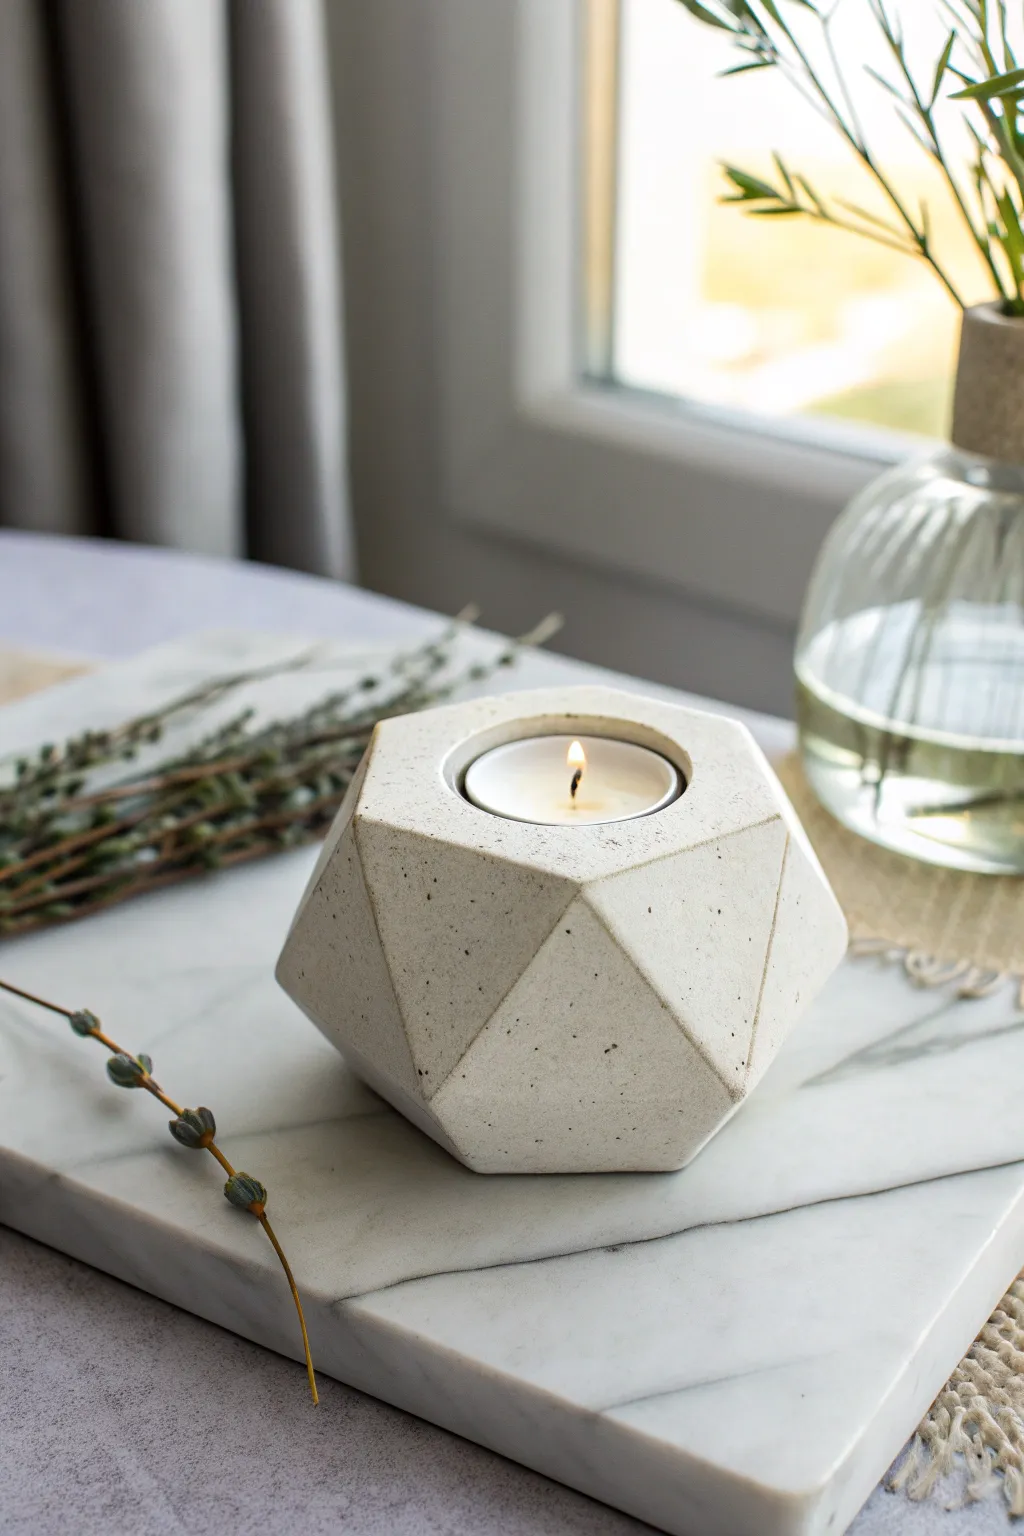
Bring a touch of minimalist Scandinavian design to your space with this faceted geometric tealight holder. The clean lines and subtle speckled finish mimic the look of expensive cast concrete, but it’s easily achieved with clay.
Step-by-Step
Materials
- White polymer clay (oven-bake)
- Black pepper or black embossing powder (for speckles)
- Sharp craft knife or tissue blade
- Rolling pin
- Tealight candle (for sizing)
- Ruler
- Parchment paper
- Fine-grit sandpaper (400 and 800 grit)
Step 1: Preparation and Shaping
-
Condition the clay:
Start by warming up a substantial block of white polymer clay in your hands until it becomes pliable and soft. You’ll need a ball roughly the size of a tennis ball for this project. -
Create the faux-concrete effect:
Flatten the clay slightly and sprinkle a small amount of coarse black pepper or black embossing powder over it. Fold the clay over and knead it repeatedly until the speckles are evenly distributed throughout the block. -
Form the base shape:
Roll your conditioned clay into a smooth, tight sphere, ensuring there are no trapped air bubbles or large cracks. -
Establish the height:
Gently press the sphere onto your work surface to flatten the bottom. Then, press down on the top to create a thick, puck-like cylinder shape, roughly 2.5 inches tall. -
Create the candle recess:
Take a standard tealight candle (removing the wick/wax if possible, using just the metal tin is safer) and press it firmly into the center of the top surface. Push it down until the rim is flush with the clay surface, then carefully wiggle it out to leave the depression.
Step 2: Carving the Facets
-
Cut the top hexagon:
Using your sharp craft blade, slice off the curved shoulders around the top rim to create a hexagonal (six-sided) perimeter around the candle hole. Try to keep these cuts relatively symmetrical. -
Start the side facets:
This is the most critical aesthetic step. Slice triangular planes ideally connecting from your top hexagonal corners down towards the middle of the block. I find it helpful to visualize where the light will hit before making a cut. -
Create the lower facets:
Continue slicing away the rounded parts of the clay near the bottom, leaning your blade at an angle so these new cuts meet the upper cuts, creating sharp ridges where the planes intersect. -
Refine the geometry:
Rotate the piece and look for any remaining curved areas. Slice them off to ensure the entire surface is made of flat, geometric planes. -
Smooth the surfaces:
If your knife left any drag marks, lightly smooth them with your finger, but be very careful not to round over the sharp edges you just created.
Cold Cut Technique
For sharper edges, chill the clay block in the fridge for 20 minutes before carving. Cold clay is firmer and slices cleanly without deforming under the pressure of the blade.
Step 3: Finishing Touches
-
Bake the holder:
Place your faceted block on a baking sheet lined with parchment paper. Bake according to your clay manufacturer’s instructions—usually around 275°F (130°C) for 30-45 minutes due to the thickness. -
Cool down:
Turn off the oven and open the door slightly, letting the piece cool down slowly inside. This prevents cracking in thicker pieces of clay. -
Initial sanding:
Once fully cool, use 400-grit sandpaper to remove any fingerprints or slight imperfections on the flat planes. Place the sandpaper on a flat surface and rub the clay block against it to keep the facets perfectly flat. -
Polishing:
Switch to 800-grit sandpaper for a smoother finish. You can do this wet (dip the paper in water) to keep the dust down and achieve a satiny, stone-like texture. -
Final clean:
Wipe the geometric block with a damp cloth to remove sanding dust and place a fresh tea light inside to test the fit.
Stone Effect Upgrade
Mix in a pinch of translucent clay with your white clay. This adds depth and makes the material look more like real quartz or marble rather than opaque plastic.
Now you have a stunning, modern accent piece ready to light up a cozy corner
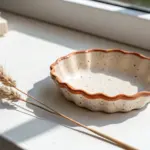
Marbled Clay Tea Light Set
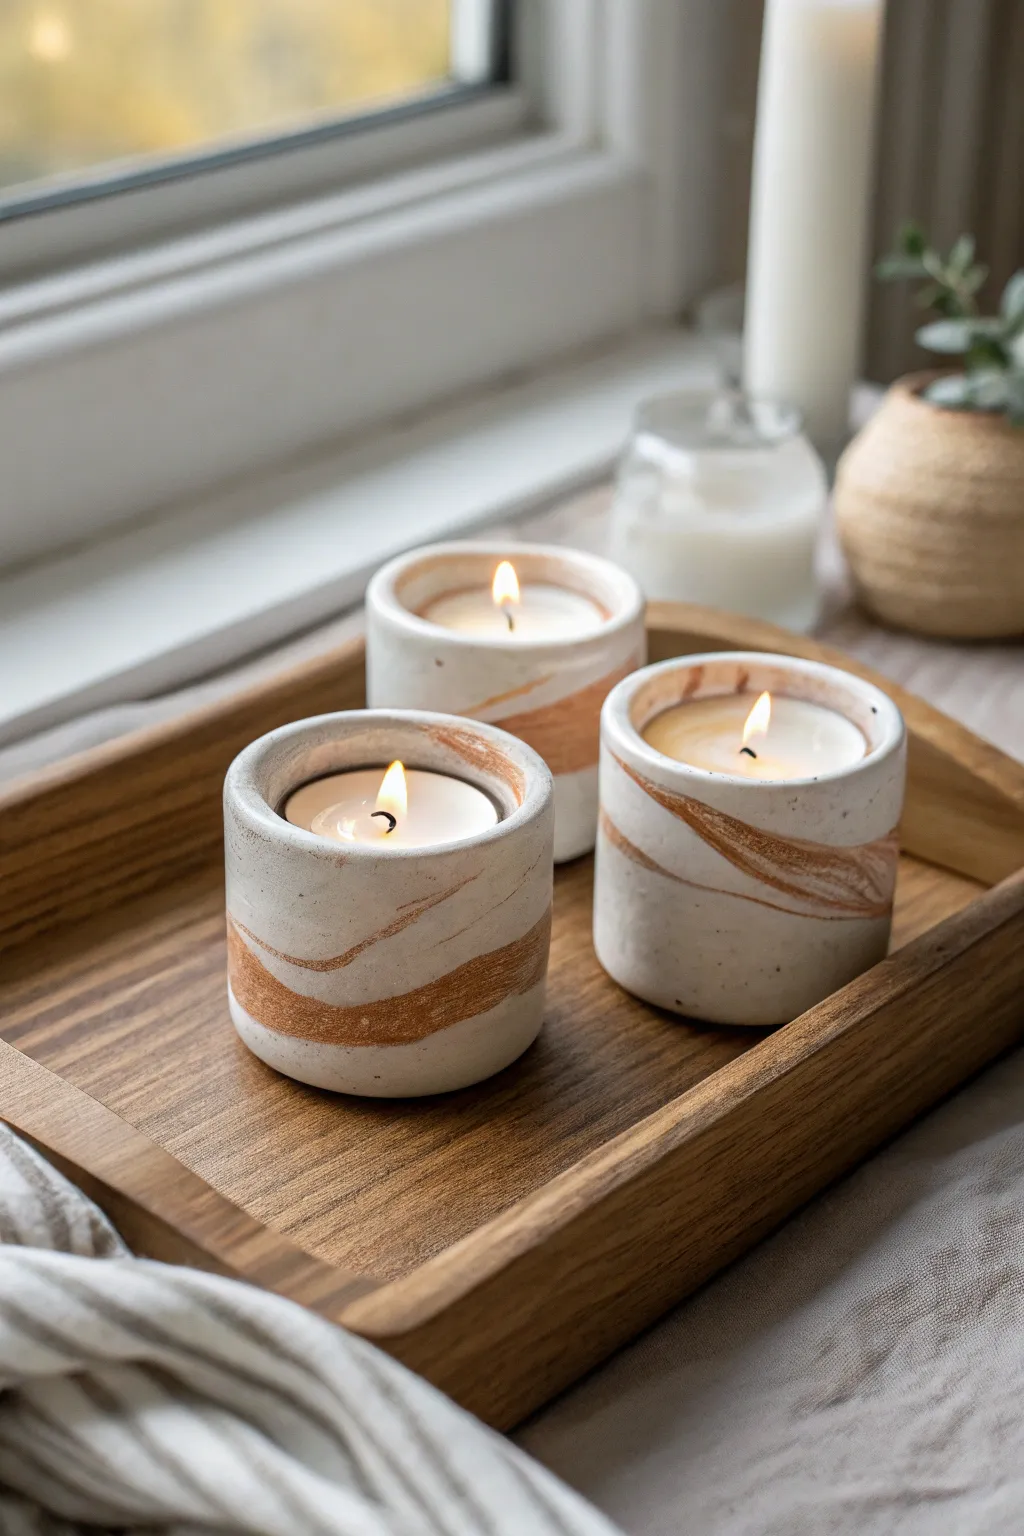
Achieve a sophisticated, high-end look with these minimalist tea light holders featuring warm, organic terracotta marbling against smooth white clay. This project is deceptively simple and results in a stunning set that adds a cozy, handmade touch to any windowsill or coffee table.
Step-by-Step Guide
Materials
- White polymer clay (or air-dry clay)
- Terracotta or copper-colored polymer clay
- Rolling pin or acrylic roller
- Circular cookie cutter (approx. 3 inches diameter)
- Blade or craft knife
- Tea light candle (for sizing)
- Smooth work surface (ceramic tile or glass mat)
- Fine grit sandpaper (400-600 grit)
- Matte varnish or sealant (optional)
Step 1: Preparing the Clay
-
Condition the white clay:
Start by taking a large block of white clay and kneading it thoroughly in your hands until it becomes soft, pliable, and warm. This conditioning step is crucial to prevent cracks later on. -
Prepare the accent color:
Condition a much smaller amount of the terracotta or copper-colored clay. You want a ratio of about 10 parts white to 1 part color to keep the white dominant. -
Create color ropes:
Roll the colored clay into long, thin snakes or ropes. Vary the thickness slightly for a more natural, organic look in the final marbling.
Muddy Colors?
If your swirl looks brown instead of marbled, you over-mixed. Stop twisting earlier next time. The distinct streaks come from barely folding the clay together.
Step 2: Marbling Technique
-
Combine the clays:
Form the white clay into a thick log. Lay the colored ropes lengthwise along the white log, pressing them gently so they stick. -
Twist and fold:
Twist the log like a candy cane to spiral the colors together. Fold the log in half, roll it smooth again, and twist once more. Repeat this 2-3 times—but stop before the colors blend completely into a new shade. -
Form a ball:
Roll your marbleized clay log into a smooth, tight ball, ensuring there are no air pockets trapped inside.
Step 3: Shaping the Cylinders
-
Divide the clay:
Cut your large ball into three equal portions if you are making a trio. Roll each portion into a smooth, individual cylinder shape. -
Create the indentations:
Take a real tea light candle (remove the wick/wax if possible, or just used the metal casing) and press it firmly into the center of each cylinder. Push down until the top of the candle is flush with the clay rim. -
Refine the walls:
While the sizing object is still inside, gently reshape the outer walls with your fingers to ensure they are even and cylindrical. I prefer to roll the side against the table gently to smooth it out. -
Remove the sizer:
Carefully wiggle the tea light casing out of the clay. If the shape distorts slightly, gently push it back into a perfect circle with your fingers.
Level Up
Mix a pinch of gold leaf flakes into the white clay before twisting. As you sand the finished piece, little glimmers of gold will appear alongside the terracotta swirls.
Step 4: Finishing Touches
-
Smooth the rims:
Check the top rim of each holder. If it’s uneven, use your finger dipped in a tiny bit of water (for air dry) or baby oil (for polymer) to smooth the edges. -
Bake or dry:
If using polymer clay, bake according to the package instructions (usually 275°F for 15-30 minutes). If using air-dry clay, leave them in a cool, dry place for 24-48 hours. -
Sand for perfection:
Once fully cured or dry, use fine-grit sandpaper to gently buff the outside. This removes fingerprints and reveals the marble pattern more clearly. -
Seal the surface:
Apply a thin coat of matte varnish if you want to protect the clay from soot or dust, though leaving the raw clay finish has a lovely earthy texture.
Place your new candle holders on a wooden tray and enjoy the warm glow of your handmade creation


What Really Happens Inside the Kiln
Learn how time and temperature work together inside the kiln to transform clay into durable ceramic.
Speckled Stone-Effect Candle Holder
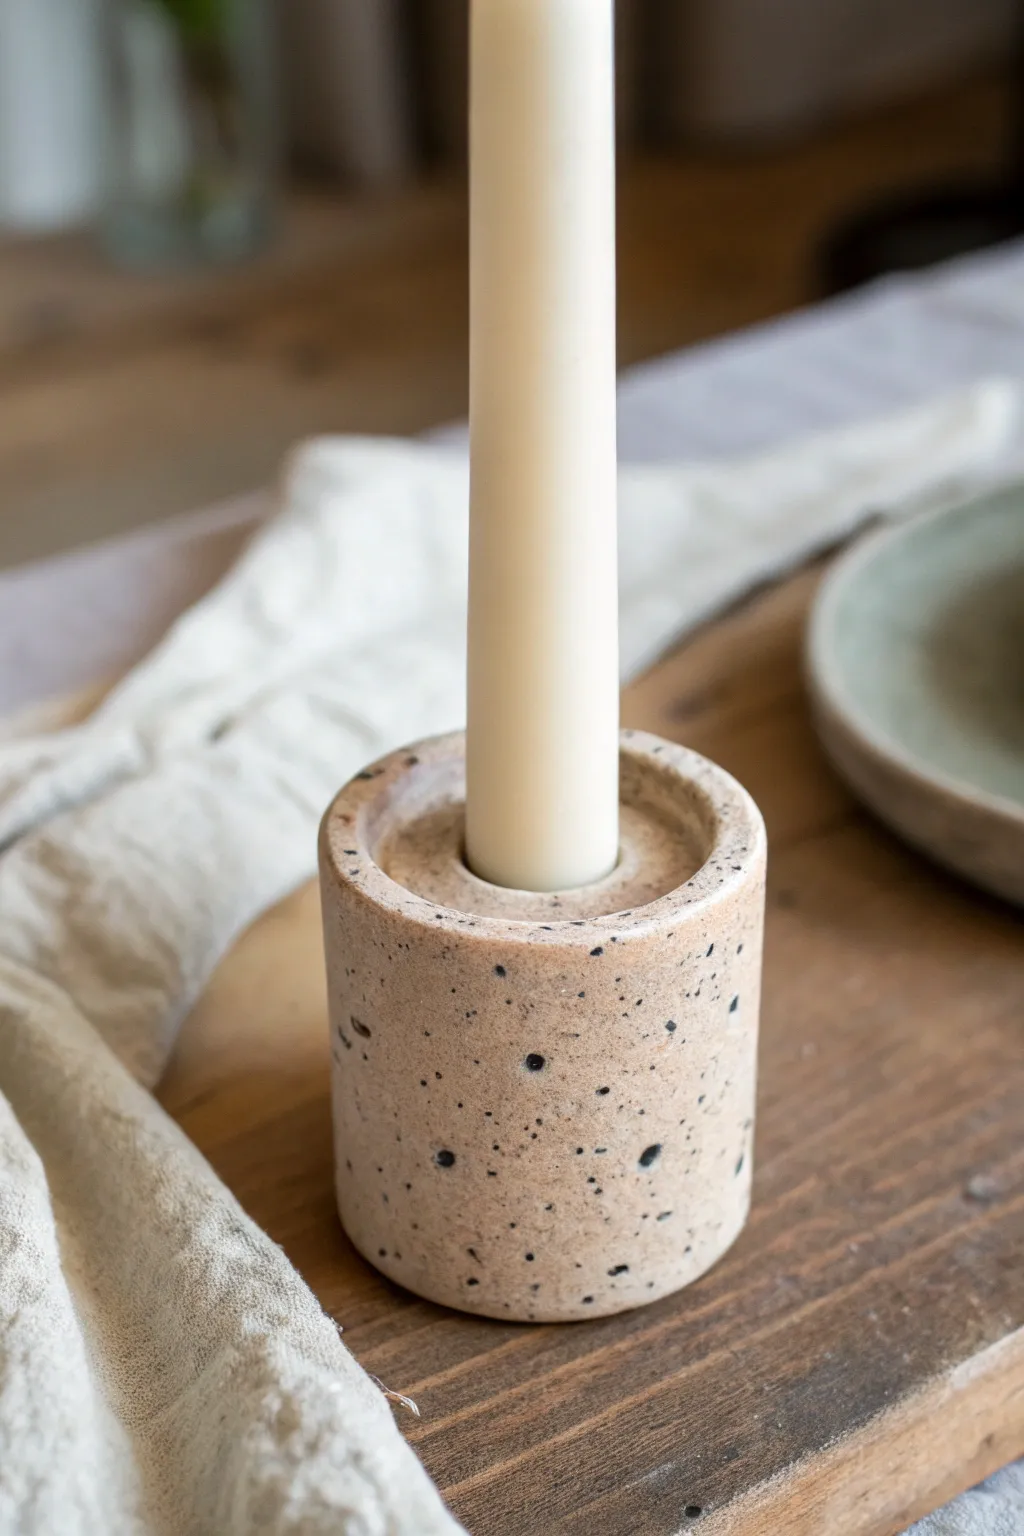
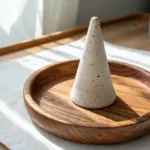
Achieve a high-end, minimalist aesthetic with this simple yet striking clay project. The finished holder mimics the organic beauty of speckled stone, perfect for grounding your table setting with natural tones.
Step-by-Step Tutorial
Materials
- Stone-effect polymer clay (granite or sandstone color)
- Acrylic roller
- Flexible tissue blade or craft knife
- A standard taper candle (for sizing)
- Round cookie cutter (approx. 2.5 inches diameter)
- Round cookie cutter (approx. 1 inch diameter, matches candle base)
- Sandpaper (various grits, 400-1000)
- Oven and baking tray
- Ceramic tile or glass work surface
- Optional: Cornstarch (to prevent sticking)
Step 1: Preparation & Base
-
Condition the clay:
Start by warming up your stone-effect polymer clay in your hands. Knead it thoroughly until it is soft and malleable, which ensures you won’t have cracks later. -
Roll out the slab:
Using your acrylic roller, roll the clay into a thick, even slab directly on your work surface. Aim for a thickness of about 1/4 inch or slightly more to give the base some weight. -
Cut the circles:
Press the larger 2.5-inch round cutter firmly into the slab to create your circles. You will need to cut out about 6 to 8 of these identical discs to stack them up to the desired height. -
Create the center hole:
Take your smaller 1-inch cutter (or whatever size fits your taper candle snugly) and cut the exact center out of all but one of your large discs. That one solid disc will be the bottom floor of your holder.
Seamless Blending
If the clay gets too sticky while smoothing seams, dip your fingertip or tool in a tiny bit of cornstarch or baby oil for an effortless glide.
Step 2: Assembly
-
Stack the rings:
Place the solid base disc onto your baking tile. Place the first ring (the disc with the hole) on top of it, aligning the outer edges perfectly. -
Continue building:
Continue stacking the remaining rings on top. Press gently as you add each layer to ensure they adhere to one another without squashing the shape. -
Check the fit:
Pause briefly to test your candle in the hole. It should slide in easily but not wobble. If it’s too tight, gently widen the inner walls with your finger or a tool. -
Smooth the seams:
Using your thumb or a modeling tool, drag the clay from the top layer down across the seam lines to merge the layers. Do this all around the outside cylinder until the horizontal lines disappear. -
Blend the inside:
Don’t forget the interior; use a smooth tool or your pinky finger to smooth the inside seams as well so the candle sits straight. -
Refine the shape:
Roll the entire cylinder gently on your work surface like a wheel to ensure the outside wall is perfectly round and smooth.
Step 3: Finishing
-
Detail the rim:
I prefer to slightly flatten clean the top rim with the blade to make it crisp, or round it off with a fingertip for a softer look. -
Bake:
Place the tile with the clay holder into the oven. follow the temperature and time instructions specific to your brand of polymer clay (usually 275°F for 15-30 minutes). -
Cool down:
Allow the clay to cool completely inside the oven with the door slightly ajar to prevent thermal shock cracking. -
Initial sanding:
Once cool, use lower grit sandpaper (around 400) under running water to smooth out any fingerprints or bumps on the outer surface. -
Fine sanding:
Move to a higher grit sandpaper (800-1000) for a polished, professional finish. The water sanding technique helps keep the stonedust out of the air and reveals the speckles beautifully. -
Wash and dry:
Rinse the holder thoroughly to remove any clay residue and dry it with a soft cloth.
Terrazzo Twist
Mix small chopped chunks of black, white, and translucent clay into a neutral base color before rolling to create a custom terrazzo pattern instead of granite.
Pop in a cream taper candle and enjoy the warm, earthy atmosphere this piece brings to your space
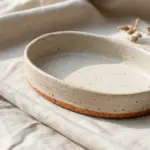
Stamped Pattern Taper Base
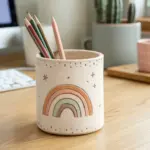
This earthy, stamped candle holder combines a functional taper base with a wide catchment tray, perfect for protecting surfaces from wax drips. The speckled finish and rust-colored geometric patterns give it a warm, artisanal pottery look that feels right at home in a cozy Scandi or bohemian setting.
Step-by-Step Tutorial
Materials
- Speckled stoneware clay (or air-dry clay with faux speckles)
- Rolling pin
- Guide strips or slats (approx. 1/4 inch thick)
- Circle cutter or bowl method (approx. 6-7 inches diameter)
- Fettling knife or craft knife
- Slip and scoring tool (if using kiln clay) or water/slip for air-dry
- Small geometric stamps (triangle, dot, leaf shape)
- Taper candle (for sizing)
- Sponge
- Underglaze or acrylic paint (rust/terracotta color)
- Clear glaze or varnish (matte or satin)
Step 1: Forming the Base Dish
-
Roll the Slab:
Begin by wedging your clay to remove air bubbles. Lay down your guide strips and roll out a slab of clay to an even thickness, roughly 1/4 inch. If you are using plain clay and want speckles, you can knead in some ground pepper or coffee grounds (for air dry) or use speckled stoneware. -
Cut the Circle:
Place your circle cutter or an inverted bowl onto the slab. Cut around it using a fettling knife to create a perfect circle, about 6 to 7 inches in diameter. -
Create the Rim:
Roll a long, thin coil or cut a long strip from your remaining slab, about 3/4 inch tall. Score and slip the outer edge of your circular base, then attach the strip vertically to create the rim of the dish. -
Blend the Seams:
Use a modeling tool or your finger to firmly smooth the clay on the inside and outside where the rim meets the base. The connection should be invisible and seamless. -
Construct the Holder:
Roll a rectangular strip of clay that is roughly 1.5 inches tall. Wrap this strip loosely around the base of your taper candle to measure the circumference needed, leaving just a tiny bit of wiggle room for shrinkage. -
Attach the Cylinder:
Join the ends of your strip to form a cylinder. Mark the exact center of your dish, score and slip that area, and attach the cylinder firmly. Ensure it stands perfectly straight.
Uneven Rim Fix
If your rim looks wavy or uneven after attaching, flip the leather-hard piece upside down onto a flat board and gently press. This naturally levels the top edge.
Step 2: Stamping and Decorating
-
Smooth the Surfaces:
Use a damp sponge to wipe down the entire piece. Smooth out any fingerprints, sharp edges on the rim, or rough spots on the central cylinder. The rim should be slightly rounded. -
Plan the Pattern:
Before stamping, visualize your design. This piece uses a radiating leaf pattern on the floor of the dish and a geometric triangular border on the exterior rim. -
Stamp the Interior:
Using a leaf-shaped stamp, press gently into the floor of the dish. Start closest to the central holder and stamp in a circle, pointing the leaves outward. Repeat for a second, larger ring. -
Decorate the Exterior:
On the outside wall of the dish, use a small triangle stamp and a dot tool. Create a pattern of alternating triangles and dots all the way around the circumference. -
Initial Drying:
Let the piece dry until it is leather hard. This makes it easier to apply color without smudging the textured clay.
Faux Speckle Hack
Using plain air-dry clay? Mix in dried tea leaves or used coffee grounds before rolling. When sealed, they mimic the iron speckles found in high-fire stoneware.
Step 3: Finishing
-
Apply Color:
To achieve the look in the photo, dip a small brush into rust or terracotta-colored underglaze (or acrylic paint if air-drying). Carefully paint inside the stamped depressions. Wipe away any excess on the surface with a barely damp sponge, leaving color only in the grooves. -
Add Circles:
Paint thin concentric circles on the floor of the dish to frame your leaf patterns. I find a banding wheel helps get steady lines here, but a slow hand works too. -
Glaze the Holder Rim:
Add a touch of the rust color to the very top rim of the central candle holder for a cohesive look. -
Final Dry:
Allow the piece to dry completely. For kiln clay, this means bone dry before bisque firing. for air-dry clay, wait 24-48 hours. -
Seal or Fire:
If using ceramic clay, fire according to your clay body’s instructions, apply a clear matte glaze, and fire again. If using air-dry clay, apply a coat of matte varnish to seal and protect the surface.
Once fully cured, place a simple white taper inside to let the warm geometrical patterns shine

TRACK YOUR CERAMIC JOURNEY
Capture glaze tests, firing details, and creative progress—all in one simple printable. Make your projects easier to repeat and improve.
Ribbed Column Taper Holder
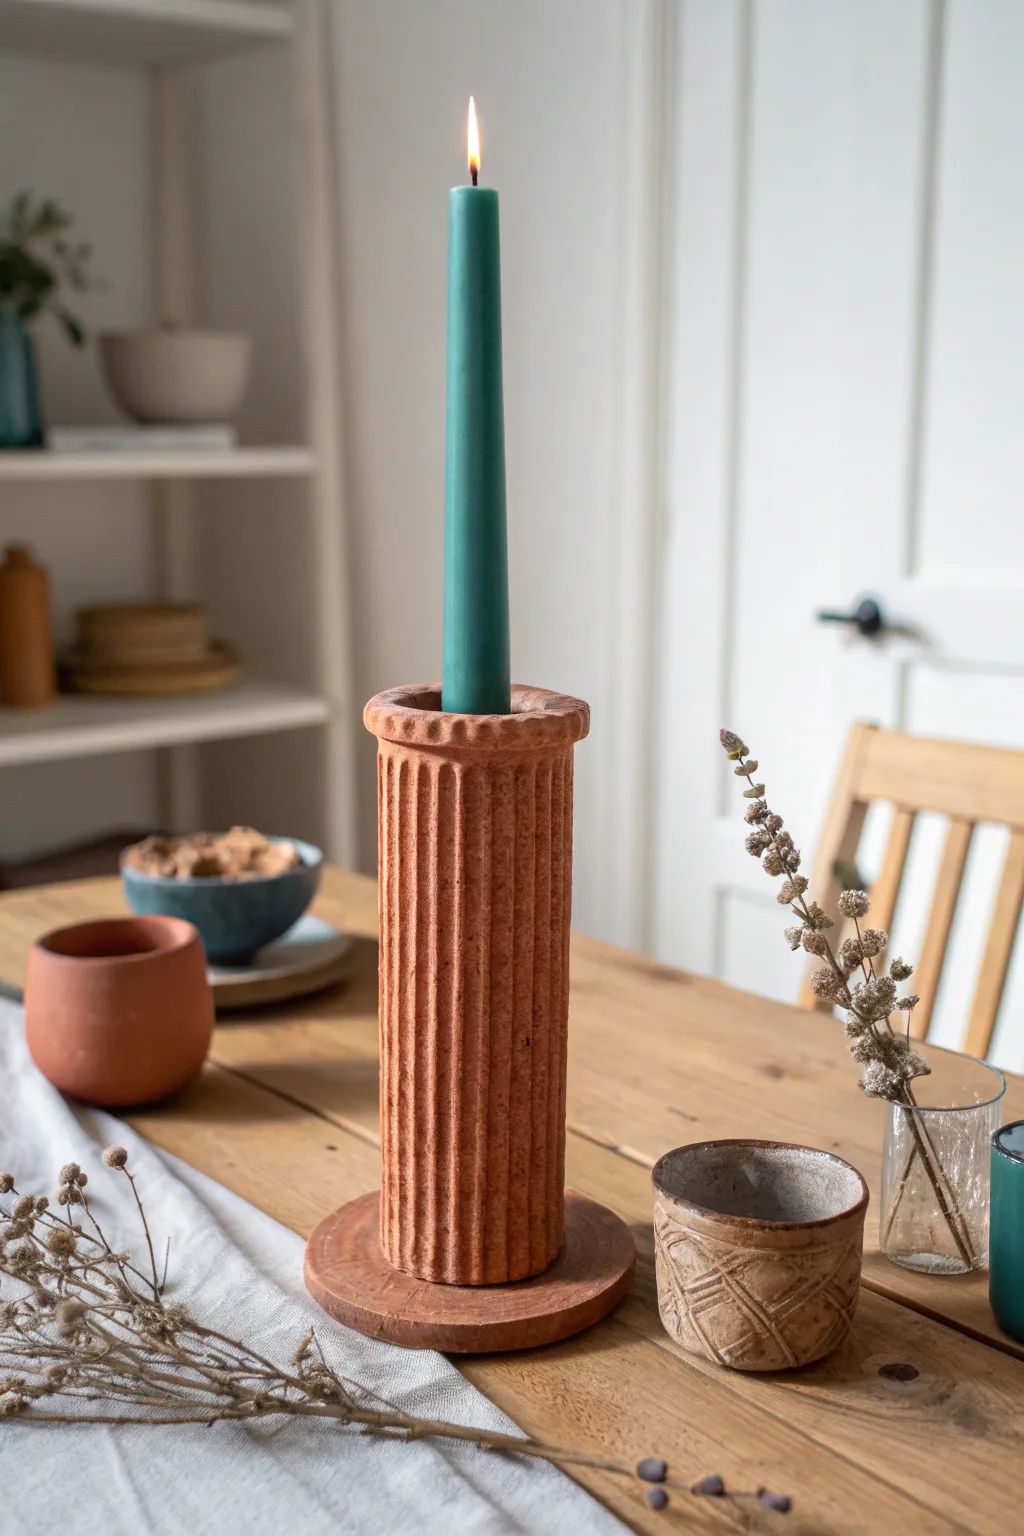
Bring a touch of architectural elegance to your table setting with this ribbed column candle holder that mimics the warmth of classic terracotta. Its stately vertical lines and rustic finish create the perfect pedestal for a dramatic 12-inch taper candle in a contrasting hue.
Step-by-Step
Materials
- Air-dry clay (terracotta color preferred) or polymer clay
- Rolling pin
- Cardboard tube (from paper towels) or PVC pipe (approx. 1.5 inch diameter)
- Ruler
- Sharp craft knife or clay slicing blade
- Small bowl of water
- Clay scoring tool or fork
- Sandpaper (fine grit)
- Acrylic sealer (matte)
Step 1: Forming the Column Base
-
Prepare the core:
Cut your cardboard tube or PVC pipe to your desired height, around 6 to 7 inches works well for this design. If using a cardboard tube, wrap it in parchment paper so the clay doesn’t stick permanently. -
Roll the main sheet:
Roll out a large slab of clay to about 1/4 inch thickness. Measure the circumference of your tube and cut a rectangle wide enough to wrap fully around it with a little overlap, and tall enough to cover the tube. -
Wrap the tube:
Carefully lift your clay sheet and wrap it around the tube structure. Score the overlapping edges with your tool, dampen them slightly with water, and press them firmly together to create a seamless cylinder. -
Smooth the seam:
Using a wet finger or a clay rib, smooth out the vertical seam until it is invisible. This will be the foundational layer for your ribbing.
Step 2: Creating the Ribbed Detail
-
Roll clay coils:
Roll out numerous long, thin snakes of clay. Aim for them to be roughly the same thickness, about 1/4 inch diameter. You will need enough to cover the entire circumference of your cylinder. -
Flatten the coils slightly:
I find it helpful to gently press each coil flat just a bit on one side; this flat side will adhere better to the column base. -
Attach the first rib:
Score a vertical line on your column, dab with water, and press your first coil onto the cylinder, running from the very bottom to the top. -
Continue attaching ribs:
Place the next coil directly beside the first one, touching it tightly. Repeat this process around the entire cylinder. The goal is to have them packed closely to create that dense, fluted column look. -
Trim the ends:
Once the cylinder is covered, use your sharp knife to slice off any excess coil length at the top and bottom so they are perfectly flush with the inner tube.
Cracks Appearing?
If small shrinkage cracks appear while drying, mix a small amount of clay with water to make a paste (slip) and fill the cracks. Smooth over with a damp finger and let dry again.
Step 3: Adding the Base and Rim
-
Create the bottom disc:
Roll out a fresh slab of clay about 1/2 inch thick. Cut a circle that is about 1 inch wider in diameter than your finished column. This wide base adds stability. -
Attach the column:
Score the bottom of your ribbed column and the center of the base disc. Apply slip (water mixed with clay) and press the column firmly onto the center of the base. -
Make the top rim:
Roll a slightly thicker coil and flatten it. Attach this ring to the top edge of your column to create a finished lip. You can use your thumb to create small indentations or texture around this rim for a rustic touch. -
Fit the candle hole:
Before the clay hardens, take a standard taper candle and gently press it into the top to ensure the opening is the correct size. Wiggle it slightly to create a little clearance for shrinkage.
Color Wash
For an aged look, brush on diluted white or grey acrylic paint, then immediately wipe most of it off with a rag. This leaves residue in the textured crevices.
Step 4: Finishing Touches
-
Add surface texture:
To mimic the aged terracotta look in the photo, gently tap the surface with a stiff bristle brush or a crumpled ball of aluminum foil. This removes the ‘perfect’ look of fresh clay. -
Dry slowly:
Let the piece dry slowly away from direct heat or sunlight to prevent cracking. This heavy piece may take 48-72 hours to dry completely. -
Remove the core:
If you used a cardboard tube, you can carefully pull it out once the clay is leather-hard but not fully brittle. If it’s stuck, you can leave it if it’s not visible. -
Protect the piece:
Once fully dry, apply a matte acrylic sealer. This won’t make it glossy but will protect the clay from dust and moisture.
Place a deep teal or forest green candle inside to perfectly complement the warm earthy tones of your new centerpiece
Lotus Petal Tea Light Holder
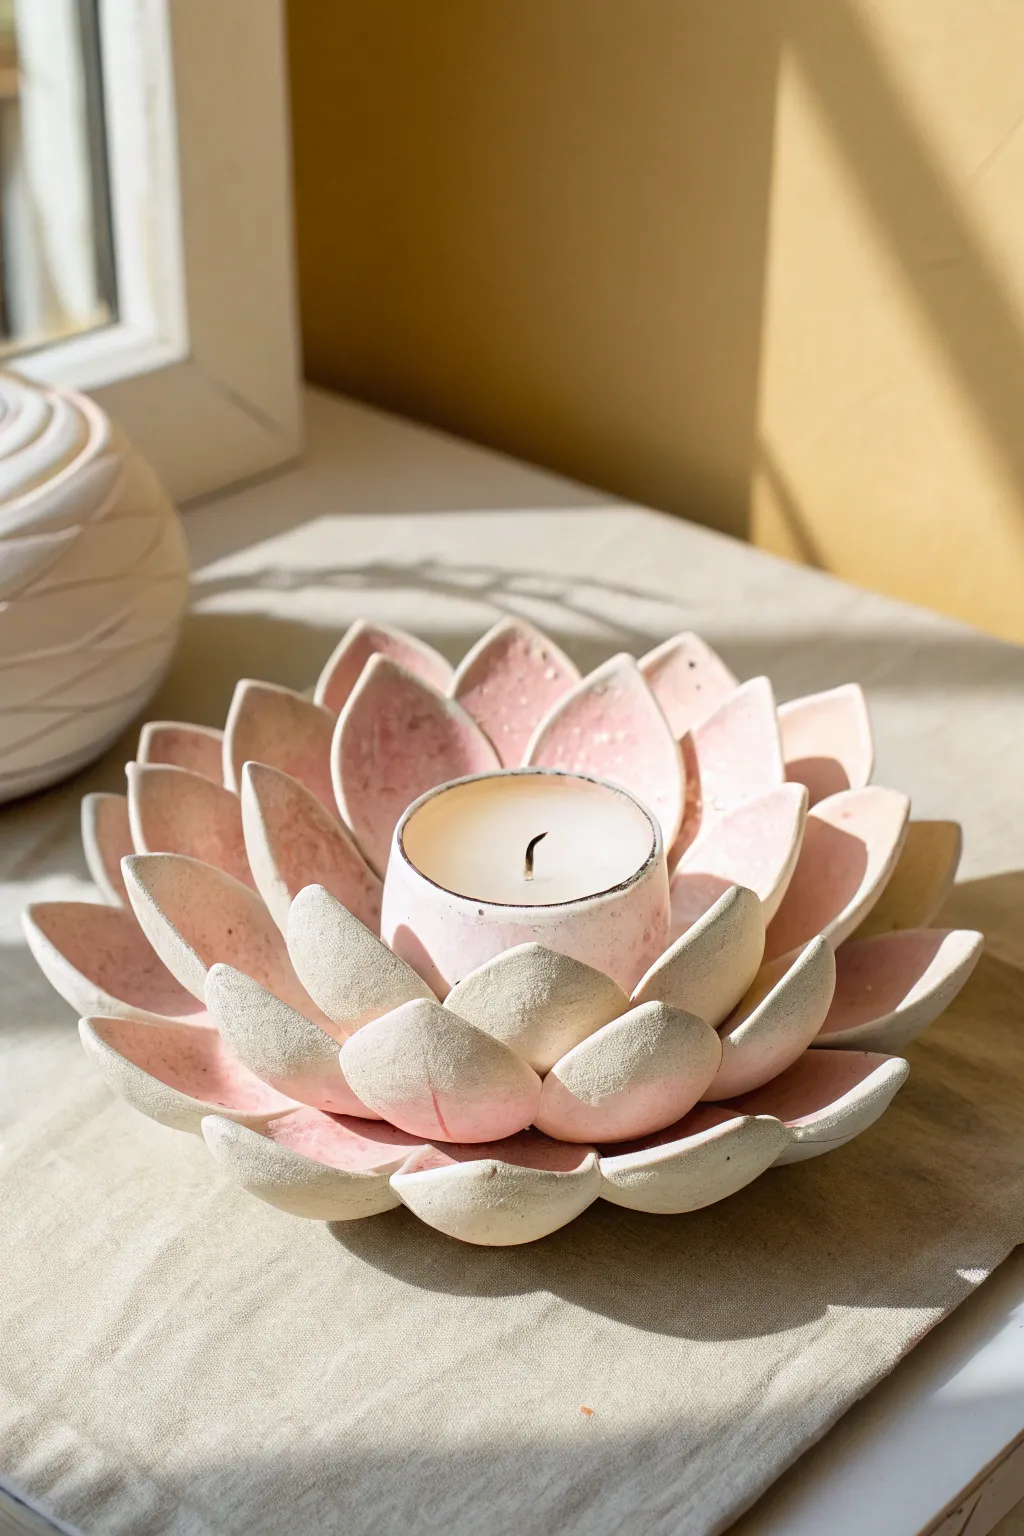
Bring a sense of serenity to your space with this stunning clay lotus flower, designed to cradle a single tea light. The textured pink and white petals create a soft, organic feel that glows beautifully when the candle is lit.
Step-by-Step Tutorial
Materials
- Air-dry clay or polymer clay (white)
- Small cup or cookie cutter (approx. 2 inches diameter)
- Leaf or teardrop-shaped clay cutter (medium and large sizes)
- Rolling pin
- Small bowl or sphere (for shaping the base)
- Clay sculpting tools (specifically a smoothing tool)
- Acrylic water-based paints (pastel pink and white)
- Small sponge or paintbrush
- Matte sealant or varnish
- Sandpaper (fine grit)
- Tea light candle (for sizing)
Step 1: Creating the Central Holder
-
Prepare the Clay:
Start by kneading a manageable chunk of white clay until it is soft, pliable, and free of air bubbles, which helps prevent cracks later. -
Roll the Base Slab:
Roll out a portion of the clay to an even thickness of about 1/4 inch on a clean, flat surface. -
Cut the Core Cylinder:
Cut a strip of clay approximately 1.5 inches tall and long enough to wrap around your tea light with a little wiggle room. -
Form the Cup:
Wrap this strip around a circular cutter or the tea light itself (wrapped in plastic wrap to prevent sticking) to form a cylinder. Smooth the seam completely with your fingers or a tool. -
Attach the Base:
Cut a small circle for the bottom of the cylinder, place the cylinder on top, and blend the clay edges together so the cup is one solid piece. -
Smooth the Rim:
Dip your finger in a little water and run it along the top rim of the cup to soften any sharp edges.
Drooping Petals?
If gravity is pulling your wet petals down, support them with small balls of crumpled paper or foil underneath until the clay stiffens enough to hold its own shape.
Step 2: Sculpting the Petals
-
Cut the Petals:
Roll out more clay and use your teardrop cutters to create about 18-24 petals. You’ll want a mix of sizes if you have them, or you can hand-shape them to vary the scale. -
Texture the Clay:
For that unique organic look seen in the photo, gently press a piece of coarse fabric or a crumpled foil ball onto the wet petals to give them a subtle, porous texture. -
Curve the Leaves:
Gently cup each petal in your palm to give it a slight curve; they shouldn’t be perfectly flat. -
Attach Inner Layer:
Score (scratch) the bottom of the central cup and the base of your smallest petals. Add a dab of water or liquid clay (slip) and press the first row of 5-6 petals around the cup, curving them upward. -
Add Middle Layer:
Attach the next row of petals, positioning them in the gaps between the first row’s petals. Angle these slightly more open than the first layer. -
Final Outer Layer:
Attach the largest petals for the final outer row. Press these so they lay almost flat against your work surface, creating the blooming effect. -
Refine the Shape:
Before the clay dries, gently adjust the petal tips. I find creating a slight point or curl at the very tip adds a lovely realistic touch.
Step 3: Finishing Touches
-
Dry Completely:
Let the piece dry according to your clay’s instructions. Air-dry clay often needs 24-48 hours. Rotate it occasionally for even airflow. -
Sand Imperfections:
Once fully cured, use fine-grit sandpaper to smooth out any rough fingerprints or sharp edges on the petals. -
Paint the Shadows:
Dilute your pastel pink acrylic paint with water to create a wash. Apply this primarily to the inner curves and centers of the petals. -
Sponge Effect:
While the pink is still damp, use a clean sponge or cloth to wipe away the excess paint from the high points and outer edges, leaving the pink color settled in the textured crevices. -
Seal the Piece:
Finish by applying a matte varnish or sealant to protect the paint and clay from heat and dust.
Pro Tip: Ombre Effect
For a deeper glow, use a slightly darker pink or peach paint near the very center of the candle cup, fading out to white at the tips of the outermost petals.
Now you have a tranquil centerpiece ready to light up your evening relaxation routine
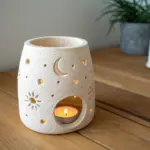
Spooky Mini Halloween Candle Holder Set
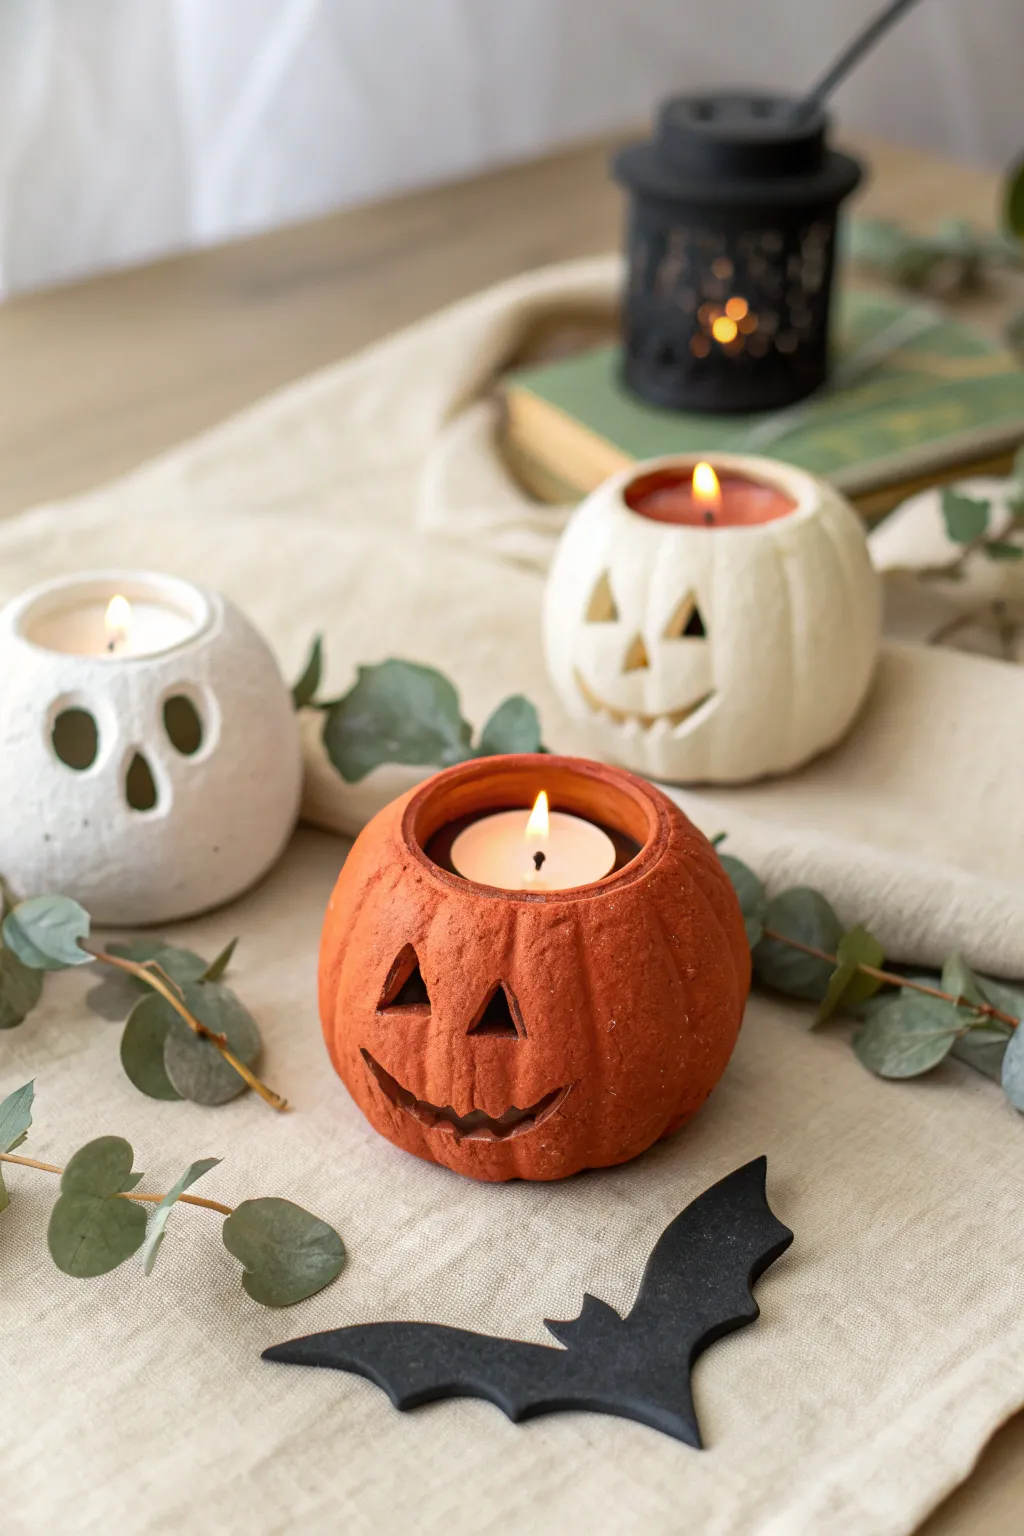
Create a charmingly spooky atmosphere with this set of hand-sculpted clay votive holders. Featuring two grinning pumpkins and a ghostly face, these textured pieces bring a warm, rustic glow to your Halloween decor.
Step-by-Step Guide
Materials
- Air-dry clay (terra cotta and white)
- Small rolling pin
- Sculpting tools (needle tool, small loop tool)
- Tea light candles (for sizing)
- Texturing tool or old toothbrush
- Sponge and water
- Round cookie cutter (approx. 3-4 inches)
- Aluminum foil
- Acrylic paints (optional, if using white clay for all)
- Matte sealant or varnish
Step 1: Shaping the Base Forms
-
Prepare the foil cores:
Crumple aluminum foil into three distinct balls slightly larger than a golf ball but smaller than a tennis ball. These will serve as internal supports to save clay and keep the shapes lightweight. -
Flatten the bottoms:
Press each foil ball firmly onto your work surface to create a flat, stable base so your candle holders won’t wobble later. -
Sheet the clay:
Roll out your air-dry clay to an even thickness of about 1/4 inch. If you are using colored clays, roll out the terra cotta for the orange pumpkin and white for the other two. I like to keep a damp sponge nearby to smooth any cracks immediately. -
Cover the cores:
Drape the clay sheets over your foil balls, smoothing the clay down the sides and trimming away excess at the bottom. Ensure the foil is completely fully covered with a seamless layer of clay.
Cracking Clay?
If small cracks appear while the clay is drying, mix a tiny amount of fresh clay with water to make a paste (slip) and fill in the cracks, then smooth over.
Step 2: Sculpting the Details
-
Create the candle well:
Press a real tea light candle gently into the top center of each ball to mark the size. Remove the candle, then use your sculpting tools to dig out a well deep enough to hold the candle flush with the top rim. -
Define the pumpkin ribs:
For the two pumpkins, use a sculpting tool or the side of a paintbrush handle to press vertical indentations from the top rim down to the base, creating those classic pumpkin ridges or lobes. -
Smooth the ghost shape:
For the white ghost/skull holder, skip the ridges. Instead, focus on keeping the surface relatively round, perhaps slightly more irregular and organic than the pumpkins. -
Add surface texture:
To achieve the rustic, stone-like look seen in the photo, gently tap the entire surface of the clay with a texturing tool, a stiff brush, or even a ball of crumpled foil. This removes the ‘perfect’ manufactured look. -
Refine the rims:
Smooth the top edges of the candle wells with a little water on your finger so they aren’t sharp.
Step 3: Carving Faces & Finishing
-
Draft the faces:
Using a needle tool, very lightly sketch out your jack-o’-lantern faces and the ghost’s hollow eyes. The orange pumpkin gets classic triangular eyes, the white pumpkin gets similar triangles, and the ghost gets oval eye sockets. -
Carve the orange pumpkin:
Carefully cut out the triangular eyes and a jagged grin from the terra cotta clay. Remove the cut pieces and smooth the inner edges of the holes with a damp brush. -
Carve the white pumpkin:
Repeat the process for the white pumpkin, giving it a similarly spooky triangular nose and a toothy smile. -
Carve the ghost:
For the ghost figure, carve out two larger, somewhat drooping oval eyes and a smaller inverted teardrop shape for the nose area. -
Deepen the shadows:
Since you have a solid core, you can’t carve all the way through to the hollow center. Instead, carve deep into the clay (about 1/4 inch) and paint the inside of these recesses black later to create the illusion of depth. -
Dry thoroughly:
Allow your trio to air dry completely for at least 24-48 hours. Turn them occasionally to ensure the bottoms dry evenly. -
Apply paint accents:
If you used uncolored clay, paint the orange pumpkin now. For all three, paint the inside ‘carved’ areas black. You can also dry-brush a tiny amount of brown paint over the textured surfaces to highlight the gritty details. -
Seal the work:
Apply a coat of matte varnish or sealant to protect the clay and give it a finished, professional appearance.
Pro Tip: Realistic Glow
Since these are solid forms, use battery-operated LED tea lights instead of real flames to prevent the clay from overheating or scorching intimately.
Set your trio on a mantle or table runner to enjoy their spooky charm all season long