If you’ve got a plain mug sitting around, you’ve already got a perfect little canvas for a fun afternoon of DIY mug magic. Here are my favorite diy mug ideas—starting with the classic, super-doable designs and sliding into the more playful, “wait, you can do that?” territory.
Classic Paint-Pen Doodles
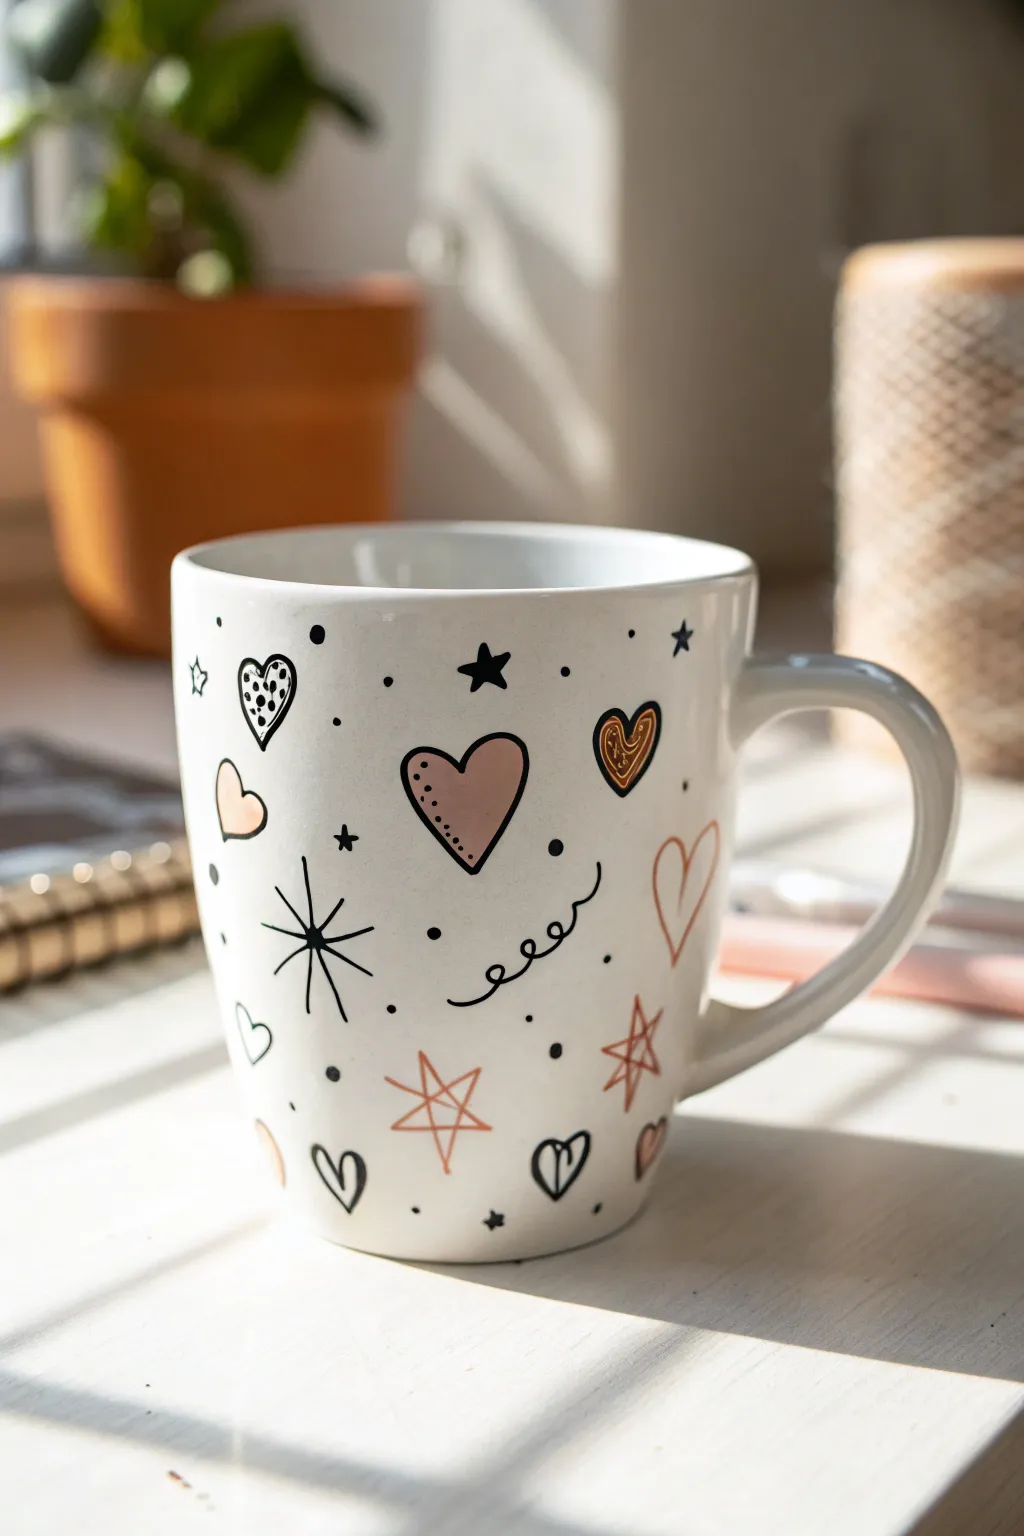
Transform a plain white mug into a charming piece of art with simple, hand-drawn motifs like hearts, stars, and playful squiggles. This project combines classic black outlines with soft pastel accents for a cozy, personalized look perfect for your morning coffee.
Detailed Instructions
Materials
- Plain white ceramic mug (clean and dry)
- Black oil-based paint pen (fine tip)
- Pink oil-based paint pen (fine tip)
- Gold or bronze oil-based paint pen (fine tip)
- Rubbing alcohol
- Cotton pads or paper towel
- Oven (for baking/curing)
Step 1: Preparation & Planning
-
Clean the surface:
Before even touching a pen to the mug, give it a thorough wipe down with rubbing alcohol on a cotton pad. This removes any invisible oils or fingerprints that could prevent the paint from sticking properly. -
Avoid the rim:
Mentally mark off the top inch of the mug where your lips will touch. I prefer to keep the design below this area for safety and longevity. -
Plan your spacing:
Visualize where the largest elements (the big hearts) will go first. You want them scattered evenly around the mug, not clumped in one spot.
Step 2: Drawing the Main Motifs
-
Draw the main outlines:
Using your black paint pen, draw three or four medium-sized hearts at different angles around the mug. Keep the lines confident but don’t worry about perfection; the hand-drawn look is part of the charm. -
Create the patterned heart:
Select one of your outline hearts and fill the inside with small, irregular black dots. Leave a tiny white border between the dots and the outline for clarity. -
Draw the burst star:
Find an empty space and draw a central dot. Pull six to eight lines outward from that center point to create a firework-style starburst. -
Add a solid star:
Draw a classic five-point star silhouette near the top of the design area and fill it in completely with black ink for a bold contrast. -
Incorporate the squiggles:
Draw a loopy, coiled line—like an old telephone cord—floating horizontally between two larger elements.
Fixing Mistakes
Make a smudge? Don’t panic. While the paint is still wet, a cotton swab dipped in rubbing alcohol acts exactly like an eraser. Wipe it away, let it dry for a second, and redraw.
Step 3: Adding Color & Detail
-
Fill the pink heart:
Take your pink paint pen and carefully fill in one of the open heart outlines. You might need two thin coats here to get a solid opaque color. -
Add bronze warmth:
Inside another black heart outline, draw a smaller bronze heart, then add tiny squiggles inside that bronze shape for texture. -
Create geometric stars:
Using the bronze or pink pen, draw two intersecting triangles (one pointing up, one down) to create a six-pointed linear star shape. Don’t fill these in; just keep them as skeletons. -
Draw a tiny heart accent:
Add a very small, solid pink heart turned on its side near the handle area to act as filler. -
Detail the pink heart:
Once the large pink heart is fully dry, switch back to your black pen. Add a row of tiny dots along just one curve of the heart’s interior for a shadowed effect.
Gift-Ready Upgrade
Turn this into a gift set by filling the finished mug with a packet of gourmet hot cocoa, mini marshmallows, and tying a matching pink ribbon around the handle.
Step 4: Finishing Touches & Curing
-
Fill the gaps:
Look for any ‘awkward silence’ white spaces. Fill these with tiny black dots, small open circles, or mini solid stars. -
Add open hearts:
Draw a few tiny, uncolored black hearts, perhaps upside down or tilted, to keep the design dynamic. -
Let it cure:
Allow the finished mug to air dry for at least 24 hours. Do not rush this step, or the paint may bubble in the oven. -
Bake the design:
Place the mug in a cold oven. Turn the heat to 350°F (176°C) and bake for 30 minutes. Turn the oven off and let the mug cool completely inside the oven before removing.
Enjoy sipping from your new favorite mug knowing the design is uniquely yours


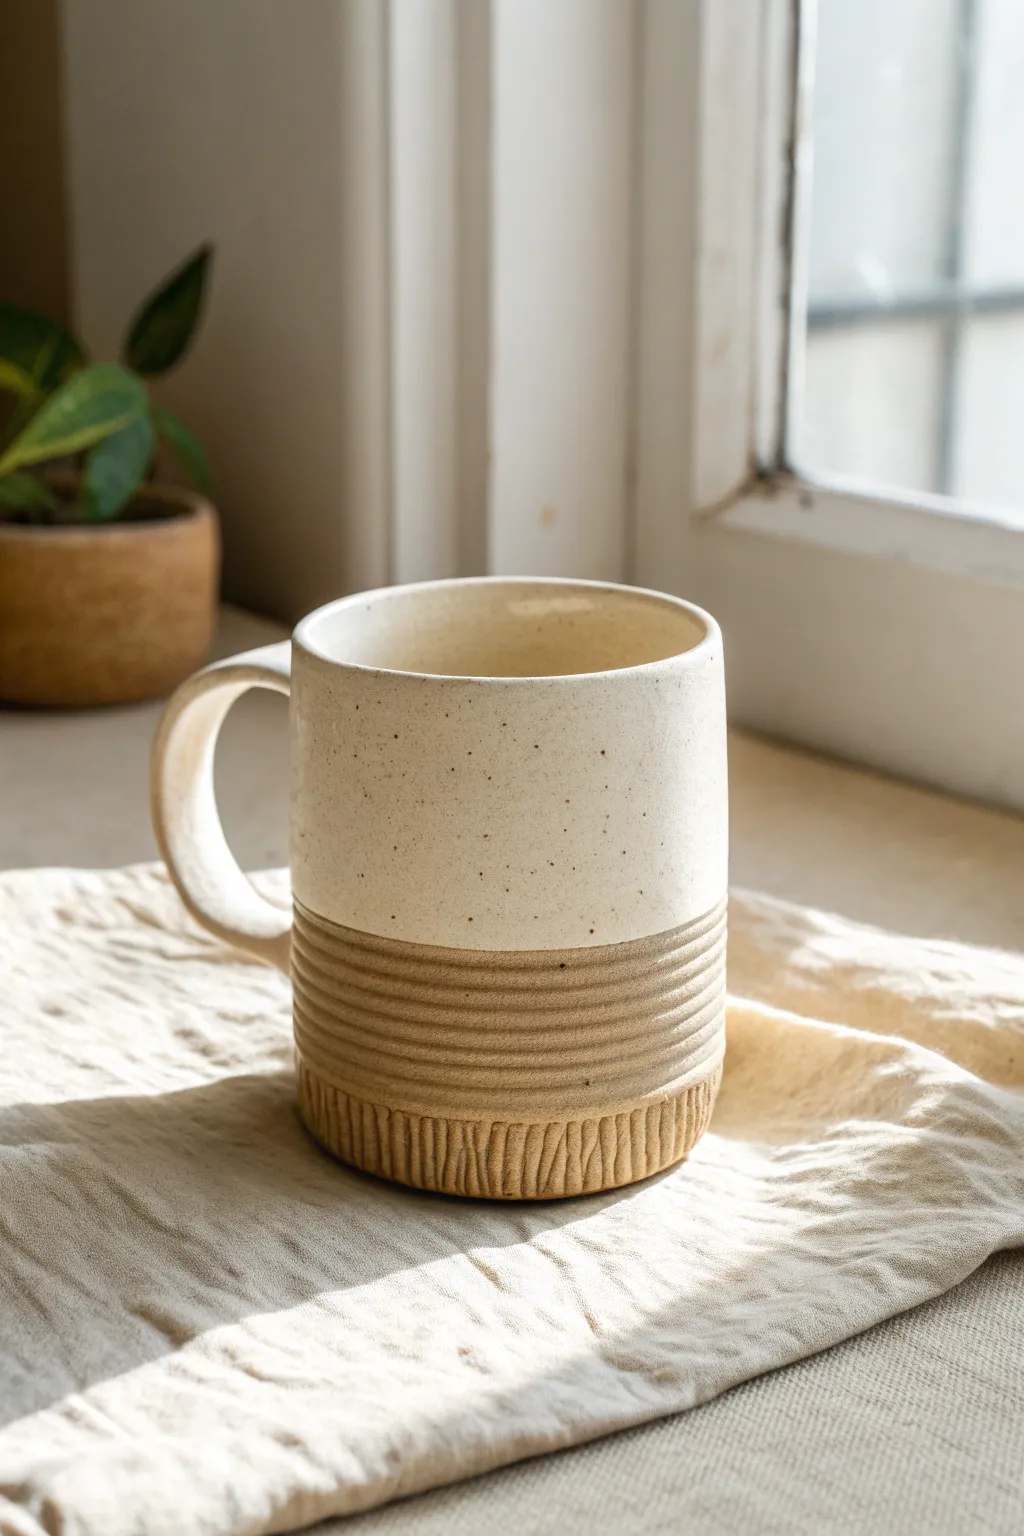
Easy Initial Monogram
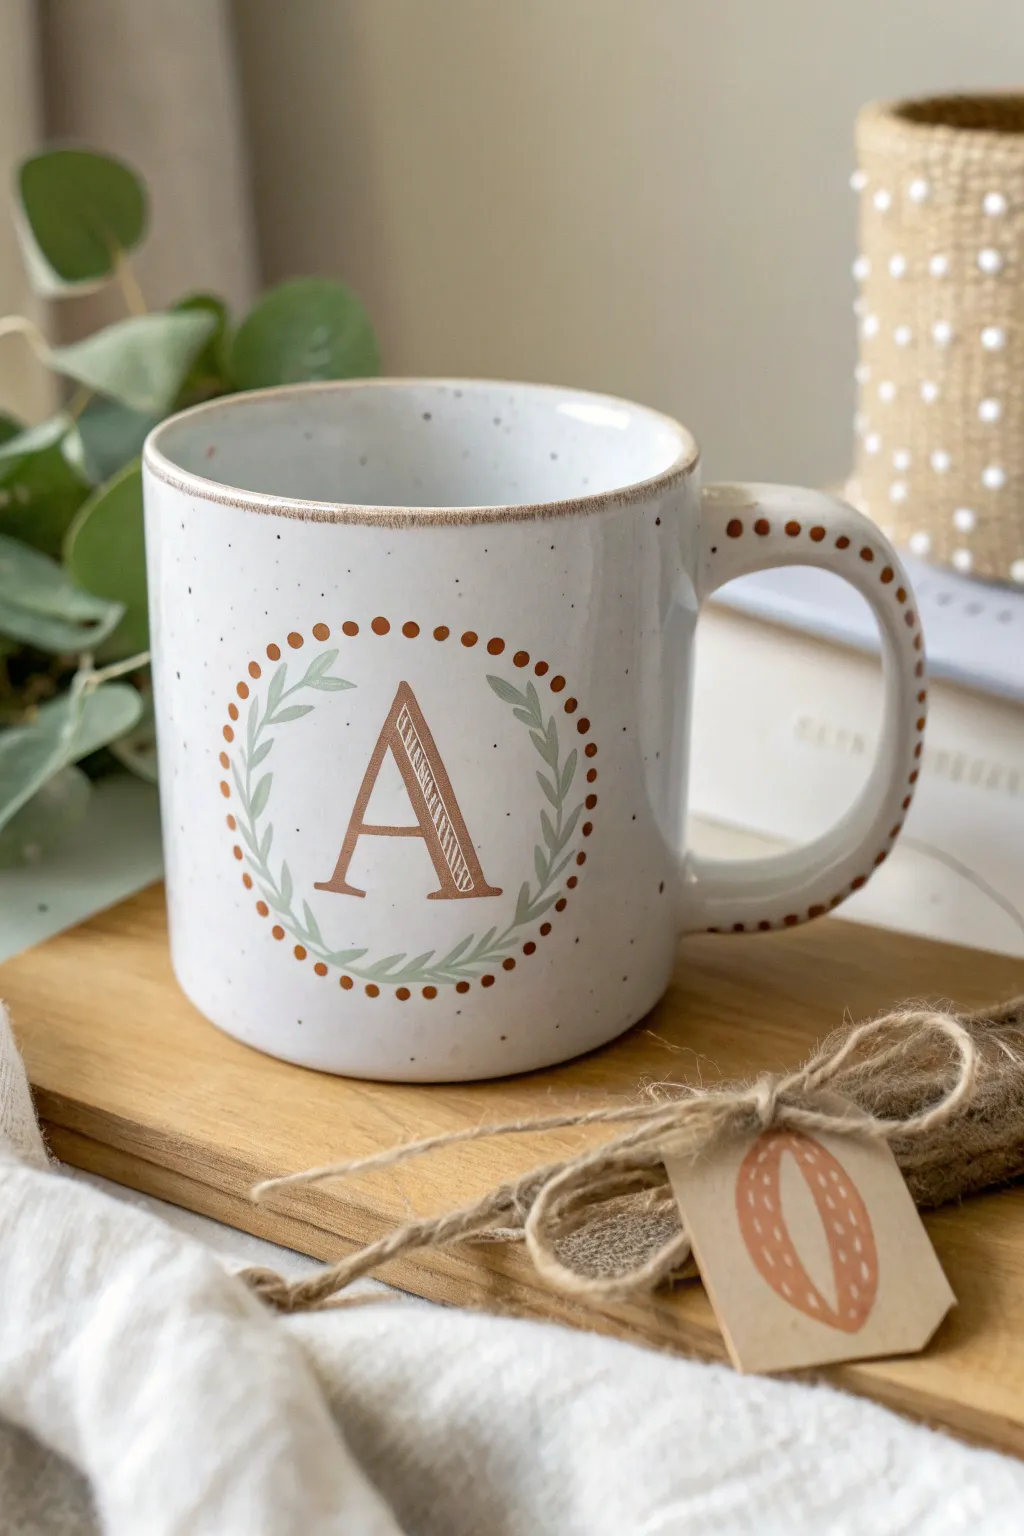
Transform a plain white mug into a bespoke piece of drinkware with this rustic, hand-painted design. The combination of warm copper tones and soft sage greens creates an inviting, earthy aesthetic perfect for cozy mornings.
Step-by-Step Guide
Materials
- Plain white ceramic mug (straight sides are easier for beginners)
- Enamel or ceramic paint (Copper/Bronze metallic)
- Enamel or ceramic paint (Sage Green)
- Standard pencil
- Fine point detail paintbrush (size 0 or 00)
- Medium point round paintbrush (size 2)
- Cotton swabs (Q-tips) or a dotting tool
- Rubbing alcohol
- Paper towel
- Computer and printer (optional for stencil)
- Oven (for curing)
Step 1: Preparation & Planning
-
Clean the surface:
Before putting any paint down, wipe the entire exterior of the mug with rubbing alcohol and a paper towel. This removes oily fingerprints and dust that prevent paint adhesion. -
Draft the monogram:
If you are confident in your lettering, lightly sketch a large serif ‘A’ (or your chosen letter) in the center of the mug using a pencil. Pencil lead will usually burn off in the oven later. -
Use a template (optional):
For a perfect font, print your letter at the desired size on paper. Rub pencil lead heavily on the back of the paper, tape it to the mug, and trace the outline to transfer the graphite. -
Sketch the wreath:
Lightly draw two curved lines stemming from the bottom center, curving up around the letter to form the stems for your laurel wreath. Leave a gap at the top.
Oops! Smudged paint?
Don’t panic! While the paint is wet, a damp cotton swab acts like an eraser. If it’s dried slightly, use a wooden toothpick to gently scrape the unwanted speck away without ruining the glaze.
Step 2: Painting the Monogram
-
Base letter coat:
Using your fine detail brush and the metallic copper paint, carefully fill in the outline of your letter. Keep the paint application smooth but not too thick to avoid dripping. -
Add dimension:
Once the base coat is tacky (about 10 minutes), add a second layer to the right-hand strokes of the letter to give it a shadowed or slightly 3D effect, similar to calligraphy. -
Create the texture lines:
I like to take an extremely fine brush—or even a toothpick—and scratch very fine diagonal lines into the thicker parts of the freshly painted letter to create that scratched, vintage texture shown in the image.
Pro Tip: Custom Colors
Mix a tiny drop of orange into your bronze paint to warm it up, or add a speck of white to your green for a softer, pastel sage look that matches farmhouse decor perfectly.
Step 3: Adding the Foliage
-
Paint the stems:
Switch to your sage green ceramic paint. With a steady hand and the fine brush, trace over your pencil lines for the main stems of the wreath. -
Add leaves:
Paint small, marquise-shaped leaves coming off the stem. Press the belly of the brush down and lift up quickly to create the tapered leaf shape naturally. -
Vary the direction:
Ensure the leaves on the left side curve left and the leaves on the right curve right, mimicking natural growth patterns.
Step 4: The Dotted Details
-
Create the dot border:
Dip the end of a cotton swab or a dedicated dotting tool into the copper paint. Press gently to create uniform dots forming a large circle that encompasses the entire wreath design. -
Space them evenly:
Try to keep the spacing consistent between dots. If you make a mistake, quickly wipe it away with a damp Q-tip before it dries. -
Decorate the handle:
Using the same dotting technique, apply a row of copper dots down the center spine of the handle for a cohesive look. -
Add the speckles:
To achieve the faux-pottery look, dilute a tiny bit of dark brown or black paint with water. Load an old toothbrush, hold it near the mug, and run your thumb over the bristles to flick tiny speckles across the surface.
Step 5: Curing
-
Let it dry:
Allow the mug to dry completely for at least 24 hours. The paint needs to fully set before the baking process. -
Load the oven:
Place the mug into a *cold* oven. Do not preheat the oven, as the sudden temperature change can crack the ceramic. -
Bake the design:
Turn the oven to 350°F (175°C). Once it reaches temperature, set a timer for 30 minutes. Turn the oven off and let the mug cool down completely inside before removing.
Now you have a personalized mug ready for your favorite warm beverage or to give as a thoughtful handmade gift


Geometric Tape Blocks
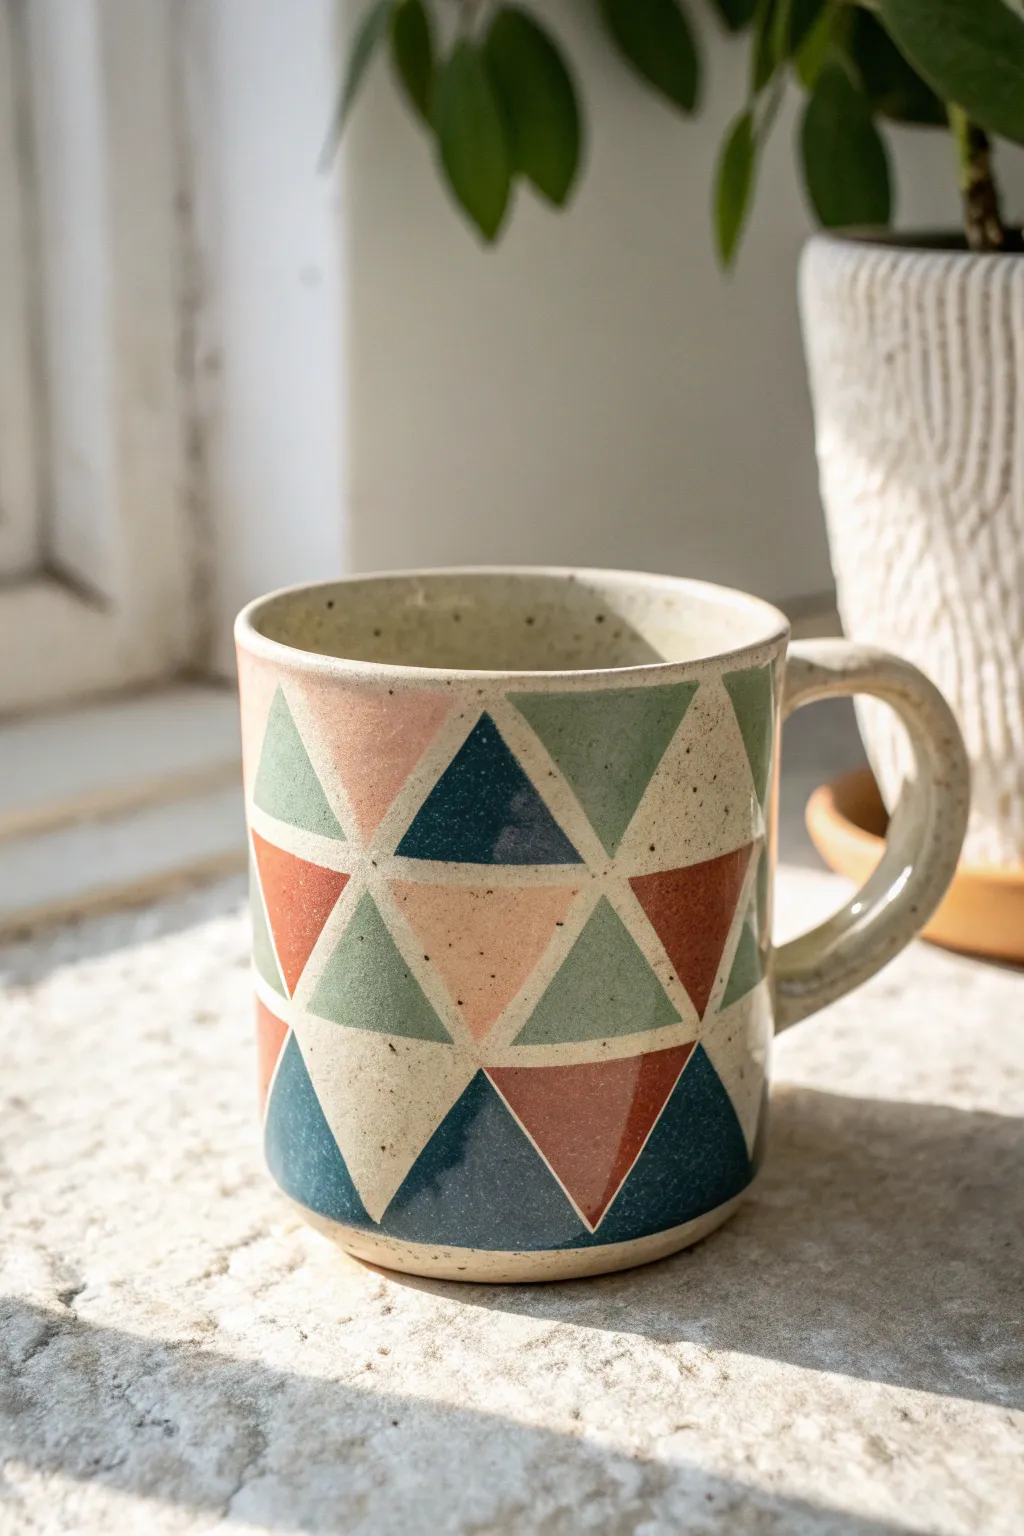
Transform a plain ceramic mug into a piece of modern art with this simple yet striking geometric design. Using tape to create crisp lines, you’ll paint interlocking triangles in a muted, earthy palette for a sophisticated finish.
Step-by-Step Tutorial
Materials
- Plain white or cream ceramic mug
- Porcelain paints (colors: navy blue, rust/terracotta, sage green, blush pink)
- Painter’s tape or graphic art tape (1/4 inch width works best)
- Small flat synthetic paintbrush
- Rubbing alcohol and cotton pads
- Oven for curing (if required by paint type)
- Craft knife or scissors
- Palette or small plate for mixing
Step 1: Preparation
-
Surface Cleaning:
Before starting, wipe the entire exterior of the mug with rubbing alcohol on a cotton pad. This removes any oils or fingerprints that could prevent the paint from adhering properly. -
Initial Tape Layout:
Cut strips of your painter’s tape or graphic art tape. Begin by creating a zig-zag pattern around the circumference of the mug. The points of the zig-zag should nearly touch the top rim and the bottom edge. -
Creating the Grid:
Run a second horizontal line of tape directly through the middle of your zig-zags if you want to create smaller triangles, or angle more strips across the existing ones to break the large shapes into smaller triangular sections like the reference photo. -
Seal the Edges:
Once your design is taped out, firmly press down on all tape edges with your fingernail or a credit card tool. It is crucial that there are no gaps for paint to bleed under.
Step 2: Painting the Pattern
-
Planning Your Palette:
Squeeze out small amounts of your navy, rust, sage, and blush paints onto your palette. Decide on a rough color distribution; aim to keep identical colors from touching each other directly. -
First Color Application:
Start with the sage green. Fill in random triangles around the mug using your flat brush. Apply the paint in smooth, even strokes, moving from the tape inward to avoid pushing paint under the tape edge. -
Adding Warmth:
Next, switch to the rust or terracotta color. Fill in several more triangles, balancing them out so the warm tones are evenly distributed around the mug’s surface. -
Deepening the Contrast:
Apply the navy blue paint to selected sections. This dark color adds depth and grounds the lighter pastel tones. Be careful near the raw ceramic sections if you are leaving some triangles unpainted. -
Softening the Look:
Fill remaining planned sections with the blush pink. I find this soft color bridges the gap between the dark blue and the earthy green perfectly. -
Leaving Negative Space:
Remember to leave several triangular sections completely unpainted. The natural cream color of the mug acts as a fifth color in your palette and gives the design breathing room. -
Second Coats:
Depending on the opacity of your porcelain paint, you may need a second coat. Let the first layer dry to the touch (usually 15-20 minutes) before applying a second thin layer for solid coverage.
Crisp Line Secret
Before painting colors, paint a thin layer of clear medium or white paint over the tape edges. This seals the tape, ensuring any bleed is invisible.
Step 3: Revealing and Curing
-
Partial Drying:
Allow the paint to set slightly but not cure completely. If the paint is fully dry, it might peel up with the tape. Aim for the ‘tacky’ stage. -
Tape Removal:
Slowly peel off the tape at a 45-degree angle. Pull gently away from the painted areas to reveal your crisp, clean geometric lines. -
Touch Ups:
If any paint bled under the tape, use a damp cotton swab or a toothpick to gently scrape or wipe away the excess while it is still relatively fresh. -
Speckling Effect (Optional):
To mimic the speckled pottery look in the photo, dip a stiff brush or toothbrush into a diluted brown or grey paint and lightly flick tiny speckles over the entire mug. -
Drying Time:
Let the mug sit undisturbed for at least 24 hours to allow the moisture to fully evaporate from the paint. -
Baking:
Place the mug in a cold oven. Set the temperature to the manufacturer’s recommendation (often around 300°F/150°C). Once the oven reaches temperature, bake for 30-35 minutes. -
Cooling Down:
Turn the oven off and leave the mug inside to cool down gradually with the oven. Removing it too deeply can cause thermal shock and cracking.
Textured Finish
Mix a tiny pinch of baking soda into your paint for a matte, terra-cotta texture that feels amazing to hold while sipping coffee.
Enjoy your stylish new mug with your morning coffee, knowing you created that beautiful pattern yourself


Confetti Dot Party
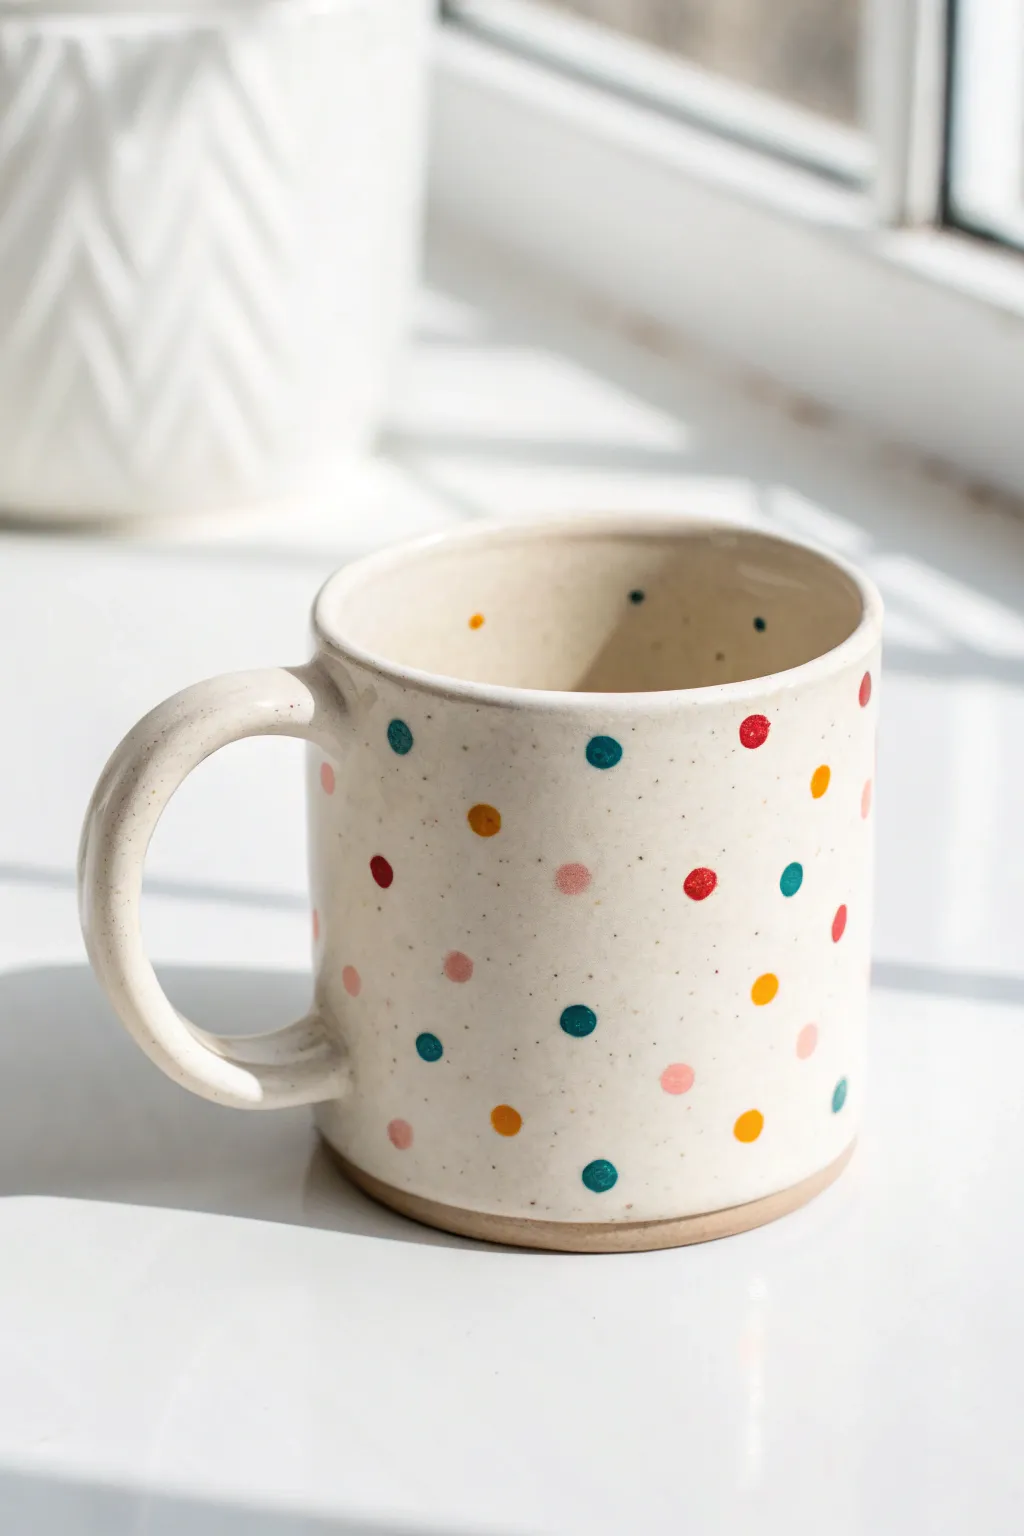
Transform a plain ceramic mug into a cheerful celebration of color with this simple confetti technique. The scattered pattern of tiny, imperfect dots creates a playful and whimsical look perfect for your morning coffee.
Detailed Instructions
Materials
- Plain white ceramic mug (or bisque ware if firing)
- Ceramic paints or porcelain markers (Teal, Mustard Yellow, Coral Pink, Red, Light Pink)
- Small round paintbrush (size 0 or 2) or fine-tip applicators
- Rubbing alcohol
- Cotton pads
- Paper plate or palette
- Oven (for curing)
Step 1: Preparation
-
Clean surface:
Begin by thoroughly washing your mug with soap and warm water to remove any factory residue. -
Degrease:
Once dry, wipe the entire outer surface of the mug using a cotton pad soaked in rubbing alcohol. This removes hidden oils from your fingers that could repel the paint. -
Avoid touching:
After cleaning, handle the mug mostly by the inside or the handle to keep the painting surface pristine.
Step 2: Painting the Confetti
-
Prepare palette:
Squeeze a dime-sized amount of each ceramic paint color onto your paper plate. -
First color application:
Dip the tip of your round brush (or the back end of the brush for perfect circles) into the teal paint. -
Scatter the teal:
Press the brush gently onto the mug to create small dots. Space them randomly and widely apart; remember you have four or five other colors to fit in. -
Wipe and switch:
Clean your brush thoroughly or switch to a new cotton swab/applicator. Pick up the mustard yellow paint next. -
Add yellow dots:
Place yellow dots in the open spaces between the teal ones. Try to avoid placing two dots of the same color right next to each other. -
Introduce reds:
Repeat the process with the red paint. Keep the dot sizes roughly similar, but don’t worry if some are slightly larger or smaller—that adds charm. -
Layer in pinks:
Add your coral and light pink dots into the remaining gaps. I like to step back occasionally to ensure the distribution looks balanced across the whole mug. -
Fill the gaps:
Look for any large white spaces that feel empty and add a single dot in whichever color is least represented in that area. -
Check the rim:
Don’t forget to add a few partial dots near the top rim or the bottom base to make the pattern look continuous. -
Interior detail:
For a fun surprise, paint one or two stray dots just inside the upper rim of the mug.
Oops, Smudged It?
If you smear a wet dot, quickly dampen a Q-tip with rubbing alcohol and wipe it away cleanly. Let that spot dry for a minute before repainting.
Step 3: Curing and Finishing
-
Dry time:
Let the paint dry completely according to the manufacturer’s instructions, usually at least 24 hours. -
Load the oven:
Place your mug into a **cold** oven. Do not preheat the oven, as the sudden temperature change can crack the ceramic. -
Bake:
Set the oven to the temperature specified on your paint bottle (typically around 300°F – 350°F) and bake for about 30 minutes. -
Cool down:
Turn off the oven and leave the mug inside until it has cooled completely back to room temperature. -
Final check:
Remove the mug and gently test a dot with your fingernail to ensure it has hardened and adhered bond.
Pro Tip: Perfect Circles
Instead of a brush, use the flat end of a wooden skewer or the eraser of a new pencil. Dip and stamp for perfectly uniform, round confetti dots.
Now you have a festive, custom detailed mug ready for your favorite hot drink

The Complete Guide to Pottery Troubleshooting
Uncover the most common ceramic mistakes—from cracking clay to failed glazes—and learn how to fix them fast.
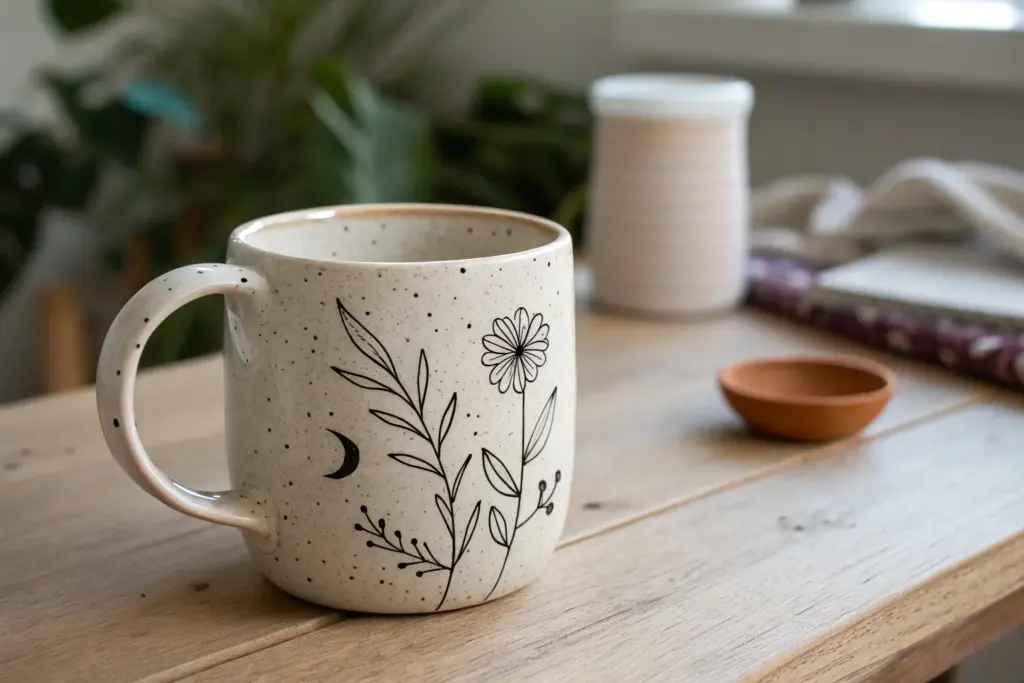
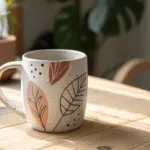
Minimal Line Florals
Capture the delicate beauty of a wildflower garden with this elegant, minimal line art mug. Using simple black strokes on clean white ceramic creates a modern, sophisticated look that feels effortlessly artistic.
Step-by-Step
Materials
- Plain white ceramic mug (smooth glaze is best)
- Black oil-based paint pen (fine point) or porcelain marker
- Rubbing alcohol
- Cotton pads or paper towel
- Pencil (optional, for drafting)
- Oven (for baking the design)
- Cotton swabs (for cleanup)
Step 1: Preparation & Planning
-
Clean surface:
Begin by thoroughly wiping down the exterior of your mug with rubbing alcohol on a cotton pad. This removes invisible oils or fingerprints that could prevent the ink from adhering properly. -
Practice sketches:
Before touching the mug, grab a scrap piece of paper and practice drawing your florals. Focus on the main daisy shape and the elongated leaves seen in the inspiration image. -
Drafting (optional):
If you’re nervous about freehanding, you can lightly sketch your layout onto the ceramic with a pencil. The graphite will interact differently with the slick surface than paper, but it gives you a guide that can be wiped away later.
Smudged Ink?
If you accidentally smudge wet ink, don’t wipe immediately! Let it dry completely, then use a Q-tip dipped in nail polish remover to erase the mistake precisely.
Step 2: Drawing the Main Bloom
-
Start the center:
Prime your black paint pen until the ink flows smoothly. Choose the central spot for your large daisy and draw a small, textured circle for the pollen center. -
Add petals:
Draw long, slender petals radiating outward from the center. Keep them somewhat irregular—loops that don’t close perfectly or vary slightly in length add to that hand-sketched charm. -
Draw the stem:
Extension a thin, slightly curved line downwards from the flower head to create the main stem. -
Leaf details:
Add leaves to the main stem. Notice how the leaves in the design have a central vein with diagonal cross-hatching or shading lines inside—recreate this by drawing the leaf outline first, then adding the interior texture.
Step 3: Adding Filler Flora
-
Create variety:
To the right of the main daisy, draw a different type of stem. Create long, pointed oval leaves that grow upwards, resembling eucalyptus or olive branches. -
Add side blooms:
Draw a smaller, simpler flower head that looks like it’s facing sideways or drooping slightly, using simple ‘U’ shapes for the petals. -
Fill the gaps:
Look for empty white space around the base. Add tiny sprouting buds or very small wildflowers near the bottom to ground the composition. -
Incorporate whimsy:
Scatter a few tiny dots or specks around the upper part of the flowers to mimic pollen or floating seeds. -
Fixing mistakes:
If a line goes rogue, quickly dampen a cotton swab with rubbing alcohol and wipe it away while the ink is wet. I find this is much easier than scraping it off after it dries.
Textured Touch
Mix a tiny amount of glass paint medium with your ink and apply with a thin brush instead of a pen. This creates a slightly raised, embossed texture for the petals.
Step 4: Curing & Finishing
-
Dry time:
Let the mug sit undisturbed for at least 24 hours. This allows the paint to essentially ‘skin over’ before the baking process begins. -
Preheat strategy:
Place your mug in the oven while it is still cold. Do not put a cold mug into a hot oven, as the thermal shock could crack the ceramic. -
Bake carefully:
Set the oven to 375°F (190°C). Once the oven reaches temperature, set a timer for 40 minutes. -
Cool down:
Turn the oven off after the timer beeps, but leave the mug inside. Open the oven door slightly and let the mug cool down completely inside the oven. -
Final check:
Once fully cool, the design should be cured. For longevity, hand washing is recommended, though many baked mugs can withstand the top rack of a dishwasher.
Enjoy your morning coffee in a mug that carries the quiet beauty of a sketchbook garden
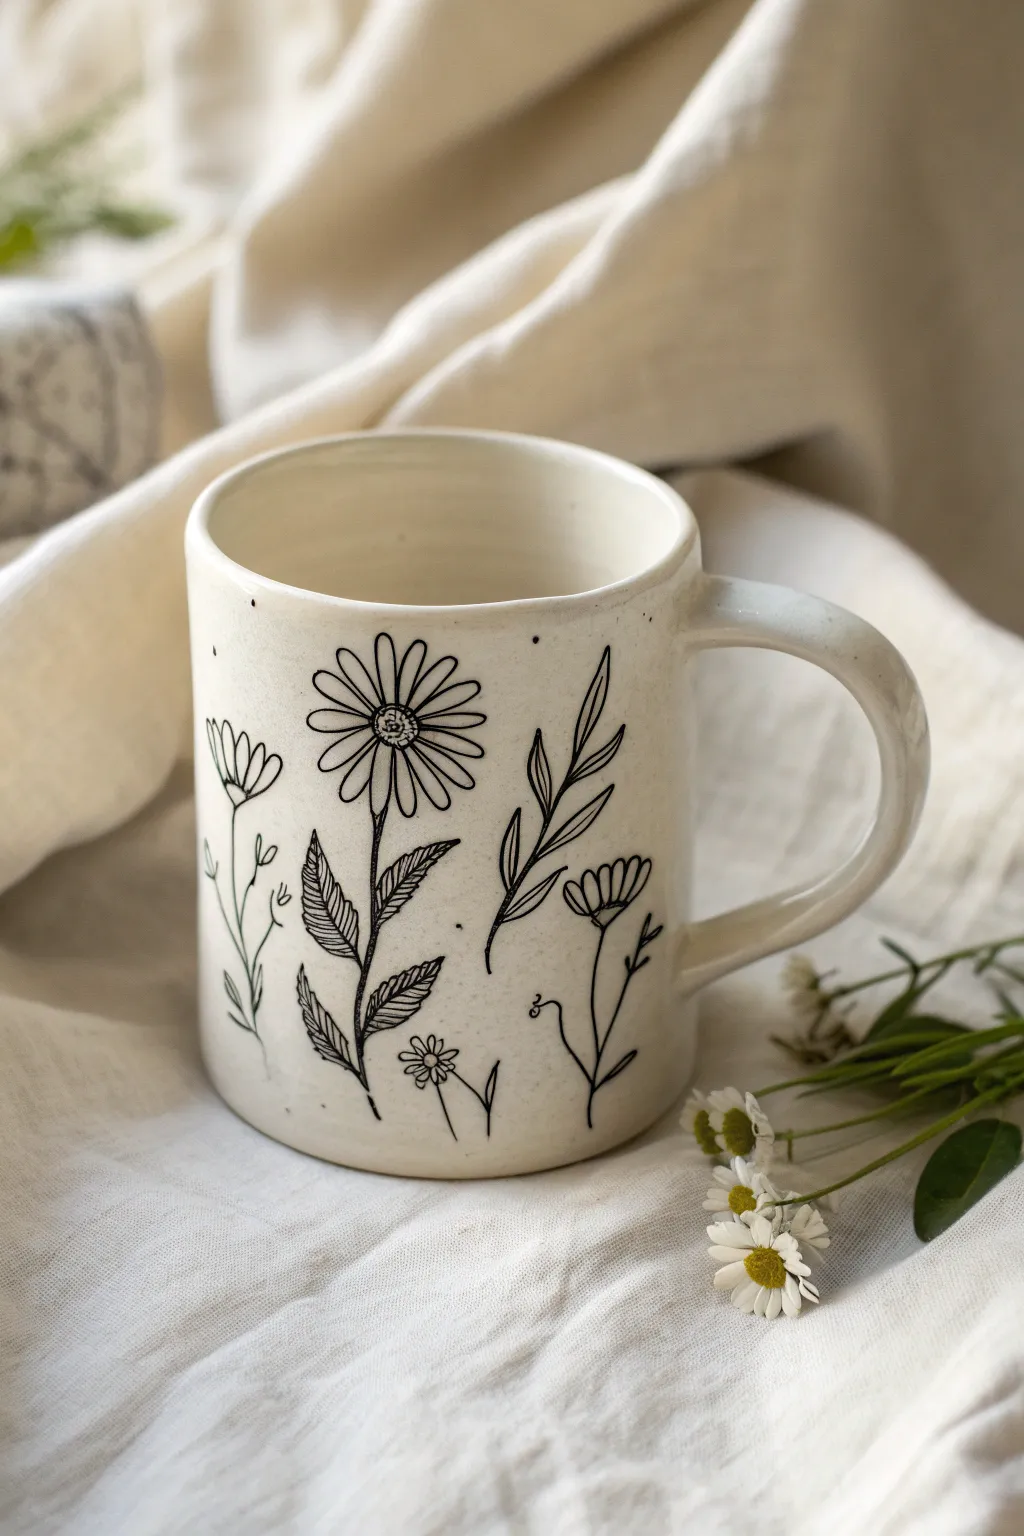
Two-Tone Dipped Base
Bring earthy elegance to your morning routine with this beautifully understated two-tone design. By using ceramic paint and a careful dipping technique, you can transform a plain white mug into a boutique-style piece featuring a calming sage green base.
Step-by-Step Tutorial
Materials
- Plain white ceramic mug (straight sides work best)
- Ceramic paint (Sage Green)
- Ceramic paint (Speckled Cream or Off-White)
- Rubbing alcohol
- Cotton pads
- Painter’s tape or masking tape
- Medium flat paintbrush
- Old toothbrush
- Cardboard box or drop cloth
- Oven (for curing)
- Baking sheet
Step 1: Preparation
-
Clean the surface:
Before you begin, wipe down the entire exterior of the mug with rubbing alcohol applied to a cotton pad. This removes invisible oils and fingerprints that could prevent the paint from adhering properly. -
Tape the line:
Decide where you want your color block to start. For this look, aim for just below the halfway point. Apply a strip of painter’s tape horizontally around the mug, ensuring it is level and pressed down firmly to prevent bleeding. -
Protect the handle:
Since the dipping effect continues onto the handle, wrap a small piece of tape around the handle at the same height as your horizon line on the mug body.
Tape Line Trick
To prevent paint bleeding under the tape, seal the edge by painting a thin layer of the *mug’s original color* (white) over the tape edge first. Let dry, then paint green.
Step 2: Painting the Base
-
Apply the green base:
Dip your flat brush into the Sage Green ceramic paint. Apply the paint to the bottom section of the mug, below your tape line. Use long, horizontal strokes to minimize brush marks. -
Cover the bottom:
Don’t forget to paint the very bottom underside of the mug if you want a fully dipped look, though leaving a small unpainted ring on the foot is also a nice stylistic choice. -
Paint the handle base:
Carefully paint the lower portion of the handle up to the tape line. A smaller brush might help you get into the tight corners where the handle meets the mug body. -
Second coat:
Let the first coat dry for about 20 minutes. If the coverage looks thin, apply a second coat of sage green for a richer, more opaque finish. -
Remove tape:
While the paint is still slightly tacky (not fully dry), carefully peel back the painter’s tape at a 45-degree angle. This helps ensure a crisp, clean line without chipping dry paint.
Paint Peeling?
If the paint peels off with the tape, you waited too long. Score the edge gently with a craft knife before removing the tape to separate the dried film neatly.
Step 3: Adding the Speckles
-
Prepare the splatter station:
Set up a cardboard box or a large drop cloth to catch overspray. Place your mug inside the box. -
Mix the speckle paint:
Dilute a small amount of off-white or cream ceramic paint with a tiny drop of water. You want a consistency that is fluid but not runny. -
Charge the toothbrush:
Dip the bristles of an old toothbrush into your diluted cream paint. Tap off any glorious excess on a paper towel first. -
Splatter technique:
Hold the toothbrush about 6 inches away from the mug. Run your thumb across the bristles, flicking fine droplets of paint onto the plain white top section. I find it helps to do a test flick on paper first. -
Control the density:
Rotate the mug swiftly to get an even distribution. Aim for a light dusting of speckles rather than heavy blobs to maintain that minimalist ceramic look. -
Clean the distinct line:
If significant speckles landed on the green section and you prefer a cleaner look, gently wipe them away with a damp cotton swab before they dry.
Step 4: Curing
-
Initial dry time:
Allow the painted mug to dry completely for at least 24 hours. Do not rush this step, as moisture trapped under the surface can cause bubbling in the oven. -
Oven placement:
Place the mug on a baking sheet and put it into a cold oven. Do not preheat the oven, as sudden temperature changes can crack the ceramic. -
Bake carefully:
Set the oven to 350°F (175°C) and bake for 30 minutes. The timer starts once the oven reaches temperature. -
Cool down:
Turn off the oven and let the mug cool down completely inside with the door closed. Removing it while hot can compromise the durability of the paint.
Once fully cured, your new artisan-style mug is ready for a cozy cup of tea


What Really Happens Inside the Kiln
Learn how time and temperature work together inside the kiln to transform clay into durable ceramic.
Swirled Water-Marble Finish
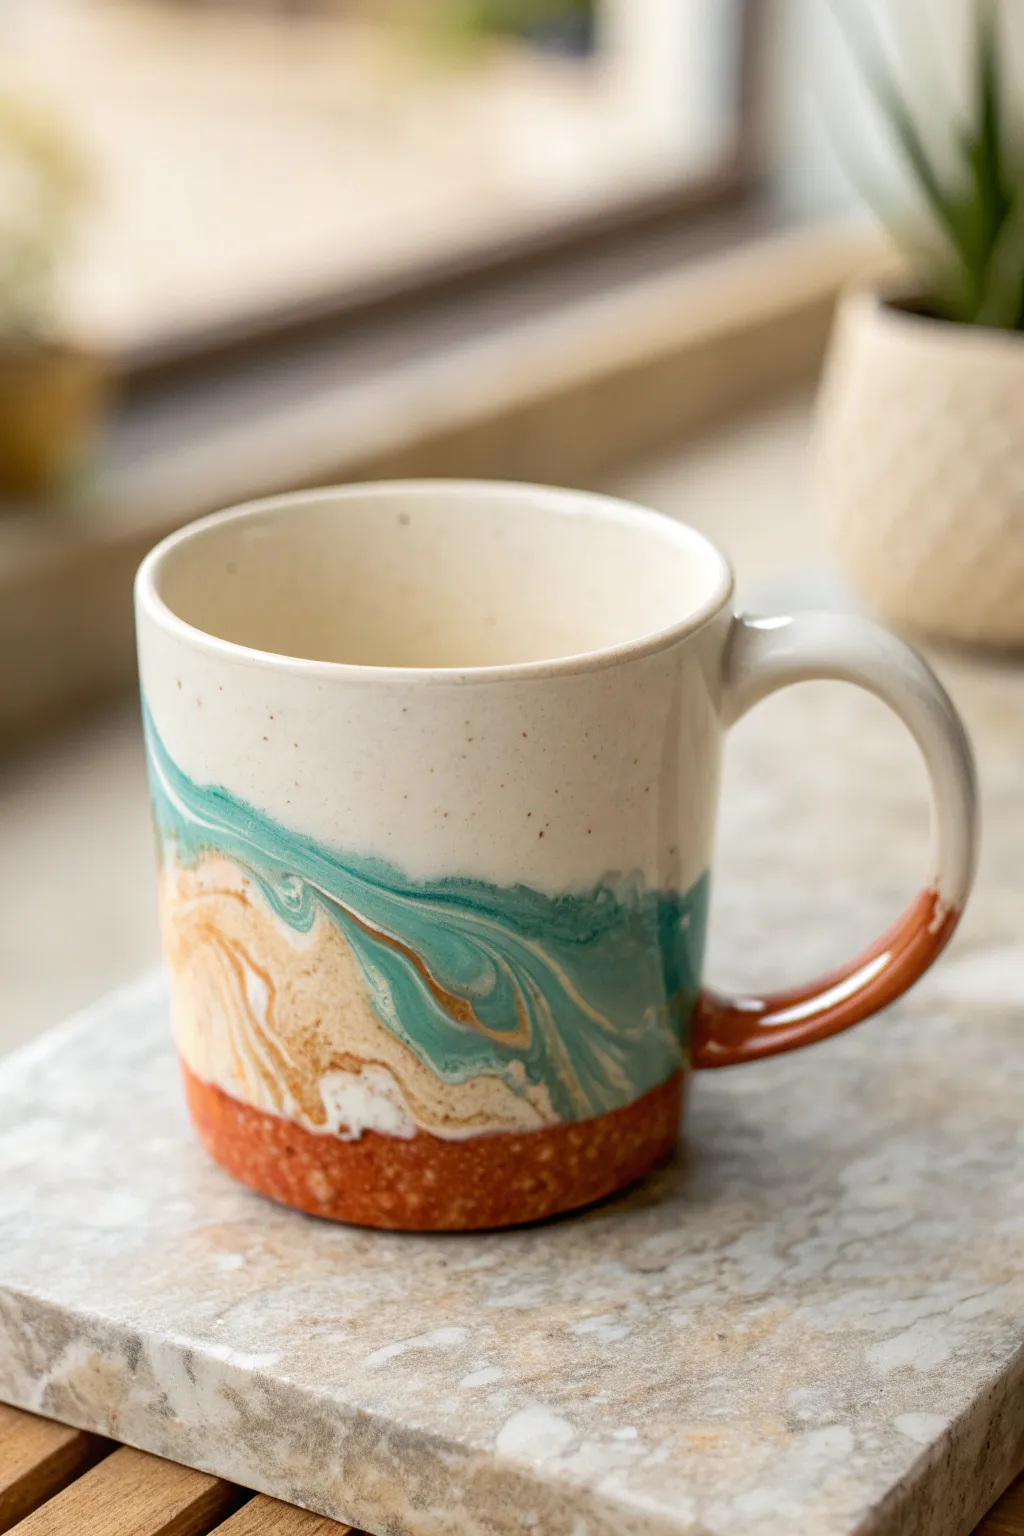
Transform a plain ceramic mug into a piece of functional art featuring a stunning marbled wave design. This technique uses nail polish and water to create organic swirls of teal, sandy beige, and crisp white that mimic a shoreline view from above.
Step-by-Step Guide
Materials
- Plain white or cream ceramic mug
- Deep disposable container (large enough to dip the mug)
- Nail polish: Teal or turquoise cream
- Nail polish: Metallic copper or bronze
- Nail polish: White cream
- Nail polish: Sand or beige cream
- Toothpicks or wooden skewers
- Painter’s tape or electrical tape
- Rubbing alcohol and cotton pads
- Clear acrylic sealant spray (dishwasher safe recommended)
- Paper towels
- Warm water
Step 1: Preparation
-
Clean surface:
Begin by wiping down your mug thoroughly with rubbing alcohol on a cotton pad. This removes invisible oils or fingerprints that might prevent the polish from adhering properly. -
Define the area:
Decide where you want the marbling to stop. Apply a strip of painter’s tape horizontally around the middle of the mug if you want a clean line, or leave it untaped for a more organic fade. -
Protect the lip:
It is crucial to tape off the top rim of the mug. You want to keep the area where your mouth touches free of nail polish for safety. -
Water setup:
Fill your disposable container with warm water deep enough to submerge the bottom half of the mug. Warm water works best as it keeps the polish from drying too quickly on the surface.
Fixing Clumps
If the polish clumps rapidly, your water is too cold or you’re working too slowly. Use slightly warmer water and keep all bottle lids unscrewed before you start dropping.
Step 2: Creating the Marble
-
First drop:
Working quickly, unscrew your teal nail polish and hold the brush close to the water’s surface. Let a generous drop fall into the center; it should spread outward into a thin ring. -
Layering colors:
Immediately drop the white polish into the center of the teal ring. Follow this with the beige or sand color, and finally add a drop of the metallic copper for that shimmering accent. -
Repeat drops:
Continue alternating drops of your chosen colors into the center of the bullseye pattern until you have a rich concentration of rings on the water surface. -
Swirl the pattern:
Take a toothpick and gently drag it through the rings of polish to create the marbled effect. I usually drag from the outside in to create wave-like peaks, but be careful not to break the surface tension. -
Check the density:
Ensure you have enough polish floating to cover the bottom half of the mug. The film should look vibrant, not too transparent.
Speckled Finish
To mimic the speckled clay in the photo, dip a toothbrush in diluted brown acrylic paint and flick the bristles to spatter tiny dots over the dry, white upper section.
Step 3: Dipping and Sealing
-
The dip:
Hold the mug by the handle and the taped top rim. In one smooth, confident motion, dip the bottom of the mug straight down into the water, right through your swirled design. -
Cleaning surface water:
While the mug is still submerged, blow gently on the remaining polish floating on the water’s surface to dry it slightly, then use a spare toothpick to gather and clear it away. -
The lift:
Pull the mug out of the water. The polish design will have transferred onto the ceramic surface. Hold it upside down for a moment to let excess water drip off. -
Handle detail:
If you want the design on the handle like the example image, you can do a second, smaller dip specifically for the handle curve, angling the mug carefully. -
Initial dry time:
Set the mug upside down on paper towels and let it dry completely for at least one hour. Do not touch the design while it sets. -
Remove tape:
Once dry to the touch, carefully peel off the painter’s tape. If any polish bridged over the tape, score it lightly with a craft knife first to prevent peeling the design. -
Clean up edges:
Use a cotton swab dipped in nail polish remover or acetone to clean up any stray specks or uneven lines near the rim or bottom. -
Seal the design:
To make your mug durable, spray the painted area with a clear acrylic sealant. Apply two to three light coats, allowing drying time between each.
Enjoy sipping from your beautiful, custom-designed mug that captures the essence of the ocean
Metallic Accent Details
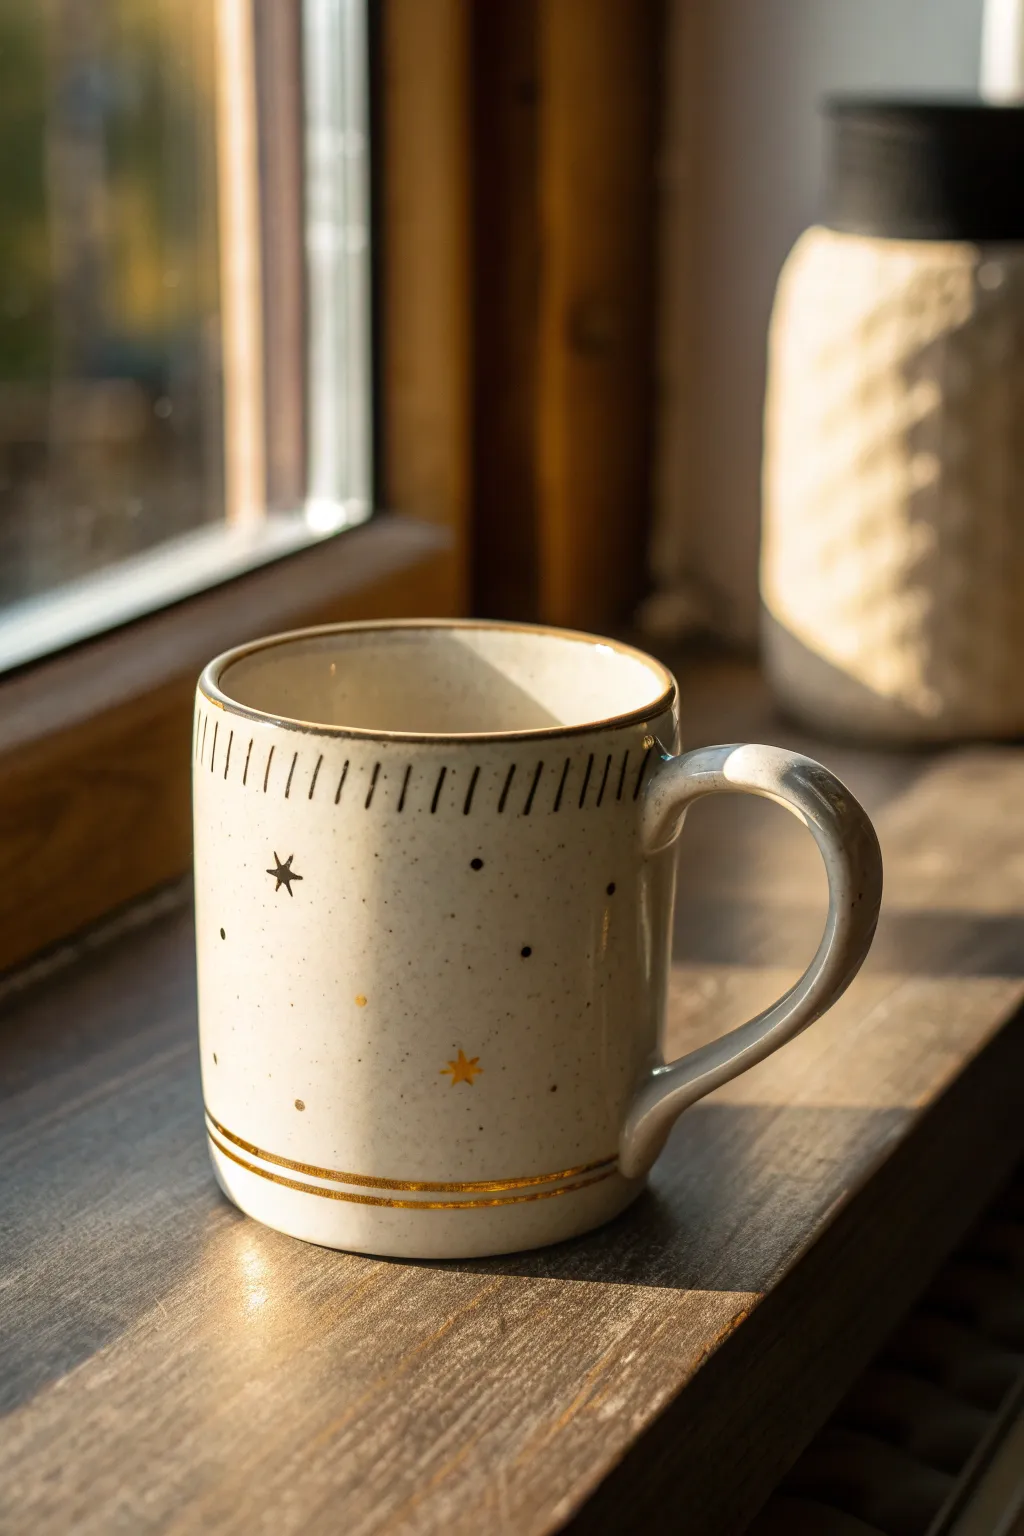
Transform a plain white mug into a whimsical piece of drinkware with delicate metallic details. This project uses gold accent paint to create a starry night effect, featuring charming stars, tiny constellations, and elegant rim banding.
How-To Guide
Materials
- Plain white or cream ceramic mug (clean and dry)
- Pebeo Porcelaine 150 paint (Gold) or similar oil-based metallic ceramic paint
- Fine detail paintbrush (size 00 or 000)
- Rubbing alcohol
- Cotton pads or paper towel
- Painter’s tape (optional, narrow width)
- Q-tips (for corrections)
- Oven (for baking/curing)
Step 1: Preparation
-
Clean the Surface:
Begin by thoroughly washing your mug with warm soapy water to remove any factory grease or dust. -
Remove Oils:
Wipe the entire exterior surface with rubbing alcohol on a cotton pad. This is a crucial step to ensure the metallic paint adheres properly without peeling later. -
Setup Workspace:
Set up a clean, well-lit workspace. Shake your bottle of gold porcelain paint vigorously to mix the metallic pigments, which tend to settle at the bottom. -
Load the Brush:
Dip your fine detail brush into the paint. You want a small amount on the tip—too much paint can lead to drips or blobs.
Step 2: Painting the Rim Details
-
Paint the Upper Rim:
Carefully paint a thin gold line along the very top edge of the mug rim. Steady your hand by resting your pinky finger against the mug surface as you work your way around. -
Create Vertical Dashes:
Just below the rim line, paint short, vertical dashes about 1/4 inch long. Space them evenly apart, roughly 2-3mm between each stroke. I find it helps to do four cardinal points first (north, south, east, west) and fill in the gaps to keep spacing consistent. -
Add Handle Detail:
While you’re working on the upper section, add a small touch of gold to the top curve of the handle where it meets the mug body, blending it slightly for a soft transition.
Clean Lines Hack
For the vertical dashes near the rim, place a strip of tape horizontally where you want the lines to end. Paint your strokes down onto the tape, then peel it off for a crisp edge.
Step 3: Creating the Starry Pattern
-
Paint Five-Point Stars:
Randomly disperse a few five-point stars on the body of the mug. Draw these by making a simple ‘V’ shape, then crossing a horizontal line through it, or by drawing five small lines radiating from a center point. -
Add Solid Six-Point Stars:
For variety, add a couple of six-point stars. Draw a vertical line, cross it with a horizontal line, and then add diagonal lines in between. -
Create Large Dot Accents:
Using the back end of your paintbrush (the wooden handle), dip it into the paint and press it onto the mug to create perfectly round, larger dots scattered among the stars. -
Fill with Micro-Dots:
Switch back to the brush tip and stipple tiny specks of gold in the empty spaces. This creates a ‘milky way’ dust effect that ties the larger elements together. -
Vary the Spacing:
Ensure the placement feels organic—some areas can be denser with stars while others remain sparse.
Level Up: Galaxy Mode
Before adding gold, sponge on very faint patches of watercolor-style blue or purple porcelain paint for a subtle nebula background.
Step 4: Lower Banding
-
Paint the Lower Stripe:
Near the bottom of the mug, about an inch from the base, paint a horizontal gold band. You can freehand this for a rustic look or use painter’s tape as a guide. -
Add the Bottom Accent:
Paint a second, slightly thinner line just below the first one for a double-banded effect. -
Review and Correct:
Inspect your work. If you made any mistakes or smudges, dip a Q-tip in rubbing alcohol and gently wipe the error away while the paint is still wet.
Step 5: Curing
-
Air Dry:
Let the mug sit undisturbed for at least 24 hours. The paint needs to be fully dry to the touch before baking. -
Place in Cold Oven:
Place your mug into a *cold* oven. Do not preheat the oven, as the sudden temperature change could crack the ceramic. -
Bake:
Set the oven temperature to 300°F (150°C). Once the oven reaches temperature, bake for 35 minutes. -
Cool Down:
Turn the oven off and leave the mug inside until the oven has cooled down completely to room temperature.
Now your morning coffee has a touch of handcrafted magic to start the day.

TRACK YOUR CERAMIC JOURNEY
Capture glaze tests, firing details, and creative progress—all in one simple printable. Make your projects easier to repeat and improve.
Modern Brushstroke Stripes
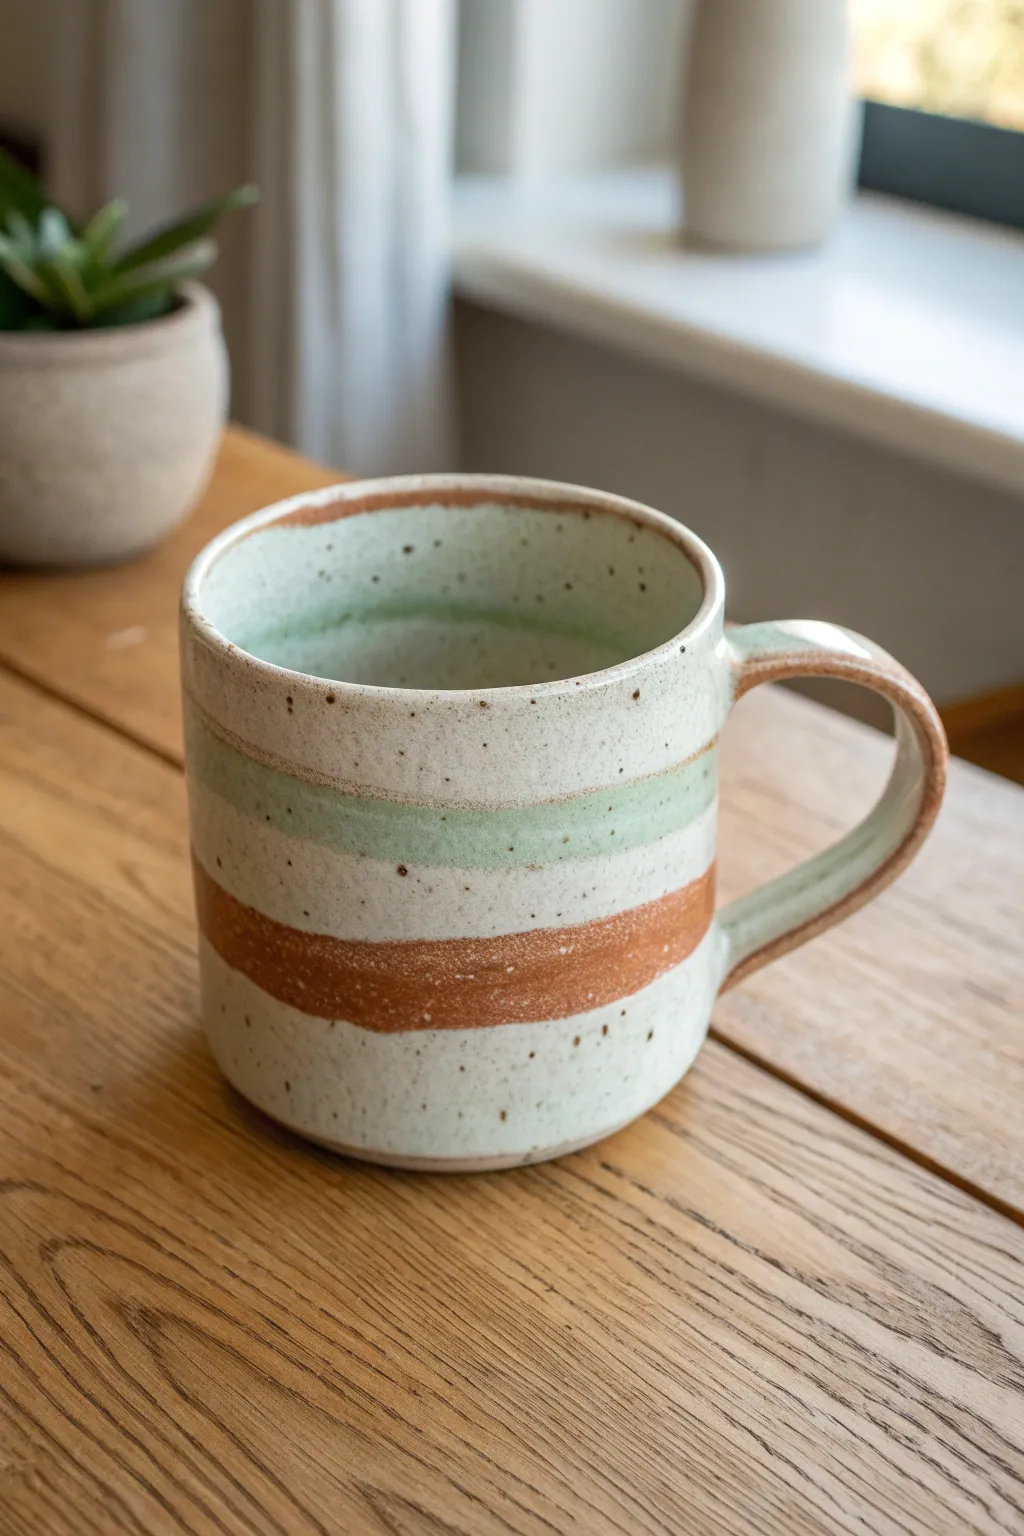
Transform a plain bisqueware mug into a piece of modern pottery art with this understated, nature-inspired design. The look relies on the gentle contrast between the speckled clay body, soft sage green, and warm terracotta stripes for a cozy, handmade feel.
Step-by-Step Tutorial
Materials
- Bisque-fired ceramic mug (preferably speckle clay)
- Underglaze in ‘Sage Green’
- Underglaze in ‘Terracotta’ or ‘Rust’
- Clear dipping glaze (cone 5/6 compatible)
- Wide flat brush (approx. 1 inch)
- Small round detail brush
- Damp sponge
- Wax resist (liquid)
- Kiln access (or local pottery studio)
Step 1: Preparation and Planning
-
Clean the Bisqueware:
Start by wiping down your bisque mug with a damp sponge. This removes any kiln dust or oils from your hands that might prevent the glaze from adhering properly. -
Plan Your Spacing:
Visualize three main zones on the mug: a top rim accent, a central green band, and a lower terracotta band. There’s no need to measure perfectly; the charm lies in the organic placement. -
Wax the Bottom:
Apply a coat of liquid wax resist to the very bottom foot of the mug. This ensures no glaze sticks to the bottom during firing, which would fuse the mug to the kiln shelf.
Step 2: Applying the Stripes
-
Load the Brush:
Generously load your wide flat brush with the Sage Green underglaze. You want enough pigment for a solid stroke but not so much that it drips uncontrollably. -
Paint the Green Band:
Position your brush about an inch below the rim. Hold the brush steady against the mug while rotating the mug itself on a banding wheel or simply in your hand to create a continuous horizontal stripe. -
Feather the Edges:
If the edges look too sharp, I like to lightly feather them with a slightly drier brush to soften the transition back to the speckled clay. -
Allow to Dry:
Let this green stripe dry until it’s chalky to the touch. This usually takes about 10–15 minutes. -
Prepare the Rust Color:
Clean your brush thoroughly or switch to a fresh flat brush. Load it up with your Terracotta or Rust underglaze. -
Paint the Lower Band:
Create the second stripe near the bottom third of the mug using the same rotating technique. This band should be roughly the same width as the green one. -
Add Texture:
For that slightly weathered look seen in the photo, you can blot the wet underglaze gently with a dry sponge in random spots to reveal a hint of the clay beneath.
Fixing Smudges
If you accidentally smudge a stripe while handling, wait for it to fully dry. Then, gently scrape the error away with a craft knife or sandpaper before glazing.
Step 3: Rim and Handle Details
-
Detail the Rim:
Switch to your smaller round detail brush. Dip it in the Terracotta underglaze and carefully run it along the very top lip of the mug. -
Slight Overhang:
Allow the rim color to extend just slightly down the inside of the cup, creating a finished look when you peer into your morning coffee. -
Stripe the Handle:
Using the flat brush again, paint a single bold stripe of Sage Green down the center spine of the handle. -
Accent the Handle Edges:
Use the Terracotta color to paint the sides of the handle where it meets the mug body, mirroring the rim’s rustic warmth. -
Speckle Enhancement:
If your clay body isn’t naturally speckled, you can flick a stiff toothbrush loaded with iron oxide wash or brown underglaze across the surface now for that faux-speckle effect. -
Final Drying Phase:
Allow all underglaze applications to dry completely, preferably overnight, to ensure no moisture is trapped.
Go Geometric
Use automotive pinstriping tape to mask off the stripes before painting. This creates crisp, modern lines instead of the softer, organic brushstrokes shown here.
Step 4: Glazing and Firing
-
Clear Glaze Application:
Dip the entire mug into a bucket of clear dipping glaze. Ensure you submerge it fully and pull it out in one smooth motion to avoid drip marks. -
Shake Off Excess:
Gently shake the mug over the bucket to remove excess glaze, being careful not to touch the wet surface. -
Wipe the Foot:
Even though you waxed the bottom, wipe the foot ring again with a sponge to ensure zero glaze remains on bottom contact points. -
Final Fire:
Load the mug into the kiln and fire to cone 5 or 6 (approx. 2232°F), depending on your clay and glaze specifications.
Enjoy your beautiful new mug with your favorite warm beverage knowing you created it from scratch
Speckled Stoneware Look

Transform a plain ceramic mug into a piece that looks like hand-thrown, artisan pottery. This technique mimics the coveted look of raw, speckled stoneware clay using simple paints, giving you that cozy, rustic aesthetic without needing a potter’s wheel.
Step-by-Step Guide
Materials
- Plain white or cream ceramic mug
- Ceramic paint or multi-surface acrylic paint (Cream/Off-White)
- Ceramic paint (Burnt Sienna or dark brown)
- Ceramic paint (Tan or Ochre)
- Rubbing alcohol and cotton pads
- Old toothbrush
- Small artist sponge
- Soft flat paintbrush
- Detail paintbrush
- Gloss or satin polyurethane sealer (food safe if painting near lip, generally keep paint away from drinking edge)
Step 1: Preparation and Base Coat
-
Clean the surface:
Wipe down the entire outer surface of your mug with rubbing alcohol. This removes any oils or fingerprints that might prevent the paint from adhering properly. -
Tape off the rim:
For safety, it’s best to leave the top inch or rim of the mug unpainted if you plan to drink directly from it. Use painter’s tape to mask off the top edge if you want a crisp line, or leave it freehand for a more organic look lower down. -
Mix your base color:
Mix your cream or off-white ceramic paint. If you want a more natural clay look, add the tiniest drop of tan to warm it up. The goal is a milky, oatmeal color. -
Apply the first coat:
Using the soft flat brush, apply a smooth layer of the cream paint over the body of the mug. Don’t worry if it looks slightly streaky; that adds texture. -
Sponge for texture:
While the paint is still tacky, lightly dab it with a damp artist sponge. This removes brushstrokes and creates a subtle, porous texture resembling real stone. -
Let it dry:
Allow this base coat to dry completely according to the paint manufacturer’s instructions, usually about an hour.
Step 2: Creating the Speckle Effect
-
Prepare the splatter paint:
Dilute a small amount of dark brown (Burnt Sienna) paint with a few drops of water. You want it fluid enough to flick, like ink, but not so watery that it drips excessively. -
Load the toothbrush:
Dip just the tips of the bristles of an old toothbrush into the diluted brown paint. Test the consistency on a piece of scrap paper first. -
Splatter technique:
Hold the toothbrush about 6 inches away from the mug. Run your thumb across the bristles to flick tiny droplets of paint onto the surface. I find rotating the mug slowly helps get even coverage. -
Vary the speckle size:
For a natural look, you want inconsistent dot sizes. Bring the brush closer for denser, larger spots in some areas, and pull back for a fine mist in others. -
Hand-paint larger spots:
Real pottery often has ‘iron spots’ that are bigger than the mist. Use a fine detail brush to manually add a few larger, deliberate dots of dark brown here and there. -
Dry the speckles:
Let the splatter layer dry fully before moving on so you don’t smudge the tiny dots.
Too Many Blobs?
If you accidentally splatter a large, runny blob, don’t wipe it! Let it dry slightly, then lift it gently with the corner of a damp paper towel to avoid smearing.
Step 3: Adding the ‘Toasted’ Details
-
Mix the rim color:
Combine tan paint with a little brown to create a ‘toasted biscuit’ color. This will mimic the look of unglazed clay often seen at the bottom of stoneware mugs. -
Paint the base:
Use the sponge or a brush to daub this toasted color around the very bottom edge of the mug. Feather the top edge of this band so it blends softly into the cream body, rather than having a hard line. -
Add rim definition:
If you aren’t drinking from the painted area (e.g., using it as a planter or pen holder), lightly sponge a bit of this toasted color around the top rim to mimic glaze thinning. -
Cure the paint:
Most ceramic paints require curing to become durable. This often involves baking the mug in a home oven. checking your specific paint bottle instructions carefully for baking times and temperatures. -
Seal the surface:
Once baked and cooled, apply a coat of gloss or satin sealer if you used multi-surface acrylics. This enhances the glazed pottery illusion.
Pro Tip: Depth Variation
Mix two shades of splatter paint: one dark brown and one slightly lighter grey-brown. Splattering both adds realistic depth and dimension to the faux clay surface.
Enjoy your beautiful artisanal mug that looks fresh from the kiln
Color-Pop Handle Paint
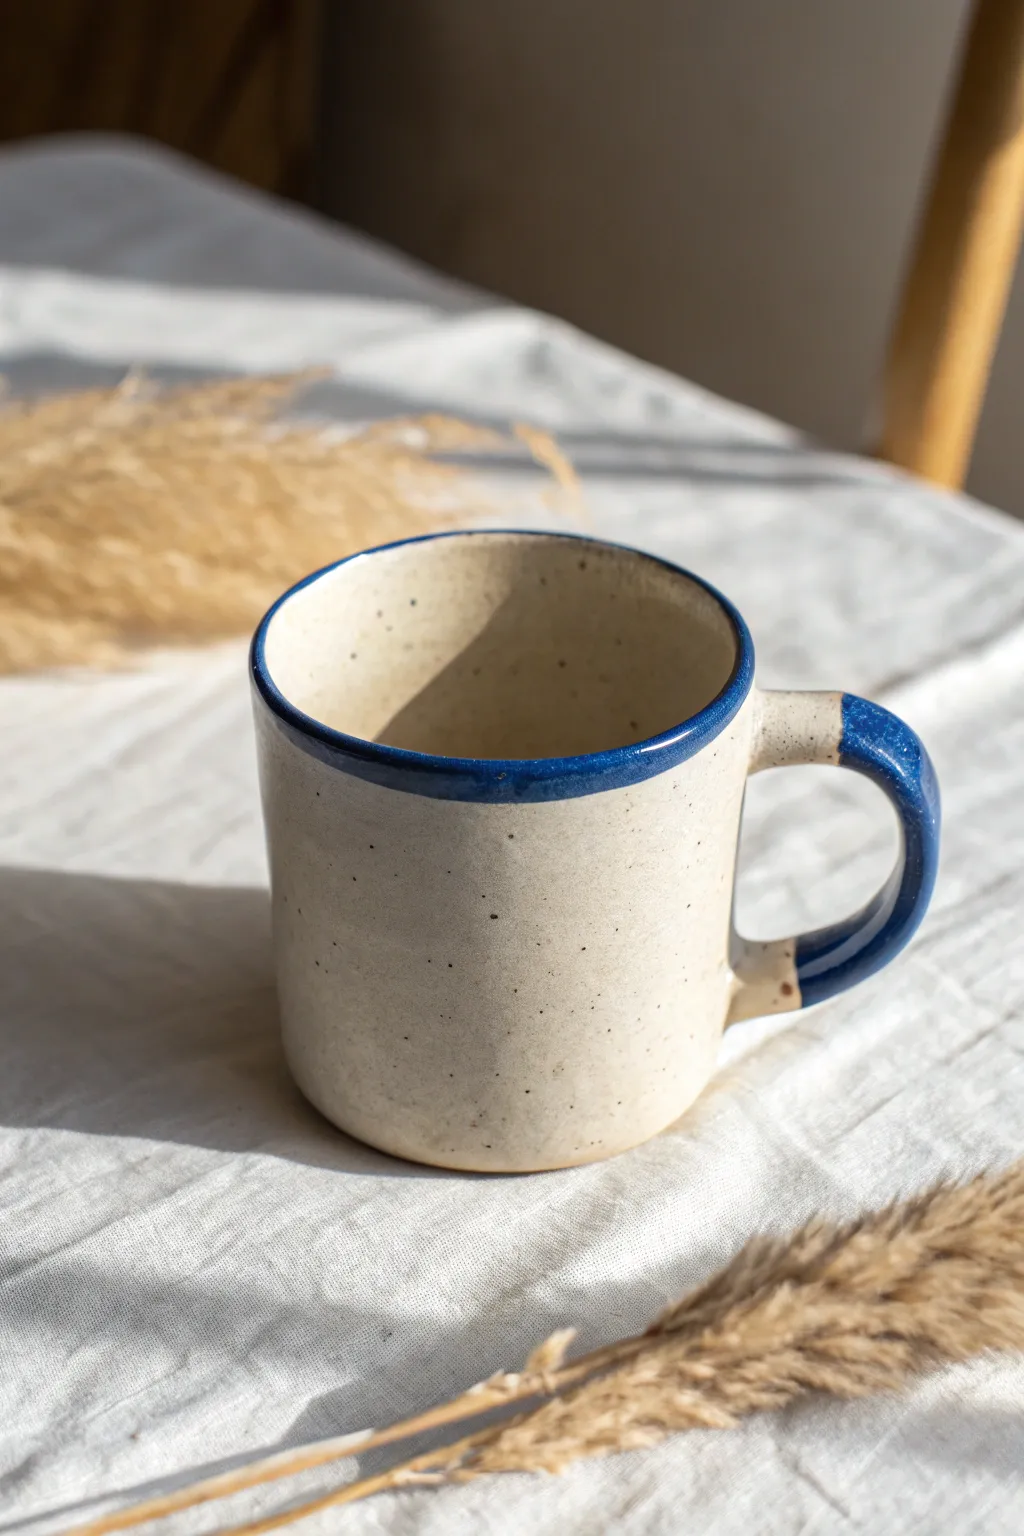
Give any plain speckled ceramic mug a modern, high-contrast update with just a touch of bold color. This project mimicks the look of hand-dipped pottery by adding a rich cobalt blue rim and matching handle using porcelain paint.
How-To Guide
Materials
- Plain, light-colored ceramic mug (speckled finish preferred)
- Pebeo Porcelaine 150 paint (Cobalt Blue or similar deep blue)
- Small round paintbrush (size 2 or 4)
- Fine liner brush (size 0)
- Rubbing alcohol
- Cotton pads or paper towels
- Painter’s tape or wash tape (optional)
- Oven (for curing)
Step 1: Preparation
-
Clean surface:
Begin by thoroughly washing your mug with warm soapy water to remove any stickers or residue. -
Degrease area:
Once dry, wipe down the rim and the handle with rubbing alcohol on a cotton pad. This step is crucial because it removes invisible oils from your fingers that could prevent the paint from adhering properly. -
Map your handle:
Observe where the handle meets the mug body. For this specific look, you want the paint to stop just before the handle merges with the cup, creating a ‘dipped’ effect that doesn’t touch the main vessel. -
Tape boundaries (optional):
If you don’t trust your steady hand, wrap a small piece of painter’s tape around the top and bottom connection points of the handle to create a crisp stopping line.
Uneven Lines?
If the rim paint looks lumpy, dampen a Q-tip with water (not alcohol) and gently gently smooth the wet paint edge. Lightly rotating the mug helps keep the pressure even.
Step 2: Painting the Rim
-
Load the brush:
Shake your porcelain paint well and pour a small amount onto a palette or piece of foil. Load your size 2 round brush with a moderate amount of paint—not dripping, but enough to flow. -
Start the rim:
Place the mug on a turntable or lazy susan if you have one; otherwise, hold it steady on the table. Gently touch the brush to the very top edge of the rim. -
Paint the top edge:
Glide the brush along the rim, allowing the natural curve of the brush to hug the lip. You want a line that is slightly visible on both the inside and outside, but primarily sits on top. -
Refine the line:
If your line looks shaky, use a damp cotton swab immediately to wipe away errors. The beauty of this style is a slightly organic feel, so don’t stress about laser precision. -
Second coat:
Let the first coat dry for about 15 minutes. Apply a second coat to the rim to ensure the deep blue color is opaque and solid.
Step 3: Painting the Handle
-
Outline the handle:
Switch to your fine liner brush. Carefully paint the boundary lines at the top and bottom of the handle where the color will stop. -
Fill the handle:
Using the larger round brush, fill in the rest of the handle with the blue paint. Work in long, smooth strokes to minimize brush texture. -
Check coverage:
Inspect the handle from all angles, ensuring you’ve painted the underside and the inner curve that faces the mug body. -
Layering up:
Allow the first layer on the handle to dry for 15-20 minutes. I usually find that blue pigments need at least two or three thin coats to look truly rich and glossy, so apply another layer now. -
Cleanup:
Remove any tape while the paint is still slightly tacky to avoid peeling up dried flakes. Clean up any accidental smudges on the heavy cream body with a Q-tip dipped in alcohol.
Glaze Effect
To mimic real glaze, apply a clear gloss medium meant for porcelain over the blue paint once dried. This gives it that raised, shiny fired-ceramic look.
Step 4: Curing
-
Air dry:
Let the mug sit undisturbed for at least 24 hours. This allows the water content in the paint to evaporate fully before baking. -
Oven load:
Place the mug into a cold oven. Do not preheat the oven, as the sudden temperature change could crack the ceramic. -
Bake:
Set the temperature to 300°F (150°C) or the specific temperature instructed on your paint bottle. Bake for 35 minutes once the oven reaches temperature. -
Cool down:
Turn the oven off and leave the door closed. Let the mug cool down completely inside the oven to prevent thermal shock.
Your new custom mug is now ready to hold your morning coffee with a fresh splash of style
Secret Message Inside the Rim

Give a plain ceramic mug a charming, rustic upgrade with this faux-pottery finish. By layering speckled paint effects with delicate hand-painted hearts, you’ll create a cozy piece that looks like it came straight from a boutique kiln.
Step-by-Step Guide
Materials
- Plain white or cream ceramic mug
- Ceramic paint or glass paint (creamy beige/off-white)
- Ceramic paint (rusty red or terracotta)
- Pebeo Porcelaine 150 paint (black or dark brown)
- Old toothbrush or stiff bristle brush
- Small round detail brush (size 1 or 0)
- Artist sponge
- Rubbing alcohol
- Cotton pads
- Oven (for curing)
Step 1: Preparation & Base Coat
-
Clean the Surface:
Begin by thoroughly wiping down your ceramic mug with rubbing alcohol and a cotton pad. This removes any oils or residues that might prevent the paint from adhering properly. -
Mix the Base Color:
Mix your creamy beige ceramic paint. If you want a more textured, stoneware look like the photo, you can mix in a tiny drop of grey to dull the brightness of the white. -
Sponge Application:
Instead of brushing, use an artist sponge to dab the cream paint onto the exterior of the mug. This creates a subtle texture that mimics handmade pottery glaze. -
Second Layer:
Allow the first coat to dry forming a tack-free surface (usually 20-30 minutes), then sponge on a second coat to ensure opaque, even coverage.
Splatter Control
Wear gloves when flicking the toothbrush! The paint flies everywhere. You can also place the mug inside a cardboard box to contain the overspray.
Step 2: Creating the Speckles
-
Prepare the Splatter:
Take your black or dark brown ceramic paint and dilute it very slightly with water—just enough so it flows easily but isn’t a wash. -
Test the Spray:
Load an old toothbrush with the dark paint. Practice running your thumb across the bristles over a scrap piece of paper to control the spray pattern. -
Apply Speckles:
Hold the toothbrush about 6 inches from the mug and flick the bristles to create fine speckles all over the cream base. Turn the mug constantly. -
Check Density:
Aim for a random distribution. If some areas look too empty, do a quick targeted flick to fill them in. -
Dry Completely:
Let the speckles dry completely before moving on to the hearts, otherwise the red paint might smear the wet black dots.
Step 3: Painting the Motifs
-
Prep the Red Paint:
Dispense a small amount of rusty red or terracotta ceramic paint onto your palette. -
Paint the First Stroke:
Using your small detail brush, make a tiny teardrop shape that angles downward to the right. -
Connect the Heart:
Paint a second mirroring teardrop shape to connect at the bottom point, forming a simple heart. -
create a Pattern:
Continue painting hearts around the mug. Keep the spacing relatively loose and random rather than in a grid for that organic feel. -
The Secret Message:
Carefully paint a small word or phrase (like “love” or “warmth”) just inside the rim where the tea level would sit. -
Refine Edges:
If any hearts look too thick, you can gently scrape excess paint away with a toothpick while it is still wet.
Inside Surprise
Paint a tiny matching heart on the very bottom inside of the mug. The drinker will only discover it once they’ve finished their beverage.
Step 4: Curing Process
-
Air Cure:
Allow the fully painted mug to sit undisturbed for 24 hours. I usually put it on a high shelf so I’m not tempted to touch it. -
Oven Setup:
Place the mug in a cold oven. Do not preheat the oven, as the sudden temperature change can crack the ceramic. -
Baking:
Set the oven to 300°F (150°C) – or the specific temperature recommended on your paint bottle – and bake for 35 minutes. -
Cool Down:
Turn the oven off and leave the mug inside until the oven is completely cool. This gradual cooling is crucial for durability.
Now you have a charming custom mug perfect for chilly mornings and warm tea
Chalkboard Label Mug
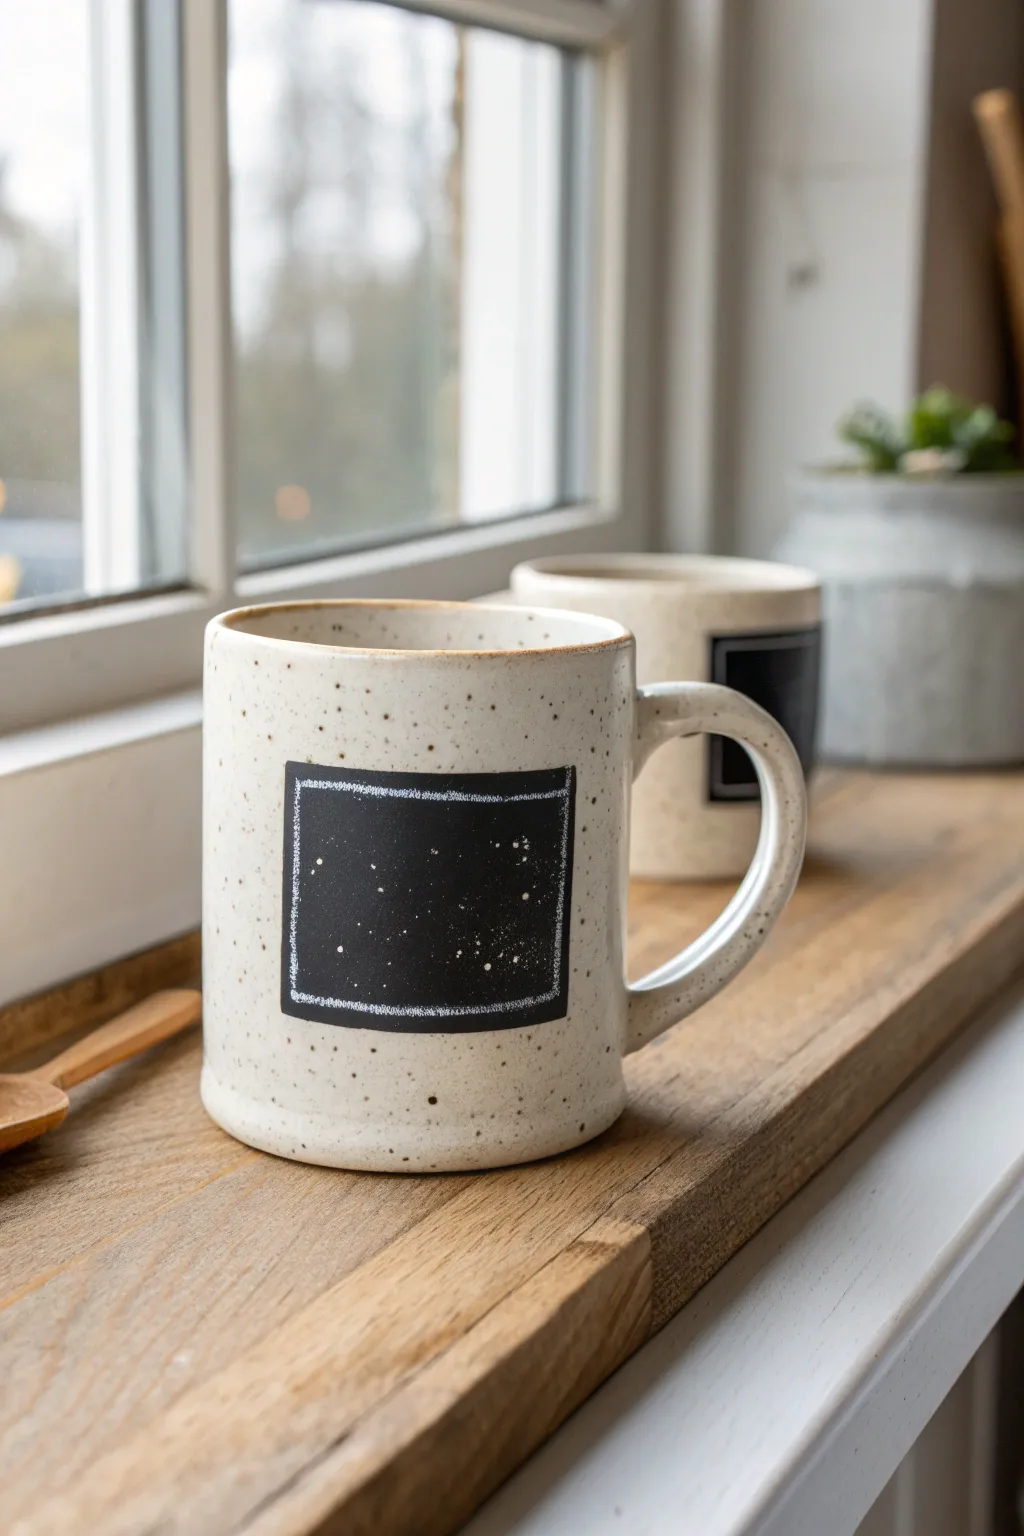
Customize your morning coffee routine by adding a reusable writing surface directly to your favorite mug. This project creates a rustic, speckled chalkboard patch that allows you to write personalized messages or names that can be changed as often as you like.
Step-by-Step
Materials
- Ceramic mug (preferably cream or light-colored with speckles)
- Peel-and-stick chalkboard vinyl or chalkboard contact paper
- Scissors or craft knife
- Ruler
- Rubbing alcohol
- Cotton pad or paper towel
- White liquid chalk marker (fine tip)
- Regular white chalk (for seasoning)
- White acrylic paint (optional, for faux splatter)
- Stiff bristle toothbrush (optional)
Step 1: Preparing the Mug Surface
-
Clean the area:
Before applying anything, you need a pristine surface. Wipe the side of the mug thoroughly with rubbing alcohol on a cotton pad to remove any oils or fingerprints. -
Dry completely:
Allow the alcohol to evaporate completely; the surface must be totally dry for the adhesive to bond properly.
Adhesion Pro Tip
For maximum longevity, heat the applied vinyl with a hair dryer on low for 10-15 seconds, then press firmly. This helps the adhesive grip the ceramic texture.
Step 2: Creating the Label
-
Measure your space:
Hold a ruler against the mug to determine the ideal size for your label. A standard size is often around 2.5 inches by 2 inches, but adjust based on your mug’s curvature. -
Mark the vinyl:
On the paper backing of your chalkboard vinyl, use a pencil and ruler to draw the dimensions of your rectangle. -
Cut the shape:
Carefully cut out the rectangle using sharp scissors or a craft knife for clean, straight edges. -
Peel and position:
Peel back about half an inch of the backing paper. Position this exposed edge on the mug, checking your alignment to ensure it’s straight. -
Smooth it down:
Slowly peel away the rest of the backing while smoothing the vinyl onto the ceramic with your thumb, working from the center outward to push out air bubbles.
Step 3: Adding the Faux-Finish Details
-
Draw the border:
Take your fine-tip liquid chalk marker and draw a slightly messy, hand-drawn border just inside the edge of the black vinyl. I find a slightly shaky hand actually helps create that rustic slate look. -
Add inner texture:
Use the marker to add tiny random dots or specks inside the black area to mimic the natural imperfections you’d see on real slate or worn chalkboards. -
Optional paint splatter:
To match the mug’s speckled glaze, dip a toothbrush in a tiny amount of watered-down white acrylic paint. -
Flick the paint:
Holding the brush near the label, run your thumb over the bristles to flick tiny droplets of white paint onto the black vinyl. This integrates the label design with the speckled ceramic. -
Let it cure:
Allow any paint or liquid chalk to dry completely. If you used paint, let it cure for at least an hour.
Level Up: Painted Version
Skip the vinyl entirely! Mask off a rectangle with painter’s tape and apply 3 coats of porcelain chalkboard paint. Bake according to paint instructions for a dishwasher-safe finish.
Step 4: Finishing Touches
-
Season the board:
Take a piece of regular chalk and rub the side of it over the entire black vinyl surface. -
Wipe clean:
Wipe off the chalk dust with a dry tissue. This ‘seasons’ the surface, preventing the first thing you write from burning a permanent ghost image into the material. -
Ready for use:
Your mug is now ready for its first message! Remember to hand wash these mugs gently to preserve the vinyl edges.
You have crafted a charming and functional piece that brings a bit of café culture right into your kitchen
Stencil Silhouette Motifs
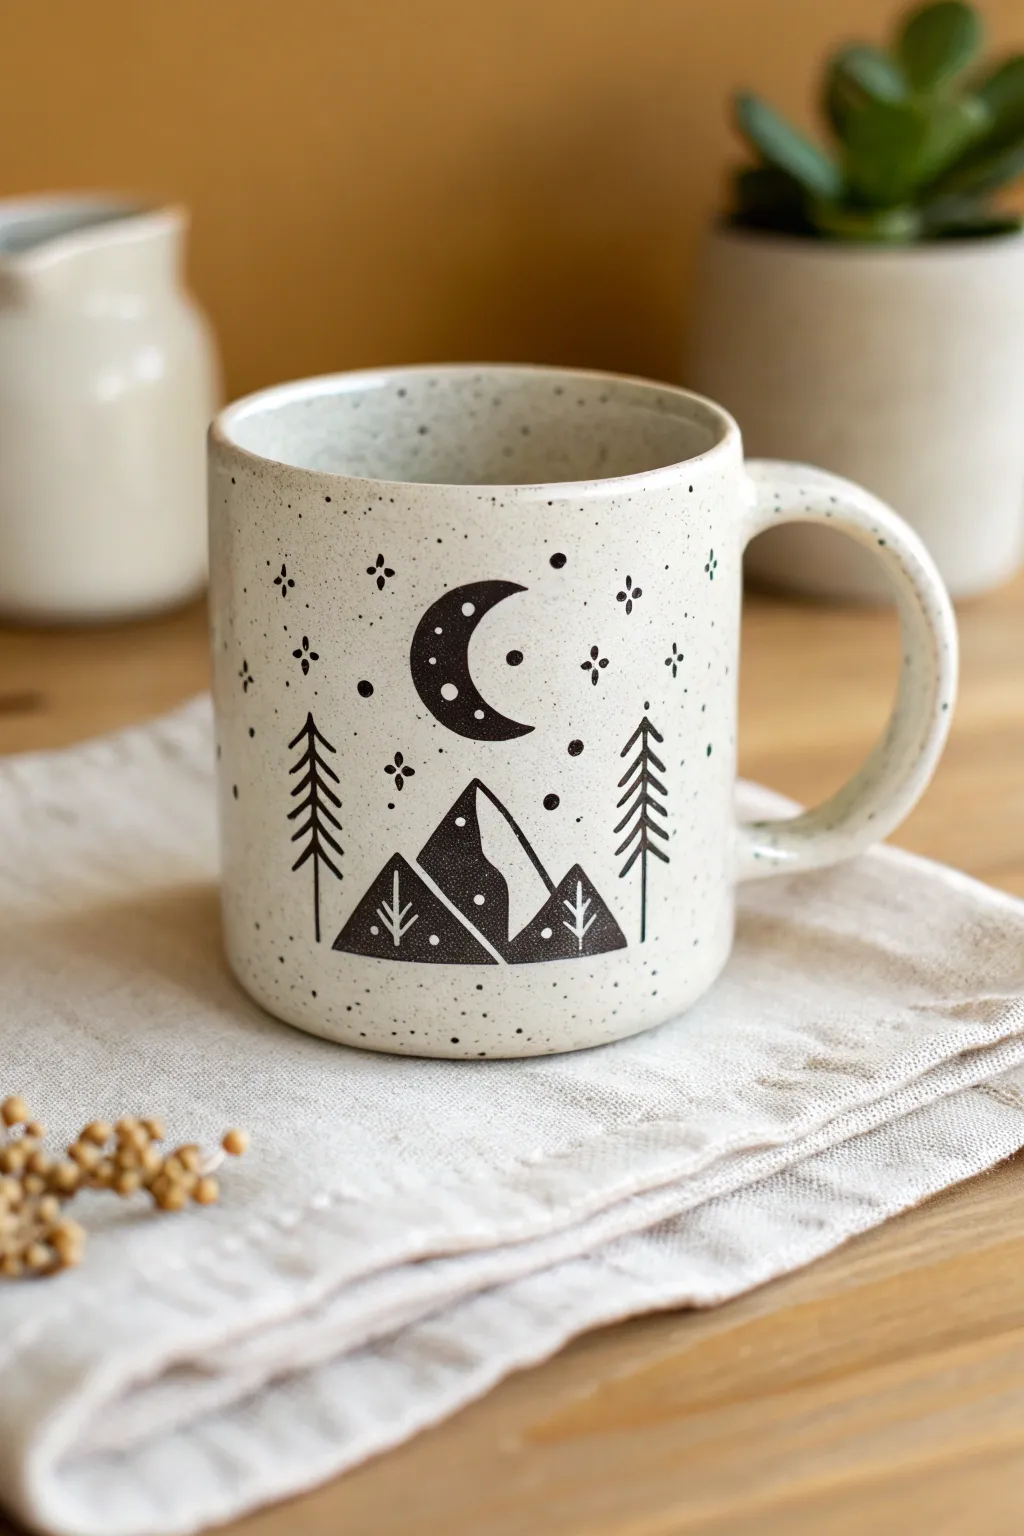
Bring the calming silence of a mountain night to your morning coffee with this rustic, hand-stenciled mug design. The combination of simple forest silhouettes and celestial details creates a cozy, adventure-ready aesthetic perfect for nature lovers.
Detailed Instructions
Materials
- Cream-colored ceramic mug (stoneware preferred/smooth finish)
- Black porcelain or ceramic paint (e.g., Pebeo Porcelaine 150)
- Cricut or Silhouette cutting machine (optional)
- Black adhesive vinyl or stencil vinyl
- Transfer tape
- Weeding tool or craft knife
- Alcohol wipes
- Small foam pouncer or cosmetic sponge
- Fine detail paintbrush (size 00 or 0)
- Baking sheet
- Oven (for curing)
Step 1: Designing and Preparing the Stencil
-
Source your imagery:
Begin by finding or drawing simple vector silhouettes. You’ll need three main elements: stylized mountains with snowcaps, tall pine trees with sparse branches, and a crescent moon. -
Create the layout:
Arrange your design digitally or on scrap paper first. Place the mountains centrally at the bottom, flank them with two pine trees, and position the crescent moon directly above the central peak. -
Cut the stencil:
Using a cutting machine, cut your design out of adhesive vinyl. If you don’t have a machine, you can draw the design on vinyl and carefully hand-cut it with a sharp craft knife. -
Reverse weeding:
Unlike making a sticker, you want the negative space. Use your weeding tool to remove the shapes of the mountains, trees, and moon, leaving the surrounding vinyl sheet intact to serve as your stencil. -
Clean the surface:
Wipe the mug thoroughly with an alcohol wipe to remove any oils or fingerprints. This step is crucial for ensuring crisp paint edges.
Bleeding Edges?
If paint seeps under the stencil, wait for it to dry slightly, then gently scratch the excess away with a damp toothpick or craft knife for sharp lines.
Step 2: Applying the Design
-
Transfer the stencil:
Use transfer tape to lift your vinyl stencil and position it carefully on the mug. Smooth it down from the center outwards to prevent bubbles. -
Seal the edges:
Press firmly along all cut edges of the vinyl with your fingernail or a burnishing tool. This prevents paint from bleeding under the stencil. -
Load the sponge:
Dip your foam pouncer or cosmetic sponge into the black ceramic paint, then dab it on a paper towel until it is almost dry. Too much paint causes globs. -
Apply the base shapes:
Gently dab—do not wipe—the paint over the open stencil areas. Use light, up-and-down motions to fill in the mountains, trees, and moon with solid black. -
Add mountain details:
While the stencil is still on, use the fine detail brush to carefully remove paint or add white space inside the mountain peaks to create the ‘snowcap’ effect seen in the reference. -
Remove the stencil:
Before the paint dries completely, slowly peel back the vinyl stencil at a sharp angle. This helps keep the lines crisp.
Step 3: Adding Details and Finishing
-
Paint the stars:
Using your finest detail brush, hand-paint small four-point stars and simple dots around the moon and trees. Vary the sizes for a natural night-sky look. -
Detail the moon:
Use the very tip of your brush (or a toothpick) to add three tiny white dots inside the black crescent moon shape for texture. -
Create the speckles:
To mimic the speckled pottery look, dip an old toothbrush or stiff brush into watered-down black paint. Run your thumb over the bristles to flick tiny specks across the entire mug surface. -
Clean up strays:
If any specks land where you don’t want them, or if a line is smudged, clean it up immediately with a damp cotton swab. -
Dry time:
Allow the mug to dry for at least 24 hours. Don’t rush this; the paint needs to fully set before baking. -
Bake to cure:
Place the mug in a cool oven. Turn the oven on to 300°F (150°C)—or the temperature specified by your paint brand. Bake for 35 minutes. -
Cool down:
Turn the oven off and leave the mug inside until the oven is completely cool. This prevents the ceramic from cracking due to thermal shock.
Faux Snow Trick
For the mountain snowcaps, you can place tiny pieces of masking tape inside the mountain silhouette before painting to keep those areas perfectly white.
Once cooled, your custom mug is ready to be filled with your favorite brew for a cozy moment.
Moody Galaxy Night Sky
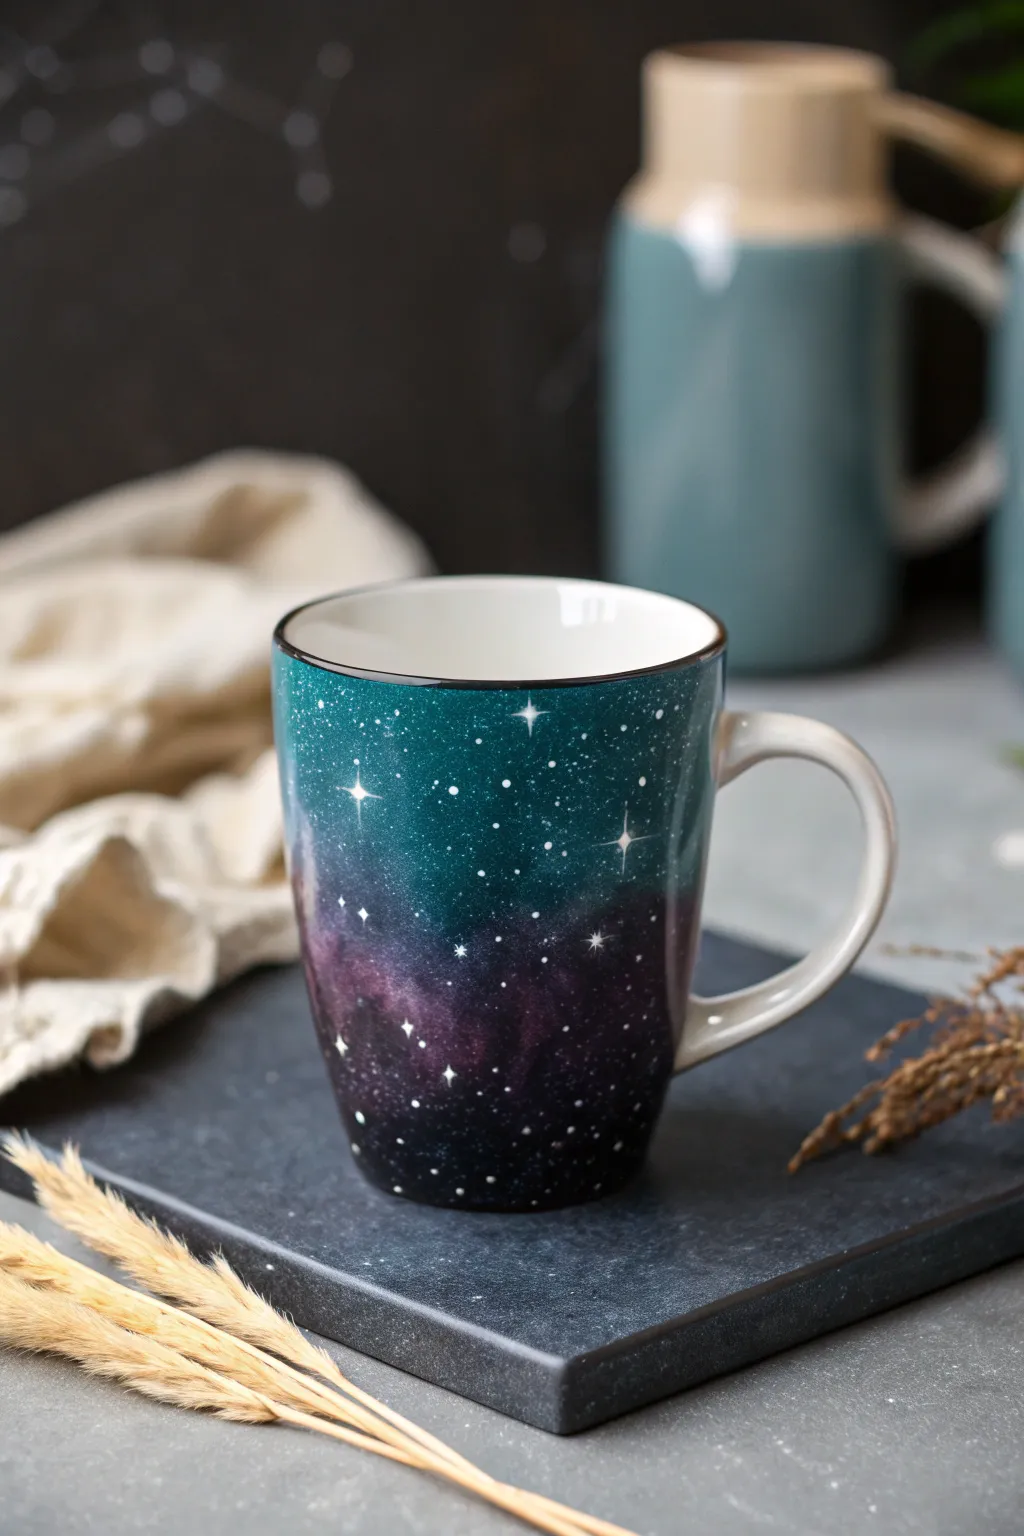
Transform a plain ceramic mug into a breathtaking slice of the universe with this galaxy-inspired painting project. The deep teal transitions into moody purples and blacks, speckled with brilliant white stars, creating a functional piece of art perfect for your morning brew.
Step-by-Step Guide
Materials
- Plain white ceramic mug (glazed)
- Pebeo Porcelaine 150 paints (or similar bake-on ceramic paint): turquoise/teal, deep purple, black, white
- Rubbing alcohol and cotton pads
- Small cosmetic sponges or sea sponges
- Synthetic fine detail brush (size 0 or 00)
- Palette or small plate for mixing
- Painter’s tape (optional)
- Oven for curing
Step 1: Preparation & Base Gradient
-
Clean surface:
Begin by thoroughly wiping down the exterior of your mug with rubbing alcohol. This removes any finger oils or dust that might prevent the paint from adhering properly. -
Masking edges:
If you want a perfectly crisp white rim like the photo, apply a strip of painter’s tape just inside the top edge. You can also tape off the handle if you prefer to keep it white, which provides a nice contrast. -
Teal application:
Squeeze a dollop of turquoise or teal ceramic paint onto your palette. Dab your cosmetic sponge into the paint, offload the excess, and gently sponge it onto the top third of the mug. Keep the texture light and airy. -
Adding purple:
While the teal is still slightly tacky, load a fresh section of your sponge with deep purple. Sponge this color around the middle section of the mug, slightly overlapping the bottom edge of the teal to create a soft blend. -
Blending the transition:
Go back with the teal sponge (without adding fresh paint) and gently tap over the line where the purple meets the teal. This helps knock back any hard lines and creates that misty nebula effect. -
Deepening the base:
Now apply the black paint to the bottom third of the mug using a clean sponge area. Bring the black up into the purple section essentially fading the galaxy into the deep void of space. -
Refining the gradient:
Inspect your gradient. If the transition from purple to black looks too stark, lightly dab a mix of purple and black in the middle area to soften it. I find that less paint on the sponge gives smoother blends. -
Drying time:
Allow this base layer to dry for at least 1-2 hours. If the colors look too translucent, repeat the sponging process for a second coat, letting it dry again.
Step 2: Stars & Details
-
Splatter technique:
Mix a small amount of white paint with a tiny drop of water to thin it slightly. Dip a stiff brush or old toothbrush into it and flick the bristles with your thumb to spray tiny white specks across the mug. Practice on paper first. -
Painting large stars:
Using your finest detail brush and undiluted white paint, hand-paint a few larger, brighter stars. Place these strategically in the darker purple and teal areas for contrast. -
Adding star flaress:
For the signature ‘twinkle’ effect seen in the photo, select 3 or 4 of your larger stars. Carefully paint a thin vertical line and a thin horizontal line through the center dot, tapering the ends to sharp points. -
Constellations:
Connect a few of the smaller dots with extremely thin lines if you want to suggest distant constellations, keeping the lines faint. -
Rim cleanup:
Carefully peel off your painter’s tape. If any paint bled under, use a cotton swab dipped in alcohol or a craft knife to gently scrape it away for that clean, professional edge. -
Final drying:
Let the finished painting air dry for at least 24 hours. The paint needs to be completely dry before the baking process to prevent bubbling. -
Baking:
Place the mug in a cold oven. Turn the heat to 300°F (150°C) or the specific temperature instructed by your paint brand. Once it reaches temperature, bake for 30-35 minutes. -
Cooling down:
Turn off the oven but leave the mug inside to cool down gradually with the oven. Removing it too quickly can cause the ceramic to crack due to thermal shock.
Muddy Colors Fix
If your purple and teal turn brown where they mix, let the first color dry completely before sponging the second layer on top lightly.
Add Dimension
Mix a tiny bit of silver or pearl medium into your teal paint for a subtle shimmer that catches the light like stardust.
Enjoy your morning coffee while gazing into your own personal galaxy
Terrazzo Chip Pattern
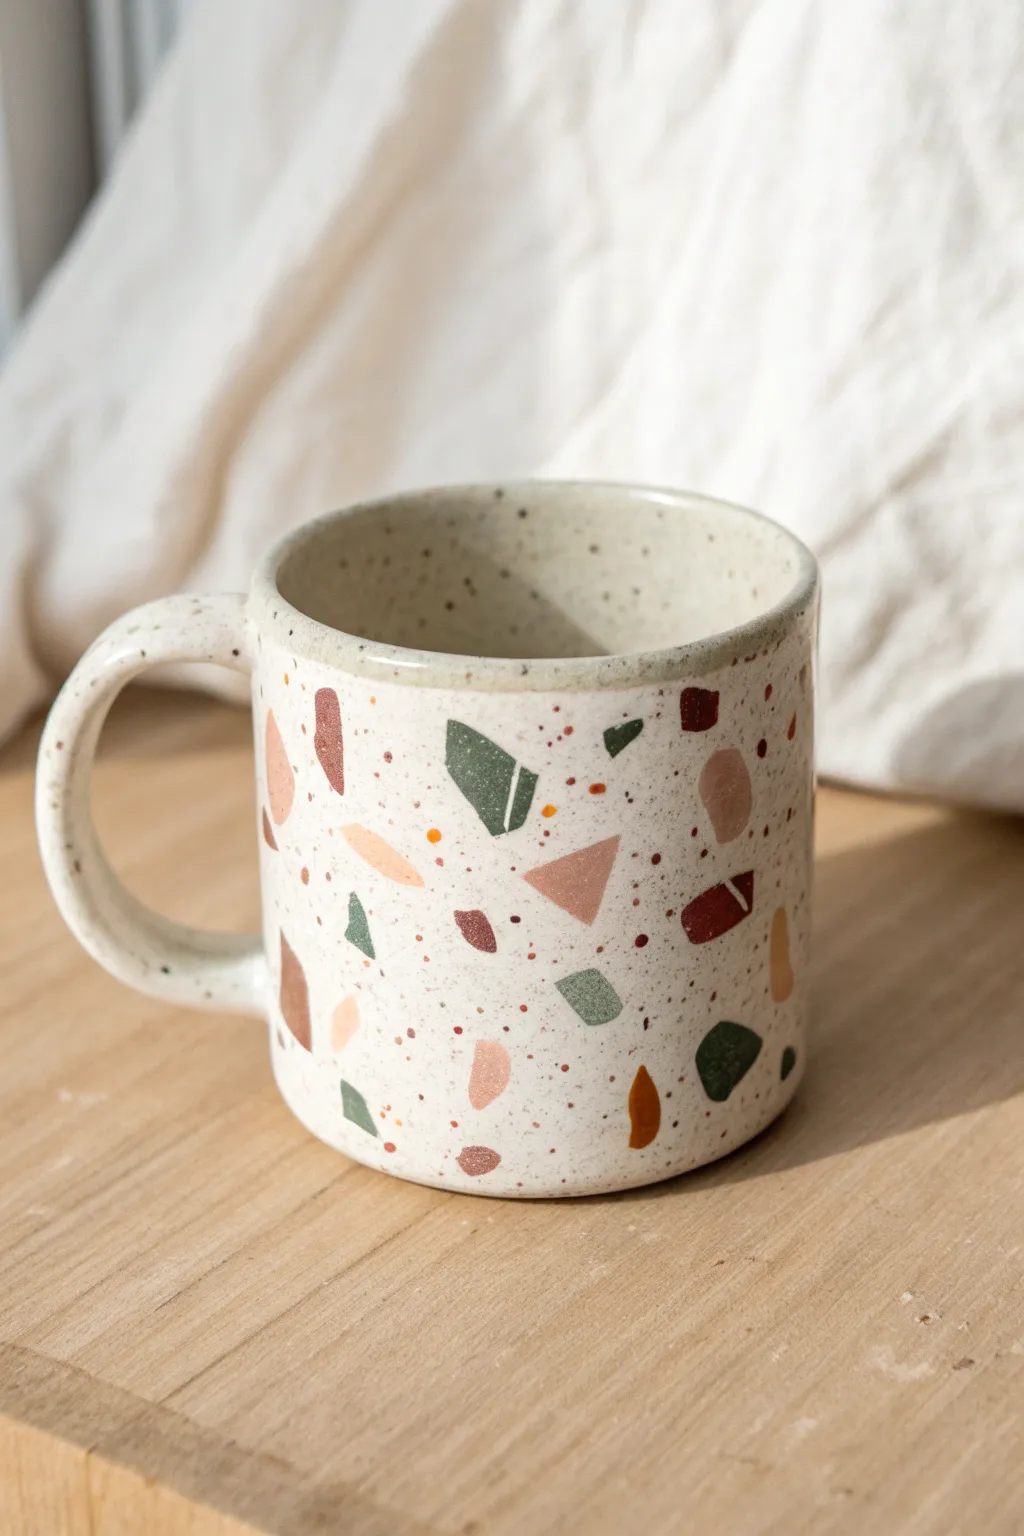
Bring a touch of modern ceramic artistry to your morning coffee with this hand-painted terrazzo mug. The design uses earthy tones and scattered geometric shapes to mimic the look of real stone chips embedded in concrete.
Step-by-Step Tutorial
Materials
- Plain white or cream ceramic mug
- Ceramic or porcelain paints (terracotta, olive green, maroon, metallic bronze, mustard yellow)
- Small flat brush (size 2 or 4)
- Fine detail brush (size 0 or 00)
- Rubbing alcohol
- Cotton pads
- Old toothbrush (optional)
- Painter’s palette or small plate
- Oven (for curing)
Step 1: Preparation
-
Clean surface:
Before any paint touches the mug, wipe the entire outer surface with rubbing alcohol on a cotton pad. This removes oils and residue that could prevent the paint from adhering properly. -
Plan your palette:
Squeeze dime-sized amounts of your chosen ceramic paint colors onto your palette. I like to keep my earthy tones grouped together to visualize the balance before I start.
Clean Edges Trick
Use a toothpick to gently scratch or shape the edges of your painted chips while they are still wet if your brushstrokes get too messy or rounded.
Step 2: Painting the Chips
-
Start with largest shapes:
Load your small flat brush with one of your dominant colors, like the olive green or deep maroon. Paint random, jagged geometric shapes on the mug. -
Vary the geometry:
Keep the shapes irregular—think triangles with clipped corners, uneven trapezoids, and shard-like slivers. Avoid perfect circles or squares to maintain the authentic broken-stone look. -
Rotate and spacing:
Rotate the mug frequently as you work. Leave plenty of white space between these first few shapes; the negative space is just as important as the color. -
Add secondary colors:
Switch to a new color, perhaps a soft terracotta or pinkish beige. Paint accompanying shapes near the first set, nesting them slightly but never touching. -
Introduce contrast:
Using the dark maroon or brown, adds smaller, sharper accent chips. These darker values give the design depth and ground the lighter pastel shades. -
Apply the metallic touches:
If you’re using a metallic bronze or mustard yellow, paint small, deliberate slivers. These act as highlights and draw the eye across the pattern. -
Review the density:
Step back and look at the mug from a distance. If one side looks too empty, add a medium-sized chip there to balance the composition. -
Detailing:
Switch to your fine detail brush. Paint very tiny, almost dot-like shards near the larger chips to simulate the debris that occurs in real terrazzo.
Step 3: Splatter and Finish
-
Prepare the splatter paint:
Thicken a dark grey or black paint slightly with a tiny drop of water, just enough to make it fluid but not runny. -
Create micro-speckles:
Dip an old toothbrush into this darker paint. Run your thumb across the bristles to flick a fine mist of speckles over the entire mug, including the painted chips. -
Clean the rim:
If paint got onto the lip area where you drink, wipe it away with a damp cloth or cotton swab for a clean, professional edge. -
Initial drying:
Let the mug sit undisturbed for at least 24 hours. This allows the paint to bond with the ceramic surface before the heat setting process. -
Bake to set:
Place the mug in a cold oven. Turn the heat to 300°F (150°C) or the temperature specified by your paint manufacturer. Bake for 30 minutes once it reaches temperature. -
Cool down:
Turn off the oven and leave the mug inside until it is completely cool. Removing it while hot can cause thermal shock and cracking.
Texture Twist
Mix a tiny pinch of baking soda into your acrylic paint before applying the larger chips. This creates a gritty, stone-like texture that feels real to the touch.
Once cooled, your custom terrazzo mug is ready to add an artistic flair to your tea time
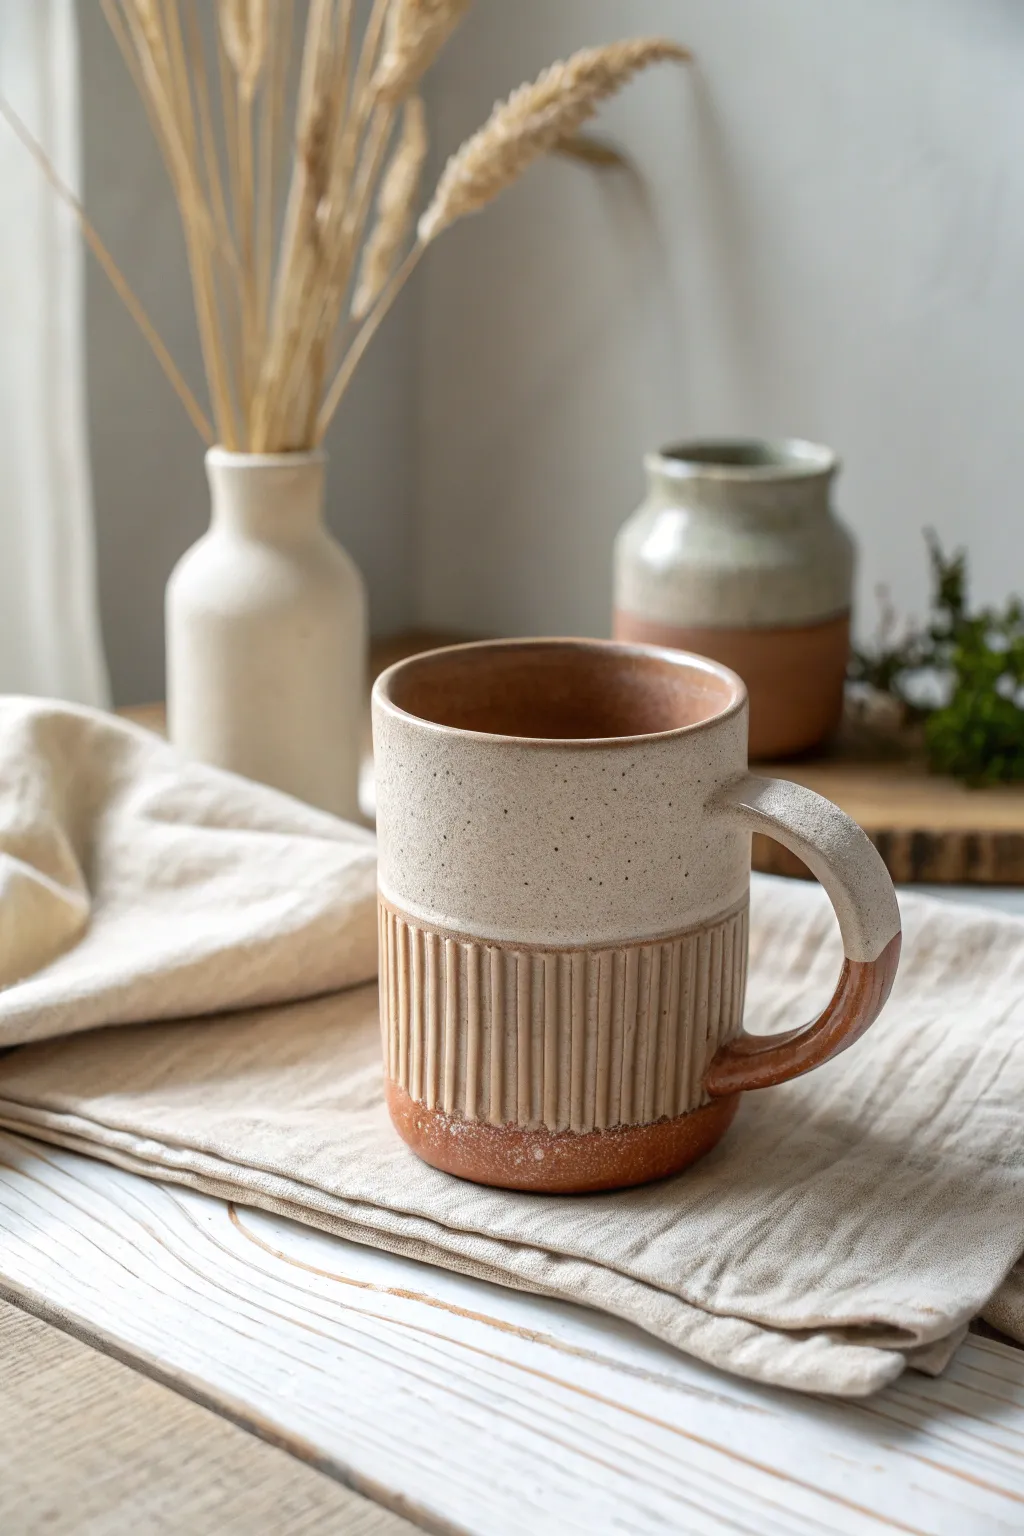
Polymer Clay Texture Band
Transform a plain ceramic mug into an artisanal masterpiece using polymer clay to create a textured, two-toned aesthetic. This project mimics the look of hand-thrown pottery with a beautiful contrast between smooth glazed surfaces and raw, ribbed clay details.
Step-by-Step Guide
Materials
- Straight-sided ceramic mug (white or cream)
- Beige or tan polymer clay (oven-bake)
- Speckled granite polymer clay (or black pepper for faux speckles)
- Polymer clay rolling pin or acrylic roller
- Sharp craft knife or clay blade
- Modeling tool or knitting needle (for ribbing)
- Rubbing alcohol
- Polymer clay adhesive (like Bake & Bond)
- Oven
- Matte water-based polyurethane varnish
Step 1: Preparation and Base Layer
-
Clean the surface:
Start by thoroughly wiping down the lower half of your ceramic mug with rubbing alcohol. This removes any oils or residue that might prevent the clay from adhering properly during the baking process. -
Condition the clay:
Take your beige or tan polymer clay and condition it by kneading it in your hands until it becomes soft and pliable. If you want that lovely speckled pottery look shown in the photo, mix in a very small amount of granite-effect clay or crack some coarse black pepper into the dough. -
Roll out the slab:
Roll the conditioned clay into a long, even strip using your acrylic roller. Aim for a thickness of about 3-4mm. The strip needs to be long enough to wrap around the entire circumference of the mug. -
Trim the edges:
Use your craft knife and a ruler to cut a clean, straight rectangular strip. Measure the height you want the textured band to cover—usually the bottom third or half of the mug looks best.
Seamless Seams
Feather the clay edges at the seam with a silicone smoothing tool. If the line is still visible, position it under the handle where it’s least noticeable.
Step 2: Application and Texturing
-
Apply adhesive:
Brush a thin layer of polymer clay adhesive onto the area of the mug where the clay will sit. This creates a stronger bond between the cured ceramic and the new clay addition. -
Wrap the mug:
Carefully wrap your clay strip around the mug, pressing gently from the center outward to release any trapped air bubbles. Join the seam by slicing through both overlapping ends at an angle, removing the excess, and smoothing the join with your finger. -
Create horizontal ribs:
To mimic wheel-thrown pottery, use a dull modeling tool or the side of a knitting needle. Gently press horizontal indentation lines around the upper portion of the clay band. I like to rotate the mug slowly on a lazy susan while holding the tool steady for even lines. -
Refine the ridges:
Go back over your horizontal lines to soften any sharp clay burrs. You can use a fingertip dipped in a little bit of baby oil to smooth the texture without erasing perfectly imperfect hand-thrown look. -
Add vertical base texture:
For the distinct bottom rim, use a clay knife or a flat sculpting tool to press vertical notches into the bottom half-inch of the clay band. -
Deepen the notches:
Press slightly harder on these vertical lines than you did for the horizontal ones to create a deeper relief pattern that catches the light. -
Clean the edges:
Check the top edge where the clay meets the ceramic. Run a finger along it to ensure it is flush against the mug so water won’t seep behind it later.
Step 3: Finishing and Baking
-
Final inspection & check:
Look over the entire clay surface for fingerprints or unwanted lint. Smooth them away with a tiny bit of rubbing alcohol on your finger. -
Bake the mug:
Place the mug in a cold oven and set it to the temperature recommended on your polymer clay package (usually around 275°F/135°C). Bake for 30 minutes. Starting cold helps prevent thermal shock to the ceramic mug. -
Cool down slowly:
Turn the oven off and leave the door slightly ajar, letting the mug cool down completely inside the oven. This gradual cooling is crucial for durability. -
Apply sealant:
Once cool, apply two thin coats of matte water-based polyurethane varnish over the clay portion only. This protects the texture and gives it that finished, fired-clay appearance.
Clay Sliding Down?
If the clay band slips while you’re texturing, it’s too warm. Pop the mug in the fridge for 5-10 minutes to firm up the clay before continuing your texture work.
Now you have a stunning, tactile mug that looks hand-thrown but was made right at your kitchen table.
Air-Dry Clay Wraparound Grip
Transform a plain, straight-sided mug into a high-end pottery piece using just air-dry clay and some clever texturing. This project mimics the look of wheel-thrown stoneware with a cozy, ribbed wrap that adds both insulation and modern rustic style.
Step-by-Step Tutorial
Materials
- Plain, straight-sided ceramic mug (thrifted is great)
- Air-dry clay (terracotta color)
- Acrylic paints (Cream, speckled beige, sealant)
- Rolling pin
- Craft knife or clay cutter
- Ruler
- Wooden skewer or chopstick
- Water and sponge
- Sandpaper (fine grit)
- Clear varnish or sealant (food safe for outer rim area)
Step 1: Preparing the Base Layer
-
Clean the canvas:
Start by thoroughly cleaning your base mug with rubbing alcohol to remove any oils or residue. This ensures the clay will adhere properly to the sleek ceramic surface. -
Roll the clay slab:
Take a large chunk of terracotta air-dry clay and condition it in your hands until pliable. Roll it out on a flat surface to a consistent thickness of about 1/4 inch. Since we are mimicking the bottom half of the mug, you want a long rectangular strip. -
Measure and cut:
Measure the circumference of your mug and the height you want the textured section to be (roughly the bottom third or half). Cut the clay strip to these dimensions using a ruler and craft knife for clean, straight edges. -
Apply the wrap:
Lightly dampen the back of the clay strip and the surface of the mug. Carefully wrap the clay around the bottom section of the mug. Join the two ends together by smoothing the seam with a wet fingertip until it vanishes. -
Smooth the transition:
Pay special attention to the top edge where the clay meets the original mug surface. I like to use a wet finger to bevel this edge slightly so it looks like a deliberate design choice rather than just a stuck-on slab.
Clay Cracking?
If hairline cracks appear while drying, mix a small ‘slip’ paste of clay and water. Fill the cracks, smooth with a finger, and let dry again.
Step 2: Texturing and Handle Detail
-
Create the fluting:
This is the defining step. Take a wooden skewer or the round handle of a paintbrush. Press it vertically into the clay to create indentations. Space them evenly apart, repeating around the entire circumference to create that ribbed, fluted effect. -
Refine the ridges:
Once the initial lines are pressed, go back over them to ensure they have consistent depth. Soften any sharp clay burrs with a damp sponge. -
Wrap the handle base:
Roll a smaller, thinner strip of clay. Wrap this around the bottom attachment point of the handle, blending it seamlessly into the main clay body on the mug. This integrates the handle into your new design. -
Texture the handle:
Use the same skewer technique to add a few vertical flutes to this new handle addition, continuing the pattern from the mug body. -
Let it dry completely:
Allow the mug to dry for at least 24-48 hours. Air-dry clay shrinks slightly as it dries, which effectively tightens the grip around the mug.
Step 3: Painting and Finishing
-
Sand for smoothness:
Once bone dry, take fine-grit sandpaper and lightly glide over the fluted ridges to knock down any rough spots. Wipe away all dust with a tack cloth. -
Paint the top section:
Using a creamy off-white acrylic paint, coat the exposed upper ceramic part of the mug and the top rim of your clay section. You want to create the illusion that the top half is a different glaze. -
Add speckles:
To get that stoneware pottery look, dilute a tiny bit of brown or black paint on a toothbrush. Run your thumb over the bristles to flick tiny speckles onto the cream painted section. -
Paint the bottom section:
If your clay dried a bit chalky, you can enhance the bottom fluted section with a wash of terracotta paint mixed with water. This brings back that rich, warm earthen tone visible in the crevices. -
Seal the handle:
Paint the upper part of the handle to match the cream top, blending the color down to meet the terracotta section. -
Final sealing:
Apply a clear, waterproof varnish over the entire exterior. I prefer a matte varnish for the bottom to keep it looking earthen, and a satin one for the top ‘glazed’ portion.
Pro Tip: Seamless Join
Score (scratch) the back of the clay and the mug surface before attaching. This rough texture acts like Velcro for a stronger, lasting bond.
Remember to only hand-wash your new creation gently to preserve the finish