
There’s something magical about turning simple terracotta lamps into little works of art with diya painting—it’s quick, soothing, and wildly satisfying. Here are my favorite diya painting ideas I keep coming back to when I want a set that looks festive, coordinated, and totally doable at home.
Classic Red Base With Gold Rim Detailing
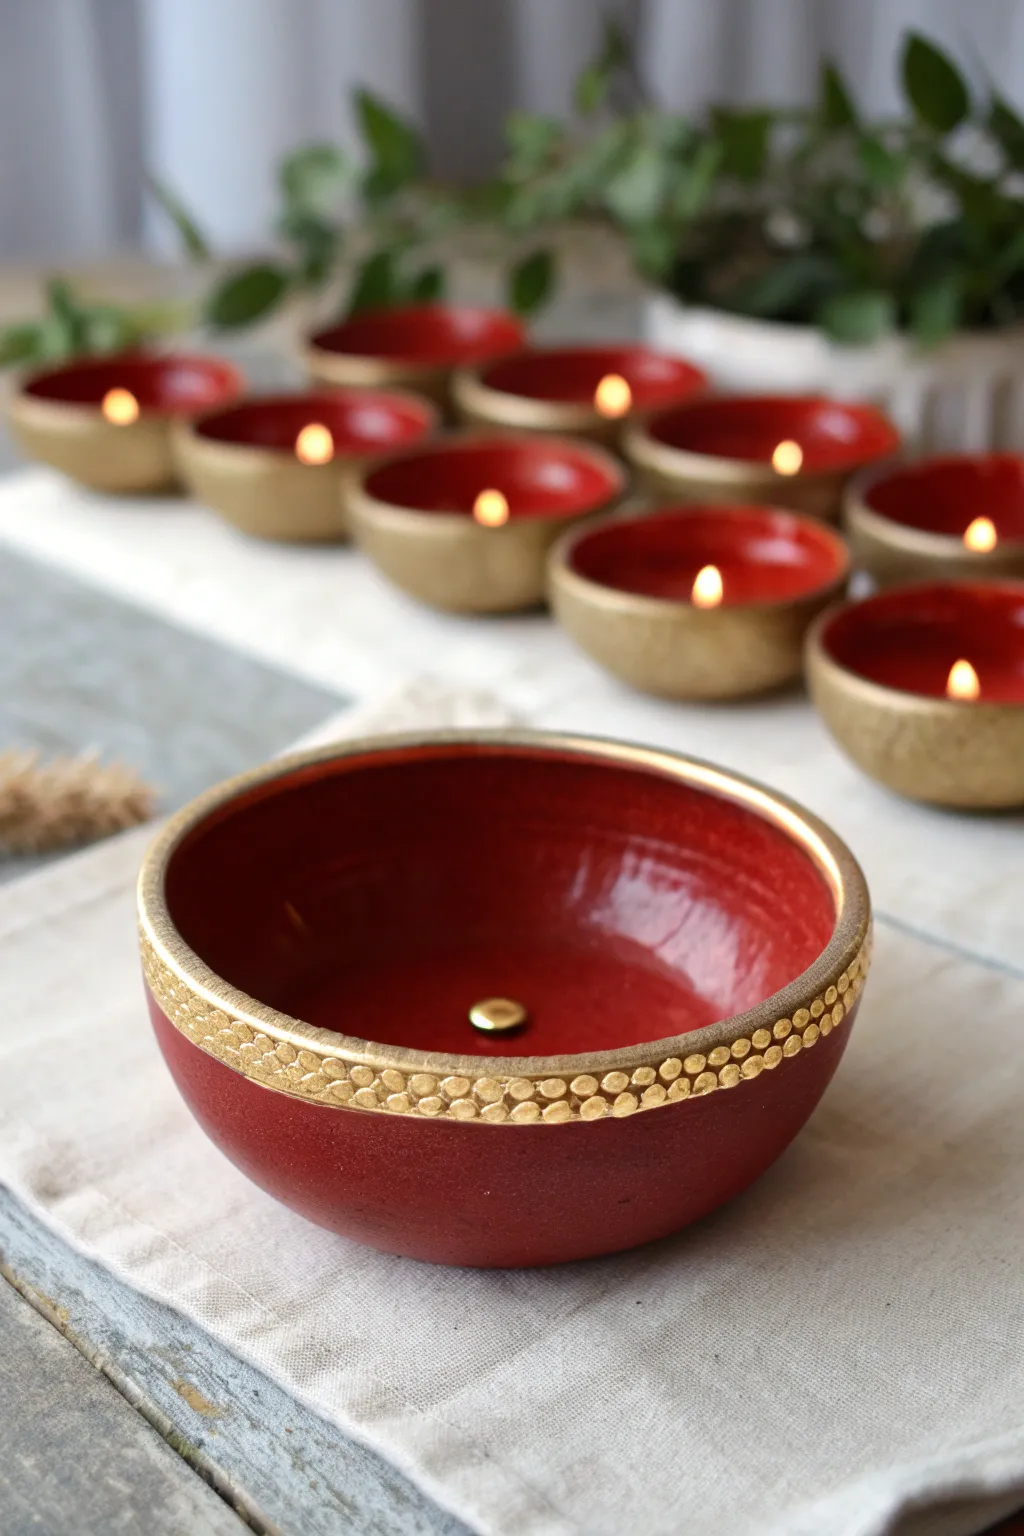
Transform a plain terracotta bowl into a stunning centerpiece with this rich, traditional design. The deep crimson interior contrasts beautifully with a raised, textured gold border, perfect for elevating your festive decor.
Detailed Instructions
Materials
- Medium-sized terracotta or clay bowl (smooth surface)
- Deep red acrylic paint (Crimson or Maroon)
- Metallic gold acrylic paint (Antique Gold finish)
- 3D Gold Outliner or Puff Paint (Gold)
- Flat paintbrush (size 8 or 10)
- Fine round paintbrush (size 0 or 1)
- Gold stud bead or sequin (optional, for center)
- Clear varnish (glossy)
- Palette
- Water cup and paper towels
Step 1: Base Preparation
-
Clean the surface:
Begin by wiping down your terracotta bowl with a slightly damp cloth to remove any dust or loose clay particles. Let it dry completely before applying any paint. -
Prime the interior:
Apply a base coat of the deep red acrylic paint to the entire inside of the bowl. Don’t worry about perfect opacity yet; this layer just seals the clay. -
Paint the exterior:
Paint the outside of the bowl up to the rim with the same deep red shade. This creates a cohesive look similar to the main bowl in the photo. -
Second coat:
Once dry, apply a second, thicker coat of red to both the interior and exterior. Ensure the color is solid and opaque, covering any streaks. -
Rim definition:
Carefully paint the top edge (the lip) of the bowl with your metallic gold paint using the flat brush. Paint about a half-inch strip down the outside edge to create the band’s base.
Mastering the Dots
To get uniform dots on the rim, hold the 3D liner tube vertically, not at an angle. Squeeze gently and lift straight up to avoid ‘tails’ on your dots.
Step 2: Texturing the Rim
-
Prepare the outliner:
Take your 3D gold outliner or puff paint. Squeeze a small amount onto a scrap paper first to ensure the flow is smooth and release any air bubbles. -
Dot the bottom row:
Start applying small, distinct dots along the bottom edge of your painted gold band. Space them very closely together to mimic a beaded edge. -
Create the upper row:
Add a second row of dots right along the very top lip of the bowl. Try to keep them aligned with the bottom row for a neat, geometric appearance. -
Fill the middle:
Between your two rows of dots, pipe small vertical lines, ovals, or a honeycomb pattern. In the image, it looks like a dense pattern of flattened dots or scales. -
Flatten the texture (optional):
If your 3D paint is too pointy, wait about 5 minutes for it to skin over, then gently tap the peaks with a damp finger to flatten them into discs like the reference image.
Wobbly Lines?
If your gold rim line isn’t perfectly straight, don’t stress. Use a piece of masking tape around the bowl to create a crisp guideline before painting the gold band.
Step 3: Finishing Touches
-
Drying time:
Allow the textured rim to dry completely. This usually takes longer than standard acrylics—often 2 to 4 hours depending on humidity. -
Overlay painting:
Once the 3D texture is hard, I find it helps to brush a thin layer of the metallic gold acrylic over the textured area. This unifies the color of the outliner and the base band. -
Refine the red:
Use your fine brush and the red paint to touch up any areas where the gold might have strayed below the rim line. -
Center embellishment:
Place a small drop of strong glue or heavy paint in the very center of the bowl’s bottom interior. Press a gold stud or large sequin into it. -
Varnish application:
Coat the red interior with a glossy varnish to give it that ‘wet’ ceramic look. A matte varnish works better for the exterior if you want a natural clay feel.
Now you have a centerpiece-worthy vessel ready to be filled with oil for a warm glow or used as a festive decor bowl


Bright Solid Base With a Contrasting Inner Color
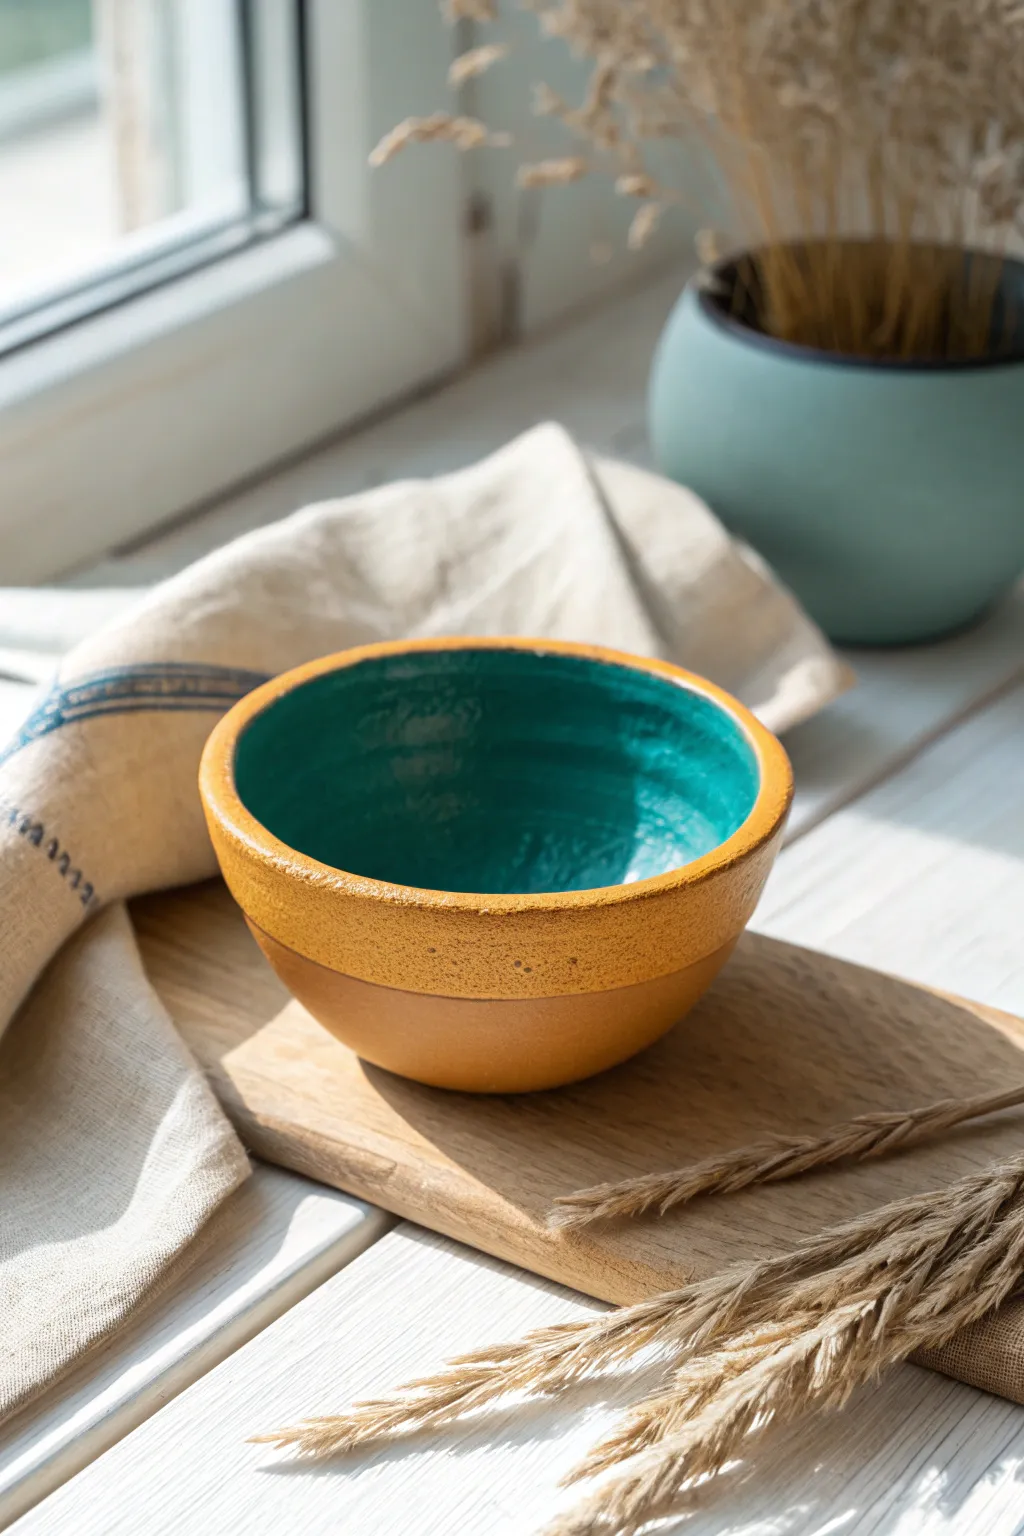
This project transforms a simple clay bowl into a vibrant decorative piece featuring a warm, earthy exterior and a striking turquoise surprise inside. The contrast between the matte, textured mustard yellow rim and the deep, glossy teal interior creates a stunning visual pop perfect for festive decor.
Step-by-Step Tutorial
Materials
- Small clay diya or terracotta bowl (unglazed is best)
- Acrylic paints: Mustard Yellow, Deep Teal/Turquoise, Burnt Sienna
- Gesso or white acrylic primer
- Medium flat paintbrush
- Small round paintbrush for detailing
- Dish sponge or texture sponge
- Matte varnish
- Gloss varnish
- Palette for mixing
- Water cup and paper towels
- Fine-grit sandpaper (optional)
Step 1: Preparation & Priming
-
Inspect and clean:
Before you begin, wipe down your clay bowl with a slightly damp cloth to remove any dust or loose clay particles. If there are rough bumps, gently smooth them with fine-grit sandpaper. -
Apply the base coat:
Using your flat brush, apply a coat of white gesso or white acrylic primer to the entire bowl, including the inside and outside. This ensures your colors will pop and not soak into the porous clay. -
Let it dry completely:
Allow the primer to dry fully. If the coverage looks patchy, apply a second thin coat. A solid white base is crucial for getting that vibrant turquoise hue later.
Step 2: Painting the Exterior
-
Mix the base color:
On your palette, mix a small amount of Burnt Sienna with Mustard Yellow. You want a warm, earthy terra-cotta tone, not too bright but not too muddy. -
Paint the bottom section:
Paint the lower half of the outside of the bowl with this mix. Use smooth, horizontal strokes. Don’t worry about a perfect line at the top just yet. -
Create the textured rim mix:
For the upper rim, squeeze out pure Mustard Yellow. I like to add just a tiny drop of orange to warm it up. To get that stone-like texture, you can mix in a tiny pinch of baking soda or use heavy-body acrylics dabbing it on thickly. -
Apply the rim color:
Paint the upper part of the exterior, overlapping slightly with your bottom color. A slightly uneven, organic line between the two yellows adds charm. -
Add texture with a sponge:
While the rim paint is still wet, take a small piece of a dish sponge and lightly dab over the Mustard Yellow area. This creates the pitted, rustic texture seen in the photo. -
Define the lip:
Carry this mustard yellow color right over the top lip of the bowl, just barely touching the inner edge. -
Finalize exterior texture:
If you want more depth, speckle the rim section by flicking a toothbrush with diluted Burnt Sienna paint very lightly. This mimics natural pottery speckles.
Uneven Rim Line?
If the line between the inner and outer colors is messy, use a gold or bronze paint pen to draw a thin line along the rim. This hides mistakes and adds a touch of shine.
Step 3: The Turquoise Interior
-
Load your brush:
Clean your flat brush thoroughly. Load it generously with your Deep Teal or Turquoise paint. -
Paint the inside walls:
Start painting the inside of the bowl. Apply the paint thickly to cover any brushstrokes. The goal is a saturated, solid block of color. -
Refine the edge:
Carefully paint up to the rim. Create a clean line where the interior turquoise meets the exterior mustard yellow on the lip. A steady hand or a smaller round brush helps here. -
Check for coverage:
Inspect the inside under a bright light. If you see white primer showing through, apply a second coat of turquoise once the first layer is dry. -
Create depth (optional):
To give the inside a hand-thrown look, you can mix a slightly darker shade of teal and paint faint horizontal rings inside the bowl, mimicking potter’s wheel marks.
Level Up: Metallic Pop
Before varnishing, dry brush a tiny amount of metallic copper paint over the textured mustard rim. It will catch the light and make the texture look more expensive.
Step 4: Sealing & Finishing
-
Seal the exterior:
Once all paint is bone dry, apply a coat of matte varnish to the outside of the bowl. This preserves the rustic, earthy texture we created. -
Glaze the interior:
For the inside, switch to a high-gloss varnish. Apply 1-2 coats. This makes the turquoise look like glazed ceramic and contrasts beautifully with the matte outside. -
Final dry time:
Let the varnishes cure according to the bottle instructions (usually 24 hours) before handling or placing anything inside.
Place your finished bowl deeply in a bright spot where the sun can catch that glossy teal interior


Easy Petal Flower Inside the Bowl
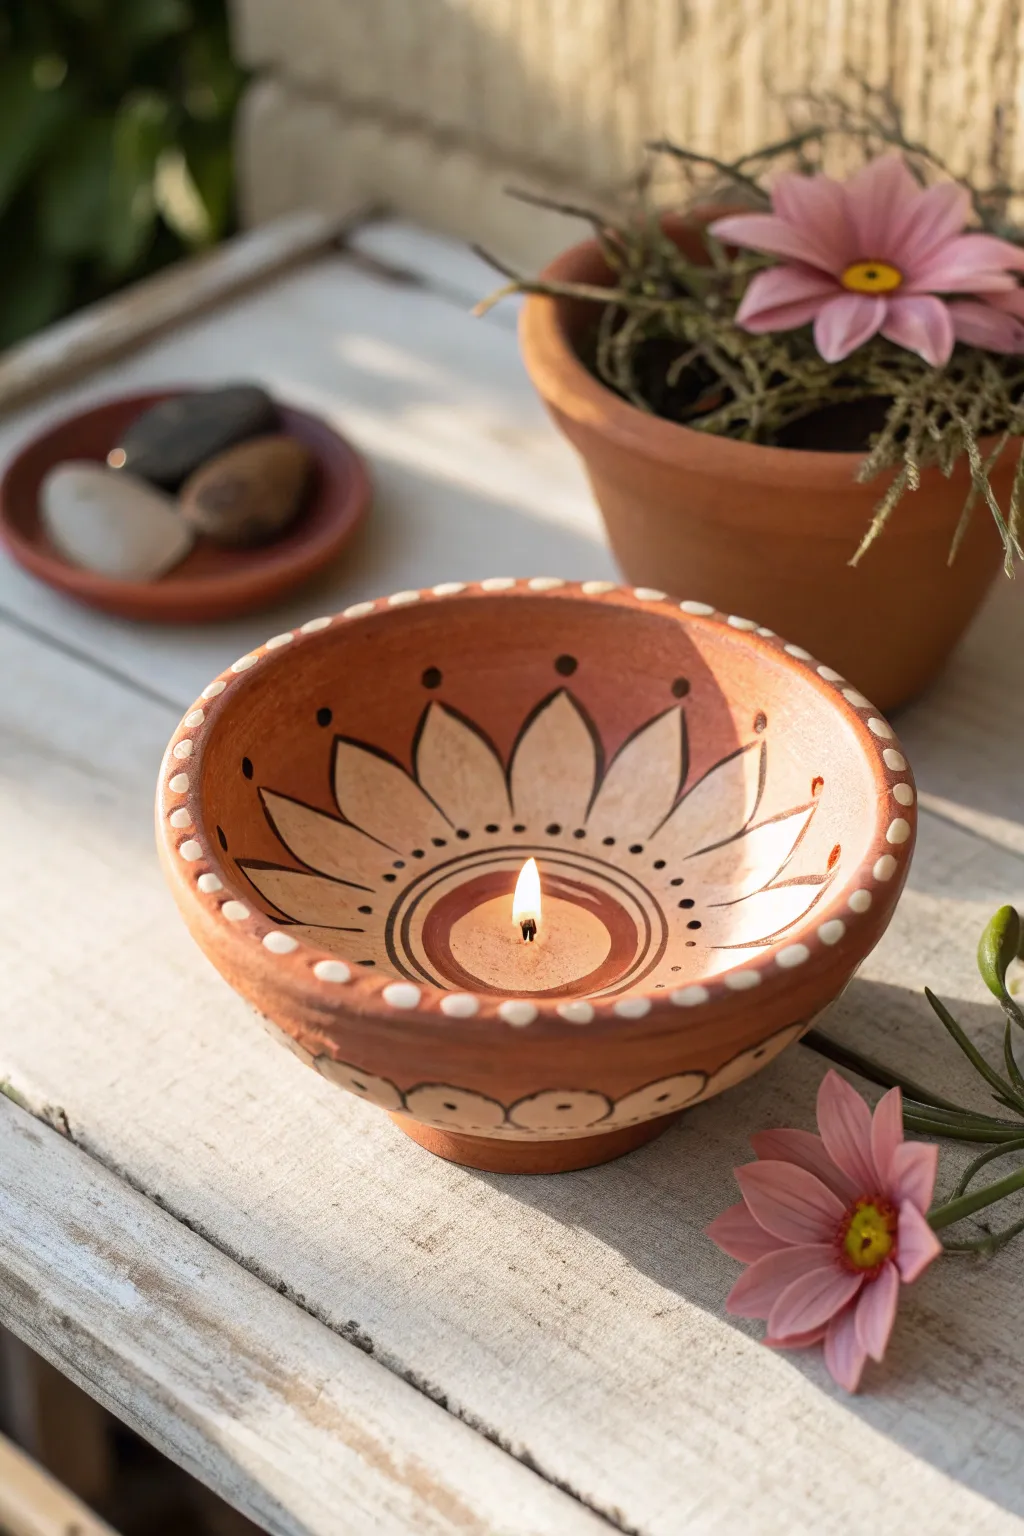
Transform a simple terracotta bowl into a festive centerpiece with this striking petal design. The contrast between the natural clay and the stark white petals, accented with black detailing, creates a traditional yet modern folk-art aesthetic ideal for Diwali.
Detailed Instructions
Materials
- Terracotta diya or small clay bowl
- White acrylic paint
- Black acrylic paint
- Small round paintbrush (size 2 or 3)
- Fine liner brush (size 0 or 00)
- Dotting tool or back of a paintbrush handle
- Pencil
- Varnish (optional)
Step 1: Preparation and Base Layer
-
Clean surface:
Begin by ensuring your terracotta bowl is clean and dry. Wipe away any loose dust with a dry cloth to help the paint adhere properly. -
Sketch the center:
Using a pencil, lightly draw a small circle at the very bottom center of the bowl. This will be the base for your wick. -
Outline the petals:
From that central circle, sketch large, curved petal shapes that reach up toward the rim. Aim for about 8-10 petals depending on the size of your bowl. -
Draft the outer rim pattern:
Flip the bowl carefully or work on the side to sketch a scalloped, semicircular pattern along the exterior lower edge.
Soak It First
Before painting, soak the terracotta diya in water for an hour and let it dry completely. This prevents the clay from absorbing all the moisture from your paint too quickly.
Step 2: Painting the Design
-
Fill the petals:
Load your round brush with white acrylic paint. Carefully fill in the petal shapes you sketched inside the bowl. -
Apply second coat:
Terracotta is porous and drinks up paint, so let the first layer dry and add a second coat of white to ensure the petals look bright and opaque. -
Paint the exterior scallops:
While the inside dries, paint the scalloped shapes on the outside of the bowl white, matching the style of the interior petals. -
Create the center rings:
With a steady hand or a smaller brush, paint a thick ring around the central depression (where the wick goes) in a dark brown or reddish tone, or leave it natural clay and outline it with black later. -
Add the rim dots:
Dip the back of a paintbrush handle or a large dotting tool into white paint. Stamp evenly spaced dots along the entire top rim of the diya.
Glow Up
Mix a tiny amount of gold metallic paint into your white acrylic for the petals. It won’t change the color much but will add a beautiful shimmer when the flame is lit.
Step 3: Detailing and Outlining
-
Outline petals:
Switch to your fine liner brush and black paint. Carefully outline each white petal. I like to keep the line slightly organic rather than perfectly rigid. -
Add inner petal details:
Using the liner brush, add a small V-shape or a single line inside the tip of each white petal to give it dimension. -
Paint dividing lines:
Draw thin black lines extending from the rim down between the petals, pointing toward the center. -
Add central dots:
Using a smaller dotting tool, place tiny black dots around the base of the petals, circling the central area. -
Decorate the upper petals:
Place a medium-sized black dot floating just above the tip of each petal, near the rim design. -
Outline exterior pattern:
Use the liner brush to outline the white scallops on the outside of the bowl with black paint. -
Add exterior dots:
Place a black dot in the center of each exterior white scallop. -
Dry and protect:
Allow the paint to cure fully for at least an hour. If you plan to reuse this yearly, apply a coat of clear varnish to seal the design.
Now you are ready to fill your beautiful creation with oil and light the wick to enjoy the warm glow


Two-Tone Border With Cute Polka Dots
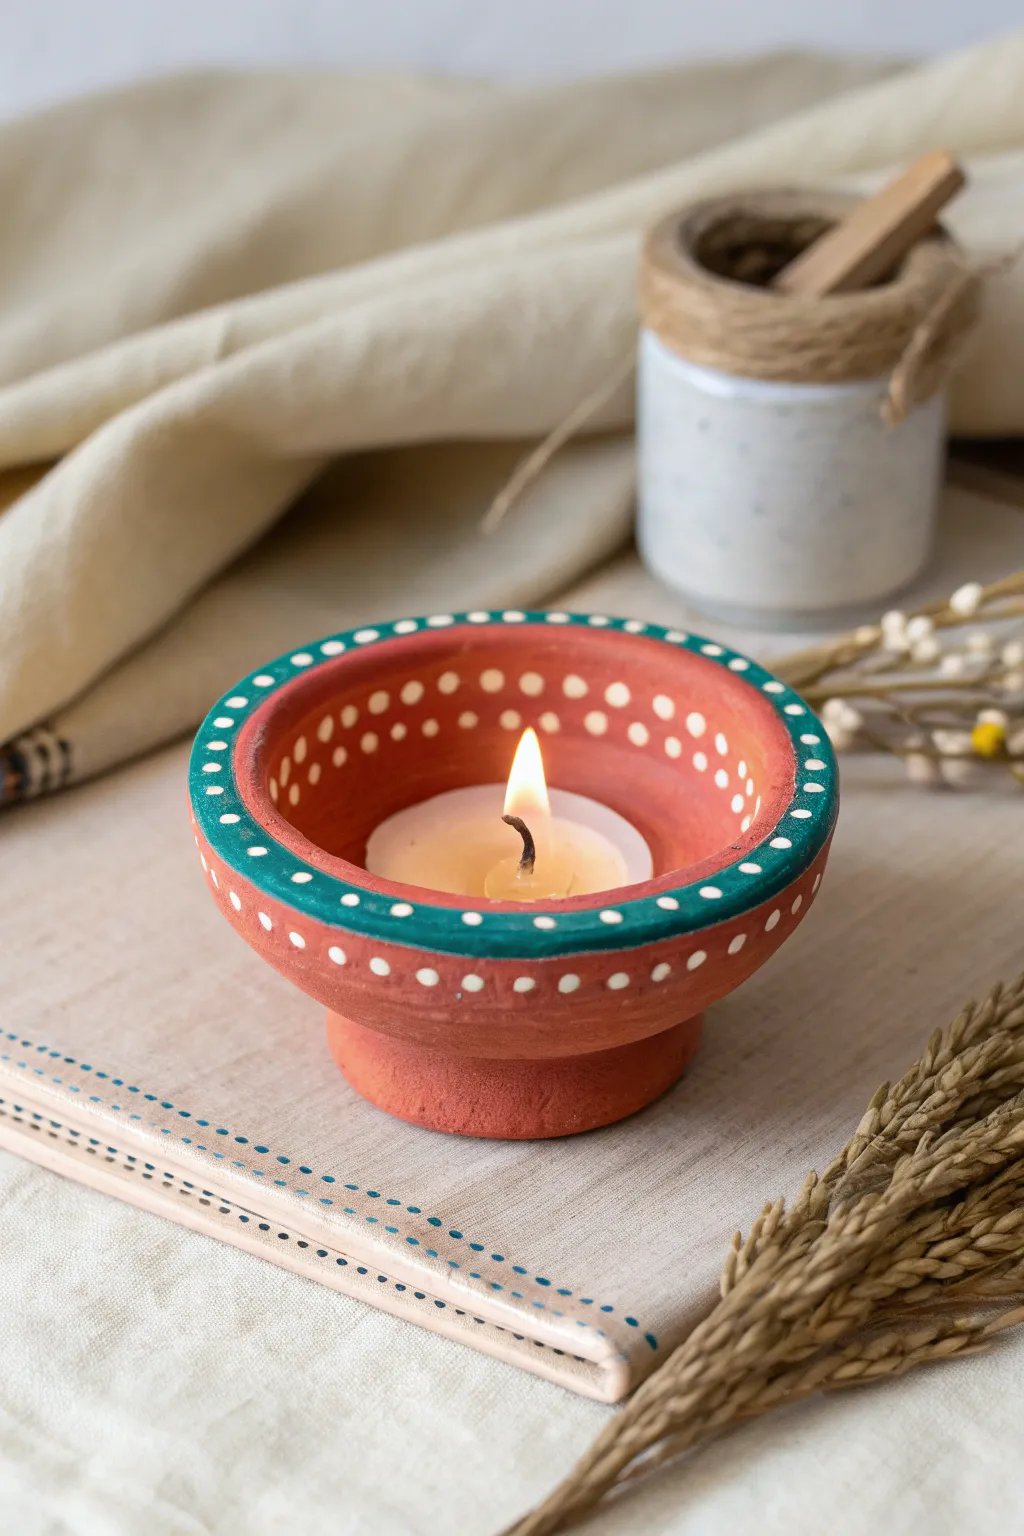
Transform a simple terracotta diya into a festive centerpiece with this charming two-tone design. The combination of a rich teal border and delicate white polka dots creates a look that is both traditional and playful.
How-To Guide
Materials
- Terracotta diya (bowl shape with pedestal)
- Acrylic paints: Teal (or deep turquoise) and White
- Flat paintbrush (size 4 or 6)
- Fine tip paintbrush (size 0 or 00) or a dotting tool
- Palette or small dish for mixing
- Cup of water and paper towels
- Clear acrylic varnish (optional, for sealing)
Step 1: Preparation and Base
-
Clean the surface:
Start by gently wiping down your terracotta diya with a dry cloth to remove any loose dust or clay particles. If there’s stubborn dirt, use a slightly damp cloth, but let the clay dry completely before painting. -
Inspect for imperfections:
Check the rim and the exterior for any rough bumps. While terracotta is naturally textured, you want a relatively smooth surface for the rim where the main color will go.
Step 2: Painting the Rim
-
Load your brush:
Squeeze a small amount of teal or deep turquoise acrylic paint onto your palette. Load your flat brush evenly, but don’t overload it to prevent dripping. -
Paint the top edge:
Carefully paint the flat top surface of the diya’s rim. Use smooth, horizontal strokes to get an even coat. I find rotating the diya with my other hand while painting helps keep the line steady. -
Extend to the outer lip:
Bring the teal paint down slightly over the outer edge of the rim, creating a band about 1/4 inch thick. This frames the top of the bowl nicely. -
Refine the inner edge:
Clean up the inner edge of the rim with your brush to ensure a sharp line where the paint meets the unpainted terracotta interior. -
Check for opacity:
Acrylics on clay can sometimes look streaky. If the terracotta color is showing through the teal too much, let the first layer dry for 10 minutes and apply a second coat for a solid, opaque finish. -
Let it dry:
Allow the green border to dry completely to the touch before moving on to the white details. This prevents the colors from muddying.
Uneven Dots?
If a dot looks messy or smudged, wait for it to dry completely. Then, carefully scrape it off with a craft knife or paint over it with the base color (teal or terracotta match) before re-dotting.
Step 3: Adding the Polka Dots
-
Prepare the white paint:
Place a drop of white acrylic paint on your palette. It should be fluid but not watery; if it’s too thick, the dots might form peaks. -
Choose your tool:
For the most uniform dots, use a specialized dotting tool. If you don’t have one, the back end of a small paintbrush handle or a toothpick works surprisingly well. -
Dot the teal rim:
Dip your tool into the white paint and gently press onto the painted teal rim. Create a single row of evenly spaced dots all around the top face of the rim. -
Create the inner ring:
Moving to the interior of the bowl, paint a ring of white dots on the unpainted terracotta surface, just below the teal rim. Try to align these roughly with the gaps between the top dots for a staggered look. -
Add the outer accent:
Finally, add a row of very small white dots on the unpainted terracotta exterior, just below the teal band. Keep these subtle and delicate. -
Dry generally:
Set the diya aside in a safe, dust-free spot to dry completely. Since the dots are thicker deposits of paint, give them at least an hour to harden fully.
Level Up: Golden Glow
Swap the white paint for a metallic gold acrylic. The gold dots will catch the candlelight beautifully and give the diya a more opulent, regal appearance suitable for big celebrations.
Step 4: Styling
-
Insert the candle:
Once fully dry, place a standard tealight candle or a small oil wick setup into the center of the bowl. -
Light and enjoy:
Light the candle to see how the flame illuminates the inner terracotta color and contrasts with your painted teal border.
Your handcrafted diya is now ready to add warmth and light to your festive decor

The Complete Guide to Pottery Troubleshooting
Uncover the most common ceramic mistakes—from cracking clay to failed glazes—and learn how to fix them fast.
Rangoli-Inspired Concentric Rings and Triangles
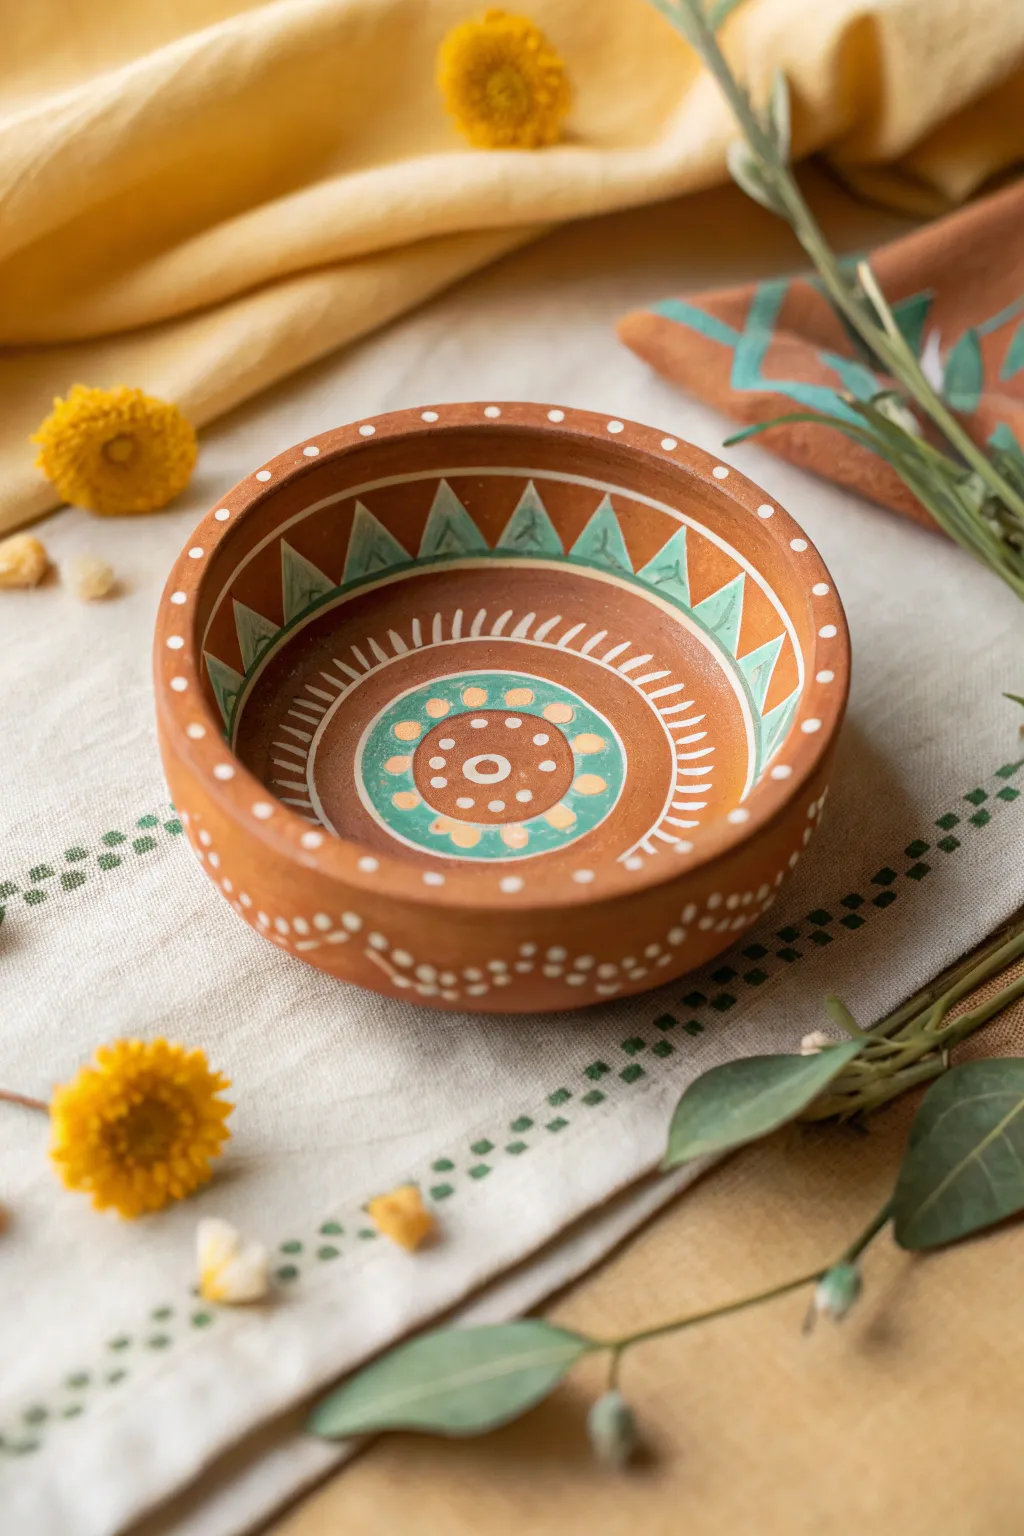
Bring the symmetry of Rangoli art to your festive decor with this meticulously hand-painted terracotta diya. The design features soothing teal triangles and concentric patterns that radiate outward, creating a balanced and earthy aesthetic perfect for Diwali.
Step-by-Step Guide
Materials
- Terracotta diya or small clay bowl (pre-soaked and dried)
- Acrylic paints: White, Teal/Turquoise, Lemon Yellow (or light ochre)
- Fine detail paintbrush (size 0 or 00)
- Flat paintbrush (size 2 or 4)
- Pencil (optional)
- Palette for mixing
- Water cup and paper towels
- Clear varnish (matte or gloss)
Step 1: Preparation & Base Design
-
Prepare the surface:
Ensure your terracotta bowl is clean and completely dry. If you haven’t already, soak it in water for a few hours and let it dry overnight to prevent the clay from soaking up all your paint. -
Map the center:
Using a pencil very lightly, mark the center point inside the bowl. Just sketch a small circle about the size of a coin; this will be the heart of your mandala design. -
Draft the triangle band:
Move up to the inner rim or the wall of the bowl. Lightly sketch a zig-zag line all the way around to create a continuous band of triangles pointing upwards.
Steadiness Hack
Rest your pinky finger on the dry parts of the bowl while painting fine lines. It acts as an anchor to stop your hand from shaking during detailed work.
Step 2: Painting the Center
-
Create the central motif:
Dip your fine brush into white paint. In the very center of your pencil circle, paint a small solid white dot. Surround this with a thin, terracotta-colored ring (essentially just leaving the clay bare) and then paint a circle of small white dots around that. -
Paint the teal ring:
Load your flat brush with teal paint. Paint a solid, thick band around the central dot cluster. I like to keep the paint consistency creamy so it covers the clay texture smoothly without needing a second coat. -
Decorate the teal band:
Once the teal is dry to the touch, switch back to the fine brush and yellow paint. Add small yellow dots spaced evenly around the teal ring. Between each yellow dot, add a tiny white dot or a small U-shape curve for extra detail. -
Add the radiating lines:
Outside the teal ring, paint a series of short, white dashed lines radiating outward like sun rays. Keep them closely spaced and uniform in length. -
Frame the center:
Finish the bottom section by painting a thin, solid white line that encircles the entire sunburst pattern, separating the bottom of the bowl from the walls.
Go Glam
For a festive evening look, glue tiny mirrors (shisha) into the center of the teal triangles or the middle of the bowl to catch and reflect the candlelight.
Step 3: The Triangle Wall & Rim
-
Fill the triangles:
Locate the zig-zag pencil line you drew earlier on the walls. Fill every upward-pointing triangle with the teal paint. Leave the downward-pointing triangles bare (showing the natural terracotta). -
Outline the geometry:
Using your thinnest brush and white paint, carefully outline each teal triangle. This crisp white line makes the geometric pattern pop against the earthy clay. -
Detail the bare triangles:
Inside the empty terracotta triangles, add a small vertical line or an inverted ‘V’ shape in white to fill the negative space without overpowering it. -
Dot the rim:
Moving to the flat top edge of the rim, dip the back end of your paintbrush (the handle) into white paint. Stamp evenly spaced dots all around the circumference.
Step 4: Outer Details & Finishing
-
Create the outer wave:
On the exterior of the bowl, paint a gentle, wavy line using white paint. It should mimic a garland draped around the bowl’s belly. -
Add exterior dots:
Follow the curve of your white wave with small white dots. Additionally, place a larger dot in each dip of the wave and a cluster of dots at each peak. -
Final inspection:
Check for any uneven lines or smudges. You can scratch off dried acrylic mistakes gently with a toothpick or cover them with a touch of terracotta-colored paint if you have it. -
Seal the artwork:
Once the paint is completely cured (wait at least an hour), apply a layer of clear varnish. This protects the design from heat and oil if you plan to light the diya.
Place a tea light inside to see how the flame illuminates your intricate design patterns
Mandala Dot Art on a Dark Background
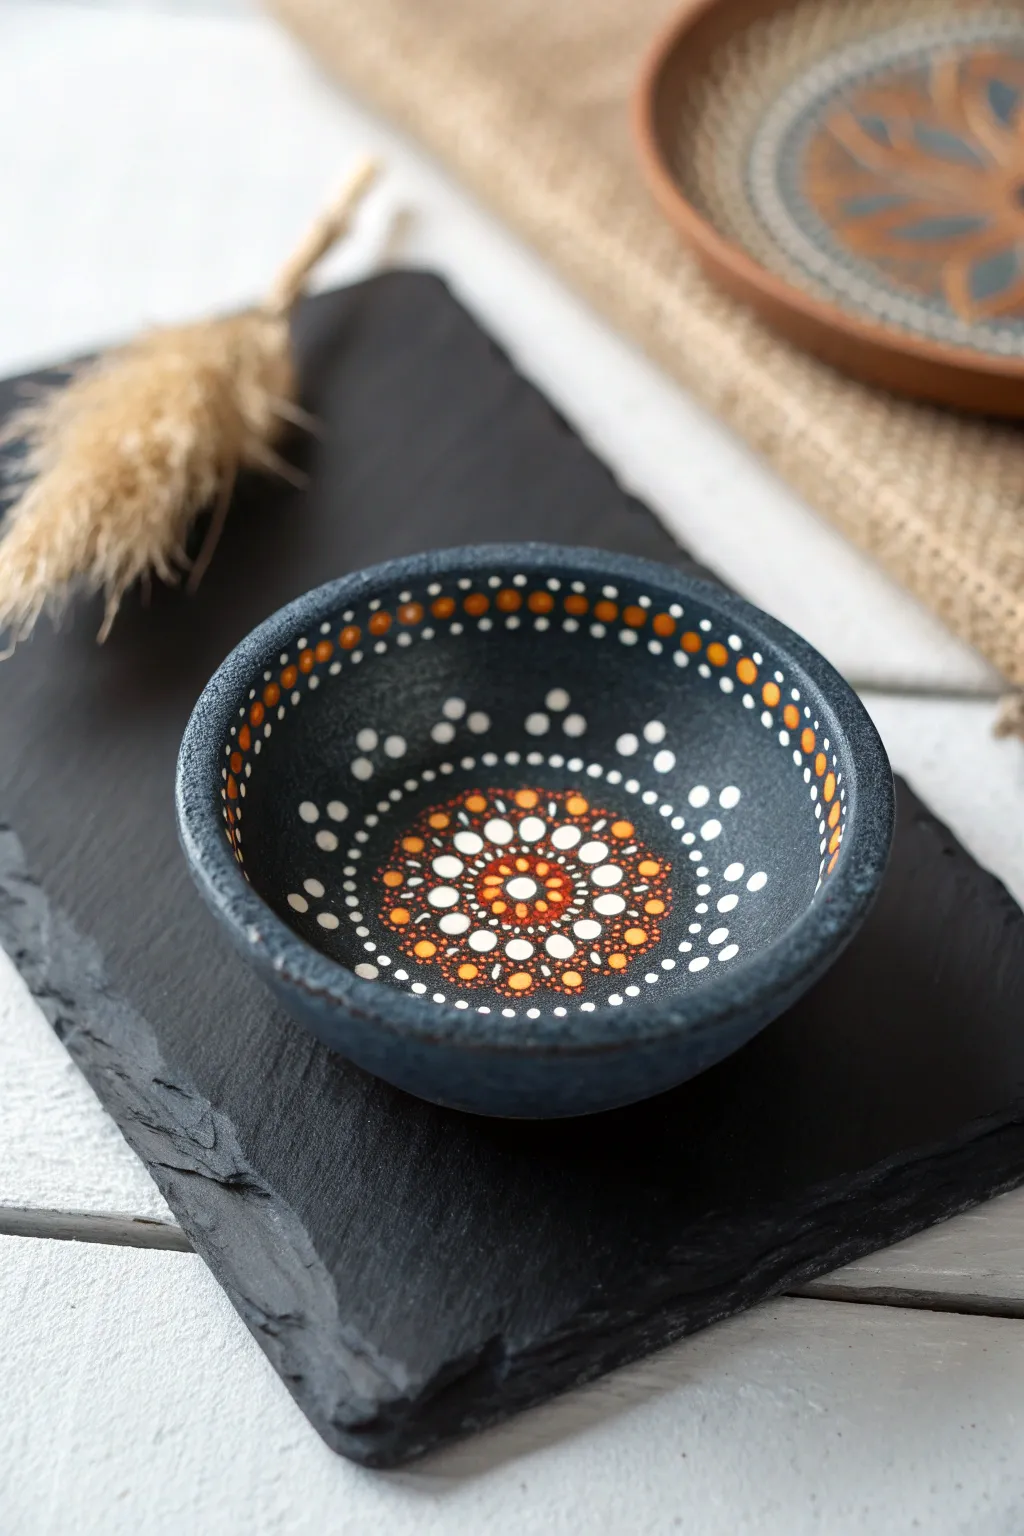
Transform a simple clay bowl into a stunning piece of decor using the mesmerizing technique of mandala dot art. The high contrast of bright whites and warm oranges against a charcoal background creates a radiating energy perfect for holding trinkets or purely for display.
Step-by-Step
Materials
- Small ceramic or terracotta bowl
- Matte black or charcoal acrylic paint
- White acrylic paint
- Orange acrylic paint
- Terracotta/Red-brown acrylic paint
- Set of dotting tools (various sizes)
- Small flat paintbrush
- Cotton swabs or damp cloth (for mistakes)
- Spray varnish (gloss or matte)
Step 1: Base Preparation
-
Clean surface:
Ensure your ceramic bowl is completely clean and dry. If you are using a raw terracotta diya or bowl, give it a quick wipe to remove dust. -
Base coat:
Apply a coat of matte black or dark charcoal acrylic paint to the entire interior of the bowl. Don’t forget the rim. -
Second layer:
Once the first coat is dry, apply a second layer to ensure opaque, solid coverage. Let this dry completely before starting the dot work to prevent colors from muddying.
Paint Consistency
For perfectly round dots that don’t retain “peaks,” mix a tiny drop of pouring medium or water into your heavy body acrylics. It should have the texture of fluid cream.
Step 2: The Center Design
-
Center dot:
Using your largest dotting tool, place a single white dot in the absolute center of the bowl’s bottom. -
First ring:
Switch to a smaller tool. Dip it in the terracotta/red-brown paint and create a ring of small dots closely hugging the central white dot. -
Second ring:
Using orange paint and a slightly larger tool than the previous step, create a second ring of dots around the first one. -
White accent ring:
With a medium-sized tool and white paint, create a third ring. Focus on spacing them evenly; imagine a clock face to help with symmetry.
Add Some Gradient
Instead of solid orange dots, dip your tool in orange, then half-dip it in white before dotting. This creates a beautiful 3D bullseye effect instantly.
Step 3: Expanding the Pattern
-
Large petals:
Using a larger tool, place substantial orange dots in a circle around your white ring. Leave a tiny bit of space between these dots and the previous row. -
Walk the dots:
This is a classic technique: Take a tiny tool with white paint. placing a small dot at the top of each large orange dot, then ‘walk’ smaller and smaller dots down the sides of the orange dot to frame it. -
Outer fill:
In the negative space between the orange ‘petals’, place medium-sized white dots to expand the circle further towards the bowl’s walls. -
Terracotta details:
Add small terracotta dots in between the white dots you just placed to add color depth and density to the mandala.
Step 4: Bowl Walls & Rim
-
Scattered stars:
Move onto the sloping walls of the bowl. Instead of a tight geometric pattern here, create an airy feel by scattering groups of 3 to 4 varying-sized white dots. -
Start the rim:
For the rim pattern, dip a medium tool in orange paint. Place dots along the very top edge, spacing them out so you can fit other colors in between. -
Fill the rim:
Fill the gaps between the orange rim dots with white dots of the same size. This alternating pattern frames the artwork beautifully. -
Inner rim border:
Just below the rim on the inside surface, create a consistent line of tiny white dots. This acts as a border between the rim and the interior bowl space. -
Final accents:
Look for any large gaps in your center mandala. I like to fill these empty spaces with tiny micro-dots of white or orange to make the design look intricate.
Step 5: Finishing
-
Curing time:
Allow the paint to cure for at least 24 hours. Because the paint is applied thickly in dots, the center needs time to harden all the way through. -
Seal:
Hold a spray varnish about 12 inches away and give the bowl a light, even coat to protect the paint from chipping and dust.
Once dry, your intricate bowl is ready to bring a touch of artisanal warmth to any corner of your home


What Really Happens Inside the Kiln
Learn how time and temperature work together inside the kiln to transform clay into durable ceramic.
Minimal White Linework on Natural Terracotta
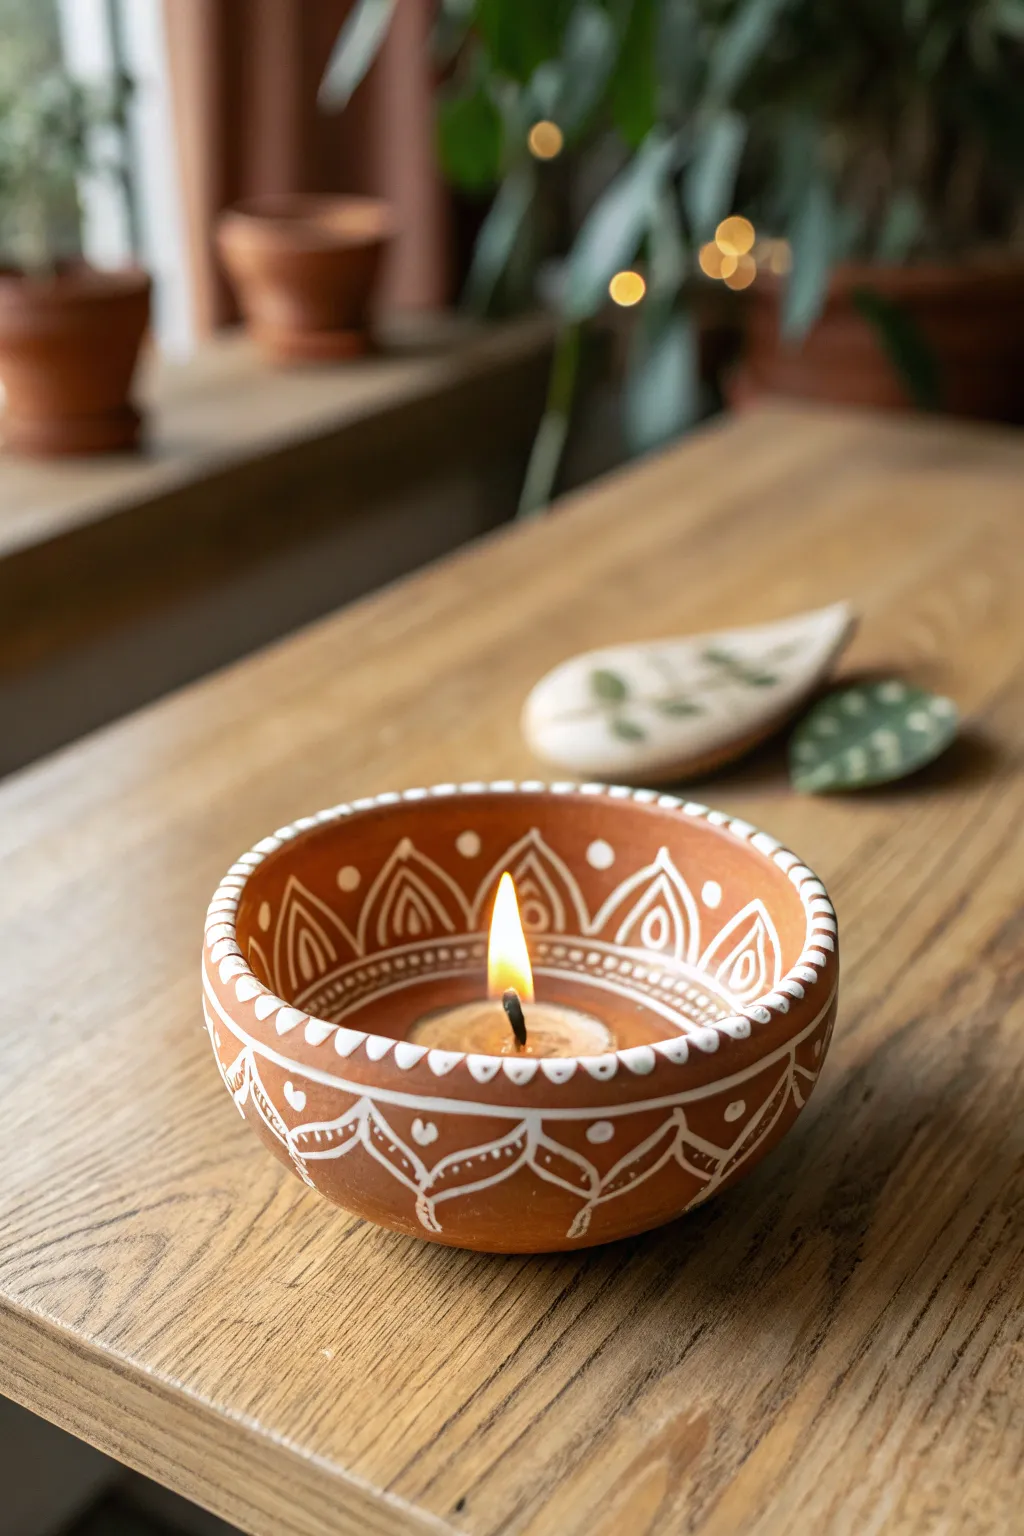
This elegant diya design celebrates the raw beauty of terracotta by using simple white linework to create a stark, beautiful contrast. The delicate patterns mimic lace or embroidery, turning a plain clay pot into a sophisticated centerpiece perfect for Diwali or cozy home decor.
Step-by-Step Tutorial
Materials
- Plain terracotta diya (bowl shaped)
- White acrylic paint (heavy body preferred)
- Fine tip paint brush (size 0 or 00)
- Small dotting tool or toothpick
- Palette or small dish
- Paper towels
- Varnish (matte or satin, optional)
- Tea light candle
Step 1: Preparation & Base
-
Clean the surface:
Begin by wiping down your terracotta diya with a dry or slightly damp cloth to remove any loose dust or pottery powder. The surface needs to be completely dry and clean for the paint to adhere properly. -
Test paint consistency:
Squeeze a small amount of white acrylic paint onto your palette. You want a creamy consistency that flows easily off a thin brush but isn’t watery. If it’s too thick, add a tiny drop of water and mix.
Shaky Hands?
Rest your pinky finger on the dry part of the terracotta surface while painting. This acts as an anchor, giving you much more stability for fine lines.
Step 2: Interior Design
-
Paint the rim dots:
Start at the very top edge of the diya’s rim. Using your fine brush or a dotting tool, create a consistent row of small white dashes or dots all along the flat upper lip. -
Create the inner arches:
Just below the rim on the inside surface, paint a row of connected arches (scallops). Try to keep them evenly spaced, reaching about halfway down the inner wall. -
Add the inner tear-drops:
Inside each of the arches you just painted, add a smaller, floating tear-drop or petal shape. This creates a layered, floral look without requiring complex shading. -
Detail the inner pattern:
Place a single white dot between the peaks of each arch for extra detail. I like to add a second, smaller concentric line inside the tear-drops for added depth if the brush is fine enough.
Level Up: 3D Texture
Use 3D puff paint or dimensional fabric paint in a squeeze bottle instead of flat acrylics. This will give the white pattern a raised, embossed texture.
Step 3: Exterior Design
-
Mirror the scalloped edge:
Move to the outside of the bowl. Paint a similar row of connected arches starting just below the rim, mirroring the pattern you created on the inside. -
Outline the scallops:
Carefully paint a second line following the curve of the exterior arches to thicken them up and make the white pop against the terracotta. -
Add petal details:
Draw three small lines extending downward from the base point where two arches meet. This mimics the vein structure of a leaf or flower. -
Incorporate dots:
Using your dotting tool or the back of a paintbrush, place a prominent white dot inside each exterior arch, centered near the top curve. -
Add the suspended hearts:
Paint a small heart or V-shape floating in the negative space between the arches, slightly lower down the bowl. -
Refine the linework:
Go back over any lines that look faint. The white needs to be opaque to stand out, so a second coat on the main structural lines is often necessary.
Step 4: Finishing Touches
-
Let it dry:
Allow the paint to dry completely. Since terracotta is porous, the acrylic usually dries fast, but give it at least 20 minutes to be safe. -
Add the rim detail:
Paint a final thin line right under the rim on the outside to frame the entire design and connect the top section to the rest of the bowl. -
Optional sealing:
If you plan to reuse this diya often, apply a coat of matte varnish over the painted areas to protect the design from heat and soot. -
Light it up:
Place a tea light or pour oil and a wick into the center. The glow of the flame will illuminate the white patterns against the warm clay.
Enjoy the warm, festive atmosphere your handcrafted diya creates.
Metallic Accents With Tiny Stipple “Sparkle”
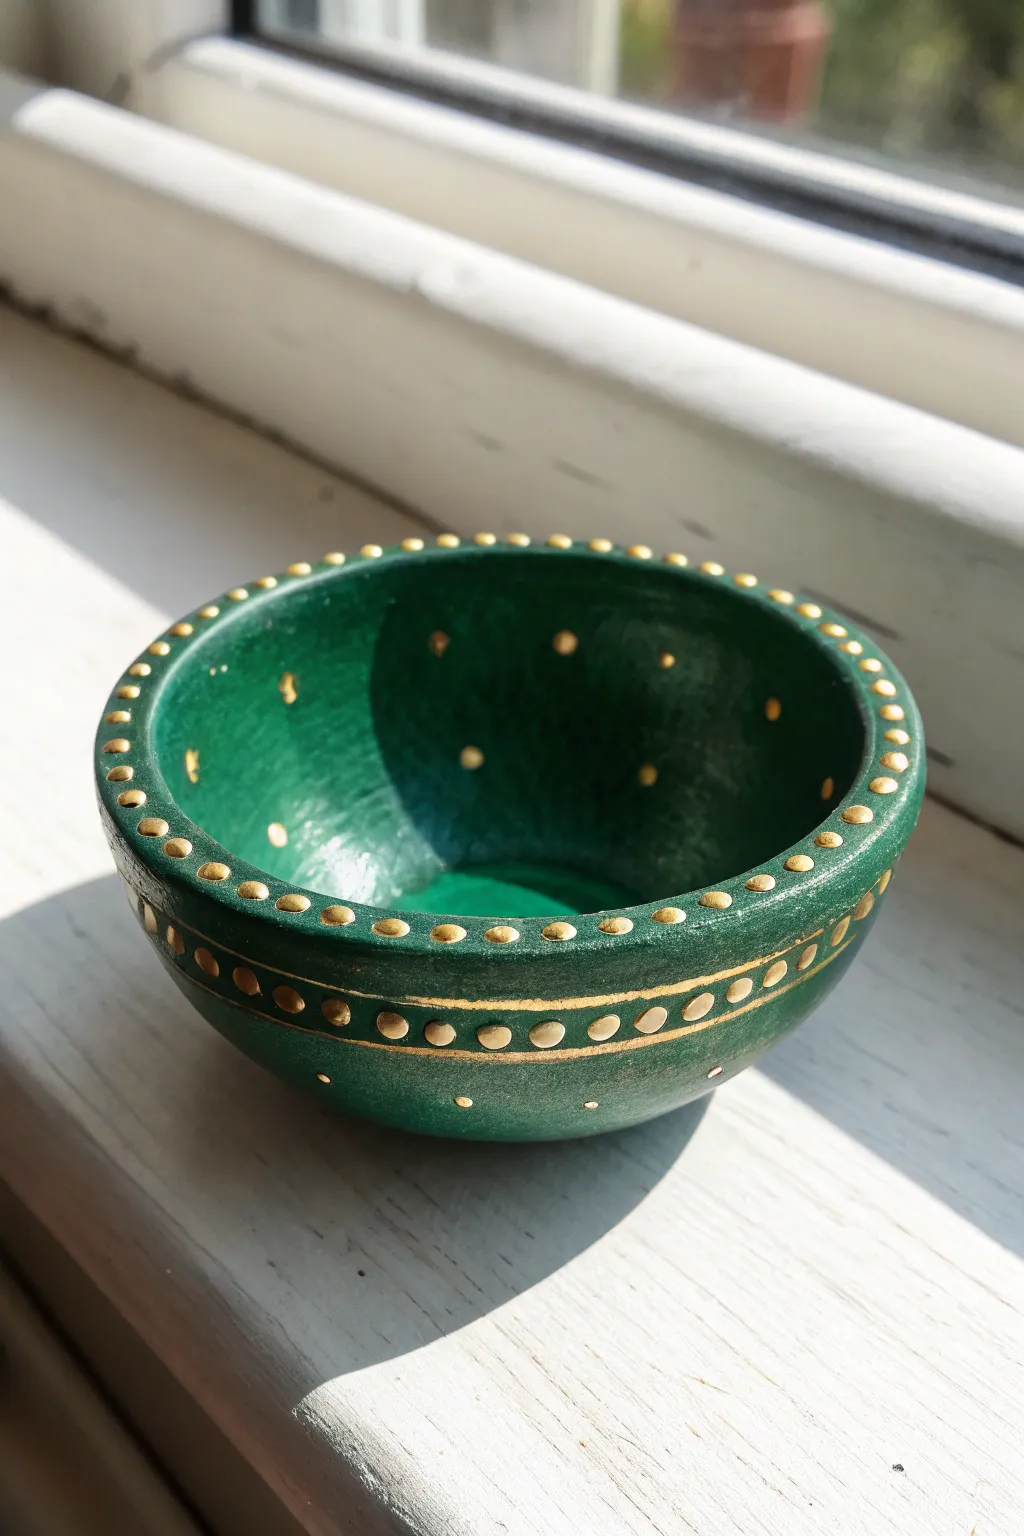
This project transforms a simple clay diya into an elegant piece of decor using a rich, dark green base and precise metallic detailing. The effect creates a sophisticated look resembling regal velvet or enameling, perfect for adding a touch of understated luxury to your festive setting.
Step-by-Step Guide
Materials
- Small clay diya or terracotta bowl
- Deep forest green acrylic paint
- Metallic gold acrylic paint (or gold dimensional fabric paint)
- Flat paintbrush (medium size)
- Fine detail paintbrush (size 0 or 00)
- Dotting tools (or the back end of paintbrush handles)
- Mod Podge or clear gloss varnish
- Paper palette or small plate
- Cup of water and paper towels
Step 1: Base Preparation
-
Clean surface:
Begin by wiping down your clay diya with a dry cloth to remove any loose dust or debris. If the clay is particularly rough, you can give it a gentle sanding with fine-grit sandpaper, but wiping usually suffices. -
First coat of green:
Load your flat brush with the deep forest green acrylic paint. Apply an even coat over the entire exterior of the diya. -
Inside coverage:
While the outside is wet, paint the interior of the bowl as well. Ensure you get into the corners at the bottom so no bare clay is showing. -
Drying time:
Allow the first layer to dry completely. This usually takes about 15–20 minutes. If the clay is porous, it might dry faster as it soaks up the paint. -
Second coat:
Apply a second coat of green paint to ensure a solid, opaque finish. The color should look deep and uniform without any streaky patches. Let this dry thoroughly before moving to details.
Uneven Dots?
If a dot smudges or looks mishapen, wait for it to dry completely, then paint over it with a tiny dab of the green base color. Re-apply the gold dot once fixed.
Step 2: Metallic Rim Detailing
-
Prepare gold paint:
Squeeze a small amount of metallic gold paint onto your palette. If you are using dimensional paint, ensure the nozzle is clean. -
Tool selection:
Select a medium-sized dotting tool or find a paintbrush handle with a rounded end that matches the size of the dots on the rim. -
Outer rim dots:
Dip your tool into the gold paint and carefully press a dot onto the flat, top edge of the diya’s rim. Reload your tool for every dot to keep them consistent. -
Complete the circle:
Continue placing gold dots all the way around the rim, spacing them evenly. Try to keep the distance between each dot the same for a professional look.
Dimensional Pop
Use 3D fabric paint (puff paint) instead of standard acrylic for the gold dots. This creates actual texture you can feel and catches the light better.
Step 3: Creating the Gold Band
-
Mapping the band:
Locate the midpoint on the exterior curve of the bowl. This is where your horizontal band will go. -
Painting the stripe:
Using your fine detail brush, paint a thin, continuous gold line around the circumference of the diya. It helps to rest your pinky finger on the table to steady your hand as you rotate the diya. -
Refining the line:
Go over the line a second time if the gold looks translucent. You want a solid metallic stripe. -
Adding the lower dots:
Using the same dotting tool from earlier, or a slightly larger one, press a row of gold dots directly onto the painted gold line. The dots shout sit right on top of the stripe, creating a jeweled belt effect.
Step 4: Stipple Sparkle Effects
-
Inner sparkle:
Switch to a very small dotting tool or a toothpick. Inside the bowl, apply tiny, random gold dots along the upper walls to mimic scattered starlight. -
Lower exterior accents:
Add a few very spaced-out, tiny gold dots near the bottom base of the diya’s exterior. These should be subtle and sparse. -
Dry completely:
Let all the gold paint dry completely. Metallic paint often takes a little longer than standard acrylics, so give it at least an hour. -
Sealing:
Apply a coat of gloss varnish or Mod Podge over the entire piece. This protects the paint from heat and adds a beautiful shine that makes the green look like ceramic.
Place a small tealight inside your finished diya to watch the interior gold speckles shimmer in the candlelight

TRACK YOUR CERAMIC JOURNEY
Capture glaze tests, firing details, and creative progress—all in one simple printable. Make your projects easier to repeat and improve.
Om Center Motif With Floral Border
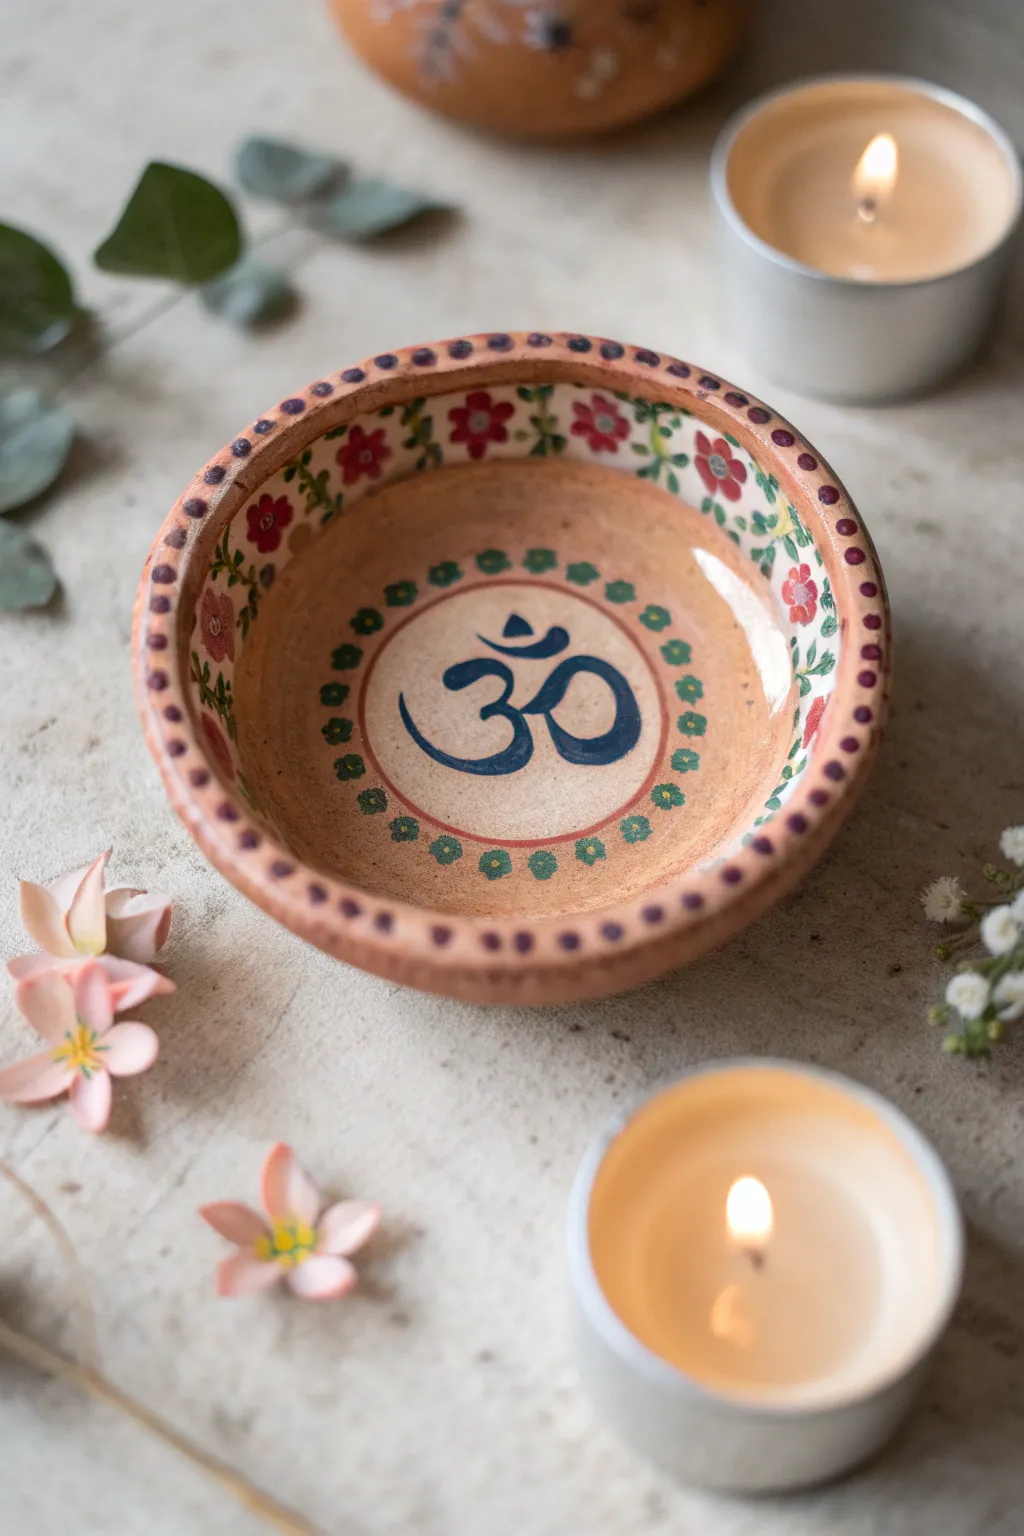
This serene terracotta diya design features a bold, navy blue Om symbol at its heart, encircled by delicate floral detailing. The natural clay background provides a warm, earthy canvas for the red and green accents, creating a piece that feels both traditional and spiritual.
How-To Guide
Materials
- Shallow terracotta bowl or diya (4-6 inch diameter)
- Fine grit sandpaper
- Acrylic paints: Navy Blue, Deep Red, Leaf Green, White
- Synthetic round brushes (sizes 0, 2, and 4)
- Small dotting tool or toothpick
- Palette
- Pencil and eraser
- Clear matte varnish spray
Step 1: Preparation & Base Layout
-
Surface prep:
Begin by gently sanding any rough spots on your terracotta bowl with fine-grit sandpaper. Wipe away all dust with a damp cloth to ensure your paint adheres smoothly. -
Center point:
Using a ruler, lightly mark the absolute center of the bowl’s interior with a pencil. This will guide the placement of your Om symbol. -
Drafting the circles:
Sketch two concentric circles around the center point. The inner circle will frame the Om symbol, while the space between this and the rim will house the floral border. -
Sketching the Om:
In the central circle, draw the Om symbol. Take your time to get the curves right—the ‘3’ shape with the tail, the crescent moon, and the dot above.
Pro Tip: Steady Hands
Rest your painting hand on a small object like a bean bag or a folded towel inside the bowl to stabilize your wrist while painting the curved inner walls.
Step 2: Painting the Central Motif
-
Outlining the symbol:
Load a size 2 brush with Navy Blue paint. Carefully outline your pencil sketch of the Om symbol. -
Refining lines:
Switch to a smaller size 0 brush to sharpen the tips and curves of the symbol, ensuring the edges are crisp against the clay background. -
Inner ring border:
With Deep Red paint and a steady hand (or resting your pinky on the bowl for stability), paint a thin line over your sketched inner circle that surrounds the Om. -
Decorative dots:
Dip the handle end of a brush or a dotting tool into Leaf Green paint. Create a ring of small, evenly spaced dots just inside the red circle border to frame the central motif.
Step 3: Creating the Floral Border
-
Marking flower spots:
Lightly mark 6 to 8 evenly spaced points around the inner wall of the bowl where your flowers will sit. -
Painting petals:
Using the Deep Red paint and a size 4 brush, press and lift the brush to create simple four or five-petal flower shapes at your marked points. -
Adding foliage:
Once the flowers are touch-dry, use your size 0 liner brush with Leaf Green to paint vine-like stems connecting the flowers. Add small leaves branching off the stems. -
Flower centers:
Add a tiny dot of White or Yellow to the center of each red flower to make them pop against the clay.
Level Up: Metallic Glint
Trace the navy blue Om symbol with a very fine gold metallic liner or gel pen to catch the light when a candle flickers nearby.
Step 4: Finishing Touches
-
Rim decoration:
For the upper rim of the bowl, mix a touch of Deep Red with a tiny bit of Navy to get a dark maroon. Use a dotting tool to create a sequence of dots all along the flat top edge. -
Cleanup:
Check for any stray pencil marks and gently erase them once you are certain the paint is completely dry. -
Sealing:
I like to finish with a coat of clear matte varnish spray. This seals the porous terracotta and protects your intricate design from heat and wear.
Now your handcrafted diya is ready to bring a peaceful glow to your space
Painted Mandala With Tiny Mirror-Style Accents
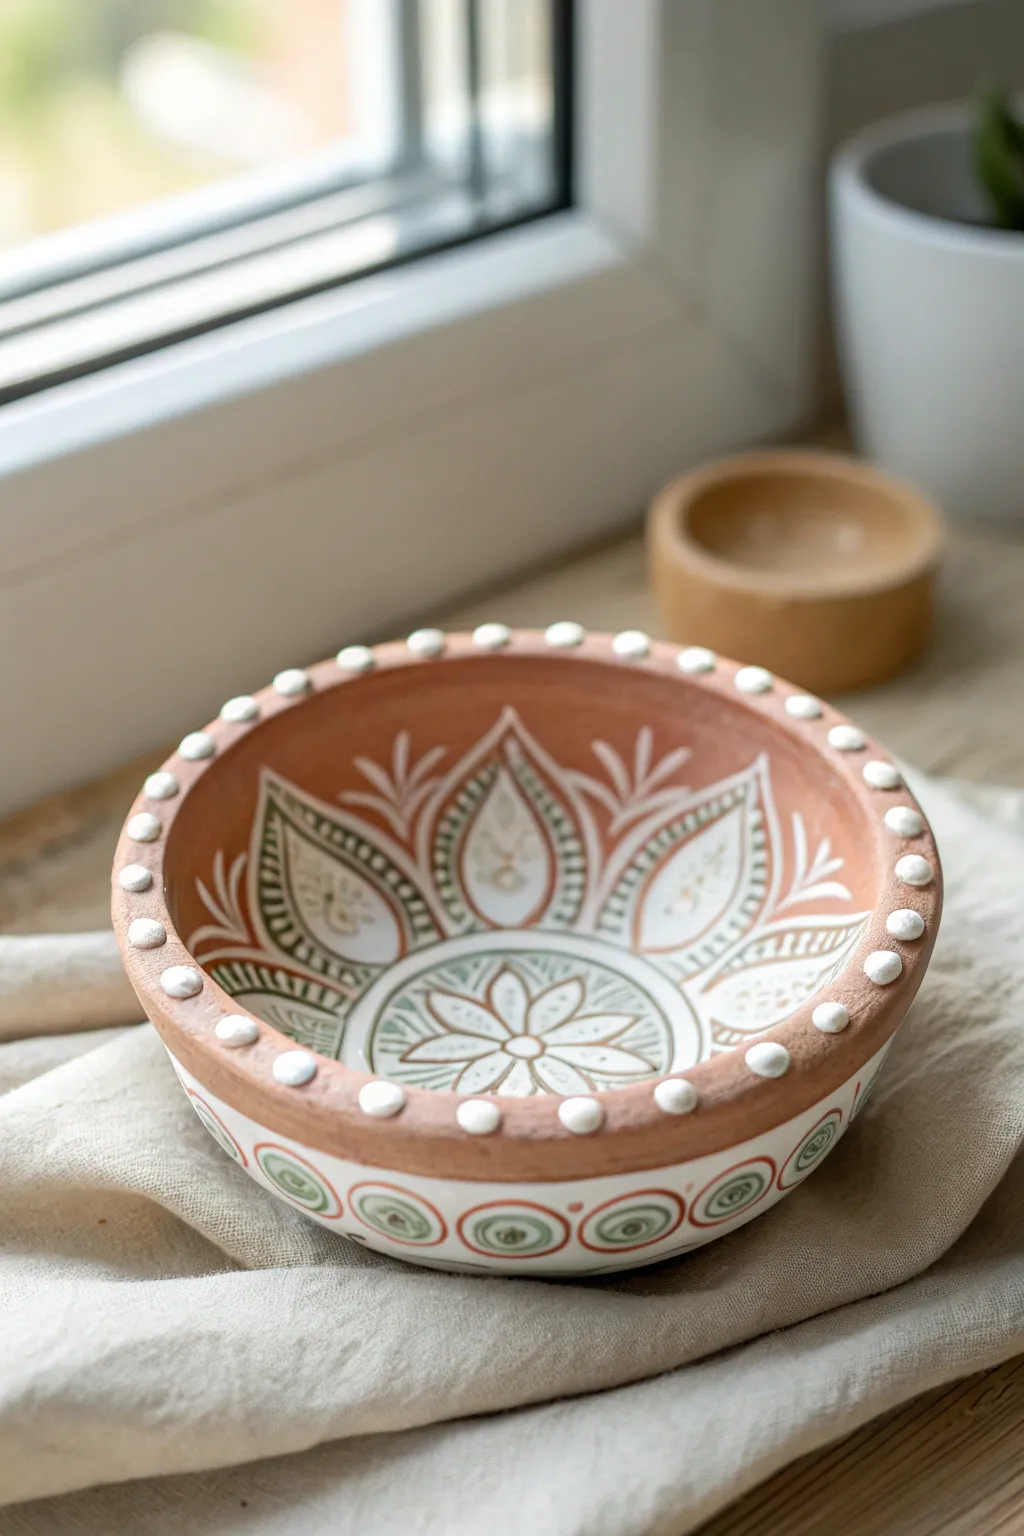
Transform a simple terracotta bowl into a stunning decorative piece using traditional mandala motifs and raised texture accents. The combination of raw clay, intricate white line work, and earthy green tones creates a harmonious, bohemian aesthetic perfect for festive décor.
How-To Guide
Materials
- Medium-sized terracotta bowl or deep diya
- White acrylic paint
- Sage green acrylic paint
- Fine detail paintbrush (size 0 or 00)
- Small round paintbrush (size 2)
- Puffy paint or 3D outliner (White)
- Pencil
- Palette
- Water container
- Paper towels
- Matte varnish (optional)
Step 1: Base Preparation & Layout
-
Clean surface:
Ensure your terracotta bowl is clean, dry, and free of dust. Wipe it down with a slightly damp cloth if needed and let it air dry completely. -
Mark center:
Identify the very center of the bowl’s interior. Using a pencil, lightly mark a small dot to serve as your anchor point for the mandala. -
Draw petals:
Sketch a large flower shape inside the bowl. Start with a central circle, then draw six to eight large, petal-like teardrop shapes radiating outward towards the rim.
Steady Hands
For steadier lines on the curved surface, rest your pinky finger on the dry part of the bowl while painting to anchor your hand.
Step 2: Painting the Interior Mandala
-
Outline petals:
Load your fine detail brush with white acrylic paint. Carefully paint over your pencil petal outlines, keeping the lines crisp and steady. -
Inner details:
Inside each large white petal outline, paint a smaller teardrop shape using sage green paint. Leave a small gap of the terracotta showing between the green fill and white outline. -
Texture leaves:
Once the green shapes are dry, use white paint to add fine vein lines or small dots inside the green areas to create texture. -
Floral center:
Paint a six-petaled flower design in the very center circle using white paint. You can add sage green accents between the petals for contrast. -
Fill gaps:
In the spaces between the large outer petals, paint delicate wisps or wheat-stalk patterns in white to fill the negative space without overcrowding it.
Faux Mirror Effect
Glue actual tiny circular craft mirrors into the centers of the exterior circles instead of painting dots for authentic shimmer.
Step 3: Detailed Rim Work
-
Top rim preparation:
Wipe the top rim clean again if any pencil marks remain. This needs to be a clean surface for the 3D paint adherence. -
Apply dots:
Using the white puffy paint or 3D outliner, squeeze gently to create uniform raised dots along the entire flat top edge of the rim. Space them evenly, about a centimeter apart. -
Let it set:
Allow these 3D dots to dry undisturbed for at least an hour. They shouldn’t be touched until they are completely hard to avoid smudging.
Step 4: Exterior Pattern & Finish
-
Sketch exterior:
Lightly pencil a row of circles around the exterior side of the bowl. Inside each circle, mark a smaller concentric circle. -
Paint rings:
Paint the outer ring of each circle set with white paint. Use your size 2 round brush for a smoother curve. -
Green centers:
Fill the inner circles with sage green paint. Add a tiny white dot in the very center of the green for a reflective ‘mirror’ look. -
Connecting lines:
I like to add small curved lines or simple dots between the circles to connect the pattern into a continuous band. -
Final cure:
Let all paint dry for 24 hours. Optionally, apply a coat of matte varnish over the painted areas to protect your artwork.
Now you have a beautifully hand-painted diya that blends rustic charm with intricate detailing
Soft Pastel Ombre Dip-Paint Look
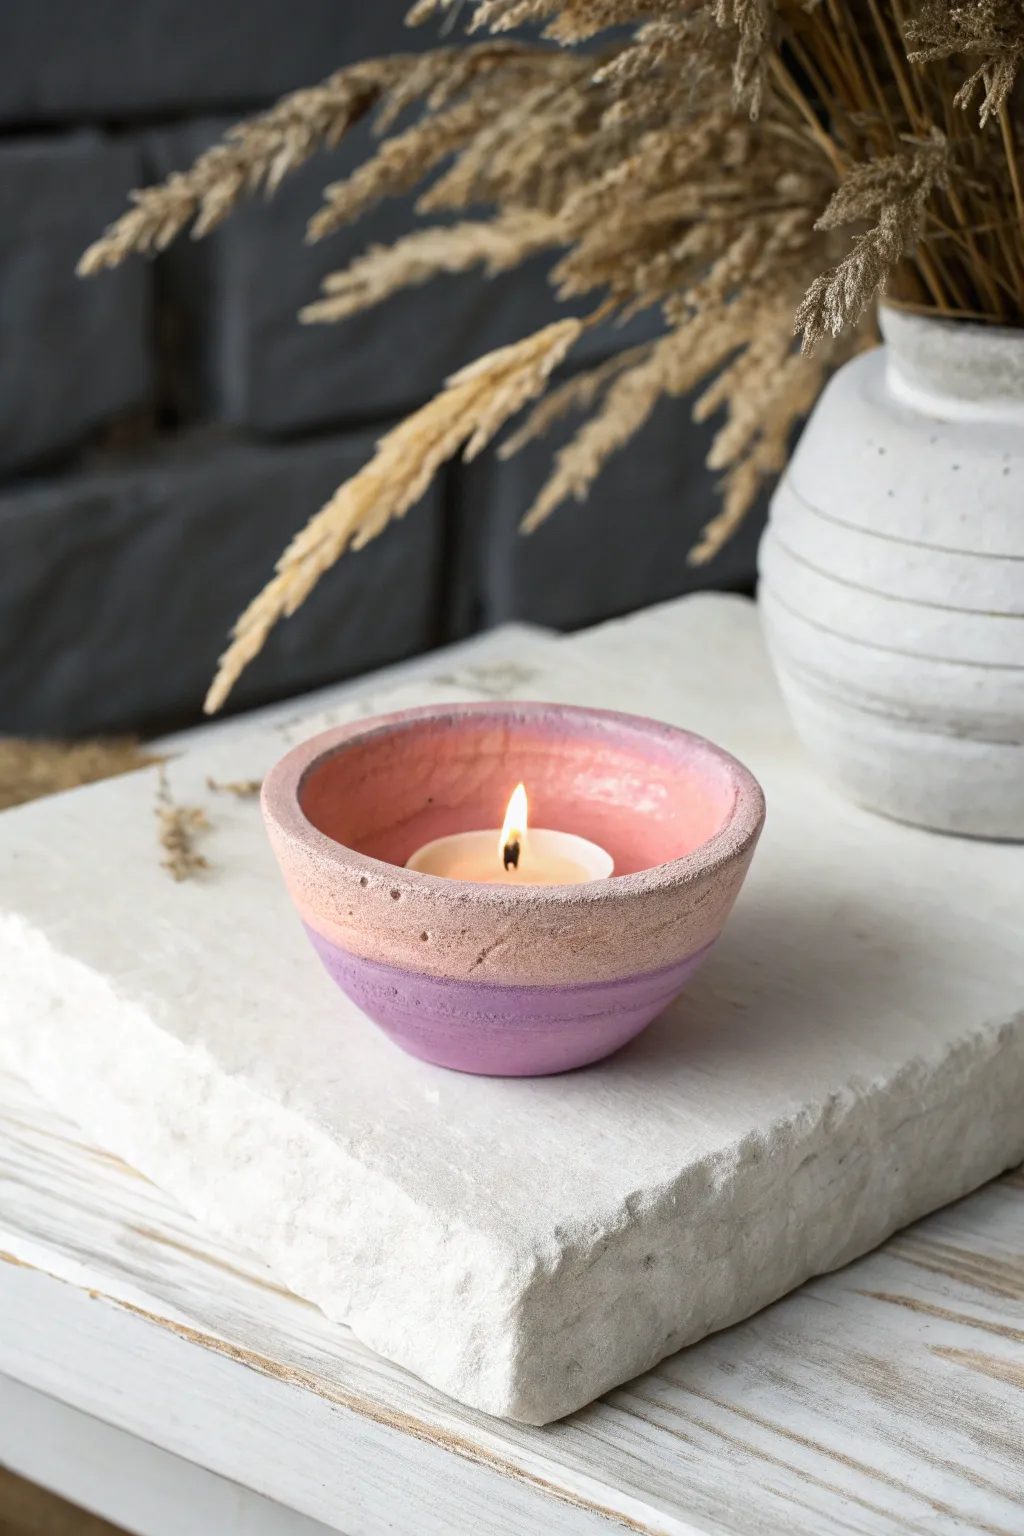
Embrace the soothing aesthetic of gradient pastels with this modern take on a traditional diya. The design features a soft, matte finish where dusty rose and lavender meet, creating a tranquil centerpiece perfect for contemporary decor.
Step-by-Step Guide
Materials
- Small clay or concrete diya/bowl (unglazed)
- White acrylic paint or gesso
- Dusty rose or coral pink acrylic paint
- Lavender or lilac acrylic paint
- Fine-grit sandpaper (optional)
- Medium soft-bristle paintbrush
- Small detail brush
- Matte finish spray sealant or Mod Podge Matte
- Painter’s tape or washi tape
- Paper plate or palette
- Water cup
Step 1: Preparation & Base Coat
-
Clean surface:
Begin by wiping down your clay diya with a slightly damp cloth to remove any dust or debris. If the surface feels very rough, you can give it a quick sanding with fine-grit sandpaper for a smoother finish. -
Apply primer:
Paint the entire diya, both inside and out, with a coat of white acrylic paint or gesso. This neutralizes the natural clay color and ensures your pastel shades will pop vividly. -
Dry completely:
Allow this white base layer to dry thoroughly. This usually takes about 15-20 minutes depending on the thickness of the coat.
Bleeding Lines?
If paint bled under the tape, wait for it to dry, then use a tiny brush with the base color (or white) to carefully touch up the line for a crisp edge.
Step 2: Creating the Two-Tone Effect
-
Tape the horizon line:
Decide where you want the color split to happen. For the look in the photo, place a strip of painter’s tape horizontally around the diya, positioning it slightly below the midpoint. -
Seal the tape edge:
Press the tape down firmly, especially along the edge where you’ll be painting, to prevent color bleed. -
Mix the top color:
On your palette, mix a touch of white into your dusty rose paint if it’s too dark. You want a soft, chalky pink hue. -
Paint the upper section:
Paint the entire interior of the bowl and the exterior section above the tape line with your pink mixture. Use smooth horizontal strokes for the exterior. -
Paint the rim:
Pay careful attention to the rim itself. Dab the brush gently to ensure the textured top edge is fully covered in pink without globs dripping down. -
Let it set:
Allow the pink paint to dry to the touch. If the coverage looks streaky, apply a second coat for a solid, opaque look. -
Remove tape:
Once the pink paint is dry, carefully peel off the painter’s tape to reveal a crisp line. -
Mix the bottom color:
Prepare your lavender shade. Again, mixing in a little white paint can help achieve that matte, pastel quality seen in the reference. -
Paint the base:
Carefully paint the bottom unpainted section with the lavender. Use your smaller detail brush when you get close to the pink line to keep the junction accidental-free. -
Refine the transition:
If you prefer a softer look rather than a hard line, I like to use a slightly damp, clean brush to gently feather the purple upward just barely overlapping the pink while the paint is still wet. -
Dry thoroughly:
Let the entire piece dry completely for at least an hour.
Step 3: Finishing Touches
-
Assess the texture:
The original look has a slightly stone-like texture. If you want to emphasize this, lightly stipple a tiny bit of darker pink or grey specks onto the rim using an old toothbrush or stiff brush. -
Seal the work:
To protect the paint from heat and soot, apply a coat of matte spray sealant or matte Mod Podge over the entire surface. -
Final cure:
Let the sealant cure according to the manufacturer’s instructions before using. -
Insert candle:
Place a standard tealight or small votive candle inside your new pastel vessel.
Texture Boost
Mix a teaspoon of baking soda into your acrylic paint before applying. This creates a grainy, concrete-like texture that mimics unglazed pottery beautifully.
Light your candle and enjoy the calm atmosphere your new pastel creation brings to the room
Faux Mosaic Tile Pattern Around the Rim
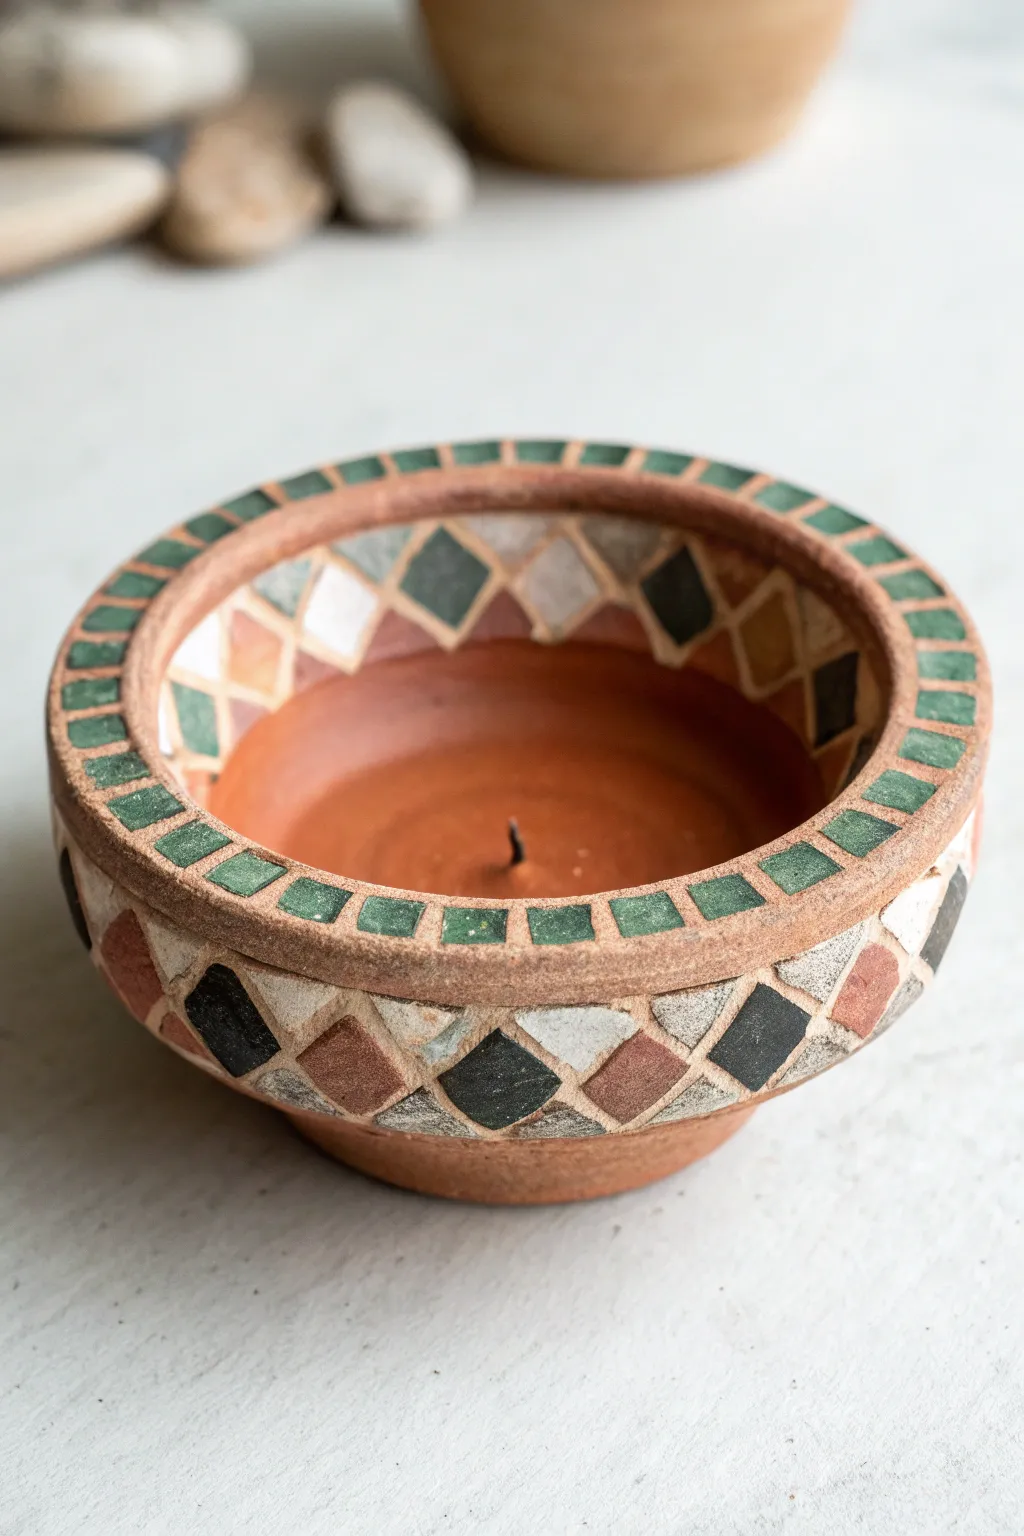
Transform a plain clay diya into an artifact that looks like it’s been tiled with tiny stones. This project uses clever painting techniques to mimic the texture and grout lines of a real mosaic without using a single shard of glass.
Step-by-Step
Materials
- Terracotta diya or small clay bowl
- Acrylic paints (Forest Green, Burnt Sienna, Black, Cream/Off-White)
- Flat shader brush (small, size 2 or 4)
- Fine liner brush (size 0 or 00)
- Pencil
- Ruler or measuring tape
- Matte varnish or sealant
- Palette
- Water cup
Step 1: Preparing the Pattern
-
Clean surface:
Begin by wiping down your terracotta diya with a slightly damp cloth to remove any loose dust or pottery shards. -
Mark the rim:
Using your pencil, lightly draw two concentric circles following the edges of the flat upper rim to create a track. -
Divide the rim:
Make small tick marks at even intervals all the way around this rim track. These will become your green square ’tiles’ later. -
Draft the diamonds:
On the exterior curve of the bowl, lightly sketch a series of connecting diamonds (rhombus shapes). Try to keep them roughly the same size, but remember that real mosaics have slight irregularities. -
Inner details:
Repeat the diamond sketch on the inner slope of the bowl. Don’t worry about drawing the ‘grout’ lines yet; just focus on the shapes.
Uneven Spacing?
Don’t stress if your diamonds aren’t perfect! Real mosaics rely on hand-cut stones, so irregularity actually adds to the authentic, rustic charm of the finished piece.
Step 2: Painting the Tiles
-
Rim base coat:
Load your flat shader brush with Forest Green paint. Carefully fill in the squares you marked on the rim. -
Spacing matters:
Leave a very tiny gap of unpainted terracotta between each green square. This gap mimics the grout line found in real tile work. -
Exterior diamonds:
Start painting the diamonds on the outside of the bowl. Alternate your colors randomly: paint one black, one cream, one brown, and one green. -
Color distribution:
I find it easiest to paint all the cream diamonds first, rinse my brush, then move on to the browns, and so forth, to modify the pattern evenly. -
Interior diamonds:
Paint the diamonds on the inside slope using the same alternating color method. Keep the paint relatively flat; you want it to look like stone, not glossy plastic. -
Drying time:
Let these painted shapes dry completely for at least 15-20 minutes before moving to the detailing phase.
Texture Trick
Mix a tiny pinch of baking soda or fine sand into your acrylic paint before applying the tile colors. This creates a gritty, stone-like physical texture.
Step 3: Adding Texture and Grout
-
Creating texture:
To make the ’tiles’ look like old stone, take a mostly dry brush with a tiny amount of a lighter shade (like mixing white with your green) and lightly stipple or dab the center of a few painted diamonds. -
Defining the edges:
Switch to your fine liner brush. If your original terracotta color is too dark or uneven between the tiles, you can mix a ‘grout’ color using beige or light grey paint. -
Painting grout lines:
Carefully trace the lines between the diamonds and squares. If the natural clay color looks good, you can skip painting the grout and just let the unpainted clay serve as the separation. -
Clean up:
If any paint bled over the edges, touch it up now with the background color or scrape it gently if the paint is still tacky. -
Seal the work:
Once everything is bone dry, apply a coat of matte varnish. This unifies the sheen and protects the paint from heat if you plan to light a candle inside.
Now you have a stunning faux-mosaic centerpiece ready to hold a warm light
Galaxy Night-Sky Diyas With Starry Splatter

Transform a simple clay bowl into a breathtaking piece of the cosmos with this night-sky inspired design. By blending deep violets, indigos, and black with delicate white detailing, you’ll create a magical vessel that seems to hold the stars themselves.
Step-by-Step Tutorial
Materials
- Terracotta or clay diya (bowl-shaped)
- Acrylic paints: Black, Deep Violet, Navy Blue, Titanium White
- Flat paintbrushes (medium and small)
- Fine detail paintbrush (size 0 or 00)
- Paint palette or mixing plate
- Water cup
- Paper towels
- Clear varnish or sealant (optional but recommended)
Step 1: Preparing the Canvas
-
Clean the surface:
Begin by wiping down your clay diya with a dry or slightly damp cloth to remove any dust or loose clay particles. Let it dry completely if you used any moisture. -
Apply a base coat:
Paint the entire diya—both inside and outside—with a solid coat of Deep Violet. This provides a rich undertone for your galaxy effect. Allow this base layer to dry for about 15–20 minutes.
Starry Splatter Trick
For a natural star field, dilute white paint slightly with water, load an old toothbrush, and flick the bristles with your thumb to mist tiny dots over the gradient.
Step 2: Painting the Galaxy Gradient
-
Create the lower gradient:
On the outside of the bowl, paint a band of Navy Blue around the very bottom third. While the paint is still wet, gently blend the top edge of this blue section into the violet base coat using slightly feathery brushstrokes. -
Deepen the middle section:
Refresh the violet section in the middle if the base coat has dried too much. You want a vibrant purple band encircling the center of the bowl. -
Add the dark rim:
Paint the top band (the rim area) with Black acrylic paint. Bring this black color down just slightly to meet the purple section. -
Blend the transitions:
Using a clean, slightly damp brush, gently blur the line where the black meets the purple, and where the purple meets the blue. The goal is a soft, ombre transition rather than hard stripes. -
Mirror the inside:
Repeat this gradient process on the inside of the bowl. Paint the bottom of the well blue, transitioning to purple walls, and finally blending into the black rim at the top. Let all paint dry fully before proceeding.
Blending Woes?
If acrylics dry too fast to blend smooth gradients, mix in a drop of ‘slow drying medium’ or keep your brush slightly damp to extend working time.
Step 3: Adding the Starry Details
-
Paint the decorative border:
Using your fine detail brush and Titanium White paint, carefully create a wavy or scalloped line separating the black rim section from the purple section on the exterior. -
Add rim dots:
Along the black band at the top rim, paint a series of small, evenly spaced white dots. This creates a framed look for your galaxy. -
Paint larger stars:
Dip your fine brush into the white paint. Paint several large, four or five-pointed stars on the purple and blue sections. I like to place a few dominant stars on the inside walls as well to draw the eye in. -
Create distant stars:
Use the very tip of your brush or a toothpick to dab tiny white specks randomly around the larger stars. Vary the size of these dots to create depth, making some look like distant planets. -
Accent the border:
If you like extra detail, add tiny starbursts or crosses along the black rim between your previous dots, alternating the pattern for visual interest.
Step 4: Finishing Touches
-
Check for consistency:
Rotate the diya and inspect your starry pattern. Add any extra white dots to fill in bare patches, ensuring the galaxy looks dense and magical from all angles. -
Let it cure:
Allow the white details to dry completely. This usually takes about 30 minutes since the dots can be thick. -
Protect your work:
Apply a coat of clear varnish or sealant over the entire painted surface. This protects the acrylic from heat and handling and gives the galaxy a nice sheen.
Light a tealight inside your new creation and watch how the flame illuminates your personal galaxy
Faux Enamel “Drip Edge” Paint Effect
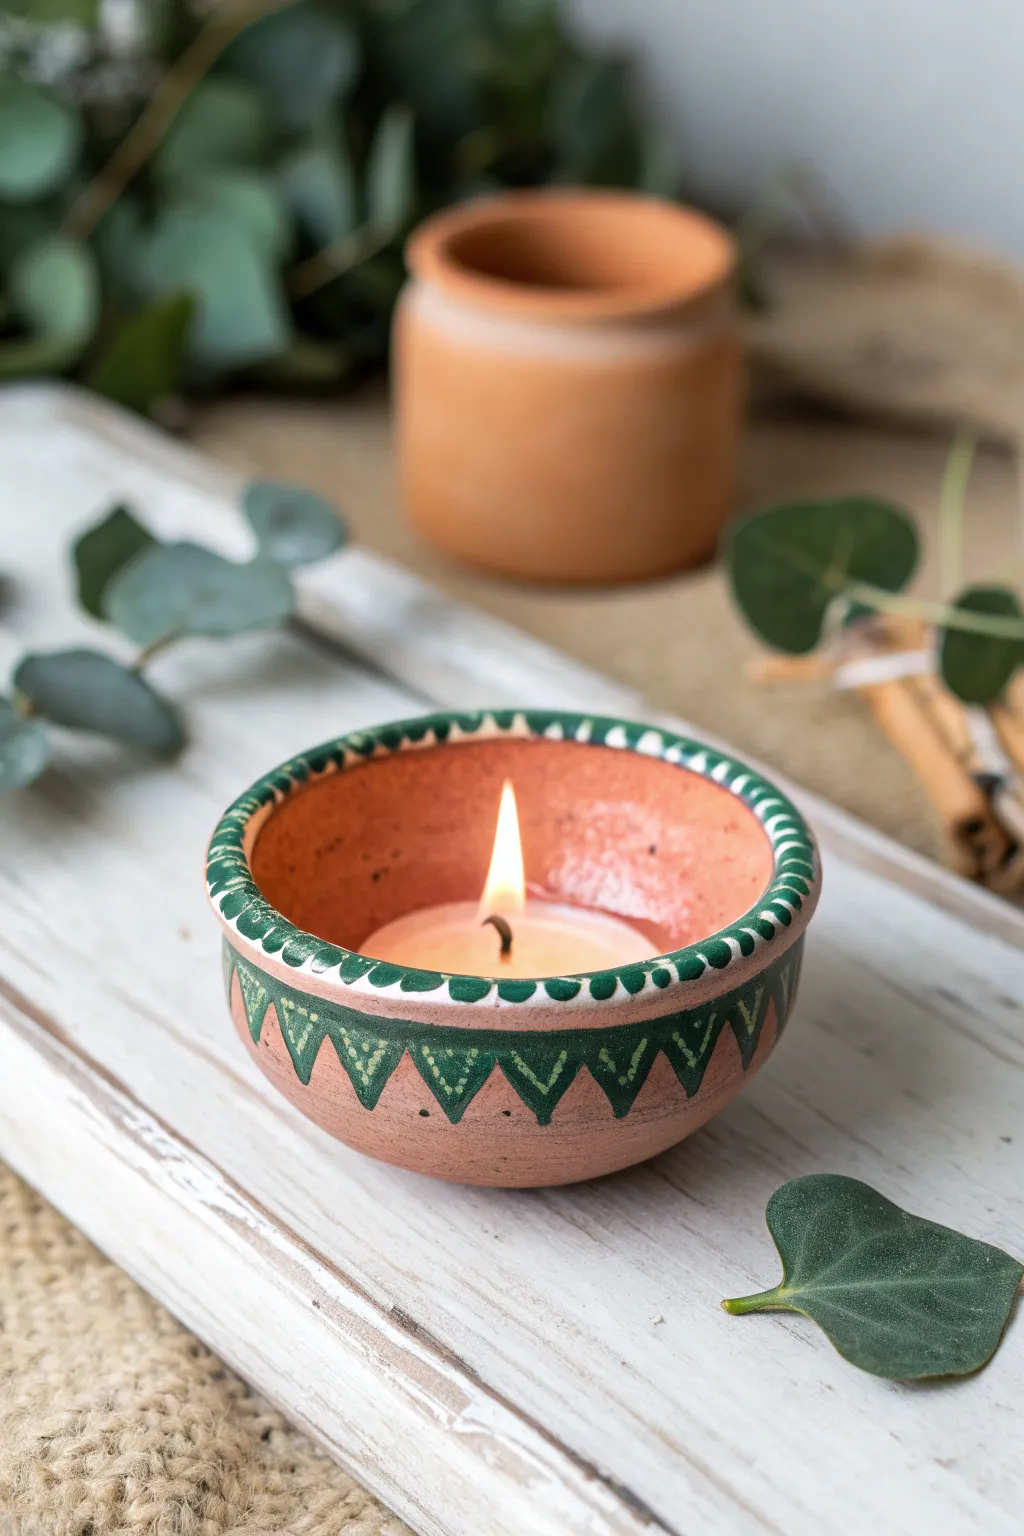
Transform a simple terracotta bowl into a stylish piece of decor with this earthy, bohemian design. The combination of raw clay texture with precise geometric painting creates a charming, handcrafted look perfect for festive lighting.
Detailed Instructions
Materials
- Small terracotta diya or bowl
- Deep forest green acrylic paint
- White or cream acrylic paint
- Fine liner paintbrush (size 0 or 00)
- Small flat paintbrush
- Tea light candle
- Water container for rinsing
- Paper towels
- Palette or small dish
Step 1: Preparation & Base Work
-
Clean the surface:
Begin by wiping down your terracotta bowl with a dry or slightly damp cloth to remove any pottery dust. The surface needs to be completely dry and clean for the paint to adhere properly. -
Define the painted area:
Mentally divide the bowl into sections. We will be leaving the bottom half and the interior completely unpainted to showcase the natural clay color, focusing our painting efforts on the upper rim and outer band.
Step 2: Painting the Green Band
-
Load your flat brush:
Squeeze a small amount of deep forest green acrylic paint onto your palette. Load your small flat brush, ensuring the bristles are coated but not dripping. -
Paint the rim’s top edge:
Carefully paint the very top flat edge of the rim. Use steady strokes to create a solid, opaque green line that follows the circle perfectly. -
Create the main band:
Extending down from the rim, paint a horizontal band around the upper exterior of the bowl. This band should be about 1/2 to 3/4 inch wide. -
Paint the triangles:
While the green paint is still wet or freshly reloaded, paint downward-pointing triangles extending from the bottom of your green band. Space them evenly around the circumference. -
Refine the shapes:
Go back and sharpen the points of your triangles. They don’t need to be mathematically perfect—a little variation adds to the handmade charm. -
Touch up opacity:
If the terracotta absorbs the first layer too much, wait for it to dry briefly and apply a second coat of green to ensure a rich, solid color. -
Let it dry beautifully:
Allow the green base coat to dry completely before moving to the detail work. This usually takes about 15-20 minutes depending on humidity.
Steady Hand Trick
Rest your pinky finger on the unpainted part of the bowl while doing the fine white line work. This anchors your hand and prevents shakes.
Step 3: Adding White Details
-
Prepare the fine brush:
Switch to your fine liner brush (size 0 or 00). Dip it into the white or cream acrylic paint. You want the paint to be fluid enough to flow but thick enough to sit on top of the green. -
Rim dash pattern:
Starting at the top rim, paint small, vertical dashes along the green edge. Keep the spacing tight and consistent, like stitch marks. -
Outline the band:
Paint a thin horizontal line directly below the rim dashes, creating a border between the rim decoration and the rest of the green band. -
Detail the triangles:
Inside each green triangle, paint a smaller ‘V’ shape or simple line work. I like to use tiny dots or stippling inside some triangles for added texture. -
Bottom border dots:
At the very bottom point of each green triangle, place a single, distinct white dot. -
Add connecting details:
Paint small white dots in the negative space between the triangles, right at the base of the green band, to tie the geometric pattern together. -
Final inspection:
Rotate the bowl slowly and look for any skipped spots. Add tiny dabs of white paint where needed to balance the pattern. -
Complete drying:
Set the diya aside in a dust-free area to dry completely. Since we used acrylics, give it at least an hour to cure fully before handling. -
Add the light:
Place a standard white tea light candle in the center of the bowl. The warmth of the flame will beautifully illuminate the terracotta interior.
Natural Texture
Instead of plain white paint, mix a tiny drop of sand or baking soda into the cream color for a raised, ceramic-glaze texture on the dots.
Now you have a serene, custom-painted accent piece ready to warm up any corner of your home
Raised 3D Outliner Patterns for Texture
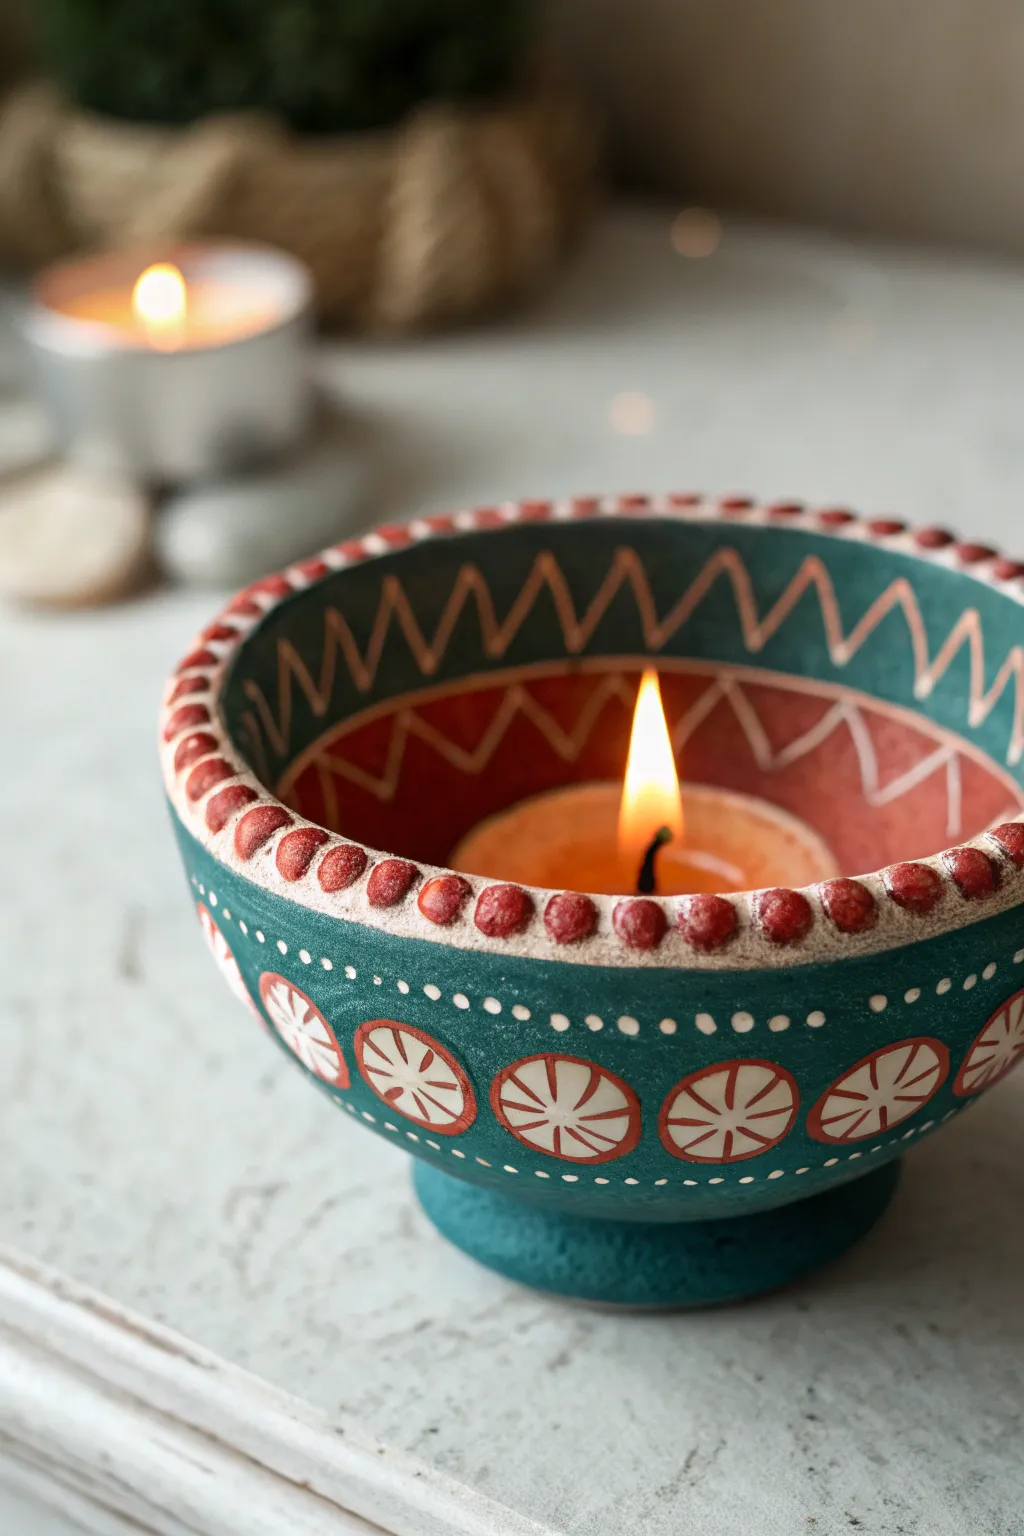
This stunning diya project combines deep teal blues with earthy terracotta tones, brought to life through intricate raised textures. By using 3D outliners and careful brushwork, you’ll transform a simple clay bowl into a patterned masterpiece perfect for festive lighting.
How-To Guide
Materials
- Deep bowl-shaped clay diya or small terracotta pot
- Acrylic paints: Deep Teal/Peacock Blue, Terracotta/Burnt Sienna, White
- 3D Outliner cones: White and Terracotta (or thick dimensional fabric paint)
- Flat shader brush (size 4 or 6)
- Fine detail brush (size 0 or 00)
- Dotting tools (various sizes)
- Matte varnish or sealant
- Water container and palette
- Pencil
Step 1: Base Painting
-
Prepare the surface:
Begin by wiping down your clay diya with a dry cloth to remove any loose dust. If the surface is very rough, give it a quick sanding with fine-grit sandpaper for a smoother painting experience. -
Apply teal base coat:
Load your flat brush with Deep Teal acrylic paint. Cover the entire exterior of the bowl, including the footed base. Apply two coats if necessary for opaque, solid coverage. -
Paint the interior rim:
Paint the upper section of the inner wall with the same Deep Teal color, extending about an inch down from the top edge. -
Add the interior band:
Switch to your Terracotta paint. Create a wide band on the inside of the bowl, just below the teal section. I like to blend the transition slightly if I want a softer look, but a hard line works great for this geometric style. -
Seal the base:
Allow the base coats to dry completely for at least 30 minutes. Once dry, apply a thin layer of matte varnish to protect the paint before adding detailed work.
Clogged Nozzle?
If your 3D outliner stops flowing, don’t squeeze harder! Use a sewing pin to gently clear the dried paint from the tip to restore smooth flow.
Step 2: Interior Detailing
-
Draft the zig-zags:
Lightly sketch a zig-zag (chevron) pattern around the interior teal band using a pencil. This ensures your spacing is even before you commit with paint. -
Outline interior patterns:
Using a White 3D outliner cone or a fine brush with heavy body white paint, trace over your zig-zag pencil lines. Keep your pressure steady to maintain a consistent line width. -
Add lower zig-zags:
Repeat the zig-zag pattern on the terracotta band below, mirroring the spacing of the upper band for visual harmony.
Step 3: Exterior Textures
-
Create the beaded rim:
Using your Terracotta 3D outliner or heavy body paint, carefully pipe small, raised beads along the very top edge of the rim. Space them closely together to mimic a beaded necklace. -
Add spacing markers:
On the exterior teal surface, use your white pencil to lightly mark where the circular medallions will go. Aim for equal distance between each circle. -
Paint the medallions:
Use a medium dotting tool or small round brush to paint solid Terracotta circles at your marked spots. These will form the base of the ‘wheel’ designs. -
Detail the wheels:
Once the terracotta circles are dry, use a fine brush with white paint to add the spokes. Paint six to eight distinct triangular wedges inside each circle, leaving thin lines of terracotta visible between them. -
Add the central dot:
Place a tiny dot of Deep Teal or White in the direct center of each wheel to finish the motif. -
Pipe the rim border:
Just under the beaded rim, pipe a thin, continuous white line using your outliner to separate the rim texture from the main body. -
Add decorative dots:
Using a small dotting tool and white paint, create a row of tiny dots just beneath the white line you just piped. This adds a delicate, lace-like quality. -
Frame the medallions:
Add a final row of tiny white dots just above the wheel medallions, curving slightly with the shape of the bowl.
Pro Tip: Steady Hands
Rest your pinky finger against the dry part of the diya while piping details. This acts as an anchor, giving you much better control over fine lines.
Step 4: FInishing Touches
-
Clean up edges:
Check for any smudges or uneven lines. Use a damp brush to gently wipe away mistakes or touch up with the base color. -
Final dry time:
The 3D outliner takes much longer to dry than standard acrylics. Let the diya sit undisturbed for at least 24 hours to ensure the raised textures harden completely. -
Protective coat:
Finish with a final spray of matte sealant to unify the sheen and protect your intricate work from heat and handling.
Light a tealight inside your new creation and watch how the flame illuminates the warm terracotta tones inside
Matte Base With Handwritten Blessings and Borders
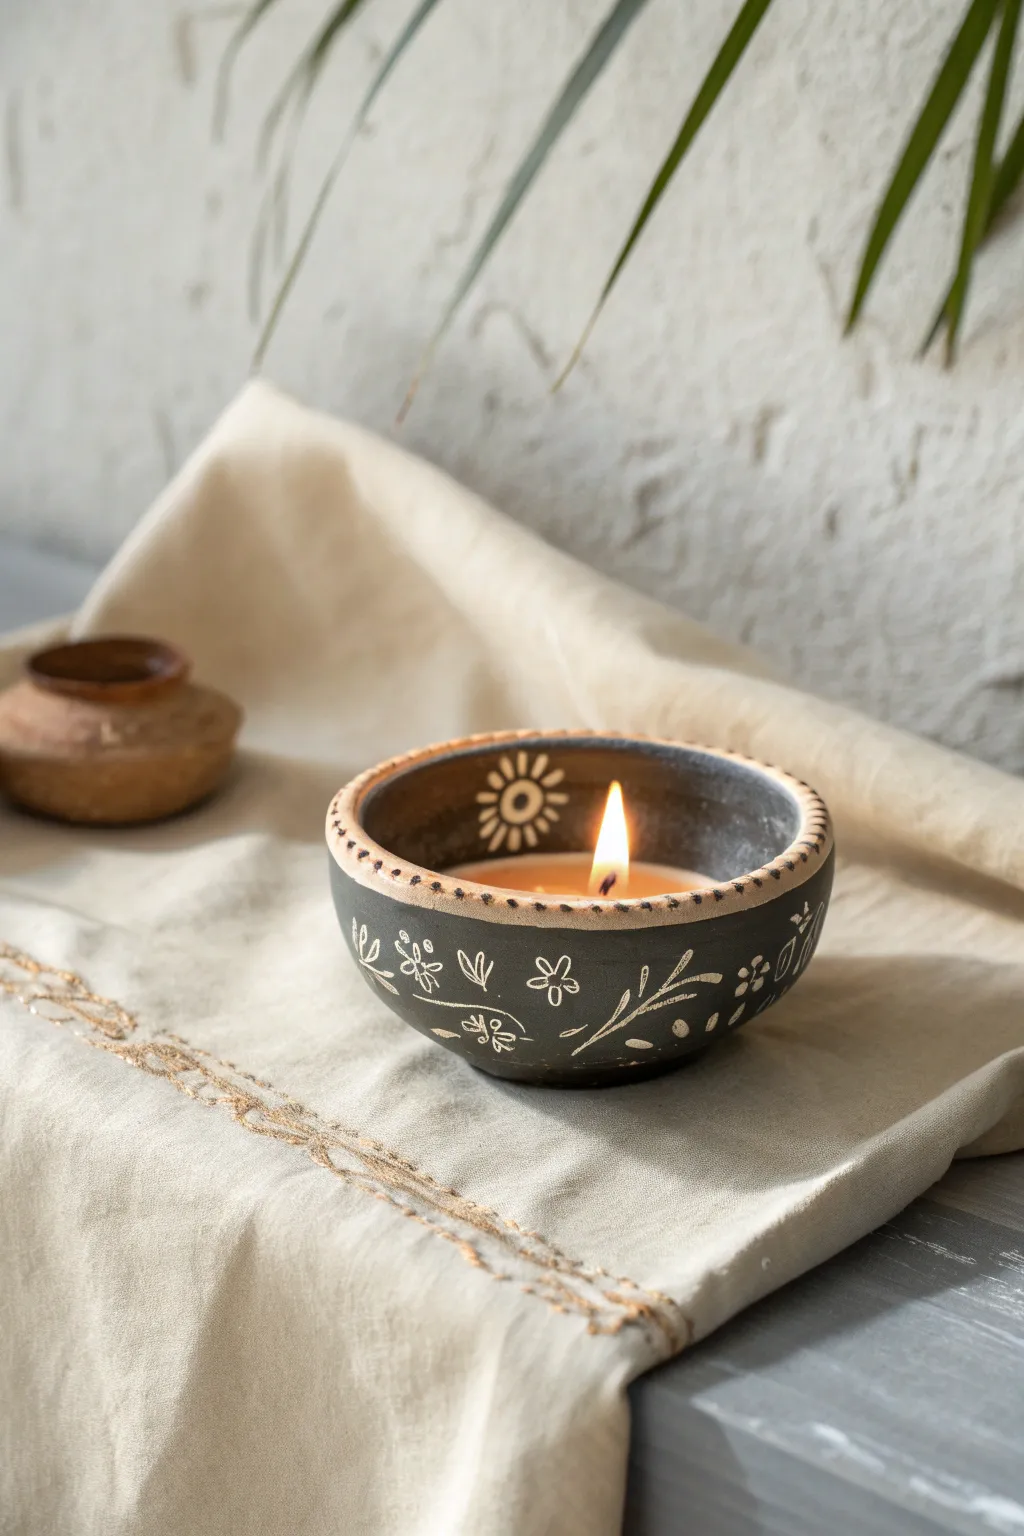
Step away from traditional vibrant hues and embrace a modern, earthy aesthetic with this charcoal and cream diya design. The matte finish combined with delicate hand-painted floral doodles creates a serene, sophisticated look perfect for a contemporary Diwali setup.
Detailed Instructions
Materials
- Terracotta diya (bowl-shaped)
- Black acrylic paint (matte finish preferred)
- Cream or off-white acrylic paint
- Fine detail paintbrush (size 0 or 00)
- Medium flat paintbrush
- Water container
- Paper plate or palette
- Pencil (optional)
Step 1: Preparing the Base
-
Clean the surface:
Before you begin, wipe down your terracotta diya with a dry cloth to ensure it is free of dust and loose clay particles. If it feels very rough, give it a quick pass with fine grit sandpaper. -
Apply the base coat:
Using your medium flat brush, apply an even coat of black acrylic paint to the exterior of the diya. -
Paint the rim:
Carefully extend the black paint over the top rim and just slightly into the inner lip of the bowl for a finished look. -
Let it dry:
Allow the first coat to dry completely. We want a solid, opaque background, so if the terracotta color is showing through, apply a second coat of black. -
Adding texture (optional):
If your black paint is too glossy, you can dab it gently with a dry sponge while it’s tacky to create a more matte, earthenware texture similar to the photo.
Keep it fluid
Thin your cream paint with a literal drop of water. This helps the paint flow smoothly from a thin brush, making fine lines and doodles much easier to control.
Step 2: Painting the Rim Details
-
Mix your cream shade:
Squeeze a small amount of off-white or cream acrylic paint onto your palette. If you only have stark white, mix in a tiny drop of yellow ochre or brown to warm it up. -
Create the dashes:
Using the very tip of your fine detail brush, paint small, vertical dashes along the top flat edge of the rim. -
Space them out:
Keep the spacing consistent, leaving a small black gap between each cream dash. They should look like little stitches framing the bowl. -
Inner rim dots:
Just below the rim on the inside (or very top edge depending on your diya shape), add tiny dots between the dashes for extra detail.
Add a inner glow
Paint the entire inside of the bowl with a gold or copper metallic paint. When the candle is lit, the flame will reflect off the metal for a stunning warm glow.
Step 3: Adding the Floral Motifs
-
Plan your design:
You can lightly sketch your floral patterns with a pencil first, though I usually prefer freehanding these simple shapes for a more organic feel. -
Paint the main stems:
Load your fine brush with the cream paint. Start by painting sweeping, curved lines around the belly of the diya to act as stems. -
Add simple flowers:
Draw small five-petaled flowers scattered along the stems. Keep the strokes loose and simple; they don’t need to be biologically accurate. -
Include leaf accents:
Off the main stems, paint small, leaf-shaped outlines. Leave the centers of the leaves black (unpainted) to maintain that illustrative doodle style. -
Draw the sun motif:
Near the inner rim, paint a small circle with radiating lines to create a sunburst or flower center, adding visual interest near the flame area. -
Fill the gaps:
Look for empty black spaces and fill them with tiny clusters of three dots or small ‘x’ shapes to mimic stars or pollen. -
Final touches:
Check your cream paint consistency; if the lines look transparent, go over the main floral elements one more time for a stark, high-contrast look. -
Dry completely:
Let the diya sit for at least an hour to ensure all fine lines are set before handling or filling with wax.
Place a tealight inside your new creation and enjoy the warm, peaceful ambiance it brings to your space