
When I’m craving a project that feels instantly satisfying, I reach for a double pinch pot—two matching pinch bowls joined into one strong, roomy hollow sphere. That simple shape is pure magic because you can turn it into everything from chunky little animals to seriously useful pots with just a few smart add-ons.
Classic Round Owl With Big Eyes

Transform two simple balls of clay into this charming, round-bellied owl character. With its minimalist carved feathers and large, expressive eyes, this double pinch pot project creates a delightful shelf companion that feels organic and modern.
Detailed Instructions
Materials
- White stoneware or earthenware clay
- Pottery needle tool
- Rib tool (metal or rubber)
- Scoring tool (or fork)
- Slip (clay and water mixture)
- Small loop tool for carving
- Underglaze (brown/terracotta)
- Small detail paintbrush
- Sponge
Step 1: Forming the Body
-
Prepare the clay:
Start by wedging two equal-sized balls of white clay, roughly the size of tennis balls. Ensure there are no air bubbles trapped inside. -
Pinch the first half:
Hold one ball in your palm and press your thumb into the center not quite to the bottom. Rotate the clay while gently pinching the walls to create an even, bowl-shaped hemisphere. -
Repeat for the second half:
Create a second matching pinch pot with the other ball of clay. Try to make the rim diameters match as closely as possible. -
Score and slip:
Score the rims of both pots aggressively with a serrated tool or fork. Apply a generous amount of slip to the roughened edges. -
Join the pots:
Press the two open ends together firmly to trap air inside. The trapped air provides resistance, helping the sphere hold its shape while you work. -
Seal the seam:
Using your thumb or a wooden tool, drag clay across the seam line in X motions to knit the two halves together, then smooth it over completely. -
Shape the sphere:
Gently paddle the hollow sphere with a wooden spoon or a flat hand to round out any lumpy areas until you have a smooth, egg-like shape. -
Create a flat base:
Tap the sphere gently onto your table to create a small flat spot so the owl will sit upright without rolling away.
Air Pocket Alert
If the sphere starts collapsing while joining, blow gently into the vent hole to re-inflate it, then quickly plug the hole until you are finished sculpting.
Step 2: Sculpting the Features
-
Define the face area:
Identify the ‘face’ side. Use your thumb to gently press a slight depression where the eyes will go, just above the midline. -
Add the eye discs:
Roll two small flat pancakes of clay. Score and slip them onto the face depression. These should be large and nearly touching in the center. -
Sculpt the beak:
Roll a tiny cone of clay. Attach it right between and slightly below the eye discs. Smooth the top edge into the forehead so it looks integrated. -
Pinch the ears/tufts:
Gently pinch the clay at the top corners of the head to pull up the characteristic ear tufts. Keep them subtle and rounded rather than sharp. -
Carve the eyes:
Use a needle tool or small loop tool to carve concentric circles inside the eye discs. Leave a central pupil raised or define it with a deeper incised line. -
Smooth the surface:
Go over the entire owl with a barely damp sponge or a soft rib. I find this connects all the added pieces visually and removes fingerprints.
Textural Contrast
Use a toothbrush to gently stipple the uncarved areas of the white body. This rough texture contrasts beautifully against the smooth, carved feather patterns.
Step 3: Detailing and Surface Decoration
-
Carve the feathers:
using a small U-shaped loop tool, carve the breast feathers. Start from the bottom and work up, making overlapping ‘U’ shapes in staggered rows. -
Define the wings:
Lightly sketch a large oval wing shape on each side. Carve a border line to separate the wing from the body, but don’t add too much texture inside the wing itself. -
Create the air vent:
This is crucial: poke a discreet hole in the bottom of the owl with a needle tool to let expanding air escape during firing, preventing explosions. -
Apply accent color:
Once the clay is bone dry (greenware), apply a brown or terracotta underglaze to the beak, the pupils, and gently wash it onto the carved wing areas. -
Wipe back method:
For the wings, paint the brown underglaze on and then wipe most of it off with a damp sponge. This leaves color only in the textures and gives a soft, tinted look. -
Dry and fire:
Let the piece dry completely before bisque firing. If your clay is naturally white and smooth, you can leave the main body unglazed for a matte finish, or add a clear matte glaze.
Once fired, sit your little observer on a windowsill where the natural light can highlight the carved textures


Chubby Piggy Bank With a Slot and Snout

This classic, rotund piggy bank starts with the fundamental double pinch pot technique, transforming two simple bowls of clay into a hollow, whimsical character. The finished piece features a soft, glossy pink glaze speckled with charming golden dots and an essential coin slot on top.
Step-by-Step Tutorial
Materials
- Stoneware or earthenware clay (approx. 2-3 lbs)
- Small bowl of water
- Serrated metal rib or scoring tool
- Wooden modeling tool or popsicle stick
- Fettling knife
- Sponge
- Pink ceramic glaze (glossy finish)
- Gold luster or overglaze decal dots (optional)
- Kiln for firing
Step 1: Forming the Body
-
Create two balls:
Begin by wedging your clay to remove air bubbles. Divide the clay into two equal portions and roll them into smooth, tight spheres about the size of large oranges. -
Pinch the pots:
Hold one ball in your palm and press your thumb into the center, stopping before you break through the bottom. Gently rotate and pinch the walls evenly until you have a bowl shape. Repeat with the second ball to create a matching pinch pot. -
Score and slip:
Take a serrated rib or scoring tool and rough up the rim of both pinch pots. Dab a little water or slip (liquid clay) onto the scored edges to act as glue. -
Join the pots:
Press the two rims together firmly to form a hollow egg shape. I like to give it a little wiggle to ensure the bond is tight before moving on. -
Seal the seam:
Using a wooden tool or your thumb, drag clay across the seam line to knit the two halves together. Smooth the area with a rib until the seam is invisible and the body is one continuous form. -
Shape the body:
With the air trapped inside, you can gently paddle or roll the form to refine its shape. Aim for a slightly elongated oval to give the pig a nice, chubby posture.
Air Trap Troubles
If the body collapses while you work, the air inside might be escaping. Patch any holes quickly; the trapped air pressure supports the walls.
Step 2: Adding Features
-
Add feet:
Roll four small, equal-sized balls of clay for feet. Flatten them slightly and score/slip them onto the bottom of the body. Press the pig down gently onto a flat surface to ensure it stands level. -
Create the snout:
Form a flattened oval of clay for the snout. Score and slip it onto the front of the face. Use the back of a paintbrush or a small dowel to press two distinct nostril holes into the snout. -
Attach ears:
Shape two triangular wedges for ears. Attach them near the top front of the head, blending the clay smoothly at the base so they don’t pop off during drying. Curve them slightly forward for personality. -
Cut the slot:
Let the clay stiffen slightly to a leather-hard state. Use a fettling knife to carefully cut a rectangular coin slot in the top. Smooth the raw edges of the cut with a damp sponge or finger. -
Create eyes:
Use a small tool to poke shallow indentations for the eyes, or simply mark where you will paint them later. -
Dry slowly:
Cover the pig loosely with plastic and let it dry slowly over several days. This is crucial for hollow forms to prevent cracking. Once bone dry, bisque fire the piece.
Step 3: Glazing and Finishing
-
Apply base glaze:
Dip or brush your bisque-fired pig with a glossy light pink glaze. Ensure the coat is even, but avoid clogging the coin slot or nostril holes. -
Second firing:
Fire the pig again to the temperature recommended for your specific glaze. -
Add details:
Once cooled, paint small black dots for eyes using acrylic paint or a low-fire overglaze. For the golden spots, apply gold luster dots randomly around the body. -
Final cure:
If using gold luster, fire the piece a third time at a very low temperature (usually cone 018) to set the metallic accents.
Cork It Up
Want to retrieve your money? Cut a large hole in the belly before firing and plug it with a standard rubber stopper from a hardware store.
Now you have a charming, handmade vessel ready to guard your loose change


Turtle With a Textured Shell Dome
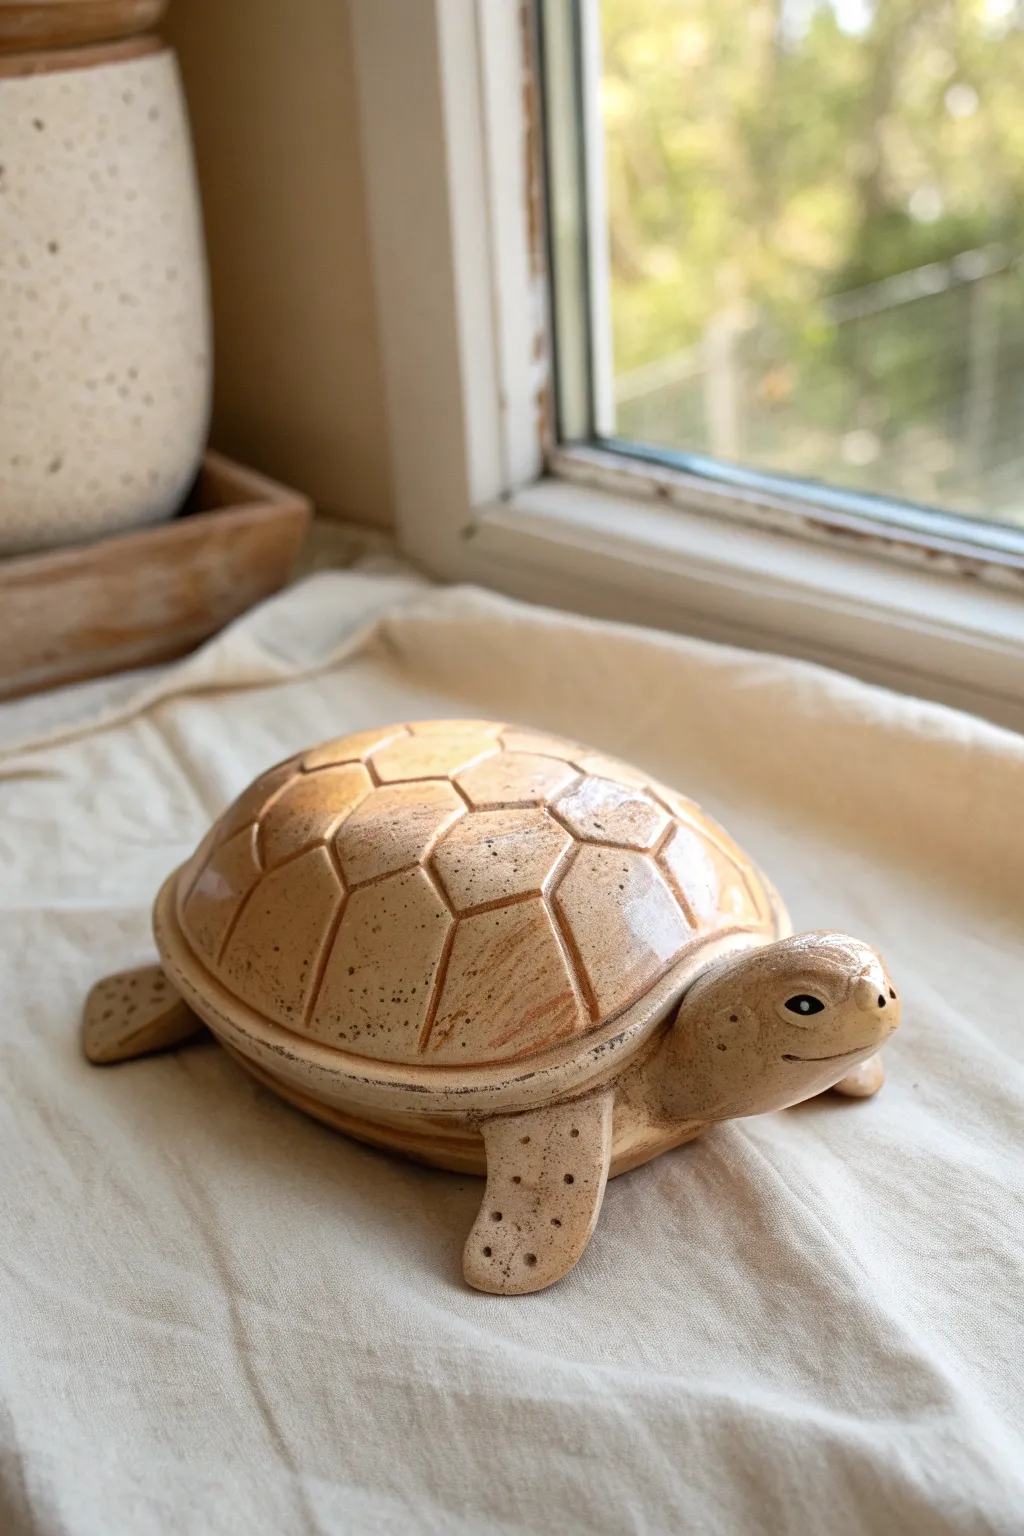
This charming ceramic turtle starts with a classic double pinch pot base that is transformed into a smooth, domed shell with distinct scute markings. The warm, speckled glaze gives it an organic, sandy finish that looks perfect basking on a windowsill.
Step-by-Step
Materials
- Stoneware clay (speckled or buff)
- Needle tool or toothpick
- Loop tool (small)
- Scoring tool (or fork)
- Slip (clay mixed with water)
- Wooden modeling tool
- Sponge
- Black underglaze (for the eyes)
- Clear or semi-transparent honey glaze
- Kiln
Step 1: Forming the Body
-
Create two pinch pots:
Start with two equal balls of clay, roughly the size of a tangerine. Press your thumb into the center of each and pinch the walls evenly while rotating until you have two symmetrical bowl shapes. -
Join the pots:
Score the rims of both pinch pots thoroughly and apply a generous amount of slip. Press the rims together firmly to trap air inside, creating a hollow sphere. -
Shape the shell:
Gently paddle or roll the sphere on your table to flatten the bottom slightly and round out the top, forming the classic dome shape of a turtle shell. -
Refine the seam:
Using a wooden tool or your thumb, smooth the seam where the two pots meet until it is completely invisible. The trapped air offers resistance, making smoothing easier.
Air Venting
Don’t forget to poke a tiny, hidden hole in the underside of the hollow shell! This allows expanding air to escape during firing and prevents explosions.
Step 2: Adding Appendages
-
Model the head:
Roll a smaller ball of clay into a thick teardrop shape for the head. Slightly flatten the wider end to create a distinct face. -
Shape the flippers:
Create four flattened, triangular shapes for the flippers. The front pair should be slightly larger and longer than the rear pair to mimic a sea turtle’s anatomy. -
Make a tail:
Roll a very small cone of clay for the tail, keeping it short and pointed. -
Attach the parts:
Score and slip the contact points on the shell and the appendages. Press the head, flippers, and tail securely onto the underbelly of the shell, blending the clay edges smooth with a modeling tool.
Natural Texture
Instead of regular dots on the flippers, try pressing coarse sea salt or sand into the wet clay for texture, which creates organic pits after firing.
Step 3: Sculpting Details
-
Carve the shell segments:
Using a needle tool, lightly sketch a hexagonal pattern on the top of the shell. Once satisfied with the spacing, carve deeper lines to define the scutes (shell plates). -
Refine the scutes:
Use a small loop tool or the edge of a wooden tool to slightly bevel the edges of each shell segment, giving them a raised, three-dimensional look. -
Add rim detail:
Carve a single, continuous line around the lower perimeter of the shell to separate the upper carapace from the belly. -
Create the face:
Press a small indentation for the mouth using a curved tool to give the turtle a slight smile. Use a needle tool to make two small nostril holes. -
Texture the flippers:
If you want the spotted look on the flippers, use the point of your needle tool to gently poke small, random divots into the clay.
Step 4: Glazing and Finishing
-
Bisque fire:
Allow the piece to dry slowly and completely before firing it in the kiln for a bisque firing. -
Paint the eyes:
Using a fine brush, apply a small dot of black underglaze to the eyes. I find adding a tiny speck of white over the black brings the character to life. -
Apply main glaze:
Dip or brush a clear or honey-colored semi-transparent glaze over the entire piece. This allows the clay’s natural speckles and the carved shell lines to show through. -
Wipe back (optional):
If your glaze is thick, gently wipe the raised surfaces of the shell with a damp sponge, leaving more glaze in the carved crevices to accentuate the pattern. -
Final fire:
Fire the turtle again according to your glaze and clay specifications (typically cone 5 or 6 for stoneware).
Place your finished turtle near a sunny window where the light can catch the glossy curves of its new shell


Round Chicken With Tiny Wings and Tail Feathers
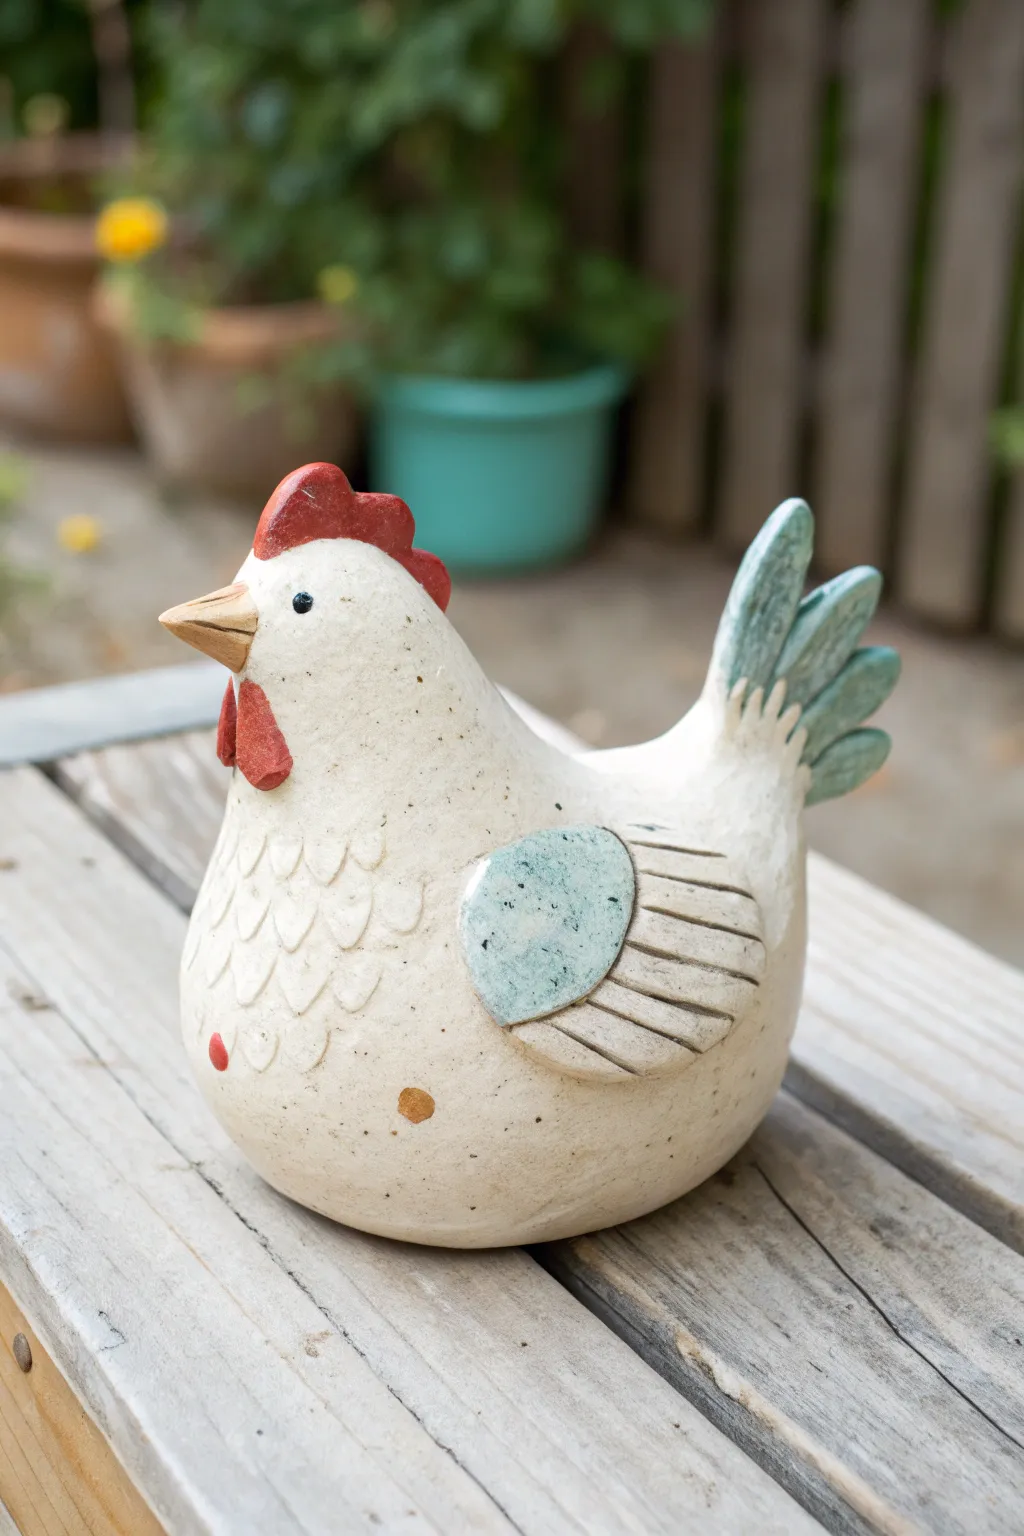
This charming ceramic chicken uses the classic double pinch pot method to create a wonderfully round, robust body. With its patterned breast feathers, teal accents, and alert posture, it makes for a delightful garden companion or kitchen shelf decoration.
How-To Guide
Materials
- High-fire white stoneware clay
- Pottery tools (needle tool, rib tool, scoring tool)
- Slip (clay and water mixture)
- Underglazes: Bright Red, Golden Yellow, Teal/Light Blue
- Clear transparent glaze (matte or satin recommended)
- Small sponge
- Assorted texture tools (u-shaped loop tool or small spoon)
- Paintbrushes (fine detail and medium flat shader)
Step 1: Forming the Body
-
Form two pinch pots:
Start by rolling two equal-sized balls of white stoneware clay, roughly the size of tennis balls. Push your thumb into the center of each and pinch the walls evenly while rotating to create two bowl shapes. -
Join the pots:
Score the rims of both pinch pots thoroughly with a serrated tool and apply slip. Press the rims together firmly to trap the air inside, creating a sealed hollow sphere. -
Shape the hen:
Hold the sphere and gently paddle the sides to smooth out the seam. Roll it slightly on your work surface to flatten the bottom so the hen will sit stable without rocking. -
Pull the neck:
Gently squeeze and pull one side of the sphere upward to suggest the neck and head area. The trapped air will help support the clay as you manipulate the form into a pear-like shape. -
Vent the piece:
Use a needle tool to make a tiny, inconspicuous hole in the bottom of the hen to allow expanding air to escape during firing; otherwise, your chicken might burst.
Step 2: Adding Features & Texture
-
Add the tail:
Roll a thick coil of clay and flatten it into a fan shape. Cut notches into the top edge to create individual feathers. Score and slip this onto the rear of the bird, angling it upwards. -
Sculpt the comb:
Create a small, wavy strip of clay for the comb. Attach it securely to the top of the head, blending the bottom edge smoothly into the skull so it doesn’t pop off later. -
Attach beak and wattle:
Form a small cone for the beak and a teardrop shape for the wattle. Join these to the face, ensuring the wattle hangs just under the beak area. -
Create the wings:
Roll out two slabs for wings. Cut them into oval shapes with a flat side. Use a tool to carve horizontal lines for feather detail on the back half of the wing. -
Texture the breast:
On the front of the chicken’s chest, use a small U-shaped loop tool or the tip of a teaspoon to press scale-like indentations into the soft clay. Overlap them slightly to look like layered feathers. -
Attach the wings:
Score, slip, and press the wings onto the sides of the body. I like to position them slightly high on the roundness of the belly to emphasize the plump look.
Air Trap Troubles
If the body collapses while shaping, the clay might be too wet or the seal broke. Re-seal the seam or let the clay firm up for 20 minutes before pulling the neck.
Step 3: Glazing & Finishing
-
Bisque fire:
Allow the clay to dry completely (bone dry) before firing it in the kiln to bisque temperature (usually Cone 04). -
Apply red and yellow:
Once fired, use a small brush to apply 2-3 coats of bright red underglaze to the comb and wattle. Paint the beak with golden yellow. -
Paint the wings and tail:
Apply a teal or light blue underglaze to the tail feathers and the front curve of the wing. For a rustic look, you can wipe it back slightly with a damp sponge to show the texture underneath. -
Add speckles:
Dilute a tiny bit of brown or black underglaze with water. Dip a stiff toothbrush in it and run your thumb across the bristles to flick tiny speckles across the white body for a natural eggshell look. -
Final glaze fire:
Coat the entire piece in a clear matte or satin glaze to seal it without making it too shiny. Fire again to the final temperature suitable for your clay body.
Textured Tail Tip
For the tail feathers, vary the thickness of the clay slightly. Thinner edges on the tips will hold the glaze differently, creating natural color variation.
Place your finished hen in a sunny spot to enjoy its rustic charm all year round

What Really Happens Inside the Kiln
Learn how time and temperature work together inside the kiln to transform clay into durable ceramic.
Penguin With a Painted Belly and Small Flippers
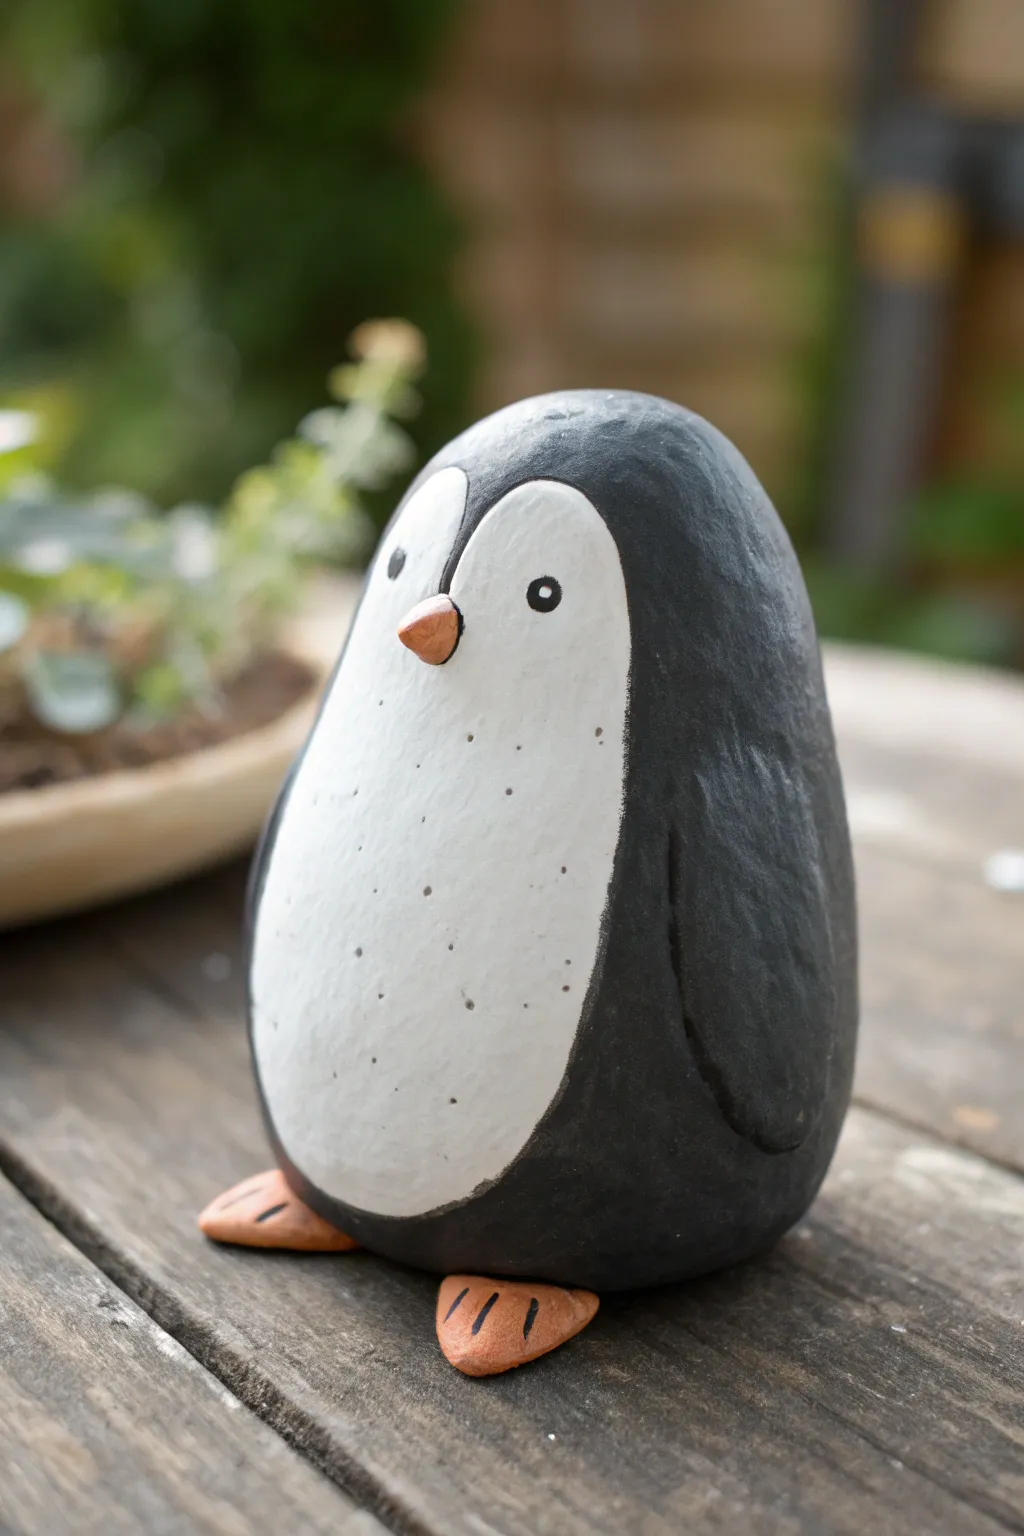
This adorable penguin sculpture is a perfect example of what you can achieve with basic double pinch pot construction. With its smooth, rounded body and charming speckled belly, it makes for a delightful garden ornament or desk companion.
Step-by-Step Guide
Materials
- Air-dry clay or kiln-fire clay (depending on preference)
- Clay scoring tool or toothbrush
- Slip (clay mixed with water)
- Small wooden modeling tool or butter knife
- Sponge
- Acrylic paints (Black, White, Orange/Terracotta)
- Small round paintbrush
- Medium flat paintbrush
- Clear matte acrylic sealer
Step 1: Forming the Body
-
Create two pinch pots:
Start by dividing a chunk of clay into two equal balls. Press your thumb into the center of each ball and gently pinch the walls while rotating to create two bowl shapes of roughly the same size. -
Join the pots:
Score the rims of both pots by cross-hatching the clay with your tool. Apply a generous amount of slip to the scored edges. -
Seal the connection:
Press the two pots together firmly to create a hollow sphere. Use your thumb or a modeling tool to smudge the clay across the seam until it disappears completely. -
Shape the egg form:
Gently roll and paddle the sphere on your work surface to elongate it slightly into an egg shape. You want the bottom to be slightly wider than the top to give the penguin a stable base. -
Smooth the surface:
Using a slightly damp sponge, wipe down the entire form to remove fingerprints and bumps. Getting the surface smooth now is crucial for that polished final look.
Air Pocket Drama
Before sealing the two pinch pots, poke a tiny hidden hole with a needle tool (the ‘vent’) on the bottom. This prevents trapped air from causing cracks while drying or exploding in a kiln.
Step 2: Adding Details
-
Add the beak:
Roll a very small cone of clay for the beak. Score and slip the back of it, then attach it to the upper third of the body, pointing slightly downward. -
Create the wings:
You don’t need to add extra clay for wings. Instead, use a modeling tool to gently carve or outline a faint wing shape on the sides, or simply leave the body smooth as the paint will define the wings later. -
Form the feet:
Flatten two small balls of clay into triangle shapes. Score where they will attach to the bottom front of the body and press them firming into place so they stick out just slightly. -
Detail the feet:
Use a knife or thin tool to press two lines into each foot to create toes. -
Let it dry:
Allow your sculpture to dry completely. For air-dry clay, this usually takes 24-48 hours; if firing, follow your kiln schedule.
Step 3: Painting
-
Base coat in black:
Using your medium flat brush, paint the entire back and sides of the penguin black. Carefully curve the paint line around the front to define the white belly area. -
Paint the belly:
Fill in the front oval area with white acrylic paint. You may need two coats to ensure it’s opaque and covers the clay color fully. -
Create the face shape:
At the top of the white belly, paint two rounded arches above where eyes would be, creating that classic heart-shaped penguin face mask. -
Color the beak and feet:
Paint the beak and the feet with a terracotta or muted orange color. I find a slightly brownish-orange looks more natural than bright neon orange. -
Add the eyes:
Using the tip of a small round brush or a dotting tool, place two black dots inside the white face area. Once dry, add a tiny white speck to each eye for a life-like glint. -
Speckle the belly:
Dilute a tiny bit of grey or brown paint with water. Dip an old toothbrush or stiff brush into it and flick the bristles with your thumb to mist tiny speckles onto the lower belly. -
Define the toes:
Paint thin black lines inside the indentations you made on the feet to emphasize the toes. -
Seal the piece:
Once all paint is fully dry, apply a coat of clear matte acrylic sealer to protect your work and give it a unified finish.
Winter Texture
Instead of smooth paint, dab the white belly area with a sponge rather than a brush. This creates a fluffy, feathered texture that contrasts beautifully with the smooth black back.
Now you have a charming little tuxedo-wearing friend to brighten up your shelf
Bear With Rounded Ears and Simple Paws
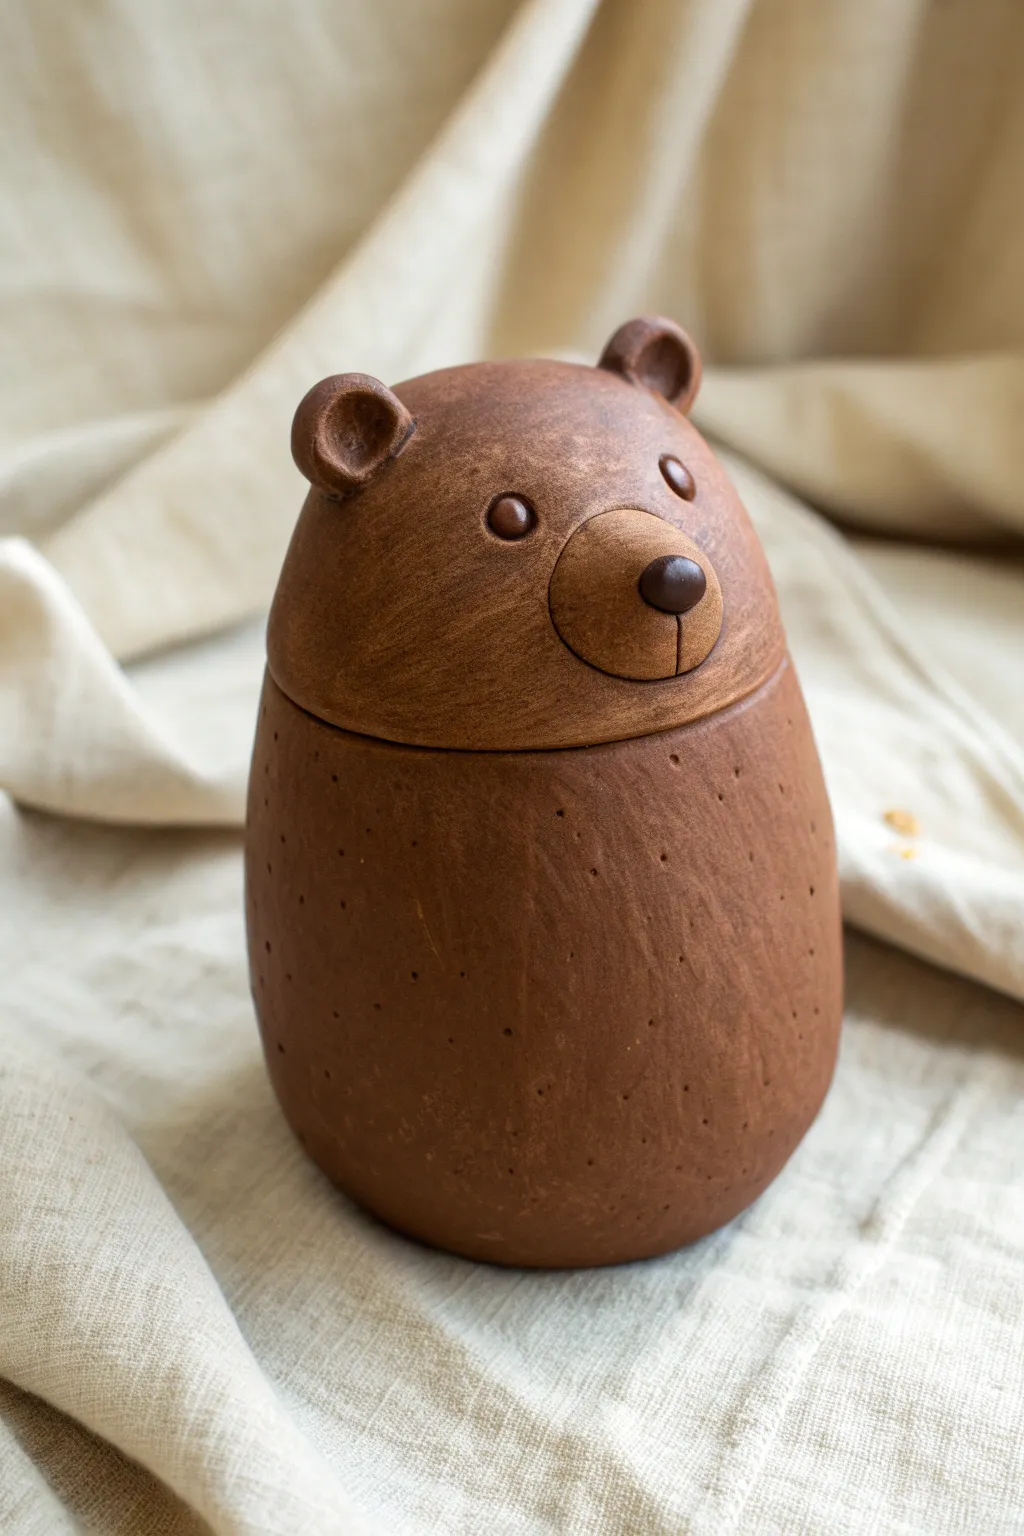
This charming ceramic bear features a clever hidden lid design, where the head lifts off to reveal a storage jar. Its textured, speckled body and smooth, expressive face give it a warm, handcrafted character perfect for holding small treasures.
How-To Guide
Materials
- Stoneware clay (brown or red firing)
- Small kidney scraper or rib tool
- Needle tool
- Scoring tool or old fork
- Slip (clay and water mixture)
- Wooden modeling tool
- Sponge
- Thin plastic bag (for slow drying)
Step 1: Forming the Double Pinch Pots
-
Prepare the Clay:
Start by wedging your clay thoroughly to remove air bubbles. Divide the clay into two balls: one slightly larger for the body and a smaller one for the head. -
Form the Body Pot:
Take the larger ball and push your thumb into the center, pinching and rotating the clay to open up a deep, rounded bowl shape. Aim for even walls about 1/4 inch thick. -
Form the Head Pot:
Repeat the pinch pot process with the smaller ball. This bowl should be shallower and slightly wider at the rim than the body pot, as it will become the lid. -
Refine the Shapes:
Gently paddle the outside of both pots with a wooden spoon or flat tool to refine the curves. The body should be egg-shaped, tapering slightly at the top, while the head should be hemispherical. -
Check the Fit:
Place the head pot upside down onto the rim of the body pot. Adjust the rims until they match in diameter perfectly.
Step 2: Creating the Flange and Lid
-
Create a Coil:
Roll out a clay coil about the thickness of a pencil. This will serve as the flange that keeps the lid secure. -
Attach the Flange:
Score and slip the inside rim of the BODY pot. Attach the coil just slightly inside the rim, smoothing it upward so it creates a raised wall that will fit inside the lid. -
Refine the Connection:
Use your finger or a modeling tool to blend the bottom of the coil into the interior wall of the jar. Ensure the lid fits snugly over this new inner rim without sticking.
Air Trap Trick
When attaching features like the snout or nose, poke a tiny hidden hole behind them into the main pot. This allows trapped air to escape during firing so they don’t pop off.
Step 3: Sculpting Features
-
Make the Ears:
Roll two small balls of clay. Press your thumb into each to create a small hollow, forming the ear shape. Score and slip the top of the head lid, then firmly attach the ears. -
Shape the Snout:
Form a flattened circle of clay for the snout. Score the center of the face and the back of the snout piece, applied slip, and press it onto the lower part of the lid. Smooth the edges down. -
Add Facial Details:
Roll three tiny balls of clay—two for eyes and one for the nose. Attach the nose to the top of the snout and the eyes just above the snout using a little slip. I like to slightly flatten the eyes so they don’t protrude too much. -
Carve the Mouth:
Using a needle tool or thin blade, incise a simple vertical line down from the nose, connecting to a soft curve for the mouth.
Add a Scarf
Roll a thin coil and wrap it around the ‘neck’ seam where the lid meets the body. Texture it to look like a knitted scarf to hide the join line even more.
Step 4: Texturing and Finishing
-
Smooth the Head:
Use a rib or the back of a spoon to burnish the surface of the head (the lid). You want this area to be relatively smooth to contrast with the body. -
Texture the Body:
Take a needle tool and gently poke random, shallow holes all over the body section only. This stippling effect creates the appearance of fur or a rough coat. -
Final Smoothing:
Run a barely damp sponge over any sharp edges, particularly around the rim and the ears, to soften the look. -
Dry Slowly:
Place the lid on the body (with a loose piece of paper towel in between to prevent sticking) and cover loosely plastic. Let it dry very slowly to prevent warping. -
Coloring:
Once bisque fired, apply an iron oxide wash or a matte brown glaze. Wipe back the glaze on the textured body so the ‘pokes’ hold more color, emphasizing the texture.
Your little bear is now ready to guard your cookies or trinkets on the shelf


The Complete Guide to Pottery Troubleshooting
Uncover the most common ceramic mistakes—from cracking clay to failed glazes—and learn how to fix them fast.
Hedgehog With Pressed-In “Spines” Texture
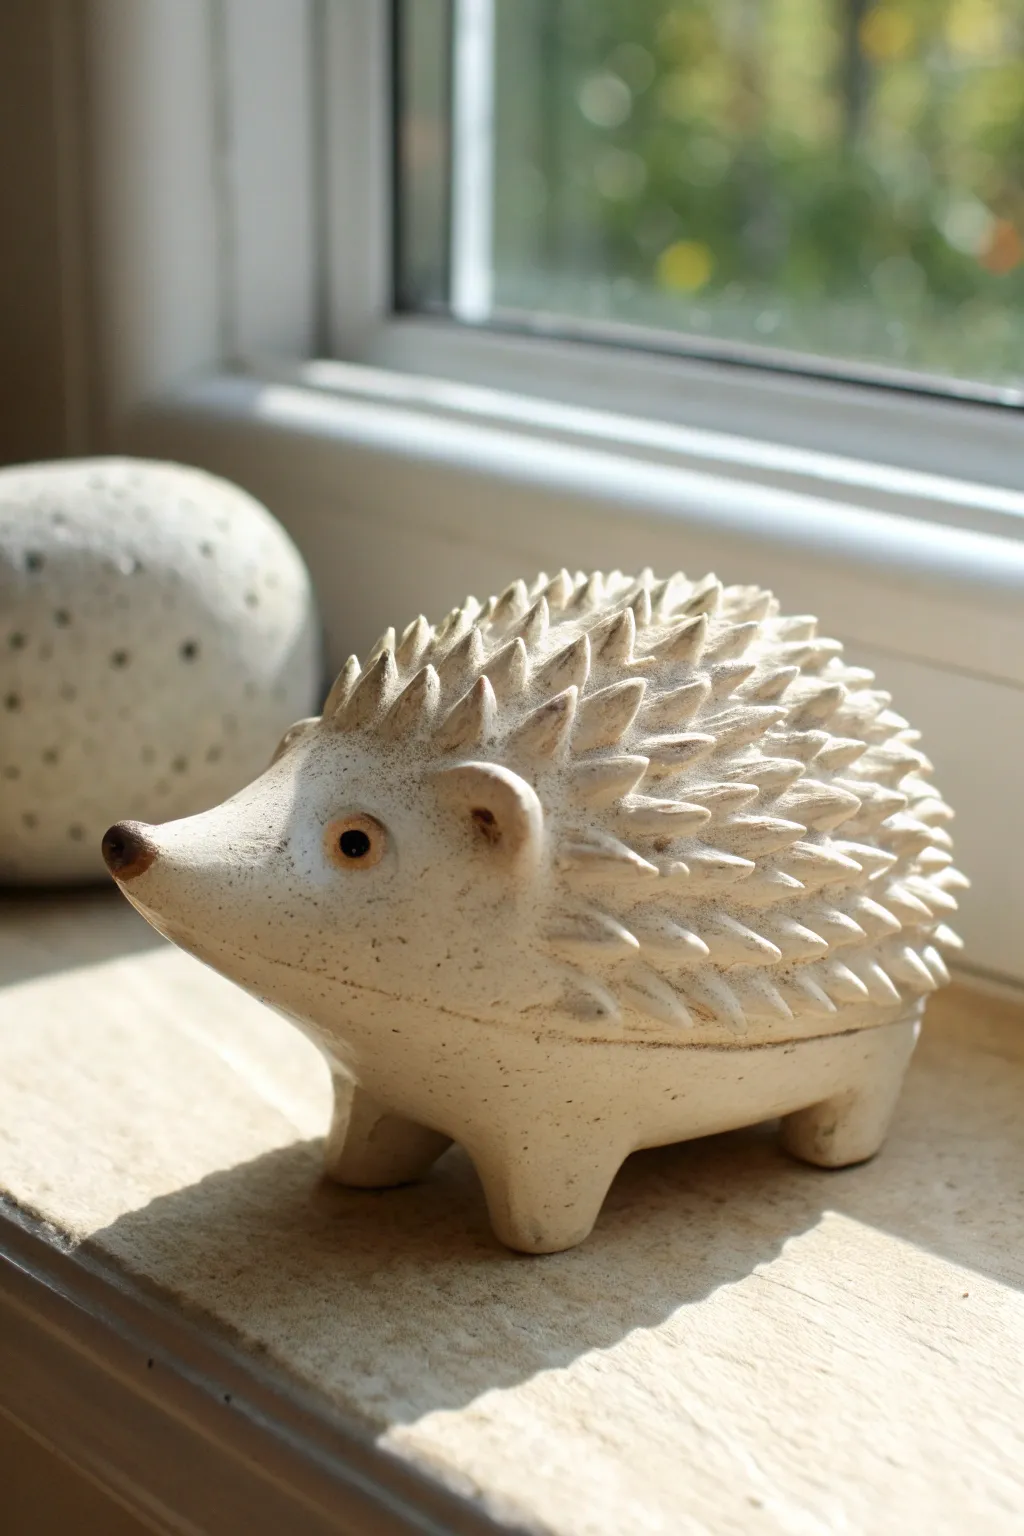
This charming hedgehog planter or sculpture starts life as a simple double pinch pot form before transforming into a spiky friend. The creamy, speckled clay body and carefully sculpted spines give it a delightful tactile quality that catches the light beautifully on a windowsill.
Step-by-Step Tutorial
Materials
- Speckled buff stoneware clay (or white clay with speckles added)
- Small wooden modeling tool or a popsicle stick
- Pin tool or needle tool
- Serrated rib or scoring tool
- Slip (clay mixed with water)
- Small sponge
- Small liner brush (for details)
- Clear or translucent satin glaze
- Underglaze (brown/black for eyes/nose)
Step 1: Forming the Body
-
Create two pinch pots:
Start with two balls of clay roughly the size of a tangerine. Stick your thumb into the center of one and pinch the walls evenly as you rotate the ball. Repeat with the second ball to create two matching bowl shapes. -
Join the pots:
Score the rims of both pinch pots by scratching cross-hatch marks with your serrated rib. Apply a generous amount of slip to the scored areas. -
Seal the seam:
Press the two pots together rim-to-rim to trap a pocket of air inside. Smooth the clay over the seam using your thumb first, then a rib tool, until the join is completely invisible and the form is an egg shape. -
Shape the silhouette:
Adjust the egg shape by gently tapping it on your work surface to create a slightly flattened bottom so it sits stable. Gently elongate one end to suggest where the face will be.
Step 2: Sculpting Features
-
Pull the snout:
At the tapered end of your egg, pinch and gently pull the clay outward to form a distinct, upturned snout. It should curve slightly upward for a cute expression. -
Add the feet:
Roll four small, equal-sized coils of clay. Score and slip the underside of the body, then attach the feet. Blend the clay from the feet onto the body so they are securely attached, leaving them slightly stubby. -
Create ears:
Shape two small, flattened semi-circles of clay. Attach these just behind the snout area using the score-and-slip method. Use a rounded tool to press an indentation into the front of each ear. -
Refine the surface:
Before texturing, smooth the entire surface using a slightly damp sponge to remove fingerprints. This is easier to do now than after the spines are added.
Spines Falling Off?
If spines detach as they dry, your clay was likely too dry when joining. Always score deeply and use plenty of slip. Re-attach with vinegar for extra grip.
Step 3: Creating the Texture
-
Mark the face boundary:
Lightly trace a faint line with a needle tool to separate the smooth face area from the rest of the body where the spines will go. -
Form individual spines:
This is the meditative part. I like to take small bits of clay—about the size of a grain of rice—and roll them into tiny tapered cones. -
Attach the first row:
Score and slip the area right behind the ears. Press the base of your clay cones onto the body, blending the bottom edge downward so the spine points back and up. -
Build up the coat:
Continue adding rows of spines, working your way back toward the tail. Stagger the placement like shingles on a roof so there are no large gaps. -
Refine spine tips:
Once all spines are attached, go back and gently sharpen or curve the tips with your fingers to ensure they look uniform and flow in the same direction.
Pro Tip: Texture Variation
Make the spines slightly different sizes—smaller near the face and larger towards the back—for a much more organic, realistic look.
Step 4: Finishing Touches
-
Add facial details:
Use a small ball of clay for the nose and attach it to the tip of the snout. For eyes, either press small holes or attach tiny balls of clay with defined pupils. -
Vent the piece:
Since this is a hollow form, use your needle tool to poke a hidden hole in the bottom (under the belly) to let air escape during firing. -
Bisque fire:
Let the piece dry slowly and completely before bisque firing to cone 04. -
Apply finish:
Paint the nose and eyes with dark underglaze. Then, dip or brush the entire piece with a satin clear glaze to show off the speckles. Wipe the bottom of the feet clean. -
Final firing:
Glaze fire the hedgehog to the temperature recommended for your specific clay body (e.g., cone 5 or 6).
Place your finished hedgehog in a sunny spot to enjoy the friendly shadow patterns it casts.
Whale Bud Vase With a “Blowhole” Opening
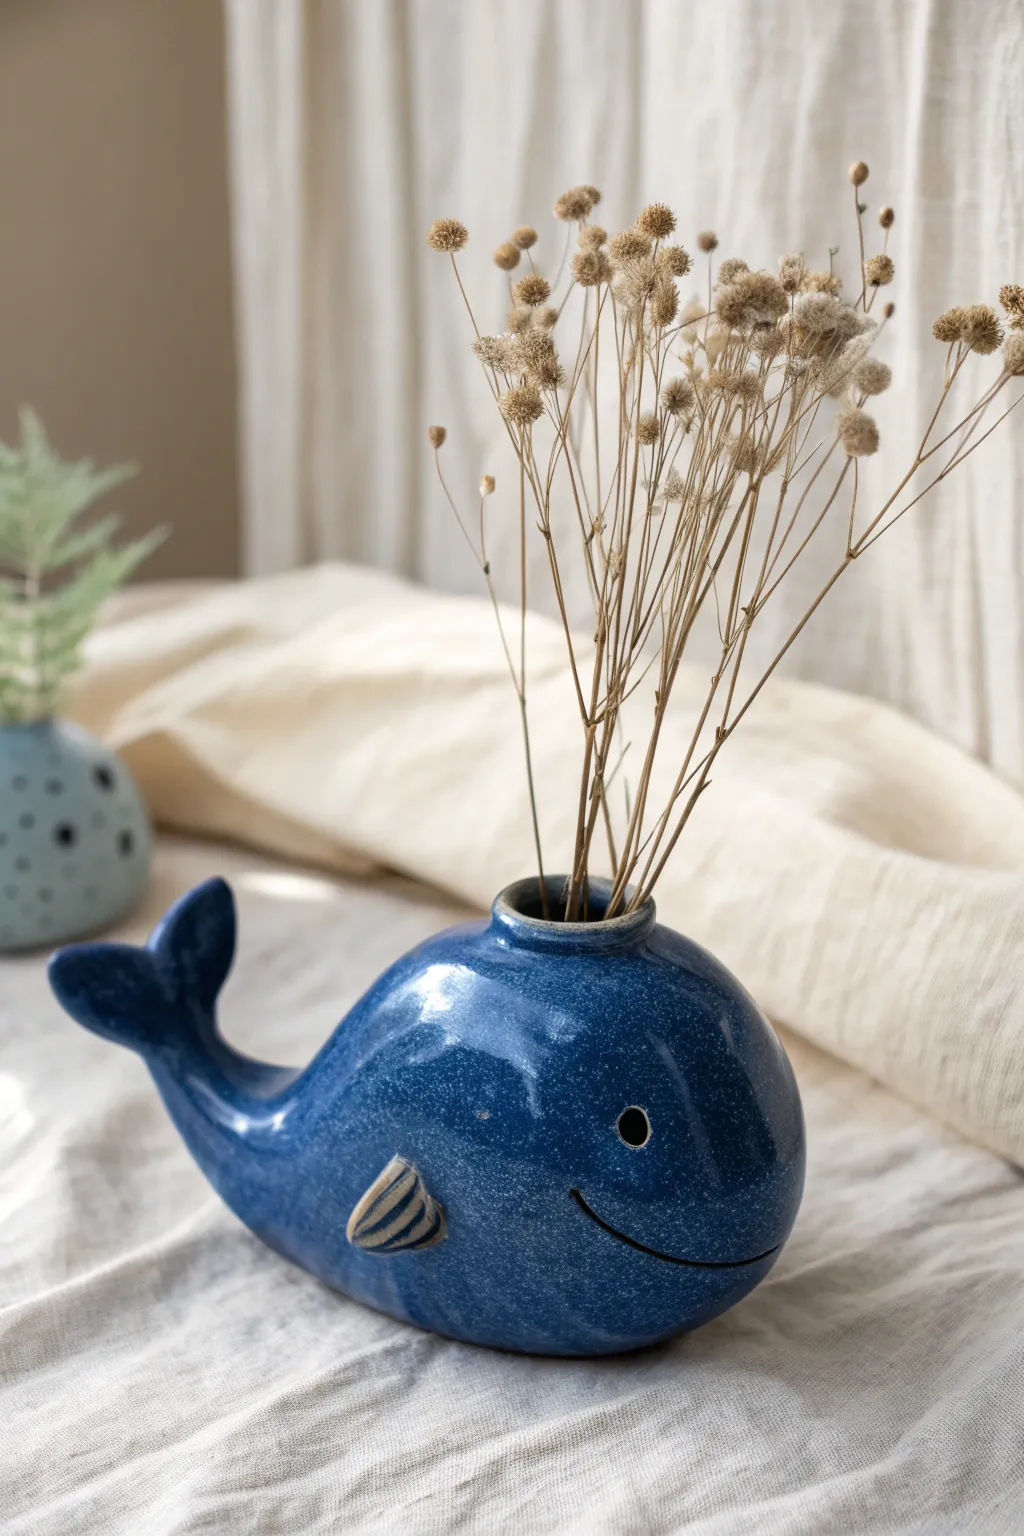
Transform two simple balls of clay into a charming ocean friend with this whale bud vase project. The finished piece features a rich, speckled blue glaze, a sturdy base for stability, and a clever blowhole that serves as the opening for your favorite dried stems.
Detailed Instructions
Materials
- Stoneware clay (white or buff)
- Needle tool
- Rib tool (kidney shaped)
- Scoring tool (or serrated rib)
- Slip (clay mixed with water)
- Sponge
- Underglaze pencil or black underglaze (for details)
- Speckled blue glaze (glossy finish)
- Small paintbrush
- Kiln access
Step 1: Forming the Body
-
Create pinch pots:
Start by rolling two equal balls of clay, roughly the size of tennis balls. Push your thumb into the center of each and pinch the walls evenly while rotating to create two hemispherical pinch pots. -
Join the halves:
Score the rims of both pinch pots thoroughly with your scoring tool and apply a generous amount of slip. Press the two halves together firmly to create a hollow sphere, trapping air inside to keep the shape rigid. -
Smooth the seam:
Using your thumb or a wooden tool, drag clay across the seam to knit the two halves together. Follow up with a rib tool to smooth the entire surface until the join line completely disappears and the sphere is round. -
Shape the whale body:
Gently tap the sphere on your work surface to create a flat stable base. Then, gently squeeze and pull one side of the sphere to elongate it slightly into a teardrop shape—this tapered end will become the tail.
Step 2: Adding Features
-
Form the tail flukes:
Roll a small coil of clay and flatten it into a ‘V’ shape. Attach this to the tapered end of your body using the score-and-slip method, smoothing the clay so the tail curves upward naturally. -
Create the blowhole:
Locate the top center of the whale’s head. Adding a very small ring of clay first can create a raised rim, then cut a hole through the center into the hollow cavity. Smooth the edges of this opening with a damp sponge. -
Release trapped air:
Since you’ve just cut the blowhole, the trapped air is released. Be gentle handling the body now as it will be softer. Use a finger inside the hole to support the wall if you need to reshape anything. -
Attach the fins:
Shape two small triangles of clay for the side fins. Score and slip them onto the lower sides of the whale body. I like to score deeper lines into the fins themselves to mimic the texture shown in the photo.
Seam Splitting?
If the join line reappears while drying, score it deeply, add fresh soft clay into the crack, and compress it firmly with a rib tool immediately.
Step 3: Refining and Decorating
-
Carve facial details:
Wait until the clay is leather hard. Using a needle tool, carve a long, curving smile line that reaches up the side of the face. -
Add the eyes:
For the eye, press a small hollow tube or the back of a paintbrush into the clay to create a clean circle impression. Add a tiny dot of black underglaze in the center for the pupil later. -
Final smoothing:
Go over the entire piece with a barely damp sponge to remove any fingerprints or rough crumbs of clay, paying special attention to the rim of the blowhole. -
Bisque fire:
Allow the whale to dry completely (bone dry) before firing it in the kiln to cone 04 (or your clay’s specific bisque temperature).
Make it a Set
Make a smaller baby whale using just one pinch pot pinched closed, or vary the tail angles to create a playful pod that looks like they are swimming.
Step 4: Glazing
-
Apply wax resist:
Paint wax resist on the bottom of the whale so it doesn’t stick to the kiln shelf. You might also wax the textured lines of the side fin if you want the raw clay to show through there. -
Highlight the smile:
Paint a thin line of black underglaze into the carved smile line and the eye indentation to make the features pop. -
Apply main glaze:
Dip or brush your speckled blue glaze over the entire whale, avoiding the bottom. If brushing, apply 2-3 coats for an opaque, glossy finish like the example. -
Wipe back details:
Use a damp sponge to carefully wipe the glaze off the textured high points of the side fin, revealing the clay body underneath. -
Final firing:
Fire the piece again to the glaze temperature recommended for your specific blue glaze (usually cone 5 or 6 for stoneware).
Once cooled, fill your whale with delicate dried grasses to complete the rustic look

TRACK YOUR CERAMIC JOURNEY
Capture glaze tests, firing details, and creative progress—all in one simple printable. Make your projects easier to repeat and improve.
Lidded Trinket Jar Made From a Sliced Double Pinch Pot
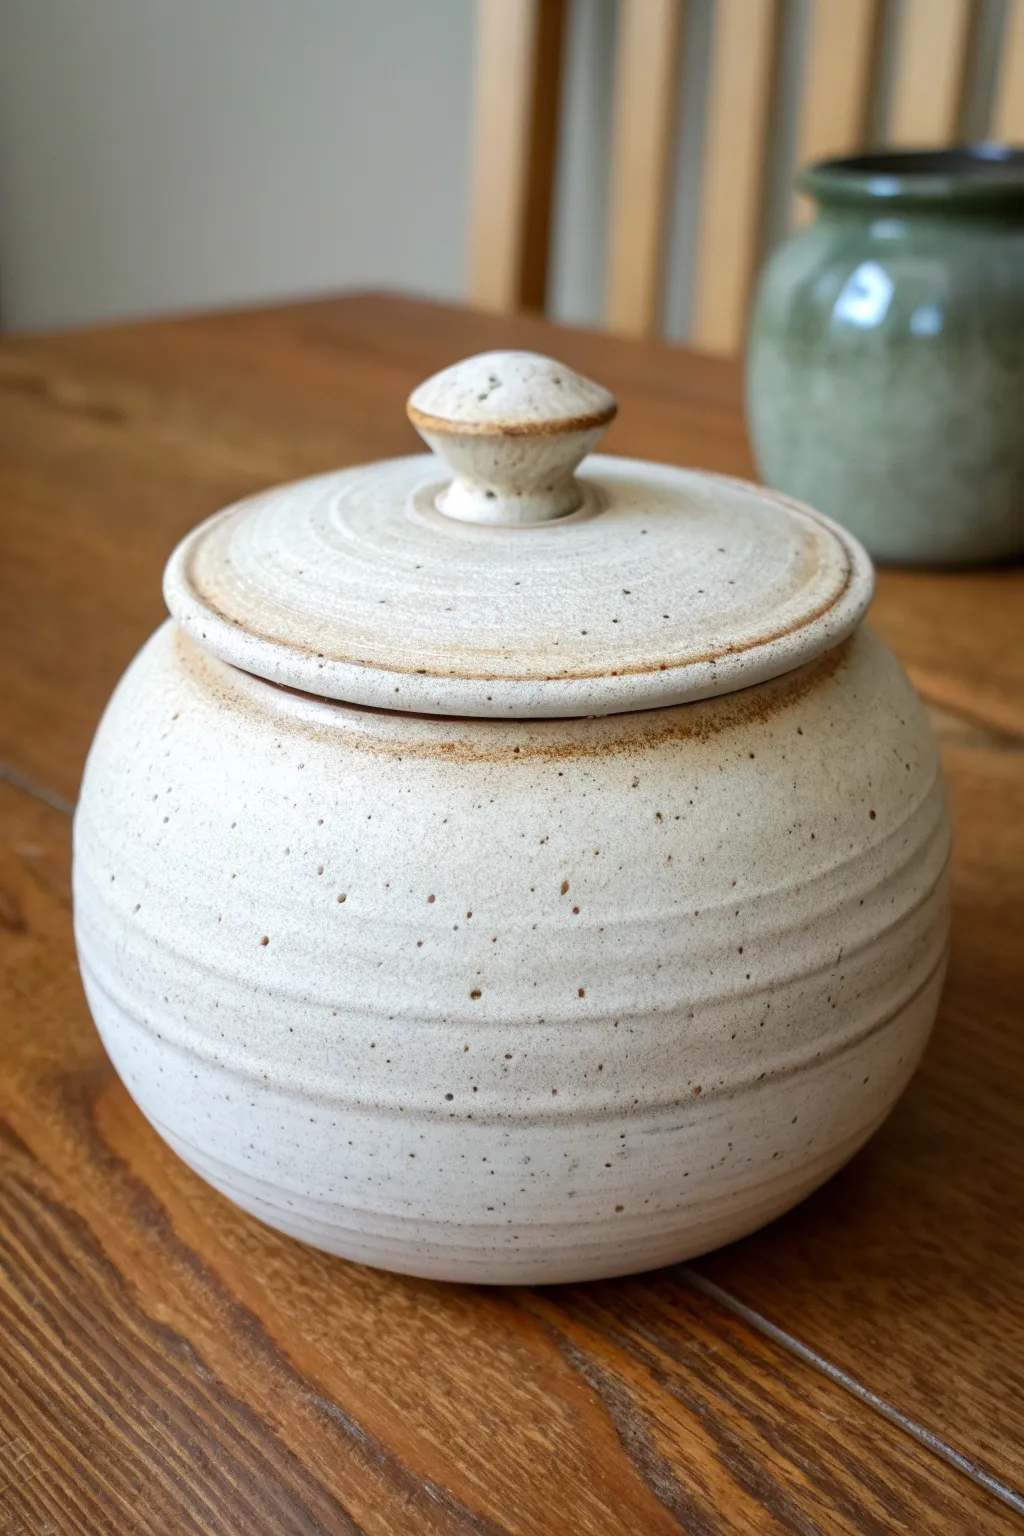
Transform two simple balls of clay into this elegant, spherical trinket jar featuring a snug-fitting lid and a tactile ribbed texture. The finish showcases a classic creamy glaze with natural iron speckles, giving it a timeless, handmade appeal perfect for storing small treasures.
Step-by-Step
Materials
- Stoneware clay (speckled or buff)
- Pin tool or needle tool
- Serrated rib tool
- Smooth yellow sponge
- Scoring tool or old fork
- Slip (clay and water slurry)
- Wooden modeling tool
- Paddle (optional)
- Creamy matte white glaze (speckled)
Step 1: Forming the Base Sphere
-
Create two pinch pots:
Start by rolling two equal balls of stoneware clay, each about the size of a tennis ball. Gently insert your thumb into the center of each and pinch the walls evenly while rotating, aiming for a consistent 1/4 inch thickness throughout. -
Check the rims:
Before joining, place the two pinch pots rim-to-rim to check their fit. Adjust the width of the openings by gently squeezing or stretching the clay until they match perfectly. -
Score and slip:
Rough up the rims of both pots using a scoring tool or fork. Apply a generous amount of slip to the scored areas to act as glue. -
Join the halves:
Press the two halves firmly together. Wiggle them slightly to lock the clay particles together, creating a trapped pocket of air inside. -
Seal the seam:
Using your thumb or a wooden tool, drag clay across the seam line to stitch the halves together. Smooth this area thoroughly so the seam disappears completely, creating a sealed hollow sphere. -
Shape into a perfect round:
Gently paddle the exterior with a wooden paddle or your hands to round out any lumpy areas. The trapped air provides internal resistance, making it easier to maintain the spherical shape.
Step 2: Creating the Lid and Texture
-
Surface texturing:
While the clay is still leather-hard but workable, take a serrated rib tool and gently drag it horizontally around the sphere. I find subtle, continuous spiral lines work best to mimic the wheel-thrown look in the image. -
Define the lid line:
Decide where you want your lid to sit—about one-third of the way down from the top is structurally sound. Mark a horizontal line around the circumference with a pin tool. -
Slice the lid:
Carefully cut along your guide line with a precise knife or fettling tool. Cut at a slight angle—aiming inward and downward—to create a natural ledge that helps the lid sit securely later. -
Add a flange:
Roll a small coil of clay. Score and slip the inside rim of the *bottom* piece, then attach the coil inside, smoothing it so it extends upward about 1/4 inch. This ‘gallery’ keeps the lid from sliding off. -
Form the knob:
Shape a small ball of clay into a flattened mushroom or door-knob shape. Ensure it is proportional to the overall pot size. -
Attach the knob:
Score the center of the lid and the bottom of your knob. Apply slip and press firmly to attach. Clean up any excess slip with a damp sponge.
Warped Lid Fix
If the lid rocks after cutting, dry the jar with the lid ON. The pieces will shrink together, maintaining their fit. Rotate the lid periodically while drying.
Step 3: Finishing and Glazing
-
Refine the edges:
Once the clay is visibly drier (leather hard), use a damp sponge to smooth the cutting lines and the rim of the lid. Sharp edges become razor sharp after firing, so soften them now. -
Bisque fire:
Let the piece dry completely (slowly, to prevent warping) and bisque fire it according to your clay body’s instructions, usually to Cone 04. -
Wax resist application:
Apply wax resist to the bottom foot of the jar and the contact points where the lid touches the jar (the gallery and the underside of the lid rim) to prevent them from fusing shut during the kiln firing. -
Glaze application:
Dip the jar and lid into a creamy, matte white glaze. If your clay body isn’t naturally speckled, choose a glaze with iron additives to achieve that spotted texture. -
Wipe back details:
For the look in the photo, take a damp sponge and gently wipe the glaze off the very edge of the knob and the rim of the lid, exposing the raw clay underneath for a lovely contrast. -
Final firing:
Glaze fire to the maturity temperature of your clay (likely Cone 5 or 6). Allow the kiln to cool naturally before removing your finished jar.
Color Pop
Swap the white glaze for a celadon or translucent blue. The texture lines you carved with the rib will catch the glaze, creating beautiful depth variation.
Now you have a charming, handcrafted vessel ready to hold sugar, jewelry, or simply sit beautifully on your shelf
Fruit-Inspired Melon Jar With Stripes and a Stem Knob
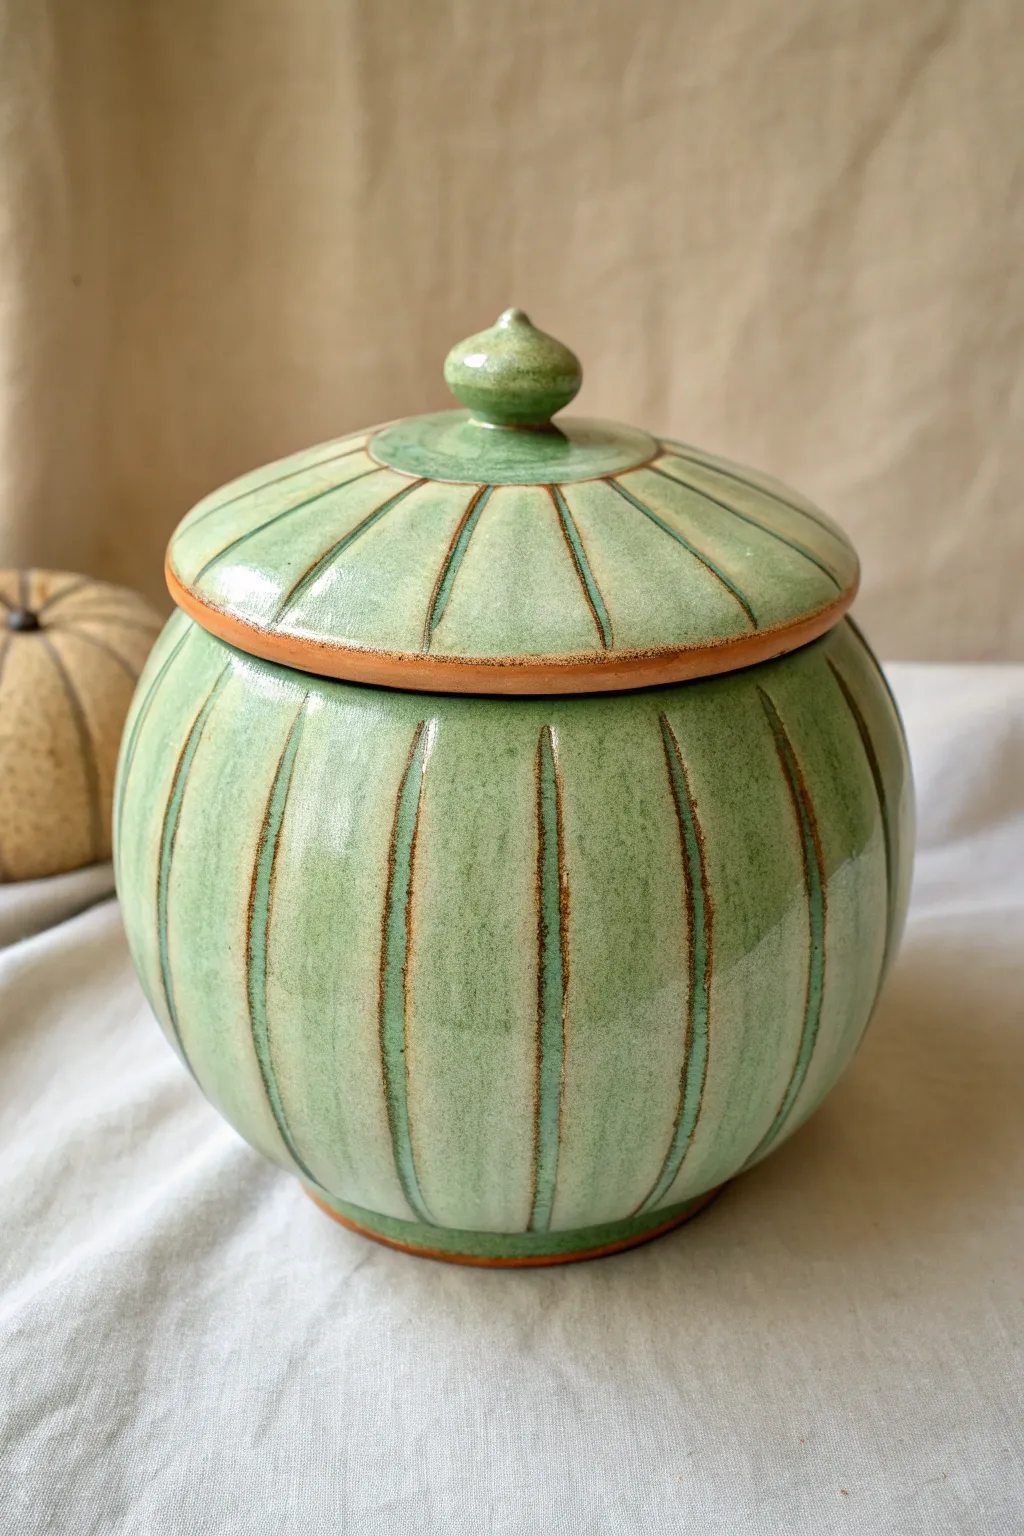
This charming ceramic jar captures the essence of a ripe melon with its spherical form, striated texture, and soft celadon-green glaze. The double pinch pot technique creates a hollow, lightweight vessel perfect for storing tea bags, sugar, or small treasures.
Step-by-Step Guide
Materials
- Stoneware clay (buff or white body)
- Scoring tool (serrated rib or needle)
- Slip (clay and water slurry)
- Wooden paddle
- Fettling knife
- Carving tool (small loop or v-tip)
- Sureform or rasp
- Soft sponge
- Celadon or translucent green glaze
- Small paintbrush (for wax resist)
Step 1: Forming the Base
-
Prepare Clay Balls:
Start with two balls of stoneware clay roughly the same size, about the size of a large orange or small grapefruit. Wedge them well to remove air bubbles. -
Pinch Two Pots:
Push your thumb into the center of the first ball and pinch the walls evenly as you rotate it. Repeat with the second ball to create two matching bowl shapes. -
Check Fit:
Place the two bowls rim-to-rim to ensure they are the same diameter. If one is slightly larger, pinch the smaller one out a bit more until they align perfectly. -
Score and Slip:
Aggressively score the rims of both pinch pots with your serrated tool. Apply a generous amount of slip to the roughened areas. -
Join the Halves:
Press the two halves together firmly. Wiggle them slightly to lock the clay particles together, trapping the air inside to support the walls. -
Seal the Seam:
Drag clay from one half across the seam to the other using your thumb or a wooden tool, smoothing it completely so the join is invisible.
Air Pressure Sensitivity
When paddling the sealed sphere, be gentle. The trapped air pushes back, helping round the form, but hitting too hard can pop seams.
Step 2: Shaping and Refining
-
Paddle into Shape:
Gently paddle the exterior of the sealed sphere with a wooden paddle. This compresses the clay and helps refine the round, melon-like shape. -
Smooth the Surface:
Let the sphere firm up to a soft leather-hard stage. Use a rasp/sureform to shave away uneven lumps, then smooth the surface with a rib tool. -
Cut the Lid:
Determine where you want your lid line to be (usually the top 1/3 of the sphere). Using a fettling knife, carefully cut through the wall at a 45-degree inward angle. The angle prevents the lid from falling in. -
Clean and Fit:
Remove the lid. Soften the cut edges with a damp sponge. Add a small coil of clay to the underside of the lid or the inside of the jar rim to create a gallery ledge if the angled cut isn’t secure enough.
Uneven Lid Issues
If your lid wobbles after cutting, place a piece of 80-grit sandpaper on a board, put the lid rim-down, and rotate it to sand it perfectly flat.
Step 3: Texturing and Finishing
-
Add the Knob:
Form a small, organic stem shape from a scrap of clay. Score and slip the center of the lid, then attach the knob firmly. Smooth the transition. -
Mark the Segments:
Using a needle tool, lightly sketch vertical lines dividing the jar into equal segments, running from the bottom center, up sharply through the lid, to the knob. -
Carve the Stripes:
With a carving tool, gouge out the sketched lines to create deep grooves. Do this while the lid is on the jar to ensure the lines match up perfectly. -
Initial Bisque Fire:
Allow the piece to dry slowly to avoid warping. Once bone dry, bisque fire the piece according to your clay body’s specifications (usually cone 04 or 06). -
Apply Wax Resist:
Paint a thin line of wax resist over the exposed clay rim of the jar and the contact point of the lid to keep them unglazed. -
Glaze Application:
Dip the entire jar (or brush heavily) with a translucent celadon green glaze. The glaze should pool slightly in the carved grooves, creating a darker green stripe. -
Wipe and Fire:
Sponge off any glaze from the foot ring and the waxed rims. Glaze fire to maturity (likely cone 5/6 or 10 depending on clay).
Once fired, the translucent glaze will highlight your carving work, giving this jar a lovely organic depth
Gourd-Shaped Bottle With a Coil-Built Neck
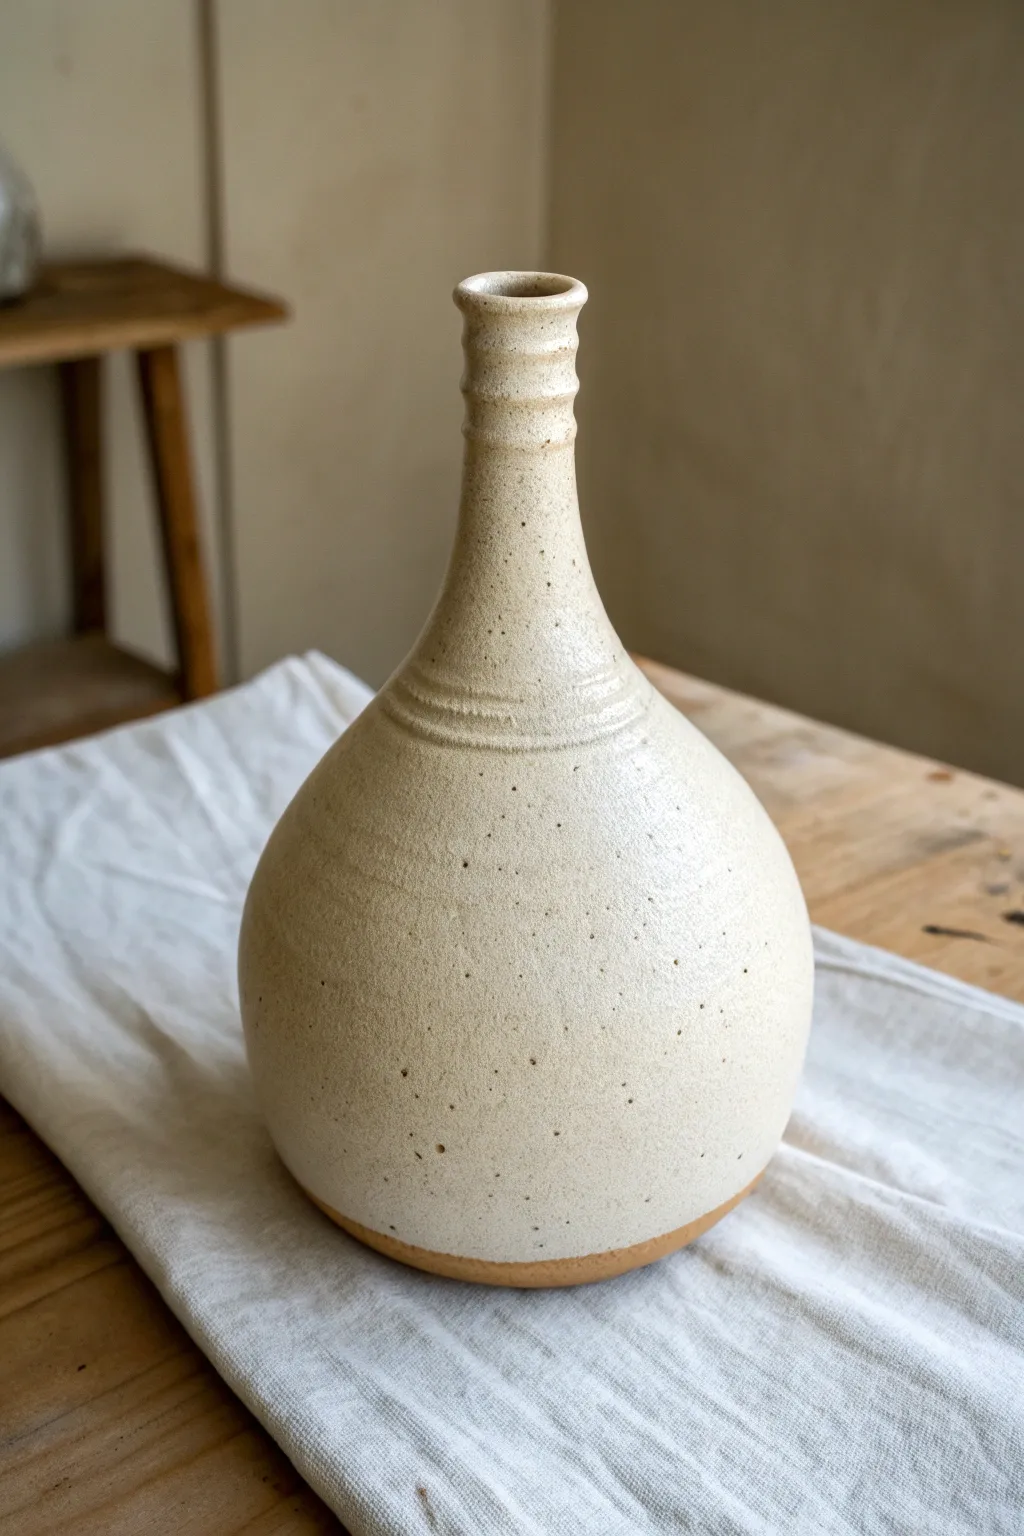
This project combines the organic feel of hand-building with the refined silhouette of a wheel-thrown piece. By stacking two pinch pots and adding a tall, graceful neck, you’ll create a timeless gourd-shaped vessel finished in a warm, speckled cream glaze.
How-To Guide
Materials
- Speckled Stoneware Clay (about 2-3 lbs)
- Serrated Rib Tool
- Rubber Kidney Rib
- Needle Tool
- Scoring Tool or Fork
- Slip (clay mixed with water)
- Wooden Modeling Tool
- Sponge
- Wooden Paddle
- Cream/White Stoneware Glaze (glossy or satin)
- Wax Resist (optional)
Step 1: Forming the Base
-
Form the pinch pots:
Start by dividing your clay into two equal balls roughly the size of large oranges. Press your thumb into the center of each and pinch the walls evenly while rotating, creating two symmetrical bowl shapes. Aim for walls about 1/4 inch thick. -
Adjust the shapes:
Since we are making a gourd shape, gently paddle the exterior of one pot to be slightly taller and narrower (the top half), and leave the other rounder and wider (the bottom belly). -
Score and slip:
Thoroughly score the rims of both pinch pots using your serrated tool or fork until the texture is rough. Apply a generous layer of slip to both roughened rims. -
Join the halves:
Press the rims together firmly. Wiggle them slightly to lock the clay particles together. This creates a hollow, enclosed sphere or egg shape. -
Seal the seam:
Using a wooden tool or your thumb, drag clay across the seam line from one pot to the other to stitch them together. Do this around the entire circumference. -
Refine the sphere:
Gently paddle the joined form to compress the seam and smooth out the shape. The air trapped inside acts like a balloon, providing resistance so the wall doesn’t collapse while you shape it.
Pro Tip: Trapped Air
Keep the main body sealed with trapped air for as long as possible while smoothing the outside. Only cut the hole for the neck once the belly is totally refined.
Step 2: Adding the Neck
-
Open the top:
Decide where the neck will sit. Use your needle tool to cut a circular hole at the top of your form, roughly 1.5 to 2 inches wide. Save the cutout clay for the coils. -
Roll a coil:
Roll a snake of clay about the thickness of your finger. Score and slip the rim of the opening you just cut, as well as the underside of your coil. -
Attach the first coil:
Place the coil onto the opening. Support the wall from the inside with one finger while blending the coil downwards onto the body on the outside. -
Build height:
Continue adding coils to build the neck upward. As you build, slightly taper the coils inward to create that narrowing gourd profile. -
Smooth the transition:
Use a serrated rib followed by a soft rubber rib to seamlessly blend the neck into the shoulder of the pot. I usually take extra time here to ensure the curve looks continuous and not disjointed. -
Detail the rim:
Once the neck reaches your desired height (about 4-5 inches tall), add a slight flare to the very top rim. Use a modeling tool to create the horizontal ridges or rings just below the rim for visual interest.
Level Up: Texture Play
Before glazing, gently wipe the ribbed neck area with a damp sponge to expose more of the raw clay texture. This creates a stronger contrast when fired.
Step 3: Finishing and Glazing
-
Dry slowly:
This shape can be prone to cracking at the neck joint, so cover it loosely with plastic and let it dry very slowly over several days before bisque firing. -
Bisque fire:
Fire the piece to cone 04 (or your clay body’s recommendation) to prepare it for glazing. -
Wax the foot:
Apply wax resist to the bottom inch of the vase. This reveals the beautiful raw clay and creates the two-tone look seen in the photo. -
Apply glaze:
Dip or brush your cream-colored glaze over the interior and exterior. The glaze should break slightly over the texture rings at the neck and the shoulder connection. -
Final wipe:
Sponge off any glaze drips from the waxed bottom area to ensure a crisp line. -
Glaze fire:
Fire the piece to maturity (likely Cone 5/6 depending on your clay). The heat will interact with the iron specks in the clay, bleeding through the white glaze to create the speckled effect.
Place a single dried branch or meadow flower in your finished vase to highlight its graceful silhouette.
Mini Pitcher With a Pinched Spout and Comfort Handle
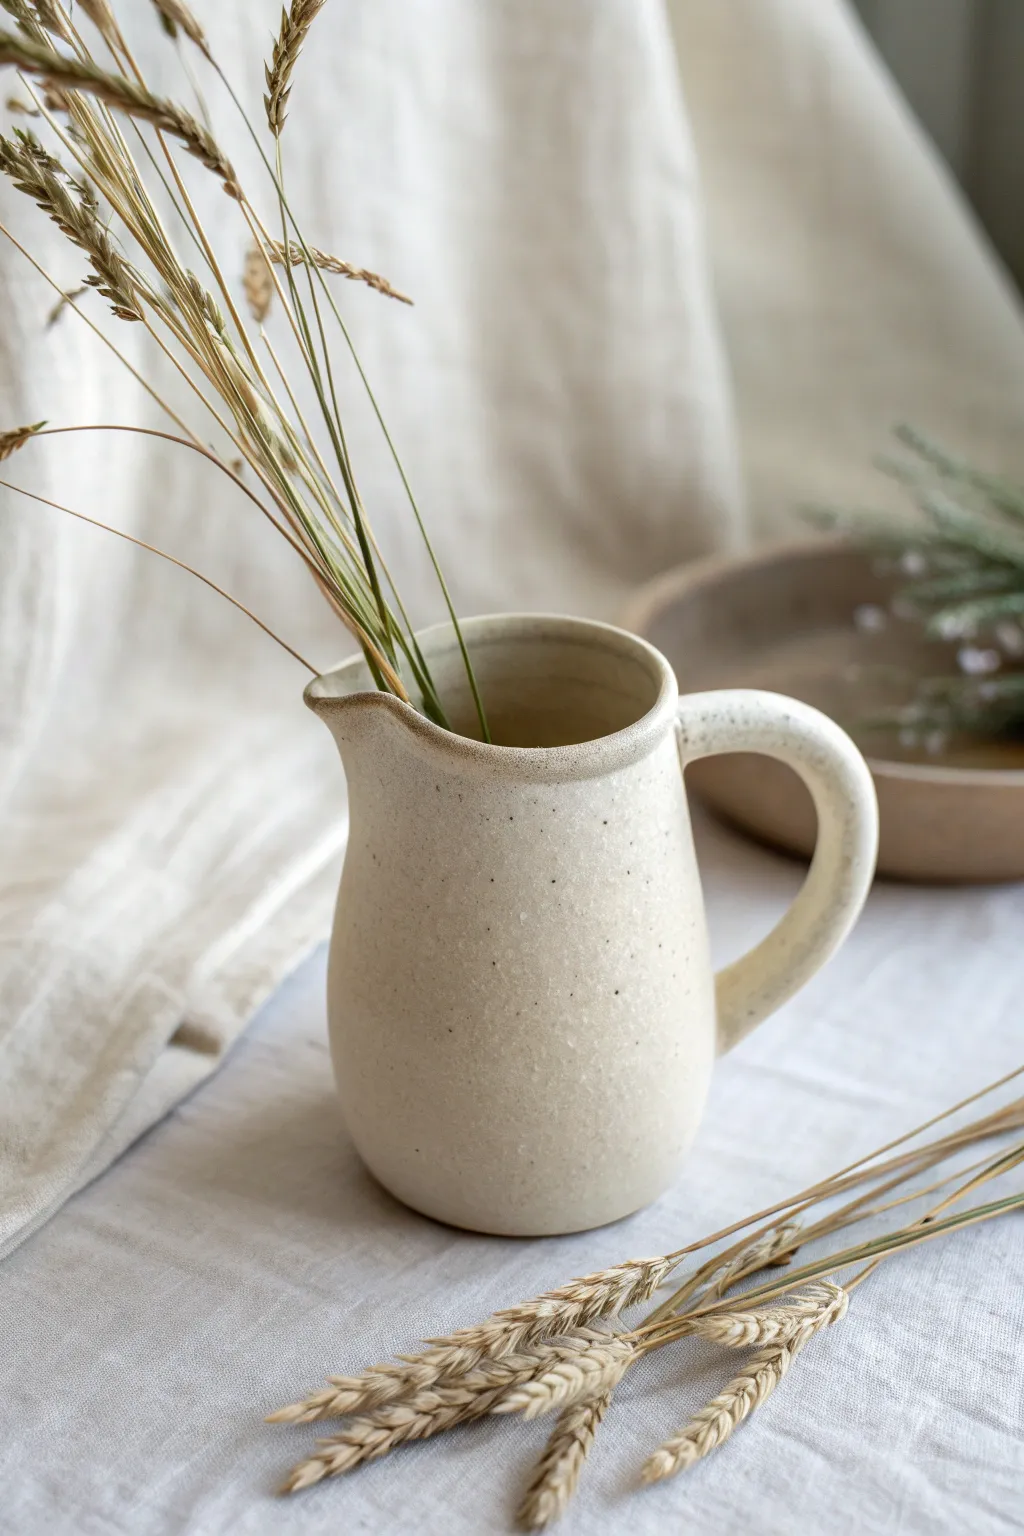
This charming, rustic pitcher showcases the beauty of hand-built ceramics with its gentle curves and speckled matte finish. Perfect for displaying dried botanicals or serving creamer, it features a classic pinched spout and a sturdy looped handle for a comfortable grip.
Detailed Instructions
Materials
- Stoneware clay (speckled or buff)
- Pottery wheel (optional, see notes)
- Rib tool (wooden or silicone)
- Needle tool
- Sponge
- Loop tool
- Serrated rib or scoring tool
- Slip (clay mixed with water)
- Cutting wire
- Matte cream or white speckled glaze
- Kiln
Step 1: Forming the Body
-
Prepare the clay:
Begin with a ball of clay about the size of a large orange. Wedge it thoroughly to remove air bubbles, as trapped air can cause cracks during firing. -
Pinch the base pot:
If hand-building, press your thumb into the center of the ball and gently pinch the walls upward while rotating. Aim for a rounded, organic shape that is slightly wider at the bottom. -
Refine the walls:
Use your fingers or a rib tool to smooth the interior and exterior walls. The goal is an even thickness of about 1/4 inch throughout the vessel to ensure even drying. -
Add height (optional):
To achieve the tall, pear-like shape seen in the image, you may need to add a small coil of clay to the rim. Score the rim, add the coil, and smooth it down to integrate it seamlessly into the pinched form. -
Shape the neck:
Gently collar the clay inward near the top to create a narrowed neck, then flare the rim outward slightly. This subtle curve gives the pitcher its elegant silhouette.
Step 2: Spout and Handle
-
Pull the handle:
Take a separate piece of clay and pull a handle blank. Use water and gentle downward stripping motions to create a tapered strap that matches the rustic aesthetic of the pot. -
Curve the handle:
Bend the pulled handle into a ‘C’ shape or ear shape and set it aside to stiffen slightly until it holds its form without sagging. -
Form the spout:
While the body is still leather hard, support the outside or the rim with two fingers and use your index finger to gently pull and press the clay outward to form a pouring spout. -
Refine the spout:
Use a damp sponge to smooth the edges of the spout, ensuring it has a sharp enough edge to cut the flow of liquid cleanly. -
Score and slip:
Identify where the handle will attach—one connection near the rim and one on the belly of the pot. Score these areas thoroughly and apply slip. -
Attach the handle:
Press the handle firmly onto the scored areas. I usually like to wiggle it slightly to ensure a strong bond between the surfaces. -
Blend the seams:
Use your thumb or a modeling tool to smooth the clay from the handle onto the body of the pitcher. Clean up any excess slip with a damp sponge.
Clean Spout Tip
When forming the spout, swipe your finger underneath the lip quickly after pulling it out. This sharpens the edge and prevents dripping when pouring.
Step 3: Finishing and Glazing
-
Smooth the surface:
Once the piece is leather hard, use a rib or a smooth stone to burnish the surface if you want a very neat look, or leave slight finger marks for a handmade feel. -
Bisque fire:
Allow the pitcher to bone dry completely, which may take several days depending on humidity. Load it into the kiln for a bisque firing (usually to Cone 04). -
Apply glaze:
Dip or pour a matte cream glaze over the bisque-fired pitcher. If your clay body doesn’t have speckles, you can look for a glaze formulation that includes iron speckles. -
Wipe the foot:
Using a wet sponge, carefully wipe all glaze off the bottom foot of the pitcher to prevent it from sticking to the kiln shelf. -
Glaze fire:
Fire the piece again to the maturity temperature of your clay and glaze (typically Cone 5 or 6 for stoneware).
Rustic Texture Bump
Instead of smoothing the exterior perfectly, tap the drying clay gently with a wooden paddle wrapped in linen to add a subtle textile texture before firing.
Fill your new pitcher with dried wheat or wildflowers to bring a touch of the countryside into your home
Teapot Body Built on a Double Pinch Pot Sphere
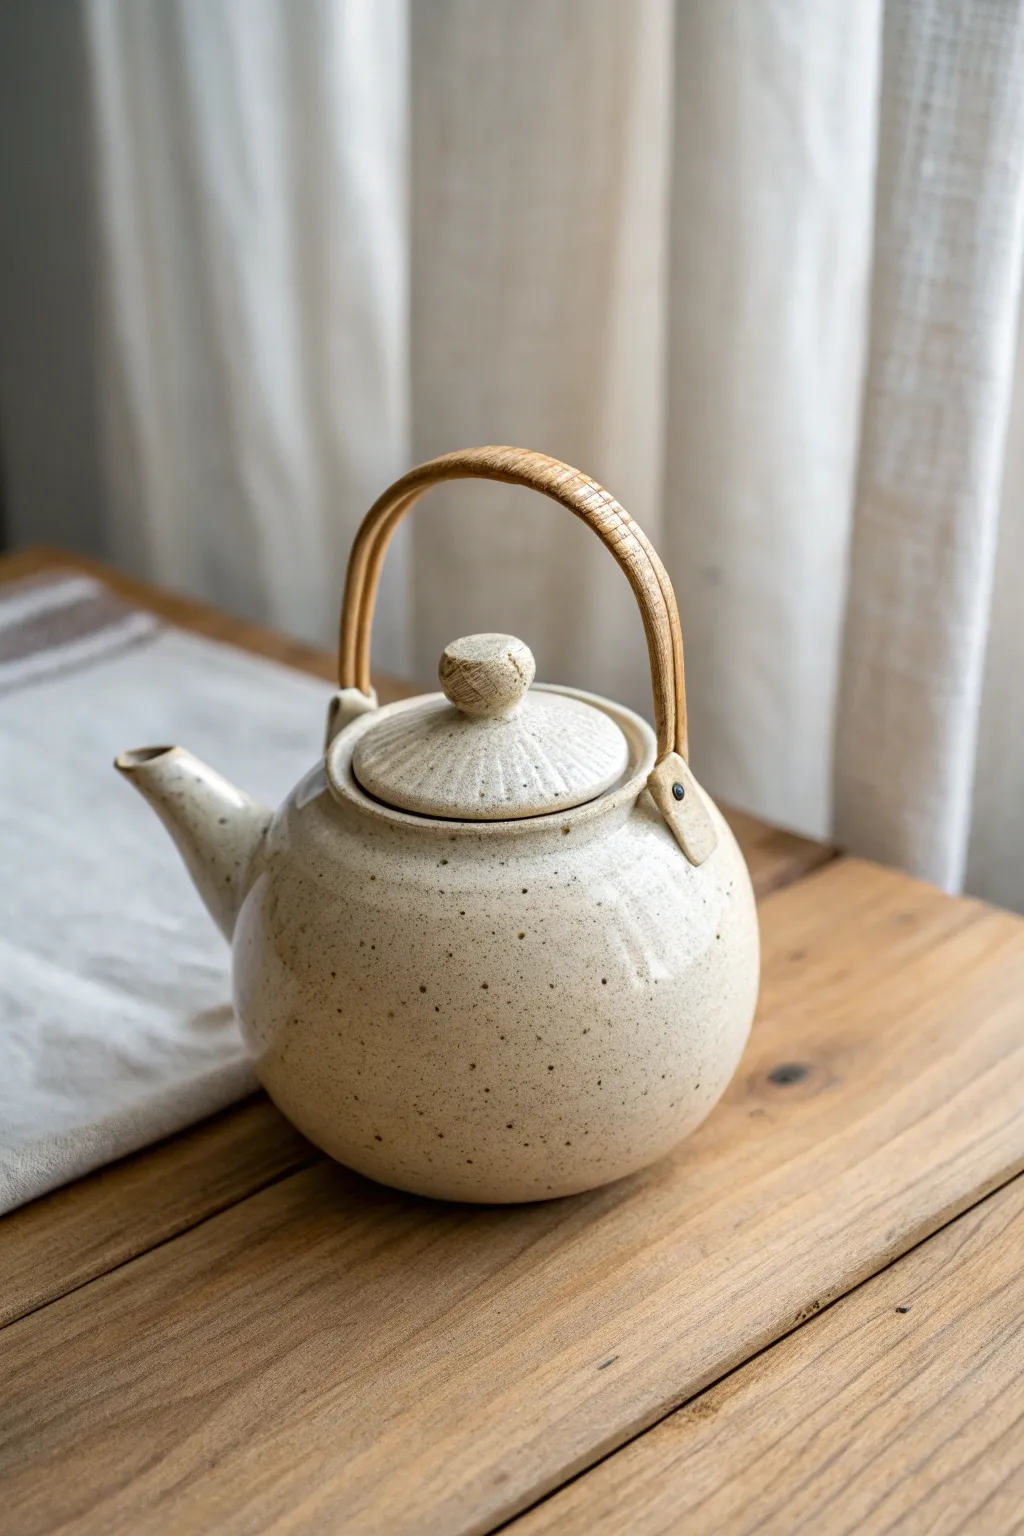
This charming teapot begins with the humble double pinch pot technique to create a perfectly rounded, organic sphere body. Finished with a speckled oatmeal glaze and an earthy bamboo handle, it balances modern simplicity with rustic warmth.
Step-by-Step Tutorial
Materials
- Stoneware clay (speckled or buff)
- Bamboo teapot handle (store-bought)
- Pottery tools (needle tool, rib, scoring tool)
- Slip or vinegar
- Rolling pin
- Small circle cutter
- Sponge
- Speckled cream or oatmeal glaze
Step 1: Forming the Body
-
Pinch two bowls:
Start with two equal balls of clay, roughly the size of large oranges. Using your thumbs, pinch them into two identical hemispherical bowls. Aim for even wall thickness throughout. -
Join the halves:
Score the rims of both bowls aggressively and apply slip or magic water. Press the rims together firmly to form a sealed sphere, trapping air inside to help hold the shape. -
Refine the sphere:
Roll the sphere gently on your work surface or paddle it lightly to round out the seam. Use a flexible rib to smooth the join line until it completely disappears. -
Create the foot:
Tap the bottom of the sphere gently on the table to create a small flat spot for stability. Add a small coil ring if you prefer a lifted foot, smoothing it onto the base.
Uneven Seams?
If your seam cracks or looks uneven during drying, score it deeper and add a tiny thin coil of soft clay into the crack, then smooth thoroughly with a rib
Step 2: Adding Components
-
Cut the lid opening:
Use a needle tool to cut a circular lid opening at the top. Be sure to cut at an inward angle (like a pumpkin lid) so the finished lid won’t fall inside the pot. -
Form the spout:
Roll a thick coil of clay and taper it. Hollow it out using the handle of a wooden spoon or a dowel. Shape it into a slightly curved spout that mimics the pot’s rotund aesthetic. -
Attach the spout:
Hold the spout against the body to check the angle; the tip must be level with the lid opening. Mark the attachment spot, drill strainer holes into the body, then score and slip to attach the spout securely. -
Make the lid:
Roll a small slab and cut a circle slightly larger than your opening, or use the clay cut-out from earlier. Add a small flange underneath so it sits securely in the gallery. -
Sculpt the knob:
Create a small, rounded knob and attach it to the center of the lid. Add texture to the lid surface using a tool to create radiating lines, giving it a sunburst effect. -
Add handle lugs:
Fashion two small tabs or loops of clay. Attach them to the shoulder of the pot on opposite sides. Ensure the holes are large enough to accommodate the wire of your bamboo handle later.
Texture Play
Before the clay hardens, gently press a rough linen cloth onto the surface. This subtle texture will break the glaze beautifully and add tactile interest
Step 3: Finishing Touches
-
Smooth and dry:
Go over the entire piece with a damp sponge to remove any sharp edges or grog. Let the teapot dry slowly under plastic to ensure all parts shrink at the same rate. -
Bisque fire:
Fire the bone-dry piece to bisque temperature (usually cone 04) to prepare it for glazing. -
Glaze application:
Dip or brush your speckled cream glaze onto the body and lid. Avoid getting glaze inside the lug holes or on the bottom foot. Wipe back any drips. -
Final firing:
Glaze fire to the temperature appropriate for your clay body (likely cone 5 or 6). I find this temperature often brings out the best iron specks in the clay. -
Attach handle:
Once the teapot is completely cool, carefully hook the wire ends of the bamboo handle into the ceramic lugs to complete the vessel.
Pour yourself a cup of tea to celebrate your new handmade creation
Sugar Bowl or Salt Cellar With a Snug Little Lid
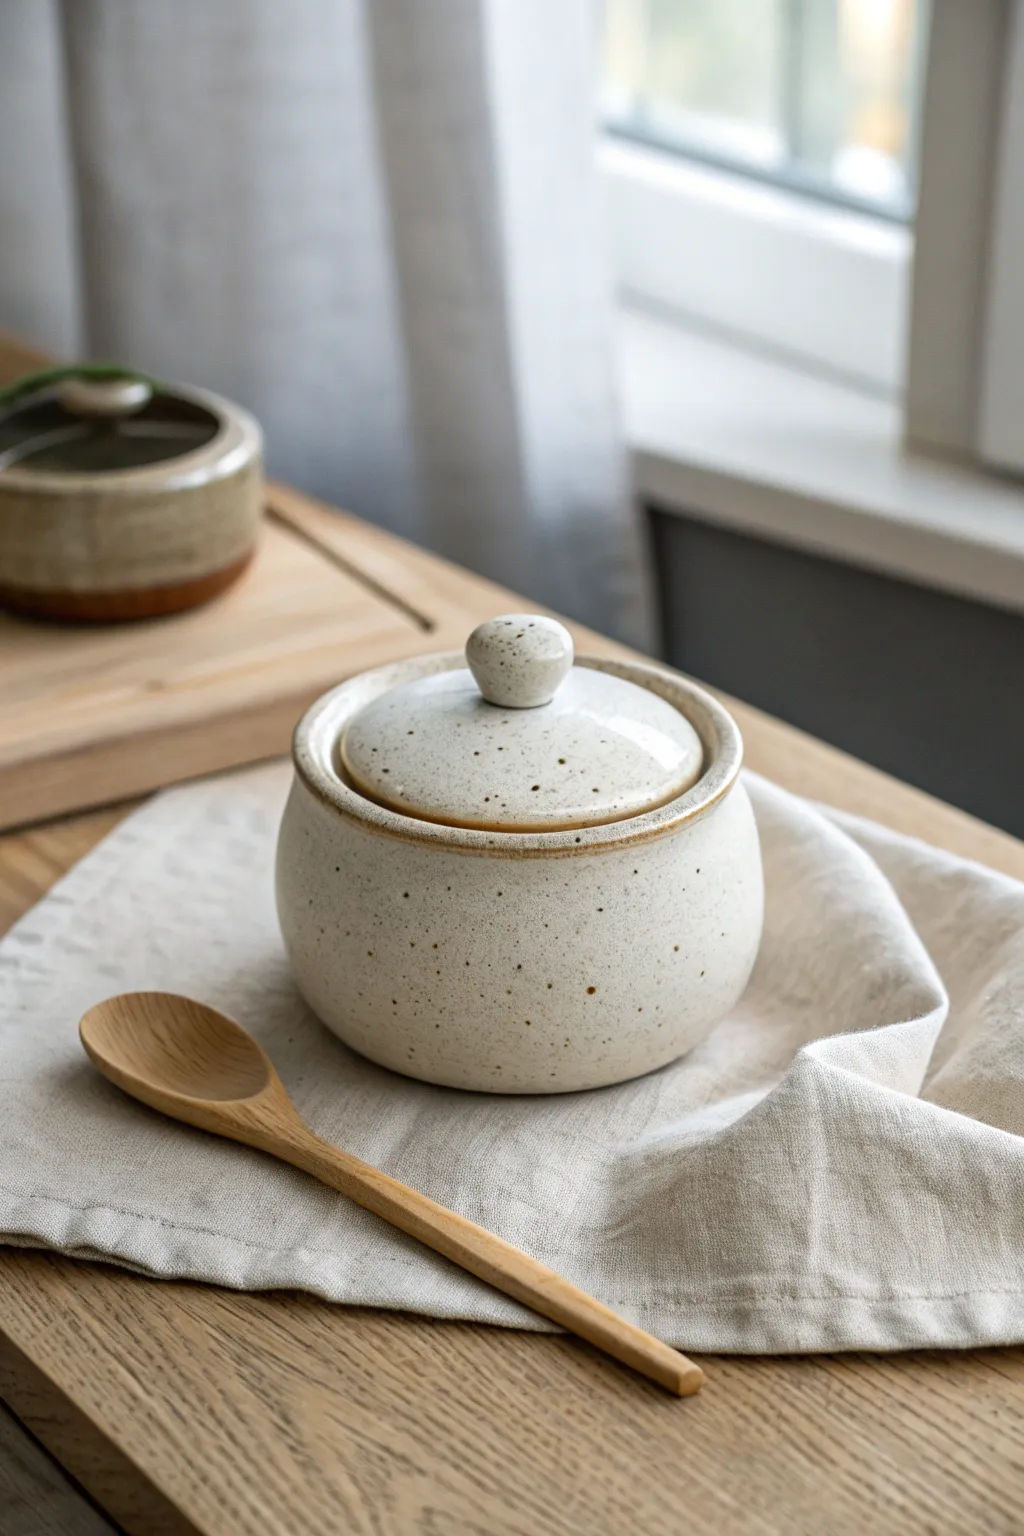
This charming, rustic salt cellar or sugar bowl uses the double pinch pot method to create a rounded, organic form. The finished piece features a snug-fitting lid with a small knob handle and a lovely speckled glaze that highlights its handmade character.
Step-by-Step Guide
Materials
- Speckled buff stoneware clay
- Pottery wire or fettling knife
- Serrated metal rib (scoring tool)
- Slip (clay mixed with water)
- Wooden modeling tools
- Rubber smoothers (ribs)
- Sponge
- White or clear glaze (food-safe)
Step 1: Forming the Base
-
Prepare the Clay:
Start by wedging your speckled clay thoroughly to remove air bubbles. Divide the clay into two equal balls, roughly the size of large tangerines. -
Open the First Pinch Pot:
Take one ball of clay and press your thumb into the center, stopping before you push through the bottom. Gently pinch and rotate the clay between your thumb and fingers to open up a bowl shape. -
Refine the Wall Thickness:
Continue pinching rhythmically, working from the bottom up to the rim. Aim for an even wall thickness of about 1/4 inch throughout the entire pot. -
Create the Second Pot:
Repeat this process with the second ball of clay. This second pot will essentially become the top half of your sphere, so ensure its rim diameter matches the first pot as closely as possible. -
Set Up for Joining:
Let both pinch pots stiffen slightly until they are ‘leather hard’—firm enough to hold their shape but still flexible. This usually takes about 30-60 minutes.
Lid Won’t Fit?
If your lid warps during drying and doesn’t sit flat, wet sand the rims after the final firing. Use wet-dry sandpaper on a flat surface and rub the lid in circles until flush.
Step 2: Joining and Shaping
-
Score and Slip:
Take your serrated rib and thoroughly scratch up the rims of both pinch pots. Apply a generous amount of slip to these scored areas. -
Create the Sphere:
Press the two rims together firmly. Wiggle them slightly to lock the clay particles together, trapping a pocket of air inside. This trapped air provides resistance for shaping. -
Seal the Seam:
Use a wooden tool or your thumb to drag clay across the seam, fully blending the two halves together. Do this until the join is invisible. -
Paddle into Shape:
Using a wooden paddle or flat spatula, gently tap the exterior of your hollow sphere. This compresses the clay and helps refine the roundness. -
Smooth the Surface:
Run a rubber rib over the entire exterior to remove paddle marks and create a smooth, continuous surface.
Make it a Set
Make a matching spoon! Use a small coil of clay for the handle and press one end into a spoon shape. Glaze only the bowl of the spoon, leaving the handle as bare, raw clay.
Step 3: Creating the Lid
-
Cut the Opening:
Decide where you want the lid separation to be. Using a needle tool or sharp knife, slice horizontally through the upper third of the sphere. Remove the top section carefully—this is now your lid. -
Reinforce the Rims:
Use a damp sponge to smooth the cut edges of both the base and the lid. You may need to add a small coil of clay to the inside rim of the lid (a flange) so it sits securely on the base without sliding off. -
Add the Knob:
Roll a small ball of clay for the handle. Score and slip the center of the lid, then attach the ball. I prefer to pinch and shape this knob slightly to give it a comfortable grip. -
Final Smoothing:
Give the entire piece a final sponge-down to remove any sharp edges or burrs. Let the piece dry slowly under plastic to prevent warping.
Step 4: Glazing and Firing
-
Bisque Fire:
Fire the bone-dry piece in a kiln to bisque temperature (usually cone 04). This prepares the ceramic for glazing. -
Apply Glaze:
Dip or brush a coat of white or clear glaze onto the piece. Leave the bottom of the base and the rim where the lid touches unglazed (or use wax resist) to prevent sticking. -
Final Fire:
Fire the piece to the maturity temperature of your clay (likely cone 5 or 6 for stoneware). The heat will draw out the iron speckles in the clay body, creating that beautiful spotted texture through the glaze.
Once cooled, your durable little vessel is ready to hold everyday spices on your countertop
Hanging Orb Planter With Cutout Windows
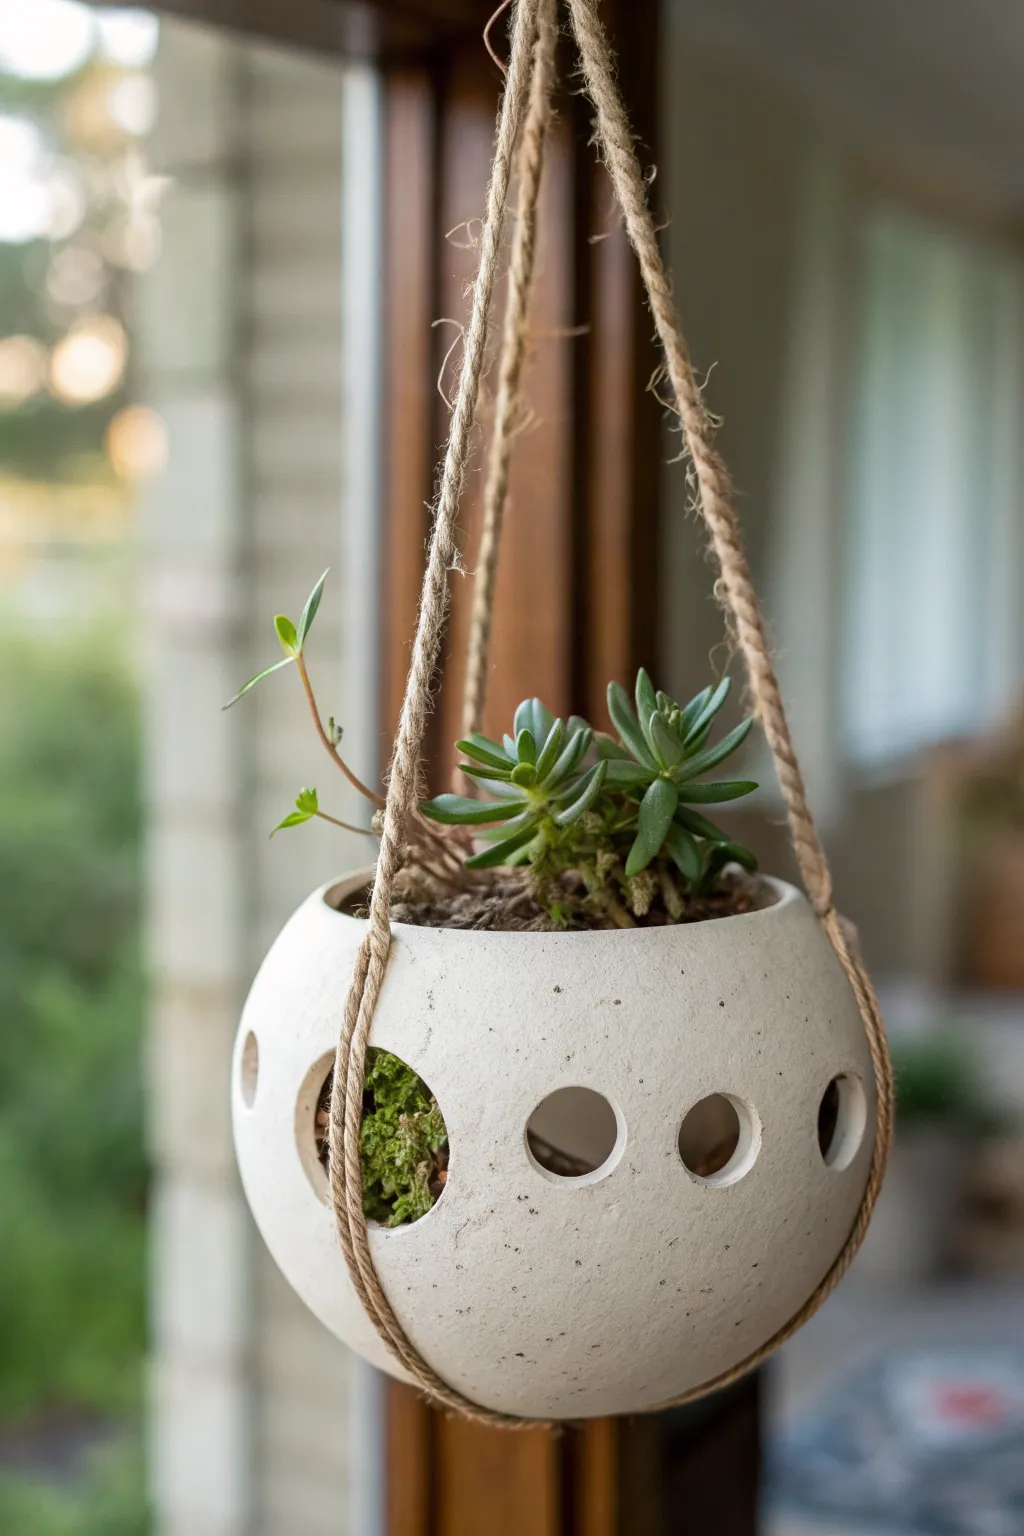
Bring a touch of modern earthiness to your window space with this suspended ceramic orb. By joining two simple pinch pots, you can create a cozy, enclosed home for succulents that features playful peek-a-boo windows.
Detailed Instructions
Materials
- Stoneware clay (smooth or lightly groggy)
- Fettling knife
- Pin tool or needle tool
- Serrated rib or scoring tool
- Slip (clay and water slurry)
- Small round cutter (approx. 1 inch)
- Wooden paddle
- Sponge
- Rubber kidney tool
- Jute twine or hemp rope
Step 1: Forming the Sphere
-
Prepare Clay Balls:
Start by wedging your clay thoroughly to remove air bubbles. Divide the clay into two equal portions and roll them into smooth, seamless balls about the size of a large orange. -
Form First Pinch Pot:
Hold one ball in your non-dominant hand. Press your thumb into the center, stopping about a half-inch from the bottom. Gently pinch and rotate the clay to thin the walls evenly. -
Refine the Rim:
As you expand the pot, pay attention to the rim. Keep it slightly thicker than the walls and ensure it stays level. Repeat this process with the second ball of clay to create a matching half. -
Score the Edges:
Using your serrated rib or needle tool, rough up the rim of both pinch pots. This texture is crucial for a strong bond. -
Apply Slip and Join:
Dab a generous amount of slip onto the scored edges. Press the two pots together firmly, rim to rim, trapping air inside. The trapped air provides resistance, helping the sphere hold its shape while you work. -
Seal the Seam:
Use your thumb or a wooden tool to smudge clay across the seam line, blending the two halves into one continuous surface. Do this until the seam is invisible.
Air Pressure Secret
Don’t rush to cut! Keep the sphere sealed with air trapped inside while smoothing. It acts like a balloon, supporting the walls so they don’t collapse under pressure.
Step 2: Shaping and Carving
-
Paddle into Shape:
Gently tap the exterior with a wooden paddle to round out any lopsided areas and compress the clay particles. This creates a more perfect orb. -
Smooth the Surface:
Run a rubber kidney tool over the entire surface to remove finger marks and paddling textures. You want a clean, matte canvas for the cutouts. -
Open the Top:
Using your fettling knife, cut a circular opening at the very top of the sphere. This will be the main entry for your soil and plants. -
Plan Window Placement:
Lightly trace a horizontal line around the ‘equator’ of your pot where the seam used to be. Mark evenly spaced points along this line where you want your windows. -
Cut the Windows:
Take your small round cutter and press firmly into the clay at your marked points. Twist slightly and pull to remove the clay plugs, creating neat portholes. I find letting the clay stiffen to leather-hard before this step prevents warping. -
Smooth Cut Edges:
Use a damp sponge or your finger to soften the sharp edges of the cutouts and the top rim. Clean up any crumbs inside the pot.
Fixing a Bulging Seam
If the join line bulges out after connecting, use a metal rib to scrape away excess clay, then paddle gentility. This ensures a perfect curve rather than a ‘ufo’ shape.
Step 3: Firing and Assembly
-
Dry Slowly:
Loosely cover the orb with plastic to let it dry slowly over several days. Uneven drying can cause cracks, especially near the join. -
Bisque Fire:
Once bone dry, fire the piece to bisque temperature (usually cone 04/06). -
Glaze and Glaze Fire:
Dip or brush the exterior with a matte white or speckled cream glaze, leaving the interior unglazed if desired for drainage. Fire again to the glaze’s recommended temperature. -
Create the Hanger:
Cut two long lengths of jute twine. Fold them in half to create a loop at the top and knot them together. -
Secure the Pot:
Place the pot in the center of the ropes, wrapping the twine around the bottom and sides so it cradles the sphere securely. Knot the strands together beneath the cutouts or at the base to hold it firm. -
Add Greenery:
Add a small layer of gravel for drainage, then cactus soil. Carefully tuck small succulents into the top opening, letting some trail out near the windows.
Hang your new creation in a bright window and watch your succulents thrive in their custom sanctuary
Luminary Globe With Pierced Constellation Dots
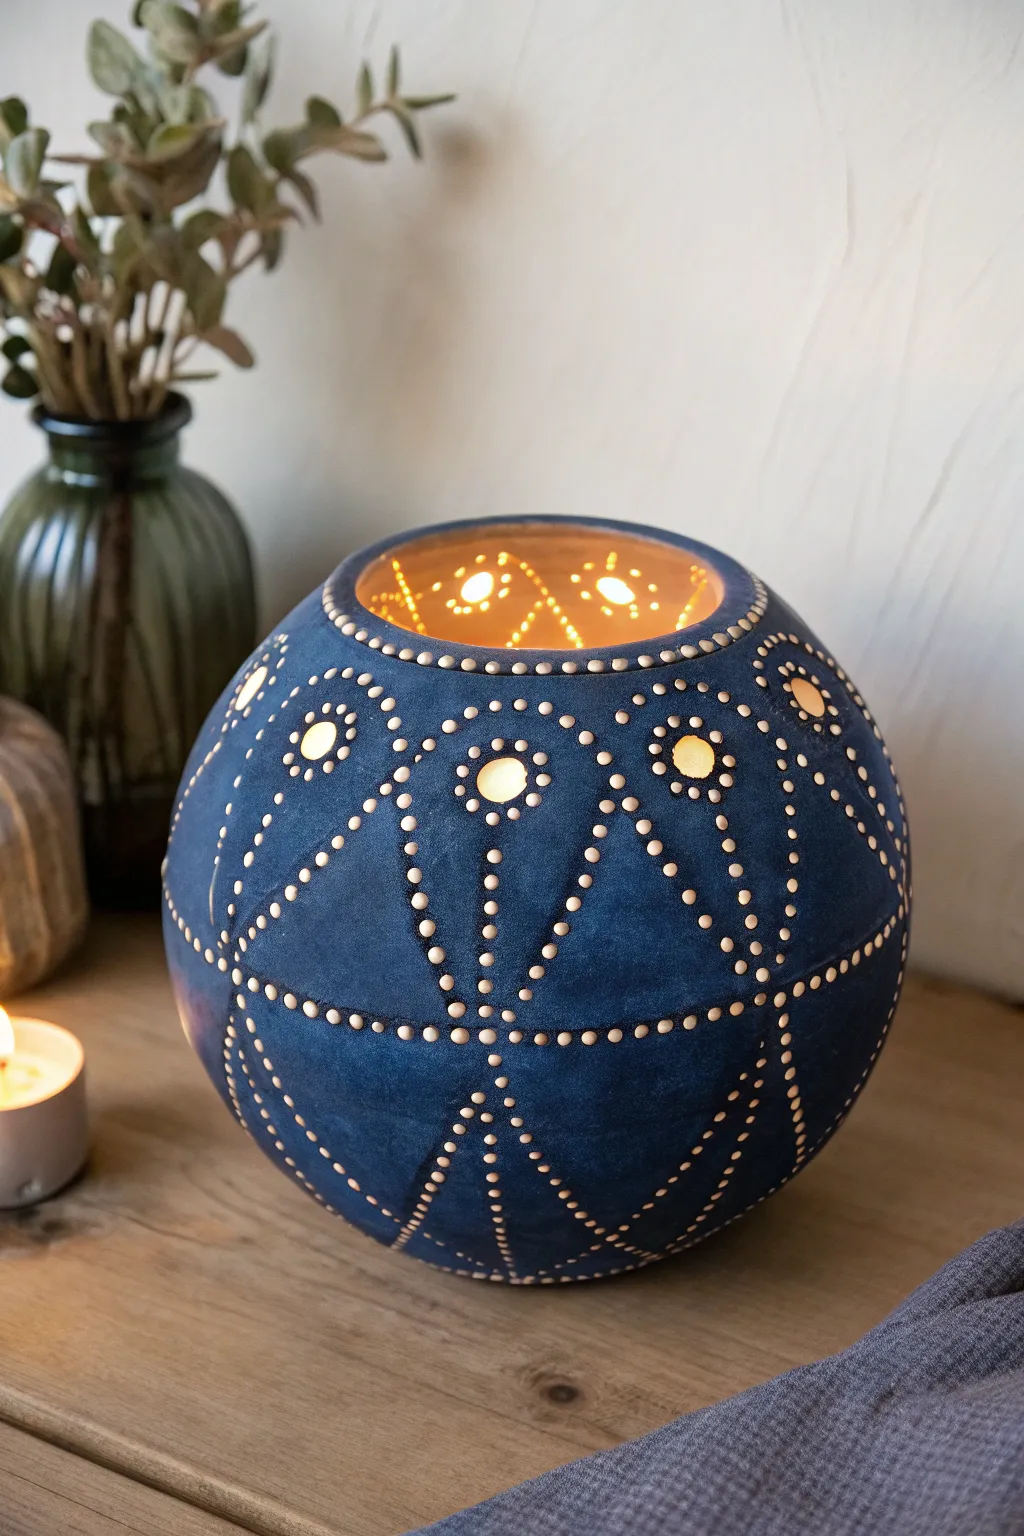
Transform a pair of simple clay bowls into a mesmerizing light display with this elegant celestial luminary. The deep mood-blue finish and intricate pierced patterns create a stunning centerpiece that glows warmly when housing a tealight.
Step-by-Step Tutorial
Materials
- Pottery clay (stoneware or earthenware)
- Scoring tool or fork
- Slip (clay mixed with water)
- Wooden paddle or spoon
- Metal kidney scraper
- Hole punch tools or drill bits (various sizes)
- Needle tool
- Sponge
- Underglaze (deep indigo or navy blue)
- Clear matte glaze
- Pottery knife
Step 1: Forming the Sphere
-
Pinch two bowls:
Start with two equal balls of clay, roughly the size of large oranges. Gently push your thumb into the center of each and pinch the walls evenly as you rotate the clay, forming two symmetrical bowls. -
Score and slip:
Score the rims of both pinch pots thoroughly using a scoring tool or fork to create a rough texture. Apply a generous amount of slip to these roughened edges to act as glue. -
Join the halves:
Press the two bowl rims together firmly. Wiggle them slightly against each other to lock the clay particles together, ensuring a tight seal. -
Seal the seam:
Using your thumb or a modeling tool, drag clay across the seam line in both directions to knit the two halves together. Smooth over this area until the join line disappears completely. -
Shape into a globe:
Trapped air inside will support the walls. Gently paddle the joined shape with a wooden spoon or paddle to round out any lumpy areas and perfect the spherical form. -
Open the top:
Wait until the clay is leather-hard (firm but not dry). Use a pottery knife to carefully cut a circular opening at the top, roughly 3-4 inches in diameter.
Clean Cuts Every Time
For the crispest holes, wait until the clay is truly leather-hard. If it’s too soft, the hole punches will warp the sphere; too dry, and the clay will crack/chip.
Step 2: Design and Detailing
-
Smooth the surface:
Use a metal kidney rib to scrape away any surface imperfections. Follow up with a damp sponge to create a pristine, smooth canvas for your pattern. -
Map out the pattern:
Lightly trace your geometric or floral pattern onto the surface using a needle tool. I find it helpful to mark the centers regarding where the larger holes will go first to ensure symmetry. -
Punch the accent holes:
Using a larger circular hole punch tool (approx. 1/2 inch), cut the main accent holes in the center of your design motifs. Remove the clay plugs immediately. -
Connect with dots:
Using a smaller hole punch or drill bit (approx. 1/8 inch), carefully pierce lines of smaller dots radiating from your large holes, connecting the patterns in sweeping curves. -
Bevel the rim:
Smooth the lip of the top opening with a sponge, or add a decorative row of small impressed dots along the rim for extra texture. -
Clean the holes:
Once the clay is fully dry, use a small dry brush or needle tool to gently clear any clay burrs from the inside of the pierced holes so the light will shine through cleanly.
Step 3: Glazing and Firing
-
Bisque fire:
Fire the piece in a kiln to cone 04 (or according to your clay body’s specifications) to harden the ware. -
Apply base color:
Brush on three even coats of a deep indigo underglaze. Wipe back slightly with a damp sponge if you want a more weathered, textured look that reveals a bit of the clay body. -
Glaze interior:
Pour a small amount of clear or gold-toned glaze inside the pot and swirl it around to coat the interior walls, then pour out the excess. This helps reflect the candlelight. -
Final coat:
Apply a clear matte glaze over the exterior blue underglaze to seal the surface without make it overly shiny. -
Glaze fire:
Fire the piece a second time to the temperature required by your glaze and clay body.
Level Up: Galaxy Glow
Paint the interior with a metallic gold luster or bright yellow underglaze. When lit, the inner color will radiate through the holes, creating a warmer, more distinct glow.
Place a battery-operated candle inside and watch your personal constellation light up the room
Sgraffito Botanical Wrap on a Smooth Double Pinch Pot Form
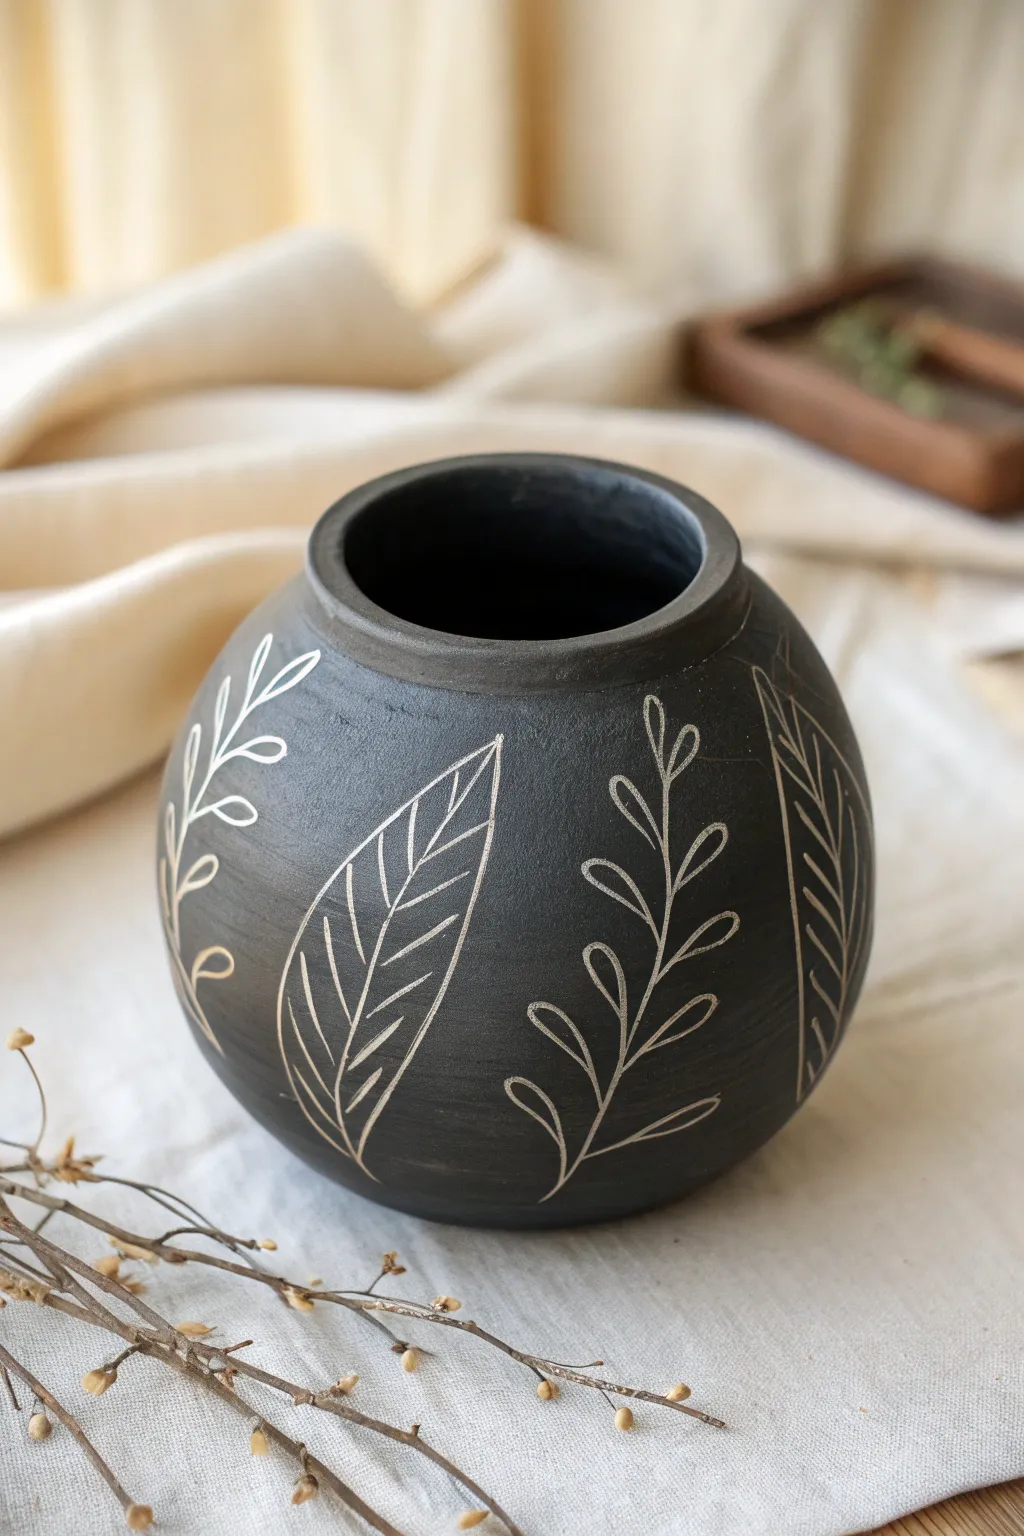
This elegant, spherical vessel uses the double pinch pot method to create a perfect canvas for high-contrast botanical art. The technique features sgraffito—scratching through a dark underglaze to reveal the raw, lighter clay body beneath.
Detailed Instructions
Materials
- Light-colored stoneware or porcelain clay (white/buff)
- Black underglaze (velvet finish recommended)
- Serrated rib or scoring tool
- Slip (clay and water slurry)
- Wood modeling tool or paddle
- Soft rubber rib
- Sgraffito loop tool or needle tool
- Soft fan brush
- Sponge
Step 1: Forming the Sphere
-
Prepare the Clay Balls:
Start with two equal-sized balls of light-colored clay, each roughly the size of a tennis ball. Wedge them well to ensure there are no air bubbles. -
Pinch the Halves:
Insert your thumb into the center of the first ball and pinch evenly while rotating to create a bowl shape. Repeat with the second ball, aiming for consistent wall thickness on both. -
Score and Slip:
Score the rims of both pinch pots aggressively with your serrated tool. Apply a generous amount of slip to the scored areas. -
Join the Halves:
Press the two halves together rim-to-rim. Wiggle them slightly to lock the clay particles together and ensure a tight bond. -
Seal the Seam:
With your thumb or a wood tool, drag clay across the seam line to knit the halves together completely. Do this on the outside first. -
Refine the Shape:
Gently paddle the exterior with a wooden paddle to round out any lumpy areas and compress the seam. The trapped air inside will help the pot hold its spherical shape. -
Smooth the Surface:
Use a soft rubber rib to smooth the entire exterior surface. I like to spend extra time here to remove all finger marks, as the smoothness is crucial for the sgraffito later. -
Create the Opening:
Once the form is leather hard (stiff but still cool to the touch), cut a circular opening at the top. Smooth the rim with a damp sponge or a strip of chamois.
Step 2: Color & Sgraffito
-
Apply Underglaze:
Using a soft fan brush, apply 2-3 even coats of black underglaze to the exterior. Let each coat dry until it loses its sheen before applying the next. -
Wait for Leather Hardness:
Allow the pot to dry back to a firm leather-hard state. The underglaze should be dry to the touch, and the clay shouldn’t be sticky. -
Sketch the Design:
Lightly scratch your botanical layout into the black surface using a dull pencil or tool. Don’t dig deep yet; just mark where your main stems and leaves will flow. -
Carve the Main Stems:
Using a sharp sgraffito tool or small loop tool, carve out the main stem lines first. Apply steady pressure to cut through the black layer and reveal the white clay. -
Outline the Leaves:
Carve the outlines of the large, broad leaves and the delicate fern-like fronds. Keep your lines fluid and confident. -
Add Leaf Details:
Inside the larger leaves, carve fine lines for the central veins. Varing your line weight here adds wonderful visual interest. -
Clean Up:
Gently brush away the clay crumbs (burrs) with a soft, dry brush. Be careful not to smudge the black underglaze into your fresh white lines. -
Bisque Fire:
Once bone dry, bisque fire the piece to the temperature appropriate for your clay body (usually Cone 04). -
Clear Glaze (Optional):
Apply a clear matte or satin glaze over the interior to make it watertight. You can leave the exterior unglazed for a tactile finish or use a clear matte glaze to seal it. -
Final Firing:
Glaze fire the piece to maturity (Cone 5, 6, or 10 depending on your clay).
Clean Lines
For crisper lines, wait until the clay is almost bone dry before carving. The drier the clay, the cleaner the clay crumbs will flake off without smudging.
Smudged Whites?
If black dust gets trapped in your white carved lines, use a stiff brush to sweep it out. If it persists, a quick wipe with a clean, slightly damp sponge can help.
Place your finished vessel near a window where natural light can highlight the contrast of your carving
Stacked Double Pinch Pots for a Two-Sphere Totem Creature

Create a charming woodland friend using a stacked pinch pot technique for a playful, totemic sculpture. This project combines simple spherical forms with delicate, minimalist surface decoration for a sweet, modern look.
How-To Guide
Materials
- Air-dry clay or polymer clay (white or cream)
- Acrylic paints (pastel pink, yellow, blue, black, brown)
- Fine-grit sandpaper
- Pointed detail brush (size 0 or 1)
- Clay scoring tool or fork
- Slip (clay and water mixture)
- Clear matte varnish or sealant
- Sponge or old toothbrush (for speckling)
- Small rolling pin
Step 1: Forming the Pinch Pot Spheres
-
Create the base pots:
Start by dividing your clay into three portions, graduating slightly in size from largest (bottom) to smallest (top). For each portion, split the clay in half again to create two equal balls. -
Pinch the halves:
Take one ball and press your thumb into the center, pinching the walls evenly while rotating the clay to form a bowl shape. Repeat this for all six balls to create six half-spheres. -
Join the spheres:
Score the rims of two matching bowls with a needle tool or fork. Apply a little slip to the rough edges, then press them firmly together to create a closed hollow sphere. Do this for all three sizes. -
Smooth the seams:
Once joined, roll the sphere gently between your palms to compress the seam. If needed, drag a little clay across the join line with your thumb to make it disappear completely. -
Shape the segments:
Gently tap the bottom of the largest sphere on your work surface to create a flat base for stability. For the middle and top spheres, you may want to gently flatten the top and bottom poles where they will stack.
Seamless Stacking
Before stacking the spheres, insert a toothpick or short piece of wire through the center of the connection points. This acts as an internal spine, keeping the totem upright while drying.
Step 2: Assembly and Refining
-
Stack and attach:
Score and slip the contact points between the bottom and middle sphere. Press them together firmly. Repeat the process to attach the head sphere on top, ensuring the stack is centered and balanced. -
Add the ears:
Roll two small balls of clay and flatten them slightly into discs. Score the top of the head and the bottom of the ears, then attach them securely. Smooth the clay at the join so they don’t pop off later. -
Refine the surface:
Use a damp sponge or finger to smooth out any fingerprints or bumps. Let the sculpture dry completely according to your clay’s instructions—usually 24-48 hours for air-dry clay. -
Sand for perfection:
Once fully dry, lightly sand the entire piece with fine-grit sandpaper. This removes any final imperfections and creates that beautiful, smooth matte texture seen in the photo.
Change the Character
Swap the round ears for long pointed ones to make a bunny, or triangular ones for a cat. You can also change the painted patterns—try stripes or flowers instead of geometric shapes.
Step 3: Painting and Decoration
-
Base speckle effect:
Mix a very watered-down brown paint. Dip an old toothbrush or stiff brush into it and run your thumb across the bristles to flick tiny speckles over the white clay. I prefer doing this lightly to mimic a ceramic glaze. -
Paint the bottom section:
Paint a solid band of mustard yellow around the very base of the lowest sphere. Above this band, use a fine brush to paint small, scattered triangles in blue, orange, and yellow. -
Decorate the middle body:
On the middle sphere, switch to painting tiny dots. Use the tip of your smallest brush or a toothpick to apply scattered polka dots in blue, orange, and red. -
Bring the face to life:
Paint the insides of the ears with a soft coral pink. Use the same pink to paint two round circles for cheeks on the face sphere. -
Add facial details:
Using a tiny detail brush and black paint, add two small dots for eyes. Paint a small brown oval for the nose, and draw a thin black ‘w’ shape underneath for the mouth. -
Seal the piece:
Protect your artwork with a coat of clear matte varnish. This will seal the paint and give the clay a finished, professional look without adding too much shine.
Display your new totem friend on a shelf or desk for a touch of handmade whimsy