When kids get their hands on air-dry clay, something clicks—squish, roll, pinch, and suddenly they’ve made a real thing they can keep. Here are my favorite dry clay ideas for kids that stay simple for small hands but still look cute on a shelf, desk, or dresser.
Heart Trinket Trays
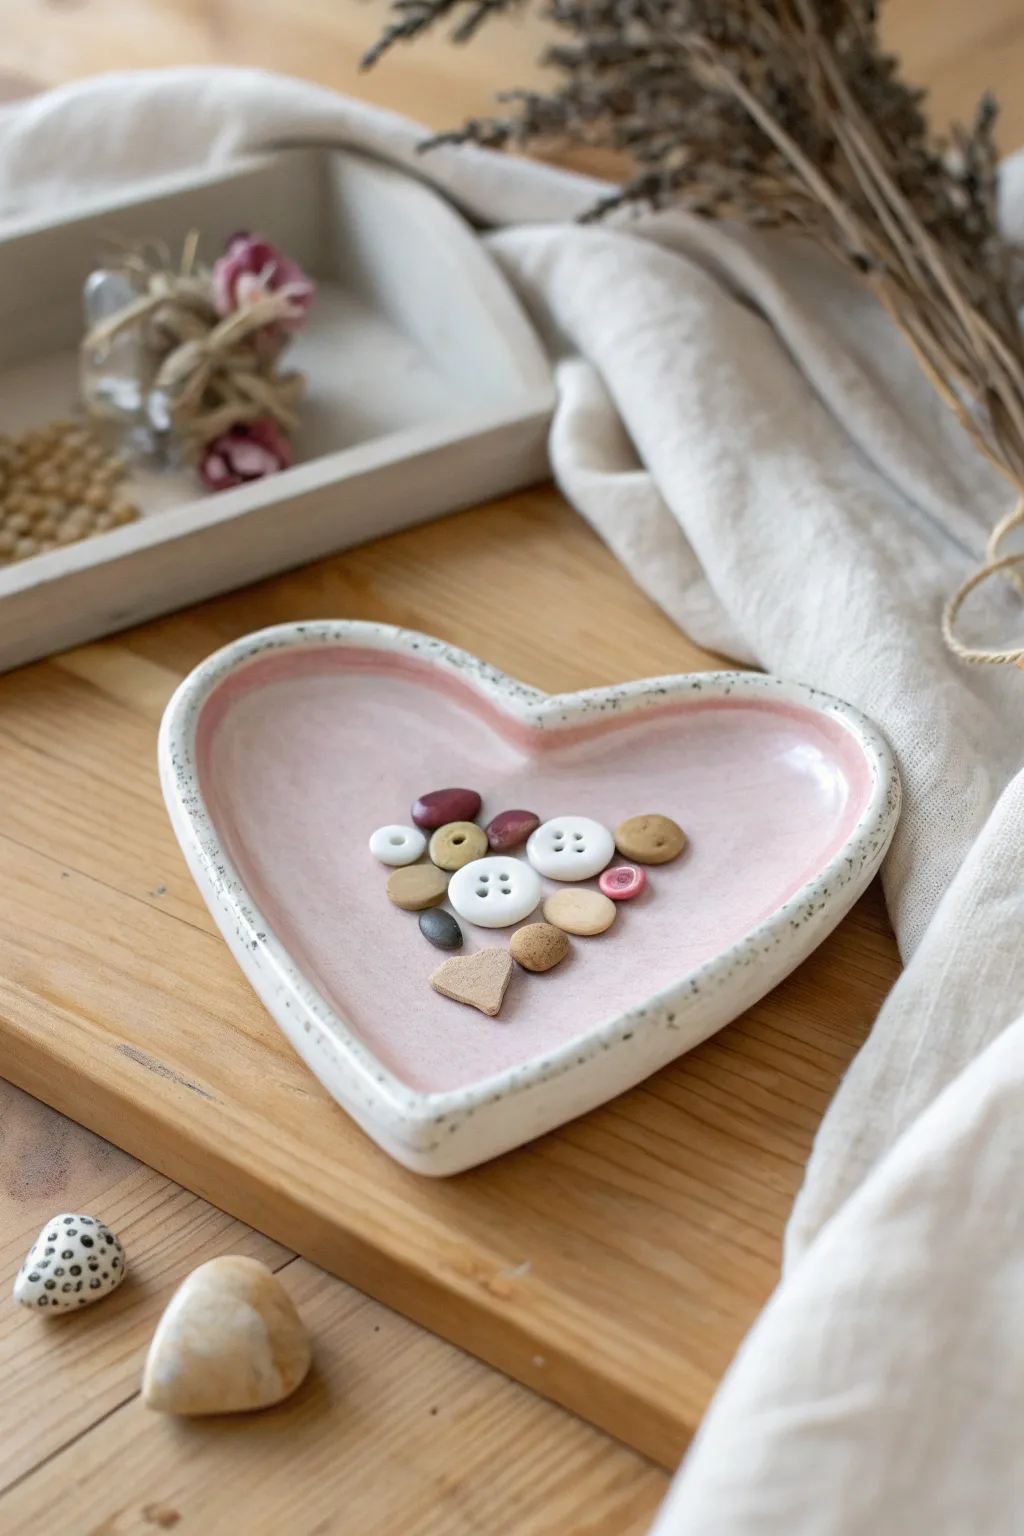
This charming, pink-glazed heart tray features a delightful speckled rim that mimics the look of high-fire ceramic stoneware, even though it’s made from simple air-dry clay. It is the perfect size for holding tiny treasures like buttons, beads, or special stones.
Detailed Instructions
Materials
- White air-dry clay (or polymer clay)
- Rolling pin
- Heart-shaped cookie cutter (large) or paper template
- Craft knife
- Small bowl of water
- Sponge or smoothing tool
- Fine-grit sandpaper
- Pink acrylic paint (soft pastel shade)
- White acrylic paint
- Black acrylic paint
- Glazing medium or high-gloss varnish
- Old toothbrush (for splattering)
- Small paintbrush
Step 1: Shaping the Base
-
Condition the clay:
Start by taking a handful of white air-dry clay and kneading it in your hands until it becomes warm, soft, and pliable. This prevents cracks later. -
Roll out the slab:
Place the clay on a smooth surface or craft mat. Use a rolling pin to flatten it into an even slab, aiming for a thickness of about 1/4 inch (6mm). -
Cut the heart shape:
Press a large heart-shaped cookie cutter firmly into the clay slab. If you don’t have a cutter, place a paper template on the clay and trace around it carefully with a craft knife. -
Create the rim:
Gently lift the edges of the heart all the way around with your fingertips. Pinch the clay upwards slightly to create a raised rim, curving it inward just a bit to form a shallow bowl shape. -
Smooth the edges:
Dip your finger into a small bowl of water and run it along the top edge of the rim to smooth out any cracks or roughness. The rim should feel rounded, not sharp. -
Refine the surface:
Use a damp sponge to wipe the inside and outside of the tray, ensuring the surface is perfectly smooth. This is crucial for a professional ceramic look. -
Let it dry:
Place the tray on a wire rack or a piece of parchment paper to dry. Depending on humidity and clay thickness, this will take 24 to 48 hours. Turn it over halfway through to ensure the bottom dries evenly.
Step 2: Painting and Finishing
-
Sand imperfections:
Once the clay is bone dry, check for any rough spots. Gently buff them away with fine-grit sandpaper until the surface feels satin-smooth. -
Paint the interior base:
Mix a soft, pastel pink acrylic paint. Apply this color strictly to the interior floor and inner walls of the heart, stopping just before you reach the very top edge of the rim. -
Leave the rim white:
Keep the top rounded lip of the rim and the exterior of the bowl unpainted (or paint them white if your clay isn’t bright enough) to create that distinct two-tone ceramic effect. -
Prepare the speckle mix:
On a palette, mix a tiny drop of water into a blob of black acrylic paint to make it fluid, almost like ink. -
Splatter the speckles:
Dip an old toothbrush into the watered-down black paint. Hold the brush over the tray and run your thumb across the bristles to flick tiny specks of paint onto the rim and the pink interior. -
Control the splatter:
Aim for a random, organic distribution. I usually practice on a piece of paper first to get the consistency right before moving to the actual project. -
Dry the paint:
Allow the paint layers and speckles to dry completely, which should only take about 15-20 minutes. -
Glaze the interior:
Apply a thick coat of high-gloss varnish or glazing medium over the entire pink interior and the rim. This mimics the kiln-fired glaze seen in the photo. -
Matte the exterior:
For the outside of the heart, use a matte varnish or leave it raw (if sealed) to contrast with the shiny interior. -
Final cure:
Let the varnish cure according to the bottle instructions, usually overnight, before placing any trinkets inside.
Cracked edges?
If edges crack while lifting them, dip your finger in clay slip (water + clay mush) and smooth over the crack immediately like spackle.
Make it shimmer
Mix a tiny pinch of gold mica powder into your clear gloss varnish for the final coat to give the pink glaze a magical, subtle sparkle.
Once fully dry, your faux-ceramic heart is ready to hold collections of buttons or jewelry on your dresser


Fingerprint Keepsake Discs
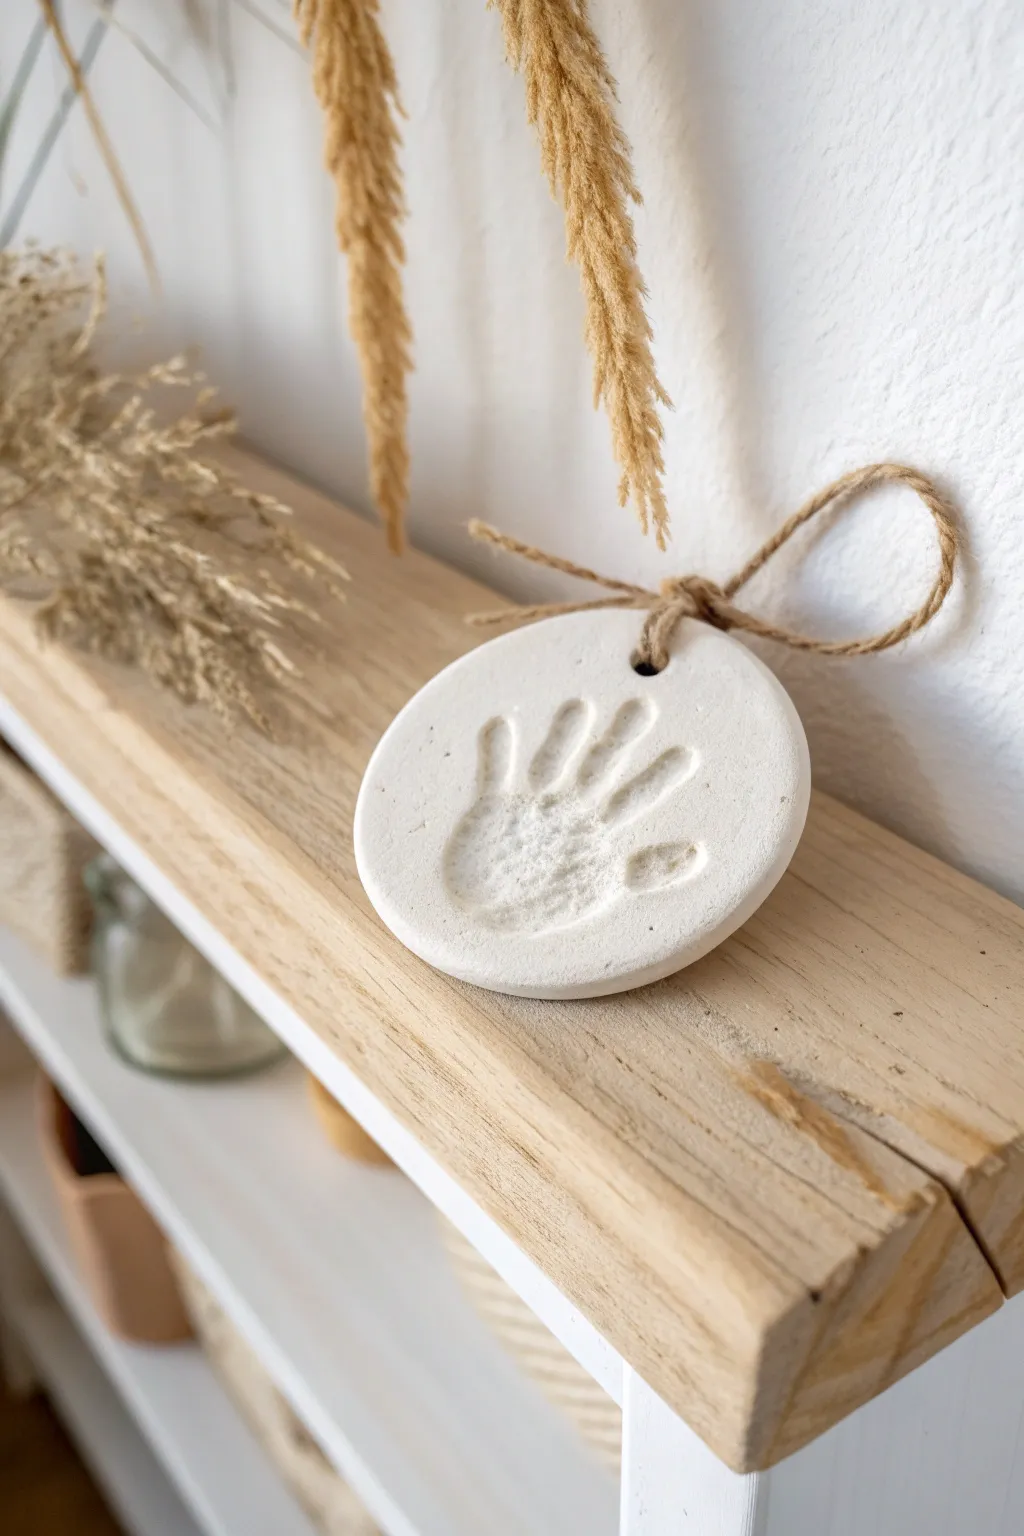
Capture a tiny moment in time with this simple yet beautiful air-dry clay handprint keepsake. The bright white clay creates a minimalist look that fits perfectly with modern shelf decor, while the rustic twine adds a lovely natural texture.
Step-by-Step Tutorial
Materials
- White air-dry clay (or salt dough)
- Rolling pin
- Parchment paper or smooth work surface
- Round cookie cutter or bowl (approx. 4-5 inches diameter)
- Drinking straw or skewer
- Sandpaper (fine grit)
- Jute twine or rustic string
- Small bowl of water
- Scissors
Step 1: Shaping the Clay
-
Prepare the workspace:
Lay down a sheet of parchment paper on a flat, stable surface. This prevents sticking and makes it easy to move the project later without distorting the shape. -
Condition the clay:
Take a handful of white air-dry clay and knead it in your hands for a minute until it feels soft, warm, and pliable. This removes air bubbles and prevents cracking. -
Roll out the slab:
Place the ball of clay on the parchment paper. Using a rolling pin, roll it out evenly until it is about 1/4 to 1/2 inch thick. Try to keep the thickness consistent. -
Cut the circle:
Press a large round cookie cutter or the rim of a bowl firmly into the clay to create a perfect circle. Peel away the excess clay from the edges. -
Smooth the edges:
Dip your finger lightly into a small bowl of water and gently run it along the cut edge of the circle. This smooths out any harsh lines or burrs left by the cutter.
Smooth Moves
Before pressing the hand, lightly dust the child’s palm with a tiny bit of cornstarch. This prevents the sticky clay from pulling up when you lift their hand.
Step 2: Creating the Impression
-
Position the hand:
Ideally, place the clay disc on a low table where the child can easily reach it. Guide their hand over the center of the circle, fingers spread naturally. -
Press firmly:
Press the child’s hand straight down into the clay. Be sure to apply gentle pressure to each finger and the palm individually to ensure a deep, clear impression. -
Lift carefully:
Hold the edge of the clay disc down with one hand while lifting the child’s hand straight up. Lifting at an angle might drag the clay and distort the print. -
Touch up:
If the edges of the impression look a bit rough, you can lightly tap them with a moistened fingertip, but be careful not to erase the fine details of the skin texture. -
Create the hanging hole:
Use a drinking straw to punch a clean hole near the top of the disc. Position it centered above the handprint, leaving enough clay margin above the hole so it won’t break later.
Step 3: Finishing Touches
-
Let it dry:
Leave the clay on the parchment paper to air dry. This typically takes 24-48 hours depending on humidity. Flip it over halfway through the drying process to ensure the back dries evenly. -
Check for dryness:
The clay should look chalky white and feel hard to the touch with no cool, damp spots. -
Sand for perfection:
Once fully dry, take a piece of fine-grit sandpaper and gently buff the outer edges of the disc. This removes any final imperfections and gives it a professional matte finish. -
Cut the twine:
Cut a piece of jute twine or rustic string, roughly 10 inches long. -
Thread and tie:
Fold the twine in half and push the loop through the hole from front to back. Pull the tails through the loop to create a luggage tag knot, or simply thread it through and tie a bow at the top as shown. -
Secure the knot:
If tying a simple bow, ensure the knot is tight against the clay or slightly above it so the disc hangs straight.
Make it Sparkle
For a subtle festive touch, mix a pinch of fine white glitter directly into the clay before rolling it out, giving the finished stone a snowy shimmer.
Place your new keepsake on a prominent shelf and enjoy this frozen moment in time


Ladybug Clay Stones

These charming little beetles bring a pop of color to any garden or windowsill, capturing the whimsy of nature in a simple clay form. With their bright red shells and friendly painted faces, they are a delightful project that turns basic sculpting into a glossy, cheerful display.
Step-by-Step Guide
Materials
- Air-dry clay (white or terracotta)
- Smooth river stones (optional base instead of solid clay)
- Acrylic paints: Bright Red, Black, White
- Paintbrushes: Medium flat brush and fine detail brush
- Water cup and paper towels
- Palette or paper plate
- Gloss varnish or clear sealant (spray or brush-on)
- Sandpaper (fine grit)
Step 1: Sculpting the Base
-
Prepare the Clay:
Take a handful of air-dry clay and knead it well with your hands to warm it up and remove any air bubbles. -
Shape the Dome:
Roll the clay into a smooth ball about the size of a golf ball or a large walnut. -
Flatten the Bottom:
Press the ball gently onto your work surface to create a flat bottom while keeping the top nice and rounded like a dome. -
Smoothing:
Dip your finger in a tiny bit of water and rub it over the clay surface to smooth out any cracks or fingerprints. -
Defining the Head:
Use your thumb to gently press a slight indentation on one side of the dome to suggest where the head section begins, though the paint will do most of the work later. -
Drying Time:
Set your clay stones aside to dry completely. Depending on the thickness, this usually takes 24-48 hours. -
Final Sanding:
Once fully dry and hard, use fine-grit sandpaper to buff away any remaining rough spots for a perfect painting surface.
Step 2: Painting the Details
-
Red Base Coat:
Using a medium flat brush, paint the entire domed surface with bright red acrylic paint. -
Second Coat:
Let the first layer dry, then add a second coat of red to ensure the color is solid and opaque. -
Painting the Face:
Switch to black paint. At the slightly flatter end of your shape, paint a semi-circle area for the face. -
The Center Line:
Using a finer brush or the edge of your flat brush, paint a thin black line running from the center of the face down the back to separate the wings. -
Adding Spots:
Dip the handle end of a paintbrush into black paint to create perfect circles, or careful paint them with your detail brush. Place them symmetrically on either side of the center line. -
Adding Eyes:
Once the black face is dry, use a small dotting tool or a toothpick dipped in white paint to add two large oval eyes. -
Smiling Face:
With your finest brush and white paint, add a tiny, curved line below the eyes for a happy smile. -
Highlighting:
Add a tiny speck of white inside the black spots on the back if you want to mimic a light reflection, though solid black is classic. -
Sealing:
Allow all paint to dry completely, ideally overnight. Finish by applying a generous coat of gloss varnish to give the ladybug that shiny, hard-shell look seen in nature.
Smoother Finishes
To get that ultra-smooth look shown in the photo, wet your finger and polish the almost-dry clay one last time before it hardens fully.
Garden Markers
Make larger versions and paint the names of vegetables or herbs on the ladybug’s back to create cute, custom markers for your vegetable patch.
Place your finished family of ladybugs on a sunny shelf to brighten up the room


Snail Desk Buddies
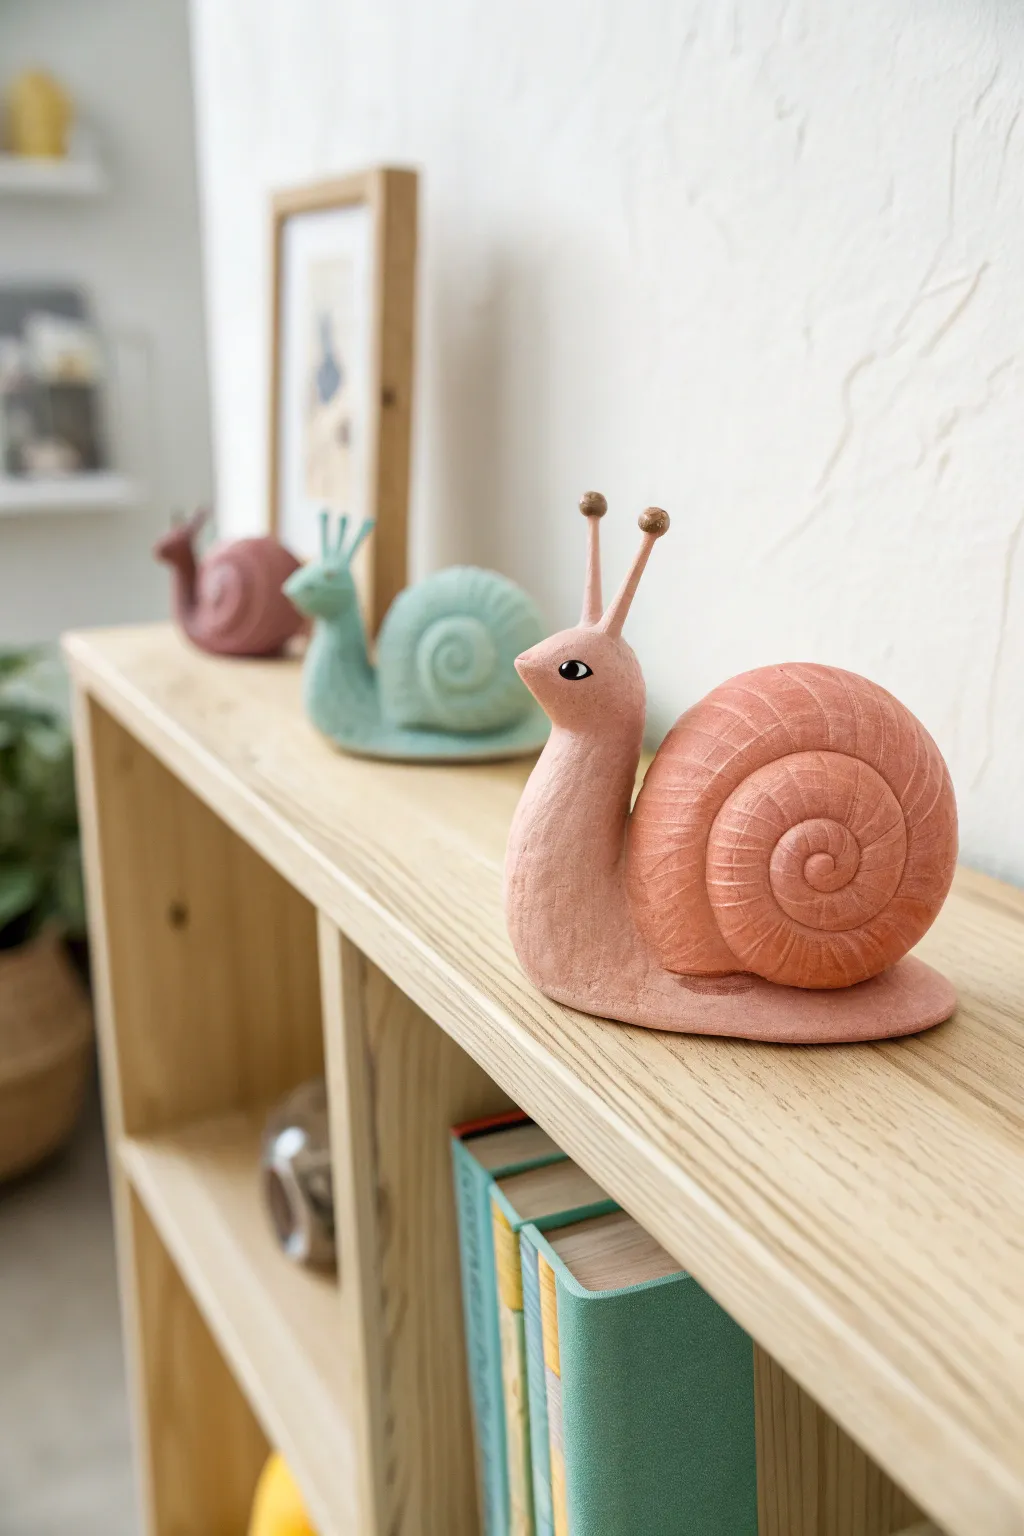
These charm-filled snails bring a touch of woodland magic right to your bookshelf with their soft, matte finish and spiraling shells. They feature sturdy, flat bases so they sit perfectly still while keeping you company during study time.
Detailed Instructions
Materials
- Air-dry clay (white or terracotta)
- Acrylic paints (dusty pink, teal, white, black)
- Fine-grit sandpaper
- Small cup of water
- Sculpting tools or a butter knife
- Paintbrushes (detail and medium flat)
- Matte varnish or sealant (optional)
Step 1: Sculpting the Body
-
Condition the Clay:
Begin by taking a handful of air-dry clay and kneading it in your hands until it is warm, pliable, and free of cracks. If it feels too dry, dip your fingers in water and work the moisture in. -
Form the Base Shape:
Roll the clay into a thick sausage shape, tapering one end slightly for the tail and keeping the other end thick for the head and neck. -
Flatten the Bottom:
Press the sausage shape gently onto your work surface to create a totally flat bottom. This ensures your snail will stand upright without wobbling later. -
Shape the Head:
Gently pinch and pull the thicker end upwards to curve the neck. Smooth the transition with a wet finger so the neck flows seamlessly out of the body. -
Refine the Head Shape:
Mold the very top of the neck into a soft, rounded triangle to form the face. It should look slightly pointed at the nose but rounded at the cheeks.
Cracks Appearing?
Mix a small amount of clay with water to create a paste (slip). Fill any drying cracks with this paste and smooth it over with a wet finger.
Step 2: Creating the Shell
-
Roll a Coil:
Take a larger ball of clay and roll it into a very long, even snake. For the size shown in the photo, your snake should be about 10-12 inches long and uniformly thick. -
Coil the Shell:
Starting at one end, tightly roll the snake into a spiral flat on the table, like a cinnamon roll. Keep the coils touching snugly. -
Dome the Shell:
Pick up the spiral and gently push the center outwards from the back to create a slight dome shape, rather than a flat disc. This gives the shell volume. -
Smooth the Shell Surface:
Using a sculpting tool or just your thumb and a little water, blend the seams of the coils together slightly so it looks like one solid shell rather than just a rolled snake. -
Carve the Grooves:
Use a modeling tool or a toothpick to re-carve the spiral lines deeply. This ensures the design remains visible after painting.
Step 3: Assembly and Details
-
Attach the Shell:
Score (scratch up) the back of the snail body and the bottom of the shell. Add a dab of water or clay slip, then press the shell firmly onto the snail’s back. -
Blend the Seams:
Use a small tool to smooth clay from the bottom of the shell onto the body, securing the bond so the heavy shell doesn’t fall off. -
Make the Antennae:
I find it easiest to roll two very thin, short snakes of clay for the stalks and two tiny balls for the tips. Press the balls onto the stalks gently. -
Attach Antennae:
Score the top of the head and attach the antennae. Because these are fragile, you can reinforce them by inserting a small piece of toothpick or wire inside the clay if you wish. -
Dry Thoroughly:
Let your snail dry completely for at least 24-48 hours. Keep it away from direct heat to prevent cracking.
Durable Antennae
For kids’ projects, use short lengths of floral wire or twist ties as the core of the antennae, molding the clay around them for extra strength.
Step 4: Painting and Finishing
-
Sanding:
Once bone dry, use fine-grit sandpaper to gently smooth out any fingerprints or rough bumps on the body and shell. -
Base Coat:
Mix a dusty pink or warm terracotta color using pink, a touch of brown, and white. Paint the entire snail with an opaque layer. -
Highlighting Texture:
After the base coat dries, mix a slightly lighter shade of your base color. Dry brush this over the ridges of the shell spiral to make the texture pop. -
Painting the Eye:
Using your smallest detail brush, paint a simple almond shape in white for the eye. Once dry, add a small black circle pupil in the center. -
Finishing Touches:
Paint the tiny balls at the top of the antennae a contrasting color, like a dark brown or copper, to match the photo’s style.
Set your finished snails on a desk or shelf to add a slow and steady vibe to your decor

The Complete Guide to Pottery Troubleshooting
Uncover the most common ceramic mistakes—from cracking clay to failed glazes—and learn how to fix them fast.
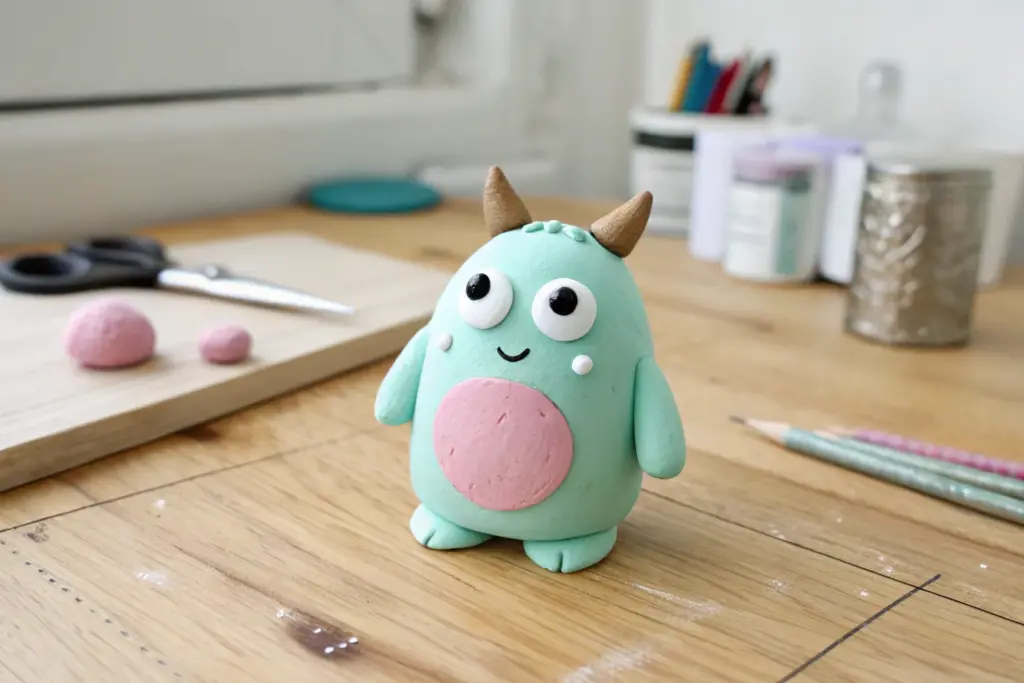
Silly Monster Minis
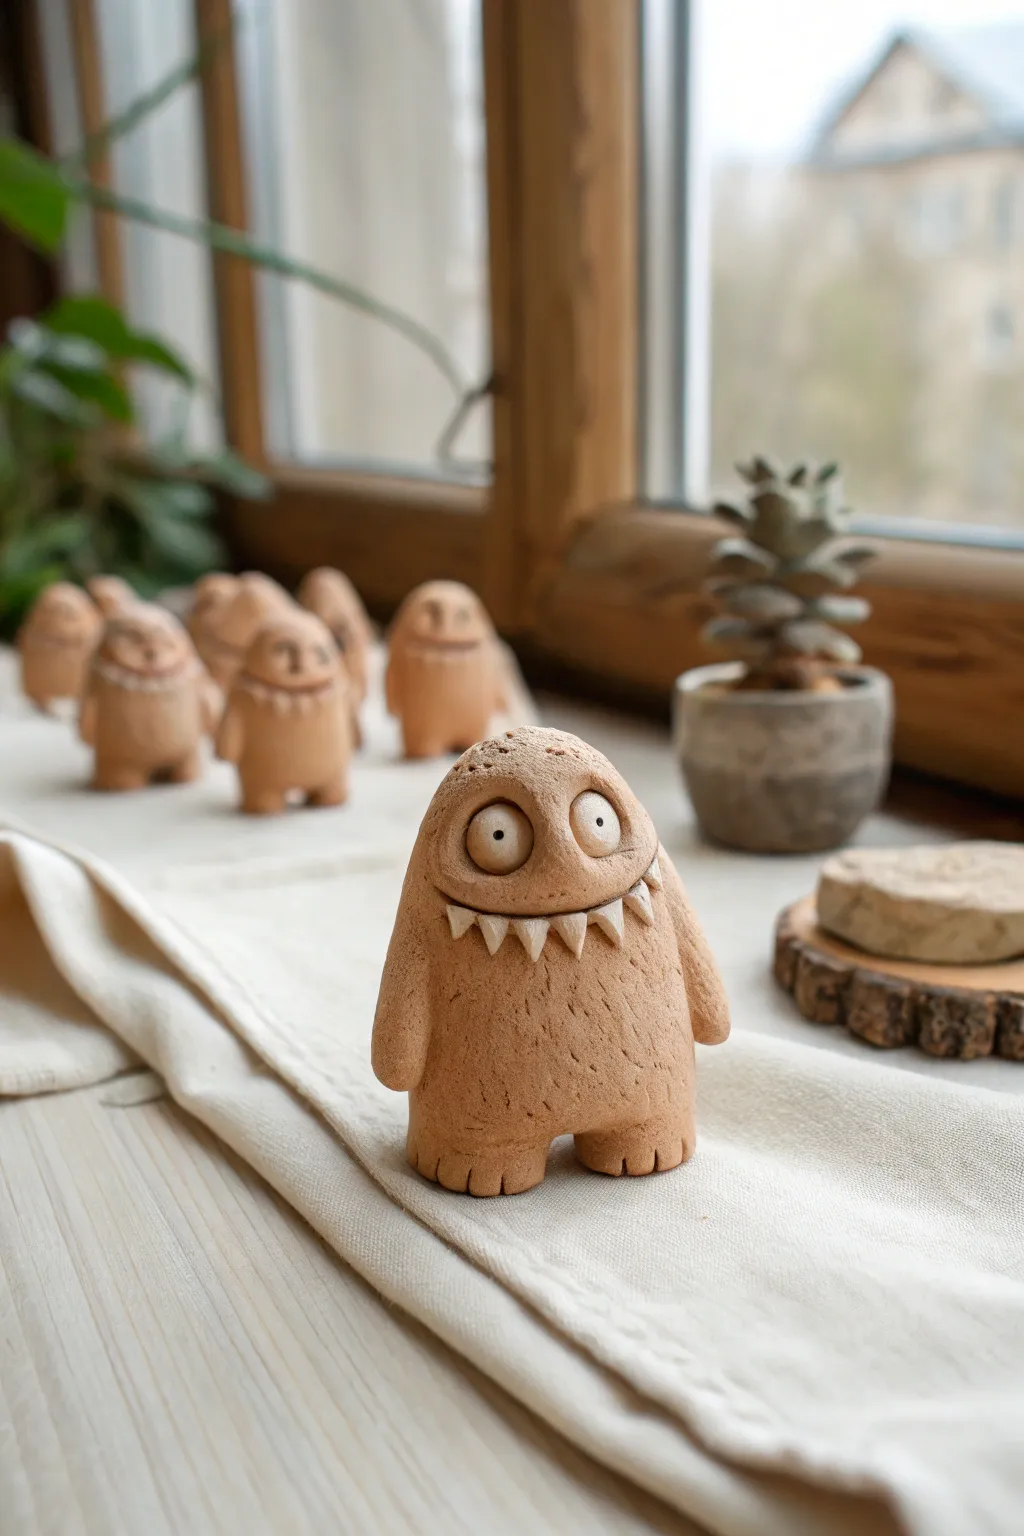
These quirky little creatures are bursting with personality and make the perfect introductory project for young sculptors. With their textured bodies, goofy wide grins, and expressive eyes, each monster ends up having its own unique character.
Step-by-Step Guide
Materials
- Air-dry clay (terracotta or beige color)
- Small bowl of water
- Pointed sculpting tool or toothpick
- Old toothbrush (for texture)
- Rolling pin (optional)
- White acrylic paint (for teeth/eyes)
- Black fine-tip marker or black paint
- Small paintbrush
Step 1: Shaping the Base
-
Roll the main body:
Start by taking a lump of clay about the size of a golf ball. Roll it between your palms until it forms a smooth, round sphere, then gently elongate it into a tall egg shape for the monster’s torso. -
Form the legs:
Instead of attaching separate legs, gently press the bottom of your egg shape against the table to flatten it. Then, use your thumb to press an indentation in the center of the base, dividing the bottom into two thick, stubby legs. -
Refine the feet:
Pinch the bottom of each leg slightly to define the feet. Use your sculpting tool or a toothpick to press three small lines into the front of each foot to create cute little toes. -
Create the arms:
Roll two small, sausage-shaped pieces of clay for the arms. They shouldn’t be too long—just enough to hang by the monster’s sides. -
Attach the limbs:
Score (scratch) the side of the body and the top of the arm where they will connect. Add a tiny drop of water to act as glue, then press the arms firmly onto the body, smoothing the seam so they look like one solid piece.
Smooth Seams
Use a tiny bit of water on your finger to smooth out any cracks or joins, especially where the arms attach. Too much water makes slime, but a damp finger acts like an eraser.
Step 2: Adding Personality
-
Carve the mouth:
Use your sculpting tool to carve a long, horizontal curved line across the ‘face’ area for the mouth. gently press the tool deeper to open the mouth slightly, creating a dark recess for depth. -
Make the teeth:
This is the fiddly part—roll a tiny snake of clay and cut small triangles from it. Carefully press these triangles along the top lip of the mouth opening so they hang down like jagged little chompers. -
Sculpt the eyes:
Roll two balls of clay for the eyes. These should be fairly large to give him that surprised look. Press them onto the face, just above the mouth, making sure they touch each other in the middle. -
Add pupils:
Use the tip of a toothpick to poke a small hole in the center of each eyeball. This creates the pupil and gives the monster a focused stare. -
Texture the body:
This is my favorite step to make them look fuzzy. Take an old toothbrush or a stiff bristle brush and gently tap it all over the clay body (avoiding the eyes and teeth). This creates a subtle ‘furry’ texture. -
Add detail scratches:
For extra detail, take your toothpick and scratch a few longer, random lines down the monster’s tummy and back to mimic coarse hair.
Scary Accessories
Before drying, press a small flat stone into the hand or give him a tiny clay accessory like a bone or a flower to hold to add a story element.
Step 3: Finishing Touches
-
Check stability:
Give your monster a little tap to make sure he stands up straight. If he’s leaning, gently press him down onto a flat surface again to level out the feet. -
Dry completely:
Let your monster sit in a dry, safe spot for 24-48 hours. The clay needs to be fully hardened and light in color before you do any painting. -
Paint the details:
Once dry, use a small brush to paint the teeth and the whites of the eyes carefully with white acrylic paint. You might need two coats for solid coverage. -
Define the pupils:
Finish his expression by using a black fine-tip marker or a tiny dot of black paint inside the holes you poked for the pupils. This instantly brings him to life.
Once dry, arrange your little monster family on a windowsill or shelf where they can keep an eye on things
Easy Animal Minis
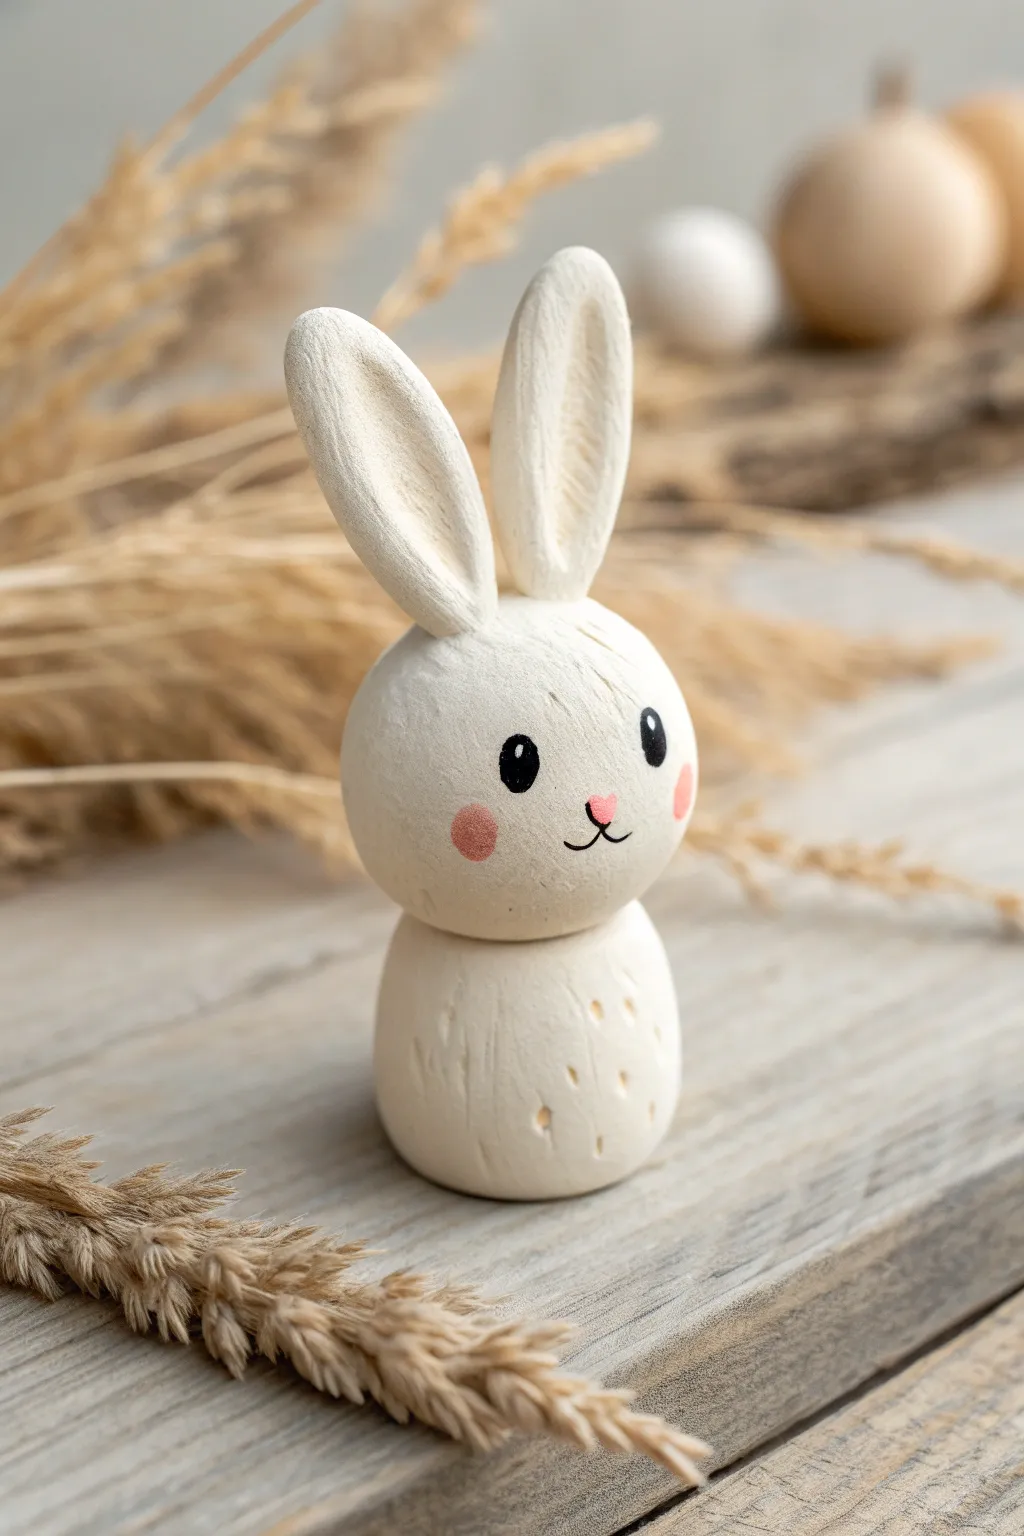
This charming little figurine captures the essence of a rabbit with simple, clean shapes and a rustic finish. It is an excellent project for practicing basic clay modeling techniques like rolling spheres and attaching appendages.
Step-by-Step Tutorial
Materials
- Air-dry clay (white)
- Small bowl of water
- Pointed sculpting tool or toothpick
- Fine-grit sandpaper
- Acrylic paint (black, pink)
- Fine detail paintbrush or paint pen
Step 1: Shaping the Body
-
Roll the base:
Start by taking a chunk of air-dry clay roughly the size of a golf ball. Roll it between your palms until you have a smooth, even sphere. -
Form the oval:
Gently press and roll the sphere on your work surface to elongate it slightly into a stout oval or egg shape. This will be the bunny’s body. -
Flatten the bottom:
Tap the bottom of the oval firmly against the table. This creates a flat base so your bunny stands upright without wobbling. -
Add texture:
Using a toothpick or a pointed clay tool, gently press small, random indentations into the lower half of the body to mimic the texture found in the reference image.
Step 2: Creating the Head
-
Roll the head:
Take a slightly smaller amount of clay than you used for the body. Roll this into a perfect sphere for the head. -
Score the connection point:
Use your tool to make rough scratch marks on the bottom of the head and the top of the body. This rough texture, sometimes called ‘scoring,’ helps the clay grip. -
Attach the head:
Dab a tiny bit of water onto the scratched areas (this acts as glue). Press the head firmly onto the body. -
Blend lightly:
If you want a seamless look, use your thumb or a tool to smooth the clay across the neck seam, though leaving it distinct like a snowman works well for this minimalist style as seen in the photo.
Slip & Score
If your ears keep falling off, make ‘slip’ by mixing a scrap of clay with water until it’s gooey. Use this paste as superglue for your clay parts.
Step 3: Ears and Drying
-
Shape the ears:
Roll two small sausage shapes of equal size. Flatten them slightly and taper the ends so they look like long flower petals. -
Create the inner ear:
Use the rounded end of a paintbrush handle or your pinky finger to press an indentation down the center of each ear. This adds depth and realism. -
Attach the ears:
Score the bottom of the ears and the top of the head. Add a drop of water and press the ears into place, smoothing the clay at the base to secure them. -
Dry completely:
Let the bunny sit in a warm, dry place. Depending on the brand of clay, this could take 24 to 48 hours. The clay will turn opaque white and feel hard when ready. -
Smooth it out:
Once fully dry, take a piece of fine-grit sandpaper and gently rub away any fingerprints or rough bumps to get that smooth, matte finish.
Go Botanical
Before the clay dries, press real dried flowers or grass into the body for texture instead of using a tool, then paint over them later.
Step 4: Painting the Details
-
Paint the eyes:
Using a fine-tip brush and black acrylic paint, or a black paint pen, draw two small ovals for the eyes. Leave a tiny bit of white space if you want a highlight, or add a white dot later. -
Add the nose:
Paint a small, soft pink triangle or heart shape right between the eyes, slightly lower down. -
Draw the mouth:
With the black paint or pen, draw a simple ‘W’ shape or anchor shape extending down from the nose to create the mouth. -
Adding blush:
I like to water down a tiny bit of pink paint until it’s very transparent. Dab this gently on the cheeks for a rosy, cute effect.
Place your finished bunny on a shelf or desk for a touch of handmade charm


What Really Happens Inside the Kiln
Learn how time and temperature work together inside the kiln to transform clay into durable ceramic.
Cutout Lantern Night Lights
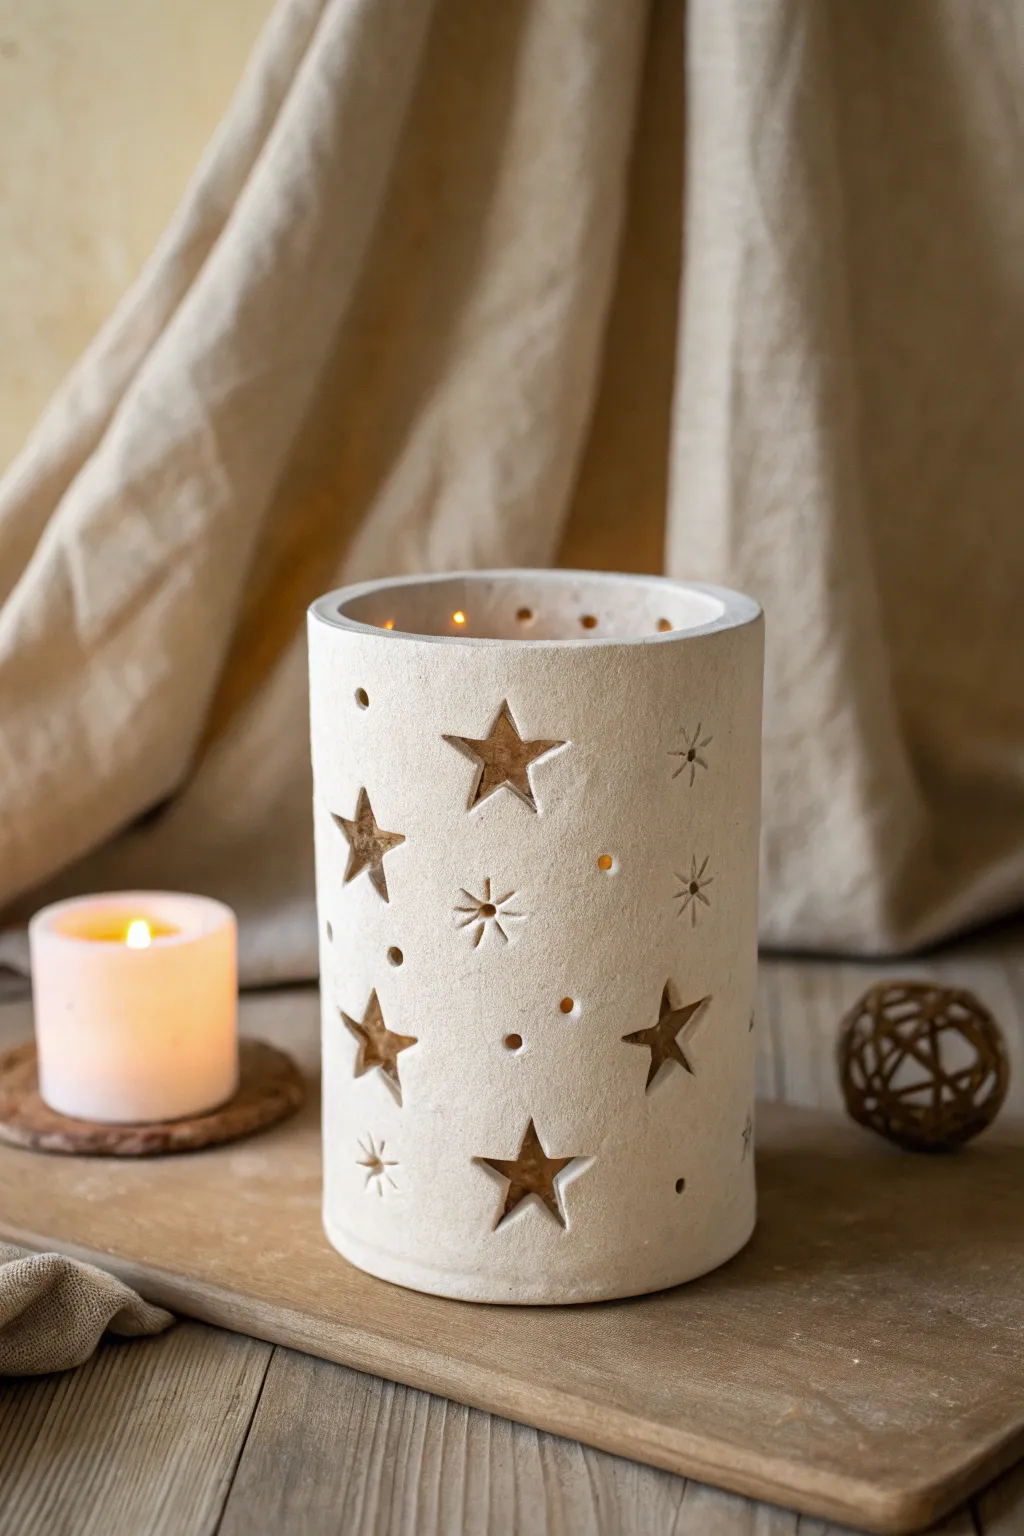
Bring the magic of the night sky indoors with these charming cylindrical lanterns. Made from simple air-dry clay, the cutout star patterns cast a warm, twinkling glow that transforms any cozy corner.
Detailed Instructions
Materials
- White air-dry clay (approx. 500g)
- Rolling pin
- Large cylindrical object (like a large glass jar or rolling pin) to use as a mold
- Parchment paper or wax paper
- Modeling knife or clay cutting tool
- Star-shaped mini cookie cutters (various sizes)
- Small straw or cocktail stick for circular holes
- Sponge and water
- Sandpaper (fine grit)
- Ruler
- LED tealight candle
Step 1: Preparing the Clay Sheet
-
Prepare your workspace:
Lay down a sheet of parchment paper on a flat surface to prevent sticking. This also helps you move the clay later without distorting it. -
Condition the clay:
Take a large chunk of white air-dry clay and knead it in your hands for a minute until it feels soft, pliable, and free of cracks. -
Roll out the slab:
Place the clay on the parchment paper. Using your rolling pin, roll it out into a long rectangle. Aim for an even thickness of about 1/4 inch (6-7mm). -
Measure the circumference:
Take your cylindrical mold (the jar or wide tube) and wrap a piece of string around it to find the circumference. Add about half an inch to this measurement for the overlap seam. -
Trim to size:
Using a ruler and your clay knife, trim the rolled-out clay slab into a neat rectangle. The width should match your desired height for the lantern, and the length should match your measured circumference.
Clean Cuts Hack
If your clay drags when lifting the star cutters, let the slab sit for 15 minutes before cutting. Slightly drier clay cuts much cleaner than freshly rolled, wet clay.
Step 2: Adding the Starry Design
-
Plan your placement:
Before you start cutting, visualize where you want your stars. A random, scattered pattern often looks best for a natural sky effect. -
Cut the larger stars:
Press your star-shaped cutters into the flat clay slab. Gently wiggle them to ensure a clean cut, then lift the cutter. Use a tool to pop the clay star out if it stays in the slab. -
Add carved details:
For the burst-style stars shown in the image, use a modeling tool or the tip of a knife to gently carve lines radiating from a center point without cutting all the way through. -
Poke tiny holes:
Using a straw or a cocktail stick, poke small circular holes scattered between the stars. I find varying the size of these holes adds a lovely texture. -
Smooth the edges:
Dip your finger or a small sponge in a little water and gently run it over the cutouts to smooth any rough, jagged clay bits.
Step 3: Forming the Cylinder
-
Prepare the mold:
Wrap your glass jar or cylindrical mold with a layer of parchment paper. This is crucial so the clay doesn’t stick to the glass as it dries. -
Lift the clay:
Carefully lift your decorated clay slab (keeping the bottom parchment attached if needed initially) and wrap it around the prepared mold. -
Join the seam:
Where the two ends of the clay meet, score both edges (scratch them up with a tool) and add a drop of water. Press the edges together firmly. -
Smooth the seam:
Use your thumb or a modeling tool to blend the clay across the seam until the join is invisible. You can smooth it with a damp sponge as well. -
Refine the shape:
Stand the cylinder upright. Check the top rim—if it looks uneven, gently tap it with a flat tool or slice off any excess to make it level.
Cracking Seams?
If the vertical seam starts to crack while drying, dip your finger in a ‘slurry’ (a mix of water and clay scraps) and rub it into the crack to seal it back up immediately.
Step 4: Drying and Finishing
-
Initial drying:
Let the lantern dry on the mold for about 24 hours. Drying it on the form ensures it stays perfectly round and doesn’t slump. -
Remove the mold:
Once the clay feels leathery and holds its shape well, gently slide the glass jar out. Peel away the parchment paper from the inside. -
Complete drying:
Allow the luminary to dry completely for another 24-48 hours. It should turn a lighter white color and feel hard to the touch. -
Sand for perfection:
Use fine-grit sandpaper to gently buff away any fingerprints, rough edges around the rim, or sharp bits inside the star cutouts. -
Light it up:
Place an LED tealight candle inside (avoid real flames as they can get too hot for some clays) and enjoy the glow.
Now dim the lights and watch your handcrafted constellation cast beautiful shadows across the room
Hanging Mobiles and Wind Chimes
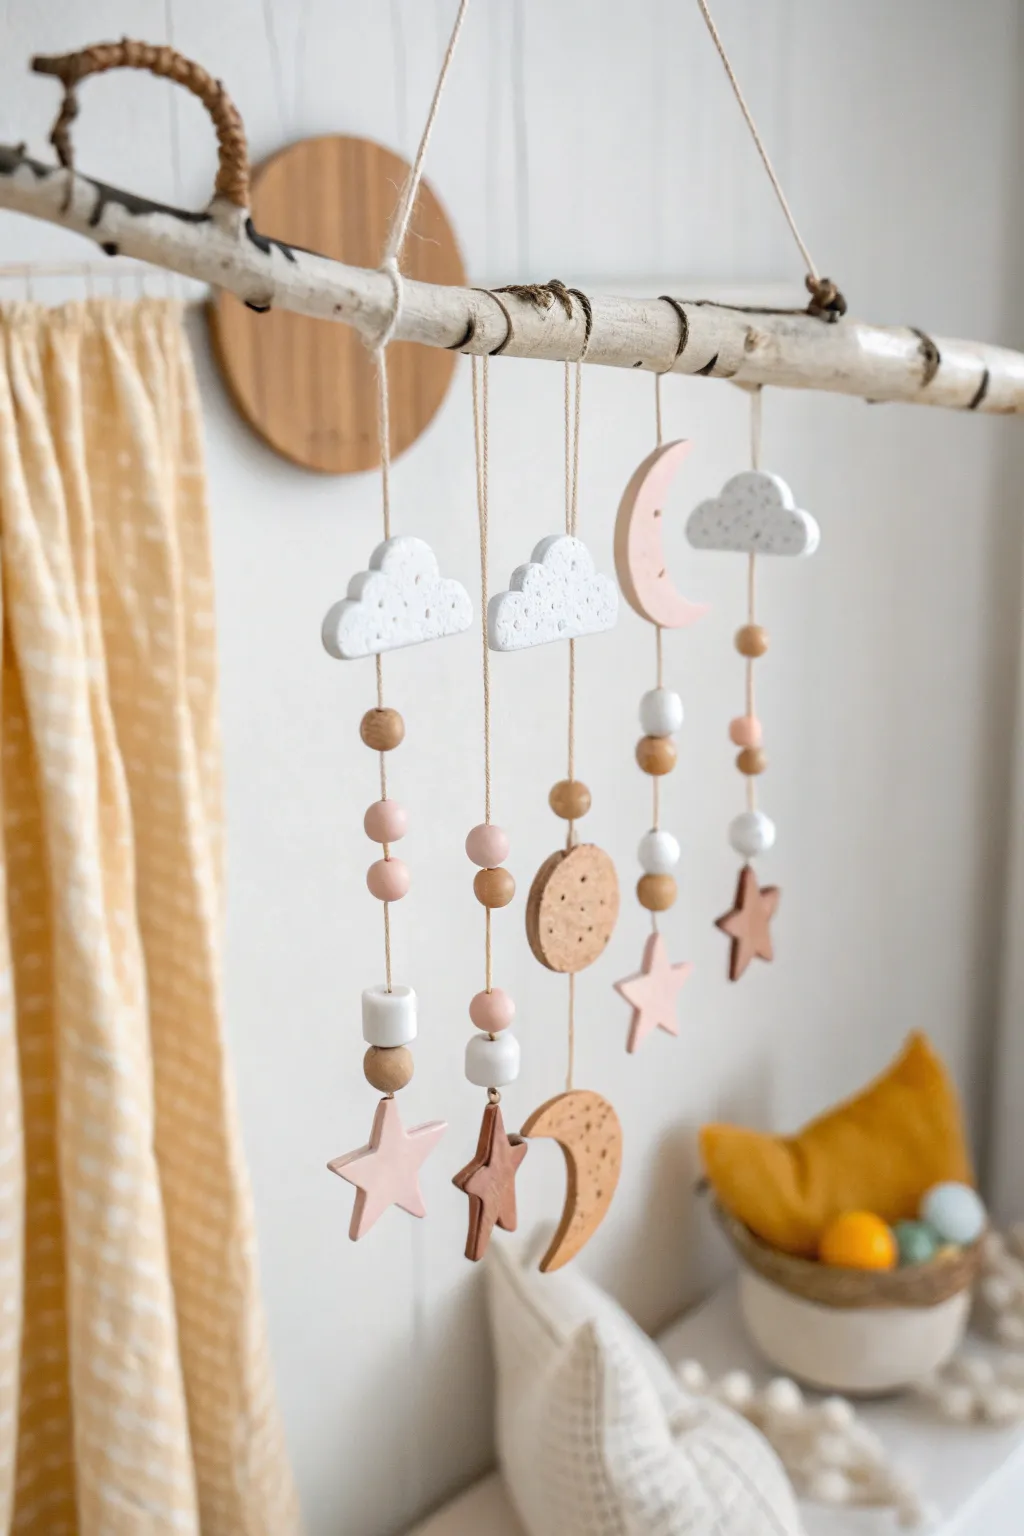
Bring the night sky indoors with this charming mobile made from simple dry clay and natural wooden beads. The combination of textured clouds, soft pink moons, and rustic birch wood creates a dreamy, Scandi-inspired decoration perfect for a nursery or kid’s room.
How-To Guide
Materials
- Air-dry clay (white)
- Small cookie cutters (clouds, stars, circles, crescent moon)
- Rolling pin
- Parchment paper
- Toothpick or skewer
- Sandpaper (fine grit)
- Acrylic paint (soft pink, white)
- Paintbrushes
- Wooden beads (various sizes: 10mm, 15mm, 20mm)
- White cotton twine or hemp cord
- Birch branch or driftwood stick (approx. 12-15 inches)
- Scissors
Step 1: Shaping the Celestial Bodies
-
Prepare your workspace:
Lay down parchment paper on a flat surface to prevent sticking. Take a handful of air-dry clay and knead it briefly until it’s pliable and smooth. -
Roll out the clay:
Use a rolling pin to flatten the clay to an even thickness of about 1/4 inch. If you want a textured look on the clouds like in the photo, gently press a piece of rough fabric or a textured sponge onto the clay surface before engaging the cutters. -
Cut out the shapes:
Using your cookie cutters, press firmly to create your shapes. You’ll need three clouds, two crescent moons (one large, one small), three stars (mixed sizes), and a few small circles. -
Refine the edges:
Dip your finger in a little water and smooth out any rough edges created by the cutters. This is the best time to fix imperfections before the clay hardens. -
Create hanging holes:
Take a toothpick or skewer and poke a hole through the top of every shape. For pieces that will hang in the middle of a strand (like the moon or circles), make sure the hole goes vertically through the center or add a second hole at the bottom if needed. -
Dry the pieces:
Place all clay shapes on a flat surface to dry. I like to flip them over after a few hours to ensure they dry evenly. Allow them to cure fully for 24-48 hours depending on your clay brand.
Natural Speckles
To get the stone look seen on the clouds without buying special paint, try mixing dry used coffee grounds or cracked black pepper into the white clay before rolling it out.
Step 2: Decorating and Painting
-
Sand for smoothness:
Once fully dry, use fine-grit sandpaper to gently buff away any remaining rough spots or sharp edges on your clay pieces. -
Mix your palette:
Prepare a soft palette of colors. Leave the clouds white or use a speckled stone-effect paint. Mix a soft blush pink for selected stars and moons, and perhaps a terracotta shade for others. -
Paint the clay shapes:
Paint the shapes according to your design. In the example, the clouds are kept white (sometimes speckled), while stars and moons alternate between natural clay tone, pink, and white. Let the paint dry completely. -
Prepare the beads:
Select your wooden beads. You can leave most of them natural wood for that organic look, but painting a few large geometric beads white or pink adds a nice pop of color.
Step 3: Assembly and Suspension
-
Cut the suspension cords:
Cut five lengths of cotton twine, varying them slightly in length (between 15 to 20 inches) to create a staggered look. -
Start the first strand:
Tie a knot at the bottom of your first string. Thread on a bottom element, like a star. Secure it with a knot above it or let it rest on the bottom knot. -
Add beads and spacers:
Thread on a sequence of wooden beads. Tie a simple overhand knot where you want the next bead or clay shape to sit so they ‘float’ with space in between. Experiment with the spacing; 1-2 inches apart usually looks best. -
Attach the top elements:
Thread the string through your larger clay pieces, like the clouds or the large moon. Secure them with knots above and below so they don’t slide down onto the beads. -
Repeat for all strands:
Assemble all five strands, varying the order of stars, moons, circles, and beads to keep the mobile visually interesting and balanced. -
Prepare the branch:
Lay your birch branch on a table. Tie the top of each finished strand securely onto the branch, spacing them evenly apart. -
Add the main hanger:
Cut a long piece of sturdy twine. Tie one end to the far left of the branch and the other to the far right to create a triangle hanging loop. -
Secure knots:
Dab a tiny drop of craft glue on each knot on the branch to ensure they don’t slip or unravel over time.
Uneven Hanging?
If the mobile tilts to one side, the weight distribution is off. Slide the main hanging cord’s center point slightly toward the heavier side until the branch balances horizontally.
Hang your new mobile near a window or over a crib and watch the peaceful shapes gently rotate in the breeze