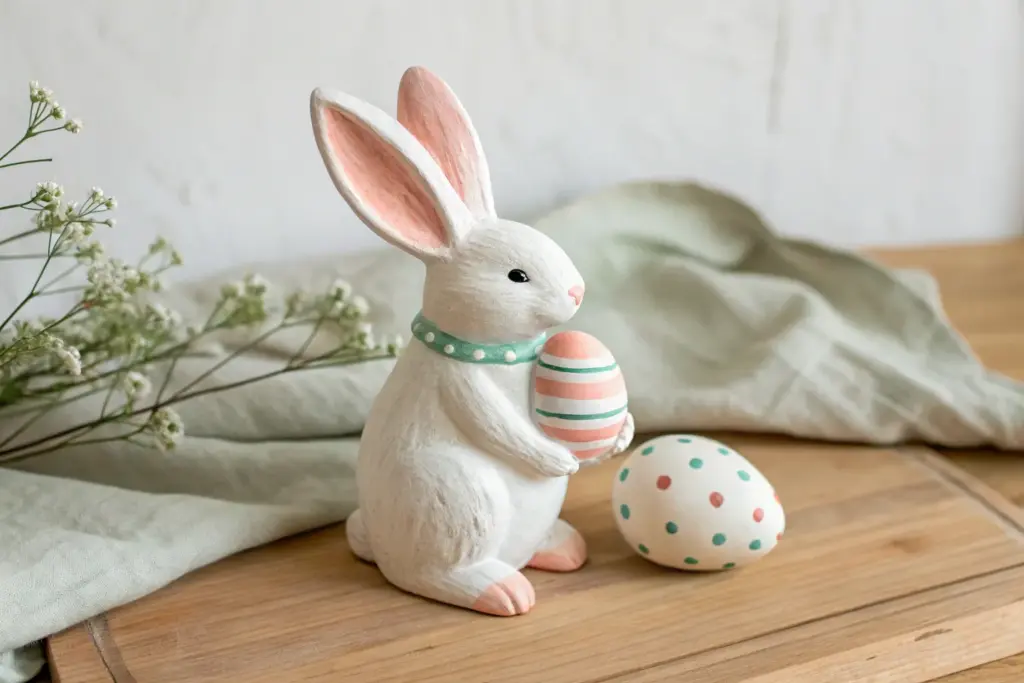
Easter is basically the perfect excuse to play with clay in soft colors, sweet shapes, and a little bit of sparkle. Here are my favorite Easter clay ideas that feel totally doable at a cozy kitchen table, but still look special enough to display every spring.
Textured Clay Egg Ornaments
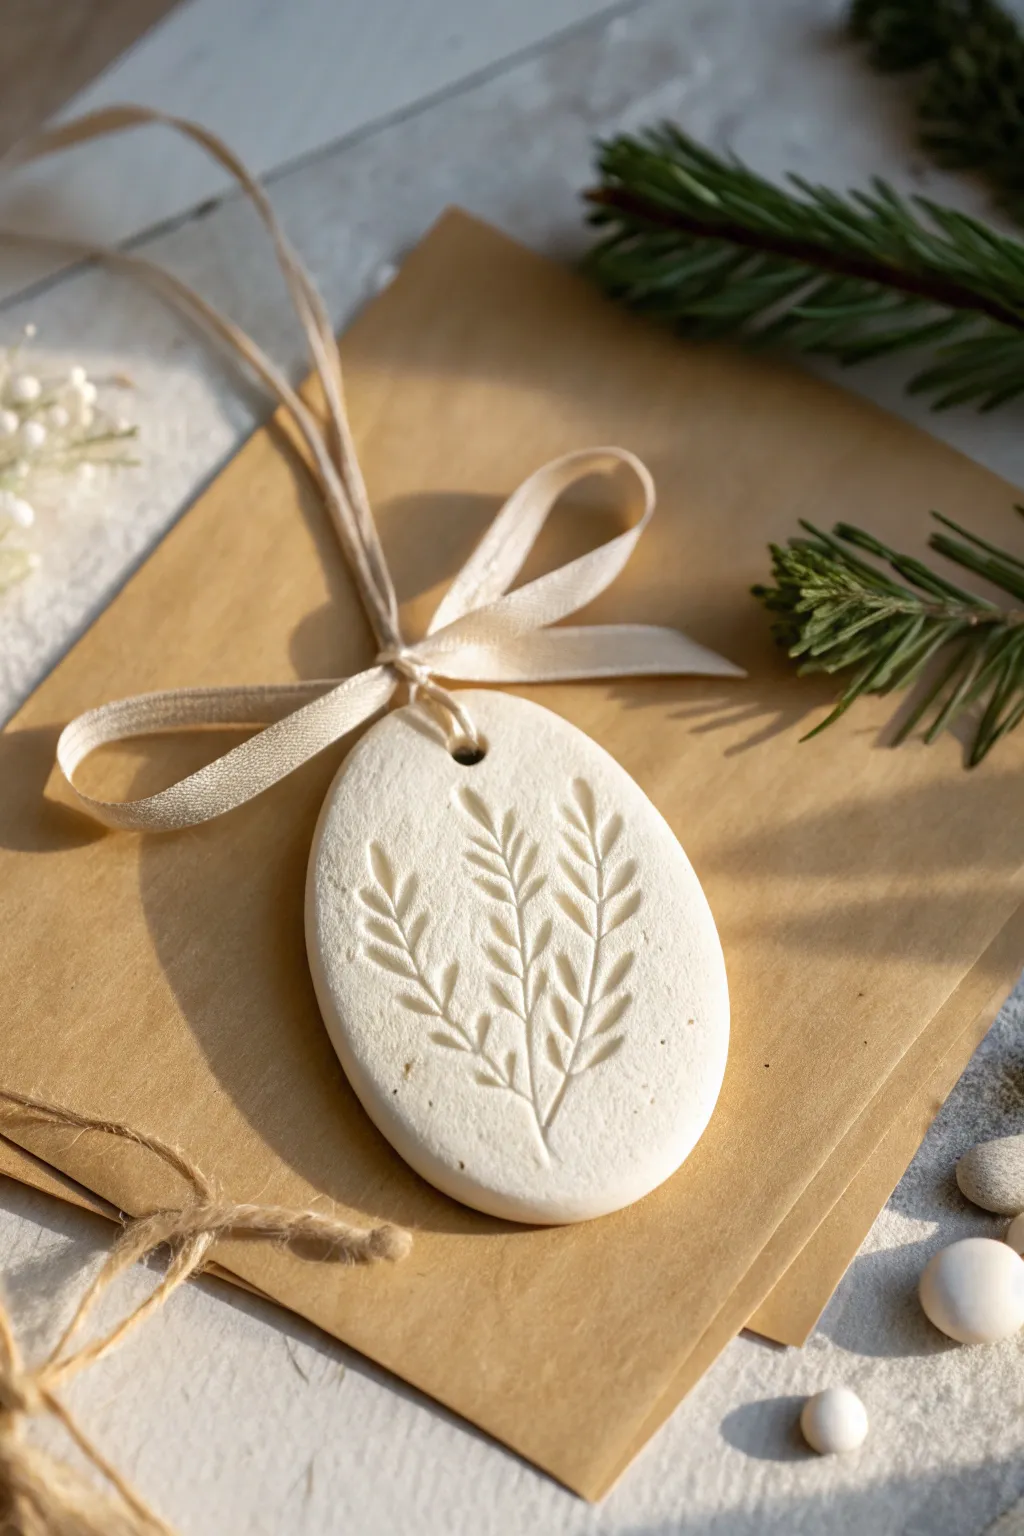
Capture the beauty of nature with these delicate textured ornaments made from simple air-dry clay. The clean white surface showcases the intricate details of pressed greenery, creating a minimalist yet stunning decoration perfect for Easter branches.
How-To Guide
Materials
- White smooth air-dry clay (or polymer clay)
- Small oval cookie cutter (or egg template)
- Live plant sprigs (ferns, herbs, or pine needles)
- Rolling pin
- Parchment paper or craft mat
- Straw or cocktail stick
- Fine sandpaper (optional)
- Cream or ivory ribbon for hanging
- Jute twine (optional)
Step 1: Preparing the Clay Base
-
Condition the Clay:
Begin by taking a handful of air-dry clay. Knead it thoroughly in your hands until it becomes warm, soft, and pliable. This prevents cracking later on. -
Roll it Out:
Place the clay on a sheet of parchment paper to prevent sticking. Use your rolling pin to flatten the clay into a slab, aiming for a consistent thickness of about 4-5mm. -
Smooth the Surface:
Run your finger or a slightly damp sponge lightly over the surface of the clay slab to remove any rolling pin marks or fingerprints.
Fixing Faint Prints
If your plant impression is too shallow, don’t re-roll the same spot. Flip the clay slab over, smooth it out, and try again on the fresh side with firmer pressure.
Step 2: Imprinting the Design
-
Select Your Greenery:
Choose a fresh sprig of greenery slightly smaller than your intended ornament size. Ferns or foliage with stiff veins work best for clear impressions. -
Position the Plant:
Lay the sprig carefully onto the center of your smoothed clay slab. I like to arrange it slightly off-center for a more organic look. -
Press the Design:
Gently roll your rolling pin over the plant material once. Apply firm, even pressure to push the leaves into the clay without making the slab too thin. -
Reveal the Texture:
Carefully find the stem of the plant and peel it away from the clay. Do this slowly to ensure no plant residue is left behind in the grooves.
Add a Pop of Color
Once dried, dilute a little watercolor or acrylic paint with water and wash it over the imprint. Wipe surface quickly to leave color only in the grooves.
Step 3: Cutting and Drying
-
Cut the Shape:
Position your oval or egg-shaped cutter over the imprinted design. Press down firmly to cut the shape, ensuring the botanical print is nicely framed within the borders. -
Remove Excess Clay:
Peel away the excess clay from around the cutter before lifting the cutter itself. This helps keep the egg shape perfect. -
Create a Hanging Hole:
Use a drinking straw or a cocktail stick to poke a clean hole near the top of the egg. This is where your ribbon will go. -
Smooth the Edges:
Dip your finger in a tiny bit of water and gently run it around the cut edges of the fresh clay to soften any sharp ridges left by the cutter. -
Initial Drying:
Leave the ornament on a flat surface lined with parchment paper. Let it air dry for at least 24 hours. Don’t rush this process with heat, or the clay might curl. -
Flip and Dry:
About halfway through the drying time, gently flip the ornament over so the backside can dry evenly. This helps prevent warping.
Step 4: Finishing Touches
-
Sand for Perfection:
Once completely bone dry, inspect the edges. If there are any rough spots, gently buff them away with fine-grit sandpaper. -
Prepare the Ribbon:
Cut a length of cream or ivory ribbon, about 8-10 inches long. You can also mix in a thin strand of jute twine for added texture. -
Thread the Loop:
Push both ends of the ribbon through the hole from front to back, creating a loop on the front side. -
Secure the Knot:
Pass the ends of the ribbon through the loop you just made and pull tight to secure it against the top of the ornament (a cow hitch knot). -
Tie a Bow:
Alternatively, thread a single piece of ribbon through the hole and tie a simple bow right at the base of the hole for a classic look.
Hang these elegant pieces on a branch or use them as sophisticated gift tags for your spring presents


Bunny Figurines With Simple Shapes
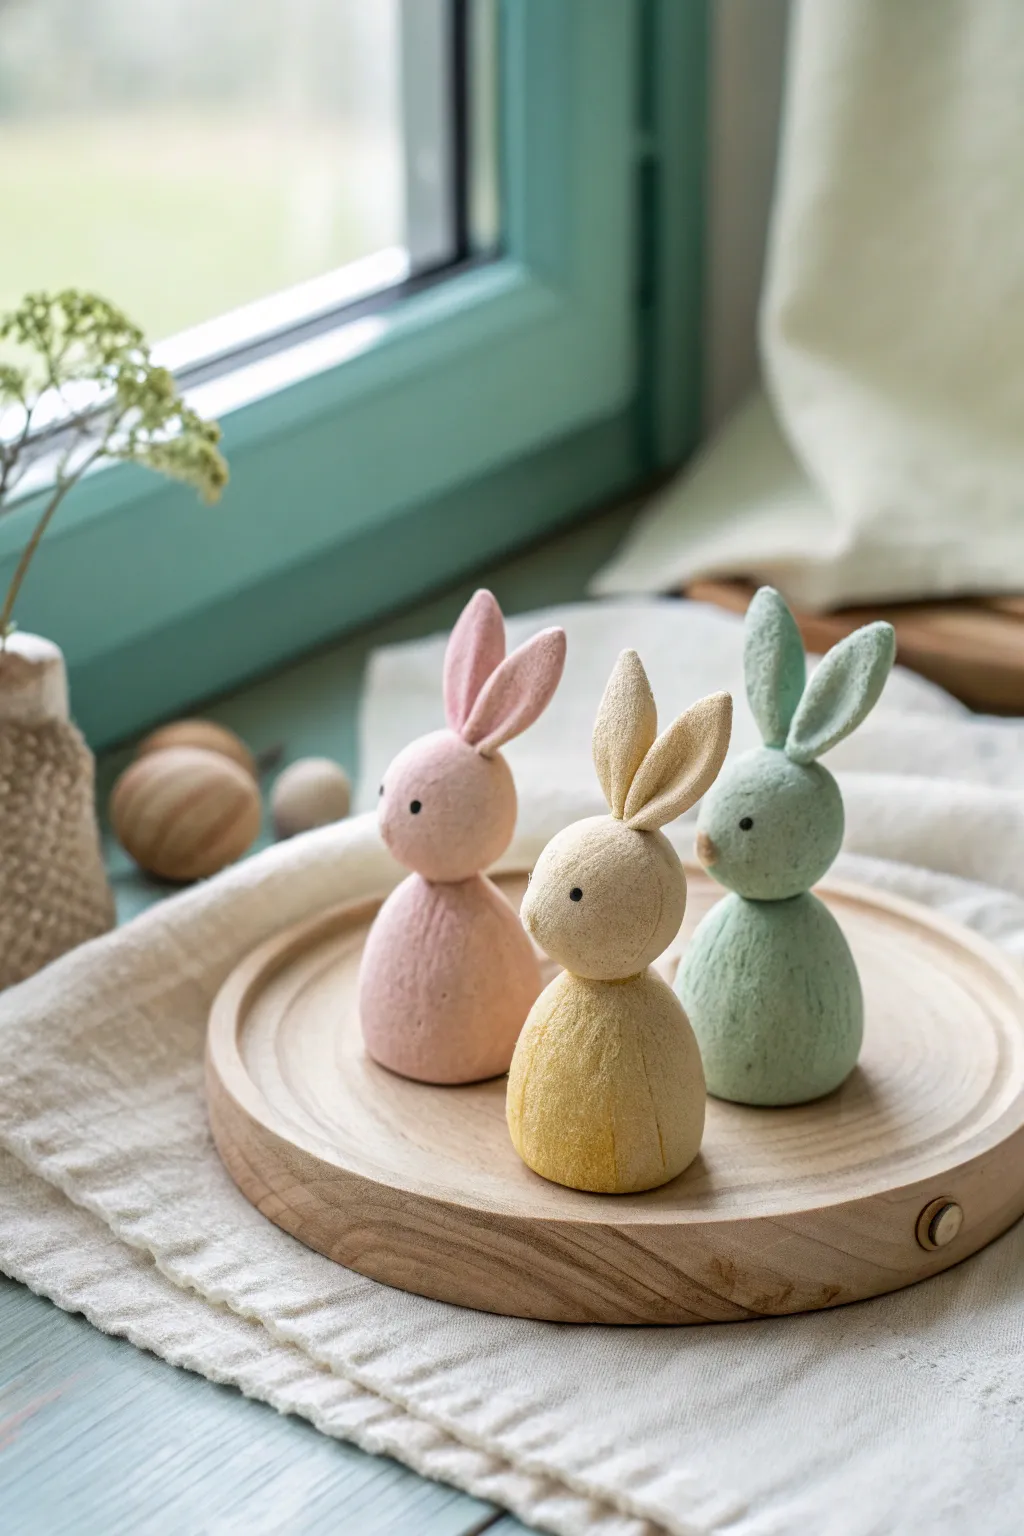
These charming bunny figurines rely on the beauty of simple geometric shapes and soft textures to create a lovely Easter vignette. With their muted pastel tones and stylized ears, they offer a modern, Scandinavian-inspired take on classic spring decor.
How-To Guide
Materials
- Air-dry clay or polymer clay (white)
- Acrylic paints (pastel pink, butter yellow, sage green)
- Black acrylic paint or a fine-tip permanent marker
- Small paintbrush
- Texturing tool (old toothbrush or stiff bristle brush)
- Toothpicks or thin wire (for structural support)
- Sandpaper (fine grit)
- Matte sealant spray or varnish
- Rolling pin (optional)
Step 1: Shaping the Bodies
-
Divide the clay:
Start by cutting your clay into three equal portions. From each portion, separate about one-third for the head and ears, keeping the larger piece for the body. -
Form the base:
Roll the larger pieces into smooth balls first to eliminate cracks. Then, gently roll them on your work surface using a slanted palm motion to create a tapered egg or teardrop shape. Flatten the bottom slightly so they stand upright securely. -
Create the head:
Take a smaller piece of clay and roll it into a clean sphere for the head. It should be proportional to the body but slightly smaller. -
Add structural support:
Insert half a toothpick or a small piece of wire into the top center of the body shape. Push the head shape down onto this support to join the pieces firmly. I like to smooth the seam slightly with a bit of water or liquid clay if needed, though a distinct separation looks nice too.
Cracked Clay Fix
If you see cracks forming as the clay dries, make a ‘slurry’ by mixing a scrap of clay with water until it’s a paste. Fill the cracks, smooth over, and let dry again.
Step 2: Sculpting the Ears
-
Preparing ear shapes:
For each bunny, roll two small logs of clay. Flatten them gently into elongated leaf shapes, tapering them at both ends. -
Adding texture:
Before attaching, use an old toothbrush or a stiff bristle brush to gently tap over the entire surface of the bunny (body, head, and ears). This creates that lovely, soft felt-like texture visible in the photo. -
Attaching the ears:
Press the ears onto the top of the head. Use a blending tool to smooth the clay from the base of the ear into the head for a seamless join. -
Pose the ears:
Give the bunnies personality by twisting or slightly folding the ears. Have one ear flop forward or tilt slightly to the side. -
Initial drying:
Allow the clay to dry completely according to the package instructions. For air-dry clay, this usually takes 24-48 hours.
Step 3: Painting and Finishing
-
Sanding:
Once fully dry, inspect your bunnies for any rough seams or jagged bits. Use fine-grit sandpaper to gently smooth these areas, but be careful not to sand away your ‘fur’ texture. -
Mixing pastels:
Prepare your palette with soft pastel shades. If you only have primary colors, mix white with tiny amounts of red for pink, yellow and ochre for the gold, and green and grey for the sage. -
Applying base color:
Paint each bunny entirely in its chosen color. Use a dry-brushing technique—wiping most paint off the brush before applying—to highlight the texture you created earlier rather than filling it in completely. -
Second coat:
If the color looks too sheer, apply a second thin coat, maintaining that matte, textured finish. -
Adding eyes:
Dip the non-brush end of a paintbrush into black paint, or use a fine-tip permanent marker. Carefully place two small dots on the sides of the head for the eyes. -
Sealing the work:
To protect the paint and give it a finished look, spray the bunnies with a matte clear coat. Avoid heavy gloss varnishes, as the matte finish is key to the soft aesthetic.
Flocked Finish
For actual fuzz instead of painted texture, coat the dried bunnies in craft glue and sprinkle heavily with embossing powder or flocking powder before the final seal.
Arranged on a simple wooden tray, these little figures bring a quiet joy to any window ledge or table setting


Chicks in Cracked Eggshells
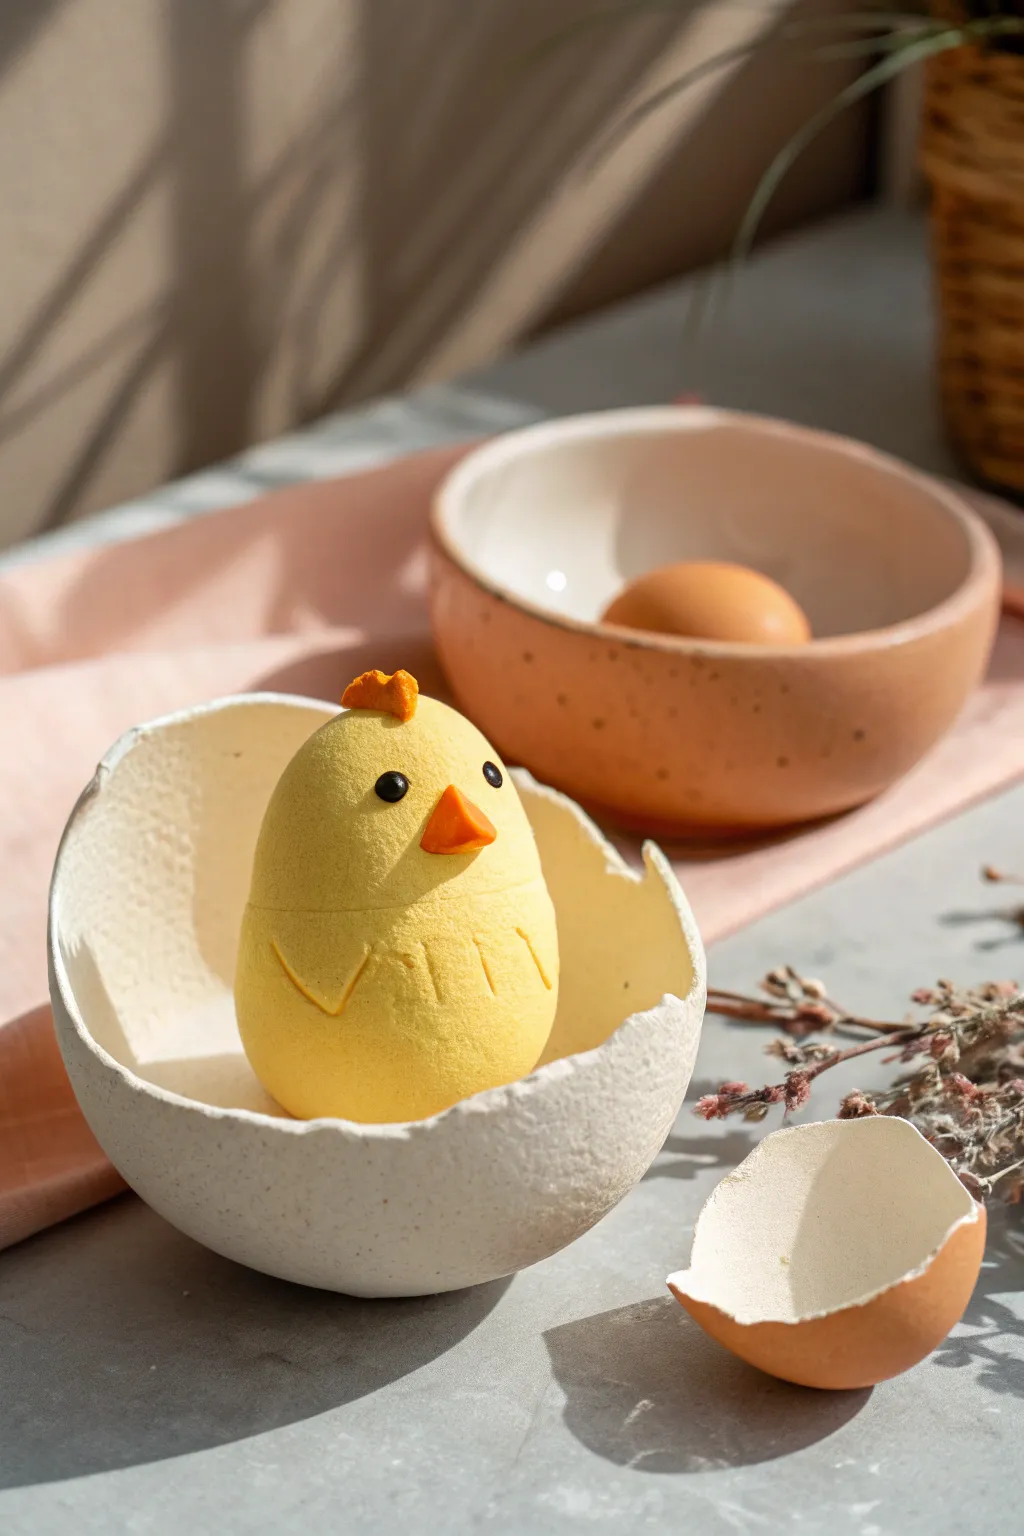
Celebrate Easter with this adorable scene featuring a minimalist clay chick peeking out from a giant, rustic eggshell. The smooth, matte texture of the chick contrasts beautifully with the textured, stone-like finish of its shell vessel.
Step-by-Step Tutorial
Materials
- Air-dry clay (white)
- Air-dry clay (yellow) or yellow acrylic paint
- Orange and black polymer clay (tiny amounts) or acrylic paint
- Medium-sized balloon (water balloon size works well)
- PVA glue or Mod Podge
- Paper towels
- Water spray bottle
- Clay roller or smooth jar
- Craft knife
- Fine-grit sandpaper
- Small needle tool or toothpick
- White or speckled ‘stone effect’ acrylic paint (for the shell)
Step 1: Crafting the Giant Eggshell
-
Prepare the base:
Inflate a small balloon to the size you want your eggshell to be—roughly 4-5 inches wide is usually perfect for a decorative piece. Tie it off securely. -
Mix water and glue:
In a small bowl, mix equal parts PVA glue and water. Tear paper towels into strips about 1 inch wide. -
Create the papier-mâché layer:
Dip the paper strips into the glue mixture and lay them over the bottom half of the balloon. Apply 3-4 layers to create a sturdy base, letting it dry completely between every few layers. This acts as a support form for your clay. -
Roll out the shell clay:
Take a large chunk of white air-dry clay and roll it out into a slab about 1/4 inch thick. Aim for a rough circle shape large enough to cover the bottom half of your balloon form. -
Drape and shape:
Carefully lift the clay slab and drape it over the paper-covered bottom of the balloon. Gently press it down to conform to the round shape, smoothing out any major creases with a bit of water on your finger. -
Create the cracked edge:
Instead of cutting a straight line, use your fingers or a craft knife to tear away the excess clay at the top edge. Create jagged peaks and valleys to mimic a naturally broken eggshell. -
Add texture:
To get that rustic look seen in the photo, gently dab a stiff paintbrush or a crumpled ball of foil over the outside surface of the clay while it’s still damp. This gives it a natural, porous egg texture. -
Dry and remove:
Let the shell dry completely (24-48 hours). Once hard, pop the balloon and peel out the paper layer from the inside. Paint the shell white or with a speckled stone-effect spray if the natural clay color isn’t quite right.
Cracking Up?
If your large eggshell cracks while drying, fill the fissures with a mix of fresh soft clay and water (slip). Smooth it over and let dry again.
Step 2: Sculpting the Chick
-
Form the body:
Take a ball of yellow air-dry clay (or white clay you plan to paint later) roughly the size of a large lemon. Roll it into a smooth egg shape, slightly wider at the bottom for stability. -
Refine the shape:
Tap the bottom of the egg shape gently on your table to flatten it just enough so the chick stands upright without wobbling. -
Add wing details:
Using a needle tool or a dull knife, carve simple wing details into the sides of the body. Two angled lines forming a ‘V’ shape on each side, as shown in the image, create a cute, minimalist wing suggestion. -
Create the beak:
Take a tiny amount of orange clay and shape it into a small cone. Flatten the underside slightly and press it firmly onto the center of the face. Use a dab of water or slip to ensure it sticks. -
Add the eyes:
Roll two miniscule balls of black clay. Press them gently into the clay above the beak. I find placing them slightly wide apart gives the chick a sweet, innocent expression. -
Sculpt the comb:
Form a small, irregular strip of orange clay. Press it onto the very top of the head to create the comb, pinching it slightly to give it a ruffled texture. -
Final drying:
Allow the chick to dry completely. If you used white clay, now is the time to paint the body yellow, the beak orange, and the eyes black using acrylics. -
Smoothing:
Once fully dry, you can lightly sand any rough fingerprints off the chick’s body with fine-grit sandpaper for that matte, velvety finish. -
Assembly:
Place your finished chick inside the cracked eggshell. You can glue it in place for a permanent decoration, or leave it loose so you can reposition it.
Natural Speckles
Mix a tiny drop of brown paint with water. Dip a toothbrush in it and flick the bristles to spray fine speckles onto the white shell for realism.
Place your hatched creation on a mantel or table for a delightful touch of spring cheer


Bunny Butt Egg Holders
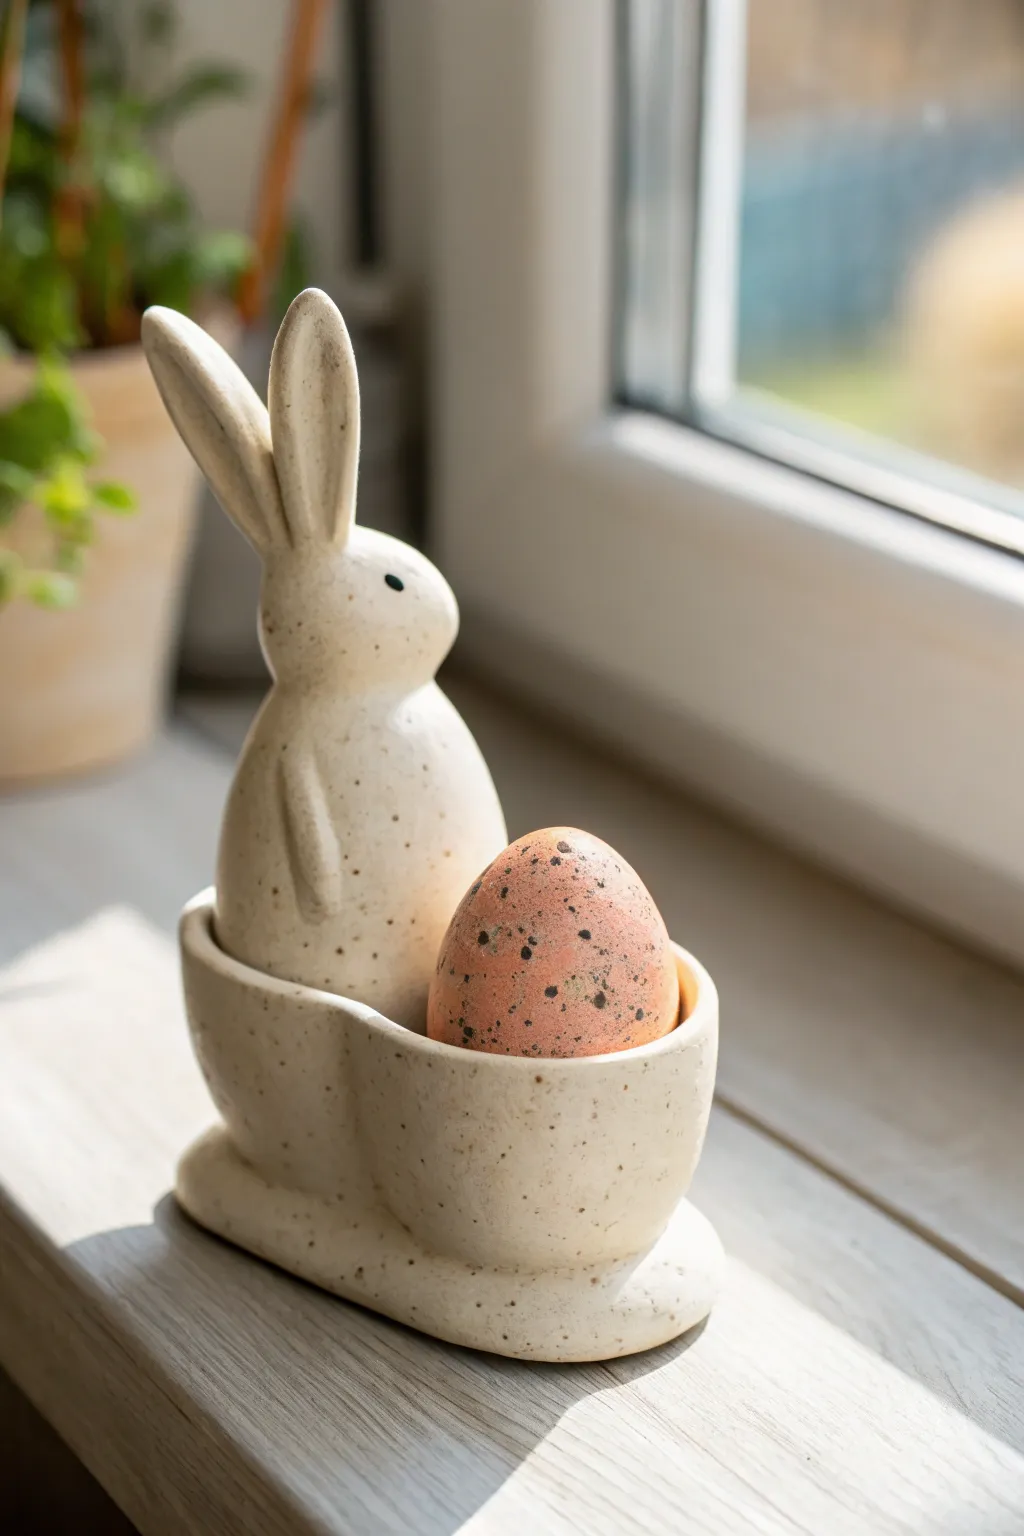
This charming clay project combines form and function, featuring a stylized rabbit figure alongside a simple cup perfect for holding a decorated Easter egg. The creamy, speckled finish gives it a delightfully rustic, pottery-studio look without needing a kiln if you choose the right clay.
Detailed Instructions
Materials
- Air-dry clay (stone or speckled finish preferred) or polymer clay in cream/granite
- Rolling pin
- Small bowl relative to egg size (for measuring)
- Clay sculpting tools (needle tool, smoothing tool)
- Water slip (for joining air-dry clay) or liquid polymer clay
- Acrylic paints (black and brown for speckling)
- Old toothbrush (for speckling)
- Gloss or matte varnish/sealant
- Sandpaper (fine grit)
Step 1: Sculpting the Base and Body
-
Form the Base:
Start by rolling out a thick slab of clay, roughly 1/4 inch thick. Cut an elongated oval shape about 4 inches long and 2 inches wide to serve as the sturdy foundation. -
Shape the Egg Cup:
Roll a ball of clay slightly larger than a golf ball. Press your thumb into the center to create a pinch pot, widening it until it can comfortably cradle an egg. The walls should be thick and smooth. -
Create the Body:
Roll a larger cone-like shape for the rabbit’s body. It should be tall and rounded at the bottom, tapering slightly as it goes up, before distinguishing the head area. -
Attach Components:
Score and slip (or use liquid clay) the bottom of the egg cup and the rabbit body. Press them firmly onto the oval base—cup in front, bunny in back—so they touch slightly for extra stability. -
Blend the Seams:
Use a modeling tool or your finger to smooth the clay where the pieces meet the base, creating a seamless transition so it looks like one solid unit.
Cracking Clay?
If air-dry clay hairline cracks appear while drying, don’t panic. Mix a tiny bit of fresh clay with water to make a paste and fill the cracks, then sand smooth once dry.
Step 2: Adding Details
-
Sculpt the Head:
Refine the top of the body cone to form a rounded head shape. It doesn’t need a distinct neck; a subtle indentation is enough to suggest the separation. -
Form the Ears:
Roll two small logs of clay and flatten them into long teardrop shapes. Attach them to the top of the head, standing upright. I like to curve one slightly for a bit of personality. -
Add the Front Paws:
Roll two thin snakes of clay. Attach them vertically to the front of the bunny’s chest to represent paws resting at its side. Smooth the edges so they look integrated, not just stuck on. -
Detail the Face:
Using a needle tool, poke a small indention for the eye. Keep the face minimal to match the modern, rustic aesthetic. -
Final Smoothing:
Dip your finger in a little water (or baby oil for polymer) and give the entire piece a final polish, removing any fingerprints or rough edges.
Weighted Base
To prevent tipping when holding a heavy egg, conceal a small, flat stone or metal washer inside the clay base before you seal it up for added stability.
Step 3: Finishing Touches
-
Dry or Bake:
If using air-dry clay, let it dry slowly away from direct heat for 24-48 hours. If using polymer clay, bake according to the package instructions. -
Sand Imperfections:
Once fully cured, use fine-grit sandpaper to gently smooth out any bumps or sharp edges, particularly around the ears and the rim of the egg cup. -
Create the Speckles:
Mix a small amount of brown and black acrylic paint with water to create a thin wash. Dip an old toothbrush into the mixture. -
Apply the Speckles:
Hold the toothbrush over the sculpture and run your thumb across the bristles to flick tiny splatters of paint onto the surface. Rotate the piece to get even coverage. -
Paint the Details:
Use a fine paintbrush and pure black paint to darken the eye indentation. -
Seal the Piece:
Finish by applying a coat of varnish. A satin or glossy finish mimics the look of glazed ceramic beautifully.
Now you have a timeless piece of decor ready to cradle your favorite Easter egg creation

The Complete Guide to Pottery Troubleshooting
Uncover the most common ceramic mistakes—from cracking clay to failed glazes—and learn how to fix them fast.
Carrot-Shaped Mini Vases

Bring the playful spirit of the garden indoors with these charming carrot-shaped bud vases. Crafted from air-dry clay and finished with a warm terracotta hue, they make for a delightful, whimsical centerpiece that looks freshly pulled from the earth.
How-To Guide
Materials
- Air-dry clay (terracotta color preferred, or white)
- Acrylic rolling pin
- Slip (clay mixed with a little water)
- Clay sculpting tools (specifically a needle tool and a small loop tool)
- Sponge
- Water cup
- Fine-grit sandpaper
- Terracotta acrylic paint (if using white clay)
- Matte spray sealant
- Dried baby’s breath or faux stems for display
Step 1: Shaping the Base
-
Condition the Clay:
Begin by taking a generous handful of air-dry clay. Knead it thoroughly in your hands to warm it up and remove any air bubbles, ensuring the texture is consistent and pliable. -
Form a Cylinder:
Roll the clay into a thick cylinder on your work surface. You want it to be substantial enough to stand on its own, about 2 inches in diameter. -
Create the Taper:
Gently roll one end of the cylinder with slightly more pressure to create a taper. You aren’t aiming for a sharp point like a real carrot, but rather a rounded, blunt bottom so the vase can stand upright safely. -
Flatten the Bottom:
Tap the tapered narrow end strictly vertically against your table to create a small flat spot. This is crucial for stability; test it to ensure the carrot form stands without wobbling. -
Hollow the Center:
Using your thumb or a large loop tool, begin to hollow out the wider top end of the carrot. Work slowly, pressing down into the center to create a cavity for your stems, leaving the walls about a quarter-inch thick.
Wobbly Carrot?
If the vase tips over, your base is too narrow. Add a flat disk of clay to the bottom to widen the footprint, blending the seams upward for a seamless look.
Step 2: Adding Details
-
Refine the Shoulder:
At the very top of the vase opening, gently pinch the clay inward to create a small ‘shoulder’ before the neck. Smooth this transition with a damp sponge. -
Create the Neck Coil:
Roll a small snake of clay, ensuring it is even in thickness. I find that rolling it to about the width of a pencil works best for this scale. -
Attach the Neck:
Score the top rim of your carrot shape and the underside of your coil. Apply a little slip, then press the coil onto the rim to form the raised neck of the vase. -
Blend the Seams:
Use a modeling tool or your finger to blend the clay of the neck coil downwards into the main body on the outside, and smooth the inside seam so it looks seamless. -
Smooth the Surface:
Dip a sponge in water and squeeze it out well so it’s just damp. Run it over the entire surface of the vase to remove fingerprints and create a smooth, matte canvas for the texture.
Step 3: Texturing and Finishing
-
Mark the Ridges:
Using a small loop tool or even the side of a popsicle stick, press horizontal indentations into the clay body. These mimic the natural ridges found on carrots. -
Vary the Pattern:
Don’t make these lines perfectly straight or uniform. Scatter short, dashed indentations randomly down the length of the body to keep the look organic and natural. -
Final Shaping Check:
Step back and look at the silhouette. If the texturing process slightly warped the shape, gently roll it on the table or reshape the opening to ensure it’s still round. -
Drying Time:
Place the vase in a cool, dry spot away from direct sunlight. Let it dry completely for 24-48 hours. Rotate it occasionally so the bottom dries evenly. -
Sanding:
Once fully dry, use fine-grit sandpaper to gently smooth any rough edges, particularly around the lip of the vase or sharp ridges in the texture. -
Painting (Optional):
If you used white clay, apply 1-2 coats of terracotta-colored acrylic paint. If you used terracotta clay, you can skip this step or add a light wash of darker brown to accentuate the ridges. -
Seal the Project:
Mist the vase with a matte spray sealant to protect the finish. Note that air-dry clay is not water-tight, so use dried flowers or insert a small glass vial if you want to use fresh water.
Fresh Flower Hack
Since air-dry clay dissolves in water, hide a small plastic test tube or a cleaned spice jar inside the clay body while building it to hold real water safely.
Fill your new creation with dainty white flowers to mimic carrot greens and enjoy your handmade harvest.
Bunny Face Trinket Dishes
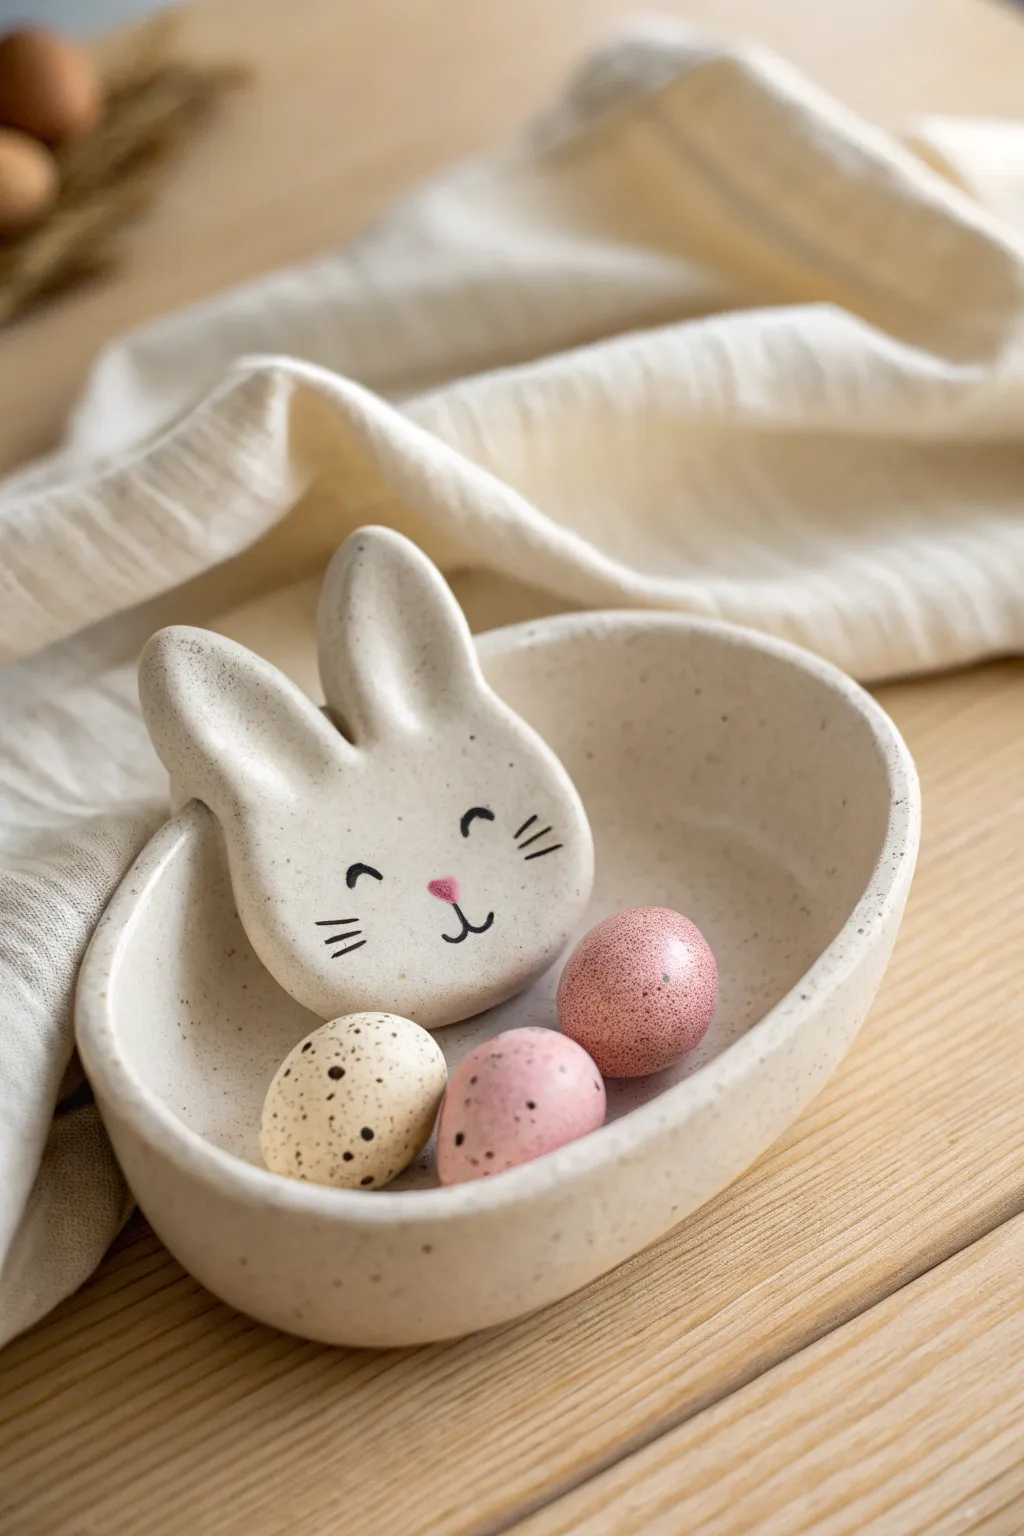
Bring a touch of springtime whimsy to your vanity with this adorable bunny-themed trinket dish featuring an integrated sculptural face. The off-white clay body is finished with a charming speckled effect, making it the perfect nest for rings or mini chocolate eggs.
Detailed Instructions
Materials
- White polymer clay or air-dry clay (approx. 200g)
- Small rolling pin
- Oval cookie cutter (approx. 4-5 inches)
- Bunny face cutter (or craft knife and paper template)
- Black acrylic paint
- Soft pink acrylic paint
- Brown fluid acrylic or watercolor (for speckling)
- Fine detail paintbrush (size 0 or 00)
- Toothbrush
- Small sponge or smoothing tool
- Clay scoring tool or needle tool
- Slip (water mixed with clay scraps)
- Matte or satin varnish
- Sandpaper (fine grit)
Step 1: Shaping the Base
-
Prepare the workspace:
Begin by cleaning your work surface thoroughly to avoid dust getting trapped in the white clay. Roll out a slab of clay to an even thickness of about 1/4 inch. -
Cut the bowl shape:
Use your oval cookie cutter to press out the main base shape. If you don’t have a cutter, trace an oval onto paper first and cut around it with a craft knife for precision. -
Create the walls:
Gently lift the edges of the oval slab with your fingers, cupping the clay in your palm to create a shallow curve. Smooth out any fingerprints immediately with a damp sponge. -
Refine the rim:
Run a wet finger along the rim of the bowl to soften the sharp edge left by the cutter, ensuring it feels smooth and rounded.
Clean Clay Tip
Keep baby wipes or a scrap piece of ‘cleaning clay’ nearby. Use it to pull dust off your hands before touching your pristine white project.
Step 2: Sculpting the Bunny
-
Cut the face shape:
Roll out a second, slightly smaller piece of clay. Use a bunny face cutter or cut a rounded shape with two prominent, upright ears by hand using a craft knife. -
Shape the ears:
Gently pinch and round the edges of the ears so they look soft and organic rather than sharp and flat. Curve them slightly forward for a more animated look. -
Score the attachment points:
Take your needle tool and scratch up the back of the bunny head and the inner side of the bowl where you plan to attach it. -
Attach the face:
Apply a small amount of slip (or water for polymer clay) to the scored areas. Press the bunny face firmly against the inside rim of the oval bowl so it peeks over the edge. -
Blend the seams:
Using a modeling tool or your finger, gently blend the clay from the back of the bunny head onto the bowl rim to ensure a secure bond that won’t crack later. -
Final smooth:
Do one last inspection for bumps or nail marks, smoothing them away with a barely damp sponge. I find this step crucial for a professional finish.
Step 3: Finishing Touches
-
Dry or bake:
Follow the manufacturer instructions for your specific clay. If baking polymer clay, tent it with foil to prevent scorching the white surface. If air-drying, let it sit for 24-48 hours. -
Sand the surface:
Once fully cured, use fine-grit sandpaper to buff away any remaining rough spots on the rim or ears. -
Paint the features:
Using a very fine detail brush, paint two small arches for closed eyes and three whiskers on each cheek using black acrylic paint. -
Add the nose:
Paint a small, soft pink heart or triangle for the nose, adding a small vertical line and curved mouth below it in black. -
Create the speckles:
This is the fun part: dip an old toothbrush into watered-down brown paint. Run your thumb across the bristles to flick tiny speckles across the entire dish and bunny face. -
Seal the piece:
Allow the paint to dry completely, then apply two coats of matte or satin varnish to protect the dish and give it a ceramic-like sheen.
Level Up: Pink Ears
Before baking, lightly brush soft pink pastel chalk dust inside the bunny’s ears. It creates a gentle, blushing gradient that won’t fade.
Place your finished bunny dish on a shelf and enjoy the homemade charm it adds to your joyful Easter decor


What Really Happens Inside the Kiln
Learn how time and temperature work together inside the kiln to transform clay into durable ceramic.
Spring Flower Egg Plaques
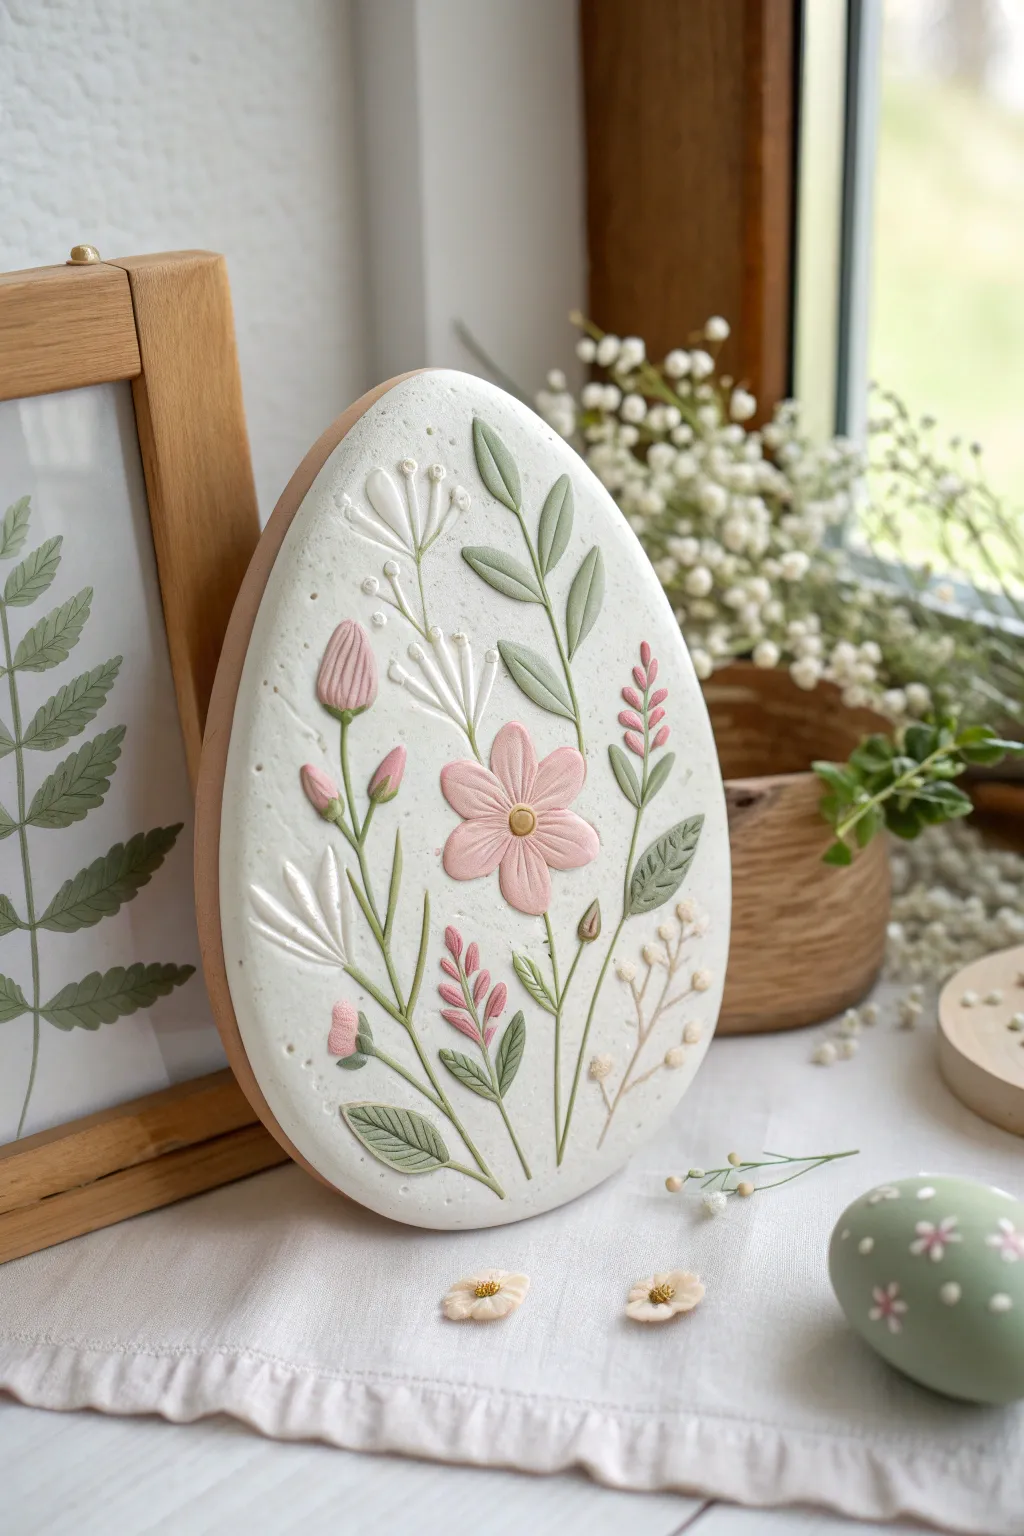
Embrace the delicate beauty of spring with this elegant egg-shaped plaque featuring raised botanical details. Using air-dry or polymer clay, you will sculpt individual petals and leaves to create a sophisticated piece of Easter decor that feels like fine ceramic.
Step-by-Step Guide
Materials
- White polymer clay or premium air-dry clay (e.g., DAS)
- Wooden rolling pin
- Egg-shaped cookie cutter (large) or paper template and knife
- Fine-grit sandpaper (optional)
- Acrylic paints (Pastel Pink, Olive Green, Sage Green, White)
- Gold acrylic paint or metallic pigment powder
- Detail brushes (sizes 00 and 0)
- Clay sculpting tools (needle tool, ball stylus)
- Clear matte varnish
- Rolling mat or parchment paper
- Toothbrush (for texturing)
Step 1: Shaping the Base
-
Condition and Roll the Clay:
Begin by thoroughly kneading your white clay until it is soft and pliable. Roll it out on a non-stick surface to a thickness of approximately 0.5 inches (1.2 cm) for a sturdy base. -
Cut the Egg Shape:
Press your large egg-shaped cutter into the clay to create the main form. If you don’t have a cutter, trace an oval template onto the clay and carefully cut around it with a craft knife or scalpel. -
Smooth the Edges:
Dip your finger in a little water (for air-dry clay) or baby oil (for polymer) and gently run it around the cut edge to soften the sharp corners, giving the plaque a smooth, finished look. -
Add Subtle Texture:
Before the clay hardens, take a clean toothbrush and lightly tap the surface of the egg. This creates a very fine, stone-like texture that mimics the speckled look of a real eggshell.
Stone Effect
Mix dried tea leaves or black pepper into the white clay before rolling. This creates natural speckles throughout the ‘stone’ without painting.
Step 2: Sculpting the Botanicals
-
Create the Central Flower:
Roll five tiny balls of clay for the petals. Press each one flat into a teardrop shape and arrange them in a circle near the center of the egg. Use a sculpting tool or toothpick to press an indentation down the center of each petal for dimension. -
Form the Leaves:
Roll small sausages of clay and taper the ends to create leaves. Flatten them gently and attach them to the ‘stem’ lines you envision. I like to use a needle tool to drag a vein line down the center of each leaf for realism. -
Add Stems and Vines:
Roll out incredibly thin snakes of clay for the stems. Lay them onto the egg base, connecting your leaves and flower, curving them gently to create movement. -
Sculpt Buds and Sprigs:
Add small teardrop shapes for closed flower buds and tiny spheres for filler flowers. Cluster these near the top and bottom of the composition to balance the design. -
Secure the Elements:
Ensure every added piece is firmly pressed onto the base. If using air-dry clay, a tiny dab of water acts as glue; for polymer, liquid clay (translucent) works best to secure the bonds.
Cracking Clay?
If air-dry clay cracks while drying, fill the gap with a wet slip made of clay and water, smooth it over, and let it dry again slowly.
Step 3: Painting and Finishing
-
Dry or Bake:
Allow your piece to dry completely (24-48 hours for air-dry clay) or bake it according to the manufacturer’s instructions for your specific brand of polymer clay. -
Base Coat the Leaves:
Using a fine detail brush, paint the leaves with sage green. For variety, mix a little white into the green for some leaves to create a lighter, softer shade. -
Paint the Blooms:
Paint the central flower petals in a soft pastel pink. Use a slightly darker pink for the closed buds to add depth to the color palette. -
Add White Accents:
Carefully paint the decorative sprigs and filler flowers with pure white acrylic. This creates a crisp contrast against the slightly off-white textured background. -
Apply Gold Detail:
Dip the very tip of a small brush or a ball tool into gold paint. Add a dot to the center of the main flower and subtle accents to the tips of the white sprigs. -
Seal the Project:
Once all paint is fully dry, apply a coat of clear matte varnish. This protects the intricate clay work and gives the piece a unified, professional finish.
Display your handcrafted botanical egg on a shelf or attach a hanger to the back for a lovely wall accent
Stamped Word Easter Eggs
Capture the spirit of the season with these minimalist, hand-stamped clay egg ornaments. With their organic shape, bright pops of color, and rustic twine hanger, they make charming additions to Easter branches or thoughtful gift toppers.
Step-by-Step Guide
Materials
- White polymer clay or fondant-style air-dry clay
- Rolling pin
- Oval cookie cutter (egg-shaped) or sharp craft knife
- Small alphabet stamps
- Fine-point paintbrush
- Acrylic paint (Red and Green)
- Small bowl of water
- Paper towel
- Plastic straw (for the hole)
- Red-and-white baker’s twine or string
- Sandpaper (fine grit, optional)
- Parchment paper or smooth work mat
Step 1: Shaping and Stamping
-
Condition the clay:
Begin by warming a small handful of white clay in your hands until it becomes soft and pliable. This conditioning step prevents cracks from forming later on. -
Roll it out:
Place your clay on a sheet of parchment paper or a smooth mat. Roll it out evenly until it is approximately 1/4 inch thick. You want it substantial enough to hold the stamp impression without getting too thin. -
Cut the egg shape:
Press your egg-shaped cookie cutter firmly into the clay. If you don’t have a cutter, you can hand-cut an oval shape using a craft knife and a paper template for guidance. -
Smooth the edges:
Dip your finger in a tiny bit of water and gently run it along the cut edges of the clay oval to smooth out any roughness or stray bits. -
Stamp the word:
Select the letters J, O, and Y from your stamp set. Carefully press each letter into the center of the egg. I prefer to start with the ‘O’ in the middle to ensure the word is perfectly centered, then add the ‘J’ and ‘Y’. -
Create decorative dots:
Using a tool with a small, round tip—like the back of a paintbrush or a large stylistic dotting tool—press a line of five evenly spaced divots just below the word ‘JOY’. -
Add a hanging hole:
Take a plastic straw or a small round cutter and press it near the top center of the egg to create a clean hole for the twine. -
Let it cure:
If using polymer clay, bake according to the package instructions (usually around 275°F for 15-30 minutes). If using air-dry clay, allow it to sit undisturbed for 24-48 hours until fully hard and white.
Step 2: Painting and Finishing
-
Sand imperfections:
Once the clay is fully hardened and cool, check the edges. If there are any sharp spots, very lightly buff them away with fine-grit sandpaper. -
Paint the letters:
Dip a fine-point brush into red acrylic paint. Carefully fill in the impressed letters ‘J-O-Y’. Don’t worry if you get a little paint outside the lines; we can clean it up. -
Wipe excess paint:
Immediately after painting the letters, dampen a paper towel slightly and gently wipe across the surface. The paint will stay deep in the impressed letters, but the surface clay will be wiped clean. -
Paint the dots:
Using a clean fine brush or a toothpick, fill the five small divots below the word with dark green paint. Use the same wipe-back technique if necessary to keep the edges crisp. -
Add the bottom stripe:
Mix a slightly lighter green if desired, or stick with the dark green. Paint a thick curve along the very bottom edge of the egg. -
Layer the red stripe:
Paint a curved red stripe directly above the green one, following the contour of the egg shape. Let the paint dry completely. -
Attach the twine:
Cut a length of red-and-white baker’s twine, about 8 inches long. Thread it through the hole at the top. -
Secure the loop:
Tie the ends of the twine securely in a knot to create a loop for hanging your ornament.
Stamp Stuck?
If your stamps are sticking to the raw clay and pulling it up, dust the stamp face lightly with cornstarch or dip it in water before pressing down.
Clean Lines Hack
For the painted stripes at the bottom, use thin washi tape or painter’s tape to mask off the areas. This ensures your red and green lines are crisp and professional.
Hang these charming little tokens on a branch or tuck them into a basket for a festive handmade touch this spring

TRACK YOUR CERAMIC JOURNEY
Capture glaze tests, firing details, and creative progress—all in one simple printable. Make your projects easier to repeat and improve.
Bunny and Egg Shelf Sitters
Bring a touch of modern farmhouse charm to your Easter decor with these sleek, minimalist clay bunnies. Their simple geometric shapes and matte finish make them a timeless addition to any shelf or mantelpiece.
Step-by-Step Tutorial
Materials
- Air-dry clay (white or off-white)
- Acrylic rolling pin
- Small bowl of water
- Clay knife or craft knife
- Fine-grit sandpaper (220-400 grit)
- Black acrylic paint
- Fine detail paintbrush (size 00 or 000)
- Toothpicks or thin wooden skewers
- Clear matte sealant spray
- Old toothbrush (for texturing)
Step 1: Shaping the Bodies
-
Prepare Clay Portions:
Start by kneading your air-dry clay until it is warm and pliable. Divide the clay into three equal portions for the bodies, roughly the size of a large tangerine each. -
Form the Base:
Roll each portion into a smooth ball between your palms to remove any major seams or cracks. Then, gently taper the top half to create a rounded cone or teardrop shape. -
Flatten the Bottom:
Press the wider bottom of the cone firmly onto your work surface. Tap it gently to ensure it stands completely flat and stable without wobbling. -
Create Heads:
Take three smaller portions of clay, slightly smaller than a ping-pong ball. Roll these into perfect spheres. -
Attach Heads to Bodies:
Insert a half-length toothpick into the top center of each body cone. Score the clay around the toothpick and add a drop of water or slip. -
Secure the Connection:
Press the head spheres onto the toothpicks so they sit flush against the body. Smooth the join slightly with your finger or leave it distinct depending on your preference; I like to leave a visible ‘neck’ seam for that wooden-toy look.
Seamless Joining
Always use the “score and slip” method (scratching both surfaces and adding water) when attaching clay pieces. This prevents ears from falling off once the clay shrinks during drying.
Step 2: Ears and Details
-
Shape the Ears:
Roll out six small sausage shapes of clay, about 1.5 to 2 inches long. Flat them slightly with your thumb to create the classic long bunny ear shape. -
Refine Ear Tips:
Pinch one end of each ear to round it off, and tap the bottom end flat where it will attach to the head. -
Attach Ears:
Score the top of the heads and the bottom of the ears. Use a tiny bit of water to adhere the ears to the head. You can pose them straight up or angled slightly for personality. -
Blend the Seams:
Use a clay modeling tool or your finger to gently drag clay from the base of the ear down onto the head to secure them firmly. -
Add Texture:
To mimic the stone-like look in the photo, lightly tap the wet clay surface with a stiff toothbrush or a crumpled ball of aluminum foil. This removes the plastic-like sheen. -
Drying Phase:
Let the bunnies dry completely in a cool, dry place. This usually takes 24-48 hours. Rotate them occasionally so the bottoms dry evenly.
Make a Tiny Tray
Use your leftover clay to form a shallow, round dish. Sand it smooth and paint it a warm beige to hold your dyed eggs alongside the bunny trio.
Step 3: Finishing Touches
-
Sand Imperfections:
Once fully dry, use fine-grit sandpaper to gently smooth out any fingerprints or rough ridges, paying attention to the ears. -
Dust Clean:
Wipe the bunnies down with a slightly damp cloth or a dry soft brush to remove all sanding dust. -
Paint the Face:
Using a very fine detail brush and black acrylic paint, add two small dots for eyes widely spaced apart. -
Add Nose and Mouth:
Paint a tiny ‘x’ or a small upside-down ‘y’ shape between the eyes for the nose and mouth. Keep the lines very thin for a delicate expression. -
Speckle Effect (Optional):
If you want the speckled ceramic look, dilute a tiny bit of brown paint with water. Dip a toothbrush in it and flick the bristles with your thumb to mist tiny specks over the bunnies. -
Seal:
Finish by spraying the bunnies with a clear matte sealant. This protects the clay and keeps the paint from chipping over time.
Arranging these little figures together creates an instant centerpiece that feels modern yet festive