If you’ve got a block of air-dry clay and a free afternoon, you’re already halfway to something cute and useful. These easy air clay ideas are my go-to projects when you want a quick win without fancy tools or a kiln.
Ring Cone Holder
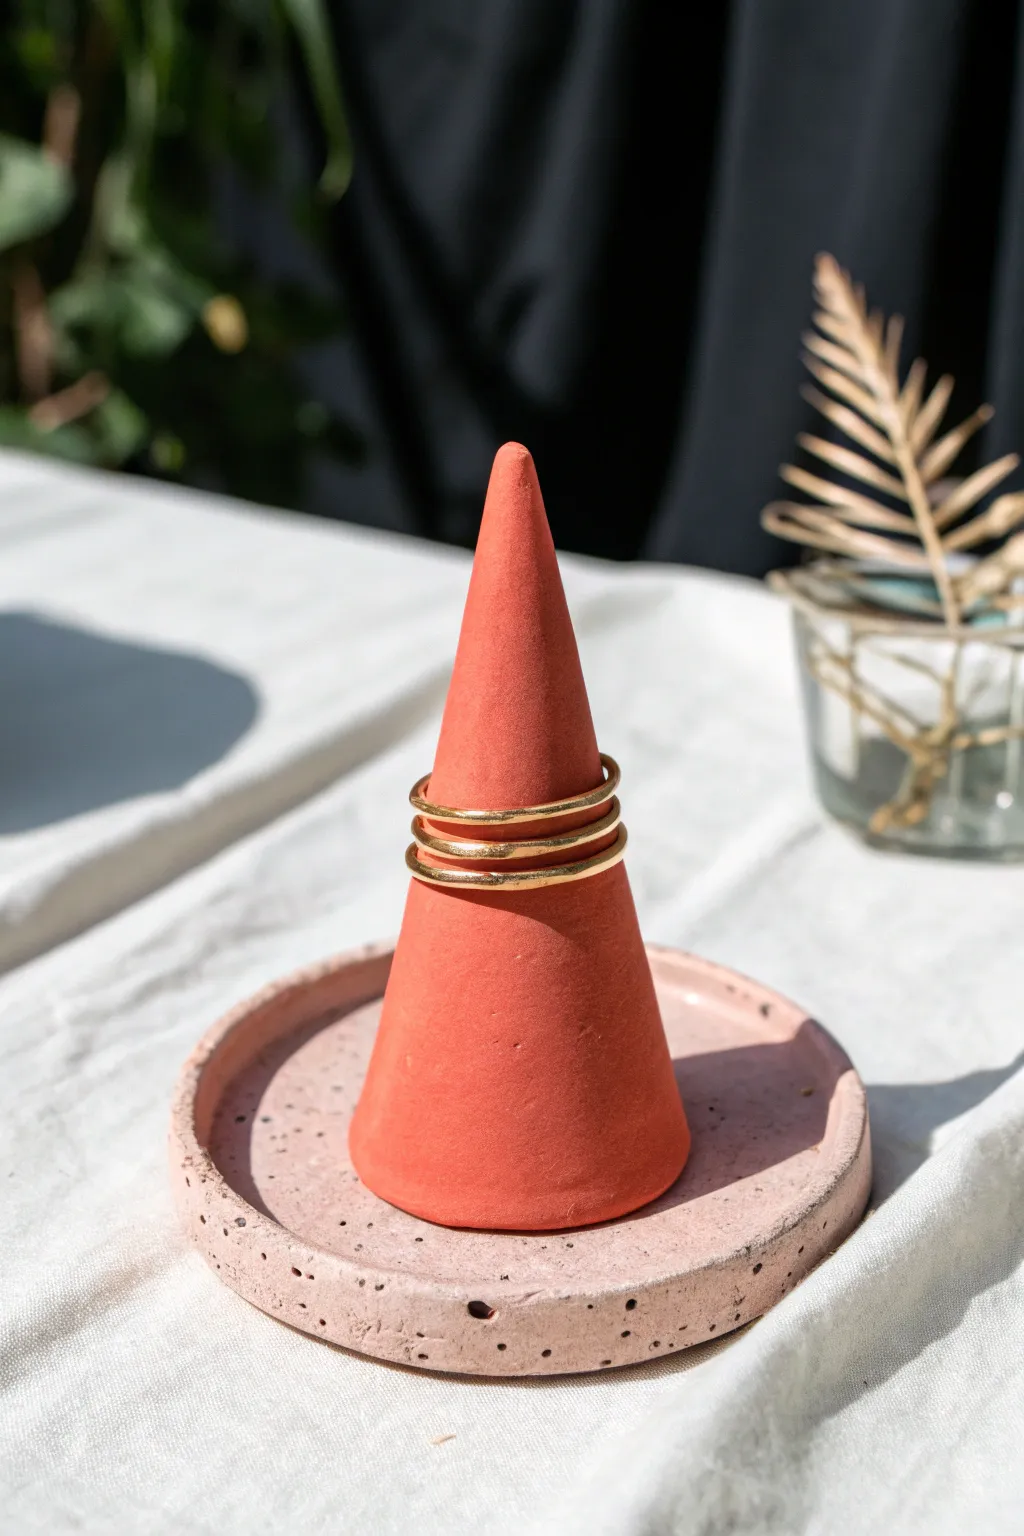
This chic organizer combines a vibrant terracotta cone with a speckled blush tray for a modern, two-tone look. It is an approachable project that creates a convenient spot for stacking rings while adding a pop of earthy color to your dresser.
Detailed Instructions
Materials
- Air-dry clay
- Acrylic paint (Terracotta/burnt orange, pale pink, black/dark brown)
- Rolling pin or smooth glass jar
- Clay knife or craft blade
- Small bowl or round cookie cutter (approx. 3-4 inches)
- Sandpaper (fine grit)
- Paintbrushes (flat and fine tip)
- Water cup
- Clear matte varnish (optional)
Step 1: Shaping the Cone
-
Form the base shape:
Start with a ball of air-dry clay about the size of a golf ball. Roll it between your palms until it is smooth and free of major cracks. -
Roll into a cone:
Place the ball on your work surface. Using the flat of your palm, roll the clay back and forth while applying more pressure to one side to naturally form a tapered cone shape. -
Refine the height:
Stand the cone up and gently tap the base against the table to flatten it. Use your fingers to smooth the sides upward, elongating the tip until it looks sharp and elegant. -
Smooth the surface:
Dip your finger in a little water and run it over the clay to erase fingerprints. Set the finished cone aside to begin drying.
Smooth Operator
Does your cone have stubborn cracks? Fill them with a slip made from wet clay scrapings and water, then smooth over.
Step 2: Creating the Speckled Dish
-
Roll the slab:
Take a larger portion of clay and roll it out flat until it is about 1/4 inch thick. Aim for an even thickness throughout. -
Cut the circle:
Use a round cookie cutter or place a small bowl upside down on the clay as a template. Cut around it with your craft knife to get a perfect circle. -
Create the rim:
Gently pinch the outer edge of the circle upwards to create a slight lip. I like to smooth this raised edge with a wet finger to keep it soft and organic rather than sharp. -
Dry completely:
Allow both the cone and the dish to dry for 24-48 hours. Turn the dish over halfway through this time to ensure the bottom dries evenly. -
Sand for finish:
Once bone dry, lightly sand any rough edges or uneven spots on both pieces with fine-grit sandpaper. Wipe away the dust with a barely damp cloth.
Golden Rim
Add a luxe touch by painting the very top rim of the pink dish with metallic gold leaf paint or a gold paint pen.
Step 3: Painting & Assembly
-
Paint the cone:
Mix a terracotta shade using burnt orange and a touch of brown. Apply two coats to the cone, letting the first coat dry fully before adding the second. -
Paint the dish base:
Paint the circular dish with a pale blush pink acrylic paint. You may need multiple thin layers to get opaque coverage. -
Apply the speckles:
Dilute a small amount of dark brown or black paint with water. Dip an old toothbrush or stiff brush into it. -
Flick the paint:
Hold the brush over the pink dish and run your thumb across the bristles to flick tiny speckles onto the surface. Practice on a paper towel first to control the spray. -
Check fit:
Place the cone in the center of the dish without gluing just to check the proportions. Step back and ensure you like the color contrast. -
Glue together:
Apply a generous dab of strong craft glue or heavy-gel medium to the bottom of the cone. -
Secure the pieces:
Press the cone firmly into the center of the dish. Wipe away any excess glue that squeezes out immediately. -
Seal the piece:
Once the glue is dry, coat the entire project with a matte clear varnish to protect the paint and give it a finished, professional look.
Now you have a stylish and functional display piece ready to hold your favorite jewelry


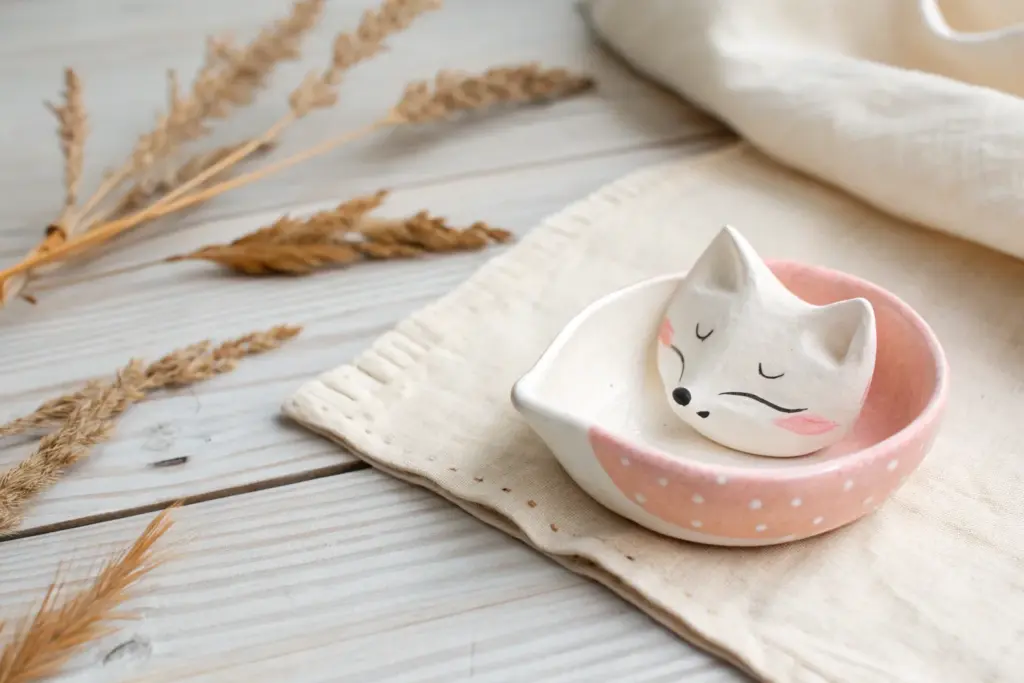
Easy Animal Minis

These charming miniature animals—a polka-dot bear, a heart-bellied chick, and a sleepy cat—are perfect beginner projects that bring instant cheer to any shelf. Their minimalist white shapes with soft pink accents evoke a clean, modern aesthetic that feels effortless yet handcrafted.
Step-by-Step
Materials
- White air-dry clay (smooth texture recommended)
- Acrylic paints (pale pink, coral pink, orange, brown, black)
- Fine detail paintbrush (size 0 or 00)
- Dotting tools or toothpicks
- Small cup of water
- Parchment paper or silicone mat
- Matte finish sealant (optional)
Step 1: Sculpting the Bear
-
Shape the Base:
Start by rolling a ball of white clay about the size of a golf ball or slightly smaller. Gently roll it into a soft egg shape, flattening the bottom so it stands securely on its own. -
Add Ears:
Pinch two very small amounts of clay from your supply. Roll them into tiny balls and press them onto the top left and right sides of the head. Use a little water to smooth the seams so the ears look seamless. -
Form the Arms:
Create two small elongated ovals for the arms. Attach them flush against the sides of the body, pointing downwards. I find blending the clay at the shoulder connection helps them stay put as it dries. -
Refine the Shape:
Smooth out any fingerprints with a slightly damp finger. Ensure the silhouette is round and chubby rather than tall and thin.
Smooth Operator
Keep a small bowl of water nearby. Dip your finger in and gently rub the raw clay to erase fingerprints before drying for a professional, porcelain-like finish.
Step 2: Sculpting the Chick
-
Create the Body:
Roll another portion of clay similar in size to the bear. Form a smooth, rounded cone shape with a flat bottom—think of a very soft triangle. -
Add Pointed Ears:
Instead of separate balls, pinch the top left and right corners of the head gently to pull up two small, pointed triangle ears directly from the main body mass. -
Attach the Beak:
Roll a minuscule, tiny sphere of clay for the beak. Press it right into the center of the face area. Don’t worry about color yet; we will paint it later. -
Add Wings:
Shape two small, flat teardrops. Attach them to the sides of the body, pressing them flat so they hug the curve of the chick.
Make it Functional
Before the clay dries, use a knife to slice a thin slit across the top of the bear or chick. Now you have an adorable photo holder or place card stand.
Step 3: Sculpting the Cat
-
Form the Sitting Body:
Roll a ball slightly smaller than the other two figures. Press it down to create a rounded gumdrop shape. -
Add Ears and Paws:
Pinch two sharp, triangular ears at the top of the head. For the paws, roll two tiny balls and press them at the bottom front of the figure to suggest it is crouching. -
The Tail:
Roll a small snake of clay and curve it around the side or back of the cat, blending it into the main body so it looks tucked in. -
Dry Completely:
Set all three figures on parchment paper in a cool, dry place. Let them dry for at least 24-48 hours until they are hard and room temperature to the touch.
Step 4: Painting & Details
-
Bear: Pink Dots:
Dip the back of a paintbrush or a dotting tool into pale pink acrylic paint. create a pattern of polka dots on the bear’s tummy. -
Bear: Face:
Use a toothpick or fine brush to paint the inner ears pink. Paint a small brown nose and mouth, and two simple black dots for eyes. -
Chick: Heart & Cheeks:
Paint an upside-down tear drop or heart shape in the center of the chick’s belly using coral pink. Add two round pink circles for blush on the cheeks. -
Chick: Beak & Eyes:
Carefully paint the beak orange. With your finest brush or toothpick, add two black eyes wide apart. -
Cat: Whiskers & Nose:
Paint a tiny pink nose in the center. Using a very steady hand and the finest brush, draw three thin black whiskers on each cheek and two small eye dots. -
Finishing Touches:
Let the paint dry completely. If you want to protect your work, apply a thin layer of matte varnish, distinct from glossy, to keep that natural ceramic look.
Now arrange your trio together near a window or plant for a cozy little vignette


Whale Phone Stand
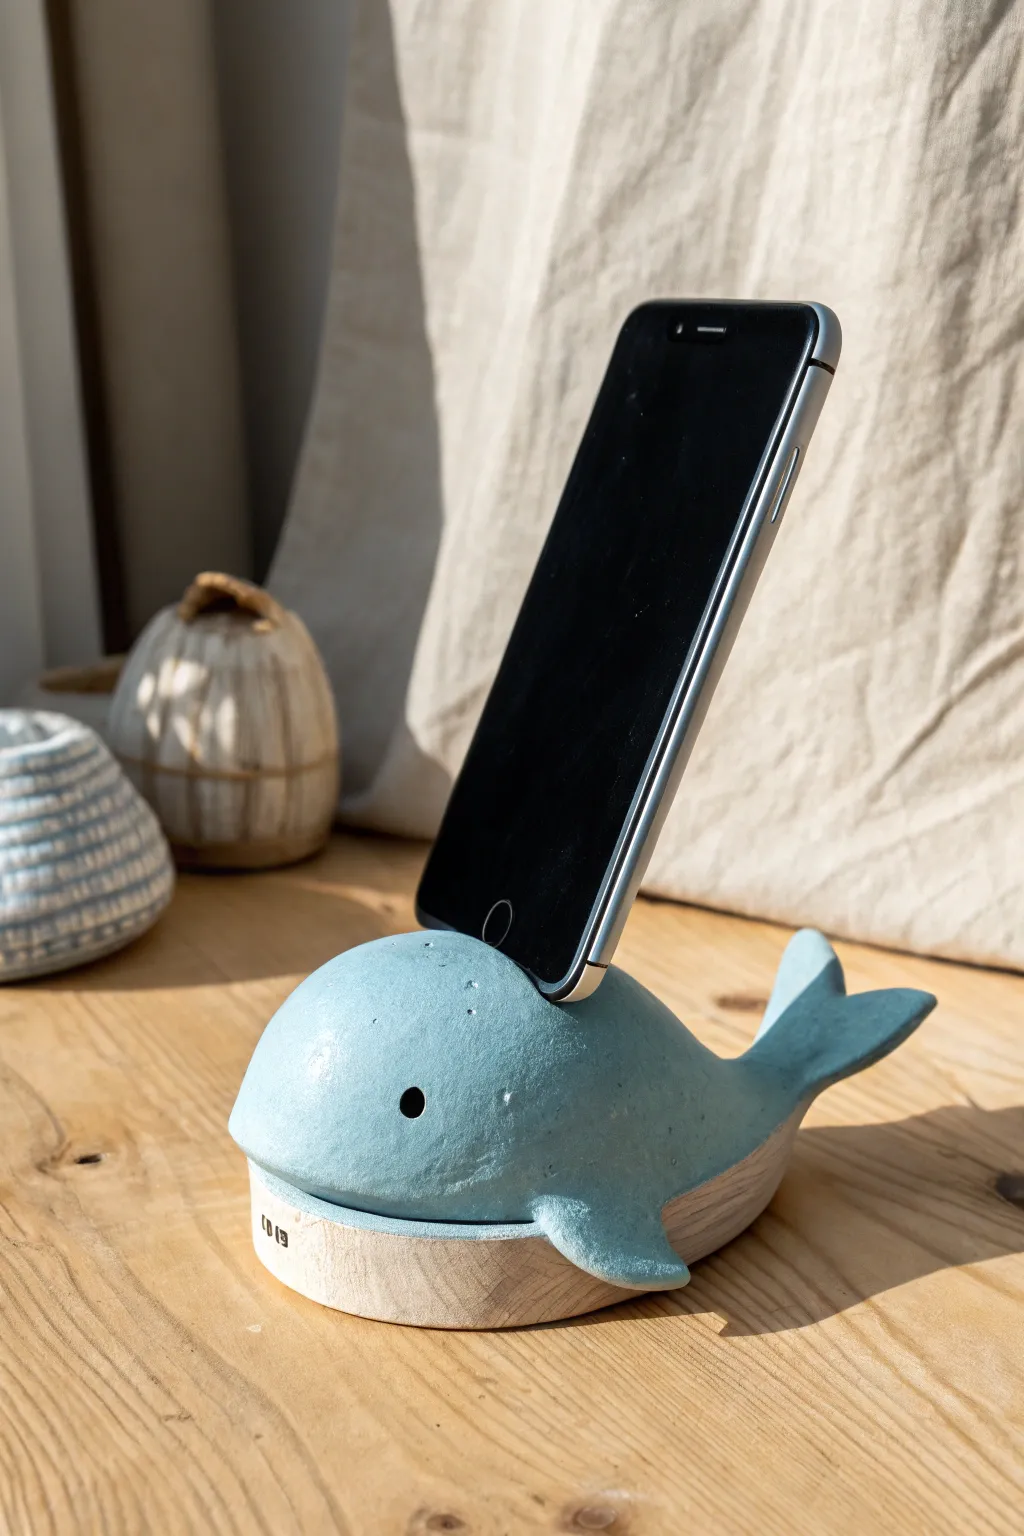
This charming project combines functionality with seaside whimsy, featuring a gentle blue whale that holds your phone securely on its back. The textured, matte finish gives it a lovely handcrafted feel, while the sturdy base ensures your device stays put.
Step-by-Step Guide
Materials
- Air-dry clay (stone effect or standard white)
- Acrylic paint (light baby blue, white)
- Wooden base oval or thick cardboard
- Sandpaper (medium and fine grit)
- Sculpting tools or a butter knife
- Rolling pin
- Craft glue or strong adhesive
- Black fine-tip marker or black paint
- Clear matte varnish
- Water cup and sponge
Step 1: Prepping the Base
-
Shape the foundation:
Start by creating the base. You can either use a pre-cut oval piece of wood about 4 inches long, or sculpt an oval slab from clay that is about half an inch thick. -
Smooth the edges:
If using clay for the base, ensure the sides are flat and vertical, not rounded. Use a wet finger to smooth out any cracks on the surface. -
Let it cure:
Allow this base piece to dry completely before moving on so it can support the weight of the whale body without warping. This usually takes 24 hours.
Shrinkage Check
Make the slot about 10-15% wider than your phone actually requires. Air-dry clay shrinks noticeably, and a too-tight fit is heartbreaking.
Step 2: Sculpting the Whale
-
Form the body:
Take a large lump of clay, roughly the size of a tennis ball, and roll it into a smooth sphere. Gently elongate one side to start forming a teardrop shape. -
Flatten the bottom:
Press the rounded shape onto a flat surface to create a flat bottom. This flat area needs to match the size of your prepared base. -
Create the slot:
This is the crucial functional step. While the clay is soft, take your phone (wrapped loosely in plastic wrap to protect it) and press it firmly into the back of the whale shape. Create a groove deep enough to hold the phone securely at a slight angle. -
Widen slightly:
Remove the phone and use a sculpting tool or knife to widen the slot just a fraction. Clay shrinks as it dries, and you don’t want the slot to become too tight. -
Shape the tail:
Roll a smaller coil of clay and flatten the end into a fluke (tail) shape. Cut a small notch in the center of the fluke for realism. -
Attach the tail:
Score the back end of the body and the base of the tail with hatch marks. Add a dab of water or liquid clay (slip) and press the tail firmly onto the rear of the body, angling it upwards. -
Add fins:
Shape two small triangles for the side fins. Attach them near the bottom of the body on either side using the same scoring and slipping method. Smooth the seams so they look like one continuous piece. -
Refine the texture:
Instead of smoothing everything perfectly, I like to dab the surface gently with a damp sponge to give it that organic, slightly pitted texture seen in the photo. -
Poke the eye:
Use the rounded end of a paintbrush handle to press a distinct indentation for the whale’s eye on the side of the head. -
Add blowhole details:
Using a needle tool or toothpick, prick a few tiny holes on the top of the head to represent the blowhole area.
Make a Splash
Add a tiny spout of ‘water’ coming from the blowhole using stiff wire painted white, or use white paint to splatter tiny sea foam dots on the tail.
Step 3: Assembly and Finish
-
Dry thoroughly:
Let the whale sculpture dry completely. This is a thick piece, so give it at least 48 to 72 hours in a dry, ventilated area. Flip it occasionally if needed. -
Sand for stability:
Once dry, lightly sand the bottom of the whale creating a perfectly flat surface for gluing. -
Painting the whale:
Mix a soft, powdery baby blue acrylic paint. Apply two coats to the whale’s body, letting it dry in between. Avoid painting the very bottom surface. -
Define the eye:
Use a fine-tip black marker or a tiny brush with black paint to fill in the eye indentation, making it pop against the blue. -
Assemble the pieces:
Apply a strong crafting adhesive to the top of your base and the bottom of the painted whale. Press them together firmly and let the glue set. -
Optional wood detail:
If you used a clay base, you can paint the rim with a beige or light brown wash to mimic the look of light wood. -
Seal the deal:
Finish with a coat of matte varnish over the entire piece to protect the paint and give it a professional, finished look.
Place this friendly whale on your desk for a helper that always makes a splash


Minimal Photo Holder
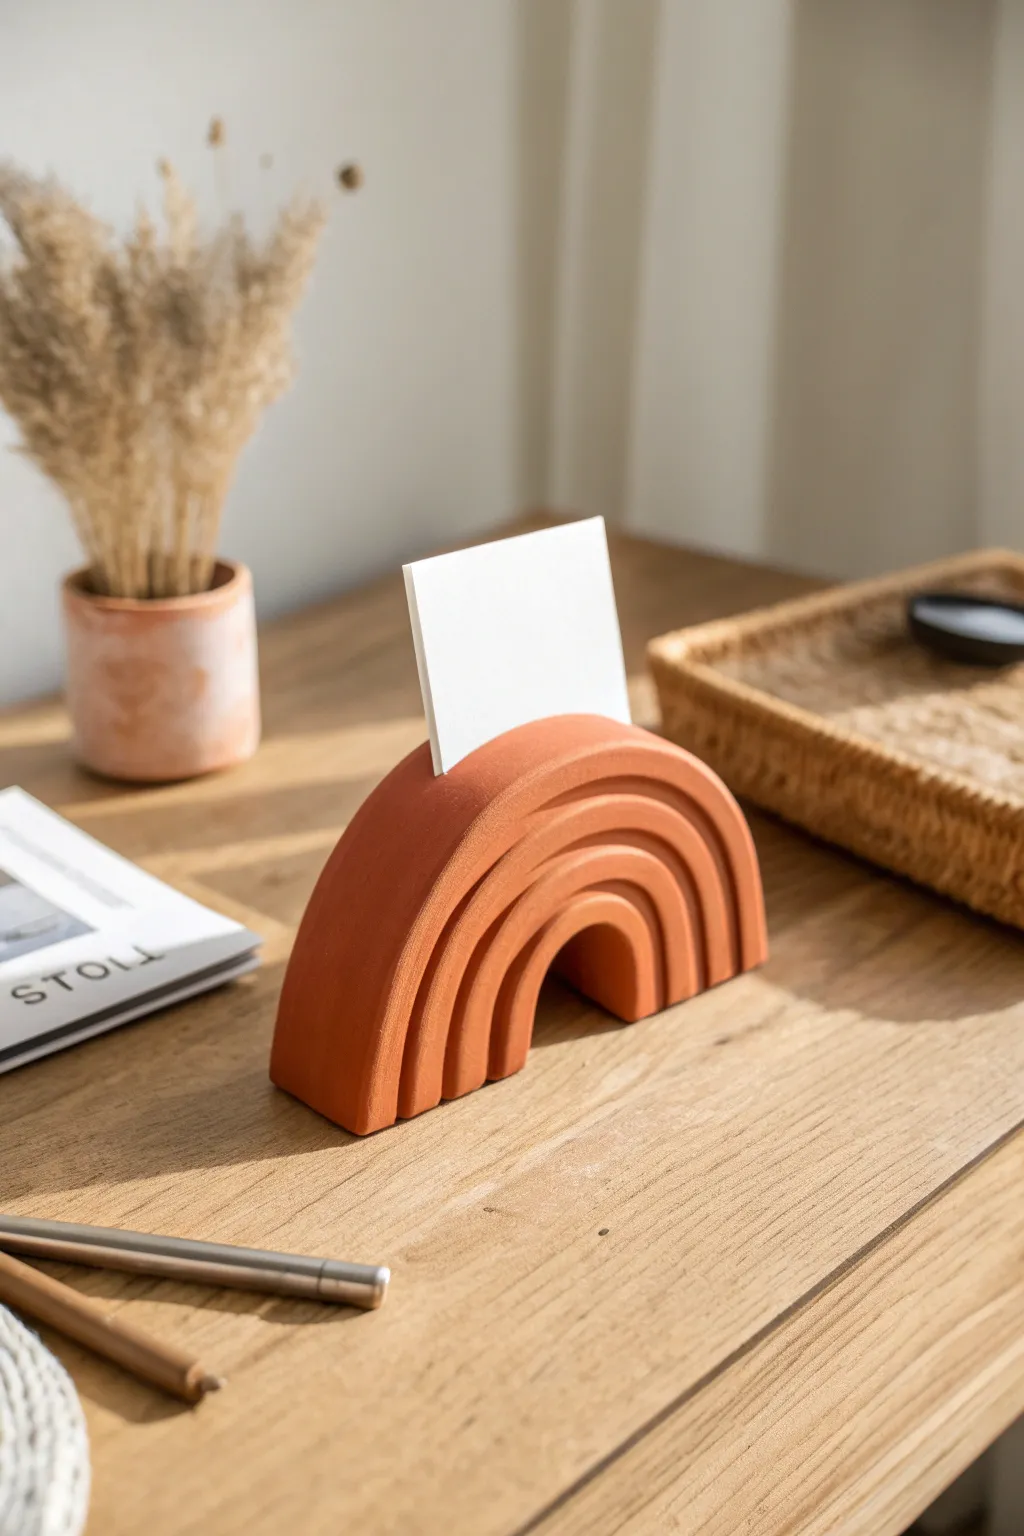
Bring a touch of modern desert warmth to your desk with this minimalist photo holder. Its clean arch shape and textured ridges mimic a stylized rainbow, all finished in a gorgeous matte terracotta hue.
How-To Guide
Materials
- Air dry clay (white or terracotta colored)
- Acrylic rolling pin
- Sharp craft knife or clay blade
- Ruler
- Flexible clay rib or old credit card
- Small bowl of water
- Sponge
- Terracotta acrylic paint (if using white clay)
- Matte sealant spray or varnish
- Paintbrush
- Sandpaper (fine grit)
Step 1: Shaping the Base Arch
-
Condition the Clay:
Start by grabbing a generous chunk of air dry clay. Knead it thoroughly in your hands until it feels warm, pliable, and free of any air bubbles. If it feels too stiff, dip your fingers in water and work the moisture in. -
Roll a Slab:
Place the clay on a smooth work surface. Use your acrylic rolling pin to roll it out into a thick slab, aiming for a consistent thickness of about 1 inch. This thickness gives the holder enough weight to stay stable. -
Cut the Rectangle:
Using your sharp craft knife and a ruler, cut a clean rectangle from the slab. The size depends on how big you want your final holder, but a standard size is roughly 4 inches wide and 2.5 inches tall. -
Create the Arch:
Freehand sketch a semi-circle arch shape onto one long side of the rectangle to guide your cut. Use your knife to slice away the excess clay, creating the smooth, curved top of the rainbow. -
Cut the Tunnel:
To make the negative space at the bottom, use a small round cutter or carefully carve out a smaller arch from the bottom center of the block. This transforms the solid block into a true bridge or rainbow shape. -
Smooth the Edges:
Dip your finger or a sponge into a little water and run it over all the cut edges. You want to soften the sharpness of the knife cuts so the final piece looks molded rather than sliced.
Step 2: Adding Texture and Detail
-
Mark the Ridges:
Using a needle tool or the back of your knife, very lightly sketch where the rainbow bands will go on the front and back faces of the arch. Keep the spacing even. -
Carve the Grooves:
Using a loop tool or a U-shaped carving tool, carefully carve out the grooves between the bands. Go slowly and maintain a consistent depth. I find it helpful to brace my hand against the table for better control during this step. -
Refine the Grooves:
Once the main channels are carved, use a damp paintbrush to smooth inside the grooves. This removes stray clay crumbs and polishes the recessed areas without removing the texture. -
Create the Card Slot:
On the very top center of the arch, use your craft knife to cut a slit straight down. It should be about 0.5 to 0.75 inches deep. Wiggle the blade slightly to widen the gap just enough to fit a thick piece of cardstock. -
Final Smoothing:
Give the entire piece one last look. Use your flexible rib or wet sponge to blend any unintentional fingerprints or blemishes on the flat sides.
Smooth Cut Trick
Before cutting the card slot, let the clay dry for about an hour until it’s ‘leather hard.’ This prevents the knife from squishing the arch shape.
Step 3: Finishing Touches
-
Let it Dry:
Place the holder in a cool, dry spot away from direct sunlight. Let it dry completely for 24-48 hours. Turn it over occasionally so the bottom dries evenly. -
Sand for Smoothness:
Once fully dry and hard, use fine-grit sandpaper to gently sand the flat surfaces. Focus on the bottom and sides to ensure it sits perfectly flat on your desk. -
Apply Paint:
If you didn’t use pre-colored terracotta clay, mix up a burnt orange or terracotta acrylic paint. Apply 2-3 coats, letting each layer dry before adding the next, to get that rich, opaque color seen in the photo. -
Seal the Project:
To protect the finish and give it a professional look, spray the entire piece with a matte sealant. This prevents the paint from chipping and keeps the matte, earthy aesthetic intact.
Make it Speckled
Mix wet coffee grounds or black pepper into your white clay before shaping to create a natural, speckled stone texture without needing to paint it later.
Now you have a stylish spot to display your favorite polaroids or daily reminders

The Complete Guide to Pottery Troubleshooting
Uncover the most common ceramic mistakes—from cracking clay to failed glazes—and learn how to fix them fast.
Cut-Out Wall Hanging
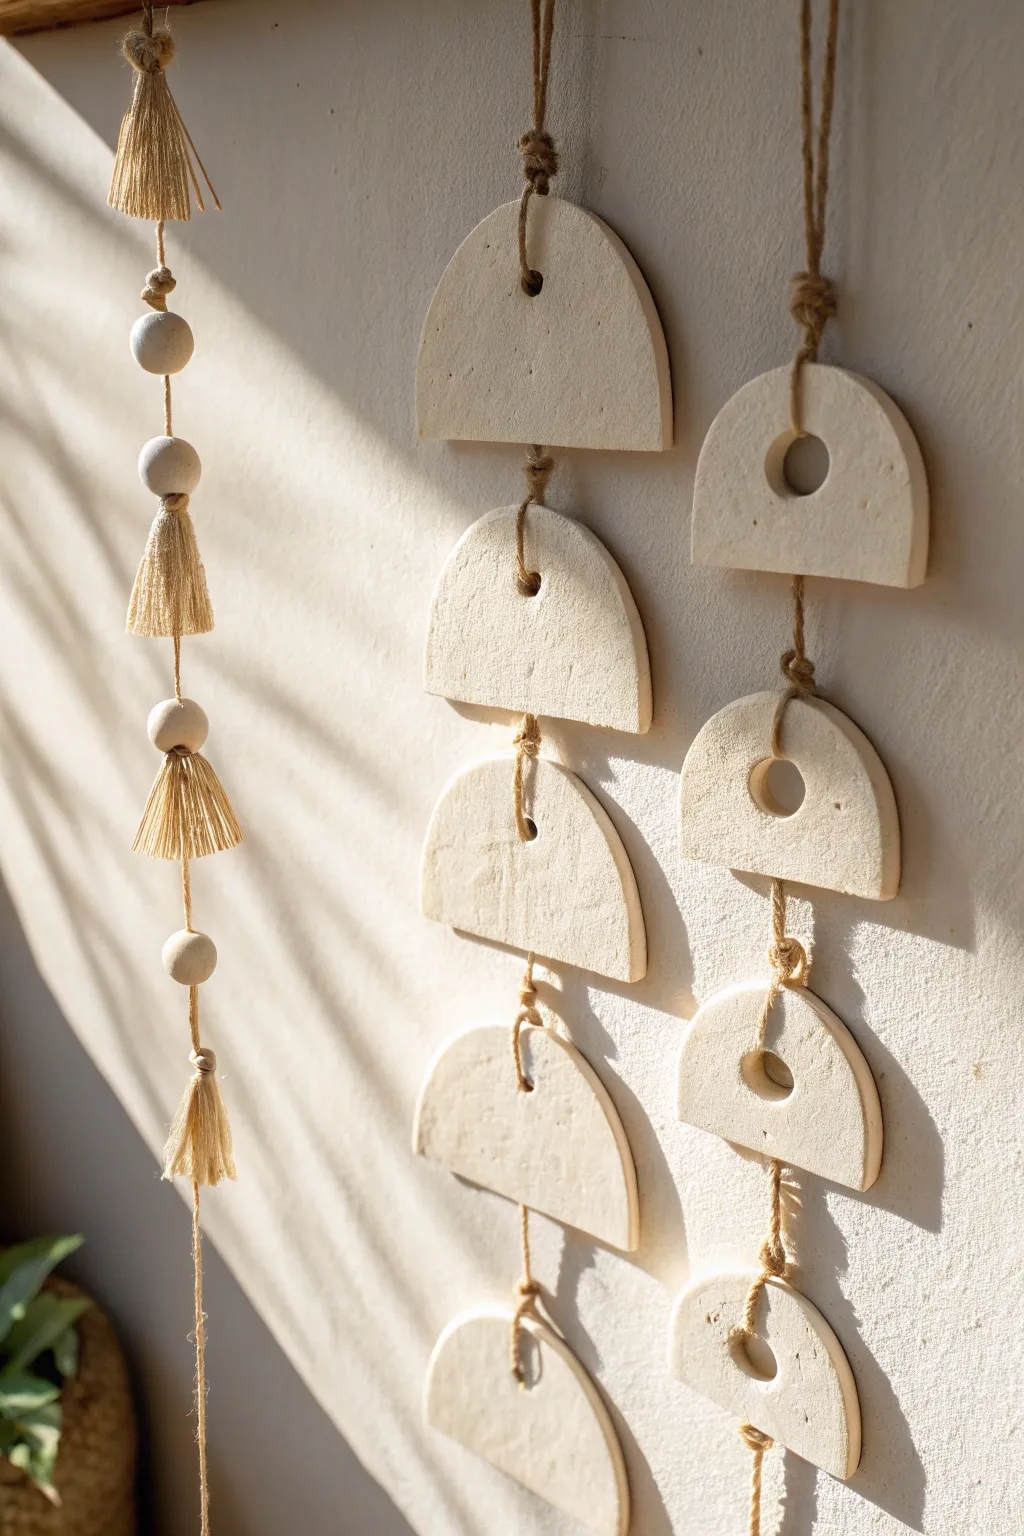
Embrace organic shapes and natural textures with this minimalist clay wall hanging. Featuring soft white semi-circles and rustic jute twine, this project adds a calm, bohemian touch to any vertical space.
Step-by-Step Tutorial
Materials
- White or cream-colored air dry clay
- Rolling pin
- Parchment paper or canvas mat
- Round cookie cutter (approx. 3-4 inches diameter)
- Small round cutter (approx. 0.5-1 inch diameter)
- Sharp craft knife or clay blade
- Jute twine or hemp cord
- Wooden skewers or straws
- Sandpaper (fine grit)
- Scissors
Step 1: Shaping the Clay Elements
-
Prepare your workspace:
Lay down parchment paper or a canvas mat to prevent sticking. Take a large ball of air dry clay and knead it briefly to warm it up and remove any air bubbles. -
Roll out the slab:
Use your rolling pin to flatten the clay to an even thickness of about 1/4 inch. Try to keep the thickness consistent so all pieces dry at the same rate. -
Cut the primary circles:
Press your large round cookie cutter firmly into the clay slab to create several perfect circles. You will need one circle for every two semi-circles you plan to hang. -
Create the semi-circles:
Using a sharp craft knife or clay blade, carefully slice each circle directly down the center to create two equal half-moons. -
Add detail cutouts (optional):
For the variation shown on the right, use the small round cutter to punch a hole in the center of the semi-circle. Positioning strictly by eye adds to the organic charm. -
Punch hanging holes:
For the solid semi-circles, create a small hole near the top center of the straight edge using a skewer. For the cut-out versions, create the hanging hole at the very top of the arch. -
Smooth the edges:
Dip your finger in a little water and gently run it along the cut edges to soften any sharpness or burrs left by the cutters. -
Dry the pieces:
Lay all the pieces flat on a clean sheet of parchment paper. Let them dry for 24-48 hours, flipping them halfway through to ensure the backs dry evenly and don’t curl.
Step 2: Assembly and Finishing
-
Sand for perfection:
Once fully dry and hard, lightly sand the edges with fine-grit sandpaper to remove any remaining rough spots. -
Prepare the main cord:
Cut a long length of jute twine—about twice the length of your desired finished hanging. Fold it in half to create a loop at the top for hanging on the wall. -
Make the top knot:
Tie a secure overhand knot a few inches down from the loop to create defined hanging point. -
Attach the first piece:
Thread one tail of the twine through the hole of your first clay semi-circle. Bring the other tail around, and knot them together securely just below the clay piece. -
Space the tiers:
Currently, the clay pieces need spacing. Tie another bulky knot in the twine about 1-2 inches below the first piece. This knot will act as a ‘stopper’ for the next clay piece to rest on. -
String subsequent pieces:
Slide the next clay shape onto the twine until it hits the stopper knot you just created. I find ensuring the knots are large enough is crucial so the pieces don’t slip over time. -
Secure the final piece:
Continue knotting and stringing until all pieces are attached. Tie a final decorative knot at the very bottom. -
Trim excess:
Cut off any remaining twine below the final knot, leaving a short tail for a rustic look.
Keep it Straight
To prevent clay pieces from curling while drying, place a lightweight book or board on top of them once they are leather-hard (mostly dry but cool to touch).
Natural Texture
Before drying, press a piece of rough linen or canvas onto the wet clay surface. This imitates a stone texture and gives the white surface more depth.
Now you have a stunning, handcrafted piece of decor ready to bring warmth to your walls
Moon Phase Mobile
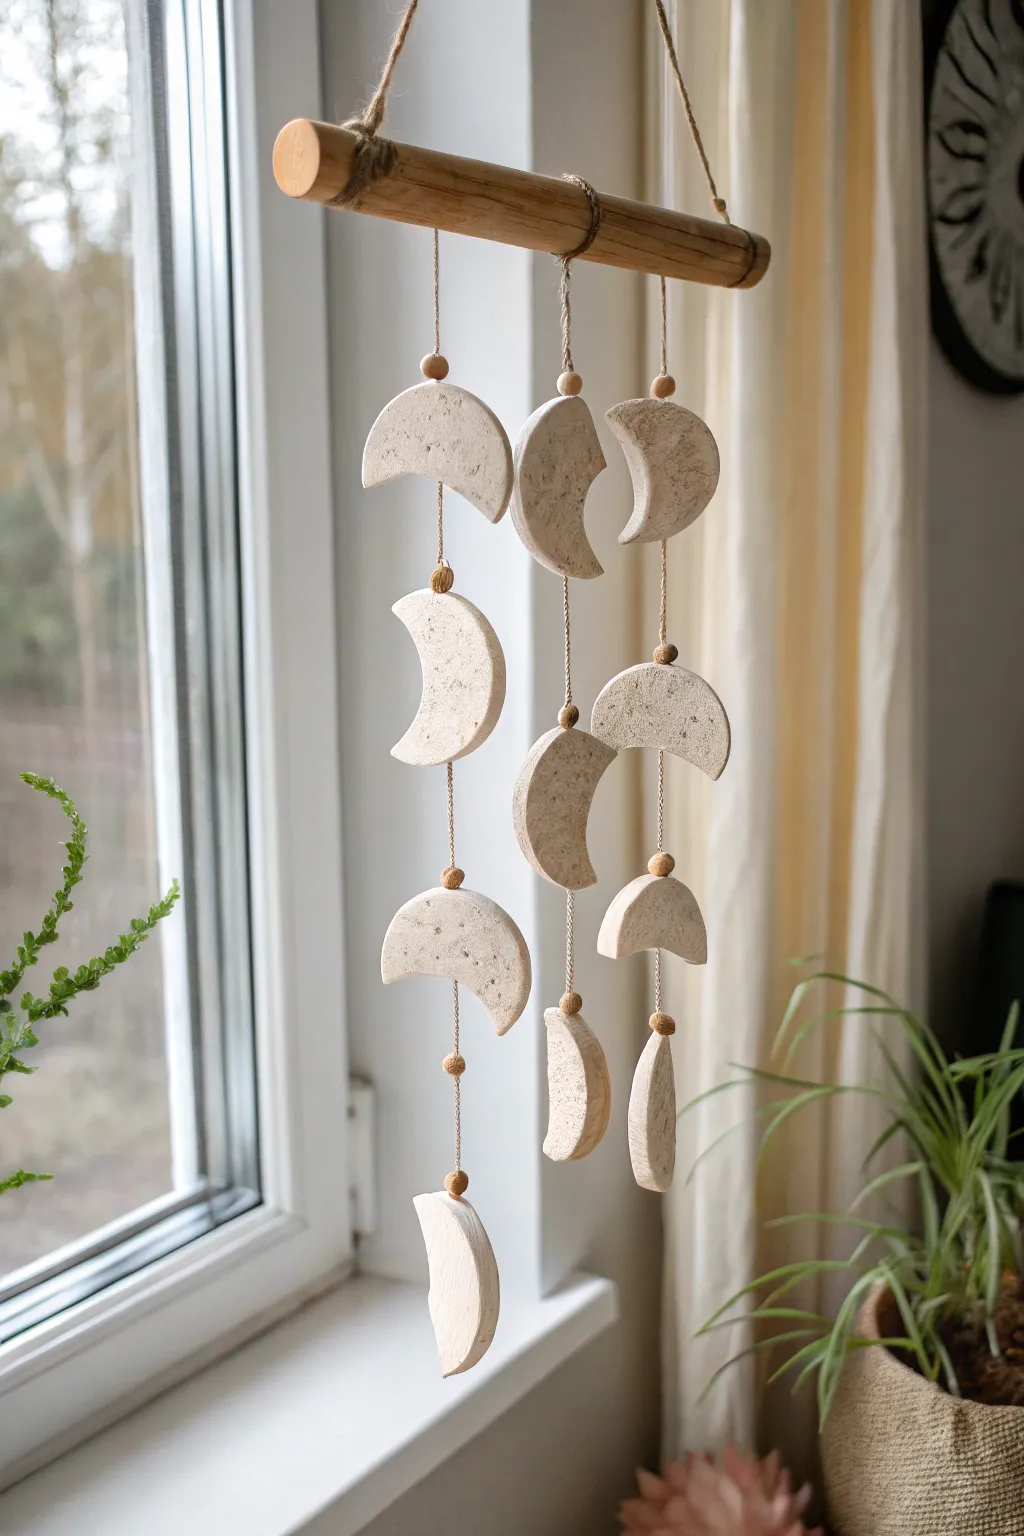
Bring celestial charm into your home with this simple yet stunning moon phase mobile. Using air-dry clay and natural elements, you will create a floating arrangement that captures the magic of the lunar cycle with a rustic, speckled finish.
Step-by-Step Guide
Materials
- White or terracotta air-dry clay
- Rolling pin
- Round cookie cutters (multiple sizes optional)
- Small coffee grounds or dried tea leaves (for texture)
- Wooden dowel or thick branch (approx. 10-12 inches)
- Natural jute twine or cotton cord
- Small wooden beads
- Sanding sponge or fine-grit sandpaper
- Straw or toothpick (for creating holes)
- Scissors
Step 1: Preparing the Clay
-
Texture the clay:
Start by conditioning a large chunk of air-dry clay in your hands until it is pliable. To achieve that dreamy speckled store-bought look seen in the photo, knead in a pinch of dried coffee grounds or tea leaves directly into the clay body. -
Roll it out:
Place the clay on a smooth surface or canvas mat. Use a rolling pin to flatten it to an even thickness of about 1/4 inch. If you are struggling with varying thickness, place two rulers on either side of the clay as guide rails for your rolling pin.
Natural Speckles
Don’t have coffee grounds? Cracked black pepper or dried herbs kneaded into white clay also create beautiful, organic granite-like textures.
Step 2: Shaping the Moons
-
Cut the primary circles:
Use your round cookie cutter to punch out approximately 10-12 full circles. These will serve as the base for all your moon phases. -
Create crescents:
Take a cut circle and position the same cookie cutter internally, offsetting it slightly to slice away a portion of the clay. This will leave you with a crescent shape. Vary the thickness of your cuts to create ‘waxing’ and ‘waning’ shapes. -
Make the holes:
While the clay is still wet, use a straw or toothpick to poke holes in each piece. Most pieces need a hole at the top and bottom to connect them in a chain. The bottom-most pieces only need a single hole at the top. -
Smooth the edges:
Dip your finger in a little water and gently run it along the cut edges of every moon to remove any harsh ridges or burrs left by the cutters. -
Drying time:
Lay all your shapes flat on a wire rack or a piece of parchment paper. Let them dry completely for 24-48 hours, flipping them halfway through to ensure they don’t curl.
Step 3: Refining and Assembly
-
Sand for finish:
Once the moons are bone dry, take your sanding sponge and lightly buff the surfaces and edges. This gives them that professional, smooth stone finish. -
Plan the layout:
Lay out your branch or dowel on a table. Arrange your clay moons below it in three vertical columns to finalize the composition before tying any knots. -
Cut the strings:
Cut three lengths of jute twine. The central string should be the longest, dropping down about 18-20 inches, while the two side strings can be slightly shorter for a staggered look. -
Start threading:
Tie the string first to the wooden dowel. Thread the other end through a wooden bead, slide it up near the dowel, and tie a small knot underneath to hold it in place if needed, or simply let it rest. -
Attach the first moon:
Thread the string through the top hole of your first moon shape. I find it easiest to tie a knot directly onto the clay loop, or knot it underneath the hole so the moon rests on the knot. -
Add beads:
Between each clay section, thread a small wooden bead onto the twine. Secure it with a knot below the bead so it stays positioned halfway between the moon shapes. -
Complete the strands:
Continue this pattern—moon, knot, bead, knot, moon—until you reach the bottom of the strand. Tie a secure double knot at the very end and trim any excess string close to the final moon. -
Hang firmly:
Finally, cut a sturdy piece of twine for the main hanger. Tie each end securely to the outer edges of the wooden dowel, creating a triangle shape for suspension.
Gilded Edges
For a touch of glam, paint the edges of each moon with liquid gold leaf or metallic acrylic paint after the sanding phase.
Hang your new mobile near a sunny window to enjoy the gentle movement and shadows it casts throughout the day