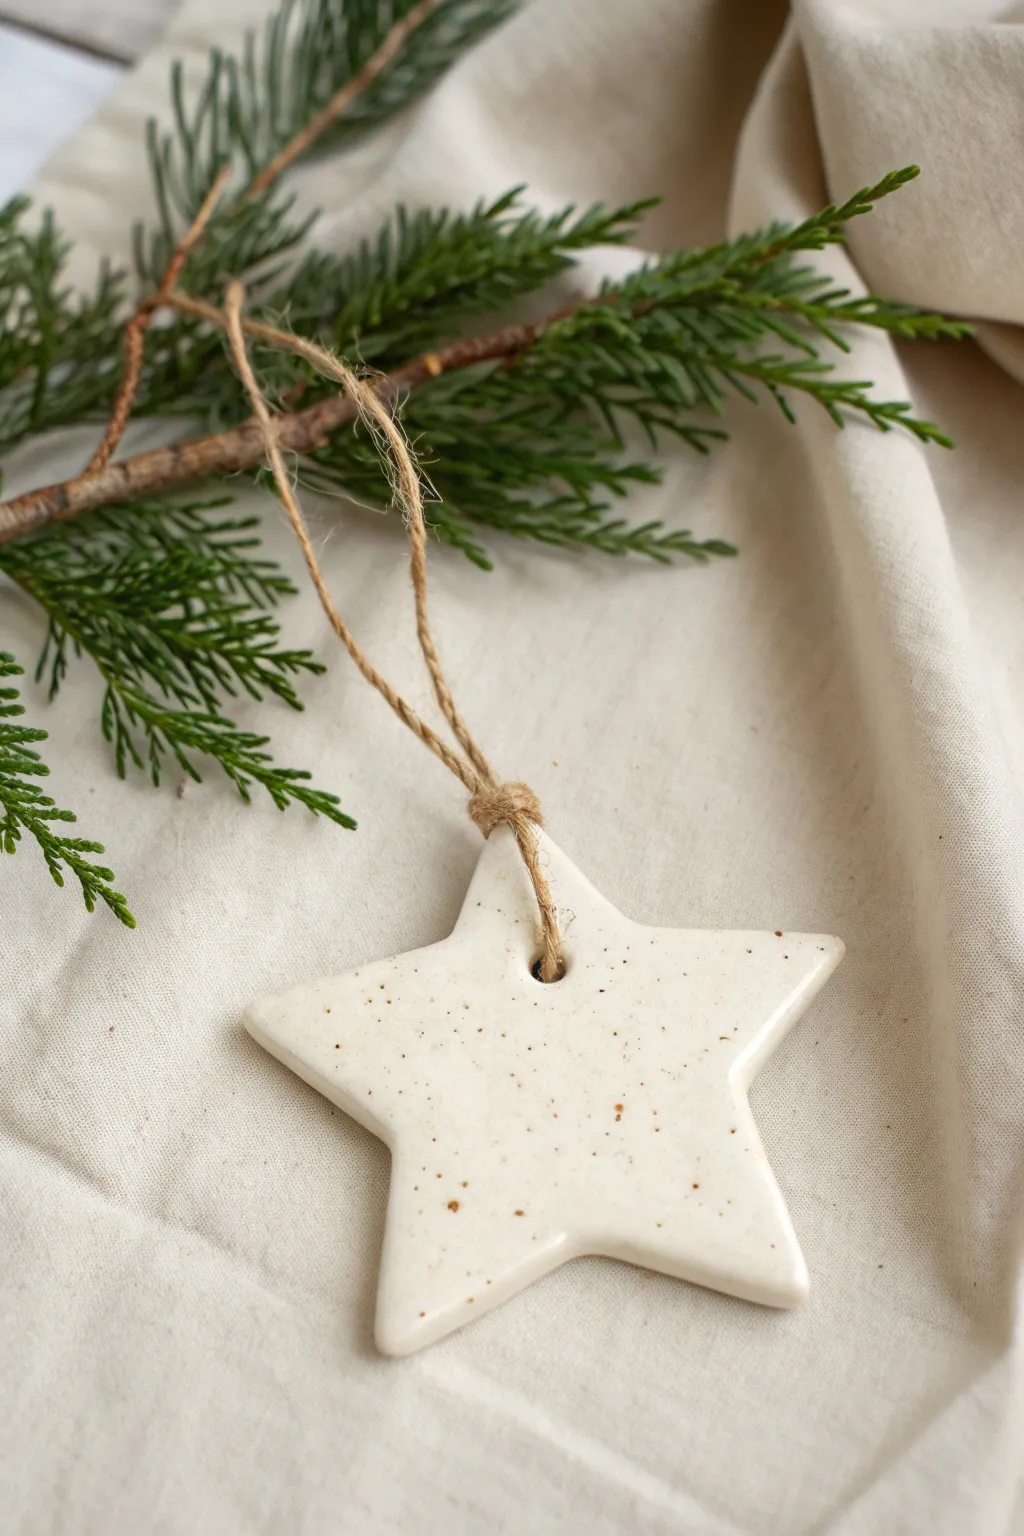
Air dry clay is my favorite way to make Christmas decor that feels handmade and meaningful without needing any fancy equipment. If you’re craving projects that are cute, quick, and totally beginner-friendly, these easy air dry clay Christmas ideas are the sweet spot.
Classic Cookie-Cutter Ornaments
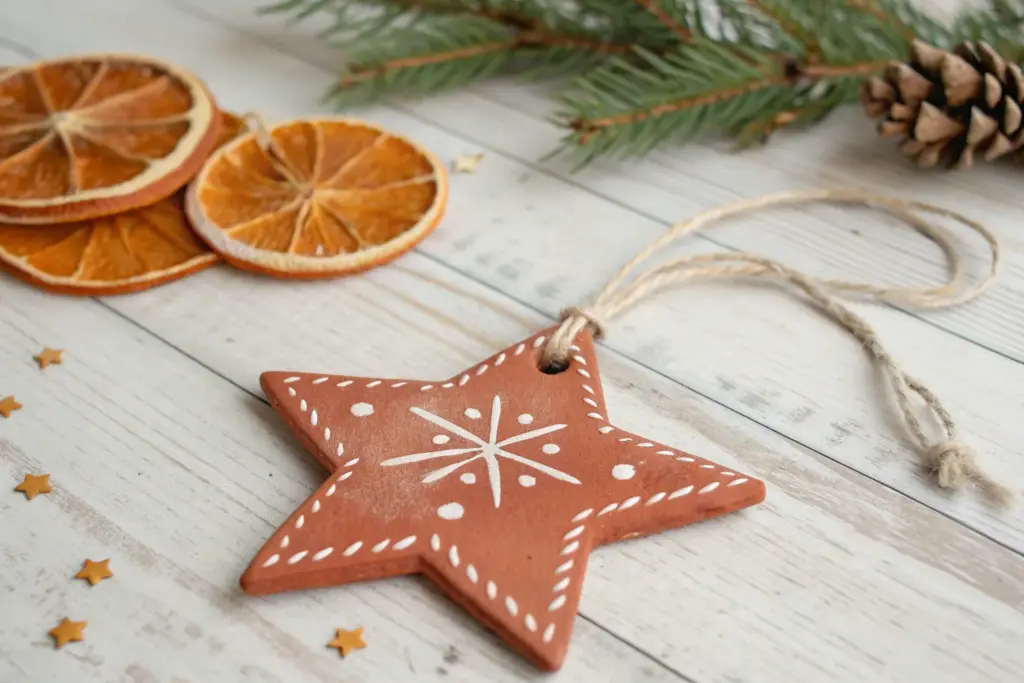
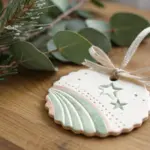
Embrace the understated elegance of Nordic décor with this deceptively simple speckled star. By mixing a touch of texture right into the clay, you achieve a sophisticated ceramic look without needing a kiln.
Step-by-Step Guide
Materials
- White polymer or air-dry clay
- Ground nutmeg, cinnamon, or black pepper (for specks)
- Star-shaped cookie cutter
- Rolling pin
- Parchment paper or craft mat
- Straw or coffee stirrer
- Fine-grit sandpaper
- Glossy varnish or Mod Podge
- Jute twine or rustic string
- Soft paintbrush
Step 1: Preparing the Speckled Clay
-
Condition the clay:
Start by taking a handful of white air-dry or polymer clay. Knead it thoroughly in your hands until it becomes warm, pliable, and easy to work with. -
Add the speckles:
Sprinkle a very small pinch of your chosen spice onto the clay. Ground nutmeg gives a warm, brownish speckle, while pepper offers a sharper black contrast to mimic stone. -
Mix it in:
Fold the clay over the spice and knead repeatedly. Continue folding and pressing until the specks are distributed evenly throughout the entire ball of clay. -
Roll it out:
Place your clay ball onto a sheet of parchment paper. Use your rolling pin to flatten it into an even slab, aiming for a thickness of about 1/4 inch so it’s sturdy but not heavy.
Clay cracked while drying?
This happens if clay dries too fast. Next time, cover the drying pieces loosely with plastic wrap for the first 12 hours to slow down moisture evaporation.
Step 2: Shaping and Refining
-
Cut the shape:
Press your star-shaped cookie cutter firmly into the rolled clay. Give it a tiny wiggle to ensure it cuts all the way through, then lift the cutter. -
Remove excess clay:
Carefully peel away the scrap clay from around your star shape. Save these scraps for another ornament. -
Create the hanging hole:
Take a drinking straw or a small coffee stirrer and press it into the top point of the star to create a hole. Position it far enough from the edge so the clay won’t tear later. -
Smooth the edges:
Dip your finger in a little water and gently run it along the cut edges of the star to smooth down any roughness or stray crumbs of clay. -
Let it dry:
Leave the star on the parchment paper to dry completely. For air-dry clay, I usually let this sit for at least 24-48 hours, flipping it once halfway through to prevent curling.
Step 3: Finishing Touches
-
Sand for perfection:
Once fully cured and hard, check the edges again. If they feel sharp or uneven, use a piece of fine-grit sandpaper to lightly buff them smooth. -
Clean dust:
Wipe the star with a slightly damp cloth or a dry brush to remove any sanding dust before you apply the finish. -
Apply the gloss:
Paint a layer of glossy varnish or Mod Podge over the front and sides of the star. This seals the spice inside and gives it that polished, ceramic-like shine seen in the photo. -
Dry the finish:
Allow the varnish to dry according to the bottle’s instructions. If you want a deeper shine, add a second coat once the first is dry. -
Cut the twine:
Cut a length of rustic jute twine, about 8 to 10 inches long. -
Thread the loop:
Fold the twine in half and push the looped end through the hole in the star from front to back. -
Secure the hanger:
Pull the loose ends of the twine through the loop and tighten it gently against the top of the star, creating a lark’s head knot. -
Tie it off:
Knot the two loose ends of the twine together at the top to complete the hanger loop.
Make it luxe
Before the clay dries, gently press a sprig of rosemary or pine into the surface and remove it to leave a subtle botanical impression alongside the speckles.
Hang your finished star on a branch or tuck it into a gift wrap bow for a handmade touch giving warmth to your holiday season


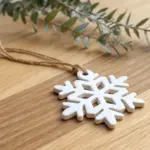
Snowflake Disc Ornaments
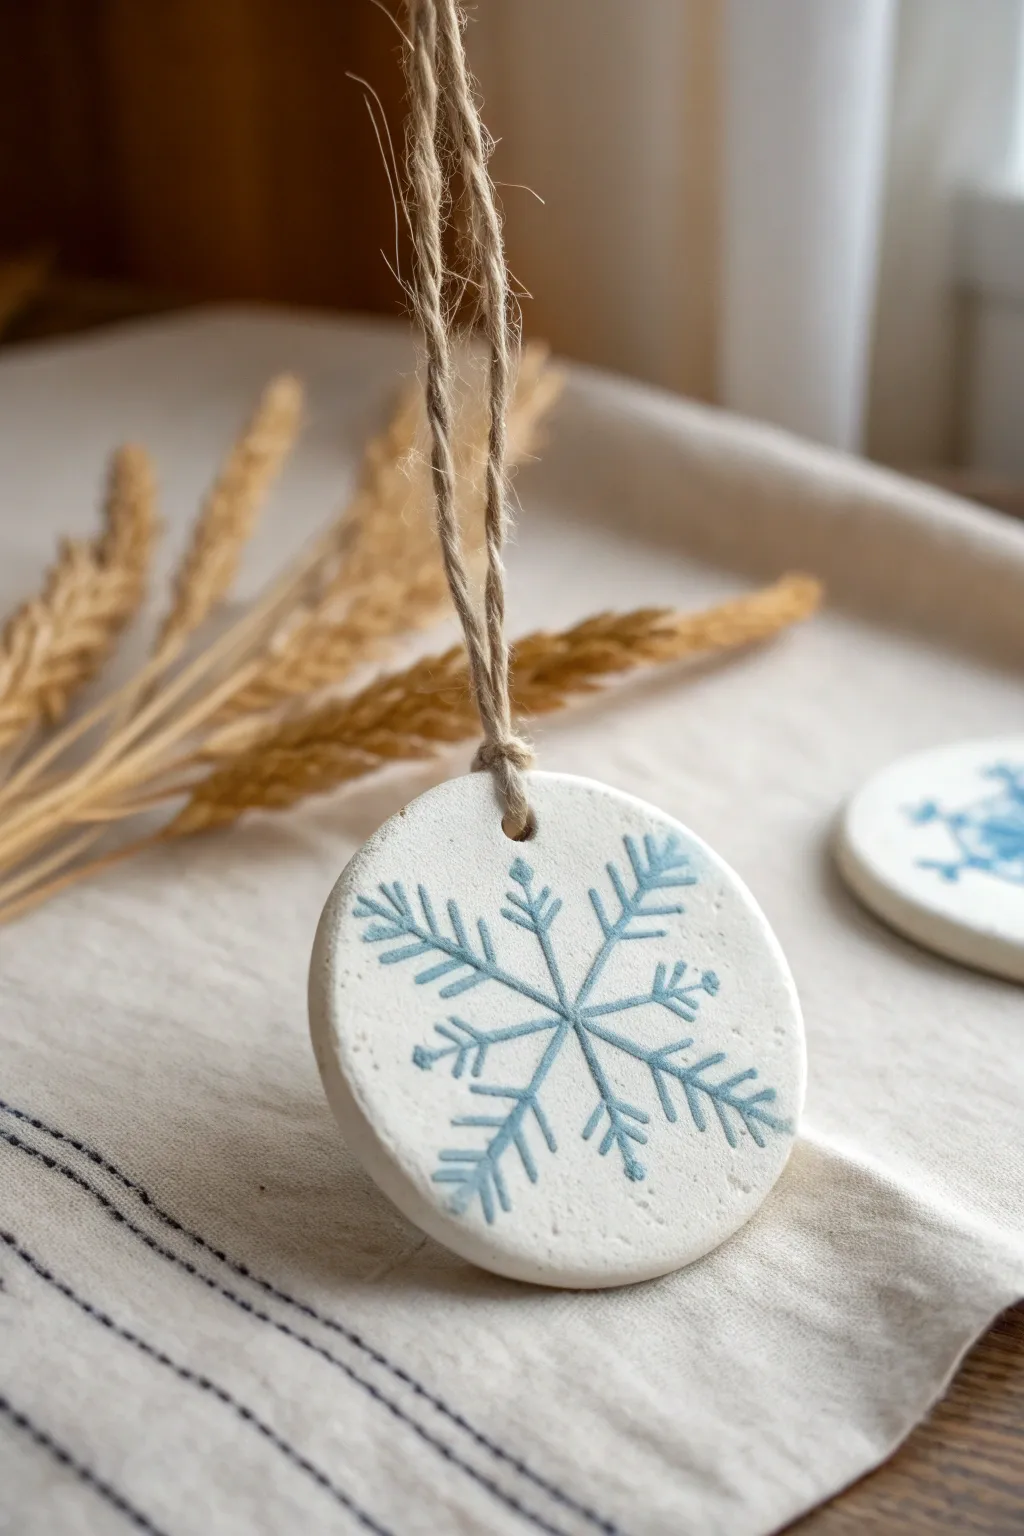
These charmingly simple ornaments combine the rustic texture of air-dry clay with a clean, Scandinavian-inspired snowflake design. They are perfect for adding a touch of wintry elegance to your tree or gift wrapping without feeling cluttered or complicated.
Step-by-Step
Materials
- White air-dry clay (e.g., DAS or Crayola)
- Rolling pin
- Circle cookie cutter (approx. 2.5 – 3 inches)
- Fine-grit sandpaper (optional)
- Straw or skewer for making holes
- Light blue acrylic paint
- Very fine detail paintbrush (size 0 or 00)
- Natural jute twine
- Parchment paper or non-stick mat
- Small cup of water
Step 1: Prepping and Shaping the Clay
-
Condition the clay:
Begin by taking a handful of air-dry clay and kneading it in your hands for a minute or two. The goal is to make it pliable and smooth out any internal air pockets, which helps prevent cracking later. -
Roll out the slab:
Place your clay on a piece of parchment paper or a non-stick mat. Roll it out evenly until it is about 1/4 inch thick. Try to keep the thickness consistent so the ornament dries evenly. -
Cut the shapes:
Use your circle cookie cutter to punch out your disc shapes. Press down firmly and give it a little wiggle before lifting to get a clean cut. -
Smooth the edges:
Dip your finger in a little bit of water and gently run it around the circumference of the cut clay circle. This smooths down any harsh ridges left by the cutter. -
Create the hanging hole:
Take a drinking straw or a skewer and press a hole near the top edge of the circle. Make sure it isn’t too close to the edge, or the clay might break when you hang it; about a half-inch down is usually safe. -
Let it dry completely:
Set the circles aside on a flat surface to dry. I prefer to turn them over after about 12 hours so the bottom gets air too. Total drying time will be 24-48 hours depending on humidity.
Fixing Clay Cracks
If small cracks appear while drying, mix a tiny bit of fresh clay with water to make a paste (slip) and fill them in gently.
Step 2: Refining and Painting
-
Sand for smoothness:
Once the clay is bone dry and hard, inspect the edges. If there are any rough spots, lightly sand them with fine-grit sandpaper until smooth. Wipe away the dust with a dry cloth. -
Mix your paint:
Squeeze a small amount of light blue acrylic paint onto a palette. If the paint is very thick, thin it with a tiny drop of water to make it flow better for fine lines. -
Paint the central cross:
Using your fine detail brush, paint a straight vertical line down the center of the disc. Cross it with a diagonal line going from top-left to bottom-right, and then another from top-right to bottom-left to form a six-point star base. -
Add inner details:
On each of the six main arms, paint small ‘V’ shapes facing outward near the center. These little chevrons add that classic snowflake complexity. -
Add outer branches:
Move further out along the arms and add a second set of larger ‘V’ branches or straight lines branching off. Keep your hand steady and use just the tip of the brush for delicate strokes. -
Cap the ends:
Finish the design by painting small dots or tiny cross-lines at the very tip of each main arm to give the snowflake a finished look. -
Dry the paint:
Let the paint dry completely, which should only take about 15-20 minutes for acrylics.
Sparkle Upgrade
While the blue paint is still wet, sprinkle ultra-fine iridescent glitter over the snowflake for a frosty, shimmering finish.
Step 3: Final Assembly
-
Cut the twine:
Cut a length of natural jute twine, approximately 8-10 inches long. -
Thread the loop:
Fold the twine in half and push the looped end through the hole in the ornament from front to back. -
Secure the hanger:
Pull the loose ends of the twine through the loop and tighten it gently against the clay. This creates a lark’s head knot that sits cleanly at the top. -
Tie the ends:
Tie the two loose ends of the twine together in a simple overhand knot to close the loop, trimming any excess jute if desired.
Now your delicate clay snowflake is ready to hang, bringing a breath of fresh winter air to your holiday decor


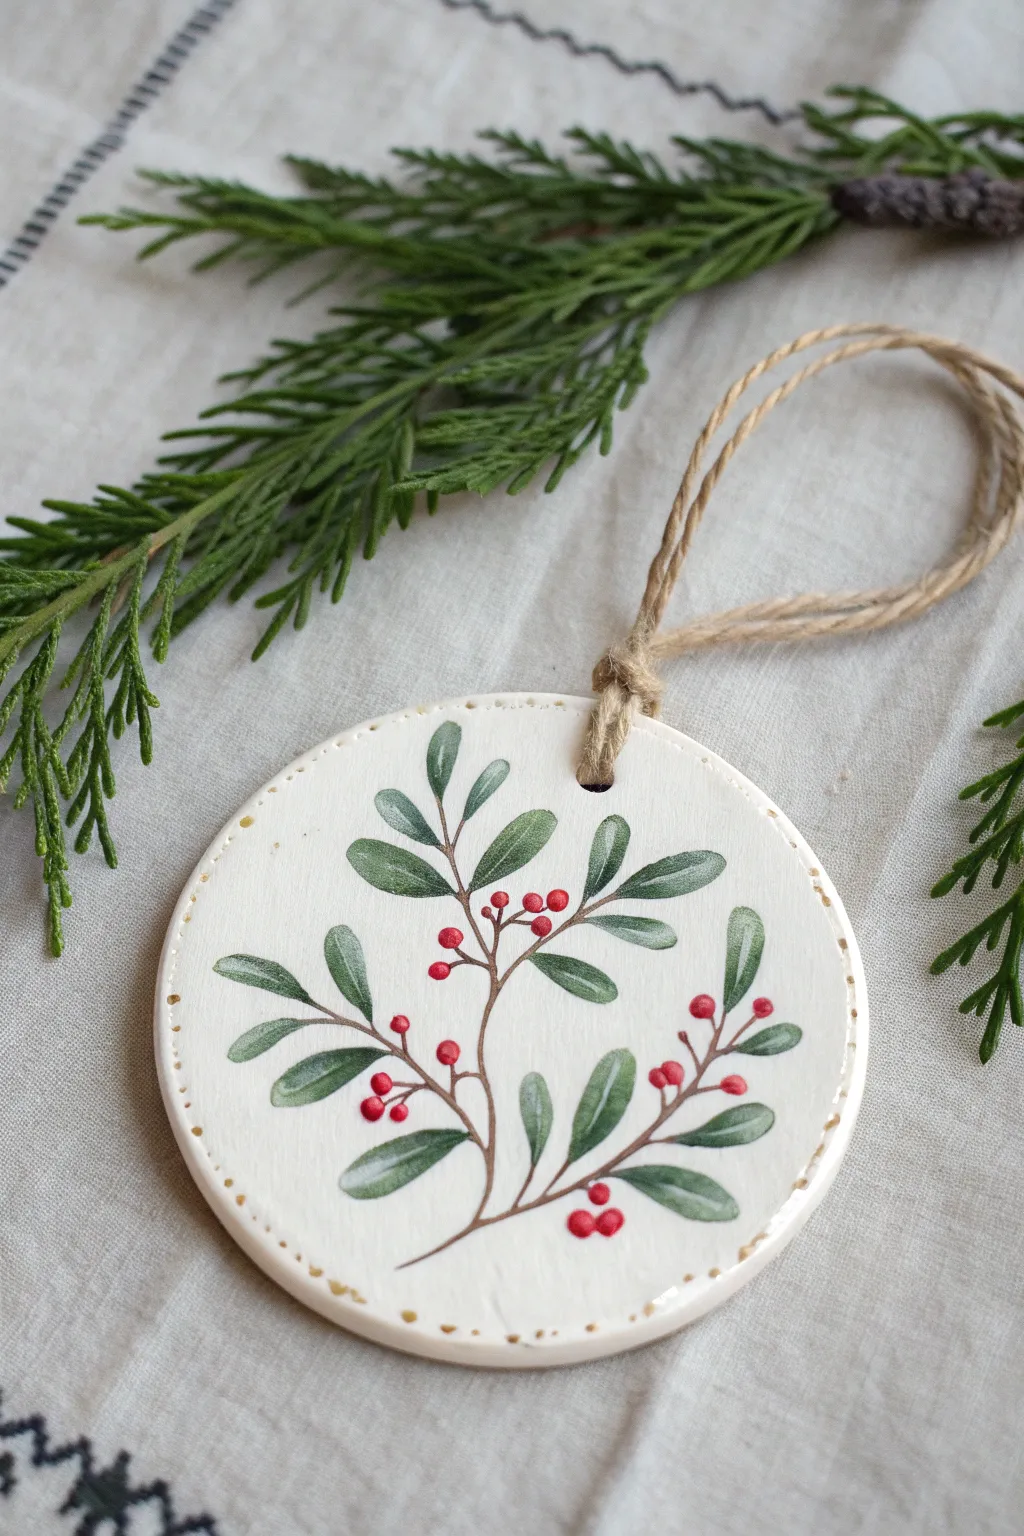
Leaf-Print Evergreen Ornaments
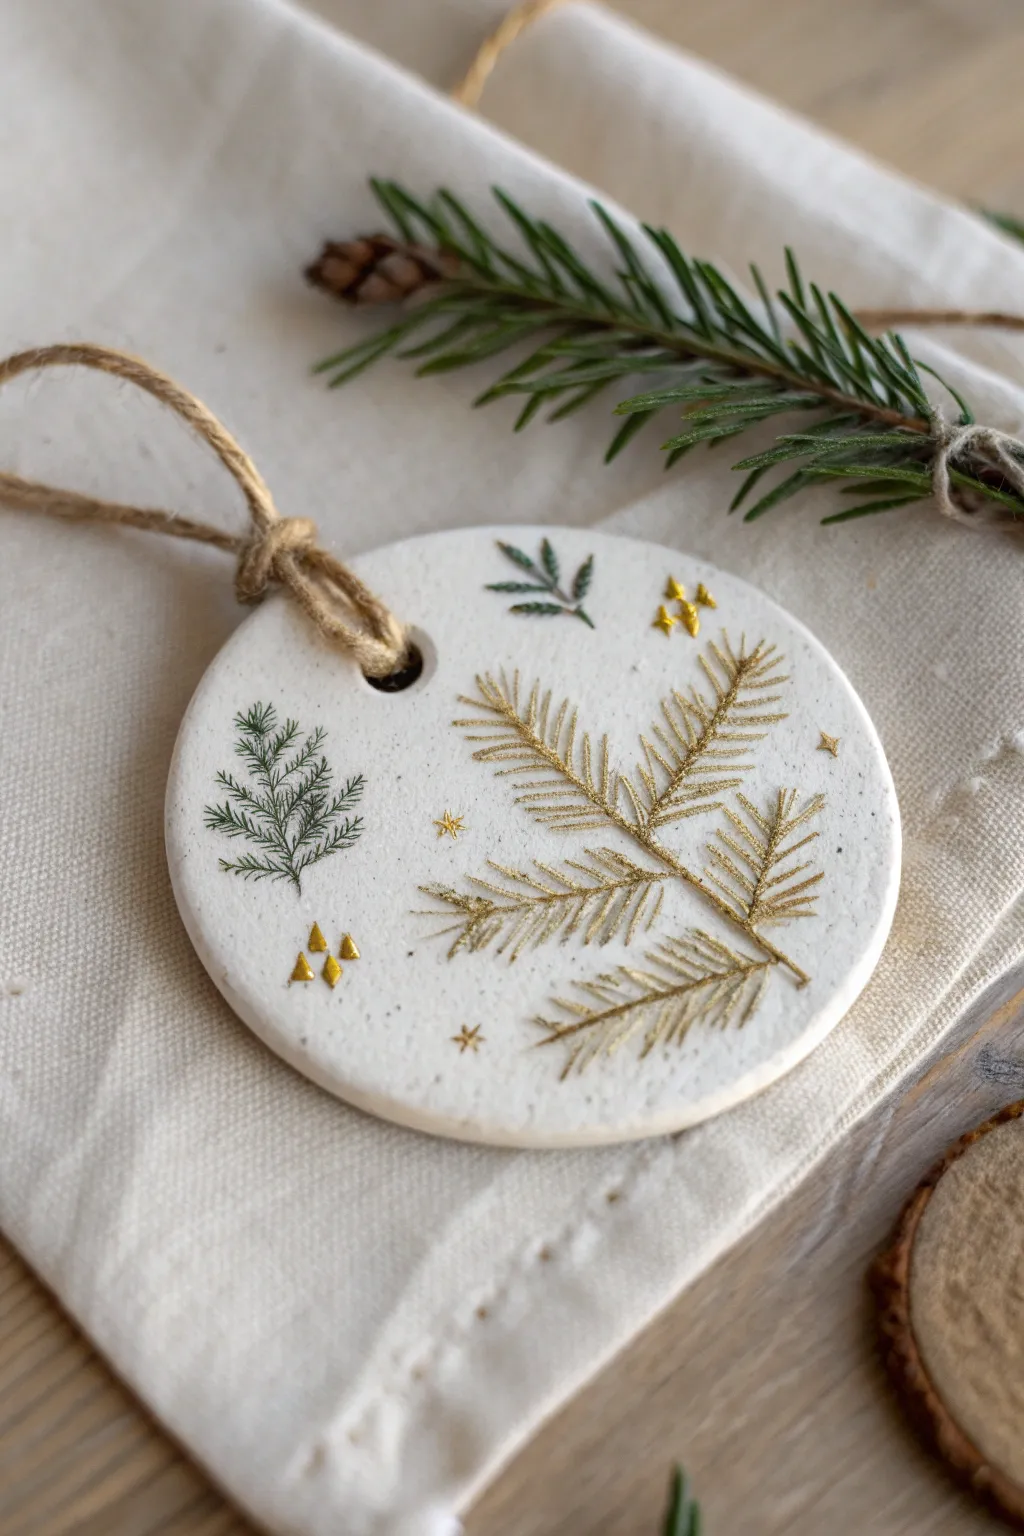
Capture the delicate beauty of winter greenery with these elegant air-dry clay ornaments. By pressing real evergreen sprigs into fresh clay and highlighting the impressions with metallic gold, you create a sophisticated keepsake that looks far more expensive than it is.
How-To Guide
Materials
- White stone air-dry clay (smooth texture)
- Small rolling pin
- Round cookie cutter (approx. 3-4 inches)
- Fresh evergreen sprigs (various textures like pine or fir)
- Small straw or cocktail stick (for the hole)
- Gold metallic acrylic paint or liquid gilding
- Fine-point paintbrush (size 0 or 00)
- Green watercolor or diluted acrylic paint (mossy green)
- Sandpaper (fine grit)
- Jute twine
- Matte spray varnish (optional)
Step 1: Shaping the Clay Canvas
-
Prepare the workspace:
Lay down a sheet of parchment paper or a silicone mat to prevent the clay from sticking to your table. Take a handful of air-dry clay and knead it briefly until it is pliable and warm spread. -
Roll the clay:
Use your rolling pin to flatten the clay to a uniform thickness, aiming for about 1/4 inch. If the clay is too thin, it might crack; too thick, and it will be heavy. -
Cut the shape:
Press your round cookie cutter firmly into the rolled clay. Wiggle it slightly to ensure a clean cut, then lift the cutter. Peel away the excess clay from the edges to reuse later. -
Smooth the edges:
Dip your finger in a tiny bit of water and gently run it circumference of the circle to smooth out any rough drag marks left by the cutter.
Step 2: Creating the Impressions
-
Select your botanicals:
Choose small, diverse pieces of evergreen. I find that stiffer sprigs, like spruce or fir, leave a much crispier impression than softer herbs. -
Arrangement strategy:
Gently lay the sprigs on top of the cut clay circle. Try placing a larger branch off-center and smaller pieces near the edges for a pleasing asymmetrical balance, mimicking the photo. -
Pressing the pattern:
Once you are happy with the placement, use the rolling pin to gently but firmly roll *over* the botanicals one time. Don’t roll back and forth, as this can create a double image. -
Reveal the design:
carefully use tweezers or the tip of a knife to lift the greenery out of the clay. Pull slowly to ensure you don’t tear the fresh edges of the impression. -
Create the hanging hole:
Use a straw or a cocktail stick to poke a hole near the top edge of the ornament. Make sure it’s large enough for your jute twine to pass through later.
Clean Press Tip
If your evergreen sprigs are sticking to the clay, lightly dust the greenery with cornstarch before pressing. It acts as a release agent and brushes off easily once dry.
Step 3: Drying and Decorating
-
Allow to cure:
Let the ornament dry flat on a wire rack for 24-48 hours. Turn it over halfway through the drying process to ensure both sides dry evenly and to prevent curling. -
Sand imperfections:
Once fully hard and white, use fine-grit sandpaper to gently buff the edges or any bumps on the surface for a professional, porcelain-like finish. -
Paint the main branch:
Dip a fine paintbrush into metallic gold paint. Carefully fill in the deepest, largest botanical impression. The gold looks best when it settles into the valleys of the needles. -
Add nature tones:
For the smaller side impressions, use a diluted mossy green paint. Apply it sparingly with a detail brush to mimic the look of a vintage botanical print. -
Embellish with details:
Using the very tip of your brush and the gold paint, add three tiny triangles in a cluster and a few scattered four-point stars around the empty white space for a bit of sparkle. -
String it up:
Cut a length of jute twine, fold it in half, and thread the loop through the hole. Pass the loose ends through the loop to create a lark’s head knot, adhering to the rustic style shown.
Add Vintage Speckle
Dip an old toothbrush in watered-down brown paint. Flick the bristles with your thumb to mist tiny speckles over the white clay for an aged pottery look.
Hang your new masterpiece on the tree and enjoy the subtle gleam of gold against the white clay

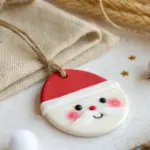
Mini Santa Face Ornaments
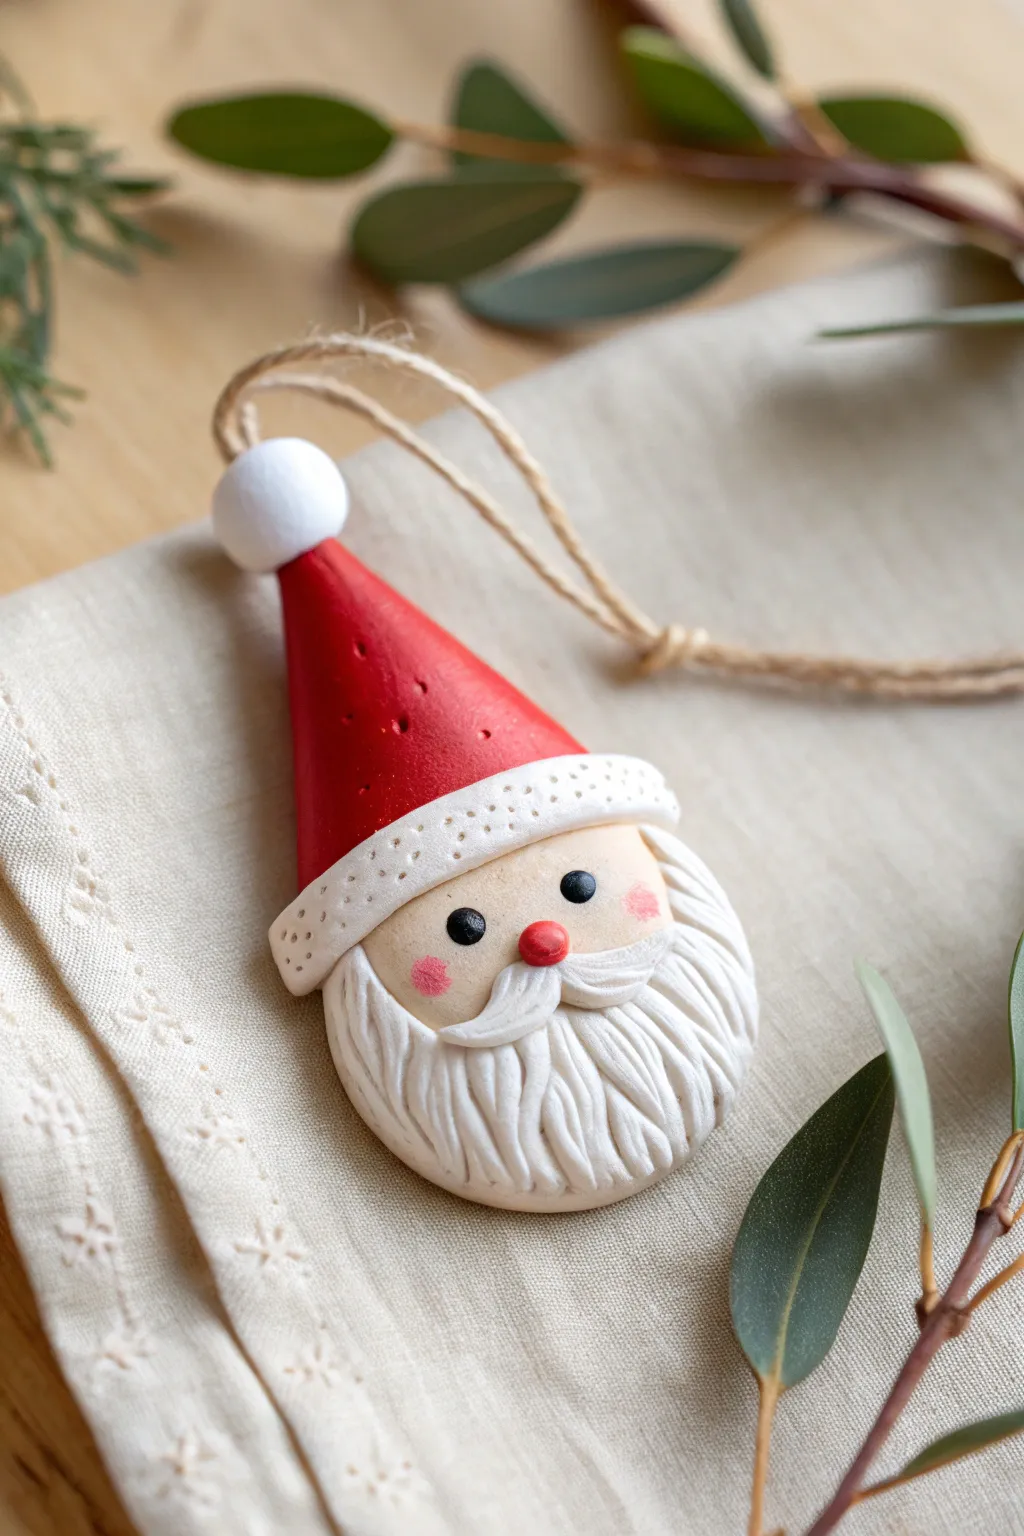
Capture the magic of the holidays with this charming Santa face ornament, featuring a classic red hat and a wonderfully textured beard. It’s a perfect beginner-friendly project that brings a handcrafted rustic feel to your Christmas tree.
Step-by-Step Tutorial
Materials
- White air-dry clay
- Rolling pin
- Craft knife or clay modeling tool
- Acrylic paints (Red, beige/flesh tone, black, white, pink)
- Fine detail paintbrushes
- Small ball tool or toothpick
- Jute twine
- Water cup (for smoothing)
- Small eye hook or wire loop
- Sealant or varnish (optional)
Step 1: Shaping the Base
-
Prepare the clay:
Start by conditioning a chunk of air-dry clay in your hands until it’s soft and pliable, then roll it out to about 1/4 inch thickness. -
Cut the primary shape:
Using a craft knife, cut out a tall, elongated teardrop shape. This will serve as the foundation for both Santa’s hat and his face. -
Smooth the edges:
Dip your finger in a little water and run it along the cut edges to remove any sharpness or burrs, creating a nice rounded finish. -
Add the hanger:
Insert a small eye hook or a loop of wire into the very top tip of the shape while the clay is still wet so you can hang it later.
Clay Cracking?
If small cracks appear as the clay dries, mix a tiny bit of fresh clay with water to make a paste and fill them in before painting.
Step 2: Adding Features
-
Create the hat band:
Roll a small snake of clay and flatten it slightly. Attach this across the shape about halfway down to separate the hat area from the face area. -
Texture the band:
Use a toothpick or a needle tool to stipple small dots all over the hat band, giving it a fluffy, fur-like texture. -
Add the pom-pom:
Roll a small ball of clay and attach it to the very tip of the hat, covering the base of your eye hook. -
Form the beard:
Add a flattened layer of clay to the bottom rounded part of the teardrop shape to build up the beard volume slightly. -
Texture the beard:
Using a modeling tool or the back of a knife, press deep, curving lines into the wet clay beard area to simulate strands of hair flowing downward. -
Sculpt the mustache:
Shape two small, curved teardrop pieces of clay. Attach them just below the face area, curling the tips upwards for a cheerful look. -
Add the nose:
Roll a tiny ball of clay and press it gently into the center where the mustache pieces meet. -
Dry completely:
Set the ornament aside on a flat surface to dry for 24-48 hours. I like to flip it over halfway through to ensure the back dries evenly.
Step 3: Painting and Finishing
-
Paint the face:
Mix a soft beige or flesh tone and carefully paint the smooth area between the hat band and the mustache. -
Paint the hat:
Paint the top triangle section a bright, festive red. Leave the textured band and pom-pom white (or paint them white if your clay isn’t bright enough). -
Add facial details:
Using the handle end of a paintbrush, dot two small black eyes onto the face. Paint the nose a soft red. -
Rosy cheeks:
Dilute a tiny drop of pink paint or use a dry-brush technique to gently dab rosy cheeks onto the face area. -
Strung up:
Once the paint is fully dry, thread a piece of natural jute twine through the loop and tie a knot to finish the rustic look. -
Seal (Optional):
To protect your work year after year, apply a coat of matte varnish over the entire piece.
Sparkle Upgrade
Before the sealant dries, dust the white hat trim and beard with clear glitter to give Santa a frosted, snowy appearance.
Hang your jolly creation on the tree and enjoy the handmade warmth it brings to your holiday decor

The Complete Guide to Pottery Troubleshooting
Uncover the most common ceramic mistakes—from cracking clay to failed glazes—and learn how to fix them fast.
Chubby Snowman Decorations
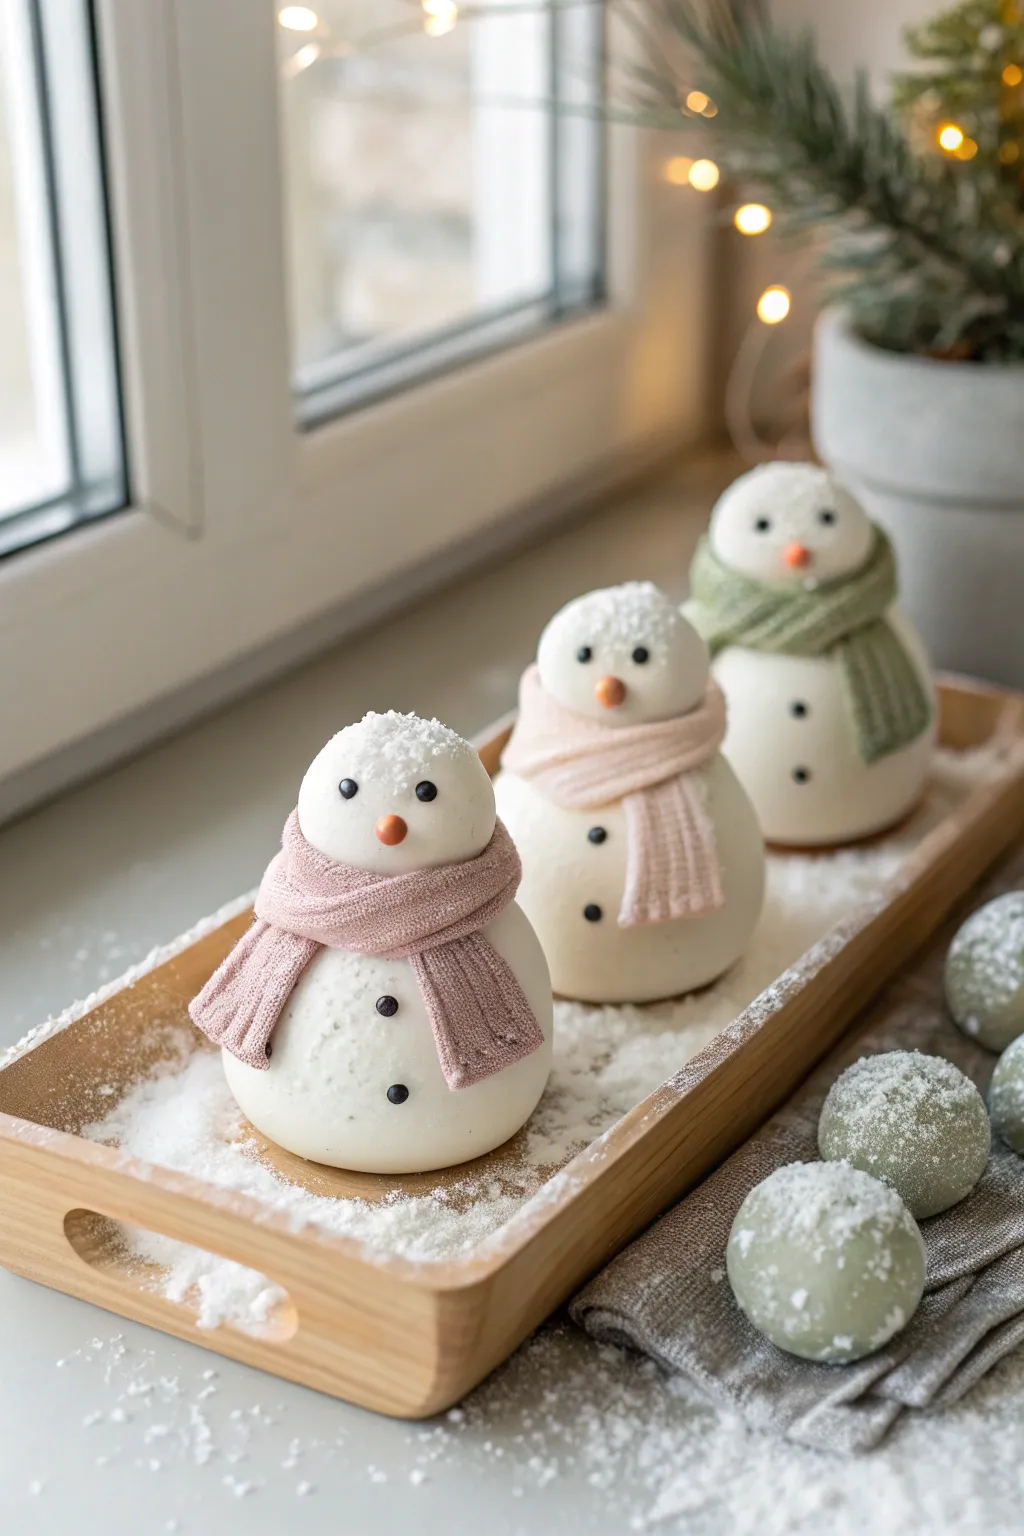
Create a heartwarming winter scene for your windowsill with these irresistibly chubby snowmen wrapped in cozy knitted-texture scarves. Their smooth, matte finish and delicate dusting of faux snow give them a sophisticated look that captures the quiet magic of a snowy day.
Step-by-Step
Materials
- White smooth air-dry clay (e.g., DAS or Crayola)
- Small black beads or seeds (for eyes/buttons)
- Orange acrylic paint or orange marker
- Fabric scraps or a small piece of old knitted sweater (for texture imprint)
- Pink and moss green acrylic paint
- PVA glue (white craft glue)
- Fine glitter or cornstarch (for the snow effect)
- Toothpicks
- Rolling pin
- Mod Podge or matte varnish
Step 1: Shaping the Bodies
-
Roll the bases:
Start by taking a generous amount of white clay and rolling it into a very smooth ball. Gently press it onto your work surface to flatten the bottom so it stands securely—this bottom part should be nice and chubby. -
Form the heads:
Roll a smaller ball for the head, roughly half the size of the body. Place it on top of the body piece to check proportions; you want a cute, rounded silhouette. -
Attach the heads:
Dip a toothpick in a little PVA glue and insert halfway into the center of the body. Slide the head onto the protruding toothpick to secure it firmly in place. -
Smooth the seams:
Use a tiny bit of water on your finger to smooth any connection points or cracks. I like to keep the neck seam slightly visible rather than completely blended, as it separates the head definition.
Step 2: Adding Features
-
Create the nose:
Pinch off a minuscule amount of clay and roll it into a tiny carrot cone shape. Use a dot of glue to attach it to the center of the face. -
Insert eyes:
While the clay is still wet, gently press two small black beads into the face for eyes. Press them deep enough so they won’t pop out when the clay shrinks slightly during drying. -
Add buttons:
Repeat the process with three beads down the front of the belly for the classic coal button look. -
Initial drying:
Set your snowmen aside to dry for about 24-48 hours until they are solid and chalky white.
Cracking Issues?
If small cracks appear as the clay dries, don’t panic. Mix a tiny bit of fresh clay with water to make a paste (slip) and fill in the cracks, then smooth it over with your finger.
Step 3: Crafting the Scarves
-
Prepare scarf clay:
Take a fresh piece of wet clay and roll it out into a flat, thin sheet, about 2-3mm thick. -
Add texture:
Press a piece of coarse fabric or an old sweater firmly into the wet clay sheet. Peel it back to reveal a realistic knitted pattern. -
Cut the strips:
Use a craft knife to cut long, rectangular strips from the textured clay. These will become your scarves. -
Drape the scarves:
Wrap a strip around the neck of a dried snowman. Cross the ends over each other at the front, letting one side hang slightly lower than the other for a natural look. -
Detail the fringe:
With the tip of your craft knife, make small vertical cuts at the ends of the scarf to mimic fringe tassels. Allow the scarves to dry completely on the snowmen.
Clean Lines
For perfectly crisp scarf edges, after texturing the clay, pop it in the freezer for 5 minutes before cutting. This stiffens it slightly, preventing the knife from dragging the clay.
Step 4: Painting and Finishing
-
Paint the noses:
Using a fine detail brush, paint the carrot noses a bright, matte orange. -
Color the scarves:
Dilute your pink and green acrylic paints slightly with water to create a soft wash. Paint the hardened clay scarves carefully, letting the paint settle into the textured grooves. -
Seal the project:
Apply a coat of matte varnish or Mod Podge over the entire snowman to protect the clay and give it a finished porcelain look. -
The snowy touch:
While the varnish is still tacky, especially on the top of the head and shoulders, sprinkle a fine dusting of white glitter or cornstarch to simulate fresh snowfall.
Arranging these little figures on a wooden tray with some faux snow creates a calm winter atmosphere.
Gnome Hat Tree Hangers

These charmingly simple ornaments combine the rustic look of terracotta with sleek, modern geometry. Perfect for a Scandinavian-style Christmas tree, this project uses layered clay shapes to suggest a tiny gnome hiding under a tall, pointed hat.
Step-by-Step
Materials
- Air dry clay (white or terracotta)
- Small wooden bead (approx. 5-8mm)
- Jute twine or hemp cord
- Rolling pin
- Small circle cookie cutter (approx. 1.5 inches)
- Craft knife or clay tool
- Acrylic paint (deep terracotta/brick red and pale beige/pink)
- Paintbrushes
- Fine-grit sandpaper
- Super glue or strong craft glue
- Toothpick or skewer
Step 1: Shaping the Gnome Base
-
Roll the clay:
Begin by conditioning your air dry clay until it is soft and pliable. Roll it out on a non-stick surface to a thickness of about 1/4 inch (6mm). You want this base piece to be sturdy. -
Cut the circle:
Use your small circle cutter to punch out a perfect round shape. This will form the face/beard section of the gnome. -
Smooth the edges:
Dip your finger in a little water and gently run it around the cut edge of the circle to remove any sharpness or burrs from the cutter.
Step 2: Creating the Hat Cone
-
Form a ball:
Take a larger lump of clay, slightly more than used for the base. Roll it into a smooth ball between your palms to eliminate cracks. -
Shape the cone:
Place the ball on your work surface. Using the flat of your hand, roll the clay back and forth while applying more pressure to one side. This tapered rolling motion creates a cone shape. -
Check proportions:
Place the cone on top of your cut circle base. The cone’s bottom width should be slightly smaller than the circle’s diameter to create a visible rim. -
Refine the height:
If the hat looks too short, gently pull the tip upward. If it’s too tall, tap the tip down. Aim for a distinct, tall point. -
Create the hanging hole:
While the clay is still wet, use a toothpick or skewer to poke a hole horizontally through the very tip of the cone. Wiggle it slightly to ensure the hole is wide enough for your twine.
Fixing Cracks
If hairline cracks appear as the cone dries, mix a tiny bit of fresh clay with water to make a paste (slip). Rub this into the crack and smooth it over with a finger.
Step 3: Drying and Refining
-
Allow to dry:
Set both the circle base and the cone aside to dry. This typically takes 24-48 hours depending on humidity. Flip the circle occasionally to prevent curling. -
Sand for finish:
Once fully cured and hard, use fine-grit sandpaper to gently smooth the surface of the cone and the edges of the circle. Wipe away any dust with a slightly damp cloth.
Texture Tip
To get the porous look shown in the photo, gently press a coarse sponge or crumpled tin foil against the clay cone while it is still wet before it dries.
Step 4: Painting and Assembly
-
Paint the hat:
Mix a deep, earthy red or terracotta color. Apply two coats to the cone, letting the first coat dry completely before adding the second. This creates that rich, matte ceramic look. -
Paint the face base:
Paint the circle base with a pale beige or dusty pink shade. This contrasts beautifully with the dark hat. -
Glue the components:
Apply a strong craft glue to the bottom of the cone. Center it carefully on top of the painted circle base and press down firmly. -
Attach the nose:
Take your small wooden bead. Apply a dot of glue to one side and place it exactly where the cone meets the base, centering it like a little nose peeking out. -
Adding texture:
For a rustic touch seen in the example, I sometimes take a stiff, dry brush or a needle tool and gently stipple tiny marks into the paint on the hat to mimic stone or felt texture. -
String the hanger:
Cut a length of jute twine. Thread it through the hole at the top of the hat. Tie a simple knot at the ends to create a loop.
Hang these adorable minimalist gnomes on your tree or attach them to gifts for a special handmade touch


What Really Happens Inside the Kiln
Learn how time and temperature work together inside the kiln to transform clay into durable ceramic.
Gingerbread-Style Clay Cookies
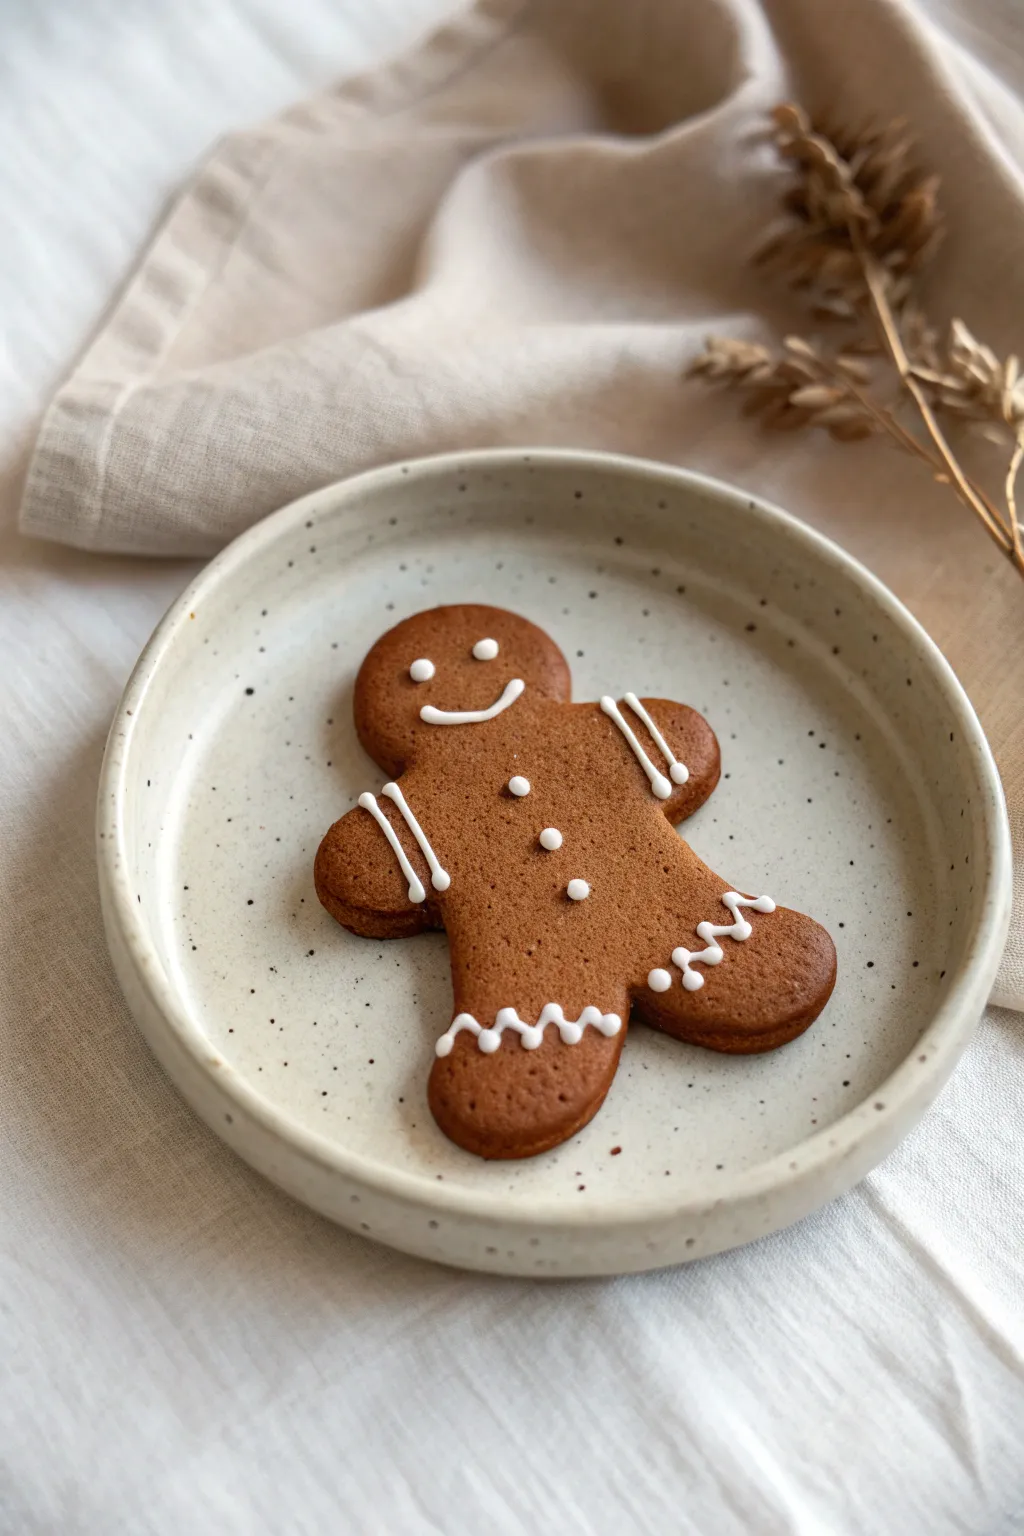
This deceptively realistic gingerbread man isn’t for eating, but he sure looks sweet enough to snack on. With the right warm brown clay and some clever puffy paint icing, you can create a festive decoration that lasts year after year.
Step-by-Step Guide
Materials
- Air dry clay (terracotta or brown)
- Acrylic paint (burnt umber, burnt sienna) if using white clay
- Rolling pin
- Gingerbread man cookie cutter
- Sandpaper (fine grit)
- White 3D fabric paint or puffy paint (in a squeeze bottle)
- Matte varnish or sealant
- Parchment paper or non-stick mat
- Small bowl of water
- Old toothbrush (for texture)
Step 1: Preparation & Shaping
-
Prepare your clay:
Start by kneading your air dry clay until it is smooth and pliable. If you are using white clay, mix in acrylic paint (a blend of burnt umber and a touch of red) now to get that baked gingerbread color all the way through. -
Roll it out:
Place the clay on a non-stick surface or parchment paper. Roll it out to an even thickness of about 5-6mm (roughly 1/4 inch). You want it thick enough to look like a real cookie. -
Texture time:
Before cutting, gently dab the surface of the clay with a clean, old toothbrush or a ball of crinkled aluminum foil. This subtle stippling mimics the baked texture of a cookie rather than perfectly smooth plastic. -
Cut the shape:
Press your gingerbread man cookie cutter firmly into the clay. Wiggle it slightly to ensure a clean cut, then lift the cutter away. -
Clean the edges:
Peel away the excess clay. If the edges of your man look too sharp or ragged, dip your finger in a little water and gently smooth them down to look rounded and baked.
Step 2: Drying & Finishing
-
Initial drying:
Let the clay figure dry flat on a clean piece of parchment paper. To prevent curling, flip the figure over every few hours. -
Full cure:
Allow the piece to dry completely for 24-48 hours. The clay will lighten slightly in color and feel hard and room temperature to the touch when ready. -
Sand edges:
Once fully dry, check for any rough spots. Use very fine-grit sandpaper to lightly buff away any stray jagged bits on the sides. -
Shading (Optional):
For extra realism, dry brush a tiny bit of darker brown pastel or paint around the very edges of the cookie to simulate that ‘just-baked’ browning.
Realistic Texture
Use a real cookie as a reference for color! If the clay looks flat, stipple brown paint lightly over the surface before icing.
Step 3: Decoration
-
Prepare the icing:
Using white 3D puffy paint (or thick white acrylic in a fine-tip applicator bottle), test the flow on a scrap piece of paper first to ensure clean lines. -
Pipe the face:
Squeeze two small dots for eyes near the top of the head. Below that, pipe a sweeping curve for a happy smile. -
Add buttons:
Place three evenly spaced dots down the center of the torso to act as traditional gumdrop buttons. -
Detail the arms:
On each arm, pipe two straight lines across the wrist area to simulate cuffs. -
Create the squiggles:
For the legs, pipe a wavy, zigzag line across each ankle area. This classic squiggle detail really sells the gingerbread look. -
Dry the icing:
Allow the puffy paint to dry completely undisturbed for several hours. It needs to be firm before handling. -
Seal:
Finish by applying a coat of matte varnish over the entire cookie (avoiding the puffy paint if you want it to stay matte white, or coat everything for uniform protection).
Scented Ornament
Knead cinnamon, nutmeg, and clove spices directly into the wet clay. Your ornament will smell just like fresh baking.
Display your new clay friend on a plate or add a ribbon to hang him on the tree
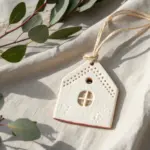
Thumbprint Christmas Tree Keepsakes
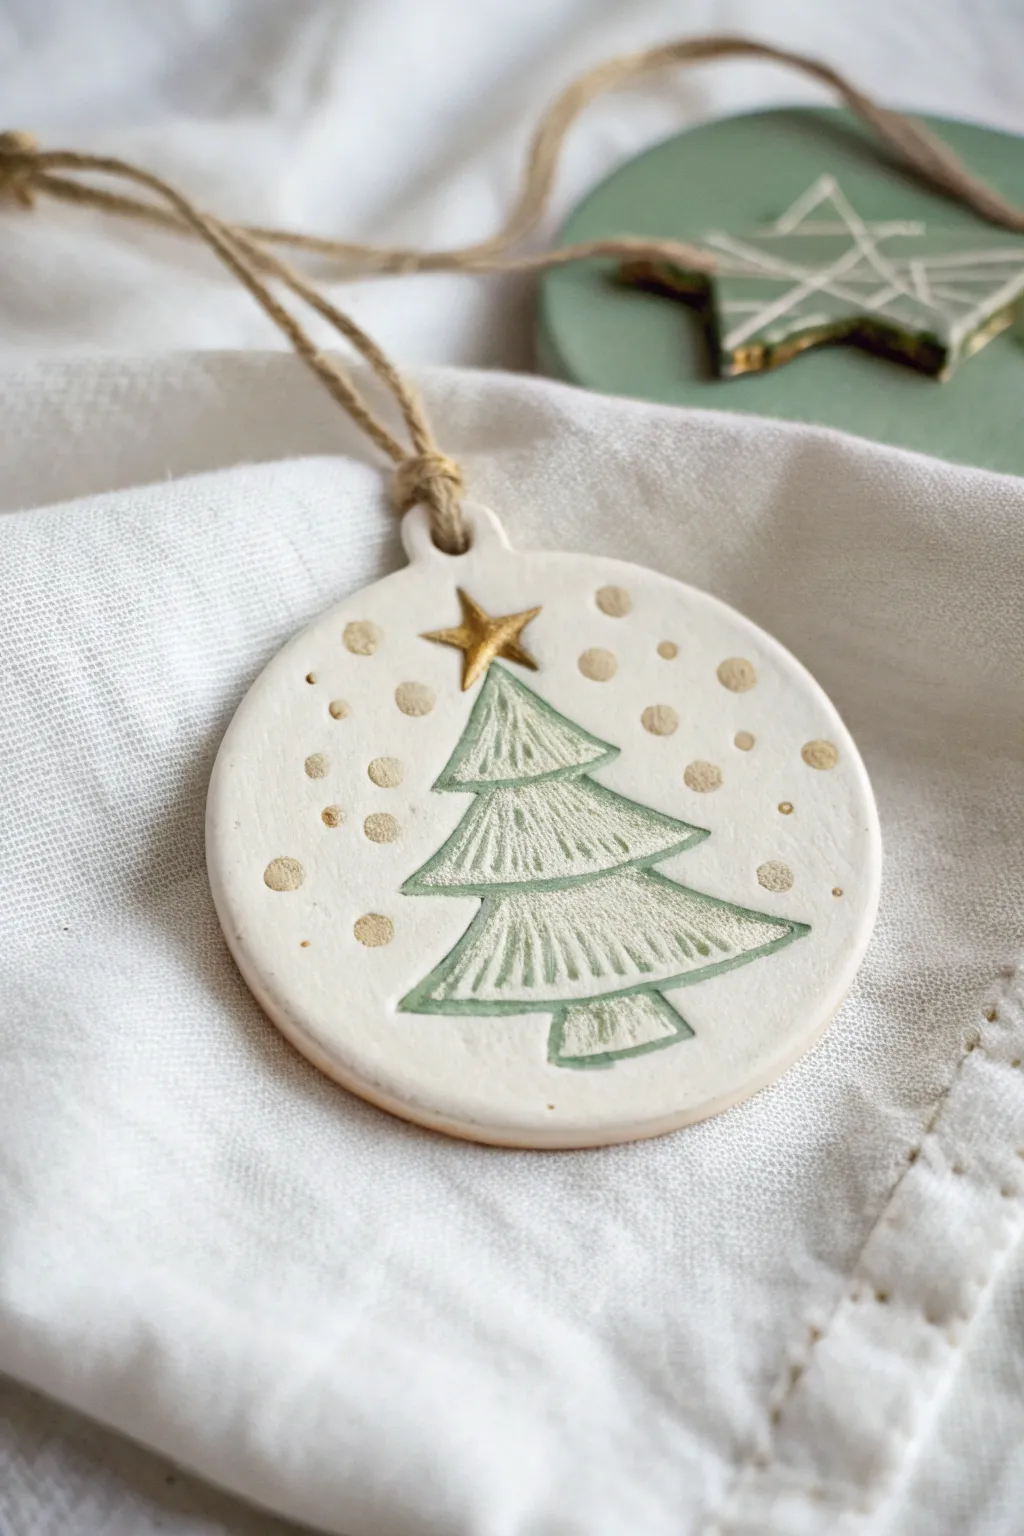
Create a rustic, elegant holiday keepsake using simple air dry clay. This round ornament features a lovely indented Christmas tree design highlighted with touches of metallic gold and soft sage green.
Step-by-Step Tutorial
Materials
- White polymer clay or air dry clay
- Rolling pin
- Round cookie cutter (approx. 3-4 inches)
- Christmas tree stamp (rubber or acrylic)
- Sage green acrylic paint
- Gold metallic paint
- Fine detail paintbrush
- Small straw or drinking straw (for hole)
- Jute twine
- Fine grit sandpaper
Step 1: Shaping the Base
-
Condition the Clay:
Begin by warming up a ball of white clay in your hands until it becomes soft and pliable, ensuring there are no cracks. -
Roll It Out:
Roll the clay out on a smooth surface to an even thickness of about 1/4 inch. If using air dry clay, you might want to roll on parchment paper to prevent sticking. -
Cut the Shape:
Press your round cookie cutter firmly into the clay to create a clean circle. Remove the excess clay from around the edges. -
Smooth the Edges:
Dip your finger in a tiny bit of water and gently run it along the cut edge of the circle to smooth out any roughness or sharp corners. -
Create the Tab:
Unlike a standard hole, this ornament has a small raised tab. Gently pinch and pull a small section of the top edge upwards to create a loop housing. -
Pierce the Hole:
Use a straw to punch a clean hole through the center of your newly formed tab. Twist the straw slightly as you pull it out to keep the hole neat.
Step 2: Creating the Design
-
Stamp the Tree:
Take your Christmas tree stamp and press it firmly into the center of the clay circle. Apply even pressure to get a deep, clear impression without pushing all the way through. -
Add Decorative Dots:
Using the back end of a paintbrush or a small dotting tool, press small indentations randomly around the tree to mimic falling snow. -
Initial Drying:
If using air dry clay, let the ornament sit for 24-48 hours until completely hard and white. Turn it over halfway through to ensure even drying. -
Check for Smoothness:
Once fully dry, inspect the edges. I like to run a piece of fine-grit sandpaper very lightly over any rough spots to give it a professional finish.
Fixing Cracks
If small cracks appear as the clay dries, mix a tiny bit of fresh clay with water to make a paste. Fill the crack, smooth it over, and let it dry again.
Step 3: Painting & Finishing
-
Paint the Tree:
Mix a small amount of water with sage green acrylic paint to create a wash. Carefully paint inside the indented tree shape. -
Wipe Away Excess:
Immediately after painting the green, use a slightly damp paper towel to wipe across the surface. This leaves paint in the deep crevices while cleaning the raised areas for a weathered look. -
Gild the Star:
Dip a fine detail brush into metallic gold paint. Carefully fill in the star impression at the top of the tree. -
Highlight the Dots:
Using the same gold paint, gently dab inside each of the circular ‘snow’ indentations you made earlier. -
Seal (Optional):
To protect your work, you can apply a thin layer of matte varnish over the entire piece once the paint is completely dry. -
Add the Hanger:
Cut a length of natural jute twine, loop it through the hole at the top, and tie a secure knot to finish your ornament.
Add Sparkle
Before the gold paint dries on the dots, sprinkle a tiny pinch of champagne-colored glitter over them for visible shimmer under Christmas lights.
Now hang your beautiful handmade creation on the tree or use it as a special gift tag

TRACK YOUR CERAMIC JOURNEY
Capture glaze tests, firing details, and creative progress—all in one simple printable. Make your projects easier to repeat and improve.
Christmas Light Bulb Ornaments
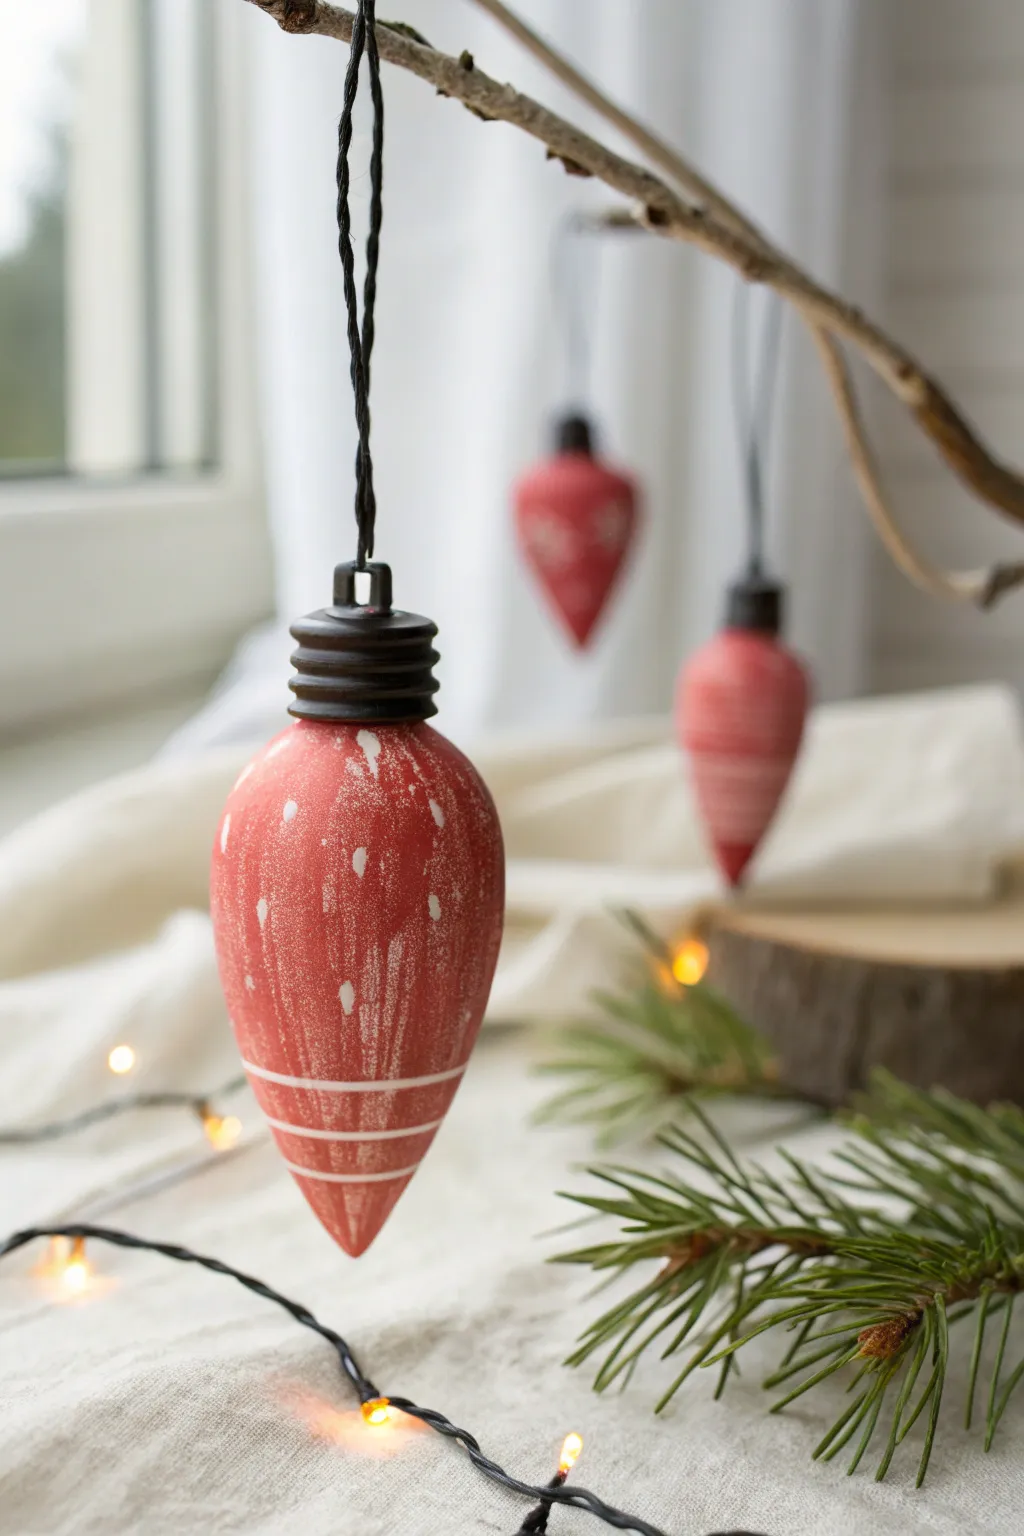
Capture the nostalgia of classic C9 Christmas lights with these charming air dry clay ornaments. Their distressed red finish and hand-painted details give them a cozy, rustic look that mimics aged wood or vintage glass perfectly.
Step-by-Step Tutorial
Materials
- Air dry clay (white or terracotta)
- Rolling pin
- Parchment paper or craft mat
- Lightbulb-shaped cookie cutter (or a cardstock template and craft knife)
- Sandpaper (fine grit)
- Acrylic paint: Deep red, black, and white
- Paintbrushes: Soft flat brush and a stiff bristle brush
- Twine or thin black cord for hanging
- Small eye hooks or wire loop
- Water cup
Step 1: Shaping the Bulb
-
Prepare your workspace:
Lay down parchment paper or a silicone craft mat to prevent sticking. Take a handful of air dry clay and knead it briefly until it is smooth and pliable. -
Roll the clay:
Use your rolling pin to flatten the clay to an even thickness. About 1/4 inch thick is sturdy enough without being too heavy for a tree branch. -
Cut the shapes:
Press your lightbulb cookie cutter firmly into the clay. If you don’t have a cutter, trace a lightbulb shape onto cardstock, cut it out, place it on the clay, and trace around it with a craft knife. -
Smooth the edges:
The cut edges can be a little sharp. Dip your finger in a tiny bit of water and gently run it along the perimeter of the bulb to round off the harsh angles. -
Add texture to the base:
The base of a real lightbulb has threads. Simulate this by taking a toothpick or dull modeling tool and pressing horizontal indentations into the rectangular ‘neck’ of the bulb. -
Insert the hanging hardware:
While the clay is still wet, carefully push a small eye hook or a loop of wire into the very top center of the bulb’s neck. Secure it by smoothing a tiny bit of clay around the entry point. -
Let them dry:
Place your ornaments on a flat surface to dry. Turn them over after about 12 hours to ensure the back dries evenly. Total drying time usually takes 24-48 hours depending on humidity. -
Sand for smoothness:
Once fully cured and hard, use fine-grit sandpaper to buff away any remaining rough spots or uneven edges on the sides.
Step 2: Painting and Distressing
-
Base coat the bulb:
Paint the main oval part of the bulb with a deep red acrylic paint. You may need two coats for opaque coverage. Let this dry completely. -
Paint the cap:
Use black acrylic paint to color the rectangular neck section at the top. Ensure you get the paint into the indented grooves you created earlier. -
Dry brushing technique:
To get that frosty, vintage look, dip a stiff bristle brush into a small amount of white paint. Wipe almost all the paint off onto a paper towel until the brush feels dry. -
Apply the ‘frost’:
Lightly sweep the dry brush vertically down the red section of the bulb. The paint should catch on the texture, creating faint, uneven streaks that look like aged glass or snow. -
Add accent spots:
This is where I like to add a bit more character. Dab a few slightly heavier spots of white here and there to mimic light reflection or heavier wear. -
Paint the stripes:
Using a very fine detail brush and white paint, carefully draw three horizontal rings near the bottom point of the bulb. These don’t have to be perfectly straight; a unsteady hand actually adds to the handmade charm. -
Final assembly:
Once all paint is dry, thread a piece of twine or black cord through the eye hook at the top and tie a knot to create your hanger.
Clean Lines
For sharper stripes at the bottom, wrap thin washi tape or painter’s tape around the dried red base before painting your white lines.
Level Up: 3D Form
Instead of flat ornaments, roll a ball of clay into a teardrop shape for fully 3D bulbs. Dry them by sticking a toothpick in the base and standing it in foam.
Now your rustic bulbs are ready to add a splash of vintage color to your holiday decor
Scandinavian Pattern Baubles
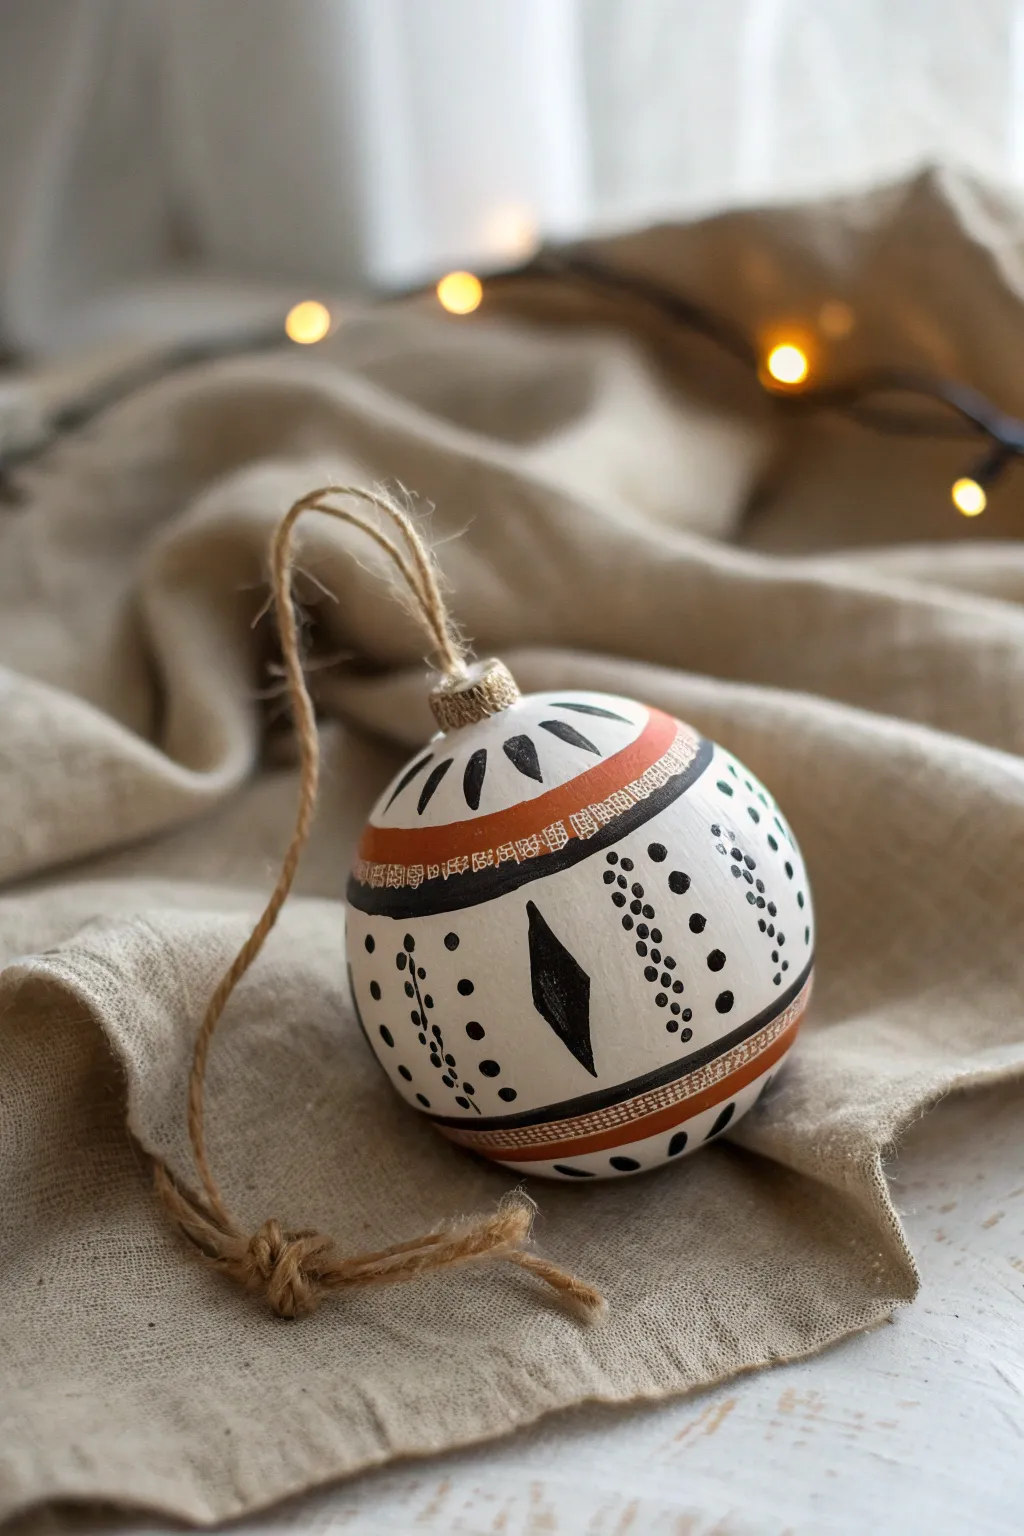
Bring a touch of cozy Scandinavian charm to your tree with these hand-painted air dry clay ornaments. The crisp black and terracotta geometric patterns against a white base create a timeless, festive look that feels both rustic and modern.
Detailed Instructions
Materials
- Air dry clay (white)
- Acrylic rolling pin
- Round cookie cutter (approx. 2.5 – 3 inches) or a spherical mold if making 3D balls
- Fine-grit sandpaper
- Acrylic paints: White (titanium), Black, and Terracotta (burnt lush/sienna)
- Fine detail brushes (size 0 and 00)
- Pencil
- Jute twine
- Gold or bronze paint pen (optional for details)
- Matte varnish or sealant
- Small eye pin or wire loop
Step 1: Shaping the Base
-
Condition the clay:
Start by kneading a chunk of air dry clay until it is warm, pliable, and free of cracks. If the clay feels too dry, dip your fingers in water and work it in. -
Form the sphere:
Roll the clay between your palms to create a smooth, perfect sphere. Aim for the size of a standard tangerine. Smooth out any visible seams with a damp finger. -
Insert the hanging mechanism:
While the clay is still wet, gently press a small eye pin or a loop of wire into the top center of the ball. Smooth the clay around the base of the metal to secure it. -
Let it dry:
Place the bauble on a soft surface, like a piece of foam or a crumpled cloth, to prevent a flat spot from forming. Allow it to dry completely for 24-48 hours, rotating it occasionally for even airflow. -
Sand for smoothness:
Once fully cured, use fine-grit sandpaper to gently buff the surface. Focus on removing any fingerprints or bumps so your painting canvas is flawless.
Step 2: Creating the Base Layer
-
Prime the surface:
Paint the entire sphere with a coat of titanium white acrylic paint. This ensures a bright, even background that makes the geometric patterns pop. -
Second coat:
If the clay color shows through after the first layer dries, apply a second thin coat of white. Let this dry completely before starting the design. -
Lightly sketch guidelines:
Using a pencil with a very light touch, draw horizontal guide rings around the bauble. I like to mark the center equator first, then add parallel lines above and below to keep the bands straight.
Clean Lines Hack
Struggling with straight horizontal lines on a round surface? Place a rubber band around the bauble as a physical guide to trace your pencil lines against.
Step 3: Painting the Scandinavian Pattern
-
The terracotta bands:
Mix a warm terracotta hue or use burnt sienna. Paint two distinct horizontal bands following your pencil guides—one slightly above the center and one below. -
Adding black outlines:
Using your finest brush and black acrylic, carefully outline the terracotta bands. This provides that sharp, graphic quality typical of Nordic design. -
Central diamonds:
In the wide white space between the two terracotta bands, paint large, bold black diamonds. Space them evenly around the circumference of the ornament. -
Dotted details:
Add vertical lines of small black dots flanking the diamonds. Keep your brush vertical and just touch the tip to the surface for perfect circles. -
Top and bottom accents:
Near the top and bottom of the bauble, add small black dash marks or teardrop shapes radiating outward from the center poles. -
Intricate band work:
Once the terracotta bands are dry, use a very fine brush or a white/gold paint pen to add tiny geometric scribbles or Greek-key style patterns directly on top of the orange paint.
Level Up: Texture
Before the clay dries, gently press a stamp or lace into the terracotta band area. Paint over it later to highlight the embossed texture with a dry-brush technique.
Step 4: Finishing Touches
-
Seal the artwork:
Apply a coat of matte varnish over the entire ornament. This protects the paint from scratches and gives the bauble a professional, finished porcelain look. -
Add the hanger:
Cut a length of natural jute twine. Thread it through the wire loop at the top and tie a secure knot to create the hanging loop. -
Final flourish:
Tie a second knot near the bottom of the loop or fray the ends of the twine slightly for a rustic textural contrast against the smooth painted surface.
Hang your new creation on a sturdy branch and enjoy the warmth it adds to your holiday decor
Lace-Pressed Snowy Ornaments
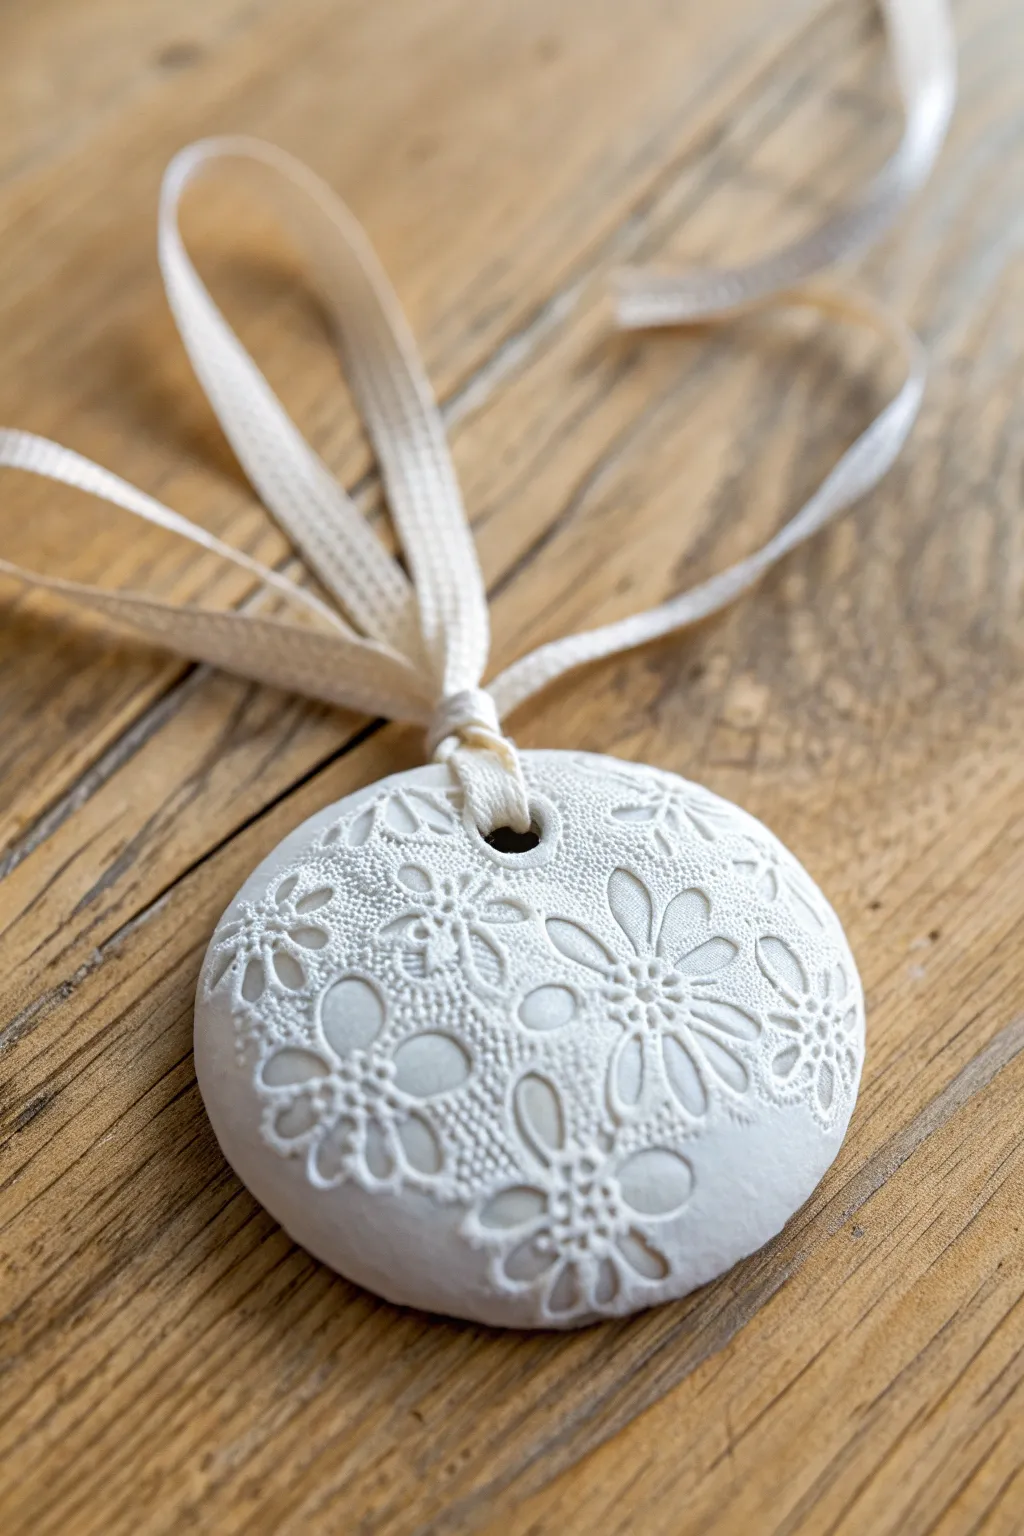
This elegant ornament captures the delicate beauty of lace in a permanent, stone-like form that feels incredibly sophisticated despite being simple to make. By pressing textured fabric into fresh clay, you create a raised floral relief that catches the light beautifully on your tree.
How-To Guide
Materials
- White classic air dry clay (or cold porcelain)
- Small piece of textured lace or a doily (thicker crochet lace works best)
- Round cookie cutter (approx. 2.5 – 3 inches)
- Rolling pin
- Parchment paper or non-stick craft mat
- Straw or small circular cutter (for the hole)
- Fine grit sandpaper (optional)
- White or cream satin ribbon (approx. 1/4 inch width)
- Clear matte varnish (optional)
Step 1: Preparing the Clay Base
-
Prepare your surface:
Lay down a sheet of parchment paper or a non-stick craft mat to protect your table and ensure the clay doesn’t stick. This makes peeling the finished shape off much easier later. -
Condition the clay:
Take a handful of white air dry clay and knead it in your warm hands for about a minute. This softens the material and prevents cracks from forming at the edges during rolling. -
Roll the slab:
Using a rolling pin, roll the clay out into an even slab. You want a thickness of about 1/4 inch (6mm)—too thin and it becomes brittle, too thick and it gets heavy.
Step 2: Creating the Texture
-
Position the lace:
Place your piece of lace or crocheted doily directly onto the smoothed clay slab. Choose a section of the lace that has a distinct floral pattern for the best visual impact. -
Impress the pattern:
Gently roll your rolling pin over the lace once or twice with firm, even pressure. Don’t press so hard that you thin the clay significantly, but push enough to embed the texture deep into the surface. -
Reveal the design:
Carefully peel back the lace from one corner to avoid distorting the clay. You should see a crisp, raised impression of the thread-work left behind.
Fixing Cracks
If tiny cracks appear while drying, mix a small amount of fresh clay with water to make a paste (slip) and smooth it into the cracks with a brush.
Step 3: Cutting and Refining
-
Cut the shape:
Center your round cookie cutter over the most attractive part of the pattern. Press down firmly to cut the circle, then give it a tiny wiggle to separate it from the excess clay. -
Remove excess clay:
Peel away the scrap clay from outside the ring first, leaving just your cut circle on the parchment paper. -
Create the hanging hole:
Using a drinking straw or a small circular detail cutter, punch a hole near the top edge of the ornament. -
Smooth the edges:
Dip your finger in a tiny bit of water and run it gently around the cut rim of the circle to smooth out any sharp ridges left by the cutter.
Pattern Definition
Thicker, crocheted lace works better than fine tulle lace. The deeper the original fabric texture, the more distinct the final clay impression will be.
Step 4: Drying and Finishing
-
Initial drying:
Let the ornament sit flat on the parchment paper in a cool, dry place. Avoid direct sunlight or heat sources, as drying too fast can cause curling. -
Flip occasionally:
After about 12 hours, I usually flip the ornament over to let the underside breathe. This helps it dry flat. Total drying time will be 24-48 hours depending on humidity. -
Sanding (Optional):
If there are any rough spots on the edges after it is fully hardened, lightly buff them away with fine-grit sandpaper. -
Sealing (Optional):
For longevity, you can brush on a coat of clear matte varnish. This seals the clay against moisture without making it shiny or plastic-looking. -
Cut the ribbon:
Cut a length of cream satin ribbon, approximately 10-12 inches long. -
Thread the loop:
Fold the ribbon in half and push the folded loop end through the hole from the front to the back. -
Secure the hanger:
Pass the loose ends of the ribbon through the loop and pull tight to create a lark’s head knot right at the top of the ornament.
Hang your new textured creation on the tree and enjoy the handmade warmth it adds to your holiday decor
Mistletoe and Holly Medallions
Capture the elegance of winter greenery on a simple clay canvas with this delicate medallion ornament. The smooth white surface highlights the lush green leaves and vibrant red berries, framed by a charming stippled gold border.
Step-by-Step Guide
Materials
- Air dry clay (white)
- Round cookie cutter (approx. 3-4 inches)
- Rolling pin
- Sandpaper (fine grit)
- Acrylic paints (olive green, forest green, bright red, brown)
- Detail brushes (sizes 0 and 00)
- Gold paint pen or metallic acrylic paint
- Gloss varnish or Mod Podge
- Jute twine
- Straw or skewer (for the hole)
- Parchment paper
Step 1: Shaping the Base
-
Roll the clay:
Begin by kneading a portion of white air dry clay until it is soft and pliable. Roll it out on a piece of parchment paper to an even thickness of about 1/4 inch. -
Cut the circle:
Press your round cookie cutter firmly into the clay to create a clean circle. Peel away the excess clay from the outside. -
Create the hanger hole:
Use a straw or a wooden skewer to poke a hole near the top edge of the circle. Make sure the hole is large enough for your twine to pass through later, keeping in mind the clay shrinks slightly as it dries. -
Smooth the edges:
Dip your finger in a little bit of water and run it gently around the cut edges of the circle to smooth out any roughness or sharp ridges. -
Allow to dry:
Let the ornament dry completely on a flat surface. This usually takes 24-48 hours depending on humidity; flip it halfway through to ensure even drying. -
Sand the surface:
Once fully cured and hard, lightly sand the front surface and edges with fine-grit sandpaper to create a perfectly smooth canvas for your painting.
Pro Tip: Pencil First
Not confident painting freehand? Sketch your stem and leaf placement lightly with a mechanical pencil directly on the dry clay before reaching for the paint.
Step 2: Painting the Design
-
Paint the stems:
Mix a diluted brown acrylic paint with a touch of water. Using your finest detail brush (size 00), paint a central, branching stem structure starting from the bottom center and reaching upward. -
Base coat the leaves:
Using a lighter olive green, paint small, oval-shaped leaves extending from the branches. Keep your brush strokes light and fluid. -
Add leaf depth:
While the olive green is still slightly tacky or after it dries, come back with a darker forest green. Add shading to the bottom half of each leaf or paint a thin vein line down the center to create dimension. -
Add berries:
Load a small round brush or a dotting tool with bright red paint. Place clusters of two or three classic berries at the junctions where leaves meet the stem. -
Highlight the berries:
I like to add a tiny white dot reflecting light on each red berry once dry; this small detail makes them look plump and three-dimensional. -
Create the gold border:
Using a gold paint pen or a small brush with metallic gold paint, dab small dots around the very perimeter of the circle. Space them evenly to create a vintage-style frame.
Level Up: Texture Play
Before the clay dries, gently press a real linen fabric swatch onto the surface to imprint a subtle woven texture that will catch the glaze later.
Step 3: Finishing Touches
-
Seal the artwork:
Protect your painting by applying a coat of gloss varnish or Mod Podge over the entire top surface. This seals the clay and gives the leaves a beautiful porcelain-like shine. -
Let the varnish cure:
Allow the sealant to dry completely according to the manufacturer’s instructions, ensuring the finish is hard and non-tacky. -
Attach the twine:
Cut a length of jute twine, fold it in half, push the loop through the hole, and thread the loose ends through the loop to create a lark’s head knot.
Hang this sophisticated little piece on your tree or attach it to a gift wrap for a personalized tag that doubles as a keepsake.
Mini Winter Village Shelf Set
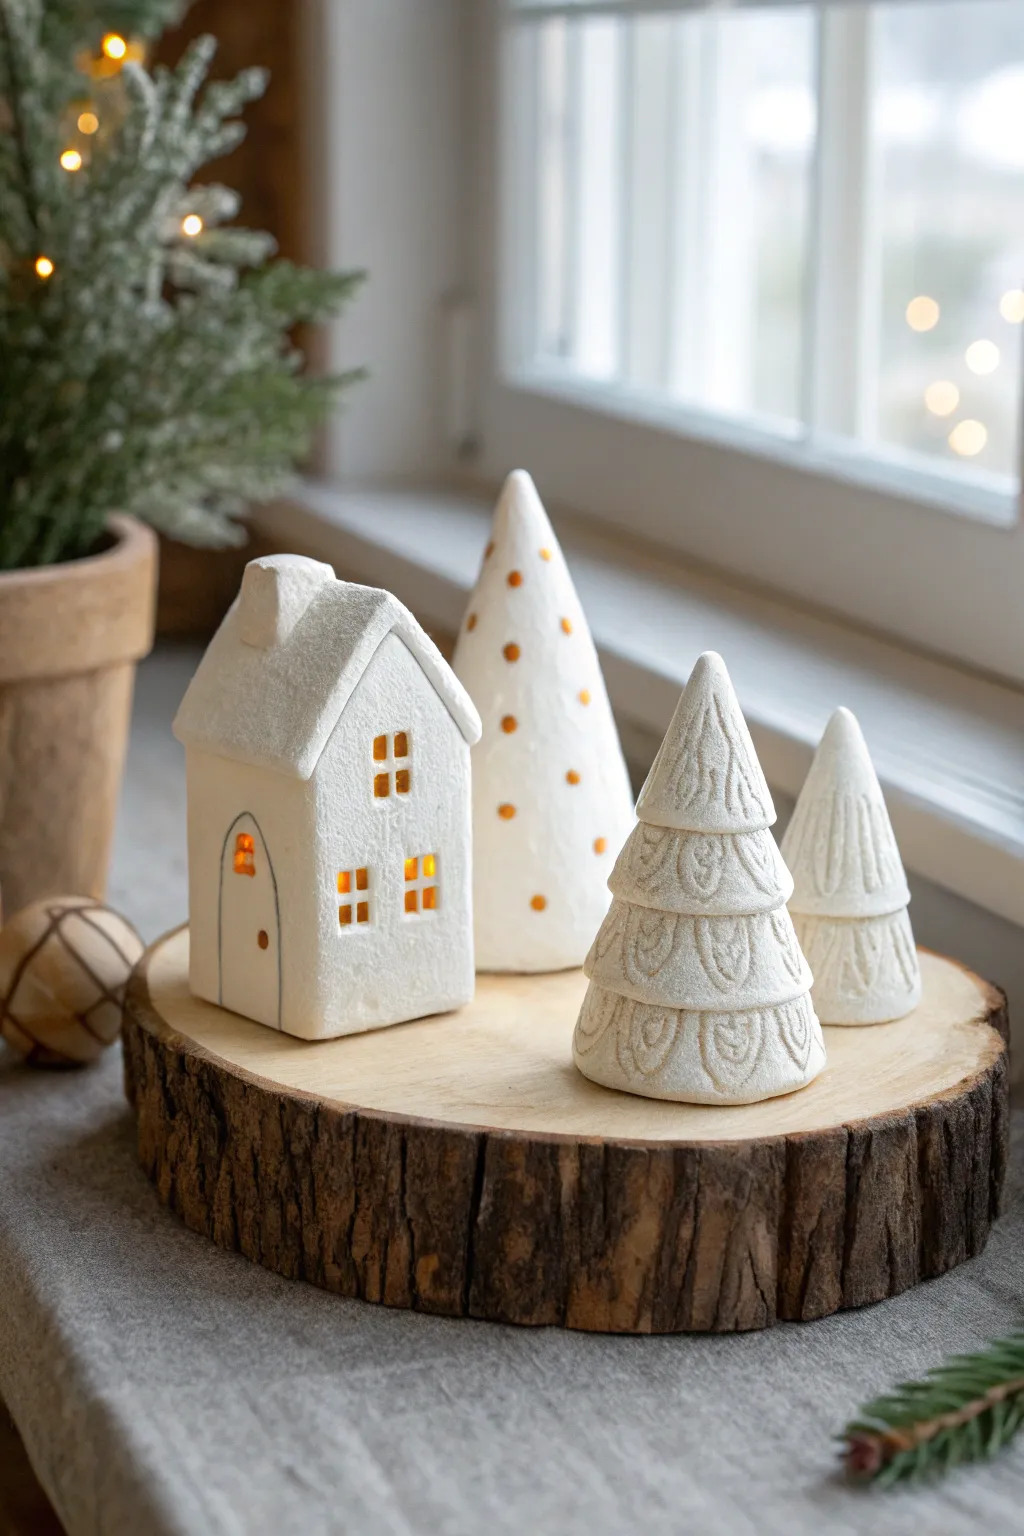
Create your own cozy winter wonderland with this charming miniature village set sculpted from air-dry clay. The finish mimics a dusting of fresh snow, while the hollow house glows warmly from within.
Detailed Instructions
Materials
- White stone-effect or standard air-dry clay
- Rolling pin
- Craft knife
- Cardstock or thin cardboard (for templates)
- Ruler
- Texture tools (or a small lace doily/clay stamp)
- Gold acrylic paint
- Small round paintbrush
- Fine-grit sandpaper
- Small rolling slats or chopsticks (for even thickness)
- Slip (clay mixed with water)
- Wood slice base (optional)
Step 1: Building the Light-Up House
-
Create templates:
Cut cardstock templates for your house: two pointed gable ends, two rectangular side walls, and two roof rectangles. Keep the scale small, about 3-4 inches tall. -
Roll the clay:
Roll out a slab of clay to a uniform thickness, about 1/4 inch. Using rolling slats on either side of your dough helps keep the surface perfectly level. -
Cut the walls:
Place your paper templates onto the clay and carefully cut around them with a craft knife. Cut out the four walls and the two roof pieces. -
Add windows and doors:
While the clay is flat, cut out small square windows and an arched doorway on the front gable piece. Use a ruler to keep window lines straight. -
Dry the slabs partially:
Let the pieces sit for about 30 minutes to an hour until -
Assemble the walls:
Score the edges of the walls with a needle tool and apply a little slip. Press the walls together to form a box, reinforcing the inside seams with a thin snake of clay. Smooth the outside seams with a wet finger. -
Attach the roof:
Score and slip the top edges of the walls. Place the roof panels on, ensuring they join at the peak. Add a small clay chimney to one side if desired.
Roof Sadness?
If the roof sags during assembly, stuff the house lightly with crumpled tissue paper or cling film for support. Remove it gently once the clay is rigid.
Step 2: Sculpting the Winter Trees
-
Form the large cone:
Roll a solid cone of clay between your palms for the tall, smooth tree. It should be taller than your house. Flatten the bottom so it stands straight. -
Create textured trees:
For the medium and small trees, start with smaller cone shapes. Instead of a smooth surface, you will build these up in layers. -
Prepare textured strips:
Roll out a thin strip of clay. Use a sculpting tool or stamp to press a scalloped or leaf-like pattern into the strip. -
Layer the foliage:
Cut the textured strip into smaller sections. Wrap these around the cone starting at the bottom and overlapping as you work your way up to the tip. -
Refine the shape:
Gently press the layers to ensure they adhere to the base cone, smoothing the very top into a neat point.
Step 3: Finishing Touches
-
Let everything dry:
Allow all pieces to dry completely for 24-48 hours. Turn them occasionally to ensure even airflow. -
Sand imperfections:
Once bone dry, lightly sand any rough edges or fingerprints with fine-grit sandpaper to achieve that smooth, stone-like matte finish. -
Paint details:
Using a fine brush and gold acrylic paint, add small polka dots to the tall smooth tree. I find a toothpick works great for getting perfect little circles. -
Create the door outline:
Use a very thin brush or a grey marker to draw a simple outline around the arched door and add a tiny gold dot for the doorknob. -
Arrange the scene:
Place an LED tea light inside the house and arrange your village on a wood slice or shelf to enjoy the glow.
Frosty Texture Hack
For a snowy texture without paint, lightly dab a stiff toothbrush onto the wet clay surface of the house or trees before they dry.
Now turn down the lights and watch your handmade village cast a warm, festive stillness over the room.
Ornament Garland Tiles
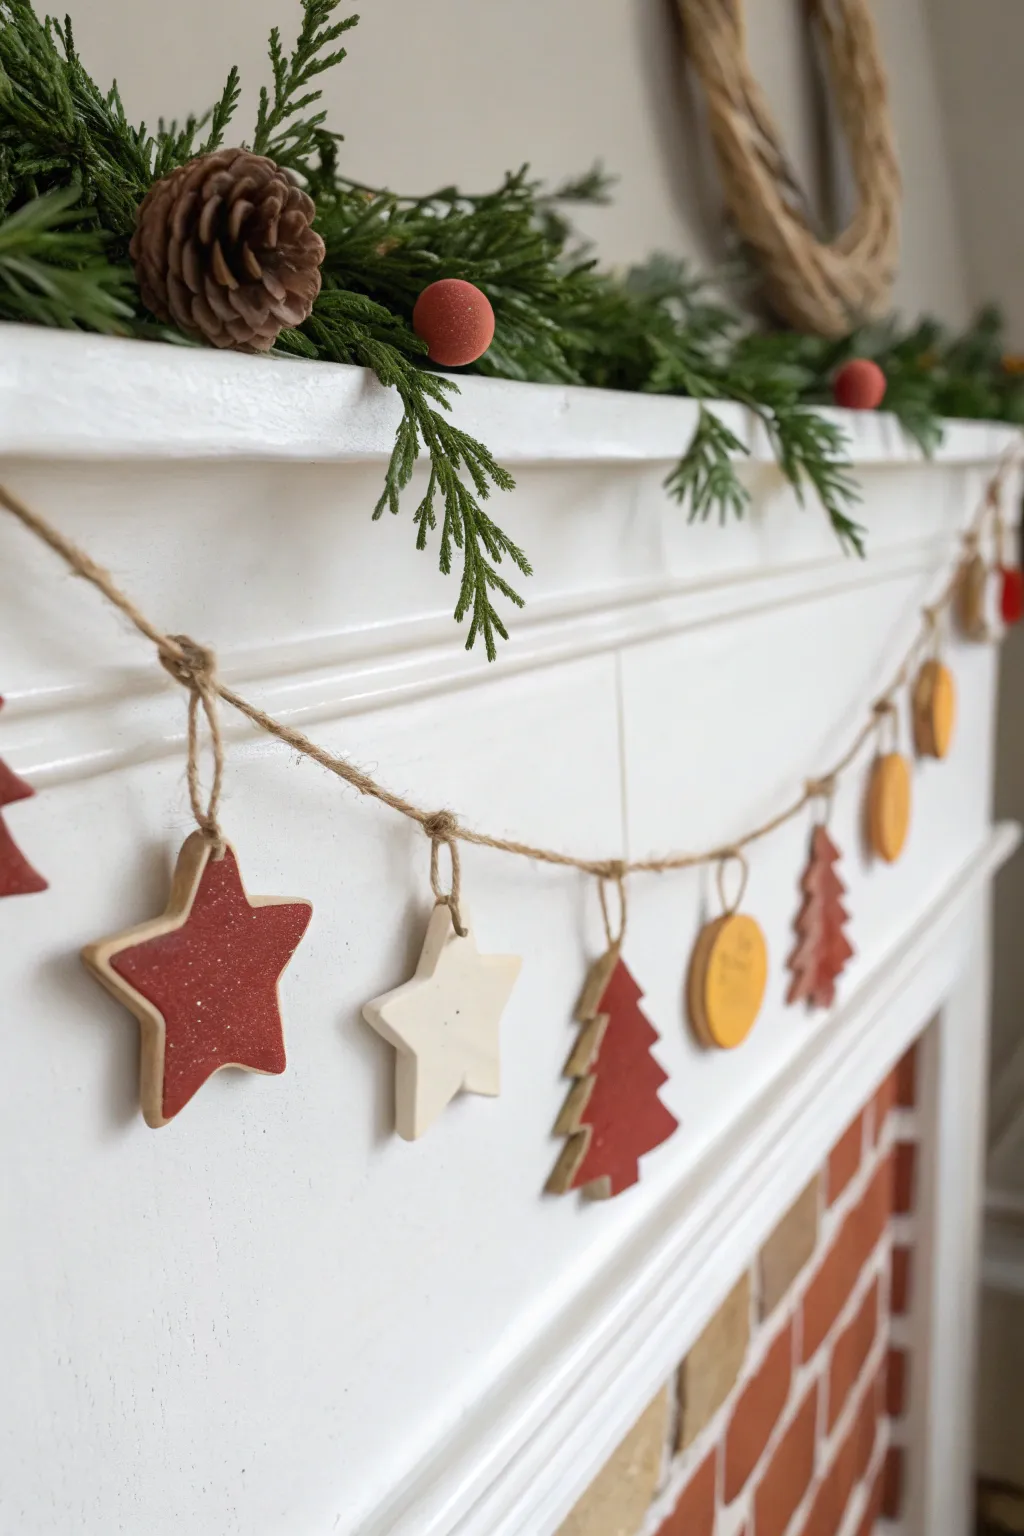
Bring a cozy, handcrafted touch to your mantel with this charming clay garland featuring classic holiday shapes. The combination of painted red motifs and natural yellow and white accents creates a warm, nostalgic feel that strings together perfectly.
Step-by-Step Guide
Materials
- Air dry clay (white)
- Rolling pin
- Parchment paper or canvas mat
- Cookie cutters (star, tree, circle)
- Straw or toothpick (for holes)
- Sandpaper (fine grit)
- Acrylic paint (deep red, mustard yellow)
- Paintbrushes (flat and detail)
- Twine or jute string
- Scissors
Step 1: Shaping the Ornaments
-
Prepare your workspace:
Lay down parchment paper or a canvas mat to prevent sticking. Take a chunk of air dry clay and knead it until it’s soft and pliable, which helps prevent cracking later. -
Roll the slab:
Roll out the clay to an even thickness, aiming for about 1/4 inch. If it’s too thin, the ornaments might be fragile; too thick, and they’ll take ages to dry. -
Cut the shapes:
Using your cookie cutters, press firmly into the clay to create your shapes. For this specific look, cut out equal numbers of stars, Christmas trees, and circles. -
Create hanging holes:
Before the clay starts to dry, use a drinking straw or a thick toothpick to punch a hole near the top of each ornament. Make sure the hole is big enough for your twine to pass through easily. -
Smooth the edges:
Dip your finger in a little water and gently run it along the cut edges of each shape to smooth out any roughness or jagged bits left by the cutter. -
Let them dry:
Place your shapes on a flat surface to dry. Flip them over halfway through the drying process (usually after 12-24 hours) to ensure both sides dry evenly and stay flat.
Curling Edges?
If your clay shapes start curling up as they dry, place a heavy book over them (with parchment paper in between) once they are semi-dry to flatten them back out.
Step 2: Decorating and Painting
-
Sand imperfections:
Once fully cured and hard, lightly sand the edges with fine-grit sandpaper if there are any remaining sharp spots. Wipe away the dust with a dry cloth. -
Paint the red stars:
Select half of your star shapes. Paint the front surface deep red, leaving the sides unpainted to reveal the raw white clay for a nice dimensional contrast. -
Detail the red trees:
Paint the Christmas tree shapes with the same deep red. Use a small flat brush to keep the edges clean, again leaving the side profile unpainted. -
Add the yellow accents:
Paint the circle ornaments a warm mustard yellow. This pop of color breaks up the red and white pattern beautifully. -
Leave some natural:
Set aside the remaining white stars without paint. The mix of painted and raw clay is key to this project’s rustic aesthetic. -
Dry the paint:
Allow the paint to dry completely. Since air dry clay is porous, the first coat usually dries quickly, but applies a second coat if you want a more opaque finish.
Add Sparkle
Mix a tiny amount of fine glitter into your red paint before applying it. It creates a subtle shimmer that catches the firelight beautifully.
Step 3: Stringing the Garland
-
Measure the twine:
Measure the length of your mantel and cut a piece of twine or jute string, adding at least 2 feet of extra length for the swag and hanging loops. -
Create jump loops:
Cut smaller pieces of twine, about 3-4 inches long, for each ornament. Thread these through the holes in your clay shapes and tie a small knot to create individual hanging loops. -
Assemble the pattern:
Lay out your main twine string on a table. Arrange your ornaments in your desired pattern below it—I prefer alternating shapes like red star, white star, tree, circle. -
Tie them on:
Tie the small loops of the ornaments onto the main garland string. Space them out by about 4-5 inches so they hang freely without bunching up. -
Secure the knots:
Once positioned correctly, tighten the knots on the main string. You can add a tiny dot of clear glue to the knot if you want to ensure they don’t slide around. -
Hang and enjoy:
Drape your finished garland across your fireplace mantel, securing the ends with heavy objects or hooks, and arrange the ornaments so they face forward.
Now you have a custom holiday decoration that looks sturdy yet delicate draped across your home’s focal point
Tiny Nativity Silhouette Ornaments
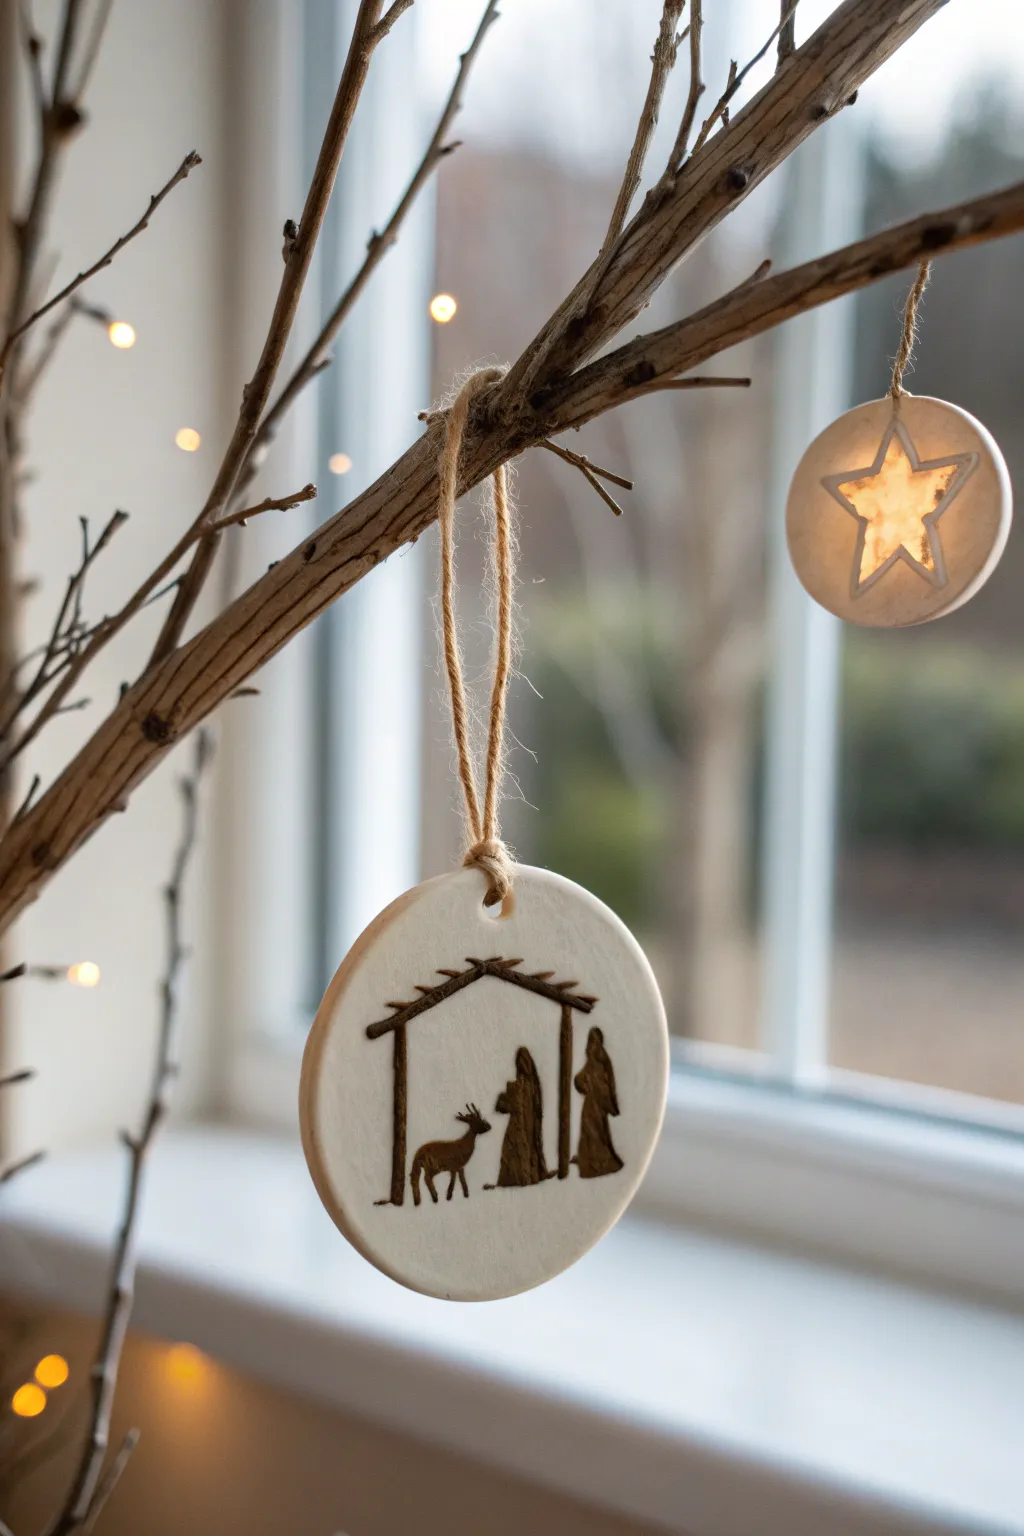
Capture the essence of the Christmas story with elegant simplicity using just air dry clay and ink. These refined white discs feature a stark, beautiful silhouette that looks stunning against evergreen branches or winter branches.
Step-by-Step
Materials
- White smooth air dry clay
- Rolling pin
- Circular cookie cutter (approx. 3 inches)
- Sandpaper (fine grit)
- Black fine-point permanent marker or archival ink pen
- Pencil and eraser
- Straw or skewer (for the hole)
- Natural twine or jute string
- Clear matte varnish or sealant (optional)
- Small cup of water
Step 1: Shaping the Base
-
Prepare the Clay:
Begin by taking a handful of smooth white air dry clay. Knead it gently in your hands to warm it up and remove any air bubbles, ensuring it’s pliable and crack-free. -
Roll it Out:
Place the clay on a clean, non-stick surface or canvas mat. Use your rolling pin to flatten the clay to a uniform thickness of about 1/4 inch; you don’t want it too thin, or it might crack when drying. -
Cut the Circle:
Press your round cookie cutter firmly into the clay to create a perfect circle. After lifting the cutter, smooth the edges of the circle with a wet fingertip to remove any roughness. -
Add Suspension Hole:
Using a plastic straw or a wooden skewer, poke a hole near the top edge of the circle. Make sure it’s centered and not too close to the edge to prevent breakage later. -
Dry Completely:
Set the clay disc aside on a drying rack or parchment paper. Air dry clay typically needs 24-48 hours to fully cure, and I find flipping it halfway through helps it dry evenly without warping.
Step 2: Sketching the Scene
-
Smooth the Surface:
Once bone dry, check the surface. If there are any bumps or fingerprints, lightly sand the face of the ornament with fine-grit sandpaper until it is silky smooth. -
Draft the Stable:
Very lightly sketch your design with a pencil. Start by drawing a simple roofline for the stable: a horizontal beam slightly angled, supported by two vertical posts. -
Outline the Figures:
Sketch the silhouettes inside the stable. Draw a tall, curved shape for Joseph on the right, leaning slightly inward or with a staff. -
Add Mary and Manger:
Draw a slightly smaller, kneeling figure for Mary in the center. Next to her, add a small shape for the manger or crib. -
Draw the Animal:
On the left side, sketch a small animal silhouette, like a donkey or sheep, facing inward toward the center figures. Keep the shapes simple and blocky.
Ink Bleeding Control
If ink bleeds into the clay’s pores, seal the dry clay with a thin layer of matte Mod Podge BEFORE drawing. Let it dry, then draw on top for crisp lines.
Step 3: Inking and Finishing
-
Trace with Ink:
Take your black fine-point permanent marker or archival ink pen. Carefully trace over your pencil lines, starting with the stable roof and posts to frame the scene. -
Fill the Silhouettes:
Create the solid silhouette look by coloring in your outlined figures completely. Use steady strokes to ensure the black is opaque and rich. -
Refine Details:
Double-check edges. Use the very tip of your marker to sharpen the corners of the stable roof or add tiny details like the animal’s ears. -
Erase Guidelines:
Wait at least 10 minutes to ensure the ink is totally dry. Gently erase any visible pencil marks remaining around the edges of your ink. -
Seal (Optional):
For longevity, you can brush on a light coat of clear matte varnish. This protects the clay from moisture and prevents the ink from fading over time. -
String It Up:
Cut a length of natural jute twine, approximately 8 inches long. Thread it through the hole you made earlier. -
Secure the Loop:
Tie a secure knot at the base of the loop, close to the clay edge, or tie the ends together at the top to create a hanger.
Burned Wood Effect
For a rustic look, skip the marker and use a wood burning tool (pyrography pen) on the dry clay. Use a low heat setting to gently etch the dark lines.
Hang your beautiful new creation in a window or on the tree to reflect on the season