Whenever I’m craving a creative reset, I reach for air dry clay—it’s the quickest way to turn a plain tabletop into a little idea factory. These easy air dry clay projects are all about simple shapes, big payoff, and that cozy “I made this” feeling without needing any special equipment.
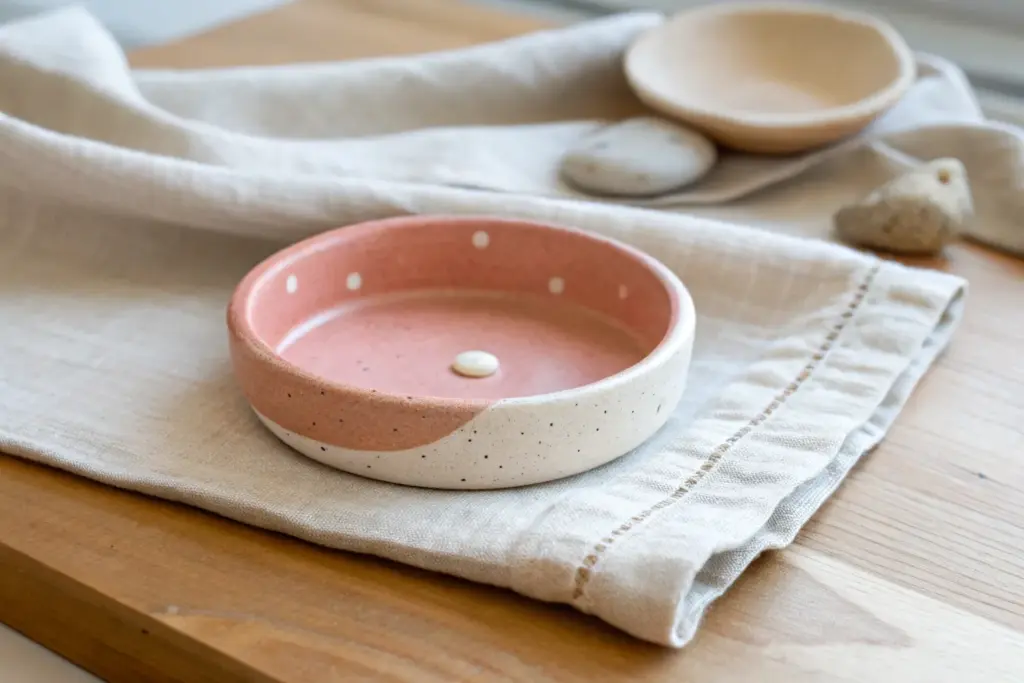
Classic Pinch-Pot Trinket Dish
This charming little dish combines the classic simplicity of a pinch pot with a playful ruffled edge and delicate hand-painted dots. It’s perfectly imperfect, creating a sweet spot to gather your favorite rings or dainty jewelry pieces.
Step-by-Step
Materials
- White air dry clay
- Rolling pin or smooth jar
- Small bowl of water
- Pointed modeling tool or pencil tip
- Fine-grit sandpaper (optional)
- Acrylic paint (burnt orange or terracotta)
- Very fine detail paintbrush
- Matte or satin varnish/sealant
- Damp sponge
Step 1: Shaping the Base
-
Prepare the Clay:
Start by grabbing a handful of air dry clay, roughly the size of a tangerine. Knead it in your hands for a minute to warm it up and make it pliable. -
Roll a Sphere:
Roll the clay between your palms until you have a smooth, round ball. Try to smooth out any major cracks as you go, using a tiny dab of water if needed. -
Start the Pinch:
Hold the ball in your non-dominant hand. Gently unexpected your thumb into the center of the ball, but don’t push all the way through to the bottom. -
Pinch the Walls:
Using your thumb on the inside and fingers on the outside, begin to pinch the clay walls gently. Rotate the ball as you pinch to keep the thickness even all the way around. -
Widen the Dish:
Continue pinching and turning until you have a small bowl shape. Aim for walls that are about a quarter-inch thick; too thin and the ruffles might crack later. -
Flatten the Bottom:
Gently tap the bottom of your bowl against your work surface. This creates a stable base so your trinket dish won’t wobble when it’s finished.
Don’t Overwork It
Avoid handling the clay too much once you start forming the ruffles. Excessive heat from your hands can dry the clay out too fast, leading to surface cracks.
Step 2: Creating the Ruffles
-
Smooth the Rim:
Dip your finger in a little water and run it along the top rim of the bowl to smooth out any cracks or jagged edges before you start sculpting. -
Mark Intervals:
Visualize where you want your waves to be. You don’t need to measure, but keeping a mental rhythm helps create a balanced look. -
Form the First Wave:
Place your index finger on the inside of the rim. With your thumb and middle finger on the outside, gently press the clay inward around your index finger to create a curve. -
Continue the Pattern:
Move slightly to the right and repeat the motion—pushing out with one finger while supporting with two on the outside—until you’ve ruffled the entire circumference. -
Refine the Shape:
Go back around the rim and gently adjust the waves with your fingertips to ensure they look soft and organic rather than sharp. -
Final Smooth:
Use a slightly damp sponge to wipe down the entire surface of the pot, smoothing away any fingerprints or harsh tool marks. -
Dry Completely:
Set the dish aside in a safe, draft-free spot. Let it air dry for 24-48 hours until the clay turns chalky white and feels room temperature to the touch.
Step 3: Decorating
-
Sand Imperfections:
Once fully dry, you can lightly sand any rough spots on the rim or base with fine-grit sandpaper for a professional finish. -
Prepare Paint:
Squeeze a small amount of burnt orange or terracotta acrylic paint onto a palette. You won’t need much for these delicate dots. -
Paint Interior Dots:
Dip your fine detail brush into the paint. Start randomly placing small dots on the inside of the bowl, keeping the spacing loose and airy. -
Paint Exterior Dots:
Continue the pattern on the outside of the bowl. I personally like to cluster a few near the bottom curve for visual interest. -
Let Paint Dry:
Allow the acrylic paint to dry completely, which usually takes about 15-20 minutes. -
Seal the Dish:
Apply a thin coat of matte or satin varnish over the entire dish to protect the clay and make the colors pop. Let this cure according to the bottle instructions.
Cracks Appearing?
If small hairline cracks appear while drying, mix a tiny bit of fresh clay with water to make a paste (slip) and fill them in, then smooth over with a finger.
Place your new ruffled dish on your bedside table or vanity for a lovely handmade touch


Minimalist Jewelry Catchall Tray
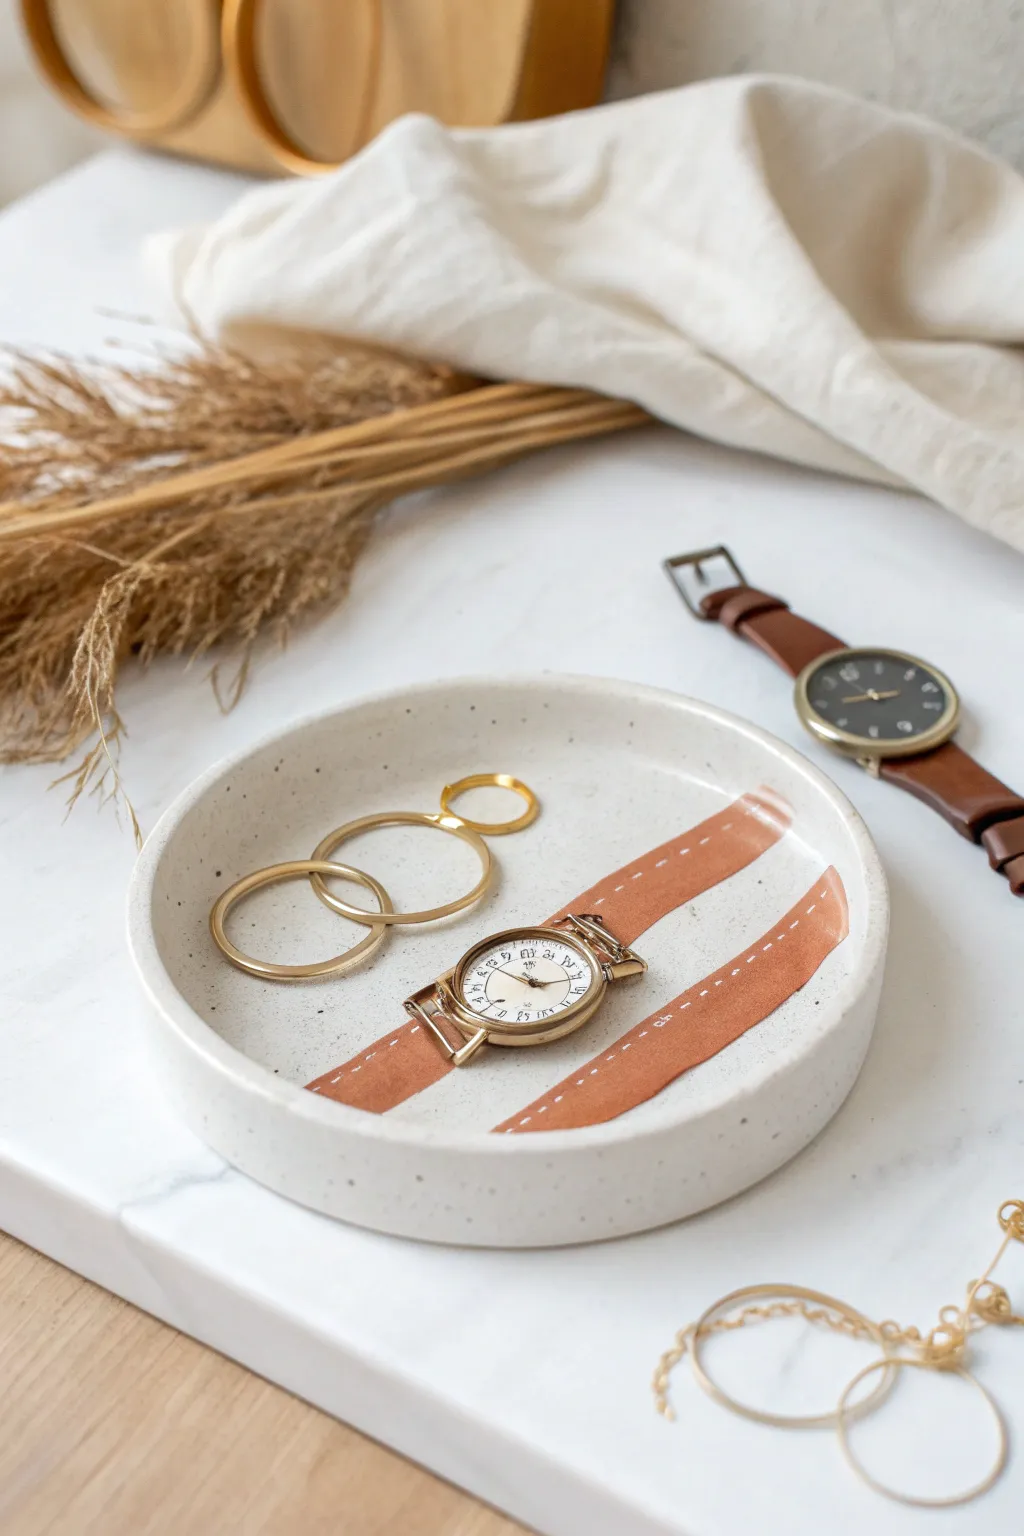
This sleek and modern jewelry tray combines the simple elegance of speckled clay with warm, terracotta-toned accents. Perfect for holding your daily rings and watches, its minimalist design brings a boutique feel right to your dresser top.
Detailed Instructions
Materials
- White or speckled air-dry clay
- Rolling pin
- Circle cutter or a bowl/plate to trace
- Craft knife
- Small bowl of water
- Sponge or fingers for smoothing
- Fine grit sandpaper
- Terracotta or rust-colored acrylic paint
- White acrylic paint or paint pen
- Painter’s tape or masking tape
- Flat paintbrush
- Detail paintbrush or fine tip marker
- Matte varnish or sealant
Step 1: Shaping the Base
-
Prepare the clay:
Begin by taking a generous handful of speckled air-dry clay. Knead it in your hands for a minute until it feels soft, warm, and pliable, which helps prevent cracks later on. -
Roll it out:
Place the clay on a clean, flat surface or a silicone mat. Use a rolling pin to flatten it into an even sheet, aiming for a consistent thickness of about 1/4 inch. -
Cut the circle:
Find a circular object like a bowl or use a large circle cutter that matches your desired tray size. Press it gently into the clay to mark the shape, then use your craft knife to cut out a clean circle. -
Smooth the edges:
Dip your finger in a little water and run it along the cut edge of your circle to smooth down any roughness or loose bits of clay.
Step 2: Building the Rim
-
Create a coil:
Roll a long snake of clay using your leftover scraps. Ensure the coil is even in thickness and long enough to go around the entire circumference of your base circle. -
Score the clay:
Using a needle tool or knife, make small hash marks (scoring) around the top edge of your base circle and along one side of your clay coil. This rough texture acts like velcro for the clay. -
Attach the rim:
Dab a small amount of water or liquid clay slip onto the scored areas. This works as glue. Gently press the coil onto the edge of the base circle. -
Blend the seams:
This is the most crucial step for a seamless look. Use your thumb or a modeling tool to drag the clay from the coil down onto the base, both on the inside and outside. I find using a slightly damp sponge helps blend everything invisibly. -
Refine the shape:
Once the coil is blended, pinch and shape the rim to get that crisp, vertical edge shown in the photo. Smooth the top lip with a wet finger. -
Let it dry:
Place your tray in a safe spot to dry completely. This usually takes 24-48 hours depending on humidity. Rotate it occasionally so the bottom dries evenly.
Cracked Up?
Small cracks can appear as clay dries. Mix a tiny bit of fresh clay with water to make a paste and fill them in, then sand smooth once dry.
Step 3: Decorating
-
Sand for perfection:
Once the clay is bone dry and hard, use fine-grit sandpaper to gently smooth out any bumps, fingerprints, or sharp edges on the rim. -
Tape the design:
To create the sharp geometric stripes, apply two strips of painter’s tape across the inside of the dish. Press the edges of the tape down firmly to prevent paint from bleeding underneath. -
Paint the stripes:
Using a flat brush and your terracotta acrylic paint, fill in the area between the tape strips. Apply thin, even layers; two coats usually gives the best opaque coverage. -
Remove tape:
Carefully peel back the tape while the paint is still slightly tacky to reveal your crisp lines. Let the paint dry fully. -
Add stitch details:
Dip a very fine detail brush into white acrylic paint (or use a white paint pen). Carefully paint small, evenly spaced dashes mostly along the center of your terracotta stripe to mimic stitching. -
Seal the piece:
Protect your work with a coat of matte varnish. This seals the paint and gives the clay a finished, professional look while keeping fingerprints at bay.
Make it Luxe
Instead of white paint for the stitching details, use a metallic gold leaf pen or gold acrylic paint for a chic, high-end finish.
Now you have a stylish resting spot for your favorite accessories that looks like stylish ceramic decor


Easy Leaf-Imprint Coasters
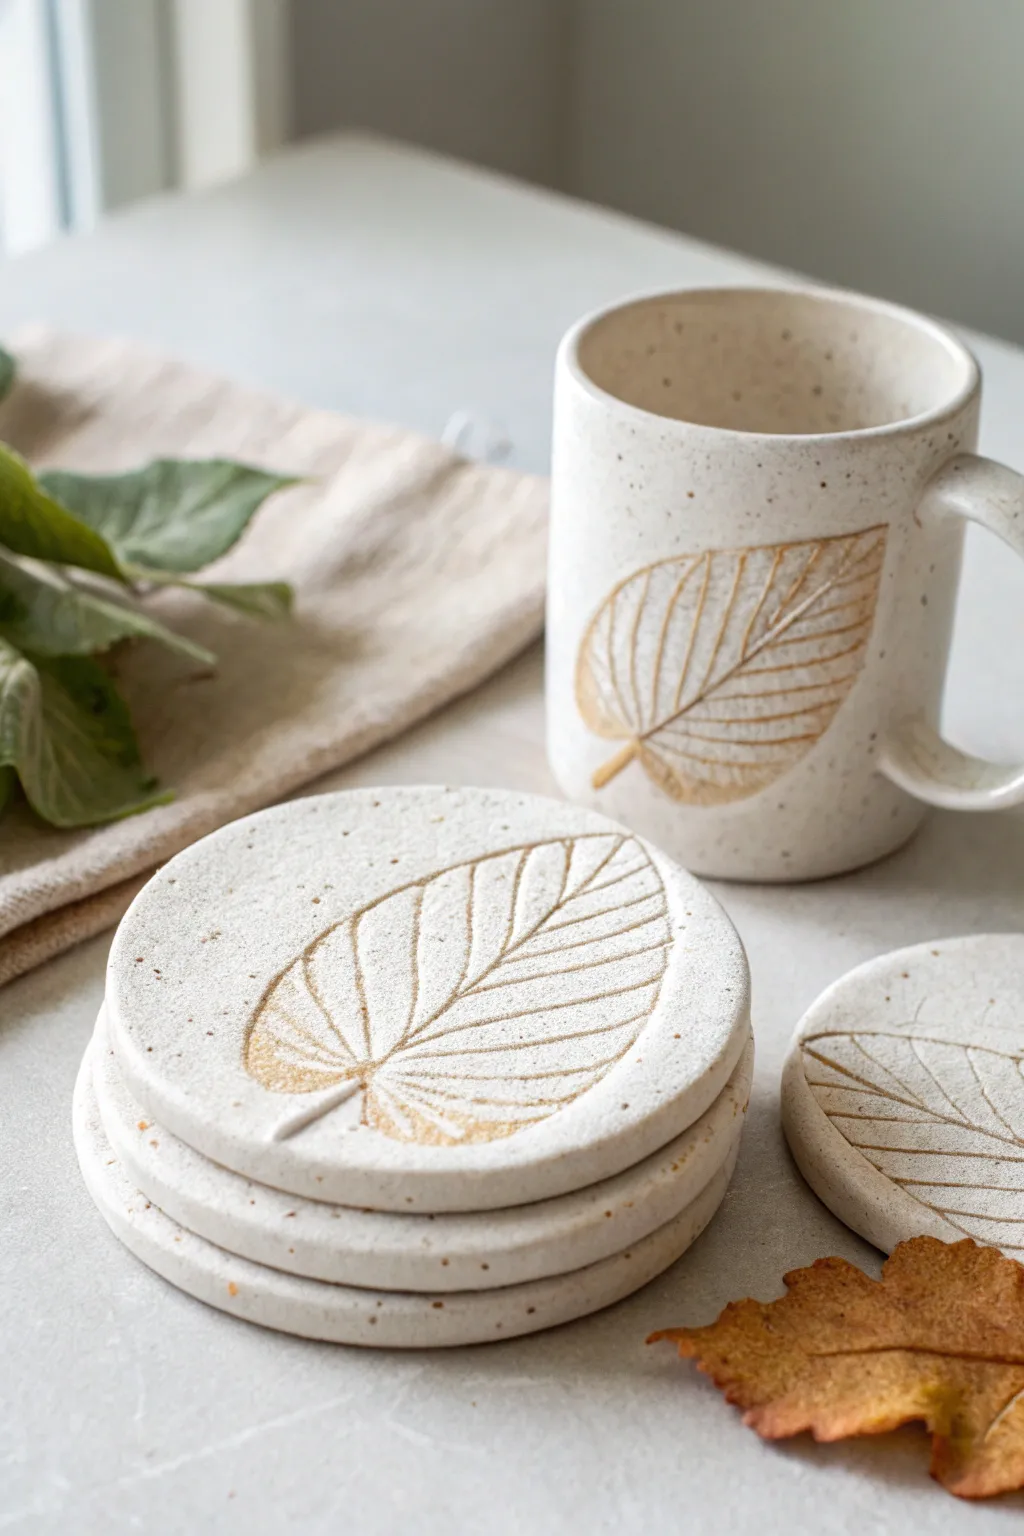
Capture the delicate beauty of autumn foliage with these minimalist air-dry clay coasters. The speckled stoneware effect and rustic golden leaf silhouettes bring an elegant, earthy warmth to any coffee table.
Step-by-Step
Materials
- White air-dry clay (or speckle-effect clay)
- Small rolling pin
- Fresh leaves with prominent veins (like hydrangea, elm, or viburnum)
- Round cookie cutter (approx. 4 inches) or a bowl guide
- Parchment paper or canvas mat
- Craft knife
- Small bowl of water
- Fine-grit sandpaper (400-600 grit)
- Acrylic paint (burnt sienna, ochre, and black/brown for speckling)
- Old toothbrush
- Small paintbrush
- Matte acrylic varnish or sealant
Step 1: Preparation & Rolling
-
Prepare your workspace:
Lay down a sheet of parchment paper or a canvas mat to prevent the clay from sticking. This also makes moving the wet coasters easier later. -
Condition the clay:
Take a handful of air-dry clay and knead it in your hands for a minute until it feels soft, warm, and pliable. This reduces the chance of cracks forming. -
Roll out the slab:
Place the clay on your mat and roll it out evenly. You’re aiming for a thickness of about 1/4 inch (6mm)—thick enough to be sturdy, but thin enough to look elegant. -
Select your botanicals:
Choose fresh leaves rather than dried ones; dried leaves tend to crumble when pressed. Look for leaves with thick, raised veins on the underside for the clearer impression.
Step 2: Creating the Impression
-
Position the leaf:
Place your chosen leaf face-down onto the clay slab, ensuring the prominent veins are against the clay surface. -
Press the design:
Gently roll your rolling pin over the leaf once or twice with firm, even pressure. Avoid rolling back and forth too much, as this can create a double image. -
Reveal the imprint:
Carefully lift the leaf stem and peel it away from the clay to reveal the detailed veining pattern underneath. -
Cut the shape:
Position your round cutter over the imprinted area, centering the leaf design nicely. Press down firmly to cut the circle, then pull away the excess clay from the outside. -
Smooth the edges:
Dip your finger in a little water and gently run it along the cut edge of the coaster to round off any sharpness and clean up clay crumbs.
Curled Edges?
If edges lift while drying, flip the coasters over halfway through the process. Placing a cutting board gently on top also keeps them flat.
Step 3: Drying & Finishing
-
Dry properly:
Move the coasters (still on their parchment) to a safe spot. I recommend placing a light book on top of them after a few hours to keep them perfectly flat as they shrink and dry. -
Sand for perfection:
Once fully cured (usually 24-48 hours), gently sand the edges and surface with fine-grit sandpaper to remove any roughness. -
Create the speckled effect:
Mix a tiny bit of black or dark brown acrylic paint with water until it’s fluid. load an old toothbrush with it and flick the bristles with your thumb to mist tiny speckles over the white clay. -
Mix the wash:
To get that fossilized look, mix a translucent wash using burnt sienna and yellow ochre paint heavily diluted with water. -
Highlight the leaf:
Paint the wash into the grooves of the leaf imprint. Wait a few seconds, then gently wipe the surface with a damp paper towel, leaving the darker pigment settled into the deep veins. -
Seal the piece:
Protect your work from moisture by applying 2-3 coats of matte varnish. Allow ample drying time between coats to ensure a durable, water-resistant finish.
Pro Tip: Depth trick
For sharper veins, don’t just roll over the leaf; place a piece of paper towel over the leaf first, then roll. It pushes the veins deeper.
Enjoy the organic, handmade touch these coasters bring to your morning coffee ritual


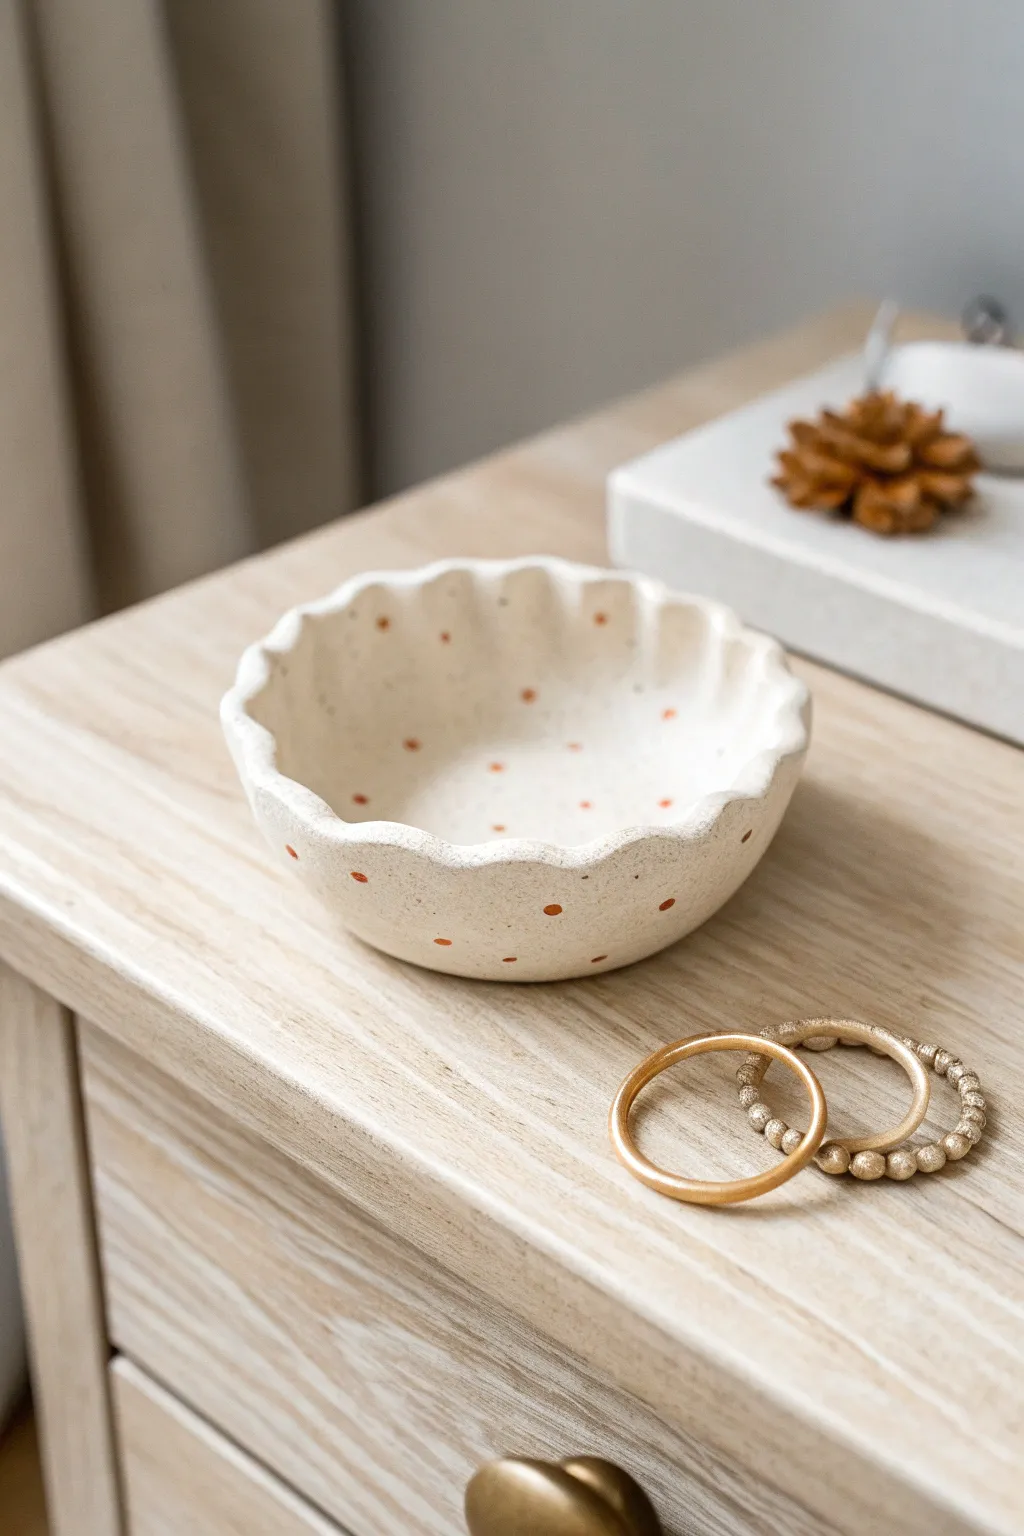
Simple Ring Cone Holder
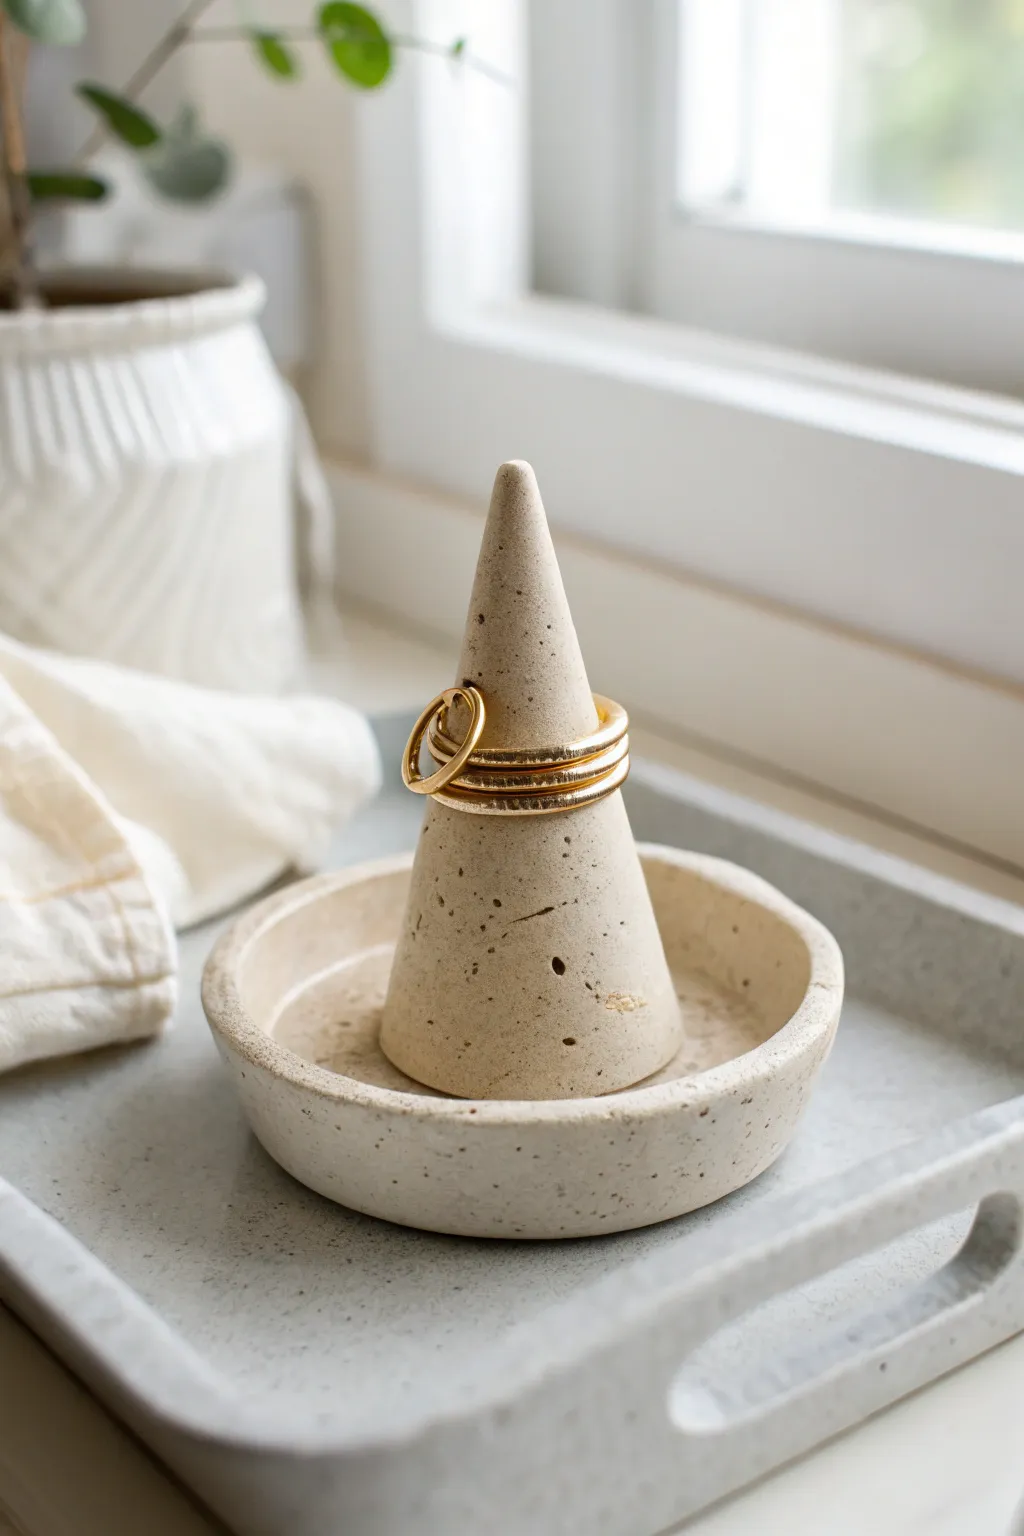
Keep your favorite rings safe and stylishly displayed with this modern, minimalist jewelry holder. The speckled finish mimics the look of natural stone or concrete, offering a high-end feel for a fraction of the cost.
Step-by-Step Tutorial
Materials
- White air dry clay
- Used coffee grounds or black pepper (for speckling)
- Small rolling pin
- Craft knife or clay cutter tool
- Small bowl (approx. 3 inches diameter) to use as a template
- Sandpaper (fine grit)
- Water in a small cup
- Clear matte varnish or sealant
- Cardstock or thick paper (for the cone template)
Step 1: Preparation & Mixing
-
Prepare the workspace:
Lay down a non-stick mat or parchment paper to protect your table and prevent the clay from sticking. -
Create the speckled clay:
Take a handful of white air dry clay and flatten it slightly. Sprinkle a generous pinch of dried coffee grounds or coarse black pepper into the center. -
Knead thoroughly:
Fold the clay over the grounds and knead it well. Continue kneading until the specks are evenly distributed throughout the entire ball of clay. If you want a heavier stone look, add more grounds.
Natural Texture
Don’t over-mix the coffee grounds if you want distinct, larger visible specks. Over-kneading can sometimes mud the color too much.
Step 2: Forming the Dish
-
Roll out the base:
Take about two-thirds of your speckled clay and roll it out until it’s roughly 1/4 inch thick. Aim for an even thickness to prevent cracking. -
Cut the circle:
Place your small bowl upside down on the flattened clay to act as a template. Use your craft knife to trace around the rim, cutting out a perfect circle. -
Create the rim:
Gently lift the edges of the clay circle slightly upward to form a shallow lip. Use water on your fingertip to smooth out the cut edge so it looks rounded and soft, like the reference image. -
Smooth the surface:
check the interior surface of the dish for any fingerprints. Dip your finger in water and gently buff them out until the surface is flawless.
Gilded Edge
Paint the very rim of the dish with a thin line of liquid gold leaf for a chic, mixed-metal contrast.
Step 3: Sculpting the Cone
-
Shape the cone:
Take the remaining third of your clay and roll it into a smooth ball first to remove air bubbles. -
Form a teardrop:
Using the palm of your hand, roll the ball against the table surface, applying more pressure on one side to elongate it into a cone or teardrop shape. -
Refine the height:
Stand the cone upright. Tap the base gently on the table to flatten it. Gently roll the cone between your palms to smooth the sides and create a sharp, rounded point at the top. -
Check proportions:
Place the cone in the center of your wet clay dish to check the size. It should be tall enough to hold multiple rings but proportional to the base width. -
Attach the pieces:
Score the bottom of the cone and the center of the dish with your knife (make little cross-hatch scratches). Add a dab of water to both scored areas. -
Join and smooth:
Press the cone firmly into the center of the dish. Use a sculpting tool or your finger to smooth the seam where the cone meets the dish so they look like one solid piece.
Step 4: Finishing Touches
-
Dry completely:
Let the piece dry undisturbed for 24-48 hours. Turn it over gently halfway through if possible to help the bottom dry evenly. -
Sand imperfections:
Once fully cured and hard, use fine-grit sandpaper to gently smooth any rough edges on the rim or the tip of the cone. -
Seal the piece:
Apply a coat of clear matte varnish to seal the clay. This protects it from moisture and gives it that finished, stone-like quality seen in the photo.
Place this beauty on your nightstand to add a touch of handcrafted elegance to your daily routine

The Complete Guide to Pottery Troubleshooting
Uncover the most common ceramic mistakes—from cracking clay to failed glazes—and learn how to fix them fast.
Stick-Style Incense Holder
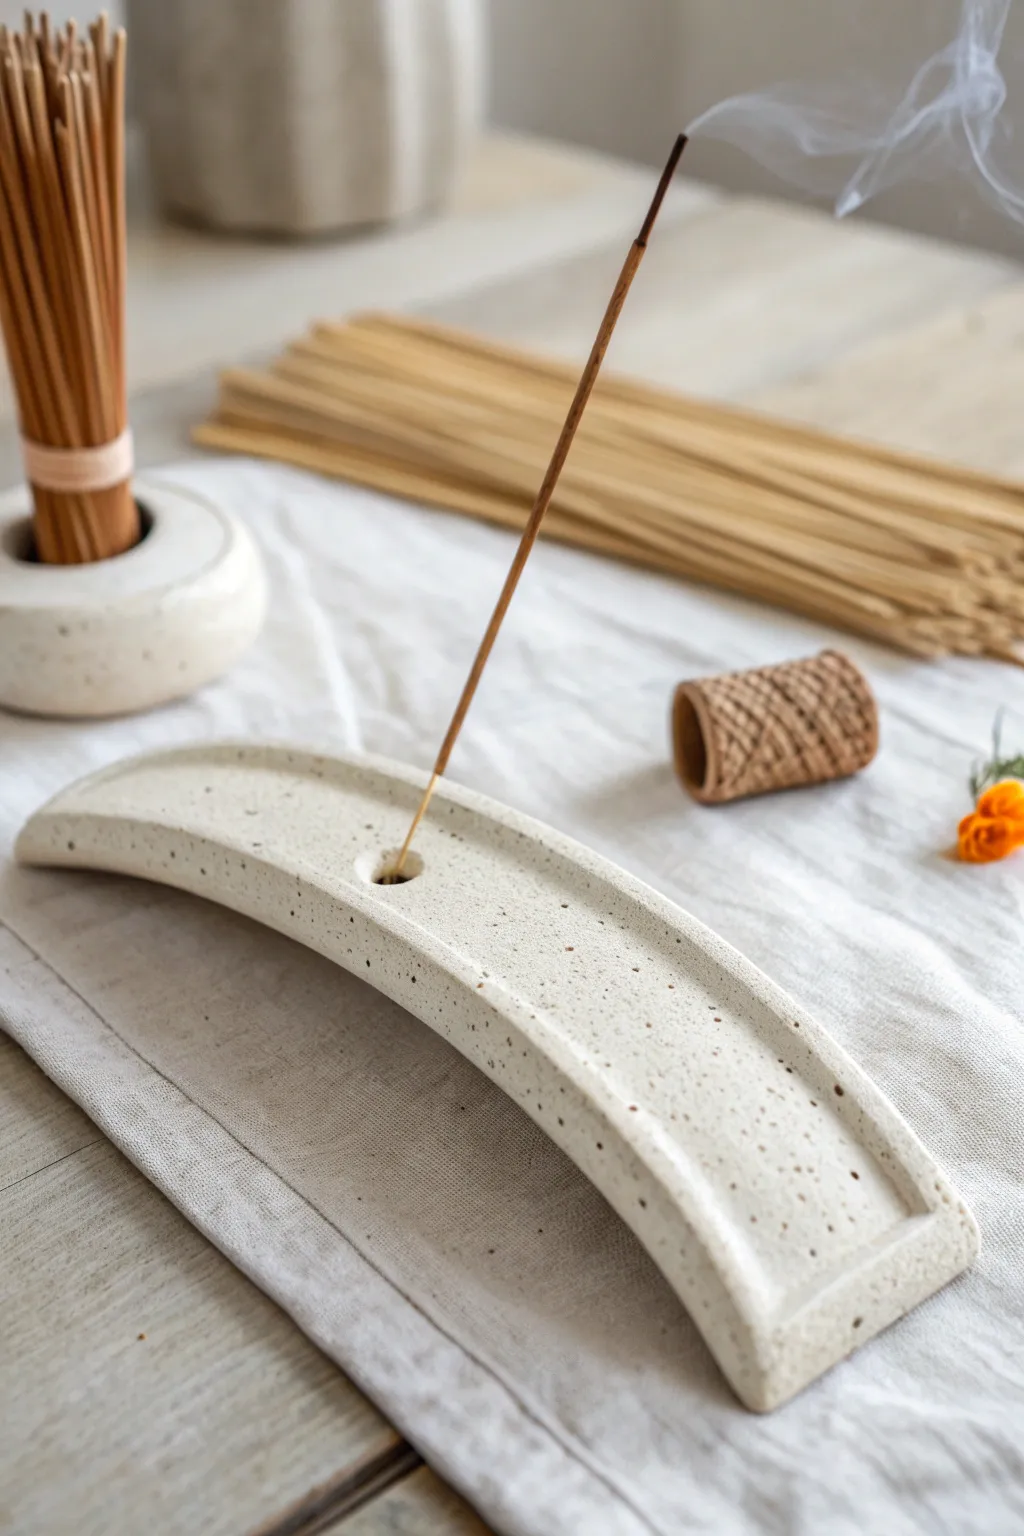
This elegant incense holder combines a modern architectural curve with a natural, speckled stone finish. Its long, gently bowed shape is designed to catch falling ash perfectly while adding a serene, minimalist touch to your space.
How-To Guide
Materials
- White or cream air-dry clay
- Rolling pin
- Ruler
- Craft knife or clay blade
- Large cylindrical object (like a large can or PVC pipe) for shaping the curve
- Small bowl of water
- Sanding sponge (fine grit)
- Bamboo skewer or toothpick
- Dry used coffee grounds or cracked black pepper (for the speckled effect)
- Clear matte acrylic sealer
Step 1: Preparation and Mixing
-
Condition the Clay:
Begin by taking a handful of your air-dry clay and kneading it thoroughly in your hands until it becomes soft, pliable, and free of cracks. -
Add Texture:
To achieve that beautiful speckled stone look seen in the photo, flatten your clay slightly and sprinkle in a pinch of dry coffee grounds or coarse black pepper. -
Integrate the Specs:
Fold the clay over the grounds and knead it again until the specks are evenly distributed throughout the entire lump.
Sagging clay?
If the clay is too soft to hold the curve, let the flat strip dry for about 30 minutes on a flat surface to firm up slightly before draping it over your curved mold.
Step 2: Shaping the Form
-
Roll it Out:
Using a rolling pin, roll the clay out into an even slab that is roughly 1/4 inch thick. Try to keep the thickness consistent. -
Measure and Cut:
Use a ruler to guide your craft knife, cutting a long strip approximately 2 inches wide and 8-10 inches long. -
Create the Lip:
Roll a very thin snake of clay, about the thickness of a shoelace, long enough to go around the perimeter of your rectangular strip. -
Score and Slip:
Use a blade to lightly scratch the top edges of your rectangle and the bottom of your clay snake. Apply a tiny amount of water to the scratched areas. -
Attach the Border:
Press the thin snake onto the edges of the rectangle to create a raised border. This lip will ensure ash stays contained. -
Smooth the Seams:
Wet your finger slightly and smooth the clay where the border meets the base, blending them so it looks like one solid piece rather than two separate parts.
Step 3: Curving and Detailing
-
Create the Arch:
Carefully lift your clay strip and drape it over a large cylindrical object, like a large coffee can on its side or a section of PVC pipe. This creates the gentle, bridge-like curve. -
Mark the Center:
While it is draped, use your ruler to find the exact center of the arch at the highest point. -
Pierce the Hole:
Using a bamboo skewer, poke a hole straight down through the center point. Make the hole slightly larger than your incense sticks, as the clay will shrink slightly when drying. -
Angle Check:
Ensure the hole goes straight through vertically relative to the table, not perpendicular to the curve, so the stick will stand upright. -
Refine Edges:
Do a final check of your edges while the clay is still damp, smoothing out any fingerprints with a little water.
Make it yours
Before drying, press a piece of lace or a textured leaf into the clay surface to create a subtle, embossed pattern underneath the speckles.
Step 4: Finishing Touches
-
Let it Dry:
Allow the clay to dry completely while still on the curved form. This usually takes 24-48 hours depending on humidity. -
Sand for Smoothness:
Once bone dry, take a fine-grit sanding sponge and gently buff the surface to remove any rough spots or sharp edges. -
Clean Up:
Wipe away any clay dust with a slightly damp cloth or a soft brush. -
Seal the Piece:
Apply a coat of clear matte acrylic sealer. This protects the clay from burn marks and makes it easier to wipe clean after use.
Place your favorite scent in the holder and enjoy the calming atmosphere you have created
Tiny Bud Vase Wrap (Decor-Only)
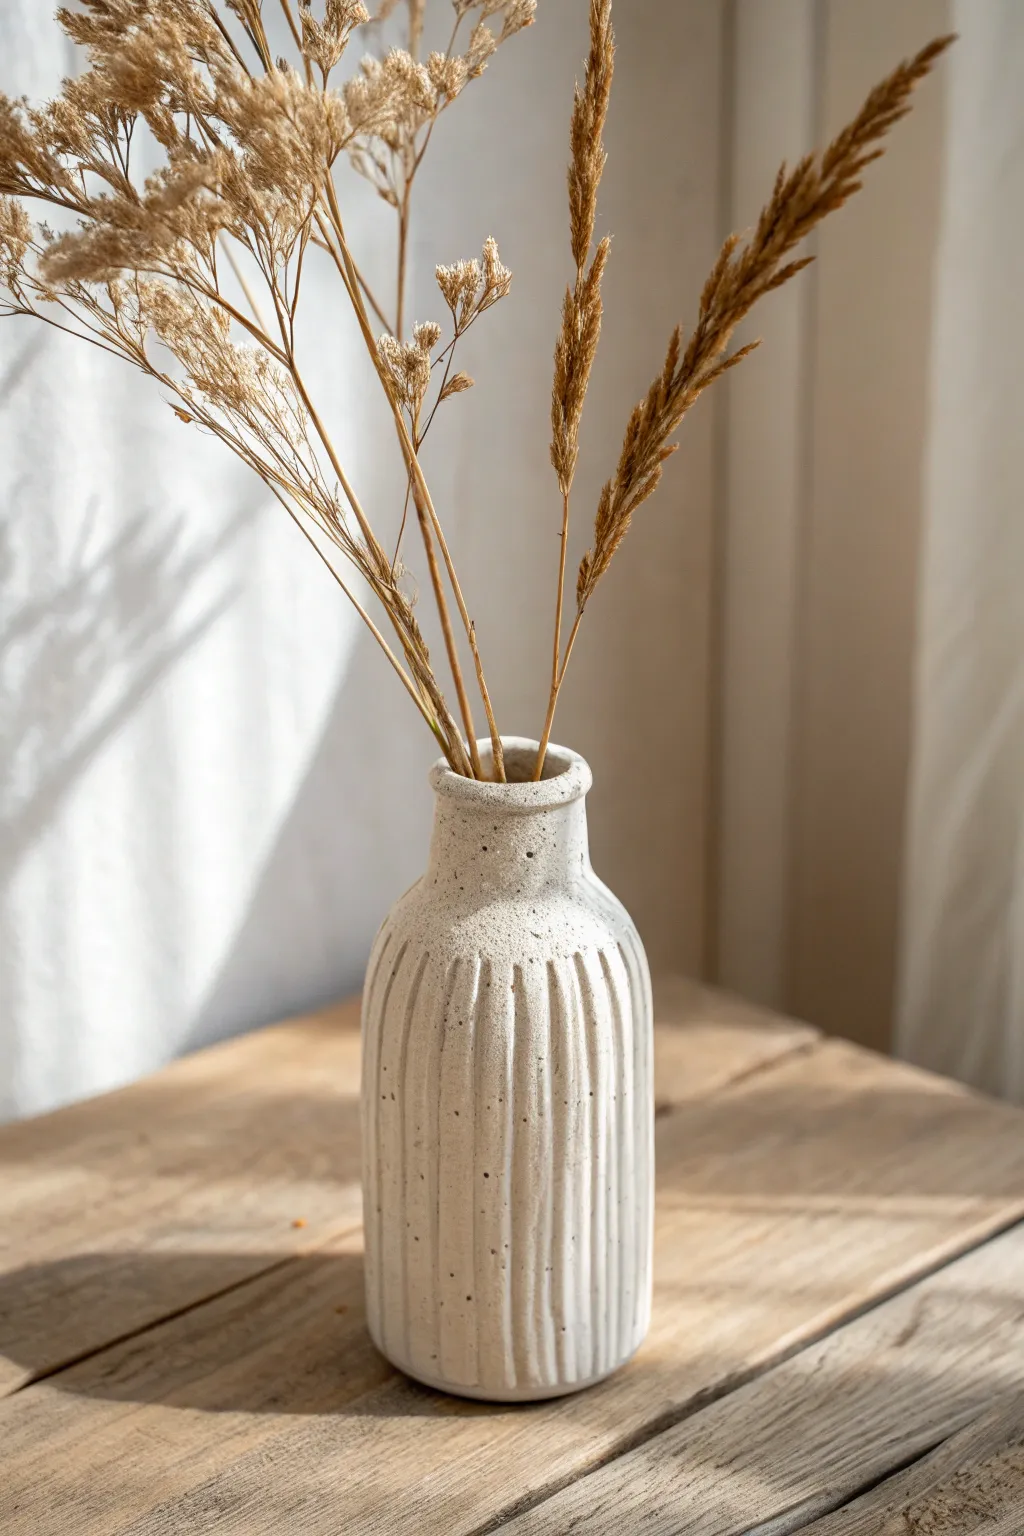
Transform a plain glass bottle into a piece of high-end home decor with this textured air dry clay project. The ribbed sides and speckled finish give it an organic, modern pottery look that perfectly highlights dried floral arrangements.
Step-by-Step
Materials
- Small glass bottle or jar (recycled)
- Air dry clay (white or cream)
- Rolling pin
- Clay knife or craft knife
- Water in a small cup
- Modeling tool or wooden skewer
- Acrylic paint (cream/white and black/brown)
- Old toothbrush
- Matte varnish or sealant
- Rolling mat or parchment paper
Step 1: Prepping and Wrapping
-
Roll the slab:
Begin by rolling out a generous ball of air dry clay onto your mat or parchment paper. Aim for a consistent thickness of about 1/4 inch so the wrap feels substantial but not too heavy. -
Measure the glass:
Lay your recycled glass bottle on the clay to estimate the size. You need a rectangle that is tall enough to cover the bottle completely and wide enough to wrap around the circumference with a little overlap. -
Cut to size:
Use your craft knife to cut a clean rectangle based on your measurements. I usually cut slightly taller than the bottle neck to create a nice clay rim at the top. -
Wrap the bottle:
Gently lift the clay rectangle and wrap it around the glass bottle. Press the two vertical seams together firmly. -
Seal the seam:
To make the seam disappear, dip your finger in water and smooth the clay where the edges meet. Drag a little clay from one side to the other until the join is seamless.
Shrinkage Warning
Clay shrinks as it dries! Don’t wrap the glass too tightly. Leave a tiny bit of wiggle room so the clay doesn’t crack against the unyielding glass as it tightens.
Step 2: Shaping and Texturing
-
Mold the neck:
Gently squeeze the clay inward around the neck of the bottle to conform to its shape. If there is excess clay bunching up, trim small triangles out of the top and smooth the edges together. -
Create the rim:
Roll the top edge of the clay slightly outward or smooth it flat to create a finished rim. Use a wet finger to ensure there are no sharp or rough edges at the opening. -
Mark vertical guides:
Lightly scratch vertical lines around the vase where you want your flutes to go. Keeping them evenly spaced now prevents running out of room later. -
Carve the grooves:
Using a rounded modeling tool or the side of a wooden skewer, press firmly into the clay to create deep vertical grooves. Run the tool from the bottom edge all the way up to the base of the neck. -
Refine the flutes:
Go back over each groove to smooth out any clay crumbs. You can gently round the ridges between the grooves with a damp finger to soften the look. -
Dry thoroughly:
Set the vase aside to dry completely. Since the clay is wrapped around glass, this may take 24-48 hours. Rotate it occasionally so all sides get airflow.
Smoother Sliding
If your modeling tool drags and creates jagged edges in the grooves, dip the tool in a tiny bit of water or oil before carving for a much cleaner slide.
Step 3: Finishing Touches
-
Base coat:
Once dry, paint the entire vase with a creamy white acrylic paint. This unifies the surface and covers any discoloration from the drying process. -
Create the speckle mix:
Dilute a tiny amount of black or dark brown acrylic paint with water until it is very runny and resembles ink. -
Splatter effect:
Dip an old toothbrush into the watered-down dark paint. Holding the brush near the vase, run your thumb across the bristles to flick tiny specks of paint onto the surface. -
Rotate and repeat:
Rotate the vase and continue splattering until you have an even distribution of ‘stone’ speckles all around. Go lightly at first; you can always add more. -
Seal the work:
After the paint is fully dry, apply a coat of matte varnish to protect the finish without adding unwanted shine.
Pop in some tall dried grasses to complete the rustic, natural aesthetic of your new vessel


What Really Happens Inside the Kiln
Learn how time and temperature work together inside the kiln to transform clay into durable ceramic.
Mountain Photo or Card Holder
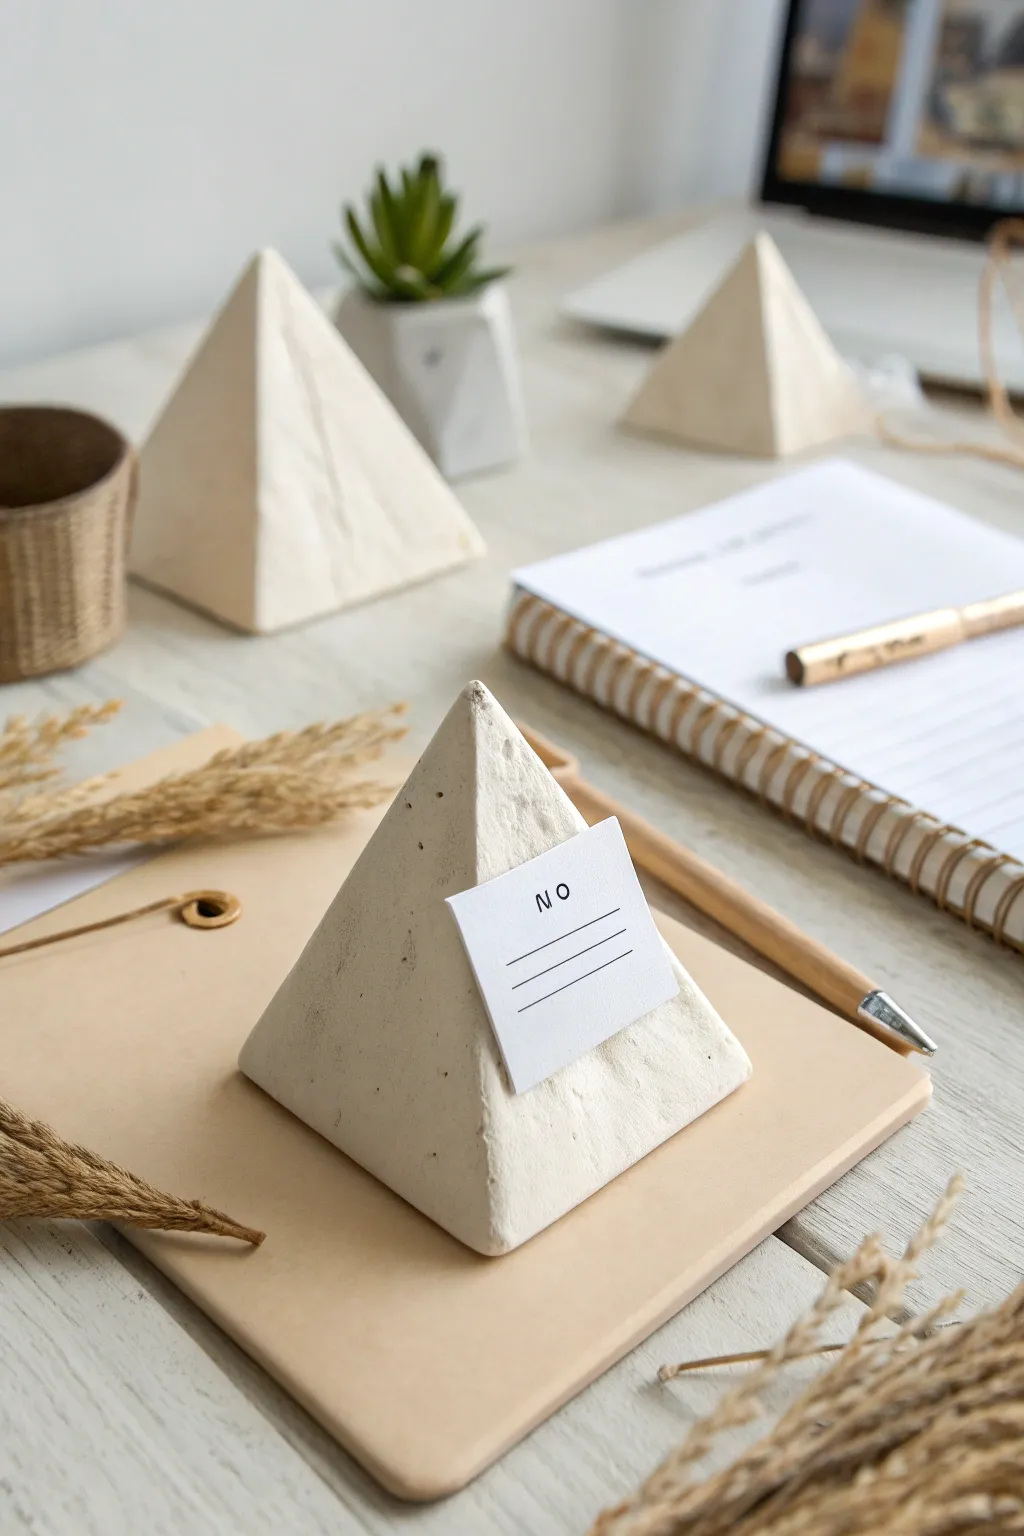
Bring a touch of modern minimalism to your desk with these pyramid-shaped card holders that mimic the look of clean concrete. They are surprisingly simple to sculpt and perfect for displaying photos, business cards, or important reminders.
Step-by-Step Guide
Materials
- White air-dry clay (stone or concrete effect clay is optional but recommended)
- Rolling pin
- Sharp craft knife or clay blade
- Ruler
- Sandpaper (fine grit)
- Small bowl of water
- Acrylic sealer (matte finish)
Step 1: Shaping the Base
-
Condition the clay:
Begin by taking a generous handful of air-dry clay. Knead it thoroughly in your hands to warm it up and ensure there are no air bubbles, which helps prevent cracks later. -
Form a rough block:
Roll the clay into a smooth ball, then gently tap it against your work surface to flatten the bottom. Use your hands to press the sides in, creating a rough cube shape. -
Create the taper:
Start shaping the pyramid by pinching the top corners of your cube inward. Use your palms to smooth the clay upwards from the base to a center point. -
Refine the walls:
Place the shape on your work surface. Use a flat tool or a ruler to press against each of the four sides, flattening them to create sharp, definition planes. -
Check the symmetry:
Rotate the piece and look at it from above. Adjust the peak so it sits directly over the center of the square base. I like to keep the surfaces slightly imperfect for that organic stone look. -
Slice the slot:
While the clay is still wet but firm, take your craft knife. Carefully cut a slit straight down into the peak of the pyramid, going about half an inch deep. This will hold your card. -
Widen the gap slightly:
Gently wiggle the knife blade side-to-side just a fraction to ensure the slot is wide enough for a piece of thick cardstock, then smooth the edges of the cut with a wet finger.
Slit Closing Up?
If the card slot closes while drying, simply fold a piece of sandpaper in half and gently sand inside the groove to re-open it.
Step 2: Finishing Touches
-
Dry completely:
Set your pyramid aside in a cool, dry place. Allow it to air dry for at least 24-48 hours, depending on the thickness. Don’t rush this part or the center may remain damp. -
Initial sanding:
Once fully hard and white, take your fine-grit sandpaper. Lightly sand the flat faces of the pyramid to remove any prominent fingerprints or unwanted lumps. -
Sharpen the edges:
Focus your sanding on the four corner ridges and the bottom edge. Creating crisp, sharp lines here really sells the geometric, architectural look of the piece. -
Dust off:
Wipe the entire sculpture down with a slightly damp cloth or a dry paintbrush to remove all the clay dust from the sanding process. -
Add texture (optional):
If you want a pitted concrete look like in the photo, you can use a stiff bristle brush or a needle tool to gently poke tiny divots into the surface before sealing. -
Seal the piece:
Apply a coat of matte acrylic sealer to protect the clay from moisture and dirt. The matte finish is crucial to maintaining that raw stone aesthetic. -
Insert your card:
Once the sealer is dry, slide your photo, note, or business card into the top slot to test the fit.
Create a Stone Effect
Mix a tiny pinch of black pepper or dried used coffee grounds into your white clay before sculpting to create a faux speckled granite look.
Place your new mountain holder on your desk to organize your notes with style
Alphabet Charms and Key Tags
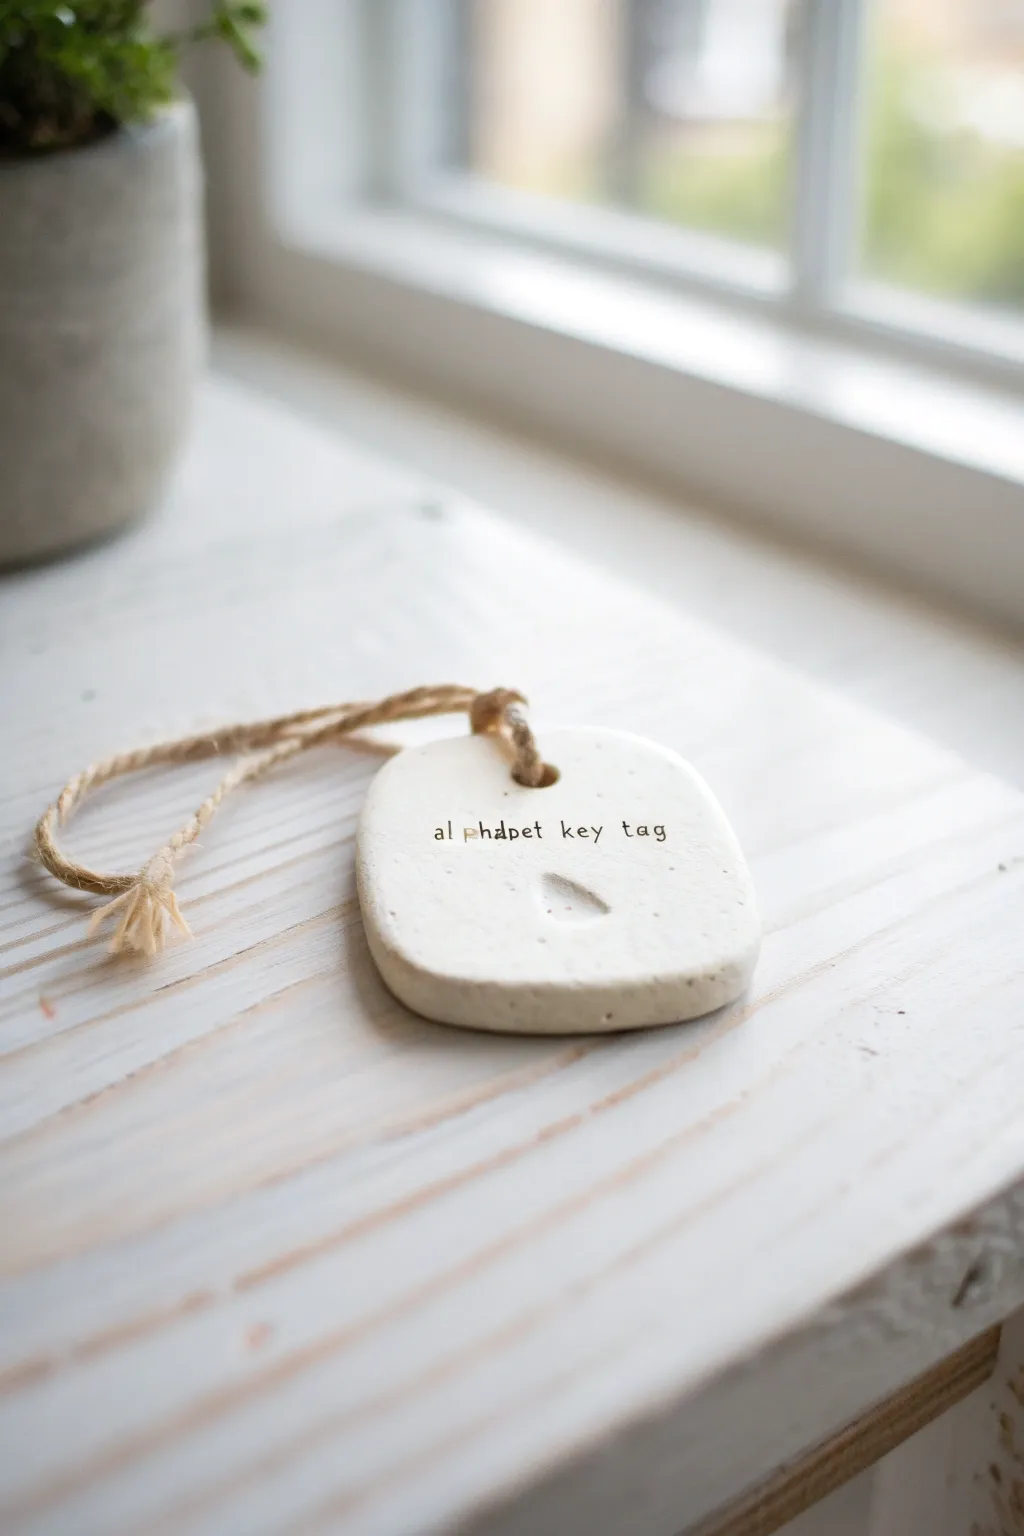
Create a charming, rustic key tag that feels right at home with minimalist decor. This simple air dry clay project features delicate stamped lettering and a speckled stone finish, perfect for organizing your keys or gifting as personalized charms.
How-To Guide
Materials
- Air dry clay (white or cream)
- Small rolling pin
- Small alphabet stamp set
- Toothpick or skewer
- Fine grit sandpaper
- Jute twine or hemp cord
- Small shaped stamp (triangle or geometric)
- Baking paper or craft mat
- Bowl of water
- Matte finish sealant (optional)
Step 1: Shaping the Tag
-
Condition the Clay:
Begin by taking a walnut-sized amount of air dry clay. Knead it in your hands for about a minute until it feels warm, pliable, and free of cracks. -
Roll it Out:
Place your clay on a sheet of baking paper or a craft mat to prevent sticking. Use your small rolling pin to flatten the clay to an even thickness of about 4-5mm. -
Cut the Shape:
You can use a small cookie cutter if you have one, but for this organic look, use a craft knife or a clay tool to cut a rounded rectangle shape directly. It should be roughly 1.5 inches by 2 inches. -
Smooth the Edges:
Dip your finger into a little water and gently run it along the cut edges. This softens the sharp angles and gives that smooth, pebble-like finish seen in the photo. -
Create the Hanging Hole:
Using a skewer or a straw, punch a hole centered near the top edge of the tag. Make sure the hole is wide enough to accommodate your jute twine later. -
Check for Cracks:
Inspect the clay near the hole you just made. If creating the hole caused any tiny stress fractures, smooth them over with a damp finger immediately.
Clean Impressions
If your stamps are sticking to the clay, lightly dust the stamp face with cornstarch or baby powder before pressing it into the wet clay. This ensures a crisp release.
Step 2: Stamping and Details
-
Plan Your Text:
Before stamping the clay, arrange your alphabet stamps on the table to check the spacing. I like to press them lightly onto a scrap piece of clay first to ensure the letters are facing the right way. -
Stamp the Letters:
Gently press your small alphabet stamps into the center of the tag. Apply even pressure, but don’t push all the way through. Aim for a distinct, clean impression for ‘alphabet key tag’ or your chosen phrase. -
Add the Accent:
Below the text, press your geometric or triangle stamp into the clay to create a focal point. This adds visual balance to the design. -
Refine the Surface:
If stamping caused the surrounding clay to bulge slightly, very gently tap it flat with your finger, being careful not to distort the letters. -
Add Faux Texture (Optional):
To achieve the speckled stoneware look shown in the image without specialty clay, you can flick a tiny amount of watered-down brown paint onto the wet clay using an old toothbrush, or wait until the next phase.
Make it Waterproof
For a truly durable keychain, swap air dry clay for polymer clay. Bake according to package instructions, and the final piece will be virtually unbreakable.
Step 3: Finishing Touches
-
Dry Completely:
Leave the tag to dry on a flat surface for 24-48 hours. Turn it over halfway through the drying process to ensure both sides dry evenly and to prevent warping. -
Sand the Edges:
Once bone dry, take fine-grit sandpaper and lightly buff the edges. This removes any lingering roughness and perfects the shape. -
Highlight the Text:
If you want the letters to pop, use a very fine-tip black pen to trace inside the stamped impressions. Alternatively, leave them natural for a subtle, embossed look. -
Seal the Piece:
Apply a coat of matte sealant to protect the tag from moisture and dirt. This is especially important for items that will be handled frequently like a keychain. -
Attach the Twine:
Cut a 6-inch length of jute twine or hemp cord. Fold it in half to create a loop. -
Secure the Knot:
Pass the folded loop through the hole in the tag adjacent to the front side. Thread the loose ends through the loop and pull tight to secure it with a lark’s head knot. -
Tie Off:
Tie the loose ends of the twine together in a simple overhand knot to create a closed loop for hanging.
Now you have a custom, boutique-style tag ready to organize your keys or label your favorite items

TRACK YOUR CERAMIC JOURNEY
Capture glaze tests, firing details, and creative progress—all in one simple printable. Make your projects easier to repeat and improve.
Easy Pressed-Pattern Ornaments
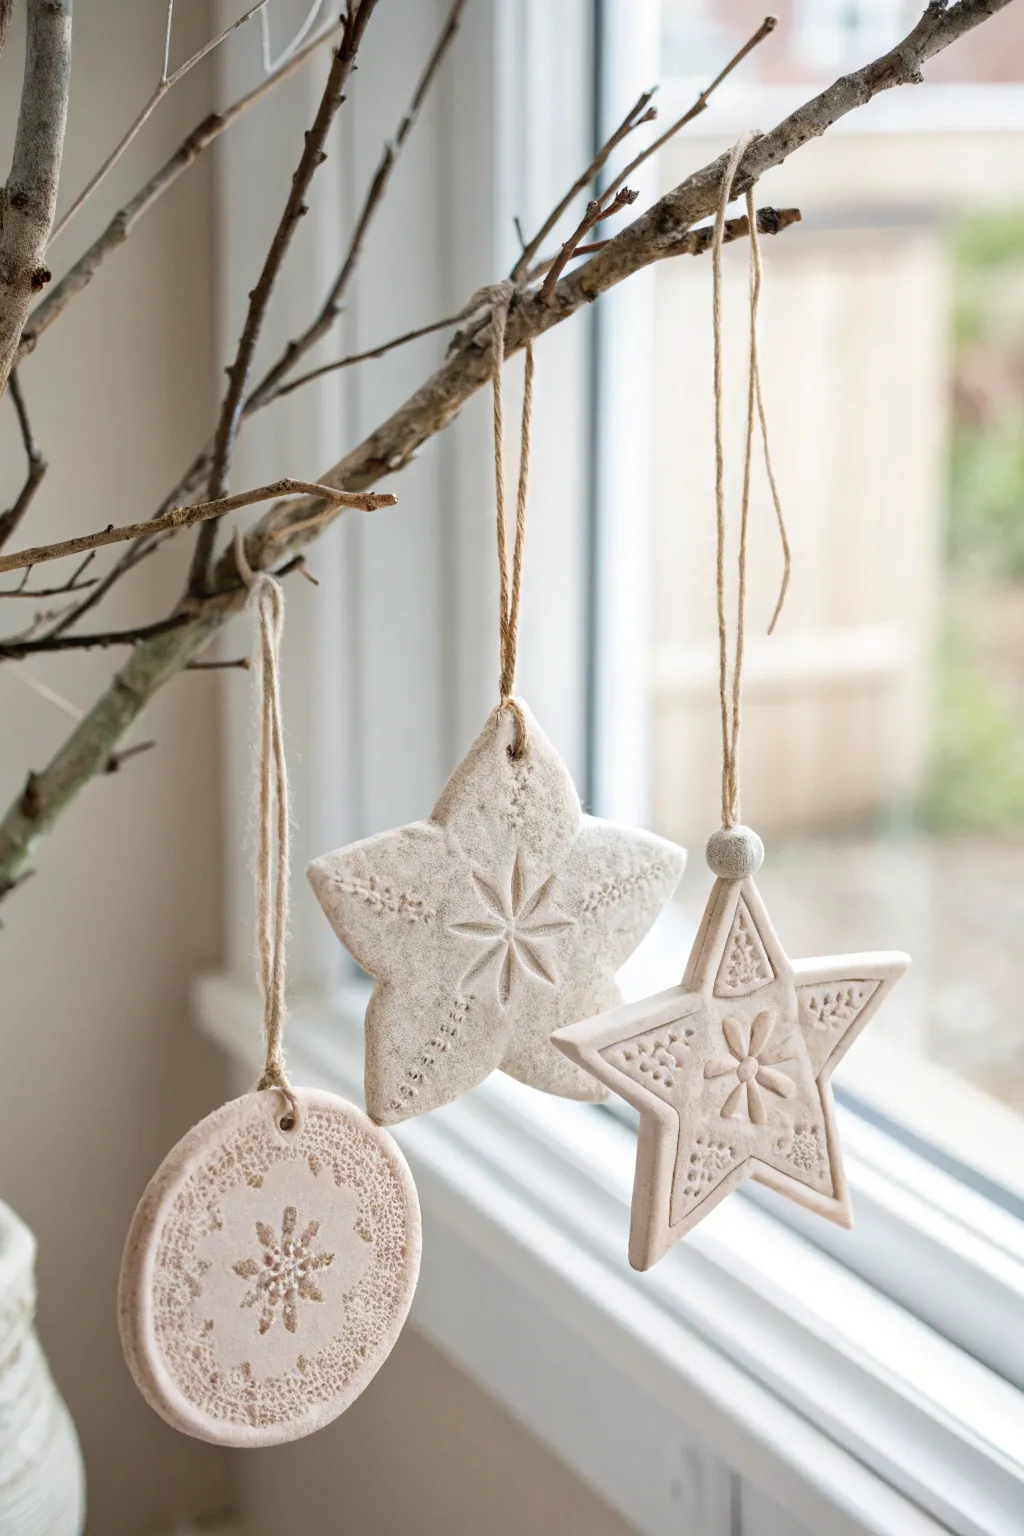
Embrace the simple beauty of natural textures with these air dry clay ornaments, featuring delicate impressions and classic shapes perfect for hanging by a window or on a tree. Their natural off-white finish and rustic twine ties create a calm, organic aesthetic that suits any season.
Detailed Instructions
Materials
- White air dry clay
- Rolling pin
- Cookie cutters (circle, rounded star, 6-point star)
- Textured fabric (lace, doily, or burlap)
- Small snowflake or flower stamps
- Small wooden bead
- Jute twine
- Straw or toothpick (for piercing)
- Parchment paper or canvas mat
- Fine grit sandpaper
Step 1: Preparing the Clay
-
Condition the clay:
Start by taking a handful of air dry clay and kneading it in your hands until it becomes pliable and warm. This prevents cracks later on. -
Roll out the slab:
Place the clay on parchment paper or a canvas mat to prevent sticking. Use a rolling pin to flatten the clay to an even thickness of about 1/4 inch (5-6mm). -
Check consistency:
Ensure the clay is smooth and free of major air bubbles. If you see any, prick them with a pin and smooth over with your finger.
Step 2: Creating Texture
-
Apply the base texture:
Gently lay a piece of textured lace or a doily over the flattened clay slab. Roll over the fabric once with the rolling pin using firm, even pressure to imprint the pattern. -
Reveal the pattern:
Carefully peel back the fabric to reveal the intricate background texture left in the clay. -
Cut the shapes:
Press your cookie cutters into the textured clay. Aim for a mix of shapes like the simple circle, the rounded 5-point star, and the sharper 6-point star seen in the example. -
Clean edges:
Lift the shapes away from the excess clay. Gently run your finger along the cut edges to smooth down any roughness caused by the cutter.
Cracked Edges?
If edges begin to crack while drying, dip your finger in a tiny bit of water and smooth over the fissure immediately. Don’t over-wet the clay.
Step 3: Adding Details
-
Add a central motif:
Take a small snowflake or floral stamp and press it directly into the center of each ornament. I find that pressing slightly deeper here creates a nice focal point. -
Pierce the hanging hole:
Use a straw or a toothpick to create a hole near the top of each shape. Make sure the hole is large enough to fit your twine through later. -
Create the layered star:
For the sharp 6-point star, use a smaller tool (like a dull pencil tip or modeling tool) to press an indentation outlining the inner star shape, giving it a framed, dimensional look. -
Detail the layered star:
Add tiny dot impressions inside the points of the 6-point star using a toothpick for extra decoration.
Clearer Impressions
Lightly dust your chosen lace or stamp with cornstarch before pressing it into the clay. This prevents sticking and keeps the details crisp.
Step 4: Drying and Finishing
-
Let them dry:
Place the ornaments on a clean sheet of parchment paper in a safe spot. Let them air dry for 24-48 hours, flipping them halfway through to ensure even drying. -
Sand for perfection:
Once fully hard and white, use fine-grit sandpaper to gently buff the edges and surface if there are any unwanted sharp bits. -
Cut the twine:
Cut lengths of jute twine, approximately 8-10 inches long for each ornament. -
Attach the twine:
Thread the twine through the hole at the top of the ornament. Tie a simple knot at the top to create a loop. -
Add a bead accent:
For the sharp star ornament, thread a small wooden bead onto the twine loop before hanging it, letting it rest just above the clay for a polished touch. -
Hang and display:
Suspend your finished ornaments from a branch arrangement or in a sunny window to let the light highlight the textures.
Enjoy the peaceful atmosphere these handcrafted pieces bring to your home decor
Flat Cookie-Cutter Shapes for Magnets
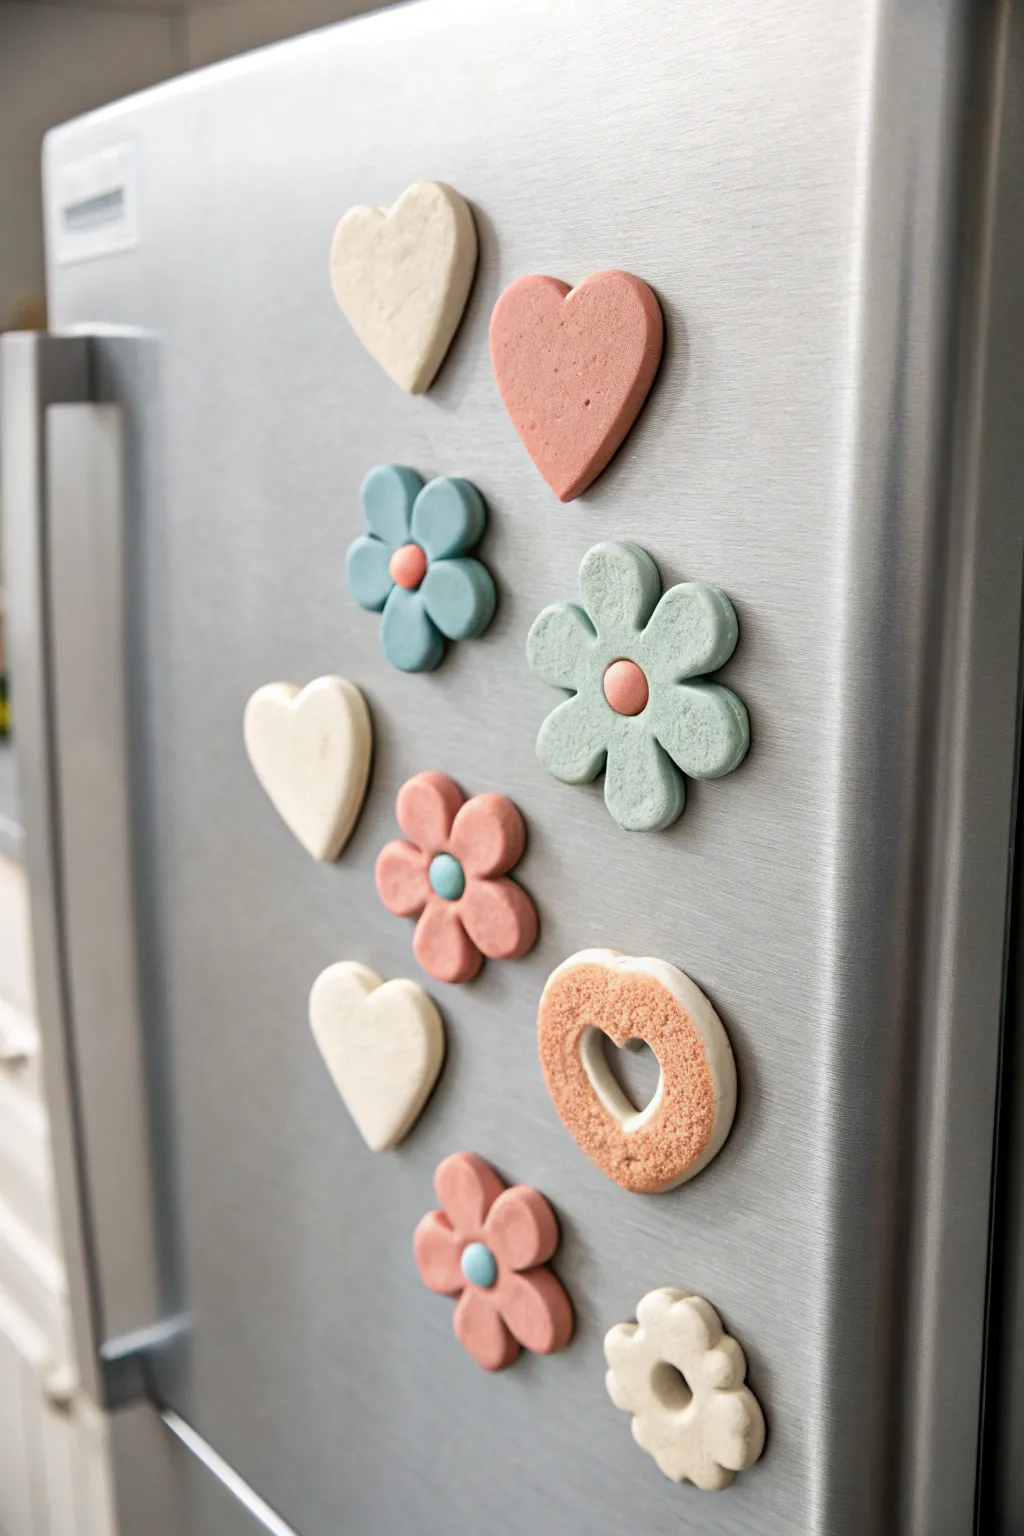
Add a touch of sweetness to your kitchen with these charming, cookie-style magnets made from air-dry clay. These flat, pastel-colored shapes bring a soft, homemade aesthetic to your fridge while being sturdy enough to hold your favorite photos and notes.
Step-by-Step Tutorial
Materials
- White air-dry clay
- Acrylic paints (cream, dusty pink, sage green, teal)
- Rolling pin
- Cookie cutters (hearts and flowers in various sizes)
- Sandpaper (fine grit)
- Strong craft glue (E6000 or super glue)
- Round magnets
- Parchment paper or silicone mat
- Small paintbrush
- Toothbrush or textured sponge (optional for texture)
Step 1: Prepping and Cutting
-
Prepare your workspace:
Lay down parchment paper or a silicone mat to protect your table and prevent the clay from sticking. Take a chunk of white air-dry clay and knead it in your hands until it feels warm and pliable. -
Roll out the clay:
Using a rolling pin, flatten the clay to an even thickness of about 1/4 inch. If you want a perfectly uniform look, place two wooden rulers on either side of the clay to guide your rolling pin. -
Cut your shapes:
Press your cookie cutters firmly into the clay to create hearts and flowers. Wiggle the cutter slightly before lifting it away to ensure a clean cut. -
Create variation:
For the flowers, stamp out the main petal shape. To make the centers, roll tiny balls of clay by hand, flatten them slightly, and press them gently into the middle of the flower shapes. Using a tiny dab of water acts as glue here. -
Make the donut heart:
For the textured open heart, cut a large heart shape first. Then, use a much smaller heart cutter to remove the center. To replicate the ‘sugar’ texture seen in the photo, gently tap the surface with a clean toothbrush or a textured sponge before drying.
Step 2: Drying and Refining
-
Smooth the edges:
Dip your finger in a little water and run it along the cut edges of your wet clay shapes to smooth out any roughness or stray bits left by the cutter. -
Let them dry:
Place your shapes on a flat surface to dry. This usually takes 24-48 hours depending on humidity. Flip them over halfway through the drying process to prevent curling. -
Sand for perfection:
Once fully dry and hard, use fine-grit sandpaper to buff away any remaining sharp edges or bumps on the surface. Wipe away the dust with a dry cloth.
Uneven drying?
If your shapes start to curl upward at the edges while drying, gently weigh them down with a heavy book placed on top of a sheet of parchment paper.
Step 3: Painting and Finishing
-
Mix your palette:
Prepare your acrylic paints. The look we are going for is soft and matte. Mix white into your pinks, greens, and teals to achieve those dusty pastel tones. -
Paint the base coats:
Apply an even coat of paint to the front and sides of each shape. I find a flat synthetic brush works best for getting smooth coverage without streaks. -
Detail the flowers:
For the flower magnets, use a small detail brush to paint the center button a contrasting color. A peach center on a teal flower or a teal center on a pink flower adds a lovely pop. -
Create the textured effect:
For the open heart ‘donut’ shape, use a dry-brushing technique. Dip a stiff brush in slightly darker pink paint, wipe most of it off, and stipple it over the textured surface to mimic sprinkles or sugar. -
Seal the paint (optional):
The example image has a very matte finish, so you can leave the paint as-is. However, if you want extra durability, apply a coat of matte spray varnish. -
Attach the magnets:
Turn your shapes over. Apply a strong dab of E6000 or craft glue to the back of each shape. -
Secure the hardware:
Press a round magnet firmly into the glue. Let them sit undisturbed for several hours until the glue is completely cured.
Add sparkle
For a ‘frosted cookie’ look, brush a thin layer of white glue on top of the dried paint and sprinkle fine iridescent glitter over the surface.
Arranging these sweet pastel shapes on your fridge creates an instant gallery for your memories
Easy Slab Earrings in Simple Shapes
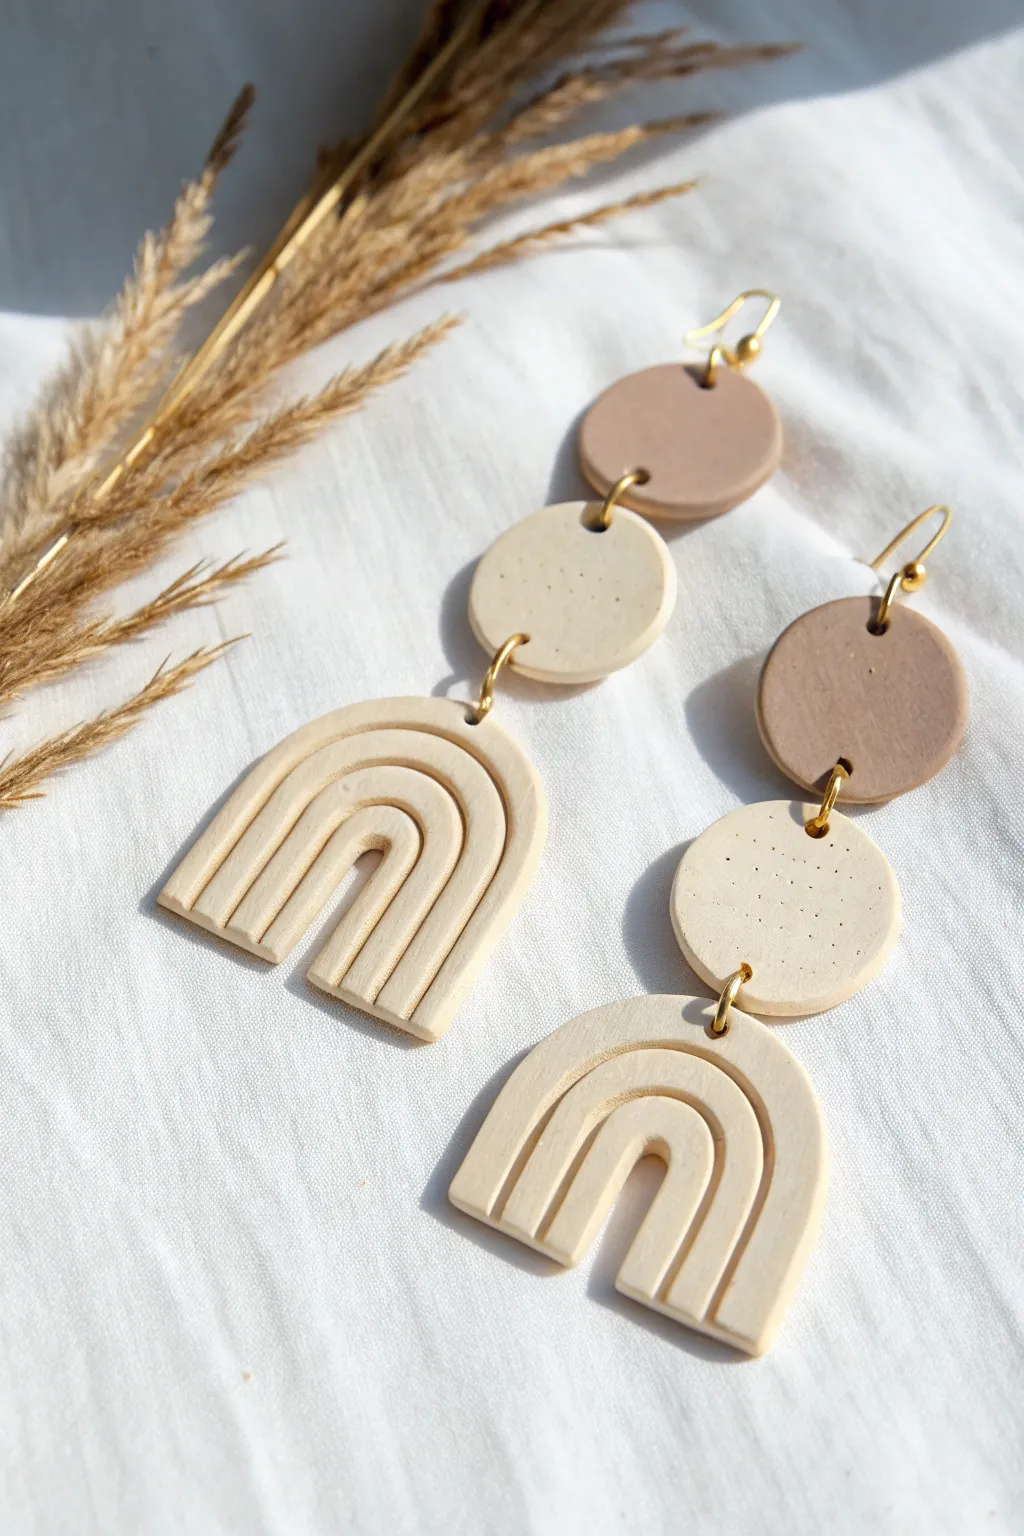
Embrace warm, neutral tones with these delightful tiered earrings featuring a simple rainbow arch. The combination of speckled cream giving way to solid tan creates a sophisticated, earthy look perfect for adding a touch of handmade charm to any outfit.
Step-by-Step
Materials
- Air dry clay (white and terracotta/brown)
- Acrylic rolling pin
- Circle clay cutter (approx. 0.75 inch)
- Speckled clay effect paint or black pepper (optional)
- Craft knife or X-Acto blade
- Sandpaper (fine grit)
- Jump rings (gold)
- Earring hooks (gold)
- Jewelry pliers
- A needle or small drill bit
- Clear varnish or sealant
Step 1: Preparing the Clay Slabs
-
Condition the white clay:
Start with a chunk of white air dry clay. Knead it in your hands until it’s soft, pliable, and free of cracks. This conditioning step is crucial for smooth results. -
Add the speckled effect:
If you want that authentic stoneware look, knead a tiny pinch of cracked black pepper or dried coffee grounds into the white clay. Mix it thoroughly until the specks are evenly distributed. -
Roll the white slab:
Using your acrylic rolling pin, roll the speckled white clay out into an even slab, roughly 3mm to 4mm thick. Keep the thickness consistent so your earrings hang evenly. -
Prepare the tan clay:
Repeat the conditioning process with your brown or terracotta-colored clay. Roll this out into a separate slab of the exact same thickness as the white one.
Step 2: Cutting the Shapes
-
Cut the circles:
Using your circle cutter, punch out two circles from the brown clay slab and two circles from the speckled white clay slab. -
Cut the rainbow arches:
Cut a larger rectangle from the speckled white slab. Using your circle cutter again, cut a half-circle out of the bottom to create an arch shape. -
Add detail lines:
To create the rainbow effect on the arch, use the dull back side of your craft knife or a sculpting tool. Gently press curved lines into the clay, following the shape of the arch, without cutting all the way through. -
Refine the edges:
Before the clay dries, dip your finger in a little water and gently smooth any rough edges on your cut shapes. This reduces sanding time later. -
Pierce the holes:
While the clay is still wet, use a needle or toothpick to poke holes for the jump rings. Make a hole at the top and bottom of the brown circles, top and bottom of the white circles, and just the top center of the arches.
Smooth Operator
To fix tiny cracks during drying, make a ‘slip’ paste of water and clay dust. Fill the crack, let dry, then sand smooth.
Step 3: Finishing and Assembly
-
Allow to dry:
Place your clay pieces on a clean, flat surface and let them dry completely. This usually takes 24–48 hours depending on humidity. Flip them halfway through for even drying. -
Sand for smoothness:
Once fully dry, take your fine-grit sandpaper and gently buff the edges of each piece to ensure they are perfectly smooth and professional-looking. -
Seal the pieces:
Apply a thin coat of clear varnish or sealant to protect the clay from moisture and give it a finished sheen. Let this dry completely before handling. -
Open the jump rings:
Using two pairs of jewelry pliers, twists your gold jump rings open sideways (never pull them apart outward) to preserve their shape. -
Connect the tiers:
Attach the bottom of the brown circle to the top of the white circle using a jump ring. Then, attach the bottom of the white circle to the top of the rainbow arch. -
Attach the hardware:
Finally, attach an earring hook to the top hole of the brown circle using a smaller jump ring. Repeat the assembly for the second earring.
Gilded Edges
After sealing, paint just the thin side edges of your shapes with liquid gold leaf for a high-end, gallery-ready finish.
Now you have a stunning, lightweight pair of statement earrings ready to wear or gift
Wavy Painted Bowl for Keys and Coins
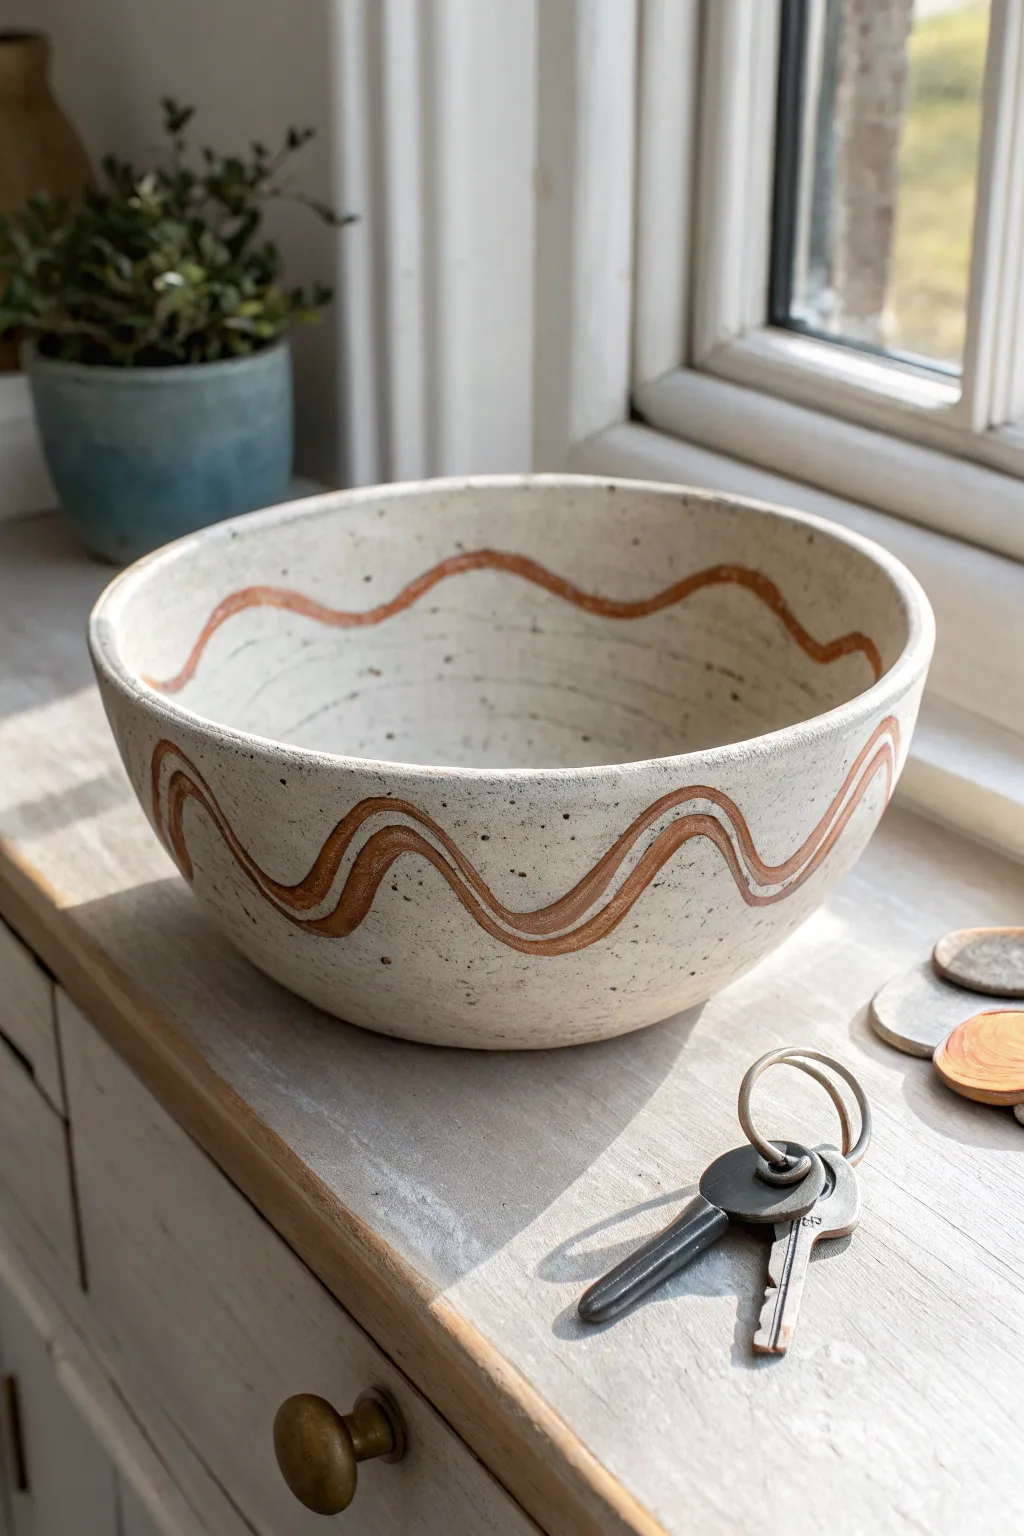
This rustic, charming bowl adds a touch of handmade warmth to any entryway table while keeping your keys and coins organized. The speckled stone effect and terracotta-colored waves give it an earthy, artisanal pottery vibe without needing a kiln.
Step-by-Step Guide
Materials
- Air dry clay (white or light grey)
- Acrylic paint (terracotta/burnt sienna, cream/off-white, black)
- Small paintbrush (round tip)
- Medium paintbrush (flat)
- Small bowl (to use as a mold)
- Plastic wrap
- Rolling pin
- Clay sculpting tools or a butter knife
- Sponge
- Water cup
- Fine-grit sandpaper
- Matte spray varnish
Step 1: Shaping the Bowl
-
Prepare the mold:
Select a medium-sized kitchen bowl to use as your form. Cover the inside completely with plastic wrap, ensuring it’s as smooth as possible to prevent the clay from sticking. -
Roll out the base:
Take a handful of air dry clay and roll it into a ball. Flatten it with your rolling pin until it’s about 1/4 inch thick. Cut out a circle that matches the bottom size of your mold bowl and place it inside. -
Create coils:
Roll out long snakes of clay on your work surface. Aim for an even thickness, roughly the width of your pinky finger. You will need several of these to build up the walls. -
Stack the coils:
Place the first coil around the edge of your base circle inside the bowl. Gently press the ends together to join them. -
Blend the seams:
Use your thumb or a modeling tool to smear the clay from the coil down into the base to bond them. Continue adding coils one on top of the other, blending each layer downwards into the one below it. -
Smooth the interior:
Once you’ve reached the desired height, use a damp sponge or your fingers to smooth out the inside walls. You want to hide the coil lines completely for a seamless look. -
Smooth the exterior:
Carefully lift the clay bowl out of the mold using the plastic wrap. Gently smooth the outside coil connections just like you did the inside. I like to leave a little bit of uneven texture here to keep that handmade feel. -
Refine the rim:
Run a damp finger along the top rim to round it off and fix any cracks. Let the bowl dry completely for 24-48 hours until it turns white and feels hard.
Step 2: Painting and Finishing
-
Sand imperfections:
Once fully dry, take your fine-grit sandpaper and gently buff away any sharp ridges or rough bumps on the surface. Wipe away the dust with a barely damp cloth. -
Create the speckled base:
Mix a creamy off-white acrylic paint. Cover the entire bowl, inside and out. While the paint is wet, dip an old toothbrush into watered-down black paint and flick tiny speckles onto the bowl to mimic stoneware clay. -
Draft the wave pattern:
Use a pencil to lightly sketch a flowing wave line around the exterior. Try to keep the peaks and valleys relatively consistent. -
Paint the exterior wave:
Using a round brush and terracotta or burnt sienna paint, follow your pencil line. Paint a double line—two parallel waves close together—to match the reference image. -
Paint the interior rim:
Repeat the single wave pattern on the inside of the bowl, just below the rim. This creates a lovely continuity when looking into the bowl. -
Clean up lines:
If your lines are a bit shaky, use a small brush with your cream base color to tidy up the edges of the waves once the brown paint is dry. -
Seal the piece:
Protect your hard work by applying a coat of matte spray varnish in a well-ventilated area. This prevents the paint from chipping and makes the bowl easier to dust later.
Smooth Operator
Keep a small bowl of water nearby while blending coils. A tiny drop of water on your finger acts like slip, helping fuse the clay layers seamlessly without cracking.
Faux Pottery Look
Mix baking soda into your base cream paint before applying it. This adds a gritty, stone-like texture that makes the air dry clay look and feel like real kiln-fired ceramic.
Place your finished bowl on a console table or shelf to give your everyday items a beautiful home
Simple Napkin Rings With Stamped Texture
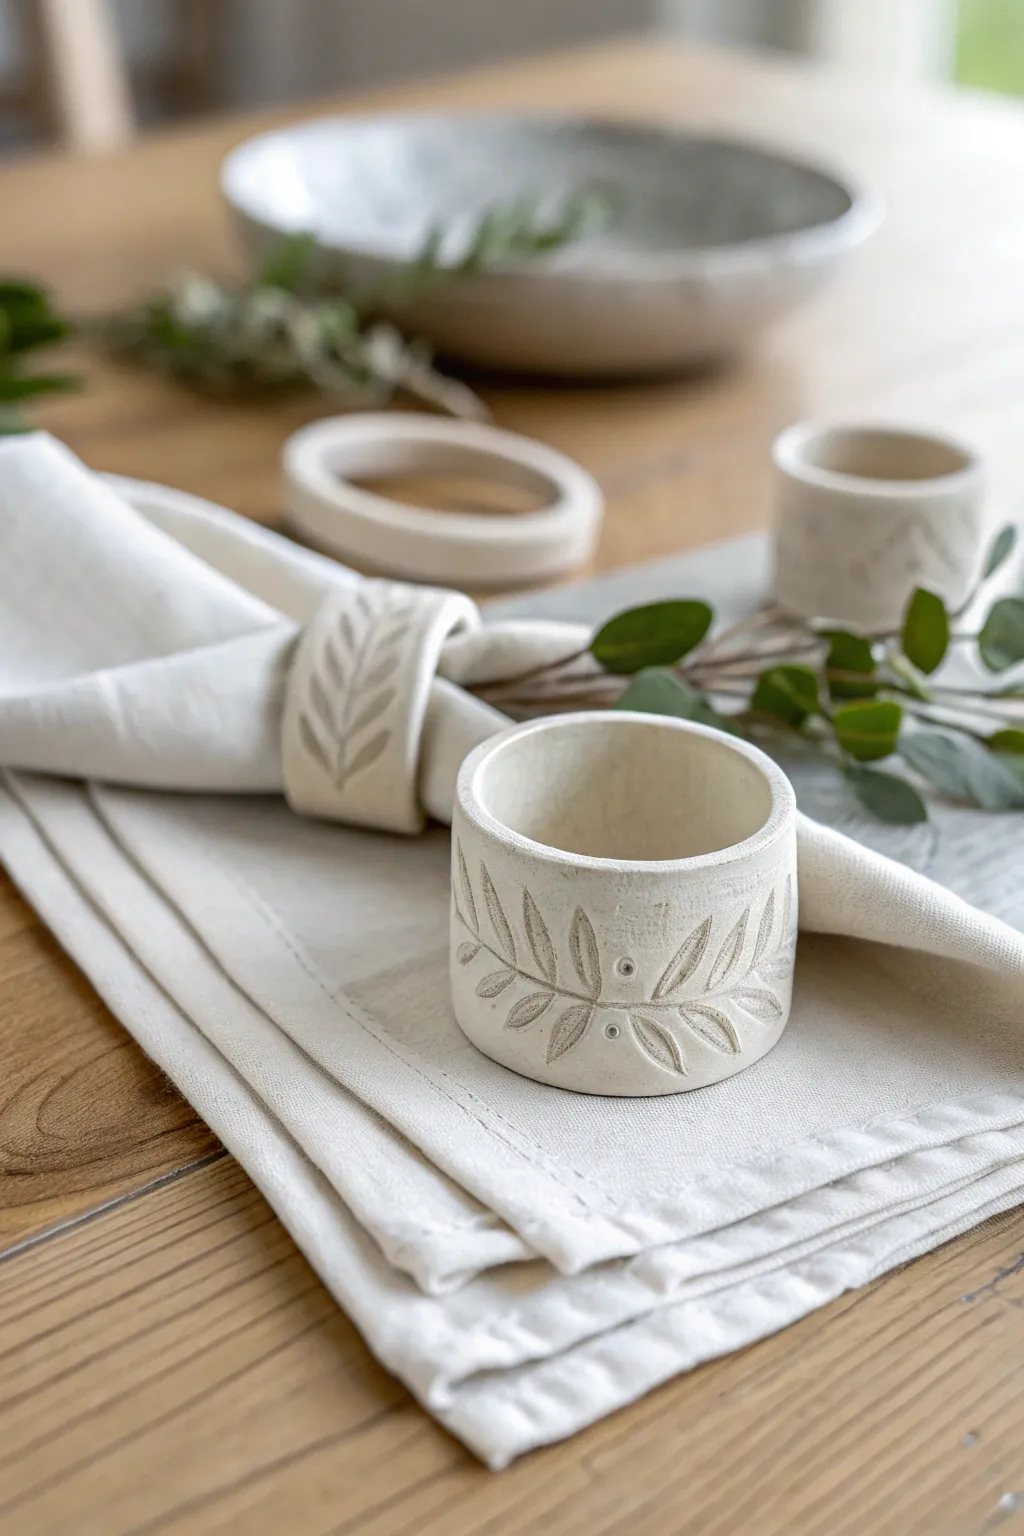
Elevate your table setting with these handcrafted, minimalist napkin rings featuring delicate botanical impressions. The natural clay finish and simple stamped branch design add a touch of rustic elegance to any meal.
How-To Guide
Materials
- White or cream air-dry clay
- Rolling pin
- Parchment paper or canvas mat
- Ruler
- Craft knife or sharp blade
- Circular cookie cutter or small glasses (optional for sizing)
- Leafy branch stamp or carving tools
- Small bowl of water
- Sponge
- Cardboard tubes (from paper towels or toilet paper)
- Sandpaper (fine grit)
- Matte sealant or varnish
Step 1: Preparation and Rolling
-
Set up your workspace:
Begin by covering your work surface with a piece of parchment paper or a canvas mat to prevent sticking. This makes it much easier to move your clay later. -
Condition the clay:
Take a handful of air-dry clay and knead it in your hands until it becomes soft, pliable, and free of air bubbles. If it feels a bit dry, I like to dampen my fingers slightly to rehydrate it. -
Roll out a slab:
Place the clay ball on your mat and use the rolling pin to flatten it into an even slab. Aim for a thickness of about 1/4 inch (5-6mm) for sturdy rings. -
Smooth the surface:
Take a slightly damp sponge and gently wipe the surface of the clay slab to remove any canvas textures or fingerprints, creating a pristine canvas for your design.
Step 2: Cutting and Stamping
-
Measure your strips:
Use a ruler to mark out rectangular strips. A good standard size is approximately 1.5 inches wide by 6 inches long, but you can adjust depending on how thick your napkins are. -
Cut the clay:
With a sharp craft knife and your ruler as a guide, carefully cut out the long rectangular strips. Keep the edges as straight and clean as possible. -
Design orientation:
Decide where you want your pattern. For the look in the photo, the leaf design sits horizontally, centered heavily on the front face of the ring. -
Apply the texture:
Gently press your leaf stamp into the clay strip while it is still flat. If you don’t have a stamp, use a dull needle tool or toothpick to hand-carve a simple branch design with small leaves. -
Add details:
To mimic the featured design closely, add small dot accents between the leaves using the head of a pin or a small stylus tool. -
Refine the imprint:
Check your stamped design. If any clay pushed up around the edges of the impression, gently pat it down with a finger to keep the surface smooth.
Stamp Clarity Trick
Dust your rubber stamp or texture tool with a tiny bit of cornstarch before pressing it into the wet clay. This releases the tool cleanly without pulling up sticky clay bits.
Step 3: Forming and Drying
-
Prepare the form:
Cut a cardboard tube into smaller sections that match the width of your clay strips. Cover these cardboard rings with a layer of parchment paper so the clay doesn’t stick to them. -
Shape the ring:
Carefully lift a clay strip and wrap it around the parchment-covered cardboard tube. Bring the two ends together. -
Join the seam:
Score (scratch) the touching ends of the clay and add a drop of water. Press them firmly together to create a bond. -
Blend the connection:
Use a modeling tool or your finger to smooth the seam on the inside and outside until the line disappears and the ring looks seamless. Wet your finger slightly to help blend. -
Initial drying:
Set the rings upright on their flat edges to dry. Keep them on the cardboard tubes for at least the first few hours to ensure they hold a perfect circle shape. -
Remove supports:
Once the clay is visibly firm and lighter in color (usually after 12 hours), carefully slide out the cardboard tube and parchment paper to allow the inside to dry. -
Full cure:
Let the rings air dry completely for 24 to 48 hours, flipping them occasionally to ensure even airflow.
Rustic Wash Technique
Mix a tiny drop of brown acrylic paint with water. Brush it over the dry carvings and wipe away the excess immediately. The dark color stays in the grooves, making the design pop.
Step 4: Finishing
-
Sand the edges:
Once bone dry, take fine-grit sandpaper and gently smooth the top and bottom rims of the ring, as well as the seam area, to remove any sharpness. -
Seal the piece:
Apply a coat of matte spray varnish or brush-on sealant. This protects the napkin ring from moisture and oil stains during dinner use.
Slide your favorite linen napkins through your new custom rings and enjoy a beautifully set table
Easy Desk Organizer Cups From Pinch Pots
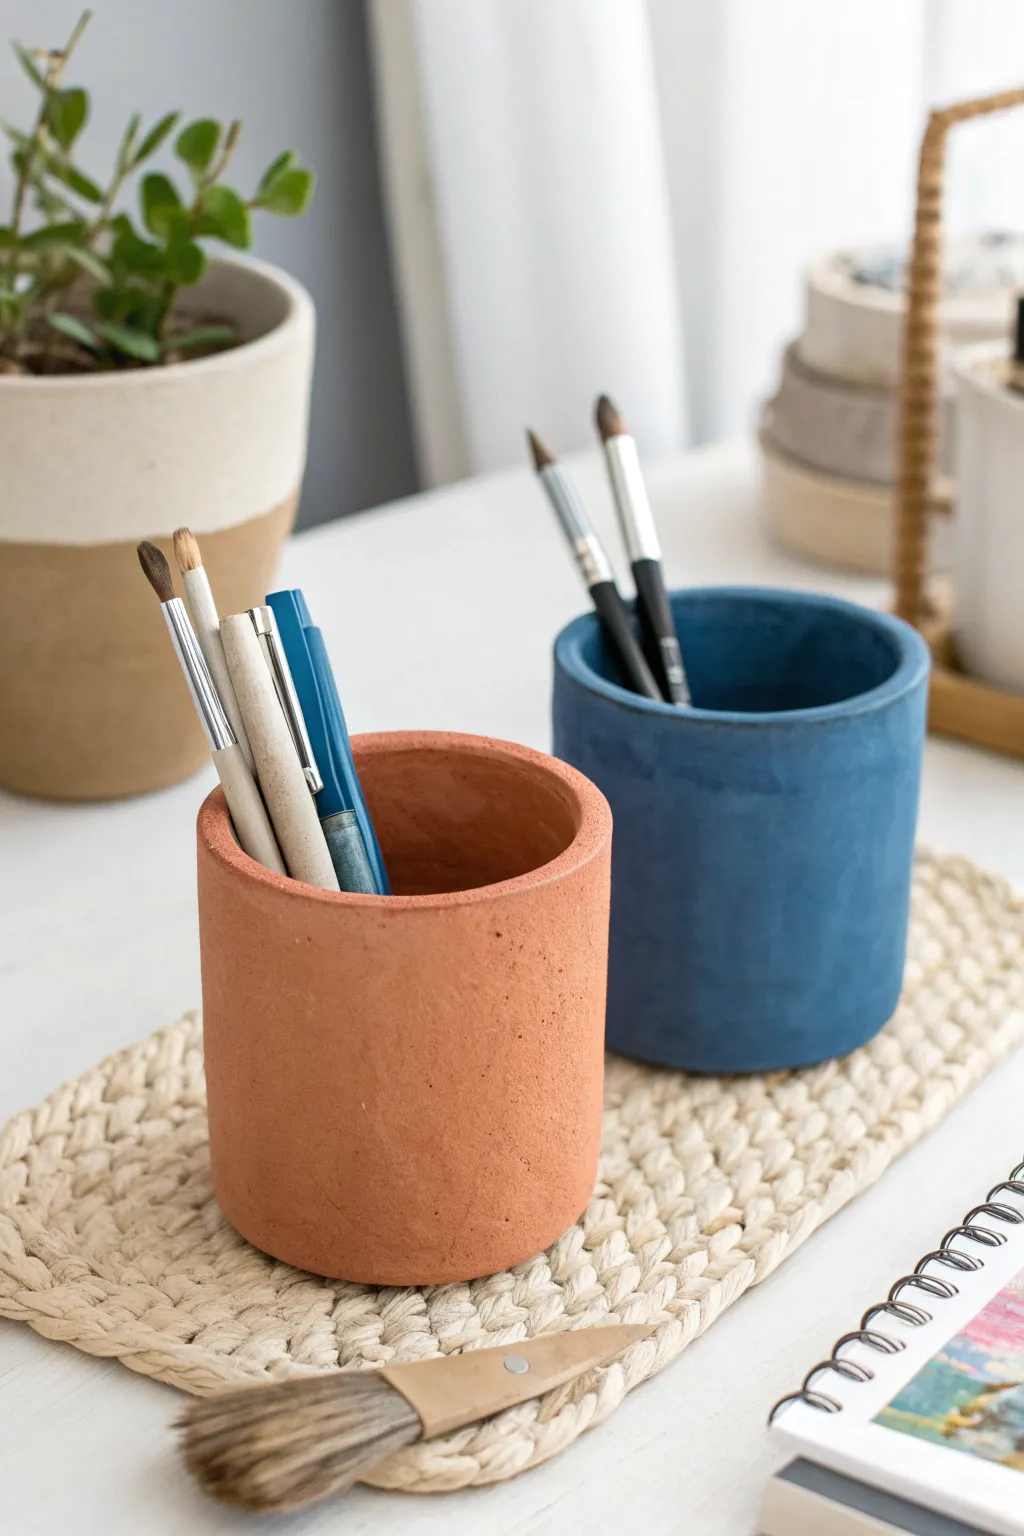
Bring a touch of sleek, modern design to your workstation with these sturdy cylindrical organizers. Crafted from air dry clay and painted in bold matte shades, they offer a perfect home for your favorite art supplies.
Detailed Instructions
Materials
- Air dry clay (white or terracotta)
- Acrylic paints (burnt orange, indigo blue)
- Rolling pin
- Clay knife or craft knife
- Small bowl of water
- Medium grit sandpaper
- Matte varnish or sealant
- Paintbrushes (flat shader)
- Ruler
Step 1: Forming the Base
-
Prepare your clay:
Start by kneading a large handful of air dry clay until it is warm and pliable. This conditioning step prevents cracks later on. -
Roll the slab:
Use your rolling pin to flatten the clay into a uniform slab. You want this quite thick for stability, roughly 1/4 to 1/2 inch thick. -
Cut the base:
Find a circular object like a large mug or use a cookie cutter to trace and cut out a perfect circle for the bottom of your cup. Set this aside. -
Measure the walls:
Measure the circumference of your base circle. Then, cut a long rectangular strip from your remaining clay slab that matches this length plus a tiny bit for overlap. -
Determine height:
Trim the width of your rectangular strip to your desired cup height. Three to four inches works well for pens and brushes.
Cracks Appearing?
If small hairline cracks appear while drying, mix a tiny bit of fresh clay with water to make a paste and fill them in before sanding.
Step 2: Constructing the Cup
-
Score the edges:
Use your knife to make small hatched marks (scoring) along the outer edge of the circular base and the bottom long edge of your rectangular wall. -
Slip and join:
Dab a little water or liquid clay (slip) onto the scored areas. Carefully wrap the rectangular wall around the base circle. -
Seam the wall:
Where the two ends of the wall meet, score and slip the vertical edges. Press them firmly together to close the cylinder. -
Blend the seams:
Using your thumb or a modeling tool, smooth the clay across the seams on both the inside and outside until the join is invisible. I find supporting the inside wall with my other hand helps keep the shape. -
Smooth the lip:
Run a wet finger along the top rim of the cup to smooth out any sharp edges or unevenness from cutting. -
Let it dry:
Place your cup in a cool, dry spot away from direct sunlight. Let it cure for at least 24-48 hours until completely hard and white.
Step 3: Finishing Touches
-
Sand for perfection:
Once fully dry, take your medium grit sandpaper and gently sand the outside walls to remove fingerprints or lumps. -
Clean the surface:
Wipe the cup down with a slightly damp cloth or dry brush to remove all the clay dust before painting. -
Apply base color:
Mix your acrylic paint. For the orange cup, aim for a warm terracotta tone; for the blue, a deep dusty indigo. -
Paint the exterior:
Apply the paint in smooth, even strokes. You may need two coats to get that solid, opaque look shown in the photo. -
Paint the interior:
Don’t forget the inside rim and walls. Painting the interior gives the piece a professional, finished quality. -
Seal the work:
Finish with a coat of matte varnish to protect the paint without adding unwanted shine, keeping that natural clay aesthetic.
Add Texture
Before drying, gently press a piece of canvas or linen into the wet clay surface to give the organizers a subtle woven texture.
Place your new organizers on your desk and enjoy the satisfaction of a tidy workspace
Hanging Clay Wall Charm Garland
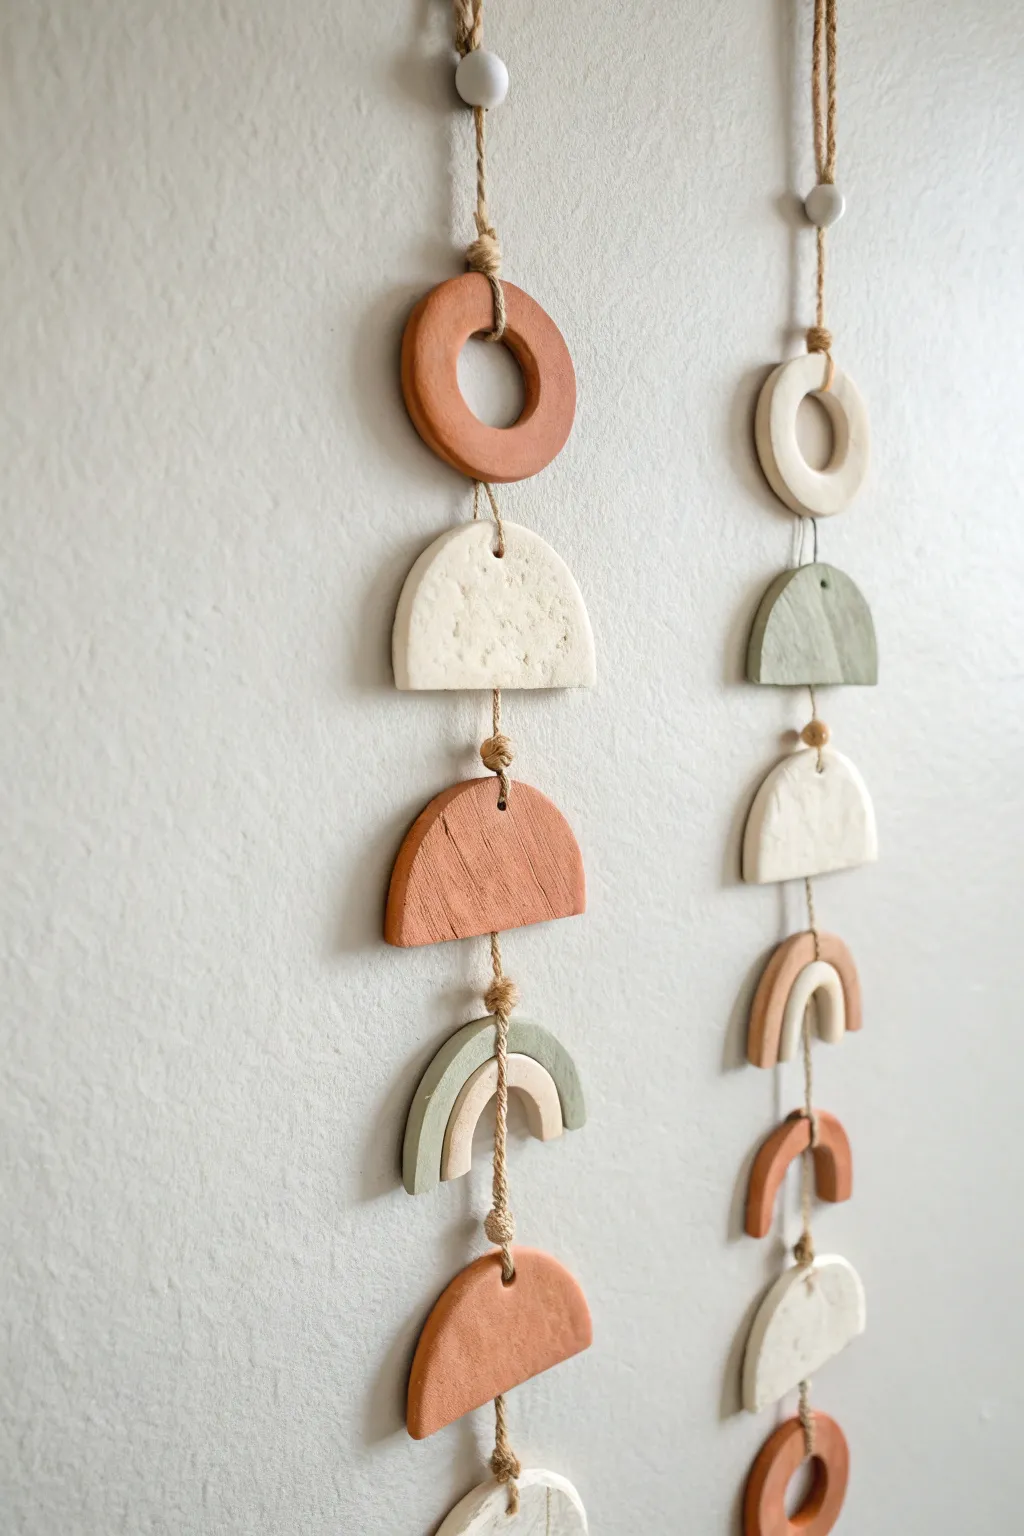
Add a touch of earthy, bohemian texture to your walls with these simple yet striking clay garlands. Using air-dry clay in soft terracotta, sage, and cream tones, this project combines geometric shapes like circles, semi-circles, and arches for a modern mobile-style decor piece.
Step-by-Step Guide
Materials
- Air dry clay (white)
- Acrylic paints (terracotta, sage green, cream/off-white)
- Jute twine or hemp cord
- Rolling pin
- Circle cookie cutters (various sizes)
- Knife or clay tool
- Straw or wooden skewer (for making holes)
- Fine grit sandpaper
- Paintbrushes
- Small wooden beads (white or natural)
- Kneading surface or parchment paper
Step 1: Shaping the Clay Elements
-
Prepare the clay:
Start by kneading your air-dry clay until it is soft and pliable. Roll it out on a smooth surface or parchment paper to an even thickness of about 1/4 inch. -
Cut the circles:
Use your circle cookie cutters to stamp out several round shapes. For the open rings shown in the top of the garland, simply punch a smaller circle out of the center of a larger one using a smaller cutter. -
Create semi-circles:
Cut out more full circles, then carefully slice them perfectly in half using a knife or straight-edge tool to create the semi-circle shapes. -
Form the arches:
To make the rainbow-style arches, roll a small coil of clay and bend it into a U-shape. Flatten it gently with the rolling pin. You can nest a smaller arch inside a larger one for the double-arch look seen in the lower sections. -
Add hanging holes:
Before the clay begins to dry, use a straw or a wooden skewer to poke holes in each piece. For most pieces, you will need a hole at the very top and very bottom center so they can link together vertically. -
Final smooth:
Dip your finger in a little water and gently smooth out any rough edges or fingerprints on your shapes.
Clean Hole Tip
Twist your straw or skewer gently as you push it through the clay, rather than pressing straight down. This prevents the clay from deforming or squishing around the hole.
Step 2: Drying and Refining
-
Let them dry:
Arranged your pieces on a flat surface and let them air dry completely. This usually takes 24-48 hours depending on humidity; flip them halfway through to ensure even drying. -
Sand for smoothness:
Once fully rigid/dry, lightly sand the edges with fine-grit sandpaper to remove any sharp burrs or irregularities.
Texture Twist
Before the clay dries, press a piece of lace, a leaf, or a coarse fabric onto the surface of the white pieces to give them a unique imprinted texture that catches the light.
Step 3: Painting and Assembly
-
Apply base colors:
Select your color palette. Paint the open rings and some semi-circles in a warm terracotta. Use a muted sage green for the arches or alternate semi-circles, and leave some pieces a textured creamy white. -
Add texture (optional):
For the white semi-circles, you can create a stone-like effect by dabbing the paint on thick or mixing in a tiny bit of baking soda for grit. -
Dry the paint:
Allow all the paint layers to dry completely before you start handling the pieces for assembly. -
Start the knotting:
Cut a long length of jute twine. Tie a loop at the very top for hanging, and thread on a decorative wooden bead to sit just below the loop. -
Attach the top piece:
Tie the twine securely through the top hole of your first shape (like the terracotta ring). I prefer to use a simple overhand knot or a chunky knot that sits visible on the front depending on the look you want. -
Link the chain:
Thread the twine down through the bottom hole of the first piece, add a knot or a small bead spacer, and then tie it into the top hole of the next shape (the white semi-circle). -
Repeat until finished:
Continue this process—linking top to bottom—varying your shapes and colors until you reach your desired length. -
Secure the end:
After the final piece is attached, tie a secure double knot at the bottom and trim any excess twine for a clean finish.
Now you have a stunning, custom piece of wall art that brings organic warmth to any room
Simple Sun Catcher Shapes With Cutouts
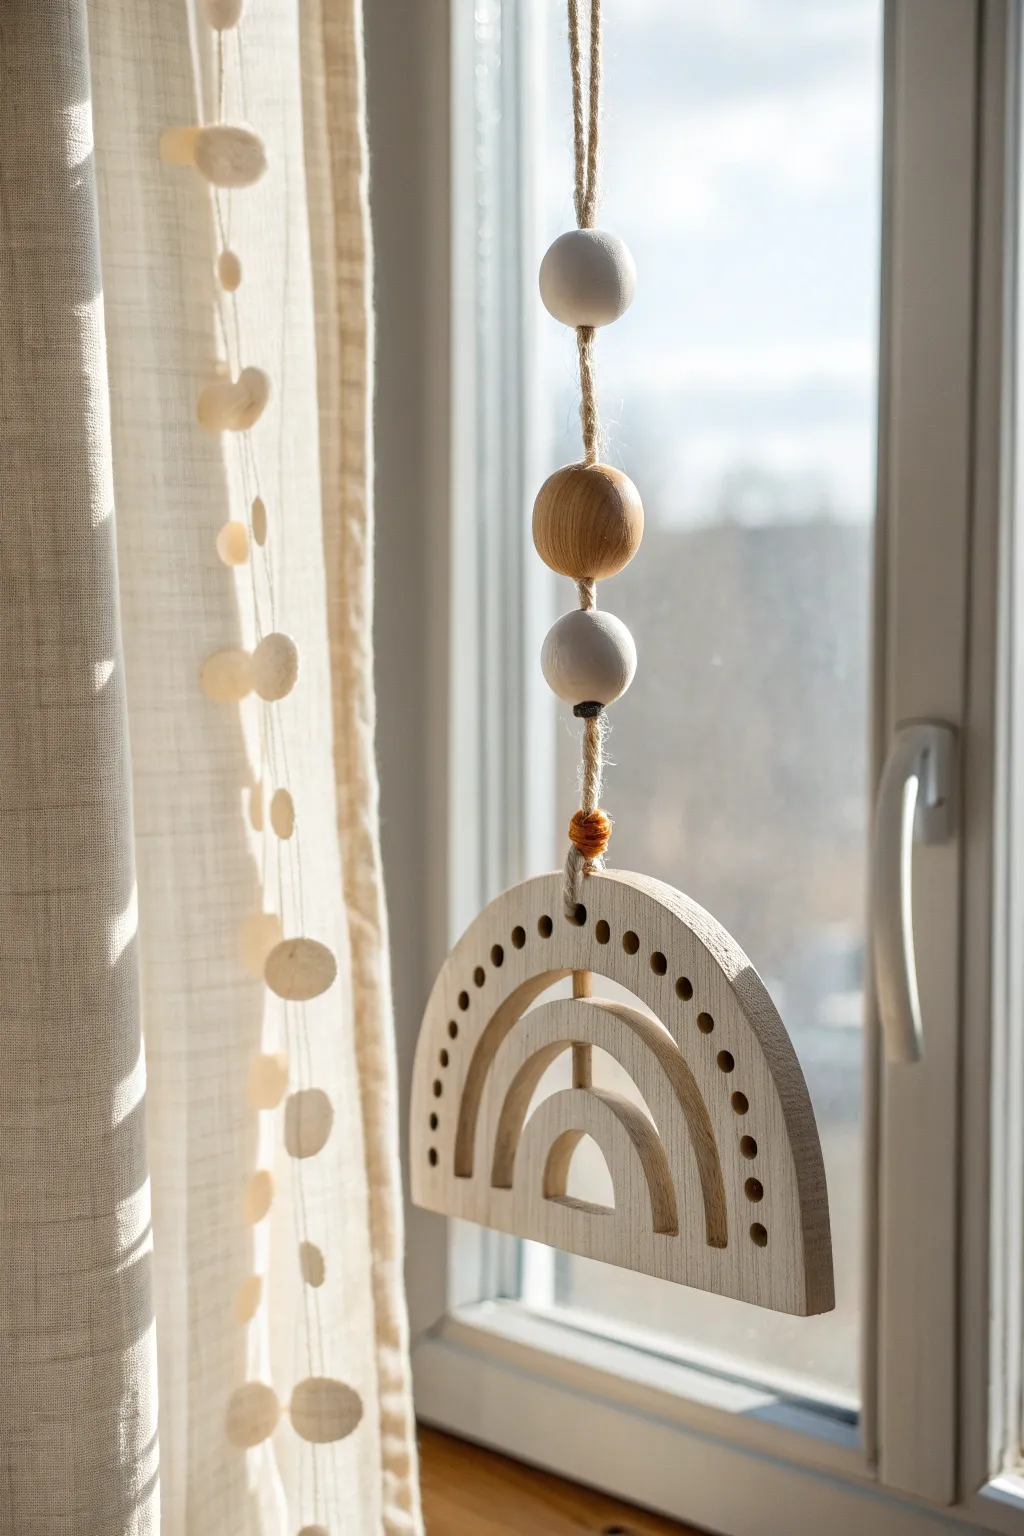
This minimalist sun catcher combines the warmth of natural textures with a modern, earthy design. By using air-dry clay to mimic the look of light wood, you’ll create a charming hanging piece perfect for capturing the afternoon light in any window.
How-To Guide
Materials
- White or natural air-dry clay (approx. 200g)
- Rolling pin
- Parchment paper or craft mat
- Craft knife or scalpel tool
- Circle cutters (various sizes) or round household objects
- Ruler
- Wooden skewer or toothpick
- Sandpaper (fine grit)
- Jute twine or hemp cord
- 3 large wooden beads (2 white/natural, 1 varnished wood)
- Small bowl of water (for smoothing)
- Acrylic paint (optional: cream or pale beige)
Step 1: Shaping the Rainbow Base
-
Condition the clay:
Start by taking a handful of air-dry clay and kneading it in your hands until it is soft, pliable, and free of cracks. If it feels too dry, dip your fingers in water and work it in. -
Roll out the slab:
Place your clay on parchment paper. Use a rolling pin to flatten it into an even slab, aiming for a thickness of about 1/4 inch (6mm). Ensure the thickness is consistent so it dries evenly. -
Cut the main semi-circle:
Find a large round bowl or circular cutter (about 4-5 inches in diameter). Press it into the clay to cut a circle, then use your craft knife and ruler to slice that circle exactly in half. You now have your base semi-circle. -
Mark the arches:
Using smaller circular objects or just lightly sketching with a toothpick, mark out two inner arches on your semi-circle. These will guide your cutouts to create the rainbow shape. -
Create the cutouts:
Carefully use your craft knife to trace your marked lines. You want to cut out negative space between the arches, leaving sturdy strips of clay that connect at the bottom. The image shows two distinct open channels. -
Connect the center:
Notice the central vertical line in the design? Don’t cut the arches all the way around. Leave a small vertical bridge of clay in the very center of the rainbow to hold the inner arches in place. -
Add decorative holes:
Along the outermost top curve of the rainbow, use a skewer or a straw to poke a series of small, evenly spaced holes. These add a lovely texture and let more light filter through. -
Pierce the hanging hole:
Use your skewer to poke a hole at the very top center of the semi-circle. Make sure it goes all the way through and is wide enough for your twine to pass through later. -
Smooth the edges:
Dip your finger in a little water and gently run it along all cut edges to soften any sharpness. This gives it that professional, finished look.
Prevent Cracking
Does your clay crack while drying? Slow down the process! Lightly cover the drying piece with a damp paper towel or plastic wrap for the first 12 hours to let moisture escape gradually.
Step 2: Finishing and Assembly
-
Let it dry:
Place your clay piece on a wire rack or leave it on parchment paper to dry. This usually takes 24-48 hours. I like to flip it over halfway through the drying process to prevent curling. -
Sand for perfection:
Once fully dry and hard, use fine-grit sandpaper to smooth out any rough bumps or uneven edges on the surface and inside the cutouts. Wipe away the dust with a dry cloth. -
Optional painting:
If your clay dried stark white, you can leave it as is or dilute some beige acrylic paint with water to give it a ‘wsh’ that resembles pale wood grain. -
Prepare the cord:
Cut a length of jute twine, about 20 inches long. Fold it in half to create a loop at the top for hanging, and tie a knot about 3 inches down from the loop. -
Thread the beads:
Thread the loose ends of the twine through your first white bead, then the wooden bead, and finally the second white bead. Push them up against the top knot. -
Secure the beads:
Tie another knot snugly underneath the bottom bead to hold the trio in place. You can wrap a bit of extra twine or embroidery floss (like the orange shown in the photo) around this knot for a pop of color. -
Attach the rainbow:
Thread the twine ends through the top hole of your clay rainbow. Tie a secure double knot at the back or front, depending on your preference. Trim any excess string.
Texture Play
Before the clay dries, gently press a textured fabric like linen or burlap onto the surface. This imitates a wood-grain or woven feel that looks amazing when painted.
Hang your new creation in a sunny spot and enjoy the interplay of light and shadow