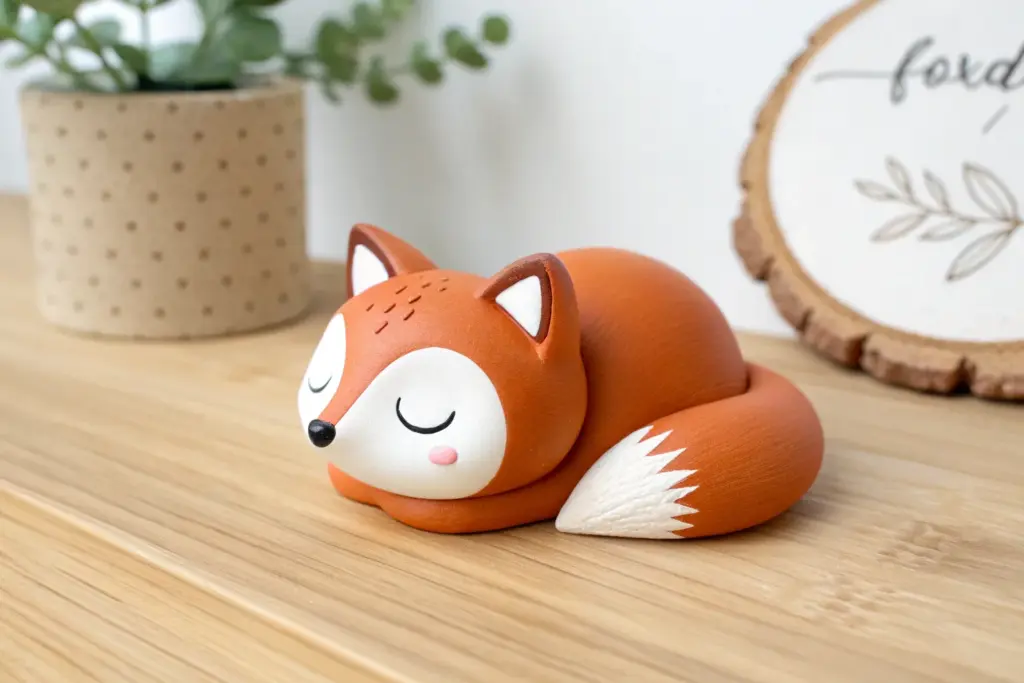
If you can roll a ball of clay, you can make the sweetest little air dry clay animals—no fancy tools, no perfect sculpting skills needed. These ideas are all about simple shapes, cute details, and projects that dry beautifully on a shelf while you dream up the next critter.
Classic Cute Clay Cat
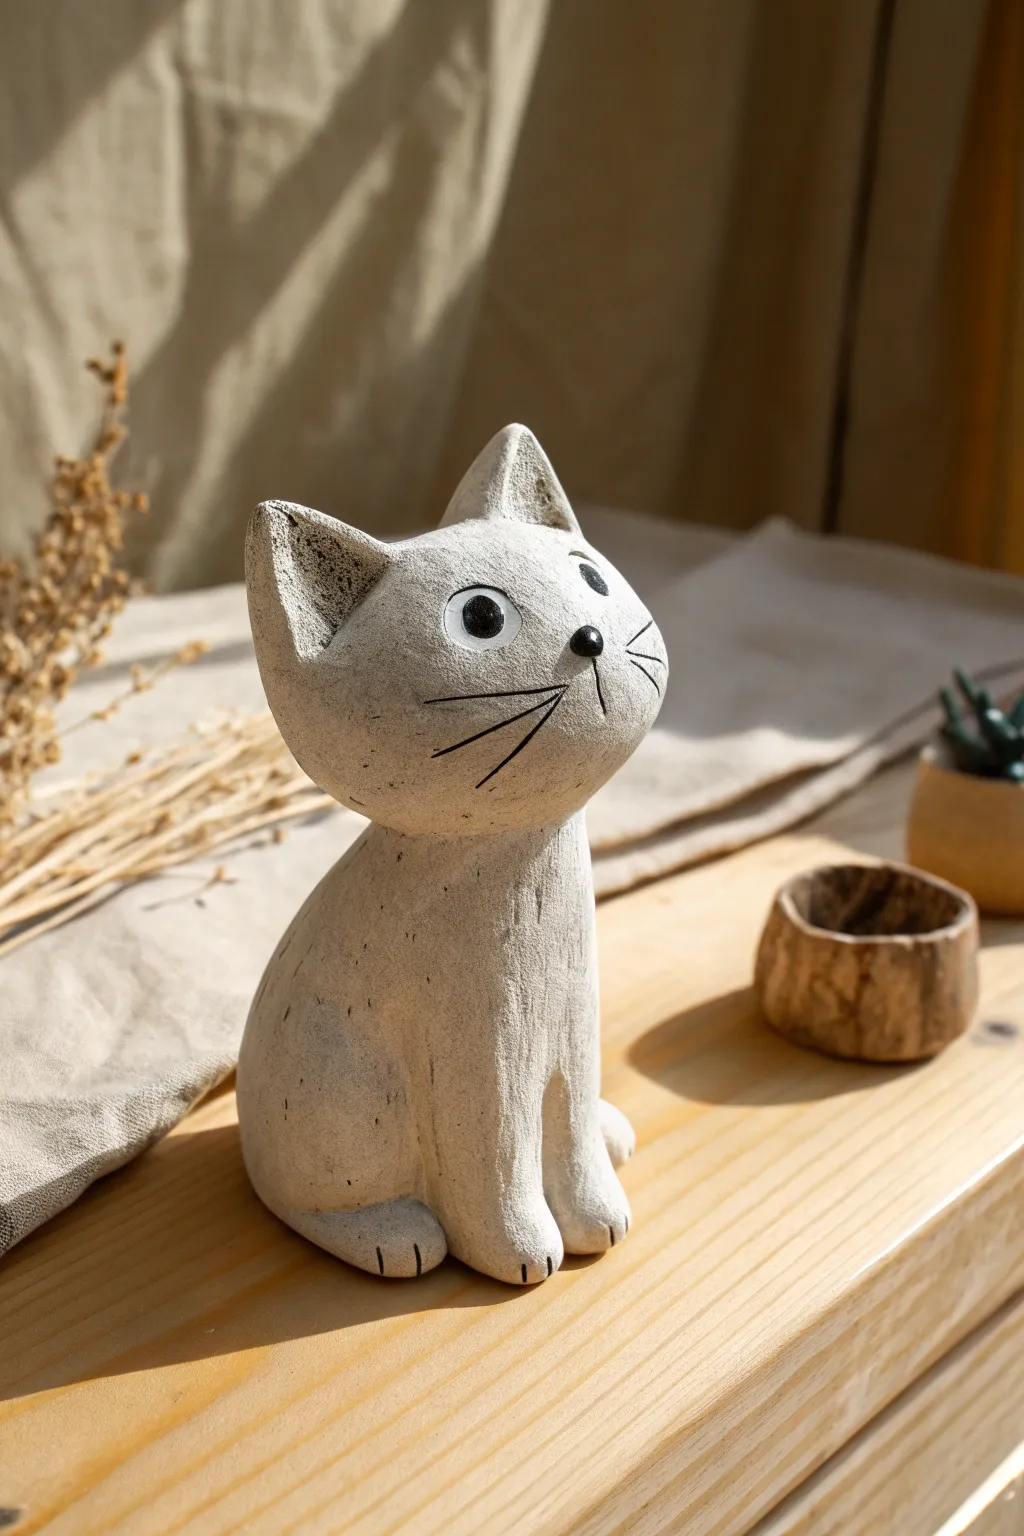
Capture the charm of minimalist sculpture with this adorable sitting cat figurine. Its speckled, stone-like texture and simple lines make it a timeless piece of decor that looks far more expensive than the simple air-dry clay it’s made from.
Detailed Instructions
Materials
- Air-dry clay (white or light grey)
- Wooden sculpting tools (or a butter knife and toothpick)
- Water in a small cup
- Acrylic paint (black, white, grey, beige)
- Old toothbrush
- Small detail paintbrush
- Fine-grit sandpaper
- Matte varnish or sealant
Step 1: Forming the Body
-
Create the base:
Start with a large ball of clay roughly the size of a tennis ball. Roll it firmly between your palms to remove cracks, then gently shape it into a rounded pear or teardrop shape. This will be the main body sitting upright. -
Flatten the bottom:
Press the wider end of your teardrop onto your work surface firmly. You want a completely flat base so the cat sits stable and doesn’t wobble. -
Delineate the legs:
Using a wooden modeling tool or a dull knife, gently press two vertical lines into the front of the body to suggest the front legs. Don’t cut all the way through; just create indentations to define the form. -
Refine the paws:
At the bottom of these leg sections, press inwards slightly to distinguish the feet from the legs. Use a knife edge to make two tiny vertical marks on each foot for the toes. -
Shape the tail:
For a seamless look, you can carve a shallow curve into the side of the body to suggest a tail wrapped around, or roll a small snake of clay and attach it flush against the side, blending the edges completely with a bit of water.
Stone Texture Tip
For a rougher, more realistic sandstone texture, mix a pinch of fine sand or baking soda directly into your white base paint before applying it to the dry clay.
Step 2: Sculpting the Head
-
Roll the head shape:
Roll a second, smaller ball of clay for the head. It should be slightly oval-shaped, like a flattened egg, rather than a perfect sphere. -
Form the ears:
Pinch the top two corners of the oval to create triangular ears. I find it helpful to support the back of the ear with my thumb while shaping the front with my index finger to create a slight curve. -
Hollow the ears:
Use a small rounded tool or the back of a paintbrush to gently press into the center of each triangle, creating the inner ear depth. -
Attach head to body:
Score (scratch) the top of the body and the bottom of the head. Add a dab of water to the scored areas and press the head firmly onto the body. Use your thumb or a tool to smooth the clay across the seam at the back of the neck until the join is invisible. -
Position the gaze:
Tilt the head slightly upward before the clay sets. This gives the cat that inquisitive, attentive look seen in the reference photo.
Level Up: Garden Decor
Make a larger version using polymer clay or outdoor-sealed cement to create a weatherproof garden guardian for your potted plants.
Step 3: Adding Details & Texture
-
Add the nose:
Roll a tiny, peppercorn-sized ball of clay. Attach it to the center of the face with a drop of water, pressing it down slightly to secure it. -
Carve the whiskers:
Use a sharp needle tool or toothpick to carve the whisker lines. Aim for three lines on each side, radiating outward from the nose area. Make these incisions fairly deep so paint can settle into them later. -
Smooth everything out:
Dip your finger in water and run it over the entire sculpture to remove fingerprints. The surface should be relatively smooth but organic. -
Let it dry completely:
Allow the sculpture to air dry for 24-48 hours. Turn it over halfway through to ensure the bottom dries out. Once dry, sand any rough patches gently with fine-grit sandpaper.
Step 4: Faux-Stone Finish
-
Base coat:
Mix white acrylic paint with a tiny drop of beige or warm grey. Paint the entire cat with this off-white mixture to create an even, matte base. -
Create the speckles:
Dilute a small amount of dark grey or black paint with water. Dip an old toothbrush into this mixture, aim it at the cat, and run your thumb across the bristles to flick tiny speckles over the surface. Go lightly—less is more for this stone effect. -
Paint the eyes:
Use a detail brush to paint two solid black circles for eyes. Keep them relatively large and round for a cute expression. -
Add eye highlights:
Once the black eye paint is dry, use a toothpick to place a tiny white dot in the upper corner of each eye. This ‘catchlight’ brings the character to life. -
Define the features:
Paint the nose black. Then, thin down some black paint with water to make a wash, and carefully run it into the whisker groves and ear indentations you carved earlier. -
Seal the piece:
Finish with a coat of matte varnish. Avoid glossy finishes, as the matte look is essential for mimicking the stone texture shown in the photo.
Place your little stone-effect cat on a sunny windowsill where its textured finish can catch the light


Puppy Dog With Floppy Ears
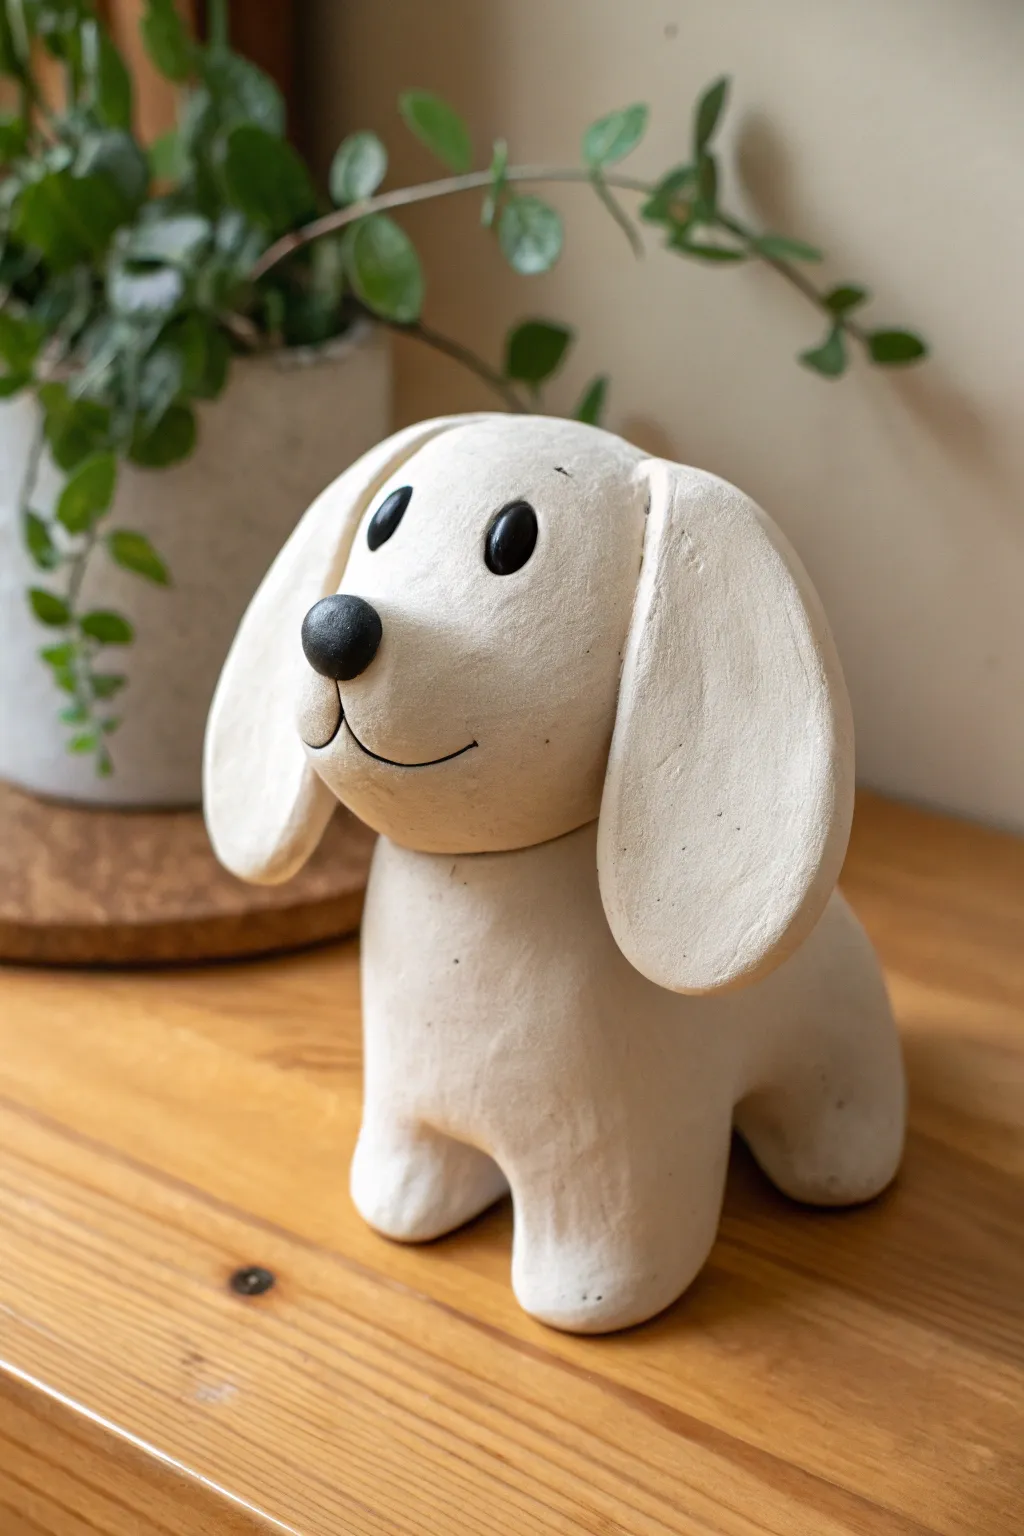
This charming, smooth-finished puppy sculpture captures a sweet expression with simple shapes and large, floppy ears. Its minimalist white aesthetic makes it a perfect modern decor piece that looks far more expensive than just a handful of air-dry clay.
Step-by-Step Guide
Materials
- White smooth air-dry clay
- Small cup of water
- Clay sculpting tools or a butter knife
- Rolling pin
- Black acrylic paint
- Fine-grit sandpaper
- Satin or matte varnish (optional)
- Small round paintbrush
- Toothpick (for scratching attachment points)
Step 1: Sculpting the Body Base
-
Roll the main body:
Start by conditioning a large handful of clay until it is pliable. Roll this into a smooth, thick cylinder shape about the size of a large potato. This will serve as the combined body and leg base. -
Define the legs:
Instead of attaching separate legs, gently press your thumb into the center underside of the cylinder to create an arch. Use your fingers to pull and shape the four corners of the cylinder downwards to form blunt, sturdy legs. -
Refine the stance:
Stand the body on your work surface and tap it gently to flatten the feet. Smooth the arch between the front and back legs so the underbelly looks natural. -
Smooth the surface:
Dip your finger in a tiny bit of water and rub away any cracks or fingerprints on the body. I like to spend extra time here ensuring the finish is porcelain-smooth.
Step 2: Creating the Head and Features
-
Form the head shape:
Roll a second ball of clay, slightly smaller than the body section. Gently flatten it into a thick, rounded disk shape, similar to a hamburger bun but fuller. -
Attach head to body:
Score the top of the body (neck area) and the bottom of the head with a toothpick. Apply a dab of water or slip, then press the head firmly onto the body. Blend the seam at the back of the neck so it looks like one continuous piece. -
Create the floppy ears:
Roll out a slab of clay to about 1/4 inch thickness. Cut two large, elongated teardrop shapes. Smooth the edges with a wet finger so they are rounded, not sharp. -
Attach the ears:
Score the sides of the head and the top inside edge of the ears. Press the ears onto the head, positioning them so they drape down past the ‘chin’ line. The connection point should be fairly high on the head. -
Sculpt the snout:
Roll a small ball of clay for the nose and gently press it onto the center of the face. It should be slightly raised to give dimension. -
Add the smile:
Using a needle tool or a sharp toothpick, carve a simple curved line extending from the bottom of the nose to create a sweet, subtle smile.
Cracks while Drying?
Mix a tiny bit of fresh clay with water to make a paste (slip). Fill the crack, let it dry, and sand it smooth. It’ll disappear completely.
Step 3: Drying and Painting
-
Initial Drying:
Let the sculpture sit undisturbed for 24 to 48 hours. Turn it over gently halfway through to ensure the belly dries completely. -
Sanding for perfection:
Once fully dry and hard, take fine-grit sandpaper and lightly buff the entire surface. This removes any lingering fingerprints or bumps and gives it that professional ceramic look. -
Painting the nose:
Use a small brush and black acrylic paint to carefully fill in the raised nose button. A steady hand is key here to keep the edges crisp. -
Painting the eyes:
Paint two vertical ovals for the eyes just above the nose. Keep them simple, solid black, and widely spaced for that innocent puppy look. -
Lining the mouth:
Use a very fine liner brush or even a black ultra-fine marker to trace the carved smile line, connecting it to the bottom of the black nose. -
Sealing the piece:
Finish by applying a coat of matte or satin varnish to protect the clay and deepen the black paint contrast.
Sanding Secret
Don’t skip sanding! A quick light sanding transforms ‘homemade’ texture into something that looks like store-bought ceramic.
Place your little pup near a plant or on a shelf where its sweet expression can greet you every day


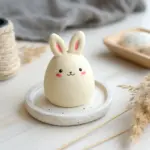
Easy Bunny With Long Ears
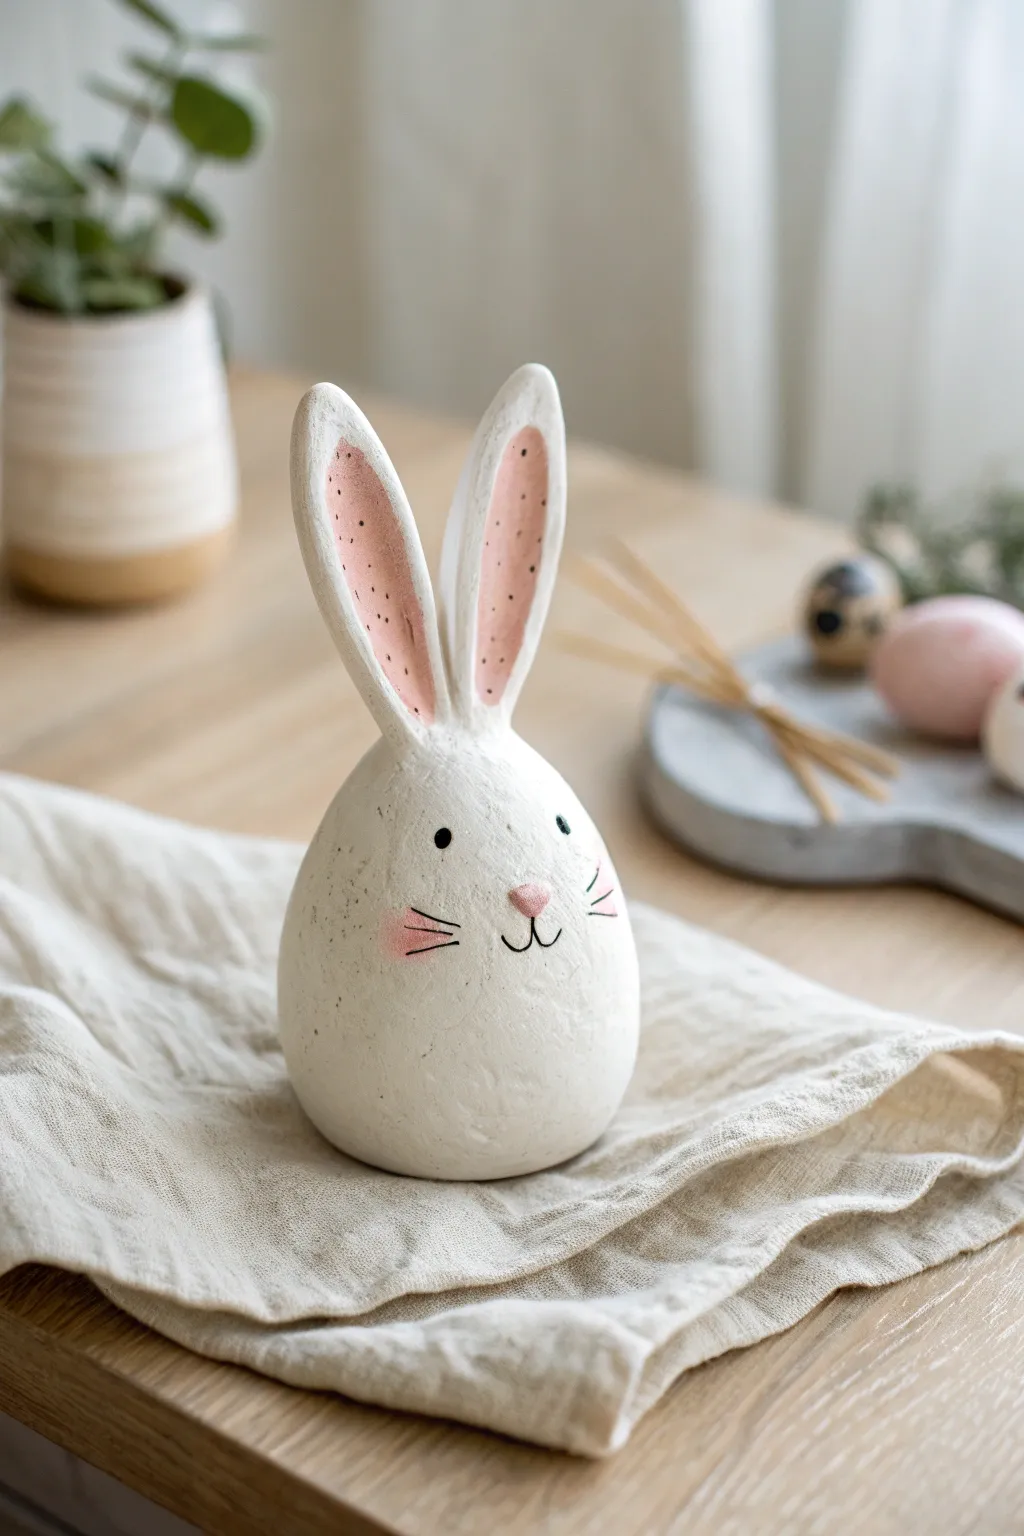
This adorable bunny figurine combines a sleek, modern egg shape with charming hand-painted details for a perfect spring decoration. The smooth white clay finish and delicate pink accents give it a professional, store-bought look that is surprisingly easy to achieve at home.
How-To Guide
Materials
- White air dry clay
- Water (for smoothing)
- Small rolling pin
- Clay knife or craft blade
- Sandpaper (fine grit)
- Acrylic paints (black, soft pink)
- Small detail brush
- Toothpick (optional, for structure)
Step 1: Shaping the Base
-
Prepare the clay:
Start with a handful of white air dry clay. Knead it thoroughly in your hands until it becomes warm, pliable, and free of any cracks. -
Form the body:
Roll the clay into a smooth ball first to eliminate seams. Then, gently taper the top portion to create a subtle egg shape. -
Flatten the base:
Gently tap the wider bottom of your egg shape against your work surface. This creates a flat area so your bunny stands up straight without wobbling. -
Smooth the surface:
Dip your finger in a tiny bit of water and run it over the clay body to erase fingerprints and smooth out any bumps.
Use Toothpicks for Support
If the long ears keep drooping while you work, hide a half-toothpick inside each one and push it into the head for an invisible internal skeleton.
Step 2: Creating the Ears
-
Roll coils:
Take two smaller equal-sized pieces of clay. Roll each piece into a thick, elongated log shape, about 2-3 inches long. -
Flatten and shape:
Gently press down on the logs to flatten them slightly. Pinch the ends to create tapered points, mimicking the shape of bunny ears. -
Create the inner ear:
Using your thumb or a modeling tool, press a shallow indentation down the center of each ear. This adds dimension and creates a spot for the pink paint later. -
Attach the ears:
Score the bottom of the ears and the top of the head with a craft knife (making little hatch marks). Apply a drop of water or clay slip to the scored areas. -
Blend the seams:
Press the ears firmly onto the head. Use a clay tool or your finger to smooth the clay from the base of the ears down onto the head so they are essentially one piece. I find this helps prevent them from falling off later.
Cracks Appearing?
Surface cracks usually happen if the clay dries too fast. Mix a tiny bit of fresh clay with water to make a paste and fill the cracks, then sand smooth once dry.
Step 3: Drying and Refining
-
Let it dry completely:
Allow your bunny to dry for at least 24 to 48 hours depending on humidity. Place it somewhere safe away from direct heat. -
Sand for smoothness:
Once fully hard, take a piece of fine-grit sandpaper and gently buff the entire surface. Focus on any fingerprints or rough seams where the ears attach. -
Wipe clean:
Use a dry cloth or a slightly damp paper towel to remove all the sanding dust before you start painting.
Step 4: Painting the Details
-
Mix your pink:
Prepare a soft, pastel pink acrylic paint. If your pink is too bright, mix in a little white to soften it. -
Paint the inner ears:
Using a small brush, carefully fill in the indented areas of the ears with the pink paint. You can add tiny darker speckles if you want a textured look. -
Add facial features:
With a fine detail brush (or a fine-tip marker if you prefer), paint two small black dots for eyes and a small curved ‘w’ shape for the mouth. -
Paint the nose:
Paint a small, soft pink inverted triangle or oval for the nose right above the mouth lines. -
Rosy cheeks and whiskers:
Add three thin horizontal lines on each side for whiskers. finish by dry-brushing a very faint amount of pink on the cheeks for a blushing effect.
Place your minimalist bunny on a shelf or use it as a centerpiece for a charming handmade touch


Panda Bear From Two Ovals
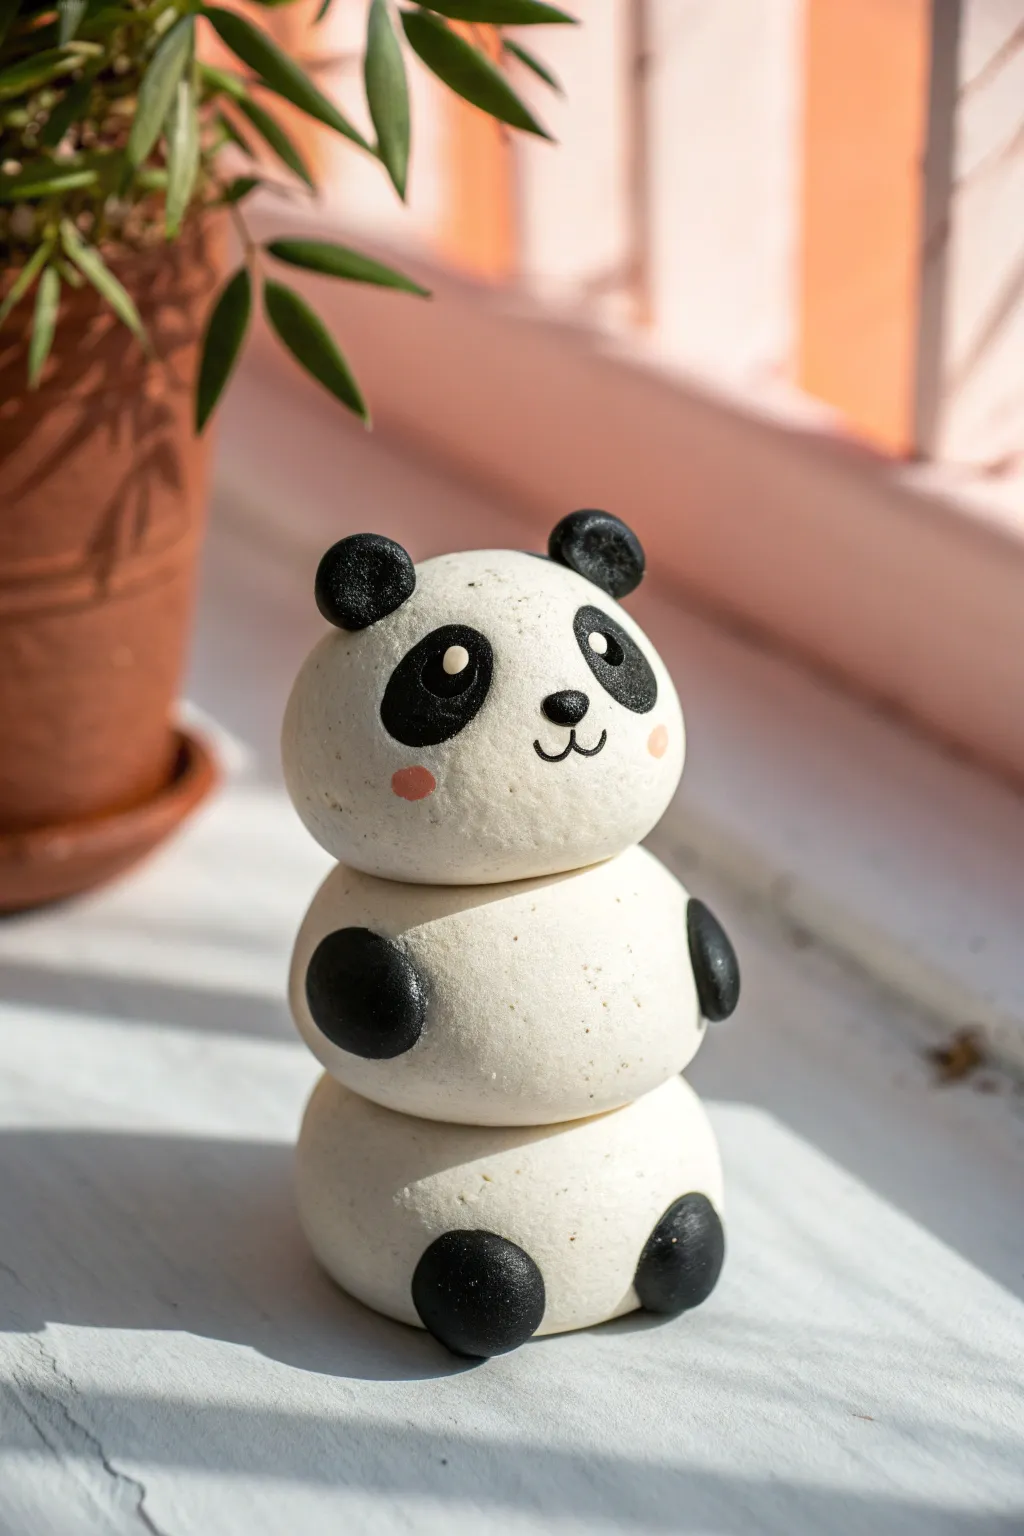
This adorable panda sculpture uses a playful stacking technique to create a stylized, totem-like figure that is perfect for a desk buddy or window sill decoration. The smooth, stone-like texture and simple shapes make this an incredibly satisfying beginner project.
Step-by-Step Tutorial
Materials
- White cosmetic sponges (round wedge shape) or air dry clay formed into flat discs
- Air dry clay (white)
- Black acrylic paint
- Small round paintbrush
- Fine-point black permanent marker or detail brush
- Pink acrylic paint or pastel chalk
- PVA glue or heavy body gel medium
- Clear matte varnish (optional)
Step 1: Forming the Body Segments
-
Create the base shapes:
If using air dry clay, roll three balls of white clay. One should be slightly larger for the bottom, a medium one for the middle, and a slightly distinct one for the head. -
Flatten the spheres:
Gently press each ball down onto your work surface until they resemble smooth, thick river stones or marshmallows. They shouldn’t be pancake-flat; keep them chunky. Smooth out any fingerprints with a drop of water on your fingertip. -
Dry the segments:
Let these three main body pieces dry completely according to your clay’s instructions before assembling. This prevents them from squishing under each other’s weight.
Smoother Stone Look
To get that river-rock texture, gently rub the dried clay with a slightly damp sponge before painting. This softens any harsh tool marks.
Step 2: Adding the Appendages
-
Make the ears:
While the body chunks dry, roll two tiny pea-sized balls of fresh clay. Pinch them slightly to flatten the bottom edge where they will attach to the head. -
Create the arms:
Roll two slightly larger oval shapes for the arms. Flatten them slightly so they will sit flush against the curve of the middle body segment. -
Form the feet:
Create two semi-circles or flattened domes for the feet, similar in size to the arms but shaped to sit flat on the ground. -
Attach the limbs:
Using a tiny bit of water or slip (clay mixed with water), attach the ears to the top head piece, the arms to the sides of the middle piece, and the feet to the bottom front of the base piece. Smooth the seams for a strong bond.
Step 3: Assembly and Painting
-
Stack the body:
Once all pieces are dry, use strong craft glue or PVA to stack the three segments. Place the largest at the bottom, the middle section next, and the head on top. -
Paint the black details:
Using black acrylic paint and a small round brush, carefuly paint the ears, the arm ovals, and the feet domes. Let the black paint dry completely. -
Paint the eye patches:
Paint two slanted oval shapes on the face for the classic panda eye patches. They should angle slightly downward toward the nose area. -
Add the nose:
Paint a small, inverted soft triangle or oval for the nose right between the eye patches. -
Detail the mouth:
Using a very fine liner brush or a permanent marker, draw a simple ‘w’ shape or shallow anchor shape connected to the nose for the mouth. -
Add the eye highlights:
Dip the non-brush end (the handle tip) of your paintbrush into white paint. dot a small white highlight into the upper corner of the black eye patches. This brings the panda to life. -
Apply blush:
I like to use a very dry brush with a tiny amount of pink paint, or even a Q-tip with pink chalk dust, to dab soft rosy cheeks just under the eyes. -
Seal the project:
Once all paint is totally dry, apply a coat of matte varnish to protect your panda and give it a unified finish.
Wobbly Stack?
If the pieces won’t stack straight, use a piece of sandpaper to gently flatten the top and bottom contact points of each segment.
Place your new panda friend in a sunny spot to enjoy his cheerful expression

The Complete Guide to Pottery Troubleshooting
Uncover the most common ceramic mistakes—from cracking clay to failed glazes—and learn how to fix them fast.
Big-Eyed Frog Pebble Buddy
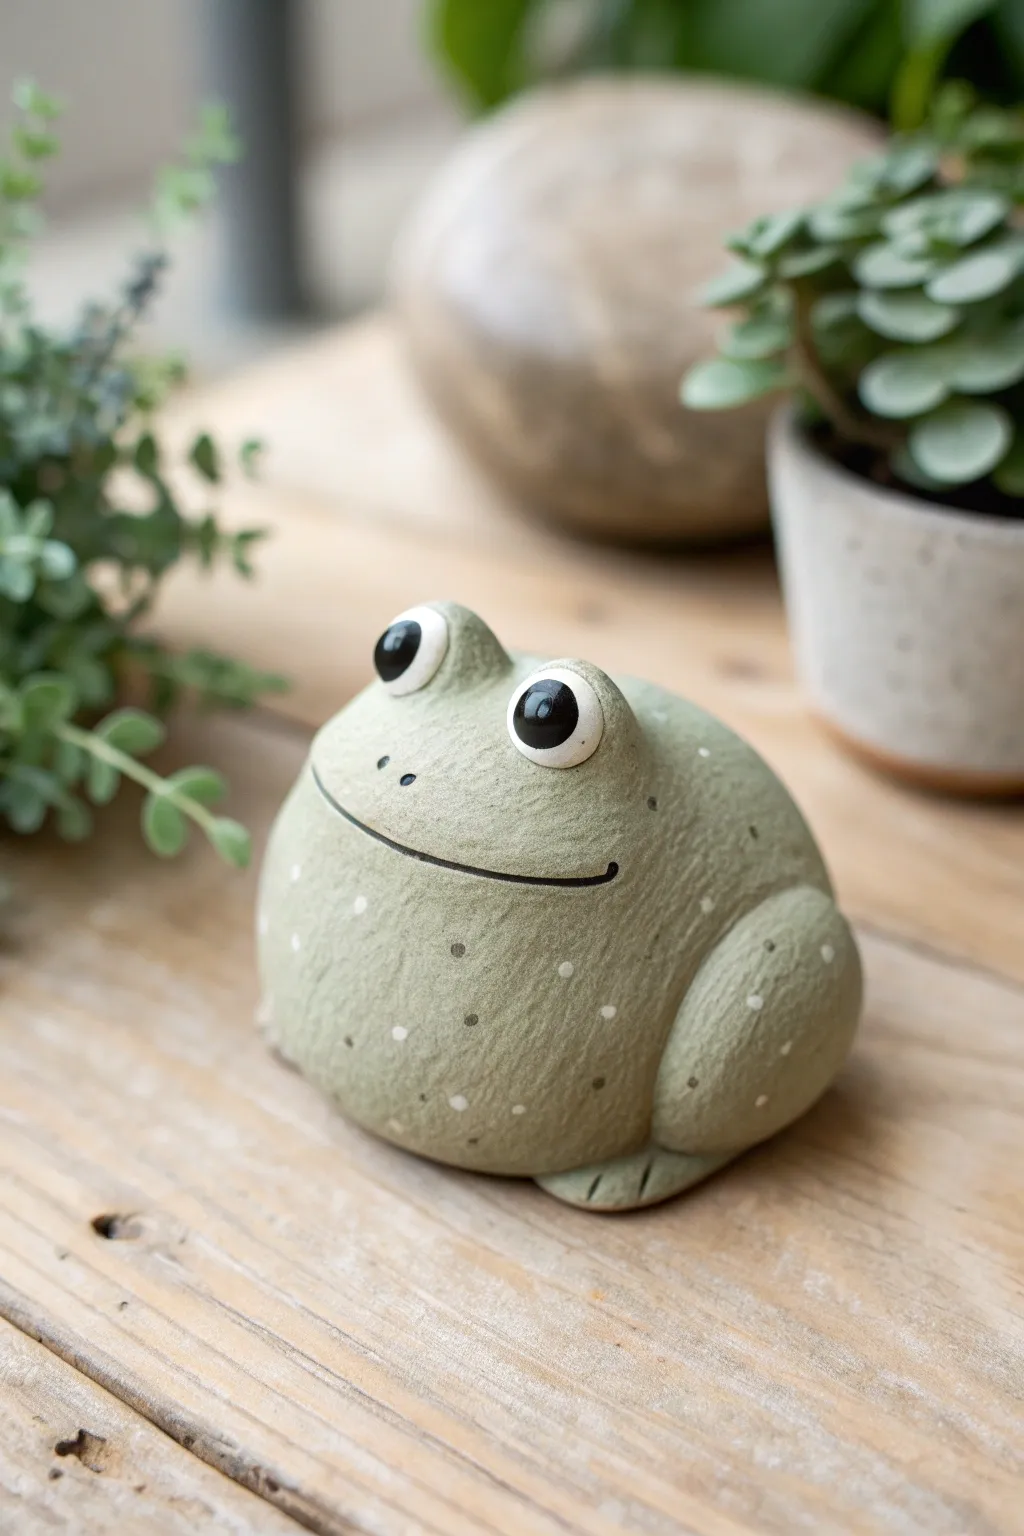
Create a charming desk companion with this simple yet expressive frog project. Featuring a textured, stone-like finish and delightfully oversized eyes, this rounded amphibian is perfect for bringing a touch of nature indoors.
Detailed Instructions
Materials
- Air dry clay (white or grey)
- Acrylic paints (sage green, white, black, brown)
- Texture tool (stiff bristle brush, sea sponge, or toothbrush)
- Small bowl of water
- Sculpting tools (needle tool, smoothing tool)
- Matte varnish or sealant
Step 1: Sculpting the Body
-
Form the base:
Start with a generous handful of air dry clay. Roll it into a smooth ball, then gently flatten the bottom against your work surface so it sits stable without rolling away. -
Shape the mound:
Press down slightly on the top to create a rounded, dome-like shape rather than a perfect sphere. This squat, chubby form gives the frog its character. -
Add the legs:
Roll two smaller balls of clay for the hind legs. Flatten them into thick oval discs and press one onto each side of the frog’s body, towards the back. -
Blend the seams:
Use a little water on your finger or a smoothing tool to firmly blend the edges of the legs into the main body. You want them to look like folded limbs resting against the side, not stuck-on lumps. -
Create the feet:
At the base of each leg oval, pinch a small amount of clay out slightly to form a foot. Use a needle tool or knife to gently press two indentations, creating three simple toes.
Step 2: Adding Facial Features
-
Make the eye sockets:
Roll two small spheres of clay for the eyes. Before attaching them, press your thumbs gently into the top of the head to create slight depressions where the eyes will sit. -
Attach the eyes:
Score the bottom of the eye spheres and the depressions on the head (scratch cross-hatch marks). applied a dab of water (slip), and press the eyes firmly into place. -
Support the eyes:
Roll tiny snakes of clay and wrap them around the base of the eyes like eyelids. Blend the bottom edge of these snakes into the head to secure the eyes permanently. -
Carve the smile:
Using a needle tool or a clay knife, carve a long, wide smile that curves slightly upward at the ends. Make the line deep enough that it won’t disappear when you add texture later. -
Add nostrils:
Poke two small, shallow holes just above the smile line for the nostrils.
Cracking Up?
If you see small cracks forming while drying, mix a tiny bit of fresh clay with water to make a paste (slip). Fill the cracks with this paste and smooth it out with your finger.
Step 3: Texturing and Finishing
-
Apply texture:
To get that stone-like look, take a stiff toothbrush or a crumpled ball of aluminum foil. Gently tab it all over the frog skin, avoiding the smooth eyeballs. I find this hides fingerprints perfectly. -
Let it dry:
Allow your frog to dry completely. Depending on humidity and thickness, this takes 24 to 48 hours. Turn it over halfway through to let the bottom dry. -
Base coat:
Paint the entire body with a muted sage green acrylic paint. You might need two coats for opaque coverage. Leave the eyeballs white. -
Define the eyes:
Paint a large black circle in the center of each white eye. Once dry, add a tiny white dot in the upper corner of the black pupil for a life-like reflection. -
Highlight the smile:
Mix a tiny bit of water with black or dark brown paint to make a wash. Carefully run a thin brush along the carved mouth line to darken it. -
Add speckles:
Dip a toothbrush or stiff brush into thinned white or pale yellow paint. Run your thumb across the bristles to flick tiny speckles across the frog’s back and sides. -
Seal the work:
Finish with a coat of matte varnish to protect the paint and enhance the stone texture effect.
Garden Guardian
Want this frog to live in a plant pot? Use polymer clay instead of air dry clay, or seal your air dry creation heavily with waterproof outdoor varathane to handle moisture.
Place your new speckled friend on a shelf or near a potted plant to enjoy his goofy grin
Tiny Elephant With a Curled Trunk
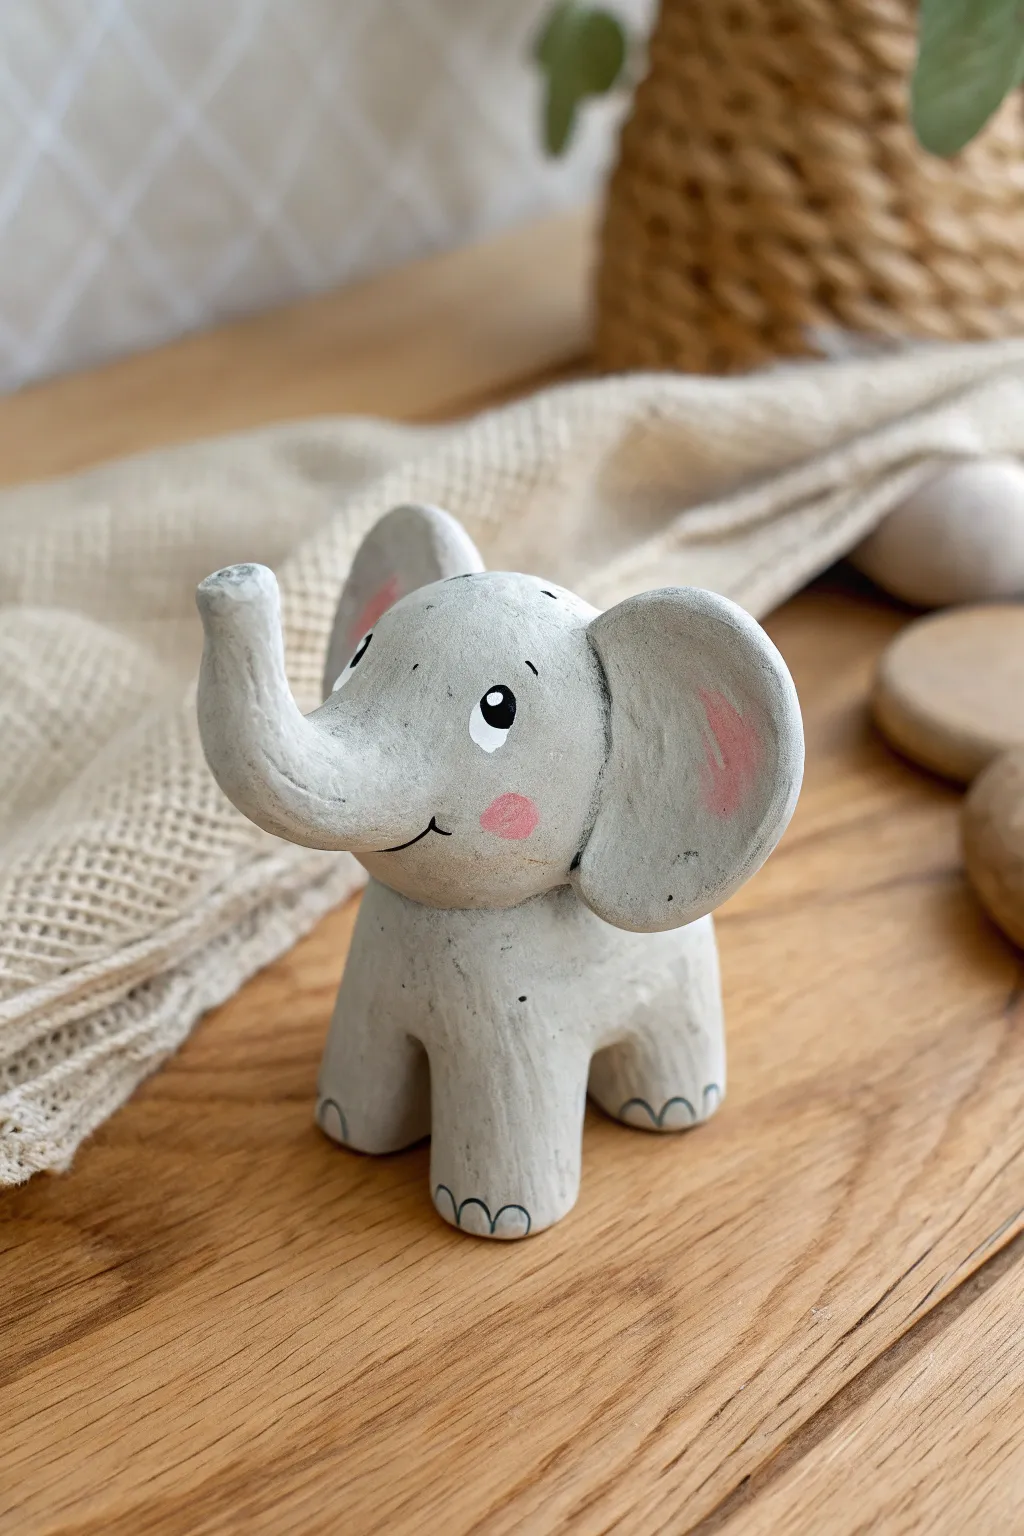
This adorable little elephant brings a touch of playful charm to your shelf with its trunk happily curled upward. Its simple, rounded shapes and sweet painted details make it a perfect project for beginners looking to create something truly heartwarming.
Step-by-Step Guide
Materials
- Air dry clay (white or grey)
- Acrylic paints: light grey, black, white, soft pink
- Small detail paintbrush
- Medium flat paintbrush
- Cup of water and paper towels
- Clay sculpting tools (or a toothpick)
- Fine-grit sandpaper (optional)
- Matte varnish or sealant
Step 1: Sculpting the Body
-
Form the torso:
Start with a golf-ball-sized piece of clay. Roll it firmly between your palms until it forms a smooth, crack-free sphere to serve as the main body. -
Shape the legs:
Take four smaller, equal sized pieces of clay. Roll each into a short, thick cylinder to create the sturdy legs. -
Attach the legs:
Press the four cylinders onto the bottom of the spherical body. Blend the seams upwards into the body using your thumb or a smoothing tool so the legs are securely attached and look seamless. -
Check stability:
Gently press the figure down onto your work surface to flatten the bottoms of the feet slightly, ensuring the elephant stands evenly without wobbling.
Step 2: Adding the Head and Trunk
-
Create the head:
Roll a slightly smaller sphere for the head. It should be proportional to the body but substantial enough to hold the large ears. -
Form the trunk:
Pull a section of clay from the front of the head sphere outwards, rolling it between your fingers to elongate it into a trunk. Gently curl the tip upward for a happy expression. -
Join head to body:
Score the top of the body and the bottom of the head (scratch hatch marks) and add a tiny dab of water. Press the head firmly onto the body and blend the clay at the neck for a strong bond. -
Shape the ears:
Flatten two balls of clay into large, smooth discs. These should be quite large relative to the head to capture that classic elephant look. -
Attach the ears:
Press the ears onto the sides of the head. Curve them slightly forward to give the face some dimension and personality. -
Smooth perfection:
Dip your finger in a little water and run it over the entire sculpture to smooth out any fingerprints or rough textures before letting it dry completely (usually 24-48 hours).
Cracking Up?
If cracks appear while drying, don’t panic. Make a paste of clay and water (slip) and fill the cracks, then smooth over.
Step 3: Painting and Details
-
Base coat:
Once fully dry, paint the entire sculpture with an opaque light grey acrylic paint. You may need two coats for full coverage. -
Add rosy cheeks:
Dip a brush into soft pink paint and wipe most of it off on a paper towel. Gently dry-brush pink circles onto the cheeks and the inside curve of the ears. -
Paint the eyes:
I like to use a very fine brush or a toothpick for this part. Paint two small black ovals for eyes, then add a tiny white dot in each for a sparkle of life. -
Define the features:
Using a thin liner brush and black paint, draw thin eyebrows, a small curved smile, and creases on the trunk. -
Detail the toes:
Paint three small half-circles at the bottom of each foot to represent toenails giving the figure a finished look. -
Seal the work:
Protect your painting with a coat of matte varnish to prevent chipping and give the clay a professional finish.
Make it a Set
Create a whole family by varying the sizes of your starter spheres. A tiny baby elephant looks adorable next to this one.
Your charming little elephant is now ready to greet visitors with its cheerful trunk


What Really Happens Inside the Kiln
Learn how time and temperature work together inside the kiln to transform clay into durable ceramic.
Round Owl With Painted Feathers
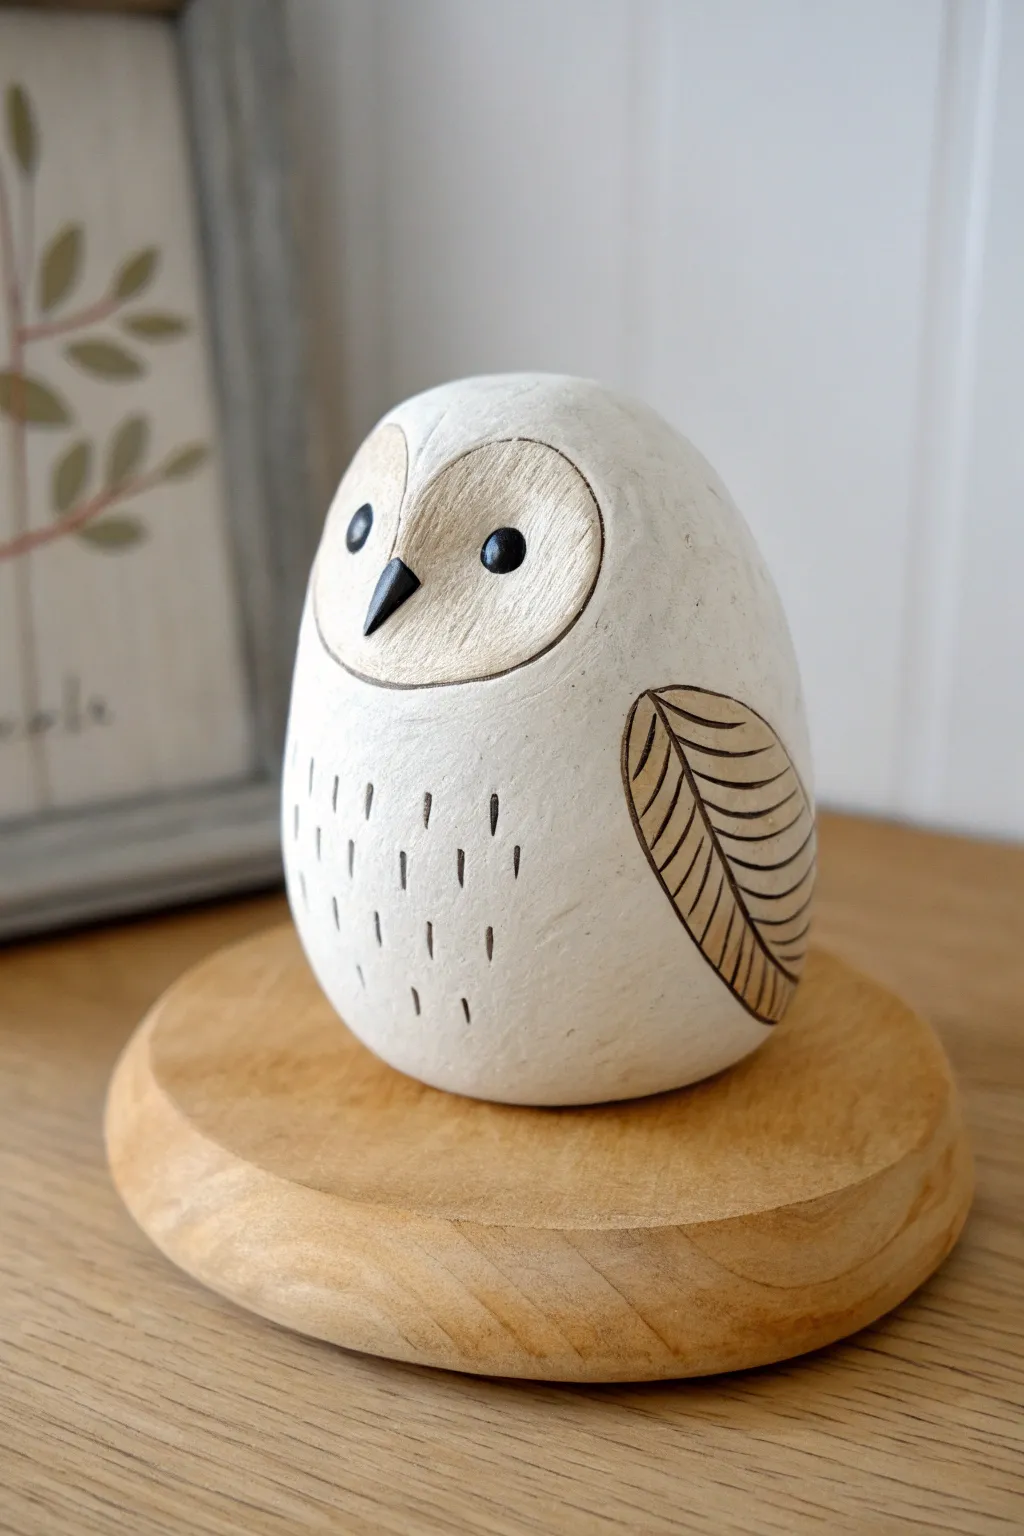
This charming, egg-shaped owl combines smooth, organic forms with subtle carved details for a modern folk-art aesthetic. Its creamy white finish and simple painted accents make it a perfect beginner sculpting project that looks professional when finished.
Detailed Instructions
Materials
- White smooth air-dry clay (e.g., La Doll or refined paper clay)
- Small bowl of water
- Modeling tools (simple knife or needle tool)
- Small fine-Grit sandpaper or sanding sponge
- Acrylic paints (Tan/Beige, Brown, Black)
- Fine detail paintbrush
- Matte varnish or sealant
- Wooden base (optional for display)
Step 1: Shaping the Base Form
-
Form an egg shape:
Start by conditioning a handful of clay until it’s pliable. Roll it into a smooth ball, then gently taper the top half to create a substantial egg shape. The bottom should be slightly wider for stability. -
Flatten the base:
Tap the bottom of your egg firmly against your work surface. You want a flat, sturdy base so the owl stands upright without wobbling. -
Smooth the surface:
Dip your finger in a tiny bit of water and rub it over the entire surface of the clay. Aim to remove any fingerprints or cracks, creating a porcelain-like finish.
Step 2: Carving Details
-
Outline the face:
Using a needle tool or a dull knife, lightly scribe a large heart-shaped perimeter on the upper half of the egg to define the barn owl’s facial disc. -
Create the heart shape:
Deepen the line you just drew. I like to gently press the clay down inside the line to create a very slight recess, distinguishing the face from the rest of the body. -
Add the beak:
Take a tiny, rice-sized piece of fresh clay and form a triangular beak. Score the center of the face, add a dot of water, and press the beak firmly into place, point facing down. -
Incise the wing:
On the right side of the body, use your tool to carve a leaf-shaped outline for the wing. It should curve gently around the owl’s side. -
detail the feathers:
Inside the wing outline, carve a central spine line. Then, draw angled lines radiating from the spine to mimic feathers. Keep the lines clean and deliberate. -
Add chest texture:
Using the very tip of your tool, press small, vertical dashed lines into the chest area. These should be random and sparse to suggest fluffy feathers. -
Dry completely:
Let the owl dry for 24-48 hours. Turn it occasionally so the bottom dries evenly. It is ready when it feels room temperature to the touch, not cool.
Clean Lines Hack
If your carving tool drags the clay and creates crumbs, wait 20 minutes for the surface to firm up slightly before carving the wing details.
Step 3: Painting and Finishing
-
Sand for smoothness:
Once fully dry, use fine-grit sandpaper to gently buff the surface. Focus on smoothing out any rough ridges from your carving tools. -
Base coat the face:
Mix a very watery tan or beige wash. Carefully paint the heart-shaped face area. The wash allows some of the white clay texture to show through for a natural look. -
Paint the wing:
Using a slightly darker brown paint, carefully fill in the carved lines of the wing. You can wipe the surface immediately with a damp cloth to leave paint only in the crevices (an antiquing technique). -
Highlight the chest:
Use a fine brush to dab a tiny amount of black or dark brown paint into the small vertical dashes on the chest. -
Define the eyes:
Paint two wider black circles for the eyes within the face disc. Add a tiny white dot to each eye as a highlight to bring the owl to life. -
Paint the beak:
Paint the beak solid black for high contrast against the pale face. -
Seal the piece:
Finish with a coat of matte varnish to protect the paint and give the clay a unified, soft sheen.
Rustic Texture
For a wood-carved look, brush diluted brown paint over the whole dried owl, then wipe it off quickly with a rag. The paint stays in the texture lines.
Place your finished owl on a small wooden round to complete the natural display
Smiling Whale Pocket Sculpture

This joyful blue whale brings a splash of the sea to your shelf with its gentle curve and happy expression. Sculpted from simple air dry clay and painted with a dreamy textured matte finish, it’s a perfect beginner project that feels surprisingly professional.
Step-by-Step
Materials
- Air dry clay (white or grey)
- Acrylic paints: medium blue, white, black
- Small paintbrush (flat)
- Fine detail brush (liner)
- Bowl of water
- Sculpting tool or plastic knife
- Sandpaper (fine grit)
- Needle tool or toothpick
Step 1: Shaping the Body
-
Prepare the clay:
Start with a ball of clay about the size of a tangerine. Knead it well in your hands until it is warm and pliable to prevent cracking later. -
Form the teardrop:
Roll the ball into a smooth sphere, then gently roll one side against your work surface to elongate it into a teardrop shape. This thicker end will be the head, and the tapered end will become the tail. -
Bend the tail:
Gently curve the tapered tail end upwards. You want a smooth, swooping C-curve so your whale looks like it’s about to dive. -
Create the flukes:
Take a smaller piece of clay, split it into two flattened triangles, and attach them to the very tip of the tail. Blend the seams completely using a little water so the tail looks like one solid piece. -
Attach the fins:
Form two small, flat triangles for the side fins. Score the clay (scratch cross-hatch marks) on the body where you want to attach them, add a drop of water, and press the fins firmly into place near the bottom of the body. -
Smooth the surface:
Dip your finger in water and run it over the entire sculpture to smooth out fingerprints and bumps. I find this step crucial for getting that stone-like finish later.
Step 2: Adding Details
-
Carve the texture:
Before the clay dries, take a needle tool or toothpick and gently scratch faint horizontal lines across the body. These don’t need to be deep; they just add that subtle weathered texture. -
Scribe the smile:
Using your tool, crave a long, gentle curve for the mouth. Start low on the side and curve it up toward the eye area to give it that permanent smile. -
Dry completely:
Let the whale sit for 24-48 hours. Turn it over occasionally so the bottom dries evenly. It is ready when it feels room temperature, not cool to the touch. -
Sand it down:
Once bone dry, take fine-grit sandpaper and lightly sand any rough edges, particularly around the tail connection and the bottom.
Cracks happen!
If small cracks appear while drying, mix a tiny bit of fresh clay with water to make a paste (slip). Paint this into the cracks and smooth it over with your finger.
Step 3: Painting
-
Base coat:
Mix blue acrylic paint with a tiny bit of white to get a nice sky-blue tone. Paint the entire whale, pushing the paint into the texture lines you carved. -
Create texture:
While the blue is still slightly wet, use a dryer brush to drag lightly over the surface. This emphasizes the scratched texture we added earlier. -
Add the eye:
Using the back of a paintbrush or a dotting tool, dip into black paint and press a clean circle just above the corner of the mouth smile. -
Highlight the eye:
Wait for the black eye dot to dry completely. Then, using a toothpick dipped in white paint, add a tiny speck of light to the black dot for a spark of life. -
Define the mouth:
Use your finest liner brush or a fine-tip black marker to carefully trace inside the carved smile line to make it pop.
Make it a spout
Before drying, insert a thick piece of wire or a bent paperclip into the top of the head. After painting, glue a small tuft of cotton or wire structure to mimic water spray.
Place your happy blue whale on a windowsill or desk to bring a calm ocean vibe to your day

TRACK YOUR CERAMIC JOURNEY
Capture glaze tests, firing details, and creative progress—all in one simple printable. Make your projects easier to repeat and improve.
Simple Turtle With a Patterned Shell
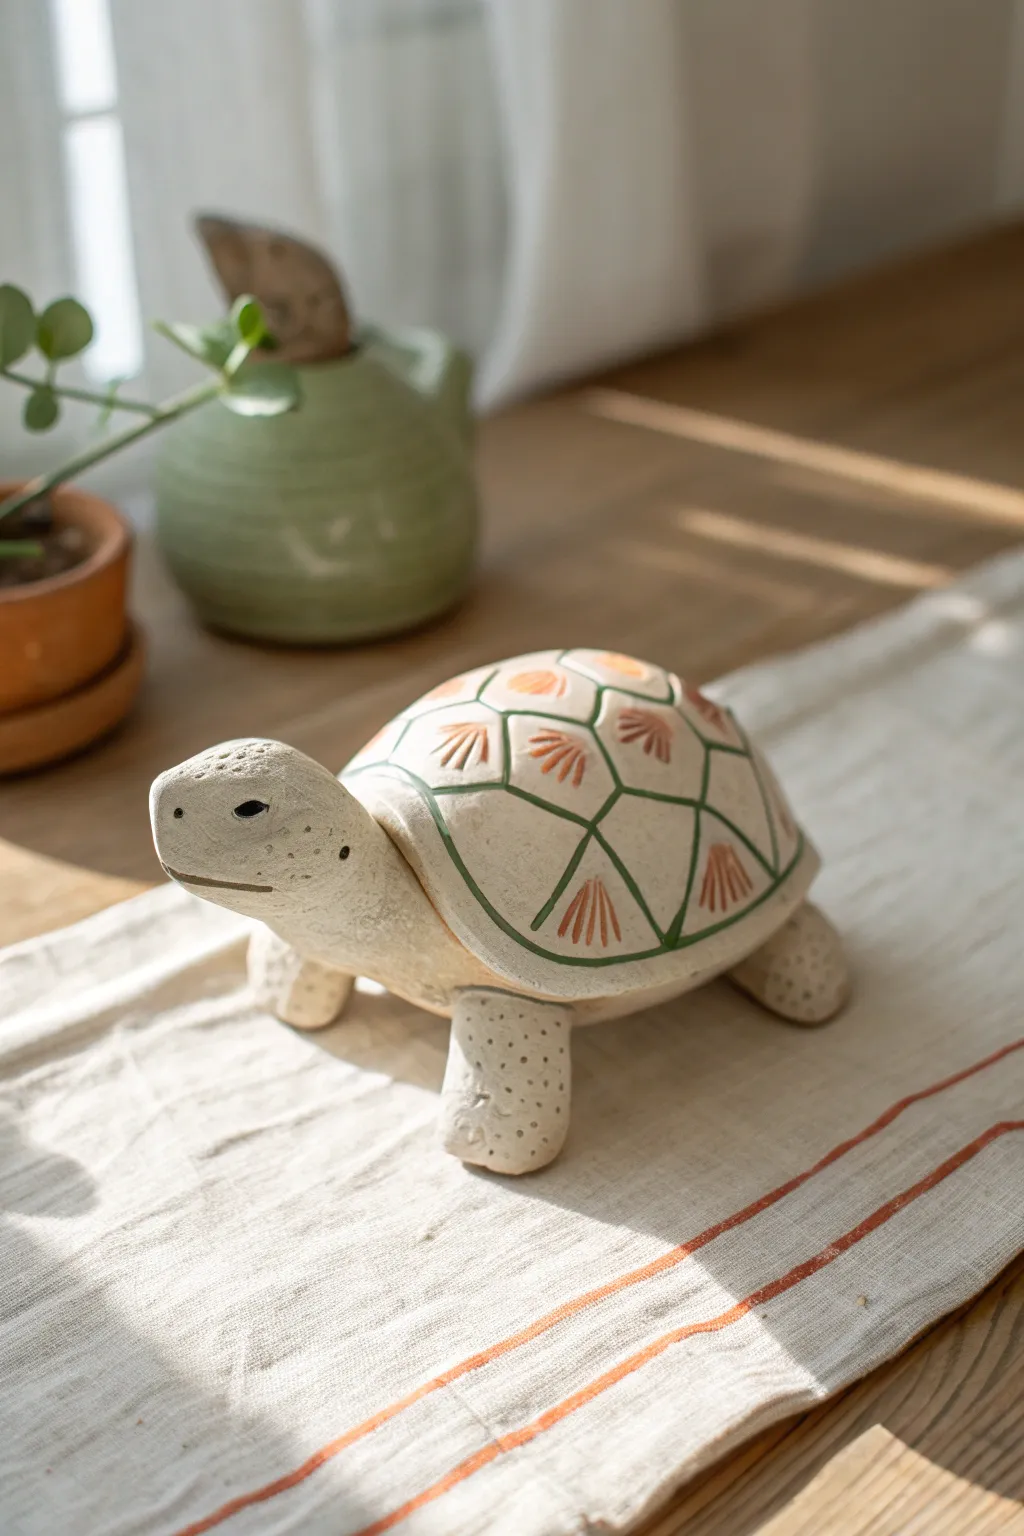
This charming turtle features a wonderfully tactile speckled texture and a shell patterned with sunburst designs. Its sturdy, grounded pose and neutral earth tones make it a perfect decorative accent for a sunny windowsill.
How-To Guide
Materials
- Air dry clay (stone or white color)
- Small bowl of water
- Rolling pin
- Needle tool or toothpick
- Craft knife
- Slip (clay mixed with water)
- Acrylic paints (terracotta orange, forest green, black)
- Fine detail paintbrushes
- Old toothbrush (optional for texture)
- Matte varnish
Step 1: Shaping the Body
-
Form the shell base:
Start with a large ball of clay roughly the size of a fist. Gently press it onto your work surface to flatten the bottom while keeping a smooth, rounded dome shape on top for the shell. -
Create the head and neck:
Roll a smaller sausage shape of clay, making one end slightly bulbous for the head. Curve it slightly upwards to give the turtle an inquisitive look. -
Make the legs:
Roll four equal-sized cylinders for the legs. They should be stout and thick enough to support the shell. Slightly flare the bottom of each leg to create a stable foot. -
Shape the tail:
Form a tiny, pointed triangle of clay for the tail. It should be small enough to peek out from under the back of the shell. -
Score and slip:
Use your needle tool to scratch cross-hatch marks on the attachment points (where legs, head, and tail meet the shell). Apply a dab of water or clay slip to these scored areas. -
Assemble the turtle:
Press the legs firmly onto the underside of the shell. Attach the neck to the front and the tail to the back. Smooth the clay seams with your finger or a modeling tool so the parts look seamless and integrated.
Cracks happen!
If small cracks appear while drying, don’t panic. Mix a tiny bit of fresh clay with water to make a paste and fill the crack, then smooth it over.
Step 2: Adding Details
-
Define the shell rim:
Roll a thin snake of clay and flatten it slightly. Wrap this strip around the bottom edge of the shell to create a distinct rim or border, blending the bottom edge smoothly into the body. -
Sculpt the face:
Use a modeling tool to carve a simple, horizontal line for the mouth. Use the end of a paintbrush handle to make two small indentations for the eye sockets. -
Texture the skin:
To mimic the speckled stoneware look in the photo, take an old toothbrush or a needle tool and gently stipple tiny dots all over the skin of the head and legs. Leave the shell smooth for now. -
Sketch the shell pattern:
Lightly draw the geometric pattern onto the shell using a needle tool. Start with a pentagon or hexagon at the very top, then draw lines radiating down to create the surrounding segments. -
Carve the relief:
Once you are happy with the spacing, carve deeper grooves over your sketch lines. This creates the raised relief look of the shell scutes. Smooth any rough crumbs of clay away with a damp finger. -
Drying:
Let the turtle dry completely in a safe place. This usually takes 24-48 hours depending on humidity. Turn it over halfway through so the bottom dries evenly.
Level Up: Hidden Storage
Make the shell hollow and removable! Form the shell over a bowl covered in plastic wrap, then create a separate flat base with the head/legs attached.
Step 3: Painting and Finishing
-
Paint the groove lines:
Using a fine brush and forest green paint, carefully trace the carved grooves on the shell. If you get paint on the raised panels, wipe it away quickly with a damp cloth or paint over it later with the base color. -
Add the sunbursts:
Mix a warm terracotta orange paint. In the center of each shell segment, paint a small fan or sunburst shape. These should look like simple, radiating brushstrokes. -
Detail the eyes:
Paint the inside of the eye indentations black. If you like, add a tiny white dot highlight once the black is dry to bring the character to life. -
Seal the piece:
Finish with a coat of matte varnish to protect the paint and give the clay a finished, professional look without making it too shiny.
Place your finished turtle on a shelf to enjoy its calming, handcrafted presence
Chubby Pig With a Button Snout
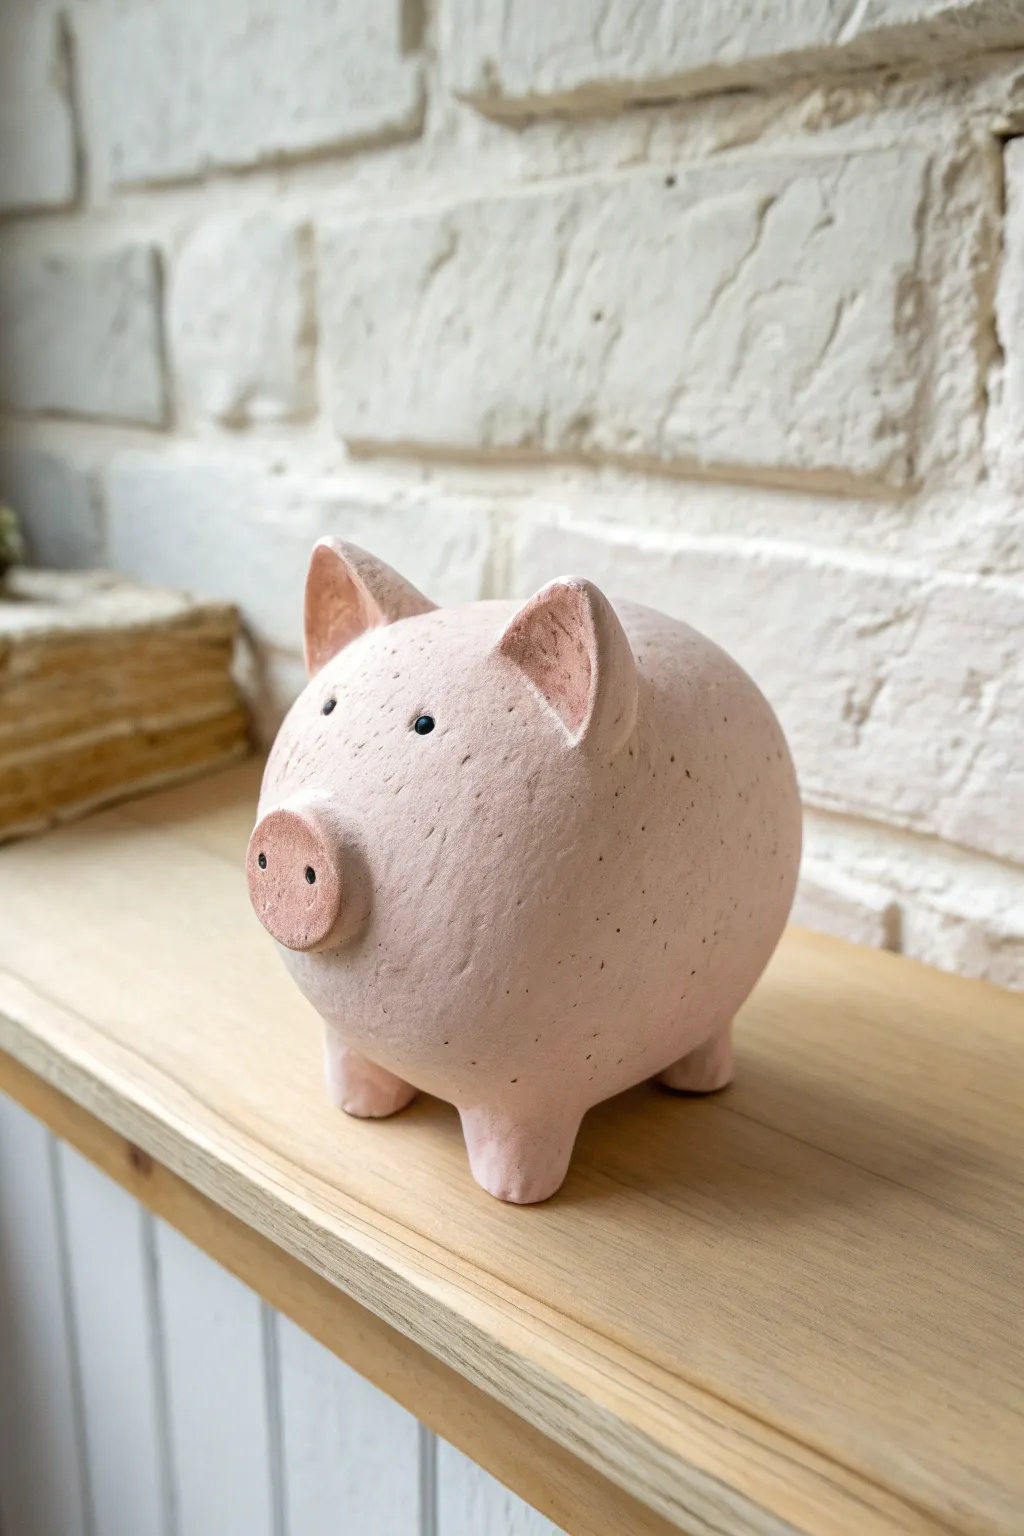
Create a charming, rustic piglet that looks like it wandered out of a farmhouse pottery studio. With its textured skin, oversized snout, and sweet little ears, this air dry clay project perfectly captures a primitive, handmade aesthetic.
How-To Guide
Materials
- Air dry clay (white or terra cotta)
- Acrylic paint (pale pink, darker pink, black)
- Water in a small cup
- Pointed sculpting tool or toothpick
- Small round paintbrush
- Medium flat paintbrush
- Old toothbrush or stippling brush
- Sponge for smoothing
- Matte sealant or varnish
Step 1: Shaping the Base
-
Prepare the main body:
Start with a large handful of clay and knead it well to remove air bubbles. Roll it into a smooth, slightly squashed sphere to form the chubby body. -
Create the legs:
Pinch four small sections of clay from the bottom of the sphere and pull them downwards to create short, stubby legs. Tap the pig gently on your work surface to flatten the feet so it stands stable. -
Smooth the form:
Dip your finger in water and smooth out the transitions between the legs and the body. The goal is a seamless, organic shape without harsh lines.
Step 2: Adding Features
-
Make the snout:
Roll a small ball of clay, flatten it into a thick disc, and attach it to the front of the face using the slip and score method (scratching both surfaces and adding water). -
Detail the snout:
Use the rounded end of a paintbrush handle to press two distinct nostrils into the snout disc. Blend the back edges of the snout onto the face just slightly. -
Form the ears:
Shape two triangles of clay. Gently curve them forward to give them a cupped appearance. -
Attach the ears:
Score the top of the head and attach the ears. Smooth the clay at the base of the ears into the head so they feel securely connected. -
Add eye indentations:
With a small tool, press two tiny holes where the eyes will go. I like to place them slightly wide apart to give the pig a sweet, innocent expression. -
Create texture:
Take an old toothbrush or a stiff stipple brush and gently tap it all over the pig’s skin. This creates the speckled, stone-like texture seen in the photo. -
Dry completely:
Let the sculpture dry for 24-48 hours until it is fully hard and lighter in color.
Pro Texture Tip
Don’t over-smooth the clay before painting. Leaving small bumps and tool marks adds to the primitive, stoneware look that gives this pig its character.
Step 3: Painting and Finishing
-
Base coat:
Mix a very pale pink acrylic paint. Apply a solid coat over the entire pig, ensuring you get paint into all those little texture dimples. -
Shading the ears:
Mix a slightly darker, dustier pink. Paint the insides of the ears and the flat front surface of the snout to make them pop. -
The speckled effect:
Dilute a tiny bit of grey or brown paint with water. Load a toothbrush, point it at the pig, and run your thumb over the bristles to flick tiny speckles onto the body. -
Paint the eyes:
Use a fine-point brush or a toothpick dipped in black paint to fill the eye indentations. Two simple black dots work perfectly. -
Add nostrils:
Add a touch of black or dark grey inside the nostril indentations for depth. -
Seal the piece:
Once the paint is fully dry, apply a matte varnish to protect your new friend without making him too shiny.
Cracks Appearing?
If hairline cracks appear while drying, mix a tiny bit of fresh clay with water to make a paste (slip) and fill the cracks. Smooth over with a damp finger.
Your rustic pig is now ready to add a touch of farmhouse charm to any shelf or mantelpiece
One-Ball Penguin With a White Belly
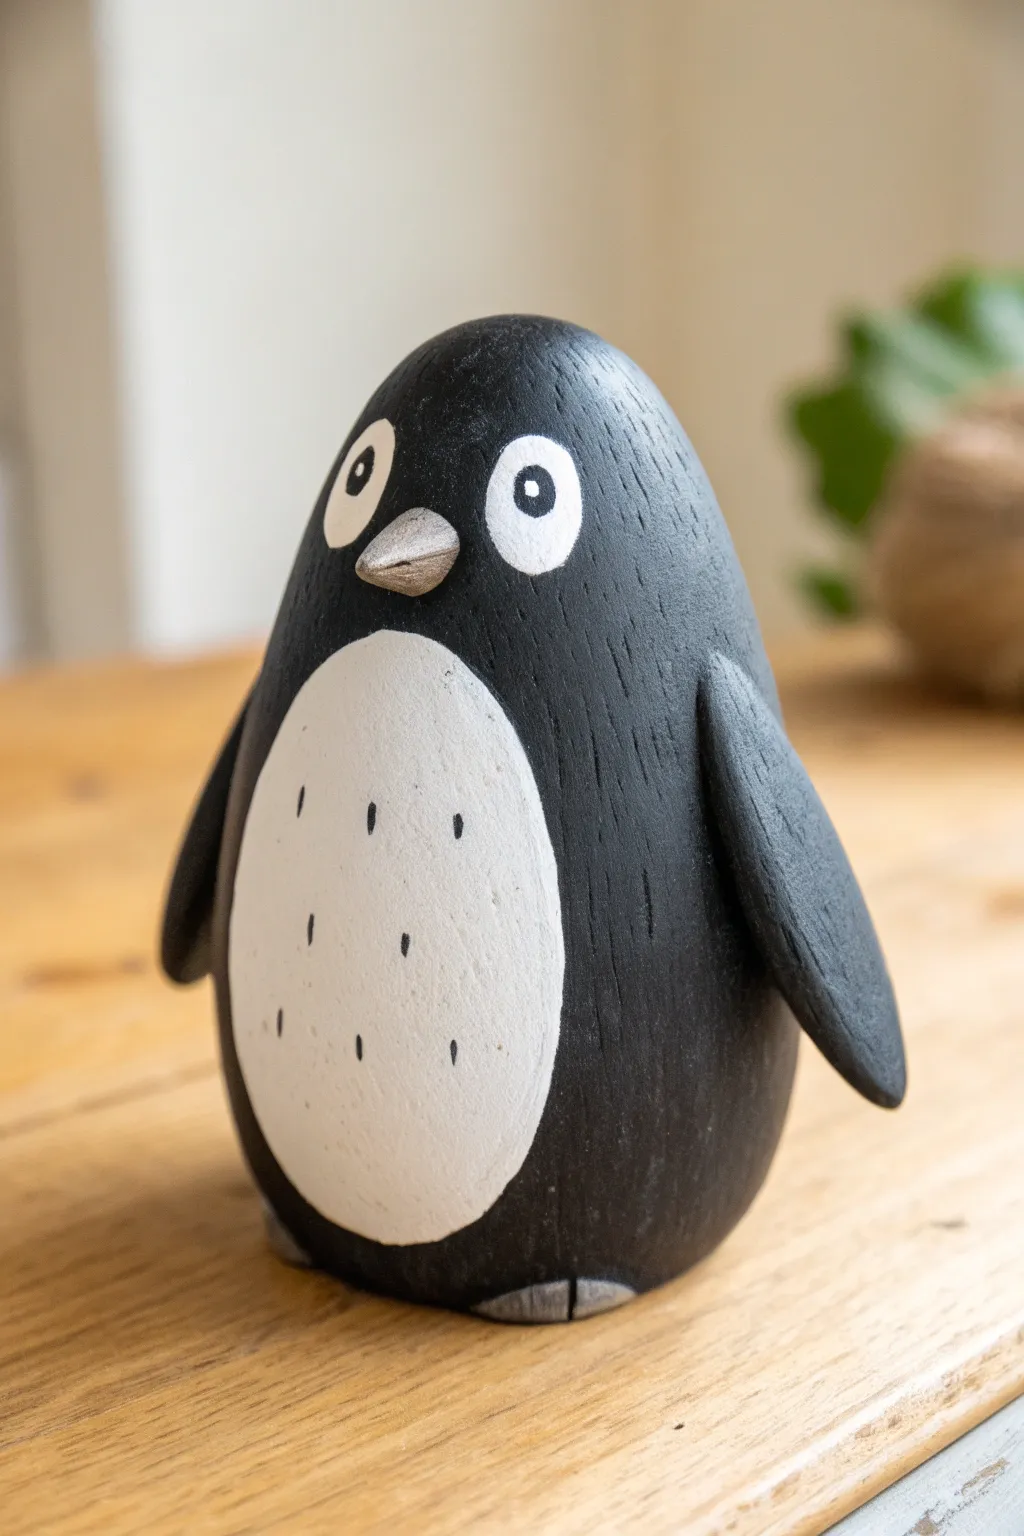
This minimalist penguin captures the charm of a washed river stone with its smooth, rounded silhouette and wood-like texture. It’s a delightfully simple project that relies on a single egg-shaped form and contrasting black-and-white paint to bring its character to life.
Step-by-Step Guide
Materials
- Air-dry clay (white or grey)
- Acrylic paints (matte black, white, silver/metallic grey)
- Small flat paintbrush
- Fine detail paintbrush or toothpick
- Course bristle brush (optional for texture)
- Cup of water
- Sandpaper (fine grit)
- Matte varnish (optional)
Step 1: Sculpting the Base Form
-
Roll the main body:
Start with a handful of air-dry clay roughly the size of a tennis ball. Knead it well to remove air bubbles, then roll it into a smooth, solid egg shape. The bottom should be slightly wider than the top to give it a stable, bottom-heavy look. -
Flatten the bottom:
Gently tap the wider end of your egg shape onto your work surface. You want a flat base so the penguin stands upright without wobbling. -
Shape the flipper wings:
Pinch two small pieces of clay, each about the size of a kidney bean. Flatten them into elongated teardrop shapes. Attach one to each side of the body, positioning them fairly low and angling them slightly backward. -
Smooth the seams:
Dip your finger in a little water and blend the clay where the wings attach to the body. The connection should look seamless, as if the wings are carved from the same block. -
Create the beak:
Form a tiny triangular cone of clay. Attach this to the upper third of the ‘face’ area, blending the base strictly while keeping the tip pointed. It should protrude slightly but remain small and subtle. -
Add carved feet:
Instead of adding protruding feet, carve two shallow semi-circle notches at the very bottom front edge of the body. Divide each notch with a single vertical line to suggest webbed toes tucked underneath. -
Imitate wood texture (Optional):
Since the inspiration is wooden, I like to gently drag a coarse, dry bristle brush vertically down the wet clay. This creates faint striations that mimic wood grain. -
Let it cure:
Allow your penguin to dry completely. This usually takes 24-48 hours depending on thickness. Rotate it occasionally so the bottom dries evenly.
Cracking Up?
If you see hairline cracks while drying, mix a tiny bit of fresh clay with water to make a paste (slip). Rub this into the cracks and smooth it over.
Step 2: Painting and Finishing
-
Sand for smoothness:
Once fully dry, use fine-grit sandpaper to knock off any rough bumps, especially around the beak and wing tips yet preserving the vertical texture if you added it. -
Apply the base coat:
Paint the entire penguin, including the bottom, with matte black acrylic paint. You may need two coats to get a solid, opaque finish that hides the clay color. -
Paint the belly:
Using a separate brush, paint a large white oval on the tummy. Start smaller than you think you need—it’s easier to expand the oval than to shrink it. The shape should be slightly wider at the bottom. -
Add belly details:
Mix a tiny drop of black into your white paint to make a very light grey. Use a toothpick or fine brush to make tiny, vertical dashed lines on the white belly for a feathery texture. -
Paint the eyes:
Paint two white circles above the beak. Unlike many cartoons, space them moderately apart. Once dry, add a small black dot in the center of each white circle for the pupils. -
Highlight the beak:
Paint the beak with a silver or metallic grey paint. This differentiates it from the matte body and adds a nice focal point. -
Detail the feet:
Use the same silver or grey color to paint the little feet area at the bottom base, highlighting the carved toes. -
Seal the work:
Finish with a coat of matte varnish to protect the paint and give it that soft, smooth sheen of a finished wooden toy.
Wood Grain Hack
After painting the black base coat, lightly ‘dry brush’ imperfect vertical streaks of dark grey. This enhances the faux-wood look instantly.
Place your little faux-wood penguin on a shelf where its stoic expression can keep you company
Friendly Dinosaur Nugget Figure
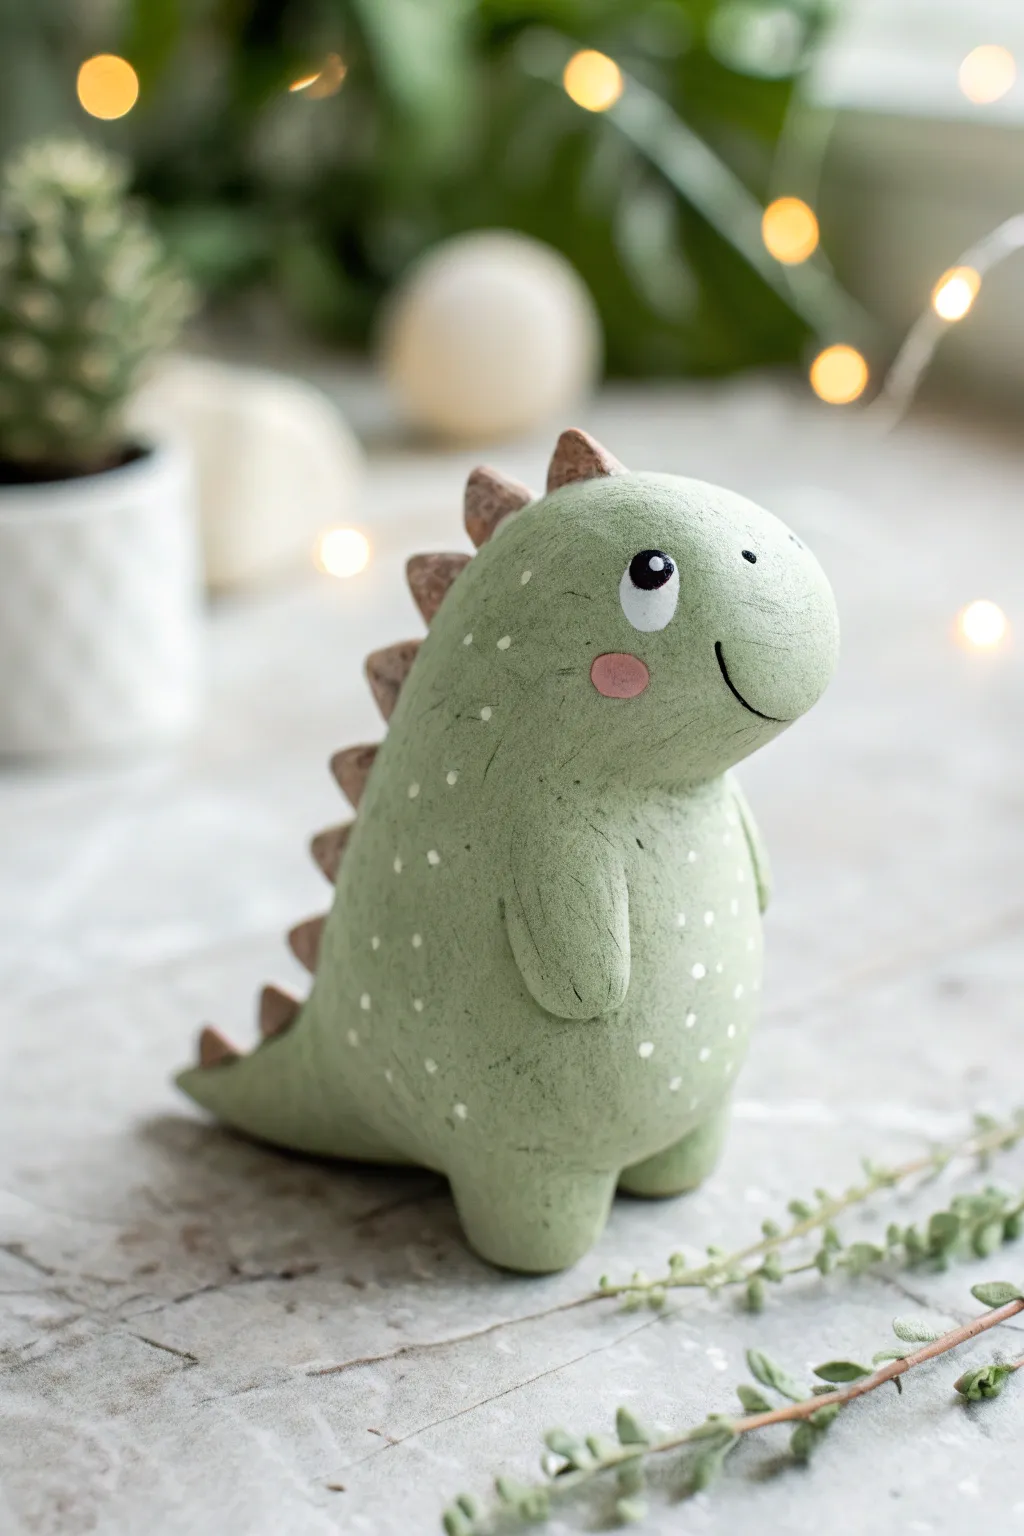
Create this irresistibly cute dinosaur figurine that looks like a little nugget of prehistoric joy. With its matte green finish, speckled texture, and simple sweet face, it makes for a perfect desk companion or nursery decoration.
Step-by-Step Tutorial
Materials
- White air dry clay
- Acrylic paints (Sage green, brown, pink, white, black)
- Small paintbrush
- Dotting tool or toothpick
- Clay sculpting tools or a smooth butter knife
- Cup of water
- Fine-grit sandpaper (optional)
- Aluminum foil (for the core)
Step 1: Sculpting the Body
-
Prepare the foil core:
Crumple a small amount of aluminum foil into a tight egg shape. This helps save clay and reduces drying time while keeping the figure lightweight. -
Roll the main body:
Knead a generous chunk of air dry clay until soft. Flatten it slightly and wrap it completely around your foil core, ensuring there are no air bubbles trapped inside. -
Shape the dinosaur:
Roll the clay-covered form gently on your work surface to smooth it out. Gently pull and taper one end upwards to form the head and neck area, and taper the opposite lower end to start forming the tail. -
Form the legs:
Roll two small, equal-sized balls of clay. Press them gently onto the bottom of the body to form stubby feet. Use a little water on your finger to blend the seams smoothly into the main body so they don’t pop off later. -
Create the arms:
Roll two smaller, elongated tear-drop shapes for the arms. Press them against the sides of the belly, pointing slightly downwards. Blend the top shoulder seam, but leave the bottom edge distinct for dimension. -
Add the tail:
If your tail pull wasn’t long enough earlier, add a small cone of clay to the back bottom. Smooth the transition completely so it looks like one solid piece. -
Smooth the surface:
Dip your finger in water and gently rub the entire figure to remove fingerprints and cracks. Let the main body dry for about an hour until it’s firm enough to handle without squishing.
Step 2: Adding Details
-
Make the spike plates:
Roll out a small snake of clay and flatten it. Cut out about 6-8 small triangles. These don’t need to be perfect; slight variation adds character. -
Attach the spikes:
Score (scratch) the back of the dinosaur lightly where the spikes will go. Apply a dab of water and press the triangles in a row from the top of the head down to the tail. -
Final drying:
Allow the entire figure to dry completely. For a piece this thick, I usually let it sit for at least 24 to 48 hours. Turn it occasionally so the bottom dries too.
Smooth Seams
Use a wet paintbrush instead of your finger to smooth hard-to-reach crevices, like between the legs or around the spikes. It acts like a mini mop for clay slip.
Step 3: Painting and Finishing
-
Base coat:
Once bone dry, sand any rough spots if desired. Paint the entire body (except the spikes) with a sage or moss green acrylic paint. You might need two coats for full coverage. -
Paint the spikes:
Carefully paint the triangular spikes in a soft brown or tan color using a small brush. -
Add texture marks:
Using a very fine detail brush and a slightly darker green or grey watered-down paint, add tiny, thin vertical scratch marks sporadically over the skin to simulate texture. -
Create the speckles:
Dip a toothpick or small dotting tool into white paint. Dot random speckles all over the green body, concentrating a few more on the back and belly. -
Paint the face:
Paint a large white circle for the eye. Once dry, add a smaller black circle inside, leaving a tiny white dot for a catchlight. Paint a simple curved black line for the smile and a small dot for the nostril. -
The finishing touch:
Mix a tiny bit of red with white to make a soft pink. Dab a small circle right under the eye to create a rosy cheek.
Accessories
Before the clay dries, create a tiny clay party hat or a miniature scarf to give your dinosaur friend a festive or cozy seasonal personality.
Place your little dino on a shelf where its cheerful smile can greet you every day
Pastel Axolotl With Frilly Gills
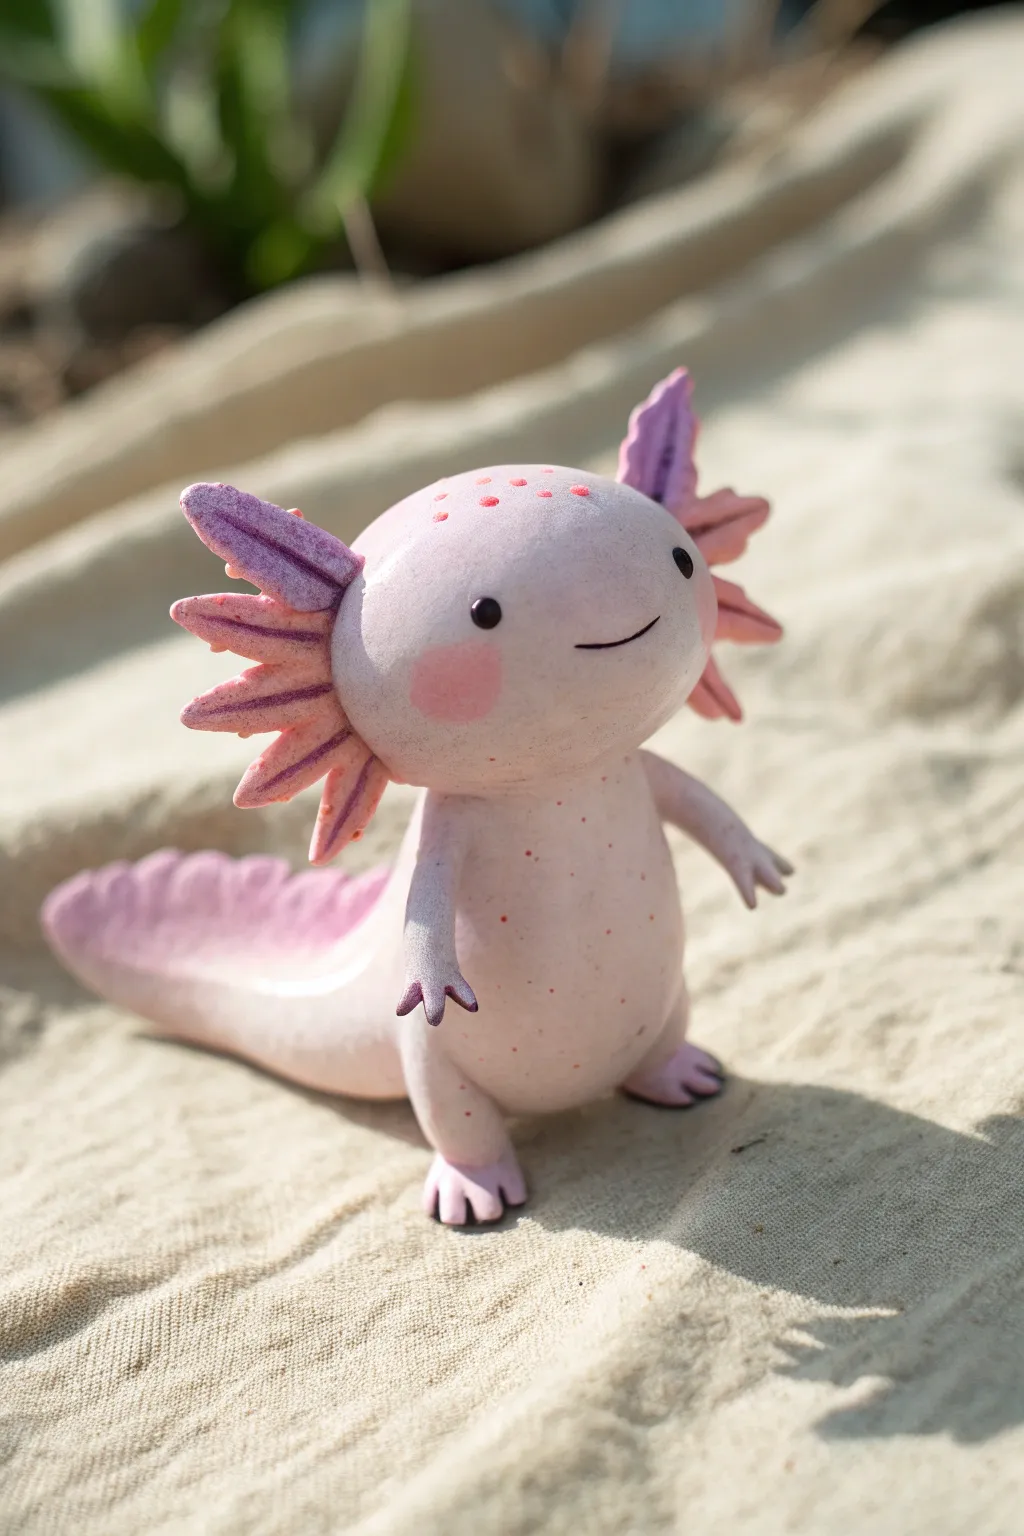
Capture the whimsical charm of a Mexican walking fish with this adorable pastel axolotl figurine. With its chubby body, frilly gills, and sweet smile, this little clay friend brings a soft, aquatic vibe to any shelf or desk.
Detailed Instructions
Materials
- White air-dry clay
- Acrylic paints (pale pink, medium pink, purple, black)
- Small round paintbrush
- Detail brush (fine tip)
- Clay sculpting tools (specifically a needle tool and a smoothing tool)
- Water bonding slip (water mixed with a little clay)
- Sandpaper (fine grit)
- Matte varnish (optional)
Step 1: Sculpting the Body Base
-
Form the head:
Start with a ball of clay roughly the size of a golf ball. Flatten it slightly into a smooth, rounded oval shape to create a chubby, playful head. -
Shape the torso:
Create a second slightly larger and elongated teardrop shape for the body. The wider bottom will help your axolotl stand up on its own later. -
Connect head and body:
Score the bottom of the head and the top of the body with a needle tool. Apply a dab of water slip and press the pieces together, smoothing the seam with your finger or a tool until the neck join is invisible. -
Add legs and arms:
Roll four small sausages of clay. Attach two to the bottom of the body for legs and two higher up for arms. I like to taper the ends slightly where the hands and feet will be. -
Detail the digits:
Use a small knife or needle tool to gently cut tiny notches into the ends of the limbs to create little fingers and toes. Splay them out just a bit for cuteness.
Gills Falling Off?
If the heavy gills droop while wet, prop them up with small pieces of folded cardboard or foam until the clay stiffens enough to hold its own weight.
Step 2: Adding Signature Axolotl Features
-
Create the tail:
Form a wide, flat tadpole shape for the tail. It should be thick enough to support weight but taper to a thin fin at the edges. Attach this securely to the back of the body, blending the clay smoothly. -
Make the gill stalks:
Roll six small, flattened teardrop shapes. These will be the famous external gills. You need three for each side of the head. -
Detail the frills:
Using a needle tool, press lines or small indentations into the gill stalks to mimic the feathery texture seen in real axolotls. -
Attach the gills:
Score and slip the gills onto the sides of the head—three on the left, three on the right. Angle them slightly backward and upward. -
Dry completely:
Let the sculpture dry for at least 24-48 hours. Turn it occasionally to ensure airflow reaches all sides, especially under the tail.
Step 3: Painting and Finishing
-
Sand imperfections:
Once fully dry, use fine-grit sandpaper to gently smooth out any fingerprints or rough bumps on the surface. -
Base coat:
Mix a very pale pink paint and cover the entire figurine. You may need two thin coats for opaque coverage. -
Gradient gills:
Mix a purple-pink shade. Paint the gill stalks, blending the color so it’s darker at the tips and fades into the pale head color near the base. -
Paint the tail fin:
Use a medium pink to paint the upper ridge and back of the tail, creating a soft gradient into the main body color. -
Add speckles:
Taking a small brush or even a toothbrush, lightly flick or dab tiny dots of darker pink and purple across the body and head for texture. -
Draw the face:
Using your finest brush and black paint, add two small, wide-set dots for eyes and a tiny, curved line for a gentle smile. -
Rosy cheeks:
Dab a very watered-down pink circle under each eye to give your axolotl a blushing look.
Pro Tip: Velvet Texture
For a soft, skin-like finish instead of a glossy plastic look, mix a tiny pinch of cornstarch into your acrylic paint before applying the base coat.
Now you have a charming little amphibious friend ready to brighten up your workspace
Spiral-Shell Snail Buddy
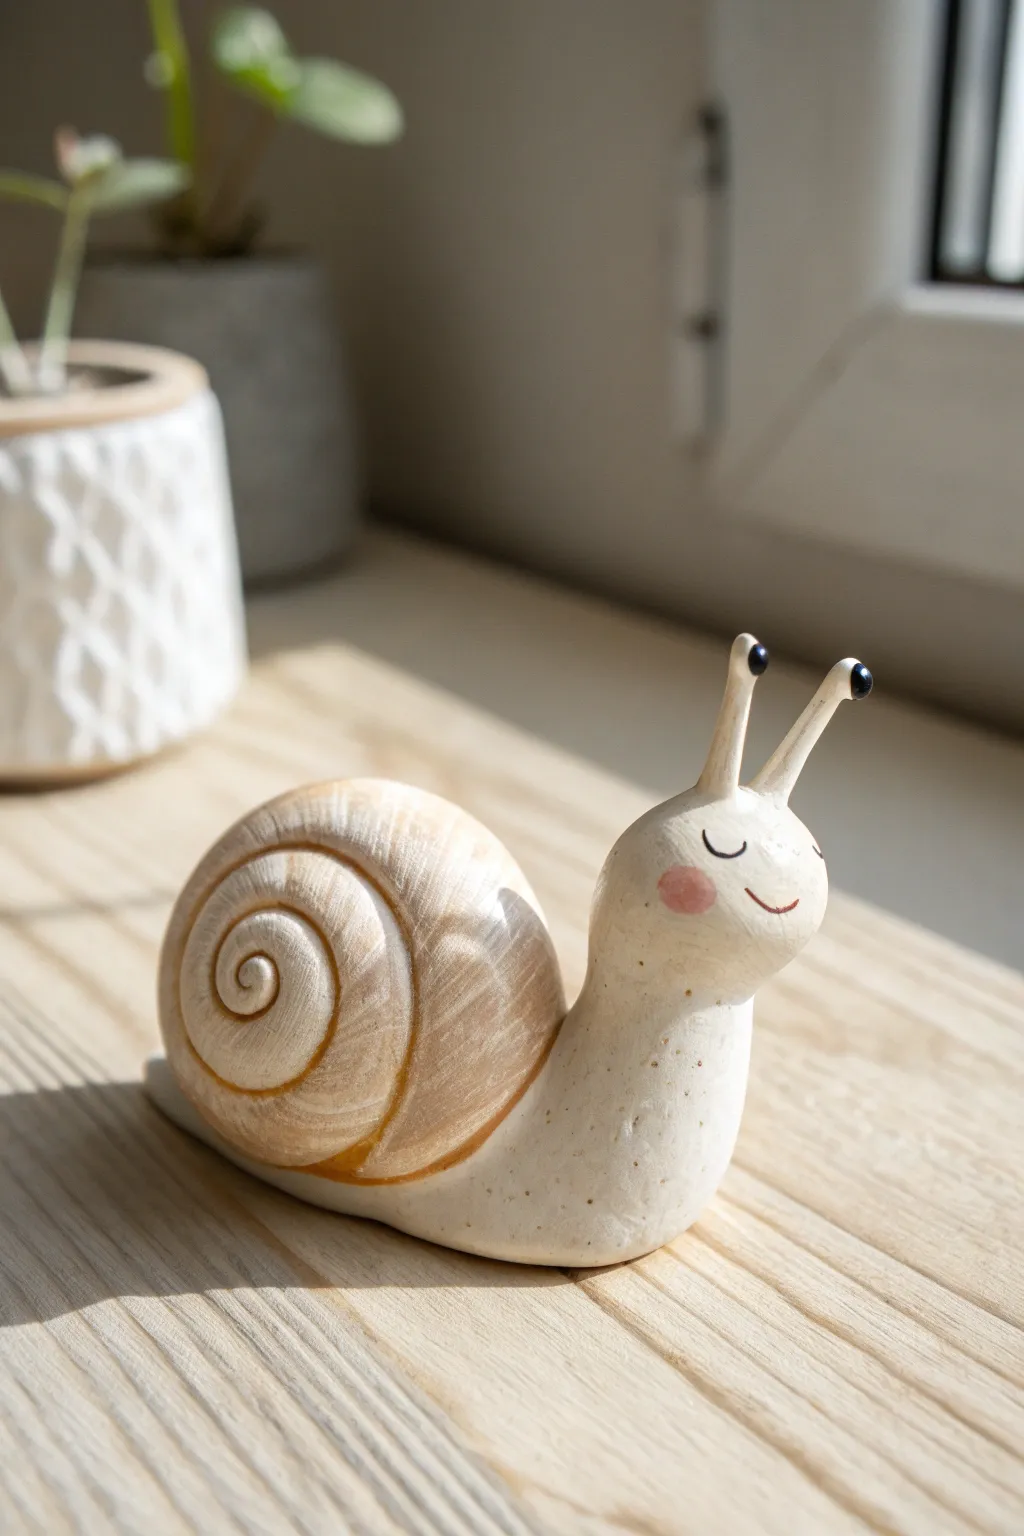
Sculpt a gentle garden friend with a charming spiral shell and a peaceful, sleepy expression. This air dry clay project focuses on distinct shapes and adding warmth through simple painting techniques.
How-To Guide
Materials
- White air dry clay
- Rolling pin
- Clay sculpting tools (needle tool, blending tool)
- Small cup of water
- Acrylic paints (beige/tan, creamy off-white, black, pink)
- Small paintbrushes
- Clear matte varnish (optional)
Step 1: Sculpting the Body
-
Form the base:
Start with a lime-sized ball of clay for the body. Roll it into a thick, tapered log shape, slightly thicker at one end for the head and trailing off into a flatter tail. -
Curve the shape:
Gently curve the tapered log upwards at the thicker end to create the snail’s neck and head area. Flatten the bottom slightly on your work surface so it sits stably. -
Smooth the surface:
Dip your finger in a tiny bit of water and rub away any cracks or uneven bumps on the body. You want a smooth, organic slope. -
Create the eye stalks:
Roll two small, thin coils of clay for the antennae. Attach them to the top of the head using a bit of water or slip (clay mixed with water). -
Blend the seams:
Use a blending tool or your finger to smooth the join where the antennae meet the head so they look like one continuous piece rather than stuck-on additions. -
Add the tips:
Roll two tiny spheres and press them onto the very tops of the antennae to create the eyes.
Cracked Clay Crisis?
If small cracks appear while drying, don’t panic. Mix a small amount of fresh clay with water to make a paste and fill the cracks, then smooth over.
Step 2: Creating the Shell
-
Prepare the shell coil:
Take a larger portion of clay and roll it into a very long, tapering snake. One end should be quite thick, gradually getting thinner. -
Coil the spiral:
Starting from the thinnest end, tightly roll the snake up like a cinnamon roll. Keep the coiling tight to create the classic snail shell shape. -
Define the texture:
Before attaching, use a damp finger to smooth out the overall dome shape, but leave the spiral lines visible. You want the definition of the coil to remain. -
Attach the shell:
Score (scratch) the back of the snail body and the bottom of the shell. Add a dab of water to the scratched areas and press the shell firmly onto the body. -
Secure the join:
Where the shell meets the body, use a sculpting tool to gently blend a little bit of clay from underneath to lock it in place, ensuring it won’t pop off later. -
Refine grooves:
Use a needle tool or the edge of a spatula to re-emphasize the spiral groove if it got squished during attachment. I find doing this now creates a cleaner final look.
Step 3: Painting & Finishing
-
Final drying:
Let the snail dry completely for at least 24-48 hours. It should feel room temperature to the touch, not cold. -
Base coat the shell:
Paint the shell with a beige or tan acrylic paint. You can water it down slightly for a ‘wash’ effect that settles nicely into the grooves. -
Highlight the shell:
Once the beige is dry, dry-brush a lighter cream color over the raised parts of the spiral to accentuate the texture. -
Paint the body:
Paint the body and head a solid creamy off-white color. It might need two coats for opaque coverage. -
Add the face:
Using a very fine brush or a toothpick, paint two small U-shapes for closed eyes and a curved line for the smile in black or dark brown. -
Detail the eyes:
Paint the tiny spheres on top of the antennae black. -
Rosy cheeks:
Dilute a tiny drop of pink paint with a lot of water. Dab it gently onto the cheeks for a soft blush effect.
Nature Inspired
Make it realistic by gluing a real empty snail shell (cleaned thoroughly) onto your clay body instead of sculpting one.
Place your happy little snail on a windowsill or near a house plant for instant charm
Rainbow Caterpillar Made of Mini Balls
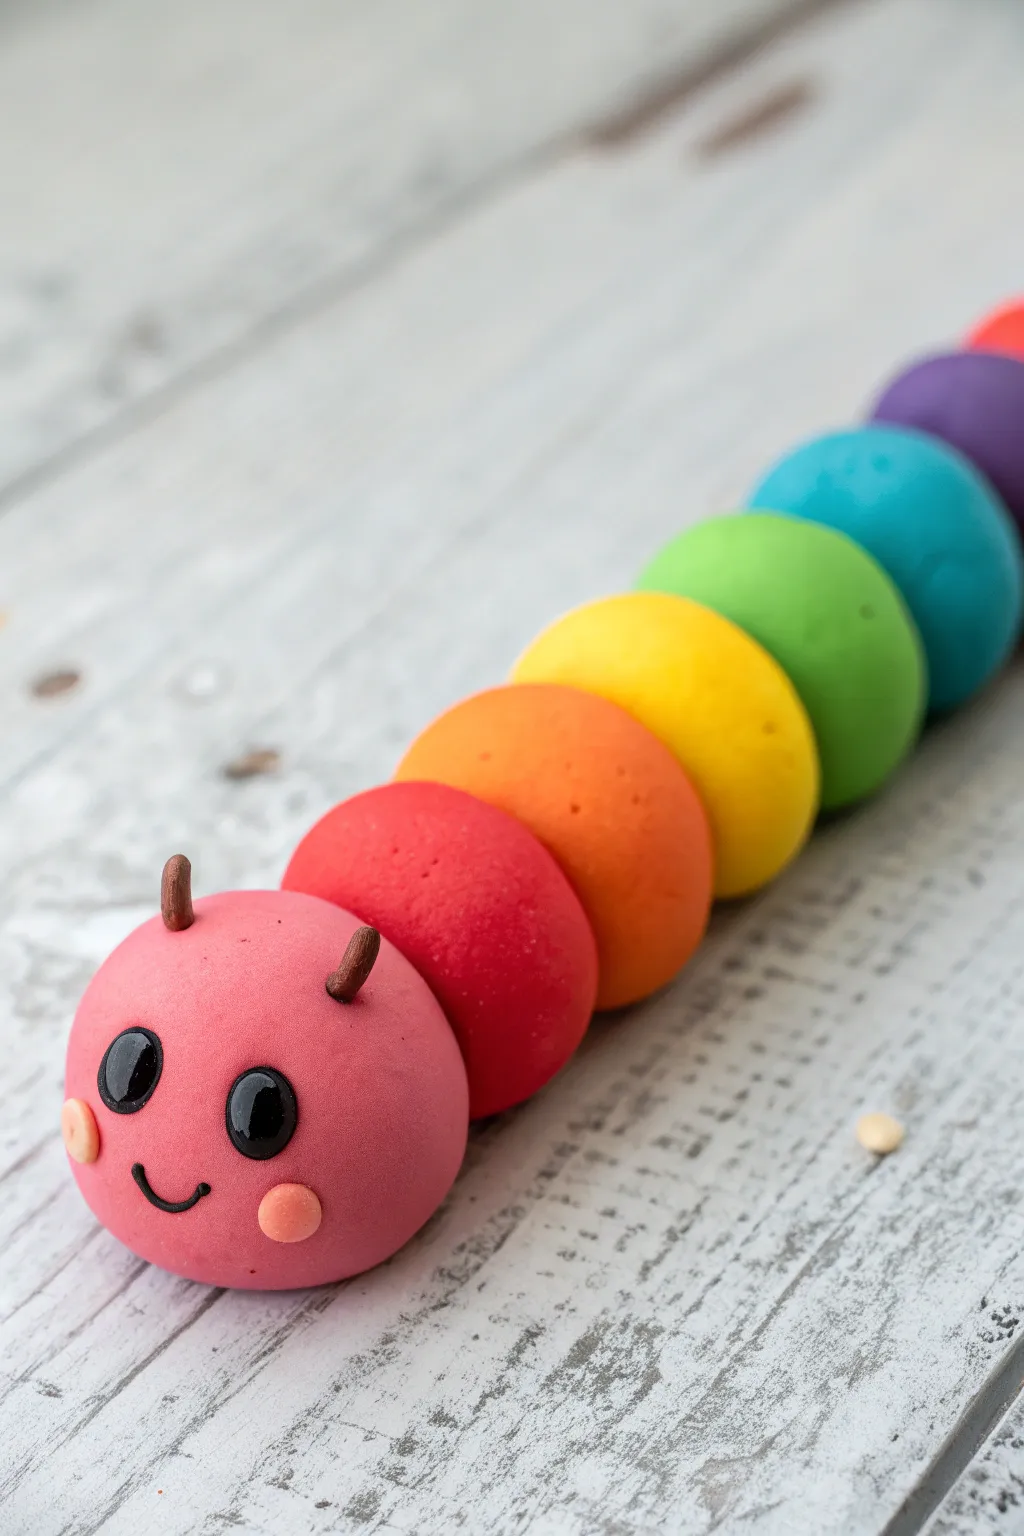
Brighten up your day with this cheerful caterpillar that marches through the entire color spectrum. Its smooth, rounded segments are satisfying to roll, making it a perfect project for mastering basic clay shapes.
Step-by-Step
Materials
- Air dry clay (white or pre-colored)
- Acrylic paints (pink, red, orange, yellow, green, blue, purple)
- Black beads or small black clay balls (for eyes)
- Small piece of brown clay or wire (for antennae)
- Fine tip black marker or black paint pen
- Rolling pin or smooth flat surface
- Small dotting tool or toothpick
- Clay glue or water
- Gloss varnish (optional)
Step 1: Preparing the Palette
-
Mixing Colors:
If you are starting with white clay, separate it into seven equal portions. Knead acrylic paint into each ball to create your rainbow spectrum: pink for the head, followed by red, orange, yellow, green, blue, and purple. -
Size Check:
Ensure the pink portion (for the head) is slightly larger than the other colors so the face stands out. The body segments should graduate slightly in size, but keeping them uniform works beautifully too.
Step 2: Creating the Body
-
Rolling the Head:
Take your pink clay and roll it between your palms. Apply even pressure in a circular motion until you have a perfect, smooth sphere with no cracks. -
Forming the Segments:
Repeat the rolling process for the remaining six colors: red, orange, yellow, green, blue, and purple. I find it helpful to wipe my hands between colors to keep the bright hues pure. -
Checking Smoothness:
Inspect each ball for tiny creases. If you find any, dip your finger in a tiny bit of water and smooth them away. -
Base Flattening:
Gently tap the bottom of each sphere onto your work surface. This creates a tiny flat spot that prevents your caterpillar from rolling away while you work.
Cracked Clay?
If small cracks appear as the balls dry, mix a tiny amount of fresh clay with water to make a paste (slip). Paint this into the cracks and smooth with a damp finger.
Step 3: Assembly
-
Starting the Chain:
Apply a tiny dab of clay glue or water to the side of the pink head sphere. -
Connecting Red:
Press the red sphere gently against the glued spot on the pink head. Hold them together for a few seconds to ensure they bond. -
Building the Rainbow:
Continue this process, adding the orange sphere to the red one, then yellow, green, blue, and finally purple. Follow a slight curve creates a sense of movement. -
Securing the Bond:
Once all spheres are connected, gently push from both ends of the caterpillar to snug the pieces together without deforming the circles.
Make It Wobble
Instead of gluing the balls in a fixed line, run a piece of stiff wire or a pipe cleaner through the center of all the balls while wet. Now your caterpillar is poseable
Step 4: Bringing it to Life
-
Eye Placement:
While the head is strictly still soft, press two small indentations where you want the eyes to go using a round tool. -
Inserting Eyes:
Press two black beads or tiny rolled balls of black clay into the indentations. They should sit slightly flush with the surface. -
Rosy Cheeks:
Roll two minuscule balls of lighter pink or peach clay. Flatten them slightly and attach them below the eyes for flushed cheeks. -
Drawing the Smile:
Use a fine sculpting tool to gently impress a small curve for the mouth, or wait until dry to draw it on with a marker. -
Antennae Prep:
Roll two very small, thin logs of brown clay for the antennae. -
Attaching Antennae:
Use a toothpick to make two tiny holes on top of the head. Dab a bit of glue on the ends of your brown logs and insert them. -
Final Touches:
If painting the mouth, use a fine tip black marker to draw a sweet, simple smile connecting the cheeks.
Place your colorful creation on a shelf to dry completely and enjoy the splash of joy it brings
Sloth Hanging on a Branch Base
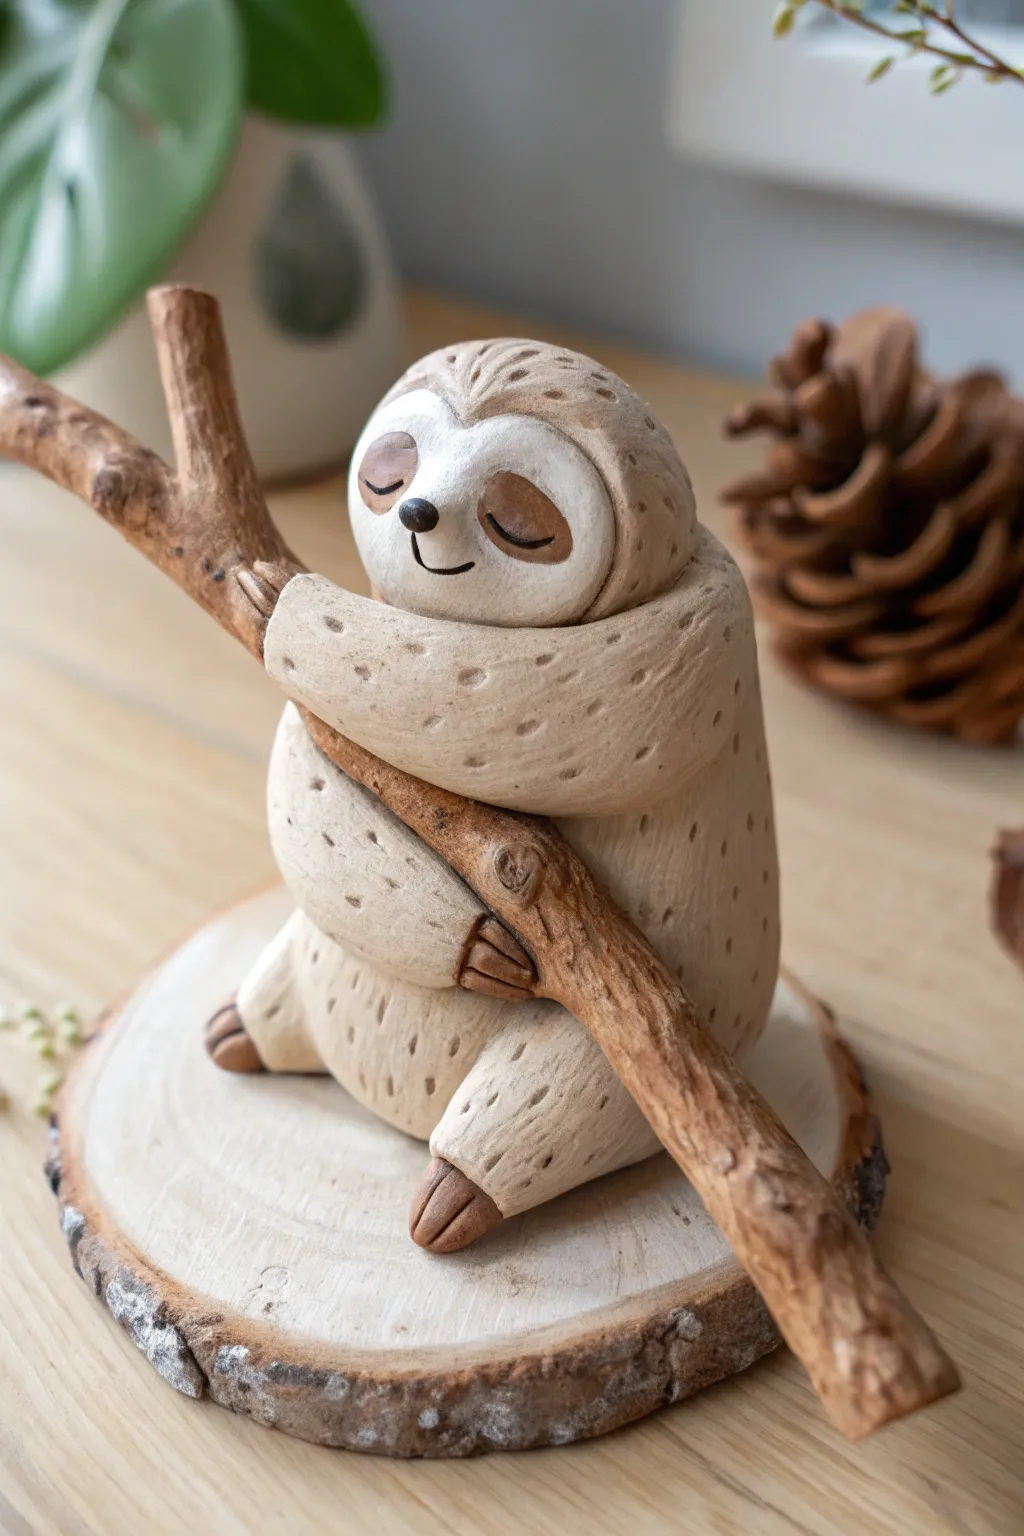
Capture the slow-paced charm of the rainforest with this adorable air dry clay sloth sculpture. This project features a stylized, textured finish and incorporates natural wood elements for a rustic, mixed-media display piece that looks right at home on a shelf.
Step-by-Step Tutorial
Materials
- Air dry clay (white or light clay)
- Real wooden branch (approx. 1/2 inch thick, Y-shaped or curved)
- Small wood slice base
- Aluminum foil
- Basic sculpting tools (needle tool, modeling tool)
- Texture tool (or a stiff bristled brush)
- Acrylic paints (creamy beige, dark brown, black)
- Matte varnish
- Strong craft glue (E6000 or similar)
- Water and sponge for smoothing
Step 1: Creating the Core and Base
-
Prepare the Armature:
Before touching the clay, find your perfect branch. It needs to curb or fork in a way that allows the sloth to hug it while sitting on the base. Test the fit by holding the branch against the wood slice to ensure stability. -
Bulk Out the Body:
Crumple aluminum foil into a pear shape to create the core of the sloth’s body. This saves clay and keeps the sculpture lightweight. The foil core should be slightly smaller than the final desired size. -
Cover with Clay:
Roll out a slab of clay to about 1/4 inch thickness. Wrap this completely around your foil pear, smoothing the seams together with a bit of water until you have a seamless organic shape. -
Positioning:
While the clay is still soft, gently press the body onto the branch to create an indentation where it will eventually sit. This ensures a snug fit later.
Texturing Pro-Tip
Instead of poking hundreds of holes one by one, bundle three toothpicks together with tape. This lets you stamp the fur texture three times faster for a uniform look.
Step 2: Sculpting the Features
-
Shape the Head:
Form a ball of clay for the head and attach it to the top of the body. Blend the neck seam smoothly so the head looks like it’s resting comfortably on the shoulders. -
Add the Face Plate:
Flatten a small oval of clay and press it onto the front of the face area. This distinct ‘mask’ is key to the sloth’s iconic look. Smooth the edges down onto the head. -
Form the Arms:
Roll two long logs of clay for the arms. Attach them at the shoulders and wrap them forward as if hugging the branch. I find it helps to actually place the branch in position while doing this to get the curve right, then carefully remove it. -
Shape the Legs:
Create two shorter, thicker logs for the legs. Attach them to the bottom of the body, bending them upward slightly so the feet will rest against the branch or the belly. -
Refine the Claws:
At the end of each limb, use a knife tool to score three distinct toes. Gently shape the ends to look like curved claws grabbing the wood.
Step 3: Texturing and Drying
-
Add Fur Texture:
Using a needle tool or the point of a modeling tool, press small, shallow dashes all over the body (avoiding the face mask). These little indents mimic the stylized fur texture seen in the photo. -
Create Facial Details:
Use a small ball tool to indent the eye sockets. Add a tiny triangle of clay for the nose and use a needle tool to carve a simple, curved smile. -
Let it Dry:
Allow the sculpture to dry completely. This can take 24-48 hours depending on humidity. Rotate it occasionally so the bottom dries evenly.
Make it a Planter
Before drying, hollow out a small section in the top of the sloth’s back to hold a mini air plant. It turns your sculpture into a functional piece of decor.
Step 4: Painting and Assembly
-
Base Coat:
Paint the entire sloth body (except the face mask) with a creamy beige or light taupe acrylic paint. You might want to water the paint down slightly to let it settle into the texture marks. -
Paint the Face:
Paint the face mask white or a very pale grey. Once dry, paint the nose black and add two dark brown patches for the eyes. -
Detailed Features:
Using a fine liner brush, paint simple closed eyelids (u-shapes) inside the brown eye patches. Paint the claws a dark brown to match the wood tones. -
Bring Out Texture:
To highlight the fur texture, mix a slightly darker brown wash (paint diluted with water) and brush it over the body, then immediately wipe off the surface with a paper towel. The dark paint will stay in the little indents. -
Final Assembly:
Once the paint is dry and sealed with varnish, glue the branch onto the wood slice base. Finally, apply strong glue to the sloth’s belly and limbs and permanently attach him to his branch.
Place your little sloth on a sunny windowsill or desk to remind you to take things slow and enjoy the moment
Stacked Animal Totem Mini Sculpture
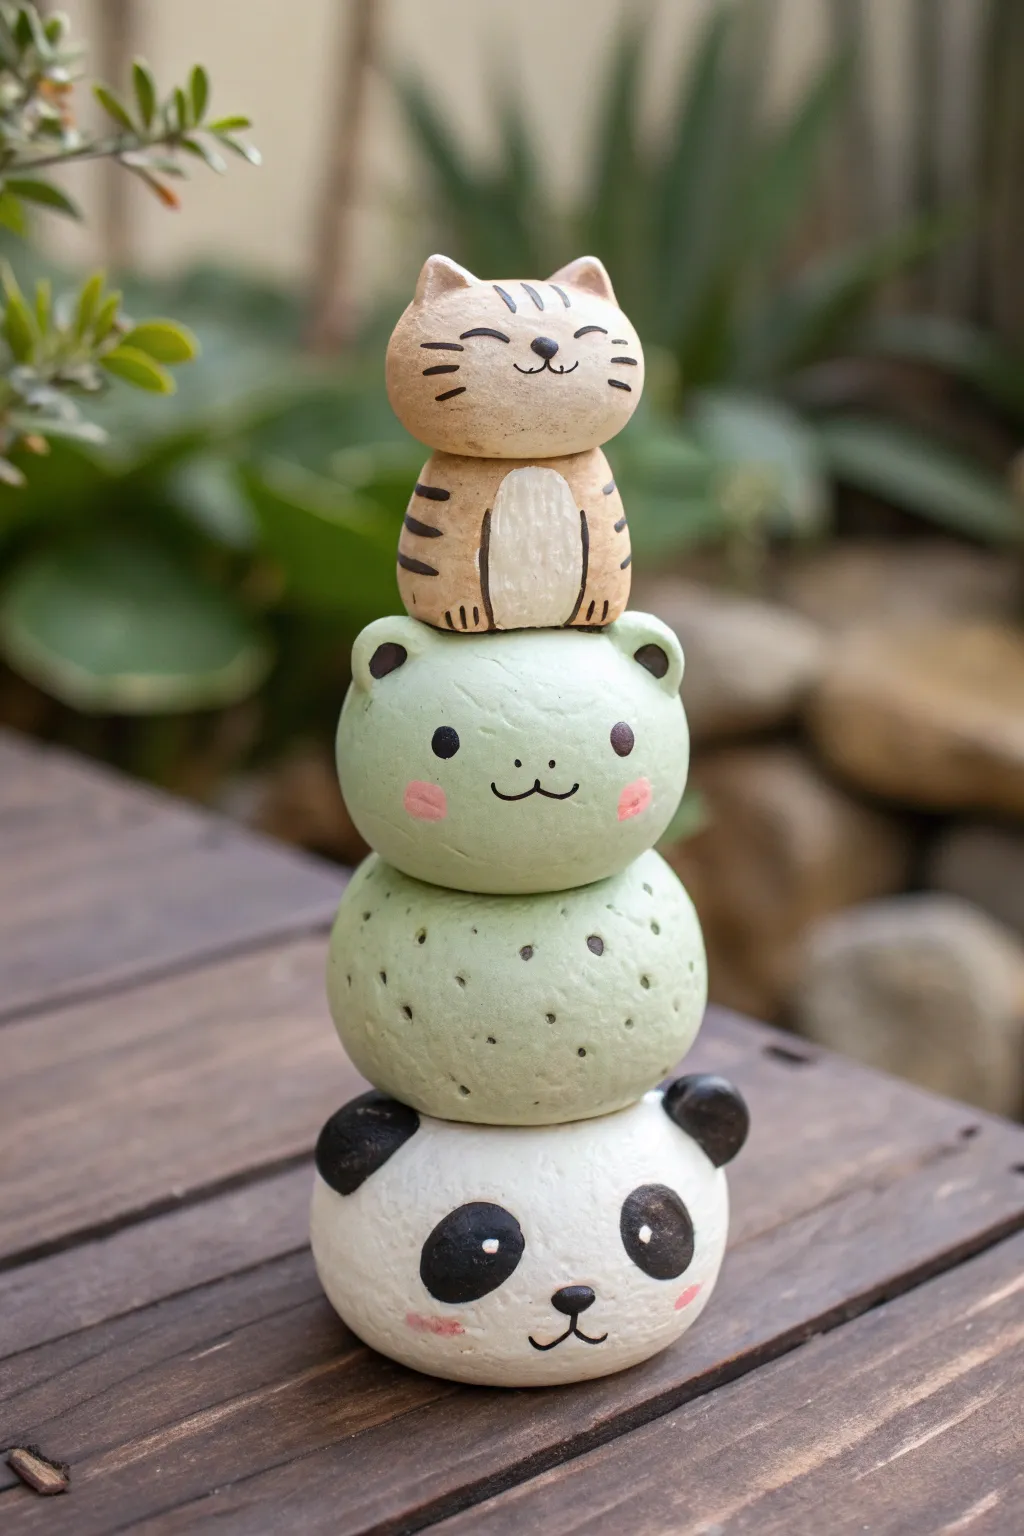
Create a charming desk companion with this vertical stack of adorable clay animals. This totem features a panda base, a minty-green bear middle, and a triumphant tabby cat perched on top, all sculpted with simple shapes and painted details.
Detailed Instructions
Materials
- Air dry clay (white)
- Acrylic paints (black, white, mint green, beige/tan, pink)
- Fine detail paintbrushes
- Water cup and paper towels
- Sculpting tools (needle tool or toothpick)
- Rolling pin (optional)
- Fine grit sandpaper (optional)
- Matte varnish or sealant
Step 1: Sculpting the Base Layers
-
Form the Panda Base:
Start with a generous lump of clay and roll it into a smooth, slightly flattened sphere. This will be the panda’s head and the sturdy foundation for the whole stack. -
Add Panda Ears:
Roll two small pea-sized balls of clay. Attach them to the top sides of the panda head using a little water to score and slip the joints so they stick permanently. -
Create the Middle Body:
Roll another sphere, slightly smaller than the panda head. Gently flatten the top and bottom so it sits flush. Stack this securely onto the panda’s head, using a dab of water to bond them. -
Sculpt the Middle Head:
Form a second sphere for the green bear’s head, keeping it proportional to its body below. Attach small, round ears to this head just like you did for the panda, then mount the head onto the middle body sphere.
Stability Secret
Insert a toothpick or stiff wire vertically through the center of the wet clay stack. This acts like a spine, keeping the totem from tipping while it dries.
Step 2: Topping it Off
-
Build the Cat’s Body:
Roll a smaller, slightly elongated u-shape or cylinder with rounded edges for the cat’s torso. Secure this onto the top of the green bear’s head. -
Form the Cat’s Head:
Roll the final sphere for the cat’s face. Pinch two small triangles at the top to create pointy ears, smoothing the clay so the ears feel seamless with the head. -
Attach the Top Tier:
Place the cat head onto its body. Check the stability of your stack; if it leans, gently adjust the shapes while the clay is still wet to align the center of gravity. -
Texture the Middle:
For the green bear’s body, use a needle tool or toothpick to poke small, random indents all over the surface, giving it a speckled, textured look. -
Dry Completely:
Let the sculpture sit undisturbed. I usually suggest leaving it for 24 to 48 hours depending on humidity, ensuring the core is fully hardened before painting.
Make it Useful
Before the clay dries, carve a vertical slot into the top of the cat’s head to turn your totem into a cute photo or memo holder for your desk.
Step 3: Painting and Finishing
-
Base Coat the Panda:
Paint the bottom sphere white. Once dry, use black acrylic to paint the round ears and large, sloping oval patches for the eyes. -
Paint the Middle Bear:
Mix a soft, uneven mint green. Paint the middle body and head. The texture holes created earlier will catch a bit of shadow, adding depth to this section. -
Color the Cat:
Paint the top cat logic a warm beige or tan color. Add a creamy white oval on the tummy and ensure the clay is fully covered. -
Safe Face Details:
Using your finest brush or a paint marker, add the tiny facial features. Draw simple ‘w’ mouths, small noses, and dot eyes. Add three whiskers on each side of the cat’s face. -
Add Character Details:
Paint stripes on the cat’s sides and top of the head using dark brown or black. For the green bear, add dark brown dots inside the texture holes if you want them to pop. -
Blush and Polish:
Dab a tiny amount of pink paint on the cheeks of all three animals for a rosy glow. Add small white highlights to the eyes to bring them to life. -
Seal:
Once all paint is dry, coat the entire stack with a matte varnish to protect your artwork.
Now you have a trio of stacked friends to keep you company on your desk or shelf