If you’re craving easy ceramic ideas that feel relaxing (not intimidating), you’re in the right headspace. I’m sharing my go-to beginner projects that keep things simple, look super cute when finished, and don’t require fancy skills to feel proud of.
Pinch Pot Bowls You Can Make in One Sitting
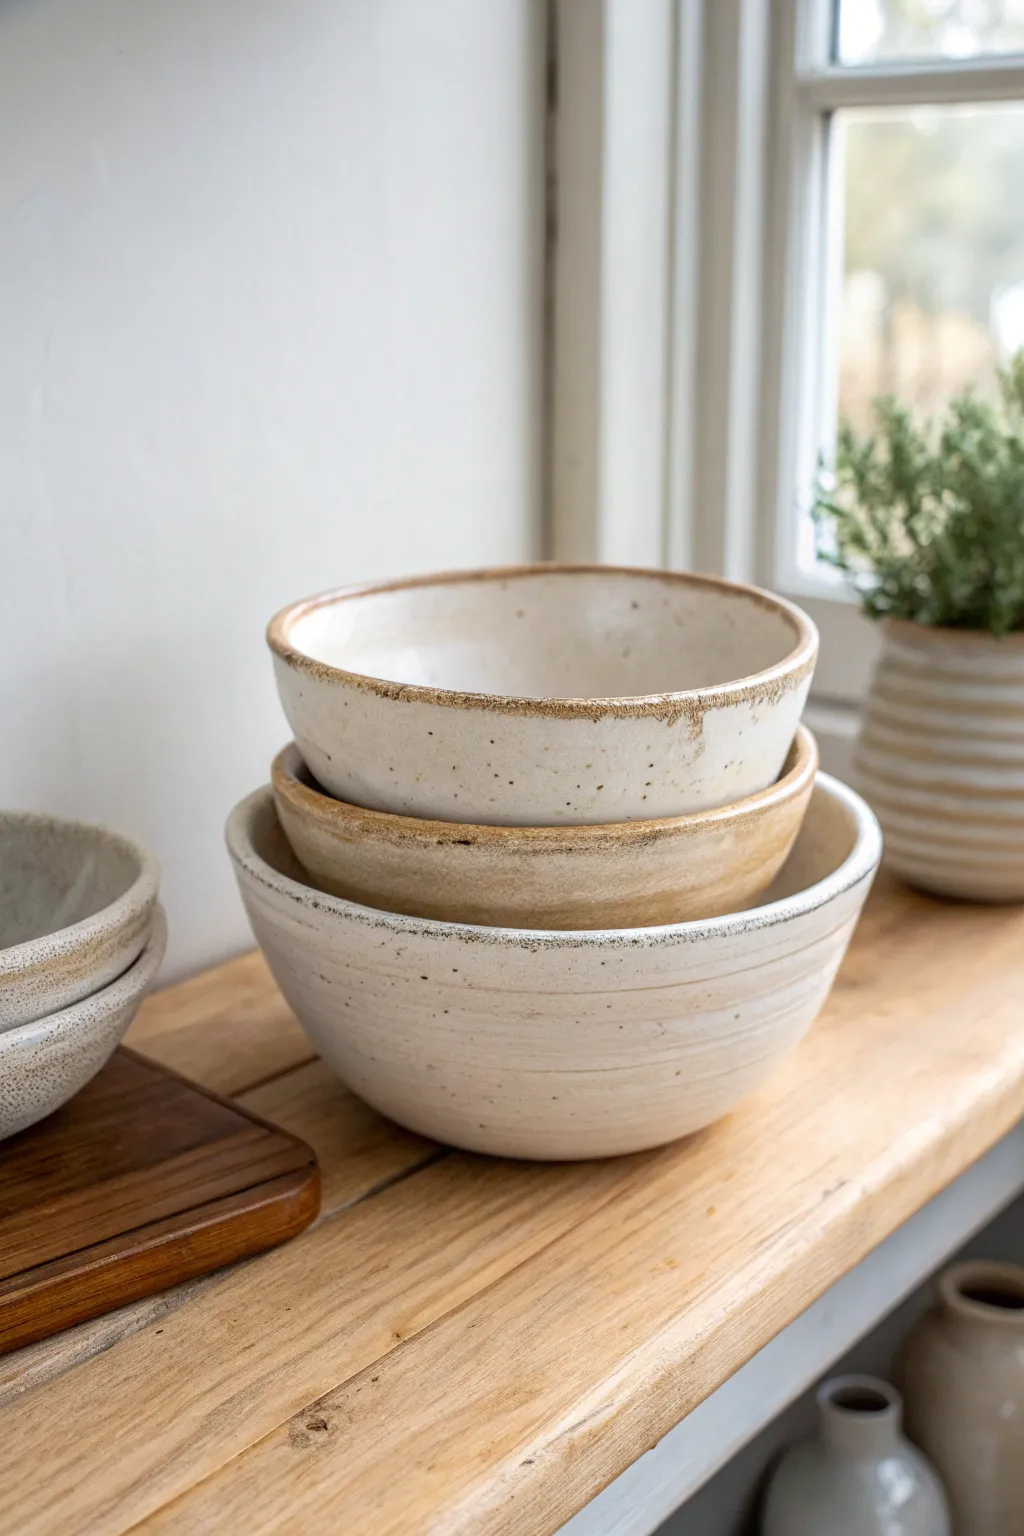
Embrace the imperfect charm of hand-built pottery with this set of nesting pinch bowls. Featuring a creamy speckled glaze and distinct earthy rims, these bowls balance rustic character with everyday functionality.
How-To Guide
Materials
- Stoneware clay (smooth or light grog)
- Pottery sponge
- Rib tool (metal and rubber)
- Fettling knife
- Ware board
- Speckled off-white matte glaze
- Iron oxide wash or dark brown underglaze
- Kiln (or access to a firing service)
- Paintbrush (fan brush and detail brush)
- Bowl of water
Step 1: Forming the Base
-
Preparing the clay:
Begin by wedging your stoneware clay thoroughly to remove air pockets. Divide your clay into three balls of graduated sizes—small, medium, and large—to ensure your finished bowls will nest comfortably. -
Opening the first pinch pot:
Start with the medium-sized ball. Cradle it in one hand and firmly press your thumb into the center, stopping about a half-inch from the bottom. This thickness is crucial for a sturdy base. -
Pinching the walls:
Rotate the clay slowly while making rhythmic pinching motions between your thumb and fingers. Work from the bottom upward, aiming for an even wall thickness of about 1/4 inch. Keep the rim slightly thicker for now to prevent cracking. -
Refining the curve:
As the bowl widens, gently press the curve outward with your thumb to create a deep, open shape rather than a tall cylinder. Repeat the pinching process for the small and large clay balls. -
Smoothing the interior:
Use a damp sponge to smooth out your finger marks on the inside of each bowl. If the bottom feels uneven, press firmly with the sponge to compress the clay floor.
Smooth Operator
To get perfectly smooth walls without a wheel, try paddling the outside of the bowl gently with a wooden spoon while holding a smooth stone on the inside for support.
Step 2: Refining and Shaping
-
Ribbing the exterior:
Once the clay has stiffened slightly (leather hard stage), use a metal rib to Scrape and smooth the exterior walls. This removes the lumpy ‘pinched’ look and gives the bowls that clean, wheel-thrown appearance seen in the photo. -
Defining the rim:
Hold a piece of soft plastic or a chamois cloth over the rim and gently run your finger along it as you rotate the bowl. This compresses the lip and creates a smooth, rounded edge that is pleasant to drink or eat from. -
Creating the foot:
Flip the bowls over. You can simply smooth the bottom flat for a stable surface, or if you are feeling adventurous, use a trimming tool to carve a shallow heat ring into the base. -
Drying:
Place the three bowls upside down on a ware board. Cover them loosely with plastic for the first day to equalize moisture, then uncover them to dry completely until they are bone dry. -
Bisque firing:
Load your bone-dry greenware into the kiln for a bisque firing (usually Cone 04). This initial firing hardens the clay and prepares it for glazing.
Step 3: Glazing and Finishing
-
Wiping down:
Remove the bisque-fired bowls from the kiln. Use a clean, slightly damp sponge to wipe away any kiln dust, which can prevent the glaze from adhering properly. -
Applying the main glaze:
Dip the top and bottom bowls into a speckled off-white matte glaze. For the middle bowl, use a slightly warmer, sandy beige glaze to create the subtle tonal variation shown in the image. -
Cleaning the foot:
Immediately wipe the glaze off the bottom of each bowl with a wet sponge. No glaze should touch the kiln shelf during firing. -
Accenting the rim:
Dip a detail brush into iron oxide wash or a dark brown underglaze. Gently run the brush along the very edge of the rim. I find it easiest to load the brush and hold it steady while rotating the bowl itself. -
Creating the rustic drip:
Allow the rim accent to bleed slightly into the main glaze. If it looks too perfect, dab it lightly with a sponge to encourage that organic, handmade interaction between the materials. -
Glaze firing:
Fire the bowls again, this time to the maturity temperature of your clay and glaze (typically Cone 5 or 6 for stoneware). Ensure the bowls are not touching each other in the kiln. -
Sanding the bottom:
Once cooled and unloaded, check the unglazed bottoms. If they feel rough, briefly sand them with fine-grit sandpaper so they won’t scratch your table.
Texture Play
Before the clay dries, press a piece of coarse linen or burlap against the exterior. The glaze will break beautifully over the fabric texture, adding more visual depth.
Stack your finished set on a shelf near a window to let the natural light highlight their beautiful organic textures


Slab-Built Mugs With a Simple Strap Handle
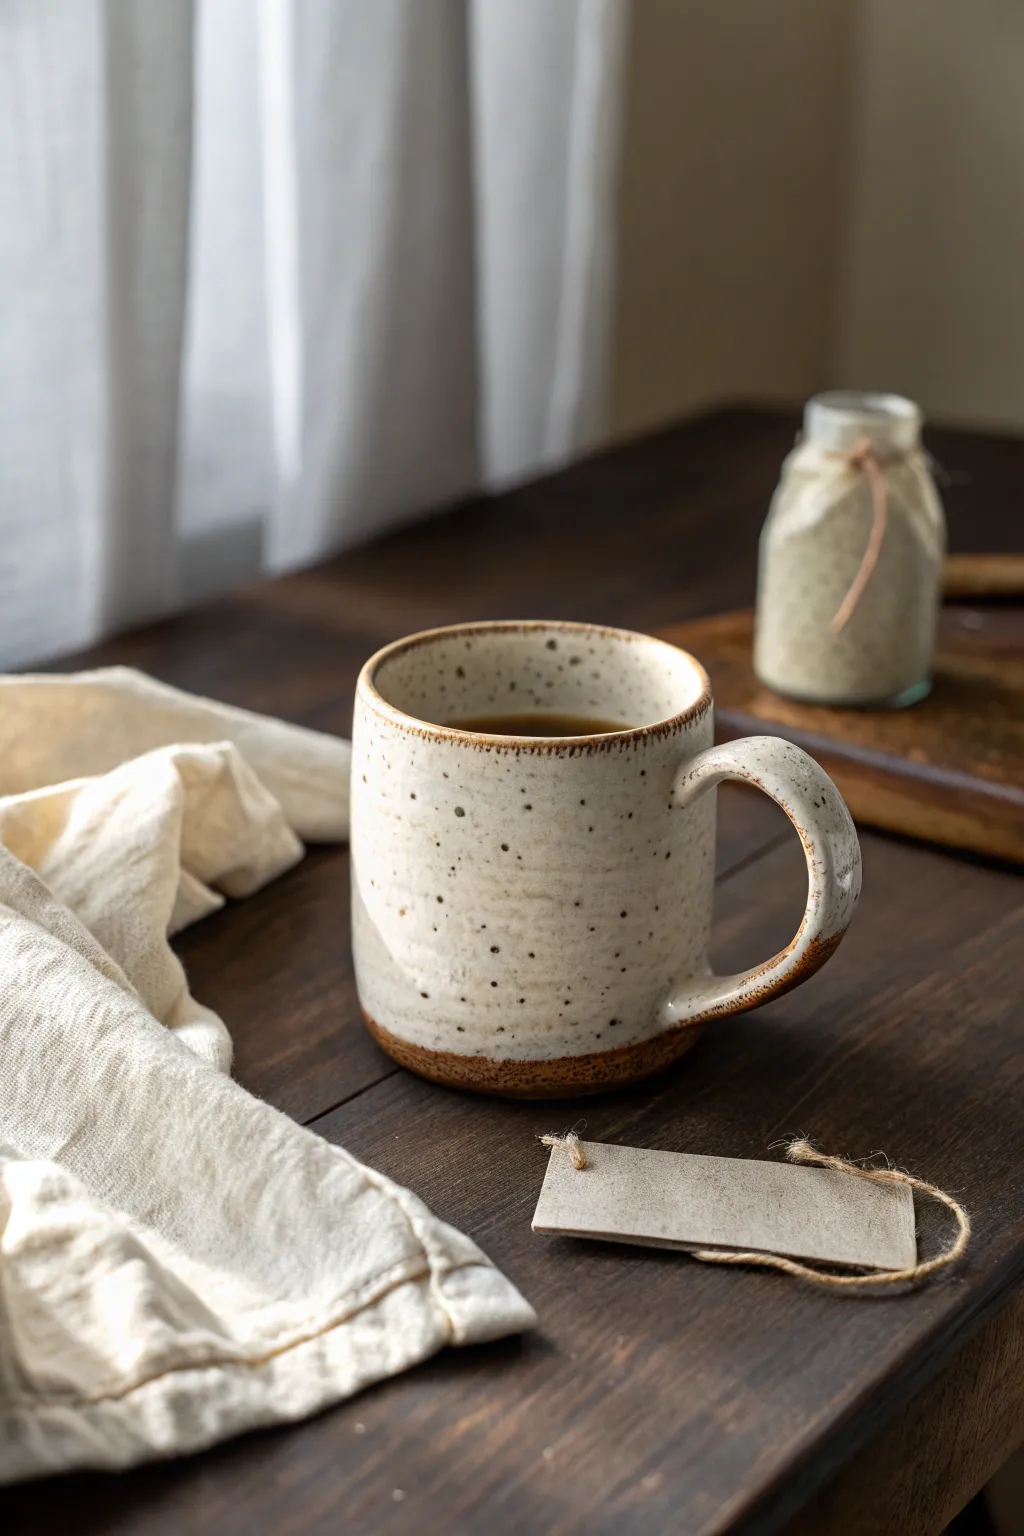
Embrace the imperfect beauty of hand-built pottery with this charming, speckled mug project. Using basic slab techniques and a creamy, speckled clay body, you’ll create a cozy vessel featuring earthy brown rims and a comfortable strap handle.
Detailed Instructions
Materials
- Speckled cream stoneware clay
- Rolling pin
- Two guide strips (1/4 inch thickness)
- Needle tool or fettling knife
- Serrated rib or fork (for scoring)
- Slip (clay mixed with water)
- Cardboard cylinder or rolling tube (optional support)
- Wooden modeling tool
- Sponge
- Iron oxide wash or dark brown underglaze
- Clear or transparent matte glaze
Step 1: Forming the Cylinder Body
-
Roll the Slab:
Begin by flattening a wedge of speckled clay. Place your 1/4 inch guide strips on either side of the clay and roll it out with your rolling pin until it is a uniform thickness. -
Cut the Rectangle:
Use a ruler and needle tool to cut a long rectangle. A standard mug usually needs a rectangle about 10-11 inches long and 4-5 inches tall, but you can adjust this based on your preferred size. -
Bevel the Edges:
Cut the shorter ends of your rectangle at a 45-degree angle. Be sure to angle them in opposite directions so they will overlap seamlessly when you curve the clay into a cylinder. -
Score and Slip:
Using your serrated rib, rough up the texture on the beveled edges. Apply a generous amount of slip to these scored areas. -
Create the Cylinder:
Gently curve the slab until the ends meet. If the clay is soft, you might wrap it loosely around a cardboard tube for support. Press the beveled seams together firmly. -
Reinforce the Seam:
Use a wooden tool to blend the seam on both the inside and outside. I like to run the tool vertically to drag clay across the join line until it disappears. -
Add the Base:
Roll a small piece of clay for the base. Place your cylinder on top of it and trace around the bottom with your needle tool. Cut out the circle, score and slip the contact points, and attach the base firmly.
Step 2: Handle and Refinement
-
Prepare the Strap:
Cut a strip of clay for the handle, roughly 1 inch wide and 5 inches long. Smooth the sharp edges with a damp sponge so they are rounded and comfortable to hold. -
Shape the Handle:
Curve the strip into a ‘C’ shape or an ear shape. Hold it up to your mug cylinder to check the proportions and trim the ends if the loop is too large. -
Attach the Handle:
Mark the attachment points on the mug body. Score and slip both the handle ends and the mug wall. Press the handle firmly onto the mug. -
Smooth the Joints:
Use a small coil of clay around the handle joints if needed to fill gaps, then smooth everything down with a designated wooden tool or your finger. -
Clean the Rim:
Run a damp chamois or sponge over the top rim of the mug to ensure it is perfectly smooth for drinking. -
Drying:
Cover the mug loosely with plastic to let it dry slowly to the leather-hard stage, then uncover to bone dry before bisque firing.
Warping Walls?
If your cylinder slumps while working, the clay is too wet. Let the slab stiffen up on a wooden board for 20-30 minutes before forming it into a circle.
Step 3: Glazing and Finishing
-
Apply Oxide Detail:
Once bisque fired, brush a thin band of Iron Oxide wash or dark brown underglaze along the very bottom edge and the top rim to mimic the rustic exposure seen in the photo. -
Wipe Back:
If the oxide line is too heavy, gently wipe it back with a sponge so it looks like a natural, toasted edge rather than a painted stripe. -
Glaze Application:
Dip or brush the entire mug in a transparent matte glaze. This will seal the clay while allowing the natural speckles of the stoneware to shine through. -
Wipe the Foot:
Thoroughly wipe all glaze off the bottom of the mug (the foot) so it doesn’t stick to the kiln shelf during the final firing. -
Final Fire:
Fire the mug to the temperature recommended for your specific clay body (typically Cone 5 or 6 for stoneware) to achieve that durable finish.
Make it Yours
Lightly press a coarse linen fabric or canvas onto the slab before rolling it into a cylinder to add a subtle textile texture to the outside surface.
Once fired, fill your new handmade vessel with your favorite brew and enjoy the warmth of your craftsmanship in your hands


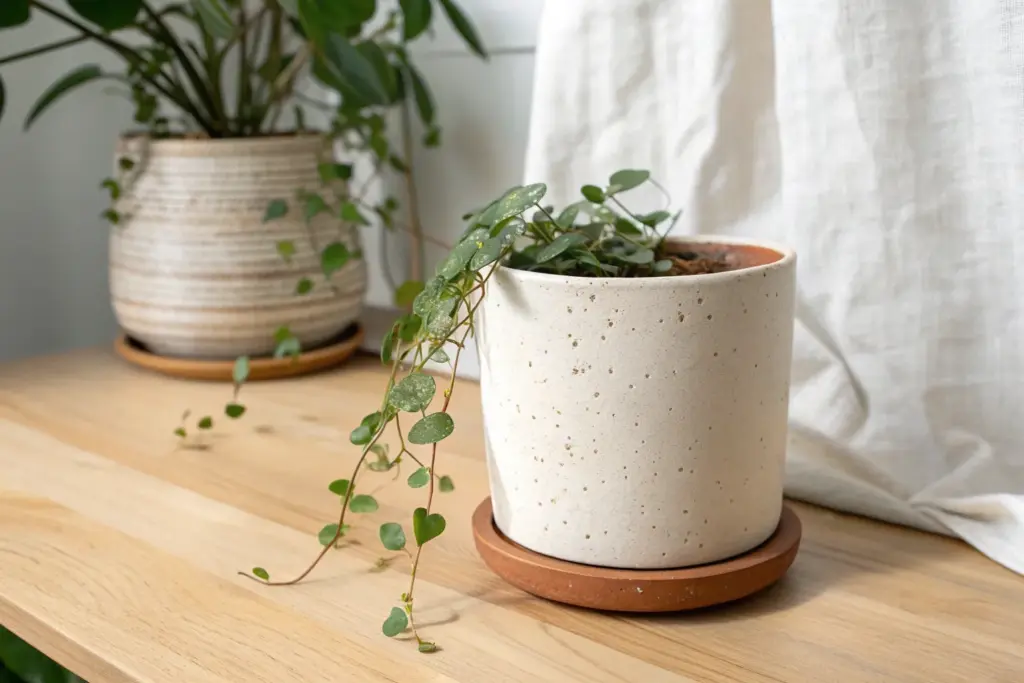
Coil-Built Mini Planters for Tiny Succulents
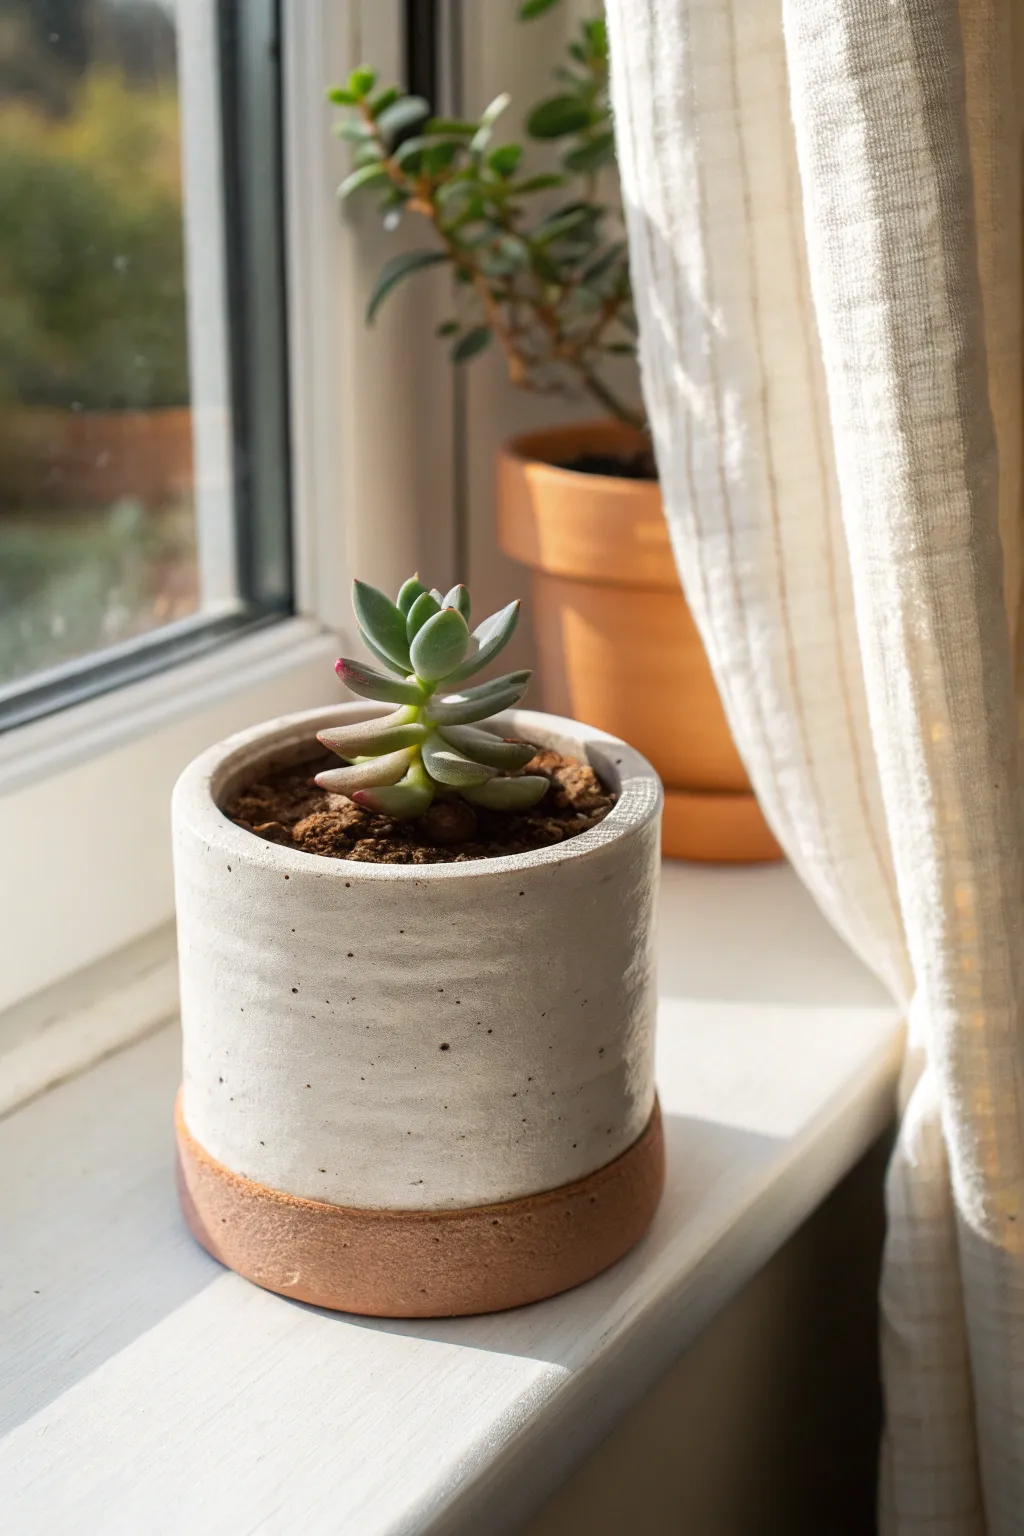
This charming project features a straight-sided cylinder with a satisfying tactile contrast. Using basic coil-building techniques, you’ll create a modern home for your tiniest succulents, finished with a classic creamy white glaze that leaves the raw clay base exposed.
How-To Guide
Materials
- Terracotta or red stoneware clay
- Rolling pin
- Canvas work surface or ware board
- Clay knife or needle tool
- Serrated rib or flexible metal rib
- Sponge
- Creamy white stoneware glaze (dip or brush)
- Wax resist (optional)
- Small succulent for planting
Step 1: Building the Base
-
Roll the slab base:
Begin by rolling out a small portion of clay into a flat slab, approximately 1/4 inch thick. This will form the floor of your pot. -
Cut the circular floor:
Use a round cookie cutter or trace around a circular object (about 3 inches in diameter) to cut out your base. Smooth the edges with your finger. -
Score the perimeter:
Rough up the outer edge of your circular base using a serrated rib or needle tool. Apply a small amount of slip (clay mixed with water) to the scored area.
Clean Those Speckles
If using speckled clay, wipe the bare bisque area firmly with a clean sponge after firing. This exposes the grit and enhances the raw texture contrast.
Step 2: Constructing the Walls
-
Roll your coils:
Roll out several snake-like coils of clay on your canvas. Aim for an even thickness, roughly matching a thick pencil or marker. -
Attach the first coil:
Place your first coil directly onto the slipped edge of the base. Gently press it down to ensure good contact. -
Build upward:
Stack subsequent coils on top of the first. You can spiral them gradually or stack rings. Build up to a height of about 3 to 4 inches. -
Blend the coils:
This is crucial for structural integrity. Support the outside wall with one hand while using your thumb or a modeling tool to smear the clay from the top coil down into the one below it on the inside. -
Smooth the exterior:
Now, do the same for the outside. Smear the clay upwards or downwards to merge the coils completely so individual lines disappear. -
Refine the cylinder shape:
Use a flat wooden paddle or a stiff rib against the outside while supporting the inside. Gently beat or scrape the walls to make them perfectly vertical and remove the knobbly coil texture. -
Refine the rim:
Use a damp sponge to smooth the top rim. You want it slightly flattened but with softened edges, not sharp.
Step 3: Surfacing
-
Add texture (optional):
If you want that subtle, horizontal texture seen in the photo, lightly drag a soft rib or your finger around the pot as it spins on a banding wheel to create faint, organic grooves. -
Slow drying:
Cover the pot loosely with plastic and let it dry slowly to the leather-hard stage, then uncover until bone dry. -
Bisque fire:
Fire the piece in a kiln to cone 04 (or your clay’s specific bisque temperature) to prepare it for glazing.
Speckled Glaze Hack
Add 1% granular ilmenite to a plain white glaze. It creates tiny iron speckles that mimic the look of reduction firing in an electric kiln.
Step 4: Glazing & Finishing
-
Clean the bisque:
Wipe the fired pot down with a damp sponge to remove any kiln dust ensuring the glaze adheres properly. -
Mark the glaze line:
Decide where you want the raw clay to end. A good rule of thumb is leaving the bottom 1/2 to 3/4 inch exposed. -
Apply wax resist:
Paint liquid wax resist on the bottom of the pot and up the sides to your marked line. Let this dry completely; it will repel the glaze. -
Dip the pot:
Holding the pot by the waxed bottom or using tongs, dip it upside down into your creamy white glaze. Hold for 3 seconds and lift fast. -
Clean up drips:
Even with wax, beads of glaze might form on the bottom edge. Sponge these off carefully to ensure a crisp line between glaze and raw clay. -
Glaze fire:
Fire the pot a final time to the temperature required by your glaze and clay body (often Cone 5 or 6 for stoneware).
Once cooled, pot up your favorite succulent and enjoy the beautiful contrast between the smooth glaze and earthy base


Ring Dish Trinket Trays With Soft Curved Edges
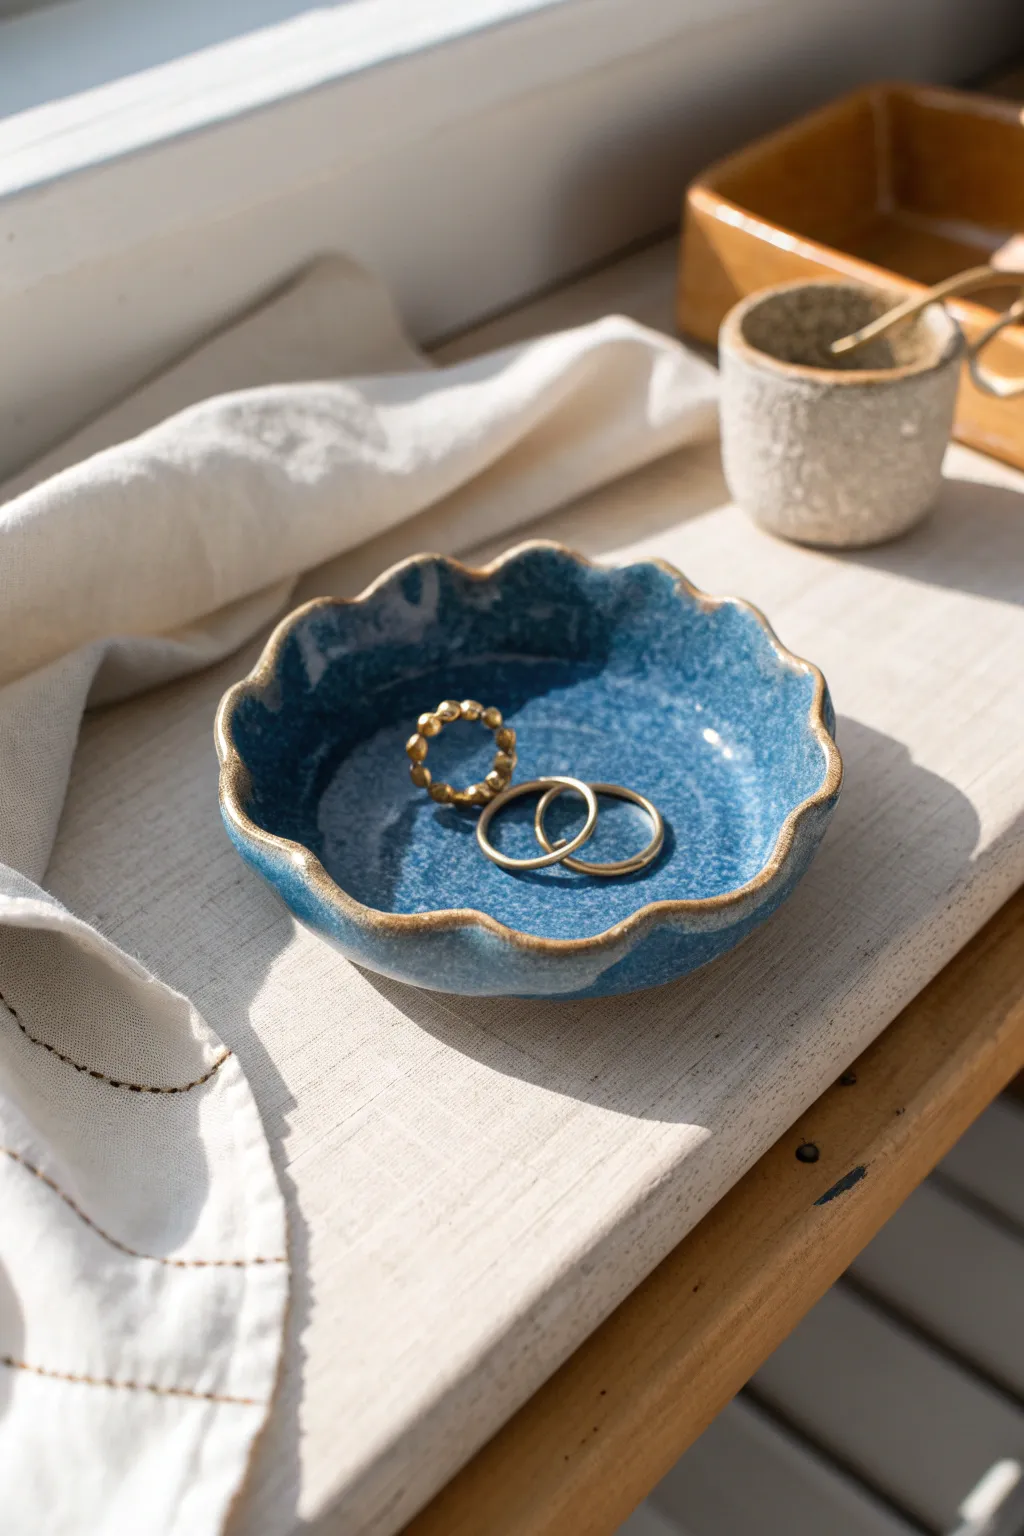
Create a stunning scalloped ring dish that balances organic shape with a polished finish. This beginner-friendly project features a deep ocean-blue glaze accented by a warm, toasted rim that looks professionally crafted.
Step-by-Step Guide
Materials
- Low-fire white earthenware clay (or similar smooth clay body)
- Rolling pin
- Canvas mat or cloth for rolling
- Circular template (cardboard or a small bowl, approx. 4-5 inches)
- Needle tool or fettling knife
- Small sponge
- Rib tool (soft, smooth rubber)
- Pottery wheel or banding wheel (optional but helpful)
- Bisque kiln firing service access
- Speckled blue glaze (glossy)
- Toasted brown or oxide wash for the rim
- Fan brush and detail brush
Step 1: Forming the Dish
-
Prepare the clay:
Begin by wedging a baseball-sized ball of white earthenware clay to remove air bubbles and ensure a uniform consistency. -
Roll the slab:
Place the clay on your canvas mat. Using a rolling pin, roll out a slab to an even thickness of about 1/4 inch. If you rotate the clay 90 degrees after every few rolls, you’ll get a more even circle. -
Cut the circle:
Lay your circular template gently on top of the slab. Trace around it with a needle tool to cut out a perfect circle, then peel away the excess clay. -
Smooth the surface:
Take a slightly damp sponge or a soft rubber rib and gently compress the surface of the clay circle to remove any canvas texture or imperfections. -
Shape the curve:
Place the clay circle into a slump mold (a small bowl lined with plastic works well) or gently curve the edges upward with your hands to create a shallow bowl shape. -
Create the wave:
To form the scalloped edge, use your thumb and forefinger to gently pinch the rim at regular intervals. Push slightly outward with one finger while supporting the inside with two fingers to create undulating waves. -
Refine the rim:
Go around the rim once more with a slightly damp sponge or chamois leather. Smooth out the pinched areas so the transition of the waves feels organic and soft rather than sharp. -
Dry slowly:
Allow the dish to dry slowly under a loose sheet of plastic for a day to prevent warping, then uncover it to dry completely until it reaches bone dry stage. -
Bisque fire:
Fire the piece in a kiln to cone 04 (or the temperature recommended for your specific clay body) to prepare it for glazing.
Step 2: Glazing and Finishing
-
Clean the bisque:
Wipe the fired bisque piece down with a damp sponge to remove any dust that might prevent the glaze from adhering properly. -
Apply the blue base:
Stir your speckled blue glaze thoroughly. Using a fan brush, apply three even coats to the entire top surface (inside) of the dish. I like to let each coat dry until it’s no longer shiny before applying the next. -
Glaze the exterior:
Flip the dish carefully and apply the same blue glaze to the underside, leaving a small dry foot ring unglazed at the very bottom so it doesn’t stick to the kiln shelf. -
Accent the rim:
Dip a detail brush into a contrasting toasted brown glaze or an iron oxide wash. Carefully run the brush along the very top edge of the wavy rim. -
Soften the transition:
Let the rim accent drip slightly or bleed naturally into the blue glaze, or dab it gently with a sponge if the line looks too severe. -
Final check:
Inspect the bottom of the dish again. Use a sponge to wipe away any stray drips of glaze on the foot ring. -
Glaze fire:
Load the piece into the kiln for the final glaze firing, usually cone 05/06 for earthenwares, ensuring it doesn’t touch other pieces.
Fixing a Warped Rim
If the rim starts to slump too much while drying, prop up the lower distinct “waves” with small balls of paper towel or foam until the clay is leather hard.
Level Up: Gold Luster
For extra luxury, fire a third time with 24k gold luster painted over that brown rim line. It requires a much lower temperature causing the gold to fuse to the glaze.
Once cooled, your dish is ready to hold your favorite rings and trinkets safely

The Complete Guide to Pottery Troubleshooting
Uncover the most common ceramic mistakes—from cracking clay to failed glazes—and learn how to fix them fast.
Spoon Rest Shaped Like a Leaf or Wave
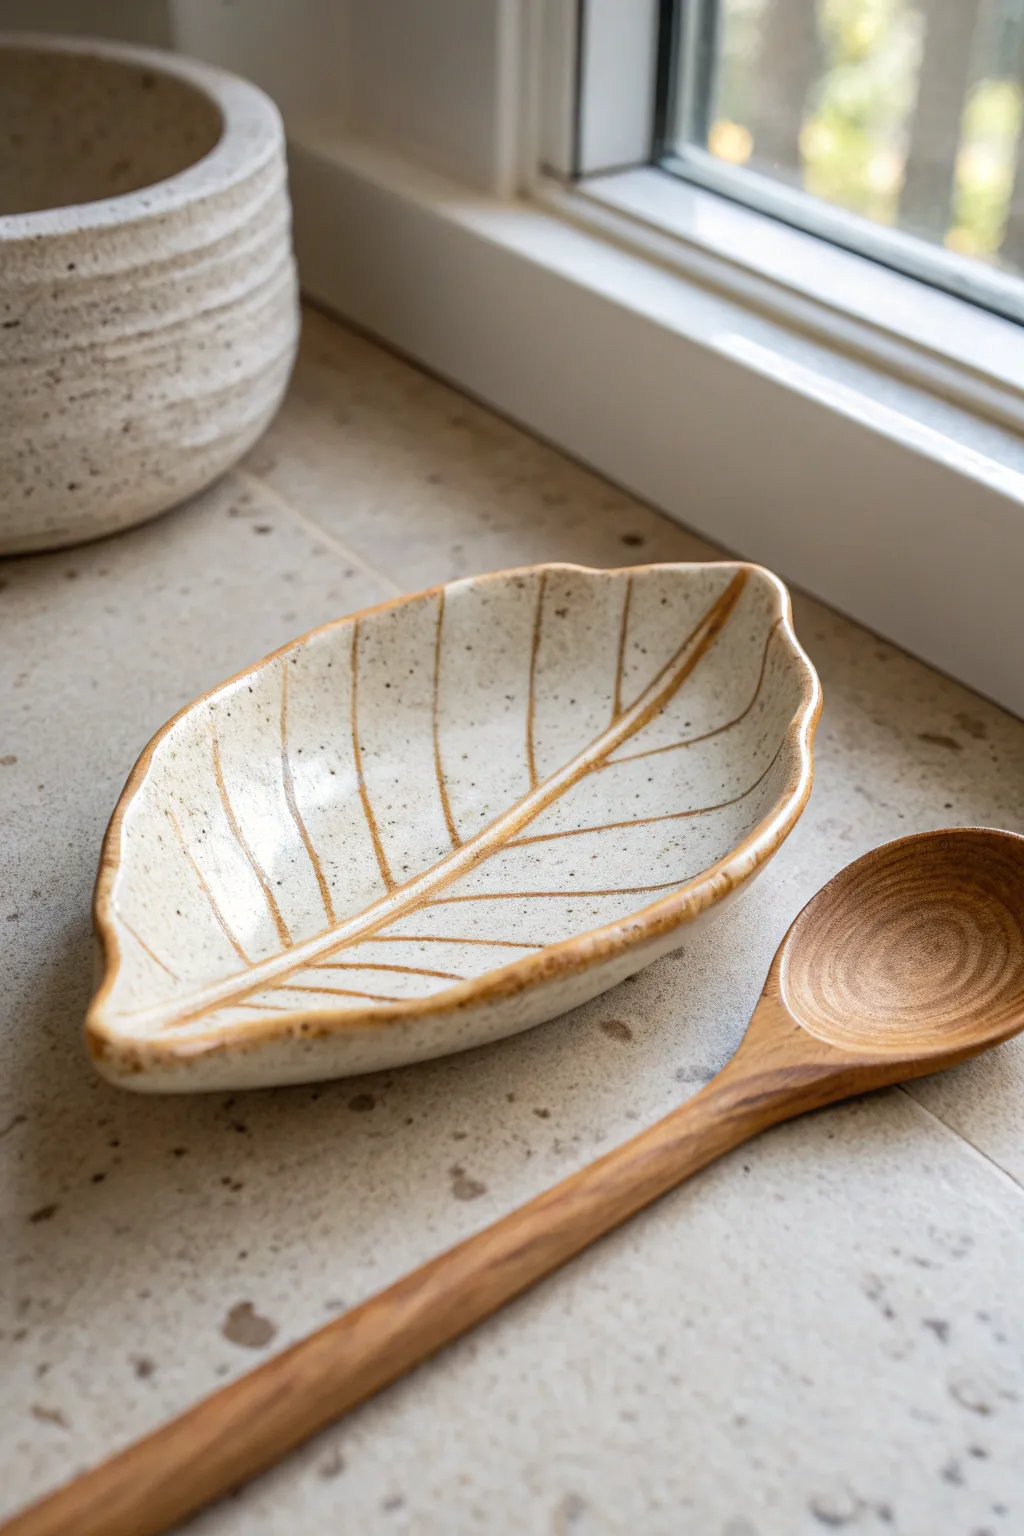
This elegant spoon rest brings a touch of nature to your kitchen counter with its organic leaf shape and speckled cream finish. The subtle carved veins and raised edges are functional yet beautiful, perfectly catching drips while you cook.
How-To Guide
Materials
- Speckled stoneware clay (mid-fire)
- Leaf template (paper or real leaf)
- Rolling pin and guide sticks (1/4 inch)
- Fettling knife or needle tool
- Carving tool (small loop or v-tip)
- Sponge
- Iron oxide wash or brown underglaze
- Clear glossy glaze
- Soft paintbrush
- Canvas work surface
Step 1: Shaping the Form
-
Roll the Slab:
Begin by wedging your speckled stoneware clay to remove air bubbles. Roll it out on your canvas surface using guide sticks to ensure an even thickness of about 1/4 inch. -
Cut the Outline:
Place your leaf template gently on the clay slab. Using a fettling knife or needle tool, trace around the perimeter to cut out your leaf shape. Smooth the freshly cut edges with a damp sponge to remove any sharp burrs. -
Create the Curve:
While the clay is still pliable, gently lift the edges of the leaf upward. I like to rest the clay on a piece of foam or a crumpled towel to help it hold this concave shape. -
Refine the Rim:
Use your fingers to round over the lifted rim, creating a smooth transition that feels nice to the touch. Ensure the center remains flat enough for a spoon to rest stably. -
Dry to Leather Hard:
Set the piece aside to dry until it reaches the leather-hard stage. It should be firm enough to handle without warping but soft enough to carve into easily.
Natural Texture Tip
Instead of a paper template, press a large, real leaf (like a Hosta) vein-side down into the wet clay. This transfers the exact natural texture instantly
Step 2: Carving and Decoration
-
Mark the Veins:
Using a dull pencil or the back of a needle tool, lightly sketch the central vein running from the stem to the tip, followed by the branching side veins. -
Carve the Lines:
With a V-tip carving tool or a small loop tool, carefully carve along your sketched lines. Create a groove deep enough to hold glaze but not so deep it weakens the slab. -
Clean the Residue:
After carving, you’ll likely have small ‘crumbs’ of clay. Wait for them to dry slightly, then brush them away with a soft dry brush rather than smearing them with water. -
Bisque Fire:
Allow the spoon rest to dry completely to the bone-dry stage. Fire it in the kiln to cone 04 (or your clay’s specific bisque temperature).
Color Variation
Try using a celadon green glaze instead of clear. Since celadon is translucent, it will pool darker in your carved veins for a stunning deep green contrast
Step 3: Glazing and Finishing
-
Wipe Down:
Once the bisque firing is complete, wipe the piece with a damp sponge to remove any kiln dust before glazing. -
Apply Oxide Wash:
Mix your iron oxide with water (or use a thinned brown underglaze). Paint this wash into the carved vein lines and along the rim of the leaf. -
Wipe Back:
Using a clean, damp sponge, wipe away the excess oxide from the high points of the surface. This technique leaves the dark color only in the recessed veins and highlights the rim. -
Glaze Application:
Dip the entire piece into a clear glossy glaze, or brush on three even coats if you are using a brushing glaze. The clear coat will allow the speckles in the clay and the dark veins to show through. -
Clean the Foot:
Flip the piece over and sponge off any glaze from the bottom to prevent it from sticking to the kiln shelf. -
Glaze Fire:
Load the kiln and fire to the maturity temperature of your clay and glaze (typically cone 5 or 6 for stoneware).
Once cooled, your new spoon rest is ready for service near the stovetop
Soap Dish With Drain Holes and a Raised Foot
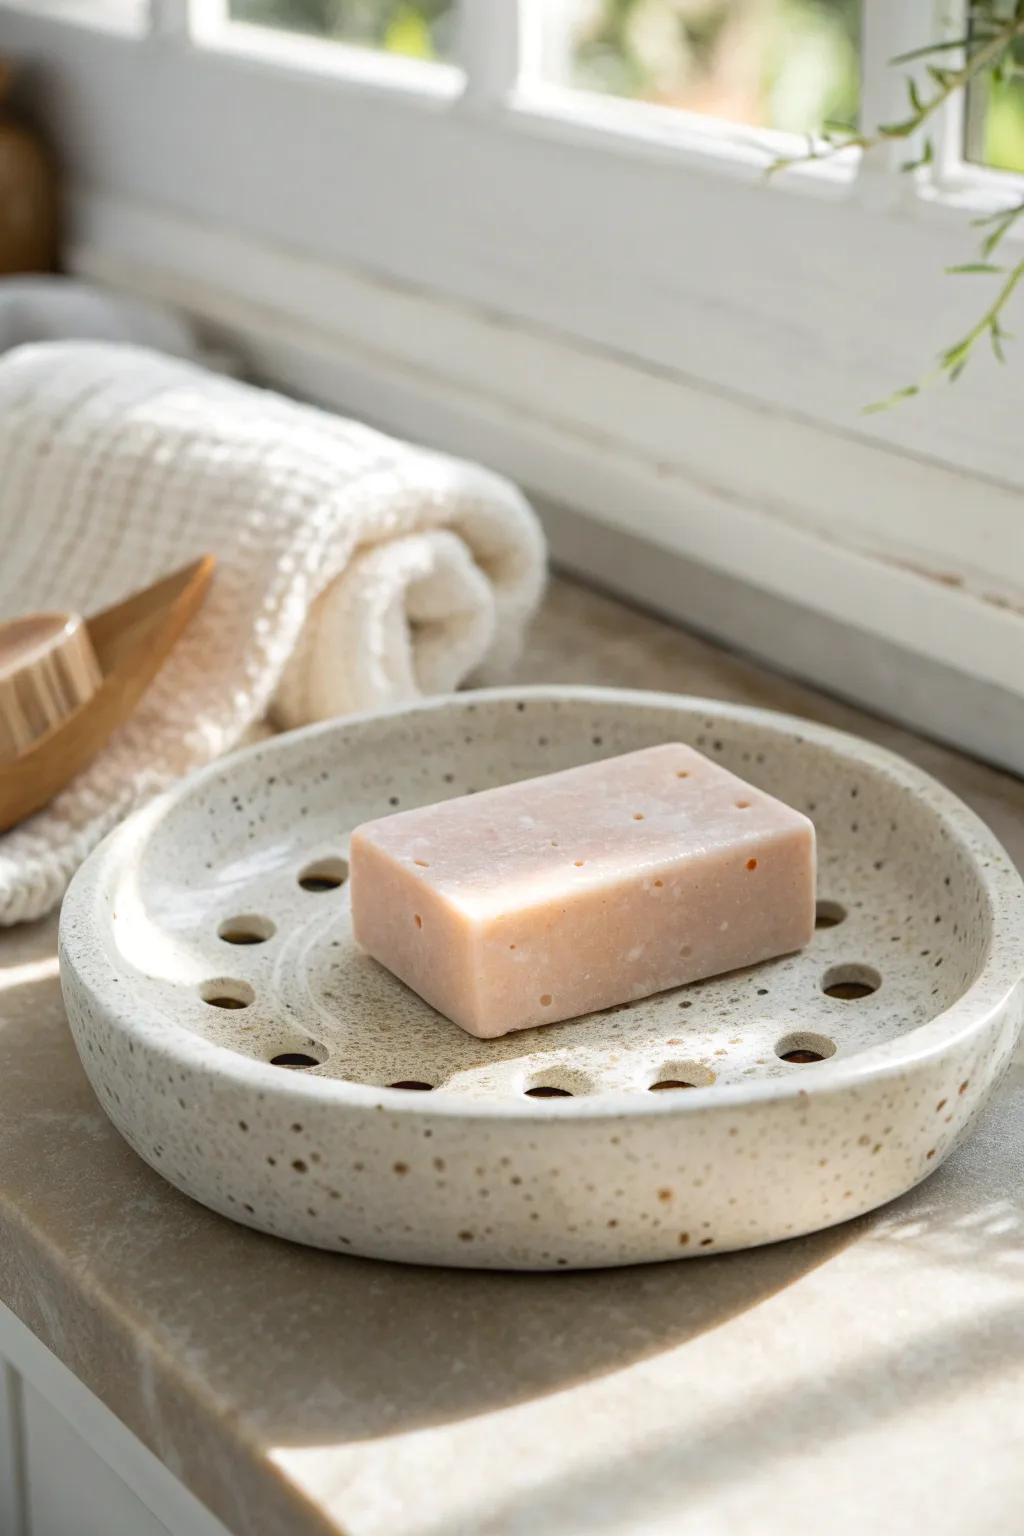
This rustic yet elegant soap dish features a generous basin with practical drainage holes, ensuring your artisanal soaps stay dry between uses. The speckled clay body and soft white glaze create a calming, spa-like aesthetic perfect for any bathroom counter.
Detailed Instructions
Materials
- Speckled stoneware clay (mid-fire)
- Pottery wheel (or can be hand-built with slab)
- Wooden rib tool
- Metal rib tool
- Wire cutter
- Pin tool or hole punch tool (approx. 5-8mm diameter)
- Trimming tools (loop tools)
- Sponge
- Matte white glaze (translucent)
- Kiln
Step 1: Throwing the Form
-
Preparing clay:
Begin by wedging about 1 to 1.5 pounds of speckled stoneware clay. Ensure it is fully de-aired to prevent bubbles during throwing. -
Centering:
Secure the clay to the wheel head and center it. You want a relatively wide and low puck shape to start, rather than a tall cone, as we are making a shallow dish. -
Opening the floor:
Open the clay, leaving the floor slightly thicker than a standard bowl—aim for at least 1/2 inch thickness. This extra thickness is crucial because you will later need to trim a foot ring into it. -
Establishing the bottom:
Competently compress the floor with a wooden rib. Instead of a curved bowl interior, aim for a mostly flat bottom that transitions gently into the walls. -
Pulling the walls:
Pull the walls up, keeping them thick and sturdy. The walls should rise vertically or flare out slightly, standing about 1.5 inches high. -
Refining the rim:
Use a piece of chamois or a wet sponge to round off and compress the rim. A rounded rim, as seen in the photo, is more durable against chipping.
Clean Hole Punching
When punching the drainage holes, twist the tool gently as you push through. Support the clay from underneath with your hand to prevent the floor from cracking or deforming.
Step 2: Trimming and Detailing
-
Drying to leather hard:
Cut the piece from the wheel and allow it to dry to a leather-hard state. It should be firm enough to handle without warping but still cool to the touch. -
Centering for trim:
Place the dish upside down on the wheel head. Tap it into center and secure it with small coils of soft clay. -
Trimming the foot:
Using a sharp loop tool, carve away the excess clay from the outside bottom to define a foot ring. This elevates the dish, allowing water to drain away freely underneath. -
Smooth the surface:
I like to run a slightly damp sponge or a smooth rib over the trimmed areas to burnish the clay, pushing the grog back in for a smoother finish. -
Planning the holes:
Flip the dish right-side up. Lightly mark a circle on the interior floor where you want your drainage holes to sit.
Step 3: Finishing Touches
-
Punching holes:
Using a hole punch tool or a clean straw, punch a series of holes along your guide circle. Add a central hole if desired. Clean up any ‘burrs’ of clay on the underside immediately. -
Bisque firing:
Let the piece dry completely (bone dry) before loading it into the kiln for a bisque fire (usually Cone 04). -
Glazing:
Dip the bisqued dish into a matte white glaze. Since we used speckled clay, a slightly translucent glaze works best to let those beautiful iron spots show through. -
Cleaning the foot:
Wipe the bottom of the foot ring completely clean of glaze with a wet sponge to prevent it from sticking to the kiln shelf. -
Final firing:
Fire the piece to the maturation temperature of your clay body (typically Cone 5 or 6 for stoneware).
Level Up: Spirals
Before punching holes, coat the interior with white slip. As you spin the wheel, drag a finger through the slip to create a spiral texture beneath the glaze.
Place your favorite bar of soap on your new creation and enjoy the clean, handmade touch it adds to your sink area


What Really Happens Inside the Kiln
Learn how time and temperature work together inside the kiln to transform clay into durable ceramic.
Bud Vase From Two Slabs and a Pinched Neck
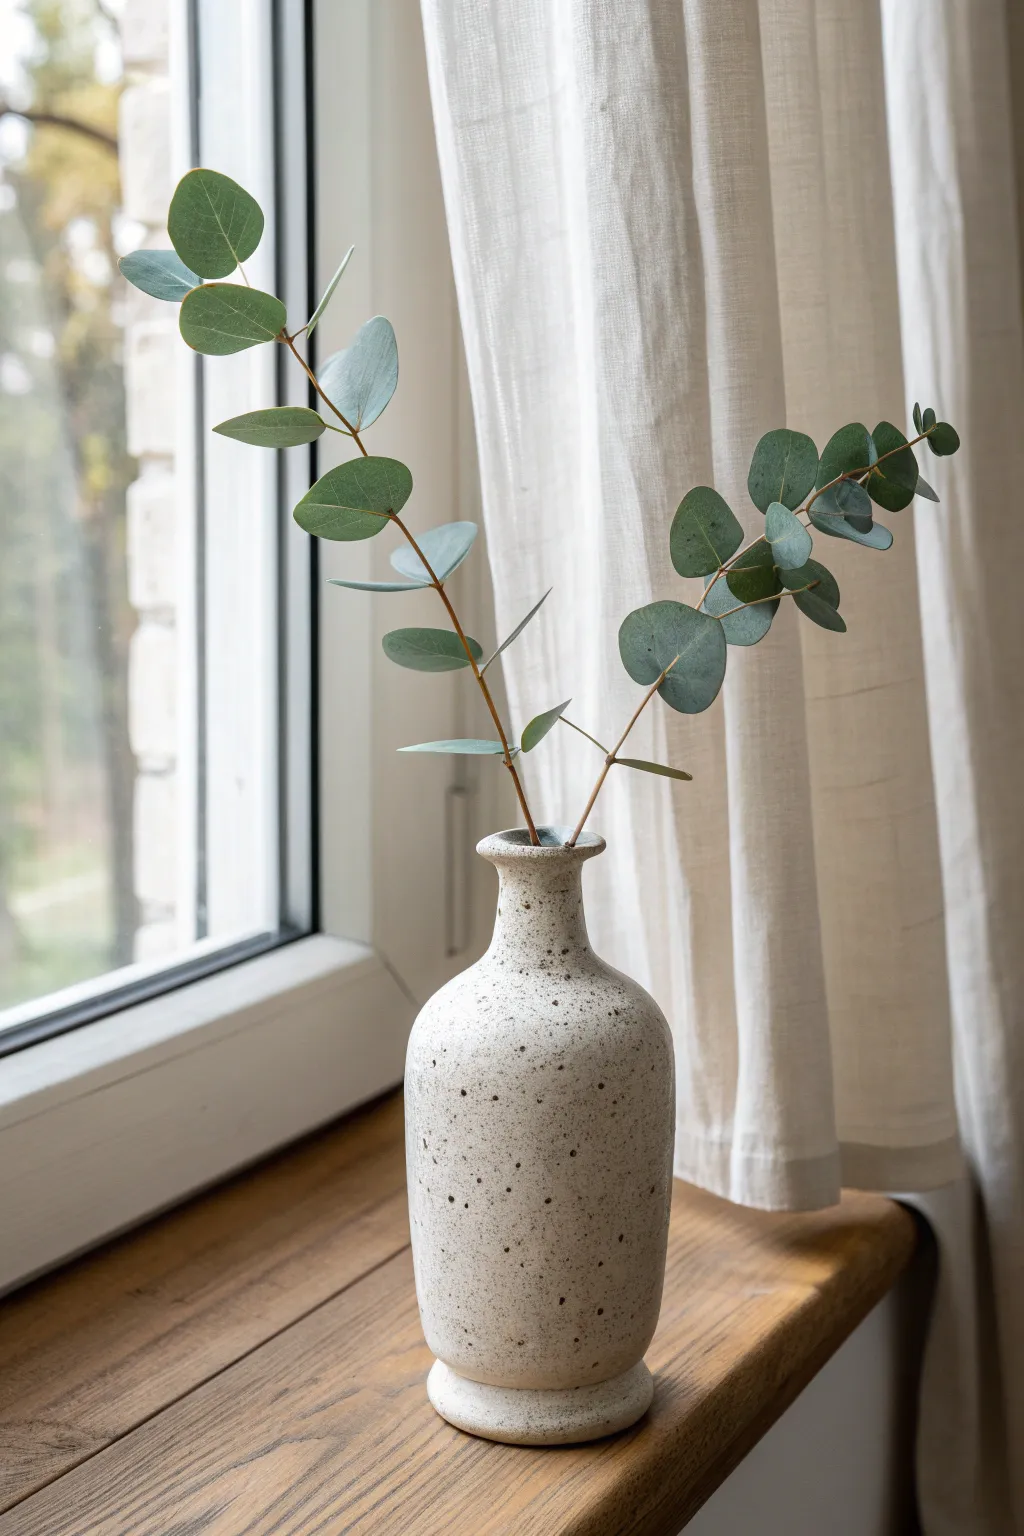
Create a minimal and rustic vessel perfect for showcasing delicate stems like eucalyptus. This project combines simple slab construction with a pinched neck to form a beautifully imperfect shape with a classic speckled finish.
Step-by-Step Guide
Materials
- Speckled stoneware clay (white or cream body)
- Rolling pin
- Canvas working surface or slab mat
- Needle tool or fettling knife
- Scoring tool (serrated rib or fork)
- Slip (clay and water mixture)
- Wooden modeling tool
- Sponge
- Clear or transparent white glaze
- Kiln
Step 1: Creating the Body
-
Roll out the clay:
Begin by rolling out a slab of speckled clay on your canvas surface. You want an even thickness of about 1/4 inch. If you want a more organic feel, avoiding guide sticks can leave slight variations that add character. -
Cut the main slabs:
Using your needle tool, cut two identical tall rectangles with rounded corners at the top. The shape should resemble a tall tombstone or arch. These will form the front and back of your vase. -
Create the side panels:
Cut two long, narrow rectangular strips from the remaining slab. These strips should be the same height as your arched pieces but only about 3/4 inch wide to give the vase some volume without making it too bulky. -
Form the base:
Cut a small square or rectangle for the bottom that matches the width of your main panels and the depth of your side strips. -
Let the clay leather-harden:
Allow all your cut pieces to dry until they are ‘leather hard’—stiff enough to hold their shape upright but still soft enough to join. This usually takes an hour or two depending on humidity.
Cracking at the Seams?
If seams crack during drying, the clay was likely too dry when joining. Scrape the crack, add fresh slip, and compress hard. Dry slowly under loose plastic.
Step 2: Assembly and Shaping
-
Score the edges:
Using a serrated rib or fork, scratch up the edges of all pieces where they will connect. Be thorough here; roughing the surface is key to a striong bond. -
Apply slip and join:
Brush a generous amount of slip onto the scored areas. Press the side strips onto one of the main arched panels first, then attach the back panel, sealing the seams firmly with your fingers. -
Attach the base:
Score and slip the bottom edges of your now-assembled tube and press it firmly onto the base piece. Pad the clay on the outside to secure the connection. -
Reinforce the seams:
Roll a very thin coil of wet clay. Place this coil along the interior seams where possible, or use a wooden tool to smudge the exterior seams together until they are invisible. -
Paddle the form:
Gently paddle the sides of the vase with a flat wooden tool or your hand to round out the boxy shape. You want the sharp corners to soften into a continuous curve.
Step 3: Defining the Neck and Finish
-
Pinch the neck:
At the top of the vase, gently pinch the clay inward to create a narrow opening. I like to wet my fingers slightly for this part to keep the clay moving smoothly without cracking. -
Flare the rim:
Once the neck is narrowed, carefully press the very top edge outwards to create a small flared lip. This mimics the look of a thrown pot and gives the vase a finished appearance. -
Add the foot ring:
Roll a medium-thick coil of clay. Create a ring the same diameter as the base of your vase. Score, slip, and attach this ring to the bottom to create a distinct ‘foot’. -
Smooth the surface:
Use a damp sponge to wipe down the entire piece, smoothing out finger marks and softening any remaining sharp edges. This exposes the grit in the clay, which contributes to the speckled look. -
Bisque fire:
Allow the vase to dry completely (bone dry) before firing it in a bisque kiln to prepare it for glazing. -
Glaze application:
dip or brush on a clear or semi-transparent white glaze. A transparent glaze is crucial because it allows the natural iron speckles in the clay body to show through after the final firing. -
Final firing:
Fire the piece again to the temperature recommended for your specific clay and glaze combination.
Enhance the Speckle
Wiping the bisque-fired piece with a damp sponge before glazing can clean dust off the iron spots, making them pop more clearly through the transparent glaze.
Once cooled, fill with water and your favorite clippings to enjoy the organic elegance of your new vase
Textured Coasters Pressed With Leaves or Lace
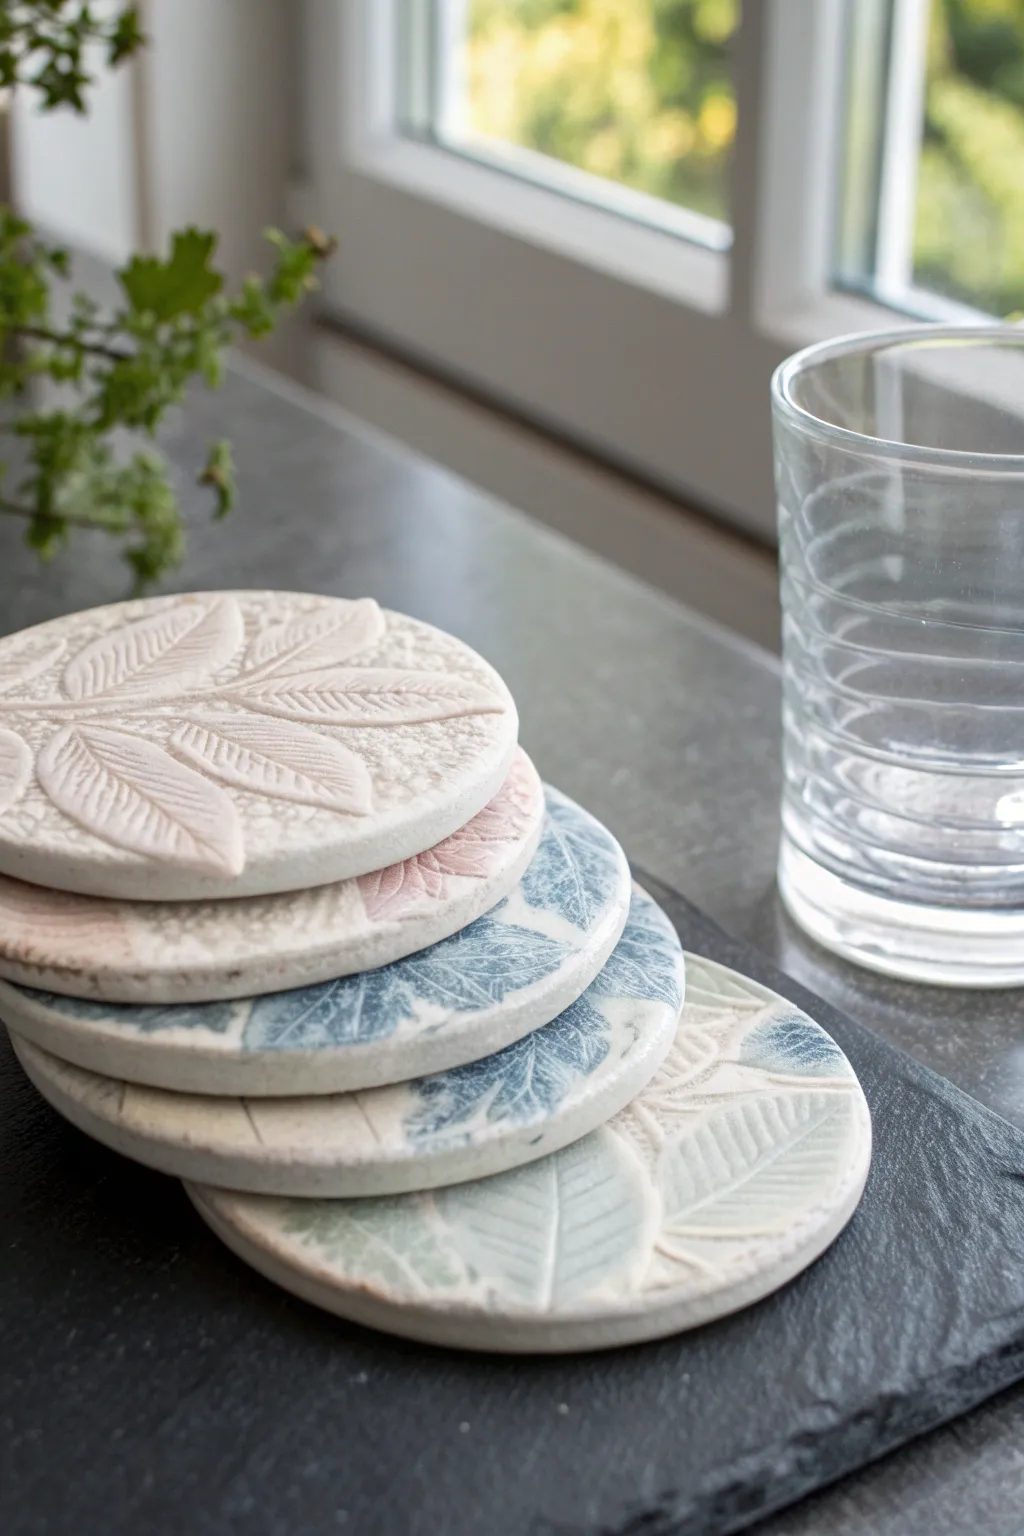
Bring nature into your home with these elegant, botanical-inspired coasters featuring delicate leaf impressions. The process captures the finest veins and textures of real leaves, creating a sophisticated set perfect for gifting or personal use.
Step-by-Step Tutorial
Materials
- White air-dry clay or kiln-fire clay
- Fresh leaves with prominent veins (like sage, mint, or fern)
- Rolling pin
- Circular cookie cutter (approx. 4 inches)
- Canvas mat or parchment paper
- Sponge and water
- Fine grit sandpaper
- Watercolors or underglazes (soft greens, blues, and muted pinks)
- Clear acrylic sealant or ceramic glaze
Step 1: Preparing and Rolling
-
Condition the clay:
Begin by wedging your clay to remove any air bubbles. If you are using air-dry clay, knead it briefly until it is soft and pliable. -
Set up your workspace:
Lay down a piece of canvas or parchment paper to prevent sticking. This also adds a nice, subtle texture to the back of your coasters. -
Roll out the slab:
Use your rolling pin to flatten the clay into a smooth slab. Aim for an even thickness of about 1/4 inch so the coasters feel substantial but not clunky. -
Smooth the surface:
Wipe a slightly damp sponge over the clay surface to remove any canvas marks or imperfections, creating a pristine canvas for your leaves.
Step 2: Creating the Impressions
-
Select your botanicals:
Choose fresh leaves that are slightly stiff rather than flimsy, as these hold their shape better. Ensure they are dry and clean. -
Arrange the composition:
Place your leaves onto the clay slab vein-side down. This is crucial because the veins provide the most distinct texture. -
Press the leaves:
Gently roll your rolling pin over the leaves using firm, even pressure. You want to embed the leaf flush with the clay surface without thinning the slab too much. -
Remove the leaves:
carefully peel the leaves away from the clay using a needle tool or the tip of a knife to lift the stem. Reveal the detailed impression left behind.
Vein-Side Down
Always place leaves vein-side down against the clay. The back of the leaf has the raised structure that creates the deep, crisp impression needed for the glaze to settle into.
Step 3: Cutting and Drying
-
Cut the shapes:
Position your circular cutter over the most interesting part of the leaf impression. Press down firmly to cut out the coaster shape. -
Refine the edges:
After lifting the circle away from the excess clay, dip your finger in a little water and smooth the raw edges to give them a professional finish. -
Dry the coasters:
Place the coasters on a flat surface to dry. If using air-dry clay, let them sit for 24-48 hours, flipping them occasionally to prevent warping. -
Sand for smoothness:
Once fully dry (bone dry), lightly sand the edges and the surface with fine-grit sandpaper to remove any sharp burrs.
Dual-Tone Effect
Try using two different colored washes. Paint the leaf impression in a darker tone first, wipe it back, and then apply a very pale, contrasting wash over the whole coaster.
Step 4: Painting and Finishing
-
Prepare the paint:
Dilute your watercolors or underglazes with plenty of water. We want a ‘wash’ effect rather than opaque coverage to highlight the texture. -
Apply the color wash:
Brush the color over the entire surface, letting the liquid pool naturally into the deep veins of the leaf impression. -
Wipe back excess:
Before the paint dries completely, take a slightly damp sponge and gently wipe the surface. This removes paint from the high points while leaving color in the crevices. -
Detailing:
I like to add a tiny bit of darker pigment just to the central stem line for extra contrast, but keep it subtle. -
Seal the piece:
Apply a coat of clear acrylic sealant if using air-dry clay to make them water-resistant. If using ceramic clay, apply a clear glaze and fire in the kiln according to manufacturer instructions.
Stack your finished coasters and admire the organic elegance they add to your coffee table

TRACK YOUR CERAMIC JOURNEY
Capture glaze tests, firing details, and creative progress—all in one simple printable. Make your projects easier to repeat and improve.
Hanging Ornaments Cut From Simple Shapes
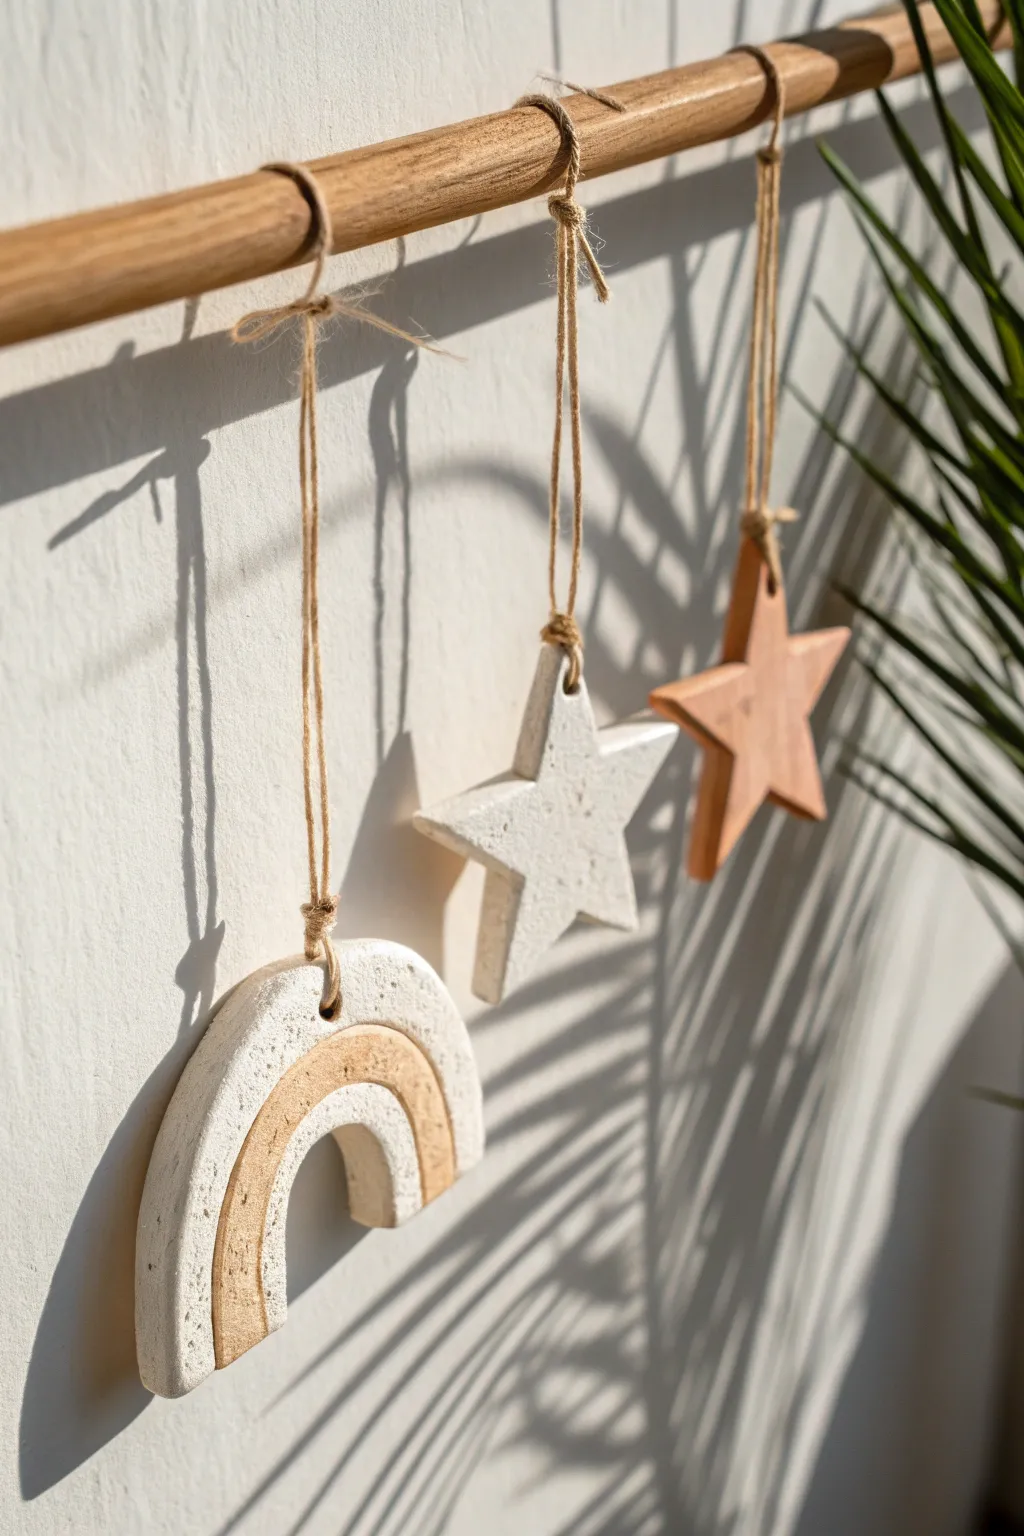
Capture the warmth of natural textures with these minimalist hanging ornaments made from simple clay shapes. Featuring a charming rainbow arch and classic stars suspended on rustic twine, this project adds a breezy, handcrafted touch to any wall.
Detailed Instructions
Materials
- Air-dry clay (white or terra cotta)
- Rolling pin
- Parchment paper or canvas mat
- Cookie cutters (star shape and circle)
- X-Acto knife or clay needle tool
- Drinking straw or skewer
- Wooden dowel (approx. 1/2 inch diameter)
- Jute twine or hemp cord
- Fine-grit sandpaper
- Acrylic paint (optional: beige/tan)
- Small paintbrush
- Bowl of water
- Sponge
Step 1: Preparing the Clay Shapes
-
Roll out the slab:
Begin by kneading a handful of air-dry clay to warm it up. Place it on your parchment paper or canvas mat and roll it out evenly until it is about 1/4 inch thick. Aim for a consistent thickness so everything dries at the same rate. -
Cut the star:
Use your star-shaped cookie cutter to press firmly into the clay slab. Wiggle it slightly before lifting to ensure a clean cut. -
Create the rainbow arch:
For the rainbow, use a large circle cutter or trace a bowl to cut a round shape. Then, use a slightly smaller circle cutter inside that one to create a ring. Cut this ring in half with your knife to create two arches. -
Make the suspension holes:
While the clay is still wet, take your drinking straw or skewer to punch a hole at the top of each shape. Ensure the hole is at least 1/4 inch away from the edge to prevent cracking later. -
Smooth the edges:
Dip your finger in a little bit of water and run it gently along the cut edges of your shapes to smooth out any roughness or burrs.
Keep it Straight
To prevent your clay shapes from curling up at the edges as they lose moisture, define a specific drying spot and flip the pieces over gently every 4-6 hours during the first day.
Step 2: Texturing and Drying
-
Add surface texture:
For that rustic, stone-like look seen in the photo, gently dab the surface of the wet clay with a damp sponge or a crumpled piece of foil. I like to do this lightly so the texture isn’t too overwhelming. -
Carve the rainbow detail:
On the rainbow arch piece, use your needle tool to lightly score a curved line following the shape’s arc, separating the ‘bands’ of the rainbow. -
Dry the pieces:
Place your cutouts on a wire rack or leave them on parchment paper to dry. Flip them over every few hours to keep them flat. Allow a full 24-48 hours for drying depending on humidity. -
Sand for perfection:
Once fully bone dry, inspect the edges. Use fine-grit sandpaper to gently buff away any remaining sharp spots until the clay feels smooth to the touch.
Step 3: Painting and Assembly
-
Paint the accent:
To mimic the two-tone look of the rainbow, use a small brush to paint just the inner band with a beige or terra cotta acrylic paint. Leave the rest of the shape (and the white star) natural. -
Paint the terra cotta star:
If you want the second star to look like natural terra cotta but used white clay, paint the entire star with a wash of burnt orange or tan paint. -
Prep the twine:
Cut three lengths of jute twine. Vary the lengths to create visual interest—for example, make the outer strings slightly longer than the middle one. -
Attach to shapes:
Thread one end of the twine through the hole in your clay shape. Tie a secure knot just above the piece so it hangs freely. -
Secure to the dowel:
Take the other end of each twine length and tie it around your wooden dowel. Arrange them evenly: the rainbow on the left, the white star in the center, and the terra cotta star on the right. -
Trim excess:
Snip off any loose tail ends of the knots near the dowel for a neat finish. -
Final adjustment:
Slide the knots along the dowel until the spacing feels balanced, and hang your new mobile on a wall hook or nail.
Make it Smell Good
Add a sensory element by putting a drop of essential oil on the unpainted backside of the clay shapes. The porous clay acts as a natural diffuser for your room.
Hang your finished mobile near a window to catch the shifting shadows of the day
Fridge Magnets With Tiny Food or Plant Motifs
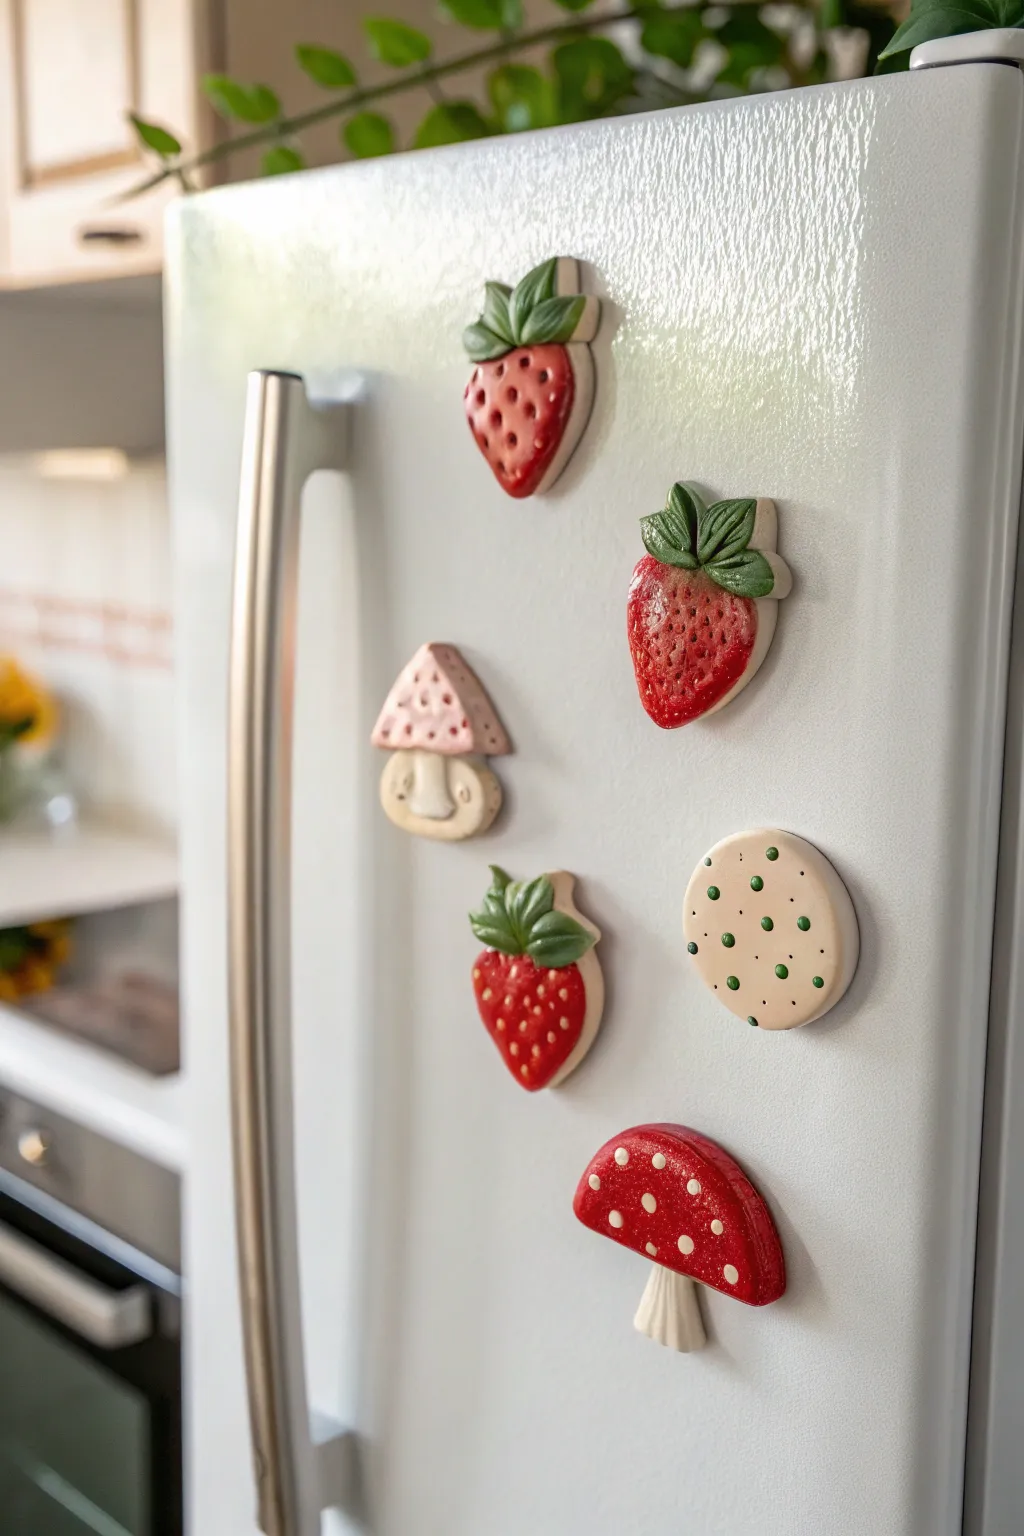
Brighten up your kitchen appliances with these adorable, hand-sculpted ceramic magnets featuring whimsical strawberry and mushroom designs. Their glossy finish and dimensional textures turn everyday fridge decor into a gallery of tiny, functional art.
Step-by-Step Guide
Materials
- White or light-colored earthenware clay
- Rolling pin and canvas mat
- Needle tool or X-Acto knife
- Slip and scoring tool
- Underglazes (red, green, white, cream/beige)
- Clear gloss glaze
- Small round brushes (sizes 0 and 2)
- Strong round craft magnets (neodymium recommended)
- E6000 or two-part epoxy glue
- Small sponge
Step 1: Sculpting the Shapes
-
Roll the slab:
Begin by rolling out a lump of clay on your canvas mat until it is an even slab, approximately 1/4 inch thick. You want it substantial enough to be durable but not so heavy that the magnet slides down the fridge. -
Cut the outlines:
Using a needle tool, freehand cut simple strawberry shapes (rounded triangles) and mushroom shapes (caps with stems). Aim for pieces about 1.5 to 2 inches tall. -
Smooth the edges:
Dip a small sponge in water and gently run it around the cut edges of each shape to soften any sharp corners or burrs left by the cutting tool. -
Make the strawberry leaves:
Roll a small, thinner coil or tiny slab of clay. Cut out small leaf shapes and score the back of them, as well as the top of your strawberry base. -
Attach the greenery:
Apply a dab of slip to the scored areas and press the leaves onto the top of the strawberry. Use a modeling tool to verify the bond is seamless. -
Add texture details:
For the strawberries, press the tip of a small paintbrush handle or needle tool gently into the clay to create the seed indentations. For leaves, draw delicate veins. -
Refine the mushrooms:
If desired, you can add slightly raised dots to the mushroom caps by rolling tiny balls of clay, scoring, slipping, and flattening them onto the cap, though painting them later is also an option. -
Initial drying:
Place your pieces between two boards or under plastic to dry slowly to the leather-hard stage to prevent warping.
Sliding Down?
If your magnets slide down the fridge, the ceramic is likely too heavy for the magnet strength. Use two magnets per piece or switch to strong neodymium (rare earth) magnets.
Step 2: Painting and Glazing
-
Bisque fire:
Once bone dry, fire the pieces in the kiln to cone 04 (or according to your clay body’s instructions). -
Base coat the strawberries:
Apply 2-3 coats of bright red underglaze to the berry body. Let each coat dry slightly before adding the next to ensure opacity. -
Paint the leaves:
Carefully paint the leaves with a deep forest green underglaze. I find a size 0 brush helps keep the edges crisp where the green meets the red. -
Detail the strawberry seeds:
Using a very fine detail brush or a slip trailer bottle with a fine tip, add tiny dots of yellow or white inside the indented seed pockets. -
Decorate the mushrooms:
Paint the stems a creamy beige and the caps either red or a soft pink. Add white polka dots to the red caps for the classic fly agaric look, or dark speckles for a more organic feel. -
Glaze application:
Once the underglaze is completely dry, apply a coat of clear gloss glaze over the entire front and sides of each piece. Do not glaze the back. -
Glaze fire:
Fire the pieces again to the temperature required for your clear glaze (often cone 05 or 06).
Step 3: Assembly
-
Prepare the backs:
If the ceramic backs are very smooth, scuff them slightly with sandpaper to give the glue more tooth to grab onto. -
Attach magnets:
Apply a pea-sized drop of E6000 or mix a small amount of two-part epoxy. Press the magnet firmly onto the center back of the ceramic piece. -
Cure time:
Let the glue cure undisturbed for at least 24 hours before placing them on your refrigerator.
Texture Play
Instead of painting dots on the red mushroom, carve small circles out of the damp clay before firing. Fill these divots with white glaze later for an inlaid effect.
Now you have a charming set of handmade magnets ready to hold up your most important notes and photos.
Photo Stand With a Simple Slot for Cards
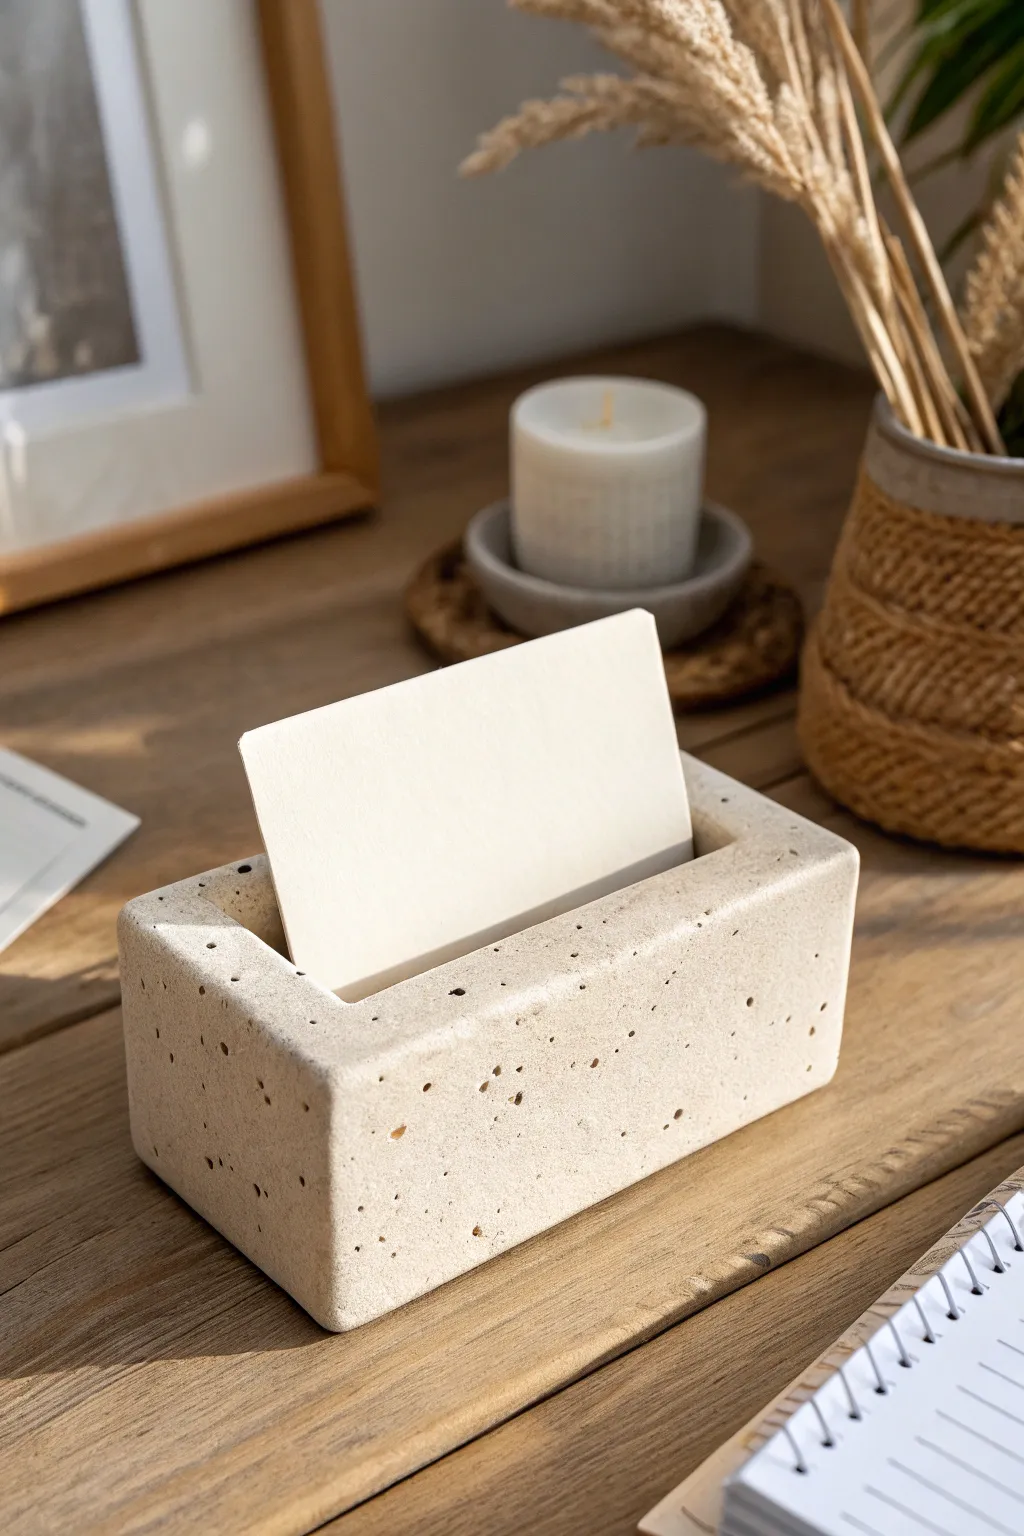
Create a sophisticated, heavyweight photo stand that mimics the look of natural travertine stone. This modern, rectangular block features a simple central channel perfect for displaying your favorite polaroids, business cards, or art prints.
Detailed Instructions
Materials
- White sculpting clay (air-dry or polymer based)
- Course black pepper or dried coffee grounds (for texture)
- Rolling pin
- Sharp crafting knife or clay blade
- Ruler or straight edge
- Smooth wooden block or thick cardboard (for slot sizing)
- Sandpaper (fine and medium grit)
- Matte sealant (optional)
Step 1: Preparing the Clay Body
-
Condition the clay:
Begin by kneading your white clay thoroughly until it becomes soft, pliable, and free of any air pockets. Warm clay is much easier to shape. -
Add the speckles:
To achieve that signature stone look, sprinkle a pinch of course black pepper or dried coffee grounds onto the flattened clay. -
Mix for texture:
Fold the clay over the granules and knead repeatedly. You want the speckles to be distributed unevenly throughout the block for a natural, organic appearance. -
Form the basic shape:
Shape the clay into a rough rectangular log using your hands, ensuring it is thick enough to stand stably on a desk.
Step 2: Shaping the Block
-
Square the edges:
Using a flat surface and a straight edge (like a ruler or wooden block), gently tap and press the sides of your clay log to create crisp, sharp corners. -
Refine dimensions:
Aim for a block that is approximately 4 inches long, 2 inches tall, and 2 inches deep, though you can adjust this based on what you plan to display. -
Smooth the visible faces:
Run your finger or a slightly damp sponge over the exterior surfaces to remove fingerprints, but don’t worry about perfect smoothness; a little texture adds character. -
Slice the ends:
Use your sharp blade to slice off the rounded ends of the log, creating perfectly flat, vertical faces on the left and right sides.
Uneven Slot?
If the slot closes up during drying, insert a piece of folded parchment paper into the groove while it cures to hold the shape without sticking.
Step 3: Creating the Display Slot
-
Mark the center:
With a ruler, lightly mark a line running lengthwise down the direct center of the top face of your block. -
Create the channel guide:
Press the edge of your ruler or a thick piece of cardstock into the clay along your marked line to establish the initial groove. -
Detail the slot width:
To make the slot wide enough for a card, I find it helpful to wiggle the ruler back and forth very slightly to widen the gap without distorting the walls. -
Check the depth:
Ensure the slot is about 0.5 to 0.75 inches deep so your photos will stand up straight without flopping over. -
Clean the opening:
If the clay pushed up around the edges of the slot, gently smooth it back down flat with your thumb or a smoothing tool.
Color Wash
For an aged look, dilute a tiny drop of beige acrylic paint with water and wash over the dry block, wiping it off quickly so color remains only in the pits.
Step 4: Finishing Touches
-
Pitting technique:
To mimic travertine’s porous nature, use a toothpick or the end of a paintbrush to poke small, random holes of varying depths into the surface. -
Let it cure:
Allow the project to dry completely according to your clay’s package instructions. Air-dry clay may take 24-48 hours for a block this thick. -
Sand the surface:
Once fully hard, use sandpaper to lightly buff the flat sides. This exposes the cross-section of the pepper or coffee grounds, enhancing the speckled stone effective. -
Soften the corners:
Gently sand the sharp 90-degree edges to give them a slightly rounded, tumbled stone feel. -
Seal (optional):
If you want extra durability, apply a coat of matte varnish. Avoid glossy finishes if you want to maintain the raw stone aesthetic.
Place your favorite memory in the slot and enjoy the earthy charm this piece brings to your space
Paint Palette With Little Wells and a Brush Rest
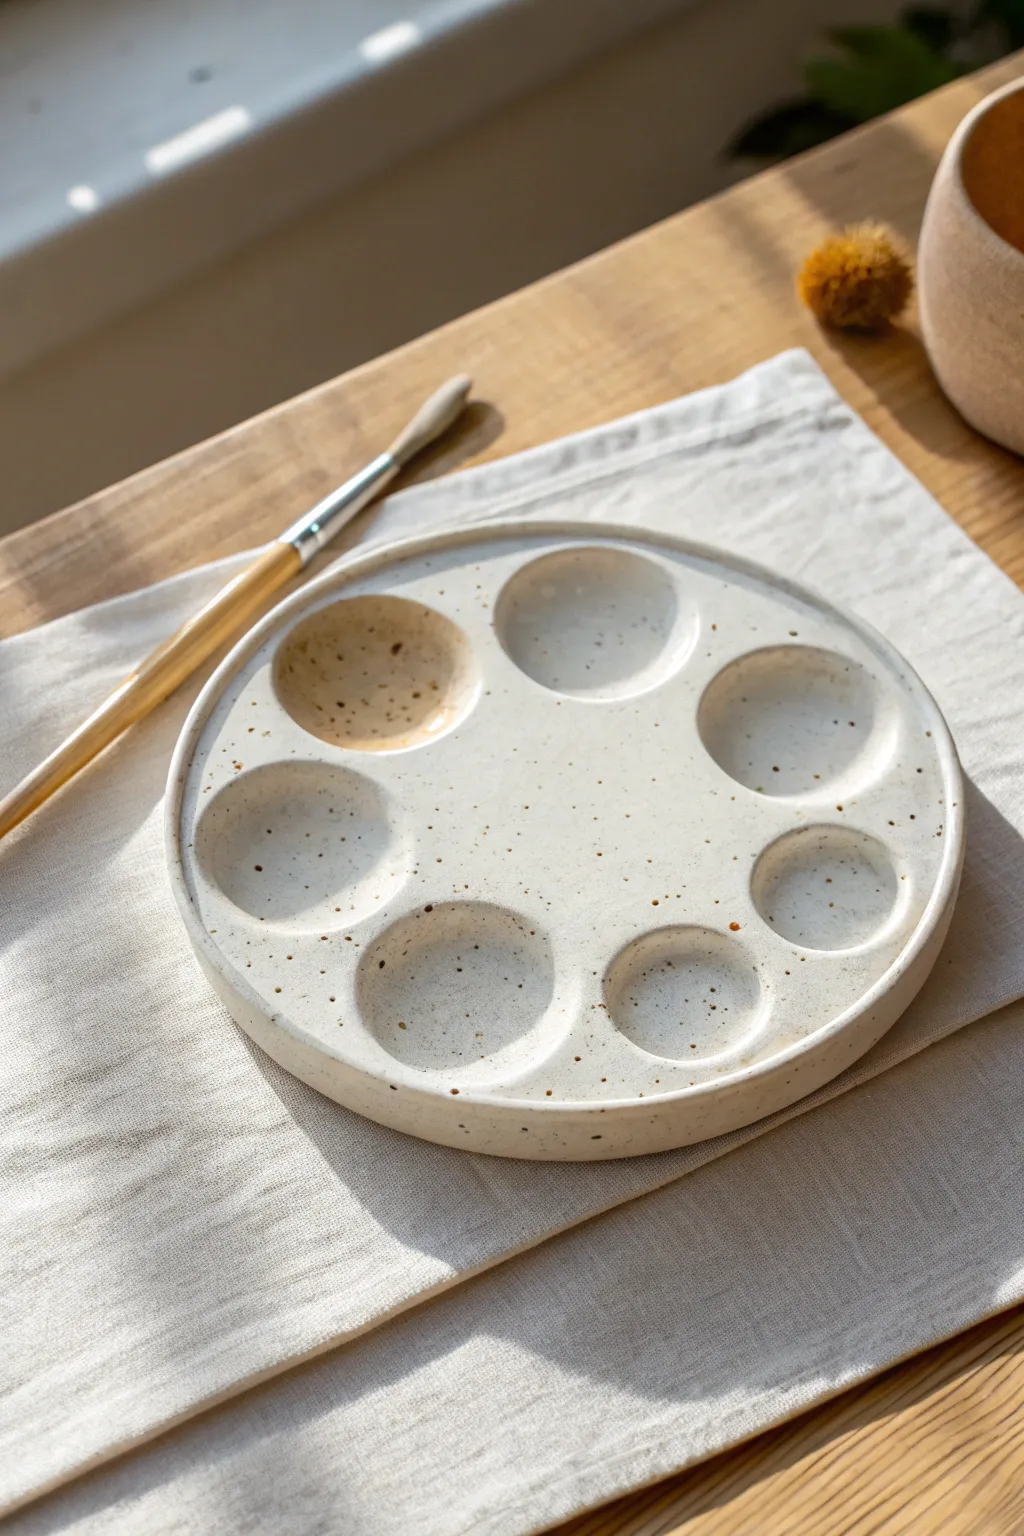
Create a charming, functional workspace companion with this handmade ceramic paint palette. Featuring seven distinct wells for color mixing and a creamy, speckled finish, this piece is both a practical tool and a beautiful object to display.
Step-by-Step
Materials
- Speckled stoneware clay (approx. 1 lb)
- Rolling pin
- Canvas work surface or slab mat
- Needle tool
- Round cookie cutter or template (approx. 6-7 inches)
- Small circle template or measuring spoons
- Rib tool (metal or rubber)
- Sponge
- Clear glaze
- Kiln access
Step 1: Forming the Base
-
Prepare the slab:
Begin by wedging your speckled clay to remove air bubbles. Roll it out into an even slab about 1/4 to 1/2 inch thick on your canvas surface, turning the clay periodically to ensure uniform thickness. -
Smooth the surface:
Use a flexible rib tool to compress the clay slab. Drag it gently across the surface in multiple directions; this removes canvas texture and strengthens the clay particles to prevent warping later. -
Cut the shape:
Place your round template or large cookie cutter onto the slab. Cut around it cleanly with a needle tool to create the main circular body of your palette. -
Refine the rim:
Run a damp sponge or your finger along the cut edge to soften the sharpness. Creating a rounded rim now is easier than sanding it later.
Smooth Moves
Use a damp chamois leather strip to compress the rim one last time before drying. It creates the smoothest professional edge possible.
Step 2: Creating the Wells
-
Plan the layout:
Lightly mark the position of your paint wells before pressing. Aim for a layout that circles the perimeter, perhaps leaving the center open for mixing. -
Press main wells:
Using your thumb, a rounded stone, or even the back of a large measuring spoon, gently press into the clay to form the larger depressions. Support the underside of the slab with your other hand to keep the bottom flat. -
Add variation:
Create a few smaller wells using a smaller tool or your pinky finger. I find having different sizes is helpful for when you only need a drop of a specific intense pigment. -
Smooth the transitions:
Dip your finger in a tiny bit of water and smooth the inside of each well, erasing any tool marks or fingerprints. -
Create a brush rest:
On the raised rim between two wells, gently press a small indentation using the handle of a paintbrush. This provides a designated spot for your brush to sit without rolling away. -
Lift the rim:
Gently pinch and lift the outer edge of the entire disk slightly upwards. This creates a subtle wall that prevents watery washes from spilling off the palette.
Step 3: Drying and Firing
-
Slow drying:
Cover the piece loosely with plastic for the first 24 hours to let moisture even out. Then uncover and allow it to dry completely to the bone-dry stage, which usually takes several days. -
Bisque fire:
Load the bone-dry palette into the kiln for a bisque firing (usually Cone 04). This hardens the clay and prepares it for glazing. -
Clean the bisque:
Once cool, wipe the bisque piece with a damp sponge to remove any kiln dust, which could prevent the glaze from adhering properly. -
Apply clear glaze:
Dip the palette into a clear glaze, or brush on three even coats. A clear glaze is perfect here because it lets those natural clay speckles shine through beautifully. -
Wipe the foot:
Use a wax resist solely on the bottom ring, or meticulously wipe away any glaze from the underside of the palette so it doesn’t fuse to the kiln shelf. -
Glaze fire:
Fire the piece again to the maturation temperature of your specific clay and glaze (often Cone 5 or 6 for stoneware).
Level Up: Color Test
Before the final firing, dab a tiny dot of heavy iron wash on the rim near each well to create a permanent ‘swatch’ marker.
Once cooled, your durable stoneware palette is ready to be filled with color for your next masterpiece
Snack Plate With a Built-In Dip Divot
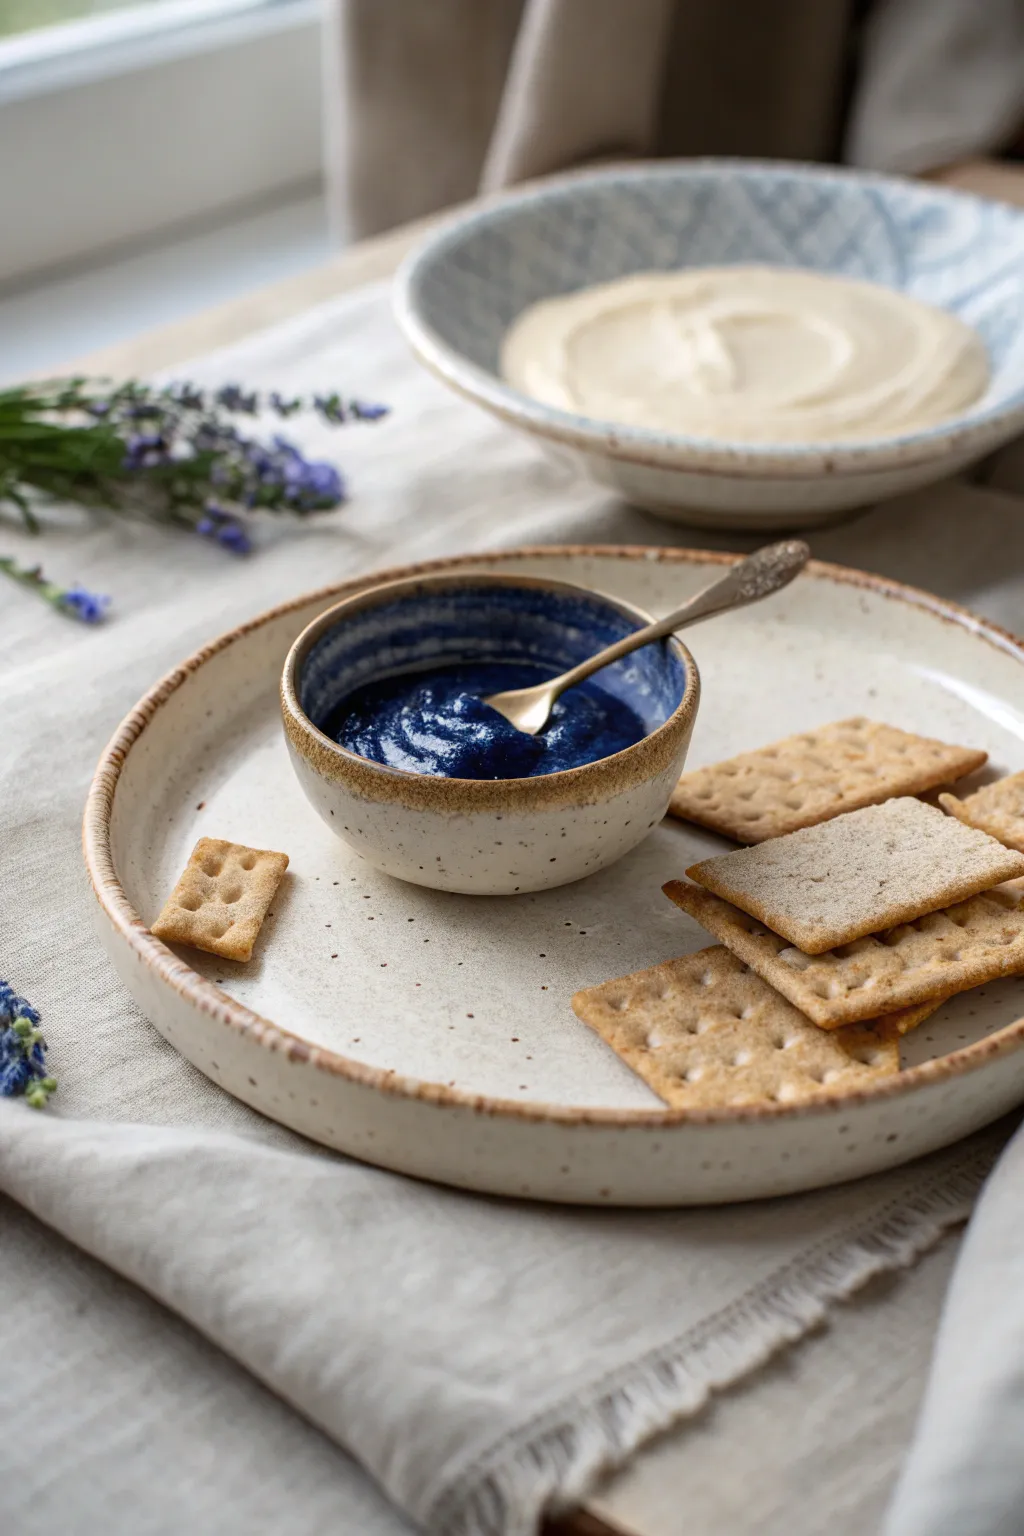
Elevate your snacking rituals with this handcrafted ceramic set featuring a generous rimmed plate and a perfectly matching nesting dip bowl. The speckled rustic finish and deep indigo glaze inside the bowl create a stunning contrast that makes even simple crackers feel sophisticated.
Step-by-Step Tutorial
Materials
- Stoneware clay (speckled or grit-rich)
- Rolling pin with guide strips (1/4 inch thickness)
- Canvas or slab mat
- Large round slump mold or plate mold (approx. 8-10 inches)
- Small round bowl mold or plaster hump mold (approx. 3-4 inches)
- Needle tool or fettling knife
- Potter’s sponge
- Soft rib (rubber or silicone)
- Semi-matte cream or oatmeal glaze
- Deep glossy indigo or cobalt blue glaze
- Modeling tool (wooden)
- Paintbrushes for glazing
Step 1: Forming the Plate
-
Roll the Slab:
Begin by wedging your stoneware clay thoroughly to remove air bubbles. Roll it out on your canvas into a smooth slab about 1/4 inch thick, turning the clay periodically to ensure even compression. -
Cut and Smooth:
Place your large plate template or mold upside down on the slab and cut around it with a needle tool. Once cut, take a damp sponge and gently compress the rim to round off the sharp cut edge. -
Shape the Form:
Carefully transfer your clay circle onto your slump mold or into a plate form. Use a soft rib to gently press the clay against the mold, starting from the center and spiraling outward to establish the curve. -
Define the Rim:
To achieve that distinct vertical rim seen in the photo, allow the clay to stiffen slightly, then use your fingers or a wooden modeling tool to gently pull the very edge upward, creating a low wall about 1/2 inch high. -
Add Texture (Optional):
While the clay is still leather hard, you can use a serrated rib or a rough texturing tool along the outside rim to mimic the rustic, earthy texture shown in the reference.
Step 2: Creating the Dip Bowl
-
Roll Smaller Slab:
Using the remaining clay, roll out a smaller slab. Since this bowl is small, you can go slightly thinner than the plate, perhaps just under 1/4 inch. -
Mold the Bowl:
Cut a small circle (approx. 4-5 inches diameter) and drape it over a small hump mold or press it into a small bowl form. Smooth it with a rib to remove canvas textures. -
Refine the Lip:
Just like the plate, pay attention to the rim. Compress it with a damp sponge or a piece of chamois leather to ensure it is smooth and comfortable to touch. -
Dry Slowly:
Place both the plate and the bowl under loose plastic. I find that drying them slowly together helps prevent warping, especially for the large flat surface of the plate. -
Bisque Fire:
Once bone dry, load both pieces into the kiln for a bisque firing to Cone 04 (or as per your clay body’s instructions).
Warping Woes?
If your plate edges curl up during drying, weigh the center down with a small sandbag (over plastic) creates even tension while the rim dries.
Step 3: Glazing the Set
-
Wax the Bottoms:
Apply wax resist to the foot ring or bottom surface of both the plate and the bowl to prevent glaze from adhering to the kiln shelf. -
Glaze the Plate:
Dip or brush the entire plate in the semi-matte cream or oatmeal glaze. This neutral tone highlights the speckles in the clay body. -
Glaze the Bowl Exterior:
Apply the same cream glaze to the *exterior* of the small bowl only. Keep the rim clean or let the cream glaze just touch the edge. -
Glaze the Bowl Interior:
Pour the glossy indigo glaze into the dip bowl, swirl it to coat the entire interior, and pour out the excess. Wipe any drips off the exterior immediately. -
Rim Detail:
For the rustic brown rim effect, dip a sponge lightly in iron oxide wash or a toasted brown underglaze and gently dab it along the extreme edge of both the plate and the bowl rim. -
Final Firing:
Load the pieces into the kiln for the glaze firing (usually Cone 5 or 6). Ensure the bowl is not sitting on the plate during firing; they must be fired separately side-by-side.
Pro Tip: Perfect Fit
Before the clay dries, press the base of your finished wet bowl gently onto the wet plate to slightly flatten the resting spot, ensuring no wobbling later.
Now you have a stunning, cohesive serving set ready for your next gathering
Cute Animal Figurines Made From Basic Shapes
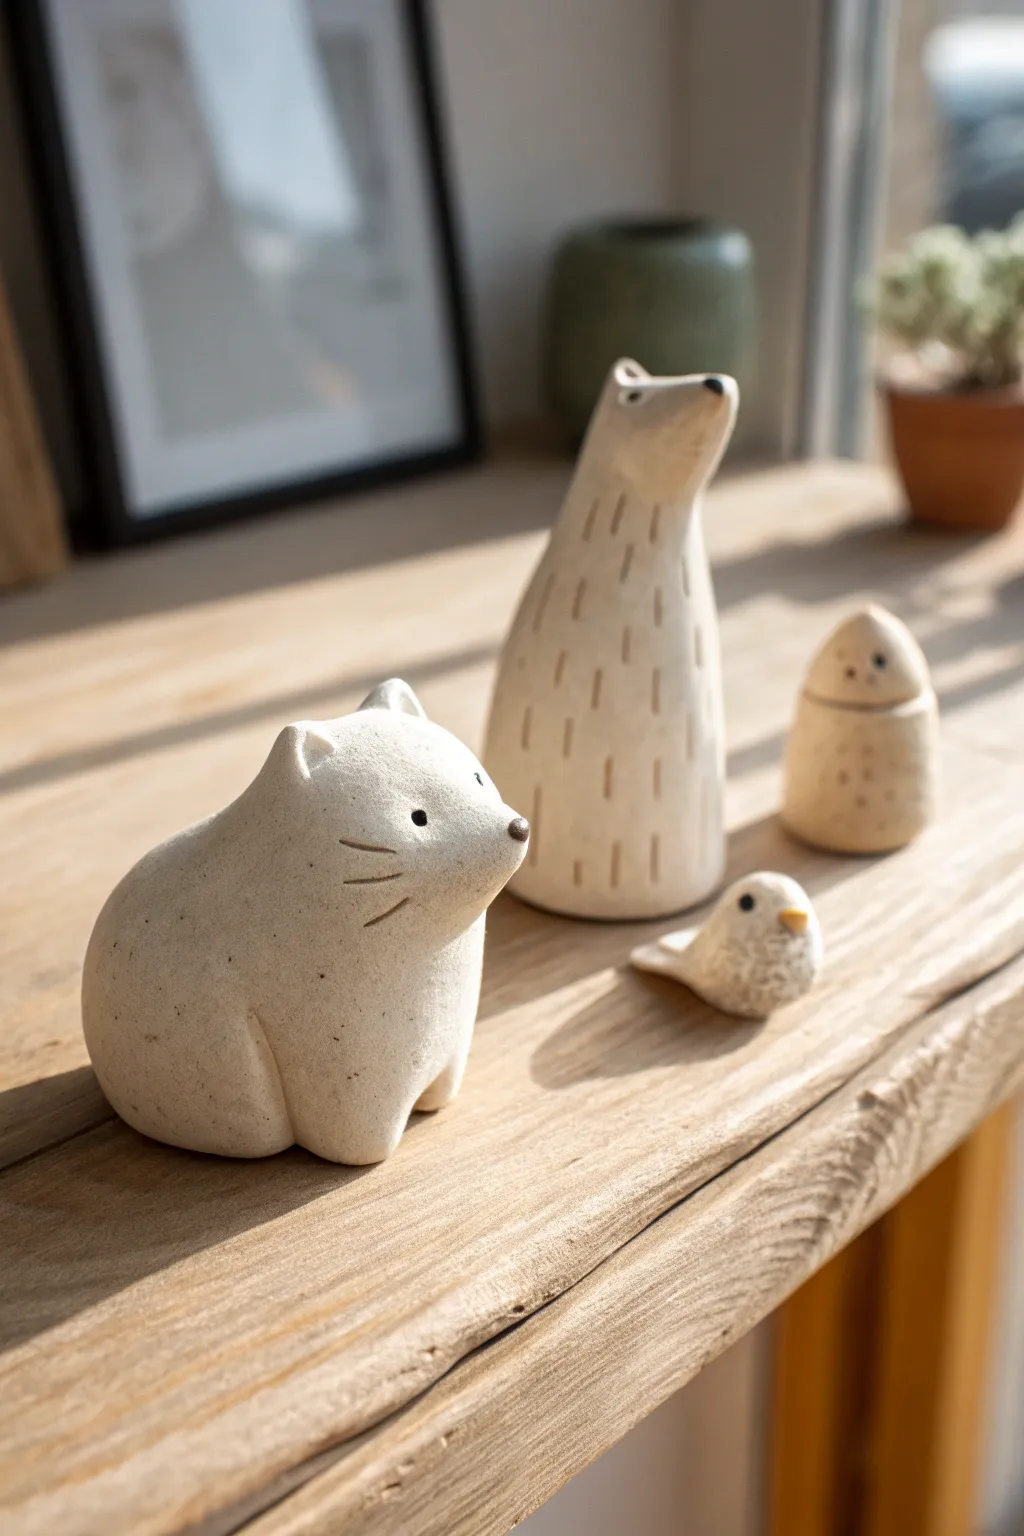
Embrace the charm of simplicity with these adorable ceramic animal figurines. Using basic geometric forms like cones, spheres, and ovals, you will create a cohesive family of creatures featuring a smooth, matte finish and subtle incised details.
Step-by-Step
Materials
- White stoneware or polymer clay (for a no-kiln option)
- Small needle tool or toothpick
- Wooden modeling tool with a rounded edge
- Clean sponge and water
- Rolling pin
- Black underglaze or acrylic paint (for eyes/noses)
- Fine detail brush
- Ceramic kiln (if using stoneware) or oven (if polymer)
Step 1: Shaping the Bear
-
Create the base:
Start with a handful of clay and roll it into a tall, slightly tapered cylinder. This will be the main body of the bear. -
Form the head:
Pinch the top of the cylinder gently to narrow it, creating a definition between the neck and the shoulder area. -
Extend the snout:
Pull the clay at the very top forward and slightly upward to form a long, inquisitive snout. -
Add ears:
Use your thumb and forefinger to pinch two small, triangular ears right at the crest of the head, blending the clay smoothly into the skull. -
Smooth the surface:
Use a damp sponge to wipe away any fingerprints, ensuring the iconic smooth, modern silhouette remains nice and rounded. -
Add texture:
Take your needle tool and gently press small, vertical dashed lines down the front of the bear’s chest to mimic fur texture.
Cracks Appearing?
If small cracks form while shaping, your clay is too dry. Dip your finger in water and smooth the crack immediately. Don’t add too much water or the clay will collapse.
Step 2: Creating the Cat
-
Roll the body:
Start with a ball of clay slightly larger than a golf ball. Gently flatten the bottom so it sits securely. -
Define the head:
Pinch the front section of the ball to pull a smaller rounded shape forward, creating the head distinct from the rounded back. -
Sculpt the ears:
Using your fingertips, pinch two distinct triangles at the top of the head area. I like to press the centers slightly with a rounded tool to give them depth. -
Shape the legs:
With a wooden tool, press vertical indentations into the front of the body to suggest front paws sitting tucked beneath the chest. -
Detail the face:
Use your needle tool to carefully press three horizontal whisker lines onto each cheek area.
Level Up: Speckled Clay
Use a speckled buff clay body instead of plain white. The natural iron spots that appear after firing add instant texture and an organic, professional pottery studio look.
Step 3: Crafting the Bird & Gnome
-
Form the bird:
Roll a small marble-sized piece of clay into a teardrop shape. -
Define the tail:
FLatten the pointed end of the teardrop slightly and curve it upward to act as the tail feathers. -
Add the beak:
Attach a tiny, rice-sized piece of clay to the rounded front for a beak, blending the edges seamlessly. -
Shape the little totem:
For the standing oval figure, roll a piece of clay into an egg shape and flatten the bottom. -
Add a rim:
Use a needle tool to score a horizontal line around the upper third, suggesting a hat or separation. -
Pattern the body:
Add small, random indentations or dots on the lower section for visual interest.
Step 4: Finishing Touches
-
Dry properly:
Allow all pieces to dry leather-hard (or follow baking instructions for polymer clay). -
Bisque fire:
If using ceramic clay, fire the pieces in a kiln to bisque temperature. -
Paint details:
Using a fine brush and black underglaze or paint, carefully dot the eyes and the tips of the noses on all animals. -
Final protection:
Leave the clay unglazed for a raw, natural look, or apply a clear matte glaze/sealer before the final firing/setting to separate the look from the raw clay feel.
Arrange your little ceramic family on a sunny windowsill and enjoy their quiet company
Simple Surface Designs: Dots, Stripes, and Color Blocking
Embrace the beauty of contrast with this simple yet striking tumbler design. Featuring a warm, earthy base blocked against a creamy speckled white glaze, this project uses easy glazing techniques to achieve a professional, modern ceramic look.
Step-by-Step Guide
Materials
- Bisque-fired white stoneware tumbler
- Wax resist
- Pencil
- 1/2-inch flat glazing brush
- Speckled cream or white dipping glaze (food safe)
- Terra cotta or rust-orange brush-on underglaze
- Black underglaze (in a precision applicator bottle)
- Small round brush (size 2 or 4)
- Damp sponge
- Clear matte glaze (optional to cover underglaze)
Step 1: Color Blocking the Base
-
Clean surface:
Begin by wiping down your bisque-fired tumbler with a clean, slightly damp sponge to remove any kiln dust or oils from your hands. -
Mark the horizon:
Using a pencil, lightly draw a guideline around the circumference of the cup, about one-third of the way up from the bottom. If you have a banding wheel, spin it slowly while holding your pencil steady for a perfect line. -
Lower stripe application:
Load your flat brush with the terra cotta or rust-orange underglaze. Apply an even coat to the bottom section below your pencil line, brushing horizontally to follow the curve of the cup. -
Build opacity:
Let the first coat dry until it’s chalky to the touch. Apply a second and third coat to ensure the orange color is rich and opaque. -
Clean edges:
If your brush strokes went over the pencil line, gently wipe them back with a damp sponge or your fingernail to keep that horizon line crisp. -
Wax resist application:
Once the orange underglaze is fully dry, apply a coat of wax resist over the entire painted area and the bottom of the foot ring. This will repel the dipping glaze later. -
Detail stripe masking:
For the thin white stripe within the orange block (as seen in the photo), you can actually scratch a thin line through the wax and underglaze with a needle tool, or better yet, apply a thin strip of tape *before* painting the orange, then peel it off before waxing.
Glaze Beading Up?
If glaze beads up on the non-waxed areas, your bisque might be too oily or dusty. Wash the piece, let it dry fully, then lightly sand the spot before reglazing.
Step 2: Glazing the Upper Body
-
Prepare dipping glaze:
Stir your speckled cream dipping glaze thoroughly. You want the speckles—often iron oxide particles—to be evenly suspended in the mixture. -
The dip:
Holding the tumbler by the waxed foot (or using glazing tongs), dip the entire cup upside down into the bucket. Submerge it until the glaze reaches slightly past your waxed orange section to ensure full coverage inside and out. -
Drain and shake:
Pull the cup out straight and hold it upside down for a few seconds. Give it a gentle shake to remove excess drips from the rim. -
Clean the resist:
Turn the cup right side up. The wax resist over the orange section should have repelled most of the glaze, but you’ll likely see beads of glaze sitting on top. Wipe these away gently with a damp sponge. -
Refine the line:
Ensure the transition line between the orange base and the white speckled glaze is clean. I like to use a stiff angled brush to clean up any glaze that dripped past the wax line.
Band Stability
Rest your pinky finger against the cup while painting horizontal lines. This anchors your hand against the surface, acting as a stabilizer for much straighter stripes.
Step 3: Adding the Dots
-
Prep the dots:
Wait for the main glaze layer to dry completely; it should be powdery to the touch. If you try to add dots while it’s damp, the glazes might bleed. -
Dot application:
Using a precision applicator bottle filled with black underglaze (or a very fine brush), apply small dots randomly over the white glazed section. -
Vary the sizes:
Make some dots slightly larger than others, and include a few “micro-dots” for a natural, speckled texture that complements the glaze. -
Inside detail:
Don’t forget the interior! Add a few random black dots near the inside rim to carry the design over the edge. -
Final check:
Inspect the foot ring one last time to make sure no glaze is adhering to the bottom, which would fuse to the kiln shelf. -
Fire:
Load the piece into the kiln and fire to the temperature recommended for your specific stoneware clay and glaze combination.
Once fired, fill your new tumbler with a hot drink and enjoy the tactile contrast of the surfaces