As soon as the holidays hit, I love pulling out my clay and making little keepsakes that feel instantly festive. These easy Christmas clay ideas are all about simple shapes, quick wins, and that cozy handmade look you’ll want to bring out every year.
Classic Cookie-Cutter Christmas Ornaments
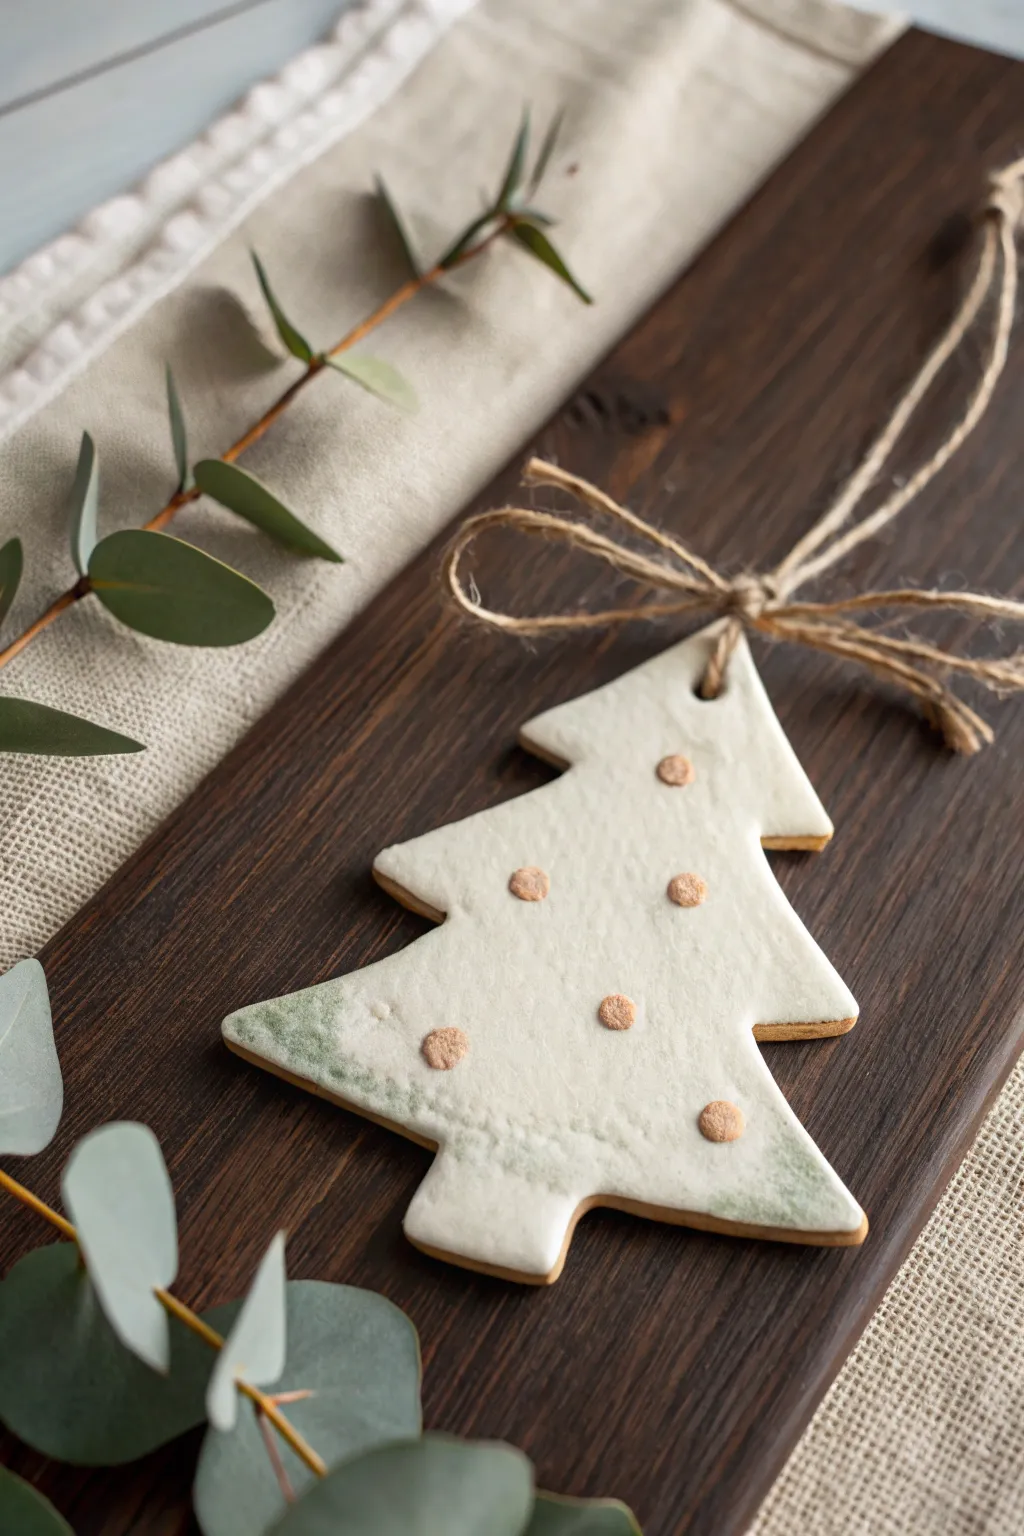
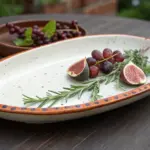
These charming ornaments mimic the look of classic sugar cookies with a sophisticated twist, featuring a crisp white finish and delicate speckles. The subtle sage-green ombré effect adds a natural touch that pairs beautifully with the rustic jute hanger.
Detailed Instructions
Materials
- Air-dry clay (white or terracotta)
- Christmas tree cookie cutter
- Rolling pin
- Parchment paper or canvas mat
- Straw or small dowel (for the hole)
- Sandpaper (fine grit)
- White acrylic paint or matte glaze
- Sage green acrylic paint
- Light brown/terracotta acrylic paint or puffy paint
- Small round paintbrush
- Small piece of sponge or foam wedge
- Jute twine
- Scissors
- Water cup and palette
Step 1: Shaping the Clay
-
Prep your surface:
Lay down parchment paper or a canvas mat to prevent sticking. Take a handful of air-dry clay and knead it briefly until it is pliable and smooth. -
Roll it out:
Roll the clay to an even thickness of about 1/4 inch (6mm). If you want the ornament to feel substantial like a cookie, don’t roll it too thin, or it might become brittle. -
Cut the shape:
Press your Christmas tree cookie cutter firmly into the clay. Give it a tiny wiggle to ensure it cuts all the way through, then lift the cutter away. -
Create the hanging hole:
While the clay is still wet, use a straw or a small dowel to punch a hole near the top of the tree. Make sure the hole is largely enough to accommodate the jute twine later. -
Smooth the edges:
Dip your finger in a little water and gently run it along the cut edges of the tree to smooth out any rough bits or clay burrs left by the cutter. -
Let it dry:
Place the clay tree on a flat surface to dry. I usually flip the ornament over halfway through the drying process to ensure both sides dry evenly and prevent curling. This can take 24-48 hours depending on humidity.
Fixing Curled Edges
If your clay curls while drying, weigh it down with a heavy book placed over parchment paper during the final few hours of the drying process.
Step 2: Painting and Finishing
-
Sand imperfections:
Once fully dry and hard, inspect the edges. Use a piece of fine-grit sandpaper to buff away any remaining sharp spots for a professional finish. -
Apply the base coat:
Paint the entire front surface and edges with a coat of white acrylic paint. If your clay was dark, you might need a second coat to get that opaque, sugary icing look. -
Create the ombré effect:
While the white paint is barely dry, dampen a small sponge and dip the very edge into sage green paint. Blot most of it off on a paper towel until it’s almost dry. -
Sponge the bottom:
Gently dab the sponge along the bottom branches of the tree, fading the green upward into the white. You want a soft, misty transition, not a hard line. -
Add the dots:
Using a small detail brush dipped in light brown paint, or a bottle of dimensional puffy paint, add small dots scattered across the tree surface. These represent ornaments or spices. -
Seal the ornament:
Allow all paint to dry completely. For longevity, you can brush on a layer of matte varnish, though leaving it raw preserves the matte, cookie-like texture. -
Prepare the twine:
Cut a length of jute twine about 8-10 inches long. Thread one end through the hole at the top of the tree. -
Tie the bow:
Tie the twine into a simple shoelace bow right at the base of the hole. Adjust the loops so they are even and slightly droopy for a relaxed look. -
Create the hanger:
Finally, take the two loose ends of the twine extending from the bow and knot them together at the top to create the hanging loop.
Add Scent
Mix a pinch of cinnamon or nutmeg directly into your acrylic paint. The ornament will not only look like a darker cookie but will smell festive too.
Hang your new rustic ornament on the tree or use it as a special gift tag for a loved one


Stamped Snowflake Ornaments With Easy Texture
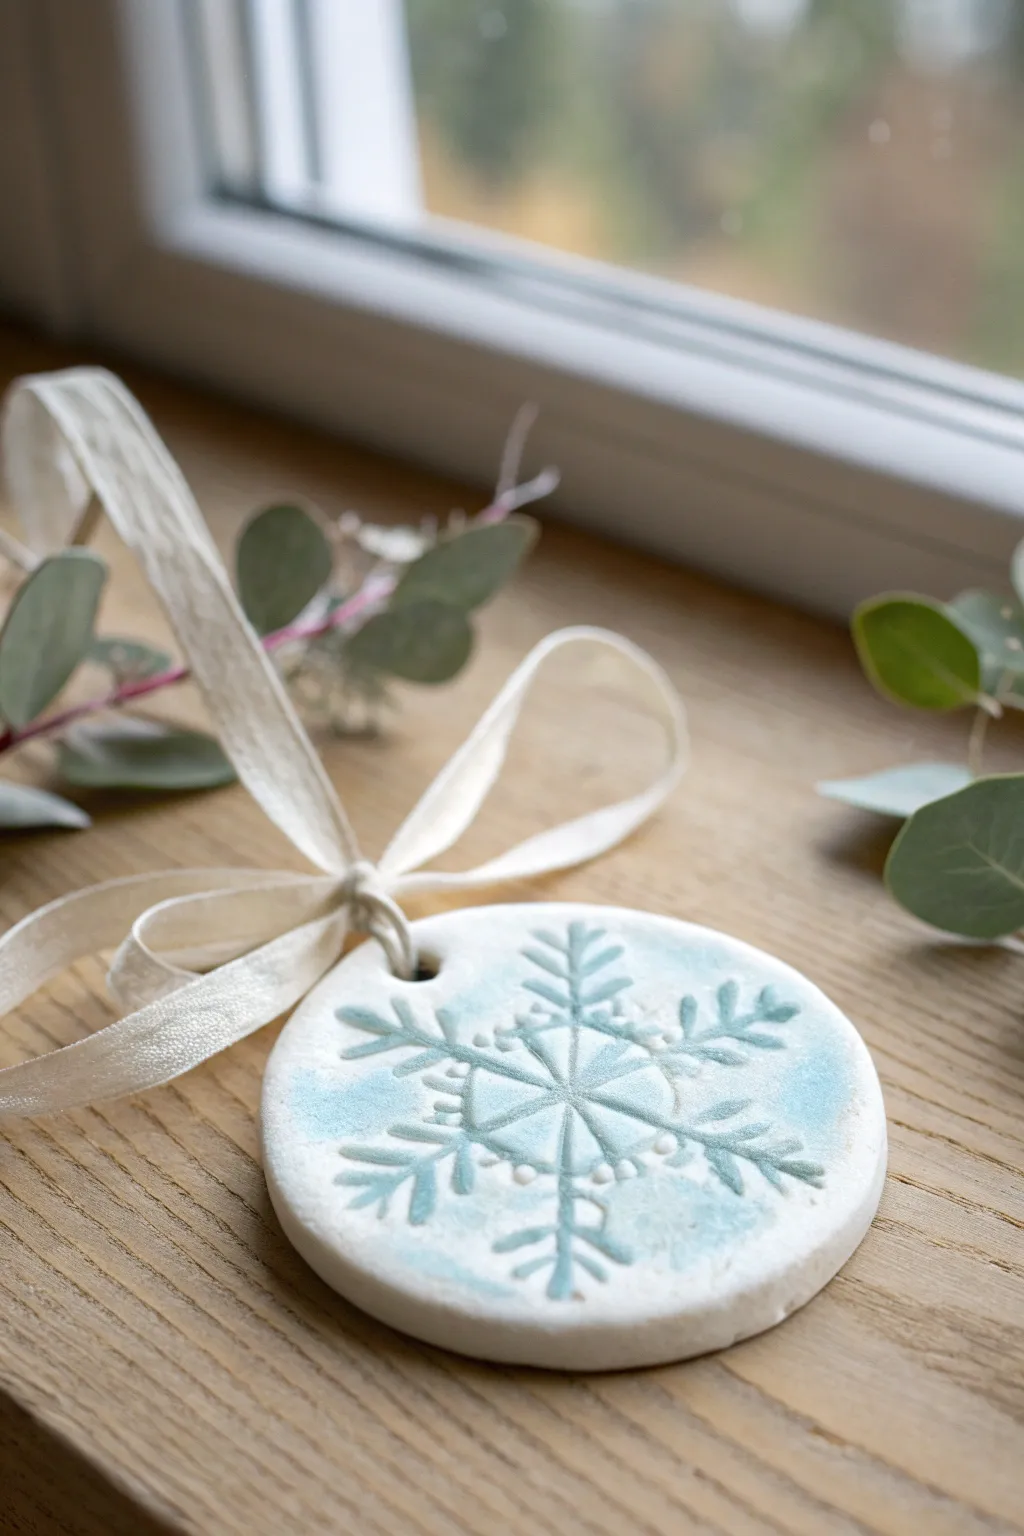
Capture the delicate beauty of a winter frost with these simple yet elegant stamped clay ornaments. Featuring embossed snowflake details and a soft watercolor wash, they bring a handmade touch of icy elegance to your holiday decor.
Step-by-Step Tutorial
Materials
- Air-dry clay (white) or polymer clay
- Rolling pin
- Circular cookie cutter (approx. 3 inches)
- Rubber snowflake stamp (or similar texture tool)
- Straw or small circular cutter (for the hanging hole)
- Light blue watercolor paint or watered-down acrylics
- Soft paintbrush
- Paper towel or sponge
- Clear matte varnish (optional)
- White or cream ribbon (shear or velvet)
Step 1: Shaping the Clay Base
-
Prepare the Clay:
Begin by kneading a handful of white air-dry clay until it feels soft, warm, and pliable. This conditioning step prevents cracks from forming later. -
Roll it Out:
Place the clay on a clean, non-stick surface or parchment paper. Use your rolling pin to flatten it to an even thickness of about 1/4 inch; you want it sturdy enough to hang but not too heavy. -
Cut the Circle:
Take your circular cookie cutter and press it firmly into the clay to create a clean, round shape. Gently peel away the excess clay from the outside. -
Smooth the Edges:
Dip your finger in a tiny bit of water and run it gently around the cut rim of the circle to smooth down any rough or sharp edges leftover from the cutter.
Step 2: Adding Texture and Detail
-
Position the Stamp:
Choose a detailed snowflake rubber stamp. Center it visually over your clay circle, ensuring the snowflake arms will extend nicely toward the edges. -
Press the Design:
Press the stamp down firmly and evenly. Apply consistent pressure to ensure all the fine lines of the snowflake imprint deep enough to catch the paint later. -
Remove the Stamp:
Lift the stamp straight up to avoid smudging the design. If the clay sticks slightly, just gently peel it away. -
Create the Hanging Hole:
Using a drinking straw or a small circular tool, punch a hole near the top edge of the ornament. Make sure it’s not too close to the edge to prevent breaking. -
Let it Dry:
Allow the clay to dry completely according to the manufacturer’s instructions. flipping it over halfway through the drying process helps keep it flat.
Clean Impressions
Dust your rubber stamp lightly with cornstarch or baby powder before pressing it into the clay. This acts as a release agent and prevents the clay from getting stuck in the intricate stamp details.
Step 3: Painting and Finishing
-
Prepare the Wash:
Dilute a small dollop of light blue acrylic paint with water, or wet your watercolor palette. You are aiming for a very translucent, watery consistency rather than opaque block color. -
Apply the Color:
Brush the watery blue paint loosely over the center of the snowflake design. Don’t worry about staying perfectly in the lines; the organic look is part of the charm. -
Wipe Back Excess:
Immediately use a slightly damp paper towel to wipe the surface. This technique removes paint from the raised areas while leaving the blue pigment settled into the deep creases of the snowflake stamp. -
Deepen the Texture:
If you want more contrast, dab a tiny bit more concentrated blue into the deepest center points of the snowflake and let it pool slightly. -
Dry the Paint:
Let the paint dry fully. Since it’s a thin wash, this should only take about 15-20 minutes. -
Optional Sealant:
For longevity, brush a thin coat of matte varnish over the top to seal the paint and protect the clay from moisture. -
Thread the Ribbon:
Cut a length of white ribbon. Fold it in half to create a loop and thread the folded end through the hole from front to back. -
Secure the Loop:
Pass the loose ends of the ribbon through the loop and pull tight to create a lark’s head knot, or simply tie a classic bow at the top as shown in the image.
Fixing Warped Clay
If your ornament curls up while drying, it’s usually due to uneven evaporation. Place a heavy book gently on top of the clay once it’s mostly dry but still slightly flexible to flatten it back out.
Hang these frosty creations in a window or on your tree for a lovely touch of handmade winter magic


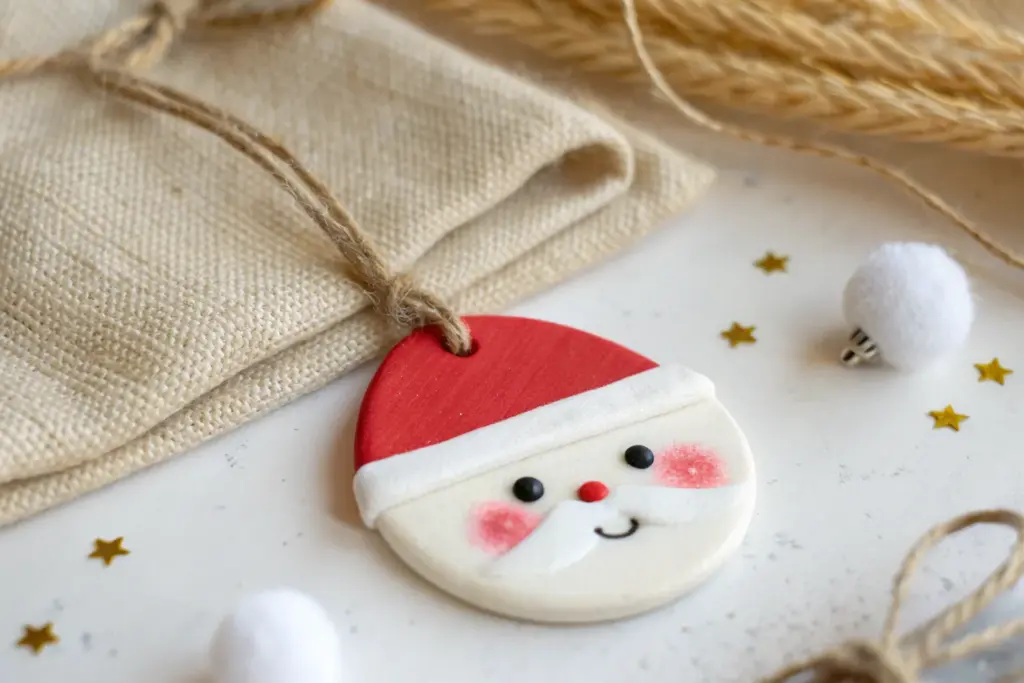
Handprint Santa Keepsake Ornament
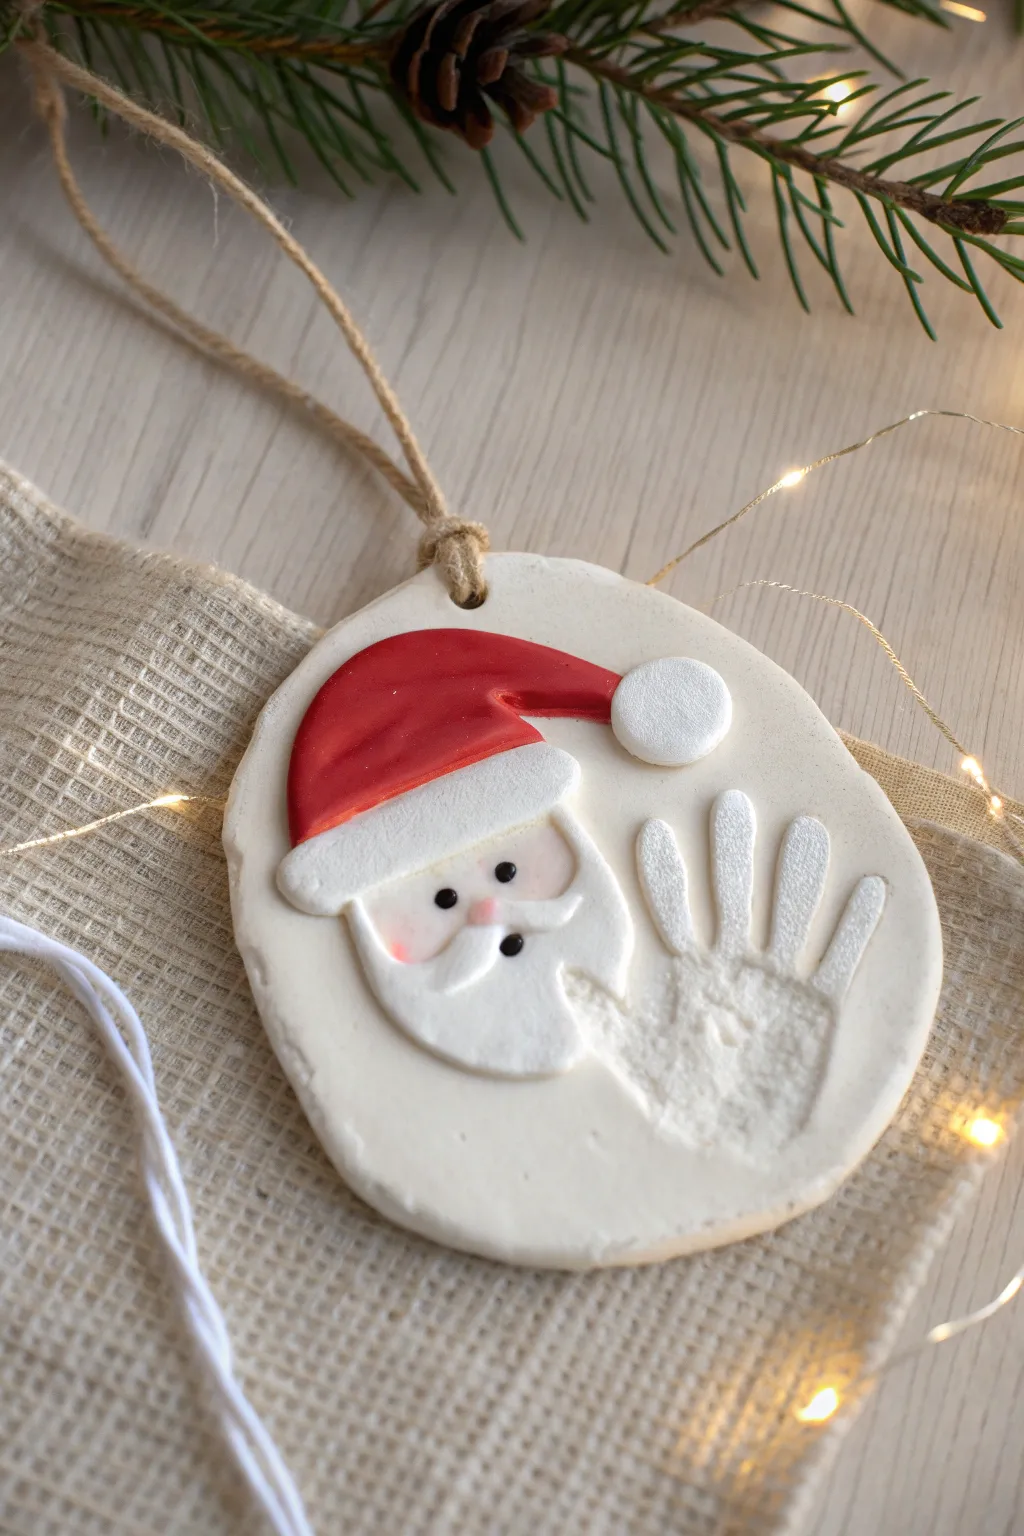
Transform a simple handprint into Santa’s flowing beard with this clever keepsake ornament. The smooth white clay captures every little detail, while a painted red hat brings festive cheer to this personalized decoration.
Step-by-Step
Materials
- White air-dry clay or polymer clay
- Rolling pin
- Circle cookie cutter (large enough for the hand) or modeling knife
- Parchment paper
- Acrylic paints: Bright red, white, pale peach/flesh tone, black, pink
- Fine detail paintbrush
- Small flat paintbrush
- Jute twine for hanging
- Clear matte sealer (optional)
- Straw or skewer for the hole
Step 1: Shaping the Base
-
Prepare your surface:
Lay down a sheet of parchment paper to work on. Take a large ball of white clay and knead it until it is soft, pliable, and free of cracks. -
Roll out the slab:
Use a rolling pin to flatten the clay to an even thickness of about 1/4 inch. If you want a perfectly smooth surface, wipe the rolling pin with a damp cloth first. -
Create the impression:
Have the child press their hand firmly into the center of the clay slab. Ensure the palm and fingers make a deep, clear impression. Help them lift their hand straight up carefully to avoid smudging the edges. -
Cut the shape:
Using a modeling knife or a large round cutter, cut a generous organic oval or circle shape around the handprint. Leave plenty of room above the palm area, as this is where Santa’s hat will go. -
Add the hanging hole:
Use a straw or a skewer to poke a hole near the top edge of the ornament, centering it above the palm area. Make sure the hole goes all the way through.
Cracked Clay Fix
If small cracks appear while drying, don’t panic. Mix a tiny bit of fresh clay with water to make a paste and fill them in before painting.
Step 2: Sculpting Santa Details
-
Add the hat trim:
Roll a small snake of clay and flatten it slightly. attach this strip horizontally across the ‘wrist’ area of the palm print. This serves as the fluffy brim of Santa’s hat. -
Form the hat shape:
Take a flat piece of clay and shape it into a triangle that curves downward. Attach this above the brim strip you just placed, smoothing the edges into the background clay so it looks like one cohesive piece. -
Add the pom-pom:
Roll a small ball of clay and press it onto the tip of the hat. You can texture this slightly with a toothbrush to make it look fluffy. -
Sculpt the mustache:
Roll two tiny teardrop shapes of clay. Attach them just below the hat brim in the center of the ‘palm’ area, arranging them to curl upwards slightly like a mustache. -
Create the nose:
Roll a tiny pea-sized ball of clay and place it right in the center where the two mustache pieces meet. -
Smooth and dry:
Dip your finger in a little water to smooth out any rough join lines. Let the clay dry completely according to package instructions (usually 24-48 hours for air-dry clay).
Step 3: Painting and Finishing
-
Paint the hat:
Once dry, use a flat brush to paint the main hat section bright red. Be careful not to get red paint on the trim or the pom-pom, which should stay white. -
Paint the face:
Mix a very pale peach or flesh tone color. Carefully paint the small area of the palm between the hat brim and the mustache. Leave the mustache, nose, and the rest of the handprint (the beard) unpainted white. -
Add facial features:
Using a fine detail brush or the end of a toothpick, dot two small black eyes onto the peach-painted face area. -
Highlight the nose:
Mix a tiny bit of pink with your peach color and gently dab it onto the nose creates a rosy, cold-weather glow. -
Optional cheek blush:
I like to dry-brush a tiny amount of pink on the cheeks next to the mustache for extra cuteness. -
Seal the ornament:
If desired, coat the entire piece with a matte clear sealer to protect the paint and clay from moisture. -
Attach the hanger:
Cut a length of jute twine, thread it through the hole at the top, and tie a secure knot to create a rustic loop for hanging.
Year & Name
Before the clay dries, use a toothpick or clay stamp to write the year and the child’s name on the back of the ornament for a true memory.
Hang this adorable handcrafted Santa on your tree to remember just how small those hands once were


Gingerbread Man Clay Ornaments With “Icing” Lines

These charming ornaments look good enough to eat but are actually a permanent addition to your holiday decor. With their warm, toasted brown finish and delicate white icing details, they capture the classic coziness of real gingerbread cookies.
Step-by-Step
Materials
- Light brown polymer clay (or air-dry clay)
- Soft pastels (brown, ochre, rusty red for shading)
- White 3D puffy paint or liquid polymer clay in a fine-tip bottle
- Gingerbread man cookie cutter
- Silver seed beads or small ball bearings (for eyes)
- Jute twine
- Rolling pin
- Paintbrush (soft, fluffy)
- Toothpick or needle tool
- Sandpaper or stiff toothbrush (for texture)
- Baking sheet and parchment paper (if using polymer clay)
Step 1: Shaping the Dough
-
Preparation:
Begin by conditioning your clay until it is soft and malleable. Roll it out into a flat sheet about 1/4 inch thick—you want these to have a nice, sturdy cookie thickness rather than being wafer-thin. -
Texturing:
Before cutting, give the clay a realistic baked texture. Gently press a sheet of sandpaper or tap a clean, stiff toothbrush all over the surface of the clay to create tiny pores and imperfections mimicking baked dough. -
Cutting:
Press your gingerbread man cookie cutter firmly into the textured clay. Wiggle it slightly to ensure a clean cut, then carefully remove the excess clay from around the shape. -
Refining Edges:
Use your finger to gently soften the sharp cut edges of the clay. Real cookies puff up and have rounded sides, so smoothing the harsh angles will sell the illusion. -
Adding the Hole:
Using a toothpick or a straw, poke a hole at the very top of the head for the hanging loop. Ensure the hole is wide enough to accommodate the thickness of your jute twine.
Sticky Icing?
If your icing lines smudge or flatten, put the bottle in the fridge for 10 minutes. Cooler paint is thicker and holds the 3D ‘piped’ shape much better.
Step 2: Adding the Baked Effect
-
Preparing Pastels:
Scrape some brown, ochre, and rust-colored soft pastels into fine powders. I like to mix a little dark brown and rust together to get that perfectly toasted edge color. -
Shading:
Dip a soft, fluffy brush into the pastel powder. Gently brush the powder onto the edges of the gingerbread man, shading inward. -
Highlighting:
Concentrate darker brown shading on the tips of the hands, feet, and the top of the head, leaving the center of the belly slightly lighter. This gradient mimics how real cookies brown in the oven. -
Embedding Eyes:
While the clay is still soft, gently press two silver seed beads firmly into the face area to create the eyes. Make sure they are seated deep enough so they won’t pop out later. -
Curing:
Bake the clay according to the manufacturer’s package instructions (usually 275°F for polymer clay). If using air-dry clay, let the pieces dry completely for 24-48 hours.
Step 3: Decorating & Finishing
-
Cooling:
Allow the ornaments to cool completely after baking. Decoration works best on a room-temperature surface. -
Icing Prep:
Shake your white puffy paint or liquid clay bottle well to remove air bubbles. Test the flow on a scrap piece of paper first to ensure you can make thin, consistent lines. -
Piping Details:
Squeeze the bottle gently to pipe squiggly ‘rick-rack’ lines across the wrists and ankles. Keep your hand steady and move at a consistent speed. -
Adding Buttons:
Place three small dots vertically down the center of the chest to serve as gumdrop buttons. Try to make them relatively uniform in size. -
Drawing the Smile:
Carefully pipe a thin U-shape smile under the eyes. Since the nozzle can be tricky for curves, you can use a needle tool to gently nudge the paint into a perfect curve if it looks uneven. -
Drying the Icing:
Let the paint or liquid clay dry completely. This usually takes a few hours for puffy paint or a quick bake for liquid polymer clay. -
Stringing:
Cut a length of jute twine, about 8 inches long. Thread it through the hole in the head. -
Knotting:
Tie a secure knot at the end of the twine loop to finish the ornament.
The Cookie Smell
Mix a tiny pinch of cinnamon or ginger spice directly into the clay during the conditioning phase for ornaments that smell as authentic as they look.
Hang these on your tree and enjoy the warmth of homemade baking without the crumbs

The Complete Guide to Pottery Troubleshooting
Uncover the most common ceramic mistakes—from cracking clay to failed glazes—and learn how to fix them fast.
Easy Santa, Snowman, and Reindeer Mini Figurines

These charming, minimalist figures mimic the look of turned wood but are surprisingly crafted from clay. With their clean lines and matte finish, this snowman and reindeer set makes for a timeless mantel display.
Step-by-Step Tutorial
Materials
- Air-dry clay (white and terracotta/brown)
- Wooden balls or styrofoam balls (for structure/armature)
- Acrylic paints (white, red, black, orange, brown)
- Fine grit sandpaper
- Small detail paintbrushes
- Sculpting tools or a toothpick
- Textured stiff brush or toothbrush
- Matte spray sealant (optional)
- Craft glue
Step 1: Sculpting the Bases
-
Prepare the armatures:
To keep the figures lightweight and uniform, start with foam or wooden balls as your core. You’ll need two sizes for each figure: a larger one for the body and a slightly smaller one for the head. -
Wrap the bodies:
For the two snowmen, roll out sheets of white air-dry clay. Wrap the clay smoothly around your base balls, rolling them on your work surface to eliminate seams and create a perfect sphere. -
Create the reindeer body:
Repeat the wrapping process for the reindeer using brown or terracotta-colored clay. If you don’t have colored clay, you can use white clay and paint it later, but pre-colored clay gives that natural wood look effortlessly. -
Different shapes:
Keep the round snowman’s body spherical. For the taller snowman and the reindeer, I like to shape the body piece into a slightly elongated, tapered cylinder—wider at the bottom and slightly narrower at the neck. -
Stack and secure:
Use a dab of craft glue or a small piece of toothpick inserted between the head and body pieces to stack them securely. Press them together gently.
Cracking Clay?
Cracks often happen if clay dries too fast. Smooth a little water over cracks as they appear, or fill dried cracks with a mix of clay and water (slip) and sand smooth.
Step 2: Adding Character Details
-
Sculpt the scarf:
For the tall snowman, roll a thin snake of red-tinted clay (or paint it red later). Wrap it around the neck area, flattening the ends slightly to look like a scarf draping down. -
Form the hats:
Shape a cone of clay for the tall snowman’s hat and a smaller, rounded cap shape for the shorter snowman. Add a small textured band of white clay for the brim and a tiny ball for the pom-pom on top. -
texture tip:
Before the hat brim and pom-pom dry, tap them gently with a stiff toothbrush or crumpled foil. This creates a realistic ‘woolly’ texture. -
Reindeer antlers and ears:
Shape two small tear-drop ears for the reindeer. For the antlers, roll very thin snakes of brown clay and attach them in a branching ‘Y’ shape. Let these dry flat separately before gluing them to the head to avoid drooping. -
Carrot noses:
Roll tiny cones of orange clay for the snowmen’s noses. Attach them to the center of the faces with a touch of water or slip. -
Reindeer nose:
Roll a small ball of red or orange clay and press it onto the reindeer’s face for a bright, festive nose.
Add a Cozy Touch
Make tiny twisted wire spectacles for the reindeer or use real miniature fabric scraps for the scarves instead of clay for a delightful mixed-media texture.
Step 3: Painting and Finishing
-
Faux wood finish:
Once the clay is fully dry (wait 24–48 hours), use fine sandpaper to gently smooth out any fingerprints on the white and brown bodies. This step is crucial for that polished ‘turned wood’ appearance. -
Painting the whites:
Paint the snowmen bodies with white acrylic paint. Apply multiple thin coats rather than one thick one to maintain a smooth texture. -
Wood grain effect:
For the reindeer, mix a slightly darker brown paint with water to make a glaze. Brush it vertically over the dried brown clay to simulate subtle wood grain streaks. -
Facial features:
Using your smallest brush or the tip of a toothpick, dot on black eyes for all three figures. Add buttons down the chest of the snowmen and the reindeer. -
Smile details:
Paint a simple curved line for the short snowman’s smile. For the tall snowman, create a mouth using tiny black dots for a ‘coal’ look. Give the reindeer a gentle carved smile. -
Final assembly:
Glue the dried antlers onto the reindeer’s head. If you painted separate pieces, ensure everything is dry before gluing the hats onto the snowmen.
Arrange your trio on a shelf or mantelpiece to bring a touch of handcrafted warmth to your holiday decor
Simple Reindeer Face Ornaments With Antlers
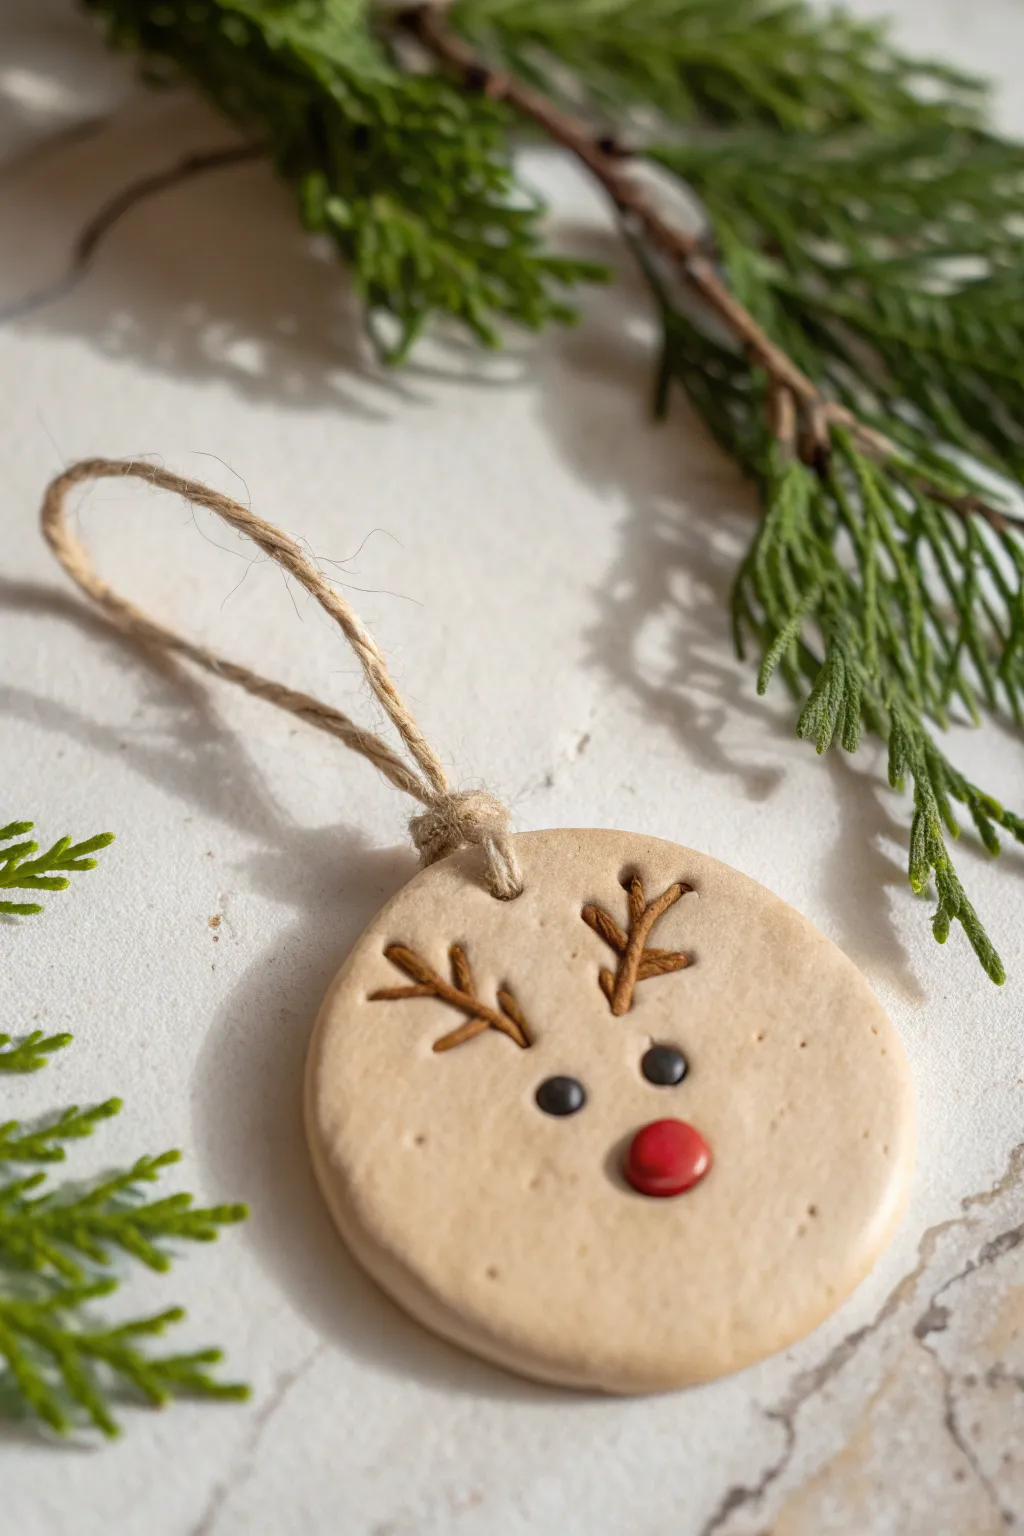
These charming ornaments bring a touch of woodland whimsy to your tree with their natural tones and minimalist design. Made from air-dry or polymer clay, each reindeer features delicate antler details and a classic red nose for a festive finish.
Step-by-Step
Materials
- Air-dry clay or polymer clay (beige or biscuit color)
- Rolling pin
- Circle cookie cutter (approx. 2.5 – 3 inches)
- Small twig stamps, brown paint, or permanent marker for antlers
- Two small black beads or black clay
- One small red button, bead, or red clay
- Jute twine or rustic string
- Straw or skewer (for creating the hole)
- PVA glue or strong craft adhesive
- Fine grit sandpaper (optional)
Step 1: Shaping the Base
-
Condition the clay:
Start by taking a handful of your beige clay and kneading it in your hands until it becomes warm, pliable, and free of cracks. -
Roll it out:
Place the clay on a smooth, clean surface. Use a rolling pin to flatten it to an even thickness of about 1/4 inch (6mm). If the clay sticks, you can use a little parchment paper underneath. -
Cut the circles:
Press your circular cookie cutter firmly into the rolled clay to create the ornament shape. Lift the cutter and carefully remove the excess clay around the edges. -
Smooth the edges:
Dip your finger in a tiny bit of water and run it gently around the rim of the clay circle to smooth out any rough cutting marks or jagged edges. -
Create the hanging hole:
Before the clay starts to dry, use a drinking straw or a bamboo skewer to punch a hole near the top edge of the circle. Position it centered so the face will hang straight.
Smooth Surface Secret
Use a slightly damp sponge to wipe the clay surface before it dries. This acts like ‘wet sanding’ and creates a porcelain-smooth finish without dust.
Step 2: Adding the Face Details
-
Position the antlers:
For the antlers, you have a creative choice. You can gently press real thin twigs into the clay for texture and then remove them to leave an impression, or leave the surface smooth to paint later as shown in the inspiration. I prefer scratching the design in lightly first. -
Create the eye sockets:
Using the blunt end of a small paintbrush or a dotting tool, make two shallow indentations where the eyes will sit. This helps secure the beads later. -
Embed the nose (optional):
If you are using a clay nose, roll a small ball of red clay and press it firmly onto the center of the face now. If gluing a button later, skip this step. -
Dry the ornament:
Let the clay dry completely according to package instructions. For air-dry clay, flip it over halfway through the drying process to prevent curling.
Reindeer Blush
Use real powder blush or pink chalk pastel. Brush a tiny amount onto the cheeks with a soft shapow brush for a rosy, adorable glow.
Step 3: Finishing Touches
-
Sand imperfections:
Once fully solid, lightly sand the edges with fine-grit sandpaper if there are any remaining rough spots. -
Define the antlers:
Using thin brown paint or a fine permanent marker, carefully draw the antler branches coming out from the top center of the ‘head’. Make them slightly asymmetrical for a natural look. -
Attach the eyes:
Apply tiny dots of strong craft glue into the eye indentations you made earlier. Place the small black beads (or black clay balls) into the glue. -
Attach the nose:
Glue the red button or bead into the center position. Ensure it sits slightly lower than the eyes to create that cute animal proportion. -
Prepare the twine:
Cut a length of jute twine, approximately 6 to 8 inches long. -
Thread the loop:
Feed the folded end of the twine through the hole in the ornament from front to back. -
Secure the hanger:
Pass the loose ends of the twine through the loop and pull tight to create a lark’s head knot right at the top of the ornament. -
Final knot:
Tie the two loose ends of the twine together in a simple overhand knot to close the loop for hanging.
Hang your new herd on the tree and enjoy the handmade charm they add to your holiday decor


What Really Happens Inside the Kiln
Learn how time and temperature work together inside the kiln to transform clay into durable ceramic.
Flat Holly Leaf Magnets for Quick Decor
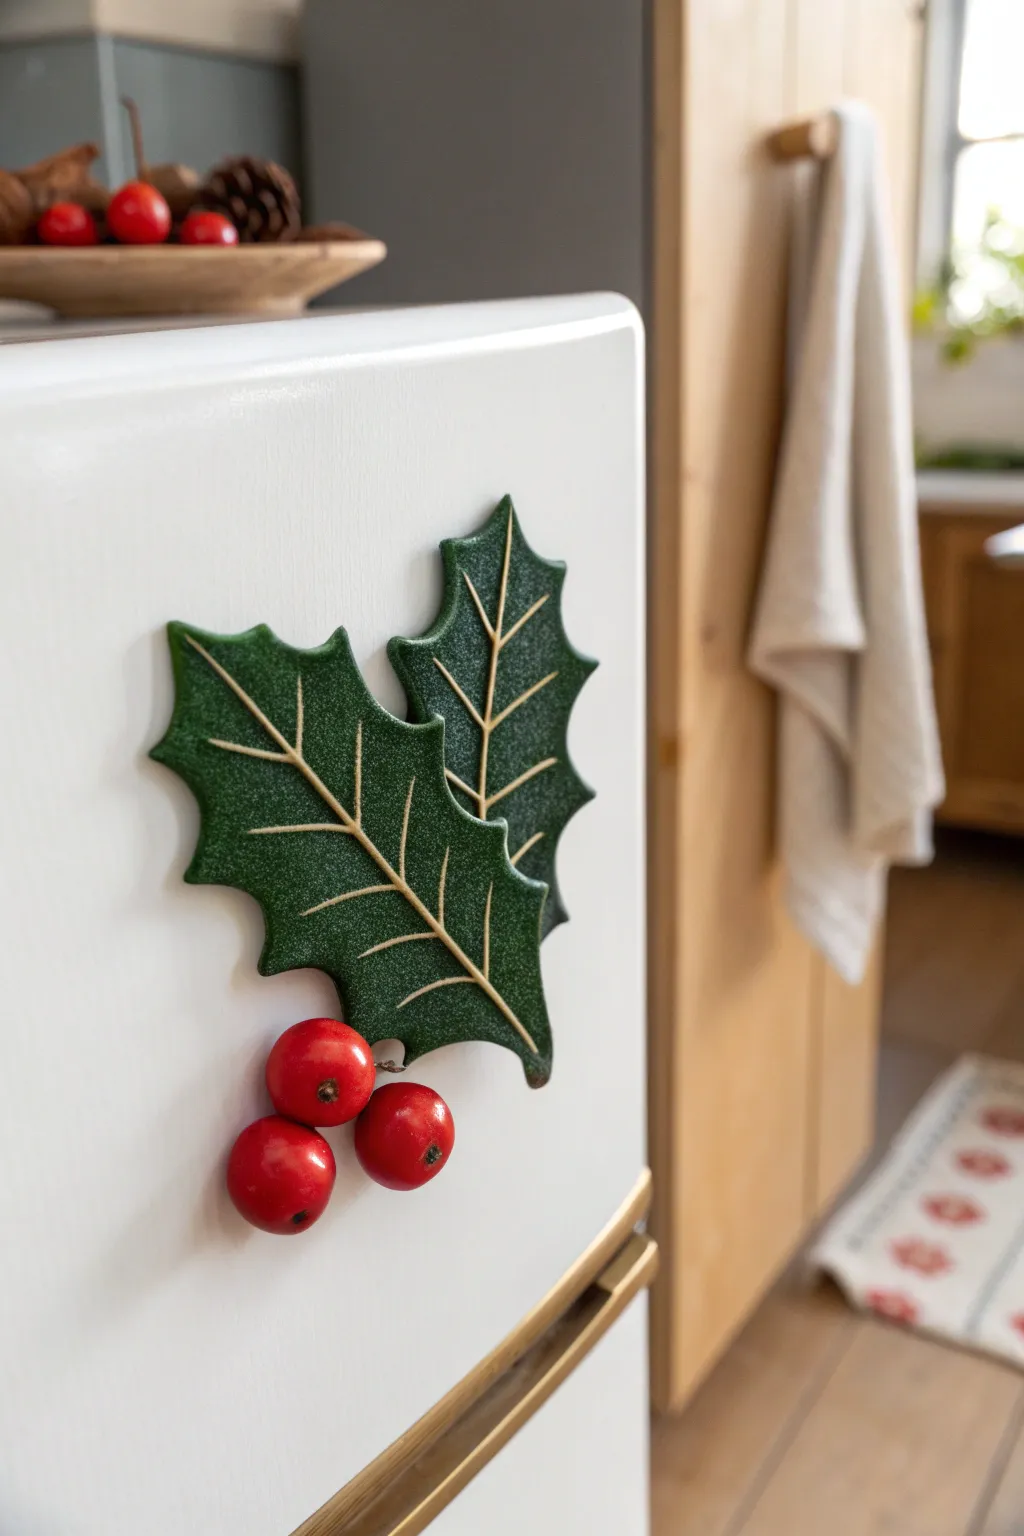
Bring a classic festive touch to your kitchen with these charming, high-gloss holly magnets. The deep green leaves feature prominent sculpted veins and pair perfectly with bright red berries for a project that looks professionally fired but can be made right at home.
How-To Guide
Materials
- Dark green polymer clay
- Bright red polymer clay
- Rolling pin or clay roller
- Needle tool or toothpick
- X-acto knife or clay blade
- Holly leaf cutter (optional)
- Strong craft magnets (round)
- Super glue or E6000
- Translucent liquid sculpey (optional)
- High-gloss glaze or polyurethane varnish
- Soft synthetic brush
- Baking sheet and parchment paper
Step 1: Sculpting the Leaves
-
Condition the clay:
Start by warming the dark green polymer clay in your hands. Knead it thoroughly until it is soft, pliable, and free of any cracks or air bubbles. -
Roll it out:
Using your rolling pin, flatten the green clay into an even slab. You want it to be about 1/4 inch thick—sturdy enough to hold a magnet but not too heavy. -
Cut the shapes:
If you have a holly cutter, press it firmly into the clay. If working freehand, use an X-acto knife to cut out two distinct holly leaf shapes with sharp, pointed edges. -
Smooth the edges:
Gently run your finger around the cut edges of the leaves to soften any harsh cuts or clay burrs left by the knife. -
Create the veins:
Take your needle tool and draw a central line down the middle of each leaf. Don’t press all the way through; just create a clear indentation. -
Add detail lines:
Branching off from the center vein, press smaller diagonal lines extending toward the leaf points. These should be deep enough to catch the light later. -
Layer the leaves:
Place one leaf slightly overlapping the other to form a cluster. Press gently where they touch to bond the clay together.
Step 2: Adding Berries & Finishing
-
Form the berries:
Taking your bright red clay, roll three small, equal-sized spheres. -
Attach the berries:
Position the three red spheres in a tight cluster at the base where the two leaves meet. Press them down firmly so they adhere to the green clay. -
Add berry details:
Using the very tip of your needle tool, poke a tiny, shallow hole in the center of each berry to mimic the natural look of holly fruit. -
Bake the clay:
Transfer your creation to a parchment-lined baking sheet. Bake according to your specific clay package instructions (usually around 275°F/130°C for 15-30 minutes). -
Cool down:
Allow the piece to cool completely on a flat surface before handling it. The clay hardens as it cools. -
Highlight the veins:
For that crisp look in the photo, you can optionally run a tiny amount of diluted tan or gold acrylic paint into the veins, wiping away the excess on top, though leaving them plain works too. -
Apply the glaze:
Brush a thick, even coat of high-gloss glaze over the entire front surface. This mimics the shiny ceramic look seen in the inspiration image. -
Attach magnets:
Once the glaze is fully dry, flip the piece over. Apply a drop of strong super glue or E6000 to the back and press your magnets firmly into place.
Leaves Won’t Stick?
If the leaves separate while sculpting, apply a tiny drop of liquid clay or ‘Bake & Bond’ between layers before pressing them together for a secure hold.
Level_Up: Texture Trick
Before baking, lightly press a piece of fine sandpaper onto the green leaves (avoiding the veins) to give the leaf surface a realistic, natural texture.
Now your stunning holly magnets are ready to hold up holiday cards with festive flair
Evergreen Sprig Relief Ornaments (Nature-Inspired)

Capture the delicate details of winter foliage with these elegant clay relief ornaments. Using real greenery to emboss the surface creates a sophisticated, fossil-like impression that is beautifully highlighted with a touch of gold.
Step-by-Step Tutorial
Materials
- Air-dry clay (white) or polymer clay
- Rolling pin
- Round cookie cutter (approx. 3-4 inches)
- Fresh evergreen sprigs (pine, cedar, or rosemary work well)
- Straw or skewer (for the hole)
- Fine grit sandpaper
- Gold Rub ‘n Buff or metallic gold acrylic paint
- Small stiff paintbrush or soft cloth
- Dark green satin ribbon (1/4 inch width)
- Parchment paper or non-stick mat
Step 1: Preparation and Rolling
-
Prepare your workspace:
Lay down a sheet of parchment paper or a non-stick mat to protect your table and prevent the clay from sticking. This makes lifting the delicate shapes much easier later on. -
Condition the clay:
Take a handful of your white air-dry or polymer clay and knead it until it’s smooth, pliable, and free of cracks. Warm clay responds better to detailed impressions. -
Roll out the slab:
Using your rolling pin, flatten the clay to an even thickness of about 1/4 inch. Avoid going too thin, as you need enough depth for the plant impression without breaking the ornament.
Step 2: Creating the Impression
-
Select your greenery:
Choose a fresh sprig of evergreen. I find that stiffer needles, like rosemary or spruce, create cleaner lines than very soft ferns. -
Position the botanical:
Place your chosen sprig gently onto the rolled clay slab. Arrange it artistically, keeping in mind where you will cut your circle so the design is centered or nicely offset. -
Press the design:
Use the rolling pin to firmly roll partially over the sprig one time. Apply consistent downward pressure to embed the foliage into the clay surface. -
Remove the greenery:
Carefully find the stem end of the sprig and slowly peel it away from the clay. Use a needle tool or tweezers to pick out any small bits of leaf that might have broken off inside the impression. -
Add berry accents:
To mimic the berries seen in the photo, use the rounded end of a small paintbrush or a dotting tool to gently press small indentations near the stems of your leaf design.
Sticky Sprigs?
If your greenery is sticking to the clay and ruining the imprint, lightly dust the sprig with cornstarch or baby powder before rolling it into the slab.
Step 3: Cutting and Drying
-
Cut the shape:
Position your round cookie cutter over the impression to frame it perfectly. Press down firmly to cut the circle, then wiggle slightly to ensure a clean separation from the excess clay. -
Create the hanging hole:
Use a plastic straw to punch a clean hole near the top edge of the ornament. A straw removes the core of clay cleanly, whereas a skewer just pushes it aside. -
Smooth the edges:
Dip your finger in a little bit of water and run it gently around the rim of the cut circle to smooth out any rough seams or jagged bits left by the cutter. -
Let it dry:
Allow the clay to dry completely according to the package instructions. For air-dry clay, this usually takes 24-48 hours. Flip the ornaments halfway through so both sides dry evenly. -
Sand for perfection:
Once fully cured and hard, lightly use fine-grit sandpaper to buff away any remaining rough spots on the edges or surface.
Pro Tip: Depth Check
Don’t press too hard near the edges of the sprig. Taper your pressure so the stem doesn’t create a ‘moat’ around the plant, which makes the imprint look less natural.
Step 4: Finishing Touches
-
Apply the gold highlight:
Put a tiny amount of gold Rub ‘n Buff (or dry-brush acrylic paint) onto your finger or a cloth. Gently rub it over the debossed sprig design. -
Distress the surface:
The goal is to catch the gold in the deep crevices of the pine needles. If you get too much on the flat surface, quickly wipe it back with a damp cloth/paper towel so the gold stays primarily in the imprint. -
Cut the ribbon:
Cut a length of dark green satin ribbon, approximately 10-12 inches long. -
Thread the loop:
Fold the ribbon in half, push the folded loop through the hole from front to back, and pull the tails through the loop to create a lark’s head knot. -
Secure the ends:
Tie the loose ends of the ribbon into a simple knot at the top to complete the ornament hanger.
Enjoy hanging these sophisticated botanical treasures on your tree or using them as unique gift toppers

TRACK YOUR CERAMIC JOURNEY
Capture glaze tests, firing details, and creative progress—all in one simple printable. Make your projects easier to repeat and improve.
Confetti-Style Terrazzo Christmas Ornaments
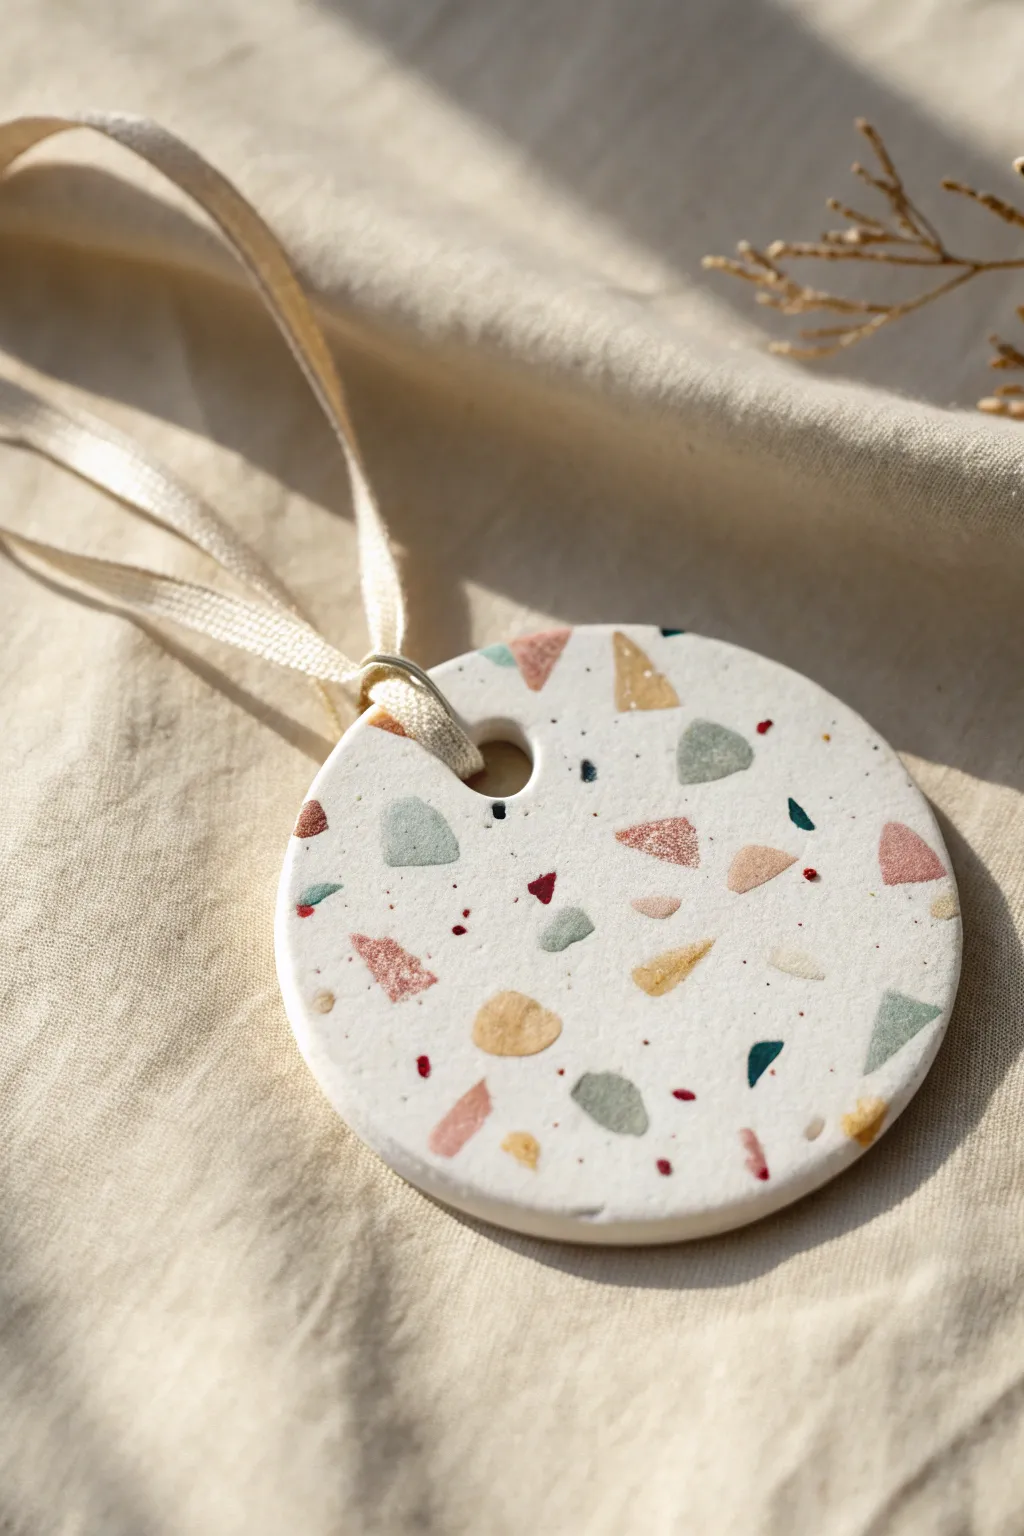
Bring a touch of modern artistry to your holiday decor with these stunning terrazzo-style clay ornaments. The random scattering of colorful chips creates a playful yet sophisticated look that mimics the classic Italian flooring material perfectly.
Step-by-Step Tutorial
Materials
- White or translucent white polymer clay (base)
- Small amounts of colored polymer clay (muted pink, sage green, mustard yellow, coral, deep teal)
- Acrylic rolling pin or pasta machine
- Round cookie cutter (approx. 3-4 inches)
- Parchment paper or ceramic tile work surface
- Sharp craft blade or tissue blade
- Small circular cutter or straw (for hanging hole)
- Fine-grit sandpaper (400 to 1000 grit)
- Satin ribbon (cream or off-white)
- Oven for baking
Step 1: Prepping the ‘Chips’
-
Condition the colors:
Start by conditioning your small amounts of colored clay until they are soft and pliable. Roll each color out into a very thin sheet, roughly 1mm thick or even thinner if possible. -
Create the confetti:
Use your craft blade to chop these thin color sheets into random geometric shapes. Aim for varied triangles and irregular quadrilaterals rather than perfect squares. -
Vary the sizes:
Cut some pieces slightly larger (about the size of a lentil) and keep others tiny like sprinkles. Keep the colors separated in little piles for now.
Step 2: Forming the Base
-
Roll the white base:
Condition a large block of white clay. Roll it out into a slab that is roughly 4mm thick. It needs to be thick enough to be sturdy but not too heavy for a tree branch. -
Scatter the colors:
Take your pre-cut colored chips and sprinkle them randomly over the white clay slab. Don’t overthink the placement; randomness is key to the authentic terrazzo look. -
Add micro-details:
For extra depth, I like to take tiny pinched bits of the deep teal or red clay and scatter them between the larger chips to look like fine speckles. -
Embed the chips:
Place a sheet of parchment paper over the clay to prevent sticking. Gently roll over the slab with your acrylic roller, pressing the colored chips *into* the white base until the surface is completely smooth and flush.
Smudged Colors?
If your colored chips smear when rolling, the clay might be too warm or soft. Pop the slab in the fridge for 10 minutes before the final roll to keep lines crisp.
Step 3: Cutting and Refining
-
Cut the shape:
Position your round cookie cutter over the pattern you like best. Press down firmly to cut out the ornament shape. -
Create the hanging hole:
Using a straw or a very small circular cutter, punch a hole near the top edge. Make sure it’s roughly 5mm from the edge so the clay doesn’t break later. -
Smooth the edges:
Lift the circle and gently rub the edges with your fingertip to soften any harsh cuts or loose bits of clay. -
Bake the ornament:
Place the ornament on a baking sheet lined with parchment paper. Bake according to your specific clay brand’s instructions (usually 275°F/135°C for 15-30 minutes per 1/4 inch of thickness). -
Cool completely:
Allow the piece to cool down fully on a flat surface. Do not try to handle it while warm, or it may warp.
Pro Tip: Depth Check
Use translucent clay mixed with a little white for the base. After baking, the chips will look like they are floating at different depths, mimicking real store.
Step 4: Finishing Touches
-
Wet sanding:
Dip your fine-grit sandpaper in water and sand the surface of the ornament in a circular motion. This reveals the crisp edges of the colored chips and removes any fingerprints. -
Buffing:
Rub the sanded ornament vigorously with a piece of denim or a soft cotton cloth to give it a smooth, natural matte sheen. -
Add the ribbon:
Cut a length of cream satin ribbon. Thread it through the hole, creating a lark’s head knot or a simple loop for hanging.
Hang your beautiful new creation on the tree and admire the modern pop of color it brings to the branches
Cute Stocking Ornaments With Simple Color Blocking
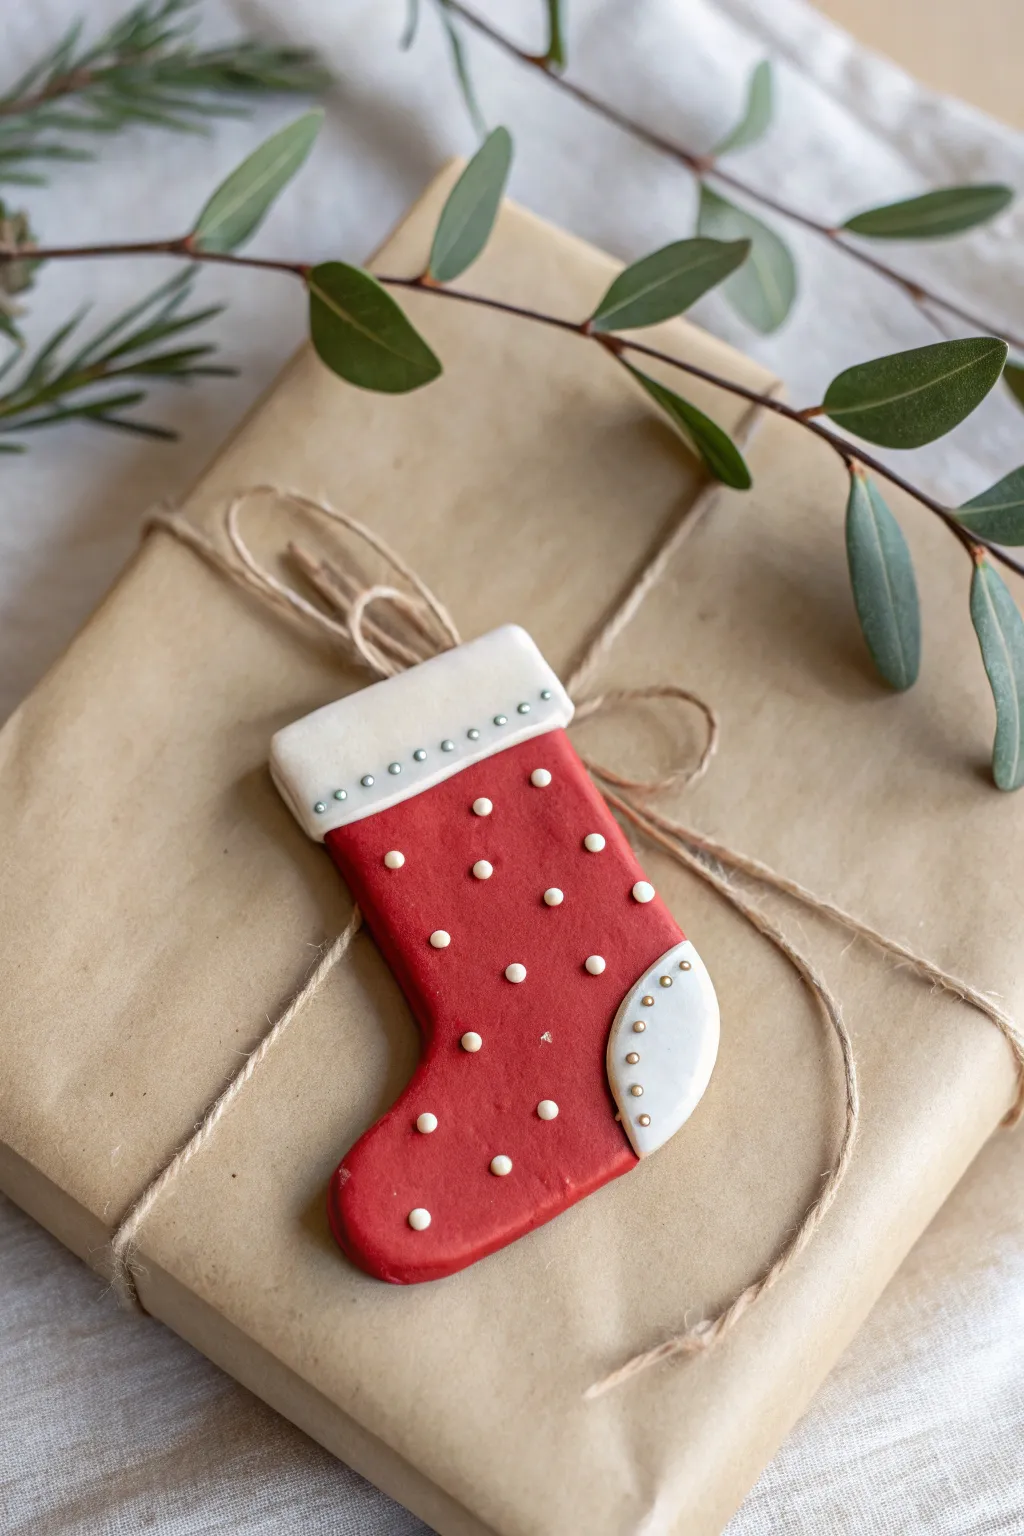
These charming polymer clay stockings add a pop of festive red to any gift wrapping or tree branch. The look relies on clean lines and simple rolled pearl accents for a polished, textured finish.
Step-by-Step
Materials
- Red polymer clay
- White polymer clay
- Rolling pin or clay machine
- Stocking cookie cutter
- Clay knife or craft blade
- Small ball tool or toothpick
- Silver and gold micro beads or tiny clay balls
- Baking sheet
- Parchment paper
- Twine or ribbon for hanging
Step 1: Setting the Base
-
Condition the Clay:
Start by kneading your red polymer clay until it is soft and pliable. This ensures you won’t get cracks during baking. -
Roll It Out:
Roll the red clay into a sheet approximately 1/4 inch thick. Use a rolling pin or a pasta machine to get an even surface. -
Cut the Shape:
Press your stocking cookie cutter firmly into the red clay. Remove the excess clay and carefully smooth the edges of your cutout with your finger to remove any burrs.
Smooth Surface Trick
Before baking, lightly wipe your fingerprints off the clay using a bit of baby oil or rubbing alcohol on a soft brush or your finger.
Step 2: Adding the Accents
-
Create the Cuff:
Condition a piece of white clay and roll it out, aiming for the same thickness as the stocking body. -
Cut and trim:
Cut a rectangular strip that matches the width of the top of your stocking. Trim it so it’s about 3/4 inch tall. -
Attach the Cuff:
Place the white rectangle directly onto the top of the red stocking. Gently press it down so the clays bond together without distorting the shape. -
Make the Heel/Toe Patch:
Roll out another small piece of white clay. Use a small round cutter or freehand cut a curved crescent shape to mimic the reinforced toe area of a sock. -
Apply the Patch:
Position this white curved piece on the toe area of the red stocking and press gently to adhere.
Step 3: Pearl Details
-
Prepare White Dots:
Roll tiny bits of remaining white clay into very small spheres. You’ll need about 15-20 of these for the polka dot pattern. -
Apply Polka Dots:
Press the tiny white spheres onto the red section of the stocking in a random but balanced pattern. Flatten slightly with your finger so they stick well. -
Add Metallic Accents:
For the cuff, press tiny silver micro beads (or tiny grey clay balls) in a straight line across the middle of the white rectangle. -
Detail the Toe:
Press gold micro beads or tiny tan clay balls along the curved inner edge of the white toe patch for a decorative border. -
Create the Hole:
Use a straw or a tool to punch a small hole at the top corner of the stocking, just under the cuff or through the top corner, for hanging later.
Initial Personalization
Before baking, use a tiny alphabet stamp set to impress a name or the year into the white cuff area for a custom keepsake.
Step 4: Baking and Finishing
-
Bake:
Place the finished ornament on parchment paper on a baking sheet. Bake according to your specific clay brand’s package instructions (usually 275°F for 15-30 minutes). -
Cool Down:
Let the ornament cool completely on the baking sheet before handling to prevent warping. -
Add String:
Thread a piece of natural jute twine through the hole and tie a knot to create a loop. -
Final Touch:
Optionally, seal the clay with a matte varnish if you want extra durability, though the raw clay finish looks lovely and rustic on its own.
Your adorable handmade stocking is now ready to tag a special gift or hang on the tree
Simple Christmas Village House Shelf Decor
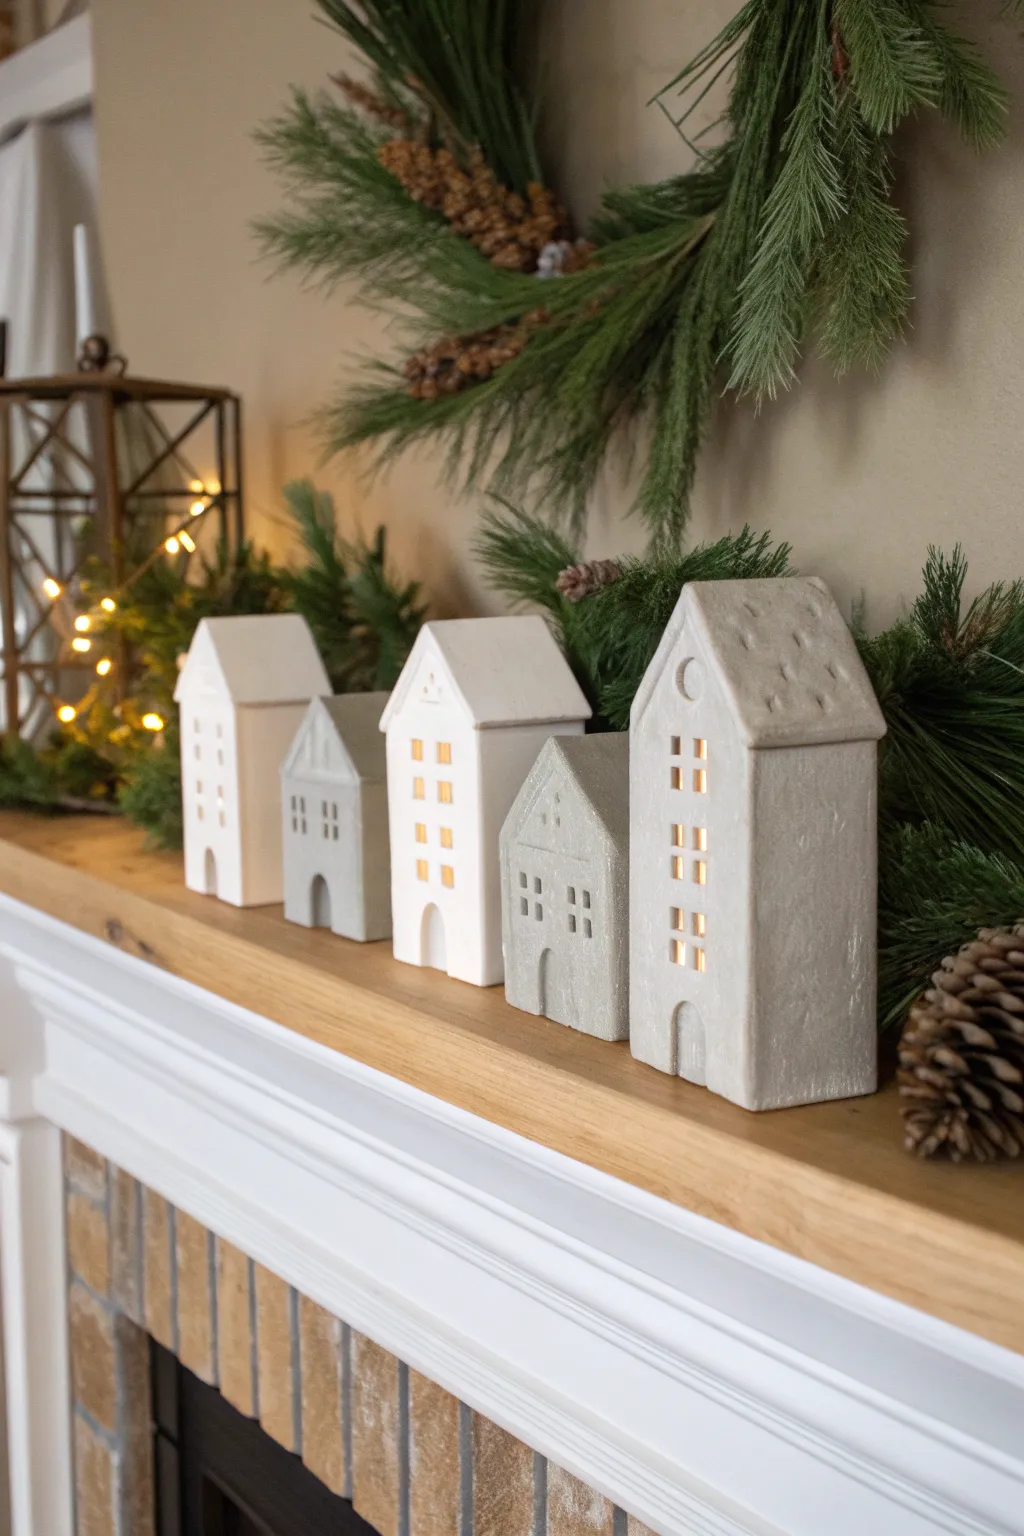
Create a cozy winter scene on your mantel with these elegant, minimalist village houses crafted from air-dry clay. Their clean lines and soft white and grey tones bring a modern Scandinavian charm to your holiday decor, especially when illuminated from within.
Step-by-Step Tutorial
Materials
- White air-dry clay (approx. 2-3 lbs)
- Grey air-dry clay (or grey acrylic paint to mix in)
- Rolling pin
- Parchment paper or silicone mat
- X-acto knife or craft blade
- Ruler
- Cardboard or cardstock (for templates)
- Slip (clay mixed with water)
- Fine-grit sandpaper (220 grit)
- LED tea lights
- Small sponges or smoothing tools
Step 1: Preparation & Cutting
-
Draft your templates:
Begin by sketching simple house shapes on cardstock or cardboard. Create three distinct sizes for variety—tall and narrow, short and wide, and medium. Draw a front/back piece (with a peaked roof) and two side wall rectangles for each house design. -
Condition the clay:
Take a chunk of white air-dry clay and knead it in your hands until it’s warm and pliable. If you want grey houses, either use pre-colored grey clay or knead a very small drop of grey acrylic paint into the white clay until uniform. -
Roll out the slab:
Place the clay on parchment paper or a silicone mat to prevent sticking. Use a rolling pin to flatten the clay to an even thickness of about 1/4 inch. For a uniform look, I like to place two wooden dowels on either side of the clay as guide rails for the rolling pin. -
Cut the walls:
Lay your cardstock templates onto the smooth clay slab. Using a ruler and an X-acto knife, carefully cut around the templates. For each house, you need two gable-end pieces (front/back) and two rectangular side walls. -
Add windows and doors:
Before assembling, decide which piece is the front. Use your knife to cut out small square or rectangular windows and an arched doorway. Use the tip of the blade to lift the tiny cutouts away carefully. -
Create roof texture:
Cut two rectangular roof panels that are slightly wider than your house frame. For added character, use a textured tool or the back of your knife to gently press small indentations or ‘shingle’ marks into the roof pieces while they lie flat.
Step 2: Assembly
-
Score the edges:
Once your pieces have stiffened slightly (let them sit for about 20 minutes), take your knife or a needle tool and scratch up (score) the edges where the walls will connect. This rough texture helps the bond. -
Apply slip:
Dab a little bit of slip—a mixture of clay and water that acts like glue—onto the scored edges. -
Construct the walls:
Stand the walls up and press the corners together to form the box of the house. Use your finger or a small tool to smooth the clay on the inside seams so they are sturdy. Gentle pressure is key here so you don’t warp the walls. -
Attach the roof:
Score and slip the top angled edges of the front and back walls. Carefully place your roof panels on top, joining them at the peak. Smooth the peak seam gently with a little water on your finger. -
Smooth the exterior:
With the house fully assembled, dip a sponge or your finger in water and gently smooth out any fingerprints or rough seams on the outside corners.
Clean Corner Hack
Use a small, damp paintbrush to smooth the inside corners of windows. It gets into tight spaces your fingers can’t reach.
Step 3: Finishing Touches
-
Allow to dry:
Let the houses dry completely in a cool, dry place. This usually takes 24-48 hours depending on humidity. Rotate them occasionally to ensure even airflow. -
Sand for perfection:
Once bone dry, take fine-grit sandpaper and lightly buff the surface. Focus on the window cutouts and the roof edges to make them crisp and clean. -
Final wipe down:
Use a barely damp cloth or a dry soft brush to remove the sanding dust. The finish should look matte and chalky like natural stone. -
Add illumination:
Place battery-operated LED tea lights underneath the houses to create that warm, inviting glow through the windows.
Sagging Roofs?
If the roof sags during assembly, loosely crumple a paper towel and place it inside the house structure for support until the clay hardens.
Enjoy the peaceful ambiance these little custom houses bring to your holiday evenings
Stitched-Look Snowflake Ornaments (Clay Plus Thread)
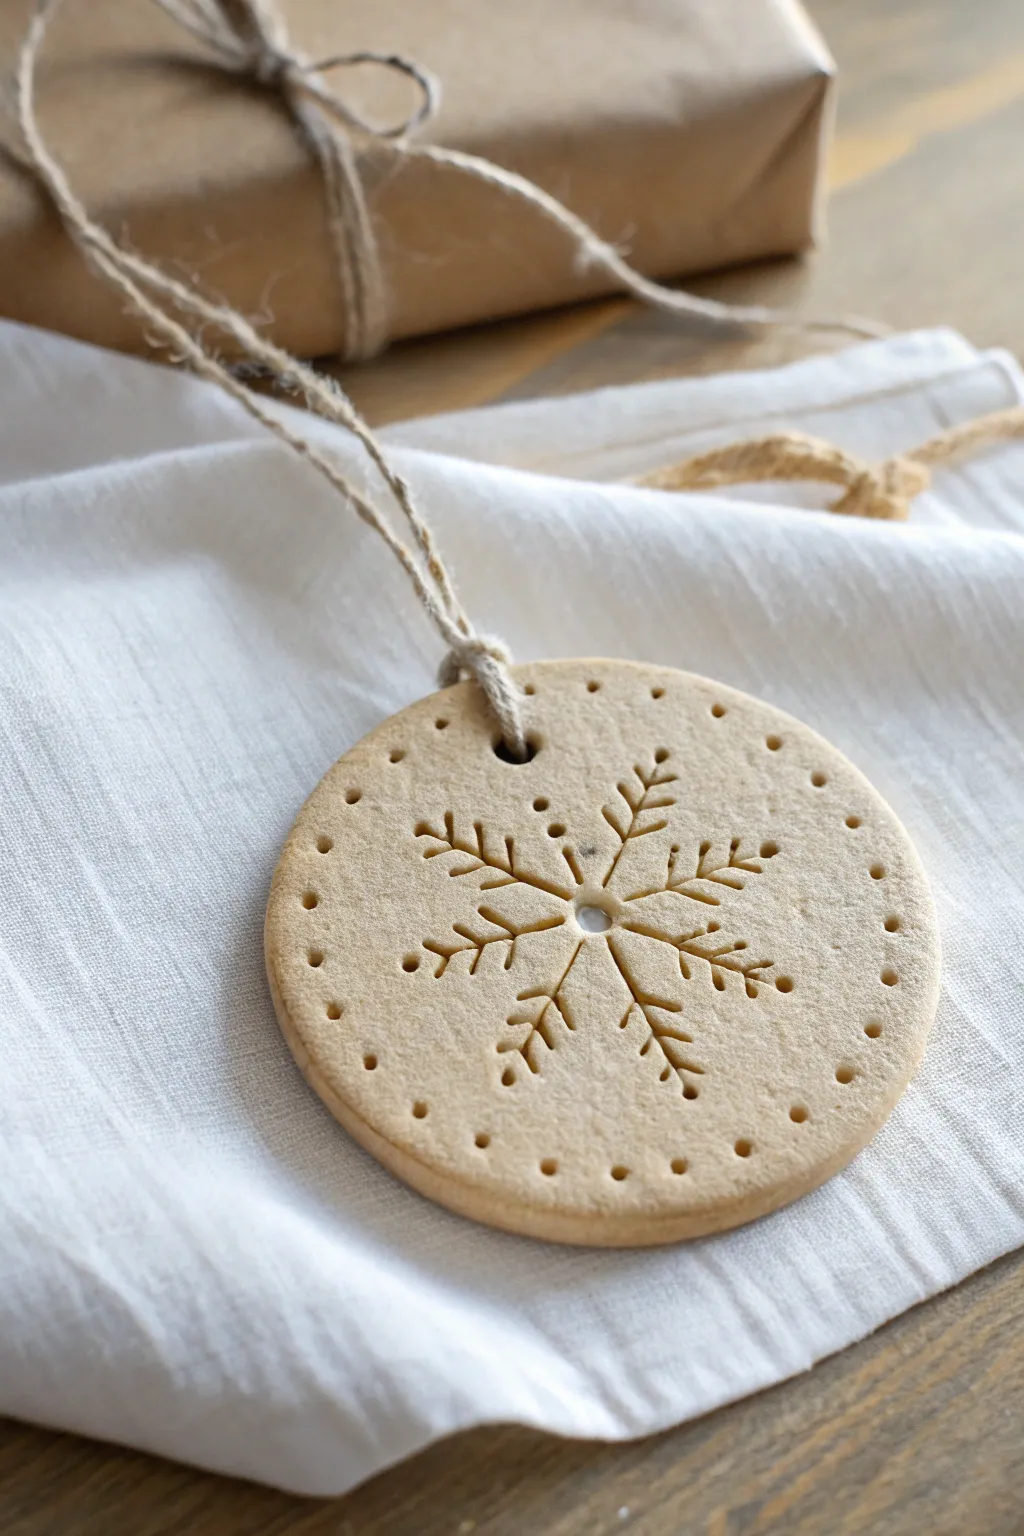
These charming ornaments combine the rustic look of unglazed ceramics with delicate, embroidery-inspired details. Using simple tools to create faux-stitching marks, you can achieve a sophisticated, minimalist holiday decoration that looks intricate but is surprisingly simple to make.
How-To Guide
Materials
- Air-dry clay (white or light beige)
- Round cookie cutter (approx. 3 inches)
- Rolling pin
- Parchment paper or canvas mat
- Stylus tool, awl, or large toothpick
- Drinking straw (for hanging hole)
- Small coffee stirrer or cocktail stick (for snowflake indents)
- Natural jute twine
- Fine grit sandpaper
Step 1: Preparing the Base
-
Condition the Clay:
Begin by working a handful of air-dry clay in your hands until it becomes warm and pliable. This conditioning step is crucial to prevent cracks later on. -
Roll it Out:
Place the clay on parchment paper or a canvas mat to prevent sticking. Roll it out to an even thickness of about 1/4 inch (6mm). If you want it perfectly uniform, you can place wooden skewers on either side of the clay as guide rails for your rolling pin. -
Cut the Shape:
Press your round cookie cutter firmly into the clay. Give it a gentle wiggle to ensure it separates cleanly, then peel away the excess clay from the outside. -
Smooth the Edges:
Dip your finger in a tiny bit of water and run it gently around the cut circumference to smooth down any sharp ridges or rough clay crumbs left by the cutter.
Step 2: Creating the Design
-
Mark the Center:
Find the approximate center of your circle. Using a small embossing tool or the flat end of a wooden skewer, press a small, circular indentation right in the middle. Do not punch all the way through; this is just the snowflake’s hub. -
Create Hanging Hole:
Use a drinking straw to punch a clean hole near the top edge of the ornament. Twist the straw as you lift it to remove the clay plug cleanly. -
Punch the Border Holes:
Using a stylus tool or an awl, create a ring of small holes around the perimeter of the ornament. Space them evenly, about 1/4 inch apart and 1/4 inch from the edge. Again, press firmly to create a deep divot but don’t pierce completely through the back unless you want actual stitching holes.
Stamp Trick
Don’t have a stylus? The tip of a mechanical pencil (without lead extended) creates perfect, uniform circles for the border pattern.
Step 3: Imprinting the Snowflake
-
Press Main Spokes:
To form the snowflake, use the side of a cocktail stick or a dull knife blade. Press six straight lines radiating outward from the center hub. Imagine a clock face and aim for 12, 2, 4, 6, 8, and 10. -
Add Inner V’s:
On each of the six spokes, press two small angled lines forming a ‘V’ shape pointing inward toward the center. Place these about halfway down the spoke. -
Add Outer V’s:
Repeat the previous step, adding a second ‘V’ shape closer to the tip of each spoke. These simplistic indentations mimic the look of embroidered thread. -
Refine the Indentations:
Check your markings. If any lines look too shallow, go back over them gently. I like to re-press the center dot just to make sure the junction points look neat.
Preventing Curling
If ornament edges curl up while drying, place a light book on top of them once they are partially dry (leather-hard) to weight them down flat.
Step 4: Finishing Up
-
Dry Completely:
Transfer the ornament (still on its parchment paper) to a drying rack. Let it air dry for 24 to 48 hours, flipping it over halfway through to ensure the back dries evenly. -
Sand for Smoothness:
Once fully cured and hard, check the edges for any burrs. Gently rub the rim with fine-grit sandpaper for a professional, polished finish. -
Add the Twine:
Cut a length of natural jute twine, approximately 8 inches long. -
Create a Loop:
Fold the twine in half and thread the folded end through the hanging hole from front to back. -
Secure the Knot:
Pull the loose ends of the twine through the loop and tighten gently to create a lark’s head knot at the top of the ornament. -
Final Tie:
Tie the two loose ends of the twine together in a simple overhand knot to close the tailored loop.
Hang your new collection on the tree for a cozy, handcrafted touch this season