If you can roll a ball and pinch a bowl, you can make an adorable clay bobblehead that actually wobbles. I love keeping these projects super simple: big heads, tiny bodies, and just enough details to make them feel full of personality.
Classic Puppy Clay Bobblehead
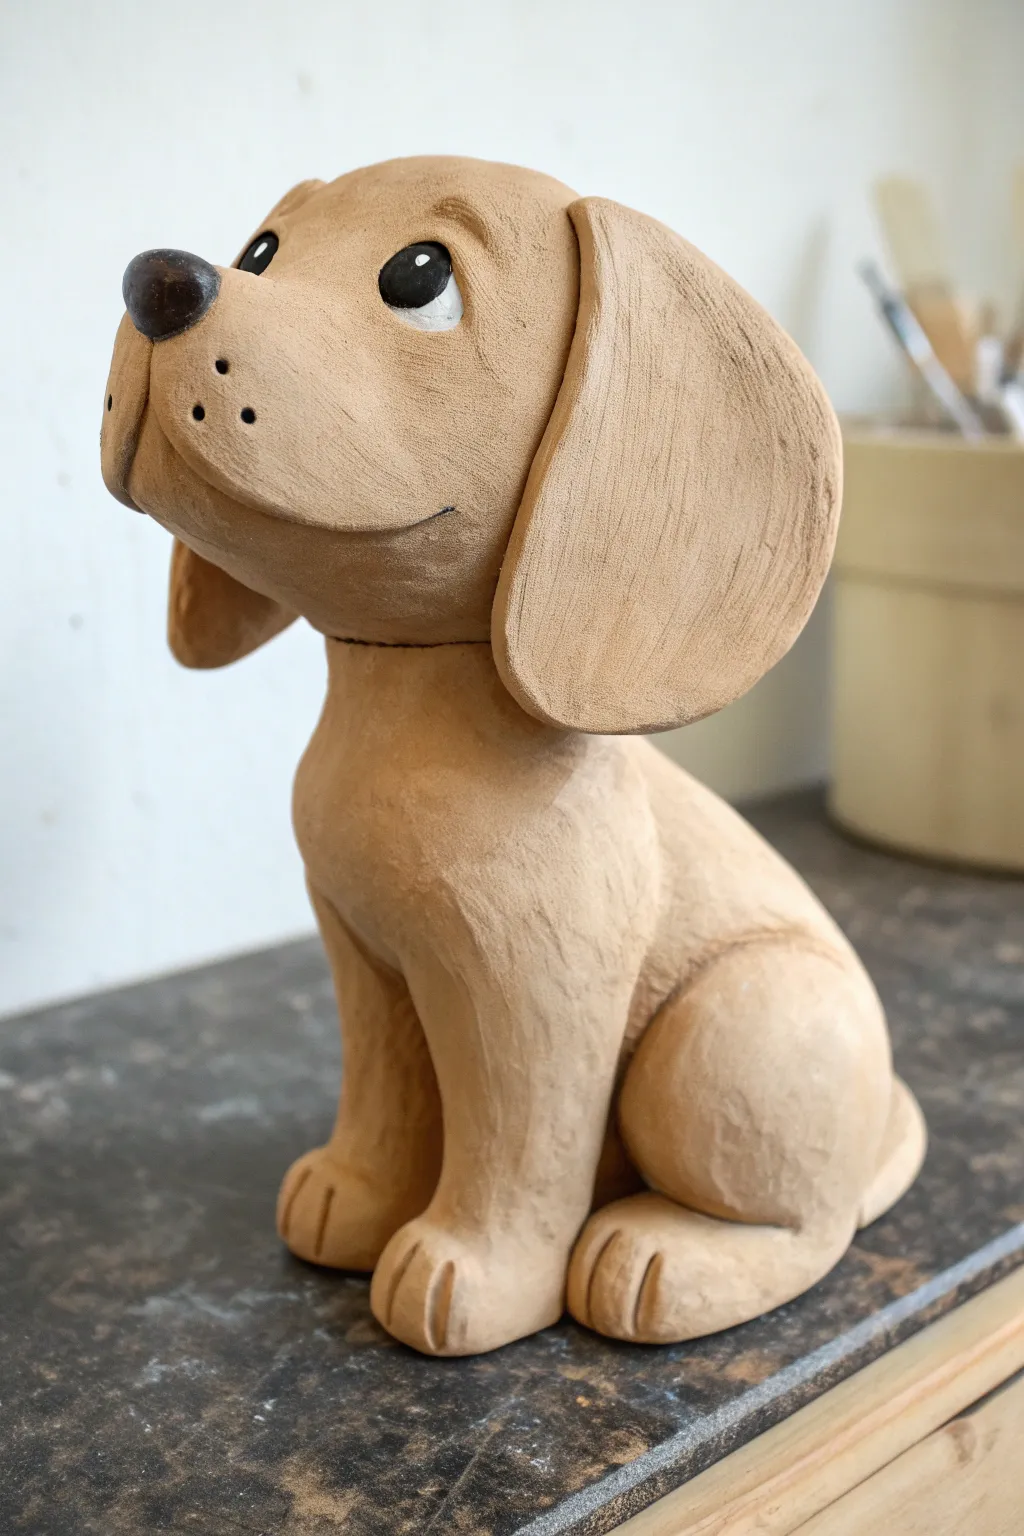
This charming, tan-colored puppy brings a playful spirit to any shelf with its classic floppy ears and sweet, upturned gaze. The simple, rounded forms make it an approachable sculpting project that results in a heartwarming, interactive companion.
Step-by-Step
Materials
- Air-dry clay or polymer clay (tan/beige color)
- Small metal spring for bobble mechanism
- Strong craft glue (e.g., E6000 or epoxy)
- Black acrylic paint
- White acrylic paint
- Sculpting tools (needle tool, ball stylus)
- Small paintbrush
- Texture sponge or stiff bristle brush
- Aluminum foil (for armature core)
Step 1: Sculpting the Body Base
-
Form the core:
Start by crumpling a small ball of aluminum foil into a pear shape. This saves clay and keeps the figure lightweight. Cover the foil completely with a layer of tan clay, rolling it until smooth. -
Shape the torso:
Mold the clay-covered pear shape so the bottom is wider and flatter for stability. This will be the seated body of the puppy. Ensure the top acts as a flat platform for the neck. -
Attach hind legs:
Roll two medium-sized balls of clay. Flatten them slightly into ovals and press them onto the sides of the body near the bottom rear to create the haunches. -
Create paws:
Form two smaller ovals and attach them to the front of the body for the front paws. Add two flattened ovals attached to the hind haunches for the back feet. -
Add toe details:
Using a blunt knife tool or the edge of a credit card, press two or three vertical indentations into the front of each paw to define the toes. -
Initial texturing:
Before the clay hardens, gently dab the entire surface with a texture sponge or a stiff brush to mimic short fur. I find this subtle texture makes the final piece look much more organic than smooth clay.
Step 2: Creating the Head
-
Form the head shape:
Roll a large ball of clay for the head. It should be slightly larger than the upper torso. Gently press the front to create a muzzle protrusion. -
Define the muzzle:
Use your thumbs to smooth the transition from the forehead to the muzzle. Scribe a smiling mouth line using a needle tool, curving it upwards at the corner. -
Adding the nose:
Roll a small distinct ball for the nose. Attach it to the tip of the muzzle. Use a needle tool to poke three tiny whisker holes on each side of the snout. -
Sculpting the eyes:
Press two shallow indentations where the eyes will go. Roll small balls of clay and flatten them into these sockets to create protruding eyeballs. -
Making the ears:
Flatten two large teardrop shapes of clay. These are the floppy ears. Attach the narrow end to the top sides of the head, letting the wide ends drape down naturally. -
Refine and dry:
Add the same fur texture to the head and ears. Once satisfied, let both the head and body dry completely according to your clay’s instructions (usually 24-48 hours).
Head Tilt Fix
If the head tilts too far backward, glue a small coin or washer inside the front of the muzzle (if hollow) or under the chin to shift the center of gravity forward.
Step 3: Assembly and Painting
-
Paint facial features:
Paint the nose solid black. For the eyes, paint a large black circle, leaving a small sliver of white at the bottom if desired, or paint it solid black initially. -
Eye highlights:
The most important step for personality: dip the back of a paintbrush in white paint and add a single, crisp white dot to the upper corner of each pupil. -
Prepare the spring:
Test your spring size. It needs to support the head’s weight without collapsing. Securely glue one end of the spring to the flat neck platform on the body. -
Attach the head:
Apply strong glue to the top of the spring. Carefully lower the head onto it, centering it so the chin clears the chest. Hold it in place until the glue grabs. -
Final touches:
Check the balance. If the head leans too far back, you can carefully bend the spring slightly forward before the glue fully cures.
Collar Customization
Roll a thin snake of red or blue clay to create a collar before attaching the head. You can even add a tiny metallic bead as a custom nametag.
Now tap that nose and watch your loyal new friend nod along with you


Chubby Kitty Clay Bobblehead
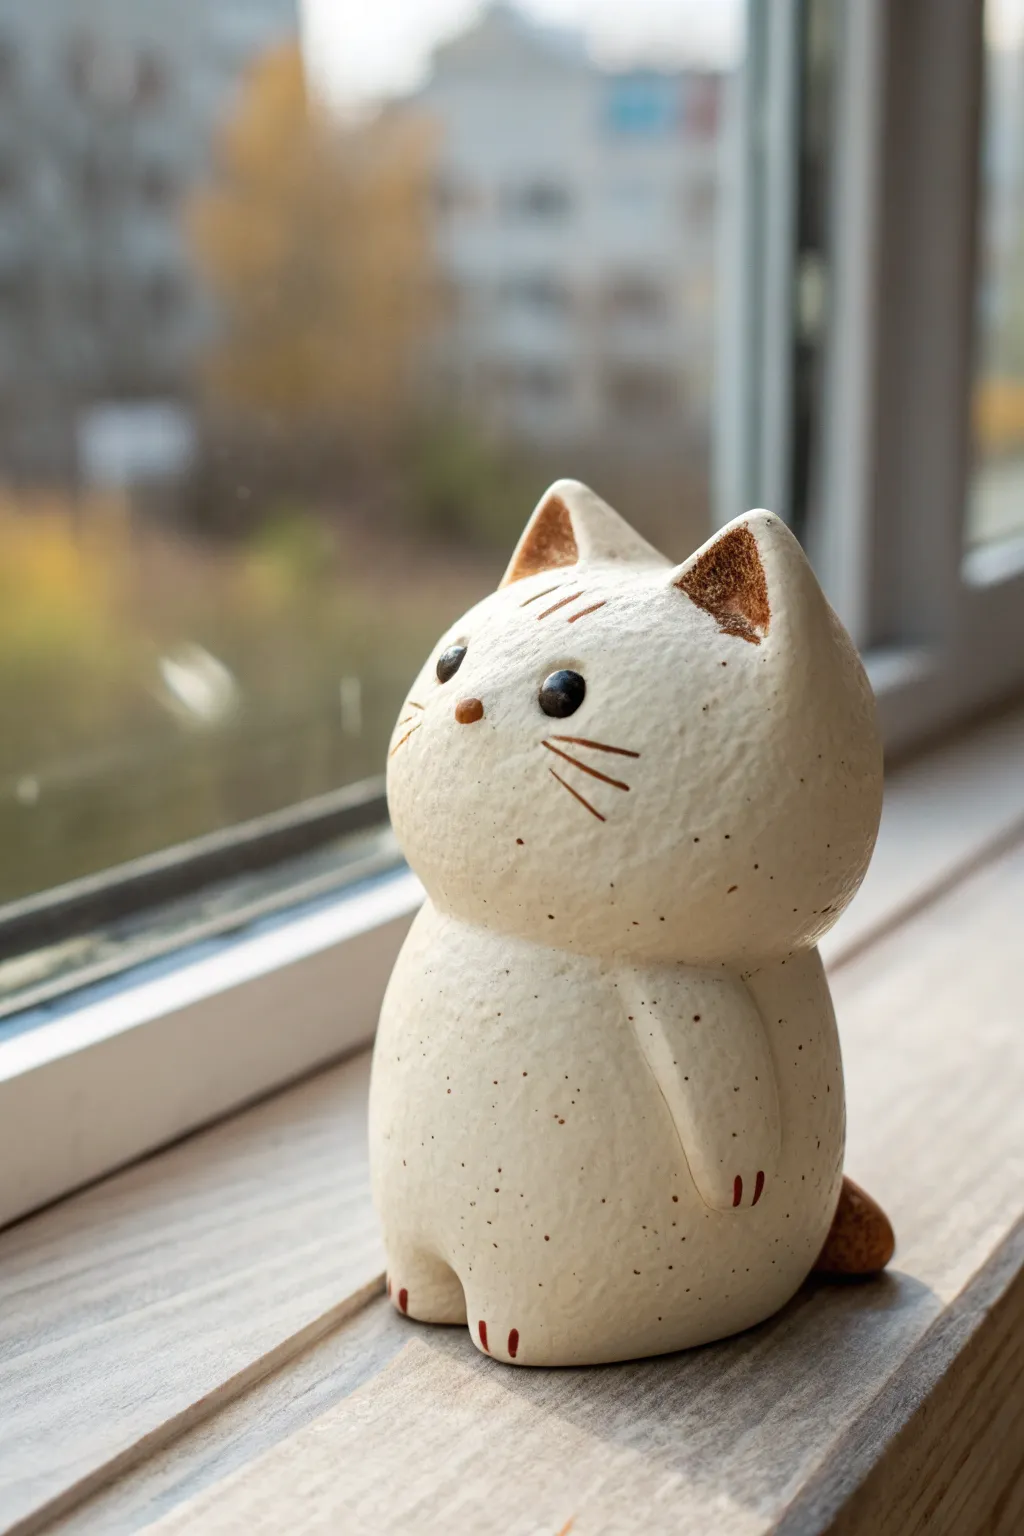
Capture the contemplative mood of a cat watching the world go by with this charmingly round figurine. Its speckled, stone-like texture and simple geometric shapes make it an approachable project that radiates calm.
How-To Guide
Materials
- Speckled cream polymer clay (or granite effect)
- Brown polymer clay (for tail/ears/details)
- Black polymer clay (for eyes/whiskers)
- Strong tension spring (bobble mechanism)
- Liquid clay or bake and bond
- Small ball tool
- Needle tool
- Aluminum foil (for armature core)
- Clay roller
- Oven (for baking)
Step 1: Sculpting the Base Body
-
Form the core:
Begin by crinkling a small amount of aluminum foil into a tight egg shape. This saves clay and keeps the figurine lightweight, which is crucial for the bobble action to work correctly. -
Cover the body:
Condition your speckled cream clay until pliable. Roll it into a sheet about 1/4 inch thick, then wrap it completely around your foil egg, smoothing out any seams with your thumb to create a unified, chubby droplet shape. -
Shape the stance:
Gently tap the wider bottom of the droplet against your work surface to create a flat base so the kitty stands securely without rolling over. -
Add tiny feet:
Roll two small balls of cream clay and flatten them slightly. Press these onto the bottom front of the body for paws. Use a needle tool to press two small indents into each paw for toes. -
Create the tail:
Take a piece of brown clay and roll it into a short, tapered sausage shape. Attach this to the lower back of the body, curving it slightly against the side so it looks tucked in.
Head Weight Balance
Make the head solid clay rather than using foil inside. The extra weight helps the head bobble longer and with a more satisfying rhythm.
Step 2: Creating the Bobble Head
-
Sculpt the head shape:
Roll a sphere of speckled cream clay that is roughly slightly smaller than the body. Flatten the back of the sphere very slightly where it will eventually connect to the spring. -
Form the ears:
Pinch two triangles of cream clay. Use your ball tool to create a hollow in the center of each, then fill that hollow with a textured triangle of brown clay to mimic the inner ear fur. -
Attach the ears:
Press the ears firmly onto the top of the head sphere, blending the clay at the join line so they look seamless and sturdy. -
Insert the spring – Body:
Push about half of your tension spring into the top of the body piece. I usually twist it in slightly to ensure the clay grips the coils well. -
Pre-drape check:
Before attaching the head, ensure the visible part of the spring isn’t too long, or the neck will look stretched. The head should hover just above the shoulders. -
Prepare the head connection:
Create a recess in the bottom of the head using a tool that matches your spring diameter. This hole needs to be deep enough to hide the mechanism but tight enough to hold.
Step 3: Face and Finishing Details
-
Make the eyes:
Roll two tiny spheres of black clay. Press them gently into the face, spacing them wide apart to enhance the cute factor. -
Add the nose:
Roll a minuscule grain of brown clay into a tiny oval and place it centrally below the eyes. -
Draw whiskers:
Roll extremely thin threads of brown clay for whiskers, or simply use a needle tool to gently etch whisker lines into the cheeks if you prefer a smoother finish. -
Sculpt the arms:
Roll two elongated teardrops of cream clay. Attach them to the sides of the body, pointing downwards, and blend the shoulders into the main form. -
Add paw details:
Using a tiny bit of brown clay, add tiny vertical dashes on the tips of the hands and feet to represent claws or toe markings. -
Final Assembly:
Apply a drop of liquid clay or bake-and-bond to the top of the spring sticking out of the body, and carefully mount the head onto the spring. -
Bake:
Place your bobblehead on a ceramic tile and bake according to your clay manufacturer’s instructions (usually 275°F/130°C for 15-30 minutes).
Texture Trick
Before baking, gently tap the entire surface with an old toothbrush or stiff bristle brush. This mimics the rough, sandy texture of stoneware pottery.
Set your little friend on a windowsill and enjoy the gentle nod every time a breeze passes by


Panda Pal Clay Bobblehead
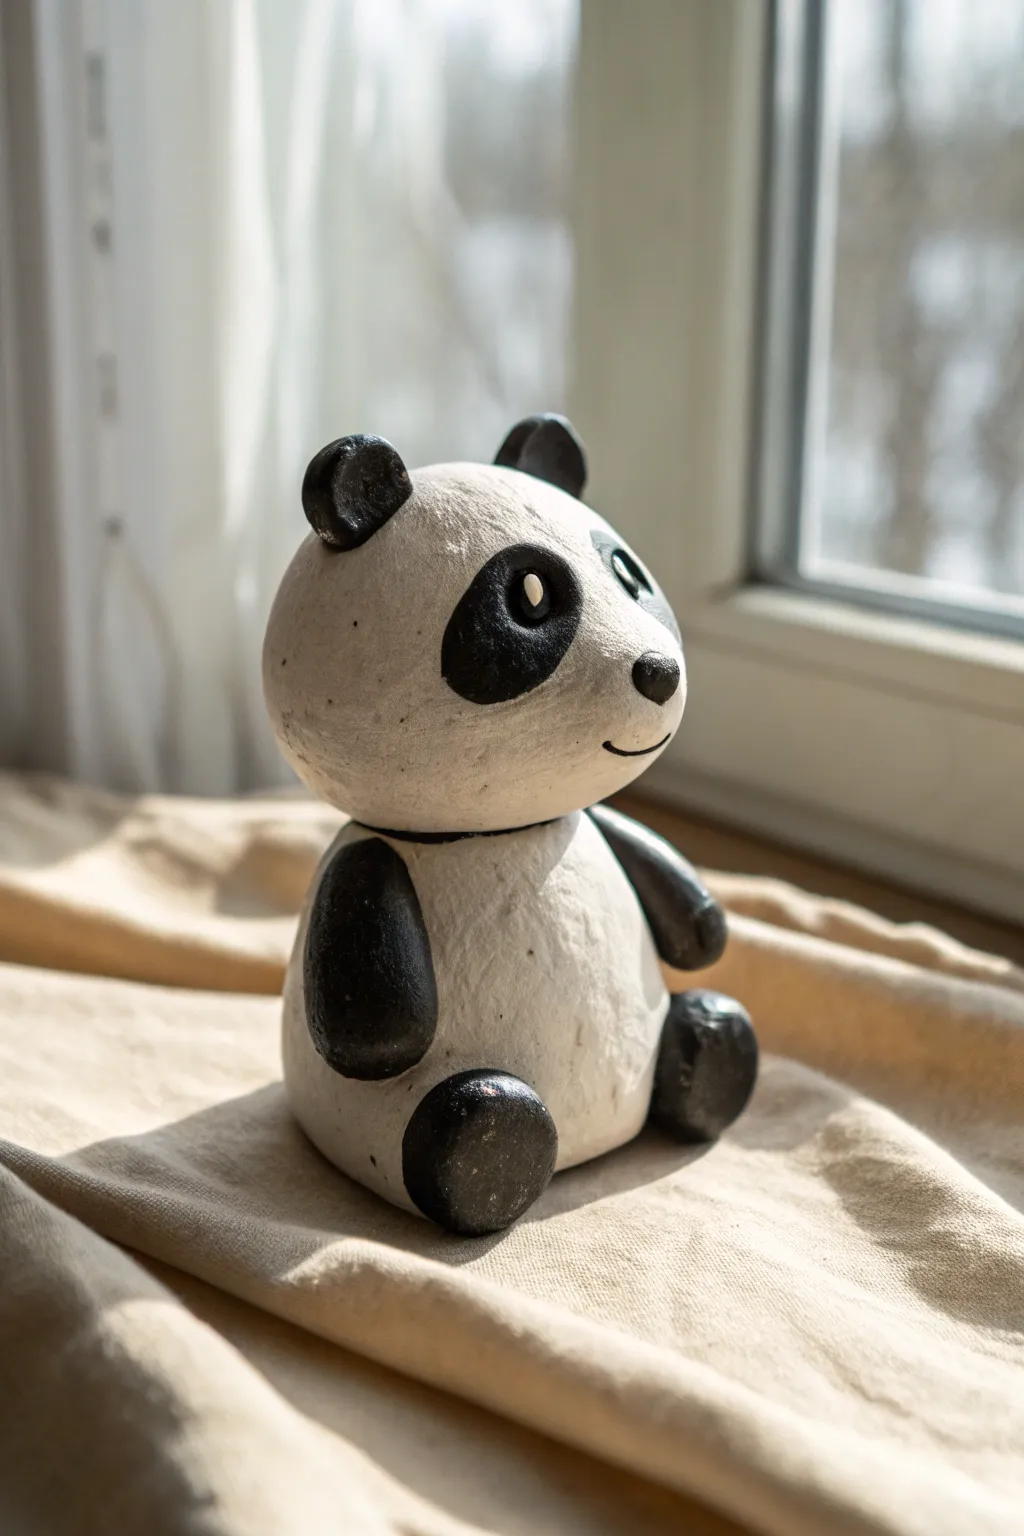
This adorable panda figurine brings a touch of whimsy to any desk or shelf with its playful, oversized head and simple, rounded features. The textured, matte finish gives it a charming, handmade stone-like quality that feels both modern and classic.
Step-by-Step
Materials
- White organic air-dry clay (or polymer clay)
- Black acrylic paint
- Small metal spring or bobblehead mechanism
- Basic sculpting tools (needle tool, smoothing sponge)
- Aluminum foil
- Fine-grit sandpaper
- Matte varnish or sealant
- Strong super glue or epoxy
- Paintbrushes (small detail and medium shader)
Step 1: Sculpting the Body Base
-
Create the core:
Start by crumpling a small ball of aluminum foil about the size of a golf ball. This reduces the weight and amount of clay needed. -
Cover with clay:
Roll out a thick sheet of white clay and wrap it fully around your foil core. Roll it between your palms until you have a smooth, slightly squat egg shape. -
Flatten the seat:
Gently tap the wider end of the egg shape onto your work surface to create a flat base so the panda sits securely without wobbling. -
Insert the neck connector:
If using a spring, press the bottom coil slightly into the top of the body clay while it’s still wet to create an indentation, then remove it. If you’re using a wire armature, insert it now.
Wobbly Head Woe?
If the head tilts too far backward or forward, the cavity inside the head isn’t aligned with the center of gravity. Adds a bit of clay inside the hole to re-center the connection point.
Step 2: Forming the Oversized Head
-
Shape the head armature:
Crumple a second, slightly larger ball of foil for the head. The head should be noticeably bigger than the body for that cute bobblehead look. -
Mold the clay head:
Cover this foil ball with clay just like the body. Shape it into a slightly flattened sphere, keeping the cheeks chubby and round. -
Create the spring cavity:
On the underside of the head, use a sculpting tool to hollow out a space wide and deep enough to accommodate the top half of your spring mechanism. -
Add the ears:
Roll two small marble-sized balls of clay. Flatten them slightly and attach them to the top of the head. Use a blending tool to smooth the seams so they don’t pop off later. -
Sculpt the snout:
Add a small, flattened oval of clay to the lower center of the face for the snout area. Blend the edges seamlessly into the main head shape.
Bamboo Accessory
Sculpt a tiny bamboo shoot from leftover clay and paint it green. Glue it to one of the panda’s paws before sealing to give him a sweet little snack to hold.
Step 3: Adding Limbs and Details
-
Attach the legs:
Create two small, pill-shaped logs of clay for legs. Attach them to the bottom front of the body, angling them slightly outward. -
Attach the arms:
Make two slightly longer teardrop shapes for the arms. Attach these to the sides of the body, pressing them firmly so they rest naturally against the torso. -
Smooth the texture:
Take a slightly damp sponge and gently pat the entire surface of the panda. This removes fingerprints and gives that subtle, organic texture seen in the photo. -
Dry thoroughly:
Allow all clay parts to dry completely. For air-dry clay, I usually wait at least 24-48 hours depending on humidity to ensure the core is solid.
Step 4: Painting and Assembly
-
Sand imperfections:
Once dry, use fine-grit sandpaper to gently smooth out any rough patches, paying extra attention to the areas where limbs attach. -
Paint the black patches:
Using a small brush and black acrylic paint, carefully paint the ears, the arms, the legs, and the iconic eye patches. Don’t forget a small black nose and thin smile line. -
Add eye highlights:
Inside the black eye patches, paint small white circles for eyes. Once dry, add a tiny black pupil and a minuscule white dot for a lifelike reflection. -
Seal the surface:
Apply a coat of matte varnish over the entire piece. This protects the paint and unifies the sheen of the painted and unpainted clay. -
Connect the spring:
Use strong super glue or epoxy to secure the bottom of the spring into the body indentation. Let it cure. -
Attach the head:
Apply glue to the top of the spring and carefully lower the head onto it, ensuring the spring fits snugly into the cavity you made earlier.
Give the head a gentle tap to see your new panda friend nod in agreement with your crafting skills


Smiley Frog Clay Bobblehead
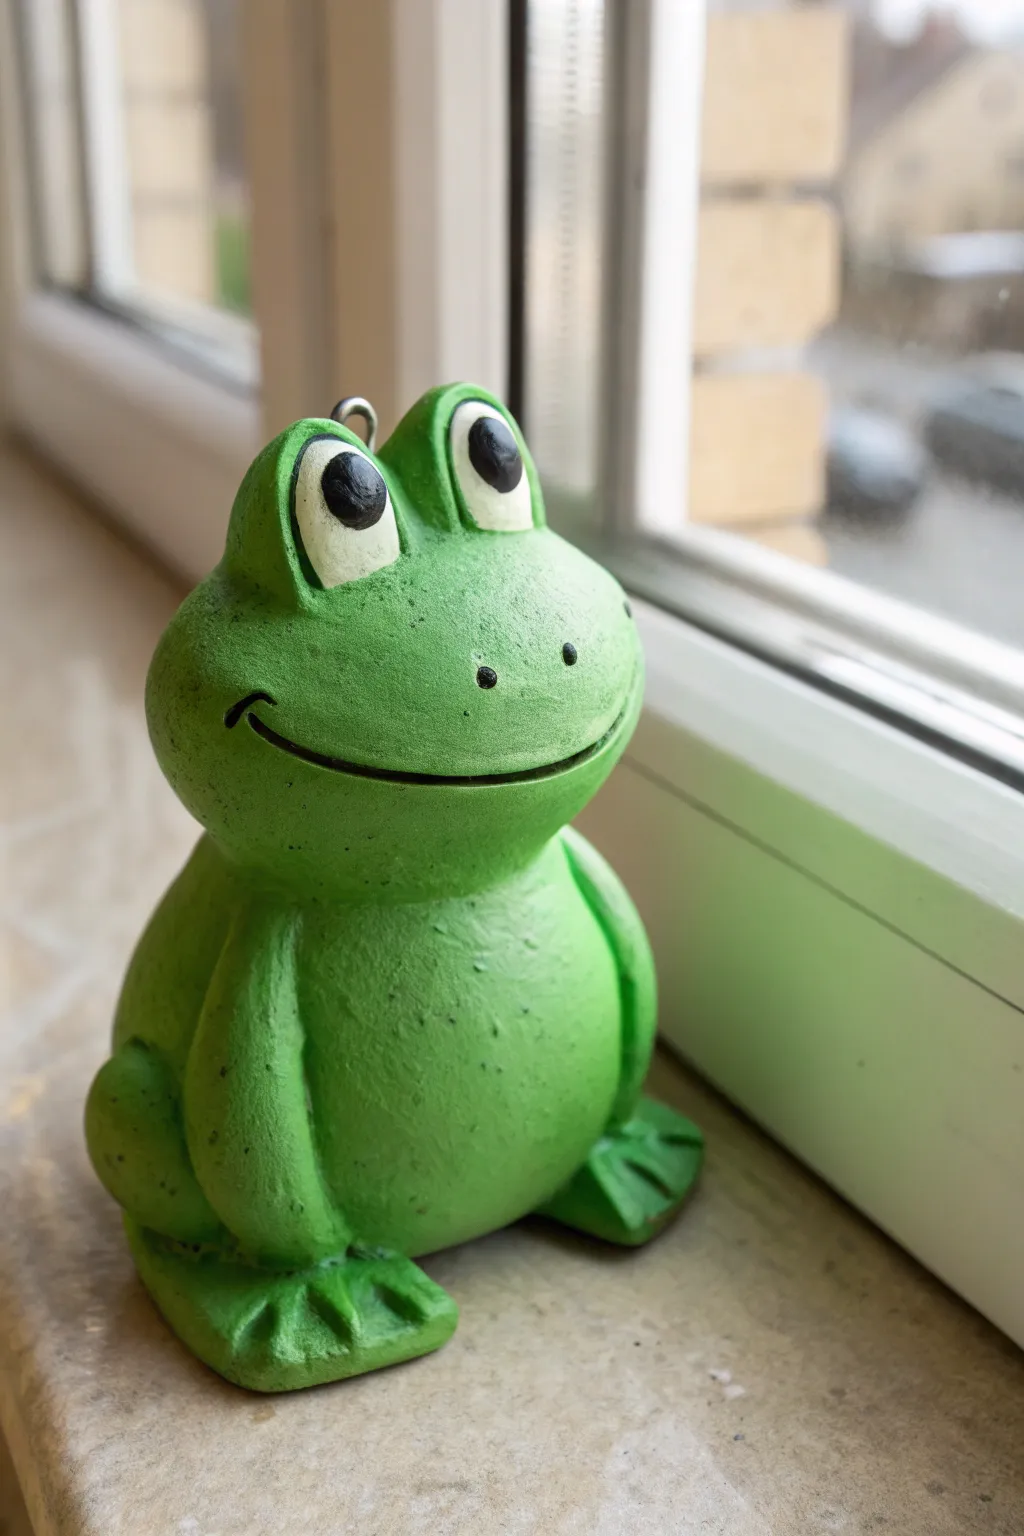
Brighten up any windowsill with this cheerful green frog friend, featuring oversized cartoon eyes and a contagious smile. This sturdy polymer clay project uses simple shapes to build a charming character that captures the essence of a lazy afternoon.
Step-by-Step Tutorial
Materials
- Polymer clay (Bright Green, White, Black)
- Aluminum foil
- Small metal spring or bobblehead mechanism
- Liquid polymer clay (Wait/Bake & Bond)
- Needle tool or toothpick
- Ball stylus tool
- Small metal eye screw hook (optional for hanging)
- Green acrylic paint (for dry brushing texture)
- Gloss glaze or varnish
Step 1: Shaping the Base Body
-
Create a foil core:
Start by scrunching aluminum foil into a tight ball, roughly the size of a golf ball. This saves clay and keeps the figurine lightweight so it bobbles better later. -
Cover the core:
Condition a large portion of bright green clay until soft. Roll it into a sheet about 1/4 inch thick and wrap it completely around your foil ball, smoothing out all seams. -
Form the pear shape:
Roll the clay-covered ball on your work surface to create a smooth, pear-like shape. The bottom should be wider for the belly, tapering slightly toward the neck area. -
Add the hind legs:
Roll two medium-sized balls of green clay. Flatten them slightly into thick discs and press them firmly onto the sides of the lower body for the haunches. -
Sculpt the feet:
Shape two smaller green rectangles and attach them under the haunches. Use a needle tool to press two indentations into each, creating three distinct toes per foot. -
Attach the front arms:
Roll two logs of green clay. Attach them vertically to the front of the belly, blending the top seam into the body so the arms appear to hang naturally. -
Insert the mechanism:
Press the bottom of your spring or bobble mechanism into the top center of the body neck area. I like to secure this with a drop of liquid clay for extra grip.
Weight Balance Tip
Keep the head lighter than the body! Use more foil inside the head and less clay. A top-heavy bobblehead tends to tip over rather than bounce.
Step 2: Creating the Bobbling Head
-
Shape the head:
Form a second, slightly smaller ball of green clay (you can use a smaller foil core here too if it feels heavy). Flatten the bottom slightly where it will meet the neck. -
Carve the smile:
Use a needle tool to carve a exceedingly wide, U-shaped smile stretching across the entire face. Deepen the corners to give it that friendly, tucked-in cheek look. -
Add nostrils:
Poke two small, symmetrical holes just above the smile line using your smallest ball stylus or a toothpick. -
Build the eye sockets:
Roll two small balls of green clay and press them onto the top of the head. Use your thumb to create a deep indentation in the front of each mound for the eyeballs. -
Insert the eyes:
Roll two balls of white clay and press them firmly into the green sockets. They should bulge out slightly. -
Add pupils:
Press small flattened discs of black clay onto the white eyeballs. Place them slightly askew or looking upward to give the frog a goofy, lively expression. -
Insert the top hook:
If you want to hang this later, screw a small metal eye hook into the very top of the head between the eyes.
Step 3: Assembly and Finish
-
Texture the skin:
Before baking, gently tap the entire green surface with an old toothbrush or a stiff bristle brush. This creates a realistic, porous skin texture. -
Initial Bake:
Bake the head and body separately according to your clay manufacturer’s instructions (usually 275°F/130°C for 15-30 minutes). Prop the head up so the back stays round. -
Connect the parts:
Once cool, attach the head to the exposed spring on the body. You may need a strong epoxy glue here to ensure the connection holds during movement. -
Enhance texture:
Use a dry brush with a tiny amount of darker green acrylic paint to lightly dust the textured surface. This makes the toothbrush pitting stand out. -
Seal the piece:
Finish by applying a coat of clear gloss glaze to the eyes for a wet look, and a matte or satin varnish to the body to protect your paint job.
Spring Won’t Stick?
If the metal spring slides out of the raw clay, bake the spring into the clay body first, then use two-part epoxy glue to secure the head after baking.
Place your little green friend in a sunny spot and give him a nudge to watch him bobble happily

The Complete Guide to Pottery Troubleshooting
Uncover the most common ceramic mistakes—from cracking clay to failed glazes—and learn how to fix them fast.
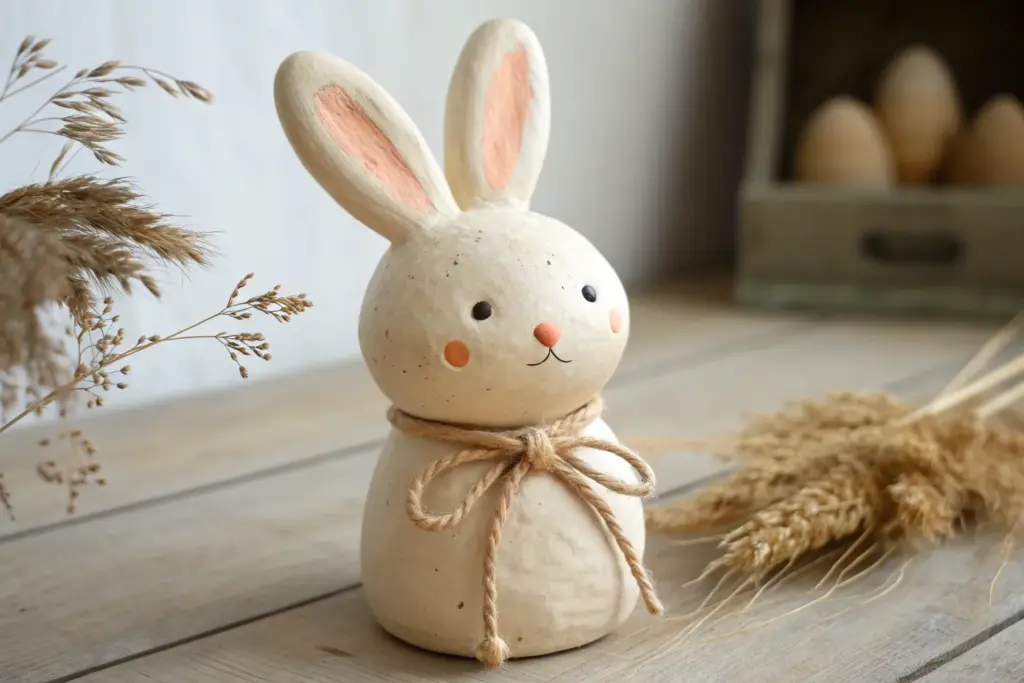
Floppy-Ear Bunny Clay Bobblehead
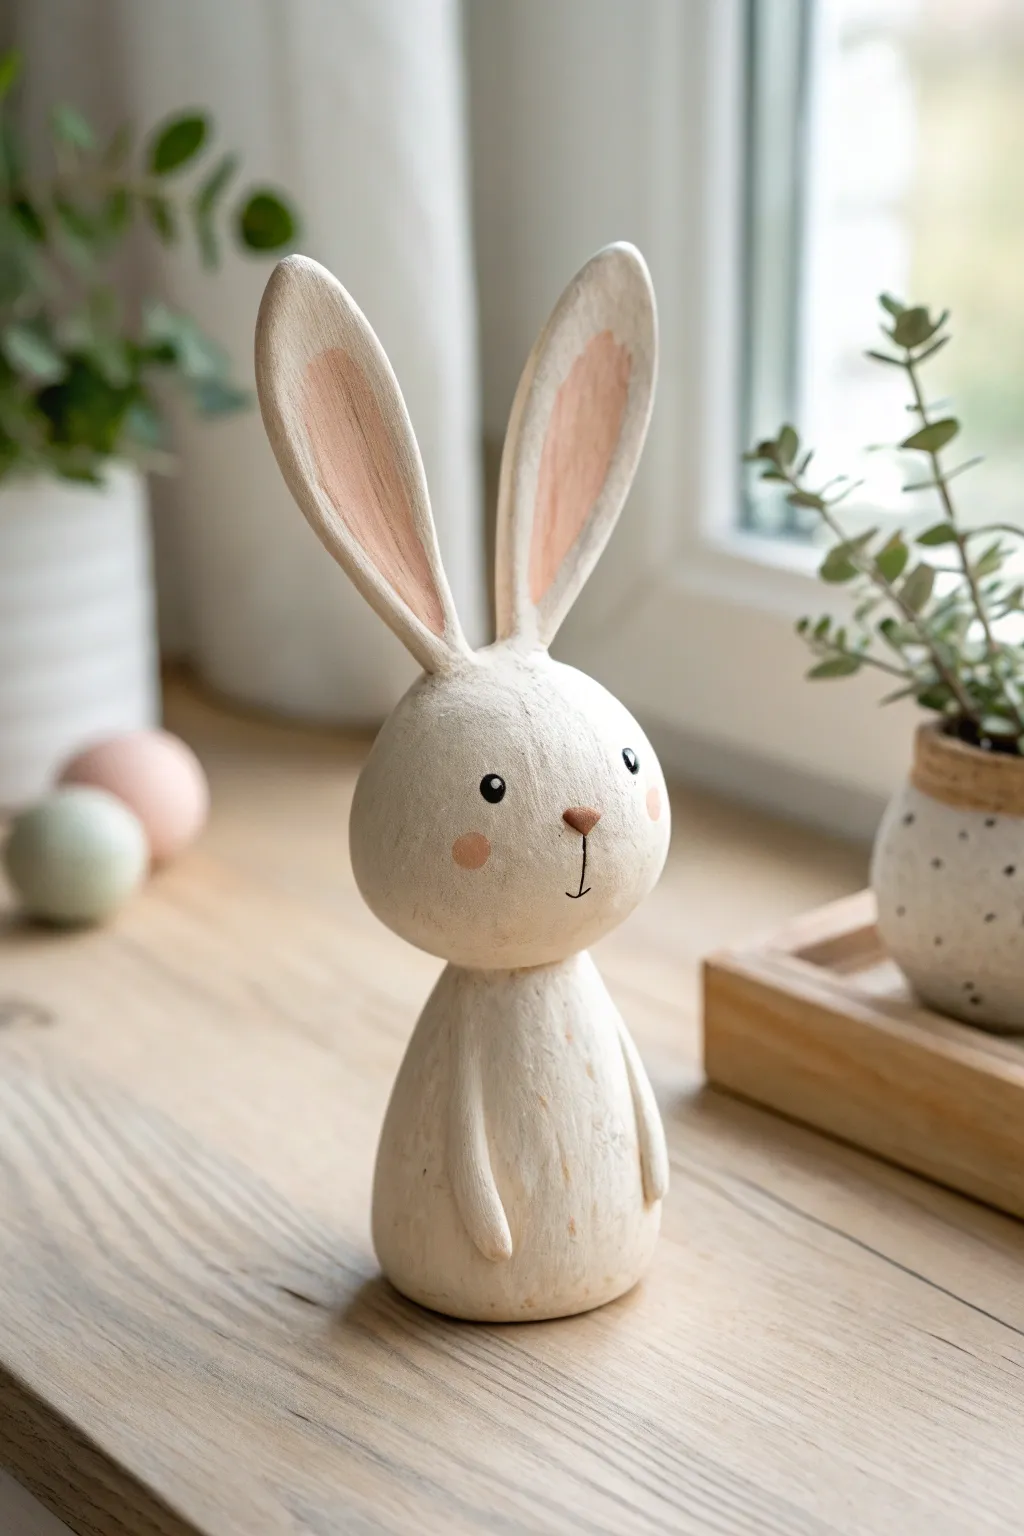
Capture the charm of spring with this adorable, minimalist bunny bobblehead that mimics the look of carved wood. Its clean lines, soft blushing cheeks, and oversized ears make it a delightful addition to any windowsill or shelf.
Step-by-Step
Materials
- Air-dry clay (white or natural stone color)
- Small bobblehead spring mechanism (or stiff wire to make your own)
- Sculpting tools (needle tool, smoother)
- Acrylic paints: Creamy white, soft pink, black, brown
- Paintbrushes: Medium flat brush and fine detail brush
- Fine-grit sandpaper
- Matte sealant spray or mod podge
- Aluminum foil (for armature core)
- Water cup
Step 1: Sculpting the Base Form
-
Prepare the foil core:
Crumple a small amount of aluminum foil into a teardrop shape. This will act as the core for the bunny’s body, saving clay and reducing drying time. -
Form the body:
Roll a ball of air-dry clay and flatten it slightly. Wrap it around the foil teardrop, smoothing the seams until you have a solid, seamless pear shape that stands flat on its own. -
Create the arms:
Roll two thin tapered sausages of clay. Attach them vertically to the sides of the body, blending the top shoulder area seamlessly into the main form while leaving the bottom ‘paws’ slightly raised for dimension. -
Sculpt the head:
Roll a separate, slightly flattened sphere for the head. It should be proportional to the body but large enough to support those magnificent ears. -
Make the ears:
flatten two long oval pieces of clay. Pinch the bottoms slightly to curve them. Use a modeling tool to create a shallow depression running up the center of each ear for the inner ear detail. -
Attach the ears:
Score and slip the top of the head and the bottom of the ears. Attach them firmly, blending the clay at the join so they look like they grew naturally from the head. -
Create the spring cavity:
Before the clay dries, press your finger or the spring mechanism into the bottom of the head and the top of the body to create recesses where the spring will eventually sit.
Head Too Heavy?
If the head tilts too far, the clay might be too thick. Drill a small hole from the bottom neck area upward to hollow out excess weight without damaging the face.
Step 2: Refining and Assembly
-
Let it dry completely:
Allow all your pieces to dry for at least 24-48 hours. I usually rotate the pieces occasionally so the bottom gets airflow too. -
Sand for finish:
Once bone dry, use fine-grit sandpaper to smooth out any fingerprints or rough bumps. To mimic the photo’s ‘carved wood’ look, you can leave slight vertical sanding marks. -
Install the spring:
Super glue one end of your bobblehead spring into the cavity in the body. Let it set, then glue the other end into the head cavity. Hold it steady until the glue bites.
Pro Tip: Texture Trick
Before the clay dries, lightly drag a stiff bristle brush vertically over the body. This creates subtle grooves that catch the paint later, looking just like carved wood.
Step 3: Painting the Details
-
Base coat:
Paint the entire bunny with a creamy white or off-white acrylic paint. Apply two thin coats rather than one thick one for a smoother finish. -
Add texture (optional):
To enhance the organic feel, you can dry-brush a tiny amount of very light beige vertically over the body to simulate wood grain direction. -
Paint the inner ears:
Mix a soft, dusty pink and paint the inside depressions of the ears. Feather the edges slightly so the transition isn’t too harsh. -
Face details:
Using a fine detail brush and black paint, dot two wide-set eyes. Add a small white highlight dot in each eye to bring them to life. -
Nose and mouth:
Paint a small, inverted soft brown triangle for the nose. Extend a thin black line downward from the nose, curving it slightly at the bottom for a gentle smile. -
Rosy cheeks:
Dip your finger or a dry brush into the pink paint, wipe most of it off, and gently dab two circular rough spots on the cheeks for a blushing effect. -
Seal the work:
Finish by spraying the bunny with a matte sealant. This protects the paint and maintains that natural, unglazed pottery aesthetic seen in the inspiration image.
Place your finished bunny in a sunny spot and give its head a gentle tap to see it greet the day
Easy Self-Portrait Clay Bobblehead
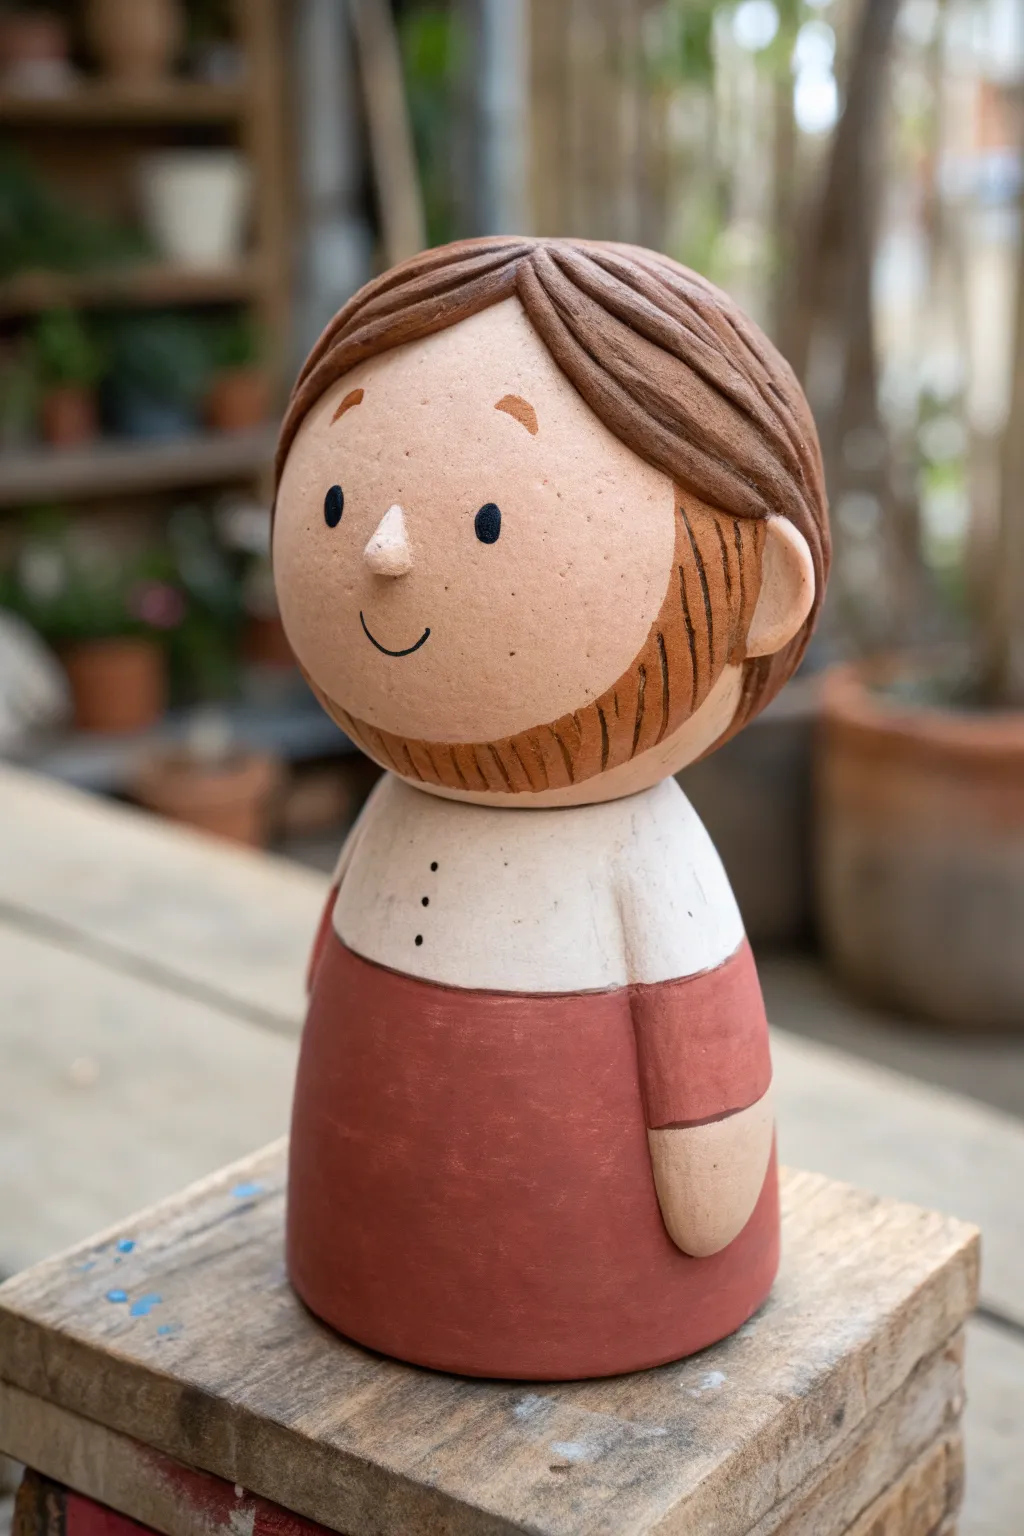
Capture your likeness in charming miniature form with this smooth, matte-finish clay figure. With its rounded features and warm, earthy tones, this self-portrait bobblehead makes for a delightful desk companion or a personalized gift.
Detailed Instructions
Materials
- Air-dry clay (white or light terracotta)
- Acrylic paints (terracotta/red-brown, chocolate brown, white, black, beige/flesh tone)
- Small styrofoam ball or foil ball (for the head core)
- Spring or bobblehead mechanism
- Sculpting tools (needle tool, smoother)
- Fine grit sandpaper
- Paintbrushes (flat and fine detail)
- Clear matte varnish (optional)
Step 1: Sculpting the Head
-
Create the core:
Start by rolling a ball of aluminum foil or using a small Styrofoam ball about the size of a tangerine; this keeps the head light enough to bobble effectively. -
Cover with clay:
Roll out a sheet of your base clay and wrap it smoothly around the core, ensuring there are no air bubbles, then roll it in your palms until perfectly spherical. -
Add the nose:
Pinch off a tiny amount of clay, roll it into a small cone or drop shape, and attach it to the center of the face using a little water to blend the seams invisibly. -
Sculpt the ears:
Create two small flattened C-shapes for ears and attach them symmetrically on the sides of the head, blending the back edges into the sphere. -
Form the hair base:
Flatten a pancake of clay and drape it over the top/back of the head, trimming the excess to form the hairline. -
Texture the hair:
Use a needle tool or knife to gently carve deep, sweeping lines into the hair clay to simulate strands, parting them slightly off-center.
Wobbly Head Fixes
If the head tilts too far backward, adjust the spring angle before gluing. If it’s too heavy and doesn’t bounce, your clay layer was too thick—hollow it out more next time.
Step 2: Forming the Body
-
Shape the torso:
Mold a solid piece of clay into a bell shape or a rounded cone with a flat bottom so it stands sturdily on its own. -
Define the arms:
Unlike the head where we added pieces, for the arms, lightly score vertical lines down the sides of the torso to suggest arms resting against the body, slightly carving out the ‘cuff’ area. -
Create hands:
Add small, flattened ovals of clay at the bottom of your arm indents to represent the hands peeking out of sleeves. -
Install the spring:
Create a small divot in the top of the neck area and the bottom of the head, then press your spring mechanism securely into the wet clay of the body only; let both pieces dry completely (24-48 hours).
Level Up: Accessories
Personalize it further by adding tiny wire glasses, a clay hat, or holding a miniature item like a phone or coffee cup made from scrap clay.
Step 3: Painting and Assembly
-
Sand for smoothness:
Once bone dry, take fine-grit sandpaper and gently buff the face and body to remove any fingerprints or rough texture. -
Base coat the face:
Paint the entire head and hand areas with a matte flesh-tone acrylic suitable for your complexion. -
Paint the clothing:
Apply a white coat to the upper chest area for the shirt, and a reddish-brown terracotta color to the lower body, creating a clean curved line where they meet. -
Add hair color:
Paint the sculpted hair brown, letting the paint get into the grooves you carved earlier to add depth. -
Paint the beard:
Using a fine brush and the same brown paint, carefully draw the beard directly onto the dry face, painting vertical lines to match the hair texture. -
Detail the face:
Using a very fine detail brush or a paint pen, add two solid black circles for eyes, small arched eyebrows, and a simple curved smile line. -
Paint buttons:
add three tiny vertical dots down the center of the white shirt area. -
Final assembly:
Using strong adhesive like hot glue or super glue, attach the head to the exposed spring on the neck body.
Give your little clay likeness a gentle tap and watch it nod back at you approvingly.


What Really Happens Inside the Kiln
Learn how time and temperature work together inside the kiln to transform clay into durable ceramic.
Baseball Cap Kid Clay Bobblehead
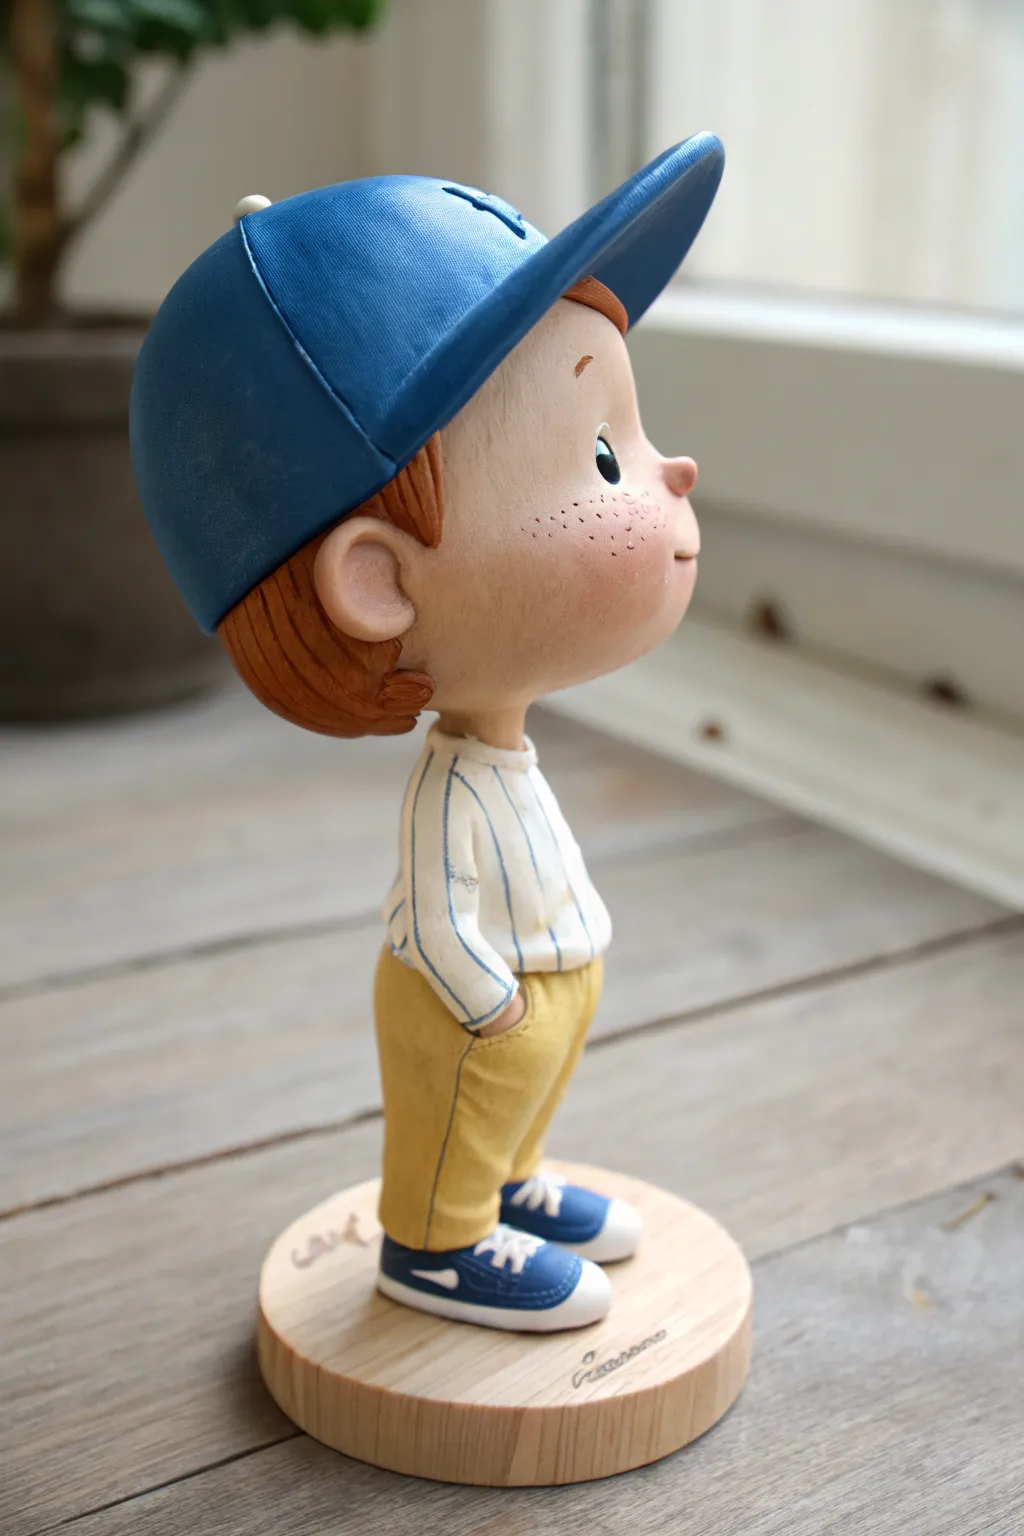
Capture the nostalgic spirit of a sunny afternoon game with this charming clay bobblehead. This project features detailed textures, from freckles to fabric folds, giving your figurine a heartwarming, illustrative style.
Step-by-Step Tutorial
Materials
- Polymer clay (flesh tone, burnt orange/brown, blue, white, mustard yellow)
- Aluminum foil
- Wire armature (aluminum wire)
- Bobblehead spring mechanism (standard size)
- Small wooden display round
- Sculpting tools (needle tool, ball stylus, rubber shaper)
- Acrylic paints (black, white, blue)
- Fine detail paintbrush
- Texturing tool or old toothbrush
- Baking sheet and oven
Step 1: Building the Head and Face
-
Core construction:
Begin by crinkling a ball of aluminum foil slightly smaller than a golf ball to form the core of the head. This saves clay and keeps the head light enough to bobble properly. -
Covering the core:
Roll out a sheet of flesh-toned clay and wrap it smoothly around the foil ball, ensuring there are no air bubbles trapped underneath. Blend the seams until invisible. -
Sculpting features:
Add a small, distinct button nose in the center of the face. Use a ball stylus to gently indent the eye sockets and the corners of the mouth for a slight smile. -
Adding texture:
Before adding hair, take a stiff toothbrush or a texturing sponge and very gently tap the skin surface to remove fingerprints and give it a matte, realistic finish. -
The hair:
Create the hair using burnt orange clay. Instead of one solid piece, attach small flattened snakes of clay to the back and sides of the head. Use a needle tool to drag lines through the clay for hair strands. -
Preparing the bobble mechanism:
Create an indentation at the base of the neck area deep enough to house the top half of your spring mechanism, but don’t glue it in yet.
Texturing Like a Pro
For the baseball cap, press a piece of denim or canvas fabric onto the raw clay before baking. This imitates the woven texture of a real hat perfectly.
Step 2: Sculpting the Body
-
Armature setup:
Twist two pieces of aluminum wire together to create a leg and torso armature. Drill small holes into your wooden base and secure the feet wires so the figure stands firmly while you work. -
Mustard trousers:
Wrap the leg wires with mustard yellow clay. Keep the shape fairly straight but add subtle horizontal creases near the ankles where fabric would naturally bunch up. -
Classic sneakers:
Mold two small ovals of blue clay for feet. Add white tips for the toe caps and thin white strips for the soles. Use a needle tool to scratch ‘laces’ into the top. -
The torso:
Form a teardrop shape of white clay for the upper body. Smooth it down onto the pants to create a seamless waistline. -
Shirt details:
Roll very thin strings of blue clay. Carefully press these vertically onto the white shirt to create the pinstripe pattern. Gently roll over them with a smooth tool to embed them flush with the shirt surface. -
Shaping the arms:
Form two arms with the same striped pattern. Position them so the hands (balls of flesh-toned clay) are tucked casually into the pockets of the yellow pants. -
Mounting the spring:
Embed the bottom of the spring into the neck of the torso. Ensure the wire extends up enough to support the head without being visible.
Step 3: The Hat and Final Details
-
Cap base:
Roll a disk of blue clay and drape it over the top of the head, covering the upper hair. Smooth it to fit the curve of the skull. -
Stitching details:
Use a needle tool to create the signature seams of a baseball cap—usually six panels meeting at the top. Add a tiny button of clay at the very peak. -
The brim:
Cut a crescent shape from a thicker sheet of blue clay. Attach it to the front of the hat, curving it slightly upward. Smooth the connection point firmly. -
Baking:
Bake the head and body separately according to your clay manufacturer’s instructions (usually 275°F/130°C for 15-30 minutes). Support the head on a bed of fiberfill so the back doesn’t flatten. -
Painting the face:
Once cool, paint two small black ovals for eyes with tiny white reflection dots. I like to use a toothpick for the freckles—dip it in diluted brown paint and gently dot the cheeks and nose. -
Assembly:
Use strong epoxy or super glue to attach the spring inside the head. Test the bobble action to ensure it moves freely without hitting the shoulders.
Team Spirit Upgrade
Swap the blue and white colors for your favorite local team’s colors, or paint a tiny logo onto the front of the cap after baking for a custom touch.
Place your finished slugger on a shelf and enjoy the cheerful nod every time you walk by
Mini Astronaut Clay Bobblehead
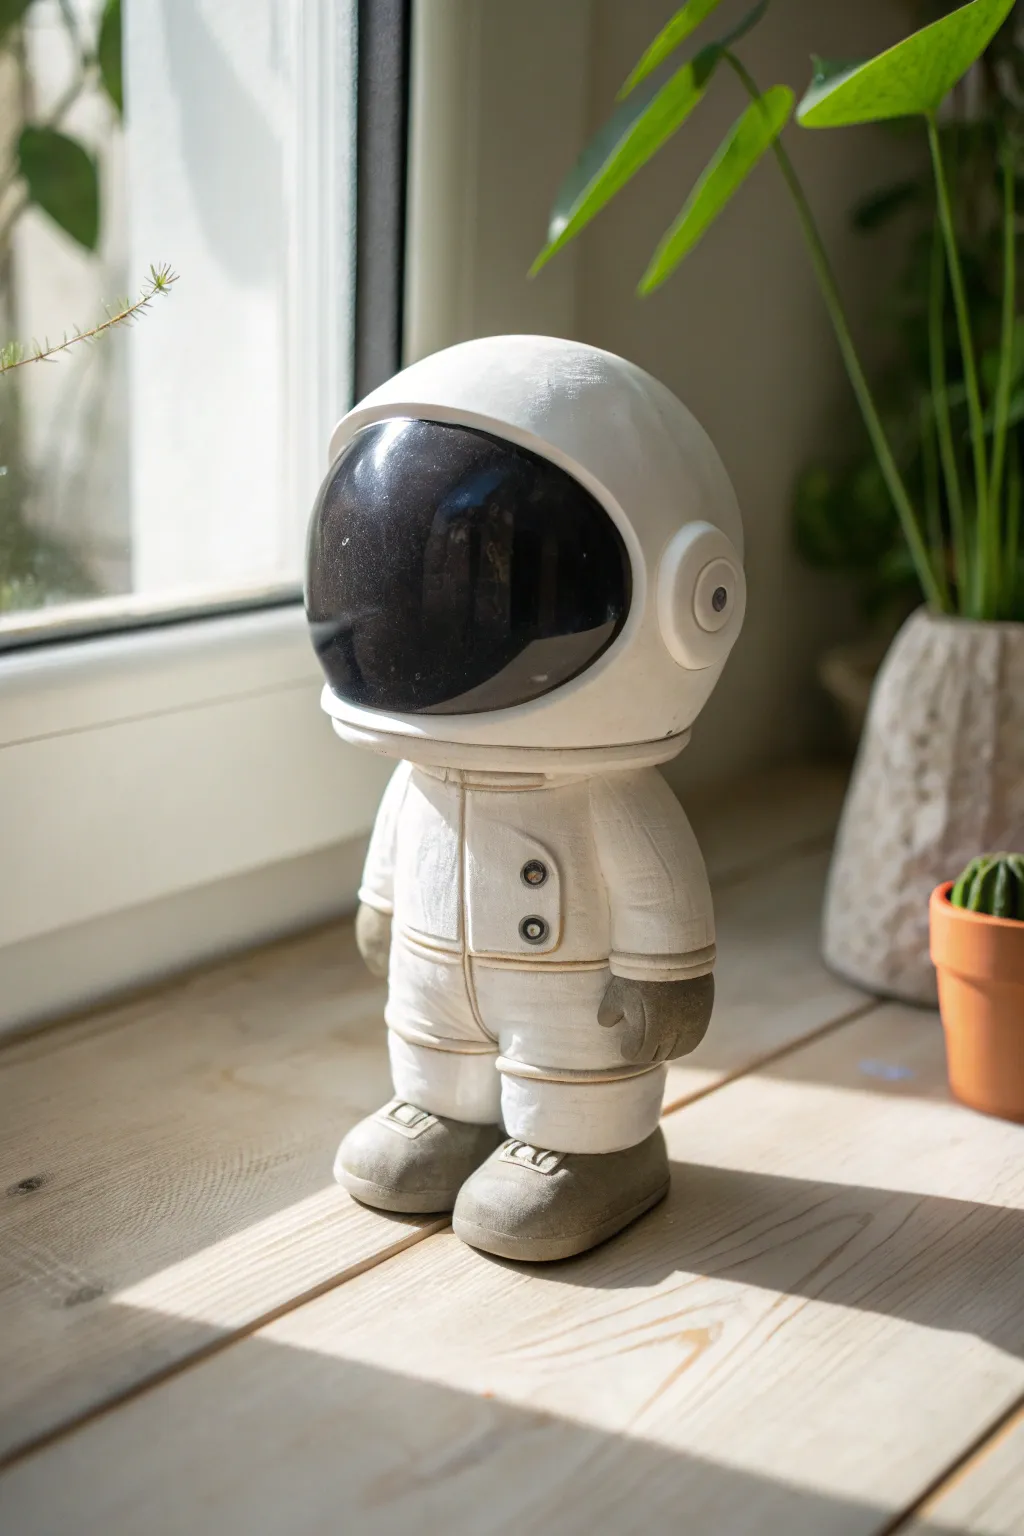
Blast off into creativity with this adorable mini astronaut bobblehead, featuring a polished, oversized helmet and chunky space gear. The stark white suit contrasts beautifully with the glossy black visor, making it a perfect futuristic addition to your desk or shelf.
Step-by-Step Guide
Materials
- White polymer clay
- Gray polymer clay
- Glossy black polymer clay
- Bobblehead spring mechanism (or repurposed spring)
- Small rolling pin
- Clay sculpting tools (needle tool, ball stylus)
- Strong craft glue (e.g., E6000)
- Gloss glaze or UV resin
- Matte varnish (optional)
- Diluted brown or gray acrylic paint (for weathering)
Step 1: Suiting Up: The Body
-
Form the Torso:
Start by conditioning a chunk of white clay and shaping it into a rounded rectangular block for the main body. It should be slightly wider at the bottom than the top to create a sturdy base. -
Create the Legs:
Roll two thick sausages of white clay for the legs. They don’t need to be long; the chibi style relies on stubbier proportions. Attach them firmly to the bottom of the torso, blending the seams with a sculpting tool so they look like one continuous piece of fabric. -
Adding the Boots:
Switch to gray clay for the moon boots. Shape two oval lumps, flatten the bottoms for stability, and attach them to the ends of the white legs. Add a small rectangular detail on the top front of each boot to mimic straps or vents. -
Sculpting the Arms:
Roll two more coils of white clay for arms. Attach them to the sides of the torso, keeping them fairly straight down. Add small gray mittens for gloves at the ends, ensuring the thumbs point inward. -
Suit Details:
Using a needle tool, gently score horizontal lines around the knees, ankles, and elbows to suggest padded joints in the space suit. Create a vertical line down the center of the chest and add a small rectangular panel on the right side. -
Button Accents:
Press two tiny black or dark gray clay circles into the chest panel. Use a small ball stylus to make indentations in the center of each button for a mechanical look.
Keep it Clean
White clay picks up dust instantly. Keep baby wipes or rubbing alcohol nearby to clean your hands and tools often, especially after handling the black visor clay.
Step 2: Helmet Headquarters
-
Shape the Helmet Base:
Roll a large ball of white clay. This needs to be significantly larger than the body to achieve that classic bobblehead aesthetic. Press slightly on the bottom to create a flat area for the neck connection. -
Carve the Visor Space:
Use a large ball tool or your thumb to press a deep, wide indentation into the front of the helmet sphere. This cavity will house the visor. -
Insert the Visor:
Take a piece of glossy black clay and shape it into a smooth, convex oval that fits perfectly into the indentation you just made. Smooth the edges where the black meets the white so there are no gaps. -
Ear Geometries:
Create two small white circles and attach them to the sides of the helmet where ears would be. Add a smaller circle on top of each, and press a tiny dot in the center to look like communication devices. -
Establish the Rim:
Roll a thin snake of white clay and wrap it around the bottom edge of the helmet to create a defined neck ring. This adds structural visual weight to the head.
Gravity Defying
Add a small, hidden magnet inside the bottom of the boots before baking. This lets you stick your explorer to metal surfaces or create a magnetic moon base.
Step 3: Assembly and Finish
-
Pre-Bake Prep:
Before baking, make a hole in the bottom of the head and the top of the neck deep enough to accommodate your spring mechanism ends. Check the fit, then remove the spring for baking. -
Bake:
Bake your clay pieces according to the package instructions. I usually prop the round head on a bed of cornstarch or batting to prevent a flat spot from forming during baking. -
Weathering (Optional):
Once cool, mix a tiny drop of brown paint with water. Brush it over the white suit, specifically into the creases and join lines, then immediately wipe away the excess with a paper towel. This gives the suit a realistic, traveled look. -
High Gloss Finish:
Apply a thick coat of gloss glaze or UV resin specifically to the black visor. This is crucial for that reflective, glass-like space helmet effect. -
Final Assembly:
Using strong craft glue, secure the spring into the neck hole of the body first. Let it set, then glue the head onto the top of the spring. Hold it in place until the glue grabs.
Now your little space traveler is ready to nod along to your daily adventures

TRACK YOUR CERAMIC JOURNEY
Capture glaze tests, firing details, and creative progress—all in one simple printable. Make your projects easier to repeat and improve.
Sleepy Sloth Clay Bobblehead
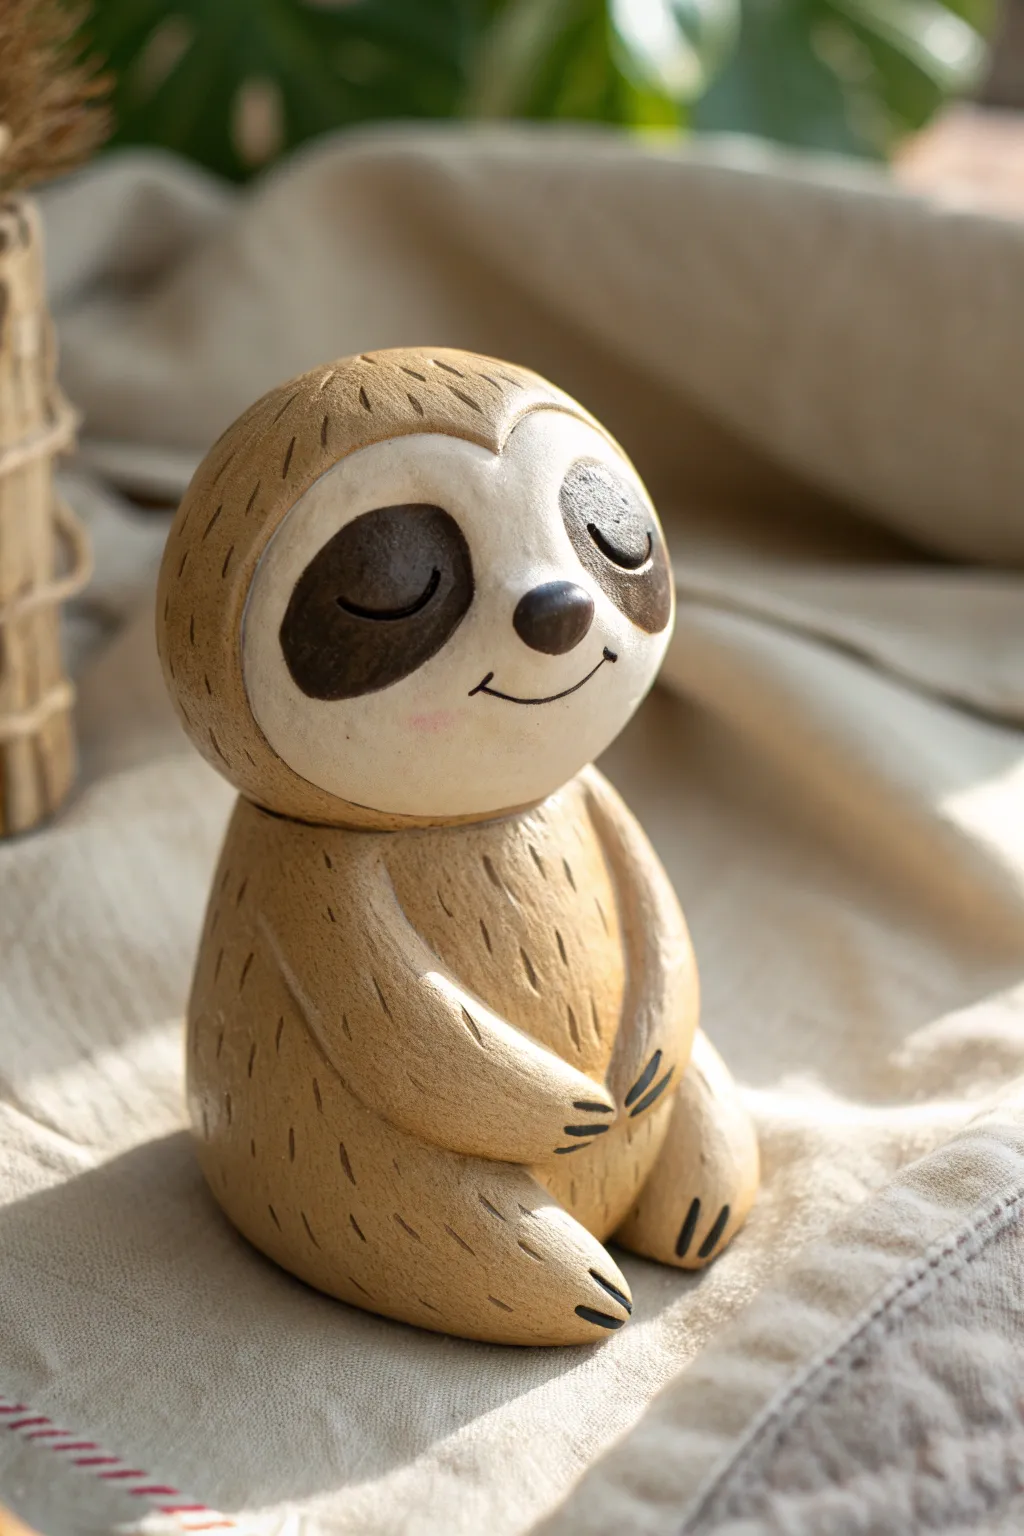
Embrace the slow life with this incredibly charming and simple sloth figure that seems to dozing off in the sun. The smooth, earthy textures and peaceful expression make this bobblehead a relaxing addition to any desk or shelf.
Step-by-Step
Materials
- Polymer clay (beige/tan, white, dark brown)
- Small bobblehead spring or flexible wire
- Clay sculpting tools (needle tool, smoothing tool)
- Acrylic paints (black, pink for blush)
- Fine detail paintbrush
- Aluminum foil (for armature)
- Super glue or strong craft adhesive
- Texturing tool or old toothbrush
Step 1: Sculpting the Body Base
-
Form the Core:
Start by crumpling a small ball of aluminum foil into a pear shape. This will be the core of the sloth’s body, saving clay and reducing weight. -
Cover with Clay:
Roll out a sheet of beige or tan polymer clay. Wrap it completely around your foil pear, smoothing all seams until you have a seamless, organic teardrop shape that sits flat on the bottom. -
Shape the Limbs:
Roll two thick sausage shapes for legs and attach them to the bottom sides of the body, curving them forward so the feet meet in the middle. -
Add the Arms:
Create two slightly longer rolls for the arms. Attach them at the shoulders and curve them down across the belly, resting the hands gently on top of the feet. -
Create Texture:
Using a needle tool or a small knife, gently score short, vertical lines all over the tan clay to mimic fur texture. Keep the strokes random but generally flowing downward. -
Detail the Claws:
Use your needle tool to press three distinct indentations into the ends of each hand and foot to suggest claws. Optionally, paint these grooves with a tiny bit of black paint later.
Head Too Heavy?
If the head droops too much, the spring might be too weak. Shorten the spring by cutting a coil off, or create a larger foil center for the head to reduce the clay weight.
Step 2: Creating the Head
-
Form the Head Shape:
Roll a ball of tan clay slightly smaller than the body. Flatten the back slightly where it will eventually connect to the neck area. -
Add the Face Mask:
Flatten a piece of white clay into a soft heart or kidney-bean shape. Press this onto the front of the tan head ball and smooth the edges so it sits flush. -
Sculpt Eye Patches:
Take two small pieces of dark brown clay and flatten them into teardrop shapes. Press these onto the white face mask, angling them slightly downwards for that sleepy look. -
Add the Nose:
Roll a tiny oval of dark brown clay and press it into the center of the face, right between the eye patches. -
Detail the Fur:
Just like the body, add subtle texture marks to the tan part of the head, avoiding the white face mask.
Pro Tip: Smooth Seams
Before baking, brush a tiny amount of baby oil or clay softener over the white face mask. This removes fingerprints and makes the ‘skin’ look incredibly smooth.
Step 3: Assembly and Finishing
-
Bake the Pieces:
Bake the body and head separately according to your clay package instructions. I find propping the head on a crumpled foil nest keeps it round during baking. -
Paint the Details:
Once cool, use a fine brush with black acrylic paint to interpret two closed, curved eyelids on the dark eye patches and a gentle smile line. -
Add Blush:
Dry brush a very small amount of pink paint onto the cheeks for a rosy, warm glow. -
Install the Spring:
Glue the bottom of your bobblehead spring firmly into the neck area of the body. Let it set completely. -
Attach the Head:
Apply strong glue to the top of the spring and carefully lower the head onto it. Hold it in place until the bond is secure.
Give the head a gentle tap and watch your sleepy friend nod off into a nap
Flower Crown Girl Clay Bobblehead
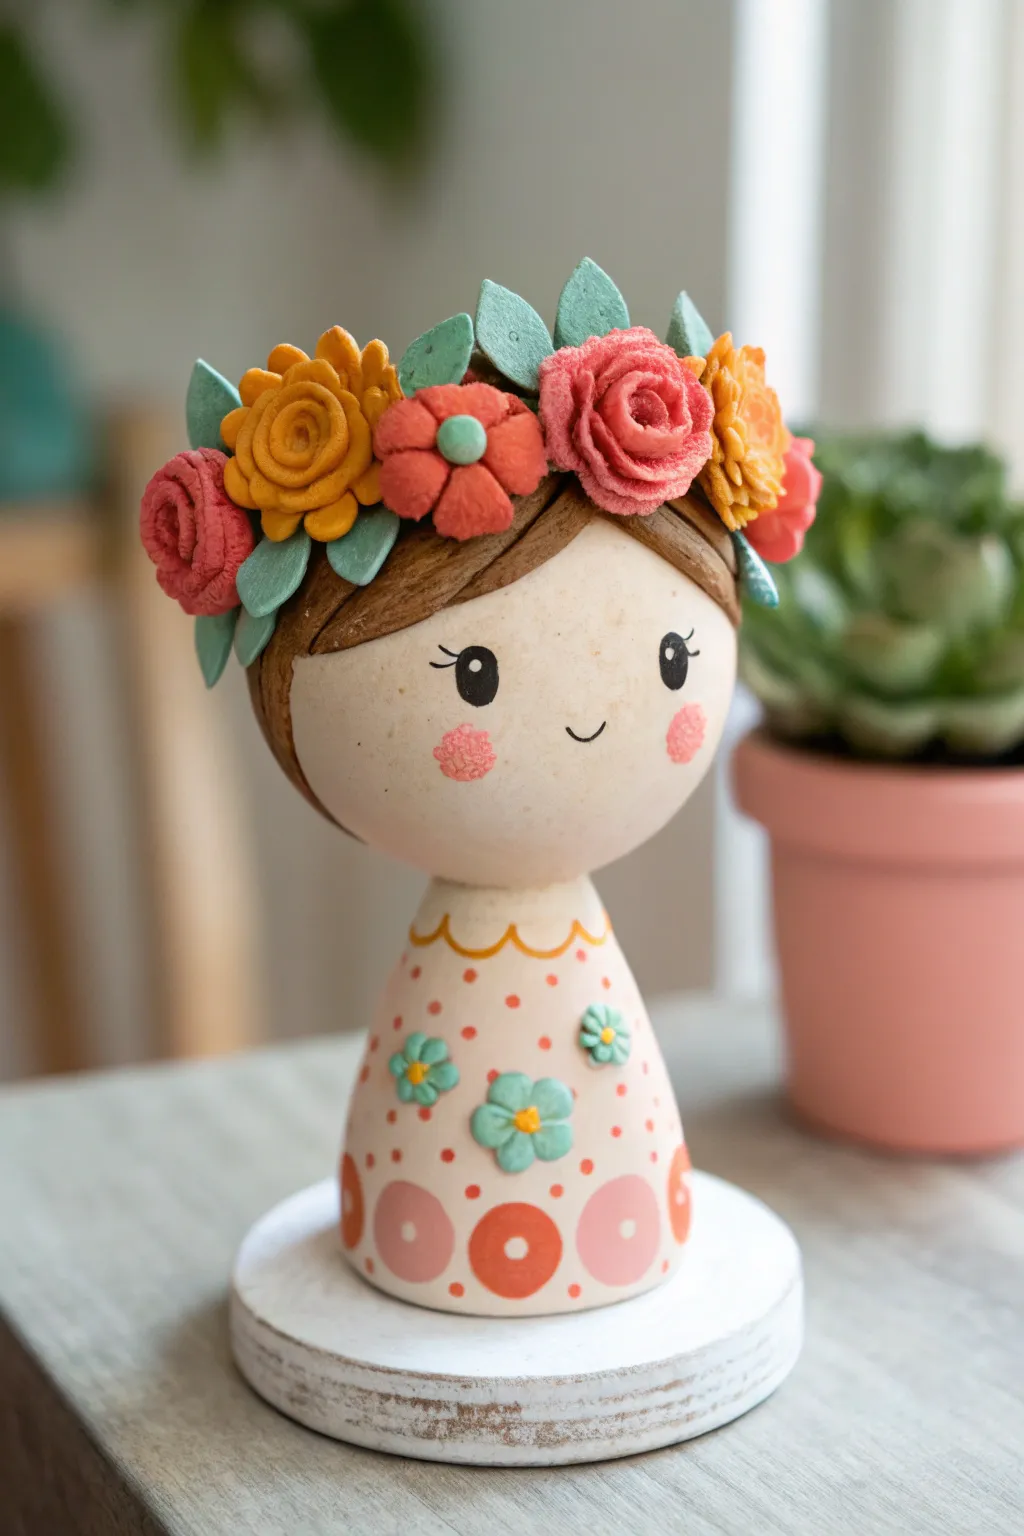
Bring a touch of springtime charm to your desk with this adorable clay bobblehead featuring a detailed floral wreath. With her sweet expression and colorfully patterned dress, this figure makes a delightful handmade gift or a cheerful addition to your own collection.
Step-by-Step Tutorial
Materials
- Polymer clay (white, beige/flesh tone, brown, coral pink, yellow, teal/mint green)
- Small tension flair spring or bobblehead spring mechanism
- Acrylic paints (black, pink, white, mint, orange)
- Fine detail paintbrushes
- Dotting tools or ball stylus
- Clay sculpting tools (modeling tool, needle tool)
- Strong super glue or E6000
- Round wooden base (optional)
- Matte varnish
- Aluminum foil (for armature core)
Step 1: Sculpting the Base Form
-
Form the core:
Begin by crumbling a small ball of aluminum foil to create a lightweight core for the head. This saves clay and reduces baking time. Roll a sheet of flesh-toned clay and wrap it smoothly around the foil ball until fully covered. -
Shape the head:
Refine the covered ball into a smooth, slightly flattened oval shape to serve as the face. Ensure the surface is free of fingerprints by lightly buffing it with your finger or a little cornstarch. -
Create the body:
Roll a piece of white clay into a cone shape. The base should be wide enough to stand stable, tapering up to a narrower neck area. Flatten the top of the cone slightly where the spring will eventually sit. -
Attach the hair base:
Roll out a thin sheet of brown clay. Cut a circle and drape it over the back of the head, molding it down to form the hair. Use a sculpting tool to impress gently curved lines into the brown clay to simulate hair strands swooping across the forehead.
Wobbly Head Fix
If the head tilts too much, the neck hole for the spring might be too shallow. Before gluing, carve a small recess into the bottom of the head so the spring sits deeper inside.
Step 2: Crafting the Floral Crown
-
Make mini leaves:
Using mint or teal clay, shape tiny teardrops and flatten them. Use a needle tool or knife to score a central vein down each leaf. Create about 6-8 of these. -
Sculpt the roses:
For the pink roses, roll a very thin strip of coral clay. Tightly coil one end to start the center, then wrap the rest of the strip loosely around it, flaring the edges slightly outward to mimic petals. -
Sculpt the daisies:
For the yellow and orange flowers, roll small balls of clay and flatten them. Press a smaller contrasting ball into the center. You can use a needle tool to impress petal lines radiating from the center. -
Arrange the crown:
I find it best to start with the largest flowers first. Press the roses and daisies firmly onto the top of the brown hair section. Tuck the green leaves throughout the arrangement to fill gaps.
Step 3: Adding Body Details
-
Sculpt dress flowers:
Make three tiny flowers using teal clay for the petals and yellow for the centers. Press these onto the front of the white cone body. -
Bake the pieces:
Place the head and body on a baking sheet. Follow the specific temperature and time instructions on your polymer clay package (usually around 275°F or 130°C for 15-30 minutes). Let them cool completely.
Level Up: Texture
Before baking, gently press a piece of sandpaper or a toothbrush bristles against the face cheeks and flower petals. This creates a soft, felt-like texture often seen in boutique crafts.
Step 4: Painting and Assembly
-
Paint the face:
Using a very fine brush and black acrylic paint, draw two oval eyes. Add tiny eyelashes at the corners. Paint a small, curved smile in the center. -
Add blush:
Dip a dry, stiff brush or a cotton swab into a tiny amount of pink paint. Dab it on a paper towel until almost dry, then gently stipple pink circles onto the cheeks for a textured, rosy look. -
Decorate the dress:
Use a dotting tool dipped in orange paint to create the polka dots on the dress. Paint larger circles near the hemline in pink and orange shades. Add a scalloped neckline in orange. -
Attach the mechanism:
Once the paint is fully dry, glue the bottom of your spring to the flat top of the body cone. Apply glue to the top of the spring and carefully center the head on top. -
Enhance the details:
Use a white paint pen or fine brush to add tiny highlights to the eyes and the centers of the painted circles on the dress. -
Final Step:
Allow all glue to cure for 24 hours. Optionally, glue the finished figure onto a white wooden base for extra stability.
Give the head a gentle tap and watch your floral creation nod happily on your shelf
Simple Robot Clay Bobblehead
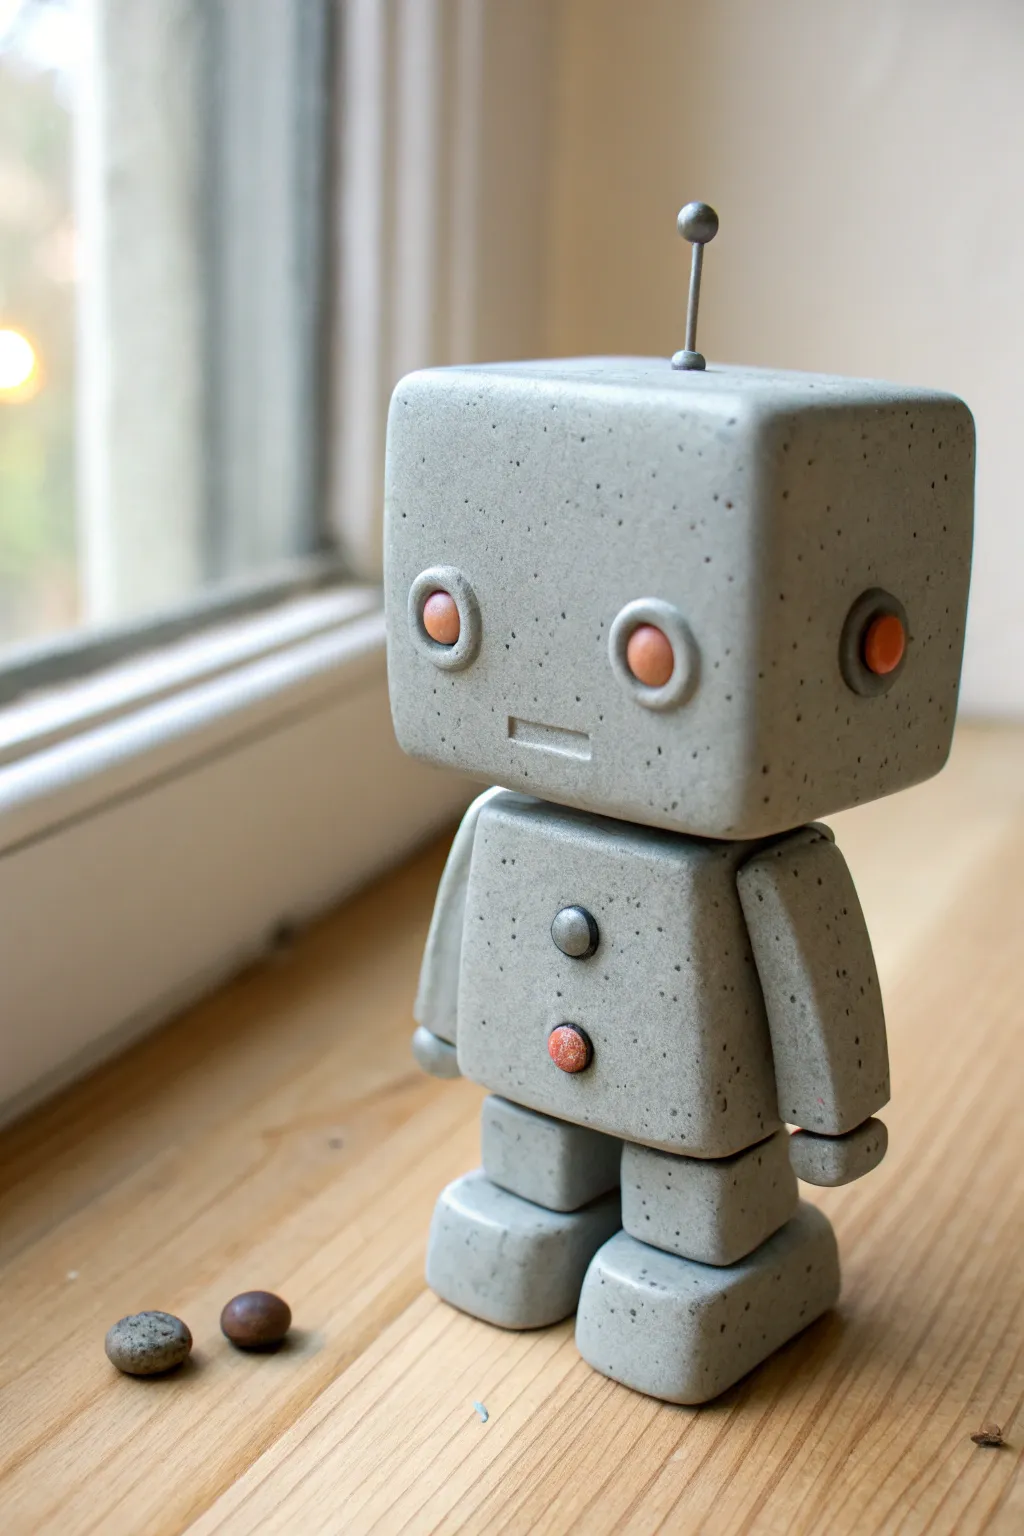
Create a charming, industrial-chic robot character that looks like heavy concrete but is sculpted from friendly polymer clay. This speckled, blocky friend features cute copper accents and a jaunty antenna, making it a perfect modern desk companion.
Detailed Instructions
Materials
- Grey polymer clay (granite or stone effect)
- Small amount of burnt orange or copper clay
- Silver or grey clay (slightly darker than body)
- Short length of crafting wire or a headpin
- Small silver bead
- Needle tool or toothpick
- Clay blade or craft knife
- Spring bobble mechanism (small)
- Liquid polymer clay or strong superglue
- Ruler (optional for precision)
Step 1: Forming the Body Blocks
-
Prepare the Clay:
Begin by conditioning the grey granite-effect clay until it is soft and pliable. If you can’t find pre-speckled clay, mix black pepper or fine glitter into grey clay to mimic that stone texture. -
Shape the Head:
Roll a large ball of grey clay and use your work surface to flatten all six sides, forming a smooth, sharp-edged cube. This should be the largest component, roughly 1.5 to 2 inches wide. -
Shape the Torso:
Create a second, vertically rectangular block for the body. It should be slightly narrower than the head but tall enough to support buttons. -
Smooth the Edges:
Gently run your finger along the sharp edges of your cubes to soften them slightly, giving the clay that worn, cast-concrete appearance rather than a freshly cut look.
Clean Corners Pro-Tip
To get those sharp, architectural edges on the cubes, use two acrylic blocks or rulers to press against opposite sides of the clay simultaneously.
Step 2: Detailed Face and Chest Features
-
Create Eye Sockets:
Roll two small circles of the darker grey clay and flatten them onto the face block. Press a round tool into the center of each to create a rimmed socket effect. -
Add Eye Buttons:
Roll two tiny balls of the orange/copper clay. Press them gently into the centers of the grey sockets you just made. -
Indenting the Mouth:
Use a straight edge or a clay blade to press a clean, horizontal rectangular indentation near the bottom of the face for a sleek, expressionless mouth. -
Adding Chest Buttons:
On the torso block, attach two flattened circles. Use dark grey for the top button and the orange clay for the bottom button to add a pop of color. -
Ear Details:
Repeat the eye socket process on the sides of the head: a dark grey ring with an orange center to simulate bolts or audio sensors.
Cleaning Fingerprints
If you see fingerprints on your smooth ‘concrete’ surfaces before baking, lightly brush them with a little baby oil or cornstarch to smooth them out.
Step 3: Limbs and Assembly Prep
-
Sculpting Arms:
Shape two long prisms for arms. Round off the top shoulder area and create a slight cuff detail at the wrist by scoring a line around the circumference. -
Forming Legs and Feet:
Create two small cubes for the upper legs and two slightly flatter, wider rectangular blocks for the feet. Stack the leg cubes onto the feet, blending the clay where they join if you want a seamless look. -
Attaching Limbs to Body:
Press the arms firmly against the sides of the torso. Press the torso onto the leg assembly. I find using a small dab of liquid clay here helps ensure a permanent bond during baking. -
The Antenna:
Take your wire or headpin and attach a small grey clay bead to the top. Insert the wire deep into the top center of the head block.
Step 4: Baking and Bobbling
-
Baking:
Bake the head and the body (torso/legs) separately according to your clay package instructions. Keep the head separate so we can install the spring later. -
Cooling Down:
Allow the pieces to cool completely. The granite clay can be brittle when hot, so patience is key here. -
Attaching the Spring:
Glue the bottom of your bobble spring to the top center of the torso block. Use a strong superglue or epoxy for a hold that will last. -
Final Assembly:
Apply glue to the top of the spring and carefully lower the head onto it. Hold it in place for a minute to ensure it sets straight and balanced.
Give the head a gentle tap to see your concrete robot spring to life on your windowsill