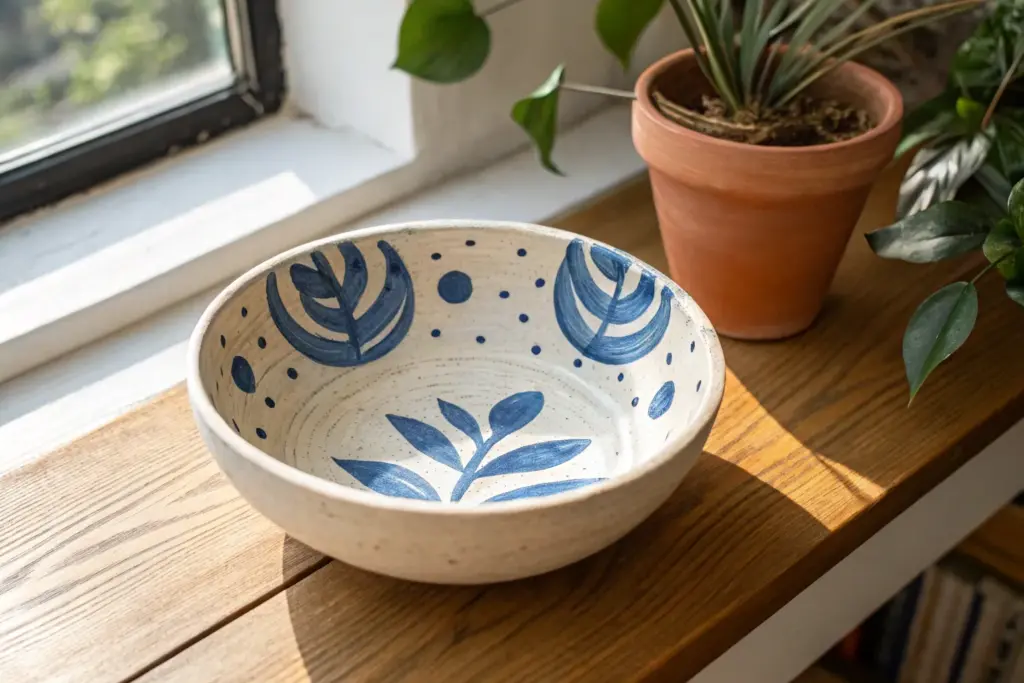
If you’ve been craving a satisfying little project, easy clay bowls are the perfect place to start. I love them because they’re quick, beginner-friendly, and you end up with a cute trinket dish you’ll actually use every day.
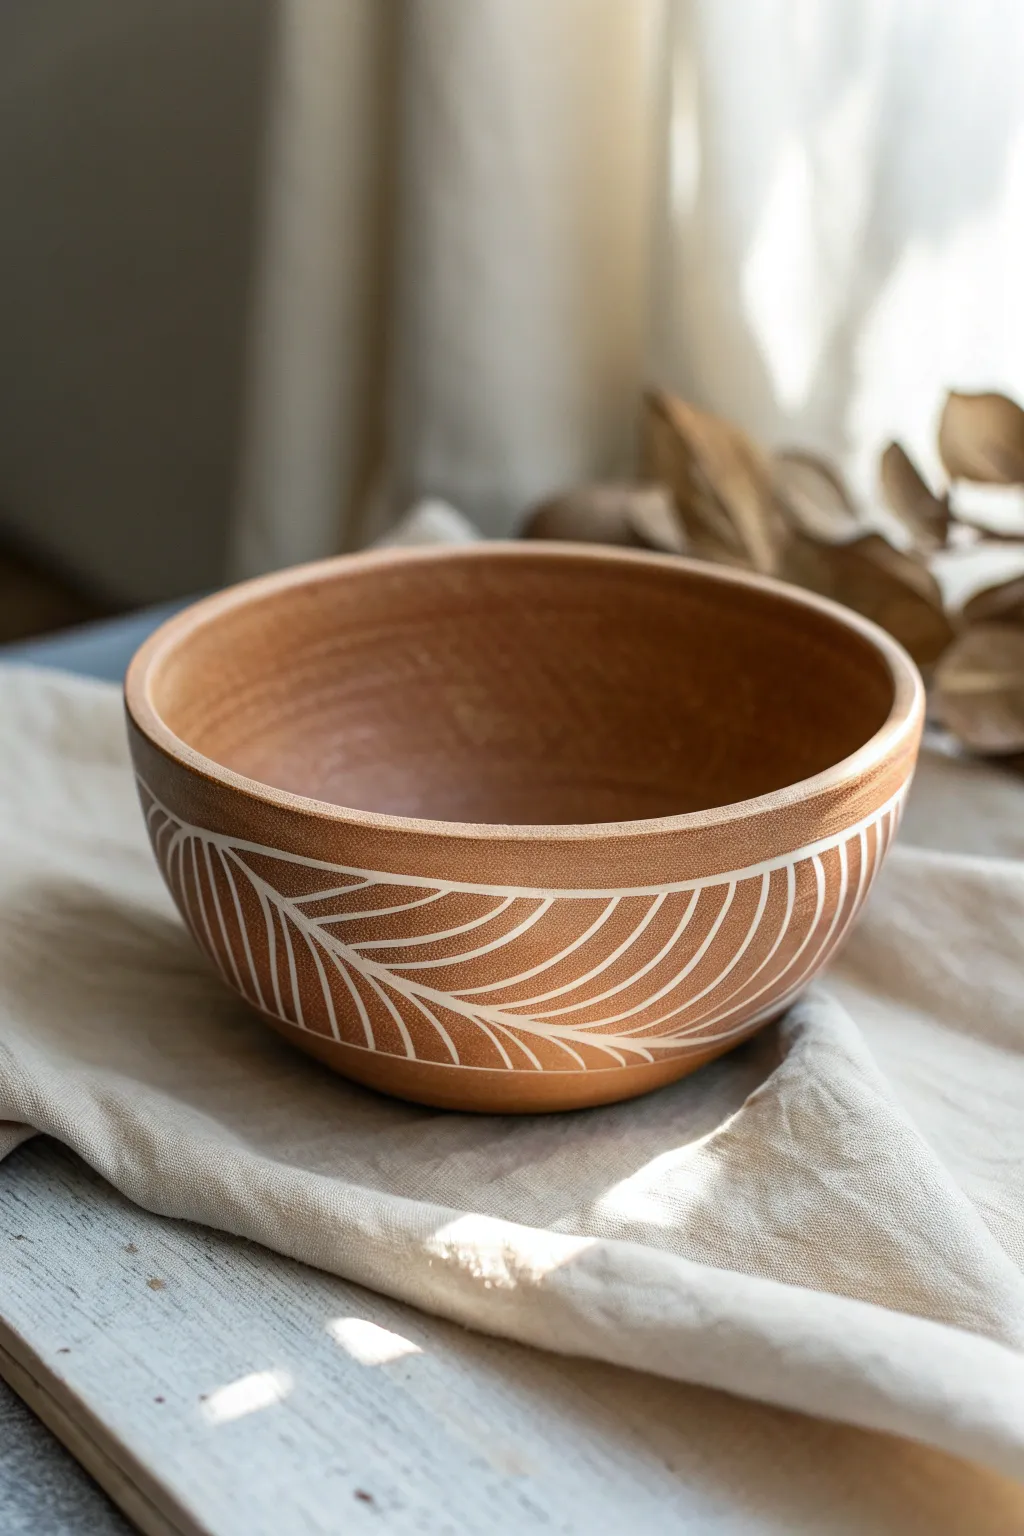
Stamped Pattern Catchall Bowl
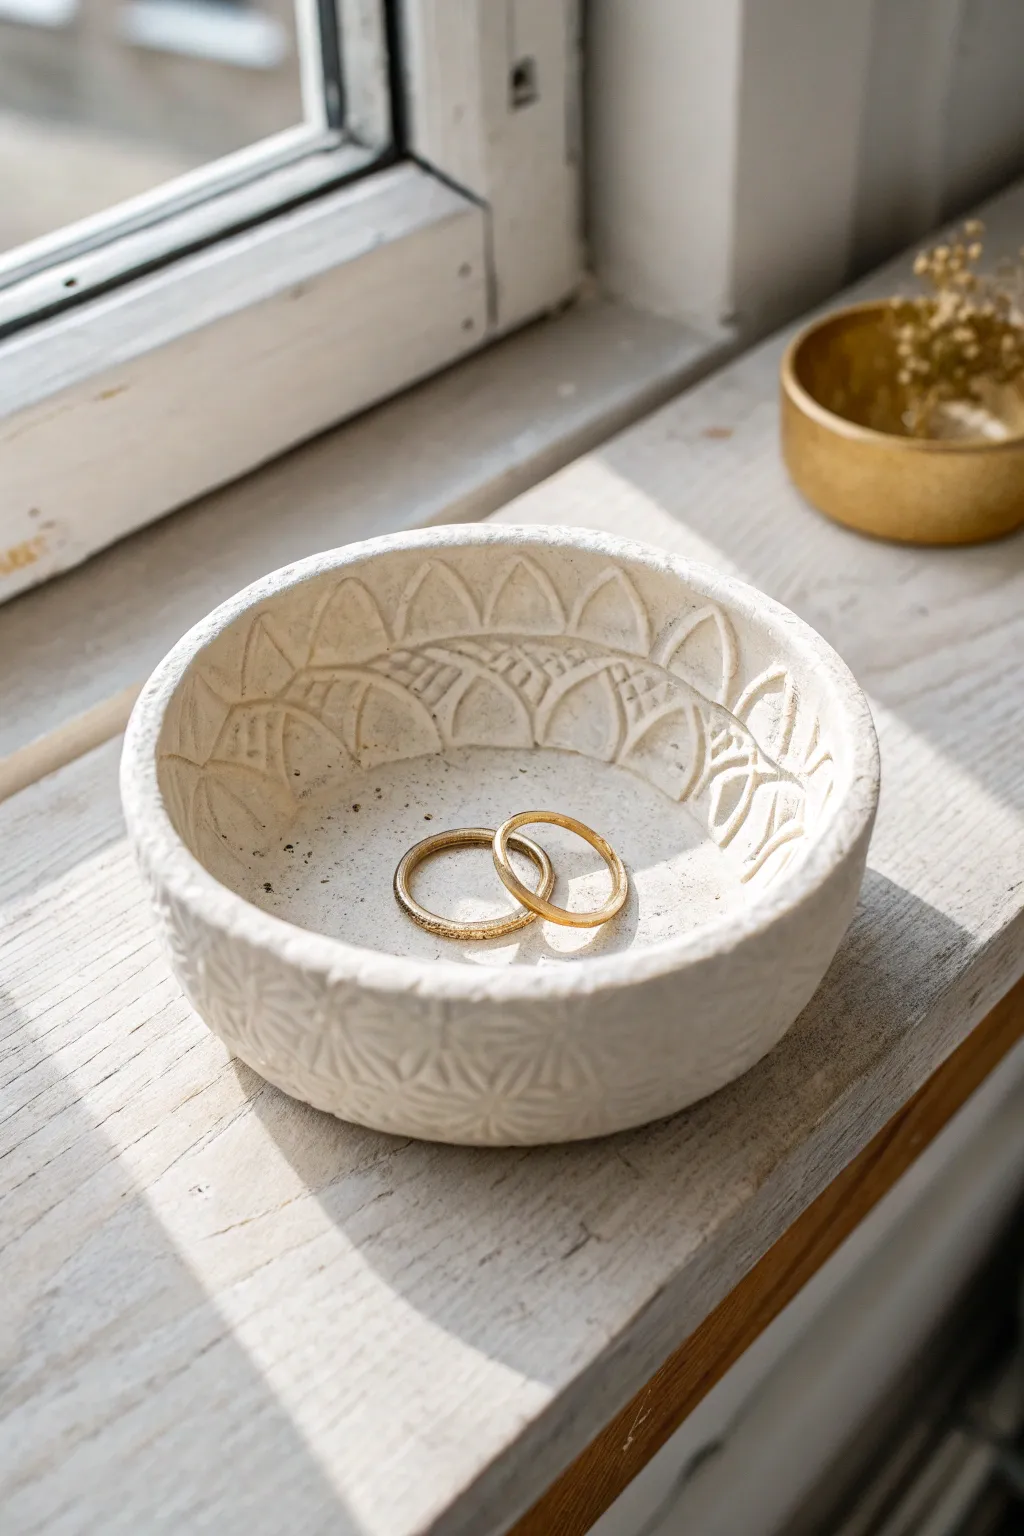
This elegant catchall bowl mimics the look of carved stone with intricate geometric patterns impressed directly into the clay. It’s the perfect size for keeping rings safe by the windowsill or organizing small treasures on your dresser.
Detailed Instructions
Materials
- White air-dry clay (approximately 1 lb)
- Rolling pin
- Patterned stamps (or found objects like textured buttons/glass)
- Small bowl (for a mold shape)
- Plastic wrap
- Craft knife
- Fine-grit sandpaper (220 grit)
- Small bowl of water
- Clear matte varnish or sealant
Step 1: Shaping the Base
-
Condition the clay:
Begin by taking a chunk of white air-dry clay and kneading it in your hands until it becomes soft, pliable, and free of cracks. -
Roll it out:
On a clean, flat surface, roll the clay out into a slab that is roughly 1/4 inch thick. Try to keep the thickness even across the entire slab to prevent cracking later. -
Texture the surface:
Before cutting the shape, gently press your chosen stamps or textured objects into the flat clay slab to create the pattern. Don’t press all the way through; just enough to leave a clear impression. -
Cut the circle:
Find a bowl or round object slightly larger than your desired finished size. Place it upside down on the stamped clay and use a craft knife to trace around it, cutting out a perfect circle. -
Smooth the edges:
Dip your finger in a little water and run it along the cut edge of the circle. This smooths out any harsh knife marks and refines the rim.
Stamp Hunting
Look for vintage glassware bottoms or lace doilies to press into the clay. These create intricate, professional patterns without buying expensive tools.
Step 2: Forming the Bowl
-
Prepare the mold:
Take the bowl you are using as a form and cover the inside of it completely with plastic wrap. This step is crucial so your clay doesn’t stick to the mold while drying. -
Place the clay:
Carefully lift your stamped clay circle and gently drape it inside the bowl mold. I find gravity does most of the work here, so let it settle naturally. -
Secure the shape:
Lightly press the clay against the bottom and sides of the mold to ensure it takes on the curved shape, being careful not to smudge or flatten your stamped patterns. -
Refine the rim:
Check the top edge of the clay again. If it has become uneven while transferring, gently pat it level with a damp finger. -
Initial drying:
Leave the clay inside the mold for about 24 hours to set the shape. Place it in a cool, dry spot away from direct heat sources.
Cracks Appearing?
If small hairline cracks appear while drying, don’t panic. Make a paste of clay and water (slip) and smooth it into the crack with your finger; sand later.
Step 3: Finishing Touches
-
Remove from mold:
Once the clay feels semi-hard but still slightly cool to the touch, carefully lift it out of the mold using the plastic wrap. -
Dry completely:
Place the bowl upside down on a wire rack to allow air to circulate underneath. Let it dry for another 24 to 48 hours until it is bone dry and chalky white. -
Inspect for imperfections:
Look closely at the rim and exterior. If there are any sharp bits or rough patches, use fine-grit sandpaper to buff them away gently. -
Clean up dust:
Wipe the bowl down with a dry cloth or soft brush to remove any sanding dust from the crevices of the pattern. -
Seal the piece:
Apply a thin coat of clear matte varnish to the inside and outside. This protects the clay from moisture and gives it a finished, professional look. -
Final cure:
Allow the sealant to dry according to the bottle’s instructions before placing any jewelry inside.
Your new patterned bowl is now ready to hold your favorite rings and trinkets in style


Classic Smooth Trinket Dish
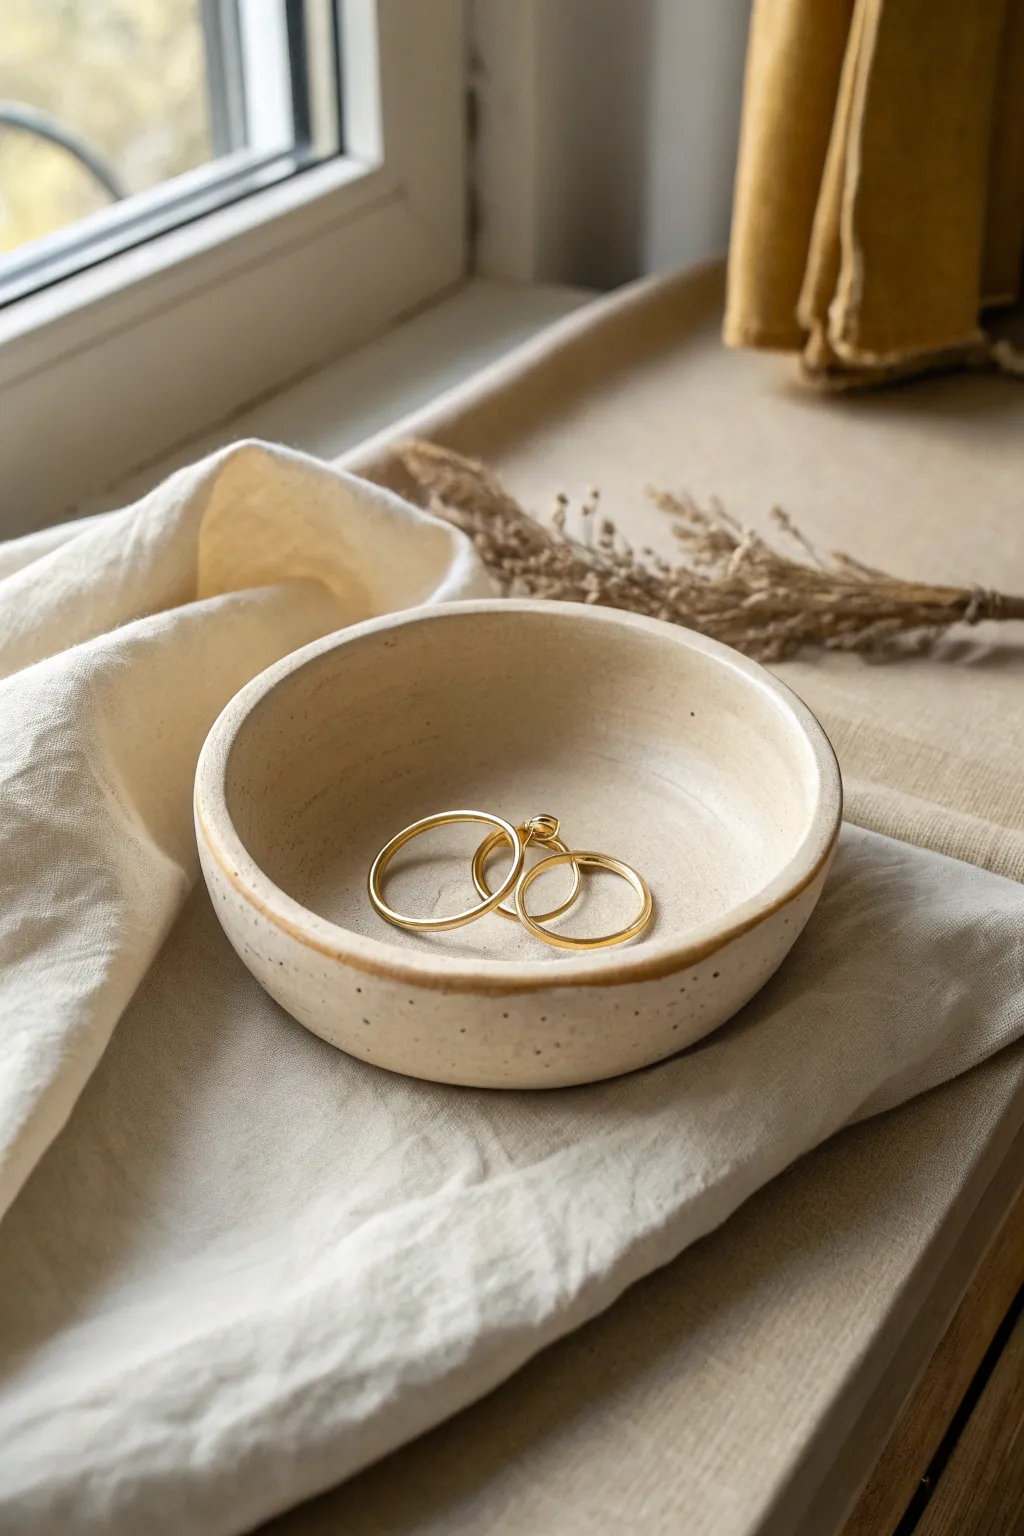
This project embraces the beauty of imperfection with a soft, organic shape and a warm speckled finish. It is the perfect beginner-friendly piece that looks sophisticated enough to hold your favorite gold rings or dainty treasures.
Step-by-Step
Materials
- Air-dry clay or polymer clay (white or cream)
- Acrylic rolling pin
- Small bowl (for use as a slump mold)
- Parchment paper
- Sponge
- Water cup
- Sandpaper (fine grit)
- Acrylic paint (cream/beige)
- Acrylic paint (dark brown/black for speckles)
- Acrylic paint (burnt umber for the rim)
- Old toothbrush
- Fine detail paintbrush
- Matte or satin varnish
Step 1: Shaping the Base
-
Prepare your workspace:
Lay down a sheet of parchment paper to protect your surface and prevent the clay from sticking. Knead a ball of clay roughly the size of a tennis ball until it is soft and pliable. -
Roll the slab:
Using your acrylic roller, flatten the clay ball into a smooth slab. Aim for a thickness of about 1/4 inch to ensure the bowl feels sturdy but delicate. -
Cut the circle:
Find a circular object slightly larger than your slump mold bowl—a large mug or a cereal bowl works well. Place it facedown on the clay and trace around it with a craft knife or needle tool. -
Smooth the edges:
Dip your finger in a little bit of water and run it gently along the cut edge of your clay circle. This eliminates any sharp burrs or rough textures left by the knife. -
Form the bowl shape:
Take your slump mold bowl and gently lower your clay circle into it. Press lightly to help the clay take the shape of the interior, ensuring the bottom is flat. -
Refine the rim:
While it’s in the mold, use a damp sponge to smooth the top rim. I like to gently pinch the rim slightly to give it that handmade, organic unevenness seen in the photo. -
Let it dry:
Allow the clay to dry completely inside the mold. For air-dry clay, this usually takes 24-48 hours. If using polymer clay, bake according to the package instructions while it rests inside an oven-safe glass bowl.
Natural Texture
Before drying, gently press a piece of linen fabric into the wet clay surface. This leaves a subtle woven texture that looks incredible under the glaze.
Step 2: Finishing & Painting
-
Sand for smoothness:
Once fully dry (and cool, if baked), pop the clay out of the mold. Use fine-grit sandpaper to gently buff away any fingerprints or rough spots on the rim and interior. -
Wipe clean:
Use a slightly damp cloth or tack rag to remove all the sanding dust. A clean surface is crucial for a smooth paint application. -
Apply the base coat:
Mix a warm cream or beige acrylic paint. Apply two even coats to the entire dish, allowing the first coat to dry before adding the second. -
Create the speckles:
Water down a tiny amount of dark brown paint until it is inky. Dip an old toothbrush into the mixture, aim it at the bowl, and run your thumb across the bristles to flick tiny splatters. -
Control the splatter:
Start by splattering onto a piece of scrap paper to test the density. You want a very fine mist of dots, focused on the lower half of the bowl’s interior. -
Paint the rim:
Using a fine detail brush and burnt umber paint, carefully outline the top rim. Don’t worry about being perfectly straight; a slightly wavering line adds to the ceramic aesthetic. -
Seal the piece:
Once all paint is bone dry, apply a coat of matte or satin varnish. This protects the finish and gives it that smooth, fired-ceramic feel.
Faux Glaze Effect
Mix gloss varnish with a tiny drop of amber ink or paint for a final coat. This creates a deep, glassy finish that mimics high-fire pottery.
Place your finished dish on a sunny windowsill or bedside table to organize your daily jewelry pieces


Marbled Swirl Mini Bowl

Capture the organic beauty of sandstone canyons with this small, speckled bowl featuring dynamic swirls of terracotta and charcoal. The marbled effect creates a mesmerizing focal point on the interior while the exterior shows off the smooth movement of the clay.
How-To Guide
Materials
- White or beige stoneware clay with speckles
- Red/terracotta clay slip or underglaze
- Black/dark grey clay slip or underglaze
- Pottery wheel (or circular slab mold for hand-building)
- Sponge
- Rib tool (metal or rubber)
- Wire cutter
- Trimming tools
- Clear glossy glaze
- Kiln
Step 1: Preparing the Swirled Clay
-
Wedge the base:
Start by weighing out about 1 to 1.5 pounds of your speckled white stoneware clay. Wedge it thoroughly to remove air pockets, forming it into a smooth ball. -
Prepare the colored accents:
Grab two smaller pieces of stoneware clay. Mix red iron oxide or mason stains into one to create a terracotta color, and black mason stain into the other for charcoal. Alternatively, use pre-colored clays if available. -
Layering the colors:
Flatten your main white clay ball slightly. Smear thick streaks of the colored clays (or heavy slip) across the surface. Don’t overmix; you want distinct bands of color, not a muddy blend. -
Create the marble:
Gently twist the clay ball once or twice to spiral the colors through the white body. Reshape it into a round ball, ensuring the marbled veins are visible on the outside.
Step 2: Throwing the Form
-
Center on the wheel:
Slam the ball onto the center of your wheel bat. Using plenty of water, center the clay. As you coning up and down, the swirls will stretch and distort wonderfully. -
Open the vessel:
Press your thumbs into the center to open the bowl. Pull the floor out to your desired width, leaving about a half-inch thickness for the base. -
Pull up the walls:
Slowly pull the walls upward. Maintain a steady pressure to ensure the walls are even. The swirling colored clays will start to elongate along the curve of the bowl. -
Shape the curve:
Using a rib tool on the inside, gently push the belly of the bowl out to create a rounded, inviting curve. I like to keep the rim slightly thicker for durability. -
Refine the rim:
Use a chamois or your sponge to compress and smooth the rim. This helps prevent future cracking and makes it pleasant to touch. -
Wire off:
Run a wire cutter under the base of the bowl to separate it from the bat. Leave it to dry until it reaches leather-hard consistency.
Don’t Over-Wedge
When mixing your colored clays into the white body, wedge very lightly. Too much wedging blends the colors into a solid gray/pink instead of distinct streaks.
Step 3: Trimming and Finishing
-
Center for trimming:
Once leather hard, flip the bowl upside down onto the wheel. Center it perfectly and secure it with small clay lugs. -
Trim the foot:
Using a loop tool, trim away the excess clay at the base to define a neat foot ring. This also reveals more of the interior marbling pattern on the outside surface. -
Smooth the exterior:
Run a damp sponge or a soft rib over the trimmed areas to remove tooling marks and bring the grog (speckles) to the surface. -
Bisque fire:
Let the bowl dry exceedingly slowly to prevent warping where the different clays meet. Once bone dry, fire it in the kiln to bisque temperature (usually cone 04). -
Glazing:
Wipe the bisque-ware with a damp sponge to remove dust. Pour a clear glossy glaze inside, swirl it to coat, and pour it out. Dip the exterior to coat the outside. -
Clean the foot:
Use a sponge or wax resist to ensure the bottom foot ring is completely free of glaze, preventing it from fusing to the kiln shelf. -
Final wipe:
Check the rim for any sharp glaze drips and smooth them out with your finger. -
Glaze fire:
Fire the piece again to your clay body’s maturity temperature (e.g., cone 5 or 6). The clear glaze will make the terracotta and charcoal swirls pop against the speckled white background.
Cracks at Seams?
If cracks appear where colors meet, the clays may have different shrinkage rates. Dry the bowl very slowly under loose plastic over several days to equalize stress.
Once cooled, your bowl is ready to bring an earthy, artistic touch to your table setting


Metallic Rim Jewelry Bowl
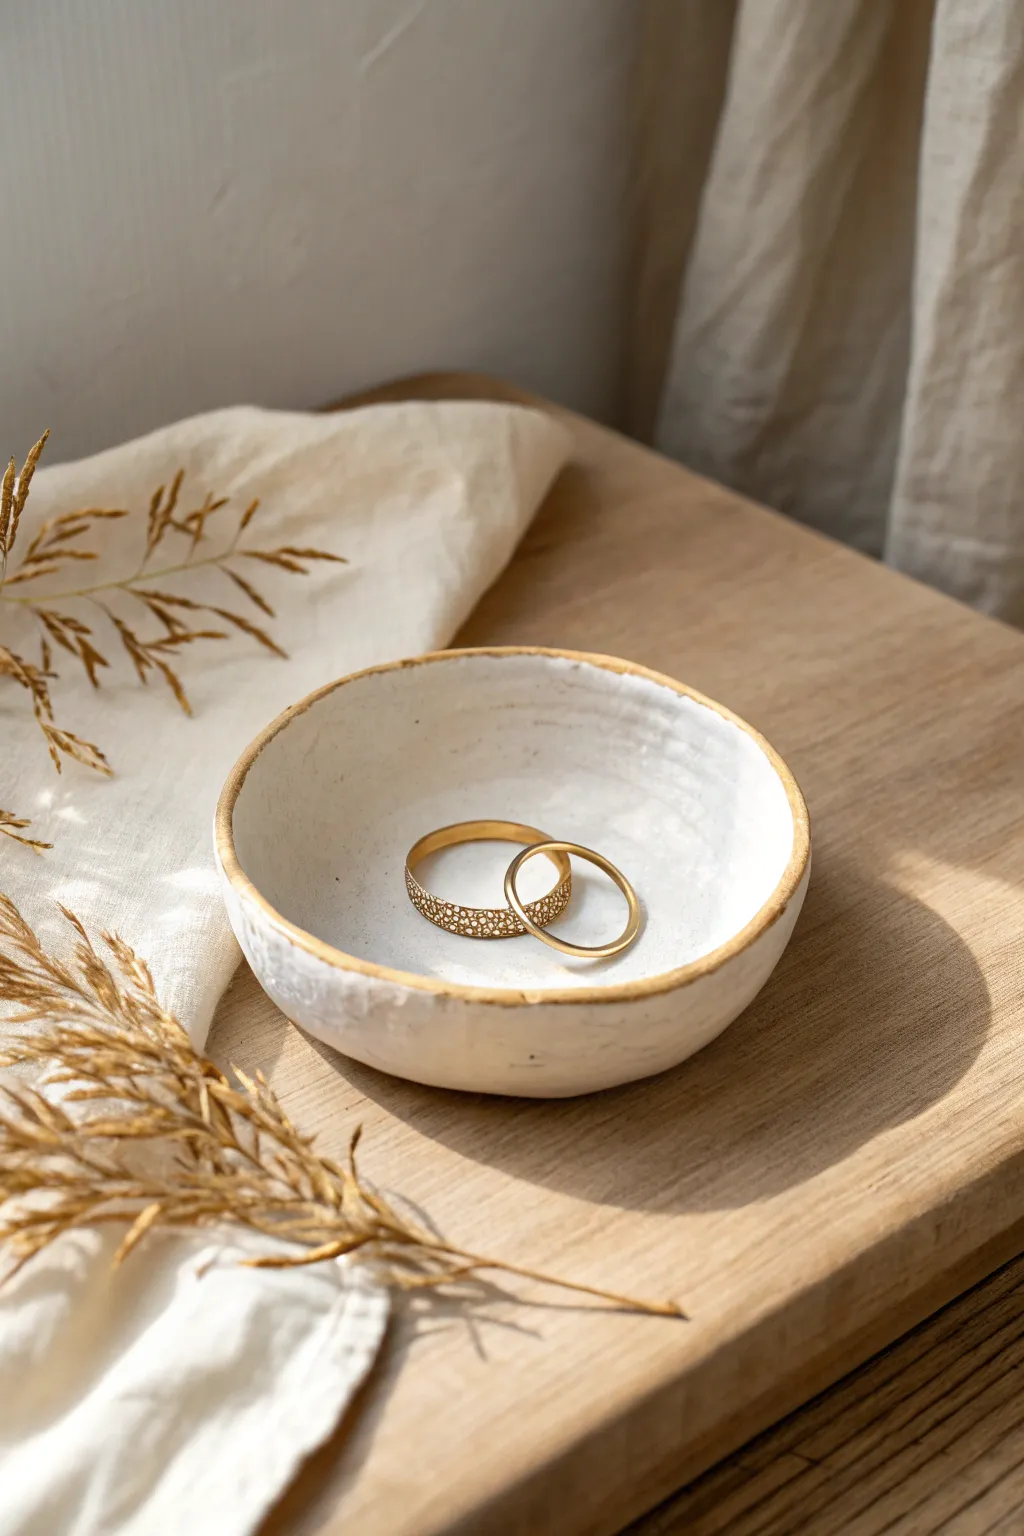
This charming, organically shaped jewelry bowl brings a touch of rustic elegance to your dresser with its textured white finish and delicate metallic edge. Perfect for holding rings and small treasures, it combines the handmade feel of pottery with a luxurious flash of gold.
Step-by-Step Guide
Materials
- White sir-dry clay (or white polymer clay)
- Rolling pin
- Small bowl (to use as a mold)
- Plastic wrap
- Sandpaper (fine grit)
- White acrylic paint
- Glossy varnish or sealant
- Gold leafing pen or gold liquid gilding
- Small soft paintbrush
- Water and sponge
Step 1: Shaping the Bowl
-
Prepare the Clay:
Begin by taking a handful of white air-dry clay and kneading it in your hands until it becomes soft, pliable, and free of cracks. If it feels too dry, you can add a tiny drop of water. -
Roll the Slab:
Using a rolling pin, flatten the clay into an even slab about 1/4 inch thick. Aim for a relatively uniform thickness to ensure even drying later. -
Cut the Circle:
Find a circular object slightly larger than your desired finished bowl size, like a large mug mouth or a small plate, and use a craft knife or needle tool to cut a clean circle from your clay slab. -
Texture the Clay:
For that subtle, organic look seen in the photo, gently dab the surface of the clay with a damp sponge or even a crumpled piece of aluminum foil to give it a slightly pitted texture. -
Mold the Shape:
Cover your mold bowl with plastic wrap to prevent sticking. Carefully lift your clay circle and drape it inside the bowl, gently pressing it down to take the curved shape without flattening your texturing entirely.
Liquid Gold Trick
For a richer metallic look than a marker provides, use liquid gold leaf applied with a very fine detail brush. Do this in a well-ventilated area.
Step 2: Refining and Drying
-
Smooth the Edges:
Dip your finger in water and run it along the rim of the clay. You want to soften any sharp cutting marks, rounding the lip slightly to mimic the soft edge in the photo. -
Initial Drying:
Allow the clay to dry inside the mold for at least 24 hours. Placing it in a cool, dry spot away from direct sunlight helps prevent warping. -
Remove and Cure:
Once the clay is firm enough to hold its shape, carefully lift it out of the mold by pulling on the plastic wrap. Let it dry completely upside down for another 12-24 hours until it is bone dry and chalky white. -
Sand for Perfection:
Use fine-grit sandpaper to gently smooth any rough spots on the rim or underside. Be careful not to sand away the beautiful surface texture you created earlier.
Cracking Clay?
If small cracks appear while the clay is drying, mix a tiny bit of fresh clay with water to make a paste (slip) and fill them in before painting.
Step 3: Painting and Gilding
-
base Coat:
Even if your clay is white, applying two coats of white acrylic paint gives a consistent, opaque finish. Let the first coat dry fully before applying the second. -
Seal the Surface:
Apply a coat of glossy varnish or sealant over the entire bowl. This mimics the glazed look of ceramics and provides a smooth surface for the gold rim. -
Prepare the Gold:
Shake your gold leafing pen or liquid gilding thoroughly. I recommend testing the flow on a scrap piece of paper first to ensure you don’t get a sudden blob of ink. -
Apply the Rim:
Hold the pen or brush at a slight angle and run it along the very edge of the bowl’s rim. Allow the natural unevenness of the handmade edge to guide your hand for that organic line. -
Thicken the Line:
Go back over the rim a second time, slightly thickening the line in random spots to enhance the rustic aesthetic. It shouldn’t be a perfect, machine-made line. -
Final Cure:
Let the gold accent dry completely according to the manufacturer’s instructions before using the bowl.
Place your finished bowl on a bedside table to catch your daily jewelry in style

The Complete Guide to Pottery Troubleshooting
Uncover the most common ceramic mistakes—from cracking clay to failed glazes—and learn how to fix them fast.
Leaf-Imprint Nature Bowl
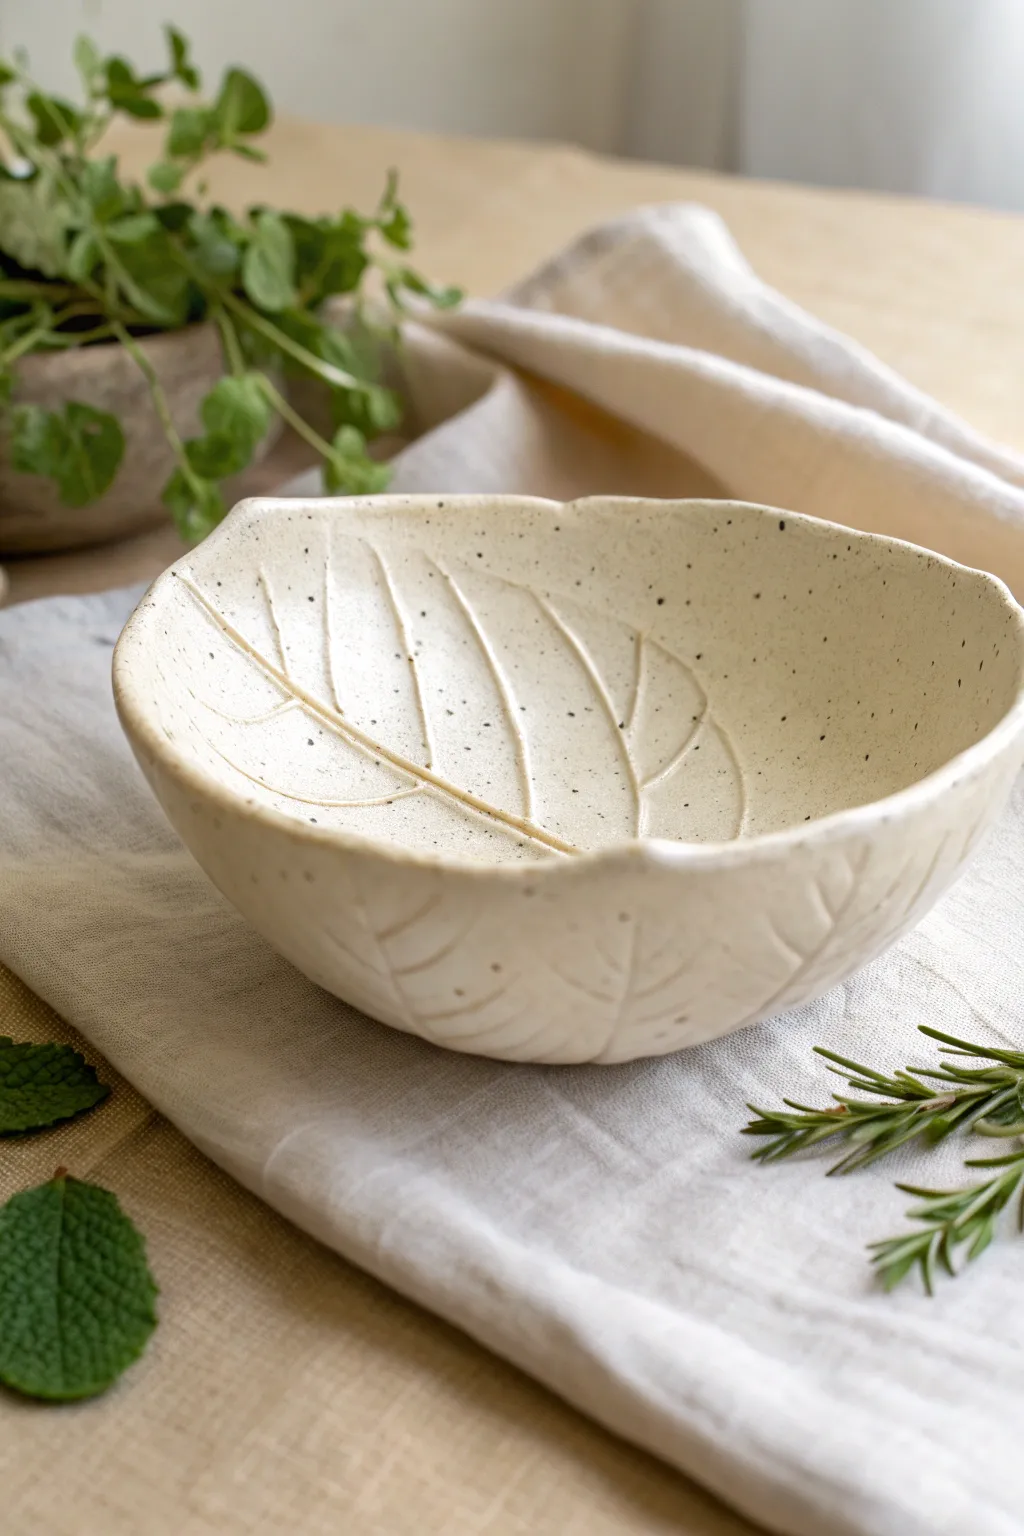
Bring the outdoors in with this lovely, organic pottery project that captures the delicate veins of a real leaf. The finished bowl features a creamy, speckled finish and an irregular rim that celebrates natural imperfections.
Step-by-Step
Materials
- Speckled stoneware clay (white or cream)
- Large, fresh leaf with prominent veins (e.g., Hosta or Hydrangea)
- Rolling pin
- Canvas mat or cloth
- Needle tool or fettling knife
- Bisque mold or a simple cereal bowl (for shaping)
- Smoothing sponge
- Clear or transparent white glaze
- Rib tool (optional)
Step 1: Preparation & Rolling
-
Wedging the clay:
Begin by wedging a baseball-sized ball of speckled stoneware clay to remove any air bubbles. This ensures a strong finished piece without hidden weak spots. -
Rolling the slab:
Place the clay on your canvas mat. Roll it out evenly until it is approximately 1/4 inch thick. Try to maintain a circular shape, though it doesn’t need to be perfect. -
Smoothing the surface:
Take a damp sponge or a flexible rib tool and gently compress the surface of the clay slab. This removes canvas textures and prepares a smooth canvas for your leaf print.
Fixing Flat textures
If the veins aren’t showing up clearly, the clay might be too dry. Mist the slab lightly with water and wait 5 minutes before rolling the leaf again for a deeper print.
Step 2: Impressing the Texture
-
Placing the foliage:
Select your leaf and place it vein-side down onto the center of the clay slab. The vein side usually has the most prominent texture, which gives the crispest impression. -
Rolling the impression:
Use your rolling pin to firmly roll over the leaf once or twice. Use steady pressure to embed the veins into the clay without thinning the slab too much. -
Adding underside texture:
Carefully flip the slab over. If you want a double-sided effect like the reference, lightly press a second leaf or carve vague vein lines on the back, though a smooth back works beautifully too. -
Cutting the shape:
Flip the slab back so the main leaf impression is facing up. Using a needle tool, cut around the general shape of the leaf, leaving a small border of clay around the edge for stability.
Add an oxide wash
Before glazing, rub a watered-down iron oxide wash into the veins and wipe away the excess. This will make the leaf skeleton pop dark brown against the white glaze.
Step 3: Shaping & Refining
-
Removing the leaf:
Find the stem of the leaf and very gently peel it away from the clay to reveal the skeleton pattern underneath. -
Lifting the slab:
Carefully lift your clay slab. I find it helpful to support it with a wide spatula or simply peel the canvas away from the clay rather than pulling the clay off the canvas. -
Slumping the form:
Place your clay slab inside your chosen bowl mold. Let it slump naturally into the curve. Gravity will do most of the work here. -
Adhering to the mold:
gently press the clay against the walls of the form with a sponge, ensuring you don’t smudge the intricate vein lines in the center. -
Refining the rim:
While the clay is in the mold, smooth the cut edges with a damp finger. You can gently manipulate the rim to create subtle waves, enhancing the organic leaf look.
Step 4: Finishing & Glazing
-
Drying phase:
Allow the clay to dry to a leather-hard state before removing it from the mold. Once removed, let it dry completely to the bone-dry stage. -
Bisque firing:
Fire the piece in a kiln to cone 04 (or according to your clay’s instructions) to create bisque ware. -
Applying glaze:
Dip or brush a clear or semi-transparent white glaze over the bowl. The transparency is crucial so the speckles in the clay body show through. -
Wiping the texture:
For higher contrast, you can lightly wipe the glaze off the raised veins with a damp sponge, leaving more glaze in the recesses. -
Final firing:
Glaze fire the bowl to the temperature recommended for your specific clay and glaze combination (often Cone 5 or 6 for stoneware).
Start your collection of seasonal shapes and enjoy using your nature-inspired creation
Doily-Texture Lace Bowl
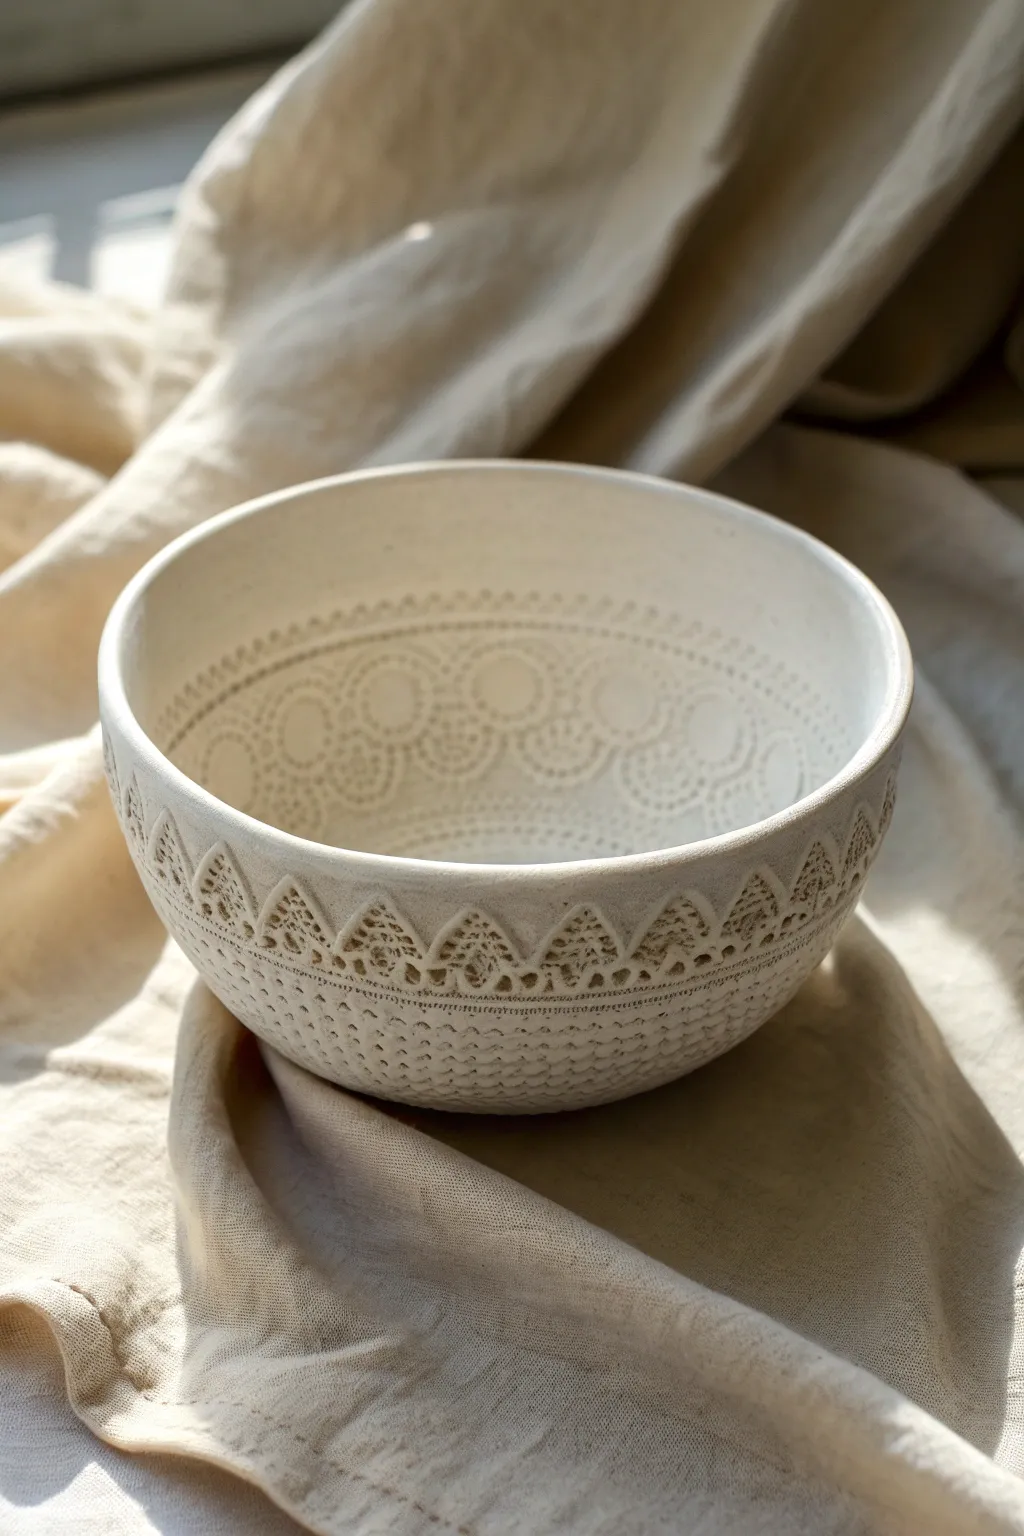
This project transforms simple clay into an heirloom-quality piece by using lace or doilies to impress delicate patterns directly into the surface. The result is a stunning white bowl with intricate, embossed textures that feel both vintage and modern.
Step-by-Step Tutorial
Materials
- Air-dry clay or kiln-fire clay (white)
- Cotton lace trim or a vintage doily
- Rolling pin
- Bowl mold (a smooth kitchen bowl)
- Plastic wrap or cling film
- Pottery sponge
- Fettling knife or craft knife
- Clear matte varnish (for air-dry) or clear glaze (for kiln-fire)
- Sandpaper (fine grit)
- Small cup of water
Step 1: Preparation and Rolling
-
Prepare your workspace:
Begin by covering your work surface with a piece of canvas or a smooth mat to prevent the clay from sticking. Clean your rolling pin to ensure no debris mars the white clay. -
Condition the clay:
Take a generous ball of white clay and knead it well. This warms it up and removes air bubbles, making it pliable and ready for shaping. -
Roll out the slab:
Flatten the clay ball with your palm first, then use the rolling pin to roll it into a large circle. Aim for an even thickness of about 1/4 inch (6mm). -
Smooth the surface:
Before adding texture, take a slightly damp sponge or a rubber rib tool and gently wipe the surface of the clay slab to remove any canvas marks or wrinkles.
Step 2: Creating the Texture
-
Position the lace:
Lay your strip of lace or doily across the clay slab. For the design shown, place a lace strip horizontally across what will become the rim area, or cover the entire lower section for an all-over pattern. -
Impress the pattern:
With the lace in place, roll over it firmly with your rolling pin. Press hard enough to push the fabric deep into the clay, which creates that beautiful raised relief, but be careful not to make the slab too thin. -
Reveal the design:
Carefully peel back the lace to reveal the intricate impression left behind. I always find this moment incredibly satisfying as the pattern emerges crisp and clear. -
Check for flaws:
Inspect the pattern. If there are any jagged bits or loose clay crumbles interrupting the design, carefully pick them out with a needle tool or toothpick.
Pro Tip: Release Agent
Lightly dust your lace or doily with cornstarch before pressing it into sticky clay. This acts as a release agent and prevents the fabric from pulling up clay bits when you peel it off.
Step 3: Shaping the Bowl
-
Prepare the mold:
Take your kitchen bowl that will serve as the mold. Cover the outside of it completely with plastic wrap, ensuring the plastic is smooth to avoid unwanted creases in your clay. -
Drape the clay:
Lift your textured clay slab and drape it over the upside-down bowl mold. Position it so the lace pattern sits exactly where you want it—usually wrapping around the sides. -
Form the shape:
Gently press the clay against the mold with your hands. Start from the bottom (which is currently on top) and work your way down the sides, guiding the clay to hug the bowl’s shape. -
Trim the excess:
Using a fettling knife or craft knife, cut away the excess clay at the bottom edge of your mold to create an even rim for your bowl. -
Refine the rim:
Dip your finger in a little water and run it along the cut edge of the rim to smooth it out. This prevents sharp or rough edges once the piece dries.
Level Up: Double Texture
Roll texturing on BOTH sides of the slab before draping. This puts a pattern on the inside and outside of the bowl for a truly intricate, professional look.
Step 4: Finishing Touches
-
Initial drying:
Let the clay sit on the mold until it is leather-hard (stiff but still cool to the touch). This usually takes a few hours depending on humidity. -
Remove the mold:
Once the clay holds its shape, carefully lift it off the mold and peel away the plastic wrap. Set the bowl upright to continue drying. -
Sand imperfections:
After the bowl is completely bone dry, use fine-grit sandpaper to gently smooth the rim or any rough spots on the un-textured areas. Avoid sanding over the lace pattern itself. -
Clean dust:
Wipe the bowl with a slightly damp sponge to remove all sanding dust before applying any finish. -
Seal the piece:
If using air-dry clay, apply two coats of clear matte varnish inside and out to protect it. If using pottery clay, bisque fire, apply a clear glaze, and glaze fire according to your clay’s specifications.
Once fully cured and sealed, your textured lace bowl will make a beautiful, decorative centerpiece for holding dry trinkets or simply admiring.


What Really Happens Inside the Kiln
Learn how time and temperature work together inside the kiln to transform clay into durable ceramic.
Speckled Terrazzo-Style Bowl
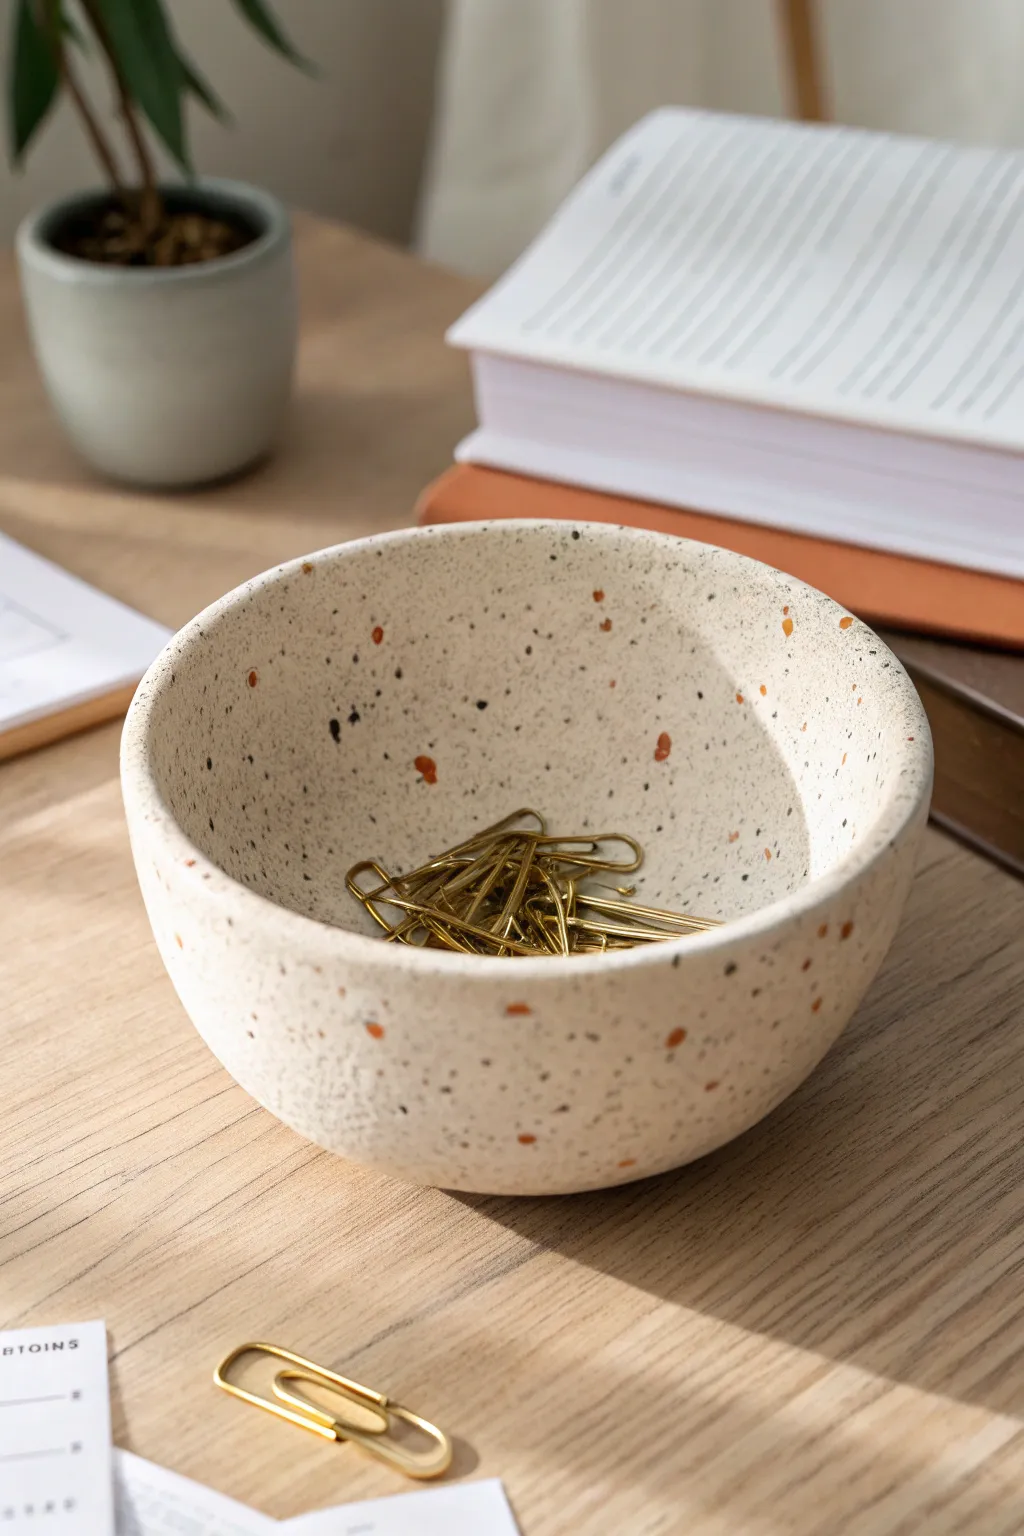
This charming little bowl perfectly mimics the look of high-end speckled stoneware but can be made right at home without a kiln. Its matte, textured finish and warm terrazzo flecks make it a sophisticated organizer for your desk or vanity.
Detailed Instructions
Materials
- Air-dry clay (white or light cream)
- Acrylic paints (black, burnt sienna/terracotta, beige)
- Old toothbrush or stiff bristle brush
- Fine grit sandpaper (320 or 400 grit)
- Small bowl of water
- Rolling pin (optional)
- Matte varnish or sealant
- Sponge
Step 1: Forming the Bowl
-
Condition the clay:
Start with a ball of air-dry clay roughly the size of a tennis ball. Knead it in your hands for a minute until it feels soft, warm, and pliable, removing any potential air bubbles. -
Start the pinch method:
Hold the ball in your non-dominant hand. With your dominant thumb, push directly into the center of the ball, stopping about a half-inch from the bottom. -
Shape the walls:
Gently pinch the clay between your thumb (inside) and fingers (outside), rotating the ball as you go. Work your way from the bottom up to the rim. -
Even out thickness:
Aim for a consistent wall thickness of about 1/4 inch. If you feel thick spots, gently press them out. I find that keeping my fingers slightly damp helps the clay glide rather than drag. -
Flatten the base:
Once you like the shape, gently tap the bottom of the bowl on your work surface to create a flat, stable base so it won’t wobble. -
Smooth the surfaces:
Dip your finger in a little water and run it over the entire surface to smooth out fingerprints and cracks. Pay special attention to the rim—you can gently round it off for a soft look. -
Drying time:
Set the bowl aside in a cool, dry place. Let it dry completely for 24-48 hours. It should turn chalky white and feel room temperature (not cold) to the touch when ready.
Practice Your Splatter
Before flicking paint on your bowl, test the splatter on a scrap piece of paper. This helps you gauge how wet the brush should be to get tiny dots versus big globs.
Step 2: Creating the Stone Effect
-
Sand for perfection:
Once fully dry, use fine-grit sandpaper to gently buff the surface. Focus on the rim and any uneven bumps on the exterior to get that professional ceramic look. -
Base coat mixing:
Mix a tiny drop of beige or cream paint into white acrylic to create an off-white ‘bisque’ color. It should look like natural unglazed pottery. -
Apply base color:
Paint the entire bowl, inside and out, with your base mixture. You might need two thin coats for full opacity. -
Prepare the speckle paint:
Dilute a small amount of black acrylic paint with water until it is the consistency of ink. Do the same in a separate palette well with your burnt sienna (reddish-brown) paint. -
Apply large spots:
Dip a small detail brush into the undiluted burnt sienna. Randomly dab tiny, irregular spots onto the bowl. Keep them sparse; these are your larger ‘terrazzo’ chips. -
splatter technique setup:
Place your bowl inside an old cardboard box to contain the mess. Dip an old toothbrush into your diluted black paint. -
Splatter the black specks:
Hold the toothbrush near the bowl and run your thumb across the bristles to flick a fine mist of paint. Rotate the bowl to get even coverage inside and out. -
Splatter the brown specks:
Clean your toothbrush and repeat the splatter process with the diluted burnt sienna paint. This layers the colors for depth. -
Refine the look:
If any splatters are too big or smear, quickly dab them with a damp paper towel or paint over them with a touch of your base color once dry. -
Seal the piece:
After the paint is bone dry, apply a coat of matte varnish. This protects the paint and enhances the stone-like texture without making it look glossy and plastic.
Fixing Cracks
If small cracks appear as the clay dries, don’t panic. Mix a tiny bit of fresh clay with water to make a paste (slip) and fill the crack, then smooth it over.
Enjoy styling your modern speckled bowl on your desk to hold your favorite small treasures
Easy Geometric Hexagon Bowl
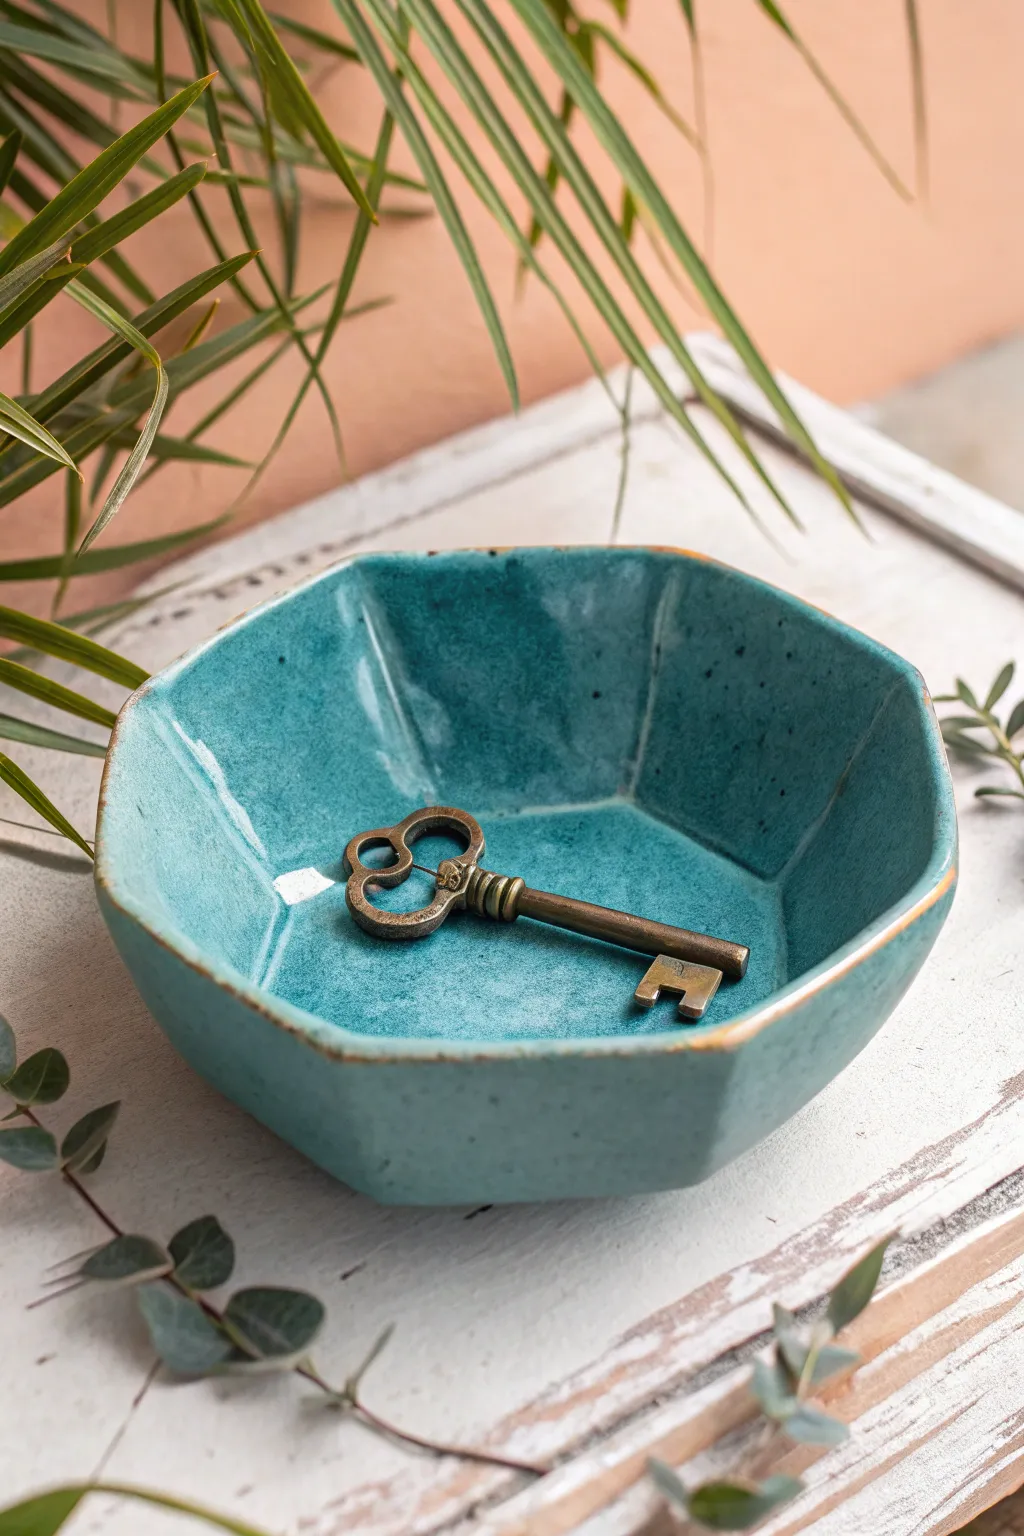
This stunning geometric bowl combines sharp modern angles with an organic, hand-formed feel, perfect for holding keys or jewelry. The deep teal glaze pools beautifully in the bottom, while the distinct octagonal shape gives it a sophisticated, faceted appearance.
Step-by-Step Tutorial
Materials
- Air-dry clay or polymer clay (white)
- Rolling pin
- Octagon paper template (about 6-7 inches wide)
- Craft knife or clay slicer
- Small bowl for use as a mold (ceramic or glass)
- High-gloss teal acrylic paint or ceramic glaze
- Gold acrylic paint (for the rim)
- Fine grit sandpaper
- Glossy varnish or sealant
- Paintbrushes (flat and fine tip)
- Water and sponge (for smoothing)
Step 1: Shaping the Base
-
Condition the clay:
Start by kneading your clay until it is soft, pliable, and free of air bubbles. If you are using polymer clay, the warmth of your hands will make this easier. -
Roll out a slab:
Using your rolling pin, flatten the clay into an even slab about 1/4 inch thick. Try to keep the thickness consistent so the bowl walls will be sturdy. -
Apply the template:
Place your printed octagon template gently onto the clay slab. Ensure it’s centered and you have enough clay around all edges. -
Cut the shape:
With a sharp craft knife, carefully trace around the template, cutting straight down into the clay to create clean, sharp edges. Remove the excess clay.
Cracked edges?
If air-dry clay cracks while drying, mix a tiny bit of fresh clay with water to make a paste (slip) and fill the crack, then sand smooth once dry.
Step 2: Forming the Bowl
-
Prepare the mold:
Take the small bowl you’ve chosen as a mold. If using air-dry clay, putting a layer of plastic wrap inside helps prevent sticking. -
Drape the clay:
Lift your clay octagon and center it inside the mold bowl. Gently press the center down first. -
Define the angles:
Slowly press the sides of the clay against the mold walls. Instead of smoothing it into a circle, pinch the corners of the octagon slightly to maintain that distinct geometric faceted look on the inside. -
Smooth the interior:
Dip your finger in a little water and run it over any fingerprints inside the bowl, keeping the bottom flat and the sides rising at an angle. -
Refine the rim:
While the clay is in the mold, check the rim. If the clay has stretched unevenly, trim it slightly with your knife to keep the octagon shape crisp. -
Dry or bake:
If using air-dry clay, let it sit in the mold until it’s leather-hard (about 24 hours), then remove carefully to dry completely. For polymer clay, bake according to the package instructions while inside the oven-safe mold.
Step 3: Refining and Painting
-
Sand for perfection:
Once fully cured and dry, take your fine-grit sandpaper and gently smooth any rough edges on the rim or bumps on the surface. Wipe away the dust with a damp cloth. -
Base coat:
Paint the entire bowl, inside and out, with your deep teal color. You might need two or three coats to get that rich, opaque coverage seen in the photo. -
Create the faux-glaze effect:
To mimic the speckled stoneware look, I like to dilute a tiny bit of darker blue or black paint and splatter it extremely lightly across the surface using an old toothbrush. -
Paint the rim:
Using a fine-tip brush, carefully paint the very top edge of the rim with metallic gold paint. This highlights the geometric shape and adds a touch of elegance. -
Apply varnish:
Finish with a high-gloss varnish. This step is crucial as it gives the piece that wet, ceramic-like shine and deepens the teal color significantly. -
Final cure:
Let the varnish dry completely in a dust-free area for at least 24 hours before placing your keys inside.
Sharper Geometrics
Instead of a round mold, use a larger octagon box or folded cardboard as a mold to get even sharper, straighter creases between the wall facets.
Place your finished bowl on an entryway table to catch the light and your essentials

TRACK YOUR CERAMIC JOURNEY
Capture glaze tests, firing details, and creative progress—all in one simple printable. Make your projects easier to repeat and improve.
Scalloped Petal Edge Bowl
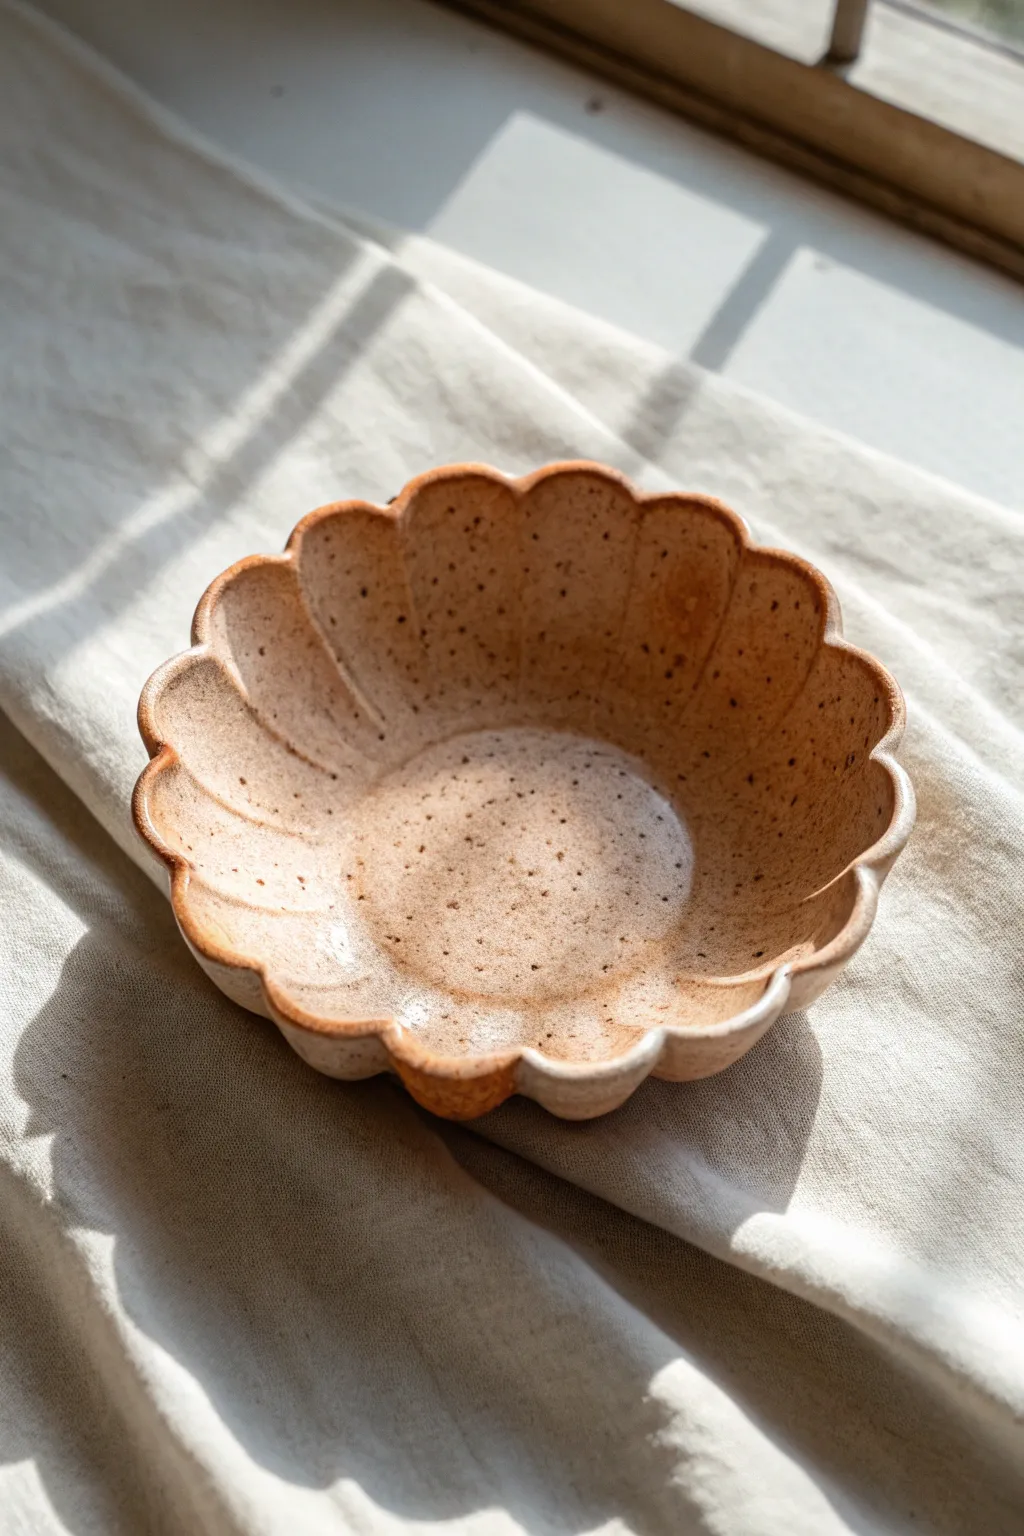
This charming bowl mimics the delicate curves of a flower with its rhythmic scalloped edge and warm, speckled glaze. Perfect as a trinket dish or snack bowl, the organic shape brings a soft, natural element to any table setting.
Step-by-Step Guide
Materials
- Speckled cream or buff stoneware clay
- Rolling pin
- Canvas work surface or slab mat
- Circular template (paper or bowl)
- Needle tool or fettling knife
- Small slump mold (or a small bowl covered in plastic)
- Soft rib tool (rubber or silicone)
- Sponge
- Warm amber/peach semi-transparent glaze
- Kiln (or access to firing services)
Step 1: Preparing the Slab
-
Wedge the clay:
Start by wedging a softball-sized amount of speckled clay to remove air bubbles and ensure an even consistency. -
Roll the slab:
Roll out your clay on the canvas until it is an even thickness, roughly 1/4 inch thick. Turn the slab occasionally as you roll to prevent it from sticking to the surface. -
Smooth the surface:
Take your soft rubber rib and gently compress the clay surface on both sides. This aligns the clay particles and removes the canvas texture, giving you a smooth canvas for the glaze later. -
Cut the circle:
Place your circular template onto the slab. Using a needle tool held vertically, cut around the template to create a perfect clay disc.
Warped Rim?
If your scallops warp while drying, weigh the center down with a small beanbag or sandbag during the leather-hard phase to keep the bottom flat.
Step 2: Shaping the Petals
-
Mark the segments:
Lightly visualize or mark the edge of the circle into equal segments—aim for about 12 to 14 sections for that dense petal look. -
Pinch the scallops:
Using your thumb and forefinger, gently pinch the clay edge inward at each mark to create the ‘valley’ between petals. Push the clay between your fingers outward to form the rounded ‘peaks’. -
Refine the curve:
Go around the rim a second time, using a damp sponge to smooth the peaks of the petals so they are rounded and soft, not sharp. -
Detail the interior:
I like to use a modeling tool or the back of a paintbrush to gently press a line from the ‘valley’ of the scallop down toward the center of the bowl. This emphasizes the separate petal shapes.
Step 3: Forming and Finishing
-
Slump the bowl:
Carefully lift your clay flower and place it inside your slump mold (or inside a plastic-lined bowl). Gently press the center down so it takes the concave shape. -
Adjust the rim:
Gravity might pull the petals down; check the rim and push the scalloped edges slightly inward or upward to ensure they hold a nice cupped shape while drying. -
Dry slowly:
Loosely cover the bowl with plastic to let it dry slowly to the leather-hard stage. This prevents the rim from warping. -
Bisque fire:
Once bone dry, fire the piece to bisque temperature (usually cone 04) to prepare it for glazing. -
Apply glaze:
Dip or brush on a semi-transparent warm amber or peach glaze. A transparent quality is key here because it allows the darker clay speckles to show through. -
Wipe the foot:
Use a damp sponge to completely wipe any glaze off the bottom foot of the bowl so it doesn’t stick to the kiln shelf. -
Glaze fire:
Fire the bowl again to the maturation temperature of your specific clay and glaze (often cone 5 or 6 for stoneware).
Rim Variation
Brush a layer of darker oxide or stain just on the very edge of the scallops before glazing to create a contrasting ‘burnt’ rim effect.
Once fired, you will have a durable, blossom-inspired vessel ready for holding jewelry or serving treats
Pinch-Pot Everyday Bowl
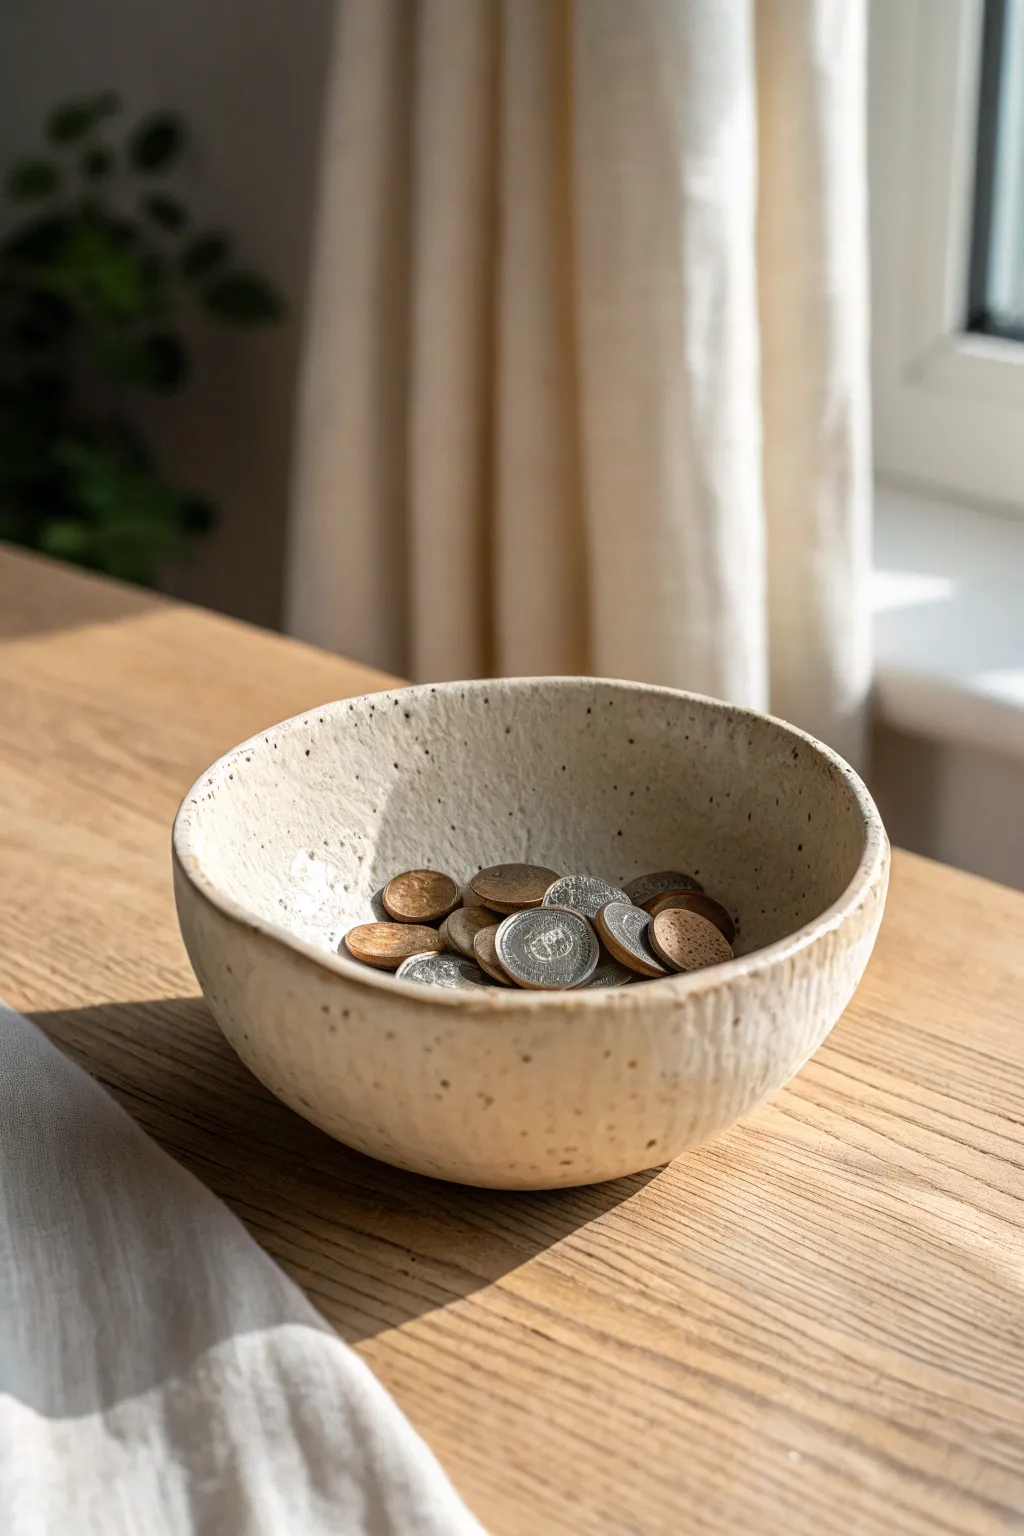
This rustic, speckled bowl is the perfect introduction to hand-building pottery, embracing the beauty of imperfection with its organic rim and texture. Glazed in a soft, satin oatmeal white, it lets the natural clay body peek through like scattered sand.
Step-by-Step Tutorial
Materials
- Speckled stoneware clay (pyrite or iron-rich)
- Small bowl with water
- Porous sponge
- Smooth wooden rib or metal kidney scraper
- Needle tool
- Fettling knife
- Satin white or oatmeal glaze (cone 5/6 recommended)
- Medium soft paintbrush
- Canvas mat or wooden board
Step 1: Forming the Base
-
Prepare the clay ball:
Cut off a piece of speckled stoneware clay roughly the size of a large orange. Wedge it thoroughly to remove air bubbles, then pat it into a smooth, round ball in your hands. -
Open the center:
Hold the clay ball in your non-dominant hand. Press your thumb firmly into the center, stopping about half an inch from the bottom to ensure the base is sturdy. -
Begin pinching:
With your thumb still inside and fingers on the outside, gently pinch and rotate the clay. Start near the bottom and work your way up spirally, keeping the walls even as the opening widens.
Cracks on the rim?
If the rim starts cracking while shaping, your clay is too dry. Dip your fingers in water (sparingly!) and compress the rim by running a finger along it to heal the splits.
Step 2: Refining the Shape
-
Expand the walls:
Continue pinching until the walls are about 3/8 inch thick. Angle your pinching outward slightly to encourage a wide, open bowl shape rather than a tall cup. -
Smooth the interior:
I like to dampen a sponge slightly and run it along the interior floor and walls to erase finger marks, compressing the clay to prevent cracks. -
Define the outer curve:
Use a smooth wooden rib against the outside of the bowl while supporting the inside with your hand. Scrape gently to refine the curve and create that subtle texture seen in the photo. -
Establish the foot:
Tap the bowl gently on your table to flatten the bottom just enough so it sits stable. Alternatively, you can carve a small foot ring later when the clay is leather-hard. -
Work the rim:
The rim in the photo has a lovely, uneven organic quality. Run a piece of soft plastic or chamois leather over the lip to smooth it without making it perfectly level.
Step 3: Drying and Glazing
-
Slow drying:
Place your bowl on a wooden board and cover it loosely with plastic. Let it dry slowly to the leather-hard stage, usually taking a day or two. -
Final smoothing:
Once bone dry (greenware stage), use a dry sponge to gently buff away any sharp crumbs or burrs, particularly around the rim. -
Bisque fire:
Fire the bowl in a kiln to cone 04 (or per your clay body’s instructions) to harden it for glazing. -
Wax the bottom:
Apply a thin layer of wax resist to the bottom of the bowl and roughly 1/4 inch up the side to prevent glaze from running onto the kiln shelf. -
Apply the glaze:
Dip the bowl into a satin oatmeal or creamy white glaze. Aim for a medium application thickness—too thick and you lose the speckles; too thin and it feels scratchy. -
Clean the foot:
Wipe the waxed bottom with a damp sponge to remove any stray drips of glaze, ensuring the ‘bare clay’ aesthetic at the base is clean. -
Glaze fire:
Fire the bowl a final time to the temperature required by your glaze and clay (typically cone 5 or 6 for stoneware).
Make it a set
Create three pinch pots of varying sizes (small, medium, large) using the same clay body. They nest beautifully and look cohesive even with slight variations in shape.
Once cooled, fill your new handmade bowl with coins or keys to enjoy its rustic charm every day
Word-Stamped Message Bowl
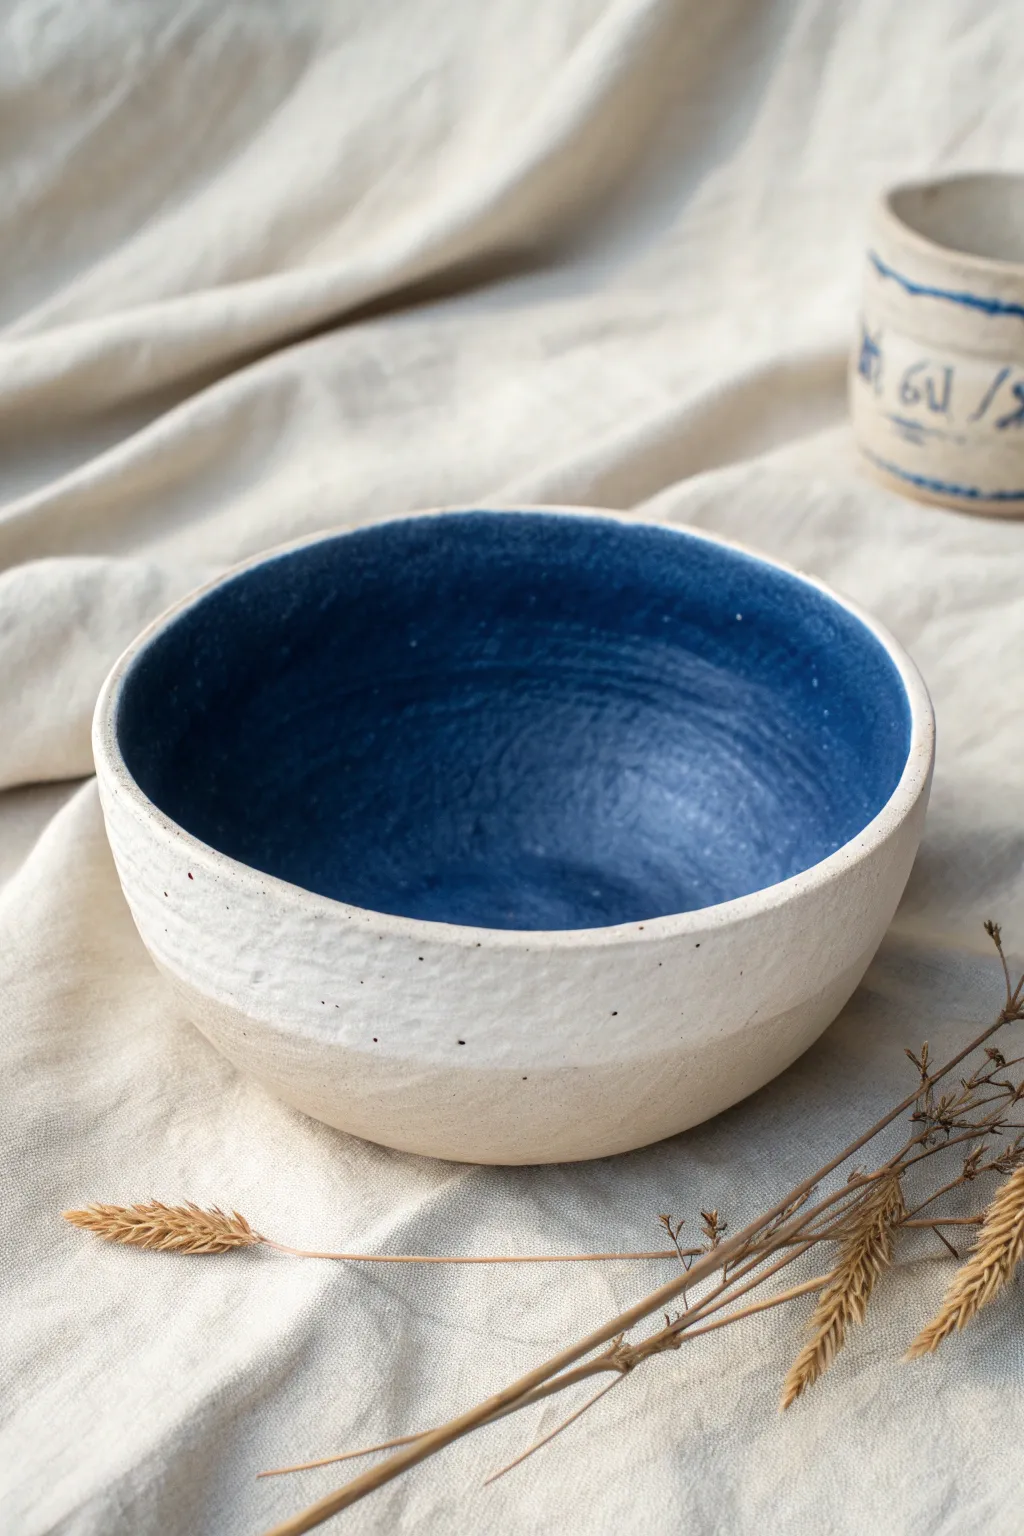
Create a stunning contrast between rustic texture and vibrant color with this deep blue glazed bowl. The smooth, saturated interior hides a secret stamped message, while the exterior shows off the raw beauty of speckled clay.
Step-by-Step
Materials
- Speckled stoneware clay (white or buff)
- Pottery wheel (or slab mold for hand-building)
- Small alphabet stamp set
- Rib tool (metal and rubber)
- Trimming tools
- Sponge
- Deep blue/Indigo underglaze or glaze
- Clear transparent glaze (if using underglaze)
- Matte white glaze (optional for exterior top rim)
- Kiln
Step 1: Shaping the Form
-
Center the clay:
Begin with a well-wedged ball of speckled clay on your wheel head. Center it firmly, ensuring there is no wobble before you open it. -
Open and widen:
Open the clay to create the floor of the bowl. For a message bowl, keep the floor slightly flatter than usual to provide a good surface for stamping later. -
Pull the walls:
Pull the clay upward to create height. Aim for a gentle curve, keeping the walls relatively thick at first to allow for shaping and stamping. -
Refine the curve:
Use a rib on the inside to smooth the curve and remove throwing lines if you prefer a cleaner look, though leaving some texture adds character. Flare the rim slightly outwards. -
Smooth the exterior:
Run a rib gently over the exterior to compress the clay, but avoid over-smoothing; the natural clay texture is a key feature of this design.
Step 2: Stamping and Drying
-
Dry to leather hard:
Allow the bowl to dry until it reaches a sturdy leather-hard stage. It shouldn’t be sticky to the touch but should still be cool and slightly flexible. -
Identify the stamping zone:
Look at the interior bottom of your bowl. Decide if you want your message right in the center or spiraling along the lower curve. -
Stamp your message:
Press your alphabet stamps firmly into the clay. Support the outside of the bowl with one hand while stamping the inside to prevent warping the wall. -
Trim the foot:
Flip the bowl over and center it on the wheel. Trim the bottom to create a neat foot ring, removing excess weight from the base. -
Final drying:
Let the piece dry completely to the bone-dry stage. This is crucial to prevent explosions in the kiln. -
Bisque fire:
Load the bowl into the kiln for a bisque firing (usually Cone 04 or 06) to harden the clay for glazing.
Stamp Getting Stuck?
If stamps pull up clay, dust the letters lightly with cornstarch before pressing. This acts as a release agent and burns off cleanly in the kiln.
Step 3: Glazing and Finishing
-
Clean the bisque:
Wipe the fired bowl with a damp sponge to remove any kiln dust, which can cause pinholes in your glaze. -
Pour the interior:
Pour a generous amount of deep indigo blue glaze into the bowl. Swirl it around ensuring it covers every inch of the interior, including the stamped letters. -
Pour out excess:
Quickly pour the excess glaze back into your bucket. Give the bowl a little shake as the last drops fall to settle the glaze layer evenly. -
Clean the rim:
Use a damp sponge to wipe the very top edge of the rim if you want a sharp transition, or let the blue wrap slightly over the top. -
Glaze the upper exterior:
Dip the top two-thirds of the exterior into a matte white glaze, or apply it with a brush for a thicker, textured look like the example image. I like to leave the brush strokes visible here. -
Reveal the clay body:
Ensure the bottom third of the bowl remains completely unglazed. Wipe away any drips with a sponge to keep that clean line between glaze and raw clay. -
Glaze fire:
Fire the bowl again to your clay’s maturity temperature (e.g., Cone 5 or 6). The blue glaze will melt and pool slightly in the stamped letters, highlighting them beautifully.
Sharper Letters
For ultra-readable text, rub a dark underglaze into the stamped letters and wipe the surface clean before applying a translucent blue glaze over top.
Once cooled, your bowl is ready to hold soup, cereal, or just sit beautifully on a shelf displaying its hidden message
Citrus Slice Painted Bowl
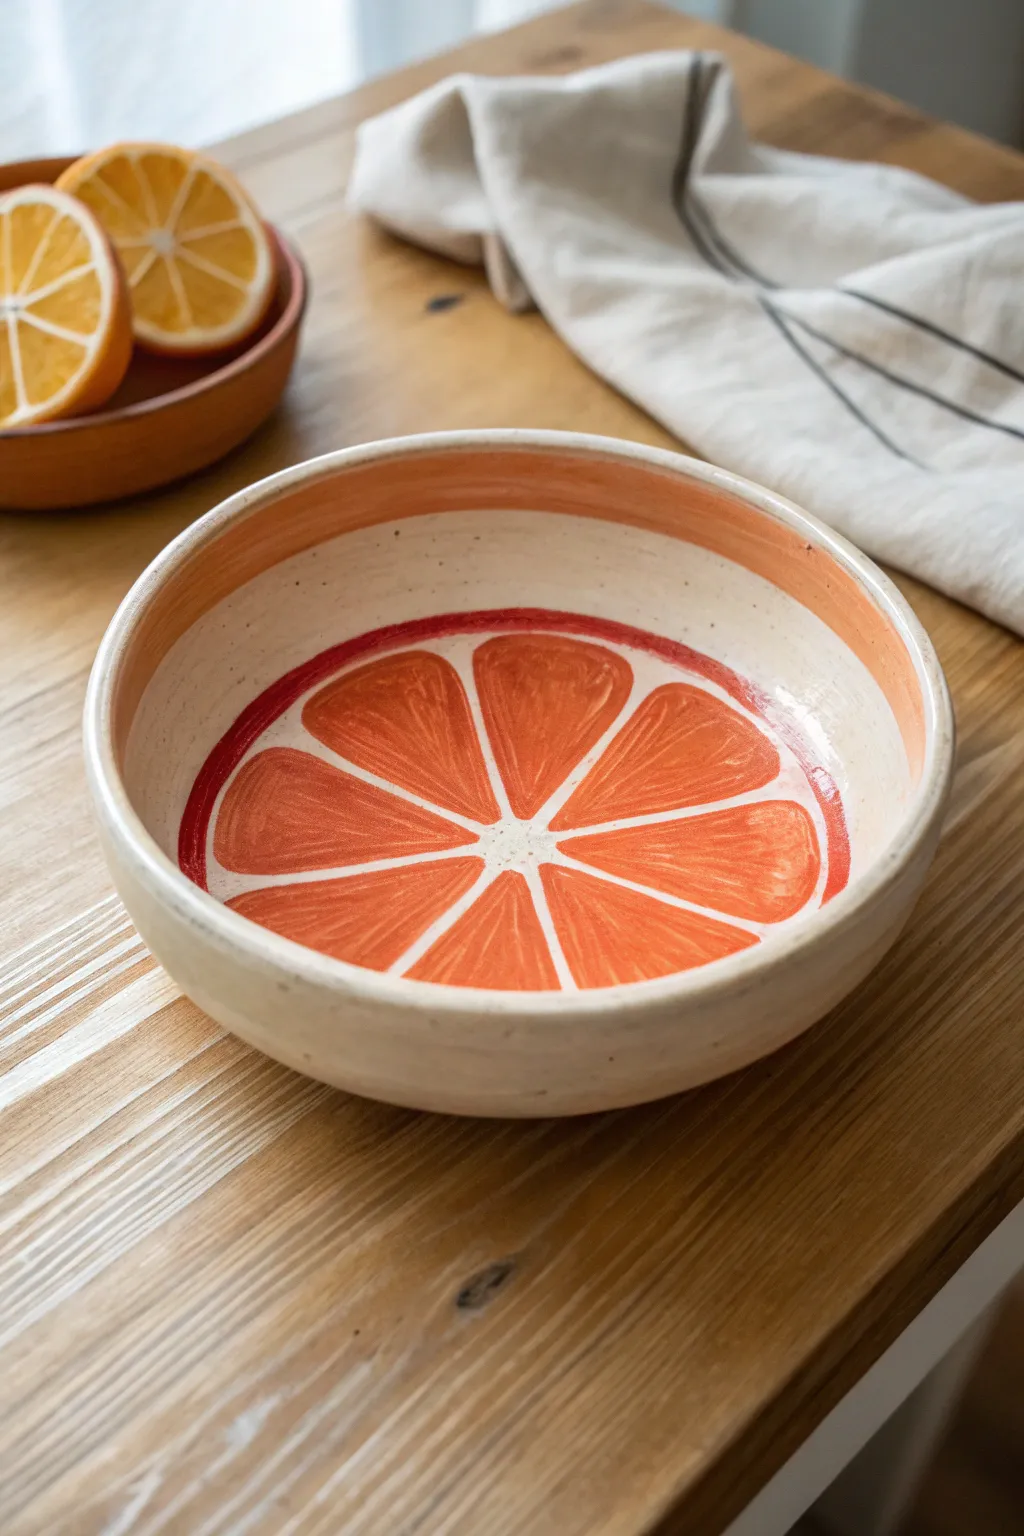
Brighten your kitchen table with this cheerful, summery bowl designed to look like a fresh slice of grapefruit or blood orange. The playful interior design features vibrant segments and a matching rim, all painted on a speckled clay body that adds rustic charm.
Detailed Instructions
Materials
- Speckled stoneware clay (or white clay with speckles)
- Pottery wheel (or slab roller/rolling pin for hand-building)
- Rib tool
- Sponge
- Underglazes: Bright Orange, Red-Orange, Deep Red
- Clear transparent glaze
- Small fine-liner brush
- Medium flat brush
- Needle tool
- Compass or round template
Step 1: Forming the Bowl
-
Prepare the Clay:
Begin by wedging your speckled stoneware clay thoroughly to remove air bubbles. You want a consistent texture throughout. -
Throw the Form:
Center your clay on the wheel and open it up wide. Pull the walls outward to create a shallow, open bowl shape with a distinct vertical rim. -
Refine the Shape:
Use a rib tool to smooth the interior curve, ensuring there are no finger ridges. The surface needs to be very smooth to act as your painting canvas later. -
Define the Rim:
Compress the rim with a chamois or sponge. Keep it slightly thick and rounded, which mimics the rind of the fruit. -
Dry to Leather Hard:
Allow the piece to dry slowly until it reaches a leather-hard state. It should be firm enough to handle without warping but still cool to the touch. -
Trim the Foot:
Flip the bowl over and trim a clean foot ring. Smooth the bottom with a damp sponge.
Uneven Segments?
If freehanding is tricky, create a paper stencil. Cut a circle the size of your bowl’s floor, fold it to create segment creases, and trace these lines onto the clay.
Step 2: Painting the Design
-
Mark the Center:
Lightly mark the exact center of the bowl’s interior using a needle tool or pencil. This will be the anchor for your citrus segments. -
Sketch the Segments:
Using a pencil (the graphite will burn off in the kiln), lightly draw a small circle in the center. Then, sketch 8-10 triangular segments radiating outward, leaving consistent gaps between them for the white pith lines. -
Outline the Rim:
Draw a circle about an inch below the physical rim on the inside of the bowl. This defines the outer edge of your fruit slice. -
Mix Your Colors:
Pour out your underglazes. I like to mix a bit of deep red into my bright orange to get that rich blood-orange look visible in the photo. -
Paint the Segments:
Using a medium flat brush, fill in the segments with your orange mixture. Apply 2-3 coats for solid opacity, letting each coat dry slightly in between. -
Add Texture Details:
Once the base colour is dry, take a fine-liner brush with a slightly lighter or darker orange. Paint tiny directional strokes inside the segments to mimic pulp texture. -
Paint the Outer Ring:
Apply a band of red-orange underglaze around the perimeter of the segments, creating a thin, defined border that frames the fruit slice. -
Paint the Upper Rim:
Paint the physical top rim of the bowl with a lighter peach or diluted orange underglaze, letting it wash slightly down the interior wall. -
Clean Up Lines:
Use a clean, damp brush or a scratching tool to neaten up the ‘pith’ lines (the unpainted clay areas) between the segments. Sharp, clean lines make the design pop.
Keep it Clean
Use liquid wax resist on the ‘pith’ lines (the unpainted clay strips) before painting the orange sections. This ensures your white lines stay perfectly crisp.
Step 3: Glazing and Firing
-
Bisque Fire:
Load the bone-dry bowl into the kiln for a bisque firing (usually Cone 04 or 06). This sets the shape and makes the underglaze permanent. -
Apply Clear Glaze:
Dip the entire bowl into a clear, transparent glaze. Shake gently to remove drips. -
Wipe the Foot:
Sponge off any glaze from the foot ring to prevent the bowl from sticking to the kiln shelf. -
Final Firing:
Fire the piece to the maturity temperature of your clay body (likely Cone 5 or 6 for stoneware).
Once cooled, fill this vibrant bowl with fresh fruit or serve a summer salad to show off your handiwork
Two-Tone Dip-Dyed Bowl

Embrace the beauty of raw clay with this elegant bowl project that celebrates texture and contrast. By leaving the base unglazed, you create a striking visual and tactile balance between the smooth, creamy upper glaze and the warm, earthy terracotta beneath.
How-To Guide
Materials
- Red stoneware or terracotta clay (approx. 2 lbs)
- Pottery wheel (or coil building tools for hand-building)
- Sponge
- Wire cutter
- Rib tool (wooden or metal)
- Trimming tools
- Cream or speckled white dipping glaze
- Wax resist (liquid)
- Brush for wax
- Kiln access
Step 1: Forming the Bowl
-
Prepare the Clay:
Begin by wedging your red stoneware clay thoroughly to remove air pockets and align the particles. Form it into a smooth, round ball. -
Center on the Wheel:
Throw the clay ball firmly onto the center of your wheel head. Using moistened hands and steady pressure, center the clay until it spins true without wobbles. -
Open the Form:
Drill your thumbs into the center of the mound, leaving about a half-inch of thickness for the floor. Gently pull the clay outward to establish the interior width of your bowl. -
Pull the Walls:
Using a pincer grasp with one hand inside and one outside, slowly pull the clay upward. Aim for an even wall thickness from bottom to top, creating a deep, rounded curve rather than a V-shape. -
Refine the Shape:
Use a rib tool on the interior to smooth out throwing lines and compress the floor. On the exterior, use a rib to perfect the curve, ensuring the transition from the base to the wall is seamless. -
Refine the Rim:
Compress the rim gently with a piece of chamois or your sponge to make it smooth and rounded, which helps prevent chipping later. -
Wire Off:
Draw a taut wire tool underneath the base of the bowl to separate it from the wheel head. Carefully lift it off and set it aside to dry until leather-hard.
Straight Lines Secret
To get a perfectly straight resist line, center the bowl on a banding wheel. Hold your brush steady against the spinning pot to apply the wax evenly.
Step 2: Trimming and Finishing
-
Center for Trimming:
Once the clay is firm enough to handle without deforming (leather-hard), place the bowl upside down on the wheel. Secure it with small coils of fresh clay. -
Define the Foot:
Use a sharp trimming tool to carve away excess clay from the base. Create a defined foot ring that lifts the bowl slightly, mirroring the curve of the interior. -
Smooth the Exterior:
I like to run a smooth metal rib over the trimmed area while the wheel spins slowly to burnish the raw clay slightly, removing any harsh tool marks. -
Bisque Fire:
Allow the bowl to dry completely (bone dry). Load it into the kiln for a bisque firing, typically to cone 04 or 06, to harden the clay for glazing.
Step 3: Glazing the Two-Tone Look
-
Clean the Bisqueware:
Wipe the fired bowl with a damp sponge to remove any kiln dust, which can prevent the glaze from adhering properly. -
Apply Wax Resist:
Paint a line of wax resist around the bottom third of the bowl’s exterior. Fill in the area below this line and the entire underside/foot with wax. This ensures these areas remain bare clay. -
Prepare the Glaze:
Stir your cream or speckled white glaze thoroughly. It should have the consistency of heavy cream for the best coverage. -
Pour the Interior:
Pour a ladle full of glaze into the bowl. Roll the bowl around to coat the interior completely, then pour the excess back into the bucket. -
Dip the Exterior:
Hold the bowl by the foot (or using dipping tongs if preferred) and dip it straight down into the glaze bucket. Stop just slightly past where your wax resist line begins to ensure a crisp edge. -
Clean Up:
Once the glaze is dry to the touch, use a damp sponge to wipe away any stray beads of glaze that might be sitting on top of the waxed area. -
Final Fire:
Load the bowl into the kiln for the final glaze firing (temperature depends on your specific clay and glaze, often cone 5 or 6 for stoneware).
Level Up: Speckle Effect
If you don’t have a speckled clay body, add a small amount of granular ilmenite or manganese to your white glaze to achieve those lovely dark flecks.
Now you have a stunning piece of functional art that highlights the natural warmth of the earth
Simple Sgraffito Line Bowl
This project transforms a simple terracotta vessel into a piece of functional art using the sgraffito technique. By carving through white underglaze, you’ll reveal the warm clay body beneath in a stunning, repetitive leaf pattern.
Step-by-Step
Materials
- Red stoneware or terracotta clay (approx. 2-3 lbs)
- Pottery wheel (or slab roller/coil tools for handbuilding)
- White underglaze
- Medium soft fan brush
- Loop tool (for trimming)
- Wire loop or sgraffito tool (small, sharp tip)
- Clear transparent glaze
- Sponge
- Pottery rib (wood or rubber)
Step 1: Forming the Bowl
-
Prepare the clay:
Wedge your red clay thoroughly to remove air bubbles, aiming for a smooth, pliable consistency. Form it into a ball. -
Construct the base form:
Throw a medium-sized bowl on the wheel, focusing on creating a symmetrical, curved wall. If handbuilding, pinch or coil build a bowl shape and smooth the walls meticulously with a rib. -
Refine the curve:
Use a rib to compress the inside and outside walls, ensuring a smooth, even surface without finger marks, as these will disrupt your carving later. -
Leather hard drying:
Allow the bowl to dry slowly until it reaches a leather-hard state. It should be firm enough to handle without deforming but still hold moisture. -
Trim the foot:
Invert the bowl on the wheel (or a banding wheel) and trim a clean foot ring. Smooth out any trimming marks with a slightly damp sponge, but avoid re-wetting the clay too much.
Moisture Matters
Carving when the clay is too dry causes chipping. If the tool ‘chatters’ or the lines look jagged, the clay is too dry. Mist it lightly and wrap it up for an hour.
Step 2: Applying the Design
-
Apply underglaze band:
While the bowl is spinning slowly or on a banding wheel, apply 2-3 coats of white underglaze. Cover the bottom two-thirds of the exterior, leaving a raw clay rim at the top for specific contrast. -
Let underglaze set:
Wait until the underglaze is dry to the touch but the clay is still leather hard. This is the sweet spot where carvings will be crisp rather than jagged. -
Mark the spacing:
Lightly visualize or mark a horizontal center line around the belly of the bowl. This will be the ‘spine’ or central vein for your leaf pattern. -
Carve the central vein:
Using your sgraffito tool, carve a continuous horizontal wavy line around the circumference. Vary the pressure slightly to give the line an organic feel. -
Draft the leaf structures:
Carve the outer boundaries of the leaves. Create large, elongated almond shapes that follow the flow of your central wavy line. -
Add the veins:
Systematically carve the angled veins inside each leaf shape. Start from the center line and curve them gently outward toward the leaf edge. -
Refine the lines:
Go back over your main lines if needed to ensure the red clay is clearly visible and clean. I find a quick brush with a dry soft brush helps remove the clay burrs. -
Clean up crumbs:
Use a soft, dry brush to gently sweep away all the little clay crumbs created by carving. Do not use a wet sponge here, or you might smear the white underglaze.
Invert the Pattern
Try black slip over white clay for a dramatic, graphic look, or carve just the space *between* the leaves for a ‘reverse’ sgraffito effect.
Step 3: Finishing
-
Bisque fire:
Once the bowl is bone dry, load it into the kiln for a bisque firing (usually Cone 04 or 06, depending on your clay). -
Rinse and dry:
After the bisque firing, quickly rinse the bowl under water to remove dust and let it dry completely. -
Clear glaze application:
Dip the entire bowl into a clear, transparent glaze. This seals the clay and makes the white underglaze pop against the darkening red clay. -
Wipe the foot:
Carefully sponge off any glaze from the bottom foot ring to prevent it from fusing to the kiln shelf. -
Final glaze fire:
Fire the bowl to the maturity temperature of your clay body (likely Cone 5 or 6 for stoneware).
Once cooled, you’ll have a stunning vessel perfect for serving or display, with a design that feels both primal and modern
Nesting Mini Bowl Set
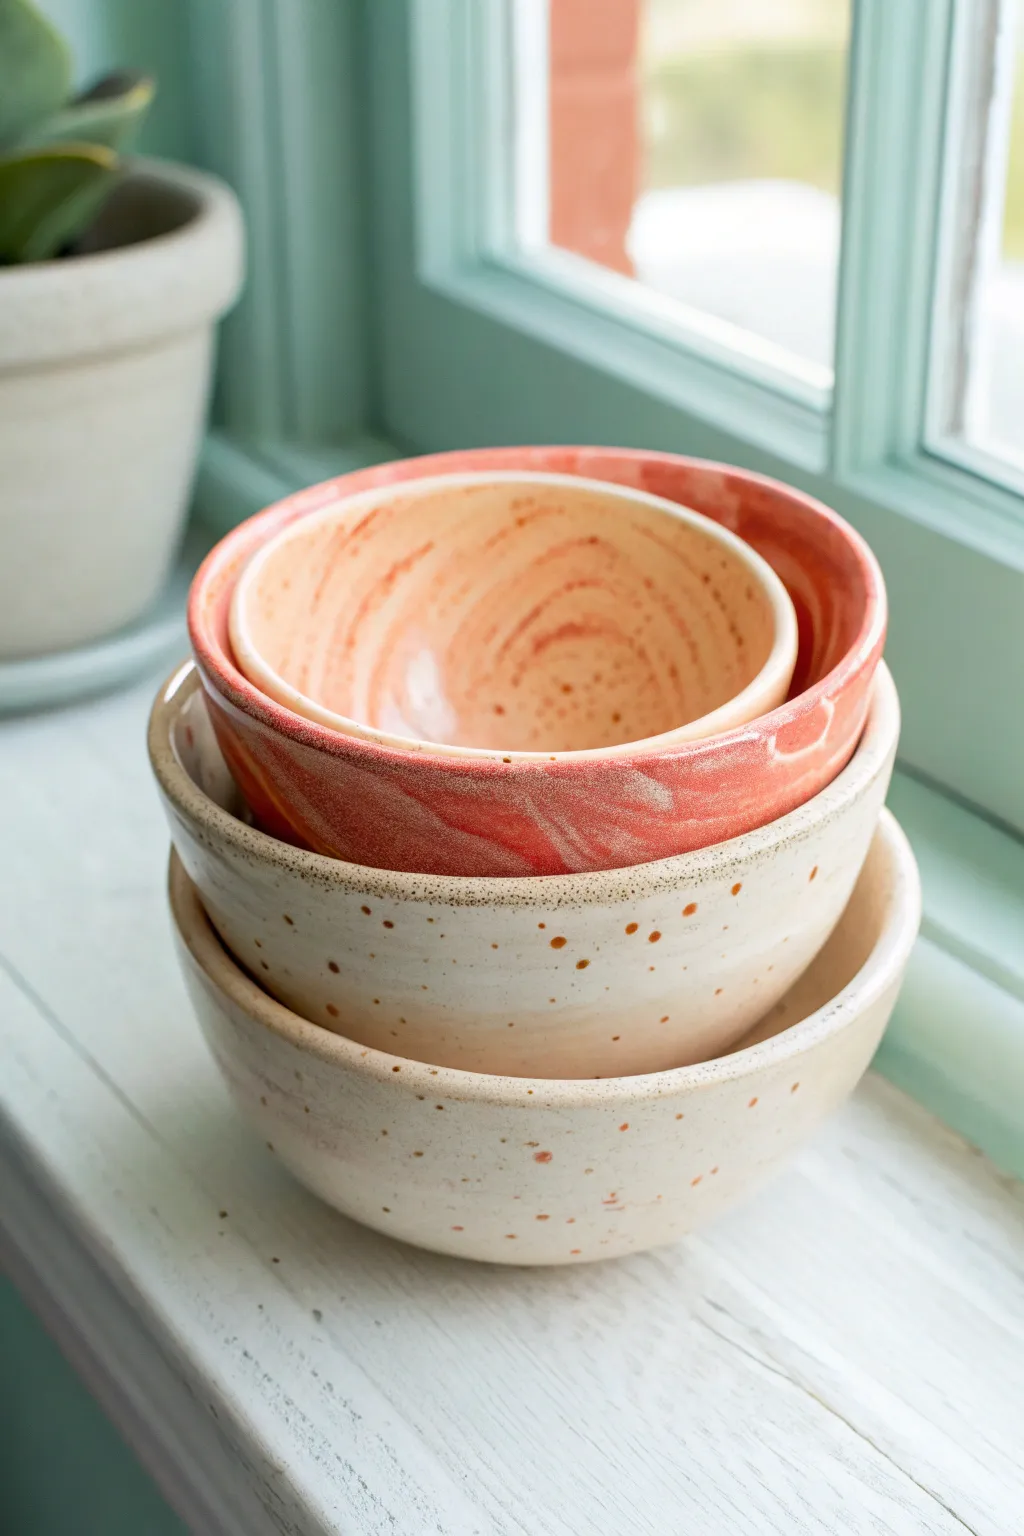
These charming mini bowls fit snugly inside one another, showcasing a beautiful progression from creamy speckles to a vibrant coral marble. This project is perfect for creating a cohesive set that functions as both decor and useful storage for trinkets.
Step-by-Step Tutorial
Materials
- White polymer clay or air-dry clay (approx. 1 lb)
- Coral or terracotta colored clay
- Brown acrylic paint (for speckling)
- Old toothbrush
- Rolling pin
- Three bowls of varying sizes (to use as molds)
- Plastic wrap
- Craft knife or clay cutter
- Sandpaper (fine grit)
- Clear gloss varnish or glaze
- Paintbrush
Step 1: Preparing the Clay
-
Condition the white clay:
Start by kneading a large portion of your white clay until it is soft and pliable. Divide this white clay into three portions: large, medium, and small. -
Prepare the marble mix:
Take the smallest portion of white clay intended for the top bowl. Roll out a thin snake of your coral-colored clay. -
Create the marble effect:
Twist the coral snake together with the white clay portion. Fold the twisted log in half and twist again. Repeat this folding and twisting motion until you see distinct streaks of color, stopping before the colors blend completely into a new solid shade.
Rim Smoothing Trick
Use a damp sponge to smooth rim edges while the clay is still wet. This saves significant sanding time later and results in a more professional, rounded lip.
Step 2: Shaping the Bowls
-
Line the molds:
Select three kitchen bowls that nest inside each other to act as your forms. Cover the inside of each bowl smoothly with plastic wrap to prevent sticking. -
Roll the slabs:
Roll out your large white clay portion into a slab about 1/4 inch thick. I find turning the clay frequently helps keep the thickness even. -
Form the large bowl:
Drape the rolled slab into your largest bowl mold. Gently press the clay against the sides, smoothing out any air bubbles with your fingertips. -
Trim the edge:
Use your craft knife to slice off the excess clay around the rim of the bowl mold. Run a wet finger along the cut edge to smooth and round it slightly. -
Repeat for the medium bowl:
Roll out the medium white clay portion and press it into the medium-sized mold, trimming and smoothing the rim just as before. -
Form the marbled bowl:
Take your marbled coral-and-white clay mixture, roll it into a slab, and press it into the smallest mold. This will be the colorful centerpiece of your set.
Gilded Edges
After glazing, paint just the very rim of each bowl with liquid gold leaf or metallic gold paint for a luxurious, modern finish.
Step 3: Finishing Touches
-
Initial drying:
Let the bowls sit in their molds until the clay is leather-hard (firm but still cool to the touch). This usually takes a few hours for air-dry clay or polymer clay. -
Remove and refine:
Gently lift the clay forms out of the molds and peel away the plastic wrap. If baking polymer clay, follow package instructions now. If using air-dry clay, let them dry completely. -
Sand the surfaces:
Once fully cured or dry, use fine-grit sandpaper to smooth any rough spots on the rims or outer surfaces. -
Mix the speckle paint:
Dilute a small amount of brown acrylic paint with water until it has an inky consistency. -
Apply the speckles:
Dip an old toothbrush into the paint mixture. Hold it over the two larger white bowls and run your thumb across the bristles to flick tiny splatters onto the surface. Let the paint dry completely. -
Seal the set:
Apply a coat of clear gloss varnish or glaze to the inside and outside of all three bowls to give them a ceramic-like shine and protect the paint.
Stack your new creations on a sunny windowsill or use them to organize your jewelry for a functional piece of art