If you can roll a slab, pinch a bowl shape, or attach a simple handle, you can make a seriously cute clay cup. These easy clay cup ideas are the kind of projects I love teaching because they look special without requiring complicated tools or perfect symmetry.
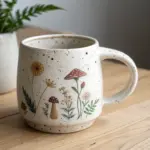
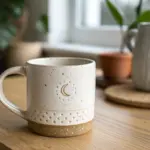
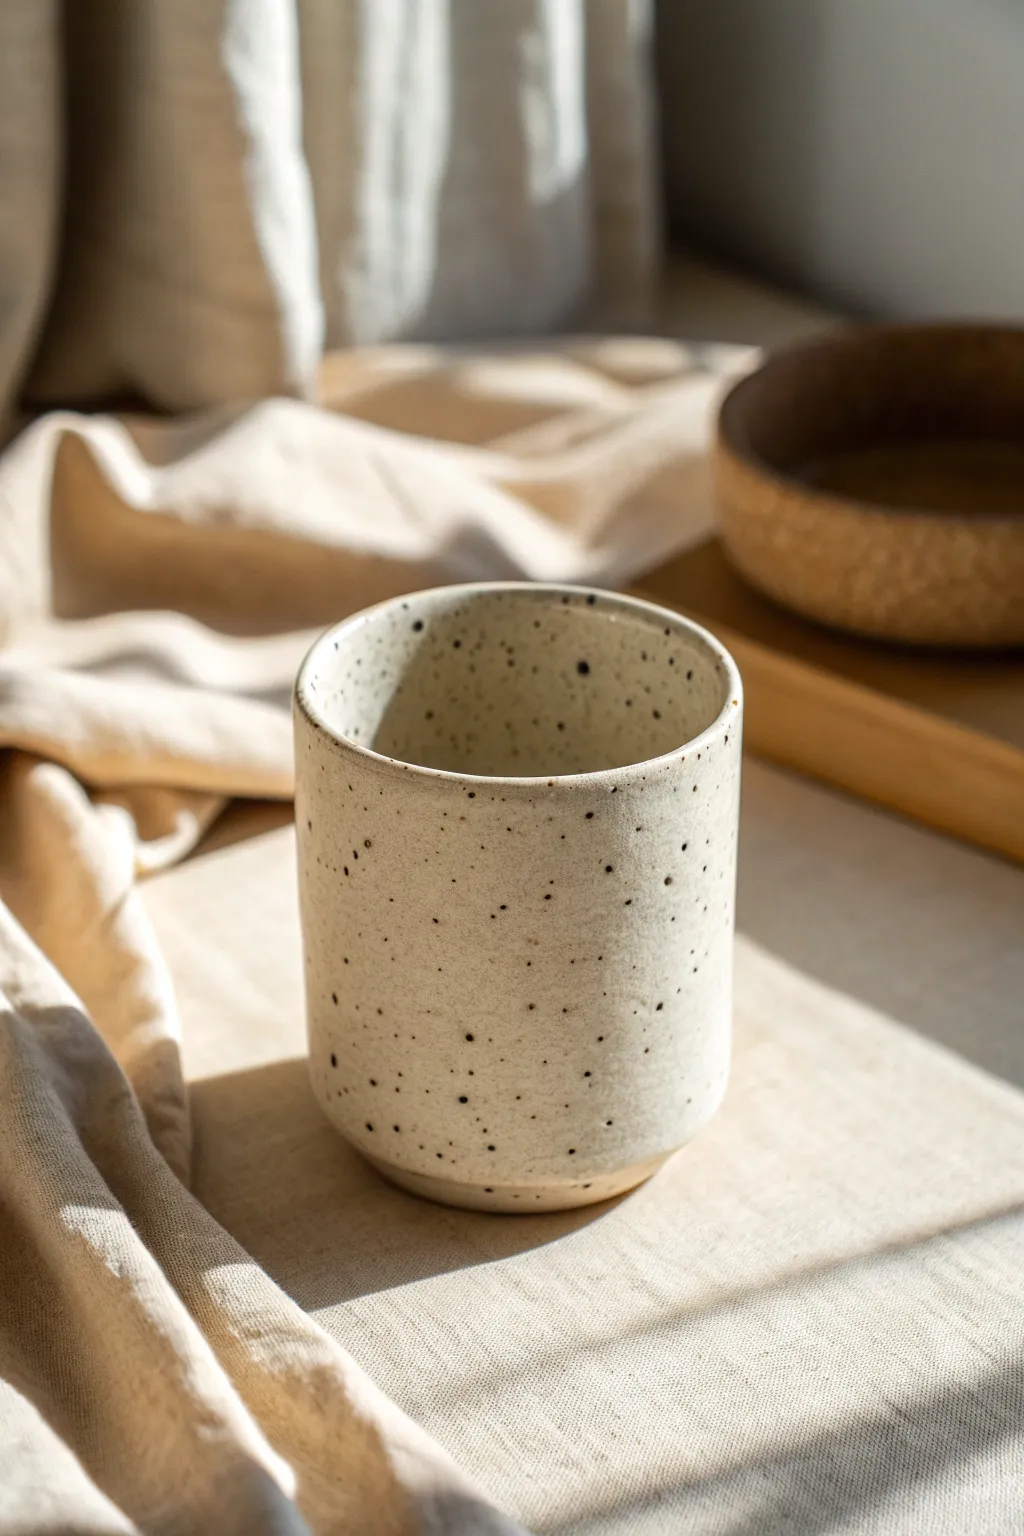
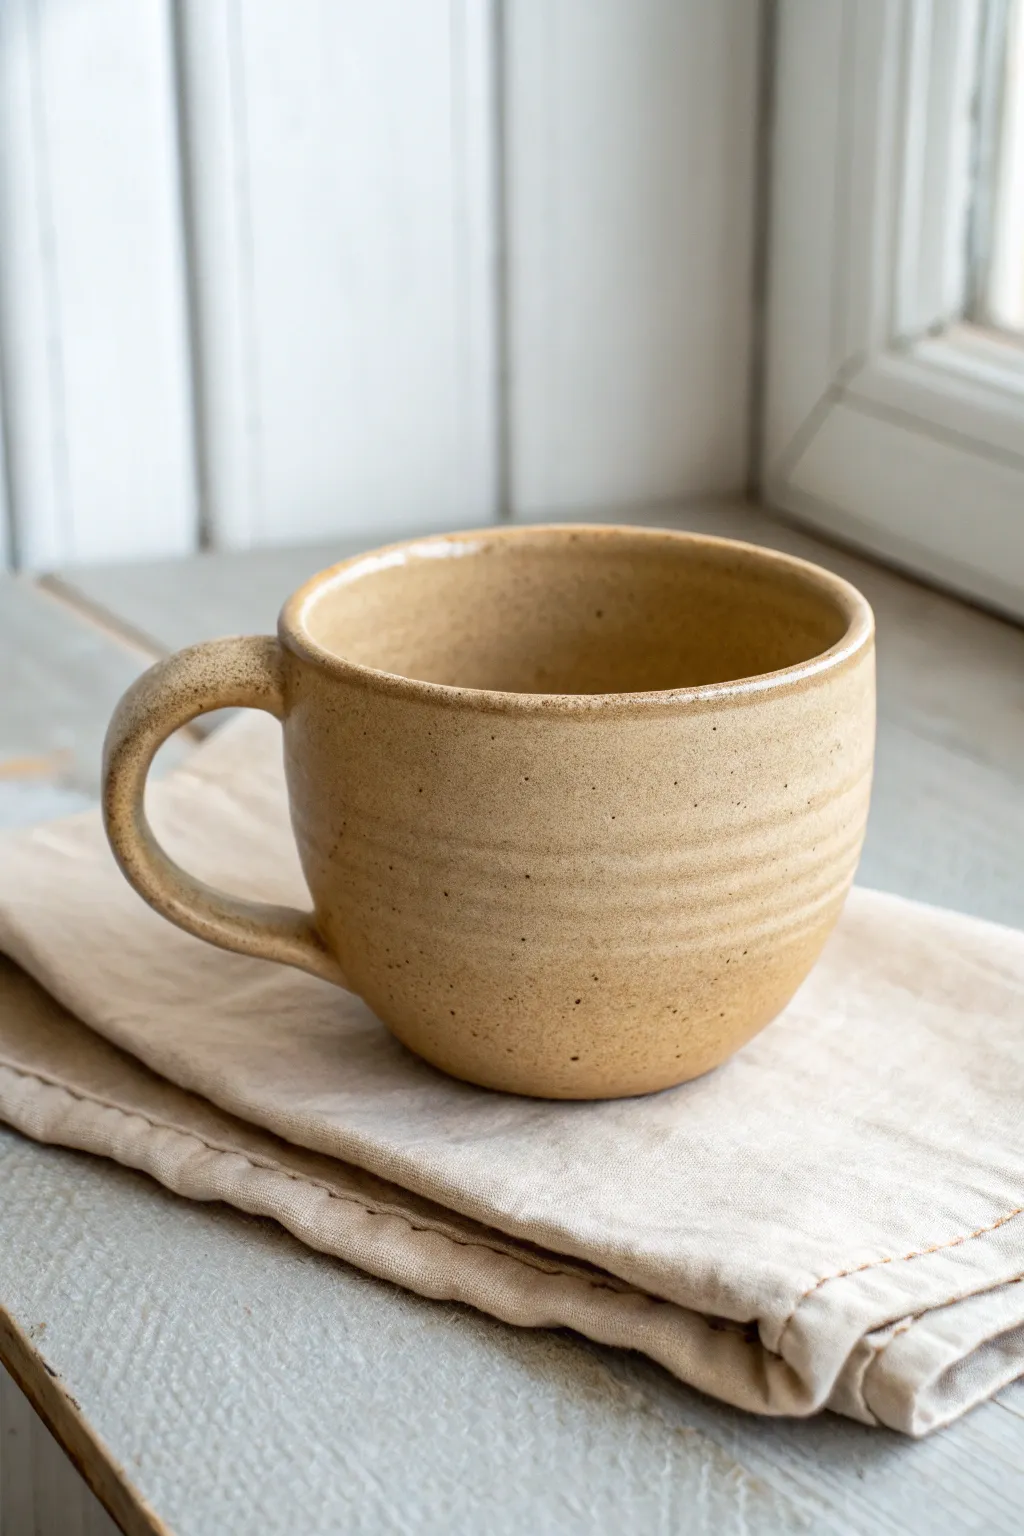
Pinch Pot Tea Cup

This minimalist tea cup embraces the natural beauty of hand-built pottery with its organic, rounded form and milky white glaze. The subtle speckling in the clay body gives it a timeless, rustic charm perfect for your quiet morning rituals.
Step-by-Step Tutorial
Materials
- Speckled stoneware clay (approx. 1 lb)
- Sponge
- Water cup
- Wooden modeling tool or old spoon
- Metal rib or old credit card
- Needle tool
- Soft paintbrush
- Satin white glaze
- Kiln access (or air-dry alternatives if not firing)
Step 1: Forming the Cup
-
Prepare your clay ball:
Take your lump of speckled stoneware clay and pat it firmly into a smooth sphere. You want it to be roughly the size of a large orange or a tennis ball, ensuring there are no air bubbles trapped inside. -
Initial thumb hole:
Hold the clay ball in your non-dominant hand. With your dominant thumb, press directly into the center of the sphere, stopping about half an inch from the bottom so the base isn’t too thin. -
Pinch the walls:
Begin pinching the clay between your thumb (inside) and fingers (outside). Rotate the ball slightly with each pinch to ensure even wall thickness. -
Extend the height:
Move your pinching motion from the bottom upward to draw the walls out. Keep the pressure consistent so the walls remain even—aim for about a quarter-inch thickness throughout. -
Shape the vessel:
As you pinch, gently curve the walls inward slightly at the top to recreate that cozy tea cup silhouette rather than a wide bowl shape. -
Flatten the base:
Gently tap the bottom of your pot against your work surface to create a flat, stable foot. This prevents the cup from rocking.
Step 2: Refining Surface
-
Smooth the interior:
Use a slightly damp sponge to compress the clay on the inside bottom and walls, smoothing out any deep fingerprints or cracks. -
Refine the exterior:
Using a metal rib or an old credit card, scrape the outside walls while supporting the inside with your hand. This removes lumpy finger marks and reveals the beautiful grog or speckles in the clay. -
Define the rim:
Use a damp chamois or just your moistened fingertips to round off the rim. A sharp rim is uncomfortable to drink from, so spend extra time softening this edge. -
Drying:
Set the cup aside to dry slowly. Cover it loosely with plastic for the first day, then uncover it until it reaches the bone-dry stage (completely moisture-free).
Keep it Even
Use a needle tool to check wall thickness as you work. Poke it through; if walls vary widely, pinch thick spots before the clay dries out.
Step 3: Glazing & Finishing
-
Bisque fire:
Fire the bone-dry piece in a kiln to bisque temperature (usually Cone 04). This hardens the clay so it’s ready for glazing. -
Wax the foot:
Apply a layer of wax resist to the bottom of the cup and about 1/4 inch up the side. This prevents the glaze from sticking to the kiln shelf. -
Prepare the glaze:
Stir your satin white glaze thoroughly. For this look, we want a glaze that breaks slightly over texture, allowing the speckled clay to show through. -
Dip or brush:
Quickly dip your cup into the glaze bucket, holding it by the foot, or brush on 2-3 even coats if you are painting it on manually. -
Check the drip line:
I always use a sponge to wipe back any glaze that might have trickled down near the wax line to ensure a clean finish after firing. -
Glaze fire:
Place the cup back in the kiln for the final glaze firing (temperature depends on your specific clay and glaze, usually Cone 5 or 6). -
Final sanding:
Once cool, check the unglazed bottom. If it feels rough, sand it lightly with fine-grit sandpaper so it doesn’t scratch your table.
Texture Twist
Before drying, press a piece of coarse linen fabric into the wet clay exterior for a tactile, woven texture that pops under white glaze.
Enjoy the warmth of your handmade cup during your next tea break


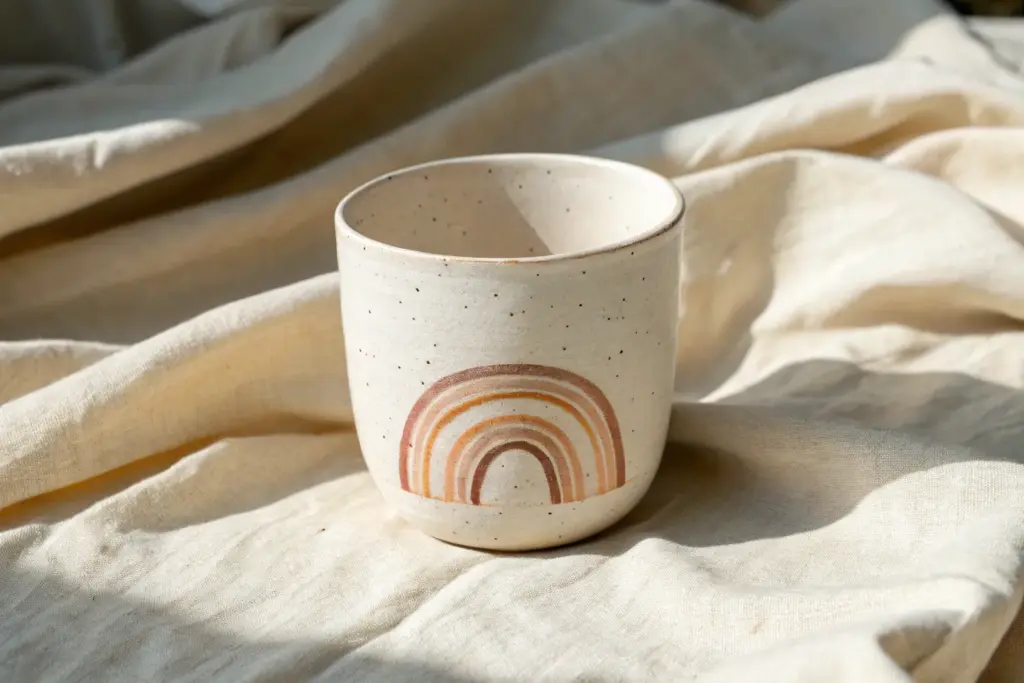
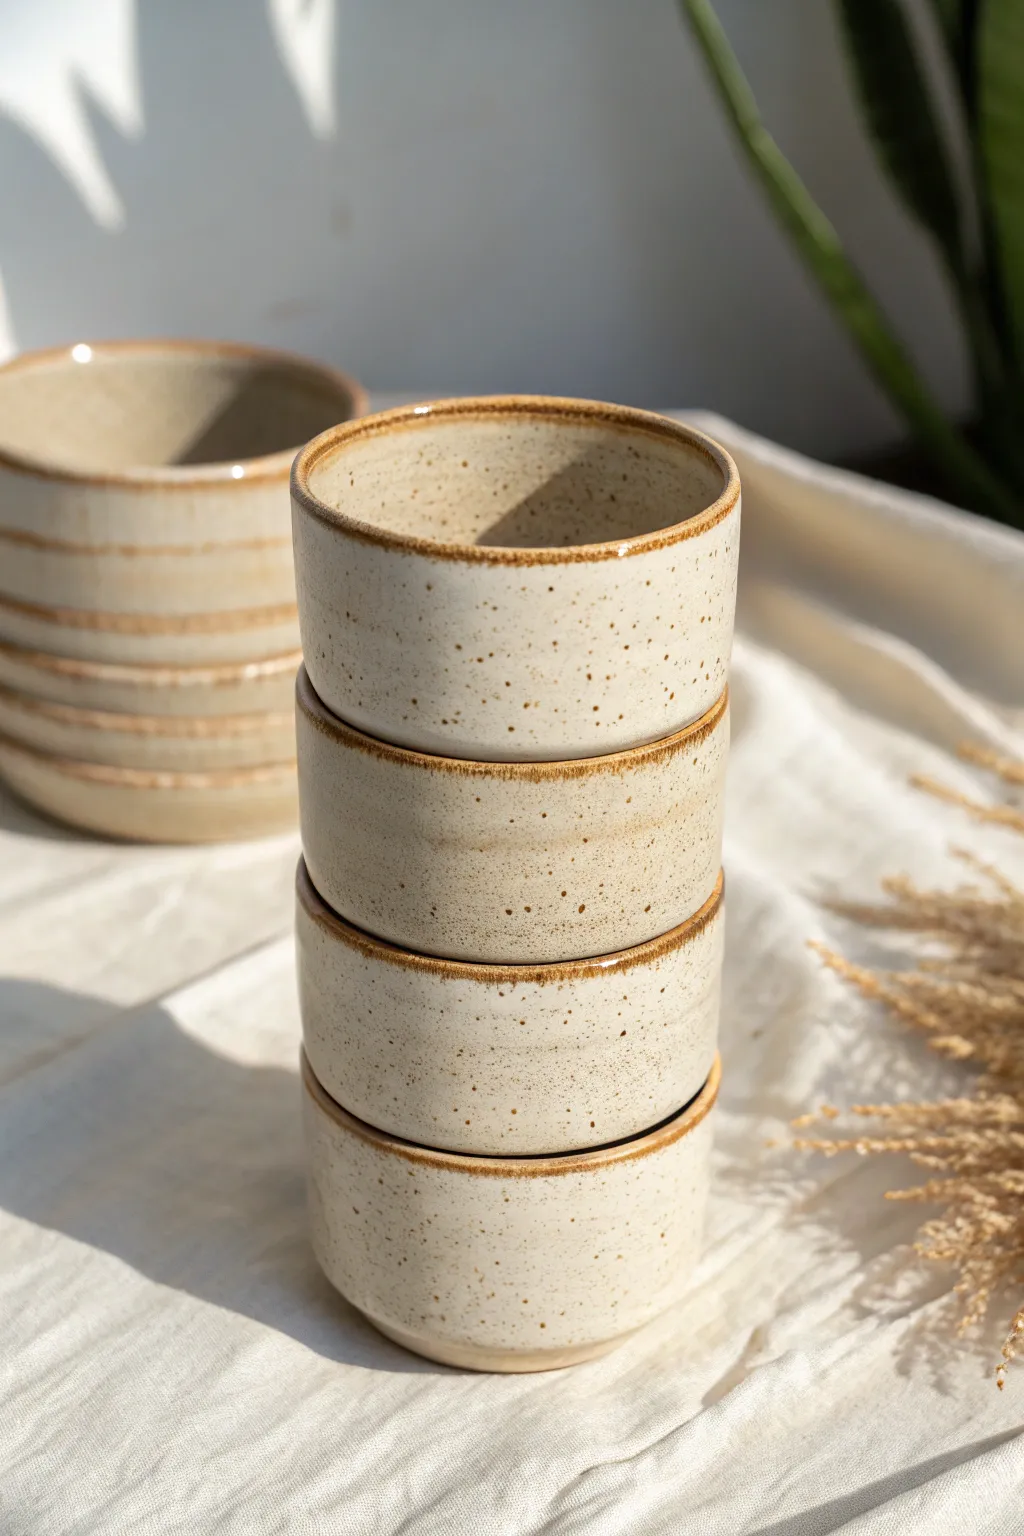
Slab-Built Straight Tumbler
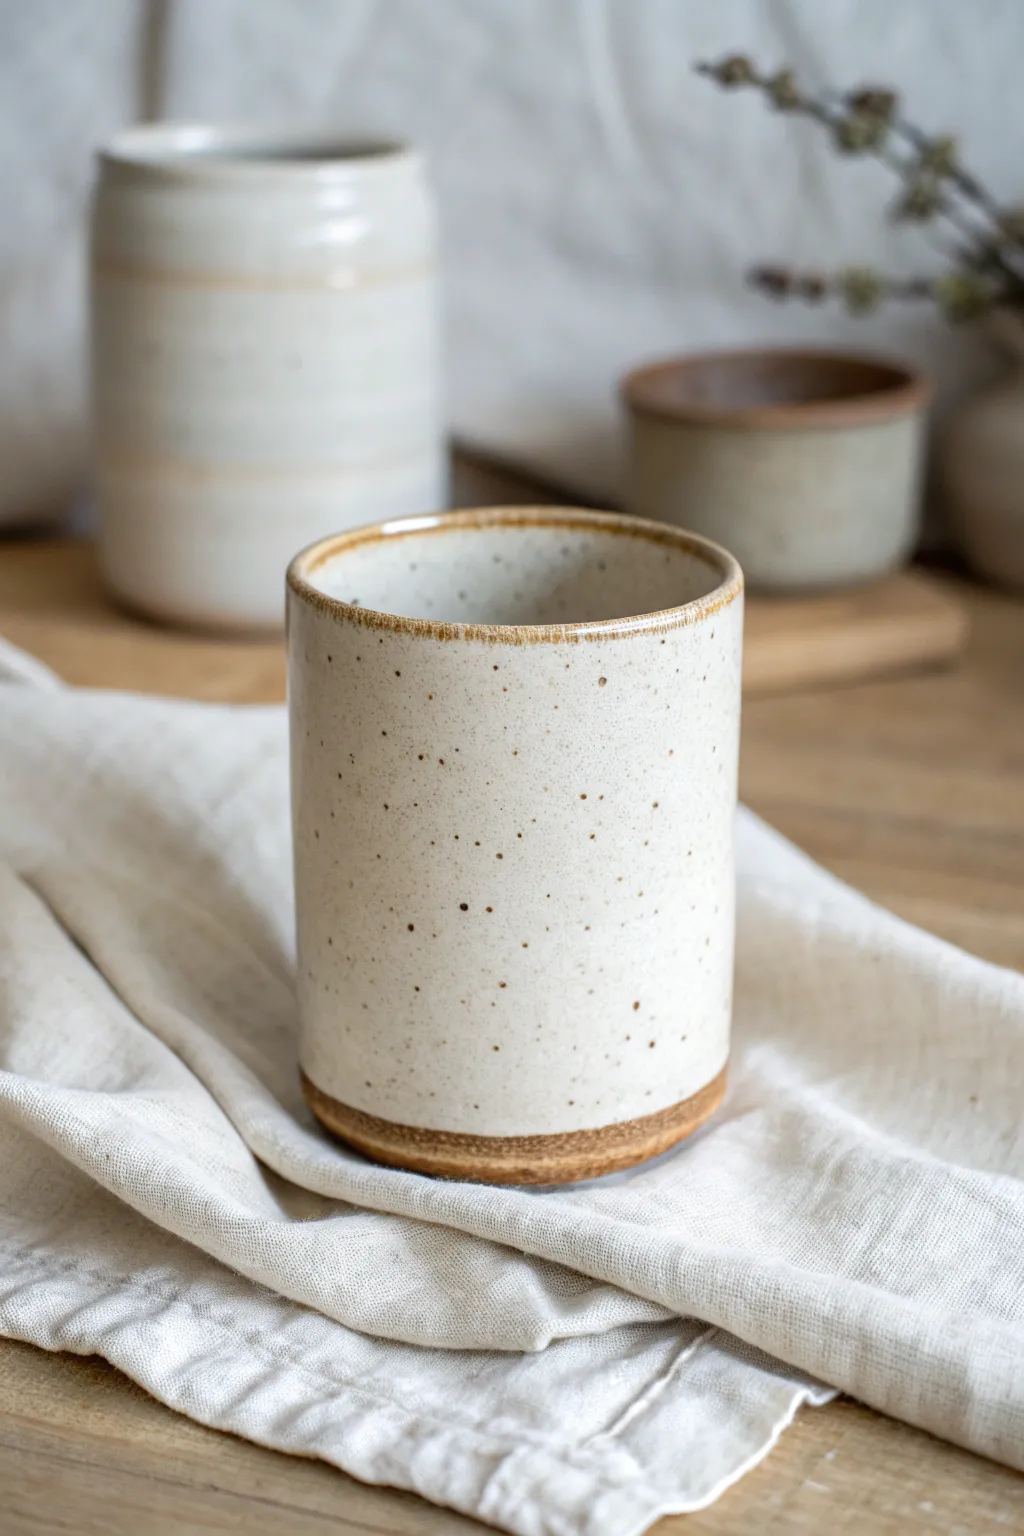
This project features a clean, straight-sided cup crafted from speckled stoneware that showcases the natural beauty of the clay body. The exposed raw base creates a lovely textural contrast against the glossy, creamy white glaze.
Step-by-Step
Materials
- Speckled stoneware clay (mid-fire)
- Rolling pin with texture-free surface
- Slab roller or guide sticks (approx. 1/4 inch)
- Canvas or slab mat
- Fettling knife or needle tool
- Ruler or straight edge
- Template (paper or tar paper)
- Scoring tool (serrated rib or needle)
- Slip (clay and water mixture)
- Wooden modeling tool
- Rubber rib (soft)
- Sponge
- Wire cutter
- Creamy white dipping glaze
Step 1: Prepping and Rolling Slabs
-
Wedge the clay:
Start with a softball-sized ball of speckled stoneware clay. Wedge it thoroughly to remove air pockets and ensure an even consistency, which is crucial for sturdy slab work. -
Flatten the base:
Press the clay ball onto your canvas or slab mat with your palm to flatten it into a thick pancake shape, flipping it over once to prevent sticking. -
Roll the slab:
Using guide sticks or a slab roller set to about 1/4 inch thickness, roll out the clay into a long, rectangular sheet. Roll in multiple directions to compress the clay particles. -
Smooth the surface:
Before cutting, take a soft rubber rib and gently compress the surface of the slab on both sides. This removes canvas texture and aligns the clay particles to prevent warping.
Pro Tip: Seamless Join
When smoothing the vertical seam, support the cylinder from the inside with one hand while ribbing the outside. This prevents the wall from collapsing or denting inwards.
Step 2: Cutting and Assembling
-
Cut the rectangle:
Using a ruler and your fettling knife, cut a rectangle approximately 4.5 inches tall by 10 inches long (adjust based on your desired cup diameter). -
Bevel the short edges:
To create a seamless join, cut the two short ends of your rectangle at a 45-degree angle in opposite directions. This allows the ends to overlap flush without added thickness. -
Score and slip:
Rough up the beveled edges with your scoring tool and apply a generic amount of slip. -
Form the cylinder:
Stand the clay slab up and curve it into a cylinder, pressing the scored ends together firmly. I find using a wooden tool on the inside seam helps fuse the clay completely. -
Cut the base:
Roll a small piece of leftover clay for the floor. Place your cylinder on top of it and trace around the outside with a needle tool to cut a perfect circle. -
Attach the bottom:
Score and slip the bottom edge of your cylinder and the outer edge of your clay circle. Press them together firmly. -
Reinforce the interior:
Roll a very thin coil of clay and place it inside the bottom seam. Smooth it down with a modeling tool to ensure the cup is water-tight.
Step 3: Refining and Glazing
-
Smooth the exterior seam:
Use your rubber rib to smooth the vertical seam on the outside until it is invisible. This creates that clean, modern look seen in the photo. -
Compress the rim:
Using a damp sponge or piece of chamois, gently compress and round the drinking rim so it feels comfortable against the lips. -
Dry and bisque fire:
Let the cup dry slowly under plastic to prevent warping, then bisque fire it to cone 04. -
Wax resist:
Apply wax resist to the bottom half-inch of the exterior and the entire underside. This creates the ‘exposed clay’ detail at the base. -
Dip glaze:
Dip the cup into a creamy white glaze, holding it for 3-5 seconds. Shake off excess glaze gently as you pull it out. -
Clean up:
Use a sponge to wipe away any stray glaze droplets that may have beaded up on the waxed area at the bottom. -
Final firing:
glaze fire the piece to the temperature recommended for your specific clay body, typically cone 5 or 6 for mid-fire stoneware.
Troubleshooting: Warping
If your cylinder creates an oval shape during drying, place a lightweight circular object (like a yogurt lid) gently on the rim while it dries to help hold its round shape.
Once fired, fill your new tumbler with tea or coffee and enjoy the rustic warmth of handmade ceramics


Easy Mug With Strap Handle

This charming, minimalist mug features a beautifully subtle ribbed texture and a classic strap handle for comfortable gripping. The speckled stoneware clay adds a rustic, earthy feel that glows warmly in natural light.
Detailed Instructions
Materials
- Speckled stoneware clay (mid-fire)
- Pottery wheel
- Throwing sponge
- Needle tool
- Wire cutter
- Wooden rib or modeling tool
- Ribbon trim tool
- Serrated rib or scoring tool
- Slip (clay slurry)
- Clear or transparent white glaze (food safe)
- Flat, soft paintbrush
- Kiln
Step 1: Throwing the Cylinder
-
Center the Clay:
Begin by securing a ball of speckled clay onto the wheel head. Use wet hands to cone the clay up and down until it is perfectly centered and spinning without wobbling. -
Open and Pull:
Open the centered mound to create the floor. Compress the floor well to prevent cracking later. Slowly pull the walls up into a tall, straight cylinder shape, aiming for an even thickness throughout. -
Refine the Shape:
Once the height is established, gently collar the rim inward slightly if you prefer a straighter profile, or leave it slightly open. Use a sponge to smooth the lip so it will be comfortable to drink from. -
Create the Ribbed Texture:
While the wheel is spinning at a slow-to-medium speed, press your finger or a rounded wooden modeling tool gently against the outside wall. Start at the bottom and slowly move upward to create a continuous spiraling groove or distinct horizontal rings. -
Cut from Wheel:
Run your wire cutter underneath the base of the mug to separate it from the wheel head. Let it sit until it is leather-hard—firm enough to handle without deforming but still cool to the touch.
Clean Texture Tip
When creating the ribs, keep your sponge or tool very steady. If your hand shakes, the lines will wave. Brace your elbows against your body for stability.
Step 2: Trimming and Handling
-
Trim the Foot:
Center the leather-hard mug upside down on the wheel. Use a ribbon tool to trim away excess clay from the bottom, creating a clean, defined foot ring that complements the mug’s vertical lines. -
Pull a Strap Handle:
To make the strap handle, wedge a small piece of clay and pull it into a long, flat strip using plenty of water. It should look like a flattened ribbon rather than a round coil. -
Shape the Curve:
Cut the strap to the desired length. Gently curve it into a ‘C’ or ear shape and set it aside for about 10–15 minutes to firm up so it holds its arch. -
Score and Slip:
Identify where you want the handle to attach. Use a serrated tool to score (scratch) the mug surface and the handle ends. Apply a dab of slip to the scored areas. -
Attach the Handle:
Firmly press the handle onto the mug. Use your thumb or a modeling tool to smudge the clay from the handle onto the mug body, ensuring a seamless and strong bond. -
Clean Up:
Wipe away any excess slip with a damp sponge. Run a damp finger along the edges of the strap handle to soften them, making sure they aren’t sharp against the hand.
Step 3: Glazing and Firing
-
Bisque Fire:
Once the mug is bone dry (completely chalky and room temperature), load it into the kiln for the bisque firing. This initial firing prepares the clay to accept glaze. -
Wax the Bottom:
Apply wax resist to the foot ring and the very bottom of the mug. This prevents the glaze from sticking to the kiln shelf during the final firing. -
Apply Glaze:
For the look in the photo, dip the mug into a clear or semi-transparent creamy white glaze. This type of glaze allows the natural speckles of the clay body to show through. -
Check Consistency:
I like to make sure the glaze isn’t too thick, or it might fill in the beautiful ribbed texture you created. A thinner application highlights the grooves. -
Clean the Foot:
Even with wax, double-check the bottom. Use a damp sponge to wipe any stray glaze droplets off the foot ring. -
Glaze Fire:
Place the mug back into the kiln for the glaze firing, following the temperature guidelines for your specific clay and glaze combination.
Color Pop
Instead of a full clear glaze, try doing a rim dip in a colored glaze (like navy or moss green) and letting it drip slightly down the textured sides.
Enjoy your morning coffee in a vessel that feels wonderful to hold


Coil-Built Rustic Cup
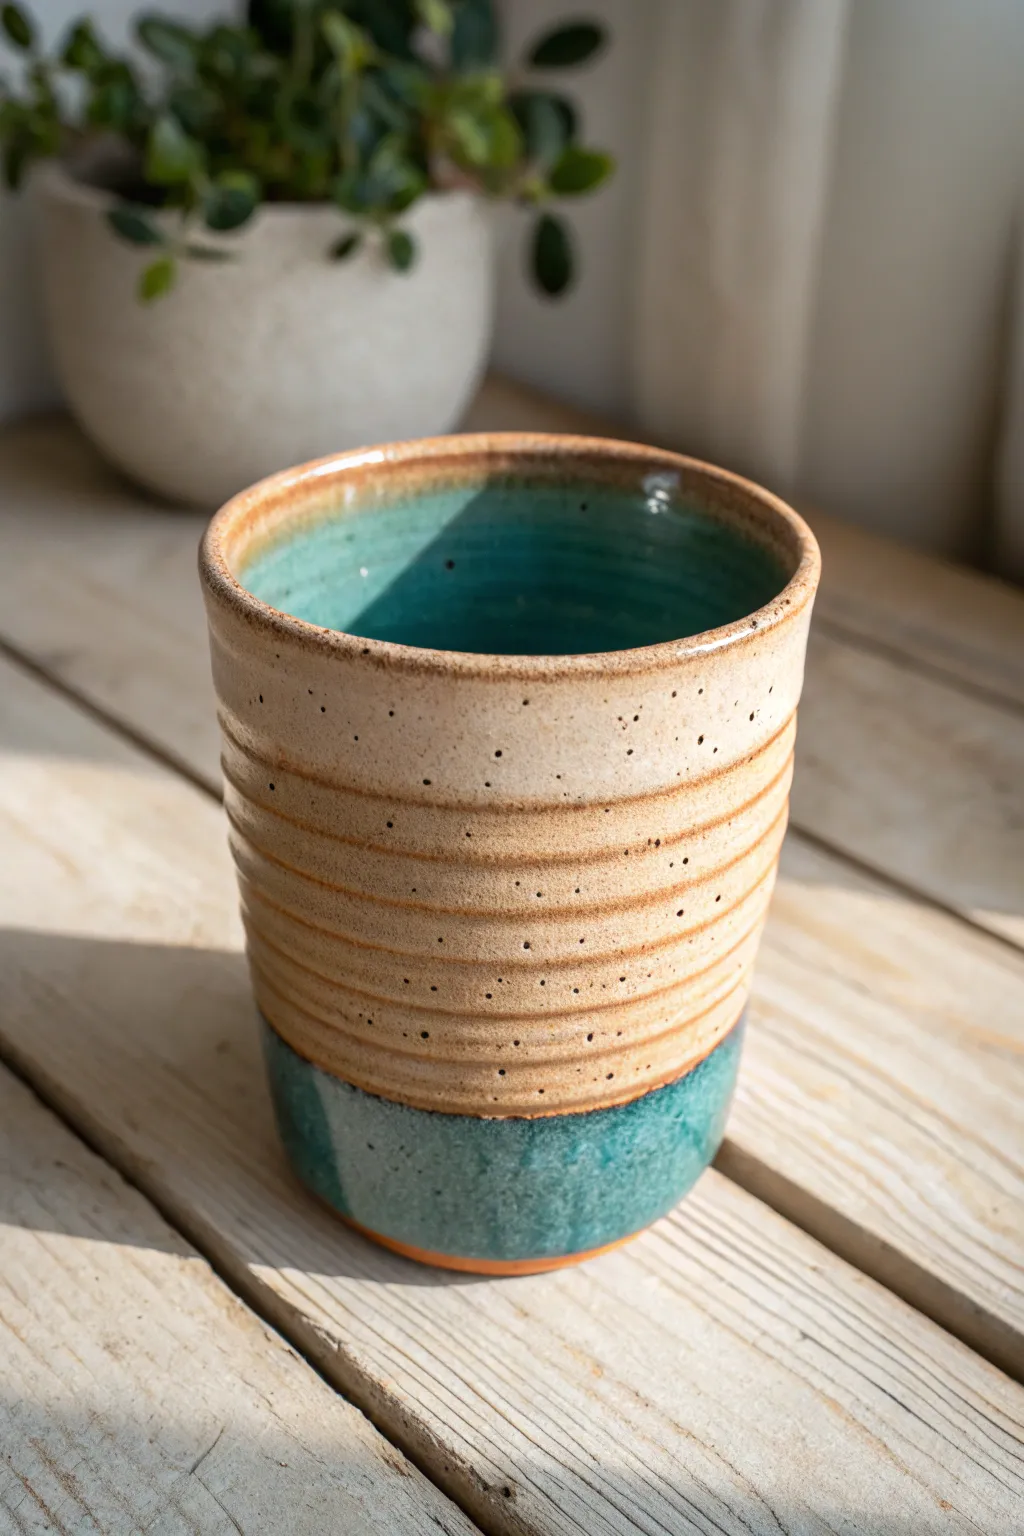
Embrace the charm of handcrafted pottery with this beautiful stoneware cup featuring distinct horizontal ridges and a stunning dual-glaze finish. The speckled clay body peeking through the cream glaze pairs perfectly with the deep teal interior for a professional-looking vessel.
How-To Guide
Materials
- Speckled stoneware clay (mid-fire)
- Clay scoring tool or serrated rib
- Slip (clay mixed with water)
- Small sponge
- Wooden modeling tool
- Wire cutter
- Rolling pin
- Canvas mat or work board
- Teal/Turquoise ceramic glaze
- Cream/Beige speckled ceramic glaze
- Wax resist (liquid)
- Soft glaze brushes
Step 1: Forming the Base
-
Prepare the clay slab:
Begin by rolling out a small amount of speckled stoneware clay on your canvas mat to about 1/4 inch thickness. -
Cut the circular base:
Use a round cookie cutter or a needle tool guided by a circular template to cut out a disc that is approximately 3 inches in diameter. This will form the floor of your cup. -
Preparation for coiling:
Score the top outer edge of your clay circle thoroughly with your scoring tool and brush on a generous amount of slip to act as glue.
Step 2: Building the Walls
-
Roll the coils:
Take a chunk of clay and roll it back and forth on the table with the flats of your hands until you have a long, even snake about the thickness of your pinky finger. -
Attach the first coil:
Place the coil onto the scored edge of the base. Gently press it down, overlapping the ends slightly and cutting off the excess. Smear the inside of the coil down onto the base to seal it securely. -
Continue stacking:
Score and slip the top of the first coil. Add a second coil on top. I find it helpful to stagger the seam where the coils join so they aren’t all on one side. -
Seal the interior:
As you build upward, use your wooden modeling tool or your thumb to smear the clay from the upper coil down into the lower coil on the *inside* only. Keep the outside coils distinct. -
Refine the shape:
Build up to your desired height (about 4-5 inches). Because we want a straight-walled cylinder, check occasionally that your walls aren’t flaring out too wide. -
Smooth the exterior ridges:
Instead of smoothing the outside completely, use a damp sponge or your finger to gently soften the valleys between the coils. You want to keep those horizontal ridges visible but comfortable to hold. -
Rim finishing:
Use a damp sponge or chamois leather to compress and smooth the very top rim so it is rounded and pleasant to drink from.
Keep it uniform
When rolling coils, use long strokes from your fingertips to your palms. This prevents flat spots and ensures your ridges look even.
Step 3: Buttering & Glazing
-
Bisque firing:
Let the cup dry slowly under plastic for a day, then uncover until bone dry. Fire it in a kiln to cone 04 (or according to your clay’s bisque schedule). -
Apply wax resist:
Once bisqued, paint a layer of wax resist on the bottom of the cup and slightly 1/4 inch up the side wall to prevent glaze from running onto the kiln shelf. -
Glaze the interior:
Pour the teal glaze inside the cup, swirl it around to coat every inch, and pour the excess back into the bucket. Wipe any drips off the rim immediately. -
Dip the bottom:
Holding the cup by the rim, dip the bottom third of the exterior into the teal glaze. Hold it for just a few seconds, then lift and let it dry. -
Glaze the top exterior:
Using a soft brush, apply the cream speckled glaze to the top two-thirds of the exterior. Carefully meet the teal line without overlapping too much to keep a clean transition. -
Final smooth:
If the brush left streaks, gently pat the wet glaze with your finger to settle it into the coil ridges. -
Glaze firing:
Fire the piece again to the maturity temperature of your clay and glaze combination (usually cone 5 or 6 for stoneware).
Make it a set
Vary the height of your next few pieces to create a nesting cylinder set. Use the same glaze combo on all of them for a cohesive collection.
Now you have a sturdy, earthy cup perfect for your morning coffee routine

The Complete Guide to Pottery Troubleshooting
Uncover the most common ceramic mistakes—from cracking clay to failed glazes—and learn how to fix them fast.
Faceted Slab Cup
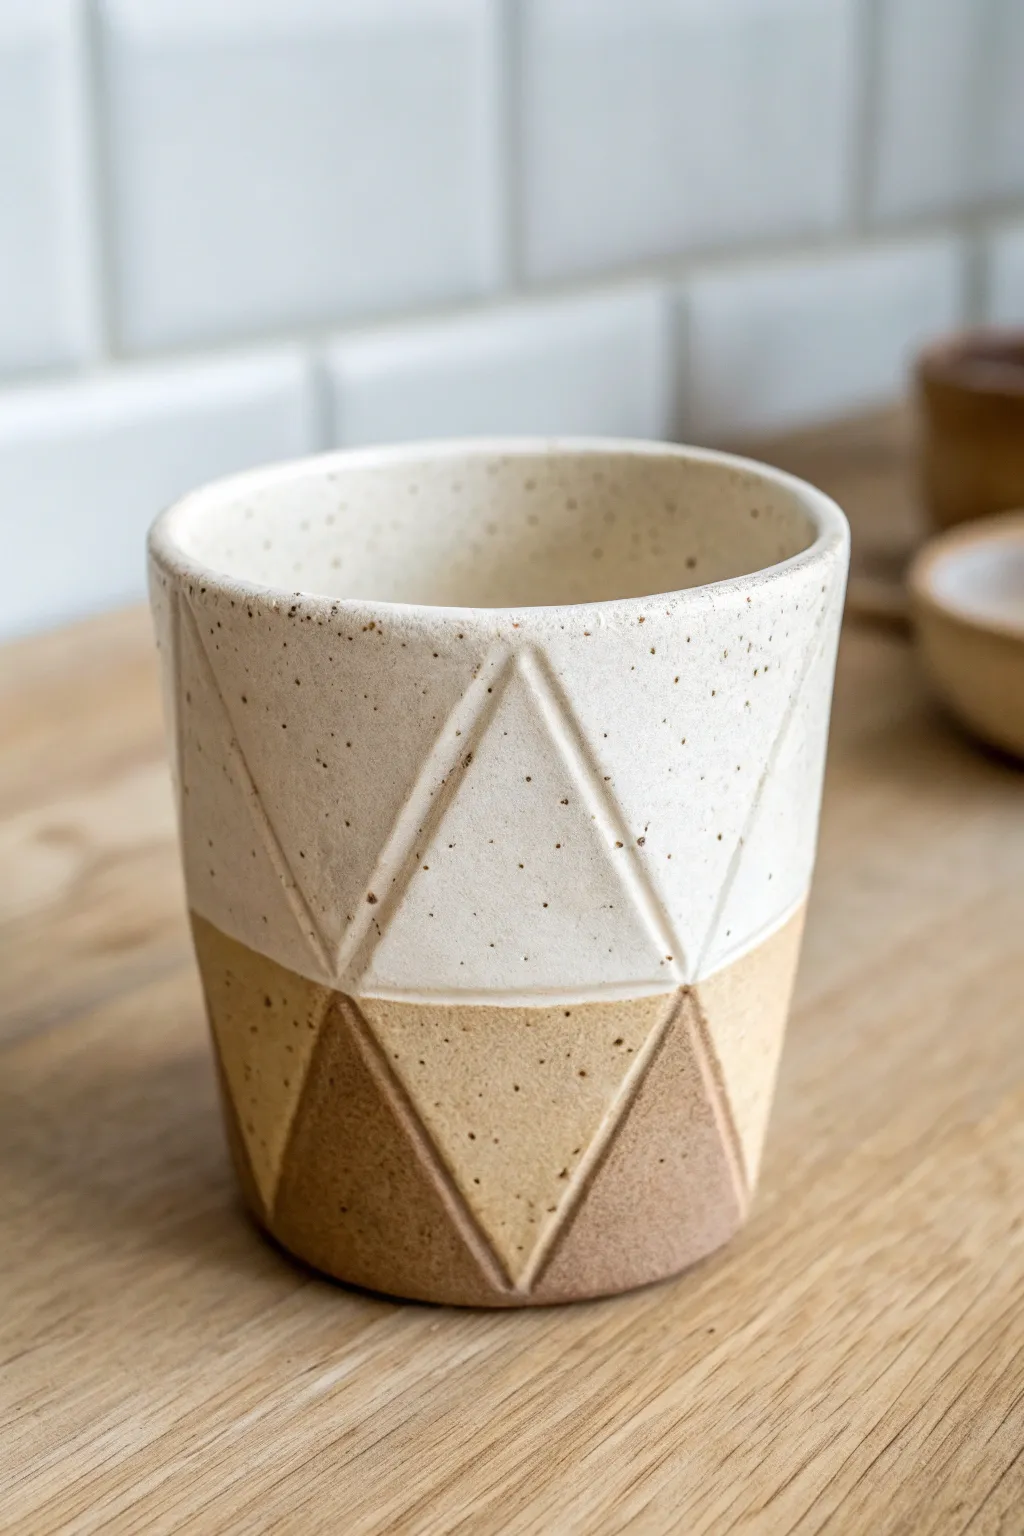
This modern ceramic cup combines sharp geometric lines with a soft, speckled finish for a piece that feels great in the hand. By layering incised triangles over a simple slab cylinder, you create a stunning depth that looks far more complex than it actually is.
Step-by-Step
Materials
- Speckled cone 6 stoneware clay
- Rolling pin
- Canvas work surface or slab mat
- Fettling knife or craft knife
- Ruler
- Scoring tool (serrated rib or needle tool)
- Slip (made from the same clay body)
- Carving tool (triangle loop or V-tip)
- Small sponge
- Clear matte glaze
- White or cream matte glaze
- Soft fan brush
Step 1: Preparing the Slab
-
Roll the clay:
Begin by wedging your speckled stoneware clay to remove air bubbles. Roll it out on your canvas surface into a consistent slab about 1/4 inch thick. I find using guide sticks on either side helps keep the thickness perfectly even. -
Cut the rectangle:
Using a ruler and your fettling knife, cut a clean rectangle. For a standard mug size, aim for a rectangle approximately 10-11 inches long and 4-5 inches tall. Save the excess clay for the base. -
Bevel the edges:
On the two short ends of your rectangle, cut 45-degree bevels. Bevel one end on the top surface and the other end on the bottom surface; this ensures they overlap seamlessly when rolled into a cylinder.
Warped Cylinder?
If your cup looks oval instead of round, the slab was likely too soft. Let the slab firm up on the canvas for 15-20 minutes before rolling it so it holds its shape better.
Step 2: Forming the Cylinder
-
Score and slip:
Score the beveled edges thoroughly using your serrated tool. Apply a generous amount of slip to the scored areas. -
Create the cylinder:
Carefully lift the slab and curl it into a cylinder, matching up the beveled ends. Press the seam together firmly but gently, supporting the wall from the inside with one hand. -
Smooth the seam:
Use a rib or your thumb to blend the vertical seam on both the interior and exterior until it is invisible. -
Attach the base:
Place your cylinder on the leftover slab. Trace around the bottom, remove the cylinder, score/slip both the traced circle and the cylinder bottom, and press them together. Trim away excess clay flush with the wall.
Step 3: Carving the Geometry
-
Mark the grid:
Once the cup is leather hard (sturdy but not dry), lightly use a needle tool to scratch a horizontal line around the circumference, roughly 1/3 of the way up from the bottom. -
Draft the triangles:
Using a ruler, lightly sketch a zigzag pattern. For the top section, draw large inverted triangles. For the bottom section, draw standard triangles that meet the top ones point-to-point. -
Carve the lines:
With a V-tip carving tool, carve distinct grooves along your drawn triangle lines. Make these cuts deep enough to be tactical but careful not to pierce through the wall. -
Clean up burrs:
Wait for the clay to dry slightly more, then gently rub a damp sponge or fingertip over the carved lines to soften any sharp clay burrs or crumbs.
Pro Tip: Sharp Lines
Don’t sponge your carved lines immediately after cutting. Wait until the clay is bone dry and use a dry, scouring pad to sand away burrs for crisper geometric edges.
Step 4: Glazing and Finishing
-
Bisque fire:
Let the cup dry completely to the bone-dry stage. Fire it in the kiln to bisque temperature (usually cone 04). -
Wax the bottom design:
To achieve the look in the image, apply wax resist to the lower triangular sections you want to remain raw, toasted clay. Be precise with your brush along the carved grooves. -
Glaze the interior:
Pour a glossy clear or white glaze into the cup, swirl it to coat the entire inside, and pour it out immediately. -
Glaze the exterior:
Dip or brush the upper portion of the cup with a matte cream or white glaze. The wax resist on the bottom triangles will repel the glaze, creating the clean two-tone effect. -
Clean edges:
Use a damp sponge to wipe any stray glaze droplets off the waxed areas or the bottom foot of the cup. -
Final firing:
Fire the piece to cone 6 (or the temperature specific to your clay and glaze). The heat will reveal the speckles through the cream glaze and toast the raw clay at the bottom.
Enjoy your morning coffee in a custom mug that highlights the natural beauty of the clay.
Short Espresso Cup Set
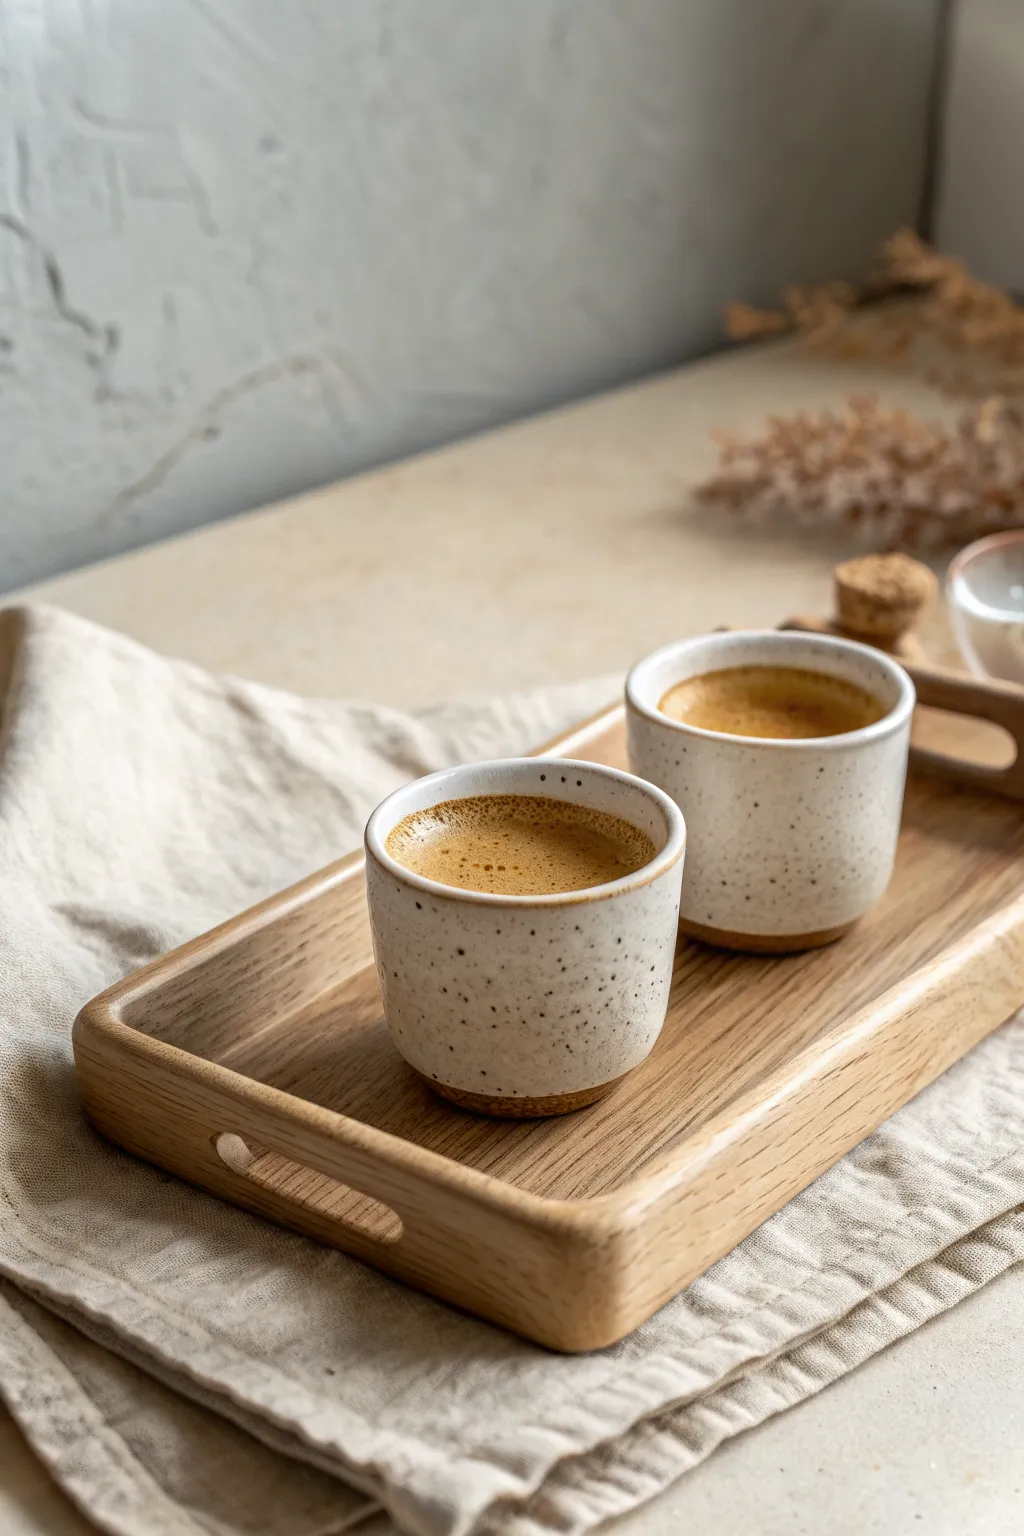
Create a cozy pair of handleless espresso cups characterized by their modern, cylindrical form and warm, sandy clay body. The charm of this set lies in the speckled cream glaze that contrasts beautifully with the exposed raw ceramic base.
Step-by-Step Guide
Materials
- Speckled buff stoneware clay (or sand-colored clay)
- Pottery wheel (or rolling pin for hand-building)
- Wooden rib tool
- Needle tool
- Wire cutter
- Trimming tools (loop tool)
- Sponge
- Speckled cream or white semi-matte glaze
- Small kiln (capable of firing to Cone 6)
Step 1: Throwing the Forms
-
Prep the clay:
Start by wedging two balls of speckled buff clay, weighing approximately 300g (0.6 lbs) each. Ensure all air bubbles are removed to prevent explosions in the kiln. -
Center on the wheel:
SLAM one ball of clay onto the center of the pottery wheel. Using wet hands and steady pressure, cone the clay up and down until it is perfectly centered and spinning smoothly. -
Open the clay:
Drill your thumbs into the center of the mound, leaving about 1 cm (0.4 inches) of clay at the bottom for the floor. Gently pull outward to establish the interior width, which should be slightly wider than a standard shot glass. -
Pull the walls:
Using your fingertips or a knuckle, pull the clay upward to create the walls. Aim for a straight cylinder shape. Keep the walls even, approximately 4-5mm thick. -
Shape the profile:
I like to use a wooden rib on the outside while supporting the inside with my hand to straighten the walls. Create a very subtle curve inward at the bottom so the cup doesn’t look too blocky. -
Refine the rim:
Use a chamois or a wet sponge to gently compress and round the rim. A smooth rim is crucial for a pleasant drinking experience. -
Cut off:
Run a wire cutter underneath the cup to separate it from the wheel head. Carefully lift it off and place it on a ware board. Repeat the process for the second cup.
Step 2: Trimming and Finishing
-
Leather hard stage:
Let the cups dry slowly until they reach a ‘leather hard’ state. The clay should be firm enough to handle without deforming but stil cool to the touch. -
Center for trimming:
Place the cup upside down on the wheel. Secure it with small lugs of soft clay. -
Define the foot:
Using a sharp loop tool, trim away the excess clay at the base. Carve a distinct line where the wall meets the bottom to create a ‘shadow’ gap, giving the cup a slight floating effect. -
Smoothing:
Once trimmed, use a barely damp sponge to wipe away any sharp grog or rough texture left by the trimming tool. This burnishes the surface slightly. -
Bisque fire:
Let the cups dry completely (bone dry). Load them into the kiln and fire to Bisque temperature (usually Cone 06/04).
Wobbly rims?
If your rims get untrue during drying, gently place a small wooden board on top of the rim while it’s still slightly damp to weigh it down evenly.
Step 3: Glazing
-
Wax resist:
Apply liquid wax resist to the bottom 1 cm (0.4 inches) of the exterior and the entire underside of the foot. This ensures the clean, raw clay line visible in the project photo. -
Prepare glaze:
Stir your speckled cream glaze thoroughly. If the glaze is too thick, the speckles might get swallowed; it should have the consistency of heavy cream. -
Dip and pour:
Pour glaze inside the cup, swirl to coat, and pour out. Then, holding the cup by the waxed foot, dip the exterior into the glaze bucket just until the glaze meets the wax line. -
Clean up:
Wait for the glaze to dry to the touch. Use a sponge to wipe any stray glaze droplets off the waxed bottom area. -
Final smooth:
Check the rim for any sharp glaze drips and gently rub them flat with your finger. -
Glaze fire:
Load the cups into the kiln again. Fire to the maturity temperature of your clay and glaze (typically Cone 6 for stoneware). -
Sanding:
Once cool and unloaded, use high-grit sandpaper to wet-sand the unglazed bottom so it won’t scratch your wooden furniture.
Glaze Thickness Hack
To see speckles clearly, the glaze shouldn’t be too thick. Dip quickly—count ‘one-Mississippi’ and pull it out immediately.
Now brew a fresh espresso and enjoy the warmth of your handmade ceramics


What Really Happens Inside the Kiln
Learn how time and temperature work together inside the kiln to transform clay into durable ceramic.
Stackable Straight-Sided Cups
These minimalist, straight-sided cups feature a warm, speckled cream glaze with a distinct rust-lined rim that adds a vintage touch. Their uniform shape makes them perfectly stackable, saving cupboard space while looking effortlessly chic on your table.
Detailed Instructions
Materials
- Speckled buff stoneware clay
- Pottery wheel
- Sponge
- Wire cutter
- Rib tool (metal or wood)
- Pin tool
- Trimming tools
- Creamy white matte glaze
- Iron oxide wash or rust-colored glaze
- Small liner brush
- Kiln
Step 1: Throwing the Cylinder
-
Prepare the Clay:
Begin by wedging about 1 pound (450g) of speckled buff stoneware clay per cup to remove air bubbles and ensure consistency. -
Center and Open:
Throw the ball onto the wheel head and center it. Open the clay to create a flat bottom, leaving about a quarter-inch of thickness for the base. -
Pull the Walls:
Slowly pull the walls straight up. Aim for a perfect cylinder shape rather than a tapered bowl. Keep the walls even from bottom to top. -
Refine the Shape:
Use a metal or wooden rib tool against the outside of the spinning cup while supporting the inside with your hand. This scrapes away slurry and creates that signature straight-sided profile. -
Form the Rim:
Compress the rim with a piece of chamois or your sponge to round it off slightly. Keep the rim minimal and clean, matching the modern aesthetic. -
Check Dimensions:
If making a set, use calipers to measure the rim diameter and height now so you can match the next cups to this one. -
Wire Off:
Run a wire cutter underneath the cup to separate it from the wheel head, then carefully lift it off onto a ware board to dry to leather-hard.
Stacking Success
To ensure they stack safely, slightly curve the interior bottom of the cup during throwing, matching it to the curve of the rim.
Step 2: Trimming and Finishing
-
Center for Trimming:
Once leather-hard, place the cup upside down on the wheel. Secure it with small clay lugs. -
Define the Foot:
Trim away excess clay from the bottom edge to create a clean, 90-degree angle where the wall meets the table. You can trim a slight foot ring or leave it flat for a modern look. -
Smooth the Surface:
Run a slightly damp sponge over any rough trimming marks or sharp edges to ensure the cup feels comfortable in the hand. -
Bisque Fire:
Allow the cups to dry completely (bone dry) before loading them into the kiln for a bisque firing at Cone 04.
Rim Variation
Instead of a brush, dip just the very lip of the cup into a contrasting dark glaze for a more organic, uneven drip effect.
Step 3: Glazing the Stack
-
Clean the Bisqueware:
Wipe the fired cups with a damp sponge to remove any dust that might resist the glaze. -
Dip the Base Coat:
Dip the entire cup into a creamy white matte glaze. Hold it for 3-4 seconds to get an even coat. Let this layer dry completely. -
Expose the Speckles:
If your glaze is very opaque, the clay’s natural speckles might be hidden. Speckled clay works best with semi-opaque glazes, but if using a standard white clay, you might need a dedicated speckled glaze. -
Apply the Rim:
Using a small liner brush or a sponge, carefully apply a band of iron oxide wash or a rust-colored glaze to the very top rim. -
Refine the Rim Line:
I like to steady my hand on the table and spin the banding wheel to get a clean line, allowing the rust color to naturally bleed slightly down the side for that rustic effect. -
Wipe the Foot:
Use a sponge to wipe all glaze off the bottom of the cup and about 2mm up the side to prevent it from fusing to the kiln shelf. -
Final Fire:
Load the glazed cups into the kiln and fire to the maturity temperature of your clay and glaze (typically Cone 5 or 6 for stoneware).
Enjoy your morning coffee in a custom set that feels as good to hold as it looks on the shelf
Stamped Texture Wrap Cup
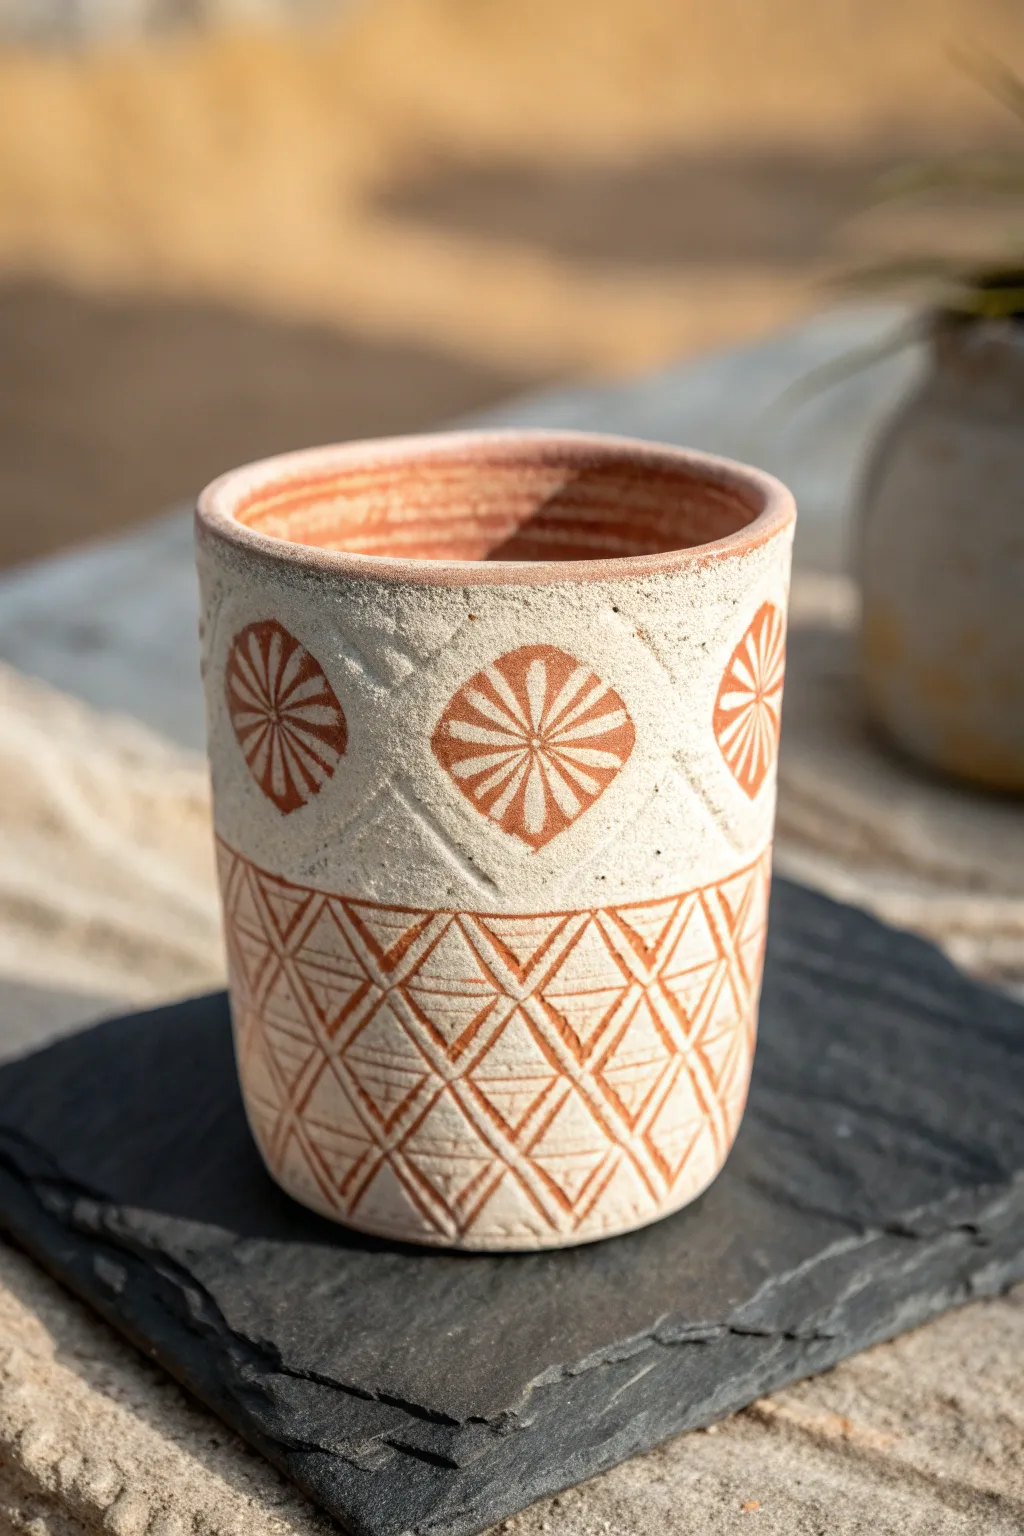
This rustic, charming vessel combines earthy red clay with a crisp white slip to create high-contrast patterns. Using simple carving and stamping techniques, you’ll reveal warm terracotta tones beneath a textured cream surface for a truly handcrafted look.
Step-by-Step Guide
Materials
- Red stoneware or earthenware clay
- White decorative slip (engobe)
- Cylindrical bisque mold or rolling pin (optional)
- Fettling knife
- Needle tool
- Loop tool or small carving gouge
- Sponge
- Soft brush for applying slip
- Ruler
- Scoring tool
- Clear matte glaze
Step 1: Building the Form
-
Roll out the slab:
Begin by rolling out your red clay to an even thickness, approximately 1/4 inch thick. Compress the clay on both sides with a rib to prevent warping later. -
Cut the rectangle:
Measure and cut a long rectangle that will determine the height and circumference of your cup. A standard size is roughly 4 inches high by 10-11 inches long. -
Form the cylinder:
Wrap the clay rectangle around a cylindrical mold (or just curve it gently by hand) to form a tube. Be careful not to create sharp creases. -
Join the seam:
Score the two short ends aggressively and apply slip. Overlap them slightly or butt them together, pressing firmly to create a seal. Smooth the seam inside and out so it virtually disappears. -
Add the base:
Place your cylinder on a fresh piece of rolled slab. Trace around the bottom, score and slip both contact areas, and attach the base. Trim the excess clay flush with the walls. -
Refine the rim:
Use a damp sponge or piece of chamois leather to smooth the rim of the cup, ensuring it is rounded and comfortable for drinking.
Step 2: Applying Slip & Design
-
Apply the white slip:
Once the cup is leather-hard (stiff but still cool to the touch), brush on 2-3 coats of white decorative slip. Let each coat lose its sheen before applying the next. -
Mark the sections:
Lightly use a needle tool to scratch a horizontal line around the center of the cup, dividing it into a top and bottom section. -
Map out the diamonds:
On the top half, lightly sketch large diamond shapes. Inside each diamond, draw a circle where the floral motif will go. -
Carve the flowers:
Using a loop tool or carving gouge, carve out the negative space inside your circles to create the flower petals. You want to remove the white slip to reveal the red clay beneath. -
Texture the top background:
For the area surrounding the diamonds on the top half, I like to gently stipple the surface with a stiff brush or coarse sponge to add that grainy, stony texture visible in the reference. -
Trace the bottom grid:
On the bottom half, use a ruler to lightly scratch a grid pattern of intersecting diagonal lines, creating a series of triangles and diamonds. -
Carve the geometric lines:
Go over your sketched grid lines with a slightly wider carving tool. Deepen the lines enough to clearly show the red clay contrast. -
Add detail to triangles:
Inside specific triangles of your grid, carve smaller horizontal lines or “steps” to add complexity to the pattern, as seen in the bottom section of the project image.
Slip Timing is Key
Apply slip when clay is leather-hard. If the clay is too dry, the slip will flake off; too wet, and the pot will collapse.
Step 3: Finishing
-
Bisque fire:
Allow the cup to dry slowly and completely. Once bone dry, fire the piece to bisque temperature (usually cone 04). -
Glaze application:
Apply a clear matte glaze over the entire interior to make it food safe. For the exterior, you can brush a thin coat of clear glaze over it or leave the raw clay texture if your clay body is vitrified enough at maturity. -
Final wipe:
Wipe the bottom of the cup with a damp sponge to remove any glaze drips that could stick to the kiln shelf. -
Final firing:
Fire the cup to the maturity temperature of your specific clay and glaze combination.
Messy Lines?
If carving leaves burrs or crumbs, wait for the pot to dry a bit more, then gently brush them away with a stiff, dry paintbrush.
Enjoy using your beautifully textured cup for your morning coffee or tea

TRACK YOUR CERAMIC JOURNEY
Capture glaze tests, firing details, and creative progress—all in one simple printable. Make your projects easier to repeat and improve.
Lace-Imprint Sweet Cup
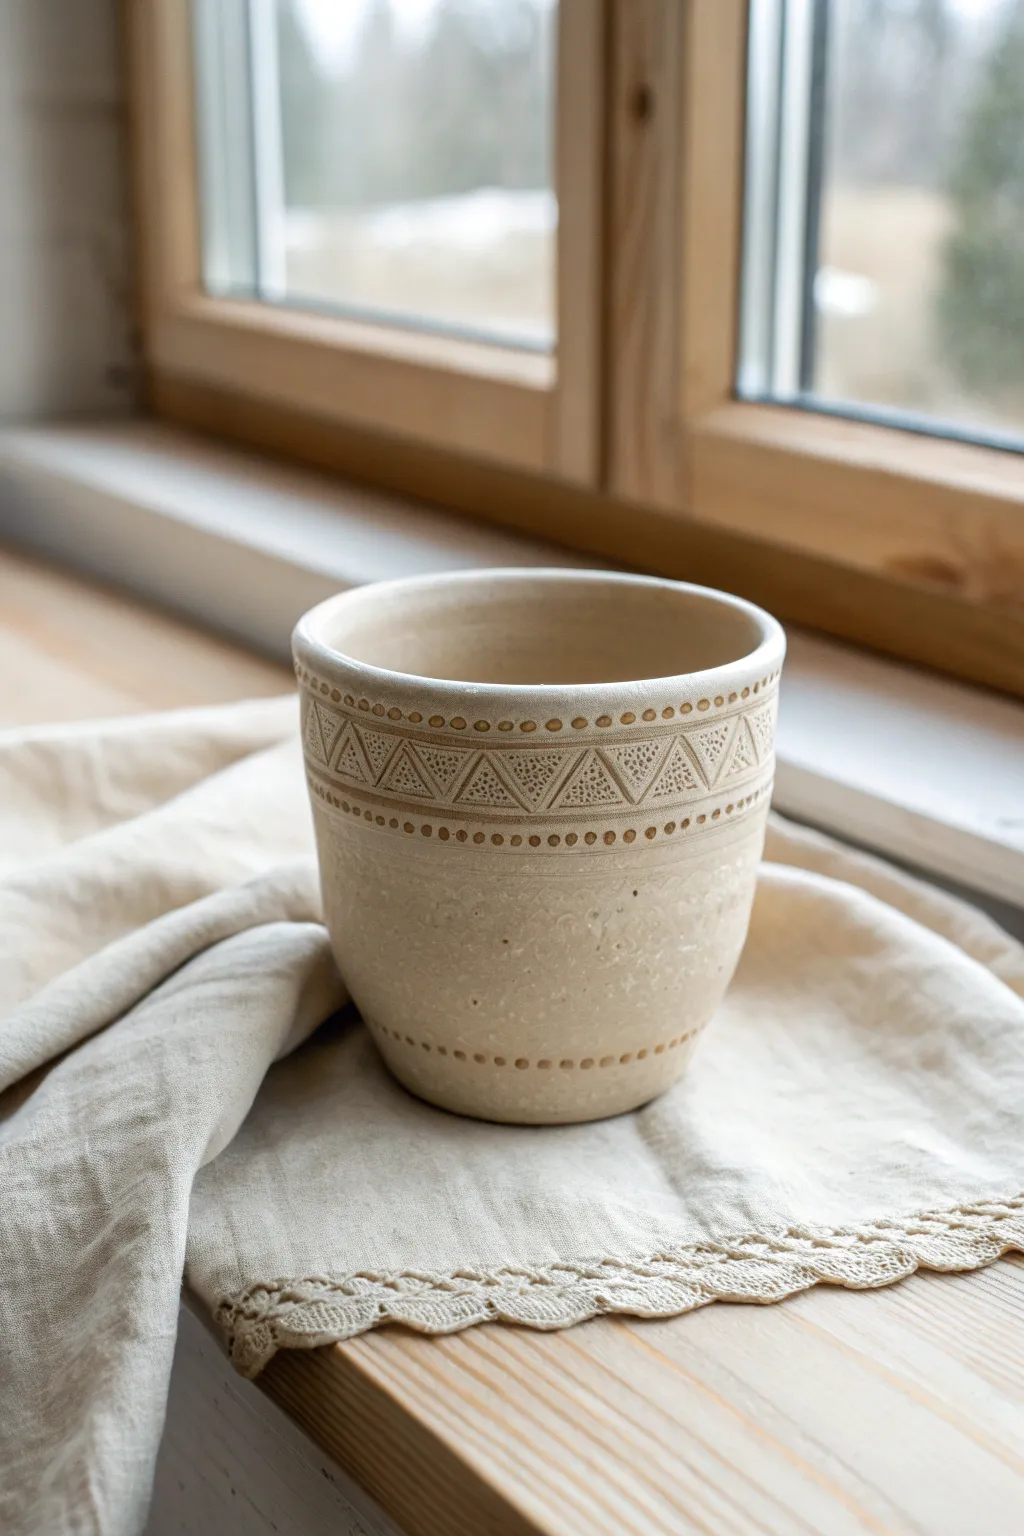
This charming, rustic cup captures the delicate beauty of lace without needing a single thread. Using simple impression techniques, you can transform a plain slab of clay into a textured vessel that feels both vintage and modern.
Detailed Instructions
Materials
- Stoneware clay (buff or speckled)
- Rolling pin
- Fettling knife or clay cutter
- Wooden dowel or small round tool
- Textured stamp or lace strip (triangle pattern)
- Slip (clay and water mixture)
- Scoring tool or fork
- Sponge
- Matte clear glaze or white wash
Step 1: Preparing the Slab
-
Roll out the clay:
Begin by wedging your stoneware clay to remove air bubbles, then roll it out into a smooth slab approximately 1/4 inch thick. Aim for an even consistency across the entire surface. -
Cut the rectangle:
Measure and cut a long rectangle that will form the body of your cup. A standard size is roughly 10 inches long by 4 inches tall, but you can adjust this depending on how wide or tall you want your vessel. -
Cut the base:
Use a round cookie cutter or trace a circle onto the remaining clay slab to create the bottom of the cup. Ensure the circumference of this circle matches the length of your rectangle.
Sticky Stamps?
If your stamp or lace is sticking to the moist clay, lightly dust the clay surface with cornstarch before pressing. Specifically, brush it off before firing to avoid issues.
Step 2: Adding Texture
-
Plan the design:
Lay the rectangular clay strip flat on your work surface. Visualize where the rim will be; we will add the primary pattern about half an inch down from this top edge. -
Impress the decorative band:
Using a triangle-patterned stamp or a stiff piece of lace trim, press firmly into the clay to create the central decorative band. If using a stamp, repeat the impression carefully to form a continuous line. -
Add the dotted borders:
Take a small wooden dowel or a blunt tool and press a row of small dots directly above the triangle band. Repeat this process to create a matching row of dots directly below the band. -
Create the bottom detail:
Near what will be the bottom edge of the cup, press a single row of slightly larger dots. Use equal spacing to keep the look cohesive and tidy. -
Clean up edges:
Run a damp finger along the top and bottom long edges of the rectangle to smooth any sharpness before assembling.
Color Wash
Mix a small amount of mason stain (like burnt sienna) into the clear glaze. This tinted glaze will settle into the dots and triangles, making the pattern pop beautifully.
Step 3: Assembling the Cup
-
Score the edges:
Score (scratch) the short ends of the rectangular slab and the edges of the circular base. Apply a generous amount of slip to these roughened areas. -
Form the cylinder:
Carefully lift the rectangle and curve it into a cylinder, overlapping the scored ends slightly. Press the seam firmly to join them. I find it helpful to reach inside and support the wall with one hand while smoothing the outside seam with the other. -
Attach the base:
Place the cylinder on top of the scored circular base. Press down gently to secure the connection. -
Blend the seams:
Use a modeling tool or your finger to blend the clay from the cylinder down onto the base, ensuring a watertight seal. Do the same for the vertical side seam, smoothing it so the texture isn’t disrupted too much. -
Refine the rim:
Using a slightly damp sponge, smooth the rim of the cup to make it comfortable for drinking. Round it off gently.
Step 4: Finishing
-
Dry slowly:
Cover the cup loosely with plastic to let it dry slowly. This prevents the bottom from cracking away from the walls as the clay shrinks. -
Bisque fire:
Once bone dry, fire the piece in a kiln to the bisque temperature appropriate for your specific clay body. -
Glaze application:
Apply a matte clear glaze or a very thin white wash. The goal is to highlight the texture rather than cover it up. -
Final wipe back:
If using a wash or glaze that pools, gently wipe the raised surfaces with a sponge immediately after dipping. This leaves glaze in the recesses (the dots and triangles) while exposing the raw clay color on the high points. -
Glaze fire:
Fire the cup a second time to the final maturation temperature for your clay and glaze combination.
Enjoy sipping from your handcrafted mug, knowing the beautiful pattern was made by your own hand
Simple Carved Band Tumbler
This project features a cozy, hand-built look with a sophisticated twist thanks to raw clay accents. The combination of a creamy speckled glaze and a textured, unglazed band creates a beautiful tactile contrast for your morning coffee.
How-To Guide
Materials
- Speckled stoneware clay (roughly 1 lb)
- Pottery wheel (or rolling pin for hand-building)
- Loop tool or trimming tool
- Carving tool (needle tool or small sgraffito loop)
- Sponge
- Wire cutter
- Rib tool (wooden and metal)
- Creamy matte white glaze
- Wax resist (optional but helpful)
Step 1: Fronm the Wheel
-
Center the clay:
Start by throwing your ball of speckled stoneware clay onto the wheel head. Cone it up and down to ensure the clay particles are aligned and the mound is perfectly centered. -
Open and pull:
Open the clay to create the floor of your tumbler. Compress the floor well to prevent cracks later. Slowly pull up the walls to form a cylinder shape, aiming for a consistent thickness of about 1/4 inch. -
Shape the tumbler:
Using a rib tool on the inside, gently press outward to create a slight curve at the bottom, tapering in just a little at the rim. This subtle barrel shape fits nicely in the hand. -
Define the rim:
Compress the rim with a piece of chamois or your sponge to make it smooth and pleasant for drinking. -
Cut and dry:
Wire the cup off the wheel head. Let it dry to a ‘leather hard’ state—firm enough to handle without deforming, but soft enough to carve.
Step 2: Trimming and Carving
-
Trim the foot:
Place the leather-hard cup upside down on the wheel (or use a Giffin Grip). Trim away excess clay from the bottom to create a clean foot ring. -
Mark the band:
While the cup is spinning slowly, use a needle tool to lightly score two horizontal parallel lines around the middle section. The space between these lines will be your carving zone, roughly an inch wide. -
Carve the diagonal texture:
Stop the wheel. Using a small carving loop or sharp tool, carve short, diagonal parallel lines inside the band you marked. Try to keep the pressure consistent so the grooves have the same depth. -
Refine the edges:
I find it helpful to run a clean finger or a slightly damp brush over the carved area to soften any sharp burrs of clay left behind by the tool. -
Smooth the surfaces:
Use a sponge to wipe down the upper and lower uncarved sections, ensuring they are perfectly smooth for glazing later. -
Bisque fire:
Once fully bone dry, fire the piece in the kiln to cone 04 (or your clay’s specific bisque temperature).
Fixing Sharp Rims
If the rim feels sharp after the glaze firing, use a diamond sanding pad or wet sandpaper (400 grit) to smooth it down under running water for a softer lip feel.
Step 3: Glazing
-
Clean the bisque:
Wipe the fired cup with a damp sponge to remove any kiln dust, which can cause glaze defects. -
Wax the band (optional):
Carefully paint wax resist over the carved band area. This prevents glaze from sticking to the texture, saving you cleanup time later. If you don’t have wax, you’ll need to wipe the glaze off carefully. -
Glaze the interior:
Pour your creamy matte white glaze inside the cup, swirl it around to coat the entire inner surface, and pour out the excess. -
Dip the exterior:
Hold the cup by the foot (or use glazing tongs) and dip the exterior into the glaze bucket. If you waxed the band, the glaze will bead off that section. -
Clean the band:
If you didn’t use wax, use a damp sponge to meticulously wipe all glaze off the carved band area. You want the raw, toasted clay color to show through the texture. -
Wipe the foot:
Ensure the bottom foot ring is completely free of glaze so it doesn’t fuse to the kiln shelf. -
Final glaze fire:
Fire the cup to cone 6 (or your clay body’s maturation temperature). The heat will turn the glaze creamy white and bring out the iron speckles in the clay.
Dual-Tone Carving
Brush a dark underglaze (like black or navy) into the carved lines before bisque firing, then pledge clear glaze over the band for a high-contrast graphic look.
Enjoy the comforting weight of your new tumbler as you sip your favorite drink
Dot-and-Dash Raised Pattern Cup
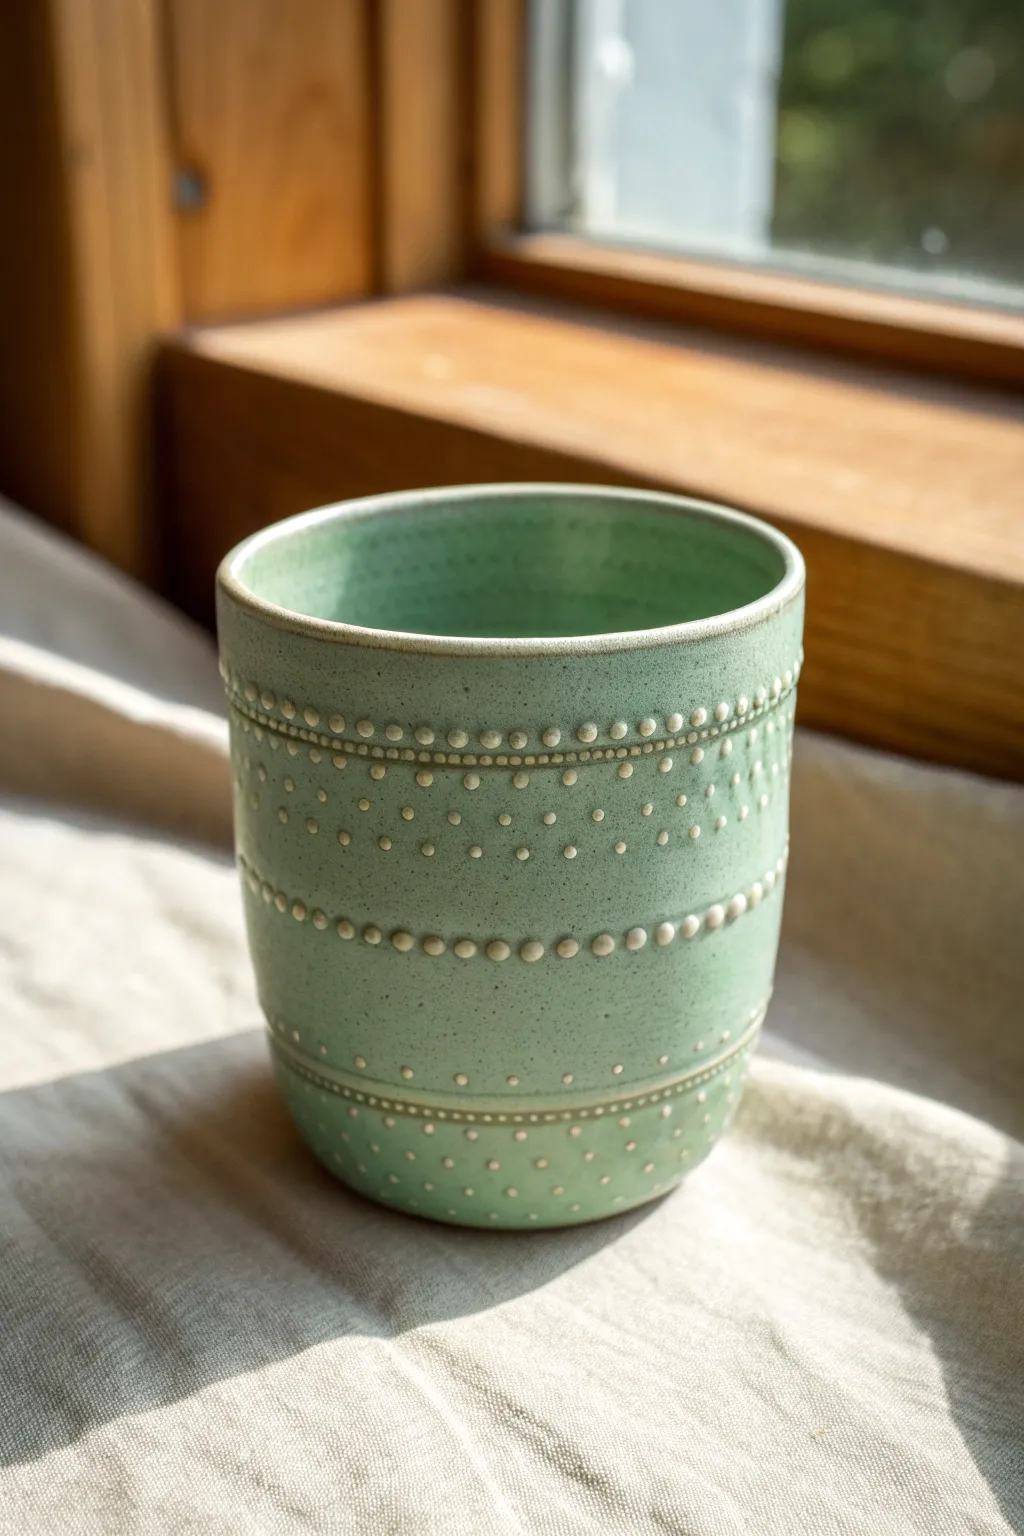
This charming hand-built tumbler features a soothing mint green glaze accented by rows of delicate, raised slip dots that add a wonderful tactile experience. It’s a perfect project for slipping into a meditative rhythm while decorating.
Step-by-Step
Materials
- Stoneware clay (speckled or white)
- Slip trailer bottle with fine nozzle
- Thick white slip (cake batter consistency)
- Rolling pin
- Canvas mat or cloth
- Cylindrical form or bisque mold (optional)
- Needle tool
- Scoring tool or serrated rib
- Sponge
- Semi-transparent mint green glaze
- Clear glaze (optional)
Step 1: Forming the Cup
-
Prepare the slab:
Begin by rolling out a slab of stoneware clay to a uniform thickness of about 1/4 inch. Smooth both sides with a rib to compress the clay particles. -
Cut the rectangle:
Using a ruler and needle tool, cut a rectangle approximately 10 inches long and 4.5 inches tall (adjust based on your desired cup size, accounting for shrinkage). -
Bevel the edges:
Bevel the short ends of your rectangle at opposite 45-degree angles. This creates a stronger, seamless join when rolled into a cylinder. -
Form the cylinder:
Wrap the clay slab around a cylindrical form or simply curl it by hand to create a tube. Score the beveled edges, apply a little slip/water, and press them firmly together. -
Smoothen the seam:
Use a wooden tool or your thumb to blend the seam inside and out until it is invisible. I like to gently paddle the seam flat to ensure the wall thickness is even. -
Attach the base:
Roll a small separate piece of clay for the base. Place your cylinder on it, trace around the bottom, and cut out the circle. Score and slip both contact surfaces, then press the base firmly onto the cylinder. -
Refine the rim:
Use a slightly damp sponge or a piece of chamois leather to smooth and round the rim of the cup so it will be comfortable to drink from.
Slip Too runny?
If your dots flatten out immediately, your slip has too much water. Let the slip sit open for a few hours to evaporate, or add a pinch of dry powdered clay to thicken it up.
Step 2: Applying the Texture
-
Mark guidelines:
Once the cup is leather-hard, use a needle tool to very lightly scratch horizontal guidelines around the cup where you want your textured bands to sit. This ensures your dots stay straight. -
Prepare the slip trailer:
Fill your slip trailer with thick white slip. Test the flow on a scrap piece of clay first; you want it to hold a bead shape without running. -
Pipe the main dot rows:
Carefully squeeze small, uniform dots of slip along your top and middle guidelines. Aim for high, rounded peaks rather than flat circles. -
Add detail rows:
Between the main rows, add smaller, more delicate dots. You can vary the spacing or create zigzag patterns to mimic the cup in the image. -
Create the bottom border:
Pipe a final row of dots near the base. Add a thin trailed line of slip just above or below these dots to create a ‘dashed’ border effect. -
Clean up peaks:
Let the slip dry slightly. If any dots have sharp ‘chocolate chip’ peaks, gently tap them down with a clean finger once they are no longer sticky but still soft.
Go for ombre
Mix a tiny amount of mason stain into your white slip before piping. Use a gradient of colored slips for the dots to create a subtle ombre effect beneath the translucent glaze.
Step 3: Glazing and Firing
-
Bisque fire:
Allow the cup to dry completely—this may take a few days as the added slip contains moisture. Bisque fire to cone 04 (or your clay’s specific temperature). -
Wipe down:
Wipe the bisqued cup with a damp sponge to remove dust, paying extra attention to the crevices between the raised dots. -
Apply glaze:
Dip the cup into a semi-transparent mint green glaze. Hold it upside down for a few seconds to let excess glaze drip off the rim. -
Reveal the texture:
While the glaze is powdery but dry, you can very gently rub the tops of the highest dots with a clean finger to thin the glaze there, letting the white slip show through more clearly. -
Clean the foot:
Wipe the bottom of the cup and about 1/4 inch up the side with a wet sponge to remove all glaze, preventing it from sticking to the kiln shelf. -
Glaze fire:
Fire the cup to maturity (Cone 5/6 typically for stoneware). The glaze should break beautifully over the raised texture.
Enjoy your new morning coffee ritual with this beautifully textured handmade piece
Two-Tone Dipped Color Cup
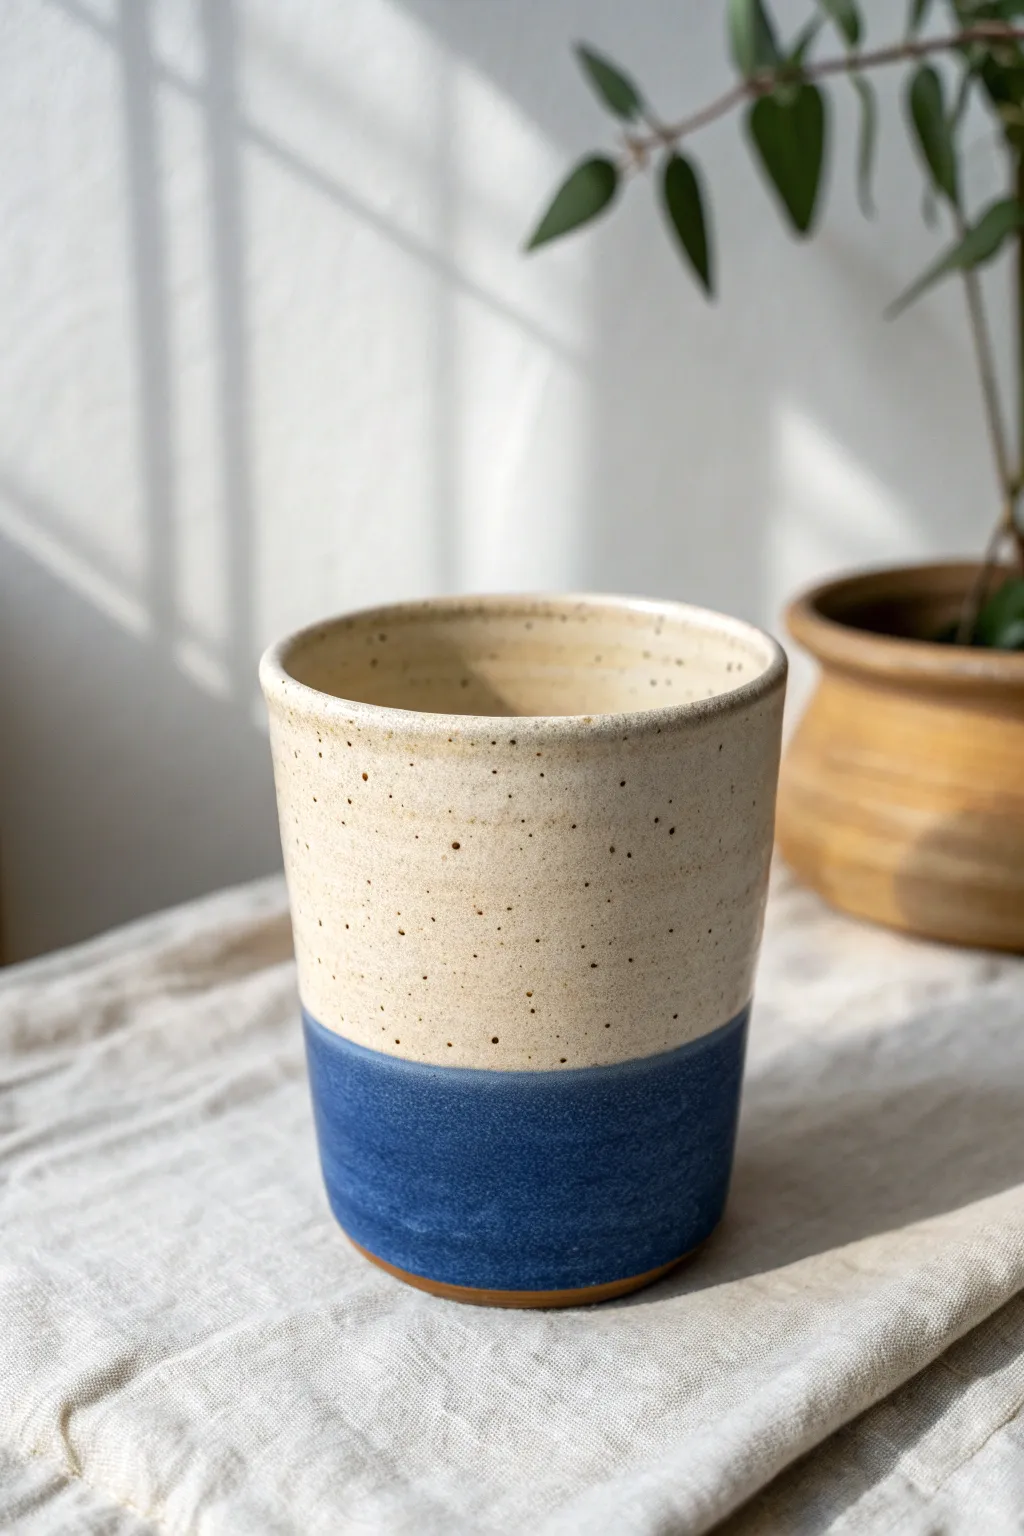
This elegant everyday vessel combines the rustic charm of speckled stoneware with a clean, modern color block design. The deep navy dip creates a striking contrast against the creamy upper glaze, making it a perfect beginner-friendly project for exploring glazing techniques.
Step-by-Step Tutorial
Materials
- Speckled stoneware clay (mid-fire)
- Potter’s wheel (or slab roller for hand-building)
- Throwing tools (sponge, needle tool, wire cutter, ribs)
- Trimming tools
- Cream/matte white cone 6 glaze
- Navy blue cone 6 glaze
- Wax resist and brush
- Damp sponge
- Kiln
Step 1: Forming the Cup
-
Prepare the Clay:
Begin by thoroughly wedging about 1 pound (450g) of speckled stoneware clay to remove air bubbles and ensure consistency. -
Center on the Wheel:
Throw the clay onto the wheel head and center it. This cup has a simple cylindrical form, so ensure your base is centered perfectly before opening. -
Open and Pull Walls:
Open the clay and gently pull up the walls. Aim for a vessel height of about 4-5 inches. Keep the walls even, approximately 1/4 inch thick. -
Shape the Cylinder:
Use a rib tool on the exterior while supporting the interior with your other hand. Create a very subtle taper at the bottom, widening slightly as you move toward the rim. -
Refine the Rim:
Compress the rim slightly with a chamois or your finger to make it smooth and pleasant for drinking. -
Wire Off:
Run your wire cutter under the base of the cup and lift it off the wheel head carefully. Set it aside until it reaches a leather-hard state.
Straight Lines Only
To get that perfectly straight separation line, mark the height using a pencil while spinning the cup on a banding wheel before you dip. Use the line as your guide.
Step 2: Trimming and Bisque
-
Center for Trimming:
Once leather-hard, place the cup upside down on the wheel. Secure it with clay lugs. -
Trim the Foot:
Trim away excess weight from the bottom third to refine the shape. Carve a small foot ring if desired, or leave it flat-bottomed but smooth. -
Smooth the Surface:
Before firing, I like to run a smooth, damp sponge over the entire surface to bring some of the grog and speckles to the surface texture. -
Bisque Fire:
Let the cup dry completely to the bone-dry stage. Load it into the kiln for a bisque firing (usually to Cone 04).
Drip Prevention
If the glaze looks too thick where the blue overlaps the white, lightly sponge the transition line before firing. This prevents the second layer from running excessively.
Step 3: The Two-Tone Glazing
-
Clean the Bisque:
Wipe the bisque-fired cup with a damp sponge to remove any dust, which ensures the glaze adheres properly. -
Wax the Bottom:
Apply wax resist to the very bottom of the cup and about 1/4 inch up the side to prevent glaze from running onto the kiln shelf. -
Dip the Interior:
Pour the cream/matte white glaze inside the cup, swirl it around quickly to coat the entire interior, and pour out the excess. -
Dip the Exterior Top:
Hold the cup by the foot and dip it upside down into the cream glaze bucket. Submerge it until the glaze covers the entire exterior, then lift and shake off the last drip. -
Clean the Foot:
Allow the cream glaze to dry until it’s powdery to the touch. Gently wipe any cream glaze off the wax resist at the bottom. -
Prepare the Blue Line:
This is the critical step. You are going to double-dip just the bottom section. -
Dip the Blue Bottom:
Hold the cup upside down again, but this time hold it by the rim (ensure your hands are clean and dry). Carefully lower the bottom third of the cup into the navy blue glaze. -
Create the Horizon:
Hold it straight and steady in the blue glaze for 2-3 seconds to get a crisp line, then lift straight up. Don’t wobble, or your line will be wavy. -
Final Cleanup:
Once the blue glaze is dry, double-check the wax resist area on the bottom foot. Sponge away any stray droplets of glaze. -
Glaze Fire:
Load the cup into the kiln and fire to Cone 6 (or whatever temperature your clay and glaze combination requires).
Once cooled, your cup is ready for your morning coffee and serves as a beautiful testament to careful dipping techniques
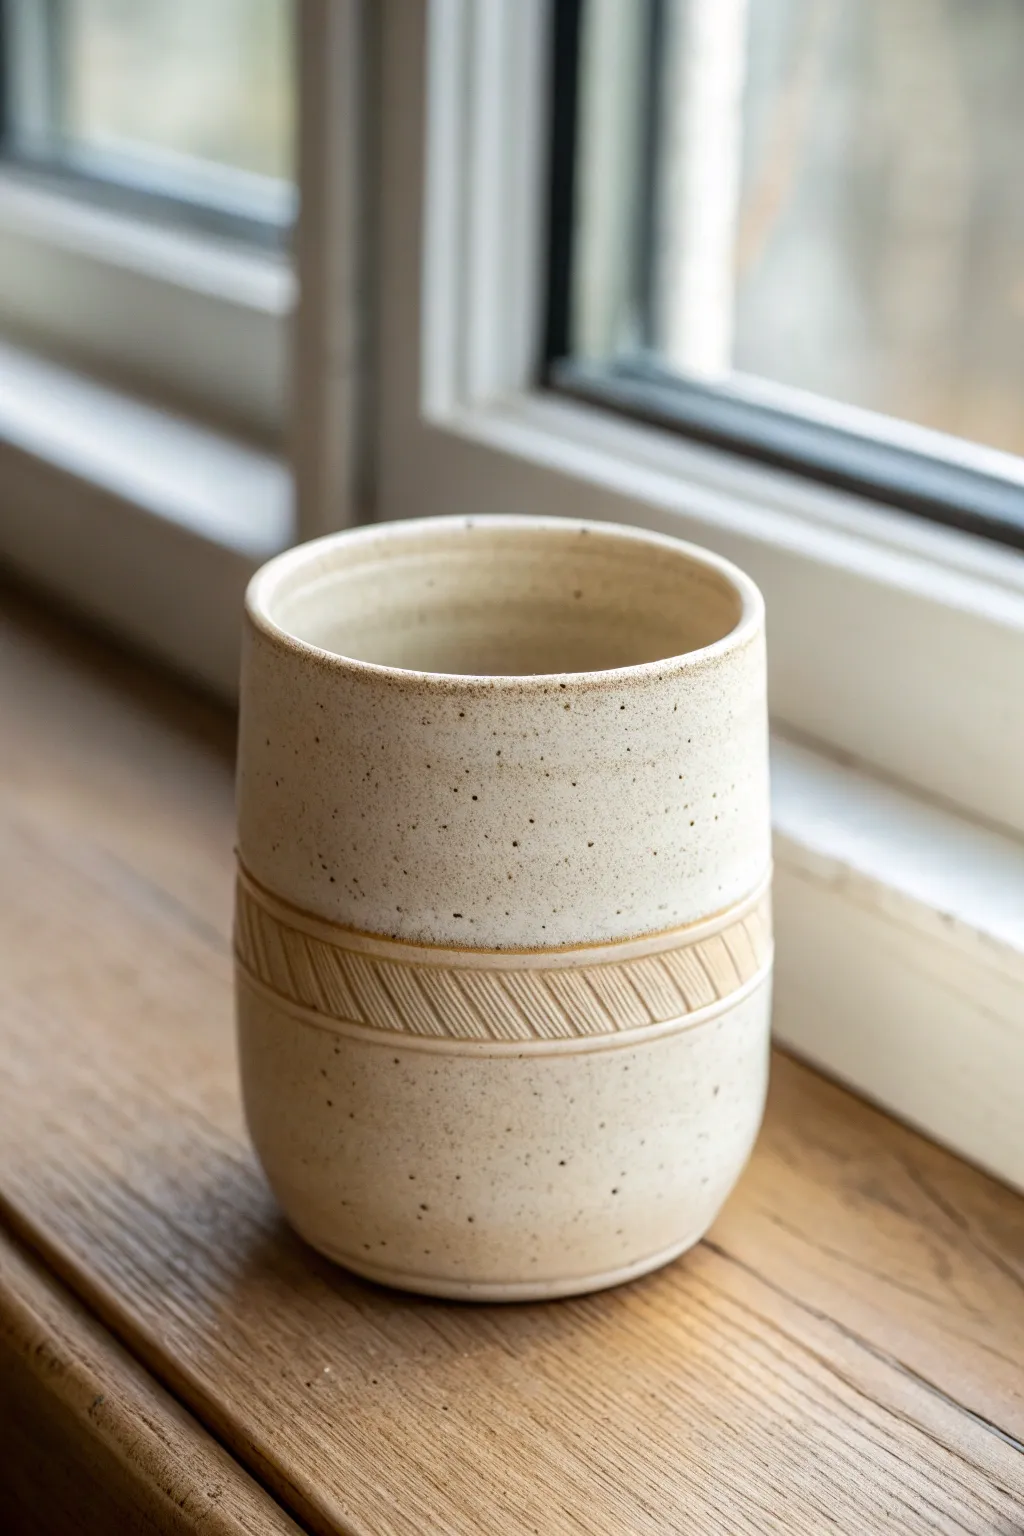
Speckled Minimal Clay Cup
This project features a clean, minimalist silhouette highlighted by the natural beauty of speckled stoneware clay. The cup’s unadorned, handle-less design allows the organic texture and soft cream glaze to take center stage, creating a soothing vessel for your morning routine.
Detailed Instructions
Materials
- Speckled buff stoneware clay (or white clay with speckle inclusions)
- Pottery wheel (or slab roller for hand-building)
- Wooden modeling tool
- Metal rib
- Sponge
- Wire cutter
- Trimming tools
- Transparent or glossy cream glaze (food safe)
- Kiln
Step 1: Throwing the Form
-
Preparing the clay:
Begin by wedging about 1 to 1.5 pounds of speckled buff clay. Thorough wedging distributes the moisture evenly and ensures those beautiful speckles are integrated well, preventing air bubbles later. -
Centering:
Throw the ball of clay firmly onto the center of the wheel batt. Using wetted hands, cone the clay up and down a few times before pressing it down into a smooth, centered puck shape. -
Opening:
Press your thumbs into the center of the puck, leaving about half an inch of clay at the bottom for the floor. Gently pull the opening outward until the base is your desired width, likely around 3 inches for a standard cup. -
Compressing the floor:
It is crucial to compress the bottom of the cup to prevent cracking. Use your fingertips or a flat tool to smooth the floor from the center out to the wall. -
Pulling the walls:
Slowly pull the walls upward. Keep your hand movements steady to create an even cylinder. Aim for straight vertical walls rather than bowing them out, maintaining that ‘minimal’ straight-sided look from the photo. -
Smoothing the surface:
Take a metal rib and run it gently up the exterior of the spinning pot. This removes excess slurry and reveals the gritty texture of the speckled clay, sharpening the silhouette. -
Refining the rim:
Clean up the rim with a small piece of chamois leather or a smooth sponge tip. A slightly rounded rim is more comfortable to drink from than a sharp edge. -
Cutting off:
Run a wire cutter underneath the cup to separate it from the batt. Carefully slide it onto a ware board and set it aside until it becomes leather hard.
Warped Walls?
If your cup walls warp during firing, they might have been too thin or uneven. Check your wall consistency with a pin tool during the throwing stage next time.
Step 2: Trimming and Finishing
-
Defining the base:
Once leather hard, center the cup upside down on the wheel. Use a trimming tool to define a small foot ring or simply bevel the bottom edge inward slightly to give the cup a ‘lifted’ appearance. -
Smoothing imperfections:
Run a barely damp sponge over any rough spots created during trimming. Be careful not to wash away the natural texture of the clay, as those speckles need to remain visible. -
Bisque firing:
Allow the cup to dry completely—this usually takes several days. Once bone dry, fire it in the kiln to cone 04 (or your clay’s specific bisque temperature). -
Glazing the interior:
Pour a glossy cream or clear glaze inside the cup, swirl it around to coat every surface, and pour the excess out. Wipe the rim clean if you want an exposed clay lip, though fully glazing is standard for this look. -
Glazing the exterior:
Hold the cup by the foot (or use tongs) and dip the exterior into the same glaze. If you prefer the raw texture, you can use a matte clear glaze, which protects the surface while keeping the natural look. -
Wiping the foot:
I always use a wax resist or a wet sponge to completely clean the bottom of the foot ring. Any glaze left here will fuse the cup to your kiln shelf. -
Glaze firing:
Place the cup back in the kiln for the final glaze firing, usually typically cone 5 or 6 for stoneware. This high heat melts the glaze and brings out the dark iron speckles through the translucent coating.
Boosting the Speckle
To make the speckles pop even more without changing clay, use a transparent glaze rather than an opaque white, which can sometimes cloud the iron spots.
Enjoy the simple pleasure of sipping from a vessel made with your own hands
Fluted Rim Flower Cup

Capture the delicate beauty of a blooming flower with this charming fluted cup. Featuring soft, scalloped edges and a lovely speckled pink finish, this hand-built vessel is perfect for holding trinkets or a tiny succulent.
How-To Guide
Materials
- Light-colored stoneware clay (white or buff)
- Rolling pin
- Circle template or compass
- Needle tool
- Surform tool (cheese grater style)
- Sponge
- Slip (liquid clay)
- Scoring tool (or fork)
- Rib tool (flexible metal or rubber)
- Speckled pink matte glaze
- Kiln (or air-dry clay alternatives for decorative use)
Step 1: Forming the Base
-
Roll the clay:
Begin by wedging your clay to remove air bubbles. Roll it out into a smooth slab that is approximately 1/4 inch thick, ensuring even thickness throughout. -
Cut the base:
Using a circle template or a compass, mark a circle about 3 inches in diameter on your slab. Carefully cut this out using your needle tool to serve as the floor of your cup. -
Create the walls:
Roll out a coil of clay that is roughly the same thickness as your slab. Flatten this coil gently into a long rectangular strip, slightly taller than the desired height of your finished cup.
Even Spacing Secret
Use a paper strip cut to the circumference of your rim. Fold it in half repeatedly to create even crease marks, then wrap it around the cup to mark perfect flute guides.
Step 2: Building the Structure
-
Score and slip:
Score the outer edge of your circular base and one long edge of your rectangular strip. Apply a generous amount of slip to both scored areas. -
Attach the wall:
Wrap the rectangular strip around the base circle. Join the ends of the strip by cutting them at an angle for a stronger seam, then score, slip, and press them firmly together. -
Blend the seams:
Support the wall from the outside with one hand. Use your thumb or a wooden tool to smudge the clay from the wall down onto the base on the inside to seal the joint. -
Smooth the exterior:
Repeat the blending process on the outside, dragging clay from the base up onto the wall. Follow up with a rib tool to scrape away excess clay and smooth the surface.
Step 3: Creating the Flutes
-
Shape the curve:
With the cylinder formed, use your fingers to gently push the walls outward from the inside to create a rounded, bowl-like belly shape, tapering slightly back in at the rim. -
Mark vertical guides:
To ensure even spacing, lightly mark vertical lines on the outside of the cup where you want the deepest part of each flute to be. -
Press the indentations:
I usually hold the cup in my lap for stability during this part. Use the side of your finger or a thick modeling tool to press vertical indentations into the wall, following your guide marks. -
Define the ridges:
As you press in, pinch the clay between the indentations slightly to sharpen the outward-facing ridges, creating that distinctive ribbed pumpkin look. -
Scallop the rim:
Using your thumb and forefinger, gently shape the top rim to follow the waves of the body. Press down on the indented sections and pull up slightly on the ridges to exaggerate the flower shape.
Texture Twist
Instead of a smooth finish, gently tap the exterior with a stiff-bristled toothbrush before firing. This enhances the stone-like feel of the matte glaze.
Step 4: Finishing Touches
-
Refine the surface:
Once the clay is leather-hard, use a slightly damp sponge to soften any sharp edges on the rim and smooth out fingerprints without losing the texture. -
Dry slowly:
Place the cup under a loose plastic sheet to dry slowly. This prevents the rim from drying too fast and warping the delicate scalloped shape. -
Bisque fire:
Load your bone-dry piece into the kiln for a bisque firing to cone 04 (or according to your clay body’s instructions). -
Glaze application:
Select a matte pink glaze that contains speckles (or obtain a speckled clay body initially). Pour glaze inside, swirl, and pour out. Dip the exterior for an even coat. -
Final wipe:
Use a sponge to wipe the foot of the cup completely clean of glaze to prevent it from sticking to the kiln shelf. -
Glaze fire:
Fire the piece a second time to the temperature required by your specific glaze, usually Cone 5 or 6 for stoneware.
Place your finished cup on a sunny windowsill where the light can catch the soft curves of the rim
Thumb-Dimple Comfort Cup
Embrace the warmth of handmade pottery with this cozy, wheel-thrown style mug. Featuring subtle horizontal throwing rings and a beautiful toasted oatmeal glaze with natural speckles, this piece is designed for slow mornings and hot coffee.
Step-by-Step Guide
Materials
- Stoneware clay (speckled buff or oatmeal body recommended)
- Pottery wheel
- Sponge
- Wire cutting tool
- Pin tool
- Rib tool (wooden or silicone)
- Loop tool for trimming
- Scoring tool or serrated rib
- Slip (clay and water slurry)
- Clear matte or satin glaze
- Kiln
Step 1: Throwing the Cylinder
-
Prepare the clay:
Wedge about 1 to 1.5 pounds of speckled stoneware clay thoroughly to remove air bubbles. Form it into a tight ball before slamming it onto the center of your wheel head. -
Center the clay:
With the wheel spinning at a medium-fast speed, use wet hands to cone the clay up and press it back down until it spins perfectly smooth without wobbling. -
Open the form:
Press your thumbs into the center of the clay mound, opening a hole down to about a quarter-inch from the bat. Slowly pull the opening wider to establish the floor width of your cup. -
Pull the walls:
Using your sponge on the outside and fingers on the inside, gently squeeze and lift the clay upward. I find it helpful to slow the wheel down slightly as the wall gets taller and thinner. -
Create the texture:
To achieve the look in the photo, leave the subtle throwing lines visible on the exterior walls instead of smoothing them completely away with a rib. This adds tactile character. -
Shape the belly:
Gently push the wall outward from the inside to create a slight curve or ‘belly’ near the bottom, tapering in slightly at the rim to help keep liquids warm. -
Finish the rim:
Use a chamois or a damp sponge to compress and round the rim, ensuring it is smooth and comfortable for drinking. -
Cut off:
Run your wire tool under the base of the cup and lift the bat off the wheel. Set it aside to dry until leather-hard.
Step 2: Trimming and Handle
-
Trim the foot:
Once leather-hard, center the cup upside down on the wheel. Use a loop tool to trim away excess weight from the bottom and carve a neat foot ring. -
Pull a handle:
Take a separate lug of clay and wet your hand. Pull a strip of clay downward, creating a smooth, tapered strap that is thick enough to support the cup but comfortable to hold. -
Curve the handle:
Bend the pulled handle into a ‘C’ or ear shape and lay it on its side to firm up for about 15-20 minutes. -
Attach the handle:
Score the attachment points on the mug body and the handle ends. Apply slip generously. -
Blend the seams:
Press the handle firmly onto the mug. Use your thumb or a modeling tool to smooth the clay where the handle meets the body, blending it seamlessly so it looks like it grew out of the side. -
Adjust the shape:
Ensure the handle loop is wide enough for a finger or two, matching the comfortable curve seen in the reference image.
Comfort Grip Tip
For a true ‘comfort cup,’ slightly flatten the top of the handle where your thumb rests. This tiny ergonomic adjustment makes holding a full cup of tea much steadier.
Step 3: Glazing and Firing
-
Bisque fire:
Allow the mug to dry completely (bone dry) before loading it into the kiln for a bisque fire (usually Cone 04). -
Apply glaze:
Dip the mug into a clear matte or semi-matte glaze. Because you used speckled clay, a transparent glaze will allow the natural iron pyrite speckles to show through beautifully. -
Clean the foot:
Use a damp sponge to wipe any glaze off the foot ring and the very bottom of the cup to prevent it from fusing to the kiln shelf. -
Glaze fire:
Fire the mug again to the maturation temperature of your specific clay and glaze (typically Cone 5 or 6 for stoneware).
Troubleshooting Cracks
If your handle cracks away from the body while drying, wrap the joined area in plastic or wax resist immediately after attaching to equalize the moisture content.
Now you have a beautifully earthy mug ready to be filled with your favorite warm drink
Simple Smiley Face Cup
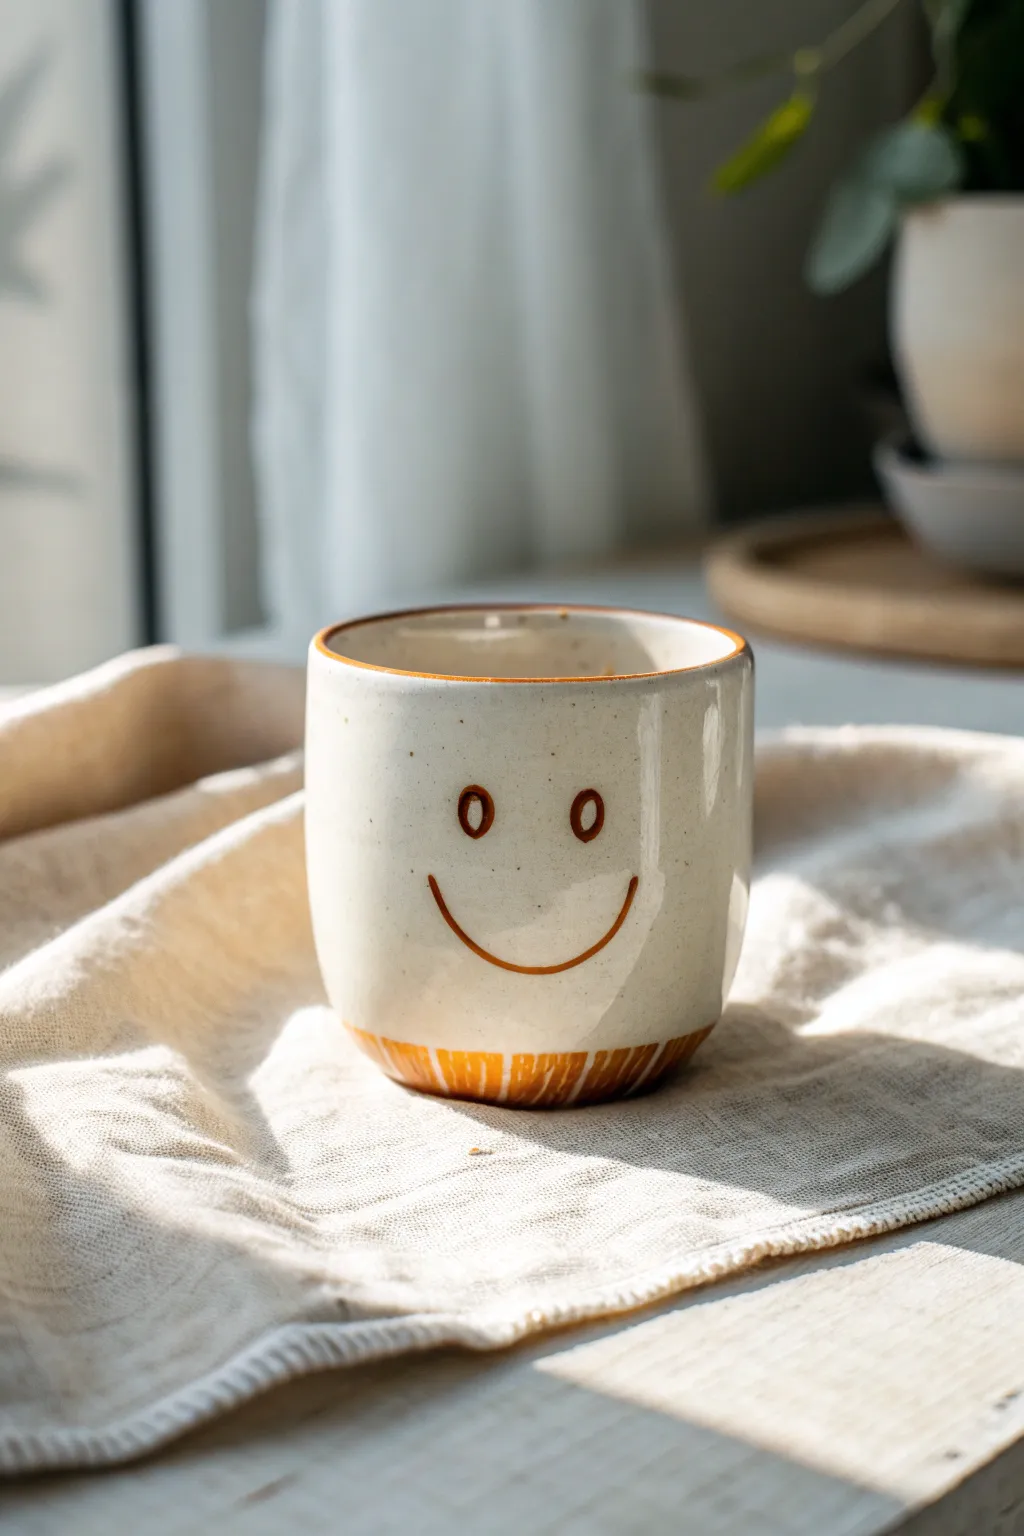
Brighten your morning coffee routine with this charmingly simple ceramic project. Featuring a warm, speckled cream glaze and a minimalist brown smiley face, this cup radiates positivity and handmade warmth.
Detailed Instructions
Materials
- Stoneware clay (smooth, light-bodied)
- Fettling knife
- Metal rib tool
- Pottery sponge
- Rolling pin
- Needle tool
- Speckled vanilla/cream glaze (food safe)
- Brown underglaze
- Small round paintbrush (sz 2 or 4)
- Clear dipping glaze (optional, depending on speckled glaze)
- Kiln access
Step 1: Forming the Cup Base
-
Wedge the clay:
Start by thoroughly kneading your stoneware clay to remove any air bubbles. Form it into a smooth ball about the size of a large orange. -
Create the shape:
If you are using a pottery wheel, throw a simple cylinder with vertical walls. If hand-building, roll out a slab to 1/4 inch thickness. -
Cut the slab:
For the hand-building method, cut a rectangle from your slab approximately 4 inches high and 10 inches long, then cut a separate circle for the base. -
Assemble the cylinder:
Score the short edges of your rectangle and the edge of your circle base. Apply slip and join the walls to the base, smoothing the seam thoroughly on both the inside and outside. -
Refine the walls:
Use a damp sponge to smooth out any fingerprints or rough textures. The walls should be straight with no flare, creating a modern, clean silhouette. -
Round the rim:
Gently compress the rim with a piece of plastic or a chamois cloth to create a soft, rounded drinking edge. I like to spend extra time here to ensure it feels comfortable against the lips.
Steady Hands
Rest your pinky finger against the dry side of the cup while painting the face. This acts as an anchor to keep your brush strokes smooth and confident.
Step 2: Decorating and Firing
-
Bisque fire:
Allow the cup to dry slowly until bone dry, then load it into the kiln for a bisque firing (usually Cone 04). -
Apply base glaze:
Once cooled, dip the entire cup into a speckled vanilla or cream-colored glaze. Ensure an even coat and wipe the foot ring clean with a damp sponge. -
Paint the eyes:
Using your small round brush and brown underglaze (or specialized overglaze), paint two vertical ovals for the eyes. Place them slightly higher than center for a cute look. -
Draft the smile:
With a steady hand, paint a wide, simple ‘U’ shape for the smile. Keep the line weight consistent with the eyes. -
Rim detail:
Dip just the very tip of your brush in the brown glaze and carefully trace the rim of the cup to create a thin, defining border. -
Create the base pattern:
Paint vertical stripes along the bottom 1/2 inch of the cup. These strokes should be somewhat loose and organic, resembling gathered fabric or a textured base. -
Glaze fire:
Load the decorated cup into the kiln for the final glaze firing (temperature depends on your specific clay and glaze, typically Cone 5 or 6). -
Cool and inspect:
Allow the kiln to cool completely before opening. Check the glaze for any pinholes or sharp spots before washing and using.
Make It Yours
Try using an iron-rich clay body and a transparent white glaze. The natural speckles of the dark clay will show through, mimicking the look shown here perfectly.
Now you have a cheerful companion for your daily coffee that is sure to start your day on a high note
Mushroom Accent Mug
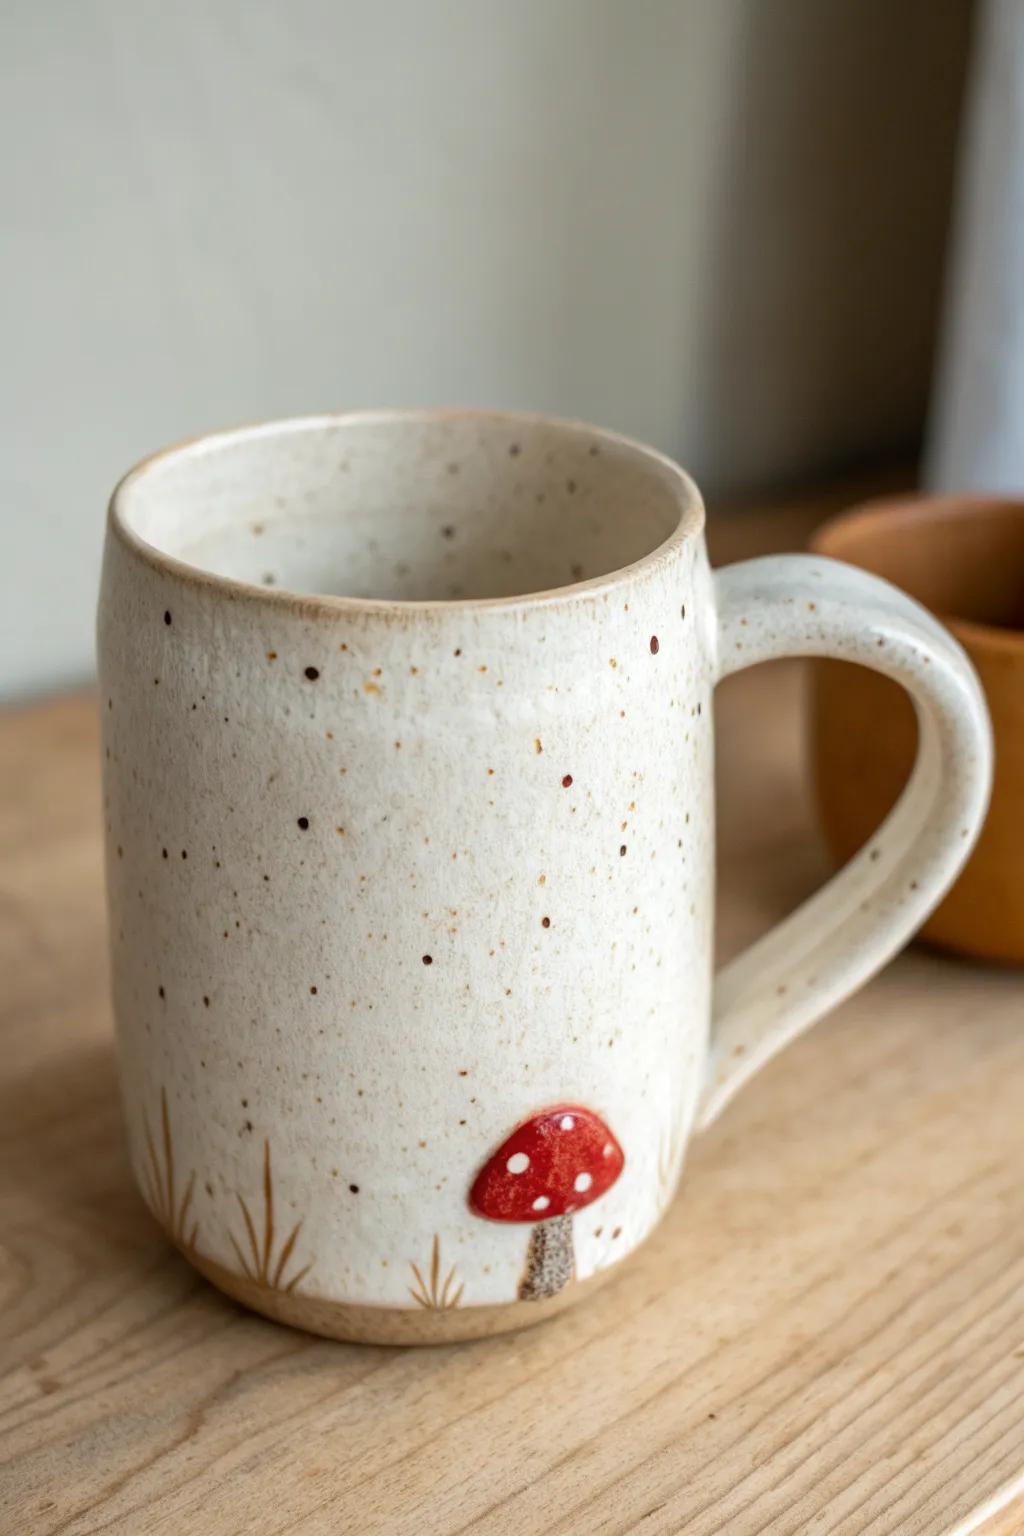
Bring the charm of a woodland forest to your morning coffee with this speckled ceramic mug featuring a delightful 3D mushroom accent. The combination of a creamy, dotted glaze and raw clay details gives this piece a cozy, earthy feel that begs to be held.
Step-by-Step
Materials
- Stoneware clay (speckled or buff)
- Pottery wheel (or rolling pin for hand-building)
- Underglazes (Red, White, Green/Brown)
- Speckled Cream/White Glaze (translucent/semi-opaque)
- Sponge
- Pin tool
- Scoring tool (or serrated rib)
- Small paintbrush
- Loop tool (for trimming)
- Kiln
Step 1: Forming the Mug Body
-
Throw the Cylinder:
Begin with about 1 lb of well-wedged stoneware clay. Center it on the wheel and throw a straight-sided cylinder, aiming for a consistent wall thickness. -
Shape the Belly:
Gently apply pressure from the inside to create a very subtle curve or ‘belly’ near the bottom third, while keeping the rim perfectly round and smooth. -
Smooth the Surface:
While the wheel is spinning slowly, run a rib or a smooth sponge up the outside to remove throwing lines, creating a pristine canvas for your mushroom. -
Trim the Foot:
Once leather hard, trim the bottom of the mug. I like to leave a distinct, unglazed band at the very base, so define a sharp line where the glaze will eventually stop.
Clean Lines
When painting the white dots on the mushroom cap, wait for the red underglaze to be dry to the touch. This prevents the red from bleeding into the white and keeps the dots crisp.
Step 2: Adding Handle & Details
-
Pull the Handle:
Pull a strap of clay for the handle. For this style, aim for a medium thickness that feels sturdy but not chunky. -
Attach the Handle:
Score and slip the attachment points on both the mug and the handle. Attach the top of the handle near the rim and loop it down, creating a generous ear shape before attaching the bottom. -
Sculpt the Mushroom Cap:
Roll a very small ball of clay (pea-sized) and flatten it slightly into a dome shape to form the mushroom cap. -
Form the Stem:
Roll a tiny cylinder of clay for the stem. It should be proportional to your cap but slightly thicker at the base. -
Attach the Mushroom:
Score a small spot near the bottom of the mug (about an inch above the unglazed foot). Slip and attach the stem first, blending the edges into the mug wall, then attach the cap on top.
Step 3: Decoration & Glazing
-
Paint the Mushroom:
Using a small detail brush, apply red underglaze to the mushroom cap. You may need 2-3 coats for solid opacity. -
Paint the Stem:
Apply a white or light beige underglaze to the stem, or leave it raw if your clay body is light enough. -
Add the Dots:
Dip the back end of a paintbrush into white underglaze and gently dot the red cap to create the classic fly agaric look. -
Paint the Grass:
With a fine liner brush and a diluted brown or moss-green underglaze, paint simple, sweeping lines specifically around the bottom of the mushroom to simulate grass blades. -
Bisque Fire:
Allow the mug to dry completely—this usually takes a few days—and then bisque fire it according to your clay’s cone rating (usually Cone 04 or 06). -
Wax Resist:
Apply wax resist to the mushroom accent itself and the bottom foot ring of the mug. This prevents the dipping glaze from covering your hard work. -
Dip Glaze:
Stir your speckled cream glaze thoroughly. Using tongs, dip the entire mug. The wax on the mushroom will resist the glaze, but allow any glaze droplets to bead up before wiping them off gently with a damp sponge. -
Clean Up:
Wipe away any glaze that may have stuck to the waxed foot ring or excessively pooled around the mushroom edges. -
Final Fire:
Glaze fire the piece to the final temperature (likely Cone 5 or 6). The glaze will melt around the mushroom, sealing it in place.
Double Fungi
Try making a ‘fairy ring’ version by adding two or three tiny mushrooms in a cluster of varying sizes instead of just one solitary mushroom.
Enjoy your cozy new vessel as you sip your favorite warm beverage
Polymer Clay Handle Upgrade
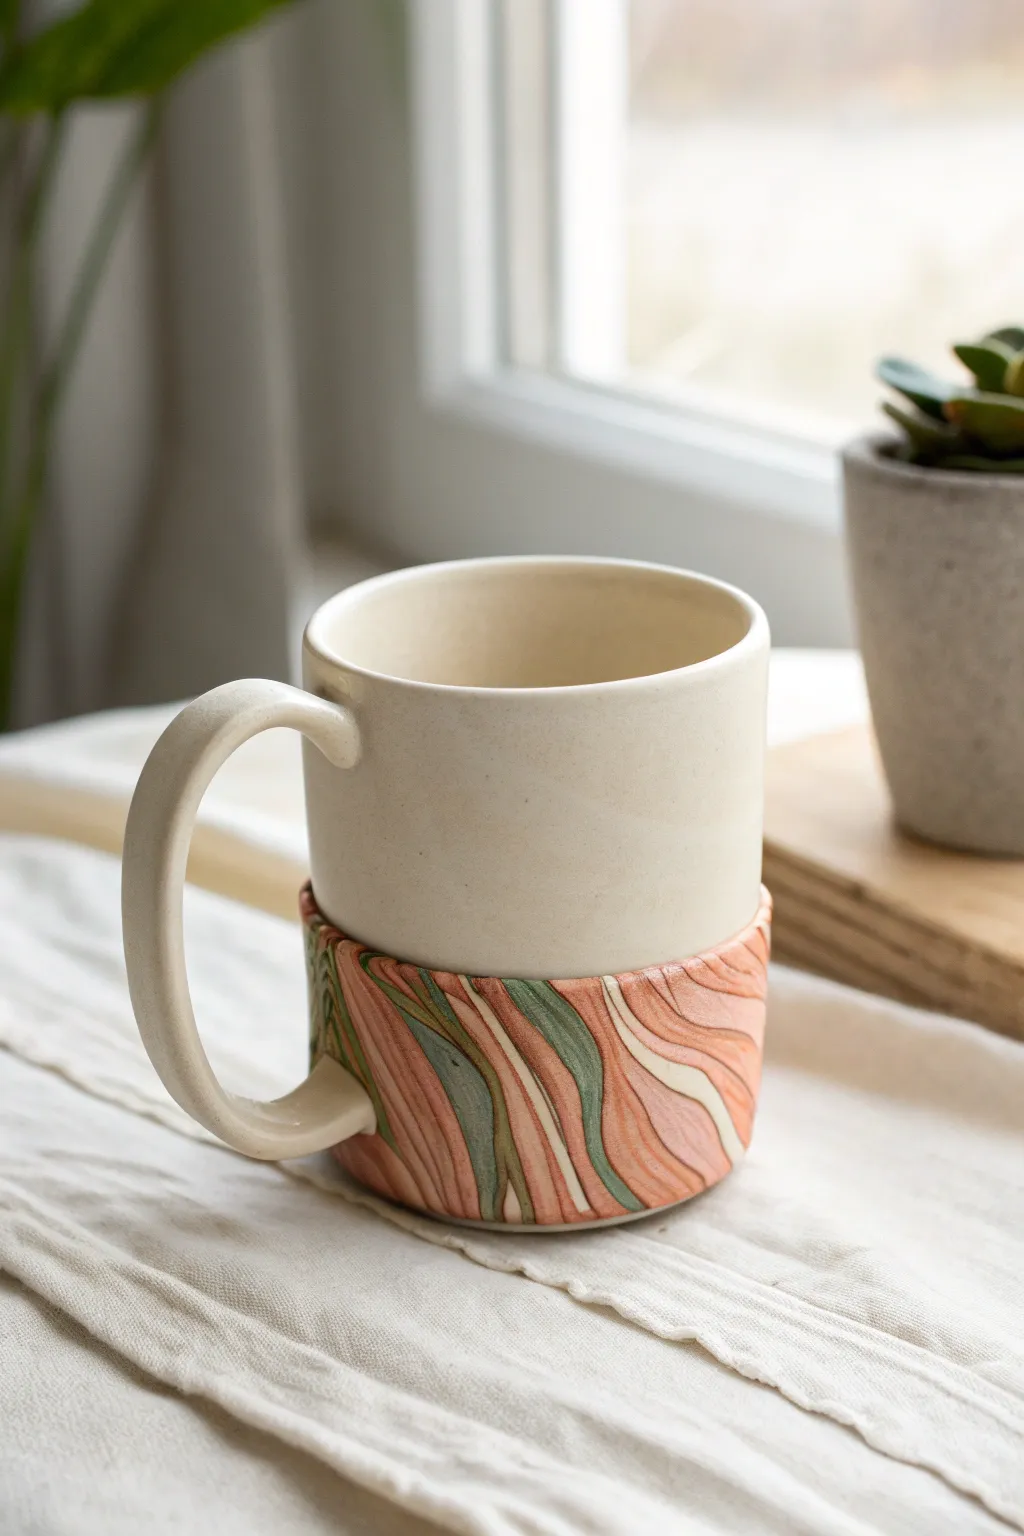
Transform a plain ceramic mug experience by adding a custom, tactile base with fluid swirls of earthy color. This project combines sleek cream stoneware with a marbled overlay of rose, sage, and tan clay for a look that feels both organic and modern.
Detailed Instructions
Materials
- Plain bisque-fired or leather-hard ceramic mug (straight-sided)
- White stoneware clay
- Mason stains or colored clay bodies (Rose, Sage Green, Tan)
- Rolling pin
- Fettling knife or clay knife
- Scoring tool (or serrated rib)
- Slip (liquid clay slurry)
- Smoothing sponge
- Clear glaze (food safe)
- Kiln access
Step 1: Preparing the Colored Clay
-
Mix your colors:
If you don’t have pre-colored clay, take three balls of white stoneware. Knead a small amount of mason stain into each ball until the color is uniform—create a soft rose pink, a muted sage green, and a warm tan. -
Create clay logs:
Roll each colored clay ball into a long, thin snake, roughly 6 inches long. Roll a larger snake of white clay as well to act as a spacer and highlighter. -
Twist and combine:
Bundle the snakes together, holding them at one end. Twist the bundle tightly like a rope to start blending the colors without fully mixing them. -
Fold and roll:
Fold the twisted rope in half and roll it out again into a snake. Repeat this process 2-3 times—stop before the colors turn muddy; you want distinct striations. -
Flatten the slab:
Using a rolling pin, flatten your marbled snake into a long, rectangular slab. Aim for a consistent thickness of about 3-4mm.
Step 2: Applying the Design
-
Measure the circumference:
Take a flexible measuring tape or a string to measure around the base of your mug. Cut your marbled clay strip to this length, ensuring the height covers the bottom third of the cup. -
Prepare surface for attachment:
For the best adhesion, the mug should ideally be leather-hard. Score the bottom third of the mug’s exterior vigorously with your serrated tool. -
Apply slip:
Brush a generous layer of slip over the scored area. I find using a slightly thicker slip here acts like a strong glue to prevent the added layer from peeling during firing. -
Wrap the clay:
Carefully lift your marbled strip and wrap it around the base of the mug. Press it firmly against the slip-covered surface. -
Join the seam:
Where the two ends of the clay strip meet (ideally under the handle area), cut through both layers at an angle and press them together to create a seamless flush joint.
Cracks Appearing?
If the added layer cracks away from the mug during drying, the moisture content between the two pieces was too different. Score deeper and use vinegar-slip next time.
Step 3: Refining and Finishing
-
Level the rim:
Use your fettling knife to trim the top edge of the marbled section so it creates a clean, straight horizontal line around the mug. -
Bevel the transition:
Use a damp finger or a small tool to gently press the top edge of the marbled clay into the mug wall, eliminating any sharp ledges where dirt could collect. -
Smooth the texture:
Wipe the surface with a slightly damp sponge to reveal the grain of the marbling and remove any fingerprints, but be careful not to smear the colors too much. -
Accommodate the handle:
If the handle attachment is low, carefully trim the marbled strip around the handle join point so it sits flush against the handle base without overlapping awkwardly. -
Dry slowly:
Cover the mug loosely with plastic to let it dry very slowly. This is crucial because the added clay layer will shrink, and fast drying can cause cracks. -
Bisque fire:
Once bone dry, fire the mug in the kiln to bisque temperature (usually cone 04 or 06). -
Glaze interior:
Pour clear glaze inside the mug and pour it out. For the exterior, you can dip the top half in a satin white glaze or leave the marbled section unglazed for a matte, stone-like texture. -
Final smooth:
Wipe away any rogue glaze drops from the marbled section with a clean sponge before the final firing.
Carve for Depth
Before firing, use a small loop tool to carve vertical flutes or grooves into the marbled section. This creates a deeply tactile grip and distorts the pattern beautifully.
Enjoy the soothing feel of the textured clay beneath your fingers as you sip your morning coffee