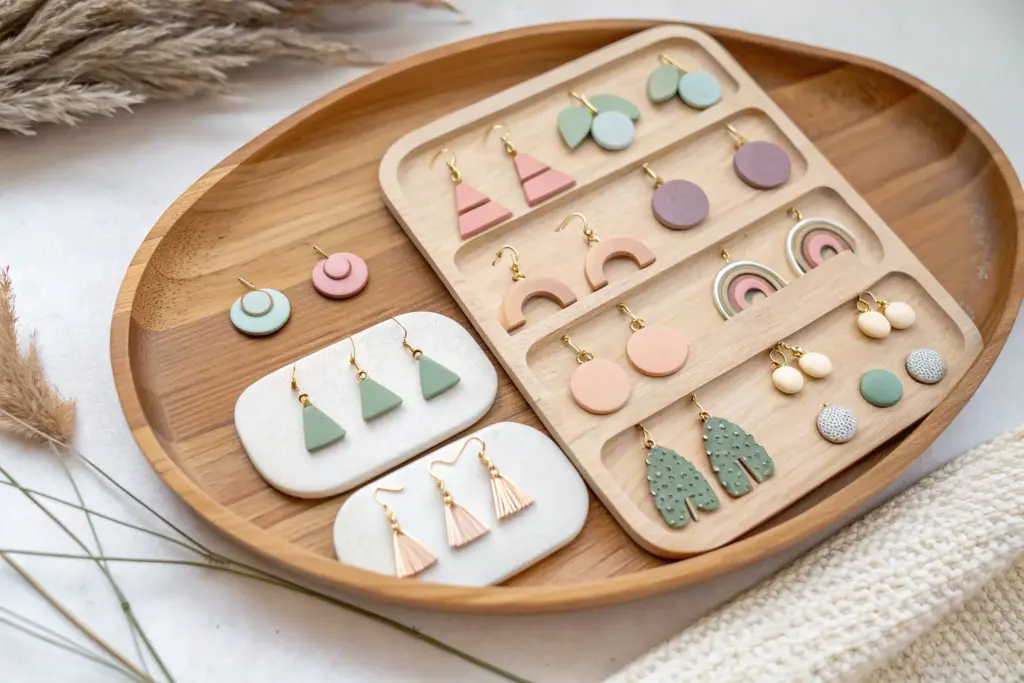
If you’ve been craving cute earrings you can actually finish in one sitting, clay is your best friend. These ideas are all about simple shapes, easy techniques, and that satisfying “I made that” glow when you put them on.
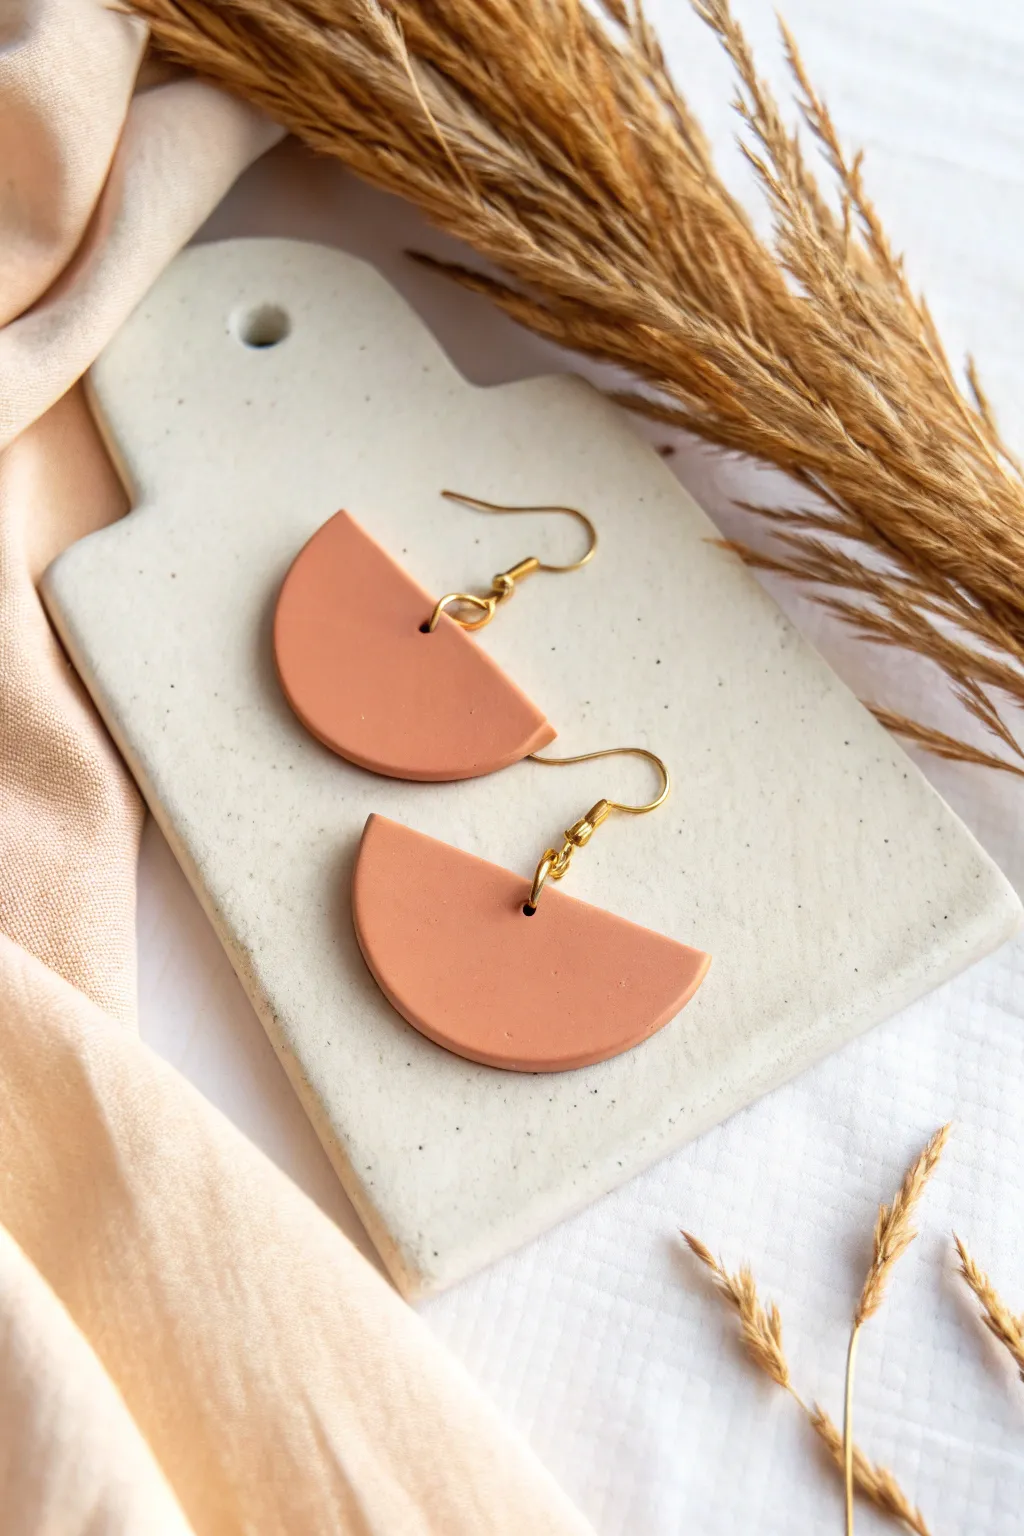
Classic Arch Dangles
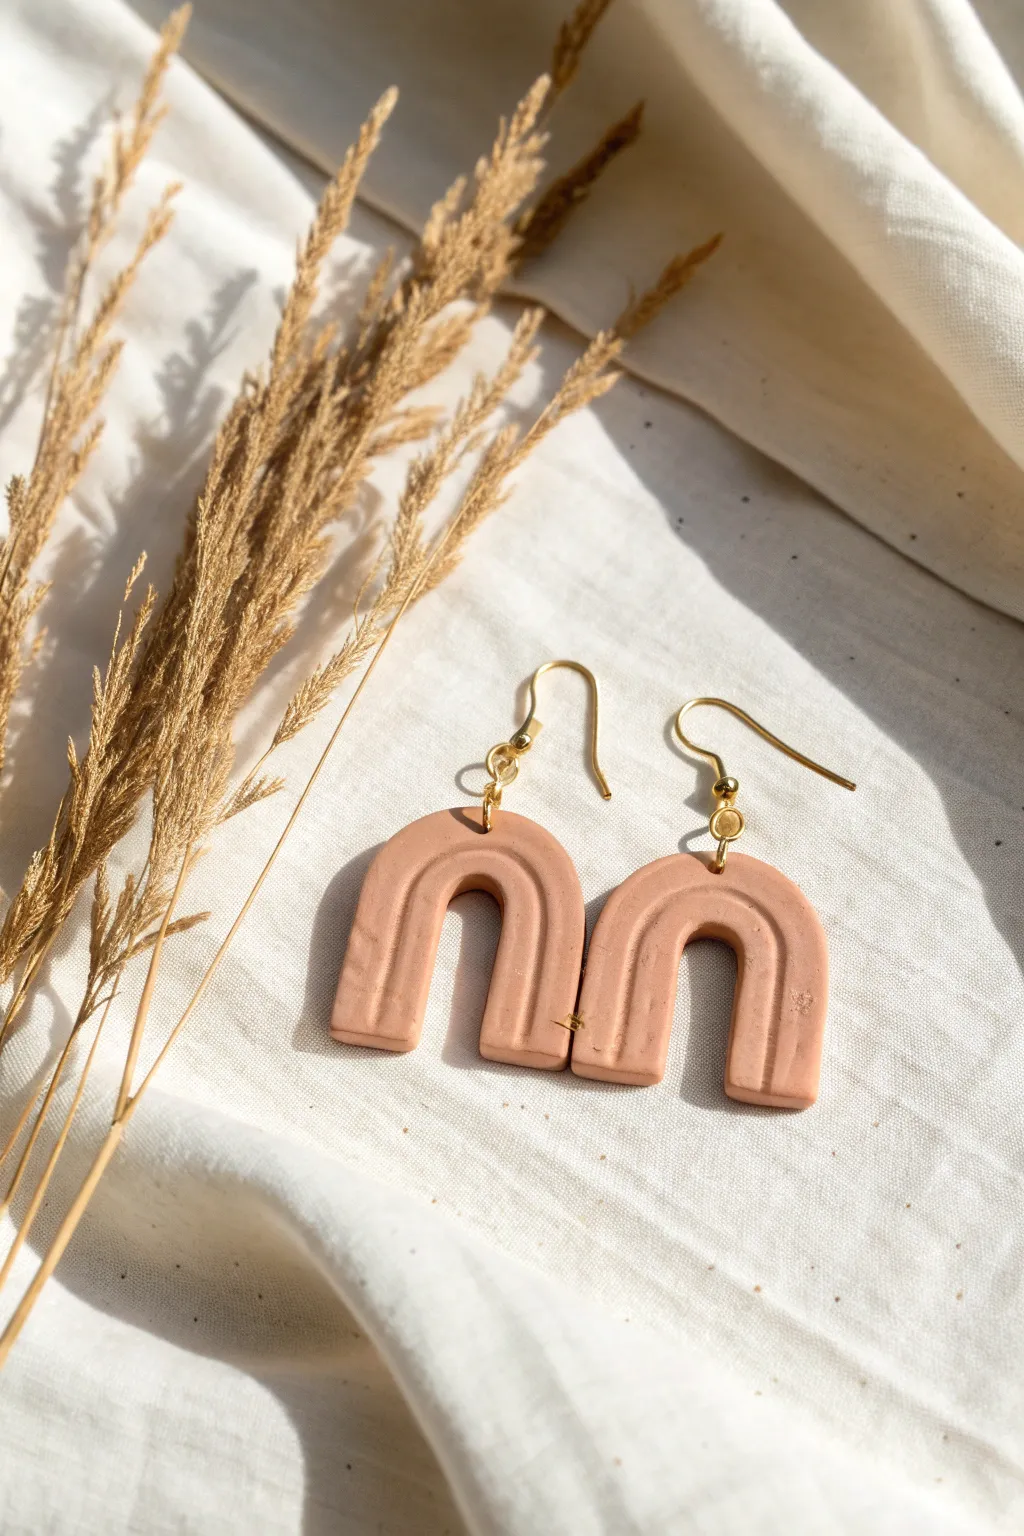
These understated earrings feature a timeless double-rainbow shape in a warm, earthy terracotta hue. The textured, minimalist design mimics the look of raw pottery, making them a perfect everyday accessory with a touch of boho charm.
Detailed Instructions
Materials
- Terracotta or nude pink polymer clay
- Clay roller or pasta machine
- Flexible tissue blade or craft knife
- U-shaped clay cutter (medium size) or round cookie cutters
- Tiny round cutter (for jump ring holes) or a needle tool
- Gold fishhook ear wires
- Gold jump rings (approx 6-8mm)
- Jewelry pliers (flat nose and round nose)
- Parchment paper or ceramic tile for baking
- Optional: Clay extruder with a rectangular disc
Step 1: Preparing the Clay
-
Condition the clay:
Start by warming the polymer clay in your hands, kneading it until it’s soft and pliable. This conditioning step is crucial to prevent cracks during baking. -
Roll out a slab:
Using a rolling pin or a pasta machine on a medium setting (approx. 3mm thick), roll the clay out into an even slab on a clean work surface. -
Create strips:
Cut long, narrow strips from your slab using a tissue blade. Aim for strips that are about 4-5mm wide. Alternatively, if you have a clay extruder, extrude a long rectangular snake of clay for perfectly uniform width. -
Texture the strips (Optional):
To achieve the slightly rustic look seen in the photo, you can lightly press a piece of sandpaper or a toothbrush onto the surface of the strips before shaping them. This gives a nice matte, stone-like finish.
Clean Cuts Every Time
Does your blade drag? Dust your clay strips lightly with cornstarch before cutting, or wipe your blade with a baby wipe to prevent sticking and distortion.
Step 2: Shaping the Arches
-
Form the inner arch:
Take one strip of clay and gently curve it into a tight U-shape. You can wrap it around a small round object like a marker cap to help hold the shape perfectly while you work. -
Trim the inner base:
Use your tissue blade to slice the bottom ends of this first arch evenly, creating a flat base. -
Form the outer arch:
Take a second strip of clay and drape it snugly over the first arch. Press the two strips together gently along the seam so they adhere without smashing the rounded profile. -
Trim the outer base:
Cut the ends of the outer strip to match the length of the inner strip, ensuring the bottom of the earring allows it to stand flat if placed on a table. -
Repeat for the second earring:
Repeat the previous steps to create a matching second earring. Place them side-by-side to ensure they are symmetrical in height and width. -
Smooth the seams:
Turn the arched shapes over carefully. On the back, gently smudge the clay across the seam where the two strips meet to reinforce the bond, ensuring they won’t separate after baking.
Step 3: Finishing and Assembly
-
Make the holes:
Before baking, use a needle tool or a very small round cutter to punch a hole at the very top center of the outer arch. Ensure the hole is large enough for your jump ring to pass through freely. -
Bake the pieces:
Place your clay arches on a ceramic tile or parchment-lined baking sheet. Bake according to your customized clay package instructions (typically 275°F/130°C for 15-30 minutes per 1/4 inch of thickness). -
Cool down:
Allow the pieces to cool completely inside the oven or on the tray. Handling them while warm can cause warping. -
Sand edges (Optional):
If there are any rough spots on the bottom cut or sides, use high-grit wet/dry sandpaper to smooth them out gently under running water. -
Open the jump ring:
Grasp a gold jump ring with two pairs of pliers. Twist one side forward and the other back (never pull them apart horizontally) to open the ring. -
Attach the hardware:
Slide the open jump ring through the hole in the clay arch, and then hook the fishhook ear wire onto the jump ring. -
Close the ring:
Use your pliers to twist the jump ring back into a closed position, ensuring the ends meet perfectly flush so the earring doesn’t slip off. -
Final check:
Give the earrings a gentle shake to ensure all hardware is secure and the movement is fluid.
Make it Speckled
Mix black pepper or dried used coffee grounds into your terracotta clay before rolling. This creates a trendy ‘faux stone’ granite effect.
Now you have a stylish pair of handmade arches ready to wear or gift to a friend


Simple Circle Studs
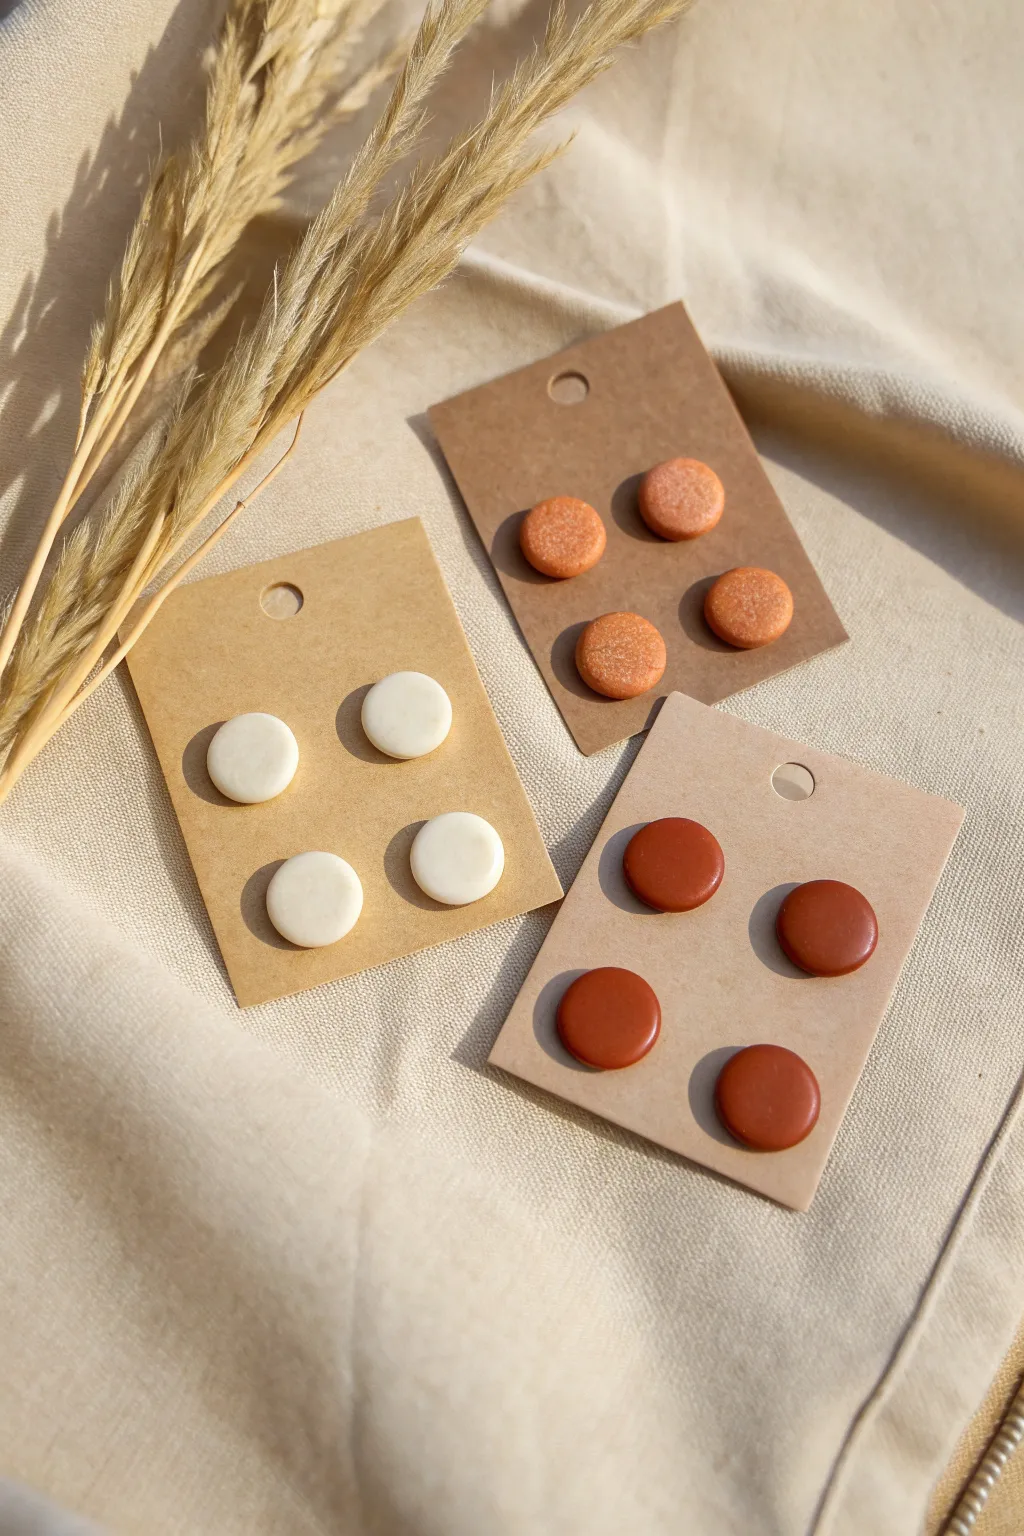
These understated stud earrings prove that simplicity is often the most stylish choice. Featuring a smooth matte white, a rich glossy rust, and a shimmering textured orange, this trio is the perfect introduction to creating uniform shapes with polymer clay.
How-To Guide
Materials
- Polymer clay (white, rust/terracotta, and shimmering copper/orange)
- Small circle clay cutter (approx. 1 cm diameter)
- Acrylic rolling pin or pasta machine
- Earring posts and butterfly backs
- Super glue (specifically gel formula works best)
- Parchment paper or ceramic tile
- Fine-grit sandpaper (optional)
- Gloss glaze or resin (for the rust pair)
- Soft paintbrush
- Oven
Step 1: Preparation & Shaping
-
Condition the Clay:
Start by warming up your chunk of white clay in your hands so it becomes pliable. Knead it thoroughly until it is soft and free of cracks. Repeat this process separately for the rust and shimmering orange clays, washing your hands between colors to prevent staining. -
Roll out the Slab:
Place your conditioned white clay on a flat surface or ceramic tile. Using your acrylic rolling pin, roll the clay out to an even thickness of about 3mm. If you have a pasta machine, I usually run it through a medium setting to ensure it is perfectly flat. -
Cut the Shapes:
Take your small circle cutter. Firmly press down into the clay slab to cut out four circles. Lift the cutter straight up to keep the edges clean. Repeat this process for the rust and orange clay slabs until you have four circles of each color. -
Smooth the Edges:
Gently pick up each clay circle. If there are any jagged bits from the cutter, smooth them down lightly with your finger tip. For the white pair, you want a very clean, soft edge, so take your time here. -
Create Texture (Optional):
For the shimmering orange pair in the image, the surface looks slightly rougher than the others. You can achieve this by gently tapping the surface with a piece of sandpaper or a toothbrush before baking to give it that organic feel.
Step 2: Baking & Assembly
-
Bake the Pieces:
Arrange all your cut circles on a parchment-lined baking sheet or a ceramic tile. Bake them in your oven according to the specific temperature and time instructions on your package of polymer clay. Do not overbake, especially the white clay, as it can yellow. -
Cool Down:
Once bakes, let the clay pieces cool completely inside the oven with the door slightly ajar, or on a cooling rack. They need to be fully hard before you move to the next step. -
Sand for Perfection:
If your white circles have any fingerprints or uneven spots, wet sand them gently. Dip your sandpaper in water and buff the surface in circular motions until smooth. -
Clean the Backs:
Wipe the back of each earring with a little rubbing alcohol. This removes oils and dust, ensuring a much stronger bond with the glue. -
Attach the Posts:
Place a small dot of gel super glue on the flat pad of an earring post. Press the post firmly onto the center back of a clay circle. Hold it there for 10-15 seconds to let the bond set initially. -
Secure the Posts:
Repeat for all 12 earring pieces. Allow the glue to cure fully—usually 24 hours—before wearing them.
Uneven Edges?
If your cutter is sticking and dragging the clay, try dipping the cutter into cornstarch or water before pressing it into the slab. This acts as a release agent for cleaner cuts.
Step 3: Finishing Touches
-
Glaze the Rust Pair:
To get the shiny finish seen on the rust-colored studs, apply a thin coat of gloss glaze or UV resin. Use a soft brush to apply it evenly over the top and sides, being careful not to let it drip down the back. -
Avoid Bubbles:
If using resin, pop any tiny bubbles with a toothpick before curing under a UV lamp. If using air-dry glaze, let it dry in a dust-free area. -
Carding the Earrings:
To recreate the presentation in the photo, take squares of kraft cardstock and punch two small holes near the top and bottom of each card. Insert your finished studs for a professional, gift-ready look.
Embedded Posts
For extra durability, bake the metal post *into* the clay by covering the pad with a small scrap of clay and baking it again, or using liquid clay to seal it.
Now you have a versatile set of studs ready to match any outfit in your wardrobe

Half-Moon Statement Pieces
Embrace minimalist chic with these warm, terracotta-toned half-moon earrings. Their clean geometric lines and matte finish make them a versatile statement piece that looks effortless with any outfit.
Step-by-Step Tutorial
Materials
- Terracotta or peach colored polymer clay
- Acrylic rolling pin
- Depth guides or playing cards (approx. 2-3mm thickness)
- Circle cutter (approx. 4cm diameter)
- Sharp tissue blade or rigid clay slicer
- Hand drill or needle tool
- Fine-grit wet/dry sandpaper (400-1000 grit)
- 2 Gold earring hooks (fishhook style)
- 4 Gold jump rings (approx. 6mm)
- Jewelry pliers (flat nose and round nose)
- Ceramic tile or baking sheet
- Oven
Step 1: Clay Preparation
-
Condition the clay:
Begin by warming the terracotta polymer clay in your hands. Knead and roll it repeatedly until it becomes soft, pliable, and free of any crumbly texture. -
Set up depth guides:
Place your depth guides on your work surface on either side of the clay ball. You want a uniform thickness of about 2mm to 3mm for sturdy but lightweight earrings. -
Roll the slab:
Using your acrylic roller, roll the clay flat between the guides. Ensure the surface is perfectly smooth; if you see air bubbles, gently pierce them with a needle and smooth over the area.
Sticky Situation?
If clay sticks to your cutter, dip the cutter in cornstarch or water before pressing down. This helps it release cleanly without distorting the shape.
Step 2: Cutting and Shaping
-
Cut the primary shape:
Take your large circle cutter and press firmly into the clay slab to cut out two distinct circles. Lift the cutter straight up to avoid distorting the edges. -
Slice the moons:
Using your rigid tissue blade, align it across the center of one circle. Press straight down to cut the circle perfectly in half, creating two semi-circles. You will only need one half-circle per earring, so you’ll have extras. -
Refine the edges:
Before baking, gently tap the cut edges with your finger to soften the sharp corners slightly. This reduces sanding time later. -
Pierce the holes:
Identify the top center of the straight edge on your semi-circle. Use a needle tool to pierce a hole about 2mm from the edge. Make sure the hole is large enough for your jump rings to pass through freely.
Smooth Surface Secret
Before baking, use a cotton swab dipped in rubbing alcohol to gently wipe the clay surface. It melts away fingerprints and lint instantly.
Step 3: Baking and Finishing
-
Bake the pieces:
Place your shapes on a ceramic tile or baking sheet lined with parchment paper. Bake according to your specific clay brand’s instructions (usually around 275°F/130°C for 30 minutes). -
Cool down:
Allow the clay pieces to cool completely inside the oven or on a wire rack. Don’t handle them while hot, as they are still slightly flexible and fragile. -
Sand the imperfections:
Once cool, use fine-grit sandpaper with a little water to smooth the curved edges and flat sides. This removes fingerprints and creates that professional matte look shown in the photo. -
Buff clean:
Wipe the pieces down with a damp cloth or rinse them to remove all sanding dust.
Step 4: Assembly
-
Open the jump rings:
Hold a jump ring with two pairs of pliers. Twist one side away from you and the other toward you to open it without distorting the circle shape. -
Connect the hook:
Slide the open jump ring through the hole in the clay piece. Thread the loop of the earring hook onto the same jump ring. -
Secure the ring:
Using your pliers, twist the jump ring ends back together until they meet perfectly flush. I always double-check this closure so the clay doesn’t slip off. -
Repeat for the second earring:
Follow the same assembly steps for the matching earring to complete your pair.
Enjoy wearing your handcrafted, earth-toned creations with pride


Teardrop Cutout Dangles
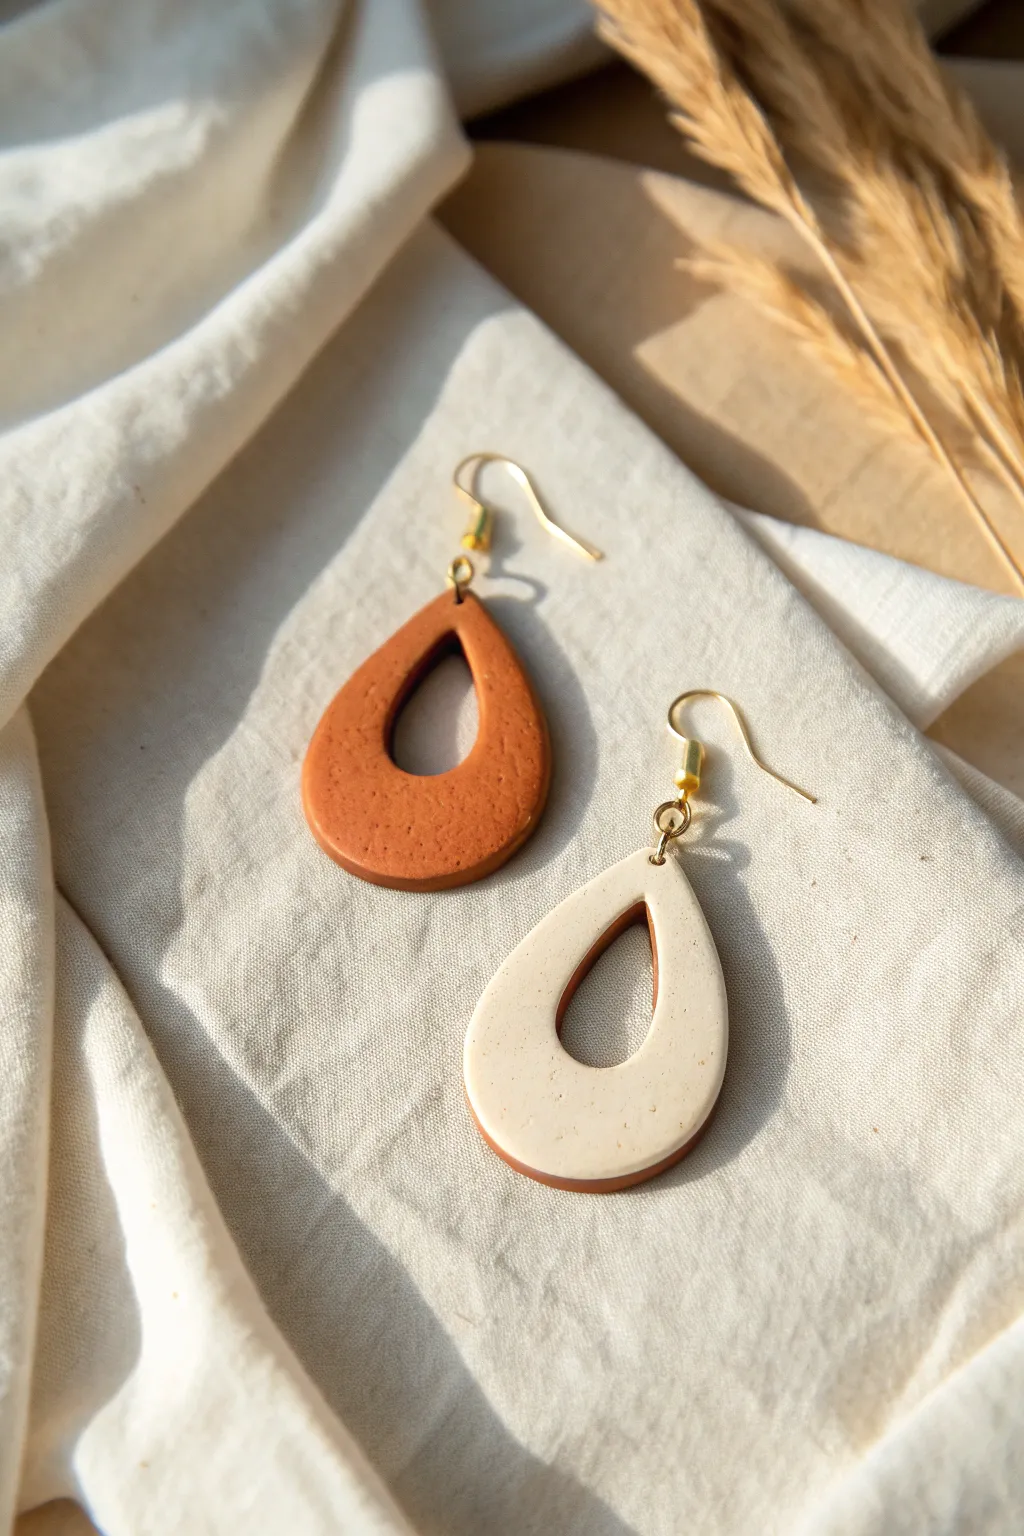
Embrace the warmth of nature with these sophisticated teardrop dangles, featuring an organic texture and a sleek, modern silhouette. The combination of rich terracotta and creamy speckled white clay creates a versatile accessory perfect for everyday wear.
Detailed Instructions
Materials
- Polymer clay (terracotta/burnt orange)
- Polymer clay (cream or granite splatter effect)
- Teardrop clay cutters (nested set: one large, one medium)
- Acrylic roller or pasta machine
- Tissue blade
- Parchment paper or ceramic tile
- Hand drill or needle tool
- Gold-tone earring hooks (fishhook style)
- Gold-tone jump rings (6mm or 7mm)
- Jewelry pliers (flat nose and round nose)
- Fine grit sandpaper (optional)
- Oven
Step 1: Preparing the Clay
-
Condition the clay:
Start by warming the terracotta clay in your hands, kneading it until it is soft and pliable. Do the same for your cream or speckled clay. -
Roll out the base sheets:
Using your acrylic roller or pasta machine, roll the terracotta clay into a smooth slab about 3mm thick. This will be used for both the solid earring and the backing of the two-tone earring. -
Roll the accent color:
Roll your cream clay slightly thinner, perhaps around 2mm, as this will be layered for the two-tone earring.
Step 2: Cutting the Shapes
-
Cut the solid earring:
Press your large teardrop cutter firmly into the terracotta slab to cut out the first complete shape. -
Create the cutout:
Take the medium-sized teardrop cutter and align it inside the large shape you just cut. I find looking directly from above helps ensure the margins are even. Press down to remove the center, creating an open loop. -
The two-tone technique:
For the second earring, cut a large teardrop from the terracotta slab again. Then, cut a matching large teardrop from the thinner cream slab. -
Layering the colors:
Gently place the cream teardrop directly on top of the terracotta teardrop. Use your roller lightly to bond them without distorting the shape too much. -
Cut the second loop:
Just as before, position the medium cutter in the center of your layered stack and press through all layers to create the open loop. -
Refine the edges:
Before baking, gently smooth the edges with your finger to remove any jagged clay bits or fingerprints.
Sticky Cutter?
If your clay sticks inside the cutter, dip the cutting edge into cornstarch or water before pressing down. This acts as a release agent for clean cuts.
Step 3: Baking and Assembly
-
Pierce holes:
Use a needle tool to poke a hole at the very top point of each teardrop. Ensure the hole is large enough for your jump rings. -
Bake firmly:
Place your pieces on a ceramic tile or parchment-lined baking sheet. Bake according to your clay manufacturer’s instructions—usually around 275°F (135°C) for 30–45 minutes. -
Cool down:
Allow the pieces to cool completely inside the oven or on the tray before handling them to prevent warping. -
Sand edges:
If there are any rough spots, lightly buff the edges with fine-grit sandpaper or a buffing block for a professional finish. -
Open the jump rings:
Using two pairs of pliers, twist a jump ring open sideways (never pull it apart outwards). -
Attach hardware:
Slide the jump ring through the hole in the clay piece, then loop the earring hook onto the ring. -
Close and secure:
Twist the jump ring back into a closed position using your pliers, ensuring the gap is completely shut so the hook doesn’t slip out.
Add Texture
Before cutting your shapes, roll the clay over coarse sandpaper or use a toothbrush to gently tap the surface for the organic texture seen in the photo.
You now have a beautiful set of handmade earrings ready to gift or wear around town

The Complete Guide to Pottery Troubleshooting
Uncover the most common ceramic mistakes—from cracking clay to failed glazes—and learn how to fix them fast.
Easy Triangle Drops
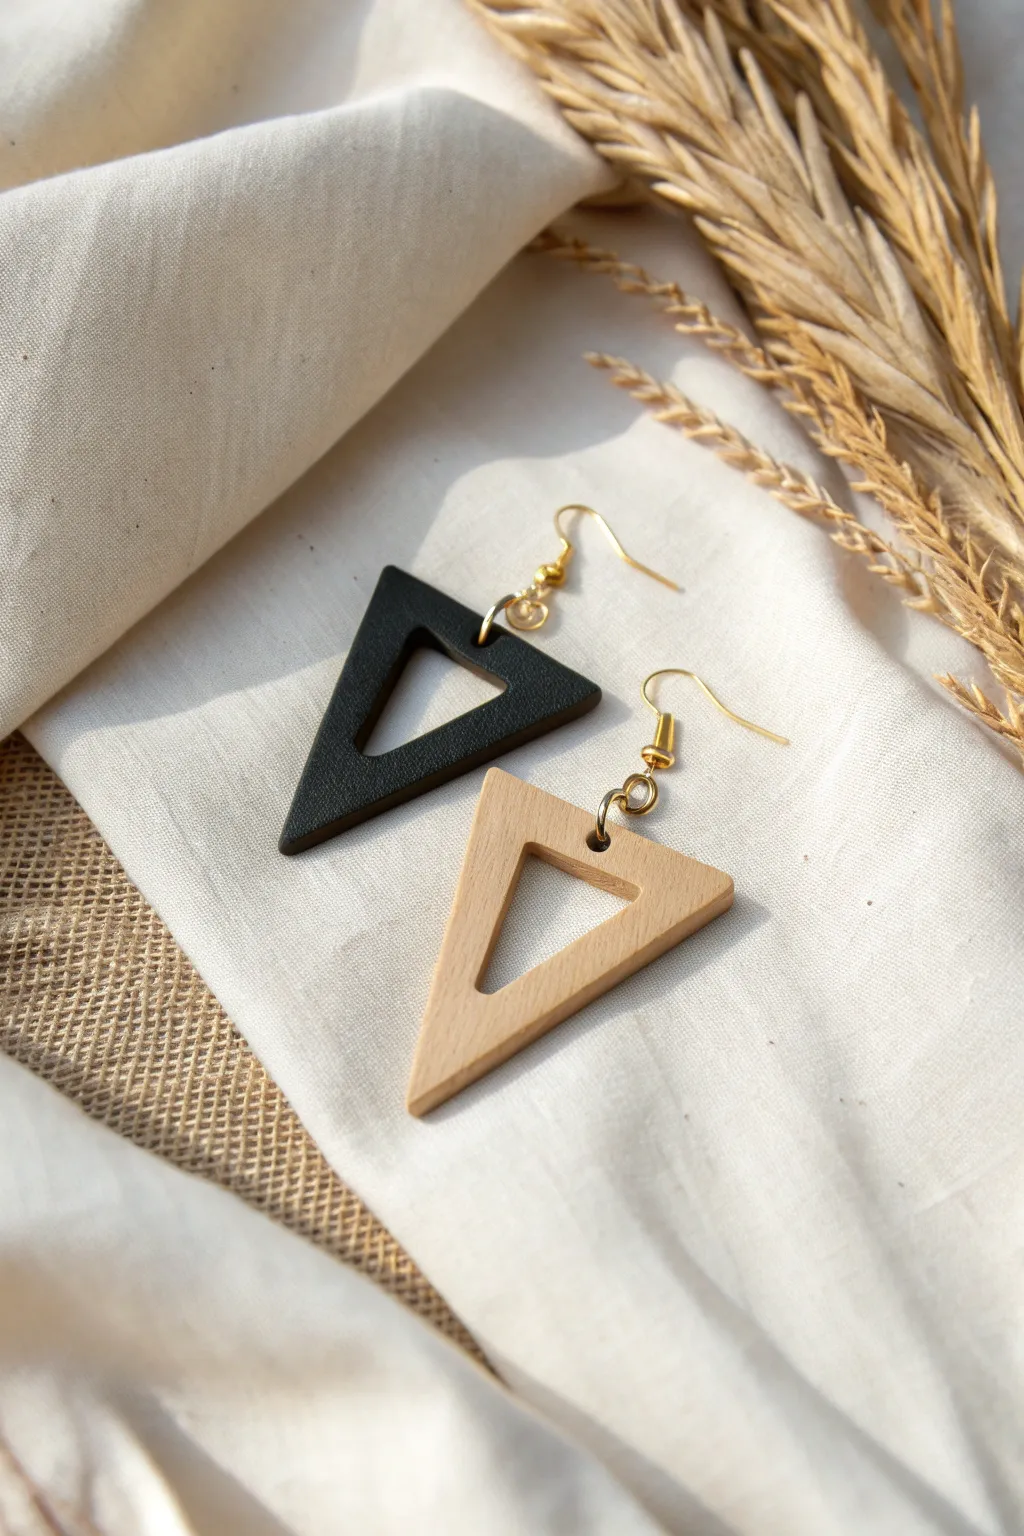
These striking open-triangle earrings combine modern geometry with an organic feel, featuring one sleek black drop and one natural wood-effect drop. They are lightweight, minimalist, and perfect for adding a touch of contemporary style to any outfit.
How-To Guide
Materials
- Polymer clay (black)
- Polymer clay (beige or light tan)
- Acrylic rolling pin
- Triangle clay cutter (medium size)
- Smaller triangle cutter (for the center cutout)
- Sharp craft blade or X-Acto knife
- Sandpaper (various grits, 400-1000)
- Hand drill or pin vibe
- 2 Gold earring hooks (fishhook style)
- 4 Gold jump rings (6mm)
- Jewelry pliers (flat nose and round nose)
- Optional: Texture sponge or coarse sandpaper for wood effect
Step 1: Preparing the Clay Slabs
-
Conditioning the clay:
Start by warming the black polymer clay in your hands, kneading it thoroughly until it creates a smooth, pliable consistency without any cracks. -
Rolling the black slab:
Using your acrylic roller, flatten the black clay into an even sheet approximately 3mm thick. Ensure the surface is free of fingerprints. -
Creating the beige slab:
Repeat the conditioning process with the beige or tan clay. Roll this out to the exact same 3mm thickness as the black sheet to keep the earrings balanced. -
Adding optional texture:
To mimic the wood-like finish seen in the photo, gently press a piece of coarse sandpaper or a texture sponge onto the beige clay slab before cutting.
Step 2: Cutting the Shapes
-
Cutting the outer triangles:
Press your larger triangle cutter firmly into the black clay slab. Wiggle it slightly to ensure a clean cut, then lift. Repeat this on the beige clay slab. -
Positioning the inner cut:
Take your smaller triangle cutter and center it visually inside the black triangle shape you just cut. I find looking straight down from above helps align the borders perfectly. -
Creating the open frame:
Press the small cutter down to remove the center, leaving a frame-like triangle shape. Repeat this process for the beige triangle. -
Smoothing edges:
Gently run your finger dipped in a little cornstarch or water along the cut edges to smooth out any harsh cutter lines or clay burrs.
Clean Edges Trick
Place a piece of plastic wrap over the clay before using your cutter. It creates a beautiful, rounded ‘beveled’ edge and reduces the need for sanding later.
Step 3: Baking and Finishing
-
Baking instructions:
Place your clay shapes on a ceramic tile or baking sheet lined with parchment paper. Bake according to your specific clay brand’s instructions (usually 275°F/135°C for 30 minutes). -
Cooling down:
Allow the pieces to cool completely inside the oven or on a wire rack. Do not handle them while hot as they are still slightly flexible. -
Sanding for perfection:
Once cool, use fine-grit sandpaper to buff the edges and flat surfaces. This gives that professional, matte finish seen in the image. -
Drilling the holes:
Mark a spot at the very top center of each triangle point. Use your hand drill or pin vise to carefully bore a hole for the hardware.
Clay Too Soft?
If your clay is getting sticky or misshapen while cutting, pop the rolled slab in the fridge for 10 minutes. The chilled clay cuts much cleaner.
Step 4: Assembly
-
Opening jump rings:
Using two pairs of pliers, twist your jump rings open sideways (never pull them apart outward) to preserve their circle shape. -
Attaching the primary ring:
Slide an open jump ring through the hole you drilled in the black triangle. Close it securely with your pliers. -
Adding the hook:
Add a second jump ring connected to the first one. Before closing this second ring, slide on the loop of your gold earring hook, ensuring the hook faces the correct direction. -
Completing the set:
Repeat the assembly process for the beige triangle. Double-check that all jump rings are closed tightly so the clay pieces can’t slip out.
Now you have a chic, mismatched set of geometric earrings ready to wear or gift.
Two-Piece Stacked Shapes
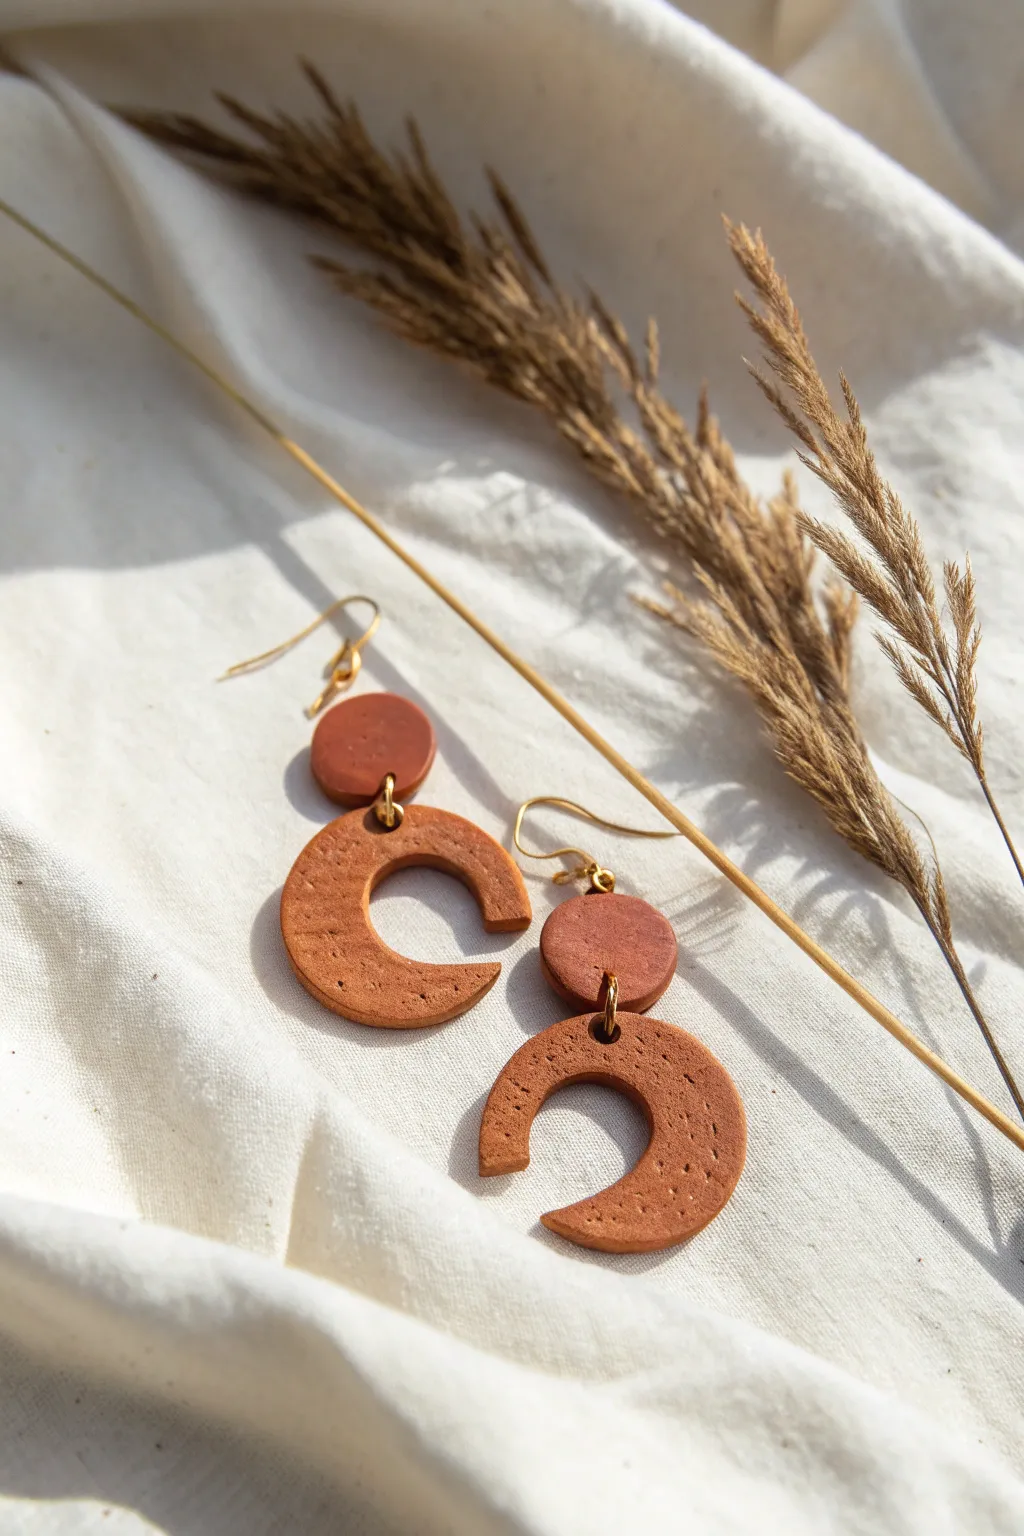
Embrace earthy warmth with these sophisticated two-piece stacked earrings featuring a rich terracotta hue and subtle texturing. The design pairs a simple stud top with a statement crescent moon drop for a look that feels both modern and grounded.
Step-by-Step Guide
Materials
- Terracotta colored polymer clay
- Rolling pin or acrylic roller
- Small circle cutter (approx. 10mm)
- Medium/Large circle cutter (approx. 30-35mm)
- X-Acto knife or clay blade
- Needle tool or toothpick
- 4 large gold jump rings
- 2 earring posts (gold finish)
- Jewelry pliers (flat nose and round nose)
- Parchment paper or ceramic tile
- Super glue or UV resin (for posts)
Step 1: Shaping the Clay Components
-
Condition the clay:
Begin by working a block of terracotta polymer clay in your hands until it is soft, pliable, and free of air bubbles. -
Roll it out:
Roll the clay into a flat slab on your work surface or tile, aiming for an even thickness of about 3mm or 1/8 inch. -
Cut the top circles:
Use your smallest circle cutter to punch out two identical circles. These will serve as the top studs that sit on the earlobe. -
Cut the base circles:
Use the larger circle cutter to cut two big circles from the remaining slab to form the base of your crescent moons. -
Form the crescents:
Take the same large cutter and offset it over the circles you just cut, slicing away an inner section to leave a “C” or crescent moon shape. Make sure the thickness of the crescent arms is consistent on both sides. -
Smooth the edges:
Gently run your finger dipped in a tiny bit of water or cornstarch along the cut edges to smooth out any sharpness or burrs left by the cutters.
Step 2: Adding Texture and Assembly Holes
-
Add surface texture:
To mimic the stone-like look in the photo, lightly prick the surface of the clay with a needle tool. I like to focus these tiny dots randomly rather than in a uniform pattern for a more organic feel. -
Create connection holes:
Pierce a hole at the very bottom of each small circle stud and at the very top center of each crescent shape. Ensure the holes are large enough for your jump rings but not too close to the edge to prevent tearing. -
Bake the pieces:
Transfer your clay pieces to a baking sheet lined with parchment paper. Bake according to your specific clay brand’s package instructions (usually 275°F/135°C for 15-30 minutes). -
Cool down:
Let the pieces cool completely on the baking sheet before handling them, as warm clay is fragile.
Sticky Cutters?
If your clay sticks inside the cutter, dip the cutter into a small pile of cornstarch or water before pressing it into the clay. This acts as a release agent for clean cuts.
Step 3: Final Assembly
-
Attach the posts:
Turn the small circle studs face down. Apply a drop of strong super glue to the pad of your earring post and press it firmly onto the back of the clay circle, near the top edge. -
Open the jump rings:
Using your jewelry pliers, twist a gold jump ring open laterally (twist ends away from each other, don’t pull apart). -
Connect the pieces:
Thread the open jump ring through the hole in the crescent moon and the hole in the circle stud. -
Close the rings:
Use the pliers to twist the jump ring back into a closed position, ensuring the ends meet perfectly flush so the ring doesn’t slip off. -
Double check movement:
Hold the earring up to see if the crescent swings freely. If it feels stiff, your jump ring might be too small or the holes might need a tiny widening with a small drill bit.
Natural Stone Look
Mix a tiny pinch of black pepper or used coffee grounds into your terracotta clay before rolling. This creates realistic specks that enhance the organic, earthen vibe.
Now you have a gorgeous set of earthy statement earrings ready to wear or gift


What Really Happens Inside the Kiln
Learn how time and temperature work together inside the kiln to transform clay into durable ceramic.
Color-Blocked Slab Earrings
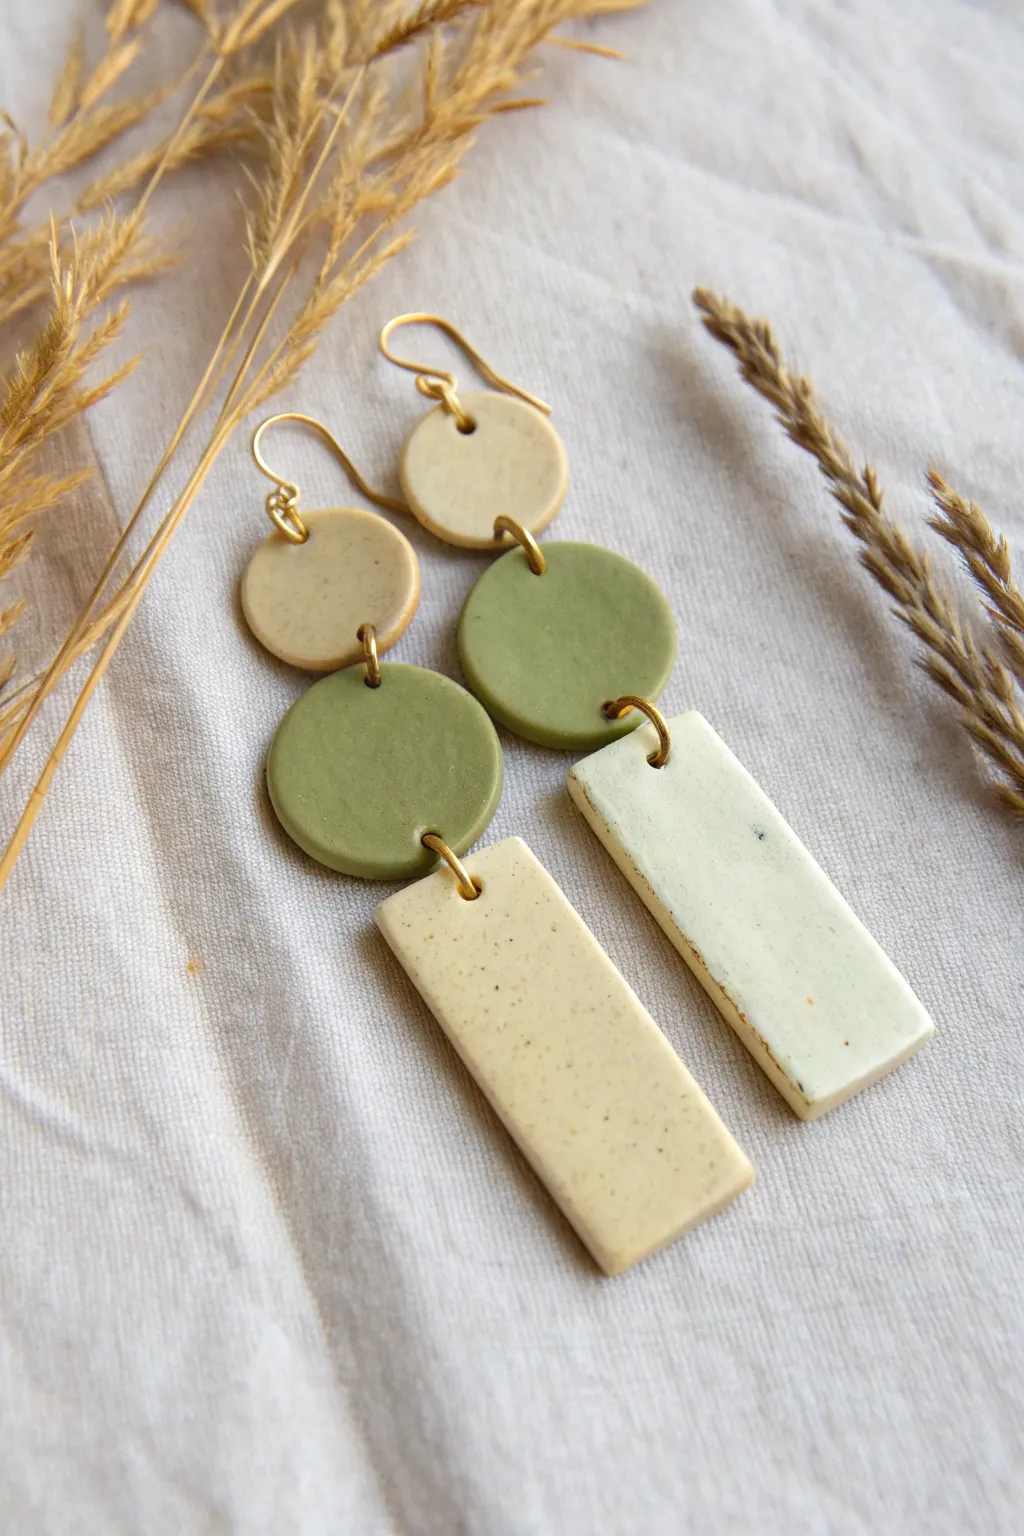
These elegant dangle earrings combine soft, creamy beige tones with earthy olive green in a striking three-tiered design. The subtle speckled texture mimics natural stone, giving them a high-end ceramic look without the weight.
How-To Guide
Materials
- Polymer clay in beige/cream
- Polymer clay in olive green
- Coarse black pepper or dried coffee grounds (for speckling)
- Clay rolling pin or acrylic roller
- Small circle cutter (approx. 10mm)
- Medium circle cutter (approx. 15mm)
- Rectangle cutter or craft knife
- Jump rings (gold-tone, 6mm)
- French hook ear wires (gold-tone)
- Hand drill or needle tool
- Jewelry pliers (flat nose)
- Baking sheet and parchment paper
- Needle tool or toothpick
Step 1: Preparing the Clay
-
Condition the beige clay:
Warm up your beige polymer clay by kneading it in your hands until it becomes soft and pliable. This ensures it won’t crack during baking. -
Create the speckled effect:
Sprinkle a tiny pinch of coarse black pepper or dried coffee grounds onto the beige clay. Fold the clay over and knead it until the specks are distributed evenly throughout the block. -
Condition the green clay:
Repeat the conditioning process with the olive green clay. You can choose to add speckles to this color as well, or leave it solid for a nice contrast like I did here. -
Roll out slabs:
Use your acrylic roller to flatten both clay colors into even sheets. Aim for a thickness of about 3mm—thick enough to be sturdy but thin enough to be lightweight.
Uneven Edges?
If your rectagles have ragged edges after cutting, dip your finger in a little cornstarch and gently rub the sides before baking to smooth them out completely.
Step 2: Cutting and Shaping
-
Cut the top circles:
Using your smallest circle cutter, punch out two circles from the speckled beige clay slab. These will form the top tier where the earring hook attaches. -
Cut the middle circles:
Switch to your medium-sized circle cutter and punch out two circles from the olive green slab. Smooth the edges with your finger if they look rough. -
Cut the rectangles:
Using a rectangle cutter or a sharp craft knife and ruler, cut two long rectangles from the speckled beige clay. They should be roughly the same width as the green circles and about 1.5 inches long. -
Smooth the edges:
Gently run your fingertip along the cut edges of all shapes to soften them slightly and remove any loose clay bits. -
Pierce the holes:
Use a needle tool to poke holes for assembly. The top beige circles need a hole at the top and bottom. The middle green circles need a hole at top and bottom. The rectangles only need one hole at the top.
Step 3: Baking and Assembly
-
Prepare for baking:
Arrange all your cut pieces on a baking sheet lined with parchment paper. Make sure no pieces are touching. -
Bake the pieces:
Bake according to your specific polymer clay package instructions (usually around 275°F or 135°C for 15-30 minutes). Let them cool completely before handling. -
Open jump rings:
Using two pairs of pliers, twist your gold jump rings open. Remember to twist sideways (bringing one hand toward you and one away), never pull them apart horizontally. -
Connect middle to bottom:
Thread an open jump ring through the top hole of a beige rectangle and the bottom hole of a green circle. mild Close the ring completely. -
Connect top to middle:
Use another jump ring to connect the top hole of the green circle to the bottom hole of the small beige circle. -
Attach the ear wire:
Open the loop on your French hook ear wire (or use a small jump ring) and attach it to the top hole of the small beige circle. -
Repeat for second earring:
Follow the same assembly steps for the second set of shapes to complete the pair.
Add Shine
After baking, coat just the green circles with a gloss glaze or UV resin. The contrast between the matte speckled stone and shiny green looks incredible.
Wear your new earthy creations with a cozy sweater or a simple linen top.
Soft Marble Swirl Dangles
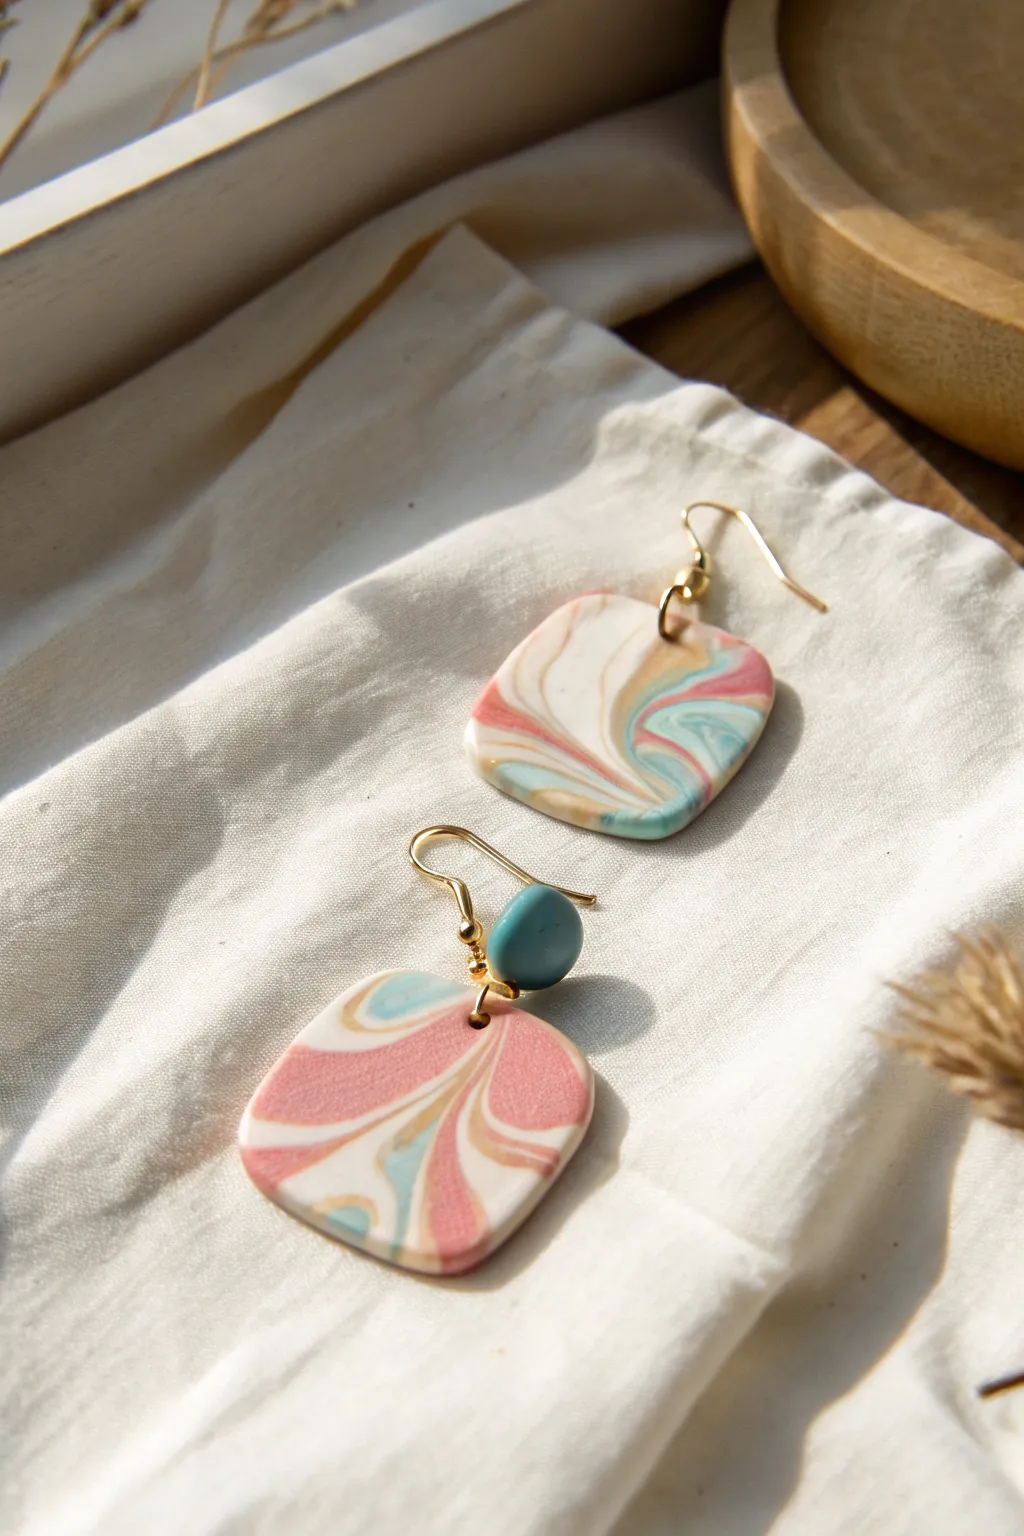
These elegant earrings feature a soft marbled pattern of white, salmon pink, teal, and beige that captures the dreamy look of agate stone. The organic square shapes combined with brass findings create a modern, minimalist accessory perfect for everyday wear.
Detailed Instructions
Materials
- Polymer clay (white, salmon pink, pastel teal/blue, beige/tan)
- Acrylic roller
- Tissue blade or sharp clay knife
- Square clay cutters/shape templates (approx. 1 inch)
- Hand drill or needle tool
- Sandpaper (various grits from 400 to 1000)
- Brass earring hooks (gold-plated)
- Brass jump rings (4-6mm)
- Jewelry pliers (round nose and flat nose)
- Small teal accent beads (optional, seen on one variation)
- Parchment paper or ceramic tile for baking
Step 1: Preparing the Pattern
-
Condition the Clay:
Start by warming up each color of polymer clay in your hands until it becomes soft and pliable. You will need a larger amount of white clay compared to the colored clays to achieve the light, airy background seen in the photo. -
Create Snakes:
Roll each color into long, thin snakes. The white snake should be the thickest (about 1cm diameter), while the pink, teal, and beige snakes should be thinner (about 3-5mm diameter). -
Combine and Twist:
Gather your clay snakes together into one bundle and twist them tightly, like wringing out a towel. This begins the marbling process. Fold the twisted log in half and twist it again. -
Roll and Fold technique:
Roll the twisted clay into a ball, then use your acrylic roller to flatten it out slightly. I like to tear the clay slightly and re-stack pieces if the colors aren’t blending enough, but avoid over-mixing or you’ll get a muddy gray instead of distinct swirls. -
Create the Slab:
Roll the marbled clay out into a flat slab about 3mm thick. Look for areas in the slab where the swirling pattern is particularly pleasing, showing nice separation between the pink, teal, and white.
Air Bubble Blues?
If you see tiny bubbles after rolling your slab, pierce them gently with a needle and smooth the clay down with your finger before cutting your shapes to ensure a smooth surface.
Step 2: Shaping and Baking
-
Cut the Shapes:
Using a square cutter with rounded corners, press firm and straight down into your chosen areas of the slab. If you don’t have a cutter, you can hand-cut an organic rounded square shape using your blade. -
Pierce the Holes:
Before baking, use a needle tool or toothpick to carefully poke a hole near the top, centered edge of each shape. Ensure the hole is large enough for your jump rings but not so close to the edge that it might break. -
Smooth the Edges:
Gently rub your finger along the cut edges of the clay to smooth out any harsh lines or fingerprints. A tiny dab of cornstarch or water on your finger helps glide over the raw clay. -
Bake:
Place your pieces on a ceramic tile or baking sheet lined with parchment paper. Bake according to your specific clay brand’s instructions (usually around 275°F or 130°C for at least 30 minutes). -
Sand and Finish:
Once fully cooled, wet-sand the edges and surface using progressively finer grit sandpaper (start at 400, finish with 1000) to achieve a smooth, professional matte finish that feels nice to the touch.
Step 3: Assembly
-
Prepare Findings:
Open your jump rings by twisting into an ‘S’ shape with two pairs of pliers. Never pull them directly apart, as this weakens the metal circle. -
Attach Simple Hooks:
For the simple dangle style, slide the open jump ring through the hole in your clay square, then loop on the ear wire hook. Close the jump ring securely so there is no gap. -
Add Optional Bead Accent:
To recreate the beaded variation, thread a teal bead onto an eye pin. Create a loop at the top of the bead, then attach the bottom of the eye pin to the clay piece via a jump ring, and attach the ear hook to the top loop. -
Final Check:
Hold the earrings up to check that they hang straight and the front patterned side is facing forward. Adjust the jump rings slightly if needed.
Gloss it Up
While the reference image shows a matte finish, applying a coat of UV resin to the top will make the colors pop and give the earrings a glass-like shine.
Enjoy wearing your unique, handmade marbled art pieces.

TRACK YOUR CERAMIC JOURNEY
Capture glaze tests, firing details, and creative progress—all in one simple printable. Make your projects easier to repeat and improve.
Terrazzo Speckle Earrings
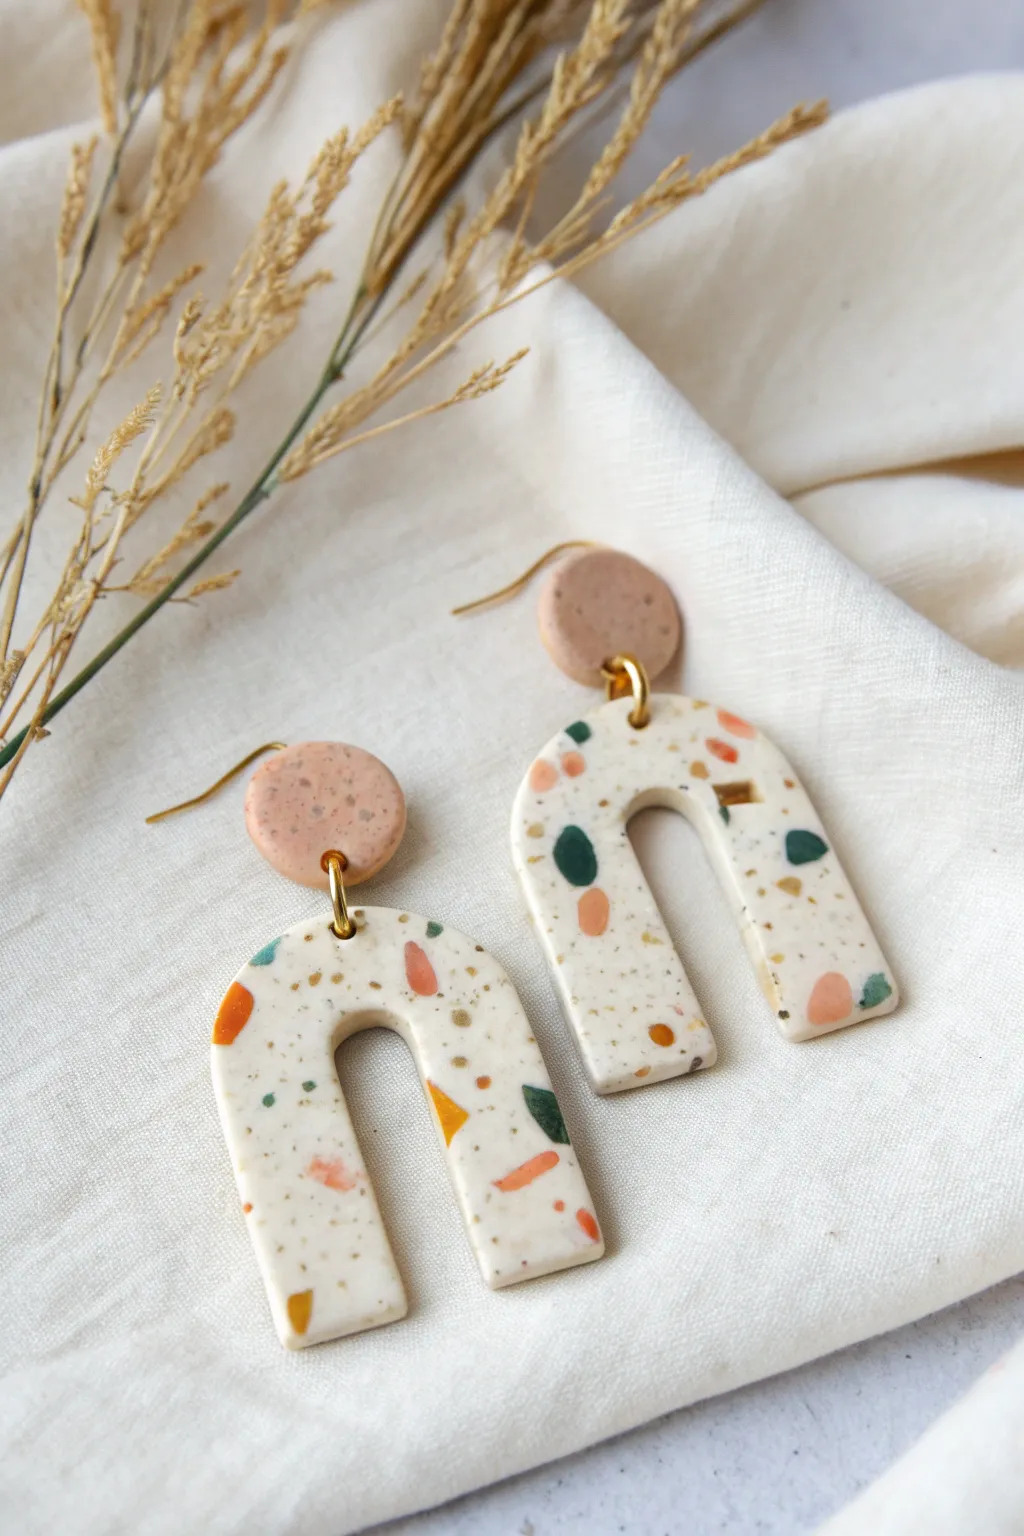
These stunning abstract earrings feature a classic terrazzo look with a clean, modern aesthetic. By embedding tiny chips of colored clay into a white base, you create a sophisticated pattern that pairs perfectly with soft, dusty-pink stud tops.
How-To Guide
Materials
- Polymer clay in White (for base)
- Polymer clay in Dusty Pink or Beige (for studs)
- Polymer clay scraps in Emerald Green, Burnt Orange, Mustard Yellow, and Black (for terrazzo)
- Acrylic rolling pin
- Clay machine (pasta machine) – optional
- U-shaped or Arch clay cutters (approx. 1.5 – 2 inches)
- Small circle clay cutter (approx. 0.5 inch)
- Exacto knife or clay blade
- Wax paper or baking tile
- Hand drill or pin vibe
- Gold tone jump rings (6mm or 8mm)
- Earring posts and backs
- Superglue or liquid clay
- Fine grit sandpaper (400-1000 grit)
- Flat nose jewelry pliers
Step 1: Preparing the Terrazzo Chips
-
Condition the colors:
Start by thoroughly conditioning your small amounts of green, orange, yellow, and black clay until they are soft and pliable. You only need a very small amount of each accent color. -
Create thin sheets:
Roll each colored piece of clay as thinly as possible. If using a pasta machine, use the thinnest setting; if rolling by hand, aim for paper-thickness. -
Chop the clay:
Using your clay blade or Exacto knife, roughly chop these thin sheets into random, jagged little confetti pieces. Keep the colors separate for now or mix them on your work surface for easier grabbing later.
Smudged Colors?
If your colored chips are smearing during the rolling phase, let the chopped confetti sit for 15 minutes before applying. This ‘leaches’ slightly, making them firmer and less likely to streak.
Step 2: Creating the Terrazzo Slab
-
Prepare the base:
Condition a larger block of white polymer clay. Roll it out into a slab that is about 3mm or 4mm thick. This will be the foundation of your arch. -
Add speckling:
Gently sprinkle your chopped colored chips onto the white slab. I like to scatter the larger pieces first and fill in gaps with the tiniest crumbs for a natural stone look. -
Embed the chips:
Place a piece of wax paper over the slab to prevent sticking, then gently roll over the surface with your acrylic roller. Apply just enough pressure to push the colored chips flush with the white base without distorting the shape too much. -
Smooth the surface:
Continue rolling until the surface is completely smooth and level. If the pattern stretches too much, you can fold the clay and re-roll it once to create a smaller, denser pattern, but be careful not to muddy the colors. -
Add texture (optional):
For that extra ‘stone’ feel shown in the photo, you can lightly sprinkle ground black pepper or very fine black glitter over the slab and verify it’s pressed into the clay.
Pro Tip: Depth trick
Mix translucent clay into your white base (about 20%). This creates a faux-stone depth where some chips look like they are floating beneath the surface rather than just sitting on top.
Step 3: Cutting and Baking
-
Cut the arches:
Position your U-shaped cutter on the most visually interesting parts of your terrazzo slab. Press down firmly and give a slight wiggle before lifting to get a clean cut. Cut two identical arches. -
Prepare the studs:
Condition your dusty pink or beige clay. Roll it to the same thickness as your arches (3-4mm). Use your small circle cutter to punch out two round tops. -
Create holes:
Before baking, use a toothpick or a small tool to poke a hole at the very top center of each arch and the bottom center of each stud circle. Ensure the hole is large enough for your jump rings. -
Bake the clay:
Arrange your pieces on a baking tile or parchment-lined tray. Bake according to your brand of polymer clay instructions (usually around 275°F/135°C for 30 minutes, but always check the package).
Step 4: Finishing and Assembly
-
Cool and sand:
Allow the pieces to cool completely. Once hard, dip your sandpaper in water and gently sand the edges and surface to remove any fingerprints or rough spots, revealing the crisp edges of the terrazzo chips. -
Drill (if needed):
If your pre-poked holes closed up during baking, use a hand drill to carefully reopen them now. -
Attach posts:
Apply a small dot of strong superglue or use liquid clay (and re-bake briefly) to attach the metal earring posts to the back of the round pink studs. -
Connect the pieces:
Open a gold jump ring using your flat nose pliers. Thread it through the hole in the arch and the hole in the stud, then twist the ring closed securely so the gap disappears. -
Final polish:
Wipe the earrings down with a soft cloth (some artists use a tiny bit of baby oil) to remove sanding dust and make the terrazzo colors pop.
Now you have a chic, lightweight pair of statement earrings ready to wear or gift
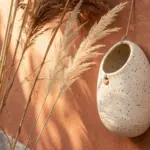
Tiny Dot Pattern Studs
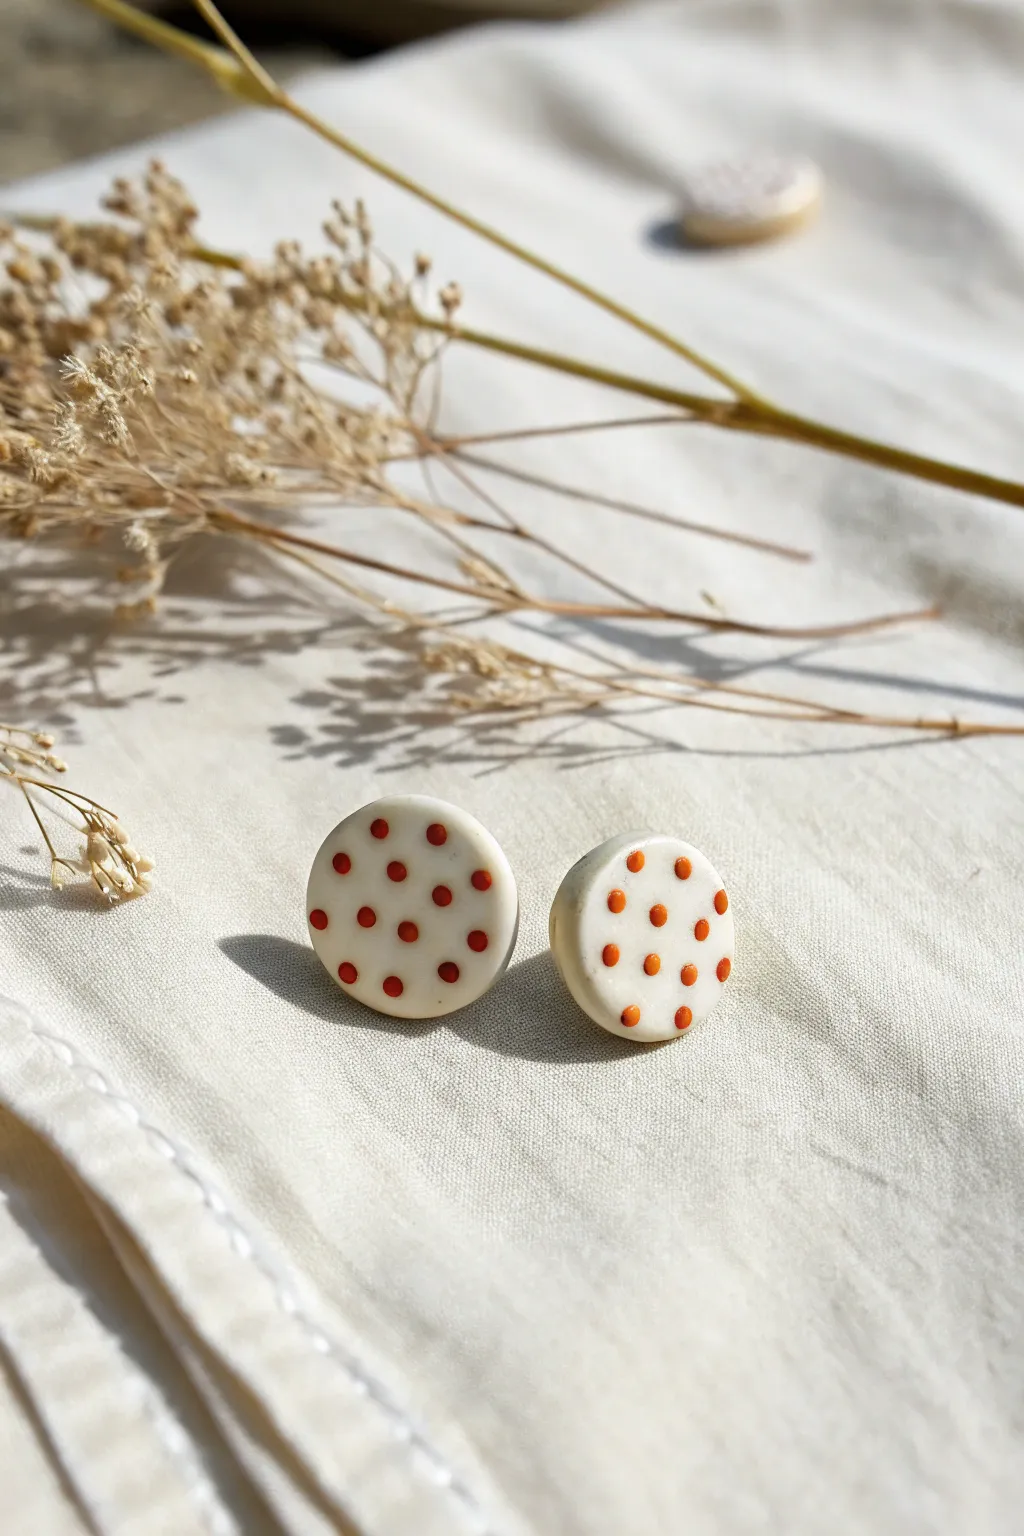
These charmingly rustic studs combine a creamy, stoneware-inspired base with a playful pop of terracotta dots, creating a design that feels both modern and handmade. The organic, slightly imperfect circle shape adds character, making them perfect for everyday wear.
Step-by-Step
Materials
- Polymer clay (white or beige/ecru)
- Acrylic paint (terracotta or reddish-orange)
- Small circle cutter (approximately 10-12mm)
- Earring posts and backs
- Strong jewelry glue (like E6000)
- Dotting tool or a fine-point toothpick
- Rolling pin or pasta machine
- Parchment paper or ceramic tile
- Oven for baking
- Gloss or matte glaze (optional)
Step 1: Prepping the Base
-
Condition the clay:
Start by warming up your white or beige polymer clay in your hands. Knead it thoroughly until it is soft, pliable, and free of any cracks. -
Roll it out:
Using your rolling pin or a pasta machine on a medium setting, flatten the clay into an even sheet. Aim for a thickness of about 3mm—substantial enough to be durable but light on the ear. -
Cut the shapes:
Press your small circle cutter firmly into the clay sheet. Twist slightly before lifting to ensure a clean cut. -
Refine the edges:
Gently gently run your finger around the perimeter of each circle to smooth out any sharp edges left by the cutter. This gives the studs that soft, stone-like finish seen in the photo. -
Initial bake:
Place your clay circles on a parchment-lined baking sheet or ceramic tile. Bake according to your specific clay package’s instructions (usually around 275°F or 130°C for 15-30 minutes). -
Cool down:
Once baked, let the clay circles cool completely before moving on to the decorating phase. Painting on warm clay can affect how the paint dries.
Clean Edges Secret
Before baking, dip your finger in a tiny bit of cornstarch and rub it over the clay surface to remove pesky fingerprints without warping the shape.
Step 2: Adding the Pattern
-
Prepare your palette:
Squeeze a tiny drop of terracotta or reddish-orange acrylic paint onto a palette or scrap piece of paper. -
Map the center:
Dip your dotting tool or toothpick into the paint. Start by placing one dot directly in the center of the clay circle. -
Create the grid:
Place four more dots around the center dot in a square formation—top, bottom, left, and right. -
Fill the gaps:
Add surrounding dots to fill out the pattern. Aim for a grid-like structure, but don’t stress about perfect alignment; the slight irregularity adds to the organic charm shown in the image. -
Watch the pressure:
Try to use consistent pressure when dotting to keep the size of the dots relatively uniform. Re-load your tool with paint every 2-3 dots. -
Let it set:
Allow the paint to dry completely. Acrylics dry fast, but giving it 10-15 minutes ensures you won’t smudge your work.
Step 3: Finishing Touches
-
Seal the design (optional):
If you want extra durability, brush a thin layer of matte or gloss glaze over the front of the studs. This protects the paint from chipping over time. -
Prepare the glue:
In a well-ventilated area, dispense a small amount of strong jewelry glue onto a disposable surface. -
Attach the posts:
Dip the flat pad of the earring post into the glue, ensuring the surface is coated but not dripping. -
Position the hardware:
Press the glued post firmly onto the center of the back of your clay circle. I hold it in place for ten seconds to ensure a good initial bond. -
Final cure time:
Let the glue cure fully before wearing. Most strong glues require at least 24 hours to reach maximum strength.
Color Customization
Mix a tiny speck of black or brown granite-effect clay into your white base before rolling to create a realistic speckled pottery look underneath the dots.
Once the glue has fully set, your earthy, patterned studs are ready to add a touch of artistic flair to any outfit
Textured Stamp Impressions
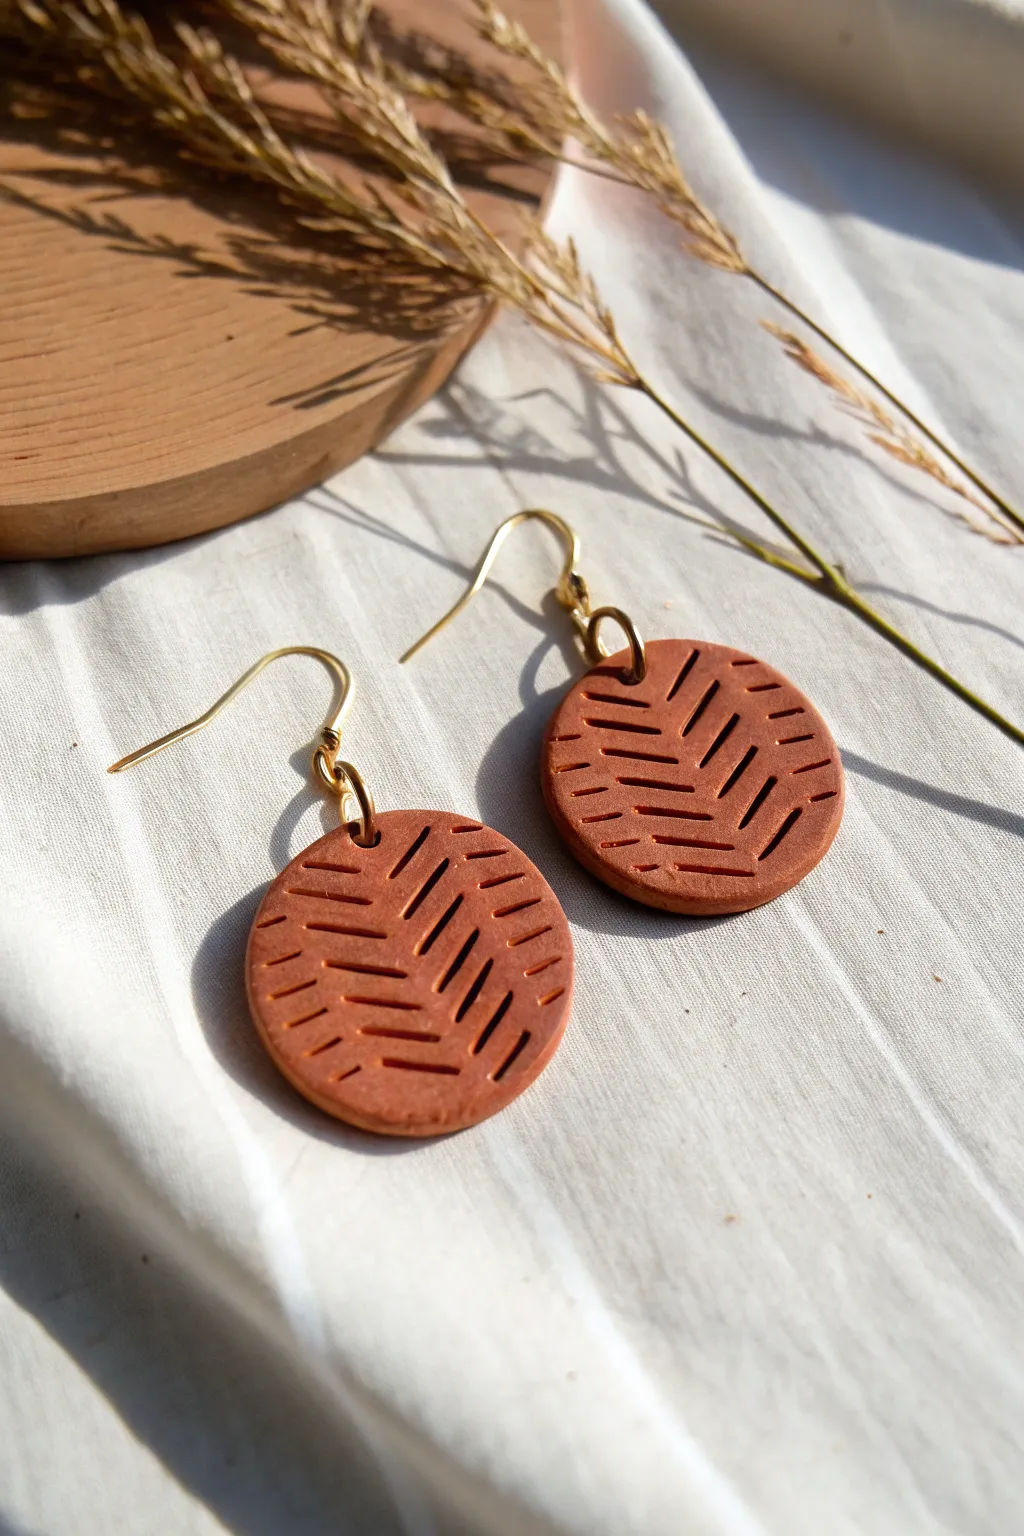
Capture the warmth of earthy tones with these simple yet striking terracotta clay earrings. The repeating herringbone pattern adds a delightful texture that catches the light, giving these pieces a professional, handcrafted finish perfect for everyday wear.
Detailed Instructions
Materials
- Terracotta or rust-colored polymer clay
- Rolling pin or pasta machine
- Circle clay cutter (approx. 1-1.5 inch diameter)
- Texture stamp or texture sheet (herringbone/chevron pattern)
- Small jump rings (gold finish)
- Fishhook ear wires (gold finish)
- Jewelry pliers (flat nose and round nose)
- Hand drill or large needle tool
- Parchment paper or ceramic tile
- Cornstarch or water (as a release agent)
Step 1: Preparing and stamping the clay
-
Condition the clay:
Start by kneading your terracotta polymer clay in your hands until it becomes soft and pliable. This warmth helps prevent cracking later on. -
Roll out a slab:
Using a rolling pin or a pasta machine on a medium setting, roll the clay out into an even slab. Aim for a thickness of about 3mm—thick enough to be sturdy but light enough to wear comfortably. -
Prepare the texture tool:
Before stamping, lightly mist your texture sheet with water or dust it with a tiny bit of cornstarch. This simple trick prevents the clay from sticking inside the fine grooves of the pattern. -
Impress the pattern:
Place your herringbone texture sheet face down onto the clay slab. -
Apply pressure:
Use your rolling pin to roll firmly over the back of the texture sheet. Apply consistent pressure to ensure the pattern imprints deeply and evenly across the surface. -
Reveal the texture:
Peel back the texture sheet carefully from one corner to reveal your beautiful herringbone design.
Uneven Impressions?
If one side of the pattern is deeper than the other, try using acrylic spacers or playing cards on either side of your rolling pin to keep the height perfectly consistent while pressing.
Step 2: Cutting and curing
-
Cut the shapes:
Position your circle cutter over the textured clay. Look for a section where the pattern aligns nicely—having the ‘V’ of the herringbone centered often looks best. -
Press and lift:
Press the cutter straight down firmly, give it a slight wiggle to separate the clay, and lift. -
Smooth the edges:
Gently run your finger around the rim of each circle to smooth out any rough cut lines or loose bits of clay. -
Create hanging holes:
Using a needle tool or a toothpick, pierce a small hole near the top edge of each circle. Make sure the hole is big enough for your jump ring but not too close to the edge to avoid tearing. -
Bake the clay:
Place your clay pieces on a parchment-lined baking sheet or a ceramic tile. Bake according to your specific brand’s package instructions—usually around 275°F (135°C) for 15–30 minutes. -
Cool down:
Once the baking time is up, turn off the oven and let the pieces cool down completely before handling them. I prefer to leave them in the oven as it cools to prevent thermal shock.
Add an Antique Look
After baking, rub a little brown or white acrylic paint into the grooves and wipe the surface with a damp cloth. The paint stays in the recesses, making the pattern pop.
Step 3: Assembly
-
Open the jump ring:
Using two pairs of pliers, grip a gold jump ring on either side of the split. -
Twist to open:
Twist one hand forward and one hand backward to open the ring sideways. Never pull the ring ends apart horizontally, as this weakens the metal. -
Attach the hardware:
Slide the open jump ring through the hole in your clay circle, then thread the loop of the fishhook ear wire onto the same ring. -
Close the ring:
Using the same twisting motion with your pliers, close the jump ring until the ends meet perfectly flush. -
Repeat for the second earring:
Repeat the assembly process for the second earring, ensuring the pattern faces forward correctly.
Now you have a gorgeous pair of textured earrings ready to complement any outfit with their warm, natural style
Rainbow Arch Stripes
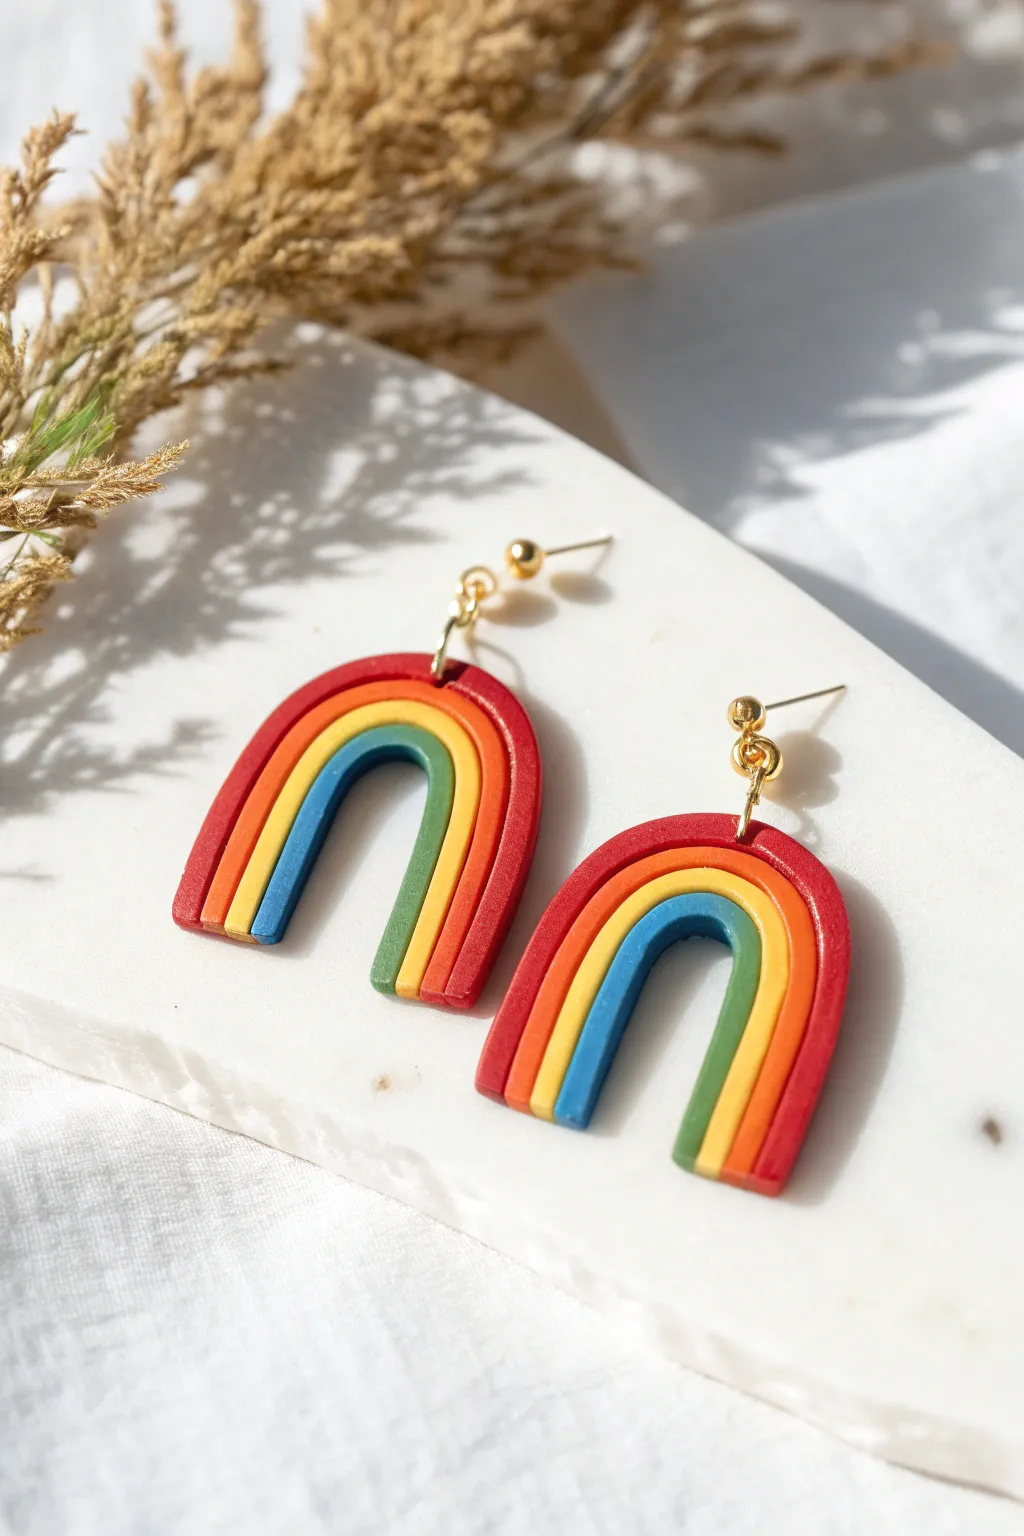
Brighten up your accessories game with these vibrant, classic rainbow arch earrings. Featuring distinct stripes of red, orange, yellow, and cool blue-green, these polymer clay creations have a smooth, matte finish that feels modern and playful.
Step-by-Step Guide
Materials
- Polymer clay (Red, Orange, Yellow, Teal/Blue-Green)
- Acrylic rolling pin
- Clay extruder (optional but helpful)
- Tissue blade or sharp craft knife
- Small circle cutter (approx. 0.75 inch)
- Larger oval or arch cutter (optional)
- Needle tool
- Small jump rings (gold)
- Ball stud earring posts (gold)
- Jewelry pliers
- Parchment paper or ceramic tile
- Oven
Step 1: Prepping the Clay
-
Condition the Clay:
Begin by thoroughly conditioning each color of clay—red, orange, yellow, and teal—until it is soft and pliable. This step creates a smoother final surface and prevents cracking. -
Create Snakes:
Roll each color into a long, thin snake. Aim for an even thickness of about 3-4mm for each strand. If you have a clay extruder, use a medium circle disc to get perfectly uniform ropes.
Seamless Stripes
Apply a tiny bit of liquid polymer clay between the colored snakes before pressing them together. This acts like glue and ensures your rainbow won’t separate after baking.
Step 2: Forming the Arch
-
Arrange the Order:
Lay your snakes out on your work surface (parchment paper or tile) in rainbow order: Teal on the inside, followed by Yellow, Orange, and finally Red on the outside. -
Curve the Inner Layer:
Take the teal snake and gently bend it into a tight U-shape. This will be the foundation for the rest of your arch. -
Add Subsequent Layers:
Carefully wrap the yellow snake around the teal one, pressing them gently together so they adhere without smashing their round shape. -
Complete the Rainbow:
Repeat the process with the orange snake, and finish by wrapping the red snake around the very outside. Ensure all layers are snug against each other. -
Secure the Bonds:
Once assembled, gently press the flat side of your acrylic roller or block on top of the rainbow just enough to flatten the surface and fuse the stripes, ensuring they stick together as one unit.
Step 3: Shaping and Refining
-
Cut the Base:
Use your sharp tissue blade to make a swift, straight cut across the bottom of the legs. This creates a clean, flat bottom for your rainbow arch. -
Refine the Shape:
If the arch looks a bit wonky, gently nudge the sides with your fingers or a flat tool to regain symmetry. -
Create the Hanger Hole:
Using a needle tool, poke a hole through the top center of the red arch layer. Make sure the hole is big enough for your jump ring but close enough to the edge to hang properly. -
Smooth Imperfections:
Dip your finger in a tiny bit of water or baby oil and gently rub out any fingerprints or lint on the surface of the clay.
Cloud Bottoms
Instead of a straight cut at the bottom, attach small balls of white clay to the ends of the rainbow legs to create fluffy little clouds for a dreamier look.
Step 4: Baking and Assembly
-
Bake the Pieces:
Place your tile or parchment paper on a baking sheet. Bake according to your brand of clay’s instructions—usually around 275°F (135°C) for 30 minutes. -
Cool Down:
Allow the pieces to cool completely inside the oven or on a wire rack before handling them, as warm clay is fragile. -
Open Jump Rings:
Using two pairs of pliers, twist a jump ring open sideways (never pull it apart). -
Attach the Post:
Thread the open jump ring through the hole you made in the clay, then slip the loop of the ball stud post onto the ring. -
Close and Finish:
Twist the jump ring closed securely so there is no gap. Repeat for the second earring.
Enjoy wearing your cheerful handmade rainbows and showing off those clean, colorful stripes
Sweet Daisy Stud Earrings

Capture the fresh, sunny energy of a summer meadow with these charming daisy stud earrings. With their bright yellow centers and textured white petals, they are a simple yet stunning project perfect for beginners working with polymer clay.
Step-by-Step
Materials
- White polymer clay
- Yellow polymer clay
- Small circle cutter (approximately 1.5 cm)
- Tiny circle cutter or straw (for the center)
- Needle tool or toothpick
- Round ball tool
- Sandpaper or toothbrush (for texture)
- Earring posts and backs
- Strong jewelry glue (E6000 or similar)
- Ceramic tile or baking sheet
- Oven
Step 1: Forming the Petals
-
Condition the white clay:
Start by kneading the white polymer clay in your hands until it becomes soft, pliable, and free of any cracks. -
Create a base slab:
Roll the white clay out into a thin, even sheet, roughly 2-3mm thick. You can use a rolling pin or a pasta machine for precision. -
Cut the petals:
Since these are tiny studs, we aren’t cutting individual petals first. Instead, use your small circle cutter to punch out two identical circles for the earring bases. -
Divide the circle:
Using a craft knife or a thin blade, gently make small indentations around the edge of each circle to mark where your petals will be. Aim for about 8-10 sections. -
Shape individual petals:
Now, take a tiny pea-sized amount of white clay and roll it into a teardrop shape. You will need about 8-10 of these per earring. -
Arrange the petals:
Place the teardrops onto your circular base in a radial pattern, with the pointed ends meeting in the very center. Press them down gently to adhere. -
Refine the shape:
I like to use a needle tool to gently press down the center of each petal, creating a slight groove that adds realism and separates them visually. -
Soften the edges:
With a round ball tool or just your fingertip, gently smooth the outer rounded edges of the petals so they look organic rather than sharp.
Dirty Clay?
White clay picks up everything! Keep baby wipes nearby to clean your hands and tools often. Acetone on a q-tip removes lint.
Step 2: Adding the Textured Center
-
Prepare the yellow clay:
Condition a small amount of yellow clay until it represents the bright, cheerful yolk color typical of daisies. -
Form the center domes:
Roll two small balls of yellow clay. They should be sized to fit perfectly in the middle of your petal ring, covering the points where the petals meet. -
Place the centers:
Gently press a yellow ball into the center of each flower. Flatten it slightly so it looks like a dome, not a sphere. -
Add texture:
To mimic the pollen texture seen in real flowers, gently tap the surface of the yellow dome with a clean toothbrush or the tip of a needle tool repeatedly. -
Final shaping check:
Look at the earrings from the side. Ensure the petals are lifting slightly at the edges for a 3D effect, rather than lying completely flat.
Step 3: Baking and Assembly
-
Prepare for baking:
Place your finished daisies on a ceramic tile or a parchment-lined baking sheet. -
Bake the clay:
Bake according to the manufacturer’s instructions on your specific package of clay. Usually, this is around 275°F (135°C) for 15-30 minutes. -
Cool down:
Allow the clay pieces to cool completely before moving them. They are fragile while warm. -
Prepare the posts:
Apply a tiny dab of strong jewelry glue to the flat pad of an earring post. -
Attach the hardware:
Press the glued post firmly onto the back of the baked clay daisy. Center it as best as possible. -
Set the glue:
Let the glue cure for the full time recommended on the tube (usually 24 hours) to ensure a secure bond.
Realistic Pollen
For extra detail, dust the yellow centers with a tiny bit of orange soft pastel powder before baking to add depth and shading.
Enjoy wearing your fresh floral studs or gifting them to a friend who loves nature
Citrus Slice Dangles
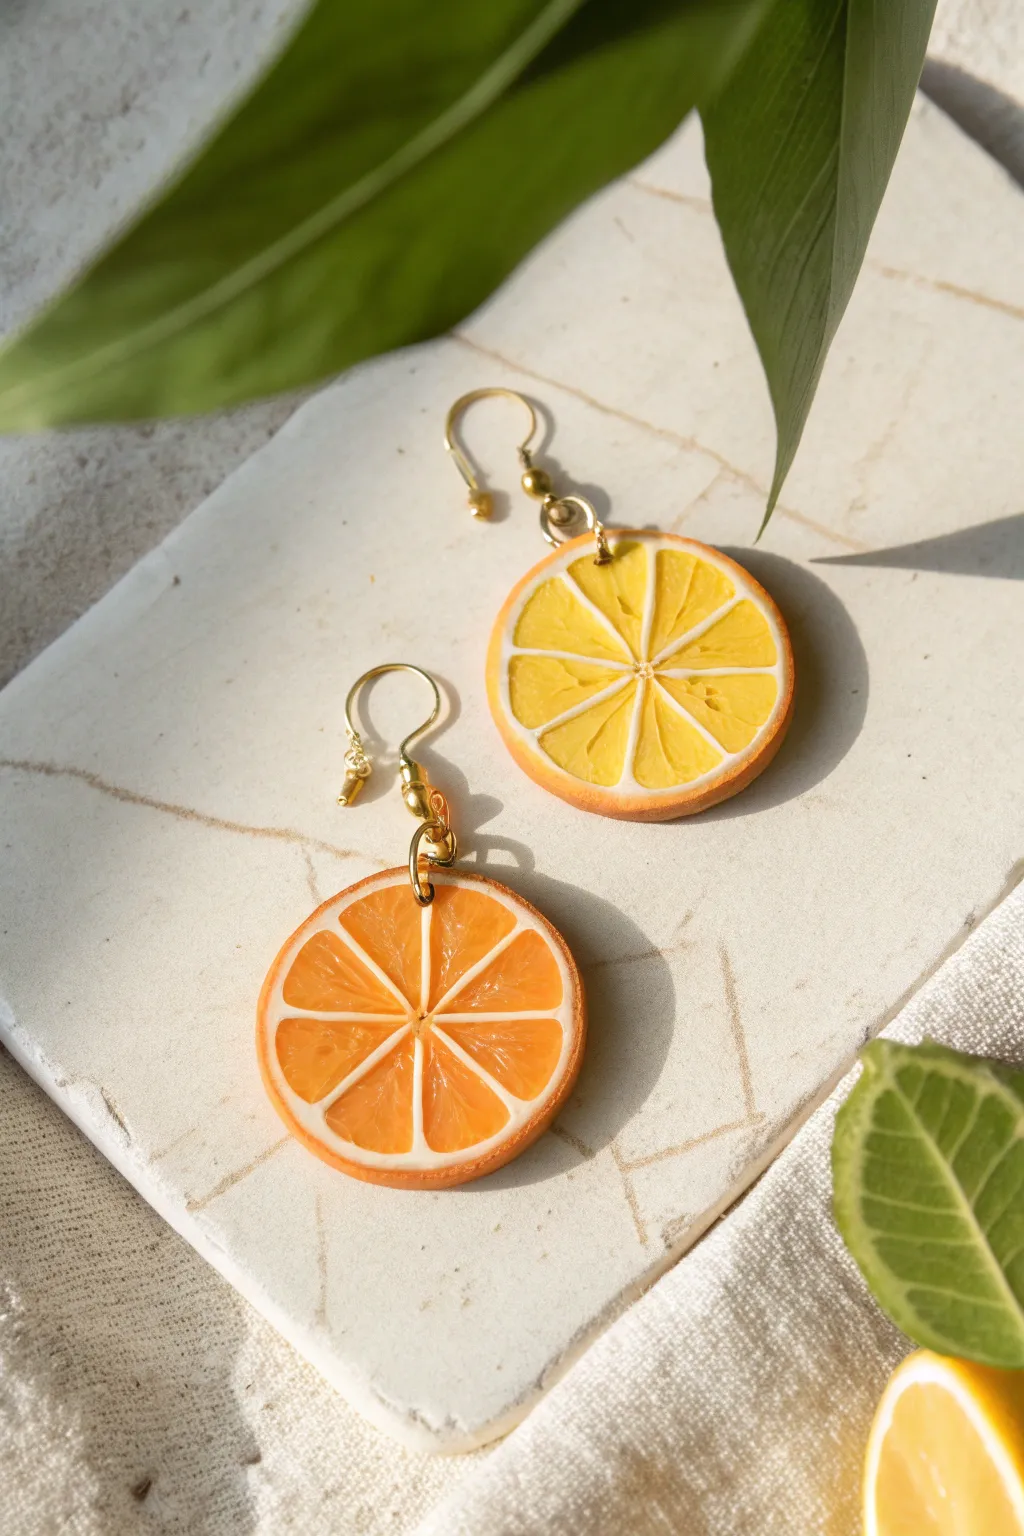
Capture the fresh, vibrant energy of summer with these delightful polymer clay citrus earrings. Whether you choose tangy orange or bright lemon, the translucent cane technique creates a realistic juicy effect that looks good enough to eat.
Detailed Instructions
Materials
- Translucent polymer clay (for the pulp)
- Opaque white polymer clay (for the pith)
- Yellow and orange alcohol inks or clay colorants
- Orange or yellow polymer clay (for the rind)
- Pasta machine or acrylic rolling pin
- Tissue blade or sharp craft knife
- Needle tool or toothpick
- Small round cutter (approx. 1 inch)
- Texturing tool (toothbrush or stiff paintbrush)
- Gold earring hooks and jump rings
- Hand drill or pin vibe
- Gloss glaze or UV resin (optional)
Step 1: Creating the Citrus Canes
-
Tint the translucent clay:
Begin by conditioning your translucent clay thoroughly. Divide it into two batches if you want to make both lemon and orange slices. Mix in a few drops of yellow alcohol ink for lemons and orange ink for oranges, kneading until the color is uniform. -
Form the segments:
Roll the tinted translucent clay into a thick log, about 1 inch in diameter. This will become the juicy interior of your fruit. -
Wrap in pith:
Condition the opaque white clay and roll it into a thin sheet using a pasta machine or rolling pin. Wrap this white sheet around your translucent colored log, trimming away any overlap to create a seamless border. -
Shape the wedges:
Squeeze and stretch the log until it is much longer and thinner—about 1/4 inch thick. Cut this long snake into 8 equal lengths. Pinch one side of each small log to form a teardrop or wedge shape. -
Assemble the fruit center:
Arrange the 8 wedges in a circle with the pointy ends facing inward. You might need a very thin snake of white clay in the absolute center to help them fit perfectly. -
Add the outer rind:
Wrap the assembled circle of wedges with another thin sheet of white clay (the pith). Finally, wrap the entire bundle with a thicker sheet of your opaque orange or yellow clay to create the skin.
Step 2: Slicing and Texturing
-
Reduce the cane:
Gently squeeze and roll your large cane to reduce it to your desired earring size. I like to let the cane rest for about 20 minutes before slicing so it isn’t too soft. -
Slice the earrings:
Using a very sharp tissue blade, slice two even disks from your cane. Aim for a medium thickness—not too thin so they break, but light enough for earrings. -
Texture the surface:
Take a needle tool and gently scratch radiating lines into the translucent segments to mimic juice sacs. You can also lightly tap the surface with a toothbrush/stiff brush to add realistic fruit texture. -
Texture the rind:
Don’t forget the skin! Use a needle tool to stipple tiny dots all around the colored outer ring for that pitted citrus skin look. -
Bake:
Place your slices on a ceramic tile or parchment-lined baking sheet. Bake according to your clay manufacturer’s instructions, usually around 275°F (135°C) for 30 minutes.
Suss Out Smudges
If your white pith gets smeared with orange color during slicing, use a Q-tip dipped in rubbing alcohol to gently wipe the surface clean before baking.
Step 3: Finishing Touches
-
Cool and drill:
Allow the pieces to cool completely. Use a hand drill or pin vise to carefully bore a small hole near the top edge of the rind. -
Add shine:
For a ‘freshly sliced’ wet look, coat the front of the slices with a thin layer of gloss glaze or UV resin. Cure or dry fully. -
Assemble hardware:
Open a gold jump ring using two pairs of pliers. Thread it through the drilled hole and attach your gold earring hook. -
Secure closure:
Close the jump ring securely, ensuring there is no gap for the thread to slip through. Repeat for the second earring.
Make it a Necklace
Create a matching pendant by slicing a slightly larger, thicker piece from your cane and adhering a bail to the back with liquid clay before baking.
Now you have a refreshing pair of accessories perfect for brightening up any outfit
Watermelon Wedge Earrings
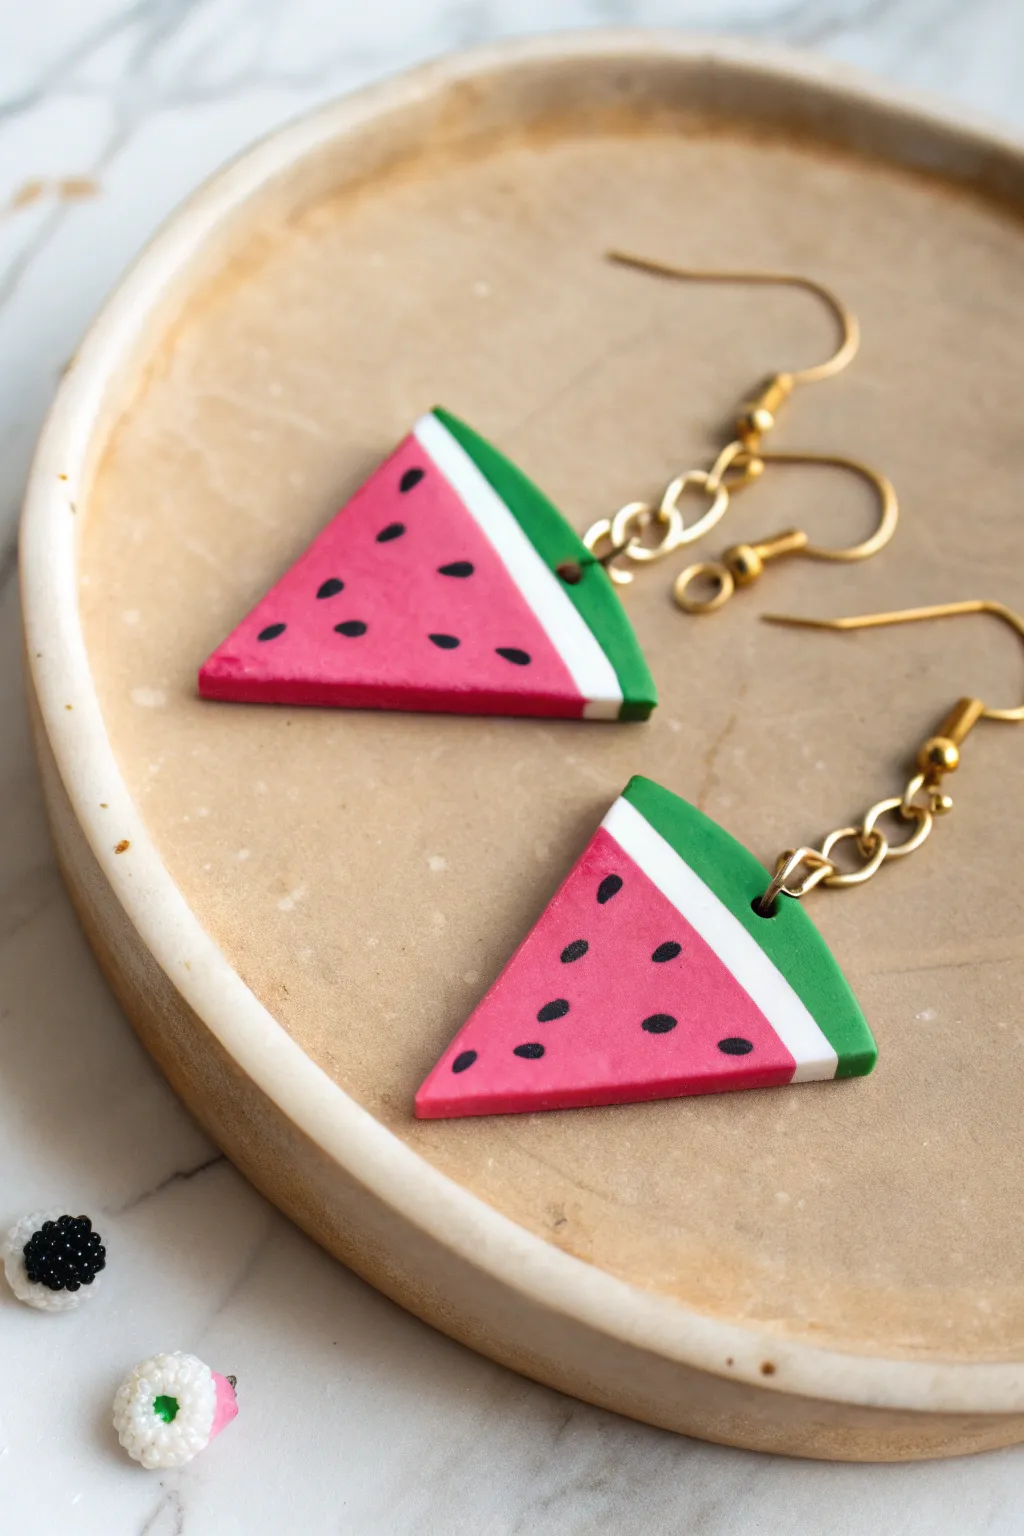
Capture the essence of summer with these vibrant watermelon wedge earrings made from polymer clay. Their crisp lines and bright colors make for a juicy accessory that adds a playful pop to any outfit.
How-To Guide
Materials
- Polymer clay (hot pink, white, emerald green, and black)
- Clay roller or pasta machine
- Tissue blade or sharp craft knife
- Needle tool or toothpick
- Small jump rings (gold or silver)
- Earring hooks (gold or silver)
- Jewelry pliers
- Baking sheet and parchment paper
- Clay varnish (optional, matte or gloss)
Step 1: Prepping the Layers
-
Condition the Clay:
Start by warming up your hot pink, white, and green clay by kneading each color separately until soft and pliable. This prevents cracking later. -
Roll the Pink Core:
Roll the hot pink clay into a thick log or cylinder about 1 inch in diameter. This will form the main ‘flesh’ of the watermelon. -
Create the Sheets:
Roll out the white clay and the green clay into thin, even sheets. Using a pasta machine on a medium-thin setting works best here for uniform thickness, but a hand roller works too. -
Wrap the White Layer:
Place the pink cylinder onto the white sheet. Trim the straight edge of the white sheet to match the pink log’s length, then roll the log so the white clay wraps completely around it once. Trim the excess so the seams meet perfectly without overlapping, and smooth the join with your finger. -
Wrap the Green Layer:
Repeat the previous step with the green sheet, wrapping it over the white layer. Again, trim the excess carefully so the ends butt up against each other flush. You gently roll the entire log on your work surface to bond the layers.
Smudged Colors?
If the pink smears onto the white rind during slicing, clean your blade with rubbing alcohol between every single cut. This keeps the separation crisp.
Step 2: Shaping and Slicing
-
Form the Triangle:
Place your wrapped log on your work surface. Gently pinch the top of the log to form a ridge while pressing the bottom flat against the table. Continue pinching and pressing until the round log transforms into a long triangular prism shape. -
Chill the Cane:
Let the cane rest in the refrigerator for about 15-20 minutes. Firming up the clay makes it much easier to slice cleanly without distorting the triangular shape. -
Slice the Wedges:
Use your sharp tissue blade to slice thin, even triangles from your cane. Aim for slices that are about 3-4mm thick for durability without being too heavy. -
Smooth the Edges:
If your slicing left any fingerprints or rough edges, gently smooth them out with your finger tip. I like to lightly tap the edges to ensure the triangle shape stays sharp.
Bite Marks
Before baking, use a small scalloped cutter to remove a chunk from the side of one wedge. It creates a cute ‘bitten’ effect for asymmetry!
Step 3: Adding Details
-
Make the Seeds:
Take a tiny amount of black clay and roll it into a very thin snake. Cut tiny specks off this snake. -
Shape the Seeds:
Roll these tiny specks into little teardrop shapes between your fingers. -
Apply the Seeds:
Place 5-6 seeds onto the pink area of each slice using a needle tool. Press them gently into the clay so they bond securely and sit slightly flush with the surface. -
Poke the Holes:
Use a needle tool or toothpick to create a hole near the top center of the green rind on each earring. Make sure the hole is big enough for your jump rings.
Step 4: Baking and Assembly
-
Bake:
Place the slices on a parchment-lined baking sheet. Bake according to your brand of clay’s instructions—usually around 275°F (135°C) for 15-30 minutes. -
Cool Down:
Allow the pieces to cool completely before handling. They are fragile when warm. -
Varnish (Optional):
If you want a juicy shine, apply a coat of gloss glaze. For a natural look like the photo, leave them matte or use a matte varnish. -
Attach Jump Rings:
Open a jump ring with your pliers using a twisting motion (never pull apart). Slide it through the hole in the clay. -
Add Hooks:
Before closing the jump ring, slide the loop of your earring hook onto it. You can add a short chain extension here if you want them to dangle lower as shown. -
Close and Finish:
Twist the jump ring back ensuring the ends meet tightly so the hook doesn’t slip off.
Now you have a fresh, fruity accessory perfect for brightening up warm days
Negative-Space Cutout Geometrics
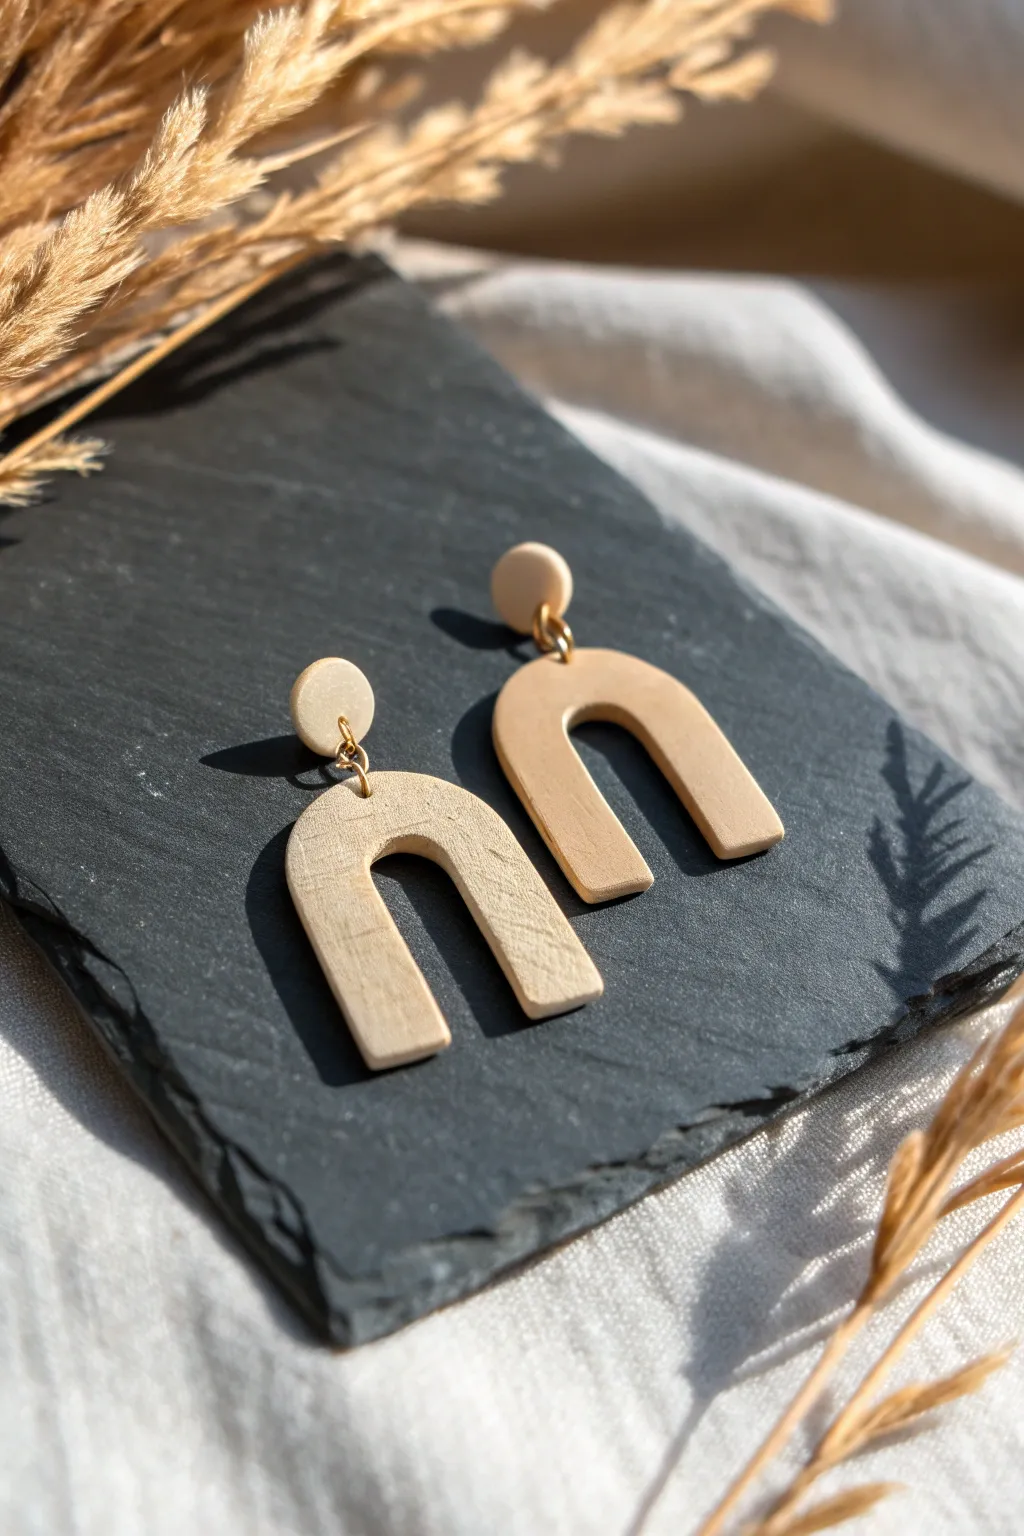
Embrace the beauty of negative space with these sleek, U-shaped clay earrings. Their monochromatic beige tone and simple geometric silhouette make them a versatile accessory for any outfit.
Step-by-Step Tutorial
Materials
- Polymer clay (beige, tan, or sand color)
- Acrylic rolling pin or pasta machine
- U-shaped clay cutter (medium size)
- Small circular clay cutter (approx. 1 cm)
- Tissue blade or flexible slicing blade
- Parchment paper or ceramic tile
- Small jump rings (gold finish)
- Earring posts (gold finish) and backs
- Jewelry pliers (flat nose and round nose)
- Hand drill or needle tool
- Superglue or heavy-duty jewelry glue
- Cornstarch or baby powder (optional)
- Fine-grit sandpaper (optional)
Step 1: Clay Conditioning & Cutting
-
Condition the Clay:
Start by warming the beige polymer clay in your hands. Knead and roll it repeatedly until it is soft, pliable, and free of air bubbles or cracks. -
Roll It Out:
Using your acrylic roller or a pasta machine on a medium setting, roll the clay into an even slab. Aim for a thickness of about 3mm to ensure the earrings are sturdy but lightweight. -
Prevent Sticking:
Lightly dust the surface of your clay slab with a tiny bit of cornstarch. This helps your cutters release the clay cleanly without dragging the edges. -
Cut the Main Shape:
Press your U-shaped cutter firmly into the clay slab. Wiggle it ever so slightly before lifting to ensure a clean cut. Repeat this to create the second arch. -
Cut the Studs:
Using the small circular cutter, cut two circles from the remaining rolled clay. These will serve as the top stud component that sits on the earlobe.
Step 2: Finishing & Baking
-
Create Connection Holes:
Before baking, use a needle tool or toothpick to poke a hole at the very top center of each U-shape arch. Make sure the hole is big enough for your jump rings. -
Piercing the Studs:
Similarly, pierce a hole near the bottom edge of each circular stud piece. Ensure this hole aligns vertically with the arch when hanging. -
Smooth the Edges:
Dip your finger in a little bit of water or baby oil and gently run it along the cut edges of the clay to smooth out any harsh lines or fingerprints. -
Bake:
Transfer the cut pieces onto a ceramic tile or baking sheet lined with parchment paper. Bake according to your brand of clay’s specific package instructions (typically around 275°F or 135°C for 15-30 minutes). -
Cool Down:
Once the baking time is up, turn off the oven and open the door slightly. Let the clay cool completely inside to prevent thermal shock and brittleness.
Sticky Cutter Fix
If clay gets stuck inside your cutter, lay a piece of plastic wrap securely over the clay slab before cutting. It rounds the edges slightly and prevents sticking.
Step 3: Assembly
-
Optional Sanding:
If your edges aren’t perfectly smooth after baking, you can lightly sand them with fine-grit sandpaper or a buffing block to get a professional finish. -
Attach the Posts:
Place a small dot of superglue on the back of the circular clay studs. Press the flat pad of the earring post firmly onto the glue and hold for a few seconds. -
Let Glue Set:
Allow the glue to cure completely according to the manufacturer’s time, usually several minutes to an hour, before handling further. -
Open Jump Rings:
Using two pairs of pliers, twist a gold jump ring open sideways (never pull it apart outwards). -
Connect Pieces:
Thread the open jump ring through the hole in the arch and the hole in the stud. I like to double-check the front/back orientation here before closing. -
Close and Secure:
Use the pliers to twist the jump ring back into a closed position until the ends meet perfectly flush. Repeat for the second earring.
Textured Twist
Before cutting your shapes, press a piece of sandpaper, fabric, or a texture sheet into the raw clay slab to give the surface an organic, stone-like finish.
Enjoy wearing your sophisticated, geometric creations with your favorite casual or dressy ensemble