If you can roll a little ball and pinch a few petals, you can make seriously cute clay flowers. These easy clay flower ideas are my go-to projects when you want quick wins that still look polished and giftable.
Classic Five-Petal Flat Flowers
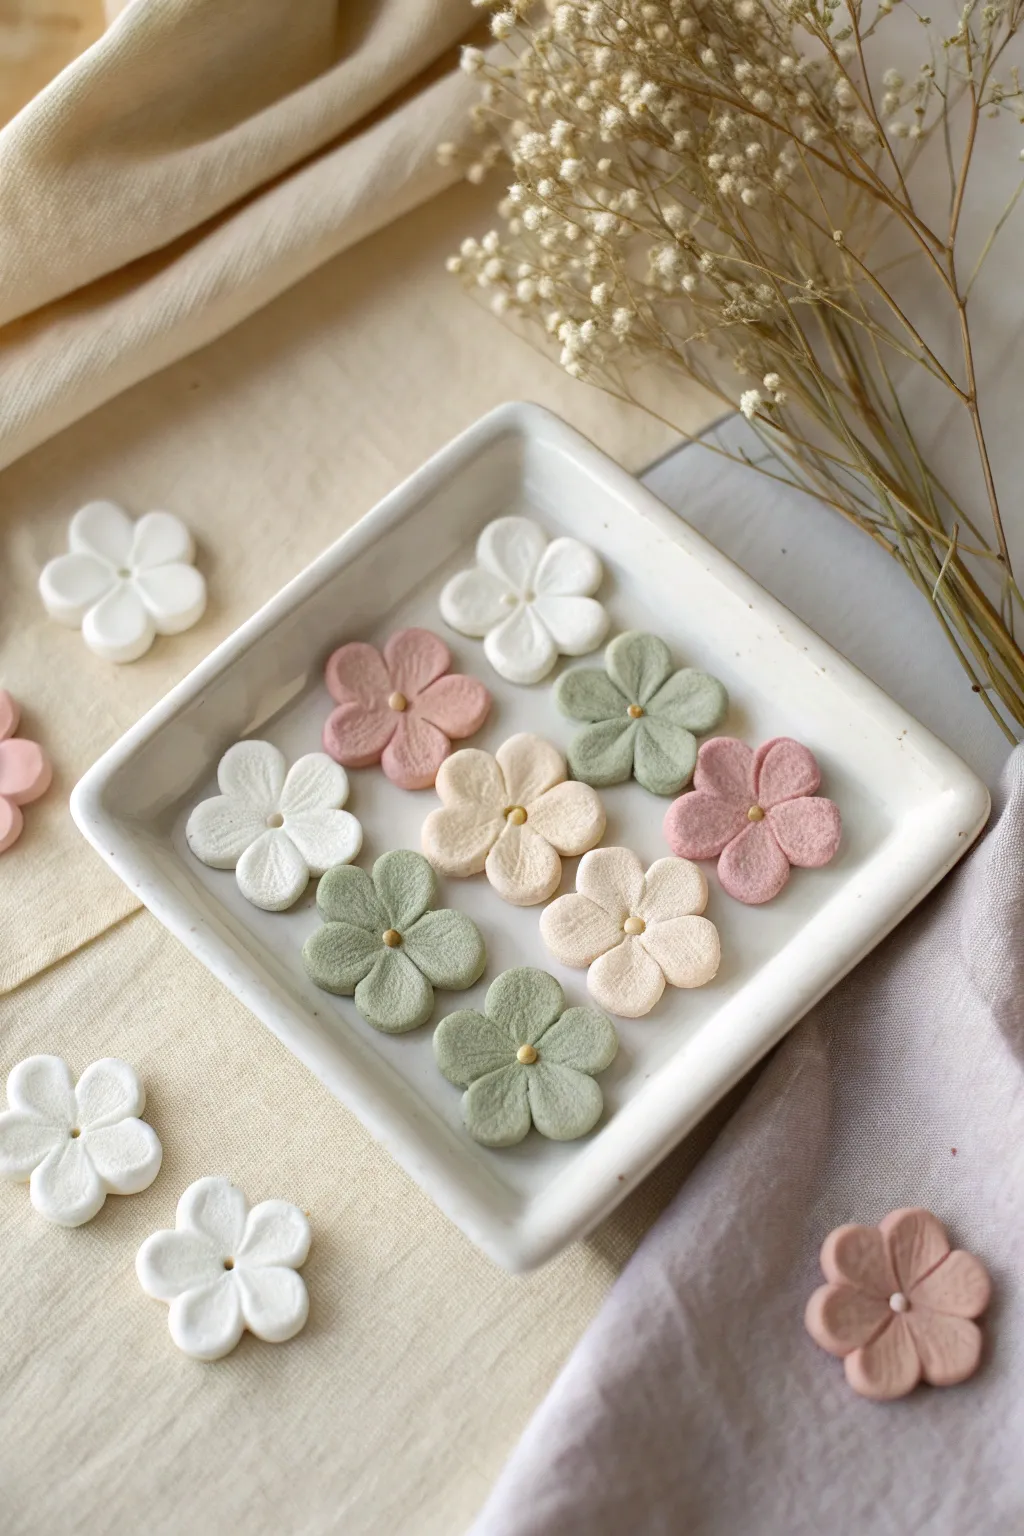
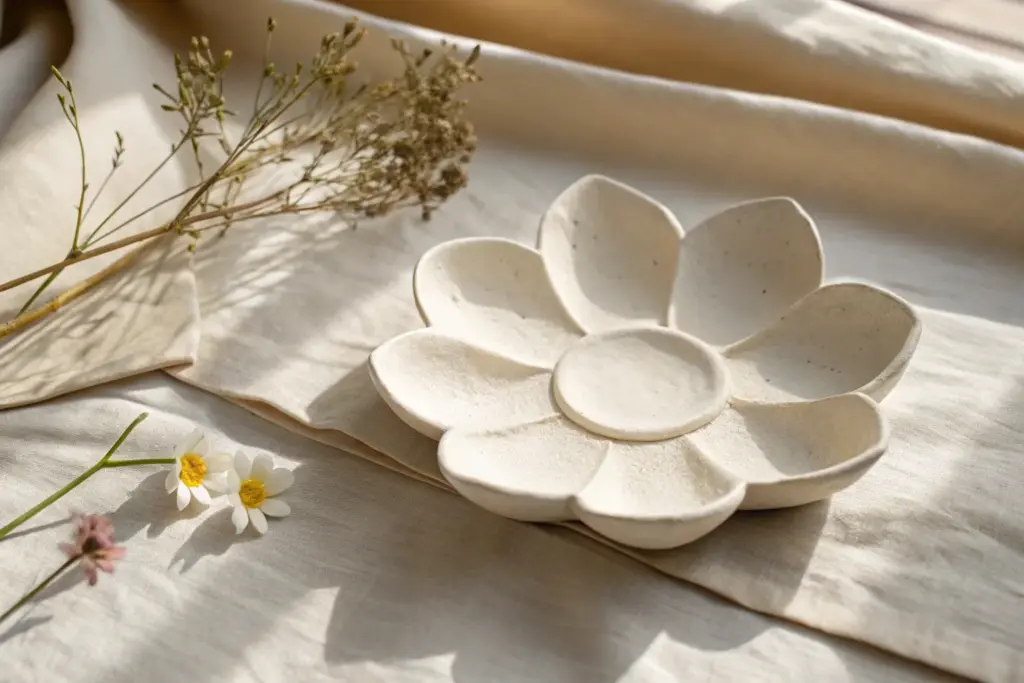
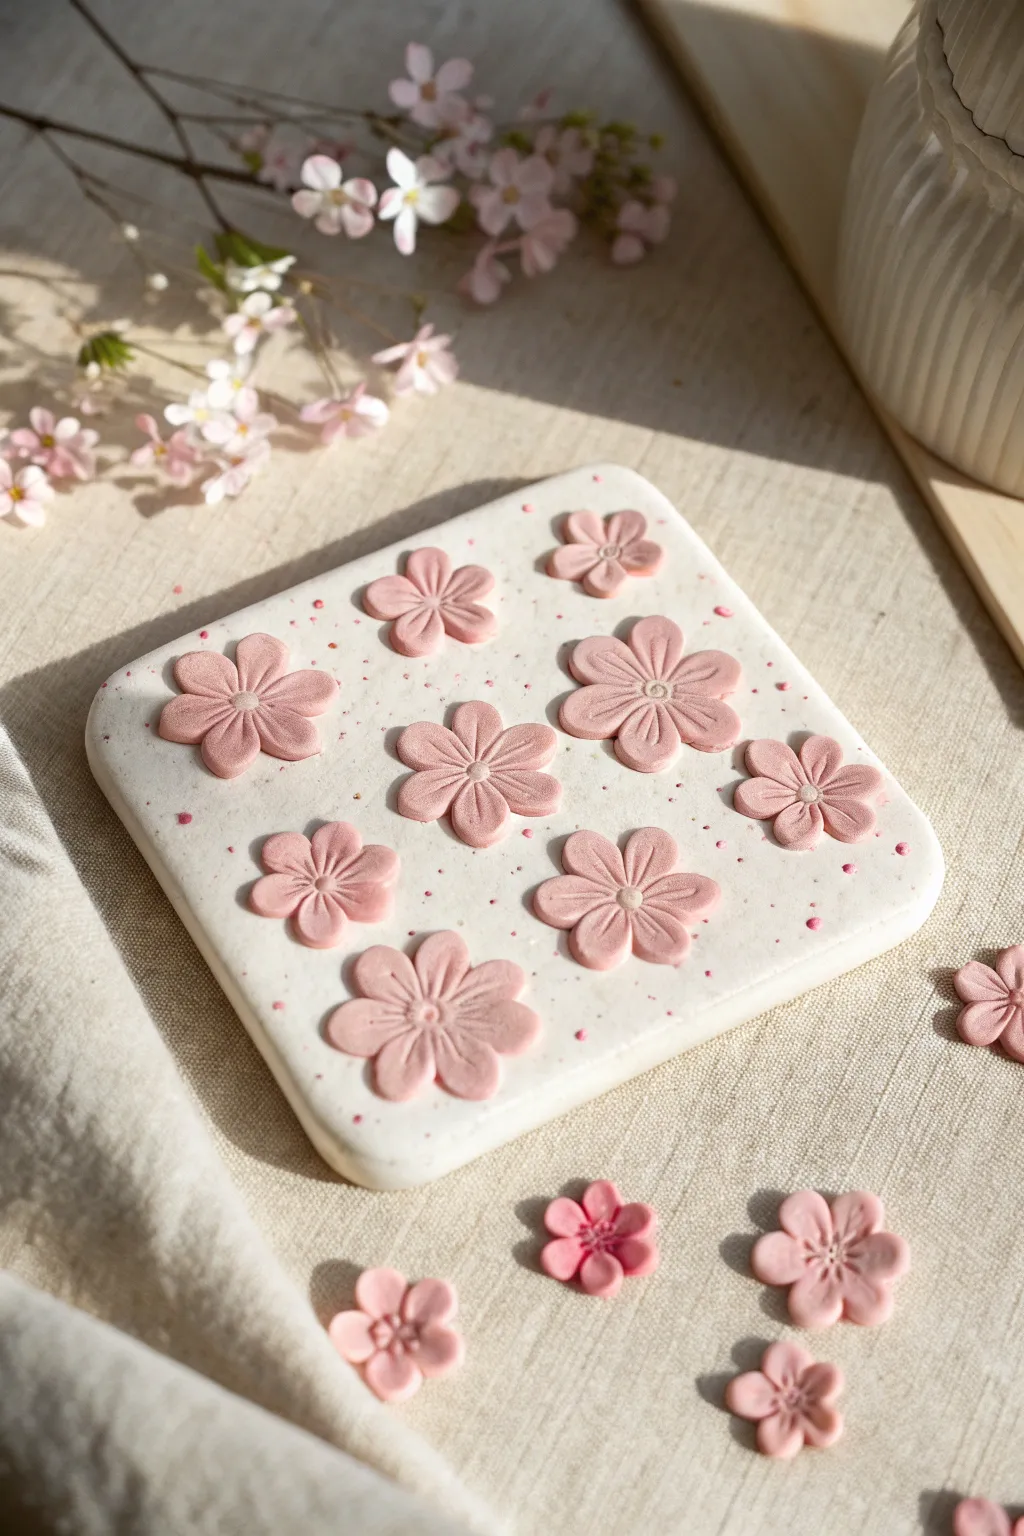
These charming five-petal blossoms capture a delicate, minimalist beauty with their soft matte finish and gentle pastel palette. Perfect for scatter decorations, jewelry components, or sweet magnets, this project relies on simple shaping techniques to create uniform yet organic-looking flowers.
Detailed Instructions
Materials
- Air-dry clay or polymer clay (White)
- Acrylic paints (Sage Green, Dusty Rose, Cream/Beige)
- Small round ball tool (or the end of a paintbrush)
- Needle tool or toothpick
- Rolling pin
- Small flower cutter (optional, but helpful for uniformity)
- Small beads or yellow clay for centers
- Parchment paper or silicone mat
- Craft glue (if using beads)
Step 1: Preparing the Clay Palette
-
Color Mixing:
Start by dividing your white clay into four equal portions. Leave one portion pure white. -
Creating Pastels:
Take a very small dab of sage green acrylic paint and knead it thoroughly into the second portion of clay. The goal is a muted, earthy green, so add paint sparingly. -
Mixing Pink and Cream:
Repeat the process with the remaining portions, creating a soft dusty rose pink and a warm cream or beige color. I find that under-mixing slightly can create a nice marbled effect, but for this project, aim for a solid, opaque color. -
Preventing Drying:
Store each colored ball of clay under a damp paper towel or in a sealed bag while you work, as air-dry clay can skin over quickly.
Clean Cuts Pro Tip
Keep a pack of baby wipes nearby. Clean your hands and tools between colors to prevent the darker pigments (like the sage green) from muddying your pure white clay petals.
Step 2: Shaping the Blossoms
-
Portioning:
Take a small amount of your first color and roll it into five tiny, equal-sized spheres. These should be roughly the size of a pea. -
Observation:
Group the five spheres into a tight circle on your work surface so they are all touching in the center. -
Flattening:
Gently press down on the cluster with your thumb or the flat bottom of a glass. Don’t squash them remarkably thin; you want them to merge slightly while keeping a pillowy, rounded edge. -
Defining Petals:
Use the side of a toothpick or a dull modeling tool to gently press indentations between the petals on the outer edge, reinforcing the separation so it doesn’t look like just one blob. -
Detailing:
Take your needle tool or toothpick and press a shallow line down the center of each petal, starting from the center and fading out toward the edge. This adds that realistic floral texture. -
Refining Shape:
If the edges became too jagged, gently tap them with your fingertip to smooth and round them back out. -
Repeat Process:
Continue this process, creating flowers in various colors. Feel free to mix sizes slightly for a more natural collection.
Step 3: Adding Centers and Finishing
-
Creating the Center:
Use the rounded ball tool to make a small, neat indentation in the absolute center of the flower where all five petals meet. -
The Golden Dot:
Roll a minuscule ball of clay (colored yellow or gold) and press it snugly into this indentation. -
Alternative Center:
If you prefer a little sparkle, you can glue a small seed bead into the center divot after the clay has begun to set. -
Drying:
Transfer your finished flowers to a sheet of parchment paper. Let them air dry completely for 24-48 hours. If using polymer clay, bake according to the package instructions. -
Matte Finish:
To maintain the soft look shown in the image, avoid glossy varnishes. If you want to protect them, use a matte sealant spray.
Jewelry Level Up
Before the clay dries, carefully poke a horizontal hole through the top petal with a needle. Once dry, these make adorable charms for necklaces or dainty earrings.
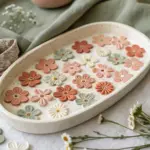
Arranging these little blooms on a decorative tray brings a touch of eternal spring to any room

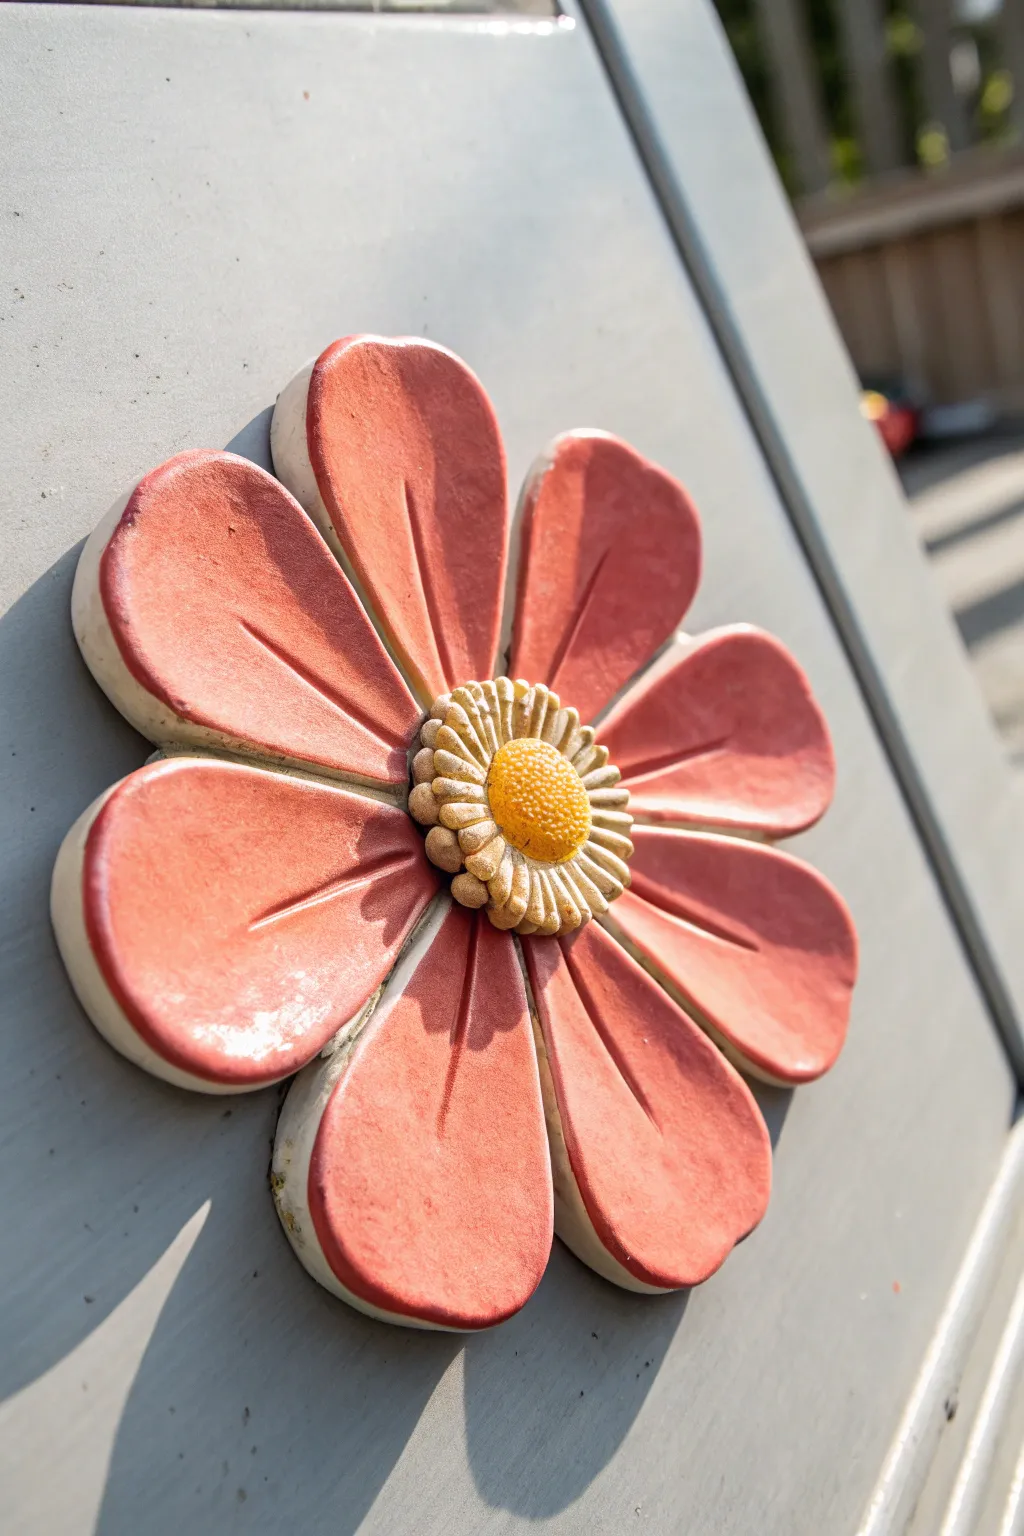
Simple Daisies With Teardrop Petals
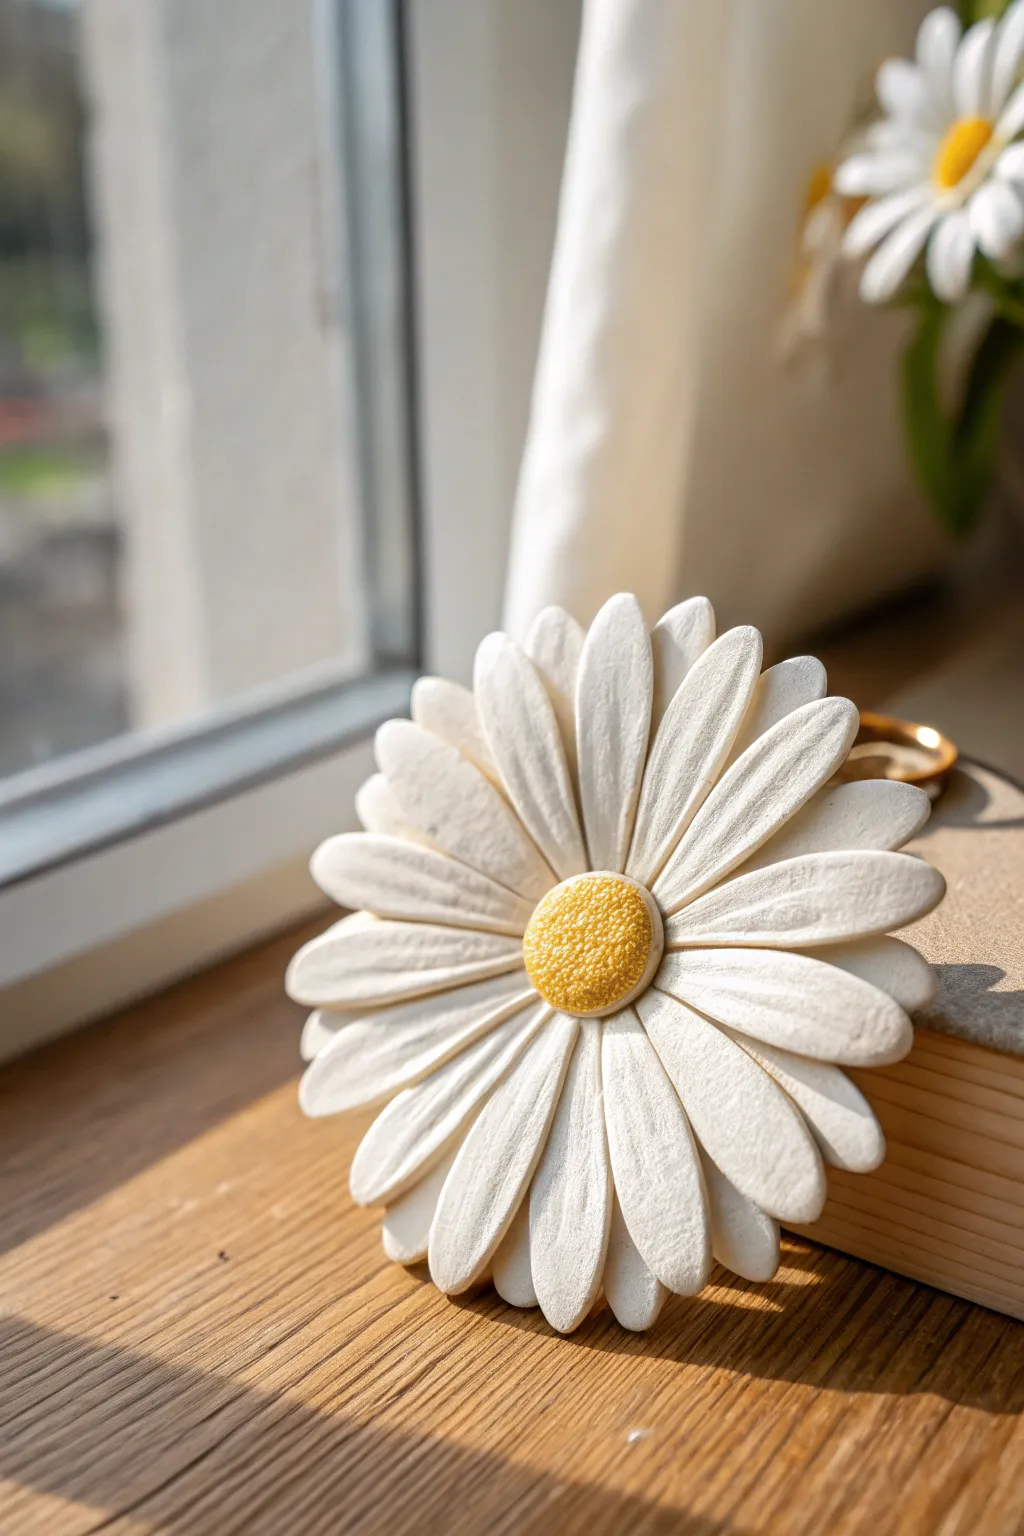
Capture the pristine beauty of spring with this elegant clay daisy project, featuring perfectly sculpted teardrop petals and a textured pollen center. The result is a substantial, matte-finish bloom that looks lovely as a desk decoration or ring holder.
How-To Guide
Materials
- White polymer clay (or air-dry clay)
- Yellow polymer clay
- Rolling pin
- Teardrop-shaped cutter (small/medium)
- Needle tool or toothpick
- Ball stylus tool
- Texture sponge or toothbrush
- Baking sheet and parchment paper (if using polymer clay)
- Oven (if using polymer clay)
Step 1: Prepping the Base
-
Condition the clay:
Begin by kneading your white clay thoroughly until it is soft, pliable, and free of any cracks. Clean hands are essential here, as white clay shows every speck of dust. -
Roll the sheet:
Roll out the white clay to a uniform thickness, roughly 3mm (1/8 inch). You want it thick enough to hold its shape but thin enough to look delicate. -
Cut the base:
Cut a simple circle about 1.5 inches in diameter to serve as the base behind the petals. This won’t be visible in the end, but it provides structural support for the layers.
Step 2: Forming the Petals
-
Cut basic shapes:
Using your teardrop cutter, punch out approximately 18-24 petal shapes from the rolled white clay. If you don’t have a cutter, roll small balls and flatten them into teardrops by hand. -
Soften the edges:
Gently run your finger around the perimeter of each cut petal to smooth out any sharp cutter lines, giving them a more organic, natural look. -
Add the crease:
Take a needle tool or toothpick and press a single, straight line down the center of each petal, stopping just short of the tip. Don’t cut all the way through; just make a nice indentation. -
First layer assembly:
Place the first layer of petals onto your base circle. Arrange them so the rounded tips point outward and the pointed ends meet in the center. They should barely touch or slightly overlap. -
Second layer assembly:
Lay down a second layer of petals on top of the first. Position these petals in the gaps (interstices) between the bottom petals to create fullness and dimension. -
Secure the center:
Use your ball stylus to press firmly into the very center where all the petal points meet. This bonds the layers together and creates a cup for the yellow center.
Clean White Clay
Keep baby wipes nearby. Wipe your hands and tools before touching white clay, as dark lint transfers easily. If dirty marks appear, sand them off gently after baking.
Step 3: The Pollen Center
-
Create the yellow core:
Roll a ball of yellow clay roughly the size of a large marble. Flatten it slightly into a dome shape. -
Texture the surface:
Before attaching it, press a clean toothbrush or texture sponge gently over the entire surface of the yellow dome to mimic the look of pollen. -
Refine the texture:
I like to go back in with a needle tool and poke tiny, shallow holes densely across the surface to deepen the texture contrast. -
Attach to flower:
Place the textured yellow dome into the depression you made in the center of the white petals. Press gently around the edges to secure it without squashing your texture work.
Droopy Petals?
If your petals are sagging too flat against the surface, prop them up with little bits of folded paper or cornstarch while baking to maintain a 3D cupped shape.
Step 4: Finishing Touches
-
Final shaping:
Before curing, gently lift the tips of a few top-layer petals to give the flower a sense of movement and life, rather than looking perfectly flat. -
Inspect for lint:
Give the white petals one last check for stray dust or lint. You can carefully remove specks with a cotton swab dipped in a tiny bit of rubbing alcohol or acetone. -
Cure the clay:
Bake the flower according to your polymer clay package instructions (usually around 275°F/135°C for 15-30 minutes). If using air-dry clay, set it in a dry spot for 24-48 hours. -
Cool and set:
Allow the flower to cool completely on the baking sheet before handling it, as warm clay is fragile.
Now you have a permanent blossom that brings a touch of nature’s serenity to your space


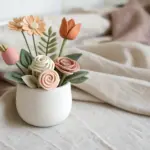
Easy Rolled Rose Buds
Create an elegant, everlasting bouquet featuring perfectly spiraled roses in soft cream and blush pink tones. This project uses the simple rolled technique to achieve realistic, uniform petals that look stunning when bundled together.
Detailed Instructions
Materials
- Air-dry foam clay or polymer clay (cream/white and soft pink)
- Green floral wire (18-20 gauge)
- Rolling pin or smooth glass jar
- Circle cutter (approx. 1-1.5 inch diameter)
- Green floral tape
- White craft glue (PVA) or liquid clay
- Small blending tool or toothpick
- Sharp scissors
- White satin ribbon
Step 1: Preparing the Clay Components
-
Condition the clay:
Begin by kneading your cream and pink clay separately until they are warm, pliable, and free of any cracks. If using polymer clay, ensure it is soft enough to roll thinly. -
Roll sheet:
Take a portion of the pink clay and roll it out into a thin sheet, aiming for about 2mm thickness. A consistent thickness ensures your petals look uniform. -
Cut circles:
Use your circle cutter to punch out 7 to 9 circles for a single rose head. Repeat this process with the cream clay so you have enough circles for multiple flowers. -
Thin edges:
Place a circle on your palm and gently press or roll the outer edges with your thumb or a ball tool to thin them out slightly. This makes the petals look more delicate and realistic.
Cracked Clay Fix
If petal edges crack while thinning, your clay is likely too dry. Work a tiny amount of water or lotion into the raw clay to restore moisture before rolling again.
Step 2: Assembling Individual Roses
-
Create the center bud:
Take one clay circle and roll it up tightly like a cigar. This tight spiral will form the very center of your rose. -
Add the first petal:
Take a second circle and wrap it around the center roll, positioning the overlap point on the opposite side of the first roll’s seam. Press the bottom specifically to adhere it. -
Layer petals:
Continue adding circles one by one, overlapping the previous petal by about half. Gently flare the top edge of the clay outward slightly as you work your way out. -
Form the shape:
Keep the base of the flower pinched tight while keeping the top open and spiraled. I find that alternating the height slightly makes the rose look more organic. -
Trim excess:
once you are happy with the size (usually 7-9 petals), carefully use scissors to trim off the excess bulky clay at the very bottom of the rose to create a flat base. -
Insert stem:
Dip the tip of a floral wire into white glue. Insert it directly into the center of the trimmed base of the rose. Gently pinch the clay around the wire to secure it. -
Smooth the join:
Use a small amount of water (for air-dry clay) or baby oil (for polymer) to smooth the clay where it meets the wire so the transition is seamless.
Step 3: Finishing the Bouquet
-
Repeat production:
Create approximately 12 to 15 roses, creating an even mix of cream and pink blooms. Let them fully dry or bake according to your clay package instructions. -
Wrap stems:
Starting just under the rose head, wrap green floral tape down the length of each wire stem. Stretch the tape slightly as you wrap to activate the adhesive. -
Arrange layers:
Start with a central pink rose and surround it with three cream roses. Tape these stems together about 2 inches down from the heads. -
Build the dome:
Add the remaining roses in a circle around this central cluster, alternating colors to create a pleasing pattern. Adjust the heights so they form a gentle dome shape. -
Bind securely:
Wrap floral tape tightly around the entire bundle of stems to hold the arrangement structure in place. -
Add ribbon:
Wrap the handle of the bouquet in white satin ribbon to cover the floral tape, securing the end with a dab of glue or a decorative pin.
Scented Blooms
Mix a few drops of rose essential oil into the clay during the kneading phase. Your bouquet will carry a subtle, lovely fragrance forever.
Place your beautiful handmade bouquet on a side table or windowsill to enjoy floral charm that never fades


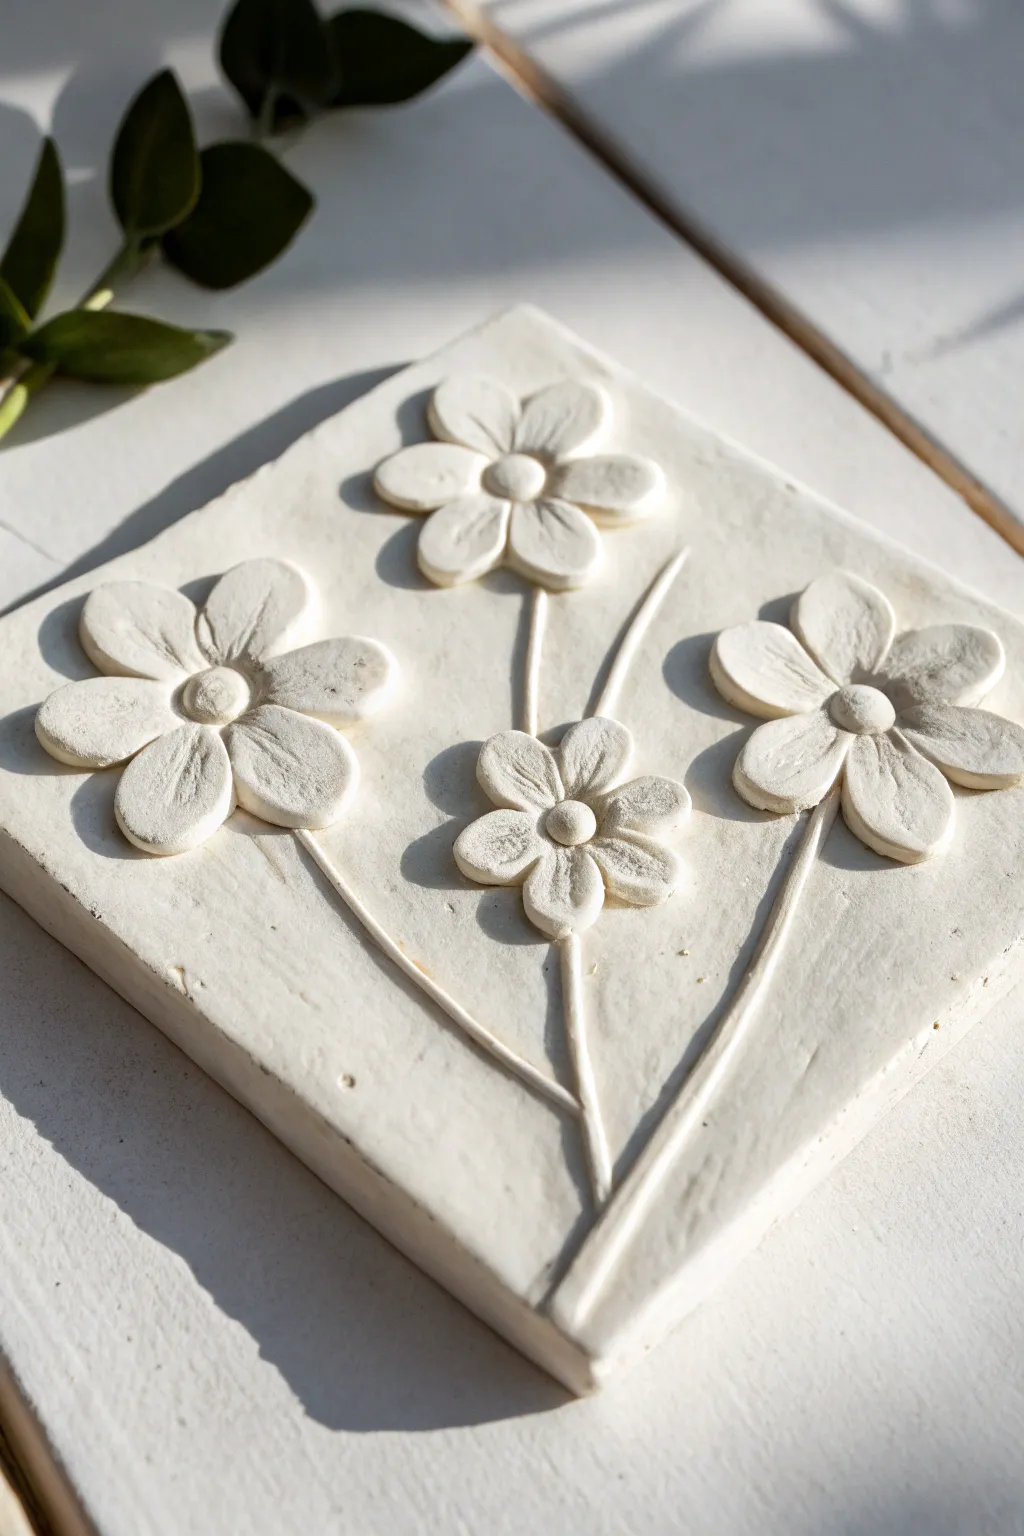
Layered Petal Flowers for Quick 3D
This elegant floral relief brings a touch of modern serenity to any space with its monochromatic palette and clean lines. By layering simple teardrop shapes on a flat base, you can achieve a sophisticated sculpted look without advanced modeling skills.
Step-by-Step
Materials
- White smooth air-dry clay (approx. 1kg)
- Rectangular wooden board or sturdy cardboard (approx. 8×12 inches) as a base
- Rolling pin
- Parchment paper or non-stick craft mat
- Clay knife or craft scalpel
- Teardrop-shaped cookie cutters (optional, varied sizes)
- Small bowl of water
- Smoothing sponge
- Acrylic rolling rod or paintbrush handle
- Fine-grit sandpaper
- Matte white acrylic paint or gesso (optional)
Step 1: Preparing the Base
-
Roll out the foundation:
Begin by conditioning your clay until it’s pliable. Roll out a large slab about 1/4 inch thick that is slightly larger than your support board. -
Cover the support:
Apply a thin layer of PVA glue to your wooden or cardboard backing. Carefully lay the clay slab over it, pressing gently to remove air pockets. -
Trim the edges:
Using your craft knife and a straight edge, trim the excess clay flush with the board’s edges to create a sharp, clean rectangle. Smooth the cut sides with a damp finger.
Step 2: Sculpting the Petals
-
Create petal blanks:
Roll out more clay to the same thickness (approx. 1/4 inch). Cut out numerous elongated teardrop shapes. You will need about 6-8 petals per flower, with varying sizes for different blooms. -
Refine the shape:
Take a petal blank and softly pinch the wider end to make it slightly more pointed if desired, matching the stylized look in the image. The edges should be pillowed and soft, not sharp. -
Add the crease detailing:
Use a modeling tool or the back of a knife to gently press a central vein line down the middle of each petal. Start near the center and fade it out before reaching the tip. -
Smooth the surfaces:
Dip your finger in water and lightly run it over the petal surface to erase fingerprints and soften the central crease line so it looks organic.
Clean Cuts Pro Tip
Before cutting your petals, rub a tiny drop of baby oil or lotion onto your clay knife. This prevents dragging and keeps your petal edges perfectly smooth.
Step 3: Assembling the Composition
-
Draft the layout:
I find it helpful to lightly sketch circles on the clay base with a needle tool to plan where the flower centers will sit before committing to the glue. -
Place the first layer:
Start with the largest flowers at the top. Apply a dab of clay slip or water to the back of each petal and press them onto the base, arranging them in a radial circle. -
Create dimension:
As you place the petals, ensure the tips slightly overlap the background or neighboring flowers. This overlapping creates the crucial 3D depth seen in the relief. -
Form the centers:
Roll small balls of clay for the flower centers. Press them gently into the middle where the petal tips meet. Use a needle tool to stipple a rough texture onto these center buttons. -
Add variety:
Continue adding flowers descending down the plaque. Use slightly smaller petals for the lower flowers to create visual interest and balance. -
Fill the gaps:
Check for negative space that feels too empty. You can add a single petal or a partial flower peeking out from behind a larger bloom, referencing the smaller flower at the bottom.
Level Up: Stone Texture
Mix baking soda into white acrylic paint for the final coat. Stipple this mixture on to give the smooth clay a realistic limestone or sandstone grain.
Step 4: Finishing Touches
-
Final smoothing:
Once all elements are attached, give the entire piece a final inspection. Use a slightly damp brush to clean up any visible join marks or rough clay burrs. -
Drying process:
Allow the relief to dry flat in a cool place away from direct sunlight. This ensures it dries evenly without cracking. This may take 24-48 hours depending on thickness. -
Sanding:
When bone dry, extremely gently sand any sharp edges or rough spots with fine-grit sandpaper. -
Painting:
For a unified, plaster-like finish, coat the entire piece including the sides with matte white acrylic paint or gesso. This creates that seamless, stone-carved appearance.
Hang your finished relief on a colored wall to watch the shadows play across the petals throughout the day

The Complete Guide to Pottery Troubleshooting
Uncover the most common ceramic mistakes—from cracking clay to failed glazes—and learn how to fix them fast.
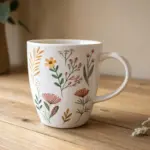
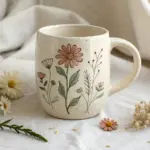
Cherry Blossom-Style Mini Flowers
Capture the delicate beauty of spring with this charming clay project featuring raised cherry blossoms on a speckled white base. The soft pink petals and subtle spatter effect give this piece a lovely, handmade pottery feel without needing a kiln.
Detailed Instructions
Materials
- White air-dry clay (or polymer clay)
- Pink air-dry clay (soft pastel shade)
- Square cookie cutter (approx. 4 inches) or craft knife
- Small flower plunger cutters (various sizes)
- Needle tool or toothpick
- Ball tool (small)
- Rolling pin
- Acrylic rolling guides or playing cards (for even thickness)
- Pink acrylic paint (slightly darker than the clay)
- Clean toothbrush or stiff paintbrush
- Strong craft glue (PVA or super glue gel)
- Matte varnish or sealant
Step 1: Creating the Base
-
Condition the white clay:
Start by kneading a large ball of white clay until it is warm, pliable, and free of cracks. If using air-dry clay, keep your hands slightly moist to prevent drying. -
Roll the slab:
Place the clay on a smooth work surface. using rolling guides or stacks of playing cards on either side, roll the clay out to a uniform thickness of about 1/4 inch (6mm). -
Cut the square:
Press your square cutter firmly into the clay slab. If you don’t have a cutter large enough, use a ruler and a craft knife to cut a perfect 4×4 inch square. -
Smooth the edges:
Dip your finger in a little water and gently run it along the edges of the square to soften the sharp cuts and round off the corners slightly. -
Add the speckled effect:
Dilute a tiny drop of dark pink paint with water. Dip a toothbrush into this mixture, test it on a paper towel first, and then flick the bristles to create a fine mist of speckles across the white tile. Set the tile aside to dry completely.
Step 2: Sculpting the Blossoms
-
Roll the pink clay:
Take your soft pink clay and roll it out much thinner than the base, approximately 1/8 inch (3mm) thick. -
Cut flower shapes:
Use your flower plunger cutters to punch out varied sizes of blossoms. You will need about 9-10 flowers for the main tile, plus extras for practice. -
Detail the edges:
If the cutter didn’t separate the petals enough, gently use a craft knife to deepen the cuts between each petal toward the center, but don’t cut all the way through. -
Soften the petals:
Place a flower on your palm or a foam mat. I find that gently pressing a ball tool into the center of each petal gives it a natural, cupped shape rather than looking flat. -
Mark the centers:
Use a needle tool or the tip of a toothpick to press a small circular indentation into the very center of each flower. -
Add radial lines:
With the same needle tool, lightly score short lines radiating from the center indentation outward onto each petal to mimic the texture of a real cherry blossom.
Clean Cuts Only
Use a piece of cling film over the clay before using cutters. This softens the edges instantly, creating a rounded, pillowy look without sanding.
Step 3: Assembly and Finishing
-
Plan the layout:
Once your white base is dry or firm enough to handle, gently place your loose pink flowers on top to decide on an arrangement that feels balanced. -
Attach the flowers:
Lift one flower at a time, apply a small dab of strong craft glue to the back, and press it firmly onto the white tile. If using polymer clay, bake the pieces together instead of gluing. -
Enhance the speckles:
If you want a cohesive look, add a very light, controlled flick of the pink paint speckles over the flowers themselves, tying the design together. -
Final drying:
Allow the glue (or clay, if air-drying) to cure completely according to package instructions. This usually takes 24 hours for air-dry clay. -
Seal the piece:
Apply a coat of matte varnish over the entire surface to protect the paint speckles and give the clay a durable, finished texture.
Make it Functional
Glue a square of cork sheet or small felt pads to the bottom of the finished tile to turn this art piece into a usable, non-slip drink coaster.
Now you have a serene piece of floral decor that captures the stillness of a spring garden.
Hydrangea-Style Four-Petal Clusters
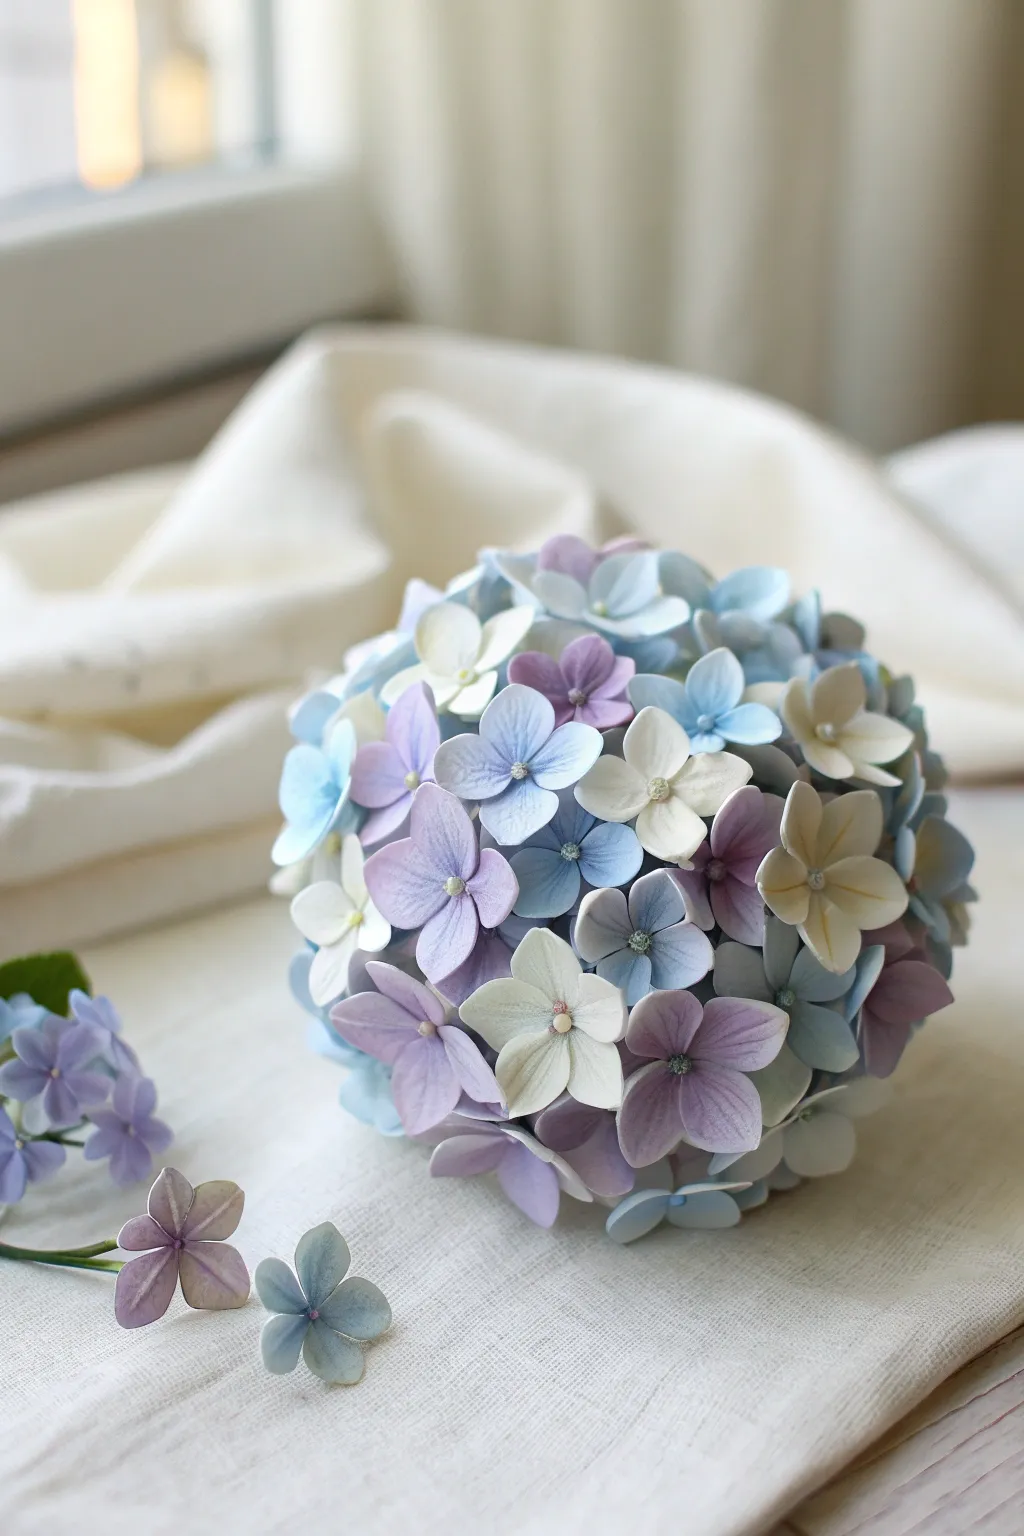
Capture the delicate beauty of a blooming hydrangea ball without the wilting petals. This project uses soft air-dry clay to create a stunning, permanent centerpiece featuring a gradient of lavender, sky blue, and creamy white blossoms.
How-To Guide
Materials
- Air-dry clay (white)
- Acrylic paints or clay pigments (lavender, soft blue, cream)
- Styrofoam ball (approx. 3-4 inches diameter)
- Small ball tool
- Pointed sculpting tool or needle tool
- PVA glue or tacky glue
- Small pearl beads or iridescent glitter dust (optional)
- Rolling pin
- Small 4-petal flower cutter (approx. 0.5 – 0.75 inch)
- Foam mat
Step 1: Preparing the Clay
-
Divide the clay:
Start by separating your white clay into three equal portions. Keep one portion pure white or mix in a tiny dot of cream acrylic paint for warmth. -
Mix your colors:
Take the second portion and knead in a small amount of lavender pigment until the color is consistent. Repeat with the third portion using soft blue pigment. Aim for pastel shades rather than deep colors. -
Create intermediate shades:
To achieve that natural, varied look, take small pinches of white and mix them with pinches of the blue and purple clays. I like to marble them just slightly so each petal isn’t perfectly uniform. -
Prevent drying:
Wrap each colored lump of clay tightly in plastic wrap or keep them under a damp cloth while you aren’t actively using them to prevent premature drying.
Sticky Petals?
If the clay sticks to your cutter or tools, dip the tools lightly in cornstarch or baby oil before pressing. This ensures clean edges and prevents tearing.
Step 2: Forming the Blossoms
-
Roll out the clay:
Select your lavender clay first. Roll it out on a non-stick surface until it’s quite thin, roughly 1-2mm. A thinner petal looks more realistic. -
Cut the shapes:
Use your 4-petal cutter to punch out multiple flower shapes. You will need dozens of these, so cutting them in batches by color is most efficient. -
Thin the edges:
Place a cut flower on your foam mat. Using the ball tool, gently roll over the center of each petal. This thins the edges and makes them curl up slightly, giving the flower life. -
Detail the center:
Press the small ball tool directly into the center of the flower to create a cupped shape. This dip is crucial for assembly later. -
Add petal texture:
With your needle tool or a dull knife edge, gently press a single vein line down the center of each petal for added texture. -
Create centers:
Roll tiny distinct balls of clay for the flower centers (stamen), or prepare small pearls. Place a tiny dot of glue in the center cup and attach the detail. -
Dry the batch:
Set these finished lavender blooms aside to firm up slightly. Repeat the cutting and sculpting process with your blue and cream clays until you have a large pile of varied flowers.
Step 3: Assembly
-
Prepare the base:
Take your Styrofoam ball. If the white styrofoam is too stark, you can paint it a muted green or grey so any gaps won’t be glaringly bright. -
Begin placement:
Apply a generous dab of tacky glue to the back of a flower. Press it gently onto the Styrofoam ball. -
Cluster the colors:
Continue gluing flowers, placing them very close together so their petals overlap slightly. Try to distribute the colors randomly—place a blue next to a cream, then a lavender, avoiding large patches of a single color. -
Fill the gaps:
Work your way around the sphere. If you find small gaps between the larger flowers, simply sculpt a smaller 3-petal bud by hand to fill the space. -
Final adjustments:
While the glue is still tacky, gently fluff any petals that were flattened during handling. Add a tiny brush of iridescent glitter dust to the centers for a morning-dew look. -
Set to dry:
Place the finished sphere on a soft cloth or a cup rim to dry completely overnight without flattening the bottom flowers.
Stem Addition
Before gluing flowers, insert a thick wire or wooden dowel into the foam ball to create a stem. Cover it with green floral tape for a full bouquet look.
Display your pastel masterpiece on a decorative plate or atop a vase for an instant calm atmosphere


What Really Happens Inside the Kiln
Learn how time and temperature work together inside the kiln to transform clay into durable ceramic.
Cartoon Flowers With Bold Dot Centers
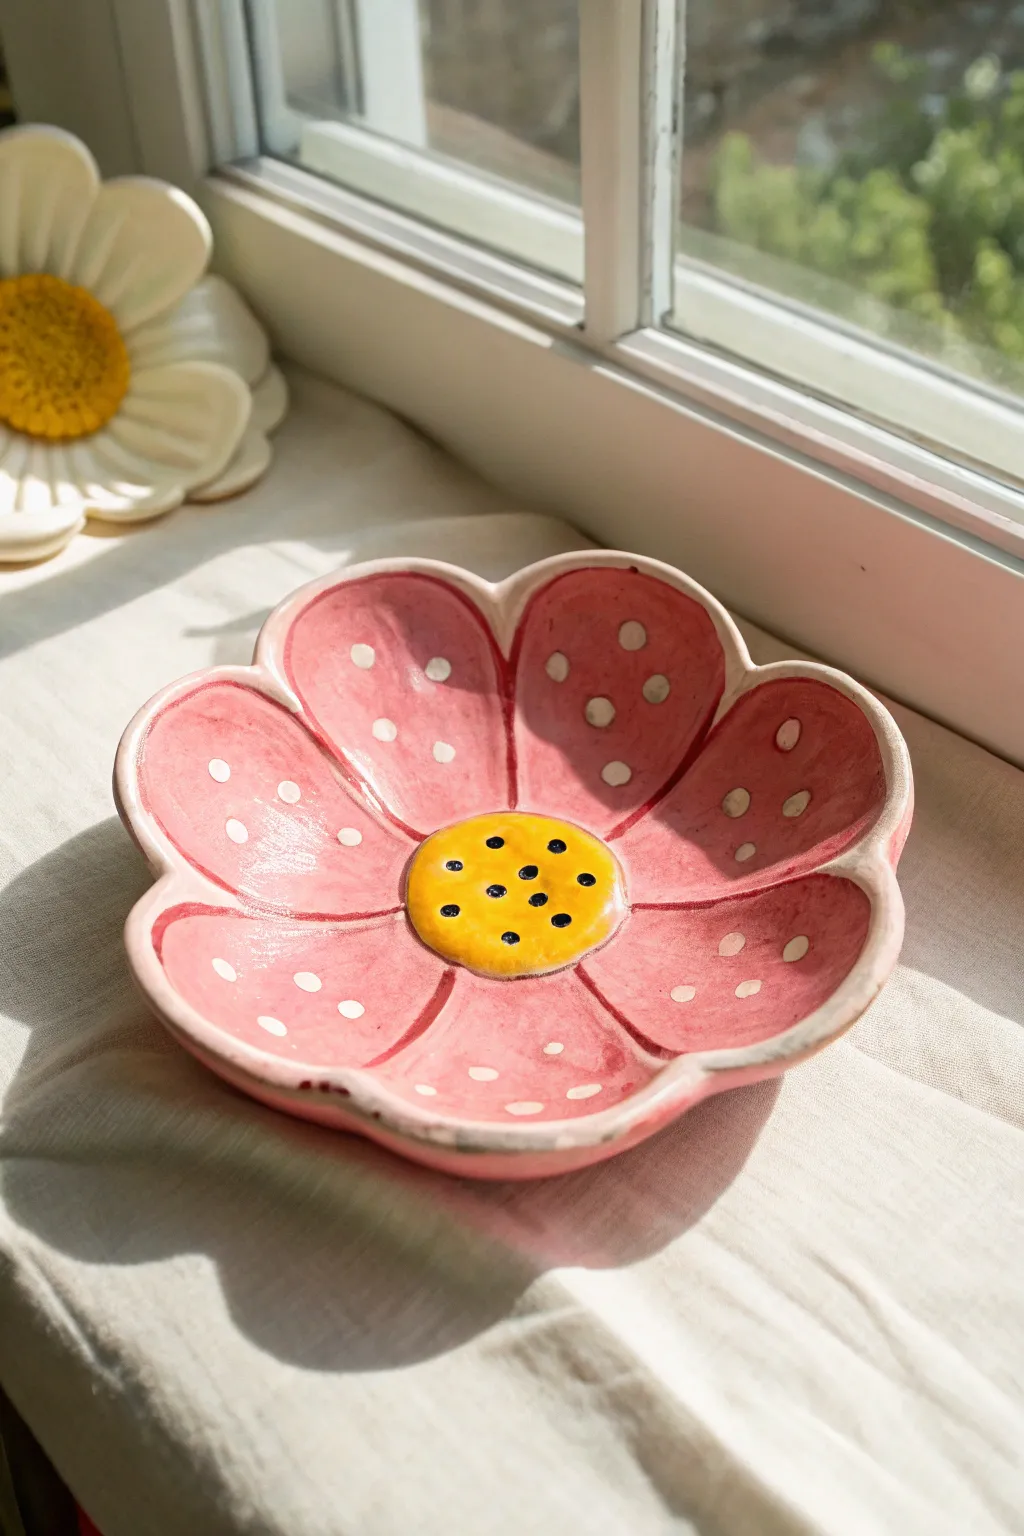
Brighten up your windowsill with this charming, carton-style flower dish featuring vibrant pink petals and a playful polka-dot center. This shallow bowl is perfect for holding trinkets, jewelry, or simply shining as a piece of cheerful décor.
Step-by-Step Guide
Materials
- Air-dry clay or polymer clay (white)
- Rolling pin
- Flower template (paper)
- Craft knife or clay tool
- Small bowl (for shaping)
- Fine-grit sandpaper
- Acrylic paints (pink, yellow, white, black)
- Fine detail paintbrush
- Medium flat paintbrush
- Gloss varnish or sealant
Step 1: Shaping the Clay
-
Roll the base:
Begin by conditioning your clay until it is smooth and pliable. Roll it out on a flat surface to an even thickness of about 1/4 inch, ensuring it’s wide enough for your flower shape. -
Cut the shape:
Place a six-petaled paper flower template over your rolled clay. Carefully trace around the edge with a craft knife or needle tool to cut out the flower silhouette. -
Smooth the edges:
Dip your finger in a little bit of water and run it along the cut edges of the flower to smooth out any roughness or sharp debris from cutting. -
Define the center:
Take a separate small ball of clay, flatten it slightly into a disc, and press it firmly into the center of your flower shape. Use a modeling tool to blend the seams underneath so it attaches securely. -
Add texture:
Use a scoring tool or the back of a butter knife to gently press indentation lines radiating from the center disc out towards the middle of each petal to create separation and dimension. -
Form the bowl:
Carefully lift your clay flower and drape it inside a small cereal bowl or over a curved surface. Let gravity help the petals curve upward naturally to create that gentle dish shape.
Smooth Moves
Use a damp sponge to smooth the clay edges before drying. It works better than sanding later and creates a soft, professional ceramic look.
Step 2: Drying and Refining
-
Let it dry:
Allow the clay to dry completely according to the package instructions. This usually takes 24-48 hours for air-dry clay. I like to rotate it occasionally to ensure even airflow. -
Sand it smooth:
Once fully cured, use fine-grit sandpaper to gently buff away any fingerprints or rough edges on the rim of the petals. -
Wipe clean:
Use a slightly damp cloth or dry brush to remove all sanding dust before you start painting.
Make it Bloom
Try layering a smaller flower shape inside a larger one before curving the bowl to create a double-petaled 3D effect.
Step 3: Painting the Details
-
Paint the petals:
Apply a base coat of soft pink acrylic paint to the petals, leaving the center circle unpainted. You may need two coats for a solid, opaque look. -
Paint the center:
Fill in the raised center circle with a bright, sunny yellow paint. Use a smaller brush to keep the edges neat where the yellow meets the pink. -
Add petal definition:
Mix a slightly darker shade of pink (or red) and very thinly outline the petals and the crease lines you scored earlier. This gives it that illustrated, cartoonish vibe. -
Dot the petals:
Using the handle end of a paintbrush, dip it into white paint and stamp random polka dots across the pink petals. -
Dot the center:
Switch to black paint and use a very fine tip or a toothpick to add small black dots to the yellow center, mimicking seeds. -
Seal the piece:
Finish by applying a glossy varnish over the entire dish. This protects the paint and gives the clay a ceramic-like shine.
Once dry, your delightful floral bowl is ready to hold your favorite little treasures
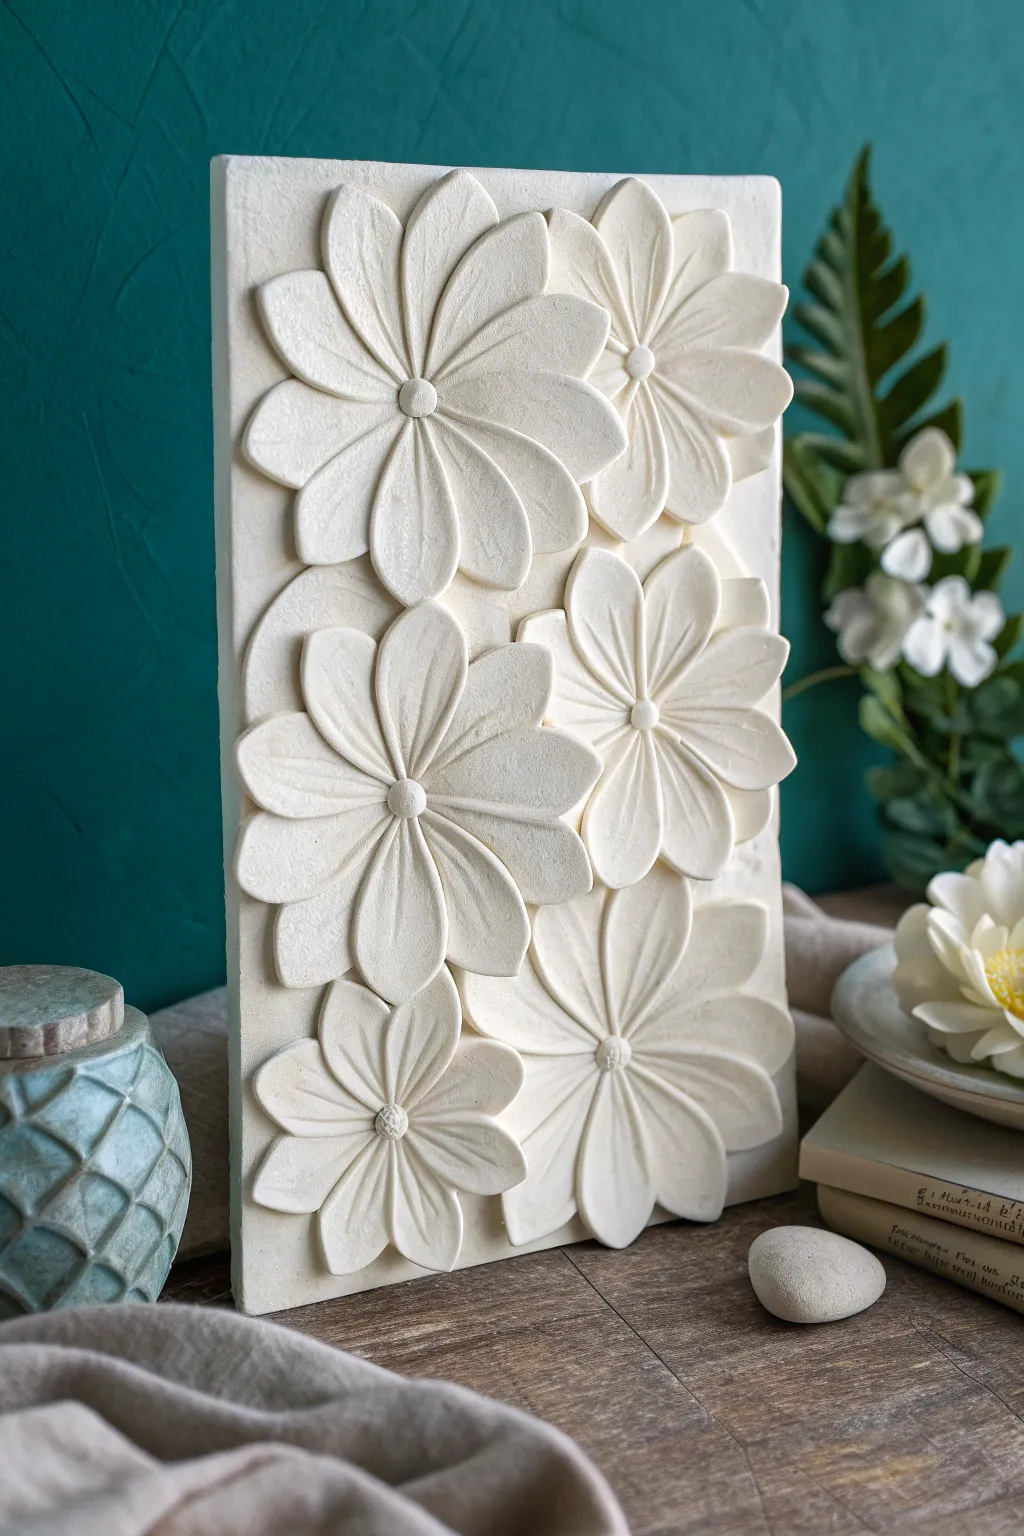
Minimal White Relief Flowers
Capture the serene beauty of nature with this elegant monochrome relief sculpture. Using simple hand-building techniques, you will create a dimensional floral tile that relies on shadow and light rather than color for its impact.
Step-by-Step Tutorial
Materials
- White classic air-dry clay or polymer clay
- Rolling pin (acrylic or wooden)
- Square cookie cutter or craft knife
- Ruler
- Small ball tool or rounded end of a paintbrush
- Needle tool or toothpick
- Clay adhesive, slip, or water
- Fine-grit sandpaper (optional)
- Matte white acrylic paint (optional)
Step 1: Base Preparation
-
Condition the Clay:
Begin by kneading a handful of white clay until it is warm, pliable, and free of cracks. If you are using air-dry clay, keep a small bowl of water nearby to smooth out any dryness. -
Roll the Slab:
Roll the clay out on a smooth work surface or silicone mat. You want an even slab that is roughly 1/4 inch (6mm) thick. Using guides or slats on either side of your roller helps maintain a uniform thickness. -
Cut the Shape:
Using a square cookie cutter or a ruler and craft knife, cut out a perfect square base. A 4×4 inch square works beautifully for this composition. -
Smooth the Edges:
Dip your finger in a little water (or clay softener) and gently run it along the cut edges of the square to soften the sharp corners and remove any drag marks from the knife.
Clean Cuts Only
Wipe your craft knife or clay tools with a damp cloth or baby wipe between cuts. This prevents sticky clay buildup and ensures your petal edges remain crisp and unblemished.
Step 2: Creating the Stems
-
Roll Thin Coils:
Take a very small amount of clay and roll it into a thin, even snake or coil. These will form your flower stems. They should be quite delicate, roughly 2mm in diameter. -
Arrange the Layout:
Layout the stems on your square tile before attaching them. Create a natural bouquet shape where the stems converge at the bottom right corner and fan out towards the top left. -
Attach the Stems:
Once happy with the placement, score the tile surface lightly with your needle tool where the stems will go. Apply a tiny dab of water or slip, and gently press the coils down.Flatten them slightly so they look integrated rather than just floating on top.
Step 3: Sculpting the Flowers
-
Make Petal Balls:
Roll approximately 20-25 small spheres of clay. Aim for slightly different sizes—some for larger flowers and smaller ones for the central bud. Keeping them small ensures the relief stays delicate. -
Form Teardrops:
Take each sphere and pinch one side to form a teardrop shape. Flatten the teardrop gently between your thumb and forefinger to create a basic petal. -
Assemble the First Flower:
Choose a stem tip on the tile. Apply a dot of slip or adhesive. Arrange 5 petal shapes in a circle, with the pointed ends meeting in the center. Press them down gently to secure. -
Add Texture:
Press a needle tool or toothpick down the center of each petal to create a vein impression. I like to vary the pressure here to make the petals look organic and slightly cupped. -
Create the Center:
Roll a small ball of clay, slightly flatten it, and place it in the center of the petals to hide the joins. Press the edges of this center dot with your ball tool to blend it slightly. -
Repeat for All Blooms:
Repeat this process for the remaining three flowers. Place the largest blooms on the outer edges and a smaller flower in the center based on your stem arrangement. -
Add a Leaf:
If you have empty space, create a longer, slender teardrop shape for a single leaf. Attach it to one of the stems using the same slip and score method.
Framed Elegance
Instead of a standalone tile, press your clay base directly into the back of a deep shadow box frame before adding flowers. This creates instant, ready-to-hang wall art.
Step 4: Finishing Touches
-
Refine Details:
Give the entire piece a once-over. Use your needle tool to re-emphasize any petal veins that got smudged and ensure all edges are clean. -
Dry Completely:
Allow the clay to dry fully according to the package instructions. For a flat tile, dry it slowly away from direct heat to prevent warping. Turning it over carefully halfway through drying can help. -
Sand and Paint:
Once bone dry, very gently sand any rough edges with fine-grit sandpaper. If you want a pristine finish, apply a coat of matte white acrylic paint to unify the tone of the clay.
Now you have a serene, tactile piece of art that brings a touch of calm to any shelf or wall

TRACK YOUR CERAMIC JOURNEY
Capture glaze tests, firing details, and creative progress—all in one simple printable. Make your projects easier to repeat and improve.
Textured Centers With Toothpick Dots
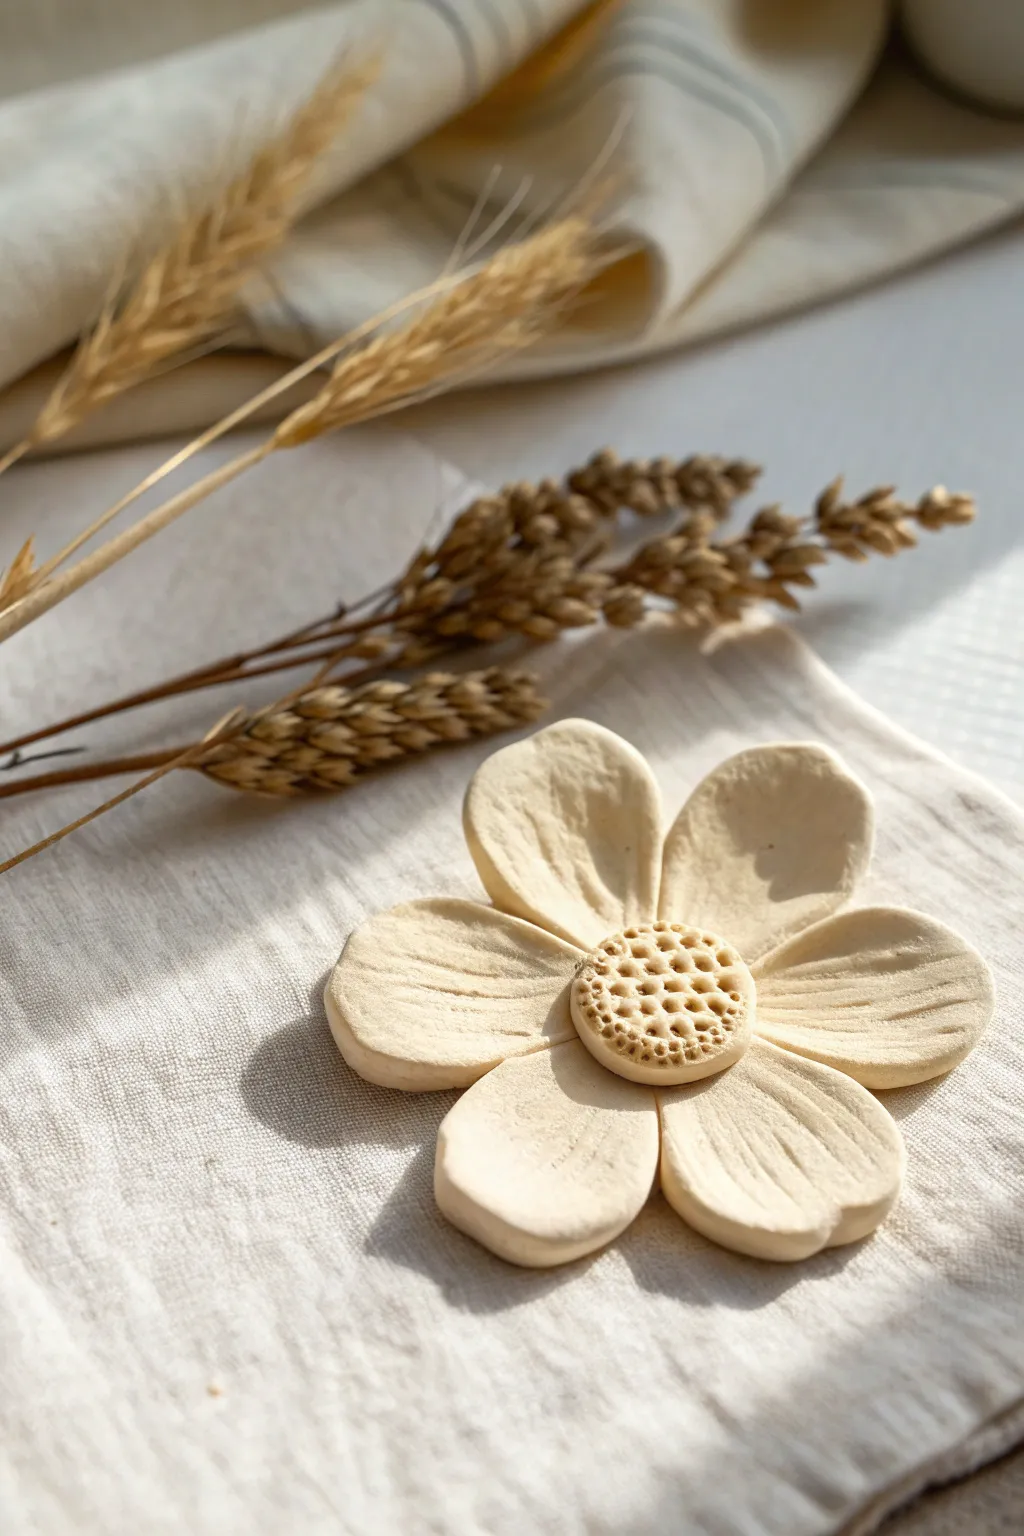
Achieve a touch of rustic elegance with this easy six-petaled flower, perfect for beginners looking to practice consistent shaping. The charm of this piece lies in its center, where simple toothpick impressions transform a plain clay button into a detailed seed pod.
How-To Guide
Materials
- White or beige air-dry clay (or polymer clay)
- Rolling pin
- Small round cutter (approx. 2 inches) or a glass
- Modeling tool or butter knife (for petal details)
- Toothpick or needle tool
- Small bowl of water (for smoothing)
- Wax paper or craft mat
Step 1: Shaping the Petals
-
Condition the Clay:
Start by kneading a golf-ball-sized amount of clay until it is soft, pliable, and free of cracks. If using air-dry clay, keep your hands slightly damp to prevent drying. -
Roll Out the Base:
Roll your clay out on wax paper until it is about 1/4 inch thick. You want it sturdy enough to hold its shape but not too chunky. -
Cut the Basic Circles:
Using your small round cutter, punch out six identical circles. These will become your petals. If you don’t have a cutter, you can roll six small balls of equal size and flatten them with your palm. -
Elongate Each Petal:
Take one circle and gently pinch one end to taper it slightly, creating a teardrop shape. -
Flatten the Tip:
Press down gently on the wider end of the teardrop to flatten it out further, giving the petal a nice, open look. -
Create Vein Texture:
Use a modeling tool or the back of a butter knife to gently press two or three long lines lengthwise down each petal. Don’t cut all the way through; just create shallow grooves for texture. -
Repeat the Process:
Perform the shaping and texturing on all six clay circles so you have a matching set of petals ready for assembly.
Step 2: Assembling the Flower
-
Prepare the Connection Point:
Roll a very small flat disk of clay to serve as a hidden base underneath the flower. This helps hold everything together securely. -
Place the First Petals:
Arrange the petals in a circle on top of your base disk. The pointed, tapered ends should all meet in the very center. -
Join the Petals:
Gently press the inner tips of the petals together where they meet. Use a tiny drop of water (or clay glue) to help them fuse properly. -
Adjust the Spacing:
Before the clay sets, nudge the petals so they are evenly spaced. It looks best if they overlap just slightly near the center but fan out at the tips. -
Make the Center Orb:
Roll a separate ball of clay, roughly the size of a marble. Slightly flatten the bottom so it sits flush, but keep the top rounded like a dome. -
Attach the Center:
Place this dome directly over the spot where all the petal tips meet. Press down firmly enough to adhere it, but gently enough to maintain the dome shape.
Natural Imperfection
Don’t stress about perfect symmetry. Slightly irregular petal edges or vein lines make the flower look more organic and realistic.
Step 3: Texturing the Center
-
Prepare Your Toothpick:
Make sure your toothpick is clean. If the clay is sticky, you might want to dip the tip of the toothpick in a little cornstarch or water. -
Create the Outer Ring:
Start poking small holes around the outer edge of the center dome. Try to keep your depth consistent—deep enough to cast a shadow, but not poking through to the petals. -
Spiral Inward:
Continue creating concentric rings of dots, working your way from the outside edge toward the very center of the dome. -
Fill the Middle:
Finish with a cluster of dots right at the apex of the dome. I prefer to pack these slightly tighter to mimic real seeds. -
Let it Cure:
Allow your finished flower to dry completely according to your clay package instructions. For air-dry clay, this usually takes 24-48 hours.
Sticky Texturing?
If the clay pulls up when you remove the toothpick, wait 10 minutes for the clay to firm up slightly, then try poking the holes again.
Once dry, this lovely textured bloom is ready to be displayed on a shelf or painted for a pop of color
Cup-Shaped Flowers Dried Over a Bowl
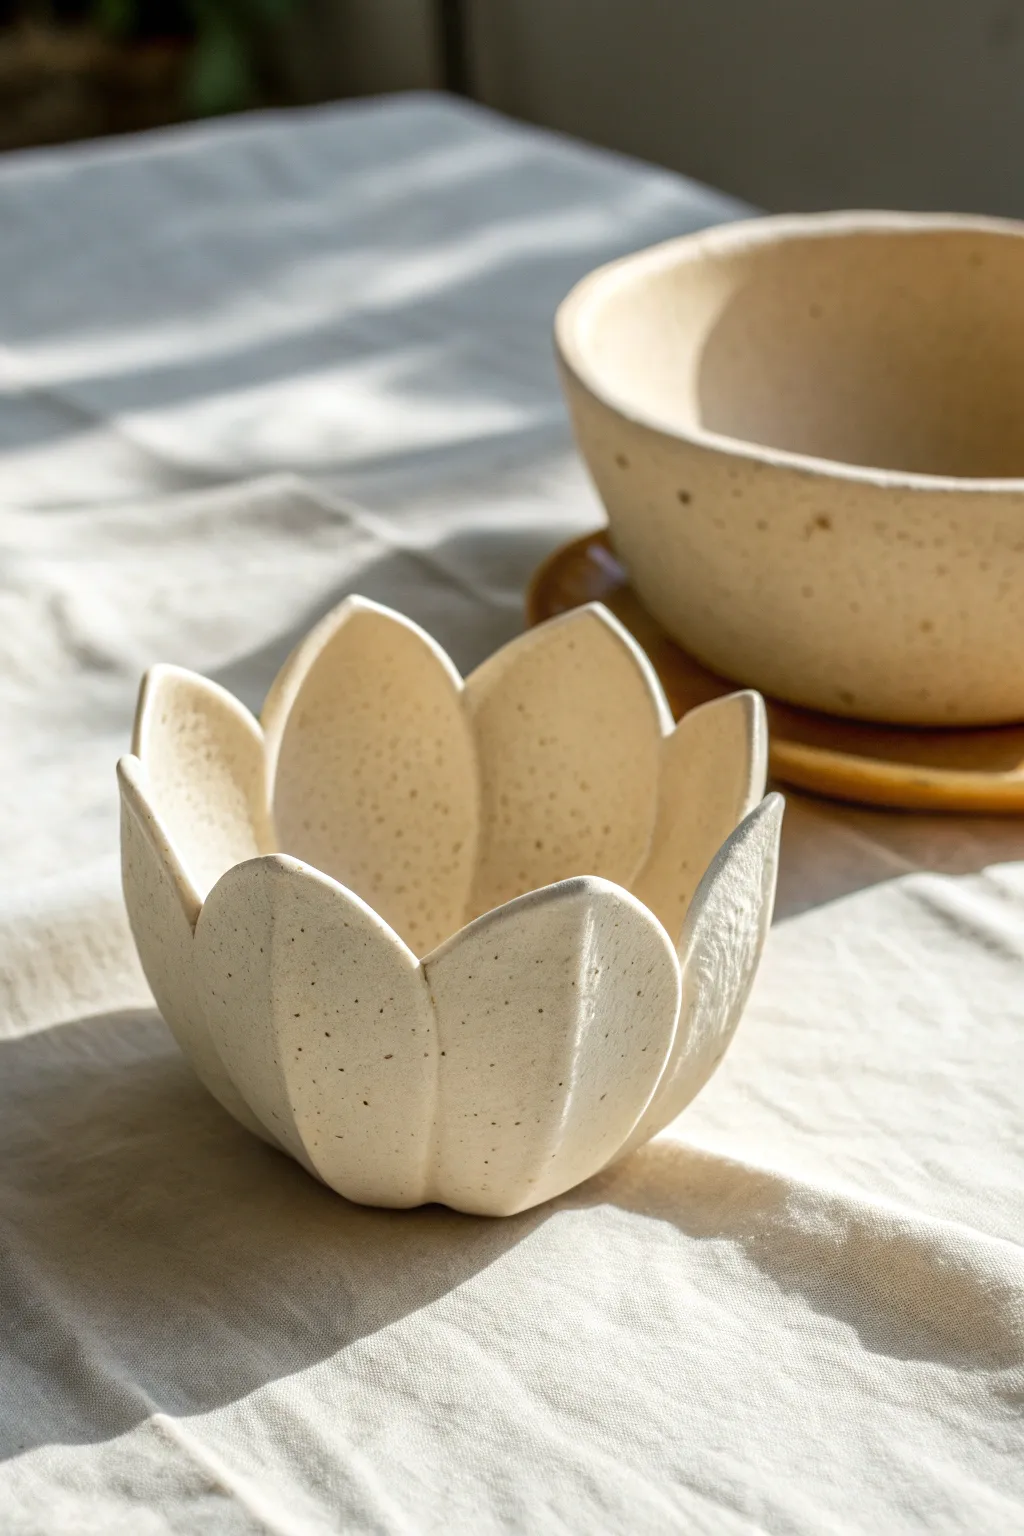
Embrace the organic beauty of handmade pottery with this delicate lotus-inspired bowl. Crafted from speckled clay and formed using a simple drape mold technique, the resulting piece features gently curving petals that mimic a blooming flower.
Step-by-Step Tutorial
Materials
- Speckled stoneware clay (or polymer clay with faux speckles)
- Small rolling pin
- Canvas mat or non-stick surface
- Leaf or petal template (cardstock)
- Needle tool or craft knife
- Small bowl (for use as a mold)
- Plastic wrap or cling film
- Sponge
- Slip (clay slurry) or scoring tool
- Rib tool
- Sandpaper (fine grit)
Step 1: Preparing the Petals
-
Roll the slab:
Begin by wedging your clay to remove air bubbles. Roll it out into an even slab, approximately 1/4 inch thick. Aim for a consistent thickness to ensure the bowl dries and fires evenly. -
Cut the base:
Cut a small circle, about 3-4 inches in diameter, from the slab. This will serve as the bottom of your lotus bowl where the petals attach. -
Create a template:
Sketch a simple, wide petal shape onto cardstock and cut it out. The shape should be slightly pointed at the top and flatter at the bottom. -
Trace the petals:
Place your template onto the clay slab multiple times. I find it helpful to arrange them tightly to minimize waste. You will need about 8-10 petals depending on the size of your base. -
Cut out the shapes:
Using a needle tool or a sharp craft knife, carefully cut around your templates. Keep the edges clean and smooth. -
Soften the edges:
Dampen a small sponge and gently run it along the cut edges of every petal. This removes sharp angles and gives the clay a softer, more organic look. -
Add texture (optional):
If your clay isn’t naturally speckled, you can gently press sand or coffee grounds into the surface now for that earthy texture seen in the photo.
Drooping Petals?
If petals flop down too much, tuck small balls of crumpled paper towel or tissue between the clay and the mold bowl for extra support while it dries.
Step 2: Assembling the Bloom
-
Prep the mold:
Select a simple kitchen bowl that has a nice curve. Cover the *inside* of the bowl with plastic wrap to prevent the clay from sticking. -
Place the base:
Gently lift your clay circle and place it in the very center of the lined bowl. -
Score the connection points:
Score (scratch) the outer perimeter of the base circle and the bottom straight edge of your first petal using a needle tool. -
Apply slip:
Dab a small amount of clay slip or water onto the scored areas to act as glue. -
Attach the first layer:
Press the first petal onto the base, allowing it to rest against the side of the bowl. Repeat this with 4-5 petals, spacing them evenly so they just barely touch or slightly overlap. -
Smooth the interior:
Where the petals meet the base, use your thumb or a modeling tool to smudge the clay together, ensuring a strong bond at the bottom seam. -
Add the outer layer:
Score and slip the backs of the remaining petals. Place these in the gaps between the first layer of petals, creating a staggered, blooming effect. -
Secure the overlaps:
Gently press the layers together where they overlap to ensure they stick, supporting the clay from behind so you don’t warp the shape. -
Refine the shape:
Use a damp rib tool or your finger to gently curve the tips of the petals slightly inward or outward depending on how open you want your flower to be.
Step 3: Drying and Finishing
-
Slow drying:
Let the clay dry slowly inside the bowl until it is leather hard. If you rush this steps, the petals might crack or detach. -
Demolding:
Once stiff enough to hold its shape, carefully lift the flower out of the bowl using the plastic wrap. -
Final smoothing:
Once fully dry (bone dry) but before firing, use fine-grit sandpaper to gently smooth any rough spots on the rim of the petals. -
Firing:
Fire the piece according to your clay’s instructions. For the finish shown, leave the exterior unglazed to show off the speckles, and use a clear matte glaze on the interior if desired.
Stagger for realism
For a natural look, ensure the second layer of petals sits directly over the seams of the first layer, rather than stacking them directly on top.
Enjoy using your new floral bowl for trinkets or simply as a sculptural display piece
Potted Mini Clay Flowers
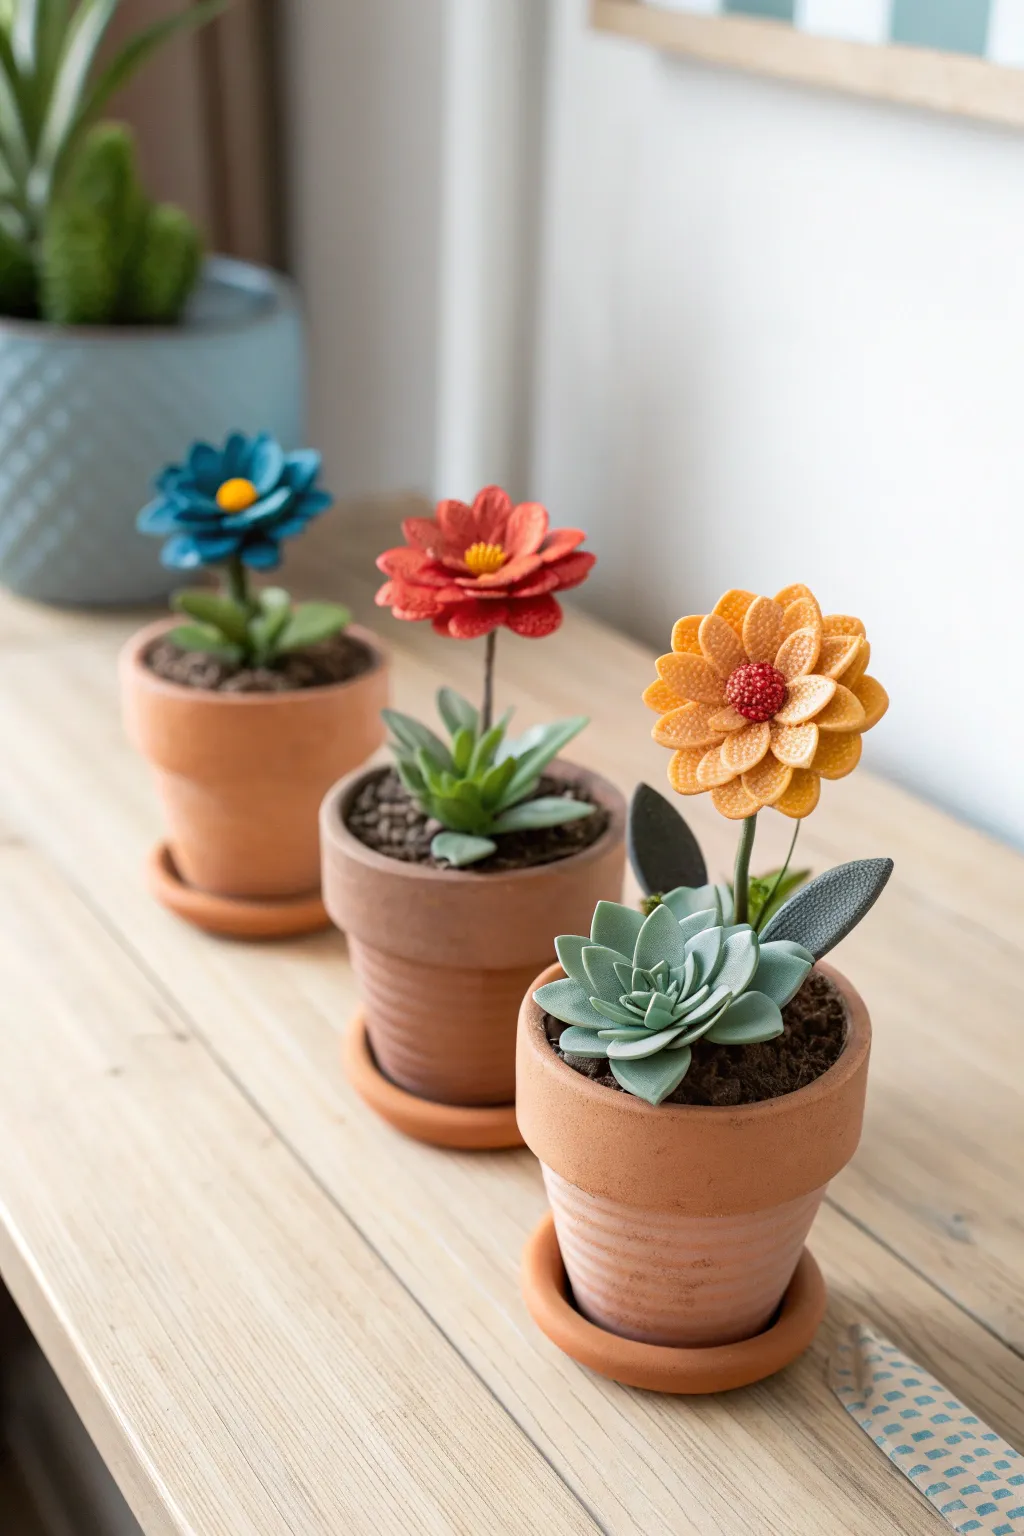
Brighten up your desk or windowsill with these charming, maintenance-free blooms made from polymer clay. This project combines simple sculpting techniques to create stylized succulents and cheerful daisy-like flowers potted in tiny terracotta vessels.
Step-by-Step
Materials
- Polymer clay (terracotta, green, blue, yellow, red, orange)
- Miniature terracotta pots (2-inch diameter)
- Floral wire (18-20 gauge)
- Liquid clay or bake-and-bond adhesive
- Brown acrylic paint (for soil effect)
- Texturing tools (needle tool, ball stylus, toothbrush)
- Rolling pin
- Small circle cutter or exacto knife
- Gloss varnish (optional)
Step 1: Preparing the Base
-
Fill the pots:
Start by balling up scrap clay or aluminum foil to fill the bottom half of your miniature terracotta pots. This saves good clay and reduces weight. -
Create the soil layer:
Roll out a sheet of brown or black clay. Cut a circle that fits snugly inside the rim of your pot, placing it over your filler material. Press the edges down gently so it sits just below the rim. -
Texture the soil:
Use a stiff-bristled toothbrush or a crumpled ball of aluminum foil to tap vigorously over the surface of the ‘soil’ clay. This creates a realistic, crumbly earth texture. -
Insert the stem wire:
Cut a piece of floral wire to your desired height (about 3-4 inches). Insert it firmly into the center of the pot while the clay is still raw.
Drooping Flowers?
If the clay flower head is too heavy for the raw stem, bake the stem and base first. Once hardened, attach the raw flower head with liquid clay and bake a second time.
Step 2: Sculpting the Succulents
-
Form the leaves:
Condition your green clay and roll several small teardrop shapes. Flatten them slightly with your thumb to create thick, succulent-style leaves. -
Arrange bottom leaves:
Place the largest leaves around the base of the wire stem, pressing them into the soil clay. I like to angle them slightly upward for a natural look. -
Build the rosette:
Create a second tier of slightly smaller leaves, staggering them between the bottom layer. For the foreground succulent (the one with the orange flower), create a dense rosette shape separate from the stem and press it into the soil next to the wire. -
Wrap the stem:
Take a small snake of green clay and wrap it around the exposed floral wire. Smooth the seams with your fingers or a sculpting tool until the wire is completely hidden and looks like a plant stalk.
Pro Tip: Textured Petals
For the specific texture seen on the orange flower, gently press a piece of coarse sandpaper against the petal clay before attaching it to the flower center.
Step 3: Creating the Blooms
-
Roll the petals:
Choose your flower color (blue, red, or orange). Roll a small log of clay and slice it into equal segments. Roll each segment into a ball, then flatten into a teardrop shape. -
Texture the petals:
Using a needle tool, gently score dragging lines from the center of each petal outward or use a specialized texture sheet to give them a veined appearance. -
Assemble the flower head:
Cut a small circle of clay to act as a backing base. Arrange your petals in a circle on this base, pressing the pointed ends towards the center. For a fuller flower like the orange one, add a second layer of petals on top. -
Attached to stem:
Apply a dot of liquid clay or bake-and-bond to the top of your green stem. Gently press the assembled flower head onto the stem. You may need to support it for a moment. -
Add the center:
Roll a small ball of contrasting clay (yellow or dark red) for the center. Press a needle tool repeatedly into it to create a fuzzy, pollen-like texture, then press it firmly into the middle of your flower.
Step 4: Baking and Finishing
-
Final inspection:
Check for any fingerprints and smooth them out with a drop of baby oil. Ensure the stems are straight and the leaves are securely attached. -
Bake the project:
Place the entire pot (since terracotta is oven-safe) onto a baking sheet. Bake according to your polymer clay manufacturer’s instructions, usually at 275°F (130°C) for 15-30 minutes. -
Cool down:
Let the pots cool completely in the oven with the door slightly ajar to prevent cracking from thermal shock. -
Add dried soil accents:
Once cool, brush a little white glue over the clay soil and sprinkle real dried coffee grounds or craft sand for an ultra-realistic finish.
Arranging these three distinct styles together creates a delightful miniature garden that never needs watering
Flower Magnets With Oversized Petals
Brighten up your fridge or metal door with this striking clay daisy magnet, featuring oversized salmon-pink petals and a detailed center. The project combines bold shapes with intricate textures for a dimensional look that mimics glazed ceramic.
Detailed Instructions
Materials
- Polymer clay (salmon pink, cream/white, yellow)
- Round clay cutter (approx. 2-inch diameter)
- Small teardrop cutter (optional)
- Modeling tools (dottin tool, needle tool, knife tool)
- Liquid polymer clay or bake-and-bond
- Strong neodymium magnet
- Gloss glaze or polyurethane varnish
- Super glue (cyanoacrylate)
- Acrylic rolling pin
- Oven baking sheet and parchment paper
Step 1: Shaping the Petals
-
Condition the main color:
Begin by thoroughly conditioning your salmon pink polymer clay until it is soft and pliable. Roll it out into a sheet approximately 1/4 inch thick; you want these petals to be chunky and sturdy. -
Cut the base shapes:
Cut out a large circle to serve as a guide, then cut 7 to 8 large petal shapes. If you don’t have a specific petal cutter, cut teardrop shapes freehand with a craft knife or reshape circles by pinching one end. -
Refine the petal form:
Take each petal and gently flatten it with your thumb to widen the top. Smooth the edges with your finger to remove any sharp cutting marks, giving them a soft, rounded ‘ceramic’ appearance. -
Add the central vein:
Using a dull knife tool or a modeling stick, press a long, shallow indentation down the center of each petal. Start from the wide outer edge and stop about halfway down toward the center point. -
Arrange the base:
Create a small, flat clay disk to act as a backing plate. Arrange your pink petals in a radial circle on top of this disk, pressing the pointed ends together at the center so they bond securely.
Fingerprint Fixer
Before baking, lightly brush the untextured clay surfaces with a little baby oil or cornstarch to smooth away any accidental fingerprints.
Step 2: Creating the Center
-
Form the middle ring:
Condition a small amount of cream or pale yellow clay. Roll it into a snake and cut it into about 12-15 small, equal segments. -
Shape the inner petals:
Roll each small segment into a ball, then flatten slightly into a rounded oblong shape. Press one side with a needle tool to create a tiny groove. -
Attach the inner ring:
Apply a tiny dot of liquid clay to the center of your pink flower. Arrange the cream-colored pieces in a tight ring overlapping the inner points of the pink petals. -
Make the pollen center:
Roll a ball of bright yellow clay for the very center. Press it directly into the middle of the cream ring, flattening it slightly so it domes upward. -
Texture the core:
Take a needle tool or a stiff toothbrush and stipple the surface of the yellow ball repeatedly. This creates a realistic, fuzzy pollen texture. -
Detail the cream ring:
Use a needle tool to press fine radiating lines into the cream ring pieces, making them look like the tiny florets found in real daisy centers.
Step 3: Finishing Touches
-
Final inspection:
Check the join between the petals and the center. Gently lift the outer edges of the pink petals just a fraction to ensure the flower isn’t completely flat against the baking surface, giving it life. -
Bake the clay:
Place your flower on parchment paper and bake according to your clay package instructions (usually around 275°F/135°C for 15-30 minutes per 1/4 inch of thickness). -
Cool down:
Allow the piece to cool completely in the oven or on a wire rack. Don’t handle it while hot, as polymer clay is fragile until fully cured and cooled. -
Apply glaze:
Brush a coat of gloss glaze over the pink petals and the center to mimic the shiny look of fired ceramic. I personally prefer two thin coats over one thick one to avoid drips. -
Attach the magnet:
Flip the cured flower over. Sand the back slightly for texture, then use a drop of super glue or strong 2-part epoxy to attach a neodymium magnet to the center backing. -
Dry and display:
Let the glue cure fully for 24 hours before expecting it to hold up on a vertical surface.
Vintage Patina
After baking but before glazing, rub brown acrylic paint into the grooves and wipe the surface clean. This highlights the textures and adds an antique look.
Now your oversized bloom is ready to hold your most important notes in style
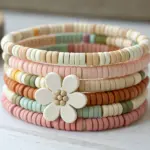
Simple Flower Beads for Bracelets
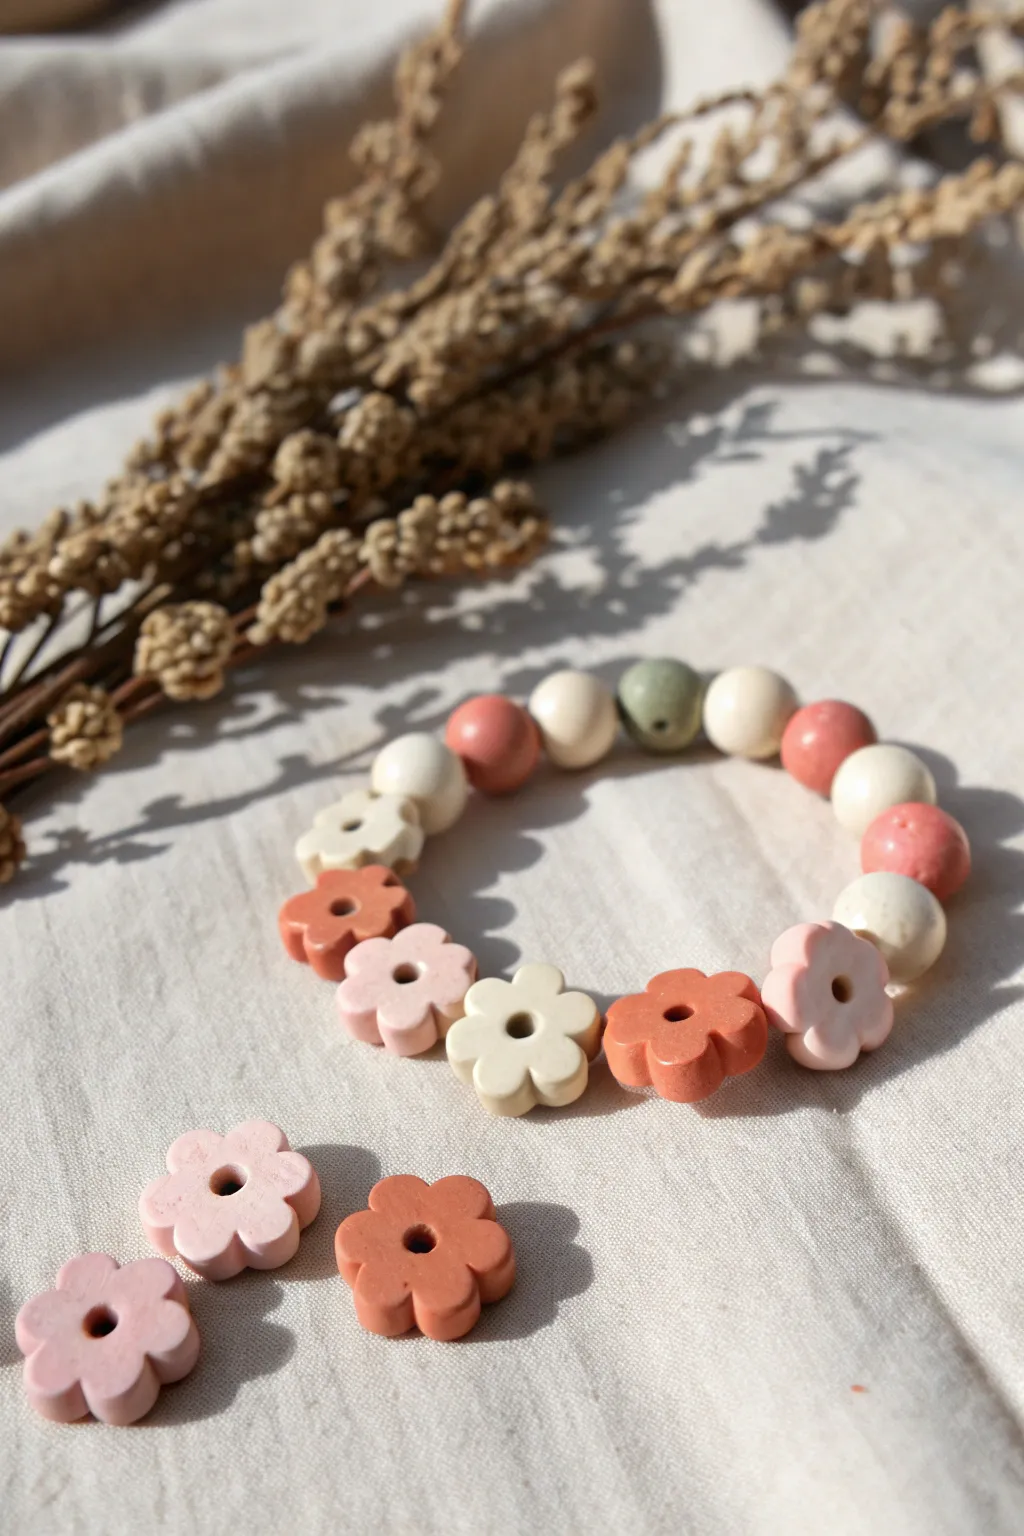
Embrace earthy tones and simple shapes with these charming handmade flower beads. This project combines classic round beads with custom-sculpted floral accents to create a soft, bohemian bracelet perfect for stacking.
How-To Guide
Materials
- Polymer clay in muted tones (blush pink, terracotta, cream, sage green)
- Elastic jewelry cord (0.8mm or 1mm)
- Needle tool or toothpick
- Small round cutter (approx 1/2 inch) or a straw
- Rolling pin or pasta machine
- Super glue or jewelry knot cement
- Baking tray and parchment paper
- Sandpaper (fine grit, optional)
- Wet wipes
Step 1: Prepping the Clay
-
Condition the clay:
Start by warming up your polymer clay in your hands. Knead each color separately until it is soft and pliable, which prevents cracking later. -
Create a slab:
Roll out your clay into an even sheet. Aim for a thickness of about 4mm to ensures the beads are sturdy but not too heavy. -
Cut the base shapes:
Use a small round cutter to punch out circles from your rolled clay. If you don’t have a cutter, you can roll small balls of clay and flatten them gently with your thumb.
Smooth Holes
Twist the needle tool as you create the bead hole rather than pushing straight through. This prevents the flower shape from warping under pressure.
Step 2: Sculpting the Flowers
-
Mark the petals:
Take one of your clay circles. Using the side of a needle tool or a dull knife, gently press indentations into the edge of the circle at five evenly spaced points to define where the petals will be. -
Shape the petals:
Pinch the clay gently between the indentations to round out each petal. I like to use my finger to smooth the edges so they look soft and organic rather than sharp. -
Add the center hole:
Use your needle tool or a toothpick to poke a hole directly in the center of the flower. Wiggle it slightly to ensure the hole is large enough for your elastic cord to pass through later. -
Smooth the bead:
Check the back of the bead where the needle exited; often the clay puckers there. Gently smooth that excess clay down so the bead sits flat. -
Make the round beads:
Roll leftover clay into simple spheres to act as spacer beads. Vary the sizes slightly for a more hand-crafted look, creating some in cream, sage, and terracotta. -
Pierce the round beads:
Carefully pierce holes through the center of your round spheres. Rotating the bead while pushing the needle through helps keep the shape from getting squashed.
Step 3: Baking and Finishing
-
Bake the beads:
Arrange all your beads on a baking sheet lined with parchment paper. Bake according to your specific clay brand’s instructions (usually around 275°F or 135°C for 15-30 minutes). -
Cool down:
Let the beads cool completely before handling them. Polymer clay hardens as it cools, so they will be fragile right out of the oven. -
Sand for smoothness (optional):
If there are any fingerprints or rough edges, lightly buff the cured beads with fine-grit sandpaper or a denim scrap for a professional matte finish.
Terrazzo Effect
Mix tiny chopped bits of different colored clay into your base color before rolling it. When you sand the baked bead, a cool speckled pattern appears.
Step 4: Assembly
-
Plan your pattern:
Lay out your beads on a flat surface to design your strand. Try alternating a flower bead with two or three round spacer beads. -
String the beads:
Cut a piece of elastic cord about 10 inches long. Thread your beads onto the cord, checking the length against your wrist as you go. -
Tie the knot:
Tie a surgeon’s knot (right over left, left over right, and pull tight). Stretch the cord slightly before tightening the knot fully to prevent future sagging. -
Secure the knot:
Add a tiny dab of super glue or jewelry cement to the knot itself. Let it dry for a moment before trimming the excess cord ends. -
Hide the knot:
Gently pull the elastic so the knot slides inside the hole of one of the larger beads to conceal it.
Enjoy wearing your custom floral creation or gifting a stack to a friend
Pressed Flower Imprint Clay Flowers
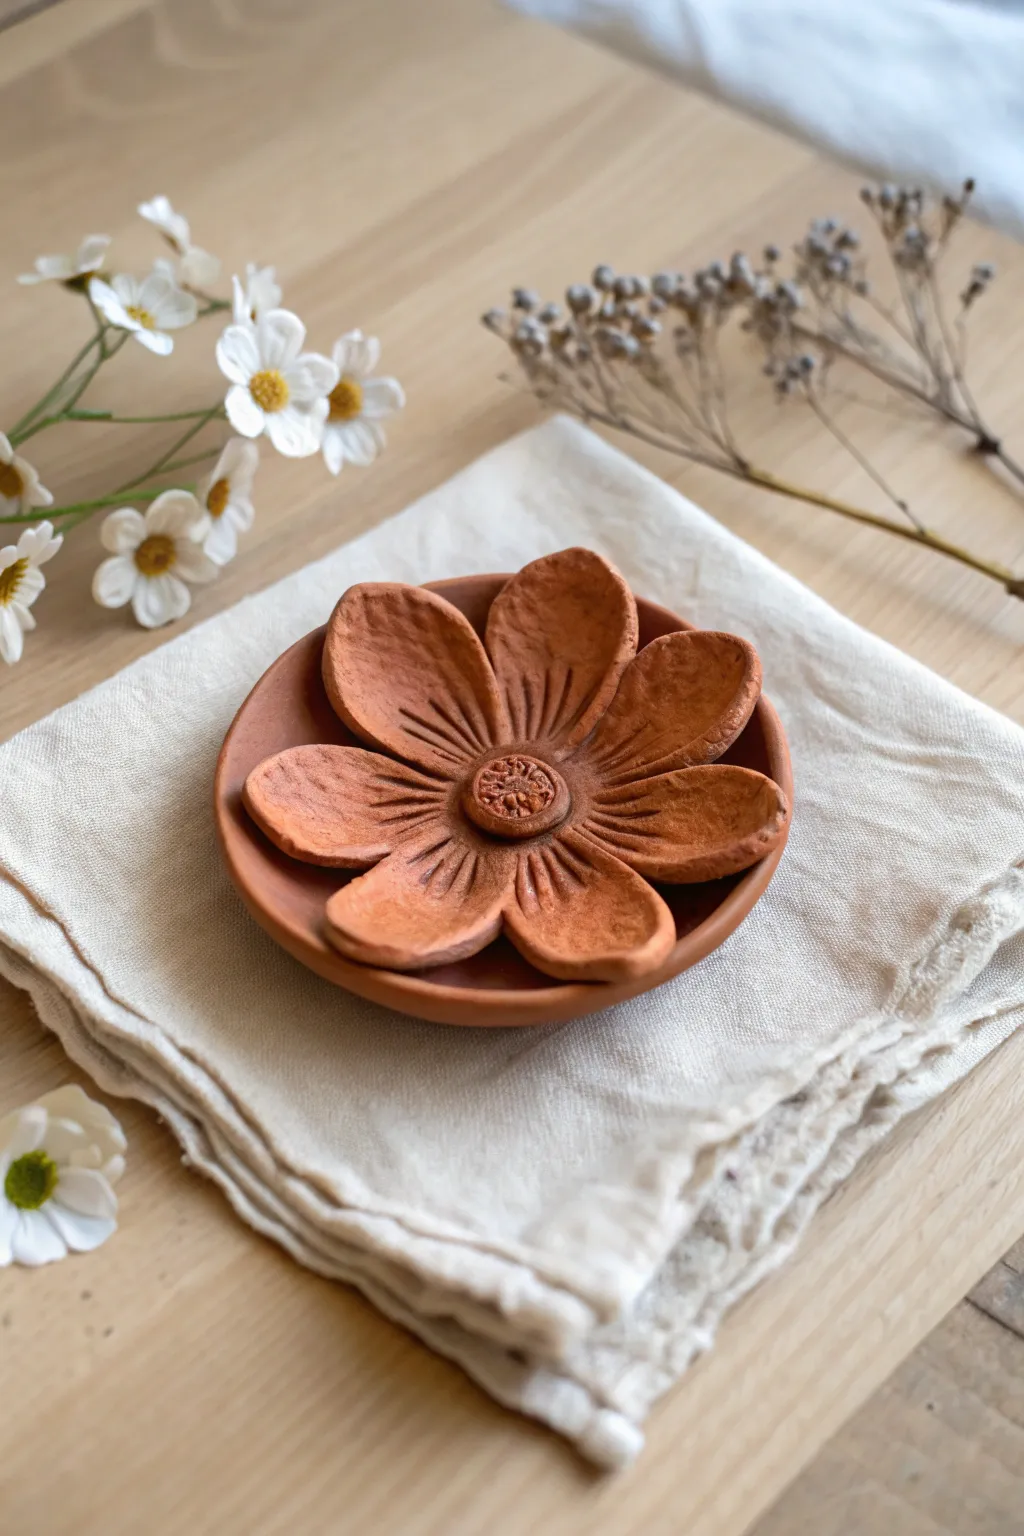
This rustic yet elegant project combines the warmth of terracotta with delicate floral details. You’ll create a lovely two-piece set featuring a shallow dish base and a sculptured flower insert perfect for holding jewelry or functioning as an incense holder.
How-To Guide
Materials
- Terracotta-colored air-dry clay or polymer clay
- Small rolling pin
- Circle cookie cutter (approx. 3-4 inches)
- Parchment paper or craft mat
- Small knife or clay cutting tool
- Needle tool or toothpick
- Small bowl (for shaping the dish)
- Sponge and water (for smoothing)
- Fine grit sandpaper
Step 1: Shaping the Base Dish
-
Condition the clay:
Begin by taking a handful of your terracotta clay and kneading it in your hands until it becomes soft, pliable, and free of cracks. Warm clay is much easier to work with. -
Roll the slab:
Place the clay on parchment paper and use your rolling pin to roll it out into an even slab, aiming for a thickness of about 1/4 inch. -
Cut the circle:
Press your circle cutter firmly into the clay to create a clean, round disc. If you don’t have a cutter, trace a bowl rim and cut around it with your knife. -
Form the curve:
Gently lift the clay circle and place it into your small bowl to give it a curved, dish-like shape. Press lightly so it takes the form without thinning the clay too much. -
Smooth the edges:
Dip your finger or a small sponge in a tiny bit of water and run it along the rim of the dish to smooth out any sharp cutting lines or imperfections.
Texturing Tip
For ultra-realistic petal texture, press a real leaf or a piece of heavy linen fabric into the damp clay before shaping the petals.
Step 2: Sculpting the Flower
-
Create individual petals:
Roll six equal-sized balls of clay, roughly the size of large marbles. Flatten each ball into a teardrop shape with your fingers. -
Shape the petal contour:
Use your thumb to press an indentation into the center of each teardrop, curling the edges upward slightly to mimic the cupped shape of a real petal. -
Assemble the flower:
Arrange the six petals in a circle, placing the pointed ends inward so they touch. Gently press the points together to join them. -
Add texture lines:
Using a needle tool or the back of a knife, carefully score three long lines radiating from the center of each petal to create realistic veins. -
Texture the surface:
I like to take a piece of crumpled aluminum foil or a stiff bristle brush and tap it gently over the petals to give them that organic, porous texture seen in the photo. -
Make the center:
Roll a small ball of clay and flatten it slightly to make a button shape. Place this directly in the middle where the petals meet. -
Detail the center:
Use a toothpick to poke tiny holes all over the center button to create a seed-pod texture. Use a slightly larger tool to press a decorative ring around the button’s edge if desired. -
Check the fit:
Carefully place your clay flower inside the still-damp dish to ensure it fits nicely. You aren’t attaching them permanently yet, just sizing them.
Make it functional
Poke a small hole in the center of the flower bud before drying strictly sized for an incense stick to turn this decor into a burner.
Step 3: Finishing Touches
-
Final drying:
Remove the flower from the dish so both pieces can dry evenly. Let them air dry for 24-48 hours, turning them over occasionally. -
Sand edges:
Once fully cured and hard, use fine-grit sandpaper to gently buff away any rough spots on the rim of the dish or the petal edges. -
Optional sealing:
If you plan to use this near moisture, apply a matte varnish to protect the clay while keeping that natural earthy look. -
Assembly:
Place your finished flower into the dish. You can leave it loose or secure it with a dab of strong craft glue for a permanent display.
Enjoy the simple beauty of your handmade terracotta bloom on your bedside table or vanity
Two-Tone Swirl Petal Flowers
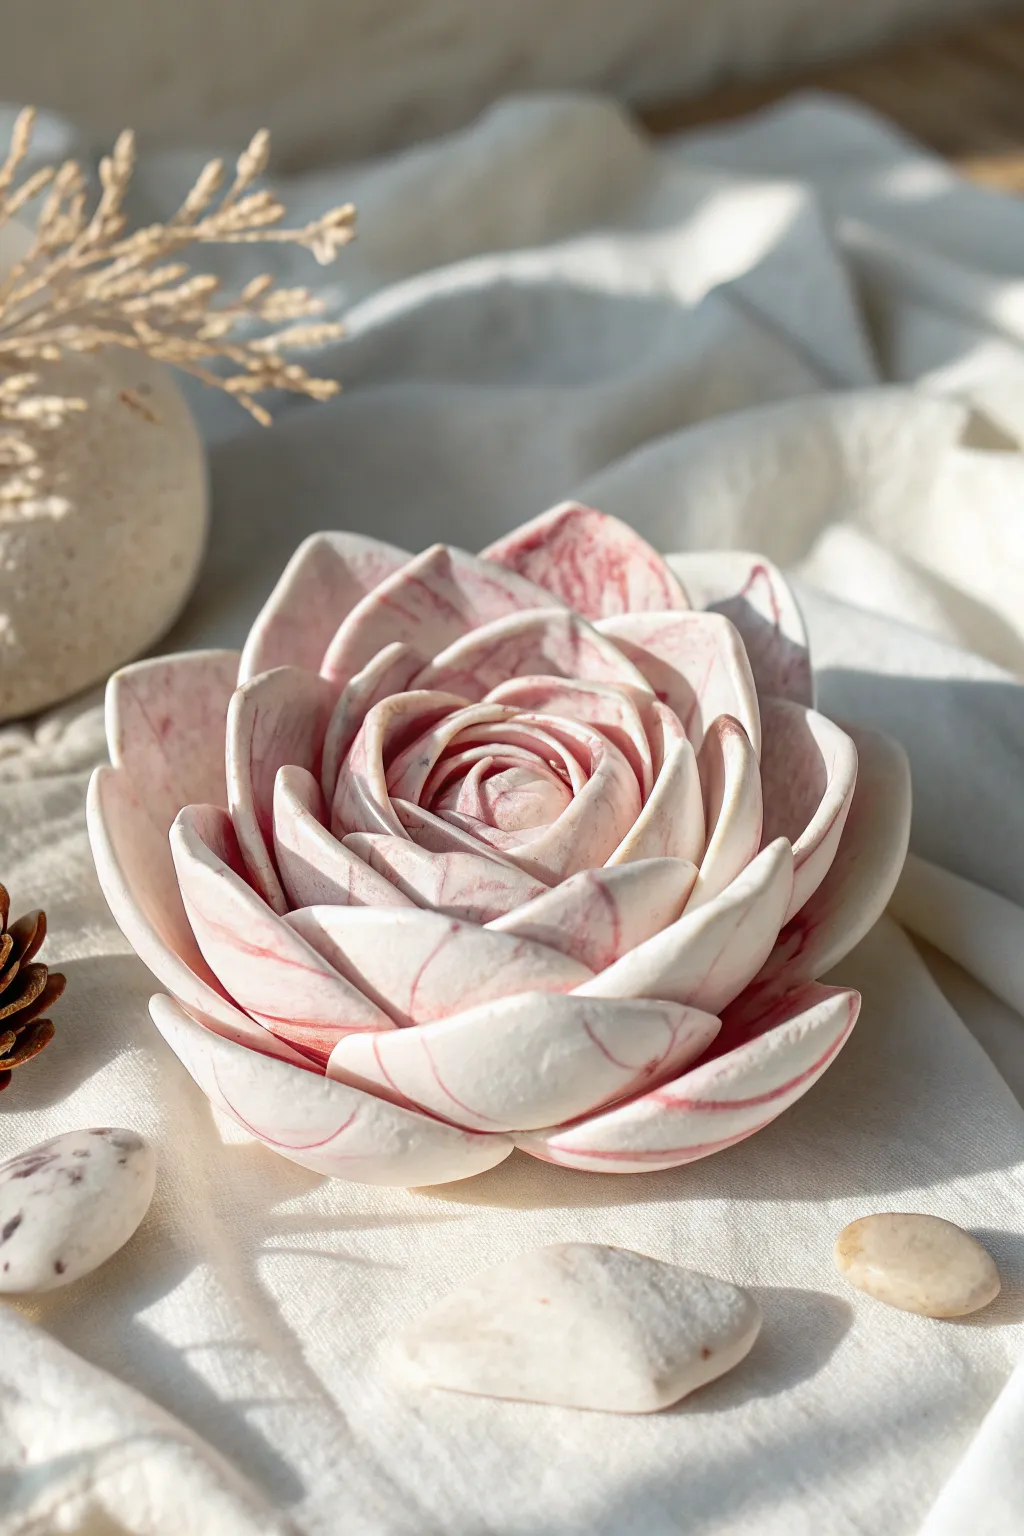
This elegant clay lotus captures the delicate beauty of nature with a sophisticated twist. By swirling rich red or pink clay into a white base, you create stunning, vein-like marble effects that make each petal completely unique.
Detailed Instructions
Materials
- White baking polymer clay (approx. 2oz)
- Deep pink or red polymer clay (very small amount)
- Acrylic rolling pin or clay machine
- Teardrop-shaped petal cutter (medium to large sizes)
- Small ball tool
- Curved sculpting tool or toothpick
- Smooth work surface (glass or tile)
- Aluminum foil
- Oven for baking
Step 1: Creating the Marbled Cane
-
Condition the Clay:
Start by thoroughly kneading your white clay until it is soft and pliable. Do the same with a tiny pinch of the deep pink or red clay. -
Form the Base Log:
Roll the white clay into a thick, short cylinder, about an inch in diameter. -
Add the Color Veins:
Roll the pink clay into extremely thin, thread-like snakes. Lay these randomly across the length of your white cylinder. You don’t need many; less is more for this delicate look. -
Twist and Fold:
Gently twist the cylinder like a candy cane to spiral the colored lines. Fold the log in half, roll it smooth again, and twist once more. -
Check the Marbling:
Stop mixing before the colors blend into a solid pink. You want distinct, thin streaks of color running through the white.
Keep it Clean
Make sure your hands and tools are spotless before starting. White clay picks up dust instantly. Keep baby wipes nearby to clean your hands frequently while sculpting.
Step 2: Shaping the Petals
-
Roll the Sheet:
Using your acrylic roller or pasta machine, flatten your marbled log into a sheet about 3mm thick. Notice how the veins stretch horizontally. -
Cut the Shapes:
Use your teardrop cutter to punch out roughly 20-25 petals. If you have graduated sizes, cut 6 small, 8 medium, and 10 large. -
Thin the Edges:
Place a petal in your palm. Using your thumb or a ball tool, gently thin out the edges of the clay without thinning the center structural ridge too much. -
Curve the Petal:
Gently pinch the pointed tip of the petal to sharpen it, then slighty curve the rounded base inward so it cups naturally.
Step 3: Assembling the Bloom
-
Create the Core:
Take a small scrap of leftover clay and roll it into a marble-sized ball. I suggest flattening the bottom slightly so it sits stable on your work surface. -
The Center Bud:
Take your smallest petal and curl it tightly into a spiral tube. Press this upright into the center of your base ball. -
First Layer:
Wrap three small petals around the center spiral, overlapping them slightly. Keep them tight and upright, hugging the center. -
Building Outward:
Begin placing the medium petals for the next row. Arrange them so the center of each new petal covers the seam between two petals in the previous row. -
Open the Bloom:
As you add the larger outer petals, angle them slightly more open and away from the center to simulate a blooming flower. -
Refine the Shape:
Once all petals are attached, gently nudge the tips of the outer petals downward or outward to create movement. -
Support the Structure:
If the outer petals are drooping too much effectively, tuck small pieces of crumpled aluminum foil under them for support during baking. -
Bake:
Transfer the flower carefully to a baking sheet. Bake according to your clay manufacturer’s instructions (usually around 275°F or 130°C for 15-30 minutes). -
Cool and Finish:
Let the flower cool completely in the oven before moving it, as hot clay is fragile. Remove any foil supports once fully hardened.
Colors Too Blended?
If your pink veins disappeared into the white, you over-kneaded the marble mix. Start over with fresh white clay and stop mixing the moment you see distinct streaks.
Now you have a permanent, serene botanical sculpture perfect for a desk arrangement or paperweight
Abstract Sculptural Flowers With Wavy Petals
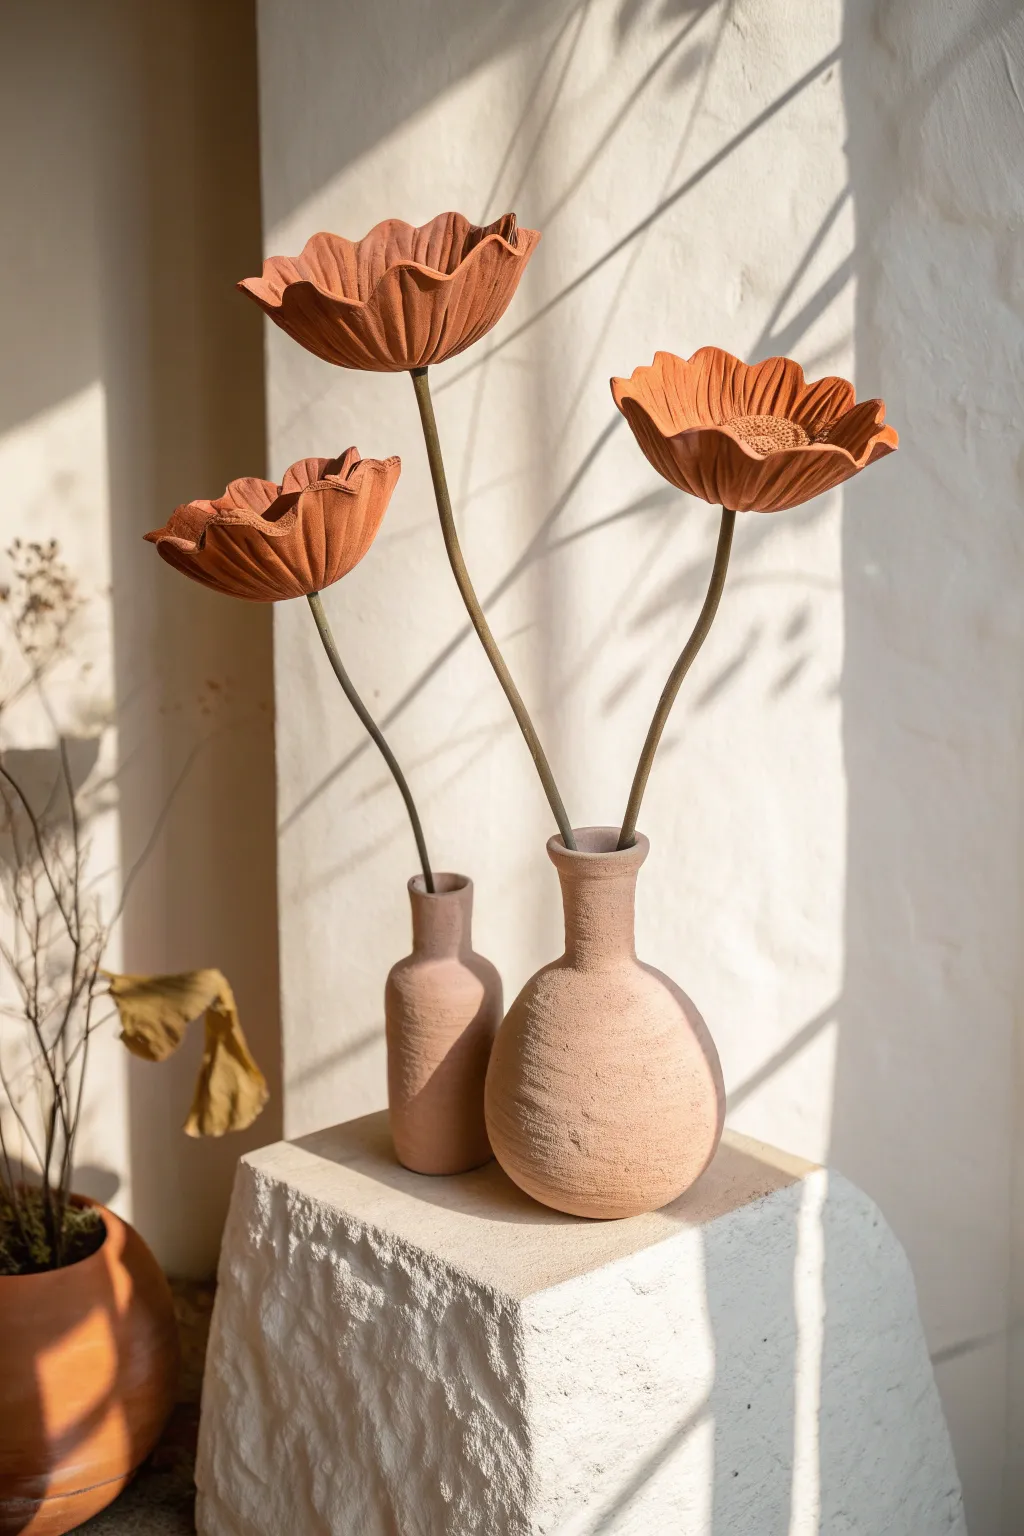
These striking, sculptural flowers mimic the warm tones of baked earth, featuring organic, wavy petals that cup upwards toward the light. Paired with matching textured bud vases, this set brings a modern, minimalist desert aesthetic into any corner of your home.
Step-by-Step Tutorial
Materials
- Air-dry clay or polymer clay (terracotta color)
- Rigid floral wire or thin metal rods (12-16 gauge)
- Rolling pin
- Circle cutter or bowl (approx. 4-5 inches diameter)
- Small bowl or sphere (for molding shape)
- Texture sponge or stiff bristle brush
- Needle toool or toothpick
- Wire cutters
- Craft glue or liquid clay
- Acrylic paint (burnt sienna, optional for color correction)
- Matte varnish spray
Step 1: Sculpting the Vases
-
Form the base:
Start with a ball of clay roughly the size of a large orange. Create a pinch pot by pushing your thumb into the center and pinching the walls to an even thickness. -
Shape the body:
Gently paddle the outside of the pot to smooth it into a rounded, bulbous shape. For the taller bottle vase, elongate the clay slightly into a cylinder. -
Add the neck:
Roll a thick coil of clay and attach it to the opening of your base piece. Smooth the seam downwards thoroughly so the join disappears completely. -
Flare the rim:
Pinch the very top of the neck and gently flare it outwards to create a soft, rounded lip. -
Texture the surface:
Take a rough sponge or a stiff bristle brush and stipple the entire surface of the damp clay. This creates that gritty, stone-like texture that makes the piece look organic.
Natural Texture Hack
Don’t have a texture tool? Ball up a piece of aluminum foil and roll it gently over the wet clay to create a perfect stone-like surface.
Step 2: Creating the Flower Heads
-
Roll the clay:
Roll out a slab of clay to about 1/4 inch thickness. Use a bowl or circle cutter to cut out a clean circle, approximately 5 inches in diameter. -
Texture the petals:
Before shaping, lightly press your texture sponge onto the clay slab to give it the same earthy finish as the vases. -
Create the waves:
Drape the clay circle over a small bowl or a sphere mold to establish a cupped shape. Using your fingers, gently pinch and pull the edges to create undulating, wavy ripples. -
Detail the center:
Using a needle tool, score faint lines radiating from the center of the flower out toward the wavy edges to simulate veins. -
Make the stamen:
Form a small, flattened button of clay and press it into the bottom center of the flower bloom. Texture this center piece heavily with a needle tool to look like pollen. -
Attach the stem mount:
On the *back* (bottom) of the flower, add a small, thick mound of clay. Pierce a hole into this mound deep enough to accept your wire stem later, but don’t insert the wire yet. -
Dry the components:
Allow both the vases and the flower heads to dry completely according to your clay’s instructions. If using oven-bake clay, bake them now.
Drooping Petals?
If the clay is too soft and the waves flatten out, support the petals with crumpled balls of paper towel or plastic wrap underneath while they dry.
Step 3: Assembly & Finishing
-
Prepare the stems:
Cut your metal rods or floral wire to varying lengths to create height interest. Bend them very slightly to give them a natural, organic curve rather than being perfectly straight. -
Color the stems:
If your wire is shiny silver, paint it with a mix of burnt sienna and grey acrylic paint to match the aged look of the clay. Let this dry fully. -
Connect the blooms:
Apply a strong craft glue (or super glue) to the tip of a wire stem and insert it firmly into the hole you created on the back of a flower head. Hold it steady until the glue sets. -
Unified finish:
If your clay color isn’t perfectly uniform, dry brush a little terracotta or rust-colored paint over the textured areas to highlight the depth. -
Final Arrangement:
Place the stems into your vases. I like to tilt the heads slightly so they seem to be looking at each other.
Now you have a timeless, sculptural floral arrangement that requires absolutely zero water to maintain