
Mini clay food is my favorite kind of project because you get that instant “I made a tiny meal!” satisfaction without needing fancy sculpting skills. If you can roll a ball, flatten a disc, and stack a few layers, you can make a whole spread of easy clay food that looks adorable on a shelf, keychain, or mini plate.
Mini Cheeseburger Stacks
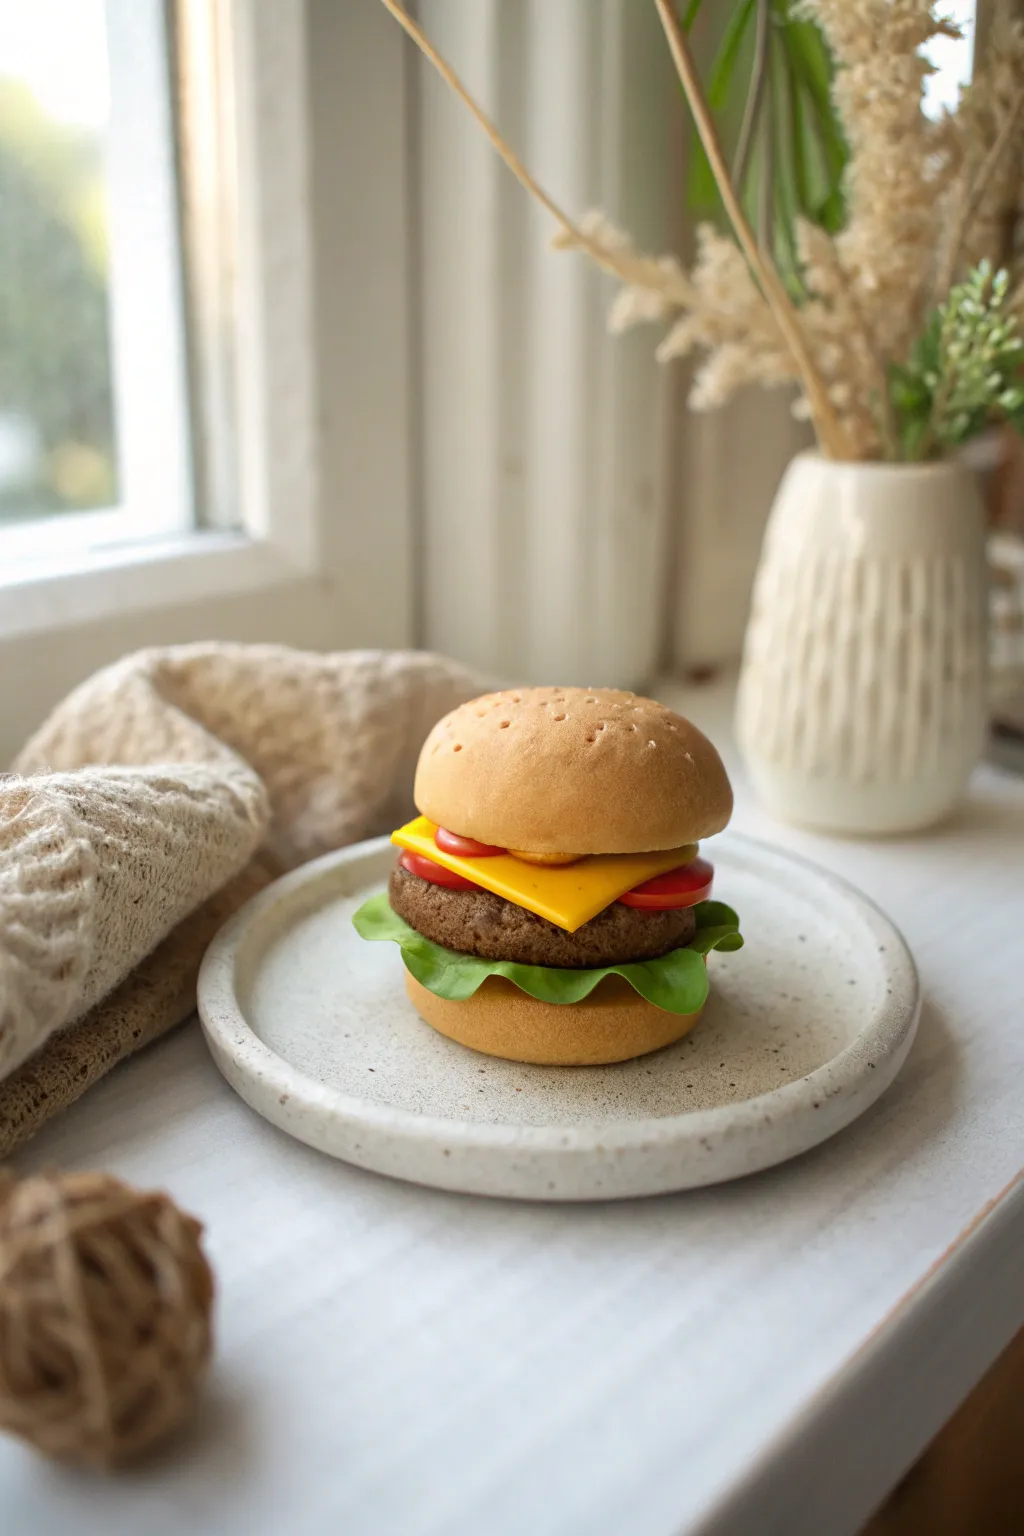
This charming little cheeseburger project captures the fun of miniature food sculpting with surprising realism. Perfect for dollhouse enthusiasts or quirky decor, the finished piece features textured buns, a rich meat patty, melted cheese, and crisp lettuce leaves.
Step-by-Step Tutorial
Materials
- Polymer clay (colors: ochre/tan, dark brown, red, green, yellow)
- Soft pastel chalks (orange, brown, dark yellow) for shading
- Liquid polymer clay (translucent or bake-and-bond)
- Small artist paintbrush
- Ball stylus tool
- Needle tool or toothpick
- Toothbrush or crumpled foil (for texture)
- X-acto knife or clay blade
- Rolling pin for clay
- Small round cutter (optional, or just shape by hand)
- Baking sheet and oven
Step 1: Baking the Buns
-
Mix the bread color:
Start by mixing a light tan or ochre clay with a good amount of white. You want a soft, warm bread dough color. If it looks too synthetic, add the tiniest speck of translucent clay to give it depth. -
Shape the bun halves:
Roll two equal spheres of your bread-colored clay. Flatten the bottom one gently to form a disc for the heel. For the crown (top bun), adhere to a dome shape, smoothing the edges so they curve underneath slightly. -
Texture the surface:
Take a clean toothbrush or a ball of crumpled aluminum foil and gently tap it over the entire surface of both bun halves. This creates that realistic baked-bread porosity. -
Add shading:
Use a knife to scrape some powder off your orange and brown soft pastels. With a dry brush, dust the top center of the crown bun heavily with orange-brown, fading out toward the edges to simulate a golden-brown crust. -
Create sesame seeds:
Actually, looking closely at this specific project, the seeds are indentations rather than added clay. Use a needle tool to poke shallow, tiny holes scattered across the top bun in a random pattern.
Step 2: The Patty & Cheese layer
-
Form the patty:
Mix dark brown clay with a touch of black and textured red to get a ‘cooked meat’ hue. Roll into a ball and flatten it into a thick disc that is slightly wider than your buns. -
Texturing the meat:
This needs rough texture. Use a stiff bristles tool or poke completely around the edge of the patty with a needle tool to create a crumbly, uneven surface. Don’t smooth it out. -
Slice the cheese:
Roll out yellow clay very thinly. It should look like a processed cheese slice. Cut a square that is large enough to drape over the corners of your burger patty. -
Melt the corners:
Place the yellow square onto the raw meat patty. Gently press the four corners downward so they look like they are beginning to melt over the hot meat.
Pastel Shading Tip
Don’t just shade the top bun! Lightly dust the edges of the lettuce with a lighter yellow-green pastel to simulate fresh, crisp edges before baking.
Step 3: Veggies & Assembly
-
Prepare lettuce:
Roll a small amount of green clay until it is paper-thin. Tear rough, ragged edges rather than cutting them. This mimics the natural tear of leafy greens. -
Ruffle the leaves:
Using a ball tool, roll gently along the torn edges of the green clay to ruffle and wave them. I like to bunch the center slightly so it has volume. -
Slice tomatoes:
Create a cane of red clay (red center, slightly lighter red rim) or just use solid red. Slice two thin rounds. Smooth the circumferences with your finger so they aren’t sharp. -
Begin stacking:
Apply a tiny dab of liquid clay or bake-and-bond to the bottom bun. Place your ruffled lettuce on top, ensuring the wavy edges spill over the perimeter. -
Add the main protein:
Place the patty-and-cheese assembly on top of the lettuce. The weight should naturally press the lettuce down slightly, which adds to the realism. -
Place the tomatoes:
Layer the two tomato slices on top of the cheese. Offset them slightly so they don’t sit in a perfect tower. -
Final assembly:
Add a final drop of liquid clay to the top of the tomatoes and press the top bun (crown) securely in place. Check from all angles to ensure the stack isn’t learning too much. -
Bake the project:
Bake strictly according to your clay manufacturer’s instructions (usually 275°F/135°C for 15-30 minutes). Let it cool completely before moving it.
Make it a Magnet
Before baking, firmly press a strong neodynium magnet into the bottom bun. Bake it upside down so the magnet sets flush with the clay.
Now you have a delicious-looking miniature that stays fresh forever


Hot Dog With Mustard Swirl
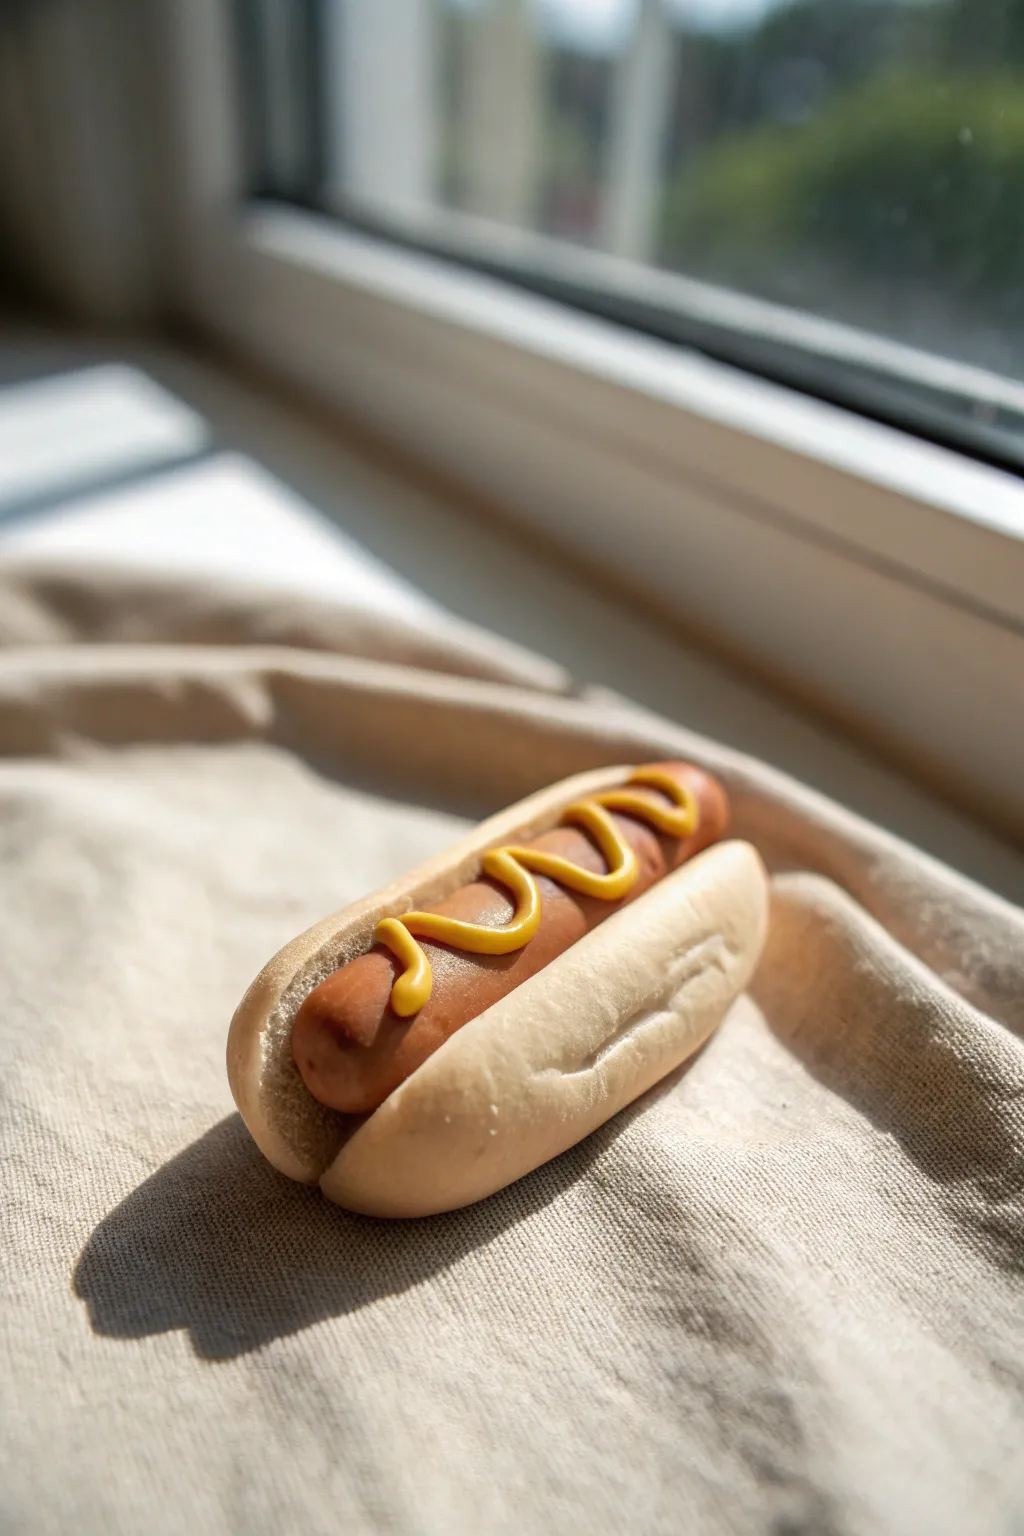
Capture the fun of a summer cookout with this incredibly realistic clay hot dog sculpture. Perfect for dollhouse enthusiasts or charm collectors, this tutorial guides you through shaping a fluffy-looking bun and topping it with a classic mustard swirl.
Step-by-Step Guide
Materials
- Polymer clay (beige/tan, reddish-brown, yellow)
- Pastel chalks (brown, orange, ochre)
- Soft paintbrush for shading
- Detailing tool or needle tool
- Liquid clay or translucent liquid Sculpey (TLS)
- Clay blade or craft knife
- Small toothbrush or sandpaper (for texturing)
- Oven for baking
Step 1: Creating the Bun
-
Mix the Dough Color:
Start by conditioning your beige clay. If it looks too stark, mix in a tiny pinhead-sized amount of ochre or translucent clay to give it that realistic baked bread tone. -
Shape the Base:
Roll the clay into a smooth log shape, roughly 1.5 inches long. Round off the ends gently so it looks like an oval cylinder rather than a rectangle. -
Slice the Bun:
Using your clay blade, make a clean cut down the center of the log lengthwise. Don’t cut all the way through; leave the bottom hinge intact so the two halves stay connected. -
Open and Adjust:
Gently pull the two halves slightly apart to create the cradle for the hot dog. Soften the cut edges with your fingertip so they look like soft dough rather than sharp plastic. -
Texture the Crust:
Take a clean toothbrush or piece of sandpaper and gently tap the entire outer surface of the bun. This removes fingerprints and mimics the porous texture of baked bread. -
Add Realistic Creases:
Use a detailing tool to press delicate, shallow lines on the sides of the bun. Real bread wrinkles when it bakes, and these imperfections sell the realism.
Pastel Shading Tip
Apply chalk pastels in light layers. You can always add more brown for a ‘toasted’ look, but it’s hard to remove if you apply too much at once.
Step 2: Forming the Frankfurter
-
Tint the Meat Clay:
Mix reddish-brown clay with a tiny bit of translucent clay. This helps the ‘meat’ look slightly cured and less opaque after baking. -
Roll the Sausage:
Roll this color into a snake that is slightly longer than your bun. The ends should be rounded and smooth. -
Check the Fit:
Place the sausage into the bun to check the size. It should nestle in comfortably with the ends peeking out just barely past the bread. -
Texture the Ends:
Use a needle tool or a crumpled ball of foil to tap the very ends of the hot dog. This mimics the gathered casing texture seen on real franks. -
Pre-Shading the Meat:
Dust the hot dog lightly with a mix of brown and red pastel chalk shavings using a soft brush to add depth before placing it permanently.
Step 3: Baking and Topping
-
Shade the Bun:
Before assembly, use ochre and orange pastel chalks to shade the top and sides of the bun. Brush heavier brown chalk along the bottom edges for a ‘well-baked’ crust look. -
Assemble the Piece:
Place a thin line of liquid clay inside the bun groove to act as glue. Press the hot dog firmly into place. -
Prepare the Mustard:
Mix yellow clay with liquid clay in a small container until it reaches a consistency similar to thick frosting or paste. It should hold a peak but flow smoothly. -
Pipe the Swirl:
I prefer to use a needle tool for this; dip the tip into your mustard mix and drape it across the hot dog in a zigzag pattern. Let gravity help the ‘sauce’ settle naturally. -
Final Texture Check:
Look over the piece one last time. If you smudged the bun texture while applying mustard, re-tap those areas lightly with your toothbrush. -
Bake:
Bake the sculpture according to your clay manufacturer’s instructions, usually at 275°F (130°C) for about 15-20 minutes. -
Cool and Finish:
Allow the piece to cool completely. If you want a shiny look for the meat, apply a tiny amount of satin glaze to just the hot dog part, keeping the bun matte.
Level Up: Relish
Chop cured green clay into tiny microscopic cubes and mix with translucent liquid clay. Dab this ‘relish’ alongside the mustard for extra detail.
Once cooled, your delicious-looking miniature is ready to act as a quirky keychain or a fun fridge magnet


Pizza Slice With Easy Toppings
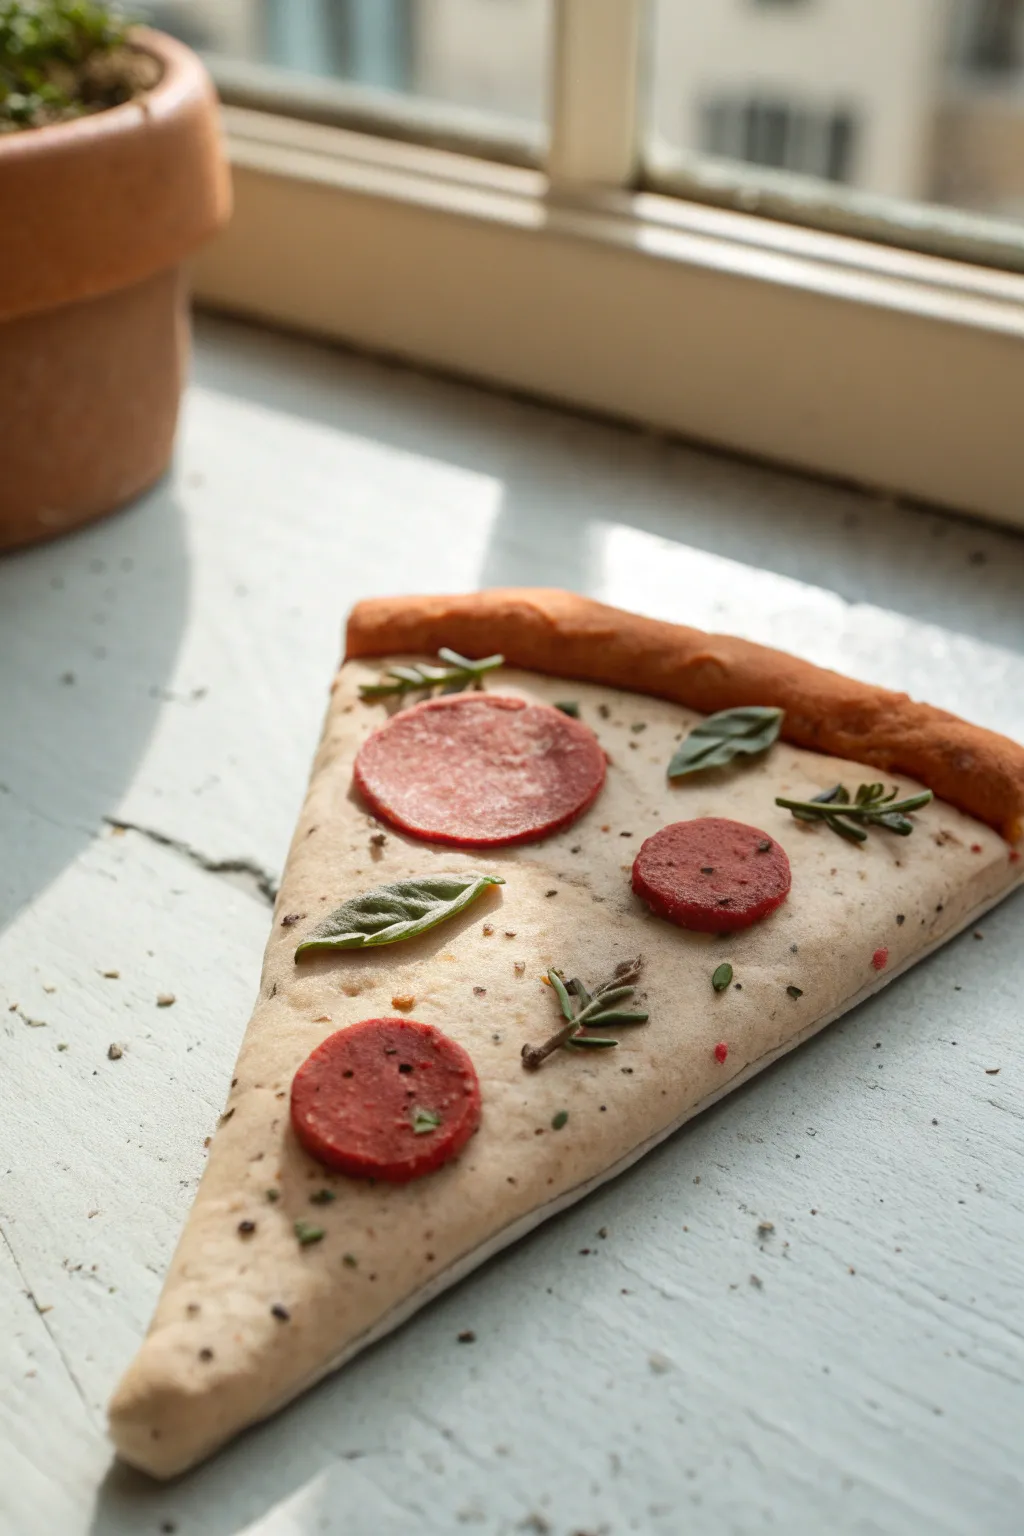
Create a mouth-watering slice of pepperoni pizza that looks good enough to eat but will last forever as a charming decoration. This project uses simple clay techniques to achieve realistic textures like bubbly cheese, crispy crust, and fresh herb toppings.
Step-by-Step Tutorial
Materials
- Polymer clay (beige/ecru, translucent white, terracotta/red-brown, dark green, olive green)
- Pastel chalks (brown, yellow ochre, orange)
- Soft paintbrush for shading
- Texturing tools (toothbrush, needle tool, aluminum foil ball)
- Blade or craft knife
- Liquid polymer clay or bake-and-bond
- Rolling pin or pasta machine
- Gloss glaze (optional)
Step 1: Forming the Base
-
Mix the dough color:
Start by mixing beige clay with a small amount of translucent white. This gives the pizza dough a realistic, slightly baked look rather than a flat, plastic color. -
Shape the wedge:
Roll your clay into a slightly flattened triangle. Don’t worry about being perfectly geometric; real pizza slices are often a bit irregular. -
Add the crust:
Roll a snake or log of a slightly darker beige clay. Attach this to the wide end of your triangle, blending the seam onto the bottom side but leaving a distinctive risen lip on top. -
Texture the dough:
Gently press a clean toothbrush or a ball of crinkled aluminum foil all over the surface of the slice (excluding the outer crust rim) to simulate the porous texture of bread and cheese. -
Pre-shade the crust:
Scrape some brown and yellow ochre pastel chalk into a dust. Use a soft brush to lightly dust the outer crust rim, focusing on the very edges to mimic a golden-brown bake.
Step 2: Creating the Toppings
-
Make the sauce layer:
Mix a tiny bit of red clay with liquid polymer clay to create a ‘sauce.’ Spread a very thin, irregular layer near the crust line so it peeks out slightly. -
Applying the cheese:
Roll out a very thin sheet of ecru or pale yellow clay. Lay this over the main triangle area. Tear the edges slightly rather than cutting them to look like melted mozzarella. -
Pepperoni prep:
Mix terracotta clay with a tiny touch of translucent. Roll it into a log and let it rest for a moment so it holds its shape during slicing. -
Slice and texture pepperoni:
Slice the log into thin rounds. Use the bristles of your toothbrush to tap the surface of each slice, giving it that meaty, uneven texture. -
Place the meats:
Arrange the pepperoni slices on your pizza. Press them down firmly so they look embedded in the cheese, not just floating on top. -
Create rosemary sprigs:
Roll very tiny, thin snakes of olive green clay. Cut them into small segments and arrange them in branching patterns to look like dried rosemary or thyme sprigs. -
Make basil leaves:
Flatten small balls of dark green clay into teardrop shapes. Use a needle tool to impress a central vein and gently curve the edges upward for liveliness.
Texture Secret
For the most realistic baked cheese look, press a piece of coarse sandpaper gently onto the clay surface before adding toppings to create tiny pores.
Step 3: Final Details & Baking
-
Add heavy seasoning:
I find this step crucial for realism: Grate tiny specks of black and dark brown baked clay (or use coarse black pepper) and sprinkle them generously over the entire slice. -
Final shading:
Apply a second pass of pastel chalk shading. Dust a little orange-brown near the pepperoni edges to simulate grease release, and darken the crust slightly more. -
Bake the project:
Bake your slice according to your clay manufacturer’s instructions, usually around 275°F (130°C) for 15-30 minutes depending on thickness. -
Finishing touches:
Once cool, you can dab a tiny amount of gloss glaze onto just the pepperoni slices to make them look oily and sizzling.
Make it a Magnet
Before baking, firmly press a strong ceramic magnet into the back of your slice. Bake it with the magnet attached for an instant fridge decoration.
Enjoy displaying your delicious-looking creation on a shelf or turning it into a fun magnet.


French Fries in a Little Holder
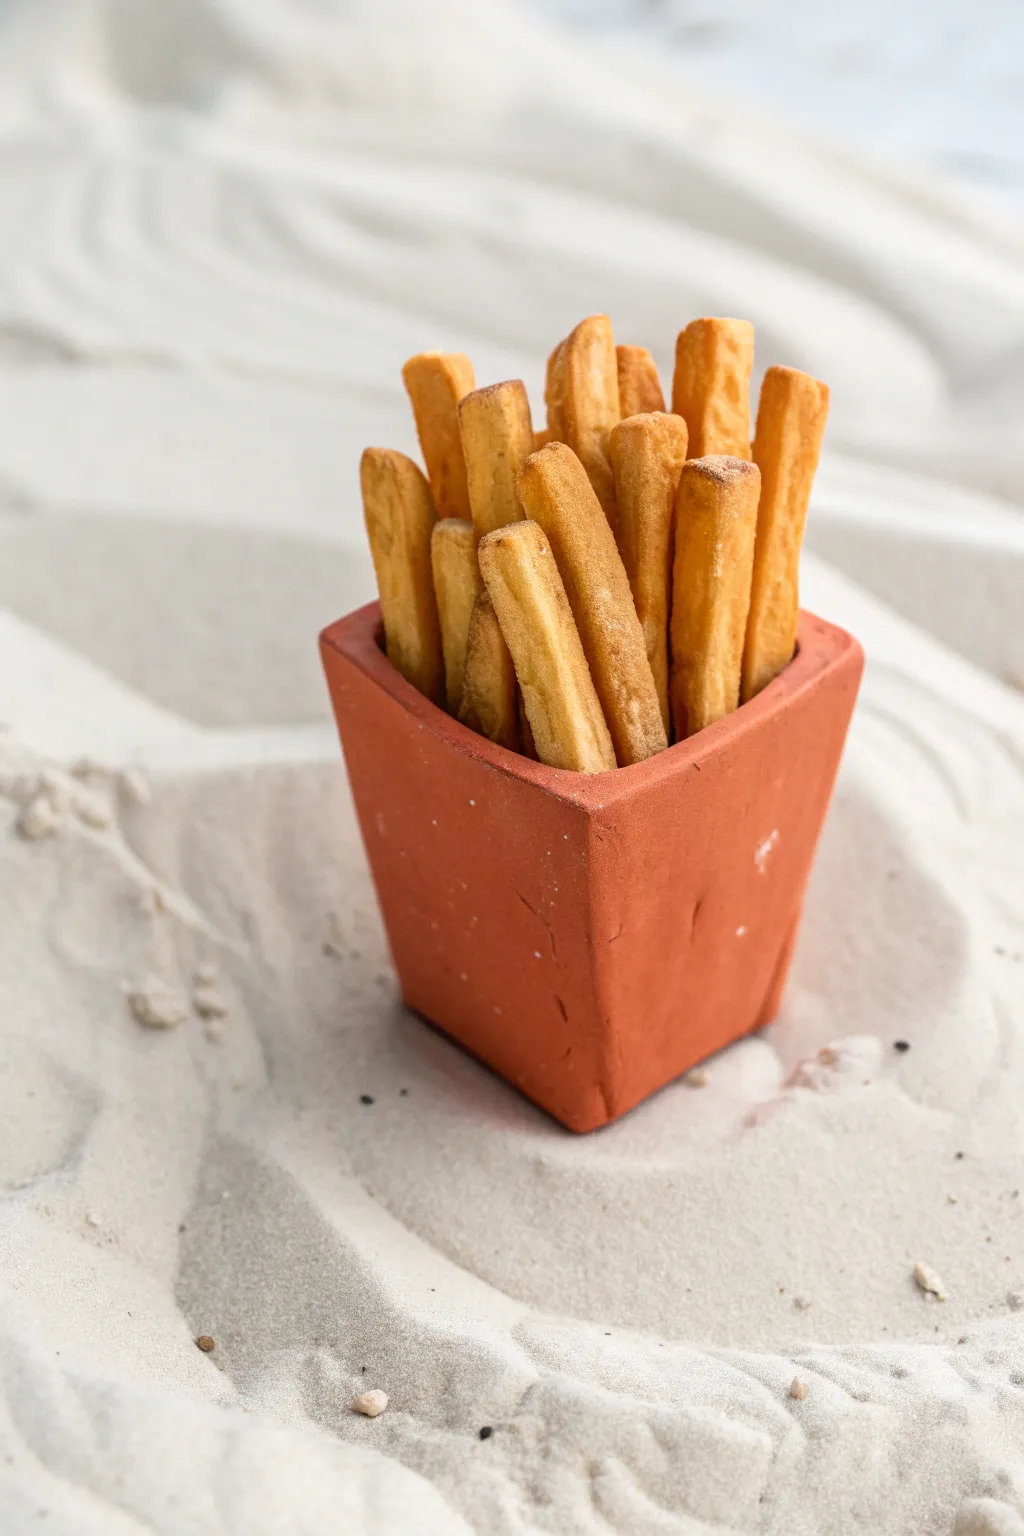
This charming little sculpture captures the classic look of golden, crispy french fries tucked into a rustic terracotta-style container. It’s a fantastic beginner project that focuses on simple shaping and realistic shading techniques to create an appetizing miniature.
How-To Guide
Materials
- Polymer clay (white, translucent, and terracotta/red-brown colors)
- Pastel chalks (yellow ochre, golden brown, burnt umber)
- Soft paintbrush for dusting
- Craft knife or tissue blade
- Needle tool or old toothbrush
- Rolling pin or pasta machine
- Sandpaper or nail file (optional)
- Liquid polymer clay (optional for adhesion)
- Matte varnish
Step 1: Crafting the Holder
-
Prepare the Clay:
Start by conditioning a block of terracotta-colored clay until it’s soft and pliable. If you don’t have terracotta, mix red, brown, and a tiny bit of orange to achieve that earthy pottery hue. -
Roll the Sheets:
Roll your conditioned clay into a slab about 3mm thick. You want it sturdy enough to hold its shape but not too chunky. -
Cut the Base:
Cut a small square for the bottom of your container, roughly 1 inch by 1 inch. -
Cut the Sides:
Cut four trapezoid shapes for the walls. The bottom of each trapezoid should match the width of your base square, while the top should be slightly wider to create that flared, open look. -
Assembly:
Press the bottom edges of your walls against the base square, smoothing the seams on the inside with your finger or a modeling tool. -
Join the Walls:
Bring the side walls up and pinch the vertical seams together gently. I find using a small amount of liquid clay here helps act as a ‘glue’ for a stronger bond. -
Refine the Shape:
Use your fingers to smooth out the corner seams on the outside so the container looks like one solid piece. Tap the bottom gently on your work surface to ensure it sits flat. -
Add Texture:
For that realistic, slightly rough pottery look, gently dab the surface with a piece of sandpaper or an old toothbrush. Don’t overdo it; just enough to remove fingerprints and add grit.
Texturing Tip
Use a toothbrush to stipple the sides of the fries. This creates tiny pockmarks that look exactly like the bubbly surface of deep-fried potato skins.
Step 2: Creating the Fries
-
Mix the Fry Color:
Combine white clay with a good amount of translucent clay and a tiny pinch of yellow ochre. You want a raw potato color that will look slightly waxy when baked. -
Form the Potato Block:
Roll this mixture into a thick log or block, approximately the height you want your longest fries to be. -
Cut the Fries:
Using your rigid blade, slice the block into thick strips. Vary the width slightly; real hand-cut fries are rarely perfectly uniform. -
Soften the Edges:
Take each individual fry and gently tap the sharp cut edges with your fingertip. You want them to look soft and fried, not sharp and geometric. -
Add Fried Texture:
To mimic the crispy potato texture, drag a needle tool lightly along the sides of the fries or press them gently against medium-grit sandpaper. -
Initial Shading:
Scrape some bright yellow and yellow-ochre pastel chalk into a powder. Use a soft brush to dust the raw fries, focusing on the edges where browning would naturally occur. -
Arrange the Fries:
Place a scrap ball of foil or clay inside the terracotta holder to act as a filler. Start sticking your fries into the holder, arranging them so they stick up at different angles and heights. -
Deepen the Color:
Once arranged, dust the very tips and outer edges with a darker golden-brown pastel. This gradient mimics perfectly fried potatoes.
Step 3: Baking and Finishing
-
Bake:
Bake the entire piece according to your clay manufacturer’s instructions, usually around 275°F (130°C) for 15-30 minutes. -
Cool Down:
Let the piece cool completely before handling. The translucent clay in the fries needs time to set properly to achieve that realistic depth. -
Add Salt:
Dab tiny spots of liquid clay or matte varnish onto the fries. Sprinkle extremely fine white sand or white embossing powder over the wet spots to simulate salt crystals. -
Varnish:
Finish by sealing the holder with a matte varnish to protect the surface while keeping the clay looking natural and dry.
Level Up: Sauces
Mix red liquid clay or red acrylic paint with gloss varnish. Drip a tiny blob onto a few fries for a ketchup effect, or mix white/yellow for mayo.
Place your finished miniature on a shelf or use it as a quirky paperweight to bring a smile to your desk

The Complete Guide to Pottery Troubleshooting
Uncover the most common ceramic mistakes—from cracking clay to failed glazes—and learn how to fix them fast.
Taco With Layered Fillings
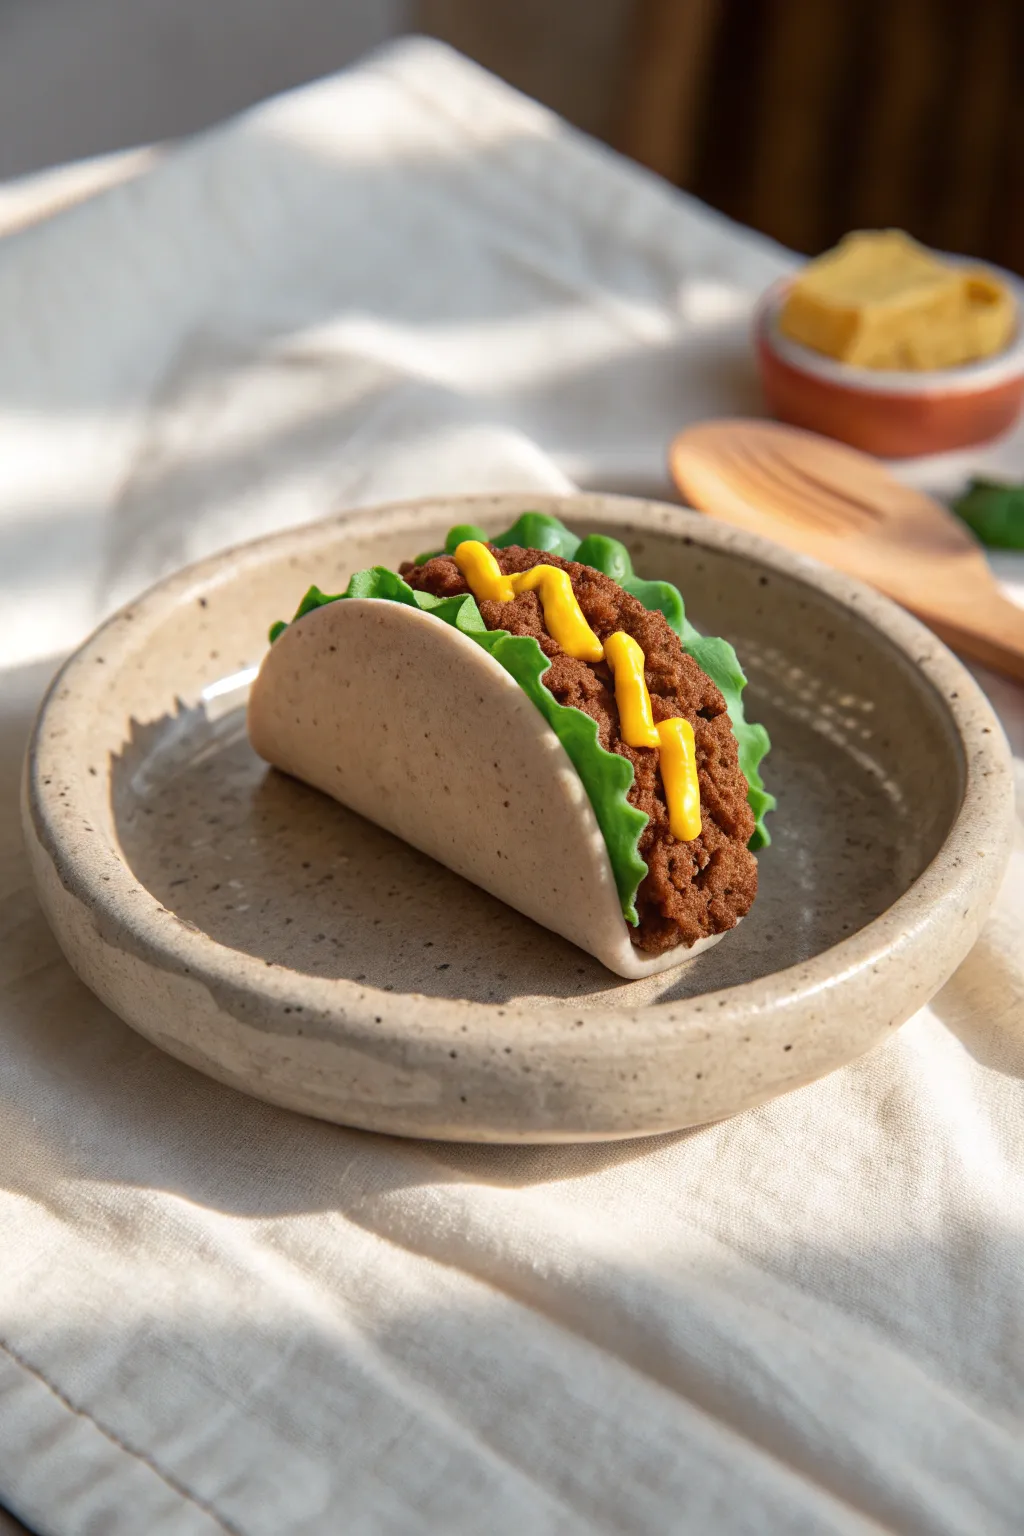
This charming little taco sculpture captures the fun of Mexican food in a permanent, bite-sized form. With its realistic textured meat and vibrant, ruffled lettuce, this piece makes for a delightful fridge magnet or a quirky desk accessory.
Step-by-Step Tutorial
Materials
- Polymer clay: Tan/Beige (for shell)
- Polymer clay: Dark Brown (for meat)
- Polymer clay: Bright Green (for lettuce)
- Polymer clay: Yellow (for cheese/sauce)
- Rolling pin or pasta machine
- Circle cutter (approx. 2-3 inches)
- Texture tool: Toothbrush, needle tool, or ball of aluminum foil
- Liquid polymer clay (Translucent or Bake & Bond)
- Clay extruder (optional, for the cheese)
- Gloss glaze (optional)
Step 1: Preparing the Shell
-
Condition the base clay:
Start by thoroughly conditioning your tan or beige polymer clay until it is soft and pliable. If you want a speckled ‘corn tortilla’ look, mix in tiny flecks of brown or black clay or black pepper. -
Roll out the tortilla:
Roll the tan clay into a flat sheet, about 2-3mm thick. You want it thick enough to hold its shape but thin enough to look like a tortilla. -
Cut the circle:
Use your circle cutter to punch out a perfect round shape. If the edges are too sharp, gently tap them with your finger to soften the look. -
Add surface texture:
Lightly press a toothbrush or a crumpled ball of aluminum foil over the surface of the circle to give it a realistic, baked flour texture. -
Form the taco shape:
Gently fold the circle in half, but do not crease the bottom. Insert a small log of scrap clay or a rolled piece of paper towel inside the fold to keep it open while you work on the fillings.
Step 2: Creating the Meat Filling
-
Mix the meat color:
Take your dark brown clay. If it looks too flat, I prefer mixing in a tiny bit of red or black to give it depth. -
Create the base texture:
Crumble the brown clay into small, uneven bits. You don’t want a smooth log; you want it to look like ground beef. -
Form the main filling shape:
Create a rough log shape from the crumbled clay that will fit inside the shell. It should be slightly shorter than the shell’s length. -
Detailing the meat:
Use a needle tool or toothpick to pick at the surface of the brown log, creating deep divots and a granular texture. The rougher, the better for realism.
Texturing Tip
For ultra-realistic meat, mix sand or used dried coffee grounds into the brown clay. This creates natural-looking graininess instantly.
Step 3: Adding Lettuce and Assembly
-
Roll the lettuce clay:
Roll out your green clay very thinly, much thinner than the tortilla shell. -
Cut and ruffle:
Tear or cut uneven strips of the green clay. Using your fingers or a ball tool, stretch and ruffle the edges to imitate leafy greens. -
Prepare the shell for filling:
Remove the temporary spacer from your taco shell. Apply a small amount of liquid polymer clay inside the bottom of the shell to act as glue. -
Insert the lettuce:
Place the ruffled green strips inside the shell first, arranging them so the wavy edges poke out generously from both sides. -
Insert the meat:
Nestle the textured brown meat log on top of the lettuce layer. Press it down gently so it settles in but doesn’t lose its texture.
Make it Spicy
Make tiny red cubes from clay to simulate diced tomatoes, or use white clay scraps to adding a dollop of sour cream on top.
Step 4: The Final Topping
-
Create the cheese sauce:
Condition the yellow clay until it is very soft. Roll it into a thin snake by hand, or use a clay extruder with a small round disc for a uniform shape. -
Apply the drizzle:
Drape the yellow snake over the top of the meat in a zigzag pattern. Let it wiggle naturally over the bumps of the meat texture. -
Final shaping check:
Check the taco from all angles. Ensure the shell isn’t collapsing and the fillings are visible. -
Baking:
Bake the piece according to your clay manufacturer’s instructions (usually 275°F/130°C for 15-30 minutes). Support the sides with extra foil if needed so it doesn’t flop open.
Once cooled, your delicious-looking taco is ready to be displayed as a fun focal point
Cute Fruit Trio: Apple, Orange, Banana
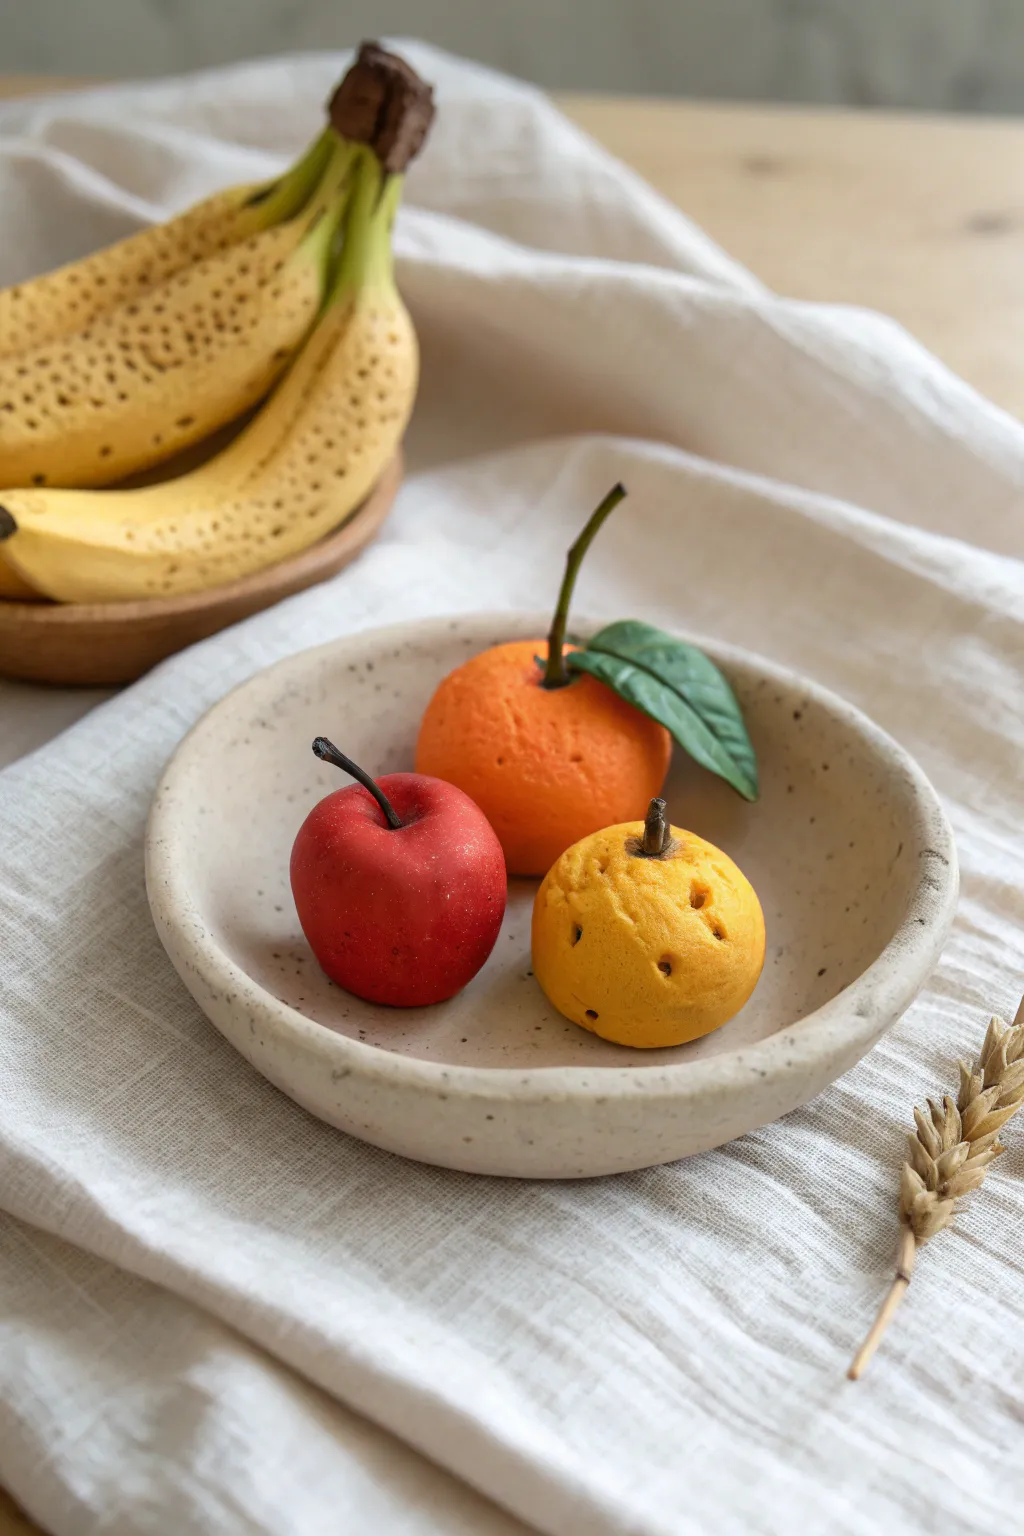
Create a charming miniature fruit bowl that looks good enough to eat but will last forever. These textured clay pieces—a ruby red apple, a vibrant orange, and a speckled lemon-quince—are perfect for beginners looking to practice realistic texturing.
How-To Guide
Materials
- Air-dry clay or polymer clay (white or pre-colored)
- Acrylic paints (red, orange, yellow, brown, green)
- Small ball tool or toothpick
- Old toothbrush or stiff bristle brush
- Wire or real dried stems for stalks
- Gloss and matte varnish
- Fine sandpaper
- Sculpting tools (needle tool, smoother)
- Green paper or clay for leaves
Step 1: Forming the Base Shapes
-
Size your portions:
Start by dividing your clay into three equal-sized portions slightly larger than a golf ball. Roll each piece into a smooth sphere using the palms of your hands to eliminate any cracks. -
Shape the apple:
Take one sphere and gently taper the bottom so it’s slightly narrower than the top. Press your thumb into the top center to create the dip where the stem will go, and slightly flatten the bottom so it stands upright. -
Texture the orange:
For the orange, keep the sphere round but flatten the bottom very slightly. Use an old toothbrush or a stiff stippling brush to tap over the entire surface, creating that characteristic citrus peel dimpling. -
Sculpt the yellow citrus:
Shape the third sphere similarly to the orange, perhaps making it slightly more irregular or squat like a quince or rustic lemon. Press a small indentation into the top center for the stem.
Natural Texture Hack
Roll your raw clay orange over a piece of real sandpaper or a textured concrete surface to get an instant, realistic rind texture.
Step 2: Adding Details and Stems
-
Create the stem holes:
While the clay is still soft, use a needle tool or toothpick to deepen the central holes on all three fruits. This ensures your stems will fit securely later. -
Prepare the stems:
For a hyper-realistic look, I prefer to use small twigs or dried clove stems. Alternatively, roll tiny snakes of brown clay or wire, tapering them, and insert them into the fruit tops with a dab of glue. -
Fashion the leaf:
Roll a small piece of green clay flat (or cut thick paper). Cut a teardrop shape for the orange’s leaf, score a central vein with a knife, and gently curl the edges for movement before attaching it near the orange’s stem. -
Add surface imperfections:
Real fruit isn’t perfect. Use a small ball tool to add a few deeper divots or ‘bruises’ to the yellow fruit and the orange to simulate organic growth marks. -
Drying time:
Let all your pieces dry completely. If using air-dry clay, wait 24-48 hours; for polymer clay, bake according to the package instructions.
Step 3: Painting and Finishing
-
Base coat the apple:
Paint the apple with a deep, matte red acrylic. You may need two coats for full opacity. Let it dry completely between layers. -
Add apple speckles:
Mix a tiny amount of brown or lighter red paint and flick it onto the apple using a toothbrush for subtle texture. -
Paint the orange:
Sponge on a bright orange paint. Sponging rather than brushing helps maintain the bumpy texture you created earlier. -
Paint the yellow fruit:
Coat the third fruit in a warm, mustard-yellow tone. Once dry, wash a very diluted brown paint into the deeper pits and wipe away the excess to highlight the texture. -
Paint the leaf:
Paint the orange’s leaf a deep forest green. Adding a lighter green highlight along the center vein adds dimension. -
Blemishes and bruising:
Using a fine brush, add tiny brown dots or ‘pockmarks’ to the yellow fruit and orange skins to mimic the realistic imperfections seen in the reference photo. -
Seal the work:
Finish the apple with a semi-gloss varnish for that waxy shine. Use a matte varnish for the orange and yellow fruit to keep their skins looking natural and velvety.
Cracking Clay?
If air-dry clay cracks while drying, mix a tiny bit of fresh clay with water to make a paste and fill the gaps, then sand smooth once dry.
Arranging your new fruit trio in a small dish creates an instant centerpiece that adds a touch of freshness to any shelf


What Really Happens Inside the Kiln
Learn how time and temperature work together inside the kiln to transform clay into durable ceramic.
Strawberry Mini Toppers
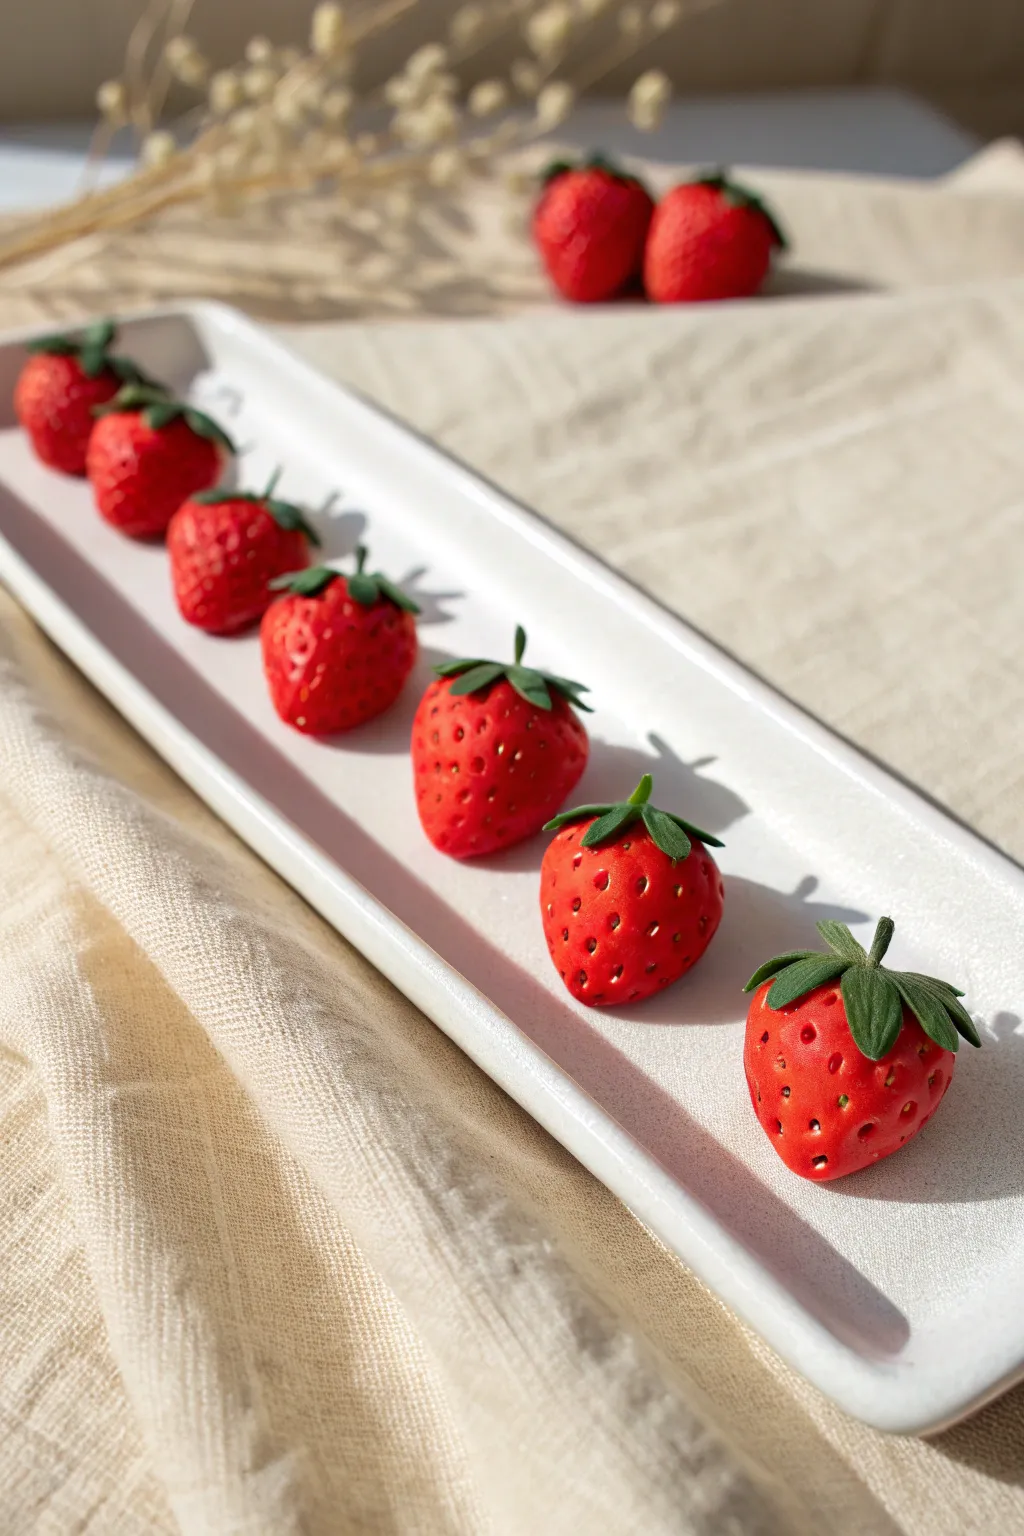
These charming strawberry miniatures capture the vibrant red hue and distinctive texture of fresh summer fruit. Perfect as cake toppers, jewelry charms, or dollhouse decor, they are surprisingly simple to sculpt with just a few basic tools.
Step-by-Step
Materials
- Polymer clay (Bright Red)
- Polymer clay (Leaf Green)
- Needle tool or toothpick
- Ball stylus tool (small)
- Pastel chalks (Dark Red/Maroon)
- Paintbrush (soft, for shading)
- Gloss glaze or polyurethane varnish
- Clay roller or pasta machine
- Scalpel or craft knife
Step 1: Shaping the Berry
-
Condition the Clay:
Begin by thoroughly kneading your bright red polymer clay until it is soft, pliable, and free of any air bubbles. Warm clay creates a smoother surface without cracks. -
Form the Base:
Roll the red clay into a ball about the size of a marble, or roughly 1 inch in diameter depending on your desired scale. -
Taper the Shape:
Gently roll one side of the ball between your palms to create a teardrop or cone shape. Flatten the wider top slightly so it isn’t perfectly round, mimicking a natural strawberry shoulder. -
Round the Tip:
Strawberries rarely have needle-sharp points. Soften the bottom tip of your cone by tapping it gently against your work surface to blunt it slightly.
Seed Specialist
For ultra-realism, roll tiny snakes of yellow or tan clay, slice off microscopic bits, and place one inside each indentation before baking to create actual seeds.
Step 2: Adding Texture and Seeds
-
Create Seed Indentations:
Using a small ball stylus or a blunt needle tool, press tiny holes all over the surface of the red cone. I find it works best to start near the tip and spiral upward. -
Stretch the Pores:
Instead of pushing straight in, angle your tool slightly downward as you press. This creates a teardrop-shaped indentation that looks more like a natural seed pocket than a simple hole. -
Refine the Surface:
If the clay has distorted from handling, gently roll it back into shape, being careful not to smooth out your new texture. -
Optional Shading:
For extra realism, shave a little dark red pastel chalk into a powder. Use a soft brush to dust it lightly over the textured berry, letting the darker dust settle into the seed holes.
Step 3: Crafting the Calyx (Leaves)
-
Prepare the Greenery:
Condition a small amount of leaf green clay. Roll it into a very thin sheet, roughly 1mm thick or less. -
Cut the Star Shape:
Using a scalpel or a tiny star cutter, cut out a 5-pointed star shape. The size should be proportional to the top of your strawberry. -
Elongate the Sepals:
Gently pull each point of the star to lengthen it slightly. Use your needle tool to press a central vein down the middle of each leaf. -
Attach the Leaves:
Place the green star centered on the wide, flat top of your strawberry. Press the center down firmly to bond the clays. -
Create the Stem:
Roll a tiny snake of green clay for the stem. Attach it to the very center of the leaf cluster, smoothing the seam with a silicone tool or your finger. -
Natural Movement:
Don’t leave the leaves sticking straight out. Gently curve the tips of the leaves downward so they hug the top of the berry, lifting one or two slightly for a natural look.
Make it a Charm
Insert a metal eye pin through the center of the stem and deep into the berry before baking to turn these into durable jewelry pendants or keychain charms.
Step 4: Finishing Touches
-
Final Inspection:
Check for fingerprints. If you find any, brush them away with a tiny bit of baby oil or clay softener on your finger. -
Bake:
Bake the strawberries according to your clay manufacturer’s instructions. Usually, this is around 275°F (130°C) for 15-30 minutes depending on thickness. -
Add the Shine:
Once fully cooled, apply a coat of gloss glaze or polyurethane varnish to the red fruit part only. Avoid glazing the green leaves to keep a realistic contrast between the matte foliage and juicy fruit.
Arrange your glossy strawberries in a small dish or on a tray to admire your harvest
Cheese Wedge With Little Holes
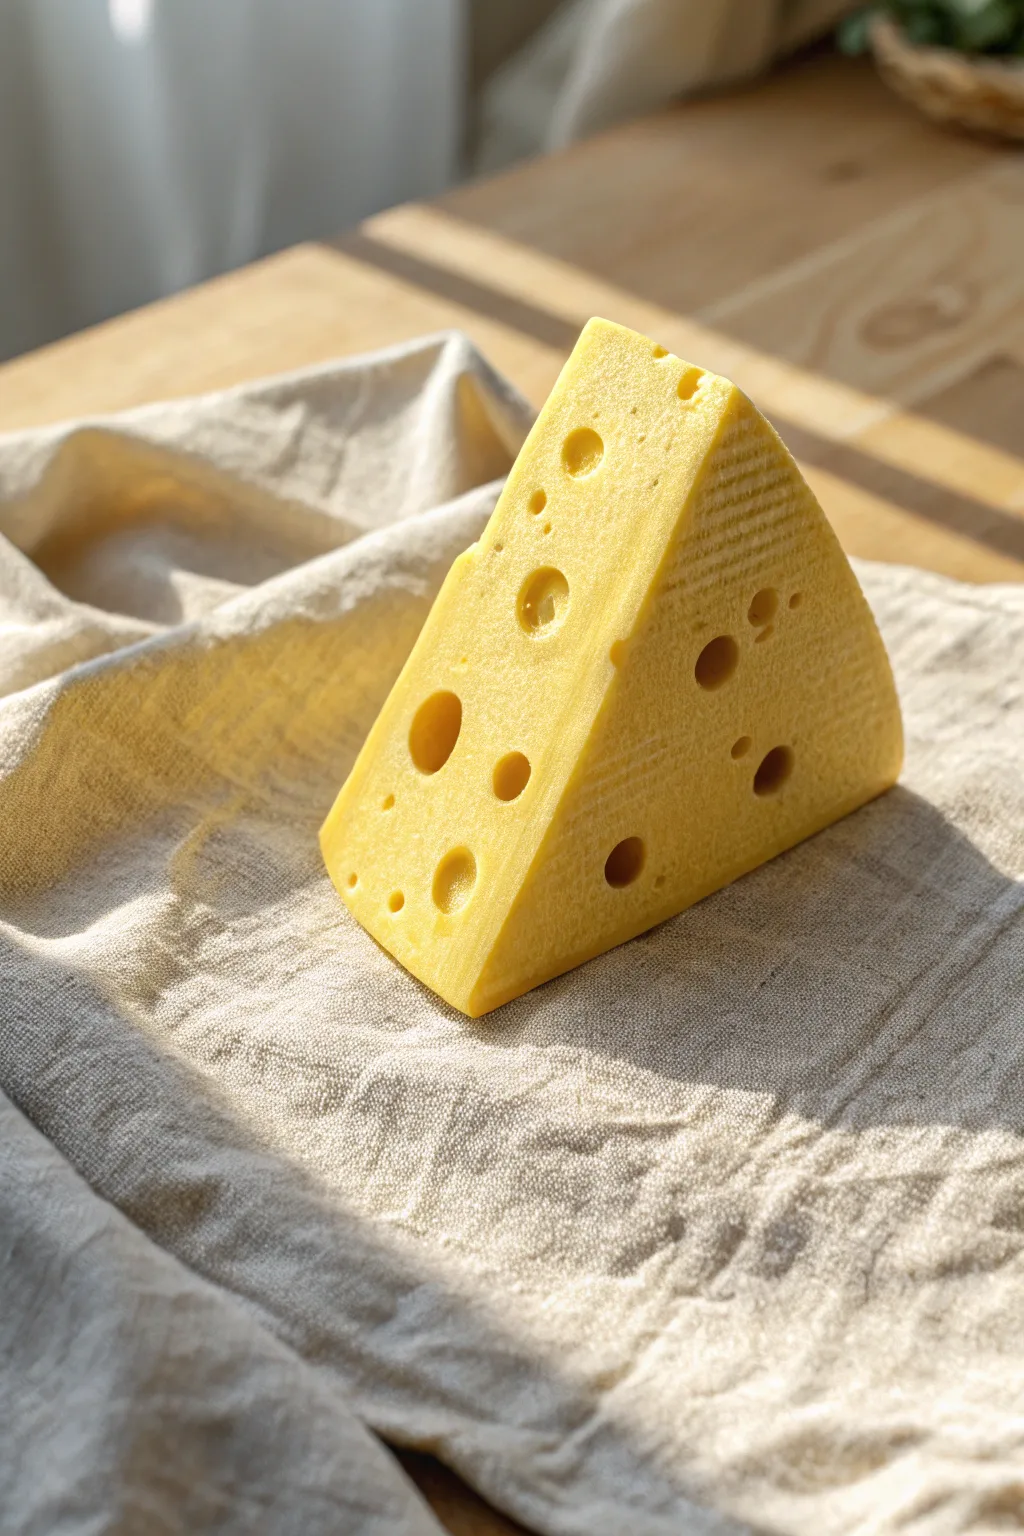
This project captures the classic look of a Swiss cheese wedge with its golden yellow hue and iconic holes. The realistic texture on the rind and natural hole placement make this simple shape surprisingly lifelike.
Detailed Instructions
Materials
- Polymer clay (yellow, white, and a tiny bit of translucent)
- Clay roller or pasta machine
- Blade or craft knife
- Ball stylus tools (various sizes)
- Dotting tools or drinking straw pieces
- Texture sponge or stiff bristle brush
- Soft pastel chalks (golden yellow, orange-brown)
- Soft paintbrush
- Needle tool
Step 1: Shaping the Base
-
Mix the perfect color:
Start by mixing a cheerful cheese color. Combine yellow polymer clay with a significant amount of white to soften it, and add a small pinch of translucent clay to give it that realistic, slightly waxy cheese finish rather than a plastic look. -
Condition the clay:
Knead the mixture thoroughly until it is warm, soft, and unified in color with no streaks remaining. -
Form a thick slab:
Roll the clay into a thick, smooth slab or block. It should be at least 1 inch thick to create a substantial wedge. -
Cut the triangular prism:
Using your sharp blade, cut a clean triangular wedge shape. Imagine a pie slice; you want two flat, long sides meeting at a point, with a curved or flat back edge. -
Smooth the edges:
Gently tap the cut sides with your finger to soften the sharp corners just slightly. Real cheese isn’t razor-sharp.
Step 2: Creating the Holes
-
Plan your placement:
Before piercing, look at the clay wedge and visualize where the gas bubbles would naturally be. Aim for randomness rather than a symmetrical pattern. -
Make large holes:
Use your largest ball stylus to press indentations into the flat sides of the wedge. Press deeply for some, and shallower for others. -
Pass-through holes:
For added realism, pick one or two spots near the thinner edge to poke a hole completely through from one side to the other, using a drinking straw or large tool. -
Add medium holes:
Switch to a medium-sized ball tool and add more craters scattered around the larger ones. -
Create tiny detail holes:
Use a small dotting tool or the head of a pin to add very tiny air pockets, especially near the edges of the cut surface. -
Smooth the rims:
I like to gently run a finger over the holes after making them. This softens the rim of the crater so the clay doesn’t look ‘pulled’ or distorted.
Fixing Squashed Shapes
If pressing holes distorts the wedge shape, gently push the flat sides against your work surface or a ruler to re-flatten them before baking.
Step 3: Texturing the Rind
-
Identify the rind side:
Focus on the back, outer curve (or flat back) of your wedge. This represents the outer rind of the cheese wheel. -
Apply rough texture:
Press a texture sponge or a stiff toothbrush firmly against this back surface to create a pitted, rough skin texture. -
Refine the surface:
You can also lightly drag a needle tool horizontally across the rind area to simulate the faint lines sometimes left by cheese molds or cloths.
Level Up: Slice It
Create a separate, thin slice of cheese lying next to the wedge. Roll a scrap of your mix very thin, poke holes, and drape it naturally for a softer look.
Step 4: Shading and Finishing
-
Prepare the pastels:
Scrape a little bit of golden yellow and orange-brown soft pastel chalk into a fine powder. -
shade the concave areas:
Dip a small, soft brush into the darker yellow powder and gently dust the inside of the larger holes. This adds depth and shadow. -
Darken the rind:
Brush the orange-brown powder onto the textured back rind. The powder will settle into the sponge marks, emphasizing the crusty texture. -
Add surface variation:
Lightly dust the sharp corners and edges of the wedge with a faint amount of yellow pastel to make it look slightly dried out or aged. -
Bake the project:
Bake the cheese wedge according to your polymer clay manufacturer’s instructions, usually around 275°F (130°C) for 15-30 minutes depending on thickness. -
Matte finish:
Once cool, the clay should already look fairly matte. Avoid glossy varnishes, as cheese has a natural, dull sheen. If needed, a light coat of matte varnish can protect the pastels.
Now you have a delicious-looking prop perfect for a miniature picnic scene