Whenever you’re craving a quick creative win, easy clay ideas are my favorite way to turn a small lump of clay into something genuinely adorable or useful. I’m going to share beginner-friendly projects that lean on simple shapes, smooth finishes, and that satisfying “I made this!” feeling.
No-Fuss Pinch Pot Trinket Dish
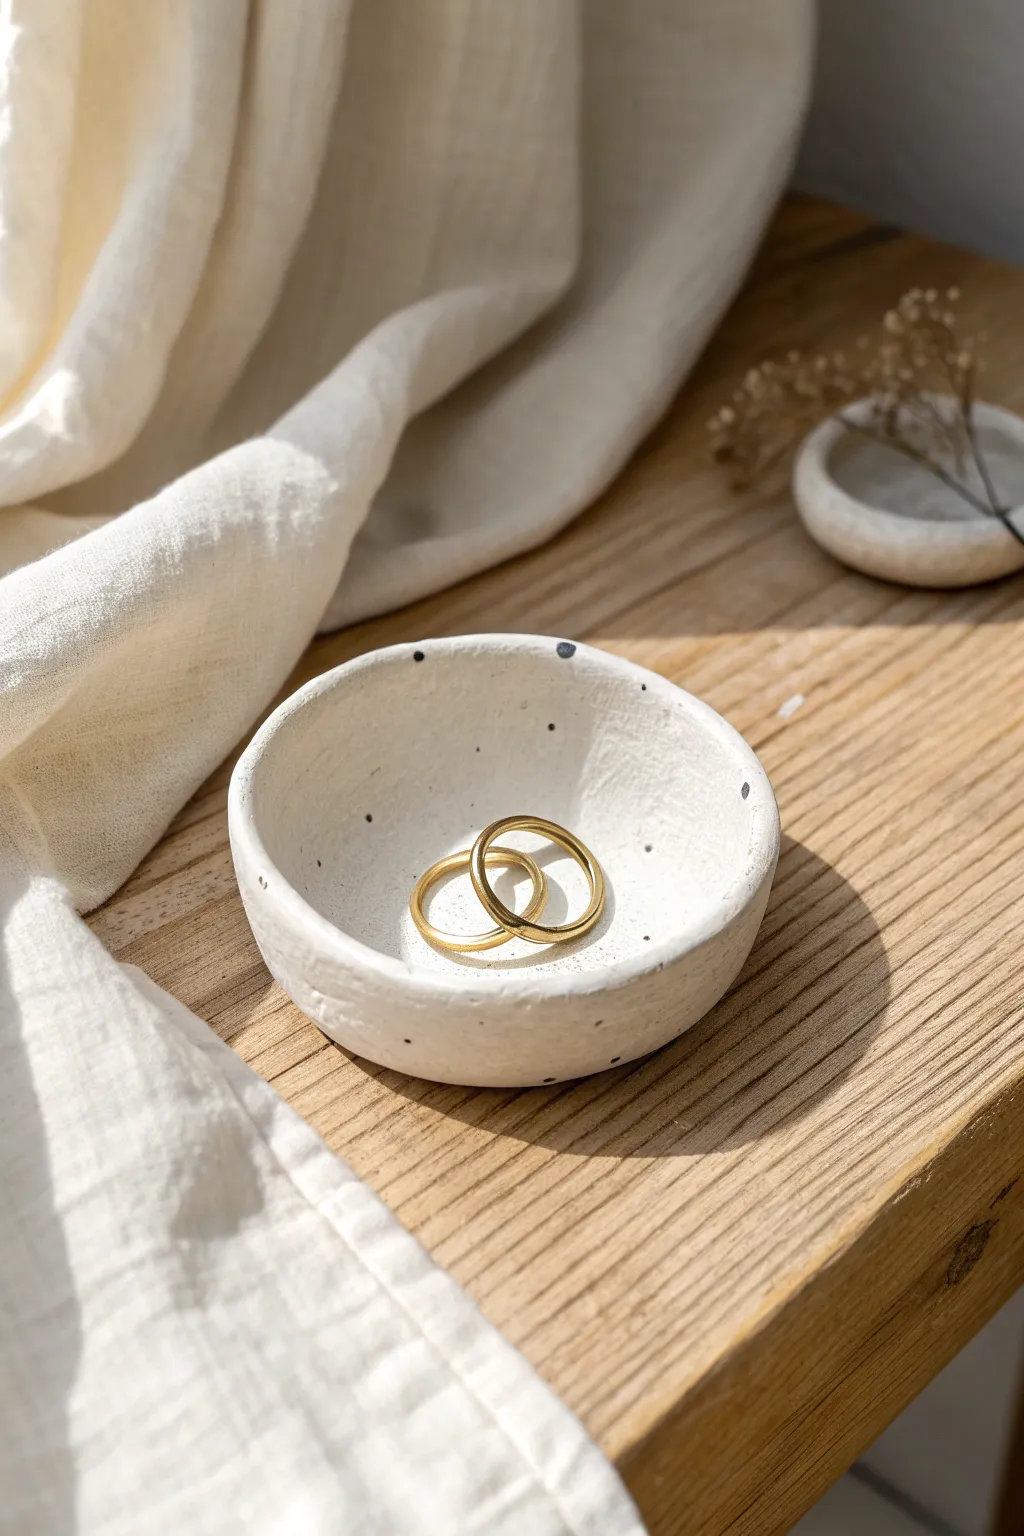
Create a minimal and organic home for your favorite rings with this simple air-dry clay pinch pot. The finish mimics speckled stoneware pottery without needing a kiln, using a clever paint splatter technique for that high-end ceramic look.
How-To Guide
Materials
- White coloring air-dry clay (or polymer clay)
- Acrylic rolling pin (or a smooth glass bottle)
- Small bowl of water
- Sponge or sandpaper (fine grit)
- White acrylic paint (matte finish)
- Black acrylic paint
- Old toothbrush or stiff bristle brush
- Matte spray varnish or sealant
- Wax paper or craft mat
Step 1: Forming the Pinch Pot
-
Condition the clay:
Start by taking a lump of air-dry clay about the size of a golf ball or slightly larger. Knead it in your hands for a minute until it feels soft, pliable, and free of cracks. -
Create a ball:
Roll the clay between your palms to form a smooth, uniform sphere. Try to smooth out any major lines or seams at this stage. -
Start the pinch:
Hold the ball in one hand and push your thumb into the center of the clay, stopping before you push all the way through the bottom. -
Detailed shaping:
Gently pinch the clay between your thumb and fingers, rotating the ball as you go. Work your way from the bottom up to the rim. -
Even out the walls:
Continue pinching and turning until the walls are an even thickness—aim for about 1/4 inch thick. Don’t worry if the rim is slightly uneven; that adds to the organic charm. -
Flatten the base:
Place your pot onto your work surface and press down gently on the inside bottom to create a flat base so the dish sits level. -
Smooth the surface:
Dip your finger into a little water and run it over the clay to smooth out any fingerprints or small cracks. Don’t use too much water, or the clay will become slimy.
Step 2: Refining and Drying
-
Initial drying:
Set the pot aside on a piece of wax paper or a drying rack. Let it sit for 24-48 hours until it is completely white and hard to the touch. -
Rotate occasionally:
I find it helpful to flip the pot upside down halfway through the drying process to ensure the bottom dries just as thoroughly as the rim. -
Sand for perfection:
Once fully dry, take a piece of fine-grit sandpaper and gently sand away any rough bumps or sharp edges on the rim. Wipe away the dust with a barely damp cloth.
Smoother Results
Use a barely damp sponge during the smoothing step instead of just your finger. The texture of the sponge helps erase fingerprints effortlessly for a professional finish.
Step 3: Simulating the Stoneware Look
-
Base coat:
Paint the entire dish—inside vs. outside—with a coat of matte white acrylic paint. This creates a uniform canvas and covers any discoloration from the clay. -
Prepare the speckles:
Squeeze a tiny dot of black acrylic paint onto a palette and water it down slightly so it is fluid but not dripping like ink. -
Apply the splatter:
Dip an old toothbrush into the watered-down black paint. Hold the brush over the dish and run your thumb across the bristles to flick tiny specks of paint onto the surface. -
Control the density:
Go lightly at first. You can always add more speckles, but you can’t easily take them away. Aim for a random distribution inside the bowl and on the outer rim. -
Add larger dots:
For variety, use the tip of a toothpick or a fine detail brush to add three or four slightly larger black dots manually, mimicking natural mineral deposits in pottery. -
Seal the piece:
Allow the paint to dry completely. Finish by spraying the dish with a matte varnish or sealant to protect the finish and prevent the paint from chipping.
Cracking Issues?
If small cracks appear while drying, mix a tiny bit of fresh clay with water to make a paste (slip) and fill the cracks, then smooth over and let dry again.
Place this lovely little dish on your bedside table or vanity to keep your daily jewelry safe and stylish


Easy Slab Coasters With Simple Stamps
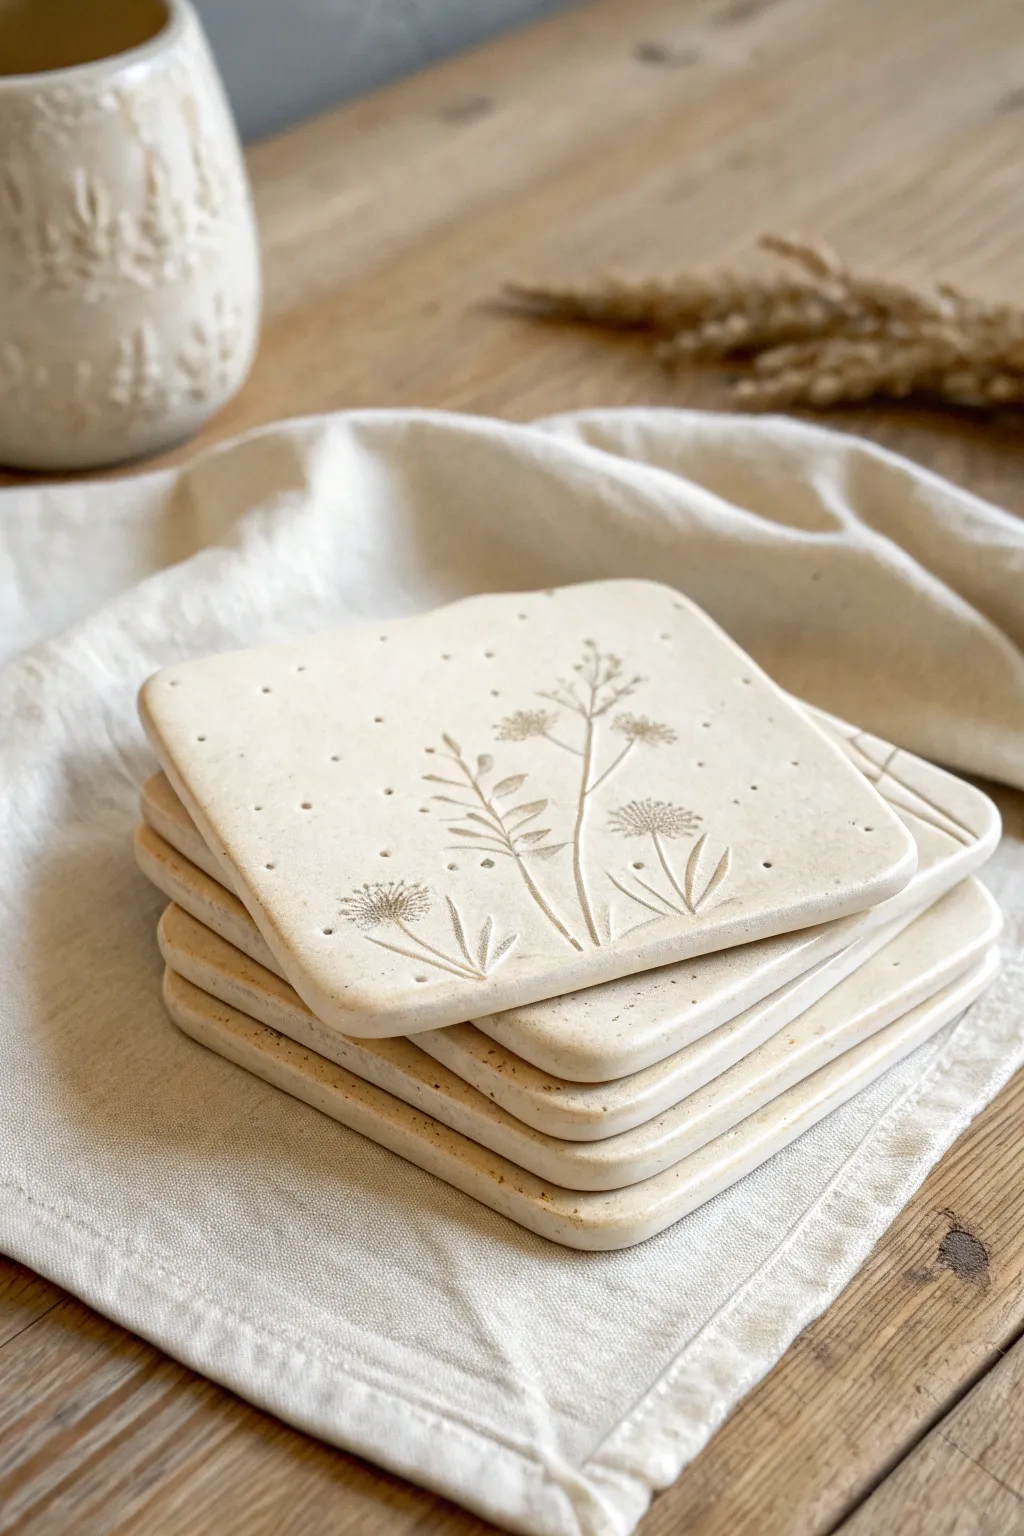
Embrace the beauty of nature with these minimalist clay coasters featuring delicate wildflower impressions. Their soft cream finish and organic speckled texture make them a perfect rustic addition to any coffee table.
Step-by-Step
Materials
- Air-dry clay (stone or white color) or polymer clay
- Rolling pin
- Two wooden guide strips (approx. 5mm thick)
- Square cookie cutter (approx. 4 inches) or a knife and ruler
- Botanical rubber stamps or dried flowers
- Detail tool or toothpick
- Fine grit sandpaper
- Matte acrylic varnish or sealant
- Canvas or cloth mat for rolling
Step 1: Preparing the Slab
-
Knead the clay:
Begin by conditioning your clay. Knead a large ball in your hands until it becomes warm, pliable, and free of air bubbles or cracks. -
Set up guides:
Place your canvas mat on a flat work surface. Position your two wooden guide strips on either side of the clay ball. These strips ensure your slab is perfectly even. -
Roll the slab:
Using your rolling pin, roll the clay out between the guides. Keep rolling until the pin rests on the wood strips, creating a consistent 5mm thickness across the entire sheet.
Step 2: Cutting and Stamping
-
Cut the shapes:
Press your square cutter firmly into the clay slab to create your coaster shapes. If using a knife, use a ruler to measure and cut 4-inch squares. Gently lift away the excess clay. -
Smooth the edges:
Dip your finger in a little water and run it along the cut edges of each square to soften any sharp corners or rough spots. -
Position the stamp:
Decide on your composition. I like to offset the floral design slightly to the right rather than perfectly centering it for a more organic look. -
Impress the design:
Press your botanical rubber stamp firmly into the wet clay. Apply even pressure to ensure all the delicate stem and petal details transfer clearly. -
Add texture dots:
Using a small detail tool or the blunt end of a toothpick, gently poke small, random dots into the background space around the flowers to mimic pollen or seeds. -
Create a speckled effect:
Take a stiff bristle brush or toothbrush, dip it lightly in diluted brown acrylic paint or watery clay slip, and flick tiny specks onto the surface for that natural stone look.
Prevent Curling
Slabs naturally want to warp as water evaporates. Dry them slowly away from direct heat and place a light book on top of them once they are leather-hard.
Step 3: Drying and Finishing
-
Flip occasionally:
Place the coasters on a flat wire rack or clean board to dry. Flip them over every few hours during the first day to prevent the corners from curling up. -
Full dry time:
Allow the clay to dry completely. This usually takes 24-48 hours for air-dry clay, depending on humidity. They will feel room temperature to the touch when ready. -
Sand edges:
Once bone dry, take fine-grit sandpaper and very gently sand the edges to ensure they are buttery smooth and won’t scratch your table. -
Apply sealant:
Coat the top and sides with a matte sealant. Applying thin layers is key here; let the first coat dry fully before adding a second. -
Seal the bottom:
Flip the coasters and seal the bottoms as well to protect them from moisture and spills. -
Final cure:
Let the sealant cure according to the manufacturer’s instructions before using your new coasters to hold your favorite mug.
Gilded Touch
After the clay is dry, paint just the indented floral lines with liquid gold leaf or metallic paint for a luxurious, modern glimmer.
Enjoy your beautiful new handmade home decor pieces


Mini Ring Cone Holder for the Sink
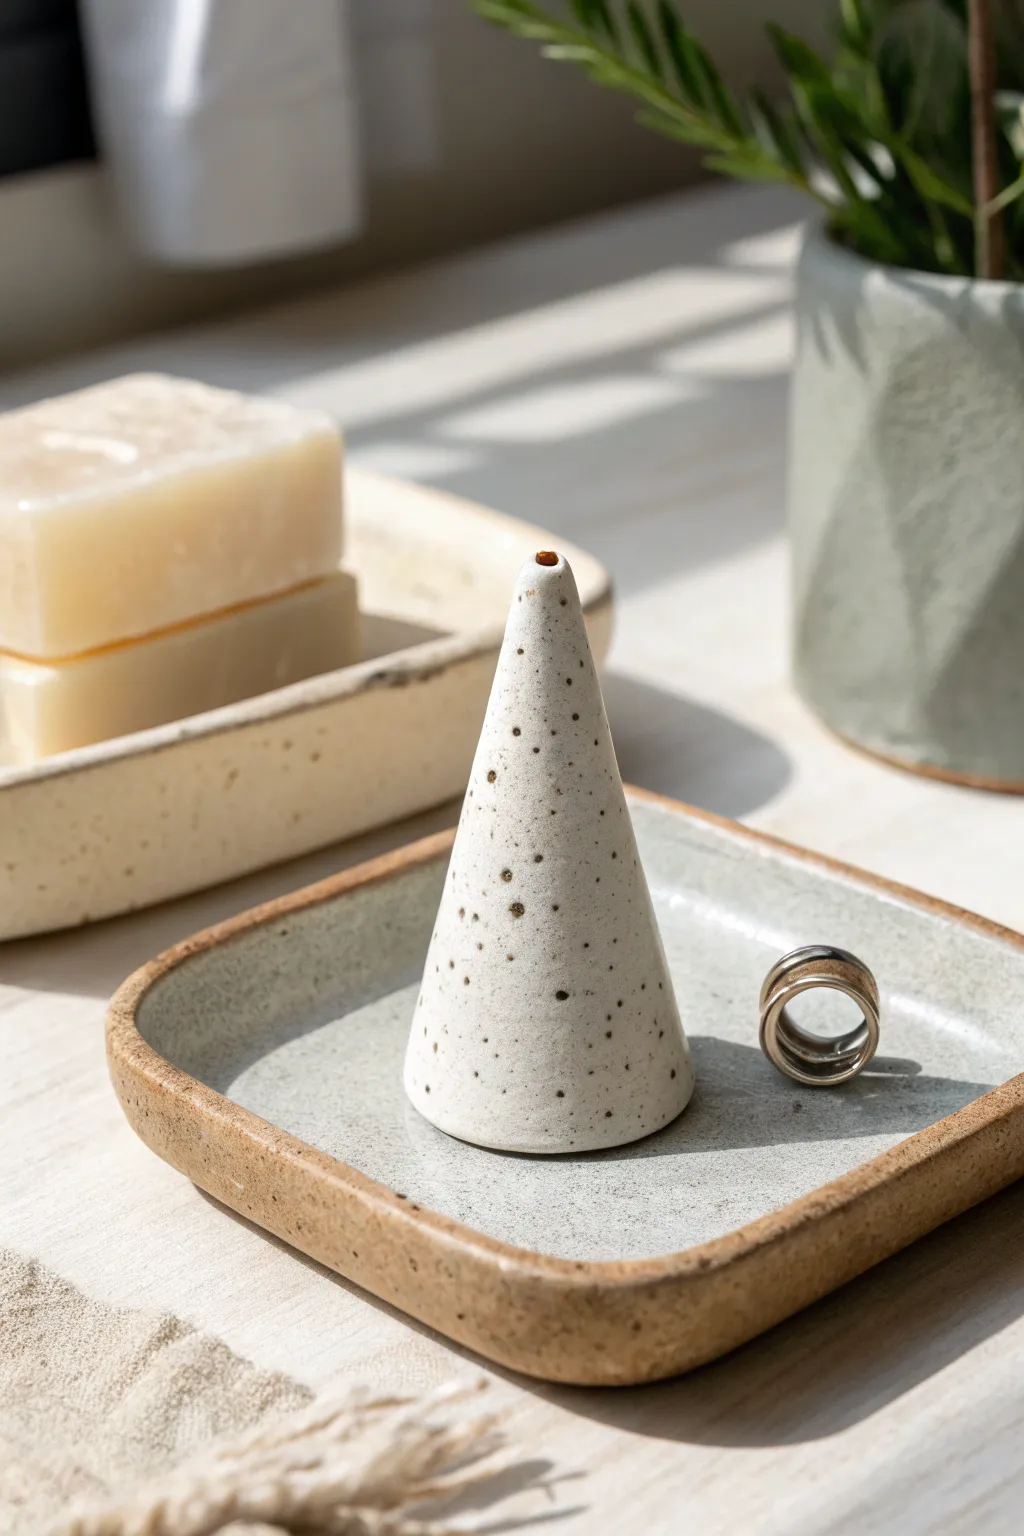
Keep your precious jewelry safe while washing up with this modern, minimalist ring holder set. The speckled stoneware finish gives it a professional, kiln-fired look that is surprisingly easy to achieve at home with polymer or air-dry clay.
Step-by-Step Tutorial
Materials
- White polymer clay (or air-dry clay)
- Black pepper or dried coffee grounds (for speckles)
- Clay rolling pin
- sharp craft knife
- Small square cookie cutter (approx. 3-4 inches)
- Sandpaper (fine grit)
- Glossy glaze or varnish
- Paintbrush
- Ruler
- Brown acrylic paint (optional, for rim)
Step 1: Preparing the Clay
-
Mix the speckles:
Begin by conditioning your white clay until it is soft and pliable. Flatten it into a pancake shape. -
Add texture:
Sprinkle a generous pinch of coarse black pepper or dried coffee grounds onto the clay. Fold the clay over to enclose the particles. -
Knead thoroughly:
Knead the clay repeatedly to distribute the speckles evenly throughout the block. Add more ‘speckles’ until you achieve that stone-like appearance shown in the photo.
Uneven Cone?
If your cone looks lopsided, roll it gently against a flat ruler while it stands upright to straighten the sides before baking
Step 2: Forming the Cone
-
Shape a cylinder:
Take a portion of the speckled clay, roughly the size of a golf ball, and roll it into a thick cylinder between your palms. -
Build the cone:
Place the cylinder on your work surface. Using the flat part of your hand, roll one end with more pressure than the other to create a tapered cone shape. -
Refine the height:
Stand the cone up. It should be tall enough to hold rings but stable at the base. Gently tap the base on the table to flatten it perfectly. -
Smooth the tip:
Use your finger to gently round off the very tip of the cone so it isn’t dangerously sharp. -
Create the hole:
Using a toothpick or a small tool, create a tiny indentation or hole right at the very top of the cone for a decorative touch.
Step 3: Creating the Tray
-
Roll out clay:
Take the remaining speckled clay and roll it out on a flat surface to a thickness of about 1/4 inch. -
Cut the square:
Use your square cookie cutter or a ruler and craft knife to cut out a perfect square base. -
Soften corners:
Use your fingertip to gently round the four sharp corners of the square to give it a softer, handmade organic feel. -
Lift the edges:
Gently pinch and lift the edges of the square upwards to create a shallow rim. I like to support the outside with one hand while pressing from the inside to get a nice curve. -
Smooth imperfections:
Dip your finger in a little water (or baby oil for polymer) and smooth out any fingerprints on the rim.
Marble Magic
Mix a tiny amount of grey or beige clay into your white base but stop kneading early to create subtle marble streaks intended to look like natural stone
Step 4: Finishing Touches
-
Bake or dry:
Follow the manufacturer’s instructions for your specific clay. If baking, place both pieces on a parchment-lined tray. -
Sand edges:
Once fully cured and cooled, use fine-grit sandpaper to smooth any rough spots on the rim of the tray or base of the cone. -
Paint the rim:
Mix a diluted wash of light brown acrylic paint. Carefully paint just the outer rim of the tray to mimic raw stoneware. -
Apply glaze:
Apply a coat of glossy varnish to the cone and the inside of the tray to simulate a glazed ceramic surface. -
Final cure:
Let the varnish dry completely in a dust-free area before assembling your set.
Place this lovely set by your kitchen sink or nightstand for an instant touch of organic elegance


Simple Clay Beads for a Stretch Bracelet
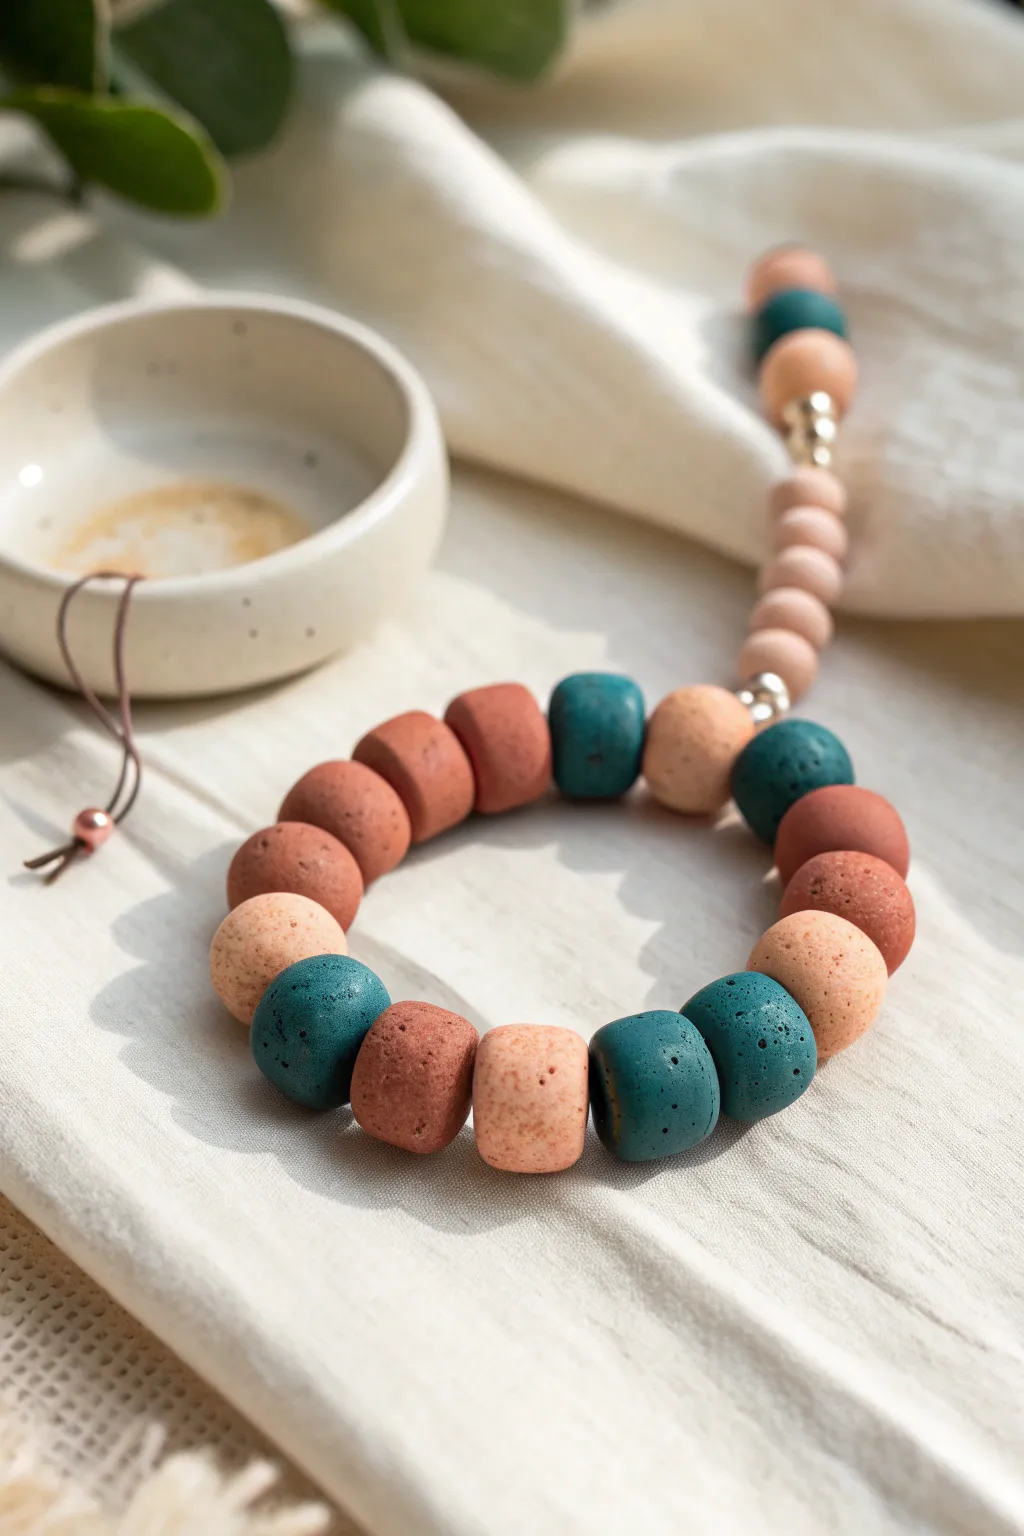
These rustic, stone-look beads bring an earthy charm to any jewelry collection with their teal, terracotta, and soft peach palette. By texturing the clay yourself using simple household items, you can mimic the look of natural ceramic or stone without need for a kiln.
Detailed Instructions
Materials
- Polymer clay in Teal, Terracotta (Rust), and Peach
- Coarse black pepper or dark sand (for speckling)
- Acrylic rolling pin
- Tissue blade or sharp craft knife
- Toothpicks or a bead piercing tool
- Baking sheet and parchment paper
- Strong elastic bead cord (0.8mm or 1mm)
- Jewelry glue (e.g., E6000 or Hypo Cement)
- Small silver spacer beads (optional)
- Old toothbrush or sandpaper (for texturing)
Step 1: Preparing the Clay
-
Condition the clay:
Start by kneading each block of polymer clay—teal, terracotta, and peach—separately until they are warm, soft, and pliable. This prevents cracking later. -
Add the speckles:
Flatten each color into a pancake. Sprinkle a pinch of coarse black pepper or very fine dark sand onto the clay. I find this creates that perfect ‘faux stone’ look. -
Incorporate the texture:
Fold the clay over the inclusions and knead thoroughly again until the speckles are evenly distributed throughout the batch. Repeat for all three colors. -
Create a log:
Roll each color into a thick, even log or snake, approximately 1/2 inch to 3/4 inch in diameter, depending on how chunky you want your final beads.
Uneven holes?
If your bead gets squashed while piercing, let the clay rest for 10 minutes to firm up, or try piercing halfway from one side and meeting in the middle.
Step 2: Forming the Beads
-
Cut uniform segments:
Using your tissue blade, slice the logs into equal segments. Aim for cuts that are about as wide as the log is thick to create a rounded cube shape. -
Reserve clay for small beads:
Save a small portion of the peach clay to roll into a much thinner snake (1/4 inch) and slice tiny segments for the decorative tail shown in the photo. -
Shape the main beads:
Take each large segment and gently roll it between your palms to soften the sharp cut edges, pressing slightly on the flat ends to maintain a drum or cylinder shape rather than a perfect sphere. -
Shape the accent beads:
Roll the tiny peach segments into smooth, distinct spheres. These will need to be much smaller and rounder than the main bracelet beads. -
Pierce the holes:
Dip your toothpick or piercing tool in a little water or cornstarch to prevent sticking. Gently twist the tool through the center of each bead, rotating the bead as you go to keep the hole centered. -
Check hole size:
Ensure the holes are wide enough to accommodate your elastic cord, especially if you plan to double the cord for strength. -
Add surface texture:
Before baking, lightly tap the surface of the large beads with an old toothbrush or roll them gently on medium-grit sandpaper to remove fingerprints and enhance the organic stone effect.
Design Tip: Matte Finish
To get that ultra-matte, powdery stone texture, lightly buff your baked beads with fine steel wool. It removes any shiny spots from handling.
Step 3: Baking and Assembly
-
Bake the beads:
Arrange the beads on a parchment-lined baking sheet. Bake according to your brand of clay’s instructions (usually 275°F/135°C for 15-30 minutes). -
Cool down:
Allow the beads to cool completely in the oven with the door slightly ajar. This gradual cooling helps tougher the clay. -
Plan your pattern:
Lay out your cooled beads on a felt mat or towel. Alternate the colors—like teal, peach, terracotta—to achieve the balanced look from the image. -
String the beads:
Cut a length of elastic cord about 10-12 inches long. Stretch it pre-emptively to prevent sagging later. String your main pattern onto the cord. -
Create the tail:
Thread the smaller peach spherical beads onto one end of the cord, adding a small silver spacer bead at the start and end of this section if desired. -
Tie the knot:
Bring the two ends of the elastic together. Tie a surgeon’s knot (right over left twice, then pull tight). Secure the knot with a dab of jewelry glue. -
Hide the knot:
If possible, gently tug the elastic so the knot slides inside the hole of one of the larger clay beads to conceal it.
Wear your new bracelet stacked with others or let it shine as a solo statement piece

The Complete Guide to Pottery Troubleshooting
Uncover the most common ceramic mistakes—from cracking clay to failed glazes—and learn how to fix them fast.
Flat Cutout Earrings With Clean Shapes
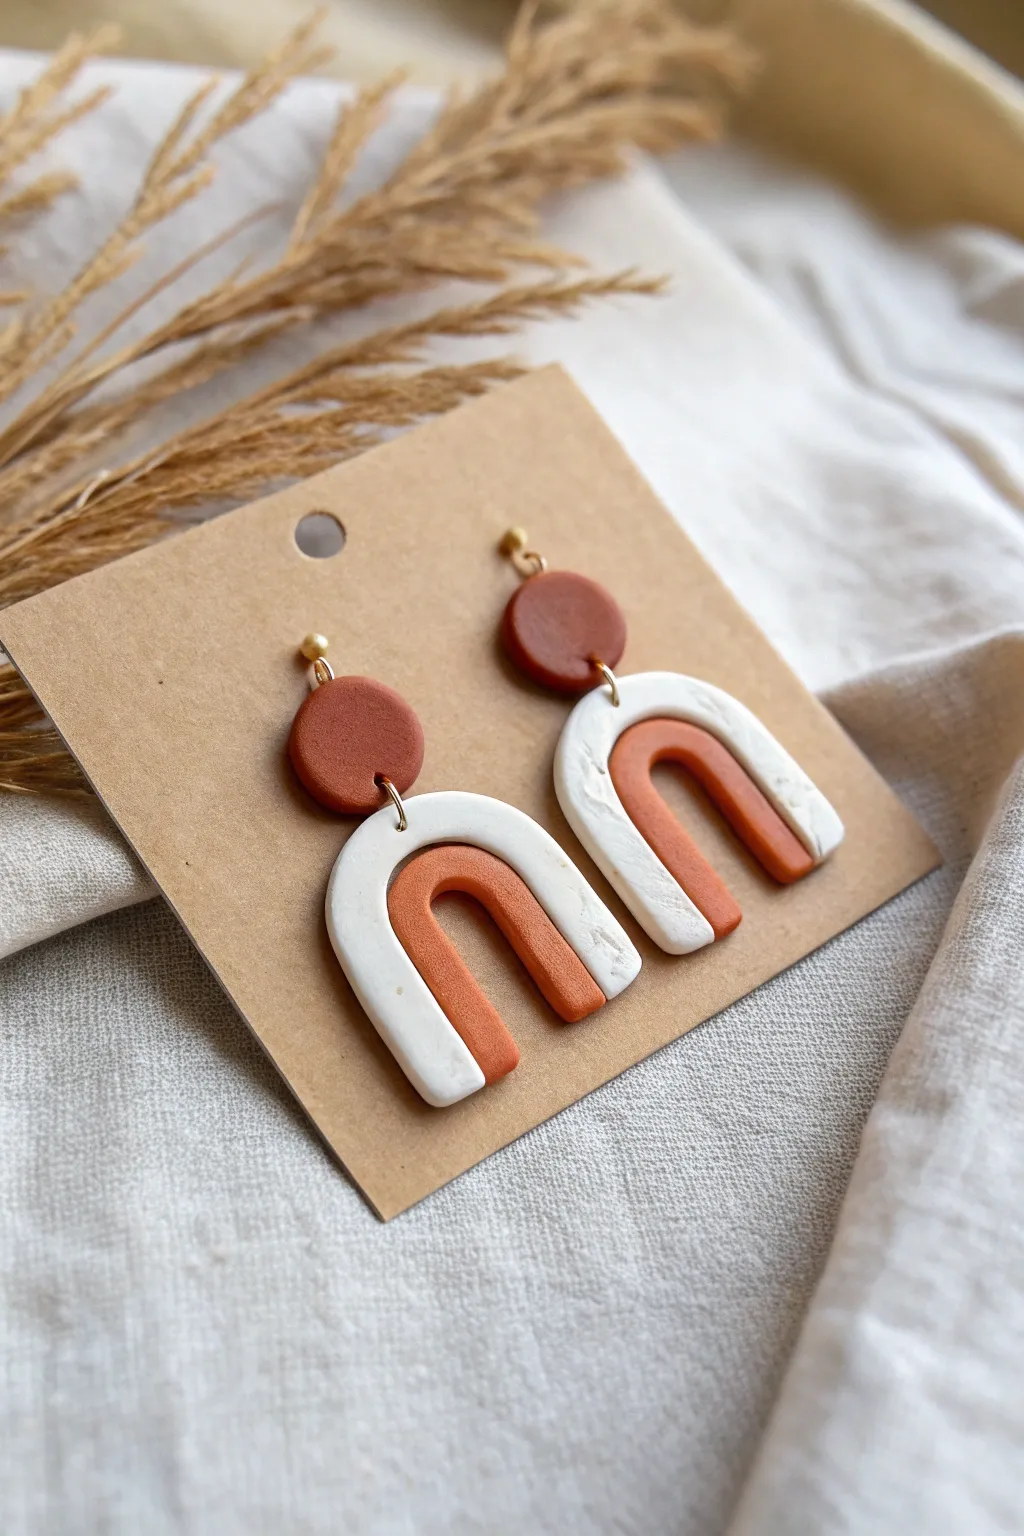
These stylish earrings combine warm terracotta tones with a cool, stone-textured white for a sophisticated, modern look. The clean, geometric arch shape is timeless and surprisingly simple to assemble using nested cutters.
Step-by-Step Tutorial
Materials
- Polymer clay in terracotta/burnt orange
- Polymer clay in white or granite effect
- Acrylic rolling pin
- Set of U-shaped or arch clay cutters (small and medium nested sizes)
- Small circle clay cutter (approx. 10mm)
- Small jump rings (gold)
- Earring stud posts and backs
- Jewelry pliers
- Super glue or liquid clay
- Pin drill or small needle tool
- Fine-grit sandpaper (optional)
- Parchment paper or ceramic tile
Step 1: Preparing the Clay
-
Condition the clay:
Start by warming the polymer clay in your hands. Knead the terracotta and white clays separately until they are soft, pliable, and free of cracks. -
Roll out slabs:
Using your acrylic rolling pin, roll both colors out onto a flat surface like a ceramic tile or parchment paper. Aim for a consistent thickness of about 3mm—playing cards stacked on either side of your roller can help act as depth guides. -
Add texture (optional):
For the white clay, if you aren’t using pre-mixed granite clay, you can mix in a tiny pinch of black pepper or dried herbs to create a speckled stone effect. I like to gently pass the roller over it once more to smooth everything down.
Clean Cuts Pro-Tip
Use a piece of plastic cling wrap over the clay before pressing your cutters down. This creates a soft, domed pillow edge rather than a sharp, harsh edge, reducing sanding time later.
Step 2: Cutting Principles
-
Cut the outer arches:
Press your larger U-shaped cutter into the white slab to create the main outer shape. Cut two identical pieces. -
Create the inner void:
Take a slightly smaller U-shaped cutter and center it perfectly inside the white arches you just cut. Press down to remove the inner section, leaving just the white outline. -
Cut the inner arches:
Press the smaller U-shaped cutter (the same size you just used to hollow out the white piece) into the terracotta slab. Cut two of these shapes. -
Assemble the arch:
Gently lift the terracotta inner arch and place it inside the white outer arch. They should fit together like puzzle pieces. Gently press the seam with your finger to ensure they adhere, or add a microscopic drop of liquid clay between them for strength. -
Cut the stud circles:
Use your small circle cutter on the remaining terracotta slab to cut two circles. These will be the top studs that cover the earlobe.
Step 3: Finishing and Baking
-
Pierce holes:
Before baking, use a needle tool or toothpick to poke a hole at the very top center of the main arch assembly. Poke a corresponding hole at the bottom of the terracotta circle stud. -
Check for imperfections:
Lightly smooth any fingerprints with a drop of baby oil on your finger, or use a cotton swab dipped in rubbing alcohol to clean up lint. -
Bake:
Preheat your oven according to your clay manufacturer’s instructions (usually around 275°F/130°C). Place the pieces on a baking sheet lined with parchment paper and bake for 30–45 minutes. -
Cool down:
Let the pieces cool completely inside the oven with the door cracked, or remove them and let them sit on the counter. Do not handle them while hot, as the clay is still fragile. -
Sand edges:
Once fully cool, use fine-grit sandpaper or a nail buffer to smooth down any rough edges or uneven spots on the sides of your cuts.
Level Up: Texture
Before cutting the terracotta inner arch, press a piece of coarse sandpaper or a fresh toothbrush onto the slab to give the ‘rust’ color a realistic, matte gritty texture.
Step 4: Assembly
-
Attach jump rings:
Using two pairs of jewelry pliers, twist a gold jump ring open sideways. Thread it through the hole in the arch and the hole in the circle stud to connect the two pieces. -
Close the rings:
Twist the jump ring back ensuring the ends meet flush so the pieces don’t slip out. -
Attach posts:
Apply a dab of super glue or strong jewelry adhesive to the back of the terracotta circle studs. Press the earring post into the glue and let it cure fully. -
Final inspection:
Give everything a gentle wipe with a soft cloth to remove dust and make sure your connections are secure.
Now you have a stunning, lightweight pair of geometric earrings to wear or gift.
One-Ball Blob Animals With Painted Dots
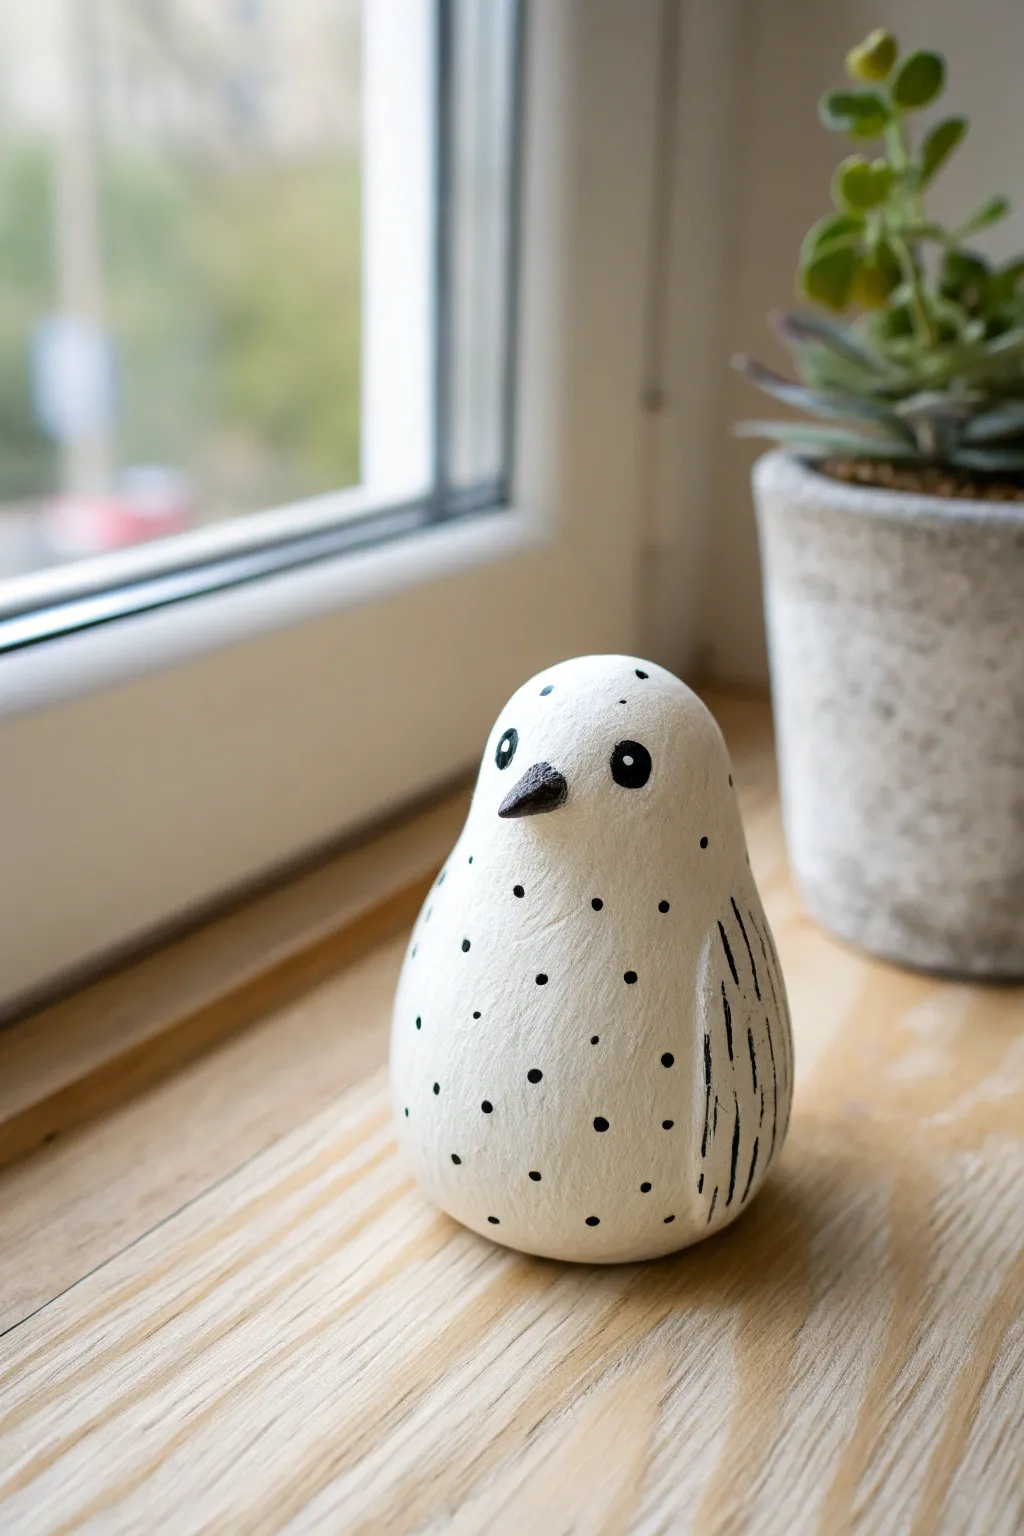
Embrace the charm of simplicity with this adorable blob-style bird that requires minimal sculpting skills. Its smooth, rounded form and high-contrast dot pattern make it a perfect modern accent for any windowsill or desk.
Step-by-Step Tutorial
Materials
- Air-dry clay (white) or polymer clay
- Acrylic paint (black and off-white/cream)
- Small paintbrush (fine tip)
- Sculpting tool or toothpick
- Fine-grit sandpaper
- Matte varnish or sealant
- Cup of water
- Parchment paper or work mat
Step 1: Sculpting the Base
-
Condition the Clay:
Begin with a golf-ball-sized chunk of clay. Kneed it thoroughly in your hands until it is warm, pliable, and free of cracks. -
Form the Initial Ball:
Roll the clay between your palms to create a smooth, seamless sphere. This ‘one-ball’ technique is the foundation of the blob style. -
Create the Pear Shape:
Gently gently roll the top third of the ball between your fingers to narrow it slightly, creating a soft pear shape. The bottom should remain wide and weighted. -
Flatten the Base:
Tap the bottom of your pear shape firmly against your work surface. This creates a flat base so your bird stands upright securely. -
Pinch the Beak:
Locate the center of the ‘head’ area. Using your thumb and forefinger, pinch a very small, triangular amount of clay outward to form a tiny beak. -
Smooth the Transitions:
Dip your finger in a tiny bit of water and run it over the beak area to smooth the join, ensuring the beak flows naturally from the face rather than looking stuck on. -
Define the Wings:
Use a modeling tool or your thumb to gently press barely-there indentations on the sides, hinting at where wings would rest against the body. -
Check Symmetry:
Rotate your figurine 360 degrees. Make sure the body looks rounded from all angles and the beak is centered. -
Allow to Dry:
Set the bird on parchment paper to dry completely. For air-dry clay, this usually takes 24-48 hours depending on thickness. Flip it occasionally to help the bottom dry.
Stamp It Out
For perfectly round dots, use different sized household items as stamps: the head of a sewing pin, a Q-tip, or the flat end of a drill bit all work great.
Step 2: Painting and Details
-
Sand Imperfections:
Once fully cured, inspect your bird. Use fine-grit sandpaper to gently buff away any fingerprints or rough bumps for a porcelain-like finish. -
Apply Base Coat:
Paint the entire body with an off-white or cream acrylic paint. I find this gives a warmer, more ceramic look than stark white. Let this layer dry completely. -
Paint the Beak:
Using your smallest brush, carefully paint the beak solid black. Keep your hand steady to maintain crisp edges against the white face. -
Add the Eyes:
Paint two small black circles for eyes on either side of the beak. Add a minuscule white dot inside each black circle to give the eyes a spark of life. -
Create the Wing Texture:
On the sides of the body where you indented the wings, paint thin, imperfect vertical black lines to suggest feathers. Vary the lengths for an organic feel. -
Start the Polka Dots:
Dip the handle end of a paintbrush into black paint to use as a stamp. Dot the chest and back of the bird randomly. -
Vary Dot Sizes:
For visual interest, use a toothpick to add smaller micro-dots between the larger ones, ensuring the pattern wraps all the way around the back. -
Seal the Work:
Once all paint is dry, apply a coat of matte varnish. This protects the paint from chipping and unifies the sheen of the piece.
Cracking Up?
If you see small cracks forming as the air-dry clay dries, mix a tiny amount of fresh clay with water to make a paste and fill them in like spackle.
Now you have a charming little companion to brighten up your shelf


What Really Happens Inside the Kiln
Learn how time and temperature work together inside the kiln to transform clay into durable ceramic.
Smiley Face Magnets You Can Make in Batches

Brighten up your fridge or magnetic board with these simple, cheerful face magnets that are perfect for making in large batches. These smooth, colorful clay discs feature classic smiley expressions that are sure to spark joy every time you see them.
Step-by-Step
Materials
- Polymer clay (yellow, orange, pink, light blue, mint green)
- Round clay cutter (approx. 1-1.5 inch diameter)
- Acrylic rolling pin or clay pasta machine
- Ceramic tile or baking sheet
- Parchment paper
- Black fine-point paint pen or black acrylic paint with a fine detail brush
- Strong round magnets (neodymium recommended)
- Super glue or E6000 adhesive
- Gloss or matte glaze (optional)
- Sandpaper (fine grit, optional)
Step 1: Shaping the Discs
-
Condition the clay:
Begin by taking small blocks of your chosen polymer clay colors. Knead each color in your hands until it becomes soft, pliable, and warm to the touch. -
Roll it out:
Using an acrylic rolling pin or a pasta machine on a medium setting, roll the conditioned clay into flat sheets. You want a consistent thickness of about 1/4 inch (6mm) so the magnets are sturdy but not too heavy. -
Cut the circles:
Press your round clay cutter firmly into the rolled clay sheet to punch out perfect circles. Twist slightly before lifting to ensure a clean cut. -
Smooth the edges:
Gently pick up each circle. Use your finger to lightly smooth the sharp cut edges, rounding them off slightly for that soft, finished look seen in the photo. -
Remove fingerprints:
Place the rounds on your baking tile or baking sheet lined with parchment paper. If you notice any fingerprints, lightly buff them away with a tiny drop of baby oil or cornstarch.
Use Plastic Wrap
Place a piece of cling wrap over the clay before using your circle cutter. This creates a naturally rounded, ‘domed’ edge instantly, saving you time smoothing edges later.
Step 2: Baking and Cooling
-
Check manufacturer instructions:
Preheat your oven according to the specific temperature directions on your package of polymer clay (usually between 230°F/110°C and 275°F/135°C). -
Bake the discs:
Bake the clay circles for approximately 15-30 minutes, depending on the brand and thickness. It is better to bake low and slow to prevent scorching the lighter colors. -
Cool down completely:
Remove the tray from the oven and let the clay discs cool completely before handling. They are still slightly soft when hot and harden as they cool. -
Optional sanding:
If there are any rough spots on the edges after baking, I like to gently rub them with fine-grit wet sandpaper under running water for a polished finish.
Stamp Instead of Paint
Instead of painting, use tiny alphabet stamps to impress words or use small metal tubes to stamp the eyes and mouth directly into the raw clay before baking.
Step 3: Adding the Faces
-
Plan the expressions:
Look at the reference image to plan your faces. Notice the simple, wide U-shapes for smiles and small ovals for eyes. Some smiles are slightly askew for character. -
Draw the eyes:
Using a black fine-point paint pen (or a fine brush with acrylic paint), carefully draw two vertical oval shapes for the eyes. Position them slightly high on the circle. -
Add the smile:
Draw a smooth, curved line for the mouth below the eyes. To replicate the style in the photo, add tiny perpendicular tick marks at the ends of the smile line. -
Dry time:
Allow the paint or ink to dry completely. This is crucial before sealing to prevent smearing your crisp black lines. -
Optional sealing:
For extra durability, coat the front of the magnet with a thin layer of matte or gloss clay glaze.
Step 4: Final Assembly
-
Prepare the back:
Flip the finished faces over so the blank side is facing up. Ensure surface is clean and dry. -
Apply adhesive:
Place a small dot of strong adhesive, like E6000 or super glue gel, onto the center of the back. -
Attach the magnet:
Press a round magnet firmly into the glue. Let the adhesive cure fully according to the glue’s instructions (usually 24 hours for maximum strength).
Once dry, stick these cheerful magnets onto your fridge to organize your photos and notes with a smile
Tiny Bud Vase With One Little Opening
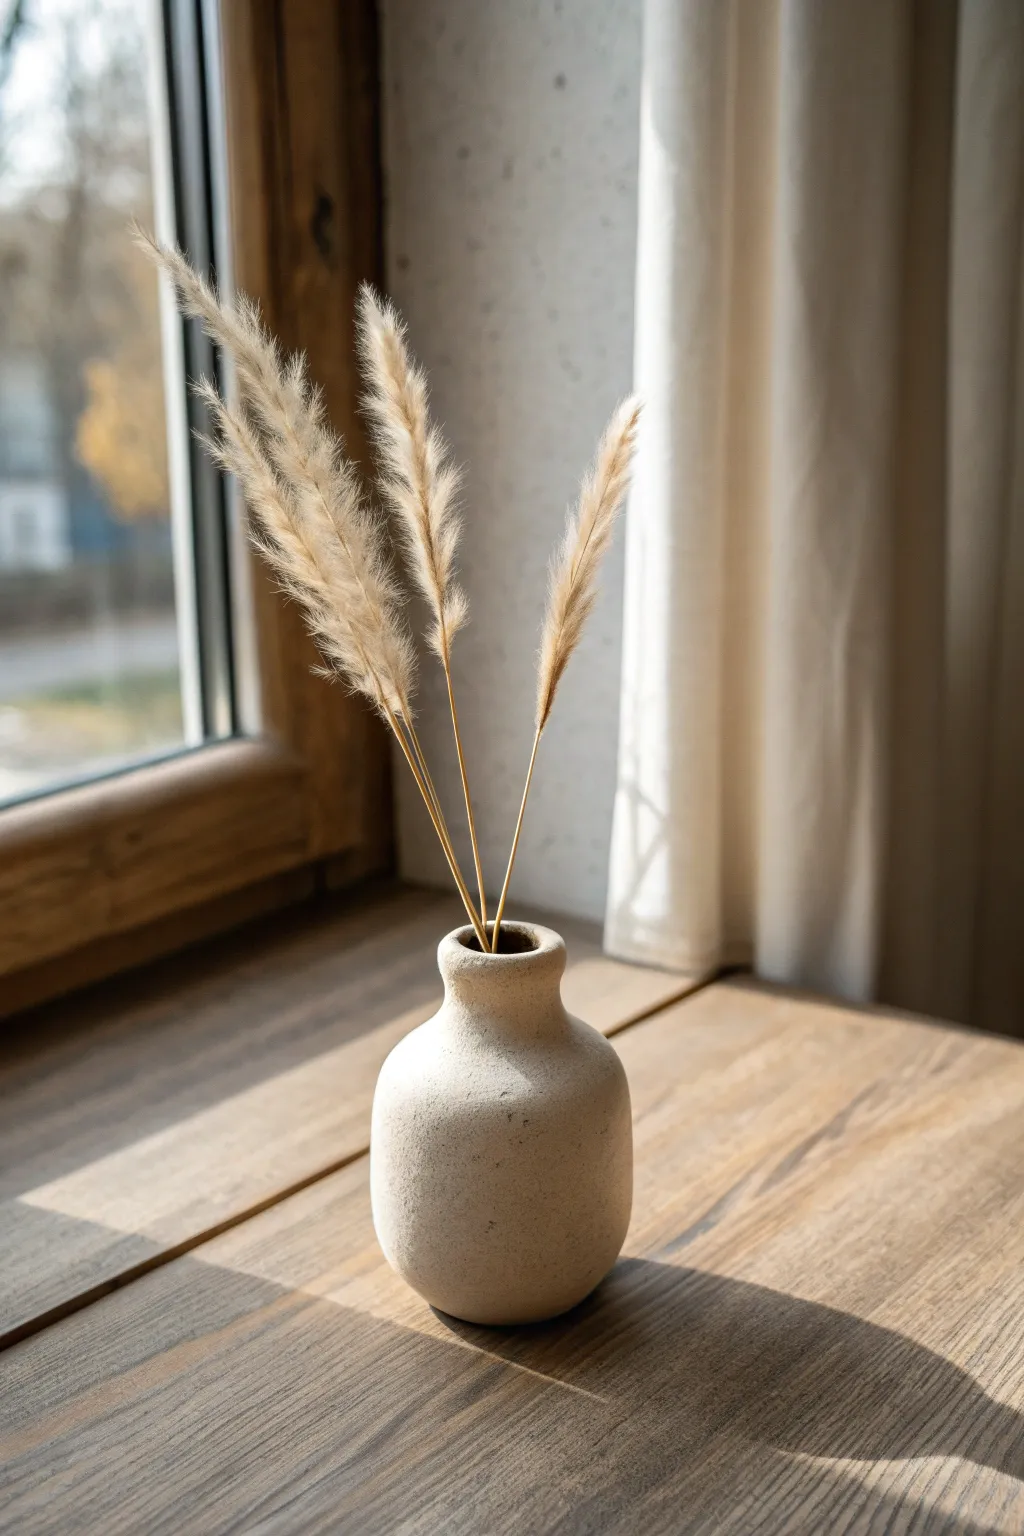
This charming, petite vase features a raw, sandy texture and a soft organic shape that mimics natural stone. It is the perfect beginner project for creating a subtle statement piece that beautifully holds dried stems or grasses.
Step-by-Step Tutorial
Materials
- Air-dry clay (stone or white color)
- Small bowl of water
- Rolling pin
- Ruler
- Needle tool or toothpick
- Sponge
- Fine-grit sandpaper
- Liquid clay slip (made from clay scraps and water)
- Stone-textured spray paint (optional, for finish)
- Parchment paper
Step 1: Forming the Base
-
Prepare the Clay:
Start by taking a chunk of clay about the size of a tennis ball. Knead it in your hands for a few minutes to warm it up and remove any potential air bubbles. -
Create a Sphere:
Roll the clay between your palms or on your work surface until you have a smooth, round ball. -
Start the Pinch Pot:
Hold the ball in one hand and gently press your thumb into the center, stopping about a half-inch from the bottom. This will be the foundational technique for our vase. -
Pinch the Walls:
Using your thumb on the inside and fingers on the outside, gently pinch and rotate the clay. Work from the bottom up to thin out the walls evenly. -
Shape the Belly:
As you pinch, encourage the clay to balloon outward slightly near the bottom to create the vase’s rounded ‘belly’ shape. Aim for a wall thickness of about a quarter-inch.
Cracks Appearing?
If tiny cracks form while drying, mix a small amount of clay with vinegar to make a thick paste. Fill the cracks, smooth over, and let dry again.
Step 2: Refining the Neck
-
Collar In the Top:
Once the body is shaped, begin gently squeezing the upper rim inwards. This technique, called ‘collaring,’ narrows the opening to prepare for the neck. -
Add a Coil:
Roll a small snake of clay about the thickness of a pencil. Score (scratch) the top rim of your base and the bottom of the coil, apply a little water or slip, and attach the coil to form the neck. -
Blend the Seams:
Use your thumb or a modeling tool to smudge the clay from the coil down onto the body on the outside, and up from the body onto the coil on the inside. Smoothing these seams completely is crucial for strength. -
Shape the Rim:
I like to gently flare the very top lip outward just a tiny bit with my fingers to give it that soft, hand-thrown porcelain look seen in the photo. -
Smooth the Surface:
Dip a small sponge in water and run it over the entire exterior. This smooths out fingerprints and helps refine the silhouette.
Go Botanical
Before the clay dries, press dried lavender or wheat stalks into the wet surface for a fossil-impression look that matches your dried arrangement.
Step 3: Adding Texture and Finishing
-
Create Texture:
To mimic the stony look in the image, take an old toothbrush or a crumpled ball of aluminum foil and gently tap it against the wet clay surface. This creates a subtle, pitted texture. -
Check Stability:
Tap the bottom of the vase gently against the table to flatten the base slightly so it stands up straight without wobbling. -
Initial Drying:
Let the vase dry slowly away from direct sunlight for 24-48 hours. Rotate it occasionally to ensure even drying. -
Sanding:
Once bone dry, use fine-grit sandpaper to gently smooth any sharp edges on the rim or rough bumps on the body, but leave the main texture intact. -
Faux Stone Finish:
For that specific speckled, sandy look, apply a light coat of stone-textured spray paint in a beige or cream color. Spray from a distance of 12 inches to keep the coat light. -
Final Seal:
If you aren’t using textured spray, finish with a matte acrylic varnish to protect the clay while keeping the natural, earthy appearance.
Place your favorite dried florals inside and enjoy the calm, organic feel this piece brings to your space

TRACK YOUR CERAMIC JOURNEY
Capture glaze tests, firing details, and creative progress—all in one simple printable. Make your projects easier to repeat and improve.
Beginner Pencil Cup With a Soft Wavy Rim

This charming, rustic pencil cup features a subtle, wavy rim and gentle horizontal ridges that give it a handmade wheel-thrown look without needing a pottery wheel. The speckled cream finish provides a warm, earthy home for your favorite art supplies.
Step-by-Step
Materials
- Speckled stoneware clay (or polymer clay with faux speckles)
- Rolling pin
- Cylindrical mold (like a sturdy can or glass jar)
- Clay knife or craft blade
- Needle tool
- Sponge
- Slip (clay mixed with water) or liquid clay adhesive
- Scoring tool (or an old toothbrush)
- Cream or white glaze (if using ceramic clay)
- Small paintbrush
- Kiln (if using stoneware) or oven (if using polymer)
Step 1: Preparation and Base
-
Roll the Slab:
Begin by rolling out a medium-sized ball of speckled clay into a flat slab. Aim for a thickness of about 1/4 inch to ensure the cup is sturdy but not too heavy. -
Cut the Base:
Place your cylindrical mold onto the clay slab and trace around it with a needle tool. Allow a tiny bit of extra width (about 1/8 inch) outside the mold line. -
Refine the Circle:
Remove the mold and carefully cut out the circle you just traced. This disc will serve as the bottom of your pencil cup. -
Prepare the Body Slab:
Re-roll the remaining clay into a long rectangular strip. You’ll need it to be tall enough for your brushes (around 4-5 inches) and long enough to wrap completely around your mold with a little overlap.
Seamless Seams
When joining the vertical seam, use a wooden spoon handle inside the cup to support the wall while you press and smooth the clay from the outside.
Step 2: Building the Form
-
Create Texture:
Before assembling, lightly drag your fingers or a modeling tool horizontally across the rectangular slab. These intentional, uneven impressions create the gentle ridges seen in the finished piece. -
Score the Edges:
Use your scoring tool to scratch up the outer edge of the circular base and the bottom long edge of your rectangular strip. -
Apply Slip:
Brush a generous amount of potter’s slip or liquid adhesive onto the scored areas to act as glue. -
Wrap the Wall:
Wrap the rectangular slab around your cylindrical mold. If you are using a non-porous mold like a glass jar, wrap it in a sheet of newspaper first so the clay doesn’t stick. -
Join the Seam:
Where the two ends of the rectangle meet, cut through both layers simultaneously at a diagonal for a clean join. Score, slip, and press the seam together firmly. -
Attach to Base:
Invert the cylinder so the mold is helping hold the shape, and press the walls down onto the scratched circular base. -
Blend the Connection:
Using a modeling tool or your finger, smudge the clay from the wall down onto the base to create a seamless, water-tight seal. Smooth the outside with a damp sponge.
Make it Matte
For a modern, tactile feel, use a matte glaze instead of a glossy one. It enhances the subtle ridges and feels wonderful in the hand.
Step 3: Finishing Touches
-
Form the Rim:
Remove the mold carefully. Dampen your fingers and run them along the top rim, pressing gently to round it off. -
Add the Wavy Detail:
Here I like to gently pinch the rim at random intervals to create a subtle, uneven wave. It shouldn’t look perfectly symmetrical; organic imperfections add character. -
Clean the Surface:
Take a slightly damp sponge and wipe the entire surface to remove any sharp burrs or rough crumbs of clay, smoothing out the horizontal ridges just enough so they feel soft to the touch. -
Dry and Fire:
Allow the clay to dry slowly (covered with plastic for the first day) to prevent warping. Once bone dry, fire the piece in a kiln according to your clay’s bisque schedule. -
Glazing:
Dip the fired cup into a creamy white glaze. If your clay body is naturally speckled, a semi-transparent glaze works best to let those lovely iron spots shine through. -
Rim Accent:
Wipe a very small amount of glaze off the very top edge of the rim with a sponge. This exposes the tan clay body underneath, creating that distinct toasted ring seen in the photo. -
Final Fire:
Fire the piece a second time to the glaze temperature listed on your glaze bottle.
Once cooled, your durable new cup is ready to organize your workspace with handmade style
Minimal Incense Holder With Easy Groove Lines

Create a serene, minimalist incense holder with a gentle curve that catches falling ash perfectly. This project highlights the natural beauty of speckled clay, using a simple slab-building technique to form an elegant, boat-like silhouette.
Step-by-Step Tutorial
Materials
- Speckled clay body (stoneware or polymer clay with faux speckles)
- Rolling pin
- Fettling knife or clay cutter
- Wooden ribs or a smooth kidney tool
- Needle tool or a small drill bit
- Forming mold (like a rolling pin, PVC pipe, or recycled bottle)
- Small bowl of water
- Sponge
- Sandpaper (fine grit)
- Matte clear glaze or sealant
Step 1: Shaping the Slab
-
Roll the slab:
Begin by wedging your speckled clay to remove air bubbles, then roll it out into a consistent slab about 1/4 inch thick. I find using wooden guide strips on either side helps keep the thickness perfectly even. -
Smooth the surface:
Before cutting, take a rubber rib or a damp sponge and gently compress the surface of the clay slab. This removes canvas texture from the rolling process and aligns the clay particles. -
Cut the rectangle:
Using a ruler and your fettling knife, cut a long rectangle from the slab. Measure approximately 2.5 inches wide by 8 inches long. -
Round the ends:
Freehand the ends of the rectangle to create tapered, rounded corners. You can also use a small round object like a jar lid as a template to trace a curve before cutting if you want perfect symmetry. -
Smooth the edges:
Dip your finger in a little water and run it along the cut edges to soften the sharpness. The finished look should feel organic and smooth, not harsh.
Step 2: Forming the Curves
-
Create the boat shape:
To get that gentle upward curve, drape your clay rectangle over a cylindrical form. A rolling pin or a piece of PVC pipe works well. -
Form the lip:
While it’s draped over the form, gently press the long edges upward slightly with your thumbs to create a shallow concave channel. This ensures the ash will land inside the holder rather than sliding off. -
Refine the curve:
Lift the ends of the clay slightly more than the center to accentuate the boat shape. You can prop the ends up with small bits of scrap sponge while the clay stiffens. -
Let it firm up:
Allow the clay to dry to a ‘leather hard’ state while resting on the form. This usually takes a few hours depending on the humidity in your room.
Angle Perfector
Test the angle of your hole immediately after piercing by inserting a real incense stick. If the ash falls outside the tray, adjust the hole’s tilt before the clay dries.
Step 3: Adding the Hole
-
Determine placement:
Once the clay is firm enough to hold its shape without slumping but still soft enough to pierce, decide where the incense stick will go. One end of the ‘boat’ is usually best. -
Pierce the clay:
Use a needle tool or an incense stick to poke a hole. This is the crucial moment: angle the tool so it points comfortably towards the center of the tray, ensuring the ash will fall along the length of the piece. -
Enlarge slightly:
Wiggle the tool gently to make the hole slightly larger than your incense sticks, accounting for clay shrinkage during drying and firing. -
Clean up debris:
Remove any little clay crumbs created by the piercing process. A soft paintbrush is great for dusting these away without marring the surface.
Warping Warning
If the edges curl up too much while drying, weigh the center down gently with a small bean bag. Uneven drying causes warping, so keep it away from direct drafts.
Step 4: Finishing
-
Dry slowly:
Remove the piece from the form and let it dry completely. Drying it slowly under loose plastic helps prevent the thin edges from warping or cracking. -
Sand (optional):
If using air-dry or polymer clay, give the edges a light sanding once fully cured. If using ceramic clay, smooth with a slightly damp sponge before the bisque fire. -
Fire or bake:
Follow the specific instructions for your clay type. For ceramics, bisque fire to cone 04. For polymer, bake according to the package temperature. -
Apply finish:
To maintain the raw, speckled look shown in the image, apply a matte clear glaze (for ceramics) or a matte varnish (for polymer clay). This seals the speckles while keeping the earthy texture. -
Final cure:
Perform the final glaze firing or let the varnish cure completely before use.
Light your favorite scent and watch the smoke gracefully trail upward from your custom-made creation.
Cute Candle Holder Made From a Simple Cylinder
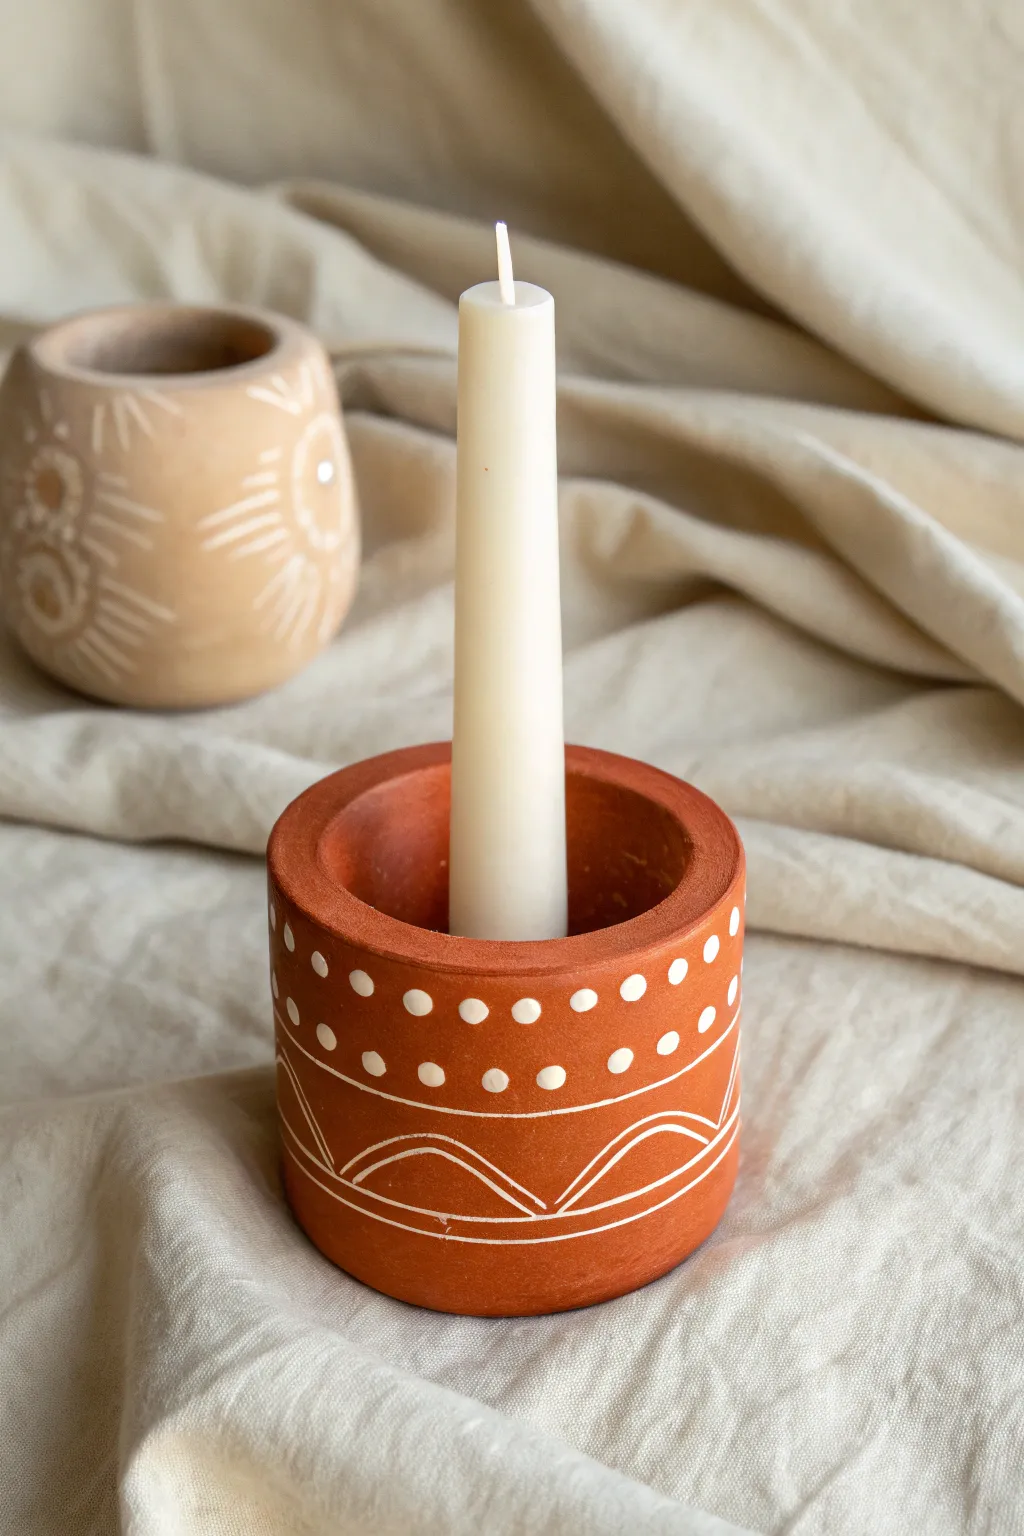
This rustic, earthy candle holder brings warmth to any space with its rich terracotta tone and delicate white detailing. The simple cylindrical shape acts as a perfect canvas for repeating geometric patterns like dots and gentle arches.
Detailed Instructions
Materials
- Terracotta-colored air-dry clay or polymer clay
- Rolling pin
- Circular clay cutter (approx. 3-4 inches diameter)
- Rectangular clay template (or ruler)
- Craft knife
- Small bowl of water (for smoothing)
- Slip (clay and water mixture) or liquid clay adhesive
- Taper candle (for sizing)
- White acrylic paint
- Fine-point paintbrush or dotting tool
- Matte varnish (optional)
Step 1: Forming the Base Structure
-
Roll the slab:
Begin by conditioning your terracotta clay until it is soft and pliable. Roll it out into a smooth, even slab that is approximately 1/4 inch thick to ensure the walls will be sturdy. -
Cut the base:
Using your circular cutter or a template, cut out a perfect circle. This will serve as the bottom of your candle holder. -
Measure the walls:
Cut a long rectangular strip from the remaining slab. The length needs to be slightly longer than the circumference of your base circle, and the height should be about 2-3 inches. -
Check the interior fit:
Before attaching anything, double-check that your taper candle will fit comfortably in the center with plenty of room around it, as the thick walls will reduce the interior space. -
Attach the wall:
Score the outer edge of your base circle and the bottom edge of your rectangular strip. Apply a little slip or adhesive to the scored areas. -
Wrap and seam:
Carefully wrap the rectangular strip around the base circle. Where the two ends of the rectangle meet, cut them at an angle for a cleaner join, score, and press them together firmly. -
Smooth the seams:
Use your fingers or a modeling tool dipped in a tiny bit of water to smooth out the vertical seam on the side and the horizontal seam at the bottom. The goal is to make the cylinder look like one solid piece. -
Refine the rim:
Gently broaden the top rim with your fingers to give it that substantial, chunky look seen in the photo. Smooth away any sharp edges.
Use a Can for Support
To get a perfectly round cylinder, wrap your clay strip around a soda can or glass jar covered in parchment paper. This supports the walls while you smooth the seams.
Step 2: Finishing and Decorating
-
Dry the piece:
Allow the clay to dry completely according to package instructions. If using air-dry clay, I usually let it sit for at least 24-48 hours to ensure deep dryness. -
Sand for smoothness:
Once fully dry (or baked and cooled if using polymer), lightly sand any rough spots or fingerprints with fine-grit sandpaper. -
Paint the rim dots:
Dip a dotting tool or the back of a paintbrush into white acrylic paint. Create a row of large, evenly spaced dots just below the top rim. -
Add the dividing lines:
Using a fine liner brush, paint two horizontal parallel lines beneath your row of dots. These lines frame the central pattern area. -
Create the central dots:
In the space between your parallel lines, add smaller white dots used as filler to create visual rhythm. -
Paint the arches:
Near the bottom third of the cylinder, paint a continuous wave or arch pattern using your fine liner brush. Try to keep the peaks of the arches consistent in height. -
Add the bottom stripe:
Finish the design by painting a final horizontal line underneath the arches, grounding the pattern near the base. -
Seal the work:
To protect your paintwork and give the clay a unified finish, apply a coat of matte varnish over the entire piece once the paint is fully dry.
Try Sgraffito Style
Instead of painting white on top, paint the whole pot white first, then scratch the designs away to reveal the terracotta clay underneath for a reverse effect.
Place your favorite taper candle inside and enjoy the warm, handmade glow this piece adds to your table
Easy Arch Photo or Place Card Holder
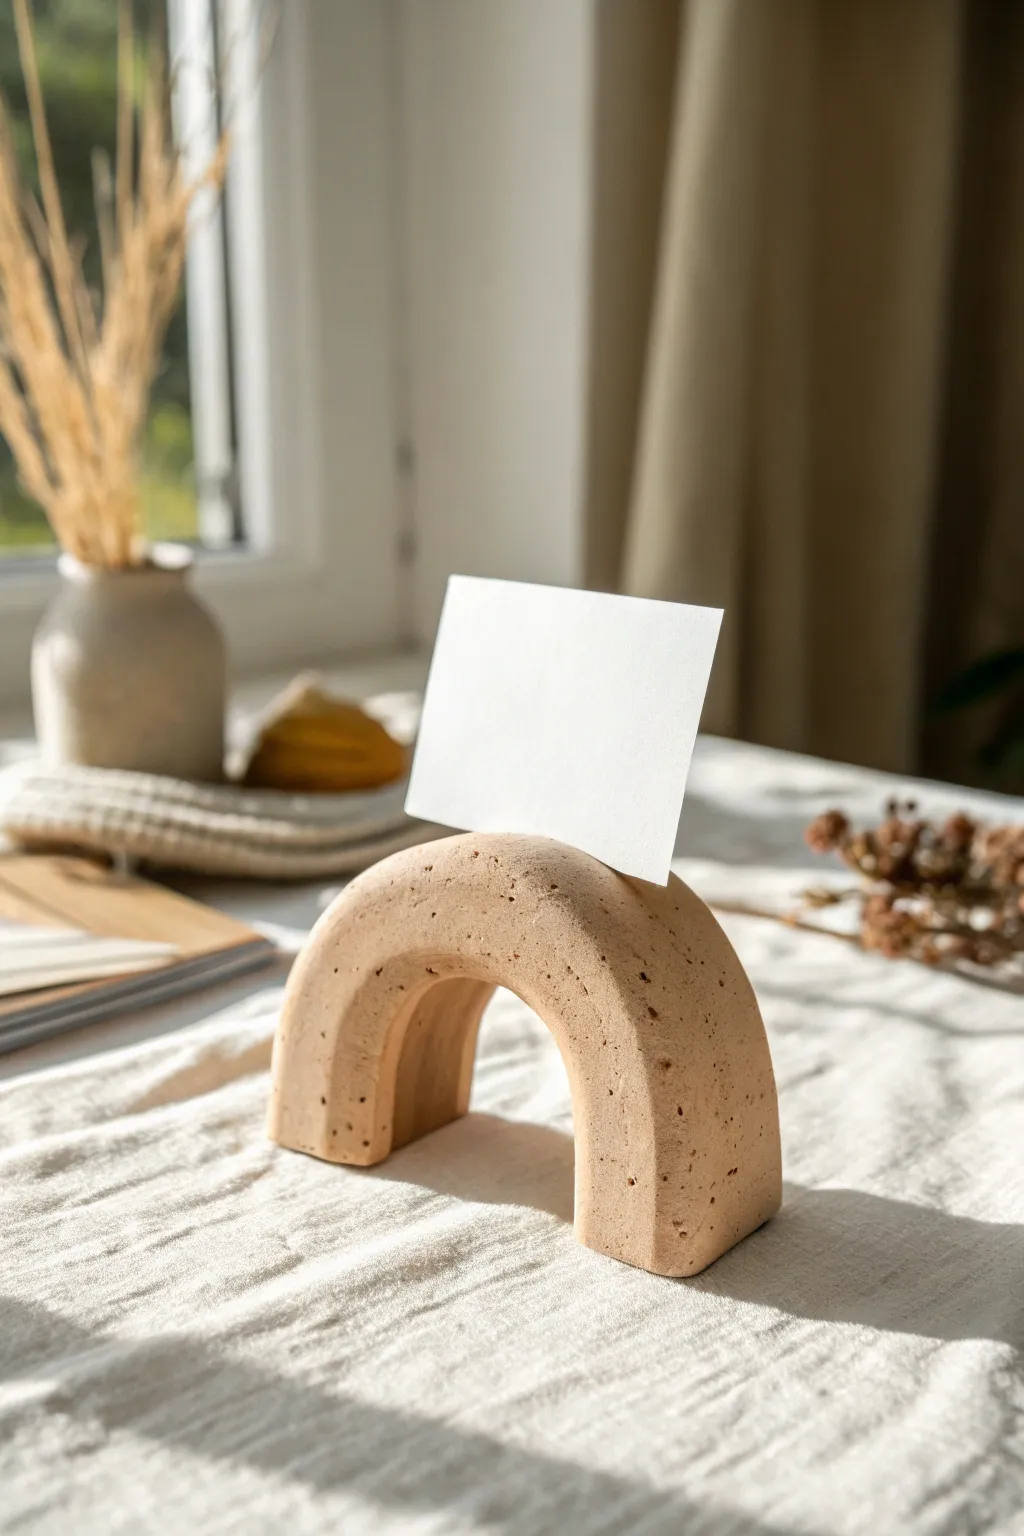
This minimalist arch photo holder brings a touch of organic warmth to your desk or tablescape. With its speckled texture and soft, rounded form, it perfectly balances modern design with handmade charm.
How-To Guide
Materials
- Air-dry clay (stone or speckled effect)
- Dowel or rolling pin
- Sharp knife or clay cutting tool
- Ruler
- Sandpaper (fine grit)
- Small bowl of water
- Two supports (like small boxes or books) for drying
- Matte sealant (optional)
Step 1: Shaping the Base
-
Prepare your clay:
Start by taking a handful of air-dry clay. Knead it in your hands until it becomes soft, pliable, and free of cracks. If the clay feels too dry, dip your fingers in water and work the moisture in. -
Roll a thick snake:
Roll the clay on your work surface into a thick log shape. Aim for a thickness of about 1 inch to ensure the final arch is sturdy enough to stand on its own. -
Flatten the shape:
Gently press down on the log with your palm or a rolling pin to flatten it slightly. You want a rectangular cross-section with rounded edges rather than a perfect cylinder. -
Create the arch:
Bend the clay log into a U-shape. Adjust the curve until it looks pleasing to you, keeping the legs parallel to each other. -
Trim the feet:
Stand the arch up to check for stability. Use your sharp knife to slice the bottom of both “feet” so they are perfectly flat and level.
Keep it Straight
Use a piece of sturdy cardstock inside the slot while the clay dries. This prevents the gap from shrinking or closing up during the drying process.
Step 2: Adding Details
-
Smooth the surface:
Dip your finger in a little water and run it over the clay to smooth out any fingerprints or unwanted bumps. I like to keep the texture slightly imperfect to enhance the natural look. -
Create the card slot:
Using your knife, carefully cut a slit directly into the top center of the arch. This cut should go about half an inch deep. -
Widen the slot slightly:
Gently wiggle the knife blade back and front just a tiny bit to widen the opening so it can easily hold a piece of thick cardstock later. -
Add texture:
If you are using plain clay but want the look in the photo, simulate the speckled stone effect now. Use a stiff toothbrush to flick tiny droplets of diluted coffee or brown watercolor paint onto the wet clay, or gently press coarse sand into the surface.
Step 3: Drying and Finishing
-
Set up drying supports:
Place two small objects (like matchboxes or books) on either side of the arch legs while it dries to prevent the clay from slumping or widening. -
Let it dry completely:
Allow the piece to dry for 24-48 hours. Turn it over gently halfway through the drying process to ensure the bottom gets air exposure. -
Sand the imperfections:
Once fully dry and hard, use fine-grit sandpaper to gently smooth any sharp edges on the feet or around the card slot. -
Dust it off:
Wipe away the sanding dust with a soft, dry cloth or a fluffy paintbrush. -
Seal the piece:
For durability, apply a thin coat of matte varnish or sealant. This will protect the clay from moisture and keep the speckles looking crisp. -
Insert your photo:
Once the sealant is dry, slide your favorite photo or place card into the slot to complete the display.
Marble Magic
Before rolling your log, twist together two different colors of clay (like beige and terracotta) to create a sophisticated marble effect arch.
Now you have a stylish, functional piece of decor ready to hold your favorite memories
Simple Herb Markers With Stamped Letters
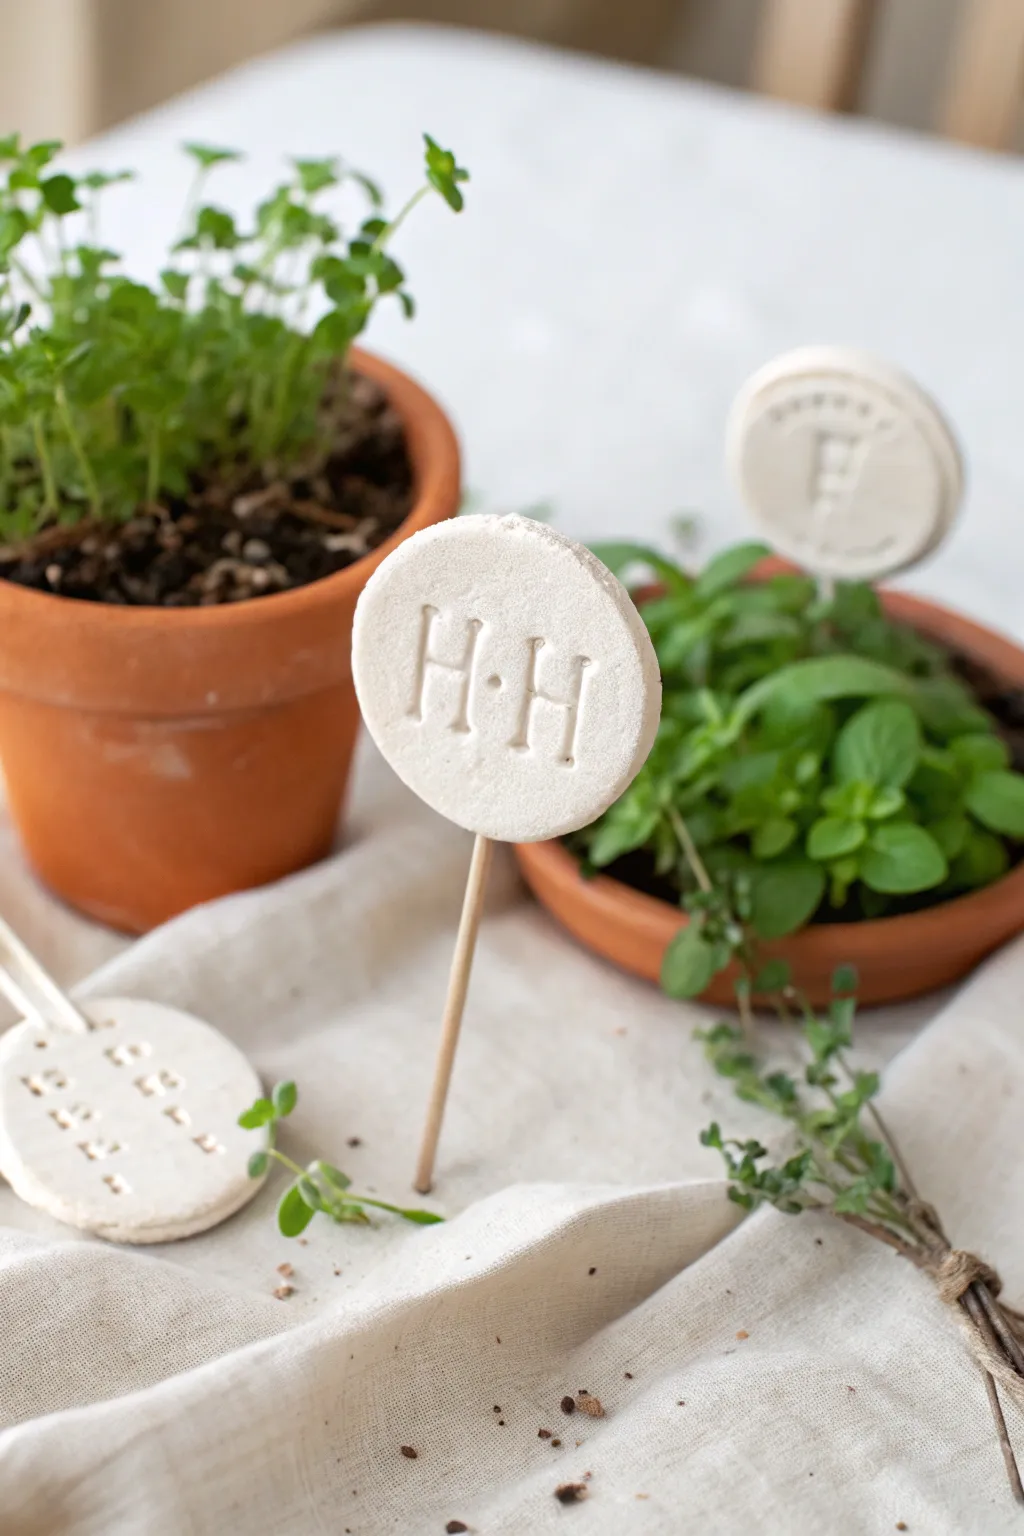
Add a touch of rustic elegance to your indoor garden with these minimalist clay herb markers. These bright white, disc-shaped labels feature classic stamped lettering and are perched on simple wooden skewers for a clean, organic look.
Detailed Instructions
Materials
- White stone clay (air-dry) or polymer clay
- Rolling pin
- Small circular cookie cutter (approx. 1.5 – 2 inches)
- Small alphabet stamps
- Wooden skewers
- Wax paper or parchment paper
- Sandpaper (fine grit)
- Small bowl of water
- Clear matte varnish (optional)
Step 1: Preparation & Rolling
-
Prepare your workspace:
Lay down a sheet of wax paper or parchment paper on a flat surface to prevent the clay from sticking while you work. -
Condition the clay:
Take a handful of your white clay and knead it in your hands until it becomes soft, pliable, and free of cracks. Warm clay is much easier to stamp cleanly. -
Roll out the slab:
Using your rolling pin, roll the clay out to an even thickness of about 1/4 inch. You want it thick enough to hold the skewer but not so heavy that it topples over. -
Smooth the surface:
Before cutting, run a slightly damp finger over the surface of the clay to smooth out any textures or fingerprints left by the rolling pin.
Step 2: Cutting & Stamping
-
Cut the shapes:
Press your circular cookie cutter firmly into the clay to create your discs. Cut as many as you need for your different herbs. -
Remove excess clay:
Gently peel away the scrap clay from around the circles, leaving the discs on the parchment paper so you don’t distort their shape by lifting them yet. -
Smooth the edges:
Dip your finger in a little water and gently run it along the cut edge of each circle to soften any sharp ridges created by the cutter. -
Plan your letters:
Select the alphabet stamps you need (e.g., ‘H’ for Herb or specific names like ‘MINT’). It helps to line them up next to the clay first to check spacing. -
Stamp the text:
Press the stamps firmly into the center of the clay disc. Apply even pressure so the impression is deep and clear, but be careful not to push all the way through. -
Add details:
If you want the ‘H.H’ style shown in the photo, use a small dot tool or the end of a toothpick to create a decorative dot between letters.
Stamp Cleaner
To prevent clay from getting stuck inside your tiny letter stamps, lightly dust the stamp face with cornstarch or dip it in water before pressing it into the clay.
Step 3: Assembly & Finishing
-
Insert the skewers:
While the clay is still wet, carefully glide the pointed end of a wooden skewer into the bottom edge of the circle. Push it in about half an inch to ensure stability. -
Secure the joint:
Gently pinch the clay around the entry point of the skewer to secure it. If the clay cracked slightly upon insertion, smooth it over with a drop of water. -
Let them dry:
Place the finished markers on a flat surface to dry completely. Depending on your specific clay type and humidity, this usually takes 24 to 48 hours. -
Check for flatness:
I like to flip them over gently halfway through the drying process to ensure both sides dry evenly and prevent curling. -
Sand imperfections:
Once fully cured and hard, use a piece of fine-grit sandpaper to buff away any rough edges or uneven spots on the rim of the disc. -
Seal (optional):
For extra durability against moisture from watering, apply a thin coat of clear matte varnish to seal the clay.
Fixing Cracks
If you notice small cracks forming as the clay dries, make a paste called ‘slip’ by mixing a tiny bit of clay with water and use it to fill the gaps immediately.
Now you have a set of personalized garden markers ready to help you organize your greenery
Pressed Flower Keepsake Ornament
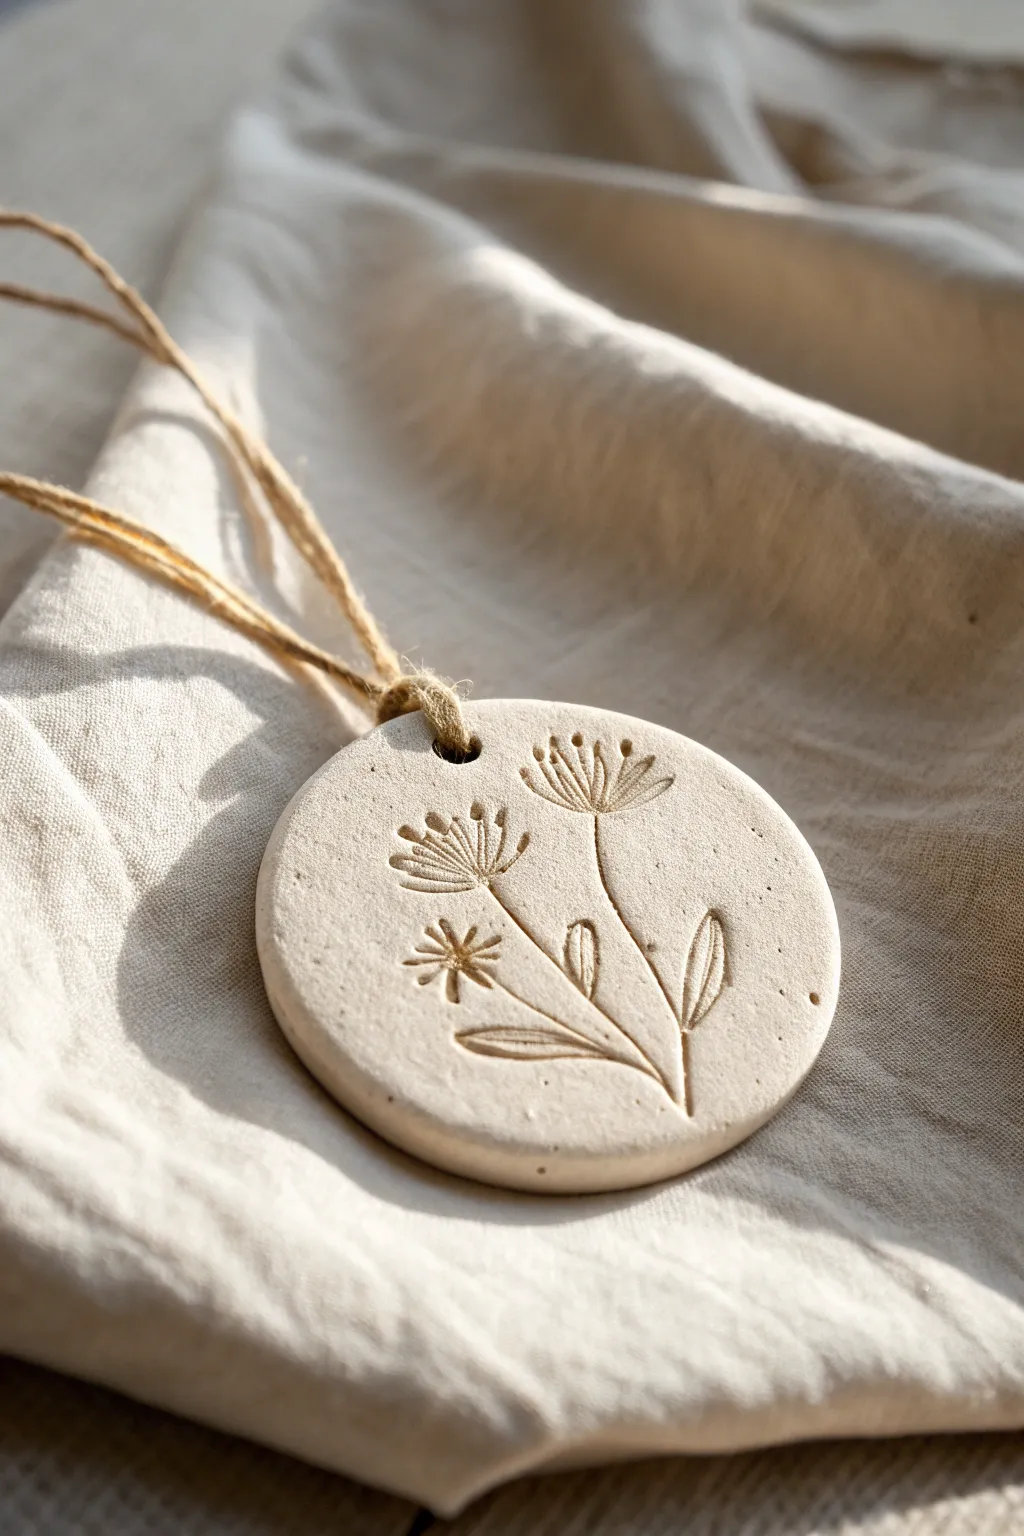
Capture the delicate beauty of nature with this minimalist clay keepsake, featuring airy wildflowers pressed into a smooth, stone-like surface. The natural jute hanger and organic texture make this an elegant addition to any gift wrap or holiday decor.
Step-by-Step Guide
Materials
- White or beige air-dry clay (or polymer clay)
- Small rolling pin
- Circular cookie cutter (approx. 3 inches)
- Fresh or dried wildflowers (look for sturdy stems like fennel, dill, or wild carrot)
- Wooden skewer or drinking straw
- Fine-grit sandpaper (optional)
- Natural jute twine
- Parchment paper or non-stick mat
- Scissors
Step 1: Preparation & Rolling
-
Condition the Clay:
Begin by taking a handful of your air-dry clay and kneading it in your hands. You want it to be warm, pliable, and free of any air bubbles. -
Flat Surface Setup:
Lay down a sheet of parchment paper or a silicone non-stick mat. This prevents the clay from sticking to your table and makes lifting the final piece much easier. -
Roll the Slab:
Use your rolling pin to flatten the clay ball into an even slab. Aim for a thickness of about 1/4 inch—too thin and it might crack; too thick and it will be heavy. -
Smooth the Canvas:
Dip your finger in a tiny bit of water and gently glide it over the surface of the clay slab to erase any small cracks or rolling pin lines.
Step 2: Creating the Design
-
Select Botanicals:
Choose your sprigs. For the look in the photo, you want plants with stiff stems and distinct seed heads or petals. Soft, mushy leaves don’t imprint as cleanly. -
Arrange the Composition:
Before pressing, lay your flowers gently on top of the clay to finalize your layout. I usually like to overlap the stems slightly at the bottom to create a bouquet effect. -
Initial Press:
Once happy with the placement, use your fingertips to gently tack the stems and flower heads into the clay so they don’t shift. -
Roll the Impression:
Take your rolling pin and roll firmly *over* the plant material once. Do not roll back and forth; just one confident pass to embed the texture deep into the clay. -
Reveal the Pattern:
Carefully find the end of a stem and use tweezers or your fingernails to lift the plant material out. Peel it away slowly to leave the clean impression behind.
Uneven Impressions?
If the clay is too sticky, the plants won’t release cleanly. Let the rolled slab sit for 10 minutes to firm up slightly before pressing your flowers in.
Step 3: Cutting & Shaping
-
Cut the Circle:
Position your circular cookie cutter over the design, ensuring the botanical imprint is centered or pleasantly off-center according to your taste. -
Press and Release:
Press the cutter straight down firmly, give it a tiny wiggle to separate the edges, and lift it up. Peel away the excess clay from around the circle. -
Smooth the Edges:
Dip your finger in water again and run it along the cut edge of the circle to soften the sharp corner left by the cutter. -
Create the Hanger Hole:
Using a wooden skewer or a straw, poke a hole near the top edge of the circle. Make sure the hole is wide enough to accommodate your jute twine later. -
Check the Back:
Flip the ornament carefully. If the hole punching created a ragged edge on the back, smooth that down with your finger now.
Add Subtle Color
After drying, rub a tiny amount of brown acrylic wash or dark wax into the grooves of the floral imprint, then wipe the surface clean to make the design pop.
Step 4: Finishing Touches
-
Drying Process:
Move the parchment paper with the clay ornament to a flat, safe spot. Let it air dry for 24-48 hours. Flip it over halfway through to ensure even drying and prevent curling. -
Sanding (Optional):
Once fully dry and hard, inspect the edges. If there are any rough spots, gently buff them away with fine-grit sandpaper for a professional finish. -
Prepare the Twine:
Cut a length of natural jute twine, approximately 8-10 inches long. -
Looping the Thread:
Fold the twine in half. Push the folded loop through the hole in the ornament from front to back. -
Securing the Knot:
Pull the loose ends of the twine through the loop you just pushed through the hole and pull tight to create a lark’s head knot. -
Final Tie:
Tie the two loose ends of the twine together in a simple overhand knot to close the loop.
Hang your beautiful new creation in a window or on a gift to enjoy the timeless texture of nature
Texture-Wrapped Mini Planter That Looks Handmade
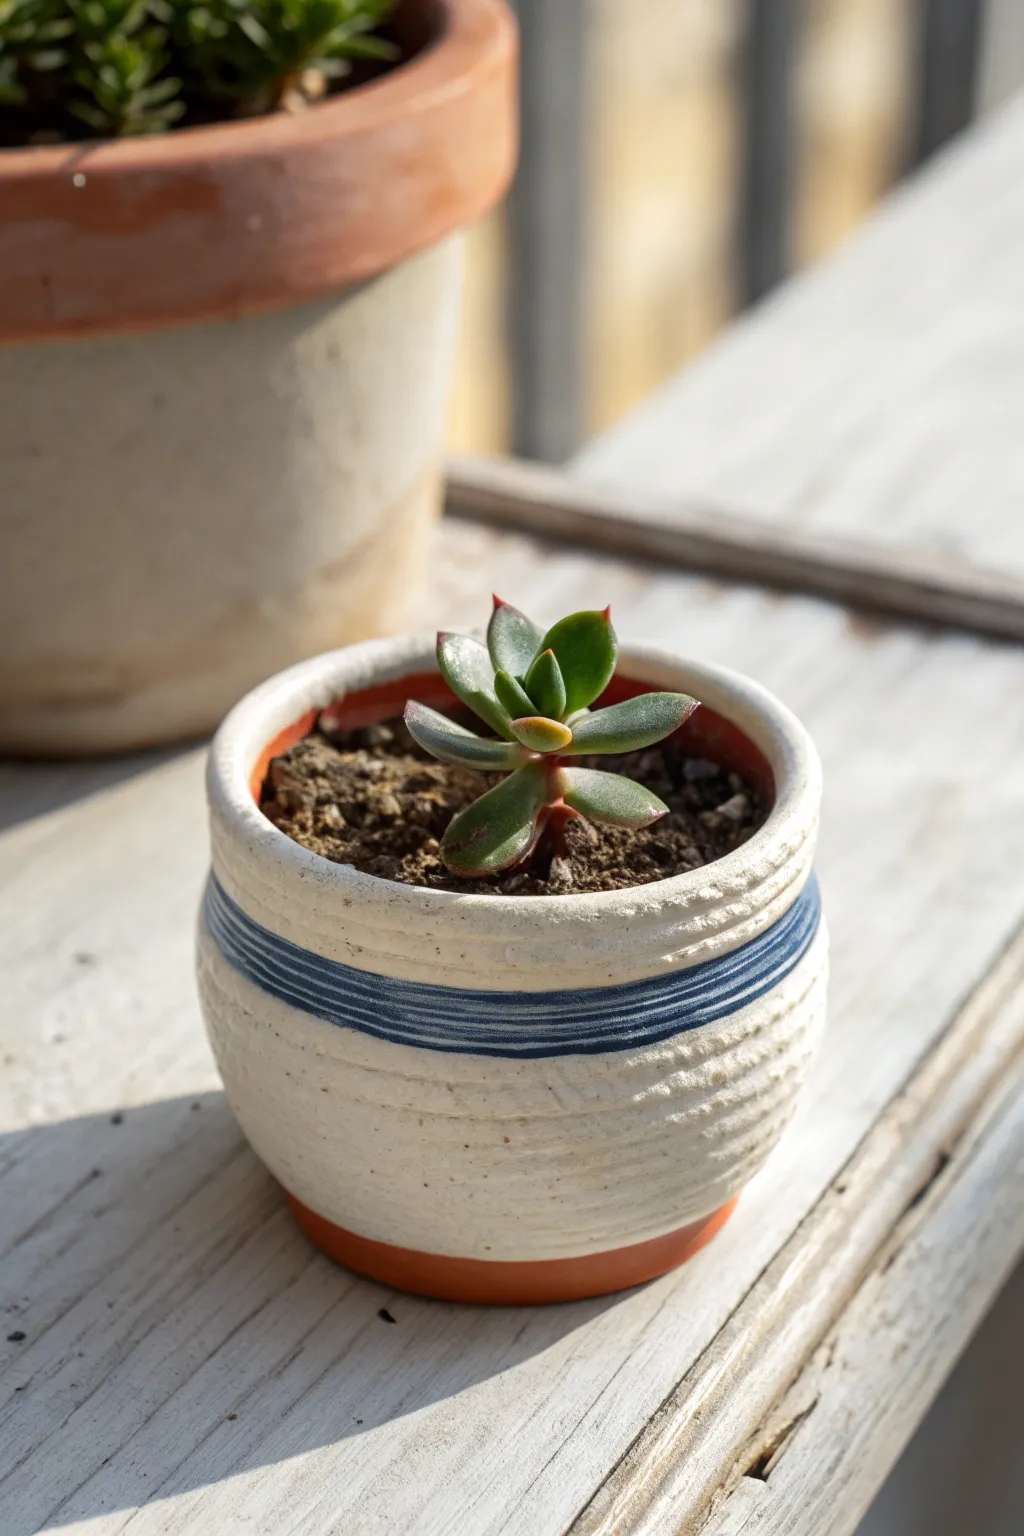
This charming, petite planter features a beautifully rustic, ribbed texture and a striking blue accent stripe that gives it a refined, hand-thrown appearance. It is a deceptively simple project that combines basic clay forming with clever carving techniques to achieve a professional finish.
Detailed Instructions
Materials
- Air-dry clay (white or light cream)
- Small rolling pin
- Circle cutter (approx. 2.5 inches diameter)
- Small cup of water
- Needle tool or toothpick
- Carving tool or old credit card
- Acrylic paint (navy blue and terracotta orange)
- Fine detail paintbrush
- Flat shader paintbrush
- Clear matte varnish or sealant
- Small sponge
- Sandpaper (fine grit)
Step 1: Forming the Base
-
Prepare the Clay:
Start with a ball of clay roughly the size of a golf ball. Knead it in your hands until it is warm and pliable to prevent cracks later. -
Roll the Base:
Roll out a small portion of your clay into a flat slab about 1/4 inch thick. Use your circle cutter to punch out a perfect circle for the bottom of the pot. -
Create the Walls:
Take the remaining clay and roll it into a long, thick snake or coil. Flatten this coil gently with your rolling pin so it becomes a long rectangular strip, approximately 1.5 inches tall. -
Assemble the Cylinder:
Wrap the rectangular strip around the circular base. Cut off any excess length, leaving just enough to join the ends together. -
Join the Seams:
Score the edges where the clay will meet (both the vertical seam and the bottom edge) by scratching cross-hatch marks with your needle tool. Dab a little water on the scored areas. -
Blend the Clay:
Press the clay walls onto the base and join the vertical seam. Use your thumb or a modeling tool to smooth the clay downward and across the seams until the joins disappear completely on both the inside and outside.
Step 2: Adding Texture and Detail
-
Shape the Form:
Gently gently press the walls outward from the inside to create a slightly bulbous, rounded shape, tapering back in slightly at the top rim. -
Create the Ribbing:
Using a needle tool or a carving tool, slowly carve horizontal grooves around the circumference of the pot. These don’t need to be perfectly straight; a wobble adds to the handmade look. -
Texturize the Surface:
Lightly drag a rough sponge or a crumpled piece of foil over the clay surface to add a subtle gritty texture between your carved grooves. -
Refine the Rim:
Dampen your finger and run it along the top rim to smooth it out, ensuring it is level. -
Initial Drying:
Let the pot sit until it is leather-hard (firm but still cool to the touch). This usually takes about 2-4 hours depending on humidity. -
Refining:
Once leather-hard, check for any sharp burrs of clay created during carving and gently smooth them down with a slightly damp finger. -
Full Cure:
Allow the pot to dry completely for 24-48 hours until it is bone dry and chalky white.
Cracks Appearing?
If small cracks form while drying, mix a tiny bit of clay with water to make a paste (slip) and fill them in immediately, then smooth over.
Step 3: The Striped Finish
-
Sand for smoothness:
Briefly sand the very bottom and the top rim with fine-grit sandpaper to ensure stability and a clean finish. -
Paint the Base:
Mix a terracotta orange acrylic paint. Paint a thin band around the very bottom edge of the pot to mimic exposed red clay. -
Paint the Stripe:
Load a fine detail brush with navy blue paint. Locate the central carved groove that sits at the widest part of the pot’s belly. -
Fill the Groove:
Carefully paint inside this specific groove, allowing the texture of the clay to guide your brush. I find rotating the pot while holding the brush still helps get a straighter line. -
Add Secondary Stripes:
Add two thinner blue lines just above and below the main central stripe to create a banded effect. -
Seal the piece:
Once the paint is fully dry, apply a coat of clear matte varnish to the entire outside and inside of the pot to protect it from moisture.
Carving Tip
For more consistent grooves, rest your hand on a stack of books at the right height and rotate the pot against the tool instead of moving your hand.
Now you have a charming little vessel ready to hold your tiniest succulent.
Color-Blocked Wall Tiles for a Quick Decor Moment
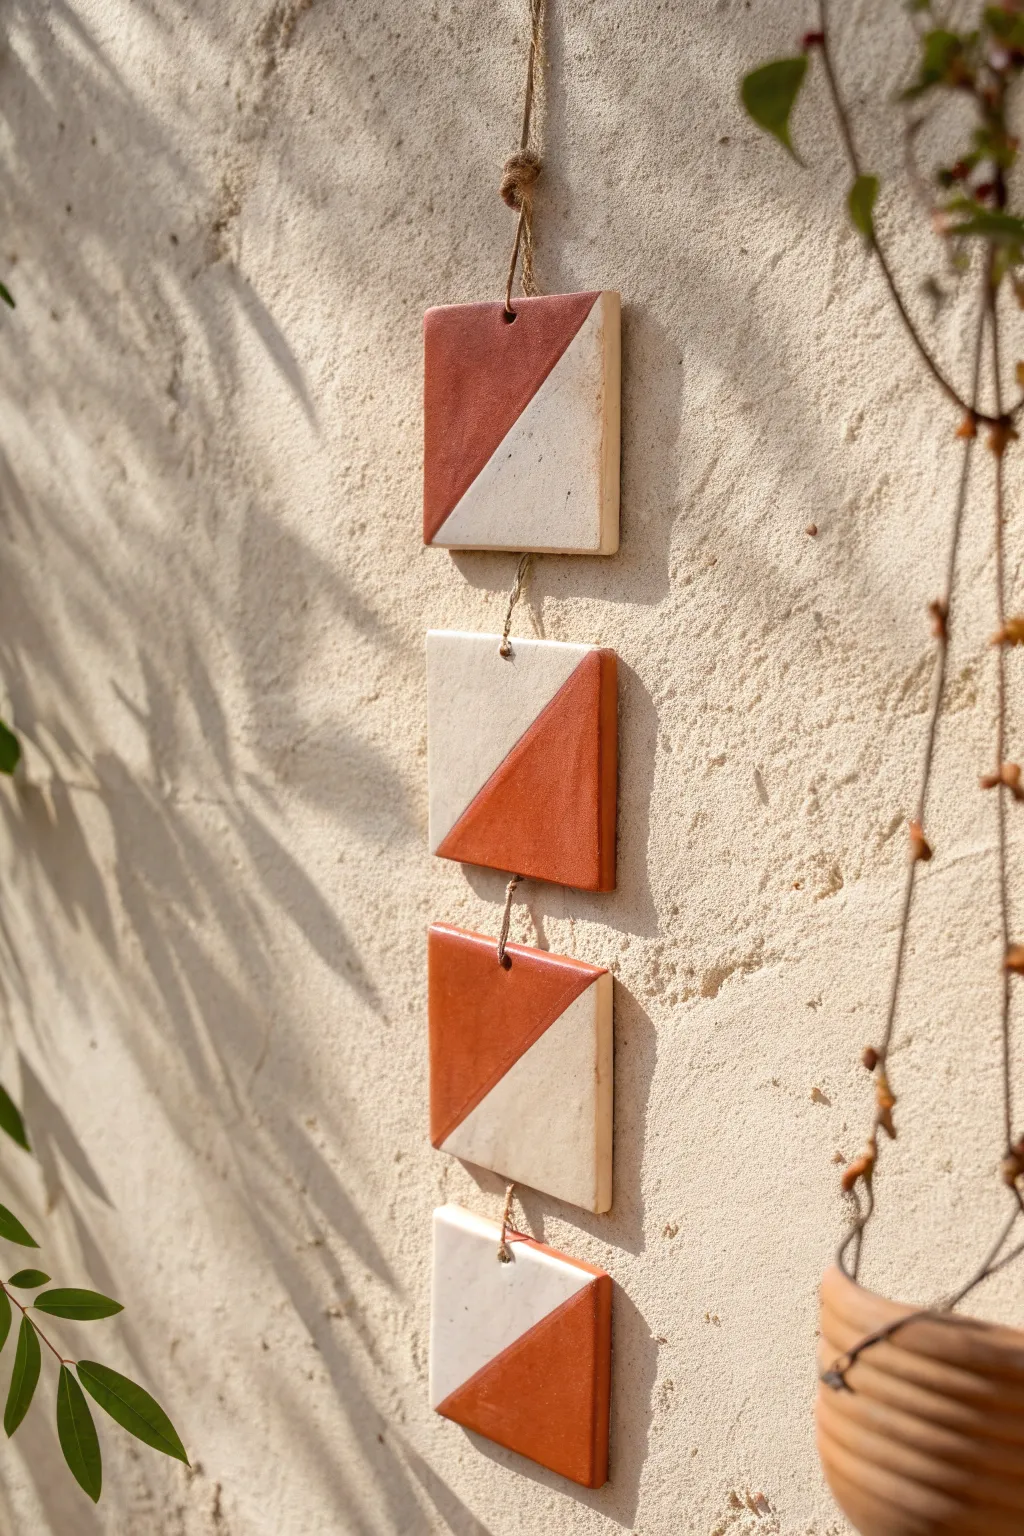
Add a touch of earthy modernism to your space with this color-blocked wall hanging. These kiln-less clay tiles are surprisingly simple to make, blending raw textures with rich terracotta tones for a warm, minimalist aesthetic.
How-To Guide
Materials
- Air-dry clay (white or light beige)
- Rolling pin
- Square cookie cutter (approx. 3-4 inches) or a sharp craft knife
- Acrylic paint (terracotta or burnt sienna)
- Painter’s tape or washi tape
- Sandpaper (fine grit)
- Jute twine or hemp cord
- Wooden skewer or straw
- Paintbrush (flat shader)
- Parchment paper
- Clear matte sealant (optional)
Step 1: Shaping the Tiles
-
Prepare the Clay:
Start by kneading a large handful of air-dry clay to warm it up and remove any air pockets. Place it on a sheet of parchment paper to prevent sticking. -
Roll it Out:
Use your rolling pin to flatten the clay. Aim for a consistent thickness of about 1/4 inch or slightly thicker; too thin and the tiles might crack, too thick and they will be heavy. -
Cut the Squares:
Press your square cookie cutter firmly into the clay to create four identical squares. If you don’t have a cutter, I find measuring and cutting a paper template first ensures my knife cuts remain perfectly uniform. -
Create Hanging Holes:
While the clay is still wet, use a wooden skewer or a straw to poke a hole in the top and bottom center of each square. Important: For the very bottom tile, only poke a hole in the top center. -
Smooth the Edges:
Dip your finger in a little water and gently run it along the cut edges of each square to soften any sharpness or rogue clay bits. -
Let it Dry:
Allow the tiles to dry completely flat on parchment paper. This usually takes 24-48 hours depending on humidity; flip them halfway through to ensure even drying.
Clean Lines Pro-Tip
For the absolute crispest paint lines, brush a tiny layer of clear matte medium or white paint over the tape edge first to seal it before adding your terracotta color.
Step 2: Decorating and Assembly
-
Sand Imperfections:
Once fully dry and hard, take your fine-grit sandpaper and lightly buff the edges and surface for a smooth finish. -
Tape the Diagonal:
Apply a strip of painter’s tape diagonally across each square, dividing it essentially into two triangles. Press the tape edge down firmly to prevent paint bleed. -
Apply the Color:
Paint the exposed half of the tile with your terracotta or burnt sienna acrylic paint. Use a flat brush and stroke away from the tape line for the crispest edge. -
Second Coat:
Let the first layer dry to the touch, then apply a second coat for opaque, rich color coverage. -
Reveal the Design:
Carefully peel off the painter’s tape while the paint is still slightly tacky to avoid chipping the dry acrylic. -
Seal (Optional):
If you want extra durability, apply a thin coat of clear matte sealant over the entire tile. -
Prepare the Twine:
Cut four pieces of jute twine. Three pieces should be roughly 4-5 inches long, and one top piece should be longer (about 10 inches) for the main hanger. -
Start Assembly:
Thread a shorter piece of twine through the top hole of the bottom tile and the bottom hole of the tile above it. -
Secure the Knots:
Tie a secure double knot on the backside of the tiles to link them together, maintaining equal spacing between each square. -
Continue Linking:
Repeat this process, working your way up the chain until all four tiles are connected in a vertical line. -
Add the Hanger:
Loop the long top piece of twine through the single hole on the uppermost tile, then knot it to create a hanging loop.
Level Up: Texture
Before the clay dries, gently press a piece of linen fabric or a dried leaf into the surface of the unpainted half to add subtle, organic texture to the white space.
Hang your new mobile near a window where shadows can play across the geometric angles throughout the day
DIY Domino Set With Painted Dots
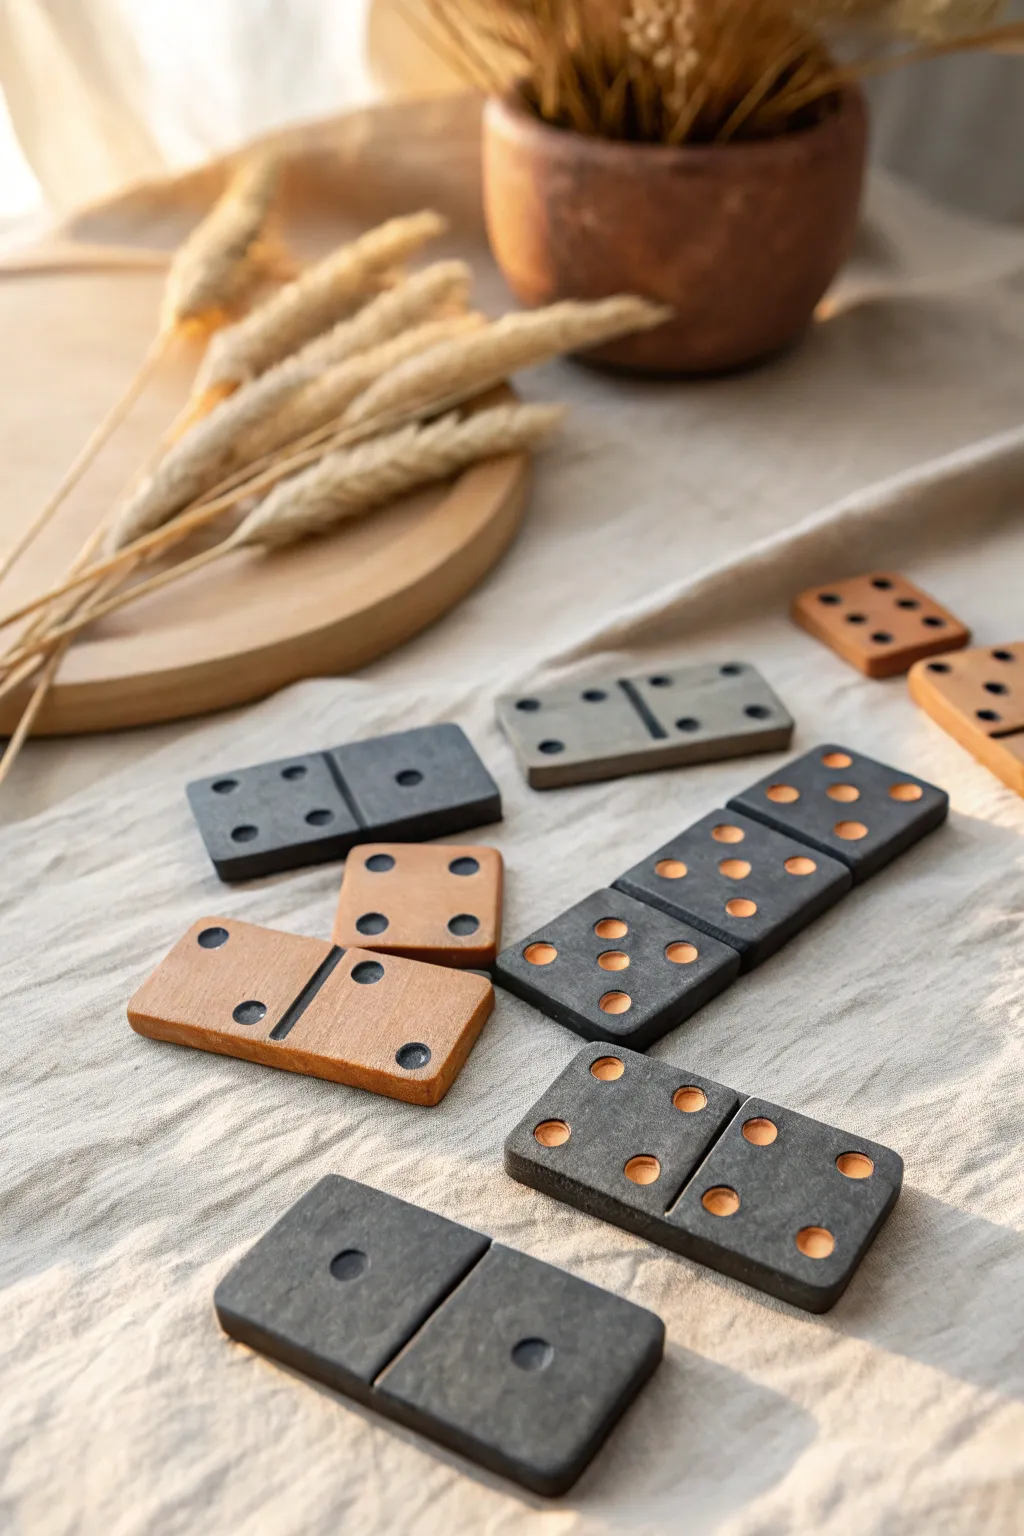
Elevate game night with this sophisticated, earthy set of handmade dominoes. Featuring a mix of charcoal and warm tan tiles with contrasting indented pips, these pieces have a delightful tactile quality that plastic just can’t match.
Step-by-Step Tutorial
Materials
- Polymer clay (black/charcoal and tan/terracotta colors)
- Acrylic rolling pin or clay machine
- sharp craft knife or blade
- Ruler
- Small circular tool for making pips (e.g., small ball stylus, drill bit shank, or chopstick end)
- Fine grit sandpaper (400-600 grit)
- Acrylic paint (black and warm orche/tan)
- Fine detail paintbrush
- Matte varnish (optional)
Step 1: Prepping and Shaping
-
Condition the clay:
Begin by thoroughly kneading your polymer clay colours separately until they are soft and pliable. This prevents cracking and ensures a smooth finish later on. -
Roll out the slab:
Using an acrylic rolling pin or a pasta machine on a medium-thick setting (approx. 1/4 inch or 6mm), roll out your clay into even sheets. Uniform thickness is crucial for fair gameplay, so take your time here. -
Measure your grid:
Lightly score lines into your clay sheet using a ruler to mark out rectangular tiles. A standard domino size is roughly 1 inch by 2 inches, but feel free to adjust slightly for your custom look. -
Cut the tiles:
Use a sharp blade to cut straight down along your scored lines. Avoid dragging the knife, which can warp the shapes; a push-down chopping motion works best. -
Smooth the edges:
Gently tap the cut edges of each rectangle with your finger to soften the sharp corners just a little, giving them that tumbled, stone-like appearance.
Clean Cuts Hack
Chill your rolled clay sheet in the fridge for 10 minutes before cutting. The firmer clay resists dragging and warping under the knife.
Step 2: Adding Details
-
Mark the center:
Use the back of your knife or a flat tool to gently press a shallow line across the center of each tile, dividing it into two equal squares. -
Create the pips:
Using your small circular tool, press indentations into the clay to form the numbers (0-6). Refer to a real domino set or image to ensure you get the standard patterns correct for each number. -
Refine the surface:
If the pip-pressing tool created slightly raised ridges around the holes, gently smooth the face of the domino with your finger or a light pass of the roller to flatten the surface again. -
Bake the tiles:
Arrange the tiles on a baking sheet lined with parchment paper or cardstock. Bake according to your specific clay manufacturer’s instructions (usually 275°F/135°C for 15-30 minutes). -
Cool down:
Allow the tiles to cool completely in the oven or on a wire rack before handling them further to ensure they harden fully.
Stone Effects
Mix black pepper or fine sand into your clay before rolling it out to create realistic granite-like speckles and added texture.
Step 3: Finishing Touches
-
Sand for texture:
Once cool, lightly sand the edges and surface with fine-grit sandpaper. This mimics the matte, stone texture seen in the photo and removes any fingerprints. -
Wash away dust:
Rinse the tiles quickly in cool water and dry them thoroughly to remove sanding dust before painting. -
Fill the pips:
Dip a fine brush into acrylic paint. For black tiles, use the tan paint; for tan tiles, use black paint. dab a small amount of paint into each recessed hanging pip. -
Clean up overflow:
I prefer to let the paint sit for just a moment, then wipe the surface of the tile with a slightly damp paper towel. This leaves paint in the holes but cleans the top surface perfectly. -
Seal the deal (Optional):
If you want extra durability, apply a very thin coat of matte varnish. However, leaving them raw maintains that lovely organic, tactile feel.
Pack your new set in a simple canvas drawstring bag and get ready to impress your friends at your next game night