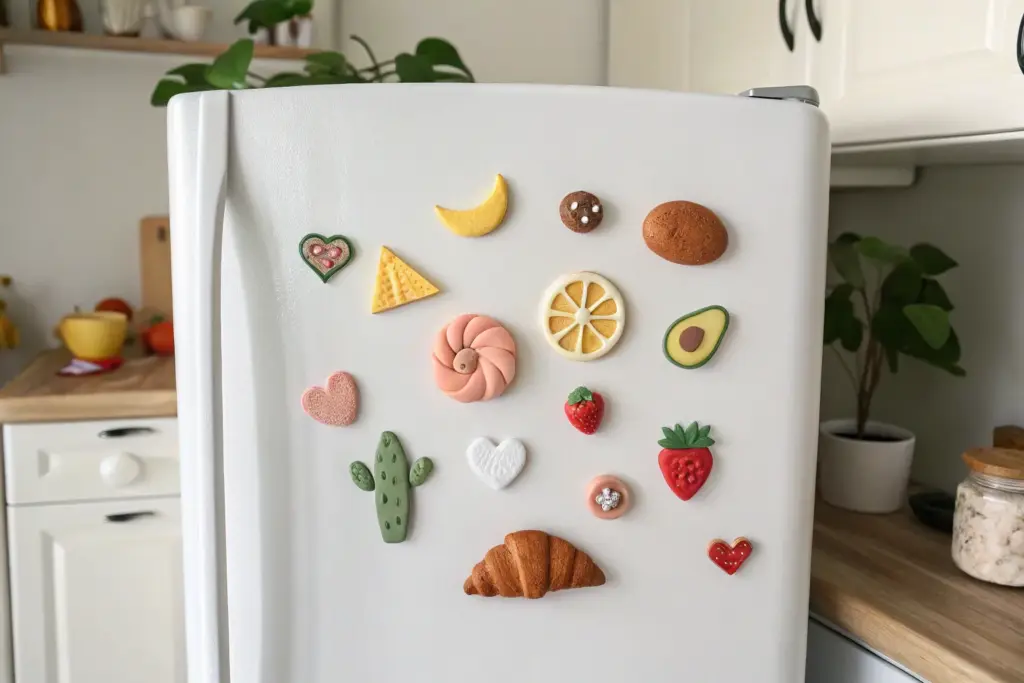
If you’ve been craving a quick win in the studio, clay magnets are my favorite tiny project that still feels super satisfying. I’m sharing my go-to easy clay magnet ideas that keep the shapes simple, the colors playful, and the results actually useful on your fridge.
Classic Pizza Slice Magnets
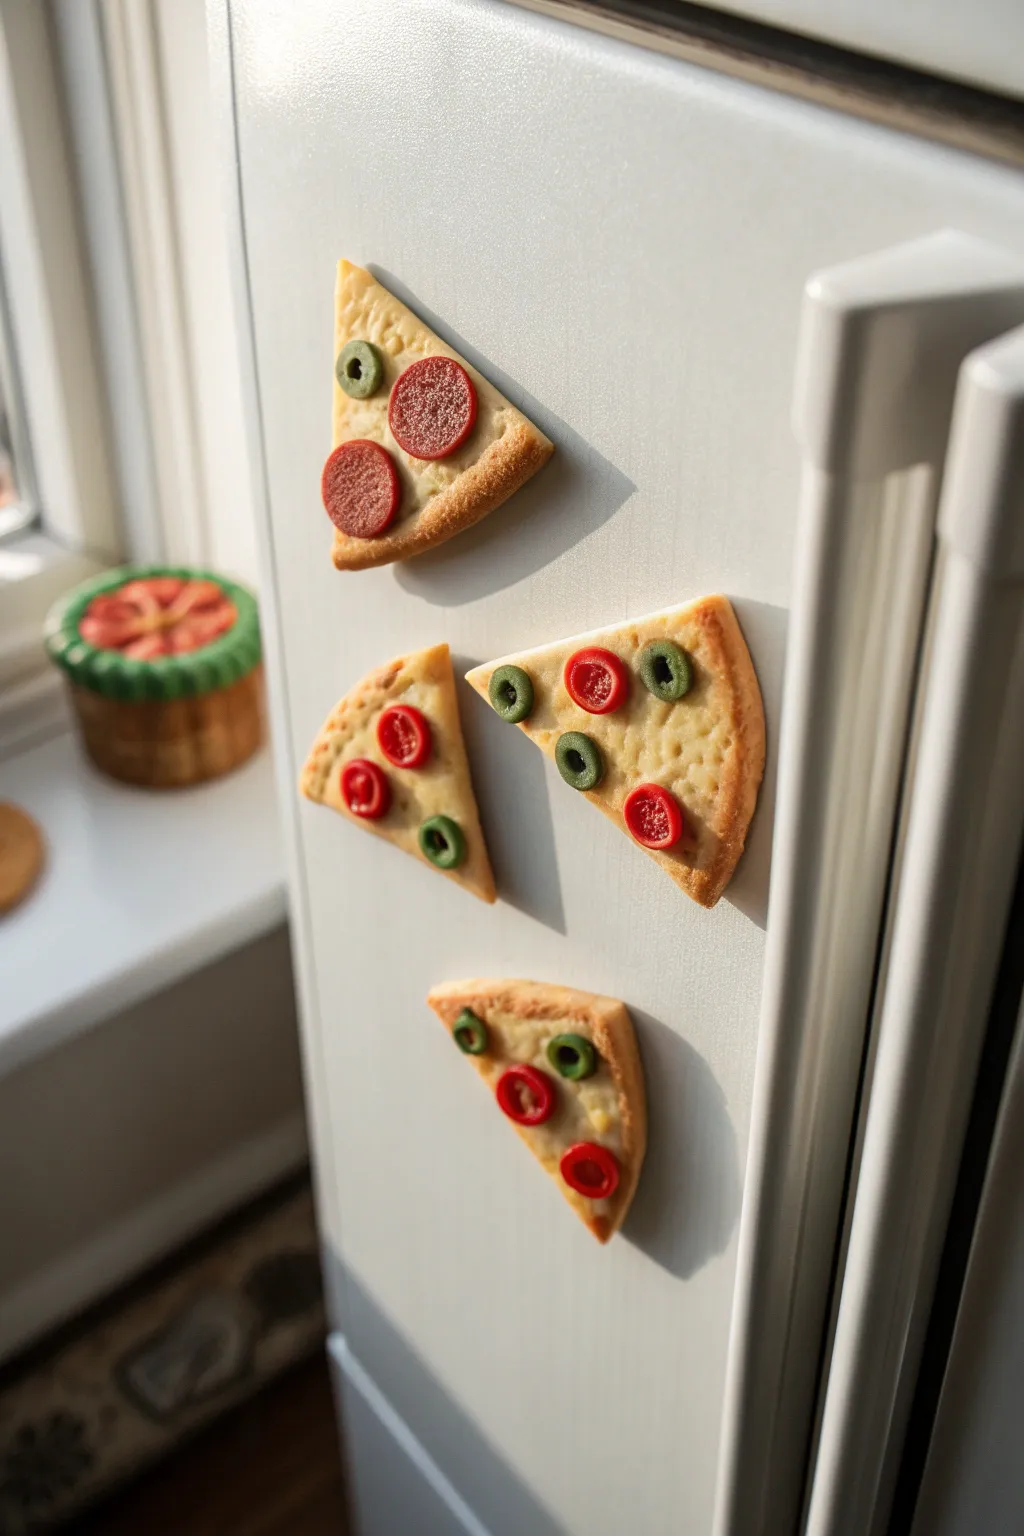
These charming little magnets turn your fridge into a pizzeria display, featuring realistic toasted crusts and tiny, detailed toppings. Crafted from polymer clay, each slice captures that cheesy, gooey look with a touch of playful realism.
Step-by-Step Guide
Materials
- Polymer clay (beige, white, translucent yellow, red, dark green)
- Liquid polymer clay (translucent)
- Soft pastels (yellow ochre, burnt sienna, dark brown)
- Needle tool or toothpick
- Small round cutter or drinking straw
- Clay blade or craft knife
- Toothbrush (for texturing)
- Strong craft magnets
- Strong adhesive (E6000 or super glue)
- Gloss varnish (optional)
Step 1: Crafting the Crust
-
Mix the dough color:
Start by mixing beige clay with a tiny amount of white to get a natural pizza dough color. You want it lighter than a baked crust initially. -
Form the base:
Roll the clay into a sheet about 1/4 inch thick. Cut out triangles for your slices; you can vary the sizes slightly for a hand-tossed look. -
Create the cornicione:
Roll a small snake of the same dough-colored clay. Attach this along the wider top edge of your triangle to form the raised crust rim. -
Texture the dough:
Press a clean toothbrush or a ball of aluminum foil gently over the entire surface of the crust, especially the raised rim, to simulate the airy texture of bread. -
Pre-shade for baking:
Scrape some yellow ochre and burnt sienna soft pastels into a powder. Using a soft brush, dust the edges and the raised crust rim to give it a ‘baked’ appearance before adding cheese.
Pro Tip: Realistic Crust
For the most realistic baked effect, use a toothpick to poke tiny holes in the crust rim, then brush darker brown chalk pastel only inside those holes to mimic air bubbles that browned precisely in the oven.
Step 2: Adding Sauce and Cheese
-
Prepare the cheese:
Mix white clay with a bit of translucent yellow. You can also mix this with a few drops of liquid clay to make a spreadable ‘sauce’ consistency if you prefer a melted look. -
Apply the cheese layer:
Spread your cheese mixture onto the triangle, leaving the textured crust rim exposed. I like to make the surface look uneven and bubbly, rather than perfectly flat. -
Texture the cheese:
Use a needle tool to stipple the cheese surface lightly, creating little dimples and ‘melted’ areas.
Step 3: Topping Time
-
Make the pepperoni:
Roll out a thin sheet of red clay. Use a small round cutter or a straw to punch out circles. Texture the top with a bit of sandpaper or a toothbrush for a meaty look. -
Create green olives:
Roll tiny snakes of dark green clay. Slice them into small rings to create sliced olives. -
Create tomato slices:
Make a small cane with red clay on the outside and a red-translucent mix inside for the seeds. Slice thinly to create tomato rounds, or simply shape small red discs and indent the centers. -
Arrange the toppings:
Press your chosen toppings gently into the cheese layer. Vary the arrangement on each slice—some full of pepperoni, others veggie-heavy. -
Final shading pass:
Lightly dust the cheese and toppings with a tiny bit more burnt sienna pastel to simulate oven browning and melted cheese spots.
Level Up: Spice It Up
Grate baked green clay into tiny dust or use actual dried oregano flakes mixed into liquid clay to sprinkle ‘herbs’ over your finished pizza for an extra layer of texture and detail.
Step 4: Baking and Assembly
-
Bake the slices:
Place your pizza slices on a baking tile or parchment paper. Bake according to your polymer clay manufacturer’s instructions (usually 275°F/130°C for 15-30 minutes). -
Cool down:
Let the pieces cool completely before handling. They will be slightly soft when hot and harden as they cool. -
Optional gloss:
If you want a greasy, delicious look, brush a very thin layer of gloss varnish over the pepperoni and cheese areas, keeping the crust matte. -
Attach the magnet:
Flip the slice over. Apply a dab of strong adhesive to the back and press your magnet firmly into place. -
Dry completely:
Allow the glue to cure fully (usually 24 hours for maximum strength) before sticking them to your fridge.
Now your kitchen has a dash of Italian flair that looks good enough to eat


Watermelon Wedge Magnets

Capture the essence of a refreshing summer snack with this vibrant watermelon wedge magnet. Using polymer clay and a few painting tricks, you’ll create a realistic texture that looks good enough to eat.
Detailed Instructions
Materials
- White or translucent polymer clay
- Acrylic paints (red, green, white, black)
- Fine-grit sandpaper
- Sculpting tool or craft knife
- Small flat brush
- Fine detail brush
- Gloss varnish or glaze
- Strong round magnet based
- Strong craft glue (E6000 or similar)
Step 1: Sculpting the Base
-
Condition the clay:
Start by kneading your white or translucent polymer clay until it is soft, warm, and pliable. This prevents cracks during baking. -
Form the wedge shape:
Roll a ball of clay roughly the size of a walnut. Flatten it slightly into a thick disk, then use your craft knife to cut a pie-slice wedge shape. It should be about 1/4 inch thick. -
Smooth the edges:
Gently tap the flat sides against your work surface to square them off. Use your finger to smooth the curved outer edge so it’s uniform. -
Clean up imperfections:
Inspect the surface for fingerprints. If you find any, lightly buff them away with a tiny bit of baby oil or cornstarch on your fingertip. -
Bake the clay:
Place your clay wedge on a baking sheet or tile. Bake according to the manufacturer’s instructions on your clay package (usually between 230°F to 275°F for 15-30 minutes). Let it cool completely.
Step 2: Painting the Colors
-
Base coat the rind:
Mix a vibrant green acrylic paint. Using your flat brush, paint the outer curved edge and slightly wrap the color around the corners onto the flat sides to create the skin. -
Create the white pith:
Once the green is dry, take white paint and add a thin, curved line right next to the green edge on the flat face of the wedge. This simulates the white rind layer. -
Fill the flesh:
Paint the remaining interior triangle area with a bright, juicy red acrylic paint. Be careful to meet the white line neatly without overlapping it too much. -
Texture the red area:
While the red paint is still tacky, stipple it gently with a dry brush or a bit of crumpled foil to give it that granular watermelon texture. -
Add dimension:
Mix a tiny drop of white into your red paint to make a soft pink. Lightly dry-brush this right where the red meets the white rind line to create a natural fade.
Seed Spacing
Don’t overcrowd the seeds. Place 5-7 seeds in a random pattern rather than perfect rows to make the watermelon look more organic and natural.
Step 3: Details & Assembly
-
Paint the seeds:
Using your finest detail brush and black paint, add small teardrop shapes scattered across the red area. I like to angle them slightly toward the center point of the wedge. -
Highlight the seeds:
For extra realism, add a microscopic dot of white or light grey on the top curve of each black seed to mimic a light reflection. -
Seal the piece:
Once all paint is perfectly dry, coat the entire front and sides with a gloss varnish. This gives the fruit a wet, fresh look and protects the paint. -
Prepare the back:
Flip the wedge over. If the back is uneven, give it a quick sand with fine-grit sandpaper so the magnet will sit flush. -
Attach the magnet:
Apply a dab of strong craft glue to the back of the clay slice and press your round magnet firmly into place. Let it cure fully before sticking it to your fridge.
Bite Mark Detail
Before baking, use a small scalloped cookie cutter or a straw to remove a curved chunk from the tip of the wedge. It’ll look like someone took a bite!
Enjoy the pop of color this juicy slice brings to your kitchen decor


Donut Ring Magnets

These hyper-realistic donut magnets look good enough to eat but are actually made from polymer clay. With their glossy icing and delicate drizzles, they add a delightful bakery vibe to any magnetic surface.
Step-by-Step Guide
Materials
- Polymer clay (dough color: mix white, translucent, and a tiny bit of ochre/yellow)
- Liquid polymer clay (white)
- Polymer clay in pink and lime green (for the drizzles)
- Soft pastel chalks (orange, light brown, yellow ochre)
- Paintbrush for shading
- Circle cutters (one large, one small for the hole)
- Toothbrush or aluminum foil ball (for texture)
- Strong round magnets
- Super glue or E6000
- Gloss glaze or varnish
- Baking sheet and oven
Step 1: Shaping the Dough
-
Mix your base color:
Start by mixing white, translucent, and a very small amount of ochre or yellow polymer clay. You want a creamy, unbaked dough color. -
Form the shape:
Roll the clay into a smooth ball, then flatten it slightly into a thick disc. It should be chubby and rounded, like a real yeasted donut. -
Cut the center:
Use your smallest circle cutter to punch a hole directly in the center of the disc. Soften the harsh edges of the hole with your fingertip so it looks realistic. -
Add texture:
Gently tap a clean toothbrush or a crumpled ball of aluminum foil over the surface of the donut. This creates that fluffy, bread-like texture rather than completely smooth plastic.
Sticky Icing?
If your liquid clay icing is too runny and drips too much, let it sit on a piece of paper for 10 minutes first. The paper will absorb some oil, thickening the clay.
Step 2: Baking and Coloring
-
Applying the ‘bake’:
Scrape some orange, light brown, and yellow ochre soft pastels into fine powder. Use a soft brush to dust this powder onto your raw clay. -
Refining the shading:
Focus the darker brown shading on the outer edges and the bottom, leaving a lighter ‘fried line’ around the middle equator of the donut, just like the real thing. -
First bake:
Bake the donut base according to your clay manufacturer’s instructions (usually around 275°F/130°C for 15-20 minutes). Let it cool completely.
Scented Donuts
Mix a tiny drop of vanilla or sweet bakery fragrance oil into your clay before baking. Your magnets will smell just like a fresh bakery.
Step 3: Icing and Decoration
-
Prepare the icing:
Take your white liquid polymer clay. If it’s too translucent, mix in a tiny bit of solid white clay to make it opaque and thick. -
Glaze the donut:
Carefully spoon or squeeze the liquid clay over the top of your cooled donut. Let it drip naturally down the sides but stop it before it reaches the bottom. -
Create the drizzles:
Softener small amounts of pink and lime green clay with a drop of liquid clay or baby oil until they are almost a paste texture. -
Apply the lines:
Roll these softened colors into extremely thin snakes or extrude them. Drape them over the wet white icing in sweeping curves to match the photo. -
Second bake:
Bake the donut again for about 10-15 minutes to set the liquid clay icing. Watch carefully so the white doesn’t brown.
Step 4: Finishing Touches
-
Gloss it up:
Once fully cooled, brush a coat of high-gloss varnish over just the icing part. This makes the glaze look sticky and sweet. -
Attach the magnet:
Flip the donut over. Apply a dab of strong glue (like E6000) to the back. -
Secure the backing:
Press a strong round magnet into the glue. Let it cure fully for 24 hours before sticking it to your fridge.
Enjoy your calorie-free confections on the fridge or give them as sweet little gifts


Fried Egg Magnets
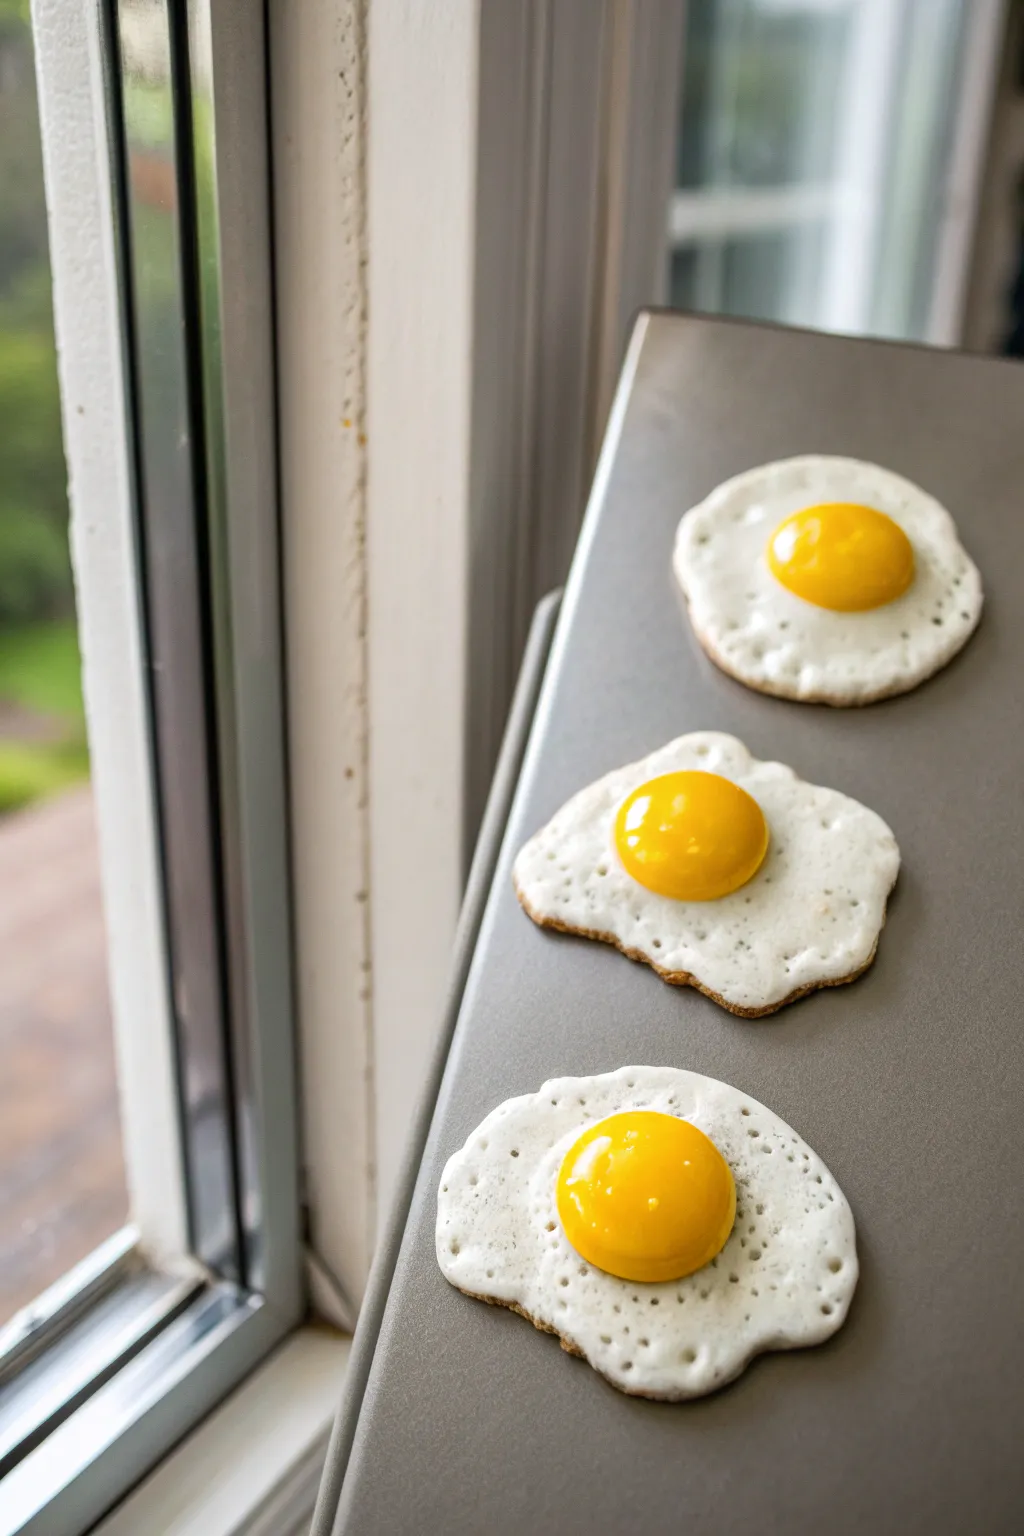
Brighten up your fridge or magnetic board with these charmingly realistic fried egg magnets. They feature textured, bubbly whites and glossy, vibrant yolks that look good enough to eat, all made from polymer clay.
Detailed Instructions
Materials
- White polymer clay
- Translucent polymer clay
- Yellow polymer clay
- Orange polymer clay (optional, for shading)
- Brown soft pastel chalk or acrylic paint
- Liquid polymer clay (optional but recommended)
- UV resin or glossy glaze
- Paintbrush (small and stiff)
- Needle tool or toothpick
- Ball tool (large)
- Small round magnets
- Super glue or E6000
- Baking sheet and parchment paper
- UV lamp (if using UV resin)
Step 1: Shaping the Egg White
-
Condition the white clay:
Begin by taking a chunk of white polymer clay and kneading it in your hands until it becomes soft and pliable. Conditioning is crucial to prevent cracks later on. -
Mix in translucent clay:
For a more realistic, slightly jelly-like appearance, I like to mix one part translucent clay with three parts white clay. Knead them together until the color is completely uniform. -
Create the base shape:
Roll the mixed clay into a balls about 1 inch in diameter, then flatten them unevenly with your thumb. You want an organic, irregular shape—perfect circles don’t look like real fried eggs. -
Thin the edges:
Use your fingers to gently pinch and thin out the very edges of your white shape, leaving the center slightly thicker to support the yolk later. -
Add texture:
Using a needle tool or toothpick, poke small holes around the surface of the white clay to mimic the air bubbles found in frying egg whites. Vary the depth and size for realism. -
Create the crispy edge:
Scrape some brown soft pastel into a powder. Use a small dry brush to dust the very edges of the egg white, giving it that cooked, crispy look.
Step 2: Creating the Yolk
-
Mix the yolk color:
Combine yellow polymer clay with a tiny pinch of orange to get a rich, deep yolk color. Roll this into a smooth ball about the size of a large pea. -
Prepare the indentation:
Press a large ball tool or your thumb gently into the center of your textured egg white to create a shallow nesting spot for the yolk. -
Attach the yolk:
Place a dab of liquid polymer clay (or use a scratch-and-attach method) in the indentation, then press the yellow ball onto the white base. Flatten it slightly so it looks like a dome, not a sphere. -
Blend the seam:
For extra realism, take a tiny bit of liquid clay or translucent clay and smooth the seam where the yellow meets the white, simulating the thin membrane over the yolk.
Pro Tip: Bubbles
Use a toothbrush to gently tap the surface of the white clay. This creates tiny, uniform micropores that look exactly like aerated egg whites.
Step 3: Finishing Touches
-
Bake the clay:
Place your eggs on a parchment-lined baking sheet. Bake according to your clay manufacturer’s instructions, typically around 275°F (135°C) for 15-20 minutes. -
Cool down:
Allow the clay pieces to cool completely before handling. They are fragile while warm. -
Glaze the yolk:
Once cool, apply a coat of UV resin or high-gloss glaze specifically to the yellow yolk. This gives it that wet, fresh-cracked shine. -
Cure the glaze:
If using UV resin, cure it under a UV lamp for 1-2 minutes until hard and non-tacky. If using regular glaze, let it air dry completely. -
Prepare the magnet:
Flip the egg over. Apply a strong adhesive like E6000 or super glue to the back center of the clay piece. -
Attach the magnet:
Press a small round magnet firmly into the glue. Let the adhesive cure fully (usually 24 hours for E6000) before sticking it to your fridge.
Level Up: Seasoning
Before baking, sprinkle tiny specks of black clay or actual ground pepper onto the yolk for a ‘seasoned’ look, or add green clay bits for chives.
Now your kitchen has a fun pop of breakfast art that is sure to make everyone smile

The Complete Guide to Pottery Troubleshooting
Uncover the most common ceramic mistakes—from cracking clay to failed glazes—and learn how to fix them fast.
Egg on Toast Magnets
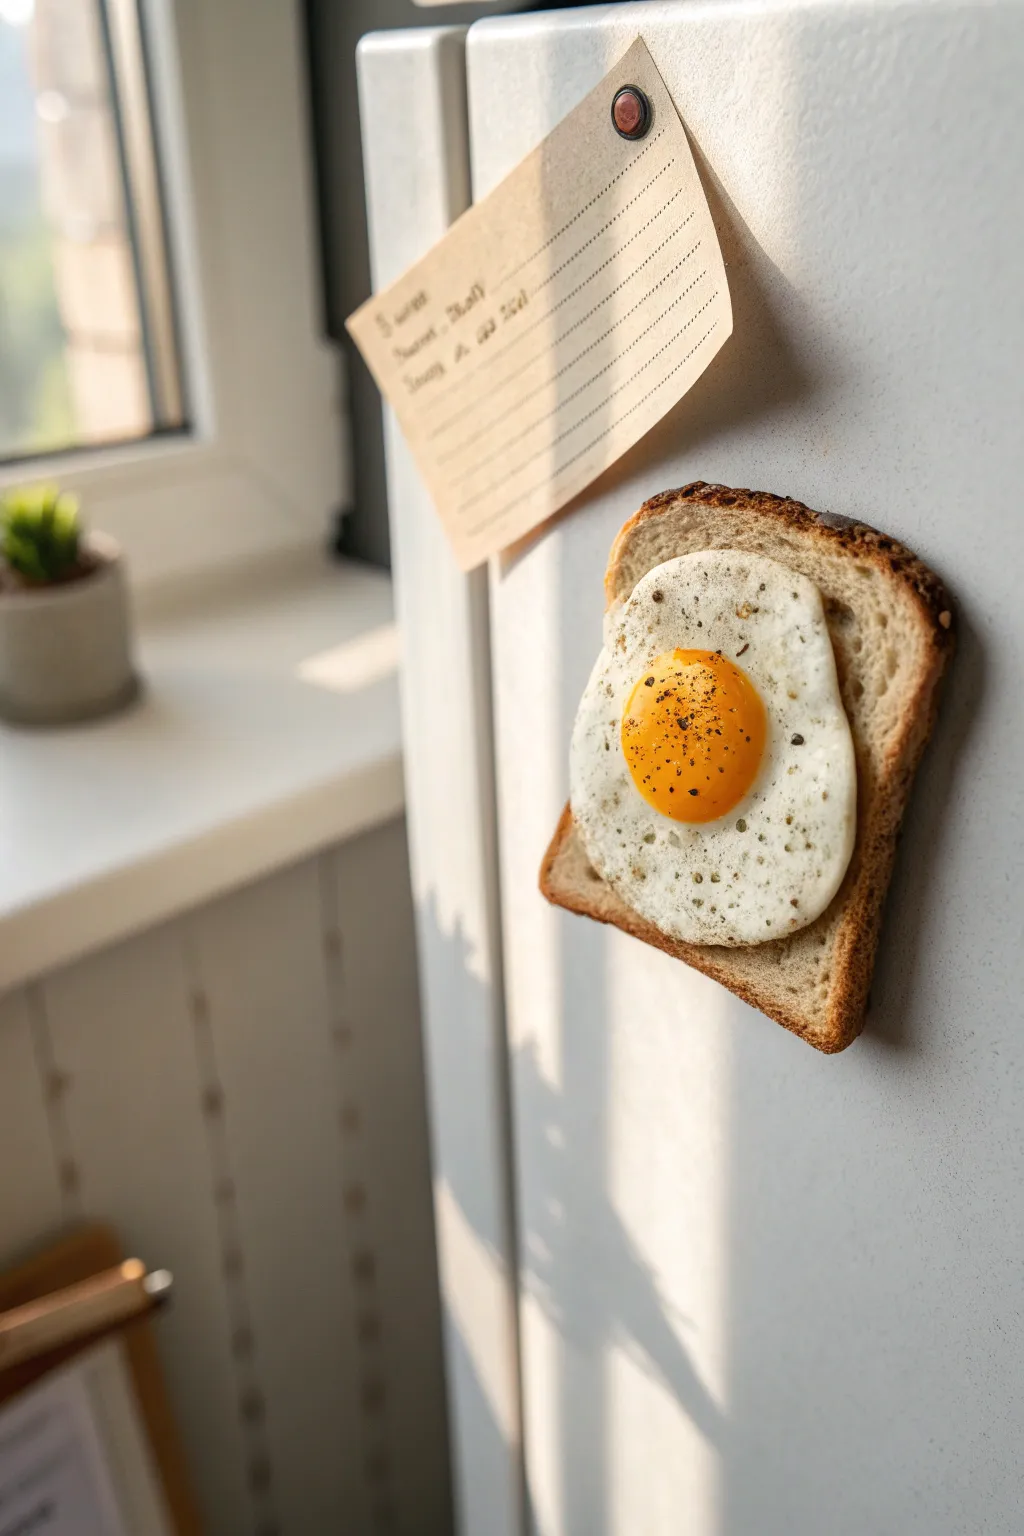
Add a deliciously realistic touch to your fridge with this quirky egg-on-toast magnet that looks good enough to eat. By combining beige clay for the bread and translucent white for the egg, you will achieve an impressively lifelike texture that is sure to fool hungry houseguests.
Step-by-Step Guide
Materials
- Polymer clay in beige, translucent white, yellow, and dark brown
- Texture tools: stiff toothbrush, crumpled aluminum foil, and a needle tool
- Soft pastels in orange, yellow ochre, and brown
- Paintbrush for pastels
- Black acrylic paint
- Gloss glaze or UV resin
- Strong round magnet
- Super glue or E6000
- Rolling pin or pasta machine
- Blade or craft knife
- Oven for baking
Step 1: Sculpting the Toast Base
-
Mix the bread color:
Start by conditioning your beige polymer clay. If it looks too synthetic, mix in a tiny pinhead amount of yellow and white to get a natural dough shade. -
Cut the toast shape:
Roll the clay out to a thickness of about 1/4 inch (6mm). Use your blade to cut a square, then gently round the top two corners and make slightly inward curves on the sides to mimic a classic bread slice silhouette. -
Texture the surface:
Press a stiff toothbrush or a ball of crumpled aluminum foil firmly all over the front surface of the clay. Don’t be afraid to press hard; bread is very porous. -
Create the crust:
Take a thin snake of dark brown clay and wrap it around the perimeter of your bread slice. Flatten it against the edge and blend the seam where it meets the beige clay on the back, but leave a distinct line on the front. -
Refine the crust texture:
Use your needle tool to drag and scrape the brown crust clay, making it look rough and baked rather than smooth. -
Shade the toast:
Scrape some yellow ochre and brown soft pastels into a powder. Use a dry brush to dust the edges of the bread face, creating a ‘toasted’ gradient that gets darker near the crust.
Step 2: Cooking the Egg
-
Form the egg white:
Take a piece of translucent white clay. Translucent is key here—it mimics the gelatinous look of real cooked egg whites much better than solid white. Flatten it into an irregular, organic shape. -
Attach the white:
Press the flattened white clay onto your textured toast. I like to let it overhang the edge of the bread just slightly for a more natural, messy look. -
Make the yolk:
Roll a small ball of yellow clay. Flatten it gently so it’s a dome, not a sphere, and press it firmly into the center of your egg white. -
Add pepper seasoning:
Take a very small brush or a toothpick and speckle the egg with tiny dots of black acrylic paint to simulate cracked black pepper. Focus the density on the yolk. -
Create egg texture:
Use the needle tool to poke tiny air bubbles into the egg white, especially near the edges where it’s ‘fried’ thinnest.
Fixing “Cloudy” Whites
If your translucent clay looks milky after baking, you likely didn’t bake it hot enough. Use an oven thermometer to ensure you hit the exact temp required for clarity.
Step 3: Finishing Touches
-
Bake the project:
Place your toast on a ceramic tile or baking sheet. Bake according to your brand of polymer clay’s specific instructions, usually between 230-275°F (110-135°C). -
Cool down:
Allow the piece to cool completely before handling. It will be slightly soft when hot but hardens as it reaches room temperature. -
Glaze the yolk:
For that runny-yolk look, apply a drop of UV resin or high-gloss glaze just to the yellow yolk part. Cure under a UV lamp or let dry. -
Attach the magnet:
flip the toast over. Apply a dab of strong glue (like E6000) to the center and press your round magnet into it. -
Final dry:
Let the glue cure for a full 24 hours to ensure the heavy clay piece doesn’t slide off firmly attached magnet.
Avocado Toast Twist
Before adding the egg, texture a thin layer of green clay onto the bread. Poke it aggressively to mimic smashed avocado, then layer the egg on top for a brunch fave.
Now your fridge is ready to serve up breakfast vibes all day long
Avocado Half Magnets
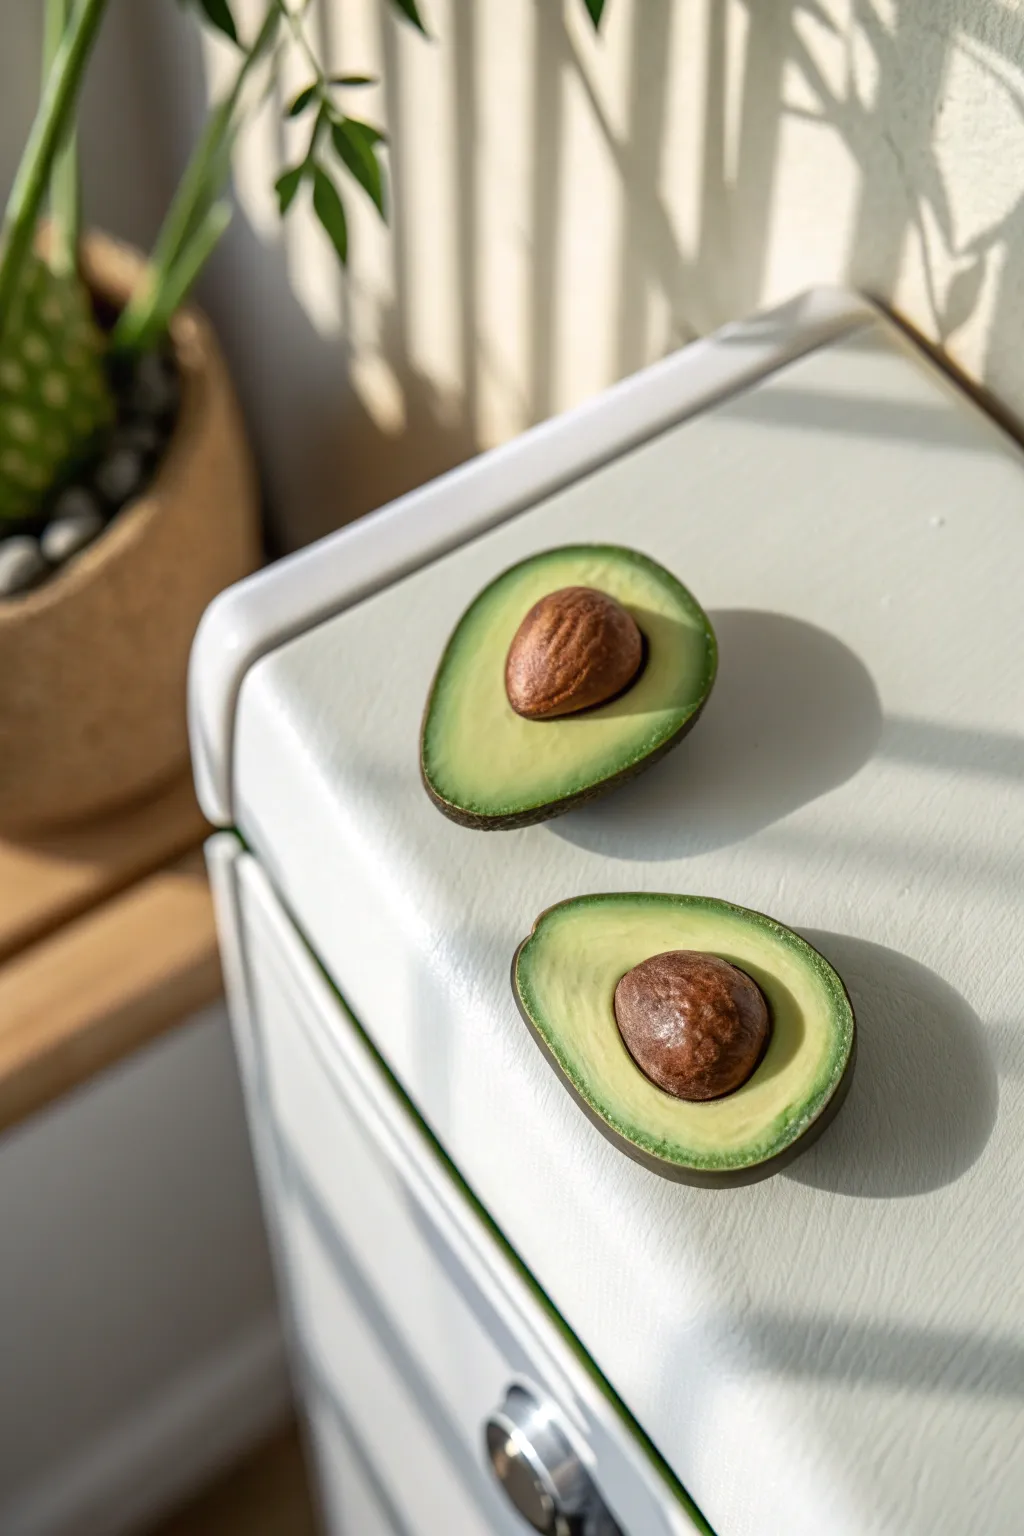
These charming magnets mimic real avocado halves so well you might be tempted to put them on toast. With their textured skin and gradient green flesh, they add a fresh, organic touch to any magnetic surface.
Step-by-Step
Materials
- Polymer clay: dark forest green, pale yellow, translucent, brown
- Texture tools: sandpaper (coarse grit), toothbrush, or stiff bristle brush
- Soft pastels or chalk: dark green, bright yellow-green
- Liquid polymer clay (optional but helpful)
- Small round magnets
- Craft knife or scalpel
- Acrylic paint: dark brown (optional)
- Gloss glaze or polyurethane varnish
- Matte varnish
- Super glue or E6000
Step 1: Shaping the Avocado Body
-
Mix the Flesh Tone:
Begin by conditioning your clay. Mix a pale yellow clay with a generous amount of translucent clay (about a 1:1 ratio) to get that slightly waxy, realistic flesh look characteristic of ripe avocados. -
Establish the Shape:
Roll the blended clay into a smooth ball, then gently taper one end to create a pear shape. Flatten it slightly so it resembles the profile of an avocado cut in half. -
Create the Skin Layer:
Roll out a thin sheet of dark forest green clay. This will serve as the thick outer skin. -
Wrap the Form:
Carefully drape the dark green sheet over the rounded back of your pear shape. Trim the excess flush with the flat face of the avocado. -
Texture the Skin:
Flip the shape over so the curved side is up. Press coarse sandpaper or use a stiff toothbrush against the dark green clay to recreate the bumpy texture of Hass avocado skin. Don’t smooth it out; the roughness adds realism.
Clean Edges Pro-Tip
After wrapping the skin, freeze the unbaked clay for 5 minutes. Then, use a sharp blade to slice a thin layer off the entire flat face. This creates a crisp, clean border between skin and flesh.
Step 2: The Pit and Details
-
Create the Pit Indentation:
On the flat, yellow face of the avocado, press a ball tool or the pad of your thumb into the wider bottom section to create a rounded hollow where the seed will sit. -
Form the Pit:
Roll a ball of brown clay that fits snugly into your indentation. Shape it slightly like a teardrop if you want a more organic seed shape. -
Texture the Seed:
Before placing it permanently, lightly scratch the surface of the brown ball with your craft knife to mimic the fibrous, wood-like texture of an avocado pit. -
Attach the Pit:
Put a tiny drop of liquid clay into the indentation and press your textured brown seed into place. -
Create the Color Gradient:
Shave some dark green and bright yellow-green soft pastels into fine powder. Using a soft detail brush, gently dust the outer rim of the yellow flesh with the green powder, fading it toward the center. This mimics the chlorophyll layer just under the skin.
Step 3: Baking and Assembly
-
Embed the Magnet (Method A):
If you want the magnet flush, flip the avocado over and press your magnet into the back to create a recess. Remove the magnet before baking. -
Bake the Clay:
Place your avocados on a tile or baking sheet. I prefer to bake these according to the clay manufacturer’s instructions, usually at 275°F (130°C) for about 30 minutes depending on thickness. -
Cool and Finish:
Allow the pieces to cool completely. Once cool, apply a coat of matte varnish to the skin and the yellow flesh to seal the pastel powders. -
Add Realistic Shine:
Because avocado pits are slightly moist or oily, apply a coat of gloss glaze strictly to the brown seed. -
Attach the Magnet:
Use a dot of super glue or strong craft adhesive to secure the magnet to the back of the avocado. If you used Method A, glue it into the recess; otherwise, glue it directly to the flat back.
Magnet Issues?
If your magnet keeps popping off the baked clay, score the back of the clay and the surface of the magnet with a knife to create a rough texture before applying the glue.
Now you have a set of adorable produce magnets that look fresh enough to eat


What Really Happens Inside the Kiln
Learn how time and temperature work together inside the kiln to transform clay into durable ceramic.
Taco Fold Magnets
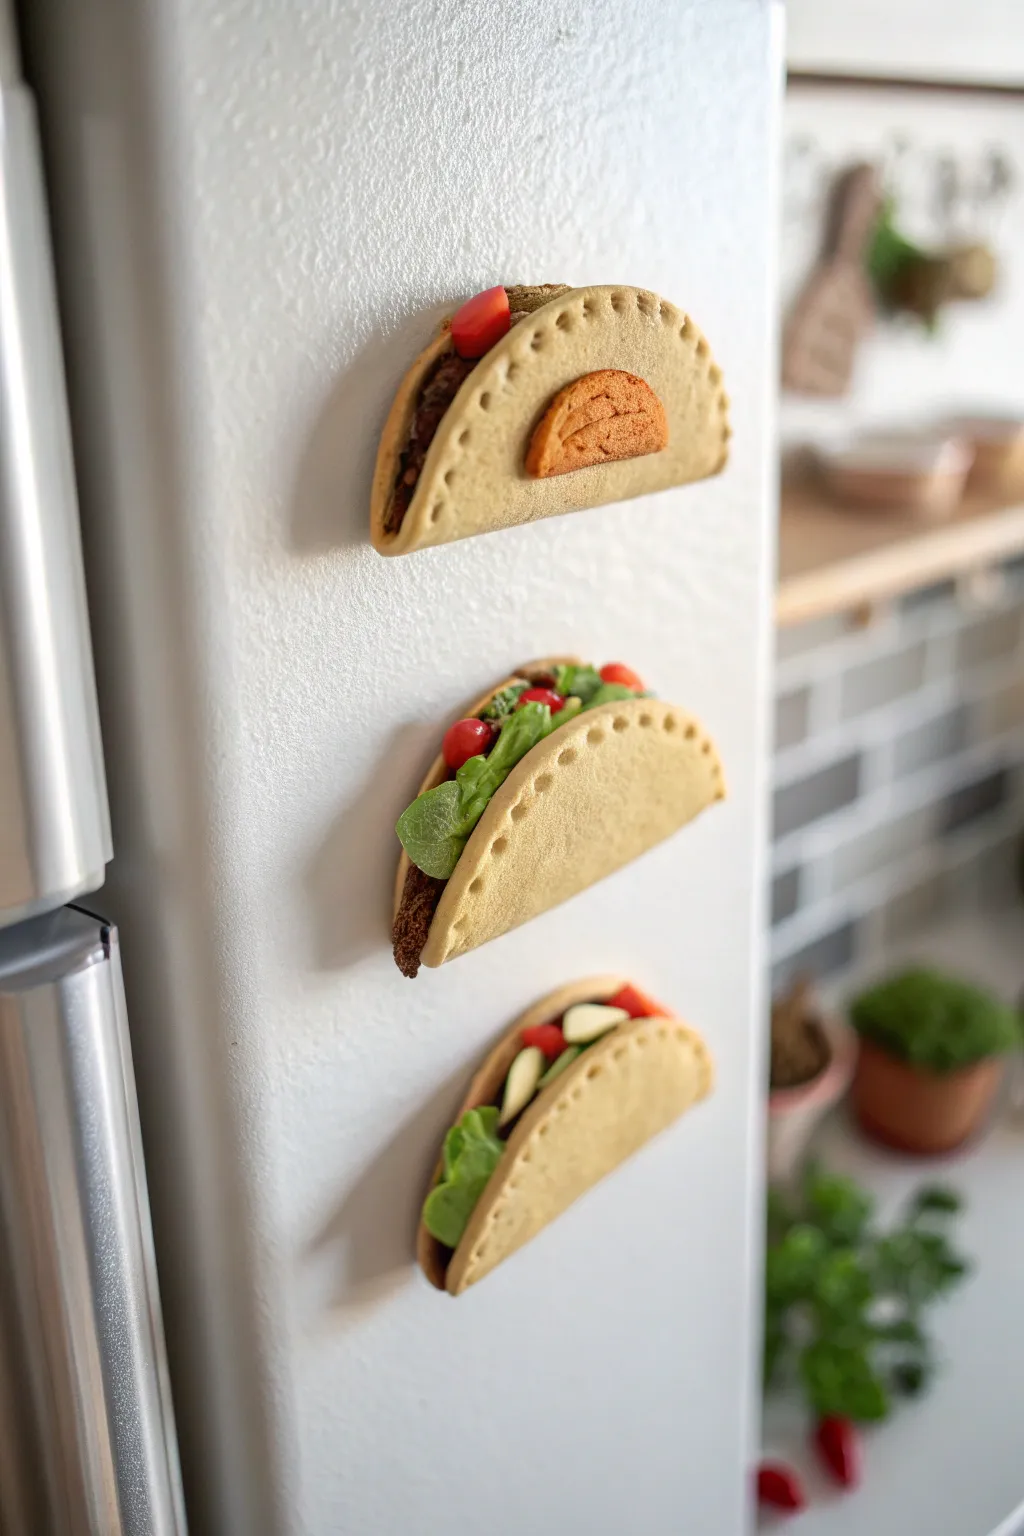
Add a dash of fun to your kitchen with these delightful little taco magnets made from polymer clay. These miniature favorites feature realistic textures and colorful fillings that look almost good enough to eat.
Step-by-Step Tutorial
Materials
- Polymer clay (tan/beige for the shell)
- Polymer clay (dark brown, red, green, orange, yellow)
- Circular cookie cutter (approx. 2 inches)
- Rolling pin or clay machine
- Needle tool or toothpick
- Ball stylus tool
- Old toothbrush or texturing sponge
- Strong round magnets
- E6000 glue or super glue
- Parchment paper
- Oven (for baking)
Step 1: Crafting the Shell
-
Condition the clay:
Start by taking a chunk of tan or beige polymer clay. Knead it in your hands until it is soft, warm, and pliable to prevent cracking later. -
Roll it out:
Using your rolling pin or clay machine, flatten the tan clay into a sheet about 1/8 inch thick. Uniform thickness helps it bake evenly. -
Cut the circles:
Press your circular cutter firmly into the clay to create the base for your taco shells. You will need one circle for each magnet you plan to make. -
Add texture:
Lightly press an old toothbrush or a piece of crumpled aluminum foil onto the surface of the clay circles. This mimics the cornmeal texture of a real tortilla.
Realism Trick
Brush soft chalk pastels in burnt orange or brown lightly over the ‘tortilla’ edges before baking to simulate a toasted, crispy look.
Step 2: Creating the Fillings
-
Make the meat:
Take small bits of dark brown clay and crumble them together to create a rough, ground-meat texture. Form this into a log shape that will fit inside the folded circle. -
Chop the veggies:
Dice tiny cubes of red clay for tomatoes and yellow clay for cheese or corn details. Keeping the pieces irregular makes them look more organic. -
Prepare the lettuce:
Roll out a very thin piece of green clay. Tear the edges with your fingers or a needle tool to create a jagged, leafy look, then ruffle it slightly. -
Form extra toppings:
For the top taco shown, create a small orange semi-circle shape. Texture it similarly to the shell if you want it to look like a chip or garnish attached to the side.
Step 3: Assembly & Baking
-
Position the filling:
Place your textured brown ‘meat’ log across the center of a texturized clay circle. -
Layer the details:
Tuck pieces of your green lettuce and red tomato chunks into the top of the meat log so they will peek out once folded. -
Fold the taco:
Gently fold the clay circle in half over the fillings. Press the bottom edge lightly to seal it, but leave the top open enough to show off the ingredients. -
Add the crimp detail:
Using a small ball stylus or the blunt end of a toothpick, press small indentations along the curved rim of the shell for a decorative, sealed look. -
Attach external details:
If you created the orange garnish piece, press it gently onto the side of the shell so it adheres. -
Bake the batch:
Place your finished tacos on parchment paper and bake according to your polymer clay package instructions (usually around 275°F for 15-30 minutes). -
Cool down:
Allow the clay pieces to cool completely before handling. They are fragile while hot and harden as they cool. -
Attach the magnet:
Flip the taco over to its flat back side. Apply a dot of strong glue and press the magnet firmly onto the clay.
Make it a Fiesta
Don’t stop at tacos! Use the same techniques to make tiny burritos, bowls of guacamole, or even a mini hot sauce bottle to complete the set.
Now your fridge is ready to serve up some serious style with these adorable handmade creations
Macaron Sandwich Magnets
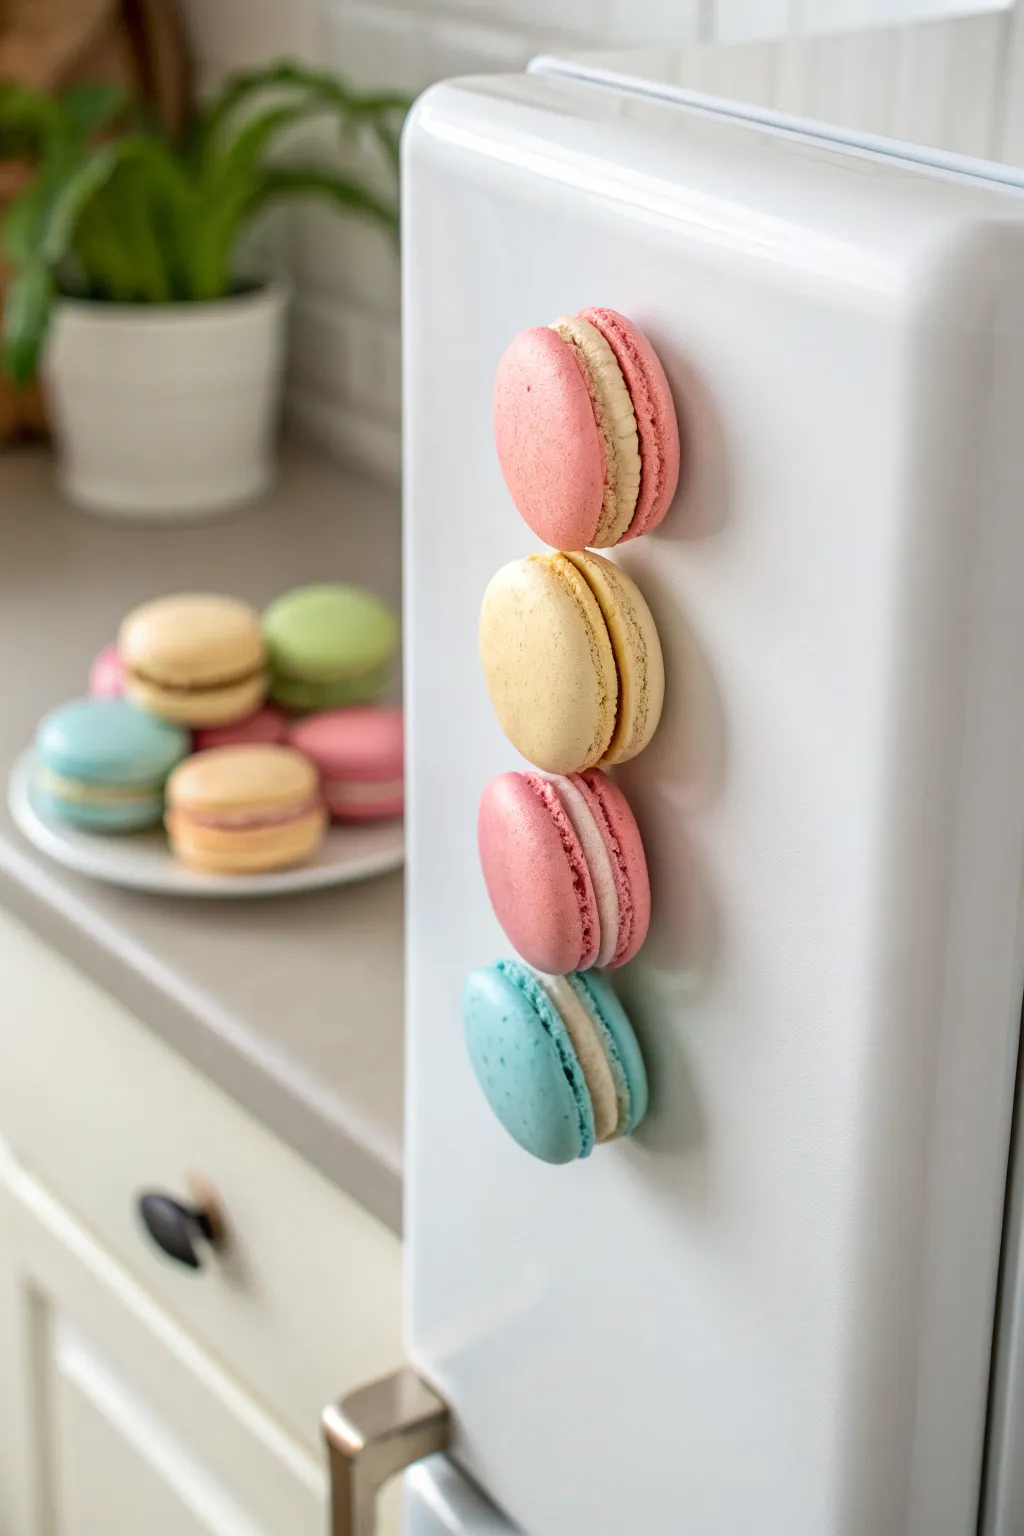
Transform your fridge into a delightful French patisserie with these hyper-realistic macaron magnets. Using polymer clay, you’ll sculpt the iconic smooth shells and textured “feet” to create a treat that looks good enough to eat but serves a practical purpose.
Detailed Instructions
Materials
- Polymer clay (pastel pink, yellow, bright pink, light blue, white/cream)
- Round clay cutter (approx. 1.5 – 2 inches)
- Needle tool or toothpick
- Ball tool (small)
- Acrylic roller or pasta machine
- Ceramic tile or baking sheet
- Strong round magnets (neodymium recommended)
- Super glue or E6000
- Texture tool (optional: sandpaper or toothbrush)
- Plastic wrap (cling film)
Step 1: Sculpting the Shells
-
Condition the clay:
Start by thoroughly conditioning your colored clays—pink, yellow, darker pink, and blue—until they are soft and pliable. Do the same for the white or cream clay which will become the filling. -
Roll out the slab:
Roll your colored clay into a thick sheet, approximately 1/4 inch thick. You want the macaron shells to have a nice, substantial dome shape. -
Cut the circles:
Place a piece of plastic wrap over the clay sheet before cutting. Press your round cutter firmly down through the plastic. This trick creates the signature domed, rounded edge on the top of the macaron rather than a sharp, flat cut. -
Refine the shape:
Remove the plastic wrap and carefully pop the circle out. If the dome isn’t high enough, gentle press the center with your thumb to round it further. -
Make the feet:
With your needle tool or toothpick, score a line around the circumference of the circle, about 1/8 inch from the bottom edge. This marks where the ‘feet’ (the rough, bubbly bottom edge) will begin. -
Texture the feet:
Using the needle tool, gently pick and tease the clay below that scored line. Pull small bits of clay outward and create a chaotic, crumbly texture. I like to vary the motion—poking and dragging—to make it look realistic.
Sticky Situation?
If clay gets stuck in your cutter, dip the cutter in cornstarch or water before pressing it into the clay. This acts as a release agent and keeps edges clean.
Step 2: Creating the Filling
-
Prepare the cream:
Roll out your white or cream clay. This layer should be slightly thinner than the shells, about 1/8 to 1/4 inch depending on how ‘stuffed’ you want the macaron to look. -
Cut the filling circle:
Use the same round cutter to punch a circle from the white clay. You don’t need the plastic wrap trick here since the edges will be textured or hidden. -
Texture the filling edge:
Gently press the edges of the white circle inward slightly so it’s just a tiny bit smaller than the colored shell. Use a needle tool to stipple the sides, giving it a fluffy buttercream appearance.
Pro Tip: Realism
Mix a tiny pinch of translucent clay into your colored clay. It mimics the slight sheen and depth of real almond flour meringue batter better than opaque colors.
Step 3: Assembly and Baking
-
Prepare the magnet:
Since we are making magnets, we need to hide the hardware. Press your strong magnet firmly into the bottom (flat side) of the colored macaron shell until it sits flush with the clay surface. -
Secure the magnet (optional):
If the magnet won’t stay, you can add a drop of liquid clay or wait to glue it after baking. Generally, embedding it now is cleaner. -
Stack the layers:
Place the white filling circle on top of the magnet-embedded side of the shell. Center it perfectly. -
Add the top shell (optional variation):
While the image shows single-shell magnets (looking like half a macaron sandwich attached to the fridge), you can add a second colored shell on top if you want a full cookie look. However, for a flatter profile against the fridge, stick to one shell and the filling. -
Final texture check:
Examine the textured feet and filling. If handling the clay smoothed them out, go back in with your needle tool and fluff them up again. -
Bake:
Place your macarons on a ceramic tile or parchment-lined baking sheet. Bake according to your polymer clay package instructions (usually 275°F/135°C for 15-30 minutes). -
Cool down:
Allow the pieces to cool completely before handling. Polymer clay is slightly fragile while warm. -
Reinforce:
If your magnets popped out during baking, apply a dot of super glue or E6000 into the indentation and press the magnet back in.
Now you have a set of charming pastel treats to hold up your grocery lists and photos

TRACK YOUR CERAMIC JOURNEY
Capture glaze tests, firing details, and creative progress—all in one simple printable. Make your projects easier to repeat and improve.
Sushi Roll Magnets
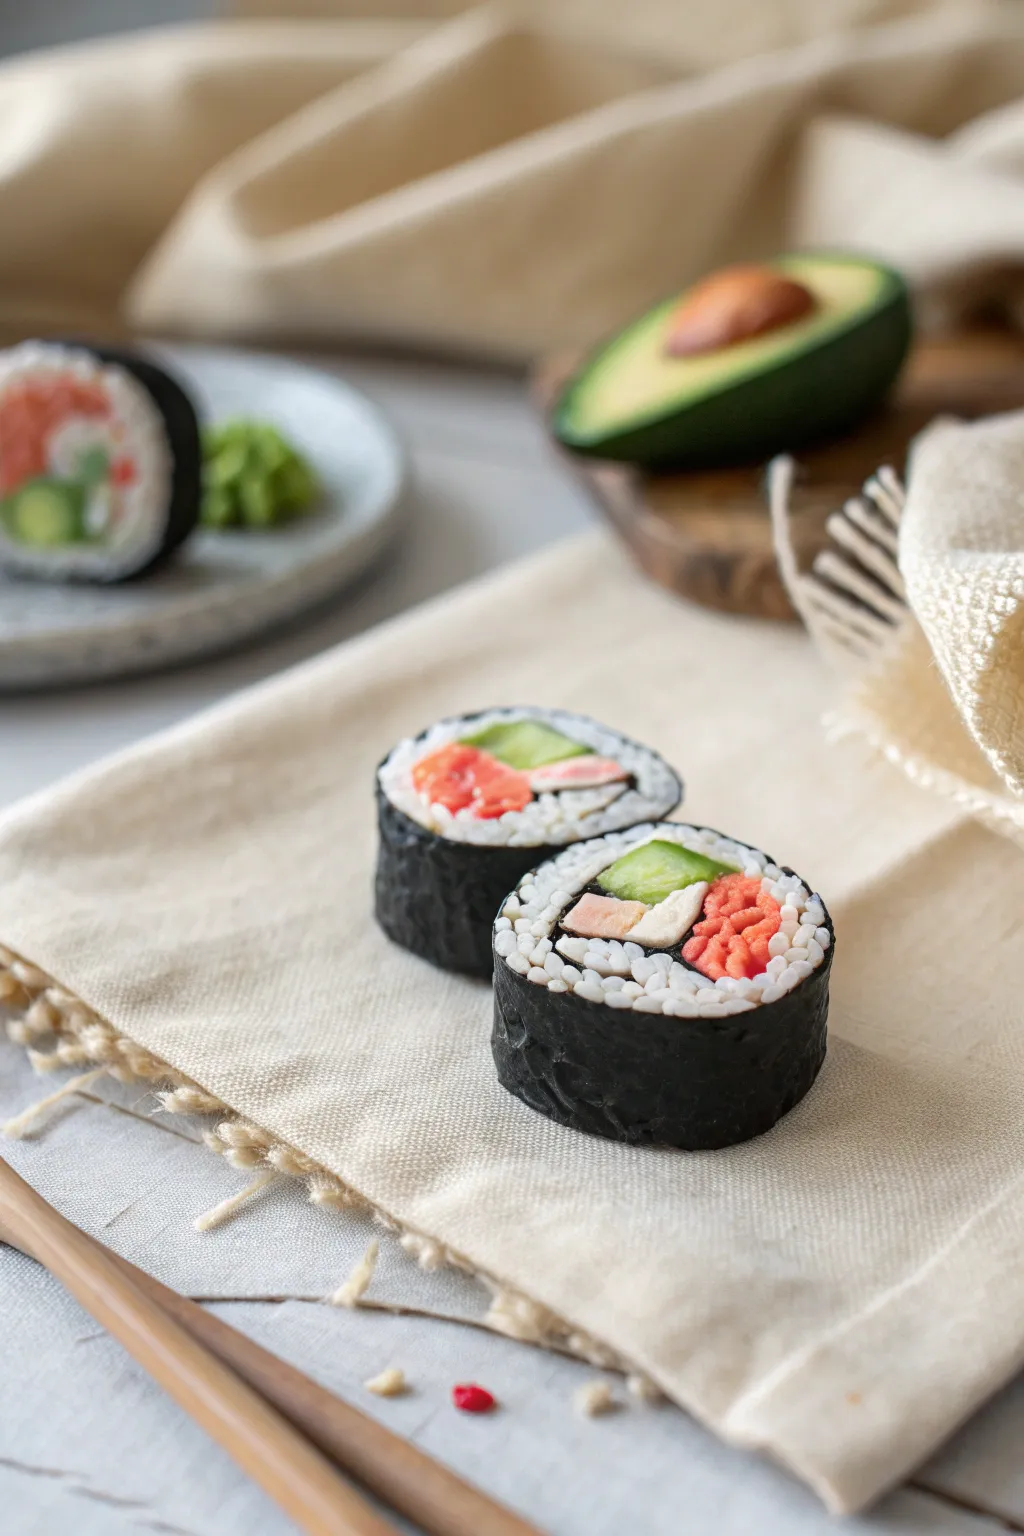
Transform your fridge into a gourmet display with these hyper-realistic polymer clay sushi magnets. By focusing on texture and layering, you’ll create miniature maki rolls that look fresh enough to eat.
How-To Guide
Materials
- Polymer clay (black, translucent white, orange/salmon, green, cream)
- Liquid polymer clay (optional)
- Texture tools (needle tool, toothbrush with stiff bristles)
- Rolling pin or pasta machine
- sharp craft blade or tissue blade
- Strong neodymium magnets
- Super glue or E6000
- Matte varnish
Step 1: Prepping the Fillings
-
Mix the rice color:
Start by conditioning the translucent white clay. Mix in a very small amount of white clay to make it opaque but still slightly waxy looking, imitating cooked sushi rice. -
Create the Salmon:
Mix orange clay with a touch of pink and translucent. Roll this into a small log. To create the fat marbling texture, take a tiny bit of white clay, stretch it into thin threads, and lay them lengthwise across the salmon log, gently rolling to incorporate them. -
Form the Cucumber:
Roll a small snake of light green clay. Wrap a very thin layer of darker green clay around it to simulate the cucumber skin, then square it off slightly with your fingers. -
Make the Crab or Tofu:
Using a cream or pale pink clay, create a small rectangular block to represent crab stick or tofu. You can add a subtle streak of red clay on one side if you want a classic imitation crab look. -
Assemble the core:
Group your salmon, cucumber, and cream ingredients together into a tight bundle. This forms the colorful center of your roll.
Step 2: Wrapping the Roll
-
Prepare the rice sheet:
Roll out your prepared rice-colored clay into a sheet about 1/4 inch thick. It needs to be thick enough to see the individual grains later. -
Wrap the fillings:
Wrap the thick rice sheet around your central bundle of fillings. Trim away any excess and smooth the seam so the rice layer is uniform all the way around. -
Create the Nori:
Roll out black clay as thinly as possible. You want this to look like a delicate sheet of dried seaweed. I find it helps to lift the clay frequently so it doesn’t stick to the work surface. -
Apply the Nori:
Wrap the thin black sheet around the rice cylinder. Overlap just slightly and slice through both layers with a sharp blade to create a perfect butt joint seam. -
Texture the Seaweed:
Before slicing, gently tap the outside of the black clay with a stiff toothbrush or a ball of crinkled aluminum foil to give it that rough, organic seaweed texture.
Smearing Colors?
If the black clay smears onto the white rice when slicing the cane, your blade might be dull or the clay too warm. Chill the cane longer and wipe the blade clean between every single cut.
Step 3: Detailing and Finishing
-
Slice the rolls:
Let the clay cane rest in the fridge for 15 minutes to firm up. Use a very sharp, thin tissue blade to slice the log into individual sushi pieces, about 1/2 inch thick. -
Texture the Rice:
This is the most crucial step for realism. Use a needle tool to gently pick at the white clay sections, disturbing the smooth surface to create the look of individual rice grains. -
Refine the fillings:
Add texture to the fillings as well—poke small holes in the cucumber seed area and gently scratch lines into the crab meat. -
Bake the clay:
Place your sushi pieces on a ceramic tile or baking sheet. Bake according to your polymer clay manufacturer’s instructions. -
Cool and varnish:
Once baked and fully cooled, apply a coat of matte varnish to everything except the salmon. If you like, add a tiny dot of gloss varnish to the salmon or ‘avocado’ sections for a moist look. -
Attach the magnet:
Flip the sushi piece over. Apply a strong dab of E6000 or super glue to the back and press your magnet firmly into place.
Rice Texture Secret
For ultra-realism, chop up cured bits of translucent white clay into tiny ‘grains’ and mix them into liquid clay. Spread this mixture onto the cut face of the sushi roll before baking.
Now your kitchen has a touch of Japanese culinary flair that will never go bad
Citrus Slice Magnets
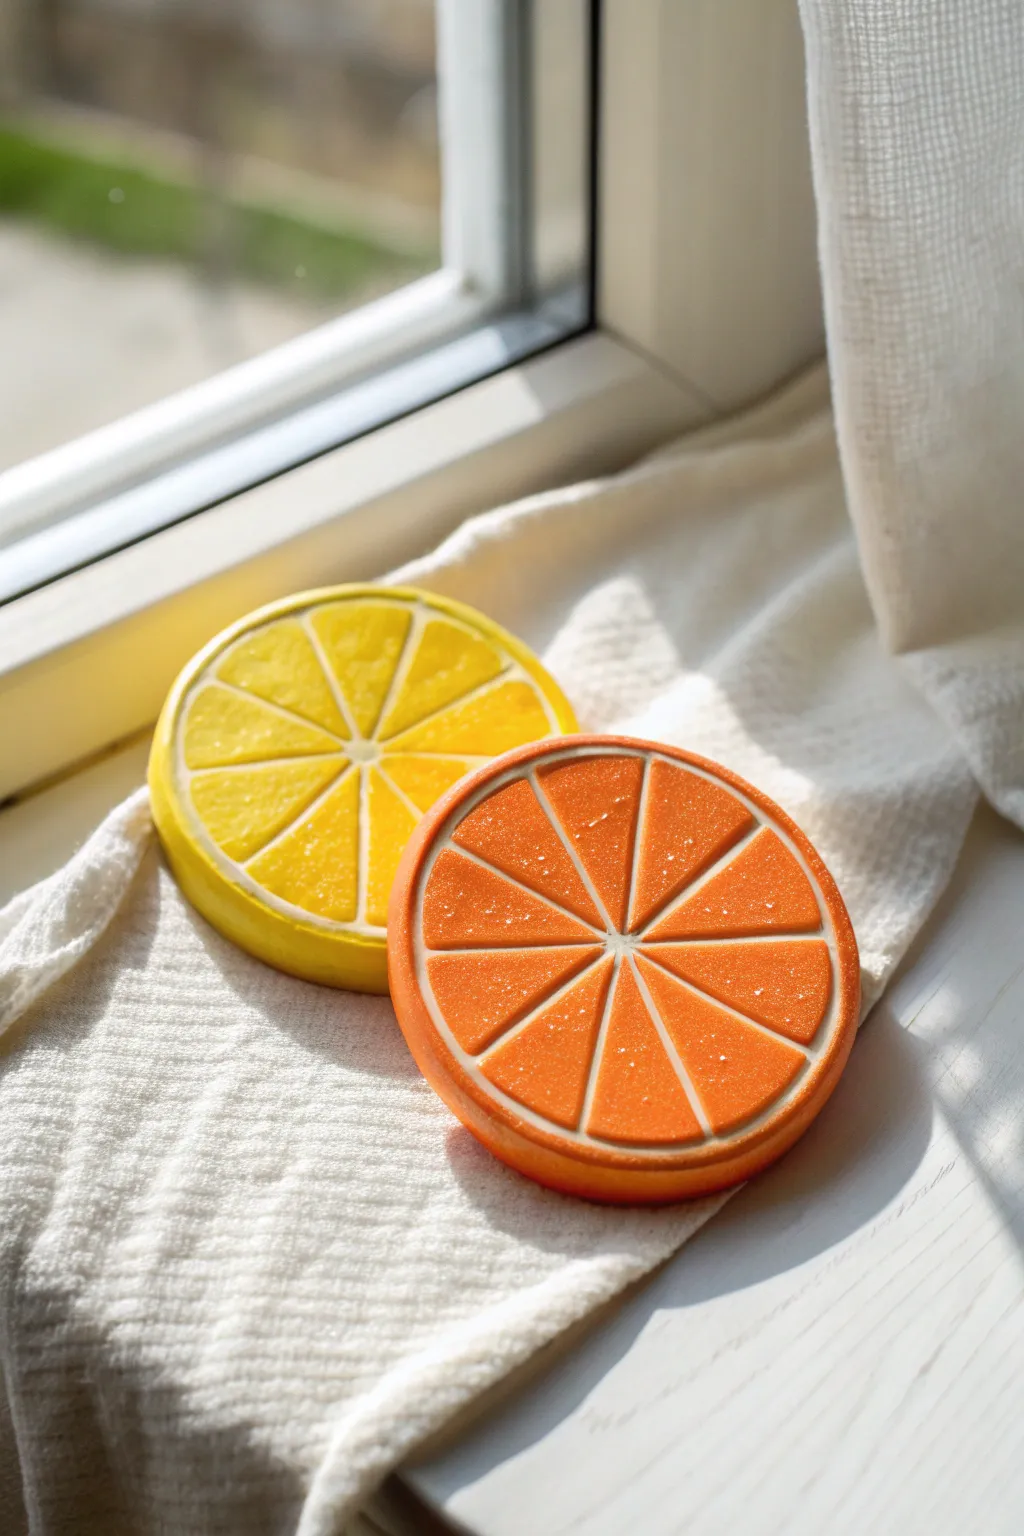
Bring a burst of perpetual summer into your kitchen with these vibrant, juicy-looking clay magnets that mimic fresh citrus slices. The textured surface and realistic segmentation make them look good enough to squeeze, adding a cheerful pop of color to any magnetic surface.
Step-by-Step
Materials
- Polymer clay (yellow, orange, translucent white, and opaque white)
- Circle cookie cutters (approx. 2-3 inches diameter)
- Blade or craft knife
- Rolling pin or pasta machine
- Needle tool or stiff toothbrush
- Strong craft magnets
- Strong adhesive (E6000 or super glue)
- Clear gloss varnish or UV resin
- Sandpaper (fine grit)
Step 1: Creating the Canes
-
Prepare the Colors:
Begin by conditioning your clay. You’ll need a vibrant yellow for the lemon and a deep orange for the orange slice. Mix a small amount of translucent clay into your colored clay (about a 3:1 ratio of color to translucent) to give the fruit segments a realistic, slightly juicy depth. -
Form the Segments:
Roll your fruit-colored clay into a thick log, about 1 inch in diameter. Then, looking at the log from the side, pinch the top to form a teardrop or triangular prism shape running the length of the log. This will be the base for our individual fruit segments. -
Wrap in Pith:
Roll out a thin sheet of opaque white clay. Wrap this sheet around your triangular log completely. Smooth the seam so it disappears. This white layer represents the thin membrane between fruit segments. -
Stretch and Cut:
Gently stretch and roll the triangular cane to make it longer and thinner. Aim for a final width appropriate for your slice size. Cut this long cane into 8 equal lengths. When you look at the ends, you should see 8 identical triangles with white outlines.
Clean Cuts
To avoid squishing your cane while cutting slices, rotate the log a quarter turn after every cut. A very sharp, thin blade is crucial here.
Step 2: Assembling the Slice
-
Arrange the Segments:
Form a very thin snake of white clay to act as the center point. Arrange your 8 triangular segments in a circle around this center piece, with the pointy ends facing inward. Press them gently together so they stick. -
Fills Gaps (Optional):
If there are significant gaps between the outer edges of your triangles, you can insert tiny snakes of translucent clay to fill them, ensuring a perfect circle later. -
Wrap the Rind:
Roll a thicker sheet of white clay and wrap it around the entire bundle of segments. This creates the thick inner pith visible in the photo. -
Add the Zest Layer:
Finally, roll a sheet of your original fruit color (yellow or orange) and wrap it around the white layer to create the outer skin. Smooth the seam carefully. -
Consolidate the Cane:
Gently squeeze and roll the large cylinder to ensure all layers are fused. I like to let the clay rest for about 15 minutes here so it firms up, making it easier to slice without distortion.
Step 3: Texturing and Finishing
-
Slice the Discs:
Using a very sharp blade, slice discs from your cane. Aim for a thickness of about 1/4 inch to match the chunky look in the reference image. -
Refine the Shape:
If the slicing flattened your circle slightly, use your circle cutter to gently reshape the edges or simply press it back into round with your fingers. -
Add Texture:
This is the secret sauce. Take a needle tool or a stiff toothbrush and stipple the colored fruit segments. Poke gently repeatedly to create that realistic, fibrous citrus texture seen in the photo. Avoid texturing the white ‘membrane’ lines. -
Bake:
Bake the clay pieces according to the manufacturer’s instructions on your clay package. Use an oven thermometer to ensure precise temperature. -
Cool and Sand:
Once baked and fully cooled, lightly sand the back of the slice to ensure it’s perfectly flat and has some tooth for the glue. -
Gloss Finish:
Apply a coat of gloss varnish or UV resin specifically to the fruit segments (avoiding the white pith and rind if you prefer a matte look there, or coat the whole thing for a ‘wet’ look). This makes the colors pop and mimics juice. -
Attach Magnet:
Using strong adhesive like E6000, attach a magnet to the center of the back. Let it cure completely before sticking it to your fridge.
Scented Slices
Mix a drop or two of lemon or orange essential oil into the clay before baking. The scent won’t last forever, but it adds a lovely sensory touch while crafting!
Step back and admire your fresh, fruity creations that are ready to brighten up your magnetic board.
Strawberry Magnets
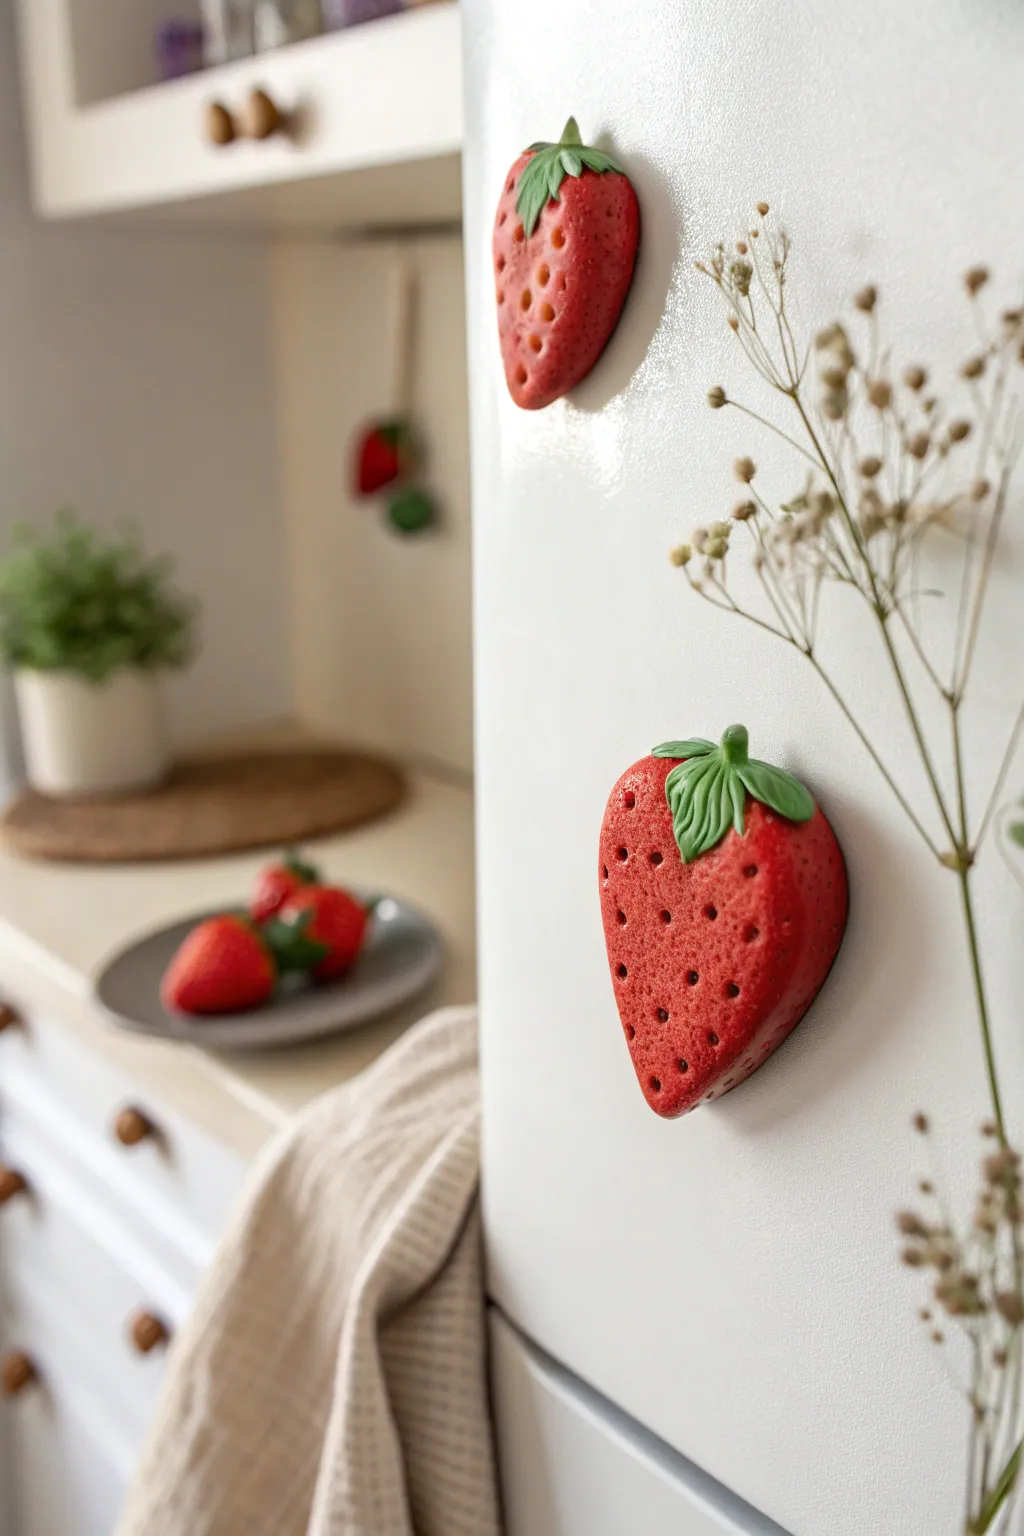
Bring a pop of fresh summer color to your kitchen with these charmingly realistic strawberry magnets. Modeled from polymer clay with a texturized finish, they look good enough to eat right off the fridge door.
How-To Guide
Materials
- Red polymer clay
- Green polymer clay (a leafy shade)
- Needle tool or toothpick
- Clay sculpting tool (or butter knife)
- Strong round magnets
- Super glue or E6000
- Oven for baking
- Baking sheet with parchment paper
- Clear matte varnish (optional)
Step 1: Forming the Berry Base
-
Condition the red clay:
Begin by kneading a chunk of red polymer clay until it is soft, pliable, and free of cracks. Warm clay is much easier to shape smoothly. -
Shape the initial ball:
Roll the clay into a smooth ball about the size of a walnut, or slightly larger depending on how big you want your magnet to be. -
Create the taper:
Gently roll one side of the ball between your palms to create a teardrop shape. Flatten the wider end slightly to form the top ‘shoulders’ of the strawberry. -
Flatten for the magnet:
Press the strawberry shape against your work surface to flatten the back completely. This ensures it will sit flush against the refrigerator or notice board. -
Refine the shape:
Smooth out any fingerprints and gently round the front face so it has a nice, organic curve, resembling a real berry cut in half.
Seed Detail Tip
For hyper-realism, mix a tiny bit of yellow or tan clay and roll microscopic balls. Place one inside each needle hole before baking to mimic actual seeds.
Step 2: Texturing the Surface
-
Plan your texture pattern:
Real strawberries have seeds set in a fairly regular pattern. Visualize diagonal lines wrapping around the berry. -
Create seed divots:
Using a needle tool or toothpick, press small, deep holes into the red clay surface. I like to angle the tool slightly upward for a more natural look. -
Ensure consistent depth:
Press firmly enough to create a distinct shadow, but be careful not to puncture all the way through to the back. -
Cover the surface:
Work your way from the tip to the top, covering the entire front and visible sides with these small indentations.
Sticky Fingerprints?
If you are leaving too many fingerprints on the smooth clay, lightly dust your fingertips with a bit of cornstarch before the final smoothing step.
Step 3: Adding the Stem
-
Form the leaves:
Take a small pinch of green clay and flatten it into a thin, uneven star shape to serve as the calyx (the leafy cap). -
Texture the leaves:
Use your sculpting tool or a knife edge to press a central vein into each leaf point for added realism. -
Attach the cap:
Press the green star onto the top ‘shoulder’ of your red berry. Gently curve the leaf tips down so they hug the fruit. -
Create the stem:
Roll a tiny cylinder of green clay and attach it to the center of the leaves, smoothing the connection point with your finger or a tool.
Step 4: Baking and Finishing
-
Prepare for baking:
Place your finished strawberry shapes on a parchment-lined baking sheet. -
Bake the clay:
Bake according to your clay package instructions. This is usually around 275°F (135°C) for 15-30 minutes, depending on thickness. -
Cool completely:
Let the pieces cool fully on the tray before handling them to ensure they harden correctly. -
Attach the magnet:
Apply a dab of strong adhesive like E6000 to the flat back of the strawberry and press your magnet firmly into place. -
Let the glue cure:
Allow the glue to dry for at least 24 hours before putting your new creation to work holding up photos.
Your fridge will look delightfully festive with these handmade berries holding up your favorite notes
Cute Mushroom Magnets
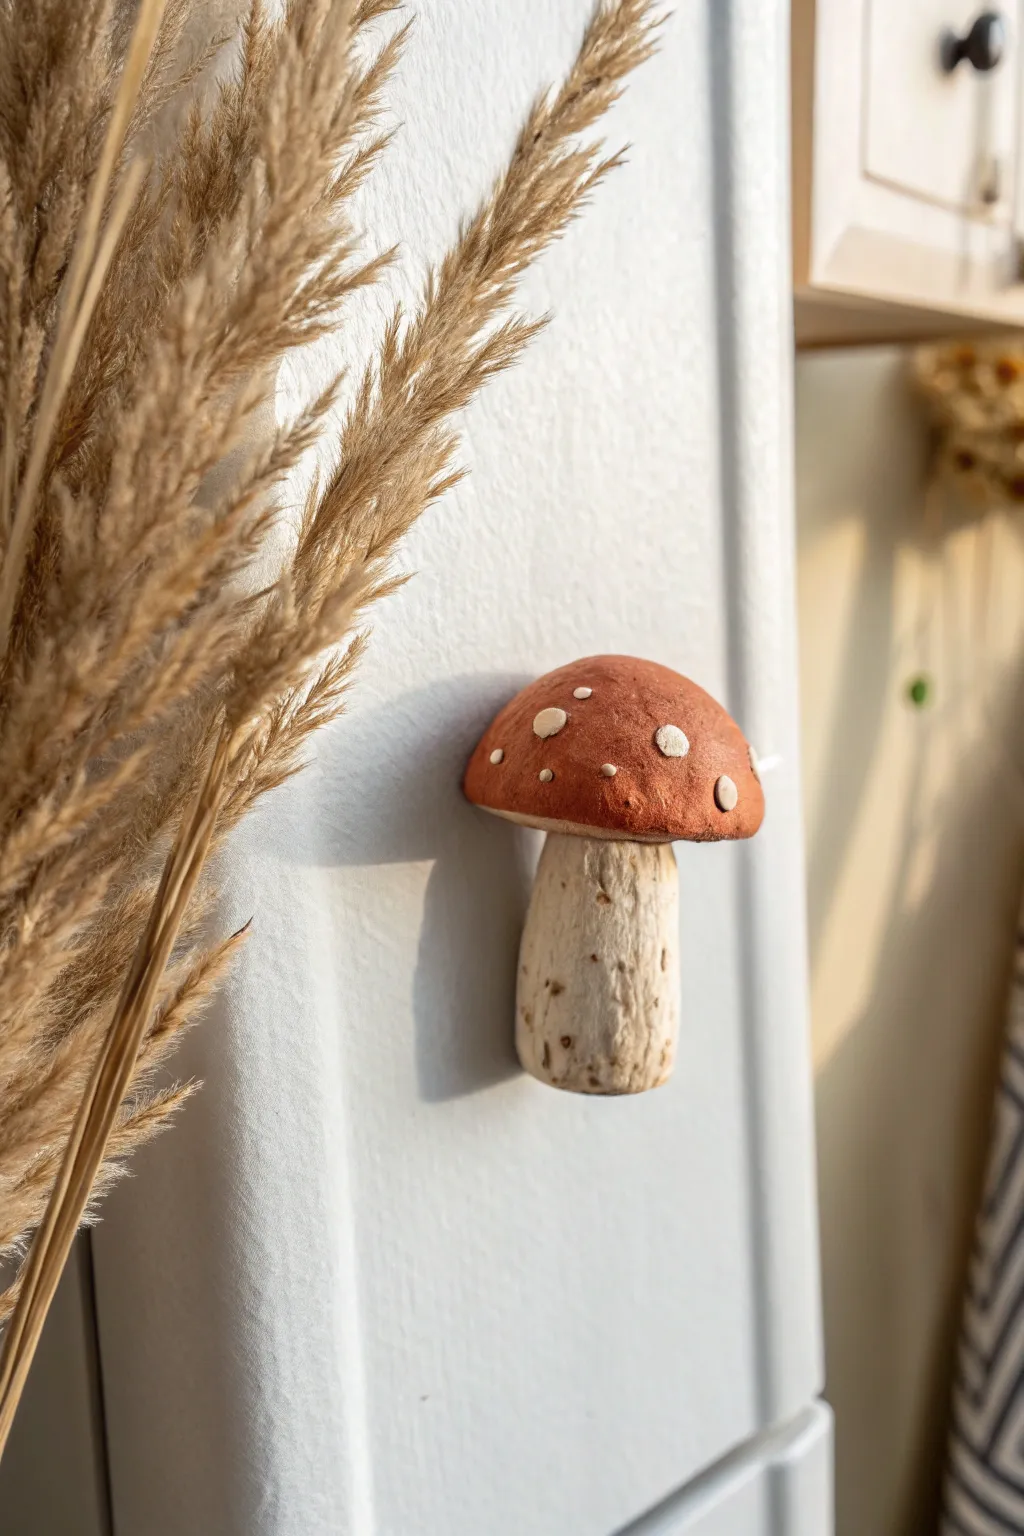
Bring a touch of woodland whimsy to your fridge with these realistic yet charming mushroom magnets. This project uses polymer clay to capture the earthy texture of a porcini mushroom, complete with a terracotta cap and speckled stem.
Step-by-Step Guide
Materials
- White polymer clay
- Terracotta or rust-colored polymer clay
- Aluminum foil
- Translucent liquid sculpey (optional)
- Small round magnet
- Needle tool or toothpick
- Toothbrush (for texture)
- Brown acrylic paint
- Water and paper towels
- Sculpting tool or craft knife
- Gloss or matte varnish (optional)
Step 1: Shaping the Base
-
Condition the clay:
Begin by kneading your white polymer clay until it is soft and pliable. This prevents cracking later on. -
Form the stem core:
Take a small ball of aluminum foil, about the size of a large pea, and compress it tightly. Wrap a layer of white clay around the foil to create a thick, slightly bulbous cylinder for the mushroom stem. -
Create the cap shape:
Roll a ball of the terracotta-colored clay. Flatten the bottom slightly and round out the top to form a classic mushroom cap dome. -
Join the pieces:
Gently press the cap onto the narrower top of your white stem. I like to twist them together slightly to ensure a strong bond without distorting the shapes.
Step 2: Adding Textures & Details
-
Texture the stem:
Use a toothbrush to tap texture all over the white stem. This mimics the organic, porous surface of a real mushroom stalk. -
Add vertical grooves:
With a needle tool, drag vertical lines down the stem. Vary the pressure to create natural-looking uneven ridges. -
Add cap spots:
Take tiny pinches of white clay and roll them into flat, irregular shapes. Press these onto the terracotta cap to create the distinctive spots. -
Blend the spots:
Use your finger or a smooth tool to gently flatten the white spots so they look embedded in the cap rather than just sitting on top. -
Embed the magnet:
Flip the mushroom over. Press your magnet firmly into the back of the stem to create an indentation. Remove the magnet, add a drop of liquid sculpey or glue into the hole, and replace the magnet. Smooth the clay around the edges.
Magnet Falling Out?
If the magnet pops out after baking, use E6000 or super glue (cyanoacrylate) to reattach it. These bond better to baked clay than standard craft glue.
Step 3: Baking & Finishing
-
Bake the clay:
Bake your mushroom according to the manufacturer’s instructions for your specific brand of polymer clay (usually 275°F/135°C for 15-30 minutes per 1/4 inch thickness). -
Cool down:
Allow the piece to cool completely before handling. Polymer clay is fragile when hot. -
Prepare an antiquing wash:
Mix a small amount of brown acrylic paint with water until it has a thin, ink-like consistency. -
Apply the wash:
Brush the watery brown paint over the entire white stem, ensuring it gets into all the textured grooves and toothbrush marks. -
Wipe away excess:
Immediately wipe the surface with a damp paper towel. The paint will stay in the crevices, highlighting the realistic texture, while the high points remain white. -
Final touches:
If desired, seal your work with a matte varnish to protect the paint, or leave it raw for a natural matte finish.
Glow-in-the-Dark Magic
Swap the white clay spots on the cap for glow-in-the-dark polymer clay. Your mushroom will look natural by day and magical by night.
Now you have a charming piece of nature to organize your notes on the fridge
Simple Flower Magnets
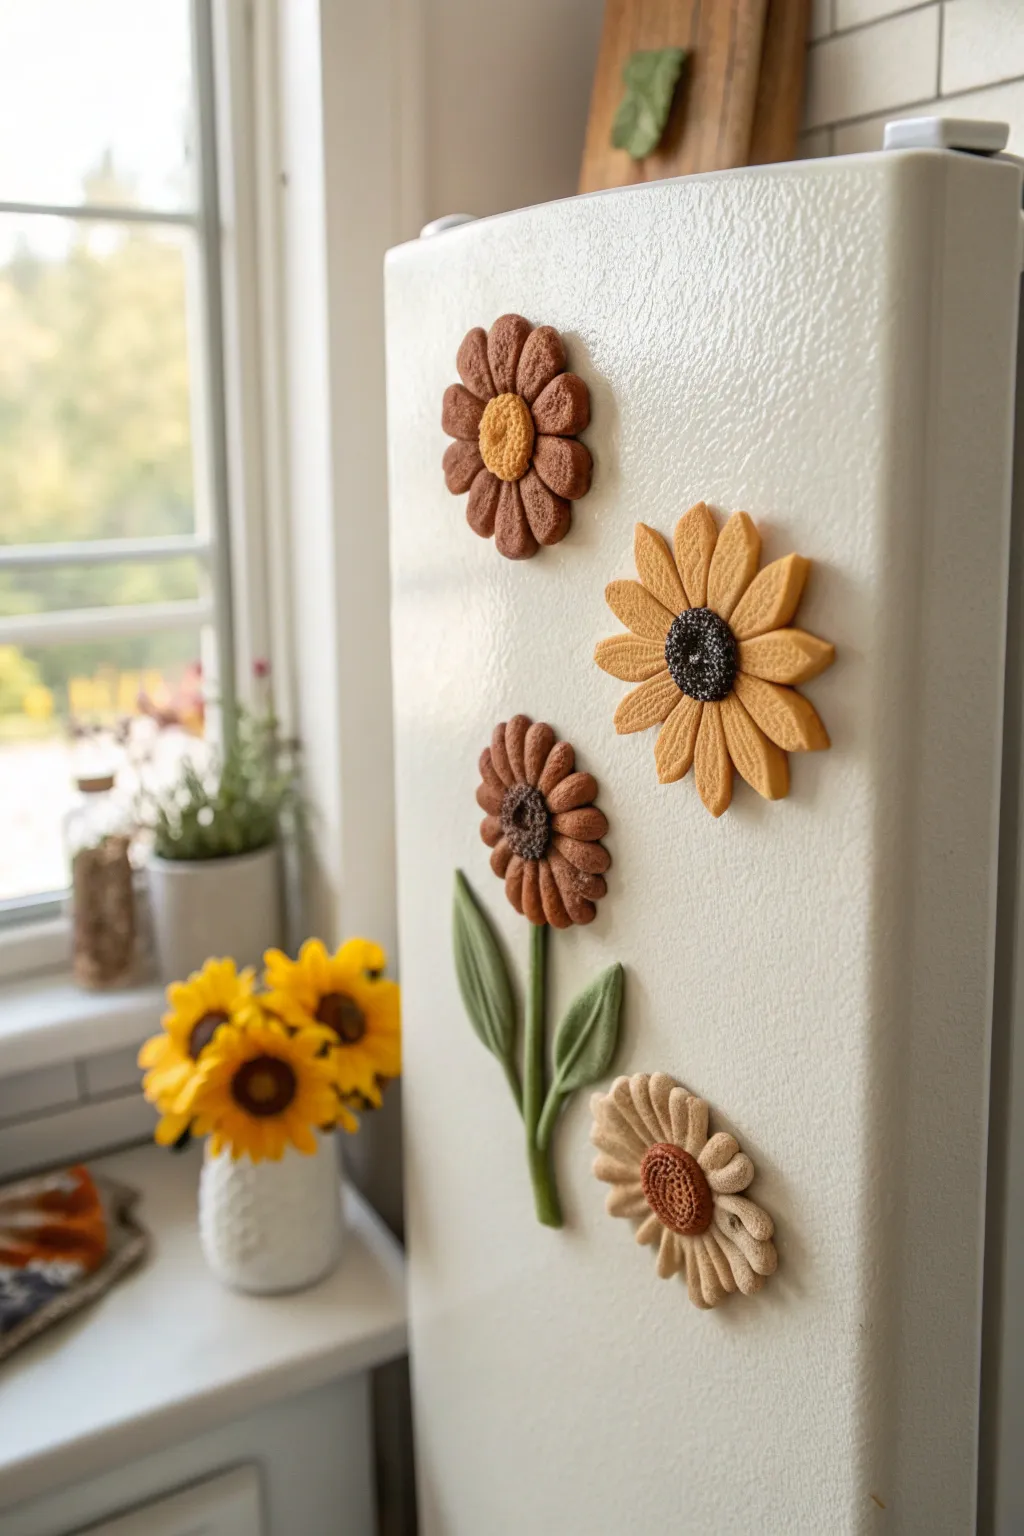
These charming flower magnets bring a touch of warm, earthy beauty to your kitchen with their intricate textures and autumnal tones. By mimicking the look of fabric or cookie dough, you’ll create a durable set of sunflowers and daisies that look almost soft to the touch.
How-To Guide
Materials
- Polymer clay (warm brown, burnt orange, golden yellow, cream, deep brown, green)
- Small round magnets (neodymium preferred for strength)
- Super glue or E6000 adhesive
- Texture tools (fabric scrap, rough sponge, or sandpaper)
- Needle tool or toothpick
- Small circle cutters (or bottle caps)
- Clay roller or pasta machine
- Clay sculpting tools (specifically a curved blade or knife)
- Baking sheet and parchment paper
- Oven
Step 1: Prepping The Clay
-
Color Mixing:
Begin by conditioning your polymer clay until it is soft and pliable. If your colors are too bright, mix in a tiny pinch of brown or black to achieve the muted, earthy tones seen in the example, like burnt sienna, mustard yellow, and oatmeal. -
Rolling Out:
Roll each clay color into a sheet approximately 1/4 inch thick. You want them thick enough to hold the magnet but not so heavy they slide down the fridge. -
Adding Texture:
Before cutting any shapes, press a scrap of denim, canvas, or a rough sponge gently onto the surface of your clay sheets. This creates the ‘fabric-like’ or ‘cookie’ texture that gives these magnets their cozy feel.
Step 2: Sculpting the Blooms
-
Creating Centers:
Roll small balls of dark brown or contrasting clay for the flower centers. Flatten them slightly into discs. -
Texturing Centers:
Use a needle tool or a stiff toothbrush to stipple the surface of these center discs heavily. This creates the seeded look of a real sunflower. -
Cutting Petals:
For the petals, cut tear-drop shapes from your textured clay sheets using a small cutter or freehand with a knife. You will need about 8-12 petals per flower. -
Shaping Petals:
Take each petal and gently pinch the inner end (the pointier side) to give it dimension. Use a sculpting tool to press a single vein line down the center of each petal if desired. -
Assembling the Base:
Lay out a small, flat circle of scrap clay to act as a base. Arrange your petals in a circle on top of this base, pressing them down lightly so they adhere to each other. -
Layering:
For the fuller sunflowers, add a second layer of slightly smaller petals on top of the first, offsetting them so they sit in the gaps between the bottom petals. -
Attaching the Center:
Press your textured center disc firmly into the middle of the petal arrangement. This should lock all the petals in place. -
Making the Stemmed Flower:
For the flower with the stem, roll a thin snake of green clay and flatten it slightly. Press it gently against your textured surface. -
Adding Leaves:
Shape two elongated leaves from green clay. Use a knife to impress a vein pattern, then attach them to the sides of the stem. -
Final Assembly:
Attach the flower head to the top of the green stem, blending the clay slightly on the backside to ensure they stick together during baking.
Uneven Texture?
If the texture fades while you are handling the clay, wait until the flower is fully assembled, then gently press your sponge or fabric tool over the petals again before baking.
Step 3: Baking & Finishing
-
Baking Prep:
Transfer your creations to a baking sheet lined with parchment paper. Check for any fingerprints and smooth them away or re-texture those spots. -
Baking:
Bake the clay pieces according to the manufacturer’s instructions on your clay package (usually around 275°F or 135°C for 15-30 minutes). I prefer to bake them slightly longer at a lower temp to prevent scorching the lighter colors. -
Cooling:
Remove from the oven and allow the flowers to cool completely. They will harden fully as they return to room temperature. -
Prepping Magnets:
Once cool, flip the flowers over. Rough up the back of the clay slightly with sandpaper to help the glue grip better. -
Gluing:
Apply a dab of strong adhesive (like E6000 or super glue gel) to the center of the back. Press your magnet firmly into the glue. -
Setting:
Let the glue cure for at least 24 hours before placing your new floral art on the refrigerator to ensure the strongest bond.
Add Subtle Shading
Before baking, lightly brush the edges of the petals with soft brown pastel chalk dust. This mimics the toasted, golden look seen in the photo.
Enjoy arranging your everlasting garden on your fridge door
Animal Face Magnets
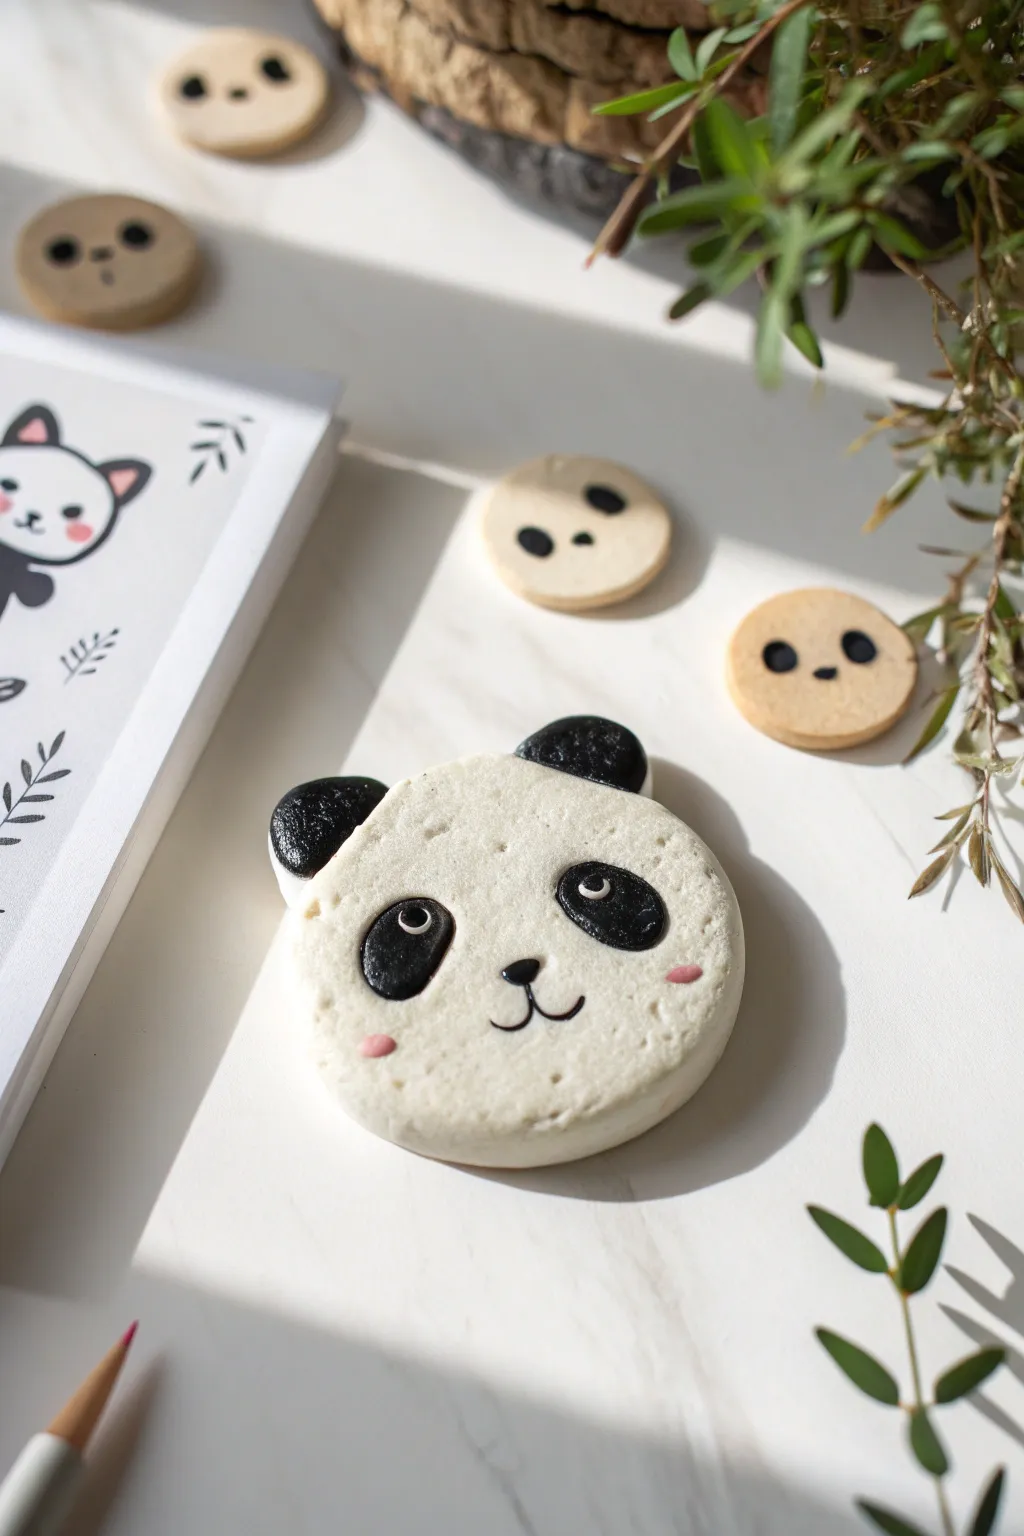
This adorable panda face magnet adds a touch of charm to any fridge or magnetic board with its soft, textured finish and sweet expression. The clean black-and-white design makes it a striking yet simple project perfect for beginners working with air-dry or polymer clay.
Step-by-Step
Materials
- White polymer clay or air-dry clay
- Black polymer clay (or black acrylic paint)
- Circle cookie cutter (approx. 2-3 inches)
- Small rolling pin
- Ball stylus tool or toothpick
- Black acrylic paint
- Pink acrylic paint
- Fine detail paintbrush
- Strong craft glue
- Round ceramic or ferrite magnet
- Matte sealant or varnish (optional)
- Texture sponge or toothbrush
Step 1: Prepping and Shaping the Base
-
Condition the clay:
Start by kneading your white clay until it is soft, pliable, and free of cracks. Warm clay is much easier to work with and results in a smoother finish. -
Roll out the face:
Roll the white clay into a smooth ball, then flatten it into a thick disc using your rolling pin. Aim for a thickness of about 1/4 inch to ensure the magnet is sturdy. -
Cut the circle:
Use your circle cookie cutter to punch out a perfect round shape. If the edges are sharp or jagged, gently tap them with your finger to round them off slightly. -
Add texture:
To mimic the slightly rough, cookie-like texture seen in the photo, gently dab the surface of the white clay with a texture sponge or an old clean toothbrush. Don’t press too hard; you just want a subtle surface grain. -
Create the ears:
Roll two small balls of black clay (or white clay if you plan to paint later). Flatten them slightly and press them onto the top left and right edges of the head. -
Secure the ears:
Blend the bottom edge of the ears into the back of the head so they are securely attached and won’t pop off later.
Step 2: Adding Facial Features
-
Form the eye patches:
Roll two smaller balls of black clay. Flatten them into ovals that slant slightly downward towards the center of the face. -
Attach the patches:
Press these black ovals firmly onto the face, positioning them symmetrically. If using polymer clay, adding a tiny drop of liquid clay or bond can help them stick better. -
Indent the eyes:
Use a ball stylus tool to create a small indentation near the top of each black eye patch. This adds dimension and creates a spot for the white eye highlight later. -
Add the nose:
Roll a tiny triangle or oval of black clay for the nose. Place it right in the center, just below the eye line. -
Baking or drying:
If using polymer clay, bake according to the package instructions (usually 275°F for 15-30 minutes). If using air-dry clay, let it sit in a dry spot for 24-48 hours until completely hard.
Keep it Clean
White clay picks up dust instantly. Keep baby wipes nearby to clean your hands and tools often. Roll the clay on parchment paper to avoid picking up debris from your table.
Step 3: Painting and Finishing
-
Paint the eye highlights:
Once the piece is fully cured or dry, use a fine tip brush to paint small white distinct crescents or dots inside the top of the black eye patches. This brings the character to life. -
Paint the mouth:
Mix a tiny amount of water into your black acrylic paint to help it flow. Painting a thin ‘w’ shape connecting to the bottom of the nose creates that classic smiling panda muzzle. -
Add rosy cheeks:
Dip the very tip of a toothpick or a small dotting tool into pink paint. Gently dot two small spots on the far edges of the cheeks. -
Seal the surface:
I like to protect my painted details with a coat of matte varnish. This prevents the acrylic from scratching off and keeps the white clay looking clean. -
Attach the magnet:
Flip the panda over. Apply strong craft glue (like E6000) to the back of the clay and press your magnet firmly into place. Let the glue cure completely before sticking it to your fridge.
Bamboo Snack
Make a tiny green bamboo shoot out of clay and glue it near the panda’s mouth or paw for an extra cute accessory that adds a pop of color.
Now you have a sweet little panda friend to keep your notes and photos company
One-Eyed Monster Magnets
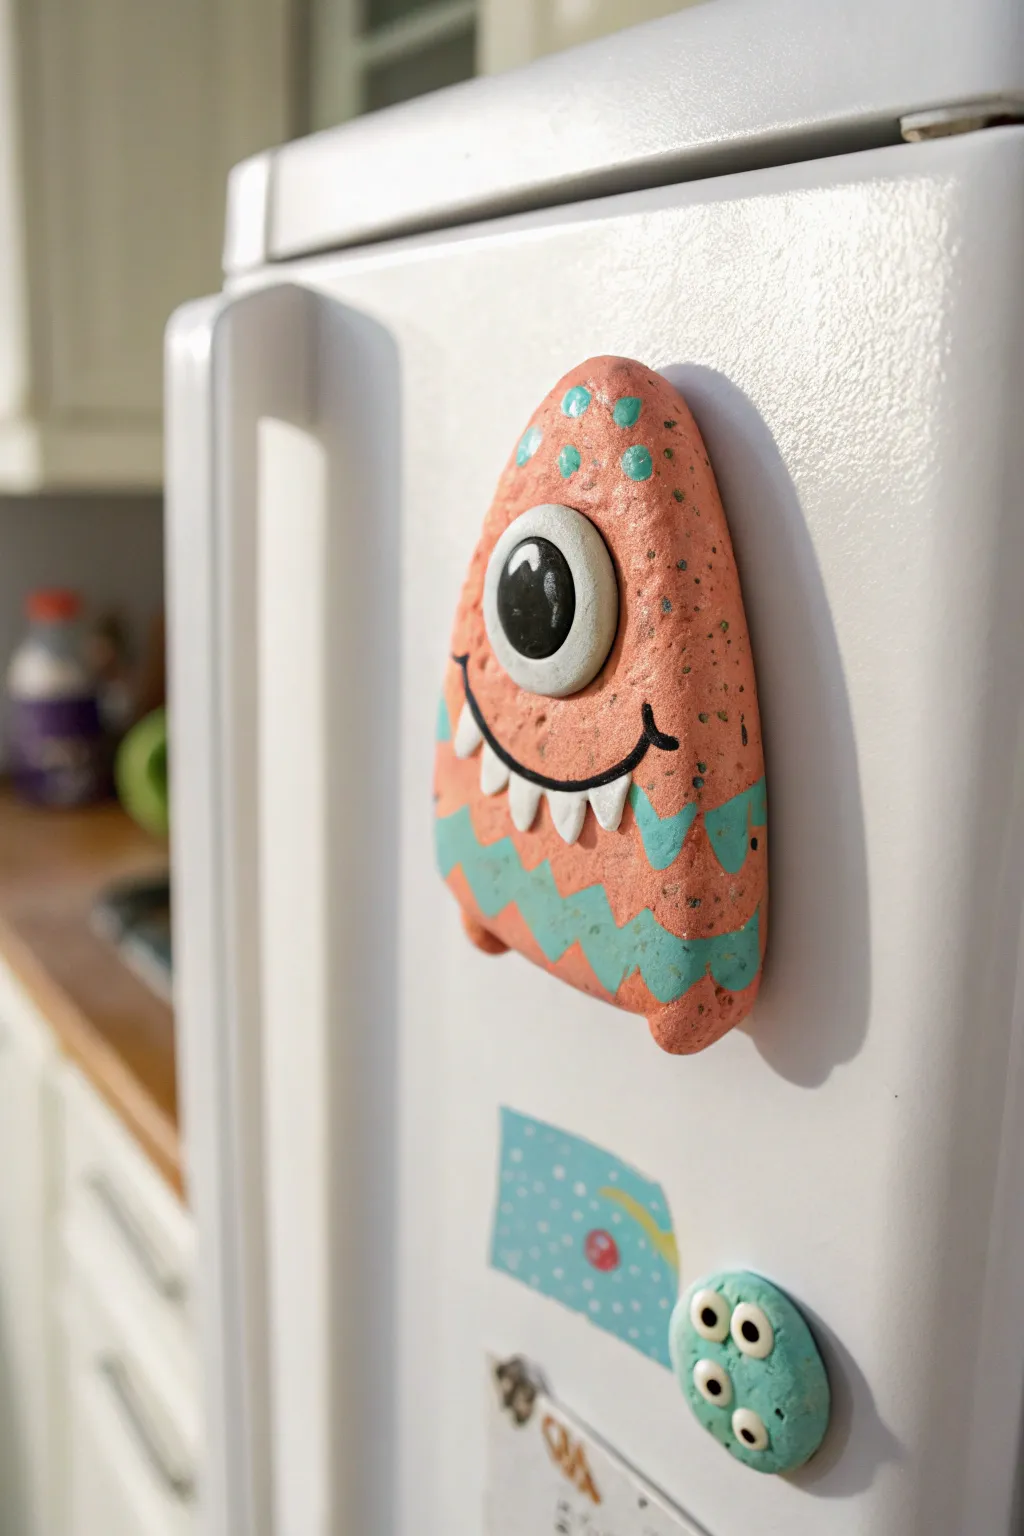
Add a splash of playful whimsy to your refrigerator with this adorable one-eyed monster magnet. Featuring a textured coral body and vibrant teal accents, this little cyclops is as fun to sculpt as it is to display.
Detailed Instructions
Materials
- Polymer clay (coral/salmon, teal, white, black)
- Strong craft magnet or disc magnet
- Sculpting tools (needle tool, small ball stylus)
- Strong craft glue (E6000 or similar)
- Small rolling pin or acrylic roller
- Parchment paper or baking tile
- Texture sponge or old toothbrush (for surface texture)
- Oven (for baking polymer clay)
- Gloss glaze (optional, for the eye)
Step 1: Sculpting the Body
-
Condition the base clay:
Start by taking a chunk of your coral or salmon-pink polymer clay. Knead it thoroughly in your hands until it becomes soft, pliable, and warm to the touch. -
Form the basic shape:
Roll the conditioned clay into a smooth ball, then flatten it slightly against your work surface. Use your fingers to shape it into a rounded triangle or gumdrop shape, keeping it about 1/4 inch thick so it’s sturdy. -
Smooth the edges:
Gently tap the edges to round them off. You don’t want sharp corners; the goal is a soft, organic, pebble-like feeling. -
Add texture:
Take a texture sponge, a piece of sandpaper, or even an old toothbrush and gently press it all over the surface of the pink body. This gives it a stony, monster-skin look rather than being perfectly smooth. -
Prepare the eye socket:
Using your thumb or a large ball tool, make a shallow indentation in the upper center of the body where the eye will sit. This helps the eye stay in place and look embedded.
Step 2: Creating the Face
-
Form the eyeball:
Roll a ball of white clay that fits nicely into the indentation you made. Flatten it slightly into a thick disk and press it gently onto the body. -
Wrap the eyelid:
This is a key detail: Roll a very thin snake of the coral clay. Wrap it around the white eyeball to create an eyelid rim. Smooth the outer edge of this ring onto the body with a sculpting tool so it looks seamless. -
Add the pupil:
Roll a smaller ball of black clay, flatten it, and place it in the center of the white eye. Press it down firmly. -
Add that sparkle:
For the finishing touch on the eye, add a tiny speck of white clay to the upper corner of the black pupil to create a ‘catchlight’. -
Carve the smile:
Use a needle tool or a small blade to gently carve a curved line for the mouth just below the eye. Widen the cut slightly to create a groove. -
Fill the smile:
Roll a very thin snake of black clay and lay it into the groove you just carved. Press it in gently to create a crisp black smile line. -
Add pointy teeth:
Shape tiny triangles of white clay. Carefully press these along the bottom edge of the black smile line. I find that using the tip of a needle tool helps position these tiny pieces without squishing them.
Fingerprint Trouble?
If you are leaving clearly visible fingerprints on the smooth eye area, dip your finger in a tiny bit of baby oil or cornstarch and rub gently to smooth them out before baking.
Step 3: Applying Details & Baking
-
Create teal spots:
Roll tiny balls of teal clay. Flatten them into small discs and press them onto the top, forehead area of the monster. -
Add zig-zag stripes:
Roll out a thin sheet of teal clay. Cut two narrow strips and use a craft knife to cut a zig-zag pattern on one edge (or both). Lay these strips across the bottom half of the monster’s body. -
Trim the excess:
If the teal stripes hang over the edge of the body, use your blade to trim them flush with the coral shape, blending the seams gently with your finger. -
Add tiny feet:
Roll two very small balls of coral clay and press them onto the bottom corners of the body to look like tiny nubs for feet. -
Final texture check:
Go back over the colored areas (teal spots and stripes) with your texture tool lightly so they match the texture of the main body. -
Bake the piece:
Place your monster on parchment paper or a ceramic tile. Bake according to your polymer clay package instructions (typically 275°F/135°C for 15-30 minutes). -
Attach the magnet:
Once fully cooled, glue a strong magnet to the back of the clay piece using E6000 or a similar industrial-strength adhesive. Let it cure for 24 hours before sticking it to the fridge.
Glossy Gaze
Make the eye pop by applying a coat of gloss polyurethane varnish or UV resin just to the eyeball after baking. It gives it a wet, lifelike look.
Now you have a charming little guardian for your grocery list to greet you every morning
Terrazzo Tile Magnets
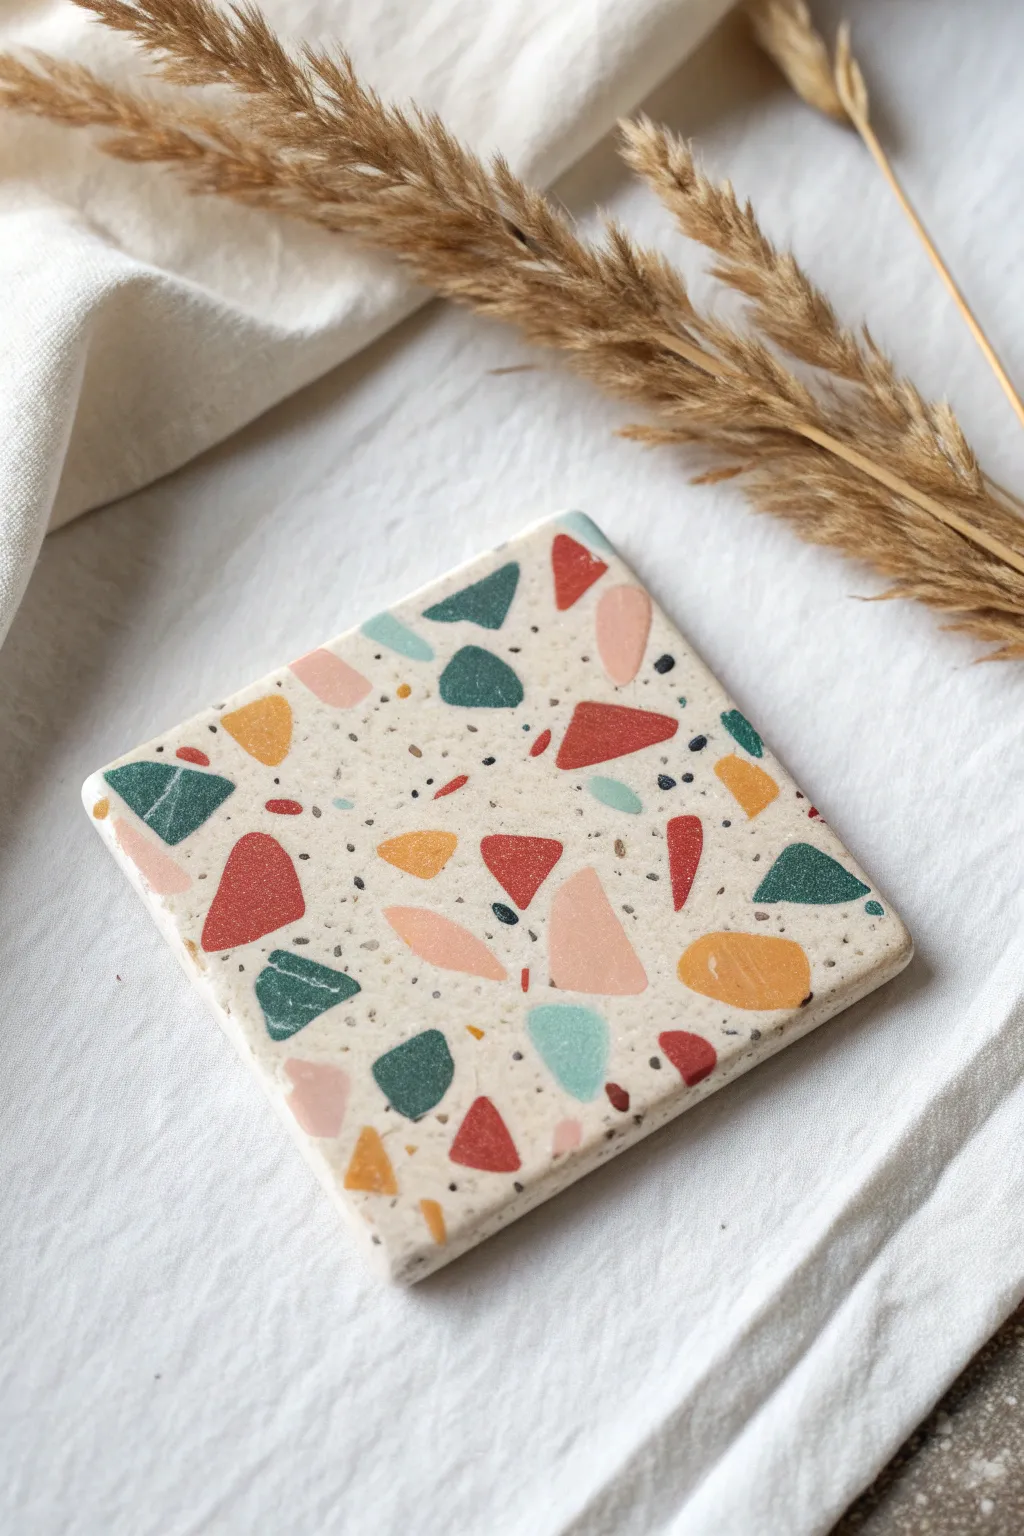
Bring a touch of modern interior design to your fridge with these clever faux stone magnets. Using polymer clay, you can easily mimic the speckled, high-end look of real terrazzo without the need for messy cement or resin.
Step-by-Step Guide
Materials
- White or translucent polymer clay (large block)
- Small amounts of colored polymer clay (rust, mustard, teal, sage, blush)
- Black polymer clay or black pepper
- Rolling pin or acrylic roller
- Square clay cutter or craft knife
- Parchment paper
- Sandpaper (various grits from 400 to 1000)
- Strong craft glue (E6000)
- Round magnets
- Matte or satin varnish (optional)
Step 1: Making the Chips
-
Condition the colors:
Start by conditioning your small colored clay blocks—rust, mustard, teal, sage, and blush pink—until they are soft and pliable. You only need a tiny amount of each color. -
Create thin sheets:
Roll each colored piece of clay out as thinly as possible. The thinner the sheet, the more delicate your final terrazzo chips will look. -
Tear and chop:
Use a blade or your fingers to tear these thin colored sheets into jagged, irregular pieces. Vary the sizes, keeping most quite small, closer to the size of a lentil or grain of rice. -
Pre-bake the chips:
To ensure sharp, defined edges in your final design, bake these little shards on parchment paper for about 10-15 minutes at the temperature recommended on your clay package. Let them cool completely.
Step 2: Forming the Base
-
Prepare the base clay:
Condition a large block of white clay. To get a more natural stone effect, I like to mix in a tiny bit of translucent clay, which adds depth. -
Add texture:
For the tiny black specks seen in the photo, either grate a very small amount of black baked clay into dust or sprinkle in some cracked black pepper. -
Mix the inclusions:
Knead the black specks thoroughly into the white base clay until they are evenly distributed. -
Roll the slab:
Roll out your speckled white clay into a thick slab, approximately 1/4 inch thick (6mm). This thickness gives the magnet a nice, substantial tile feel.
Stone Effects
Mix a tiny amount of beige or ecru paint into your white clay before adding chips. It warms up the tone, making it look more like organic limestone.
Step 3: Assembly and Design
-
Apply the colorful chips:
Take your cooled, pre-baked colored chips and press them firmly onto the surface of the raw white slab. Arrange them randomly, ensuring colors are well-spaced. -
Embed the pieces:
Use your acrylic roller to roll over the slab again. Press hard enough to force the hard baked chips down into the soft white clay until the surface is flush and smooth. -
Cut to shape:
Use a square clay cutter or a sharp blade and ruler to cut out a perfect square shape. Check the edges and smooth them slightly with your finger if needed. -
Final bake:
Place the tile on parchment paper and bake for the full duration recommended by the manufacturer, usually 30-45 minutes, to ensure durability.
Make it Functional
Before baking the base, stamp a letter into the center to create monogrammed magnets. Paint the indented letter gold after baking for a chic finish.
Step 4: Finishing Touches
-
Sand the surface:
Once cool, wet sand the surface of the tile. Start with 400 grit to reveal the crisp edges of the chips and move up to 1000 grit for a silky smooth finish. -
Buff to shine:
Rub the surface briskly with a piece of denim or a microfiber cloth to give it a natural stone sheen. Alternatively, apply a thin coat of matte varnish. -
Attach the magnet:
Apply a dab of strong glue to the back of the tile and press your round magnet firmly into place. -
Cure the glue:
Allow the glue to cure fully—usually 24 hours—before sticking your new art piece to the fridge.
Enjoy arranging your mini mosaic masterpieces on your refrigerator door