When I want a quick win in the studio, I reach for easy clay projects that start with simple shapes and end in something genuinely cute or useful. Here are my go-to easy clay project ideas you can knock out with air-dry clay or polymer clay, even if you’re brand-new.
Pinch Pot Trinket Dish
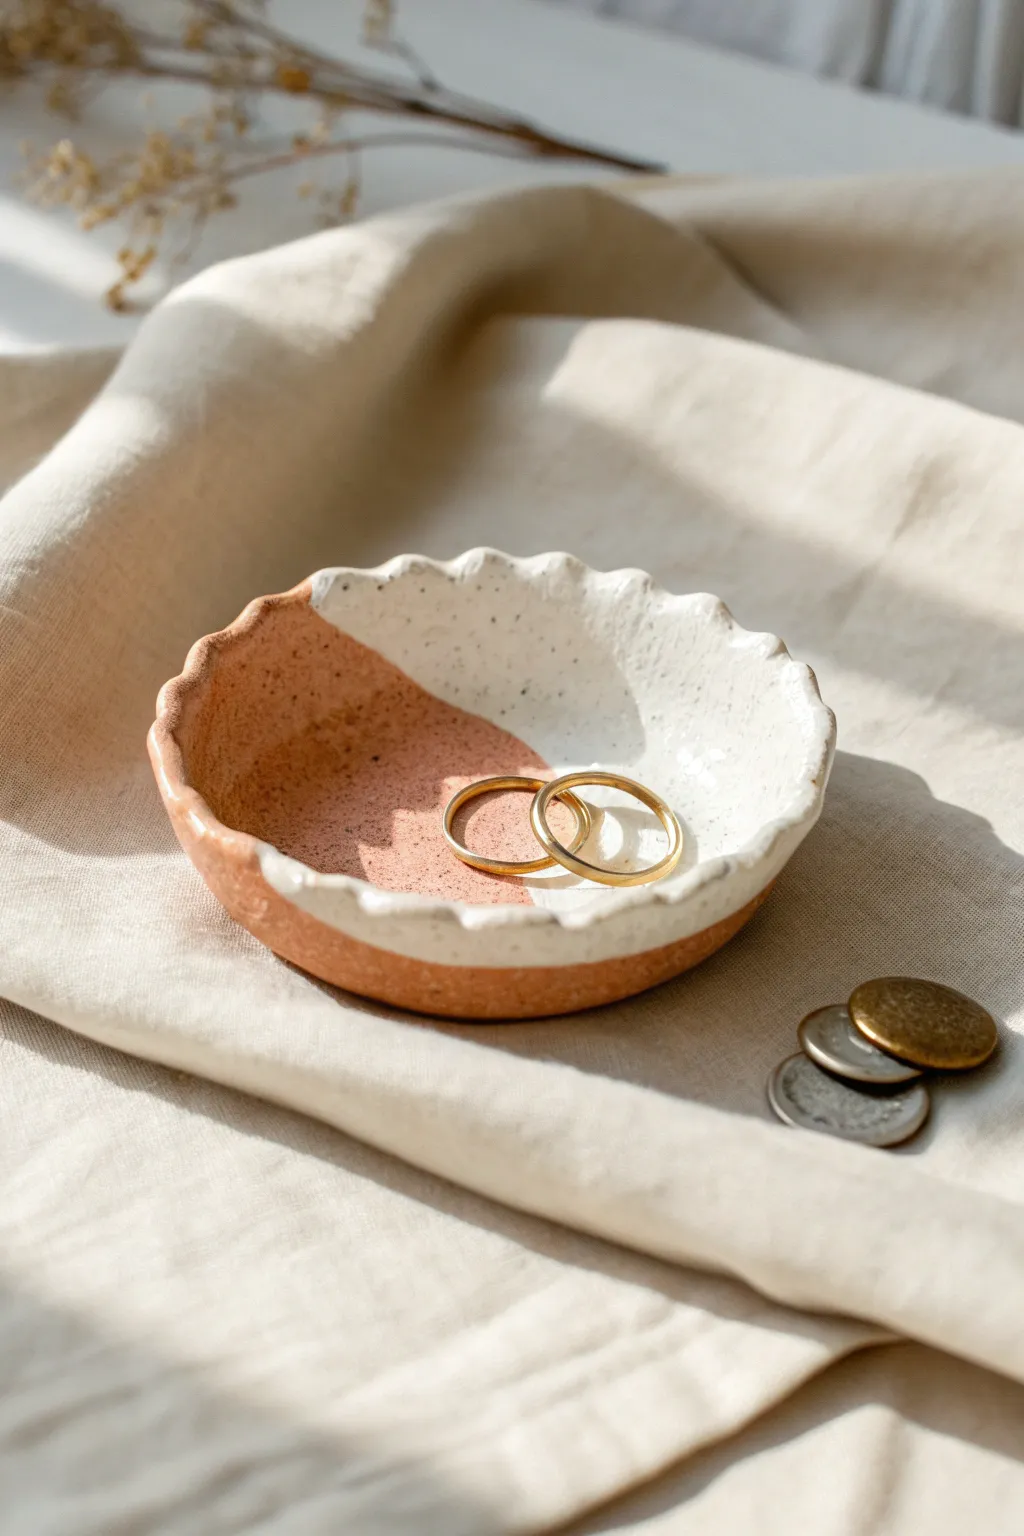
This charming little jewelry holder combines the rustic warmth of raw terracotta with a crisp, speckled white glaze for a modern look. The wavy scalloped edge adds a soft, organic touch that perfectly cradles your favorite rings and small treasures.
Step-by-Step
Materials
- Terracotta air-dry clay or polymer clay (terracotta color)
- White acrylic paint or white ceramic glaze (if firing)
- Black paint (optional, for speckles)
- Glossy varnish or sealant
- Rolling pin
- Small bowl or circle template (approx. 4 inches)
- Craft knife
- Modeling tool or smooth stick
- Fine grit sandpaper
- Old toothbrush (for splashing effect)
- Small paintbrush
- Masking tape or painter’s tape
Step 1: Shaping the Clay
-
Prepare the Clay:
Start by taking a handful of terracotta-colored clay and kneading it in your hands until it becomes soft, pliable, and free of air bubbles. -
Roll out the Slab:
Place the clay on a smooth work surface or mat. using a rolling pin, flatten it into an even slab that is roughly 1/4 inch thick. -
Cut the Circle:
Lay your circle template or small bowl onto the clay slab. Using a craft knife, carefully trace around the edge to cut out a perfect circle. -
Form the Curve:
Gently lift the clay circle and place it into the palm of your hand. Softly press the center down while cupping the sides up to create a shallow bowl shape. -
Create the Scallops:
To make the wavy rim, pinch the edge of the clay between your thumb and forefinger at regular intervals. I find spacing them about half an inch apart works best. -
Refine the Waves:
Smooth out the pinched areas with your finger or a modeling tool so the waves look intentional and organic rather than sharp or jagged. -
Smooth the Surface:
Dip your finger in a tiny bit of water and run it over the entire surface of the dish to remove any fingerprints or small cracks. -
Dry Completely:
Set the dish aside in a safe, dry place. Allow it to air dry for 24-48 hours until it lighter in color and hard to the touch.
Smooth Edges Pro Tip
Keep a small sponge damp with water nearby. Gently wiping the rim with the damp sponge while sculpting smooths out the scallops much faster than sanding later.
Step 2: Decorating and Finishing
-
Sand Imperfections:
Once fully dry, lightly sand the rim and bottom with fine-grit sandpaper to ensure a smooth, professional finish. -
Tape the Design:
Place a strip of masking tape diagonally across the dish, dividing it roughly in half. Press the edge of the tape down firmly to prevent paint bleed. -
Apply Base White:
Paint one side of the dish (covering the clay completely) with white acrylic paint. You may need two to three coats for opaque coverage. -
Create Speckles:
Dilute a small drop of black paint with water. Dip an old toothbrush into this mixture, pointing it at the white painted section. -
Splatter Effect:
Run your thumb across the bristles to flick tiny specks of black paint onto the white area. Practice on paper first to control the density. -
Remove Tape:
Wait until the paint is tacky but not fully hard, then carefully peel back the masking tape to reveal the crisp line between the raw clay and the painted side. -
Seal the Dish:
Apply a coat of glossy varnish over the entire dish, or just the painted section if you prefer the contrast of matte clay against glossy paint. -
Final Cure:
Let the varnish dry completely according to the manufacturer’s instructions before placing any jewelry inside.
Level Up: Gold Accent
Add a touch of luxury by painting just the very edge of the rim with liquid gold leaf. The metallic shine looks incredible against the matte terracotta.
Now you have a stylish spot to keep your everyday jewelry safe and organized


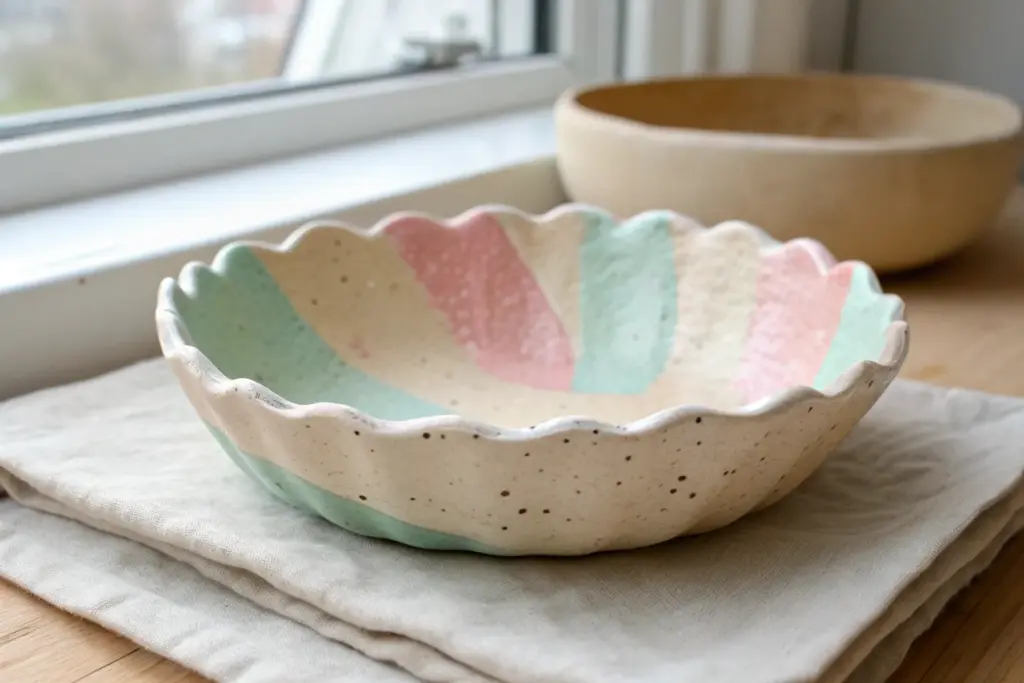
Simple Coil Bowl

This rustic, warm-toned bowl features a satisfying ribbed texture that highlights the handmade process. By leaving the coil ridges visible instead of smoothing them completely, you create a tactile surface perfect for holding keys or jewelry.
Step-by-Step Guide
Materials
- Terracotta air-dry clay (or oven-bake clay)
- Clay cutting wire or knife
- Rolling pin
- Small bowl (to use as a mold/form)
- Plastic wrap
- Slip (water mixed with clay bits) or scoring tool
- Sponge
- Pottery rib or old credit card
Step 1: Preparing the Base
-
Prepare your mold:
Select a bowl from your cupboard that has the size and shape you want to replicate. Invert it or line the inside depending on your preference, but for this project, lining the inside of a bowl allows for easier coil stacking. Cover the inside of your mold bowl completely with plastic wrap to prevent sticking. -
Roll the base slab:
Take a handful of terracotta clay and roll it out into a flat slab, about 1/4 inch thick. This doesn’t need to be huge, just large enough to form the bottom circle of your bowl. -
Cut the base circle:
Place a round object or use a compass to cut a clean circle from your slab. This circle will be the flat bottom of your bowl. Place this clay circle into the bottom of your plastic-lined mold. -
Score the edges:
Using a needle tool or a fork, gently scratch (score) the outer perimeter of your clay base circle. Dab a little water or slip onto these scratches to act as glue for your first coil.
Step 2: Building the Coils
-
Roll your first coil:
Take a chunk of clay and roll it between your hands or on the table to create a long snake-like coil. Aim for a consistent thickness, roughly the width of your pinky finger. -
Place the first coil:
Lay the coil inside the mold, resting it directly on top of the scored edge of your base. Press it down gently so it adheres, but don’t squish it flat. -
Blend the inside seam:
Important step: Use your thumb or a modeling tool to smear the clay from the coil down onto the base *only on the inside*. This bonds the pieces together. Leave the outside (the side touching the mold) un-smoothed if you want ridges there, or smooth it later. -
Continue stacking:
Roll another coil. Score the top of the previous coil and add a dab of slip. Place the new coil on top. Repeat the blending process on the interior seam to ensure structural integrity while keeping the distinct horizontal lines visible. -
Build up the walls:
Keep stacking coils, working your way up the sides of the mold. I like to stagger the joints where coils meet so you don’t have a weak vertical seam running up the bowl.
Crack Control
If you see tiny cracks forming while drying, your clay is drying too fast. Patch them with a tiny bit of wet slip and cover the bowl loosely with plastic to slow the drying process.
Step 3: Refining and Texture
-
Smooth the interior:
Once you have reached your desired height, use a damp sponge or a flexible rib tool to smooth the inside of the bowl. You can choose to leave faint ridges visible like in the photo, or smooth it completely flat. -
Define the outer ridges:
If your exterior coils got smushed during building, use a rounded wooden tool to gently re-define the grooves between the coils. The goal is that consistent, ribbed beehive look. -
Level the rim:
The top rim might be uneven from the coil ends. Use your knife to slice horizontally across the top for a flat, even rim, or use a damp sponge to round it off smoothly. -
Initial dry:
Let the bowl sit in the mold for a few hours until it is leather-hard. This means it’s firm enough to hold its shape but still workable. -
Remove from mold:
Gently lift the plastic wrap to pull your clay bowl out of the mold. Now you can see the exterior texture clearly. -
Clean up the exterior:
Inspect the outside. If there are any sharp bits or uneven clay crumbs, smooth them away with a barely damp sponge. Be careful not to erase your lovely coil lines.
Level Up: Ombré Effect
Mix a small amount of white clay into your terracotta for the top few coils. The gradual lightening of the clay color will create a stunning natural gradient from base to rim
Step 4: Finishing
-
Final drying:
Place the bowl on a flat board to dry completely. If using air-dry clay, this may take 24-48 hours. Turn it over halfway through so the bottom dries evenly. -
Sanding (Optional):
Once bone dry, you can lightly sand rough spots with fine-grit sandpaper. Wear a mask for this step to avoid inhaling clay dust. -
Sealing:
To protect that rich terracotta color and make it durable, apply a matte varnish or sealant. This won’t make it food safe, but it keeps the clay strong.
Place your finished bowl on a sunny table to let the light play across those beautiful ridges


Textured Slab Coasters
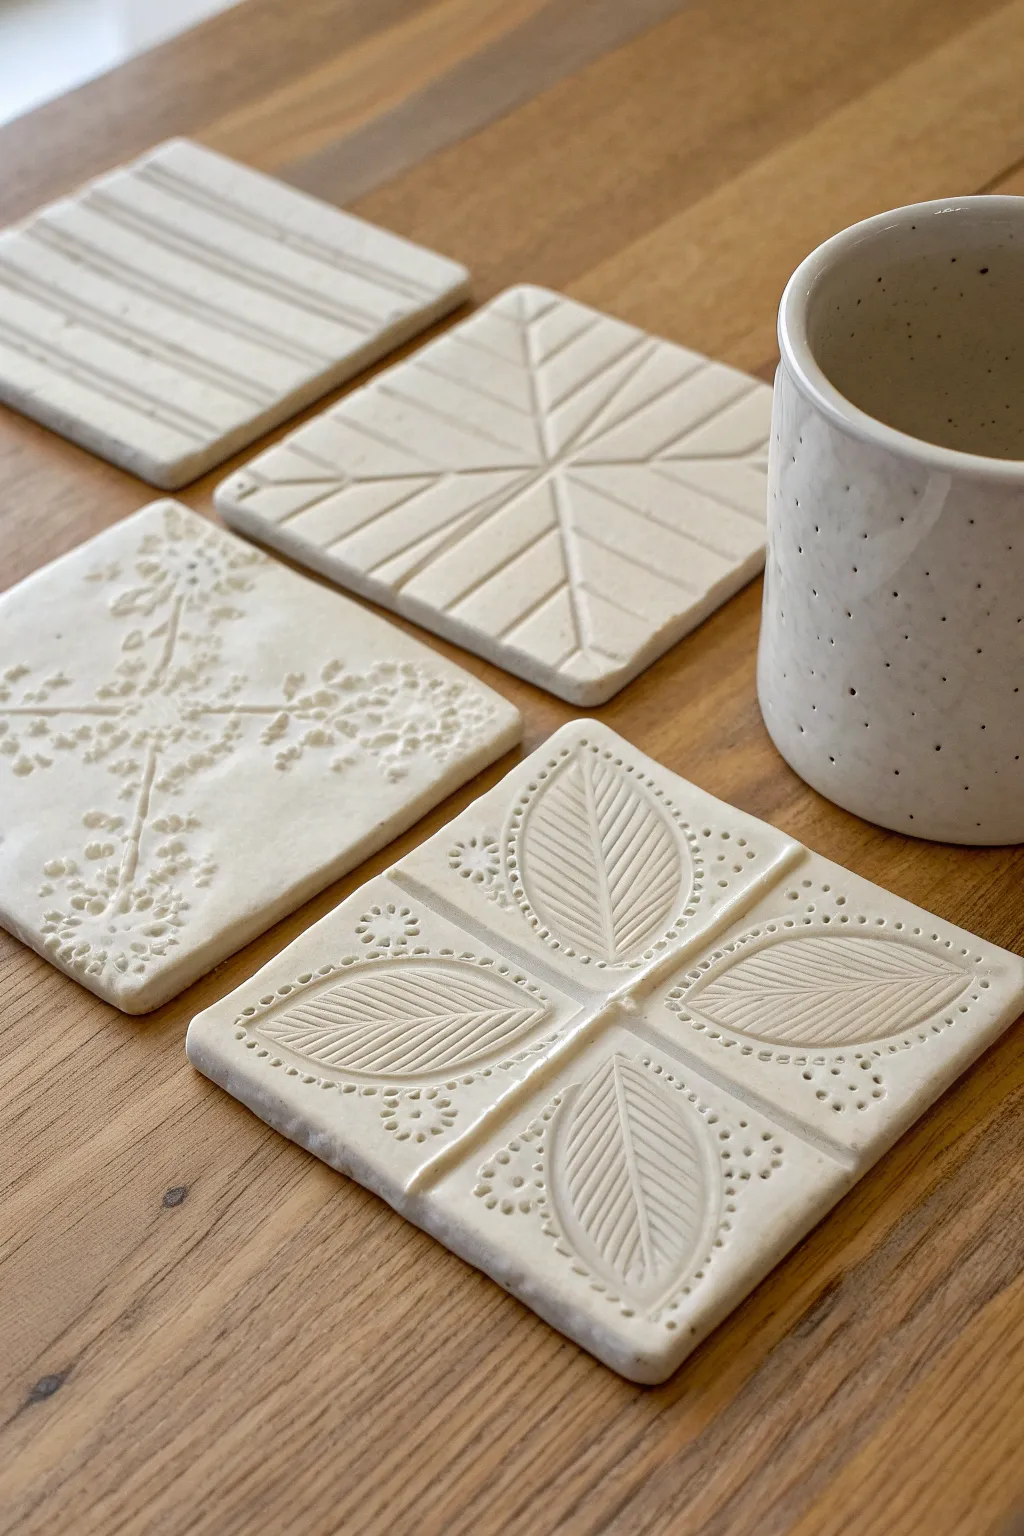
Elevate your coffee table with a set of handmade clay coasters featuring unique, touchable textures. From minimalist lines to intricate botanical reliefs, these simple slabs offer a sophisticated canvas for geometric and organic designs.
How-To Guide
Materials
- Air-dry clay or polymer clay (white or cream)
- Rolling pin
- Square cookie cutter (approx. 4×4 inches) or craft knife/ruler
- Wooden skewers or needle tool
- Rubber stamps (floral and leaf motifs)
- Lace or doilies (optional for texture)
- Sandpaper (fine grit)
- Acrylic sealant or matte varnish
- Canvas cloth or parchment paper (for working surface)
- Small bowl of water
Step 1: Planning and Rolling
-
Prepare your workspace:
Lay down a piece of canvas or parchment paper on a flat surface. This prevents the clay from sticking and picking up unwanted textures from your table. -
Condition the clay:
Take a generous handful of clay and knead it until it creates a pliable, smooth consistency. If you are using air-dry clay, keep your hands slightly damp to prevent cracking. -
Roll the slab:
Use your rolling pin to flatten the clay into an even slab. Aim for a thickness of about 1/4 inch (6mm)—too thin and they become fragile, too thick and they take forever to dry. -
Cut the shapes:
Using a square cookie cutter or a ruler and craft knife, cut out four identical squares. Clean up any rough edges by smoothing them gently with a water-dipped fingertip.
Step 2: Creating the Textures
-
Design 1: Linear Grooves:
For the striped coaster, lay a skewer or knitting needle horizontally across the clay square. Press down firmly to create a deep groove, then repeat at regular intervals to create a pattern of parallel lines. -
Design 2: Geometric Sunburst:
Mark the center of the second square lightly. Press the side of a ruler or a stiff card into the clay to create straight lines radiating outward from the center, dividing the square into triangles. -
Add detail to the sunburst:
Inside each triangular section, press shorter lines parallel to the main radiating lines to create a ‘V’ or herringbone effect, mimicking the geometric look in the photo. -
Design 3: Organic Botanical:
Select a delicate floral stamp or a piece of actual dried plant material. Press it gently but firmly into the center of the third square, rocking it slightly to ensure the entire design transfers. -
Design 4: Structured Leaf Pattern:
Divide your final square into four quadrants by lightly pressing a cross shape. Take a leaf-shaped stamp or tool and press one leaf into the center of each quadrant, angling them outward. -
Embellish the leaves:
Use a small dotting tool or the head of a pin to press tiny dots around the border of the leaves, adding contrast to the smooth clay.
Fixing the Curl
If coaster corners curl up while drying, place a flat, heavy book on top of them once they are partially dry (leather-hard) to weight them down flat.
Step 3: Finishing Touches
-
Checking the edges:
Give all four coasters a final inspection. If the stamping process distorted the square shape, gently nudge the edges back into straight lines with a ruler. -
Drying phase:
Place the coasters on a wire rack or a piece of mesh to allow airflow underneath. Let them air dry completely for 24-48 hours, flipping them occasionally to prevent curling. -
Sanding:
Once bone dry, take fine-grit sandpaper and lightly buff the edges and surface to remove any burrs or sharp points created during the texturing process. -
Sealing the surface:
Apply a thin coat of matte acrylic sealant or varnish to water-resistant the coasters. This is crucial for durability since they will holding drinks. -
Final cure:
Allow the sealant to cure fully according to the manufacturer’s instructions before using your new coasters.
Add Color
After drying but before sealing, apply a watered-down acrylic paint wash (like sage green or terracotta) into the grooves, then wipe the surface clean to highlight the texture.
Enjoy styling your coffee table with these personalized geometric pieces


Ring Cone Holder
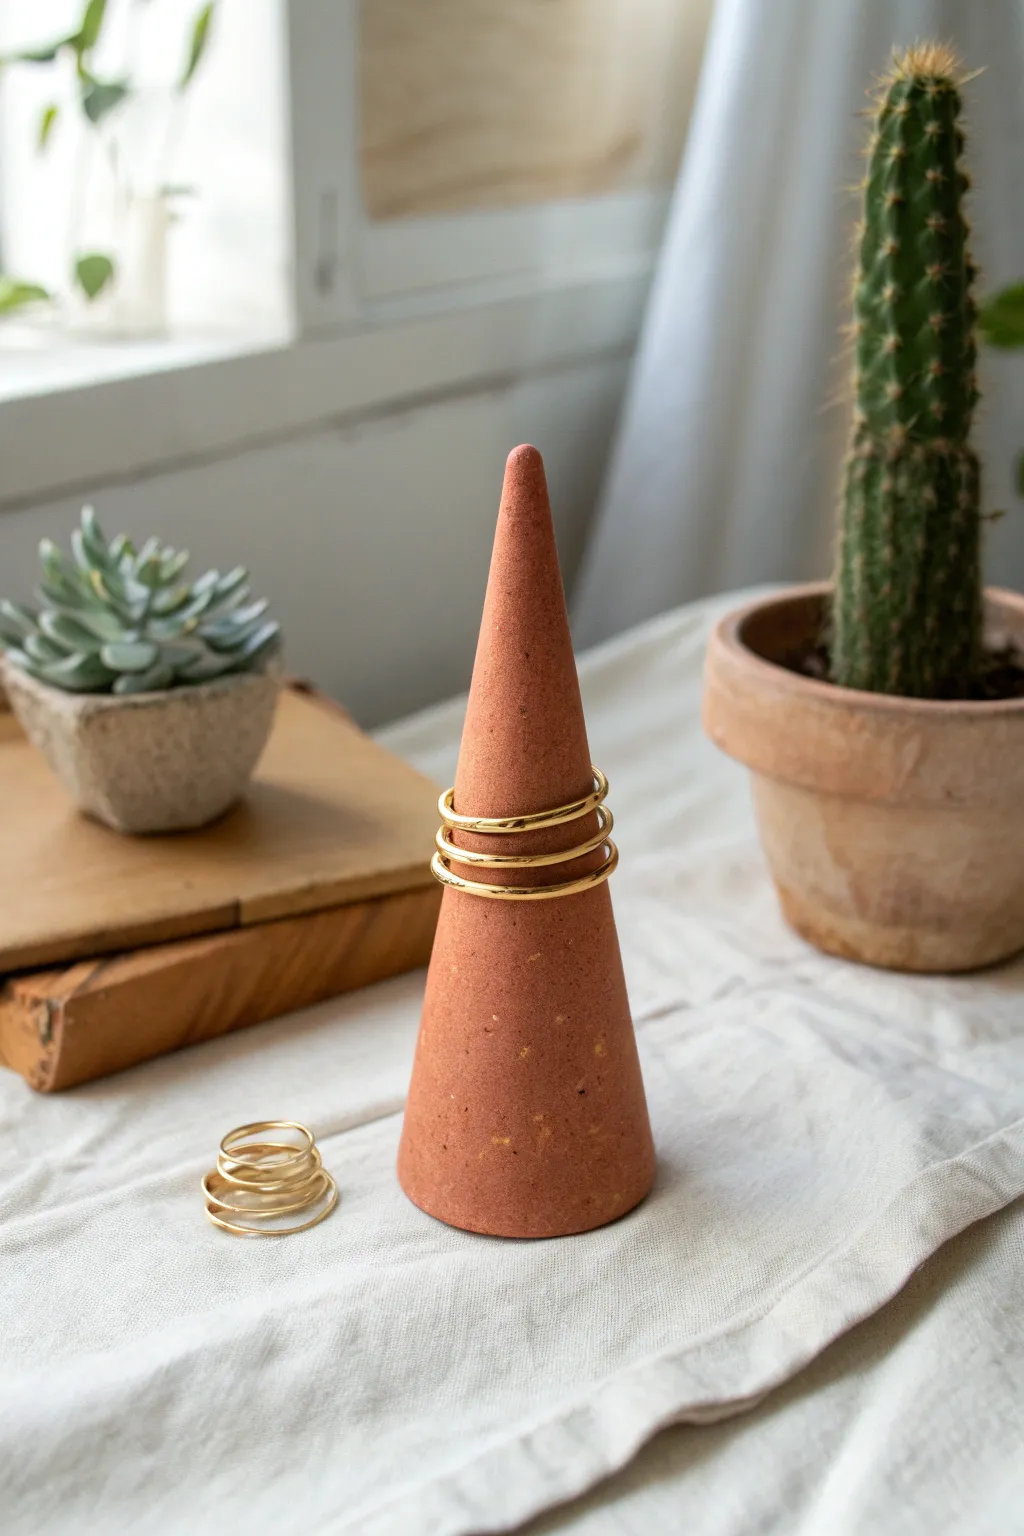
These sleek, conical ring holders are the perfect blend of modern minimalism and earthy warmth. Using terracotta-colored clay with a speckled texture, you’ll create a functional sculpture that keeps your favorite simple gold bands organized and on display.
Step-by-Step
Materials
- Terracotta-colored polymer clay (or air-dry clay)
- Small rolling pin or acrylic roller
- Flexible clay blade or craft knife
- Smooth work surface (ceramic tile or glass)
- Fine-grit sandpaper (400 and 600 grit)
- Small bowl of water (for smoothing)
- Oven (if using polymer clay) or drying space
Step 1: Rough Shaping
-
Condition the Clay:
Start by taking a chunk of your terracotta clay—about the size of a golf ball is perfect for one cone. Knead it in your hands until it’s warm, pliable, and free of any stubborn air pockets. -
Form a Cylinder:
Roll the clay ball between your palms to create a smooth sphere, then gently begin rolling it back and forth on your work surface to form a thick, short cylinder or log shape. -
Begin the Taper:
Focus your rolling pressure on just one end of the cylinder. As you roll back and forth, apply more pressure to the right side (or left, if you’re left-handed) to start narrowing that end into a point. -
Refine the Point:
Lift the clay and use your fingers to gently pinch and pull the narrow end upwards, establishing the peak of the cone. -
Flatten the Base:
Stand the rough cone upright on your work surface. Press it down firmly to create a flat, stable base. I often tap the base against the table a few times to ensure it sits perfectly level.
Step 2: Refining and Smoothing
-
Roll for Symmetry:
Place the cone back on its side. Roll it gently while keeping the base flat relative to the rolling motion. This helps smooth out finger marks and ensures the cone is perfectly round rather than lumpy. -
Check the Height:
Stand the cone up again. It should be tall enough to hold several rings (around 3-4 inches). If it feels too squat, gently roll it again to elongate the form. -
Smooth the Surface:
Dip your finger in a tiny bit of water. Rub it gently over the surface of the clay to erase any fingerprints or micro-cracks. The water acts as a slip, essentially polishing the clay before it cures. -
Sharpen the Base Edge:
Use your flexible blade to slice off a paper-thin layer from the very bottom of the base if it has become uneven during handling. This creates a sharp, professional edge where it meets the table.
Keep it Clean
Terracotta clay can stain surfaces. Tape down a sheet of parchment paper or wax paper to your work surface to prevent sticking and make cleanup faster.
Step 3: Finishing
-
Bake or Dry:
If using polymer clay, bake according to the package directions (usually around 275°F for 15-30 minutes). If using air-dry clay, set it aside in a cool, dry place for 24-48 hours. -
Cool Down:
Allow the cone to cool completely inside the oven if baking; this prevents thermal shock and cracking. If air drying, ensure it feels room temperature to the touch with no cold spots. -
Initial Sanding:
Once fully cured, take your 400-grit sandpaper and gently buff the surface. This removes any tiny bumps or lint that might have settled on the clay. -
Final Polish:
Switch to the 600-grit sandpaper for a final pass. This will leave the terracotta surface feeling incredibly smooth and looking matte but refined. -
Wipe Clean:
Use a slightly damp cloth to wipe away all sanding dust to reveal the rich, speckled color of the clay beneath.
Terrazzo Effect
Mix tiny chopped bits of white, black, or gold clay into your terracotta base before rolling to create a trendy, custom terrazzo stone look.
Place your new ring holder on your vanity and stack your favorite bands for a stylish display

The Complete Guide to Pottery Troubleshooting
Uncover the most common ceramic mistakes—from cracking clay to failed glazes—and learn how to fix them fast.
Flat-Back Clay Earrings
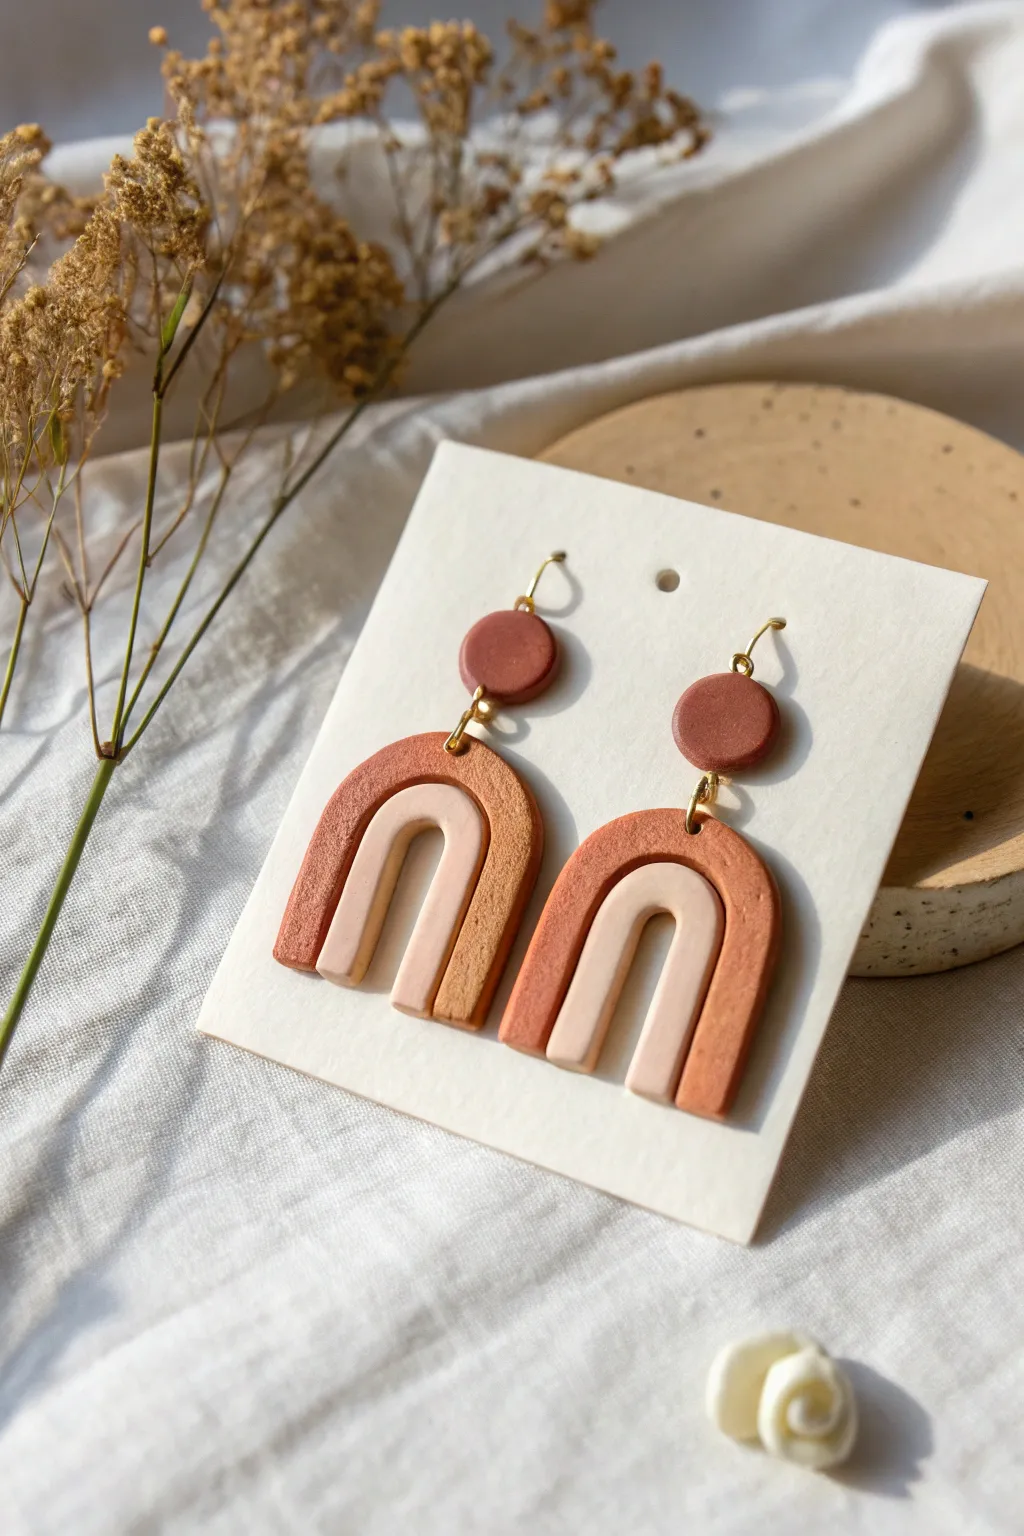
These earthy, terracotta-inspired earrings combine simple geometric shapes with subtle textures for a modern bohemian look. With their warm gradient of rust and soft peach tones, they are a lightweight and stylish accessory perfect for everyday wear.
How-To Guide
Materials
- Polymer clay in three colors: dark terra-cotta/rust, lighter peach, and dark reddish-brown
- Acrylic rolling pin or pasta machine
- U-shaped clay cutters (two sizes: one large, one medium)
- Small circle cutter (approx. 10mm)
- Texture sponge, toothbrush, or sandpaper
- Tissue blade or X-Acto knife
- Ceramic tile or baking sheet with parchment paper
- Needle tool or small drill bit
- Jump rings (gold finish)
- Earring hooks (gold finish)
- Jewelry pliers (flat nose and round nose)
- Super glue (optional, if attaching studs instead of hooks)
Step 1: Preparing the Clay
-
Condition the clay:
Start by warming up your polymer clay in your hands. Knead each color—the rust, the peach, and the dark reddish-brown—separately until they are soft and pliable. -
Roll out slabs:
Using an acrylic roller or a pasta machine on a medium setting, roll out the rust and peach clays into flat, even slabs. Aim for a thickness of about 3mm so the earrings are durable but not too heavy. -
Add texture:
Before cutting, give the rust-colored slab a stone-like texture. Gently press a coarse sponge, an old toothbrush, or even a sheet of sandpaper onto the surface of the clay to create organic pitting and marks.
Stone Effect
Mix a tiny pinch of black pepper or used dried coffee grounds into the rust clay before rolling it. This adds realistic speckles.
Step 2: Cutting the Shapes
-
Cut the outer arches:
Using your largest U-shaped cutter, press firmly into the textured rust slab to cut two identical arch shapes. -
Create space for the inner arch:
Take a slightly smaller U-shaped cutter and center it inside the large arches you just cut. Press down to remove the inner section, leaving you with just the thick outer rainbow frame. -
Cut the inner arches:
Switch to your smooth peach-colored slab. Use the smaller U-shaped cutter (the same size you used to hollow out the rust piece) to cut two solid inner arches. -
Assemble the rainbows:
Carefully place the peach inner arch inside the rust outer frame on your work surface. Gently press the seams together on the back or use a tiny bit of liquid clay to bond them if they feel loose. -
Cut the top circles:
Roll out the dark reddish-brown clay. Use your small circle cutter to punch out two discs. These will serve as the connector pieces between the hook and the main earring body.
Step 3: Baking and Assembly
-
Create holes:
Use a needle tool to pierce a hole at the very top center of each rainbow arch. Do the same for the top and bottom of the circular discs so they can connect to both the hook and the arch. -
Bake the pieces:
Arrange your clay pieces on a ceramic tile or a baking sheet lined with parchment paper. Bake according to your brand of clay’s package instructions—usually around 275°F (135°C) for 15-30 minutes. -
Cool down:
Once baked, turn off the oven and let the pieces cool completely inside before removing them. This helps prevent cracking due to thermal shock. -
Inspect edges:
Sometimes I like to use a fine-grit nail file or sandpaper to smooth out any rough edges or little clay burrs left from the cutters. -
Open jump rings:
Using two pairs of pliers, twist your jump rings open sideways (never pull them apart). This maintains the circle’s integrity. -
Connect the components:
Loop a jump ring through the top of the rainbow arch and the bottom hole of the circular disc. Close the ring securely. -
Attach the hooks:
Open the small loop at the base of your earring hook. Thread it through the top hole of the circular disc and close it tight with your pliers.
Modern Twist
Coat the inner peach arch with a thin layer of UV resin or glossy varnish after baking for a striking matte-vs-glossy contrast.
Now you have a stunning pair of handcrafted earrings ready for gift-giving or your next outing
Mini Charm Pendants
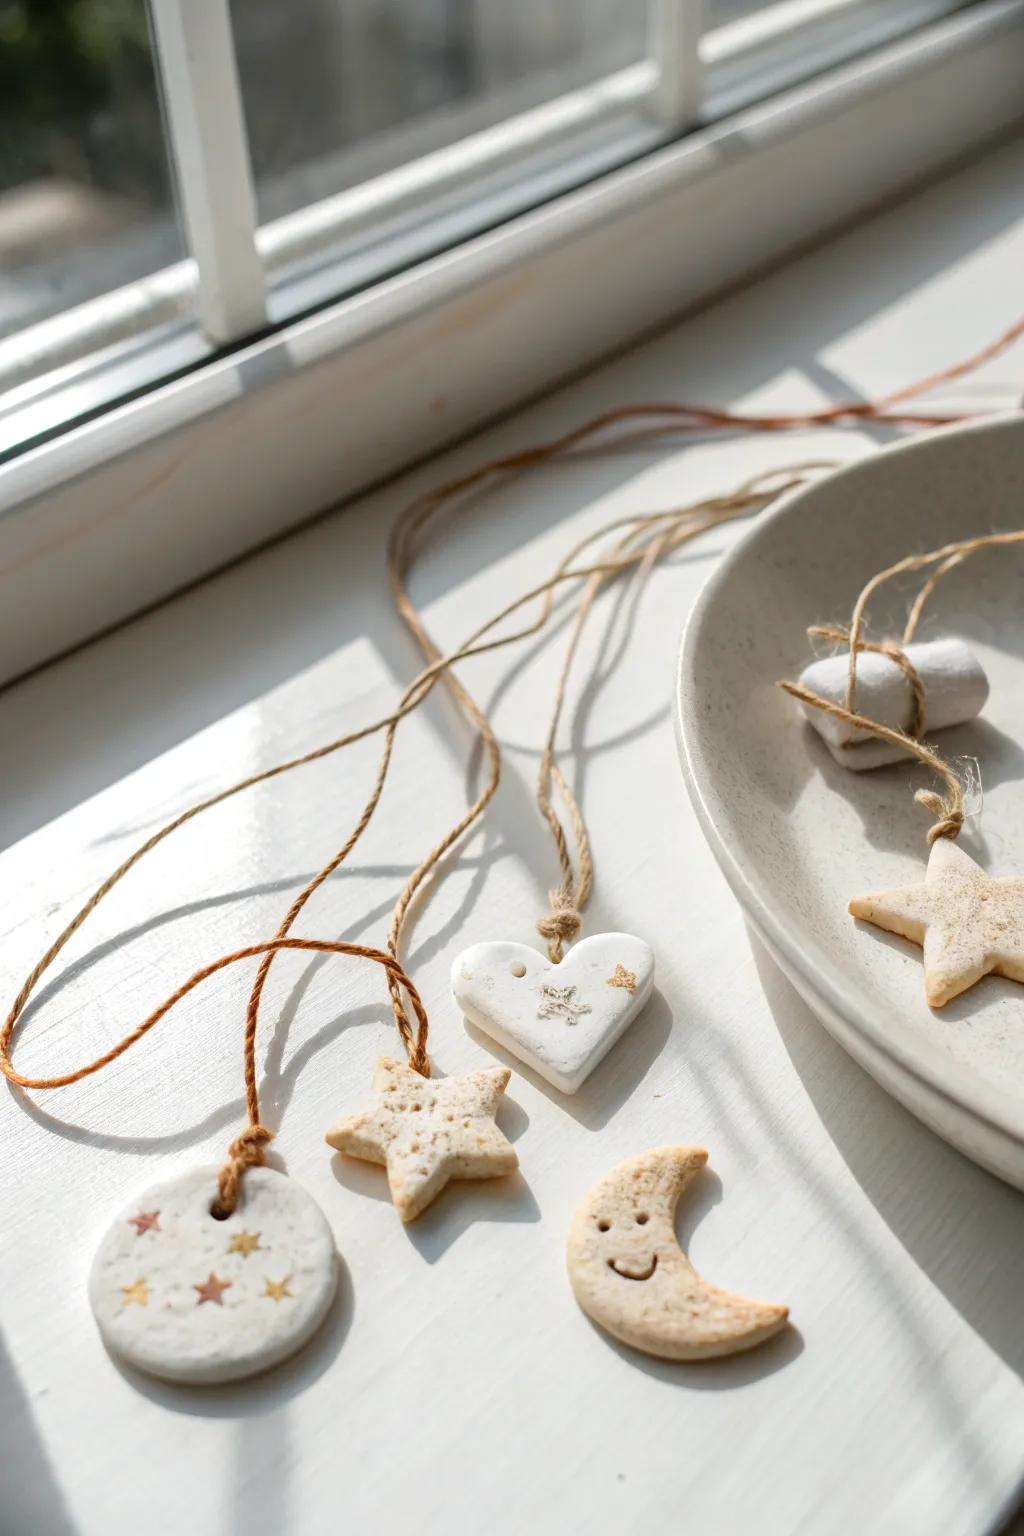
These delightful mini pendants bring a touch of cosmic charm to any crafting session, featuring simple shapes like stars, moons, and hearts adorned with rustic details. Their smooth, speckled finish and natural twine hangers make them perfect for necklaces, gift tags, or subtle home decor accents.
Step-by-Step Guide
Materials
- Air-dry clay (white or natural stone color)
- Rolling pin
- Small cookie cutters (circle, star, heart, moon)
- Toothpick or skewer
- Jute twine or thin hemp cord
- Sandpaper (fine grit)
- Gold and bronze acrylic paint or paint pens
- Clear matte varnish (optional)
- Craft knife
- Small detail brush
Step 1: Shaping the Clay
-
Condition the clay:
Begin by taking a handful of air-dry clay and kneading it in your hands until it becomes soft, pliable, and free of cracks. If the clay feels too dry, add a drop or two of water. -
Roll it out:
Place the clay on a smooth, clean surface. Use a rolling pin to flatten the clay to an even thickness of about 1/4 inch (6mm). You want them substantial enough to be sturdy but light enough to hang. -
Cut the shapes:
Press your mini cookie cutters firmly into the clay to create your shapes. Cut out a variety of forms—circles, stars, hearts, and crescent moons are perfect for this celestial theme. -
Create the holes:
While the clay is still wet, use a toothpick or a wooden skewer to poke a hole near the top of each shape. Wiggle the tool gently to ensure the hole is large enough for your twine to pass through later. -
Add texture:
For the moon charm, carefully use the toothpick to carve simple facial features—two dots for eyes and a curved line for a smile. For the star, you can gently stipple the surface for a rougher, cookie-like texture. -
Smooth the edges:
Dip your finger in a little water and run it along the cut edges of each charm to smooth out any roughness or jagged bits left by the cutter.
Cracking Up?
If small cracks appear as the clay dries, mix a tiny bit of fresh clay with water to make a paste and fill them in, then sand smooth once dry.
Step 2: Drying and Decorating
-
Let them dry:
Lay your shapes on a flat surface lined with parchment paper. Allow them to dry completely for 24-48 hours. I find flipping them over halfway through helps them dry more evenly and prevents warping. -
Sand for perfection:
Once fully dry and hard, take a piece of fine-grit sandpaper and gently buff the surfaces and edges. This removes any final imperfections and leaves a professional, smooth finish. -
Paint the stars:
On the round pendant, use a very fine detail brush or a paint pen to draw tiny stars. Alternate between gold and bronze colors for a scattered, magical look. -
Gild the heart:
For the heart shape, dab a small amount of gold paint onto the center or edges. You don’t need to be precise; an organic, splotchy application mimics gold leaf nicely. -
Enhance features:
If you carved a face into the moon, you can lightly brush a diluted brown paint into the grooves to accentuate the smile, then wipe away the excess on the surface. -
Seal the work:
To protect your designs, apply a thin coat of clear matte varnish. This steps is optional but recommended if the charms will be handled frequently.
Step 3: Assembly
-
Cut the twine:
Measure and cut lengths of jute twine or hemp cord, approximately 12-15 inches long depending on how low you want the pendants to hang. -
Thread the charms:
Fold a piece of twine in half and push the looped end through the hole in the charm from front to back. -
Secure with a knot:
Pass the loose ends of the twine through the loop you just created and pull tight. This creates a secure lark’s head knot that sits cleanly against the clay. -
Tie the ends:
Tie the two lose ends of the twine together with a simple overhand knot to close the necklace or hanger loop.
Scented Charms
Add a few drops of essential oil into the clay while kneading. Your pendants will act as passive diffusers, releasing scent as they hang.
Now you have a collection of charming, handmade tokens ready to wear or share.


What Really Happens Inside the Kiln
Learn how time and temperature work together inside the kiln to transform clay into durable ceramic.
Happy Face Magnets
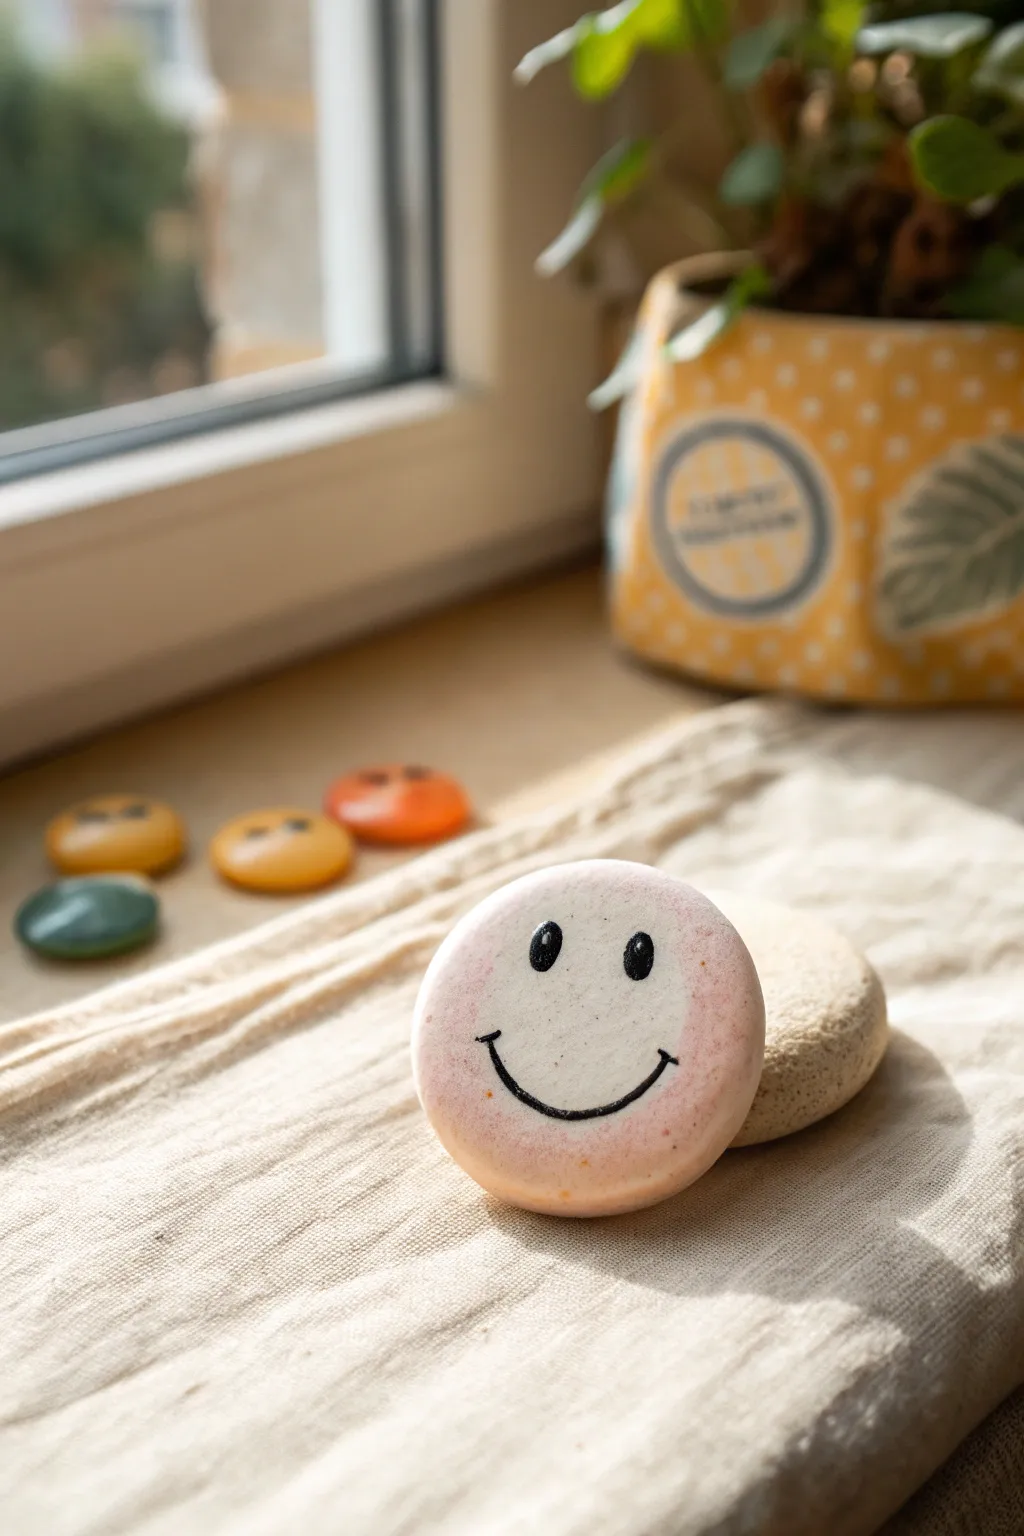
Brighten up your fridge or magnetic board with these charming, rustic smiley face magnets. This project uses air-dry or polymer clay to create smooth, tactile discs featuring simple hand-painted expressions and a soft, blushed finish.
How-To Guide
Materials
- White air-dry clay or polymer clay
- Rolling pin
- Circle cookie cutter (approx. 1.5 – 2 inches)
- Fine-grit sandpaper
- Black acrylic paint or Posca paint pen
- Soft pink pastel chalk or blush powder
- Small paintbrush (fine tip)
- Fluffy makeup brush or cotton swab
- Strong round craft magnets
- Strong adhesive (E6000 or super glue)
- Matte sealant or varnish
Step 1: Shaping the Clay Base
-
Condition the Clay:
Begin by taking a chunk of your white clay and kneading it thoroughly in your hands until it becomes soft, pliable, and free of cracks. -
Roll it Out:
Place the clay on a smooth work surface. Use a rolling pin to flatten it to an even thickness of about 1/4 inch. If you want a chunkier look like the photo, keep it slightly thick. -
Cut the Circles:
Press your circle cutter firmly into the clay to create your magnet shapes. wiggle it slightly to ensure a clean cut before lifting. -
Smooth the Edges:
With a tiny bit of water on your finger, gently run it around the circumference of the cut circle to smooth down any sharp ridges left by the cutter. -
Dry or Bake:
If using air-dry clay, set the discs aside on a flat surface to dry for 24-48 hours, flipping them occasionally to prevent warping. If using polymer clay, bake according to the package instructions. -
Sand for Smoothness:
Once fully cured or dry, use fine-grit sandpaper to buff the surface and edges. You want a very smooth canvas for your face.
Smooth Moves
To get that ultra-smooth, stone-like texture, dip your finger in water (for air-dry clay) or baby oil (for polymer) and buff the surface before drying.
Step 2: Adding the Happy Expression
-
Draft the Face:
I usually like to lightly sketch the eyes and smile with a pencil first to ensure the spacing is centered and appealing. -
Paint the Eyes:
Using a fine-tip brush dipped in black acrylic paint, or a black paint marker, create two vertical ovals for the eyes. Position them slightly high on the circle. -
Draw the Smile:
Paint a wide, simple ‘U’ shape for the smile. Add tiny little tick marks at the ends of the smile line to give it that classic, sketched character. -
Let the Ink Set:
Allow the black paint to dry completely. This is crucial so we don’t smudge the features during the next step.
Step 3: Blushing and Finishing
-
Prepare the Blush:
Scrape a little bit of pink pastel chalk into a fine powder. If you don’t have chalks, real makeup blush works surprisingly well. -
Apply the Rosy Tint:
Dip a soft, fluffy brush or a cotton swab into the pink powder. Gently dab and swirl it around the edges of the clay disc. -
Blend the Cheeks:
Continue dusting the pink powder lightly over the cheek area, blending it inward so the color fades naturally toward the center, leaving the middle white. -
Seal the Artwork:
Apply a thin coat of matte varnish or sealant over the entire front of the disc. This protects the chalk blush from rubbing off and keeps the white clay clean. -
Attach the Magnet:
Flip the dry clay disc over. Place a pea-sized dot of strong adhesive on the center of the back. -
Press and Hold:
Press your round magnet firmly into the glue. Hold it for 30 seconds to ensure a good initial bond, then let it cure completely before popping it on the fridge.
Color Pop
Make a whole set! Instead of just pink blush, use orange or yellow pastel chalks on different magnets to create a warm, sunny gradient collection.
Now you have a cheerful little friend to hold up your grocery lists and photos
Minimal Photo Holder
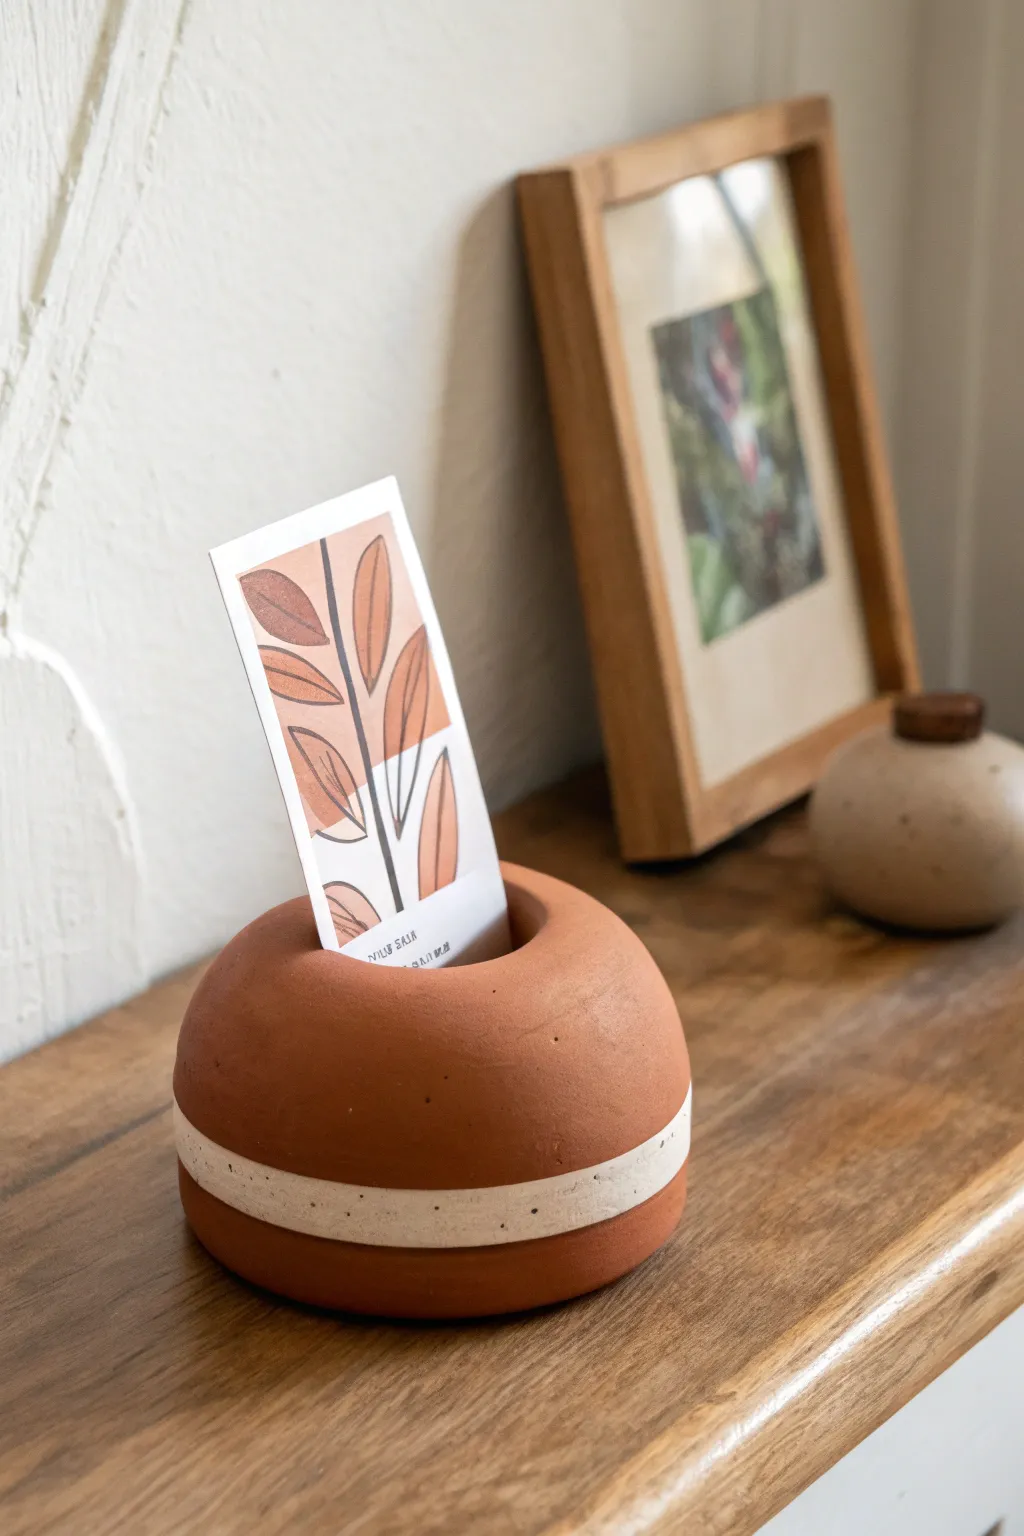
Bring an earthy, minimalist touch to your desk or mantel with this spherical photo holder. The warm terracotta tone paired with a crisp white stripe creates a modern look that beautifully frames your favorite postcards or instant photos.
Step-by-Step
Materials
- Air-dry clay (terracotta color)
- White acrylic paint
- Painter’s tape or washi tape
- Craft knife or clay wire cutter
- Rolling pin
- Sandpaper (fine grit, 220-400)
- Small flat paintbrush
- Matte varnish or sealant (optional)
- Small bowl of water
- Ruler
Step 1: Shaping the Base
-
Portion the clay:
Start by cutting a block of terracotta air-dry clay roughly the size of a tennis ball. It’s better to start with slightly more than you think you need, as you can always trim it down. -
Condition the clay:
Knead the clay in your hands for a minute or two to warm it up. This conditioning process helps prevent cracks from forming later as it dries. -
Form a sphere:
Roll the clay between your palms or on your work surface to create a smooth, round ball. Spend extra time here ensuring there are no visible seams or large bumps. -
Create the flat base:
Gently press the ball onto your work surface to flatten the bottom. You want a sturdy base so it won’t roll away, but try to keep the upper portion as round as possible. -
Refine the shape:
Use a little bit of water on your finger to smooth out any fingerprints or minor imperfections on the surface of the sphere.
Cracking Up?
If small superficial cracks appear as the clay dries, mix a tiny amount of fresh clay with water to make a paste (slip) and fill them in, then sand smooth once dry.
Step 2: Creating the Slot
-
Mark the center:
Identify the very top center of your sphere. You can make a tiny indentation with your finger to mark the spot. -
Create the depression:
Using your thumb, press firmly into the top center to create a divot. Unlike a bead, you aren’t poking a hole all the way through; you are creating a small well or crater. -
Cut the slot:
Take a craft knife or a dedicated clay tool and slice a straight line across the center of your divot. Wiggle the knife slightly to widen the slot just enough to fit a thick piece of cardstock. -
Test the fit:
I prefer to test the slot size immediately with a scrap piece of paper while the clay is still wet, adjusting the width if necessary. -
Smooth the opening:
Dip your finger in water again and gently round over the sharp edges of the opening you just cut for a finished, professional look. -
Let it dry:
Set the holder aside in a cool, dry place. Depending on the humidity and brand of clay, this usually takes 24 to 48 hours. Turn it occasionally to ensure the bottom dries evenly.
Step 3: Painting and Finishing
-
Sand for smoothness:
Once completely dry, use fine-grit sandpaper to buff away any rough textures or uneven spots on the surface. -
Clean dust:
Wipe the sphere down with a slightly damp cloth or paper towel to remove all clay dust before painting. -
Tape the stripe:
Apply two strips of painter’s tape around the lower circumference of the sphere. Leave a gap of about half an inch between the tape strips where you want the white line to be. -
Seal the tape edges:
Press down firmly on the edges of the tape to prevent paint from bleeding underneath. You can even run your fingernail along the edge for a tight seal. -
Apply the white paint:
Using a small flat brush, paint the exposed clay between the tape strips with white acrylic paint. You may need two coats for full opacity. -
Add speckles (optional):
To mimic the stone look in the reference, load an old toothbrush with a tiny bit of watered-down black or brown paint and flick it gently over the white stripe area while the tape is still on. -
Reveal the design:
Peel off the tape while the paint is still slightly tacky to ensure a crisp, clean line. -
Seal the piece:
Finish by applying a coat of matte varnish over the entire piece to protect the clay and give it a unified sheen.
Pro Tip: Weighted Base
For holding heavier photos or larger prints, press a small, flat stone or heavy washer into the bottom of the clay while wet to weigh it down and add stability.
Now you have a stylish, handmade display piece ready to showcase your favorite memories

TRACK YOUR CERAMIC JOURNEY
Capture glaze tests, firing details, and creative progress—all in one simple printable. Make your projects easier to repeat and improve.
Tiny Bud Vase (Decor Only)
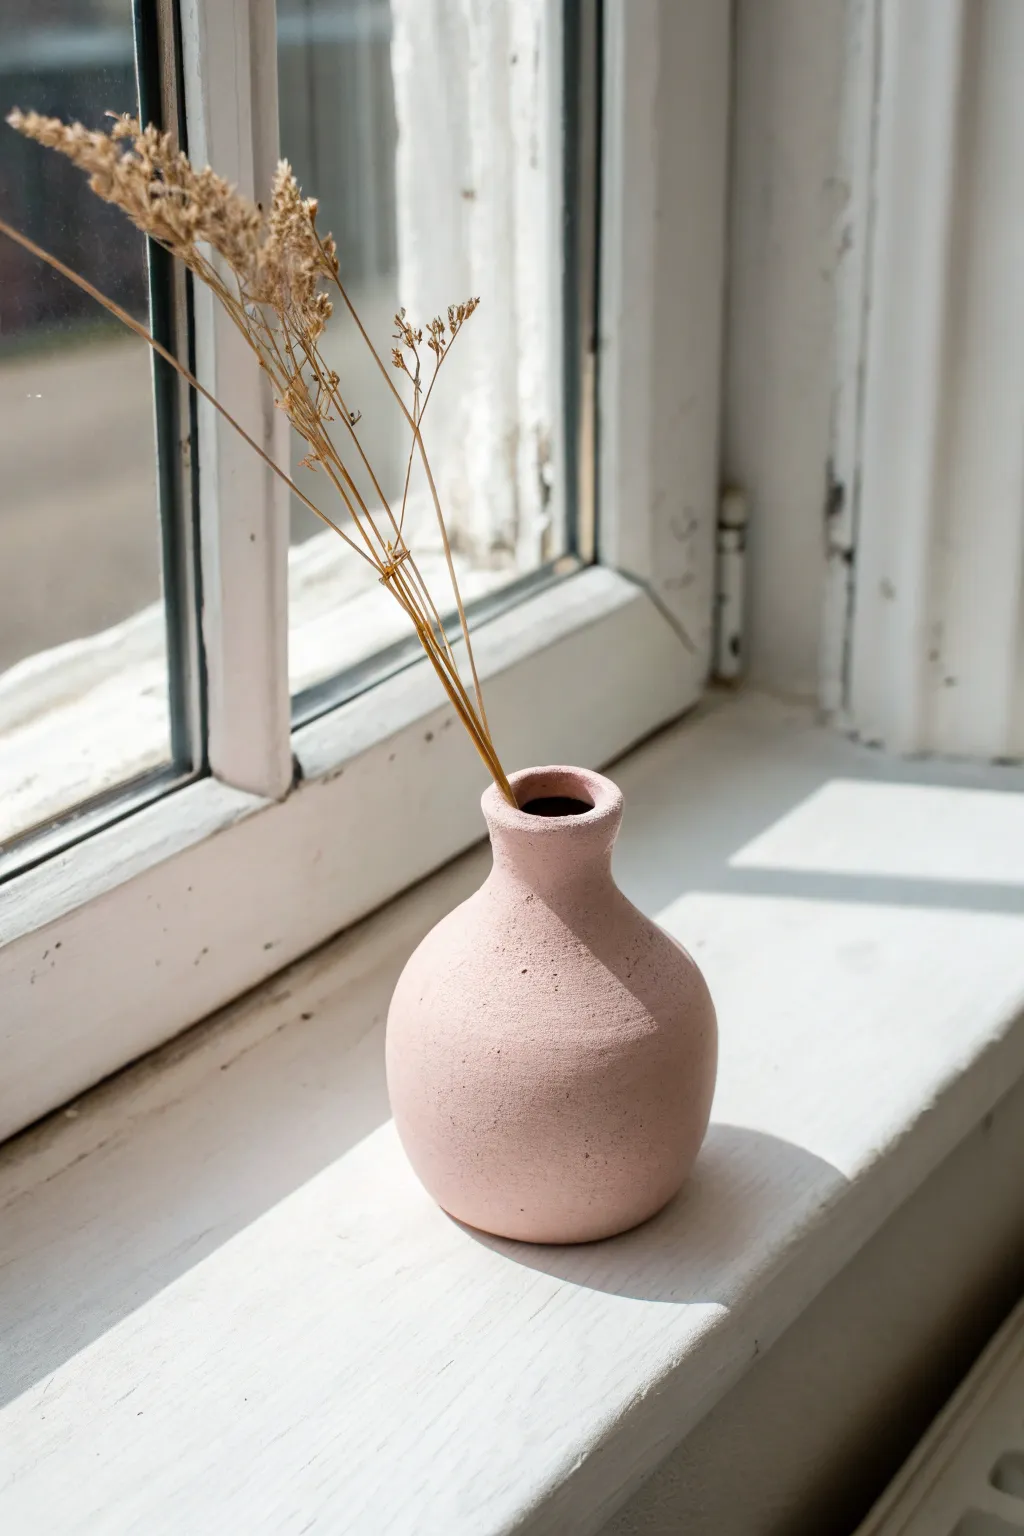
Capture the essence of understated elegance with this petite, textured bud vase, perfect for displaying dried botanicals on a sunny windowsill. The soft pink hue and organic shape create a modern yet warm aesthetic that works beautifully as a standalone decorative piece.
Detailed Instructions
Materials
- Air-dry clay (white or terracotta)
- Small cup of water
- Rolling pin or smooth glass jar
- Needle tool or toothpick
- Sponge or soft paintbrush
- Fine-grit sandpaper (220 grit)
- Acrylic paint (pale dusty pink)
- Baking soda (optional, for texture)
- Medium-sized paintbrush
- Matte varnish or sealant
Step 1: Forming the Base
-
Prepare the clay:
Start with a ball of clay roughly the size of a tennis ball. Knead it in your hands for a minute or two to warm it up and ensure it is pliable and free of air bubbles. -
Create the initial sphere:
Roll the clay between your palms or on a table until you have a smooth, round sphere. Lightly tap the bottom against your work surface to create a small flat base so the vase will stand securely. -
Open the clay:
Hold the sphere in one hand and gently press your thumb into the center top of the ball. Push down about three-quarters of the way through, leaving enough thickness at the bottom for stability. -
Pinch the walls:
Using your thumb on the inside and fingers on the outside, begin pinching and turning the clay. Aim to maintain a relatively thick wall structure for this particular chunky style, rather than thinning it out too much. -
Round the belly:
Gently push the clay outward from the inside to create the bulbous ‘belly’ shape of the vase. Smooth the exterior with a damp finger as you go to erase fingerprints.
Creating the Stone Effect
Mix 1 part baking soda to 2 parts acrylic paint. The reaction creates a fluffy, mousse-like paint that dries into a realistic faux-ceramic or terracotta texture.
Step 2: Shaping the Neck
-
Gather the top:
Place your hands around the upper opening of the sphere. Gently squeeze and collar the clay inward to narrow the opening significantly. -
Elongate the neck:
As you narrow the opening, gently pull the clay upwards to form a short, distinct neck. I like to keep this transition smooth rather than sharp. -
Level the rim:
If the top edge is uneven, use a needle tool or knife to trim it level. Alternatively, gently tap the vase upside down on the table to flatten the rim. -
Refine the rim shape:
Slightly flare the very top edge outwards with your thumb to create a soft lip. Dip your finger in water and run it along the rim to ensure it is perfectly smooth and rounded. -
Smooth the surface:
Take a slightly damp sponge or soft brush and go over the entire exterior. You want to remove craggy cracks but keep a slightly organic, handmade feel rather than making it mechanically perfect.
Cracks While Drying?
Small cracks can appear if the outer layer dries too fast. Mix a tiny bit of fresh clay with water to make a paste (slip) and fill the crack, then smooth over.
Step 3: Finishing and Painting
-
Allow to dry:
Let the vase air dry completely. This usually takes 24-48 hours depending on humidity. Rotate it occasionally so the bottom dries evenly. -
Sand imperfections:
Once fully bone dry, use fine-grit sandpaper to buff away any sharp ridges or rough patches. Wipe away the dust with a dry cloth or brush. -
Mix textured paint:
To achieve the stony, matte look seen in the photo, mix your pale pink acrylic paint with a teaspoon of baking soda. This creates a fluffy, textured consistency. -
Apply the first coat:
Paint the exterior of the vase using horizontal strokes that follow the curvature of the pot. Don’t forget to paint just inside the neck so the raw clay doesn’t show. -
Add a second coat:
Let the first layer dry completely, then add a second coat to ensure opaque coverage and a richer texture. -
Final seal:
Finish with a coat of matte varnish to protect the paint while preserving that soft, non-reflective finish.
Place your favorite dried wheat stems or delicate grasses inside to complete this serene corner display
Easy Incense Holder
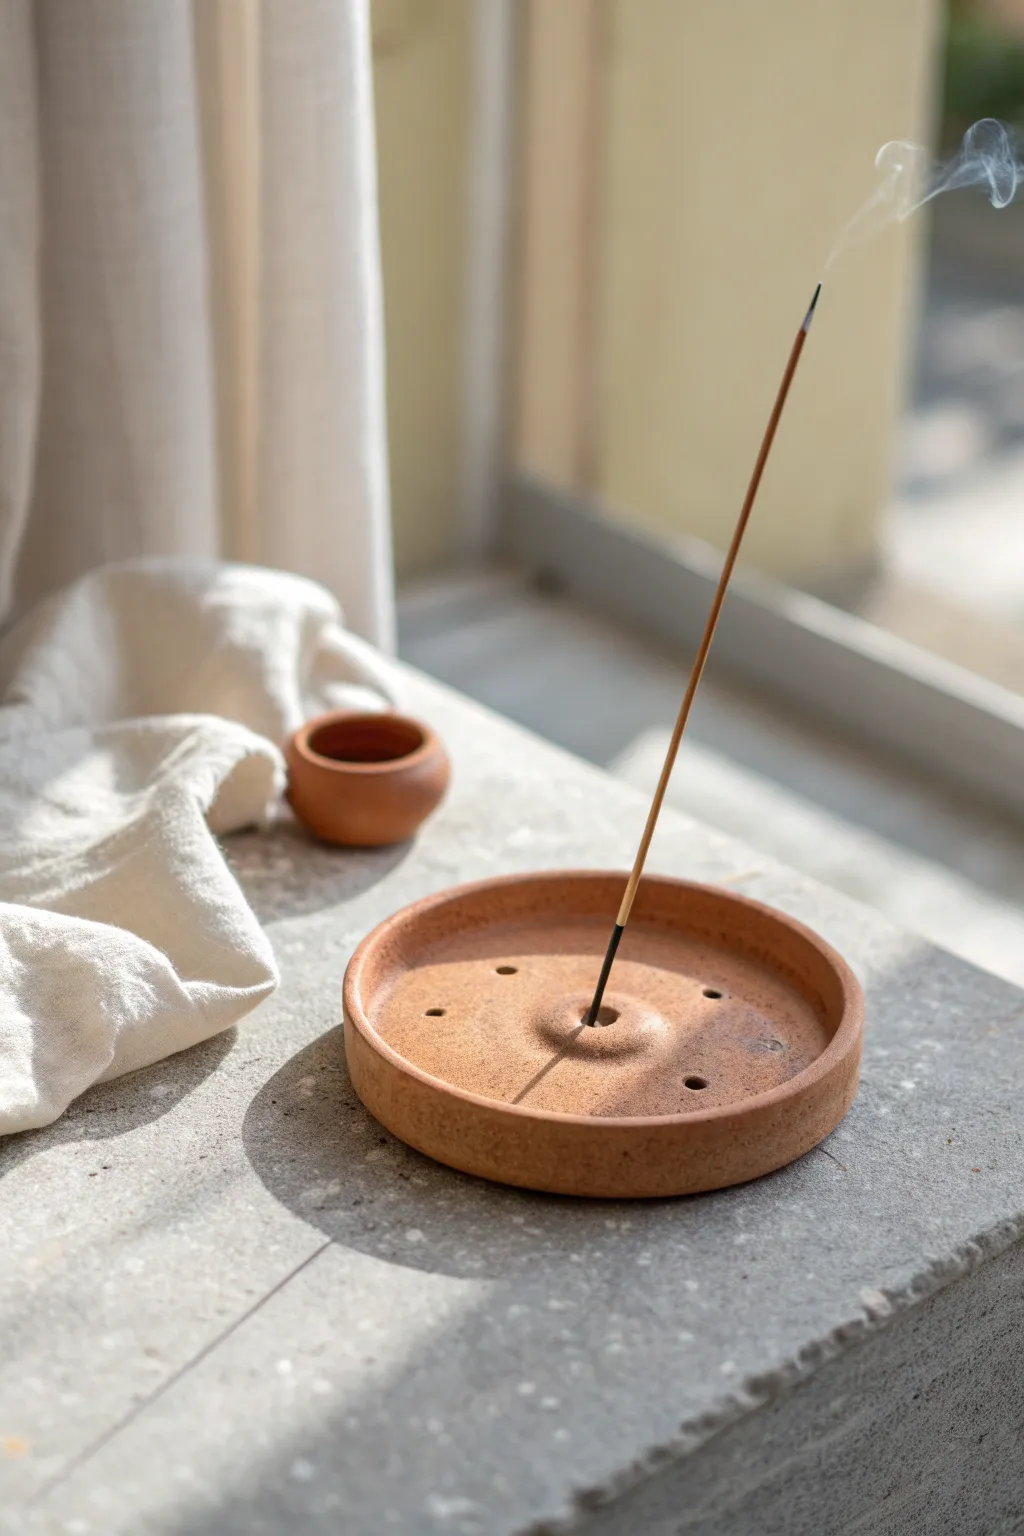
Capture the earthy warmth of traditional pottery with this simple terracotta incense holder. The design features a shallow, raised rim and patterned vents, creating a functional piece that catches ash while adding a rustic touch to your space.
Step-by-Step
Materials
- Terracotta-colored air-dry clay (or polymer clay)
- Small rolling pin
- Round cookie cutter (approx. 4 inches) or a bowl to trace
- Small sponge
- Water
- Incense stick (for sizing holes)
- Wooden skewer or toothpick
- Sandpaper (fine grit)
- Modeling tool or butter knife
Step 1: Shaping the Base
-
Prepare the Clay:
Begin by kneading a ball of terracotta-colored clay until it is soft and pliable. If the clay feels dry or crumbly, dip your fingers in a tiny bit of water to rehydrate it. -
Roll the Slab:
Flatten the ball onto a smooth work surface. Use your rolling pin to roll it out into an even slab, aiming for a thickness of about 1/4 inch. -
Cut the Disc:
Press your round cookie cutter firmly into the clay slab to create a perfect circle. If you are using a bowl, place it upside down on the clay and trace around it with a knife, then peel away the excess clay. -
Smooth the Edges:
Dip your finger in water and run it along the cut edge of the circle to smooth out any sharpness or roughness left by the cutter.
Stone Effect
Mix dried tea leaves or rough sand into your clay body before rolling it out. This creates natural speckles and a convincing faux-stone texture.
Step 2: Building the Rim
-
Create a Coil:
Take the excess clay you trimmed away and roll a long, thin snake (coil). Aim for it to be slightly thinner than a pencil. -
Attach the Coil:
Score the outer edge of your clay disc by making tiny hatched scratches with your needle tool. Add a dab of water (slip), then place the coil on top of the scored edge, encircling the disc. -
Blend the Seams:
Using your thumb or a modeling tool, drag the clay from the inside of the coil down onto the base to merge them. Do the same on the outside edge so it looks like one solid piece rather than two joined parts. -
Refine the Shape:
Pinch the rim gently to make it uniform in height. I like to use a damp sponge here to wipe the rim, which softens the look and gives it that smooth, pottery-wheel finish.
Step 3: Adding Details
-
The Main Holder Hole:
Find the exact center of your dish. Create a small mound of clay directly in the center and smooth it onto the base to give the stick extra stability. -
Pierce the Center:
Take your incense stick (or a skewer of similar size) and press it into the center mound at a slight angle. Ensure the hole is deep enough to hold the stick but doesn’t go all the way through the bottom. -
Add Ventilation Holes:
Using a skewer or the end of a paintbrush, punch 3-5 smaller holes randomly around the base of the dish. While decorative, these mimic the look of traditional burners. -
Check Stick Fit:
Test your incense stick in the center hole one last time. Wiggle it slightly to make the hole just a hair larger than the stick, as clay shrinks slightly when it dries.
Matching Set
Use your leftover clay to pinch a tiny, matching pot roughly the size of a thimble. It’s perfect for holding unburnt incense cones or matches.
Step 4: Finishing Touches
-
Texture the Surface:
If you want that gritty, stone-like texture shown in the photo, gently dab the surface with a coarse sponge or a crumpled ball of aluminum foil. -
Dry Slowly:
Place your finished piece in a cool, dry spot away from direct sunlight. Let it air dry for 24-48 hours. Drying too fast can cause cracks. -
Sanding:
Once fully dry and hard, take a piece of fine-grit sandpaper and lightly buff the rim and bottom to remove any sharp bits or fingerprints. -
Seal (Optional):
For easier cleaning later, apply a matte varnish or sealant. This prevents ash stains from darkening the clay over time.
Now you have a serene, minimalist holder ready to catch the ash from your favorite scents
Simple Tea Light Holder
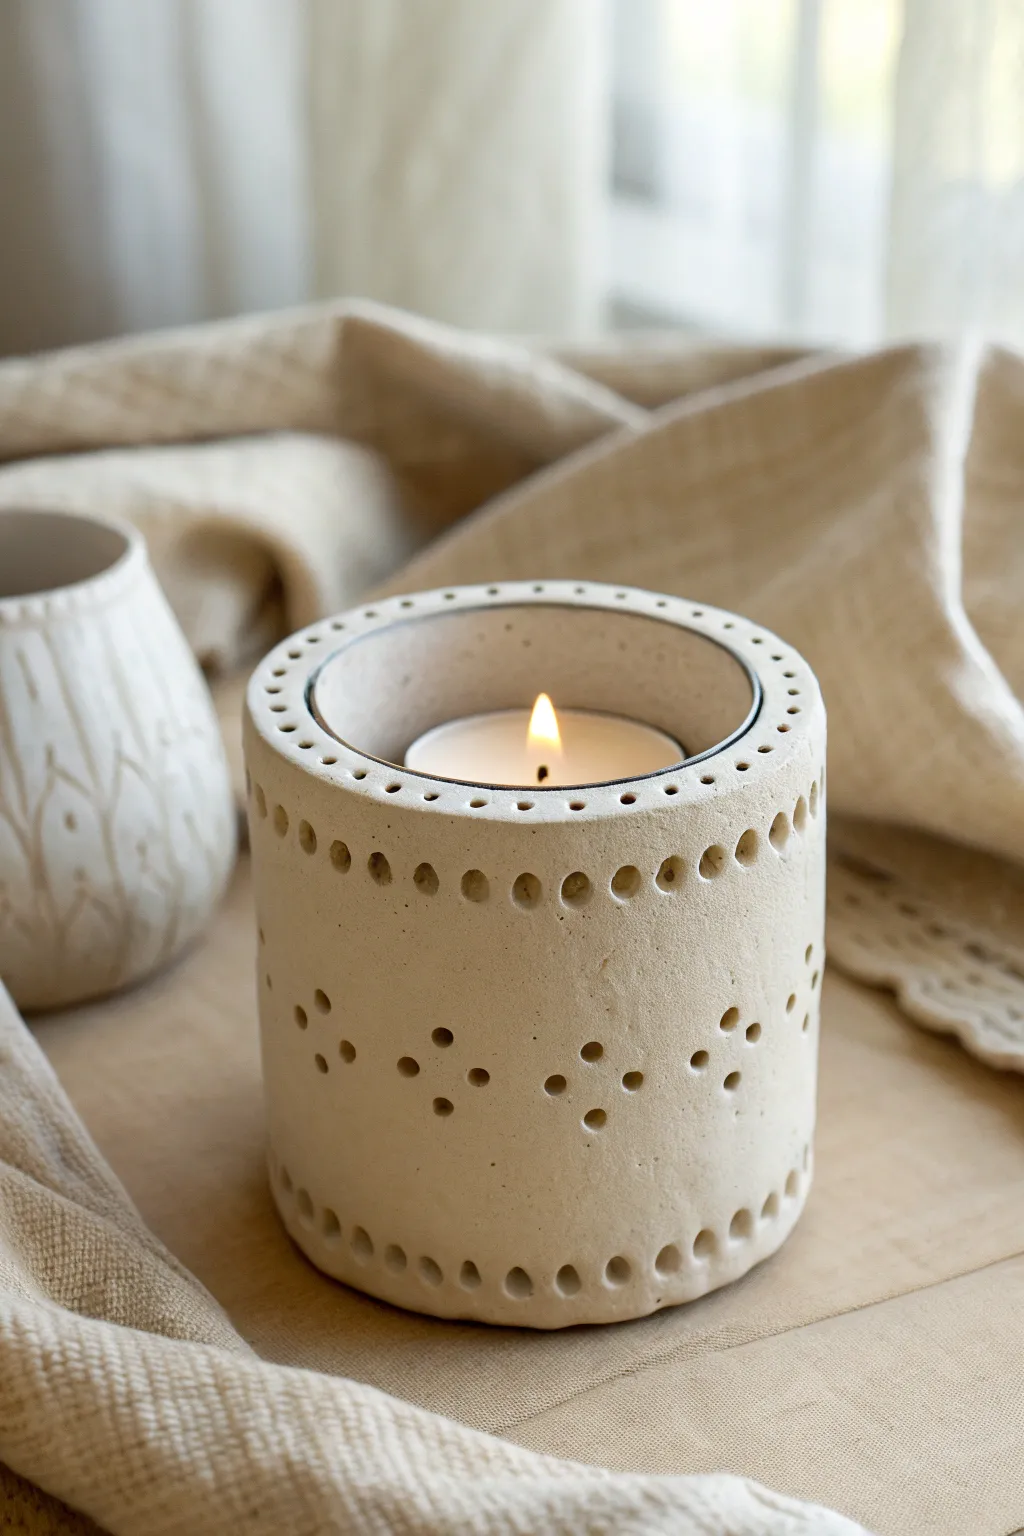
This minimalist tea light holder emits a gentle, patterned warmth through its delicate pierced design. Created with a simple slab technique, its creamy ceramic finish and subtle dot motifs bring a modern, handcrafted charm to any cozy corner.
Detailed Instructions
Materials
- White air-dry clay or polymer clay
- Rolling pin
- Cylindrical mold (like a soda can or glass jar, approx. 3-inch diameter)
- Parchment paper
- Craft knife or clay slicer
- Ruler
- Small round piping tip or sturdy straw (for larger holes)
- Toothpick or skewer (for smaller detailing)
- Water and slip (if using air-dry clay)
- Fine-grit sandpaper
- Matte sealant or varnish (optional)
Step 1: Preparing the Slab
-
Roll the clay:
Begin with a generous ball of white clay. Roll it out onto a piece of parchment paper until you have an even slab that is approximately 1/4 inch thick. Aim for a consistent thickness to ensure the candle holder stands straight later. -
Measure the circumference:
Take your chosen cylindrical mold (a soda can works perfectly for standard tea lights) and wrap a strip of paper around it to measure the exact circumference needed. Add just a tiny bit of extra length for the overlap or seam. -
Cut the rectangle:
Using your measurements, cut a clean rectangle from your clay slab. Use a ruler and craft knife to get sharp, straight edges. The height should be slightly taller than a standard tea light, perhaps 3 to 4 inches.
Step 2: Creating the Pattern
-
Plan the design:
Before rolling the clay into a cylinder, it is much easier to apply the texture while flat. Keep the clay on the parchment paper so you don’t distort the shape while working. -
Punch the top border:
Using a small tool like the end of a paintbrush or a specialized clay hole punch, press a row of evenly spaced indentations along the very top edge of the rectangle. Press firmly but don’t punch all the way through yet just to mark spacing. -
Deepen the top holes:
Go back over that top row and push the tool deeper to create distinct circular impressions. Similar to the reference image, you want these to look like deep divots rather than complete holes that go all the way through. -
Create the diamond motifs:
In the center section of your clay strip, create the diamond cluster patterns. Use a slightly smaller tool to press groups of four dots arranging them in a diamond shape. Space these clusters evenly across the length of the strip. -
Add the bottom border:
Repeat the border process along the bottom edge. Press a row of evenly spaced indentations identical to the top row to frame the design. -
Pierce for light:
Select a few specific spots in your design—perhaps the center of the diamonds—to punch fully through the clay if you want light to spill out, or keep them as deep impressions for a purely textural look as seen in the photo.
Clean Cuts Pro Tip
dip your hole-punching tool into a bit of cornstarch or baby powder before pressing it into the clay. This prevents sticking and ensures your circular impressions come out crisp and clean every time.
Step 3: Assembly and Finishing
-
Wrap the cylinder:
Carefully lift the clay rectangle and wrap it around your mold. If you wrapped the mold in parchment paper first, the clay won’t stick. Bring the two short ends together. -
Score and slip:
I always find it helpful to score (scratch) the edges that will touch and add a little water or liquid clay (slip) to act as glue. Press the seam together firmly. -
Blend the seam:
Use your finger or a clay tool to smooth the seam inside and out until it is invisible. You want the cylinder to look like one continuous piece. -
Refine the rim:
Check the top rim of the cylinder. If handling it caused any warping, gently pat it flat or run a damp finger along the edge to smooth it out. -
Check the shape:
While the clay is still on the mold, verify that your punched holes haven’t become ovals. If they have, gently reshape them with your tool. -
Remove mold and dry:
Carefully slide the cylinder off the mold. If using air-dry clay, let it sit in a cool, dry place for 24-48 hours. If using polymer clay, bake according to the package instructions. -
Sand for smoothness:
Once fully cured or dry, use fine-grit sandpaper to buff away any fingerprints or rough edges, specifically around the rim and the seam area. -
Seal the piece:
Apply a coat of matte varnish or sealant to protect the surface and give it that finished ceramic look. Let it dry completely before inserting a tea light.
Make it Shine
For a magical night-time effect, punch the holes in the diamond pattern all the way through the clay. The candlelight will project starry shapes onto your table when the room is dark.
Now you have a serene, custom-made vessel ready to add a soft flicker of light to your evening routine
Leaf-Imprint Hanging Plaque
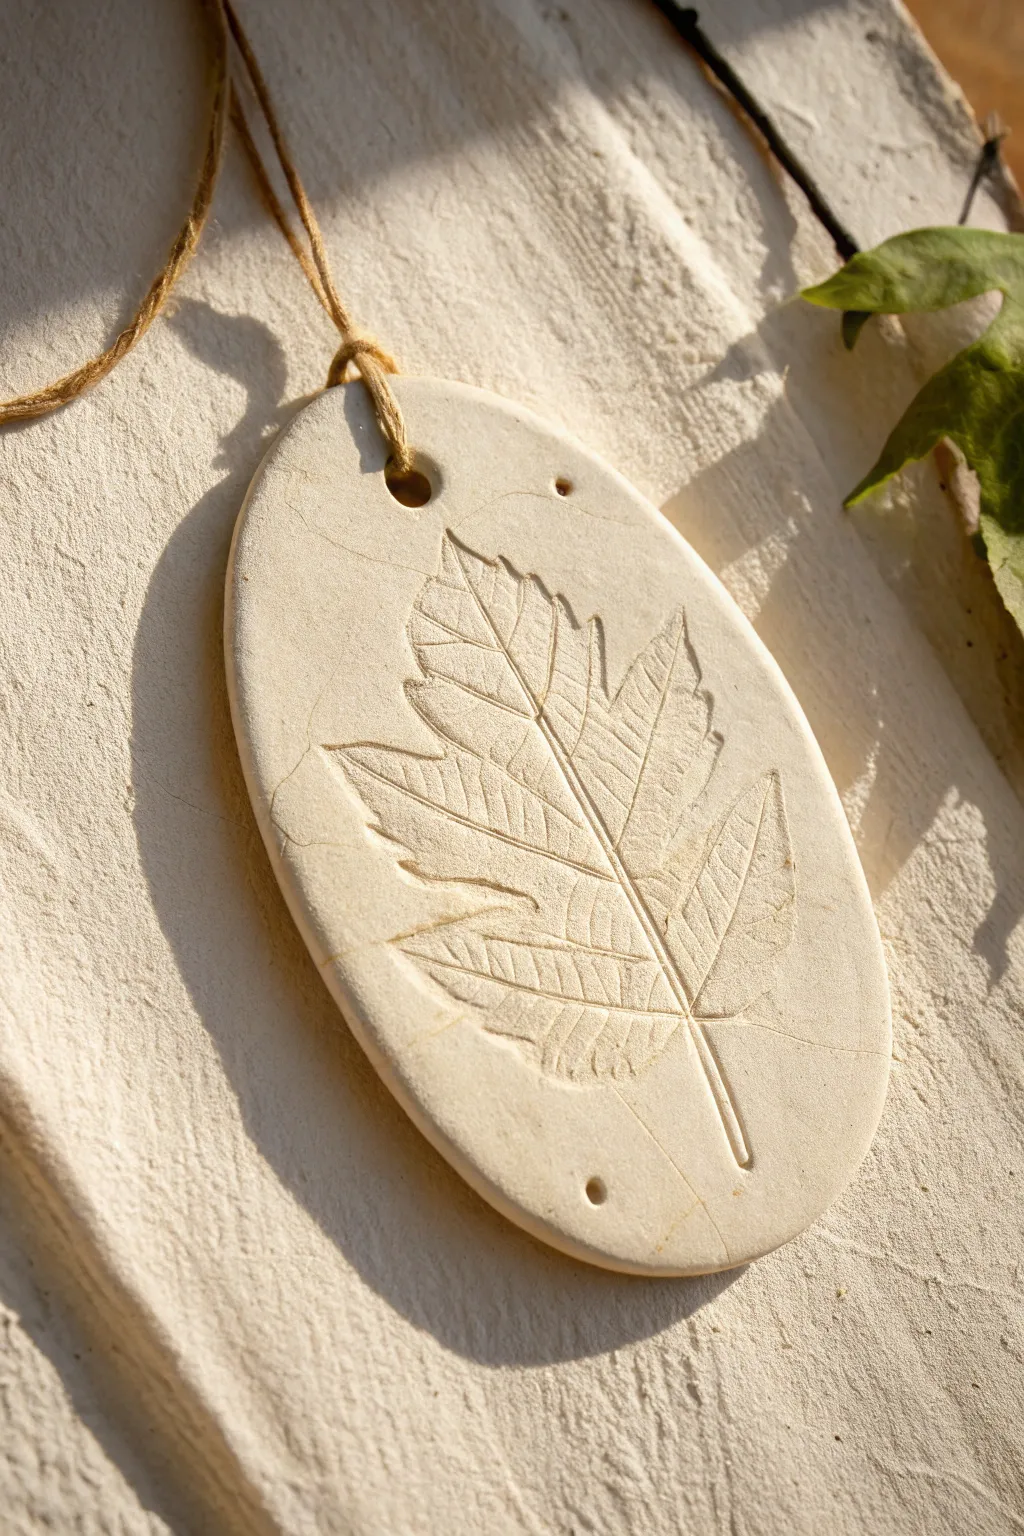
Capture the delicate veins of nature with this elegant oval wall hanging. Using simple clay and a fresh leaf, you’ll create a subtle, fossil-like relief that brings a touch of the outdoors into your home decor.
Step-by-Step Guide
Materials
- White air-dry clay or polymer clay
- Rolling pin
- Fresh leaf with prominent veins (like maple or oak)
- Oval cookie cutter or a knife and paper template
- Straw or small circular tool (for the hole)
- Fine-grit sandpaper
- Jute twine or rustic string
- Small bowl of water (for smoothing)
- Wax paper or parchment paper
Step 1: Preparation and Rolling
-
Prepare your workspace:
Lay down a sheet of wax paper or parchment paper on a flat surface. This prevents the clay from sticking and makes it easier to move later without distorting the shape. -
Condition the clay:
Take a handful of air-dry clay and knead it in your hands until it becomes soft, pliable, and warm. This removes air bubbles and prevents cracking during drying. -
Roll the slab:
Place the clay ball on your paper and use the rolling pin to flatten it. Aim for an even thickness of about 1/4 inch (6mm) to ensure the plaque is sturdy but not too heavy. -
Check for smoothness:
Inspect the surface for any unwanted lint or creases. If you see imperfections, dip your finger in a little water and gently smooth them out before proceeding.
Fixing Cracks
If small hairline cracks appear while drying, mix a tiny bit of fresh clay with water to make a paste and fill them in gently.
Step 2: Creating the Imprint
-
Position the leaf:
Select your leaf—vein side down is crucial for the best detail. Place it carefully in the center of your rolled clay slab. -
Press the leaf:
Gently roll over the leaf with your rolling pin. Use firm, even pressure to embed the leaf into the clay surface without thinning the slab too much. -
Ensure full contact:
For the edges and stem, I like to use my thumb to gently press down, ensuring every part of the leaf makes contact with the clay. -
Remove the leaf:
Locate the stem or the edge of the leaf. Carefully peel it away from the clay to reveal the intricate impression left behind.
Step 3: Shaping and Refining
-
Cut the shape:
Position your oval cutter over the impression, centering the leaf design comfortably. Press down firmly to cut the shape. Alternatively, trace around a paper template with a knife. -
Remove excess clay:
Peel away the scrap clay from around the oval. Be gentle so you don’t warp the shape of your final piece. -
Smooth the edges:
Dip your finger in water again and run it along the cut edge of the oval to round it off and remove any harsh cutting lines. -
Create the hanging hole:
Use a straw to punch a hole near the top of the oval. Make sure it’s centered and not too close to the edge to prevent tearing. -
Add decorative details:
If desired, use a small tool to add tiny dot indentations elsewhere on the plaque for a bit of texture, similar to the reference image.
Color Wash
Dilute acrylic paint with water and brush over the imprint, then wipe the surface clean to leave dark color only in the veins.
Step 4: Drying and Finishing
-
Initial drying:
Leave the plaque on the parchment paper to dry. If using air-dry clay, loosely cover it with plastic wrap for the first few hours to slow drying and prevent curling. -
Flip for even drying:
After about 12-24 hours, carefully flip the plaque over so the bottom gets air exposure. This helps keep the piece flat. -
Wait for full cure:
Allow the clay to dry completely, which may take 24-48 hours depending on humidity. The clay will turn a lighter matte color when fully dry. -
Sand imperfections:
Once bone dry, take fine-grit sandpaper and lightly buff the edges or surface if there are any rough spots. -
Seal (optional):
For longevity, you can apply a matte varnish, though leaving it raw preserves that natural stone-like texture shown in the photo. -
String it up:
Cut a length of jute twine, thread it through the hole, and tie a knot to create a loop for hanging.
Hang your finished plaque near a window to let the natural light highlight the beautiful texture of the leaf veins
Clay Suncatcher Shapes
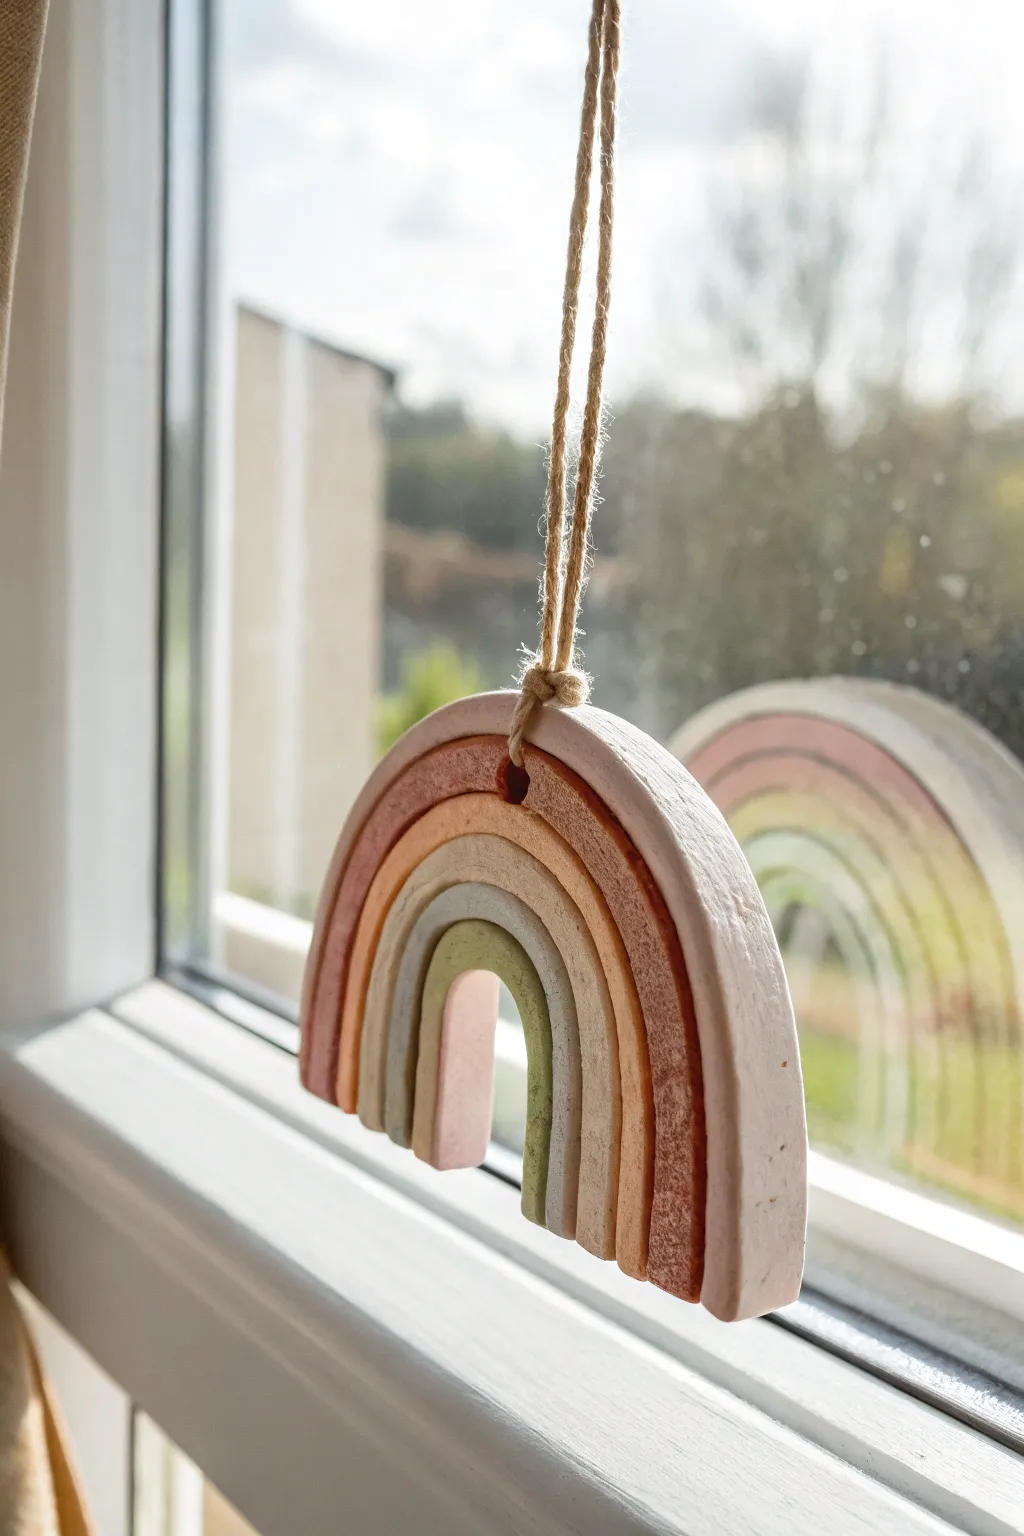
Brighten up any window with this charming, multi-layered clay rainbow suncatcher featuring muted earthy tones. The textured, matte finish gives it a trendy bohemian vibe that looks great hanging against the glass or on a wall.
Detailed Instructions
Materials
- Air-dry clay or polymer clay (white)
- Acrylic paints (terracotta, mute pink, sage green, cream, white)
- Rolling pin
- Craft knife or clay cutter
- Small round cutter or bubble tea straw (for the hole)
- Jute twine
- Fine-grit sandpaper
- Water and a small bowl
- Parchment paper or silicone mat
- Ruler
Step 1: Shaping the Arches
-
Prepare your workspace:
Lay down your parchment paper or silicone mat to prevent sticking. Take a large ball of white clay and knead it until it is soft and pliable. -
Roll out the slab:
Use your rolling pin to flatten the clay into an even slab, approximately 1/4 inch thick. Try to assist the evenness by using depth guides if you have them. -
Understanding the construction:
Unlike rolled snakes, this rainbow is made from flat concentric arches cut from a slab. Imagine drawing a rainbow on paper and cutting out the bands; that is the technique we are using. -
Cut the largest arch:
Using a craft knife, cut a large semi-circle shape for the outermost band. A large round bowl or cookie cutter can act as a helpful template for the top curve. -
Create the inner bands:
Cut subsequent, smaller semi-circles inside the first one to create nested arches. Aim for roughly four or five distinct bands. Don’t separate them yet. -
Refine the edges:
Carefully separate the bands. Dip your finger in a little water and smooth out any rough edges or jagged cuts on each individual arch piece. -
Create the hanging point:
On the very center of the top-most (smallest) arch or the one immediately surrounding the center void, use a straw or small round cutter to punch a clean hole for the twine. -
Add texture (optional):
If you want the stony look from the photo, gently dab the surface with a crumpled ball of aluminum foil or a toothbrush before the clay dries. -
Dry the clay:
Let the pieces dry completely flat on the parchment paper. Depending on your clay type and humidity, this could take 24-48 hours. Flip them halfway through for even drying.
Step 2: Assembly and Painting
-
Sand for smoothness:
Once fully cured, use fine-grit sandpaper to gently smooth the edges again. Ensure the pieces fit together snugly by testing them as you sand. -
Mix your palette:
Mix your acrylics to achieve the muted tones shown: mix orange with brown and white for terracotta, and add grey to green for sage. Keep one band natural white or cream. -
Paint the bands:
Paint each arch a different color. I prefer to paint the sides and front, leaving the back plain if it will hang against a window. -
Glue the structure:
Once the paint is dry, arrange the arches back into the rainbow shape. Apply a strong craft glue or super glue along the touching inner/outer edges to bond the arches into one solid unit. -
Attach a backing (optional):
For extra stability, you can glue a small strip of felt or a popsicle stick across the back of the rainbow, though edge-gluing is usually sufficient for small pieces. -
String it up:
Cut a length of jute twine. Fold it in half to create a loop, pass the folded end through the hole from front to back, and pull the tails through the loop to secure it with a lark’s head knot. -
Tie the hanging loop:
Tie the loose ends of the twine together at your desired length to finish the hanger.
Uneven Arches?
If your freehand cutting is shaky, find bowls or cups of varying sizes in your kitchen to use as templates for cutting perfect curves.
Make it Sparkle
Before the clay dries, press small glass beads or crystals into the bottom edge of the rainbow to catch even more light in the window.
Now you can hang your creation in a sunny spot and enjoy the cozy colors
DIY Clay Domino Set
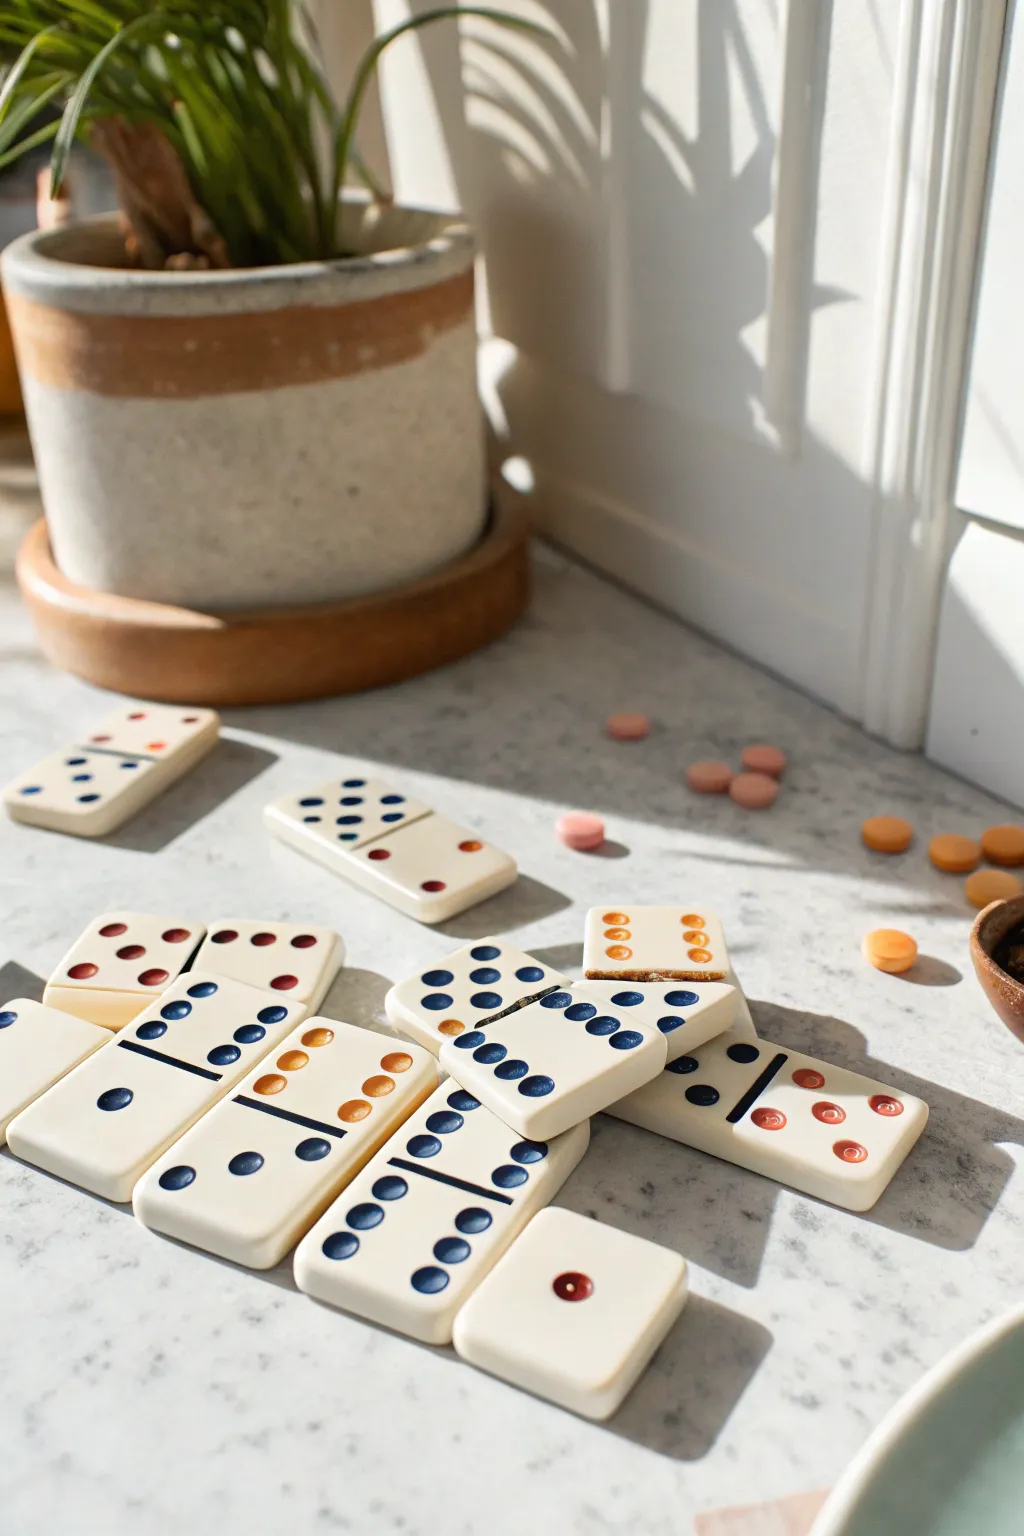
Elevate game night with this charming set of handmade dominoes, featuring a smooth, creamy finish and deeply saturated, colorful pips. These sturdy tiles have a delightful weight to them and a polished look that feels surprisingly high-end despite being a simple afternoon project.
Step-by-Step Tutorial
Materials
- White polymer clay (approx. 4-6 blocks)
- Acrylic rolling pin
- Sharp blade or clay slicer
- Rectangle clay cutter (approx. 1″ x 2″)
- Small round piping tip or ball stylus tool
- Sandpaper (400 and 1000 grit)
- Acrylic paints (navy blue, burnt orange, mustard yellow, deep red)
- Fine-point paintbrush
- Gloss or matte varnish (optional)
- Parchment paper
- Ruler
Step 1: Prepping and Shaping the Tiles
-
Condition the Clay:
Begin by warming the polymer clay in your hands, kneading it thoroughly until it becomes soft and pliable. This conditioning step is crucial to prevent cracks during baking. -
Roll out a Slab:
Place the clay between two guides (like stacked craft sticks) or use rolling pin rings to roll out an even slab. Aim for a thickness of about 1/4 inch to give the dominoes a nice, substantial weight. -
Cut Rectangles:
Using your rectangular cutter, press firmly into the clay to create uniform tile shapes. If you don’t have a cutter, carefully measure 1-inch by 2-inch rectangles with a ruler and slice them cleanly with your blade. -
Smooth the Edges:
Gently pick up each rectangle and run your finger along the cut edges. You want to soften that sharp cut line into a slightly rounded, friendly edge. -
Mark the Center Line:
Use the back of your blade or a ruler to gently press a shallow straight line across the exact center of each tile, dividing it into two squares.
Step 2: Adding Details and Baking
-
Create the Pips:
Using a small ball stylus or the opening of a small piping tip, press the pips (dots) into the clay. Reference a standard double-six domino set to ensure you create all the correct number combinations. -
Refine the Impressions:
Check that each dot is pressed to the same depth. I find that twisting the tool slightly as I lift it out helps keep the edges of the circle clean. -
Final Smoothing:
Give the surface one last check for fingerprints. A light brush with a little cornstarch or baby oil can help smooth out any unwanted texture before they go into the oven. -
Bake the Tiles:
Arrange the tiles on a parchment-lined baking sheet. Bake according to your brand of clay’s instructions—usually around 275°F (135°C) for 30 minutes. Let them cool completely on the tray. -
Sand for Perfection:
Once cool, wet-sand the edges and back of the tiles using 400 grit sandpaper, followed by 1000 grit. This creates that professional, glass-smooth feel.
Clean Imprint Hack
Place a piece of plastic wrap over the clay before pressing your dots. This softens the edges of the indentation instantly, meaning less sanding later.
Step 3: Painting and Finishing
-
Select Your Palette:
Choose a color scheme that feels cohesive. The example uses a mix of navy blue, deep red, and warm mustard tones for a sophisticated look. -
Fill the Pips:
Load a fine-point brush with acrylic paint. Carefully dab a drop of paint into each indented dot. Don’t worry if it’s messy; the indentation works to your advantage. -
Paint the Center Line:
Using a steady hand, paint a thin line of navy blue (or your main accent color) into the center groove you created earlier. -
Wipe Away Excess:
If you got paint on the flat surface of the tile, quickly wipe it away with a damp paper towel. Since the paint is resting inside the indentation, the surface wipes clean easily. -
Let Dry:
Allow the paint to dry completely. If some colors look translucent, you may need a second drop of paint to increase opacity. -
Seal the Tiles:
To protect the paint and clay from rubbing off during gameplay, brush on a thin layer of matte or gloss varnish. Pay special attention to the painted areas.
Make it Luxe
Mix a tiny amount of gold leaf flakes or granite-effect powder into your white clay during the conditioning phase for a faux-stone appearance.
Once sealed and dried, gather your tiles in a drawstring bag and you are ready to play.
Mini Shelf Room Scene
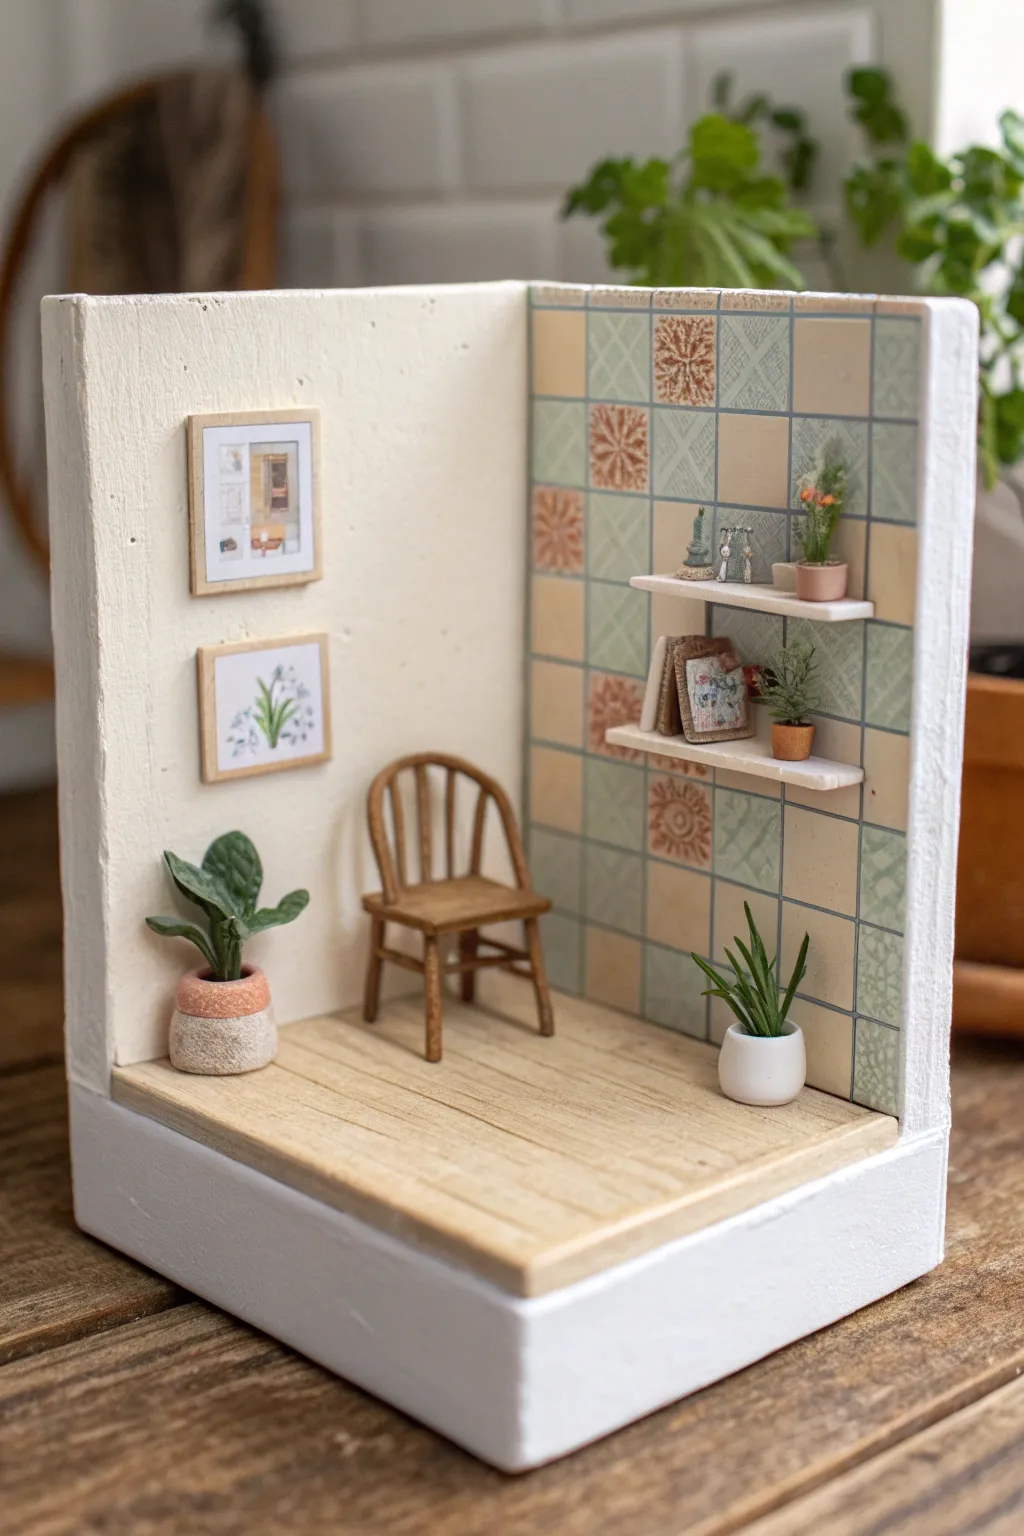
Step into the world of miniatures with this charming room box scene featuring tiny polymer clay plants and accessories. This project combines woodworking basics with clay crafting to create a cozy, detailed corner that fits in the palm of your hand.
Detailed Instructions
Materials
- Small wooden open-front box or thick cardstock/foam board
- Balsa wood sheets and strips (for floor, chair, shelves)
- White acrylic paint and various muted colors (greens, terracottas)
- Polymer clay (green, terracotta, white, grey)
- Scrapbook paper with tile pattern or thick paper to paint
- Wood glue and super glue
- Craft knife and cutting mat
- Sandpaper (fine grit)
- Small printed images for artwork
Step 1: Constructing the Room Base
-
Prepare the box structure:
If you aren’t using a pre-made shadow box, cut two pieces of foam board or 5mm plywood for the walls (joined at a 90-degree angle) and one for the floor. Glue them securely to create a corner. -
Create the flooring:
Cut thin strips of balsa wood to fit the length of your floor. I like to vary the widths slightly for realism. Glue them down side-by-side to mimic floorboards. -
Texture the main wall:
Paint the left wall white. To achieve the stucco texture seen in the photo, mix baking soda or fine sand into your white acrylic paint before applying, or dab thick gesso on with a sponge. -
Apply the tile wall:
For the back wall, cut a piece of tile-patterned scrapbook paper to size. Alternatively, draw a grid on thick paper and paint alternating squares in soft blues, peaches, and greys to match the reference.
Step 2: Crafting the Clay Plants & Pots
-
Form the large pot:
Roll a ball of white polymer clay and flatten the bottom. Mix a little terracotta clay with white for a speckled bottom rim, attaching it to the base of the white pot for a two-tone look. -
Shape the large leaves:
Using green clay, flatten small teardrop shapes. Use a needle tool to score a center vein down each leaf. Press these into the top of your large pot. -
Make the tiny shelf plants:
Create miniature pots using terracotta clay rolls about the size of a pencil eraser. Fill them with tiny green coils or spikes to represent succulents and cacti. -
Sculpt the snake plant:
For the white floor planter, roll thin, pointy spikes of dark green clay. Group three or four together and press them into a small cylinder of white clay. -
Bake the clay:
Bake all your clay pieces according to the package instructions (usually 275°F/135°C for 15-30 minutes). Let them cool completely.
Scale Check Ideas
Use a standard coin (like a quarter) while sculpting to constantly check your scale. If the pot is bigger than the coin, it might be too large for the room.
Step 3: Building Miniature Furniture
-
Cut the chair components:
Using balsa wood or toothpicks, cut four legs, a square seat, and thin curved strips for the backrest. This requires patience and a sharp blade. -
Assemble the chair:
Glue the legs to the seat first. Carefully bend a thin balsa strip or soak a toothpick to curve it for the back arch, attaching vertical spindles with tiny dots of super glue. Stain with watered-down brown paint. -
Prepare the floating shelves:
Cut two small rectangles of balsa wood. Paint them white and sand the edges for a clean finish. -
Make the picture frames:
Cut tiny squares of balsa wood. Glue your printed miniature images onto them, then frame the edges with very thin strips of wood.
Glue Ghosting?
Super glue can leave a white haze (ghosting) on miniatures. Use PVA (white) glue for wood-to-wood connections and reserve super glue only for tricky metal or plastic bonds.
Step 4: Final Assembly
-
Mount the decor:
Glue the picture frames to the textured white wall. Attach the floating shelves to the tiled wall, ensuring they are level. -
Style the shelves:
Glue your tiny clay pots onto the shelves. You can also make tiny books by folding paper and gluing cardstock covers on them. -
Position the main elements:
Place the chair in the corner slightly angled. Set the large leaf plant near the left wall and the snake plant near the right wall. -
Seal the floor:
Give the wooden floor a light wash of diluted brown paint to age it, or leave it natural for a Scandinavian look.
Now you have a serene little sanctuary to display on your bookshelf or desk