If you can make a basic pinch pot, you can totally make a clay rattle that actually sounds good. Here are my favorite easy designs that stay sturdy, feel great in your hand, and still leave tons of room for your own style.
Classic Two Pinch-Pot Rattle Ball
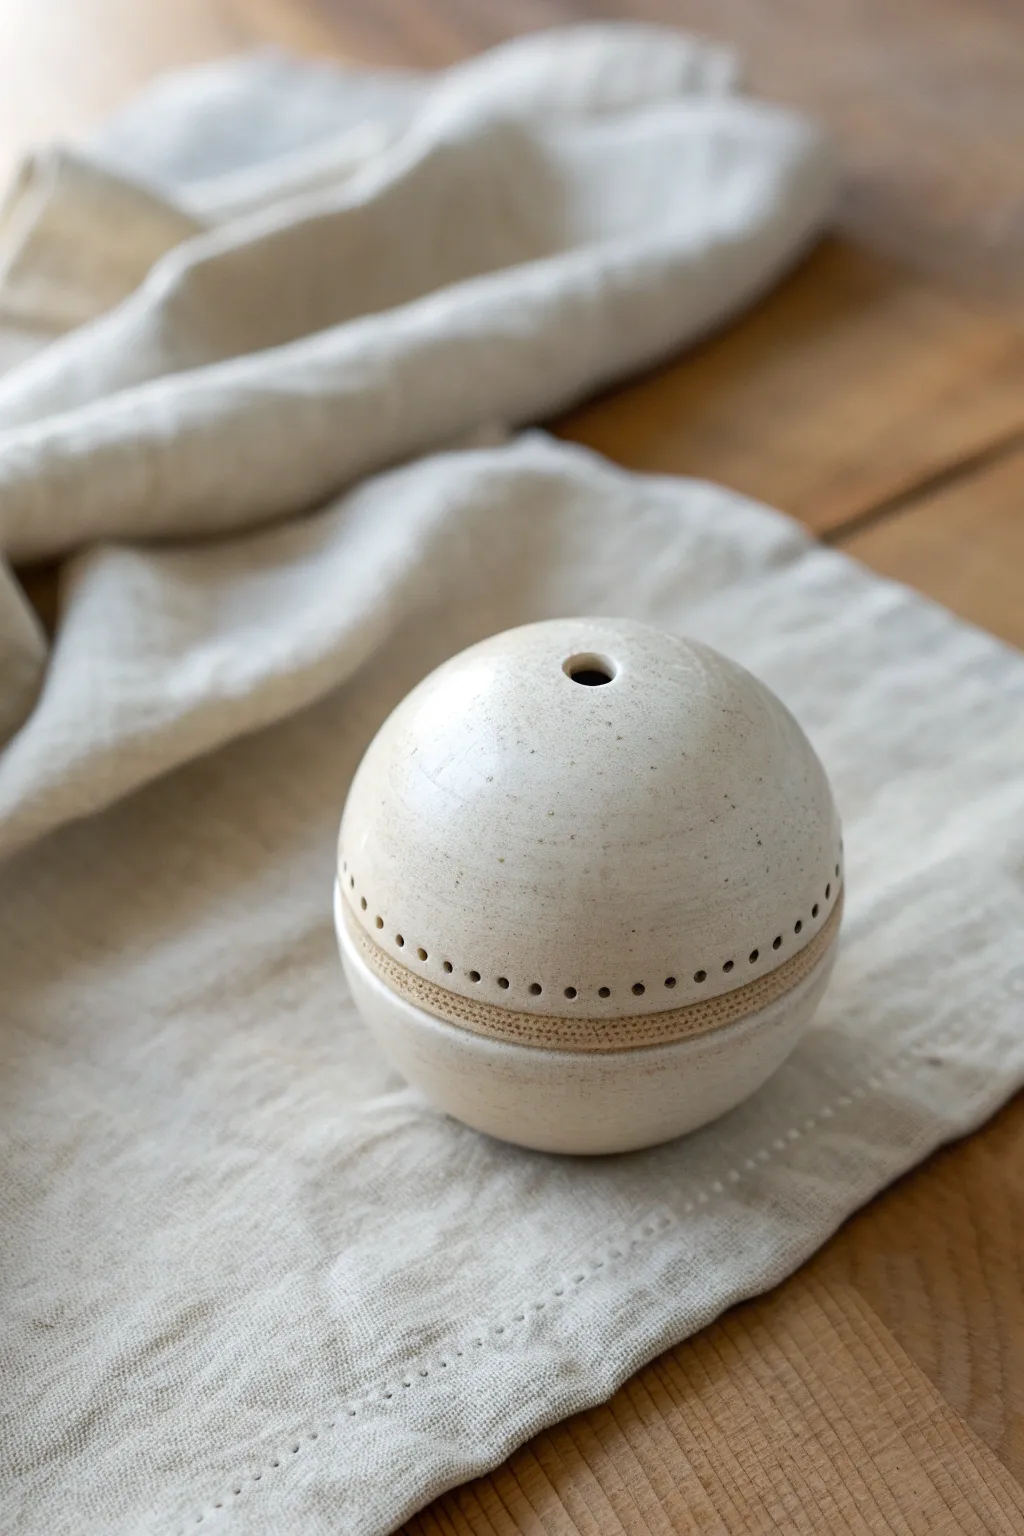
This elegant clay rattle combines the rustic simplicity of hand-building with a refined, modern finish. Created by joining two basic pinch pots, its charm lies in the delicate row of ventilation holes that serve both a functional and decorative purpose.
Step-by-Step Guide
Materials
- White stoneware or porcelain clay body
- Small clay beads or dried beans (for the rattle sound)
- Wooden modeling tool
- Pin tool or needle tool
- Serrated metal rib or scoring tool
- Basic pottery sponge
- Satin translucent white glaze
- Small paintbrush
- Water slip or vinegar
Step 1: Forming the Base
-
Wedging the clay:
Begin with a ball of clay roughly the size of a tennis ball. Wedge it thoroughly to remove any air pockets, which is crucial for a hollow form that will be fired in a kiln. -
Dividing the clay:
Cut your clay ball exactly in half using a wire cutter. You want two equal hemispheres to ensure your sphere comes together symmetrically. -
Creating the first pinch pot:
Take one half-sphere and press your thumb into the center, gently pinching the clay between your thumb and fingers while rotating the ball. Aim for an even wall thickness of about a quarter inch. -
Forming the second pinch pot:
Repeat the process with the second half of the clay. Frequently compare the rims of both pots to ensure they have the same diameter so they will meet flush. -
Refining the rims:
Gently tap the rim of each pinch pot upside down on a flat table surface. This creates a flat, wide area for better adhesion when joining them.
Step 2: Assembly & Detail
-
Scoring joints:
Use your serrated rib or needle tool to scratch up the flat rims of both pots. Be aggressive here; you want a rough texture to interlock the clay particles. -
Inserting the rattle mechanism:
Roll 5-7 small balls of clay about the size of peas. Wrap each one loosely in a tiny bit of newspaper or paper towel before placing them inside one of the pots; this prevents them from sticking to the walls while drying. -
Joining the halves:
Apply a generous amount of slip or vinegar to the scored rims. Press the two halves together firmly, giving them a slight wiggle to lock the joint. -
Smoothing the seam:
Using a wooden modeling tool or your thumb, drag clay across the seam line to knit the two halves together. Smooth the area with a damp sponge until the sphere looks seamless. -
Reshaping the sphere:
Gently roll the joined ball on your work surface or paddle it lightly with a wooden paddle to correct any lumpiness and achieve a perfect sphere shape.
Clear The Air
Make absolutely sure the holes pierce all the way through the wall. If glaze fills them during firing, the trapped air can still cause cracking.
Step 3: Decorative Drilling
-
Marking the equator:
Lightly etch a guideline around the middle of the sphere where the two pots meet. This will guide your decorative drilling. -
Drilling the vent holes:
Using a small drill bit or a needle tool, carefully puncture a row of small, evenly spaced holes all along your guideline. These holes prevent the trap air inside from exploding the piece in the kiln. -
Adding the top aperture:
Create a single, slightly larger hole at the very top of the sphere. Smooth the edges of this opening with a damp brush to soften the look. -
Refining the surface:
Let the piece dry to leather-hard. Burnish the surface with the back of a spoon or a soft rib to compact the clay and create a smooth, stone-like skin. -
Bisque firing:
Fire the piece to cone 04 (or your clay body’s bisque temperature). Once cool, the paper inside will have burned away, leaving the clay beads free to rattle.
Texture Play
Instead of smoothing the seam completely, leave a slightly raised ridge or ‘belt’ of clay where the pots join to accentuate the handmade construction.
Step 4: Glazing
-
Applying the glaze:
Dip the bisqued rattle quickly into a satin translucent white glaze. I find dipping gives a more consistent coat than brushing for round objects. -
Cleaning the holes:
While the glaze is still powdery, use a needle tool to gently clear out any glaze clogging the small equatorial holes. -
Final wipe:
Wipe the bottom of the sphere clean with a sponge so it doesn’t fuse to the kiln shelf, then fire to the final temperature (likely cone 5 or 6 depending on your clay).
This minimal ceramic rattle makes for a beautiful coffee table object that is as satisfying to hold as it is to hear


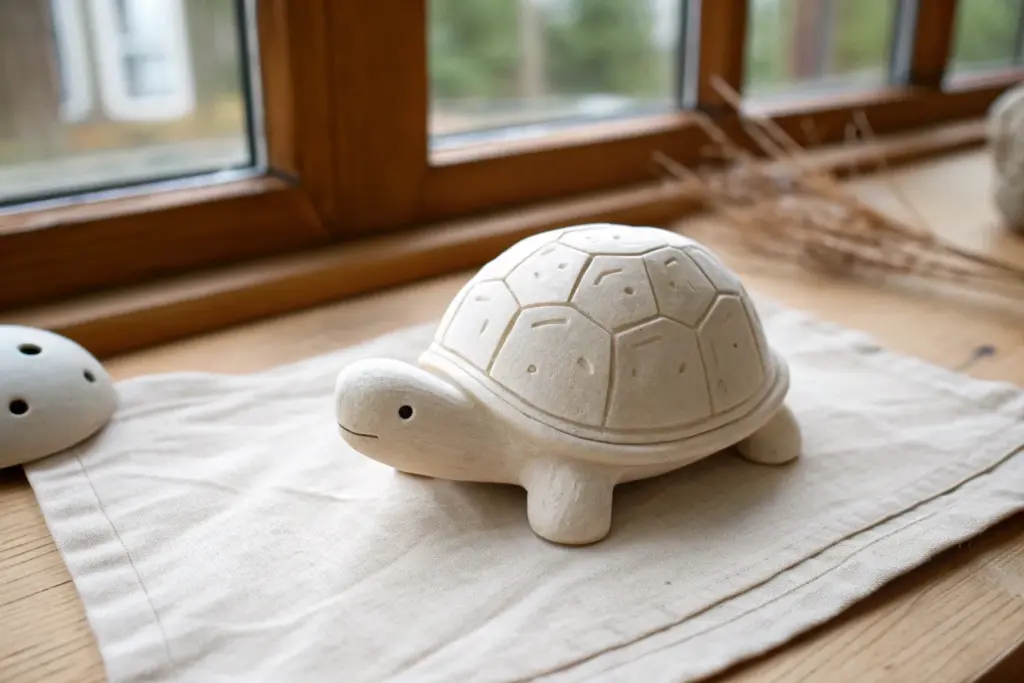
Easy Turtle Shell Rattle
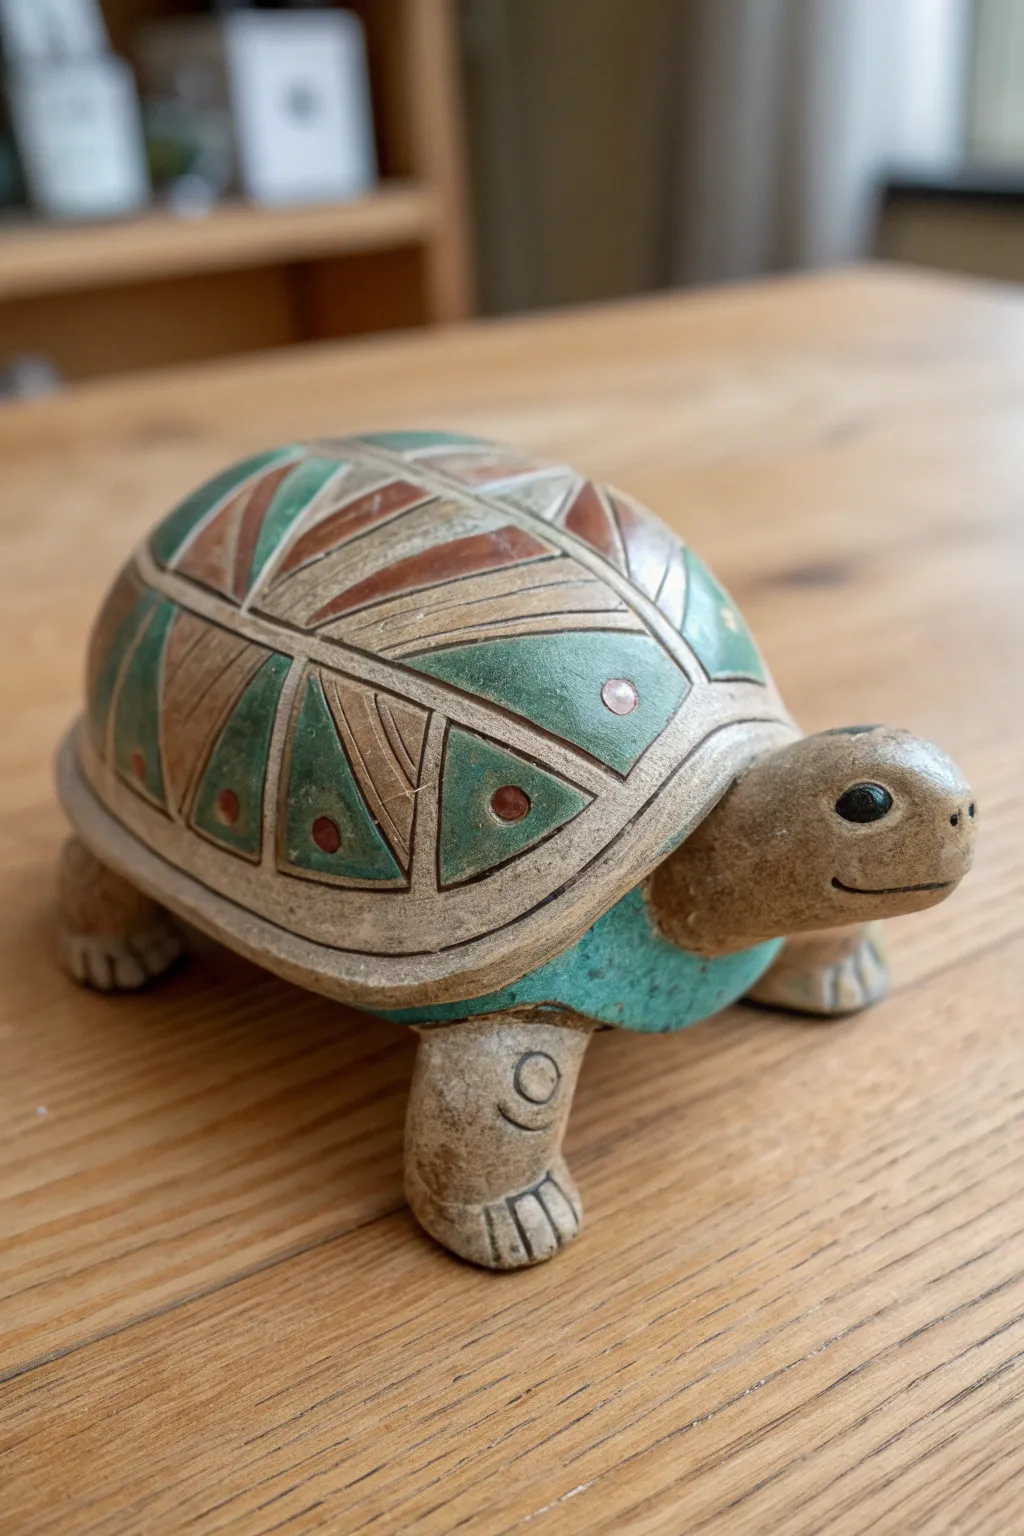
This charming turtle rattle combines the fun of making a musical instrument with the beauty of traditional geometric pottery. With its earthy terracotta, green, and cream hues, it serves as both a delightful toy and a striking decorative piece.
Step-by-Step Guide
Materials
- Air-dry clay or polymer clay (terracotta or white)
- Dried beans, ceramic pellets, or small clay balls (for the rattle)
- Clay carving tools or a toothpick
- Acrylic paints (terracotta brown, forest green, cream/off-white, black)
- Fine detail paintbrushes
- Matte or satin varnish (optional)
- Small bowl of water (for smoothing)
- Rolling pin
Step 1: Forming the Body
-
Create the Shell Base:
Start by rolling a medium-sized ball of clay and pinching it into a hollow pinch pot shape. Keep the walls relatively thick, about 1/4 inch, to prevent cracking. -
Add Rattle Filling:
Place 5-7 dried beans or ceramic pellets inside your hollow pinch pot. These will create the rattling sound once the piece is sealed and dry. -
Seal the Body:
Roll out a flat slab of clay for the turtle’s underside. Score the edges of the pinch pot and the slab, add a little water (slip), and press them together firmly to seal the rattle inside. Trim any excess clay. -
Shape the Shell:
Smooth out the seam where the bottom meets the shell using your fingers and a little water until the transition is seamless and round.
Step 2: Sculpting Details
-
Form the Head:
Roll a smaller ball of clay into an oval shape for the head. Slightly flatten one end where it will attach to the body. -
Attach the Head:
Score and slip the contact points, then firmly press the head onto the front edge of the shell. Blend the clay at the neck for a strong bond. -
Create Legs:
Roll four short, thick cylinders for the legs. Attach them to the four corners of the underbody using the score-and-slip method, blending the seams upward into the shell. -
Refine the Face:
Use a small tool to poke nostrils and carve a gentle curved line for the smile immediately while the clay is soft. -
Detail the Feet:
Use a knife or clay tool to press three vertical lines into the front of each foot to simulate toes. -
Mark Leg Joints:
Carve a small circle with a dot in the center on the upper part of the front legs to represent the ‘knee’ or joint detail seen in the reference.
Trapped Moisture?
If using polymer clay, poke a tiny, hidden pinhole on the turtle’s belly before baking. This lets hot air escape so your hollow rattle doesn’t crack or explode in the oven.
Step 3: Carving and Painting
-
Draft the Shell Pattern:
Lightly sketch the geometric design onto the damp shell with a needle tool. Draw a central spine line, then curved vertical lines to divide the shell into segments. -
Carve Deep Lines:
Go over your sketch lines with a carving tool to create deep, V-shaped grooves. These grooves will separate the painted sections later. -
Dry Completely:
If using air-dry clay, let the turtle dry for 24-48 hours. If using polymer, bake according to package instructions. The rattle should sound crisp when shaken. -
Base Tone:
If your clay isn’t already earth-toned, paint the skin areas (head and legs) with a textured sandy-brown or light terracotta color. I find stippling with a stiff brush adds a nice stone-like texture here. -
Paint Shell Segments:
Fill alternating geometric sections on the shell with forest green and terracotta brown acrylics. Leave the carved grooves unpainted or paint them a dark contrasting color. -
Add Cream Accents:
Paint thin strokes of cream or off-white within the brown sections to mimic the inlaid look. Add small dots or circles in the center of the green triangles. -
Paint the Underbelly:
Don’t forget the section of the shell just above the legs—paint this area a solid teal or green to match the shell design. -
Face Details:
Use a fine liner brush and black paint to fill in the eyes, making them bold and round. -
Sealing:
Once all paint is dry, apply a matte or satin varnish to protect the finish without making it look too glossy or plastic.
Make It Glossy
After the matte varnish dries, use a high-gloss glaze solely on the painted shell segments. This mimics the look of polished stone inlay against the matte clay body.
Give your turtle a gentle shake to hear the satisfying rattle sound created by your handiwork

Chubby Frog Rattle
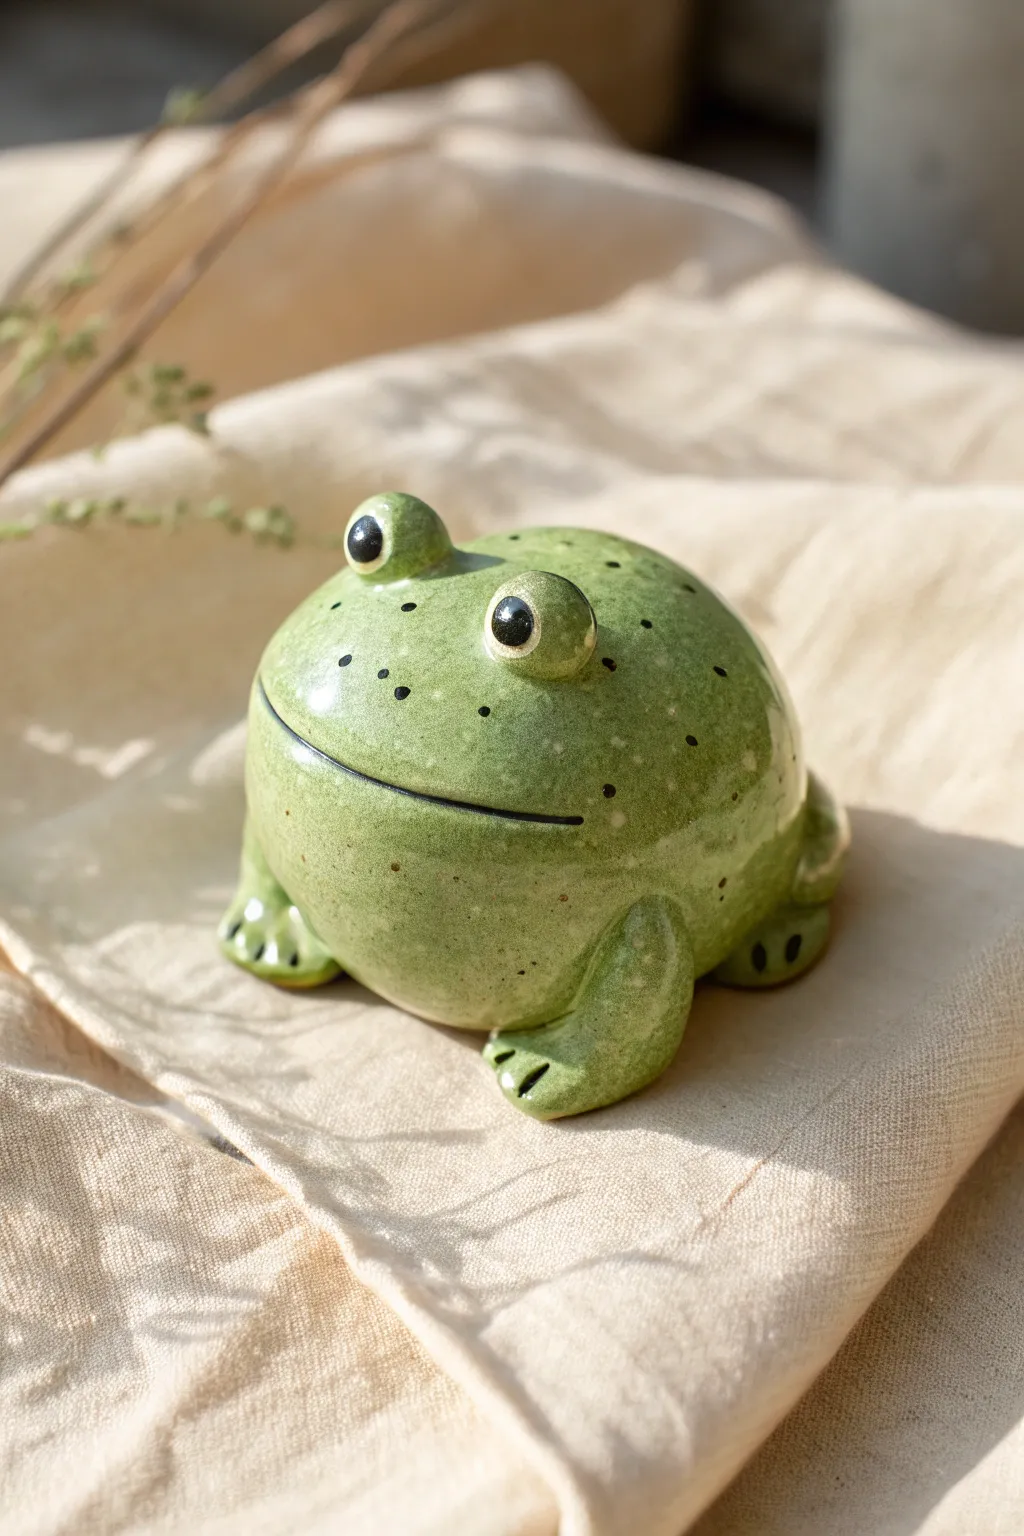
This delightful ceramic companion hides a joyful secret inside his perfectly round belly. With his wide, thin-lipped smile and speckled green glaze, he’s begging to be picked up and shaken.
Detailed Instructions
Materials
- Stoneware or earthenware clay (white or buff)
- Small clay beads or dried clay balls (for the rattle)
- Small square of newspaper or tissue paper
- Pointed wooden modeling tool
- Serrated metal rib
- Rubber kidney
- Slip (clay mixed with water)
- Sponge
- Underglazes: Leaf green, black, white
- Speckled green glaze (translucent)
- Clear gloss glaze
- Needle tool
Step 1: Forming the Body
-
Pinch Pots:
Start by rolling two equal balls of clay, roughly the size of tangerines. Press your thumb into the center of each to open them up, pinching the walls evenly as you rotate the clay to create two matching hemispheres. -
Prepare the Rattle:
Before joining, place 3-5 small clay balls (hardened or bisque fired work best) inside a scrap of newspaper and loosely fold it into a packet. Place this packet inside one of the pinch pots. -
Join the Halves:
Score the rims of both pinch pots firmly with your serrated rib, apply slip generously, and press them together. The paper packet inside prevents the rattle beads from sticking to the wet clay walls. -
Seal and Shape:
Smear the clay across the seam to seal it completely tight. Roll the form gently between your palms or on the table to recreate a perfect sphere, ensuring no air can escape. -
Smooth the Surface:
Use a damp sponge or a soft rubber kidney to smooth out the seam marks and any fingerprints. The body should look like a flawless, slightly flattened ball.
Silent frog syndrome?
If the rattle doesn’t sound after firing, the clay balls likely fused to the wall. Next time, ensure the paper packet is loose and use balls that are already bisque-fired before insertion.
Step 2: Adding Features
-
Create Eye Sockets:
Roll two small marble-sized balls for eyes. Score and slip two spots on the upper front of the body, then attach the balls firmly. Smooth the clay from the base of the eye onto the main body so they look integrated, not just stuck on. -
Shape the Feet:
Make four small, elongated tear-drop shapes for legs. Flatten the wider ends slightly where the feet will be. Attach two near the front for arms and two tucked near the back haunches. -
Detail the Toes:
Using a knife or a sharp wooden tool, press indentations into the flattened ends of the feet to suggest three toes on each limb. Keep these simple and rounded. -
Carve the Smile:
I find using a needle tool works best here. Draw a very long, wide smile across the front of the face. It should stretch almost from one side of the sphere to the other, curving slightly upwards. -
Air Hole:
Flip the frog over and use a needle tool to poke a hidden hole in the bottom. This is crucial so the trapped air doesn’t cause the frog to explode in the kiln.
Step 3: Glazing and Finishing
-
Bisque Fire:
Allow the frog to dry completely slowly. Fire to bisque temperature (usually cone 04) so it is ready for glazing. -
Base Glaze:
Apply a coat of leaf-green underglaze or a speckled green glaze. If using a brushable glaze that naturally breaks over texture, let it pool slightly around the legs for depth. -
Paint the Eyes:
carefully paint the raised eye mounds. Use white for a tiny highlight if desired, but focus on a large, glossy black pupil. A fine liner brush is essential here for clean edges. -
Add Speckles:
Dip a stiff toothbrush into black underglaze or iron oxide. Run your thumb over the bristles to flick tiny random spots across the frog’s back and nose for texture. -
Defined Mouth:
Use a very fine brush to run a line of black underglaze right into the carved mouth groove to make that smile pop. -
Final Fire:
If you used underglazes, coat the entire piece in clear gloss glaze. Fire to your clay’s maturity temperature (likely cone 5 or 6). Once cool, shake it to hear the rattle sing.
Level Up: Texture Time
Before the clay dries, gently roll the body over a piece of lace or burlap to give your frog a bumpy, warty toad skin texture instead of a smooth finish.
Give your little green friend a gentle shake and enjoy the simple, earthy sound of your handmade creation


Ladybug Pocket Rattle
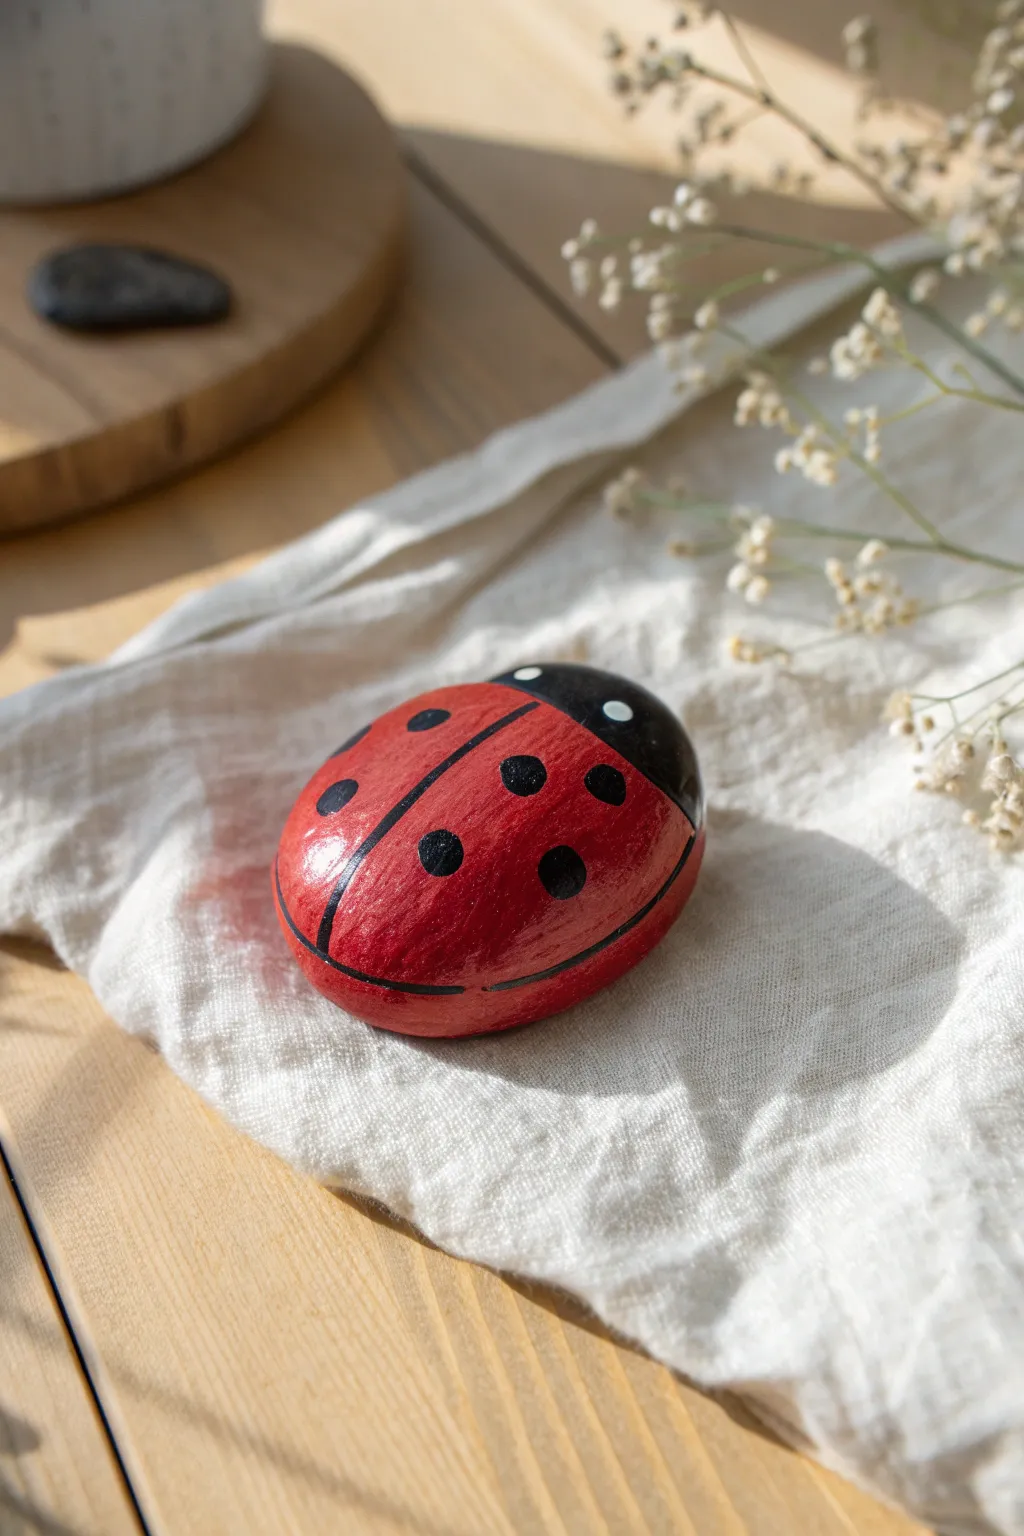
This charming ladybug rattle combines the satisfying weight of a smooth stone with a gentle, hidden sound. Its rounded, glossy red shell and classic black spots make it a perfect sensory pocket friend or a sweet decorative piece.
Step-by-Step Tutorial
Materials
- Air-dry clay or polymer clay
- Small dried beans, rice, or ceramic beads (for the rattle)
- Acrylic paint (Bright Red, Black, White)
- Glossy varnish or sealant (Mod Podge or spray acrylic)
- Sculpting tools (or a toothpick)
- Fine detail paintbrush
- Medium flat paintbrush
- Aluminum foil
- Sandpaper (fine grit)
Step 1: Sculpting the Base
-
Create the core:
Start by crunching a small piece of aluminum foil into a tight oval ball. This saves clay and keeps the weight manageable. -
Form the rattle chamber:
Flatten a piece of clay into a pancake. Place your rattle components (beans or beads) in the center. Carefully fold the clay over to create a sealed pocket around them so they can move freely inside. -
Cover the core:
Wrap your foil ball with a layer of clay, incorporating the small rattle pocket you just made. Roll it between your palms until it forms a smooth, seamless egg shape. -
Flatten the bottom:
Gently press the egg shape onto your work surface to create a flat bottom. This ensures your ladybug won’t roll away when you set it down. -
Define the head:
Use your thumb to gently indent a line across the narrower front end, separating the head area from the body. Smooth this transition so it looks like one cohesive form. -
Dry or Bake:
If using air-dry clay, let it dry completely for 24-48 hours. If using polymer clay, bake according to the package instructions. I find letting air-dry clay sit an extra day prevents cracking later. -
Smooth the surface:
Once fully cured, use fine-grit sandpaper to buff away any fingerprints or bumps. Wipe away the dust with a slightly damp cloth.
Step 2: Painting the Details
-
Base coat:
Paint the entire body with a coat of Bright Red acrylic paint. You may need two coats for full opacity, letting the first layer dry completely before adding the second. -
Painting the head:
Using the black paint, carefully fill in the semi-circle section you defined earlier for the head. Extend the black slightly curved backward to mimic the pronotum. -
Drawing the wings:
With a thin brush or a steady hand, paint a thin black line straight down the center of the red body, starting from the back of the head to the tail. -
Adding the wing outline:
Paint a thin black outline around the very bottom edge of the red wings to define the shape against the flat bottom. -
Creating the spots:
Dip the handle end of a paintbrush into black paint to create perfect circles. Stamp several dots onto the red wings in a symmetrical pattern. -
Adding eyes:
Once the black head is dry, use a smaller tool (like a toothpick) dipped in white paint to add two small dots for eyes on the sides of the head. -
Sealing the work:
Finish by applying a coat of glossy varnish over the entire ladybug. This protects the paint and gives it that realistic, shiny beetle-shell look.
Pro Tip: Better Rattle
Make the hollow rattle chamber separately and let it dry hard BEFORE embedding it in the main clay body. This ensures the walls don’t collapse on the beads.
Level Up: Texture
Before the clay dries, gently score the lines for the wings instead of just painting them. The paint will settle into the grooves for a 3D effect.
Now you have a delightful little nature-inspired instrument to shake and enjoy

The Complete Guide to Pottery Troubleshooting
Uncover the most common ceramic mistakes—from cracking clay to failed glazes—and learn how to fix them fast.
Tiny Piglet Rattle
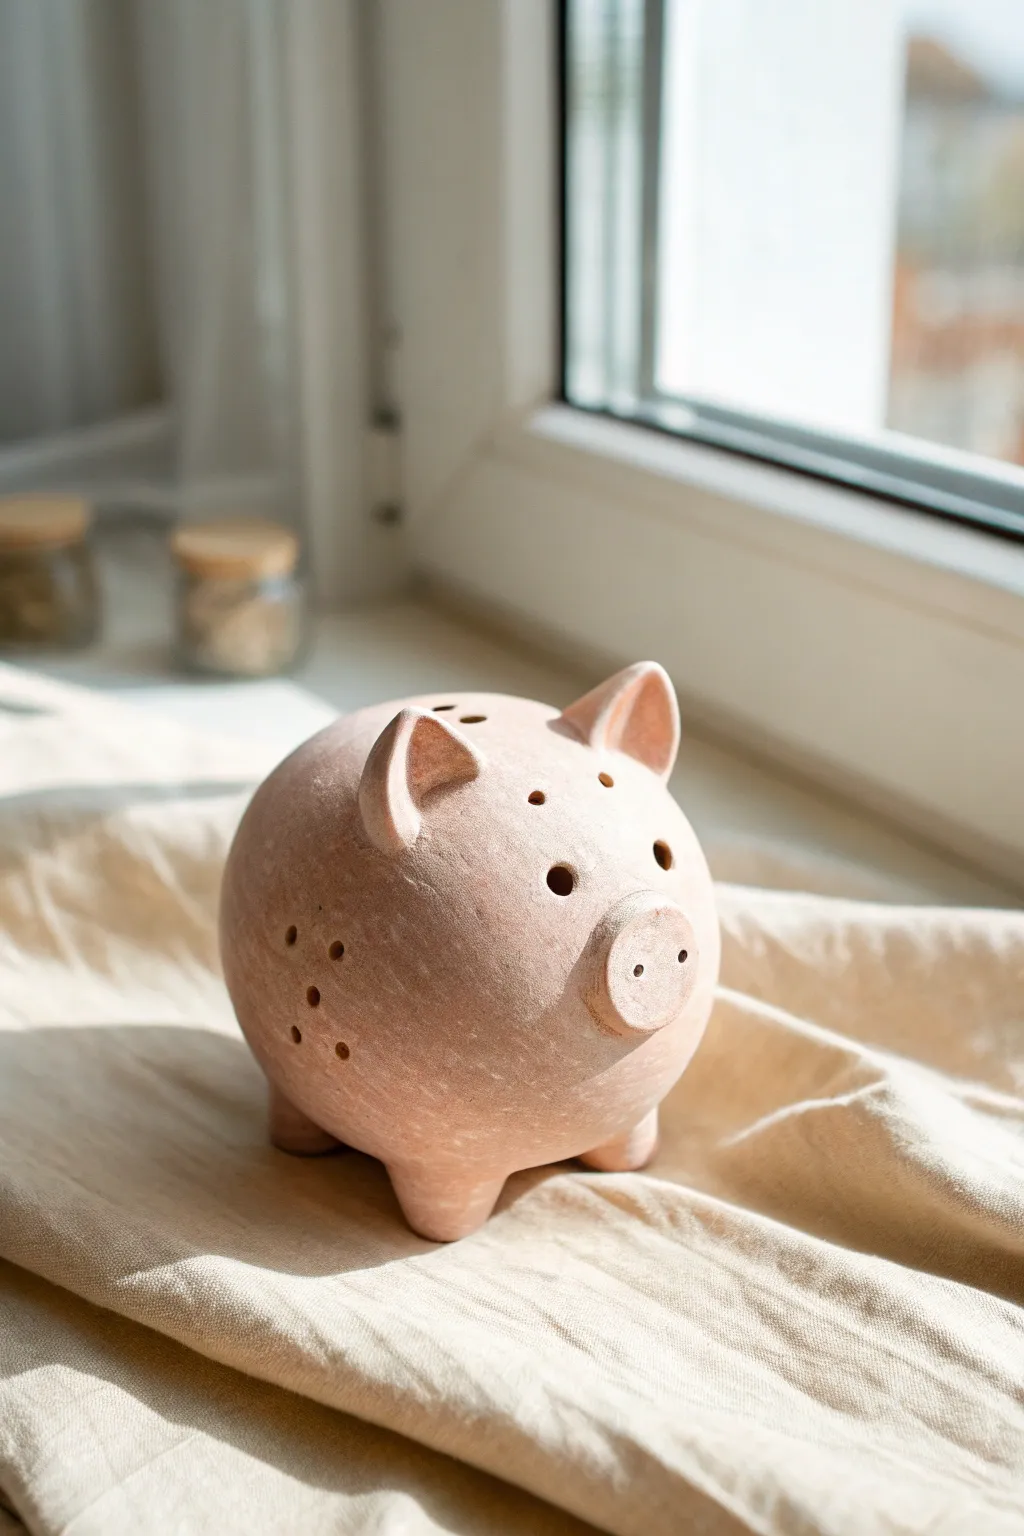
Create this charmingly rustic terracotta piglet that doubles as a gentle rattle. Its smooth, rounded form and unglazed finish give it a timeless, handcrafted appeal perfect for a nursery shelf.
How-To Guide
Materials
- Terracotta air-dry clay or earthenware clay
- Small ceramic beads or dried beans (for the rattle)
- Small bowl of water
- Needle tool or toothpick
- Sponge
- Small circular cutter or bottle cap
- Wooden sculpting tool
- Rolling pin
Step 1: Forming the Body
-
Shape the pinch pots:
Start by rolling two equal balls of terracotta clay, roughly the size of a tangerine. Using your thumbs, gently press into the center of each ball and pinch the walls evenly to create two matching bowl shapes. -
Insert the rattle element:
Before closing the form, place 5-7 small ceramic beads or dried beans inside one of the pinch pots. Wrapped in a small scrap of paper towel can stop them from sticking to the wet clay. -
Join the halves:
Score the rims of both pinch pots with a needle tool and apply a little water or slip. Press the rims together firmly to form a hollow sphere, trapping the rattle materials inside. -
Smooth the seam:
Using your thumb or a wooden tool, drag clay across the seam line to merge the two halves completely. Smooth over this area until the sphere looks seamless and round. -
Add the feet:
Roll four small, equal-sized balls of clay. Attach these to the bottom of the sphere to act as nimble little trotters, blending the clay upwards into the body so they are secure.
Clearer Sound
Wrap your rattle beads in a small piece of paper towel before sealing them inside. The paper burns away (kiln) or disintegrates (air-dry), leaving beads free to rattle.
Step 2: Details & Features
-
Create the snout:
Flatten a small ball of clay into a thick disk. Score and slip the back of it, then press it onto the front center of the sphere. -
Define the snout:
Use a needle tool or the back of a small paintbrush to poke two nostrils into the disk. Smooth the edges where the snout meets the face. -
Shape the ears:
Form two small triangles of clay. Gently curve them to create a cupped shape, mimicking a pig’s ears. I find it helpful to pinch the tips slightly for character. -
Attach the ears:
Score the top of the head and the base of the ears. A firm press and some blending at the back of the ear will ensure they don’t pop off during drying. -
Make the eyes:
Instead of painting eyes, use the wide end of a sculpting tool or a straw to press or punch out two circular eye holes. This adds to the stylized, primitive look. -
Drill sound holes:
To let the rattle sound escape, punch a few decorative holes along the sides or back of the pig using a smaller tool. In the image, there is a cluster of three small holes on the flank. -
Refine the surface:
Take a slightly damp sponge and wipe down the entire pig. This removes fingerprints, softens sharp edges around the poked holes, and gives the clay that smooth, stone-like texture.
Rustic Wash
Once dry (or bisque fired), dilute some white acrylic paint or decorative slip and brush it over the pig, then wipe most of it off to highlight the textures.
Step 3: Drying
-
Initial dry:
Let the pig sit loosely covered with plastic for the first 24 hours. This slow drying helps prevent cracks, especially where the ears and legs join the body. -
Final cure:
Remove the plastic and let the clay dry completely for another 24-48 hours. If you used kiln-fire clay, it is now ready for bisque firing; if air-dry, it is finished once fully hard and pale in color.
Give your little pig a gentle shake to hear its cheerful sound
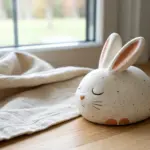
Fluffy Sheep Texture Rattle
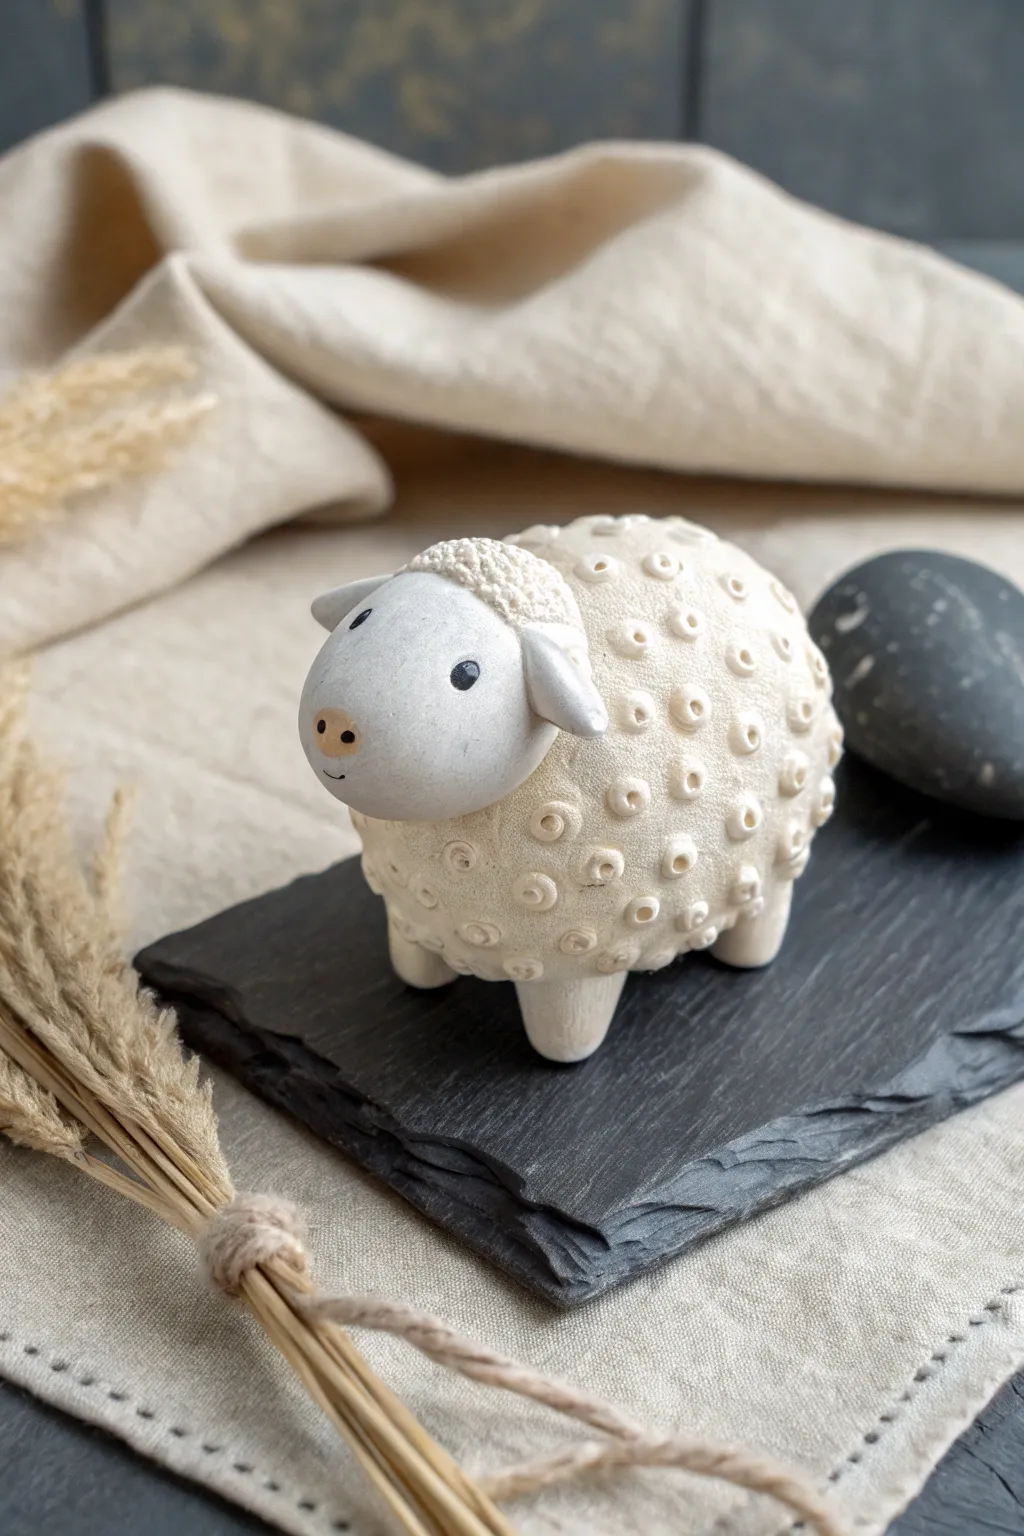
Create a charming, textured companion that makes a gentle sound with this clay sheep rattle project. Its tactile, curly wool design and smooth, expressive face make it a delightful sensory toy or a sweet decorative piece.
Step-by-Step Tutorial
Materials
- White or light beige polymer clay or air-dry clay
- Small clay rattling insert or dried beans/beads
- Aluminum foil
- Small round sculpting tool or ball stylus
- Needle tool or toothpick
- Black acrylic paint
- Fine detail paintbrush
- Blush pink chalk pastel or watered-down pink paint
- Clay roller (optional)
- Small straw or tubing (for texture imprinting)
Step 1: Forming the Core
-
Prepare the sound box:
First, create the rattling core. If you are using a pre-made rattle insert, wrap it tightly in aluminum foil to form an egg shape about the size of a large hen’s egg. If using beans, create a hollow ball of foil or clay, place the beans inside, and seal it shut. -
Cover the core:
Condition your white clay until it is soft and pliable. Roll out a sheet of clay roughly 1/4 inch thick. Wrap this sheet completely around your foil egg core. -
Smooth the body:
Gently massage the seams together until they disappear completely. Roll the shape between your palms to ensure the body is smooth and oval-shaped. -
Shape the legs:
Roll four small, equal-sized sausages of clay. These should be short and sturdy to support the sheep’s weight. Attach them to the bottom of the body, blending the clay upwards into the belly so they are securely joined.
Stamp It Out
Use different sized straw openings to vary the circle sizes on the wool. This creates a more organic and fluffy texture than uniform dots.
Step 2: Adding the Wool Texture
-
Choosing your tool:
For the distinctive woolly look, find a small tube, like an empty pen casing or a small straw. You can also use a small ball stylus. -
Creates the curls:
Gently press the end of your tube or stylus into the clay body to create small circular indentations. Repeat this over the entire body, keeping the circles close together but random for a natural look. Leave the very front area where the head will attach smooth. -
Detailing the curls:
To add depth, press a small dot into the center of some of the larger circles using a smaller tool or toothpick. This mimics the spiral look of thick wool.
Natural Finish
Mix tiny speckles of black pepper or sand into the clay before sculpting for a speckled, stone-like ceramic pottery finish.
Step 3: Sculpting the Head
-
Form the head shape:
Roll a smooth, slightly flattened teardrop shape from a fresh piece of clay. This will be the sheep’s head. It should be proportional to the body but smooth, contrasting with the textured wool. -
Attach the head:
Score the smooth patch you left on the body and the back of the head piece. Apply a little water or liquid clay (if using polymer) and press the head firmly onto the front of the body. -
Make the ears:
Shape two small, flattened teardrops for ears. Attach one to each side of the head, blending the connection point under the ‘wool’ line. Gently fold them downward for a sweet, relaxed expression. -
Add the ‘toupee’:
Take a tiny patch of clay and texture it just like the body. Place this on top of the head between the ears like a little woolly hat to integrate the head with the body.
Step 4: Finishing Touches
-
Sculpt the face:
Use a needle tool to gently scribe a small curved mouth. I like to keep this very subtle for a gentle look. Poke two tiny shallow dents for nostrils. -
Bake or dry:
If using polymer clay, bake according to the package instructions (usually around 275°F/135°C for 15-30 minutes). If using air-dry clay, allow it to dry completely for 24-48 hours. -
Paint the eyes:
Once dry and cool, dip a fine detail brush or a toothpick into black paint. Dot two small, wide-set eyes onto the face. Add a tiny white highlight dot if you want extra sparkle. -
Rosy cheeks and nose:
Using a dry brush and a little chalk pastel dust (or very watered-down pink paint), gently blush the nose area and cheeks to bring the character to life.
Give your new little friend a gentle shake to hear the soothing rattle sound you’ve hidden inside


What Really Happens Inside the Kiln
Learn how time and temperature work together inside the kiln to transform clay into durable ceramic.
Chick in a Cracked Egg Rattle
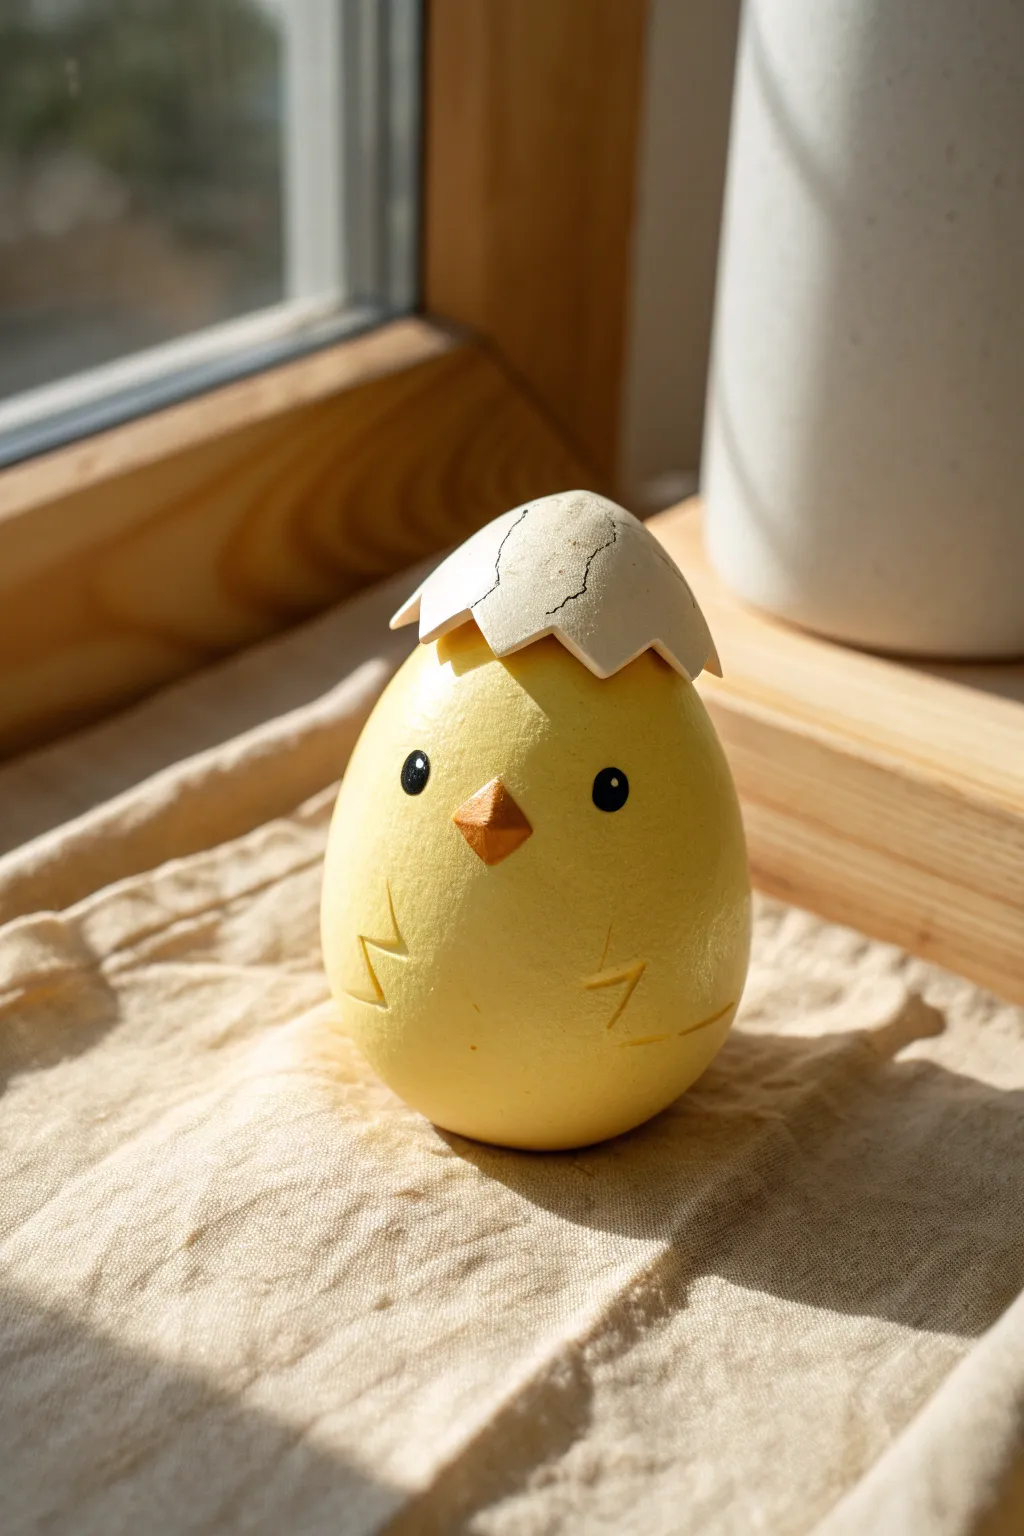
Celebrate new beginnings with this charming rattle that looks like a little yellow chick popping out of its shell. Its rounded shape fits perfectly in small hands, and the gentle sound inside adds a delightful sensory surprise.
Detailed Instructions
Materials
- Air-dry clay (yellow and white)
- Small plastic rattle insert or dried beans
- Aluminum foil
- Orange clay or acrylic paint (for beak)
- Black acrylic paint
- Fine detail paintbrush
- Clay sculpting tools (needle tool or toothpick)
- Water (for smoothing)
- Matte varnish or sealant (optional)
Step 1: Forming the Core
-
Create the armature:
Start by crumpling a small amount of aluminum foil into a tight egg shape. This saves clay weight and creates a sturdy core. -
Insert the rattle:
Create a small hollow or depression in your foil core and nestle the rattle insert inside. While I sometimes use dried beans in a pinch, a specialized plastic insert is safer if the toy breaks. -
Wrap the foil:
Roll out a slab of yellow air-dry clay to about 1/4 inch thickness. Wrap this completely around the foil core, sealing all seams tightly. -
Refine the shape:
Roll the clay egg between your palms to smooth out any wrinkles and perfect the oval shape. It should look like a smooth, uncracked egg at this stage.
Cracking Up?
If the clay develops unwanted cracks while drying, mix a tiny bit of fresh clay with water to make a paste (slip) and fill them in, then smooth with a finger.
Step 2: Sculpting the Chick
-
Add wing details:
Using a needle tool or the edge of a credit card, gently press zig-zag lines into the sides of the yellow body. These simple indentations suggest folded wings without adding bulk. -
Form the beak:
Take a tiny pinch of orange clay (or white clay you plan to paint later) and roll it into a small pyramid or diamond shape. -
Attach the beak:
Score the center of the face slightly and dab a tiny drop of water on the spot. Press the beak firmly onto the face.
Make it wobble
Add a slightly heavier weight (like a washer) to the very bottom of the foil core before wrapping in clay. This creates a roly-poly toy that always stands upright.
Step 3: Creating the Hat
-
Roll out the shell:
Clean your hands thoroughly to avoid staining the white clay. Roll out a small circle of white clay, slightly thinner than the yellow body. -
Cut the jagged edge:
Use a craft knife or clay tool to cut a jagged, zig-zag pattern around the circumference of your white circle to mimic a broken eggshell. -
Shape the cap:
Gently drape this white ‘cap’ over the top of the chick’s head. Press down lightly so it adheres to the yellow clay. -
Add crack details:
To enhance the realism, use a needle tool to etch fine, branching lines on the surface of the white cap. These look like hairline fractures in the eggshell.
Step 4: Finishing Touches
-
Let it dry:
Allow the sculpture to dry completely. Depending on your humidity and clay brand, this usually takes 24 to 48 hours. -
Paint the eyes:
Dip the handle end of a paintbrush into black acrylic paint. Dot two wide-set eyes onto the face, placing them symmetrically on either side of the beak. -
Add eye highlights:
Once the black dots are dry, use a toothpick to add a miniscule dot of white paint to each eye for a spark of life. -
Paint the beak:
If you used white clay for the beak instead of orange, carefully paint it now with orange acrylic paint. -
Enhance the cracks:
For depth, you can do a very light wash of gray paint over the etched cracks on the hat, quickly wiping it away so the dark color remains only in the crevices. -
Seal carefully:
Apply a coat of matte varnish to protect the paint and clay, ensuring the rattle remains durable for handling.
Now you have a sweet little chick that rattles cheerfully when shaken
Sweet Heart Token Rattle
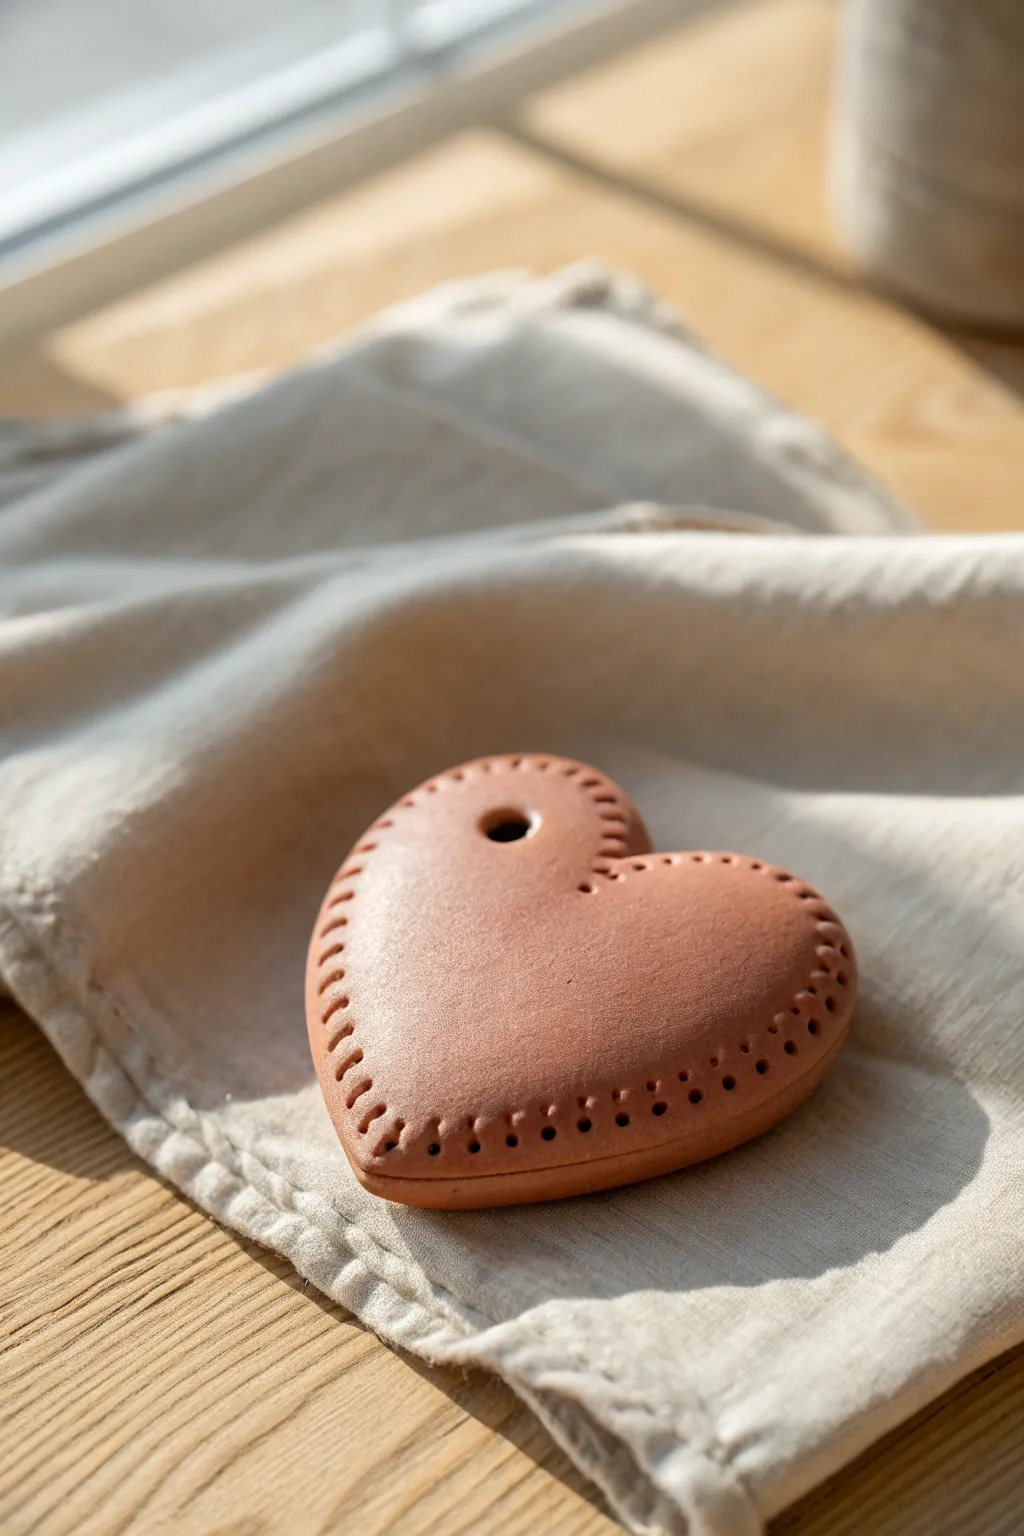
This charming, plump heart rattle feels wonderful in the hand and fits perfectly in a pocket as a soothing worry stone. With its warm terracotta tone and delicate stitched edge details, it makes a lovely handmade gift that creates a gentle sound when shaken.
Step-by-Step
Materials
- Terracotta colored polymer clay or air-dry clay
- Small dried beans, beads, or ceramic baking weights (for the rattle)
- Small heart-shaped cookie cutter (optional)
- Rolling pin or clay machine
- Needle tool or toothpick
- Ball stylus tool
- Wax paper or craft mat
- Fine grit sandpaper
- Water (if using air-dry clay) or oven (if using polymer)
Step 1: Forming the Base
-
Condition the clay:
Begin by warming up your terracotta clay in your hands. Knead it thoroughly until it is soft, pliable, and free of any cracks or air bubbles. -
Roll out the slab:
Roll your clay out onto a non-stick surface to a uniform thickness of about 1/4 inch (6mm). You want it thick enough to hold its shape but thin enough to not be too heavy. -
Cut the shapes:
Cut out two identical heart shapes. If you don’t have a cutter, I like to sketch a heart on paper, cut it out, and trace around it lightly with a needle tool. -
Prepare the pocket:
On one of the heart halves, use your thumb or a ball stylus to gently press an indentation into the center, leaving a raised rim around the edge. This creates space for the rattle elements.
Clear Sound
Make sure your rattle ‘insides’ are heat-safe if baking! Avoid plastic beads that might melt. Ceramic baking weights or small metal bells work best for oven-bake clay.
Step 2: Assembly and Detail
-
Add the noise makers:
Place a few small dried beans, ceramic beads, or clay pellets into the indented center. Don’t overfill it, or they won’t have room to move and make noise. -
Score and slip (for air-dry):
If using air-dry clay, score the edges of both hearts with a needle tool and dab a tiny amount of water on the scratches. For polymer clay, you can skip scoring but ensure the surfaces are clean. -
Seal the heart:
Place the second heart directly on top of the first. Press the edges together firmly all the way around to seal in the beads. -
Refine the shape:
Gently smooth the seam where the two halves meet with your finger. Rub carefully until the seam disappears and the heart looks like one solid, puffy pillow. -
Pierce the pendant hole:
Using a straw or a larger round tool, punch a clean hole near the top center of the heart if you intend to hang it. Smooth the edges of the hole so they aren’t sharp. -
Add the stitching detail:
Using a needle tool, gently press small indentations around the perimeter of the heart to simulate stitching marks. Space them evenly for a professional look. -
Create the decorative dots:
Next to each ‘stitch’ mark, use a smaller needle point to poke a tiny, deeper hole. This creates the decorative perforated pattern seen in the example.
Step 3: Finishing Touches
-
Smooth the surface:
Do a final check for fingerprints. Lightly brush a tiny bit of baby oil (for polymer) or water (for air-dry) over the surface to smooth out imperfections. -
Cure or dry:
Bake the rattle according to your polymer clay package instructions, or let it air dry for 24-48 hours until fully hardened. -
Sand for softness:
Once fully cured and cool, take a piece of fine-grit sandpaper and very gently buff the surface. Focus on the edges to ensure the rattle feels smooth and soft in the hand. -
Clean up:
Wipe away any sanding dust with a slightly damp cloth to reveal the rich terracotta color.
Scented Token
Use porous air-dry clay or unglazed terra cotta. After the project is finished, drop essential oils onto the back. It becomes a calming rattle and a scent diffuser in one.
Give your heart a little shake to hear that satisfying sound and enjoy holding your new handmade craft

TRACK YOUR CERAMIC JOURNEY
Capture glaze tests, firing details, and creative progress—all in one simple printable. Make your projects easier to repeat and improve.
Stamped Pattern Pebble Rattle
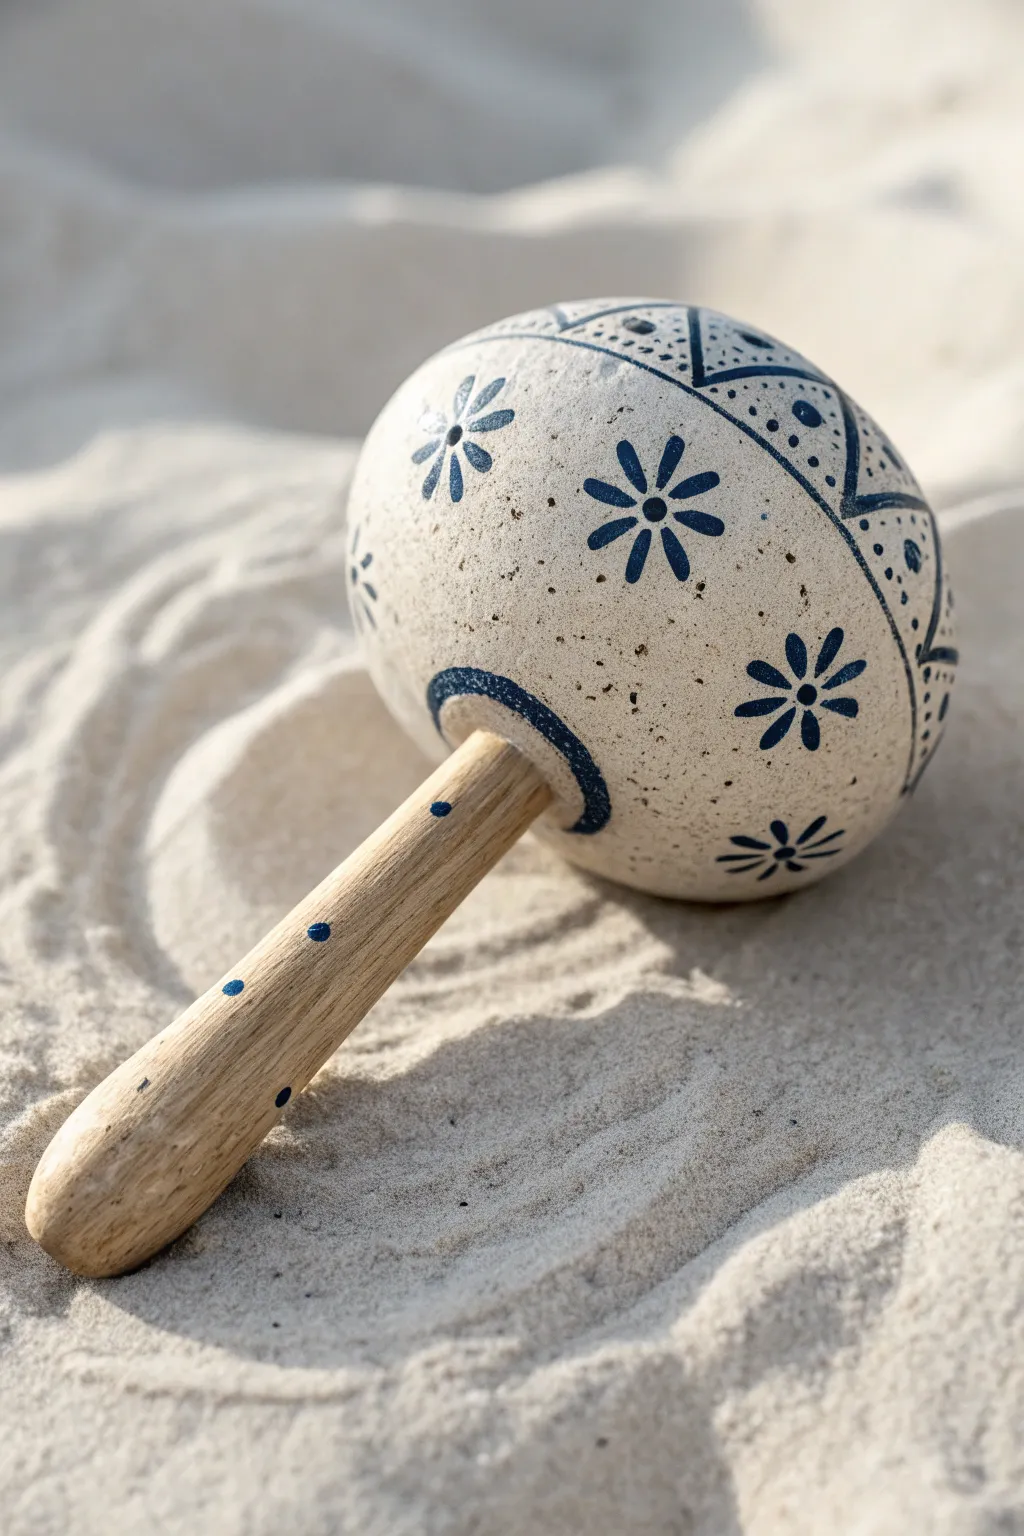
Embrace the soothing aesthetic of beach stones with this speckled clay rattle featuring a smooth wooden handle. The simple blue floral stamps and geometric patterns give it a charming folk-art feel that is both rustic and modern.
Detailed Instructions
Materials
- White speckled pottery clay (stoneware or polymer clay with granite effect)
- Wooden dowel (approx. 1/2 inch diameter)
- Small clay or ceramic beads (for the rattle inside)
- Dark blue underglaze (or acrylic paint if using polymer clay)
- Small flower stamp (rubber or carved erasers)
- Fine-point paintbrush
- Sandpaper
- Epoxy or strong craft glue
- Clear matte varnish or glaze
Step 1: Forming the Rattle Body
-
Prepare the Clay:
Start by kneading your speckled white clay until it is smooth and pliable. If you are using polymer clay, ensure it is conditioned well to prevent cracks later. -
Create Pinch Pots:
Divide your clay into two equal balls. Press your thumb into the center of each ball and pinch the walls evenly to create two matching bowl shapes. -
Add the Sound:
Place a few small clay beads or dried ceramic balls into one of the pinch pots. Test the sound by covering it with your hand and shaking lightly; add more beads if you want a louder rattle. -
Seal the Sphere:
Score the edges of both pinch pots and apply a little slip (liquid clay) or water. Press the two halves together firmly to close the sphere. -
Smooth the Form:
Using a rib tool or your fingers, smooth over the seam where the two halves meet. Gently roll the sphere on your work surface until it is perfectly round and the seam is invisible. -
Create the Handle Opening:
Take your wooden dowel and gently press it into the bottom of the sphere to create a socket. Don’t go all the way through; just create a snug indentation about 3/4 of an inch deep.
Stamp Cleanliness
If your stamp impressions look messy, wipe the stamp clean after every two applications. Keeps the blue distinct against the speckled white background.
Step 2: Decoration and Assembly
-
Initial Drying:
Let the clay leather-harden slightly. It needs to be firm enough to handle without denting, but soft enough to accept the glaze or paint. -
Prepare the Stamp:
Load your flower stamp with dark blue underglaze. I prefer to brush the color onto the stamp rather than dipping it to ensure a clean, crisp impression. -
Stamp the Flowers:
Press the flower stamp firmly onto the middle section of the sphere. Space them out evenly around the circumference, rotating the rattle carefully as you go. -
Add Geometric Details:
Using a fine-point brush and the same dark blue color, paint a band around the upper portion of the rattle. Add triangle motifs pointing upwards from this band, filling them with small dots for texture. -
Paint the Socket Ring:
Paint a thick blue ring around the opening where the handle will go. This creates a clean visual transition between the clay body and the wooden handle. -
Prepare the Handle:
While the clay body dries or fires, sand your wooden dowel until it feels smooth in the hand. Round off the bottom end for a comfortable grip. -
Decorate the Wood:
Using the tip of your brush handle or a dotting tool, apply small blue dots along the length of the wooden dowel to tie the design together. -
Fire or Bake:
If using ceramic clay, fire the rattle body in a kiln according to the clay manufacturer’s instructions. For polymer clay, bake it in your home oven as directed on the package. -
Attach the Handle:
Once the rattle head is completely cool, apply strong epoxy glue into the socket opening. Insert the decorated wooden dowel and hold it in place until the bond is secure. -
Final Seal:
Apply a clear matte varnish or glaze over the painted areas to protect the design and give the piece a finished, professional look.
Textured Handle
Wrap leather cord or twine around the lower half of the handle for better grip and a rustic, mixed-media finish.
Give your new instrument a shake and enjoy the timeless sound of your handcrafted creation
Sgraffito Doodle Rattle
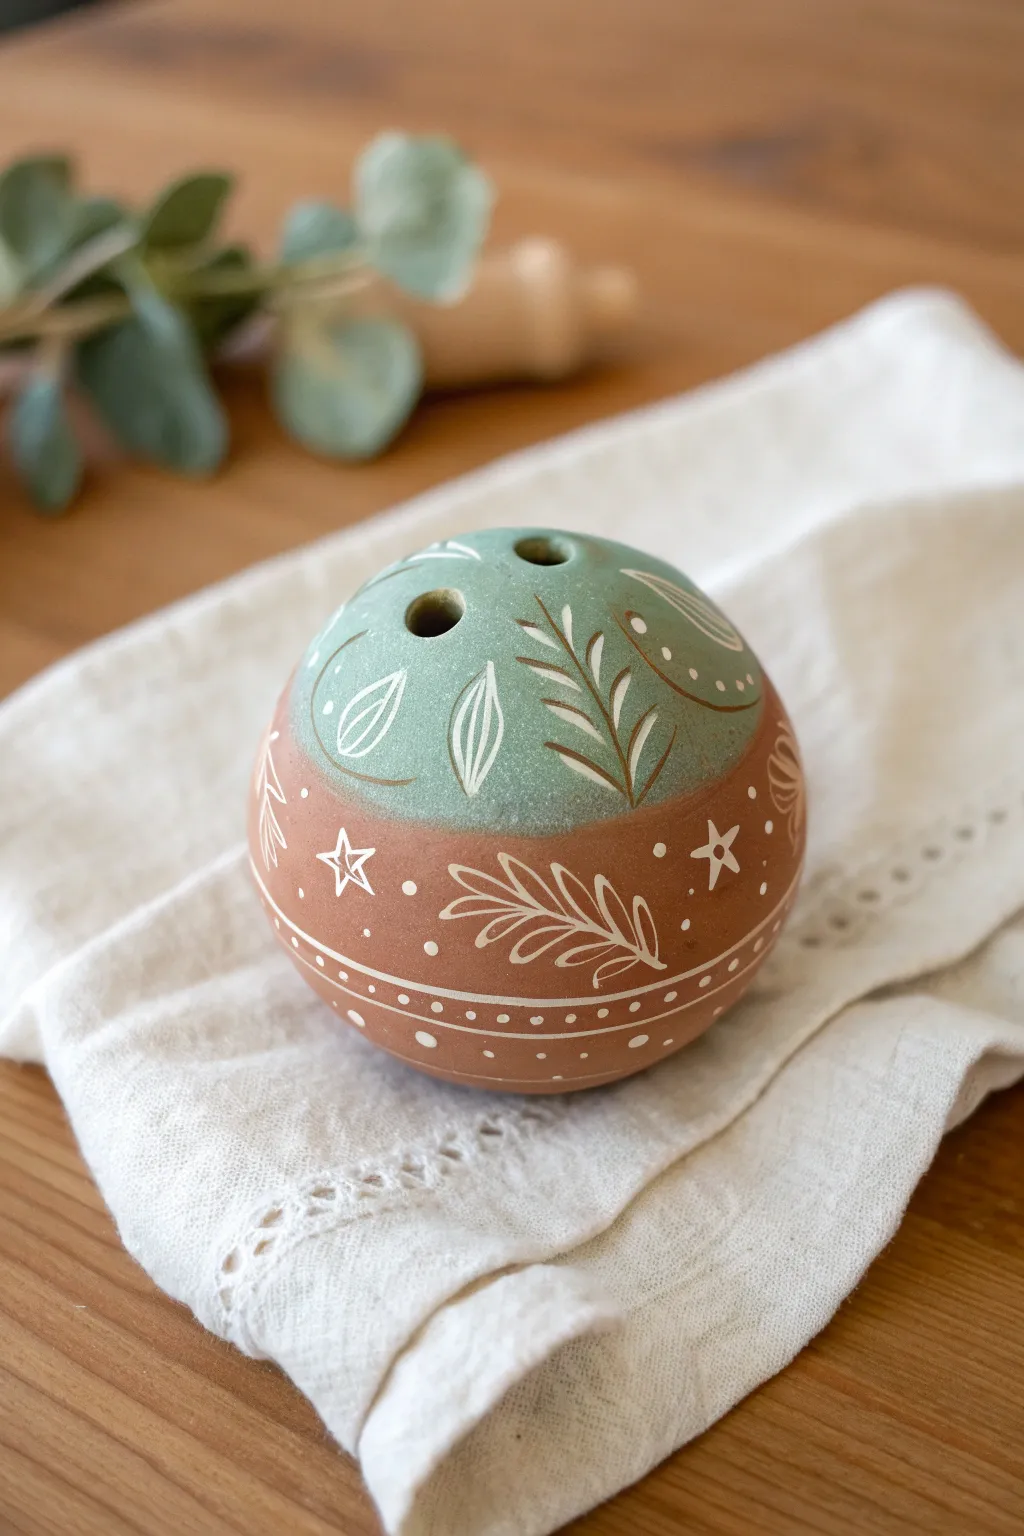
This charming handheld instrument combines the ancient art of sgraffito with a simple pinch-pot construction. The two-tone finish creates a lovely contrast against the white clay body revealed beneath the glaze.
Step-by-Step Tutorial
Materials
- Pottery clay (white earthenware or stoneware)
- Small clay beads or dried beans (for the rattle sound)
- Underglaze (sage green and terracotta/rust)
- Sgraffito carving tool or needle tool
- Soft paintbrush
- Sponge
- Water
- Clear glaze (optional)
Step 1: Forming the Sphere
-
Create pinch pots:
Start with two balls of moist clay, each roughly the size of a tangerine. Press your thumb into the center of one ball and pinch around the sides to create a uniform bowl shape. Repeat with the second ball to make a matching pair. -
Add the rattle elements:
Before joining, place 5-10 small balls of clay inside one of the pinch pots. Wrap these in a small piece of newspaper or paper towel; this prevents them from sticking to the walls while you work and will burn away later in the kiln. -
Score and slip:
Use a needle tool or serrated rib to scratch up the rims of both pinch pots. Apply a little water or ‘slip’ (clay mixed with water) to the scratched areas to act as glue. -
Join the halves:
Press the two halves firmly together. Smooth the seam completely with your thumb or a rib tool until the sphere looks seamless and round. I find gently rolling it purely on the table helps true up the shape. -
Pierce sound holes:
Using a hole punch tool or the back of a paintbrush, create two or three small holes near the top. This allows air to escape during firing and helps the sound resonate later.
Oops! Flaking Paint?
If underglaze chips off while carving, the clay was likely too dry or the paint too thick. Dampen the area slightly with a sponge before trying again gently.
Step 2: Applying Color
-
Leather hard stage:
Let the sphere dry slowly until it reaches the leather-hard stage—firm enough to handle without denting, but still cool to the touch. -
Map the color zones:
Lightly sketch a horizontal line around the equator of the sphere to separate your top and bottom sections. -
Paint the bottom:
Using a soft brush, apply 2-3 coats of terracotta or rust-colored underglaze to the bottom half. Allow each coat to dry briefly until the shine disappears before adding the next. -
Paint the top:
Apply 2-3 coats of sage green underglaze to the top hemisphere, carefully meeting the terracotta edge. -
Dry slightly:
Let the underglaze dry until it is no longer tacky but hasn’t become completely chalky dry.
Go Geometric
Instead of leaves, try carving tessellating triangles or zig-zags. A high-contrast black and white underglaze combo looks striking with geometric patterns.
Step 3: Carving the Design
-
Carve the border:
Use your sgraffito tool to carve two parallel lines just below the color divide on the terracotta side. Carve small dots between these lines to create a decorative band. -
Detail the greenery:
On the green top, scratch out leaf shapes. Outline a leaf first, then carve a central vein, leaving the green underglaze intact on either side of the vein. -
Add botanical motifs below:
On the terracotta bottom, carve larger fern-like branches. Drawing the stem first helps guide the placement of the smaller leaves. -
Embellish with stars:
Fill the empty spaces on the bottom half with simple five-point stars. Carve the outline firmly to reveal the white clay beneath. -
Add texture dots:
Scatter groups of small dots across both color zones to add texture and fill negative space. -
Clean up burrs:
Once fully dry, lightly brush the surface with a soft, dry brush to remove any clay crumbs or ‘burrs’ created during carving. Do not use a wet sponge, or you might smear the colors. -
Final steps:
Fire the piece according to your clay’s instructions (bisque fire). Optionally, apply a clear glaze and fire again for a glossy, durable finish.
Listen to the gentle sound of your creation once it comes out of the kiln fresh and warm
Coiled Swirl Grip Rattle

Create a stunningly simple yet tactile rattle using the ancient coil-building technique. This egg-shaped shaker features a consistent spiral texture that is not only pleasing to the eye but offers an excellent grip for little hands.
How-To Guide
Materials
- Light-colored polymer clay or air-dry clay (buff or beige)
- Small dried beans, rice, or ceramic beads (for the rattle sound)
- Clay roller or rolling pin
- Clean work surface (glass or silicone mat)
- Slip and scoring tool (if using air-dry clay)
- Liquid clay or ‘bake and bond’ (if using polymer clay)
- Smooth scraping tool or old credit card
Step 1: Creating the Rattle Core
-
Establish the base:
Begin by pinching off a small ball of clay about the size of a walnut. Flatten it slightly to create a sturdy, rounded base that will sit at the bottom of your rattle. -
Roll the first coil:
Take a chunk of your clay and roll it on your work surface into a long, even snake. Aim for a thickness of about a 1/4 inch, similar to a pencil. -
Begin the spiral:
Attach one end of your coil to the edge of your base. If you are using air-dry clay, remember to score the edges and add a touch of water or slip to ensure a strong bond. -
Build the wall upwards:
Gently wind the coil on top of itself, stacking each layer directly over the one below to create vertical walls for the first few turns. -
Smooth the interior:
As you build up, pause to gently smooth the inner seams of the coils together with your finger or a modeling tool. This strengthens the structure without ruining the beautiful exterior ridges. -
Shape the belly:
Start laying the coils slightly outward to widen the shape, creating the ‘belly’ of the egg form. -
Add the sound elements:
Once you have formed a small cup shape, place your dried beans or ceramic beads inside. Don’t overfill it; they need room to move around to make a sound.
Coil Consistency
Use an acrylic guide or two stacks of playing cards when rolling your snakes. This helps ensure every coil is exactly the same thickness.
Step 2: Closing the Form
-
Taper the shape:
Continue adding coils, but now begin placing them slightly further inward with each rotation. This will start to close the egg shape. -
Maintain even pressure:
Use gentle finger pressure to join the coils downward. I prefer to support the inside wall with one finger while pressing the new coil down with the other to prevent collapsing. -
Refresh clay supply:
If your coil runs out, simply roll a new snake and attach it seamlessly to the end of the previous one by blending the clay ends together diagonally. -
Tighten the spiral:
As you reach the top, the circles will become quite small. Be patient here and keep your coils even to maintain that satisfying concentric look. -
Finish the cap:
Coil the clay all the way to the center until only a tiny hole remains. -
Seal the top:
Place a tiny button of clay into the final center gap or simply spiral the coil tight until it closes completely. Blend the very end tip so it disappears into the pattern. -
Refine the texture:
Check the exterior for any uneven areas. You want the ridges to be distinct, dry, and sandy-looking, so minimal smoothing is needed on the outside.
Sagging Walls?
If the clay starts to slump while building, let the bottom half firm up (leathery for air-dry, or cooled in the fridge for polymer) before finishing the top.
Step 3: Final Touches
-
Surface check:
Inspect your rattle from all angles. If you see any gaps where light shines through between coils, gently smudge a tiny bit of clay into the crack from the outside to seal it. -
Drying or baking:
If using polymer clay, bake according to the manufacturer’s instructions (usually around 275°F for 15-30 minutes). If using air-dry clay, set it in a dry spot for 24-48 hours. -
Optional sanding:
Once fully cured, you can very lightly sand any sharp bits, but try to preserve the matte, textured finish shown in the photo.
Now you have a beautifully textured rattle that looks as natural as a beehive and sounds delightful when shaken
Two-Tone Marbled Clay Rattle
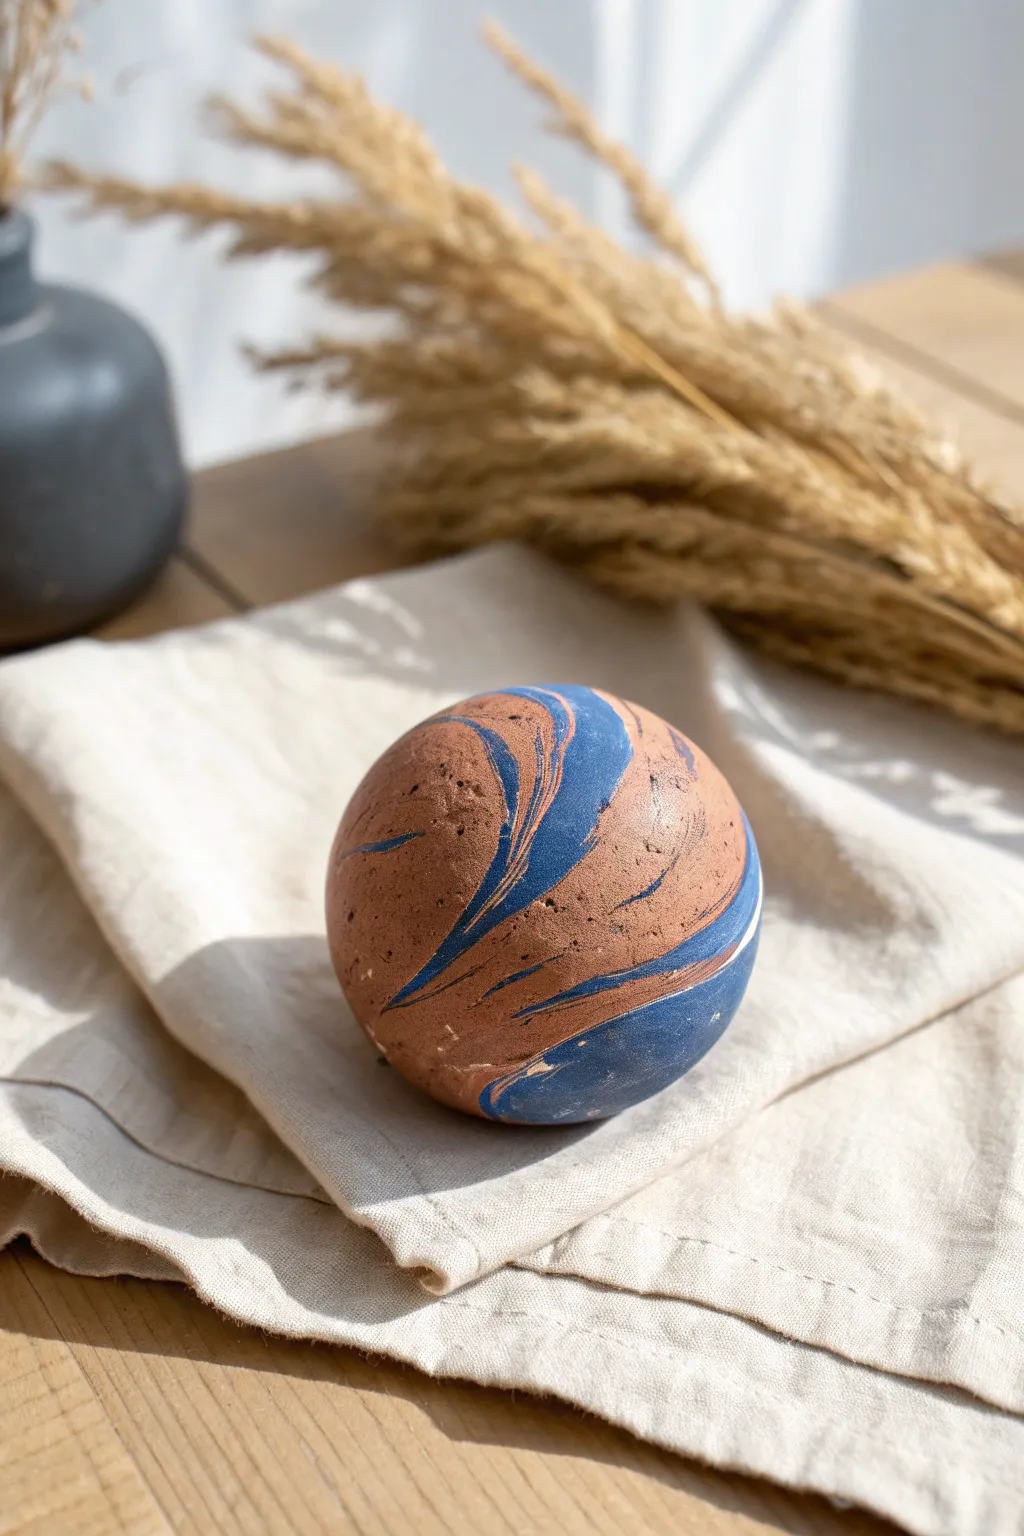
This simple yet striking rattle captures the look of polished river stone with swirls of terracotta and deep denim blue. The smooth, spherical shape fits perfectly in the palm of your hand, hiding a gentle shaker inside.
Detailed Instructions
Materials
- Polymer clay (terracotta or reddish-brown)
- Polymer clay (deep denim blue or navy)
- Small metal bells or dried beans (for sound)
- Aluminum foil
- Tissue blade or craft knife
- Acrylic rolling pin (optional)
- Fine grit sandpaper (400-800 grit)
- Oven for baking
Step 1: Forming the Core
-
Prepare the sound mechanism:
Begin by creating a small, loose ball of aluminum foil about the size of a large grape. This will house your rattle elements. -
Add the noise makers:
Cut a small slit in the foil or wrap it loosely around your metal bells or dried beans. Ensure there is enough empty space inside the foil pocket for the items to move around freely and make noise. -
Compact the core:
Gently squeeze the foil ball to make it spherical, but be careful not to crush the internal cavity against the beans or bells. This lightweight core reduces the amount of clay needed and keeps the rattle light.
Muddled Colors?
If your blue and brown blur together too much, stop twisting sooner. Chill the clay in the fridge for 10 min before rolling to keep lines crisp.
Step 2: Creating the Marble Effect
-
Condition the clay:
Knead your terracotta and blue clay separately until both are soft, pliable, and warm. I find that conditioning them to the same consistency prevents cracking later. -
Create clay logs:
Roll each color into a long, snake-like cylinder, approximately 4 inches long and 1/2 inch thick. -
Twist them together:
Hold the two logs together and twist them around each other like a candy cane. Keep twisting until the stripes become thinner and more frequent. -
Fold and roll:
Fold the twisted log in half and roll it into a smooth cylinder again. Repeat this twist-and-fold process about 2 or 3 times. Don’t overmix, or the distinct colors will turn into a muddy purple. -
Form a ball:
Once the marbling looks pleasing, roll the clay into a solid ball. You should see distinct swirls of blue cutting through the brown. -
Flatten into a sheet:
Using your acrylic roller or the palm of your hand, flatten this marbled ball into a disk about 1/4 inch thick. This sheet needs to be large enough to cover your foil core.
Level Up: Sound
Instead of beans, use different sized metal washers or ceramic beads inside. Different materials create unique pitches and rattle volumes.
Step 3: Assembly and Finishing
-
Wrap the core:
Place your foil rattle core in the center of your marbled clay disk. Gently wrap the clay up and around the foil, pinching the edges together to seal it completely. -
Roll to smooth:
Roll the clay-covered ball vigorously between your palms. The heat and pressure from your hands will smooth out the seams where you joined the clay. -
Refine the shape:
Continue rolling until you have a perfect sphere. Inspect the surface for any trapped air bubbles or seams; smooth them out gently with your thumb. -
Add texture (optional):
To mimic the natural stone look in the photo, you can lightly tap the surface with a toothbrush or a crumpled piece of aluminum foil to add tiny pores. -
Bake the rattle:
Place your sphere on a baking sheet or a bed of polyester batting (to prevent flat spots). Bake according to the manufacturer’s instructions for your specific brand of polymer clay. -
Cool down:
Allow the rattle to cool completely in the oven with the door cracked open. This gradual cooling helps make the clay stronger. -
Sand for finish:
Once fully cool, use fine-grit sandpaper under running water to lightly sand the surface. This removes fingerprints and gives it that smooth, matte, stone-like finish shown in the image. -
Buff (optional):
Rub the dry rattle briskly with a piece of denim or unbleached muslin cloth to bring out a subtle, natural sheen.
Enjoy the soothing sound and tactile feel of your new stone-inspired rattle
Double-Sound Chamber Rattle
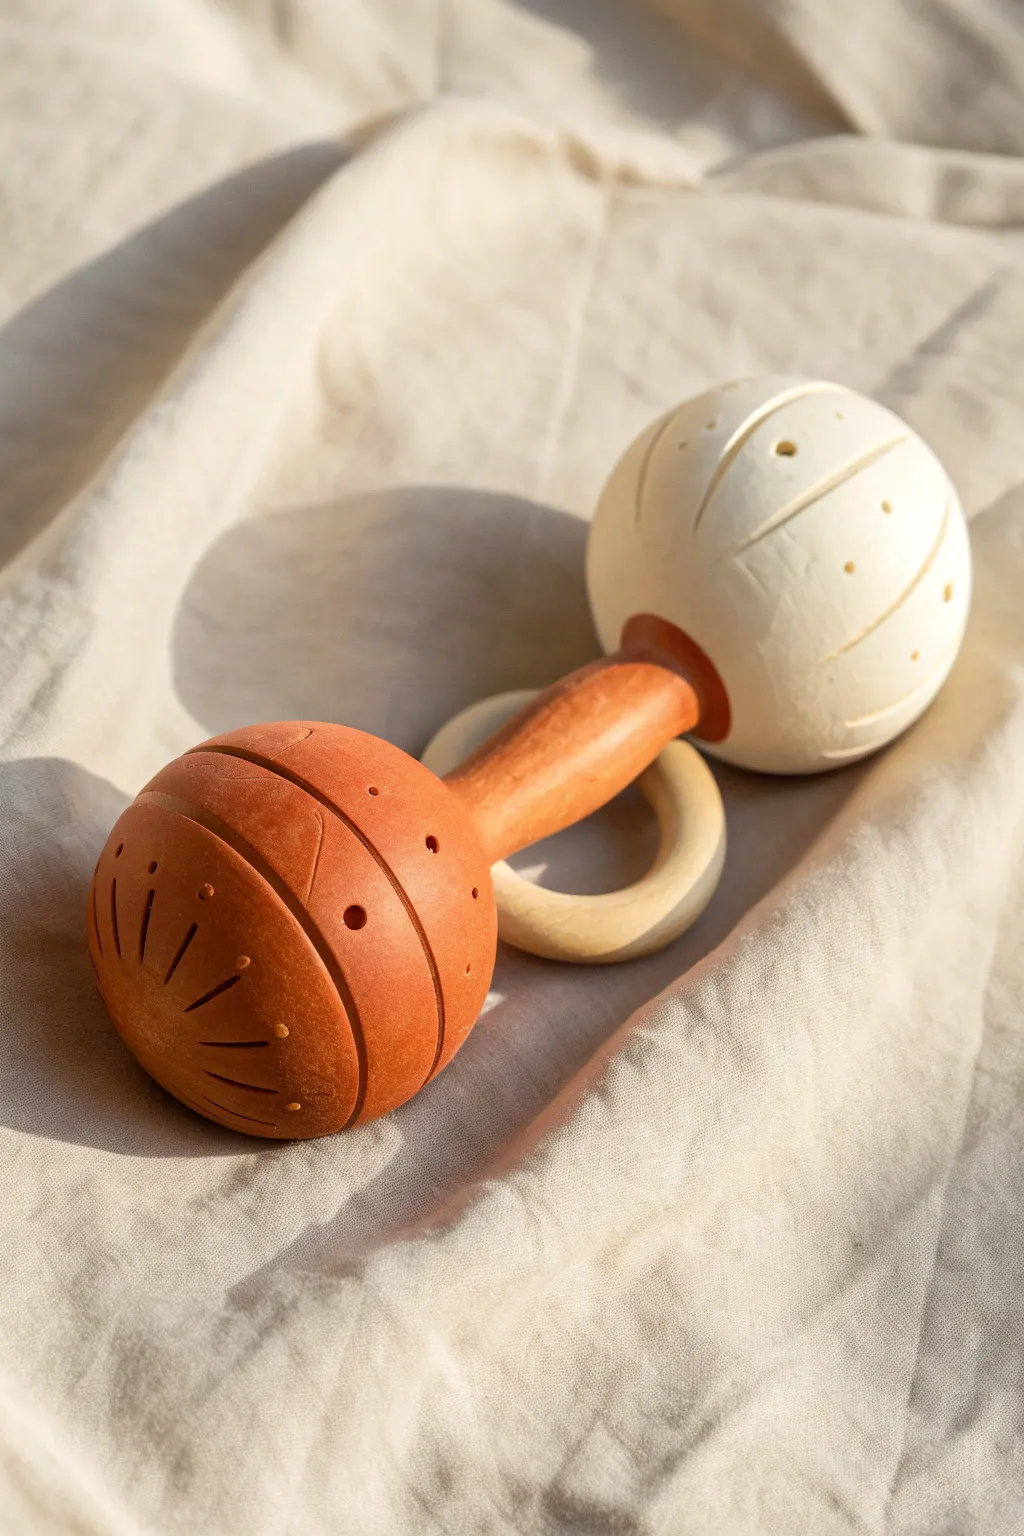
This charming, Montessori-inspired rattle features two hollow spheres with distinct sounds and textures, joined by a smooth handle and adorned with a playful captive ring. With its warm terracotta and natural cream finish, it mimics the look of turned wood while offering the creative freedom of clay.
Step-by-Step Guide
Materials
- Polymer clay (Terracotta color)
- Polymer clay (Cream or White granite color)
- Wooden sculpting tools (needle tool, small ball stylus)
- Wooden dowel or thick paintbrush handle (for shaping the connecting rod)
- Pre-made wooden ring (2-inch diameter)
- Aluminum foil
- Dried beans, rice, or ceramic rattle beads (for sound)
- Liquid polymer clay (Bake & Bond)
- Sandpaper (various fine grits)
- Matte varnish (optional)
Step 1: Creating the Sound Chambers
-
Form the foil cores:
Creating hollow forms is tricky, so start by tightly crunching aluminum foil into two identical spheres, roughly 1.5 inches in diameter. These will support the clay while you work. -
Prepare the terracotta clay:
Condition a block of terracotta-colored polymer clay until it is soft and pliable. Roll it into a sheet about 1/4 inch thick using a roller or pasta machine. -
Cover the first sphere:
Wrap the terracotta sheet around one of your foil balls. Smooth the seams carefully with your fingers or a smoothing tool so the sphere looks seamless. -
Cut the clay in half:
Using a sharp blade, carefully slice the clay sphere in half around its equator. Gently remove the foil core from inside both halves. -
Add the noise makers:
Place a few dried beans or ceramic beads into one of the hollow terracotta halves. I usually test the sound by cupping my hand over it before sealing. -
Reseal the sphere:
Apply a thin line of liquid polymer clay to the raw edges. Press the two halves back together and smooth the seam completely until it vanishes. -
Create the cream sphere:
Repeat the entire process—wrapping foil, cutting, filling with a different material (like rice for a softer sound), and resealing—using the cream-colored clay for the second sphere.
Sound Design Tip
Vary your fillings! Use large wooden beads in one side for a deep ‘clunk’ and tiny glass beads or rice in the other for a high-pitched ‘sh-sh’ sound.
Step 2: Handle and Assembly
-
Shape the connector:
Roll a thick cylinder of terracotta clay to form the handle. It should be sturdy, about 3 inches long, and slightly flared at the ends to create a secure join. -
Attach the first sphere:
Make a small depression in the terracotta sphere. Apply liquid clay to one end of the handle and press it firmly into the depression, blending the clay edges together with a sculpting tool. -
Insert the captive ring:
Before attaching the second side, slide your pre-made wooden ring onto the handle. It must be loose enough to slide back and forth freely. -
Attach the second sphere:
Connect the cream sphere to the other end of the handle using the same depression and blending method, ensuring the whole structure is straight and the ring is trapped safely in the middle.
Level Up: Dyed Patterns
Before baking, rub a small amount of dark acrylic paint into your carved lines and wipe away the excess immediately. This antiquing highlights the geometry.
Step 3: Detailing and Finishing
-
Carve the lines:
Using a needle tool, carve deep, curving longitude lines into both spheres. On the terracotta side, I like to create a mix of long indented lines and short sun-ray dashes. -
Add texture dots:
Take a small ball stylus and press rows of decorative dots into the clay surface. Follow the curve of your carved lines to create a rhythmic pattern. -
Texture the handle:
Gently rub the handle with a stiff brush or crumbled foil to remove fingerprints and give it a slightly organic, matte texture. -
Vent holes (Critical):
Use a needle to poke a tiny, inconspicuous air hole in each sphere. This allows hot air to escape during baking and prevents cracks or explosions. -
Bake carefully:
Bake the rattle according to your clay manufacturer’s instructions, usually around 275°F (130°C) for 30–45 minutes. Support the ends with polyester batting so flattened spots don’t form. -
Sand and buff:
Once fully cooled, lightly sand any rough spots with fine-grit sandpaper. Leave the finish natural for a raw clay look, or apply a matte varnish for extra durability.
Listen to the satisfying dual tones of your custom rattle as you admire the sleek, modern design you created by hand