
If you’ve been itching to make a clay teapot but the idea feels a little intimidating, I’ve got you. These easy clay teapot ideas lean on beginner-friendly handbuilding so you can get something cute (and totally you) without needing perfect symmetry.
Classic Round Belly Teapot
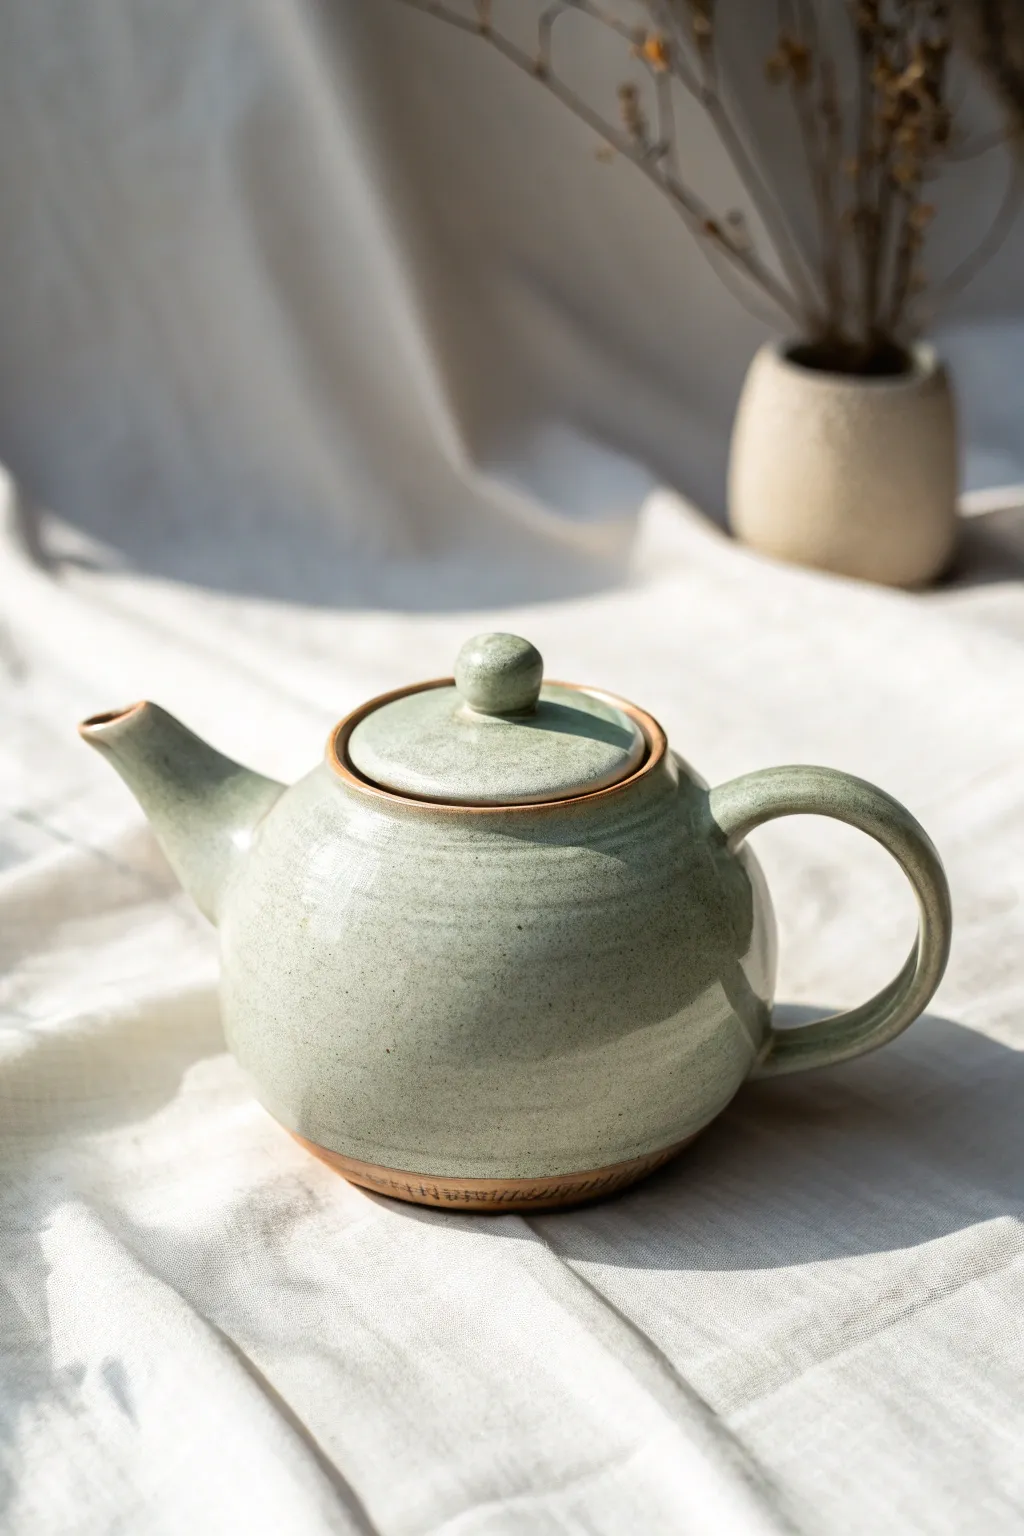
Embrace the elegance of tradition with this beautifully rounded teapot, featuring a soothing celadon glaze that breaks over raw clay edges. Its generous belly shape is perfect for brewing loose leaf tea, while the exposed stoneware foot adds a rustic, grounding warmth.
Step-by-Step Guide
Materials
- Stoneware clay (smooth or lightly grogged)
- Pottery wheel
- Throwing tools (sponge, needle tool, rib, cutting wire)
- Trimming tools
- Caliper
- Slip and scoring tool
- Celadon glaze (pale green/grey)
- Kiln
Step 1: Throwing the Body
-
Center the clay:
Begin with about 1.5 to 2 lbs of wedged clay. Center it firmly on the wheel head, ensuring a stable base before opening. -
Drive the main form:
Open the clay and pull up the walls into a cylinder first. Once you have height, gently belly out the walls from the inside using a rounded rib to create that classic spherical shape. -
Refine the gallery:
At the rim, careful split the clay or compress inward to create a gallery (a small ledge) for the lid to sit on. Measure this opening with calipers before cutting the pot off the wheel.
Pour Control
Sharpen the very edge of the spout lip after throwing. A sharp, crisp edge cuts the stream of water cleanly, preventing the dreaded teapot drip.
Step 2: Creating Components
-
Throw the lid:
Using a smaller ball of clay (off the hump or centered), throw a shallow dome that matches your caliper measurement. Add a small, solid knob in the center for lifting. -
Shape the spout:
Throw a tall, narrow cone for the spout. Use a finger or tool handle to create a slight curve or belly in the spout itself, ensuring the base is wide enough to attach to the body. -
Pull the handle:
Pull a strap of clay for the handle directly from a lump of clay, tapering it slightly. Let it curve into a ‘C’ shape and set it aside until it reaches leather-hard consistency.
Step 3: Trimming and Assembly
-
Trim the foot:
Once leather hard, flip the teapot body. Trim away excess weight from the bottom and carve a neat foot ring. I like to leave this area slightly rougher to contrast with the smooth glaze later. -
Prepare the spout area:
Hold the spout against the body to check the angle. Mark the attachment area, score it, and drill several strainer holes inside the marked circle to allow tea to flow. -
Attach the spout:
Score and slip both the spout base and the body. Press the spout firmly into place, smoothing the transition to make it look seamless. -
Attach the handle:
Score and attach the handle opposite the spout. Ensure the top attachment is strong and the curve mimics the belly of the pot for visual balance. -
Fit the lid:
Place the lid on the pot to ensure it still fits after drying. If it’s tight, gently sand or trim the edge while it’s still leather hard. -
Dry slowly:
Cover the teapot loosely with plastic to equalize moisture. Dry very slowly to prevent the spout or handle from cracking away from the body.
Add Texture
Before glazing, gently chatter or carve shallow lines into the belly. The translucent celadon glaze will pool in these recesses, creating beautiful depth.
Step 4: Glazing and Firing
-
Bisque fire:
Fire the thoroughly dry piece to bisque temperature (usually cone 04-06) to prepare it for glazing. -
Wax resin application:
Apply wax resist to the foot ring and the gallery rim where the lid touches. This is crucial to prevent the lid from fusing to the pot. -
Dip in glaze:
Dip the entire teapot into a celadon glaze. Pour glaze inside first, swirl, and dump out. Then dip the exterior. -
Clean up:
Wipe away any glaze droplets on the foot or the gallery rim with a damp sponge. -
Final Fire:
Fire to the maturation temperature of your clay and glaze (likely cone 6 or 10). The celadon should become translucent, pooling slightly in the crevices.
Enjoy the ritual of serving tea from your own handmade vessel


Pinch Pot Mini Teapot
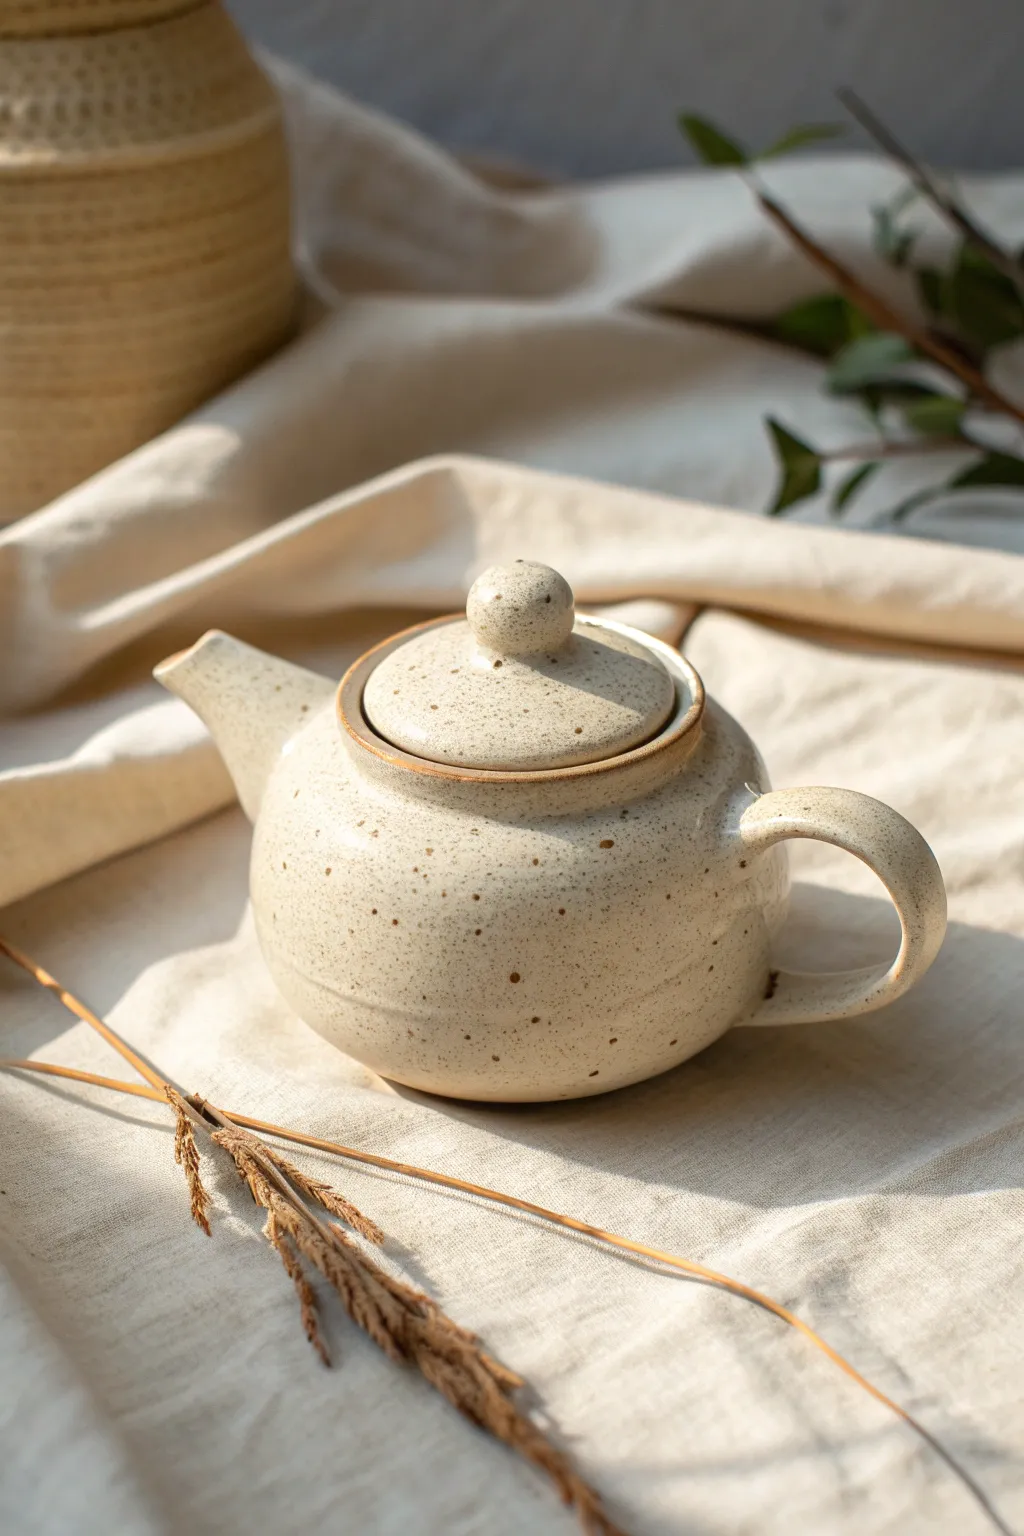
This charming, petite teapot features a creamy, speckled glaze finish and soft, organic curves achieved through simple hand-building techniques. It’s the perfect beginner project to practice pinch potting and joining attachments for a rustic, cozy aesthetic.
Step-by-Step
Materials
- Speckled buff stoneware clay (or white clay with grog)
- Pottery tools (needle tool, rib tool, scoring tool)
- Slip (clay mixed with water)
- Small rolling pin
- Sponge
- Cream or oatmeal matte glaze
- Small paintbrush (for slip application)
- Kiln (or access to a firing service)
Step 1: Forming the Body
-
Prepare the Clay:
Start with a ball of well-wedged clay about the size of a grapefruit. Ensure there are no air bubbles, as these can cause issues during firing. -
Open the Pinch Pot:
Hold the ball in one hand and press your thumb deep into the center, leaving about half an inch of thickness at the base. -
Pinch the Walls:
Gently pinch the clay between your thumb and fingers, rotating the ball as you go. Work your way from the bottom up to thin the walls evenly. -
Shape the Belly:
Collar the rim slightly inward by gently squeezing with both hands to create a rounded belly shape, rather than an open bowl shape. -
Smooth the Surface:
Use a flexible rib tool on the exterior while supporting the wall from the inside to smooth out finger marks and refine the round profile.
Uneven Drying?
Handles dry faster than the body and can crack. Wrap the handle in extra plastic or wax resist it to slow its drying speed so it matches the pot.
Step 2: Adding Spout and Handle
-
Form the Spout:
Roll a small coil of thick clay. Taper one end and hollow it out carefully using a tool handle or your finger to create the spout shape. -
Create the Handle:
Pull a small strap of clay or roll a coil, slightly flattening it. Bend it into a ‘C’ shape that looks comfortable to hold. -
Score and Slip:
Mark the attachment points on the body, spout, and handle by scratching the surface (scoring). Apply a generous amount of slip to these rough areas. -
Attach Components:
Press the spout firmly onto the front and the handle onto the back. Smooth the seams where the clay meets using a wooden tool or your finger to ensure a strong bond. -
Cut the Pour Hole:
Use a needle tool or hole cutter to create an opening behind the attached spout so liquid can flow through from the body.
Built-in Strainer
Instead of one big hole behind the spout, poke multiple small holes in the teapot wall before attaching the spout to act as a built-in tea strainer.
Step 3: Lid and Refinement
-
Measure the Opening:
Use calipers or a ruler to measure the exact diameter of your teapot’s rim opening. -
Create the Lid Gallery:
Roll a slab of clay and cut a circle slightly larger than the opening. On the underside, add a small ring of clay that fits *inside* the pot’s rim to keep the lid stable. -
Add the Knob:
Roll a tiny ball of clay and attach it to the center of the lid using the score and slip method. I like to shape this slightly rounded for a comfortable grip. -
Final Smoothing:
Wipe the entire piece down with a slightly damp sponge to remove any sharp burrs or rough textures. -
Dry Slowly:
Cover the teapot loosely with plastic to let it dry very slowly. This helps prevent the handle or spout from cracking away from the body.
Step 4: Glazing and Firing
-
Bisque Fire:
Once bone dry, fire the piece to a bisque temperature (usually cone 04) to prepare it for glazing. -
Apply Glaze:
Dip the teapot into a cream or oatmeal-colored speckled glaze. If brushing, apply 2-3 even coats, letting each dry in between. -
Create the Rim Detail:
Wipe a tiny bit of glaze off the very edge of the rim and lid gallery with a damp sponge to expose the raw clay, creating that darker defining line seen in the photo. -
Glaze Fire:
Fire the piece again to the maturation temperature of your specific clay and glaze (often cone 5 or 6 for stoneware).
Once cooled, your handmade teapot is ready to brew a comforting cup of tea


Coil-Built Teapot With Soft Ridges
Embrace the meditative process of coil building with this charming, ridged teapot that highlights the natural beauty of hand-building techniques. The soft, horizontal grooves create a wonderful tactile surface for glazes to break over, resulting in a warm, earthy finish.
Step-by-Step Guide
Materials
- Stoneware clay (speckled or buff)
- Clay scoring tool or serrated rib
- Slip (clay mixed with water)
- Wooden modeling tool
- Sponge
- Fettling knife
- Clear or honey-colored glossy glaze
- Kiln
Step 1: Building the Body
-
Create the Base:
Start by rolling out a slab of clay about 1/4 inch thick. Cut out a perfect circle, roughly 4-5 inches in diameter, to serve as the floor of your teapot. -
Roll Your Coils:
Roll out several long, even snakes of clay. Aim for a thickness of about half an inch—thick enough to maintain the structure but not so heavy that the pot becomes unwieldy. -
Layer the First Coils:
Score the outer edge of your base and apply a little slip. Lay your first coil on top, wrapping it around the circumference. Gently press it down to adhere. -
Build Up and Out:
Continue stacking coils. To create the rounded belly shape, place each new coil slightly further outward than the one below it. Don’t smooth the outside—we want those ridges visible. -
Smooth the Interior:
While preserving the exterior texture, use your thumb or a wooden tool to smear the coils together on the inside. This is crucial for a watertight vessel. -
Curve Inward:
Once you reach the widest point of the belly, begin placing coils slightly further inward to taper the shape back towards the center. -
Form the Gallery:
At the top opening, add a final, vertical coil. Use your thumb to press a small ledge (gallery) inside the rim where the lid will eventually sit.
Smooth Seams
For the interior smoothing, use a curved rib tool. It aligns the clay particles better than your finger alone, significantly reducing the chance of cracks or leaks during firing.
Step 2: Spout, Handle, and Lid
-
Shape the Spout:
Roll a thick, tapered coil of clay. Gently bend it into an ‘S’ curve. Hollow it out carefully using a tool handle or dowel, ensuring the walls are even. -
Attach the Spout:
Hold the spout up to the body to check the angle. Score and slip both contact points, then press the spout firmly onto the body. Blend the clay at the seam for a seamless transition. -
Pull the Handle:
Pull a strap of clay or roll a thick coil for the handle. Flatten it slightly for comfort. Attach it to the back of the pot using the score-and-slip method, creating a large C-shape curve. -
Make the Lid:
Measure the gallery opening you created earlier. Create a small, slightly domed slab that fits this measurement. Add a small coil ring underneath to keep it from sliding off. -
Add Texture to Lid:
To match the body, add thin, flattened coils in concentric circles on top of the lid. Top it off with a small, cylindrical knob. -
Create Strainer Holes:
Before the clay gets too hard, use a small drill bit or needle tool to poke several holes in the teapot wall strictly behind where the spout attaches.
Change the Texture
Instead of leaving the coils round on the outside, use a flat paddle to gently beat the pot when it’s soft. This creates a faceted, geometric surface while keeping the coil structure.
Step 3: Finishing
-
Refine the Ridges:
Once the clay is leather-hard, use a damp sponge to gently soften the sharp edges of the coils without erasing the definition. -
Bisque Fire:
Allow the teapot to dry completely (slowly, to avoid cracking handles) before firing it in a bisque kiln. -
Glaze Application:
Dip or brush on a semi-transparent glaze—a honey amber or clear glaze works beautifully on speckled clay. The glaze will pool in the coil grooves, accentuating the form. -
Final Fire:
Fire the piece again to the temperature recommended for your specific clay and glaze combination.
Now brew your favorite loose leaf tea and enjoy the warmth of a handmade vessel


Slab-Built Boxy Teapot
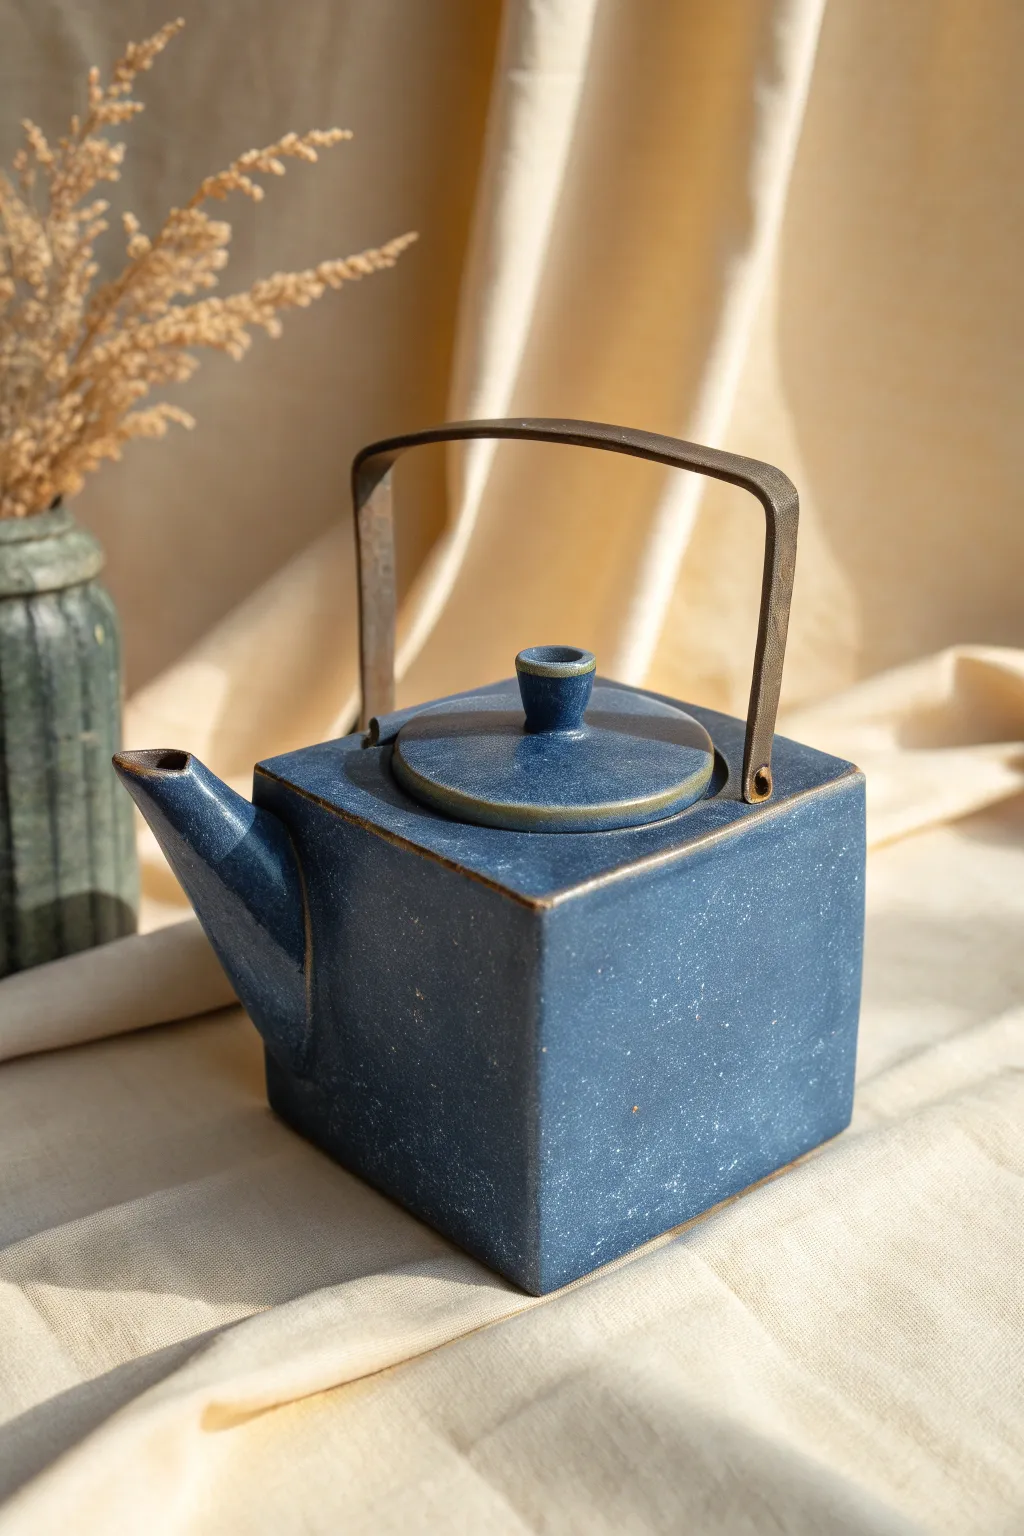
Move away from traditional curves with this striking, minimalist teapot featuring a sharp cubic form and a textured matte blue glaze. The boxy silhouette is achieved through precise slab building, while the contrasting metallic handle adds a modern industrial touch.
Step-by-Step
Materials
- Stoneware clay (speckled or plain)
- Rolling pin and guide slats (approx. 1/4 inch)
- Fettling knife or X-Acto blade
- Ruler and square tool
- Paper templates (for the cube sides)
- Scoring tool or serrated kidney
- Slip (clay mixed with water)
- Wooden paddle
- Loop trimming tool
- Sponge
- Matte dark blue glaze
- Thick brass or copper wire (for the handle)
- Pliers
- Drill bit or hole punch tool
Step 1: Creating the Box Body
-
Roll your slabs:
Start by rolling out a generous amount of clay into an even slab, about 1/4 inch thick. Compress the clay on both sides with a rib to prevent warping later. -
Cut the walls:
Using a square template or ruler, cut out five identical square tiles (four walls and one base) and one slightly larger square for the top. Precision is key here for tight corners. -
Leather hard stage:
Let the tiles dry to a leather-hard state. They need to be stiff enough to stand up without sagging but soft enough to join. -
Bevel the edges:
Cut 45-degree angles (miters) on the edges where the walls will meet. This creates a stronger seamless joint than a simple butt joint. -
Assemble the cube:
Score the beveled edges thoroughly and apply slip. Join the four walls to the base, pressing them firmly together. I find using a small interior coil reinforces these seams invisibly. -
Attach the top:
Attach the top slab to seal the box completely. Paddle the outside gently with a wooden paddle to sharpen the corners and ensure the shape is perfectly cubic.
Step 2: Spout and Lid Mechanics
-
Open the lid:
Once the box is sealed and firm, use a needle tool to cut a circular opening in the top center. Save the cutout piece if you want to use it as the base of your lid, or throw a new lid on the wheel. -
Add the gallery:
To hold the lid, you’ll need a flange or gallery. Attach a strip of clay inside the rim of the opening you just cut, smoothing it downwards so the lid sits flush. -
Form the spout:
Roll a small slab into a cone shape. Trim the wider end at an angle so it fits flush against one of the flat side walls. -
Attach the spout:
Hold the spout against the body to check the angle. Trace the outline, score the area, drill strainer holes inside the traced area, and then score and slip the spout into place. -
Create the lid knob:
Fashion a small, hollow cylindrical knob. It should flare slightly at the top for a good grip. Attach this securely to the center of your lid.
Warping Walls?
If your flat sides start bowing inward or outward, trap air inside by sealing the box fully earlier. The internal air pressure supports the walls while you paddle them flat.
Step 3: Handles and Finishing
-
Make handle lugs:
Create two small tabs or lugs with holes in them. Attach these to the shoulder of the teapot, near the front and back edges, to hold the metal handle later. -
Clean and refine:
Use a damp sponge to smooth all sharp edges slightly, just enough so they aren’t sharp to the touch but retain the geometric look. Pay attention to the spout tip to ensure a clean pour. -
Bisque firing:
Once bone dry, fire the piece to bisque temperature. -
Glazing:
Apply a matte, speckled blue glaze. Dip or spray for an even coat. Wipe the bottom and the lid gallery clean before the final glaze firing. -
Fabricate the handle:
While the pot fires, bend a flat strip of heavy-gauge brass or copper into a rectangular ‘U’ shape. Hammer it for texture if desired. -
Final assembly:
After the glaze firing, attach the metal handle by hooking the ends through the ceramic lugs and bending them securely with pliers.
Master the Pour
Ensure the tip of your spout is physically higher than the lid opening. If it’s too low, the tea will spill out of the spout before you can fill the pot to the top.
Once the handle is attached, you have a functional piece of modern art ready for your next tea ceremony

The Complete Guide to Pottery Troubleshooting
Uncover the most common ceramic mistakes—from cracking clay to failed glazes—and learn how to fix them fast.
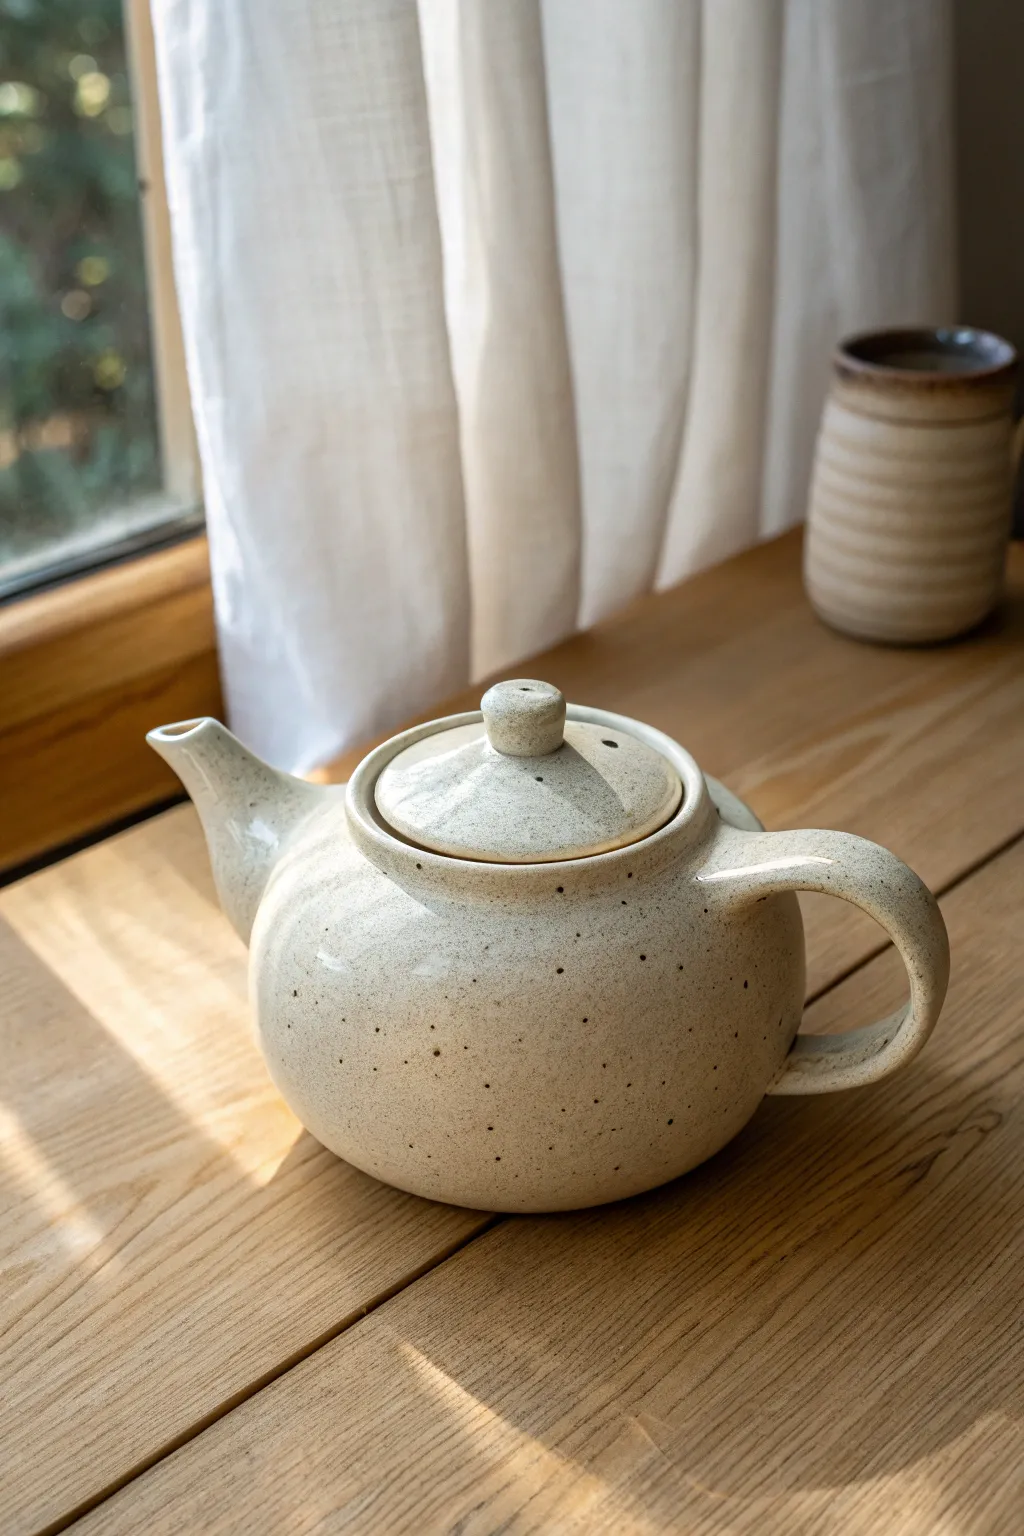
Teapot With A Simple Dome Lid
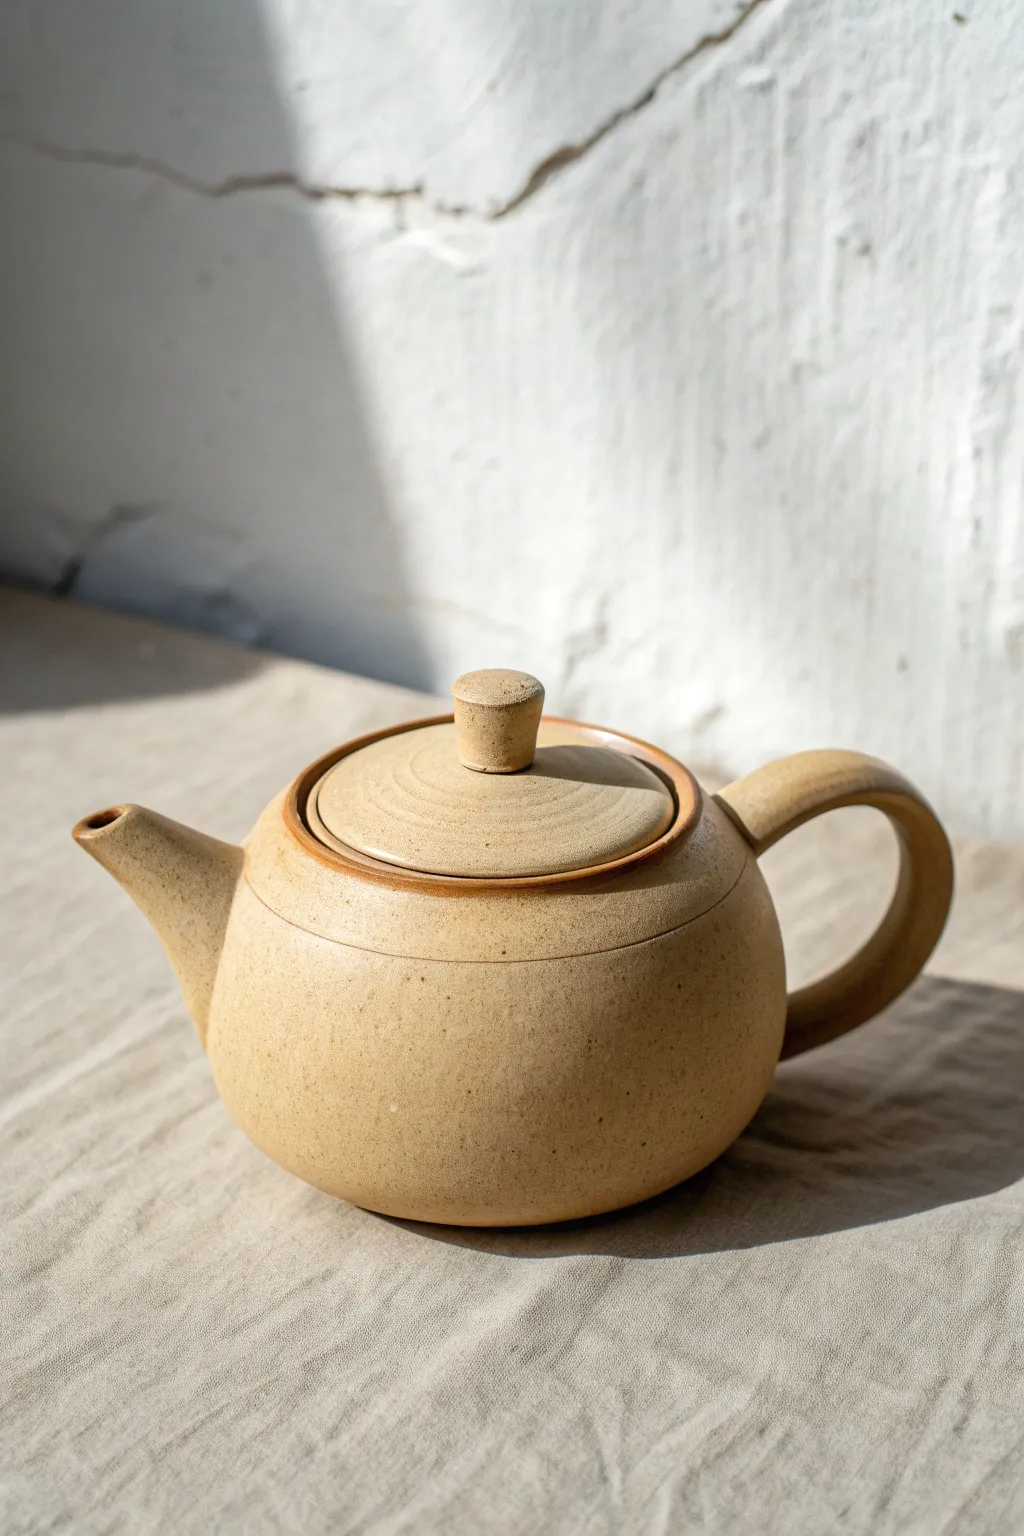
Embrace the beauty of simplicity with this wheel-thrown teapot that features pure, clean lines and a soothing speckled glaze. Its unpretentious dome lid and sturdy C-handle make it a functional favorite that feels grounded and earthy.
Step-by-Step Tutorial
Materials
- Speckled stoneware clay (approx. 2-3 lbs)
- Pottery wheel
- Throwing sponge
- Needle tool
- Wire cutter
- Rib tool (wooden or metal)
- Trimming tools
- Scoring tool or serrated rib
- Slip (clay slurry)
- Calipers
- Clear or light matte glaze
Step 1: Throwing the Body
-
Center and open:
Begin with about 1.5 lbs of well-wedged speckled clay. Center it on the wheel head and open the clay, leaving the floor slightly thicker than a standard mug to account for trimming later. -
Pull the walls:
Pull the cylinder walls up, keeping a consistent thickness. As you reach the desired height, begin to belly out the form gently from the inside to create that rounded, soft shape. -
Refine the gallery:
Before you finish the rim, use a wooden rib or your finger to split the rim slightly or compress it downwards to create a ‘gallery’—the internal ledge where the lid will sit. Ensure this ledge is sharp and clean. -
Measure the gallery:
Using your calipers, measure the diameter of the gallery seating area exactly. Lock the calipers in place; you will need this measurement for the lid. -
Cut and dry:
Undercut the base with a wooden knife, wire the pot off the wheel, and set it aside to reach a leather-hard state.
Step 2: Creating the Lid and Spout
-
Throw the lid off the hump:
Using a larger mound of clay, center just the top portion. Open it shallowly, checking the width against your calipers frequently. You want a simple inverted bowl shape that fits snugly into your teapot’s gallery. -
Form the knob:
While throwing the lid, pinch up a small amount of clay from the center to form a solid, tapered knob. Once finished, cut the lid from the hump. -
Throw the spout:
Throw a small, tall cone shape for the spout. I find it helpful to throw it slightly taller than needed and cut it down later. Make sure the base of the spout is wide enough to attach securely to the body. -
Pull a handle:
Pull a thick strap of clay for the handle. Curve it into a ‘C’ shape and let it stiffen up alongside the other components until everything is leather hard.
Lid Wobbles?
If the lid rattles, apply a dab of grinding paste (valve grinding compound) to the gallery ledge after firing, twist the lid back and forth, and wash clean for a perfect, airtight seal.
Step 3: Trimming and Assembly
-
Trim the body:
Center your leather-hard teapot body upside down on the wheel. Trim the bottom to create a rounded foot that continues the curve of the walls, removing excess weight. -
Fit the lid:
Clean up the underside of the lid if necessary. Test the fit in the gallery; it should seat comfortably without wiggling. Sand slightly if it’s too tight. -
Cut the spout angle:
Hold the spout up to the teapot body. Use a fettling knife or wire tool to cut the base of the spout at an angle that complements the curve of the pot. -
Create the strainer:
Mark where the spout will attach. Use a hole cutter or drill bit to create a cluster of holes inside that marked area to act as a built-in tea strainer. -
Attach the spout:
Score the attachment site and the base of the spout aggressively. Apply slip, press the spout firmly onto the body, and smooth the seam with a coil or modeling tool. -
Attach the handle:
Score and slip the attachment points for the handle opposite the spout. Press it on, ensuring the curve mimics the roundness of the pot, and clean up connections with a damp sponge.
Level Up: Cane Handle
Instead of a clay handle, attach two small clay loops (lugs) on the top shoulders. After firing, attach a bent bamboo or cane handle for a mixed-media organic look.
Step 4: Finishing Touches
-
Dry slowly:
Cover the assembled teapot loosely with plastic to ensure the handle, spout, and body dry at the same rate to prevent cracking. -
Bisque fire:
Once bone dry, bisque fire the piece to approximately Cone 04. -
Glaze application:
Dip or spray the exterior with a translucent matte glaze that allows the natural speckles of the clay to show through. Avoid glazing the gallery ledge and the contact rim of the lid. -
Final firing:
Fire to the maturity temperature of your clay body (likely Cone 5 or 6) to vitrify the clay and melt the glaze.
Enjoy brewing your first pot of tea in a vessel that is truly one of a kind
Leaf-Knob Teapot Lid
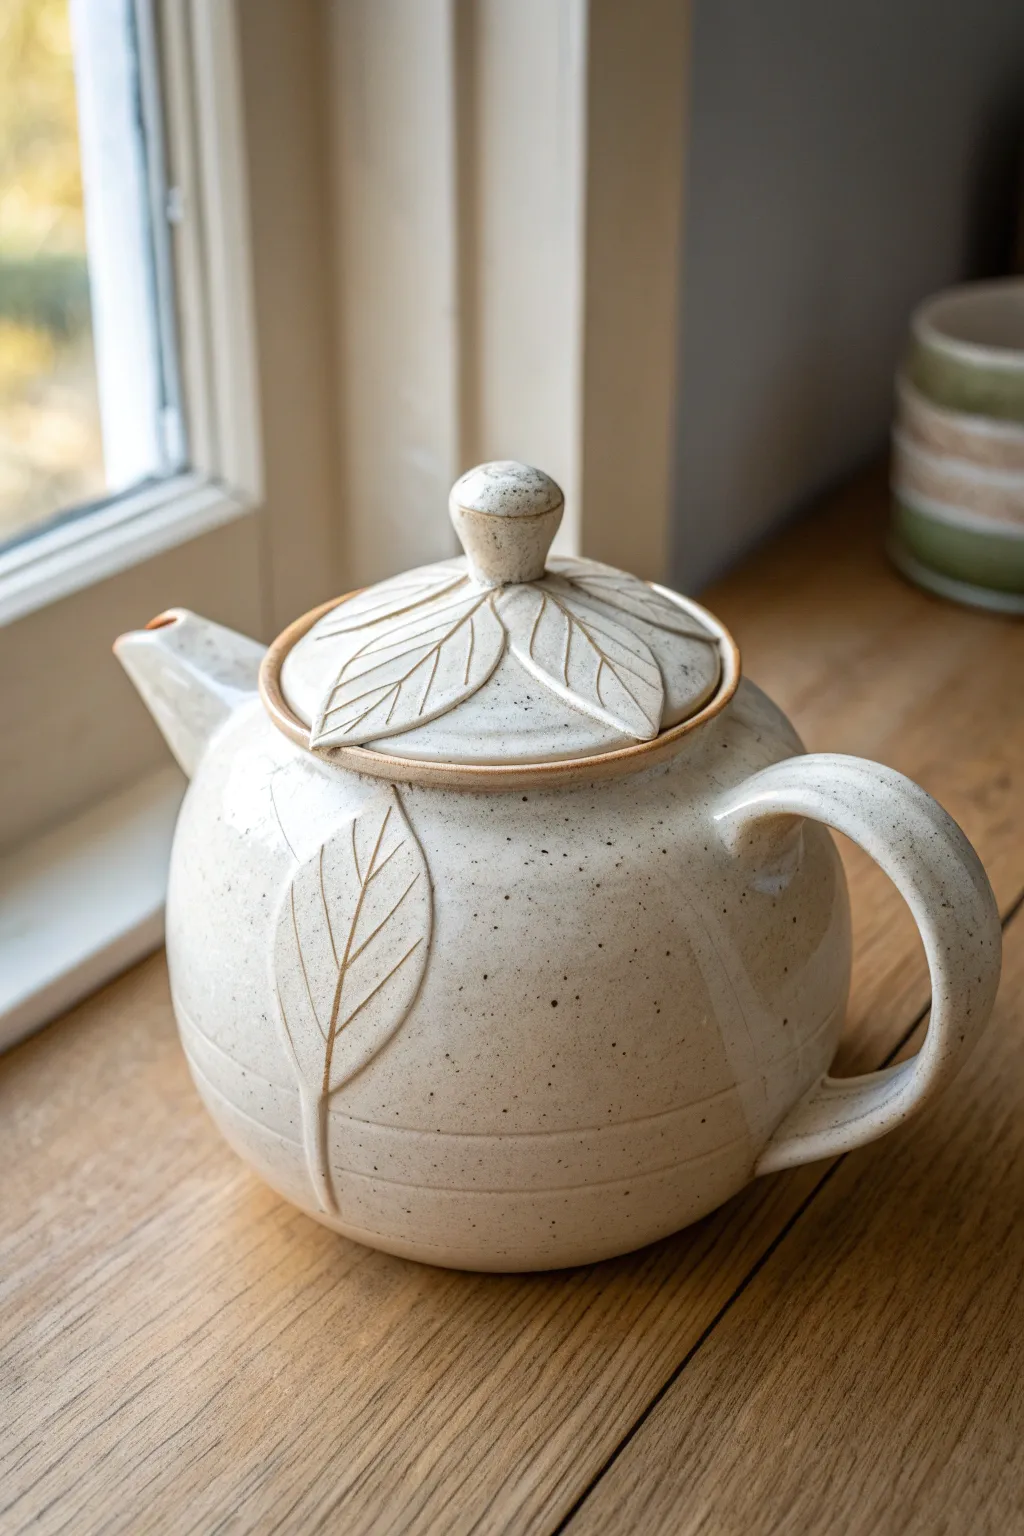
Embrace the natural beauty of clay with this elegant teapot featuring organic leaf motifs. The speckled beige stoneware is accented by a hand-carved leaf lid and a distinctive relief leaf on the body, creating a piece that feels both rustic and refined.
How-To Guide
Materials
- Speckled stoneware clay (approx 3-4 lbs)
- Pottery wheel
- Throwing tools (sponge, needle tool, rib, wire cutter)
- Trimming tools
- Scoring tool or serrated rib
- Slip
- Modeling tool or wooden knife
- Soft paintbrush
- Clear or semi-matte transparent glaze
Step 1: Throwing the Body & Lid
-
Prepare the Clay:
Wedge about 2.5 lbs of clay for the body and 1 lb for the lid and spout. Ensure the clay is free of air bubbles for smooth throwing. -
Throw the Body:
Center the larger ball of clay on the wheel. Open and pull the walls into a bulbous, spherical shape. Keep the opening at the top wide enough to accommodate a gallery for the lid later, roughly 3-4 inches. -
Refine the Shape:
Collar the neck in slightly and use a rib to smooth the curve of the belly. Leave the walls slightly thicker than a standard bowl to support the spout and handle. -
Measure the Gallery:
Use calipers to measure the inside diameter of the rim so you can throw a perfectly fitting lid. -
Throw the Lid:
Throw the lid ‘right side up’ or off the hump. Create a domed shape that fits your caliper measurement. Crucially, throw a solid, tall knob in the center—don’t hollow it out—as you’ll be carving this later. -
Throw the Spout:
With a small amount of clay, throw a tapered spout. I like to throw it taller than needed and cut it down later to get the angle right.
Lid Fit Issues?
If the lid wobbles after firing, apply a grinding paste to the gallery and twist the lid back and forth. This grinds the surfaces to a perfect, airtight match.
Step 2: Trimming & Assembly
-
Trim the Foot:
Once leather hard, trim a neat foot ring on the bottom of the teapot body. While spinning, use a tool to incise two or three subtle horizontal lines near the bottom third of the pot for texture. -
Attach the Spout:
Cut the spout at an angle that matches the curve of the pot. Score and slip both surfaces, then press firmly to attach. Ensure the tip of the spout is level with the lid gallery so it doesn’t drip. -
Pull and Attach Handle:
Pull a strap handle or extrude a coil. Attach it opposite the spout, creating a comfortable C-curve that balances the visual weight of the spout.
Step 3: Sculpting the Leaf Details
-
Create the Body Leaf:
Roll out a thin slab of clay. Cut out a large, simple leaf shape. Score the side of the teapot where you want the leaf, apply slip, and gently press the clay leaf onto the rounded surface. -
Refine Body Leaf:
Use a modeling tool to smooth the edges of the attached leaf so it looks integrated, not just stuck on. Use a needle tool or knife to gently carve the central vein and side veins into the relief. -
Sculpt the Lid Knob:
Smooth out the thrown knob on the lid. Then, form 3-4 small, flat teardrop shapes from fresh clay to act as leaves. -
Attach Lid Leaves:
Score and slip these small leaves onto the dome of the lid so they radiate outward from the base of the central knob. Press them down firmly, curving them to match the dome’s slope. -
Carve Lid Details:
Using a fine tool, carve vein details into the lid leaves. Clean up the central knob, giving it a rounded, mushroom-cap top for easy gripping.
Add Variety
Try using a darkly colored slip or oxide wash (like iron oxide) on the leaf veins before glazing. Wipe it back with a sponge to highlight the carved textures.
Step 4: Glazing & Firing
-
Bisque Fire:
Allow the teapot to dry very slowly under plastic to prevent the handle or spout from cracking. Bisque fire to cone 04. -
Wax Resist:
Wax the foot ring and the gallery where the lid touches the pot. This prevents the lid from fusing shut during the glaze firing. -
Glaze Application:
Dip or pour a clear or semi-matte transparent glaze over the entire piece. This transparency allows the natural speckles of the clay and the carved leaf details to show through clearly. -
Final Fire:
Glaze fire to maturity (usually cone 5 or 6 for stoneware). Check that the glaze breaks beautifully over the leaf textures.
Enjoy brewing your favorite tea in this functional piece of art that brings the garden into your kitchen


What Really Happens Inside the Kiln
Learn how time and temperature work together inside the kiln to transform clay into durable ceramic.
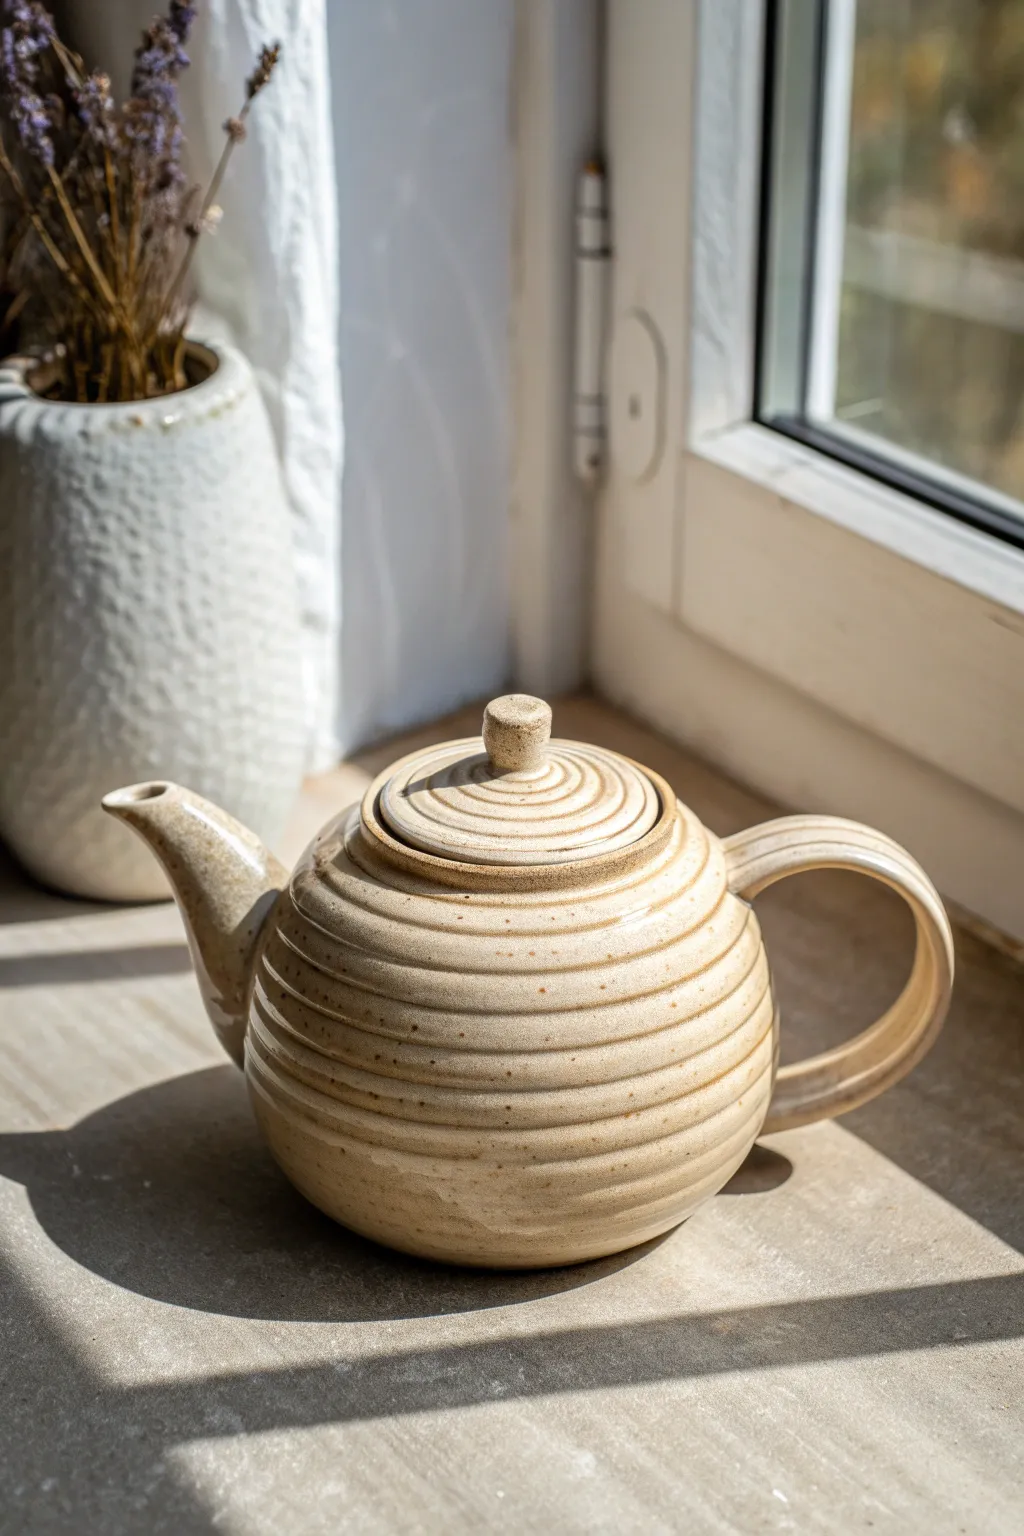
Ball-Knob Teapot For Beginners
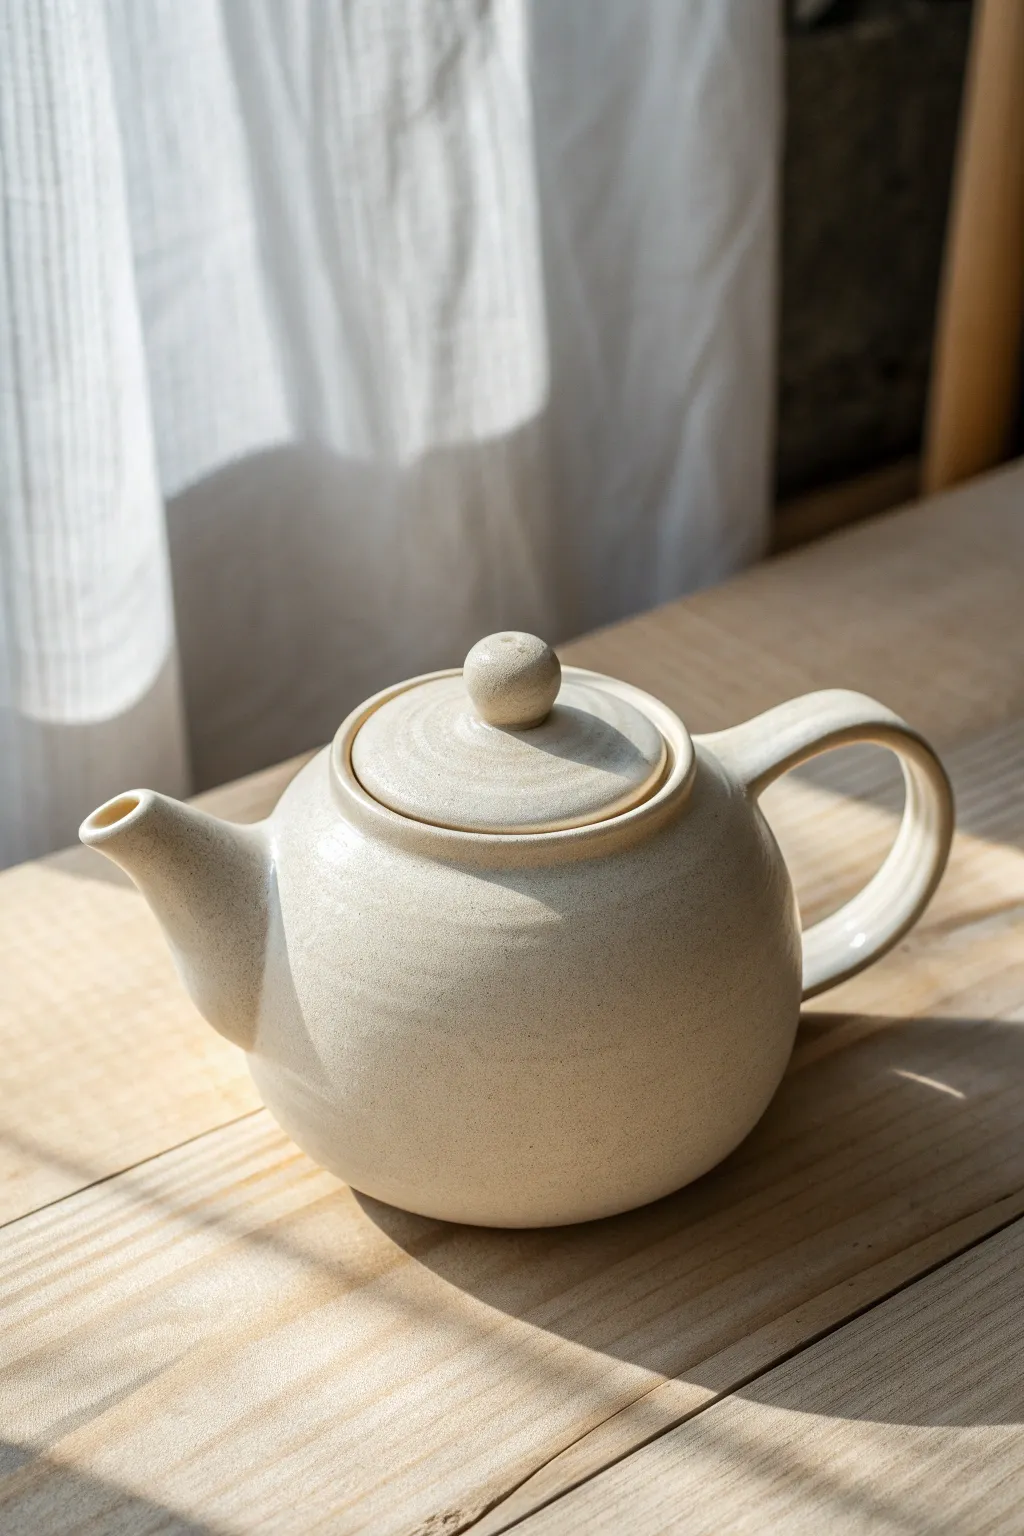
This classic, round-bellied teapot features a soothing cream glaze and a perfectly spherical knob, making it an approachable project for beginners. Its clean lines and gentle curves create a timeless silhouette that sits beautifully in any morning light.
Step-by-Step Tutorial
Materials
- Stoneware clay (smooth, cream or white firing)
- Pottery wheel
- Throwing tools (sponge, needle tool, rib, wire cutter)
- Trimming tools
- Scoring tool or serrated rib
- Slip
- Satin matte cream or oatmeal glaze
- Calipers (optional but helpful)
Step 1: Throwing the Body
-
Center and open:
Begin with about 1.5 to 2 lbs of wedged clay on the wheel. Center it low and wide, then open the clay, leaving a base about 3/8 inch thick to allow for trimming later. -
Pull the walls:
Pull the walls up into a cylinder first, keeping the top slightly thicker for the gallery. Aim for an even thickness throughout the walls. -
Shape the belly:
Using a rib on the outside and your hand on the inside, gently push the belly of the pot outward to create a round, spherical shape. Be careful not to let the walls get too thin at the widest point. -
Create the gallery:
At the rim, use a wooden tool or your thumb to press a small ledge (gallery) inward. This is where your lid will eventually sit. Measure the diameter of this gallery with calipers now. -
Finish the rim:
Smooth the lip of the pot with a chamois or sponge. Cut the pot off the wheel with a wire tool and set it aside to stiffen to leather-hard.
Step 2: Creating Components
-
Throw the lid:
Using a small amount of clay (about 0.5 lb) directly on the wheelhead or a bat, throw a small, flat bowl shape inverted. Measure it constantly to ensure it matches your caliper measurement from the teapot body gallery. -
Shape the knob:
Instead of trimming a knob later, you can throw a solid ball shape directly on top of the inverted lid while throwing, or attach a hand-rolled ball later. For this look, a separate small ball attached during the leather-hard stage works best for crisp definition. -
Throw the spout:
Throw a small, tall cone without a bottom. Pull it taller than you think you need, narrowing the neck significantly. Use a needle tool to cut it off the wheel. -
Pull the handle:
Pull a strap of clay for the handle. I like to let this dry briefly until it can hold an arch without collapsing, forming it into a ‘C’ shape on a table.
Spout Drip Fix
To prevent dripping, sharpen the inside edge of the spout lip slightly after throwing. This sharp edge ‘cuts’ the water flow cleanly when pouring stops.
Step 3: Assembly and Trimming
-
Trim the body:
Once the body is leather-hard, center it upside down on the wheel. Trim the bottom to create a rounded curve that continues the line of the belly, refining the foot ring. -
Trim the lid:
Trim the excess clay from the heavy part of the lid so it fits the gallery perfectly. If you didn’t throw the knob, score and slip a small clay ball onto the center now. -
Cut and fit the spout:
Cut the base of your spout at an angle to fit the curve of the teapot body. Hold it up to the pot to check the angle; the tip of the spout should be level with the rim of the teapot. -
Attach the spout:
Trace the spout placement on the body. Drill multiple small strainer holes inside this outline. Score and slip both surfaces thoroughly, pressing the spout firmly into place and smoothing the seam. -
Attach the handle:
Score and slip the handle attachments directly opposite the spout. Secure the top and bottom of the ‘C’ shape, blending the clay smoothly into the body for a seamless look. -
Clean up:
Wipe down the entire piece with a damp sponge to remove any joining slip or rough fingerprints.
Make It Yours
Before glazing, gently dab a sponge with iron oxide wash lightly over the texture lines or throw marks to highlight the spiral movement underneath the cream glaze.
Step 4: Glazing
-
Bisque fire:
Fire the assembled teapot and lid to cone 04 (or your clay’s bisque temperature). -
Wax the galleries:
Apply wax resist carefully to the gallery on the body and the rim of the lid where they will touch. This prevents the lid from fusing to the pot during firing. -
Apply glaze:
Dip the teapot and lid into a satin cream or oatmeal glaze. Shake off excess gently. Check the spout hole to ensure it isn’t clogged with glaze. -
Final fire:
Fire to cone 6 (or your glaze/clay maturity temperature) in an oxidation atmosphere to maintain that warm, neutral tone.
Brew your favorite tea and enjoy the comfort of your handmade creation.
Easy Teapot With Coil Handle
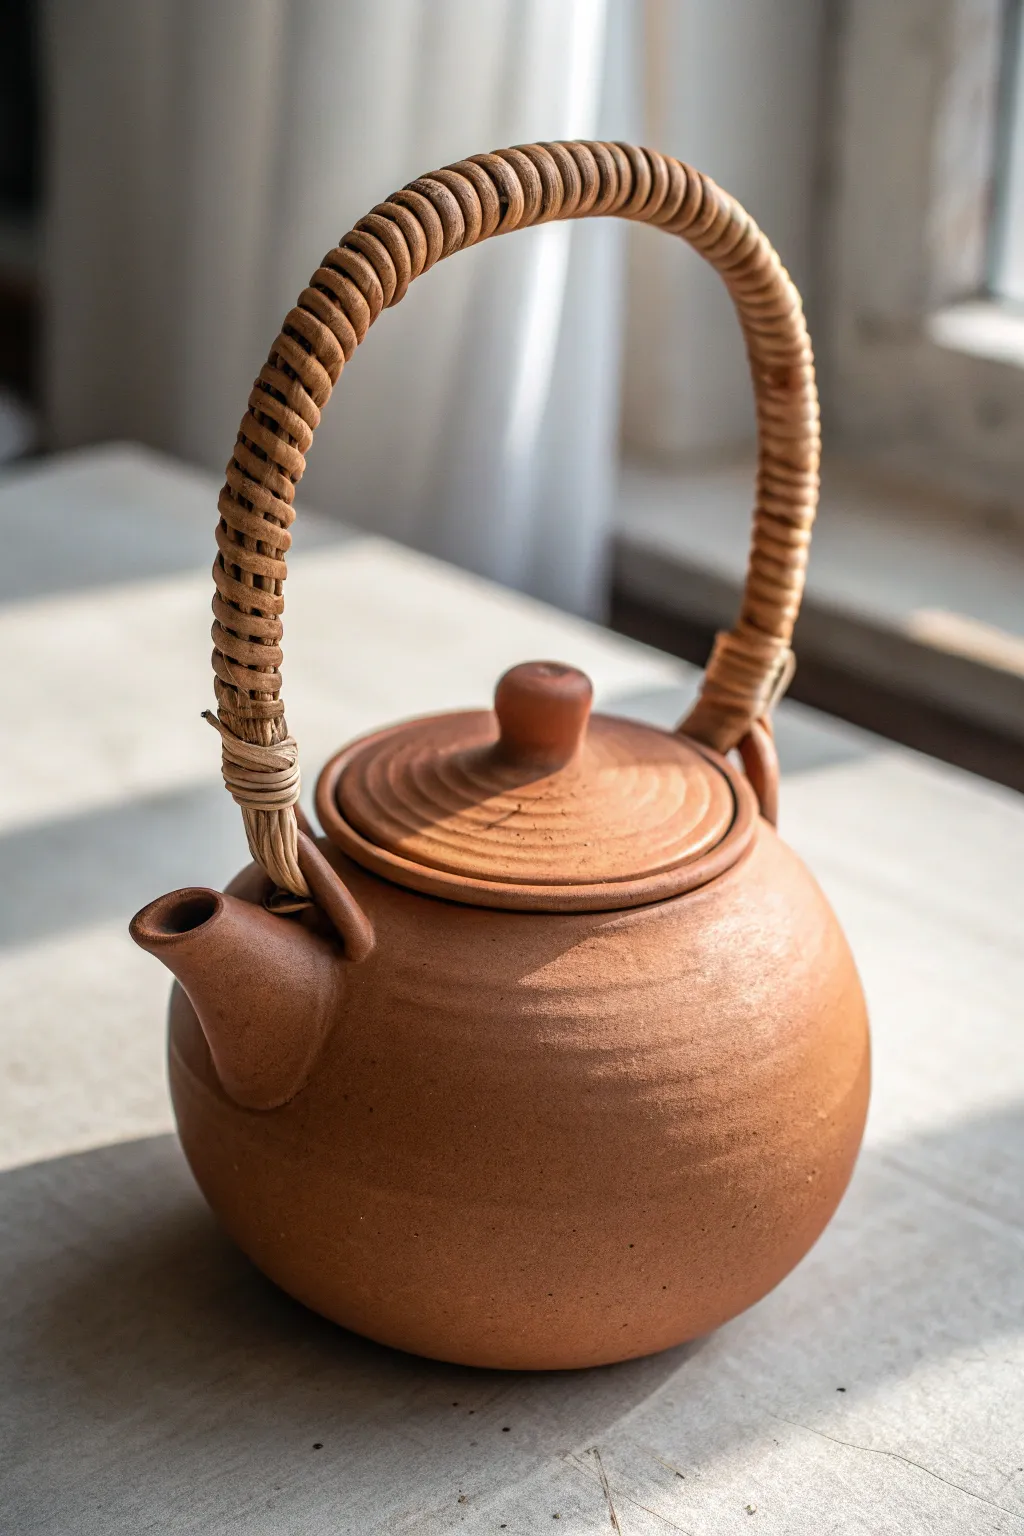
Create a warm, earthy vessel that balances traditional pottery techniques with a unique, textured handle design. This project focuses on building a perfectly round body and crafting a distinctive, wrapped-style handle that adds organic charm to your tea service.
How-To Guide
Materials
- Terracotta or red stoneware clay
- Pottery wheel (optional, can be hand-built)
- Needle tool
- Rib tool (wooden or metal)
- Sponge
- Thick cane or rattan for the handle (or textural clay coil)
- Slip and scoring tool
- Wire cutter
- Calipers (optional for lid sizing)
- Kiln
Step 1: Forming the Body
-
Prepare the Clay:
Begin with a well-wedged ball of terracotta or red stoneware clay, ensuring all air bubbles are removed to prevent cracking during firing. -
Center and Open:
Throw the ball onto the wheel head or place it on a banding wheel if hand-building. If throwing, center the clay and open it up, leaving a floor thickness of about a quarter-inch. -
Pull the Walls:
Pull the walls up into a cylinder first to get height, keeping the walls even in thickness. -
Shape the Belly:
Using a rib tool on the outside and your hand on the inside, gently push the clay outward to create a bulbous, round shape. Smooth the surface consistently to create the subtle horizontal ‘throwing lines’ visible in the finish. -
Finish the Rim:
Collar the neck in slightly and use a shammy or sponge to smooth the rim perfectly flat so the lid will sit flush later. -
Trim the Base:
Once the body is leather-hard, trim the bottom to create a clean foot ring that lifts the pot slightly off the table.
Clean Pour Tip
When attaching the spout, ensure the tip is level with the rim of the pot. If it’s too low, you won’t be able to fill the teapot completely without spilling.
Step 2: Creating the Spout and Lugs
-
Form the Spout:
Roll a small cone of clay or throw a tiny cylinder without a bottom. Shape it into a short, stout spout, cutting the attachment end at an angle to fit the curve of the pot. -
Attach the Spout:
Score the pot body and the spout base, apply slip, and press firmly. Smooth the join with a modeling tool so it looks seamless. -
Create Handle Lugs:
Fashion two small loops or ‘ears’ from clay. These need to be sturdy enough to hold the handle material later. -
Attach the Lugs:
Attach these loops on the shoulder of the pot, directly opposite each other and at a 90-degree angle from the spout.
Step 3: Structuring the Lid
-
Measure the Opening:
Use calipers to measure the inner diameter of your teapot’s rim precisely. -
Throw or Build the Lid:
Create a flat disk that fits this measurement, adding a vertical flange underneath to keep it from sliding off. -
Add Texture Details:
While the lid spins (or while turning it on a banding wheel), use a tool to carve concentric circles for visual interest. -
Attach the Knob:
Form a small, rounded knob and score-and-slip it onto the center of the lid.
Level Up: Burnishing
For a smoother, satin-like finish without glaze, rub the leather-hard clay with the back of a spoon (burnishing) before firing. It creates a soft sheen.
Step 4: The Distinctive Handle
-
Fire the Piece:
Bisque fire the teapot body and lid. Since this is an unglazed look, you may choose to high-fire it now to vitrify the clay while keeping the matte finish. -
Prepare the Handle Material:
Soak thick rattan or cane in warm water until it is pliable. Alternatively, for a purely ceramic version, you could have extruded a textured coil and fired it attached, but organic material is often easier. -
Anchor the End:
Loop one end of your damp cane through one of the ceramic lugs and secure it tightly with a binding knot. -
Wrap the Arc:
Create an arch shape with a core wire or thick reed, then wrap your thinner cane tightly around this core in a spiral pattern, ensuring no gaps show. -
Secure the Finish:
Wrap the cane through the second ceramic lug and bind it off securely. As the cane dries, it will shrink slightly and tighten around the lugs.
Brew a pot of herbal tea and enjoy the grounded feeling of pouring from your own handmade creation.

TRACK YOUR CERAMIC JOURNEY
Capture glaze tests, firing details, and creative progress—all in one simple printable. Make your projects easier to repeat and improve.
Short Spout, Low-Drip Teapot
This charming, handmade teapot features a gentle, rounded belly and a practical short spout designed to minimize drips, all finished in a warm, speckled cream glaze. Its cozy, organic form makes it a perfect introductory project for wheel-throwing or a meditative hand-building session.
Detailed Instructions
Materials
- Stoneware clay (preferably a buff or speckled body)
- Pottery wheel (or banding wheel for coil building)
- Throwing sponge
- Rib tool (metal or wood)
- Needle tool
- Wire cutter
- Loop trimming tools
- Speckled cream or ‘oatmeal’ cone 6 glaze
- Kiln
- Scoring tool or serrated rib
- Slip
Step 1: Forming the Body
-
Center and open:
Start with about 2-3 pounds of wedged clay on the wheel. Center it firmly, then open the clay, leaving a base about 3/8-inch thick to allow for later trimming. -
Establish the floor:
Compress the floor with a rib or sponge to prevent S-cracks during drying. -
Pull the cylinder:
Begin pulling the walls upward. Keep the shape relatively vertical at first, aiming for even wall thickness from bottom to top. -
Shape the belly:
Using a rib on the outside and your hand on the inside, gently push the clay outward to create that generous, rounded curve. I like to work slowly here to ensure the curve is continuous. -
Create the gallery:
At the rim, collar the clay in slightly. Use your finger or a specialized tool to split the rim, creating a small internal ledge (gallery) where the lid will sit. -
Measure the opening:
Use calipers to measure the exact diameter of your gallery. This measurement is crucial for making a snug-fitting lid.
Step 2: Throwing the Spout and Lid
-
Throw the spout:
Use a small lump of clay (about 1/2 pound) to throw a short, tapered tube. Make the base wider than the tip. For this style, keep the spout relatively short and minimal. -
Refine the spout tip:
While the pottery wheel is spinning slowly, use your finger to gently flare the very tip downward just a hair; this sharp edge helps cut the flow of tea and prevents dripping. -
Throw the lid:
Using the caliper measurement, throw a lid ‘off the hump’ or centered on a bat. Include a small, solid knob in the center for lifting.
Fixing a Dribbling Spout
If the spout drips post-firing, the edge likely isn’t sharp enough. Apply a tiny amount of water-repellent wax to the underside of the spout tip to break the surface tension of the liquid.
Step 3: Trimming and Assembly
-
Trim the body:
Once the body is leather hard, trim the bottom to create a clean foot ring that mirrors the curve of the pot’s shoulder. -
Create the handle:
Pull a strap handle from a lump of clay. Let it curve naturally into a ‘C’ shape and set it aside until it holds its form but is still flexible. -
Prepare the spout location:
Hold the spout up to the body to find the right angle. Mark the spot, then use a specialized hole cutter or a needle tool to create a strainer grid of small holes in the teapot body. -
Attach the spout:
Cut the base of the spout at an angle to fit the curve of the pot. Score and apply slip to both surfaces, then press firmly to attach. Smooth the seam with a small coil if needed. -
Attach the handle:
Score and slip the attachment points on the opposite side of the spout. Attach the top of the handle first, smooth the join, then curve it down and attach the bottom. -
Fit the lid:
Test fit the lid. If it’s too tight, you can carefully sand or trim it now while leather hard. Use a needle tool to poke a tiny steam vent hole in the lid, near the knob.
Cane Handle Alternative
Instead of a clay handle, attach two small clay loops (lugs) on the shoulder. After firing, attach a bamboo or bent wood handle for a rustic, mixed-material aesthetic.
Step 4: Glazing and Firing
-
Bisque fire:
Slowly dry the assembled pot under plastic for several days to equalize moisture, then bisque fire to cone 04. -
Apply glaze:
Dip the entire pot into a speckled cream or oatmeal glaze. Ensure the inside is fully coated. Wipe the foot ring and the gallery rim clean so the lid implies sticks. -
Glaze fire:
Fire to cone 6 (or your clay body’s maturation temperature). Allow the kiln to cool completely before opening.
Now brew your favorite loose-leaf tea and enjoy the satisfying pour from your handcrafted vessel
Stamped Texture Teapot
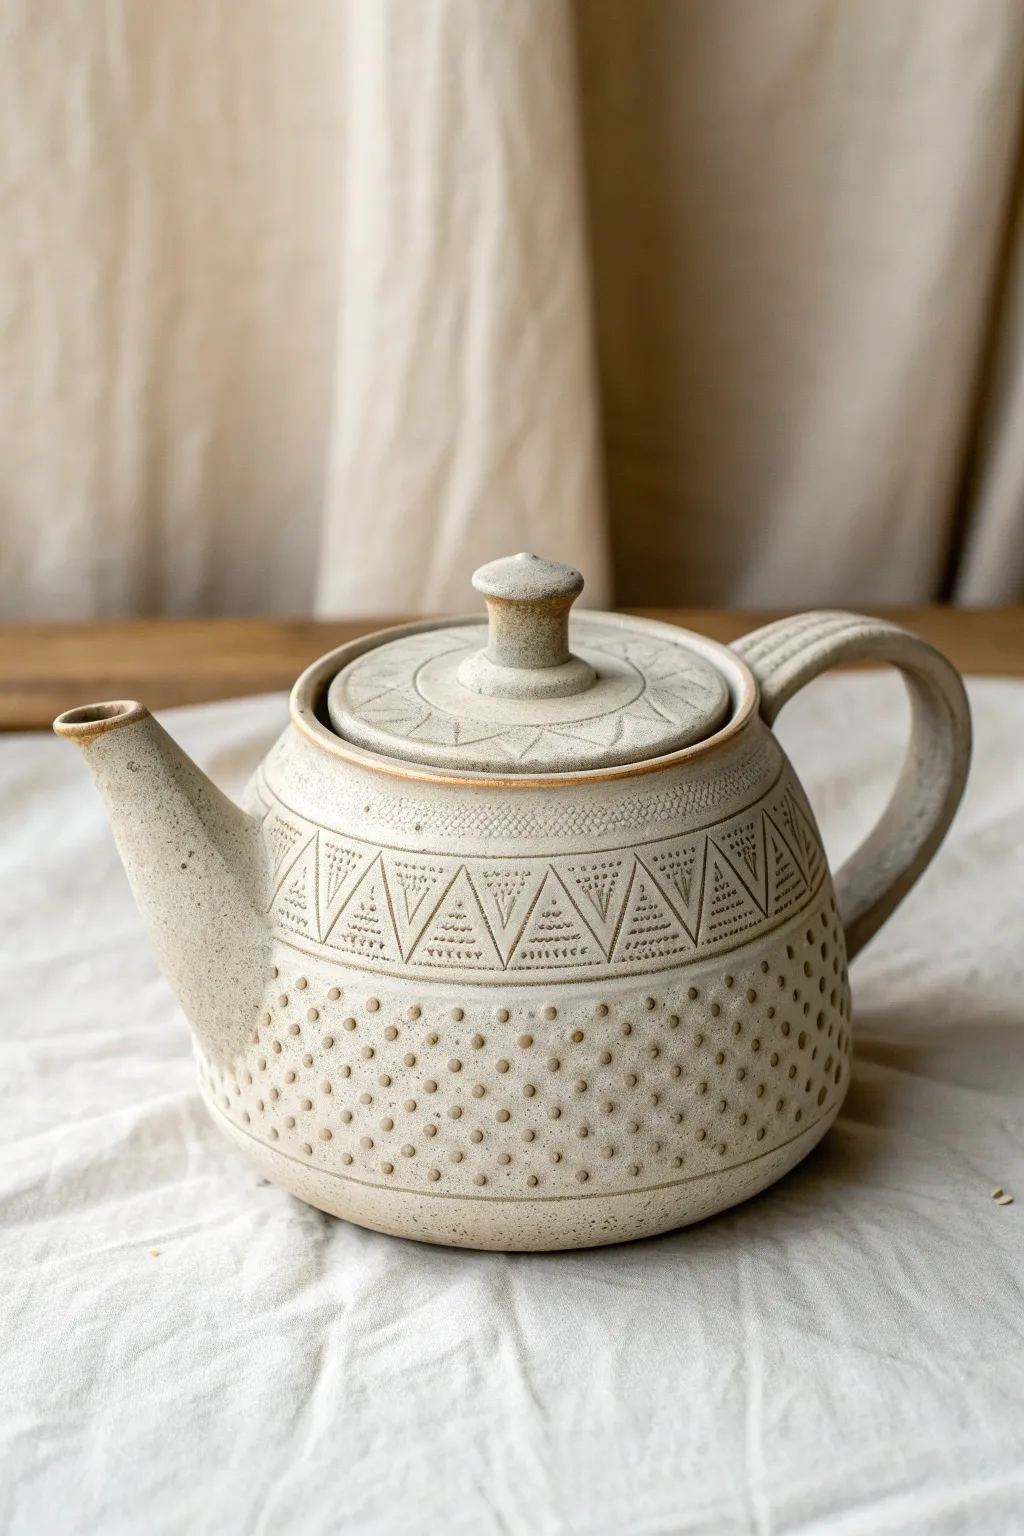
This handmade teapot features a charming combination of soothing repetition and geometric precision. With its tactile rows of stippled dots and a striking band of patterned triangles, this project explores the beauty of simple stamping tools on raw clay.
How-To Guide
Materials
- Stoneware clay (speckled or buff)
- Pottery wheel (or slab roller/hand-building tools)
- Ribs (metal and wooden)
- Needle tool
- Trimming tools
- Small round dowel or drill bit (for dot stamping)
- Triangle stamp (handmade or purchased)
- Scoring tool or serrated rib
- Slip
- Sponge
- Wire cutter
- Matte oatmeal or cream glaze
Step 1: Throwing the Body
-
Center and open:
Begin with about 2-3 pounds of well-wedged clay. Center it on the wheel and open the form, leaving the floor slightly thicker than usual to support trimming later. -
Pull the walls:
Pull the clay up into a cylinder first, then gently shape it into a bulbous curve. Aim for a wide base that tapers inward toward the top, creating a classic beehive silhouette. -
Form the gallery:
At the rim, use a wooden rib or your fingers to create a recessed gallery. This ledge is crucial as it will hold the lid securely in place. -
Refine the curve:
Use a flexible metal rib on the exterior while pushing out gently from the inside to perfect the curve and remove throwing lines. The surface needs to be smooth for the stamping to look crisp.
Uneven Stamping?
If your stamps are distorting the wall shape, support the clay wall from the inside with a wooden rib or your hand while you press the stamp on the outside.
Step 2: Stamping the Texture
-
Leather hard stage:
Allow the pot to dry to a soft leather-hard state. I find that if the clay is too wet, the stamps stick; too dry, and they crack the surface. -
Mark your guidelines:
Place the pot on a banding wheel. lightly etch two parallel horizontal lines around the mid-upper section to define the band where your triangles will go. -
Stamp the triangles:
Using your triangle stamp, press firmly into the clay between your guidelines. Alternate the orientation—one pointing up, one pointing down—to create a continuous zagging pattern. -
Add detail to triangles:
If your stamp doesn’t have internal texture, use a needle tool or a very small stamp to add rows of tiny dots or lines inside each triangle for that intricate look shown in the photo. -
Stipple the base:
Take a small round dowel or the back of a drill bit. Press rows of dots into the lower half of the teapot. Start just below the triangle band and work your way down, staggering the dots like bricks for a uniform texture.
Step 3: Creating Components
-
Throw the lid:
Measure the gallery diameter with calipers. Throw a lid to fit upside down on a bat, or throw it right-side up with a knob. The example shows a tiered detail on the lid, so carve a slight step into the surface. -
Texture the lid:
While the lid is leather hard, use the triangle stamp to create a radial pattern pointing inward toward the knob. -
Pull the handle:
Pull a strap handle from a lug of clay. Give it a deep curve. Use a tool to gently groove parallel lines down the length of the handle for added visual interest. -
Throw the spout:
Throw a small spout on the wheel. It should have a wide base for attachment and taper to a sharp, clean creating a good pouring lip. Bend it slightly while wet to give it gesture.
Pro Tip: Clean Pour
Sharpen the very edge of the spout lip with a fettling knife or rib just after throwing. A sharp, crisp edge
Step 4: Assembly and Finishing
-
Trim the base:
Place the teapot body upside down on the wheel (using a chuck if necessary) and trim a clean foot ring. Smooth the transition where the stippling ends. -
Attach the spout:
Hold the spout up to the body to check the angle. The tip of the spout should be level with the rim. Score and slip both surfaces, then press firmly to attach. Smooth the seam. -
Attach the handle:
Attach the handle opposite the spout. Ensure the curve allows enough room for a hand to grip comfortably without touching the hot body of the pot. -
Punch holes:
Before the clay gets too dry, use a hole cutter or drill bit to puncture a strainer grid behind where the spout attaches. -
Bisque fire:
Let the teapot dry slowly under plastic to prevent handle cracks. Once bone dry, bisque fire to Cone 04. -
Glaze and final fire:
Dip the teapot in a matte oatmeal or cream glaze. The glaze should be thin enough that it breaks over the stamped texture, highlighting the relief. Wipe the foot ring and lid contact points, then fire to maturity (likely Cone 6).
Now brew your favorite tea and enjoy the way the texture feels in your hands
Leaf-Imprint Teapot
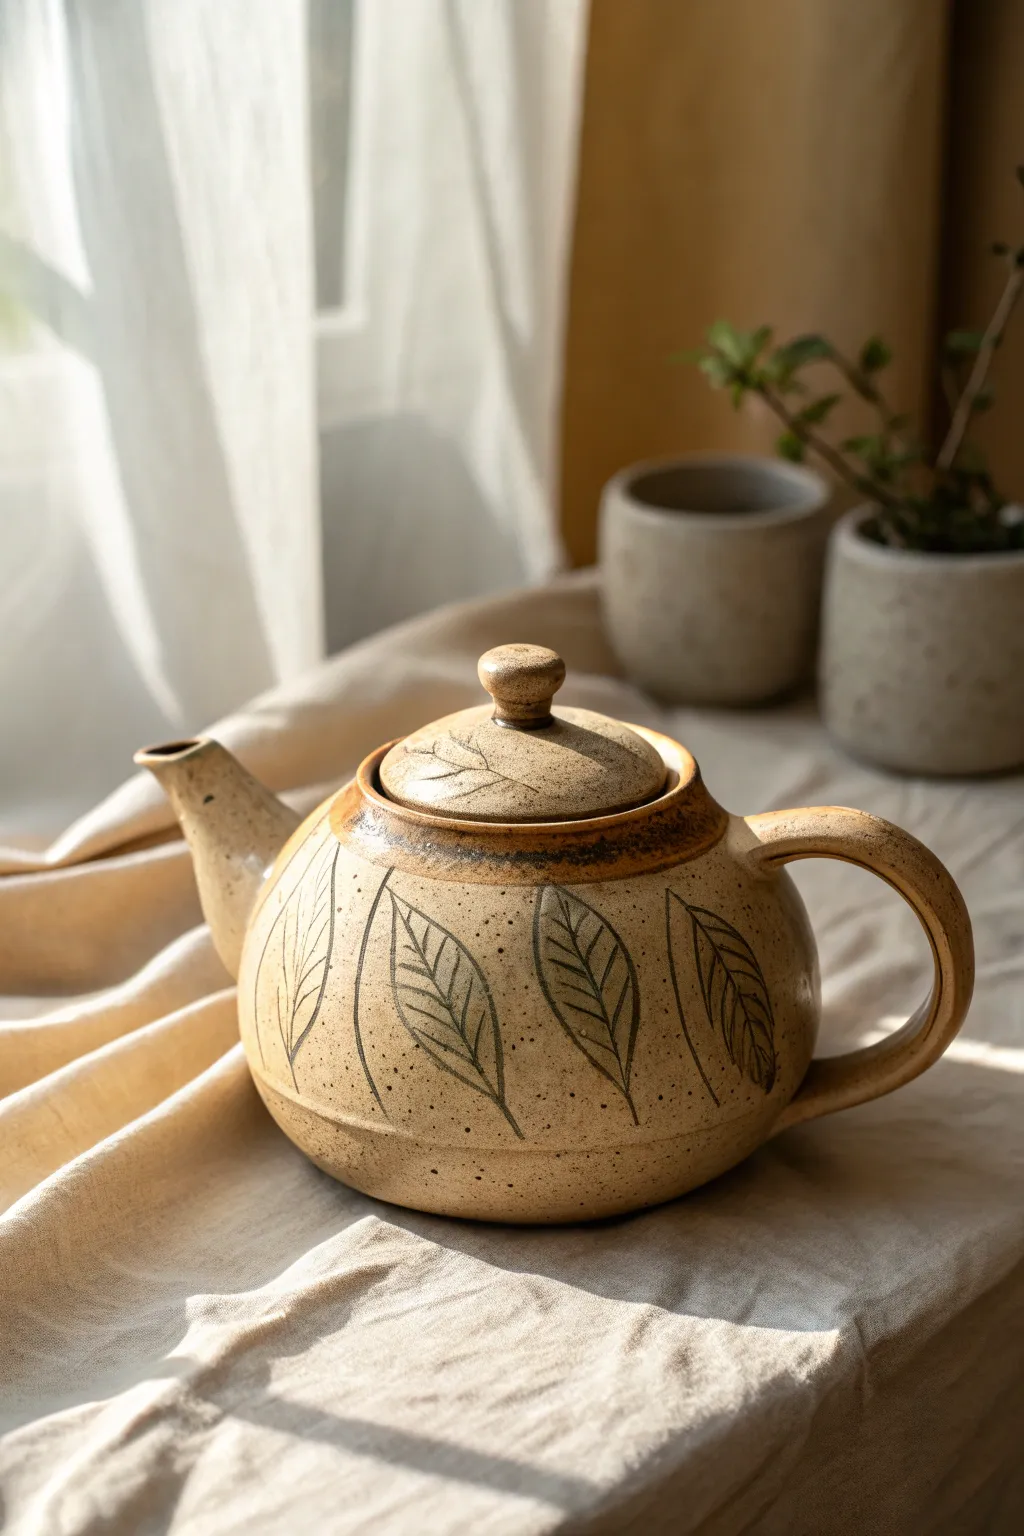
This charming project combines the natural warmth of speckled stoneware with simple sgraffito-style leaf motifs. The result is a cozy, earthy vessel perfect for slow mornings, featuring a comforting rounded shape and organic texture.
Step-by-Step
Materials
- Speckled buff stoneware clay (approx. 3-4 lbs)
- Pottery wheel (or can be hand-built with coils)
- Rib tools (metal and wooden)
- Needle tool
- Loop trimming tools
- Sponge
- Scoring tool or serrated rib
- Slip (clay mixed with water)
- Carving tool or fine stylus
- Dark underglaze (black or dark brown)
- Clear matte glaze
- Calipers (optional but helpful)
Step 1: Throwing the Body and Lid
-
Center the clay:
Start with about 2.5 lbs of well-wedged speckled clay on the wheel. Center it firmly into a low, wide mound to prepare for opening. -
Open and pull the walls:
Open the clay and pull the walls upward. Aim for a bulbous, spherical shape by applying pressure from the inside out as you pull, keeping the opening at the top slightly narrower than the belly. -
Shape the gallery:
At the rim, use a wooden tool or your thumb to press a small ledge (gallery) into the inside of the neck. This is where your lid will sit. Smooth the rim with a chamois. -
Measure and cut:
Measure the diameter of your gallery with calipers. Wire the pot off the wheel and set it aside to stiffen to leather-hard. -
Throw the lid:
Using a smaller lump of clay (approx. 0.5 lb), throw a small dome shape upside down (a mood jar lid style) or right-side up, ensuring the flange fits the measurement you took with the calipers. -
Throw the spout:
Throw a tall, narrow cone shape for the spout. Ensure the base is wide enough to attach to the pot body, tapering to a sharp, clean pouring edge at the top.
Keep the spout high
Ensure the tip of your spout sits higher than the rim of the teapot body. If it’s too low, you won’t be able to fill the pot fully without tea spilling out the spout.
Step 2: Trimming and Assembly
-
Trim the body:
Once the body is leather-hard, center it upside down on the wheel. Trim the base to create a designated foot ring, mirroring the curve of the pot inside the foot. -
Trim the lid:
Trim the excess clay from the lid to create a pleasant curve. You can either throw a knob during the initial step or hand-build a small mushroom-shaped knob and attach it now by scoring and slipping. -
Attach the spout:
Hold the spout against the pot to find the correct angle. Trace the outline, cut a hole in the body (leaving a sieve if desired), and score and slip both contact areas firmly to attach. Smooth the transition coil. -
Pull and attach the handle:
Pull a strap of clay for the handle. Attach it opposite the spout, creating a comfortable C-curve or ear-shape. Ensure the handle is aligned vertically with the spout.
Step 3: Decoration and Glazing
-
Sketch the leaves:
Lightly scratch the outline of large, simple leaves around the belly of the pot using a needle tool. Spacing them evenly creates a nice rhythm. -
Carve the details:
I like to use a fine loop tool or a sharp stylus to carve slightly deeper lines for the leaf veins. The goal is to create physical grooves that will catch the glaze later. -
Bisque fire:
Allow the teapot to dry slowly and completely (this may take a week). Bisque fire it to Cone 04 (or your clay body’s specifications). -
Apply an oxide wash:
Brush a dark oxide wash or underglaze into the carved leaf lines. Wipe away the excess with a damp sponge on the surface, leaving the dark color trapped only in the recessed lines. -
Glaze application:
Dip or spray the entire teapot in a clear matte glaze. This allows the natural speckles of the clay and the dark leaf carvings to show through clearly. -
Final firing:
Fire the teapot to the maturity temperature of your clay and glaze (likely Cone 5 or 6). Ensure the lid is fired separately or with wax resist on the contact points to prevent sticking.
Lid fitting issues
If your lid is slightly too big after trimming, let the pot dry a bit more—it shrinks. If still too big, gently sand the rim after the bisque firing but before glazing.
Now you have a beautifully handcrafted vessel ready to brew your favorite tea
Slip-Trailed Swirl Teapot
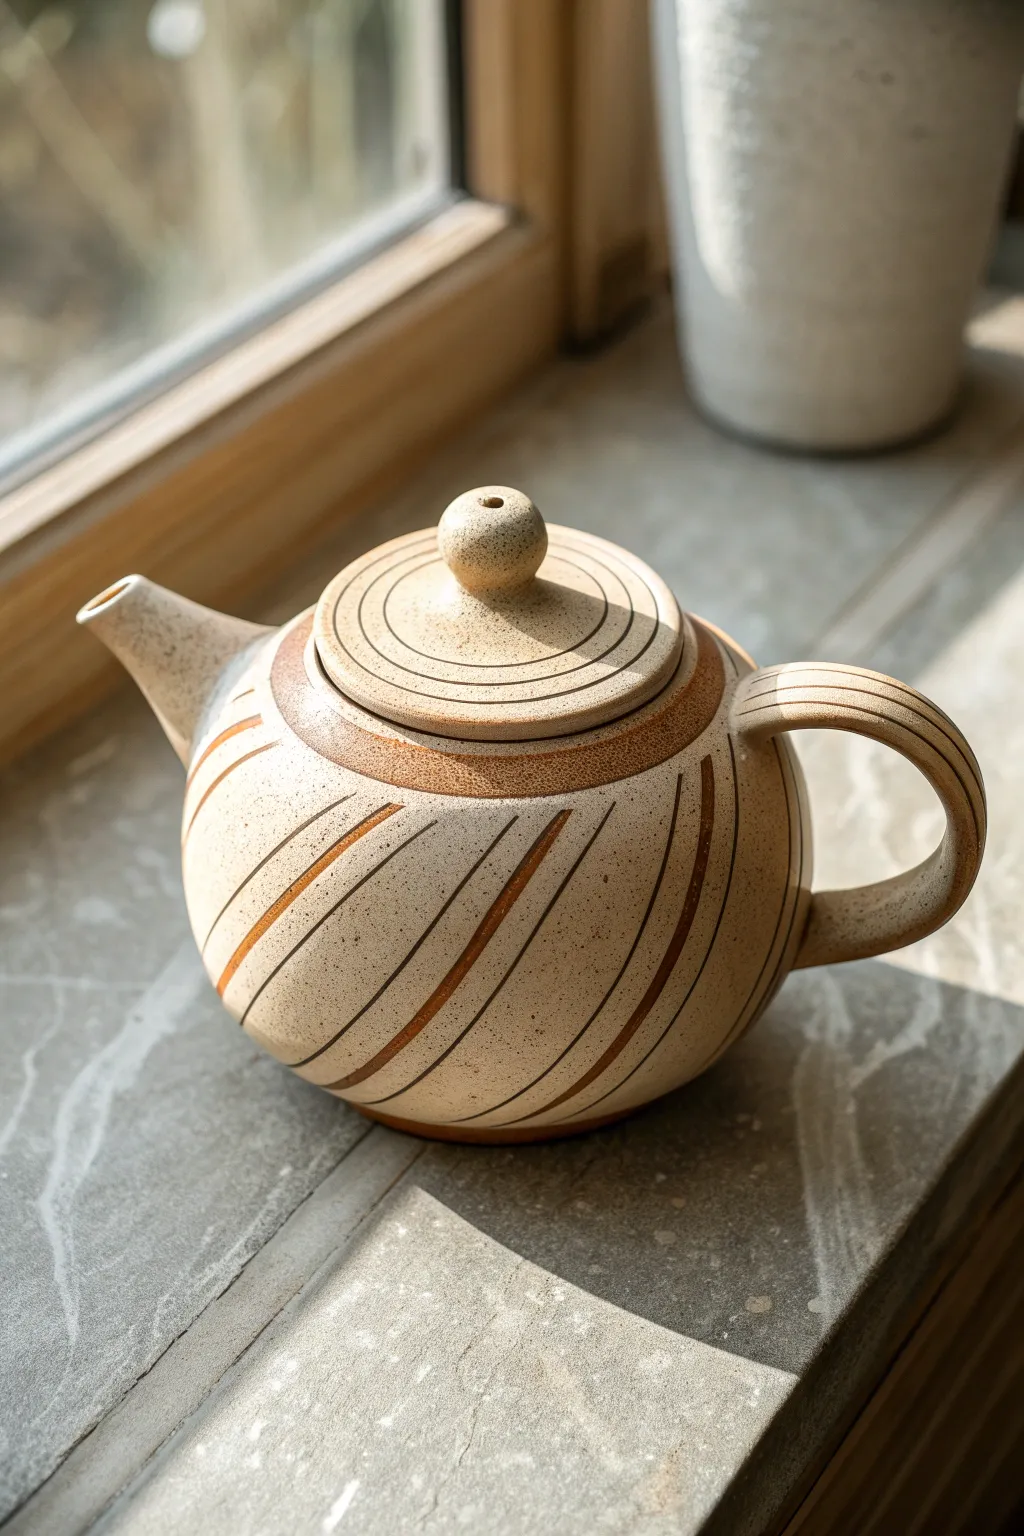
This charming teapot features a warm, speckled clay body adorned with rhythmic, swirling lines that dance across its surface. The technique uses a combination of carving and slip inlay to create a smooth, integrated finish that feels as good as it looks.
Step-by-Step Tutorial
Materials
- Speckled stoneware clay (approx 2-3 lbs)
- Pottery wheel
- Throwing tools (sponge, rib, wire cutter)
- Calipers
- Needle tool
- Trimming tools
- Dark brown underglaze or slip (terra cotta color)
- Small carving loop tool
- Soft rubber kidney rib
- Scoring tool
- Clear matte glaze
Step 1: Throwing the Body & Lid
-
Center and open:
Begin with about 1.5 lbs of wedged speckled clay. Center it on the wheel and open the form, aiming for a rounded, bulbous belly shape rather than a tall cylinder. -
Shape the gallery:
As you pull up the walls, collar the neck in significantly. Use your thumb or a gallery tool to press a distinct ledge (gallery) inside the rim to hold the lid securely. Measure this width with calipers. -
Form the spout and handle:
Hand-build or throw a small, tapered spout and pull a sturdy strap handle from a separate piece of clay. Set these aside under plastic to firm up to leather-hard. -
Throw the lid:
Using a small amount of clay (hummingbird method or off a hump), throw a lid that matches your caliper measurement. Creating a simple, round knob on top during this phase ensures it’s perfectly centered. -
Refine the lid surface:
While the lid is spinning, use a sharp tool to gently incise concentric circles onto the top surface of the lid, radiating out from the knob. This adds texture that complements the final design.
Step 2: Assembly & Decoration
-
Trim the foot:
Once the body is leather-hard, trim a clean foot ring. I find this is the best time to do a final check of the surface smoothness with a rib before decorating. -
Map out the swirls:
Using a needle tool, lightly sketch the sweeping diagonal curves across the belly of the pot. Aim for a pattern that mimics wind-blown reeds or fabric folds. -
Carve the channels:
Use a small carving loop tool to follow your sketched lines, creating shallow channels. Keep the depth consistent, about 1-2mm deep. -
Apply the slip inlay:
Fill the carved channels generously with thick, dark brown slip or underglaze. It’s okay if it looks messy and overflows the lines; you want sure the grooves are completely packed. -
Scrape back:
Let the slip dry until it’s no longer shiny but not bone dry. Carefully scrape away the excess surface slip with a metal rib, revealing the crisp brown lines inlaid into the beige clay. -
Attach components:
Score and slip the areas for the spout and handle. Attach the spout low on the belly and the handle opposite it. Ensure the spout tip is level with the rim so it doesn’t drip. -
Decorate the shoulder:
Before the clay dries too much, apply a band of the dark slip around the shoulder (the area just below the gallery). Use a stiff brush or a serrated rib to add faint texture to this colored band. -
Detail the handle:
Use a modeling tool to press linear grooves along the length of the handle, echoing the concentric circles of the lid.
Smearing Issues?
If the dark slip smears across the beige clay while scraping, the slip is too wet. Wait another 10-15 minutes. It should flake off like shavings, not smear like mud.
Step 3: Finishing Touches
-
Smoothing:
Go over the entire piece with a soft rubber kidney rib to compress the clay and smooth out any harsh edges from the scraping process. -
Bisque fire:
Allow the teapot to dry slowly and completely before loading it into the kiln for a bisque firing (usually Cone 06 or 04). -
Glazing:
Dip or spray the exterior and interior with a clear matte glaze. The matte finish preserves the natural stony look of the speckled clay and keeps the inlaid lines sharp. -
Final wipe:
Wipe the foot ring clean with a damp sponge to prevent it from sticking to the kiln shelf. -
Glaze fire:
Fire to the maturity temperature of your clay body (typically Cone 5 or 6 for stoneware).
Variation Idea
Try using colored mason stains in white slip for the inlay instead of brown. A teal or cobalt blue inlay creates a striking modern contrast against the beige body.
Once fired, you’ll have a beautifully tactile teapot ready for your afternoon brew
Two-Tone Dipped Glaze Teapot
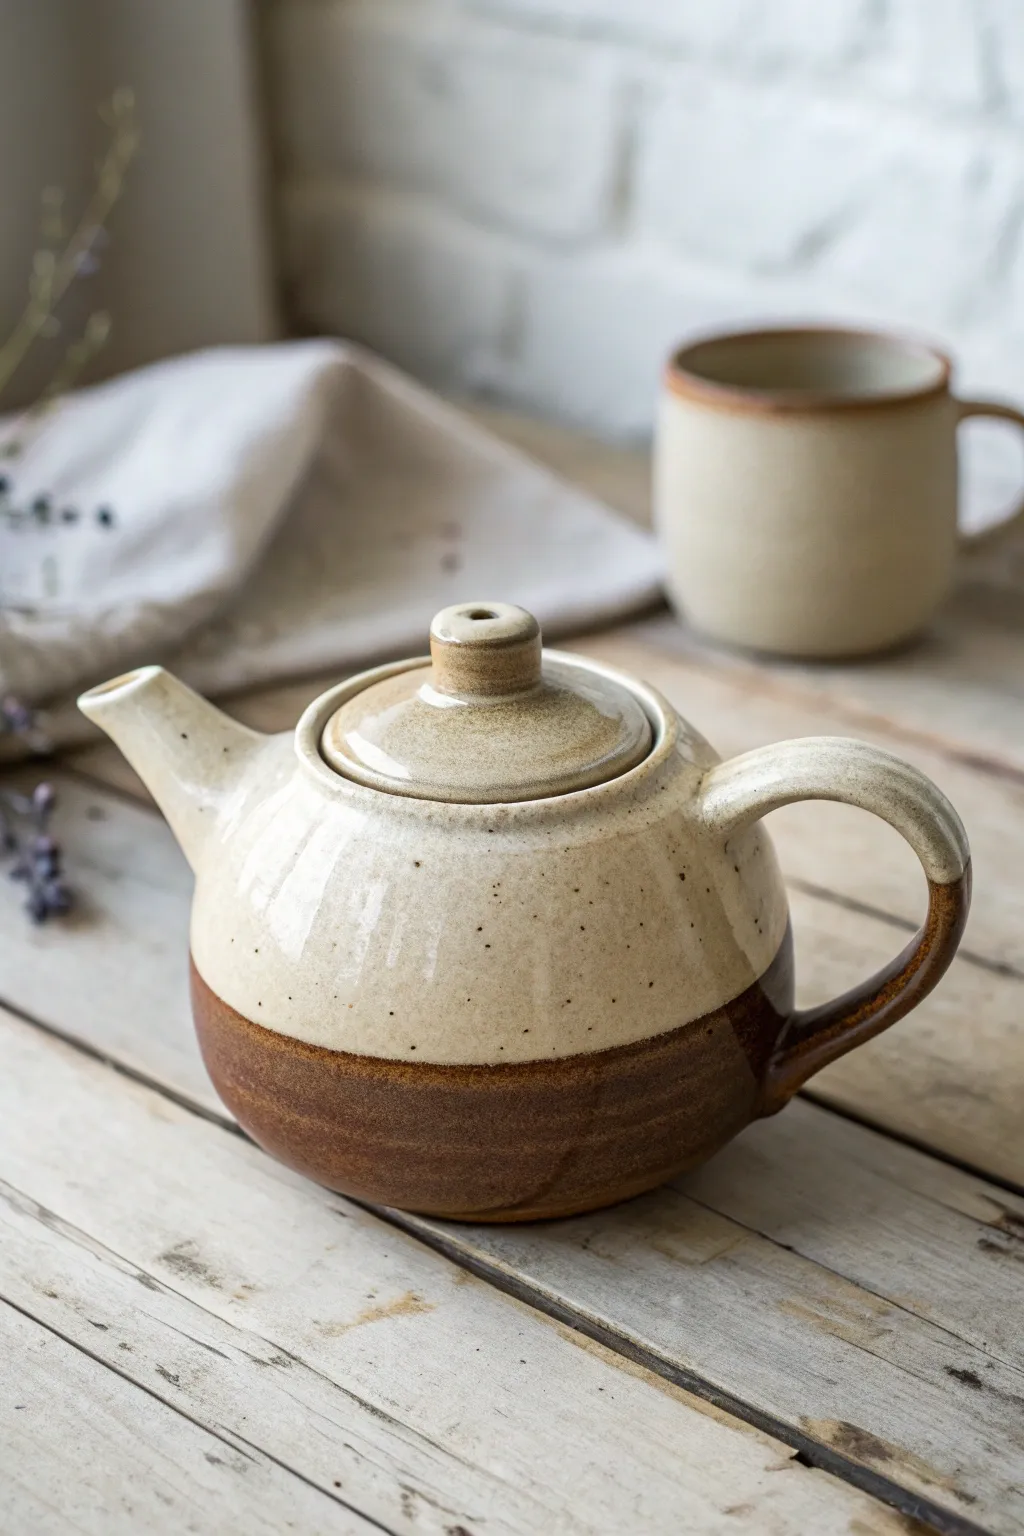
Master the art of the dipped glaze aesthetic with this approachable wheel-thrown teapot project. The result is a cozy, rustic vessel featuring a warm brown base that transitions beautifully into a creamy, speckled upper body.
Detailed Instructions
Materials
- Speckled stoneware clay (approx. 3-4 lbs)
- Pottery wheel
- Throwing tools (sponge, needle tool, rib, wire cutter)
- Warm brown dipping glaze (gloss or satin)
- Creamy white speckle dipping glaze
- Calipers
- Scoring tool or fork
- Slip
- Wax resist
- Teapot trimming tools
Step 1: Throwing the Body and Lid
-
Center and open:
Start with about 2 pounds of well-wedged speckled clay on the wheel. Center it firmly and open the clay, pulling the floor out to about 3-4 inches wide for a stable base. -
Pull the walls:
Pull the walls up into a cylinder first, keeping the rim slightly thicker for strength. Remember, we are aiming for a rounded belly, so ensure you have enough clay thickness in the middle section. -
Shape the belly:
Using a rib on the outside and your hand inside, gently push the belly of the pot outward to create that classic round teapot curve. Bring the neck in slightly at the top to form a gallery for the lid. -
Refine the gallery:
Use a wooden stick tool or the corner of your rib to define a sharp, cleaner gallery (shelf) inside the rim where the lid will sit. Measure this diameter with calipers before cutting the pot off the wheel. -
Throw the lid:
Using a smaller amount of clay (about 0.5 lb), throw a lid ‘off the hump’ or centered on a bat. Use your caliper measurement to ensure the lid flange fits perfectly into the gallery you just made. Shape a simple, rounded knob at the top.
Clean Dips
For a straighter line between the two glaze colors, use a wide masking tape to define the boundary before dipping the first color. Remove it before the second dip.
Step 2: Spout, Handle and Assembly
-
Throw the spout:
Throw a tall, tapered cylinder for the spout. I like to make it slightly longer than necessary so I can trim it to the perfect angle later. Ensure the rim of the spout is thin and sharp to prevent dripping. -
Trim the components:
Once the body, lid, and spout are leather hard, trim away excess clay. Turn the body over to trim a clean foot ring. This delineates where the glaze will stop. -
Pull the handle:
Pull a strap of clay for the handle. For this design, aim for a medium thickness that feels comfortable in the hand, with a slight taper. -
Attach the spout:
Hold the spout against the body to find the right angle; the tip should be level with the rim. Cut the spout base to fit the curve of the pot. Score and slip both surfaces, then press firmly to attach. Smooth the seam. -
Drill straining holes:
Before the spout is permanently set, use a drill bit or hole cutter to create straining holes in the body of the pot behind where the spout attaches. -
Attach the handle:
Score and slip the attachment points opposite the spout. Attach the top of the handle near the rim and the bottom near the belly’s widest point. Curve it gracefully and clean up any excess slip.
Textured Grip
Before glazing, leave the raw clay on the handle or knob unglazed for a tactile contrast, or scuff the brown glaze area with a green scouring pad for a matte finish.
Step 3: Glazing and Finishing
-
Bisque fire:
Let the teapot dry slowly and completely to avoid cracks, especially around attachments. Bisque fire to Cone 04 (or your clay’s specific bisque temperature). -
Wax the foot and gallery:
Apply wax resist to the foot ring and the gallery rim where the lid touches. Also wax the flange of the lid to prevent them from fusing together during firing. -
Dip the top glaze:
Hold the teapot by the foot and submerge the top portion into the creamy white speckle glaze. Dip fast but smoothly, covering the top 2/3 of the pot, including the spout and handle. Let it dry. -
Dip the bottom glaze:
Clean any drips. Now, hold the teapot by the rim (carefully!) or use glazing tongs. Dip the bottom 1/3 into the warm brown glaze. You can slightly overlap the glazes for a blending effect, or keep a sharp line. -
Glaze the lid:
Dip the exterior of the lid into the creamy white glaze to match the top of the teapot. Ensure no glaze is on the contact points. -
Clean spout hole:
Double-check the pouring hole of the spout is clear of glaze which might clog it during firing. -
Final Fire:
Glaze fire to Cone 6 (or appropriate temp for your clay/glaze combo). Ensure the lid is fired separately or on a stilt if you are worried about sticking, though waxing should suffice.
Once cooled, your teapot is ready to brew a comforting cup of tea and serve as a beautiful centerpiece for your table
Drip-Glaze Teapot That Hides Wobbles
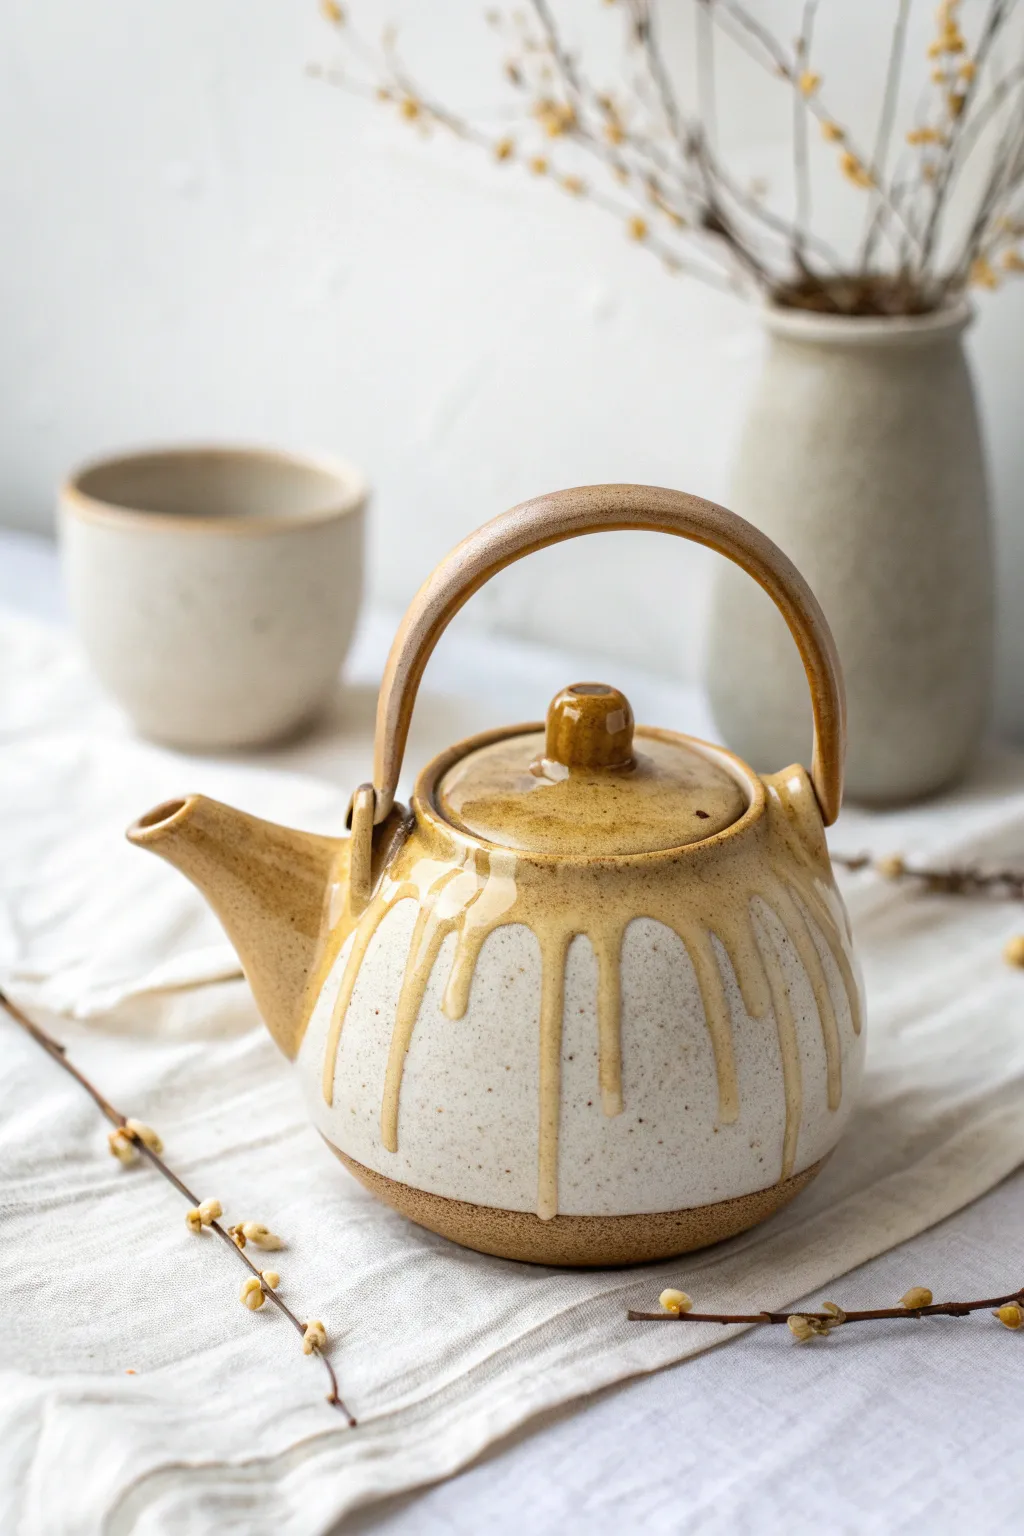
Embrace the charm of imperfection with this delightful stoneware project that uses a heavy drip glaze to add character and mask any uneven surfaces. The contrast between the speckled matte body and the glossy, honey-colored drips creates a cozy, artisanal aesthetic perfect for your morning brew.
Step-by-Step Tutorial
Materials
- Speckled stoneware clay (mid-fire)
- Pottery wheel
- Throwing tools (sponge, rib, wire cutter)
- Trimming tools
- Needle tool
- Scoring tool or serrated rib
- Slip
- Glossy honey-amber glaze
- Matte cream or white speckled glaze
- Natural sponge
- Kiln
Step 1: Throwing the Body and Lid
-
Center the clay:
Begin with about 1.5 to 2 lbs of speckled stoneware clay. Center it firmly on the wheel head, ensuring a stable base for the round form. -
Open and pull:
Open the clay and pull up the walls to create a cylinder. Gently shape it outward from the inside to create a rounded, bulbous belly, bringing the neck in slightly at the top. -
Refine the gallery:
Use a wooden tool or your finger to create a distinct gallery (ledge) inside the rim where the lid will sit. Confirm the measurements with calipers before cutting it off the wheel. -
Throw the lid:
Using a smaller ball of clay, throw a simple doomed lid that matches your caliper measurements. Add a small knob at the center for easy lifting. -
Throw the spout:
Throw a small, bottomless cylinder that tapers slightly. This will become your spout. Cut it off and set it aside to firm up to leather hard.
Gravity Assist
Apply the second glaze quite thick. If it’s too thin, it will blend rather than drip. You want distinct rivulets.
Step 2: Assembling the Teapot
-
Trim the base:
Once leather hard, flip the teapot body and trim the foot ring. Clean up the curve of the belly so it feels smooth and balanced. -
Create the spout opening:
Hold the spout against the body to find the right placement. Trace the outline, then use a needle tool to cut strainer holes inside that outlined area. -
Attach the spout:
Score and slip both the spout base and the attachment point on the body. Press the spout firmly into place, blending the clay seams smoothly with a wooden tool. -
Shape the handle:
Roll a thick coil of clay and flatten it slightly to create a strap handle. Arch it into a high semicircle that spans over the lid comfortably. -
Attach the handle:
Score and slip attachment points on the shoulder of the pot (not the rim). Attach the handle securely, reinforcing the connection with small coils if necessary. Let the entire piece dry slowly under plastic.
Step 3: Glazing and Firing
-
Bisque fire:
Fire the bone-dry teapot and lid to cone 04 (or your clay’s bisque temperature). -
Wax parts of the exterior:
Apply wax resist to the bottom inch of the teapot and the foot ring. This leaves the raw speckled clay exposed at the base, grounding the design. -
Apply the base glaze:
Dip the entire teapot (holding it by the foot) into a matte cream or white glaze. Pour the glaze inside first to coat the interior, then dip the exterior. Let this layer dry completely. -
Create the drip effect:
Load a large brush or bulb syringe with a thick, glossy honey-amber glaze. Apply a heavy band around the shoulder of the pot, just below the neck. -
Encourage drips:
I like to gently tap the pot on the table or add extra dollops of glaze at intervals to encourage it to run down the sides. Do the same for the lid and the top of the handle for continuity. -
Clean up:
Ensure no glaze has run onto the foot ring or the gallery where the lid sits. Wipe these areas meticulously with a sponge. -
Glaze fire:
Fire the piece to cone 5/6 (mid-fire). The honey glaze should melt and travel down the sides, creating those beautiful, organic drips.
Handle Texture
Before attaching the handle, gently roll it over a piece of canvas or coarse fabric to imprint a subtle texture that catches the glaze.
Now brew your favorite tea and enjoy the warmth of your handmade creation
Polka Dot Teapot With Appliqué Spots
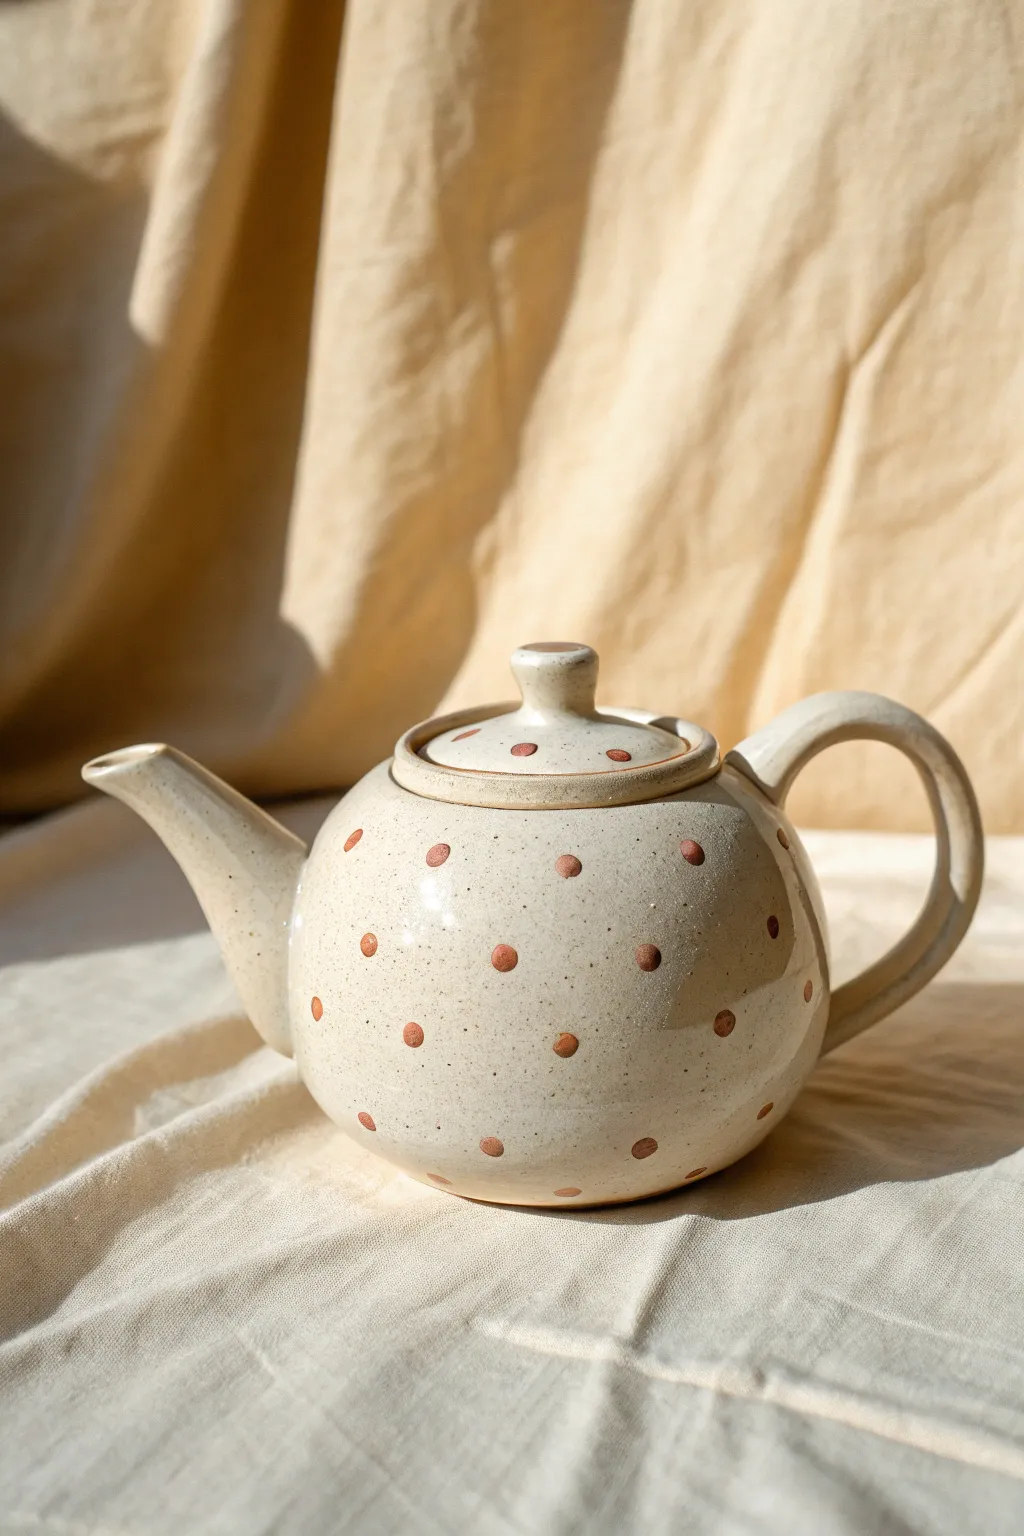
This handmade ceramic teapot combines the warmth of speckle-toned clay with the playful charm of rust-colored polka dots. The smooth, rounded bell shape and glossy glaze make it a cozy addition to any afternoon tea ritual.
How-To Guide
Materials
- Speckled stoneware clay body (cone 5-6)
- Red stoneware or terracotta slip (for dots)
- Potter’s wheel
- Throwing tools (sponge, wire cutter, rib)
- Trimming tools
- Pin tool or needle tool
- Scoring tool (serrated rib)
- Small paintbrush
- Clear glossy glaze (food safe)
- Calipers (optional but helpful)
Step 1: Throwing the Body
-
Center the clay:
Start with about 2-3 pounds of speckled stoneware clay. Wedge it thoroughly to remove air bubbles, then slam it onto your wheel head and center it using firm pressure and water. -
Open and pull:
Open the clay down to the base, leaving about a half-inch of thickness for the bottom. Begin pulling the walls upward, focusing on maintaining an even thickness throughout the cylinder. -
Shape the belly:
Using a rib on the outside and your hand on the inside, gently belly out the form to create a rounded, spherical shape. Be careful not to let the walls get too thin at the widest point. -
Collar the neck:
Gently collar the top of the pot inward to create a narrower opening for the lid gallery. Use your fingers or a calipers to measure the opening so you know exactly how wide to make your lid later. -
Refine and cut:
Smooth the exterior with a rib to remove throwing lines if you prefer a cleaner look. Wire cut the refined body from the bat and set it aside to reach leather-hard consistency.
Step 2: Creating Components
-
Throw the lid:
Using a smaller lump of clay, throw the lid upside down (as a bowl shape) or right-side up off the hump. Ensure the flange matches the gallery measurement of your pot body. Add a small knob top while throwing, or attach one later. -
Throw the spout:
Throw a tall, tapered cylinder for the spout. It should be wider at the base and narrow at the pouring tip. Refine the shape to have a slight curve if desired. -
Pull the handle:
Pull a strap handle from a lug of clay using plenty of water. Aim for a comfortable C-curve shape that will balance the visual weight of the spout. Let it stiffen slightly on a board. -
Trim the body:
Once leather hard, flip the teapot body over and center it on the wheel. Trim the bottom to create a neat foot ring, mirroring the curve of the belly.
Cracking Handles?
Handles often dry faster than the body. Wrap the handle tightly in plastic or wax the varying thicknesses to slow drying and ensure even shrinkage.
Step 3: Assembly & Decoration
-
Prepare the spout:
Cut the base of the spout at an angle to fit the curve of the pot. Hold it up to the body to check the fit; the tip of the spout should be level with the lid opening. -
Attach the spout:
Trace the spout placement on the body. Drill several strainer holes inside this traced area. Score and slip both surfaces thoroughly, then press the spout firmly onto the body and smooth the seam. -
Attach the handle:
Score and slip the attachment points for the handle directly opposite the spout. Press the handle on securely and reinforce the join with a tiny coil of clay if necessary. -
Check the lid fit:
Place the leather-hard lid onto the pot. If it’s a bit tight, sand it gently; if loose, the glaze will likely fill the gap later. I prefer to trim the lid while it’s seated on the pot for perfect continuity. -
Apply the dots:
Using a thick slip made from red stoneware or terracotta, dab small circular spots onto the pot’s surface. You can use a round brush or a slip trailer for this. Keep the pattern random but balanced. -
flatten the appliqué:
Let the slip dots dry slightly until they aren’t tacky. Gently press them flat with your finger or a soft rib so they integrate slightly with the surface rather than sitting too high. -
Bisque fire:
Allow the entire teapot to dry very slowly under plastic to prevent cracks at the attachments. Once bone dry, bisque fire the piece to approximately cone 04. -
Glaze application:
Dip the entire teapot into a clear, food-safe glossy glaze. This will amplify the speckles in the clay and turn the matte slip dots into rich, reddish-brown accents. -
Final firing:
Wipe the foot ring clean of any glaze. Fire the teapot to the maturity temperature of your clay body (usually cone 5 or 6 for stoneware).
Color Pop
Instead of red slip, use colored underglazes for the dots. A mix of pastel blue and yellow dots creates a fun, modern confetti look under the clear glaze.
Brew your favorite tea and enjoy the comforting feel of your handmade creation.
Heart Accent Teapot
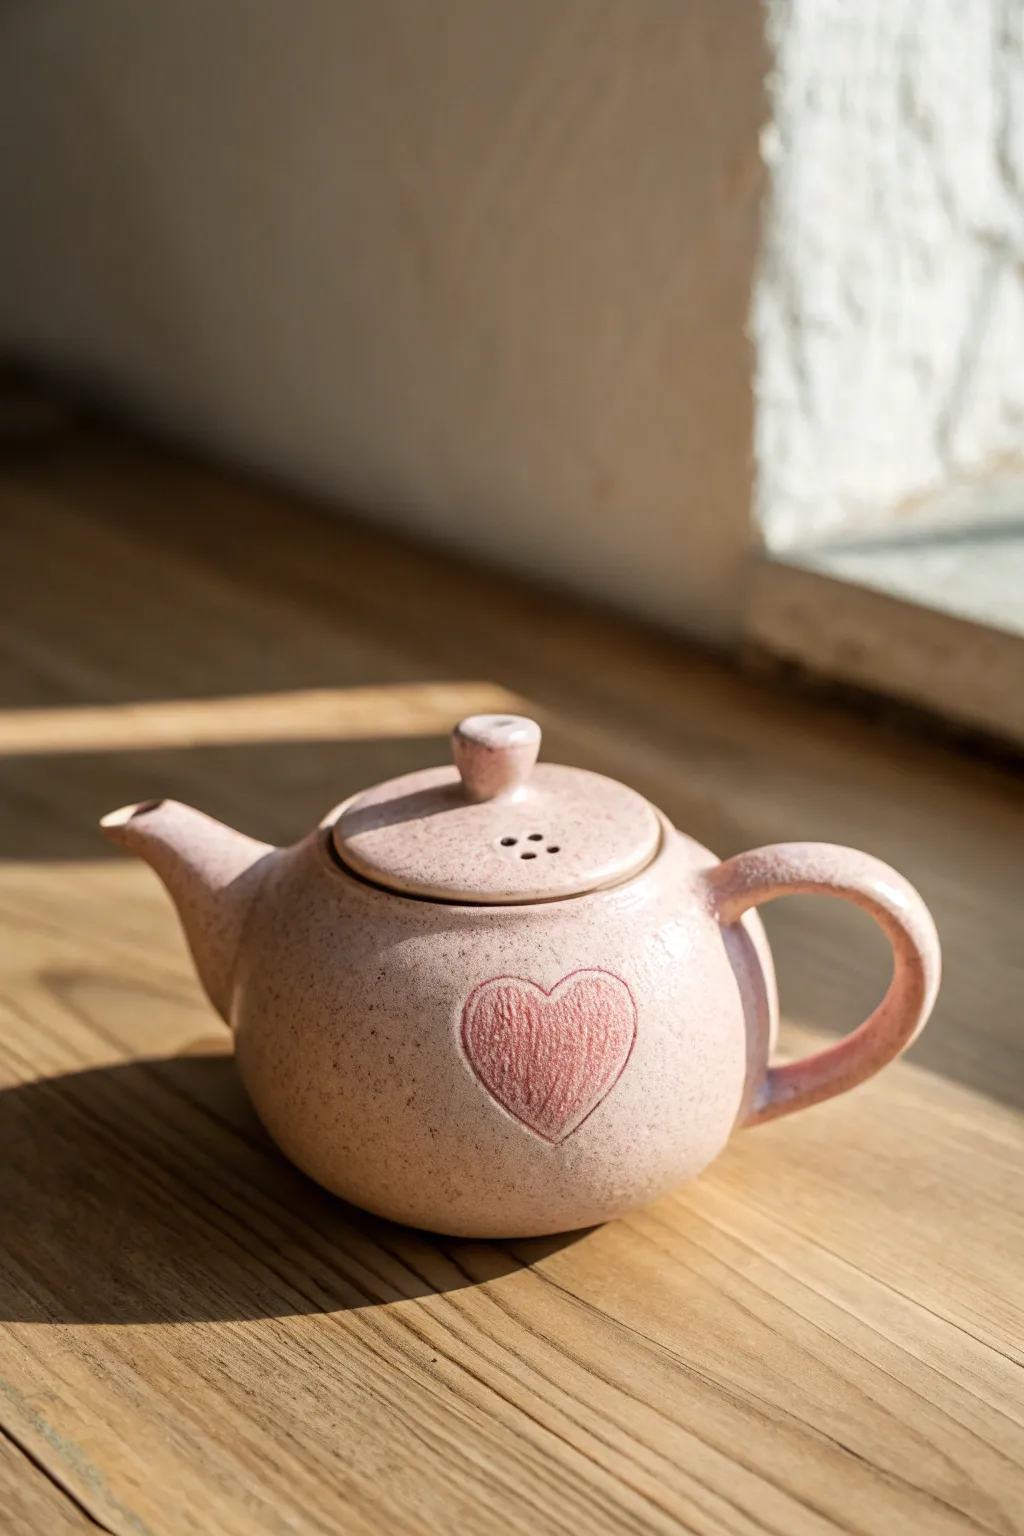
This charming ceramic teapot features a soft, speckled pink glaze and a sweet, hand-drawn heart motif that acts as a focal point. Its classic rounded form and sturdy handle make it perfect for brewing your favorite afternoon blends.
Step-by-Step Tutorial
Materials
- Stoneware clay (speckled or light)
- Pottery wheel
- Throwing tools (sponge, needle tool, rib, wire cutter)
- Trimming tools
- Scoring tool and slip
- Underglaze pencil or red underglaze
- Fine detail brush
- Hole cutter or small drill bit (for lid vents)
- Semi-matte pink glaze
Step 1: Throwing the Body
-
Center the clay:
Start with a ball of clay roughly the size of a large grapefruit. Wedge it well to remove air bubbles, then secure it to the center of your wheel head. Use steady pressure and water to cone the clay up and down until perfectly centered. -
Open and pull the walls:
Open the centered clay to create the floor, leaving it slightly thicker than a typical bowl to support the gallery. Pull the walls upward into a cylinder first, keeping the rim controlled and compressed. -
Shape the belly:
Using a rib tool on the outside and your fingers inside, gently push the walls outward to create a rounded, bulbous belly shape. Be careful not to let the walls get too thin near the base. -
Form the gallery:
At the rim, use a wooden tool or your thumb to split the clay slightly, creating a seated ledge (gallery) where the lid will eventually rest. Measure the diameter with calipers before cutting the pot off the wheel.
Clean Pour Tip
When shaping the spout tip, pull the very edge outward slightly with a finger to create a sharp, distinct lip. This breaks the surface tension and prevents drips.
Step 2: Creating Components
-
Throw the lid:
Throw a small amount of clay using the measurement from your calipers. Create a domed shape that fits upside down (or right-side up depending on your preference), ensuring the flange matches the teapot’s gallery. -
Throw the spout:
Throw a tall, narrow cone shape for the spout. It should flare slightly at the base where it will attach to the pot and taper at the pouring tip to prevent dripping. -
Pull the handle:
Take a separate lug of clay and wet-pull a classic strap handle. Aim for an elegant curve that mimics a question mark shape. Lay it aside to stiffen until it holds its form without drooping. -
Trim the pieces:
Once the body and lid are leather hard, flip them over and trim away excess weight. Create a clean foot ring on the bottom of the teapot body.
Lid Fit Issues
If the lid is wobbly after trimming, apply a small amount of grinding paste to the gallery and twist the lid back and forth to grind the two surfaces until they mate perfectly.
Step 3: Assembly and Decoration
-
Cut the spout:
Hold the spout up to the body to determine the angle. Cut the base of the spout diagonally so it fits flush against the curve of the teapot’s belly. -
Attach the spout:
Mark the attachment area on the body and pierce several strainer holes inside this outline. Score and slip both surfaces thoroughly, then press the spout firmly into place, smoothing the seam. -
Attach the handle:
Score and slip the attachment points opposite the spout. Attach the top of the handle near the rim and the bottom near the belly’s curve. Ensure the handle is aligned vertically with the spout. -
Refine the lid:
Attach a small knob to the center of the lid. Using a small hole cutter or drill tool, create 3-4 small vent holes in a decorative pattern near the knob to allow steam to escape. -
Draw the heart:
On the side of the pot (between the handle and spout), lightly sketch a heart outline. I prefer using a needle tool for a very faint guide before committing with color. -
Fill the detail:
Using a red underglaze pencil or a fine brush with red underglaze, fill in the heart with sketched, hatched lines to give it a textured, hand-drawn look.
Step 4: Glazing
-
Bisque fire:
Load the thoroughly dried greenware into the kiln and bisque fire to cone 04 (or your clay’s specific bisque temperature). -
wax resist:
Apply wax resist to the foot ring and the gallery rim where the lid sits to prevent the lid from fusing to the pot during firing. -
Apply pink glaze:
Dip the teapot and lid into a semi-matte pink glaze. If your clay isn’t naturally speckled, choose a glaze with suspended speckles to achieve the finish shown in the photo. -
Glaze fire:
Fire the piece to maturity (likely cone 5 or 6 depending on your stoneware). Allow the kiln to cool completely before removing your new teapot.
Enjoy the ritual of tea with a vessel you crafted with your own hands
Asymmetrical Whimsy Teapot
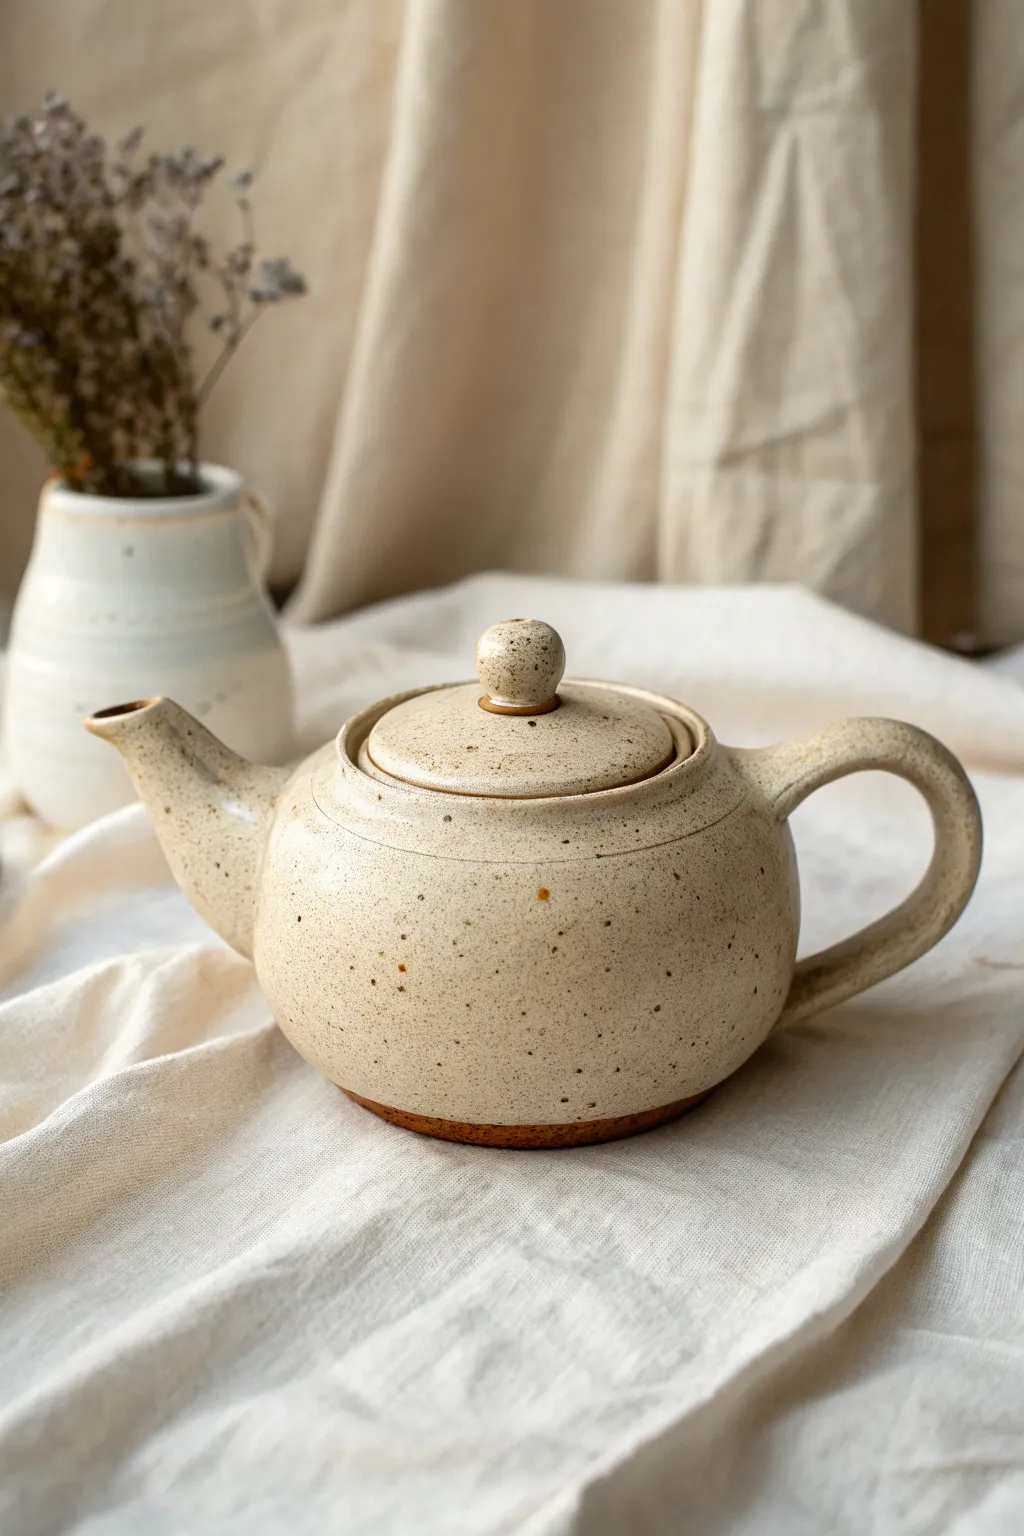
Embrace the beauty of imperfection with this charmingly rustic teapot, featuring a cozy, speckled cream glaze on a warm stoneware body. Its rounded form and simple handle invite you to slow down and savor your favorite brew.
Step-by-Step
Materials
- Speckled stoneware clay (approx. 2-3 lbs)
- Pottery wheel
- Throwing sponge
- Wire cutter
- Rib tool (wooden and metal)
- Needle tool
- Trimming tools
- Scoring tool or serrated rib
- Slip (liquid clay)
- Cream or oatmeal matte glaze
- Kiln
Step 1: Throwing the Body
-
Center the clay:
Start with about 1.5 lbs of well-wedged speckled clay on your wheel. Center it firmly, creating a low, wide mound rather than a tall cone to prepare for a globular shape. -
Open and widen:
Open the clay down to about a quarter-inch from the bat. Pull the floor out wide to establish the base width of your teapot belly. -
Pull the walls:
Begin pulling the walls upward. Aim for a cylinder first, keeping the walls even thickness from bottom to top. Don’t worry about the curve just yet; height is key. -
Shape the belly:
Using a rib tool on the outside and your hand inside, gently push the walls outward from the inside to create that lovely round, spherical shape. Be careful not to stretch the clay too thin at the widest point. -
Collar the neck:
As you reach the top, gently collar the clay inward to form the opening for the lid. Use your fingers or a sponge to compress the rim, ensuring it’s sturdy enough to hold a gallery. -
Create the gallery:
Use a wooden tool or your thumb to split the rim, pressing down slightly on the inner edge to create a shelf (gallery) where the lid will sit. Clean up the edge with a chamois.
Step 2: Lid, Spout, and Trim
-
Throw the lid:
Using a small ball of clay, throw the lid upside down (as a bowl shape) or right-side up off a hump. Measure carefully with calipers to match the gallery you just made. Don’t forget to throw a small knob on top. -
Throw the spout:
Throw a small, tapering cylinder for the spout. It should be wider at the base and narrow at the pouring end. Cut it off the wheel and let it stiffen to leather-hard. -
Trim the body:
Once the teapot body is leather-hard, center it upside down on the wheel. Trim away excess weight from the bottom, creating a neat foot ring that defines the curve of the pot.
Spout Success
When attaching the spout, ensure the tip is level with or slightly higher than the rim of the pot. If it’s lower, you won’t be able to fill the teapot completely.
Step 3: Assembly and Glazing
-
Pull the handle:
Pull a strap of clay for the handle. For this rustic look, keep it simple and slightly thick. Curve it into a ‘C’ shape and let it set up slightly until it holds its form. -
Cut and fit the spout:
Hold the spout against the body to find the right angle. Cut the base of the spout at a slant so it fits flush against the curve of the pot. -
Attach the spout:
Mark the attachment area on the pot. Use a hole cutter or needle tool to create strainer holes inside this area. Score both the pot and the spout, apply slip, and press firmly to attach. Smooth the seam effortlessly. -
Attach the handle:
Score and slip the attachment points opposite the spout. Attach the handle, ensuring the curve flows nicely from the rim to the belly. Reinforce the join with a small coil if needed. -
Bisque fire:
Allow the entire piece to dry slowly under plastic to prevent cracking. Once bone dry, bisque fire the teapot to cone 04 (or your clay body’s specifications). -
Wax the foot:
Apply wax resist to the foot ring and the gallery rim where the lid sits to prevent the lid from fusing to the pot during firing. -
Glaze application:
Dip the teapot into a cream, matte glaze. If using a brush, apply 2-3 even coats. The unexpected brown speckles come from the clay body reacting through the glaze, so a semi-opaque glaze works best. -
Final wipe:
Wipe back any glaze that may have dripped onto the waxed foot. I check the lid fit one last time to ensure no glaze is touching the contact points. -
Glaze fire:
Fire the teapot to cone 5/6 (mid-range oxidation) to achieve that durable, stony finish.
Recycled Texture
Wedge some dried, crushed clay scraps or coarse sand into your clay body before throwing. This adds extra grit and enhances the speckled, earthy texture under the glaze.
Now brew a pot of tea and enjoy the warmth of your handmade vessel
Fairy Cottage Teapot
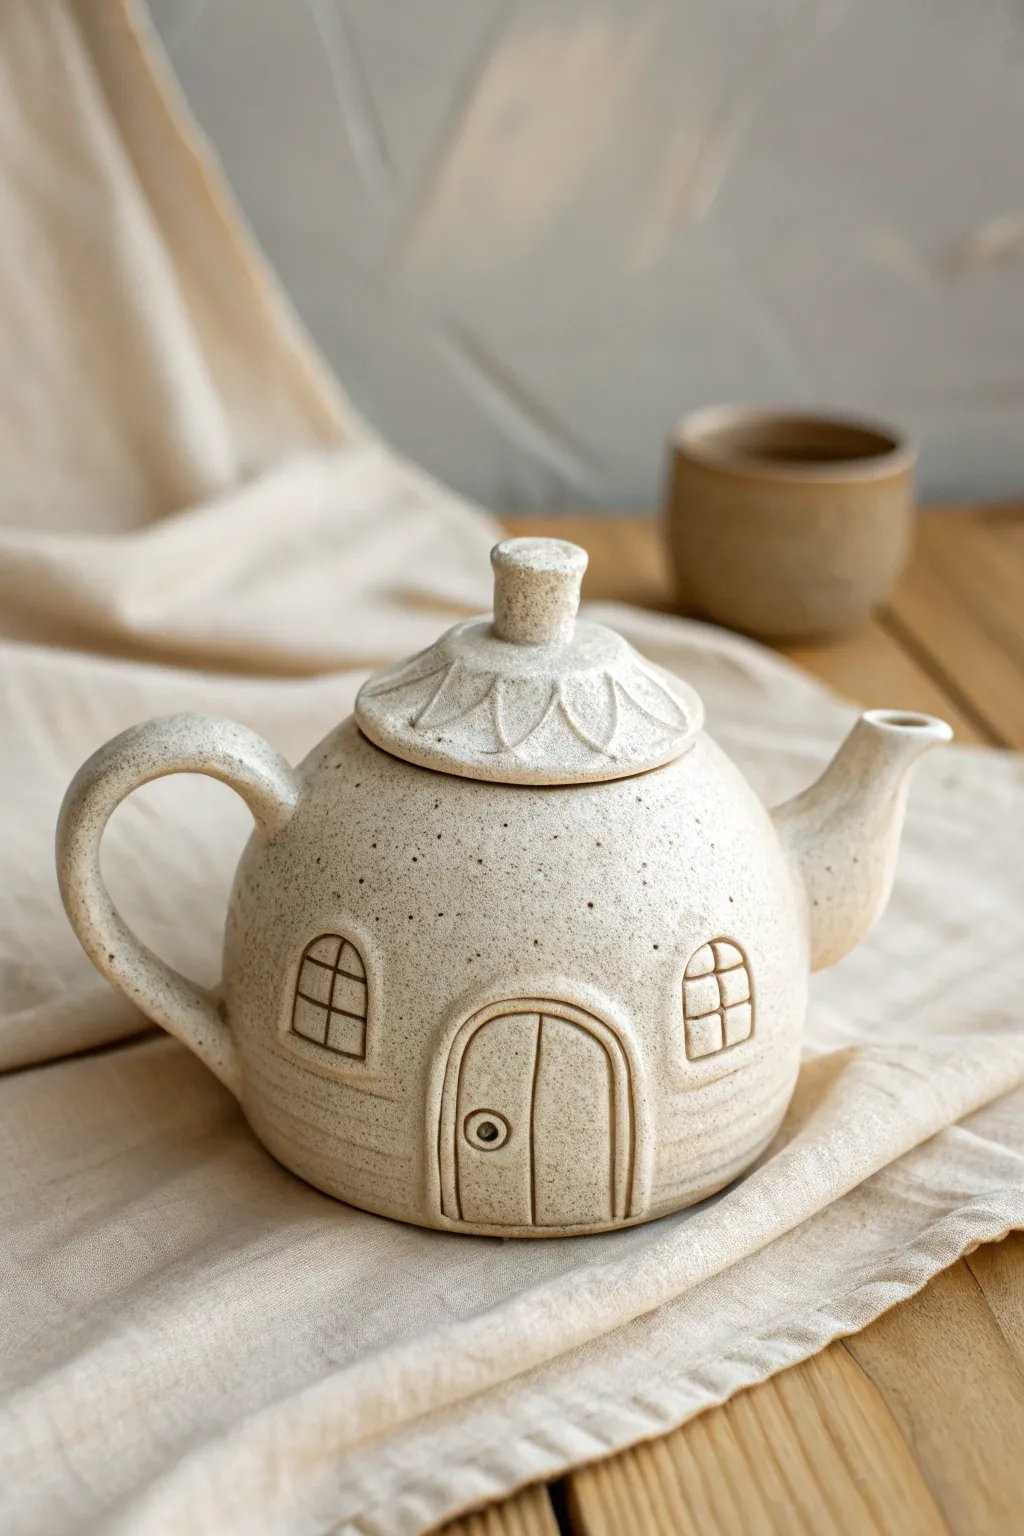
Transform a simple sphere of clay into an enchanting dwelling with this cozy cottage teapot project. Featuring charming arched windows, a rustic wooden door, and a petal-stitched roof, this piece combines speckle-clay warmth with storybook architectural details.
Detailed Instructions
Materials
- Speckled stoneware clay (approx. 2-3 lbs)
- Pottery wheel (or can be hand-built with coils)
- Rolling pin and canvas mat
- Fettling knife
- Needle tool
- Scoring rib or serrated kidney tool
- Water and slip in a small container
- Wooden modeling tool with a flat edge
- Small loop tool for carving steps
- Sponge
Step 1: Forming the Body and Lid
-
Throw or build the base:
Begin by forming a rounded, bulbous belly shape. If using a wheel, center about 1.5 lbs of clay and throw a closed-form sphere, cutting off the top gallery later. If hand-building, create two pinch pots, score and slip them together, and smooth the seam. -
Create the gallery:
Cut an opening at the top of your sphere about 3 inches wide. Refine the rim so it is smooth and can support a lid. -
Shape the lid:
Using a smaller amount of clay, fashion a domed lid that fits snugly into your gallery. I like to throw this upside down on the wheel for precision, or you can pinch a shallow bowl shape and refine it. -
Add the knob:
Form a small, thick cylinder for the chimney-style knob. Attach it to the center of the lid using scoring and slip.
Cracked Spout?
Cracks at the spout connection often mean the clay was too dry during attachment. Score deeper next time and use plenty of thick slip to hydrate the joint.
Step 2: Sculpting the Spout and Handle
-
Make the spout:
Roll a thick coil of clay and taper one end. Create a channel through the center (or throw a small spout). Curve it gently so it resembles a swan’s neck. -
Attach the spout:
Hold the spout against the body to check the angle; the tip should be level with the rim. Score both surfaces heavily, add slip, and press firmly. Smooth the transition with a wooden tool. -
Create the handle:
Pull a strap handle or roll a sturdy coil. Curve it into a question-mark ear shape. -
Secure the handle:
Attach the handle opposite the spout. Ensure the top attachment is strong and the curve allows comfortable gripping space for fingers.
Pro Tip: Lid Fit
Wrap a strip of newspaper around the lid flange while the clay is wet. This keeps the lid from fusing to the pot during drying but ensures a perfect custom fit.
Step 3: Adding Architectural Details
-
Sketch the layout:
Lightly trace the outline of a central door and two side windows onto the leather-hard clay using your needle tool. -
Build the door frame:
Roll a very thin coil (a ‘snake’) of clay. Score the outline of the door arch and attach this coil to create a raised door frame. Flatten it slightly with your finger. -
detail the door:
Incise a vertical line down the center of the door for the seam. Add a tiny ball of clay for the doorknob, pressing a small indentation into the center of it. -
Sculpt the windows:
Outline the arched windows with thin coils similar to the door. Inside the frame, use the needle tool to draw a grid pattern to represent windowpanes. -
Carve the siding:
Using a wooden tool or a dull knife, gently press horizontal lines around the lower half of the pot to mimic wooden clapboard siding. Keep these lines intentionally slightly wobbly for rustic charm. -
Texture the roof:
On the lid aka the ‘roof,’ use a loop tool or modeling tool to carve overlapping petal shapes radiating from the knob. This simulates shingles or large leaves. -
Clean up:
Go over all attachments with a slightly damp sponge to remove sharp burrs, but be careful not to wash away your fine textures.
Step 4: Finishing
-
Dry slowly:
Loosely cover the teapot with plastic to let it dry very slowly. This equalization of moisture is critical to prevent the spout or handle from cracking away. -
Bisque fire:
Once bone dry, bisque fire the piece to Cone 04 (or according to your clay body’s specs). -
Glaze application:
Dip or brush a clear or semi-matte white glaze over the entire piece. The speckles in the clay will show through, providing the texture seen in the photo. -
Final firing:
Glaze fire to maturity (likely Cone 5/6 for stoneware). Be sure to wipe the foot clean before loading the kiln.
Once fired, this delightful little home is ready to brew your favorite tea or simply brighten up your kitchen shelf
Garden Teapot With Simple Flowers
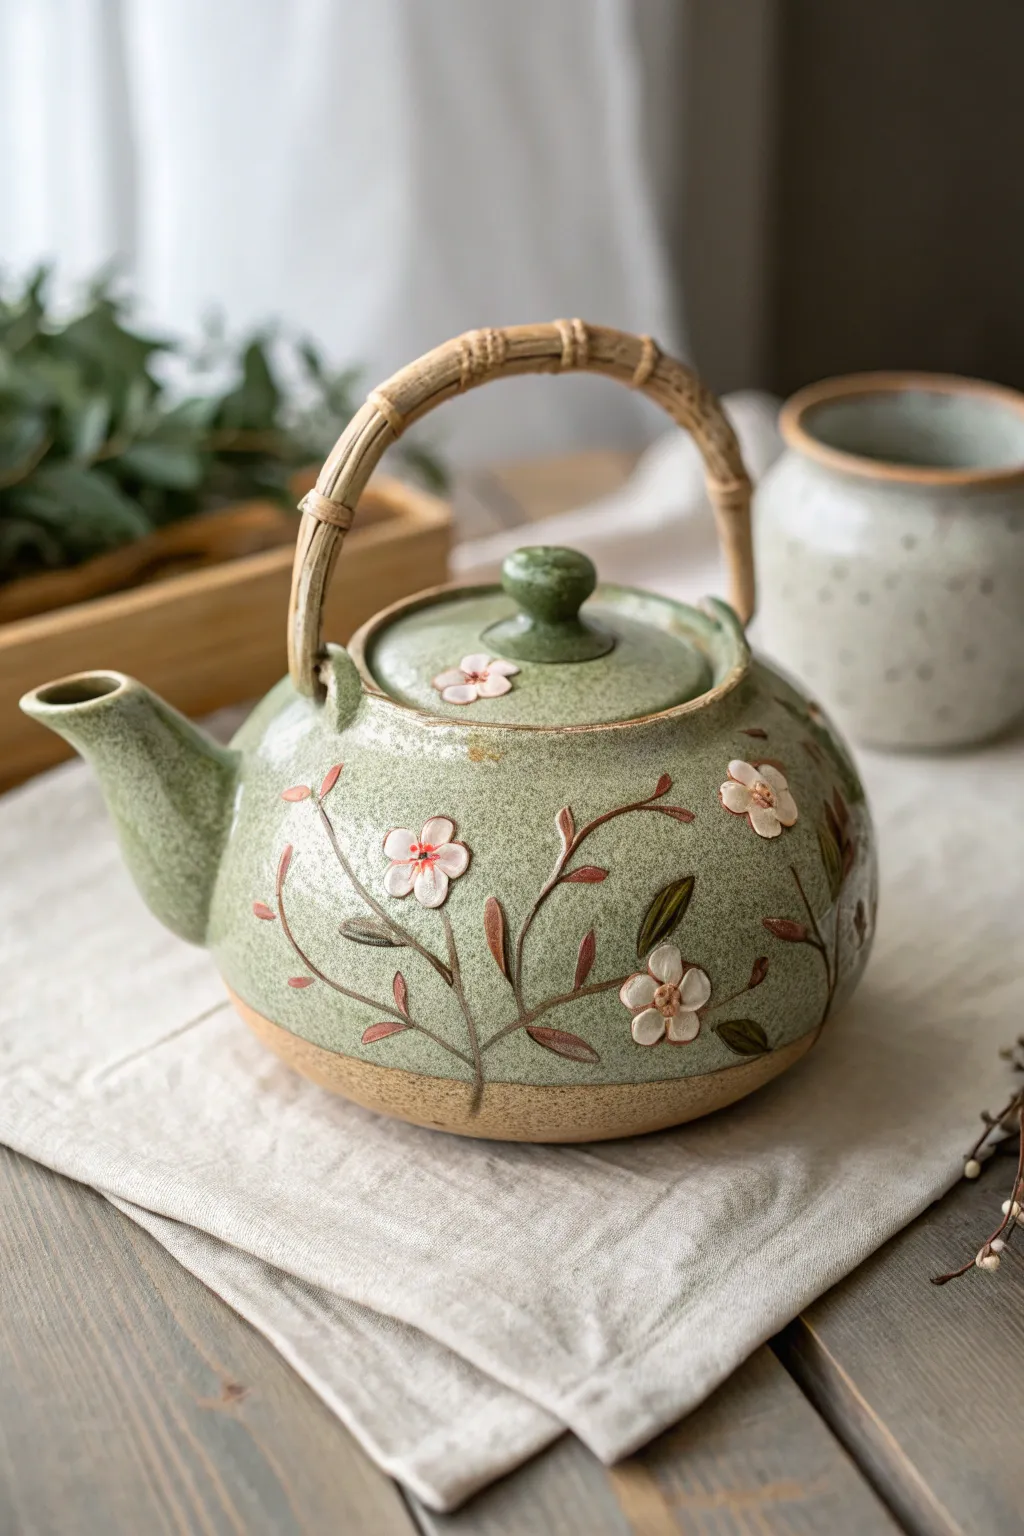
This charming, rustic teapot brings the serenity of a garden into your kitchen with its speckled sage green glaze and raised floral reliefs. The combination of earthy, unglazed clay at the base and delicate, hand-sculpted blossoms creates a tactile piece that feels both organic and refined.
Step-by-Step
Materials
- Stoneware clay (preferably speckled)
- Pottery wheel (or coil/slab building tools)
- Rib tool
- Needle tool
- Modeling tool (tiny spoon or ball end)
- Underglazes (white, deep brown/green, pale pink)
- Sage green stoneware glaze (semi-opaque)
- Wax resist
- Bamboo or cane teapot handle
- Kiln
Step 1: Forming the Body and Lid
-
Throw the Main Body:
Begin with about 2-3 lbs of clay on the wheel. Center the clay and open it wide to create a rounded, bulbous belly form. Pull the walls to an even thickness, narrowing the neck significantly at the top to create a gallery for the lid. -
Refine the Shape:
Use a rib tool on the exterior while the wheel is spinning to smooth the curve and remove throwing lines. The goal is a smooth, continuous curve from the foot to the shoulder. -
Trim the Foot:
Once the body is leather hard, trim a clean, defined foot ring at the bottom. Leave the bottom half-inch of the wall slightly thicker to visually anchor the piece. -
Create the Spout:
Throw a small, tapering cylinder for the spout. While still soft, cut the base at an angle to fit the curve of the pot and gently pull the tip downward to create a dripless pouring edge. -
Make the Lid:
Throw a simple domed lid that fits snugly into the gallery of your teapot body. Add a small, mushroom-shaped knob to the center for easy lifting. -
Attach Components:
Score and slip the spout onto the body. Poke strainer holes into the body wall behind where the spout attaches before sealing it on. Attach two small clay loops (lugs) on the shoulder for the bamboo handle later.
Spout Spluttering?
If the spout pours poorly, the edge might be too round. Use sandpaper on the fired tip to sharpen the edge slightly, which breaks the surface tension for a clean pour.
Step 2: Sculpting the Floral Relief
-
Roll Tiny Spheres:
Roll very small balls of clay, about the size of peppercorns, to serve as the petals for your cherry blossoms. -
Form the Petals:
Press five small balls into a circle directly onto the leather-hard surface of the teapot. Flatten them gently with your finger or a modeling tool to merge them slightly at the center. -
Define the Flower Centers:
Use a small ball-end tool or needle to press a tiny indentation into the center of each flower cluster, giving the petals dimension and a focal point. -
Add Leaves:
Roll tiny coils of clay, distinct from the petals. Press them onto the pot near the flowers and flatten one end to a point to create simple leaf shapes. -
Carve the Stems:
Instead of adding clay for stems, use a needle tool or a fine sgraffito tool to carve thin, winding lines connecting your flowers and leaves. This incised line contrasts beautifully with the raised flowers.
Texture Twist
Before attaching flowers, gently dab the leather-hard surface with a coarse sponge. This subtle texture will break the glaze further, adding more visual depth.
Step 3: Glazing and Finishing
-
Bisque Fire:
Allow the teapot to bone dry completely, usually over several days, before firing it to bisque temperature (typically Cone 04). -
Paint the Flowers:
Apply a dab of white underglaze to the raised petals. Add a tiny dot of pink or red to the very center. Paint the leaves and carved stems with a dark brown or deep green underglaze. -
Wax the Base:
Apply wax resist to the bottom inch of the teapot and the foot ring. This will keep the raw, speckled clay exposed, creating that earthy two-tone look. -
Apply Wax to Florals:
Carefully paint wax resist over your underglazed flowers and leaves. I find this resist step crucial so the green glaze doesn’t obscure your detailed painting. -
Dip in Green Glaze:
Dip the entire lid and the main body (up to the waxed bottom line) into a semi-opaque sage green stoneware glaze. The glaze will bead off the waxed flowers and base. -
Clean Up:
Use a damp sponge to wipe away any stray glaze droplets on the waxed flowers or the exposed clay base to ensure a clean finish. -
Glaze Fire:
Fire the piece to maturity (Cone 5 or 6, depending on your clay body). Ensure the lid is fired separately or with a wax barrier so it doesn’t fuse. -
Attach Handle:
Once cool, attach the bamboo handle by threading the loops through the clay lugs you created earlier. Secure the ends firmly.
Now you have a fully functional, handcrafted vessel ready for your next tea ceremony.
Animal-Shaped Teapot With Easy Features
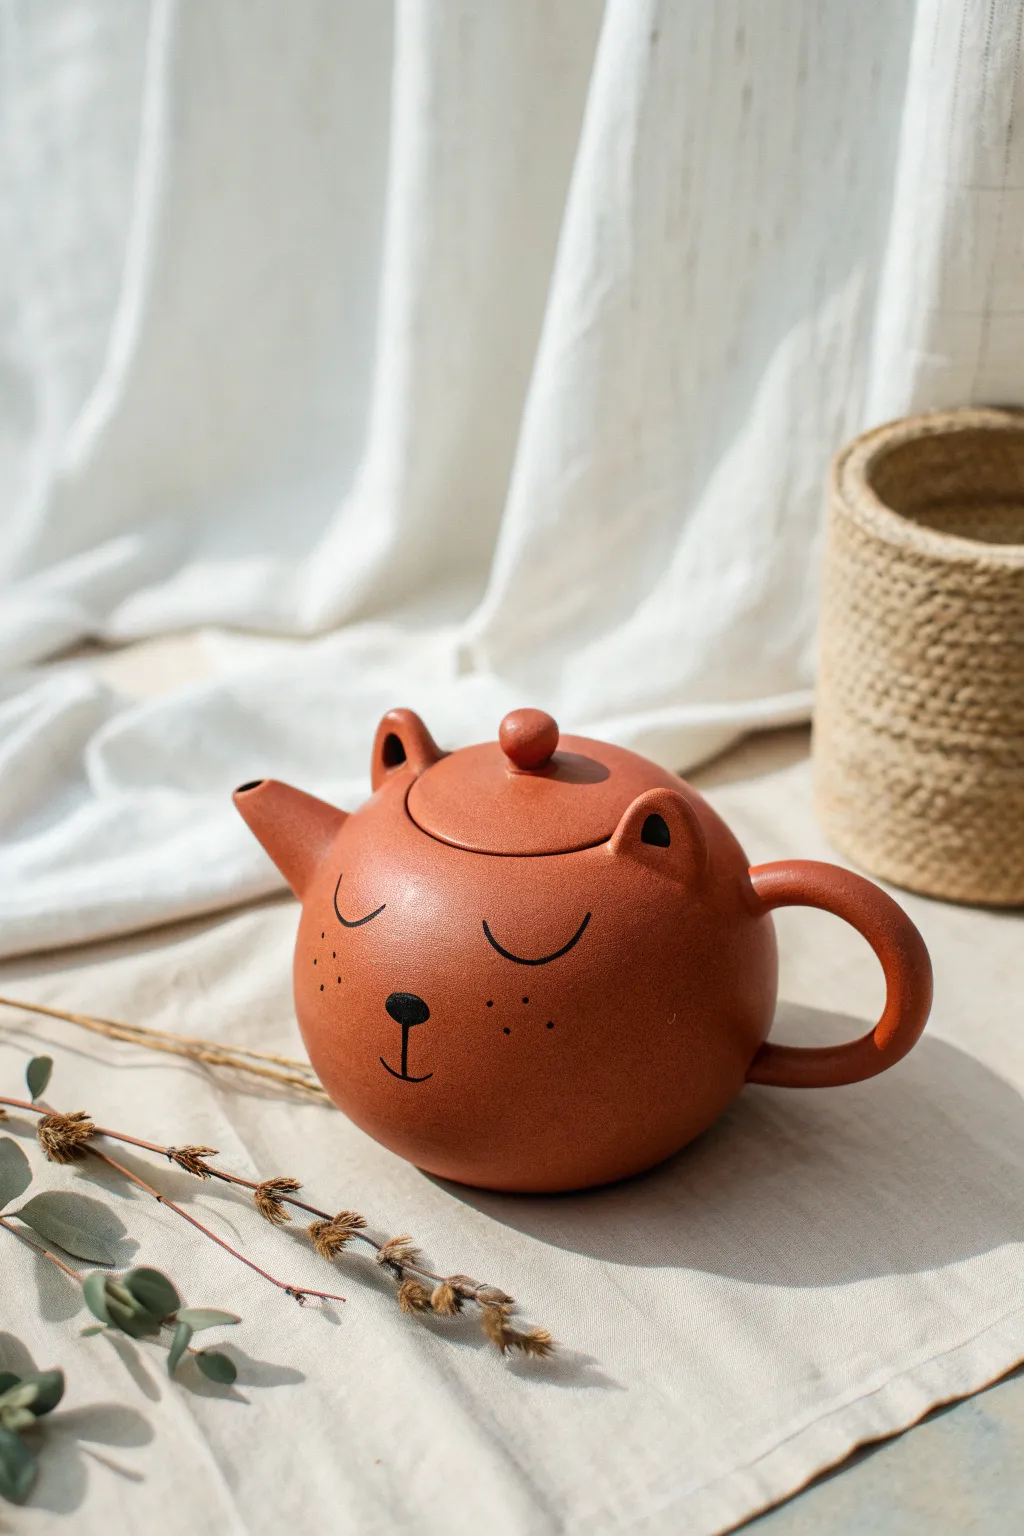
Transform a simple sphere of clay into an adorable, sleeping bear teapot that brings warmth to any tea time. This project relies on basic hand-building techniques like pinch potting and slab work to create a charming, functional piece with a natural terracotta finish.
Step-by-Step Tutorial
Materials
- Red earthenware or terracotta clay
- Pottery tools (needle tool, rib tool, loop tool)
- Slip (clay mixed with water)
- Scoring tool or old fork
- Rolling pin
- Sponge
- Black underglaze or ceramic paint
- Fine detail paintbrush
- Clear food-safe glaze (optional, for interior)
Step 1: Forming the Body and Lid
-
Create two pinch pots:
Start with two equal-sized balls of clay. Push your thumb into the center of each and pinch the walls evenly as you rotate the clay, creating two bowl shapes. These will be joined to form the hollow body. -
Join the halves:
Score the rims of both pinch pots thoroughly and apply slip. Press the two halves together firmly to create a sealed sphere. Smooth the seam completely with a rib tool so the join is invisible. -
Cut the lid opening:
Once the sphere is leathery hard, use a needle tool to cut a circular opening at the very top. Cut at an inward angle so the lid will have a natural ledge to sit on and won’t fall in. -
Form the lid gallery:
Refine the cut-out circle piece to serve as your lid. You may need to add a small coil of clay to the underside of the lid piece to create a flange that keeps it secure. -
Add the knob:
Roll a small ball of clay and attach it to the center of the lid using the score and slip method. Smooth the connection point for a seamless look.
Clean Spout Pour
Make the lip of the spout sharp, not rounded. A sharp edge cuts the water flow cleanly and prevents dripping after you pour.
Step 2: Adding Features and Handle
-
Shape the spout:
Roll a thick coil of clay and taper one end. Create a channel through the center using a wooden dowel or handle of a paintbrush, or build it hollow by hand. Cut the base at an angle to fit the curve of the body. -
Attach the spout:
Score and slip the attachment area on the body and the base of the spout. Press it firmly onto the body, fairly high up. Ensure you drill holes through the body wall behind the spout to allow liquid to pour. -
Create the handle:
Pull or roll a coil for the handle. Shape it into a ‘C’ or ear shape ensuring it is thick enough to support the weight of a full pot. I usually flatten the profile slightly for a better grip. -
Secure the handle:
Attach the handle opposite the spout using slipping and scoring. Reinforce the join with tiny coils of clay blended smoothly into both the handle and the body. -
Sculpt the ears:
Form two small, rounded triangles from clay scraps. Attach these near the top rim of the body, just beside the lid opening. Use your thumb to create a slight depression in the front of each ear.
Cracked Handle?
If the handle cracks at the join during drying, wrap the join tightly in plastic while leaving the rest exposed to balance moisture levels.
Step 3: Finishing Details
-
Smooth the surface:
Use a damp sponge to wipe down the entire teapot, removing any fingerprints or rough textures. The surface should be very smooth to match the sleek look in the photo. -
Dry slowly:
Cover the teapot loosely with plastic to let it dry very slowly. This prevents the handle or spout from cracking away from the body as the clay shrinks. -
Bisque fire:
Once bone dry, fire the piece in a kiln to bisque temperature according to your clay type. -
Paint the face:
Using a fine brush and black underglaze, carefully paint the sleeping features. Draw two ‘U’ shapes for closed eyes, a small rounded triangle nose, and a simple vertical line for the mouth. Add three dots on each cheek for freckles. -
Glaze interior:
Pour a food-safe clear glaze inside the teapot and swirl it around to coat the interior. This makes it functional and waterproof. -
Final firing:
Fire the piece again to the appropriate temperature for your clay and glaze. The exterior can remain unglazed for that raw, earthy texture shown in the image.
Now you have a charming little friend to join you for your afternoon tea break