If you’ve been itching to make clay tiles but want something genuinely doable, I’ve got you. These easy tile ideas lean hard into texture, simple shapes, and low-stress motifs that still look handmade and special.
Lace-Pressed Texture Tile
Transform a simple slab of clay into an elegant piece of home decor using nothing more than a scrap of textured fabric. This project captures the delicate intricacy of lace in a permanent, durable medium, resulting in a sophisticated coaster or decorative tile with a lovely tactile finish.
Step-by-Step Tutorial
Materials
- White or beige air-dry clay (or polymer clay)
- Textured lace doily or heavy lace fabric
- Rolling pin
- Square cookie cutter or sharp craft knife
- Ruler (if using a knife)
- Two wooden guide strips (approx. 1/4 inch thick)
- Fine-grit sandpaper
- Clear matte acrylic sealer or varnish
- Parchment paper or non-stick mat
- Sponge
Step 1: Preparing the Clay Base
-
Condition the clay:
Begin by kneading a handful of your air-dry clay until it is warm, pliable, and free of cracks. If it feels too dry, you can work in a tiny drop of water. -
Set up your workspace:
Place a sheet of parchment paper or a non-stick mat on your work surface. This prevents the clay from sticking and makes it easier to move later without distorting the shape. -
Roll the slab:
Position your two wooden guide strips on either side of the clay ball. These will ensure your tile is perfectly even. Roll the clay out with your rolling pin until the pin rides on the guide strips. -
Smooth the surface:
Before texturing, check for any air bubbles or uneven spots. I like to run a slightly damp sponge or just my finger over the surface to make it pristine and ready for the impression.
Sticky Situation?
If the lace sticks to the clay, lightly dust the clay surface with cornstarch or baby powder before laying down your fabric. It acts as a release agent and brushes off later.
Step 2: Creating the Texture
-
Position the lace:
Take your lace doily or fabric and place it thoughtfully onto the clay slab. Ensure the most interesting part of the pattern—like a central flower—is right where you want the center of your tile to be. -
Roll the impression:
Using the rolling pin again, press firmly and roll over the lace once. Try to do this in a single, confident pass rather than rolling back and forth, which can blur the delicate pattern. -
Check the depth:
Before removing the fabric entirely, lift a corner gently to peek at the impression. If it’s too faint, lay it back down exactly as it was and press deeper with your fingers or the roller. -
Reveal the design:
Carefully peel the lace away from the clay. Pull slowly to avoid distorting the clay slab underneath, revealing the crisp, raised details of your design.
Antique Wash
After sealing, wipe diluted brown acrylic paint over the surface and immediately wipe it off. The dark paint stays in the crevices, highlighting the lace details beautifully.
Step 3: Cutting and Refining
-
Frame the composition:
Hover your square cookie cutter or ruler over the pattern to decide on the final crop. Aim to center the main floral motif for a balanced look. -
Cut the shape:
Press the cutter straight down firmly. If using a knife and ruler, make clean, vertical slices rather than dragging the blade, which can warp the edges. -
Remove excess clay:
Peel away the excess clay scrap from outside your square cut. Save this for another project, keeping your main tile undisturbed on the parchment paper. -
Soften the edges:
Dip your finger in a little water and gently run it along the cut edges of the tile to round them off slightly. This prevents sharp, brittle edges once dry. -
Add corner details:
If your pattern left the corners looking bare, you can use a small tool or toothpick to add a few manual dots or marks to frame the design, blending them with the lace texture.
Step 4: Finishing the Tile
-
Leisurely drying:
Let the tile air dry completely. This usually takes 24-48 hours depending on humidity. To prevent warping, flip the tile over gently about halfway through the drying process. -
Sand for perfection:
Once fully cured and hard, use fine-grit sandpaper to smooth out any rough spots on the sides or back. Be remarkably gentle on the textured face to avoid erasing the pattern. -
Clean the dust:
Wipe the tile with a dry soft cloth or a very slightly damp sponge to remove all sanding dust before sealing. -
Apply sealer:
Brush on a thin coat of clear matte acrylic varnish or sealer. This protects the clay from moisture and stains, which is crucial if you plan to use this as a coaster. -
Final cure:
Allow the varnish to dry according to the manufacturer’s instructions. A second coat can be added for extra durability if desired.
Enjoy using your custom textured tiles as unique coasters or charming wall accents.


Simple Geometric Stamp Tile
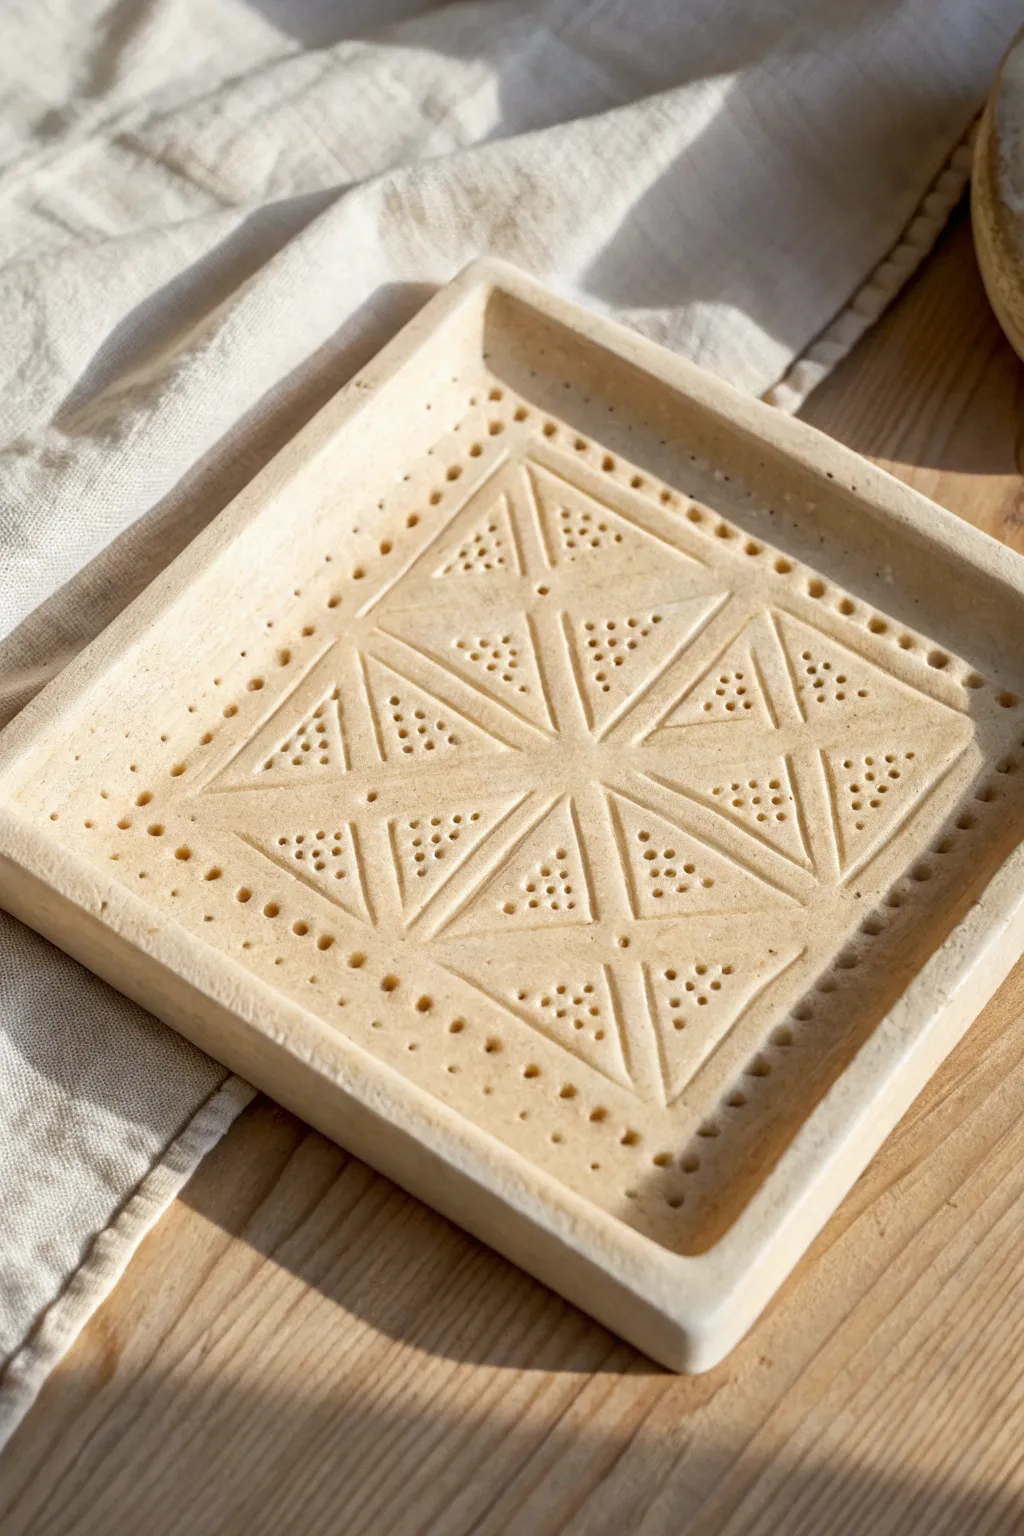
This elegant square dish features a classic, geometric relief pattern reminiscent of traditional shortbread molds. Its raised rim and intricate dotted design create a tactile surface that feels both modern and timeless, perfect for a trinket tray or coaster.
How-To Guide
Materials
- Light-colored stoneware or polymer clay (approx. 1 lb)
- Rolling pin
- Two 1/4-inch wooden slats (guide rails)
- Square template (paper or cardstock, approx. 5×5 inches)
- Fettling knife or clay cutter
- Ruler or straight edge tool
- Needle tool or toothpick
- Small round tool (like the back of a paintbrush or a 2mm drill bit)
- Sponge and water
- Canvas or wooden board for working
Step 1: Forming the Base
-
Prepare the slab:
Wedge your clay thoroughly to remove air bubbles. Place the clay between two 1/4-inch wooden slats on your canvas work surface. These slats will act as depth guides to ensure your tile has a perfectly even thickness. -
Roll it out:
Using your rolling pin, roll the clay out until the pin rests flat on both wooden slats. Smooth the surface with a damp sponge or a rubber rib to remove any canvas texture. -
Cut the square:
Place your square template gently on the clay. Using a Fettling knife held vertically, cut around the template to create a clean square shape. Do not discard the excess clay yet. -
Create the rim strips:
Gather the excess clay and re-roll it, or use remaining slab sections. Cut four long strips that are roughly 1/4 inch wide and the same length as the sides of your square tile. -
Attach the rim:
Score the outer edges of your square base and the bottom of your four clay strips. Apply a small amount of slip (clay and water mixture) to the scored areas. -
Secure and smooth:
Press the strips onto the edges of the base to create a raised border. Use your fingers or a modeling tool to blend the seams on the inside and outside, ensuring the rim is fully integrated with the base.
Step 2: Carving the Design
-
Mark major diagonals:
Lightly trace an ‘X’ from corner to corner using your ruler and needle tool. This divides the square into four large triangular quadrants. Don’t carve deep yet; just mark the path. -
Bisect the quadrants:
Draw a vertical line and a horizontal line crossing through the center point, effectively splitting your ‘X’ into eight equal pie-slice triangles. -
Deepen the main lines:
Once you are happy with the spacing, use a slightly wider modeling tool or the edge of a ruler to press these lines deeper into the clay, creating a distinct groove. -
Create interior triangles:
Inside each of the eight triangular sections, carve a smaller triangle shape parallel to the main lines. This creates a nested effect. -
Detail the border:
Use your needle tool or a small stylus to press a row of evenly spaced dots along the inside edge of the raised rim. This frames the central pattern.
Warping Woes?
If corners curl up while drying, flip the leather-hard tile onto a piece of drywall or wood and weigh the corners down gently with small sandbags.
Step 3: Adding Texture and Finish
-
Dot the interior:
Using your small round tool (like the blunt end of a paintbrush), press holes into the smallest central triangles. Start at the wide end and taper the number of dots as the triangle narrows. -
Fill remaining spaces:
Add corresponding rows of dots in the remaining negative spaces of the larger triangles. I find that counting the dots as I go helps keep the pattern symmetrical across all four quadrants. -
Clean up burrs:
The punching process might raise small ‘crumbs’ of clay. Let the piece dry until leather-hard, then gently brush these away with a soft, dry brush or smooth them with a tentative finger. -
Final drying:
Place a piece of plastic loosely over the tile to let it dry slowly. This prevents the corners from curling up as the clay shrinks. -
Fire or bake:
Once bone dry, fire the piece in a kiln according to your clay type (or bake if using polymer clay). This design looks beautiful left unglazed, or finished with a matte clear coat.
Make it a Mold
Use this finished fired tile as a stamp! Press it into a fresh slab of clay to create a reverse-relief version of this pattern instantly.
Enjoy the rhythmic process of dotting this pattern and displaying your unique geometric creation


Sunburst Sgraffito Tile
Capture the warmth of the sun with this charmingly rustic clay tile project that uses simple carving techniques to create texture and depth. The monochromatic, creamy finish highlights the incised lines, making it a perfect minimalist accent piece for any windowsill or shelf.
Step-by-Step Guide
Materials
- White or cream-colored air-dry clay (or polymer clay)
- Rolling pin
- Two 1/4-inch thick wooden slats (for depth guides)
- Square cookie cutter (approx. 4×4 inches) or ruler and craft knife
- Small circular cookie cutter or bottle cap (approx. 1 inch)
- Needle tool or toothpick
- Carving tool or linocut gouge (V-shaped)
- Small sponge
- Bowl of water
- Fine-grit sandpaper
Step 1: Preparing the Base
-
Condition the clay:
Start by taking a handful of your air-dry clay and kneading it in your hands until it becomes warm, soft, and pliable. This prevents cracks later on. -
Set up your workspace:
Place a sheet of parchment paper or a canvas mat on your work surface to prevent sticking. -
Roll the slab:
Place your two wooden slats on either side of the clay ball. Roll the rolling pin over the slats to ensure your clay slab is a perfectly even 1/4-inch thickness. -
Cut the square:
Using your square cookie cutter or a ruler and craft knife, cut out a clean square shape. Smooth the raw edges gently with a damp finger to round them slightly.
Step 2: Carving the Sunburst
-
Mark the center:
Find the rough center of your tile. Gently press your small circular cutter or bottle cap into the clay to make an impression, but don’t cut all the way through. -
Deepen the center circle:
Using your carving tool or V-gouge, carefully carve out the outline of the central circle you just marked, removing a thin strip of clay to define the sun’s core. -
Plan the rays:
I like to lightly sketch the main rays extending from the circle to the corners and mid-points first using a needle tool, just to get the spacing right. -
Carve the primary rays:
Using the carving tool, gouge out straight lines radiating from the center circle toward the edges of the tile. Vary the pressure slightly so the lines have a natural, hand-carved feel. -
Add secondary rays:
In between the longer rays, carve shorter lines that start from the circle but don’t reach quite as far to the edge. -
Create texture details:
Use a needle tool or the tip of a toothpick to poke clusters of tiny dots or small scratches near the ends of some rays. This adds that lovely speckled texture seen in the photo. -
Add floral or star accents:
For the tiny star-like details between rays, gently press the tip of a star-shaped tool or carefully scratch small ‘x’ shapes or asterisks into the clay surface.
Clean Carving Tip
Let the clay dry to a ‘leather hard’ state (about 1-2 hours) before carving deep lines. It prevents the clay from dragging and creates crisper edges.
Step 3: Finishing Touches
-
Smooth the surface:
Dip your small sponge in water and wring it out until it’s just barely damp. Gently wipe the surface of the tile to soften any sharp ridges created by the carving tools. -
Clean the lines:
If the sponging pushed any loose clay into your carved grooves, use your needle tool to quickly clear them out again. -
Initial drying:
Place the tile on a wire rack or leave it on the parchment paper. Let it sit in a cool, dry place away from direct sunlight to prevent warping. -
Flip for even drying:
After about 12 hours, carefully flip the tile over so the bottom can breathe and dry evenly. -
Sand the edges:
Once fully cured (usually 24-48 hours), take your fine-grit sandpaper and lightly buff the corners and edges to make them buttery smooth. -
Seal (Optional):
If you plan to use this as a coaster, apply a coat of clear matte acrylic sealer to protect it from moisture.
Make It a Trivet
Glue a square of cork or felt to the bottom of your finished tile. This protects your furniture and gives the piece a professional, finished weight.
Enjoy the gentle, handmade aesthetic of your new sunburst tile as it catches the light on your windowsill


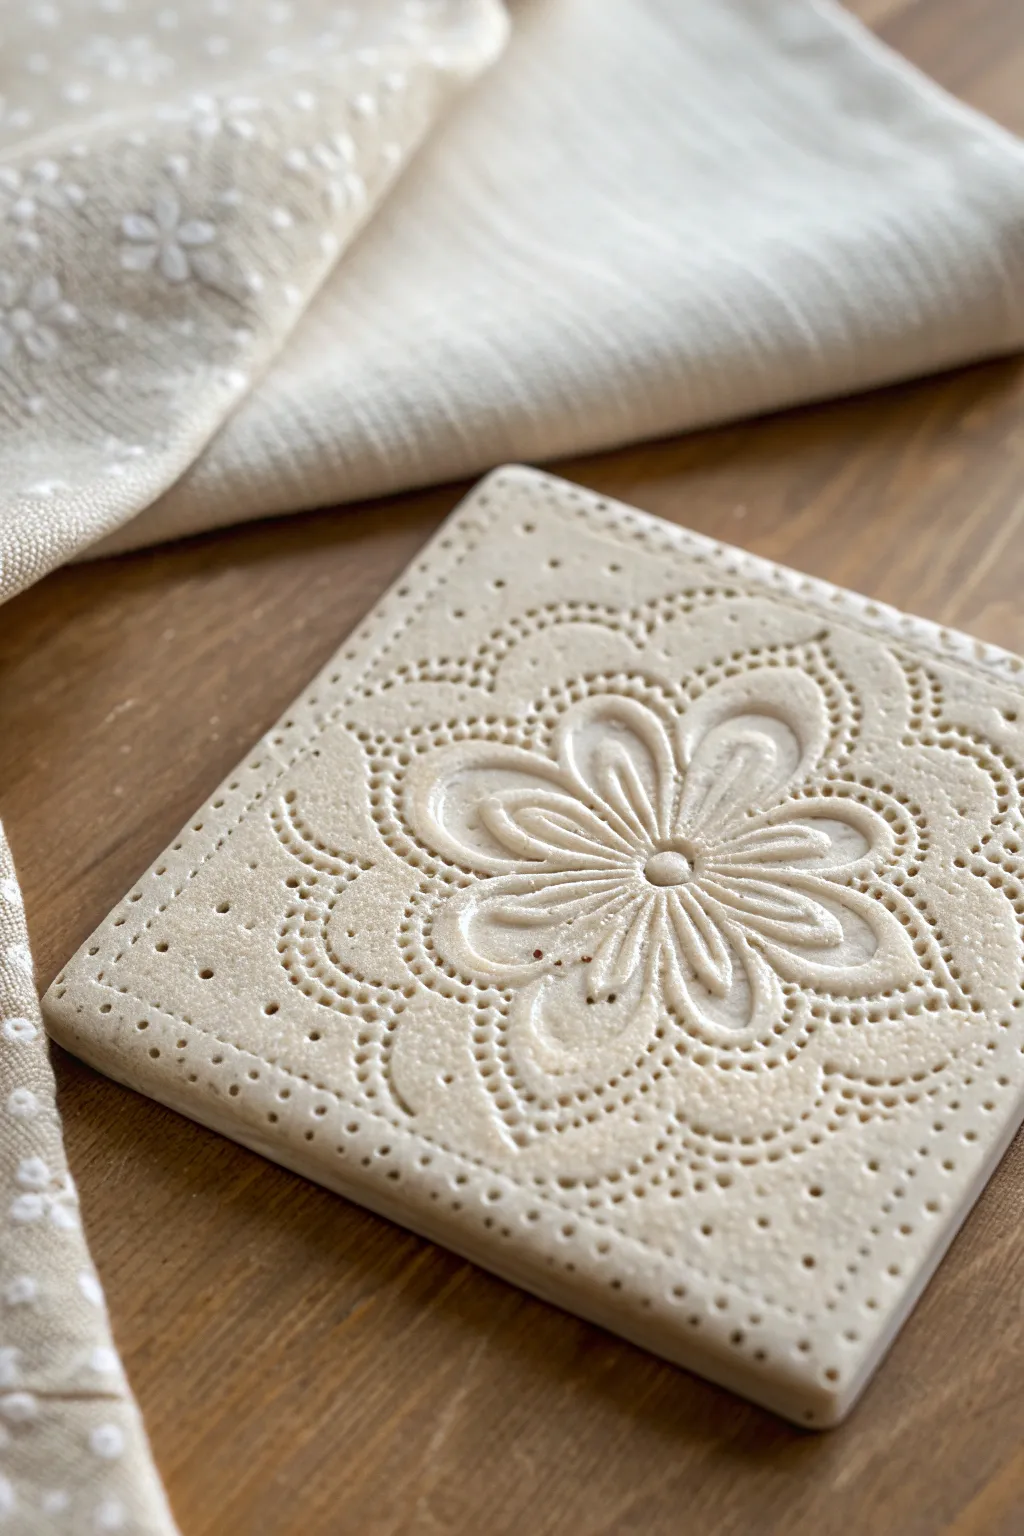
Frame-and-Center Medallion Tile
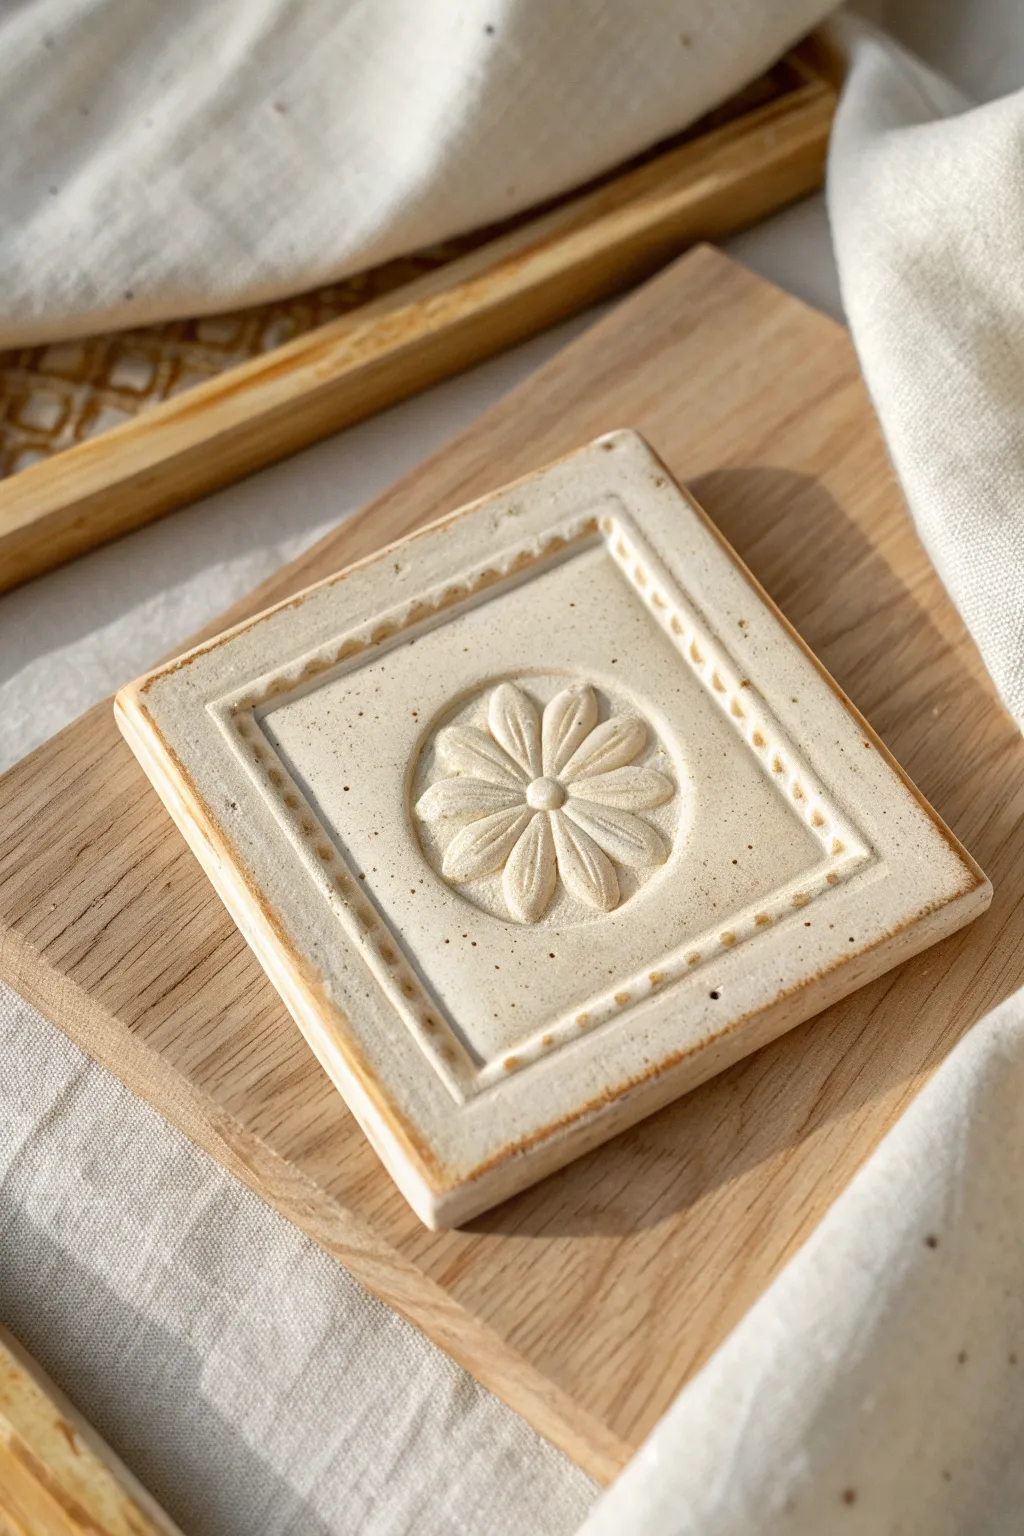
Embrace the beauty of simplicity with this charming ceramic tile featuring a raised floral medallion and a textured frame. The speckled cream finish highlights the intricate details, making it a perfect coaster or decorative accent.
How-To Guide
Materials
- Speckled stoneware clay (light cream firing)
- Rolling pin
- Two wooden guide strips (approx. 1/4 inch thick)
- Square cookie cutter or square template (approx. 4×4 inches)
- Small round cutter (approx. 1.5 inches)
- Needle tool
- Loop carving tool
- Wooden modeling tool with a slightly pointed tip
- Scoring tool (or serrated rib)
- Slip (clay mixed with water)
- Sponge
- Clear matte glaze or satin white glaze
Step 1: Creating the Tile Base
-
Prepare your clay:
Start by wedging a good-sized chunk of speckled stoneware clay to remove any air bubbles. Pat it into a rough square shape to make rolling easier. -
Roll the slab:
Place your clay between two wooden guide strips on a canvas-covered surface. Roll the clay out until the rolling pin rests flat on the guides, ensuring a perfectly even thickness. -
Smooth the surface:
Take a slightly damp sponge or a soft rubber rib and compress the surface of the clay slab. This aligns the clay particles and creates a smooth canvas for your design. -
Cut the square:
Using your square cutter or a template with a needle tool, cut out the main tile shape. Remove the excess clay but save it for the decorative elements. -
Round the edges:
Gently run a damp finger or sponge along the sharp cut edges of the square to soften them slightly. This prevents the edges from being sharp after firing.
Warping Warning
Tiles curl easily! Dry them very slowly under plastic, or weighted between wooden boards. If edges lift while drying, gently flip it over.
Step 2: Constructing the Frame
-
Measure the border:
Lightly sketch a smaller square about 1/2 inch inside the outer edge of your tile using a needle tool. Don’t cut through; just mark it as a guide. -
Create coils:
Roll out thin, even coils of clay. You can use an extruder if you have one, or roll them by hand to about the thickness of a pencil. -
Score and slip:
Score (scratch) the area along your marked guide lines and apply a dab of slip. Score one side of your clay coil as well. -
Attach the frame:
Lay the coil onto the scored square outline. Press it down firmly but gently to adhere it without flattening it completely. Trim the corners at a 45-degree angle for a neat mitered joint. -
Refine the border:
Use a wooden modeling tool to blend the very bottom edge of the coil onto the tile base for strength, then reform the top shape. I like to press a small, blunt tool into the top of the ridge at regular intervals to create that decorative ‘stitch’ texture shown in the image.
Step 3: Adding the Floral Center
-
Form the center disc:
Roll a small ball of clay and flatten it significantly to create a low disc, or cut a small circle from your leftover slab. Score the center of your tile and the back of the disc, then attach it with slip. -
Shape the petals:
Using a loop tool or a small carving tool, gently carve away clay from the center disc to define individual petals. You are essentially sculpting the flower in relief (bas-relief) rather than adding separate petals. -
Detail the flower:
Use a needle tool or small modeling stick to press a line down the center of each petal. Add a tiny ball of clay to the very center of the flower for the pistil. -
Clean up:
Use a small brush with a tiny amount of water to smooth out any carving marks or rough burrs on the flower petals. -
Dry slowly:
Tiles are prone to warping, so dry this slowly. Place a piece of plastic loosely over the tile or sandwich it between two pieces of drywall (sheetrock) to ensure even drying.
Make it a Set
Make 4 tiles but vary the center medallion. Try a leaf, a sun, a moon, and a star for a celestial coaster set.
Step 4: Firing and Glazing
-
Bisque fire:
Once bone dry, fire the tile to bisque temperature (usually cone 04 or 06, depending on your clay). -
Apply glaze:
Dip or brush a clear matte glaze, or a semi-opaque white glaze, over the entire piece. The goal is to let the speckles of the clay show through. -
Wipe back (optional):
If you want to highlight the texture, gently wipe a damp sponge over the raised areas (the flower and frame) immediately after glazing. This removes some glaze from the high points, creating contrast. -
Glaze fire:
Fire the tile to the final maturity temperature of your clay body (likely cone 5 or 6 for stoneware).
Once cooled, add felt pads to the bottom corners to protect your table surface

The Complete Guide to Pottery Troubleshooting
Uncover the most common ceramic mistakes—from cracking clay to failed glazes—and learn how to fix them fast.
Four-Quadrant Pattern Tile
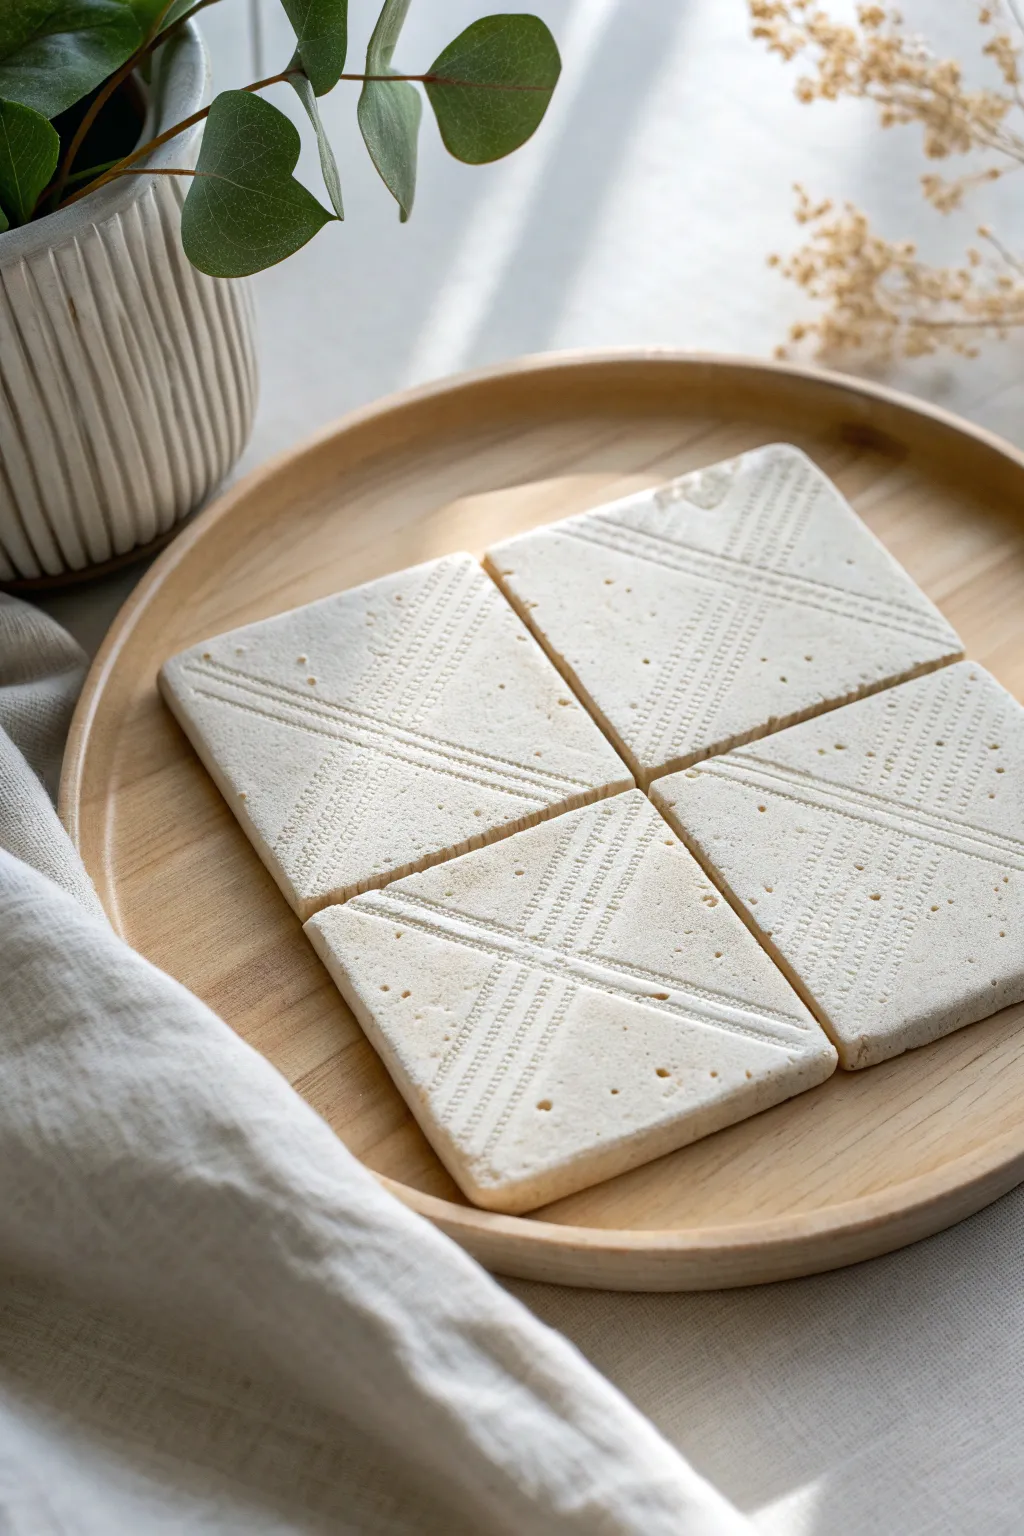
This project creates a stunning four-part tile series that works wonderfully as a set of minimalist coasters or a decorative wall hanging. The unglazed, textured white clay offers a modern, organic look featuring delicate diagonal lines and stippled details.
Detailed Instructions
Materials
- White air-dry clay or polymer clay
- Rolling pin
- Two wooden guide strips (approx 1/4 inch thick)
- Square cookie cutter (approx 3.5 inches) or a knife and ruler
- Dull butter knife or modeling tool (for lines)
- Toothpick (for dots)
- Fine-grit sandpaper
- Clean canvas or parchment paper
Step 1: Preparation and Shaping
-
Prepare your workspace:
Lay down a piece of canvas or parchment paper on a flat surface. This prevents the clay from sticking and picking up unwanted textures. -
Condition the clay:
Take a large chunk of white clay and knead it until it’s soft, pliable, and free of air bubbles. If using polymer clay, make sure it’s warm enough to prevent cracking. -
Roll out the slab:
Place your wooden guide strips on either side of the clay ball. Roll the rolling pin over the guides to create a perfectly even slab that is roughly 1/4 inch thick. -
Cut the rough squares:
Using your square cutter, punch out four identical squares. If you don’t have a cutter, measure and cut precise 3.5-inch squares using a ruler and a sharp knife. -
Refine the edges:
Gently tap the sides of each square against your work surface to square them up. Smooth any sharp cutting burrs with a damp finger.
Clean Lines
To keep your impressed lines crisp, place a sheet of cling film over the clay before pressing your tools into it. This softens the edges and prevents crumbling.
Step 2: Creating the Pattern
-
Mark the center lines:
Lightly trace a diagonal line across each tile. To achieve the specific look in the photo, you want the lines to meet in the center when the four tiles are arranged together. -
Create the main channels:
Using a modeling tool or the back of a dull butter knife, press firmly along your traced line to create a wide, deep groove. Flank this wide groove with two thinner, parallel pressed lines. -
Add cross-hatching texture:
On one side of the diagonal channel, use your modeling tool to impress a series of short, perpendicular hash marks. I find it helps to work quickly here to keep the spacing consistent. -
Stipple the surface:
Take your toothpick and gently poke random dots into the negative spaces of the design. Vary the pressure slightly so some holes are deeper than others for visual interest. -
Add detail borders:
On the sections without hash marks, drag the toothpick very lightly to create faint, scratchy patches of texture parallel to the main groove. -
Check the composition:
Place all four tiles together on the table to ensure the patterns align nicely across the gaps as they do in the reference photo. Make adjustments while the clay is still soft.
Step 3: Finishing and Drying
-
Initial drying phase:
Separate the tiles and let them sit on a flat, porous surface (like a wood board or cardboard) to begin drying. If using air-dry clay, loosely cover them with plastic wrap for the first few hours to prevent curling. -
Flip for flatness:
After about 6 hours, gently flip the tiles over. This ensures even airflow and helps keep straight edges. -
Complete drying:
Allow the tiles to dry completely for 24-48 hours until they are solid and room temperature to the touch. Polymer clay should be baked according to package instructions at this stage. -
Sand the imperfections:
Once fully cured or dry, use fine-grit sandpaper to gently smooth the outer edges and corners. -
Clean the surface:
Wipe away any clay dust with a slightly damp cloth or a soft brush. -
Optional sealing:
For functionality as coasters, apply a thin layer of matte varnish to protect the surface from moisture without changing the raw stone look.
Color Wash
Mix a tiny drop of brown acrylic paint with water and brush it over the dried texture. Wipe it back immediately to leave pigment only in the deep grooves.
Now you have a beautiful, custom geometric set ready to display or gift
Polka Dot Puff Relief Tile
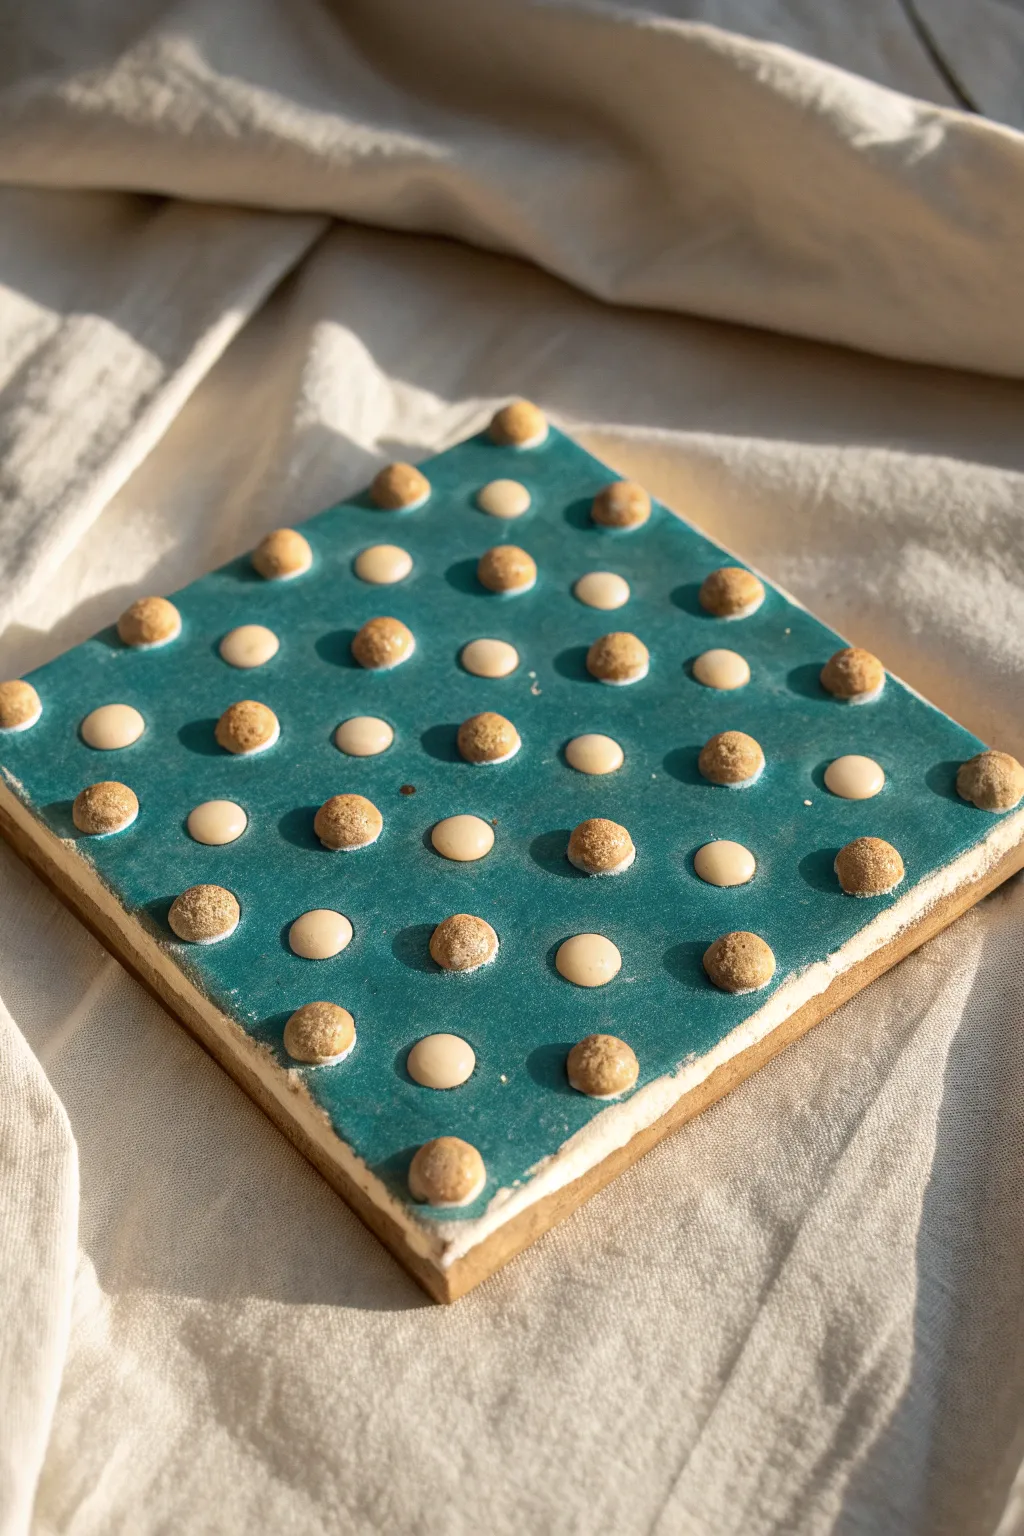
This striking ceramic tile project plays with dimension and finish by pairing a sleek, glassy teal background with raised relief dots of varying textures. The alternating pattern of creamy smooth puffs and earthy speckled mounds creates a tactile surface that is as fun to touch as it is to admire.
Step-by-Step
Materials
- Slab of medium-grog stoneware clay (approx. 1/2 inch thick)
- Square template (cardstock or plastic)
- Needle tool or fettling knife
- Rolling pin
- Two 1/2 inch wooden guide slats
- Slip (liquid clay)
- Scoring tool or serrated rib
- Teal gloss glaze
- Cream opaque glaze
- Speckled tan glaze or iron wash
- Small soft paintbrush
- Detail brush
- Ruler
Step 1: Base Construction
-
Roll the Slab:
Begin by rolling out your clay slab. Place the wooden guide slats on either side of your clay ball to ensure an even thickness of about 1/2 inch as you roll. -
Cut the Square:
Lay your square template over the smoothed slab. Using a needle tool, cut straight down to create sharp, 90-degree edges. Avoid dragging the tool, which can warp the corners. -
Smooth the Edges:
With a damp finger or a barely wet sponge, gently run over the cut edges to compress the clay particles and remove any sharp burrs left from cutting. -
Mark the Grid:
Use a ruler to lightly score a grid pattern onto the surface. You aren’t cutting the clay, just making faint guide marks where your dots will eventually sit to ensure perfect spacing.
Uneven Dots?
If your rolled clay balls vary too much in size, try using a small round fondant cutter or a circular piping tip to punch identical circles from a thin slab, then round them by hand.
Step 2: Creating the Relief
-
Form the Dots:
Roll small balls of leftover clay between your palms. Aim for consistent pea-sized spheres. You will need enough to cover your grid intersections. -
Score the Connections:
At each grid intersection on your tile base, scratch the surface with your scoring tool. Do the same to the bottom of each small clay ball. -
Attach the Dots:
Apply a dab of slip to the scored spot on the tile. Press a clay ball firmly into place. Repeat this for every intersection on your grid. -
Clean Up:
Once all dots are attached, check around the base of each one. Use a small detail tool or brush to clean up any slip that squeezed out, ensuring a crisp transition between the dot and the flat tile. -
Bisque Fire:
Allow the tile to dry slowly under plastic to prevent warping, then let it air dry completely before bisque firing it in the kiln according to your clay body’s specifications.
Crisp Glaze Lines
Apply liquid wax resist to the raised dots before painting the teal background. The background glaze will roll right off the dots, keeping them perfectly clean for their own colors later.
Step 3: Glazing Strategy
-
Apply the Base Color:
Using a soft, medium-sized brush, carefully apply the teal gloss glaze to the flat background of the tile. Work around the raised dots, trying to get close without coating them. -
Second Coat:
Let the first coat dry until chalky, then apply a second coat of teal. I find painting in a cross-hatch direction helps achieve an even, opaque finish. -
Glaze the Cream Dots:
Identify every other dot in the grid to create a checkerboard pattern. Carefully brush a dollop of opaque cream glaze onto these specific raised mounds. -
Glaze the Texture Dots:
On the remaining unglazed dots, apply the speckled tan glaze. If you want a rougher texture like the example, you can use a thinner iron wash instead of a full glaze layer. -
Wipe the Edges:
Use a clean, damp sponge to wipe any stray glaze off the vertical side edges of the tile, leaving the raw clay exposed for a nice frame effect. -
Glaze Fire:
Load the tile into the kiln for the final glaze firing. Make sure it is level so the teal glaze settles evenly across the flat surface.
Display your finished tile on a stand or mount it to a wall for a pop of modern ceramic art


What Really Happens Inside the Kiln
Learn how time and temperature work together inside the kiln to transform clay into durable ceramic.
Wavy Water Ripple Tile

Capture the calming movement of tidal sands with this elegantly simple clay tile project. The finished piece features deep, rhythmic grooves carved into a warm, sandy-toned clay, creating striking shadows that change with the light throughout the day.
Detailed Instructions
Materials
- Polymer clay or air-dry clay (stone or beige color)
- Rolling pin or acrylic roller
- Two 1/4-inch dipping sticks or depth guides
- Square tile cutter or craft knife and ruler
- Loop tool (medium size)
- Ribbon tool (small size)
- Smooth work surface or ceramic tile
- Small bowl of water (if using air-dry clay)
- Sponge or soft paintbrush
- Sandpaper (fine grit)
Step 1: Preparation & Shaping
-
Condition the Clay:
Begin by kneading your chosen clay until it is soft, pliable, and free of air bubbles. If you are using polymer clay, ensure it’s warm enough to prevent cracking during the rolling process. -
Set Up Depth Guides:
Place your depth guides (dipping sticks) on either side of your work surface. This ensures your tile will have a perfectly uniform thickness, which is crucial for even carving later. -
Roll the Slab:
Roll the clay ball out between the guides. Keep rolling until the rolling pin rests on the sticks and the clay surface is completely flat and smooth. -
Cut the Square:
Use a square tile cutter to punch out your shape, or measure a perfect square (approx. 4×4 inches) with a ruler and slice cleanly with a craft knife. -
Smooth the Edges:
I like to take a moment here to gently tap down any sharp edges created by the cut. Run your finger along the perimeter to slightly round the corners for a more finished look.
Uneven Grooves?
If your carving tool is dragging, the clay might be too sticky. Let air-dry clay sit for 15 mins to leather-hard, or chill polymer clay slightly.
Step 2: Carving the Ripples
-
Plan the Flow:
Lightly visualize where your waves will go. The design works best if the waves move diagonally across the tile, rather than straight across. -
First Carve Use the Loop Tool:
Take your medium loop tool and carve the first wavy line from one edge to the other. Apply consistent pressure to keep the groove depth uniform. -
Create Parallel Paths:
Carve a second line parallel to the first, leaving a raised ridge of clay between them about the same width as your tool. -
Continue the Pattern:
Work your way across the entire tile, adding parallel waves. Don’t worry if they aren’t mathematically perfect; organic variations make it look more natural. -
Detail with Ribbon Tool:
Switch to a smaller ribbon tool to refine the bottom of the grooves. You can deepen specific sections to create more dramatic shadow play. -
Clean Up Crumbs:
Carving often leaves little ‘clay crumbs.’ Gently brush these away with a soft, dry paintbrush. Avoid pressing them back into the surface.
Step 3: Finishing
-
Soften the Ridges:
Dip a sponge or finger in a tiny bit of water (or baby oil for polymer) and very gently run it along the cut grooves to smooth out any tool marks. -
Texture the Surface (Optional):
To mimic the speckled stone look in the photo, you can gently tap the high points with a stiff bristle brush or a piece of coarse darker grit sandpaper. -
Drying or Baking:
If using air-dry clay, let it dry slowly on a wire rack away from direct heat to prevent warping. If using polymer, bake according to package instructions on a ceramic tile. -
Sanding:
Once fully cured or dry, use fine-grit sandpaper to smooth the outer edges and the top of the ridges one last time. -
Final Wipe Down:
Wipe the tile with a slightly damp cloth to remove sanding dust and reveal the clean, matte finish.
Natural Stone Look
Mix black pepper or used coffee grounds into your clay before rolling. This creates instant organic speckles that look like real stoneware.
Enjoy the interplay of light and shadow on your new textured artwork
Honeycomb and Bee Tile
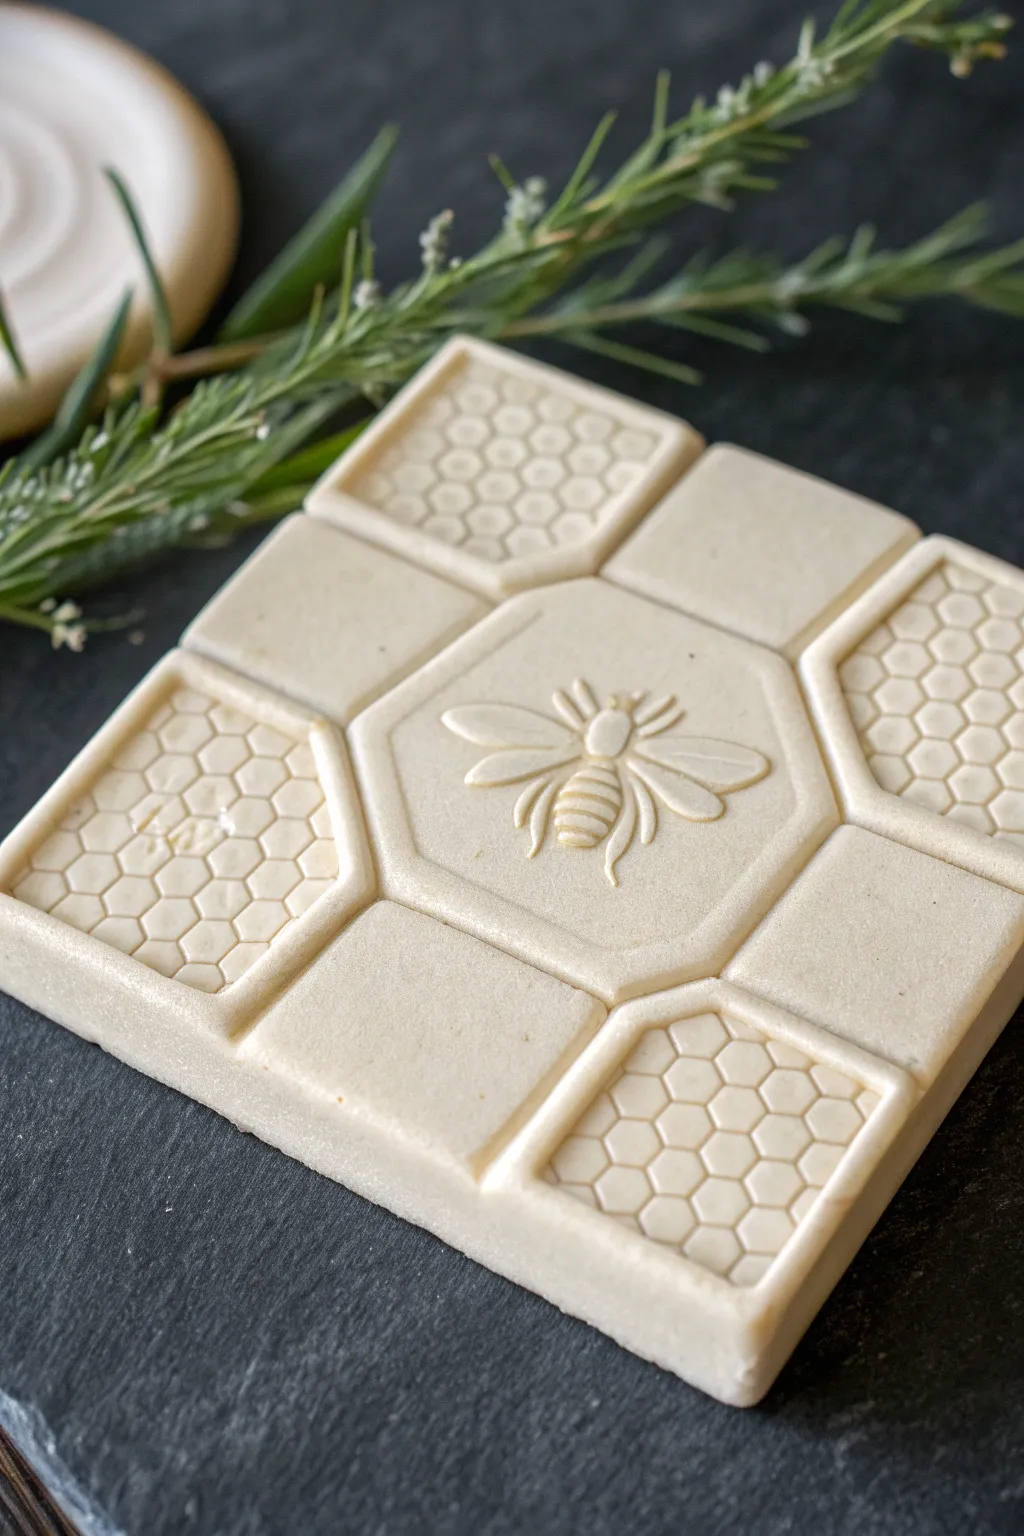
This elegant square tile combines crisp geometric lines with organic motifs, featuring a central bee surrounded by honeycomb grids. The soft, creamy shimmer gives it a sophisticated stoneware look that feels much more advanced than it actually is.
How-To Guide
Materials
- White air-dry clay or polymer clay (approx. 200g)
- Rolling pin
- Square cookie cutter or knife (approx. 4×4 inches)
- Ruler
- Needle tool or toothpick
- Small coffee straw or hexagon cutter tool
- Small carving loop tool (optional)
- Bee stamp or silicone mold (alternatively, sculpting tools)
- Pearl white acrylic paint or mica powder
- Sponge or soft paintbrush
- Sandpaper (fine grit)
Step 1: Preparing the Base
-
Condition the clay:
Begin by kneading your white clay thoroughly until it’s pliable and smooth. This prevents cracks from forming later during the drying process. -
Roll out the slab:
Roll the clay out into an even slab, aiming for a thickness of about 1/4 to 1/2 inch. Using depth guides or two wooden rulers on either side can help ensure the thickness is perfectly uniform. -
Cut the square:
Use your square cutter or a sharp knife guided by a ruler to cut a clean, perfect square. Smooth the edges with a slightly damp finger to remove any burrs or sharpness from the cut.
Step 2: Drafting the Design
-
Mark the center:
Lightly find the center of your square tile. I find it helpful to press just the very corners of my ruler to visually check the middle without marring the surface. -
Outline the central octagon:
Using a needle tool, lightly sketch an octagon in the center. Don’t press deep yet; these are just guide lines. Ensure there is equal space on all sides. -
Create the grid sections:
Draw lines extending from the octagon’s angles to the tile’s edge. This should create four small corner sections and four rectangular middle sections surrounding the center shape.
Stamp Shortcut
Don’t want to sculpt the bee by hand? Use a wax seal stamp or a baking mold to press a perfect bee into an added disc of clay before attaching it to the tile center.
Step 3: Sculpting the Relief
-
Deepen the dividers:
Go back over your separation lines with a slightly thicker tool or the edge of a ruler, pressing down firmly to create distinct channels between the geometric sections while leaving the ‘islands’ raised. -
Define the borders:
Use a carving tool or the side of a toothpick to bevel the edges of each raised section slightly, giving them a pillowed, dimensional look rather than a sharp, flat cut. -
Add the honeycomb texture:
Select the four corner sections (or alternating sections). Press a small hexagonal cutter or the end of a hex key repeatedly into the clay to create the honeycomb pattern. Keep the impressions tight and aligned. -
Smooth the plain sections:
Check the alternate rectangular sections. If you accidentally marked them while texturing, smooth them out gently with a bit of water on your fingertip so they remain flat and pristine.
Warping Prevention
Tiles often curl up at the corners while drying. Dry your tile slowly under a loose sheet of plastic, or place a light board on top of it once the surface is firm.
Step 4: The Bee Centerpiece
-
Prepare the center:
Ensure the central octagon is smooth and flat. If you used a stamp for the grid earlier, make sure this center area remains untouched. -
Form the bee body:
Roll three tiny balls of clay: a small one for the head, a larger oval for the thorax, and a segmented oval for the abdomen. Press these gently onto the center of the octagon. -
Add wings:
Create four teardrop shapes from thin clay. Attach two large ones for the upper wings and two smaller ones below them. Press them flat against the tile surface. -
Detail the bee:
Using your needle tool, press horizontal stripes across the abdomen. Add tiny veins to the wings and define the separation between the head and body. -
Refine legs:
Roll hairline-thin snakes of clay for the legs. Attach them carefully, bending them at the ‘joints’ for a realistic insect posture. Blend the attachment points into the main body.
Step 5: Finishing Touches
-
Final smooth:
Look over the entire piece. Gently brush away any clay crumbs with a soft brush and smooth any harsh fingerprints. -
Dry completely:
Allow the clay to dry fully. For air-dry clay, this may take 24-48 hours. Turn the tile over halfway through so the bottom dries evenly. -
Sand edges:
Once bone dry, take fine-grit sandpaper and lightly buff the outer edges and corners of the tile for a professional finish. -
Apply finish:
To achieve the look in the image, brush on a coat of pearl white metallic paint or rub the surface with a white pearl mica powder. This catches the light on the high points of the relief.
This sophisticated tile makes a wonderful coaster or can be framed as a piece of wall art

TRACK YOUR CERAMIC JOURNEY
Capture glaze tests, firing details, and creative progress—all in one simple printable. Make your projects easier to repeat and improve.
Dragonfly Garden Tile
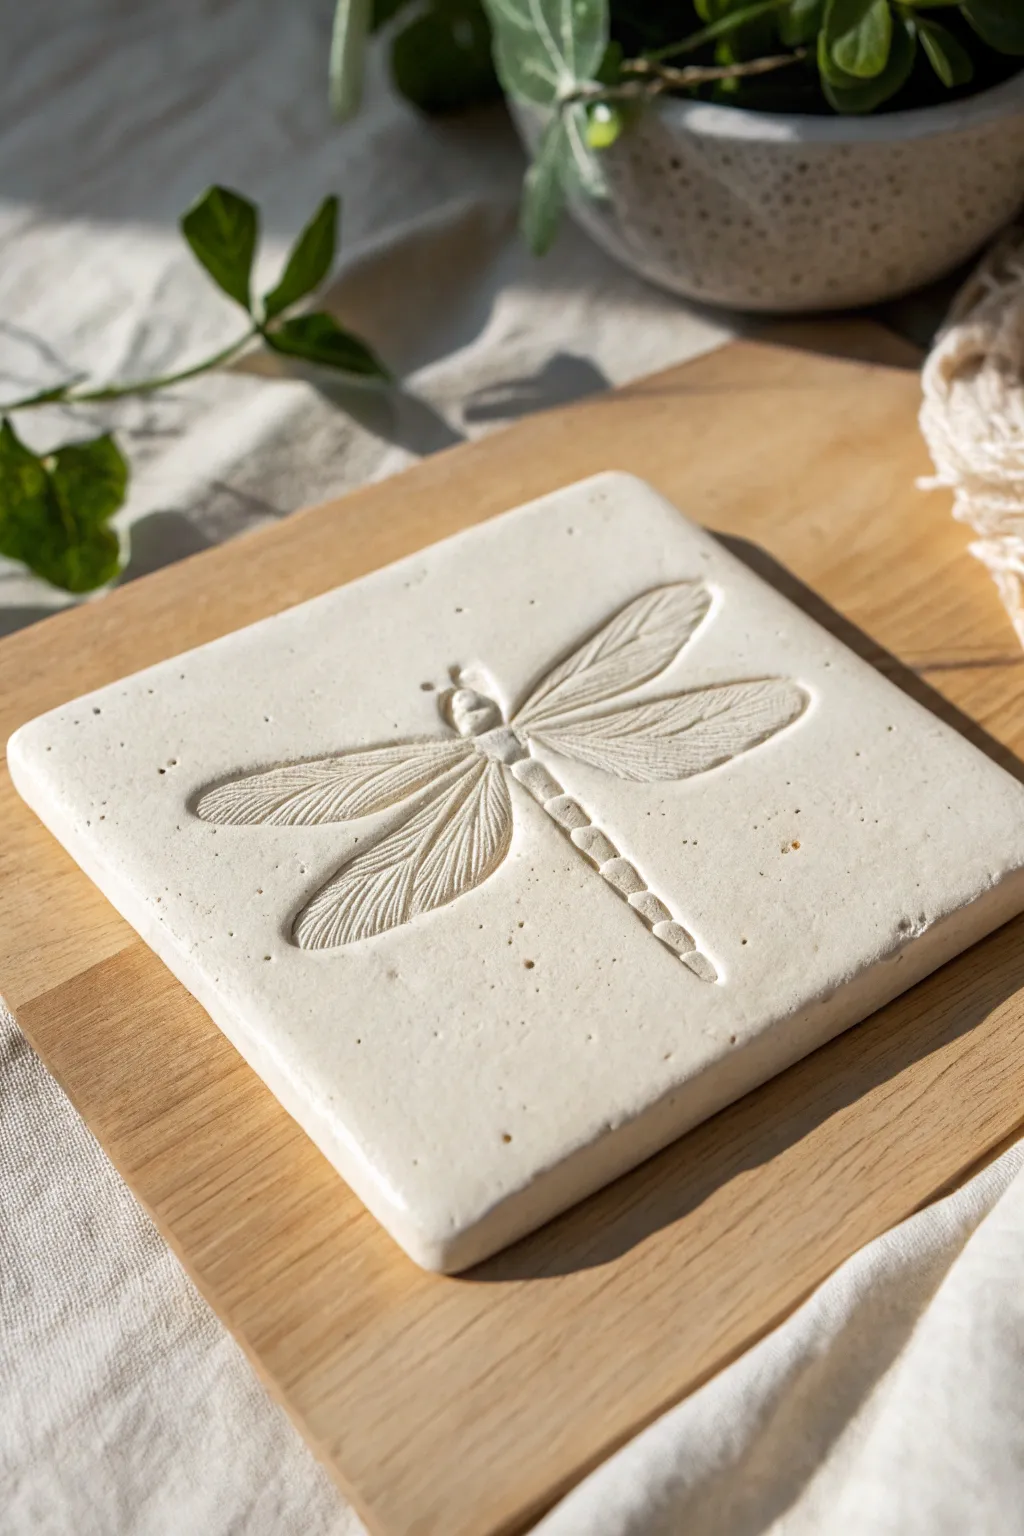
Bring the delicate beauty of garden insects indoors with this minimalist relief tile project. Using simple carving and molding techniques, you’ll create a sophisticated, fossil-like dragonfly impression in bright white clay that looks lovely on a mantle or as a coaster.
Step-by-Step Guide
Materials
- White air-dry clay (or white polymer clay)
- Square cookie cutter (approx. 4-5 inches) or a ruler and craft knife
- Rolling pin
- Parchment paper or canvas mat
- Needle tool or toothpick
- Small loop tool or carving tool
- Dragonfly rubber stamp (optional but helpful for outline)
- Fine-grit sandpaper
- Small cup of water
- Clear matte sealant spray (optional)
Step 1: Preparing the Base
-
Condition the clay:
Start by taking a handful of white air-dry clay and kneading it in your hands until it feels warm, pliable, and free of cracks. If it feels too dry, dip your fingers in water and work the moisture in. -
Roll out the slab:
Place your clay on a piece of parchment paper to prevent sticking. Use your rolling pin to create an even slab that is roughly 1/2 inch thick; you want it substantial enough so it doesn’t warp easily. -
Cut the square shape:
Position your square cookie cutter over the smoothest part of the slab and press down firmly. If you don’t have a cutter, measure a 4×4 inch square with a ruler and carefully cut it out with a craft knife. -
Smooth the edges:
Dip your finger in a little water and run it along the cut edges of the square to soften the sharp corners and smooth away any cutting debris.
Warping Woes?
If your tile corners start curling up while drying, place a lightweight book on top of the corners (avoiding the dragonfly design) to gently weigh them down flat.
Step 2: Sculpting the Dragonfly
-
Outline the design:
Lightly sketch the basic dragonfly shape centered on your tile using a needle tool. Draw a long vertical line for the body and two intersecting lines for the wings. I find it easiest to mark the head placement first to ensure it’s centered. -
Add volume to the body:
Roll a very thin snake of fresh clay for the tail and a small oval for the thorax (the middle section). Press these onto your sketched line, blending the edges down slightly so they attach firmly. -
Define the segments:
Use your needle tool to press horizontal indentations along the tail section, creating the segmented look of the dragonfly’s abdomen. -
Shape the head:
Add a small ball of clay for the head. Use the tip of your tool to create tiny indentations for the eyes. -
Create the wings:
Instead of adding clay for wings, we will carve them *into* the slab for a relief effect. Use a small loop tool to gently scoop out shallow, petal-shaped depressions where the four wings should be. -
Refine the wing shape:
Smooth the interior of these scooped areas with a damp finger. The wings should look slightly recessed compared to the raised body. -
Detail the veins:
Take your needle tool and gently drag it through the clay inside the wing depressions. Draw a central line down each wing, then feather out faint diagonal lines to mimic delicate veins. -
Clean up crumbs:
Carving often leaves little ‘clay crumbs.’ Use a soft, dry paintbrush to sweep these away without smudging your detailed work.
Clean Lines Pro Tip
Dip your carving tools in water or a tiny bit of oil before slicing into the clay. This creates much smoother drag lines and reduces the crumbly edges on the wing details.
Step 3: Finishing Touches
-
Add texture:
For a rustic stone look, gently tap the flat surfaces around the dragonfly with the bristles of an old toothbrush or a crumpled ball of foil to create subtle pitting. -
Initial drying:
Let the tile sit undisturbed on the parchment paper for about 24 hours. Don’t try to move it yet, as it might bend. -
Flip for even drying:
After the top feels dry to the touch, gently flip the tile over to let the bottom dry. This helps prevent the corners from curling upward. -
Sand the imperfections:
Once fully cured (usually 48-72 hours), take fine-grit sandpaper and lightly buff the edges and surface to remove any fingerprints or rough spots. -
Seal the piece:
To protect your tile from moisture and dust, spray it with a clear matte sealant. Two light coats are better than one heavy coat.
Display your new handcrafted tile on a wooden stand or gift it to a nature-loving friend
Snail Trail Spiral Tile
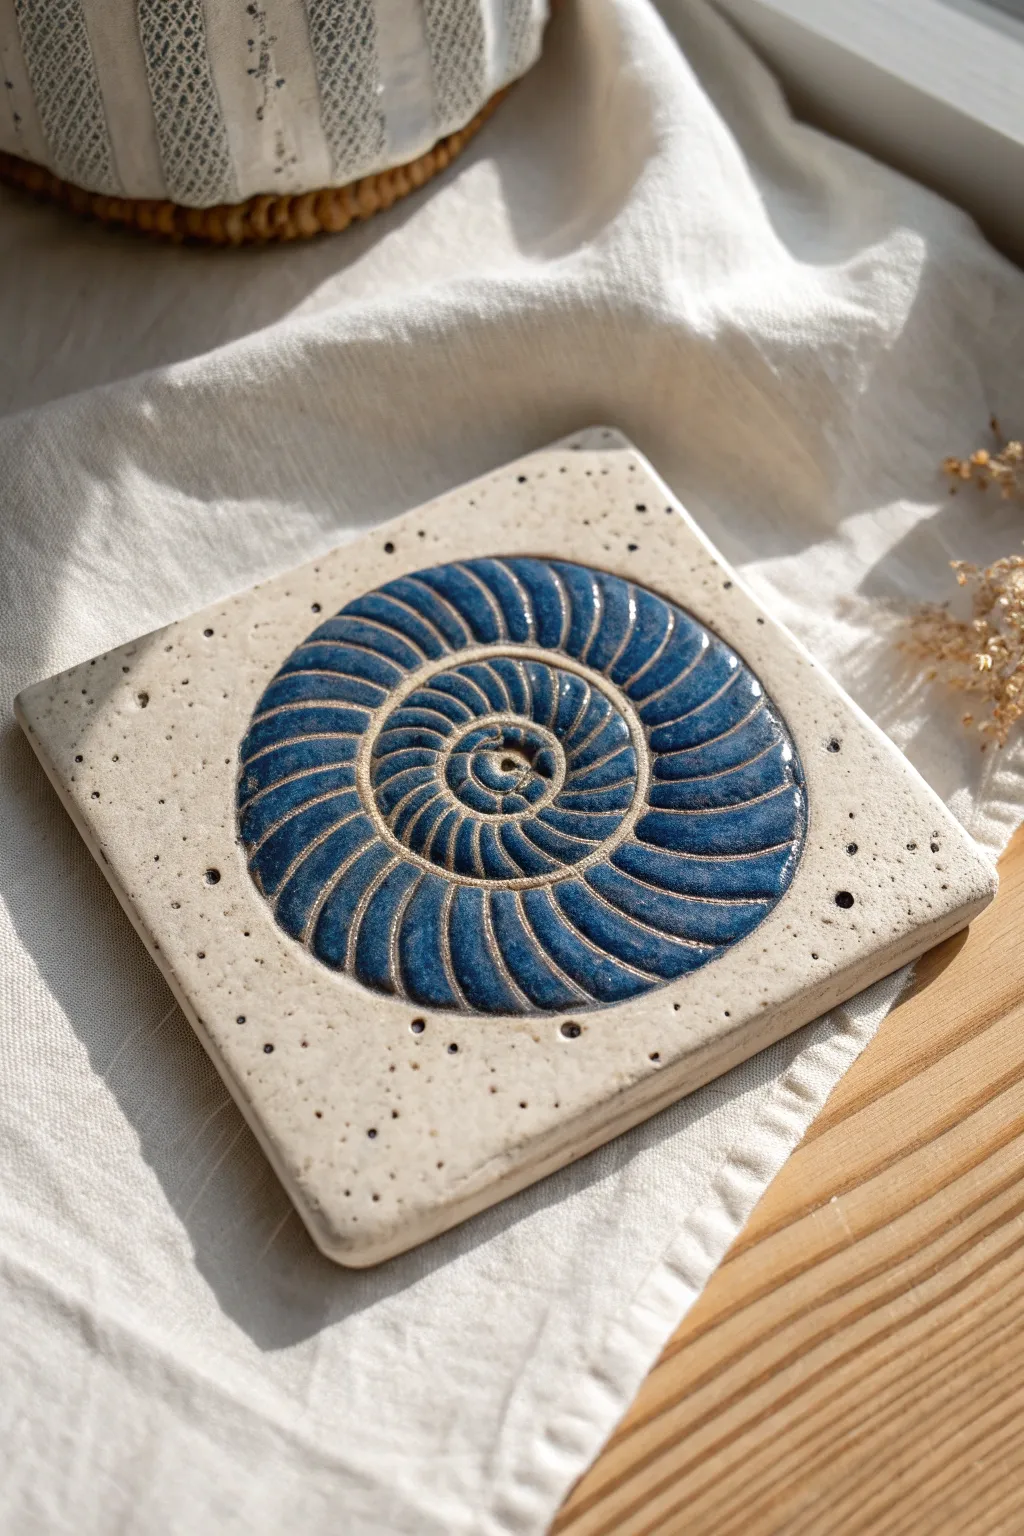
This rustic ceramic tile captures the ancient beauty of an ammonite fossil with a modern twist. Featuring a deep indigo spiral set against speckled stoneware clay, it makes for a stunning coaster or decorative accent piece.
Step-by-Step Tutorial
Materials
- Speckled stoneware clay (approx. 1 lb)
- Rolling pin
- Two wooden guide strips (approx. 1/4 inch thick)
- Square tile cutter or ruler and needle tool
- Carving tool set (specifically a loop tool and needle tool)
- Sea sponge
- Deep blue gloss glaze (cone 5/6 recommended)
- Small flat tip paintbrush
- Wax resist (optional)
- Clear matte glaze (optional)
- Canvas or ware board for working
Step 1: Shaping the Tile
-
Prepare your clay:
Begin by wedging your speckled stoneware clay thoroughly to remove air bubbles. This ensures your tile won’t crack during firing. -
Roll out the slab:
Place the clay between two wooden guide strips on your canvas. Use the rolling pin to flatten the clay until the roller rests on the guides, creating a perfectly even thickness. -
Cut the square:
Using a square tile cutter or a ruler and needle tool, cut out a 5×5 inch square. Wiggle the wire or blade slightly as you cut to create a clean separation. -
Smooth the edges:
Dip a small sponge in water and wring it out well. Gently run it along the sharp edges of the square to soften and round them off, giving the tile a finished, professional look. -
Mark the center:
Lightly find the center of your tile. You can do this by gently laying a ruler diagonally corner-to-corner and making a tiny mark where the lines intersect.
Step 2: Carving the Design
-
Draft the spiral:
Using a needle tool with very light pressure, sketch a large spiral starting from the center mark and expanding outward. Leave about a 3/4 inch border of empty space around the edges. -
Carve the main channel:
Switch to a small loop tool. Carefully carve out the continuous spiral path you just drew, pressing deep enough to create a distinct groove but not so deep that you weaken the tile structure. -
Mark the segments:
Within the spiral path, use your needle tool to lightly mark radial lines that divide the shell into segments. These should curve slightly, mimicking the natural chambers of a nautilus. -
Relief carve the segments:
Use a smaller carving tool to bevel the edges of each segment. The goal is to make each little section look slightly domed or rounded, rather than flat. -
Clean up crumbs:
Once carved, use a dry, soft brush to sweep away any clay burrs or crumbs from the grooves. Avoid using water here, as it can muddy your crisp carving lines.
Warping Woes?
Tiles love to warp. Dry them slowly! Sandwiching the tile between two pieces of drywall or smooth plywood while drying ensures it stays perfectly flat.
Step 3: Glazing and Finishing
-
Bisque fire:
Allow the tile to dry slowly between two pieces of drywall or under loose plastic to prevent warping. Once bone dry, fire the tile to cone 04 (bisque). -
Apply wax resist:
Brush a coat of wax resist carefully over the outer uncarved borders and the thin raised ridges between the spiral segments. This will help keep the clay raw and speckled in those areas. -
Fill with glaze:
Load a small flat brush with deep blue gloss glaze. Dab it generously into the recessed spiral segments. I find pooling the glaze slightly helps achieve that rich, dark depth. -
Wipe back access:
If any glaze got onto the waxed ridges, use a damp sponge to gently wipe it away immediately. The wax should resist it, but a quick wipe ensures clean lines. -
Glaze fire:
Let the glaze dry completely. Fire the tile again to the temperature recommended for your specific clay and glaze combination (usually cone 5 or 6 for stoneware). -
Clean the bottom:
After firing, you might want to sand the bottom of the tile lightly if there are any rough spots to protect your table surface.
Pro Tip: Highlight the Speckles
If you want the unglazed border to shine, wipe it down with a damp sponge right before firing. This exposes more of the grog/speckles for a textured finish.
Place your finished tile on your coffee table and enjoy the blend of prehistoric inspiration and modern craft
Turtle Shell Pattern Tile
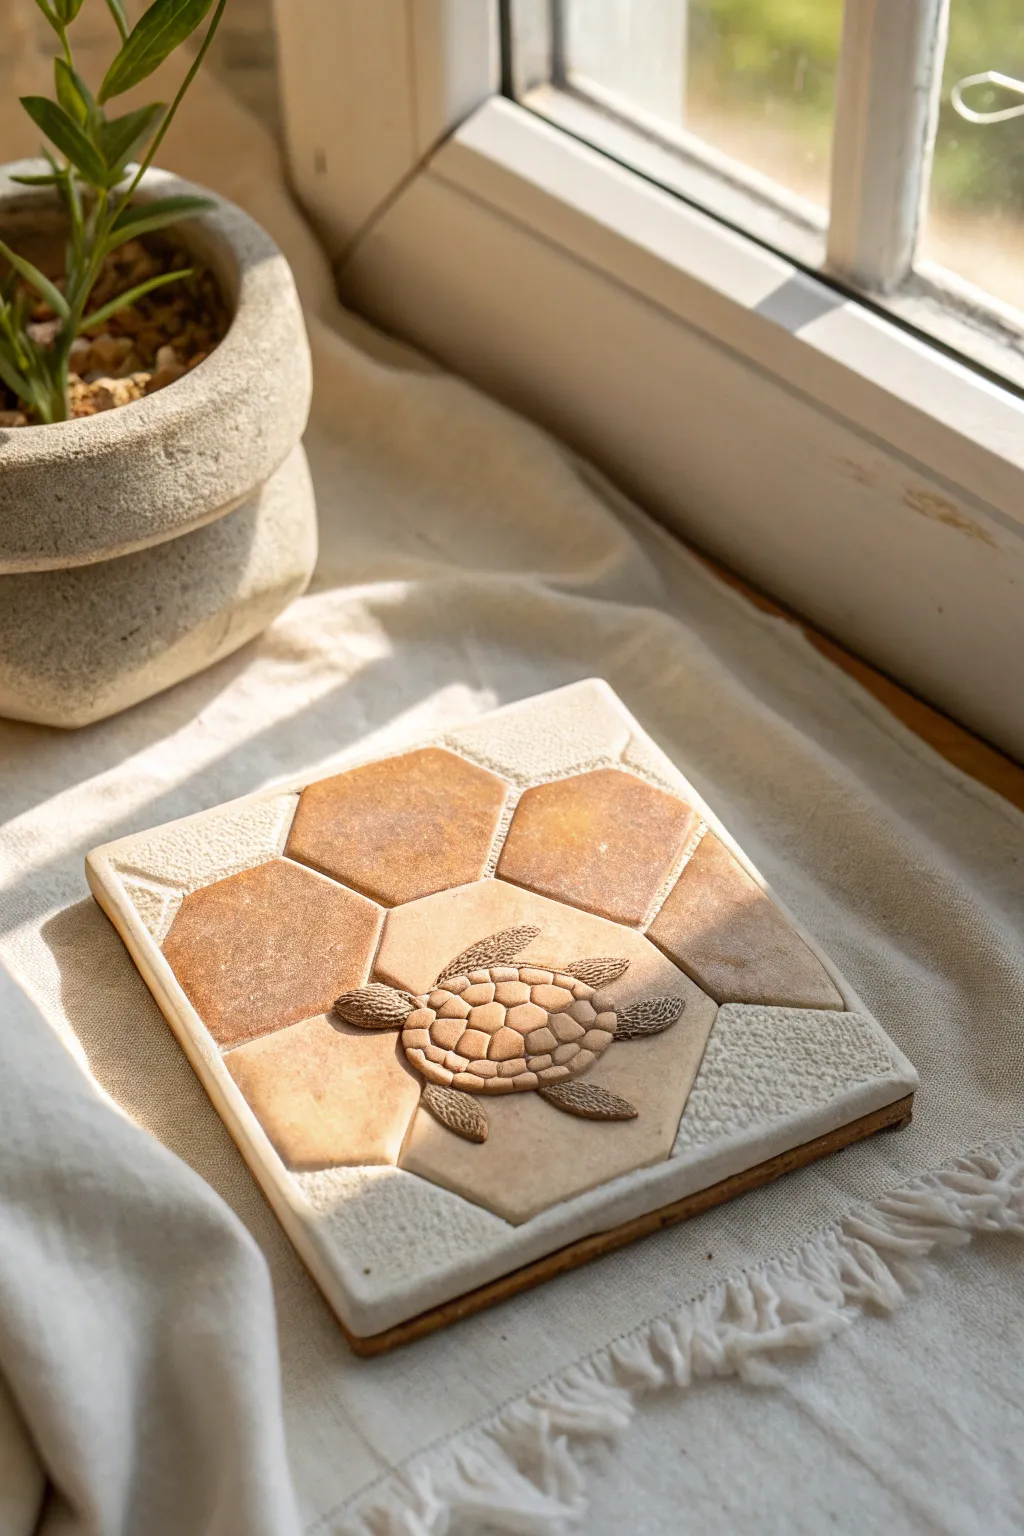
This charming decorative tile combines the satisfying geometry of a hexagonal shell pattern with a delicate, sculpted sea turtle relief. The earthy tones of amber and cream give it a sun-baked, rustic feel that looks beautiful displayed near a window or used as a unique coaster.
Detailed Instructions
Materials
- White or cream-colored air-dry clay (or polymer clay)
- Square tile base (cork or pre-made ceramic biscuit) or extra clay to form one
- Rolling pin
- Hexagon cookie cutter (small) or printed template
- Modeling tools (needle tool, small ball stylus)
- Craft knife
- Acrylic paints (amber/terracotta, beige, dark brown)
- Matte or satin varnish
- Sponge or textured fabric
- Paintbrushes (detail and flat shader)
- Sandpaper (fine grit)
Step 1: Preparing the Base
-
Roll and Cut the Canvas:
Begin by rolling out a flattened slab of your white clay to a thickness of about 1/4 inch. Cut this into a perfect square, roughly 4×4 inches, or match it to your desired tile size. Smooth the edges with a damp finger to remove any sharpness. -
Texture the Border:
Before the clay hardens, gently press a coarse sponge or a piece of textured fabric into the four corners of the square. This creates that rustic, sandy stone look on the outer edges that frames the central design. -
Draft the Hexagons:
Using a ruler and a needle tool, lightly scribe a hexagon grid pattern into the center or use a small hexagon cutter to lightly impress the shapes. You want the appearance of individual tiles fitting together like a puzzle, leaving the textured corners free. -
Define the Grout Lines:
Deepen the lines between your marked hexagons using a modeling tool or the back of a knife. The lines should be distinct enough to separate the ‘cells’ of the shell pattern but not cut all the way through the base.
Step 2: Sculpting the Turtle
-
Form the Body:
Take a small ball of fresh clay and flatten it into an oval shape for the turtle’s shell. Place this directly in the center of your tile, overlapping the hexagon grid. -
Add Head and Limbs:
Roll five smaller tear-drop shapes. Attach the largest one for the head and four for the flippers. Blend the clay seams gently onto the underside of the shell body so they look connected. -
Detail the Shell Pattern:
With your needle tool, carefully draw the carapace pattern onto the turtle’s back. Start with a central row of pentagons or hexagons and draw radiating lines down to the edges to mimic a real shell. -
Texture the Flippers:
This is where the realism happens—use a small needle tool to stipple or scratch tiny distinct lines across the flippers and head. This mimics the leathery skin of a sea turtle. -
Allow to Dry:
Let the entire piece dry completely. If using air-dry clay, this may take 24-48 hours. Flip it occasionally to ensure the bottom dries evenly and doesn’t warp.
Fixing Cracks
If hairline cracks appear in the clay as it dries, mix a tiny bit of fresh clay with water to make a paste (slip) and fill the crack. Smooth it over and sand once dry.
Step 3: Painting and Finishing
-
Base Coat the Hexagons:
Mix a warm amber or terracotta paint with a drop of water to create a glaze. Paint specific hexagons in the background grid, leaving the central area under the turtle and the textured corners unpainted or very light beige. -
Dry Brushing the Texture:
Take a very small amount of beige paint on a dry brush and lightly sweep it over the amber hexagons. This highlights the uneven surface and gives it a weathered stone appearance. -
Painting the Turtle Base:
Paint the turtle’s shell and body in a soft, sandy beige tone. Ensure you get paint into all the crevices of the shell pattern. -
Applying the Wash:
Mix a dark brown paint with plenty of water. Brush this wash over the entire turtle, letting it settle into the carved lines of the shell and the texture of the flippers. -
Wipe Back:
Before the wash dries fully, gently wipe the surface of the turtle with a damp paper towel or sponge. The dark color will stay in the recesses, making the details pop, while the raised areas return to the sandy beige. -
Seal the piece:
Once all paint is bone dry, apply a coat of matte varnish to protect your work and unify the sheen.
Make it Functional
Glue a sheet of cork or felt to the entire bottom surface of your finished tile. This turns your art piece into a functional coaster that won’t scratch your table.
Now you have a tranquil piece of coastal art that captures the stillness of sunlight on a shell
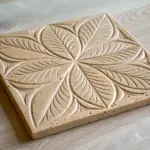
Tree of Life Coil Tile
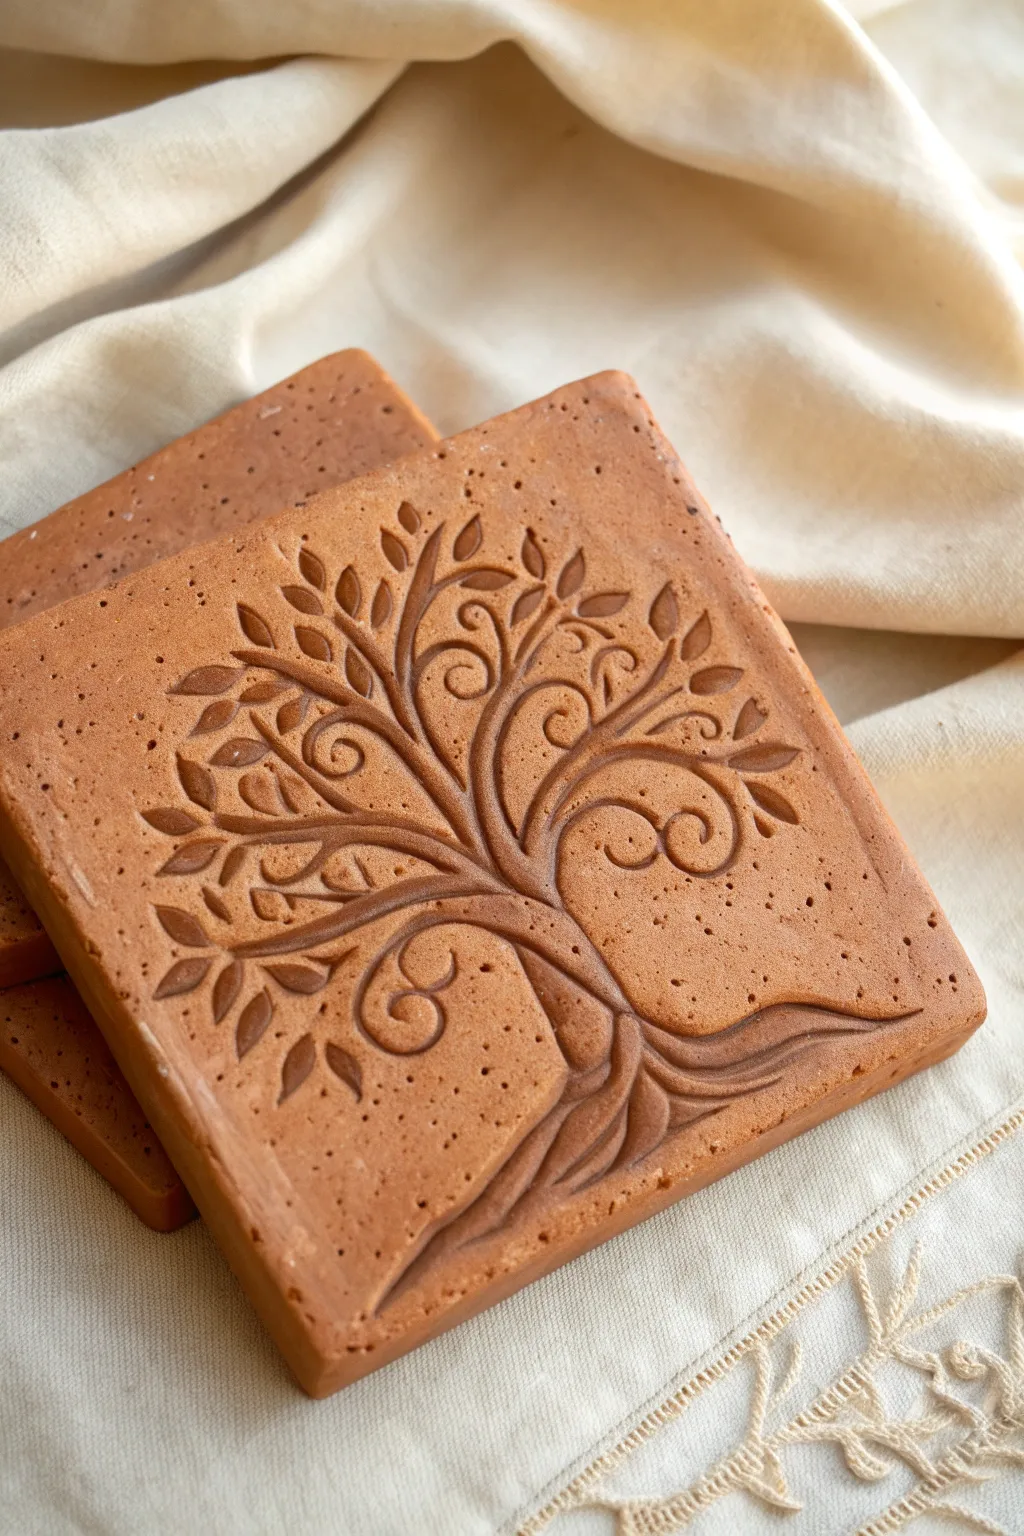
Capture the organic beauty of nature with this warm, terracotta-hued clay tile featuring a stylized Tree of Life design. The project uses simple carving and embossing techniques to create a sophisticated, textured relief that looks like an ancient artifact.
Step-by-Step Tutorial
Materials
- Terracotta air-dry clay or polymer clay (approx. 1 lb)
- Rolling pin
- Square cookie cutter (4×4 or 6×6 inches) or a knife and ruler
- Two wooden guide strips (1/4 to 1/2 inch thick)
- Needle tool or sharp skewer
- Small loop tool or carving gouge
- Rubber blending rib or smooth sponge
- Bowl of water (if using air-dry clay)
- Canvas mat or non-stick work surface
- Fine-grit sandpaper (optional)
- Small stamp tool or stiff brush for stippling
Step 1: Preparing the Base
-
Prepare your workspace:
Set up your canvas mat or non-stick surface to prevent the clay from sticking. If using air-dry clay, keep a small bowl of water nearby for smoothing. -
Condition the clay:
Take a generous amount of terracotta clay and knead it until it’s pliable and free of air bubbles. This ensures a crack-free finished tile. -
Roll the slab:
Place the clay between your two wooden guide strips. Use the rolling pin to roll the clay out into a smooth, even slab. The guides ensure the tile has a uniform thickness, crucial for even drying. -
Cut the square:
Using your square cutter or a knife with a ruler, cut a clean square from the slab. Remove the excess clay and set it aside for future use. -
Smooth the edges:
Dip your finger in a little water (or clay softener) and gently run it along the cut edges to round them slightly and remove any sharp burrs.
Warping Woes?
If your tile edges curl up while drying, flip the tile over every 12 hours. Drying it slowly under loose plastic wrap also helps keep it perfectly flat.
Step 2: Carving the Design
-
Sketch the trunk:
Lightly trace the outline of the tree trunk and main roots using a needle tool. Start from the bottom corner, allowing the roots to flow naturally into the trunk. -
Draft the branches:
Extend the lines upward to create swaying, curved branches. Incorporate spiral motifs and swirls at the ends of the branches to mimic the ‘Tree of Life’ style shown in the reference. -
Carve the main lines:
Once satisfied with the sketch, use a small loop tool or V-gouge to carve out the background space around the branches and trunk. You want the tree itself to remain raised. -
Deepen the relief:
Go back over your main lines with the needle tool to deepen the separation between the branches. This creates shadows that pop once the tile is finished. -
Add leaf details:
Press a small, leaf-shaped tool or simply use the side of your needle tool to indent almond-shaped leaves along the swirling branches. -
Refine the swirls:
Enhance the spiral ends of the branches by carefully carving a deeper channel into the center of each swirl, giving the design a graceful flow.
Make a Set
Create four tiles with slightly different branch patterns that connect when placed together, forming one large, continuous tree mural.
Step 3: Finishing Textures
-
Clean up crumbs:
Use a soft, dry brush to sweep away any little crumbs of clay produced during the carving process. -
Texturize the background:
To make the smooth tree stand out, add texture to the negative space. Gently stipple the background areas with a stiff brush or a needle tool created tiny dots and pits. -
Smooth the raised surfaces:
I like to take a slightly damp finger and very lightly glide it over the top of the raised tree design. This burnishes the surface and removes any tool marks. -
Create a border (optional):
If you wish, lightly press a subtle border line around the very edge of the tile to frame your artwork. -
Dry slowly:
Place the tile on a wire rack or a piece of drywall to dry. Cover it loosely with plastic wrap for the first 24 hours to prevent warping, then uncover to finish drying. -
Sand and finish:
Once fully cured, use fine-grit sandpaper to gently smooth any rough edges. You can leave it raw for a matte look or apply a sealant.
Display your finished tile on a small easel or use it as a striking coaster for your favorite mug
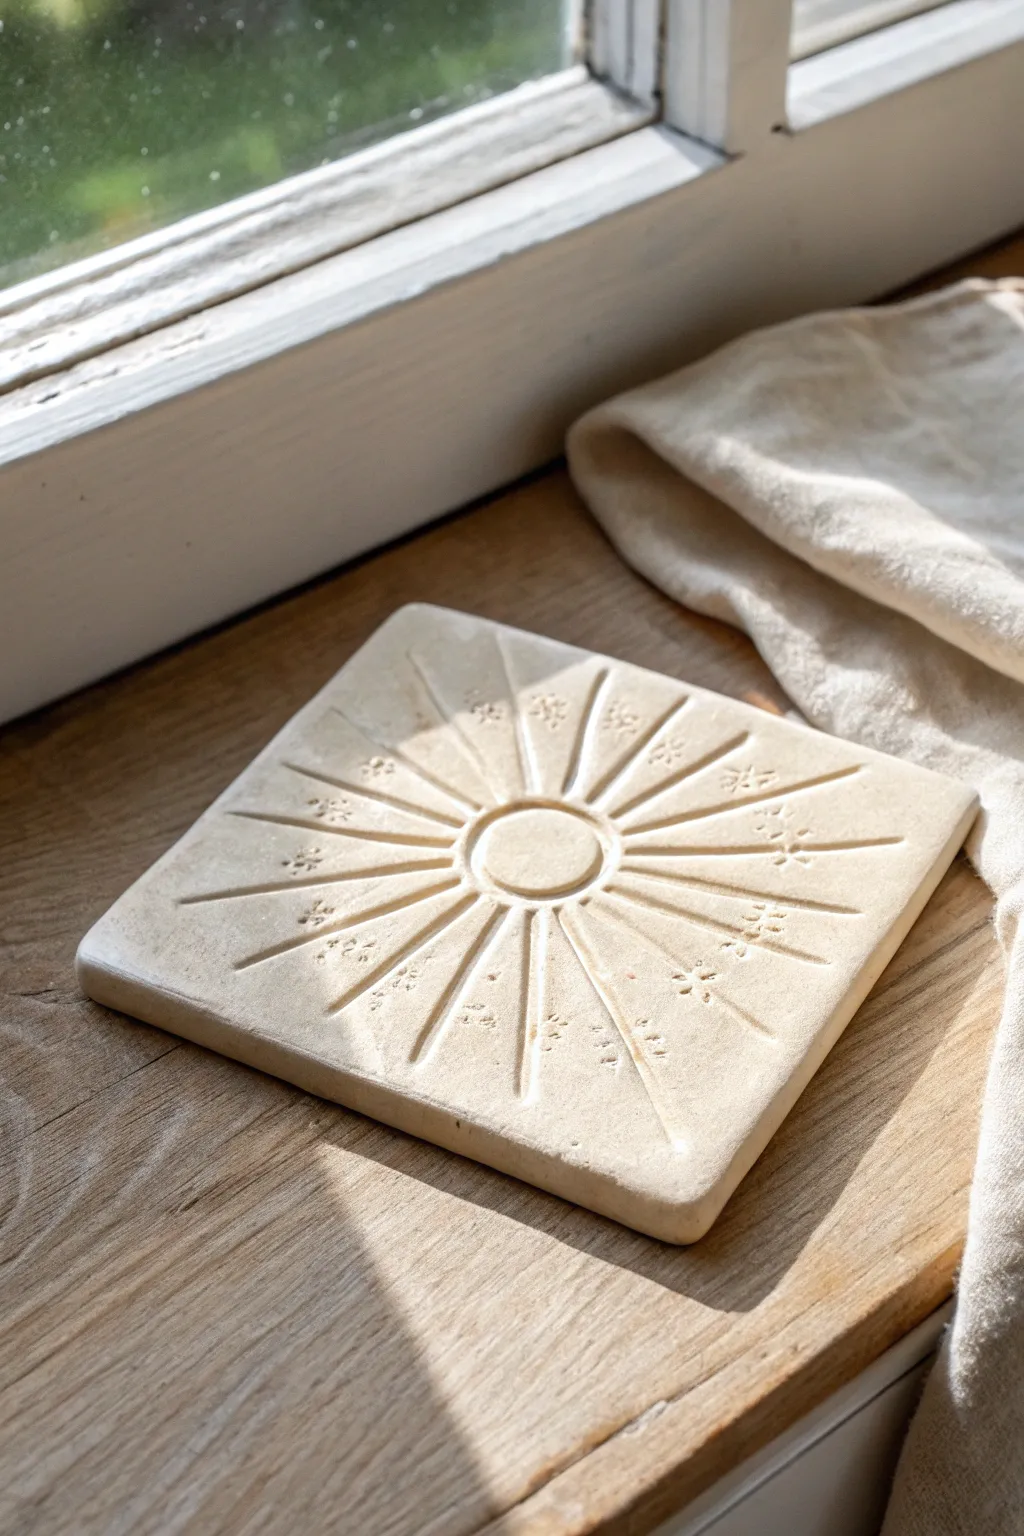
Moon Phases Minimal Tile
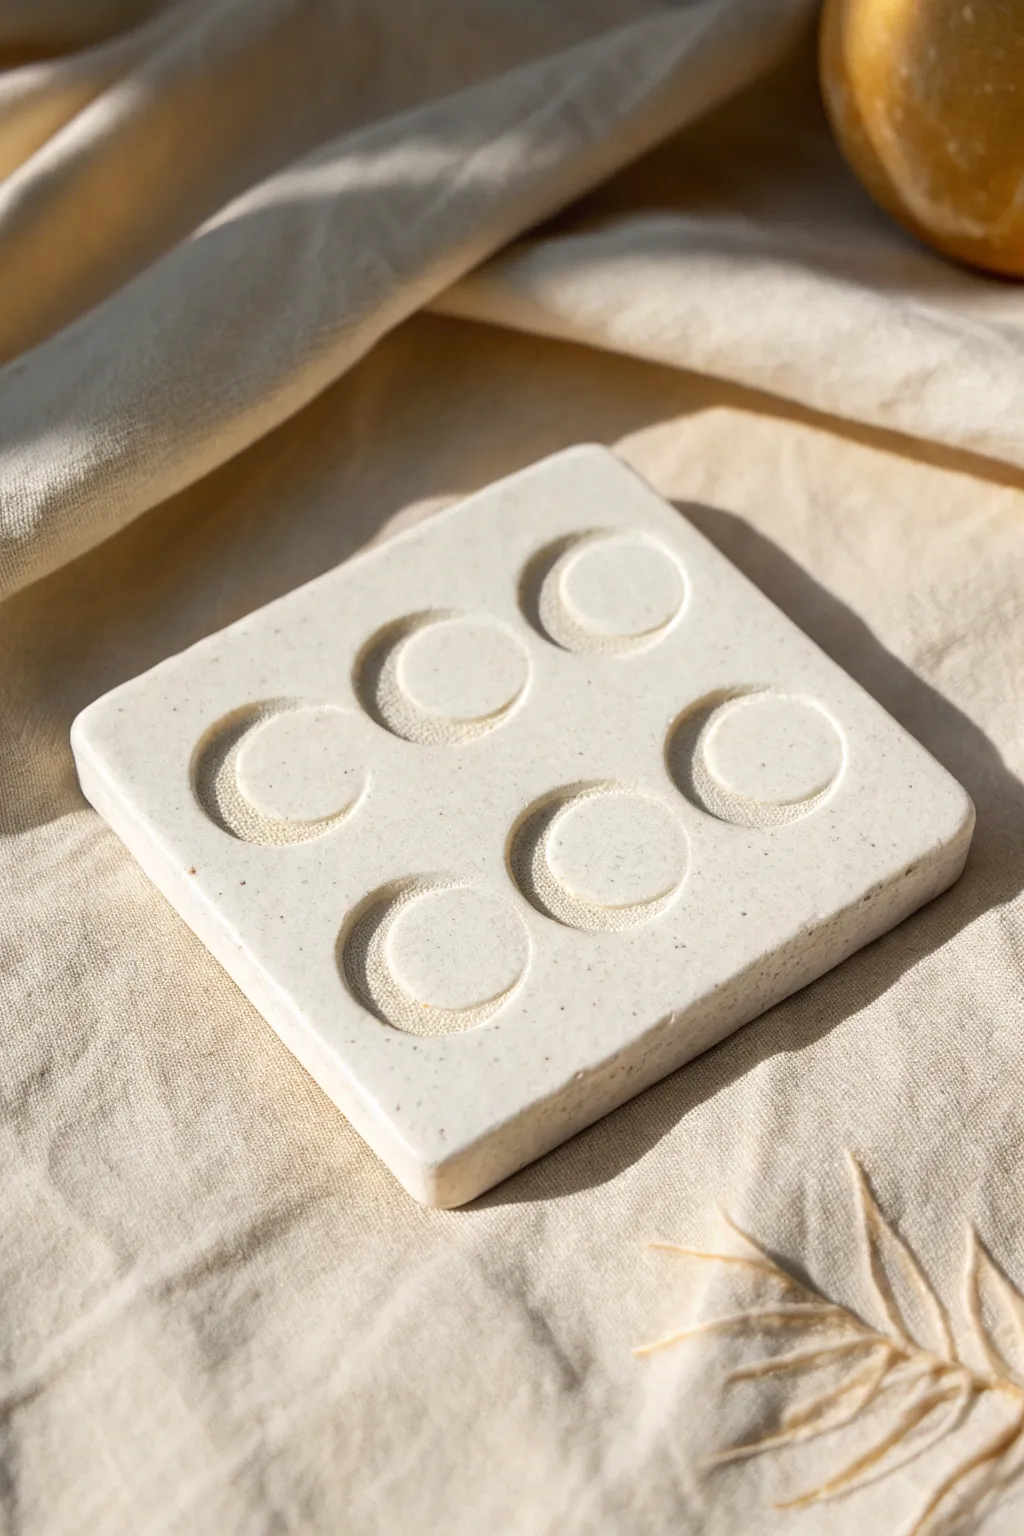
Capture the serene beauty of the lunar cycle with this simple yet elegant stamped clay tile. The textured, speckled finish and minimalist relief design make it a perfect coaster or decorative tray for your favorite trinkets.
Step-by-Step
Materials
- White polymer clay or air-dry clay (preferably with a speckled or ‘granite’ finish)
- Rolling pin or acrylic roller
- Square cookie cutter (approx. 4 inches) or a craft knife and ruler
- Small circular cutter or a pill bottle cap (approx. 1 inch diameter)
- Sandpaper (fine grit)
- Parchment paper or a smooth work mat
- Water bowl (for smoothing)
Step 1: Preparation & Base
-
Condition the Clay:
Begin by warming up your speckled clay in your hands. Knead it thoroughly until it is soft, pliable, and free of any air bubbles. -
Prepare the Surface:
Lay down a sheet of parchment paper or clear your work mat to prevent the clay from sticking to your table. -
Roll the Slab:
Using your rolling pin, roll the clay out into an even slab. Aim for a thickness of about 1/4 to 1/2 inch to ensure the tile feels substantial and durable. -
Cut the Square:
Position your square cutter over the smooth slab and press down firmly to cut the shape. If you don’t have a cutter, use a ruler to measure a perfect square and slice it cleanly with your craft knife. -
Smooth the Edges:
Dip your finger slightly in water and run it gently along the cut edges of the square to soften any sharp corners or drag marks from the blade.
Sticky Clay Problems?
If the cutter sticks to the clay when lifting, dust the clay surface lightly with cornstarch or dip your cutter in water before pressing down.
Step 2: Creating the Relief
-
Plan the Layout:
Visualize where your six moons will go. You want two slightly offset columns of three, creating a dynamic, floating composition rather than a strict grid. -
First Impression – Top Right:
Take your circular cutter. For the first shape (top right), press the cutter gently into the clay to create a full circle outline, but do not cut all the way through. -
Create the Crescent:
To make the crescent relief, shift the cutter slightly to the left and press down again, overlapping the first circle. This isolates the crescent shape. -
Scoop the Relief:
Carefully use a modeling tool or the edge of a spoon to scoop out the clay *inside* the circle but *outside* the crescent sliver you just created. You want the crescent to remain raised while the rest of the circle is depressed. -
Second Impression – Middle Left:
Move diagonal to the left. Repeat the process: stamp a circle, offset the cutter to mark a crescent, and gently compress or scoop out the negative space to reveal the raised moon shape. -
Third Impression – Bottom Right:
Move back to the right column for the bottom shape. Press your cutter to define the circle, then create the relief indentation. Vary the angle of the crescent slightly if desired for variety. -
Fourth Impression – Top Left:
Return to the top, this time on the left side. Press your circle indentation firmly. I find that pressing slightly deeper here creates a nice shadow effect in the final piece. -
Fifth Impression – Bottom Left:
Complete the left column with the bottom circle. Ensure the spacing between this one and the one above it matches the spacing on the right side. -
Sixth Impression – Middle Right:
Add the final moon in the middle of the right column. Step back and look at the composition to ensure the visual weight feels balanced. -
Refine the Depressions:
Use your finger or a smooth, rounded tool to flatten the bottom of each circular indentation. The texture inside should feel deliberate and relatively smooth.
Step 3: Finishing Touches
-
Final Surface Check:
Look over the flat surface of the tile for any accidental fingerprints or dents. Smooth them out gently with a damp finger. -
Drying or Baking:
If using polymer clay, bake according to the package instructions (usually 275°F for 15-30 minutes). If using air-dry clay, leave it in a cool, dry place for 24-48 hours, flipping it occasionally to prevent warping. -
Sanding:
Once fully cured and cooled, take a piece of fine-grit sandpaper and lightly buff the edges and corners for a professional, stone-like feel. -
Clean Up:
Wipe away any sanding dust with a slightly damp cloth to reveal the beautiful speckled texture of the clay.
Pro Tip: Depth Control
Wrap a piece of tape around your circular cutter to mark a depth line. This helps you press down to the exact same depth for every single moon.
Place this celestial tile on your nightstand or coffee table to bring a touch of lunar magic to your daily routine.
Concentric Circle Target Tile
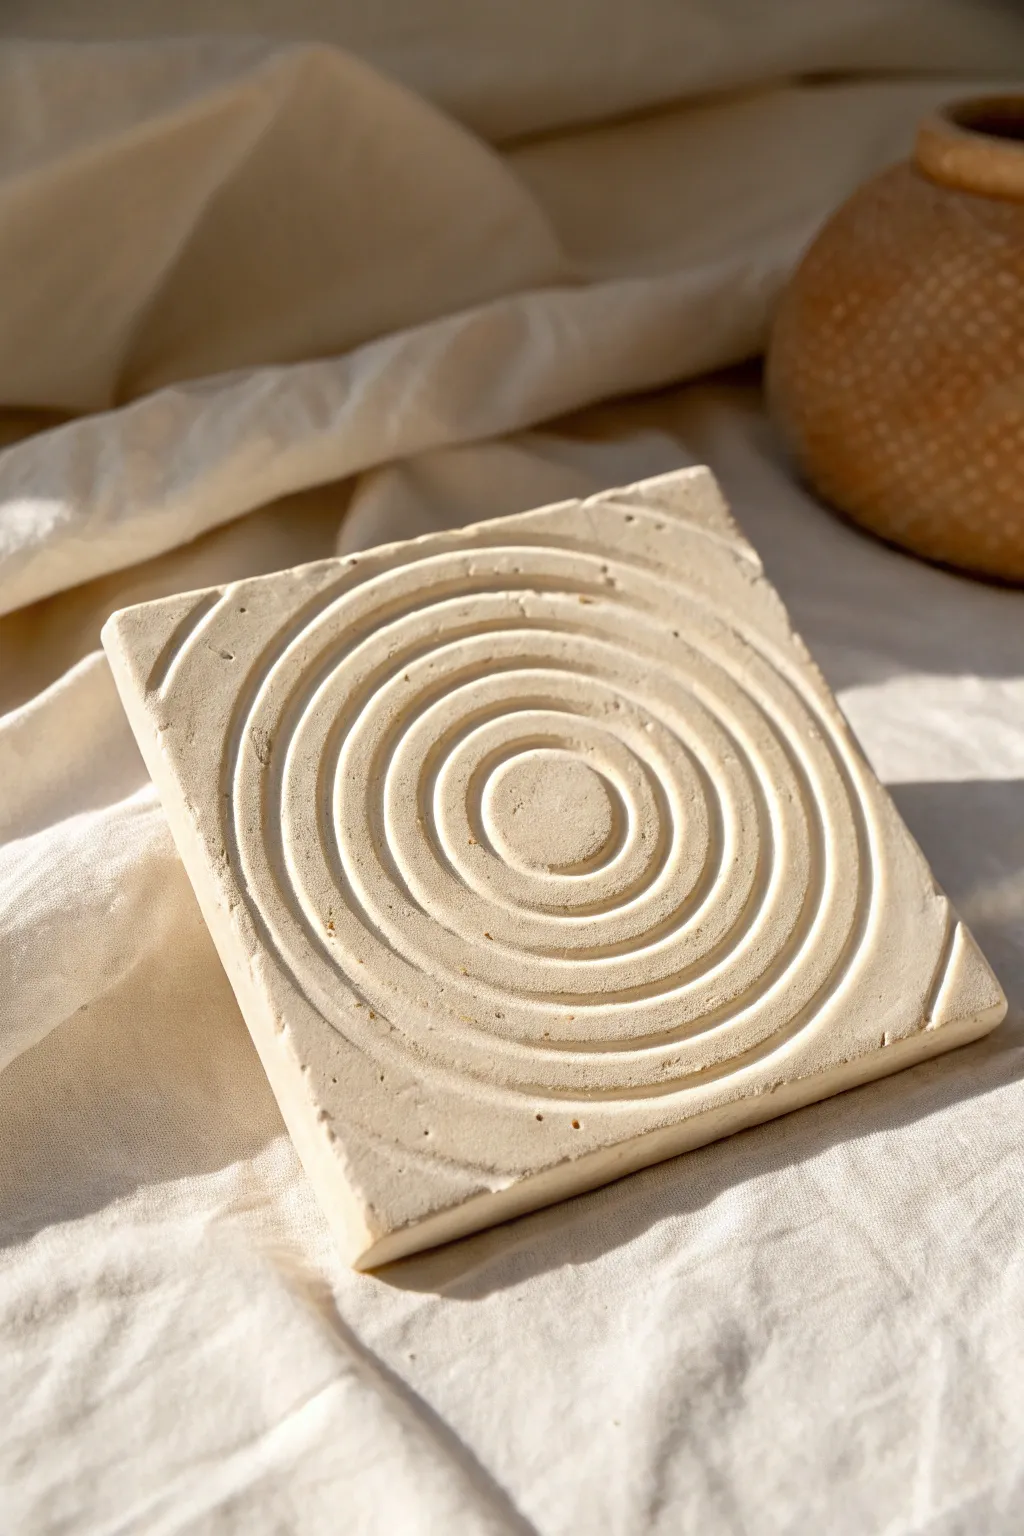
This elegant clay tile features a satisfying ripple pattern reminiscent of a target or water droplets. Its natural, unglazed finish highlights the simple geometry, making it a perfect trivet or a standalone piece of modern decor.
Step-by-Step Tutorial
Materials
- Air-dry clay (white or cream) or ceramic clay
- Rolling pin
- Two guide sticks (approx. 1/4 inch thick)
- Square cookie cutter or square template and knife
- Compass or series of circular objects relative in size
- Carving tool (loop tool or needle tool)
- Sponge
- Sandpaper (fine grit)
- Matte sealant (optional)
Step 1: Preparing the Base
-
Condition the clay:
Start by kneading a handful of clay in your hands to warm it up. You want it to be pliable and free of air bubbles but not sticky. -
Set up guides:
Place your two guide sticks on your work surface parallel to one another. These will ensure your tile has a perfectly even thickness. -
Roll out the slab:
Place your clay ball between the sticks and use the rolling pin to flatten it until the pin rides along the sticks. -
Smooth the surface:
Before cutting, take a slightly damp sponge and gently wipe the surface of the clay to remove any canvas texture or rolling pin marks. -
Cut the square:
Using a square cookie cutter or a paper template with a sharp knife, cut out your tile shape. A 4×4 or 5×5 inch square works beautifully for this design.
Depth Trick
Vary texture by smoothing the raised rings while leaving the recessed grooves slightly rough. This contrast adds visual depth.
Step 2: Creating the Pattern
-
Find the center:
Lightly mark the exact center of your square tile with a small dot. This reference point is crucial for keeping your circles symmetrical. -
Mark the rings:
Using a compass lightly set on the clay (don’t dig in yet), trace your concentric circles evenly spaced apart. If you don’t have a compass, you can light press a series of nested bowls or lids to leave guide impressions. -
Carve the center:
Start with the innermost circle. Instead of cutting all the way through, use a loop tool to gently carve out a shallow trough, leaving a raised ‘bullseye’ in the very middle. -
Carving out grooves:
Work your way outward. For every alternating ring, carve out the clay to create distinct valleys. I find that pulling the tool towards me gives better control than pushing away. -
Refining ridges:
Ensure the raised ridges between your carved valleys are consistent in width. If a ridge looks too thick, carefully shave down the side to balance it. -
Cleaning the edges:
The carving process creates little crumbs of clay. Use a soft, dry brush to sweep these out of the grooves rather than picking them out with fingers.
Step 3: Fishing Touches
-
Initial smoothing:
Dip your finger in water and run it very gently over the raised ridges to soften any sharp edges created during carving. -
Dry slowly:
Place the tile on a wire rack or between two boards to dry. Letting it dry slowly away from direct heat prevents the corners from curling up. -
Sand for perfection:
Once bone dry, take fine-grit sandpaper and lightly buff the surface. This creates that lovely matte stone texture seen in the reference image. -
Seal (optional):
If you plan to use this as a coaster, apply a clear matte sealant to protect it from moisture without changing the raw look.
Color Wash
Mix a tiny bit of brown acrylic paint with water and wash over the dry tile, then wipe it off. It stays in the grooves for an ‘aged’ look.
Now you have a structured, architectural piece ready to display on a shelf or table
Terrazzo-Style Speckled Tile
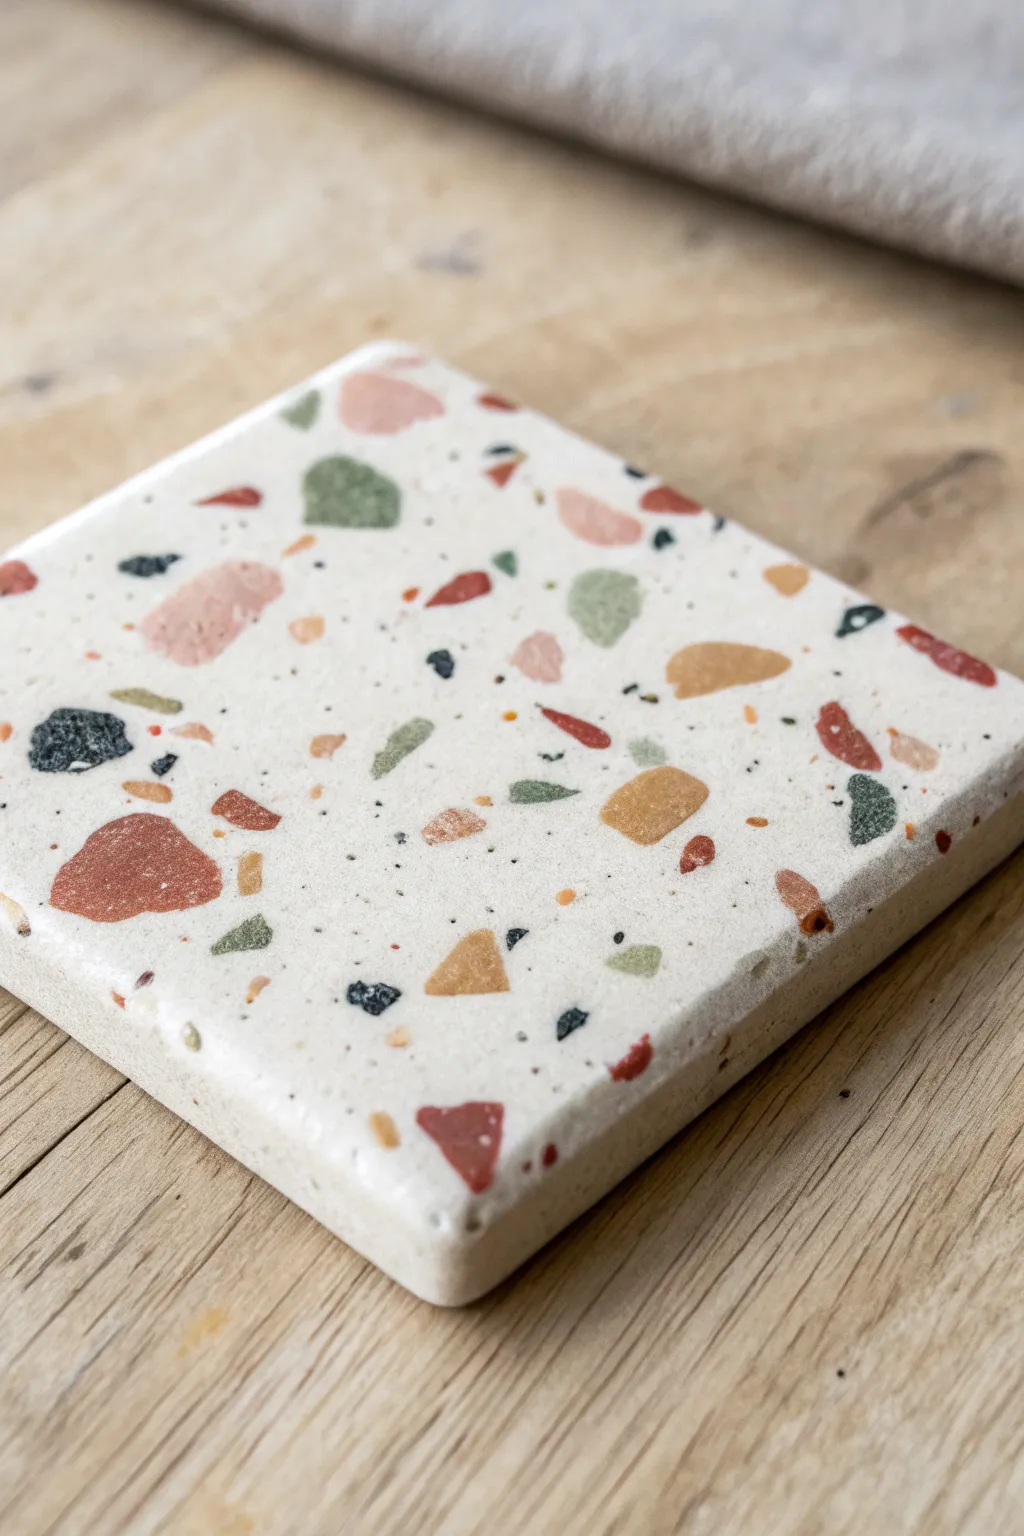
Achieve the high-end look of traditional terrazzo without pouring concrete by using polymer clay. This project features scattered, colorful chips embedded in a neutral base, resulting in a smooth, polished tile perfect for a modern coaster.
Step-by-Step Guide
Materials
- White or beige polymer clay (base)
- Small amounts of colored polymer clay (terracotta, olive green, ochre yellow, light pink, black)
- Rolling pin or clay machine
- Square clay cutter (approx. 4 inches) or craft knife/ruler
- Parchment paper or ceramic tile for baking
- Sanding paper (various grits: 400, 600, 1000, 2000)
- Bowl of water (for wet sanding)
- Matte or glossy sealant (optional)
Step 1: Prepping the ‘Chips’
-
Condition the colors:
Start by conditioning your small blocks of colored clay until they are soft and pliable. Use earthy tones like terracotta, olive, and ochre to match the reference image. -
Roll thin sheets:
Roll each colored piece of clay out very thinly. It doesn’t need to be perfectly even, but aim for a thickness of about 1mm or less. -
Create the chips:
Using a craft knife or simply tearing with your fingers, break these thin sheets into random shards. Make a variety of sizes—some tiny specks and some larger, chunky geometric shapes. -
Set aside:
Group your chips into little piles by color on a piece of parchment paper so they are ready to grab.
Step 2: Forming the Base
-
Prepare the base clay:
Take a large block of your white or beige clay. Condition it thoroughly until it’s warm and easy to work with. -
Roll the slab:
Roll the base clay out into a thick slab, approximately 1/4 inch thick. This needs cause heft to act as a sturdy coaster. -
Initial distribution:
Begin placing your colored chips onto the slab. Gently press them onto the surface, scattering the colors randomly. -
Layering for depth:
Don’t just do one layer; overlap a few chips and sprinkle the tiniest crumbs of black and terracotta clay in the empty spaces to create a realistic aggregate look. -
Embed the chips:
Once you are happy with the arrangement, use your rolling pin to roll over the slab again. Apply firm pressure to force the colored chips flush into the white base. -
Check surface level:
Continue rolling until the surface is completely flat and the chips are fully integrated, not sitting on top. The slab might get slightly thinner/wider during this process.
Clean Cuts Only
To avoid distorting your square shape when cutting the thick slab, put the clay in the fridge for 15 minutes first. The firmer clay slices much cleaner.
Step 3: Cutting and Baking
-
Cut the shape:
Place your square cutter over the patterned slab. If using a knife, measure a 4×4 inch square and slice cleanly downwards. -
Soften edges:
Gently tap the cut edges with your finger to round them off slightly, removing the sharp angle from the cutter. -
Bake:
Place the tile on parchment paper or a ceramic tile. Bake according to your clay package instructions (usually 275°F/130°C for 30 minutes per 1/4 inch of thickness). -
Cool down:
Allow the tile to cool completely inside the oven or on a wire rack before handling it further to prevent warping.
Add Sparkle
Mix a small amount of gold leaf flakes or translucent clay into your chip pile. When sanded down, these add gorgeous depth and light reflection.
Step 4: Finishing
-
Prepare for sanding:
Once cool, prepare a bowl of water. Wet sanding keeps the clay dust out of the air and produces a smoother finish. -
Start coarsing:
Start with your lowest grit sandpaper (around 400). Dip the paper in water and sand the surface in circular motions to reveal the sharp edges of the chips. -
Refine the finish:
Progressively move up through your sandpaper grits (600, 1000, then 2000). I like to spend a good 2-3 minutes on each grit level for a glass-like feel. -
Buff and seal:
Dry the tile thoroughly. You can buff it vigorously with a denim cloth for a natural sheen, or apply a thin layer of matte varnish for extra protection.
Your finished tile now has a sophisticated, architectural look that is ready to protect your tabletops with style
Faux Mosaic Score-Line Tile
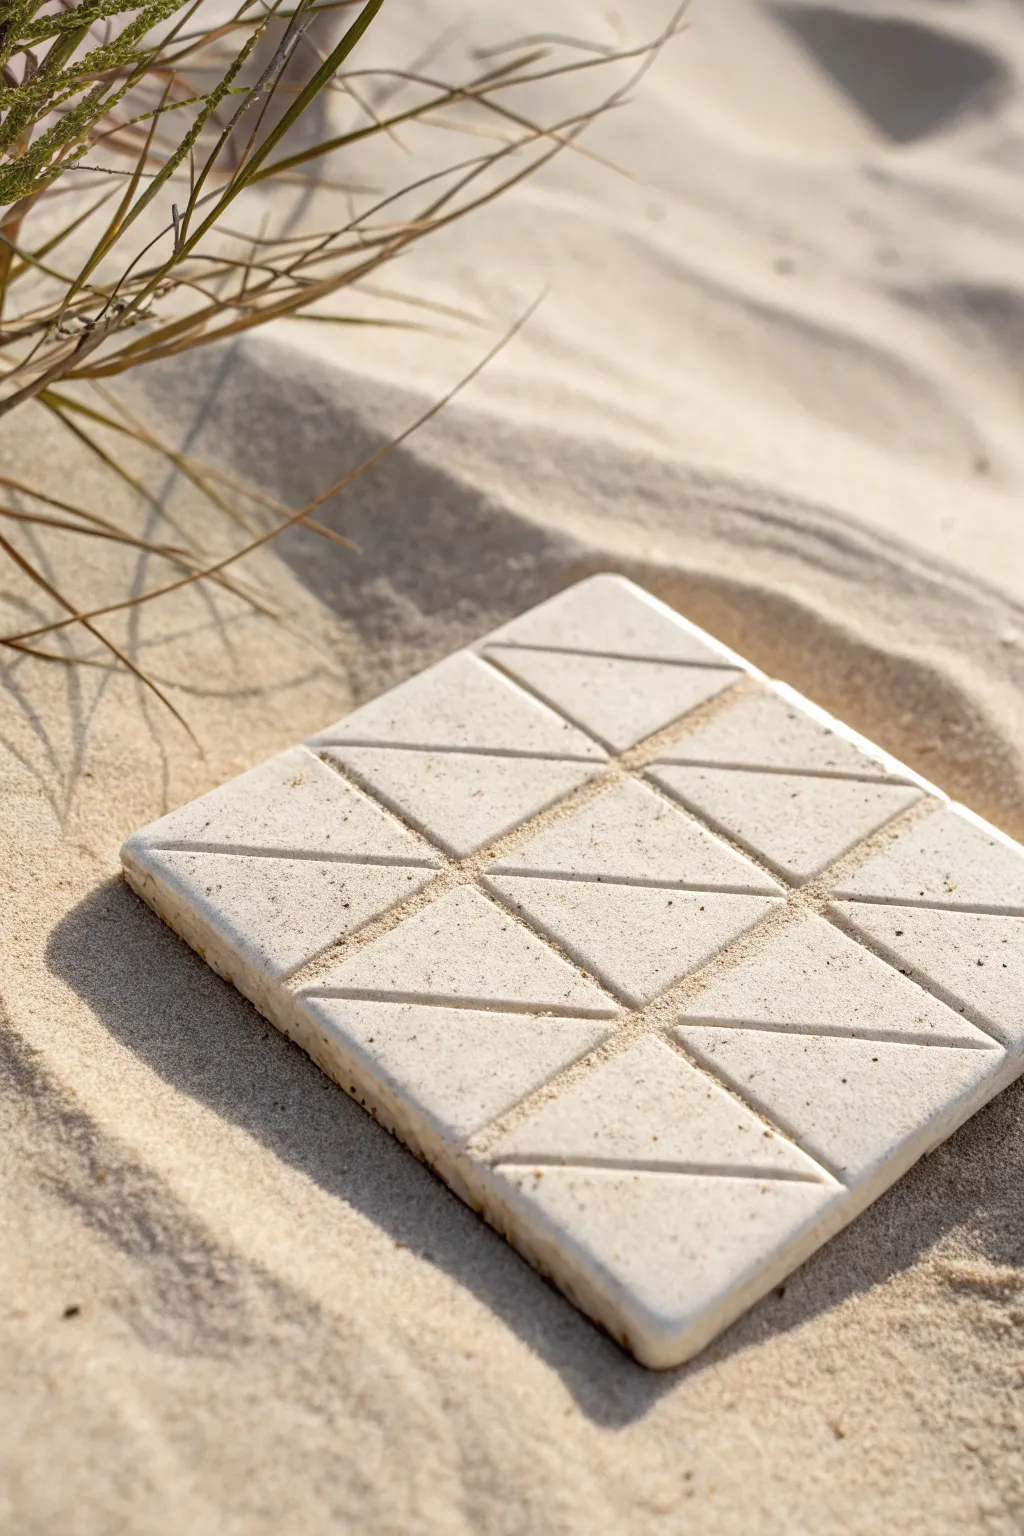
Achieve the sophisticated look of a complex mosaic without cutting a single piece of tile using this clever score-line technique. This project uses air-dry clay to create a minimalist, cream-colored coaster or decorative piece that features deep grooves mimicking grout lines.
How-To Guide
Materials
- White or cream air-dry clay (approx. 1 lb)
- Rolling pin
- Two wooden rulers or depth guides (1/4 inch thick)
- Square cookie cutter (approx. 4×4 inches) or knife
- Needle tool or toothpick
- Ruler
- Sculpting tool with a V-shaped tip or a dull pencil
- Fine-grit sandpaper
- Matte acrylic sealer or varnish
- Small basin of water and sponge
Step 1: Shaping the Base
-
Prepare the workspace:
Lay down a non-stick work mat or a piece of parchment paper to prevent your clay from sticking to the table. -
Condition the clay:
Take a generous handful of air-dry clay and knead it in your hands until it becomes warm, pliable, and free of cracks. -
Set the thickness:
Place your two wooden rulers or depth guides on either side of the clay ball. These will ensure your tile has a perfectly even thickness. -
Roll out the slab:
Using the rolling pin, roll the clay flat until the pin rests on the guides. Aim for a thickness of about 1/4 to 1/2 inch for durability. -
Cut the square:
Press a square cutter firmly into the clay. If you don’t have a cutter large enough, measure a 4×4 inch square with a ruler and carefully slice it out with a craft knife. -
Soften the edges:
Dip your finger in a little water and run it along the cut edges to smooth out any sharpness or burrs left by the cutter.
Fixing warped corners
If edges curl while drying, slightly dampen the concave side and place a heavy book on top (with parchment paper in between) for a few hours.
Step 2: Scoring the Pattern
-
Map the grid:
Using a ruler and a needle tool, lightly mark the clay to divide the square into a 3×3 grid. Don’t cut deep yet; these are just guidelines. -
Mark the diagonals:
Draw diagonal lines across each of the nine small squares. Vary the direction of the diagonals to create visual interest rather than a uniform pattern. -
Create the channels:
Using a V-shaped sculpting tool or a dull pencil, trace over your guidelines. Press firmly to create deep grooves. -
Widen the grout lines:
Go over the lines a second time, slightly widening them. I find that rocking the tool gently side-to-side helps create that ‘grout’ look. -
Clean up crumbs:
The carving process will likely create small crumbs of clay. Use a soft, dry brush to sweep these out of the grooves. -
Check the depth:
Ensure the grooves are deep enough to remain distinct after drying, but not so deep that they weaken the structural integrity of the tile.
Step 3: Finishing Touches
-
Initial Drying:
Let the tile sit undisturbed for about 24 to 48 hours. Turn it over halfway through to ensure the bottom dries evenly and to prevent curling. -
Sanding:
Once fully dry and bone-white, gently sand the surface and edges with fine-grit sandpaper to remove any fingerprints or imperfections. -
Texturing the grooves:
For a truly faux-mosaic look, you can gently scratch inside the grooves with a needle tool to mimic the texture of sandy grout. -
Sealing:
Apply a coat of matte acrylic varnish to protect the clay from moisture and stains, especially if using it as a coaster. -
Final cure:
Allow the sealer to cure completely according to the bottle instructions before placing the tile on any delicate surfaces.
Color wash
Mix a tiny drop of brown paint with water and brush it into the grooves, then wipe the surface clean, to make the ‘grout’ lines pop.
Now you have a stunning geometric piece that brings a calm, sandy aesthetic to your home decor
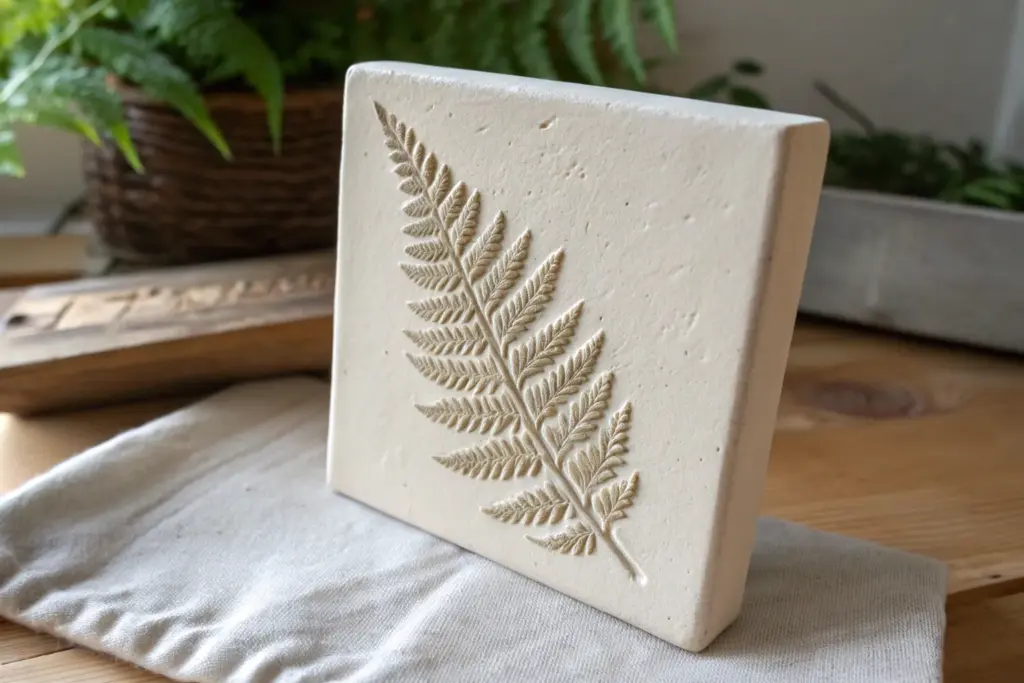
Mini Hanging Tile Set
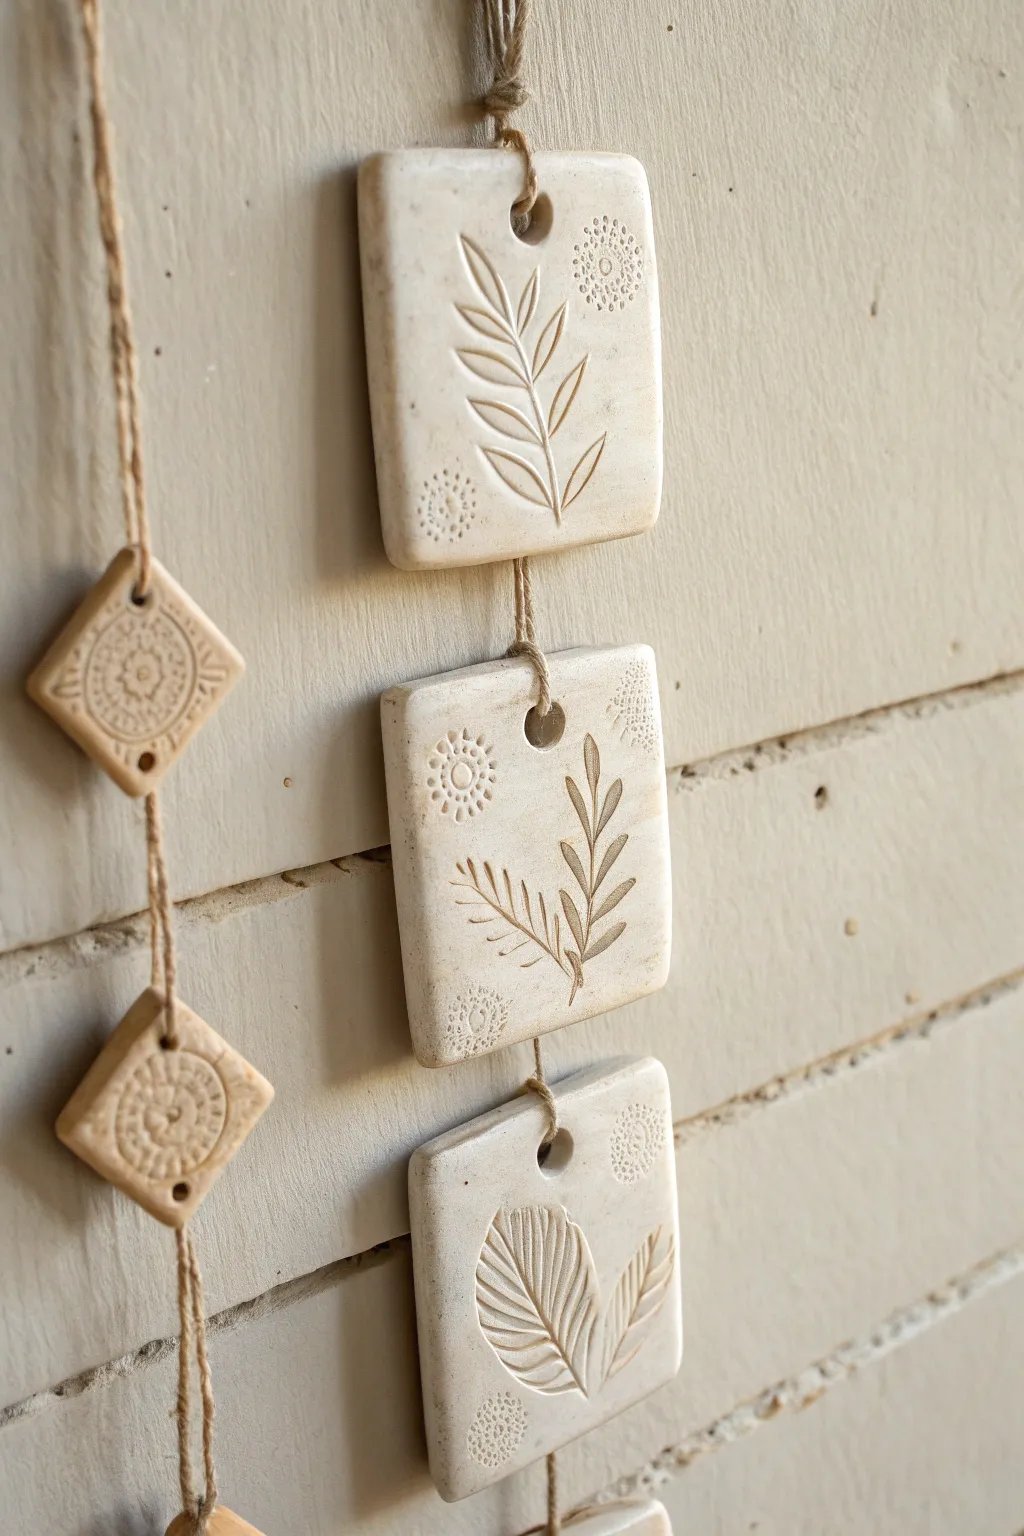
Bring a touch of nature indoors with this rustic, minimalist wall hanging featuring impressed botanical designs. These delicate clay tiles strung on natural twine create a serene, vertical accent perfect for narrow wall spaces.
Detailed Instructions
Materials
- White beautiful air-dry clay (or polymer clay)
- Rolling pin
- Square cookie cutter (approx. 2-3 inches)
- Small diamond cookie cutter (optional)
- Fresh or dried botanical sprigs (fern, lavender, small leaves)
- Geometric texture stamps or lace doilies
- Drinking straw or small circular tool (for holes)
- Fine-grit sandpaper
- Jute twine or hemp cord
- Sharp knife or craft blade
- Parchment paper or non-stick mat
Step 1: Shaping the Tiles
-
Condition the clay:
Start by kneading a handful of air-dry clay until it becomes soft, pliable, and free of cracks. If it feels too dry, wet your hands slightly. -
Roll out the slab:
Place the clay on a sheet of parchment paper. Use your rolling pin to flatten it to a consistent thickness of about 1/4 inch. Try to keep the surface as smooth as possible. -
Cut the shapes:
Using your square cookie cutter, punch out three or four squares. If you want to recreate the side details, cut out smaller diamond shapes as well. Remove the excess clay from around the shapes. -
Smooth the edges:
Dip your fingertip in a little water and gently run it along the cut edges of each tile to smooth out any roughness or sharp corners left by the cutter.
Clay Cracking?
If small cracks appear while drying, mix a tiny amount of fresh clay with water to make a paste perfectly matching the color, then fill the cracks and smooth.
Step 2: Imprinting Designs
-
Arrange the botanicals:
Select your leaf or FERN sprig. Place it face down onto one of the damp clay squares. I find placing the vein-side down leaves a much crispier impression. -
Press the impression:
Gently roll over the botanical material with your rolling pin once. Apply firm, even pressure to embed it into the clay, but be careful not to distort the square shape. -
Remove the plant:
Carefully peel the leaf or stem away from the clay using tweezers or your fingernail to reveal the intricate fossil-like impression. -
Add accent textures:
Take your geometric stamps or a small piece of lace. Press them gently into the corners or empty spaces around the leaf to add decorative circular patterns. -
Create the hanging hole:
Use a drinking straw or a small circular tool to punch a clean hole near the top center of each square tile. Make sure the hole is big enough for your twine to pass through later. -
Create connector holes:
For the bottom and middle tiles, punch a second hole at the bottom center, directly aligning with the top hole. The very bottom tile only needs a top hole.
Step 3: Finishing and Assembly
-
Dry the tiles:
Leave the tiles on a flat surface to dry completely. This usually takes 24-48 hours depending on humidity. Flip them over halfway through to ensure even drying and prevent curling. -
Sand for perfection:
Once bone dry, take fine-grit sandpaper and lightly buff the edges and surface. This removes any fingerprints or burrs for a professional, stone-like finish. -
Cut the twine:
Cut a length of jute twine. Depending on how long you want your hanging, start with about 3 feet to give yourself plenty of slack for knots. -
Knot the top loop:
Fold the twine in half or create a loop at the very top for hanging and secure it with a sturdy overhand knot. -
String the first tile:
Thread the twine through the top hole of your first (topmost) tile. Tie a knot immediately above the hole to keep it in place, or tie a knot below the hole to support it. -
Attach subsequent tiles:
Thread the twine down through the bottom hole of the first tile and into the top hole of the second tile. Leave about 1-2 inches of space between them. -
Secure the spacing:
Tie a knot underneath the top hole of the second tile to hold it at the desired height. Repeat this process until all tiles are attached. -
Final trim:
After the final knot below the last tile, trim any excess twine. You can fray the end slightly for a rustic tassel effect if desired.
Add Color
After drying, dilute brown or green acrylic paint heavily with water. Wash it over the impressions and wipe the surface immediately to highlight the grooves.
Hang your new botanical artwork in a bright spot to let the shadows accentuate the textures