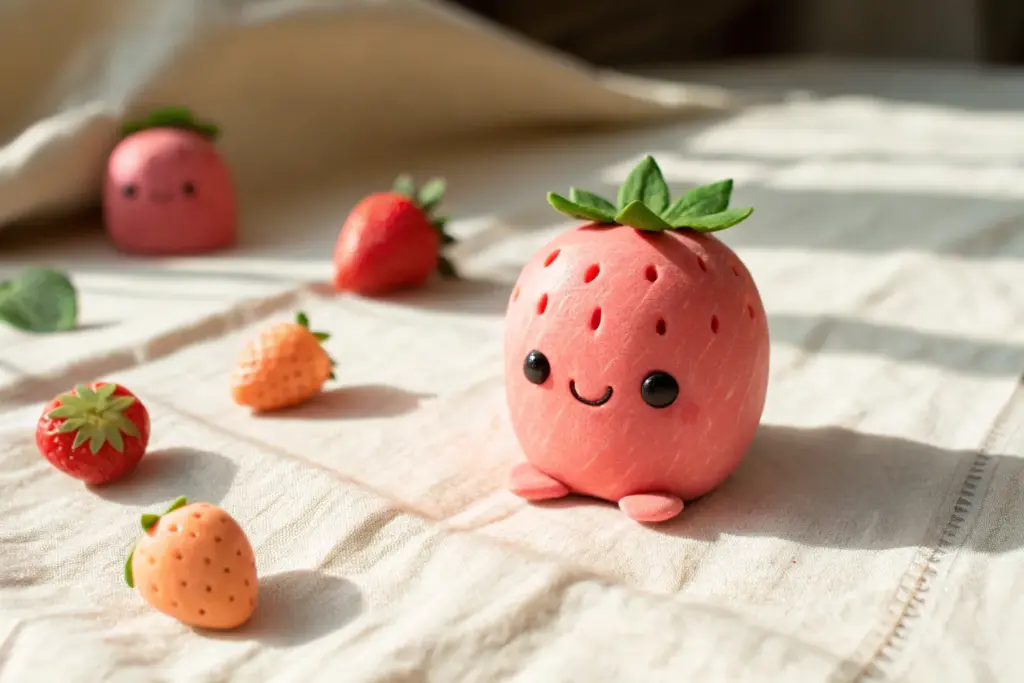
Kids don’t need fancy tools to make cute clay crafts—they just need a few simple shapes and permission to be playful. These ideas are my go-to studio favorites for quick wins that look adorable the moment they dry.
Tiny Clay Animal Friends
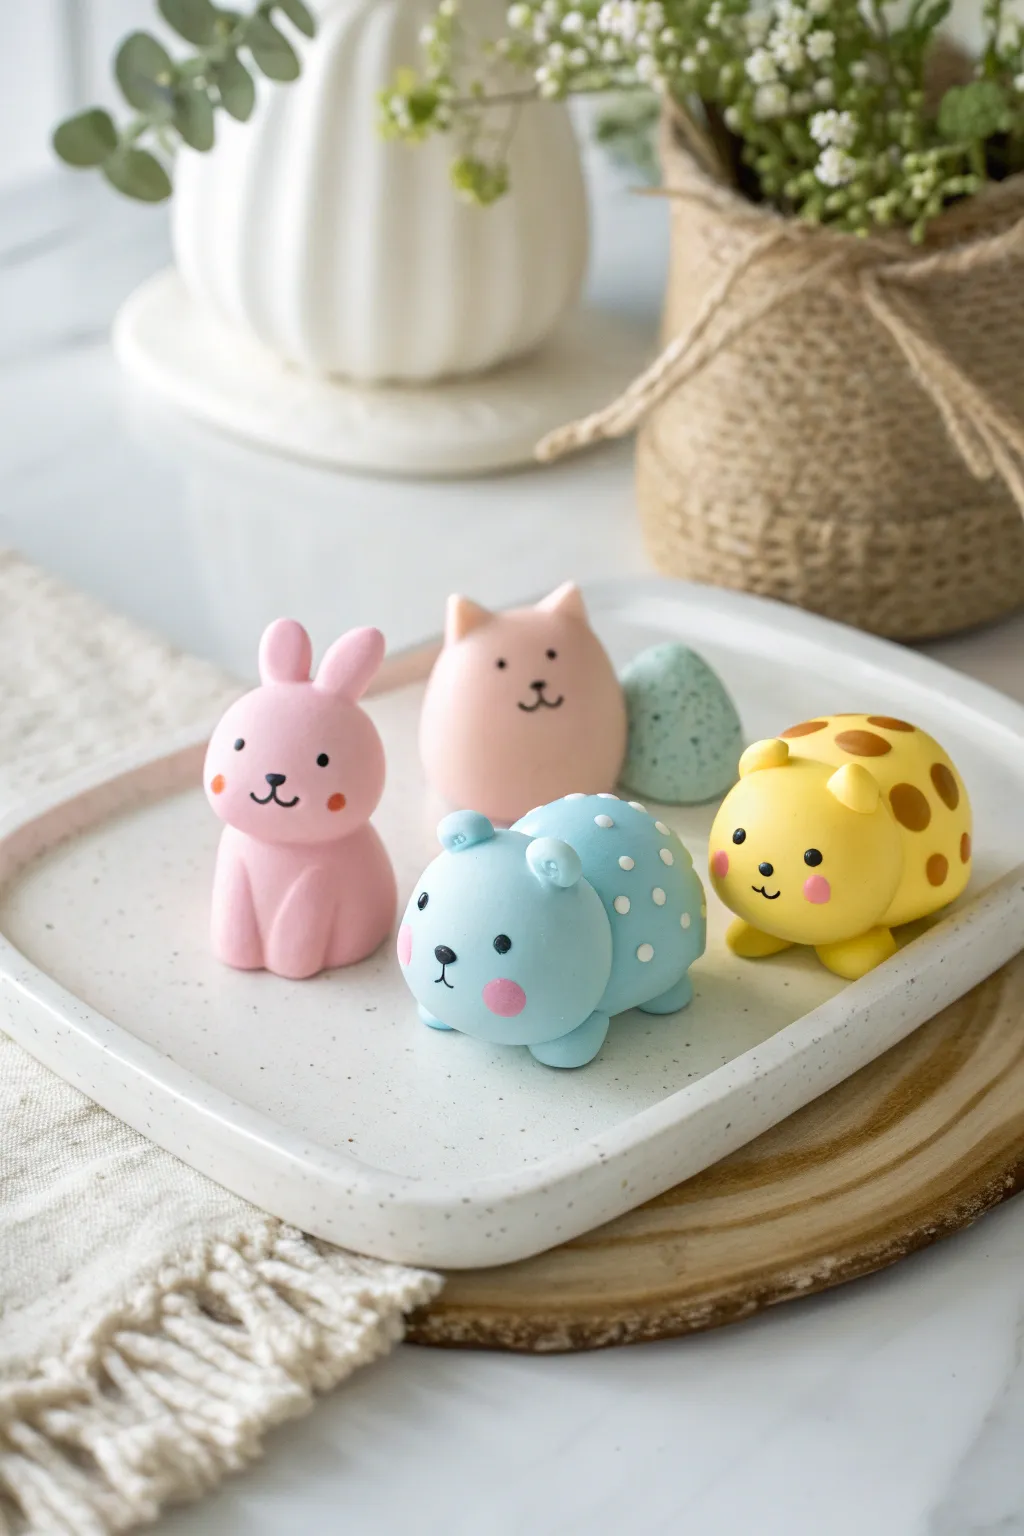
Create an adorable set of miniature animal friends using smooth, pastel-colored clay. These tiny figures—a bunny, cat, bear, and leopard—feature rounded, soft shapes and sweet, minimalist faces perfect for a quick afternoon craft.
Step-by-Step
Materials
- Polymer clay or air-dry clay (pink, light pink, light blue, yellow, brown, white)
- Black thin-tip marker or black acrylic paint with a fine detail brush
- Pink acrylic paint or clay for cheeks
- Small ball stylus tool
- Clay sculpting tools (plastic knife or needle tool)
- Smooth work surface or mat
- Gloss varnish (optional)
Step 1: Prepping the Clay
-
Condition the clay:
Start by kneading your clay colors—pink, light pink, pastel blue, and yellow—until they are soft, pliable, and free of cracks. Warm clay is much easier to shape smoothly. -
Create base spheres:
For the bunny and the pink cat, roll two balls of clay about the size of a large grape. For the blue bear and yellow leopard, roll slightly oval-shaped lumps to create lying-down poses.
Smooth Seams
When attaching ears or limbs, use a rubber-tipped clay tool to blend the clay edges together. This prevents pieces from falling off after baking.
Step 2: Sculpting the Pink Bunny
-
Form the body:
Take the pink sphere and gently shape it into a pear-like form, slightly wider at the bottom for stability. -
Add the ears:
Roll two small logs of pink clay. Flatten them slightly and attach them to the top of the head using a blending tool to smooth the seam so they stand upright. -
Make the paws:
Roll two tiny sausages of pink clay and press them vertically onto the front of the body to look like front legs sitting politely.
Step 3: Sculpting the Round Cat
-
Shape the head-body:
Take the light pink/peach sphere and taper the top slightly. This figure is a single ‘blob’ shape where the head and body are one. -
Pinch the ears:
Instead of adding separate clay, gently pinch the top two corners of the shape to form small, triangular ears directly from the main mass.
Turn Them into Charms
Before baking or drying, insert a small metal eye screw into the top of each head. Once finished, thread a cord through to make adorable necklaces.
Step 4: Sculpting the Blue Bear
-
Shape the lying pose:
Take the blue oval of clay and flatten the bottom so it sits stable. Round out the front end to define the head area. -
Attach ears and limbs:
Roll two tiny blue balls for ears and press them onto the head, indenting the centers with a ball tool. Add four small nuggets of clay underneath for stubby legs. -
Add polka dots:
Roll extremely tiny balls of white clay. Press them gently onto the bear’s back until they are flush with the surface to create a polka dot pattern.
Step 5: Sculpting the Yellow Leopard
-
Create the base form:
Similar to the blue bear, shape a yellow oval. Distinguish a rounder head section slightly from the body section. -
Add spots:
Roll small, flat circles of brown clay in varying sizes. Press these randomly all over the yellow body for the leopard spots. -
Add ears:
Attach two small yellow semicircles to the top of the head for ears.
Step 6: Finishing Touches
-
Smooth everything:
Go over each figure with your finger to remove any fingerprints. For stubborn prints, a tiny bit of baby oil (for polymer clay) or water (for air dry) works wonders. -
Bake or dry:
If using polymer clay, bake according to the package instructions (usually 275°F for 15-30 mins). If using air-dry clay, let them sit for 24-48 hours. -
Paint the faces:
Once cool or dry, use a fine-tip black marker or paint to draw simple faces: two dots for eyes and a small ‘w’ or curve for the mouth. -
Add rosy cheeks:
Dip a cotton swab or small brush into pink paint (or crushed chalk pastel) and gently dab rosy cheeks onto each animal for immediate cuteness.
Display your new tiny zoo on a shelf or gift them to a friend as a pocket-sized surprise


Smiley Face Magnets
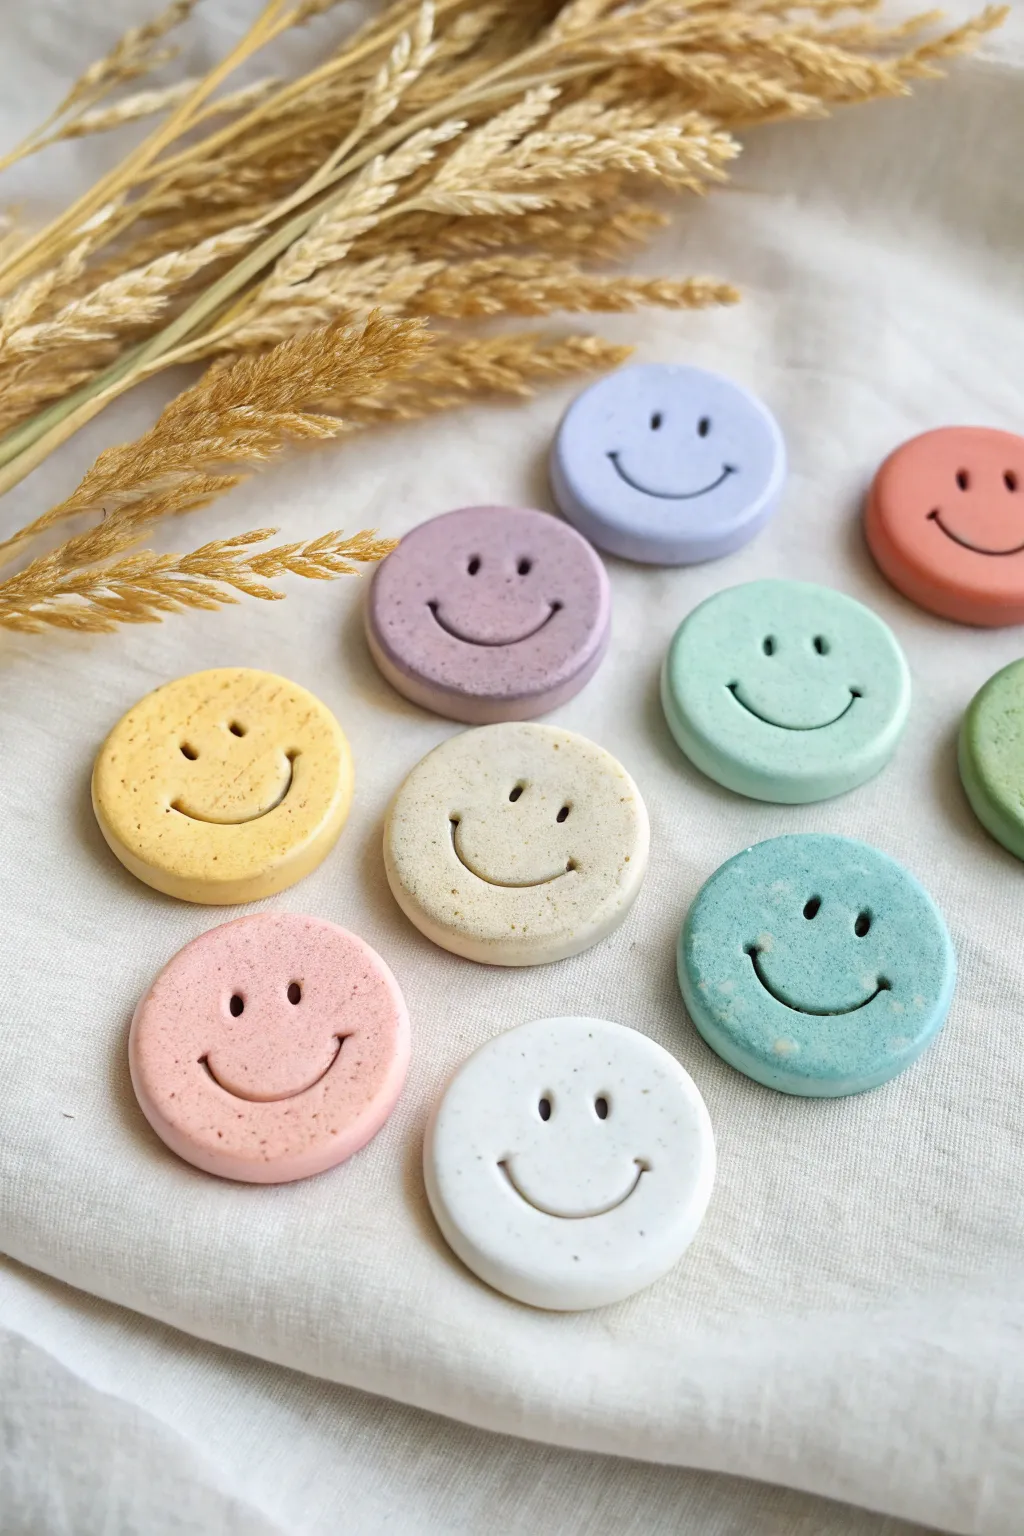
Brighten up your fridge with these adorable, charmingly rustic smiley face magnets. With their smooth, matte finish and subtle speckled texture, they add a perfect pop of earthy color to any magnetic surface.
Detailed Instructions
Materials
- Polymer clay or air-dry clay (various pastel colors)
- Round cookie cutter (approx. 1.5 – 2 inches)
- Small dotting tool or a rounded toothpick
- Curved tool (like a piping tip edge or clay tool) for the smile
- Rolling pin
- Parchment paper or baking mat
- Small round magnets
- Strong craft glue (E6000 or superglue)
- Fine-grit sandpaper (optional)
- Speckled clay effects (optional: pepper or dried herbs)
Step 1: Preparing the Clay Base
-
Condition the clay:
Start by warming up your clay in your hands. Knead it thoroughly until it is soft, pliable, and free of any cracks. -
Add texture (optional):
To achieve the speckled, stone-like look seen in the photo, mix a tiny pinch of coarse black pepper or dried herbs into your clay. Knead until well distributed. -
Roll it out:
Place the clay on parchment paper or a baking mat to prevent sticking. Use a rolling pin to flatten the clay to an even thickness of about 1/4 inch. -
Cut the shapes:
Press your round cookie cutter firmly into the clay. Give it a little wiggle before lifting to ensure a clean cut. -
Smooth the edges:
Gently run your finger around the perimeter of each circle to soften any sharp ridges left by the cutter.
Perfect Smile Hack
Don’t have a curved tool? Cut a plastic straw in half lengthwise. It creates a perfect, consistent arc for stamping smiles every time.
Step 2: Creating the Faces
-
Mark eye placement:
Visualize where the face should sit. The eyes look best placed slightly above the center line for that cute factor. -
Indent the eyes:
Using a medium-sized dotting tool or the rounded end of a paintbrush, press straight down into the clay to create two deep circular indulges. -
Form the smile:
For the mouth, use a curved tool. The edge of a metal piping tip works perfectly here. Press the curved edge gently into the clay below the eyes. -
Refine the expression:
Wiggle the tool slightly side-to-side to widen the smile if desired, ensuring the indentation is deep enough to remain visible after drying. -
Clean up details:
If the clay displaced around the eyes or mouth created unwanted bumps, gently tap them down with your fingertip.
Step 3: Finishing Up
-
Bake or dry:
If using polymer clay, bake according to the package instructions (usually 275°F for 15-30 minutes). If using air-dry clay, let them sit undisturbed for 24-48 hours. -
Check for flatness:
I always place a heavy book on top of air-dry pieces while they cure to prevent curling, but be careful not to squash the face details. -
Sand edges:
Once fully cured, use fine-grit sandpaper to buff away any fingerprints or rough spots on the rim of the circle. -
Attach the magnet:
Flip the smiley face over. Apply a dab of strong craft glue to the center of the back. -
Secure and set:
Press a magnet firmly into the glue. Let the glue cure completely for the time specified on the adhesive bottle before sticking them to the fridge.
Sticky Situation
If the clay sticks to your cutter, dip the cutter in a little cornstarch or water before pressing down to ensure a clean release.
Once the magnets are securely attached, your cheerful new collection is ready to hold up artwork or shopping lists


Mini Food Charms That Look Sweet
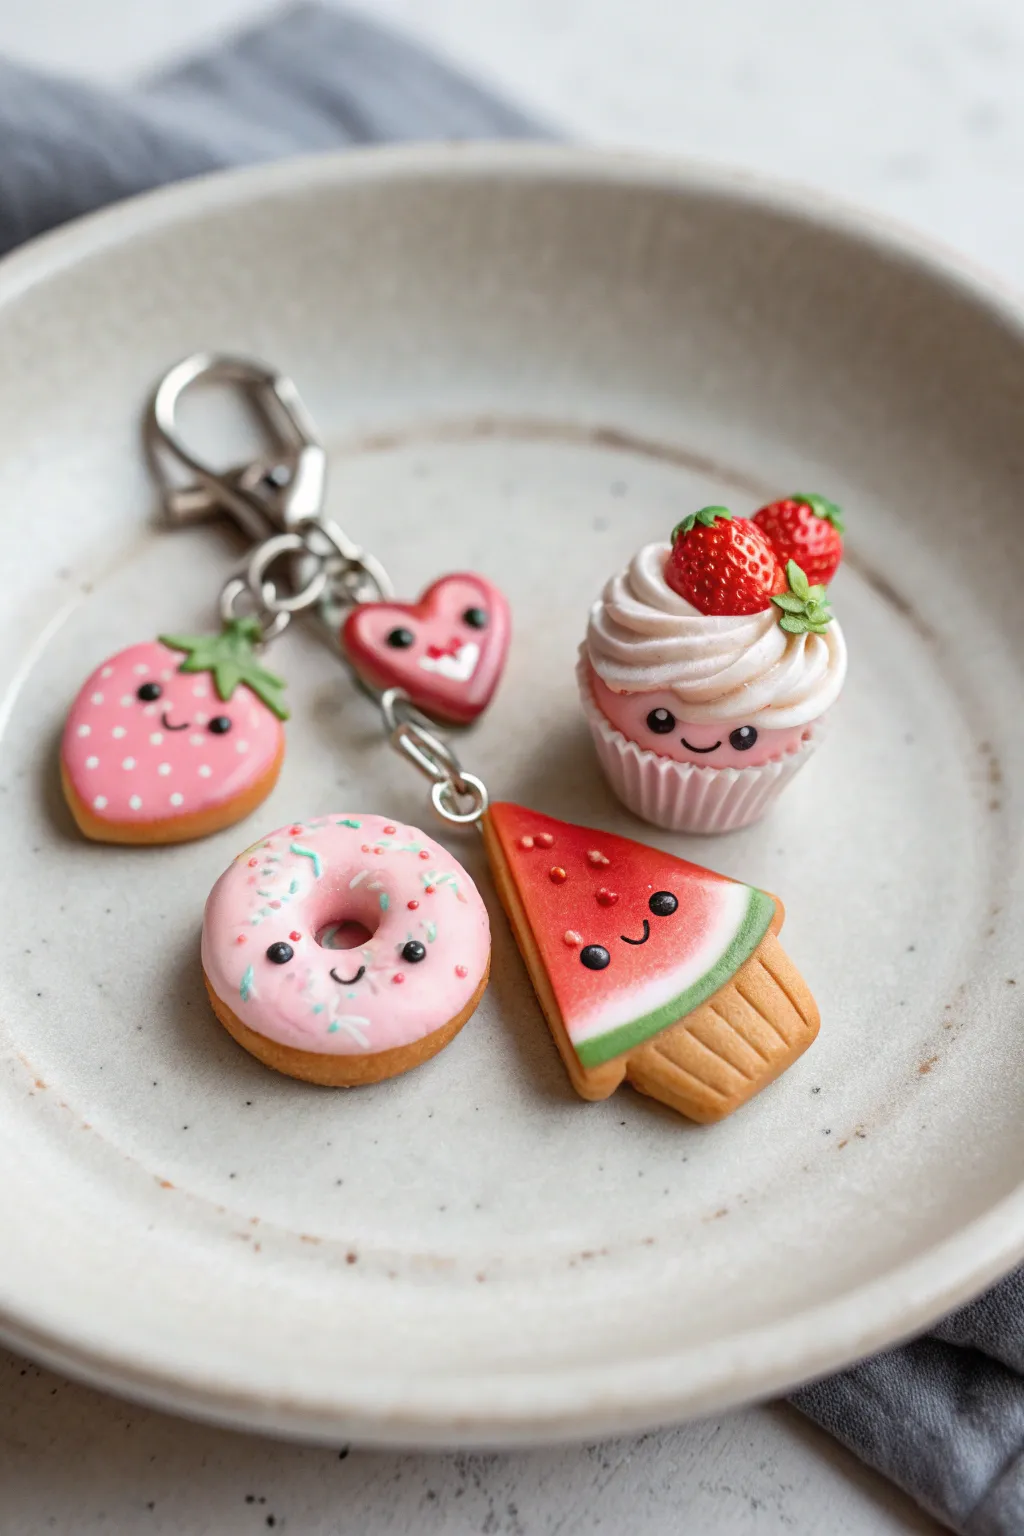
These adorable polymer clay charms transform your favorite sweet treats into bite-sized accessories perfect for backpacks or keyrings. With their happy faces and realistic textures, this project combines the fun of sculpting with the charm of kawaii style.
Step-by-Step Guide
Materials
- Polymer clay (tan/beige, pink, red, green, white)
- Eye pins (silver)
- Jump rings and keychain hardware
- Liquid polymer clay (white and pink for frosting)
- Dotting tools or needle tool
- Black acrylic paint or clay for eyes
- Soft pastels (brown/orange) for shading
- Glaze (glossy and matte)
- Small paintbrush
Step 1: The Strawberry Cookie
-
Base Shape:
Start by mixing a light tan clay to resemble cookie dough. Roll a small ball and flatten it slightly into a thick oval shape, tapering the bottom just a bit to mimic a strawberry silhouette. -
Adding Icing:
Roll out a thin sheet of pink clay. Cut a shape slightly smaller than your cookie base and press it gently onto the front. Smooth the edges so it looks like dipped icing. -
Leaf Detail:
Create a tiny stem cap using green clay; shape a small star or flower shape and press it onto the top of the strawberry. -
Cute Features:
Use a needle tool or small dotting tool to indent two eyes and a tiny smiling mouth. Using a toothpick, add small white clay dots or paint dots across the pink area for seeds.
Baking Pro-Tip
Bake your charms on a bed of polyester fiberfill or batting. This prevents the backs from getting shiny flat spots where they touch the baking tray.
Step 2: The Happy Donut
-
Donut Form:
Roll a ball of tan clay and flatten it into a thick disc. Use a rounded tool handle or a straw to punch a clean hole through the center. Soften the edges with your finger so it looks baked, not sharp. -
Pink Glaze:
Mix pink clay with a drop of liquid clay or translucent liquid sculpey to make a thick ‘frosting’ paste, or simply cut a wavy ring of pink clay. Apply it to the top of the donut, letting the edges look uneven and natural. -
Sprinkle Time:
Roll extremely thin snakes of blue, white, and pink clay. Cut tiny segments and gently press them into the frosting layer as sprinkles. -
Face Details:
Just like the strawberry, press in indentations for the eyes and mouth. Fill the eye sockets with tiny balls of black clay or paint them after baking.
Step 3: The Watermelon Slice
-
Triangular Base:
Form a triangle from tan clay for the ‘crust’ or cookie base. I like to texture the bottom edge with a needle tool to make it look like a crimped pie crust. -
Fruit Layer:
Layer a thin strip of white clay followed by a larger triangle of red clay on top of the tan base. Make sure the red section is the thickest part. -
Green Rind:
Add a very thin strip of green clay between the white layer and the tan crust to represent the watermelon rind. -
Seeds and Smile:
Press small black seeds (tiny tear-drop shapes of black clay) into the red area. Add the signature smiling face in the center.
Dust Trouble?
If dust gets stuck in your light-colored clay, use a cotton swab dipped in rubbing alcohol or acetone to gently wipe the surface clean before baking.
Step 4: The Tiny Cupcake
-
Cupcake Liner:
Form a cylinder of pink clay. Use a needle tool to press vertical lines all around the sides to mimic a paper cupcake liner. -
Frosting Swirl:
Roll a long, tapered snake of white clay. Twist two strands together or just coil one strand starting from the outer edge of the cupcake top, spiraling upward to a peak. -
Strawberry Topper:
Mold two microscopic strawberries from red clay. Texture them with a needle tool for seeds and place them near the peak of the frosting swirl. -
Green Garnish:
Add tiny green leaves next to the strawberries for a pop of color.
Step 5: Assembly and Finish
-
Adding Hardware:
Insert a silver eye pin into the top of each charm before baking. For security, you can bend the bottom of the pin into a hook shape inside the clay. -
Shading:
Brush crushed soft pastel chalk (in light brown or orange) around the edges of the ‘cookie’ parts (tan clay) to give them a perfectly baked, golden-brown look. -
Baking:
Bake all pieces according to your polymer clay package instructions (usually 275°F/135°C for 15-30 minutes). Let them cool completely. -
Glazing:
Apply a glossy polyurethane glaze to the ‘fruit’ parts (strawberries, watermelon flesh) and the frosting to make them shine. Keep the cookie parts matte. -
Connect:
Use jump rings and pliers to attach your finished charms to the main keychain loop.
Clip your new sweet squad to your bag and enjoy the smiles they bring


Cute Clay Monsters With Many Eyes
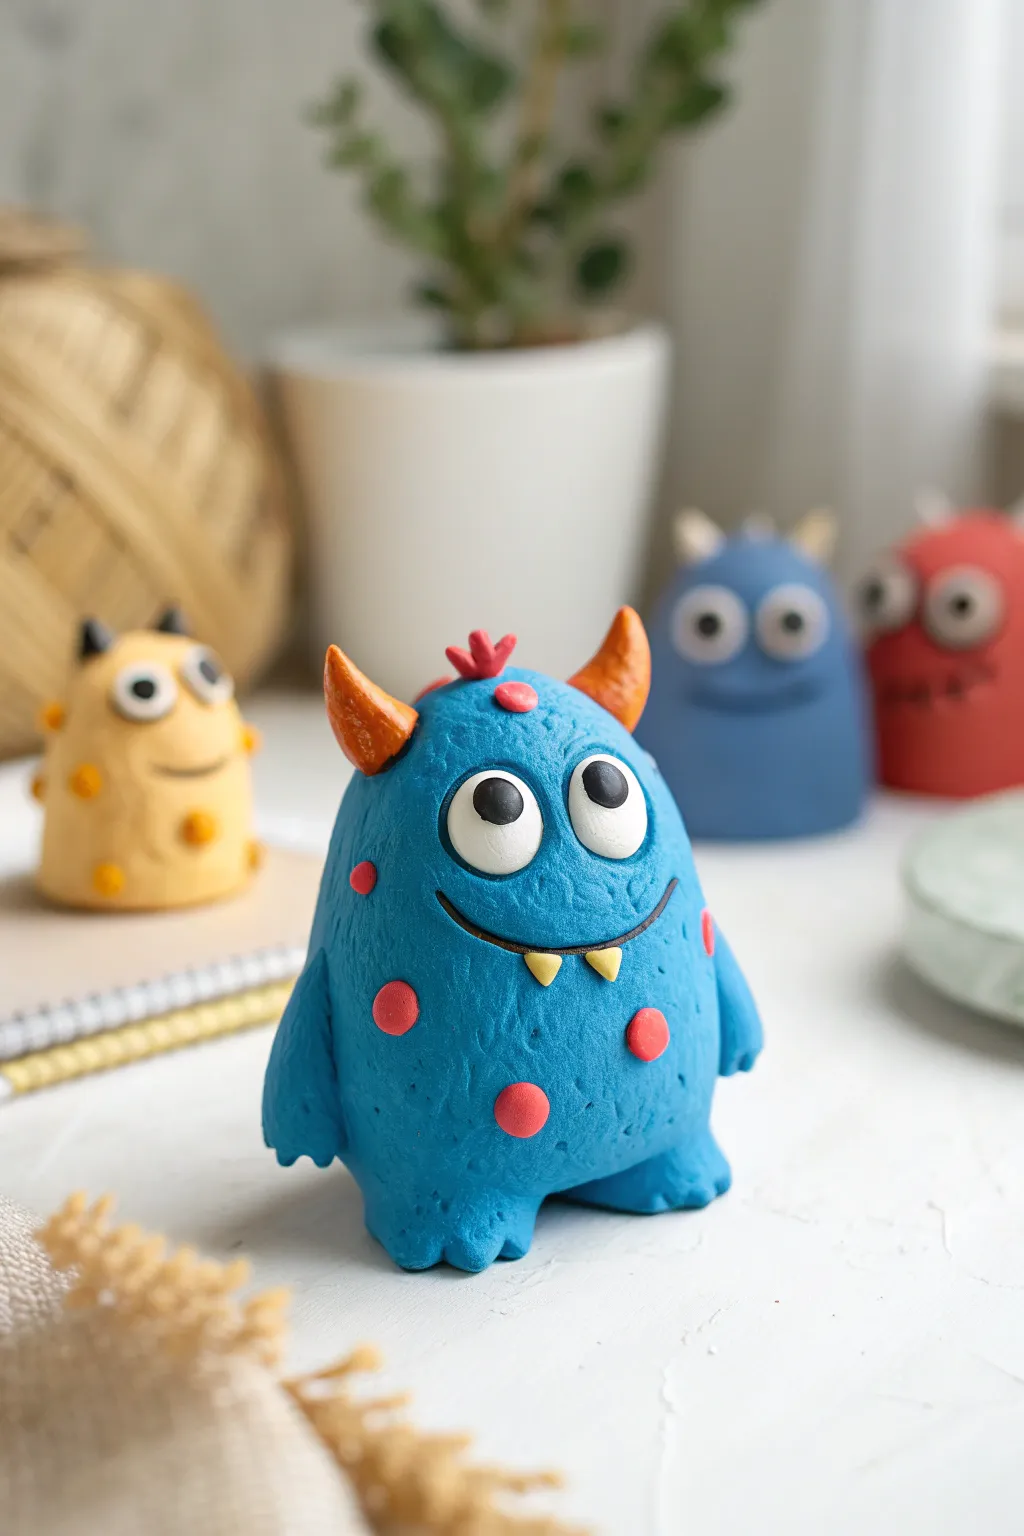
This lovable blue monster stands out with his bright orange horns, playful pink spots, and a goofy, toothy grin. With a sturdy, textured body and oversized expressive eyes, he’s the perfect mix of spooky and sweet for your clay collection.
How-To Guide
Materials
- Blue polymer clay (or air-dry clay)
- Orange polymer clay
- Pink polymer clay
- Yellow polymer clay
- White polymer clay
- Black polymer clay
- Texturing tool (stiff bristle brush or toothbrush)
- Clay sculpting tools (needle tool, ball tool)
- Small rolling pin
- Look-up tool or toothpick for support (optional)
- Baking sheet and oven (if using polymer clay)
Step 1: Shaping the Base
-
Mix and condition:
Start by warming up a generous amount of blue clay in your hands until it’s soft and pliable, ensuring there are no cracks when you flex it. -
Form the body:
Roll the blue clay into a large, smooth ball, then gently taper the top just slightly to create a rounded pear or gumdrop shape. This will serve as the monster’s main body. -
Create the feet:
Pinch the bottom two corners of the shape gently to pull out two stubby feet, keeping them connected to the main body so he stands upright on his own. -
Add texture:
Using a stiff bristle brush, a clean toothbrush, or a texturing sponge, dab the entire surface of the blue body to create a rough, monster-skin texture. I find this hides fingerprints really well.
Seamless Stick
If using polymer clay, a drop of liquid clay or ‘Bake and Bond’ helps the arms and horns stay attached permanently during baking.
Step 2: Adding Facial Features
-
Make the eyes:
Roll two medium-sized balls of white clay. Press them flat against the upper center of the face, making sure they touch each other. -
Add pupils:
Roll two much smaller balls of black clay. Press these onto the white circles, placing them slightly cross-eyed or looking upward to give him a silly expression. -
Carve the mouth:
Using a needle tool or a clay knife, gently press a long, curved smile line into the blue clay just below the eyes. -
Fill the smile:
Roll a very thin snake of black clay and press it into the groove you just made to define the mouth clearly. -
Add fangs:
Shape two tiny triangles out of yellow clay. Attach these pointing downward from the top lip of the smile.
Step 3: Horns and Arms
-
Shape the horns:
Roll two cones of orange clay. Curve the tips slightly to make them look sharp but friendly. -
Texture the horns:
Lightly scratch tiny lines up and down the horns with a needle tool for a ridged bone effect before attaching them to the top of the head. -
Create arms:
Form two small sausages of blue clay. Flatten one end of each to create hands and use a knife or tool to cut simple notches for fingers. -
Attach the arms:
Press the arms onto the sides of the body. Don’t forget to re-texture the seams where the arms join the body so they look seamless.
Glow Up
Use glow-in-the-dark clay for the eyes or spots to make your monster serve as a cute nightlight companion on a bedside table.
Step 4: Final Details
-
Make the spots:
Roll several small balls of pink clay in varying sizes. Flatten them into discs. -
Apply spots:
Press the pink discs randomly all over the monster’s body—front, back, and sides—for a polka-dotted look. -
Top tuft:
Create a tiny cluster of three small red or pink spikes and place them right in the center of the head, between the horns. -
Check balance:
Set your monster down on a flat surface to ensure he stands up straight without tipping over before you cure the clay. -
Bake or dry:
Follow the specific instructions on your package of clay to bake (for polymer) or dry (for air-dry) your finished creature.
Now you have a charming little monster friend ready to guard your desk or shelf with a smile

The Complete Guide to Pottery Troubleshooting
Uncover the most common ceramic mistakes—from cracking clay to failed glazes—and learn how to fix them fast.
Mushroom Buddy Figures
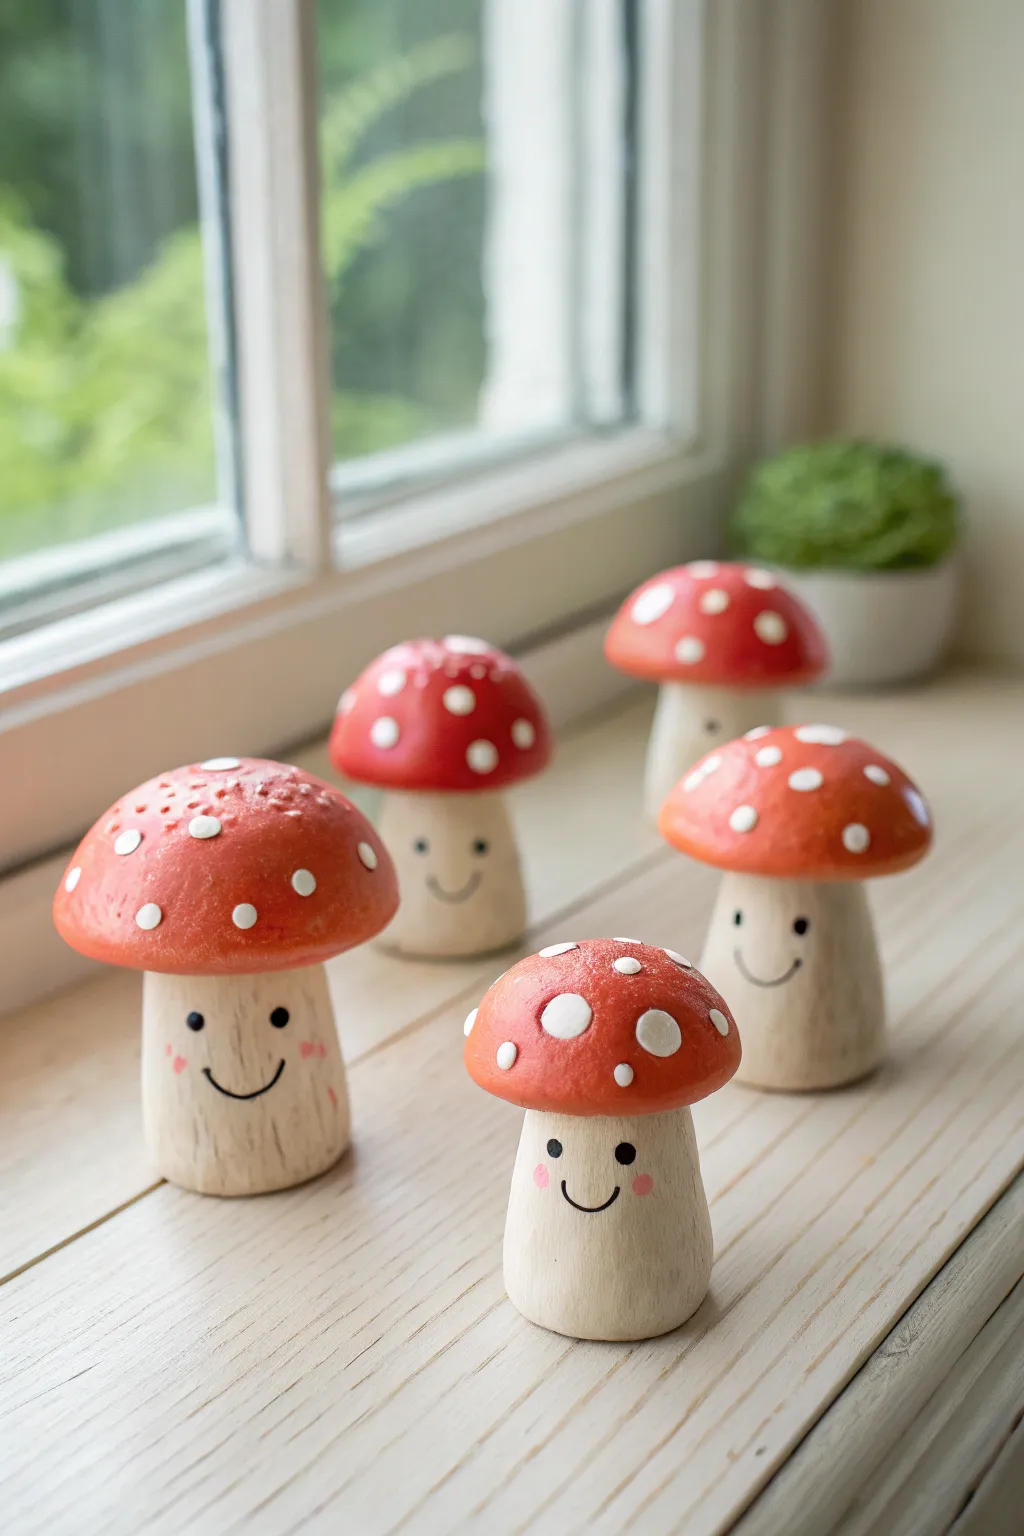
These adorable little fungi friends bring a touch of woodland magic to any windowsill or shelf. Featuring natural wooden stems and vibrant, spotted red caps, each one smiles back at you with its own unique personality.
Step-by-Step Tutorial
Materials
- Unfinished wooden peg doll bodies (mushroom shape) or wooden dowels and wooden knobs
- Air-dry clay or polymer clay (if not using pre-shaped wooden mushroom pegs)
- Acrylic paint (Red, White, Black, Pink)
- Small flat paintbrush
- Fine detail paintbrush or toothpick
- Dotting tool or the back of a paintbrush
- Matte or satin sealant (Mod Podge or spray varnish)
- Strong craft glue (if assembling separate wood pieces)
- Fine-grit sandpaper
Step 1: Shaping the Base
-
Prepare the wood:
If you are lucky enough to have pre-shaped wooden mushroom pegs, simply give them a light sanding to ensure a smooth surface. If using separate parts, glue a wooden knob or half-sphere onto a short, thick wooden dowel to create the classic mushroom shape. -
Clay alternative:
If you can’t find the right wooden shapes, shape a cap out of air-dry clay directly onto a thick wooden dowel. Create a smooth, domed top and flatten the underside where it meets the ‘stem’. Let this dry completely according to the package instructions. -
Smooth the surface:
Once your glue or clay is fully dry, gently sand any rough spots, especially around the rim of the mushroom cap. The smoother the surface, the cleaner your paint job will be.
Clean Lines Trick
Use a strip of painter’s tape or washi tape around the top of the stem before painting the red cap. This ensures a crisp, perfect line where the red paint meets the natural wood.
Step 2: Painting the Cap
-
Base coat:
Load your flat brush with bright red acrylic paint. Apply a smooth, even coat over the entire mushroom cap. I find it helpful to hold the mushroom by the stem and rotate it as I paint to keep my fingers clean. -
Second layer:
Let the first coat dry for about 15-20 minutes. If the wood grain or clay texture is still showing through, apply a second coat of red for a solid, vibrant color. -
Adding the spots:
Dip the handle end of a paintbrush or a dotting tool into white acrylic paint. Gently press it onto the red cap to create perfect circles. Vary the spacing—some can be close together, others further apart. -
Varying dot sizes:
For a natural look like in the photo, use different sized tools for the dots. Mix large, bold spots with tiny, delicate speckles scattered around the edges.
Glow-in-the-Dark Magic
Swap the white acrylic paint for glow-in-the-dark paint when making the spots on the cap. Your mushrooms will turn into nightlights when the sun goes down.
Step 3: Bringing them to Life
-
Placement planning:
Before painting the face, decide which side of the bare wooden stem looks best. Look for a clean area without distracting wood knots. -
Painting eyes:
Using a very fine detail brush or a toothpick dipped in black paint, place two small vertical ovals or circles for the eyes. Position them slightly apart on the upper half of the stem. -
Adding the smile:
Paint a thin, curved line between the eyes using the tip of your finest brush. A simple ‘U’ shape creates a happy expression, while a slightly lopsided smile adds quirkiness. -
Rosy cheeks:
Dip a cotton swab or a small, dry brush into a tiny amount of pink paint. Dab off the excess on a paper towel until the brush is almost dry, then gently stamp small pink circles just below the eyes. -
Highlighting:
For that extra sparkle shown in the image, add a tiny white dot reflecting inside the black part of the eyes once the black paint is fully dry.
Step 4: Finishing Touches
-
Adding texture:
If you want the stem to look more rustic like the example, dilute a tiny drop of brown paint with water. Use a dry brush to create very faint, vertical streaks on the stem to mimic bark texture. -
Sealing the project:
Once all paint is completely dry (give it at least an hour), brush on a layer of matte or satin sealant. This protects the wood and keeps the colors bright without making them overly shiny. -
Final display:
Arrange your little mushroom family on a windowsill or shelf. They look best in small groups of varying heights.
Now you have a cheerful little forest family ready to brighten up your room
Mini Photo Holders With Animals
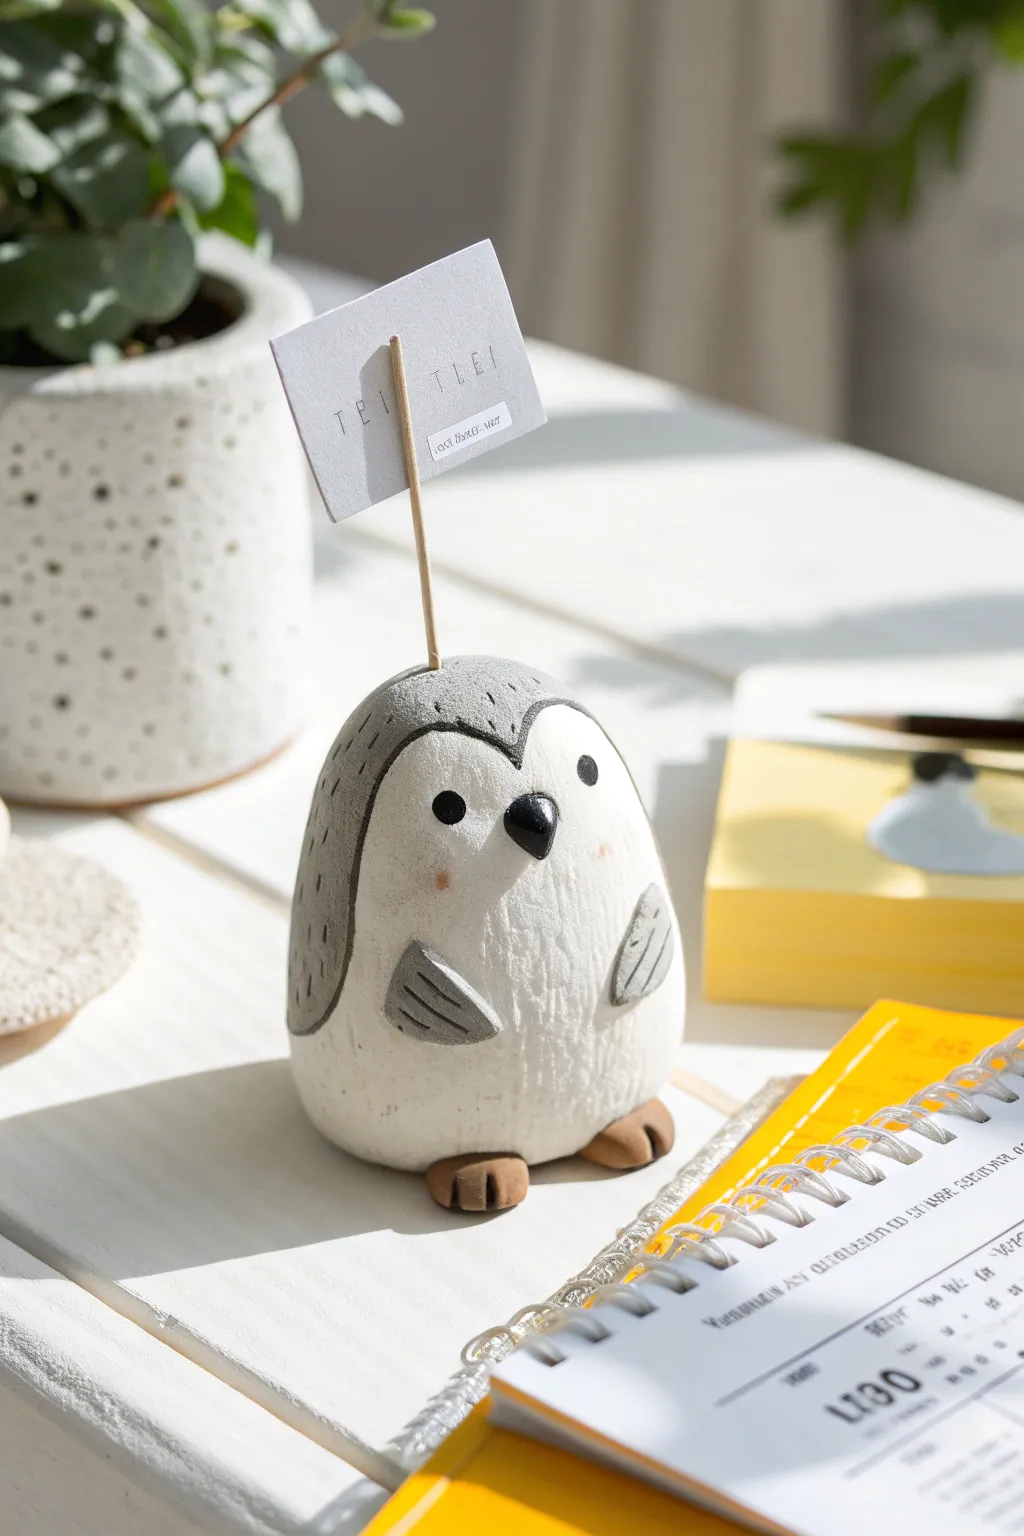
This adorable penguin makes the perfect desk companion to hold your important notes or favorite photos. With its textured finish and sweet expression, it brings a charming handmade touch to any workspace.
Detailed Instructions
Materials
- Air-dry clay (white)
- Acrylic paints (black, grey, soft pink, white)
- Wooden skewer or crafting wire
- Sculpting tools (or a toothpick)
- Small paintbrush
- Water cup
- Sandpaper (fine grit)
- Matte varnish (optional)
Step 1: Shaping the Body
-
Prepare the base:
Start by taking a handful of white air-dry clay. Knead it in your hands until it becomes soft and pliable to remove any air bubbles. -
Form the shape:
Roll the clay into a smooth ball, then gently taper the top just a little to create an egg-like shape. Flatten the bottom firmly against your work surface so the penguin stands up straight without wobbling. -
Insert the holder:
Take your wooden skewer or wire and insert it vertically into the center of the head. Push it deep enough to be secure, but leave about 2-3 inches visible at the top to hold your note. -
Add texture:
To achieve that rustic look shown in the photo, gently tap the surface of the clay with a stiff-bristled brush or a textured sponge. Avoid making it too smooth.
Make it Functional
If using a wooden skewer, wait until the paint dries, then carefully split the top centimeter of the wood with a craft knife create a slot for the paper.
Step 2: Adding Details
-
Create the wings:
Pinch off two small, identical pieces of clay. Flatten them into teardrop shapes to form the wings. -
Attach the wings:
Score the sides of the body and the back of the wings with a toothpick. Add a dab of water (slip) and press the wings onto the sides of the penguin. Smooth the seams gently. -
Sculpt the beak:
Roll a tiny cone of clay for the beak. Attach it to the center of the face area using the score-and-slip method, pointing it slightly downward. -
Make the feet:
Form two small, flat ovals for the feet. Use your tool to press two indentations into the front of each oval to create toes. -
Attach the feet:
Place the body on top of the feet so they poke out from underneath the front. Press down gently to bond them together. -
Let it dry:
Allow your penguin to dry completely. This usually takes 24-48 hours depending on the brand of clay and humidity. Rotate it occasionally for even drying.
Step 3: Painting & Finishing
-
Outline the face:
Once dry, use a pencil to lightly sketch the heart-shaped boundary that separates the white face from the grey markings. -
Paint the grey areas:
Mix a soft grey acrylic paint. Clearly paint the back, the top of the head (following your pencil line), and the outside of the wings. I like to keep the brush fairly dry here to maintain the texture. -
Paint the beak:
Use black paint for the beak. Carefully paint the entire cone shape. -
Add the eyes:
Dip the non-brush end of your paintbrush into black paint. Dot two eyes onto the white face area. -
Wing details:
Using a very fine brush or a black fine-tip marker, draw three small lines on each wing to suggest feathers. -
Rosy cheeks:
Dilute a tiny amount of pink paint with water. Dab it very gently onto the cheeks for a subtle blush effect. -
Paint the feet:
Paint the feet usually a brown or dark beige color to ground the figure. -
Final touches:
If you want to protect your work, apply a coat of matte varnish over the entire penguin once the paint is fully dry.
Cracked Clay?
If small cracks appear as the clay dries, mix a tiny bit of fresh clay with water to make a paste and fill the cracks, then smooth it over with your finger.
Now your little penguin is ready to help you remember your most important tasks


What Really Happens Inside the Kiln
Learn how time and temperature work together inside the kiln to transform clay into durable ceramic.
Tic-Tac-Toe With Cute Tokens
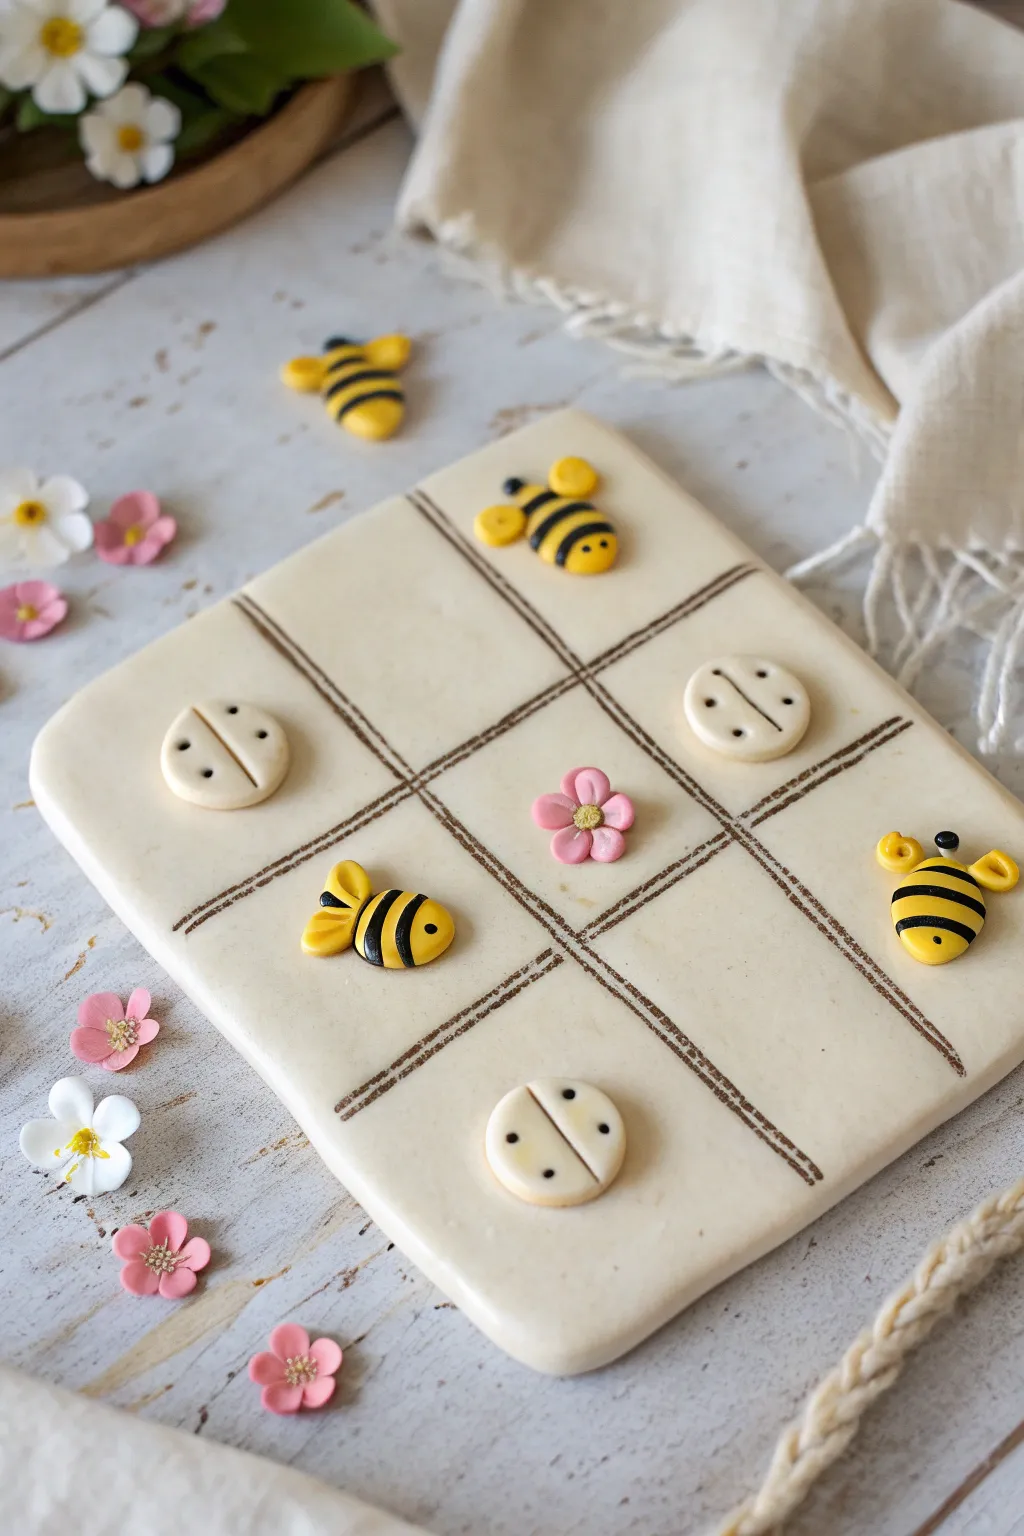
Create a buzz with this adorable handmade game board featuring busy bees and minimalist ladybugs. This clay project results in a softly textured, cream-colored slate perfect for lazy afternoon games and doubles as sweet desk décor.
Step-by-Step Tutorial
Materials
- Polymer clay or air-dry clay (Cream/White, Yellow, Black)
- Acrylic rolling pin
- Clay knife or craft blade
- Needle tool or toothpick
- Small round cutter (for ladybugs)
- Brown acrylic paint (optional, for grid lines)
- Fine detail brush
- Gloss varnish (optional)
Step 1: Crafting the Board
-
Roll the Base:
Begin with a large ball of cream or white clay. Roll it out into a smooth, even slab about 1/4 inch thick to ensure it’s sturdy enough for play. -
Shape the Square:
Use your clay knife to trim the edges, creating a neat square base. Smooth the cut edges with your fingertip to round them slightly for a finished look. -
Mark the Grid:
Lightly etch a crisscross pattern to form a 3×3 grid. I like to use a ruler here to keep the lines perfectly straight. -
Define the Lines:
Deepen the grid lines using a needle tool or the edge of a ruler, pressing in to create a distinct groove without cutting all the way through. -
Add Texture:
To mimic the dark, earthy lines in the example, you can either fill the grooves with a thin snake of dark brown clay or paint inside the grooves later. If using clay, press the thin dark strands into the grooves now.
Step 2: Creating the Game Pieces
-
Shape Bee Bodies:
Roll small balls of yellow clay into ovals for the bee bodies. You will need about five of these to have a full set. -
Stripe the Bees:
Roll extremely thin threads of black clay. Wrap these carefully around the yellow bodies and gently roll the whole piece to flatten the stripes into the body. -
Add Tiny Wings:
From the yellow clay, shape two tiny teardrops for each bee. Press these onto the upper back of the tokens for wings. -
Detail the Face:
Use a needle tool or a speck of black clay to create eyes on the front of each bee. A tiny dot is all you need. -
Make Ladybug Bases:
For the opposing team, roll out cream clay and use a small circle cutter to make five flat discs. These should be smaller than your grid squares. -
Detail the Ladybugs:
Use a knife to gently press a line down the center of each disc. Poke two small indentations on either side of the line using a needle tool for a minimalist look. -
Create a Center Flower:
Optionally, sculpt a small pink flower to decorate the center square when not in use. Flatten five tiny pink balls for petals and add a textured yellow center.
Clean Cuts
Chill your clay in the fridge for 10 minutes before cutting the square base. Firm clay cuts much cleaner and resists warping while you work on the edges.
Step 3: Finishing Touches
-
Bake or Dry:
If using polymer clay, bake the board and pieces according to the package instructions (usually 275°F for 15-30 minutes). If using air-dry clay, let it sit for 24-48 hours. -
Enhance the Grid:
Once hardened, if you didn’t use dark clay for the lines, paint the grooves with diluted dark brown acrylic paint to make the grid pop. -
Seal the Project:
Apply a coat of satin or matte varnish to protect the board from scratches during gameplay.
Magnetic Magic
Glue small magnets to the back of the pieces and embed a metal sheet inside the clay board. Now you have a travel-ready magnetic game set.
Enjoy challenging your friends on your charming new handmade game board
Tiny Plant Pot Pals
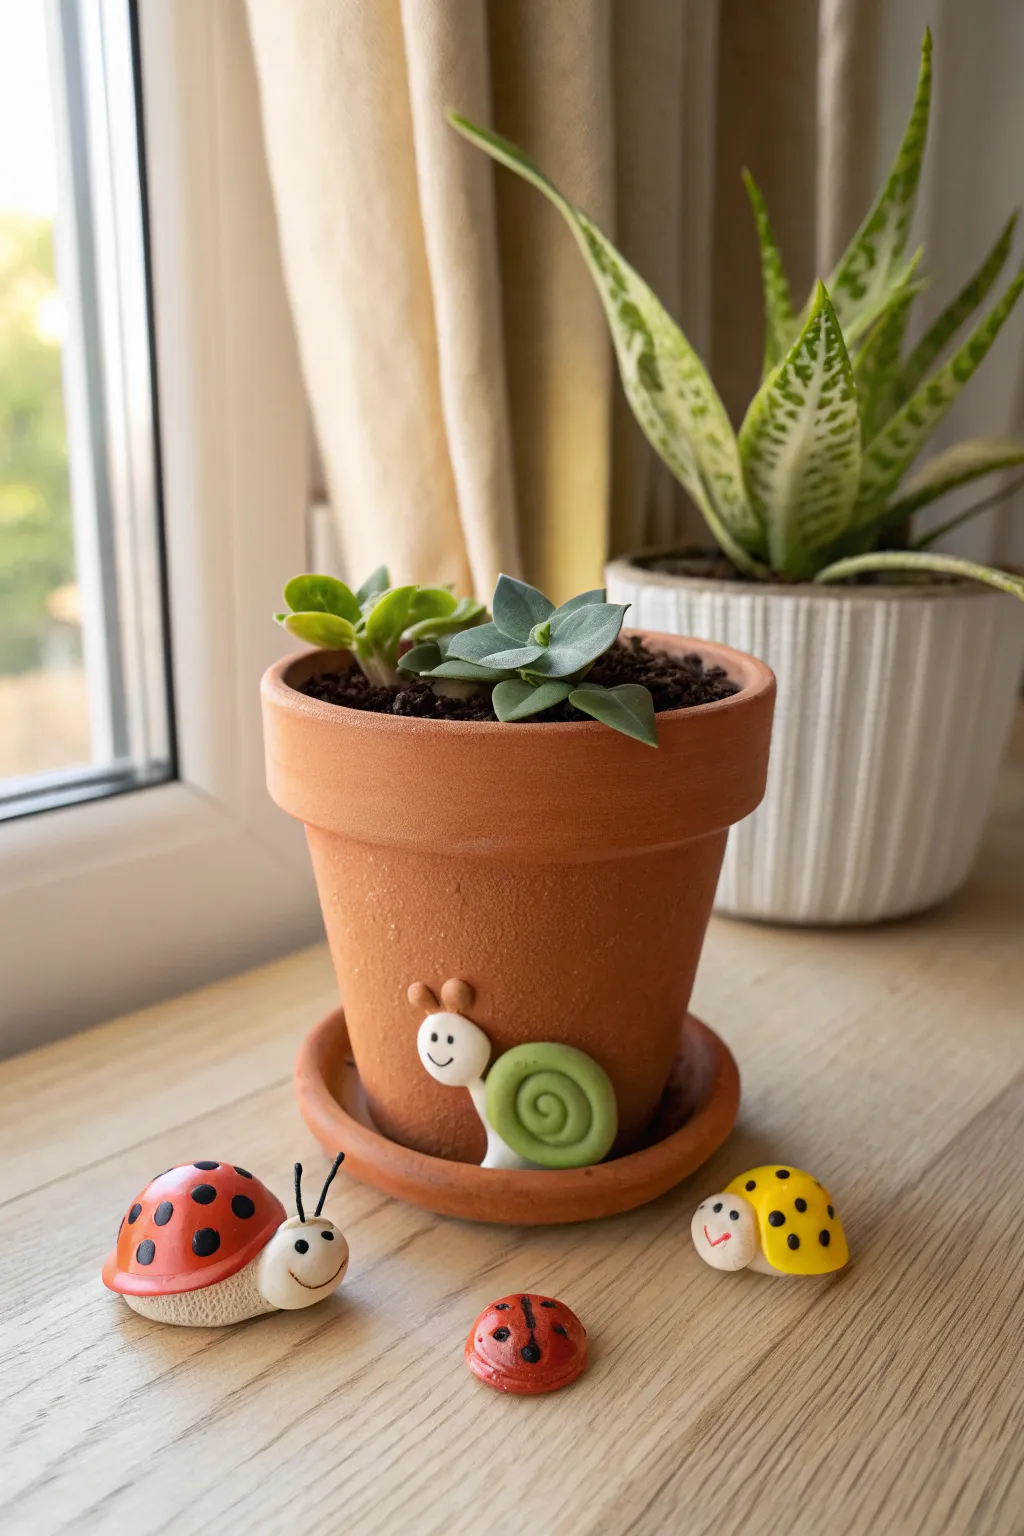
Transform a plain terracotta pot into a charming garden scene with these adorable clay companions that crawl and slide right along the rim. This project features a cheerful snail clinging to the pot and a family of ladybug pebbles to keep it company on the windowsill.
How-To Guide
Materials
- Polymer clay or air-dry clay (Red, White, Green, Yellow, Black)
- Small terracotta pot with saucer
- Acrylic paints (Black, Red)
- Small craft paintbrush or dotting tool
- Thin crafting wire or stiff black thread (for antennae)
- Strong craft glue or superglue (adult supervision required)
- Clear varnish or sealant (optional)
- Modeling tools or a toothpick
Step 1: Sculpting the Snail
-
Prepare the snail body:
Start with a small chunk of white clay. Roll it into a smooth ball, then gently elongate it into a teardrop shape that curves slightly upwards at the larger end to form the head and neck. -
Shape the shell:
Take a piece of light green clay and roll it into a long, even snake or rope. Starting from one end, tightly coil the rope around itself to create a spiral shell. -
Attach shell to body:
Press the flat side of your green spiral firmly onto the back of the white body. If using polymer clay, blending the seam slightly with a tool can help it stick. -
Add facial details:
Roll two tiny brown or tan balls for the antennae or ‘eye stalks’ and press them onto the top of the head. Use a toothpick or needle tool to gently indent a smiling mouth. -
Fit to the pot:
Before the clay hardens, press the snail gently against the side of your terracotta pot so the back of the clay contours perfectly to the curve of the pot.
Clay Won’t Stick?
If the snail keeps sliding off the terracotta before the glue dries, use a piece of masking tape to hold it tightly in place while the adhesive sets completely.
Step 2: Creating the Ladybugs
-
Form the red ladybug base:
Roll a medium-sized ball of red clay. Flatten the bottom against your table to create a dome shape. This will be the main body. -
Add the head:
Create a smaller ball of white clay. Press it firmly against the front of the red dome to make the face, smoothing the connection point. -
Make the yellow ladybug:
Repeat the previous two steps, but this time use yellow clay for the body dome and keep the white head slightly smaller for variety. -
Sculpt the tiny red baby:
For the smallest bug, make a tiny red dome. Instead of a clay head, you can simply paint the details later, or add a minuscule white speck for a face if you have the patience. -
Insert antennae:
While the clay is soft, cut two short pieces of black wire or stiff thread. Poke them into the top of the white head pieces for antennae. -
Texture the bodies:
I like to use a knife tool to gently press a line down the center of the red and yellow backs to suggest separate wings, and press a line around the bottom edge to act as a rim.
Step 3: Baking and Painting Details
-
Cure the clay:
Bake the pieces according to your polymer clay package instructions (usually 275°F/135°C for 15-30 minutes). If using air-dry clay, let them sit undisturbed for 24 hours. -
Paint the ladybug spots:
Once cool, use a small dotting tool or the wrong end of a brush dipped in black acrylic paint to add spots to the red and yellow shells. -
Add facial features:
Carefully paint two tiny black dots for eyes on the white heads of the ladybugs and the snail. Add a tiny red smile to the yellow ladybug if desired. -
Detail the snail:
Trace the spiral groove of the snail’s green shell with a darker green paint or a fine-tip marker to make the swirl pop. -
Attach the snail:
Apply a strong craft glue to the back of the finished snail and adhere it to the spot on the pot you measured earlier. -
Seal for protection:
Brush a coat of clear varnish or mod podge over the clay figures to give them a nice shine and protect the paint from water droplets.
Pro Tip: Custom Shells
For a marbled snail shell effect, twist two different shades of green clay together before rolling your snake coil.
Arrange your little ladybug family around the base of the saucer and enjoy your lively new plant display

TRACK YOUR CERAMIC JOURNEY
Capture glaze tests, firing details, and creative progress—all in one simple printable. Make your projects easier to repeat and improve.
Pocket-Sized Fairy Garden Gnomes
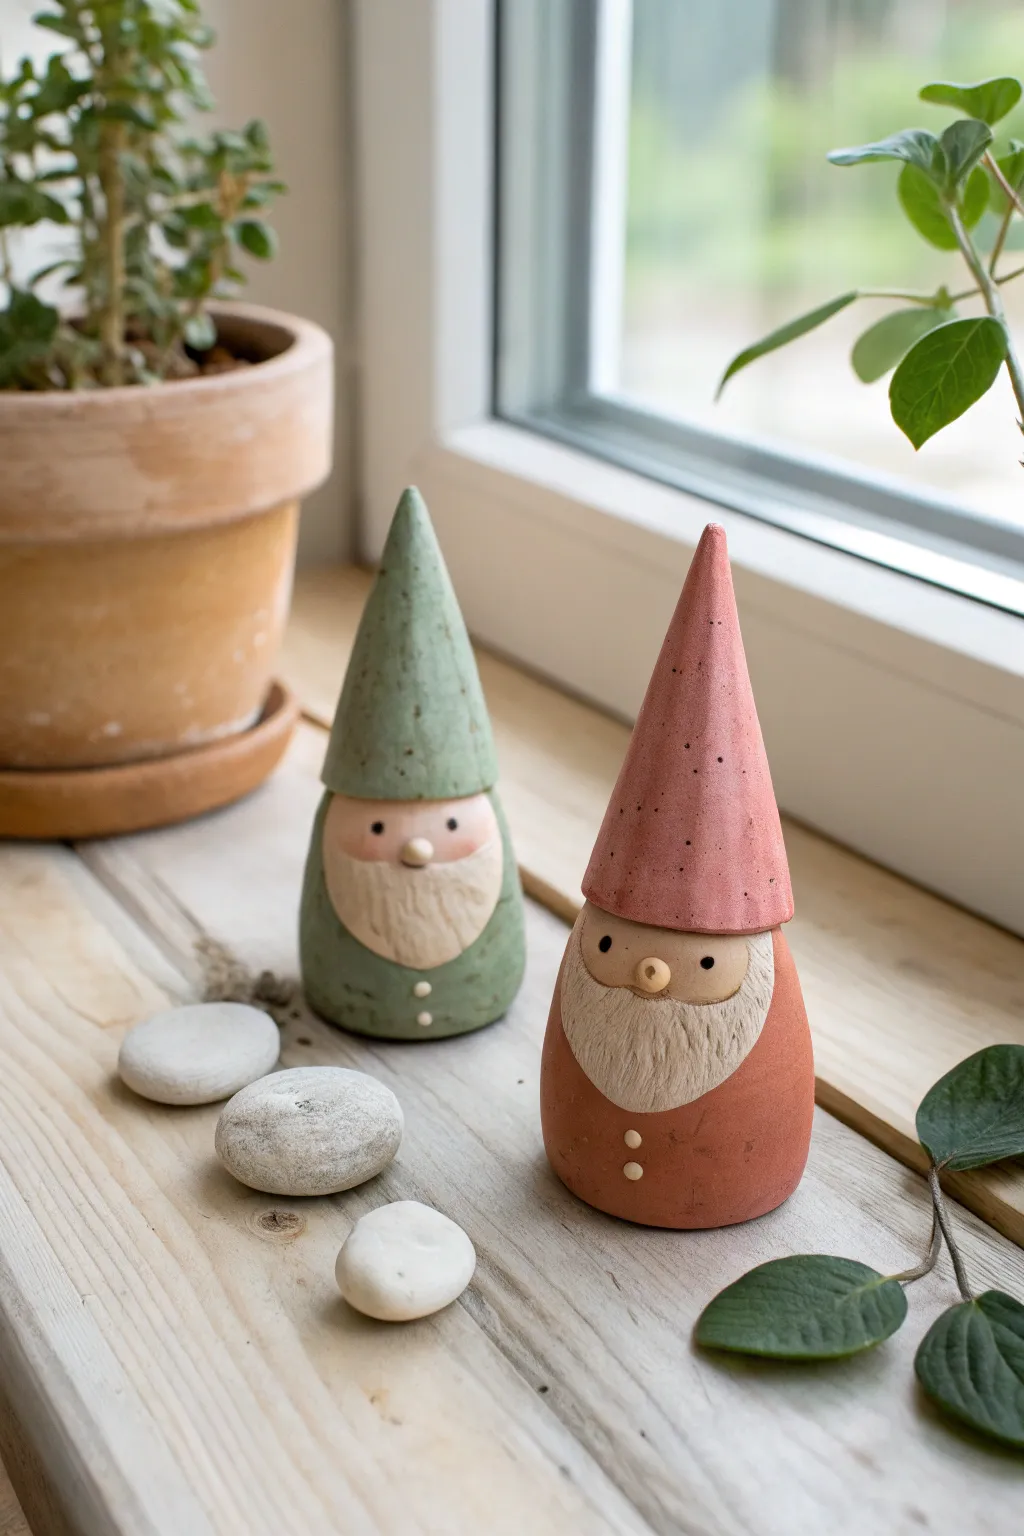
These charming, minimalist gnomes are perfect for tucking into houseplants or watching over a windowsill fairy garden. With their sleek conical hats and textured beards, they combine modern design with a touch of woodland magic.
Step-by-Step Guide
Materials
- Air-dry clay or polymer clay (white or terracotta)
- Acrylic paints (muted sage green, dusty rose pink, cream/flesh tones, white)
- Fine grit sandpaper
- Small rolling pin
- Modelling tools or a toothpick
- Paintbrushes (small round and detail)
- Matte finish clear varnish/sealer
- Water cup (for smoothing)
Step 1: Shaping the Bodies
-
Create the base:
Start by taking a lump of clay about the size of a golf ball. Roll it smooth in your palms to remove any cracks, then gently shape it into a chunky, rounded cone or gumdrop shape. This will be the gnome’s body. -
Flatten the bottom:
Press the wide end of your shape onto your work surface firmly so the gnome stands straight up without wobbling. Smooth out the sides with a slightly damp finger. -
Form the hat:
Take a second piece of clay, slightly smaller than the body. Roll this into a taller, sharper cone to form the hat. Test the fit by placing it on top of the body; the base of the hat should slightly overhang the top of the body section. -
Join the pieces:
Score (scratch) the top of the body and the bottom of the hat. Add a tiny dab of water or liquid clay (if using polymer) and press the hat firmly onto the body. Gently blend the seam only where the back of the hat meets the back of the body, leaving the front overhang distinct.
Step 2: Adding Character Details
-
Define the face area:
Under the front brim of the hat, create a flat, smooth semi-circle area on the body. This is where the face will peek out. -
Sculpt the beard:
Below the face area, add a thin, flattened tear-drop shaped layer of clay for the beard. Smooth the edges so it seems to grow naturally from the face area down onto the belly. -
Texture the beard:
Using a needle tool or toothpick, scratch gentle, vertical lines into the beard clay to mimic hair texture. I find varying the pressure slightly makes the beard look more organic and fluffy. -
Add the nose:
Roll a very tiny ball of clay for the nose. Press it right in the center, overlapping where the hat brim meets the beard. -
Create buttons:
Roll two minuscule balls of clay and flatten them slightly onto the belly area below the beard to look like coat buttons. -
Final smoothing:
Check the entire figure for fingerprints. Use a tiny bit of water on your finger to buff them away, then let the clay dry or bake according to your package instructions.
Cracking Up?
If small cracks appear as your clay dries, mix a tiny bit of fresh clay with water to make a paste and fill the gaps, then sand smooth once dry.
Step 3: Painting and Finishing
-
Sand for smoothness:
Once fully cured and dry, gently sand any rough spots, especially on the hat tip or bottom edge. -
Painting the hat:
Paint the hat section with your chosen muted tone—dusty pink or sage green work beautifully. You may need two thin coats for opaque coverage. -
Painting the body:
Match the body color to the hat, carefully painting around the beard and face area. Paint the tiny buttons in a contrasting cream color. -
Painting the face and beard:
Paint the face area with a flesh tone and the beard in a soft cream or white. Don’t worry if the beard paint gets into the texture grooves; it adds depth. -
Adding eyes:
Using the smallest dotting tool or the back of a paintbrush, create two small dots for eyes wide apart on the face. Keep them simple for that sweet, innocent look. -
Speckled texture effect:
To master that stony look in the photo, dilute a tiny bit of dark brown or grey paint. Dip an old toothbrush in it and run your thumb over the bristles to flick tiny speckles over the dried paint. -
Seal:
Finish with a coat of matte varnish to protect your paint job and give the gnomes a finished, professional ceramic feel.
Make it a Trio
Vary the heights! Make one tall and thin, one short and stout, and one medium to create a perfectly balanced family group for your shelf.
Now you have a pair of adorable, pocket-sized friends ready to bring a smile to any corner of your room
Cute Space Rockets and Planets
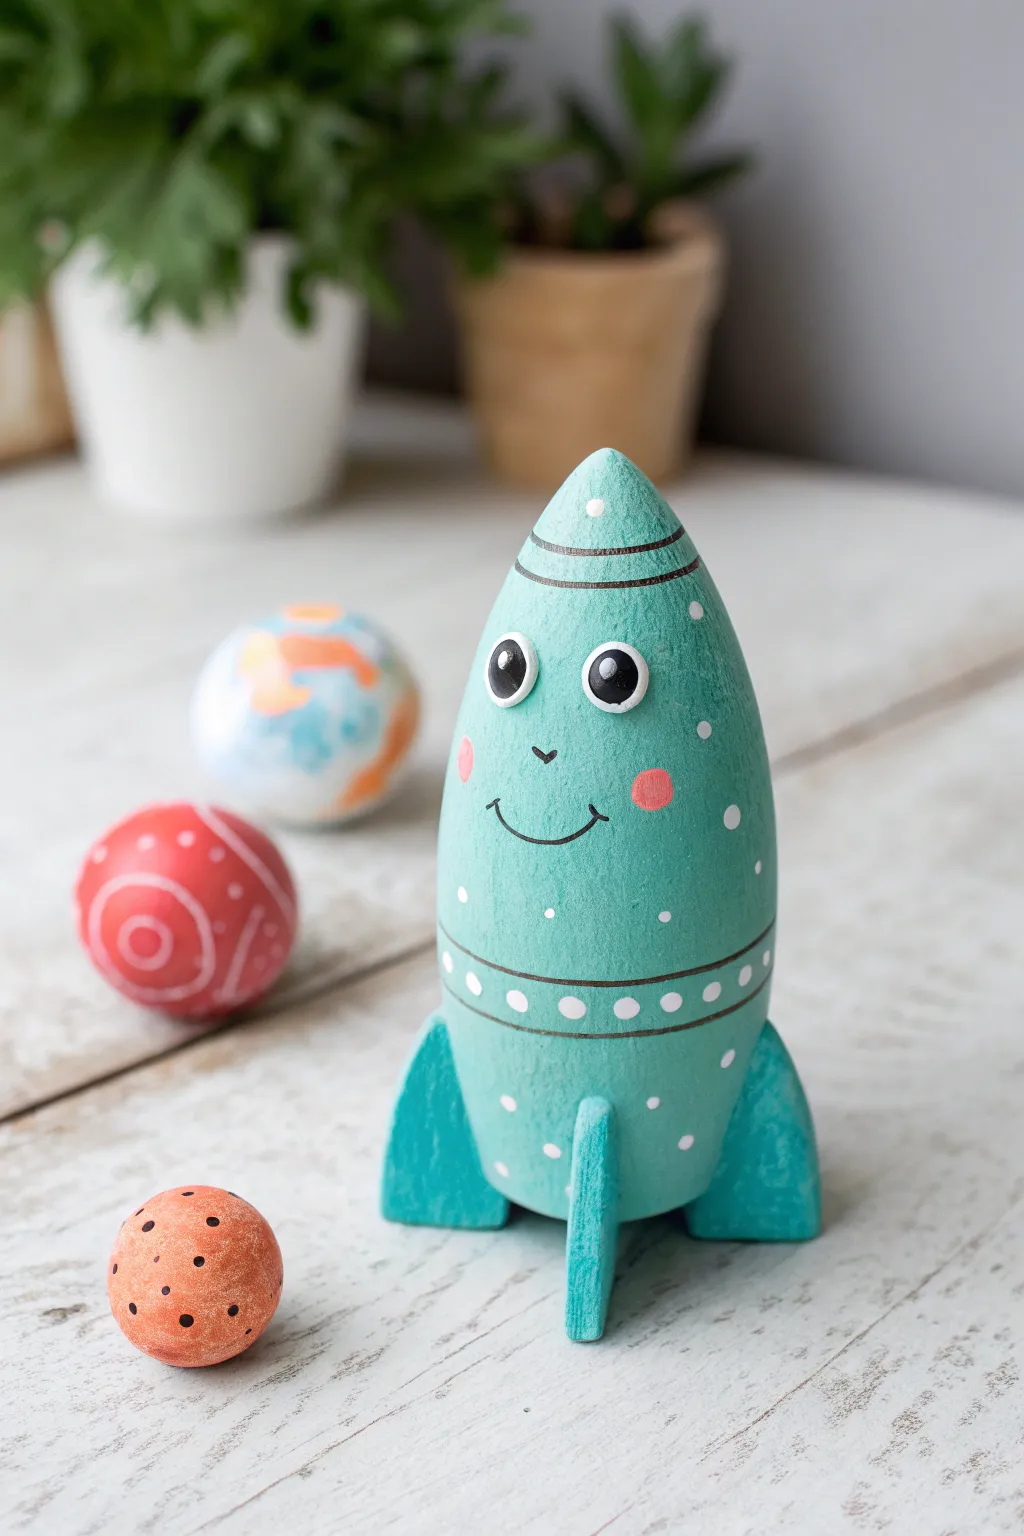
Blast off into creativity with this adorable retro-style rocket ship featuring a friendly face and three colorful planetary companions. The smooth, matte finish and simple geometric shapes make this a perfect beginner project that looks charmingly handmade.
Detailed Instructions
Materials
- Air-dry clay or polymer clay (white)
- Acrylic paints (turquoise/teal, white, black, pink, red, orange, light blue)
- Fine detail paintbrush
- Medium flat paintbrush
- 2 small googly eyes or wiggle eyes
- Craft glue
- Rolling pin
- Modelling tools or a dull butter knife
- Fine-grit sandpaper (optional)
- Water cup and palette
Step 1: Shaping the Rocket Body
-
Form the main fuselage:
Start by taking a large handful of white clay and rolling it into a smooth, thick cylinder. Gently taper one end into a rounded cone shape to form the nose of the rocket, keeping the bottom flat so it stands upright on its own. -
Smooth the surface:
Dip your finger in a little water to smooth out any cracks or fingerprints on the clay body. You want a sleek, aerodynamic look. -
Create the fins:
Roll out a flat slab of clay about 1/4 inch thick. Use a knife to cut out three identical triangular shapes for the fins. The bottom edge of each triangle should align with the bottom of your rocket body. -
Attach the fins:
Score (scratch) the clay slightly where the fins will attach to the rocket body and on the edge of the fins themselves. Apply a dab of water or slip, then press the three fins firmly onto the base, spacing them equally around the rocket. -
Make the planets:
Roll three balls of clay in varying sizes—one small, one medium, and one slightly flattened. Roll them firmly between your palms to ensure they are perfectly round. -
Dry the pieces:
Set all your clay components aside to dry completely. If using air-dry clay, this might take 24-48 hours; for polymer clay, bake according to package instructions.
Smooth Operator
Before painting, lightly sand the dried clay with fine-grit sandpaper. This removes bumps and creates a professional surface for the paint.
Step 2: Painting the Galaxy
-
Base coat the rocket:
Mix a vibrant teal or turquoise paint. Apply a solid base coat to the entire rocket, including the fins. You may need two coats to get full, opaque coverage. -
Paint the red planet:
While the rocket dries, paint the medium-sized ball bright red. Once that layer is dry, use a fine brush with white paint to add swirling concentric circles and dots. -
Paint the earthy planet:
Dab patches of light blue, orange, and white onto the largest ball, blending the edges slightly while the paint is wet to create a cloud-like atmosphere. -
Paint the cratered planet:
Paint the smallest ball a solid orange. Use the handle end of your paintbrush dipped in black paint to stamp small black dots all over it, simulating craters.
Step 3: Adding Rocket Details
-
Add stripe details:
Using a very fine brush and black paint, carefully paint two thin horizontal lines near the top of the rocket cone and two horizontal lines near the bottom, just above the fins. -
Create the porthole dots:
Between the two bottom black lines, use the handle of your brush dipped in white paint to stamp a row of evenly spaced white dots. -
Paint a starry pattern:
Scatter tiny white dots randomly across the upper body of the rocket to look like distant stars or reflections. -
Draw the face:
With your fine liner brush and black paint, draw a simple ‘u’ shape for a smile and a small ‘v’ for the nose. I find it helpful to practice the smile on paper first. -
Add rosy cheeks:
Dip a cotton swab or a small round brush into pink paint and dab two gentle circles on either side of the smile for cheeks. -
Attach the eyes:
Once the paint is fully dry, apply a tiny drop of craft glue to the back of two small googly eyes and press them into place above the nose. -
Final touches:
Check your paintwork for any needed touch-ups. If you want a longer-lasting finish, apply a coat of matte varnish over the entire project.
Cosmic Display
Bend a piece of craft wire into a spiral and stick it into a clay base to make your planets ‘orbit’ around the rocket instead of sitting on the table.
Arrange your little space scene together and get ready for an imaginative journey to the moon