If you can roll a few balls and snakes of clay, you can totally make something adorable. These easy cute clay ideas step by step are the kind of projects I teach when you want quick wins, sweet little faces, and zero stress.
Chubby Bear Mini Figurine
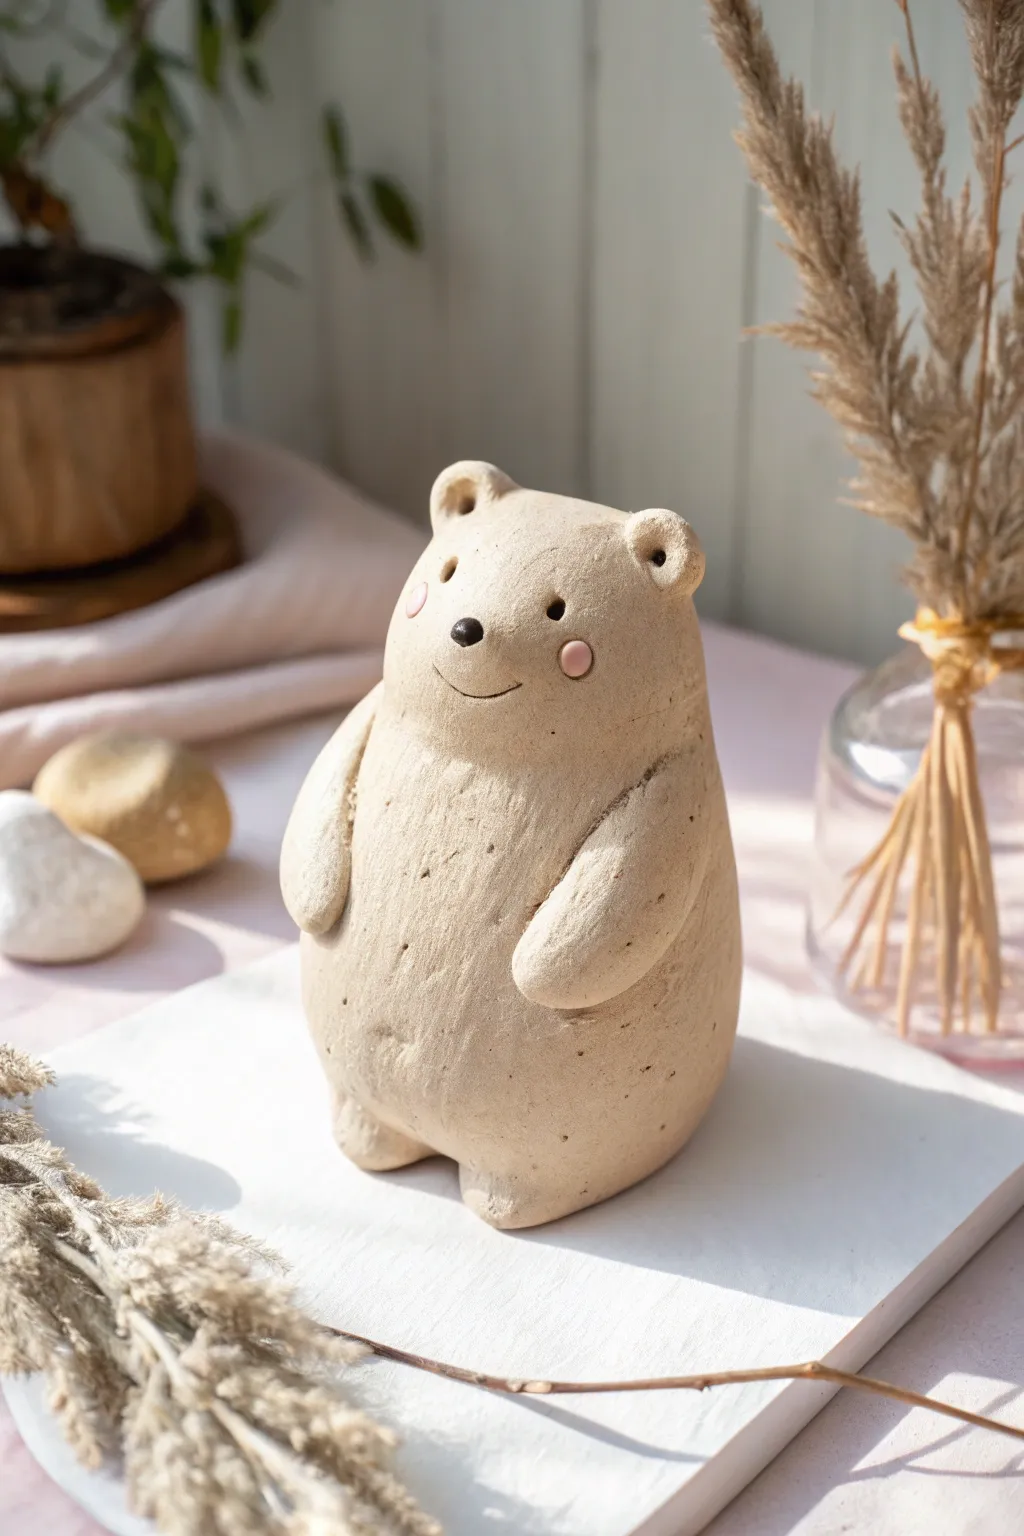
This adorable bear radiates warmth with its smooth, speckled clay finish and sweetly simple expression. Its standing pose and soft, rounded curves make it a charming, minimalist project perfect for beginners looking to practice shaping basic forms.
Step-by-Step Tutorial
Materials
- Speckled beige polymer clay or air-dry clay (stone effect)
- Black acrylic paint
- Pink acrylic paint (or soft pastel chalks)
- Small dotting tool or toothpick
- Fine-grit sandpaper
- Clay sculpting tools (smoothing tool, needle tool)
- Small paintbrush
- Matte varnish (optional)
Step 1: Shaping the Base Body
-
Prepare the clay:
Start by conditioning your speckled clay until it is soft and pliable. If you’re using air-dry clay, knead it briefly to remove air bubbles. -
Form the main shape:
Roll a large ball of clay about the size of a tangerine. Gently roll it on your work surface to elongate it slightly into a fat, rounded teardrop or egg shape. -
Flatten the base:
Tap the wider bottom end of your egg shape onto the table to create a flat standing surface so the bear doesn’t wobble. -
Define the head:
Using your fingers, gently pinch and smooth the upper third of the egg shape to slightly narrow it, distinguishing the head area from the chubby belly. -
Smooth the surface:
Take a moment to smooth out any fingerprints. I find using a tiny bit of water (for air-dry clay) or baby oil (for polymer) helps achieve that seamless finish.
Seamless Smoothness
For a truly professional stone look, lightly buff the dried clay with fine sandpaper before painting. This removes dust and creates a soft, matte texture.
Step 2: Adding Extremities
-
Create the ears:
Roll two small pea-sized balls of clay. Press them gently onto the top corners of the head. -
Blend the ears:
Use a sculpting tool to drag the clay from the bottom of the ears onto the head, blending the seams so they are completely invisible. -
Indent the ears:
Press the rounded end of a tool into the center of each ear to create the inner cup shape. -
Make the arms:
Roll two small sausages of clay, slightly tapered at one end. These should be about an inch long. -
Attach the arms:
Press the arms vertically onto the sides of the body, curving them slightly forward so they rest on the belly. -
Blend the shoulders:
Smooth the top seam of the arms into the body, leaving the bottom rounded part separate to give it dimension. -
Form the feet:
Create two small flattened ovals and attach them to the bottom front of the body. Blend the back edges so they look integrated.
Cracks Appearing?
If small cracks appear while air-dry clay is drying, mix a tiny bit of fresh clay with water to make a paste and fill them in immediately.
Step 3: Detailing & Finishing
-
Create the eye sockets:
Using a small ball tool or the end of a paintbrush, make two small, deep indentations for where the eyes will go. -
Sculpt the snout:
The snout is subtle here; gently press the clay between the eyes and the chin forward just a tiny bit to give the face profile. -
Carve the mouth:
Use a needle tool or a very sharp blade to carve a tiny, curved smile. Keep the line thin and delicate. -
Add the nose:
Roll a minuscule ball of black clay (or paint it later) and press it right above the mouth line. -
Baking or drying:
Follow your package instructions to cure the bear. For air-dry clay, let it sit for 24-48 hours until fully hard. -
Painting details:
Once dry, use a toothpick dipped in black paint to fill the eye holes. Add two soft pink circles for cheeks using diluted paint.
Place your little bear on a shelf or desk where its friendly smile can brighten your day


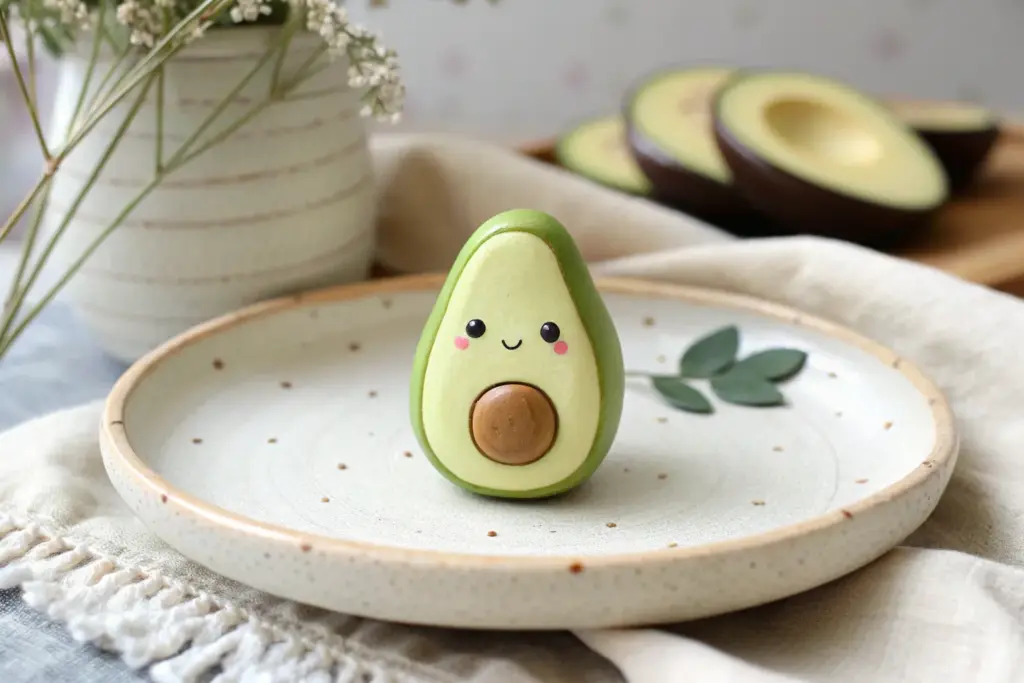
Smiling Avocado Buddy
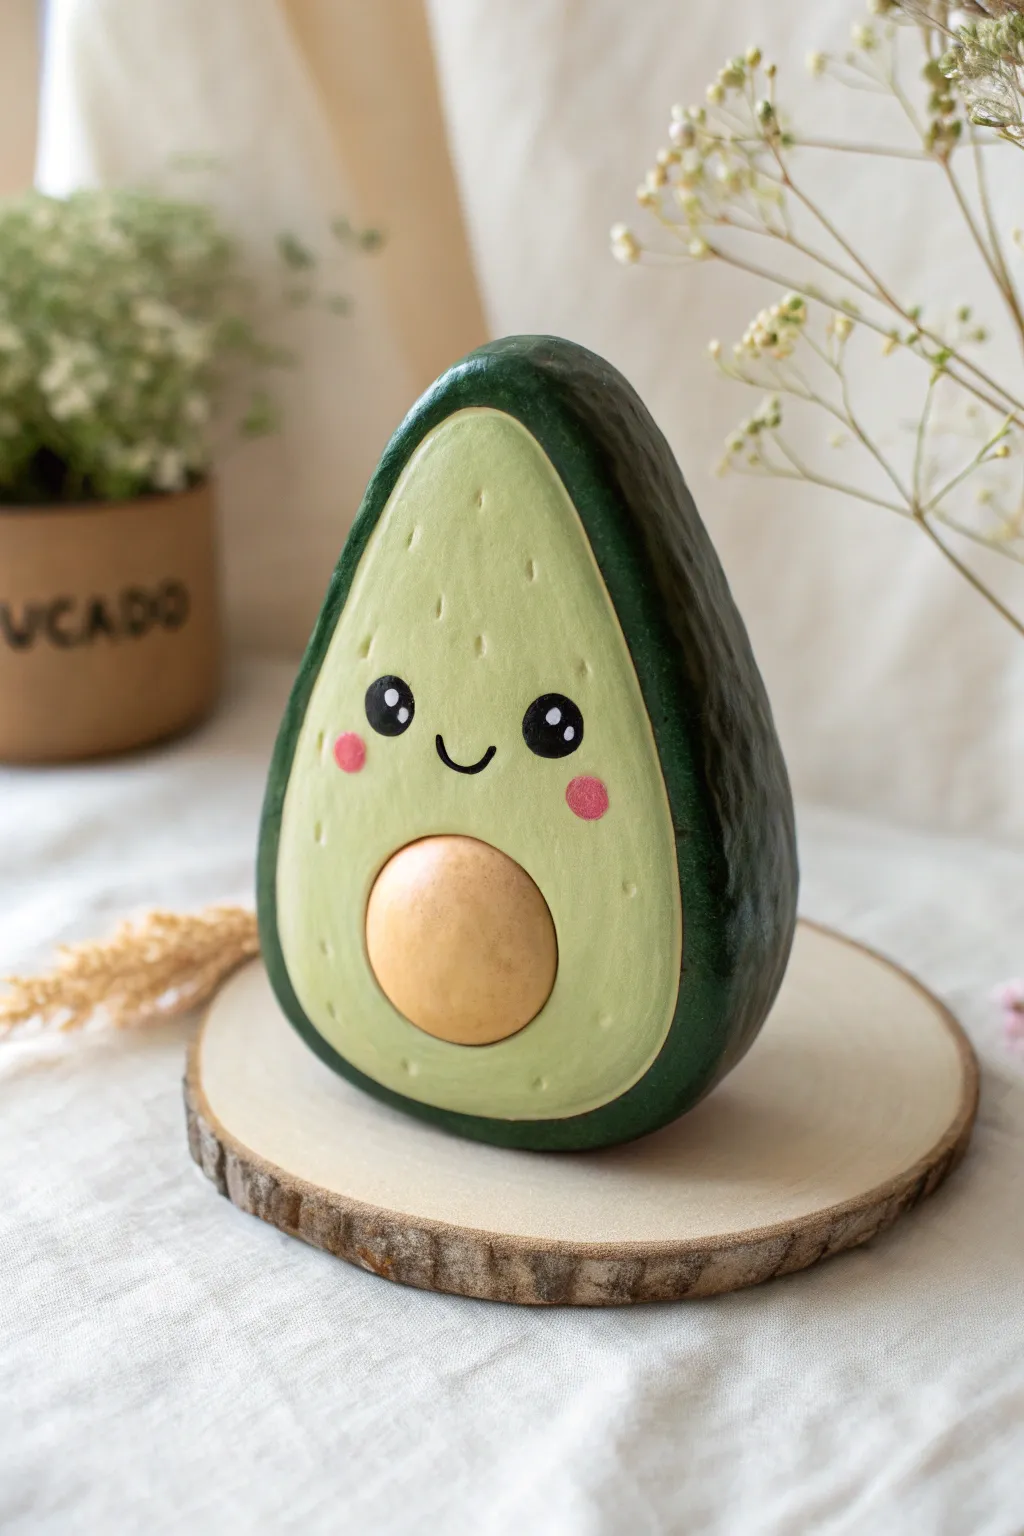
This adorable avocado figurine makes a charming desk companion or a cute gift for a food-loving friend. With its smooth, pear-shaped body and kawaii expression, it is simple to sculpt yet full of personality.
Detailed Instructions
Materials
- Air-dry clay or polymer clay
- Aluminum foil (for the core)
- Sandpaper (fine grit)
- Acrylic paints (dark green, light avocado green, yellow-ochre/tan, pink, black, white)
- Gloss varnish or sealant
- Sculpting tools or a craft knife
- Paintbrushes (medium flat and fine liner)
- Water and palette
Step 1: Shaping the Core
-
Create a foil armature:
To save clay and reduce weight, crumple a piece of aluminum foil into a tight pear shape. It should be roughly 1 inch smaller in all directions than your desired final size. -
Prepare the clay:
Knead your clay thoroughly until it is soft and pliable. Roll it out into a flat sheet, about a quarter-inch thick. -
Cover the armature:
Wrap the clay sheet around your foil core. Press the seams together and smooth them out with your fingers or a little water until the surface is seamless and resembles a plump pear. -
Flatten the base:
Gently tap the wider bottom of the pear shape against your work surface. This creates a small flat spot so your avocado will stand up confidently on its own. -
Carve the cut face:
Decide which side will be the front. Use your thumb or a rounded tool to gently flatten slightly more than half of the front face, creating the ‘cut’ surface of the avocado.
Cracked Clay?
If small cracks appear as the clay dries, mix a tiny bit of fresh clay with water to make a paste and fill in the gaps, then sand smooth once dry.
Step 2: Sculpting Details
-
Form the pit indentation:
In the lower center of the flat front face, press a rounded object (like a measuring spoon) or use your thumbs to create a deep, circular indentation where the pit will sit. -
Make the pit:
Roll a separate ball of clay that fits snugly into that indentation. I like to make it slightly protruding so it looks nice and round. -
Attach the pit:
Score the back of the pit and the inside of the hole with a needle tool. Add a dab of water or slip (clay slurry) and press the pit firmly into place. -
Refine the shape:
Check the silhouette. The top should be slightly narrower than the bottom. Smooth any fingerprints using a damp sponge or finger. -
Dry completely:
Let the sculpture dry fully. For air-dry clay, this might take 24-48 hours. Turn it occasionally to ensure even drying.
Clean Lines
Use masking or washi tape to mask off the light green flesh area before painting the dark green skin to get a super crisp, perfect edge.
Step 3: Painting & Finishing
-
Sand for smoothness:
Once bone dry, lightly sand the surface with fine-grit sandpaper to remove any bumps or uneven texture. Wipe away the dust with a barely damp cloth. -
Paint the flesh:
Paint the flat front face (excluding the pit) with a soft, creamy light green. You may need two coats for opaque coverage. -
Paint the skin:
Carefully paint the rounded back and sides with a dark forest green. Create a clean line where the dark skin meets the light flesh on the front edge. -
Detail the pit:
Paint the round pit with a warm tan or yellow-ochre color. While the paint is wet, you can blend in a tiny touch of white at the top for a highlight effect. -
Add texture marks:
Using a very fine brush and a slightly darker shade of the light green, add tiny vertical ticks or dashes on the upper part of the flesh to mimic avocado texture. -
Paint the face:
Use a fine liner brush or a dotting tool dipped in black paint to create two wide-set round eyes. Paint a small ‘u’ shape between them for a smile. -
Add highlights and cheeks:
Add tiny white dots inside the black eyes to bring them to life. Then, dab two soft pink circles under the eyes for rosy cheeks. -
Seal:
Once all paint is completely dry, coat the entire piece with a gloss varnish to protect it and give it a shiny, ceramic-like finish.
Place your finished avocado buddy on a shelf or desk to add a cheerful touch to your day


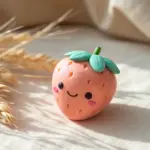
Tiny Strawberry Charm
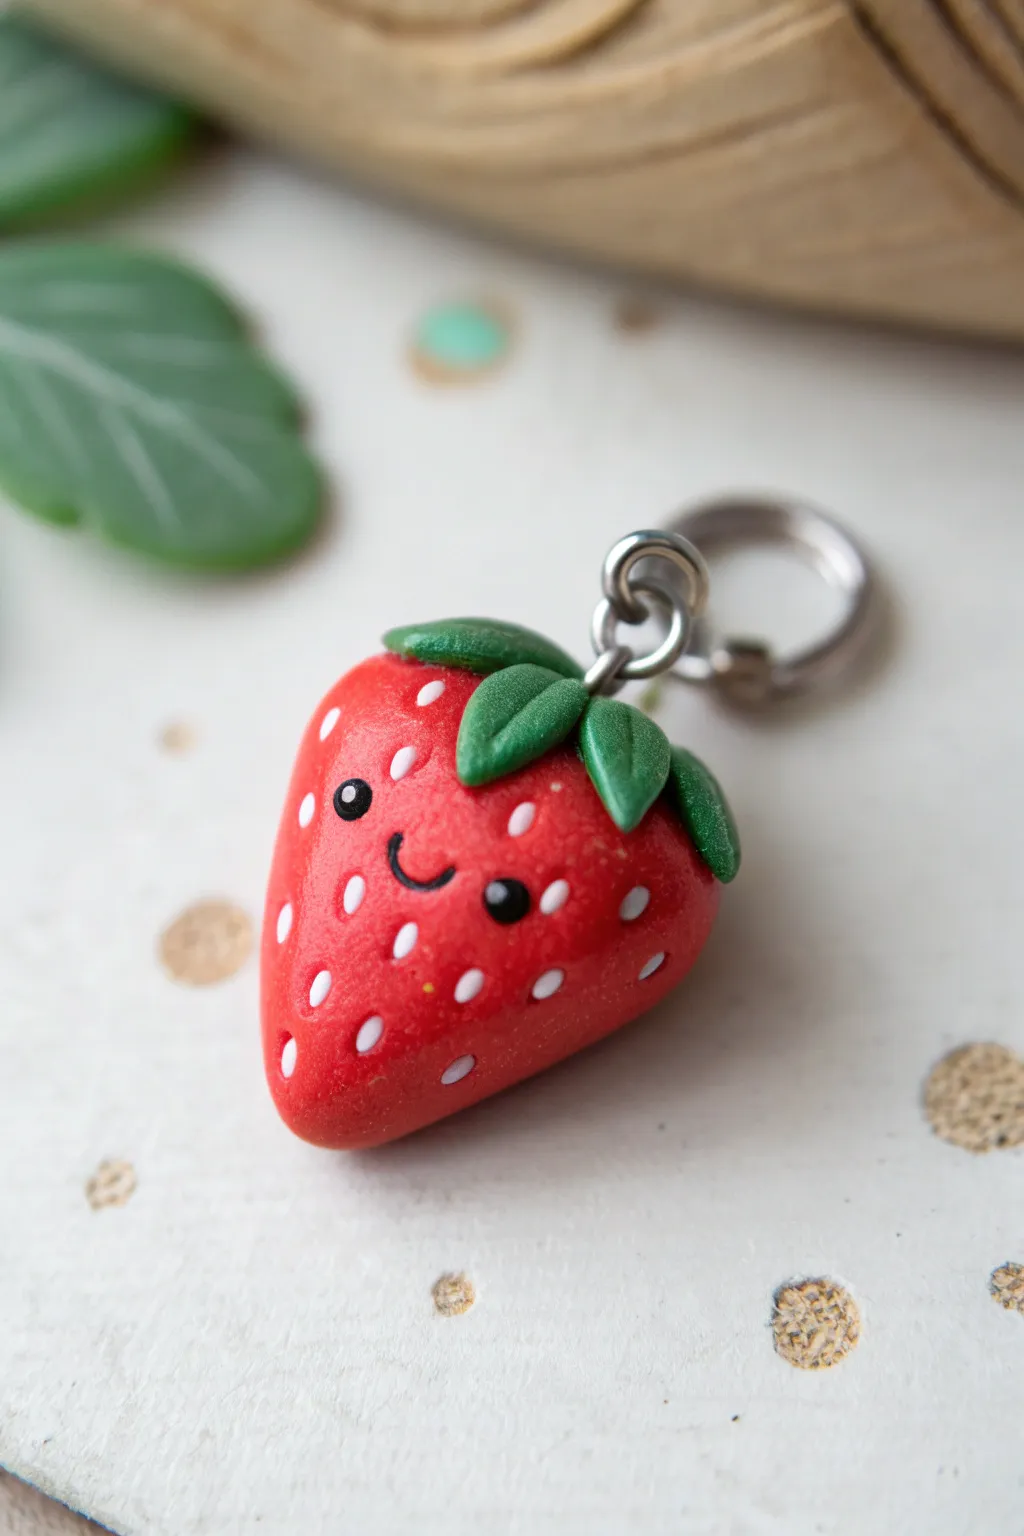
This adorable polymer clay strawberry charm brings a burst of cheer with its friendly little face and vibrant red hue. It’s perfect for turning into a keychain, necklace pendant, or zipper pull for a pop of fruity fun.
Step-by-Step Tutorial
Materials
- Red polymer clay
- Green polymer clay (leaf shade)
- Black polymer clay (tiny amount)
- White acrylic paint
- Fine tip detail brush or toothpick
- Eye pin or screw eye
- Metal jump ring and keyring finding
- Sculpting tool with a pointed tip (or needle tool)
- Gloss or satin glaze (optional)
Step 1: Shaping the Berry Base
-
Condition the clay:
Start by taking a piece of red polymer clay about the size of a large marble. Knead it in your hands until it becomes soft, warm, and pliable to prevent cracking. -
Form a ball:
Roll the conditioned red clay between your palms until you have a perfectly smooth sphere with no seams or lines. -
Create the taper:
Gently gently roll one side of the ball against your palm or work surface to narrow it slightly, creating a rounded cone shape that mimics a real strawberry. -
Flatten the top:
Press the wider end of the cone lightly against your work surface to flatten it just enough so the leaves will have a place to sit.
Fixing Fingerprints
If you see fingerprints on your clay before baking, lightly brush the surface with a little baby oil or cornstarch to smooth them away instantly.
Step 2: Leafy Greens
-
Make leaf teardrops:
Take your green clay and roll five or six tiny balls, each roughly the size of a grain of rice. Roll each ball into a small teardrop shape. -
Flatten the leaves:
Press each green teardrop flat with your finger. They should look like little petals. -
Add texture:
Using a needle tool or small knife, gently press a central vein line down the middle of each leaf for a realistic touch. -
Attach the calyx:
Arrange the leaves in a star pattern on top of the red berry, pressing the wider ends into the center and letting the pointed tips drape slightly down the sides. -
Secure the hardware:
Insert a metal eye pin or screw eye directly into the center of the green leaves, pushing it down into the red body of the strawberry.
Make it Sparkle
Mix a tiny amount of ultrafine glitter into the red clay before sculpting to give your strawberry a sugary, candy-like appearance.
Step 3: The Kawaii Face
-
Make the eyes:
Roll two incredibly tiny balls of black clay. Position them on the upper middle section of the strawberry, spacing them apart slightly. -
Embed the eyes:
Press the black balls gently into the red clay so they are flush with the surface, not sticking out like bugs. -
Create the mouth:
Roll a very thin, short snake of black clay. Use a needle tool to curve it into a ‘U’ shape and press it onto the face between the eyes to make a smile. -
Add eye highlights:
Using the tip of a needle or toothpick, place a microscopic dot of white paint (or a spec of white clay) onto the upper corner of each black eye for a sparkle.
Step 4: Seeding and Finishing
-
Paint the seeds:
Using a very fine detail brush or a toothpick dipped in white acrylic paint, carefully dab small teardrop shapes or dots all around the red surface. -
Refine the seed placement:
I prefer to space the seeds somewhat randomly but evenly, avoiding the immediate area around the eyes and mouth to keep the face clear. -
Bake the charm:
Place your strawberry on a baking sheet or ceramic tile. Bake according to the instructions on your specific brand of polymer clay (usually around 275°F/135°C for 15-30 minutes). -
Cool down:
Let the charm cool completely before handling it. The clay is fragile while hot and hardens as it returns to room temperature. -
Optional glaze:
For extra protection and shine, brush a thin layer of polymer clay glaze over the finished piece. -
Assemble keychain:
Open a jump ring with pliers, loop it through the eye pin on your strawberry, and attach it to your keyring clasp before closing the ring securely.
Now you have a sweet little fruit companion ready to brighten up your day


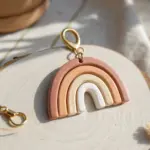
Cloud and Rainbow Keychain Tag
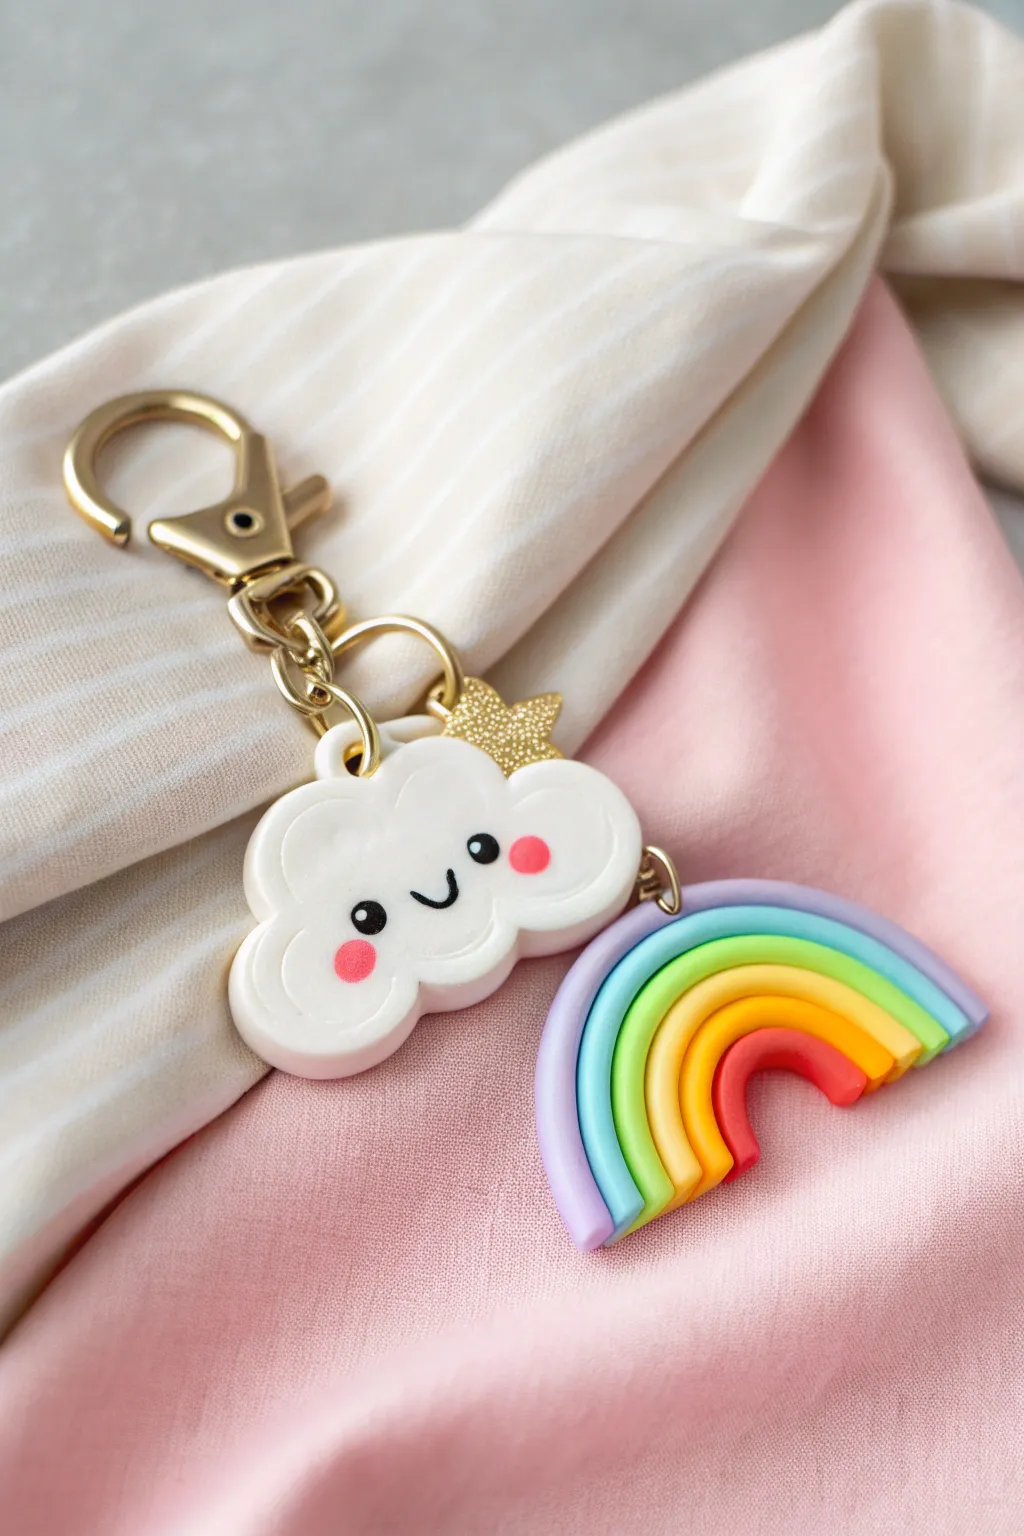
Brighten up your keys or backpack with this adorable duo that brings a little sunshine wherever you go. This polymer clay project features a happy, fluffy cloud paired with a vibrant, dangling rainbow charm for a sweet, layered look.
Step-by-Step
Materials
- White polymer clay
- Polymer clay in rainbow colors (purple, light blue, green, yellow, orange, red)
- Gold glitter polymer clay (or gold paint/glitter mix)
- Black acrylic paint or black clay for eyes/mouth
- Pink chalk pastel or pink clay for cheeks
- Clay roller or pasta machine
- Cloud shaped cutter (approx. 1.5 – 2 inches)
- Small circle cutter or straw (for rainbow edges)
- Needle tool or toothpick
- Eye pins (gold)
- Gold jump rings
- Gold keychain lobster clasp
- Gloss glaze (UV resin or polyurethane)
- Super glue (optional)
Step 1: Sculpting the Cloud
-
Condition and Roll:
Begin by conditioning your white polymer clay until it is soft and pliable. Roll it out into a smooth slab that is about 1/4 inch thick; you want it sturdy enough to hold the hardware. -
Cut the Cloud Shape:
Use your cloud-shaped cutter to punch out the main body. If you don’t have a cutter, you can freehand cut a rounded shape with a craft knife or shape small balls of clay together and smooth the seams. -
Soften the Edges:
Gently rub your finger along the cut edges of the cloud to round them off slightly, removing any sharp angles from the cutter for a softer, puffier look. -
Add a Glitter Star:
Take a tiny amount of gold glitter clay (or mix gold glitter into translucent clay). Shape it into a small star. Press this firmly onto the top right curve of the cloud. -
Create the Face:
For the rosy cheeks, you can either press on tiny flattened circles of pink clay or brush on a little pink pastel dust. For the face, indent two small sockets for eyes if you plan to fill them with paint later, or press in tiny black clay balls now. -
Insert Hardware:
Insert a gold eye pin into the top center of the cloud. Insert a second eye pin into the bottom right side of the cloud (this will hold the rainbow later). Secure the pins with a dab of liquid clay if you have it.
Step 2: Forming the Rainbow
-
Prepare Color Snakes:
Roll out thin, even snakes of clay in your rainbow colors: red, orange, yellow, green, light blue, and purple. Try to keep them all the exact same thickness. -
Arch the Colors:
Starting with the smallest inner color (red in this design, though the image shows a reversed palette, follow your preference!), curve it into a U-shape. Wrap the next color snugly around it. I find it helps to gently press them together as I go to ensure they bond. -
Complete the Stack:
Continue stacking the arched snakes until all colors are used. The purple should be the outermost layer. -
Trim the Bottom:
Once stacked, use a sharp blade to slice straight across the bottom of the rainbow legs so they are perfectly flush and even. -
Add Hardware:
Carefully insert a gold eye pin (or a large jump ring directly into the clay if thick enough) into the top center of the rainbow arch.
Uneven Rainbow?
If your rainbow snakes keep losing their round shape while stacking, bake the inner arches for 5 minutes just to firm them up before adding the outer layers.
Step 3: Baking & Assembly
-
Bake:
Place both pieces on a tile or parchment paper. Bake according to your clay package instructions (usually 275°F/135°C for 15-30 minutes). Let them cool completely. -
Paint Details:
If you indented the eyes earlier, paint them black now using a fine detail brush. Paint a small ‘U’ shape for the smiling mouth between the cheeks. -
Glaze:
Coat the front of both the cloud and the rainbow with a glossy glaze or UV resin. This protects the paint and gives it that professional, shiny finish seen in the photo. -
Reinforce Pins:
If the eye pins feel loose after baking, pull them out gently, add a dot of super glue, and slide them back in. -
Connect Pieces:
Use pliers to open a small gold jump ring. Connect the bottom eye pin of the cloud to the top loop of the rainbow. -
Attach Clasp:
Attach the main lobster clasp chain to the top eye pin of the cloud using another jump ring. Ensure all rings are closed tightly.
Add Sparkle
Mix chunky holographic glitter into your white cloud clay before rolling it out to give the entire piece a subtle, magical shimmer.
Now you have a charming accessory to keep your keys organized or to gift to a friend who needs a smile

The Complete Guide to Pottery Troubleshooting
Uncover the most common ceramic mistakes—from cracking clay to failed glazes—and learn how to fix them fast.
Mini Mushroom Couple
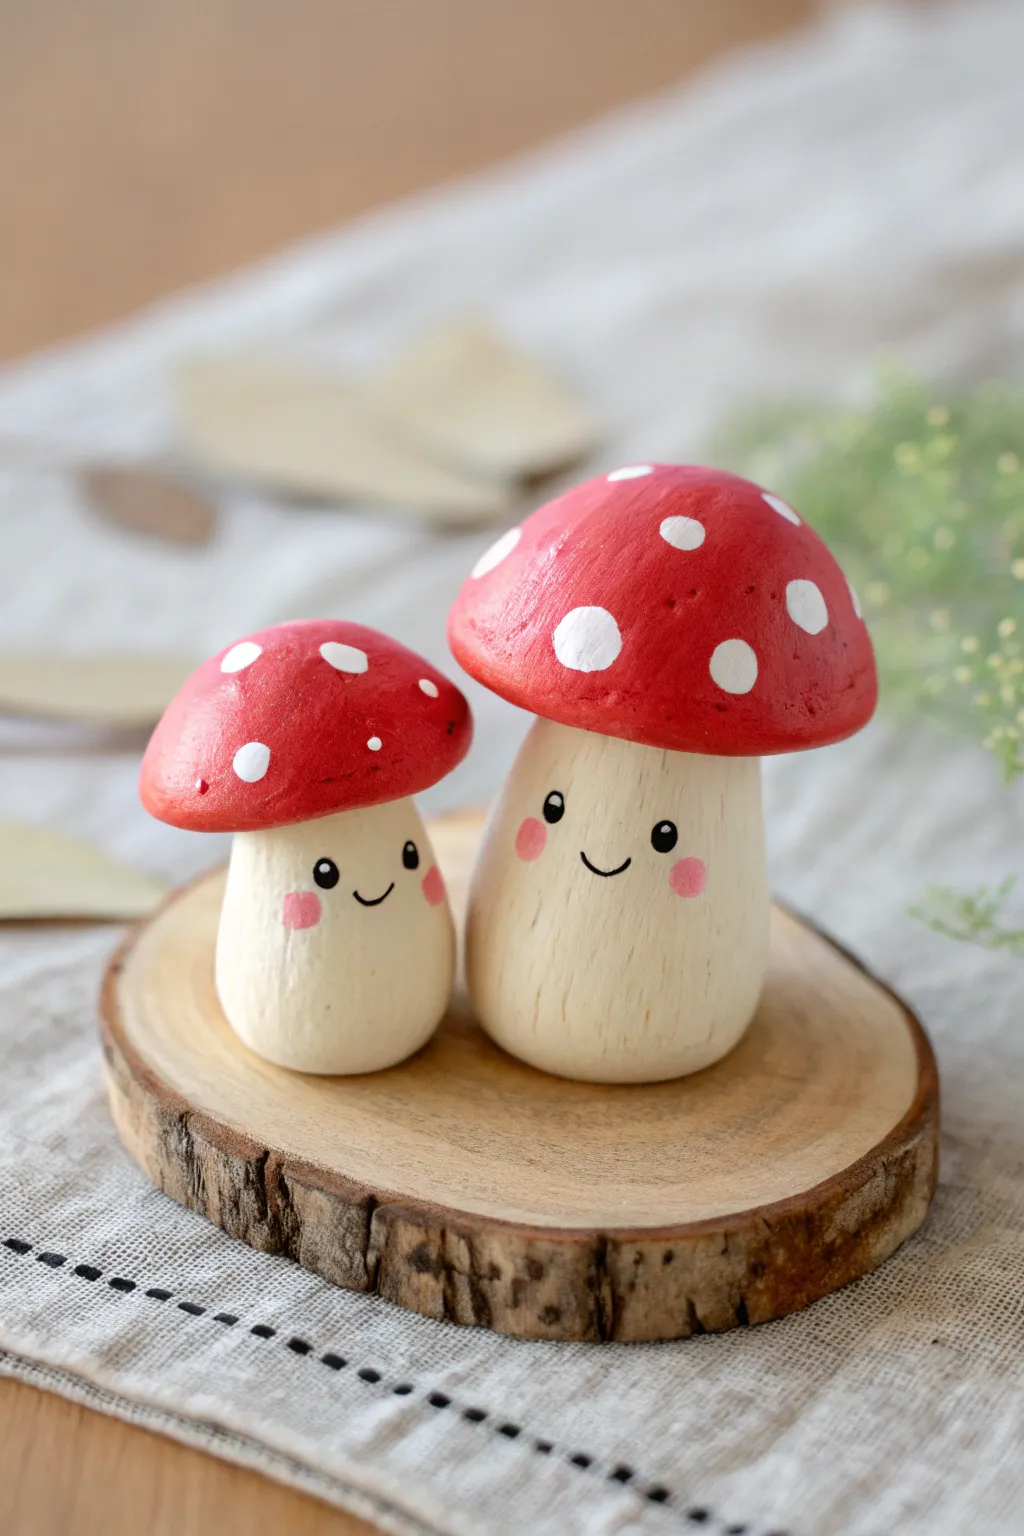
Bring a touch of woodland whimsy to your desk with this adorable pair of smiling clay mushrooms. With their bright red caps, blushing cheeks, and simple sweet expressions, they make for a charming beginner-friendly sculpting project.
Step-by-Step Tutorial
Materials
- White air-dry clay or polymer clay
- Acrylic paints: Bright red, white, black, pink, cream/beige
- Small styrofoam ball or aluminum foil (for armatures)
- Fine grit sandpaper
- Detail paintbrushes (specifically a fine liner brush)
- Dotting tool or toothpick
- Matte varnish or sealant
- Water cup and paper towels
Step 1: Sculpting the Shapes
-
Form the mushroom stems:
Start by rolling two balls of white clay, one slightly larger than the other. Roll these into thick, sturdy cylinder shapes that flare out slightly at the bottom to create a stable base, just like a real mushroom stem. Smooth out any fingerprints with a clearer damp finger. -
Create the caps:
Roll two fresh balls of clay for the caps. Flatten the bottom of each ball against your work surface and gently round the top with your palm to create a domed hemisphere shape. One should be slightly larger to match the bigger stem. -
Hollow the connections:
Using your thumb or a modeling tool, create a slight indentation in the underside of each red cap. This socket helps the cap sit securely on top of the stem rather than just perching precariously. -
Attach the pieces:
Score the top of the stems and the underside of the caps with a needle tool or toothpick to roughen the surface. Apply a tiny dab of water (or liquid clay if using polymer) and press the caps firmly onto their respective stems. -
Smooth the transition:
Check the seam where the cap meets the stem. You want a distinct separation, but ensure they are bonded well. If you are using air-dry clay, I find it helpful to let them dry completely at this stage—usually for 24 hours—before sanding any rough spots.
Uneven Spots?
If your white dots look transparent or streaky, let them dry fully and dab a second layer of white directly on top. Don’t press hard; just ‘drop’ the paint on.
Step 2: Painting the Base Colors
-
Paint the stems:
Mix a very light cream or beige color using white and a tiny dot of brown acrylic paint. Paint the entire stem section, extending slightly up underneath the cap. You might need two coats to get an opaque, matte finish. -
Paint the caps red:
Using a bright red acrylic paint, carefully coat the top domes. Use a steady hand near the rim where the red meets the cream stem. Apply 2-3 thin layers rather than one thick one to avoid brush strokes. -
Add texture lines:
Once the cream paint is dry, mix a slightly darker beige. Using a very dry brush with barely any paint on it, lightly sweep vertical strokes up the stem to mimic wood grain or natural mushroom fibers. -
Dry thoroughly:
Allow the base coats to dry completely before moving on to the details. Handling wet paint will smudge your nice clean lines.
Forest Floor Display
Glue your finished duo onto a small wood slice (coaster size) and glue dried moss around their bases for an instant mini diorama.
Step 3: Adding the Kawaii Details
-
Dot the eyes:
Dip the handle end of a paintbrush or a large dotting tool into black paint. Place two wide-set dots on the upper third of each stem. The wide spacing is key to the cute ‘kawaii’ look. -
Add the smile:
Using your finest liner brush and black paint thinned slightly with water, paint a tiny ‘U’ shape exactly between the eyes. Keep the line thin and delicate. -
Highlight the eyes:
Once the black eye dots are dry, use a toothpick dipped in white paint to add a tiny reflection highlight in the upper corner of each eye. This brings them to life instantly. -
Apply rosy cheeks:
Mix a soft pink color or dilute pink paint with water to make a glaze. Dab two small circles just below and outside the eyes to give them a blushing appearance. -
Paint the spots:
Dip a medium-sized round brush or dotting tool into white paint. Press random polka dots all over the red caps. Vary the pressure slightly so some dots are bigger than others for a natural organic look. -
Seal the project:
Once all paint is bone dry, apply a coat of matte varnish. This protects the clay from moisture and gives the mushrooms a professional, non-chalky finish.
Now you have a sweet little mushroom family ready to brighten up your shelf
Bunny Ring Holder Cone
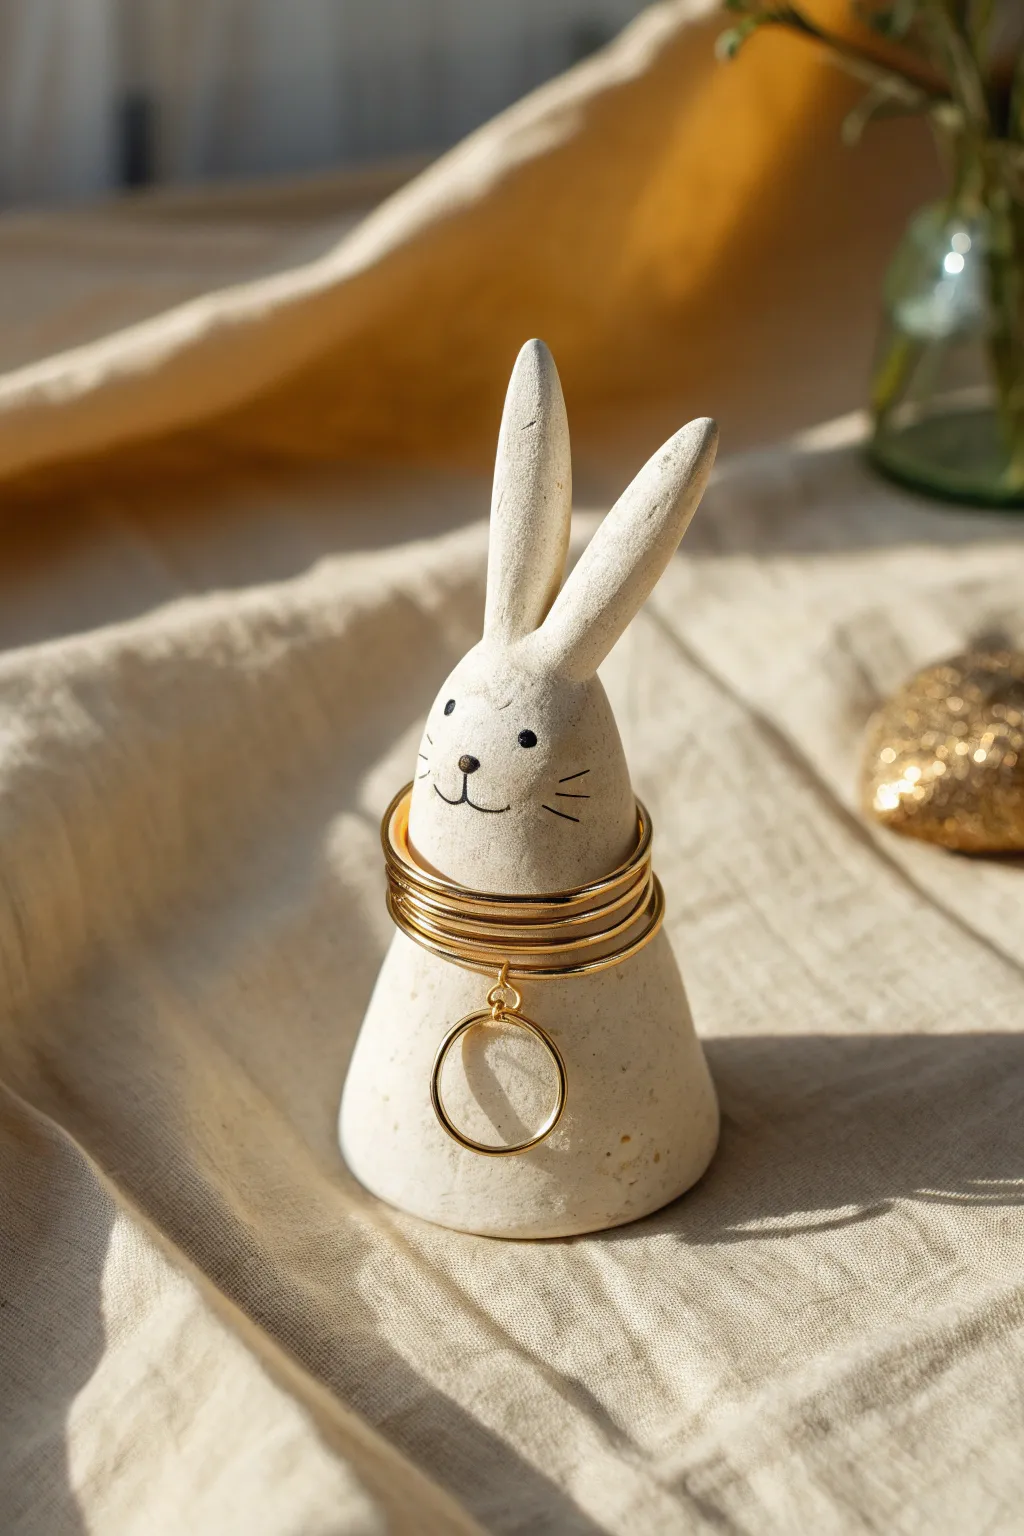
This minimalist bunny ring holder combines functionality with adorable charm, featuring a smooth, cone-shaped body and tall, expressive ears. The unglazed finish gives it a modern, organic look perfect for displaying your favorite jewelry.
Step-by-Step
Materials
- White air-dry clay or polymer clay
- Rolling pin
- Clay knife or craft blade
- Small bowl of water
- Watercolors or black acrylic paint
- Fine-point paintbrush
- Fine-grit sandpaper (optional)
- Toothpick or needle tool
- Smooth work surface
Step 1: Shaping the Base
-
Prepare the clay:
Start by conditioning a fist-sized ball of white clay in your hands until it is warm, pliable, and free of cracks. Warming it up makes smoothing much easier later. -
Form a cone:
Roll the ball on your work surface, applying more pressure to one side to create a tapered cone shape. You want a wide, stable base and a rounded top. -
Flatten the bottom:
Tap the wide end of the cone firmly against your table to create a flat bottom. Ensure the cone stands up straight without wobbling. -
Smooth the surface:
Dip your finger in a little water and gently run it over the cone to erase any fingerprints or creases. The texture should be matte and even. -
Round the top:
Use your thumb to gently round off the pointy tip of the cone. This will become the bunny’s head area where the ears attach.
Fixing Cracks
If hairline cracks appear while air-dry clay is drying, mix a tiny bit of fresh clay with water to make a paste (slip) and fill the cracks, then smooth over.
Step 2: Creating the Ears
-
Roll two coils:
Take two smaller pieces of clay and roll them into thick sausage shapes, about 1.5 to 2 inches long. -
Taper the ends:
Gently roll one end of each coil to a point, creating a long teardrop shape for the ears. -
Score the clay:
Use your needle tool or knife to scratch cross-hatch marks on the bottom of the ears and on the top of the cone where they will sit. This roughened texture acts like Velcro for the clay. -
Attach the ears:
Press the ears firmly onto the head. I find that slightly tilting one ear gives the bunny a bit more personality. -
Blend the seams:
Using a wet fingertip or a clay tool, smooth the clay from the base of the ears down onto the head until the seam disappears completely. The ears should look like they grew out of the head, not just stuck on. -
Refine the shape:
Gently pinch and smooth the ears again to fix any distortion that happened during attachment.
Step 3: Finishing Touches
-
Let it dry:
Allow the bunny to dry completely. For air-dry clay, this usually takes 24-48 hours; for polymer clay, bake according to package instructions. -
Sand for smoothness:
Once fully cured, use fine-grit sandpaper to buff away any remaining bumps or fingerprints for a professional, stone-like finish. -
Wipe clean:
Use a slightly damp cloth or dry brush to remove all sanding dust before painting. -
Paint the eyes:
Using a very fine brush and black paint, dab two small, solid black circles for the eyes. Keep them relatively wide-set for a cuter look. -
Add the nose:
Paint a small, soft triangle or oval between and slightly below the eyes for the nose. -
Draw the mouth:
Paint a simple ‘J’ curve (or a reversed ‘J’) extending down from the nose to create a subtle smile. -
Whiskers and eyebrows:
With an extremely light touch, flick three short lines on each cheek for whiskers and two tiny dashes above the eyes for eyebrows. -
Final seal (optional):
If you want to protect the paint, apply a thin layer of matte varnish over the face, though leaving it raw maintains the natural stone aesthetic.
Make it Speckled
For a ‘stoneware’ look, mix used coffee grounds or cracked black pepper into the clay before shaping to create natural-looking speckles.
Place your rings over the bunny’s ears and body to complete your functional art piece


What Really Happens Inside the Kiln
Learn how time and temperature work together inside the kiln to transform clay into durable ceramic.
Chubby Octopus Desk Buddy
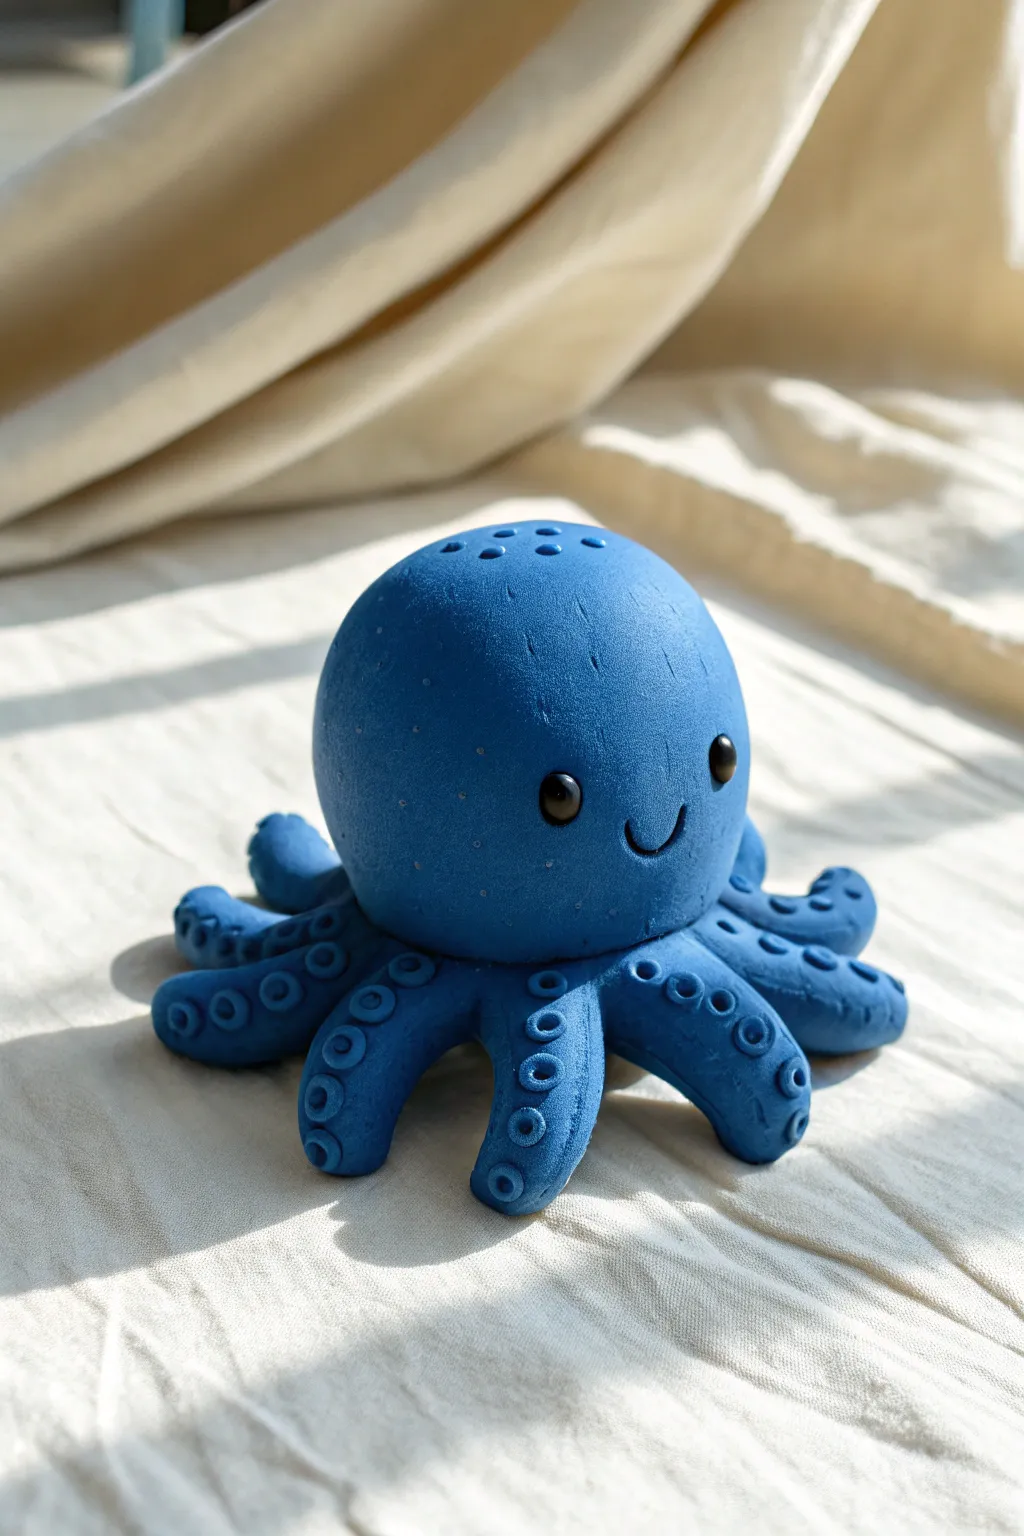
Brighten up your workspace with this adorable blue octopus friend with a cheerful smile and detailed tentacles. The smooth, matte texture combined with cute, stylized features makes this little sea creature a joy to sculpt.
Step-by-Step Guide
Materials
- Polymer clay or air-dry clay (medium to dark blue)
- Black clay (tiny amount for eyes)
- Small ball Stylus tool or round-tipped dotting tool
- Sculpting needle tool or toothpick
- Smooth work surface
- Optional: Acrylic rolling pin
Step 1: Creating the Base Shape
-
Prepare the clay:
Begin by conditioning your blue clay until it is soft and pliable. Warm it in your hands to remove any cracks and ensure a smooth finish for your sculpture. -
Form the head:
Roll a large portion of the blue clay into a smooth, seamless ball. This will be the main body and head of your octopus. -
Shape the dome:
Gently press the ball onto your work surface to flatten the bottom slightly, creating a sturdy base while maintaining a nice, high dome shape on top. -
Refine the surface:
Check for any fingerprints or uneven spots. Use the pad of your finger to buff the surface gently until it looks matte and clean.
Clean Clay Pro-Tip
Before working with the black clay for the eyes, clean your hands thoroughly with a wet wipe. Dark pigments stain easily and can ruin the bright blue body.
Step 2: Tentacles and Details
-
Portion the tentacles:
Take the remaining blue clay and divide it into eight equal-sized small balls. These will become the legs. -
Roll the legs:
Roll each small ball into a thick log shape, slightly tapered at one end to form a teardrop or cone shape. -
Attach the legs:
Position the legs around the base of the head. Press the thicker end of each tentacle under the body, blending the seam slightly if necessary so they look connected. -
Curl the tips:
Arrange the legs so they splay out naturally. Gently curl the tapered tips of the tentacles upward or to the side to give the octopus a sense of movement. -
Create suction cups:
Using your small ball stylus or dotting tool, press gently into the top surface of each tentacle to create a row of small, circular indentations. I usually make about three or four distinct rings per leg. -
Texture the head:
For a bit of extra character, you can add very faint texture to the top of the head using a toothbrush or stiff brush, or leave it smooth if you prefer a clean look. -
Add head pores:
Use the smallest end of your dotting tool to create a few random decorative holes on the very top of the head, mimicking stylized sea sponge textures.
Drooping Legs?
If the clay is too soft and the legs flatten out, put the sculpture in the fridge for 10 minutes to firm up before adding the suction cup details.
Step 3: Bringing it to Life
-
Make eye sockets:
Determine where the face will be. Use your medium ball tool to press two indentations into the front of the face for the eyes. -
Insert the eyes:
Roll two tiny spheres of black clay. Place them into the sockets you just created and press them in gently so they sit flush or slightly protruding. -
Carve the smile:
Use the edge of a curved tool, a straw cut in half, or your needle tool to carefully press a curved smile shape right between and slightly below the eyes. -
Check symmetry:
Look at your octopus from the front to ensure the legs are evenly spaced and the face is centered. -
Final smoothing:
Do a final once-over to smooth out any accidental nail marks or smudges before you set it aside to cure or dry. -
Cure or dry:
Follow the instructions for your specific clay type. If baking polymer clay, ensure you don’t overheat it to preserve that lovely blue color.
Now you have a charming little desk buddy ready to keep you company while you work
Sleepy Whale Phone Stand
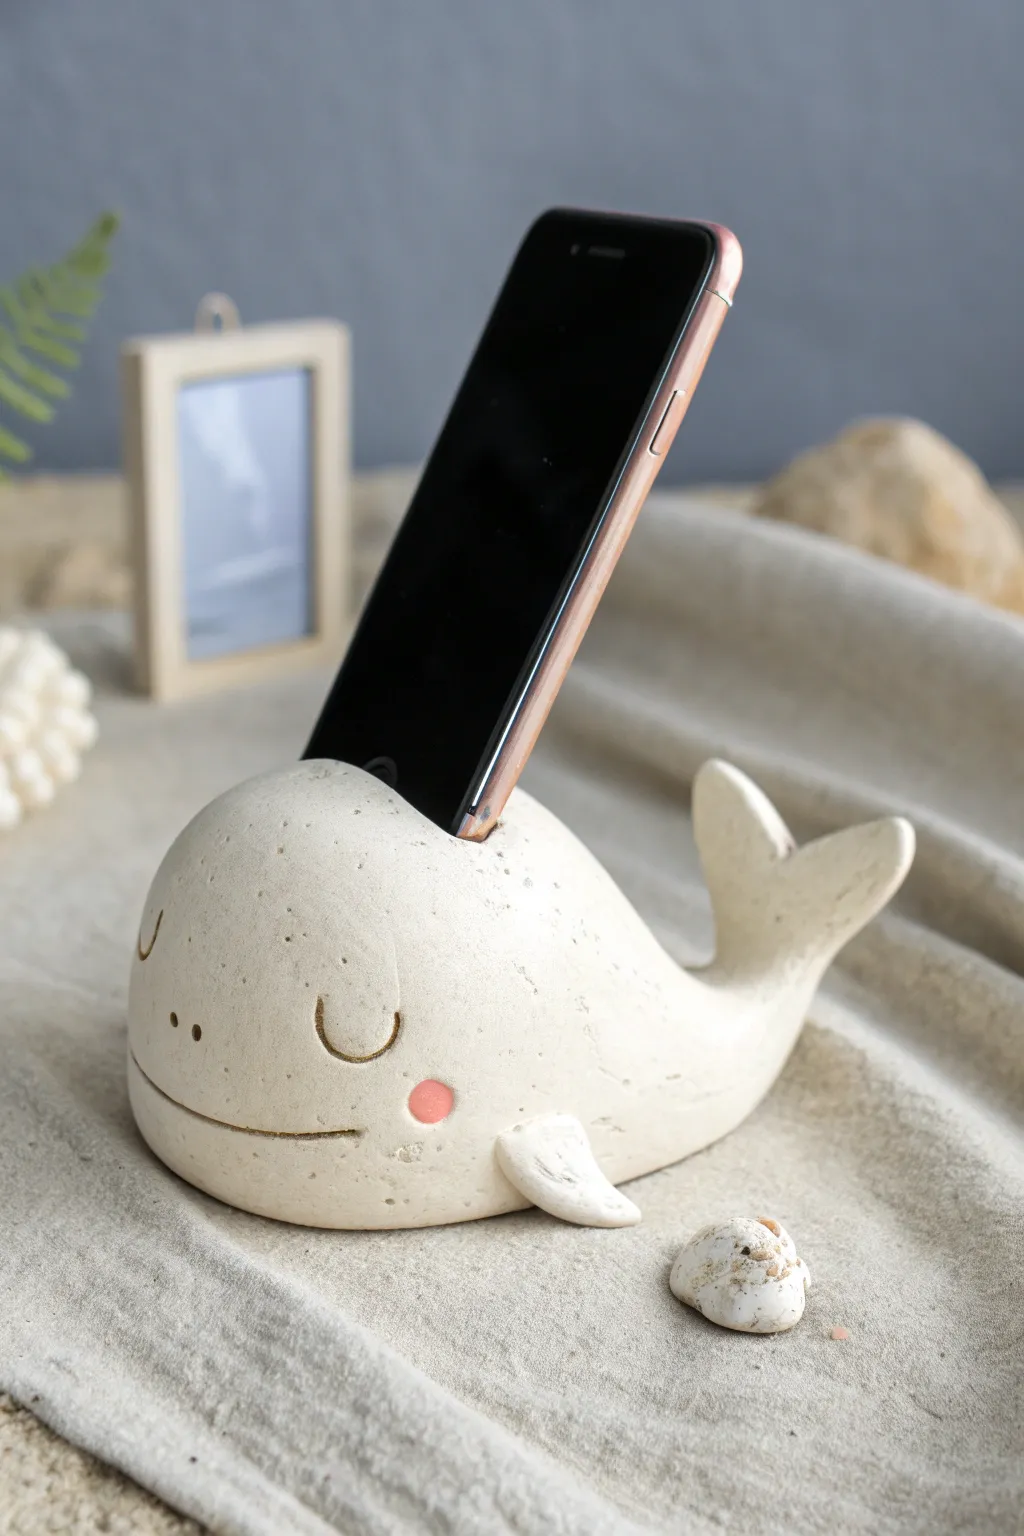
Keep your phone cozy with this adorable, sleepy whale sculpture that doubles as a functional stand. Molded from textured air-dry or polymer clay, its gentle curves and blushing cheeks bring a sense of seaside calm to any desk.
Step-by-Step
Materials
- White or speckled air-dry clay (or polymer clay)
- Clay modeling tools (or a butter knife and toothpick)
- Small bowl of water (for smoothing)
- Your phone (for sizing)
- Rolling pin
- Sandpaper (fine grit)
- Pink acrylic paint or soft pastel dust
- Clear matte varnish
Step 1: Shaping the Base
-
Create the main body:
Start with a large ball of clay roughly the size of a grapefruit. Roll it between your palms until it is smooth, then gently elongate it into a teardrop or egg shape to form the whale’s main body. -
Flatten the bottom:
Tap the bottom of your egg shape against your work surface several times. You want a distinct, flat base so the whale sits stably without rocking while holding your device. -
Form the slope:
Gently press down on the tapered back end of the teardrop to create a subtle downward slope where the tail will eventually connect. The front should remain round and bulbous for the head.
Phone Keep Tipping?
If the finished piece feels top-heavy with the phone inserted, glue a piece of jagged felt or a rubber grip pad to the bottom of the whale to create friction and prevent sliding.
Step 2: Creating the Phone Slot
-
Measure your phone:
Take your actual phone (with its case on, if you use one) and gently press the bottom edge into the top of the whale’s back, about a third of the way from the front. -
Carve the groove:
Remove the phone and use a clay knife or flat tool to carve out the indentation you just marked. Based on the reference image, this needs to be a rectangular slot deep enough to hold the phone securely. -
Widen and smooth:
Slightly widen the slot so the phone can lean back comfortably. Smooth the inside edges of the groove with a wet finger to prevent any rough spots from scratching your device later. -
Test the fit:
Carefully place your phone back into the slot to check the balance. If the whale tips over, flatten the base more or add a bit more clay weight to the front.
Make it a Speaker
Hollow out a chamber inside the body connecting to the phone slot and poke a hole near the mouth. This creates a natural amplifier to boost your phone’s volume acoustically.
Step 3: Adding Fins and Tail
-
Shape the tail fluke:
Roll a smaller piece of clay into a thick triangle and flatten it slightly. Use your knife to cut a V-notch in the wide end, then round off the tips to create the classic whale tail shape. -
Attach the tail:
Score (scratch) the back of the body and the bottom of the tail. Apply a dab of water or liquid clay, then press the tail firmly onto the upturned back of the body. Blend the seam until invisible. -
Make the side fins:
Create two small teardrop shapes for the pectoral fins. Flatten them slightly so they look like little flippers. -
Attach the fins:
Attach these to the lower sides of the whale using the score-and-slip method. Angle them slightly backyard, as if the whale is gliding through water.
Step 4: Refining Details
-
Carve the mouth:
Using a needle tool or a thin blade, carve a long, gently curving line wrapping around the lower front of the face for a wide, happy smile. -
Add sleeping eyes:
Above the mouth, carve two distinct ‘U’ shapes for the closed, sleepy eyes. Adding tiny eyelashes at the corners gives it extra character. -
Texture the surface:
If you want that speckled, stone-like look from the photo and didn’t use speckled clay, I like to gently press a toothbrush or coarse sponge against the surface to create subtle pores. -
Final smoothing:
Dip your finger in water and give the entire piece a final polish, softening any sharp edges around the tail or fins.
Step 5: Finishing Touches
-
Dry completely:
Let the clay dry according to the package instructions. For a thick piece like this, air-dry clay might take 48-72 hours to cure fully. -
Sand imperfections:
Once fully dry, use fine-grit sandpaper to gently buff away any fingerprints or rough tool marks, especially around the phone slot area. -
Add rosy cheeks:
Dip a fingertip or Q-tip into pink paint (or crushed pastel dust) and gently dab a round, blushing cheek just below the eye on each side. -
Seal the piece:
Apply a coat of clear matte varnish to protect your whale from moisture and scratches, preserving that natural, stony finish.
Now you have a charming desktop companion ready to hold your phone while you work or relax

TRACK YOUR CERAMIC JOURNEY
Capture glaze tests, firing details, and creative progress—all in one simple printable. Make your projects easier to repeat and improve.
Happy Face Magnet Set
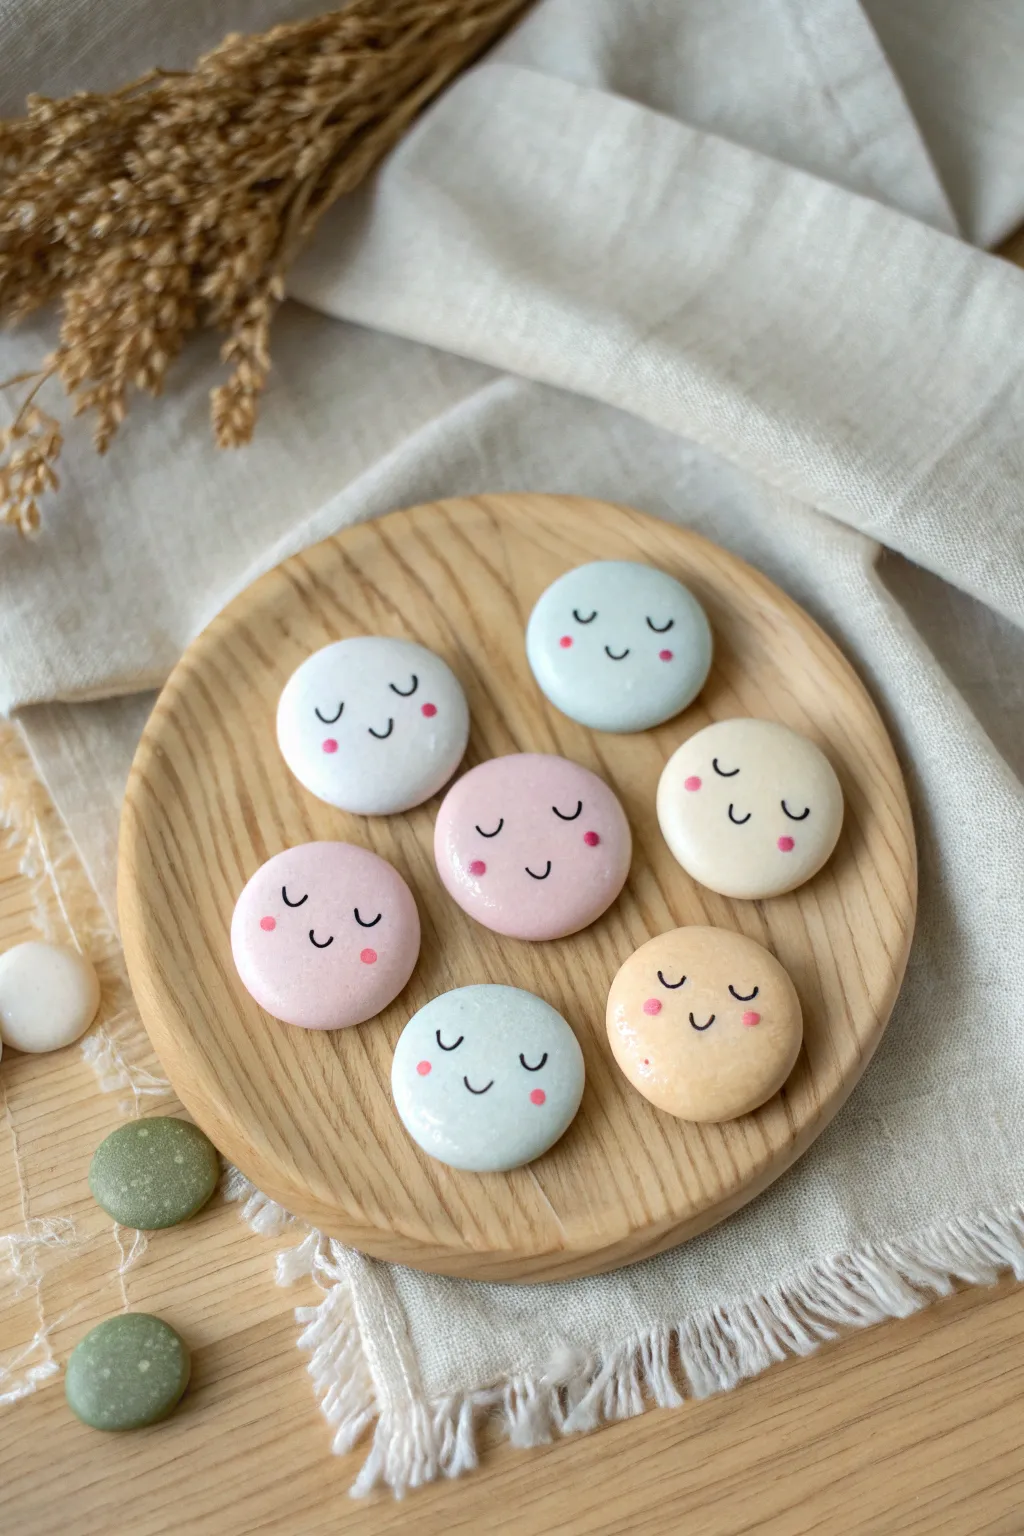
Brighten up your fridge or magnetic board with this adorable set of sleek, pastel-colored clay magnets. These cheerful little faces feature a smooth, rounded finish and simple sleepy expressions that add a touch of calm cuteness to any space.
Step-by-Step Guide
Materials
- Polymer clay (white, baby pink, powder blue, soft yellow, light orange)
- Round clay cutter (approx. 1-1.5 inch diameter)
- Rolling pin or acrylic roller
- Parchment paper or clay work mat
- Fine-grit sandpaper (optional)
- Black fine-tip acrylic paint marker or permanent marker
- Pink acrylic paint or chalk pastel (for cheeks)
- Small dotting tool or toothpick
- Glossy glaze or UV resin (optional for shine)
- Strong round magnets
- Strong craft glue (e.g., E6000)
Step 1: Shaping the Base
-
Prepare the Clay:
Begin by conditioning your polymer clay. Knead each color—white, soft pink, blue, yellow, and orange—separately in your hands until it becomes soft, pliable, and free of cracks. -
Roll it Out:
Using an acrylic roller or rolling pin, flatten a piece of clay onto your work surface or parchment paper. Aim for a consistent thickness of about 1/4 inch (6mm) to ensure the magnets are sturdy. -
Cut the Circles:
Take your round clay cutter and press firmly into the rolled clay to cut out perfect circles. Repeat this for each color until you have a nice assortment of pastel discs. -
Smooth the Edges:
Gently lift the clay circles. Use your fingertip to lightly smooth the sharp cut edges, rounding them off slightly specifically on the top side to create a soft, pebble-like appearance. -
Surface Check:
Inspect the surface for any lint or fingerprints. I like to lightly buff the raw clay with a tiny bit of cornstarch or baby oil on my finger to get it perfectly smooth before baking. -
Bake the Clay:
Place your clay circles on a baking sheet lined with parchment paper. Bake according to your specific brand’s package instructions (usually around 275°F or 135°C for 15-30 minutes). Let them cool completely before handling.
Step 2: Drawing the Faces
-
Sand for Texture (Optional):
If your baked clay feels too slick or has minor bumps, very lightly sand the surface with fine-grit sandpaper. Wipe away any dust with a damp cloth. -
Map the Face:
Visualize the placement of the face. The eyes should be in the lower-middle section, spaced widely apart to achieve that ‘kawaii’ look. -
Draw the Eyes:
Using a fine-tip black paint marker, draw two small ‘U’ shapes for the sleepy eyes. Keep the lines thin and delicate. -
Add the smile:
Directly between and slightly below the eyes (centered), draw a tiny, shallow ‘u’ shape for the smiling mouth. -
Prepare the Cheeks:
Dispense a tiny drop of pink acrylic paint onto a palette, or scrape a bit of pink chalk pastel into a powder. -
Apply Rosy Cheeks:
Dip a small dotting tool or the tip of a toothpick into the pink paint. Carefully dab two small dots just outside and slightly below the corners of the eyes. -
Let the Paint Dry:
Allow the painted details to dry completely. Acrylic marker dries fast, but give it at least 10 minutes to prevent smudging.
Clean Clay Tip
Keep separate baby wipes nearby for your hands. Wipe thoroughly between switching clay colors to prevent darker lint or clay from muddying your pristine white and pastel pieces.
Step 3: Final Assembly
-
Glazing (Optional):
For a glossy finish like the ones in the photo, apply a thin layer of gloss glaze or UV resin over the top of the face. If using resin, cure it under a UV lamp. -
Prepare the Magnet:
Flip the clay disc over so the back is facing up. Ensure the back surface is clean and dry. -
Apply Glue:
Place a pea-sized dot of strong craft glue (like E6000) onto the center of the back of the clay disc. -
Attach the Magnet:
Press a round magnet firmly into the glue. Hold it in place for a few seconds to ensure good contact. -
Final Cure:
Let the glue cure fully according to the manufacturer’s directions (usually 24 hours) before sticking your new friends onto the fridge.
Expression Variation
Mix up the faces to create a whole mood board. Try open oval eyes for surprise, inverted ‘U’ shapes for happy squinting eyes, or add tiny eyelashes for extra detail.
Now you have a charming set of smiley faces ready to hold up your most important notes and photos
Ladybug Pebble Paperweight
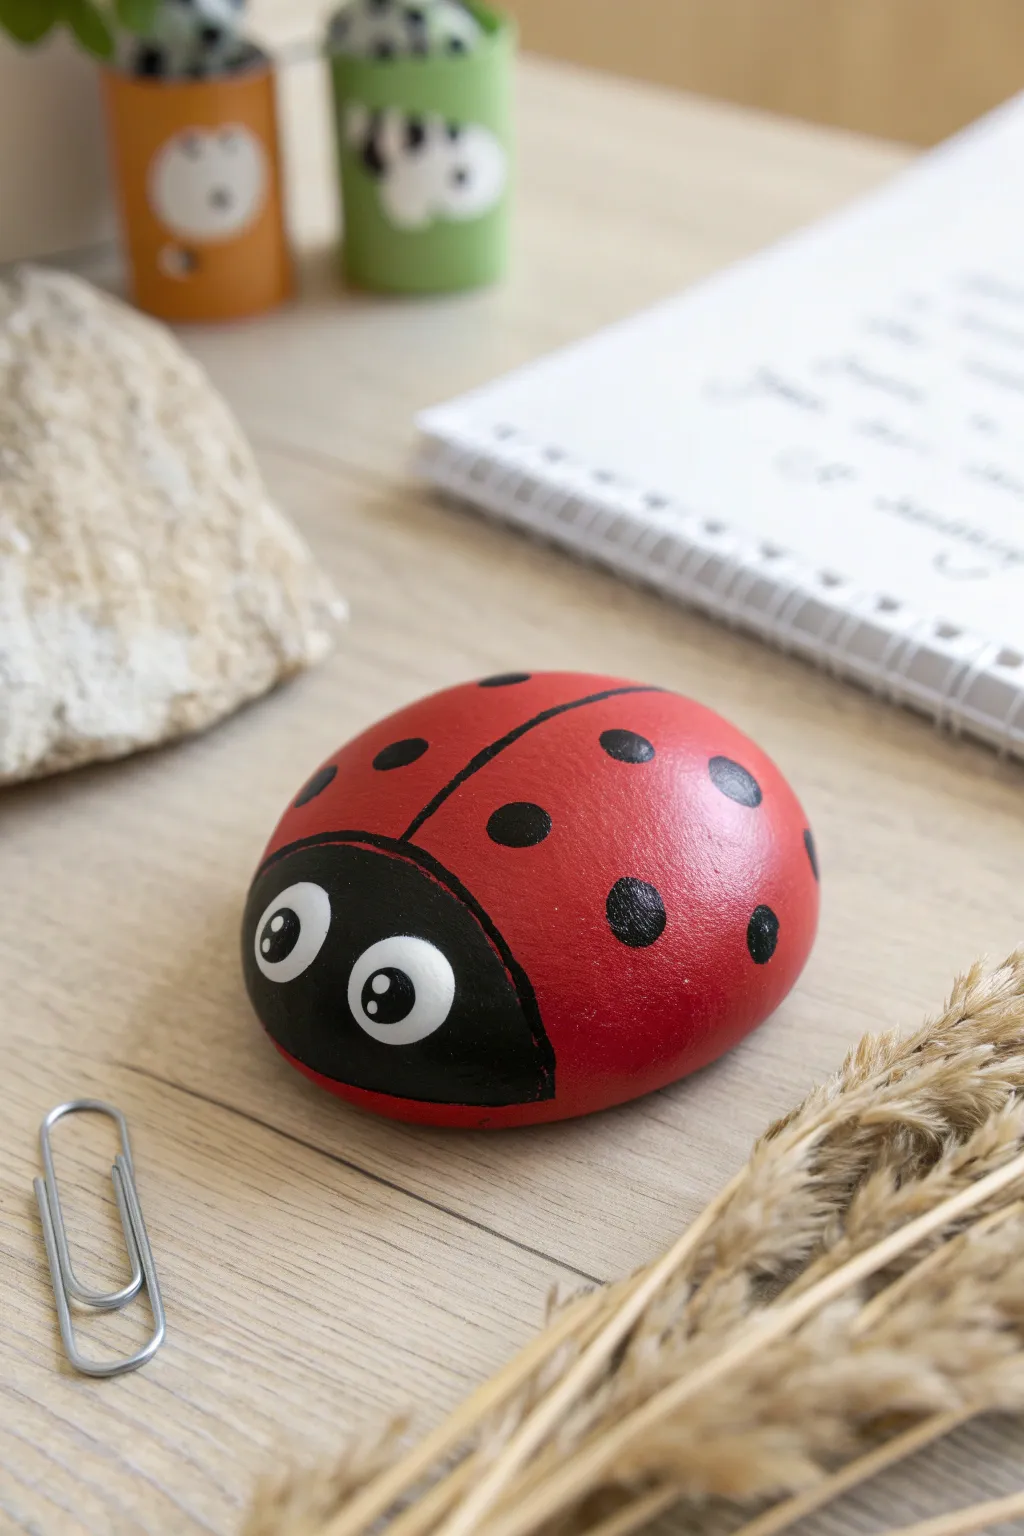
Transform a simple garden stone into an adorable desk companion with this cheerful ladybug project. The smooth, rounded finish makes it perfect for holding down loose papers while adding a pop of color to your workspace.
Step-by-Step Tutorial
Materials
- Smooth, round river rock (palm-sized is ideal)
- Red acrylic paint (bright, primary red)
- Black acrylic paint
- White acrylic paint
- Flat paintbrush (medium size)
- Fine detail paintbrush (round)
- Dotting tool or the handle end of a paintbrush
- Clear acrylic sealer (spray or brush-on)
- Water cup and paper towels
Step 1: Base Coating
-
Prepare the stone:
Begin by washing your stone thoroughly with soap and water to remove any dirt or oily residue. Let it dry completely before starting, as moisture will prevent the paint from adhering properly. -
First red coat:
Using your medium flat brush, paint the entire top surface of the stone with bright red acrylic paint. Don’t worry if the coverage looks a bit streaky at first. -
Second red coat:
Once the first layer is dry to the touch, apply a second coat of heavy red paint. This ensures a vibrant, opaque base color that really pops. -
Paint the bottom (optional):
If you want a totally finished look, flip the stone over once the top is dry and paint the bottom red as well. Otherwise, you can leave the natural stone showing on the underside.
Uneven Coverage?
If your red paint looks streaky or translucent, don’t keep brushing wet paint. Let it dry fully, then add a thin layer of white paint first. Once dry, paint red over it for better opacity.
Step 2: Defining the Shape
-
Outline the head:
With the black paint and a smaller brush, carefully paint a semi-circle shape at the front of the stone. This will become the ladybug’s face. -
Fill the face:
Fill in the semi-circle with solid black paint. I find it helpful to use curved strokes that follow the contour of the rock. -
Draw the center line:
Switch to your fine detail brush. Paint a thin, steady black line running from the center of the black head straight down the back of the red body to mimic the divided wings. -
Refine the line:
Go over the center line gently if needed to make it sharp and opaque, but try to keep it relatively thin.
Make it a Family
Create a whole colony by using rocks of different sizes. Use different colors like yellow or orange for the shells to create variety, or add tiny glitter to the wet sealer for a magical bug.
Step 3: Adding Details
-
Create the spots:
Load your round brush with black paint. Paint several round spots on either side of the center line. Vary the placement slightly for a natural look, but try to keep them somewhat symmetrical. -
Perfecting the circles:
For perfectly round spots, you can gently twist your brush in a circular motion, expanding the dot outward until it’s the size you want. -
Eye placement:
Clean your brush thoroughly or grab a clean dotting tool. Dip it into white paint and press two large white circles onto the black head area. -
Let the whites dry:
It is crucial to let the white eye circles dry completely before moving on, or the black pupils will turn grey and muddy. -
Add the pupils:
Using a smaller dotting tool or a fine brush tip, add a smaller black circle inside each white eye. -
Sparkle highlights:
To bring the ladybug to life, use a toothpick or the very tip of a fine brush to add a tiny white dot reflecting inside each black pupil.
Step 4: Finishing Touches
-
Final drying time:
Allow the entire stone to sit undisturbed until the paint is completely cured. This usually takes about an hour depending on how thick your paint layers were. -
Sealing the deal:
Coat the painted surface with a clear varnish or acrylic sealer. A glossy finish works beautifully here to replicate the shiny shell of a real ladybug.
Set your cheerful new paperweight on your desk to brighten up your daily tasks
Frog Toothbrush Holder Cup
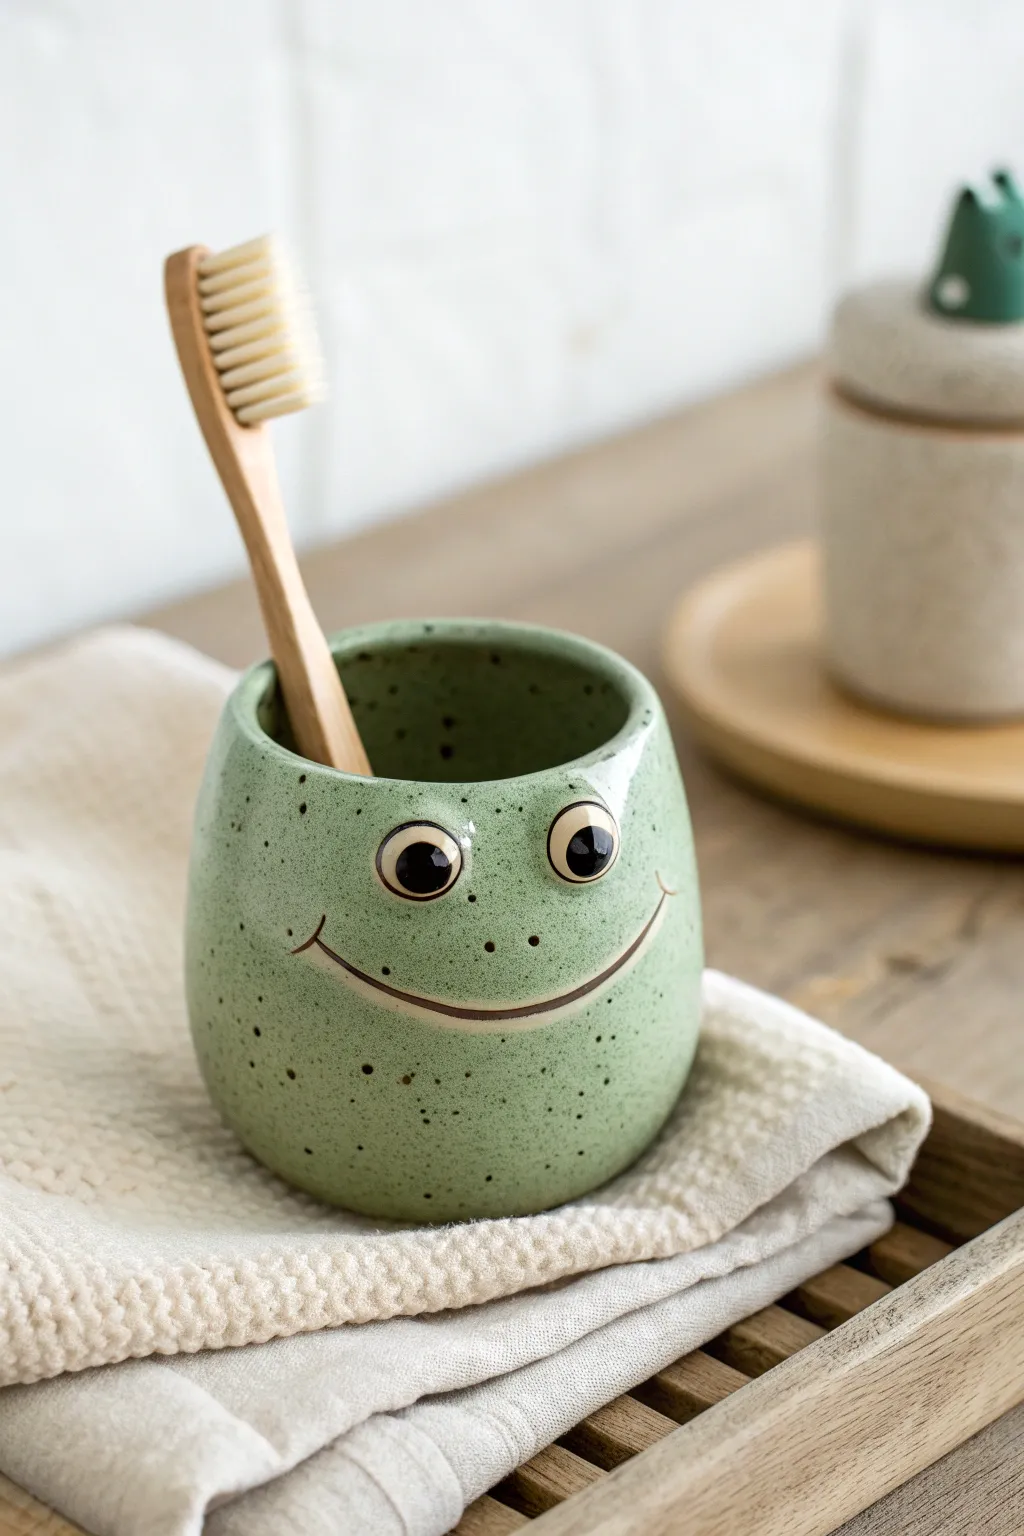
Brighten your morning routine with this charming, wide-smiling frog that keeps your toothbrush safe and dry. This project uses basic pottery techniques to create a functional piece with a trendy speckled glaze finish.
Detailed Instructions
Materials
- Air-dry clay or polymer clay (white or light grey)
- Rolling pin
- Clay knife or craft blade
- Sponge
- Small bowl or cylinder (for mold support)
- Black acrylic paint
- Sage green acrylic paint
- Light brown acrylic paint (for speckles)
- Old toothbrush (for splattering)
- Glossy sealant or varnish
- Slip (clay mixed with water)
Step 1: Forming the Cup
-
Roll the base:
Begin by working a fist-sized ball of clay until it is smooth and pliable. Roll it out into a flat, even slab about a quarter-inch thick. -
Cut the rectangle:
Measure the circumference of your support cylinder (or just estimate a good mug size) and cut a long rectangle from your slab. You’ll also need to cut a circle for the bottom base that matches the cylinder’s width. -
Assemble the cylinder:
Score the short edges of your rectangle and the edge of your circle base using a knife or needle tool. Apply a little water or slip to these scratched areas. -
Seal the seam:
Wrap the rectangle into a tube shape and press the scored edges together. Smooth the seam thoroughly with your finger or a slightly damp sponge so it becomes invisible. -
Attach the base:
Place the cylinder onto the circular base. Blend the clay from the cylinder wall down into the base on the outside, and use a modeling tool to seal the inside seam so it’s watertight. -
Shape the belly:
To get that cute, chubby frog look, gently push the walls of the cup outward from the inside. Creating a slight bulge towards the bottom makes it look friendlier and holds more water.
Pro Tip: Weighted Base
Make the base circle slightly thicker than the walls. This extra weight at the bottom prevents the cup from tipping over when it’s holding a heavy toothbrush.
Step 2: Sculpting the Face
-
Make the eyes:
Roll two small balls of clay for the eyes. Flatten the bottoms slightly so they sit flush against the cup near the top rim. -
Attach the eyes:
Score and slip the back of the eyes and the spots on the cup where they will go. Firmly press them on, smoothing the clay edges where they meet the cup so they don’t pop off later. -
Carve the smile:
Using a needle tool or a small loop tool, carve a wide, U-shaped groove for the smile. It should stretch almost from one side of the ‘face’ to the other. -
Add dimples:
At the very ends of the smile line, press a tiny vertical dimple to give the expression more character. -
Refine the surface:
Smooth out any fingerprints or rough textures with a damp sponge. Let the clay dry completely according to the package instructions.
Step 3: Painting and Finishing
-
Base coat:
Paint the entire outside of the cup with your sage green acrylic paint. You may need two coats for opaque coverage. -
Paint the eyes:
Paint the sculpted eye bumps white. Once dry, add large black circles in the center, leaving a tiny white dot in each for a reflection. -
Define the mouth:
Use a fine liner brush and black (or dark brown) paint to fill in the carved groove of the smile. Add two tiny dots for the nose holes just below the eyes. -
Create the speckles:
To mimic ceramic glaze, dip an old toothbrush into thinned brown paint. Run your thumb across the bristles to flick tiny specks all over the green surface. -
Seal it up:
Since this will be near water, apply two or three coats of a waterproof, glossy varnish to protect your paint job.
Level Up: Lily Pad Base
Instead of a plain circle base, cut your bottom slab into a lily pad shape that extends slightly wider than the cup for a fun, themed coaster effect.
Now you have a happy little sink companion to greet you every morning