Whenever I’m craving a low-stress creative win, I reach for air-dry clay or polymer clay and make something small, cute, and actually useful. Here are my go-to easy DIY clay ideas you can knock out in an afternoon—no fancy setup, just good studio vibes.
Pinch Pot Trinket Dish
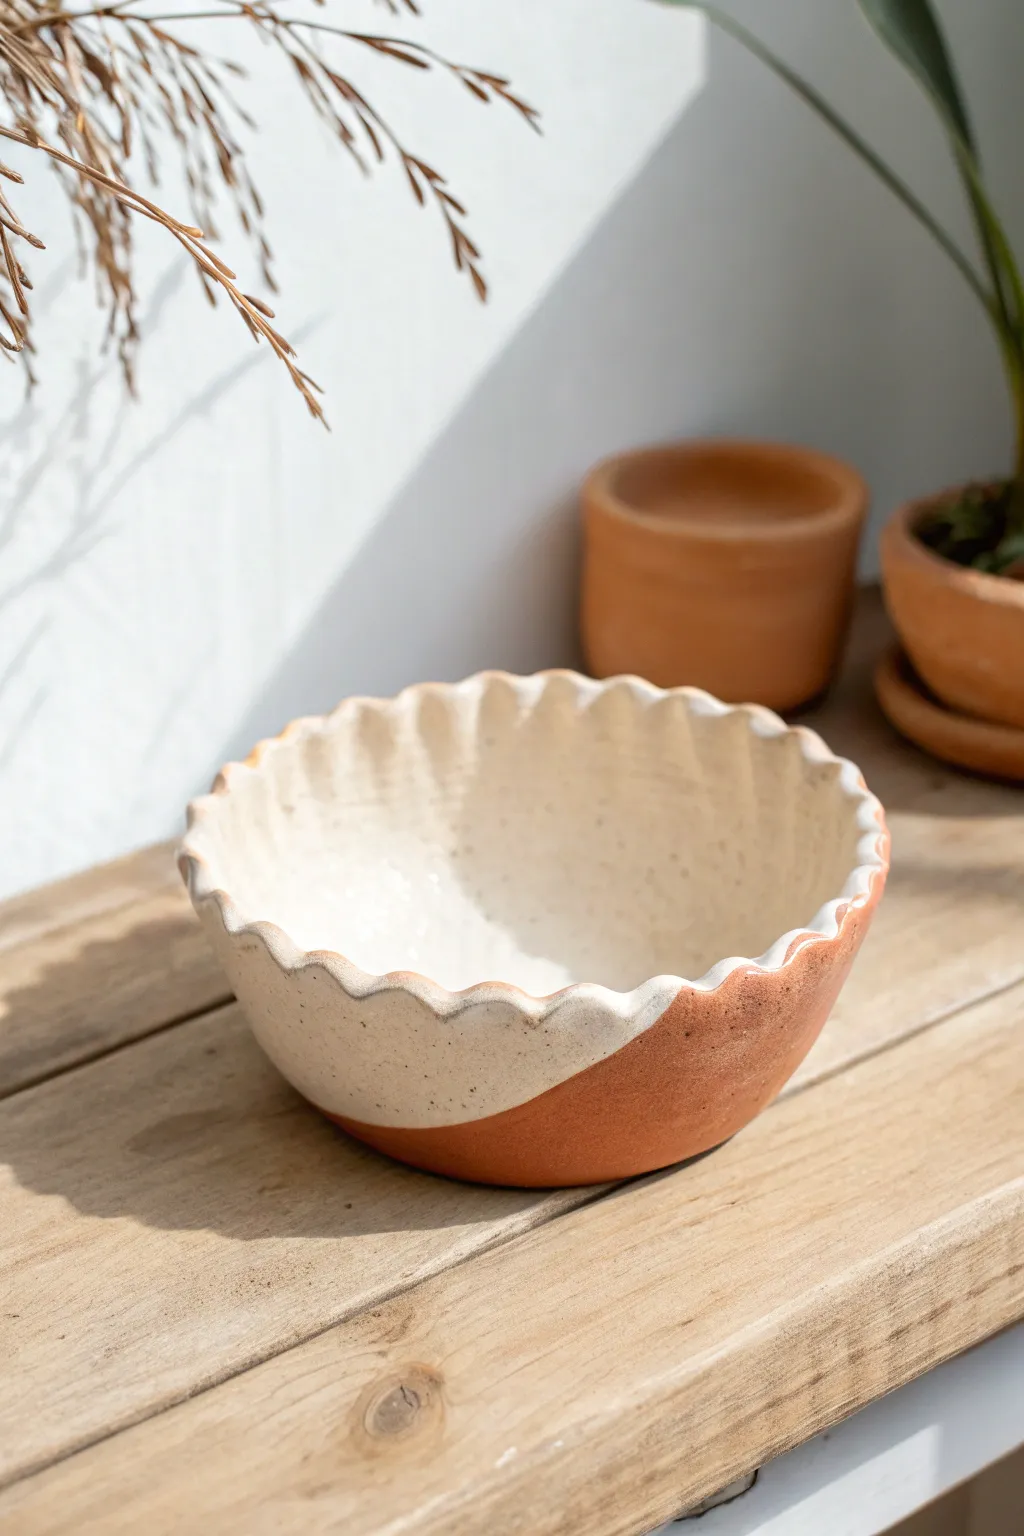
This charming, rustic bowl combines the warmth of raw terracotta with a creamy, speckled glaze for a modern two-tone effect. Its organic, fluted rim adds a delicate touch to an otherwise earthy piece, making it perfect for holding jewelry or dried botanicals.
Step-by-Step Tutorial
Materials
- Terracotta air-dry clay or kiln-fire clay
- Ceramic glaze (glossy white with speckles)
- Clear glaze (optional, for the raw clay)
- Paintbrush (soft bristle)
- Sponge
- Small bowl of water
- Wooden modeling tool or spoon handle
Step 1: Forming the Base
-
Prepare the Clay:
Start with a ball of terracotta clay roughly the size of a large orange. Knead it thoroughly to remove air bubbles and ensure it is pliable. -
Start the Pinch:
Hold the clay ball in your non-dominant hand. Press your thumb into the center, stopping about half an inch from the bottom to create the base thickness. -
Open the Walls:
Begin pinching the clay between your thumb and fingers, rotating the ball as you go. Work your way from the bottom up to the rim. -
Even Out Thickness:
Continue pinching and turning until the walls are relatively even. Don’t worry about perfection; distinct finger marks are part of the handmade charm. -
Smooth the Surface:
Dip your finger or a small sponge into water and gently smooth out any deep cracks or rough texture on the exterior and interior, keeping the organic shape intact.
Cracked Rim?
If the rim starts cracking while you scallop it, your clay is too dry. Dab a little water on the edge, wait a minute for it to absorb, and try shaping again.
Step 2: Shaping the Rim
-
Define the Edge:
Using your thumb and forefinger, gently pinch the very top edge of the rim to make it slightly thinner than the walls. -
Create the Flutes:
To make the scalloped edge, place your index finger on the inside of the rim and two fingers on the outside. Gently press the clay outward between your outer fingers. -
Repeat the Pattern:
Move along the rim, repeating this pressing motion to create a consistent wave pattern around the entire circumference. -
Refine the Scallops:
Go back around the rim with a damp sponge to soften the peaks and valleys of the scallops so they aren’t too sharp. -
Final Shaping:
Tap the bottom of the pot gently on your work surface to flatten the base so it sits stable and level.
Add Texture
Before glazing, gently press a coarse fabric or canvas onto the wet exterior clay to give the raw terracotta section a subtle, tactile woven texture.
Step 3: Finishing and Glazing
-
Dry Completely:
Allow the clay to dry fully. For air-dry clay, this takes 24-48 hours. If using kiln clay, fire it to bisque stage now. -
Dip into Glaze:
Pour your white speckled glaze into a container wide enough to fit the bowl. Hold the bowl by the base and dip it at an angle. -
Create the Angle:
Submerge the bowl so the glaze covers the entire inside and spills over the rim to cover roughly half of the exterior on a diagonal slant. -
Drip Dry:
Hold the bowl upside down for a moment to let excess glaze drip off, smoothing any heavy drips with your finger if necessary. -
Clean the Bottom:
Wipe the very bottom of the pot with a damp sponge to ensure no glaze remains on the surface that touches the shelf. -
Final Cure:
Let the glaze dry according to the manufacturer’s instructions. If using kiln clay, fire for the final glaze cycle.
Place your finished bowl on a sunny windowsill to enjoy the contrast between the shiny glaze and matte earth


Stamped Jewelry Tray
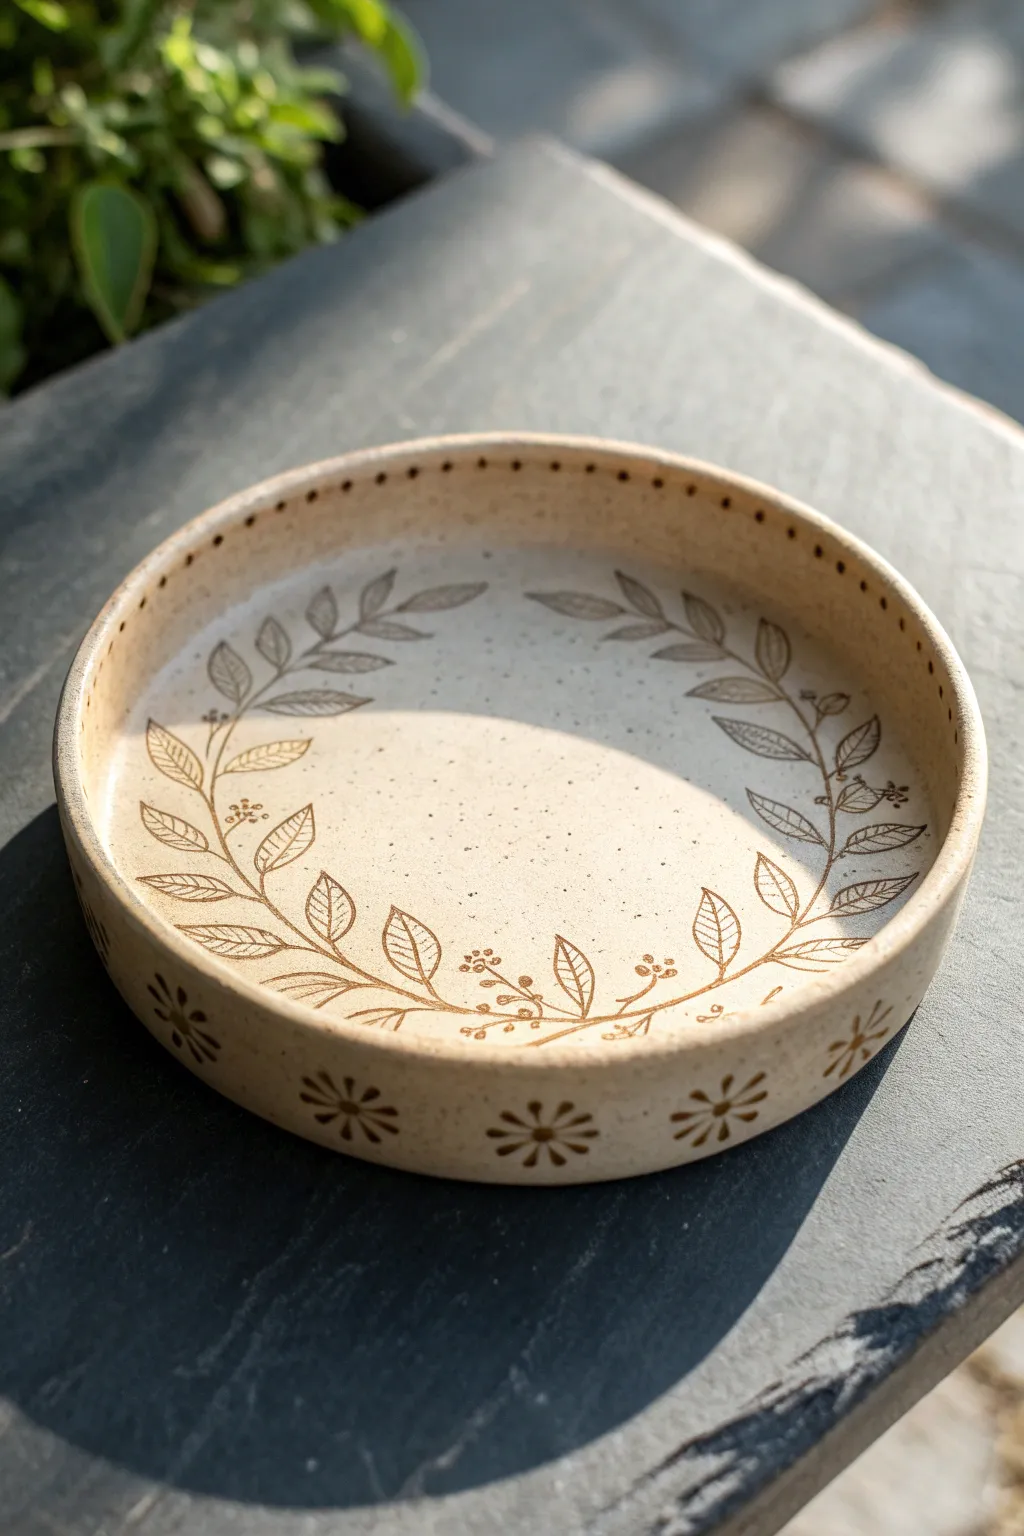
Bring a touch of nature indoors with this beautifully minimalist jewelry tray, featuring delicate vine patterns and rustic detailing. The beige speckled clay and earthy brown ink create a warm, organic feel that’s perfect for holding your favorite rings or trinkets.
Step-by-Step Guide
Materials
- Air-dry clay (speckled or beige stoneware style preferable)
- Leafy vine rubber stamp (clear stamps work best for placement)
- Small flower/starburst rubber stamp
- Rolling pin
- Circular cookie cutter or bowl (approx. 4-5 inches diameter)
- Brown ink pad (permanent or archival ink recommended)
- Small paintbrush
- Water
- Sandpaper (fine grit)
- Matte spray varnish or Mod Podge
Step 1: Prepping and Shaping the Clay
-
Condition the clay:
Begin by taking a handful of your air-dry clay and kneading it in your hands to warm it up. Condition it until it is smooth, pliable, and free of any large cracks. -
Roll out the slab:
Place the clay on a smooth, non-stick surface or a piece of parchment paper. Use your rolling pin to flatten the clay into an even slab, aiming for a thickness of about 1/4 inch. -
Cut the base:
Using your large circular cutter or a bowl as a guide, cut out a perfect circle from your clay slab. Remove the excess clay from around the edges and set it aside for the rim. -
Create the rim strip:
Roll out the excess clay into a long, thin snake, then flatten it slightly with the rolling pin to create a long ribbon. This strip should be about 1/2 inch to 3/4 inch tall and long enough to wrap around the circumference of your base. -
Attach the rim:
Score the outer edge of your circular base and the bottom edge of your clay strip by making small hash marks with a tool. Apply a little water to these scored areas to act as glue. -
Secure the walls:
Wrap the strip around the base, pressing it gently onto the scored edge. Where the ends of the strip meet, slice them at an angle for a cleaner seam and smooth them together with your finger and a dab of water. -
Blend the seams:
Use a modeling tool or your finger to smooth the inside seam where the wall meets the floor of the dish. I find that taking extra time here ensures the tray is strong and won’t separate later. -
Smooth the exterior:
Repeat the smoothing process on the outside seam, blending the clay until the transition line disappears completely and the wall looks seamless.
Ink Smudging?
If the ink smudges on the wet clay, your clay might be too moist. Let the formed tray sit for about 30-60 minutes to become ‘leather hard’ before attempting to stamp again.
Step 2: Stamping and Finishing
-
Prepare the vine stamp:
Select your leafy vine stamp and ink it up thoroughly with the brown ink pad. Test it on a scrap piece of paper first to ensure the ink coverage is even. -
Stamp the interior design:
Gently press the inked vine stamp onto the interior floor of the clay dish. Since the clay is still slightly soft, don’t press too hard or you might deform the bottom. Create a circular wreath pattern by stamping repeatedly in a curve. -
Add exterior details:
Ink up your small flower or starburst stamp. Press this pattern firmly onto the outside wall of the tray, spacing them evenly around the perimeter. -
Detail the rim:
Using a small dotting tool, a toothpick, or the end of a paintbrush, press small, evenly spaced holes along the very top edge of the rim for a decorative stitched look. -
Let it dry completely:
Place your finished tray in a cool, dry spot away from direct sunlight. Let it air dry for 24-48 hours. I usually flip it over halfway through the drying time to ensure the bottom dries evenly. -
Sand imperfections:
Once the clay is bone dry and hard, take a piece of fine-grit sandpaper and very gently sand any rough edges on the rim or seams to make them buttery smooth. Be careful not to sand over your stamped ink designs. -
Seal the piece:
In a well-ventilated area, apply a coat of matte spray varnish or brush on a thin layer of matte Mod Podge. This protects the clay and seals the ink so it won’t smudge over time.
Cleaner Impressions
Dust your rubber stamp very lightly with cornstarch before inking. This prevents the rubber from sticking to the wet clay and pulling it up when you lift the stamp.
Enjoy styling your new handcrafted tray on your dresser or nightstand


Simple Ring Cone Holder
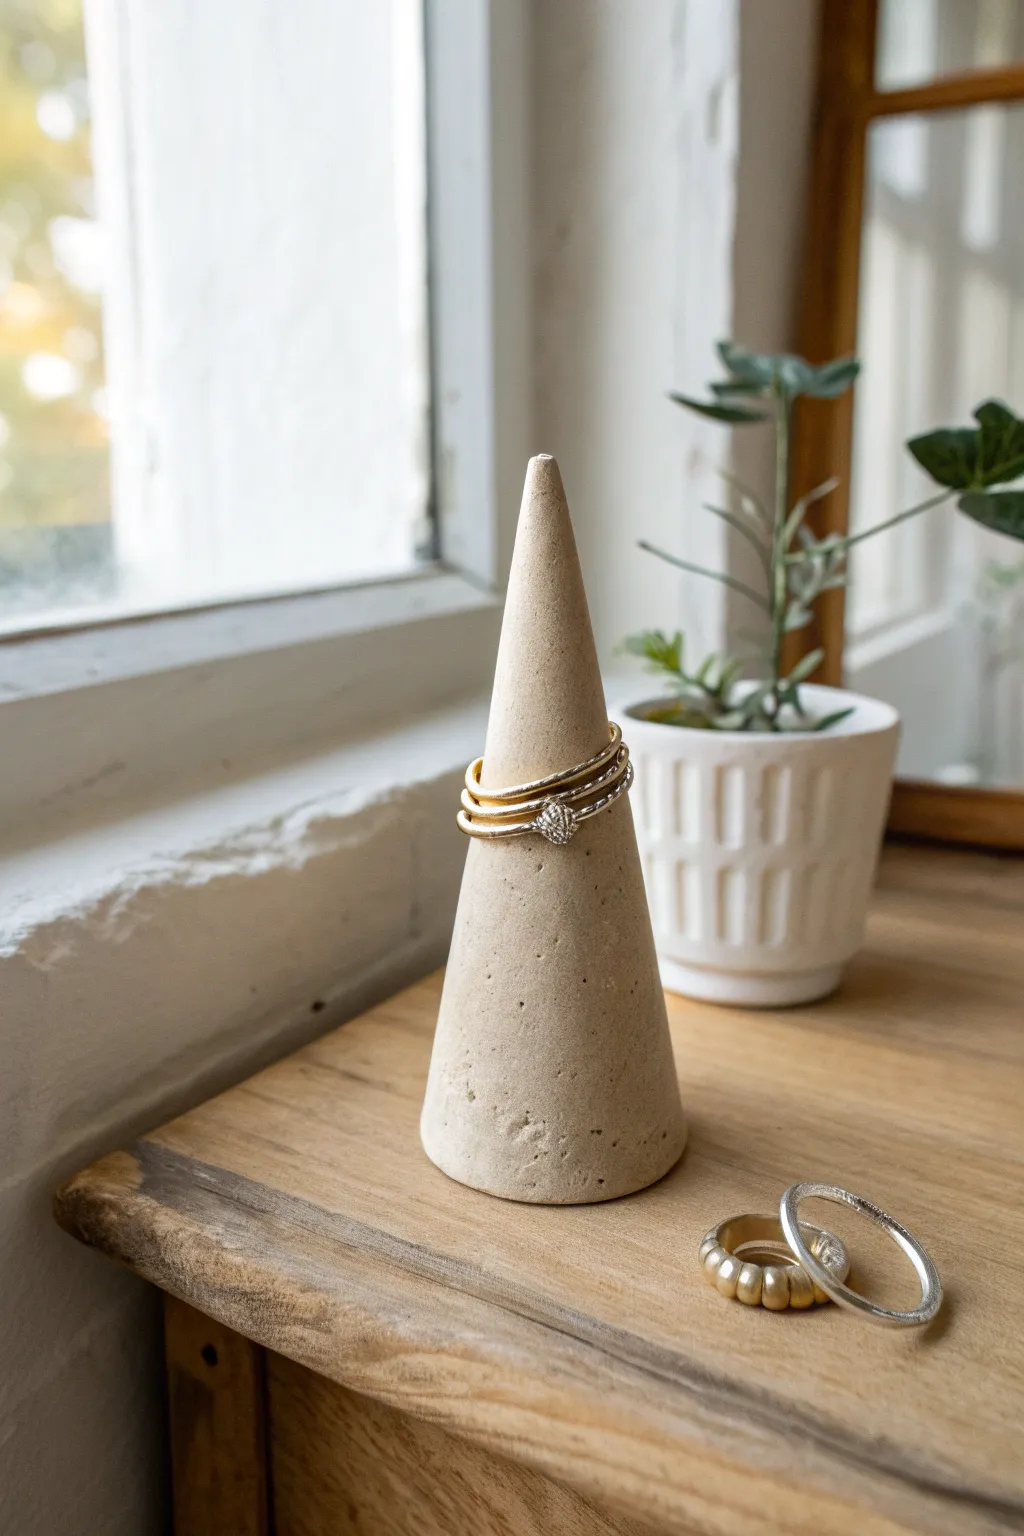
Keep your favorite rings organized and displayed beautifully on this organic, stone-textured clay cone. It features a modern, speckled finish that mimics natural concrete or sandstone without the messy pouring process.
Step-by-Step Tutorial
Materials
- Air-dry clay (white or light grey)
- Acrylic paint (beige, light grey, white)
- Used coffee grounds (dried) or fine sand
- Rolling pin
- Craft knife
- Small bowl of water
- Fine-grit sandpaper
- Gloss or matte varnish (optional)
- Paintbrush
Step 1: Shaping the Base
-
Condition the clay:
Start by taking a chunk of air-dry clay about the size of a golf ball. Knead it in your hands until it becomes warm, soft, and pliable, which helps prevent cracks later. -
Roll a ball:
Roll the conditioned clay between your palms to form a smooth sphere. Try to eliminate any major fold lines or deep creases at this stage. -
Form the cone shape:
Place the ball on your work surface. Using the flat part of your palm, begin rolling the clay back and forth while applying more pressure to one side. -
Refine the taper:
Continue rolling until you have a cone shape. You want a sturdy base that gradually tapers to a softly rounded point, rather than a needle-sharp tip. -
Flatten the bottom:
Once you like the height, pick up the cone and tap the wide bottom firmly against your table to create a flat, stable base. Check that it stands up straight without wobbling. -
Smooth the surface:
Dip your finger into a little bit of water and run it over the entire surface of the cone. This smooths out fingerprints and minor imperfections.
Cracks happen?
If you see cracks forming as it dries, mix a tiny bit of fresh clay with water to make a paste (slip) and fill the crack, then smooth it over with a finger.
Step 2: Creating Texture
-
Add surface imperfections:
To mimic the stone look in the photo, take a stiff bristle brush or a crumpled ball of aluminum foil and gently press it into the clay here and there to create tiny pockmarks. -
Initial drying:
Set the cone aside in a cool, dry place. Let it dry for at least 24-48 hours. I like to flip it on its side occasionally so the bottom dries evenly. -
Sand for finish:
Once fully dry and hard, use fine-grit sandpaper to gently buff the surface. You want to remove any sharp ridges but keep the organic texture you added.
Marble Effect
Twist two different colors of clay together before rolling the cone to create a swirled marble effect instead of the stone texture.
Step 3: Painting the Stone Effect
-
Mix the base color:
Mix white acrylic paint with a tiny drop of brown or beige to create a warm, off-white ‘sandstone’ color. It should be opaque. -
Apply the first coat:
Paint the entire cone with your base color. Don’t worry if it looks flat right now; the texture comes next. -
Create the speckles:
While the paint is still wet, sprinkle a tiny pinch of dried coffee grounds or fine sand onto the cone. Alternatively, you can mix the grounds directly into your second coat of paint. -
Blend the texture:
Dab your brush over the speckles to adhere them and blend them slightly into the paint layer. This gives that embedded stone look. -
Add depth:
Dilute a tiny bit of darker grey paint with water to make a wash. dab it into the pockmarks and wipe the excess off the surface immediately with a paper towel, leaving the dark color only in the crevices. -
Final drying:
Allow the paint to dry completely. If you prefer a sealed finish, apply a coat of matte varnish, though leaving it unvarnished provides a more realistic stone texture.
Place your cone on your nightstand or windowsill for a chic, functional piece of decor


Marbled Clay Coasters
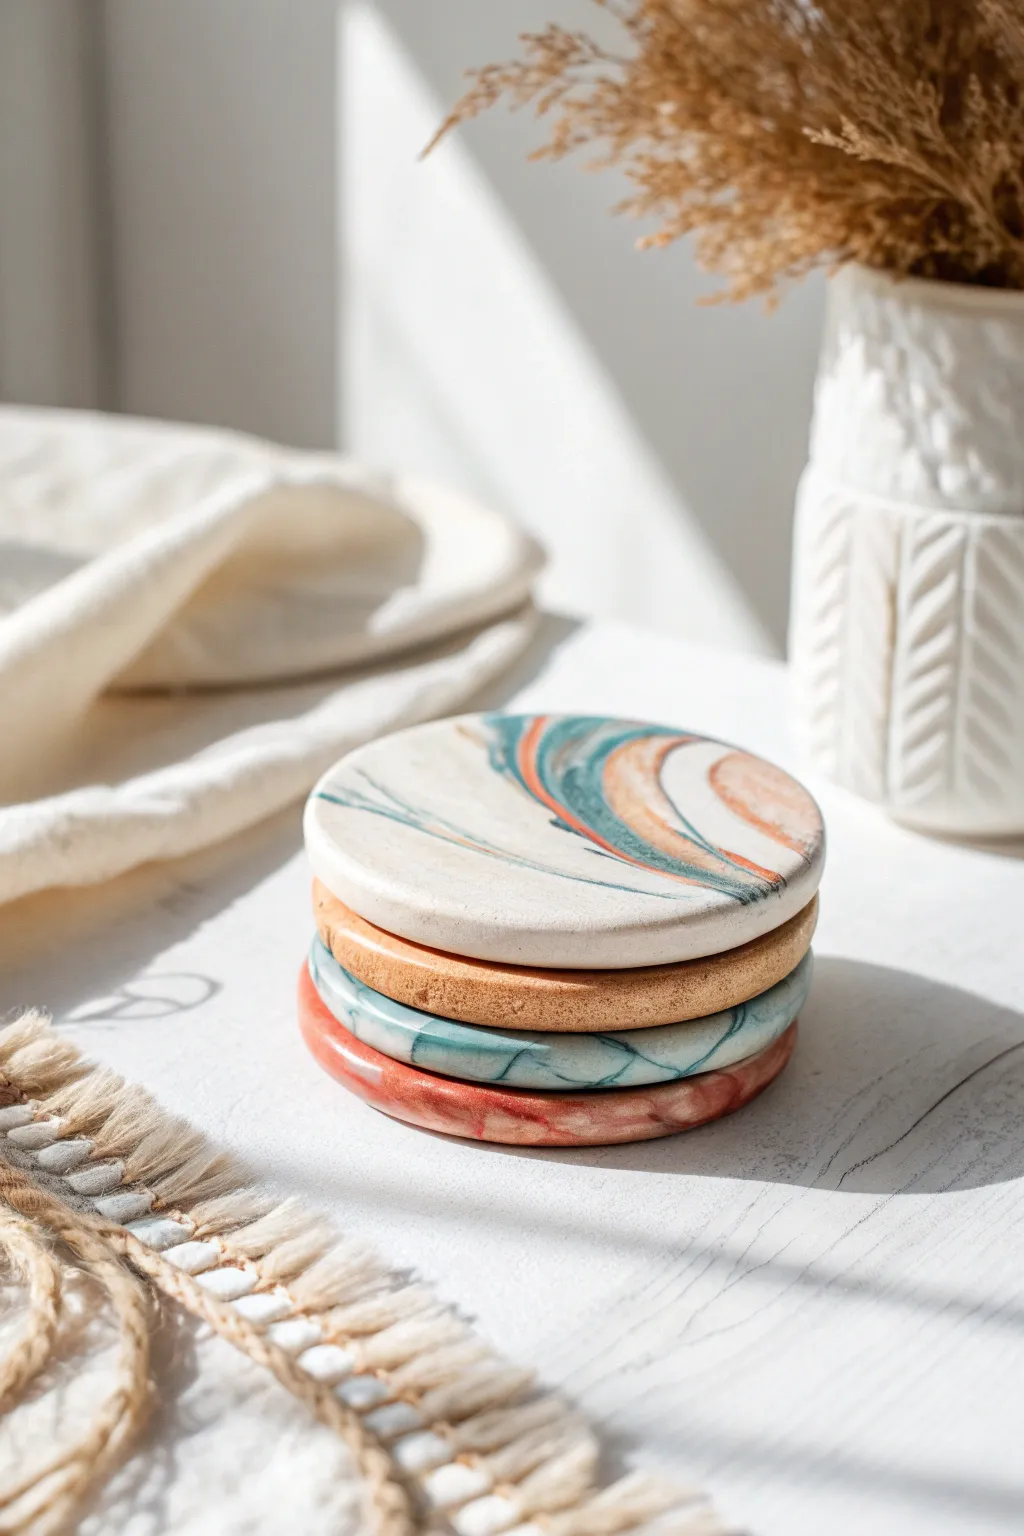
These chic, stackable coasters feature organic swirls of teal, rust, and cream, mimicking the look of high-end stone. Using polymer clay allows you to achieve this sophisticated marbled effect with surprising ease, resulting in durable home decor that looks professionally made.
Detailed Instructions
Materials
- Polymer clay in White, Teal/Turquoise, Rust/Terracotta, and Beige
- Rolling pin (acrylic or glass preferred)
- Round cookie cutter (approx. 4 inches) or a jar lid
- Parchment paper or a silicone baking mat
- Craft knife or clay blade
- Fine-grit sandpaper (400 and 600 grit)
- Baking sheet
- Oven
- Gloss or matte glaze (optional for finish)
Step 1: Preparing the Clay
-
Condition the white base:
Begin by taking a large block of white clay, which will serve as the primary color. Knead it in your hands until it is soft, pliable, and warm to the touch. -
Prep the accent colors:
Condition smaller amounts of the teal, rust, and beige clays separately. You’ll want about one part of each accent color for every four parts of white to keep the design airy. -
Create clay snakes:
Roll each color—including the white—into long, snake-like ropes. The white rope should be the thickest, while the colored ropes can vary in thickness for a more organic look.
Step 2: Creating the Marble Effect
-
Twist the colors together:
Gather your clay snakes and twist them together into one large, multi-colored rope. Twist tightly to begin merging the colors. -
Fold and roll:
Fold the twisted rope in half and roll it out again into a long snake. Repeat this folding and twisting process 2-3 times. Be careful not to over-twist, or the colors will blend into a muddy grey instead of distinct streaks. -
Form a ball:
Once you like the variegation in the rope, squash it down into a smooth ball. Ensure there are no air bubbles trapped inside by pressing firmly. -
Roll out the slab:
Place the ball on your parchment paper. Using your rolling pin, roll the clay out into a flat slab about 1/4 inch thick. Roll in different directions to stretch the marble pattern outward. -
Check the pattern:
Inspect your slab. If you want more swirls, you can gently fold a corner over and roll it flat again, but remember that less is often more with marbling.
Muddy Colors?
If your colors blended into a single messy hue, you likely over-mixed the clay. Next time, stop twisting sooner—let the distinctive lines necessary for marbling remain visible.
Step 3: Cutting and Baking
-
Cut the shapes:
Press your round cookie cutter or jar lid firmly into the clay slab to cut out your coaster shapes. If you don’t have a cutter, trace a circle lightly and cut around it with your craft knife. -
Smooth the edges:
Lift the excess clay away. Gently run your finger along the cut edge of each circle to smooth down any roughness or sharp ridges left by the cutter. -
Texture or smooth (optional):
For a stone-like unevenness shown in the bottom coasters of the stack, you can lightly tap the surface with sandpaper before baking. For a smooth marble look, leave it pristine. -
Bake the coasters:
Transfer the parchment paper with the clay rounds onto a baking sheet. Bake according to your clay manufacturer’s instructions—usually around 275°F (135°C) for 15-30 minutes depending on thickness. -
Cool down:
Remove the tray from the oven and allow the coasters to cool completely on a flat surface. Do not try to move them while hot, as they are still slightly flexible.
Pro Tip: Gold Veins
For a luxe upgrade, add thin shavings of gold leaf or metallic gold clay into your initial twist. This creates glimmering metallic veins running through the faux stone.
Step 4: Finishing Touches
-
First pass sanding:
Once fully cool, use the 400-grit sandpaper to smooth out the edges further. Wet the sandpaper slightly to minimize dust. -
Refine the surface:
Follow up with 600-grit sandpaper over the top surface if you want a super-smooth finish. I prefer to do this under running water for the cleanest result. -
Clean and dry:
Wash the coasters with mild soap and water to remove any sanding residue, then buff dry with a soft cloth. -
Seal the deal:
For protection against condensation, apply a thin coat of glaze. A matte glaze looks most like natural stone, while gloss offers a ceramic feel.
Stack your set on the coffee table and enjoy the modern, artistic flaire they add to your space

The Complete Guide to Pottery Troubleshooting
Uncover the most common ceramic mistakes—from cracking clay to failed glazes—and learn how to fix them fast.
Leaf-Shaped Catchall Tray
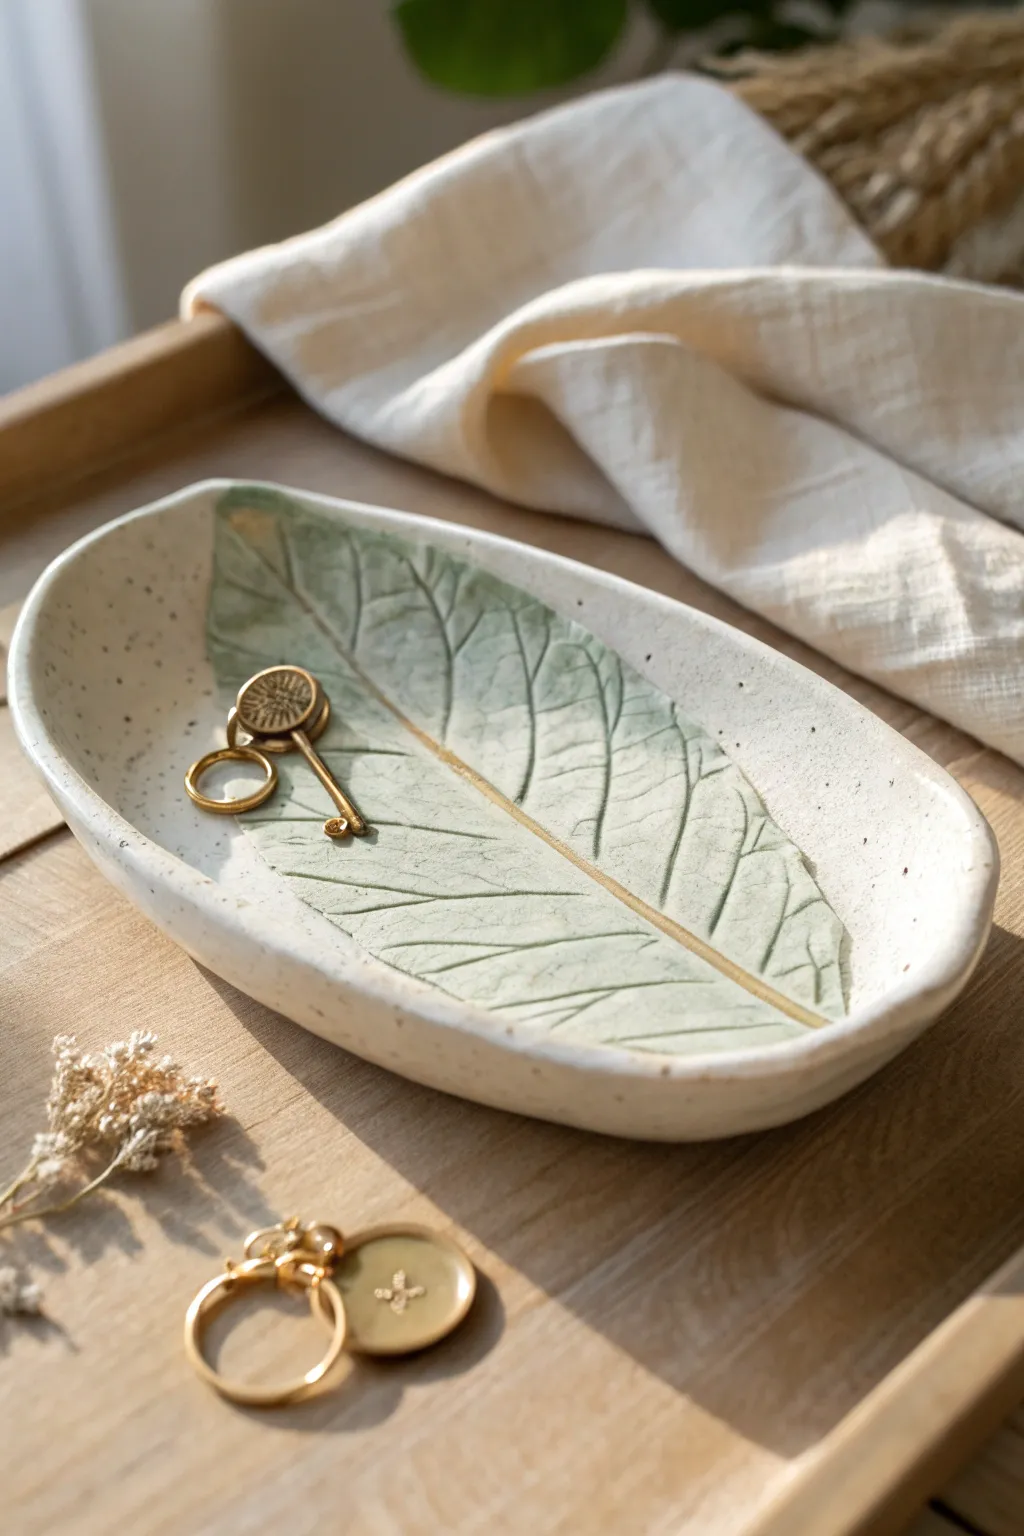
Bring a touch of botanical charm to your nightstand with this elegant, elongated catchall tray featuring a subtle leaf relief. The speckled clay body and soft green wash give it a natural, organic feel perfect for holding rings and delicate jewelry.
Step-by-Step Guide
Materials
- Speckled air-dry clay or polymer clay (white with black flecks)
- Large, fresh leaf with prominent veins (like a Hosta or similar broad leaf)
- Rolling pin
- Parchment paper or canvas mat
- Sharp craft knife or clay needle tool
- Small bowl using for shaping (optional)
- Small sponge for smoothing
- Water based varnish or sealant
- Sage or moss green acrylic paint
- Gold metallic paint (optional)
- Fine detail paintbrush
- Sandpaper (fine grit)
Step 1: Shaping the Base
-
Prep your surface:
Lay down a sheet of parchment paper or a canvas mat to prevent the clay from sticking to your work table. -
Roll the clay:
Take a handful of your speckled clay and knead it until it’s pliable. Roll it out into an oval slab about 1/4 inch thick. Aim for an elongated shape rather than a perfect circle. -
Position the leaf:
Place your fresh leaf face down onto the center of the clay slab. The vein side should be against the clay to get the best texture impression. -
Create the impression:
Gently roll over the leaf with your rolling pin. Apply firm, even pressure to embed the veins deep into the clay surface without distorting the overall shape too much. -
Reveal the texture:
Carefully peel the leaf away to reveal the intricate vein pattern stamped into your clay. -
Cut the shape:
Using a craft knife, cut a clean oval shape around the leaf impression, leaving a clear border of smooth clay around the textured leaf area. You want the tray to be larger than just the leaf itself.
Select the Best Leaf
Choose a leaf with thick, protruding veins like hydrangea, hosta, or grape leaves. These create much deeper, sharper impressions than smooth, waxy leaves.
Step 2: Forming and Refining
-
Curve the edges:
Gently lift the edges of your clay oval and curve them upward to create a shallow bowl shape. I find using my fingertips to gently pinch and lift works best here. -
Smooth the rim:
Dip your finger or a small sponge in water and run it along the cut rim of the tray to smooth out any sharp edges or roughness from the knife. -
Dry the form:
The tray needs to dry in this curved position. You can let it air dry as is, or drape it inside a larger shallow bowl or over a curved surface to help it hold its concave shape. -
Wait patiently:
Allow the clay to dry completely according to the package instructions. This usually takes 24-48 hours depending on humidity. -
Sand for perfection:
Once fully dry and hard, use fine-grit sandpaper to gently smooth any remaining rough spots on the rim or underside of the tray.
Gilded Edge Variant
For extra luxury, paint the very rim of the dish with the same gold metallic paint used on the stem. It frames the artwork beautifully.
Step 3: Painting and Finishing
-
Prepare the wash:
Dilute a small amount of sage green acrylic paint with water. You want a translucent wash, not an opaque layer, so the clay’s speckled texture still shows through. -
Apply the color:
Paint the wash carefully inside the leaf impression area only. The watered-down paint will naturally pool in the deeper vein crevices, enhancing the texture. -
Wipe back excess:
Before the paint dries, gently wipe over the raised parts of the leaf with a damp paper towel or sponge. This highlights the veins by leaving more pigment in the grooves. -
Add a golden touch:
Using a very fine brush and metallic gold paint, carefully paint a thin line down the central stem of the leaf for a subtle, elegant accent. -
Seal the piece:
Once all paint is dry, apply a coat of clear varnish or sealant over the entire tray to protect the finish and give it a slight sheen.
Now you have a serene, nature-inspired piece to organize your smallest treasures.
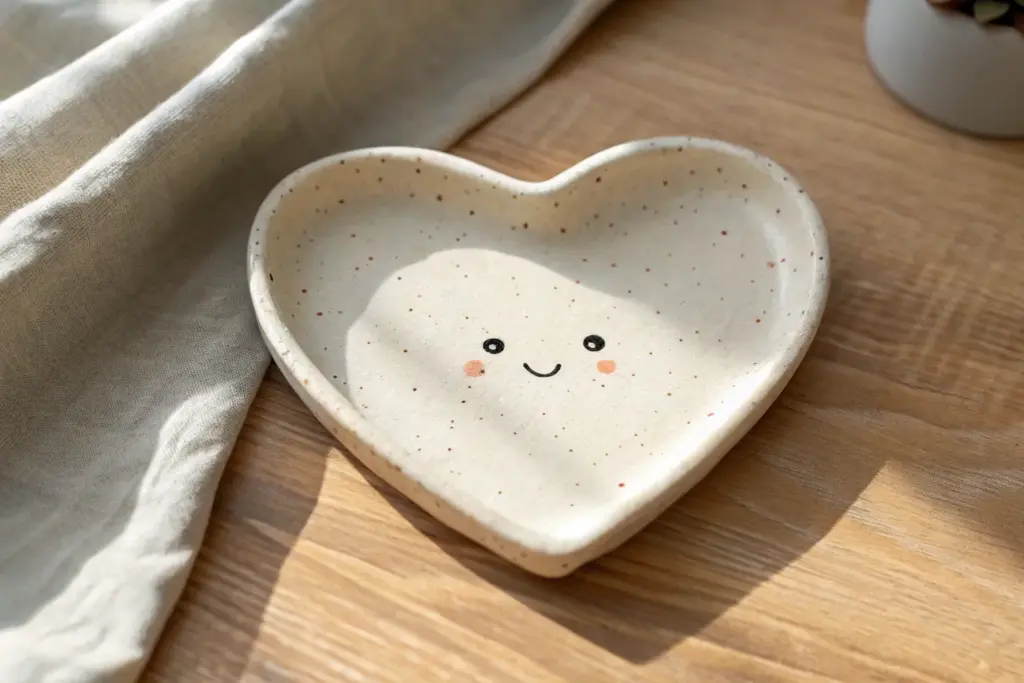
Cute Face Fridge Magnets
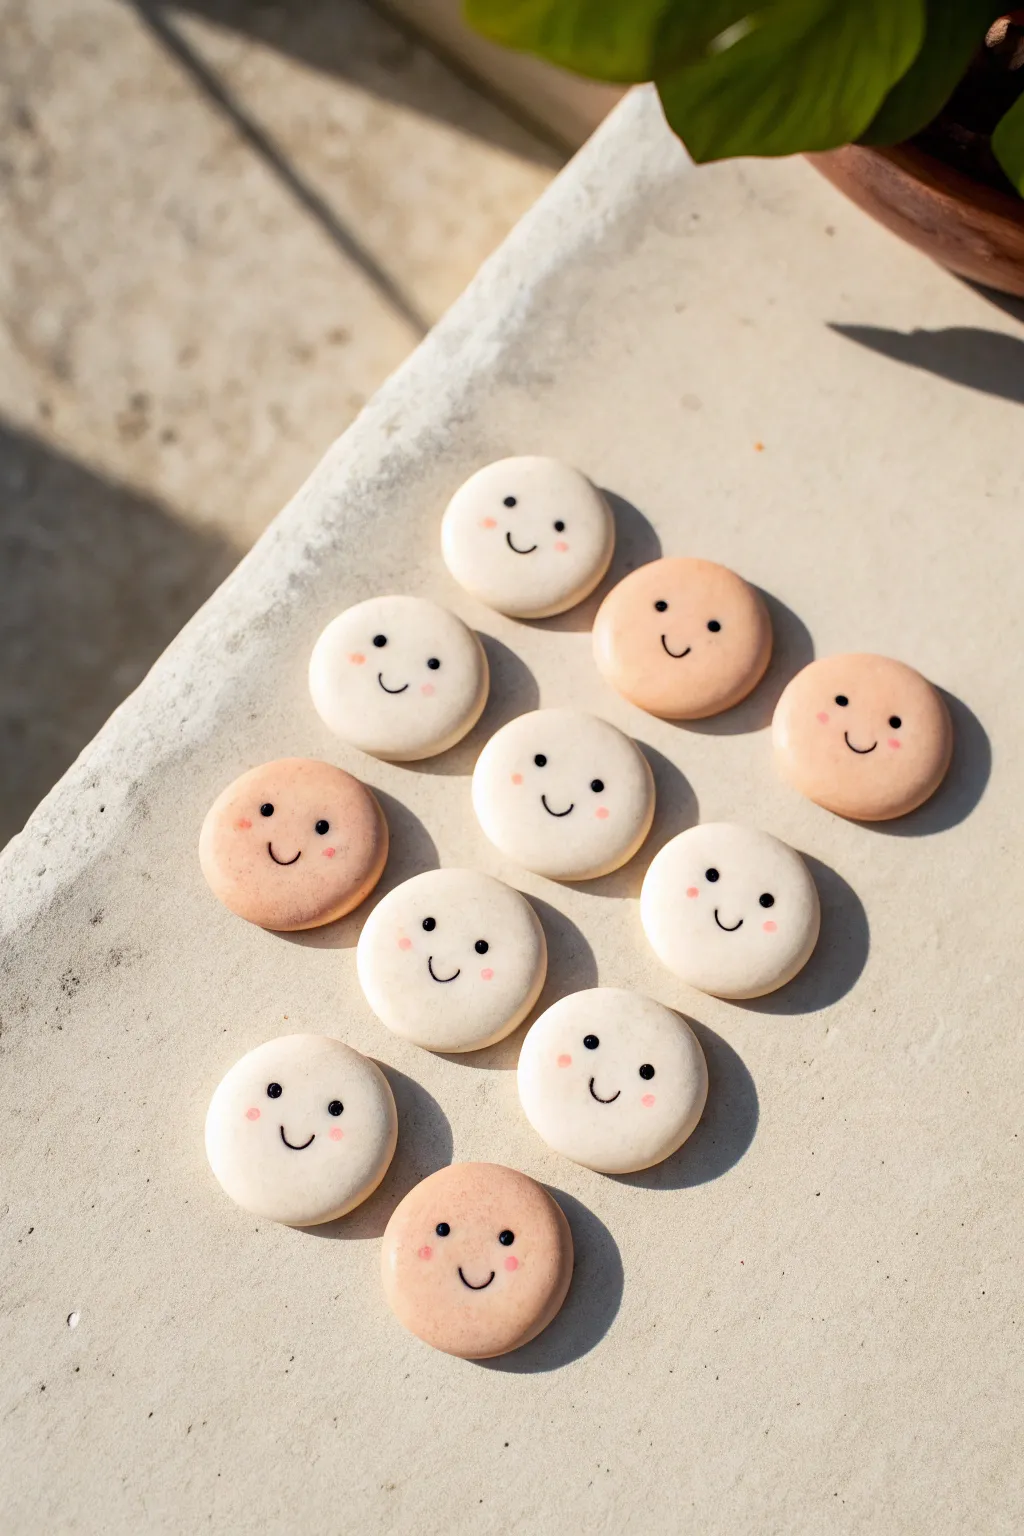
Brighten up your kitchen with these charming, minimalist clay magnets. These little faces combine gentle earth tones with cute expressions for a simple project that brings instant cheer to any magnetic surface.
How-To Guide
Materials
- White air-dry clay or polymer clay
- Acrylic paint (burnt umber/black, light peach, blush pink)
- Small round cookie cutter (approx. 1-1.5 inch)
- Rolling pin
- Fine detail paintbrush (size 00 or 000)
- Dotting tool or toothpick
- Self-adhesive round magnets
- Gloss or matte varnish (optional)
- Parchment paper
Step 1: Shaping the Clay
-
Prepare your workspace:
Lay down a sheet of parchment paper to prevent sticking and keep your clay clean from dust. -
Condition the clay:
Take a chunk of your white clay and knead it in your hands until it becomes soft, pliable, and free of cracks. -
Color mixing (optional):
To achieve the peach-toned faces seen in the photo, mix a tiny drop of peach or light brown acrylic paint into half of your white clay. Knead thoroughly until the color is completely uniform. -
Roll it out:
Roll your clay out to an even thickness of about 1/4 inch (5-6mm). You want them thick enough to be sturdy but not chunky. -
Cut the shapes:
Use your small round cutter to punch out circles. If you don’t have a cutter, you can use a small lid or bottle cap. -
Smooth the edges:
Dip your finger in a little water and gently run it around the edge of each circle to smooth out any rough cuts or sharp creates. -
Dry the bases:
Let the clay dry completely according to the package instructions. For air-dry clay, this usually takes 24-48 hours. Flip them halfway through to ensure even drying.
Step 2: Painting the Faces
-
Mix the eye color:
Prepare a very dark brown or soft black paint. Avoid stark jet black if you want a softer, more organic look. -
Practice first:
I recommend sketching a few faces on scrap paper first to get the spacing right. -
Paint the eyes:
Using a dotting tool or the back end of your paintbrush, dip into the dark paint and place two small dots wide apart on the upper half of the circle. -
Add the smile:
With your finest detail brush, paint a tiny, U-shaped mouth centered between the eyes but slightly lower. -
Add the cheeks:
Mix a soft pink or coral color. Using a clean dotting tool, dab two rosy cheeks just outside and below the eyes. -
Let paint set:
Allow the paint to dry completely. This shouldn’t take long if you applied thin layers.
Cracked Clay?
If small cracks appear while drying, mix a tiny bit of fresh clay with water to make a paste and fill them in, then smooth
Step 3: Finishing Up
-
Seal the surface:
Apply a thin coat of varnish to protect your paint. A matte finish looks very natural, while gloss gives a ceramic feel. -
Attach the magnets:
Once the varnish is dry, flip the circles over. -
Secure the back:
Peel the backing off your strong round magnets and press them firmly onto the center of the back of each clay face. If they aren’t self-adhesive, a dab of strong glue works perfectly.
Natural Pigments
Instead of mixing paint into wet clay, try dusting dried clay with soft pastel shavings or blush makeup for subtle cheeks
Now your fridge is ready to greet you with a friendly smile every time you reach for a snack


What Really Happens Inside the Kiln
Learn how time and temperature work together inside the kiln to transform clay into durable ceramic.
Tiny Animal Charms
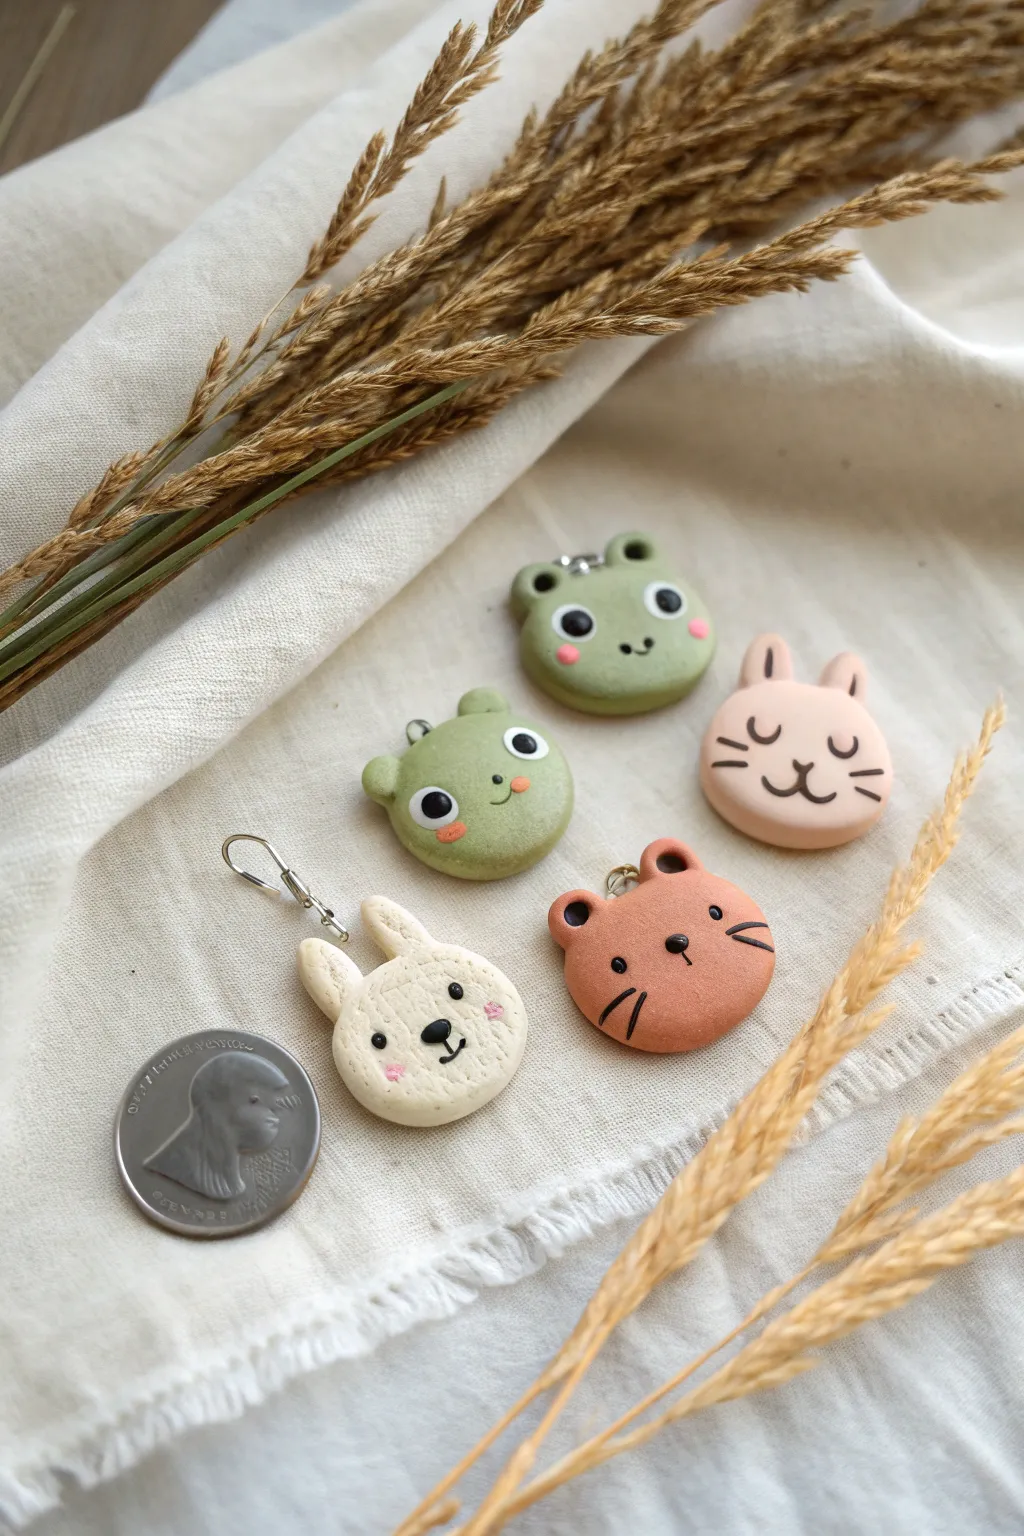
These adorable animal charms resemble tiny, perfectly baked cookies with their soft matte finish and simple, kawaii expressions. Whether you choose the sleepy rabbit, the wide-eyed frog, or the curious bear, they make perfect phone charms, stitch markers, or zipper pulls.
Step-by-Step Tutorial
Materials
- Polymer clay (white, moss green, olive green, terracotta, light pink/peach)
- Black acrylic paint or black liquid clay
- Fine detail paintbrush or needle tool
- Small eye pins (silver or gold)
- Circle cutter (approx. 1 inch diameter)
- Dotting tools (various sizes)
- Pink chalk pastel (for blush)
- Soft brush for pastels
- Oven for baking
- Parchment paper
Step 1: Shaping the Base
-
Condition the clay:
Begin by thoroughly kneading your chosen clay colors—white for the bunny, moss green for the frog, olive for the bear, etc. The clay needs to be soft and pliable to prevent cracks. -
Roll and cut:
Roll the clay out to a thickness of about 1/4 inch (6mm). Using your circle cutter, punch out round discs for the heads. Gently soften the sharp cut edges with your fingertip to give it that baked cookie look. -
Form the ears:
For the rabbits, roll two small logs of pink clay and flatten them slightly. Attach them to the top of the head, blending the seam at the back so it’s secure. -
Attach round ears:
For the bears and frogs, roll tiny balls of the matching clay color. Press them onto the top of the circle base. Use a small dotting tool to gently indent the center of the bear ears for dimension. -
Insert eye pins:
Before baking, carefully insert a small metal eye pin into the top center of the charm (between the ears). Ensure it goes deep enough to be secure.
Step 2: Adding Faces & Details
-
Create frog eyes:
For the frogs, verify the eye placement. Since frogs have eyes on top of their heads, these are actually the ‘ears’ we made earlier. Flatten the green balls slightly. -
Apply white sclera:
Roll tiny balls of white clay and flatten them onto the green frog eye bumps. For the olive bear, simply place the white flat circles on the main face area. -
Add pupils:
Roll incredibly tiny balls of black clay (or used black liquid clay later) and place them onto the white circles. Position them to look in different directions for personality. -
Sculpt the nose:
For the bears and white bunny, add a tiny triangular or oval nose using black clay. Place it centrally on the face. -
Blushing cheeks:
Scrape a little pink chalk pastel into a powder. I like to use a soft, dry brush to gently dust pink ‘cheeks’ onto the raw clay before baking for a soft, airbrushed effect. -
Mark markings:
For the spotted white bunny, use a needle tool to gently texture the surface, or press in tiny bits of contrasting clay for a speckled look.
Clean Clay Only
Lint loves polymer clay. Keep a mesmerizingly white bunny by wiping your hands and tools with a baby wipe or alcohol before switching to lighter colors.
Step 3: Baking & Finishing
-
Bake the batch:
Arrange your charms on a parchment-lined baking sheet. Bake according to your polymer clay package instructions (usually 275°F/135°C for 15-30 minutes). -
Cool down completely:
Let the charms cool fully before handling. They are fragile while warm and harden as they return to room temperature. -
Paint the details:
Using a very fine brush and black acrylic paint, carefully draw on the whiskers, smiling mouths, and sleeping eyelids (the ‘U’ shapes) on the rabbits. -
Seal (Optional):
If you want to protect the paint, apply a thin layer of matte varnish. Avoid glossy finishes if you want to maintain that realistic cookie texture. -
Attach hardware:
Once dry, use jump rings to attach your new charms to phone straps, keychains, or necklaces.
Pin Security
If an eye pin feels loose after baking, pull it out, add a dab of superglue to the shaft, and slide it back into the hole for a permanent hold.
You have now created a delightful set of pocket-sized friends ready to accompany you anywhere
Easy Clay Bead Necklace
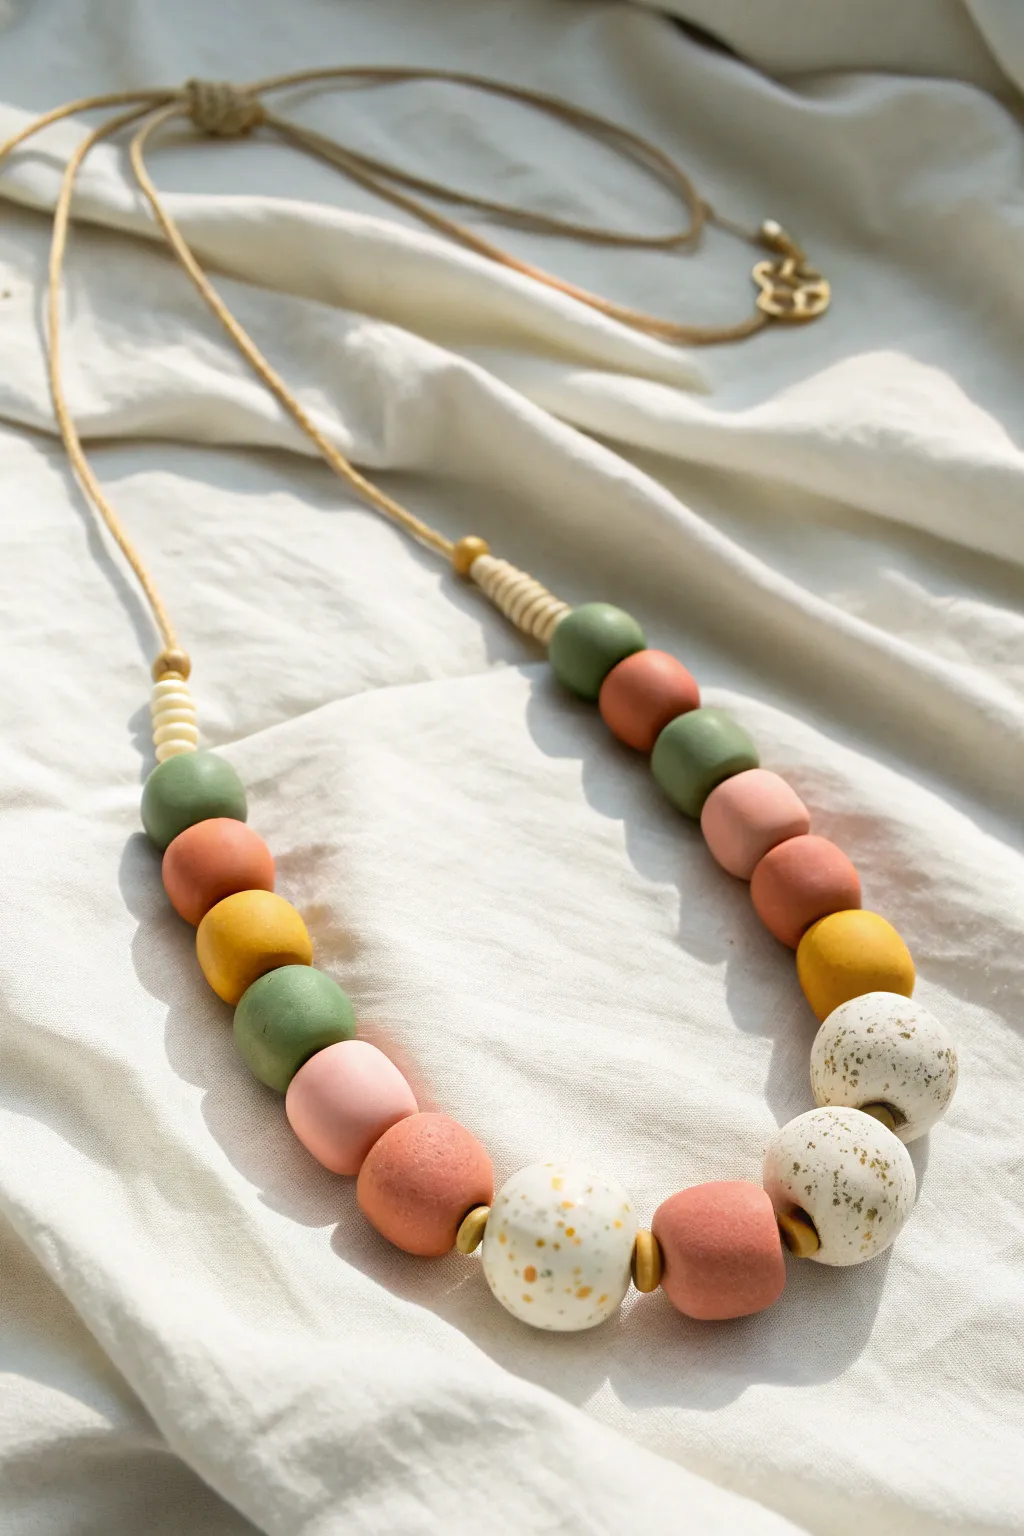
Create a statement piece that blends earthy tones with modern design using polymer clay. This necklace features a mix of smooth solid colors and large, textured speckled beads for a sophisticated yet playful accessory.
Step-by-Step
Materials
- Polymer clay (white, moss green, terracotta, light pink, mustard yellow)
- Acrylic paint (gold or brown for speckling)
- Toothbrush or firm bristle brush
- Waxed cotton cord or suede cord (beige/tan)
- Small gold spacer beads (optional)
- Baking sheet and parchment paper
- Needle tool or toothpick
- Bamboo skewers
- Wet wipes
- Glaze or sealant (matte preferred)
Step 1: Preparing the Clay
-
Condition the clay:
Start by warming various colors of polymer clay in your hands until they are soft and pliable. You will need a palette of moss green, terracotta/rust, light pink, mustard yellow, and a larger amount of white. -
Roll the main beads:
Pinch off chunks of the colored clay (green, pink, yellow, rust) to create roughly 1-inch beads. Roll them between your palms until they are perfectly smooth spheres. -
Create the large focal beads:
Take the white clay and form three slightly larger spheres. I like to make these just a bit bigger than the colored ones to act as the centerpiece of the necklace. -
Make the connector beads:
Using the white or light beige clay, roll out a thin snake about 1/4 inch thick. Slice this into small discs to create the ribbed texture beads seen near the top of the strand.
Step 2: Adding Texture and Baking
-
Pierce the holes:
Before baking, carefully pierce a hole through the center of every bead using a needle tool or toothpick. Ensure the hole is wide enough for your chosen cord. -
Speckle the white beads:
Dip a toothbrush into a small amount of gold or brown acrylic paint. Flick the bristles with your thumb to spray a fine mist of speckles onto the three large white beads. Let the paint dry completely. -
Mount on skewers:
To prevent flat spots, thread your beads onto bamboo skewers. Suspend the skewers over the edges of a baking dish so the beads hang freely. -
Bake the clay:
Bake the beads according to the manufacturer’s instructions on your clay package (usually around 275°F or 135°C for 15-30 minutes). Let them cool completely before handling.
Fixing Fingerprints
If you see fingerprints on your raw clay beads before baking, lightly brush them with a little baby oil or cornstarch to smooth the surface perfectly.
Step 3: Assembly
-
Prepare the cord:
Cut a length of beige waxed cord, approximately 30 inches long, or longer depending on your preferred drop length. -
Start stringing:
Begin threading your beads. Start with the stack of small white disc beads, followed by a gold spacer bead if you are using them. -
Create the pattern:
Follow the pattern seen in the image: Green, Rust, Green, Yellow, Green, Pink, Rust, Yellow. This creates the left visual side of the necklace. -
Add the focal section:
Thread on a speckled white bead, followed by a pink bead, then the central speckled white bead, another pink bead, and the final speckled white bead. Add gold spacers between these larger beads for extra detail. -
Mirror the design:
Continue stringing up the other side to mirror or balance the first side, finishing with the stack of small white disc beads. -
Tie the closure:
Bring the two ends of the cord together. You can tie a simple knot or create a sliding knot mechanism to make the necklace adjustable.
Make it Adjustable
Learn to tie a ‘sliding master knot’ for the closure. This allows you to easily change the necklace length from a choker to a long pendant style.
Now you have a stunning, handcrafted necklace ready to wear or gift

TRACK YOUR CERAMIC JOURNEY
Capture glaze tests, firing details, and creative progress—all in one simple printable. Make your projects easier to repeat and improve.
Minimalist Dangle Earrings
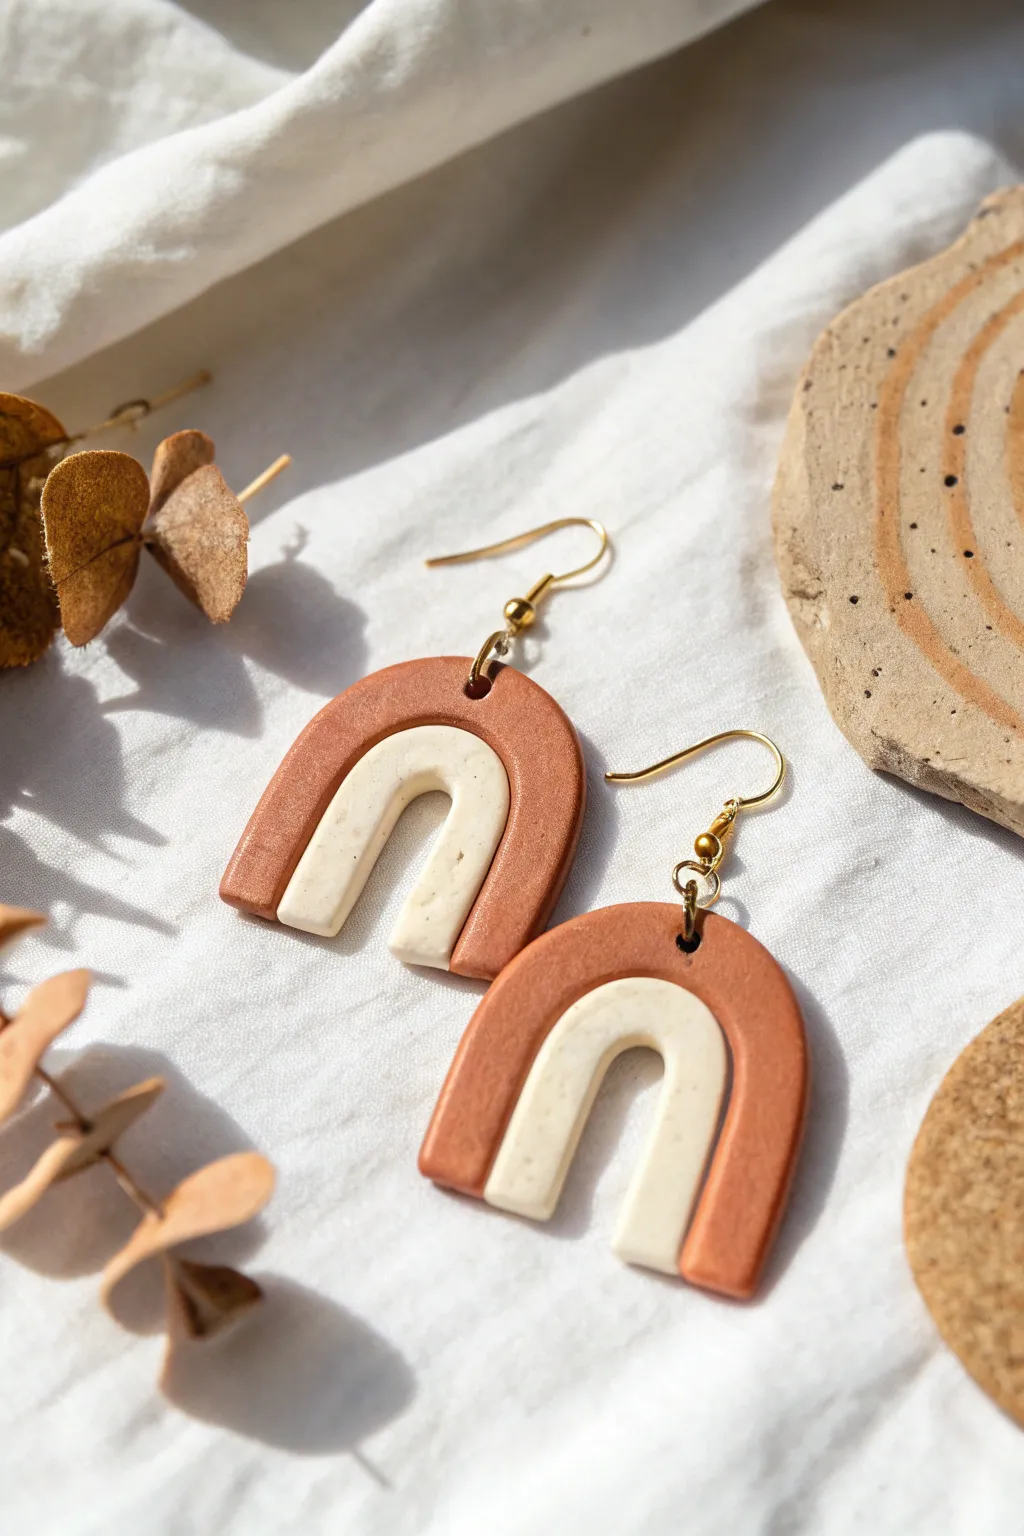
These minimalist dangle earrings combine warm terracotta tones with speckled cream for a trendy, earthy aesthetic. The nested arch design adds depth while keeping the overall look clean and modern, perfect for everyday wear.
Detailed Instructions
Materials
- Polymer clay (Terracotta or Rust color)
- Polymer clay (Cream or White with speckles)
- Acrylic rolling pin or pasta machine
- U-shaped clay cutters (two sizes: large and small)
- Clean ceramic tile or baking sheet
- Parchment paper
- Small hand drill or needle tool
- Liquid polymer clay (bakeable adhesive)
- Gold jump rings (6mm or 7mm)
- Gold fishhook ear wires
- Jewelry pliers (flat nose and bent nose)
- Fine-grit sandpaper (optional)
Step 1: Preparing the Clay
-
Condition the clay:
Start by warming up your terracotta clay in your hands. Knead and roll it until it becomes soft, pliable, and free of any air bubbles. -
Roll out the base:
Using your acrylic roller or pasta machine, roll the terracotta clay into an even slab about 3mm thick. Repeat this process with the speckled cream clay, aiming for the same thickness. -
Check for smoothness:
Inspect the surface of both slabs. If you see fingerprints, gently buff them out with a light dusting of cornstarch or by rolling over them lightly with a piece of parchment paper on top.
Clean Cuts Only
To prevent the clay from sticking to your cutters, dip the cutting edge into a small pile of cornstarch or baby powder before pressing into the slab.
Step 2: Cutting and Assembly
-
Cut the large arches:
Take your larger U-shaped cutter and press firmly into the terracotta slab. Give it a tiny wiggle to ensure a clean cut, then lift. Cut two identical shapes. -
Cut the inner arches:
Using the smaller U-shaped cutter, punch out two shapes from the cream speckled clay. -
Smooth the edges:
Before assembling, gently run your finger along the cut edges of all four pieces to smooth down any rough clay shards or sharpness. -
Nest the shapes:
Place the cream arch directly inside the ‘legs’ of the terracotta arch to test the fit. For this design, we want the cream arch to sit securely against the terracotta. -
Apply adhesive:
Apply a very thin line of liquid polymer clay (Bake & Bond) to the inner edge of the terracotta arch and the outer edge of the cream arch where they will touch. -
Join the pieces:
Gently press the cream arch into the terracotta arch so they fuse together side-by-side into a single flat unit. Wipe away any excess liquid clay immediately. -
Make the holes:
Using a needle tool, poke a hole at the very top center of the terracotta arch. Make sure the hole is large enough for your jump rings but not too close to the edge.
Step 3: Baking and Finishing
-
Bake the pieces:
Place your assembled arches on a parchment-lined baking sheet or ceramic tile. Bake according to your clay package instructions (usually 275°F/135°C for about 30 minutes). -
Cool down:
Allow the clay to cool completely in the oven or on a wire rack. Don’t handle them while hot, as the clay is still fragile. -
Sand edges:
Once fully cooled, inspect the edges. If there are any remaining rough spots, gently wet-sand them with fine-grit sandpaper for a professional finish. -
Open the jump rings:
Grab your jewelry pliers. Hold a gold jump ring with two pairs of pliers and twist your wrists in opposite directions to open the ring sideways (never pull it apart). -
Attach the hardware:
Slide the open jump ring through the hole you made in the clay. Add the fishhook ear wire onto the jump ring as well. -
Close the rings:
Using the same twisting motion with your pliers, bring the ends of the jump ring back together until they are perfectly flush. -
Final check:
Repeat the hardware attachment for the second earring and double-check that all connections are secure.
Add Subtle Shine
After baking, apply a layer of semi-gloss glaze or UV resin over just the cream-colored section to create a beautiful contrast of textures.
Now you have a stylish pair of handcrafted earrings ready for your next outfit
Tiny Stud Earrings Set
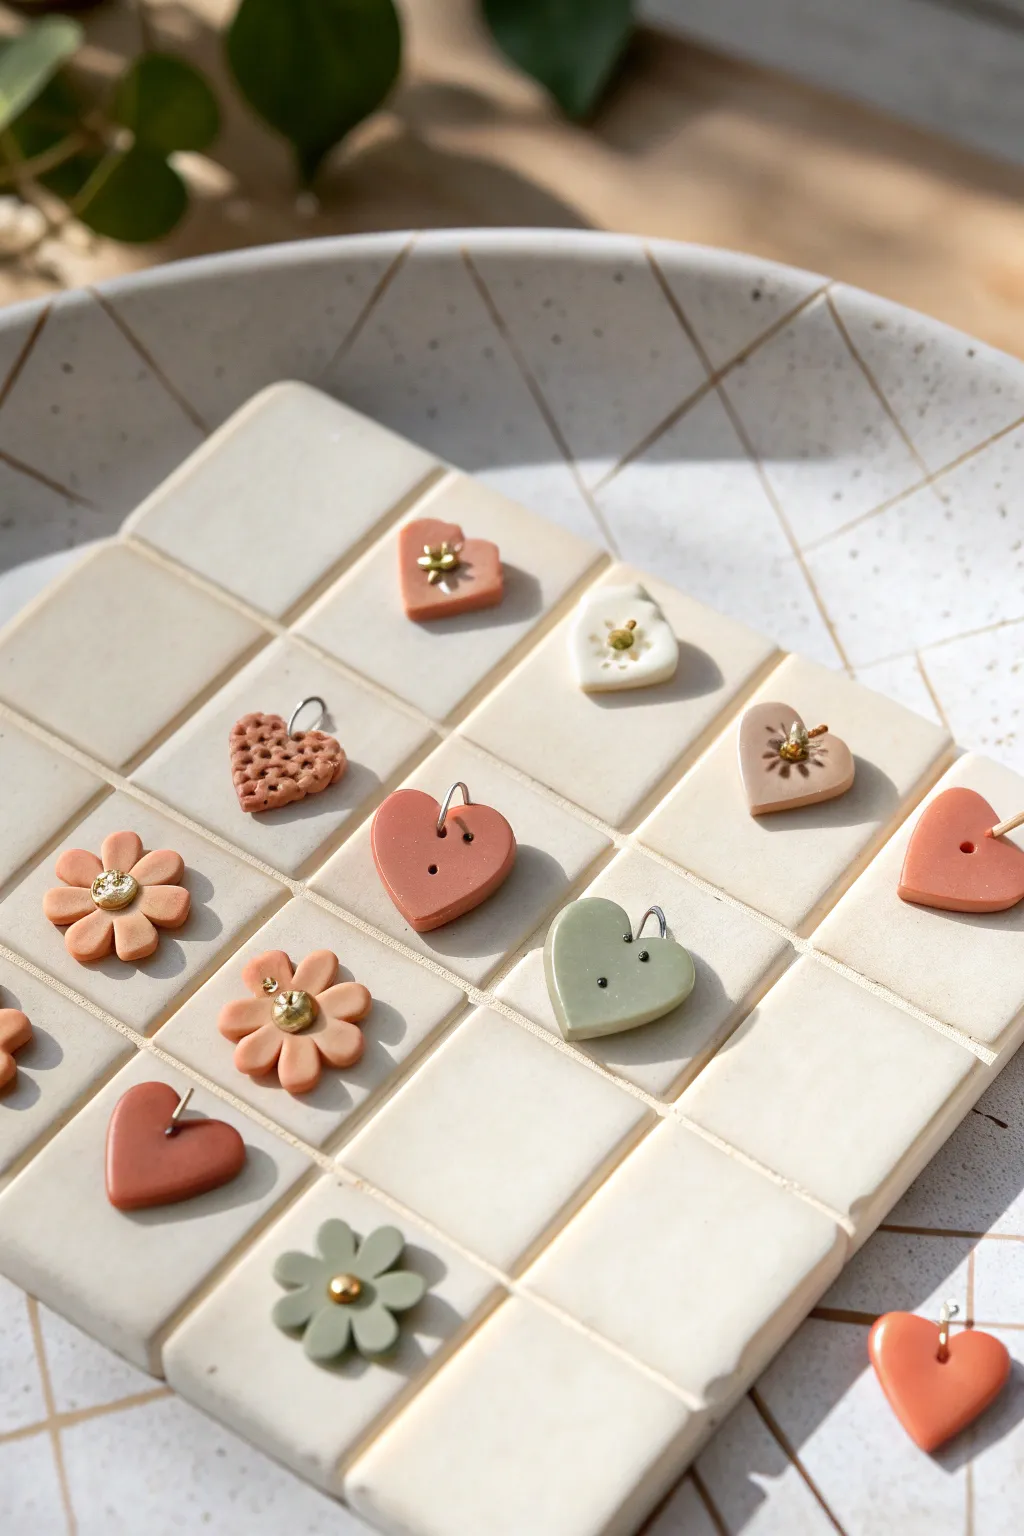
Create a delightful assortment of miniature charms perfect for dainty earrings or delicate necklaces. These tiny hearts and flowers feature a warm, earthy palette and varied textures, making them a stylish addition to any jewelry collection.
Step-by-Step Tutorial
Materials
- Polymer clay in muted tones (terracotta, sage green, cream, beige)
- Miniature clay cutters (heart and flower shapes, approx. 1cm)
- Acrylic rolling pin
- Texture tools (toothpick, small grid stamp or mesh)
- Small gold beads or rivet embellishments
- Earring posts, jump rings, or headpins
- Super glue or jewelry adhesive
- Hand drill or needle tool (for piercing holes)
- Ceramic tile or baking sheet
- Parchment paper
Step 1: Clay Preparation
-
Conditioning:
Start by warming the polymer clay in your hands. Knead each color separately until it is soft and pliable to prevent cracks during baking. -
Rolling:
Roll out a slab of clay to a uniform thickness, roughly 2-3mm. Using depth guides or playing cards on either side can help keep the surface perfectly level.
Step 2: Shaping & Texturing
-
Cutting shapes:
Use your miniature cutters to punch out several hearts and flower shapes from the different colored slabs. -
Smoothing edges:
Gently rub the edges of each cutout with your finger to remove any stray clay bits or sharp ridges left by the cutter. -
Simple piercing:
For the plain hearts, use a needle tool or toothpick to poke two small holes vertically in the center, resembling a button. -
Waffle texture:
Take a scrap of mesh or a textured tool and press it firmly into one of the heart shapes to create a waffle-grid pattern before baking. -
Sunburst detail:
For the beige hearts, gently press a small star-shaped tool or the tip of a Phillips head screwdriver into the center to create a sunburst impression. -
Flower centers:
For the flower shapes, press a small indentation into the center of each bloom to prepare it for the gold bead later. -
Adding hardware holes:
If you plan to use jump rings, carefully pierce a hole near the top edge of the shapes using a needle tool. Ensure the hole is wide enough for your jump ring.
Clean Cuts
Before cutting your shapes, dip the cutter into cornstarch or water. This prevents sticking and ensures the clay releases cleanly without distorting.
Step 3: Baking & Assembly
-
Baking:
Arrange your pieces on a ceramic tile or a parchment-lined baking sheet. Bake according to your customized clay manufacturer’s instructions, usually around 275°F (130°C) for 15-30 minutes. -
Cooling:
Let the pieces cool completely. I find that rushing this step can make the clay brittle, so be patient. -
Gold accents:
Apply a tiny dot of super glue to the center of the flowers and press a gold bead or rivet firmly into place. -
Attaching findings:
For studs, glue an earring post to the back of the shape. For swaying earrings, twist a jump ring through the pre-pierced hole. -
Final touches:
Double-check that all glued components are secure and let the adhesive cure fully before wearing.
Glossy Mix
Coat the finished pieces with a thin layer of UV resin or gloss varnish to give them a ceramic-like shine and protect the surface texture.
Enjoy mixing and matching your new collection of subtle, earthy accessories
Photo Or Card Stand
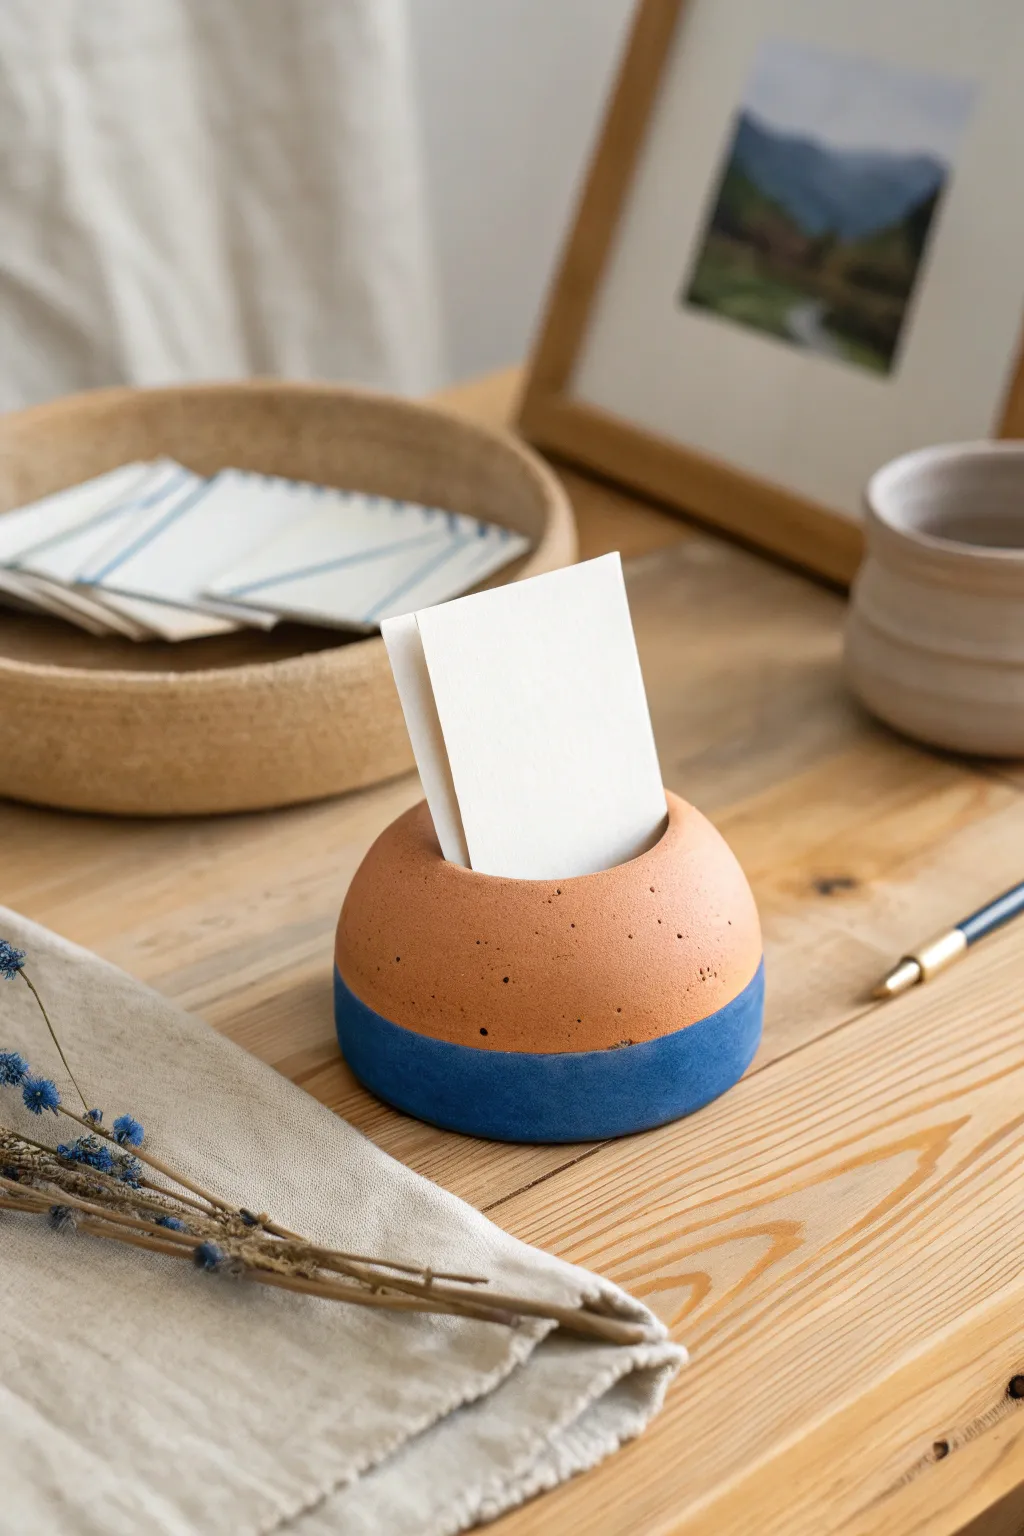
This charming, dome-shaped card stand features a lovely play on textures and colors, combining earthly terracotta tones with a deep, matte blue base. Its satisfying weight and clean slit make it perfect for displaying precious photos, business cards, or daily reminders on your desk.
Detailed Instructions
Materials
- Air-dry clay (terracotta color)
- Blue acrylic paint (matte finish)
- Fine-grit sandpaper
- Rolling pin
- Sharp crafting knife or fettling knife
- Measuring ruler or thick cardstock (for the slot width)
- Painter’s tape or wash tape
- Small foam brush
- Clear matte varnish (optional)
Step 1: Shaping the Dome
-
Condition the clay:
Begin by taking a generous handful of terracotta air-dry clay. Knead it thoroughly in your hands to warm it up and ensure there are no air bubbles trapped inside. -
Form a sphere:
Roll the clay between your palms or on your work surface until you have a smooth, solid ball about the size of a tennis ball or slightly smaller. -
Create the base:
Gently tap the ball onto your work surface to flatten one side. You want a distinct flat bottom so the holder sits securely without wobbling. -
Refine the shape:
Cup your hands around the clay to smooth out the dome shape. If you prefer the slightly flattened look shown in the photo, gently press down on the very top of the sphere with a flat object like a book. -
Smooth the surface:
Dip your finger in a tiny bit of water and run it over the clay to remove any fingerprints or large cracks. Don’t over-wet it, or the clay might become sticky. -
Cut the slot:
While the clay is still wet but firm, take your ruler or a thick piece of cardstock to mark the center line. Using your sharp knife or a fettling tool, cut a straight, deep slit directly into the top center. -
Widen the gap:
Ideally, you want the slot to be wide enough to hold a card but tight enough to keep it upright. I find gently wiggling the knife side-to-side creates just enough room without distorting the round shape. -
Final smooth:
Check the edges of your cut. If the clay dragged, use a damp fingertip to pat down any raised ridges around the opening. -
Dry thoroughly:
Set the piece aside in a cool, dry place. Let it dry completely for 24-48 hours. Turn it over halfway through so the bottom dries evenly.
Step 2: Sanding and Painting
-
Sand for texture:
Once fully cured, use fine-grit sandpaper to lightly sand the surface. You can leave some natural pockmarks for that stone-like character seen in the photo. -
Dust off:
Wipe the entire dome with a dry cloth or a soft brush to remove all clay dust before painting. -
Tape the line:
Decide where you want your color split. Apply painter’s tape horizontally around the lower third of the dome. Press the edge of the tape down firmly to prevent paint bleed. -
Prepare the blue paint:
Pour out a small amount of deep blue matte acrylic paint. If you want a more textured look like the example, you don’t need to dilute it. -
Paint the base:
Using a foam brush, dab the paint onto the exposed bottom section of the clay. Using a dabbing motion rather than long strokes helps achieve a stone-like texture. -
Check coverage:
Let the first coat dry to the touch, then check if you need a second coat for full opacity. -
Reveal the line:
Carefully peel away the painter’s tape while the paint is still slightly tacky (but mostly dry) to get the cleanest possible line. -
Clean up edges:
If any paint bled under the tape, use the tip of your craft knife to gently scrape it away, revealing the terracotta underneath. -
Seal (Optional):
To protect your work, you can apply a layer of clear matte varnish over the painted section or the whole piece, though leaving the terracotta raw maintains that lovely earthy texture.
Clean Cuts Pro Tip
To prevent the clay from dragging and ruining your slot, lightly oil the blade of your knife with vegetable oil or baby oil before cutting into the wet clay.
Cracks while Drying?
If small hairline cracks appear as the clay shrinks, mix a tiny bit of fresh clay with water to make a paste (slip) and fill the cracks, then sand smooth once dry.
Place your favorite memory in the slot and enjoy the modern touch this piece adds to your space
Desk Pen Cup With Texture
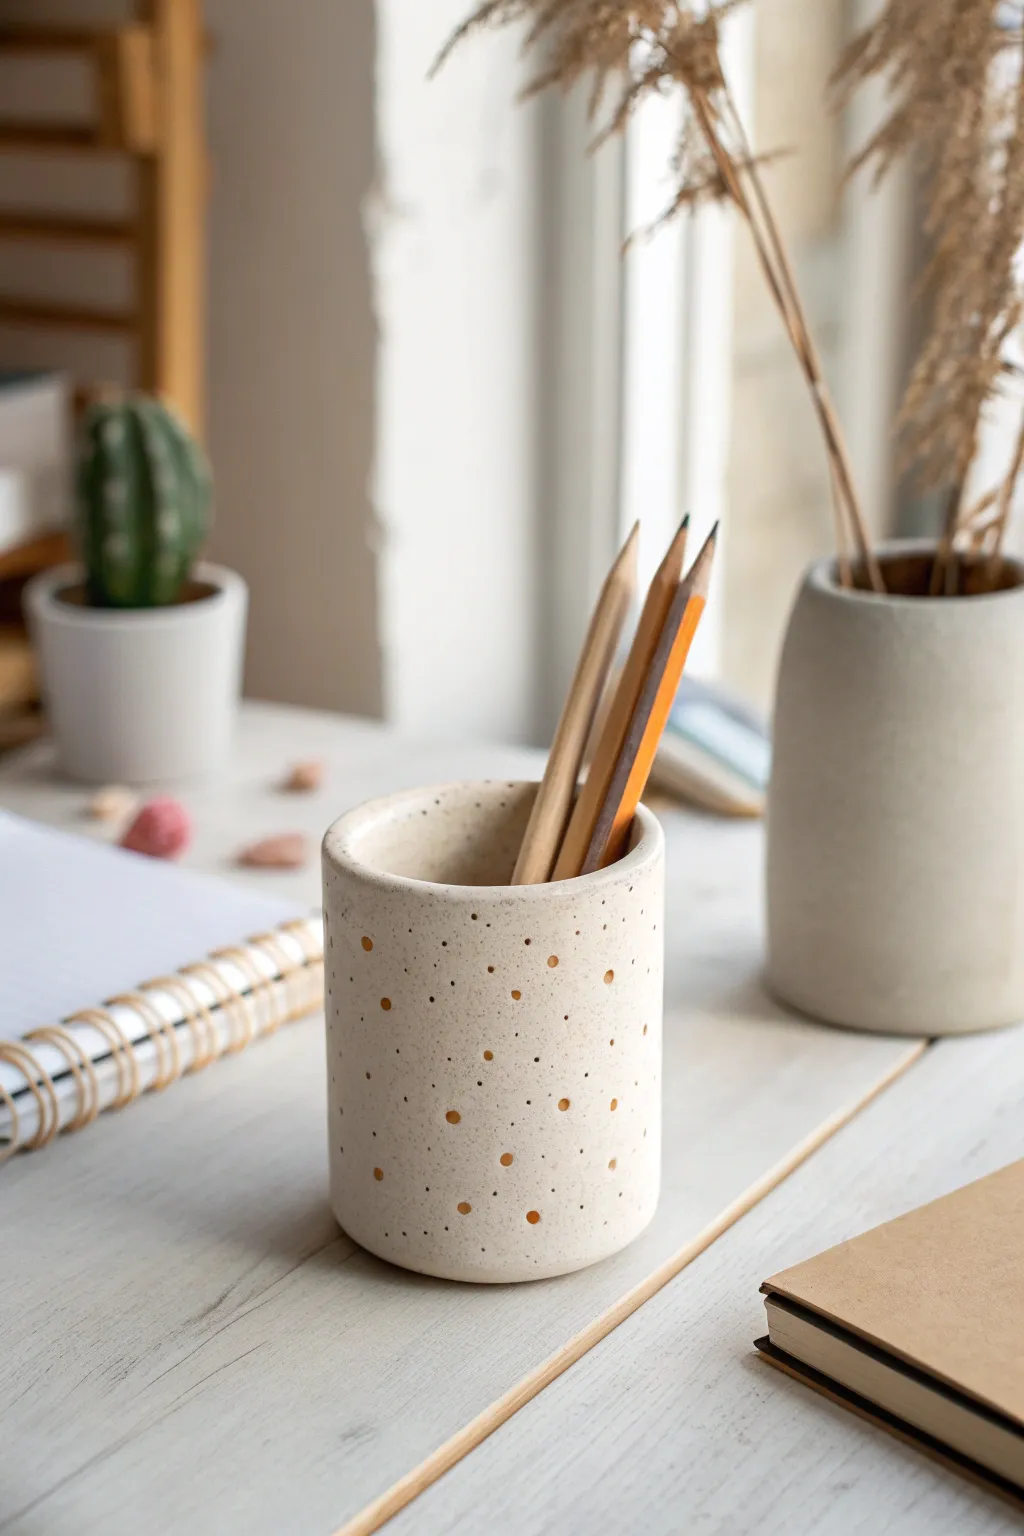
Bring a touch of modern minimalism to your workspace with this clean, cylindrical pen cup. Its charm lies in the subtle speckled clay body and the delicate pattern of perforations that allow light to filter through.
Step-by-Step Guide
Materials
- White or beige polymer clay (oven-bake)
- Granite or speckle effect polymer clay (or black pepper/dried tea leaves)
- Rolling pin or pasta machine
- Empty soda can or glass jar (for shaping)
- Craft knife or scalpel
- Parchment paper
- Small round piping tip or rigid straw (for punching holes)
- Sandpaper (fine grit)
- Ceramic sealant or matte varnish (optional)
Step 1: Preparing the Clay
-
Condition the clay:
Start by warming the white or beige polymer clay in your hands. Knead it thoroughly until it is soft, pliable, and free of any cracks. -
Create the speckled effect:
If you aren’t using pre-speckled clay, flatten your beige clay and sprinkle a tiny amount of faux granite clay, coarse black pepper, or dried tea leaves on top. Fold the clay over and knead until the specks are evenly distributed. -
Roll out a slab:
Place the clay between two sheets of parchment paper to prevent sticking. Roll it out into a long rectangular slab, aiming for a consistent thickness of about 1/4 inch (6mm) to ensure the cup is sturdy.
Step 2: Shaping the Cylinder
-
Cut the rectangle:
Using a craft knife and a straight edge, trim your clay slab into a neat rectangle. The height should be slightly shorter than your pencils, and the length must be enough to wrap fully around your chosen form (soda can or jar) with a little overlap. -
Wrap the form:
Wrap the parchment paper around your soda can first to prevent sticking. Then, gently lift your clay rectangle and wrap it around the can. -
Create the seam:
Where the two ends of the clay meet, slice vertically through both overlapping layers with your craft knife. Remove the excess trimmings from underneath and press the two cut edges together. -
Smooth the join:
Gently rub the seam with your finger or a clay tool until the line disappears and the wall is smooth. I find a little cornstarch on my finger helps it glide without dragging the clay.
Clay Slumping?
If the clay walls sag while you’re working, pop the wrapped can into the fridge for 15 minutes. Cooling firms up the clay, making it easier to smooth seams without distorting the shape.
Step 3: Adding texture and Base
-
Create the base:
Roll out a small separate piece of clay for the bottom. Place your clay-wrapped can onto this piece and trace around the bottom edge with your knife to cut a perfect circle. -
Attach the base:
Gently press the circle onto the bottom of the cylinder. Use your thumb or a modeling tool to blend the seams where the base meets the walls, ensuring a watertight-looking seal. -
Plan your pattern:
Before punching holes, you can lightly mark where you want them with a needle tool, or work freehand for a more organic look. The reference image uses a scattered, random distribution. -
Punch the holes:
Using a small round piping tip or a stiff straw, press into the clay walls to create the small circular perforations. Twist slightly as you pull the tool out to remove the clay plug cleanly. -
Vary the depth:
For added visual interest, press some holes all the way through and others only halfway deep to create shadow pockets.
Make it Glow
Turn this pen cup into a lantern by using translucent polymer clay instead of opaque opaque. Place a battery-operated tea light inside, and the glow will shine beautifully through the holes.
Step 4: Finishing Touches
-
Smooth the rim:
Run your finger along the top rim of the cup to soften any sharp edges created during cutting. It should look slightly rounded and finished. -
Bake firmly:
Bake the project according to your specific clay brand’s instructions. Often this is around 275°F (135°C) for 30 minutes. Keeping the can inside (if it’s oven-safe metal/glass) helps maintain the shape. -
Removing the form:
Once baked and fully cooled, carefully slide the inner form out. If you used parchment paper between the clay and the can, this should slide out easily. -
Sanding:
Use fine-grit wet/dry sandpaper to buff out any fingerprints or rough spots on the rim and seam. Wet sanding under a trickle of water keeps dust down and creates a smoother finish. -
Seal (Optional):
If you want a sealed finish akin to glazed pottery, apply a thin coat of matte varnish.
Fill your new creation with your favorite sketching pencils and enjoy a more organized desk
Toothbrush Holder With Cute Shape
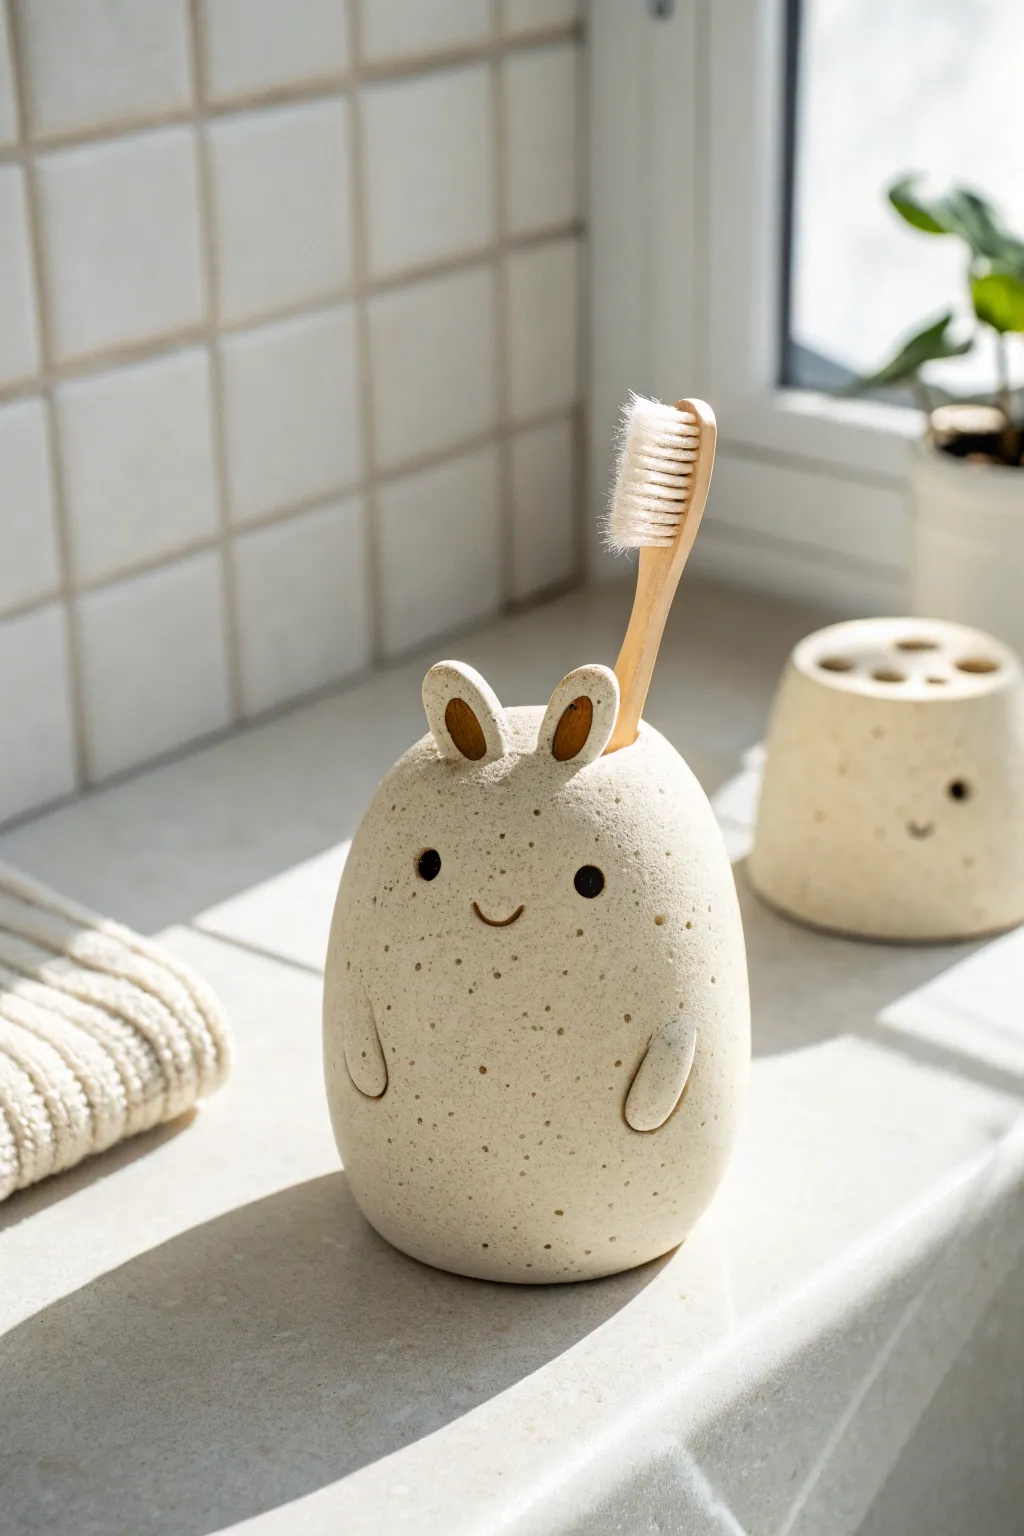
Bring a touch of playful charm to your bathroom counter with this adorable creature-shaped toothbrush holder. Modeled from speckled clay, its minimal face and rounded form make it a modern yet whimsical addition to your morning routine.
Detailed Instructions
Materials
- Air-dry clay (stone or speckled effect)
- Wooden sculpting tools
- Rolling pin
- Small bowl of water
- Sponge
- Acrylic paint (black and brown)
- Fine detail paintbrush
- Clear waterproof varnish or sealant
- Sandpaper (fine grit)
Step 1: Shaping the Body
-
Prepare the Clay:
Start by taking a large handful of your speckled air-dry clay. Knead it thoroughly in your hands to warm it up and remove any air bubbles, which helps prevent cracking later. -
Form the Base:
Roll the clay into a smooth ball about the size of a large orange. Gently tap the bottom against your work surface to create a flat base so it stands up on its own. -
Shape the Dome:
Using your palms, gently smooth the sides upward to elongate the ball slightly into a tall, rounded egg shape. The top should be slightly narrower than the bottom but still rounded. -
Create the Toothbrush Cavity:
Take a tool with a rounded handle or a thick dowel. Press it vertically into the top center of your egg shape to create the hole for the toothbrush. Ensure it goes deep enough to hold a brush securely (about 3-4 inches) but doesn’t poke through the bottom. -
Smooth the Edges:
Dip your finger in a little water and run it around the rim of the hole you just made to soften the edge. You want a smooth transition, not a sharp lip.
Step 2: Adding Features
-
Make the Ears:
Pinch off two small, bean-sized pieces of clay. Roll them into balls and then flatten them slightly into oval shapes to create the ears. -
Attach the Ears:
Score the bottom of the ears and the attachment points on top of the head with a needle tool. Add a dab of water (slip) and press the ears firmly onto the head, smoothing the seams with a sculpting tool until they look seamless. -
Detail the Ears:
Use a small, rounded tool to press a recessed oval into the center of each ear. This gives them depth and mimics the inner ear structure shown in the inspiration. -
Add the Arms:
Create two small, teardrop-shaped pieces of clay for the arms. They should be just about an inch long. -
Attach the Arms:
Score and slip the wider part of the teardrops and attach them low on the sides of the body. Angle them slightly upward. Blend the attachment point at the shoulder, but leave the bottom of the arm slightly raised for a 3D effect. -
Refine the Surface:
Take a slightly damp sponge and gently wipe over the entire sculpture. This removes fingerprints and reveals the stone-like texture of the clay.
Cracks Appearing?
If you see hairline cracks while drying, mix a tiny bit of fresh clay with water to make a paste. Fill the cracks, smooth over, and let it dry again slowly.
Step 3: Finishing Touches
-
Dry Completely:
Let the holder dry for at least 24 to 48 hours. I find it helpful to turn it occasionally if the bottom stays damp, ensuring it dries evenly. -
Sand for Smoothness:
Once bone dry, use fine-grit sandpaper to buff away any rough spots, especially around the rim of the toothbrush hole. -
Paint the Face:
Dip the handle end of a paintbrush into black acrylic paint to stamp two small dots for the eyes. Use a very fine brush to paint a simple, small ‘U’ shape for the smile. -
Paint the Inner Ears:
Mix a diluted brown paint and carefully fill inside the recessed areas of the ears to define them. -
Seal the Holder:
Since this will live in a bathroom, apply 2-3 coats of waterproof varnish inside and out. Pay special attention to coating the inside of the hole so water doesn’t degrade the clay over time.
Waterproof it right
Don’t skip the inside! Pour a bit of varnish directly into the toothbrush hole, swirl it around to coat the walls, and dump the excess out.
Enjoy seeing your cheerful new friend every time you brush your teeth
Incense Holder Dish
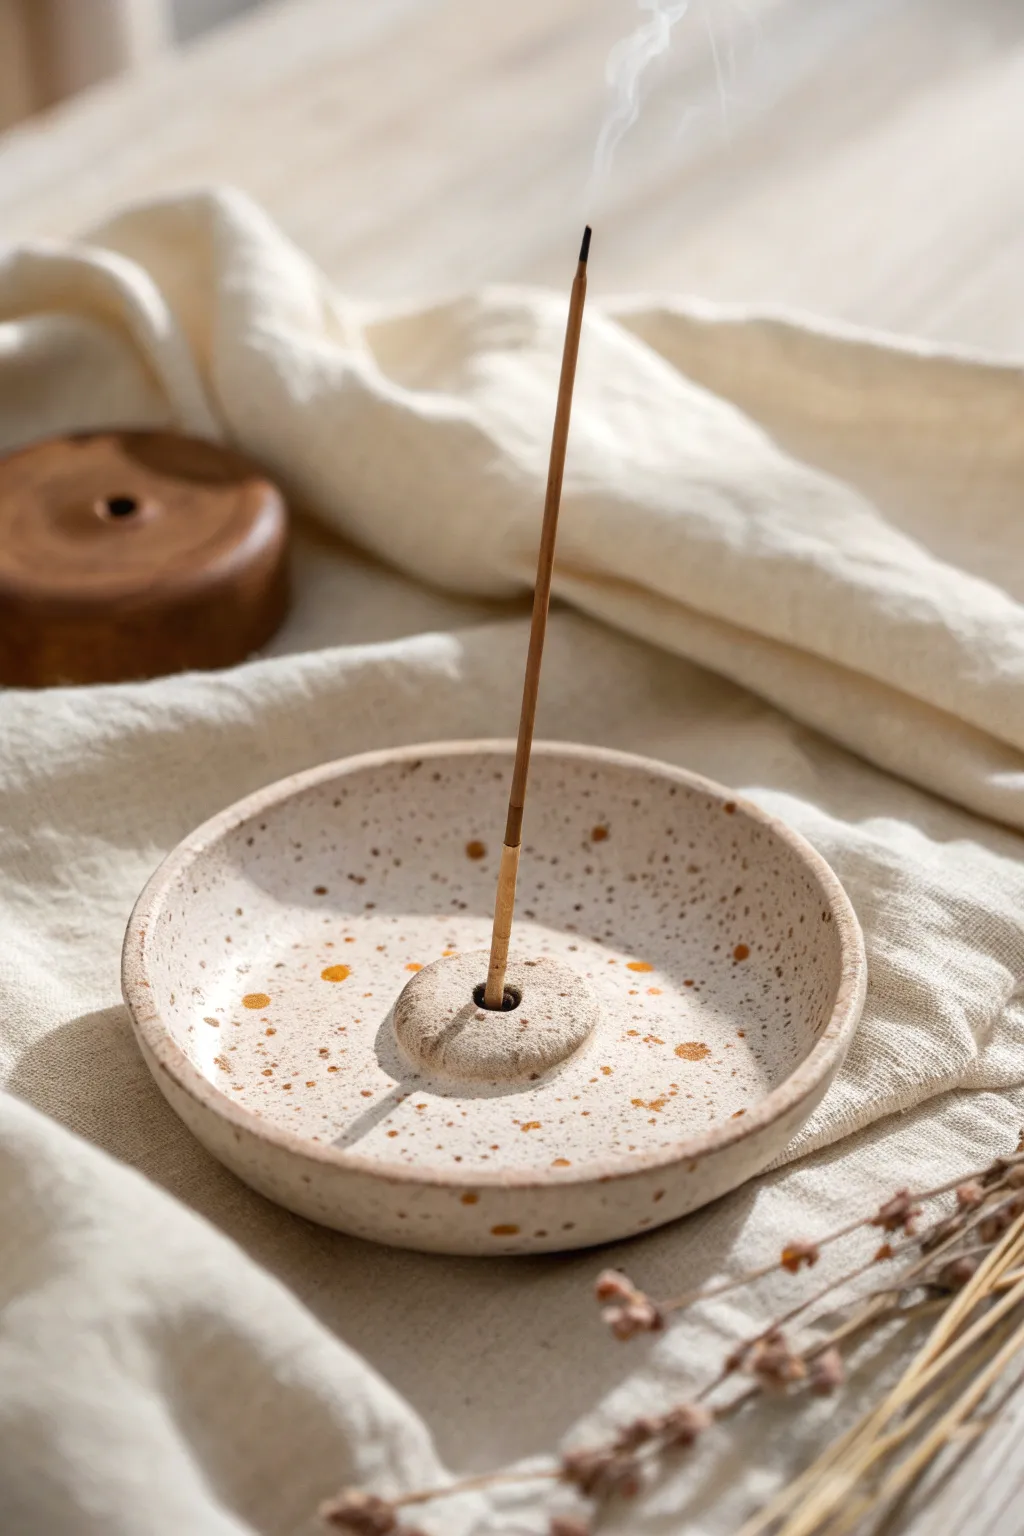
Embrace simplicity with this understated incense holder that blends organic textures with modern design. The creamy, speckled finish gives it a warm, handmade ceramic feel without needing a kiln if you use the right clay.
How-To Guide
Materials
- White air-dry clay or polymer clay
- Rolling pin
- Circle cutter or a small bowl (approx. 4-5 inches)
- Craft knife
- Small cup of water
- Wooden skewer or toothpick
- Sponge
- Brown and tan acrylic paint
- Old toothbrush or stiff bristle brush
- Matte sealant or varnish
Step 1: Shaping the Dish
-
Prepare the Clay:
Start by taking a fist-sized ball of white clay and kneading it in your hands until it becomes soft, pliable, and free of air bubbles. -
Roll it Out:
Using your rolling pin, flatten the clay on a clean, smooth surface until it is an even slab, roughly 1/4 inch thick. -
Cut the Circle:
Place your circle cutter or inverted bowl onto the clay slab and press down firmly to cut out your base shape. Remove the excess clay. -
Create the Lip:
Gently curve the edges of the circle upwards with your fingers to create a shallow dish shape. I find rotating the piece while pinching the edges helps maintain symmetry. -
Smooth the Edges:
Dip your finger into a little water and run it along the rim of the dish to smooth out any cracks or roughness.
Don’t Rush the Hole
Check your incense stick fitment after about 2-3 hours of drying. Clay shrinks as it dries, so re-insert the stick gently to ensure the hole stays the right size.
Step 2: Adding the Holder
-
Form the Center Mound:
Take a small piece of leftover clay and roll it into a ball about the size of a marble or large grape. -
Flatten Slightly:
Press the ball down gently onto your work surface just enough to give it a flat bottom while keeping the top rounded. -
Score and Slip:
Use your craft knife to make tiny hash marks (scoring) on the bottom of the mound and the center of your dish. Add a drop of water to join them. -
Attach the Mound:
Press the mound firmly into the center of the dish. Use a sculpting tool or your finger to blend the bottom edge of the mound seamlessly into the dish floor. -
Create the Ink Hole:
Take an incense stick or a skewer that matches the thickness of your incense and press it vertically into the center of the mound. Wiggle it slightly to ensure the hole is deep enough but doesn’t go all the way through the bottom. -
Final Smoothing:
Use a damp sponge to wipe the entire piece, removing fingerprints and ensuring a smooth, stone-like surface. -
Dry Time:
Let the clay dry completely according to package instructions. This usually takes 24-48 hours depending on humidity.
Natural Texture
Mix dried tea leaves or heavy cracked pepper into the clay body before rolling it out. This creates a real texture inside the clay instead of just painted speckles.
Step 3: Creating the Faux-Ceramic Texture
-
Base Coat (Optional):
If your dried clay doesn’t look creamy enough, paint the entire dish with a mixture of white and a tiny drop of beige acrylic paint. Let it dry. -
Prepare Speckle Paint:
Dilute your brown and tan acrylic paints with a small amount of water until they are fluid and inky. -
Splatter Technique:
Dip your old toothbrush into the diluted brown paint. Hold it over the dish and run your thumb across the bristles to flick tiny specks of paint onto the surface. -
Layering Speckles:
Repeat the splatter process with the tan paint to add depth. Don’t worry about being too precise; random distribution looks more natural. -
Larger Dots:
For the larger spots visible in the inspiration photo, use the tip of a toothpick dipped in paint to manually add a few bigger, irregular dots. -
Seal the Piece:
Once the paint is fully dry, apply a coat of matte sealant to protect the finish and give it that soft ceramic look.
Now you have a serene, custom-made spot to burn your favorite scents and relax
Mini Bud Vase (Decor Only)
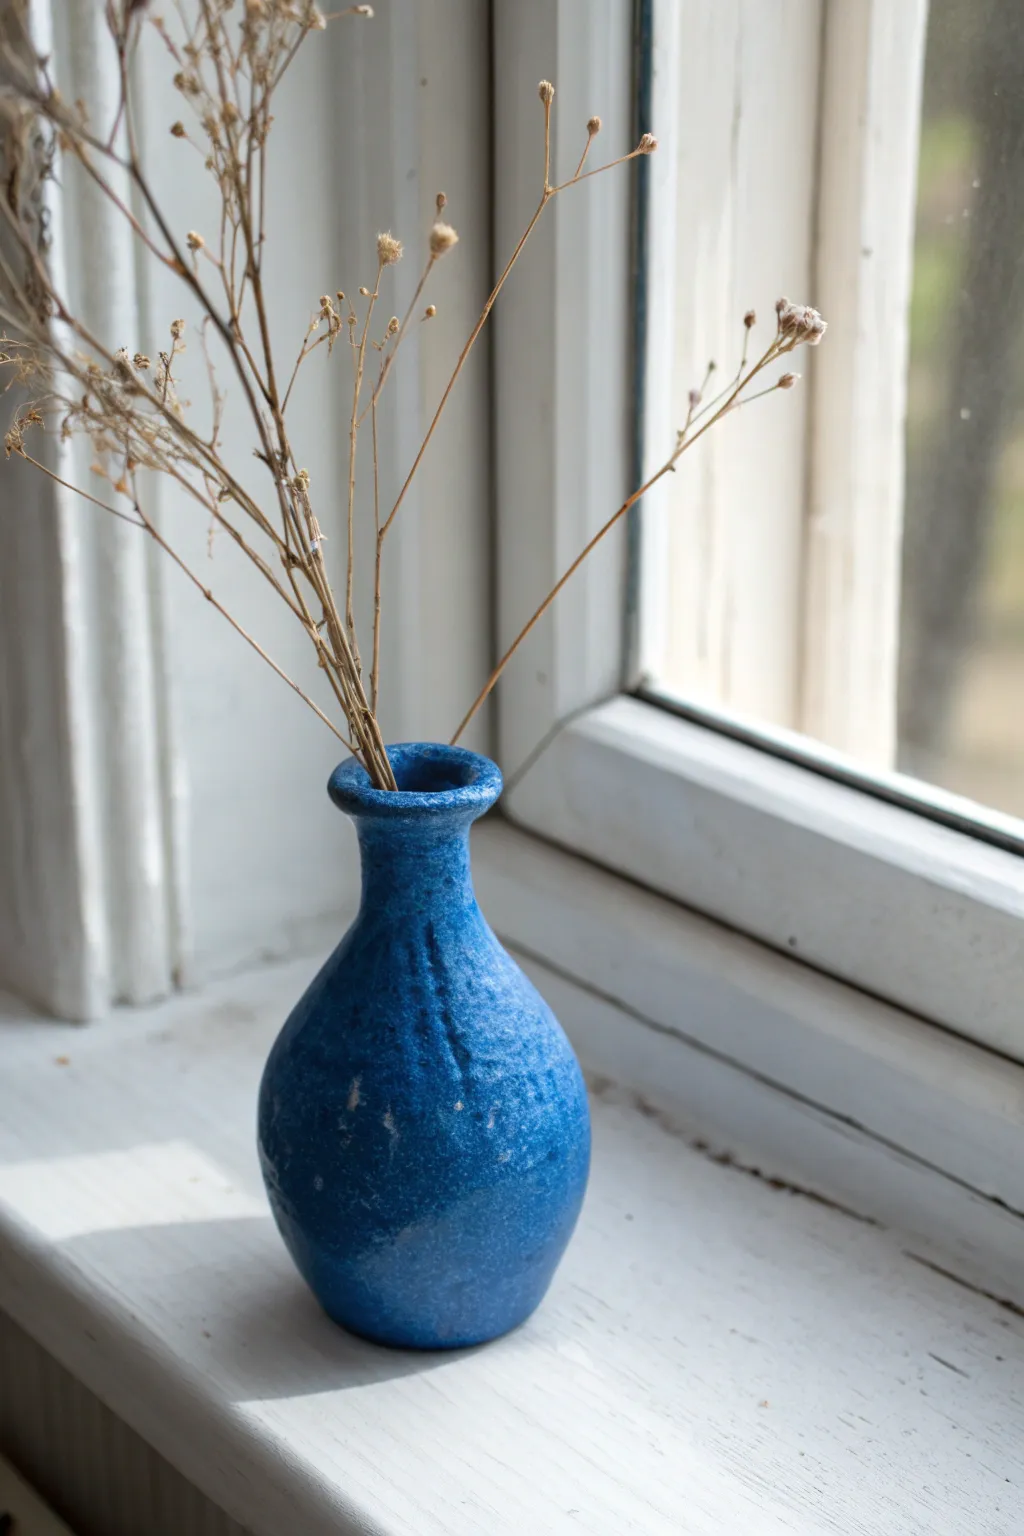
Bring a touch of rustic charm to your windowsill with this delightful mini bud vase. The deep cobalt blue finish and deliberately imperfect texture give it the look of hand-thrown pottery without needing a wheel.
Step-by-Step Tutorial
Materials
- Air-dry clay (white or terracotta)
- Small rolling pin
- Clay sculpting tools (or a butter knife)
- Small cup of water
- Synthetic sponge
- Acrylic paint (Cobalt Blue, Deep Navy, and optional White)
- Glossy varnish or Mod Podge
- Soft paintbrushes (flat and round)
- Rough sandpaper (80 or 100 grit)
Step 1: Shaping the Form
-
Prepare the clay:
Start by taking a chunk of air-dry clay about the size of a tennis ball. Knead it thoroughly in your hands until it’s warm, pliable, and free of air bubbles. -
Create the base:
Roll the clay into a smooth sphere. Gently tap the bottom against your work surface to create a flat, stable base so the vase creates a solid connection with the table. -
Form the pinch pot:
Push your thumb into the center of the sphere, stopping about half an inch from the bottom. Begin pinching the clay walls between your thumb and fingers, rotating as you go to thin out the sides. -
Draw up the neck:
As you pinch, gently coax the clay upward to elongate the form. When you reach the top third, start narrowing the opening by gently squeezing the clay inward to define the neck of the vase. -
Flare the rim:
Once the neck is defined, press your thumb slightly outward at the very top edge to create a distinctive flared lip. This gives the piece a classic vase silhouette. -
Refine the shape:
Step back and look at the proportions. Smooth out any major lumps with a wet finger, but don’t worry about perfection; organic shapes look best for this style.
Waterproof Warning
Remember, standard air-dry clay is not waterproof even when sealed. Use this vase only for dried botanicals, faux stems, or decor, never for fresh flowers with water.
Step 2: Adding Texture & Finishing
-
Add surface interest:
While the clay is still damp, take a slightly rough tool or a crumpled piece of foil and press it gently against the sides. I like to drag a tool vertically down the sides to create subtle ridges. -
Smooth the imperfections:
Dip your sponge in water and wring it out almost completely. Dabbing the surface will soften the harsh tool marks into a weathered, time-worn texture. -
Dry thoroughly:
Set the vase in a dry, well-ventilated spot. Let it cure for at least 24-48 hours. The clay must be bone dry and room temperature to the touch before painting. -
Sand for character:
Once dry, use your coarse sandpaper to scuff up parts of the surface. Focus on the ridges you created earlier to enhance the handmade aesthetic. -
Base coat:
Mix a small amount of Deep Navy into your Cobalt Blue acrylic paint. Apply a solid opaque layer over the entire exterior and just inside the rim. -
create depth:
While the first coat is tacky, dab on pure Cobalt Blue in random patches using a sponge or dry brush. This variation creates the illusion of ceramic glaze. -
Add weathered details:
Dip a nearly dry brush into a tiny bit of white or light grey paint. Very lightly dust the raised textures and the rim to make the details pop. -
Seal the piece:
Apply two coats of glossy varnish or Mod Podge. This transforms the matte acrylic paint into a surface that mimics fired ceramic glaze.
Faux Speckle Effect
To mimic stoneware speckles, dilute a tiny bit of black paint with water. Load an old toothbrush and flick the bristles to spray fine dots over the blue paint before varnishing.
Pop in a few dried sprigs to complete your stylish corner renovation
Clay Candle Holder Set
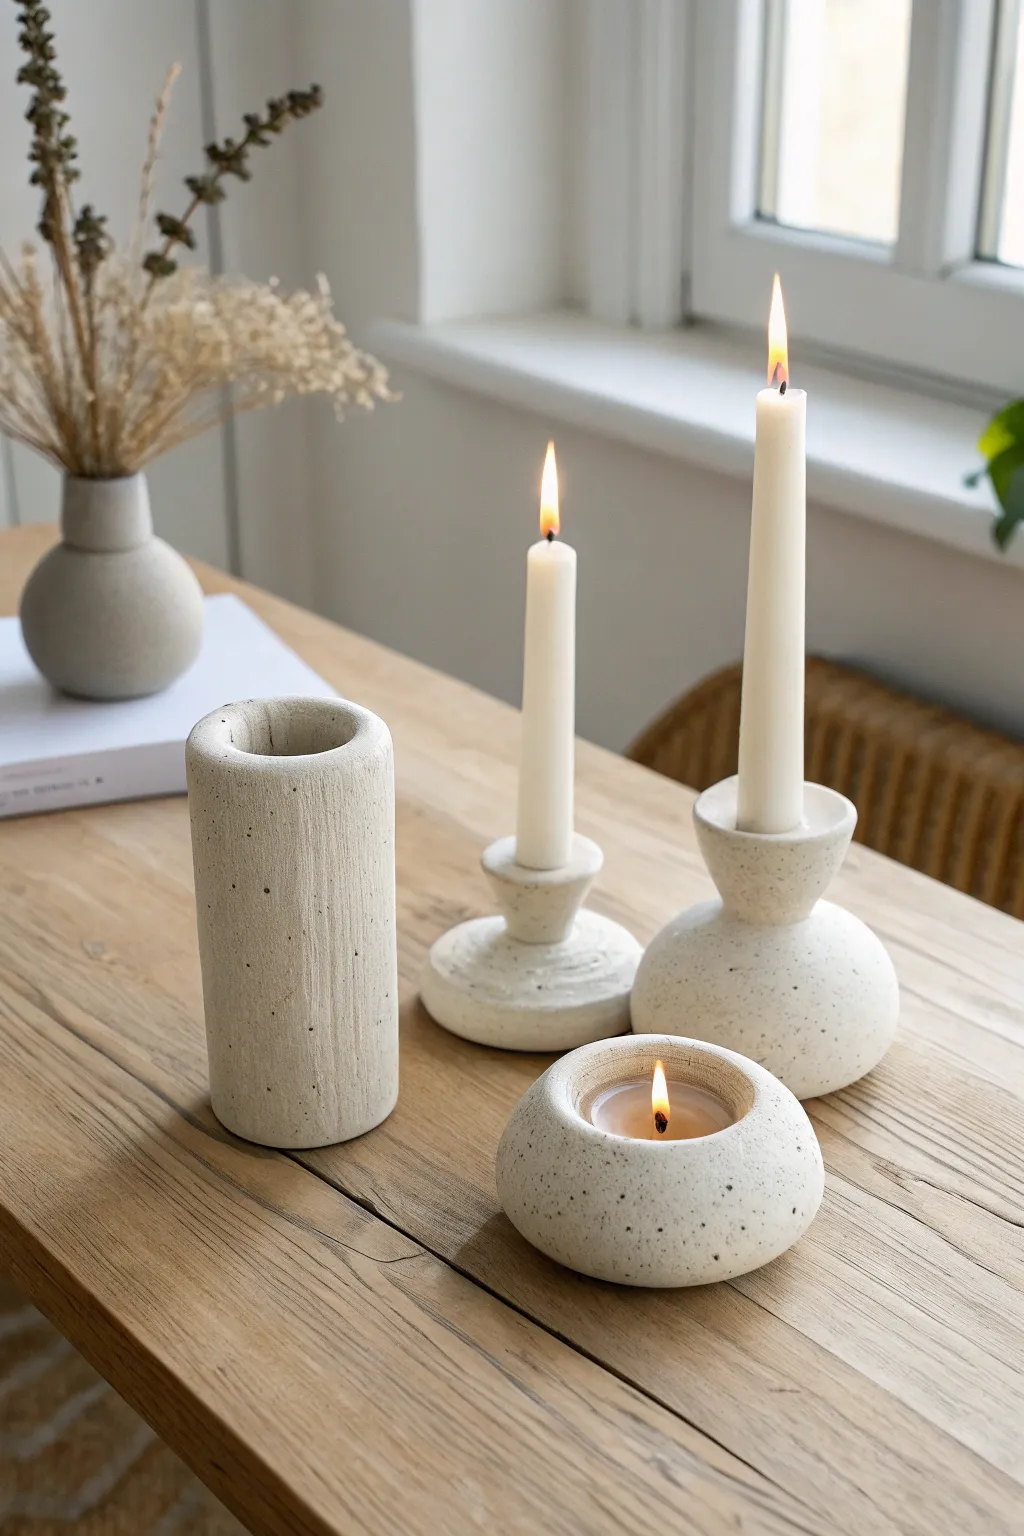
Bring a touch of minimalist Scandinavian design to your home with this stunning four-piece candle holder set. Crafted to mimic the look of natural speckled stone, these pieces combine organic shapes with a clean, matte finish that suites any modern decor.
How-To Guide
Materials
- Air-dry clay (white or light grey)
- Black pepper or dried coffee grounds (for speckling)
- Acrylic rolling pin
- Clay knife or fettling knife
- Sponge and water cup
- Sandpaper (fine and medium grit)
- Taper candle (for sizing)
- Tea light candle (for sizing)
- Slip (clay mixed with water)
- Matte spray varnish or sealant
Step 1: Preparation & Clay Mixing
-
Prepare the speckle mix:
To achieve that natural stone look without buying specialized clay, take a large chunk of white air-dry clay and flatten it slightly. Sprinkle a generous amount of coarse black pepper or dried used coffee grounds onto the surface. -
Knead thoroughly:
Fold the clay over the speckles and knead it repeatedly. You want the particles distributed evenly throughout the entire batch so the texture looks consistent. If the clay feels dry, mist it with a little water. -
Divide the clay:
Separate your clay into four portions: a large ball for the tall cylinder, two medium balls for the taper holders, and a smaller ball for the tea light holder. Keep the unused portions covered with a damp cloth or plastic wrap.
Step 2: Sculpting the Cylinder Vase
-
Form the base cylinder:
Take the largest portion and roll it into a thick log. Stand it upright on your work surface and press it down gently to flatten the bottom. Use your rolling pin to gently roll against the vertical sides to smooth them out while maintaining the cylindrical shape. -
Create the opening:
Instead of hollowing it out completely, simply press your thumb or a thick dowel into the center of the top to create a deep indentation for a candle or dried flowers. Widen it slightly with your fingers. -
Texturize the surface:
Takes a stiff-bristled brush or a fork and lightly drag it vertically up the sides of the cylinder. This creates those subtle vertical striations seen in the reference image. Smooth down any harsh burrs with a damp finger.
Cracking Issues?
If small cracks appear while drying, don’t panic. Mix a tiny bit of fresh clay with water to make a thick paste (slip) and fill the crack. Smooth it over and let it dry again.
Step 3: Creating the Taper Holders
-
Shape the base:
For the taller taper holder, form a round ball of clay and flatten the bottom so it sits stable. Gently pinch the top of the ball and pull the clay upward to start forming a neck. -
Refine the bulb shape:
Smooth the transition between the round base and the rising neck. Ideally, the base should look like a slightly flattened sphere. -
Add the candle cup:
Roll a small coil (snake) of clay. Score and slip the top of the neck, then attach the coil to form a cup shape. Smooth the seams completely with a damp sponge so it looks like one solid piece. -
Size the opening:
Insert your actual taper candle into the wet clay cup. Twist it gently to ensure a perfect fit, then remove it immediately so it doesn’t get stuck. Wiggle it slightly to make the hole just a hair larger to account for shrinkage. -
Make the shorter holder:
For the second taper holder, shape a wider, flatter disc for the base and attach a simple, short conical piece on top using the score and slip method. Hollow out the top for the candle just as you did before.
Pro Tip: Weight it Down
Air-dry clay can be light. To make your candle holders feel substantial and safe, press a large metal washer into the bottom of the wet clay base before drying.
Step 4: Forming the Tea Light Holder
-
Create a smooth pebble:
Take your final ball of clay and roll it into a very smooth, round stone shape. Tap it on the table to flatten the bottom. -
Press the insert:
Press a tea light candle directly into the center of the sphere. Push it down until the top of the candle is flush or slightly below the rim of the clay. Remove the candle carefully. -
Refine the rim:
Use a damp sponge to smooth the top rim of the hole, rounding it off so it looks soft and organic rather than sharp.
Step 5: Finishing Touches
-
Let them dry:
Allow all pieces to dry for at least 24-48 hours. I like to rotate them occasionally so the bottoms dry evenly. -
Sand for perfection:
Once fully dry, use fine-grit sandpaper to smooth out any fingerprints or rough patches. This is crucial for that store-bought ceramic look. Be careful not to sand away your vertical texture on the cylinder. -
Seal the set:
Finish by applying a matte spray varnish. This protects the clay and secures the coffee/pepper speckles so they don’t flake off over time.
Group your beautiful handmade set on a wooden table or mantle for an instant cozy atmosphere
Tiny House Keepsake Ornament
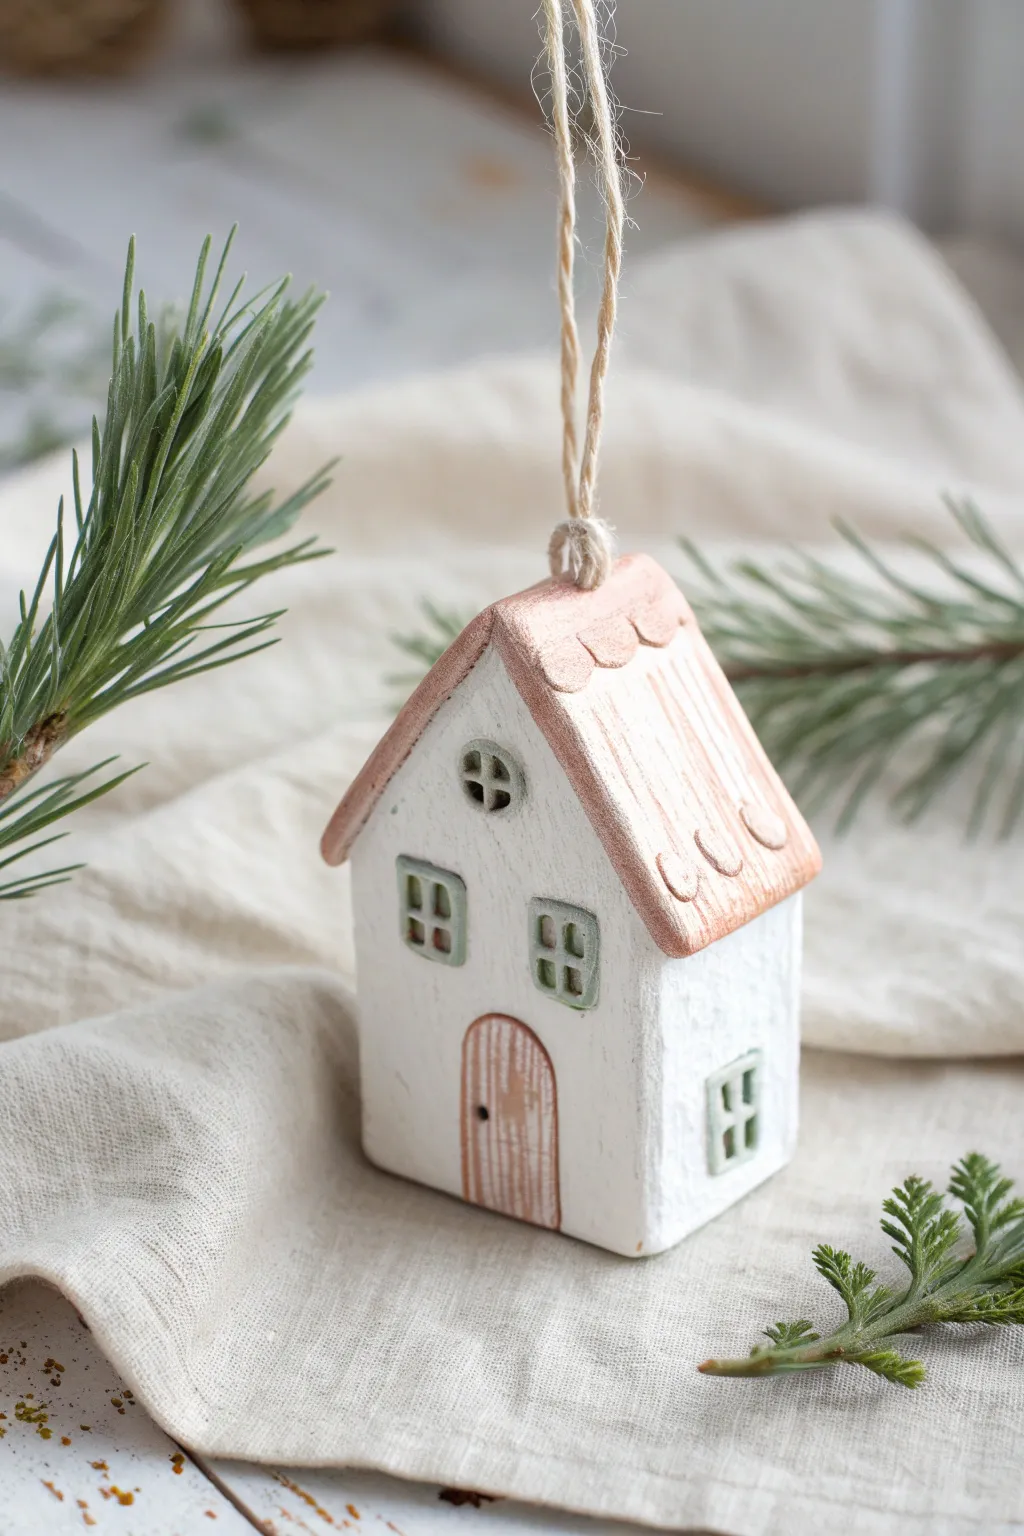
Create a cozy, miniature abode to hang on your tree or gift as a thoughtful handmade keepsake. This charming solid clay house features subtle metallic accents and a rustic, textured finish that feels both modern and timeless.
How-To Guide
Materials
- White stone clay or air-dry clay (fine texture)
- Rolling pin
- Sharp craft knife or scalpel
- Small square clay cutter (optional)
- Needle tool or toothpick
- Sandpaper (fine grit)
- Metallic copper or rose gold acrylic paint
- Sage green acrylic paint
- White matte acrylic paint
- Fine detail paintbrush (size 0 or 00)
- Small flat paintbrush
- Jute twine or string
- Eye screw (tiny) or clay loop tool
Step 1: Shaping the Base
-
Condition the Clay:
Begin by taking a chunk of your air-dry clay and kneading it in your hands until it becomes warm, pliable, and free of cracks. This conditioning step ensures the clay won’t crumble while you work. -
Form the Block:
Roll the clay into a smooth ball, then gently press it against your work surface to flatten the bottom. Use your fingers or a flat tool to shape the sides, creating a rectangular block approximately 1.5 inches wide and 2 inches tall. -
Create the Roof Pitch:
Use your craft knife to slice the top two corners off your rectangular block at an angle, creating a pointed triangle shape for the roof. Smooth the cut edges with a little water on your finger. -
Define the Roof Overhang:
Roll out a separate, thin slab of clay (about 1/8 inch thick). Cut a rectangle that is slightly wider and longer than the angled top of your house block to serve as the roof structure. -
Attach the Roof:
Score the angled top of the house and the underside of the roof slab with horizontal scratch marks. Apply a drop of water or liquid clay (slip) and press the roof slab firmly onto the house block. -
Blend the Seams:
I like to take a sturdy modeling tool to smooth the seam where the roof meets the house walls underneath, ensuring it is securely attached, though leaving a slight overhang adds character. -
Add Scalloped Detail:
For the shingles, roll three very thin snakes of clay. Flatten them slightly and attach them to the roof in horizontal rows. Use a rounded tool or the end of a paintbrush handle to press ‘U’ shapes into the clay, mimicking scalloped tiles. -
Add the Hanger:
Twist a small metal eye screw gently into the very peak of the roof. If the clay is too soft, you can wait for it to firm up slightly, or secure it with a dab of superglue after baking/drying.
Cracks while drying?
Mix a tiny bit of fresh clay with water to make a paste (slip). Fill any cracks with this paste using your finger, let dry, then sand smooth.
Step 2: Sculpting Details
-
Carve the Windows:
Using a small square cutter or your knife, gently impress one square window shape on the side and two on the front. Don’t cut all the way through; just create an indentation for the frame. -
Detail the Window Panes:
With a needle tool, press a cross shape into the center of each window indentation to simulate window panes. Add a small circular window near the peak of the attic using a drinking straw or round cutter. -
Sculpt the Door:
Score an arch shape at the base of the house front. Gently scrape away a thin layer of clay inside the arch to recess the door slightly, giving it depth. -
Texture the Walls:
To achieve that rustic plaster look, take a stiff-bristle brush or a crumpled ball of aluminum foil and lightly tap it against the exterior walls of the house, avoiding the window and door areas. -
Drying Phase:
Allow your ornament to dry completely. For air-dry clay, this usually takes 24-48 hours. Turn it occasionally to ensure even drying.
Step 3: Painting and Finishing
-
Base Coat:
Paint the entire house (including the roof) with a coat of matte white acrylic paint. This acts as a primer and unifies the texture. Let it dry fully. -
Gilding the Roof:
Using the copper or rose gold metallic paint, carefully paint the roof. Use a dry-brush technique near the edges to let some white show through for a weathered look. -
Painting the Door:
Fill in the arched door shape with the same metallic copper paint. Once dry, use a tiny dot of dark brown or black paint for the doorknob. -
Adding Vertical Door Lines:
Mix a tiny amount of water with white paint to make a wash. Use your finest brush to paint very subtle vertical stripes on the door to suggest wood planks. -
Coloring the Windows:
Dilute the sage green paint slightly. Carefully fill in the recessed window areas. The liquid paint should naturally settle into the corners, leaving the raised cross-bars lighter or white. -
Stringing:
Once all paint is cured, thread a piece of natural jute twine through the eye screw and tie a secure knot to create the hanging loop.
Make it a Village
Make a set of three houses with varying roof heights and window placements. Paint the roofs in different metallic shades like silver, gold, and bronze.
Hang your little architectural masterpiece on a branch and enjoy the handmade charm it brings to your space