Whenever you want that instant “I made this!” feeling, clay crafts are my go-to because the shapes can stay super simple and still look adorable. Here are my favorite easy and crafty ideas that feel doable on a regular day, even if you’re brand-new to air-dry clay or polymer clay.
Simple Air-Dry Clay Pinch Pots
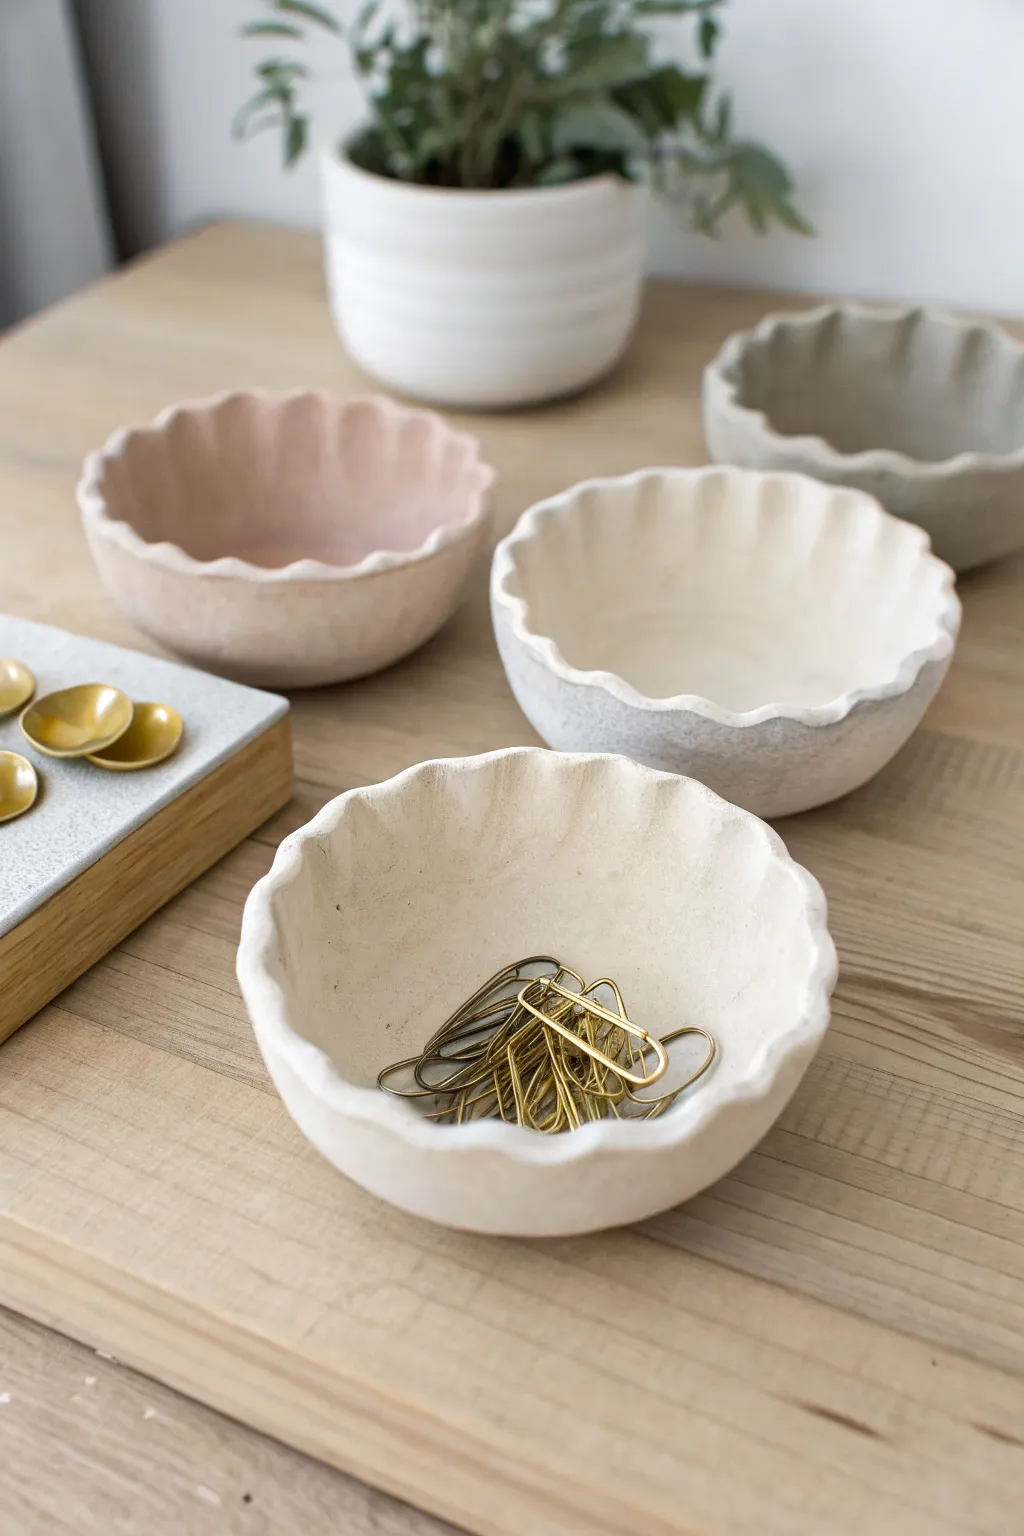
These charming little pinch pots feature a delicate scalloped rim that gives them a soft, handmade elegance perfect for holding trinkets on your desk. Using simple air-dry clay, you can mold these organic, wavy shapes without needing a kiln or expensive equipment.
Detailed Instructions
Materials
- White or terracotta air-dry clay
- Small bowl of water
- Sponge
- Potter’s rib or an old credit card (optional)
- Sandpaper (fine grit)
- Acrylic paints (pastel pink, cream, grey)
- Matte spray sealant or matte Mod Podge
Step 1: Forming the Base
-
Prepare your clay:
Cut off a chunk of air-dry clay about the size of a tennis ball. Knead it in your hands for a minute to warm it up and ensure it is pliable and free of air bubbles. -
Roll into a sphere:
Roll the clay between your palms or on a table surface until you have a smooth, round ball. -
Start the pinch:
Cup the ball in one hand. With your other hand, push your thumb firmly into the center of the sphere, stopping about half an inch from the bottom. -
Widen the bowl:
Keep your thumb inside the hole and your fingers on the outside. Gently pinch and rotate the clay ball in a rhythmic motion. Work your way from the bottom up to the rim. -
Even out the walls:
Continue pinching and turning until the walls are an even thickness, roughly 1/4 inch thick. Aim for a wide, shallow bowl shape rather than a tall cup. -
Smooth the surfaces:
Dip your finger or a small sponge into a little water. Run it over the inside and outside of the pot to smooth out cracks or fingerprints. Don’t use too much water, or the clay will become slimey. -
Flatten the base:
Gently tap the bottom of your pot against your work surface to create a flat stable base so it won’t wobble.
Step 2: Creating the Scalloped Rim
-
Prepare the edge:
Ensure the rim is relatively even in height all the way around. If it’s very jagged, trim it subtly with a craft knife or just smooth it down with a wet finger. -
Pinch the scallops:
Place your index finger on the inside of the rim and your thumb and middle finger on the outside. Press inward with the outside fingers while pushing outward with the inside finger to create a wave. -
Repeat the pattern:
Move your hand slightly to the side and repeat the pinching motion. Continue this all the way around the rim to create a continuous fluted or scalloped edge. -
Refine the waves:
Go back around the rim and gently smooth the peaks and valleys of your scallops with a damp fingertip to soften any sharp edges.
Cracking Up?
If small cracks appear while drying, mix a tiny bit of fresh clay with water to make a paste (slip) and fill the cracks. Smooth it over and let it dry again.
Step 3: Drying and Finishing
-
Let it dry:
Place your pot in a safe spot away from direct sunlight or heat sources, which can cause cracking. Let it dry for 24-48 hours until it turns white and feels hard. -
Sand for smoothness:
Once fully dry, take a piece of fine-grit sandpaper and gently sand the rim and body of the pot. This removes minor bumps and refines the scalloped shape. -
Dust off:
Wipe the pot down with a barely damp cloth or dry brush to remove all the sanding dust before painting. -
Apply base color:
Paint the pots in soft, muted tones like the ones shown here—pale pink, warm cream, or stone grey. I find two thin coats usually give better coverage than one thick one. -
Create a washed look (optional):
If you want the textured, stony look visible in the grey pot, water down your paint slightly so some of the natural clay texture shows through, or dry-brush a lighter color over the ridges. -
Seal the piece:
Finish by applying a matte spray sealant or a coat of matte Mod Podge. This protects the clay from moisture and gives the surface a unified finish.
Make It Marble
Twist two colors of air-dry clay together before rolling your initial ball. The pinching process will stretch the colors into a beautiful, natural marble effect.
Place these delightful bowls on your desk to organize clips or simply enjoy their handcrafted beauty


Clay Trinket Dishes With Easy Shapes
This charming, imperfectly shaped trinket dish brings a touch of boho elegance to any nightstand. With its delicate speckled finish and warm copper rim, it looks like high-end boutique pottery but is surprisingly simple to craft at home.
How-To Guide
Materials
- Air-dry clay (white)
- Acrylic rolling pin
- Parchment paper or canvas mat
- Small bowl (for a mold) or cling film
- Potter’s sponge or soft cosmetic sponge
- Sandpaper (fine grit, 220+)
- Acrylic paint (copper or terracotta)
- Black acrylic paint
- Old toothbrush
- Fine detail paintbrush
- Gloss varnish or sealant
Step 1: Shaping the Clay
-
Prepare the clay:
Take a handful of white air-dry clay, about the size of a lemon. Knead it in your hands for a minute until it feels soft, warm, and conditioned, eliminating any trapped air bubbles. -
Roll it out:
Place the clay onto a piece of parchment paper to prevent sticking. Use your acrylic roller to flatten the clay into a slab that is roughly 1/4 inch thick. Try to keep the thickness consistent across the entire piece. -
Cut the shape:
Using a needle tool or just a simple craft knife, cut out a rough oval or circle. Don’t worry about being perfectly geometric; the charm of this project lies in its organic, freeform silhouette. -
Smoothing edges:
Dip your finger in a tiny bit of water and run it along the cut edge of the clay. Smooth out any harsh angles or burrs left by the knife until the rim looks rounded and soft. -
Form the curve:
Gently lift the clay slab and drape it inside a shallow bowl lined with cling film, or simply curve the edges upward with your fingers to create a shallow lip. This establishes the dish shape.
Rim Too Smooth?
If the clay rim feels too uniform, gently pinch specific sections between your thumb and forefinger while wet to create deliberate undulations and waves.
Step 2: Refining and Drying
-
Refine the rim:
With the clay effectively shaped, use a slightly damp sponge to gently sweep over the surface, erasing any fingerprints or texture from the parchment paper. -
Initial dry:
Let the dish sit in its form for about 24 hours. Placing it in a cool, dry spot away from direct sunlight helps prevent warping. -
Flip and finish drying:
Once the top feels leather-hard, gently remove it from the mold or bowl. Turn it upside down so the bottom can be exposed to air. Let it dry completely for another 24 to 48 hours until it is bone dry and chalky white. -
Sanding:
Take your fine-grit sandpaper and lightly buff the entire surface. Pay special attention to the rim to ensure it is buttery smooth. Wipe away the dust with a barely damp cloth.
Step 3: Decorating
-
Prepare the speckle paint:
Squeeze a tiny drop of black acrylic paint onto a palette and dilute it with water until it is very runny and inky. -
Apply speckles:
Dip an old toothbrush into the watery black paint. Hold the brush over the dish and run your thumb across the bristles to flick tiny droplets onto the clay. I usually practice on a paper towel first to control the spray. -
Let speckles set:
Wait about 10 to 15 minutes for the paint droplets to dry completely so they don’t smear during the next steps. -
Paint the rim:
Using a fine detail brush, carefully paint the very top edge of the rim with your copper or terracotta acrylic paint. A slightly shaky hand actually helps here, adding to the wabi-sabi aesthetic. -
Seal the inside:
Apply a coat of gloss varnish to the interior of the dish. This gives it a ceramic-like shine and protects it from scratches. -
Seal the outside:
Once the inside handles are dry, flip it over and coat the bottom and outer walls with the sealant. -
Final cure:
Allow the varnish to cure fully according to the bottle instructions before placing your jewelry inside.
Cracks While Drying
Cracking often happens if clay dries unevenly or too fast. Avoid radiators or direct sun. Fix hairline cracks by rubbing a wet clay ‘slurry’ into them.
Now you have a stylish spot to keep your rings safe and sound


Clay Coasters With Stamped Texture
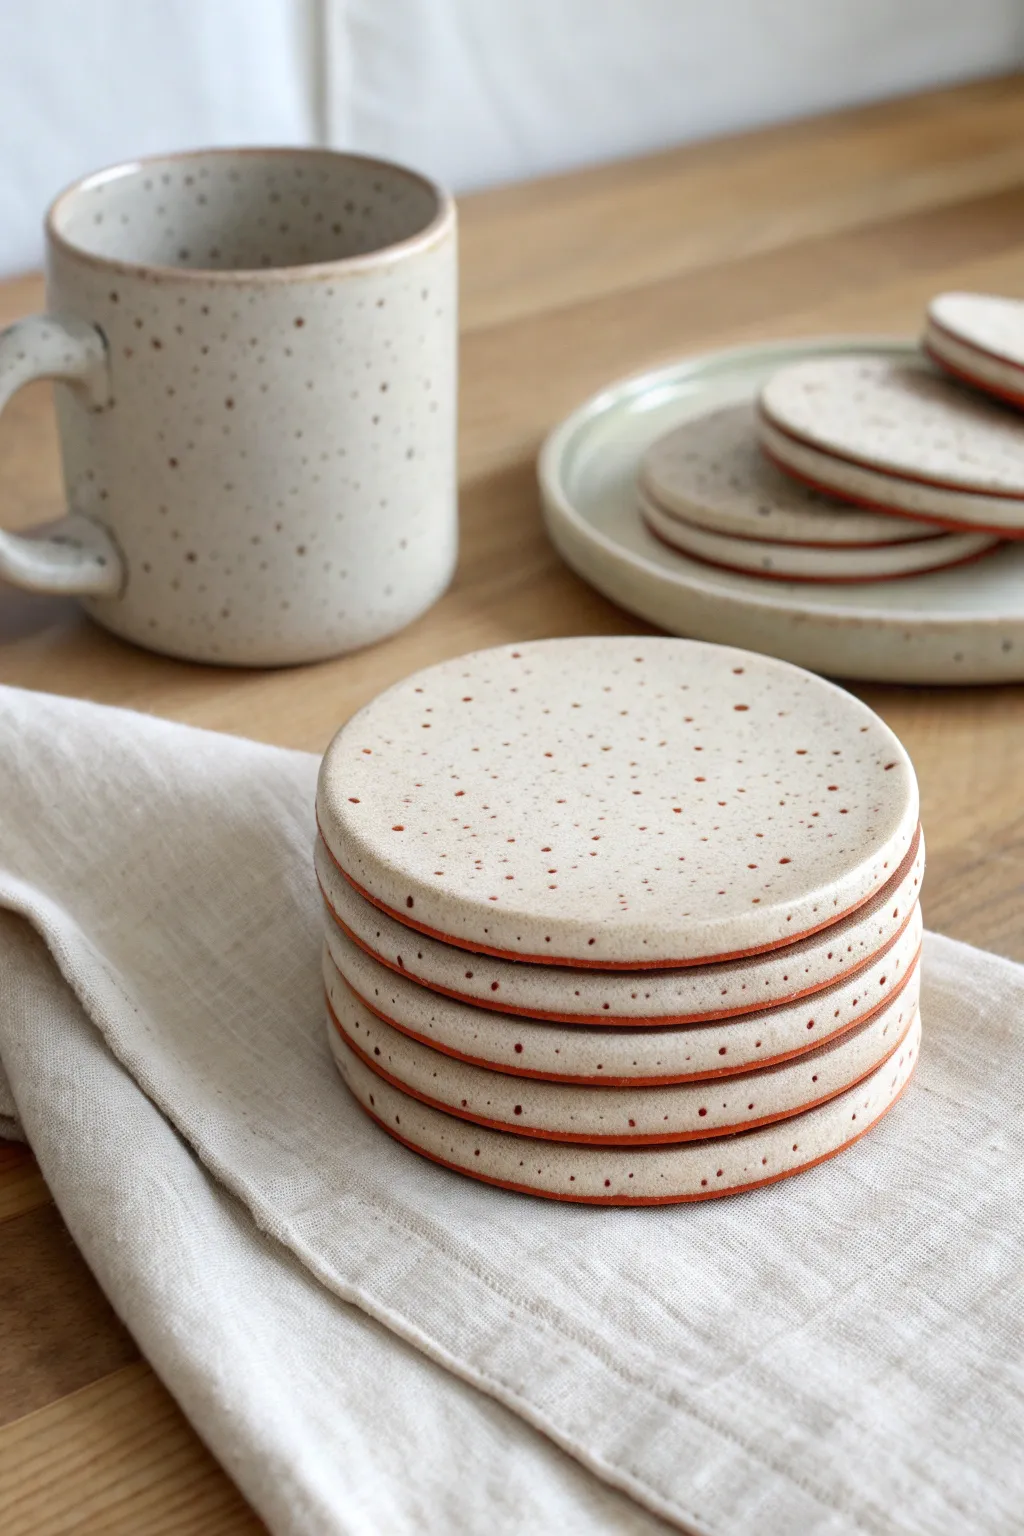
Create a sophisticated set of coasters that balances rustic charm with modern clean lines. This project features a distinctive speckled surface and a raw terracotta edge that adds a beautiful pop of warmth to your coffee table.
Detailed Instructions
Materials
- White stoneware clay with speckles (or plain white clay + granular manganese)
- Terracotta slip or underglaze
- Rolling pin
- Guide sticks or slats (approx. 1/4 inch thick)
- Round cookie cutter or jar lid (approx. 4 inches)
- Smooth work surface (canvas or ware board)
- Sponge
- Fettling knife or needle tool
- Pottery rib (smooth kidney)
- Clear matte glaze
- Kiln (or access to a firing service)
Step 1: Preparing the Clay Body
-
Wedge the clay:
Begin by thoroughly wedging your speckled white stoneware clay to remove air bubbles and ensure an even consistency. If you don’t have speckled clay, wedge granular manganese into plain clay, but wear a mask for safety. -
Set up your rolling station:
Place your canvas or smooth cloth on a flat surface. Lay down your 1/4 inch guide sticks on either side of where you will roll to ensure uniform thickness. -
Roll out the slab:
Roll the clay firmly between the guides. Rotate the clay occasionally to prevent it from stretching too much in one direction or sticking to the canvas. -
Smooth the surface:
Take your pottery rib (the kidney-shaped tool) and gently compress the slab on both sides. This aligns the clay particles, making the coaster stronger and the surface perfectly smooth for the glaze later.
Step 2: Shape and Refine
-
Cut the circles:
Using your round cutter, press firmly into the slab to cut out your coaster shapes. If you are making a full set, try to cut them close together to minimize waste. -
Release the shapes:
Gently lift the excess clay away from your circles, then carefully transfer the rounds to a dryer ware board. Be careful not to warp them as you lift. -
Refine the edges:
Once the clay has stiffened slightly to a ‘leather hard’ state, use a damp sponge to round off the sharp top and bottom corners. It makes the finished piece much more pleasant to hold.
Warping Woes?
Flat objects warp easily. Dry them very slowly under plastic, flipping them daily. You can even dry them sandwiched between two pieces of drywall for perfect flatness.
Step 3: Adding the Rust Edge
-
Prepare the rim color:
Pour a small amount of terracotta-colored underglaze or slip onto a palette. You want a consistency similar to heavy cream. -
Apply the rim detail:
Hold the coaster steady (or place it on a banding wheel if you have one). Using a small, stiff brush or a sponge applicator, carefully paint the vertical edge of the coaster. -
Clean up stray marks:
If any orange color accidentally gets onto the top or bottom face of the coaster, wipe it away immediately with a clean, damp sponge to keep the faces pristine. -
Reassess flatness:
During the drying process, flat slabs love to warp. I like to flip the coasters over once a day and gently weigh them down with a board if they look like they’re starting to curl. -
Bisque fire:
Once bone dry, fire the coasters in the kiln to cone 04 (or your clay’s specific bisque temperature).
Create a Set
Make a matching mug! Use the same speckled clay and apply the terracotta underglaze to the handle or the foot ring to tie the whole breakfast set together visually.
Step 4: Glazing and Finishing
-
Clean the bisque:
Wipe the fired coasters with a damp sponge to remove any kiln dust that might repel the glaze. -
Apply clear matte glaze:
Dip the coaster or brush on a clear matte glaze. The matte finish is crucial to get that soft, stone-like look in the reference photo rather than a high-gloss shine. -
Wipe the rim:
This is the most critical step for recreating the look! Using a damp sponge, meticulously wipe the glaze *off* the orange rim you painted earlier. You want the raw, colored texture to be exposed, not covered in glass. -
Check the speckles:
Ensure the glaze layer isn’t too thick, or it might cloud the natural speckles of the clay body more than intended. -
Final dry foot:
Double-check that the bottom of the coaster is completely free of glaze so it doesn’t fuse to your kiln shelf. -
Glaze fire:
Load the kiln and fire to the maturity temperature of your clay and glaze combination (likely Cone 5 or 6 for stoneware).
Stack your finished coasters and enjoy seeing how that exposed rim creates a striking architectural detail on your table


Cute Clay Magnets With Tiny Faces
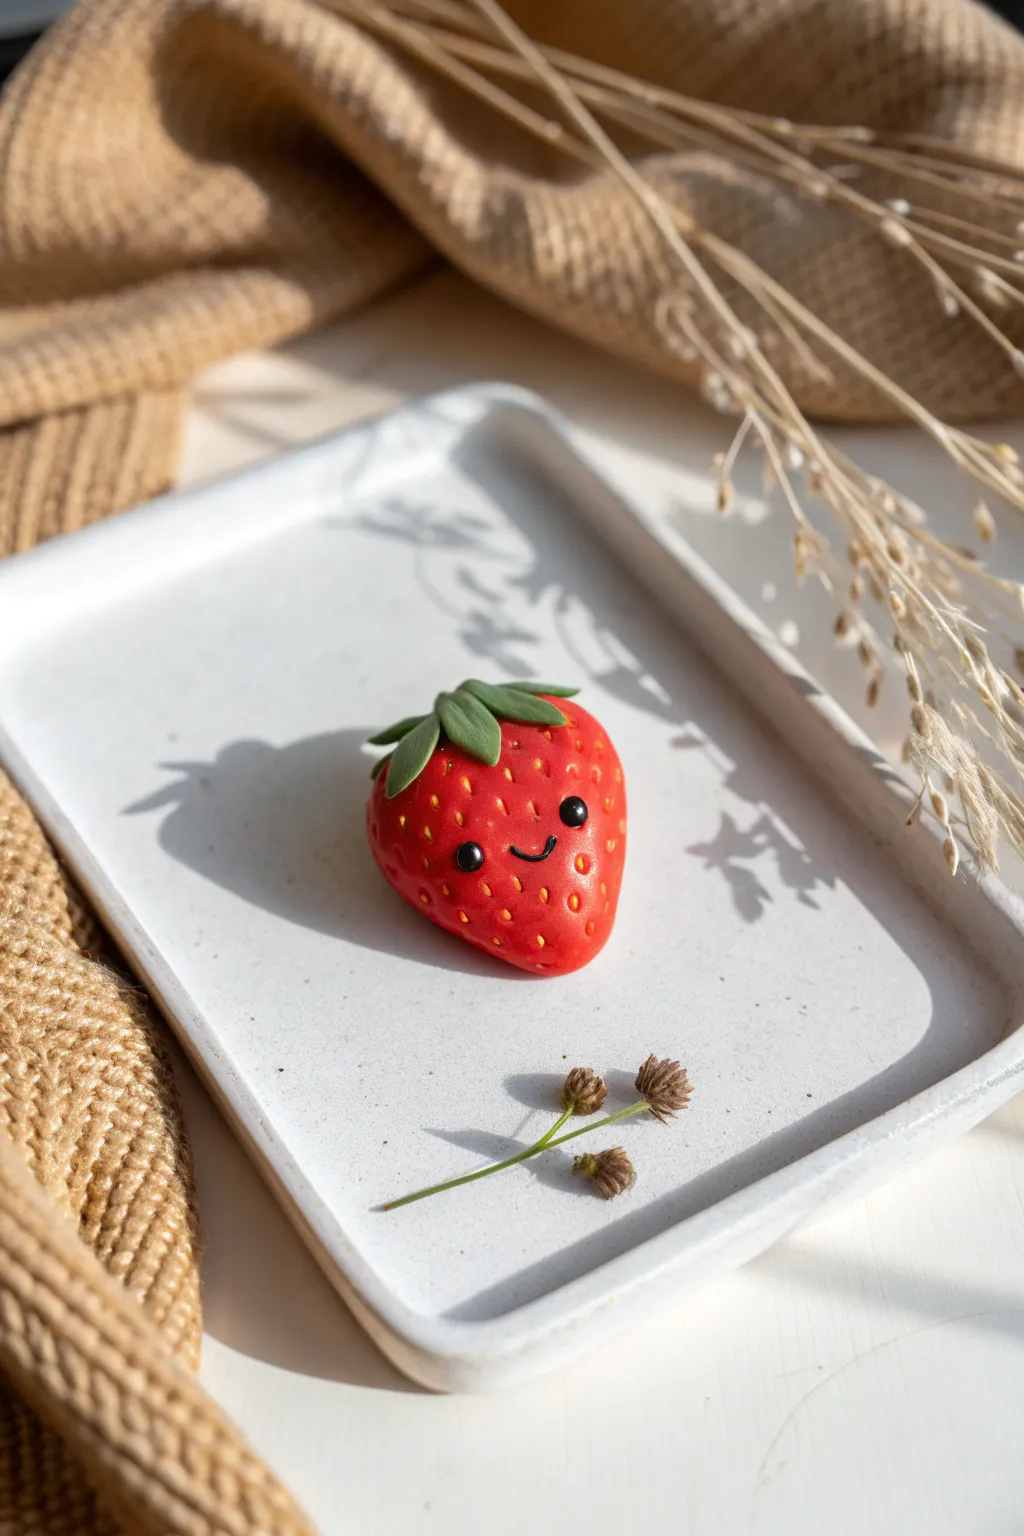
Bring a touch of sweetness to your fridge with this adorable strawberry magnet that smiles back at you. Its vibrant red color and tiny, cheerful face make it a perfect beginner-friendly clay project that captures the charm of fresh fruit.
Step-by-Step Tutorial
Materials
- Polymer clay (Bright Red, Leaf Green, and Black)
- Liquid polymer clay or bake-and-bond
- Small round sculpting tool or ball stylus
- Needle tool or toothpick
- Acrylic paint (White)
- Fine detail paintbrush
- Small round magnet
- Strong craft glue (E6000 or super glue)
- Gloss glaze (optional)
Step 1: Sculpting the Base
-
Prepare the Red Clay:
Start by conditioning a chunk of bright red polymer clay until it is soft and pliable. Roll it into a smooth ball about the size of a walnut, ensuring there are no cracks or air bubbles. -
Shape the Strawberry:
Gently roll one end of the ball between your palms to taper it, creating a soft teardrop or heart-like shape. Flatten the back slightly against your work surface so the magnet will attach easily later. -
Refine the Form:
Press the top (wider end) down slightly to flatten it for the leaves. I like to make the bottom tip slightly rounded rather than sharp for a cuter, cartoonish look. -
Add Texture:
Using a needle tool or the tip of a toothpick, gently press small indentations all over the surface of the berry to mimic seeds. Space them somewhat evenly, but keep it random enough to look natural. Leave a smooth, open space in the center for the face.
Step 2: Adding Details
-
Create the Seeds:
For added realism, you can roll incredibly tiny specks of yellow or light brown clay and press them into the indentations you made. Alternatively, you can paint these yellow after baking. -
Make the Leaves:
Condition a small amount of leaf green clay. Divide it into 4-5 small, equal-sized balls. -
Shape the Leaves:
Flatten each green ball into a teardrop shape. Use your needle tool to press a central vein down the middle of each leaf. -
Attach the Crown:
Arrange the leaves in a star pattern on top of the red strawberry body. Press them down gently to adhere, curving the tips slightly upward for a dynamic look. -
Add the Stem:
Roll a tiny cylinder of green clay and place it right in the center where the leaves meet, pressing it down to secure the greenery.
Seed Depth Trick
Make the seed indentations slightly deeper than you think necessary. Glaze or paint can fill shallow holes, making the texture disappear.
Step 3: Creating the Face
-
Sculpt Eye Sockets:
Use a ball stylus to press two shallow divots into the smooth area you reserved on the front of the strawberry. -
Insert the Eyes:
Roll two tiny spheres of black clay. Place them into the divots and flatten them gently so they look embedded rather than protruding. -
Form the Mouth:
Roll an extremely thin snake of black clay. Cut a tiny U-shaped segment and carefully press it between the eyes using your needle tool to create a happy smile. -
Bake carefully:
Place your strawberry on a parchment-lined baking sheet. Bake according to your clay manufacturer’s instructions (usually 275°F/135°C for 15-30 minutes depending on thickness).
Fingerprint Fix
If you see fingerprints on your clay before baking, lightly brush the surface with a little baby oil or cornstarch to smooth them out perfectly.
Step 4: Finishing Touches
-
Cool Down:
Allow the piece to cool completely before handling. It will be slightly soft when hot but hardens as it cools. -
Add Highlights:
Using a fine detail brush or a toothpick, add a tiny dot of white acrylic paint to the upper corner of each black eye to bring the character to life. -
Attach the Magnet:
Turn the strawberry over. Apply a dab of strong craft glue to the flat back and press your magnet firmly in place. -
Optional Glaze:
If you want a juicy, fresh look, brush a coat of gloss glaze over the red part of the strawberry, avoiding the leaves for a nice matte contrast.
Now your fridge has a charming new guardian ready to hold up your grocery lists or photos

The Complete Guide to Pottery Troubleshooting
Uncover the most common ceramic mistakes—from cracking clay to failed glazes—and learn how to fix them fast.
Easy Clay Ring Cones and Holders
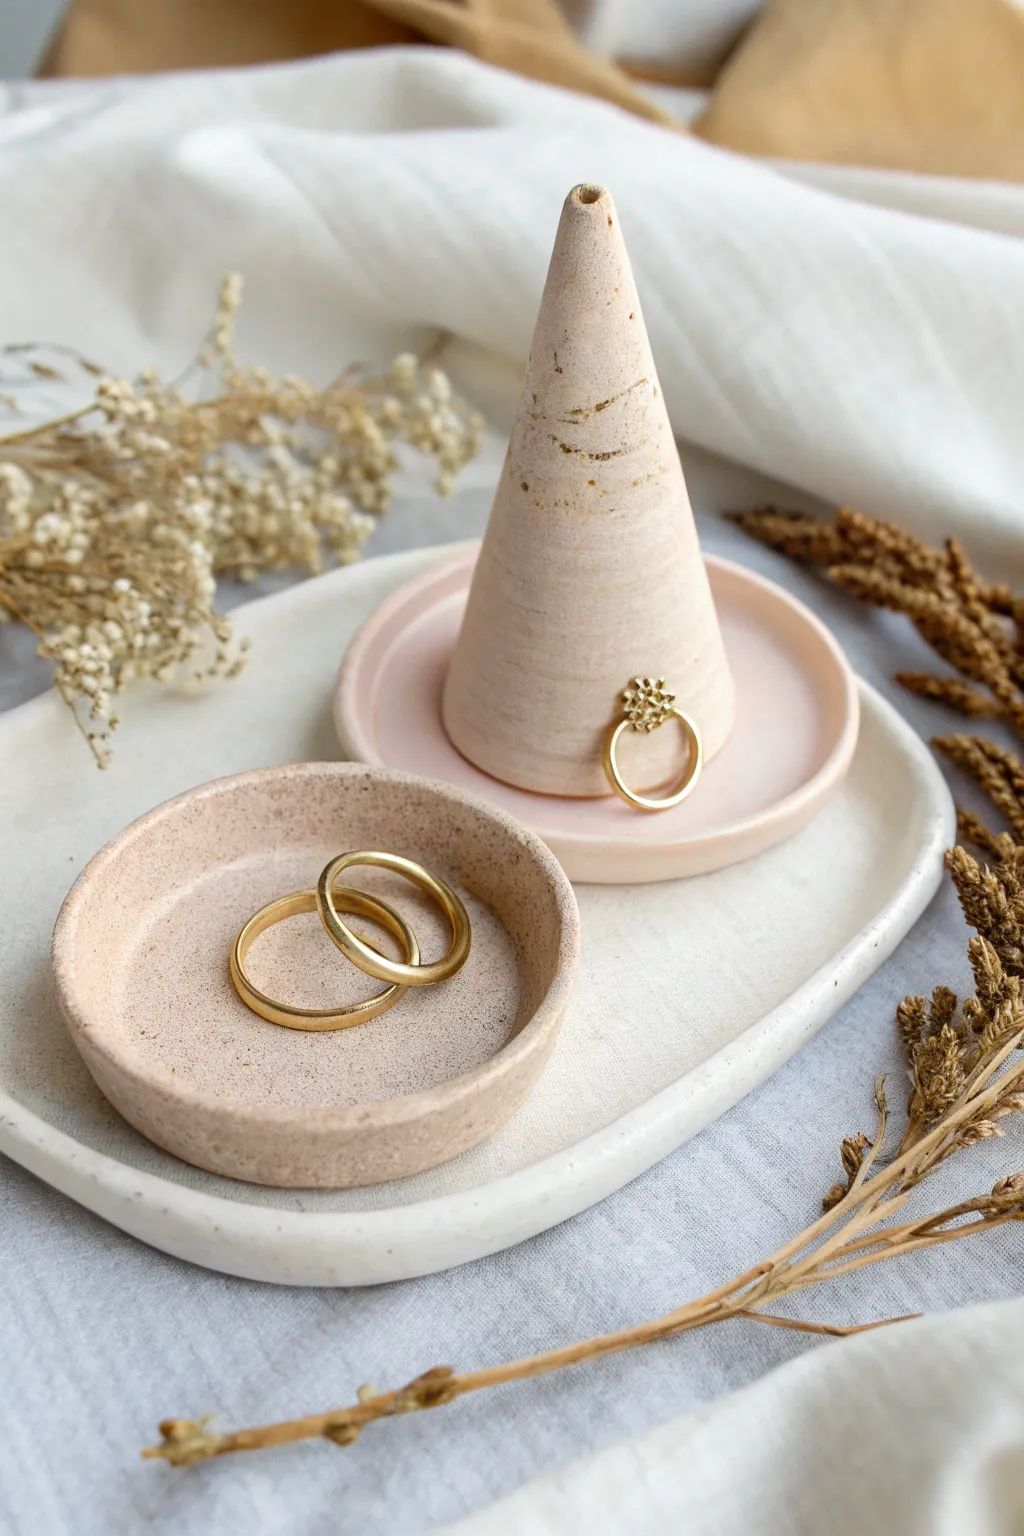
These elegant, minimalist ring holders combine multiple pottery techniques to create a cohesive vanity set. The project features a soft pink-beige ring cone on a matching saucer, a small circular dish for loose bands, and a larger organic tray to hold it all together.
How-To Guide
Materials
- Polymer clay or air-dry clay (in white and beige/terracotta)
- Speckled clay add-in (glitter, black pepper, or faux granite clay)
- Acrylic rolling pin
- Clay knife or craft blade
- Circular clay cutters (various sizes)
- Sandpaper (fine grit)
- Small bowl of water
- Sponge
- Matte sealant or varnish
Step 1: Shaping the Base Tray
-
Mix your clay tone:
Begin by conditioning your clay. To achieve the creamy white base shown in the large tray, mix white clay with a tiny pinch of beige to warm it up. If using polymer clay, knead until soft and pliable. -
Add texture:
For that lovely artisanal speckled look, I like to knead in a small amount of faux granite clay or even ground black pepper if using air-dry clay. Mix until the specks are evenly distributed but still visible. -
Roll out the slab:
Roll the clay out into a slab about 1/4 inch thick. Aim for an organic oval shape rather than a perfect circle. -
Form the rim:
Gently lift the edges of your oval slab with your fingers to create a shallow rim. Smooth the edge with a damp sponge or finger dipped in water to remove any fingerprints. -
Refine the shape:
While the clay is still workable, adjust the curves to ensure they are gentle and undulating. The charm of this piece lies in its handmade, slightly imperfect symmetry.
Clean Edges Secret
Use a tiny bit of baby oil on your finger to smooth polymer clay before baking—it removes fingerprints instantly without adding water.
Step 2: Creating the Ring Cone
-
Prepare the pink clay:
Mix a soft, muted pink clay tone. Combine white with a touch of terracotta or peach to get that warm, earthy blush shade seen on the cone and small dish. -
Form a ball:
Take a chunk of your pink clay mixture and roll it into a smooth ball about the size of a golf ball. -
Shape the cone:
Place the ball on your work surface. Using the flat of your hand, roll the clay back and forth while applying more pressure to one side to taper it into a cone shape. -
Flatten the base:
Once you have a tall cone, tap the wide bottom firmly against the table to create a flat, stable base so it stands upright without wobbling. -
Create the mini saucer:
Roll out a small amount of the same pink clay and cut a small circle using a cutter. This will serve as the base plate for your cone. -
Attach the cone:
Score the bottom of the cone and the center of the saucer. Add a dab of water or liquid clay (depending on your material) and press the cone firmly onto the saucer. -
Smooth the seam:
Use a modeling tool or your finger to smooth the connection point where the cone meets the saucer, ensuring it looks like one seamless piece. -
Detail the tip:
Use your finger to gently blunt the very tip of the cone so it isn’t dangerously sharp. I sometimes create a tiny hole at the very top for a decorative touch, like a faux incense holder look.
Step 3: Making the Small Ring Dish
-
Roll the small dish base:
Using the remaining pink speckled clay, roll a small circle approximately 3 inches in diameter. -
Build the wall:
Roll a thin snake or coil of clay. Place this coil around the perimeter of your circle base. -
Blend the coil:
Using your thumb, smudge the clay from the coil down into the base on the inside, and up from the base into the coil on the outside. This merges the pieces. -
Smooth the walls:
Pinch the walls gently to thin them out and make them uniform in height. Run a wet finger along the rim to round it off perfectly.
Marbled Sophistication
Twist two shades of beige clay together before rolling to create a subtle stone-marble effect for an even more high-end look.
Step 4: Finishing Touches
-
Dry or bake:
Follow the instructions for your specific clay type. Air-dry clay needs 24-48 hours; polymer clay requires baking in an oven at the specified temperature. -
Sand for smoothness:
Once fully cured and hard, use fine-grit sandpaper to lightly buff away any rough edges or fingerprints, giving it that professional matte finish. -
Add detail paint:
Dilute a small amount of gold or metallic bronze paint. Using a very dry brush or a splatter technique, add subtle flecks or faint lines to the cone for extra visual interest. -
Seal the pieces:
Apply a coat of matte varnish to protect your work from scratches and ring scuffs without making it look plasticky or shiny.
Arrange your completed set on your dresser and enjoy the organized elegance of your new handmade display
Mini Clay Charms for Necklaces

Create a rustic, minimalist piece of jewelry that mimics the warmth of terracotta pottery. This simple heart charm pendant features a subtle speckled texture and hangs effortlessly on a delicate gold chain for an earthy everyday look.
Step-by-Step Guide
Materials
- Polymer clay (terracotta or rust color)
- Rolling pin or smooth glass jar
- Small heart-shaped cookie cutter (approx. 1 inch)
- Needle tool, toothpick, or awl
- Sandpaper or old toothbrush (for texturing)
- Gold tone jump ring (6mm or larger)
- Gold tone necklace chain
- Pliers (chain nose and flat nose)
- Parchment paper
- Baking sheet
- Oven
Step 1: Prepping the Clay
-
Condition the Clay:
Begin by warming a small chunk of your terracotta-colored polymer clay in your hands. Knead and roll it between your palms until it becomes soft, pliable, and easy to manipulate. -
Roll it Out:
Place the softened clay onto a sheet of parchment paper to prevent sticking. Using your rolling pin or a smooth glass jar, roll the clay out into an even slab about 3-4mm thick. -
Add Texture:
To achieve the rustic, stone-like finish seen in the photo, gently tap the surface of the clay slab with a piece of coarse sandpaper or the bristles of an old toothbrush. You want a subtle, organic texture rather than a deep pattern. -
Create speckles (Optional):
I like to take a tiny needle tool and randomly poke very shallow, tiny holes across the surface to mimic the porous nature of real ceramic.
Fixing Rough Edges
If your edges look sharp after baking, use a fine-grit sandpaper or a nail file to gently buff them smooth. A drop of baby oil can help polish the clay surface.
Step 2: Shaping and Baking
-
Cut the Shape:
Press your heart-shaped cutter firmly into the textured clay slab. Wiggle it slightly to ensure a clean cut, then lift the cutter away. -
Refine the Edges:
Gently lift the heart from the parchment. Use your finger to smooth down any sharp or ragged edges left by the cutter, softening the silhouette slightly for a more handmade feel. -
Create the Hole:
Using a toothpick or a needle tool, create a hole near the top center of the heart (or slightly off-center for a whimsical look). Make sure the hole is large enough to accommodate your jump ring, keeping in mind that the clay won’t shrink much. -
Make Extra Charms:
With the leftover clay, feel free to hand-mold tiny complementary shapes like the crescent moon or star seen in the photo. These make great matching earrings or bracelet charms. -
Bake:
Arrange your pieces on a parchment-lined baking sheet. Bake according to the specific manufacturer’s instructions on your package of clay (usually around 275°F/135°C for 15-30 minutes). -
Cool Down:
Once baked, turn off the oven and let the pieces cool completely before handling them. They will harden fully as they cool.
Add Some Shine
Paint a thin layer of gloss or satin polymer clay glaze over the finished heart to make it look like glazed ceramic pottery.
Step 3: Assembly
-
Open the Jump Ring:
Take your gold jump ring and use two pairs of pliers to twist it open. Always twist the ends away from each other (front to back) rather than pulling them apart horizontally, to maintain the circle’s shape. -
Attach the Charm:
Slide the open jump ring through the hole you created in the clay heart. -
Add the Chain:
While the jump ring is still open, thread it onto your gold necklace chain. -
Close the Ring:
Using your pliers again, twist the jump ring back into a closed position until the two ends meet flush with no gap. -
Final Polish:
Give the clay a quick wipe with a soft cloth to remove any dust, and your necklace is ready to wear.
Now you have a charming, earthy accessory that adds a handmade touch to any outfit


What Really Happens Inside the Kiln
Learn how time and temperature work together inside the kiln to transform clay into durable ceramic.
Beginner Polymer Clay Earrings

Create these trendy arch-style statement earrings that combine smooth curves with earthy, textured details. The warm terracotta and soft cream palette creates a modern bohemian look that’s surprisingly lightweight and easy to wear.
Detailed Instructions
Materials
- Polymer clay (Terracotta/Burnt Orange and White/Cream)
- Beige or tan polymer clay (for the textured ends)
- Acrylic rolling pin or pasta machine
- U-shaped clay cutter (approx. 1.5 inch)
- Tissue blade or sharp craft knife
- Coarse sandpaper or a stiff toothbrush (for texturing)
- Needle tool or toothpick
- Jump rings (4mm and 6mm, gold finish)
- Earring hooks (gold finish)
- Jewelry pliers (round nose and flat nose)
- Baking sheet and parchment paper
- Oven
Step 1: Creating the Base Shape
-
Condition the clay:
Start by warming the terracotta and white polymer clays in your hands separately. Knead them until they are soft, pliable, and free of cracks. -
Roll out the slab:
Using your acrylic roller or pasta machine on a medium setting (about 2-3mm thick), roll out a smooth slab of the terracotta clay. Repeat this process for the white clay. -
Cut the arches:
Take your U-shaped cutter. Press firmly into the terracotta slab to cut out your first arch shape. Repeat with the white slab so you have one arch of each color. -
Smooth the edges:
Gently lift the cut shapes. Use your fingertip, dipped slightly in cornstarch or water if needed, to smooth any rough edges left by the cutter.
Step 2: Adding the Textured Cuffs
-
Prepare the accent clay:
Condition the beige or tan clay. Roll this out to the exact same thickness as your main arches so the surface will be flush. -
Texturing the slab:
Before cutting, press your coarse sandpaper or a stiff toothbrush firmly onto the surface of the beige clay slab. This creates that lovely organic, stony texture. -
Add speckles (optional):
If you want the speckled look seen on the white earring, sprinkle slightly darker clay shifting or coarse black pepper onto the beige clay and roll over it once more to embed the specks. -
Cut the clay strips:
Using your tissue blade, cut four small rectangles from the textured beige clay. Each rectangle should be slightly wider than the ‘legs’ of your arches and about 1/4 inch high. -
Trim the base arches:
Take your main terracotta and white arches. Use your blade to slice off the bottom 1/4 inch of each leg. Try to make these cuts straight and even. -
Attach the cuffs:
Place the textured beige rectangles against the freshly cut ends of your arches. Gently push them together so the raw edges adhere. The clay’s natural tackiness should hold them, but a drop of liquid clay can ensure a permanent bond. -
Refine the seams:
Turn the earrings over and gently smooth the seam on the back with your finger or a sculpting tool to reinforce the join. -
Clean stick trimming:
Use your blade to trim the excess beige clay from the sides of the legs, ensuring the width matches the arch perfectly.
Sticky Situation?
If clay sticks to your cutter or work surface, dust a tiny amount of cornstarch or baby powder on the clay first. It acts as a release agent.
Step 3: Baking and Assembly
-
Create holes:
Use a needle tool or toothpick to poke a hole at the very top center of each arch. Make sure the hole is big enough for your jump rings to pass through. -
Final smooth:
Do a final check for fingerprints. I like to use a q-tip dipped in a little rubbing alcohol to wipe the surface smooth before baking. -
Bake:
Place the pieces on a parchment-lined baking sheet. Bake according to your clay manufacturer’s instructions (usually around 275°F/135°C for 15-30 minutes). -
Cool down:
Let the pieces cool completely on the baking sheet. They will be slightly flexible when warm but will harden as they cool. -
Attach jump rings:
Using two pairs of pliers, twist open a jump ring. Thread it through the hole in the clay arch. -
Add the hook:
Before closing the jump ring, slide on the loop of your earring hook. Ensure the hook is facing the correct direction relative to the front of the earring. -
Close and finish:
Twist the jump ring closed securely so there is no gap. Repeat for the second earring.
Pro Tip: Seamless Finish
To remove harsh fingerprints without chemicals, gently roll a piece of plain copy paper over your raw clay pieces just before baking.
Enjoy styling these chic geometric arches with your favorite everyday outfits
Tiny Clay Bud Vases You Can Actually Use
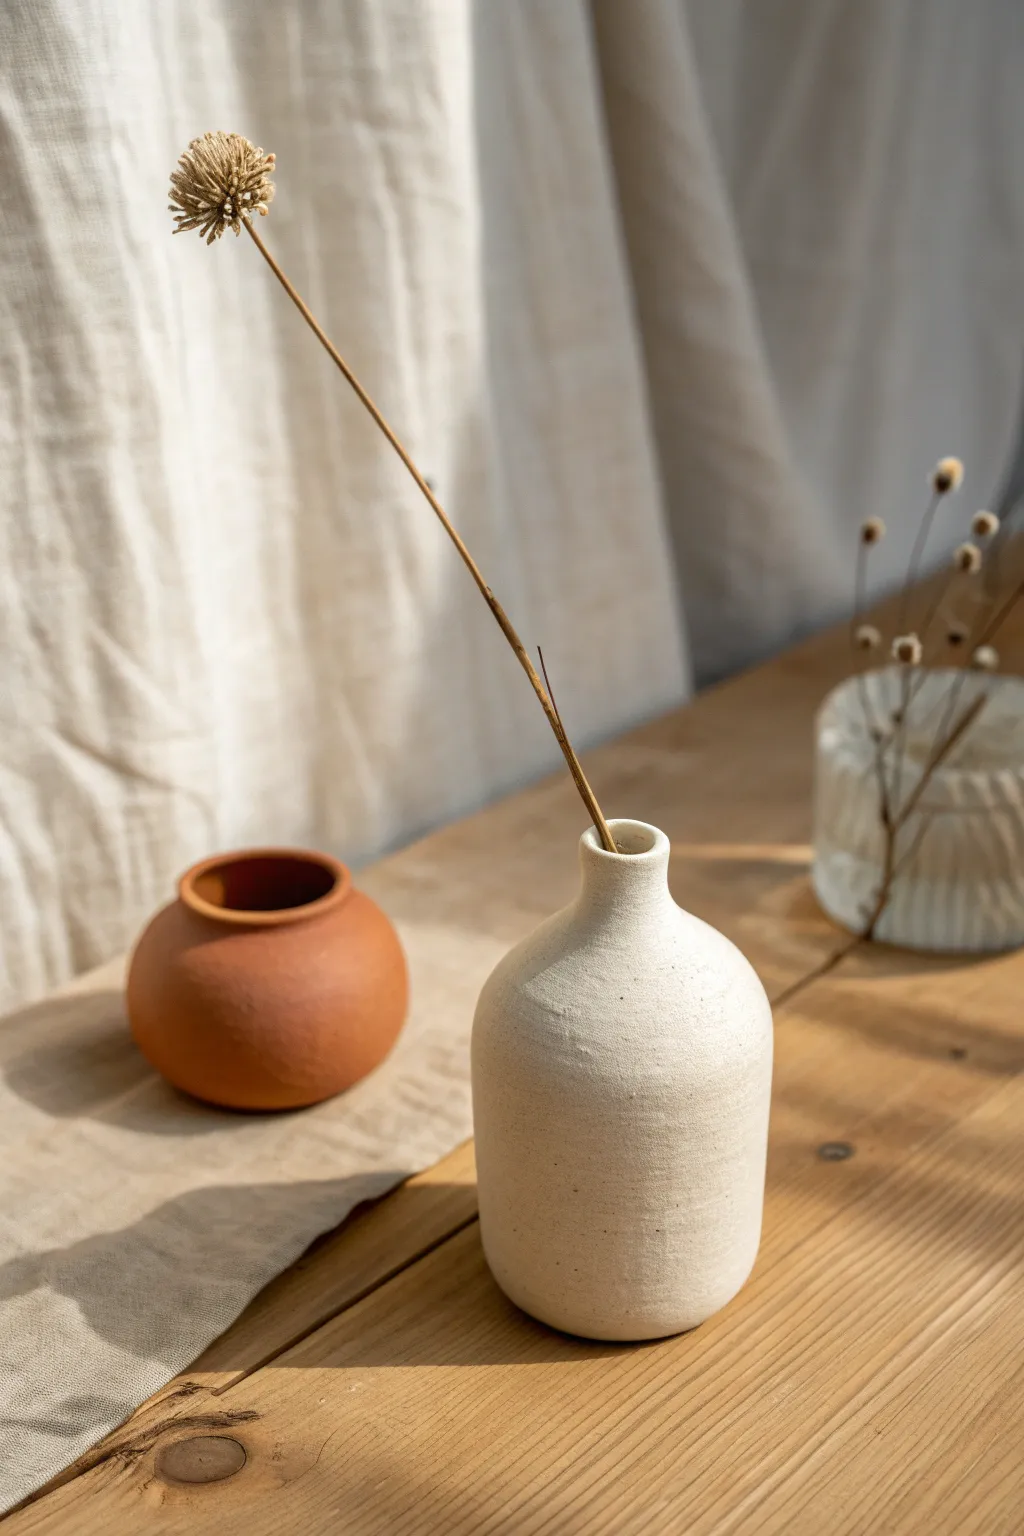
These charming, understated bud vases bring an organic warmth to any tabletop with their raw, unglazed textures and imperfectly perfect forms. You’ll create two distinct shapes—a squat terracotta vessel and a taller, cream-colored bottle—ideal for holding a single dried stem.
How-To Guide
Materials
- Air-dry clay (terracotta color)
- Air-dry clay (white or cream color)
- Small cup of water
- Sponge or smoothing tool
- Rolling pin (optional)
- Clay wire cutter or fishing line
- Small wooden sculpting tool or bamboo skewer
- Fine-grit sandpaper (220 grit or higher)
- Matte acrylic sealant (optional)
Step 1: Shaping the Terracotta Round Vase
-
Prepare the terracotta clay:
Cut a fist-sized chunk of the terracotta-colored air-dry clay. Knead it in your hands for a minute until it is pliable and warm, removing any air bubbles that might be trapped inside. -
Form the base sphere:
Roll the clay between your palms or on a clean surface to create a smooth, solid ball. Aim for something roughly the size of a tangerine. -
Open the pot:
Hold the ball in one hand and gently press your thumb into the center to create an opening. Don’t push all the way through; leave about a half-inch of thickness at the bottom for stability. -
Pinch the walls:
Using your thumb on the inside and fingers on the outside, pinch and rotate the clay to thin out the walls. Focus on pulling the clay outwards to create a wide, round belly for the pot. -
Narrow the opening:
As you get closer to the top rim, gently collar the clay inward. Cup your hands around the exterior top to gently force the opening to become smaller than the belly. -
Finish the rim:
Smooth the lip of the vase with a wet finger. It should be slightly rolled outward or simply smoothed flat, depending on your preference, but keep the opening wide enough for a few stems. -
Smooth the surface:
Dip your sponge slightly in water and wipe down the exterior to remove fingerprints. I like to leave a little bit of texture here to maintain that handmade look.
Cracks Appearing?
If small hairline cracks appear while drying, mix a tiny bit of fresh clay with water to make a paste (slip) and fill them in with a finger. Let dry again.
Step 2: Creating the White Bottle Vase
-
Prepare the white clay:
Grab a similar amount of white or cream clay. Knead it thoroughly until smooth. If the clay feels dry, dip your fingers in water and work the moisture back in. -
Create a cylinder:
Instead of a ball, roll this piece into a thick cylinder or log shape. Ideally, the base should be about 2.5 inches wide. -
Hollow out the form:
Press your thumb down the center of the cylinder to open it up. Pinch the walls from bottom to top, trying to maintain a straight vertical shape for the main body. -
Form the shoulder:
Once the body is at the desired height (about 3 inches), start angling your pinching inward sharply to create a ‘shoulder’ where the vase creates a bottleneck. -
Build the neck:
If you have enough clay remaining at the top, gently pull and squeeze it upward to form a narrow neck. If you ran out of clay, you can roll a small coil, score the top of the body, and attach the coil to build the neck up. -
Refine the shape:
Use a wooden tool or your finger to smooth the transition between the body and the neck so it looks seamless. The neck should be narrower than the terracotta pot’s opening. -
Refining the silhouette:
Look at the vase from different angles. If it leans, gently tap the base on the table to flatten the bottom and nudge the neck until it stands straight.
Step 3: Drying and Finishing
-
Let them dry slowly:
Place both vases in a cool, dry area away from direct sunlight. To prevent cracking, you can loosely tent a plastic bag over them for the first 24 hours to slow the drying process. -
Sand for texture:
Once bone dry (usually 2-3 days), take your fine-grit sandpaper and gently rub down any rough ridges or sharp spots on the rims. Wipe away the dust with a barely damp cloth. -
Add a matte finish (Optional):
Since air-dry clay isn’t waterproof, apply a coat of matte acrylic varnish if you want extra durability. Note that these are best for dried flowers, as they cannot hold water.
Create a Speckled Look
Knead tiny amounts of black pepper or dried coffee grounds into the white clay before shaping to create a faux-stone speckled texture.
Set your new vases on a sunny sill with a few dried wildflowers and enjoy the serene vibe they create

TRACK YOUR CERAMIC JOURNEY
Capture glaze tests, firing details, and creative progress—all in one simple printable. Make your projects easier to repeat and improve.
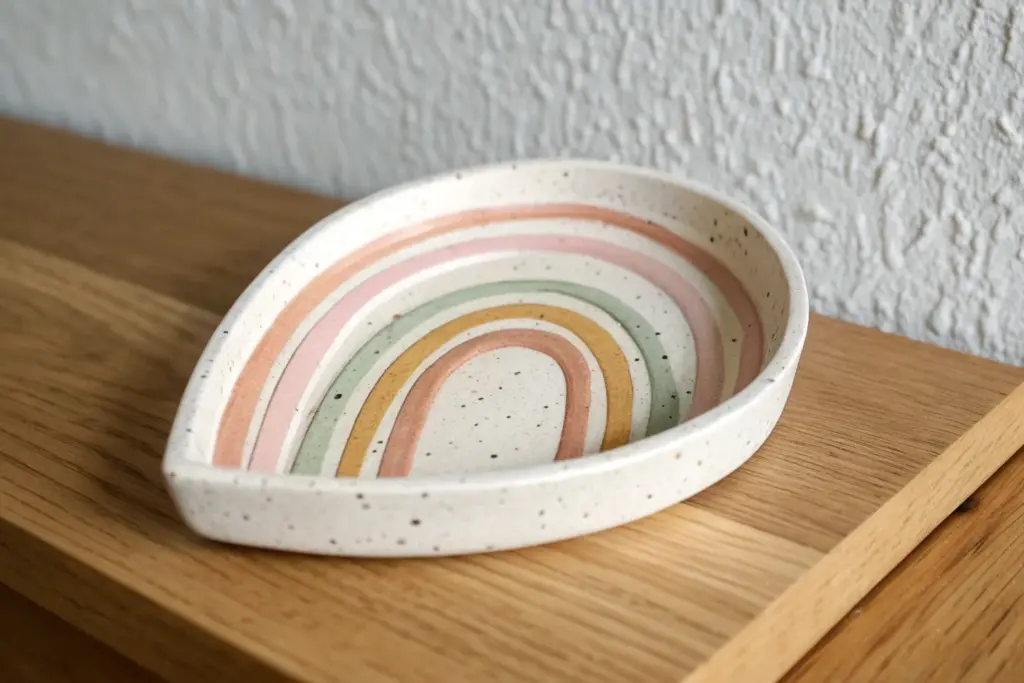
Wavy Clay Catchall Bowls With Paint
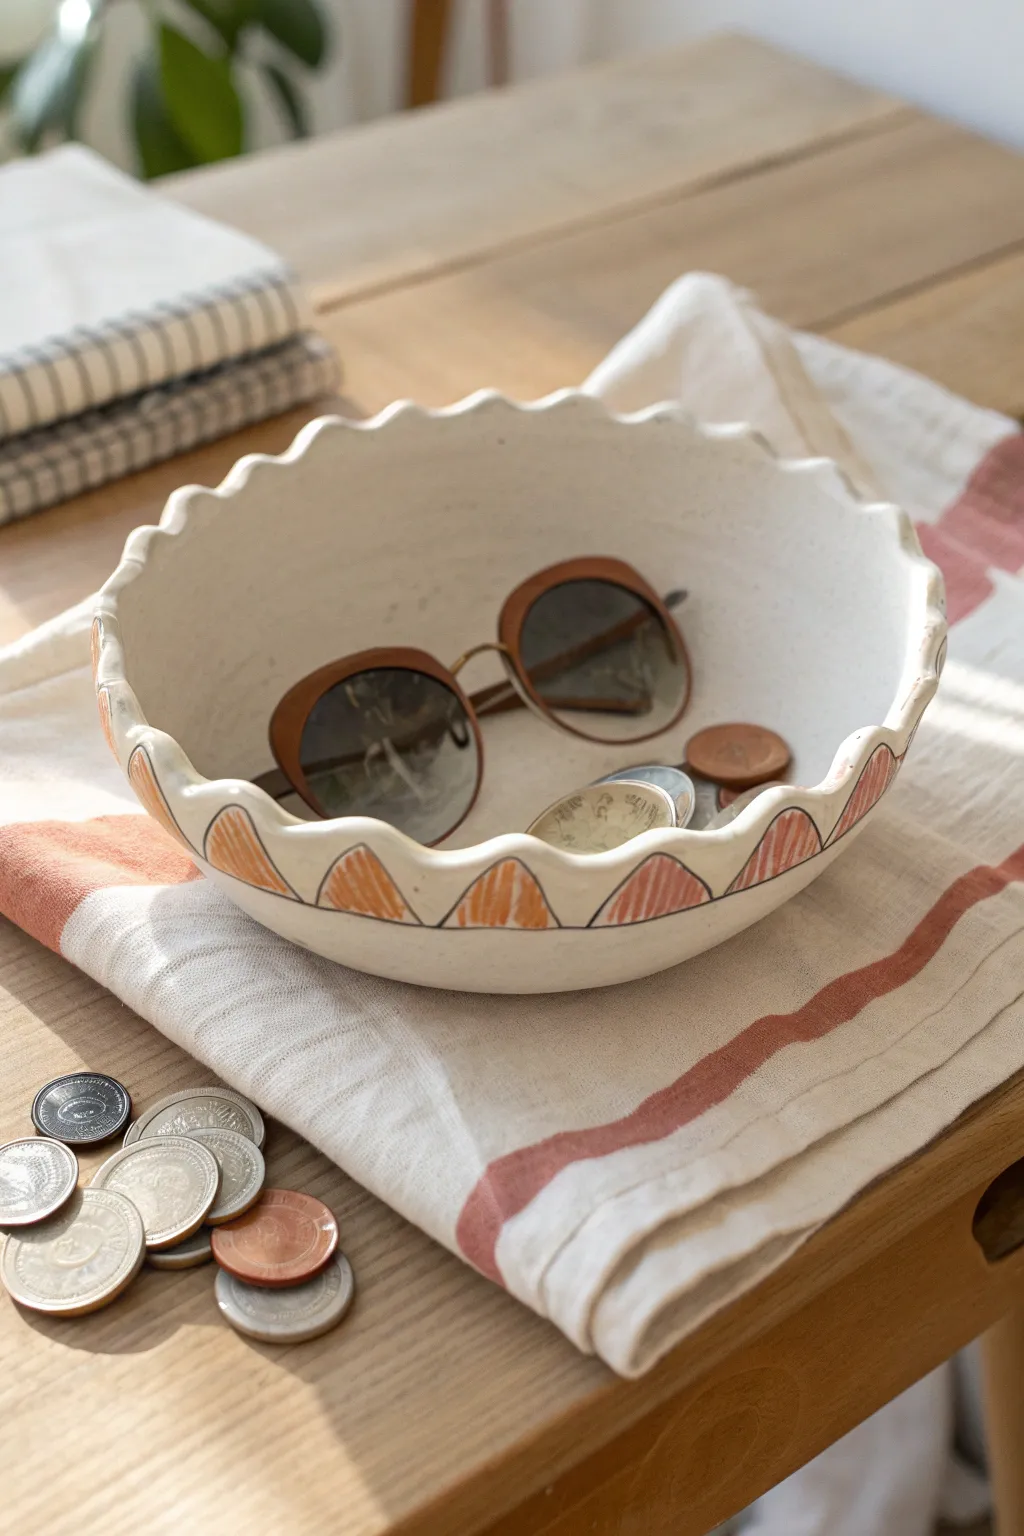
This charming catchall bowl features a gently waved rim and a warm, hand-painted geometric border that mimics the rising sun. It’s the perfect size for keeping sunglasses and loose change organized while adding an artisanal touch to your entryway table.
Step-by-Step
Materials
- Air-dry clay (white or off-white)
- Rolling pin
- Large bowl or plate (for a template)
- Clay knife or craft scalpel
- Small bowl (for shaping)
- Sandpaper (fine grit)
- Acrylic paint (burnt orange/terracotta)
- Acrylic paint (black)
- Fine-point detail brush
- Medium flat brush
- Clear matte varnish or sealant
- Sponge and water
Step 1: Shaping the Clay Base
-
Prepare the clay slab:
Begin by kneading your air-dry clay to warm it up and remove air bubbles. Roll it out on a flat surface to an even thickness of about 1/4 inch. -
Cut the circle:
Place a large bowl or dinner plate upside down onto the slab to use as a template. Trace around it with your clay knife to cut out a perfect circle. -
Smooth the edges:
Dip your finger in a little water and run it along the cut edge of the clay circle to smooth out any roughness or sharp corners. -
Create the scalloped rim:
With the clay still flat, use your thumb and forefinger to gently pinch the outer edge at regular intervals. Push down slightly between the pinch points to create a wavy, scalloped effect all the way around. -
Form the bowl shape:
Carefully lift your clay circle and drape it inside a slightly smaller bowl. Let the clay slump naturally into the curve, ensuring the scalloped edges rest evenly against the sides. -
Refine the waves:
Once inside the mold, go back around the rim. I like to gently emphasize the peaks of the waves with my fingers to ensure they don’t flatten out as the clay settles. -
Dry completely:
Allow the clay to dry in the mold for at least 24-48 hours. It needs to be bone dry and hard to the touch before you proceed.
Fixing Cracks
If hairline cracks appear while drying, mix a tiny amount of fresh clay with water to make a paste (slip). Fill the cracks, smooth over, and let dry again.
Step 2: Sanding and Painting
-
Sand for a smooth finish:
Once dry, remove the bowl from the mold. Use fine-grit sandpaper to gently buff away any fingerprints or uneven spots on the rim and interior. -
Sketch the pattern:
Lightly sketch your design onto the outer rim with a pencil. Draw small semi-circles or triangles that align with the fluted dips of your bowl’s edge. -
Outline in black:
Using a fine-point detail brush and slightly thinned black acrylic paint, carefully trace your pencil lines. Keep the line thin and organic for that hand-drawn look. -
Fill with color:
Take your burnt orange or terracotta paint and fill in the shapes you just outlined. Use a medium flat brush, stroking downward from the rim towards the center of the bowl. -
Create the texture effect:
To achieve the sketched look seen in the photo, don’t aim for solid, opaque coverage. Use a relatively ‘dry brush’ technique to let some of the white clay show through the orange paint. -
Add rim details:
Paint a very thin black line along the very top edge of the rim to define the scalloped shape. -
Paint the exterior dips:
Extend the orange pattern slightly over the lip to the outside of the bowl, matching the placement of the interior shapes. -
Seal the piece:
Once the paint is fully dry, apply a coat of clear matte varnish to the entire bowl. This protects the paint and outlines while keeping the finish non-glossy.
Speckled Finish
For a stone-like look, flick diluted brown or black paint onto the white clay using an old toothbrush before you paint the orange design.
Now you have a stylish and functional piece of decor ready to hold your daily essentials
Character Clay Toothbrush Holders
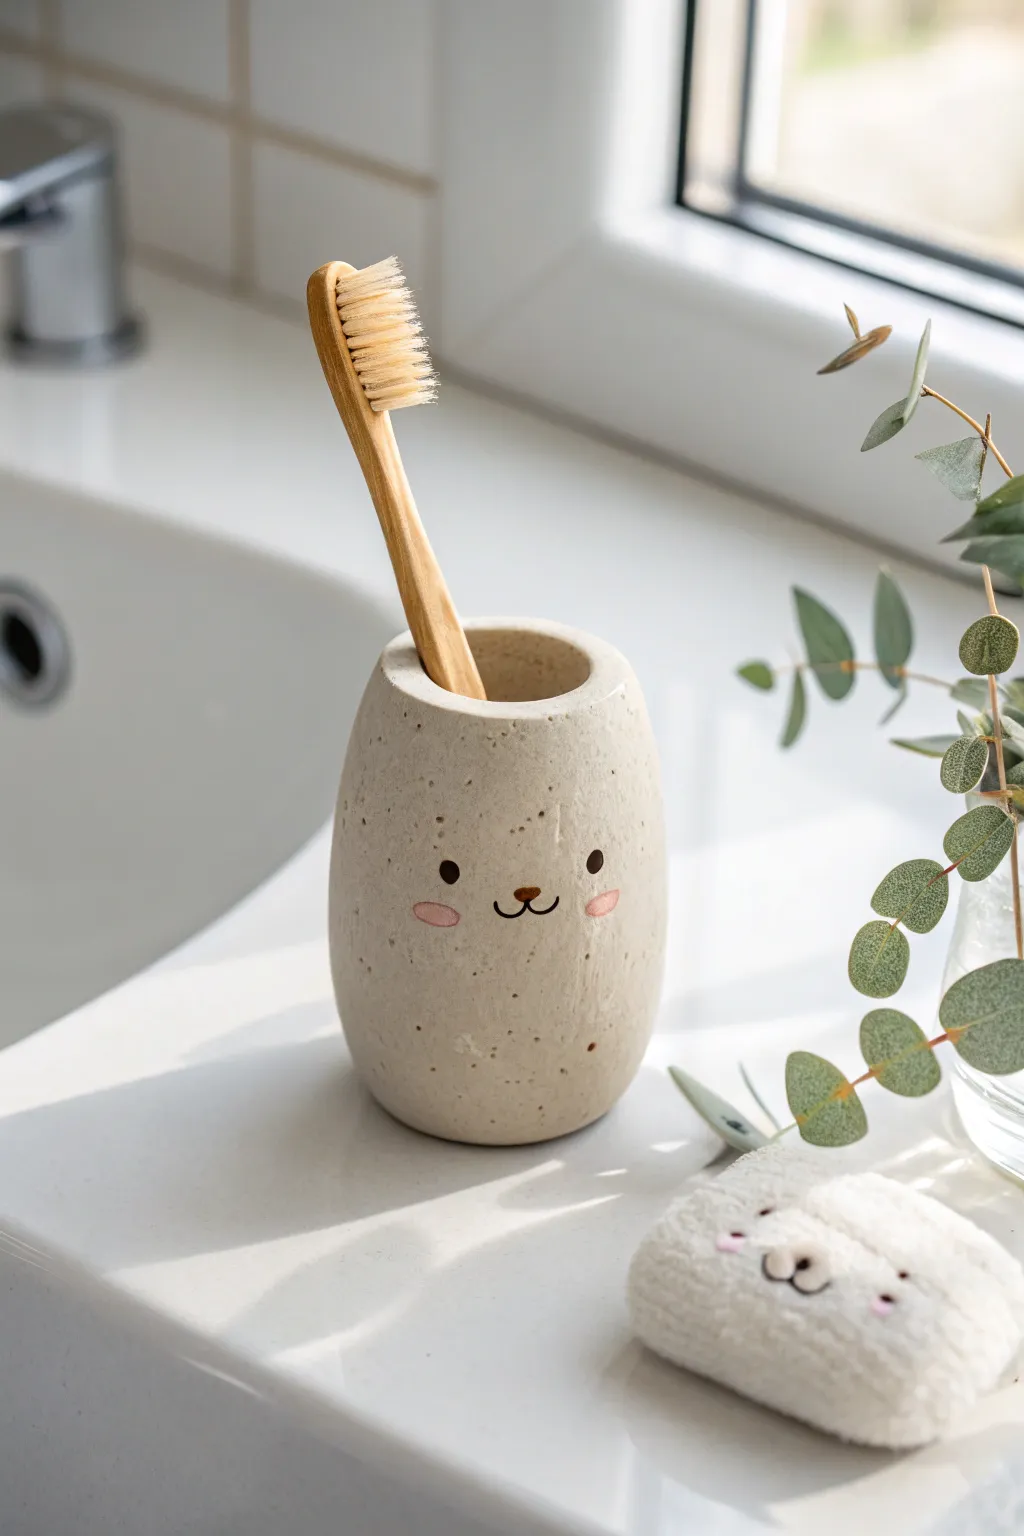
Brighten your bathroom counter with this adorable minimalistic toothbrush holder that features a sweet, hand-painted bear face. Its speckled stone-like finish and soft beige tone give it a modern organic look that pairs perfectly with bamboo brushes.
Step-by-Step Guide
Materials
- Air-dry clay (stone effect or white)
- Acrylic rolling pin
- Craft knife or clay cutter
- Empty toilet paper roll or cardboard tube (for forming)
- Small bowl of water
- Fine-grit sandpaper
- Acrylic paints (black, pink, beige/cream)
- Fine detail paintbrush
- Matte waterproof varnish or sealant
- Old toothbrush (for speckling)
- Sponge
Step 1: Forming the Base
-
Prepare the Clay:
Begin by kneading a large handful of air-dry clay until it is soft, pliable, and free of cracks. If you are using white clay but want the beige look shown, you can knead in a small drop of beige acrylic paint directly into the raw clay. -
Roll out a Slab:
Roll your clay out into an even slab, approximately 1/4 inch thick. Aim for a consistent thickness to ensure the holder stands straight later. -
Cut the Rectangle:
Measure the height of your cardboard tube. Cut a rectangle from your clay slab that is slightly taller than the tube and wide enough to wrap fully around it with a little overlap. -
Wrap the Form:
Wrap the clay rectangle around your cardboard tube. To join the seam, score (scratch) both touching edges with your craft knife, dab with a little water, and press them firmly together. Smooth the seam with a wet fingertip until it vanishes. -
Create the Bottom:
Roll out a small separate piece of clay. Place your cylinder on top of it and trace around the base. Cut out this circle and attach it to the bottom of your cylinder using the same score-and-water method, blending the clay upwards to seal it tight. -
Smooth and Shape:
Remove the cardboard tube carefully before the clay shrinks and cracks against it. Dip a sponge in water and gently smooth the top rim, rounding it off so there are no sharp edges. -
Create the Dome Effect:
To get that slightly tapered, egg-like shape seen in the photo, gently cup your hands around the top third of the cylinder and press inward while rotating the holder. This narrows the opening slightly.
Cracking Up?
If small hairline cracks appear while drying, mix a small slurry of clay and water (called slip) and fill them in with a brush, then sand smooth once dry.
Step 2: Refining and Decorating
-
Let it Dry:
Allow the piece to dry completely. This usually takes 24-48 hours depending on humidity. Turn it upside down halfway through to let the bottom breathe. -
Sand for Smoothness:
Once bone dry, take your fine-grit sandpaper and gently sand away any bumps, fingerprints, or uneven areas on the surface and the rim. -
Apply Base Color:
If your clay dried darker or lighter than you wanted, mix a creamy beige acrylic paint and apply a solid coat over the entire exterior. I like to use a sponge for this to avoid brushstrokes. -
Add Texture:
To recreate the stone speckle effect, dilute a tiny bit of brown or grey paint with water. Dip an old toothbrush into it and flick the bristles with your thumb to spray fine misty dots onto the holder. -
Paint the Face:
Using your finest detail brush and black paint, carefully paint two small wide-set eyes and a tiny U-shaped mouth with a small nose. -
Add Cheeks:
Dip the back end of your paintbrush (the handle) into soft pink paint and stamp two oval cheeks next to the mouth for a blushing look.
Step 3: Sealing
-
First Coat of Varnish:
Because this will live in a bathroom, sealing is crucial. Apply a coat of matte waterproof varnish to the inside and outside. -
Final Seal:
Wait for the first coat to dry, then apply a second or third coat. Pay special attention to the bottom seam where water might pool.
Make it a Set
Use the same technique but with a wider diameter form (like a large can) to create a matching succulent planter or a cotton round holder for your vanity.
Enjoy your charming new morning companion and the tidy sink space it brings
Clay Incense Holders That Look Handmade-Cool
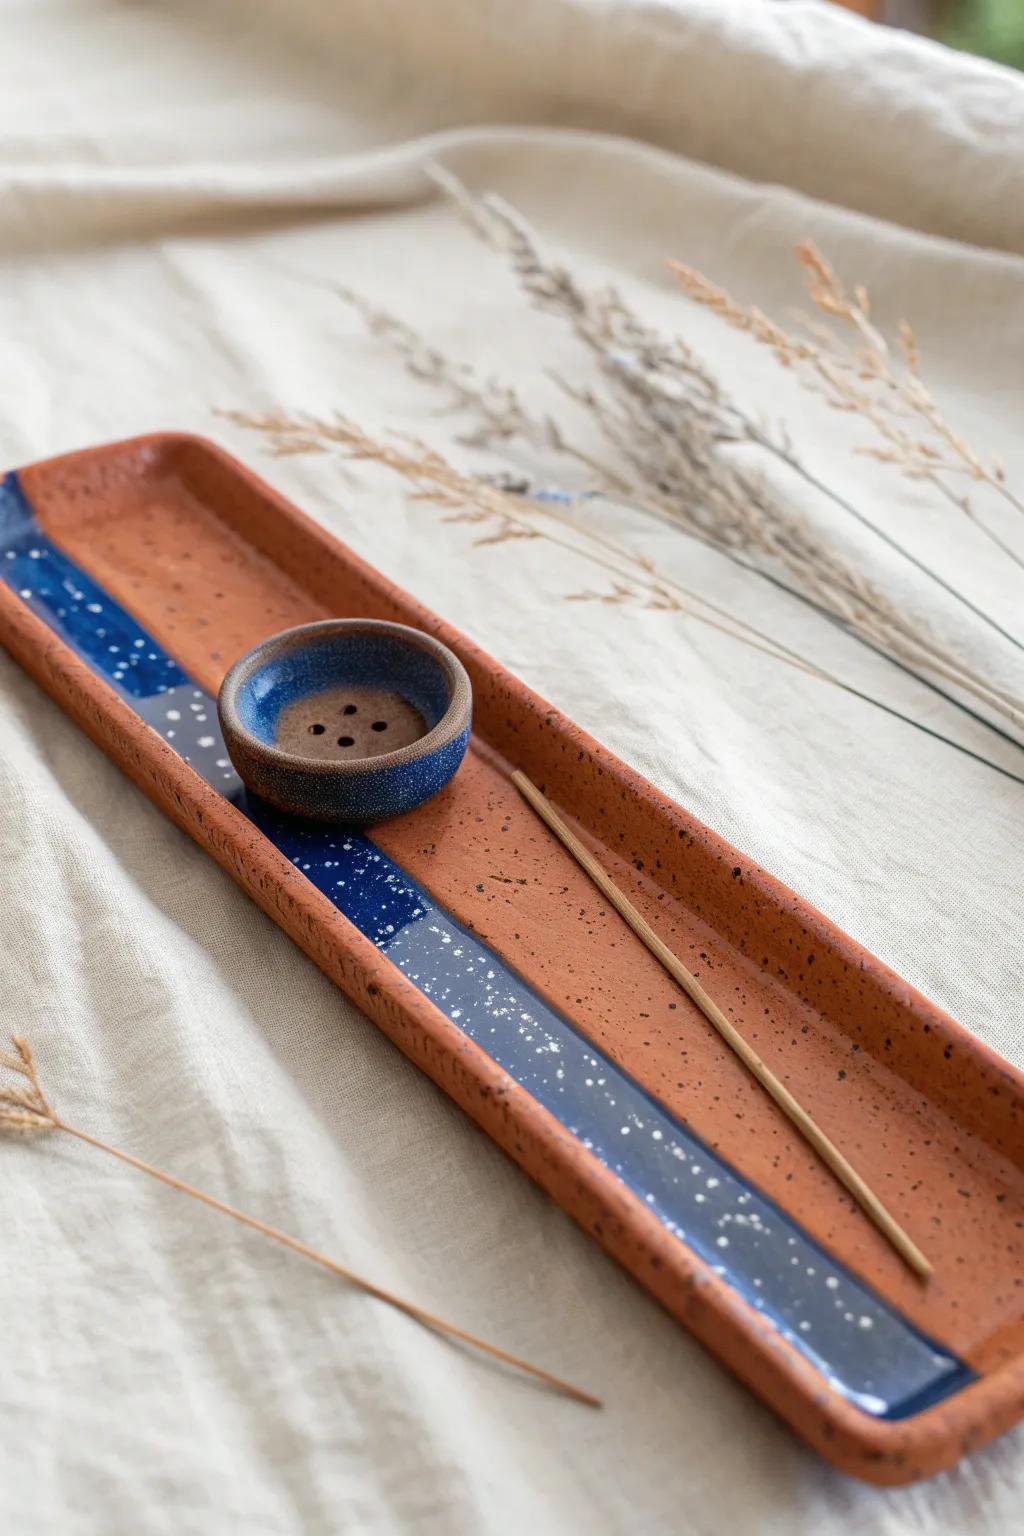
This project combines the rustic warmth of red clay with a splash of celestial blue glaze for a stunning contrast. The two-piece design features a long catch-tray and a separate, removable incense holder puck, making cleanup effortless and adding a touch of modern versatility.
How-To Guide
Materials
- Red earthenware or terracotta clay (ideally grogged/speckled)
- Rolling pin
- Two long wooden guide strips (approx. 1/4 inch thick)
- Rectangular template (or ruler + knife)
- Fettling knife or craft knife
- Small round cookie cutter or bottle cap
- Pottery sponge
- Needle tool or small drill bit (for the holes)
- Deep blue gloss glaze
- White glaze (for splatter effect)
- Masking tape
- Stiff bristle brush (e.g., old toothbrush)
- Clear matte glaze (optional, for unglazed areas)
Step 1: Shaping the Base Tray
-
Prepare your workspace:
Lay down a piece of canvas or a non-stick silicone mat to prevent the clay from sticking to your table. -
Roll the slab:
Place your wooden guide strips on either side of your clay ball. Roll the clay out until the rolling pin rests on the strips, ensuring an even thickness of about 1/4 inch. -
Cut the rectangle:
Use a ruler or paper template to cut a long rectangle, roughly 10-12 inches long and 3-4 inches wide. Clean up the cut edges with a damp sponge. -
Create the walls:
Gently pinch the edges of the slab upwards to create a shallow rim around the entire perimeter. -
Refine the shape:
Smoothing the rim with a damp sponge or your finger is crucial here; aim for a soft, rounded lip rather than a sharp edge. -
Dry stage one:
Set the tray aside on a board to dry until leather-hard. I like to loosely cover it with plastic to prevent the edges from drying too fast and warping.
Step 2: Creating the Holder Puck
-
Form the puck:
Roll a small ball of remaining clay into a thick disc, slightly wider than a bottle cap. -
Shape the indentation:
Press your thumb uniformly into the center of the disc to create a concave, bowl-like shape, leaving a thick rim. -
Add holes:
Using a needle tool or small drill bit, poke 3-5 holes in the center of the puck. Angle one slightly so it can hold the stick upright. -
Refine and dry:
Smooth any cracks with a damp finger and set the puck alongside the tray to dry completely to the bone-dry stage.
Warping Woes?
If your tray curls up while drying, flip it over periodically or weigh down the center gently with a small bag of rice or sand during the leather-hard stage.
Step 3: Bisque & Glazing
-
First firing:
Fire both pieces to bisque temperature (cone 04 usually) in a kiln. -
Clean surface:
Once cool, wipe both pieces with a damp sponge to remove any kiln dust. -
Masking the design:
On the long tray, apply masking tape to cover the right side (about two-thirds), leaving a vertical strip on the left exposed for the blue glaze. -
Applying base celestial blue:
Brush 2-3 coats of deep blue gloss glaze onto the exposed strip of the tray and onto the outer rim of the small holder puck. -
Create the galaxy splatter:
Dip a stiff bristle brush or toothbrush into white glaze. Run your thumb across the bristles to flick tiny specks onto the wet blue glaze. -
Remove tape:
Carefully peel off the masking tape before the glaze dries completely to ensure a crisp line. -
Optional sealing:
If you want the bare clay to be sealed, apply a thin coat of clear matte glaze over the unglazed red sections, though leaving it raw preserves the texture. -
Final firing:
Fire the pieces again to your glaze’s specific maturation temperature (e.g., cone 5 or 6) to vitrify the clay and melt the glass.
Try Cone Incense
Instead of small holes, create a small flat platform in the center of the puck. This adapts the design perfectly for burning cone incense as well.
Now you have a functional piece of art ready to bring calm scents into your home
Clay Plant Markers for Pots and Herbs
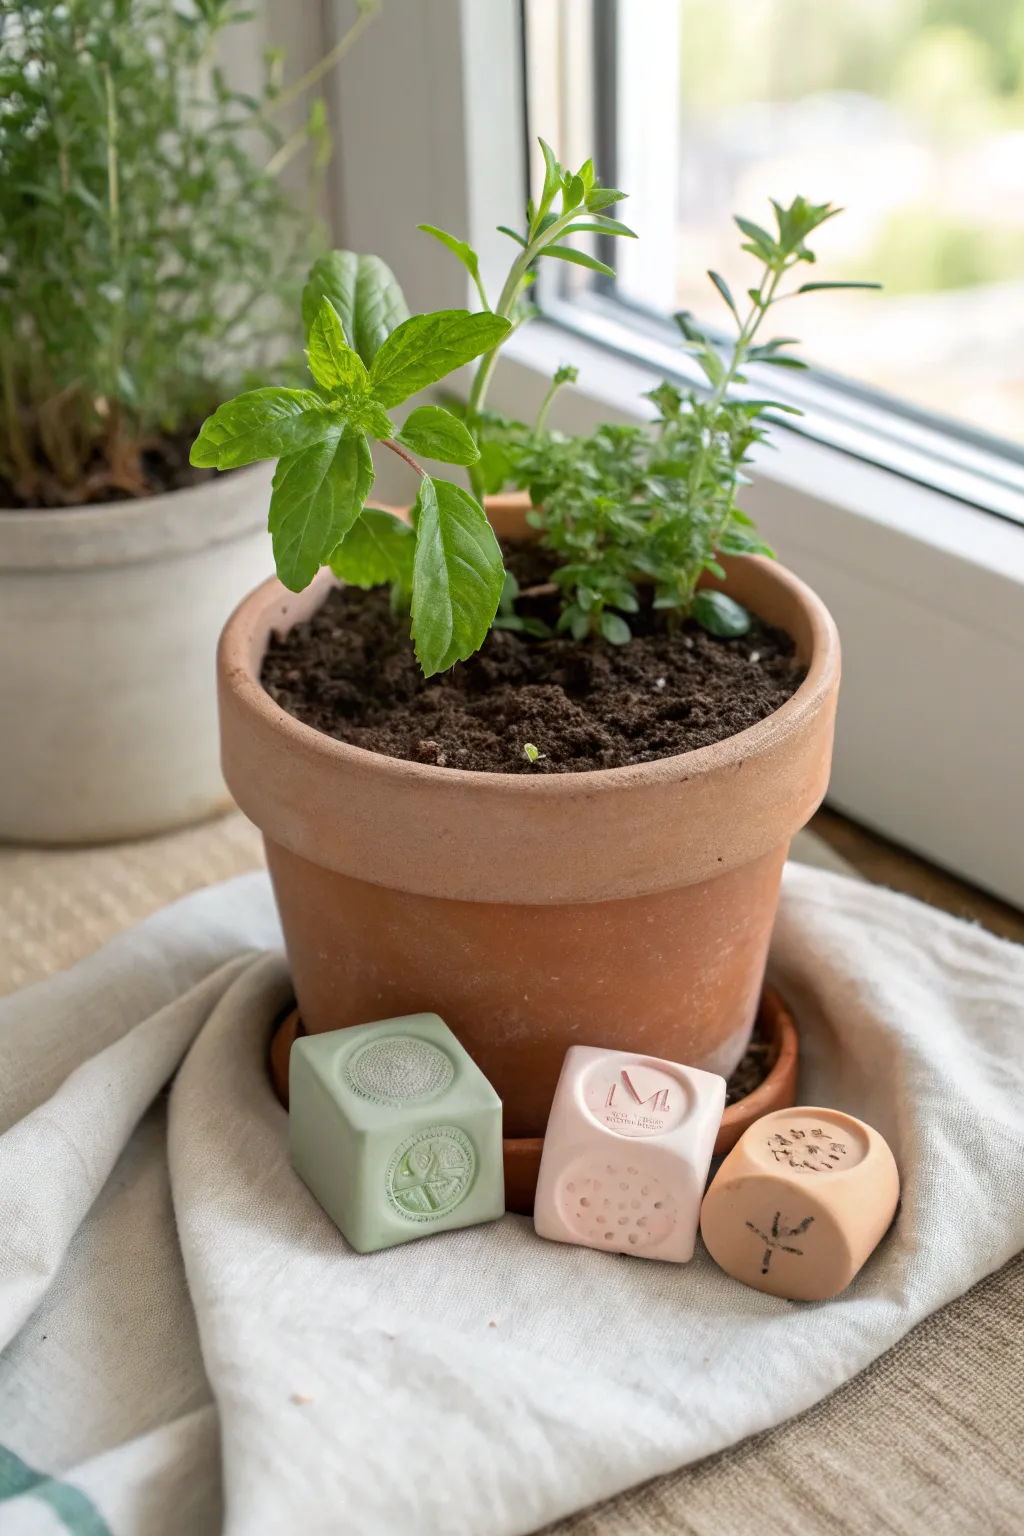
Move away from traditional stake labels with these geometric, die-inspired herb markers that sit perfectly on a windowsill or garden Ledge. These smooth, pastel cubes feature stamped motifs and initials, adding a touch of modern minimalism to your potted plants.
Step-by-Step Guide
Materials
- Polymer clay (in mint green, pale pink, and peach/terracotta colors)
- Small square cookie cutter (approx. 1 inch) or a sharp craft blade
- Rubber stamps (botanical themes and alphabet)
- Rolling pin or pasta machine
- Smooth work surface (ceramic tile or glass)
- Cornstarch or baby powder (for release)
- Fine-grit sandpaper (optional)
- Baking sheet and parchment paper
- Oven
Step 1: Prepping and Shaping
-
Condition the clay:
Begin by taking your chosen polymer clay colors and kneading them in your hands until they are soft and pliable. This conditioning process prevents cracks later on. -
Form a block:
Roll the clay into a smooth ball first, then gently press it against your work surface to flatten the bottom. Use your fingers to tap the sides, gradually manipulating the ball into a rough cube shape. -
Refine the edges:
For sharper edges, slice off the rounded sides of your clay block using a sharp craft blade. Alternatively, you can keep the edges slightly softened for the organic ‘die’ look seen in the photo. -
Check the size:
Ensure your cube is approximately 1 inch to 1.5 inches square. It needs to be heavy enough to sit stably but small enough not to dwarf your plant pot. -
Smooth the surface:
Gently embrace the cube with your fingers to smooth out any fingerprints. I find that a very light dusting of cornstarch on your finger helps glide over the clay without leaving texture.
Fixing Stuck Stamps
If a stamp sticks to the clay, don’t pull! Gently slide a thin blade under the stamp edge to break the suction, then lift. Re-dust with cornstarch before retrying.
Step 2: Designing the Impressions
-
Prepare your stamps:
Select rubber stamps that fit neatly within the face of your cube. Clean them to ensure no old ink or dust transfers to the pristine clay. -
Apply release agent:
Lightly dust the face of the rubber stamp with cornstarch or baby powder. This is crucial as it prevents the stamp from sticking to the raw clay and pulling up the design when you remove it. -
Stamp the top face:
Choose a botanical design, like a flower or leaf pattern. Press the stamp firmly and evenly directly into the top center of the cube. Do not rock the stamp; press straight down and pull straight up. -
Add side details:
Rotate the cube carefully. On a side face, use an alphabet stamp to impress the initial of the herb (like ‘M’ for Mint or ‘B’ for Basil). You can add decorative dots using a blunt tool or the end of a paintbrush handle if desired. -
Create variation:
Repeat for your other colored cubes. Try different motifs—a sunburst for the pink cube, a twig for the peach one—to differentiate your herbs visually. -
Inspect the impressions:
Look closely at your stamped areas. If you accidentally warped the cube shape while pressing, gently push the sides back into square alignment.
Step 3: Finishing
-
Prepare for baking:
Place your finished cubes onto a baking sheet lined with parchment paper. Space them out so they touch neither each other nor the sides of the pan. -
Bake the clay:
Bake according to your specific polymer clay manufacturer’s instructions (usually around 275°F or 130°C) for about 30 minutes, given the thickness of the cubes. -
Cool down completely:
Let the cubes cool in the oven with the door slightly ajar. This slow cooling helps prevent thermal shock cracks in thicker clay pieces. -
Sand edges (optional):
Once fully cool and hard, inspect the corners. If there are any sharp bits or fingerprints, lightly wet-sand them with fine-grit sandpaper for a professional matte finish. -
Clean up:
Wipe the cubes with a damp cloth to remove any residual sanding dust or cornstarch powder from the crevices of the stamped designs.
Pro Tip: High Contrast
To make the designs pop, rub acrylic paint into the stamped grooves after baking, then quickly wipe the surface clean, leaving color only in the impressions.
Place these charming cubes beside your windowsill pots for an instant organizational upgrade
DIY Clay Domino Set With Color Dots
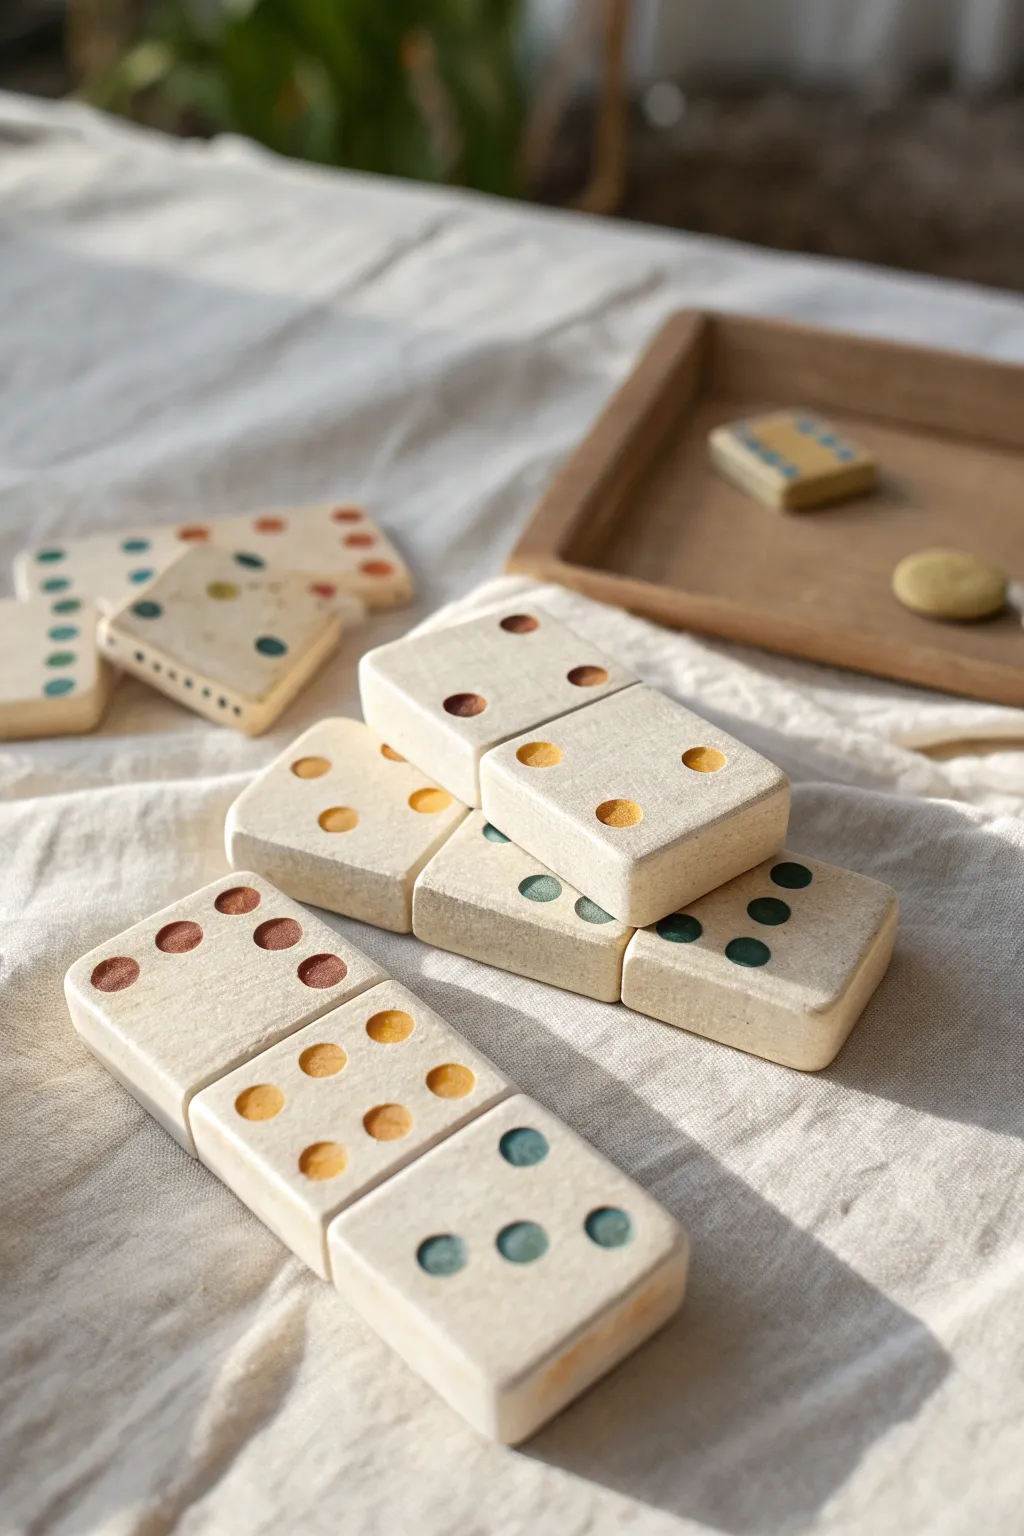
Create a timeless game set that doubles as coffee table decor with these chunky, handmade dominoes. The muted, earthy color palette and soft, imperfect edges give them a charming, artisanal feel perfect for cozy game nights.
Detailed Instructions
Materials
- Air-dry clay (white or light cream)
- Rolling pin
- Two flat wooden slats (about 1/2 inch thick) for thickness guides
- Sharp craft knife or clay blade
- Small round clay cutter or stiff straw
- Fine-grit sandpaper (220 grit)
- Acrylic paints (terracotta, mustard yellow, sage green, teal blue)
- Small detail paintbrush
- Matte sealant or varnish
- Parchment paper or canvas working surface
- Ruler
Step 1: Shaping the Tiles
-
Prepare the Clay Slab:
Begin by kneading a large handful of air-dry clay to remove air bubbles and warm it up. Place your two wooden slats on either side of the clay on your work surface; these will ensure every domino is exactly the same thickness. Roll the clay out until the rolling pin rests flat on the slats. -
Cut the Rectangles:
Using a ruler and your blade, measure and cut a long strip of clay that is approximately 1 inch wide. Then, mark every 2 inches along that strip to create standard 1×2 ratio rectangles. Make clean, straight cuts at each mark. -
Smooth the Edges:
Carefully pick up each rectangle. Dip your finger in a little water and gently run it along the cut edges and corners to soften them. You want to remove sharp angles without losing the rectangular shape. -
Mark the Dividing Line:
Find the exact center of each tile. Using the back of your knife blade or a modeling tool, gently press a shallow indentation across the width to divide the tile into two squares. Don’t cut all the way through; just create a visual separation.
Step 2: Adding the Pips
-
Plan Your Numbers:
Before impressing, have a standard set of dominoes or a reference image nearby so you know exactly which number combinations (0-6) you need to make for a full set of 28 tiles. -
Create the Intentions:
Take your small circular cutter, a blunt tool, or the end of a stiff straw. Press gently into the wet clay to create the ‘pips’ (dots). Press deep enough to hold paint later, but not so deep you compromise the tile’s strength. -
Refine the Dots:
Sometimes the clay raises up around the hole you just punched. Use your fingertip to gently tap any raised ridges back down flush with the surface. -
Allow to Dry:
Arrange the finished tiles on a mesh rack or parchment paper. Let them air dry completely for at least 24-48 hours. I find flipping them over halfway through helps them dry evenly and prevents warping.
Warping Woes?
If tiles start curling up edges while drying, place a light book on top of them (with parchment paper in between) once they are semi-dry to force them flat.
Step 3: Finishing Touches
-
Sand for Smoothness:
Once fully dry and hard, use 220-grit sandpaper to lightly buff the surface and edges. Focus on any sharp bits left from cutting. Wipe away the dust with a barely damp cloth. -
Mix Your Palette:
Squeeze out small amounts of your acrylic paints. To achieve that muted, earthy look from the photo, mix a tiny dot of brown or grey into bright colors to desaturate them. -
Paint the Pips:
Load a fine detail brush with paint. Carefully fill in the indented dots. You can stick to one color per number (e.g., all 5s are teal, all 2s are mustard) or mix them up for a more eclectic style. -
Clean Up Mistakes:
If paint gets onto the flat surface of the tile, wait for it to dry slightly and then scratch it off gently with a toothpick or sand it away lightly. -
Seal the Set:
Apply a thin coat of matte varnish over the entire tile. This protects the clay from moisture and prevents the paint from chipping during rigorous gameplay.
Level Up: Leather Case
Sew a simple pouch from scrap leather or felt to store your set. Add a drawstring closure for a truly portable, travel-ready game kit.
Gather your friends for a classic game night with your beautiful new handmade set