When you want easy cute clay ideas, the secret is keeping everything small, simple, and built from basic shapes. I’m sharing my favorite beginner-friendly projects that look polished fast—think sweet little faces, soft colors, and that instantly adorable kawaii aesthetic.
Tiny Heart Trinket Tray
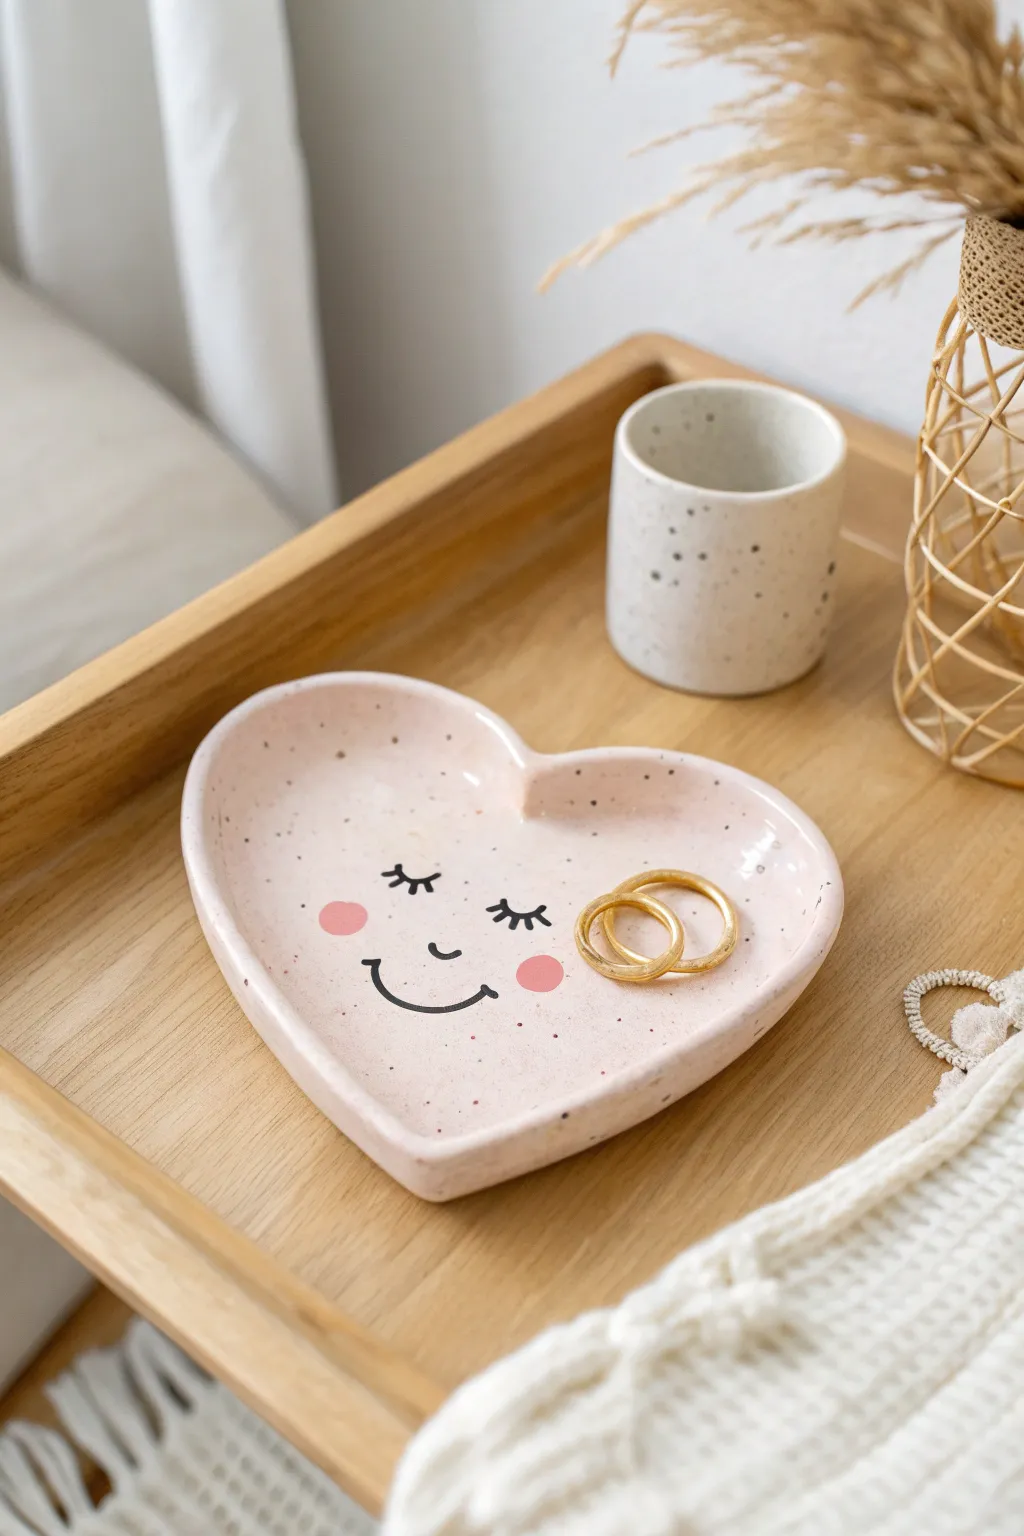
Keep your favorite rings safe in the sweetest way possible with this speckled heart-shaped trinket dish. With its gentle pink hue, charming sleeping face, and hand-formed edges, it adds a touch of whimsy to any bedside table.
Detailed Instructions
Materials
- White air-dry clay or polymer clay
- Rolling pin
- Heart-shaped cookie cutter (large) or paper template
- Craft knife
- Bowl of water (for smoothing)
- Fine-grit sandpaper
- Acrylic paints: Pale pink, black, rosy pink, and dark grey/brown
- Old toothbrush (for speckling)
- Fine detail paintbrush
- Gloss or satin varnish/sealer
Step 1: Shaping the Clay
-
Prepare the Clay:
Start by conditioning your clay. Knead a ball of white clay in your hands until it is warm, pliable, and free of cracks. -
Roll it Out:
Using a rolling pin, flatten the clay to an even thickness of about 1/4 inch. Turning the clay over occasionally helps prevent it from sticking to your work surface. -
Cut the Heart:
Press a large heart-shaped cookie cutter firmly into the clay. If you don’t have a cutter, place a paper template on the clay and carefully trace around it with a craft knife. -
Smooth the Edges:
Dip your finger in a little water and run it along the cut edges of the heart to remove any roughness or sharp bits left by the cutter. -
Create the Lip:
Gently curve the edges of the heart upwards to create a shallow bowl shape. Use your thumbs to press the center down slightly while pulling the sides up. -
Refine the Form:
Check the symmetry of your heart. I find it helpful to look at it from directly above to ensure the curve is even all the way around. -
Dry Completely:
Place the tray on a flat surface to dry. If using air-dry clay, let it sit for 24-48 hours. If using polymer clay, bake according to the package instructions.
Uneven Edges?
If the clay keeps cracking as you curve the edges up, your clay might be too dry. Add a tiny amount of water to your fingertips and massage the crack until it disappears.
Step 2: Decorating and Finishing
-
Sand for Smoothness:
Once fully cured, use fine-grit sandpaper to gently buff the surface and rim, ensuring it feels perfectly smooth to the touch. -
Base Coat:
Mix a tiny drop of red or pink acrylic paint into white paint to create a very pale, soft pink. Paint the entire surface of the tray, including the back and sides. Let this dry completely. -
Add the Speckles:
Dilute a small amount of dark grey or brown paint with water. Dip an old toothbrush into this mixture, aim it at the tray, and run your thumb across the bristles to flick tiny speckles over the surface. -
Paint the Cheeks:
Using a rosy pink paint, dab two small circles onto the cheeks. You can use the end of a paintbrush handle or a distinctive round sponge dabber for perfect circles. -
Draw the Face:
With a very fine detail brush and black paint, carefully draw the sleeping eyes with lashes, a tiny ‘u’ nose, and a wide smile. Sketching lightly with a pencil first can save stress here. -
Verify the Details:
Allow the face details to dry completely. Check if any lines need a second pass to look crisp and opaque. -
Seal the Tray:
Protect your artwork by applying a coat of gloss or satin varnish. This gives it a finished ceramic look and prevents the paint from scratching.
Perfect Speckles
Practice your toothbrush flicking technique on a piece of scrap paper first. The distance you hold the brush from the object changes the size of the splatter.
Now you have a darling little dish ready to hold your treasures or gift to a friend


Cactus Ring Holder With a Face
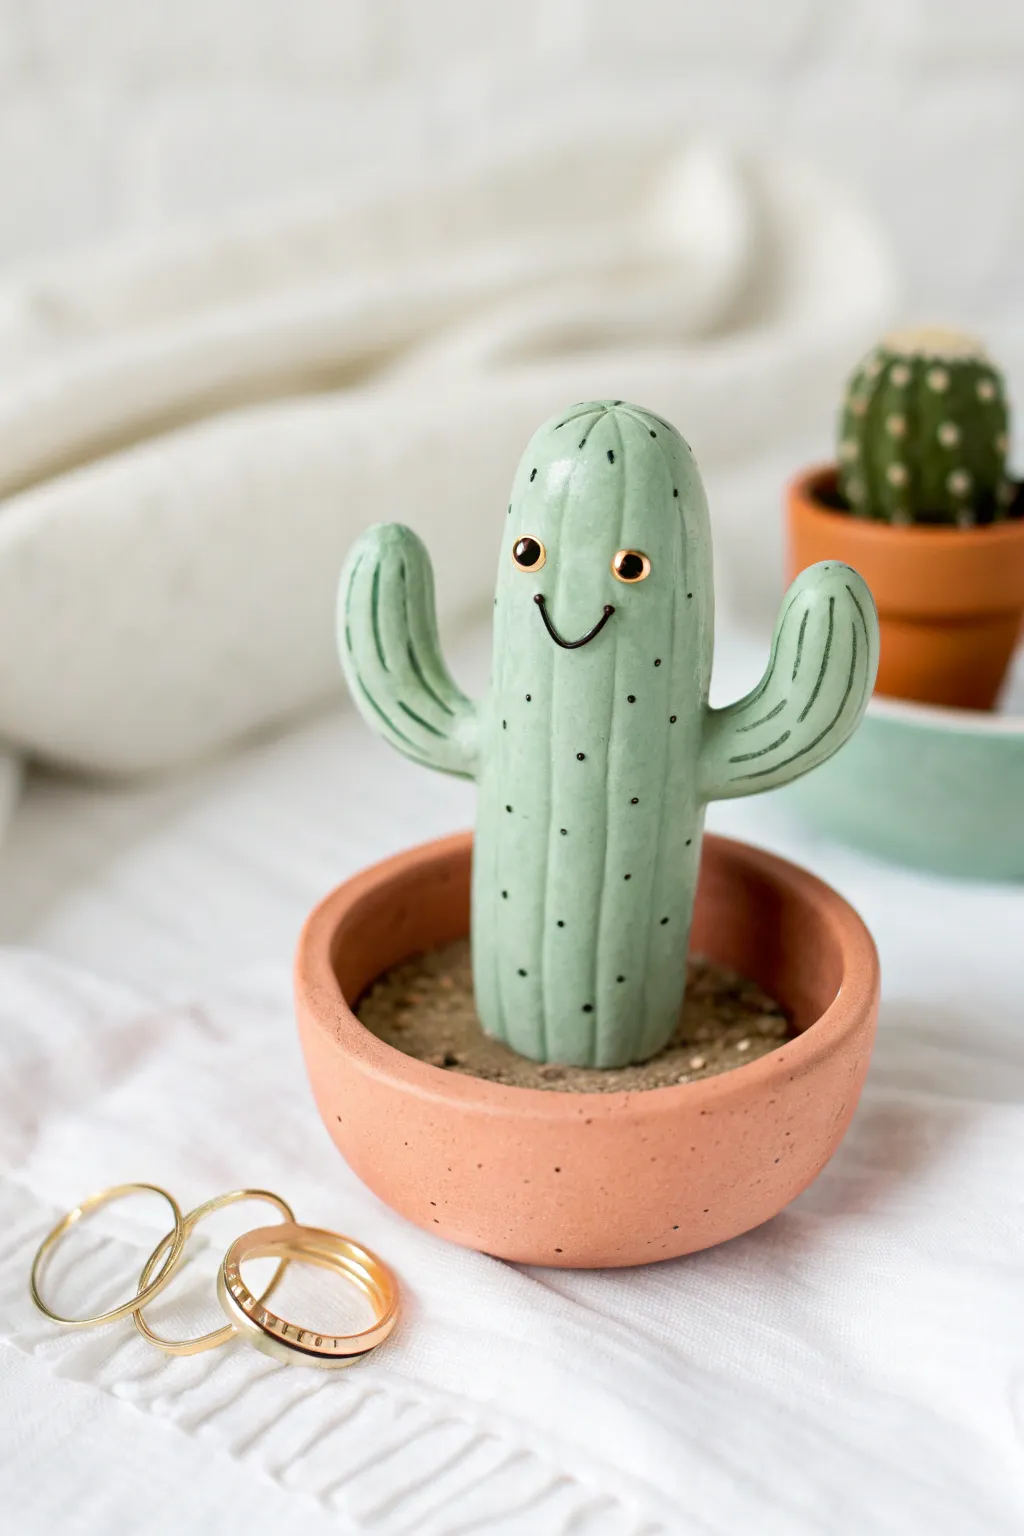
This adorable anthropomorphic cactus isn’t just a friendly face; it’s a functional sculpture designed to keep your favorite rings safe. With its glossy finish, cute expression, and sturdy base, this clay project brings a touch of desert whimsy to your vanity.
How-To Guide
Materials
- Polymer clay (pale green, terracotta/orange, brown/beige)
- Clay sculpting tools (needle tool, smoothing tool)
- Acrylic paints (black, white, gold)
- Small detail paintbrushes
- Gloss varnish or glaze
- Aluminum foil
- Superglue or liquid clay (optional for reinforcement)
- Oven for baking
Step 1: Sculpting the Base Pot
-
Prepare the terracotta clay:
Start by conditioning a ball of terracotta-colored clay until it is soft and pliable. Flatten it slightly into a thick disk to form the bottom of your pot. -
Form the walls:
Roll a long, even snake of the same terracotta clay. Coil it around the edge of your base disk to build up the walls, then create a second layer if you want a deeper pot. -
Smooth the exterior:
Using your thumb or a smoothing tool, blend the coils together on both the outside and inside so the seams disappear completely. You want a smooth, bowl-like shape. -
Create the ‘soil’ surface:
Take your brown or beige clay and form a flat disk that fits snugly inside the pot, resting a bit below the rim. I like to texture this surface by tapping it gently with a toothbrush or a crinkled ball of foil to mimic sandy soil.
Step 2: Creating the Cactus Body
-
Shape the main trunk:
Roll a cylinder of pale green clay for the main cactus body. Ensure the bottom is flat so it will stand upright, and round off the top into a gentle dome. -
Add texture lines:
Use a needle tool or a dull knife to score vertical lines running from the top center down to the base. Press gently to create grooves without cutting all the way through. -
Form the arms:
Create two smaller cylinders of green clay for the arms. Curve them slightly upwards into a ‘U’ shape. -
Attach the arms:
Score the sides of the main trunk where you want the arms to go, and score the ends of the arms. Press them together firmly and use a blending tool to smooth the clay at the join so they are seamless and secure. -
Texture the arms:
Extend your vertical groove lines onto the arms so the texture looks continuous. -
Secure to the base:
Place the cactus into the center of the ‘soil’ disk inside the pot. Press down firmly to bond them, or use a dab of liquid clay for extra security.
Drooping Cactus Arms?
If the arms sag while you sculpt, support them with small balls of foil or folded paper underneath until you bake the clay to lock the shape in place.
Step 3: Adding the Face and Baking
-
Sculpt the smile:
Roll a very thin, tiny snake of black clay (or paint it later) and press it into a ‘U’ shape for the mouth. Embed tiny balls of black clay for the eyes, or create small indentations to paint later. -
Bake the piece:
Place your finished sculpture on a baking sheet or foil. Bake according to your polymer clay package instructions (usually around 275°F or 135°C for 15-30 minutes). -
Cool down:
Let the piece cool completely in the oven or on the counter before handling it to ensure the clay hardens properly.
Pro Tip: Eye Sparkle
For the eyes, use tiny glass seed beads or oven-safe gems instead of paint! Press them into the raw clay before baking for a perfect, permanent shine.
Step 4: Painting and Finishing
-
Paint the spikes:
Using a very fine detail brush and black acrylic paint, add sets of three tiny dots or small dashes along the vertical grooves to represent spines. Keep them spaced evenly. -
Detail the face:
If you embossed the eyes, paint them black now. Add a tiny dot of white paint to each eye for a reflective highlight, and perhaps a rim of gold around the eye for that extra sparkle shown in the image. -
Add depth to the pot:
You can speckle the terracotta pot slightly with a toothbrush and diluted brown paint to give it a more natural, earthen pottery look. -
Seal the project:
Apply a coat of gloss varnish or glaze over the entire cactus to make it shine and protect the paint details. Leave the pot matte for contrast or glaze it too if you prefer.
Once dry, stack your favorite rings on the cactus arms and enjoy your charming new jewelry organizer


Chubby Frog Desk Buddy
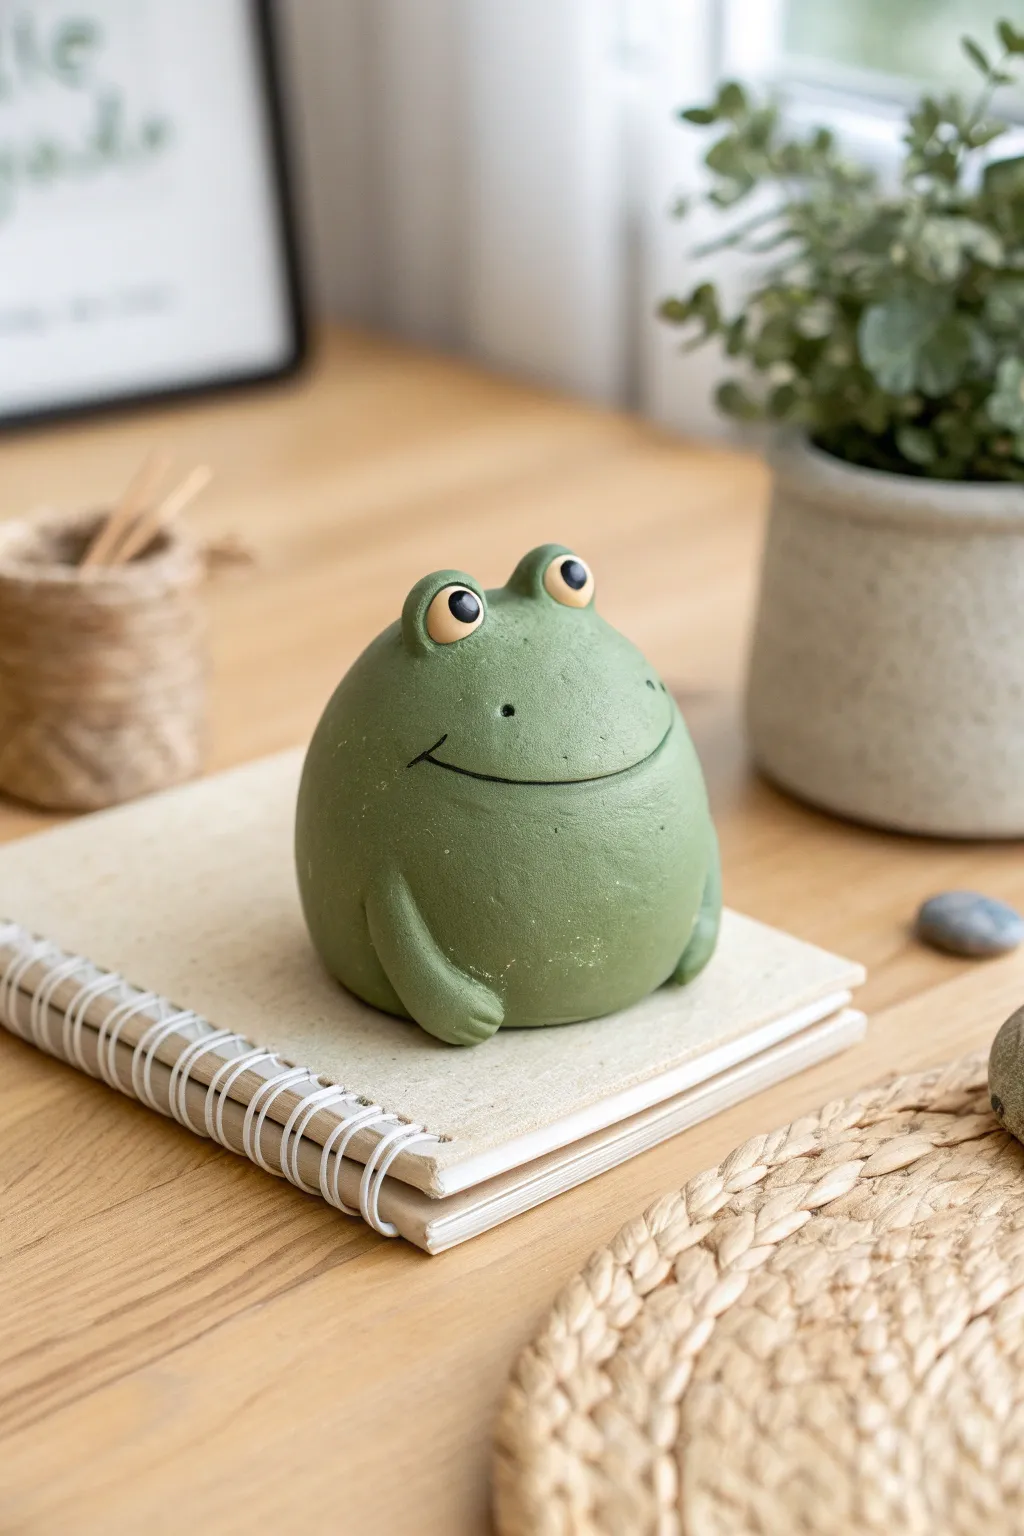
Bring a little zen to your workspace with this incredibly round and cheerful frog sculpture. Its smooth, moss-green finish and goofy protruding eyes make it the perfect friendly companion for your daily tasks.
Step-by-Step Guide
Materials
- Green polymer clay (moss or olive shade)
- Small amount of white polymer clay
- Small amount of black polymer clay
- Acrylic roller
- Needle tool or toothpick
- Ball stylus tool (medium and large)
- Smooth work surface (ceramic tile or glass)
- Oven (for baking)
- Matte varnish (optional)
Step 1: Shaping the Base
-
Warm the clay:
Start by conditioning your green clay thoroughly in your hands until it becomes soft and pliable. This prevents cracks later on. -
Form the body:
Roll almost all of your green clay into a large, smooth ball. Once spherical, gently tap the bottom against your work surface to create a flat base so the frog sits securely. -
Refine the shape:
Gently press the top of the ball slightly to turn it into a soft egg shape, keeping the bottom wide and stable. This is the main body.
Sticky Clay Problems
If your clay gets too soft and sticky from the heat of your hands, pop it in the fridge for 10 minutes. This firms it up and makes detail work much easier.
Step 2: Adding the Arms
-
Create arm sausages:
Take two small pieces of green clay, roughly the size of large peas. Roll them into short, thick logs, tapering one end slightly. -
Attach the arms:
Press the thicker end of each log onto the lower sides of the main body body. Smooth the clay where it connects to the body so there is no visible seam. -
Pose the hands:
Curve the arms forward so they rest naturally against the belly. Flatten the tips slightly to simulate hands. -
Add detail:
Using your needle tool, gently press two or three small indentations into the flattened tips to suggest fingers, giving the frog a polite, resting pose.
Step 3: Face and Expressions
-
Make the eye sockets:
Roll two small balls of green clay for the eye mounds. Attach them to the top of the head, spacing them slightly apart. -
Blend the eyes:
Use a modeling tool or your finger to smooth the bottom seams of the eye mounds into the head, keeping the round shape on top distinct. -
Create the eyeballs:
Press a medium ball stylus into the center of each green mound to create a socket. Fill these sockets with small flattened discs of off-white clay. -
Add pupils:
Take two tiny specks of black clay, roll them into balls, and flatten them onto the white clay. Place them slightly cross-eyed or looking upward for a goofier expression. -
Carve the smile:
Use your needle tool to carefully drag a wide, sweeping U-shape across the face. Make the cut fairly deep so it remains visible after baking. -
Create dimples:
At the ends of your smile line, press a small dot with the needle tool to create cute little cheek dimples. -
Add nostrils:
Between the eyes and the mouth, poke two tiny holes for the nostrils. Keep them small and spaced remarkably wide apart.
Turn It Into a Planter
Make the body much larger and hollow out the center top before baking to create a space for a tiny air plant or succulent.
Step 4: Finishing Touches
-
Smooth fingerprints:
Brush a tiny amount of baby oil or clay softener over the surface to erase any fingerprints before baking. I find this really helps achieve that professional ceramic look. -
Bake:
Bake the figure according to your specific clay package instructions. Usually, this is around 230°F to 275°F (110°C – 135°C) for 30 minutes per 1/4 inch of thickness. -
Cool down:
Let the frog cool completely in the oven with the door slightly ajar to prevent thermal shock cracking. -
Protect:
Once fully cool, apply a thin coat of matte varnish if you want to protect the surface from dust and scratches.
Place your rotund amphibian friend on a stack of books or near a potted plant to keep him company


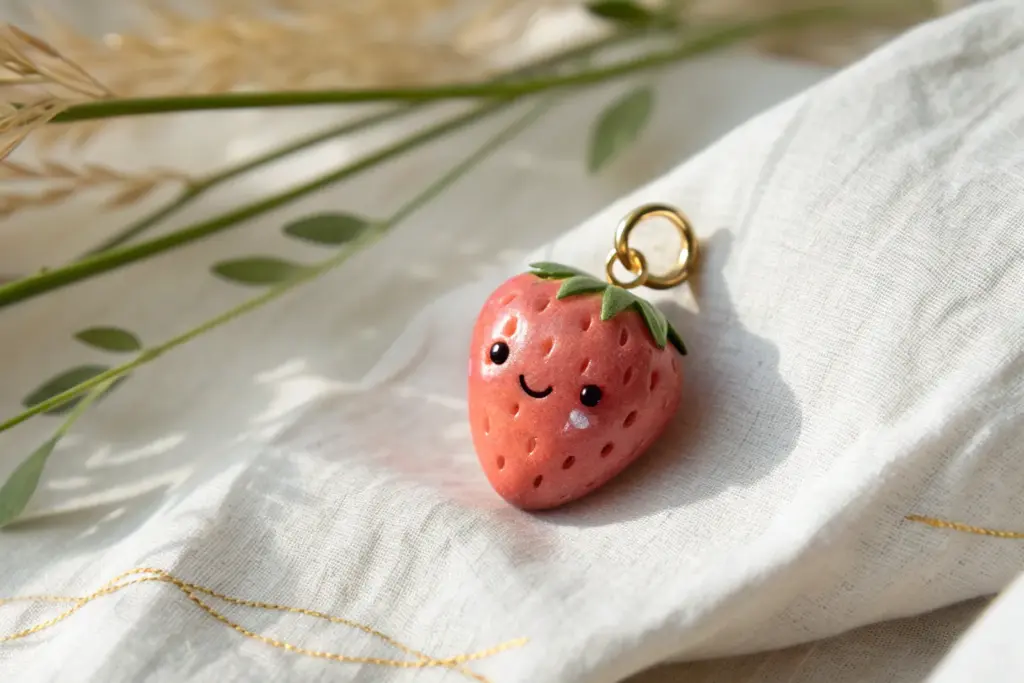
Round Bee Charm
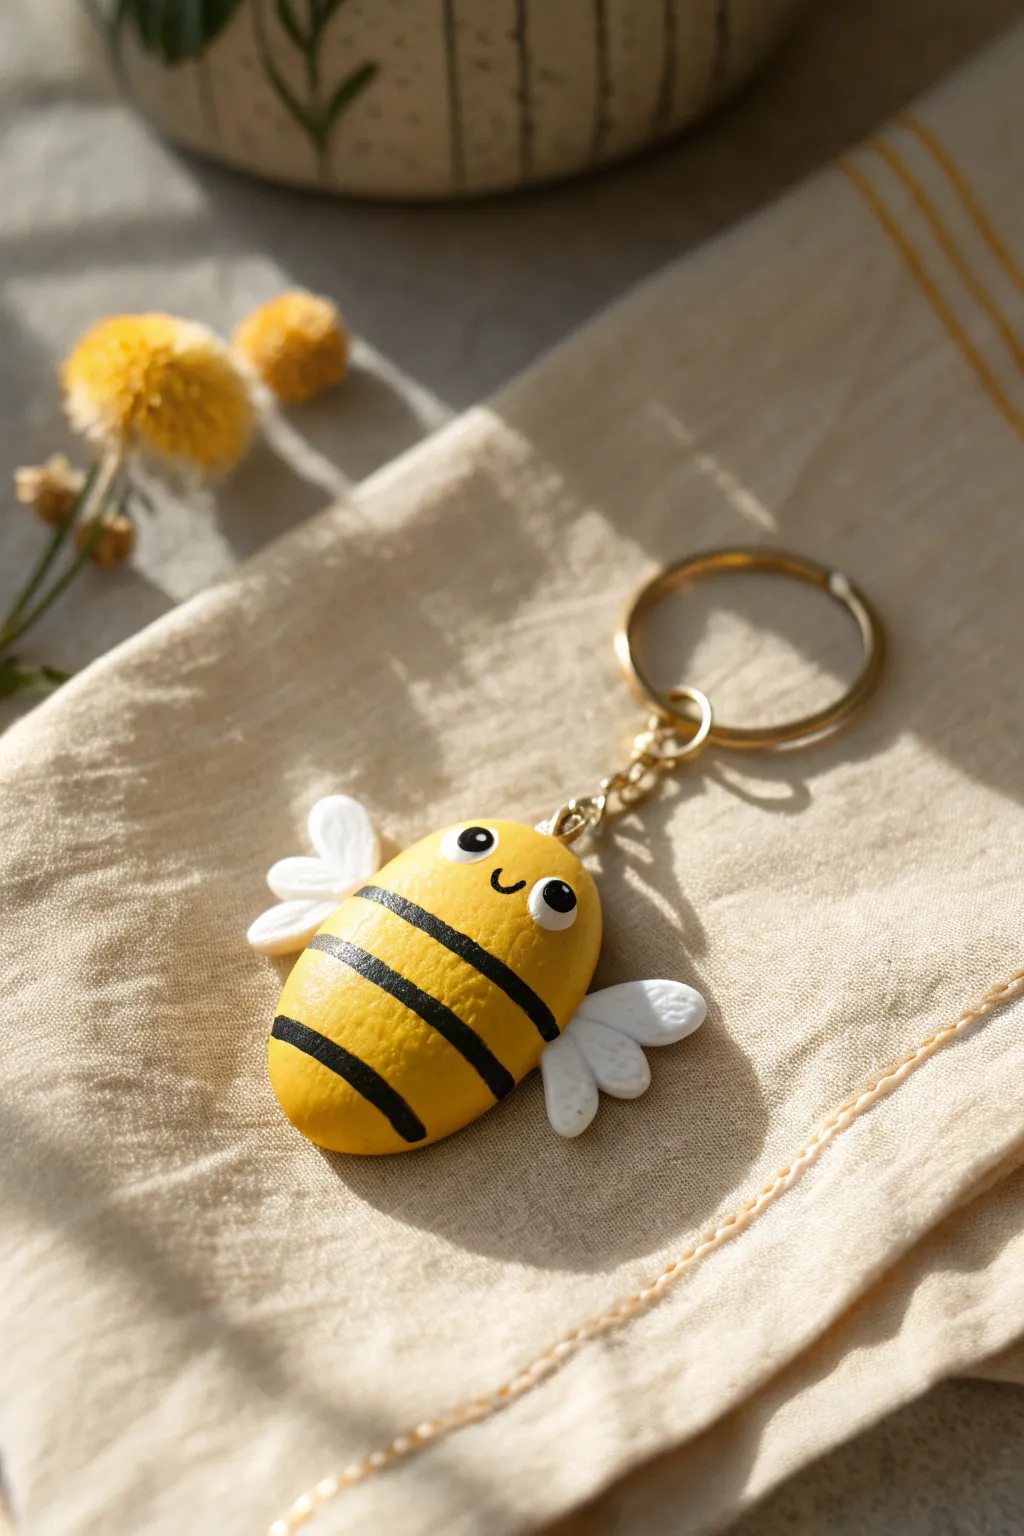
This adorable round bee charm is the perfect introduction to polymer clay sculpting, featuring a delightfully chubby yellow body and sweet little white wings. With its cheerful smile and shiny finish, it makes for a heartwarming addition to your keychain or zipper pull.
Step-by-Step
Materials
- Yellow polymer clay (or white clay and yellow acrylic paint)
- White polymer clay
- Black acrylic paint
- Gloss glaze or polyurethane varnish
- Small eye screw pin
- Jump ring and keychain ring
- Fine liner paintbrush
- Dotting tool or toothpick
- Sculpting tool or craft knife
- Oven for baking
Step 1: Sculpting the Body
-
Condition the yellow clay:
Start by kneading the yellow polymer clay in your hands until it becomes soft, pliable, and free of any cracks. -
Form the base shape:
Roll the conditioned clay into a smooth ball slightly larger than a grape. Gently flatten it just a tiny bit into an oval shape to create that perfectly chubby bee body. -
Insert the hardware:
Before baking, carefully screw the eye pin into the top center of the bee’s body. If you want it extra secure, you can add a tiny dab of liquid clay or Bake & Bond to the threads before inserting. -
Check for smoothness:
Give the body one last inspection. Smooth out any fingerprints by lightly brushing the surface with a tiny bit of baby oil or cornstarch on your finger.
Fixing Fingerprints
Can’t get rid of fingerprints? Before baking, brush the raw clay lightly with a soft paintbrush dipped in rubbing alcohol or acetone to melt away surface imperfections.
Step 2: Creating the Wings
-
Prepare the white clay:
Clean your hands thoroughly to remove yellow residue, then condition a small amount of white clay. -
Shape the wing segments:
Roll four very small balls of white clay. Make two slightly larger for the top wing sections and two smaller ones for the bottom sections. -
Form teardrops:
Pinch one side of each white ball to create a flat teardrop shape. -
Assemble the wings:
Press a small teardrop against the bottom of a large teardrop to create one full wing. Repeat for the other side. -
Add wing details:
Using a blunt tool or toothpick, gently press vertical indentations into the wings to mimic feather or vein textures. -
Attach wings to body:
Press the assembled wings firmly onto the sides of the yellow body. You can use a sculpting tool to blend the clay slightly at the connection point for a stronger bond.
Add Some Sparkle
Mix a small amount of iridescent glitter into the white clay before sculpting the wings, or brush pearl powder onto the wings before baking for a magical shimmer.
Step 3: Baking and Painting
-
Bake the charm:
Place your bee on a parchment-lined baking sheet and bake according to your specific clay manufacturer’s instructions (usually 275°F/130°C for 15-30 minutes). -
Cool down completely:
Let the piece cool completely before handling to ensure the clay hardens properly. -
Paint the stripes:
Using a fine liner brush and black acrylic paint, carefully paint three curved bands across the bee’s back. I find it easiest to rotate the bee while holding the brush steady. -
Paint the face:
Use a dotting tool dipped in black paint to make two medium circles for eyes. Use your finest brush to paint a small distinct ‘U’ shape between them for the smile. -
Add eye highlights:
Once the black paint is dry, use a toothpick to add a tiny white dot to the upper right corner of each eye for that sparkling look. -
Seal the charm:
Once all paint is fully dry, coat the entire piece in a glossy glaze. This protects the paint and gives the bee a ceramic-like shine. -
Assembly:
Open a jump ring with pliers, loop it through the eye pin on your bee, and attach it to the keychain ring before closing the jump ring securely.
Now your buzzing new friend is ready to fly alongside your keys and brighten your day

The Complete Guide to Pottery Troubleshooting
Uncover the most common ceramic mistakes—from cracking clay to failed glazes—and learn how to fix them fast.
Onigiri-Inspired Triangle Buddy
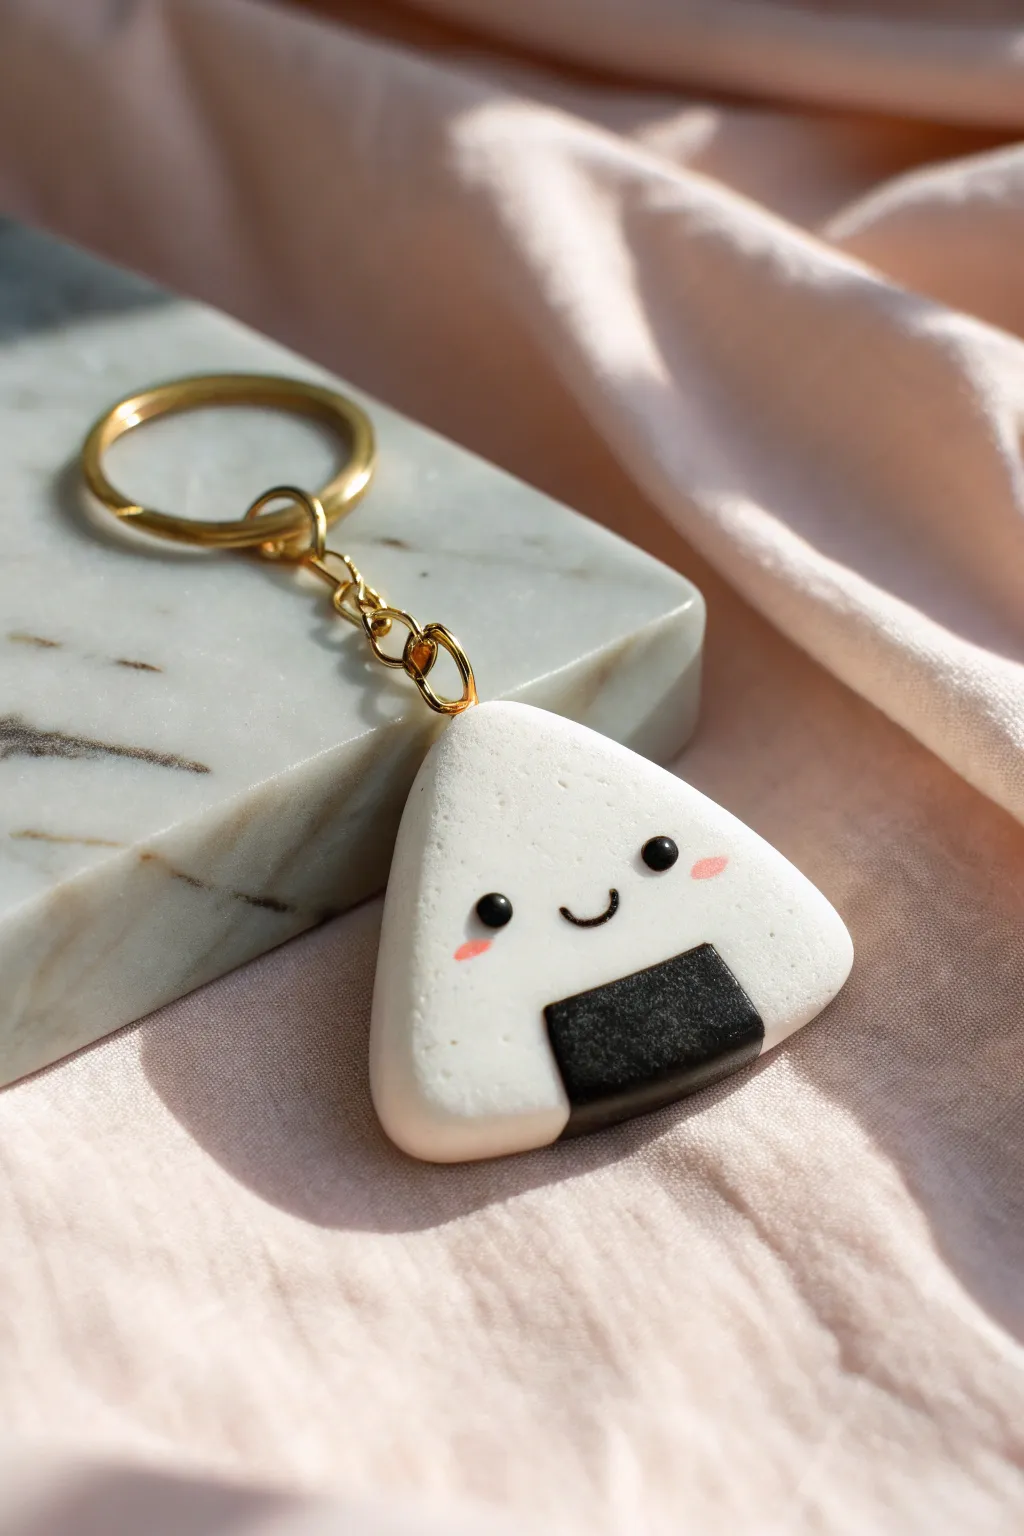
This adorable onigiri charm captures the minimalist cuteness of kawaii food art with its simple triangular shape and sweet expression. The smooth, speckled texture mimics real rice, while the tiny seaweed wrap adds a classic touch to this perfect beginner-friendly polymer clay project.
Detailed Instructions
Materials
- White polymer clay
- Translucent or granite-effect polymer clay (optional for texture)
- Black polymer clay
- Pink acrylic paint or soft pastel chalk
- Gold keychain ring with chain and jump ring
- Eye screw pin (gold)
- Dotting tool or ball stylus
- Exacto knife or clay blade
- Rolling pin
- Gloss glaze (UV resin or polyurethane varnish)
- Fine paintbrush
Step 1: Shaping the Rice Base
-
Mix the clay:
Begin by conditioning your white polymer clay until it is soft and pliable. If you want that realistic ‘rice’ texture shown in the photo, mix in a very small amount of translucent or granite-effect clay to break up the solid white color. -
Form a ball:
Roll your conditioned white clay into a smooth, seamless sphere about the size of a walnut. Ensure there are no cracks or air bubbles trapped inside. -
Flatten slightly:
Gently press the ball down onto your work surface with your palm just enough to create two flat faces, keeping the edges rounded and thick. It should look like a thick disc or hamburger patty at this stage. -
Create the triangle:
Using your thumb and forefinger, gently pinch and smooth the top of the disc to form a rounded point. This will be the peak of your onigiri. -
Refine the shape:
Press the bottom edge against your table to flatten it. Continue pressing and smoothing the sides until you have a soft, rounded triangle shape that stands up on its own. The corners should be gentle curves, not sharp points.
Dirty Clay Blues?
White clay picks up dust instantly. Before starting, wipe your hands and work surface with a baby wipe. Keep a piece of scrap clay nearby and roll it in your hands to pull off lint before touching your main piece.
Step 2: Adding Details & Hardware
-
Prepare the nori:
Condition a small piece of black polymer clay. Roll it out into a thin sheet, approximately 1-2mm thick. -
Cut the rectangle:
Use your clay blade to cut a clean, straight rectangle from the black clay about 1 inch wide and half an inch tall. -
Attach the nori:
Place the black rectangle at the bottom center of your white triangle. Fold the excess underneath the bottom so it hugs the base of the rice ball like a blanket. -
Texture the rice:
Take an old toothbrush or a needle tool and very lightly tap the white surface of the clay to add a subtle, porous texture resembling rice grains. I find this really helps eliminate fingerprints too. -
Insert the hardware:
Take your gold eye pin and dip the tip into a tiny bit of liquid clay or bake-and-bond. Push it securely into the top point of the triangle.
Flavor Variations
Make a whole bento box family! Try mixing pale pink into the white clay for ‘sakura’ rice, or add tiny bits of orange and green clay chopped up finely into the mix to look like vegetable fried rice.
Step 3: Creating the Face
-
Roll the eyes:
Take an extremely tiny amount of black clay and roll two identical microscopic balls for the eyes. -
Place the eyes:
Gently press the black eyes onto the face area, spacing them widely apart just above the ‘seaweed’ line. -
Make the mouth:
Roll a nearly invisible thread of black clay. Curve it into a tiny ‘U’ shape on your work surface first. -
Attach the smile:
Transfer the smile to the face using a needle tool, placing it perfectly centered between the eyes. -
Bake the charm:
Bake the piece according to your clay package instructions (usually 275°F/135°C for 15-30 minutes). Let it cool completely before handling.
Step 4: Finishing Touches
-
Add blush:
Dip a fine dotting tool into pink acrylic paint. Dab two small oval cheeks onto the face, positioned slightly outside and below the eyes. -
Let paint dry:
Wait for the acrylic paint to dry completely to prevent smearing during the glazing step. -
Glaze the charm:
Apply a thin coat of polyurethane varnish or UV resin over the entire charm to protect the paint and give it that store-bought shine. Cure or let dry. -
Assemble keychain:
Using pliers, open the jump ring on your gold keychain hardware. Thread it through the eye pin on top of the onigiri. -
Secure the ring:
Close the jump ring tightly with your pliers to ensure your new buddy doesn’t fall off his chain.
Now you have a charming little companion ready to hang on your bag or keys
Marshmallow Face Keychain
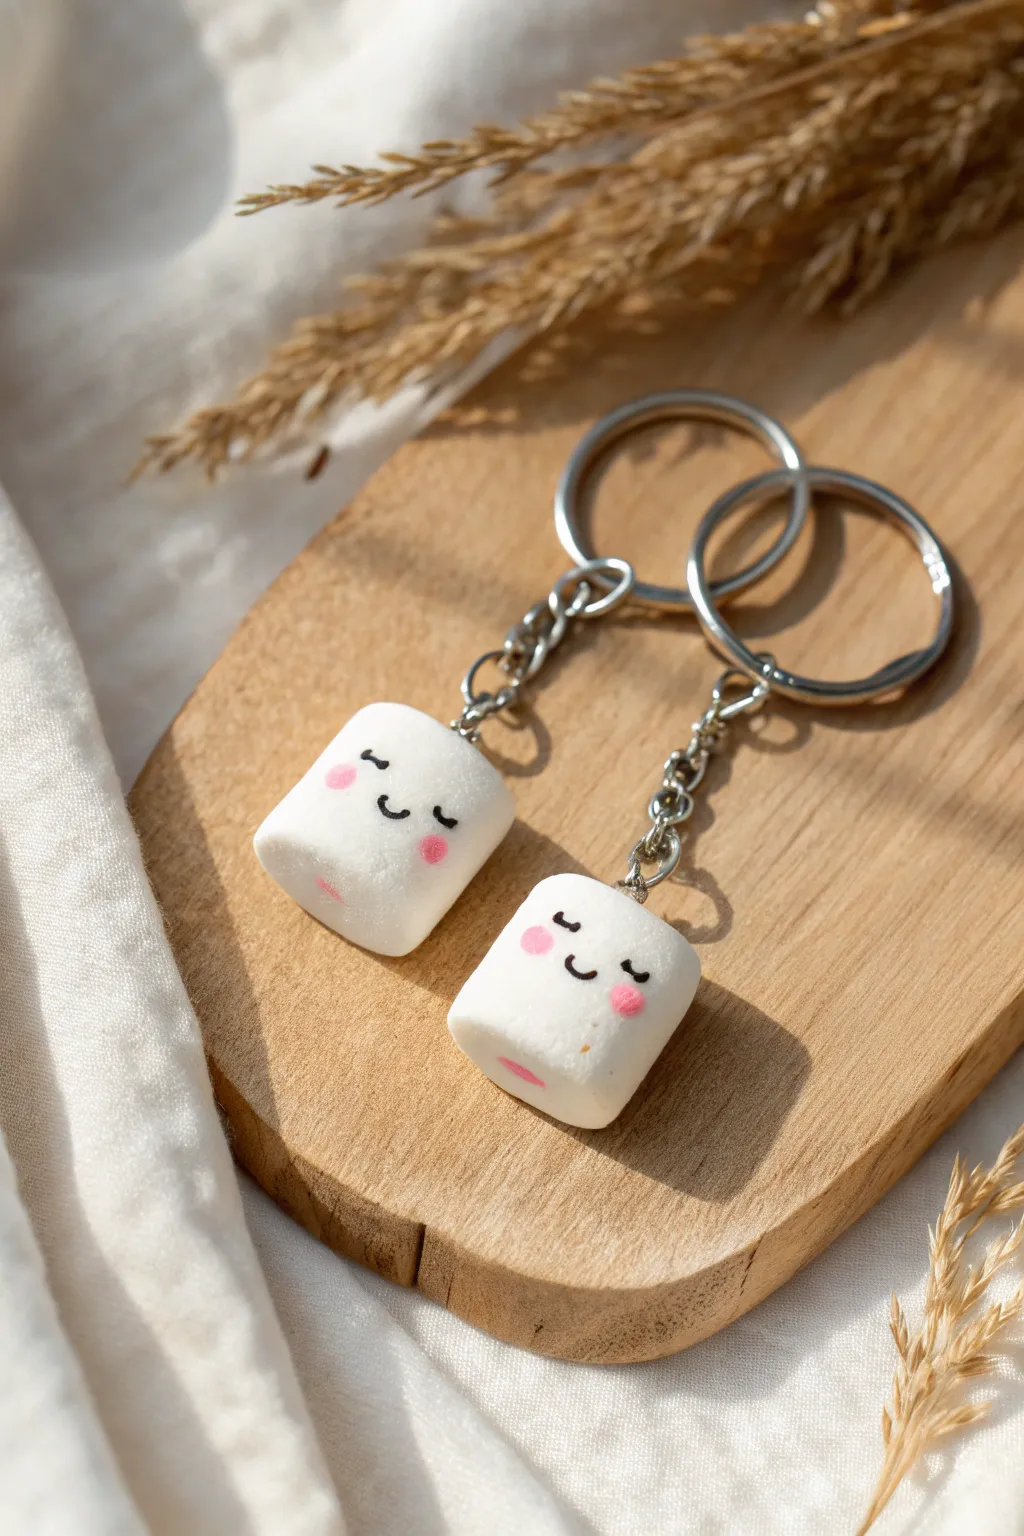
These adorable marshmallow keychains capture the cozy feeling of a warm drink on a chilly day. With their soft white texture and blushing cheeks, they make the perfect beginner-friendly clay project to share with a friend or keep for yourself.
Step-by-Step Tutorial
Materials
- White polymer clay
- Pink soft pastel chalk (or pink polymer clay)
- Black acrylic paint
- Fine detail paintbrush (size 000 or 00)
- Eye screw (eye pin)
- Jump rings (4mm or 6mm)
- Small chain
- Keyring hardware
- Needle tool or toothpick
- Q-tip or small soft brush for shading
- Gloss glaze (optional)
- Pliers (round nose and flat nose)
- Clay blade or craft knife
- Oven for baking
Step 1: Shaping the Marshmallows
-
Condition the Clay:
Start by taking a chunk of white polymer clay and kneading it thoroughly in your hands. You want it warm and pliable to avoid any cracks later on. -
Form the Base Shape:
Roll two equal-sized balls of clay, roughly 1 inch in diameter. Roll them on your work surface until they are perfectly smooth spheres. -
Create the Cylinder:
Gently press down on the top of the ball with a flat object (like an acrylic block or ruler) to flatten it slightly. Do the same to the bottom to create a short, squat cylinder. -
Texturize the Shape:
Using your thumb and forefinger, gently press on four sides to encourage a slightly squarish shape, but keep the edges extremely soft and rounded. We want that puffy, airy marshmallow look, not a perfect geometric cube. -
Smoothing:
Run your finger lightly over the surface to remove any fingerprints. If the clay is sticky, a tiny bit of cornstarch on your finger helps glide over imperfections.
Clean Clay Trick
White clay picks up every speck of dust! Before starting, wipe your work surface and wash your hands thoroughly. Keep baby wipes nearby to clean your fingers between steps.
Step 2: Adding Details & Baking
-
Insert Hardware:
Take your eye screw. If the stem is too long, trim it with wire cutters. Press the screw gently into the top center of the marshmallow. I like to remove it, add a tiny dab of liquid clay or bake-and-bond to the threads, and screw it back in for extra security. -
Prepare the Blush:
Take a stick of pink soft pastel chalk and scrape a little powder off using your craft knife. You want a fine dust. -
Apply the Cheeks:
Dip a Q-tip or soft dry brush into the pastel dust. Gently dab two round circles onto the clay face. Build the color up slowly rather than applying too much at once. -
Add the Mouth Blush:
Add a tiny, fainter dab of pink near the bottom center where the open mouth will be painted later. -
Baking:
Place your marshmallows on a ceramic tile or baking sheet lined with parchment paper. Bake according to your specific clay brand’s instructions (usually around 275°F/135°C for 15-30 minutes). Let them cool completely before handling.
Uneven Cheeks?
If you applied too much pastel dust for the blush, use a clean distinct piece of raw clay as an ‘eraser.’ Gently dab it over the excess powder to lift it off the unbaked face.
Step 3: The Faces & Assembly
-
Map Out the Face:
Once cool, you can lightly mark where the eyes and mouth go with a pencil if you’re nervous about freehand painting. -
Paint the Eyes:
Using your finest brush and black acrylic paint, create two small curved arches for the sleeping eyes. Add two tiny eyelashes to the outer corner of each eye. -
Paint the Mouth:
Paint a small ‘U’ shape between the blush spots for a smiling mouth. -
Add the Tongue:
Mix a tiny bit of white paint with red (or use pink paint) to create a soft pink. Paint a small semi-circle inside the bottom of the black mouth line to look like a tongue. -
Sealing (Optional):
If you want to protect the paint, apply a thin coat of matte or satin varnish over the face area. Avoid high gloss unless you want a wet-looking marshmallow. -
Chain Assembly:
Using your pliers, open a jump ring by twisting the ends sideways (never pull them apart). Loop it through the eye screw on the marshmallow. -
Attach the Chain:
Thread the end of your small chain onto the open jump ring, then close the ring securely. -
Final Connection:
Attach the other end of the chain to the main keyring loop using another jump ring. Give everything a little tug to make sure the links are secure.
Now you have a pair of impossibly cute marshmallow companions ready to dangle from your keys or backpack


What Really Happens Inside the Kiln
Learn how time and temperature work together inside the kiln to transform clay into durable ceramic.
Mini Macaron Stack Charm

Create the sweetest accessory for your bag or keys with this adorable polymer clay charm. Featuring a stack of three miniature macarons topped with a sleepy face, this project combines simple shaping techniques with delicate detailing.
Detailed Instructions
Materials
- Polymer clay (Soft pink, White/Cream)
- Eye pin or screw eye
- Gold keychain hardware with jump ring
- Needle tool or toothpick
- Ball stylus tool
- Small circle cutter (approx. 2-3 cm)
- Black acrylic paint
- Fine detail paintbrush (000 size)
- Liquid clay (TLS) or strong craft glue
- Ceramic tile or baking surface
- Oven
Step 1: Shaping the Shells
-
Condition the Clay:
Begin by kneading your pink and white clay separately until it is soft and pliable. This prevents cracks during baking. -
Cut the Bases:
Roll out the pink clay to a thickness of about 5mm and the white clay to the same thickness. Use your small circle cutter to punch out four pink circles and two white circles. -
Soften the Edges:
Take a cut circle and gently press your finger around the top edge to dome it slightly and remove the sharp cut line. You want a smooth, rounded macaron shell shape. -
Create the ‘Feet’:
Use a needle tool or toothpick to tease the clay at the very bottom edge of each shell. Poke and drag small bits of clay outward to create the textured ‘feet’ characteristic of a real macaron.
Uneven Texture?
If the textured ‘feet’ look too messy, gently roll the side of the macaron on your work surface to push the texture back in slightly for a uniform look.
Step 2: Assembling the Macarons
-
Roll the Filling:
Mix a tiny amount of pink and white clay to create a slightly darker pink filling for the pink shells, and use plain white for the middle one. Roll these into thin discs slightly smaller than the shells. -
First Assembly:
Sandwich the dark pink filling between the two bottom pink shells. Press gently so they adhere without squashing the texture. -
Middle Macaron:
Sandwich the white filling disc between the two white shells. Ensure the textured feet are facing inward toward the filling. -
Top Assembly:
Repeat the process for the top pink macaron. You should now have three separate complete macarons.
Add a Bow
Make a tiny clay bow in a contrasting color like teal or lavender and attach it just below the eye pin loop before baking for extra sweetness.
Step 3: Stacking & Defining
-
Create the Stack:
Apply a tiny dot of liquid clay or bake-and-bond to the center of the bottom pink macaron. Place the white macaron on top. -
Top It Off:
Apply another dot of liquid adhesive to the white macaron and place the final pink macaron on top to complete the tower. -
Insert Hardware:
Trim an eye pin to the correct length (about 2/3 the height of the stack). Push it straight down through the center of the top macaron until the loop sits flush against the clay surface. -
Bake:
Place your stack on a ceramic tile. Bake according to your clay manufacturer’s instructions, usually at 275°F (130°C) for 15-20 minutes.
Step 4: Evaluating & Finishing
-
Cooling:
Let the charm cool completely before handling. I prefer to leave it on the tray for an hour so the clay hardens fully. -
Paint the Face:
dip your fine detail brush into black acrylic paint. Carefully paint two curved lines for sleeping eyes and a tiny ‘u’ for the smile on the top pink macaron. -
Seal (Optional):
If you want extra durability, apply a thin coat of matte variance over the painted face once the paint is dry. -
Attach Keychain:
Open a jump ring using pliers and loop it through the eye pin. Attach your gold keychain clasp and close the ring securely.
This charming little stack is ready to add a touch of sweetness to your daily routine
Cute Fruit Slice Magnets
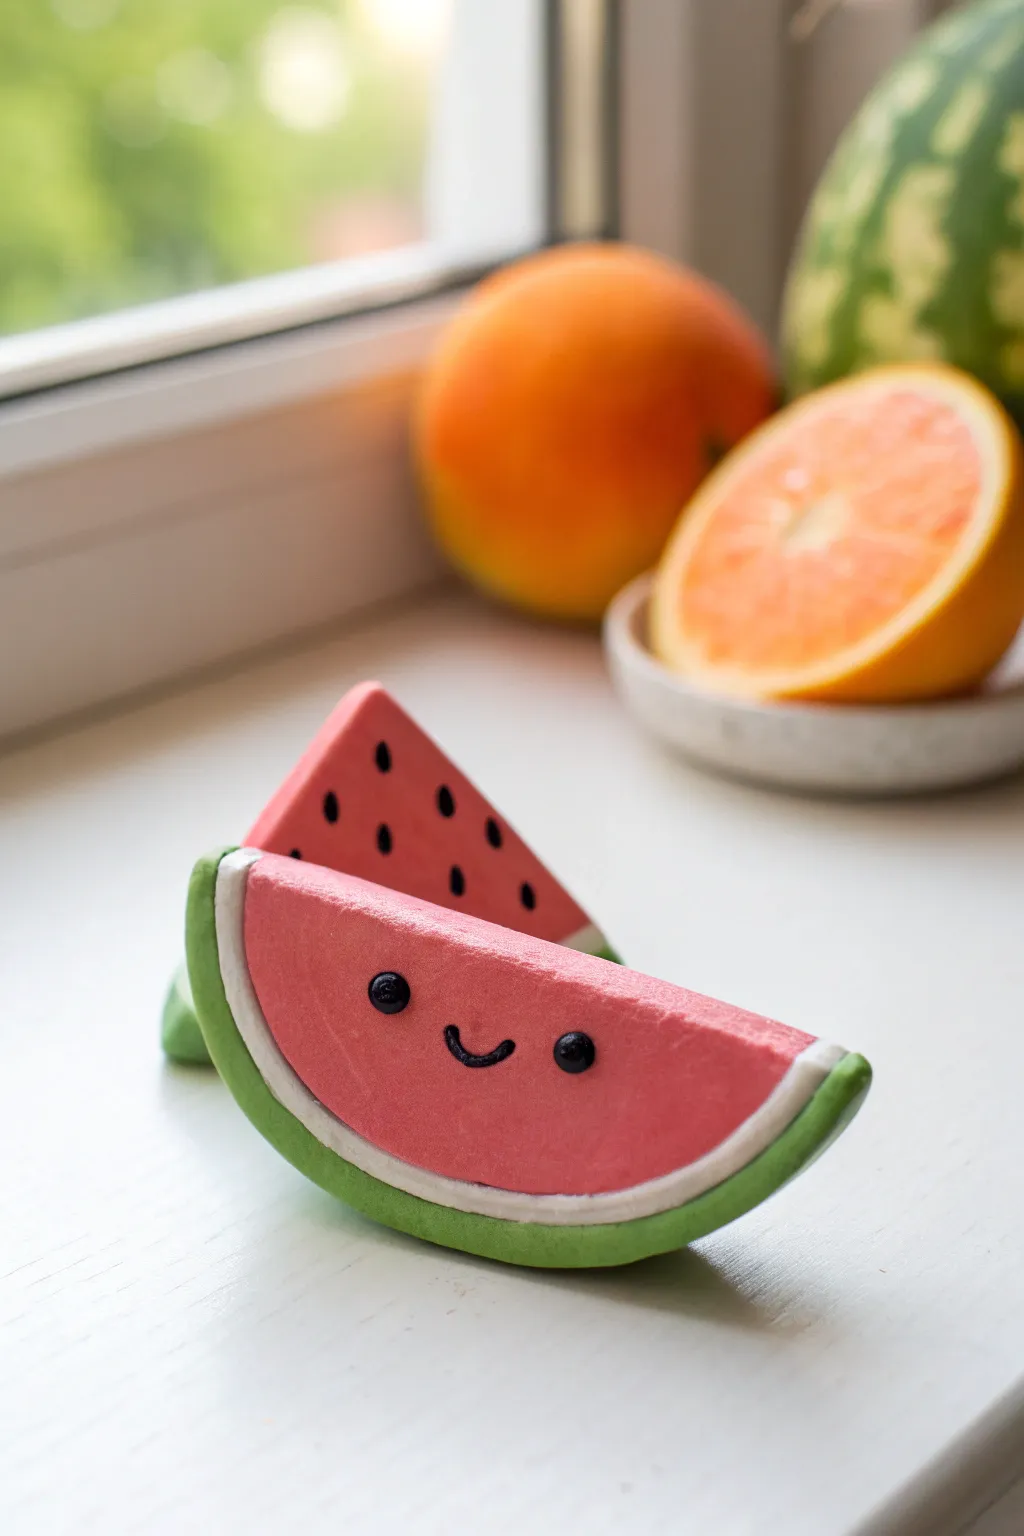
Brighten up your fridge or workspace with these adorably cheerful watermelon slice magnets. Made from polymer clay with a soft matte finish, these fruity friends feature a classic green rind, white pith, and a sweet smiling face that’s impossible to resist.
Step-by-Step Tutorial
Materials
- Polymer clay (Bright Pink, White, Green, Black)
- Clay roller or pasta machine
- Craft knife or tissue blade
- Ball stylus tool
- Small round piping tip or circle cutter (optional)
- Strong craft glue (E6000 or similar)
- Small round magnets
- Oven for baking
- Baking sheet and parchment paper
- Wet wipes (for cleaning hands between colors)
Step 1: Prepping the Colors
-
Conditioning:
Start by thoroughly conditioning each color of polymer clay until it is soft and pliable. This prevents cracking later on. -
Rolling out sheets:
Roll the pink clay into a thick sheet, about 1/4 inch thick. This will form the juicy center of your watermelon. -
Thin layers:
Roll the white and green clay into much thinner sheets, around 1/16 inch thick. These will wrap around the pink center.
Step 2: Assembling the Cane
-
Forming the core:
Take your thick pink sheet and shape it into a log or a thick block, depending on how many slices you want to make. For the semi-circle shape in the photo, a round log works best to start. -
Adding the pith:
Wrap the thin sheet of white clay completely around the pink log. Trim any excess with your craft knife and smooth the seam with your finger so it blends invisibly. -
Adding the rind:
Repeat the process with the thin green sheet, wrapping it over the white layer. Again, trim the excess carefully and smooth the seam to create a perfect cylinder. -
Consolidating:
Gently roll the entire log on your work surface to ensure all layers adhere to each other. I like to let the log rest in the fridge for 10 minutes here to make slicing cleaner.
Smudged Colors?
Red and green can smudge white clay easily. Clean your hands with baby wipes or rubbing alcohol between handling colors to keep that white pith crisp and bright.
Step 3: Slicing and Shaping
-
Cutting the log:
Slice the log into thick disks, about 1/4 to 1/3 inch thick. Use a sharp tissue blade and press straight down to avoid distorting the circle. -
Creating half-moons:
Take one disk and cut it perfectly in half to create two semi-circle watermelon slices. Gently tap the flat cut side on your work surface to smooth out any sharp edges. -
Refining the shape:
If the slicing squashed your layers, gently reshape the semi-circle with your fingers to restore the nice curve of the rind.
Pro Tip: Texture
Before baking, lightly tap the pink area with a toothbrush or stiff paintbrush to give the ‘fruit flesh’ a realistic, slightly porous texture.
Step 4: Adding the Kawaii Details
-
Forming eyes:
Roll two tiny, equal-sized balls of black clay. These should be very small to keep the cuteness factor high. -
Placing eyes:
Press the black spheres gently onto the pink flesh of the front slice. Place them wide apart for that classic kawaii look. You can use a ball tool to make a tiny indentation first to help them sit securely. -
Making the mouth:
Roll an incredibly thin snake of black clay. Cut a tiny segment, less than a quarter inch long. -
Shaping the smile:
Curve the tiny black snake into a ‘U’ shape. Using a needle tool or toothpick, carefully transfer it to the face, centered between and slightly below the eyes. Press it gently to adhere.
Step 5: The Background Slice
-
Seed details:
For the second slice that sits behind the faced one, roll tiny teardrop shapes out of black clay. -
Applying seeds:
Press these flat onto the pink surface in a random pattern, with the pointed ends facing inward toward the imaginary center of the watermelon.
Step 6: Finishing Up
-
Baking:
Place your finished pieces on a parchment-lined baking sheet. Bake according to your clay package instructions (usually 275°F/135°C for 15-30 minutes). -
Cooling:
Allow the pieces to cool completely on the baking sheet. Moving them while hot can cause them to warp. -
Magnetizing:
Once cool, apply a dab of strong glue to the back of each slice and attach your magnet. Let the glue cure fully before sticking them to your fridge.
Now you have a refreshing little set of fruit slices to hold up your notes and photos with a smile.

TRACK YOUR CERAMIC JOURNEY
Capture glaze tests, firing details, and creative progress—all in one simple printable. Make your projects easier to repeat and improve.
Axolotl Blob Figurine
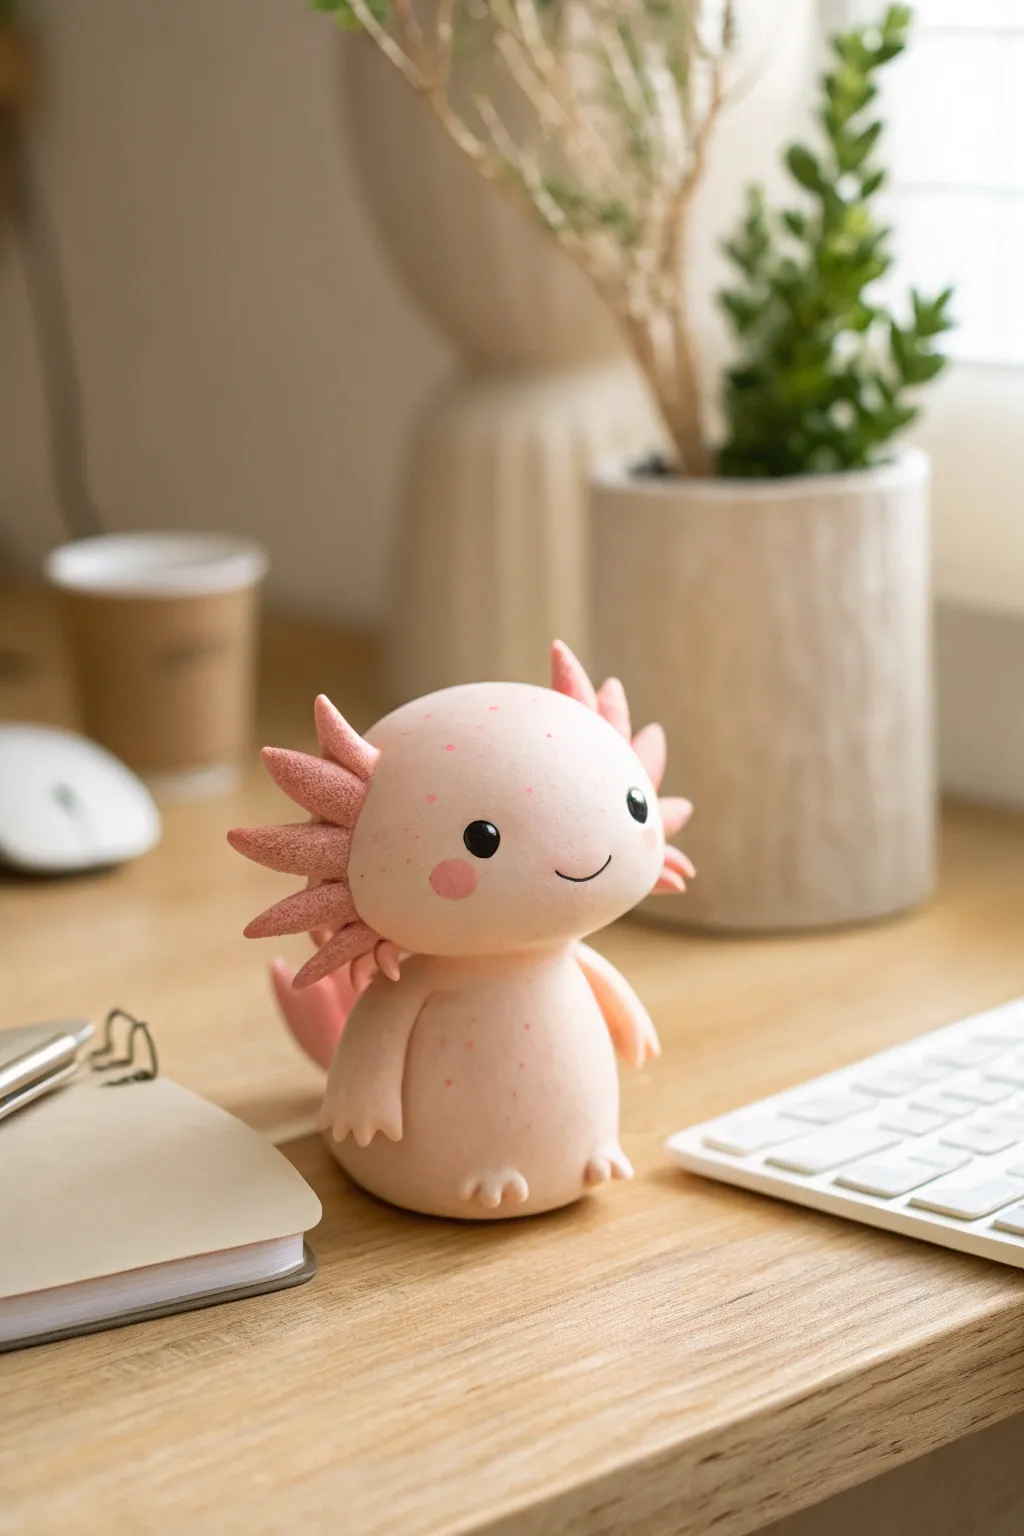
Bring a little splash of underwater joy to your workspace with this adorable, bubbly axolotl figurine. Its soft pink hue and rounded, chubby features make it a forgiving project perfect for sculpting beginners who want a cute result.
Step-by-Step
Materials
- Light pink polymer clay (soft variety)
- Darker coral/dark pink polymer clay
- Black polymer clay
- White polymer clay (tiny amount)
- Small ball tool or dotting tool
- Needle tool or toothpick
- Smooth work surface (glass or tile)
- Oven for baking
Step 1: Sculpting the Body
-
Mix your base color:
Start by conditioning your light pink clay until it is soft and pliable. If the color is too bright, mix in a little white to achieve that subtle, milky pastel tone seen in the photo. -
Form the torso:
Roll a medium-sized ball of light pink clay into a smooth egg shape. Gently flatten the bottom so it sits upright without wobbling—this will be the chubby belly and main body. -
Shape the head:
Create a second ball, slightly larger and wider than the body. Flatten it just a tiny bit into a rounded oval shape to give that cute, wide-faced look. -
Connect head and body:
Place the head securely onto the body. Gently smooth the seam at the neck with your finger or a silicone tool so the two pieces look like one continuous unit. -
Add the arms:
Roll two small sausage shapes for the arms. Press them onto the sides of the body, allowing them to hang naturally. Use your needle tool to make three tiny indentations at the ends for fingers. -
Create tiny feet:
Roll two very small balls for feet and flatten them slightly. Tuck them under the front of the belly and add three toe indentations to match the hands.
Step 2: Adding Details & Features
-
Prepare the gills:
Roll six small cone shapes using the darker coral/dark pink clay. These should be slightly textured to look feathery. -
Texture the gills:
Before attaching, use your needle tool to gently poke or scratch the surface of these cones to mimic the texture of an axolotl’s external gills. I like to keep this texture rough to contrast with the smooth skin. -
Attach the gills:
Affix three gill cones to each side of the head, fanning them out like a crown. Blend the base of each cone onto the head so they stay secure. -
Make the tail:
Form a flattened, curved tail shape from the light pink clay. Attach it to the lower back of the body, wrapping it slightly around one side so it’s visible from the front. -
Position the eyes:
Use your ball tool to make two shallow indents on the face. These should be spaced widely apart for maximum cuteness. -
Insert the eyes:
Roll two small balls of black clay and press them into the sockets. Add a minuscule speck of white clay to the top right of each eye for a shiny reflection. -
Add rosy cheeks:
Take two tiny, flat circles of the darker pink clay and press them onto the face right below the eyes. Smooth the edges so they look like a natural blush. -
Carve the smile:
Use the edge of a small circular cutter or your needle tool to press a simple, tiny curved smile right between the eyes. -
Add speckles:
For the finishing touch, take tiny crumbs of the darker pink clay and press them randomly onto the forehead and belly to create mottled skin patterns.
Clean Clay Tip
Pastel clay picks up dust easily! Keep a wet wipe nearby to clean your hands often, especially before handling the light pink clay.
Step 3: Baking & Finishing
-
Final inspection:
Check your figurine for any fingerprints. Gently buff them out with a drop of baby oil on your finger if needed. -
Bake carefully:
Bake the figurine according to your clay manufacturer’s instructions, usually around 275°F (130°C) for 15-20 minutes. Keep an eye on the light pink color to ensure it doesn’t scorch. -
Cool down:
Let the figurine cool completely inside the oven with the door cracked open to prevent cracking from sudden temperature changes.
Glossy Finish
After baking, brush a thin layer of UV resin or glossy polyurethane glaze over just the black eyes to make them look wet and alive.
Now you have a charming little amphibious friend to keep you company while you work
Cow Patch Trinket Dish
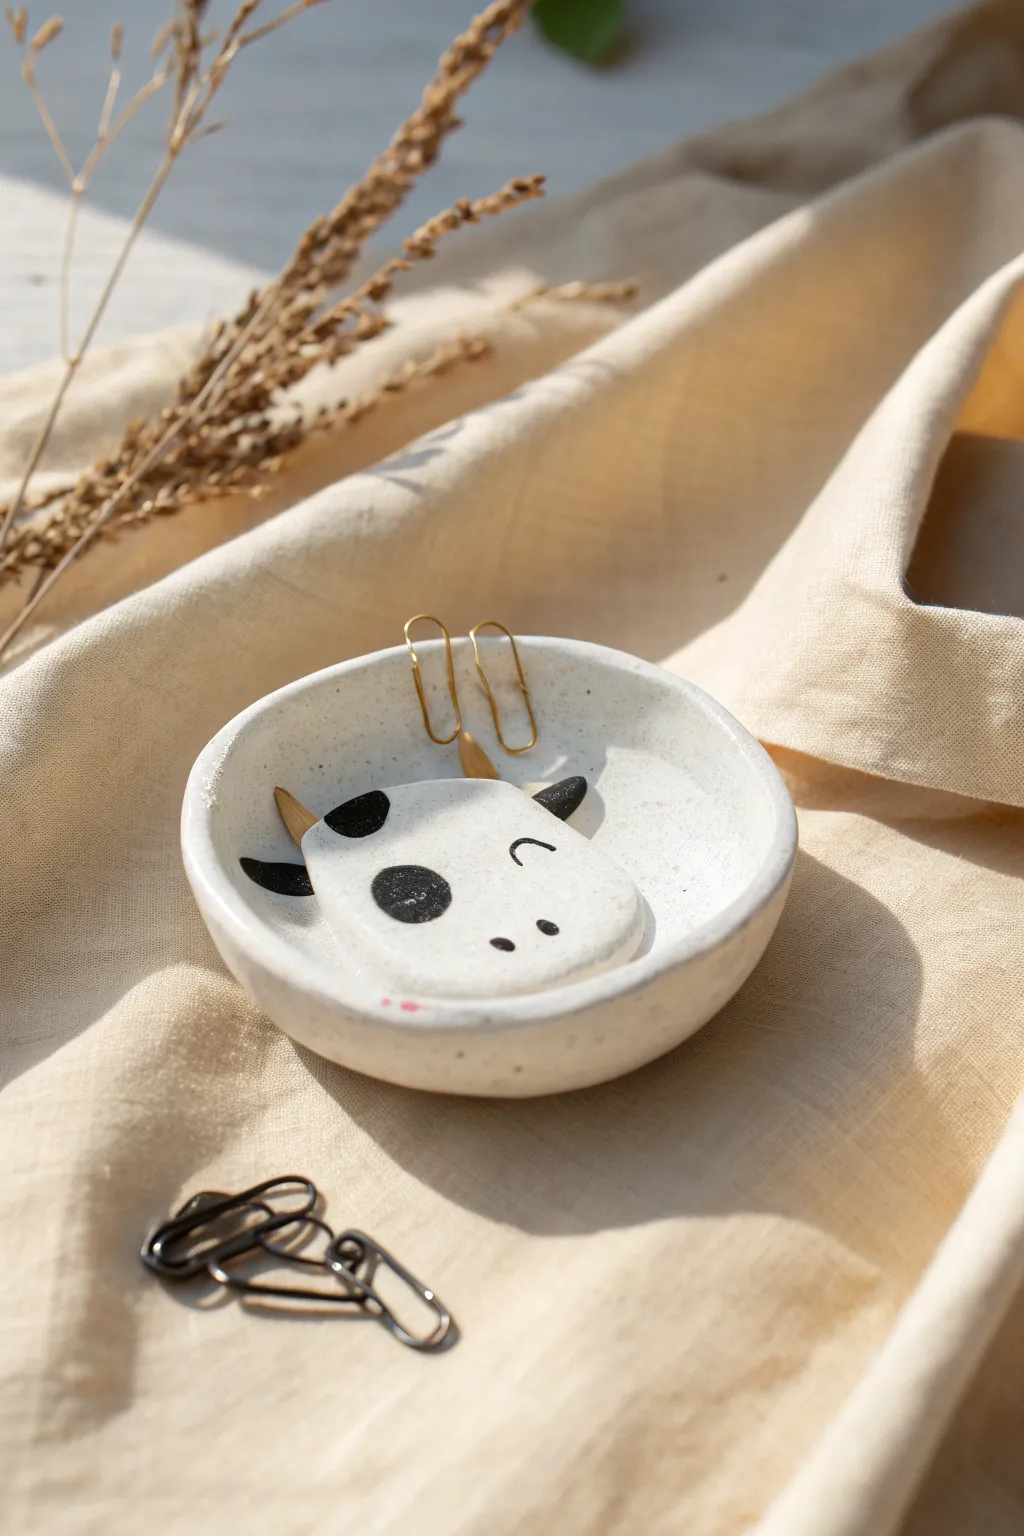
This adorable trinket dish features a slightly raised cow motif right in the center, perfect for keeping your favorite earrings or rings safe. With its speckled finish and simple black-and-white design, it brings a touch of farmhouse whimsy to any nightstand.
Step-by-Step Guide
Materials
- White polymer clay or air-dry clay
- Rolling pin
- Small bowl or round cutter (approx. 3-4 inches)
- Small knife or clay craft tool
- Sponge or sandpaper
- Acrylic paints (black, white, and gold)
- Fine detail paintbrush
- Glossy varnish or glaze
- Toothbrush (for speckling)
- Small bit of water (if using air-dry clay)
Step 1: Shaping the Base
-
Condition the clay:
Start by kneading your white clay until it is soft, pliable, and free of cracks. If you are using polymer clay, the warmth of your hands will make this easier. -
Roll out the slab:
Roll the clay into a flat, even sheet, aiming for a thickness of about 1/4 inch. Ensure the surface is smooth and free of air bubbles. -
Cut the circle:
Use a round cutter or trace around the rim of a small bowl to cut out a perfect circle. This will serve as the main body of your dish. -
Form the rim:
Gently curve the edges of the circle upwards to create a shallow bowl shape. Use your fingertips to smooth out any creases that form on the rim.
Smoother Transitions
Use a ‘snake’ of clay around the seam where the head meets the bowl. Smoother it out completely to create a seamless, raised-relief effect.
Step 2: Adding the Cow Character
-
Create the head shape:
Roll a smaller piece of white clay into a flattened, rounded rectangle or bean shape. Place this directly in the center of your dish. -
Blend the seams:
Using a modeling tool or your finger, gently smudge the edges of the cow head onto the dish base so they adhere completely. It should look like a low-relief sculpture. -
Sculpt the ears:
Form two tiny teardrop shapes for the ears and attach them to the sides of the head near the top. -
Add the horns:
Roll two very small cones for horns and press them gently between the ears. I prefer to keep these quite subtle so they don’t break off easily. -
Smooth everything down:
Dip your finger in a tiny bit of water (for air-dry clay) or baby oil (for polymer) and run it over the surface to erase fingerprints and ensure a seamless look.
Add Dimension
Instead of painting the spots flat, use tiny flattened balls of black clay pressed into the white clay before baking for textured 3D spots.
Step 3: Finishing Touches
-
Dry or bake:
Follow the instructions for your specific clay. If baking polymer clay, ensure the dish shape is supported so it doesn’t slump in the oven. -
Sand for smoothness:
Once fully cured or dried, use fine-grit sandpaper to remove any rough edges on the rim or surface. -
Paint the spots:
Using a fine brush and black acrylic paint, add the cow’s signature patches. Paint one ear black and add a large round spot on the face cheek. -
Add facial features:
Paint two tiny dots for nostrils and a small curved line for a winking eye. Simplicity is key here to maintain the cute aesthetic. -
Gild the horns:
Carefully paint the small horns with metallic gold paint to give the piece a chic finish. -
Create the speckles:
Dilute a tiny drop of brown or black paint with water. Dip an old toothbrush into it and flick the bristles with your thumb to spray tiny speckles over the entire dish. -
Seal the piece:
Finish by applying two coats of glossy varnish or glaze. This protects the paint and gives the dish that polished, ceramic-like shine.
Now you have a charming little spot to rest your trinkets at the end of the day
Smiling Cloud Charm

Brighten up your keyring or planner with this adorable, beaming cloud charm. This simple project uses classic white clay to create a smooth, puffy shape with a sweet, minimalist expression.
Step-by-Step
Materials
- White polymer clay
- Rolling pin or acrylic roller
- Cloud-shaped clay cutter (or a craft knife and template)
- Small ball stylus tool
- Fine tip black acrylic paint pen or permanent marker
- Pink acrylic paint or soft pastel shavings
- Small paintbrush or cotton swab
- Gold screw eye pin
- Gold lobster clasp with jump rings
- Gloss or matte glaze (optional)
- Oven for baking
Step 1: Shaping the Cloud
-
Condition the clay:
Begin by taking a chunk of white polymer clay and kneading it thoroughly in your hands until it becomes soft, warm, and pliable. -
Roll it out:
Place the clay on a clean, smooth surface and use your roller to flatten it into an even sheet. Aim for a thickness of about 1/4 inch (6mm) so the charm feels substantial and puffy. -
Cut the shape:
Press a cloud-shaped cutter firmly into the clay sheet. If you don’t have a cutter, you can sketch a cloud on paper, cut it out, place it on the clay, and carefully trace around it with a craft knife. -
Soften the edges:
Once cutout, lift the shape and use your fingertip to gently smooth all the sharp edges. Gently tap the perimeter to round it off, giving it that soft, pillowy look.
Clean Slate
White clay picks up dust instantly. Before starting, wipe your work surface and wash your hands thoroughly. Keep a baby wipe nearby to clean your hands between steps.
Step 2: Adding Hardware & Baking
-
Insert the eye pin:
Take a gold screw eye pin and carefully twist it into the top center bump of your cloud. Ensure it goes in straight and doesn’t poke through the front or back faces. -
Secure the pin:
To make sure the hardware stays put after baking, I like to remove the pin, add a tiny dot of liquid clay or bake-and-bond to the threads, and screw it back in. -
Final smooth:
Give the clay one last check for fingerprints. Lightly brush over any marks with a finger dipped in a tiny bit of baby oil or cornstarch if needed. -
Bake:
Place the cloud on a baking sheet lined with parchment paper. Bake according to your specific clay brand’s package instructions—usually around 275°F (135°C) for 15-20 minutes. -
Cool down:
Allow the piece to cool completely before touching it for the decoration phase. It needs to be fully hardened.
Sky Squad
Make a set of weather friends! Create a yellow sun, a grey lightning bolt, and a blue raindrop using the same techniques to create a full bag charm collection.
Step 3: Decorating the Face
-
Draw the eyes:
Using a fine-tip black paint pen or a very steady hand with a fine liner brush and black acrylic paint, add two small oval dots for eyes. Place them fairly wide apart for a cuter look. -
Add the smile:
Right between the eyes, draw a small, simple ‘U’ shape for the smile using the same black marker or paint. -
Prepare the cheeks:
Dip a small ball stylus or the back of a paintbrush into pink acrylic paint. Alternatively, you can scrape some pink chalk pastel into powder for a softer, airbrushed look. -
Apply the blush:
Touch the tool gently to the clay just outside each eye to create the rosy cheeks. If using paint, just dot it on; if using pastel, smudge it gently with a cotton swab.
Step 4: Assembly
-
Seal the charm:
To protect the face paint from scratching off, apply a thin coat of glaze over the front. A UV resin coat will make it super shiny and durable, while a matte varnish keeps it looking like natural clay. -
Attach the clasp:
Open a jump ring using two pairs of pliers (twist side-to-side, never pull apart). Loop it through the eye pin on the cloud. -
Finish assembly:
Hook your gold lobster clasp onto the open jump ring, then twist the ring back closed securely so there is no gap.
Now you have a happy little companion to hang on your bag or keys
Daisy Flower Bag Charm Set
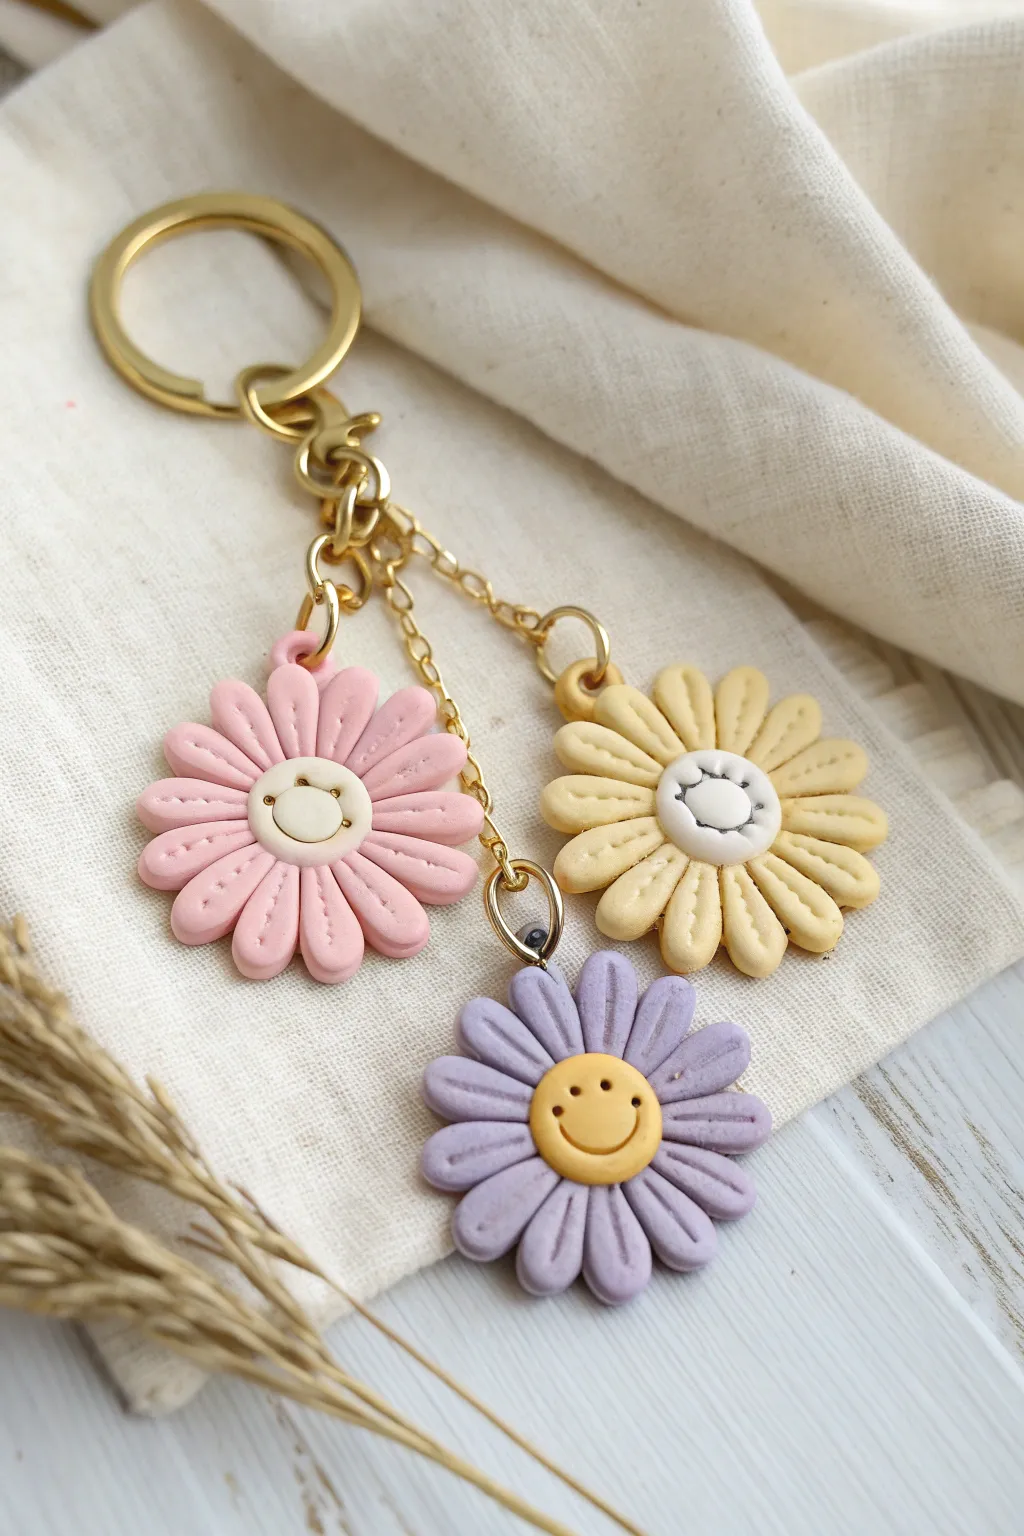
Brighten up any tote or backpack with this cheerful set of three polymer clay daisies. Featuring pastel petals and sweet smiling faces, this durable bag charm adds a touch of handmade joy to your daily accessories.
Step-by-Step Tutorial
Materials
- Polymer clay in pastel pink, yellow, lavender, pale cream, and white
- Gold keyring clasp assembly
- Gold jump rings (6-8mm)
- Gold chain
- Clay carving tools or needle tool
- Small round cutter (approx. 2-3cm)
- Small dotting tool or toothpick
- Eyepins (gold)
- Rolling pin or pasta machine
- Super glue or liquid clay
- Clay gloss or sealant (optional)
Step 1: Prepping the Daisy Centers
-
Condition the clay:
Start by warming up your pastel yellow, cream, and white clay colors in your hands until they are soft and pliable. This prevents cracking later. -
Form the center balls:
Roll three small balls of clay for the flower centers: one pale cream, one yellow, and one an orangey-yellow tone to contrast with the petals. -
Flatten and shape:
Gently press each ball flat onto your work surface so it forms a thick button shape. It shouldn’t be paper-thin; keep it slightly domed. -
Add the faces:
Using a small dotting tool, carefully press two holes for the eyes. Then, use a carved U-shaped tool or the edge of a small straw slightly bent to press a smile into the clay.
Clean Clay Pro-Tip
Keep a pack of baby wipes or rubbing alcohol nearby. Clean your hands and tools between colors (especially before white) to prevent lint or dye transfer.
Step 2: Creating the Petals
-
Roll out petal colors:
Roll out your pink, yellow, and lavender clay into even sheets, roughly 3mm thick. -
Cut the base shapes:
Use your round cutter to punch out a circle for each flower color. This acts as the base you will cut into petals. -
Attach the centers:
Place a prepared smiley face center directly in the middle of each colored circle. Press it down gently so it bonds without distorting the face. -
Cut petal strips:
Using a sharp blade or needle tool, make cuts radiating from the center outward to the edge of the circle, like slicing a pizza, creating narrow strips all around the center. -
Shape the petals:
Use a blunt tool or your fingers to round off the outer corners of each strip to make them look like soft petals rather than harsh rectangles. -
Detail the texture:
Take a needle tool and press a single line down the center of each petal, stopping just before you hit the face center. This adds dimension and separates the petals visually.
Step 3: Assembly and Baking
-
Insert eye pins:
Carefully trim a gold eyepin to a short length. Insert it into the top of each flower, pushing it down between two petals so the loop sits flush against the clay. -
Secure the hardware:
If the clay feels loose around the pin, I like to add a tiny drop of liquid clay on the pin shaft before inserting it for extra security. -
Bake carefully:
Place your daisies on a ceramic tile or baking sheet lined with parchment paper. Bake according to your clay package instructions (usually 275°F/135°C for 15-30 minutes). -
Cool down:
Allow the flowers to cool completely before handling. Polymer clay is strongest once fully cooled. -
Cut chain lengths:
Cut three pieces of gold chain at slightly varying lengths. This staggered look ensures the flowers don’t clump together when hanging. -
Attach chains to key ring:
Open the jump rings using two pairs of pliers (twist, don’t pull). Attach one end of each chain to the main large gold keyring clasp. -
Attach flowers:
Use jump rings to connect the loop of the flower eyepins to the bottom of their respective chains. -
Final check:
Ensure all jump rings are closed tightly so there are no gaps for the chain to slip through.
Level Up: Glossy Finish
For a protected, high-end look, coat just the smiley face centers with UV resin or a gloss glaze to make them shine and stand out.
Clip this adorable bouquet onto your favorite bag and enjoy the smiles it brings all day long
Mini Succulent in a Smiley Pot
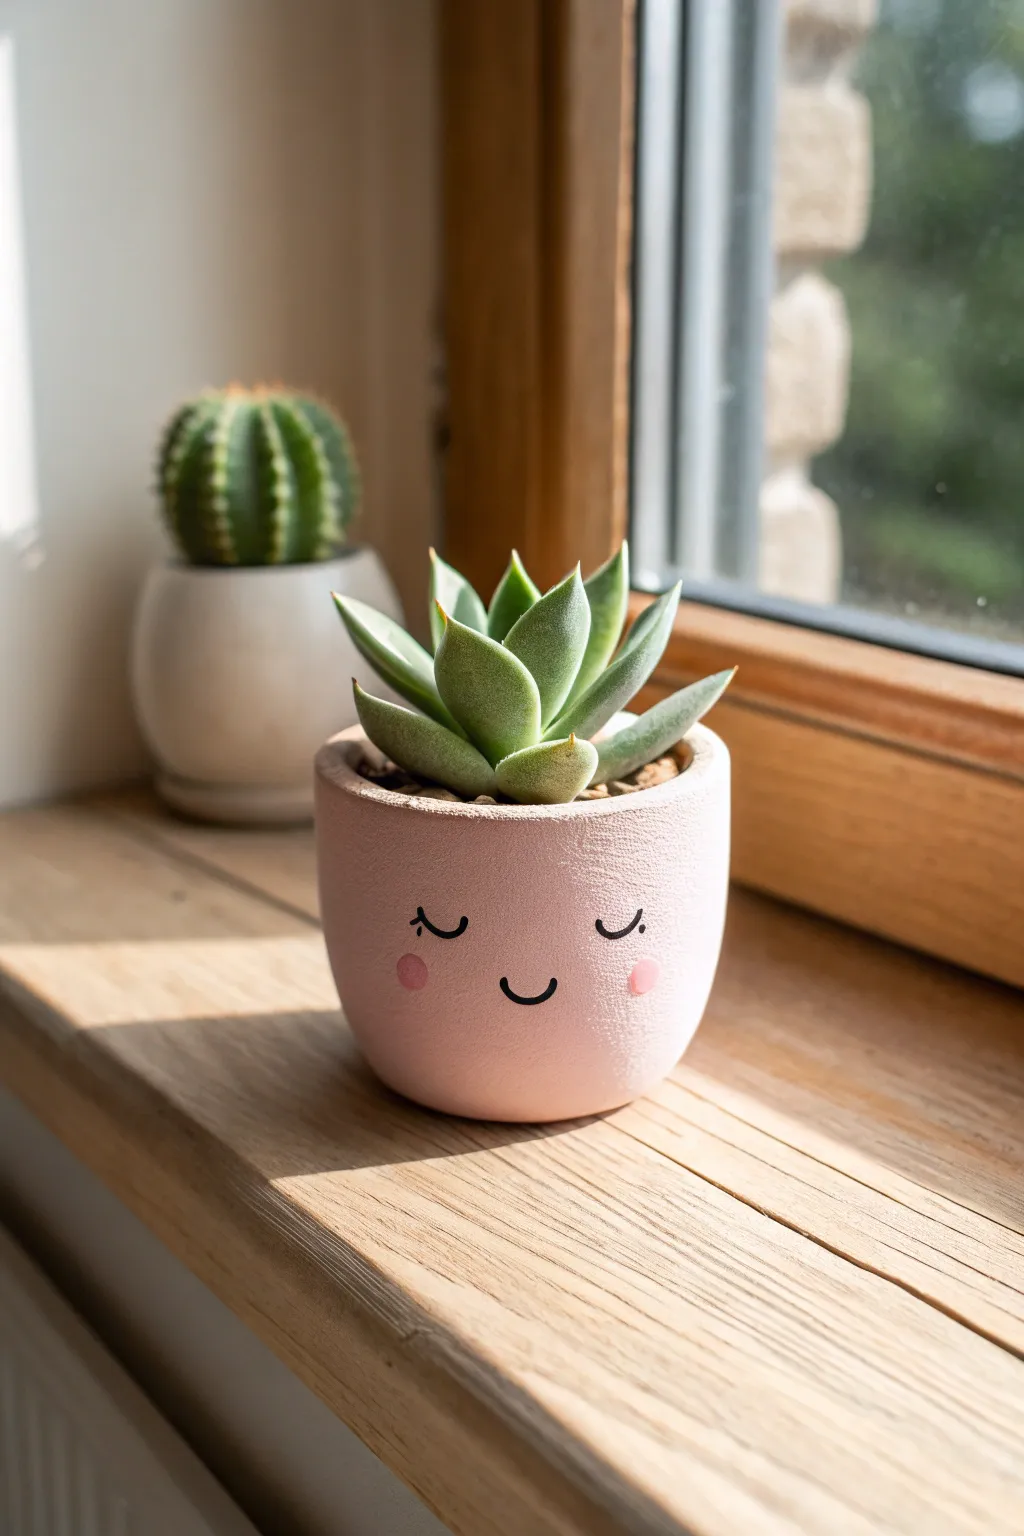
Brighten any windowsill with this adorable, blushing succulent planter crafted from simple clay. Its soft matte finish and sweet hand-drawn face make it the perfect home for your favorite tiny succulent or cactus.
Step-by-Step Guide
Materials
- Air-dry clay or polymer clay (white or terracotta)
- Small rolling pin
- Rolling guides or wooden slats (about 1/4 inch thick)
- Round cookie cutter or jar lid (approx. 3 inches diameter)
- Craft knife or clay cutter
- Small bowl of water
- Potter’s sponge or smooth cloth
- Fine-grit sandpaper (220-400 grit)
- Acrylic paint: Pale Pink (matte finish)
- Acrylic paint: Black and Bright Pink
- Fine detail paintbrush (size 00 or 0)
- Small round sponge dabber or Q-tip
- Matte spray varnish or Mod Podge (matte)
- Small succulent and potting soil
Step 1: Shaping the Clay Base
-
Prepare the Clay:
Begin by conditioning your clay. If using polymer clay, knead it until it’s soft and pliable; for air-dry clay, ensure it isn’t too dry. Roll out a slab on a clean, flat surface to a uniform thickness of about 1/4 inch. -
Cut the Base:
Use your round cookie cutter or jar lid to cut a perfect circle from the clay slab. This will be the bottom of your pot. Set this circle aside on a piece of parchment paper to prevent sticking. -
Create the Wall:
Roll out a long rectangular strip of clay, maintaining that same 1/4 inch thickness. Measure the circumference of your base circle to know exactly how long this strip needs to be, adding just a tiny bit of overlap length. -
Trim Edges:
Use a ruler and craft knife to trim the long strip into a clean, straight rectangle. You want the top and bottom edges to be parallel so the pot sits flat and the rim looks even. -
Attach the Wall:
carefully wrap the clay strip around the circular base. If using air-dry clay, score the edges (make small scratches) and add a drop of water where the pieces meet to act as glue.
Step 2: Refining the Form
-
Seal the Seams:
Where the two ends of the wall meet on the side, gently press the clay together. Use your finger or a modeling tool to smooth the seam until it disappears completely. Do the same for the bottom seam where the wall meets the base. -
Smooth the Surface:
Dip your finger or a sponge lightly in water and run it over the entire pot to erase fingerprints and imperfections. I find that spending extra time here really elevates the final look. -
Create the Rim:
Gently tap the pot upside down on the table to flatten the rim, or simply smooth the top edge with your wet finger for a soft, rounded finish similar to the image. -
Dry the Pot:
Allow the pot to dry completely. For air-dry clay, this usually takes 24-48 hours. If using polymer clay, bake it according to the manufacturer’s instructions on the package. -
Sand for Perfection:
Once fully cured or dry, inspect the pot. Use fine-grit sandpaper to gently buff away any remaining bumps using circular motions, creating a surface that is buttery smooth.
Uneven Paint Lines?
If your black lines feel shaky, try using a fine-tip permanent marker or paint pen instead of a brush. It gives you much more control for delicate features.
Step 3: Adding Character
-
Base Coat Painting:
Paint the entire exterior and inner rim with the pale pink matte acrylic paint. You will likely need 2-3 coats for opaque, even coverage. Let each coat dry fully before adding the next. -
Draft the Face:
Lightly sketch the position of the eyes and mouth with a pencil. aim for the lower half of the pot to give it that cute ‘chibi’ aesthetic seen in the photo. -
Paint the Features:
Using your finest detail brush and black paint, carefully trace over your pencil marks. Create two small curved lines for sleepy, happy eyes, adding tiny eyelashes at the ends. -
Add the Smile:
Paint a small, simple ‘U’ shape right between the eyes for the mouth. Keep the line weight consistent with the eyes for a cohesive look. -
Rosy Cheeks:
Dip a small round sponge dabber or the end of a Q-tip into the bright pink paint. Dab off excess paint on a paper towel, then gently press onto the pot below the eyes to create soft, flushed cheeks. -
Seal the Work:
Once all paint is bone dry, spray the pot with a matte varnish. This protects the paint from water damage when you water your plant later. -
Potting:
Fill your new happy planter with cactus soil and tuck your succulent inside. Top with small decorative pebbles if desired.
Drainage Hole Tip
Before drying/baking, poke a hole in the bottom center with a straw. Succulents hate sitting in water, and this ensures your plant stays healthy.
Now you have a charming little friend to keep your desk company
Pastel Bear “Blob” Figurine
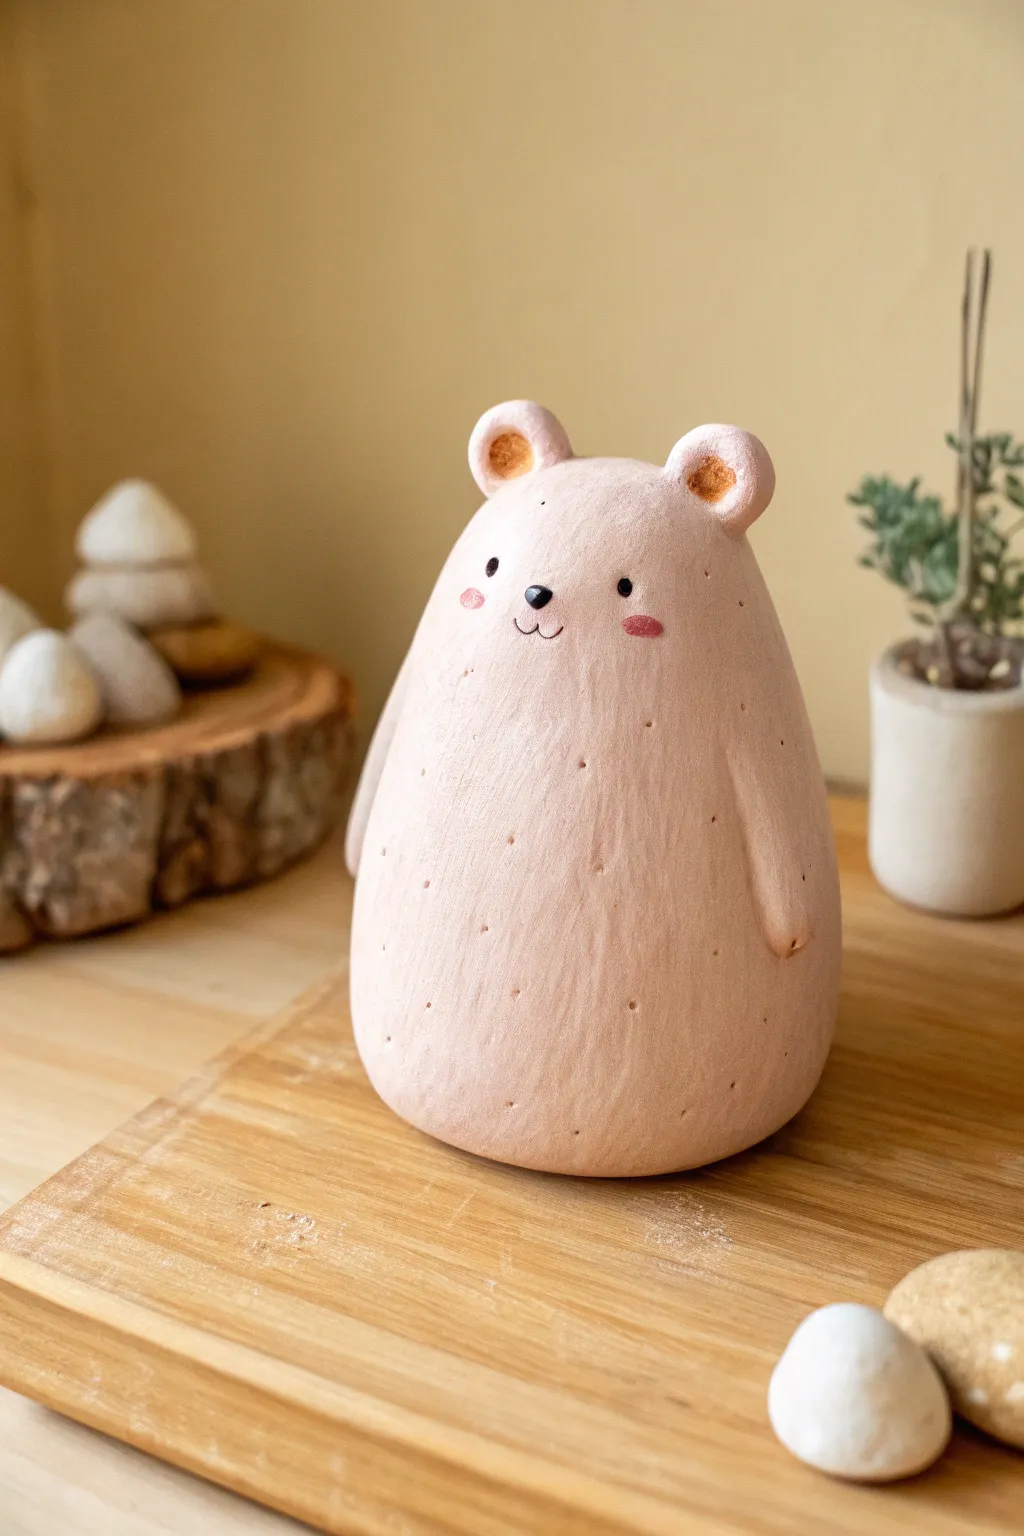
This adorable, chubby bear figurine brings a touch of whimsy to any desk or shelf with its soft pink hue and minimalist features. Its simple “blob” shape makes it a perfect beginner project, focusing on texture and subtle expression rather than complex anatomy.
Step-by-Step
Materials
- Air-dry clay or polymer clay (white or pre-colored pink)
- Acrylic paint (pastel pink, black, brown, rose/red)
- Sculpting tools (needle tool or toothpick)
- Fine-grit sandpaper
- Small paintbrush
- Water (for smoothing)
- Matte varnish or sealant
Step 1: Shaping the Base Form
-
Condition the clay:
Begin by kneading your clay until it is soft, pliable, and free of air bubbles. If you are using white clay, you can mix in a small amount of pink acrylic paint now to tint the clay body itself, or plan to paint it later. -
Form the main body:
Roll a palm-sized amount of clay into a smooth ball. Slowly roll it into a teardrop or pear shape, flattening the bottom so it sits stable and upright. -
Refine the silhouette:
Gently tap the shape on your work surface to create a wide, sturdy base. Smooth the sides upward so the bear has a chubby bottom that tapers gently toward a rounded head area. There shouldn’t be a defined neck; it’s one continuous, cute shape. -
Smooth the surface:
Dip your finger in a little water and run it over the clay to remove any fingerprints or cracks. Aim for a very smooth, matte finish before adding details.
Step 2: Adding Features and Details
-
Create the ears:
Roll two small pea-sized balls of clay. Flatten them slightly and press your pinky finger or a round tool into the center of each to create the inner ear indentation. -
Attach the ears:
Score (scratch) the top of the head and the bottom of the ears, add a dab of water or liquid clay, and press the ears firmly onto the head. Blend the seam at the back of the ears using a sculpting tool so they don’t pop off. -
Sculpt the arms:
Roll two thin log shapes for the arms. They should be simple and relatively flat against the body. -
Attach the arms:
Attach the arms to the sides of the body, blending the shoulders smoothly into the main form. Let the hands rest naturally against the belly. -
Add texture:
Using a needle tool or the tip of a toothpick, gently poke tiny shallow holes randomly all over the bear’s body. This creates a speckled, ceramic-like texture. Be careful not to poke too deep.
Cracking Up?
If air-dry clay cracks while drying, fill the fissures with a ‘slip’ made of clay mixed with water. Smooth it over, let it dry again, and sand it down.
Step 3: Finishing Touches
-
Dry or bake:
Follow the instructions for your specific clay type. For air-dry clay, let it sit for 24-48 hours. For polymer clay, bake according to the package directions. -
Sand imperfections:
Once fully cured, use fine-grit sandpaper to gently smooth out any rough patches, especially around the base or ear connections. -
Base coat painting:
If you didn’t tint your clay earlier, paint the entire bear with a soft pastel pink acrylic paint. You may need 2-3 thin coats for opaque coverage. Let this dry completely. -
Paint the inner ears:
Mix a slightly darker, brownish-orange shade and carefully paint the inside depressions of the ears. -
Draw the face:
Using a very fine detail brush or a black paint pen, make two small dots for eyes wide apart. Add a tiny triangular nose and a small ‘w’ mouth just below it. -
Add cheeks:
Dilute a bit of rose or red paint and dab two small oval cheeks on either side of the face. -
Seal the piece:
Protect your work with a coat of matte varnish. This preserves the ‘stone’ look and protects the painted details.
Make it a Set
Create a whole family of bears in different sizes and muted pastel tones like sage green or cream to display as a minimalist group.
Place your new clay friend near a small plant or on your desk for a cheerful daily companion
Tiny Birthday Cake With a Face
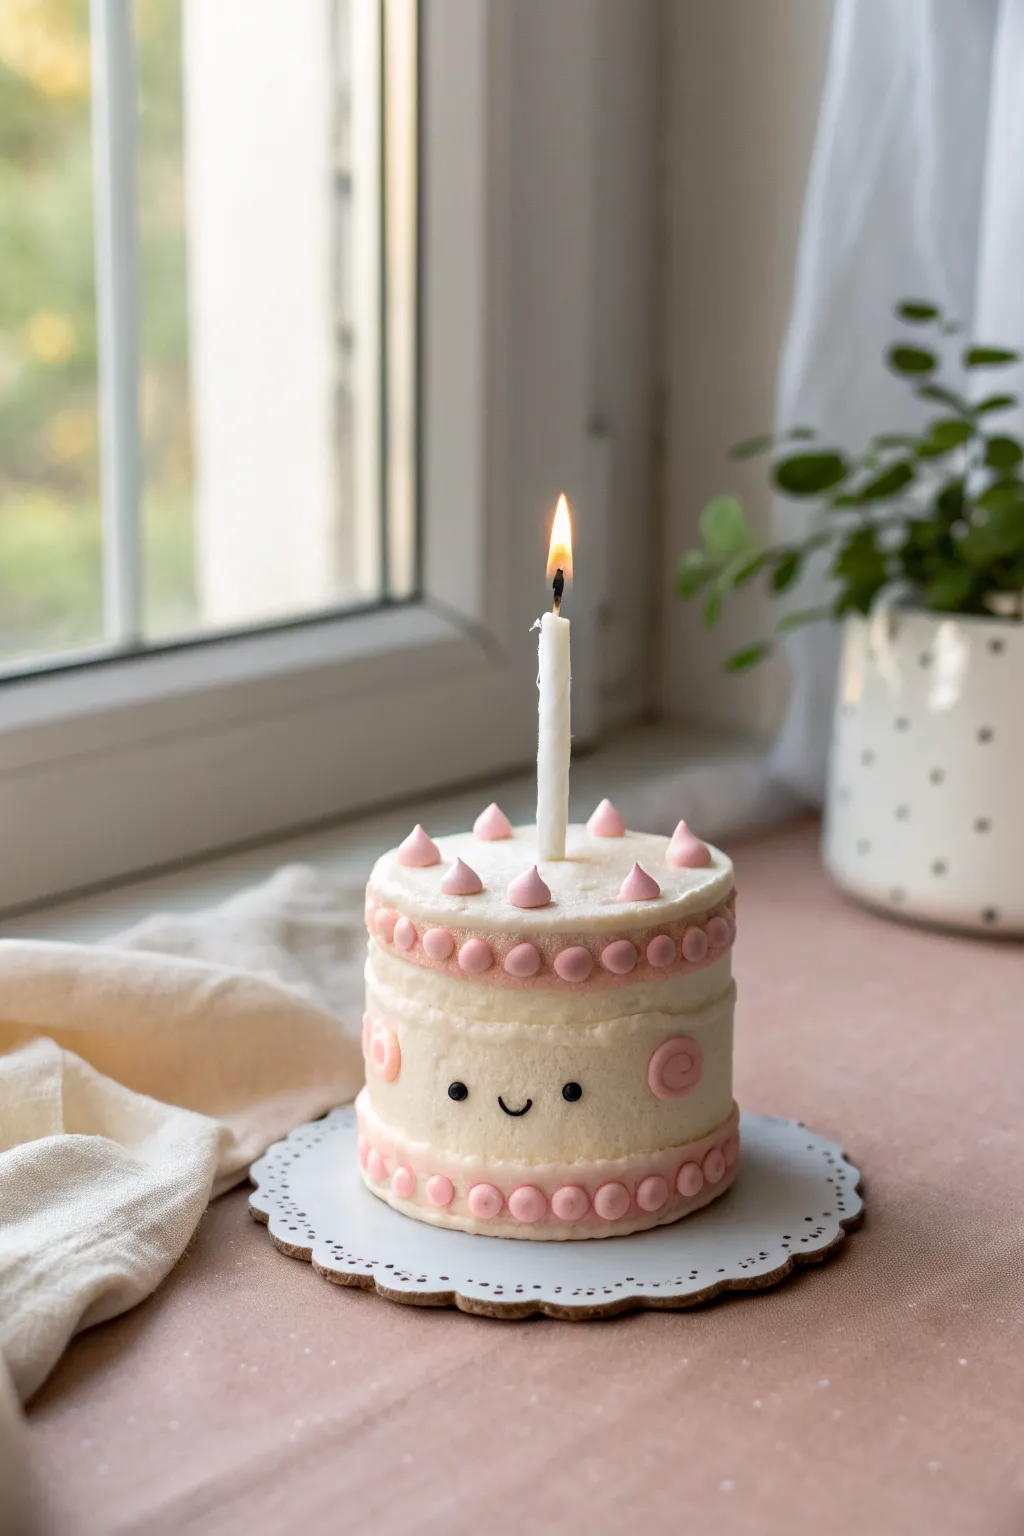
This adorable clay creation mimics a tiny, semi-naked tiered cake complete with a sweet, smiling face. It’s perfect for a desk buddy or a handmade birthday gift token, capturing the texture of sponge cake and frosting in miniature form.
Detailed Instructions
Materials
- White polymer or air-dry clay
- Soft pink polymer or air-dry clay
- Black clay (tiny amount)
- Liquid clay or clay adhesive (optional)
- Texturizing tool (needle tool, toothbrush, or crumpled foil)
- Rolling pin
- Small circular cutter (approx. 1.5 – 2 inches)
- Toothpick or small wire (for candle support)
- Thin white candle or white clay rolled into a candle shape
Step 1: Forming the Cake Base
-
Roll the base:
Start by conditioning your white clay until it’s soft and pliable. Roll it into a thick log or cylinder shape, roughly 2 inches in diameter. -
Cut the layers:
Slice two thick discs from your cylinder to act as the cake layers. You want them to look substantial, like fluffy sponge cake layers. -
Texturize the sponge:
Use a toothbrush or a ball of crumpled aluminum foil to gently tap all over the sides of the white discs. This creates that realistic, porous crumb texture of a baked cake. -
Stack the layers:
Place one disc on top of the other. If you want a ‘filling’ look, you can flatten a very thin piece of white clay, smooth the edges, and sandwich it between them, but simply stacking them usually works for this semi-naked style. -
Smooth the exterior:
Gently roll the stacked cylinder on your work surface to ensure the sides are flush. You want a bit of texture to remain, but the overall shape should be cylindrical.
Step 2: Adding the Frosting Details
-
Create the piping balls:
Take your soft pink clay and roll many tiny, uniform spheres. These will become the piped frosting decoration. -
Decorate the bottom tier:
Press a row of these pink spheres around the very bottom edge of the cake. Flatten them slightly as you press so they adhere well. -
Decorate the middle tier:
Repeat the process for the seam between the two cake layers. Place a ring of pink spheres here to mimic a decorative frosting border. -
Top decoration:
Add a few pink spheres sporadically around the top edge of the cake. Shape a few of them into slight teardrops to look like dollops of whipped cream. -
Indenting the piping:
Using a small ball tool or the rounded end of a paintbrush, gently press into the center of each pink sphere to give it a ‘piped’ look. -
Add rosy cheeks:
Flatten two remaining pink spheres into thin discs. Gently spiral them or press a swirl pattern into them, then attach them to the front of the cake as cheeks.
Sticky Situation?
If your pink piping balls aren’t sticking to the textured white base, use a tiny dot of liquid clay or PVA glue on the back of each sphere before pressing it onto the main cake body.
Step 3: Adding Personality and Finishing
-
Make the eyes:
Roll two extremely tiny balls of black clay. Position them on the front of the cake between the pink cheeks. Press them in gently so they don’t protrude too much. -
Create the smile:
Roll a very thin, short snake of black clay. Use a needle tool to curve it into a ‘U’ shape and place it centrally below the eyes. -
Secure the candle:
If using a real mini candle, insert it directly into the center of the cake top now. If making a clay candle, roll a thin white cylinder and insert a piece of wire or toothpick into the cake to hold it upright. -
Refine textures:
I like to do a final pass with my texturing tool, lightly tapping around the face features to make sure the ‘cake’ texture still looks consistent and fluffy near the added details. -
Create the base plate:
Roll out a thin sheet of white or light grey clay. Cut a scalloped circle slightly larger than your cake. Use a needle tool to poke small decorative holes around the rim. -
Final Assembly:
Place your finished cake onto the scalloped base plate. If using polymer clay, bake according to the manufacturer’s instructions. If using air-dry clay, let it sit undisturbed for 24-48 hours.
Make it Sparkle
After baking or drying, brush a thin layer of gloss glaze over just the pink piping and the black eyes. This makes the ‘frosting’ look fresh and wet while keeping the cake sponge matte.
Once dry or baked, this cheerful little cake is ready to bring a smile to any space
Cute Cable Bite Protector

Transform your boring charging cables into something adorable with this peach-colored star cable protector. This polymer clay project mimics the look of stitched leather while keeping your cords organized and adding a touch of whimsy to your tech accessories.
Step-by-Step Guide
Materials
- Peach or coral colored polymer clay
- Black acrylic paint
- Pink acrylic paint
- White acrylic paint
- Fine detail paintbrush
- Dotting tool or toothpick
- Needle tool or thick pin
- Rolling pin
- Star-shaped cookie cutter (small)
- Craft knife
- Smooth work surface (ceramic tile or glass)
- Oven for baking
Step 1: Shaping the Star
-
Condition the clay:
Start by warming up your peach or coral polymer clay in your hands until it becomes soft and pliable. This prevents cracks later on. -
Roll it out:
Roll the clay into a flat sheet, approximately 1/4 inch thick. You want it sturdy enough to hold the cable but not overly bulky. -
Cut the shape:
Use your star-shaped cookie cutter to punch out a clean star shape. If the edges are ragged, gently smooth them with your finger. -
Create the channel:
On the back side of the star, gently press a spare cable or a straw horizontally across the center to create a groove where the wire will eventually sit. Don’t press all the way through.
Clean Lines
If your hand is shaky when painting the smile, try using a fine-tip permanent marker instead of paint for more control.
Step 2: Adding Texture & Detail
-
Simulate stitching:
To get that charming ‘sewn’ look, use a needle tool to poke small, evenly spaced holes around the entire perimeter of the star, about 2mm from the edge. -
Refine the stitches:
Between each hole, lightly press the needle tool horizontally to create a tiny indentation, mimicking the thread connecting the holes. -
Add texture (optional):
If you want a leather-like texture, gently pat the surface with a piece of crumpled aluminum foil or a clean toothbrush. -
Pre-bake check:
Before baking, ensure the star is flat and the edges are smooth. Remove any fingerprints with a drop of baby oil. -
Bake:
Bake the piece according to your specific clay brand’s instructions (usually 275°F/135°C for 15-30 minutes). Let it cool completely before painting.
Custom Colors
Make a whole galaxy set by creating stars in pastel yellow, mint green, and lavender to color-code different device charger cables.
Step 3: Painting the Face
-
Paint the eyes:
Using a dotting tool or the handle end of a paintbrush, dip into black acrylic paint and place two distinct dots for the eyes near the center of the star. -
Add the smile:
With an extremely fine detail brush or a toothpick, paint a tiny, thin ‘U’ shape between the eyes for the mouth. -
Rosy cheeks:
Dip a toothpick into pink paint and dab two small circles just below and to the outside of the eyes to create blushing cheeks. -
Eye highlights:
Once the black paint is dry, use a toothpick with a tiny amount of white paint to add a small reflection dot in the upper corner of each eye. This brings the character to life. -
Seal (optional):
I like to protect the painted details with a thin layer of matte varnish to prevent the acrylic from scratching off over time. -
Assembly:
Once everything is dry, use a strong adhesive (like E6000) to glue a small strip of felt or elastic across the back groove to hold the cable in place, or simply use the groove to rest the cable if using as a topper.
Enjoy your new starry companion that makes charging your devices just a little bit sweeter
Mini Plant Marker Characters
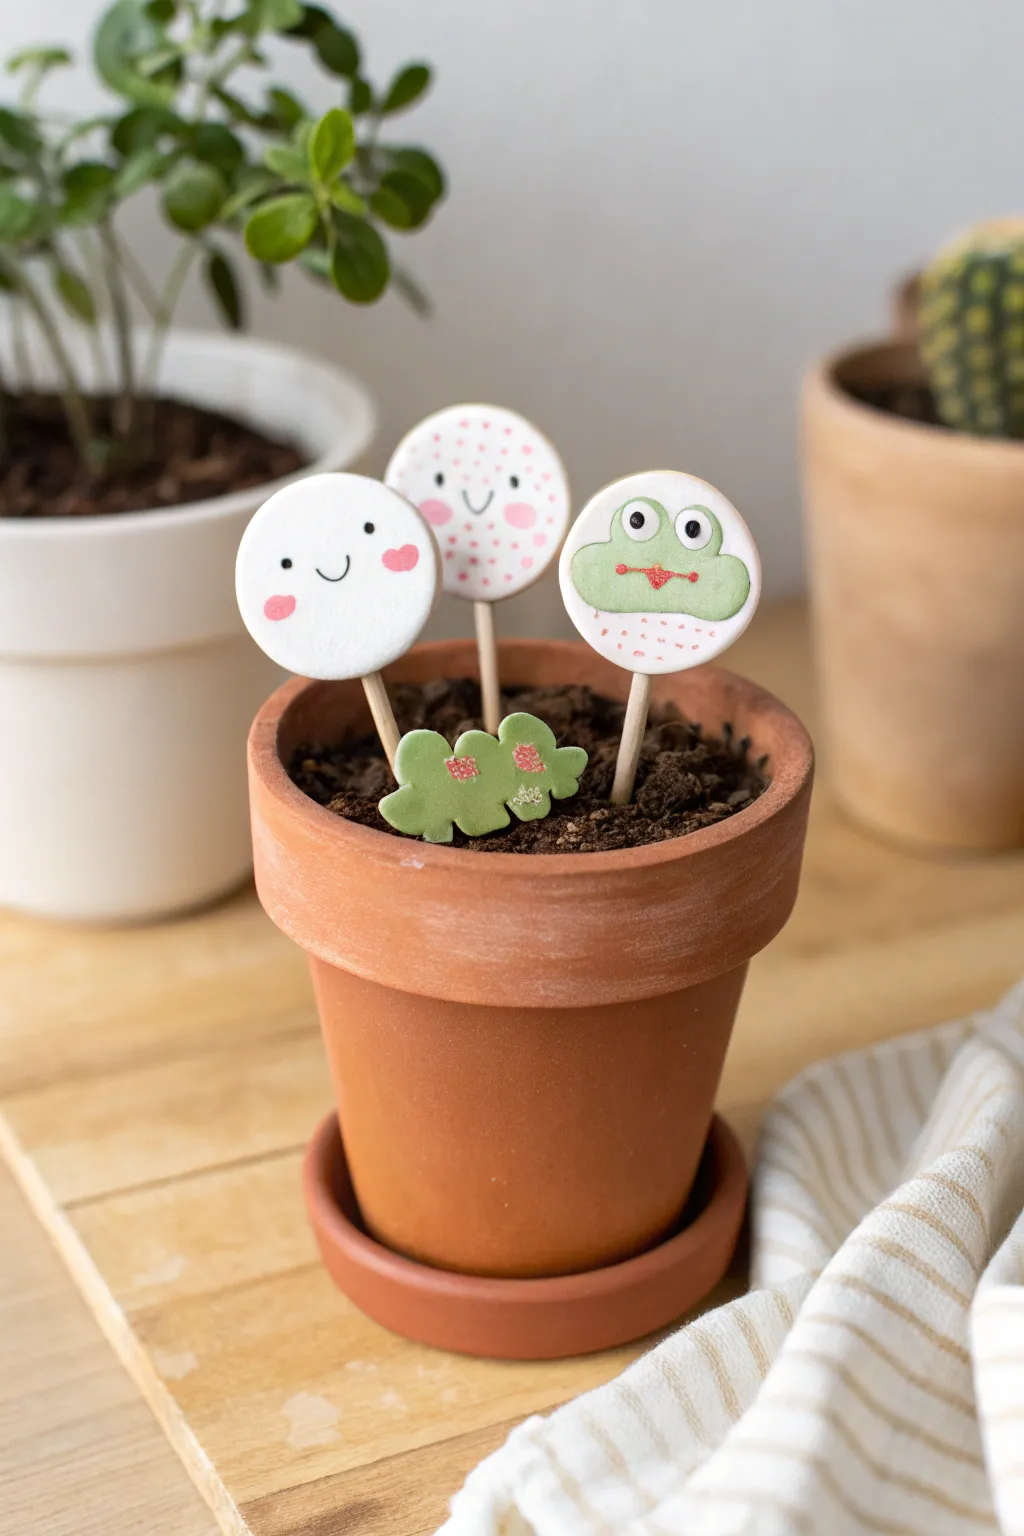
Brighten up your potted friends with these unbelievably sweet mini plant markers. Using simple round shapes and minimalistic features, you’ll create a smiling cloud, a spotted friend, and a friendly frog to keep your succulents company.
Step-by-Step Tutorial
Materials
- White air-dry clay or polymer clay
- Rolling pin or smooth round jar
- Small round cookie cutter (approx. 1.5 inch) or a bottle cap
- Wooden craft skewers or toothpicks
- Acrylic paints (pastel pink, bright green, black, white)
- Fine detail paintbrush (size 0 or 00)
- Small dotting tool or toothpick end
- Matte varnish or sealant (optional)
- Small leaf-shaped cutter (optional for the accent piece)
Step 1: Shaping the Base
-
Roll the clay:
Start by conditioning your clay until it’s soft and pliable. Roll it out on a smooth surface to an even thickness of about 1/4 inch (6mm). You want it thick enough to hold the stick but not too heavy. -
Cut the circles:
Using your small round cutter, punch out three perfect circles. Smooth the edges gently with your fingertip to remove any sharp ridges left by the cutter. -
Create the greenery:
With the leftover clay, hand-shape a small, irregular cloud or bush shape to serve as the little green accent piece at the soil level. -
Insert the stems:
Take your wooden skewers and gently insert one into the bottom edge of each circle. Push it in at least halfway up the circle to ensure stability, being careful not to distort the round shape. -
Drying time:
If using air-dry clay, lay them flat on parchment paper and let them dry completely (usually 24 hours), flipping once halfway through. For polymer clay, bake according to the package instructions.
Step 2: Designing the Characters
-
Base coats:
For the frog character (the one on the right), outline a wide, squat oval shape on the lower half of the circle with a pencil lightly. Paint this oval bright green. -
Frog details:
Paint the little bush accent piece with the same green. I find that doing all one color at a time helps save paint and washing up brushes. -
Simple Smiley:
For the left marker (the white smiley), use your finest brush or a black paint pen to draw two small, wide-set eyes and a simple U-shaped smile. -
Adding blush:
Mix a soft pastel pink. Paint small oval cheeks on the white smiley face. On the center character (the spotted one), paint large pink circular cheeks. -
The spotted design:
Using the tip of a toothpick or a very fine dotting tool, dot tiny pink speckles all over the background of the center character. Add similar pink dots to the bottom section of the frog marker, below the green face.
Clean Lines Tip
If you don’t have a steady hand for the tiny eyes, use the head of a pin dipped in paint instead of a brush. It makes perfectly round dots every time.
Step 3: Refining the Faces
-
Eye contact:
Paint two large white circles at the top of the green frog area for eyes. Let this layer dry completely before moving on. -
Frog smile:
paint a thin red or dark pink line for the frog’s mouth, connecting the two cheeks if you added them, or just a simple line across the green. -
Black pupils:
Using your black paint, add the pupils to the frog’s white eyes. Also, add the simple black eyes and smile to the center spotted character. -
Leaf details:
Add tiny pink flower dots or patterns onto your green bush accent piece to tie the color scheme together. -
Protective coat:
Once all paint is perfectly dry, brush on a thin layer of matte varnish. This seals the clay against moisture from the plant soil.
Make it Sparkle
Mix a tiny pinch of fine iridescent glitter into your varnish before applying the final coat. It gives the markers a magical morning-dew look in the sunlight.
Pop these little characters into your favorite potted plant and enjoy the instant charm they add to your windowsill
Pocket-Sized Worry Stone With a Smile
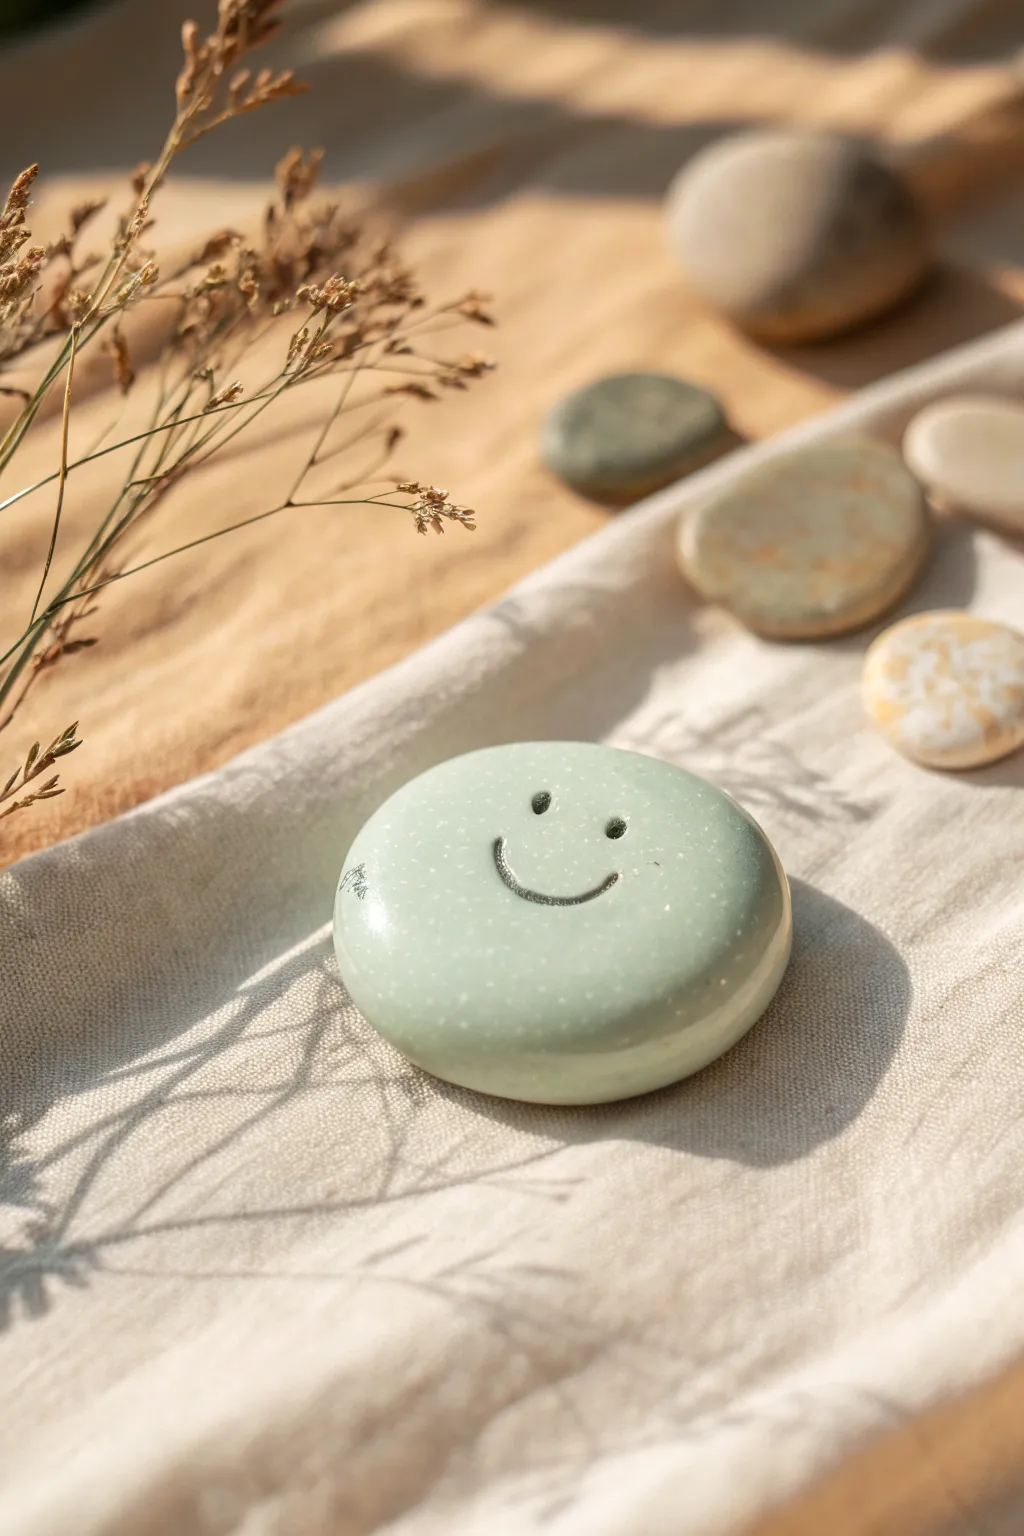
Create a soothing companion to carry in your pocket with this simple yet charming worry stone project. Crafted from smooth clay in a calming sage green hue, its friendly little smile offers a moment of comfort whenever your fingers brush across it.
Step-by-Step
Materials
- Polymer clay (sage green or mint)
- Small rolling pin or acrylic roller
- Circle cutter (approx. 1.5 – 2 inches diameter)
- Small ball stylus tool or a toothpick
- Fine-grit sandpaper (optional, for smoothing)
- Gloss glaze or varnish
- Soft paintbrush
- Black acrylic paint (optional, for enhancing the face)
- Oven based on clay instructions
Step 1: Shaping the Stone
-
Condition the clay:
Begin by taking a chunk of your sage green polymer clay and warming it up in your hands. Knead and squish it repeatedly until it feels soft, pliable, and free of any cracks or crumbly edges. -
Roll a smooth ball:
Once conditioned, roll the clay between your palms to form a perfect sphere. Focus on smoothing out any visible seams or lines for a flawless base. -
Flatten into a disk:
Place the ball on your work surface and gently press down with your palm or a flat acrylic block. You want to create a thick, rounded disk—think of a skipping stone shape rather than a flat pancake. -
Refine the edges:
Pick up the clay disk and gently tap the edges with your finger to round them off. The goal is a comfortable, ergonomic shape that feels good to rub with a thumb, so eliminate any sharp angles. -
Smooth the surface:
Dip your finger in a tiny bit of water (if using water-based clay) or baby oil (for polymer clay) and lightly buff the top surface until it is perfectly glassy and smooth.
Step 2: Adding the Smile
-
Mark the eyes:
Take your ball stylus tool or the blunt end of a toothpick. Press straight down into the upper half of the stone to create two neat, round indentations for the eyes. -
Draft the smile:
Using a very light touch with a needle tool or toothpick, trace a faint curve for the smile to ensure it’s centered and symmetrical before making it permanent. -
Impress the mouth:
Once happy with the placement, deepen the smile line. I find it easiest to use a small curved tool or simply drag the stylus tip slowly along the guide line to create a consistent groove. -
Check for debris:
Look closely at your carved lines. If there are any tiny crumbs of clay loosened by the carving, gently sweep them away with a soft brush.
Fingerprints showing?
Before baking, lightly brush the clay surface with a tiny amount of baby oil or cornstarch. This smoothes out ridges and prevents new fingerprints from forming.
Step 3: Firing and Finishing
-
Bake the stone:
Place your worry stone on a parchment-lined baking sheet or a ceramic tile. Bake it according to the specific temperature and time instructions on your package of clay. -
Cool completely:
Allow the stone to cool down naturally inside the oven or on a wire rack. Do not rush this, as polymer clay hardens fully as it cools. -
Enhance the details:
If you want the face to stand out more, dilute a tiny drop of black acrylic paint with water. Paint it into the grooves of the eyes and mouth. -
Wipe away excess:
Immediately after painting, use a damp paper towel or baby wipe to clean the surface of the stone, leaving paint only deep inside the indented lines. -
Apply glaze:
Using a soft paintbrush, apply a thin coat of gloss glaze over the entire stone. This gives it that polished, ceramic-like look seen in the photo and protects the surface. -
Let it cure:
Allow the glaze to dry completely according to the manufacturer’s directions before handling. The finished surface should feel glass-smooth to the touch.
Add a speckled look
Mix tiny pinch of black pepper or dark glitter into your clay before rolling. This creates a faux-stone granite effect that adds beautiful organic texture.
Now you have a durable, pocket-sized friend ready to bring a little cheer to your day